w,_-w.lg_pli_ees.._m.
TypeAir Condi"
MODELS: L WHD1
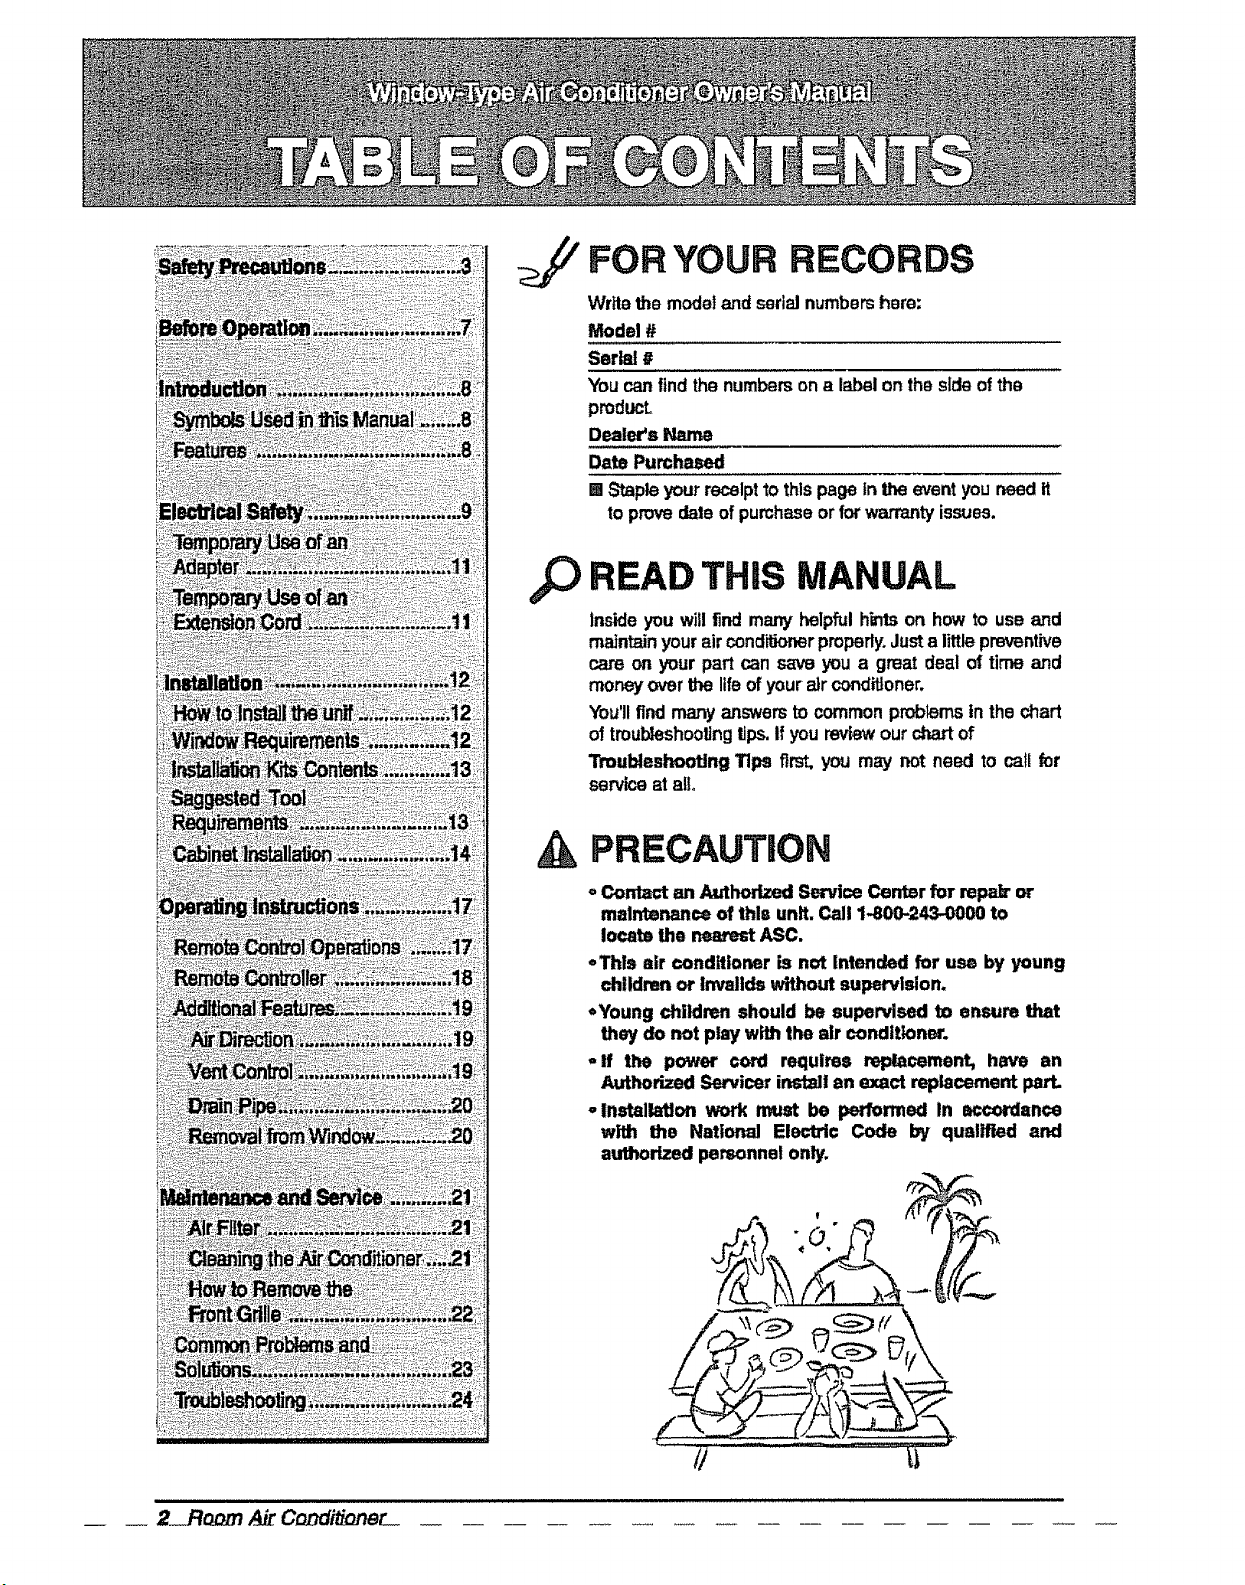
FOR YOUR RECORDS
Write themodeland serialnumbershere:
Model #
Serial#
Youcan find the numberson a labelon the side of the
producL
Dealer'sName
DatePumhased
[] Stapleyour receipttothispage intheeventyouneed it
to prove date of purchaseor forwarrantyissues.
READ THIS MANUAL
insideyou will findmany helpfulhirdson how touseand
maintainyourair conditionerproperly.Justa littlepreventive
careon your part cansave you a great deal oftimeand
moneyoverthelifeofyour air conditioner.
You'llfind many answersto commonproblemsin the chart
of troubleshoolinglips.If you reviewour chartof
Troubleshooting Tips first, you may not need tocatlfor
serviceatall.
PRECAUTION
°Co_ anAuthorized Ser,dceCenterfor rei:_dror
maintenance ofthis unit. Call1-800-243-0000 to
locate the nearest ASC.
oThis sir conditioner isnot Intended for us_ byyoung
children or In-_ilds without supervision.
*Young children should besupervised to ensure that
theydo not play with the air conditioner.
°If the power cord requires replacement, have an
Authorized Servicer install anexact replacement part.
°Installation work must be performed in accordance
with the National Electric Code by qualified and
authorized personnel only.
_ _ 2__RoDin _ Co_/itione_
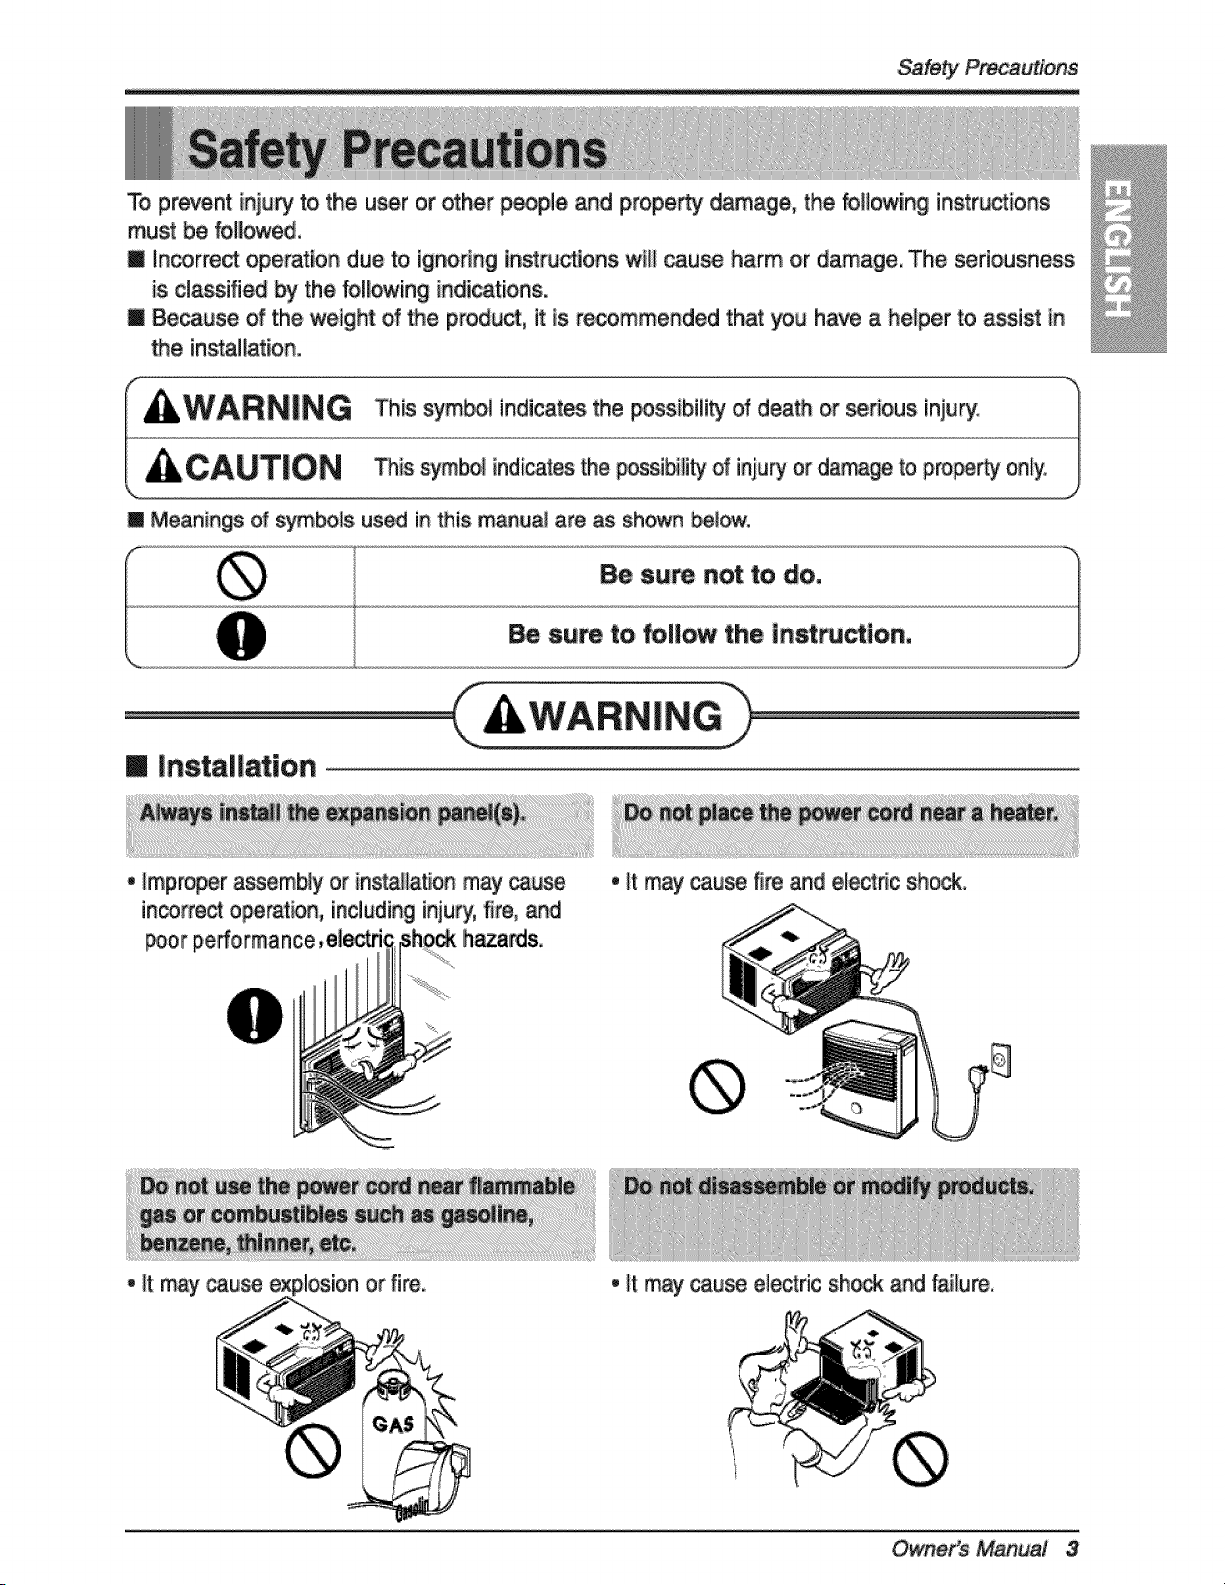
Safe_ ¸
To prevent inju_tothe u_r or ot_r pe_le and property damage, the fo{/owing instructions
must be follm,_ed.
m Incorrect operation due to ig_r_ng _nstruct_onswH__use harm or damage, The seriousness
is classified _ the foffowing indications.
m Because of the weight of the product, it _s recommended that you have a he_per to assist _n
the installationo
[] Meanings of symbols used in this manua! are as shown be/_.
®
m |nstal ion
,, Impr_er a_em_y or ins_tion may
in.fred o_rat_, including iniury,fire, and
poor performance
* It may cause fire and ele_nc shock.
• _t may cause ele_ric sh_ a_ failure.
Safety Precautions
-- =
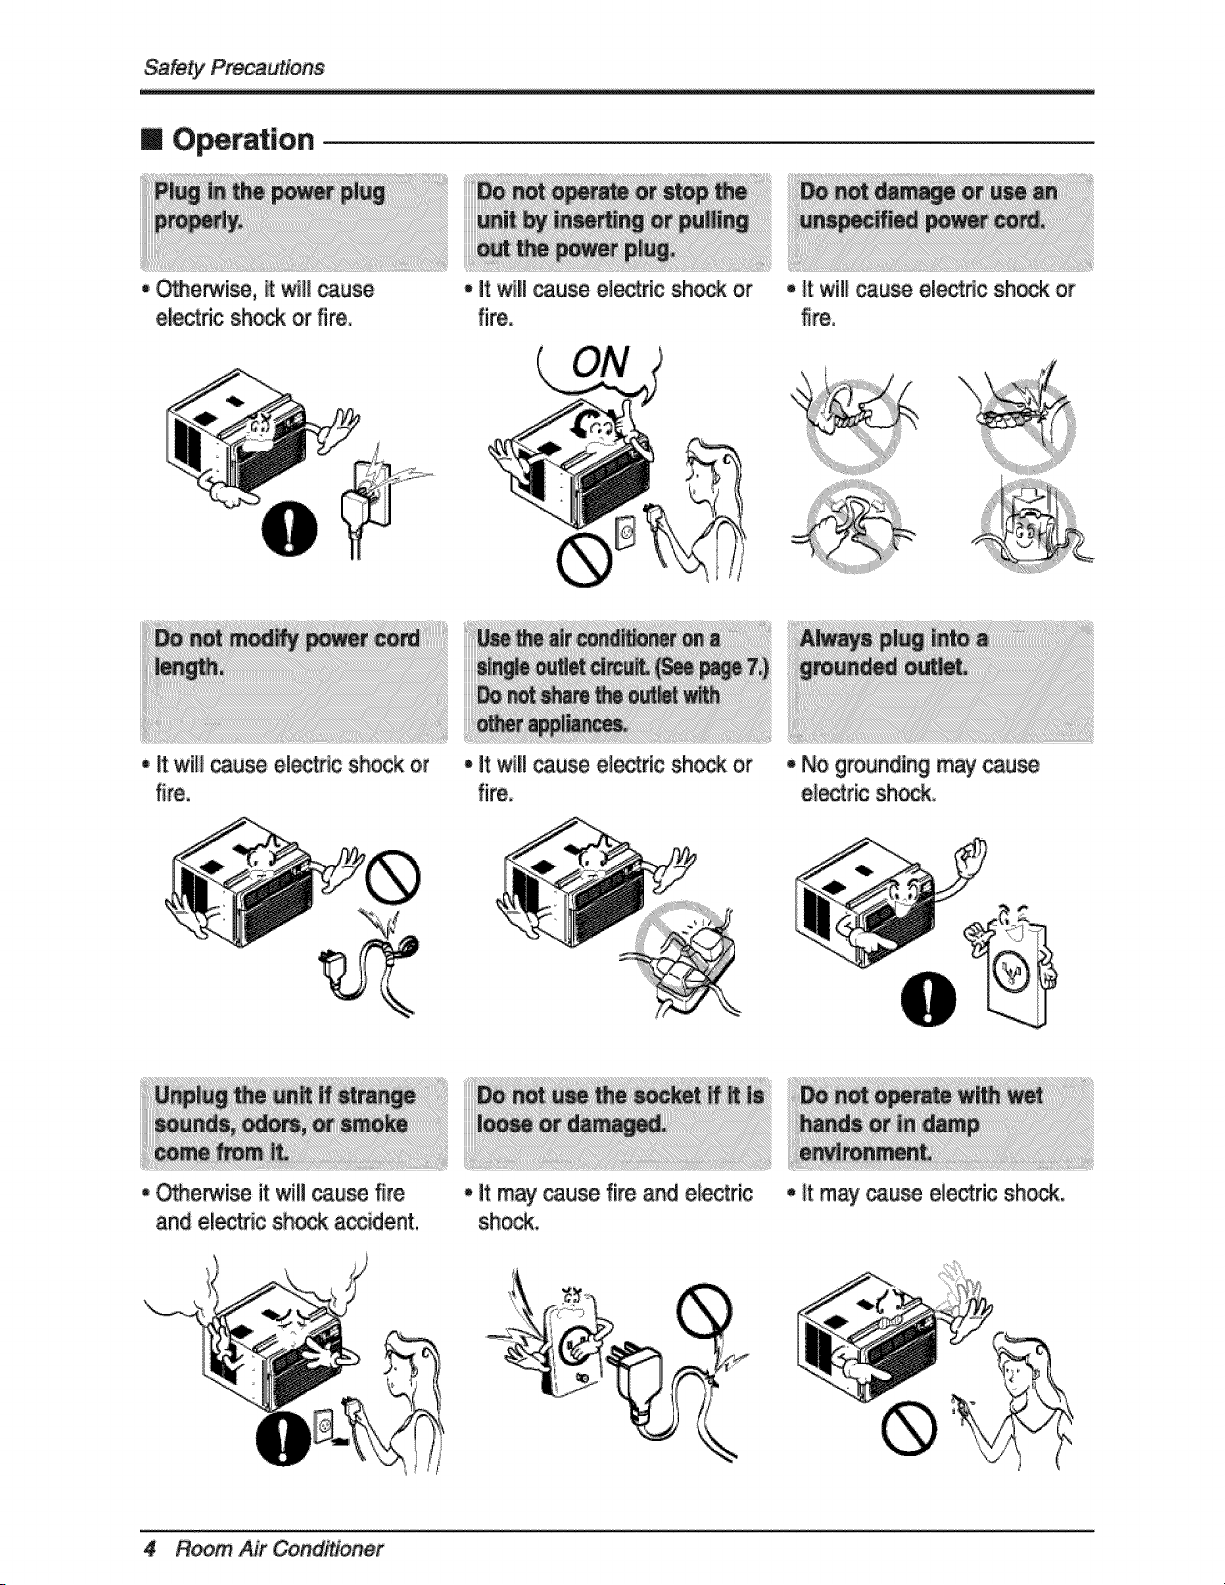
m O ration
•Othe_ise, _twill cause
e_ric shock or fire,
, It wil__use el_tr_ shockor
, O_e_ise itwili _u_ fire
and el_r_ sh_k a_ent.
- it will muse electric sh_ or
fire,
• _twlllcause etectrie shock or
fire,
,, it may cau_ fire and e_ectric
shock,
• it will cause ele_#c shock ot
fin.
4 Room Air Co r
, No grounding may _use
,, _tmay _u_ ele_ric shock.
Sa_by Pre_u_s
• The air condii_onermust be_erated in a
enc_ area to _ _ e_¢e,
• H may _ exp!_, fire, and burn.
• k will ca_e el_ric _k orfailure of
• Water may enter _e unit and degrade
ir_ul=ion° litm_ cause an el_ric sh_.
[] Ins_!lation
• _y m-esh_p andmay
cau_ injury,
• Itmaycause,_ilure of
applianceor'_,r_q,_
,/
,!
f
• If tt-_ outer case is damaged,
itmusl _ _d or
replaced imm_tely.
Leaving it _a_d _uld
resuk in the air ¢ondi_oner
_lllng out ofthe window,
creating a safety hazard.
[] O ratlon
sham
|nstaji_,
• It may _ Inju_.
(n= the _) w_n _n9
out
• it may _use el_tric sho_
anddamage.
wil! n_ be u_ _ra !ong
•it willw_ste _er
consumptionin vainand ff
my _use _dent.
c_|ng _, _, _si_
ma_i.e_, __i_j_s of a_-
•_tisan air condi_oner,_t a
prec_lonrefffgerationsystem.
• Operation wkhout filte_ will •The ap_amn_ ofthe air
_nditioner may _te_orate,
chan_ color,or _1!_
su_ce flaws.
•It is not s_i_ and cou_
_u_ iilne_ or _onal
6 Room A# Conditioner
Before
i. PIug in the power cord properIy.
2. Use a dedi circuit. Overloading the line _uld create a fire hazard.
3. Do not use an extension cord. See page 1i for more detaffs.
4. Do not start/stop o_ration by pluggin_unplugging the power cord.
5. ff the power cord is damaged and requires replacement, have an Authorized
Se_-lcer install an exact replacement part.
!. Being expos_ to direct airflow for an extended period of time could be
hazardous to your health. Do not expose occupants, pets, or plants to direct
airflow for extended periods of time.
2. Due to the possibili_ of oxygen deficiency, ventilate the room when used
together with stoves or other heating devices.
3. Do not use this air condi_oner for non-specified special purposes (e.g.
presewing precision devices, food, pets, plan_, and art objects). Such usage
could damage the items.
4. The air conditioner is a consumer comfort appliance, not a precision climate
contro! system.
i. Do not touch the metal parts of the unit when removing the rifler. Injuries can
occur when handling sharp metat edges.
2. Do net use water to dean inside the air conditioner. Exposure to water can
destroy the insulation, leading to possible electric shock.
3, When cleaning the unit, first make sure that the power and breaker are turn_
off. The fan rotates at a very high speed during operation. There is a
possibffi_ of injury if the unit's power is accidentally triggered on while
cleaning inner parts of the unit.
For repair and maintenance, contact an Authorized SepJice Center, See the
warran_ page for details or call (800) 243-_. Have your model number and
serial number avaiiabie. They should be written on page 2 of this manual..
7

Introductio_
This symbol alerts you to the risk of el_Hc sh_P_
This sym_l alerts you to ha_rds th_ could _u_ harm to t_
air conditioner,
This symbol indicates specta| notes.
WARNING: This appfiance should _ indued in acco_ance with the
N_ionai Ele_ric Cede.
Front G_l,e
Air Fiiiter
Ho,nzon_l Air Deflector
(Horizontal Louver)
Vertical mr DeNec_r
(Ve_l Louver)
-- _r Dis_arge
A_rIntake
(inlet GrilJe)
Con_l Board
Remote ControUer _,_
Base Pan
Power Cord
8 Room Air Condi

115V ~ 2_V ~ Power _,rd may include a curTent
inte_pt_ d,ev_¢e.A test a_ reset bu_n is
provi_ on me plug case, The d_i_
should be t_ted on a _odic bss_ by nrst
pressing the TEST b_on ,and men, me
RES_ button, If _e TEST bu_on d_s not
tdp or if me RESET _t_o,n _ll not _y
engaged, disc_Snee _e of the air
c_diUo_r and c_ a quailed se_i_
te_nician.
Power Su_ly
U_ Wali R_p_cie
Sta_td '__V, 3-wk_ grounding
_!e ra_d 15A, 125VAC
S_nda_ 250V, 3-w_lre g_und_'ng
recep_c_ rat_ 115A,_OV AC
S_da_ 2SOV, 3-_re gro_nd_ing
r_pta_ rated 2OA,,250V AC
U_ i5 AMP. t_me _lay fu_ o_ 15 AMP
Use _ AMP. _ _lay fus_ o_20 AMP.
c_r_ breaker:
ELEC_|CAL SAF_
_,fPORT_T GROUNDING tNSTRUC_NS
Nr _}t_er h_ a thr_rron,g grmjndlng _ug on its powersupply _d, _ich _st _ pl_ into,
p_er_ gr_ed thr_-prong wall r_p_acle for _=r prot_n agalins| _stibie _ [h_erd.,
Manual 9
WARNING: This appUance must _ p_pody g_unded,
The power cord of _is appliance is equipped with a three-prong grounding p_ug.
To minimize the dsk of electric shock, use the piug with a standard three-siot
grounding wall power outlet, if the power outiet does not include a grounding slot,
have a quaLifi_ eiectrician repiace the outtet _fore you use the room air
conditioner.
WARNING: Changing the outlet _thout making the appropriate wiring
changes wili create an unsafe condition that could result in fire or
eiectrical shock. Refer all such work to a ilcensed and qua|ifi_
ele,,'_iclan.
P_ me_c<l
Ensure p_r grou_
exi_ _f_e use
WARNING: Do not cut or remove the grounding prong f_m the power
plugo
WARNING: Attaching the adapter ground te_i_l to the wa|l
_ceptac_ cover _r_ does not ground the appliance unless _e
covet screw is metal and not insulted, and the wall receptacle is
grounded though the house widngo
WARNING: if you have any doubt whether the air conditioner is
proporly gmun_d, have the wall rece_cle and ci_uit choked _ a
qualified electrician,
10 Room Air Con r
We st_ngly discourage the use of an adapter due to potential e h_ards.
For tempomPi conn_ions, use only a UL-iisted adapter, available from mo_
local hat.are stores. Ensure that the large s_ot in the a_pter isaligned with
• e large slot in the receptacle for a proper po[ari_ connection.
To disconnect the r cord from the adapter, use one hand on each to avoid
damaging the ground terminal, Avoid frequently unplugging the power cord as
this can lead to eventual ground termina! damage,
Temp_ m_hodi _
R__o_ _t_
_rectt
WARNING; Never use the appllance with a broken adapter.
i 15VOLT UNiT
We strongly dis_rage |he u_ o!an extension cord due to poten_a_ safe_
h_ards, For temporary s_ua_ens,u_ onlyCSA _ied and UL listed 3-wi_
grmJr_ exten_ _tds, rated i5, A, i25V.
N_wiringsh_d _ m_e in,ac_dan_ with Ioca__'icel _ and _ulati,ons°
Aluminum _se wiringmay _ sp_a] _le_. _,sult a qual_ eiectt_an,
_0,20,8, and 230/208 VOLT UN_
These uni_ ai_ _ip_d with a.thre_pro_g g_u_in,,g pl_g o_the p_ s_pp_y _rd, wh_h
must _ pi_ed into a _t_ing p_y g_und_ree-p_r_ _iil recep_de _ _r !pr_t_ion
ag_i_ _ssi_ s_ Ih_rd!, _fs_h _n outlet is_t preset, o_e m=_t _ [_sta|le_ bya q_alified
e_td_.n i_a_,_ _ the Na_ona_Ele_ca| _e and $_1 cedee _nd ordinances..
DO NOT USE AN EXTENS_@,I _RD on _,208, and 230Y2_ Volt u_tt_i.
O_er's 11
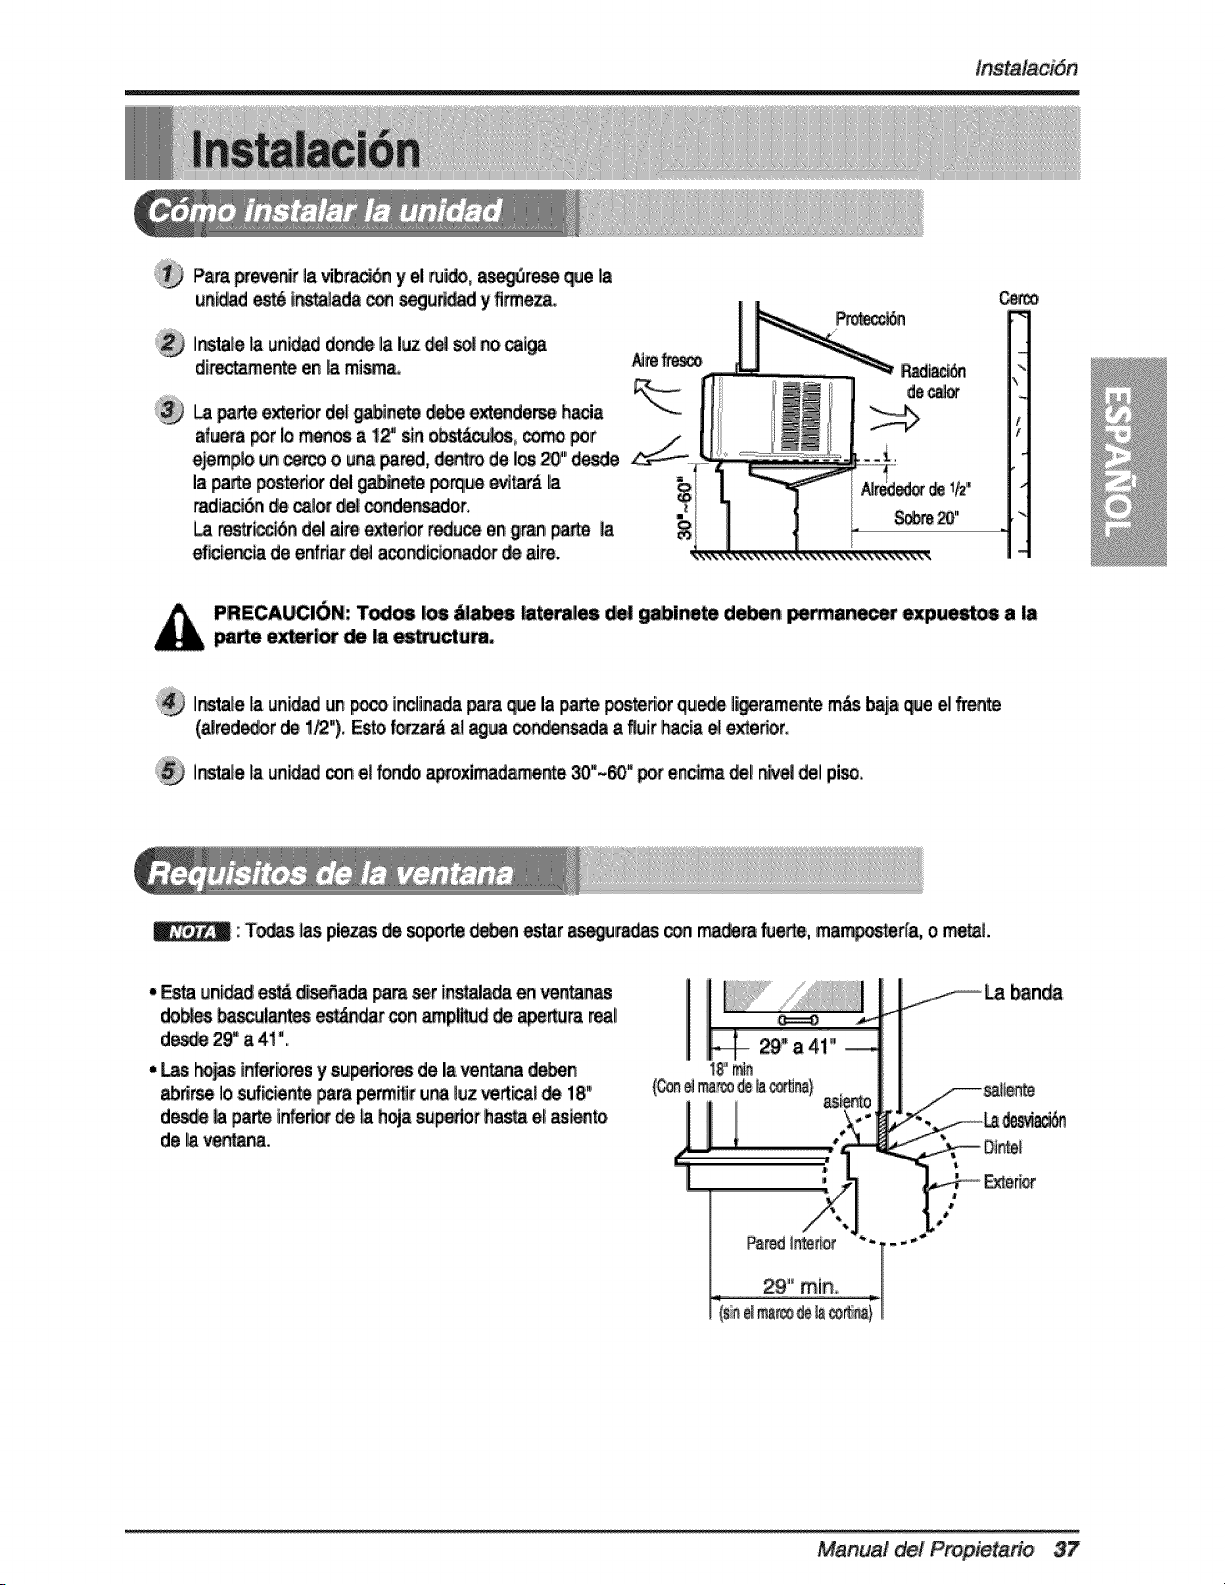
To p_vent v_m_n and n_e, make sum _ un_
isi_.a!l_ s_rely _ _rmlh/
Awning
Fen_
mq_
!
/
CAU_: All si_ I_vm _ _e _rt_ must remain .ex_ to _e ou_Ide _ _e
_ui_.
_ns_|__ _nff a I_e _n_ so the _k _ slight_y _wer _ the _t (_ut I_')o
_is _ll fo_ con_n_d water to_ m,theo_i_.
_n_ _ _nit _ the _om a_ _"_0 ° _'e _ _ I_vel.
: AHs_ppo_ing p_ sh_JId bes_u_ _ fi_ _, m_nn], or _'_L
• This _nit is d_i_ed for insta]_n in _'_l_d d_ble
hung _dows _ _ali _ning _,s from _"
41_.
• The topa_ bottom_:_ow _sh m_st o_n s_nt|y
_o.al_ _ cl_r _n':i_ o_ni_ of 18__ _ _m
the u_r _h 1othe_n_ _ool.
12 Room Air er
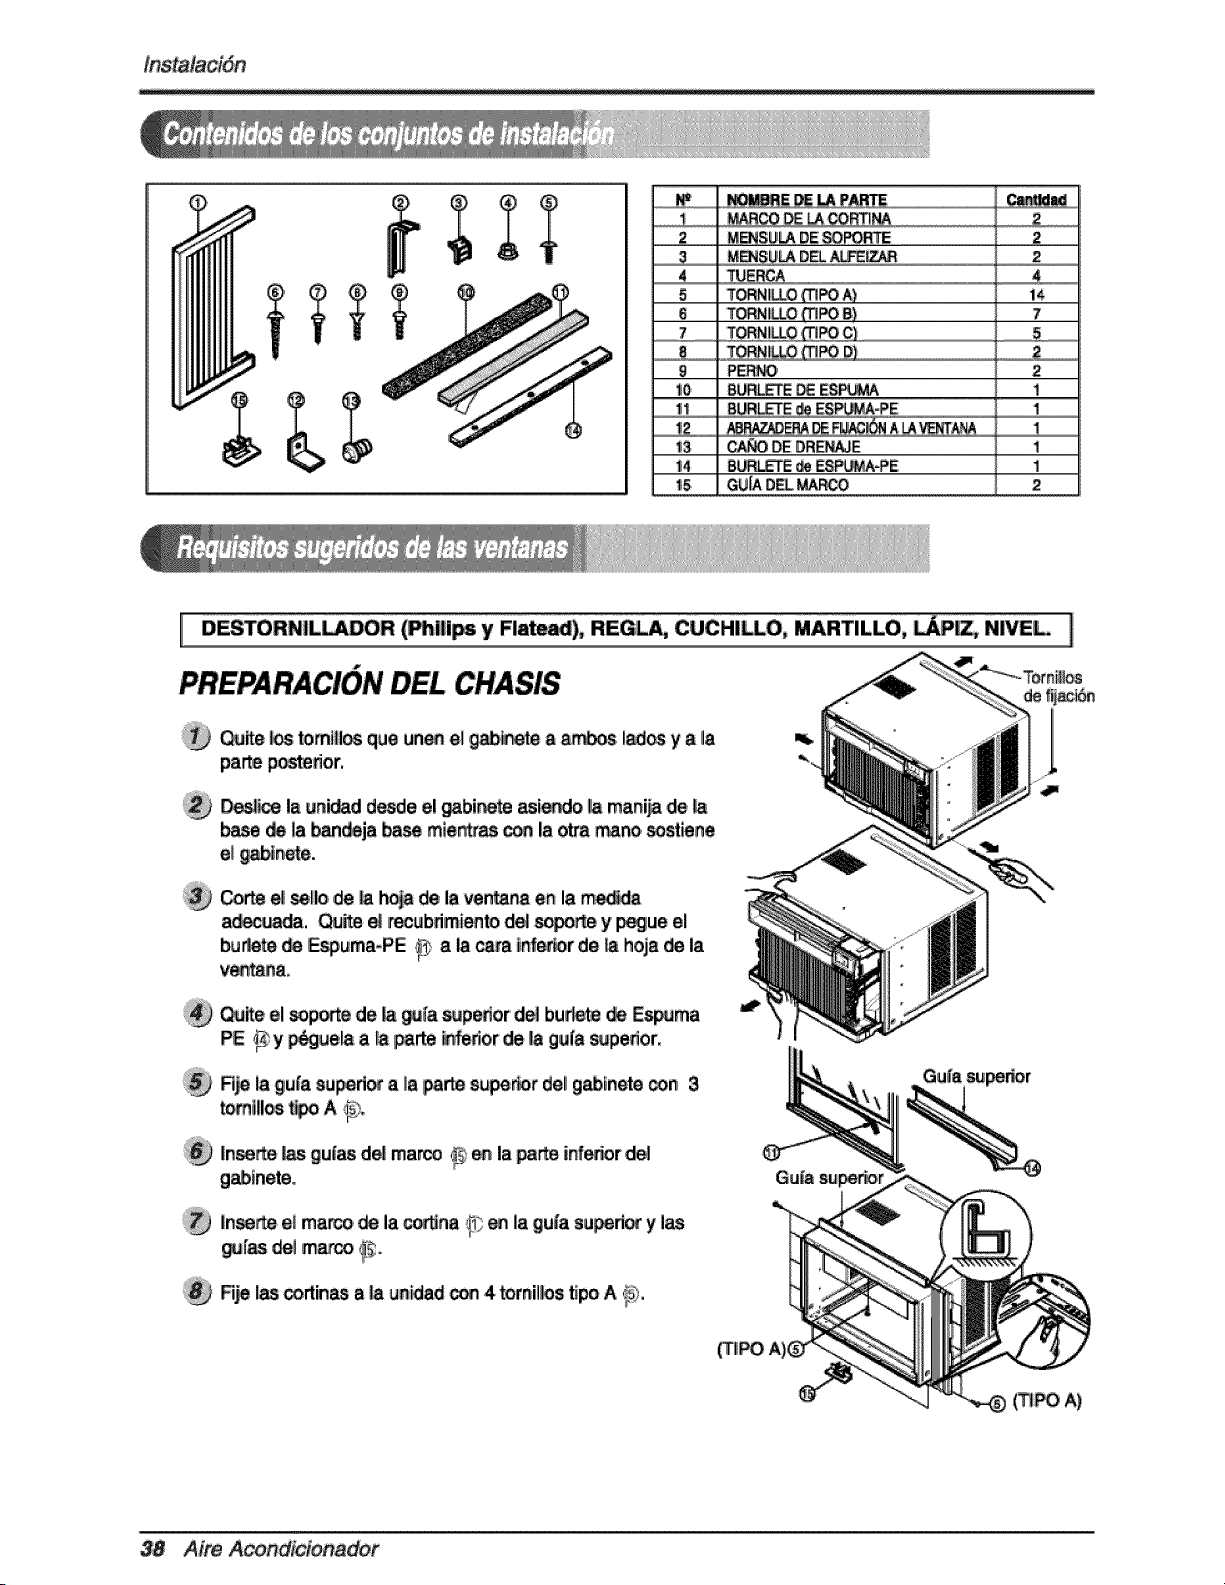
Installation
F_E _RTAI_N 2
2 SUP_RT I_K_ 2
............................4.....................L_K NLrF 4
5 _R_ (_PE A) i4
6 _R_ (_E B) 7
...........7.........................._REW_E C) S..............
8 _ :SCREW_E 0), _ 2
...................9............................CARIR_E _LT .....................................................................................................................2..........................
10 _AM _RIP 1
11 FOAMS_L 1
12. WmN_ LOCKING B_ 1
13 _N PIi_ 1
!4 FOAM.PE 1
15 IF_E GUIDE 2
Owner's Manual 13
Op_ the wi_ Ma_ a I_ne_, the cenmr of
_ndow stoo__tv_, _ s_e windowstop
moldin_o
Looselya_ _ _III bracket_, the _ppert
bra_._ usingthe cadge bott_ _ _k r_
S_ll
i_ A_ the ml!bracket tothe_ndow s_l _ the
C_efuIPt placethecabinet _ thewin_ sto_
a{ign_ _nter _tk on _e _om front
• e cen_r line ma_ed _n_ st,_,
D)
Umng theM_ew and theI_k nut, _a,ch the
su_ bracket tothe _inet _rack_e. U_ t_ fi_
tta_ h_e after thesil_bra_et on _ outer_ of
• ,ewindow sill_hten _e _.rri_e _ _ _ _
n=. Be s_m _ _net _nts _.
CA_ON: Oo n_ ddl| a hole in the _om
_. _ un_ is _gn_ _ o_ate w_h Upper
Gu_
_mately i_ _ of w_er in _m _n,
P_!!_e _om wmd_ sash _wn _hind the Top
intoner _r untilthey_m_et,
:1._ nm puU_,e _ sash_n __glhtiy
• _ the m_nt _ Fr_e c_n is
A_h the _net tothe_ln_,d_ stool by
_rivingthe screws _ype B)_rou_h _e
_binet intowiR_ s_l.
2. The _binet _ _ insmli_ _th a _ry
slightti_td_rd tow_ theou_i_.
R_m, Air Condi_oner
Ins_llation
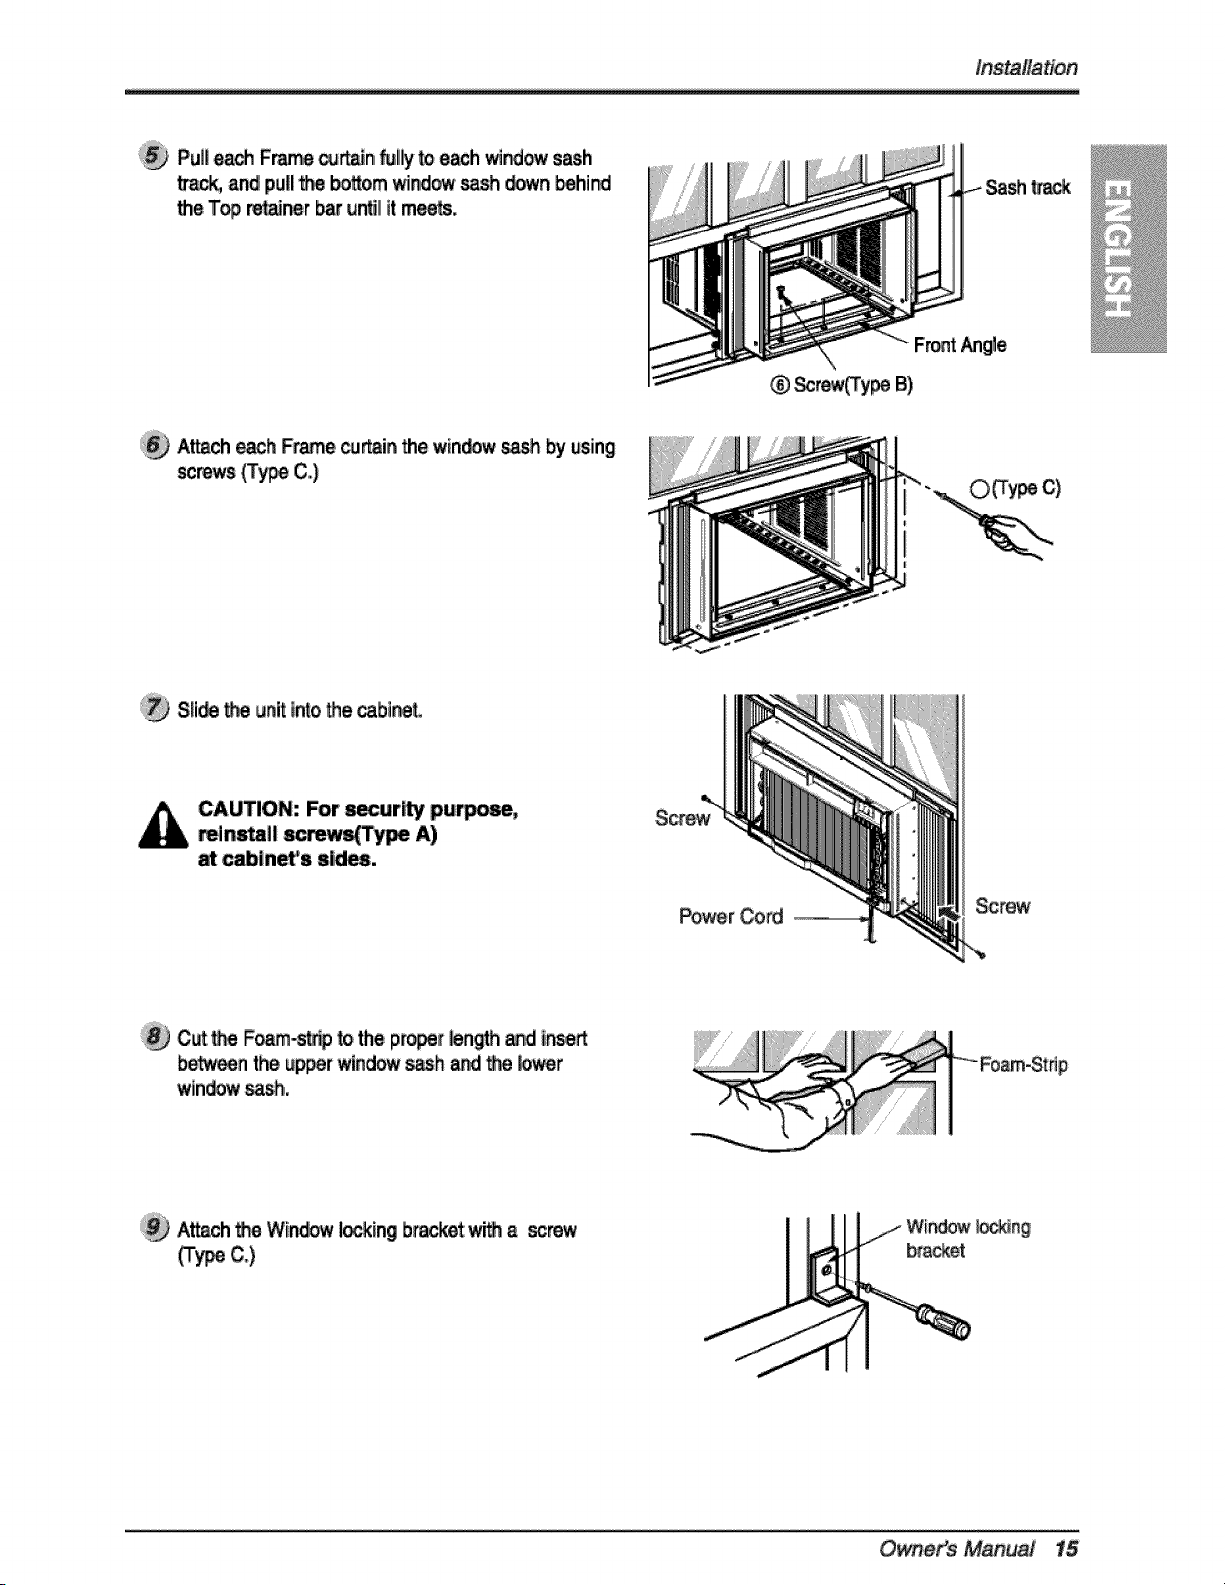
_i PU _ each F_e _n_ _jlily toeachwi_ sash
_c_ and pu_l_ _m wind_ sash_n _hind
theTop, retmner _ u_ll itmeets.
At_ch each Frame cumin _e win_ s_ byusing
Brews (Type C..)
SJi_ _ unit intothe_bi_t
CAUTION: For s_ur[ty pu_,
_1| s_w_ype A)
Power _rd
_;ew
Cut _ Foam-s_ to the pr_t _n_h _.d In_tt
b_n theu_r window_h _d _e b_r
win_ _sh.
Attach_ Window I_ing bracketv,_ a sc_
c.)
___ idow locking
b_acket
Owner's Ma#uat 15
Ins_ltation
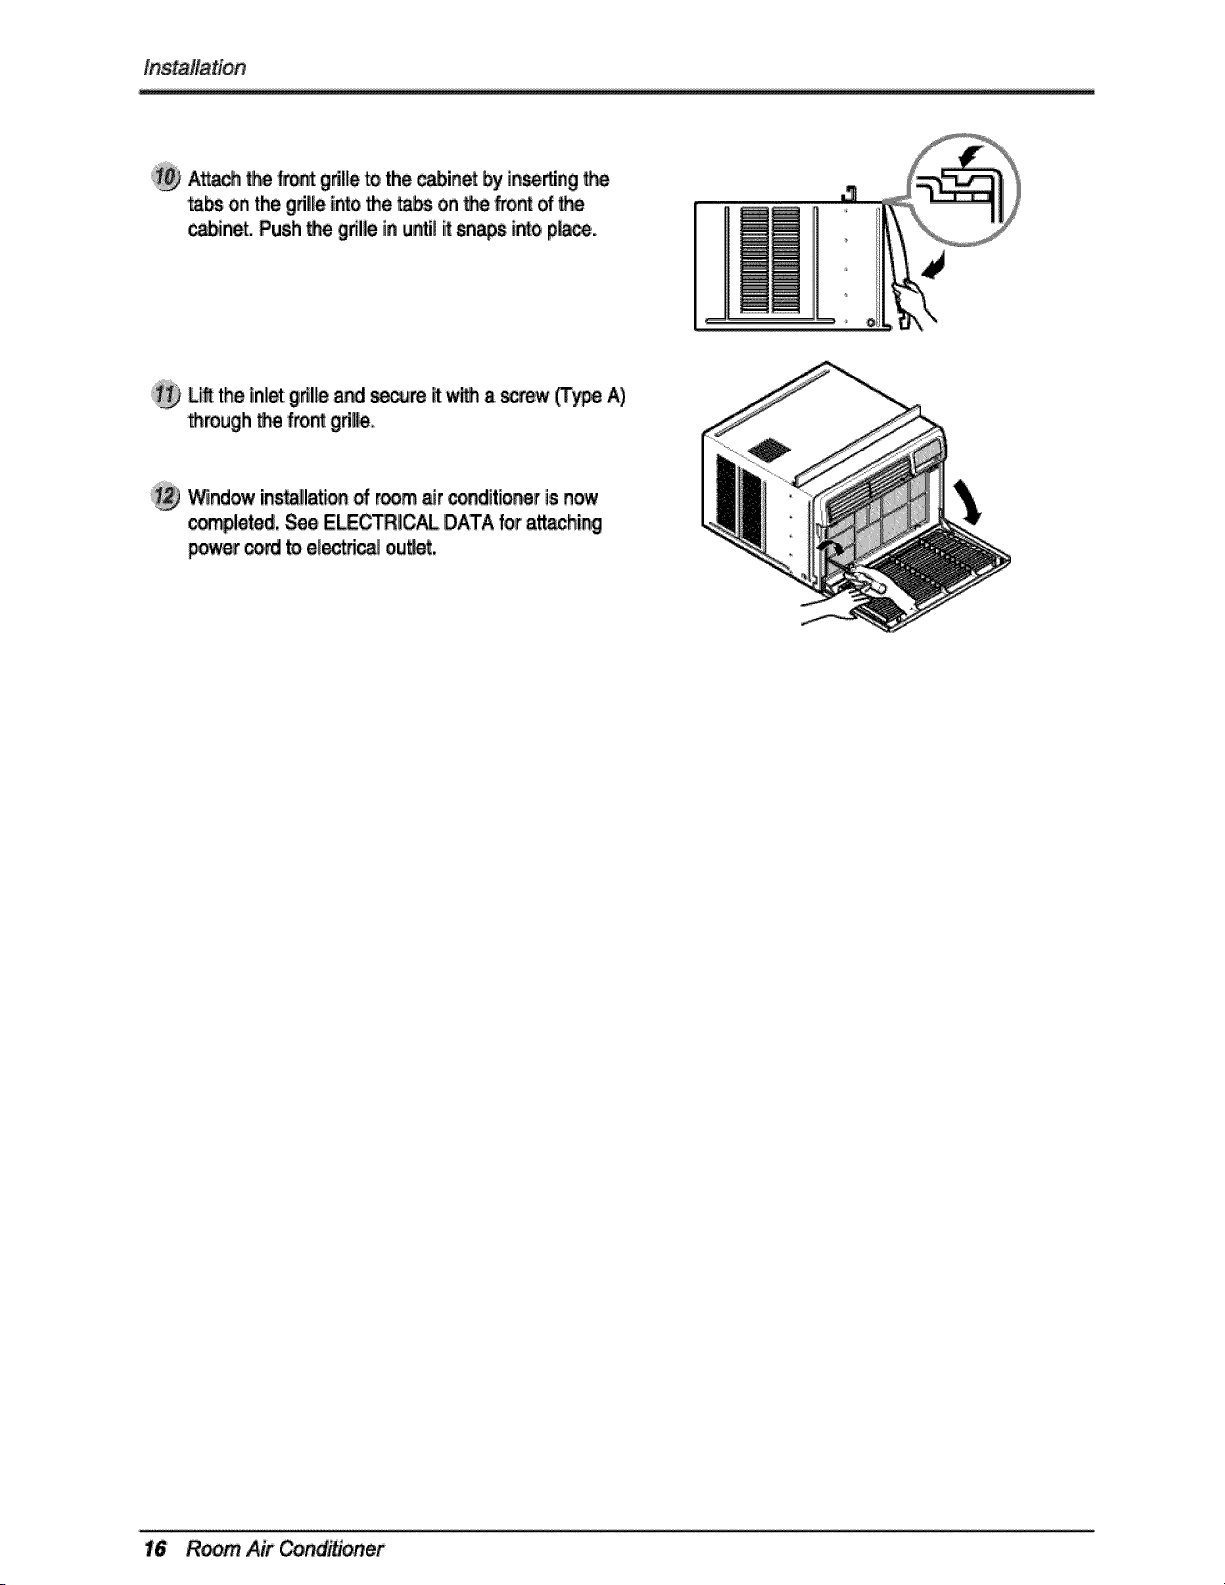
A_ _ |_t g_l[leto,the,_in_ _ ir_e_ng
_ on the,grWeintothe t_bs,on _ _ont of
_net. Push_ gril_ in until itsn_ into p_.
,_ Li_tthe,inlet g_lle a,_ _re ff w_ a _ew (Type A)
• rougih_e front gd_.,,
_nd_ inmllati_ of _m air _itionfer isnow
_leted, _e E_ICAL DATA for attaching
_r _ _ eUectric_Jou_,
Room, Air er
OperaUng instructions
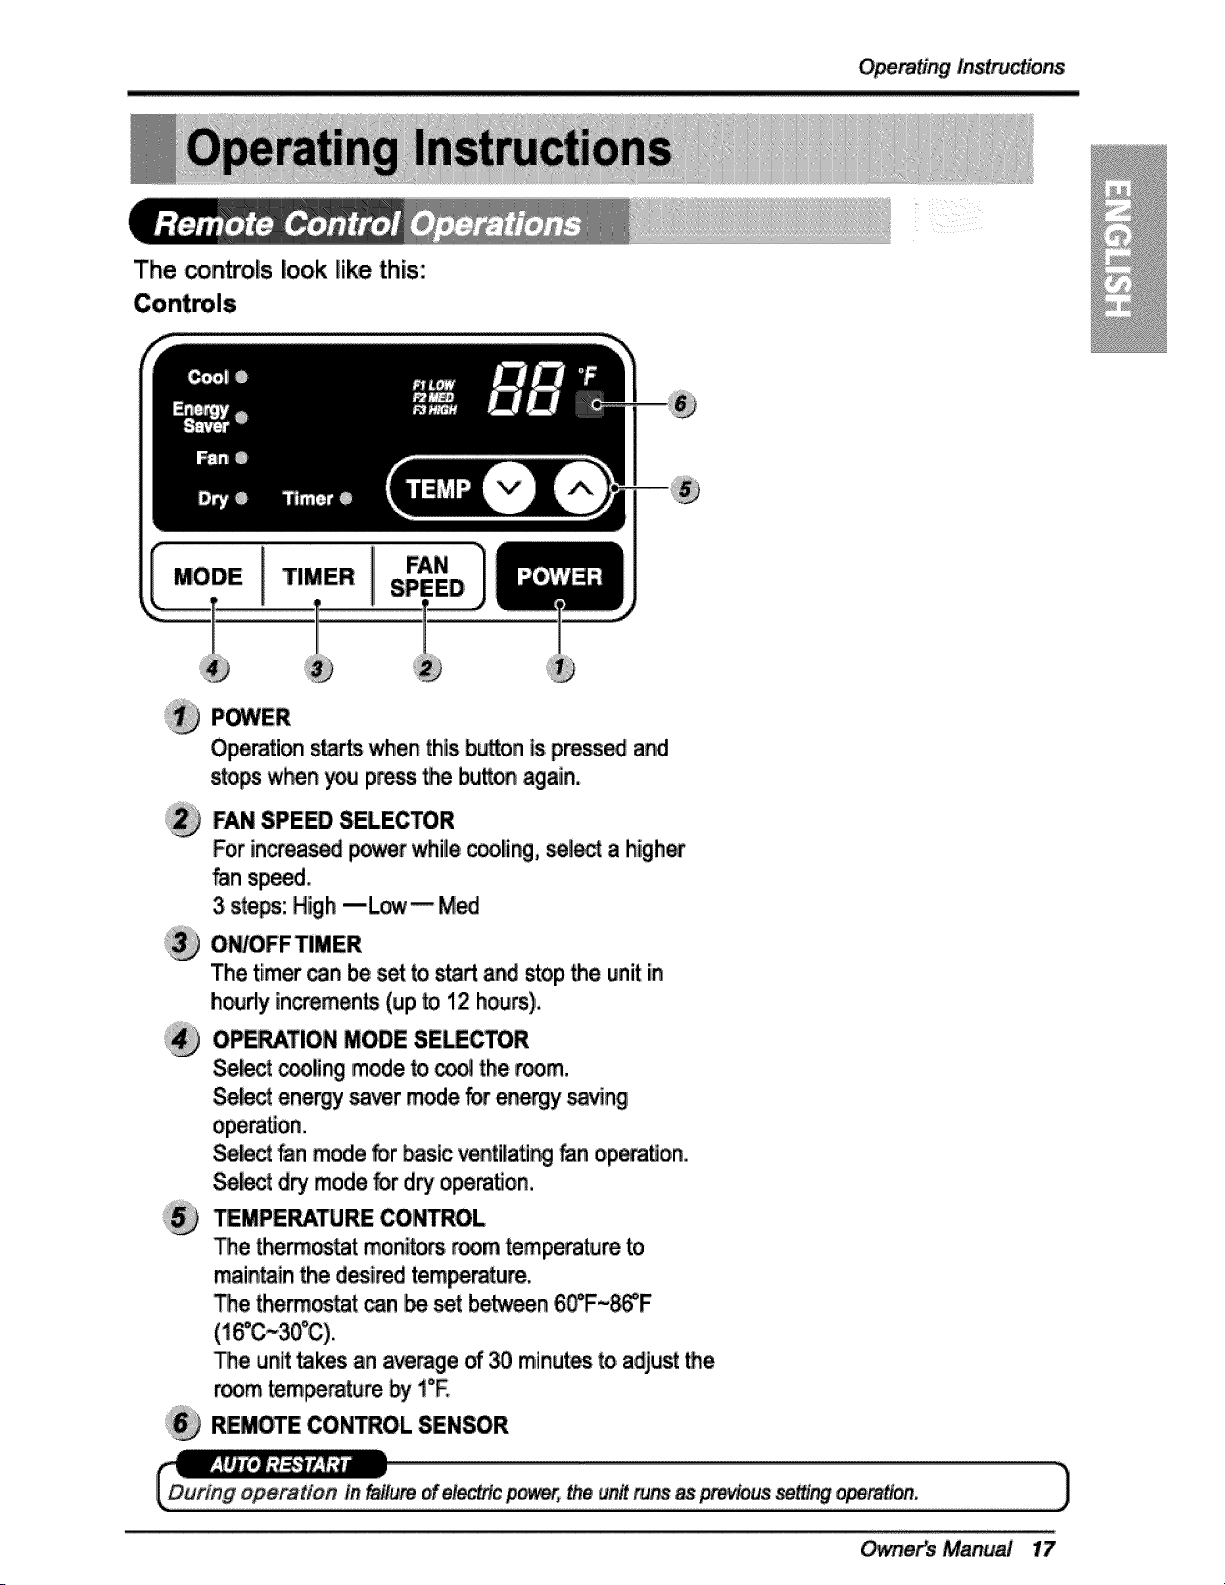
The _ntmls look like this:
Operation s_ whenthis b_on is pmss_ _d
stops w_n you p_ss the bu_ again.
FAN SPEED SELECTOR
Forincreas_ powerwhille_oliro, seli_ ahigh_
_n sp_d.
3ste_: High --Low-- M_
ONJOFF T!MER
The timer canbe setto start a_ stop_e unit in
h_fly incremen_ ,(upto 12 hours),.
OPERATION MODE SE_,_R
Se_t _li_ mode to _ the _m.
_ct ener_j _r mode for er_y _ng
Se_d _n mode _r _sic venti[ati_ _n op_t_on.
Se_ dry mode for dry operation.
_MPERATURE COiNTROL
_e therm_at monit_s _om temp_m to
maintain _e d_ired tem_rature.
The therm_tat _n beset be_en 60_F~_F
Theunittakes anaverage_ _ minutesto,adjust_e
room_mperatu_ _ I°E
REM_E CONTROLSENSOR
_ne_ Manual 17
Operating/ns_tions
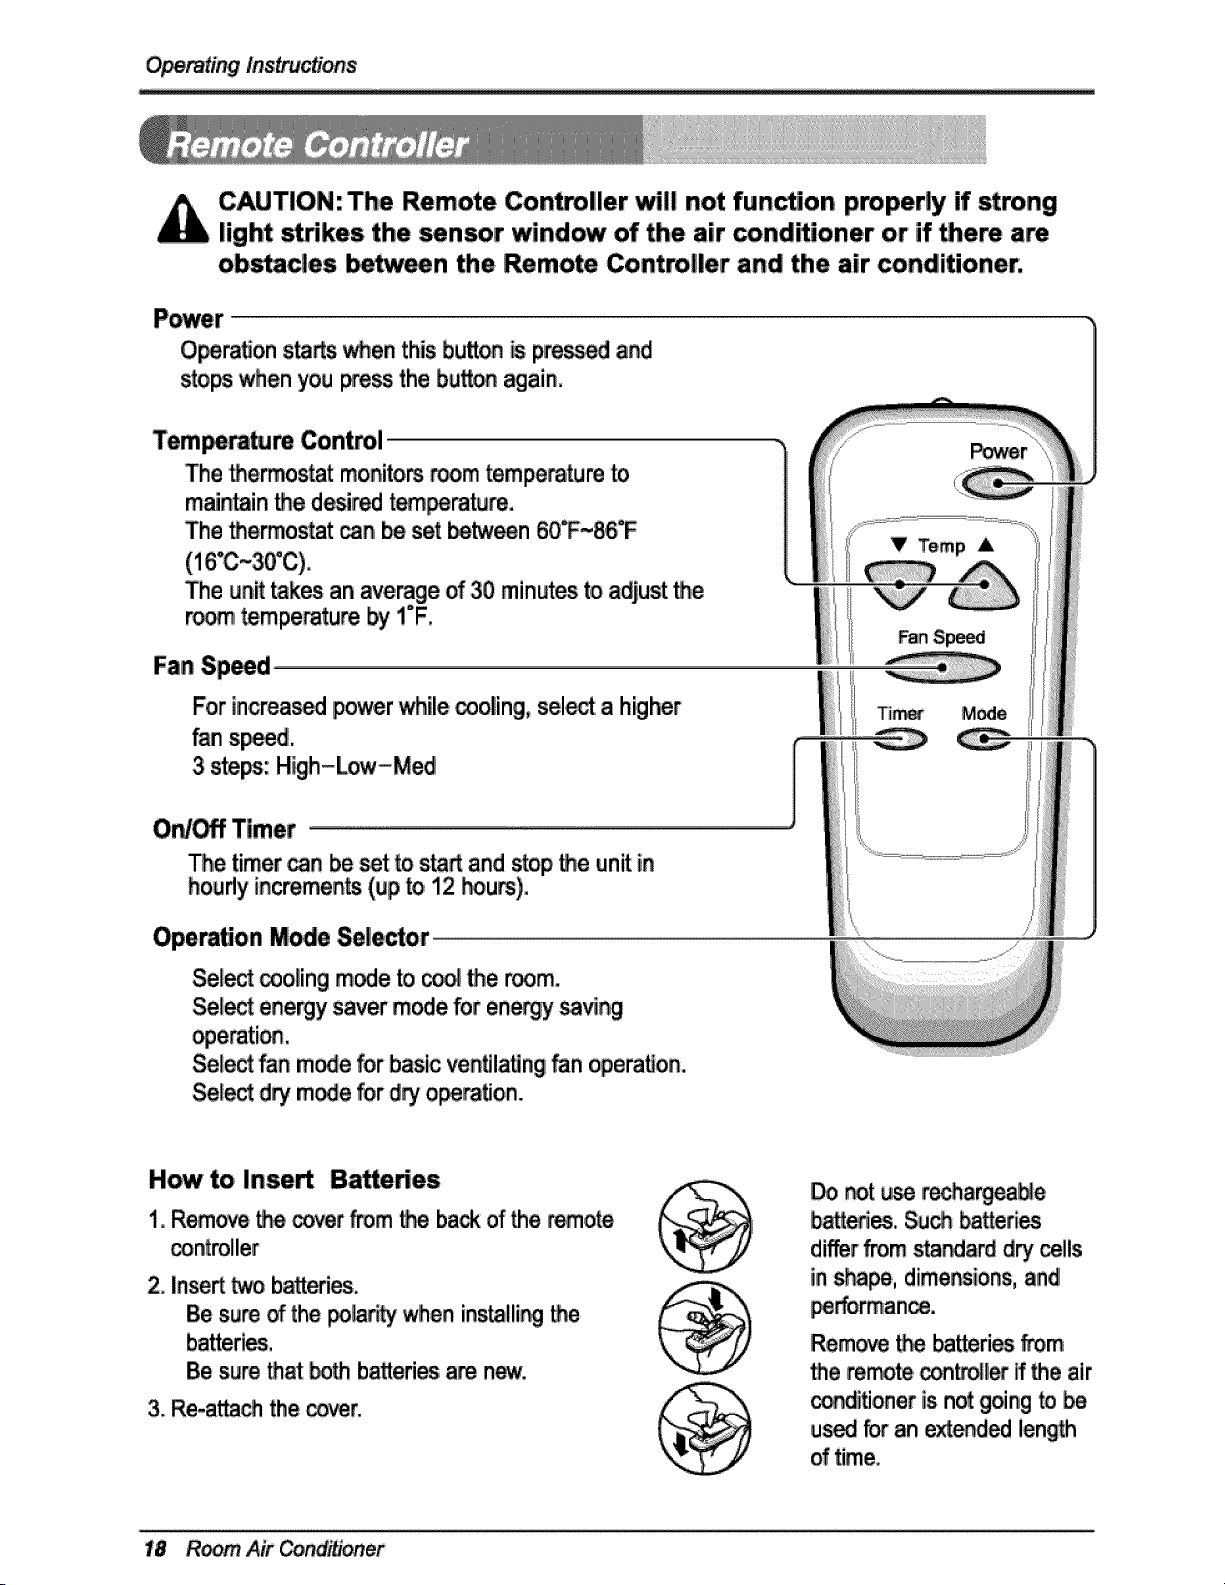
CAUTION:The Remote Controller will not fun_ion properly if strong
light strikes the sensor window _ the air _nd_oner or if them are
ob_cies I_veen the Remote Controller and the air conditioner.
O_ra_on sta_s whenthisbu_ is,press_ and
stopswhenyou _e_ the bu_oin _ain.
Tem_Jm Con_l
The_ermostat monito_ _m _mpe_tum
m_n_in _e desiredt_rature,
The _ermostat ,_n be set _n 60T~_'F
The unk _kes an _¢erage of30 minutes to adjust_e
r_ tempe_ture by !°F.
!
Fan Sp_d
Forin,crea_ power_ile _oling, sel_ ahigher
fan s_d.
3ste_: I-I_h-Low-Med
V Temp A
ON_ Timer ..............
The timer_n besetto sta_ and stop_e unitin
houdyincremen_(up to,12 l'_u_),
Oper_on Mo_
Sel_ _olJng m_e _ _ _e room_
Sel_ energy saver mode for energy _ving
Sele_ _n mode forbasic ventilaUngfan operaUon,
Sel_ d_ modefor d_ o_ration..
How to Inse_
i° Rem_e _ cover_m tt'_,backof_e remote
2. Inse_ _ batteries.
Be s_re _ the po_y when ins_lli_ _e
Be s_re _at _th ba,_edesa_ new.
3.Re-a_ the _r,
_t _ recharg_e
batte_. Su_ batter.s
differ_m sta_a_ dry _lls
in s_'_pe, dimer_ions, and!
Rem_ _ batteries _m
• e re.re _nt,_er ff _he air
_iti_er is not going to _,
us_ _ an exte_d_ len_h
oftim,e.
Room, Air er

Opera,rig in s
Air Directio, n
_ _n _ adjusted _ changing_e directionof the
air_nditio_fs Io_e_ _ canaim incase the
_ling _n_ of the air ,_nd_nef:
Adjusting Horizontal Air FI_ Direction
kdjlusti_ the v_l Io_e_ IN and right_11
change horizontalallow.
Adjustng Veffi_l Air Flow Diction
Adjusti_ithe ho_on_! vane upand _wn _U
changeverticalai_.. The var_ _n _ adjusted
by nudging the_ orup and down _ the va_.
Re_mmended orien_ion of louvers
A_just_uv_ _ fa_ upwards _en _,ll_i
tomaximize_Hlng _c_ncy...
Adjusting hodzon_l mr_
Adju_ng ve_| air fl_
Vent Control
Forma_mum _llng , CLOSEthe v_t. _is _11a|l_ I_rna| _r drcuilatton.
OPEN_e vent_ di_arge sta_,air.
CLOSE_VENT.LOPEN
0 Manual 19
OperaUng
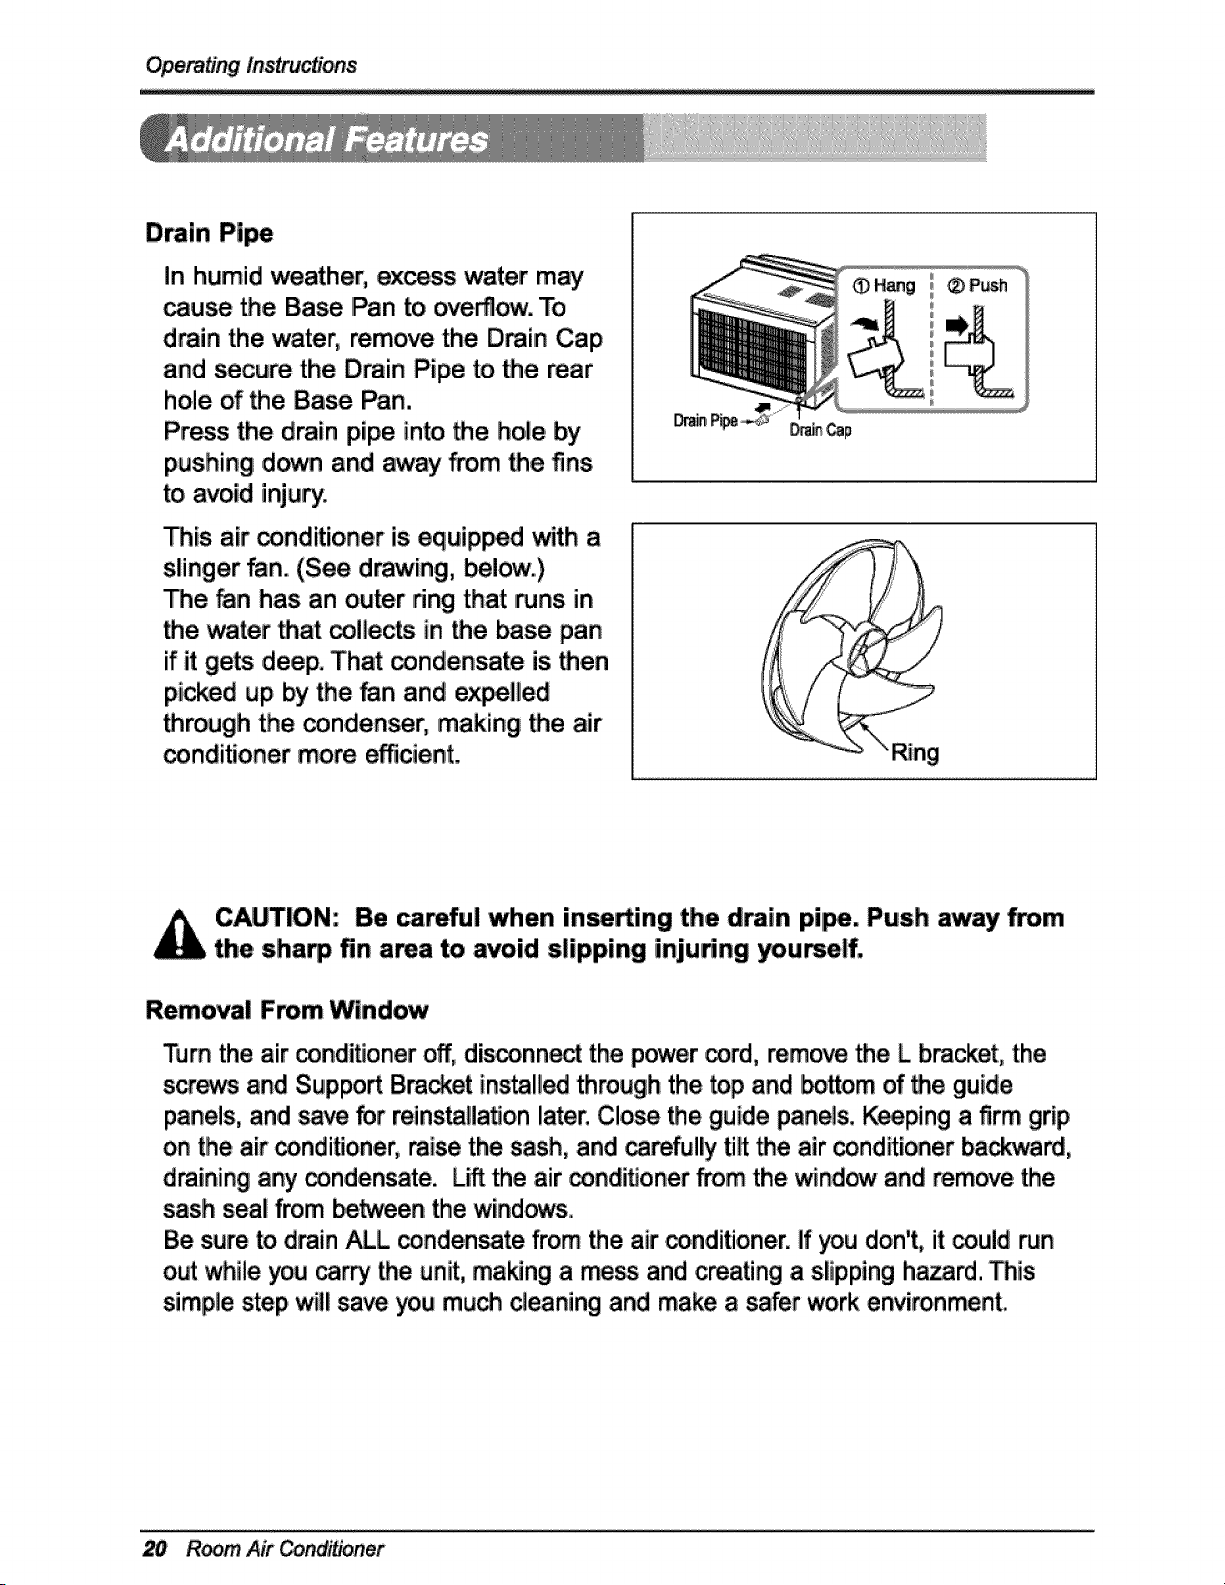
Drain Pipe
In Ihumid weather, excess water m_
_use the Base Pan to overflow. To
drain the water, remove the Drain Cap
and secure the Drain Pipe to _e rear
hole of the Ba_ Fan.
Press the drain pipe into _e hole by
pushing down and aw_ from bhe fins
to avoid injury.
_is air _nditioner is equipped _th a
slinger _n. (See drawing, _lc_,,v.)
The _n has an outer dng that runs in
• e water _at _lie_ in _e base pan
if it gets deep. That _ndensate is _en
picked up by the fan and expelled
_rough the _nden_r, making _e air
conditioner more efficient.
Be careful when inse_ing the d_in pi!_, Push away _m
the sha_ 'fin area to avoid slipping injudng youmelf.
Removal From Window
•arn the air _nditioner off,disconn_ the power _rd, iremove the L bracket, the
screws and Support Bra_et installed through the top and bo_om of _e guide
panels, and save _r reins_fla_on later. Close _e guide panels. K_ping a firm grip
on the air _nditioner, raise the sash, and _refulFi tilt _e air _ndiUoner bayard,
draining any _ndensate. Lift the air _nditioner from the _ndow and remove the
sash seal from be_en the windows.
Be sure to drain _L condensate from the air _nditioner. Ifyou don't, it _uId run
out _ile you carry _e unit, ma_ng a mess and creating a slipping hazard. This
simpie step will save you mu_ cleaning and make a safer work e_ironment°
Room Air er
Maintenance _d Service
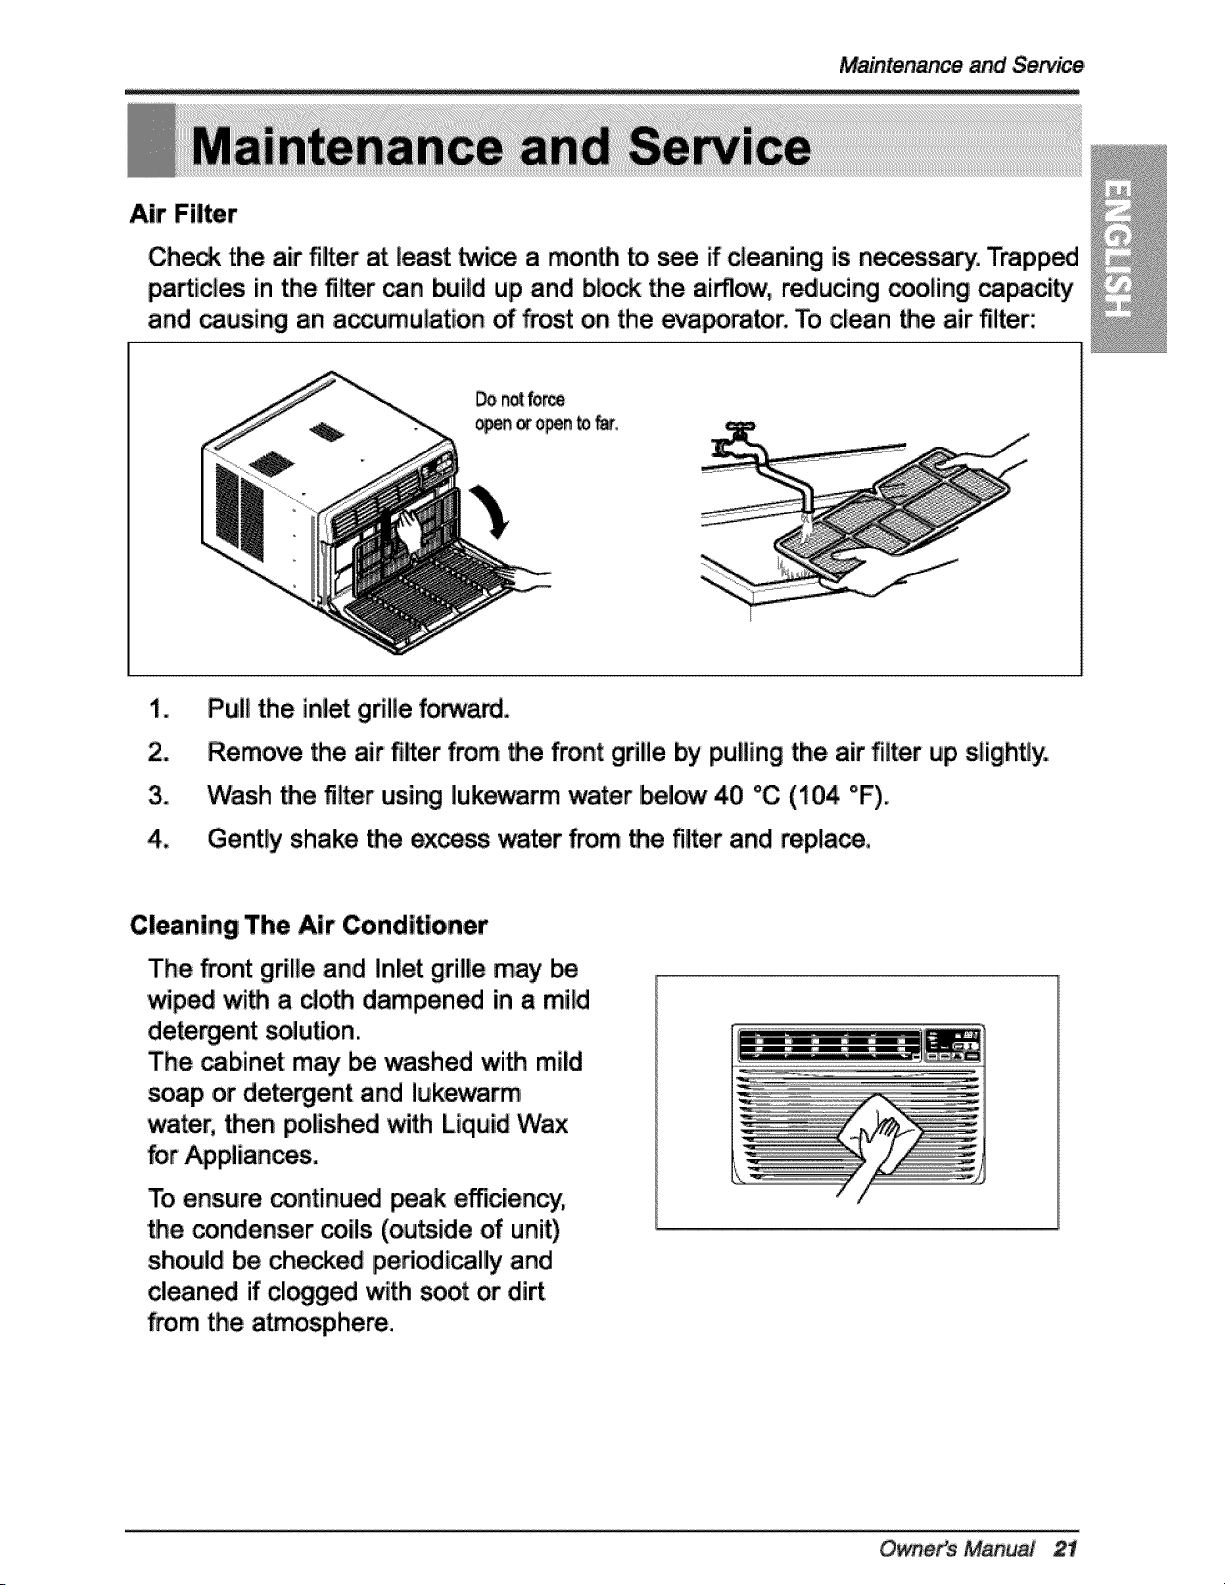
Air Filter
Check the air filter at least _ice a month to _e if cleaning is necessary. Trap_d
pa_icies in _e filter can build up and block the allow, reducing cooling ca_ci_
and _using an a_umulation of _ost on the eva_mtor. To clean bhe air filter:
3_
4_
Pull the inlet gdlle forw_.
Remove the air fi_er from _e front gdile by pulling the airfilter up s,lighBy.
Wash _e filter using lukewarm water I_!_ 40 °C (104 °F).
Gently shake _,e ,excess water from _e filter and mplac4_,
Cleaning The Air Conditioner
The _nt grille and Inlet grille may
_p,ed wi_ a do_ dampened in a mild
detergent soluUon.
The _binet may be washed with mild
_ap or detergent and lukewa_
water, then polished with Liquid Wax
_r _pliances.
To ensure continued _ak efficiency,
the condenser coils (ou_ide of unit)
should be checked periodically and
cleaned if cl_ged with soot or dirt
from the atmosphere.
0 Manual 21
Maintenance and Service
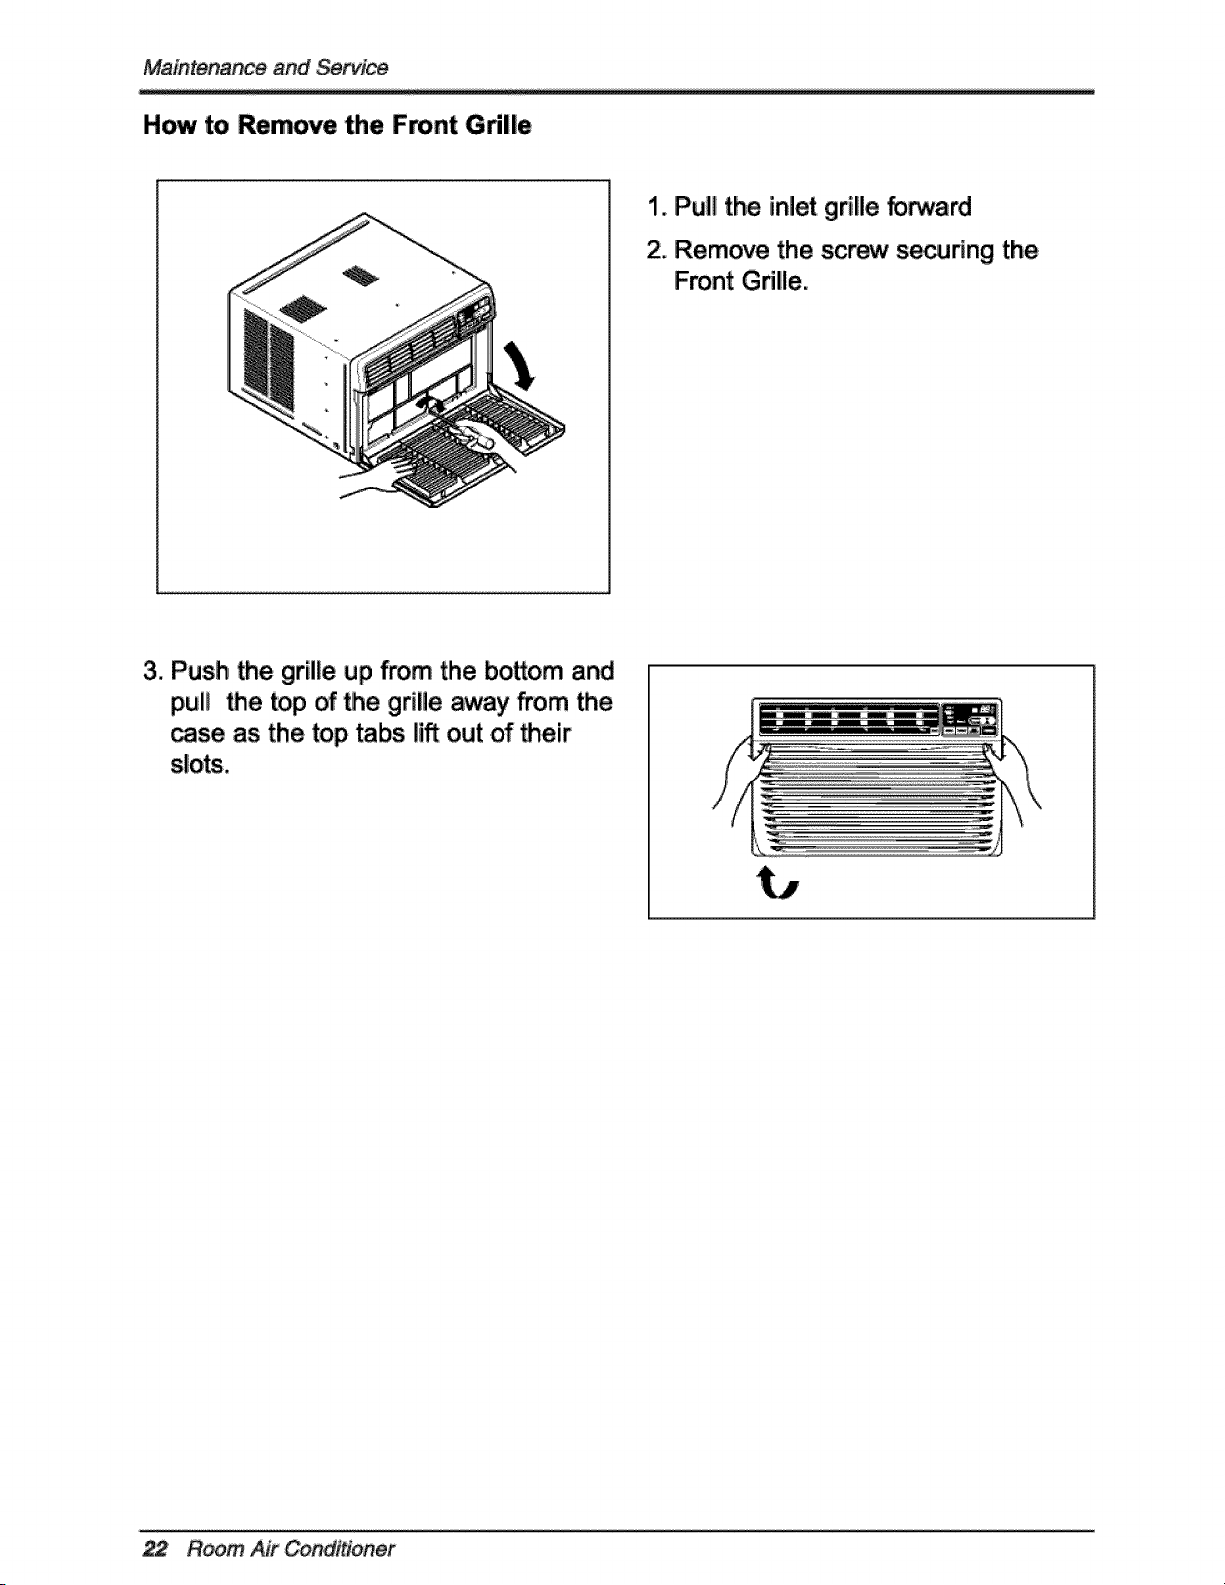
How to Remove the Front Grille
1. Pull the, inlet grille _r_ard
2. Remove the scr_ secunng the
Front Grille.
3. Push the grille up from the bosom and
pull the top of _e grille ,aw_y from the,
_se as the top tabs li_ out of _eir
22 Room Air er

and
Before Col|trig for _rvlce
I,fyou have problems with your air condffioner, read the following
information and
try to solve the problem. Ifyou cannot find a solution, turn off the air conditioner
and contact your dealer:
Air conditioner d_s am o_rate,
1. Ensure that the air condi_oner is plugged into a proper outlet.
2. Che_ the fuse or circuit breaker.
3. Che_ whether the voltage is unusually high or low:
Air does not feel cold enough on the e_|tng setting
i. Ensure that the temperature settings are correct°
2. Che_ to see if the air filter is c_ogged with dust. if so, dean the filter,
3. Ensure that the air flow from the outside is not obstructed and that there is a
clearance of over 20" between the back of the air conditioner and the wall or
fence behind it.
4. Close all d_rs and windows and check for any source of heat in the room.
Before _lHng for se_ice, please review the followinglist of common
probiems and solutions,
The air is operating n when:
You hear a pinging noise. This. is caus_ by water being picked up _ the fan on
rainy days or in highly humid conditions. This featu_ isdesigned to help remove
moisture in the air and improve cooling efficiency.
See the so,ion on Slinger Fan, page 20,.
- You hear the thermostat cH_. This is caused by the compressor cycle starting
and stopping.
You see water dripping from the rear of the un_. Water may be coH_ed in the
base pan in highly humid conditions or on rainy days. _is water overflows and
drips from _e rear of the unit.
,, You hear the fan running while the compressor issilent. This isa normal
operational feature.
0 Ma#ual _
Maintenance and Service
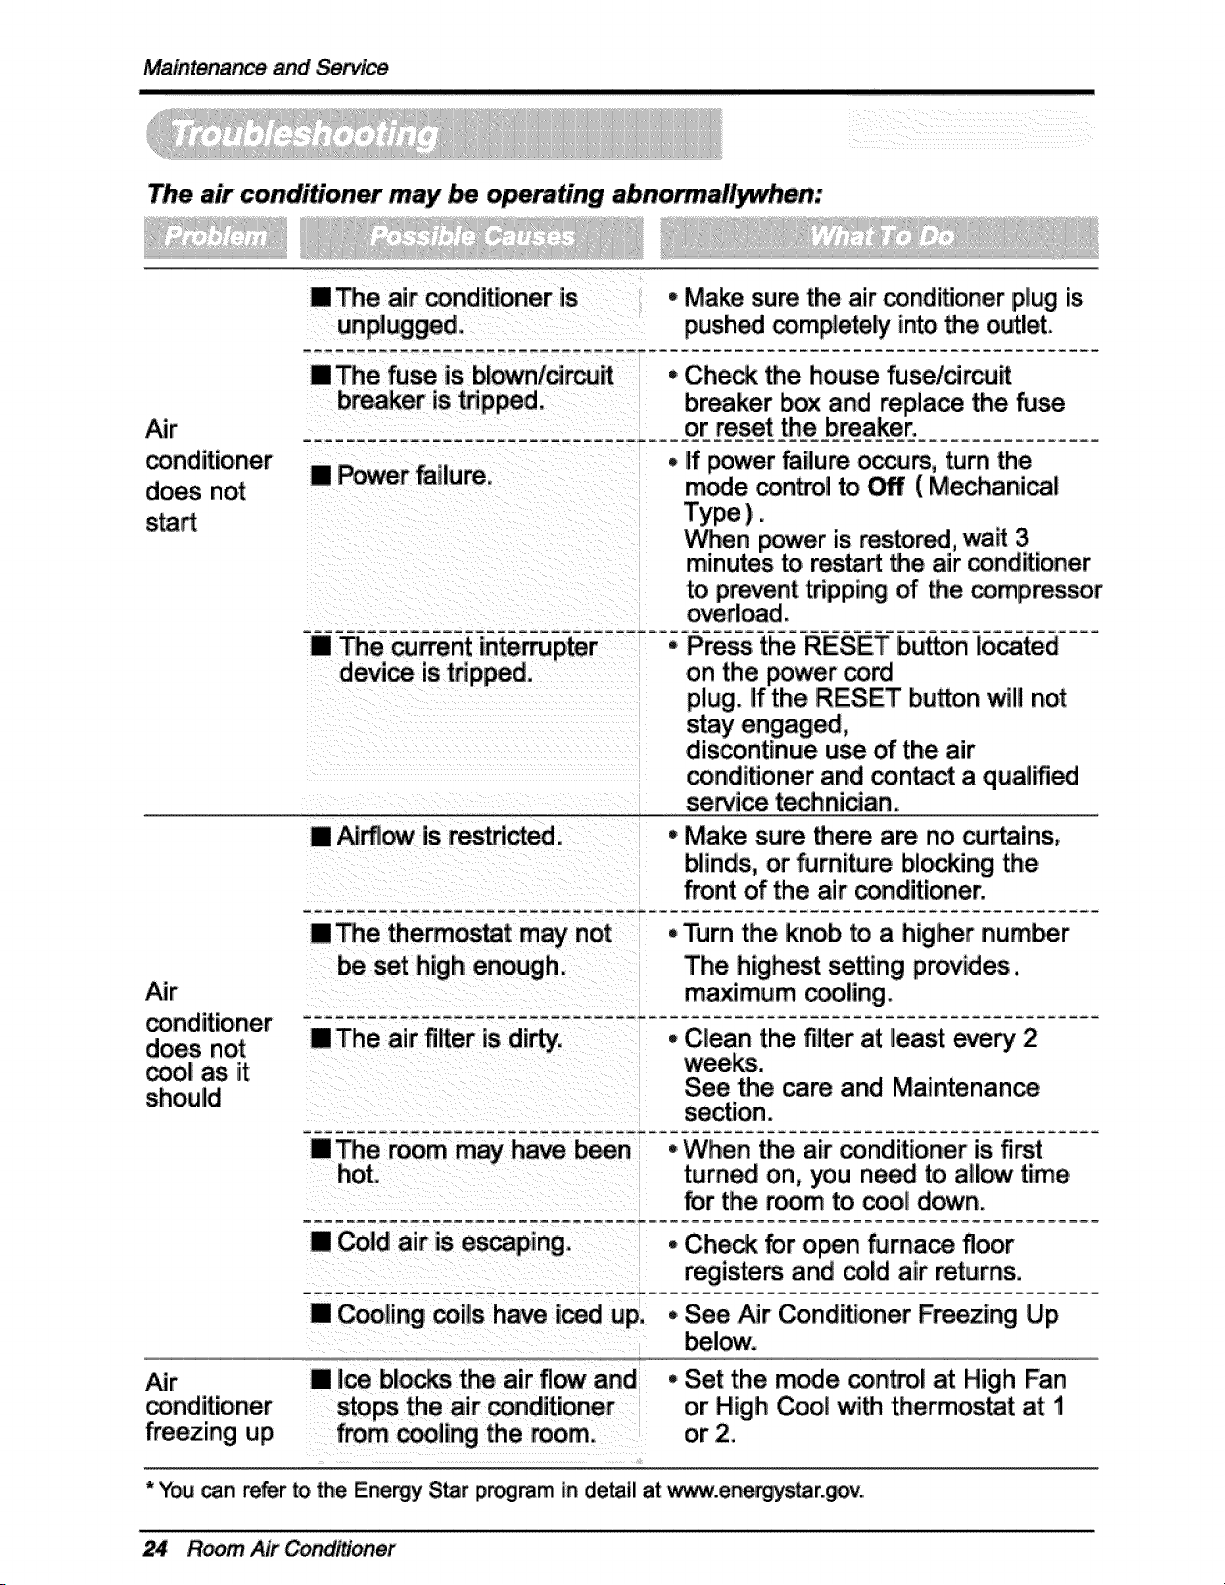
The air conditioner mw be _Qera,ting abnorma,!!_en:
[] The air conditioner is • Make sure the air condiUoner p_ug is
pushed completely intothe outlet.
• Che_ the house fuse/circuit
breaker _ and replace the Use
or re_t the breaker.
....................................................................................
• If power failure occurs, turn the
does not m_e con_ol to _ (Mechanical
Type).
to prevent tripping of the compressor
conditioner
does not
cool as iit
on the power cord
p!ug. ifthe RESET bu_on wil! not
discontinue use of the air
conditioner and contact a qualified
service t_hnidan.
[] Ai_iow is reacted. * Make sure there are no cu_ains,
blinds, or furniture bilking the
_nt of the air conditioner.
[] _e theist may not •Turn the knob to a higher num_r
be set high enough. The highe_ setting provides.
maximum cooling.
[] The air filter isdirty. • Clean the filter at least every 2
See the care and Maintenan_
[] _e morn may have b_n
[] Cold air is escaping.
•When the air conditioner is frst
turned on, you need to aJlow time
_r the _m to cool d_n.
. Che_ for open _rnace floor
registers and cold air returns.
[] _oling coils have iced up, . See Air Co nd_oner Freezing Up
freezing up
[] ice blocksthe airfl_ and
from cr_ling the room.
• Set the mode con_ol at High Fan
or High Cool with thermostat at 1
or 2.
* You _n rear to the Ene_ S_r p_mm in detail at www.en_y_tar._.
Room Air er
_ner's Man_! 25
Memo
26 Room Air Conditioner
_ _ _n_ en mamha ............32
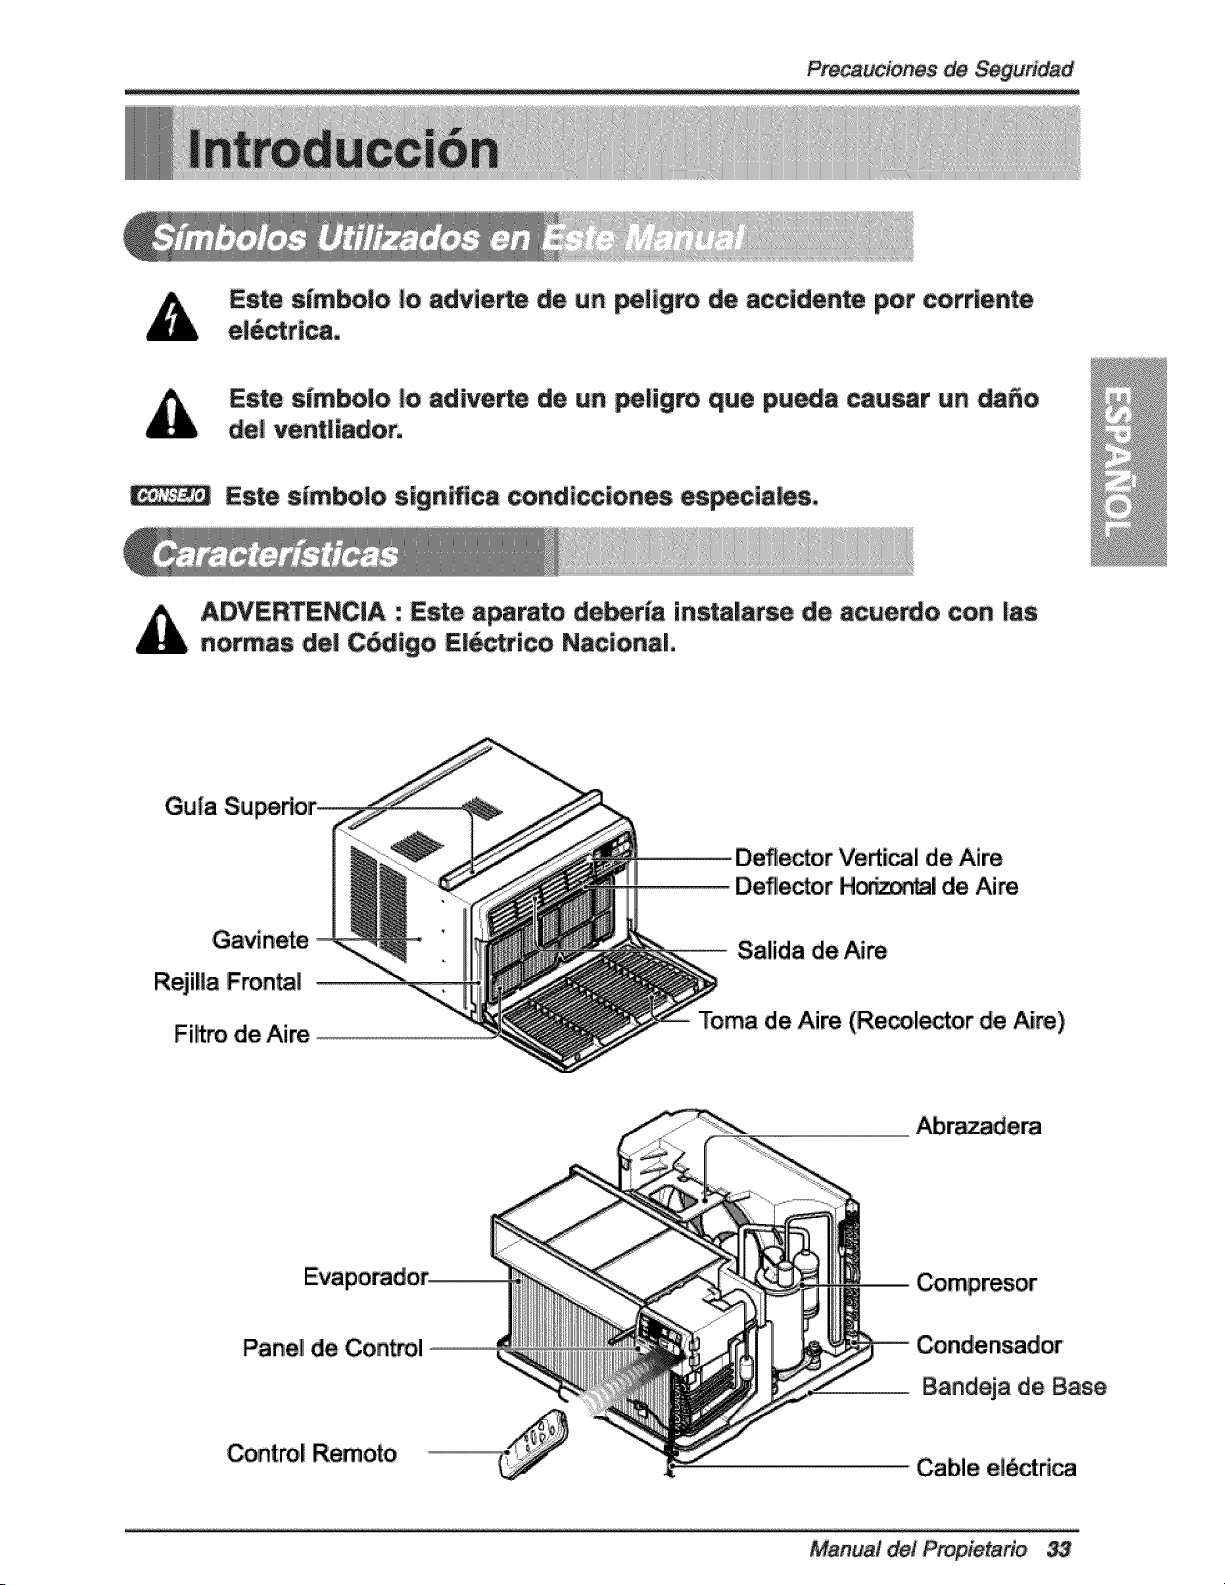
|_ducc|6n ................................... ,33
S{m_ _1_ en
Manual.....................................
C_st_ ...............................33
_Ud_ B_dca ...................... 34
Uso _o_o _ un
Adaptador..................................... 38
U_ Tempor_ dieun
C_ A!ar_or ..........................
Insta_i6n ................................... 37
CSmoinca ]a un_ad ...............37
ReQuLsitosde la Ven_a ............37
Com_enido_ de _os co_:_n:o_
_e in_s_mac_o_ .............................. 38
de]a_ _ntan,as .............................. 38
In_i6n del g_in_ ................
|n=rucc_
Fund_i_ ...............................42
Remoto .......................................... 42
C_I Remoto ........................... 43
Adiclon_es e _ra_i'sti_ .......
La Direccibn _[ A_re .................
Co_ de ventJ_|n ...............
Tubode D_g_ ..................... 45
__ _ _ Ven_ana .........45
Acomdiciona_ .......................... 4_
_o IRe_t la P_ifla
Fro_l ......................................... 47
Proble_ y_!_n_
H_uales .....................................48
Resoi=_6n _ problemas............48
PARA SUS ARCH!VOS
Escribmaqu{ el mode_oy m_ro _ s_ie:
_elo n_:
_r_ n_:
Pu_ enter I_ n_meros en _ et_eta _ la p_tte
_er_ del p_uc_,
Nom_ de| _|_|d_:
_= _ _pra:
I Adj_ surec_boa est_ pdgl_ c_ Ii_g_ pare
elmomento q_e ]o _ecesite _ pm_r _ fec_ de su
adquisict6no_a Ii__,_ldac_n de _ gar_f_
LEA ESTE MANUAL
su I_eriot en_tratd muchos _ns_ _|es _te Iia
u_|i_6_ y m_t_im[_to de su acon_or de aire.
U_s _s cuidla_s pot ,_ _te ]e pu_ _ho_
m_ho tiempo y dinero dumnte la viola de s_
_con__r _e _re.
En [a t_a _ _nsejos _ra la _[u_ r_,pi_ de
prob_e_ enc_r_d much_ respu_s a _osprobl_as
rods hab_ales. S| revisa pirime_ nuestra Ta_ de
Co_jos _ta las_uci_ rd_a de p_obt_i_, tat vez no
neces[te I1_ n_r_a _ _cio _i_.
•,El_re _icior'_ _ _ _o _ra _ uudo _t _E_
_ o dI_c_ _ la_ _a.
,,_, _ _ _n _ _perv_ _ _mr
no_ _ _ aiB _idonado,
• Si h_ _ _iar e!_ de aE_tack_n, _ aun_I_
de_m4do _ _ _ _ exacto,
_o, E_ _nai, Q_ pot¢ _ _1_ y
....
@
@
Manual _,1 Prop_tario 27
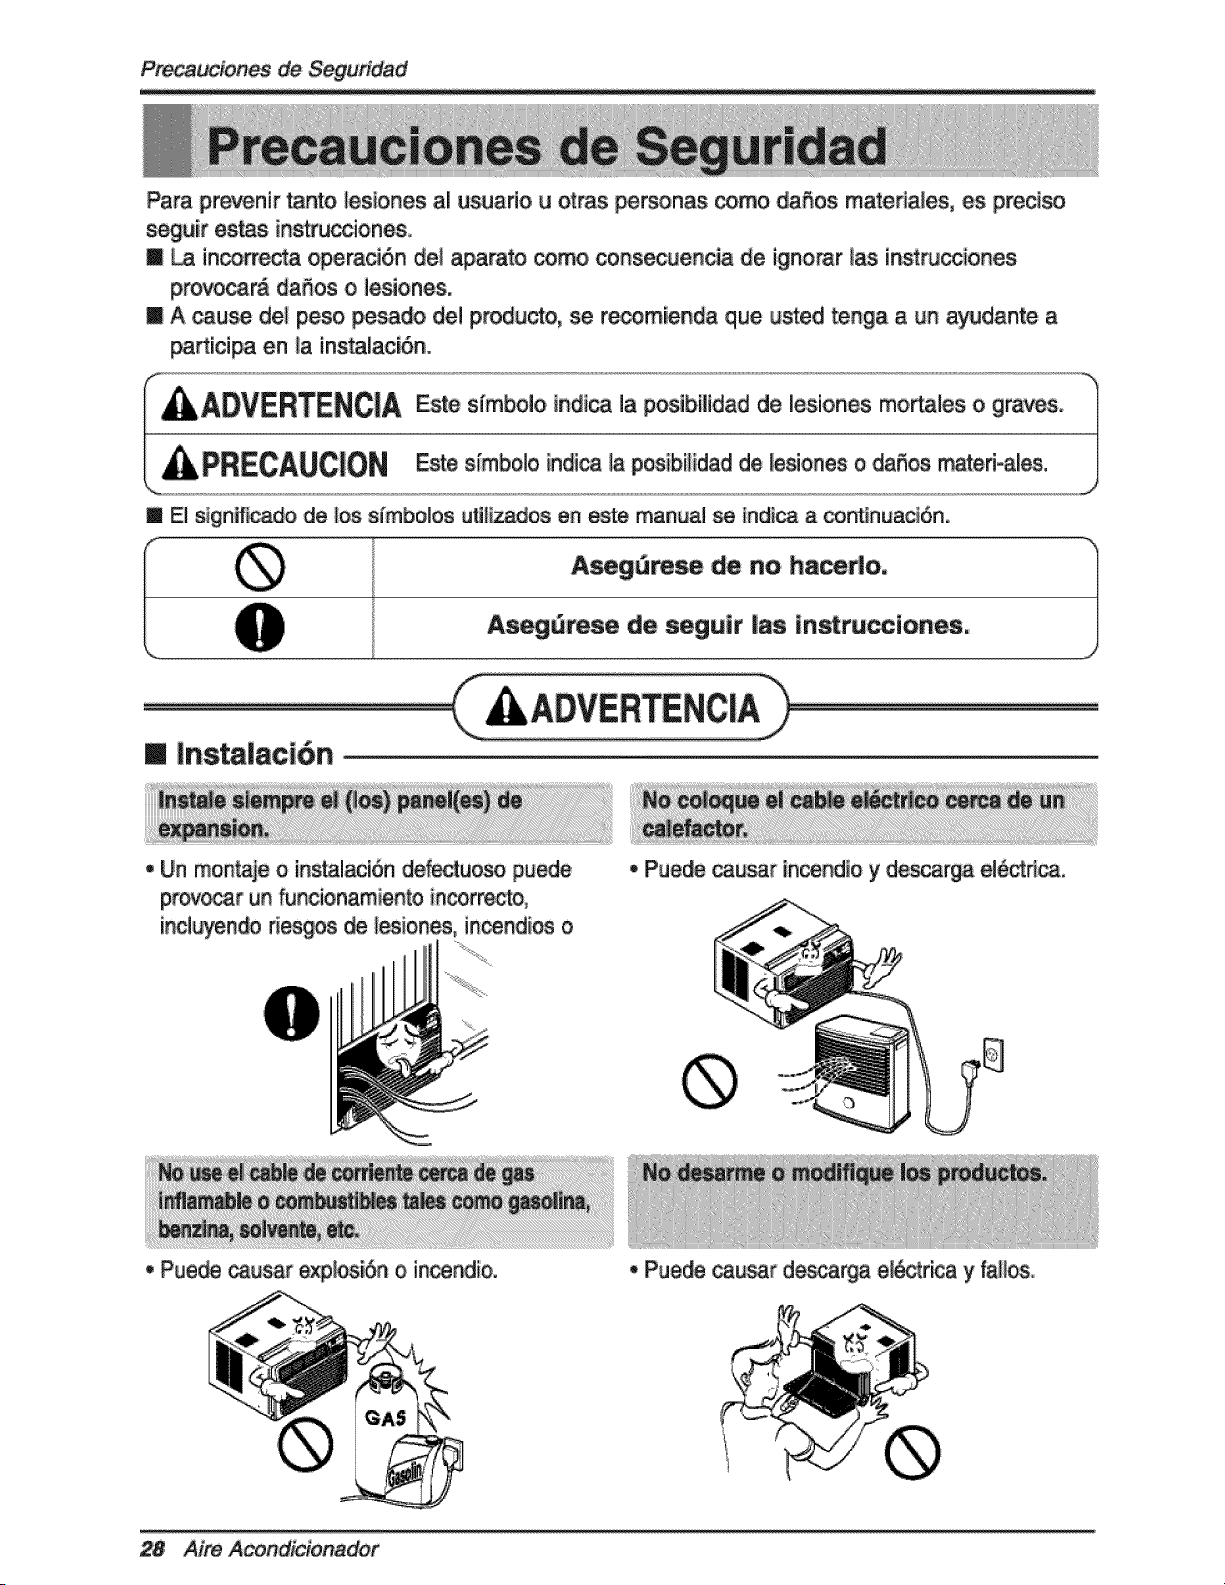
Preca de d
Para prevenir tanto 4es/ones al usuario u otras per_nas _mo daSos materlales, es prec_so
seguit estas instru_ionesi,
m _ in_rrecta operaci6n del aparato como consecuenda de igno_r _as instru_enes
provo_r_ daSos o iesiones.
B A cause del peso del producto, se recomienda que usted tenga a un ayudante a
participa en _a instalaci6n.
m El s_gn de los s[mbolos u_ ea este manual se iad_ca a con_auac_6n,
m instalaci6n
• Un montaje o instalacl6n defec_uoso puede
provocar un fundonam in_rrecto,
i_luyen_ ri_s _ _iones, incendios o
• Pue_ _os_n o incendio.
28 Aire A dot
• Pue_ causat _nce_lo y descarga el6_r}ca,
• Pue_ causar descarga e_ctrica y fa_os,
Precaudones de Seguridad
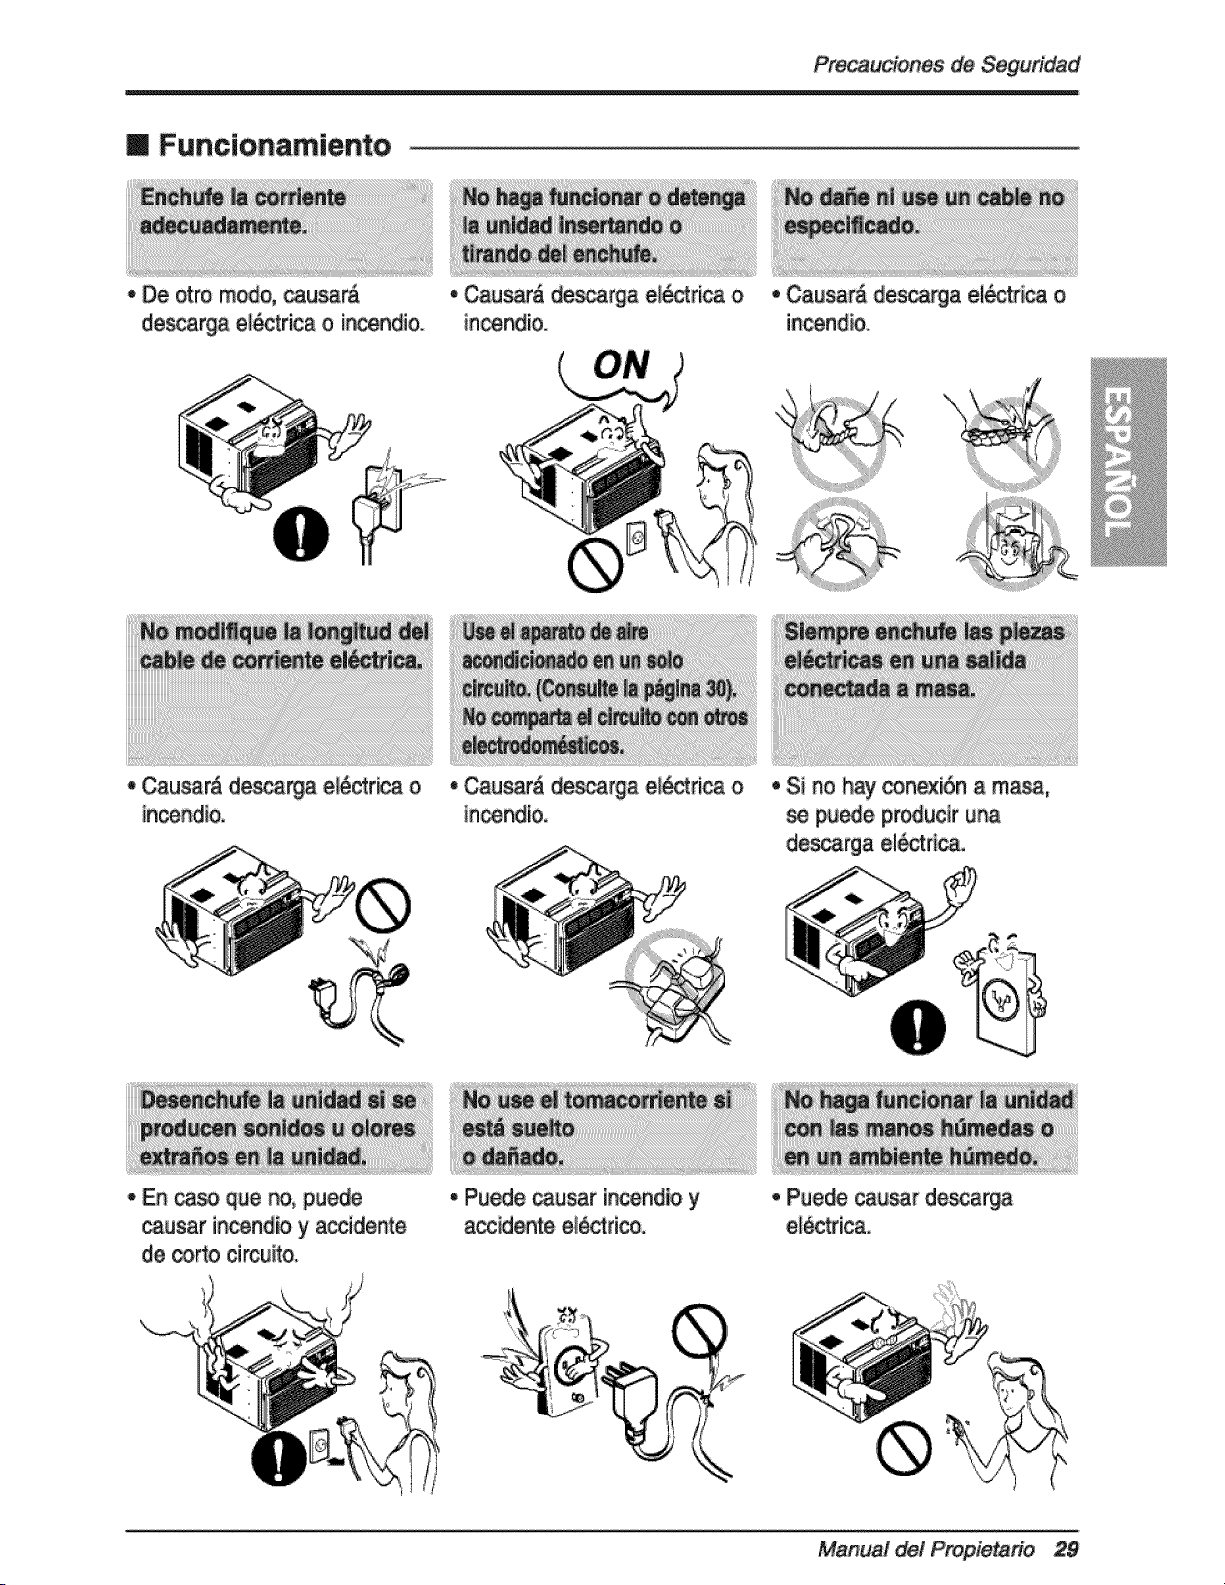
m Funcionamiento
,, De otto m_o, _usar_
de_arga el_ctrica o i_endio.
• Causar& de_arga e_ri_ o
• En _ que _, puede
,, Causar_ _arga el_rica o
in_ndio.
• Causar& _arga e/_ctrica o
In_ndlo,
• Cau_r_ descarga el o
incend_.
• Si no hay conexi6n a ma_,
se pu_e produceru_
des_rga el_tr_ca.
causar i_end_ y accidente
decorto circuito.
• Pu_e _usar incendb y
a_idente el6ctrico.
. Pue_ causar de_a_a
el_tdca.
Manua! del Propietario 29
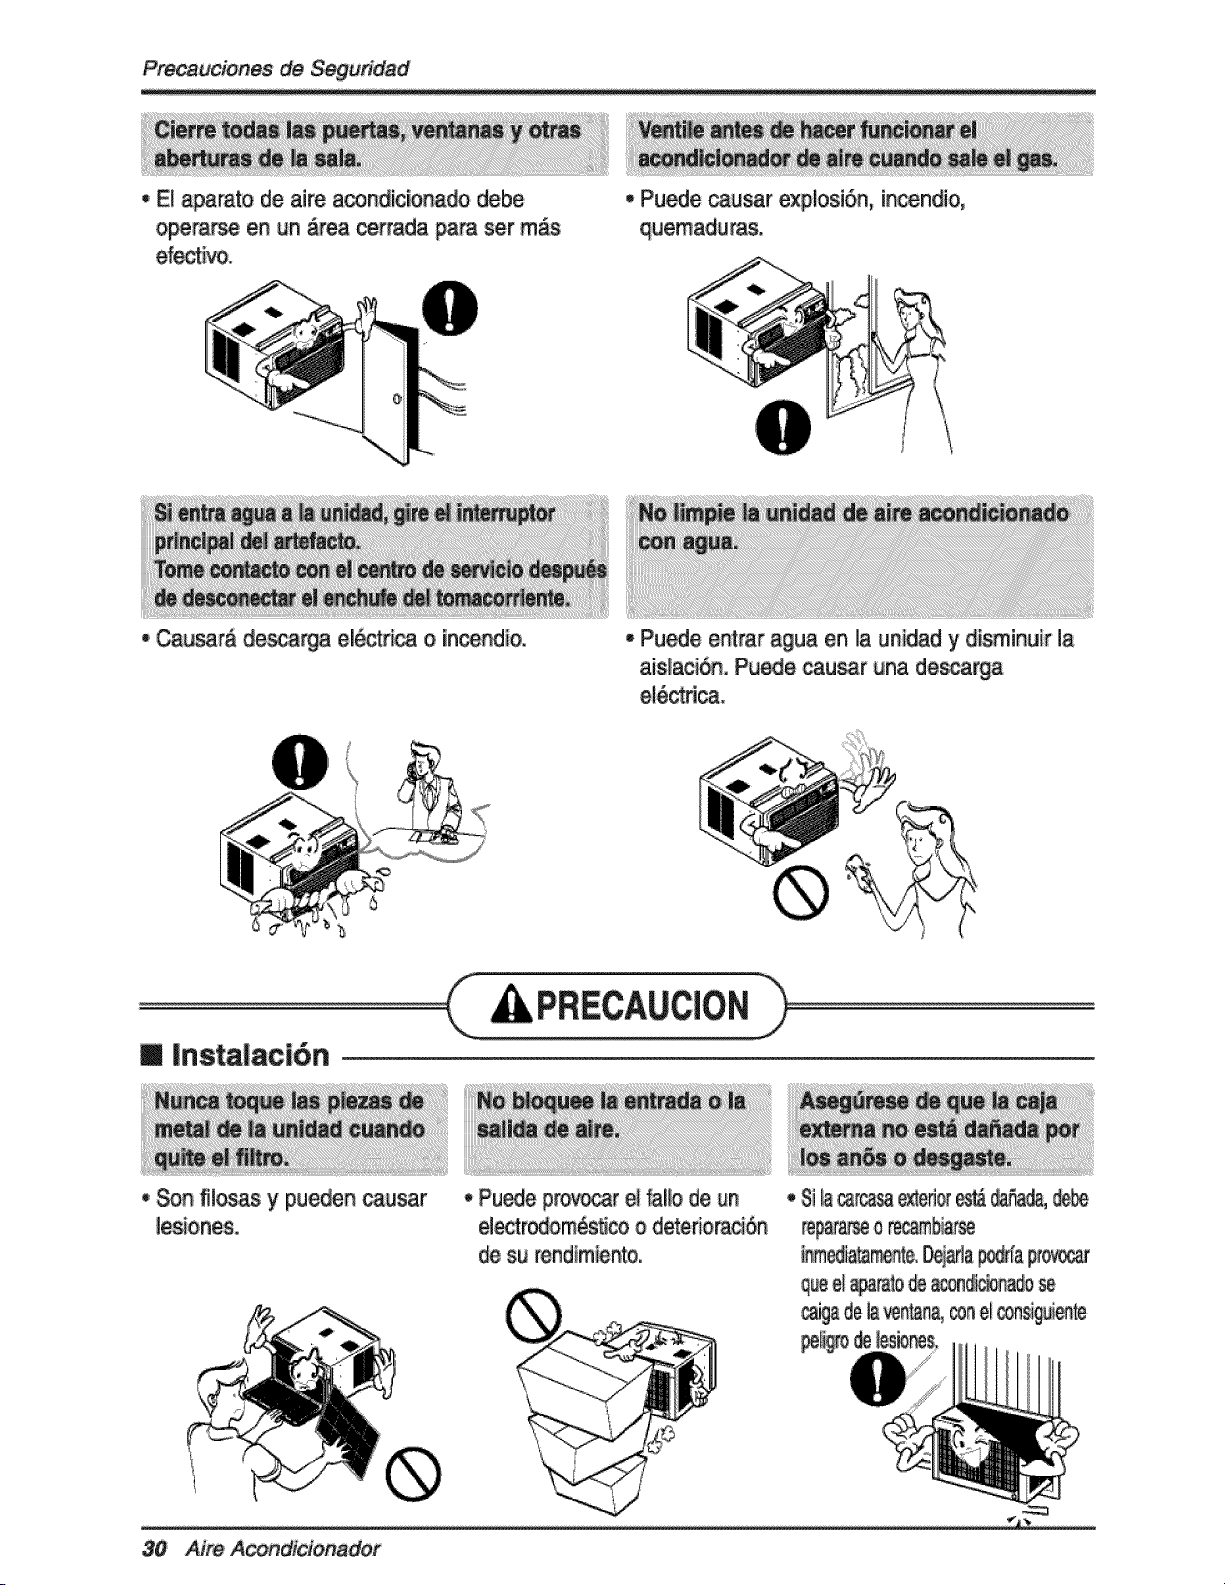
Precauciones de Seguridad
, El aparato de aire a_ndic_or_a_ debe
operarse en un _rea cerrada para set m_s
efed_vo.
, Carat& descarga el_ct_a o in_ndio.
, Pu_e causar explosi6n, incendio,
quemadura&
, Pu_e entrar agua en la unidad y d_sminuk la
ais_ac_, Puede cau_r ana descarga
e!6_dca,
m Instalaci6n
, Son fllosas ypuedencausar , Puedeprovocar e! _1_ de un
electr_m_#3co o deteriomd6n
su rendlm_nto,
, Sila_masae_eri__ ®_
repata_ o mcamNar_
_e_a_te. De_dap_rfa Fo_,_mar
queel _m_o _ _d_ se
_a de_ _n_, ®n el®nsi_ie#te
30 Aim Acondicionador
P_uciones de Segu_d
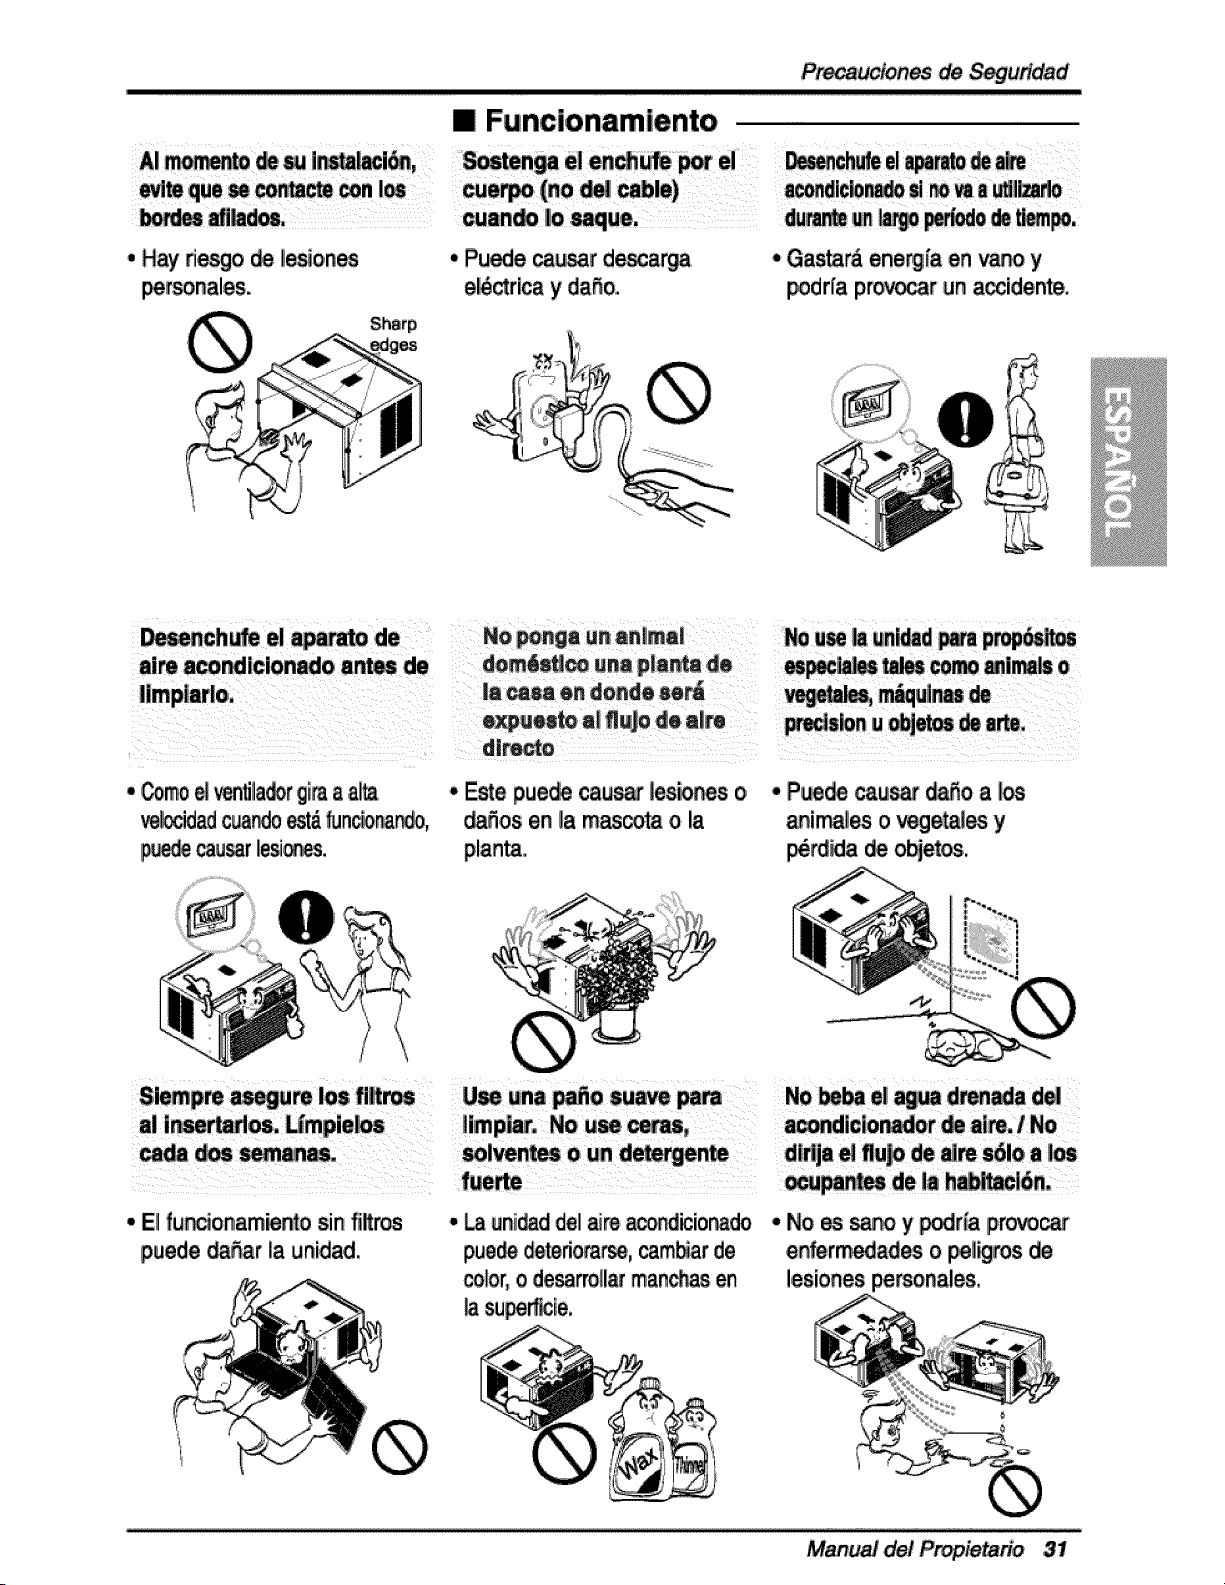
[] Funcionamlento
• Hay desgo_ ile_on_ • Puede _r d_a_
e_rica y daSo,
• Gas_r_ energfa en _ y
_dr{a provost una_idente
@
v_Ocidadcua_o _t_ _n_o_,
IP_ _sar le_
• Este pue_ cau_J lesi_s o
_os en _am_ o la
• P_ _u_ @J_oaI_
_irr_ies o vege_ y
p_ida de o_etos
• El fu_onam_nto sinfii_
puede_r la unidad
•_ uni_ddell_rea_icionado
pue_ _d_a_e, _m_r de
_lor, o de_ll_ man_ en
supen%ie
• Noes _ y podr{aprovocar
enferm_ad_ o _l]_ros
lesiones personales
Man_ de/Propietario 31
P_u_ones de _u_ad
i. Col_ue el enchufe corr_amente.
2. Use un _nico cimuito pare este a_rato. Rehear el cimu_o podrfa pro'mar
un riesgo de in_ndios.
3. No utiJi_ un _arga_r. Consulte la p&gina 36 para m_s detalles.
4. No arranque/detenga el funcionamie_o enchufando/desench_ando el _le
de corriente ei6_ri_.
5. Si el alargador est& daSado y ha de ser recambiado, _iicite a un t_cnico
a_orizado que instale un m_mbio exacto.
1. E_r expuesto _ flujo directo de aire por un _rfodo largo de tiempo pu_e
_nstituir un desgo para su salud. No exponga aias pemonas, mascotas o
plantas al flujo dir_o por _rfodos largos de tiem_.
2. Debido a la posibilidad de fall_ de oxl'geno, ventile [ah abffaci6n cuando
use a[ mismo t iempo que estufas u otros dispositivos de cale_i6n.
3, No use este acondicionador de aire para pre_sRos determinados no
especfficados (per ej,: pre_rvar dispositivos de precisi6n, alimentos,
_chorr_, plazas y o_etos de a_e). Tales usos puede daSar los e_eme_os.
4. El _amto de aire a_ndicionado es un aparato diseSado pare el _nfo_ del
consumidor. No es un sistema aclimatizador.
1, No toque las partes de meta_ de [a unidad cuando quite el filtro, Pu_e
lastimarse cuando manipule bordes fi_osos de metal,
2. No use agua _m Hmp{ar ade_ro de_ acondidonador. La exposlct6n a[ agua
pu_e destruir la ais_aci6n y esto a su vez provocar una des_rga e_ri_.
3. Cuando limpie [a unidad, asegOre_ que ia co_iente y el interruptor estdn
de_on_ados. El ventilador gira a muy alta _[_idacl cuando estd
f_ncionando. Existe la posibilidad de lesionarse si la energ{a _ conecta
acciden_lmente cuando estd limpiando I_ piezas internas de la _nidad.
Pare mparaciones y mantenimiento, p6n_se en con_cto con un centre de
servicio autorizado. Consulte la p&gina de garant{a o Ilame al in6mero (8_) 243-
0000° Tenga sui nOmeor d emodelo y nOmem de serie a mano. Los encontmr&
en la p&gina 25 de este manual.
32 Aire A_
Precauciones de _gufdad
Este sfmboio _o advie_e de un pel_gro de accidente pot corriente
ei_ctrica.
Este sfmbolo |o adiverte de un _|igro que pu_a causar un da_o
de! vent|iadoro
Este s[mbo|o sign_ca cond_cciones especia_s,
ADVERTENC|A :Este aparato d_rfa instalarse de acuerdo con |as
normas de| C6digo E|_ctri_ National,
@
@
Gu{a Su
Deflector Venial deAire
Deflie_or H__ de Aim
Rejilla Fron_l
Fi_m de Aire
Salida de _re
Toma de Aire (Recolector de Aire)
P,an,e]lde Con_ol
Control Remoto
Bandeja de Bsse
Cable ei,6_ri_
Manual det Pmpietario 33
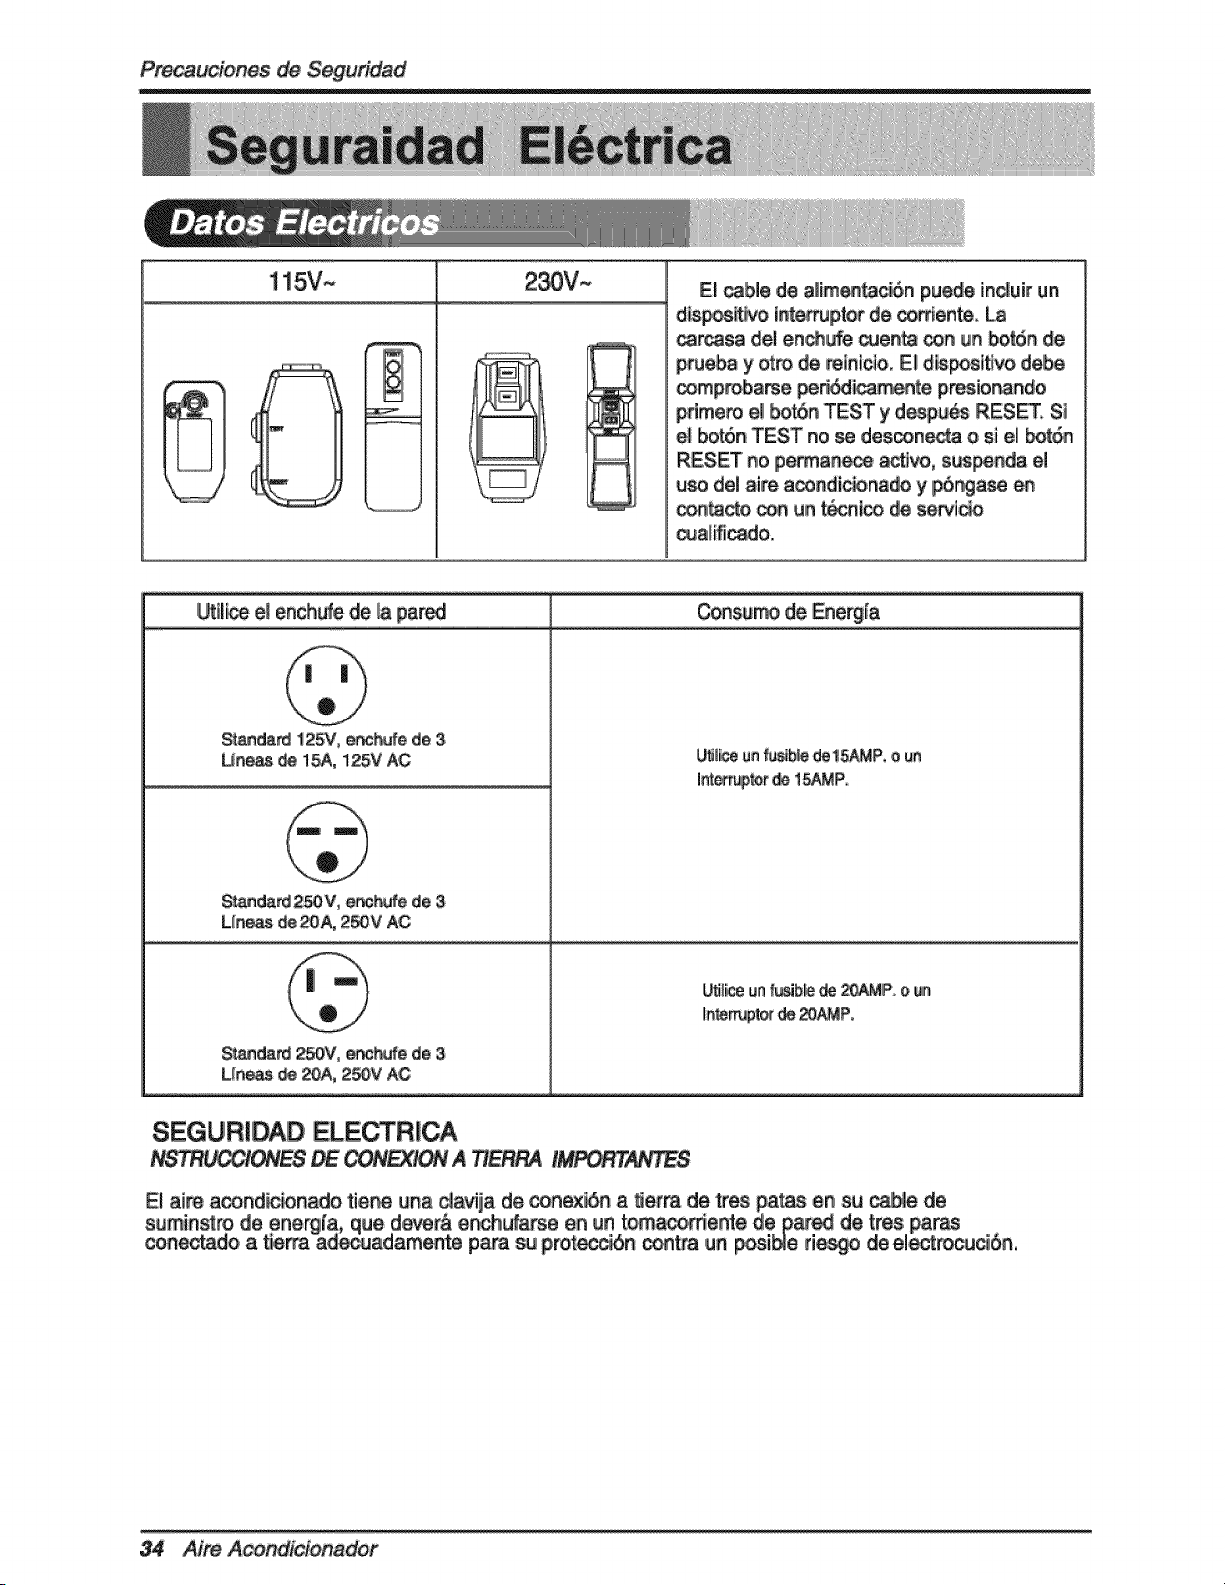
Precau_onesde S d
1i5V~ 2 V~
_oo_
El _ble de a|ime_a_n p,ue_ induir un
d_s_s_Jrvo interruptorde _rr_ente_
_rcasa dei en,_Je _en_ _n un bo_n de
_ueba yotto de re_n_c_o.E_d_poslt_vo debe
_probarse pe_camente presionan_
_mem e| _n TEST ydesp_ RESET S_
bot6n TEST ino _ des_n_ o si eli _f
RESET n,o pe_ane_ _., s_nd.a el
u_ del aire a_ndic_nado y p6nga_
_cto. _ un t_ni_ de ser_Jt_
_ailificado.
I_il_ e|encS_e de _apared Consu_ de F=_ergla
St_da_ 1_2_, ,_fe de :3
Un_ _ 15A, 125VA'C
St,anda_250V, _e de 3
L_n_ _A, 2_V A,C
LIn_ _ 20A_ 2_V AC
_ _nf_s_b_de!5A_P, o un
I_ett_ptot _ I_MP_
SEGURIDAD ELE RICA
NS__ES _ _EX_ A _RA IM__
34 Aire dot
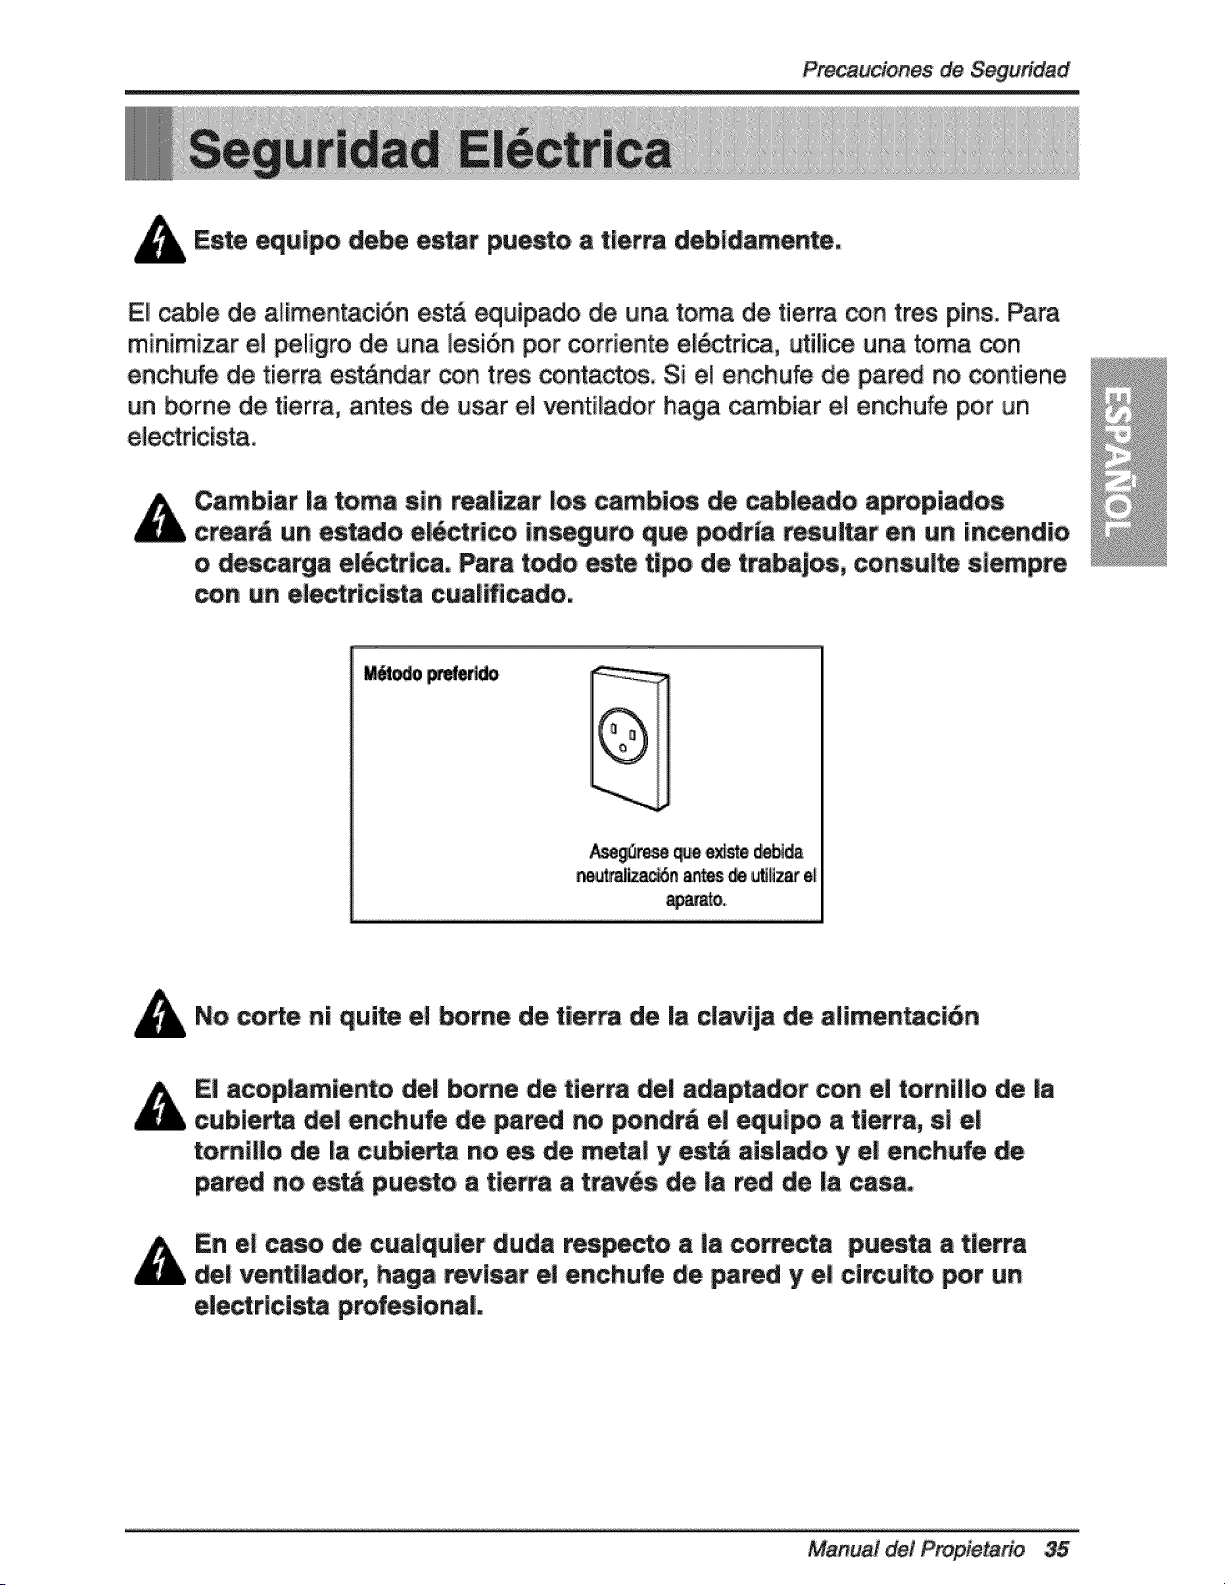
Preca_iones de Segundad
Este equipo de_ estar puesto a tJer_ debidamenteo
E_ c_le de a_imentaci6n est_ equipado de una toma de tierra con tres pins, Para
minimizar el peligro de una _esi6n per corriente e[6ctdca0 utitice una toma con
enchufe de tierm estAndar con tres contactos, Si el enchufe de pared no contiene
un borne de tierra, antes de usar el venti_ador haga cambiar el enchufe per un
electr[clsta,
Cambiar la toma sin real_at los cambios _ _bleado apropiados
crear_ un estado el_trico in_guro que p_r[a resultar en un incendio
o descarga el6_rtca° Para rode este tipo de trabajos, consuite s_empre
con un eiectrtcista cuaHflcado,
@
@
_o
_iz_n a_s _ L_]i_ eE
No corte n[ quite el _rne de,tierra de la clavija de alimen_ci6n
El acoplamiento _l borne de tierra del ada_ador con el tornillo de la
¢ubie_a del enchufe de _r_ no pondr_ el equipo a tlerra, s_el
to_illo de la cubie_ no es de rect!! y est_ aislado y el enchufe de
pared no est_ puesto a tierra a trav6s de la _d de la casao
En e! caso de cuaiquler duda resp_o a la co_ecta puesta a tlerra
del ventliador, haga revisar el enchufe de pared y e| circutto por un
electrlcis_ profesionaL
Manual det ratio 35
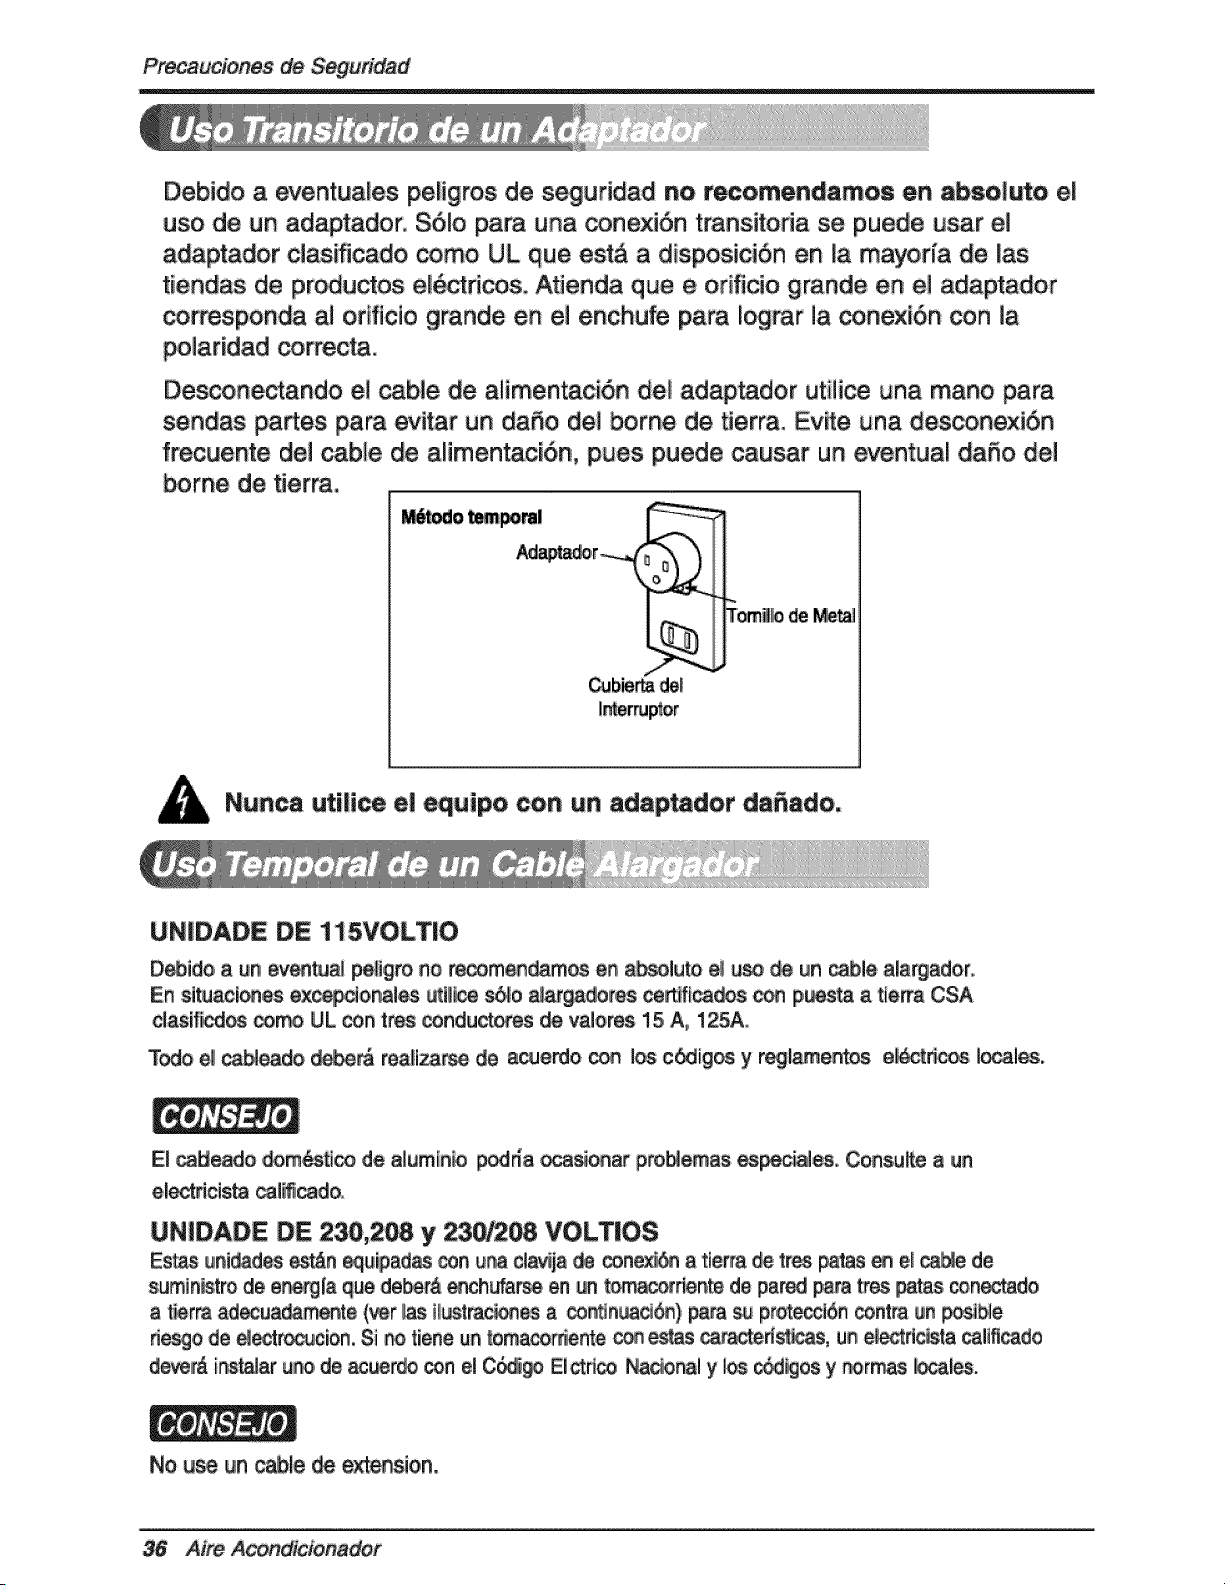
P_ _ d
Debido a eventua[es peHgros de s_uridad no tecomendamos en absolute e[
use de un adaptador, $6[o pare una _ne×i6n transitoda se puede user el
adaptador c[asificado come UL que est_ a disposici6n en [a mayorfa de [as
tiendas de pr_uctos el,6ctdcos. Atienda que e orificio grande en e[ adaptador
corresponda al orfflcio grande en el enchufe pare Iograr la conex_6n con la
_[ar[dad correcta.
Desconectando e[ cabJe de a[imentaci6n de/adaptador utilice una mane pare
sendas partes pare evitar un daSo de_ borne de tierra° Evite una des_nexiSn
frecuente de_ cable de alimentaci6n, pues puede causer un eventual daffo del
borne de tierra,
T0m_liodeMien]
Cubie_ de_
In_ptor
Nunca uti[ice el equipo con un adap_dor da_ado.
UN|DADE DE 115VOLT|O
D_ido a un ev_tual p@i,grono re_m_@mes en a_lut_ e_u_ _ un cable alargador.,
En sltuaci_es ional_ uttlt_ s6[o _dores ce_Ica_ c_ pL_ a tierra CSA
clasi_d_ _ UL con t_ conduct._es de,va[ores 1,5 A, 125A.
Todo _ c_e_o _ re_iza_ _ acuerdo _ I_ c_ig_ y reglamentos e_ces I_iee.
E[_eade _m_tlco de a[um[n_ p_da ecasionat pto_l_as _[_. Consul_ a un
el_rieista _li_doo
UNIDADE DE 230,208 y 23_ VOLTIOS
Estas _i_ades est&n _ipad_ _en, _a clavijade con__ a ttet_ _ tr_ p_tas _ e,_,_e de
sumin_ro de e_[a que debe_., _ch_ar_ en _n _riente de par_ p_r_ tree pates ten.ado
a t_rm ad_ua_mente (ver _ ili_trac_es a _r_n_) p_a sJup_otecci6n centre gn _We
desge de _r_Jcion. Si _o tiene un tomaco_ente _ es_ ,ds_, u_ e_dc_te _ltflcade
_eveir_ ii_t_ar ui_, de_ue_ _n el C_ El_rl_ N_enal y_ _,gos y r_r_s _al_.
No use _n c_le _ _ion.
36 A_re A do_
Para_r la vib_ ye!ru_, as_rese _e la
un_d _ Ir_]ada_ _u_d yfl_e_
Instaielaun_d do_ la I_ _ _ no calga
di_me_ en_ami_m&
La _rte e_r de!_n_ _ e_de_ h_a
af_ _r Iorr_os a 1_ _n o_, co_ pot
e_mp4oun_ o unapa_d,_o de los20_'d_de
la _e _te_r del_ete _ _ la
tadiad_ de _ _ conde_dot.
La mstricc_n del ake ex_ef_r r_u_ eng_ p_ I_a
ef_te_ia de e_d_ _ _i_cio_d_ _ aite.
%.
\
!
/
PRECA_ION: Tod_ _ _|a_s _tera|_ d_ gabi_ ,de_ _n_ expuestos a la
@
@
IlnstaieIlauni_ un _ i_iaada pata _e la _ _nor q_ I_arnente rods b_j,a_e el fr_
(_red_Or de1_"), E_o _zar_ _ _ _r_easada a _uir ha,c_e extent,
In_e la _ni_ _n e! f_do _imadar_ente 30_-_" _ enc_a _1 _,_ del pi_
:T_ _aspie_ ,_ _ _n estar a_rr_ _ _ fue_e, ma_te_a, ome_
•_ un_ esta_ada _ _r in.aria enve_
do_ _lan_ _diar con_pli_Jd _ _ra _1!
d_ 29_a 41%
• Las h_o_ i_eriomsy su!_ de laven_a _n
_#r_ Io s_f_n_e paraperkier unaluz ve_i_! _ 18_
d_ _ pa_ in_e_ _ _ h_a su_io_ has_ el _to
de Ilav_na
#
Manual de/Propietario 37
2 M_SU_ DE SO_RTE 2
5 TORNIL_ mPO A} 14
S TORNILLO m_ 8} 7
9 PER_ 2
li0 8U_E _ ES_MA 1
_ 1
ti3 CA_ DE DR_E 1
_4 BU_E _ _A-PE 1
15 GUIA D_ MARCO 2
I DESTORN|L_OR (_l|ips y Fla_'), REGLA, CUCH|_O, MARTILLO, _ N|VEL I
PREPARAC!ON DEL CHAS!S do
':_ _ _S tomtll_ que un_ el _i_ a _S ladosya Ila ._
_ !a unidad desdee! _bi_e asi_o _ mani_ de
base_ la _n_ja _ mien_as ._n la otra mano_stiene
el _rte_.
_r_ e_ise_io,d__ h_ de la ven_ enla mesa
a_J_a. Quite _ tecubdmiento de_l_ y_ue el
I i ho_a_ ia
_ _ E_ma-PE i_¢a a calm_r de _a
Q_iteel_p_e de _ _'a s_pe_or d_ bude_ _ _ma
PE ,_y _ue!_ a la _ _e_or _ lag_ia s,Jperior.
R_ lagiu_asu_ a _a_rt:e s_or del gabinete_n 3
t_lll_ t_ A_)_
In_rte _s gulas .d_marco ,_ _ la_rte infer de_
_n_ e_marcodiela_na _ _ la guiasu_d_ ylas
R_ !_ _dinaS a _ un_a_ _ 4 tornil_s tipoA _'.
38 Aim Acondicionador
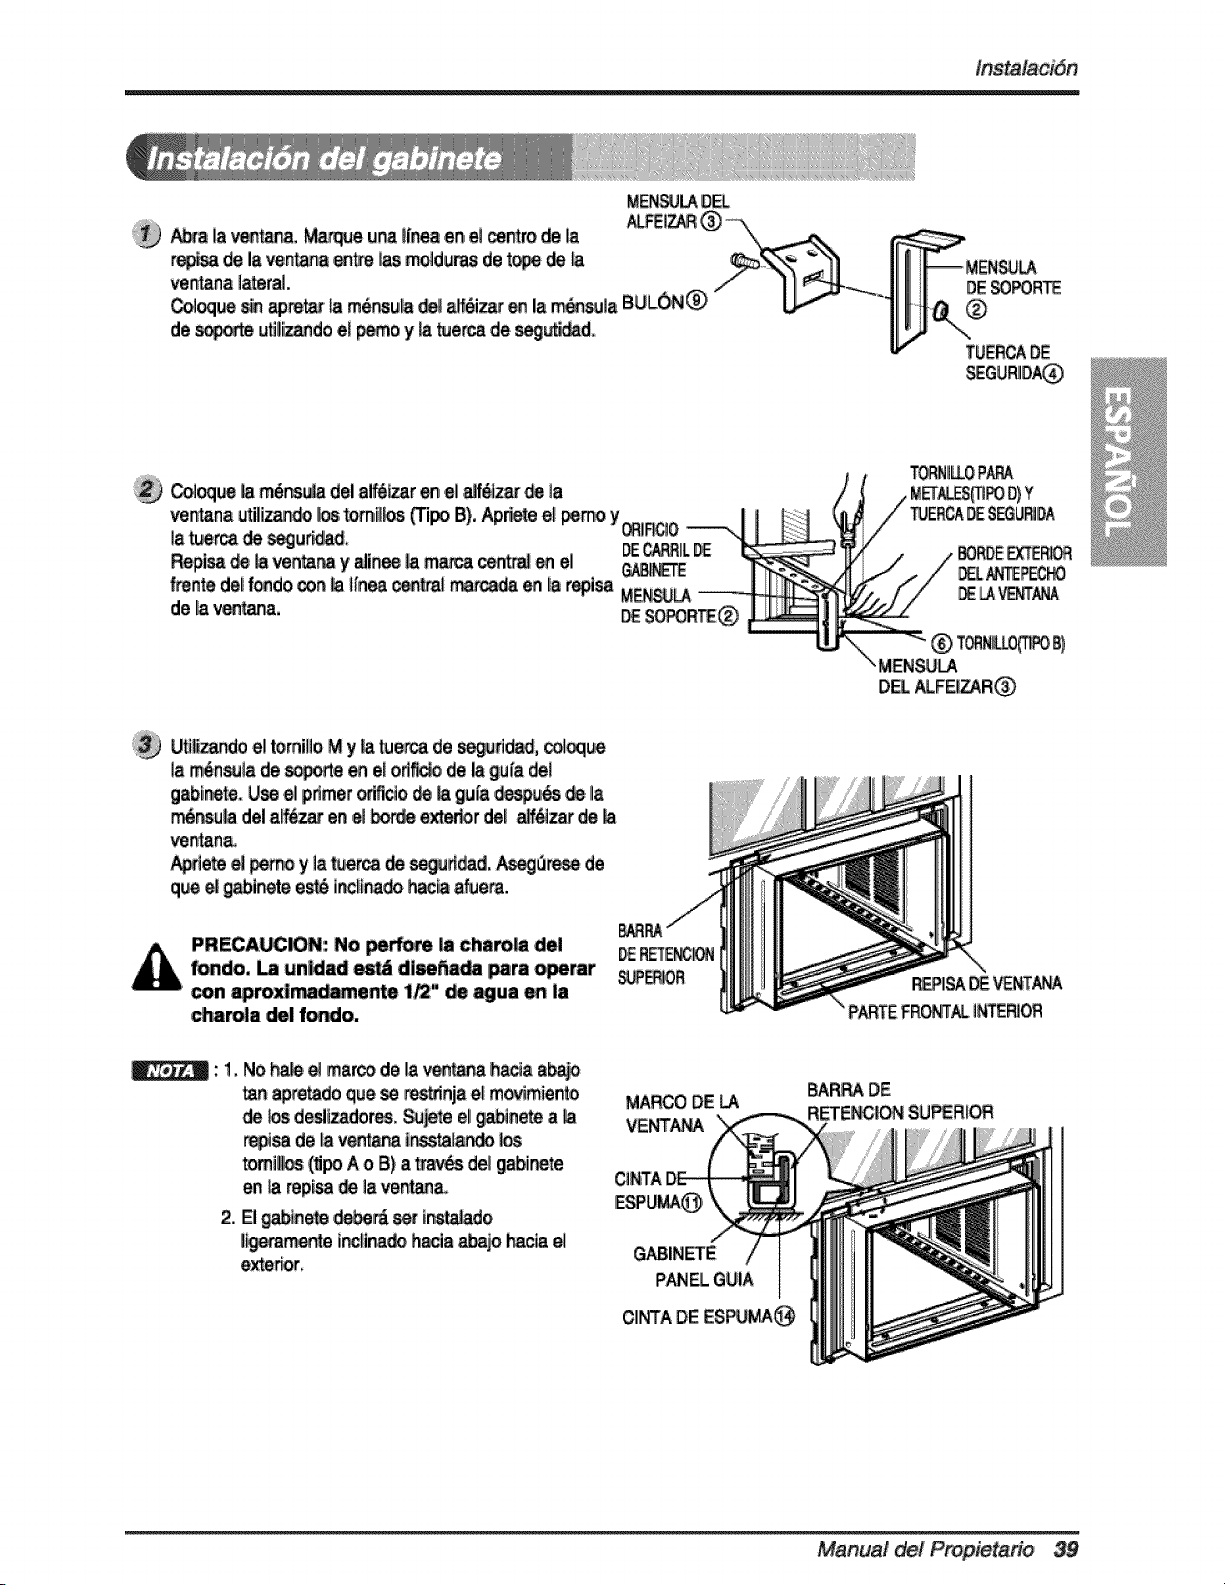
_a la _. Marqueuna i_neaen el _ntro de la
dela_,ntan8 _ _ moldu_ det_ de
ve_na J_raL
_oque _ apre_ _ rn6nsuia_ _6i_ _ la _sula
de _ ufiliza_doeJ_o y _ tuercade _6_d_
M_t_ DEL
@
@
.
No h_ e! marco de la _ h_a a_
tanap_do qiue_ _nja e( movimiertto
de_s desliz_ores_ Sure el ga_n_ a
i_ de_ _ i_]_
_mi_ (_ipoA o B) a!_avL,s del g_binete
en _ rep_ _, I_verona.,,
El _nete d_ set )nsta_do
ex_f_r
MARCODE LA
VENTA_
GABIN_E
PANEL GUIA
CI_A DE ESP_
BAR_ DE
Manual del Propietario 39
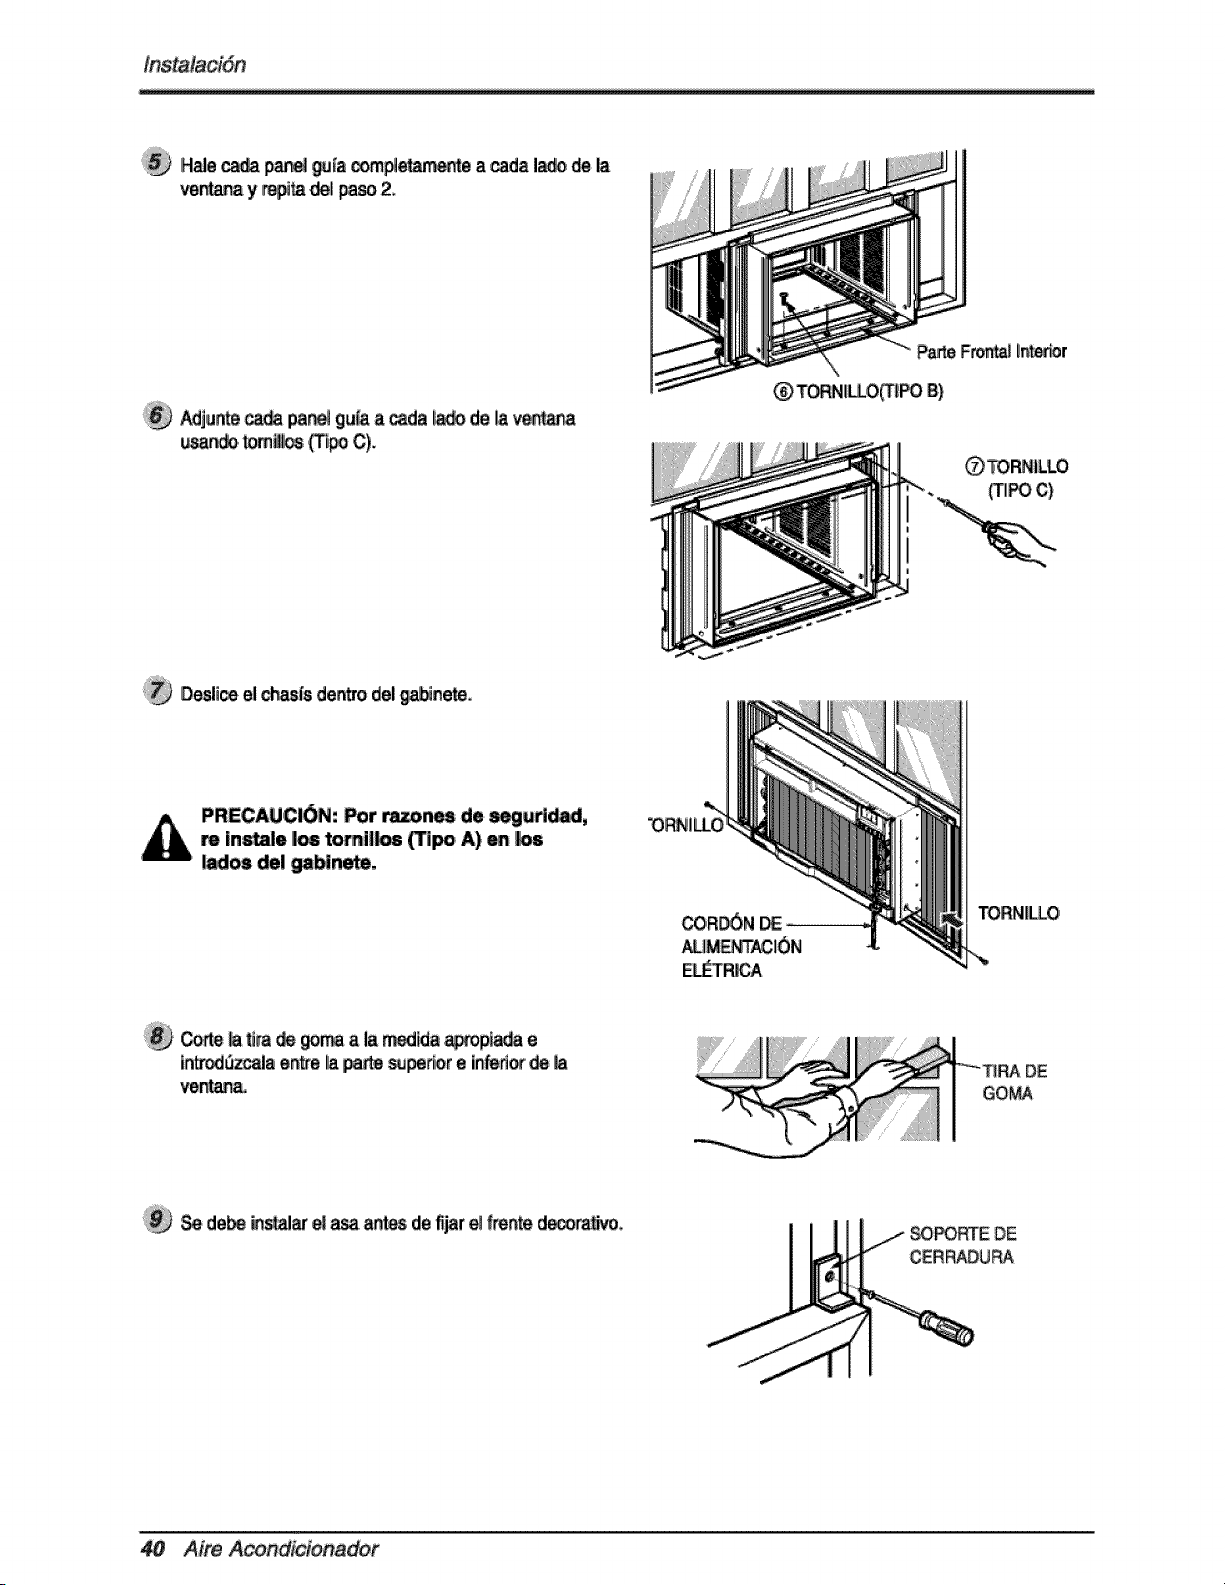
H_e _ p_e_gufacom_e_am_ a cadaI_ de la
ventanay _ de! _ 2,_
_junte ca_ par'_ gu_ a _a la_ deIlaven_
_TORNILLO
IDesli_ el c_sfs dentrodel_ne_
PRECAU,Cl6N: ,For _ de _ud_,
m, |nstale I_ tornli_ _ipo A) en
_os del p_nm,
TORN|LLO
Comteta_m _ _ma a la_ida _p_, e
in_5_a entrela _ _pertor e i_d_ de
ve_a.
GO_
de_ _al_ _ a_, ant_ de fijare__n_ d_r_vo
_ CERRADUP_
Aire Acondicionador
7_ Ins_e la r_iU_fron_l _ el _bE_te inse_
_0_ _ la _llLa a la leng_ en _ frertte del
_e_, Em_ la rejiillat-_ que_ ci_ con_rti_
gol_.
L_ Ilarejll_ade en_ y aseg_rela _n un'_mi_
(_ A)a trav6s_ _atejillafro_J,
A_ra lain_li_n delaim_ior_do en _ ve_na
_pl_ Vea I_ DATOS ELE_RICOS _m
_ e_ca_ dea_t_6n _ lato_ de co_e_e.
@
@
Manual del Propietario 41
/nstrucciones de _n_am._to
Los contro_es _en,en este aspecto.
POWER (m3_ido)
Ellfu_i_amiento se india cua_ _ pul_ es_ t_a y se
dettene cuia_o _ la pres_na nueva_te,
SE_CTOR _ VEiL_IDAD, DEL VE_I_DOR
(FAN SPEED)
Pare aumen_ lac_d mle_ras se refresca,
sel_tone una mayor ve|_idad _1 ver_lador:
3 Pasos: High (_) - _ (ba_) -Med (med_)
CR_6M_RO ON/OFF (ENCEN_DO/APA,_DO)
D cro_metm ipu_e _r _lo_do _ra linici_ y _ener ia
un|dad _ incmment_ pot hora (h_ t2 horas).
I_NCIONAMIENTO _L i_DO SELECTOR
Selecci_ el_o fr_ (cool) _a _f_iar la hab_ci_.
Sel_i_ el_ _ ahorm_ ene_a pare el
funcio,n_ien_ del ahorro_ _,erg_a.
Sel_ el_do ventil_or (fan) para el fur_onam|ento del
_ntilador,
Selecci_ el_ _ (de,,')pa_ _ fun_l_ _.
CON_OL _ TEMPEFt_iRA
Elte monltore_ IJatemperatura de _ h_._n
_ra man,net latem_ratura deseada.
Elte_ato puede _r _lo,-.,ado e_re _F~86°F
unidad toma un prom_iio de _ min_os p_a. ajus_r la
_m_tura de _ h_n e.nl°F .
S_SOR DEL C_OL REMOTO
Aire ador
I es _ funcic_amlento,
PRECAUT|6N: E| mando a distancia no,_ncionard corre_mente si
una luz fue_ ham, con_cto con el _ns,or del aIre acondicionado o s|
hay obs,_cu+os,entte e| mando a distancla y e| aire acondicionado,
POWER (encendido) i
El fur_ionamiento _ inicia cuando se pulsa e_ tecta y se detiene
cuando _ la presiona nuevamente+
CONTROL DE TEMPERATURA
El terrnostato monitor_ ia temperature de la
habi_ci6n _ra m_tener Ilatemperatura deseada+
El termostato puede _r collo_do entre 6_F~86°IF
(16°C~30°C). La unidad toma un prome,dio de 30
minutos para ajustar' Iiatem_ratum de la h_itaci6n
en i°E
DE VELOCIDAD DElL
VENTILA_R (FAN SPEED)
Paraaumentar la _pacidad mientra_sse refresca,
se+e,_one una mayor velocidad delventiiador. 3
Pasos:H+gh(a]ta)-_ (baja)-Med (reed+a)
CRONOMETRO ON/OFF
T_mer M_
El cronbm, etm puede ser _]io_do IPa_ iniciar y
detener I,a unidad en increment_ _r hora
(has_ 12 horns).
FUNCIO_MIEN_, DEL
MO_ SELECTOR
_l_ione el mo_ f_s_ (_ol) para enfriar la habitaci6n+
_l_i,one el _o de ahorro de energia pare elfuncionamiento
_1 ahorro de energla.Selecc+one el modo v_n_lador (fan) _m el
funcionamiento del vent|lair. _tone ell mlo_o se_ (dry) _ra
el funcionamiento s_o.
C6mo _net |as _atet'_as
1. Qu+te_ _a de]a _e _edor _elte]e,man_o+
_m clio haga_sl[z._ la t_ _n _adi_6n
2++,ntro_zca+_ _ _te_r_as,respe_ smmpmla
_lari_a_ al in_lar las piilas+U_ bate_ias_u_,i
3+V_,,_racenar, resbalande+atap_ h_ta la
_l_6n, In[ci,al,
+ No u_lice bare,is recalls,
6eras _n d_emntes de _rma,
_e dfmens+_ y u_ resp_to a
las ba_e_ass_as usuales.
"S_e las _terI_ del
tetemando cu_o el
_ndmionador no _ya a _r
u_ dlurante un I_go _rio_.
Manual dei Prop_rio
Ins_iones _ fun to
dtr_ci6n _l sire
El f!ujo de _ puede setajustado _mbia_o la
dire,"._6n_ I_ rejill_ devenUlad_ del a_ndicionador
d_re. Esto pu_e _mbi6n incremen_r la efi_cia del
ac_ona_r _ _re.
Aju_t I_dite_i6rt _1 flujo de aim fior;_ff_.
Aj,u_ i_ rejil_ ve_i_les, hada la _quie_a
yderecha _biar_ e! flujo horizon¢_.
Ajustar _ dim_t6n _1 flujo deaim ved_al
Aju_ eldlabe hodzon_l hacksardba y
abaj_biar_ el ffujo de aim ve_caJ. El _
pue_ser aj_a_ m_viendo la _e posterior
_l _la_hacia smba o abajo.
Odtmtaci,6n recmendsda de I_ rejffllss
Ajuste !_. rejill_ hacia amba pa,'a ilevar al _imo
a e_c_a dei _e_o.
Ajar el flujo _ ai_ h_al
Ajus_r e! flujo,de sire ve_!
Control de ventilacidn
Pars m_ima _icienc_ de frescura, CIERRE _ ventilac_n. Esto_rmitir_ la cir_laciSn inte_ de
_re..ABRA _ ve_ila_n _'a descargar elaimviciado.
CERRADA_==VE_ILACI__IERTA
A_ A,
,Operating _iS_ U_ S
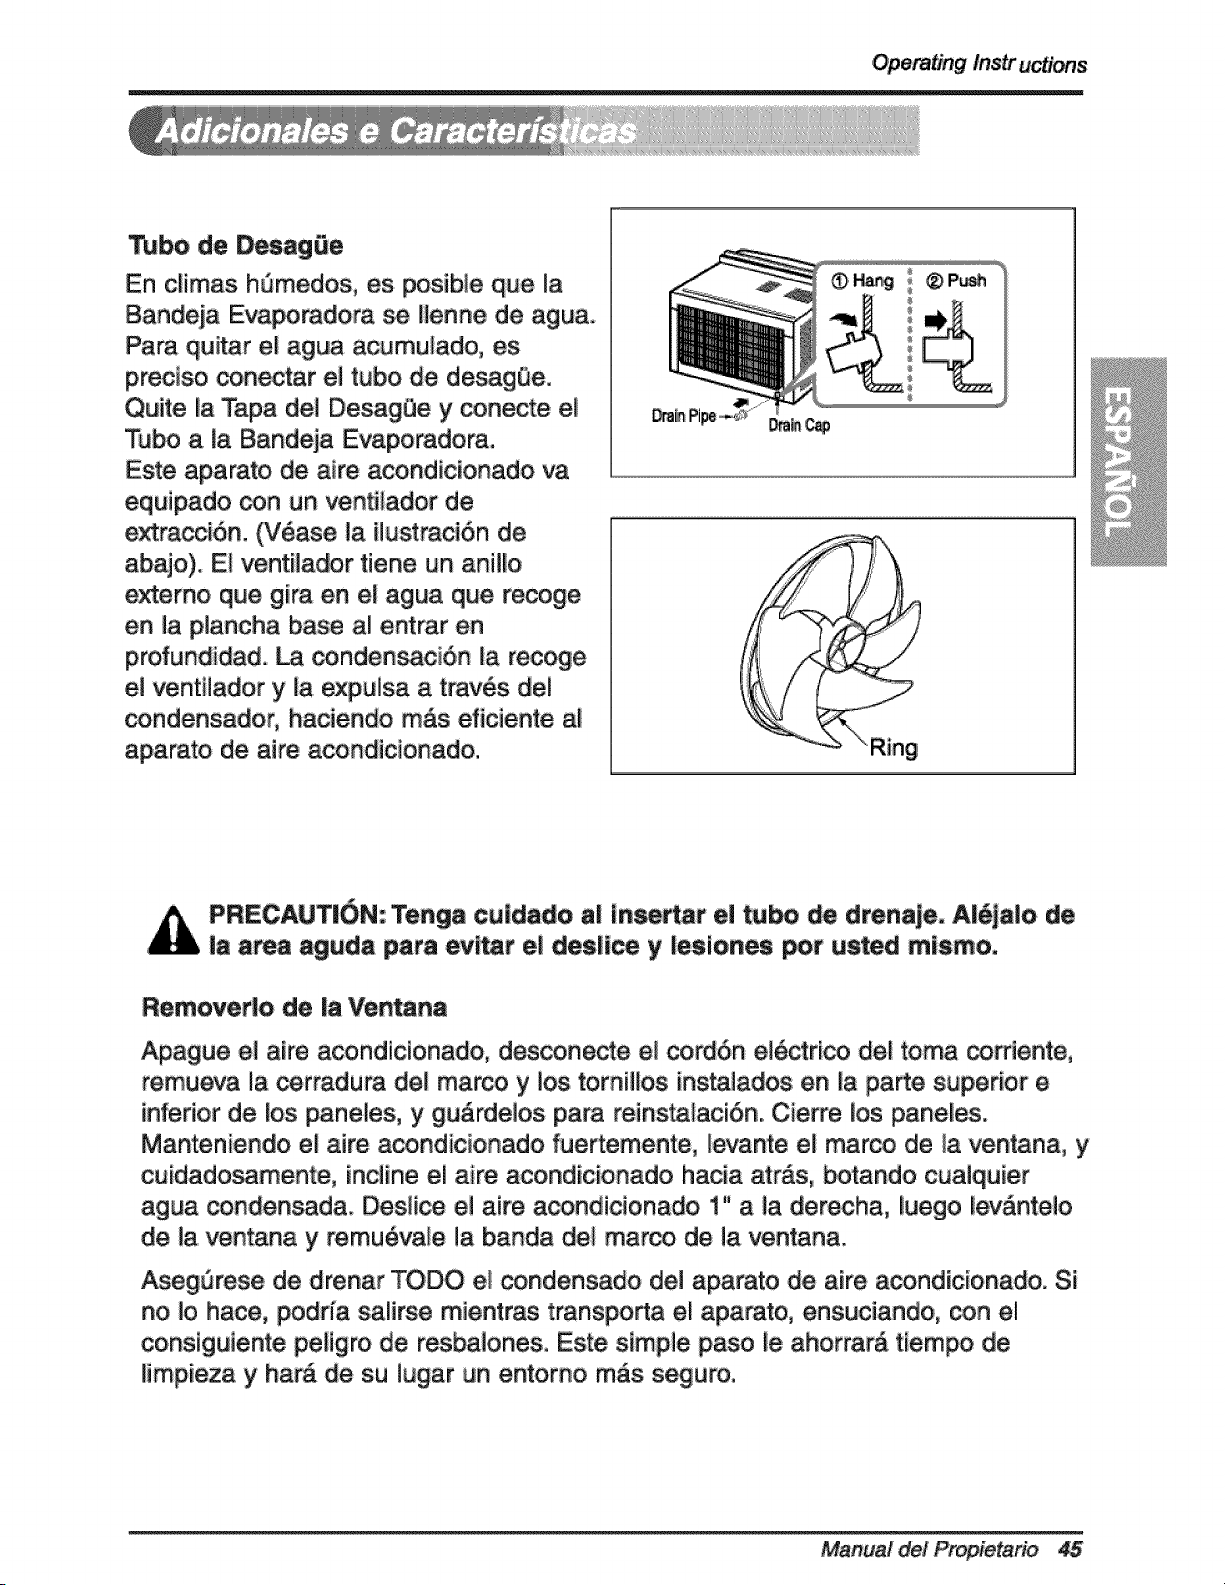
_bo de Desag0e
En c[imas hQmedos, es posib_e que la
Bandeja _dora se []enne de agua.
Para qui_r et agua acumu_ado, es
p_clso _nectar el tube de desagQe.
Quite la Tapa de_ Desag0e y conecte e_
Tube a ta Bandeja Evaporadora.
Este aparato de aire acond[c[onado va
equipado _n un venti_ador de
extra_i6no (V6ase la [Iust:raci6n de
abajo). E_ ventHador tiene un anil_o
externo que gira en el agua que recoge
en la plancha base al entrar en
profundidad° _ _nden_ci6n [a recoge
e] ventHador y ta expuisa a trav6s dei
condensado5 haciendo m&s eficiente af
aparato de aire acondicionado.
@
@
PRECAUTION: Tenga culdado a| In t e| tube _ drenaje. A|_jaio de
|a area aguda para evttat e| des|ice y |esiones _t usted mismo,
Remevedo de |aVen_na
Apague el a[re acondicionado, des_necte e_cordSn el6ctr[co del toma corflente,
remueva la cerradura de[ marco y los tomiiEos [nstalados en la parte superior e
inferior de los panefes, y gu&rdelos para reinstalaciSn. Cierre los pane_es.
Manteniendo el aire acondicionado fuertemente, levante ei marco de la ventana, y
cu[dadosamente, inciine el aire acond[c[onado hac[a atr,_s, botando cuaiqu[er
agua condensada. DesHce el aire acondicionado 1" a la derecha, Iuego [ev_ntelo
de la ventana y remu_vale la banda de! marco de la ventana.
_egOrese de drenar TODO el condensado del aparato de aire acondic[onado. Si
no Io hace, podr{a salirse mientras transporta el aparato, ensuciando, con el
consiguiente peHgro de resbaiones. Este stmpie paso ie ahorrar& t[em_ _e
{impieza y har_ de su Iugar un entomo m_s seguro.
Manual del Propietario 45
Man toy servicio
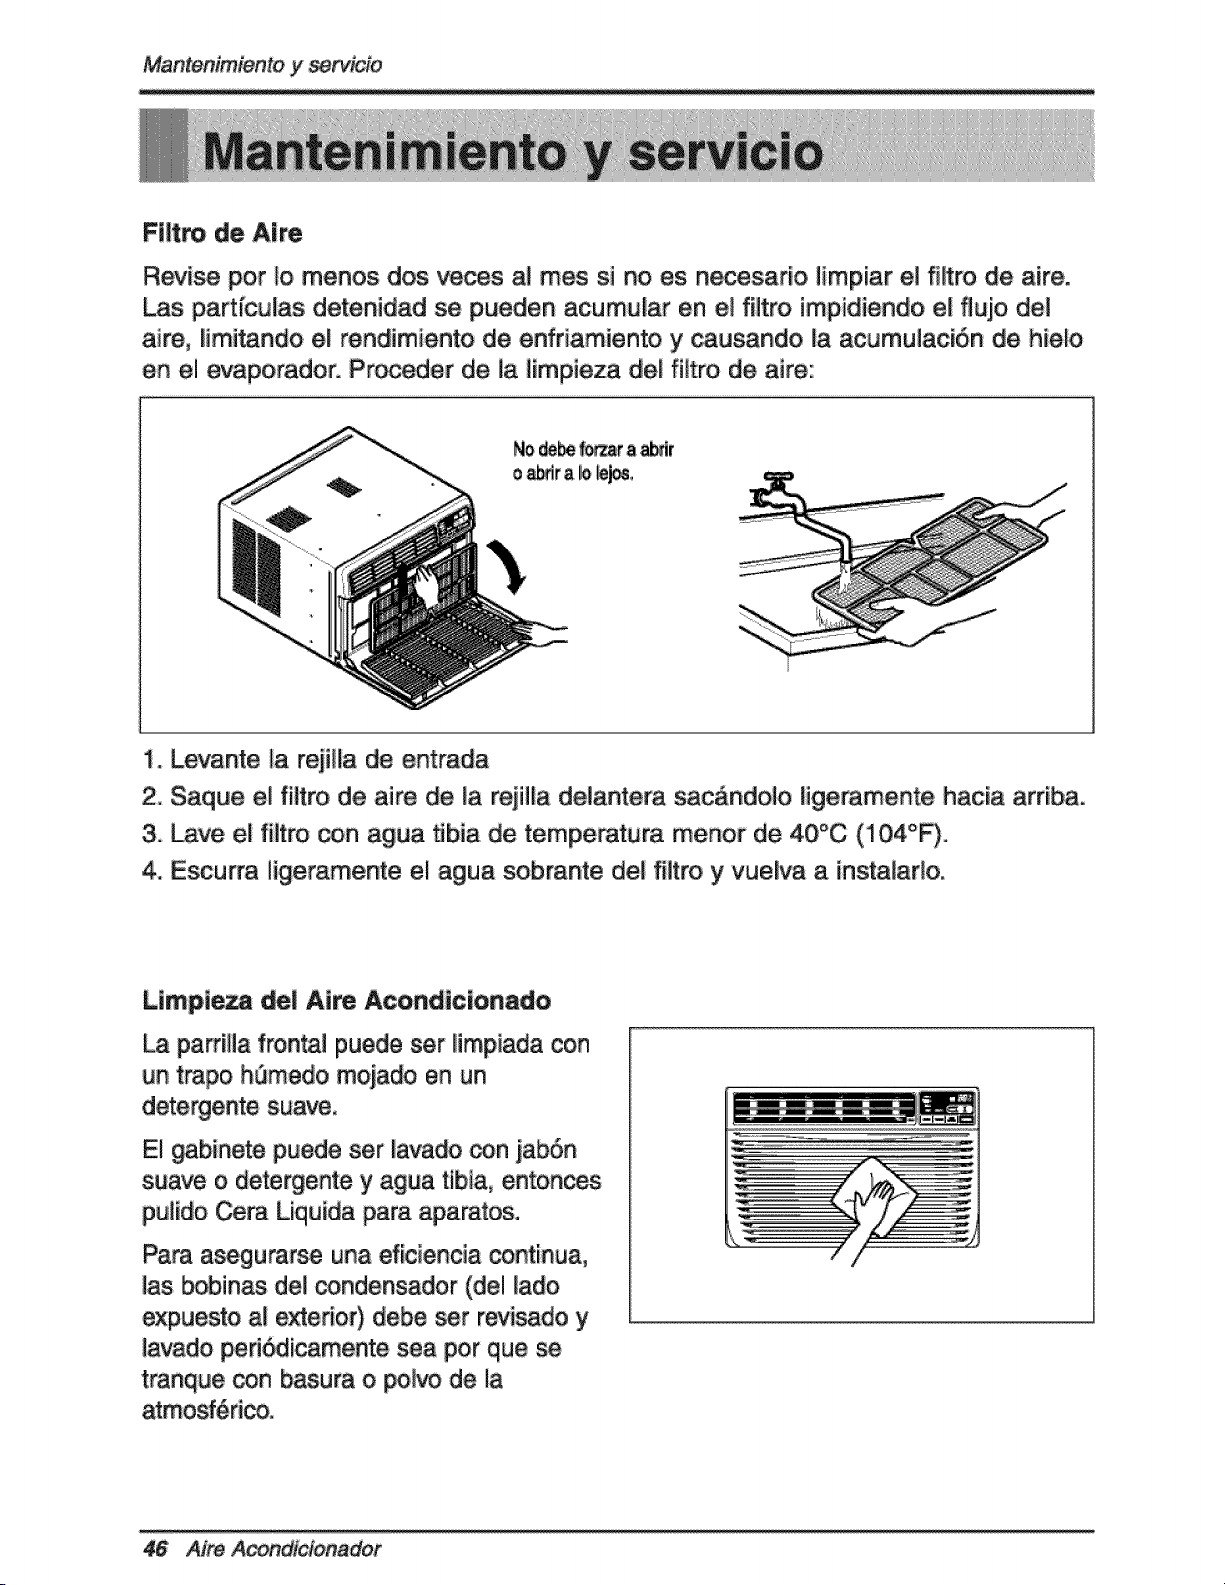
Fi|t_ de Aire
Revi_ pot {omenos dos veces al rues si no es necesario limpiar el fi_ro de aire.
Las partfcu_as detenidad se pueden acumuLar en e{filtro impidiendo e_ fluio de1
aire, IJmi_ndo er rendimiento de enfriamiento y causando La acumu_aci6n de hie_o
en el evaporadoro P der de _a iimpieza der fi{tro de aire:
i. Levante la rejiHa de entrada
2. Saque e! filtro de aire de fa rejiHa delantera sacAndolo tige_mente hacia arriba.
3. _ve e_ fUtro con agua _bia de temperatura menot de 40°C (104°F)o
4. E_urra ligeramente el agua sobrante de_ filtro y vueiva a insta_ar{o.
Llmpt_ de| Aire Acondtctonado
La papilla fronta_ puede ser limpiada con
un trapo h_medo moja_ en an
detergente suave.
El _binete puede ser Javado con jab6n
suave o detergente y agua tibia, entonces
pulidoCera Liquida para aparatos.
Para asegurarse una eficiencia continua,
las bobinas deL condensador (del lado
_puesto a_exterior) debe set revisado y
lavado ped_icamente sea por que se
tranque con basura o _lvo de la
atmosf_rico.
46 Aire
Mantenimientoy _cio
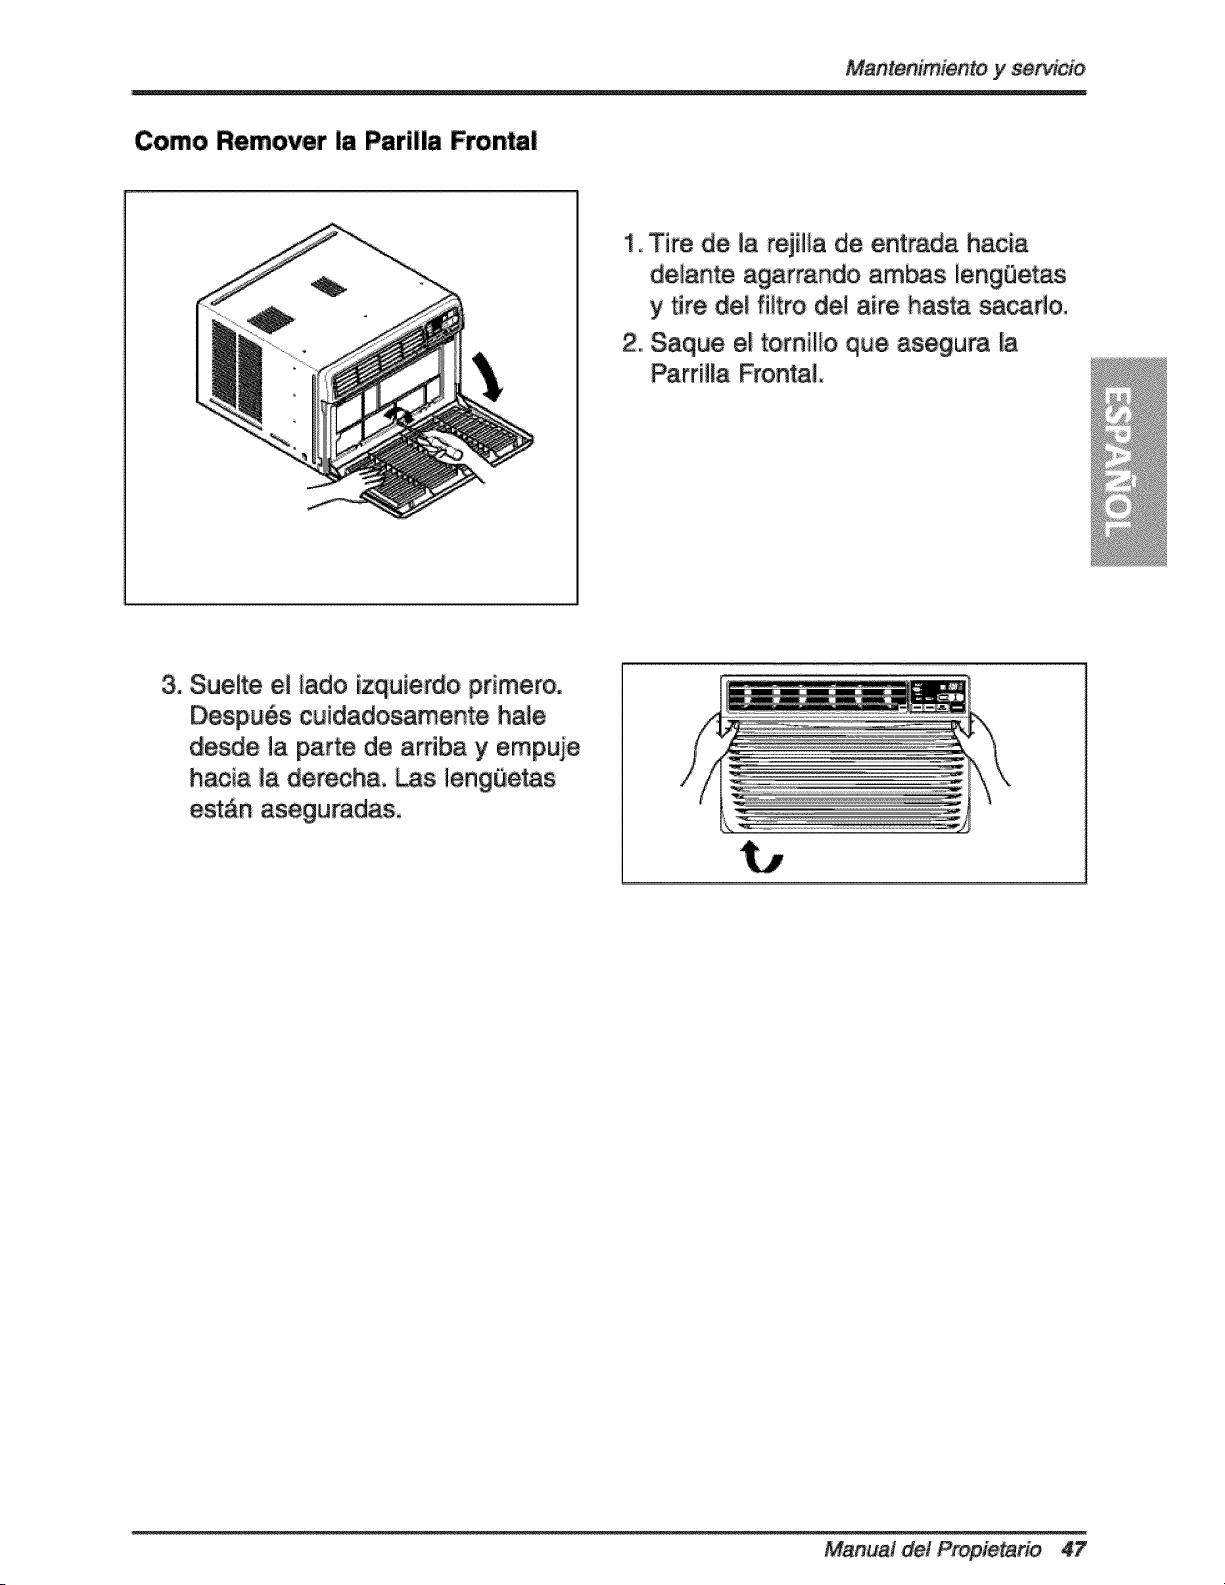
Como Remover la Parilla Frontal
1. Tire de la rejilla de entrada hacia
de,ante agarrando ambas lengOetas
y tire del filtro del aire hasta sacadoo
2. Saque el tomil_o que asegura _a
ParrHEa Frontal.
@
@
3. Suelte el _ado izquierdo primero.
Despu6s cuidadosamente ha_e
desde _aparte de arriba y empuje
hacia _a derech& _s lengOetas
estAn aseguradas°
Manual del Propietario 47
Mantenimientoy _rv_
A_ de Llamar el _rvic|o de Asistencia T6cn|_
Si tiene problemas _n su ventilador, _ea las informaciones siguientes y trate de
resolver e! problema, Si no puede encontmr la so,lud6n, desconecte el ventflador
y dirfjase a su suministradoro
El ventilador no funciona
1. Compruebe que e! ventilador est6 conectado en un enchufe correcto.
2, Revise el _sible,
3. _mpruebe que iia tensl6n no sea dem, asiado alta o baja.
AI ajustarse el en_iamlento, el aim no pa_ fr{o Iiosuficiente
i. Revise si los ajustes de la temperature son corr_os
2. Revise si el fi_tro, de aire no est;_ ata_ado de poIvo. En el caso de que s{,
,camble el fllitroo
3. Comprue_ que afuera no haya un obstdculo del flujo de aire y si entre la
parte trasera del ventilador y la pared o la barrera haya espacio libre de _r !o
menos 1 mmro (20").
4, Cierre t_as las puertas y ven_nas y _mpmebe que no haya una _ente
calor en la hab_aci6n.
Antes de Ilamar al servicio, tenga a bien revisar la siguiente fista de
problemas y sus soJuciones.
El acondicionador _ aire es_ funcionando normalmen_ cuando:
• E_ucha un sonido met_lico. Lo causa el agua que mcoge ei _ndens,ador en
dfas IHuviosos o en condiciones de mucha humedad. IEsta _racter{sUca estd
diseSada pa.m ayudar a qui_r la humedad en el aim y mejo_r la capacidad de
Consulte la s.ie_J6n del Ventilador de e_racci6n en la pdgina _.
* _je un clic en el termo_ato. Lo _usa. el cicJo del _mpresor que comienza y se
• Ve gotear agua de la _e posterior de la unidad. El agua puede _r recogida
en ia bandeja de base en _ndiciones de mu_ia humedad o d{as de il_ia. Es_
agua desboPda y gotea de_e la pa_e posterior d.e la unidad.
• Oye funcionar el ventilador mientms el compresor e_ silencioso.Esto es, una
caracter{stica operativa normal.
_re _dicionador

Mantenirniento y i
E! acondicionad_ de aim piu_e estaf funcionando anormalmente cuando:
El alre
do no
enciende
•Aseg,_re_ qlue ei aire a_ndicionado
es_ _ne_do _mpletamente a _a
_ente de en,ergia,
• Cheque _os_sible_interruptor de ila
_sa y reemp_ace_c_fusibles o
_eetablezca el Jnterruptorde energia°
Si e_ bot6n Tno p,,e_anece a_ivo
suspenda el u_ dei aire a_ndidonado y
p6ngase en _ntacto _n un t_ni_ de
_CliO cuali_.
Emaire
do no enfHa
_mO
debie_
•#_g,_re_ .que no haya cortJnas,.
pe_ianas o muebles Noqueando ei
frente de_aire acondidonado,
•_us_r el _nfsol de tempemtura a un
nQmerom_s baj.oo
•Limpie el _ltro pot Io menos cada d_
semanas. Vea la s_ci6n de
iins_u_iones de operad6no
• Cuando usted enciende e_aire
a_ndicionado debe espemr un
memento _m que I!ahabitaci6n
ei_ei.
•_g,_m_ que todas Ilassalidas de
aire est6n _das pam_que el aire
• Esta_ez_ una temperat_ra m_s alta°
El aire • Ellija eli mo_o afro del ventHador High
do enfria Fano enfriad!o alto. High _o! _n el
dernasiado term,os_ en e_n_mero 1 o2.
• Uste_ pue_ re_ti_e al Energy S_r prog_ma _n t_o detaHe en ,_',energys_r, gov,
@
@
@
M_ua! del Propietafio 49
Nota
50 Aire Acondicionador
LG E_ecfron_cs _no rr_ara_6 o _stfful'r6. gr_uita_nte, su producto s_r_lta defectuoso, en _tedal_ o maria de
@ra ha]# contrives n_es de _ dur®te el _@ ,de g.aran#a menc#nado rods a_#. ef_flvo a Ipaff_r de
_afecha de compra de_ produoto orig_na_ p,or _ffe dea consumidor, Esfa garanffa _mitada s6_o es v61_da para e_
comprador odgina! de_ pr_ucfo, y efectba s6_o cuando este se urn!ice dentro de _osEstados Uinido_, lncluyendo
_a_a. HowaL y _s te_'o_ e_o,un_denses.
_R_ _ GARAN_:
de compra.
_: 5i _1 de,de la fecho de c_pra
co_ra,
P_SO _ _C|O:
Uame a_te_6fof'_ 11-800-2_ y se_ecc#ne Ila o_l,6n
adec_a0 P_ f_, tenga dl_onlb_e _ _ de pt'oducto (A_e
acond_c_onado), n_,iero de m_e_o, nOmero de _rie, y c6d_go
La mano de _ra bajo garan_ cubfe e_caste de la _stenda
en d_dliio de todas las #ezos, I_u_ndo e_camp_r.
ESTA GA_NT[A S_ OTO_.A EN SUSTITUCi6N O _XCILSS_N DE TO_A OTRA GARAN_A_ IEXP_SA O |MPILI/CITA,
|NCLUYEN_O S|N U_A_ C_AL_I_ GA_N_fA DE _Li_ O |_O_i)_ CO_ U_ P_P6_ CONC_O_ _
MED|DA _N QUE CUALQUIE_ GARANT[A |_P'LiCiTA ESOBLiGAIDA _R ILALEY, £5_ LI_|TAD,A E_ DURAC|ON AL
P_O_ OE GA_IN_A YA _ENC1ON_O, LG _ S_ _N_B_ DE _l_ DANO R_T_TE, |_IDiRE_O, O
Ci_OS E_ADOS NO ACEPTAN _ LibRA,ClaN DE #_I_CIi_N D,EUl_ GA_A_A I_PL{CiTA O _ EXCLUSI_IN DE
DA_OS _TA_S O ACCI_A_, _ _ Q_E _ _iTAC_S O _X_US_$ _ENQONADAS PUED_N NO
S_ APUC_S _N _ CASO.
_A G_ _MffADA NO _ AP_A
1 Las v_sitas ,de As_stenc_a a domic_o pata entregar, r_oget y/o _nstalar e! prod_cto, Instruit o _Jstfu{t
fl_bl_ en su casa o co_?eg_r e_ca_b_o, o I_ correcct_ de re_r_lon_ no auto_zad/as; y
2_
Da_os o problems de funcionamlento provocados par un u_/Radecuado,, abuso,. _nc_onamlento
fue[a de especiflcoc_ones amblenta_es o contrar_o a tequI, sitos o precaucione_ en {a Guia de
funclonam_ento, acc_dlentie_ fuego, Ilnundaciones, _nstalacl6n _nadiecuada, fuerza mayor,
m_l_aclones o a{terac_ _ @Jt_l_adas, cat, ante e_,Dct_ca o ten_6n _nc_ecta, o usa com_c_aL
o _S d_ntos a aq_l_ _ra _ qua flJe dl_sef_do,.
E_be_ enfr_ar una cop]a de su recibo de comp_a
e_ e_rr_mento _ q_ rec_ _o _o _tant_a
Uame a_ _-_0-_3,-_, _ harass_1 di'a, 7 _as a la
Se_ecc_,one la opci6n adecu,ada de_ men,G, y ten,ga
dls_nlble su flpo de producto ,[a_re acondlc_on_o),
n0rn_o de m_e_o, nQmero _ ser_e, y c6d_o _Jstalt. o
vtslte _o _o Web _ _:/,_ww._ar_e&_,
LGElectronics_ncwillrepair or at ffs opit_on replace, wffheut charge, your product ff it proves to be def_tive in
materla_ or wo_k_anship under norma_ _e dudng the warranty period set forth b,elow, effective from 1'hedate of
o_g_nal co_mer purc_se of De prod_t, _ IImffed warran_ lie_od on_i to the o#gln_ purcP_r of De pr_t
_d eff_ve on_ _ u_ in the Un_ed St_es _nct_lng A_ka, H_a&. and U,& Te_rfforles,
WARTY PER_D:
_bOr: 5 Year from he D_e of _h_.
P_ GYear from the Da_e of _rchase,
C__: _ Y_ from De D_ of
_ch_
HOW SERVICE|$ I_D_:
C_ 1-_243-_ a_ choose t_ appellate pr_pt, PI_
h_ pr_JCt _pe (Room A}rC_dfftoneO, m_et number, _flal
number, and ZIP code ready.
The w_ranted liner covers the cost of _n-H_ Sem_ceon a_
parts _nc_uding_e compressor,
_!$ WARR_TY !$ iN LIE_ OF A_Y OTHE_ WA_RANTIE& EXP_ O_ IMP_ED, I_C[IJD_NG WITHO_' IJ_IITATI!ON_A_Y
W_ O_ _ERCHANTAB!_' OR _ F_ A PA_C_ P_R_, TO _ iE3C_ _ !_ WARRANTY !$
_Y _ A_Y TO ¥O&
,
_ce tfl_ to your home to del_e_, p_k: up, and/or Instal_ _ _o_Jct, lnst_ct, or rep_ce _e flJ_s or
cor_ct w_ing, _ _rrec:ti_ of una_h,or_ed re_; _d
Damages or opera,rig problems that result from misuse, abuse, operotio.n outside environmental
_ec_fi_s or contrary to the requirements or precautions in the Operating G_lde., a_nt., ve_tn_
fire, flo_, lm_oper I_|allafion, ac_'s at _d, u_ut_r_ed med_fication or affer@l_, l_ortecf electflce_
cu#enf or vo#_, or co_rc_ _e, or _e for other _n _ntend_ _r_.
To _ve W_a_ _ag_
A .copy of your .Sa_esReceipt mu# be subm_fed at
the _e wart.anW _tce _ provl_de_,
C_l| _-,8_0-243°8_0, 24 h_s a day, 7 days pe_week,
Choose the appropriate prompt from 'the menu, a_d
here your prod_t _ (Room Air C_d_one_'O, m_
number, serial number, and ZiP Code; or v_s_tour
Paint No, : Us 6, 412, 298
PII_,:_28A2 i0 i5 D Print_ inChina

