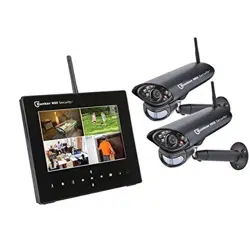
Owner 's Manual Surveillance System
Receiver Components and Controls
Back

Accessories

For technical questions, please call 1-888-866-5797.
Assembly
Thread the Antenna into the Antenna Connector on the back of the Receiver.
Before Mounting
When planning Receiver location:
1. Verify that installation surface has no hidden utility lines before drilling or driving screws.
2. Select a clean, dry location indoors with a 120V outlet nearby.
3. Take into consideration the length of the Power Adapter's cord.
CAUTION! Route the cord so as to avoid a tripping hazard.
4. Make sure the location will remain within the Receiver's Operating Temperature.
Tabletop Mounting
Place Receiver on a flat, level surface. Adjust the Stand until desired position is achieved.

Wall or Under Cabinet Mounting
Using the Base as a template, mark locations of mounting holes on mounting surfac

Solid Surface
1. Using a drill bit slightly smaller than the Screws, drill pilot holes into the marked locations.
2. Position Mounting Bracket so that mounting holes align with pilot holes.
3. Drive Screws through mounting holes in Base and into pilot holes until the Mounting Bracket
is securely attached to the mounting surface.
4. Attach Receiver to Mounting Bracket, then loosen Adjustment Knobs, adjust Receiver as needed, then tighten Adjustment Knobs.
Hollow Surface
1. Using a drill bit slightly smaller than the Anchors, drill holes in the marked locations.
2. Tap Anchors into the holes until they are almost flush with mounting surface.
3. Position Mounting Bracket so that Mounting Holes align with anchor holes.
4. Drive Screws through mounting holes in Base and into anchor holes until the Mounting Bracket is securely attached to the mounting surface.
5. Attach Receiver to Mounting Bracket, then loosen Adjustment Knobs, adjust Receiver as needed, then tighten Adjustment Knobs.
Connect Power
1. Connect the Power Adapter's cord to the back of the Receiver.
2. Plug the Power Adapter into a 120VAC outlet
3. Turn the Power Switch to the ON position.
Camera Components and Controls
 Assembly
Thread the Antenna into the Antenna Connector on the back of the Camera.
Before Mounting
Note: The included Cameras are programmed to automatically connect to Channel 1 and Channel 2.
1. When planning mounting location and angle:
- a. Verify that installation surface has no hidden utility lines before drilling or driving screws.
- b. Take into consideration the length of the Camera and Power Adapter’s cords. Route the cords so as to avoid a tripping hazard.
- c. Do not install where there are thick walls or other obstructions between the Camera and Receiver.
- d. Select a location high enough so that it is out of reach of children. but still covers the desired viewing area.
- e. Do not install the Camera facing out of a window. Make sure no strong light will shine directly into Camera Lens.
- g. Make sure location will remain within the Camera's Operating Temperature.
2. Test each Camera's function in its intended location before mounting:
- a. Connect the Power Adapter’s cord to the Camera’s Power cord.

- b. Plug the Power Adapter into a 120VAC outlet.
- c. Verify that there is an image on the Receiver.
Note: If there is no image. pair the Camera to the Receiver according to Pairing on page 11.
- d. Check the Camera's signal strength. Touch
 to check Camera 1.
Note: Touch again to check other Camera(s).

3. Low signal adjustment:
- a. Adjust the Camera and or/Receiver antenna(s).
- b. Reposition the Camera and/or Receiver.
4. When the mounting location has been chosen:
- a. Unplug the Power Adapter's cord from the Camera.
- b. Remove the Camera from the Mounting Bracket.
- c. Using the Base as a template. mark locations of mounting holes on mounting surface. (See Figure I)
5. Repeat all steps with the other Camera(s).
Mounting to Solid Surface
- Using a drill bit slightly smaller than the Screws, drill pilot holes into the marked locations.
- Position Mounting Bracket so that mounting holes align with pilot holes.
- Drive Screws through mounting holes in Base and into pilot holes until the Mounting Bracket is securely attached to the mounting surface.
- Remove protective film from the Lens.
- Attach Camera to Mounting Bracket, loosen Adjustment Knob, adjust Camera as needed. then tighten Adjustment Knob. (See Figure I)

Mounting to Hollow Surface
- Using a drill bit slightly smaller than the Anchors. drill holes in the marked locations.
- Tap Anchors into the holes until they are almost flush with mounting surface.
- Position Mounting Bracket so that Mounting Holes align with anchor holes.
- Drive Screws through mounting holes in Base and into anchor holes until the Mounting Bracket is securely attached to the mounting surface.
- Remove protective film from the Lens.
- Attach Camera to Mounting Bracket. loosen Adjustment Knob. adjust Camera as needed. then tighten Adjustment Knob. (See Figure I)
Connect Power
1. Connect the Power Adapter’s cord to the Camera’s Power cord.
2. Plug the Power Adapter into a 120VAC outlet.
Viewing Modes
- Camera Sequence (Default mode) - Automatic cycling between Cameras. Touch
 toggle between Camera Sequence and 4 Camera.
- 4 Camera - View all Cameras at the same time. Touch to toggle between 4 Camera and Camera Sequence
- Single Camera - View one Camera at a time. Touch to switch between Cameras. zoom
- Zoom - Push the
 button on the back of the Receiver to zoom in during Single Camera Viewing Mode only.
- Screen Saver - Mask Camera view with a blank screen or image(s). See Screen Saver on page 11.
Set Up
 Menus
Menus
- Touch
 to view Menus.
- Touch
 to navigate through Menus.
- Touch OK to access highlighted Menu.
- Touch
 to navigate within Menus.
- Touch at any time to cancel an action and/or go to the previous screen.
 Menu > Recording
- Insert an SD card to enable recording.
 will display to indicate the card is functioning properly.
- Touch then select Recording.
- Quality: Select HIGH (640 x 480) or LOW (320 x 240). then touch OK.
- Motion Record:
a. Duration: Select the amount of time to record after motion has been detected. then touch OK.
b. Recording Mode: Select from below. then touch OK:
- 4 Channel: Record all channels when a single camera detects motion.
- Single Channel. Record the channel for the Camera that detects motion.
5. Schedule Record:
Note: Date and time must be set before setting up Scheduled Recording. See Date & Time on page 11.
- a. Select a day to schedule. then touch OK.
- b. Enter Start Time and End Time. then select ON.
Note: Time is in 24 hour format.
- c. Repeat steps for other days.
Note: For manual recording. see Manual Recording on page 14.
6. Overwrite:
- a. Select Yes to overwrite previously recorded files when the SD card is full
Note: After selecting Yes.  will display while in Auto Sequence mode.
- b. Select No to keep all files.
Note: After selecting No, when the SD card is full. the Receiver will stop recording and the FULL indicator will display.
 Menu > Camera On/Off
1. Touch then select Camera On/Off.
2. Touch  to select a Camera
3. To turn the Camera off. touch  to select OFF.
4. To turn the Camera on. touch  select On.
5. Repeat steps for other Cameras.
6. Touch OK to save changes.
 Menu > Settings
1. Touch then select Settings.
2. Date & Time: Set date and time. then touch OK.
Note: Time is in 24 hour format.
3. Video Output: Select NTSC. then touch OK..
4. Format Memory: Select Yes or No. then touch OK.
CAUTION: Touching OK while Yes is selected will erase all files from the Micro SD Card.
5. Alarm Volume: Touch to increase volume. Touch decrease volume. then touch OK.
Note: This function also controls the volume when using AV Output.
6. Auto Mute: To mute Cameras when sound level is low. Select ON or OFF. then touch OK.
7. Default Settings: To return all Settings to factory default settings. Select Yes or No. then touch OK.
 Menu > Detect
1. Touch then select Detect.
2. Select Camera. then touch OK.
3. Select Sensitivity Settings. then touch OK.
4. Repeat steps for other Cameras.
 Menu > Brightness
To control the brightness of each Camera.
1. Touch to select a Camera.
2. Touch then select Brightness.
3. Touch to increase brightness. Touch decrease brightness. then touch OK.
4. Repeat steps for other Cameras.
 Menu > Screen Saver
To conceal the fact that the Receiver is a Security System.
1. Touch then select Screen Saver.
2. Select Blank Screen for a blank screen or select Photo Frame to add your own image(s). then touch OK.
Note: To add your own image(s). see Using Screen Saver on page 14.
3. Photo Frame:
- a.Transition Timing: Select the amount of time each image will display. then touch OK.
- b. Transition Options: Select the way the images will transition. then touch OK.
 Menu > Pairing
When adding Cameras. they will need to be programmed manually (paired) to work with the Receiver.
1. Before installing Camera(s):
- a. Connect the Power Adapter'’s cord to the Camera's Power cord.
- b. Plug the Power Adapter into a 120VAC outlet.
- c. Determine which Channel is available to use.
- d. Touch then select Pairing.
- e. Select the Channel.
- f. Press and release the Pair Button on the back of the Camera.
2. Install Camera(s) according to Mounting on page 9.
Connecting A/V Output
To view on another device. such as a television
1. Connect black plug of RCA Cable into AV Out port on back of Receiver.
2. Connect white and yellow plugs into corresponding inputs on device.
3. Press and release  to view on device.
Operating Instructions
 Read the ENTIRE IMPORTANT SAFETY INFORMATION section at the beginning of this manual including all text under subheadings therein before set up or use of this product.
Receiver Functions
Indicators
- NEW New Recording
- FULL SD Card Full (When Overwrite is set to NO)
- MOTION Motion Detection Recording
- SCAN Screen Saver On


Display Functions


 Manual Recording
Note: Manual Recording overrides all other functions, including Scheduled Recording.
To record all Cameras. touch to set Viewing Mode to 4 Camera.
To record an individual Camera. touch until desired Camera is displayed.
1. Touch  to start recording.
 and
and  will display.
2. Touch again to stop recording.
3. NEW will display and will flash.
Note: Manual Recording will not work if Manual Motion Detection is activated
 Video Motion Detection
Note: Video Motion Detection overrides Scheduled and Manual Recording.
To record all Cameras, touch to set Viewing Mode to 4 Camera.
To record the Camera that has been activated. set Viewing Mode to Camera Sequence.
1. Touch to activate motion detection. MOTION will display.
2. When motion has been detected. recording will begin.
and will display.
Note: Recording will occur for the duration specified in Recording Set up.
3. Touch again to deactivate motion detection.
 Using Screen Saver
1. Uploading Images:
Note: Mac is not supported for this function.
- a. Connect the USB cable to the computer where the images are stored
- b. On the back of the Receiver. press and hold
 and, at the same time, connect the Mini-B end of the USB cable to the Receiver.
- c. "USB PC MASS STORAGE MODE" will display on the Receiver's screen.
- d. An autorun window will appear on the computer. open the folder to view files. then run PHOTORUN.EXE.
2. Select a folder to upload images from the computer to the SD card in the Receiver.
3. Browse the computer for images.
Note: All images can be viewed on Receiver. but only images from the FAMILY folder will appear on the Screen Saver.
4. When finished. disconnect the USB cable.
5. Touch  to activate the Screen Saver.
6. Touch again to return to Viewing Mode.
Note: Screen Saver will not activate when in 4 Camera Viewing Mode.
 Using Intercom
Allows audio communication between the Receiver and the Cameras.
Setting Receiver Volume
Note: The Camera volume cannot be adjusted.
Touch to increase volume.
Touch  to decrease volume.
Note: indicates Receiver volume is off.
Speaking through Intercom
1. Touch to select the Camera to speak through.
2. Touch and hold the  Intercom Icon and speak in a normal voice within 12 inches from the Receiver.
3. Release the Icon to listen.
Playback Files on Receiver
When there is a new recording. NEW will display and will flash.
To view Recordings:
- In any Viewing Mode. touch OK to enter PLAY FILE mode.
- Select VIDEO. then touch OK. Folders are organized by date. oldest to newest.
- Select a date. then touch OK. Recordings are organized by time. oldest to newest.
- Select a recording. then touch OK to view the recording.
- a. Touch
 to stop to go back to the beginning of recording..
Note: While stopped. touch to view the next recording.
- b. Touch to play and pause.
- c. Touch to rewind.
- d. Touch to fast forward.
To view images:
1. In any Viewing Mode. touch OK to enter PLAY FILE mode
2. Select PHOTO. then touch OK.
3. Select one of the folders. then touch OK.
- a. FAMILY - Where Screen Savers images are stored.
- b. FRIENDS
- c. PERSONAL
4. Select an image file. then touch OK.
5. Touch or to scroll through images
Playback Files on Other Device
1. Remove the SD card from the Receiver.
2. Insert SD card into device's card slot.
3. Follow device's instructions to view files.
Delete Files
IMPORTANT: DO NOT DELETE FILES USING A COMPUTER. ONLY DELETE FILES USING THE SYSTEM.
1. In any Viewing Mode. touch OK to enter PLAY FILE mode.
2. Select file to delete.
3. Press and release  on the back of the Receiver.
4. Select Yes or No. then touch OK.
Maintenance Instructions
Procedures not specifically explained in this manual must be performed only by a qualified technician.
Camera Maintenance
WARNING
TO PREVENT SERIOUS INJURY FROM ELECTRIC SHOCK: Unplug the Power Adapter from its electrical outlet before inspection. maintenance. or cleaning.
1. PERIODICALLY, inspect the general condition of the Camera. Check for:
- loose hardware.
- damaged cord/electrical wiring.
- cracked or broken parts. and
- any other condition that may affect its safe operation.
2. PERIODICALLY, wipe external surfaces of Camera with clean cloth.
3. Maintain area surrounding Camera, making sure obstacles don't interfere with visibility, such as overgrown bushes.
Troubleshooting
Receiver does not display image.
Camera disconnected.
Camera out of range of Receiver.
- Relocate Camera and/or Receiver.
Picture is white.
Camera pointing at strong light source.
Picture is choppy.
Obstructions between Camera and Receiver.
- Remove obstructions between Camera and Receiver.
Frame rate too low.
Cannot access the menu.
System is recording.
Motion detection is on
"Err" appears on the screen.
SD card error.
- Turn Receiver off. remove and reinsert SD card. then turn Rreceiver back on.
Note: If "Err" still appears. reformat the card or use a different one.