D
Ohrthermometer
Gebrauchsanweisung .............................2 – 13
G
Ear thermometer
Instructions for use .............................. 14 – 25
F
Thermomètre auriculaire
Mode d’emploi .................................... 26 – 37
I
Termometro per orecchio
Istruzioni per l’uso ............................... 38 – 49
r
Термометр для измерения температу-
рывухе
Инструкция по применению .............. 50 – 63
ELECTROMAGNETIC COMPATIBILITY
INFORMATION
.........................................64 – 67
SFT 53

2
DEUTSCH
Lesen Sie diese Gebrauchsanweisung
sorgfältig durch, bewahren Sie sie für
den späteren Gebrauch auf, machen Sie
sie anderen Benutzern zugänglich und
beachten Sie die Hinweise.
Bitte lesen Sie diese Gebrauchsanweisung aufmerksam durch,
bewahren Sie sie für den späteren Gebrauch auf, machen Sie
sie anderen Benutzern zugänglich und beachten Sie die Hin-
weise.
Lieferumfang
Überprüfen Sie den Lieferumfang auf äußere Unversehrtheit
der Kartonverpackung und auf die Vollständigkeit des Inhalts.
Vor dem Gebrauch ist sicherzustellen, dass das Gerät und
Zubehör keine sichtbaren Schäden aufweisen und jegliches
Verpackungsmaterial entfernt wird. Benutzen Sie es im Zwei-
felsfall nicht und wenden Sie sich an Ihren Händler oder an die
angegebene Kundendienstadresse.
1 x Ohrthermometer
2 x 1,5 V AAA-Batterien
10 x Schutzkappen
1 x Diese Gebrauchsanweisung
Nachkaufartikel
Schutzkappenset nachkaufbar: 2 x 10 Schutzkappen,
Art.-Nr. 795.26
1. Zeichenerklärung ............................................................................. 3
2. Bestimmungsgemäßer Gebrauch ................................................... 3
3. Hinweise ............................................................................................ 4
4. Gerätebeschreibung ........................................................................ 5
5. Inbetriebnahme ................................................................................ 6
6. Einstellungen .................................................................................... 6
6.1 Uhrzeit / Datum einstellen ............................................................ 6
6.2 Temperatureinheit wählen (°C oder °F) ........................................ 7
7. Messen .............................................................................................. 7
7.1 Körpertemperatur messen ........................................................... 7
7.2 Objekttemperatur messen ............................................................ 9
7.3 Raumtemperatur anzeigen ...........................................................9
7.4 Gespeicherte Messwerte anzeigen ............................................ 10
8. Batteriewechsel .............................................................................. 10
9. Reinigung / Aufbewahrung ............................................................ 11
10. Entsorgung .....................................................................................11
11. Was tun bei Fehlermeldungen? ..................................................... 11
12. Technische Daten ........................................................................... 12
13. Garantie ...........................................................................................13
Inhaltsverzeichnis
3
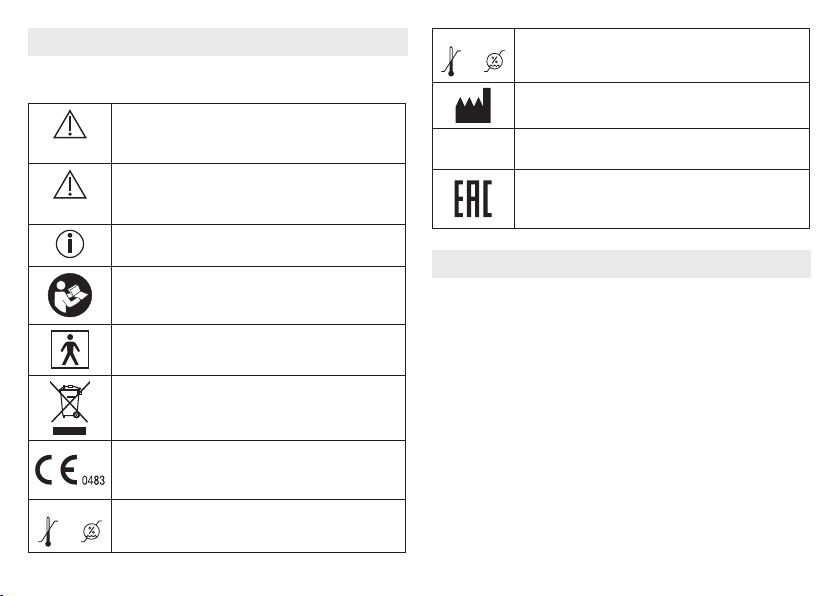
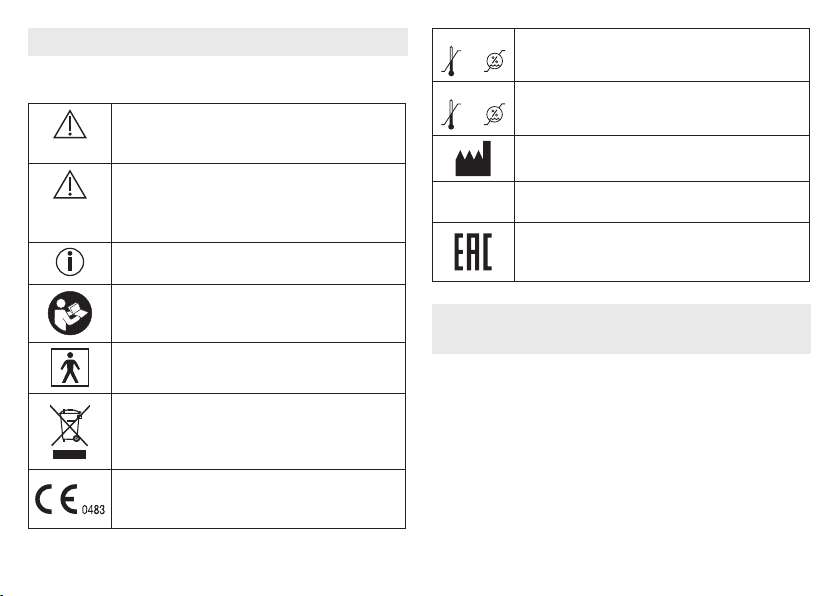
1. Zeichenerklärung
Folgende Symbole werden in dieser Gebrauchsanweisung und
auf dem Gerät verwendet:
WARNUNG
Warnhinweis auf Verletzungsgefahren oder Ge-
fahren für Ihre Gesundheit.
ACHTUNG
Sicherheitshinweis auf mögliche Schäden am
Gerät/Zubehör.
Hinweis
Hinweis auf wichtige Informationen
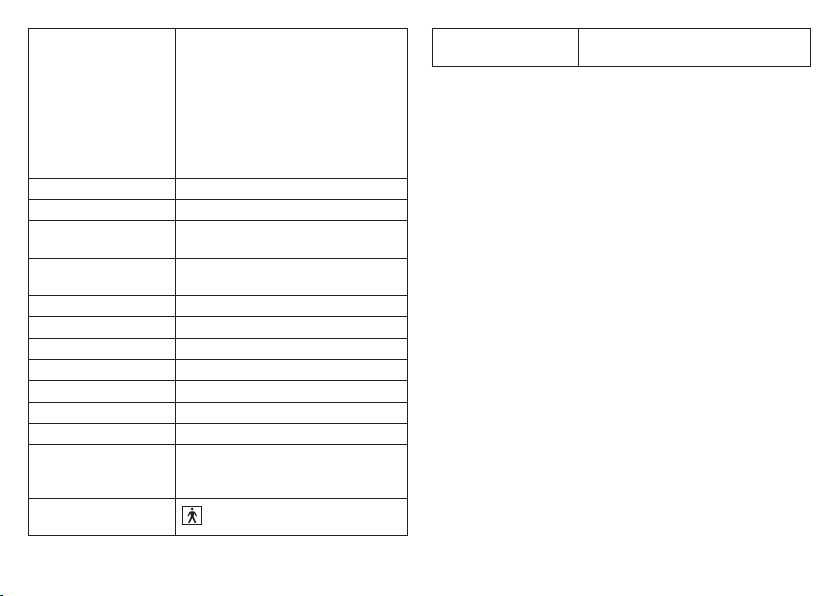
Gebrauchsanweisung beachten
Anwendungsteil Typ BF
Entsorgung gemäß Elektro- und Elektronik-Alt-
geräte EG-Richtlinie – WEEE (Waste Electrical
and Electronic Equipment)
Die CE-Kennzeichnung bescheinigt die Kon-
formität mit den grundlegenden Anforderungen
der Richtlinie 93/42/EWG für Medizinprodukte.
Storage/Transport
Zulässige Lagerungs- und Transporttemperatur
und -luftfeuchtigkeit
Operating
Zulässige Betriebstemperatur und -luftfeuch-
tigkeit
Hersteller
IP 22
IP 22, Schutz gegen schädliches Eindringen von
Wasser und Staub
Zertifizierungszeichen für Produkte, die in die
Russische Föderation und in die Länder der
GUS exportiert werden.
2. Bestimmungsgemäßer Gebrauch
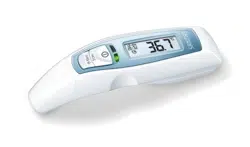
Das Ohrthermometer ist für Messungen der Körpertemperatur
im Ohr bestimmt. Verwenden Sie das Ohrthermometer nicht für
Messungen an anderen Körperstellen!
Sie können mit dem Ohrthermometer zusätzlich auch Raum-
und Objekttemperaturen messen.
Das Ohrthermometer wurde sorgfältig für exakte, sichere und
schnelle Temperaturmessungen im Ohr entwickelt. Es ist ein
nicht-invasives Ohrthermometer mit einem Infrarotdetektor zur
Erkennung der Körpertemperatur im Gehörkanal von Kindern
und Erwachsenen.
Verwenden Sie das Gerät ausschließlich für den Zweck, für den
es entwickelt wurde und auf die in dieser Gebrauchsanweisung
angegebene Art und Weise. Jeder unsachgemäße Gebrauch
kann gefährlich sein! Der Hersteller haftet nicht für Schäden,
4
die durch unsachgemäßen oder falschen Gebrauch verursacht
wurden.
Die Qualität des Geräts wurde überprüft und entspricht den
Forderungen der Richtlinie des EU-Rates 93/42/EEC (Medizin-
produkterichtlinie) Anhang I, wesentliche Anforderungen, so
-
wie den entsprechenden harmonisierten Normen. ISO 80601-
2-56:2009 Klinische Thermometer - Teil 5: Anforderungen an
Infrarot-Ohrthermometer (mit Maximumvorrichtung).
Beachten Sie dabei, dass tragbare und mobile HF-Kommunika-
tionseinrichtungen dieses Gerät beeinflussen können. Genauere
Angaben können Sie unter der angegebenen Kundenservice-Ad-
resse anfordern oder am Ende der Gebrauchsanweisung nachlesen.
3. Hinweise
Sicherheitshinweise
WARNUNG
•
Führen Sie bei Messungen im Ohr die Sensorspitze des
Ohrthermometers vorsichtig ein.
•
Die Anwendung des Ohrthermometers an verschiedenen Per-
sonen kann bei bestimmten akuten, infektiösen Erkrankungen
aufgrund einer möglichen Keimverschleppung trotz der durch-
zuführenden Reinigung und Wischdesinfektion unzweckmäßig
sein. Fragen Sie im Einzelfall Ihren behandelnden Arzt.
•
Die im Ohr gemessene Körpertemperatur kann von ande-
ren Messungen im Mund, Rektum oder in der Achselhöhle
abweichen. Daher macht es keinen Sinn, diese Werte zu
vergleichen. Messen Sie die Temperatur regelmäßig, um die
normale Ohrtemperatur zu ermitteln, und nutzen Sie diese
Messungen dann als Vergleichsbasis für Messungen, bei
denen Sie ein Fieber vermuten.
•
Dieses Ohrthermometer ist für Ohrtemperaturmessungen
vorgesehen. Verwenden Sie dieses Ohrthermometer nicht
für Messungen an anderen Körperstellen.
•
Ersetzen Sie die Schutzkappe nach jeder Verwendung, um
eine exakte Messung zu gewährleisten und eine Kreuzkon-
tamination zu vermeiden.
•
Das Ohrthermometer darf nur mit Schutzkappen von Sanitas
verwendet werden, andere Schutzkappen können Messfeh-
ler verursachen. Wenn Sie keine Schutzkappen mehr ha-
ben, wenden Sie sich wegen Ersatz an den Hersteller oder
Fachhändler.
•
Wenden Sie sich an einen Arzt, wenn Ihr Gesundheitszu-
stand Ihrer Meinung nach schlecht ist.
Hinweise zum Umgang mit Batterien
WARNUNG
•
Wenn Flüssigkeit aus einer Batteriezelle mit Haut oder Augen
in Kontakt kommt, die betroene Stelle mit Wasser auswa-
schen und ärztliche Hilfe aufsuchen.
•
Verschluckungsgefahr! Kleinkinder könnten Batterien
verschlucken und daran ersticken. Daher Batterien für Klein-
kinder unerreichbar aufbewahren!
•
Auf Polaritätskennzeichen Plus (+) und Minus (-) achten.
•
Wenn eine Batterie ausgelaufen ist, Schutzhandschuhe an-
ziehen und das Batteriefach mit einem trockenen Tuch rei-
nigen.
5
•
Schützen Sie Batterien vor übermäßiger Wärme.
•
Explosionsgefahr! Keine Batterien ins Feuer werfen.
•
Batterien dürfen nicht geladen oder kurzgeschlossen wer-
den.
•
Bei längerer Nichtbenutzung des Geräts die Batterien aus
dem Batteriefach nehmen.
•
Verwenden Sie nur denselben oder einen gleichwertigen
Batterietyp.
•
Immer alle Batterien gleichzeitig auswechseln.
•
Keine Akkus verwenden!
•
Keine Batterien zerlegen, önen oder zerkleinern.
Gefahren für das Gerät
ACHTUNG
•
Setzen Sie das Gerät keinen mechanischen Stößen aus.
•
Setzen Sie das Gerät nicht direkter Sonneneinstrahlung aus.
•
Setzen Sie das Gerät keinen Flüssigkeiten aus. Das Gerät
ist nicht wasserdicht. Vermeiden Sie jeden direkten Kontakt
mit Wasser oder anderen Flüssigkeiten.
•
Lassen Sie das Gerät nur von autorisierten Servicestellen
reparieren, sonst erlischt Ihr Garantieanspruch.
•
Tragbare und mobile HF-Kommunikationseinrichtungen kön-
nen das Gerät beeinflussen. Genauere Angaben können Sie
unter der angegebenen Kundenservice-Adresse anfordern
oder am Ende der Gebrauchsanweisung nachlesen.
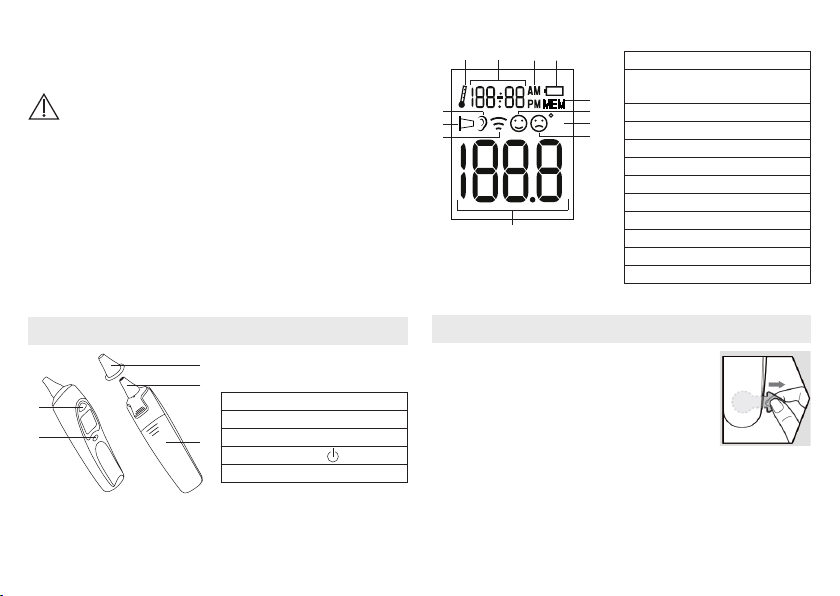
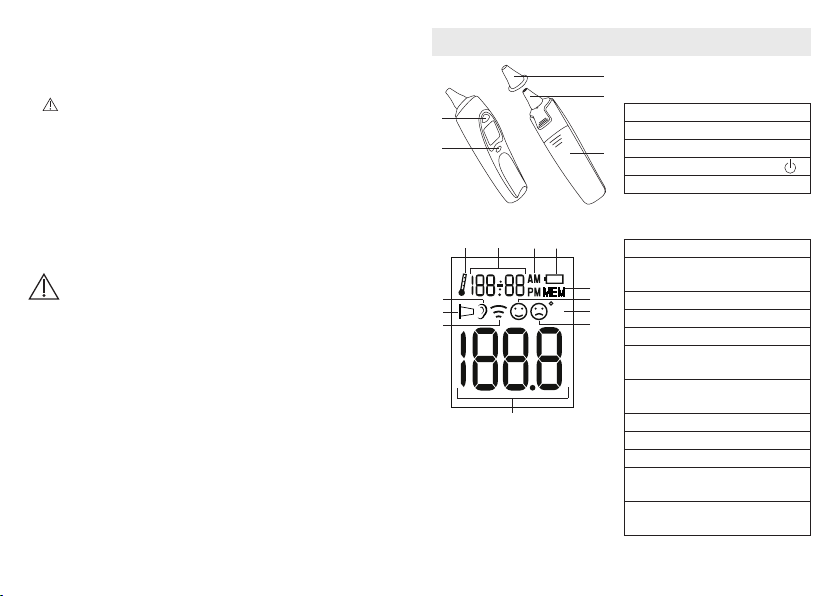
4. Gerätebeschreibung
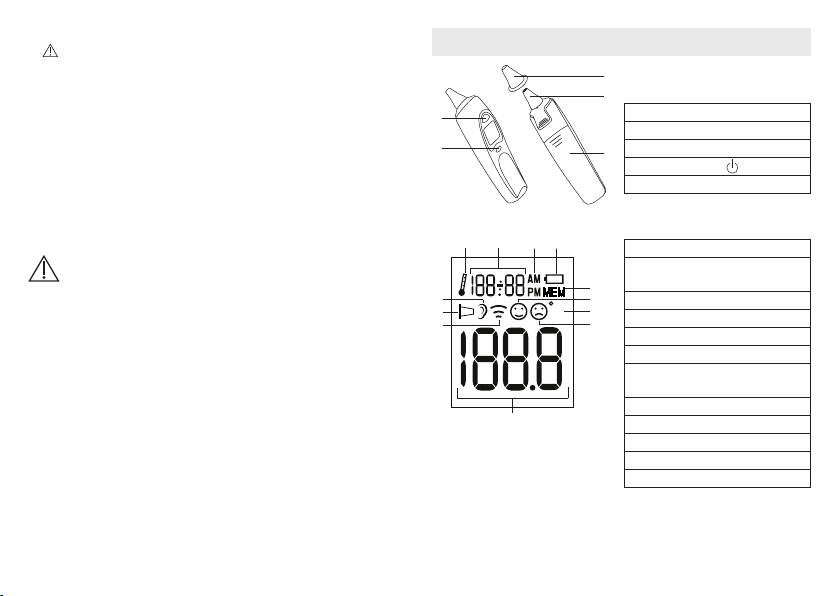
1 Schutzkappe
2 Messsonde
3 START -Taste
4 EIN/AUS-Taste
5 Batteriefach
LCD-Display
1 Raumtemperatur-Modus
2 Anzeige Raumtemperatur /
Uhrzeit / Datum
3 AM/PM-Anzeige (Uhrzeit)
4 Batterie-Symbol
5 Memory-Modus
6 Kein-Fieber-Symbol
7 Temperatureinheit (°C
oder °F)
8 Fieber-Symbol
9 Temperaturanzeige
10 Objekttemperatur-Modus
11 Schutzkappen-Symbol
12 Körpertemperatur-Modus
1
2
3
4
5
E
1
5
7
6
8
9
10
11
12
2 3 4
6
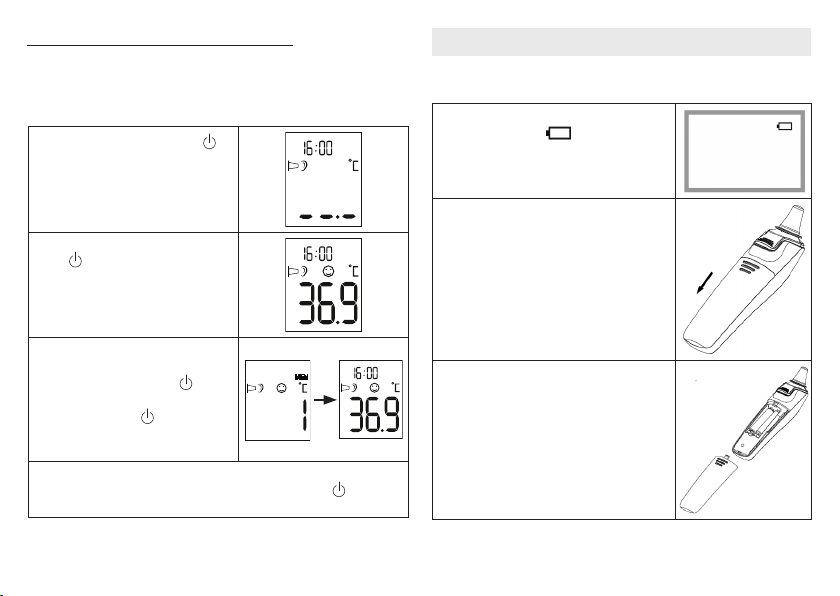
5. Inbetriebnahme
Die Batterien sind beim neuen Gerät bereits
eingelegt. Ziehen Sie vor der ersten Anwen-
dung den herausstehenden Batterieschutz-
streifen aus dem Batteriefach. Das Ohrther-
mometer schaltet sich dabei anschließend
automatisch ein.
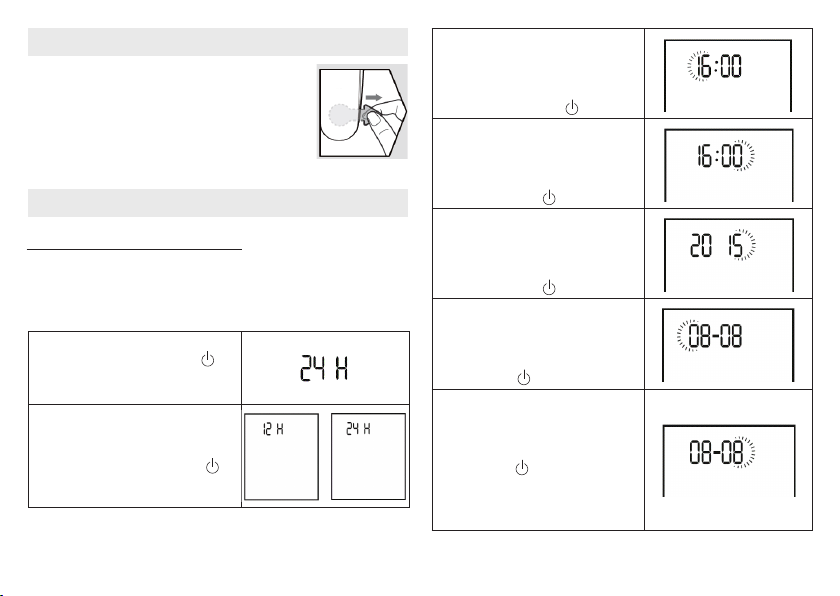
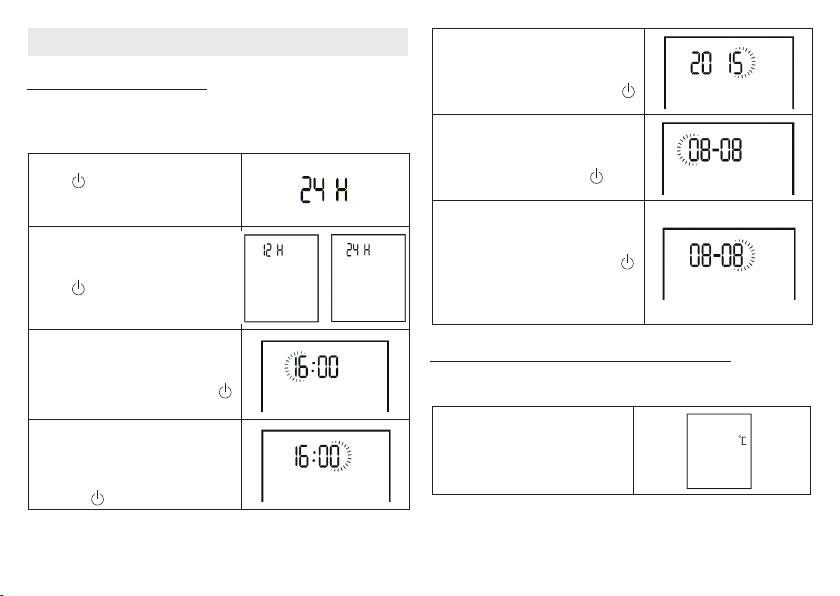
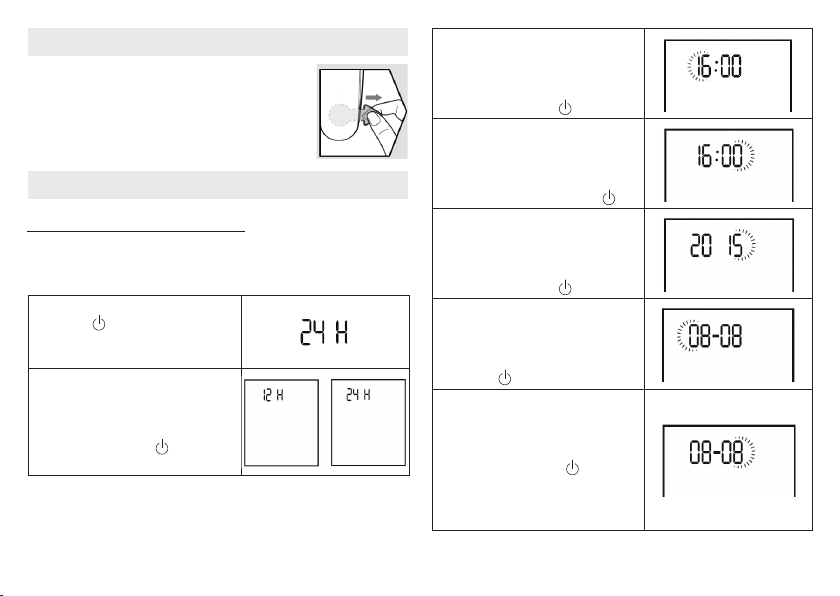
6. Einstellungen
6.1 Uhrzeit / Datum einstellen
Bevor Sie mit den Messungen beginnen, empfehlen wir Ihnen
die aktuelle Uhrzeit und das Datum einzustellen. Auf diese Wei-
se können Sie später die gespeicherten Messungen einfacher
zuordnen.
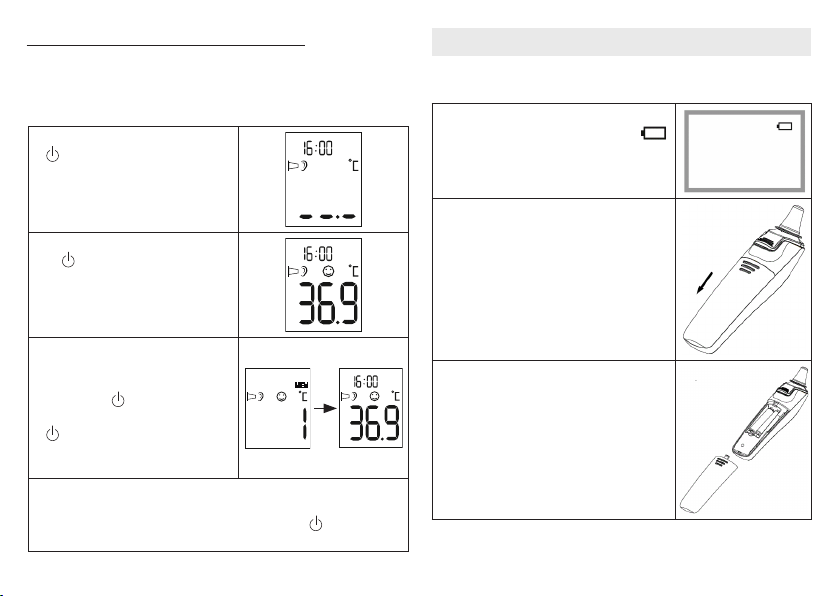
1.
Halten Sie am ausgeschalteten
Gerät die EIN/AUS-Taste für
drei Sekunden gedrückt. Auf dem
Display erscheint „24 H“.
2.
Wählen Sie nun mit der
START-Taste ein Stundenformat
(12h oder 24h) und bestätigen
Sie mit der EIN/AUS-Taste .
3.
Auf dem Display erscheint die
Stundenanzeige. Wählen Sie
mit der START-Taste die aktuel-
le Stunde und bestätigen Sie mit
der EIN/AUS-Taste .
4.
Auf dem Display erscheint die
Minutenanzeige. Wählen Sie mit
der START-Taste die aktuelle Mi-
nute und bestätigen Sie mit der
EIN/AUS-Taste
.
5.
Auf dem Display erscheint die
Jahresanzeige. Wählen Sie mit
der START-Taste das aktuelle
Jahr und bestätigen Sie mit der
EIN/AUS-Taste
.
6.
Auf dem Display blinkt die Ta-
gesanzeige. Wählen Sie mit der
START-Taste den aktuellen Tag
und bestätigen Sie mit der EIN/
AUS-Taste .
7.
Auf dem Display blinkt die Mo-
natsanzeige. Wählen Sie mit der
START-Taste den aktuellen Monat
und bestätigen Sie mit der
EIN/
AUS-Taste
. Das Gerät schaltet
sich anschließend automatisch
aus. Datum und Uhrzeit sind nun
gespeichert.

7
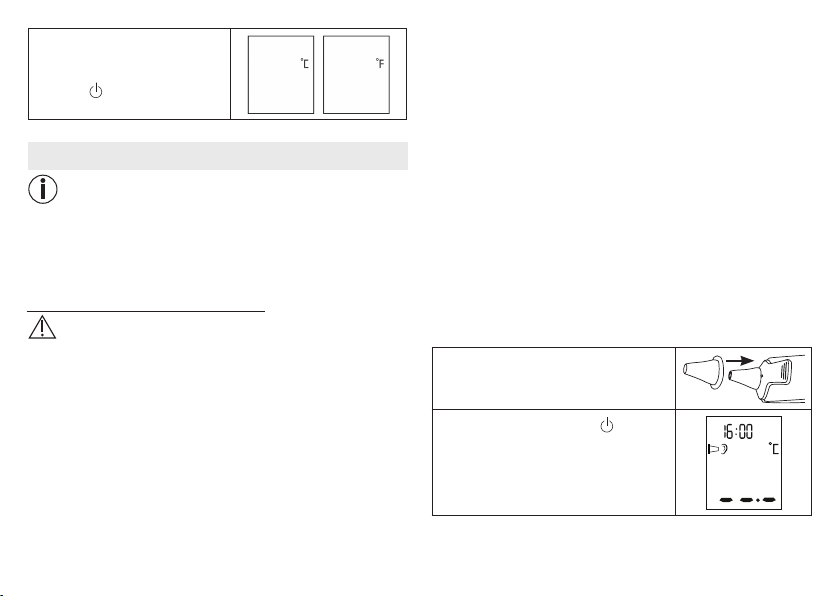
6.2 Temperatureinheit wählen (°C oder °F)
Sie können sich Ihre Messergebnisse in der Temperatureinheit
Grad Celsius (°C) oder Grad Fahrenheit (°F) anzeigen lassen.
1.
Halten Sie am ausgeschalteten
Gerät die START-Taste für drei
Sekunden gedrückt. Auf dem
Display erscheint „°C“.
2.
Wählen Sie nun mit der
START-Taste eine Temperatu-
reinheit (°C oder °F) und bestä-
tigen Sie mit der EIN/AUS-Tas-
te .
7. Messen
Hinweis
Prüfen Sie vor jeder Anwendung, ob die Linse beschädigt ist.
Falls diese beschädigt ist, wenden Sie sich an die Händler-
oder Service-Adresse. Berücksichtigen Sie, dass sich das
Ohrthermometer mindestens 30 Minuten in dem Raum befin-
den muss, in dem die Messung vorgenommen wird.
7.1 Körpertemperatur messen
WARNUNG
•
Es gibt Personen, die unterschiedliche Messwerte im lin-
ken und rechten Ohr haben. Um Temperaturveränderungen
zu erfassen, messen Sie bei derselben Person immer im
selben Ohr.
•
Das Ohrthermometer darf von Kindern nur unter Aufsicht von
Erwachsenen benutzt werden. In der Regel ist eine Messung
ab einem Lebensalter von 6 Monaten möglich. Bei Klein-
kindern unter 6 Monaten ist der Gehörgang noch sehr eng,
sodass häufig die Temperatur des Trommelfells nicht erfasst
werden kann und vermehrt zu niedrige Mess ergebnisse an-
gezeigt werden.
•
Die Messung darf nicht an einem Ohr durchgeführt wer-
den mit entzündlichen Erkrankungen (z. B. Eiterfluss, Se-
kretabgang), nach möglichen Ohrverletzungen (z. B. Trom-
melfellschaden) oder in der Heilungsphase nach operativen
Eingrien. In all diesen Fällen sprechen Sie bitte mit Ihrem
behandelnden Arzt.
•
Die Anwendung des Ohrthermometers an verschiedenen
Personen kann bei bestimmten akuten, infektiösen Erkran-
kungen aufgrund einer möglichen Keimverschleppung trotz
der durchzuführenden Reinigung und Wischdesinfektion un-
zweckmäßig sein. Sprechen Sie dazu im Einzelfall mit Ihrem
behandelnden Arzt.
•
Dieses Ohrthermometer darf nur mit aufgesetzter Schutz-
kappe verwendet werden.
•
Folgende Umstände können die Temperatur im Ohr beein-
flussen: wenn Sie längere Zeit auf einem Ohr gelegen sind,
8
die Ohren abgedeckt sind, die Ohren starker Hitze/Kälte aus-
gesetzt sind oder nach dem Schwimmen/Baden. Wenn ei-
nes dieser Umstände auf Sie zutrit, warten Sie 20 Minuten
bevor Sie die Messung durchführen.
•
Ohrenschmalz kann die Messung beeinflussen, reinigen Sie
deshalb ggf. das Ohr vor der Messung.
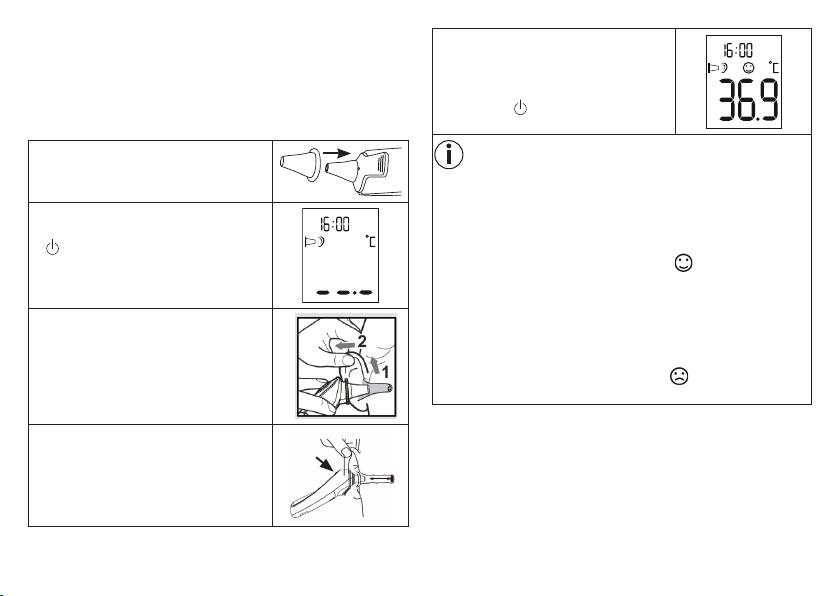
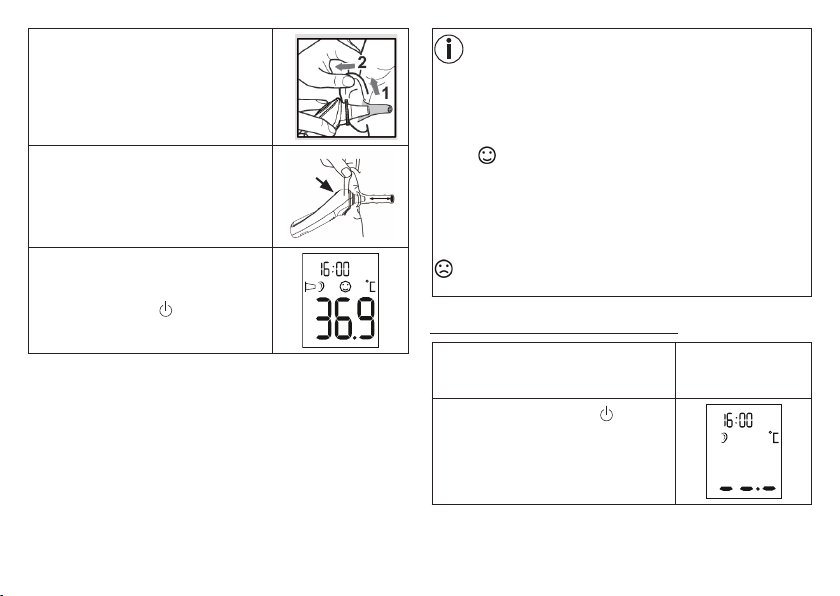
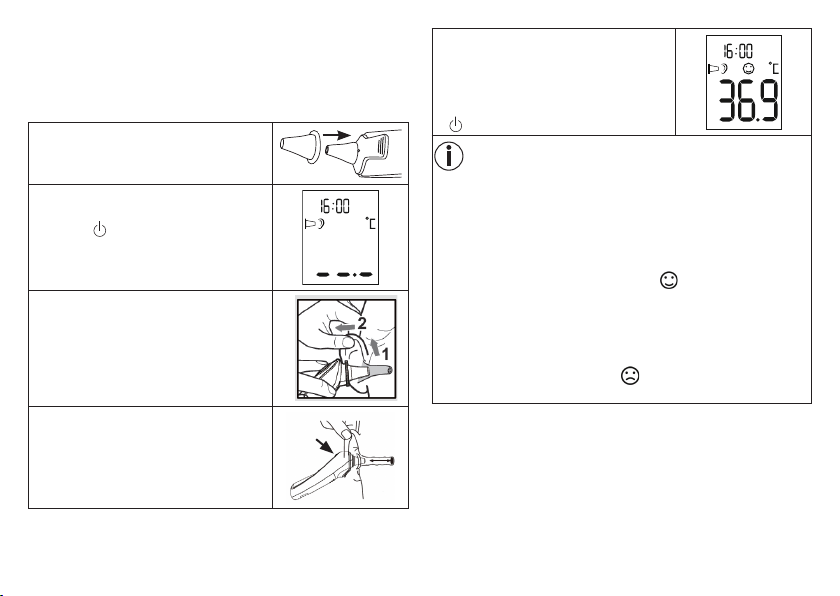
1. Setzen Sie eine saubere Schutzkappe
auf die Sensorspitze des Ohrthermo-
meters auf.
2.
Um das Ohrthermometer einzuschal-
ten, drücken Sie die EIN/AUS-Taste
. Es ertönen drei Signaltöne und
das Display schaltet sich ein.
3.
Da der Gehörgang leicht gekrümmt
ist, müssen Sie vor dem Einführen der
Sensorspitze das Ohr leicht nach hin
-
ten oben ziehen, damit die Spitze der
Schutzkappe direkt auf das Trommelfell
ausgerichtet werden kann.
4.
Führen Sie die Sensorspitze der
Schutzkappe vorsichtig in den Ge
-
hörgang ein und drücken Sie die
START-Taste um den Messvorgang zu
starten.
5.
Nach ca. einer Sekunde ertönt ein Sig-
nalton und das Messergebnis erscheint
im Display. Um das Ohrthermometer
auszuschalten, drücken Sie die EIN/
AUS-Taste .
Hinweis
Wenn Sie nach der Messung eine Minute lang keine Taste
drücken, schaltet sich das Ohrthermometer automatisch aus.
Fieberindikator
Liegt die gemessene Temperatur < 38 °C (100,4 °F), erscheint
auf dem Display ein lachendes Smiley und ein kurzer Si-
gnalton ertönt.
Wenn die gemessene Temperatur zwischen 37,5 und 37,9 °C
liegt, ertönen zusätzlich zwei kurze Signaltöne (Indikation für
„erhöhte Temperatur“).
Liegt die gemessene Temperatur ≥ 38 °C (100,4 °F), erscheint
auf dem Display ein trauriges Smiley und nacheinander
ertönen ein kurzer, ein langer und drei kurze Signaltöne.

9
7.2 Objekttemperatur messen
1.
Nehmen Sie die Schutzkappe (wenn
aufgesetzt) von der Sensorspitze des
Ohrthermometers ab.
2.
Um das Ohrthermometer einzuschal-
ten, drücken Sie die EIN/AUS-Taste
. Es ertönen drei Signaltöne und
das Display schaltet sich ein.
3.
Vergewissern Sie sich, dass Sie sich
im Objekttemperatur-Modus ( ) be-
finden.
Um zwischen Körpertemperatur- und
Objekttemperatur-Modus zu wech-
seln, halten Sie die EIN/AUS-Taste
und die START-Taste gleichzeitig kurz
gedrückt.
4.
Halten Sie die Sensorspitze des
Ohrthermometers 1 bis 2 cm vor die
gewünschte Messstelle und drücken
Sie die START-Taste .
5. Nach einer Sekunde ertönt ein Signal
-
ton und das Messergebnis erscheint
im Display. Um das Ohrthermometer
auszuschalten, drücken Sie kurz die
EIN/AUS-Taste .
7.3 Raumtemperatur anzeigen
Wenn Sie das Ohrthermometer einschalten, erscheinen auf
dem Display die Raumtemperatur, das Datum und die Uhrzeit
alle 3 Sekunden im Wechsel.
10
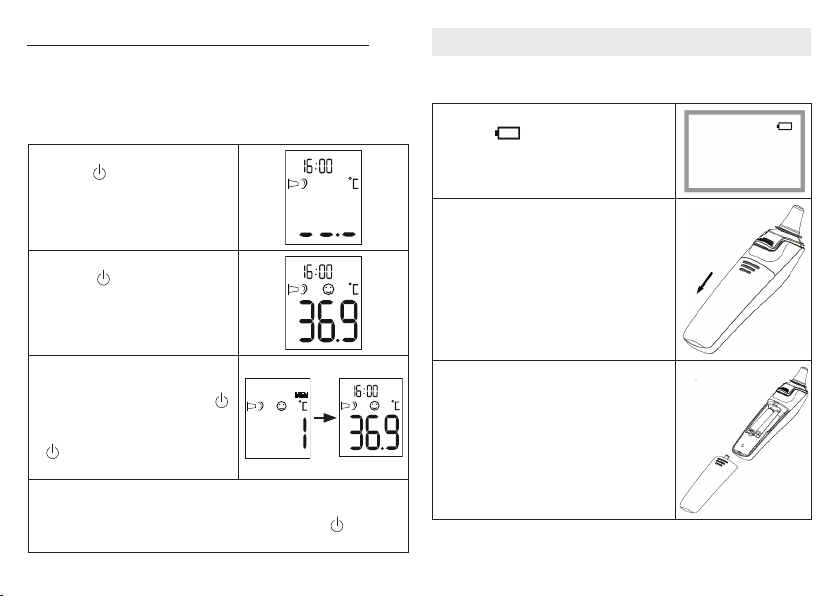
7.4 Gespeicherte Messwerte anzeigen
Das Ohrthermometer speichert automatisch die Tempera-
tur-Messwerte der letzten 10 Messungen von jeweils Körper-
und Objekttemperatur (inkl. Datum und Uhrzeit). Um die ge-
speicherten Messwerte abzurufen, gehen Sie wie folgt vor:
1.
Drücken Sie die EIN/AUS-Taste
, um das Ohrthermometer ein-
zuschalten.
2.
Halten Sie die EIN/AUS-Tas-
te für 3 Sekunden gedrückt.
Auf dem Display erscheint ein
M und der zuletzt gespeicherte
Messwert.
3.
Um zwischen den einzelnen
gespeicherten Messwerten zu
wechseln, drücken Sie die EIN/
AUS-Taste . Bei jedem weite-
ren Drücken der EIN/AUS-Taste
wird zunächst die Speicher-
platznummer und anschließend
der Messwert angezeigt.
4. Wenn Sie mit einer Messung fortfahren möchten, drücken Sie
die START-Taste. Wenn Sie das Ohrthermometer ausschal-
ten möchten, halten Sie die EIN/AUS-Taste für 3 Sekun-
den gedrückt.
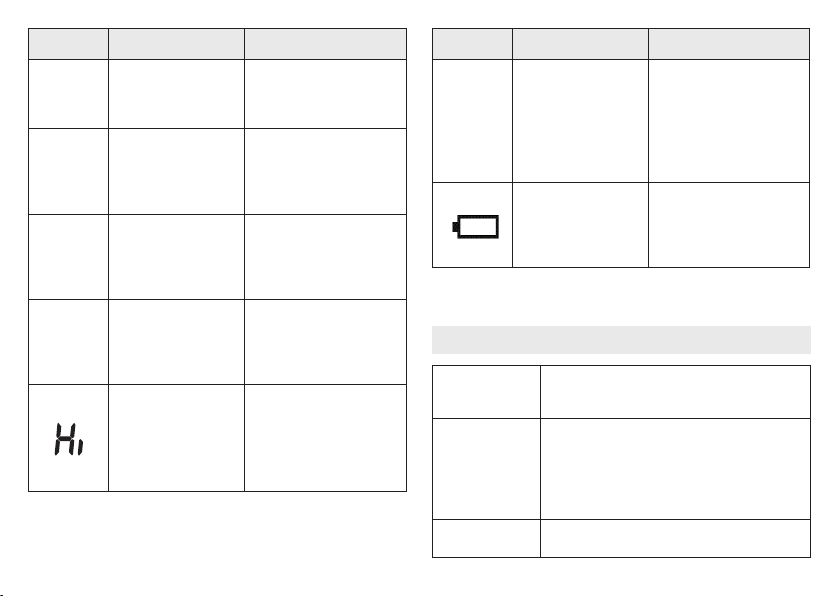
8. Batteriewechsel
Bevor Sie die Batterie wechseln, vergewissern Sie sich, dass
das Gerät ausgeschaltet ist.
1.
Tauschen Sie die Batterien aus, sobald
im Display das Batterie-Symbol ( )
erscheint.
2. Schieben Sie das Batteriefach auf und
nehmen Sie die verbrauchten Batterien
aus dem Batteriefach.
3.
Setzen Sie zwei neue 1,5 V AAA-Bat-
terien ein. Achten Sie darauf, dass die
Batterien richtig ausgerichtet sind. Ver-
schließen Sie das Batteriefach.

11
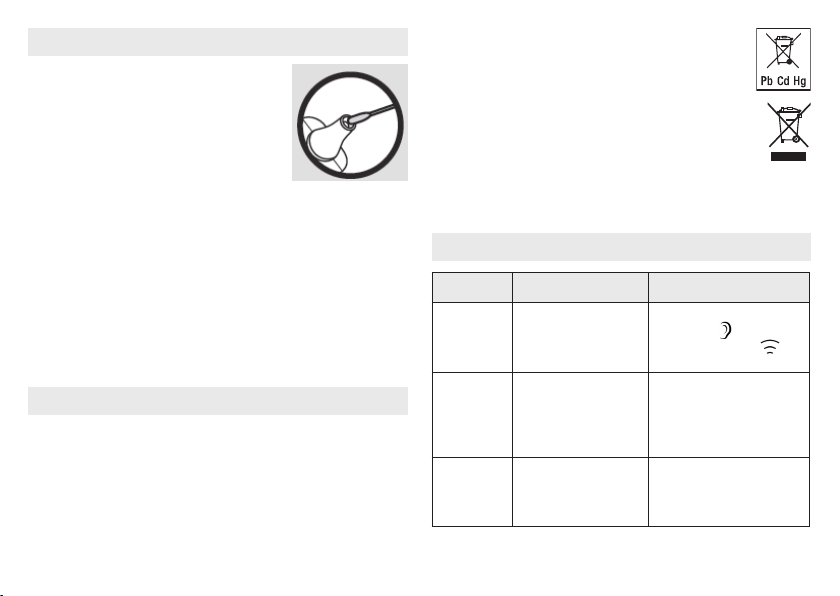
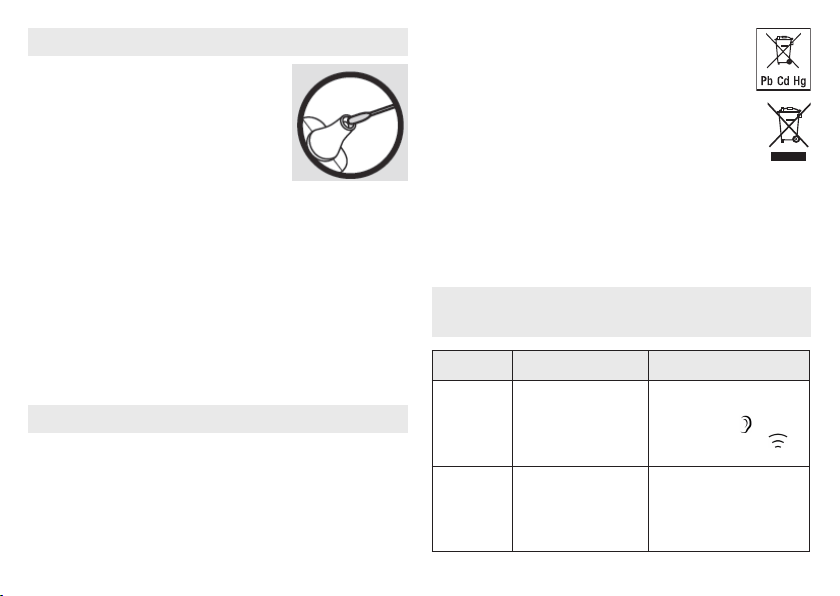
9. Reinigung / Aufbewahrung
Schutzkappen sind nur für den einmali-
gen Gebrauch bestimmt.
Die Sensorspitze ist das empfindlichs-
te Teil des Ohrthermometers. Arbeiten
Sie bei der Reinigung der Sensorspit-
ze vorsichtig, um eine Beschädigung
zu vermeiden. Verwenden Sie dazu ein
weiches Tuch oder ein Wattestäbchen,
welches mit Desinfektionsmittel, Alkohol oder warmem Was-
ser angefeuchtet werden kann.
Zur Reinigung des gesamten Gerätes verwenden Sie ein wei-
ches, leicht mit Seifenlauge angefeuchtetes Tuch.
Verwenden Sie keine aggressiven Reinigungsmittel.
Bei beabsichtigter längerer Lagerung entfernen Sie die Batteri-
en. Das Gerät darf nicht bei zu hoher oder niedriger Temperatur
oder Luftfeuchtigkeit (siehe technische Daten), im Sonnenlicht,
in Verbindung mit elektrischem Strom oder an staubigen Or-
ten gelagert oder auch benutzt werden. Ansonsten kann es zu
Messungenauigkeiten kommen.
10. Entsorgung
Die verbrauchten, vollkommen entladenen Batterien sind über
die speziell gekennzeichneten Sammelbehälter, die Sonder-
müllannahmestellen oder über den Elektrohändler zu entsor-
gen. Sie sind gesetzlich dazu verpflichtet, die Batterien zu
entsorgen.
Hinweis: Diese Zeichen finden Sie auf schadsto-
haltigen Batterien: Pb = Batterie enthält Blei,
Cd = Batterie enthält Cadmium, Hg = Batterie
enthält Quecksilber.
Im Interesse des Umweltschutzes darf das Gerät
am Ende seiner Lebensdauer nicht mit dem Haus-
müll entsorgt werden.
Die Entsorgung kann über entsprechende Sam-
melstellen in Ihrem Land erfolgen. Entsorgen Sie das Gerät
gemäß der Elektro- und Elektronik Altgeräte EG-Richtlinie –
WEEE (Waste Electrical and Electronic Equipment).
Bei Rückfragen wenden Sie sich an die für die Entsorgung
zuständige kommunale Behörde.
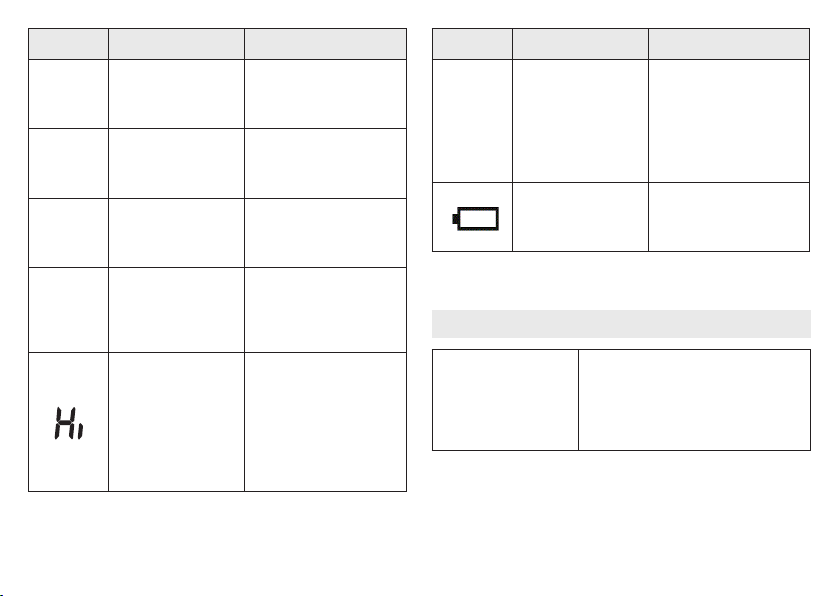
11. Was tun bei Fehlermeldungen?
Fehler-
meldung
Ursache Behebung
ER1
Das Ohrthermometer
ist noch nicht mess
-
bereit.
Messen Sie erst, sobald
Körper- (
) oder Objekt-
temperaturmodus (
)
im Display angezeigt wird.
ER2
Die gemessene Um-
gebungstemperatur
liegt nicht im Bereich
zwischen 10 °C – 40 °C
(50 °F – 104 °F).
Legen Sie das Ohrthermo
-
meter für 30 Minu ten in ei-
nen Raum mit 10 °C – 40 °C
(50 °F – 104 °F) Umge
-
bungstemperatur.
12
Fehler-
meldung
Ursache Behebung
ER3
Das Ohrthermometer
ist nicht korrekt in Ih
-
rem Ohr platziert.
Beachten Sie die Hinweise
im Kapitel „Messen“. Füh
-
ren Sie die Messung erneut
durch.
ER4
Das Ohrthermome-
ter hat eine große
Veränderung der Um
-
gebungstemperatur
festgestellt.
Legen Sie das Ohrthermo
-
meter für 30 Minu ten in ei-
nen Raum mit 10 °C – 40 °C
(50 °F – 104 °F) Umge
-
bungstemperatur.
ER5
Das Ohrthermometer
funktioniert nicht ein
-
wandfrei.
Wechseln Sie die Batteri
-
en und versuchen Sie es
erneut. Sollte der Fehler er
-
neut auftauchen, kontaktie-
ren Sie den Kundendienst.
ER6
Sie befinden sich im
Modus „Objekttempe
-
ratur messen“ und die
Schutzkappe ist noch
aufgesetzt.
Um die Messung der Ob-
jekttemperatur durchführen
zu können, müssen Sie die
Schutzkappe abziehen.
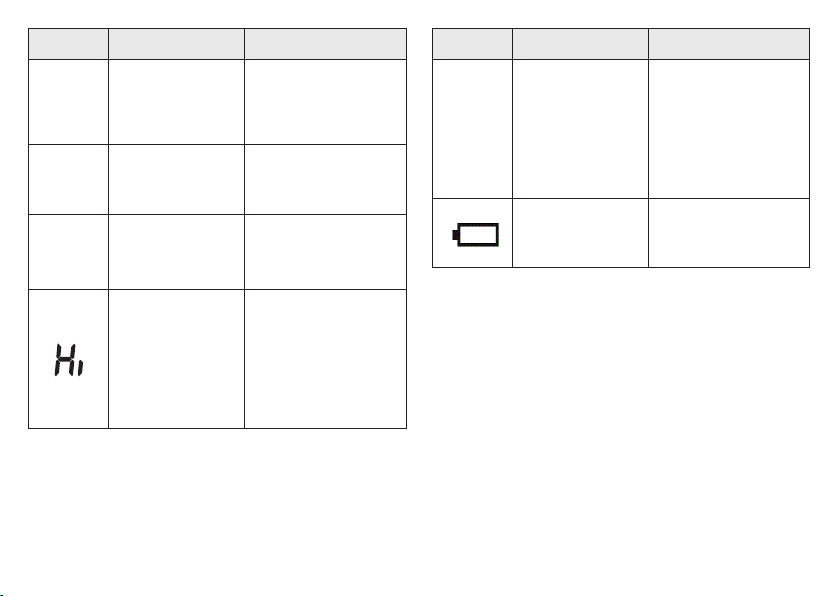
Ohrmessung: Gemes-
sene Temperatur über
43 °C (109,4 °F)
Objektmessung: Ge
-
messene Temperatur
über 100 °C (212 °F)
Vergewissern Sie sich,
dass das Gerät und die
Schutzkappe in einwand
-
freiem Zustand sind. Füh-
ren Sie die Messung erneut
durch.
Fehler-
meldung
Ursache Behebung
Lo
Ohrmessung: Gemes-
sene Temperatur liegt
unter 28 °C (82,4 °F)
Objektmessung:
Gemessene Tempe
-
ratur liegt unter -20 °C
(-4 °F)
Vergewissern Sie sich,
dass das Gerät und die
Schutzkappe in einwand
-
freiem Zustand sind. Füh-
ren Sie die Messung erneut
durch.
Die Batterien sind leer. Entnehmen Sie die zwei
leeren Batterien und set
-
zen Sie zwei neue 1,5V
AAA-Batterien in das
Ohrthermometer ein.
Falls Ihr Problem hier nicht aufgeführt wurde, kontaktieren Sie
unseren Kundenservice.
12. Technische Daten
Temperaturmess-
bereich
•
Im Ohr: 28,0 – 43,0 °C (82,4 – 109,4 °F)
•
Objekttemperatur: -20 – 100 °C (-4 – 212 °F)
•
Raumtemperatur: 0 – 50 °C (32 – 122 °F)
Labor-Messge-
nauigkeit
•
Im Ohr: ± 0 ,2 °C (0,4 °F) im Messbereich
von 35,5 – 42,0 °C (95,9 – 107,6 °F); ± 0,3 °C
(0,5 °F) im Messbereich von ≤35,5 °C
(95,5 °F) und ≥42,0 °C (107,6 °F)
•
Objekttemperatur: ± 4% oder ± 2 °C (4 °F)
•
Raumtemperatur: ± 2 °C (± 4 °F)
Klinische Wieder-
holbarkeit
0,11 °C (0,2 °F)
13
Messdauer Ca. eine Sekunde
Betriebstempera-
turbereich
10 – 40 °C (50 – 104 °F), Luftfeuchtigkeit 15 – 85%
(nicht kondensierend)
Lagertemperatur-
bereich
-25 – 55 °C (-13 – 131 °F), Luftfeuchtigkeit
15 – 95% (nicht kondensierend)
Speicher 10 Speicherplätze
Anzeigenauflö-
sung
0,1 °C oder 0,1 °F
Batterie DC 3V (2 x 1,5V AAA Batterie)
Abmessungen 155 x 38 x 47 mm
Gewicht ca. 63 g (ohne Batterien)
Schutzkappen 10
Automatische Ab-
schaltung
60 Sekunden
Batterie-Nut-
zungsdauer
3.000 Messungen hintereinander oder ein Jahr
mit ein bis zwei Messungen pro Tag einschließ-
lich Standby-Modus.
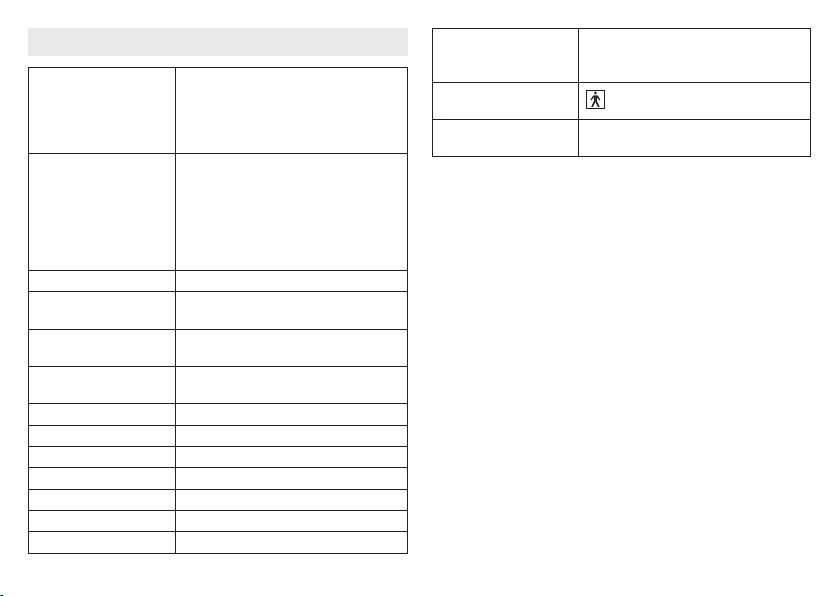
Sicherheitsklassi-
fizierung
Angeschlossenes medizinisches Gerät des
Typs BF
IP-Schutzklasse IP22, Schutz gegen schädliches Eindringen von
Wasser und Staub
Die Seriennummer befindet sich auf dem Gerät oder im Bat-
teriefach.
13. Garantie
Sie erhalten 2 Jahre Garantie ab Kaufdatum auf Material- und Fa-
brikationsfehler des Produktes.
Die Garantie gilt nicht:
•
im Falle von Schäden, die auf unsachgemäßer Bedienung be-
ruhen,
•
für Verschleißteile (z.B. Batterien),
•
für Mängel, die dem Kunden bereits bei Kauf bekannt waren,
•
bei Eigenverschulden des Kunden.
Die gesetzlichen Gewährleistungen des Kunden bleiben durch die
Garantie unberührt. Für Geltendmachung eines Garantiefalles in-
nerhalb der Garantiezeit ist durch den Kunden der Nachweis des
Kaufes zu führen.
Die Garantie ist innerhalb eines Zeitraumes von 2 Jahren ab Kauf
-
datum gegenüber der
Hans Dinslage GmbH
Riedlinger Straße 28
88524 Uttenweiler
Germany
geltend zu machen. Der Kunde hat im Garantiefall das Recht
zur Reparatur der Ware bei unseren eigenen oder bei von uns
autorisierten Werkstätten. Weitergehende Rechte werden dem
Kunden (aufgrund der Garantie) nicht eingeräumt.
Irrtum und Änderungen vorbehalten

14
ENGLISH
Read these instructions for use care fully
and keep them for later use, be sure to
make them accessible to other users
and observe the information they con-
tain.
Please read through these Instructions for Use carefully and
retain them for future reference; make them available to other
users and observe the information they contain.
Included in delivery
Check that the delivery has not been tampered with and make
sure that all components are present. Before use, ensure that
there is no visible damage to the device or accessories and
that all packaging material has been removed. If you have any
doubts, do not use the device and contact your retailer or the
specified Customer Services address.
1 x ear thermometer
2 x 1.5 V AAA batteries
10 x protective caps
1 x set of instructions for use
Subsequent purchase articles
Protective cap set replacement available: 2 x 10 protective
caps, item no. 795.26
1. Signs and symbols ......................................................................... 15
2. Intended use ................................................................................... 15
3. Notes ............................................................................................... 16
4. Unit description .............................................................................. 17
5. Initial use ......................................................................................... 17
6. Settings ........................................................................................... 18
6.1 Setting the time/date .................................................................. 18
6.2 Setting the temperature unit (°C or °F) ....................................... 18
7. Measuring ....................................................................................... 19
7.1 Measuring body temperature .....................................................19
7.2 Measuring object temperature ................................................... 20
7.3 Displaying room temperature ..................................................... 21
7.4 Displaying stored measurements ............................................... 22
8. Replacing the battery ..................................................................... 22
9. Cleaning and storage .................................................................... 23
10. Disposal .......................................................................................... 23
11. What if there are error messages? ............................................... 23
12. Technical data ................................................................................. 25
Table of contents

15
1. Signs and symbols
The following symbols appear in these instructions for use
and on the device:
WARNING
Warning notice indicating a risk of injury or
damage to health.
IMPORTANT
Safety note indicating possible damage to the
unit/accessory.
Note
Note on important information
Observe the instructions for use
Application part, type BF
Disposal in accordance with the Waste
Electrical and Electronic Equipment EC
Directive – WEEE
The CE labelling certifies that the product
complies with the essential requirements of
Directive 93/42/EEC on medical products.
Storage/Transport
Permissible storage and transport
temperature and humidity
Operating
Permissible operating temperature and
humidity
Manufacturer
IP 22
IP 22, protection against harmful ingress of
water and dust
Certification symbol for products that are
exported to the Russian Federation and CIS
countries.
2. Intended use
The ear thermometer is intended for measuring the body tem-
perature in the ear. Do not use the ear thermometer for meas-
urements in other parts of the body.
You can also use the ear thermometer to measure room and
object temperatures.
The ear thermometer has been carefully developed for precise,
safe and rapid temperature measurements in the ear. It is a
non-invasive ear thermometer with an infra-red detector to de-
termine the body temperature in the auditory canal of adults
and children.
Use the device for the intended purpose only and in the manner
specified in these instructions for use. Any form of improper use
can be dangerous. The manufacturer is not liable for damage
resulting from improper or careless use.
16
The quality of the device has been verified and conforms to the
requirements of Council Directive 93/42/EEC (Medical Devices
Directive) Annex I, Essential requirements, and the correspond-
ing harmonised standards. ISO 80601-2-56:2009 Clinical ther-
mometers – Part 5: Performance of infra-red ear thermometers
(with maximum device).
Please note that portable and mobile HF communication systems
may interfere with this device. More details can be requested from
the stated Customer Services address or found at the end of the
instructions for use.
3. Notes
Safety notes
WARNING
•
To measure temperature, insert the sensor tip of the ear
thermometer carefully into the ear.
•
Use of the ear thermometer on dierent persons can be inap-
propriate in the event of certain acute infectious diseases be-
cause of the possible spread of germs despite cleaning and
disinfection. If you have any doubts, please consult your doctor.
•
The body temperature measured in the ear may dier from
other measurements taken in the mouth, rectum or armpits.
Any comparison of these values is therefore futile. Meas-
ure temperature regularly to calculate the normal ear tem-
perature and then use these measurements as a basis for
comparison when taking measurements in the event of a
suspected high temperature.
•
This ear thermometer is intended for measuring the temper-
ature in the ear. Do not use this ear thermometer for meas-
urements in other parts of the body.
•
Replace the protective cap after each use to ensure an accu-
rate measurement and prevent cross-contamination.
•
The ear thermometer may only be used with protective
caps from Sanitas; other protective caps may result in faulty
measurements. If you have run out of protective caps, con-
tact the manufacturer or retailer for replacements.
•
Consult a doctor if you believe your medical condition to
be poor.
Notes on handling batteries
WARNING
•
If your skin or eyes come into contact with battery fluid, rinse
the aected areas with water and seek medical assistance.
•
Choking hazard! Small children may swallow and choke
on batteries. Store the batteries out of the reach of small
children.
•
Observe the plus (+) and minus (-) polarity signs.
•
If a battery has leaked, put on protective gloves and clean
the battery compartment with a dry cloth.
•
Protect batteries from excessive heat.
•
Risk of explosion! Never throw batteries into a fire.
•
Do not charge or short-circuit batteries.
•
If the device is not to be used for a relatively long period, take
the batteries out of the battery compartment.
•
Use identical or equivalent battery types only.
•
Always replace all batteries at the same time.
17
•
Do not use rechargeable batteries.
•
Do not disassemble, split or crush the batteries.
Risks to the device
IMPORTANT
•
Do not subject the device to mechanical impacts.
•
Do not expose the device to direct sunlight.
•
Do not expose the device to liquids. The device is not wa-
terproof. Avoid all direct contact with water or other liquids.
•
Have the device repaired by authorised service centres only,
otherwise its warranty is invalidated.
•
Portable and mobile HF communication systems may inter-
fere with this device. More details can be requested from
the stated Customer Services address or found at the end
of the instructions for use.
4. Unit description
1 Protective cap
2 Measuring sensor
3 START button
4 ON/OFF button
5 Battery compartment
LCD display
1 Room temperature mode
2 Displays room temperature/
time/date
3 AM/PM display (time)
4 Battery symbol
5 Memory mode
6 No fever symbol
7 Temperature unit (°C or °F)
8 Fever symbol
9 Temperature display
10 Object temperature mode
11 Protective cap symbol
12 Body temperature mode
5. Initial use
The batteries are already inserted in new de-
vices. Before first use, remove the protrud-
ing plastic insulating strip from the battery
compartment. The ear thermometer will then
switch on automatically.
1
2
3
4
5
E
1
5
7
6
8
9
10
11
12
2 3 4
18
6. Settings
6.1 Setting the time/date
Before beginning to take measurements, we recommend that you
set the current time and date. This will allow you to organise the
saved measurements more easily later.
1. Press and hold the ON/OFF but-
ton on the switched-o de-
vice for three seconds. “24 H”
appears on the display.
2. Use the START button to select
the hour format (12h or 24h) and
confirm using the ON/OFF but-
ton .
3. The hour setting appears on the
display. Use the START button to
select the current hour and con-
firm using the ON/OFF button .
4.
The minute setting appears on
the display. Use the START but-
ton to select the current minute
and confirm using the ON/OFF
button .
5. The year setting appears on the
display. Use the START button to
select the current year and con-
firm using the ON/OFF button .
6.
The day flashes on the display.
Use the START button to select
the current day and confirm us
-
ing the ON/OFF button .
7.
The month flashes on the display.
Use the START button to select
the current month and confirm
using the
ON/OFF button
.
The device then switches itself
o automatically. The date and
time are now saved.
6.2 Setting the temperature unit (°C or °F)
You can set the device to display the temperature in degrees
Celsius (°C) or degrees Fahrenheit (°F).
1.
Press and hold the START but-
ton on the switched-o device
for three seconds. “°C” ap-
pears on the display.
19
2.
Use the START button to select
the temperature unit (°C or °F)
and confirm using the ON/OFF
button .
7. Measuring
Note
Check before each use that the lens is intact. If it is damaged,
contact your retailer or the service address. Bear in mind that
the ear thermometer needs to have been in the room in which
the measurement is taken for at least 30 minutes before use.
7.1 Measuring body temperature
WARNING
•
Some people produce dierent readings in their left and right
ear. In order to record temperature changes, always measure
a person's temperature in the same ear.
•
The ear thermometer may be used by children only under
adult supervision. Measurement is usually possible over the
age of 6 months. In infants under 6 months, the ear canal
is still very narrow so the temperature of the eardrum often
cannot be recorded and the result displayed is often too low.
•
The measurement must not be taken in an ear aected by
inflammatory diseases (e.g. discharging pus or secretion),
after possible ear injuries (e.g. eardrum damage) or in the
healing period after operative procedures. In all of these
cases, please consult your doctor.
•
Use of the ear thermometer on dierent persons can be in-
appropriate in the event of certain acute infectious diseases
because of the possible spread of germs despite cleaning
and disinfection. If you have any doubts, please consult
your doctor.
•
This ear thermometer may only be used with the protective
cap in place.
•
The following circumstances may influence the temperature
in the ear: if you have been lying on the ear for an extended
period, the ears are covered, the ears are exposed to exces-
sive heat/cold, or after swimming or bathing. In the event
of one of these circumstances, wait 20 minutes before per-
forming the measurement.
•
As ear wax can aect the measurement, you should clean
the ear before measuring if necessary.
1. Place a clean protective cap on to the
sensor tip of the ear thermometer.
2. Press the ON/OFF button to switch
on the ear thermometer. Three acoustic
signals sound and the display switch-
es on.
20
3. As the ear canal is slightly curved, you
have to pull the ear slightly up and
backwards before inserting the sensor
tip. This is important so that the tip of
the protective cap can be pointed di-
rectly at the eardrum.
4.
Insert the sensor tip with the protec-
tive cap carefully into the ear canal and
press the START button to begin the
measurement.
5.
After approx. one second, a long
acoustic signal sounds and the meas-
urement is shown in the display. Press
the ON/OFF button to switch o the
ear thermometer.
Note
If no button is pressed for one minute after the measurement,
the ear thermometer automatically switches itself o again.
Fever indicator
If the measured temperature is < 38 °C (100.4 °F), a laughing
smiley appears on the display and a short acoustic sig-
nal sounds.
If the measured temperature falls between 37.5 and 37.9 °C,
two short acoustic signals will also sound (the indication for
“raised temperature”).
If the measured temperature is ≥ 38 °C (100.4 °F), a sad smiley
appears on the display and a short, a long and three short
acoustic signals sound one after the other.
7.2 Measuring object temperature
1.
Remove the protective cap from the
sensor tip of the ear thermometer (if
it is on).
2. Press the ON/OFF button
to switch
on the ear thermometer. Three acoustic
signals sound and the display switch-
es on.

21
3. Ensure that you are in object tempera-
ture mode ( ).
To switch between body temperature
and object temperature mode, brief-
ly press and hold the ON/OFF button
and the START button at the same
time.
4.
Hold the sensor tip of the ear thermom-
eter 1 to 2 cm from the desired measur-
ing point and press the START button.
5. After one second, a long acoustic sig
-
nal sounds and the measurement is
shown in the display. Briefly press the
ON/OFF button to switch o the ear
thermometer.
7.3 Displaying room temperature
When you switch on the ear thermometer, the room tempera-
ture, the date and time appear alternately on the display every
3 seconds.
22
7.4 Displaying stored measurements
The ear thermometer automatically stores the last 10 temper-
ature measurements of body and object temperature respec-
tively (incl. date and time). To recall the stored measurements,
proceed as follows:
1.
Press the ON/OFF button to
switch on the ear thermometer.
2. Press and hold the ON/OFF but-
ton for 3 seconds. An M and
the last stored measurement ap-
pear on the display.
3. To switch between the individu-
al stored measurements, press
the ON/OFF button . With
each subsequent pressing of the
ON/OFF button , the memory
space number is displayed first
followed by the measurement.
4.
If you would like to proceed with a measurement, press the
START button. Press and hold the ON/OFF button for 3sec-
onds to switch o the ear thermometer.
8. Replacing the battery
Before replacing the battery, ensure that the device is switched
o.
1.
Replace the batteries as soon as the
battery symbol ( ) appears on the
display.
2.
Slide open the battery compartment
and remove the used batteries from
the battery compartment.
3.
Insert two new 1.5 V AAA batteries.
Make sure that the batteries are in
-
serted the right way round. Close the
battery compartment.
23
9. Cleaning and storage
Protective caps are only intended for
single use.
The sensor tip is the most sensitive
part of the ear thermometer. Work
carefully when cleaning the sensor tip
to avoid causing any damage. Use a
clean cloth or cotton bud that can be
moistened with disinfectant, alcohol or
warm water.
To clean the entire device, use a soft cloth slightly moistened
with a mild soapy solution.
Do not use any harsh cleaning products.
If prolonged storage is intended, you should remove the bat-
teries. The device must not be stored or used at an excessively
high or low temperature or humidity (see technical data), in
sunlight, in association with an electrical current or in dusty
locations. Otherwise inaccuracies can occur.
10. Disposal
The empty, completely flat batteries should be disposed of
through specially designated collection boxes, recycling points
or electronics retailers. You are legally required to dispose of
the batteries.
Note: The codes below are printed on batteries
containing harmful substances: Pb = Battery
contains lead, Cd = Battery contains cadmium,
Hg = Battery contains mercury.
For environmental reasons, do not dispose of the
device in the household waste at the end of its
useful life. Dispose of the unit at a suitable local col-
lection or recycling point. Dispose of the device in
accordance with EC Directive – WEEE (Waste Electrical and
Electronic Equipment). If you have any questions, please
contact the local authorities responsible for waste disposal.
11. What if there are error messages?
Error
message
Cause Solution
ER1
The ear thermometer
is not yet ready for
measurement.
Take measurements only
once body (
) or object
temperature mode (
)
appears on the display.
ER2
The measured ambi-
ent temperature is not
in the range from 10 °C
– 40 °C (50 – 104 °F).
Place the ear thermometer
in a room with an ambient
temperature between 10 °C
and 40 °C (50 °F and 104 °F)
for at least 30minutes.
ER3
The ear thermometer
is not placed in the ear
correctly.
Please observe the notes
in the chapter “Measuring”.
Perform the measurement
again.
24
Error
message
Cause Solution
ER4
The ear thermometer
registered a large
change in the ambient
temperature.
Place the ear thermometer
in a room with an ambient
temperature between 10 °C
and 40 °C (50 °F and 104 °F)
for at least 30minutes.
ER5
The ear thermom-
eter is not working
properly.
Replace the batteries and
try again. If the fault occurs
again, contact Customer
Services.
ER6
You are in the “Measur-
ing object temperature”
mode and the protec
-
tive cap is still on.
The protective cap must be
removed to measure object
temperatures.
In-ear measurement:
the measured tem
-
perature is over 43 °C
(109.4 °F).
Object measurement:
the measured temper
-
ature is over 100 °C
(212 °F).
Ensure that the device and
the protective cap are fully
functioning. Perform the
measurement again.
Error
message
Cause Solution
Lo
In-ear measurement:
the measured temper
-
ature is below 28 °C
(82.4 °F).
Object measurement:
the measured
temperature is below
-20 °C (-4 °F).
Ensure that the device and
the protective cap are fully
functioning. Perform the
measurement again.
The batteries are
empty.
Remove the two empty
batteries and insert two
new 1.5 V AAA batteries in
-
to the ear thermometer.
If you cannot find a solution to your problem here, contact our
Customer Services.
25
12. Technical data
Temperature range
•
In ear: 28.0 – 43.0 °C (82.4 – 109.4 °F)
•
Object temperature: -20 – 100 °C
(-4 – 212 °F)
•
Room temperature: 0 – 50 °C
(32 – 122 °F)
Laboratory
measurement accuracy
•
In ear: ± 0 .2 °C (0.4 °F) in meas-
urement range of 35.5 – 42.0 °C
(95.9 – 107.6 °F); ± 0.3 °C (0.5 °F) in
measurement range of ≤35.5 °C
(95.5 °F) and ≥42.0 °C (107.6 °F)
•
Object temperature: ± 4% or ± 2 °C (4 °F)
•
Room temperature: ± 2 °C (± 4 °F)
Clinical reproducibility 0.11 °C (0.2 °F)
Duration of
measurement
Approx. one second
Operating temperature
range
10 – 40 °C (50 – 104 °F),
humidity 15 – 85% (non-condensing)
Storage temperature
range
-25 – 55 °C (-13 – 131 °F),
humidity 15 – 95% (non-condensing)
Memory 10 memory spaces
Display resolution 0.1 °C or 0.1 °F
Battery DC 3 V (2 x 1.5 V AAA batteries)
Dimensions 155 x 38 x 47 mm
Weight Approx. 63 g (without batteries)
Protective caps 10
Automatic switch-o 60 seconds
Battery operating life
3,000 measurements in succession or one
year with one to two measurements per
day, including standby mode.
Safety classification
Connected medical device of
typeBF
IP protection class IP 22, protection against harmful ingress
of water and dust
The serial number is located on the device or in the battery
compartment.
Subject to errors and changes

26
FRANÇAIS
Lisez attentivement cette notice, conser-
vez-la pour un usage ultérieur, mettez-la
à disposition des autres utilisateurs et
suivez les consignes qui y figurent.
Veuillez lire attentivement ce mode d’emploi, conservez-le pour
une utilisation ultérieure, mettez-le à la disposition des autres
utilisateurs et suivez ses conseils.
Contenu
Vérifiez si l’emballage carton extérieur du kit est intact et si tous
les éléments sont inclus. Avant l’utilisation, assurez-vous que
l’appareil et les accessoires ne présentent aucun dommage
visible et que la totalité de l’emballage a bien été retirée. En cas
de doute, ne l’utilisez pas et adressez-vous à votre revendeur
ou au service client indiqué.
1 thermomètre auriculaire
2 piles 1,5V, type AAA
10 embouts de protection
1 mode d’emploi
Accessoires en option
Recharges lot d‘embouts de protection: 2 x 10embouts de
protection, réf.-n°795.26
1. Symboles utilisés ........................................................................... 27
2. Utilisation conforme aux recommandations ............................... 27
3. Remarques ...................................................................................... 28
4. Description de l’appareil ................................................................ 29
5. Mise en service ............................................................................... 30
6. Paramètres ...................................................................................... 30
6.1 Réglage de l’heure/la date ......................................................... 30
6.2 Sélection de l’unité de température (°C ou °F) ........................... 31
7. Mesures ........................................................................................... 31
7.1 Mesurer la température corporelle ............................................. 31
7.2 Mesurer la température d’objet .................................................. 33
7.3 Acher la température ambiante ............................................... 33
7.4 Acher les valeurs de mesure enregistrées ............................... 34
8. Changement des piles ................................................................... 34
9. Nettoyage/stockage ....................................................................... 35
10. Élimination des déchets ................................................................ 35
11. Que faire en cas de messages d’erreur? .................................... 35
12. Données techniques ...................................................................... 36
Table des matières
27
1. Symboles utilisés
Les symboles suivants sont employés dans ce mode d’emploi
et sur l’appareil:
AVERTISSEMENT
Ce symbole vous avertit des risques de
blessures ou des dangers pour votre santé.
ATTENTION
Ce symbole vous avertit des éventuels
dommages au niveau de l’appareil ou d’un
accessoire.
Remarque
Indication d’informations importantes
Respecter les consignes du mode d’emploi
Appareil de type BF
Élimination conformément à la directive
européenne WEEE (Waste Electrical and
Electronic Equipment) relative aux déchets
d’équipements électriques et électroniques
Le sigle CE atteste de la conformité aux
exigences fondamentales de la directive 93/42/
CEE relative aux dispositifs médicaux.
Storage/Transport
Température et taux d’humidité de stockage et
de transport admissibles
Operating
Température et taux d’humidité d’utilisation
admissibles
Fabricant
IP 22
IP 22, Protection contre la pénétration nuisible
d’eau et de poussière
Marque de certification pour les produits
exportés en Fédération de Russie et dans
les pays de la CEI.
2. Utilisation conforme aux
recommandations
Le thermomètre auriculaire est conçu pour des mesures de
la température corporelle dans l’oreille. N’utilisez pas le ther-
momètre auriculaire pour des mesures à d’autres endroits du
corps!
Avec ce thermomètre auriculaire, vous pouvez également mesu-
rer la température ambiante ou la température d’objet.
Le thermomètre auriculaire a été développé pour des mesures
de température précises, sûres et rapides dans l’oreille. Il s’agit
d’un thermomètre auriculaire non invasif avec un détecteur infra-
rouge pour le relevé de la température corporelle dans le canal
auditif d’enfants et d’adultes.
28
N’utilisez l’appareil qu’aux fins pour lesquelles il a été conçu et
conformément aux indications données par ce mode d’emploi.
Toute utilisation inappropriée peut être dangereuse! Le fabricant
ne peut être tenu pour responsable des dommages causés par
une utilisation inappropriée ou non conforme.
La qualité de l’appareil a été contrôlée et respecte les exigences
de la directive du Conseil de l’UE 93/42/EEC (dispositifs mé-
dicaux) Annexe I, les exigences fondamentales ainsi que les
normes harmonisées respectives. ISO 80601-2-56:2009 Ther-
momètres médicaux – Partie 5: exigences sur les thermomètres
auriculaires infrarouges (avec dispositif à maximum).
Veuillez noter que les dispositifs de communication HF portables
et mobiles sont susceptibles d’influer sur cet appareil. Pour plus de
détails, veuillez contacter le service après-vente à l’adresse men-
tionnée ou vous reporter à la fin du mode d’emploi.
3. Remarques
Consignes de sécurité
AVERTISSEMENT
•
Lors des mesures, insérez avec précaution la pointe du cap-
teur du thermomètre auriculaire dans l’oreille.
•
Dans le cas de certaines maladies infectieuses aiguës, l’utilisa-
tion du thermomètre auriculaire sur plusieurs personnes peut
être inappropriée en raison d’une éventuelle transmission de
germes malgré le nettoyage et la désinfection nécessaires. Le
cas échéant, consultez votre médecin traitant.
•
La température corporelle mesurée dans l’oreille peut varier
par rapport à d’autres mesures dans la bouche, le rectum ou
les aisselles. Il ne sert donc à rien de comparer ces valeurs.
Mesurez régulièrement la température afin de déterminer la
température auriculaire normale et utilisez ensuite ces me-
sures comme point de comparaison pour les mesures qui
vous font soupçonner de la fièvre.
•
Ce thermomètre est conçu pour mesurer la température au-
riculaire. N’utilisez pas ce thermomètre auriculaire pour des
mesures à d’autres endroits du corps.
•
Remplacez la protection après chaque utilisation afin de
garantir une mesure précise et empêcher toute contami-
nation croisée.
•
Le thermomètre auriculaire doit être utilisé uniquement avec
des embouts de protection de Sanitas. D’autres embouts
de protection peuvent provoquer des erreurs de mesure. Si
vous n’avez plus d’embout de protection, consultez le fabri-
cant ou un revendeur pour en obtenir d’autres.
•
Consultez un médecin si vous constatez une dégradation
de votre état de santé.
Remarques relatives aux piles
AVERTISSEMENT
•
Si du liquide de la cellule de pile entre en contact avec la
peau ou les yeux, rincez la zone touchée avec de l’eau et
consultez un médecin.
•
Risque d’ingestion! Les enfants en bas âge pourraient
avaler des piles et s’étouer. Veuillez donc conserver les
piles hors de portée des enfants en bas âge!
29
•
Respectez les signes de polarité plus (+) et moins (-).
•
Si une pile a coulé, enfilez des gants de protection et net-
toyez le compartiment à piles avec un chion sec.
•
Protégez les piles d’une chaleur excessive.
•
Risque d’explosion! Ne jetez pas les piles dans le feu.
•
Les piles ne doivent être ni rechargées, ni court-circuitées.
•
En cas de non utilisation prolongée de l’appareil, sortez les
piles du compartiment à piles.
•
Utilisez uniquement des piles identiques ou équivalentes.
•
Remplacez toujours l’ensemble des piles simultanément.
•
N’utilisez pas d’accumulateur!
•
Ne démontez, n’ouvrez ou ne cassez pas les piles.
Risques pour l’appareil
ATTENTION
•
Ne soumettez l’appareil à aucun choc mécanique.
•
N’exposez pas l’appareil à la lumière directe du soleil.
•
Ne soumettez l’appareil à aucun liquide. L’appareil n’est pas
étanche. Évitez tout contact direct avec l’eau ou d’autres
liquides.
•
Ne faites réparer l’appareil que dans un centre de service
autorisé, sous peine d’annulation de la garantie.
•
Les dispositifs de communication HF portables et mobiles
sont susceptibles d’influer sur cet appareil. Pour plus de
détails, veuillez contacter le service après-vente à l’adresse
mentionnée ou vous reporter à la fin du mode d’emploi.
4. Description de l’appareil
1 Embout de protection
2 Capteur de mesure
3 Touche START
4 Touche MARCHE/ARRÊT
5 Compartiment à piles
Écran LCD
1 Mode température ambiante
2 Achage de la température
ambiante/l’heure/la date
3 Achage AM/PM (heure)
4 Symbole de pile
5 Mode mémoire
6 Symbole d’absence de
fièvre
7 Unité de température
(°C ou °F)
8 Symbole de fièvre
9 Achage de la température
10 Mode température d’objet
11 Symbole d’embout de
protection
12 Mode température
corporelle
1
2
3
4
5
E
1
5
7
6
8
9
10
11
12
2 3 4
30
5. Mise en service
Les piles sont déjà insérées dans l’appareil
neuf. Avant la première utilisation, retirez la
bande de protection des piles qui dépasse du
compartiment à piles. Le thermomètre auricu-
laire s’allume alors automatiquement.
6. Paramètres
6.1 Réglage de l’heure/la date
Avant de commencer les mesures, nous vous conseillons de
régler l’heure et la date. Ainsi, vous pourrez aecter les mesures
enregistrées plus simplement plus tard.
1.
Maintenez la touche MARCHE/
ARRÊT de l’appareil enfoncée
pendant troissecondes. «24 H»
s’ache sur l’écran.
2.
À l’aide de la touche START,
sélectionnez alors le format de
l’heure souhaité (12h ou 24h)
et confirmez avec la touche
MARCHE/ARRÊT .
3.
L’heure s’affiche sur l’écran.
À l’aide de la touche START,
sélectionnez l’heure actuelle
et confirmez avec la touche
MARCHE/ARRÊT .
4.
Les minutes s’affichent sur
l’écran. À l’aide de la touche
START, sélectionnez les minutes
actuelles et confirmez avec la
touche MARCHE/ARRÊT .
5.
L’année s’ache sur l’écran.
À l’aide de la touche START,
sélectionnez l’année actuelle
et confirmez avec la touche
MARCHE/ARRÊT .
6.
Le jour clignote sur l’écran.
À l’aide de la touche START, sé-
lectionnez le jour actuel et confir-
mez avec la touche MARCHE/
ARRÊT .
7.
Le mois clignote sur l’écran.
À l’aide de la touche START,
sélectionnez le mois actuel
et confirmez avec la
touche
MARCHE/ARRÊT
. Ensuite,
l’appareil s’arrête automatique
-
ment. La date et l’heure sont
alors enregistrées.

31
6.2 Sélection de l’unité de température (°C ou °F)
Vous pouvez acher vos résultats de mesure dans l’unité de
la température degrés Celsius (°C) ou degrés Fahrenheit (°F).
1. Maintenez la touche START de
l’appareil enfoncée pendant
troissecondes. «°C» apparaît
sur l’écran.
2.
À l’aide de la touche START,
sélectionnez alors l’unité de
température souhaitée (°C ou
°F) et confirmez avec la touche
MARCHE/ARRÊT .
7. Mesures
Remarque
Avant chaque utilisation, vérifiez que la lentille n’est pas en-
dommagée. Si elle l’est, adressez-vous au vendeur ou au ser-
vice après-vente. Tenez compte du fait que le thermomètre
auriculaire doit se trouver au moins 30minutes dans la pièce
dans laquelle la mesure est eectuée.
7.1 Mesurer la température corporelle
AVERTISSEMENT
•
Certaines personnes ont des valeurs de mesure diérentes
dans l’oreille gauche et l’oreille droite. Pour évaluer les chan-
gements de température, mesurez toujours dans la même
oreille pour une même personne.
•
Les enfants ne doivent utiliser le thermomètre auriculaire
que sous la surveillance d’un adulte. En général, une me-
sure est possible à partir de l’âge de 6 mois. Chez les petits
enfants de moins de 6 mois, le conduit auditif est encore
très étroit. Ainsi, la température du tympan ne peut sou-
vent pas être évaluée et des résultats de mesure trop bas
peuvent être achés.
•
La mesure ne doit pas être eectuée dans une oreille atteinte
de maladies inflammatoires (par ex. pyorrhée, sécrétions),
après d’éventuelles blessures des oreilles (par ex. blessures
du tympan) ou lors de la phase de guérison après une inter-
vention chirurgicale. Dans tous ces cas, veuillez consulter
votre médecin traitant.
•
Dans le cas de certaines maladies infectieuses aiguës, l’uti-
lisation du thermomètre auriculaire sur plusieurs personnes
peut être inappropriée en raison d’une éventuelle transmis-
sion de germes malgré le nettoyage et la désinfection né-
cessaires. Le cas échéant, consultez votre médecin traitant.
•
Ce thermomètre auriculaire doit être utilisé uniquement
quand un embout de protection est installé.
•
Les circonstances suivantes peuvent avoir un impact sur la
température auriculaire: si vous restez couché sur une oreille
pendant un temps prolongé, si les oreilles sont couvertes,
32
si elles sont exposées à une chaleur ou un froid intense ou
après la natation/baignade. Si vous êtes dans l’un de ces
cas, patientez 20minutes avant d’eectuer la mesure.
•
Le cérumen peut influencer la mesure, veuillez donc nettoyer
l’oreille avant la mesure le cas échéant.
1.
Vissez un embout de protection propre
sur la pointe du capteur du thermo-
mètre auriculaire.
2.
Pour allumer le thermomètre auricu-
laire, appuyez sur la touche MARCHE/
ARRÊT . Trois signaux sonores re
-
tentissent et l’écran s’allume.
3.
Comme le conduit auditif est légère-
ment incurvé, vous devez tirer légè-
rement l’oreille vers le haut et l’arrière
avant d’introduire la pointe de l’embout
de protection afin que celle-ci puisse
être dirigée directement sur le tympan.
4.
Insérez la pointe du capteur avec l’em-
bout de protection dans le conduit au-
ditif et appuyez sur la touche START
pour commencer la mesure.
5.
Au bout d’environ une seconde, un
signal sonore retentit et le résultat
de la mesure s’ache à l’écran. Pour
éteindre le thermomètre auriculaire, ap-
puyez sur la touche MARCHE/ ARRÊT
.
Remarque
Après une mesure, si vous n’appuyez sur aucune touche pen-
dant une minute, le thermomètre auriculaire s’éteint automa-
tiquement.
Indicateur de fièvre
Si la température mesurée est < 38°C (100,4°F), une émo-
ticône souriante s’ache à l’écran et un signal sonore
bref retentit.
Si la température mesurée se situe entre 37,5 et 37,9°C, deux
bips brefs retentissent (indication de «température élevée»).
Si la température mesurée est ≥ 38°C (100,4°F), une émo-
ticône triste s’ache à l’écran et à la suite retentissent un
signal bref, un signal long et trois signaux courts.

33
7.2 Mesurer la température d’objet
1. Retirez l’embout de protection (le cas
échéant) de la pointe du capteur du
thermomètre auriculaire.
2.
Pour allumer le thermomètre auricu-
laire, appuyez sur la touche MARCHE/
ARRÊT . Trois signaux sonores re
-
tentissent et l’écran s’allume.
3.
Assurez-vous d’être en mode tempé-
rature d’objet ( ).
Pour passer du mode température cor-
porelle au mode température d’objet,
maintenez simultanément les touches
MARCHE/ARRÊT
et START briève-
ment.
4.
Placez la pointe du capteur du thermo-
mètre auriculaire à 1 à 2 cm du point
de mesure désiré et appuyez sur la
touche START.
5. Au bout d’une seconde, un signal so
-
nore retentit et le résultat de la me-
sure s’ache à l’écran. Pour éteindre
le thermomètre auriculaire, appuyez
brièvement sur la touche MARCHE/
ARRÊT .
7.3 Acher la température ambiante
Lorsque vous allumez le thermomètre auriculaire, l’écran af-
fiche la température ambiante, la date et l’heure en alternant
toutes les 3secondes.
34
7.4 Acher les valeurs de mesure enregistrées
Le thermomètre auriculaire enregistre automatiquement les
valeurs de température des 10dernières mesures pour chaque
température corporelle et température d’objet (avec date et
heure). Procédez comme suit pour consulter les mesures en-
registrées:
1.
Appuyez sur la touche MARCHE/
ARRÊT pour allumer le ther-
momètre auriculaire.
2.
Maintenez la touche MARCHE/
ARRÊT enfoncée pendant
3 secondes. Un M et la der
-
nière valeur mesurée s’achent
à l’écran.
3. Pour passer d’une mesure enre-
gistrée à une autre, appuyez sur
la touche MARCHE/ARRÊT .
Chaque fois que vous appuyez
sur la touche MARCHE/ARRÊT
, le numéro de mémoire puis
la mesure s’achent.
4.
Si vous souhaitez poursuivre une mesure, appuyez sur la
touche START. Si vous souhaitez éteindre le thermomètre au-
riculaire, maintenez la touche MARCHE/ARRÊT enfoncée
pendant 3secondes.
8. Changement des piles
Avant de changer les piles, assurez-vous que l’appareil est
éteint.
1. Changez les piles dès que le symbole
de pile (
) s’ache à l’écran.
2. Ouvrez le compartiment à piles et reti-
rez-en les piles vides.
3. Insérez les deux nouvelles piles 1,5V
AAA. Faites attention à ce qu’elles
soient positionnées dans le bon sens.
Fermez le compartiment à piles.
35
9. Nettoyage/stockage
Les embouts de protection sont à
usage unique.
La pointe du capteur est la partie la
plus sensible du thermomètre auricu-
laire. Soyez prudent lors du nettoyage
afin d’éviter de l’endommager. Pour ce-
la, utilisez un chion doux ou un bâton-
net ouaté qui peut être humidifié avec
du désinfectant, de l’alcool ou de l’eau chaude.
Pour nettoyer l’appareil entier, utilisez un chion doux légère-
ment humidifié avec de la lessive.
N’utilisez pas de produits nettoyants agressifs.
Si vous prévoyez un stockage prolongé, retirez les piles. L’ap-
pareil ne doit pas être stocké ou utilisé sous des températures
ou une humidité de l’air trop élevées ou trop basses (voir don-
nées techniques), à la lumière du soleil, connecté au courant
électrique ou dans des endroits poussiéreux. Sinon, cela pour-
rait entraîner des imprécisions de mesure.
10. Élimination des déchets
Les piles usagées et complètement déchargées doivent être
mises au rebut dans des conteneurs spéciaux ou aux points
de collecte réservés à cet usage ou bien déposées chez un
revendeur d’appareils électriques. L’élimination des batteries
est une obligation légale qui vous incombe.
Remarque: Ces pictogrammes se trouvent sur les
piles à substances nocives: Pb = pile contenant
du plomb, Cd = pile contenant du cadmium,
Hg = pile contenant du mercure.
Dans l’intérêt de la protection de l’environnement,
l’appareil ne doit pas être jeté avec les ordures mé-
nagères à la fin de sa durée de service. L’élimination
doit se faire par le biais des points de collecte com-
pétents dans votre pays. Veuillez éliminer l’appareil confor-
mément à la directive européenne – WEEE (Waste Electrical
and Electronic Equipment) relative aux appareils électriques
et électroniques usagés. Pour toute question, adressez-vous
aux collectivités locales responsables de l’élimination et du
recyclage de ces produits.
11. Que faire en cas de messages
d’erreur?
Message
d’erreur
Cause Solution
ER1
Le thermomètre auri-
culaire n’est pas prêt
pour la mesure.
Eectuez la mesure dès
que le mode de tempéra-
ture corporelle ( ) ou de
température d’objet (
)
s’ache à l’écran.
ER2
La température
ambiante mesu
-
rée ne se situe pas
entre 10°C et 40°C
(50°F – 104°F).
Placez le thermomètre auri
-
culaire pendant 30minutes
dans une pièce entre 10°C
et 40°C (50°F et 104°F).
36
Message
d’erreur
Cause Solution
ER3
Le thermomètre auri-
culaire n’est pas placé
correctement dans
l’oreille.
Respectez les consignes
indiquées au chapitre
«Mesures». Eectuez à
nouveau la mesure.
ER4
Le thermomètre auri-
culaire a remarqué un
grand changement de
température ambiante.
Placez le thermomètre auri
-
culaire pendant 30minutes
dans une pièce entre 10°C
et 40°C (50°F et 104°F).
ER5
Le thermomètre auri-
culaire ne fonctionne
pas correctement.
Changez les piles et rées
-
sayez. Si l’erreur se repro-
duit, contactez le service
client.
ER6
Vous êtes en mode
«Mesurer la tempéra
-
ture d’objet» et l’em-
bout de protection est
encore en place.
Pour eectuer une mesure
de température d’objet,
retirez l’embout de pro
-
tection.
Mesure auriculaire:
température mesurée
supérieure à 43°C
(109,4°F).
Mesure d’objets:
température mesurée
supérieure à 100°C
(212°F).
Assurez-vous que l’appa
-
reil et l’embout de protec-
tion sont en parfait état.
Eectuez à nouveau la
mesure.
Message
d’erreur
Cause Solution
Lo
Mesure auriculaire:
température mesurée
inférieure à 28°C
(82,4°F)
Mesure d’objets: tem
-
pérature mesurée infé-
rieure à -20°C (-4°F)
Assurez-vous que l’appa
-
reil et l’embout de protec-
tion sont en parfait état.
Eectuez à nouveau la
mesure.
Les piles sont vides. Retirez les deux piles vides
et insérez deux nouvelles
piles 1,5V AAA dans le
thermomètre auriculaire.
Si votre problème ne figure pas ici, contactez notre service
client.
12. Données techniques
Plage de mesure de tem
-
pérature
•
Température auriculaire:
28,0 – 43,0°C (82,4 – 109,4°F)
•
Température d’objet: -20 – 100°C
(-4 – 212°F)
•
Température ambiante: 0 – 50°C
(32 – 122°F)
37
Précision de mesure de
laboratoire
•
Température auriculaire: ± 0,2°C
(0,4°F) dans la plage de mesure
de 35,5 – 42,0°C (95,9 – 107,6°F);
± 0,3°C (0,5°F) dans la plage de
mesure ≤35,5°C (95,5°F) et ≥42,0°C
(107,6°F)
•
Température d’objet: ± 4% ou ± 2°C
(4°F)
•
Température ambiante: ± 2°C (± 4°F)
Reproductibilité médicale
0,11°C (0,2°F)
Durée de la mesure Env. une seconde
Plage de température de
fonctionnement
10 – 40°C (50 – 104°F), humidité de l’air
15 – 85% (sans condensation)
Plage de température de
stockage
-25 – 55°C (-13 – 131°F), humidité de l’air
15 – 95% (sans condensation)
Mémoire 10emplacements de sauvegarde
Résolution de l’achage ± 0,1°C ou ± 0,1°F
Pile CC 3V (2 piles 1,5V AAA)
Dimensions 155 x 38 x 47mm
Poids Environ 63g (sans les piles)
Embouts de protection 10
Arrêt automatique 60secondes
Durée de vie de la pile
3000 mesures consécutives ou un an
avec une à deux mesures par jour, y com-
pris en mode veille.
Classe de sécurité
Dispositif médical électrique de type
BF
Indice de protection IP
IP22, Protection contre la pénétration nui-
sible d’eau et de poussière
Le numéro de série se trouve sur l’appareil ou sur le compar-
timent à piles.
Sous réserve d'erreurs et de modifications

38
ITALIANO
Leggere attentamente le presenti istru-
zioni per l'uso, conservarle per impieghi
futuri, renderle accessibili ad altri utenti
e attenersi alle indicazioni.
Leggere attentamente le presenti istruzioni d’uso, conservar-
le per impieghi futuri, renderle accessibili ad altri utilizzatori e
attenersi alle indicazioni.
Fornitura
Controllare l'integrità esterna della confezione e del contenu
-
to. Prima dell'uso assicurarsi che l'apparecchio e gli acces-
sori non presentino nessun danno palese e che il materiale di
imballaggio sia stato rimosso. In caso di dubbio non utilizzare
l'apparecchio e consultare il proprio rivenditore o contattare il
Servizio clienti indicato.
1 termometro per orecchio
2 batterie AAA da 1,5 V
10 tappi di protezione
Le presenti istruzioni per l'uso
Articoli di acquisto garantito
Set di cappucci protettivi acquistabile in seguito: 2 x 10 cap
-
pucci protettivi, n. art.: 795.26
1. Spiegazione dei simboli ................................................................. 39
2. Uso conforme ................................................................................. 39
3. Note ................................................................................................. 40
4. Descrizione dell'apparecchio ........................................................ 41
5. Messa in funzione .......................................................................... 42
6. Impostazioni ................................................................................... 42
6.1 Impostazione di data e ora ......................................................... 42
6.2 Selezione dell'unità di temperatura (°C o °F) .............................. 43
7. Misurazione .................................................................................... 43
7.1 Misurazione della temperatura corporea .................................... 43
7.2 Misurazione della temperatura superficiale ................................ 45
7.3 Visualizzazione della temperatura ambiente .............................. 45
7.4 Visualizzazione dei valori memorizzati ....................................... 46
8. Sostituzione delle batterie ............................................................. 46
9. Pulizia/Conservazione ................................................................... 47
10. Smaltimento ....................................................................................47
11. Che cosa fare in caso di messaggi di errore? ............................. 47
12. Dati tecnici ...................................................................................... 48
Sommario
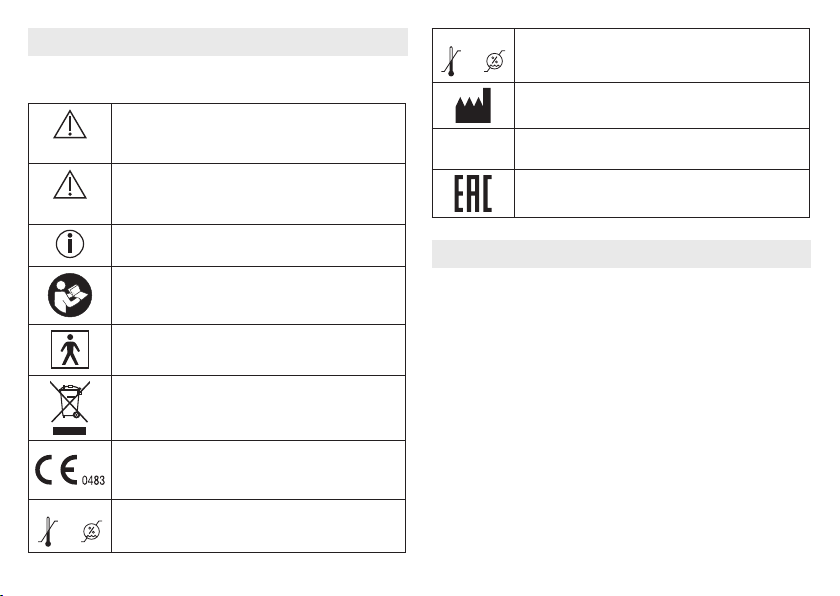
39
1. Spiegazione dei simboli
I seguenti simboli sono utilizzati nelle Istruzioni per l'uso e
sull'apparecchio:
AVVERTENZA
Segnalazione di rischio di lesioni o pericoli per
la salute.
ATTENZIONE
Segnalazione di rischi di possibili danni all'ap-
parecchio/agli accessori.
Nota
Indicazione di importanti informazioni
Seguire le istruzioni per l'uso
Parte applicativa tipo BF
Smaltimento secondo le norme previste dalla
Direttiva CE sui rifiuti di apparecchiature elet-
triche ed elettroniche (RAEE)
Il marchio CE certifica la conformità ai requisiti
di base della direttiva 93/42/CEE sui disposi-
tivi medici
Storage/Transport
Temperatura e umidità di trasporto e stoc-
caggio consentite
Operating
Temperatura e umidità di esercizio consentite
Produttore
IP 22
IP 22, protezione contro la penetrazione di
acqua e polvere
Marchio di certificazione per i prodotti espor-
tati nella Federazione Russa e nei paesi CSI.
2. Uso conforme
Il termometro per orecchio è destinato alla misurazione della
temperatura corporea nell'orecchio. Non utilizzare il termometro
per orecchio per misurazioni su altre parti del corpo!
Con questo termometro è possibile misurare anche la tempe-
ratura ambiente e superficiale.
Il termometro per orecchio è stato sviluppato con la massima
cura per misurare la temperatura in modo preciso, sicuro e ra-
pido. Si tratta di un termometro per orecchio non invasivo con
un rilevatore a infrarossi per rilevare la temperatura corporea nel
canale auricolare di bambini e adulti.
Utilizzare l'apparecchio solo per lo scopo per il quale è stato
concepito e come descritto nelle presenti istruzioni per l'uso.
Qualsiasi uso non conforme comporta un pericolo! Il produt-
tore non risponde di danni causati da un uso inappropriato o
non conforme.
40
La qualità dell'apparecchio è stata testata e soddisfa i requisiti
delle direttive del Consiglio dell'UE 93/42/EEC (direttiva sui di-
spositivi medici) Allegato I, requisiti essenziali, nonché le relative
normative armonizzate. ISO 80601-2-56:2009 Termometri clinici
- Parte 5: caratteristiche dei termometri per orecchio a infrarossi
(con dispositivo di massimo).
Apparecchiature di comunicazione HF mobili e portatili possono
influire sul funzionamento di questo apparecchio. Per informazioni
più dettagliate, rivolgersi all'Assistenza clienti oppure consultare la
parte finale delle istruzioni per l'uso.
3. Note
Avvertenze di sicurezza
AVVERTENZA
•
In caso di misurazioni auricolari, inserire con cautela la punta
del sensore del termometro nell'orecchio.
•
In presenza di determinate patologie acute e infettive, l'utiliz-
zo del termometro per orecchio su più persone, nonostante la
pulizia e la disinfezione, è da sconsigliare a causa del possi-
bile scambio di germi. Per casi particolari rivolgersi al proprio
medico curante.
•
La temperatura corporea misurata nell'orecchio può disco-
starsi da altre misurazione eettuate in bocca, nel retto o
sotto alle ascelle. Non ha quindi senso confrontare tali va-
lori. Misurare regolarmente la temperatura per calcolare la
temperatura normale dell'orecchio. Utilizzare poi tali misu-
razioni come base di confronto con misurazioni eseguite in
caso di sospetta febbre.
•
Questo termometro è destinato a misurazioni della tempe-
ratura dell'orecchio. Non utilizzarlo per misurazioni su altre
parti del corpo.
•
Sostituire il tappo di protezione dopo ciascun utilizzo per
garantire una misurazione esatta ed evitare una contami-
nazione incrociata.
•
Il termometro per orecchio può essere utilizzato esclusiva-
mente con tappi di protezione di Sanitas, altri tappi pos-
sono determinare errori di misurazione. Se si esauriscono
i tappi, rivolgersi al produttore o al rivenditore specializzato
per acquistarne altri.
•
Rivolgersi a un medico in caso di precarie condizioni di sa-
lute.
Avvertenze sull'uso delle batterie
AVVERTENZA
•
Se il liquido della batteria viene a contatto con la pelle e
con gli occhi, sciacquare le parti interessate con acqua e
consultare il medico.
•
Pericolo d'ingestione! I bambini possono ingerire le
batterie e soocare. Tenere quindi le batterie lontano dalla
portata dei bambini!
•
Prestare attenzione alla polarità positiva (+) e negativa (-).
•
In caso di fuoriuscita di liquido dalla batteria, indossa-
re guanti protettivi e pulire il vano batterie con un panno
asciutto.
•
Proteggere le batterie dal caldo eccessivo.
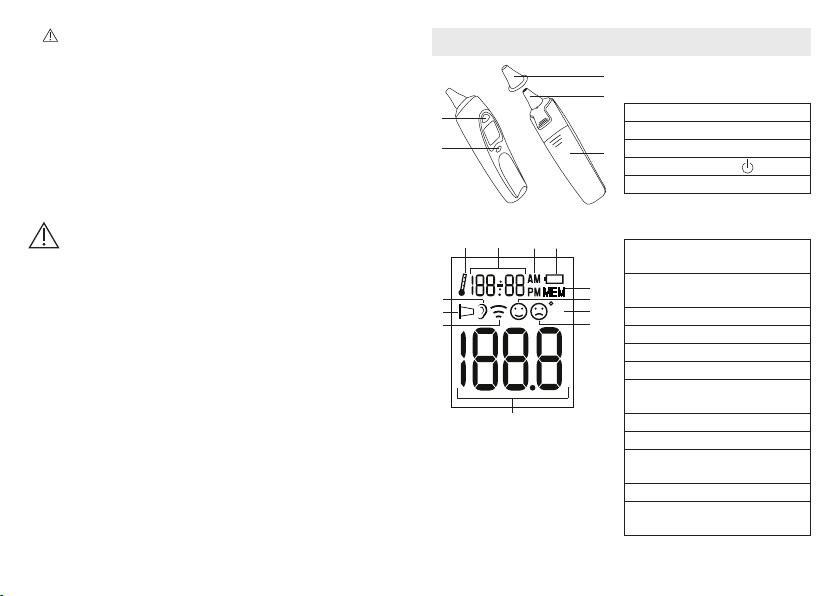
41
•
Rischio di esplosione! Non gettare le batterie nel fuoco.
•
Le batterie non devono essere ricaricate o mandate in cor-
tocircuito.
•
Qualora l'apparecchio non dovesse essere utilizzato per un
periodo prolungato, rimuovere le batterie dal vano batterie.
•
Utilizzare solo tipologie di batterie uguali o equivalenti.
•
Sostituire sempre tutte le batterie contemporaneamente.
•
Non utilizzare batterie ricaricabili!
•
Non smontare, aprire o frantumare le batterie.
Pericoli per l'apparecchio
ATTENZIONE
•
Evitare che l'apparecchio subisca degli urti.
•
Non esporre l'apparecchio alla luce diretta del sole.
•
Evitare che l'apparecchio entri in contatto con dei liquidi. Il
termometro non è impermeabile. Evitare qualunque contatto
diretto con acqua o altri liquidi.
•
Far riparare l'apparecchio solo da centri di assistenza auto-
rizzati, in caso contrario la garanzia decade.
•
Gli apparecchi per la comunicazione portatili e mobili ad
alta frequenza possono influire sul funzionamento dell'ap-
parecchio. Per informazioni più dettagliate, rivolgersi all'As-
sistenza clienti oppure consultare la parte finale delle istru-
zioni per l'uso.
4. Descrizione dell'apparecchio
1 Tappo di protezione
2 Sensore di misurazione
3 Pulsante START
4 Pulsante ON/OFF
5 Vano batterie
Display LCD
1 Modalità temperatura
ambiente
2 Indicazione temperatura
ambiente/ora/data
3 Indicazione AM/PM (ora)
4 Simbolo batteria
5 Modalità memoria
6 Simbolo assenza di febbre
7 Unità di temperatura
(°C o °F)
8 Simbolo presenza di febbre
9 Indicazione temperatura
10 Modalità temperatura
superficiale
11 Simbolo tappo di protezione
12 Modalità temperatura
corporea
1
2
3
4
5
E
1
5
7
6
8
9
10
11
12
2 3 4
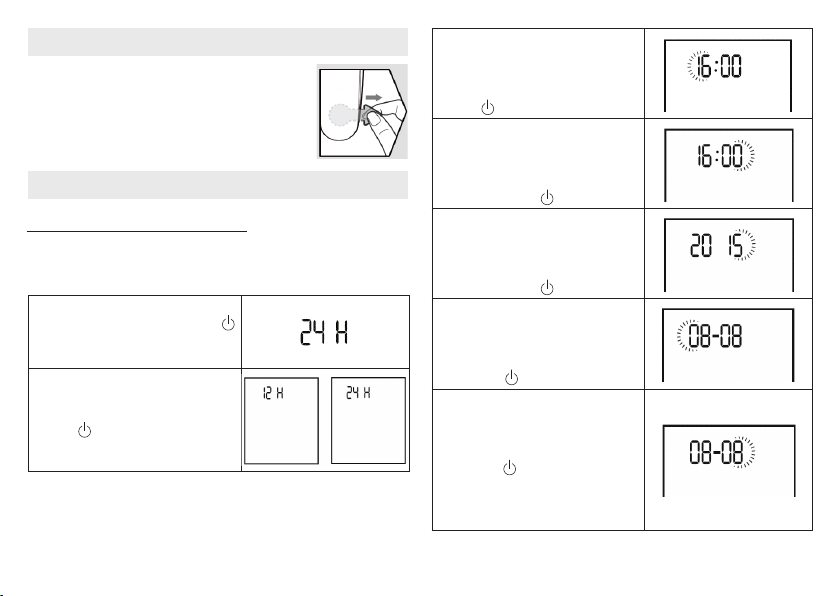
42
5. Messa in funzione
Le batterie sono già presenti sugli apparec-
chi nuovi. Prima del primo impiego rimuovere
la linguetta protettiva dal vano batterie. Il ter-
mometro per orecchio si accende automati-
camente.
6. Impostazioni
6.1 Impostazione di data e ora
Prima di iniziare le misurazioni, è consigliabile impostare la data e
l'ora attuali. In questo modo, sarà possibile in seguito assegnare
più facilmente le misurazioni memorizzate.
1.
Con l'apparecchio spento, tenere
premuto il pulsante ON/OFF
per tre secondi. Sul display com-
pare la scritta "24 H".
2.
Con il pulsante START sceglie-
re un formato ora (12h o 24h) e
confermare con il pulsante ON/
OFF .
3.
Sul display viene visualizzata l'in-
dicazione dell'ora. Con il pulsan-
te START scegliere l'ora attuale e
confermare con il pulsante ON/
OFF .
4.
Sul display viene visualizzata l'in-
dicazione dei minuti. Con il pul-
sante START scegliere i minuti
attuali e confermare con il pul-
sante ON/OFF .
5.
Sul display viene visualizzata
l'indicazione dell'anno. Con il
pulsante START scegliere l'anno
attuale e confermare con il pul
-
sante ON/OFF .
6.
Sul display lampeggia l'indica-
zione del giorno. Con il pulsante
START scegliere il giorno attua-
le e confermare con il pulsante
ON/OFF .
7.
Sul display lampeggia l'indica-
zione del mese. Con il pulsante
START scegliere il mese attua-
le e confermare con il pulsante
ON/OFF
. Al termine l'apparec-
chio si spegne automaticamente.
A questo punto, data e ora sono
memorizzate.
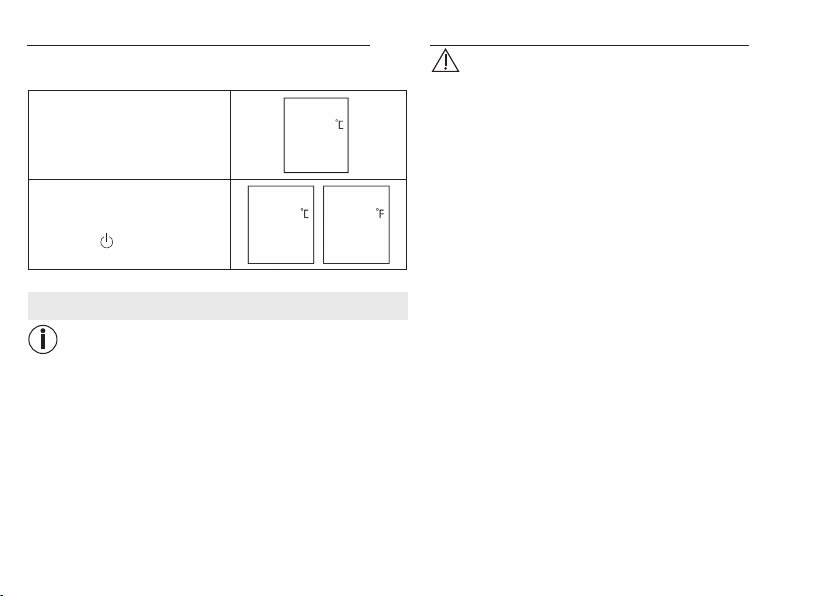
43
6.2 Selezione dell'unità di temperatura (°C o °F)
I risultati della temperatura misurata possono essere visualiz-
zati in gradi Celsius (°C) e Fahrenheit (°F).
1.
Con l'apparecchio spento, te-
nere premuto il pulsante START
per tre secondi. Sul display
compare la scritta "°C".
2.
Con il pulsante START sceglie-
re un'unità di temperatura (°C o
°F) e confermare con il pulsante
ON/OFF .
7. Misurazione
Nota
Prima di ogni utilizzo, verificare che la lente non sia danneggia-
ta. In caso di danni rivolgersi al proprio rivenditore o al Servizio
clienti. Accertarsi che il termometro per orecchio si trovi nelle
stesse condizioni ambientali per almeno 30 minuti prima di
eseguire la misurazione.
7.1 Misurazione della temperatura corporea
AVVERTENZA
•
Alcune persone presentano valori diversi nell'orecchio sini-
stro e nell'orecchio destro. Per poter valutare l'andamento
della temperatura, misurarla sempre nello stesso orecchio.
•
Il termometro per orecchio deve essere utilizzato dai bambini
solo sotto sorveglianza degli adulti. Generalmente è possibi-
le procedere a una misurazione nell'orecchio dopo i 6mesi
di vita. Nei bambini di età inferiore il canale auricolare è an-
cora molto stretto e spesso non è possibile rilevare la tem-
peratura del timpano, dando luogo a valori di misurazione
troppo bassi.
•
Non eettuare la misurazione nell'orecchio in presenza di
patologie infiammatorie (ad es. fuoriuscita di pus, secrezio-
ne) e possibili lesioni (ad es. lesioni al timpano) o durante la
convalescenza in seguito a interventi chirurgici. In tutti que-
sti casi si consiglia di consultare il proprio medico curante.
•
In presenza di determinate patologie acute e infettive, l'uti-
lizzo del termometro su più persone, nonostante la pulizia
e la disinfezione, è da sconsigliare a causa del possibile
scambio di germi. Per casi particolari rivolgersi al proprio
medico curante.
•
Questo termometro per orecchio può essere utilizzato solo
con tappo di protezione applicato.
•
Le seguenti condizioni potrebbero influenzare la temperatura
dell'orecchio: si rimane per lungo tempo appoggiati su un
orecchio, le orecchie sono coperte, le orecchie sono espo-
ste a temperatura molto calda/fredda oppure dopo il nuoto/il
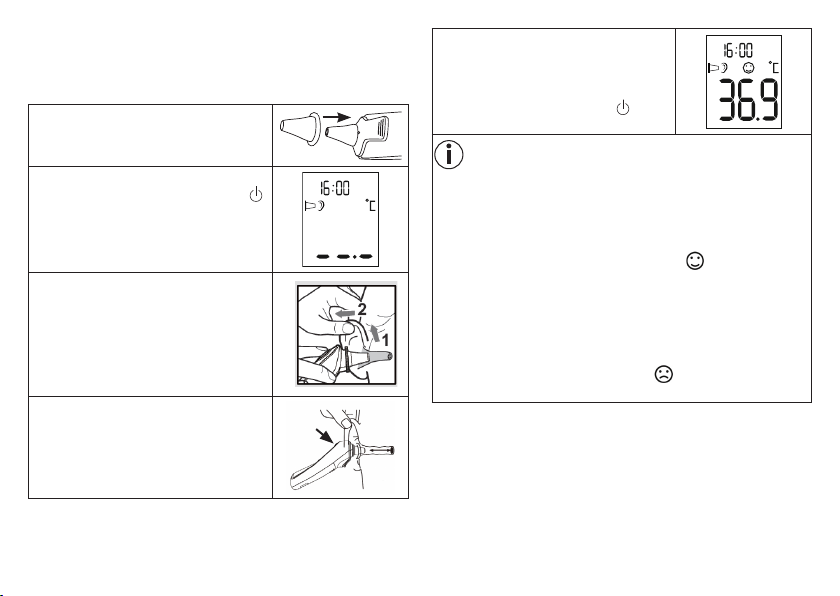
44
bagno. In questi casi è necessario attendere 20 minuti prima
di eseguire la misurazione.
•
La presenza di cerume può influire sulla misurazione: pulire
pertanto l'orecchio prima di misurare la temperatura.
1.
Applicare un tappo di protezione pulito
sulla punta del sensore del termometro
per orecchio.
2. Per accendere il termometro per orec-
chio, premere il pulsante ON/OFF .
Vengono emessi tre segnali acustici e
il display si accende.
3.
Poiché il canale auricolare è legger-
mente curvo, prima di introdurre la
punta del sensore nell'orecchio tirare
leggermente indietro il padiglione ver-
so l'alto per consentire alla punta del
tappo di protezione di raggiungere di-
rettamente il timpano.
4.
Inserire la punta del sensore con il tap-
po di protezione con cautela nel canale
auricolare e premere il pulsante START
per avviare il processo di misurazione.
5.
Dopo ca. un secondo viene emesso un
segnale acustico e l'esito della misura-
zione viene visualizzato sul display. Per
spegnere il termometro per orecchio,
premere il pulsante ON/OFF .
Nota
Se dopo la misurazione non viene premuto alcun pulsante per
un minuto, il termometro si spegne automaticamente.
Indicazione della febbre
Se la temperatura misurata è < 38 °C (100,4 °F), sul display
viene visualizzato uno smiley sorridente e viene emesso
un breve segnale acustico.
Se la temperatura misurata è compresa tra 37,5 e 37,9 °C,
vengono emessi due brevi segnali acustici (indicazione di
"aumento di temperatura").
Se la temperatura misurata è ≥ 38 °C (100,4 °F), sul display
viene visualizzato uno smiley triste e vengono emessi in
sequenza un segnale acustico breve, uno lungo e tre brevi.
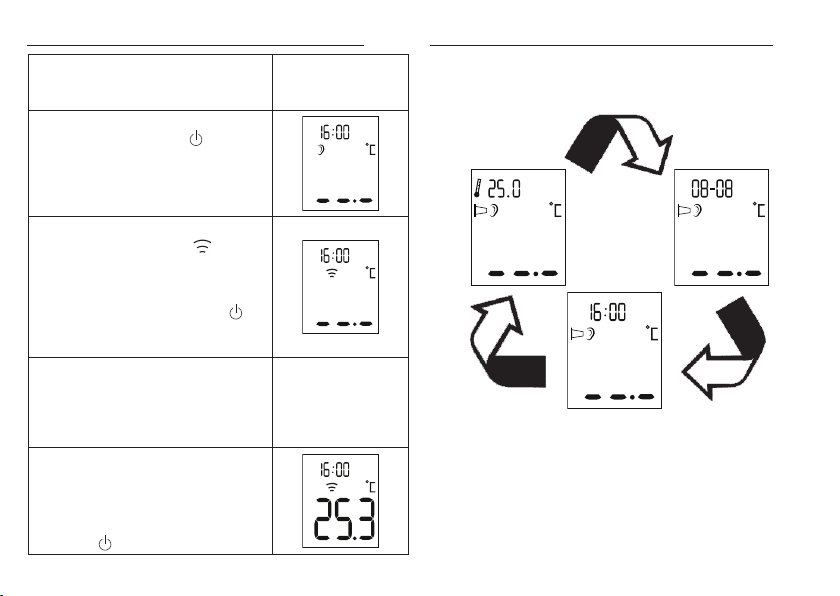
45
7.2 Misurazione della temperatura superficiale
1.
Rimuovere il tappo di protezione (se
applicato) dalla punta del sensore del
termometro per orecchio.
2.
Per accendere il termometro, preme-
re il pulsante ON/OFF . Vengono
emessi tre segnali acustici e il display
si accende.
3.
Assicurarsi che sia attiva la modalità
temperatura superficiale ( ).
Per commutare tra la modalità tempe
-
ratura corporea e la modalità tempe-
ratura superficiale, tenere brevemen-
te premuti il pulsante ON/OFF e il
pulsante START contemporaneamente.
4.
Tenere la punta del sensore del termo-
metro per orecchio a 1
–
2 cm dal punto
di misurazione desiderato e premere il
pulsante START.
5.
Dopo un secondo viene emesso un
segnale acustico e l'esito della misu-
razione viene visualizzato sul display.
Per spegnere il termometro per orec-
chio, premere brevemente il pulsante
ON/OFF .
7.3 Visualizzazione della temperatura ambiente
Quando si accende il termometro per orecchio, sul display
si alternano ogni 3 secondi la temperatura ambiente, la da
-
ta e l'ora.
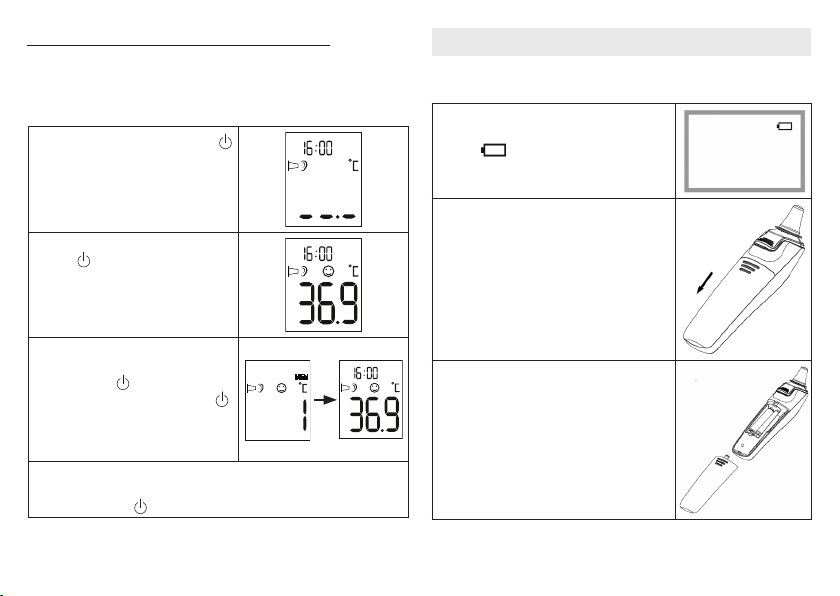
46
7.4 Visualizzazione dei valori memorizzati
Il termometro per orecchio memorizza automaticamente le
temperature delle ultime 10 misurazioni della temperatura cor-
porea e superficiale (incl. data e ora). Per richiamare i valori
memorizzati, procedere nel modo seguente:
1.
Premere il pulsante ON/OFF
per accendere il termometro per
orecchio.
2.
Tenere premuto il pulsante ON/
OFF per 3 secondi. Sul di-
splay vengono visualizzati una
M e l'ultimo valore memorizzato.
3.
Per commutare fra i singoli valori
memorizzati, premere il pulsan-
te ON/OFF . Premendo nuo-
vamente il pulsante ON/OFF ,
viene prima visualizzata la posi
-
zione di memoria e quindi il va-
lore misurato.
4.
Per procedere con una misurazione, premere il pulsante START.
Per spegnere il termometro per orecchio, tenere premuto il pul-
sante ON/OFF per 3 secondi.
8. Sostituzione delle batterie
Prima di sostituire le batterie, accertarsi che l'apparecchio sia
spento.
1.
Sostituire le batterie quando sul di-
splay viene visualizzato il simbolo bat-
teria ( ).
2.
Aprire il vano batterie ed estrarre le bat-
terie esauste.
3.
Inserire due nuove batterie AAA da
1,5 V. Accertarsi che le batterie siano
orientate correttamente. Chiudere il
vano batterie.
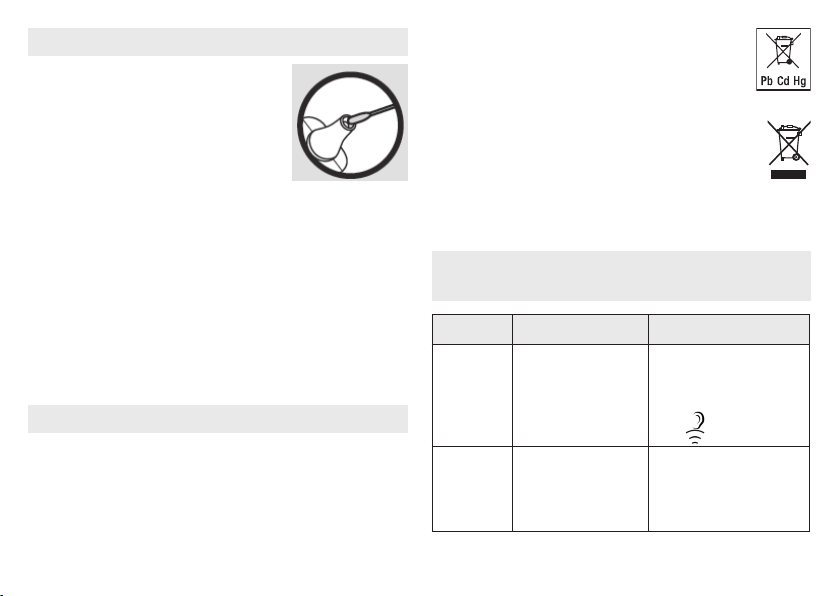
47
9. Pulizia/Conservazione
I tappi di protezione sono concepiti co-
me monouso.
La punta del sensore è la parte più
delicata del termometro per orecchio.
Procedere con cautela durante la puli-
zia della punta del sensore per evitare
di danneggiarla. A tale scopo utilizzare
un panno morbido o un cotton fioc im-
bevuto di disinfettante, alcol o acqua calda.
Per la pulizia dell'intero apparecchio utilizzare un panno mor-
bido leggermente inumidito con acqua e sapone.
Non utilizzare detergenti aggressivi.
Se si prevede di non utilizzare l'apparecchio per un lungo pe-
riodo, rimuovere le batterie. Non utilizzare né riporre l'appa-
recchio in luoghi esposti a temperature troppo alte o troppo
basse, all'umidità (vedere Dati tecnici), alla luce solare, alla
corrente elettrica o alla polvere, diversamente le misurazioni
potrebbero non essere corrette.
10. Smaltimento
Smaltire le batterie esauste e completamente scariche negli
appositi punti di raccolta, nei punti di raccolta per rifiuti tossici
o presso i negozi di elettronica. Lo smaltimento delle batterie
è un obbligo di legge.
Nota: i simboli riportati di seguito indicano che
le batterie contengono sostanze tossiche.
Pb = batteria contenente piombo, Cd = batteria
contenente cadmio, Hg = batteria contenente
mercurio.
Per motivi ecologici, l’apparecchio non deve essere
smaltito tra i normali rifiuti quando viene buttato via.
Lo smaltimento deve essere eettuato negli appositi
centri di raccolta. Smaltire l’apparecchio secondo
la direttiva europea sui rifiuti di apparecchiature elettriche ed
elettroniche (RAEE). Per eventuali chiarimenti, rivolgersi alle
autorità comunali competenti per lo smaltimento.
11. Che cosa fare in caso di messaggi
di errore?
Messaggio
di errore
Causa Soluzione
ER1
Il termometro per
orecchio non è ancora
pronto per la misura
-
zione.
Eseguire la misurazione
quando sul display viene
visualizzato il simbolo della
modalità temperatura cor-
porea ( ) oppure superfi-
ciale ( ).
ER2
La temperatura am-
biente misurata non
è nell'intervallo com
-
preso tra 10 °C e 40 °C
(50 °F – 104 °F).
Tenere il termometro per
orecchio per 30 minuti in
un ambiente con tempera
-
tura compresa tra 10 °C e
40 °C (50 °F – 104 °F).
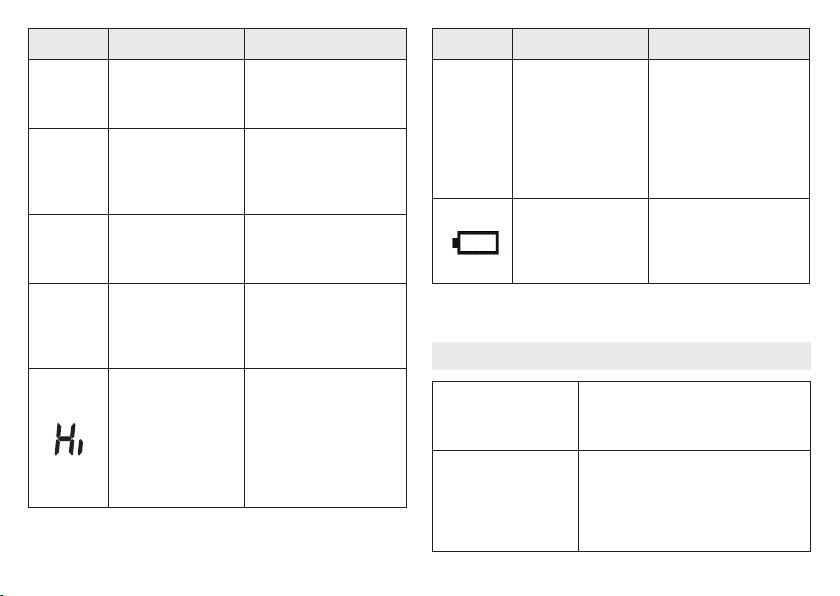
48
Messaggio
di errore
Causa Soluzione
ER3
Il termometro per
orecchio non è posi
-
zionato correttamente
nell'orecchio.
Attenersi alle indicazioni
del capitolo "Misurazione".
Eettuare di nuovo la mi-
surazione.
ER4
Il termometro per
orecchio ha rilevato
una grande variazione
nella temperatura am
-
biente.
Tenere il termometro per
orecchio per 30 minuti in
un ambiente con tempera
-
tura compresa tra 10 °C e
40 °C (50 °F – 104 °F).
ER5
Il termometro per
orecchio non funziona
correttamente.
Sostituire le batterie e pro-
vare di nuovo. Se l'errore si
verifica di nuovo, contatta
-
re il Servizio clienti.
ER6
È attiva la modalità
"Misurazione della tem
-
peratura superficiale" e
il tappo di protezione è
ancora applicato.
Per poter eseguire la misu-
razione della temperatura
superficiale, è necessario
rimuovere il tappo di pro
-
tezione.
Misurazione nell'orec-
chio: la temperatura
misurata è superiore a
43 °C (109,4 °F).
Misurazione superfi
-
ciale: la temperatura
misurata è superiore a
100 °C (212 °F).
Accertarsi che l'apparec
-
chio e il tappo di protezio-
ne siano in buono stato.
Eettuare di nuovo la mi
-
surazione.
Messaggio
di errore
Causa Soluzione
Lo
Misurazione nell'orec-
chio: la temperatura
misurata è inferiore a
28 °C (82,4 °F).
Misurazione superfi
-
ciale: la temperatura
misurata è inferiore a
-20 °C (-4 °F).
Accertarsi che l'apparec
-
chio e il tappo di protezio-
ne siano in buono stato.
Eettuare di nuovo la mi
-
surazione.
Le batterie sono sca-
riche.
Rimuovere le due batterie
scariche e inserire due
nuove batterie AAA da
1,5 V nel termometro per
orecchio.
Se il problema non viene trattato qui, contattare il Servizio
clienti.
12. Dati tecnici
Range di misurazione
della temperatura
•
Orecchio: 28 – 43 °C
(82,4 – 109,4 °F)
•
Superficiale: -20 – 100 °C (-4 – 212 °F)
•
Ambiente: 0 – 50 °C (32 – 122 °F)
Precisione di misurazione
da laboratorio
•
Orecchio: ± 0,2 °C (0,4 °F) nel range
35,5 – 42 °C (95,9 – 107,6 °F); ± 0,3 °C
(0,5 °F) nel range ≤35,5 °C (95,5 °F) e
≥42 °C (107,6 °F)
•
Superficiale: ± 4% oppure ± 2 °C (4 °F)
•
Ambiente: ± 2 °C (± 4 °F)

49
Ripetibilità clinica 0,11 °C (0,2 °F)
Durata della misurazione Ca. un secondo
Range temperature di
esercizio
10 – 40 °C (50 – 104 °F), umidità dell'aria
15-85% (non condensante)
Range temperature di
stoccaggio
-25 – 55 °C (-13 – 131 °F), umidità dell'aria
15-95% (non condensante)
Memoria 10 posizioni di memoria
Risoluzione di visualiz-
zazione
0,1 °C o 0,1 °F
Batterie CC 3 V (2 batterie AAA da 1,5 V)
Ingombro 155 x 38 x 47 mm
Peso ca. 63 g (batterie escluse)
Tappi di protezione 10
Spegnimento automatico
60 secondi
Durata utile della batteria 3.000 misurazioni consecutive o un anno
con 1-2 misurazioni al giorno inclusa la
modalità di standby.
Classificazione di
sicurezza
Apparecchio medicale collegato di
tipo BF
Classe di protezione IP
IP 22, protezione contro la penetrazione
di acqua e polvere
Il numero di serie si trova sull’apparecchio o nel vano batterie.
Salvo errori e modifiche

50
РУССКИЙ
Внимательно прочтите данную ин-
струкцию, сохраните ее для последу-
ющего использования, храните
еевместе, доступном для других поль-
зователей, иследуйте ее указаниям.
Внимательно прочтите данную инструкцию по примене-
нию, сохраните ее для последующего использования, хра-
ните ее в месте, доступном для других пользователей, и
следуйте ее указаниям.
Комплект поставки
Проверьте комплектность поставки иубедитесь втом, что
накартонной упаковке нет внешних повреждений. Перед
использованием убедитесь втом, что прибор иего при-
надлежности неимеют видимых повреждений, иудалите
все упаковочные материалы. При наличии сомнений неис-
пользуйте прибор иобратитесь кпродавцу или всервис-
ную службу поуказанному адресу.
1 термометр для измерения температуры вухе
2батарейки 1,5В типаAAA
10 защитных колпачков
1 инструкция поприменению
Дополнительно покупаемые части
Набор защитных колпачков, который можно приобрести
дополнительно: 2 x 10 защитных колпачков, № арт.
795.26
1. Пояснения ксимволам ................................................................ 51
2. Использование поназначению .................................................. 51
3. Указания ......................................................................................... 52
4. Описание прибора ........................................................................ 53
5. Подготовка кработе .................................................................... 54
6. Настройки ...................................................................................... 54
6.1 Настройка времени/даты ........................................................ 54
6.2 Выбор единиц измерения температуры (°Cили °F) .................55
7. Измерение ..................................................................................... 55
7.1 Измерение температуры тела .................................................56
7.2 Измерение температуры объекта ...........................................57
7.3 Индикация температуры помещения ..................................... 58
7.4 Отображение сохраненных измеренных
значений ....................................................................................58
8. Замена батареек ........................................................................... 59
9. Очистка/хранение ......................................................................... 59
10. Утилизация ..................................................................................... 60
11. Что делать, если появляются сообщения об ошибках? ........ 60
12. Технические характеристики ..................................................... 61
13. Гарантия ......................................................................................... 62
Содержание
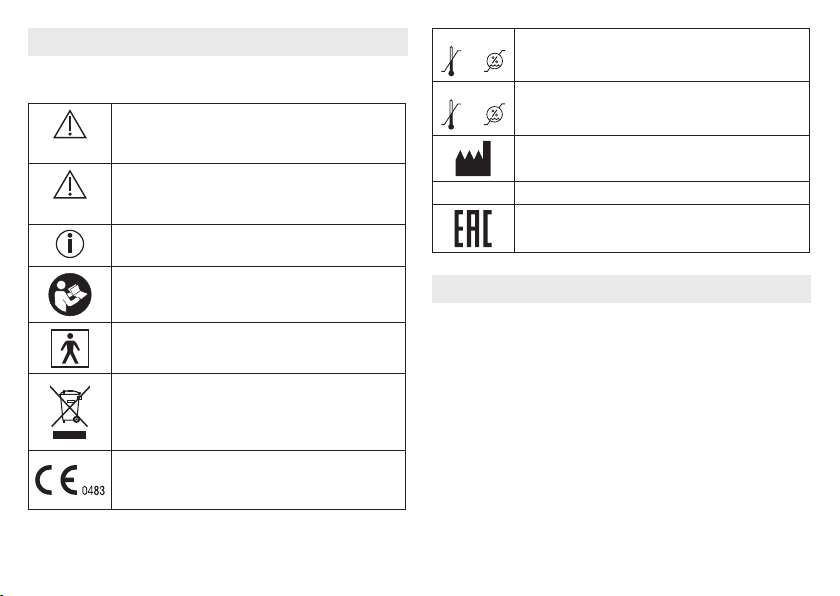
51
1. Пояснения ксимволам
Вданной инструкции поприменению ина приборе исполь-
зуются следующие символы:
ПРЕДОСТЕРЕЖЕНИЕ
Предупреждает об опасности травмирова-
ния или ущерба для здоровья.
ВНИМАНИЕ
Указывает на возможность повреждения
прибора/деталей.
Указание
Важная информация.
Соблюдайте инструкцию поприменению.
Рабочая часть типаBF
Утилизация прибора всоответствии сДи-
рективой ЕСпоотходам электрического
иэлектронного оборудования EC— WEEE
(Waste Electrical and Electronic Equipment).
Символ CE подтверждает соответствие ос-
новным требованиям директивы омедицин-
ских изделиях 93/42/EWG.
Storage/Transport
Допустимая температура и влажность
воздуха при хранении и транспортировке
Operating
Допустимая рабочая температура
ивлажность воздуха
Производитель
IP22
IP22, защита отпроникновения воды ипыли
Соответствие изделий стандартам
Таможенного союза «ЕАС».
2. Использование поназначению
Данный термометр предназначен для измерения темпера-
туры тела вухе. Термометр для измерения температуры
вухе не следует использовать для измерения температуры
надругих участках тела!
Дополнительно спомощью термометра для измерения тем-
пературы вухе можно также измерять температуру поме-
щения иразличных объектов.
Данный термометр был тщательно разработан для точно-
го, безопасного ибыстрого измерения температуры вухе.
Это неинвазивный термометр для измерения температуры
вухе, имеющий инфракрасный детектор для определения
температуры тела вслуховом канале увзрослых идетей.
Используйте прибор только вцелях, для которых он был
разработан, итолько способом, описанным вданной ин-

52
струкции поприменению. Любое применение непо назна-
чению может быть опасным! Изготовитель не несет ответ-
ственности за ущерб, вызванный неквалифицированным
или ненадлежащим использованием прибора.
Качество прибора было проверено ипризнано соответ-
ствующим требованиям директивы Совета Европейских
Сообществ 93/42/EEC (о медицинском оборудовании),
приложениеI «Существенные требования», атакже со-
ответствующим гармонизированным стандартам. ISO
80601-2-56:2009Клинические термометры — часть 5: «Ра-
бочие характеристики инфракрасных термометров для
измерения температуры вухе (сустройством сохранения
иуказания максимальной температуры)».
Следует учесть, что переносные имобильные высокочастотные
средства связи ителекоммуникации могут оказывать влияние
на работу данного прибора. Более точные данные можно за-
просить по указанному адресу сервисной службы или найти
вконце инструкции по применению.
3. Указания
Указания потехнике безопасности
ПРЕДОСТЕРЕЖЕНИЕ
•
При измерении температуры вухе осторожно вводите
наконечник датчика термометра для измерения темпе-
ратуры вухе.
•
При определенных острых инфекционных заболеваниях
неследует применять термометр для измерения темпе-
ратуры вухе для нескольких людей, т.к. при этом возмо-
жен перенос инфекции, несмотря на проведение очистки
ивлажной дезинфекции. Вотдельных случаях необходима
консультация лечащего врача.
•
Температура тела, измеренная вухе, может отличать-
ся от результатов других измерений, например во рту,
впрямой кишке или вподмышечной впадине. Поэтому
нет смысла сравнивать эти значения. Измеряйте темпе-
ратуру регулярно, чтобы определить нормальную темпе-
ратуру вухе, изатем используйте эти значения вкаче-
стве контрольных величин для измерений, при которых
Вы предполагаете наличие повышенной температуры.
•
Данный термометр предусмотрен для измерения тем
-
пературы вухе. Данный термометр для измерения тем-
пературы вухе неследует использовать для измерения
температуры надругих участках тела.
•
Заменяйте защитный колпачок после каждого приме-
нения, чтобы гарантировать точность измерения ииз-
бежать передачи инфекции.
•
Данный термометр для измерения температуры вухе
разрешается использовать только сзащитными колпач-
ками Sanitas; использование других защитных колпач-
ков может привести кошибкам визмерении. Если уВас
закончились защитные колпачки, обратитесь попово-
ду замены кпроизводителю или специализированному
дилеру.
•
Обязательно обратитесь кврачу, если Вы считаете, что
Вы больны.
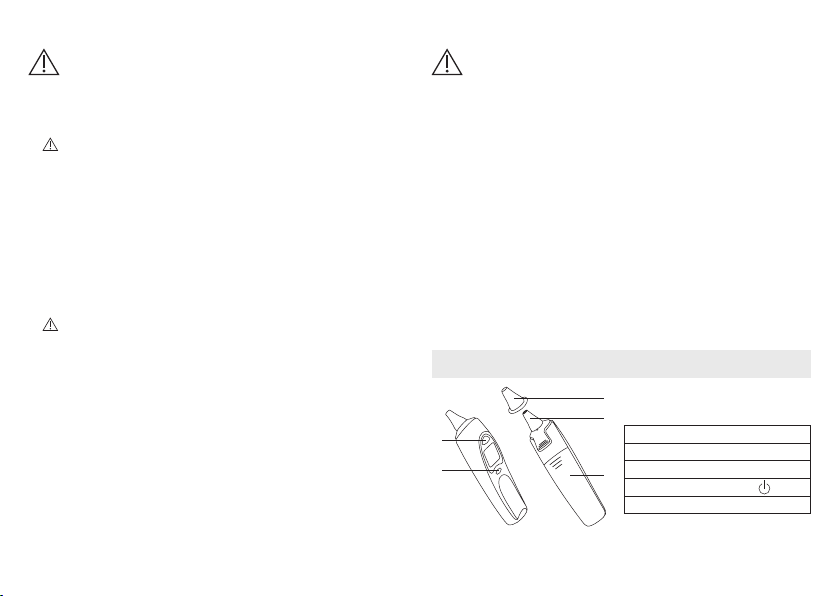
53
Обращение сбатарейками
ПРЕДОСТЕРЕЖЕНИЕ
•
При попадании жидкости из аккумулятора на кожу или
вглаза необходимо промыть соответствующий участок
большим количеством воды иобратиться кврачу.
•
Опасность проглатывания мелких деталей!
Маленькие дети могут проглотить батарейки ипода-
виться ими. Поэтому батарейки необходимо хранить
внедоступном для детей месте!
•
Обращайте внимание на обозначение полярности: плюс
(+) иминус (−).
•
Если батарейка потекла, очистите отделение для батаре-
ек сухой салфеткой, надев защитные перчатки.
•
Защищайте батарейки от чрезмерного воздействия теп-
ла.
•
Опасность взрыва! Не бросайте батарейки вогонь.
•
Не заряжайте ине замыкайте батарейки накоротко.
•
Если прибор длительное время не используется, извле-
ките батарейки из отделения для батареек.
•
Используйте батарейки только одного типа или равно-
ценных типов.
•
Заменяйте все батарейки сразу.
•
Не используйте перезаряжаемые аккумуляторы!
•
Не разбирайте, не открывайте ине разбивайте бата-
рейки.
Опасности для прибора
ВНИМАНИЕ
•
Не подвергайте прибор воздействию механических уда-
ров.
•
Не допускайте воздействия на прибор прямых солнеч-
ных лучей.
•
Не допускайте контакта прибора сжидкостями. Прибор
не является водонепроницаемым. Избегайте прямого
контакта сводой или другими жидкостями.
•
Доверяйте ремонт прибора только авторизованным сер-
висным центрам, иначе гарантия потеряет силу.
•
Переносные имобильные высокочастотные средства
связи ителекоммуникации могут оказывать влияние
наработу прибора. Более точные данные можно запро-
сить по указанному адресу сервисной службы или найти
вконце инструкции по применению.
4. Описание прибора
1. Защитный колпачок
2. Измерительный датчик
3. Кнопка СТАРТ
4. Кнопка ВКЛ./ВЫКЛ.
5. Отделение для батареек
1
2
3
4
5
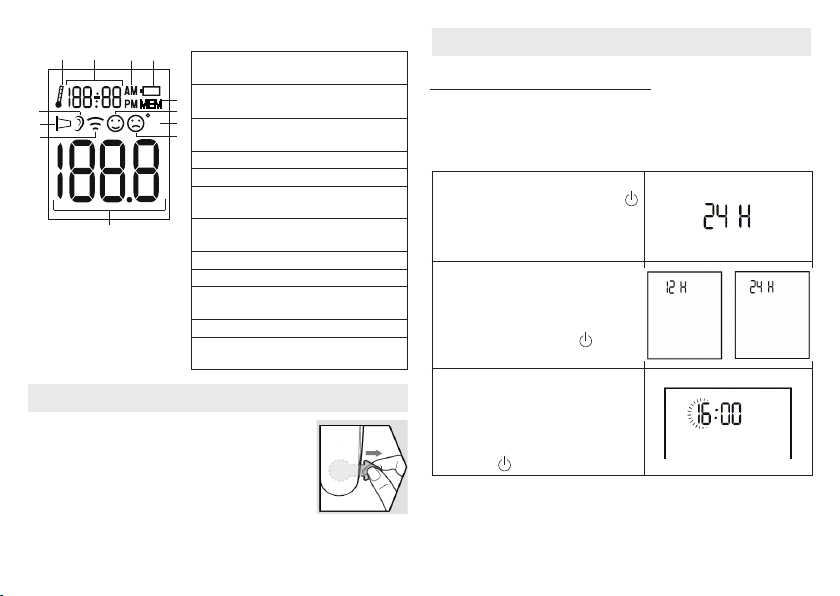
54
ЖК-дисплей
1. Режим измерения температуры
впомещении
2. Индикация температуры
впомещении/времени/даты
3. Индикация AM/PM (дополудня/
после полудня, для времени)
4. Символ батарейки
5. Режим сохранения впамяти
6. Символ нормальной
температуры
7. Единица измерения температуры
(°C или°F)
8. Символ повышенной температуры
9. Индикация температуры
10. Режим измерения температуры
объекта
11. Символ защитного колпачка
12. Режим измерения температуры
тела
5. Подготовка кработе
Новый прибор поставляется уже со встав-
ленными батарейками. Перед первым при-
менением удалите сбатареек защитную
пленку, кончик которой выступает из отде-
ления для батареек. Термометр для изме-
рения температуры вухе при этом автома-
тически включится.
6. Настройки
6.1 Настройка времени/даты
Прежде чем Вы приступите кизмерениям, рекомендуем Вам
настроить текущее время идату. Это позволит Вам впослед-
ствии легко определить, когда было выполнено измерение,
сохраненное впамяти.
1.
При выключенном приборе на-
жмите кнопку ВКЛ./ВЫКЛ.
иудерживайте ее нажатой вте-
чение трех секунд. На дисплее
появится надпись «24H».
2. Спомощью кнопки СТАРТ вы-
берите формат отображения
времени (12ч или 24ч) ипод-
твердите выбор нажатием
кнопки ВКЛ./ВЫКЛ. .
3.
На дисплее появится индика
-
ция часов. Спомощью кноп-
ки СТАРТ настройте показа-
ние часа иподтвердите вы-
бор нажатием кнопки ВКЛ./
ВЫКЛ. .
E
1
5
7
6
8
9
10
11
12
2 3 4
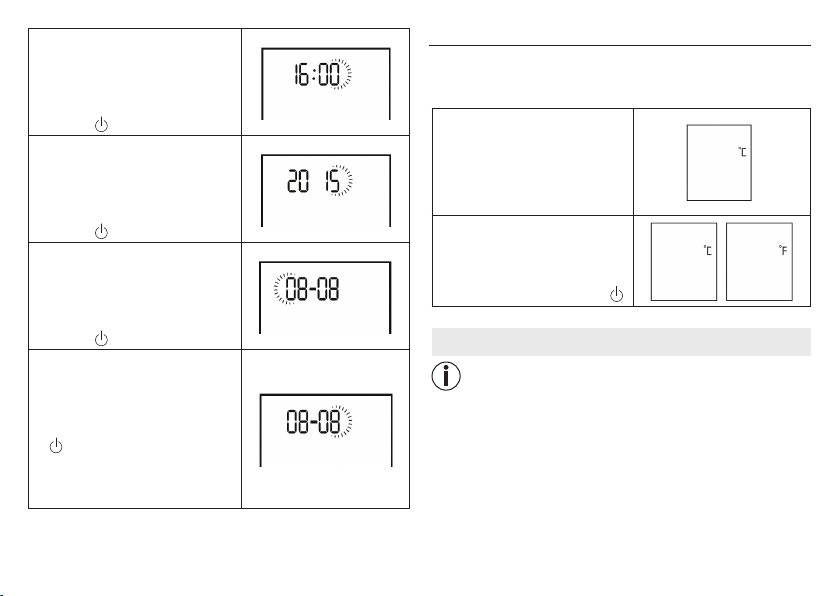
55
4.
На дисплее появится индика
-
ция минут. Спомощью кноп-
ки СТАРТ настройте показа-
ние минут иподтвердите вы-
бор нажатием кнопки ВКЛ./
ВЫКЛ. .
5.
На дисплее появится индика
-
ция года. С помощью кноп-
ки СТАРТ настройте показа-
ние года и подтвердите вы-
бор нажатием кнопки ВКЛ./
ВЫКЛ. .
6.
На дисплее замигает индика-
ция числа. Спомощью кноп-
ки СТАРТ настройте показа-
ние числа иподтвердите вы-
бор нажатием кнопки ВКЛ./
ВЫКЛ. .
7.
На дисплее замигает индика-
ция месяца. Спомощью кноп-
ки СТАРТ настройте показание
месяца иподтвердите выбор
нажатием
кнопки ВКЛ./ВЫКЛ.
. После этого прибор авто-
матически выключится. Дата
ивремя будут сохранены впа-
мяти.
6.2
Выбор единиц измерения температуры (°Cили °F)
Вы можете выбрать отображение результатов измерения
температуры вградусах Цельсия (°C) или вградусах Фа-
ренгейта (°F).
1.
При выключенном прибо-
ре нажмите кнопку СТАРТ
и удерживайте ее нажа
-
той втечение трех секунд.
На дисплее появится над
-
пись «°C».
2.
С помощью кнопки СТАРТ
выберите единицу измере
-
ния температуры (°Cили °F)
иподтвердите выбор нажа-
тием кнопки ВКЛ./ВЫКЛ. .
7. Измерение
Указание
Перед каждым применением проверяйте, не повреждена
ли линза. В случае ее повреждения обратитесь в сервис-
ный центр. Учтите, что перед использованием термометр
должен находиться в помещении, в котором выполняется
измерение, как минимум в течение 30 минут.
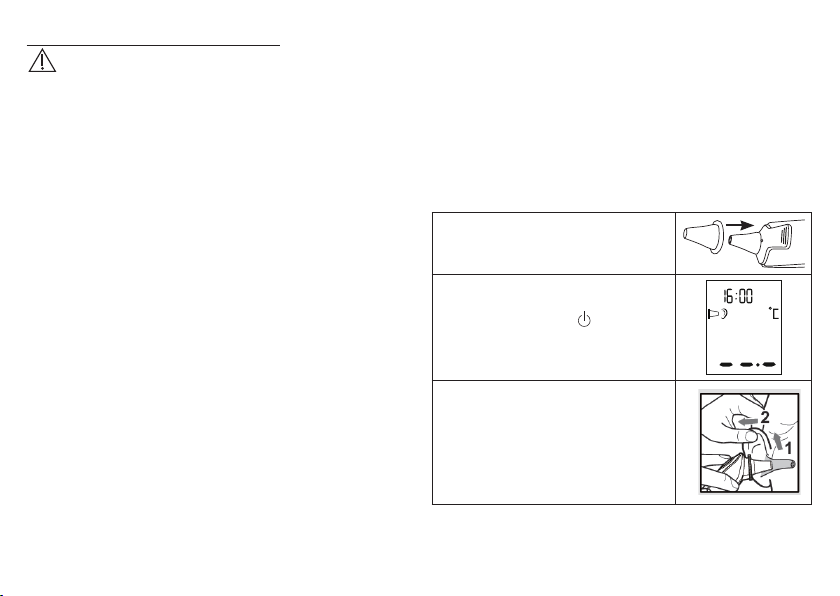
56
7.1 Измерение температуры тела
ПРЕДОСТЕРЕЖЕНИЕ
•
Унекоторых людей температура влевом иправом ухе
различна. Для отслеживания изменений температуры
уодного человека всегда измеряйте температуру вод-
ном итом же ухе.
•
Дети должны применять термометр для измерения тем-
пературы вухе только под присмотром взрослых. Как
правило, измерение температуры удетей возможно
с6месяцев. Умладенцев до 6 месяцев слуховой проход
еще очень мал, поэтому часто температуру барабанной
перепонки измерить невозможно, всвязи счем нередко
имеют место заниженные результаты измерения.
•
Запрещается проводить измерение температуры вухе
своспалительными заболеваниями (например, выде-
ление гноя, секрета), после возможных ушных травм
(например, при повреждении барабанной перепонки)
или встадии выздоровления после оперативного вме-
шательства. Во всех подобных случаях необходима кон-
сультация слечащим врачом.
•
При определенных острых инфекционных заболеваниях
не следует применять термометр для измерения тем-
пературы вухе для нескольких людей, т.к. при этом
возможен перенос инфекции, несмотря на проведение
очистки ивлажной дезинфекции. Вотдельных случаях
необходима консультация лечащего врача.
•
Данный термометр для измерения температуры вухе
разрешается использовать только снадетым защитным
колпачком.
•
На температуру вухе могут повлиять следующие об-
стоятельства: если Вы долгое время лежали на одном
ухе; если уши закрыты; если уши не защищены от силь-
ной жары или холода, или после плавания/купания. Ес-
ли вВашем случае имеет место одно из перечисленных
обстоятельств, подождите 20минут, прежде чем произ-
водить измерение.
•
Ушная сера может повлиять на результаты измерения,
поэтому перед измерением при необходимости очисти-
те ухо.
1.
Наденьте чистый защитный колпачок
на наконечник датчика термометра
для измерения температуры вухе.
2. Для включения термометра для из-
мерения температуры вухе нажмите
кнопку ВКЛ./ВЫКЛ. . После трех
звуковых сигналов включится ди-
сплей.
3.
Поскольку слуховой проход слег-
ка изогнут, перед введением нако-
нечника датчика ухо следует слегка
потянуть назад ивверх, чтобы кон
-
чик защитного колпачка можно бы-
ло направить прямо на барабанную
перепонку.
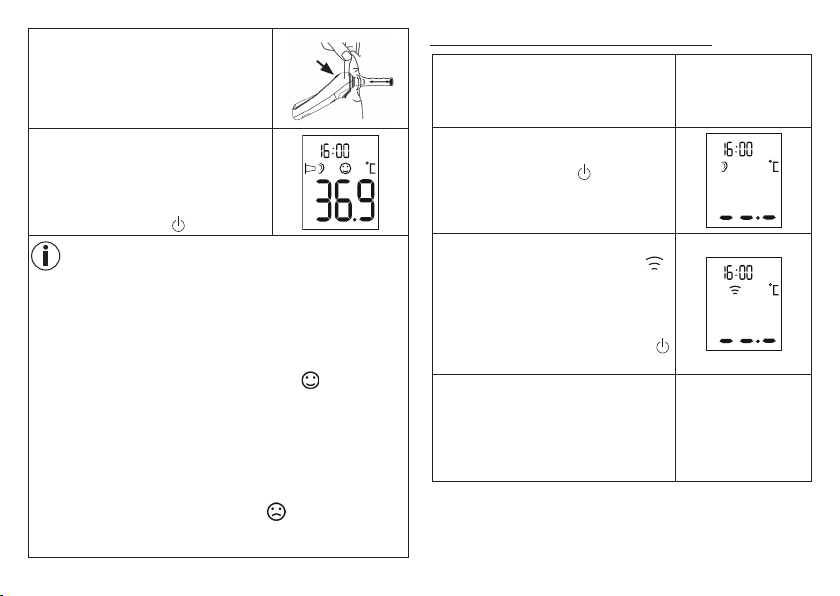
57
4.
Осторожно введите наконечник дат-
чика взащитном колпачке вслухо-
вой проход инажмите кнопку СТАРТ,
чтобы начать измерение.
5.
Примерно через однусекунду раз-
дастся звуковой сигнал, ирезультат
измерения отобразится на дисплее.
Для выключения термометра для из-
мерения температуры вухе нажмите
кнопку ВКЛ./ВЫКЛ. .
Указание
Если после измерения втечение минуты не будет нажато
никаких кнопок, термометр для измерения температуры
вухе выключится автоматически.
Индикатор повышенной температуры
Если измеренная температура < 38°C (100,4°F), на дис-
плее появляется улыбающийся смайлик ираздается
короткий звуковой сигнал.
Если измеренная температура находится вдиапазоне
от37,5 до 37,9°C, дополнительно раздаются два корот-
ких звуковых сигнала (индикация для «повышенной тем-
пературы»).
Если измеренная температура ≥ 38°C (100,4°F), на дис
-
плее появляется грустный смайлик ираздается один
короткий звуковой сигнал, потом один длинный итри ко-
ротких сигнала.
7.2 Измерение температуры объекта
1.
Снимите защитный колпачок (если
он надет) с наконечника датчика
термометра для измерения темпе-
ратуры вухе.
2. Для включения термометра для из
-
мерения температуры вухе нажмите
кнопку ВКЛ./ВЫКЛ. . После трех
звуковых сигналов включится ди-
сплей.
3.
Убедитесь, что включен режим из-
мерения температуры объекта ( ).
Для переключения между режи-
мом измерения температуры тела
ирежимом измерения температу
-
ры объекта ненадолго нажмите од-
новременно кнопку ВКЛ./ВЫКЛ.
икнопку СТАРТ.
4. Поднесите наконечник датчика тер-
мометра для измерения температу-
ры вухе кнужному месту измере-
ния на расстояние 1–2 см инажмите
кнопку СТАРТ.

58
5.
Через однусекунду раздастся зву-
ковой сигнал, ирезультат измере-
ния отобразится на дисплее. Для
выключения термометра для изме-
рения температуры вухе ненадол-
го нажмите кнопку ВКЛ./ВЫКЛ. .
7.3 Индикация температуры помещения
При включении термометра для измерения температуры
вухе на дисплее поочередно отображаются температура
помещения, дата ивремя, сменяя друг друга через каж-
дые 3секунды.
7.4 Отображение сохраненных измеренных
значений
Термометр для измерения температуры вухе автоматиче-
ски сохраняет впамяти результаты последних 10 измере-
ний температуры тела или температуры объектов (сдатой
ивременем). Чтобы просмотреть сохраненные впамяти
результаты измерений, выполните следующие действия.
1.
Нажмите кнопку ВКЛ./ВЫКЛ.
, чтобы выключить термо-
метр для измерения темпера-
туры вухе.
2.
Нажмите кнопку ВКЛ./ВЫКЛ.
иудерживайте ее нажатой
втечение 3секунд. На дис-
плее появится Mи результат
измерения, сохраненный по
-
следним.
3.
Для перехода от одного ре-
зультата измерений кдругому
нажимайте кнопку ВКЛ./ВЫ-
КЛ. . При каждом последу-
ющем нажатии кнопки ВКЛ./
ВЫКЛ. сначала отобража-
ется номер ячейки памяти,
азатем очередной результат
измерения.
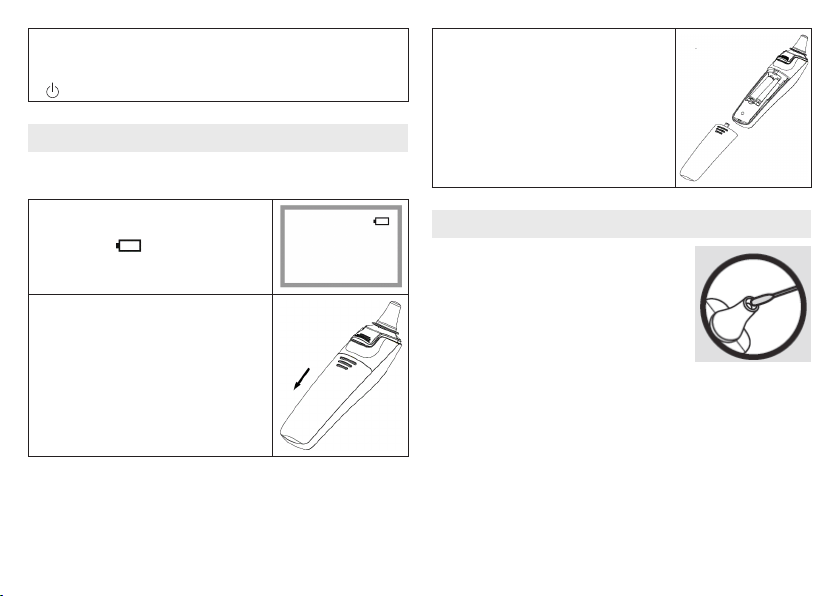
59
4.
Если Вы хотите продолжить измерение, нажмите кнопку
СТАРТ. Если Вы хотите выключить термометр для измере-
ния температуры вухе, удерживайте кнопку ВКЛ./ВЫКЛ.
нажатой втечение 3секунд.
8. Замена батареек
Прежде чем заменять батарейки, убедитесь, что прибор
выключен.
1.
Заменяйте батарейки сразу же по-
сле появления на дисплее символа
батарейки ( ).
2.
Выдвиньте крышку отделения для
батареек иизвлеките батарейки.
3. Вставьте новые батарейки 1,5В ти-
паAAA. Следите за соблюдением по-
лярности батареек. Закройте отде-
ление для батареек.
9. Очистка/хранение
Защитные колпачки предназначены
только для однократного использо-
вания.
Наконечник датчика — это самая
чувствительная часть термометра
для измерения температуры вухе.
Будьте осторожны при очистке нако-
нечника датчика, чтобы избежать его
повреждения. Используйте для этого мягкую салфетку
или ватную палочку, смоченную дезинфекционным сред-
ством, спиртом или теплой водой.
Для очистки всего прибора используйте мягкую салфетку,
слегка смоченную мыльным раствором.
Не используйте агрессивные чистящие средства.
Если Вы планируете длительное время не пользоваться
прибором, извлеките из него батарейки. Запрещается хра-
нить прибор или использовать его при слишком высокой
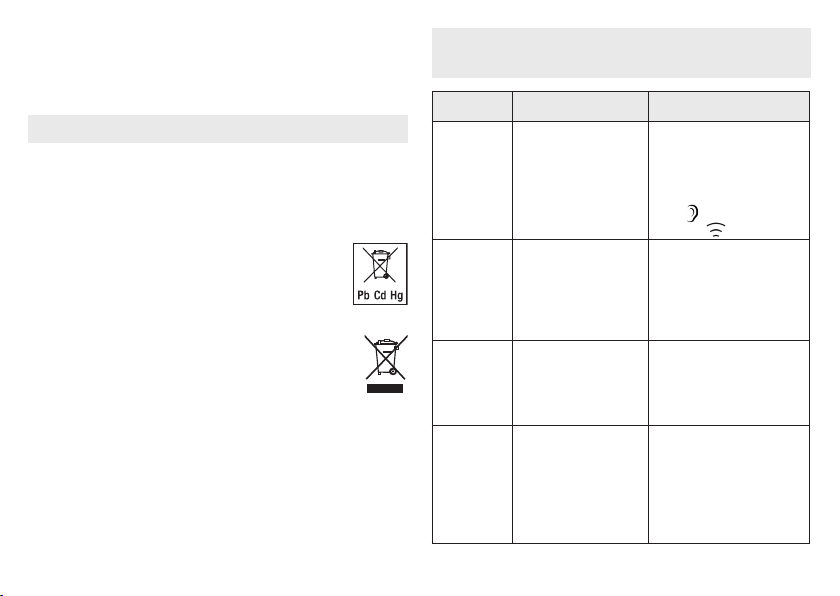
60
или низкой температуре или влажности воздуха (см. тех-
нические характеристики), на ярком солнечном свете, под
током или впыльных местах. Впротивном случае возмож-
ны неточности при измерении.
10. Утилизация
Использованные, разряженные батарейки необходи-
мо утилизировать вспециальных контейнерах, сдавать
впункты приема спецотходов или вмагазины электро-
оборудования. Закон обязывает пользователей обеспечить
утилизацию батареек.
Указание: эти знаки предупреждают оналичии
вбатарейках токсичных веществ: Pb = бата-
рейка содержит свинец, Cd = батарейка
содержит кадмий, Hg = батарейка содержит
ртуть.
В интересах охраны окружающей среды катего-
рически запрещается выбрасывать прибор по
завершении срока его службы вместе с бытовы-
ми отходами. Утилизация должна производиться
через соответствующие пункты сбора в Вашей стране.
Прибор следует утилизировать согласно Директиве ЕС
по отходам электрического и электронного оборудова-
ния – WEEE (Waste Electrical and Electronic Equipment). В
случае вопросов обращайтесь в местную коммунальную
службу, ответственную за утилизацию отходов.
11. Что делать, если появляются
сообщения об ошибках?
Сообщение
об ошибке
Причина Меры поустранению
ER1
Термометр для изме-
рения температуры
вухе еще неготов
квыполнению изме
-
рения.
Приступайте кизмере
-
нию только тогда, когда
на дисплее появится
индикация режима из
-
мерения температуры
тела (
) или температуры
объекта (
).
ER2
Измеренная темпе-
ратура окружающей
среды находится
за пределами диа
-
пазона 10°C–40°C
(50°F–104°F).
Поместите термометр для
измерения температуры
вухе на30минут впо
-
мещение стемперату-
рой окружающей среды
10°C–40°C (50°F–104°F).
ER3
Термометр для изме-
рения температуры
вухе неправильно
размещен вВашем
ухе.
Внимательно следуйте
указаниям вразделе
«Измерение». Выполните
измерение заново.
ER4
Термометр для изме-
рения температуры
вухе зарегистриро
-
вал сильное изме-
нение температуры
окружающей среды.
Поместите термометр
для измерения темпера
-
туры вухе на30минут
впомещение стемпе
-
ратурой окружающей
среды 10°C–40°C (50°F–
104°F).
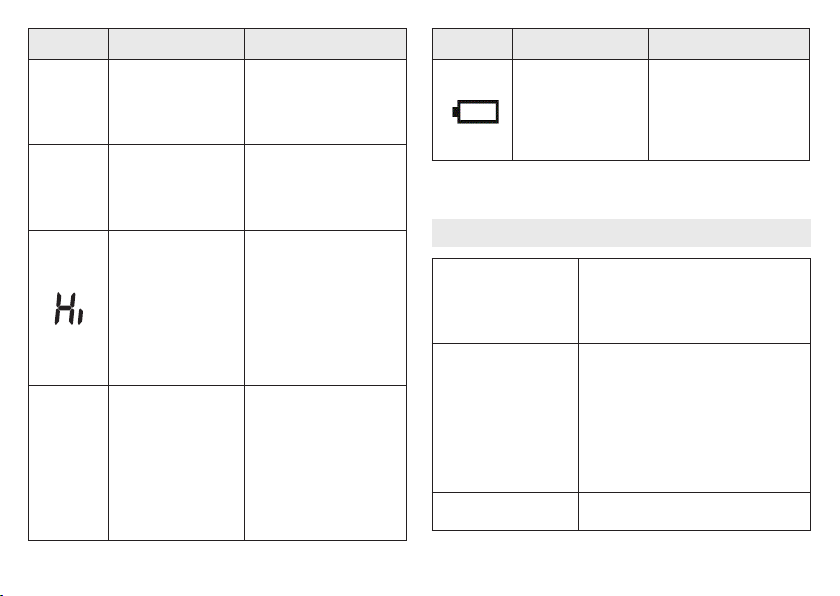
61
Сообщение
об ошибке
Причина Меры поустранению
ER5
Термометр для изме-
рения температуры
вухе работает неста
-
бильно.
Замените батарейки ипо
-
вторите попытку. Если
ошибка появится снова,
обратитесь всервисную
службу.
ER6
Термометр работает
врежиме «Измерение
температуры объек
-
та», азащитный кол-
пачок еще не снят.
Для выполнения измере-
ния температуры объекта
необходимо снять защит
-
ный колпачок.
Измерение вухе: из-
меренное значение
температуры превы
-
шает 43°C (109,4°F)
Измерение темпе
-
ратуры объекта: из-
меренное значение
температуры превы
-
шает 100°C (212°F)
Убедитесь, что прибор
изащитный колпачок
находятся сисправном
состоянии. Выполните
измерение заново.
Lo
Измерение вухе: из-
меренное значение
температуры ниже
28°C (82,4°F)
Измерение темпе
-
ратуры объекта: Из-
меренное значение
температуры ниже
−20°C (−4°F)
Убедитесь, что прибор
изащитный колпачок
находятся сисправном
состоянии. Выполните
измерение заново.
Сообщение
об ошибке
Причина Меры поустранению
Батарейки разря-
жены.
Извлеките две разря
-
дившиеся батарейки
ивставьте втермометр
для измерения темпера
-
туры вухе две новые ба-
тарейки 1,5В типаAAA.
Если Вы не нашли информацию о возникающей проблеме,
свяжитесь с нашей сервисной службой.
12. Технические характеристики
Диапазон измерения
температуры
•
Вухе: 28,0–43,0°C (82,4–109,4°F)
•
Температура объекта:
от −20 до 100°C (от −4 до 212°F)
•
Температура помещения: 0–50°C
(32–122°F)
Лабораторная точность
измерений
•
Вухе: ± 0,2°C (0,4°F) вдиапазоне
измерений 35,5–42,0°C (95,9–
107,6°F); ± 0,3°C (0,5°F) вдиапа
-
зоне измерений ≤35,5°C (95,5°F)
и≥42,0°C (107,6°F)
•
Температура объекта: ± 4%, или
± 2°C (4°F)
•
Температура помещения: ± 2°C
(± 4°F)
Клиническая повторяе-
мость показаний
0,11°C (0,2°F)
62
Продолжительность из-
мерения
Прибл. одна секунда
Рабочий диапазон тем
-
ператур
10–40°C (50–104°F), влажность воз-
духа 15–85% (без образования кон-
денсата)
Диапазон температур
для хранения
От –25 до 55°C (от –13 до 131°F), влаж
-
ность воздуха 15–95% (без образова-
ния конденсата)
Память 10ячеек памяти
Шаг отображения тем-
пературы
0,1°C или 0,1°F
Батарейка Пост. ток 3В (2 батарейки 1,5В
типаААА)
Размеры 155x38x47мм
Вес Около 63г (без батареек)
Защитные колпачки 10
Автоматическое отклю-
чение
60секунд
Ресурс батареек
3000 измерений подряд либо один
год при частоте измерений 1–2 вдень,
включая режим ожидания.
Класс безопасности
Подключенный медицинский при-
бор, рабочая часть типаBF
Степень защиты
IP22, защита от проникновения воды
ипыли
Серийный номер находится на приборе или в отделении
для батареек.
13. Гарантия
Мы предоставляем гарантию на дефекты материалов и
изготовления на срок 12 месяцев со дня продажи через
розничную сеть.
Гарантия не распространяется:
– на случаи ущерба, вызванного неправильным исполь-
зованием,
– на быстроизнашивающиеся части (в том числе батарейки
и защитные колпачки),
– на дефекты, о которых покупатель знал в
момент покупки,
– на случаи собственной вины покупателя,
– при отсутствии кассового чека.
Срок эксплуатации изделия: минимум 3 года
Фирма-изготовитель: Бойрер Гмбх,
Софлингер штрассе 218,
89077-УЛМ, Германия
для фирмы Ханс Динслаге ЛТд
88524 Уттенвайлер, Германия
Фирма-импортер:
Сервисный центр:

63
Дата продажи
Подпись продавца
Штамп магазина
Подпись покупателя
Возможны ошибки иизменения
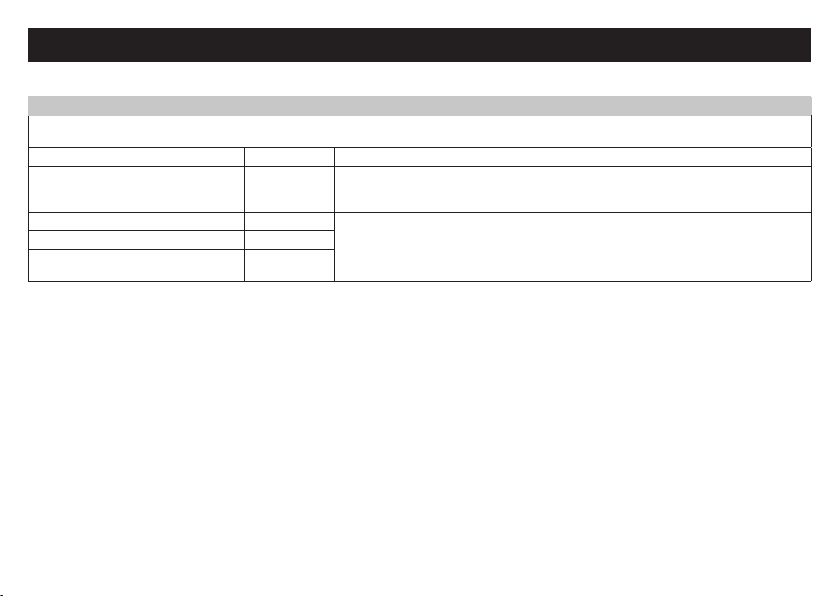
64
Table 1
Guidance and declaration of manufacturer-electromagnetic emissions
The SFT53 Ear Thermometer is intended for use in the electromagnetic environment specified below.
The customer or the user of the SFT53 Ear Thermometer should assure that it is used in such an environment.
Emissions test Compliance Electromagnetic environment – guidance
RF emissions CISPR 11 Group 1 The SFT53 Ear Thermometer uses RF energy only for its internal function.
Therefore, its emissions are very low and are not likely to cause any interference in
nearby electronic equipment.
RF emissions CISPR 11 Class B The SFT53 Ear Thermometer is suitable for use in all establishments, including dome
-
stic establishments and those directly connected to the public low-voltage power sup-
ply network that supplies buildings used for domestic purposes.
Harmonic emissions IEC 61000-3-2 Not applicable
Voltage fluctuations/flicker emissions
IEC 61000-3-3
Not applicable
ELECTROMAGNETIC COMPATIBILITY INFORMATION
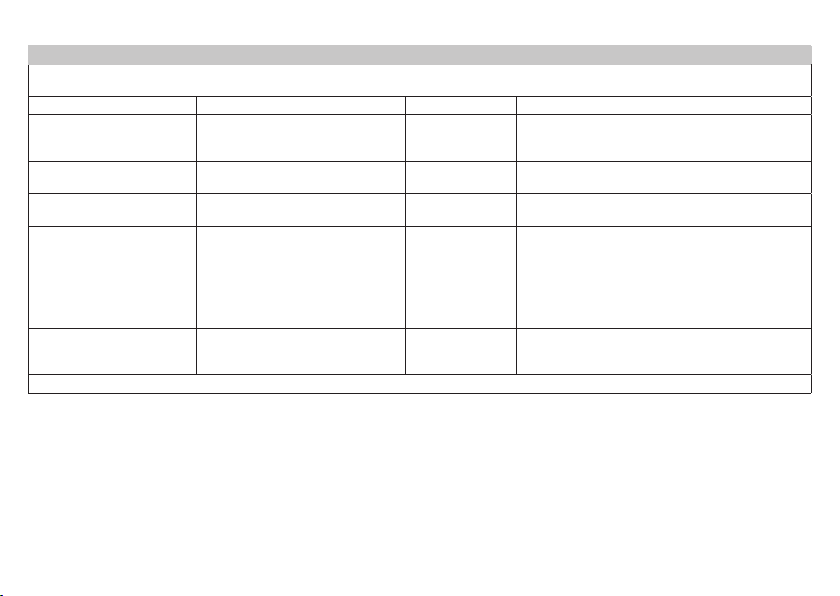
65
Table 2
Guidance and declaration of manufacturer-electromagnetic immunity
The SFT53 Ear Thermometer is intended for use in the electromagnetic environment specified below.
The customer or the user of the SFT53 Ear Thermometer should assure that it is used in such an environment.
IMMUNITY test IEC 60601 test level Compliance level Electromagnetic environment – guidance
Electrostatic discharge (ESD)
IEC 61000-4-2
± 6 kV contact
± 8 kV air
± 6 kV contact
± 8 kV air
Floors should be wood, concrete or ceramic tile. If
floors are covered with synthetic material, the rela
-
tive humidity should be at least 30 %.
Electrostatic transient/burst
IEC 61000-4-4
±2 kV for power supply lines
±1 kV for input/output lines
Not applicable
Surge IEC 61000-4-5
±1kV differential mode
±2kV common mode
Not applicable
Voltage dips, short interrup
-
tions and voltage variations
on power supply input lines
IEC 61000-4-11
<5% U
T
(>95% dip in U
T
for 0.5 cycle
40% U
T
(60% dip in U
T
) for 5 cycles
70% U
T
(30% dip in U
T
) for 25 cycles
<5% U
T
(>95% dip in U
T
) for 5 sec
Not applicable
Power frequency (50/60 Hz)
magnetic field IEC 61000-4-8
3 A/m 3 A/m
Power frequency magnetic fields should be at levels
charactertic of a typical location in a typical com
-
mercial or hospital environment.
NOTE: U
T
is the a.c. mains voltage prior to application of the test level.
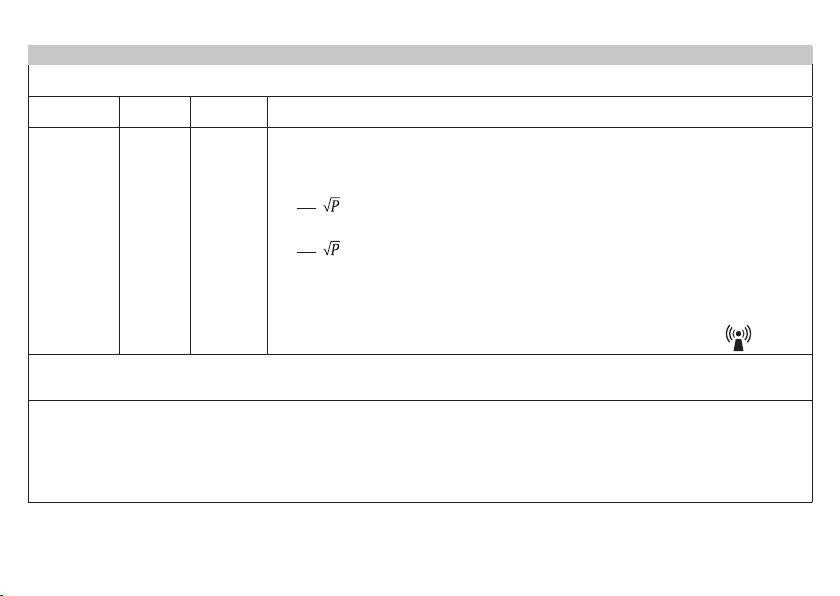
66
Table 3
Guidance and declaration of manufacturer-electromagnetic immunity
The SFT53 Ear Thermometer is intended for use in the electromagnetic environment specified below.
The customer or the user of the SFT53 Ear Thermometer should assure that it is used in such an environment.
IMMUNITY
test
IEC 60601
test level
Compliance
level
Electromagnetic environment – guidance
Conducted RF
IEC 61000-4-6
Radiated RF
IEC 61000- 4-3
3Vrms
150 kHz to
80 MHz
3 V/m
80 MHz to
2.5 GHz
Not appli
-
cable
3 V/ m
Portable and mobile RF communications equipment should be used no closer to any part of the
SFT53 Ear Thermometer, including cables, than the recommended separation distance calculated
from the equation applicable to the frequency of the transmitter.
Recommended separation distance:
d = [
3.5
E
1
] 80 MHz to 800 MHz
d = [
7
E
1
] 800 MHz to 2.5 GHz
Where P is the maximum output power rating of the transmitter in watts (W) according to the trans
-
mitter manufacturer and d is the recommended separation distance in meters (m).
Field strengths from fixed RF transmitters, as determined by an electromagnetic site survey,
a
should
be less than the compliance level in each frequency range.
Interference may occur in the vicinity of equipment marked with the following symbol:
NOTE 1 At 80 MHz and 800 MHz, the higher frequency range applies.
NOTE 2 These guidelines may not apply in all situations. Electromagnetic propagation is aected by absorption and reflection from structures,
objects and people.
Field strengths from fixed transmitters, such as base stations from radio (cellular/cordless) telephones and land mobile radios, amateur radio,
AM and FM radio broadcast and TV broadcast can not be predicted theoretic call with accuracy. To assess the electromagnetic environment
due to fixed RF transmitters, an electromagnetic site survey should be considered. If the measured field strength in the location in which the
SFT53 Multi-function Thermometer is used exceeds the applicable RF compliance level above, the SFT53 Multi-function Thermometer should
be observed to verify normal operation. If abnormal performance is observed, additional measures may be necessary, such as reorienting or
relocating the SFT53 Multi-function Thermometer.
Over the frequency range 150kHz to 80MHz, field strengths should be less than [V1] V/m.
67
Table 4
Recommended separation distances between portable and mobile RF communications equipment and the SFT53 Ear Thermometer
The SFT53 Ear Thermometer is intended for use in an electromagnetic environment in which radiated therefore disturbances are controlled. The
customer or the user of the SFT53 Ear Thermometer can help prevent electromagnetic interference by maintaining a minimum distance between
portable and mobile RF communications equipment (transmitters) and the SFT53 Ear Thermometer as recommended below, according to the
maximum output power of the communications equipment.
Rated maximum output
power of transmitter
(W)
Separation distance according to frequency of transmitter
(m)
80 MHz to 800 MHz
d = [
3.5
E
1
]
800 MHz to 2.5 GHz
d = [
7
E
1
]
0.01 0.12 0.23
0.1 0.38 0.73
1 1.2 2.3
10 3.8 7.3
100 12 23
For transmitters rated at a maximum output power not listed above, the recommended separation distance d in metres (m) can be estimated
using the equation applicable to the frequency of the transmitter, where P is the maximum output power rating of the transmitter in watts (W)
according to the transmitter manufacturer.
NOTE 1 At 80 MHz and 800 MHz, the separation distance for the higer frequency range applies.
NOTE 2 These guidelines may not apply in all situations. Electromagnetic propagation is aected by absorption and reflection from structures,
objects and people.

68
757.041 - 0917
Hans Dinslage GmbH, Riedlinger Str. 28, 88524 Uttenweiler, Germany
www.sanitas-online.de