Loading ...
Loading ...
Loading ...
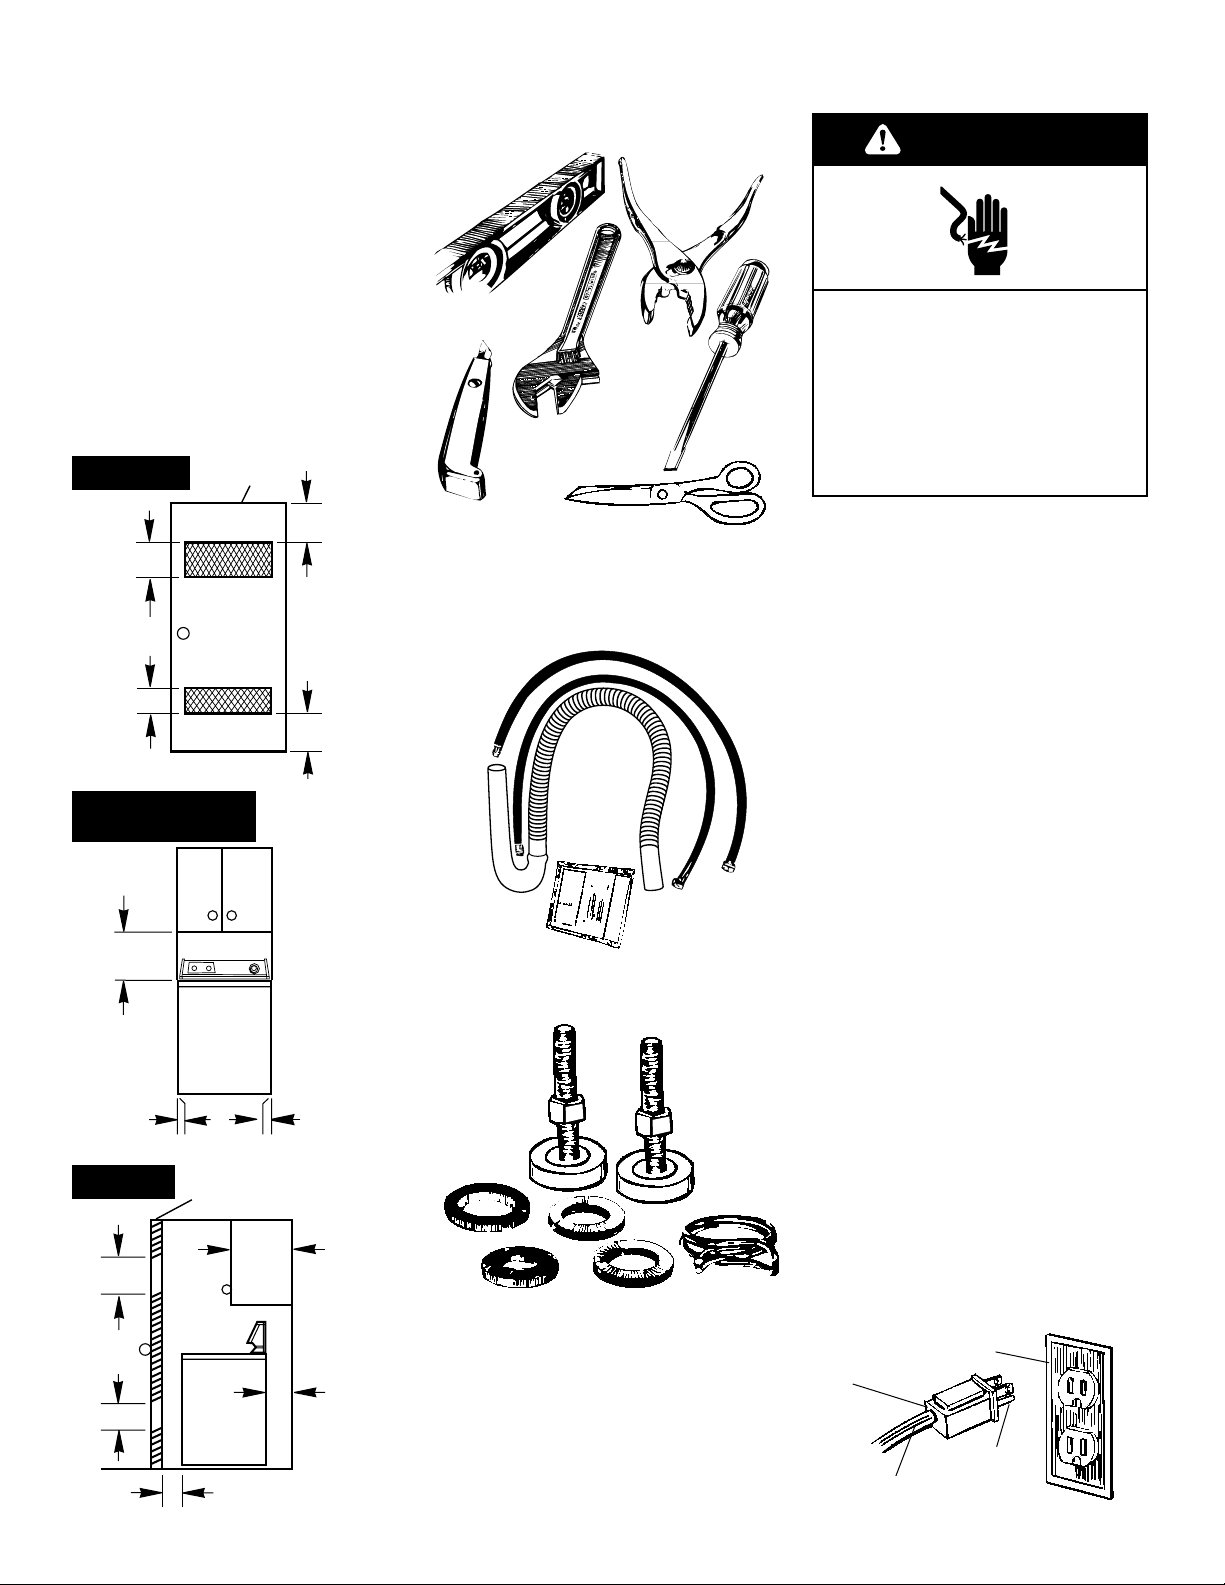
Tools needed for
installation:
Level
Pliers
Utility
knife
Wrench
Scissors
Flat-blade
screwdriver
Electrical requirements
Grounding
prong
PAGE 3
3-prong grounding-
type outlet
3-prong
grounding
plug
Power
supply cord
Plug into a grounded 3-prong outlet.
Do not remove ground prong.
Do not use an adapter.
Do not use an extension cord.
Failure to follow these instructions
can result in death, fire, or electrical
shock.
Electrical Shock Hazard
Parts supplied for
installation:
Remove parts from packages. Check
that all parts were included.
1 hose clamp
2 inlet hoses
4 flat water hose washers
2 front-leveling legs with nuts
1 drain hose
Grounding instructions
This appliance must be grounded. In the
event of a malfunction or breakdown,
grounding will reduce the risk of electric
shock by providing a path of least
resistance for the electric current. This
appliance is equipped with a cord having
an equipment-grounding conductor and
a grounding plug. The plug must be
plugged into an appropriate outlet that is
properly installed and grounded in
accordance with all local codes and
ordinances.
WARNING – Improper connection of the
equipment-grounding conductor can
result in a risk of electric shock. Check with
a qualified electrician or serviceman if you
are in doubt as to whether the appliance is
properly grounded. Do not modify the plug
provided with the appliance – if it will not fit
the outlet, have a proper outlet installed by
a qualified electrician.
WARNING
*0"
*(0 mm)
*0"
*(0 mm)
Front view
(door not shown)
Side view
Minimum installation spacing
Recessed area
instructions
This washer may be installed in a
recessed area or closet.
The installation dimensions shown are
the minimum spaces allowable.
Additional spacing should be
considered for ease of installation
and servicing. If closet door is
installed, the minimum air openings in
top and bottom of door are required.
Louvered doors with air openings in
top and bottom are acceptable.
Companion appliance spacing
should be considered.
Closet door
Front view
Closet door
17"
(432 mm)
48 sq. in.
(3.10 m
2
)
14"
(356 mm)
max.
4"
(102 mm)
min.
24 sq. in.
(1.55 m
2
)
1" (25 mm) min.
3"
(76 mm)
3"
(76 mm)
24 sq. in.
(1.55 m
2
)
48 sq. in.
(3.10 m
2
)
If codes permit and a separate ground wire
is used, it is recommended that a qualified
electrician determine that the ground path
is adequate.
Do Not ground to a gas pipe.
Check with a qualified electrician if you are
not sure the washer is properly grounded.
Do Not have a fuse in the neutral or ground
circuit.
A 120-volt, 60-Hz, AC-only, 15- or
20-ampere fused electrical supply is
required. (Time-delay fuse or circuit breaker
is recommended.) It is recommended that
a separate circuit serving only this
appliance be provided.
Use new hoses and washers that
came with your Whirlpool washer.
Replace inlet hoses after 5 years of
use to reduce the risk of hose failure.
Inspect and replace inlet hoses if
bulges, kinks, cuts, wear, or leaks are
found. When replacing your inlet
hoses, mark the date of replacement
on the label with a permanent
marker.
2. Insert a flat washer into each
end of the inlet hoses. Check that
washers are firmly seated in
couplings.
Coupling
3. Attach hose to bottom inlet
valve opening first. Then second hose
to top inlet. Tighten couplings by
hand; then use pliers to make an
additional two-thirds turn.
Slide washer onto cardboard or
hardboard before moving across
floor.
PAGE 4
Inlets are plastic.
Do Not strip or
crossthread.
Hot water
inlet valve
Cold
water
inlet
valve
Washer
Now start...
Pull firmly to remove the end of
shipping strap from the back of the
washer. The shipping strap plug must
be completely removed from the
washer for the self-leveling legs to
be released.
Save the shipping strap for use in
Step 6.
Excessive Weight Hazard
Use two or more people to move
and install washer.
Failure to do so can result in back
or other injury.
WARNING
Shipping
tape
Pull the strap completely
out of the washer.
1. Remove tape that covers
shipping strap. Pull to completely
remove the shipping strap with 2
cotterpins from the inside of the washer.
4. To prevent the drain hose from
coming off or leaking, it must be
installed per the following instructions:
1. Wet the inside end of the drain
hose with tap water. DO NOT USE
ANY OTHER LUBRICANT.
2. Squeeze ears of clamp with pliers to
open and place clamp over the
end of the drain hose.
3. While holding clamp open, work
end of drain hose onto drain
connector until drain hose contacts
ribbed stop.
4. Position clamp over the drain hose
area marked “clamp.” Release
clamp. Clamp should be 1/4 inch
(6.4 mm) from end of drain hose.
CLAMP
Slide washer onto cardboard or
hardboard before moving across
floor to avoid damaging floor
covering.
IMPORTANT: THIS PROCEDURE MUST BE
FOLLOWED TO ASSURE PROPER
INSTALLATION.
5. Open clamp
and slide over “hook”
end of drain hose to
secure the rigid and
corrugated sections
together.
6. Move washer close to final
position. Put “hook” end of drain hose
into laundry tub or standpipe. Check
for proper length of drain hose.
Drain
hose
Clamp
Ribbed
stop
1/4"
(6.4 mm)
Loading ...
Loading ...
Loading ...