Loading ...
Loading ...
Loading ...
COMMISSIONING
77
TO CHECK OR ADJUST THE PRESET OUTLET TEMPERATURE SETTING
The temperature settings will be displayed on the LED display. The preset outlet temperature settings are:
874 series 38°C, 40°C, 42°C, 43°C, 45°C, 50°C, 55°C, 60°C, 70°C, 75°C
876 series 38°C, 40°C, 42°C, 43°C, 45°C, 50°C
It is necessary to have the electrical supply to the water heater switched on during stages of checking or
adjusting the preset outlet temperature setting procedure.
Warning: The removal of the front panel will expose 240 volt wiring. Take care not to touch wiring
terminals. The adjustment must be carried out by a qualified person.
Warning: This procedure will involve the adjustment of dip switches. Adjustment of a dip switch should
only be made with an insulated tool.
To check or adjust the preset outlet temperature setting:
1. Switch off the electrical supply at the power outlet to the water heater.
2. Remove the screws holding the front panel to the jacket.
3. Gently disengage the front panel and pull forward to remove from the
water heater.
4. Close the cold water isolation valve at the inlet to the water heater.
5. Switch on the electrical supply at the power outlet to the water heater.
Note: Wait ten (10) seconds for the electronic system to initialise.
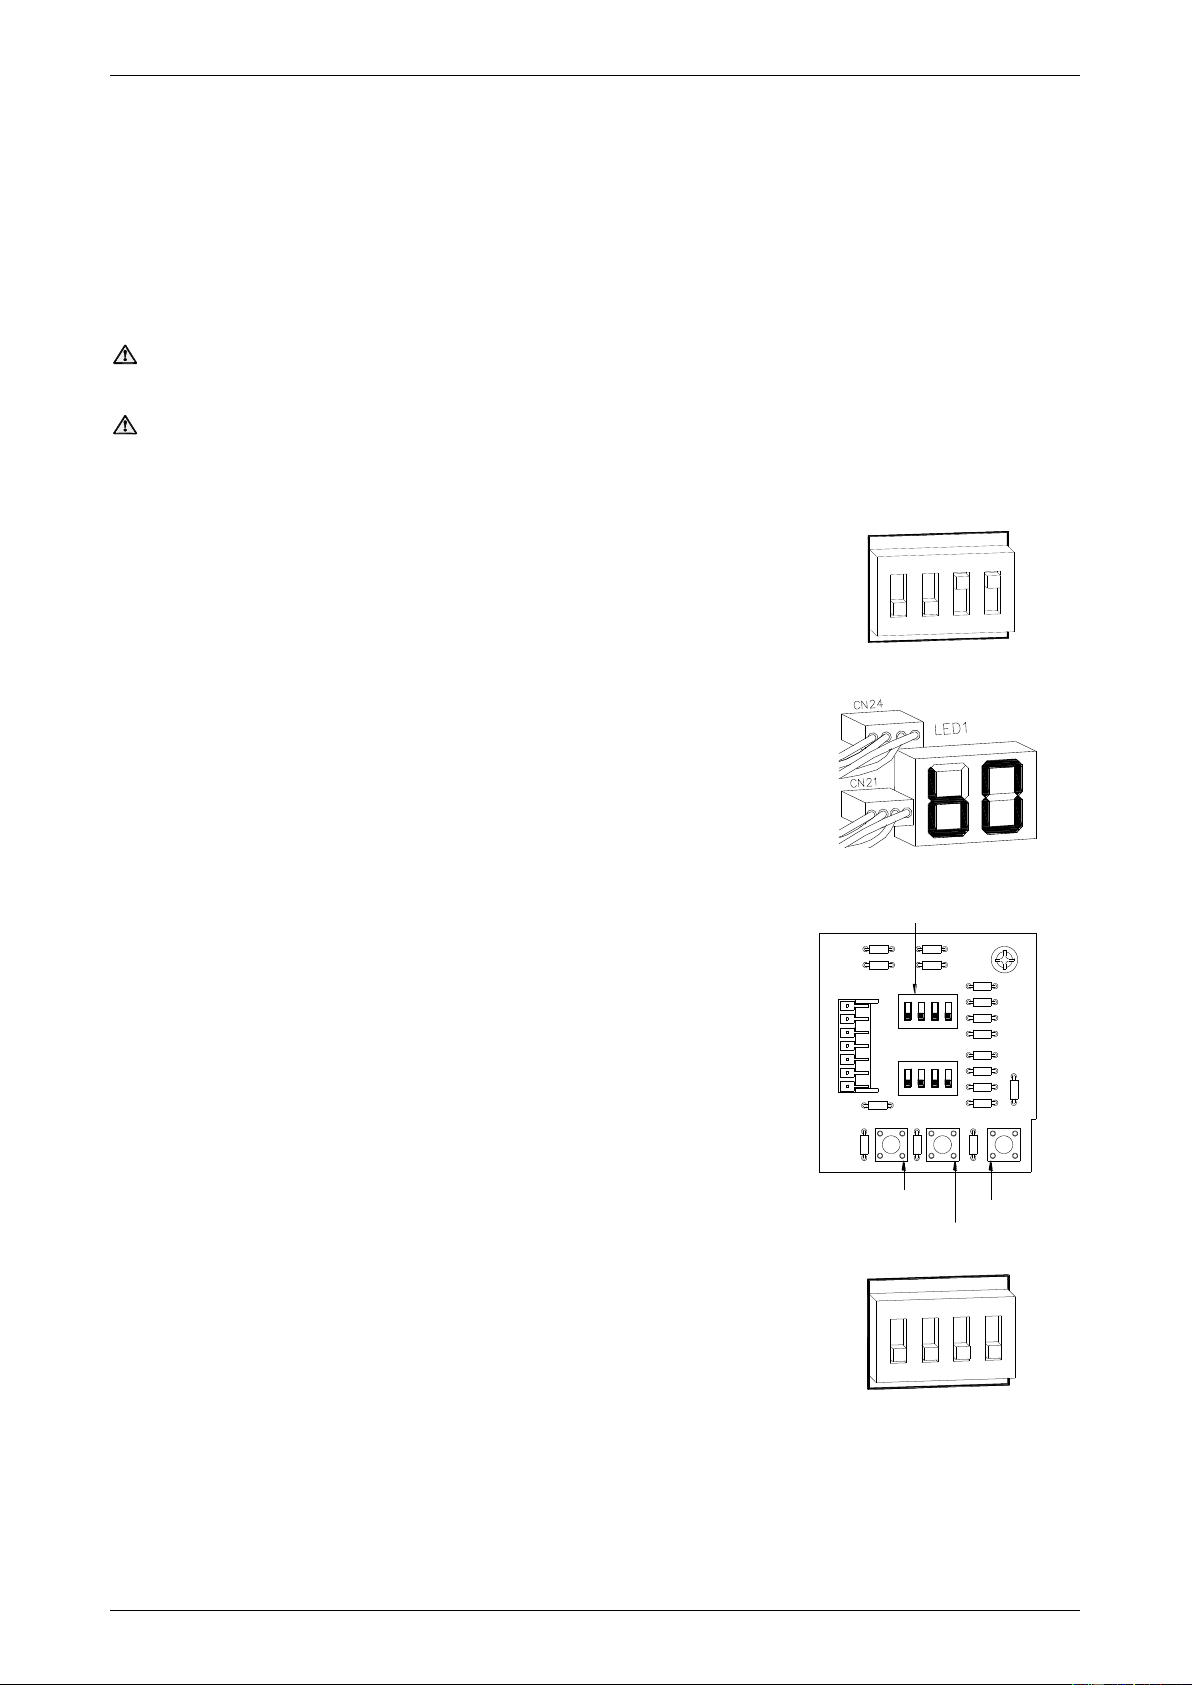
6. Switch dip switches 3 and 4 to the on (up) position on the DIP 1 set of
DIP switches on the I.C. Board.
The current preset outlet temperature setting will show on the LED
display.
If the temperature displayed on the LED display is the desired preset
outlet temperature setting, then proceed to step 8, as no further
adjustment is necessary.
7. Press the MAX button to increase or the MIN button to decrease the
preset outlet temperature setting.
Each press of the MAX or MIN button will increase or decrease the
preset temperature by one increment.
The MAX and MIN buttons are located underneath the DIP 1 and
DIP 2 set of DIP switches.
874 series
The increments are 38, 40, 42, 43, 45, 50, 55, 60, 70, 75.
876 series
The increments are 38, 40, 42, 43, 45, 50.
8. Switch dip switches 3 and 4 to the off (down) position.
The LED display will go blank.
Note: Wait ten (10) seconds for the setting to be saved. The preset
outlet temperature setting is now set.
9. Switch off the electrical supply at the power outlet to the water heater.
10. Refit the front panel and screws to the water heater.
11. Open the cold water isolation valve fully at the inlet to the water heater.
12. Switch on the electrical supply at the power outlet to the water heater.
DIP SWITCHES
PRESET OUTLET TEMPERATURE SETTINGS
CONTINUOUS FLOW FLOW WATER HEATER
86,87 SERIES, 022,024,027 MODELS
DIP1
OFF ON
1
2
3
4
1
2
3
4
1
2
3
4
ON
ON
DIP2
OFF ON
1
2
3
4
LED Display
Continuous Flow Water Heater
86, 87 Series, 022, 024, 027 Models
MIN. BUTTON
MAX. BUTTON
ADJUSTER
BUTTON
DIP 1 SET OF
DIP SWITCHES
DIP SWITCH AND ADJUSTMENT BUTTONS
CONTINUOUS FLOW WATER HEATER
86,87 SERIES, 022,024,027 MODELS
1 2 3
4
OFF ON
DIP1
1 2
3
4
ON
1 2 3 4
OFF ON
DIP2
MIN MAX
ADJ
1 2 3 4
ON
DIP1
OFF ON
1
2
3
4
1
2
3
4
1
2
3
4
ON
ON
DIP2
OFF ON
1
2
3
4
1
2
3
4
ON
DIP1
OFF ON
1
2
3
4
DIP SWITCHES
PRESET OUTLET TEMPERATURE SETTINGS
CONTINUOUS FLOW FLOW WATER HEATER
86,87 SERIES, 022,024,027 MODELS
1
2
3
4
ON
DIP2
OFF ON
1
2
3
4
Loading ...
Loading ...
Loading ...