Loading ...
Loading ...
3
J Press FREEZER TEMP again to adjust the set point. The settling
will increase by one bar with each press of the button, returning to
one bar after reaching five.
After 2 minutes of inactivity, any changes will be saved and the
display will return to the home screen.
Crisper Humidity Control
You can control the amount of humidity in the moisture-sealed crisper.
Adjust the control to any setting between LOW and HIGH.
LOW (open) for best storage of fruits and vegetables with skins.
HIGH (closed) for best storage of fresh, leafy vegetables.
Water and Ice Dispensers
NOTES:
J The dispensing system will not operate when the freezer door is
open.
J Allow 24 hours for the refrigerator to cool down and chill water.
J Allow 24 hours to produce the first batch of ice. Discard the first
three batches of ice produced. Wait 72 hours for full ice production.
J The display screen on the dispenser control panel will turn off
automatically and enter “sleep” mode when the control buttons and
dispenser lever have not been used for 2 minutes or more. While in
“sleep” mode, the first press of a control button will only reactivate
the display screen, without changing any settings.
Flush the Water System
Air in the water dispensing system can cause the water dispenser to
drip. After connecting the refrigerator to a water source or replacing
the water filter, flush the water system. Flushing the water dispensing
system forces air from the water line and filter, and prepares the water
filter for use.
NOTE: As air is cleared from the system, water may spurt out of the
dispenser.
1. Using a sturdy container, depress and hold the water dispenser
lever for 5 seconds, then release it for 5 seconds.
2. Repeat Step 1 until water begins to flow.
3. Once water begins to flow, continue depressing and releasing the
dispenser lever (5 seconds on, 5 seconds off) until a total of 3 gal.
(12 L) has been dispensed.
Additional flushing may be required in some households.
The Water Dispenser
IMPORTANT:
J Dispense at least 1 qt (1 L) of water every week to maintain a fresh
supply.
J If the flow of water from the dispenser decreases, it could be
caused by low water pressure.
J With the water filter removed, dispense 1 cup (237 mL) of water.
If 1 cup of water is dispensed in 8 seconds or less, the water
pressure to the refrigerator meets the minimum requirement.
J If it takes longer than 8 seconds to dispense 1 cup of water, the
water pressure to the refrigerator is lower than recommended.
See “Water Supply Requirements” (in the User Instructions
or the Installation Instructions and Owner’s Manual) or
“Troubleshooting” for suggestions.
To Dispense Water:
1. Press a sturdy glass against the water dispenser lever. Hold the
glass close to the water dispenser spout to ensure that the water
dispenses into the glass.
2. Remove the glass to stop dispensing.
IMPORTANT: The small tray at the bottom of the dispenser is designed
to catch small spills and allow for easy cleaning. There is no drain in
the tray.
The Ice Dispenser
Ice dispenses from the ice maker storage bin in the freezer when the
dispenser lever is pressed. To turn off the ice maker, see
“Ice Maker and Storage Bin.”
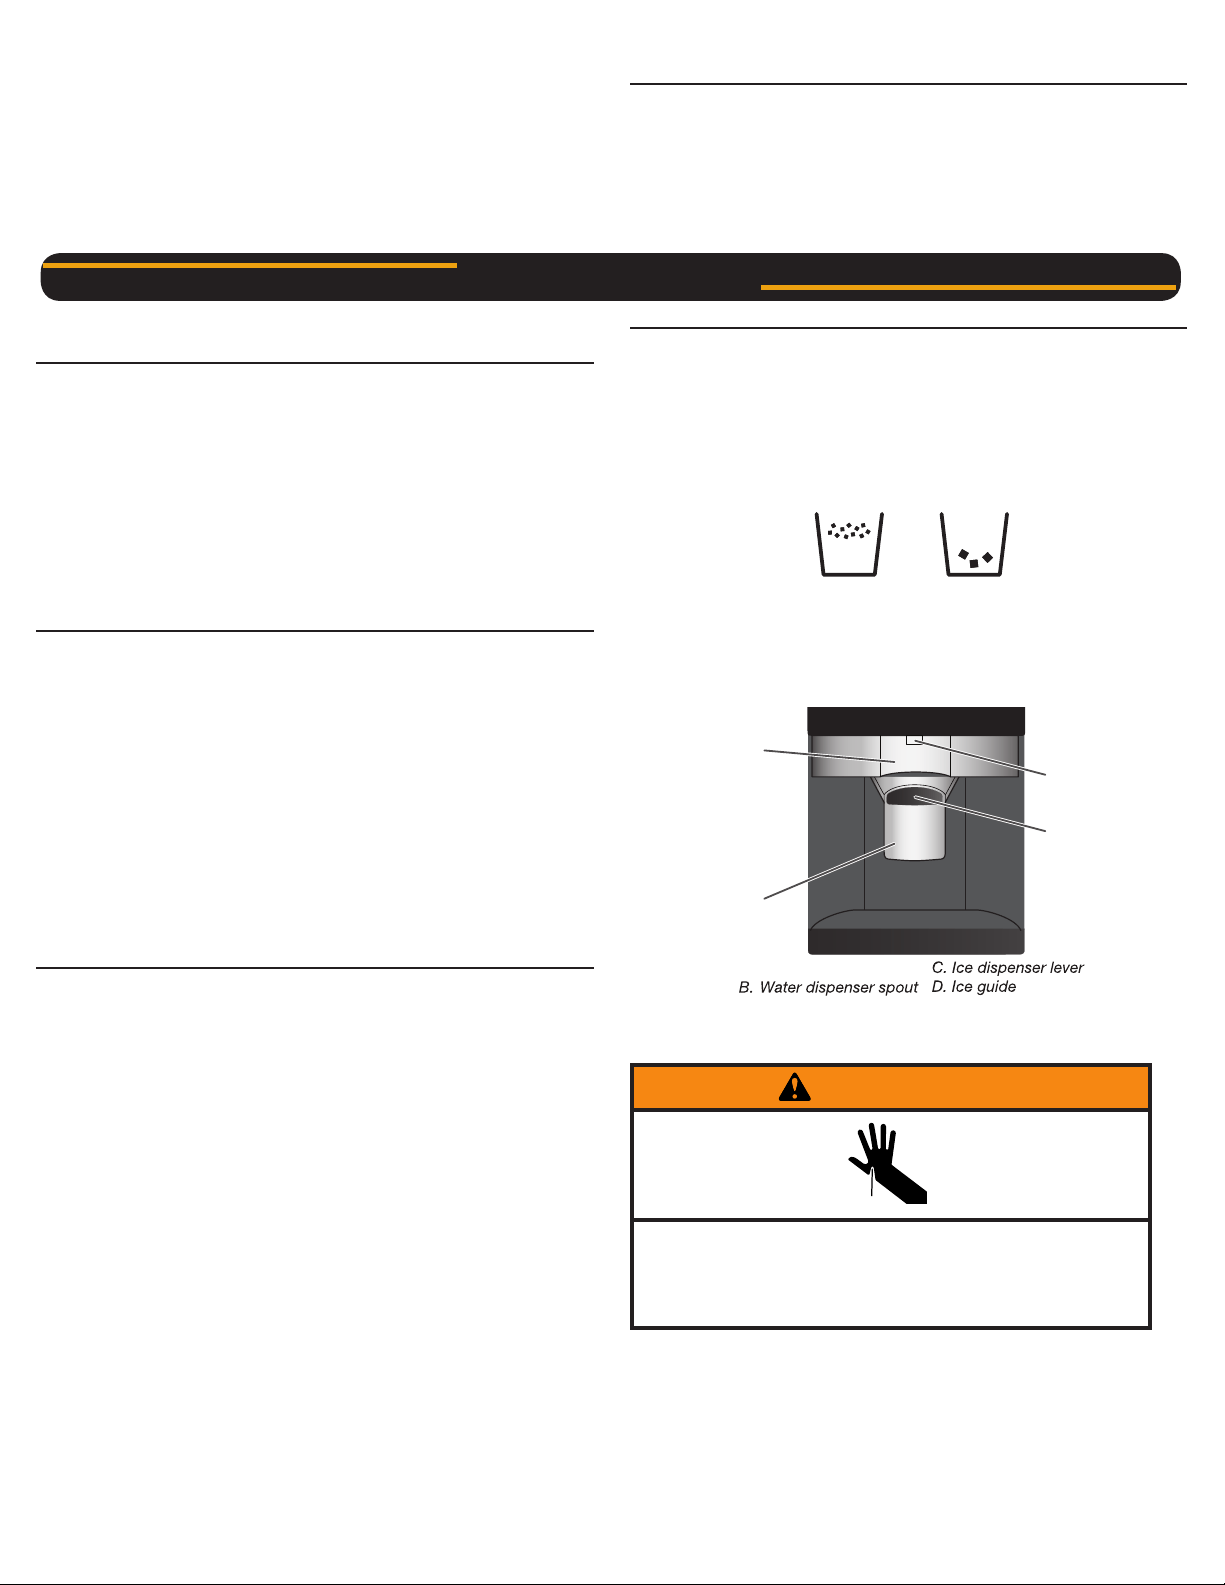
Your ice maker can produce both crushed and cubed ice. Before
dispensing ice, select which type of ice you prefer by pressing the
“Ice Type” button.
The display screen indicates which type of ice is selected.
CRUSHED CUBED
For crushed ice, cubes are crushed before being dispensed. This
may cause a slight delay when dispensing crushed ice. Noise from
the ice crusher is normal, and pieces of ice may vary in size. When
changing from crushed to cubed, a few ounces of crushed ice will be
dispensed along with the first cubes.
The Dispenser Light
When you use the dispenser, the light will automatically turn on.
If you want the light to be on continuously, press LIGHT.
Press LIGHT again to turn the dispenser light off.
The dispenser lights are LEDs that cannot be changed. If it appears
that your dispenser lights are not working, see “Troubleshooting” for
more information.
The Dispenser Lock
The dispenser can be turned off for easy cleaning or to avoid
unintentional dispensing by small children and pets.
NOTE: The lock feature does not shut off power
to the refrigerator, to
the ice maker, or to the dispenser light. It simply deactivates the
controls and dispenser lever. To turn off the ice maker, see “Ice Maker
and Storage Bin.”
Press and hold LOCK for 3 seconds to lock the dispenser.
Press and hold LOCK a second time to unlock the dispenser.
The display screen indicates when the dispenser is locked.
Ice Maker and Storage Bin
Allow 24 hours to produce the first batch of ice. Discard the first
three batches of ice produced.
The quality of your ice will be only as good as the quality of the
water supplied to your ice maker. Avoid connecting the ice maker to
a softened water supply. Water softener chemicals (such as salt)
can damage parts of the ice maker and lead to poor quality ice. If a
softened water supply cannot be avoided, make sure the water
softener is operating properly and is well mai
ntained.
Do not use anything sharp to break up the ice in the storage bin.
This can cause damage to the ice container and the dispenser
mechanism.
Do not store anything on top of or in the ice maker or storage bin.
Turning the Ice Maker On/Off
The On/Off switch, located on the left wall of the freezer door, can only
be accessed when the ice storage bin has been removed. See the
following section for bin removal instructions.
To turn on the ice maker, flip the switch to the ON (up) position.
To manually turn off the ice maker, flip the switch to the OFF
(down) position.
NOTE: Your ice maker has an automatic shutoff to keep the storage
bin from overfilling druing normal operation. As ice is made, the ice
cubes will fill the ice storage bin, and the ice cubes will raise the shutoff
arm to the OFF (arm up) position. When the storage bin is at full
capacity, the ice maker will automatically stop ice production, but the
ice maker On/Off switch will remai
n in the ON (up) position.
oving and Replacing the Ice Storage Bin
. Press down the release lever and tilt the bucket outward. Use both
hands to hold the base of the storage bin, then lift it up and out.
NOTE: It is not necessary to turn the ice maker control to the
OFF (right) position when removing the storage bin. The sensor
cover (“flipper door”) on the left wall of the freezer stops the ice
maker from producing ice if the door is open or the storage bin is
removed.
ON
OFF
The Dispenser Light
When you use the dispenser, the light will automatically turn on.
If you want the light to be on continuously, press LIGHT.
Press LIGHT again to turn the dispenser light off.
The dispenser lights are LEDs that cannot be changed. If it appears
that your dispenser lights are not working, see “Problem Solver” for
more information.
The Dispenser Lock
The dispenser can be turned off for easy cleaning or to avoid
unintentional dispensing by small children and pets.
NOTE: The lock feature does not shut off power to the refrigerator, to
the ice maker, or to the dispenser light
. It simply deactivates the
controls and dispenser lever. To turn off the ice maker, see “Ice Maker
and Storage Bin.”
Press and hold LOCK for 3 seconds to lock the dispenser.
Press and hold LOCK a second time to unlock the dispenser.
The display screen indicates when the dispenser is locked.
Ice Maker and Storage Bin
Allow 24 hours to produce the first batch of ice. Discard the first
three batches of ice produced.
The quality of your ice will be only as good as the quality of the
water supplied to your ice m
aker. Avoid connecting the ice maker to
a softened water supply. Water softener chemicals (such as salt)
can damage parts of the ice maker and lead to poor quality ice. If a
softened water supply cannot be avoided, make sure the water
softener is operating properly and is well maintained.
Do not use anything sharp to break up the ice in the storage bin.
This can cause damage to the ice container and the dispenser
mechanism.
Do not store anything on top of or in the ice maker or stora
ge bin.
Turning the Ice Maker On/Off
The On/Off switch, located on the left wall of the freezer door, can only
be accessed when the ice storage bin has been removed. See the
following section for bin removal instructions.
To turn on the ice maker, flip the switch to the ON (up) position.
To manually turn off the ice maker, flip the switch to the OFF
(down) position.
NOTE: Your ice maker has an automatic shutoff to keep the storage
bin from overfilling druing normal operation. As ice is made, the ice
cubes will fill the ice storage bin, and the ice cubes will raise the shutoff
arm to the OFF (arm up) position. When the storage bin is at full
capacity, the ice maker will automatically stop ice production, but the
ice maker On/Off switch will remai
n in the ON (up) position.
Removing and Replacing the Ice Storage Bin
1. Press down the release lever and tilt the bucket outward. Use both
hands to hold the base of the storage bin, then lift it up and out.
NOTE: It is not necessary to turn the ice maker control to the
OFF (right) position when removing the storage bin. The sensor
cover (“flipper door”) on the left wall of the freezer stops the ice
maker from producing ice if the door is open or the storage bin is
removed.
The Dispenser Light
When you use the dispenser, the light will automatically turn on.
If you want the light to be on continuously, press LIGHT.
Press LIGHT again to turn the dispenser light off.
The dispenser lights are LEDs that cannot be changed. If it appears
that your dispenser lights are not working, see “Problem Solver” for
more information.
The Dispenser Lock
The dispenser can be turned off for easy cleaning or to avoid
unintentional dispensing by small children and pets.
NOTE: The lock feature does not shut off power to the refrigerator, to
the ice maker, or to the dispenser light
. It simply deactivates the
controls and dispenser lever. To turn off the ice maker, see “Ice Maker
and Storage Bin.”
Press and hold LOCK for 3 seconds to lock the dispenser.
Press and hold LOCK a second time to unlock the dispenser.
The display screen indicates when the dispenser is locked.
Ice Maker and Storage Bin
Allow 24 hours to produce the first batch of ice. Discard the first
three batches of ice produced.
The quality of your ice will be only as good as the quality of the
water supplied to your ice m
aker. Avoid connecting the ice maker to
a softened water supply. Water softener chemicals (such as salt)
can damage parts of the ice maker and lead to poor quality ice. If a
softened water supply cannot be avoided, make sure the water
softener is operating properly and is well maintained.
Do not use anything sharp to break up the ice in the storage bin.
This can cause damage to the ice container and the dispenser
mechanism.
Do not store anything on top of or in the ice maker or stora
ge bin.
Turning the Ice Maker On/Off
The On/Off switch, located on the left wall of the freezer door, can only
be accessed when the ice storage bin has been removed. See the
following section for bin removal instructions.
To turn on the ice maker, flip the switch to the ON (up) position.
To manually turn off the ice maker, flip the switch to the OFF
(down) position.
NOTE: Your ice maker has an automatic shut off to keep the storage
bin from overfilling druing normal operation. As ice is made, the ice
cubes will fill the ice storage bin, and the ice cubes will raise the shut
off arm to the OFF (arm up) position. When the storage bin is at full
capacity, the ice maker will automatically stop ice production,
but the
ice maker On/Off switch will remain in the ON (up) position.
Removing and Replacing the Ice Storage Bin
1. Press down the release lever and tilt the bucket outward. Use both
hands to hold the base of the storage bin, then lift it up and out.
NOTE: It is not necessary to turn the ice maker control to the
OFF (right) position when removing the storage bin. The sensor
cover (“flipper door”) on the left wall of the freezer stops the ice
maker from producing ice if the door is open or the storage bin is
removed.
A
C
B
D
A
4
The Dispenser Light
When you use the dispenser, the light will automatically turn on.
If you want the light to be on continuously, press LIGHT.
Press LIGHT again to turn the dispenser light off.
The dispenser lights are LEDs that cannot be changed. If it appears
that your dispenser lights are not working, see “Problem Solver” for
more information.
The Dispenser Lock
The dispenser can be turned off for easy cleaning or to avoid
unintentional dispensing by small children and pets.
NOTE: The lock feature does not shut off power to the refrigerator, to
the ice maker, or to the dispenser light
. It simply deactivates the
controls and dispenser lever. To turn off the ice maker, see “Ice Maker
and Storage Bin.”
Press and hold LOCK for 3 seconds to lock the dispenser.
Press and hold LOCK a second time to unlock the dispenser.
The display screen indicates when the dispenser is locked.
Ice Maker and Storage Bin
Allow 24 hours to produce the first batch of ice. Discard the first
three batches of ice produced.
The quality of your ice will be only as good as the quality of the
water supplied to your ice mak
er. Avoid connecting the ice maker to
a softened water supply. Water softener chemicals (such as salt)
can damage parts of the ice maker and lead to poor quality ice. If a
softened water supply cannot be avoided, make sure the water
softener is operating properly and is well maintained.
Do not use anything sharp to break up the ice in the storage bin.
This can cause damage to the ice container and the dispenser
mechanism.
Do not store anything on top of or in the ice maker or storage
bin.
Turning the Ice Maker On/Off
The On/Off switch, located on the left wall of the freezer door, can only
be accessed when the ice storage bin has been removed. See the
following section for bin removal instructions.
To turn on the ice maker, flip the switch to the ON (up) position.
To manually turn off the ice maker, flip the switch to the OFF
(down) position.
NOTE: Your ice maker has an automatic shutoff to keep the storage
bin from overfilling druing normal operation. As ice is made, the ice
cubes will fill the ice storage bin, and the ice cubes will raise the shutoff
arm to the OFF (arm up) position. When the storage bin is at full
capacity, the ice maker will automatically stop ice production, but the
ice maker On/Off switch
will remain in the ON (up) position.
Removing and Replacing the Ice Storage Bin
1. Press down the release lever and tilt the bucket outward. Use both
hands to hold the base of the storage bin, then lift it up and out.
NOTE: It is not necessary to turn the ice maker control to the
OFF (right) position when removing the storage bin. The sensor
cover (“flipper door”) on the left wall of the freezer stops the ice
maker from producing ice if the door is open or the storage bin is
removed.
A. Water dispenser lever
Ice production off
(shut off arm UP)
Ice production on
(shut off arm DOWN)
A. Release lever
A
C
B
D
To Dispense Ice:
1. Make sure the desired type of ice is selected.
Cut Hazard
Use a sturdy glass when dispensing ice.
Failure to do so can result in cuts.
WARNING
2. Press a sturdy glass against the dispenser lever. Hold the glass
close to the ice guide to ensure that the ice dispenses into the
glass.
IMPORTANT: You do not need to apply a lot of pressure to the
lever in order to activate the ice dispenser. Pressing hard will not
make the ice dispense faster or in greater quantities.
2
IMPORTANT: Child entrapment and suffocation are not problems of the
past. Junked or abandoned refrigerators are still dangerous, even if
they will sit for “just a few days.” If you are getting rid of your old
refrigerator, please follow these instructions to help prevent accidents.
Before You Throw Away Your Old Refrigerator or Freezer:
Take off the doors.
Leave the shelves in place so that children may not easily climb
inside.
Using the Controls
The refrigerator and freezer controls are located on the dispenser
panel.
IMPORTANT: The display screen on the dispenser control panel will
turn off automatically and enter “sleep” mode when the control buttons
and dispenser lever have not been used for 2 minutes or more. While in
“sleep” mode, the first press of a control button will only reactivate the
display screen, without changing any settings.
Touch any control button on the dispenser panel to activate the
display screen. The home screen will appear as shown.
Adjusting the Controls
For your convenience, your refrigerator and freezer controls are preset
at the factory. When you first install your refrigerator, make sure that
both the refrigerator and freezer controls are still set to the recommended
“mid-setting.” This will be displayed in the sequence of bars with three
illuminated bars.
IMPORTANT:
Wait 24 hours before you put food into the refrigerator. If you add
food before the refrigerator has cooled completely, your food may
spoil.
NOTE: Adjusting the set points to a colder than recommended
setting will not cool the compartments any faster.
If the temperature is too warm or too cold in the refrigerator or
freezer, first check the air vents to be sure they are not blocked
before adjusting the controls.
The preset settings should be correct for normal household usage.
The controls are set correctly when milk or juice is as cold as you
like and when ice cream is firm.
Wait at least 24 hours between adjustments. Recheck the
temperatures before other adjustments are made.
When adjusting set points, use the following chart as a guide.
The set point range is “1 bar” (coldest) to “5 bars” (least cold).
Refrigerator Control:
Press REFRIGERATOR TEMP to view the current set point for the
refrigerator.
Important information to know about disposal of
refrigerants:
Dispose of refrigerator in accordance with Federal and Local
regulations. Refrigerants must be evacuated by a licensed,
EPA certified refrigerant technician in accordance with
established procedures.
OPERATING YOUR REFRIGERATOR
CONDITION: ADJUSTMENT:
REFRIGERATOR too cold REFRIGERATO R S etting
one setting higher
REFRIGERATOR too warm REFRIGERATO R S etting
one setting lower
FREEZER too cold FREEZER Setting
one setting higher
FREEZER too warm /
Too little ice
FREEZERSetting
one setting lower
Press REFRIGERATOR TEMP again to adjust the set point.
The setting will increase by one bar with each press of the button,
returning to one bar after reaching five. After 2 minutes of
inactivity, any changes will be saved and the display will return to
the home screen.
Freezer Control:
Press FREEZER TEMP to view the current set point for the freezer.
3
Freezer Control:
Press FREEZER TEMP again to adjust the set point. The setting
will increase by one bar with each press of the button, returning to
one bar after reaching five. After 2 minutes of inactivity, any
changes will be saved and the display will return to the home
screen.
Crisper Humidity Control
You can control the amount of humidity in the moisture-sealed crisper.
Adjust the control to any setting between LOW and HIGH.
LOW (open) for best storage of fruits and vegetables with skins.
HIGH (closed) for best storage of fresh, leafy vegetables.
Water and Ice Dispensers
NOTES:
The dispensing system will not operate when the freezer door
is open.
Allow 24 hours for the refrigerator to cool down and chill water.
Allow 24 hours to produce the first batch of ice. Discard the first
three batches of ice produced. Wait 72 hours for full ice production.
The display screen on the dispenser control panel will turn off
automatically and enter “sleep” mode when the control buttons and
dispenser lever have not been used for 2 minutes or more. While in
“sleep” mode, the first press of a control button will only reactivate
the display screen, without changing any settings.
Flush the Water System
Air in the water dispensing system can cause the water dispenser to
drip. After connecting the refrigerator to a water source or replacing the
water filter, flush the water system. Flushing the water dispensing
system forces air from the water line and filter, and prepares the water
filter for use.
NOTE: As air is cleared from the system, water may spurt out of the
dispenser.
1. Using a sturdy container, depress and hold the water dispenser
lever for 5 seconds, then release it for 5 seconds.
2. Repeat St
ep 1 until water begins to flow.
3. Once water begins to flow, continue depressing and releasing the
dispenser lever (5 seconds on, 5 seconds off) until a total of 3gal.
(12 L) has been dispensed.
Additional flushing may be required in some households.
The Water Dispenser
IMPORTANT:
Dispense at least 1 qt (1 L) of water every week to maintain a fresh
supply.
If the flow of water from the dispenser decreases, it could be
caused by low water pressure.
With the water filter removed, dispense 1 cup (237 mL) of
water. If 1 cup of water is dispensed in 8 seconds or less, the
water pressure to the refrigerator meets the minimum
requirement.
If it takes longer than 8 seconds to dispense 1 cup of water,
the water pressure to the refrigerator is lower than
recommended. See “Water Supply Requirements” (in the User
Instructions or the Installation Instructions and Owner’s
Manual) or “Problem Solver” for suggestions.
ICE AND WATER
To Dispense Water:
1. Press a sturdy glass against the water dispenser level. Hold the
glass close to the water dispenser spout to ensure that the water
dispenses into the glass.
2. Remove the glass to stop dispensing.
IMPORTANT: The small tray at the bottom of the dispenser is designed
to catch small spills and allow for easy cleaning. There is no drain in the
tray.
The Ice Dispenser
Ice dispenses from the ice maker storage bin in the freezer when the
dispenser lever is pressed. To turn off the ice maker, see “Ice Maker
and Storage Bin.”
Yo ur ice maker can produce both crushed and cubed ice. Before
dispensing ice, select which type of ice you prefer by pressing
ICE TYPE.
The display screen indicates which type of ice is selected.
For crushed ice, cubes are crushed before being dispensed. This may
cause a slight delay when dispensing crushed ice. Noise from the ice
crusher is normal, and pieces of ice may vary in size. When changing
from crushed to cubed, a few ounces of crushed ice will be dispensed
along with the first cubes.
To Dispense Ice:
1. Make sure the desired type of ice is selected.
2. Press a sturdy glass against the dispenser lever. Hold the glass
close to the ice guide to ensure that the ice dispenses into the
glass.
Cut Hazard
Use a sturdy glass when dispensing ice.
Failure to do so can result in cuts.
WARNING
IMPORTANT: You do not need to apply a lot of pressure to the lever
in order to activate the ice dispenser. Pressing hard will not make
the ice dispense faster or in greater quantities.
3. Remove the glass to stop dispensing.
NOTE: Ice may continue to dispense for several seconds after
removing the glass from the lever. The dispenser may continue to
make noise for a few seconds after dispensing.
CRUSHED CUBED
Loading ...
Loading ...
Loading ...