WARNING! Excessive Weight Hazard: Use two or more people to move and install freezer. Failure to do so can result in back or other injury.
Remove Packaging Materials
Remove tape and glue residue from surfaces before turning on the freezer. Rub a small amount of liquid dish soap over the adhesive with your fingers. Wipe with warm water and dry.
Do not use sharp instruments, rubbing alcohol, flammable fluids, or abrasive cleaners to remove tape or glue. These products can damage the surface of your freezer. For more information, see the “Safety” section.
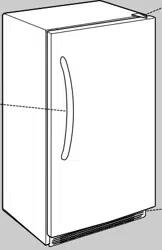
When Moving Your Freezer:
Your freezer is heavy. When moving the freezer for cleaning or service, be sure to cover the floor with cardboard or hardboard to avoid floor damage. Always pull the freezer straight out when moving it. Do not wiggle or “walk” the freezer when trying to move it, as floor damage could occur.
Clean Before Using:
After you remove all of the packaging materials, clean the inside of your freezer before using it. See the cleaning instructions in the “Caring For Your Freezer” section.
Location Requirements
Ventilation and Clearance
Keep flammable materials and vapors, such as gasoline, away from freezer.
Do not cover the freezer with items such as blankets, sheets, tablecloths, etc. This reduces air circulation.
Allow at least 3" (7.5 cm) of air space at the top and on both sides of the freezer and 1" (2.5 cm) between the back of the freezer and the wall. If the freezer is to be next to a fixed wall, leave extra space on the hinge side so the door can open wider.
Temperature
Your freezer operates most efficiently when located in an area where the temperature will not fall below 40°F (5°C). Place your freezer in a location where the temperature will not fall below this recommended temperature.
Upon Moving to Final Location
NOTE: Allow for a 3" (7.5 cm) clearance at the top and sides and a 1 /4" (6.4 mm) clearance between the appliances.
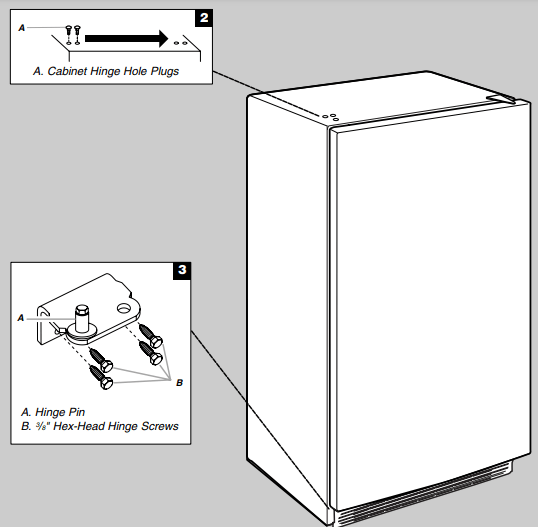
Remove Door and Hinges
Unplug freezer or disconnect power.
Keep the freezer door closed until you are ready to lift it free from the cabinet. NOTE: Provide additional support for the door while the hinges are being moved. Do not depend on the door magnets to hold the door in place while you are working.
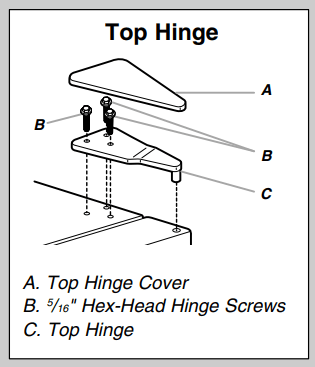
Remove the parts for the top hinge as shown in Top Hinge graphic.
Lift the freezer door free from the lower hinge and cabinet and set aside.
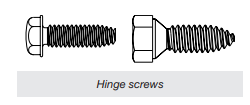
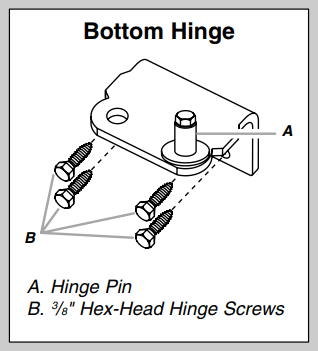
Remove the four hex-head hinge screws and bottom hinge assembly. See “Bottom Hinge” graphic.
Door Removal & Replacement
Door Swing Reversal (optional)
Freezer Leveling and Door Closing
Style 1—Without Grille
1. Locate the two front leveling legs taped among the packing materials.
2. Screw these legs into the front holes on the bottom of the freezer. The back of the freezer rests on two fixed supports.
3. Adjust the front legs enough to lift the cabinet up off the floor.
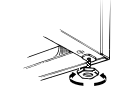
4. Place a leveling tool on top of the freezer first side to side, then front to back. Turn leg counterclockwise to raise a corner. Turn leg clockwise to lower a corner.
5. Repeat Step 4 until freezer is level.
6. After freezer is fully loaded with food, recheck with level as in Step 4.
Style 2—With Grille
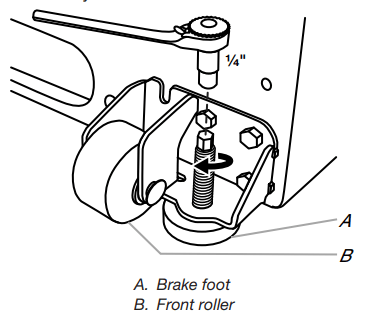
Your freezer has two front adjustable legs — one on each side. The back of the freezer rests on two fixed rollers. The base grille covers the adjustable brake feet and roller assemblies located at the bottom of the freezer below the freezer door. Before making any adjustments, remove the base grille and move the freezer to its final location.
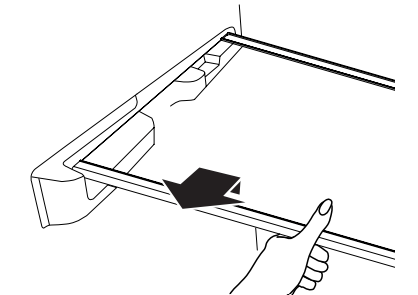
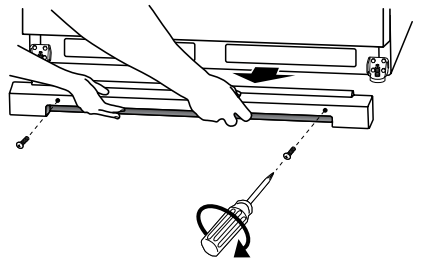
1. Remove the base grille screws. Grasp the grille firmly and pull it toward you. Open the freezer door to access the brake feet.
NOTE: To allow the freezer to roll more easily, raise the brake feet by turning them counterclockwise. The front rollers will be touching the floor.
2. Move the freezer to its final location.
3. Lower the brake feet, by turning them clockwise, until the rollers are off the floor and both brake feet are snug against the floor. This keeps the freezer from rolling forward when opening the freezer door.
IMPORTANT: If you need to make further adjustments involving the brake feet, you must turn both brake feet the same amount to keep the freezer level.
4. Make sure the door closes easily. If you are satisfied with the door opening and closing, skip the next section. If, however, the door does not close easily or the door pops open, adjust the tilt.
5. Make sure the freezer is steady. If the freezer seems unsteady or rolls forward when the door is pulled open, adjust the brake feet.
To Steady the Freezer: Open the freezer door. Using a 1 /4" hex driver, turn both brake feet clockwise the same amount until the brake feet are snug against the floor. Check again. If not satisfied, continue to adjust the brake feet by half turns of the screw until the freezer does not roll forward when the door is opened.
6. Replace the base grille by aligning the ends of the grille with the leveling assemblies on each side and snapping the grille into place. Reinstall the Phillips screws.
To Adjust the Cabinet Tilt:
NOTE: Having someone push against the top of the freezer takes some weight off the brake feet. This makes it easier to turn them.
Open the freezer door. Use a 1 /4" hex driver to turn both brake feet clockwise the same amount. This will raise the front of the freezer. It may take several turns to allow the door to close more easily.
OPERATING YOUR FREEZER
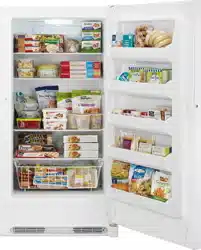
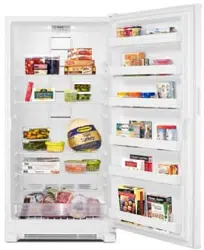
Ensuring Proper Air Circulation
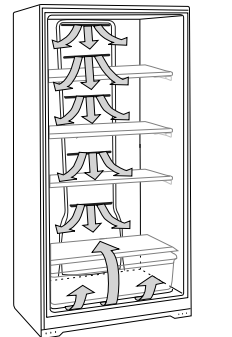
In order to ensure proper temperature, you need to permit proper airflow in the freezer. As shown in the illustration, cool air enters from the freezer wall and moves down. The air then recirculates through the vent near the bottom.
Do not block any of these vents with food packages. If the vents are blocked, airflow will be restricted and temperature and moisture problems may occur.
IMPORTANT: To avoid odor transfer and drying out of food, wrap or cover foods tightly
Using the Control
The temperature control is located at the top front of the freezer compartment.
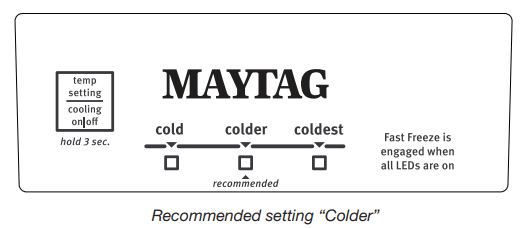
Temperature Control
For your convenience, the temperature control is preset at the factory. When you first install your freezer, check that the control is still set to the recommended setting as shown.
IMPORTANT:
The recommended setting is designed to maintain the temperature at or near 0°F (-17.8°C) under normal operating conditions.
Allow the freezer to cool 6 to 8 hours before filling with frozen food.
When the freezer is first started, the compressor will run constantly until the freezer is cooled. It may take up to 6 or 8 hours (or longer), depending on room temperature and number of times the freezer door is opened. After the freezer is cooled, the compressor will turn on and off as needed to keep the freezer at the proper temperature.
The outside of your freezer may feel warm. This is normal. The freezer’s design and main function is to remove heat from packages and air space inside the freezer. The heat is transferred to the room air, making the outside of the freezer feel warm.
Adjusting Control
If you need to adjust the temperature in the freezer compartment, press TEMP SETTING to display the desired temperature setting from Cold to Coldest.
NOTE: Except when starting the freezer, do not adjust the control more than one setting at a time. Wait 24 hours between adjustments for the temperature to stabilize.
Cooling On/Off
Your freezer will not cool when cooling is turned off. To turn cooling off, press and hold TEMP SETTING for 3 seconds. In the off condition, none of the lights on the control panel will be illuminated. The main freezer light bulb will still operate.
To turn cooling on, press and hold TEMP SETTING for 3 seconds. When cooling is on, the control panel lights will be illuminated.
Fast Freeze (on some models)
Use this feature before adding large amounts of unfrozen food. For the best food quality, do not exceed 3 lbs (1,361 g) per cu. ft (28.32 L) of freezer space.
To activate Fast Freeze, press TEMP SETTING until all the indicator light positions are illuminated simultaneously.
The freezer will remain in the Fast Freeze setting for 24 hours after the extra-low temperature is reached. Once the time has expired, the freezer will return to the previous temperature setting. Fast Freeze may be manually turned off by pressing TEMP SETTING to select the desired temperature setting from Cold to Coldest.
Freezer Features
This manual covers several different models. The freezer you have purchased may have some or all of the items listed. The locations of the features may not match those of your model.
Freezer Shelves
Store similar foods together and adjust the shelves to fit different heights. This reduces the time the freezer door is open and saves energy.
To Remove and Replace a Shelf:
1. Remove the shelf by lifting straight up and pulling the shelf out.
2. Replace the shelf by lowering the shelf onto the supports on the side wall.
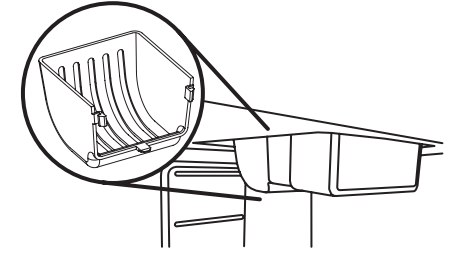
Storage Gate (on some models)
To Remove the Storage Gate:
1. Lift up the top of the gate and out of the supports.
2. Return the gate to original position. Lower the gate into the supports.
CARING FOR YOUR FREEZER
Cleaning Your Freezer
Frost-free means that you will not have to defrost your freezer. Frost is removed by air moving and collecting any moisture and depositing it on the cooling coil. The cooling coil periodically warms up enough to melt the frost and it then flows down to the drain pan (located behind the base grille) where it is evaporated.
Complete cleaning should be done at least once a year.
Press and hold TEMP SETTING for 3 seconds to turn off cooling.
Unplug freezer or disconnect power.
Remove all frozen food. Wrap frozen food in several layers of newspaper and cover with a blanket. Food will stay frozen for several hours. You may also store frozen food in a cooler, additional refrigerator-freezer, or in a cool area.
Remove all removable parts from inside, such as shelves, bins, etc.
Hand-wash, rinse, and dry removable parts and interior surfaces thoroughly. Use a clean sponge or soft cloth and a mild detergent in warm water.
Do not use abrasive or harsh cleaners such as window sprays, scouring cleansers, flammable fluids, cleaning waxes, concentrated detergents, bleaches, or cleansers containing petroleum products on plastic parts, interior and door liners or gaskets. Do not use paper towels, scouring pads, or other harsh cleaning tools. These can scratch or damage materials.
To help remove odors, you can wash interior walls with a mixture of warm water and baking soda (2 tbs to 1 qt [26 g to 0.95 L] of water).
Replace the removable parts.
Use the appropriate cleaning method for your exterior finish. Painted metal: Wash exteriors with a clean sponge or soft cloth and a mild detergent in warm water. Do not use abrasive or harsh cleaners or cleaners designed for stainless steel. Dry thoroughly with a soft cloth.
Remove the base grille by opening the freezer door and removing the two Phillips-head screws. Pull the grille toward you to remove.
Replace the base grille by aligning the ends of the grille with the leveling assemblies on each side and snapping the grille into place. Reinstall the screws.
Replace all frozen food.
Plug in freezer or reconnect power.
Set temperature control to desired setting. See “Using the Control.”
Changing the Light Bulb
NOTE: Not all appliance bulbs will fit your freezer. Be sure to replace the bulb with an appliance bulb of the same size, shape, and wattage.
1. Unplug freezer or disconnect power.
2. Remove the light shield by squeezing the lens from the sides, pushing back and pulling down.
3. Replace bulb with a 40-watt maximum appliance bulb or an LED bulb rated for wet/damp locations. NOTE: Some LED replacement light bulbs are not recommended for wet/damp environments. Refrigerator fresh food and freezer compartments are considered wet/damp environments. Read and follow all instructions on the LED packaging when replacing the factory-installed LED bulb. A replacement LED bulb can be purchased from an authorized dealer.
4. Replace the light shield.
5. Plug in freezer or reconnect power.
Power Interruptions
If the power will be out for 24 hours or less, keep the door closed to help food stay cold and frozen. If the power will be out for more than 24 hours, do one of the following:
Remove all frozen food and store it in a frozen food locker.
If a food locker is not available, consume or can perishable food at once.
REMEMBER: A full freezer stays cold longer than a partially filled one. A freezer full of meat stays cold longer than a freezer full of baked goods. If you see that food contains ice crystals, it may be refrozen, although the quality and flavor may be affected. If the condition of the food is poor, dispose of it.
Moving Care
When you are moving your freezer to a new home, follow these steps to prepare it for the move.
Remove all frozen food.
Unplug the freezer.
Take out all removable parts, wrap them well, and tape them together so they don’t shift and rattle during the move.
Clean the freezer thoroughly.
Tape the freezer shut and tape the electrical cord to the cabinet.
When you get to your new home, refer to the “Installing Your Freezer” and “Operating Your Freezer” sections for information on installation and setting the controls.
TROUBLESHOOTING
Freezer Operation
PROBLEM
RECOMMENDED SOLUTIONS
Freezer Will Not Operate
Check that it is plugged into a grounded 3 prong outlet.
Check that the temperature control is turned on.
Check that the freezer is not running an Automatic Defrost cycle. Replace the fuse or reset the circuit breaker. NOTE: If problems continue, contact an electrician.
Lights Do Not Work
Check that it is plugged into a grounded 3 prong outlet.
Check that the light bulb is tight in the socket and is not burned out
Water in Defrost Drain Pan
It is normal for water to drip into the defrost drain pan when freezer is defrosting.
When humidity is high, it is normal for water in the defrost pan to take longer to evaporate.
Motor Seems to Run Too Much
Check that the door closes properly.
Defrost and clean the freezer to remove excessive frost.
Adding a large amount of food warms the freezer causing the freezer to run longer to cool back down. If this is the situation, wait approximately 6 to 8 hours to allow the freezer to reach the correct temperature.
Get all items out at one time, keep food organized, and close door as soon as possible.
Check that the condenser coils are clean.
Check that the door gasket is sealed all the way around. If not, contact a qualified person or technician.
Check that space around freezer meets air circulation requirements. See “Location Requirements.”
NOTE: If none of the above, your new freezer will run longer than your old one due to its high-efficiency motor.
Temperature Is Too Warm
Check that air vents are clear. See “Ensuring Proper Air Circulation” for air vent locations.
Get all items out at one time, keep food organized, and close door as soon as possible.
Adding a large amount of food warms the freezer causing the freezer to run longer to cool back down.
Check that the temperature control is set correctly for surrounding conditions.
The Door Will Not Close Completely or Is Difficult to Open
Check that there are no food packages blocking the door.
On some models, check that the shelves and baskets are in the correct position.
Check that gaskets are clean. See “Caring for Your Freezer.”
Check that the freezer is stable. See “Freezer Leveling and Door Closing.”
Freezer Makes Loud Buzzing/ Clicking Sound
If the freezer has recently been plugged in or turned on following a defrost or product move, or if there has been an extended power failure, turn off the temperature alarm for the next 24 hours.
Adding a large amount of food warms the freezer. It can take several hours for the freezer to return to normal temperature. Turn the temperature alarm off for the next 24 hours.
Q: why is there a flashing red light beside the message on the tag that is located on the upper right side when the door is open. the red flashing light is to the left of the message that reads "fast freeze is on when all LEDs are on" why is the red light flashing? Reply
Q: I’d like to know the same thing...why is there a flashing red light beside the message on the tag that is located on the upper right side when the door is open. the red flashing light is to the left of the message that reads "fast freeze is on when all LEDs are on" why is the red light flashing? My freezer is BRAND NEW. Was delivered & set up yesterday. Freezer is set to “colder” (green light is on), freezer is at -5...nice & cold, compressor & fan running. I cycled through the “cold, colder, coldest” settings & the red flashing light went away. Note: the compressor & fan had just moments before kicked on. I noticed the flashing light upon opening the door to check the temp. Reply
Q: why is there a flashing red light beside the message on the tag that is located on the upper right side when the door is open. the red flashing light is to the left of the message that reads "fast freeze is on when all LEDs are on" why is the red light flashing? Reply