
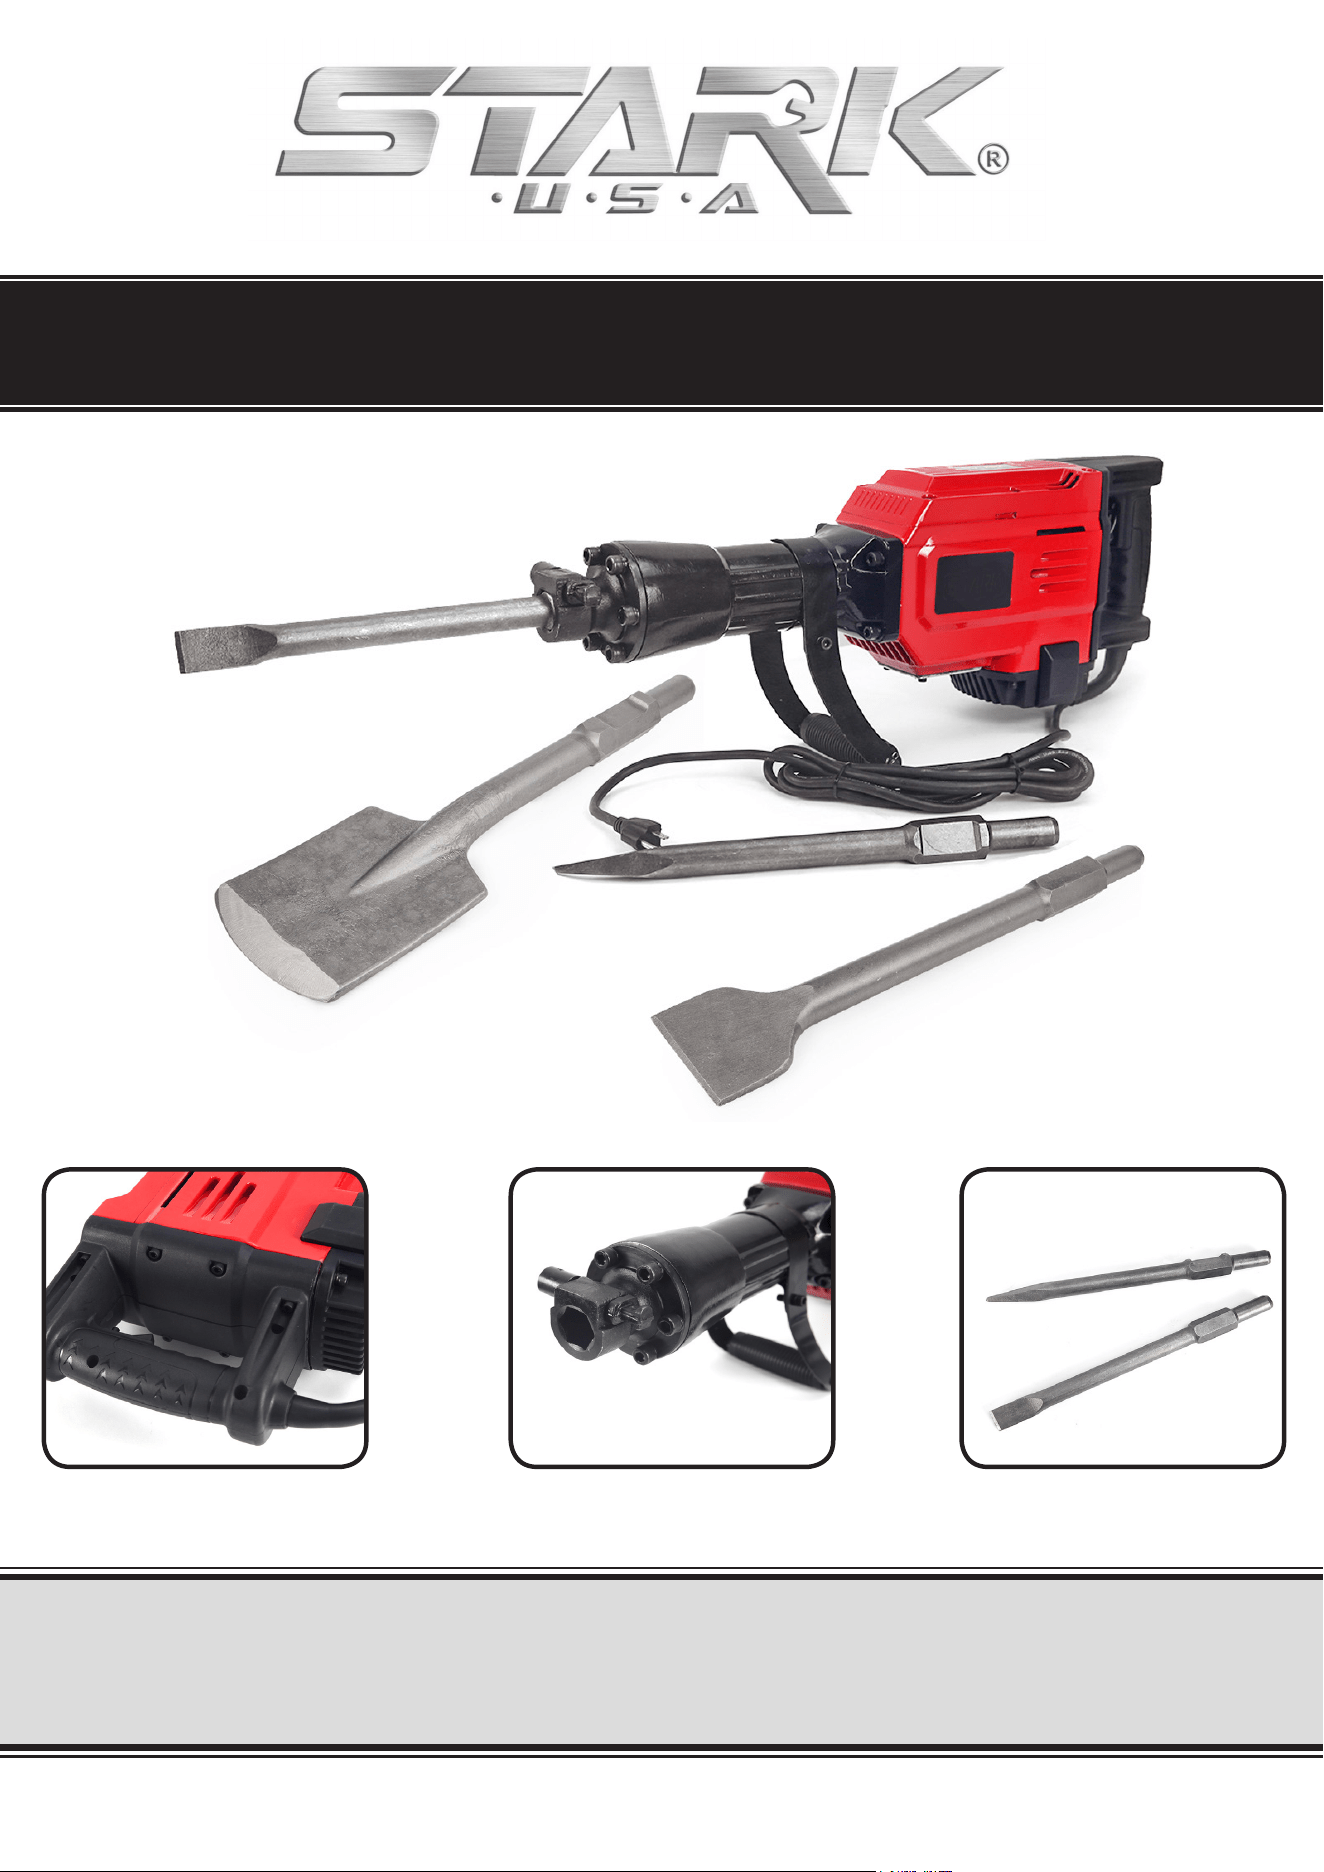
DEMOLITION JACK HAMMER 2800W
SAVE THIS MANUAL: KEEP THIS MANUAL FOR SAFETY WARNINGS, PRECAUTIONS, ASSEMBLY,
OPERATING, INSPECTION, MAINTENANCE AND CLEANING PROCEDURES. WRITE THE PRODUCT’S
SERIAL NUMBER ON THE BACK OF THE MANUAL NEAR THE ASSEMBLY DIAGRAM (OR MONTH
AND YEAR OF PURCHASE IF PRODUCT HAS NO NUMBER)
OWNER’S MANUAL AND SAFETY INSTRUCTIONS
ITEM: 61110
FOR QUESTIONS PLEASE CALL OUR CUSTOMER SUPPORT: (909) 628 4900 MON-FRI 9AM TO 3PM PST

GENERAL SAFETY WARNINGS
Read all safety warnings and instructions. Failure to follow the warnings and instructions may
result in electric shock, fire and/or serious injury. Save all warnings and instructions for future
reference.
SAFETY
The warnings, precautions, and instructions discussed in this instruction manual cannot cover all possible
conditions and situations that may occur. It must be understood by the operator that common sense and
caution are factors which cannot be built into this product, but must be supplied by the operator. Read
carefully and understand all ASSEMBLY AND OPERATION INSTRUCTIONS before operating. Failure
to follow the safety rules and other basic safety precautions may result in serious personal injury.
Read and understand all instructions. Failure to follow all instructions may result in serious injury or
property damage.
DO NOT allow persons to operate or assemble the product until they have read this manual and have
developed a thorough understanding of how it works.
DO NOT modify this product in any way. Unauthorized modification may impair the function and/or
safety and could affect the life of the product. There are specific applications for which the product was
designed.
Use the right tool for the job. DO NOT attempt to force small equipment to do the work of larger
industrial equipment. There are certain applications for which this equipment was designed. This product
will be safer and do a better job at the capacity for which it was intended. DO NOT use this equipment
for a purpose for which it was not intended.
Keep children and bystanders away from the work area while operating the tool. DO NOT allow
children to handle the product.
Always use both handles for maximum control over this hammer. Never attempt to operate this tool with
one hand. This tool develops intense percussive forces during operation and you may lose control if
attempting one hand operation.
DO NOT use the power tool if the Switch does not turn on and off. Any power tool that cannot be
controlled with the Switch is dangerous and must be repaired by a qualified technician.
Store idle power tools out of the reach of children and do not allow persons unfamiliar with the power
tool to operate the power tool.
Maintain power tools. Check for misalignment or binding of moving parts, breakage of parts and any
other condition that may affect the power tool’s operation. If damaged, have the power tool repaired
before use.
Use the power tool, accessories and tool bits etc. in accordance with these instructions, taking into
account the working conditions and the work to be performed.
Wear ear protectors. Exposure to loud noise can cause hearing loss. Wear steel-toed boots during use.
Pull on chisel after installation and before use; chisel may move but MUST NOT slide out.
DO NOT operate this tool if you have back, neck, wrist injuries or other conditions that will be
aggravated by the forces that this tool exerts upon the operator.
1
IMPORTANT SAFETY INFORMATION

2
Avoid unintentional starting. Prepare to begin work before turning on the tool.
DO NOT lay the tool down until it has come to a complete stop. Moving parts can grab the surface and pull
the tool out of your control.
When using a hand-held power tool, maintain a firm grip on the tool with both hands to resist starting
torque.
Tool service must be performed only by qualified repair personnel. Service or maintenance performed
by unqualified personnel could result in a risk of injury. For example: internal wires may be misplaced or
pinched, safety guard return springs may be improperly mounted.
DO NOT use dull or damaged bits and accessories. Dull or damaged bits have a greater tendency to bind
in the work-piece.
When operating this power tool, use the weight of the tool to do most of the work. The should be reasonable
in order to achieve high efficiency and easier operation.
DO NOT use this tool to pry apart stone. This tool should be used for crushing, tamping and compacting
work.
Ensure the handles are free of grease and water.
Double check all screws are tightened prior to using the machine. If any are found, re-tighten immediately.
Quick acceleration and fast stopping is not recommended as it may cause damage to the machine.
Avoid fragmentation impact on the tool by not using the highest speed available. Moderate speeds should
be used for this.
People with pacemakers should consult their physician(s)
before use. Electromagnetic fields near heart
pacemakers could cause pacemaker interference or pacemaker failure. In addition, people with pacemakers
should: • Avoid operating alone. • Properly maintain and inspect to avoid electrical shock. • Properly
ground power cord. Ground Fault Circuit Interrupter (GFCI) should also be implemented, it prevents
sustained electrical shock. Wear ear protectors. Exposure to noise can cause hearing loss.
Hold power tools by insulated gripping surfaces when performing an operation where the cutting tool may
contact hidden wiring or its own cord. Contact with a ″live″ wire will make exposed metal parts of the tool ″
live″ and shock the operator.
Keep cutting tools sharp and clean. Properly maintained cutting tools with sharp cutting edges are
less likely to bind and are easier to control.
Disconnect the plug from the power source before making any adjustments, changing accessories,
or storing power tools. Such preventive safety measures reduce the risk of starting the power tool
accidentally.
Only use safety equipment that has been approved by an appropriate standards agency.
Unapproved safety equipment may not provide adequate protection. Eye protection must be ANSI-
approved and breathing protection must be NIOSH-approved for the specific hazards in the work area.
If devices are provided for the collection of dust extraction and collection facilities, ensure these
are connected and properly used. Use of these devices can reduce dust-related hazards.
Dress properly. DO NOT wear loose clothing or jewelry. Keep your hair, clothing and gloves away
from moving parts. Loose clothes, jewelry or long hair can be caught in moving parts.
DO NOT overreach. Keep proper footing and balance at all times. This enables better control of the
power tool in unexpected situations.
IMPORTANT SAFETY INFORMATION
3
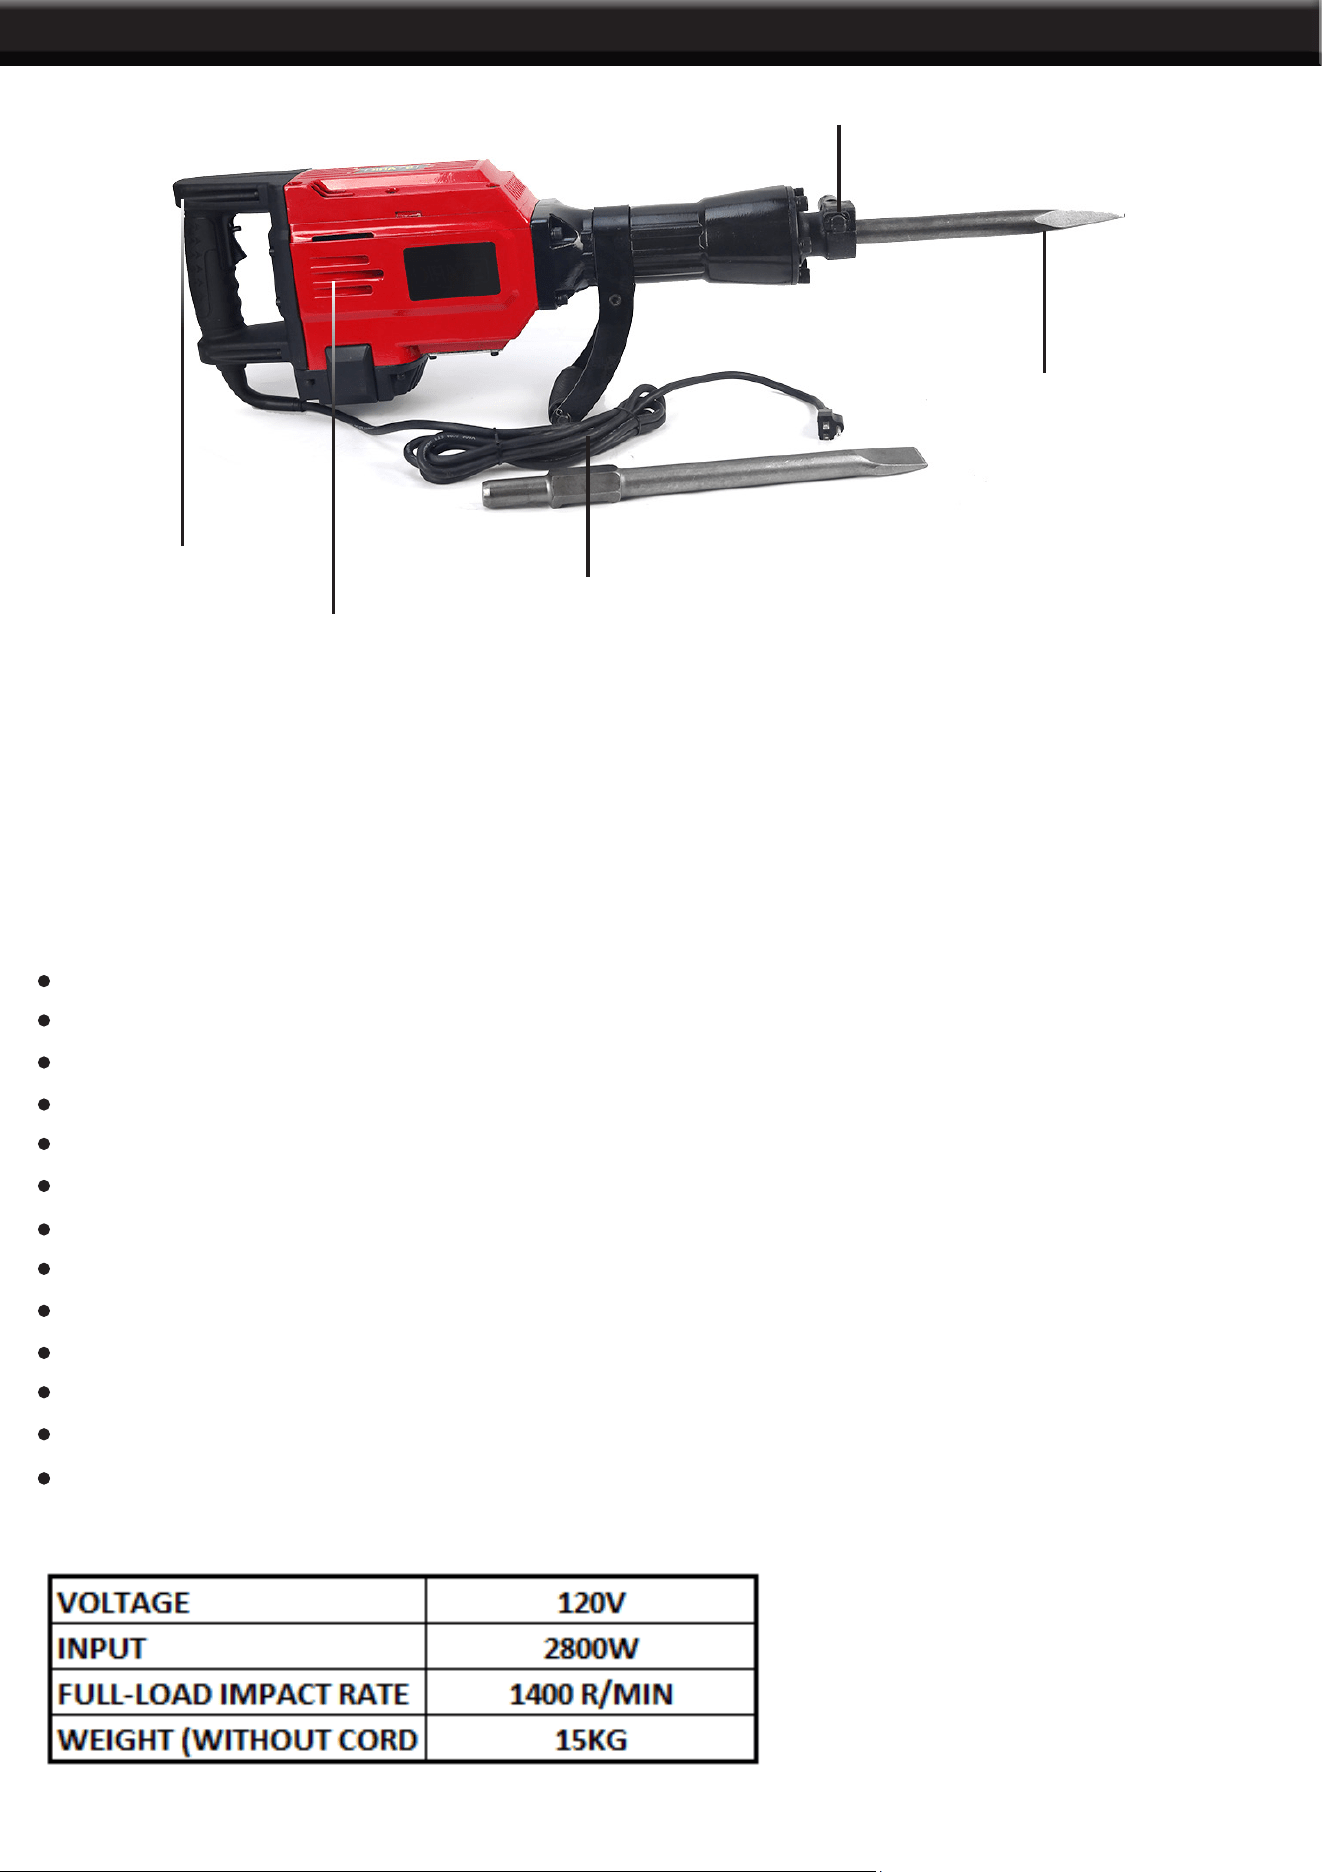
HANDLE
BAR
VENTILATION
DRILL SEAT
DRILL
POWER
CORD
FEATURES AND SPECIFICATIONS
This 2800W jack hammer is ideal for demolition, trenching, chipping, breaking holes in concrete-block-brick,
removing foundation concrete slab, oil chimney and so on. It features heavy duty construction with industrial
grade for high durability. It features two chisels for multiply functions. It comes along with 360 degree swivel
handle with slip prevent grip for stable grips. It is suitable for home and commercial applications.
Assembled Product Dimensions (L x W x H): 35.00 x 14.00 x 8.00 Inches
2800W input power
Industrial Quality, Very Durable
Heavy Duty Construction
Very Easy To Operate
Voltage: 120v/60hz
No Load Speed: 1900RPM
impact rate 1400 r/min
360° Swivel Handle
Slip Prevent Handle Grip
Heavy Duty Case With 2 Wheels & Handle
Perfect For Demolition, Trenching, Chipping, Breaking Holes In Concrete, Block, Brick,
Tile Stucco, Removing A Foundation, Concrete Slab, Oil Chimney And Much More!
Suitable For Home And Business
FEATURES
SPECIFICATIONS

4
OPERATION
1. Power Source: Ensure that the power source to be utilized conforms to the power requirements specied
on the product nameplate.
PRIOR TO OPERATION
2. Grounding: This tool should be grounded while in use to protect the operator from electric shock. The tool
is equipped with a three conductor cord and grounding type plug to t the proper grounding type receptacle.
The green or green and yellow conductor in the cord is the grounding wire. NEVER connect the green (or
green and yellow) wire to a live terminal.
3.
Power Switch: Ensure that the power switch is in the OFF position. If the plug is connected to a power
receptacle while the power switch is in the ON position. The power tool will start operating immediately. Use
caution.
4.
Extension Cord: When the work area is a distance away from the power source, ONLY use an extension
cord that is sufcient thickness and rated capacity. The extension cord should be kept as short as practical.
5.
Mounting a Tool: When handling a bull point or cold chisel bit, rotate the stop lever 180 degrees in a
clockwise direction while pulling it towards you. Next, insert the tool shank into the hexagonal hole on the
front cover. Next, clamo the tool by turning the stop lever half a turn on the opposite direction.
NOTE: When removing the tool, follow the above procedure in reverse order.
USING THE HAMMER
1. After placing the tip of the tool in the base hold switch ON. In some cases, it is necessary to punch the
top of the bitagainst the crushing position forcibly in order to begin striking the stroke. This is not due to a
malfunction of the tool, it means the safe gaurd mechanism against no-load striking is working.
2.
By utilizing the weight of the machine and by rmly holding the hammer with both hands. One can effectively
control the subsequent recoil motion. Proceed at a moderate work rate. The use of too much will impair
efciency.
CAUTION: Sometimes the tool does not begin the striking stroke even when the motor rotates because the
oil has become thick. If the tool is used in low temperatures or if it is used after extended idle time, the tool
should be ran for 5 minutes to warm up before using the tool.
PRECAUTIONS
1. Wear protective glasses to protect your eyes.
2. Wear a mask to keep dust away and ear plugs to protect your ears
3. Properly set the Bi-Holder
4. The bit becomes very hot during use, excercise extreme caution when using the bit.
5. Be sure to use the side handle when using the hammer.
6. At the start of work, conrm the oil supply and screws tightened.
7.
Before starting to break up or chip a wall, oor or ceiling, thoroughly conrm that there are no buried cables
or conduits.

5
OPERATION AND MAINTENANCE
OIL FEEDING
CAUTION: Prior to oil feeding, ALWAYS disconnect the plug from the power source. Since the oil chamber
is built in, the hammer can be used for approximitely 20 days before needing resupplied with lubricating oil.
(Used continuosly at 3-4 hours daily). Feed oil into the tanl as described below before using the hammer.
1. Feed with oil when you can see that just before no oil is visible in the oil gauge window then the tool is
held upright.
2. Before feeding oil, use the provided wrench to remove the oil gauge. Be careful not to lose the rubber
packing that is attached below the oil gauge.
3. Check the oil level once daily to conrm the oil is appropriately lled.
4. After feeding with oil, securely clamp the oil gauge.
NOTE: As an optional accessory, the oil in the tank is depleted. Shell Oil Co. Rotella #40 engine oil can also
be used.
MAINTENANCE AND INSPECTION
1. INSPECTING THE TOOL: Using a dull tool will inevitably cause motor to malfunction and degrade
efciently. Replace the dull tool with a new one immediately once abrasions or wear are noted.
2. INSPECTING MOUNTING SCREWS: Regularly inspect all mounting screws and ensure that they are
properly tightened. Should any of the screws be loose, retighten immediately. Failure to do this can result in
serious injury.
3. MAINTENANCE OF THE MOTOR: The motor unit winding is the heart of the power tool. Take care to
ensure due care the winding does not become damaged and or wet with oil or water.
4. INSPECTING THE CARBON BRUSHES: The motor employs carbon brushes which are consumable
parts. When they become near their wear limit, it can result in motor trouble. When the auto-stop carbon
brush is equipped the motor will stop automatically. At that time, replace both carbon brushes with new ones
that are identical. ALWAYS keep the carbon brushes clean and ensure they slide freely within the brush
holders. The carbon brush can be removed by removing the cap cover. Cap rubber and brush cap in that
order at the interior.
NOTE: Due to continuing program of research and development. The specications herin are subject to
change without prior notice.
APPLICATIONS
Crushing concrete, chipping, digging and squaring.
Installation of piping anwiring, sanitary facility installation, machineryinstallation, water supply and drainage
work, interior work, harbor facilities and other civil engineering work.
6
ILLUSTRATIONS FOR REFERENCEOPERATION AND MAINTENANCE
1
3
2
2
3
1
1
3
2
3
4
4
3mm
5
~
→
→
5
6
6
7
6
8
9
a mm
44
a
6
743 Z
→
→
17mm
7
PARTS LISTPARTS LIST

8
PARTS LIST

9
THE MANUFACTURER AND/OR DISTRIBUTOR HAS PROVIDED THE PARTS LIST AND ASSEMBLY
DIAGRAM IN THIS MANUAL AS A REFERENCE TOOL ONLY. NEITHER THE MANUFACTURER OR
DISTRIBUTOR MAKES ANY REPRESENTATION OR WARRANTY OF ANY KIND TO THE BUYER THAT
HE OR SHE IS QUALIFIED TO MAKE ANY REPAIRS TO THE PRODUCT, OR THAT HE OR SHE IS
QUALIFIED TO REPLACE ANY PARTS OF THE PRODUCT. IN FACT, THE MANUFACTURER AND/OR
DISTRIBUTOR EXPRESSLY STATES THAT ALL REPAIRS AND PARTS REPLACEMENTS SHOULD BE
UNDERTAKEN BY CERTIFIED AND LICENSED TECHNICIANS, AND NOT BY THE BUYER. THE BUYER
ASSUMES ALL RISK AND LIABILITY ARISING OUT OF HIS OR HER REPAIRS TO THE ORIGINAL
PRODUCT OR REPLACEMENT PARTS THERETO, OR ARISING OUT OF HIS OR HER INSTALLATION
OF REPLACEMENT PARTS THERETO.
Record Product’s Serial Number Here:
Note: If product has no serial number, record month and year of purchase instead.
Note: Some parts are listed and shown for illustration purposes only and are not available individually
as replacement parts.
PLEASE READ THE FOLLOWING CAREFULLY
TROUBLESHOOTING
PRODUCT MADE IN CHINA
