

1400W DEMOLITION JACK HAMMER
ITEM #61102
SAVE THIS MANUAL: KEEP THIS MANUAL FOR SAFETY WARNINGS, PRECAUTIONS, ASSEMBLY,
OPERATING, INSPECTION, MAINTENANCE AND CLEANING PROCEDURES. WRITE THE PRODUCT’S
SERIAL NUMBER ON THE BACK OF THE MANUAL NEAR THE ASSEMBLY DIAGRAM (OR MONTH
AND YEAR OF PURCHASE IF PRODUCT HAS NO NUMBER).
OWNER’S MANUAL AND SAFETY INSTRUCTIONS
FOR QUESTIONS PLEASE CALL OUR CUSTOMER SUPPORT: (909) 628 0880 MON-FRI 9AM TO 3PM PST

GENERAL SAFETY WARNINGS
Read all safety warnings and instructions. Failure to follow the warnings and instructions
may result in electric shock, re and/or serious injury. Save all warnings and instructions
for future reference.
SAFETY
The warnings, precautions, and instructions discussed in this instruction manual cannot cover
all possible conditions and situations that may occur. It must be understood by the operator that
common sense and caution are factors which cannot be built into this product, but must be supplied
by the operator. Read carefully and understand all ASSEMBLY AND OPERATION INSTRUCTIONS
before operating. Failure to follow the safety rules and other basic safety precautions may result in
serious personal injury.
1
Read and understand all instructions. Failure to follow all instructions may result in serious injury
or property damage.
DO NOT allow persons to operate or assemble the product until they have read this manual and have
developed a thorough understanding of how it works.
DO NOT modify this product in any way. Unauthorized modication may impair the function and/or
safety and could affect the life of the product. There are specic applications for which the product was
designed.
Use the right tool for the job. DO NOT attempt to force small equipment to do the work of larger
industrial equipment. There are certain applications for which this equipment was designed. This
product will be safer and do a better job at the capacity for which it was intended. DO NOT use this
equipment for a purpose for which it was not intended.
Keep children and bystanders away from the work area while operating the tool. DO NOT allow
children to handle the product.
DO NOT operate power tools in explosive atmospheres, such as in the presence of ammable liquids,
gases or dust. Power tools create sparks which may ignite the dust or fumes
Power tool plugs must match the outlet. Never modify the plug in any way. DO NOT use any adapter
plugs with grounded power tools. Unmodied plugs and matching outlets will reduce risk of electric
shock.
Avoid body contact with grounded surfaces such as pipes, radiators, ranges and refrigerators. There is
an increased risk of electric shock if your body is grounded.
DO NOT expose power tools to rain or wet conditions. Water entering a power tool will increase the
risk of electric shock.
If operating a power tool in a damp location is unavoidable, use a Ground Fault circuit Interrupter (GFcI)
protected supply.
DO NOT abuse the cord. Never use the cord for carrying, pulling or unplugging the power tool. Keep
cord away from heat, oil, sharp edges or moving parts. Damaged or entangled cords increase the risk
of electric shock.
When operating a power tool outdoors, use an extension cord suitable for outdoor use. Use of a cord
suitable for outdoor use reduces the risk of electric shock.
IMPORTANT SAFETY INFORMATION

2
Stay alert, watch what you are doing and use common sense when operating a power tool. DO NOT
use a power tool while you are tired or under the inuence of drugs, alcohol or medication. A moment of
inattention while operating power tools may result in serious personal injury.
Use personal protective equipment. Always wear eye protection. Safety equipment such as dust mask,
non-skid safety shoes, hard hat, or hearing protection used for appropriate conditions will reduce personal
injuries
Prevent unintentional starting. Ensure the Switch is in the off-position before connecting to power source,
picking up or carrying the tool. Carrying power tools with your nger on the Switch or energizing power
tools that have the Switch on invites accidents.
DO NOT overreach. Keep proper footing and balance at all times. This enables better control of the power
tool in unexpected situations.
Dress properly. DO NOT wear loose clothing or jewellery. Keep your hair, clothing and gloves away from
moving parts. Loose clothes, jewellery or long hair can be caught in moving parts.
If devices are provided for the connection of dust extraction and collection facilities, ensure these are
connected and properly used. Use of these devices can reduce dust-related hazards.
Only use safety equipment that has been approved by an appropriate standards agency. Unapproved
safety equipment may not provide adequate protection. Eye protection must be ANSI-approved and
breathing protection must be NIOSH-approved for the specic hazards in the work area.
DO NOT force the power tool. Use the correct power tool for your application. The correct power tool will
do the job better and safer at the rate for which it was designed.
DO NOT use the power tool if the Switch does not turn it on and off. Any power tool that cannot be
controlled with the Switch is dangerous and must be repaired.
Disconnect the plug from the power source before making any adjustments, changing accessories, or
storing power tools. Such preventive safety measures reduce the risk of starting the power tool accidentally.
Store idle power tools out of the reach of children and do not allow persons unfamiliar with the power tool
or these instructions to operate the power tool. Power tools are dangerous in the hands of untrained user.
Maintain power tools. check for misalignment or binding of moving parts, breakage of parts and any other
condition that may affect the power tool’s operation. If damaged, have the power tool repaired before use.
Many accidents are caused by poorly maintained power tools.
Keep cutting tools sharp and clean. Properly maintained cutting tools with sharp cutting edges are less
likely to bind and are easier to control.
Use the power tool, accessories and tool bits etc. in accordance with these instructions, taking into account
the working conditions and the work to be performed. Use of the power tool for operations different from
those intended could result in a hazardous situation.
DO NOT operate this tool if you have back, neck, or wrist injuries, or other conditions that will be aggravated
by the severe jerking forces that this tool exerts upon the operator.
DO NOT lay the tool down until it has come to a complete stop. Moving parts can grab the surface and
pull the tool out of your control.
People with pacemakers should consult their physician(s) before use. Electromagnetic elds near
heart pacemakers could cause pacemaker interference or pacemaker failure. In addition, people with
pacemakers should: • Avoid operating alone. • Properly maintain and inspect to avoid electrical shock. •
Properly ground power cord. Ground Fault Circuit Interrupter (GFCI)
IMPORTANT SAFETY INFORMATION
3
Hold power tools by insulated gripping surfaces when performing an operation where the cutting tool may
contact hidden wiring or its own cord. Contact with a ″live″ wire will make exposed metal parts of the tool
″live″ and shock the operator.
Keep clear of moving parts.
Avoid unintentional starting. Prepare to begin work before turning on the tool.
DO NOT leave the tool unattended when it is plugged into an electrical outlet. Turn off the tool and
unplug it from its electrical outlet before leaving.
Anyone using vibrating tools regularly or for an extended period should rst be examined by a doctor
and then have regular medical check-ups to ensure medical problems are not being caused or worsened
from use. pregnant women or people who have impaired blood circulation to the hand, past hand injuries,
nervous system disorders, diabetes, or Raynaud’s Disease should not use this tool. If you feel any
symptoms related to vibration (such as tingling, numbness, and white or blue ngers), seek medical advice
as soon as possible.
DO NOT smoke during use. Nicotine reduces the blood supply to the hands and ngers, increasing the
risk of vibration-related injury.
Wear suitable gloves to reduce the vibration effects on the user.
To reduce vibration, maintain the tool as explained in this manual. If any abnormal vibration occurs, stop
use immediately.
IMPORTANT SAFETY INFORMATION
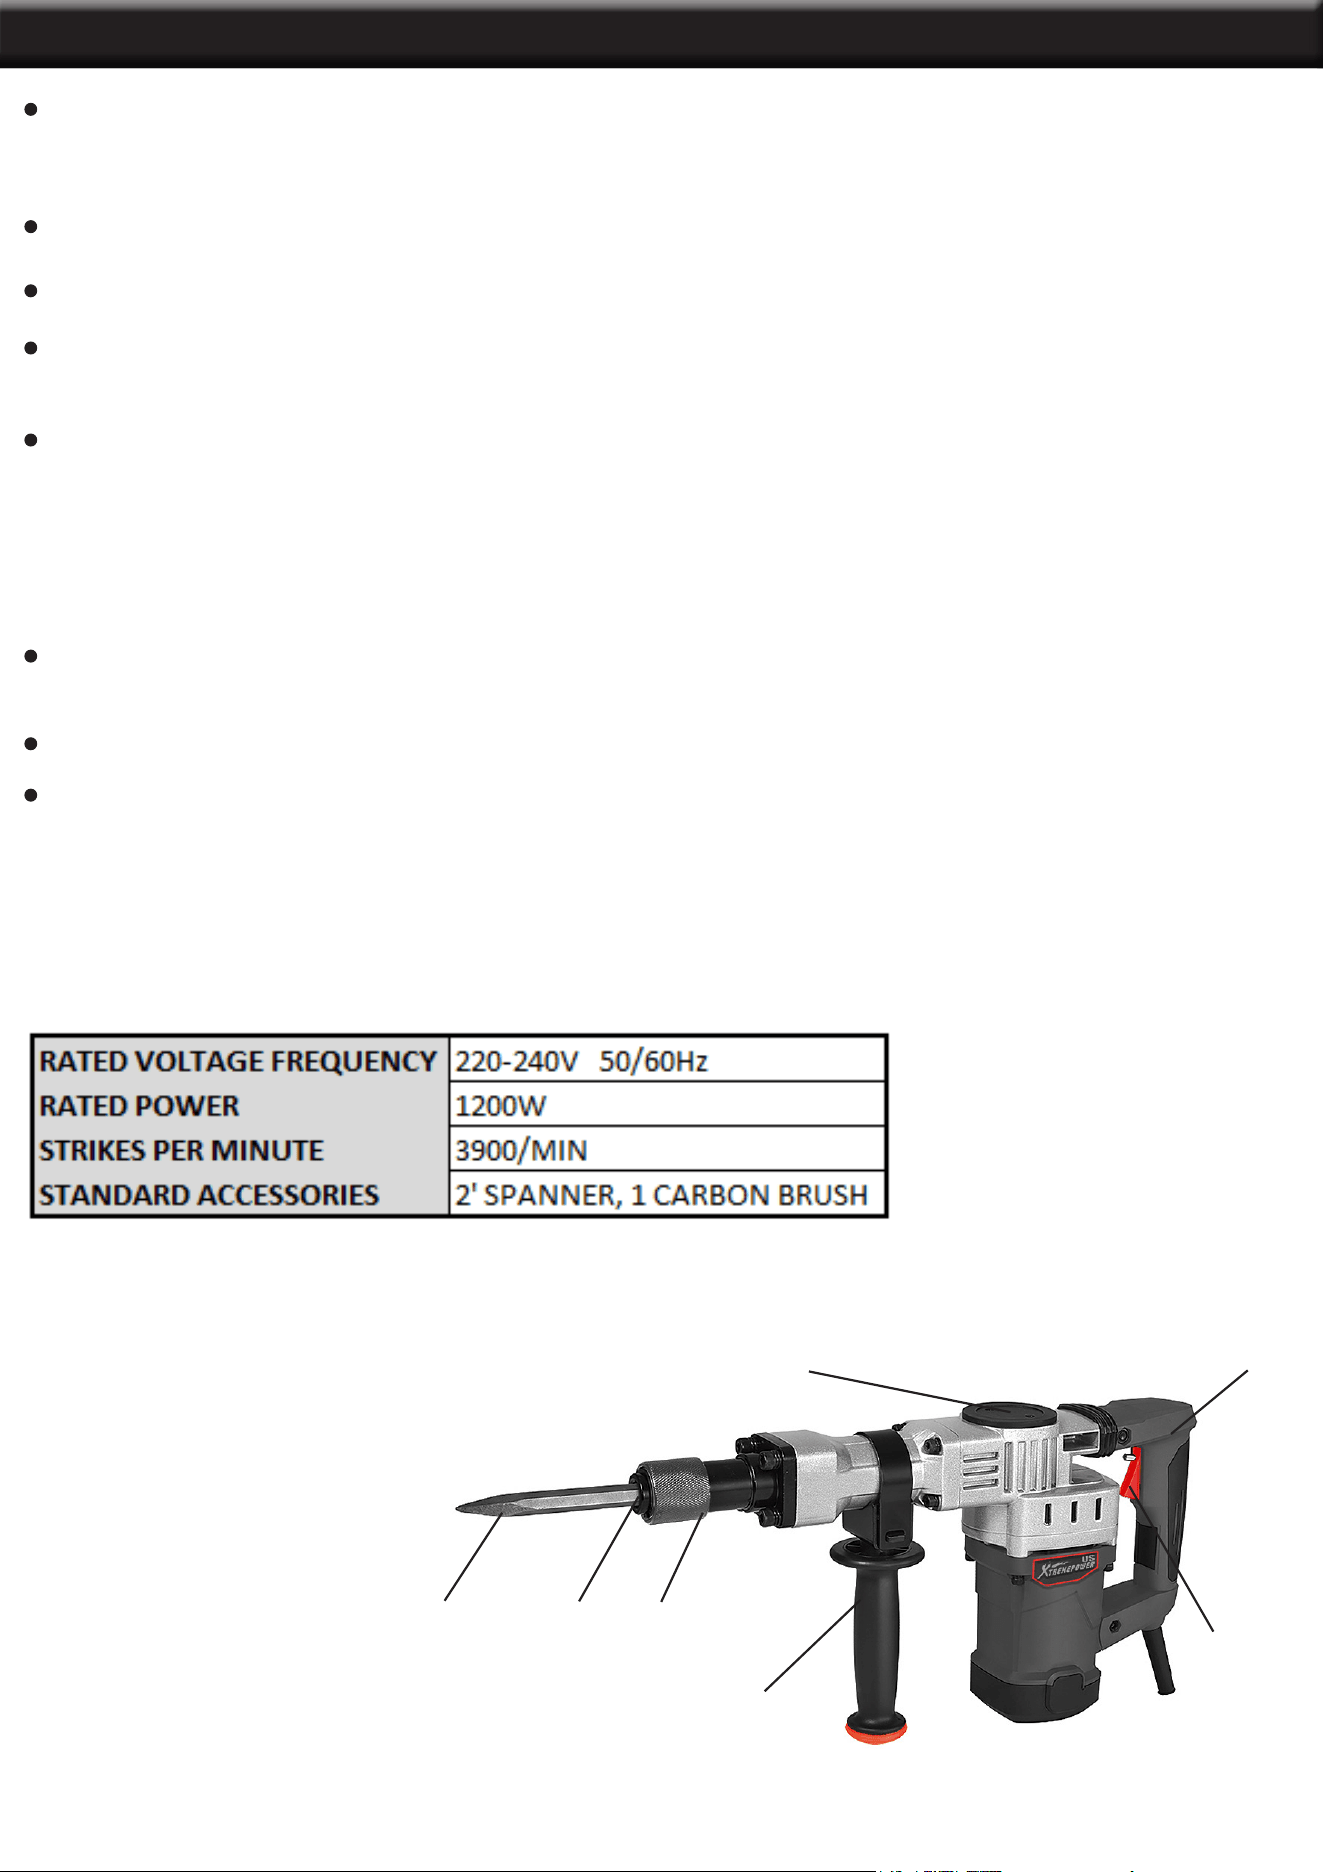
1. Trigger
2. Auxiliary
3. Chisel Release Collar
4. Chisel Holder
5. Chisel
6. Oil Cover
7. Lock On Button
1.
7.
6.
5.
4.
3.
2.
TECHNICAL SPECIFICATIONS
4
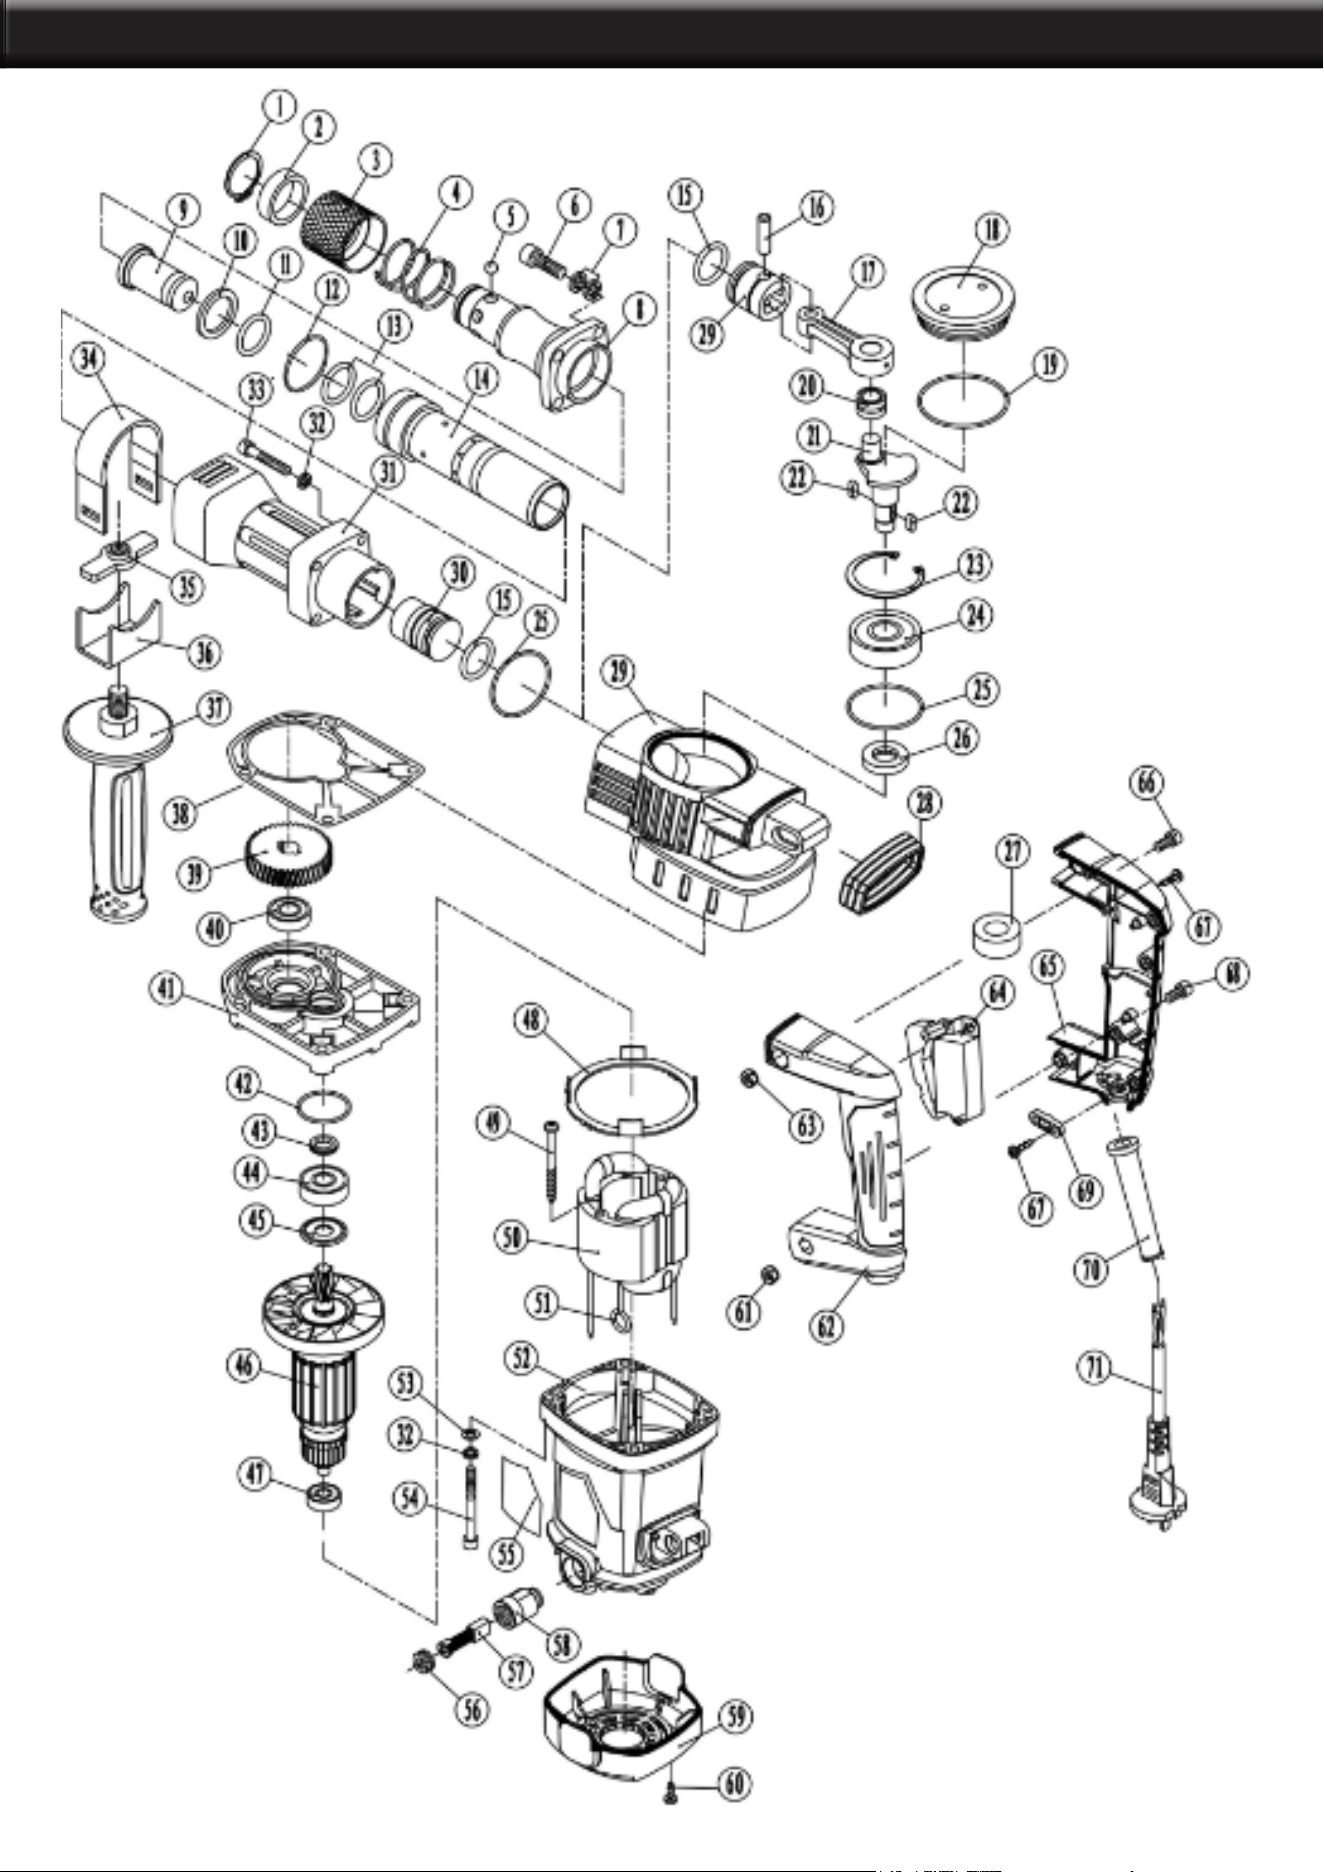
PARTS INFORMATION
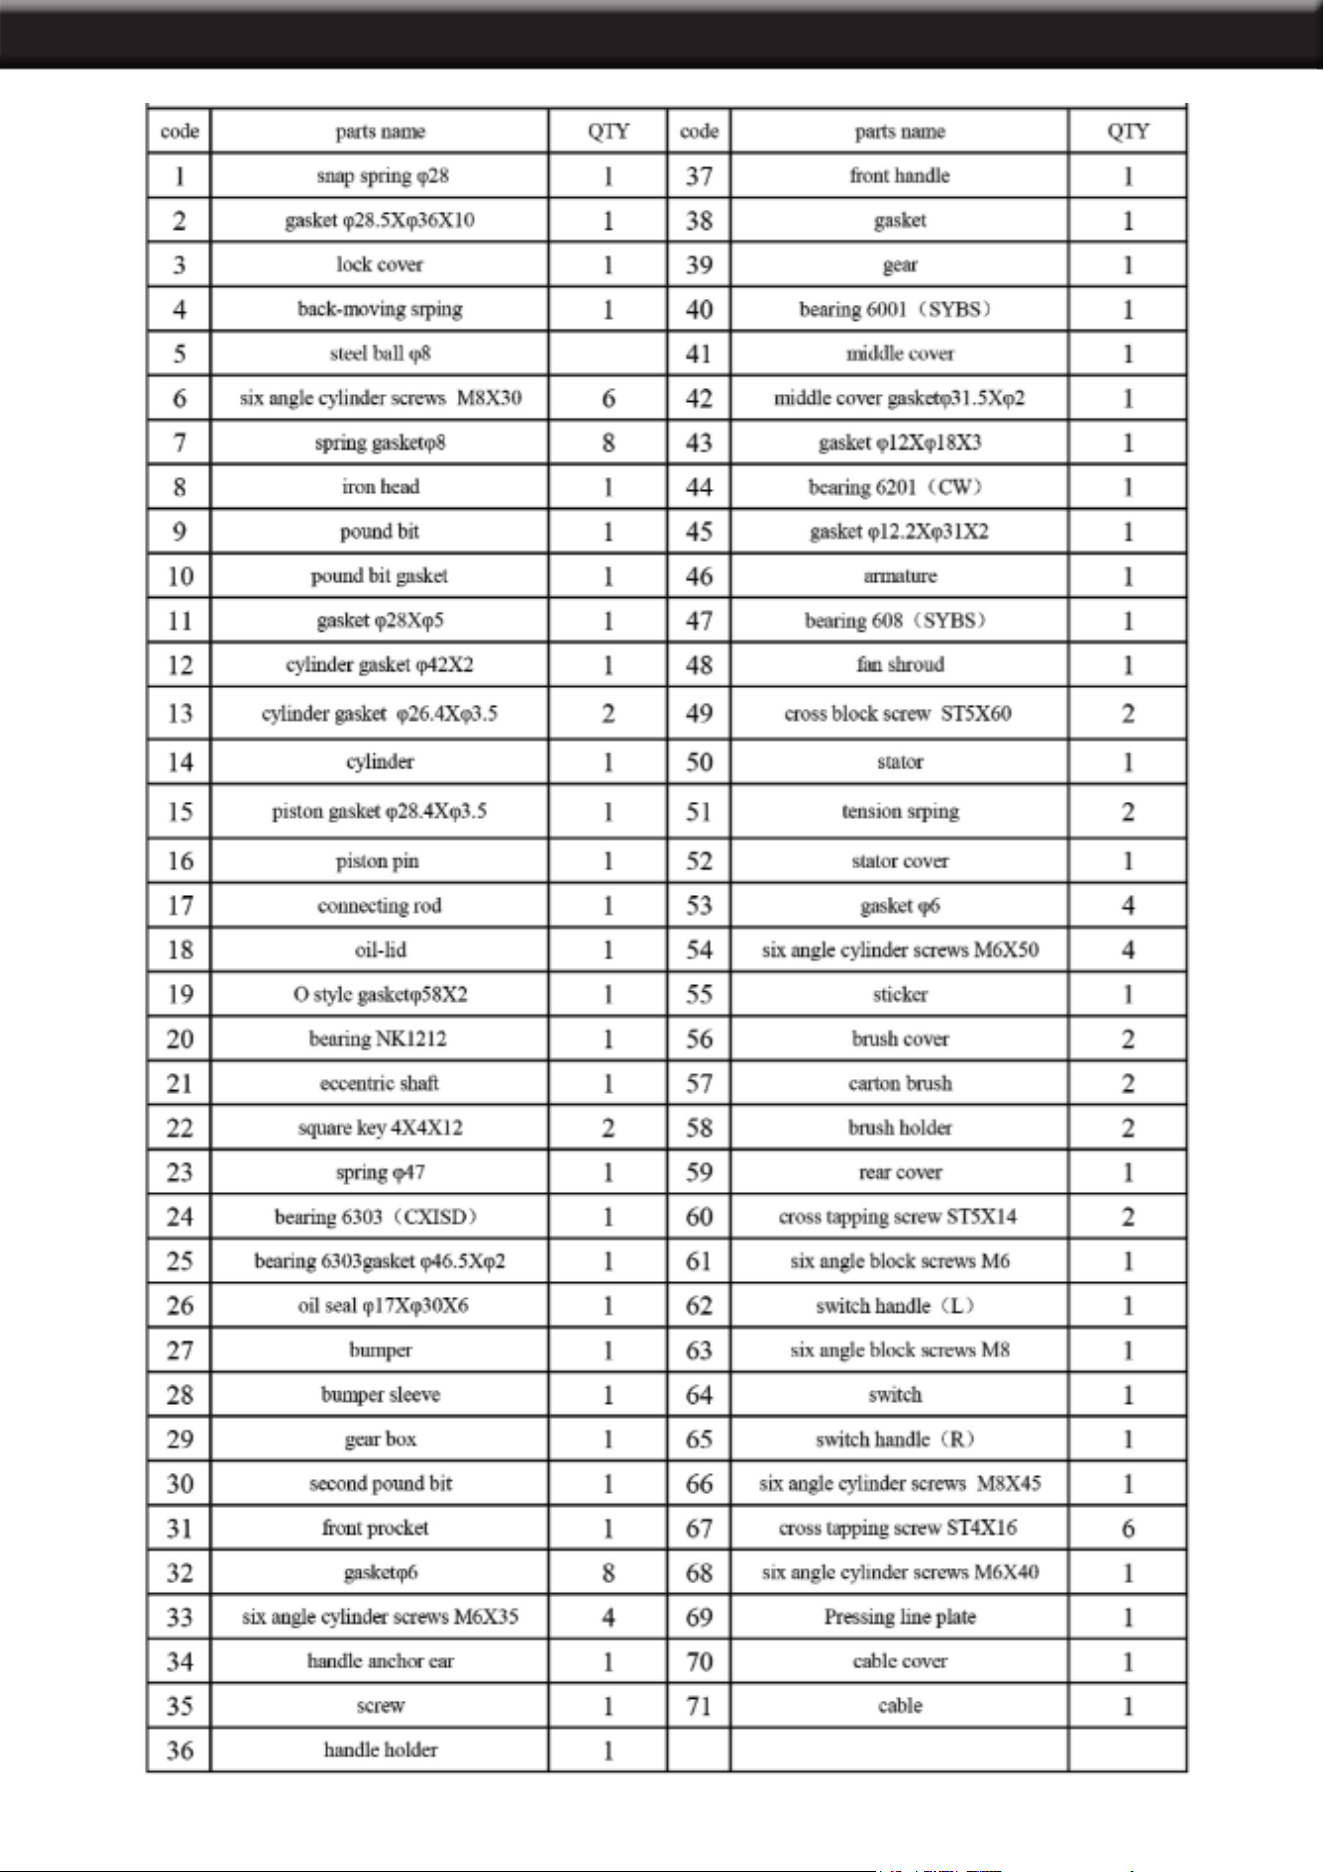
5
OPERATION
6
ASSEMBLY
AUXILIARY HANDLE
The auxiliary handle can be set to any position for a secure and low-fatigue
working posture.
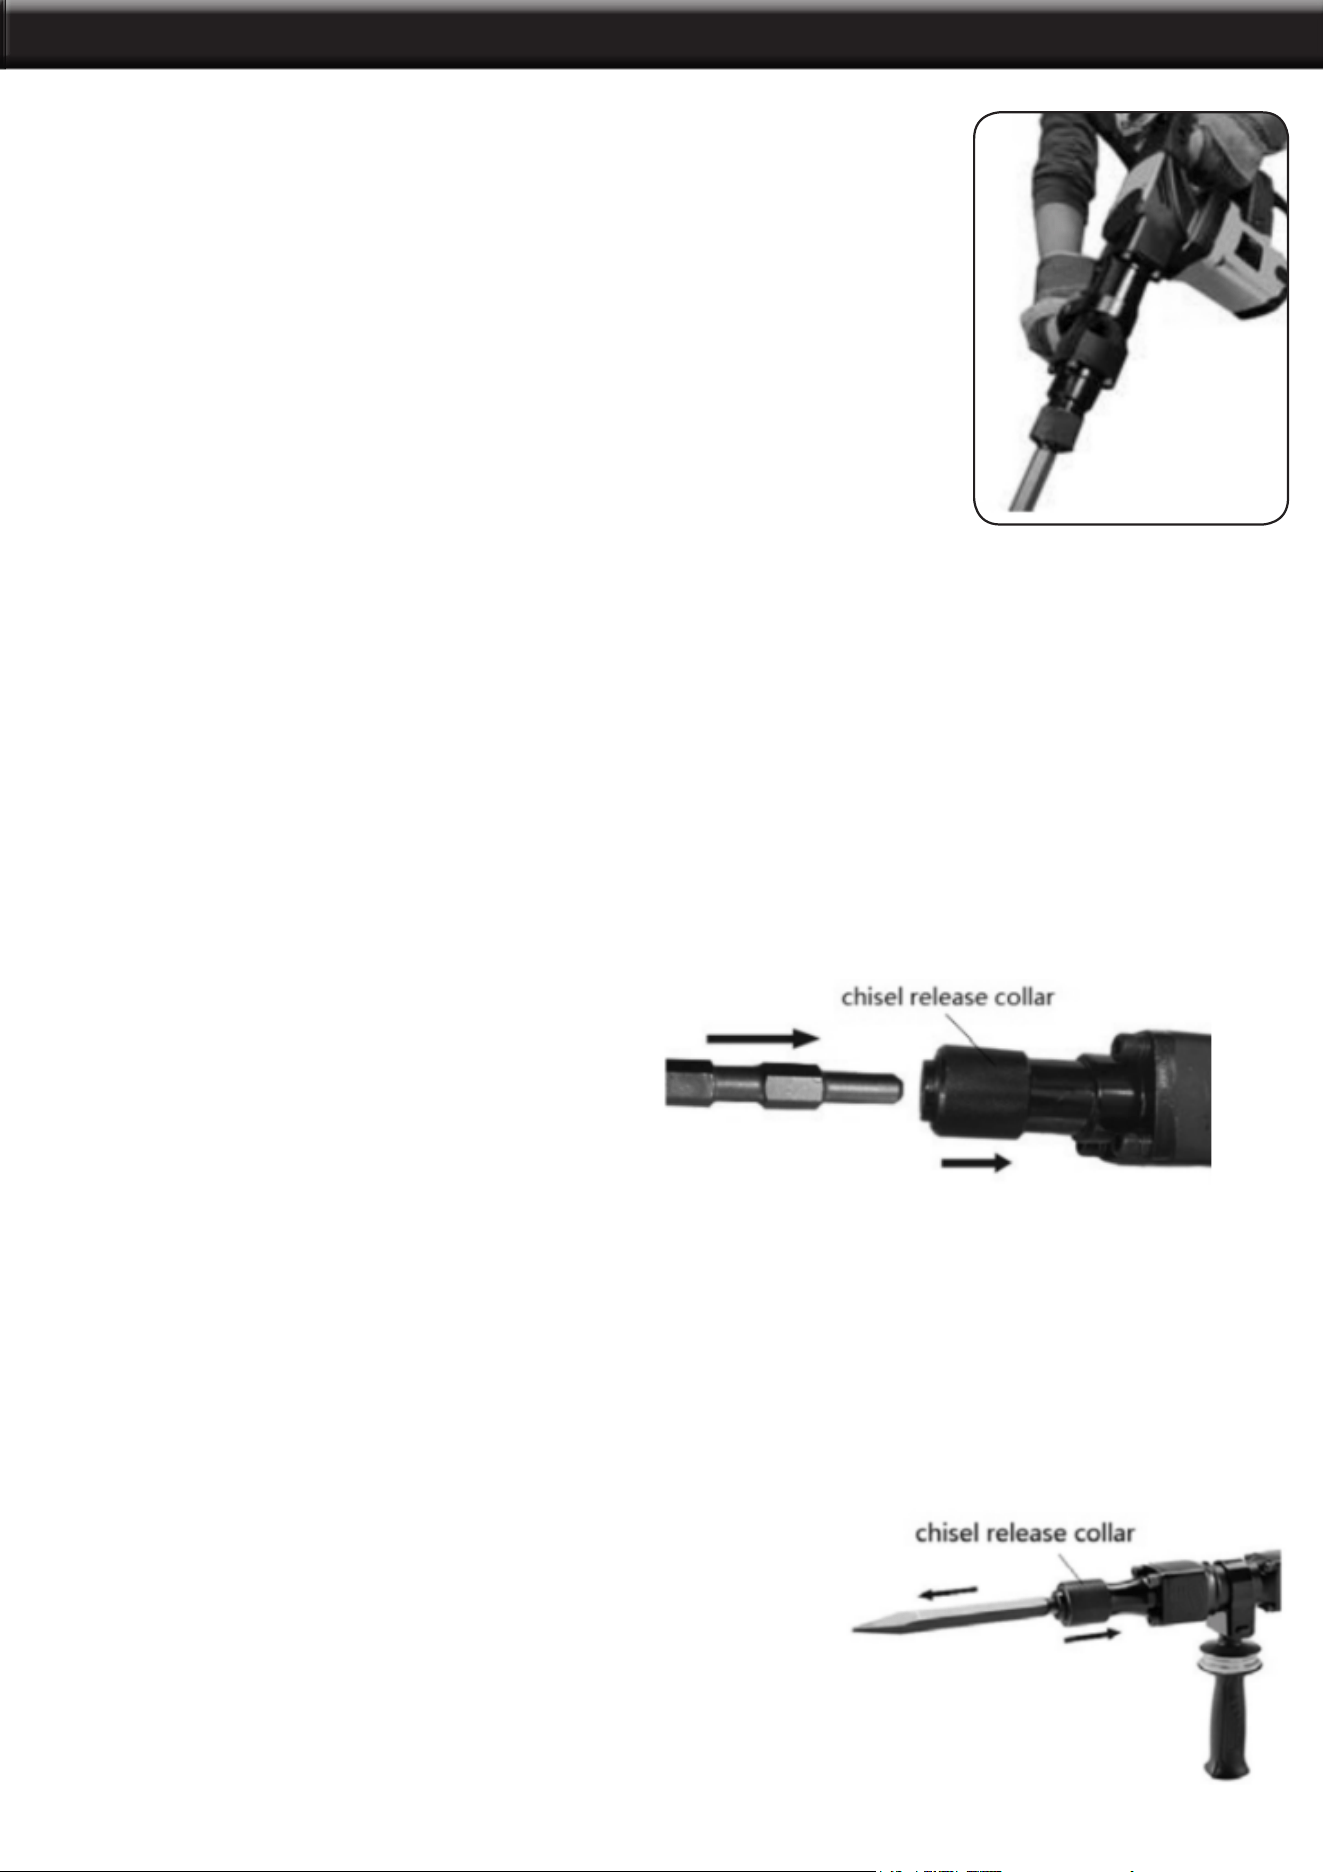
CHANGING THE CHISEL
The device is equipped with a SDS attachment system.
1. Clean tools and grease with a thin layer of machine grease before installing.
2. Pull back the bit release collar and hold it.
3. Insert the bit or chisel into the nose of the tool.
4. Rotate the bit slowly until it aligns with the locking mechanism.
5. Push bit into the tool until it locks.
6. Release the collar again in order to lock the tool.
7. Check the latching by pulling the tool.
REMOVING THE CHISEL
Pull the chisel release collar toward the rear of the tool and remove the chisel bit.

7
OPERATION and MAINTENANCE
This tool requires no hourly or daily lubrication becasue it has been properly lubricated and is ready to use.
It is recommended that the tools’ gears be degreased with a special gear lubricant at every brush change or
be reduplicated after every 6 months of operation. Send the complete tool to a service center for lubrication
service. If you choose to lubricate to lubricate the tool yourself, proceed as follows. Run the tool for several
minutes to warm it up. Switch the tool off and unplug the main plug from the socket. Remove the oil cover.
Rest the tool on the table with the bit end pointing upwards. This will allow the old grease to collect inside
the crank housing. Wipe out the old grease inside and replace with genuine hammer grease . Standard
accesssory, 45g; 1.6oz. Fill only with 15g (.5oz) grease one time.
STARTING WORK
Switching ON/OFF
Plug the cord set into power socket:
1. Switching ON: Press the trigger.
2. Switching OFF: Release the trigger. Press the trigger, meanwhile pressing the lock on the button. The tool
will continue working. For low temperatures, the machine reaches the full impact rate only after a certain
time. This start-up time can be shortened by strikig the chisel in the machine against the oor one time. To
save enrgy, only switch the power tool on when using it.
WORKING ADVICE
Sharpening Chisels
The best results are only acheived with sharp chisels. This ensure a long service life of the tools and good
working performance.
Re-Sharpening Chisels
Sharpen chiseling tools using grinding wheels with a steady supply of water. Reference values are shown in
the gure. Take care that no annealing coloration appears on the cutting edges; this impairs the hardness of
the hardness of the chiseling tools.
For forging, heat the chisel to between 850 and 1050°C, bright red to yellow.
For hardening, heat the chisel to approx 900°C and quench in oil. Then anneal in an oven for approx one
hour at 320°C. Annealing color = light blue)
MAINTENANCE
Before any work on the machine itself, pull the mains plug. For safe and proper tool use, make sure the
ventilation slots are clean. A damaged dust protection cap should be changed immediately. We recommend
having this performed by a qualied technician.
TOOL LUBRICATION

8
THE MANUFACTURER AND/OR DISTRIBUTOR HAS PROVIDED THE PARTS LIST AND ASSEMBLY
DIAGRAM IN THIS MANUAL AS A REFERENCE TOOL ONLY. NEITHER THE MANUFACTURER OR
DISTRIBUTOR MAKES ANY REPRESENTATION OR WARRANTY OF ANY KIND TO THE BUYER THAT
HE OR SHE IS QUALIFIED TO MAKE ANY REPAIRS TO THE PRODUCT, OR THAT HE OR SHE IS
QUALIFIED TO REPLACE ANY PARTS OF THE PRODUCT. IN FACT, THE MANUFACTURER AND/OR
DISTRIBUTOR EXPRESSLY STATES THAT ALL REPAIRS AND PARTS REPLACEMENTS SHOULD BE
UNDERTAKEN BY CERTIFIED AND LICENSED TECHNICIANS, AND NOT BY THE BUYER. THE BUYER
ASSUMES ALL RISK AND LIABILITY ARISING OUT OF HIS OR HER REPAIRS TO THE ORIGINAL
PRODUCT OR REPLACEMENT PARTS THERETO, OR ARISING OUT OF HIS OR HER INSTALLATION
OF REPLACEMENT PARTS THERETO.
Record Product’s Serial Number Here:
Note: If product has no serial number, record month and year of purchase instead.
Note: Some parts are listed and shown for illustration purposes only and are not available individually
as replacement parts.
PLEASE READ THE FOLLOWING CAREFULLY
WARRANTY
PRODUCT MADE IN CHINA
