
SHP 0460BK
EN
MULTIFUNCTION BLADE
Translation of the original manual

SHP 0460BK
1
2
3
4 5
6 7
A
B
D
C
E1 E2
- 1 -
03/2025
2025, .
EN
Multifunction Blade
User Manual
Important safety instructions
READ CAREFULLY AND STORE FOR
FUTURE USE.
• This appliance may be only used by children aged 8 years and older and by
persons with physical, sensory or mental impairments or lack of experience and
knowledge, if they are supervised or have been instructed on the safe use of the
appliance and understand the potential hazards.
• Children must not play with the appliance.
• Cleaning and maintenance must not be performed by children without supervision.
• If the charging cable is damaged, have it replaced in aprofessional service centre in
order to prevent adangerous situation. It is forbidden to use the appliance with the
cable damaged.
Warning:
Keep the appliance dry.
• The parts that must be attached must be installed in such away that they cannot
fall into the water.
• Only use the appliance with the charging cable supplied with the appliance. Do not
use another charging cable or use the appliance charging cable to charge other
appliances.
• Before connecting the appliance to the power adapter, make sure that the voltage
indicated on the type plate of the appliance matches the voltage on the type plate
of the adapter. The power adapter is not supplied. Follow the instructions in the user
manual for the power adapter.

- 2 -
03/2025
2025, .
• Do not place the charging cord over sharp objects; make sure it does not hang over
the edge of atable or touch aheated surface.
• Do not connect or disconnect the charging cable with wet hands.
• Store, charge anduse the appliance at an ambient temperature of 15 °C to 35 °C. Do
not charge the appliance for longer than necessary to fully charge it. After charging,
disconnect it from the power source.
• Do not expose the appliance to temperatures above 50°C. Otherwise damage to the
built-in battery may occur.
• The appliance is equipped with abuilt-in battery with along service life. Never
disassemble the appliance in order to remove the battery. Do not short-circuit the
appliance or throw it into afire. There is arisk of leakage of toxic substances, fire or
explosion if improperly handled.
• Do not charge, use, store or leave the appliance in abathroom or any place where
it could fall into abathtub, wash basin or any other container filled withwater; in
aroom where volatile, flammable or explosive substances are stored or used.
• If the appliance falls into water, underno circumstances should you touch it, but
immediately disconnect the power adapter from the socket. Never use an appliance
or charging cable that has been submerged in water. Take it to an authorised service
centre for inspection.
• Do not use the appliance in the bath or shower. Do not clean it under the tap, spray
it with water or other liquid, or immerse it in water or other liquid.
• This trimmer is designed fordomestic indoor use only and is used fortrimming
human hair, beards andhair. The trimmer is not intended for commercial purposes
or fortrimming animal fur. Do not use it outdoors.
• Use the trimmer only on dry and clean beard or facial hair. Do not use it on wet or
freshly washed hair.
• Use the trimmer and its accessories in accordance with the instructions in this
manual.
• Use only the original accessories supplied with this trimmer.
• If the blade is damaged, it must be replaced immediately. There is arisk of serious
injury.
• Do not expose the trimmer and its accessories to the outdoor environment, extreme
temperatures, direct sunlight, excessive humidity or excessive dust.
• Do not place the trimmer or its accessories near heaters, open fires or other sources
of heat.
• Before each use, check that the selected comb attachment is not damaged. Never
use the trimmer with adamaged comb attachment.
• The trimmer may heat up when used or recharged. This is normal.

- 3 -
03/2025
2025, .
• Keep the trimmer at asafe distance from your eyes.
• Always switch off and unplug the trimmer when not in use, when left unattended
and before attaching, removing or replacing the attachment, cleaning, maintenance
or storage. Store the trimmer andits power adapter inadry environment.
• Keep the trimmer clean. Perform the cleaning and maintenance following the
instructions in the Cleaning and Maintenance section.
• Do not perform any maintenance on the trimmer other than cleaning its individual
components as described in the Cleaning and Maintenance chapter.
• To avoid ahazardous situation arising, do not repair or modify the trimmer or
its accessories yourself. Contact an authorised service centre for all repairs. By
interfering with the product, you risk losing the legal right to defective performance
or warranty for quality.
This appliance can be washed under a water tap.
. . . . . . . . . . . . . . . . . . . . . . . . . . . . . . . . . . . . . . . . . . . . . . . . . . . . . . . . . . . . . . . . . . . . . . . . . . . . . . . . .
EXPLANATION OF SYMBOLS PLACED ON THE PRODUCT OR INTHE
ACCOMPANYING DOCUMENTATION
The product meets all the basic requirements of the applicable EU
directives.
This symbol on products or original documents means that used electric
or electronic products must not be added to ordinary municipal waste.
Before disposing of the product or returning it to adesignated collection
point, ensure that the battery is removed. The battery contains
environmentally harmful substances and should not be disposed of in
regular household waste. Proper disposal shall be ensured by the relevant
collection point.
. . . . . . . . . . . . . . . . . . . . . . . . . . . . . . . . . . . . . . . . . . . . . . . . . . . . . . . . . . . . . . . . . . . . . . . . . . . . . . . . .

- 4 -
03/2025
2025, .
EN
Multifunction Blade
User Manual
• Thank you for purchasing our SENCOR product; we hope it will serve to your
satisfaction.
• Prior to using this appliance, please read the user manual thoroughly, even in cases
when you are already familiar with the use of similar types of appliances. Use
the appliance only as described in this user manual. Keep the manual for future
reference. If you pass the appliance on to another person, ensure that this user
manual is included.
• Carefully unpack the appliance and make sure not to discard any part of the
packaging material until you have removed all components of the appliance. It is
recommended that you keep the original packaging, packing material, receipt and
confirmation of the extent of the seller'sliability or warranty certificate at least for
the duration of the legal right to file adefect claim or the quality warranty. When
transporting the appliance, we recommend repackaging it in the original box
provided by the manufacturer.
. . . . . . . . . . . . . . . . . . . . . . . . . . . . . . . . . . . . . . . . . . . . . . . . . . . . . . . . . . . . . . . . . . . . . . . . . . . . . . . . .
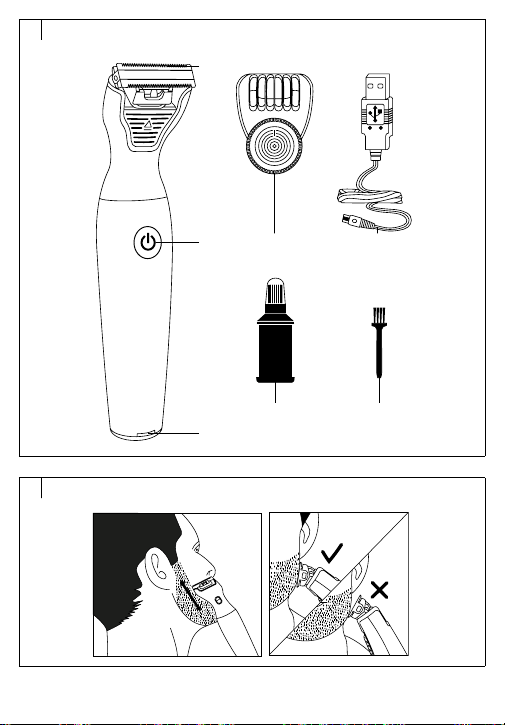
DESCRIPTION OF THE TRIMMER AND ACCESSORIES
A1 Trimmer
A2 On/off button
A3 Operation indicator
A4 Attachment for trimming hair/beard
withadjustable trimming length
A5 USB charging cable
A6 Lubricating oil
A7 Cleaning brush
. . . . . . . . . . . . . . . . . . . . . . . . . . . . . . . . . . . . . . . . . . . . . . . . . . . . . . . . . . . . . . . . . . . . . . . . . . . . . . . . .
USE
• The trimmer is suitable for trimming dry or slightly damp beard. The trimmer is not
intended for cutting freshly washed hair, cutting artificial hair or animal hair. The
trimmer is intended for household use and is not designed for commercial or other
professional applications.
. . . . . . . . . . . . . . . . . . . . . . . . . . . . . . . . . . . . . . . . . . . . . . . . . . . . . . . . . . . . . . . . . . . . . . . . . . . . . . . . .
CHARGING THE TRIMMER
• The trimmer is equipped with abuilt-in Lithium-ion battery that serves as an internal
power source andallows cordless operation of the trimmer. Allow the trimmers to

- 5 -
03/2025
2025, .
fully charge for at least 2 hours before first use or after along period of non-use. Use
only the supplied charging cable to charge.
• Make sure that the trimmer is turned off and plug the connector of the charging
cable into the socket at therear of the trimmer. Plug the other end of the charging
cable into the power adapter and plug its fork into aproperly grounded power
socket.
• Charging will start automatically and the operation indicator will be lit in red.
• Once the trimmer is fully charged, the operation indicator goes out. Disconnect the
charging cable from the trimmer and pull the power adapter out of the power socket.
• When the operation indicator flashes during use or after switching on, it is necessary
to charge the trimmer.
• The operation indicator lights up white during use.
Note:
Charge, use andstore the trimmer at an ambient temperature of 15–35
°C inadry environment. Lower or higher temperatures adversely affect
the life of the battery. We recommend charging the trimmer before it is
fully discharged. If you do not use the trimmer for along time, charge it at
least once every 6 months.
. . . . . . . . . . . . . . . . . . . . . . . . . . . . . . . . . . . . . . . . . . . . . . . . . . . . . . . . . . . . . . . . . . . . . . . . . . . . . . . . .
SETUP BEFORE USE
• Use the trimmer only on dry andclean or slightly damp beard or hair (only withthe
comb attached). Do not use gel or foam. Do not use it on wet or freshly washed hair
or hair that has gel, etc.
• Make sure the trimmer is clean before each use.
• Before each use, check that the trimmer unit or the comb attachment is not
damaged. Never use atrimmer withadamaged trimmer unit or adamaged comb
attachment.
. . . . . . . . . . . . . . . . . . . . . . . . . . . . . . . . . . . . . . . . . . . . . . . . . . . . . . . . . . . . . . . . . . . . . . . . . . . . . . . . .
POWER ON/OFF
• Theon/off button is used to switch the trimmer on and off.
• If you need to attach the attachment during the trimming process, always switch the
trimmer off with the on/off button first and then attach the attachment.
• Clean the trimmer after each use according to the instructions in the “Cleaning
andMaintenance” section.
- 6 -
03/2025
2025, .
Warning:
Do not attach or replace the attachment while the trimmer is on.
There is aserious risk of injury.
. . . . . . . . . . . . . . . . . . . . . . . . . . . . . . . . . . . . . . . . . . . . . . . . . . . . . . . . . . . . . . . . . . . . . . . . . . . . . . . . .
SHAVING (Fig. B)
• Make sure that the trimmer blade is incontact with the skin by placing it flat against
the skin.
• Turn on the trimmer andmove it up anddown, applying slight pressure.
Warning:
Make sure that the surface of the blade is held flat against the skin.
Otherwise, cuts might occur.
. . . . . . . . . . . . . . . . . . . . . . . . . . . . . . . . . . . . . . . . . . . . . . . . . . . . . . . . . . . . . . . . . . . . . . . . . . . . . . . . .
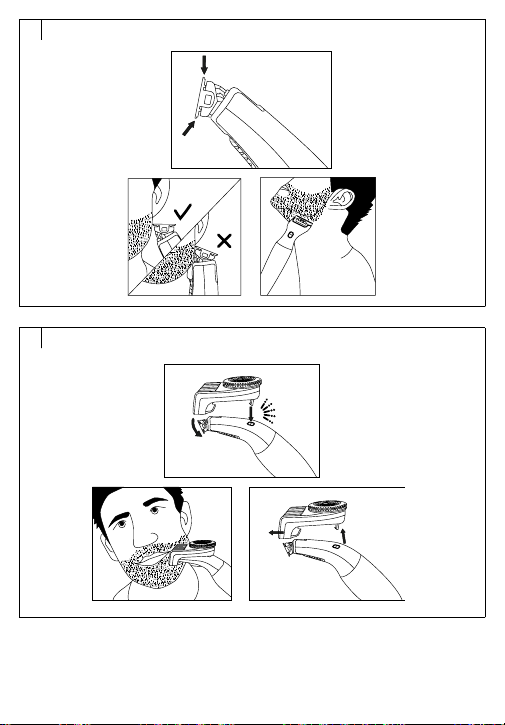
SHAPING THE CUT (Fig. C)
• Use both edges of the blade to create sharp lines andperfect edges.
• Hold the trimmer so that the blade is directed perpendicular to theskin andone of
its edges is touching the skin. This allows for more precise shaping of the cutlets
andthe area around the mouth andnose.
. . . . . . . . . . . . . . . . . . . . . . . . . . . . . . . . . . . . . . . . . . . . . . . . . . . . . . . . . . . . . . . . . . . . . . . . . . . . . . . . .
USING THE COMB ATTACHMENT (Fig. D)
• The comb attachment withadjustable cutting length allows you to trim your hair or
beard to different lengths.
• When using the comb attachment for the first time, set the maximum cutting length.
• The setting on the wheel corresponds to the remaining length of the hair
inmillimeters after trimming. You can choose acutting length from 0,5 mm to 10
mm.
• Put the front part of the comb attachment on the trimmer blade andpush the
protrusion on the back of the comb attachment into the hole in the trimmer
(see figure D). Press gently until you hear aclick. This indicates that the comb
attachment is properly secured.

- 7 -
03/2025
2025, .
• Always trim in the direction of the comb teeth andmake sure that the straight part of
the comb is infull contact with the skin. This ensures an even cutting result.
• If you need to remove the comb attachment, snap the back of the comb attachment
andpull it off the trimmer blade.
Warning:
Only attach or remove the comb when the trimmer is turned off.
There is arisk of serious injury.
. . . . . . . . . . . . . . . . . . . . . . . . . . . . . . . . . . . . . . . . . . . . . . . . . . . . . . . . . . . . . . . . . . . . . . . . . . . . . . . . .
ADVICE AND TIPS
• Start cutting when setting the highest cutting height on the cutting unit
andgradually reduce the hair length setting.
• Make anote of the length setting used for aparticular style of hairstyle so that you
don't have to search for it the next time you cut.
• The most effective is cutting against the direction of hair growth.
• As the hair grows indifferent directions, it is also necessary to move the trimmer
indifferent directions (up, down or across).
• Repeat each stroke of the trimmer to cut even those hairs that you did not catch in
the previous strokes.
• Make sure that the flat part of the comb attachment is completely in contact with
the scalp. This ensures an even cutting result.
• For good results oncurly, thinner or long hair, you can try guiding your hair through
the comb towards thetrimmer.
• Trim the beard in slow movements in the opposite direction to the growth of the
beard from the bottom upwards. When trimming the beard with the help of acomb
attachment, remember that the selected comb attachment must always be
incontact with the skin to ensure an even cut. After attaching the attachment back
to the cutting unit, be sure to adjust the cutting length again.
• Regularly clean the trimmer unit of hair and beard clippings. If alarge amount of hair
or beard hair accumulates in the trimmer, remove it from the trimmer and blow or
shake out the hair and beard hair.
. . . . . . . . . . . . . . . . . . . . . . . . . . . . . . . . . . . . . . . . . . . . . . . . . . . . . . . . . . . . . . . . . . . . . . . . . . . . . . . . .
- 8 -
03/2025
2025, .
CLEANING AND MAINTENANCE
• Always switch off the trimmer before cleaning. We recommend cleaning the
trimmer after each use.
Warning:
To avoid the risk of electric shock, do not immerse the trimmer and
charging cable in water or any other liquid.
Warning:
Do not use hard-bristled brushes, abrasive cleaners, thinners, etc.
Otherwise the surface to be cleaned may be damaged.
. . . . . . . . . . . . . . . . . . . . . . . . . . . . . . . . . . . . . . . . . . . . . . . . . . . . . . . . . . . . . . . . . . . . . . . . . . . . . . . . .
CLEANING THE TRIMMER
• Remove the comb attachment from the trimmer, if it is attached toit.
• Brush off any remaining hair, beard or facial hair from thetrimmer blade.
• You can wash the comb attachment under running water.
• The trimmer handle can be cleaned using aclean dry wiping cloth. Inthe event of
heavy soiling, you can use aslightly damp cloth. Clean the surface then properly
wipe dry.
Warning:
The blades of the trimmer are sharp, pay extra attention when
handlingthem.
Warning:
The trimmer blade is brittle. Handle it with care so as not to
damage it.
. . . . . . . . . . . . . . . . . . . . . . . . . . . . . . . . . . . . . . . . . . . . . . . . . . . . . . . . . . . . . . . . . . . . . . . . . . . . . . . . .
- 9 -
03/2025
2025, .
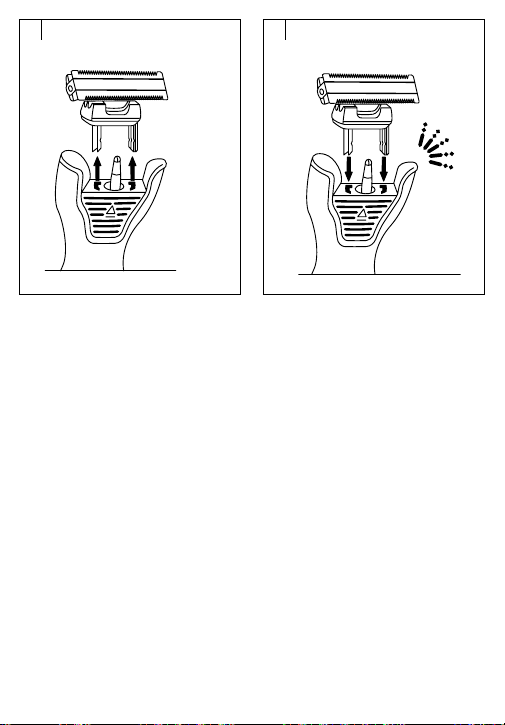
REPLACING THE BLADE
• We recommend replacing the blade every 12 months or if you find that the result
of trimming is not optimal anddoes not meet expectations. Always use the original
spare blades recommended by the manufacturer.
Warning:
If the blade is damaged, it must be replaced immediately. There is
arisk of serious injury.
To replace the blades do the following:
1. Check that the trimmer is turned off.
2. Gently grasp the blade by its lower part andpull it upwards to remove it from the
trimmer body (see Figure E1). Gripping the lower part will prevent the blade from
loosening.
3. Insert the new blade into the body of the trimmer. Gently push until you hear
aclick (see Figure E2). This indicates that the blade is securely attached.
Warning:
Be careful when handling the blade, as the edges are sharp
andthere is arisk of injury if they are not handled correctly.
Storage
• Put the comb attachment on the trimmer blade. This will protect it during storage
andprevent possible injury. Store the trimmer in adry, clean, and well-ventilated
place away from extreme temperatures and out of the reach of children or pets.
. . . . . . . . . . . . . . . . . . . . . . . . . . . . . . . . . . . . . . . . . . . . . . . . . . . . . . . . . . . . . . . . . . . . . . . . . . . . . . . . .
TECHNICAL SPECIFICATIONS
Power supply ..............................................................................................................................5 V / 1 A
Built-in battery ................................................................................................Li-ion 3.2 V500 mAh
Charging time ................................................................................................. approximately 2 hours
Operating time........................................................................................approximately 60 minutes
Dimensions .............................................................................................................. 70 x 35 x 30 mm
Weight ............................................................................................................................................... 108 g
Noise level .................................................................................................................................70 dB (A)
Water resistance ...............................................................................................................................IPX5
Power consumption in off mode .............................................................................................0.01 W

- 10 -
03/2025
2025, .
Power consumption in standby mode .....................................................................................1.5 W
Time needed for the equipment to reach the applicable low
power mode or condition ............................................................................................................. 1 hour
.................................................................................................................................................
INSTRUCTIONS AND INFORMATION ON DISPOSAL OF USED PACKAGING
MATERIAL
Dispose used packaging material at the designated municipal waste disposal site.
DISPOSAL OF USED ELECTRICAL AND ELECTRONIC EQUIPMENT
Used electrical andelectronic products must not be disposed of in ordinary municipal
waste. To enable the proper disposal and recycling of these products, deliver them to
the designated collection points. Alternatively, in some European Union states or other
European countries the products can be returned to the local retailer when buying an
equivalent new product. By properly disposing this product, you help preserve valuable
natural resources and help to prevent potential damage to the environment and human
health resulting from improper waste disposal. For more details, contact your local
authority or nearest collection point. Fines may be imposed for improper disposal of this
type of waste as per national regulations.
For business entities in European Union States
To dispose of electric or electronic equipment, request the necessary information from
your retailer or supplier.
Disposal in other countries outside the European Union
To dispose of this product elsewhere, request the necessary information on the correct
disposal method from local authorities or your retailer.
. . . . . . . . . . . . . . . . . . . . . . . . . . . . . . . . . . . . . . . . . . . . . . . . . . . . . . . . . . . . . . . . . . . . . . . . . . . . . . . . .
Changes to text and technical parameters are reserved.