SFT 2404WH
EN
BLADELESS FAN
Translation of the original manual
SFT 2404WH
A
1
2
3
4
B
1 2 3 4 5
C
1
2
3
4
5
6
7
- 1 -
12/2023
2023, .
EN Bladeless Fan
Important Safety Instructions
READ CAREFULLY AND STORE FOR FUTURE USE.
• This appliance may be used by children 8 years of age
and older and by persons with physical, sensory or mental
impairments or by inexperienced persons, if they are
properly supervised or have been informed about how to
use of the product in asafe manner and understand the
potential dangers.
• Children must not play with the appliance. Cleaning and
maintenance must not be performed by children without
supervision.
• If the power cord is damaged, have it replaced in
aprofessional service centre in order to prevent
adangerous situation. It is forbidden to use the appliance
with the power cord damaged.
• The fan is not intended tobe mounted on external
windows or walls.
• Before connecting the appliance to apower socket, check that the rated voltage on its rating label matches the electrical voltage in the power socket.
• Connect the appliance only to aproperly grounded socket. Do not use an extension cord.
• The power socket must remain easily accessible in the event of asudden disconnection.
• The appliance is designed for use in household, offices and similar types of areas. Do not use it in very dusty or humid rooms such as laundries or
bathrooms, in areas where chemical or explosive substances are stored, in industrial surroundings or outdoors.
• Do not place the appliance in the vicinity of an open flame or appliances that are sources of heat.
• Make sure that the fan, the power cord and the power cord plug do not touch ahot surface.
• To prevent electric shock, do not immerse the fan, power cord or power cord plug in water or other liquid, or rinse them under running water.
• Always turn off the appliance and disconnect it from the power socket when leaving it without supervision, when not using it and before assembly,
disassembly or cleaning.
• Never touch the appliance with wet or damp hands or when standing on awet floor.
• Do not carry the appliance by the power cord. Always grasp the body of the appliance with both hands.
• Before using the appliance, make sure it is assembled correctly.
• Unplug the appliance from the power socket by pulling the plug, not the power cord. Otherwise, damage to the power cord or the socket could occur.
- 2 -
12/2023
2023, .
• Make sure the power cord does not hang over the edge of atable or that it does not touch ahot surface. Do not place the appliance on unstable
surfaces such as carpets with very long and thick fibres. Place the appliance only on aclean, flat, dry and smooth surface.
• Do not expose children, the elderly or people who are bedridden to acold air current for an extended period of time.
• Do not cover the appliance with any items during operation.
• Never stick your fingers or other objects through the protective grille when the appliance is connected to apower socket. This is especially true when
the appliance is inoperation.
• Do not use the appliance if it is not working correctly, if it has been damaged or has been submerged in water. To avoid ahazardous situation arising,
do not repair the device yourself or modify it in any way. Have all repairs or adjustments performed at an authorised service centre. By tampering
with the appliance, you expose yourself to the risk of losing your legal rights regarding faulty performance or warranty for quality.
- 3 -
12/2023
2023, .
• Thank you for purchasing our SENCOR product; we hope you will be
satisfied with it.
• Before using this appliance, please familiarise yourself with the
user’smanual, even if you are already familiar with using similar
types of appliances. Use the appliance only as described in this
user'smanual. Keep the manual for future reference.
• It is recommended to keep the original shipping carton, packing
material, receipt and confirmation of the extent of the seller'sliability
or warranty certificate at least for the duration of the legal right of
defective performance or quality guarantee. When transporting the
appliance, we recommend packaging it again in the original box
provided by the manufacturer.
. . . . . . . . . . . . . . . . . . . . . . . . . . . . . . . . . . . . . . . . . . . . . . . . . . . . . . . . . . . . . . . . . . . .
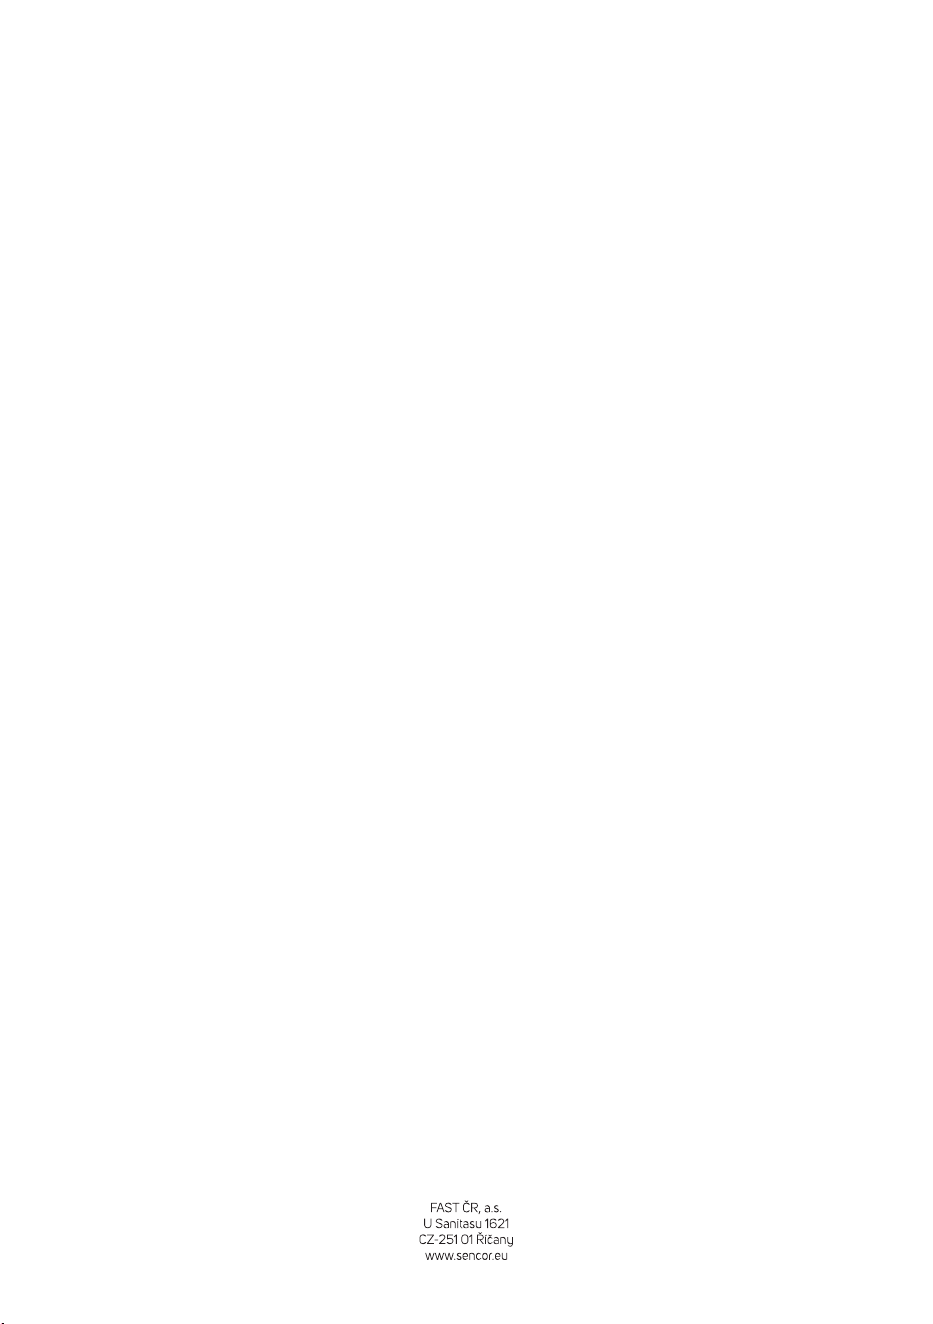
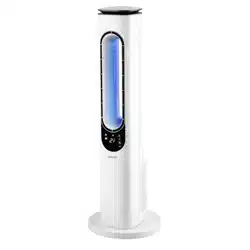
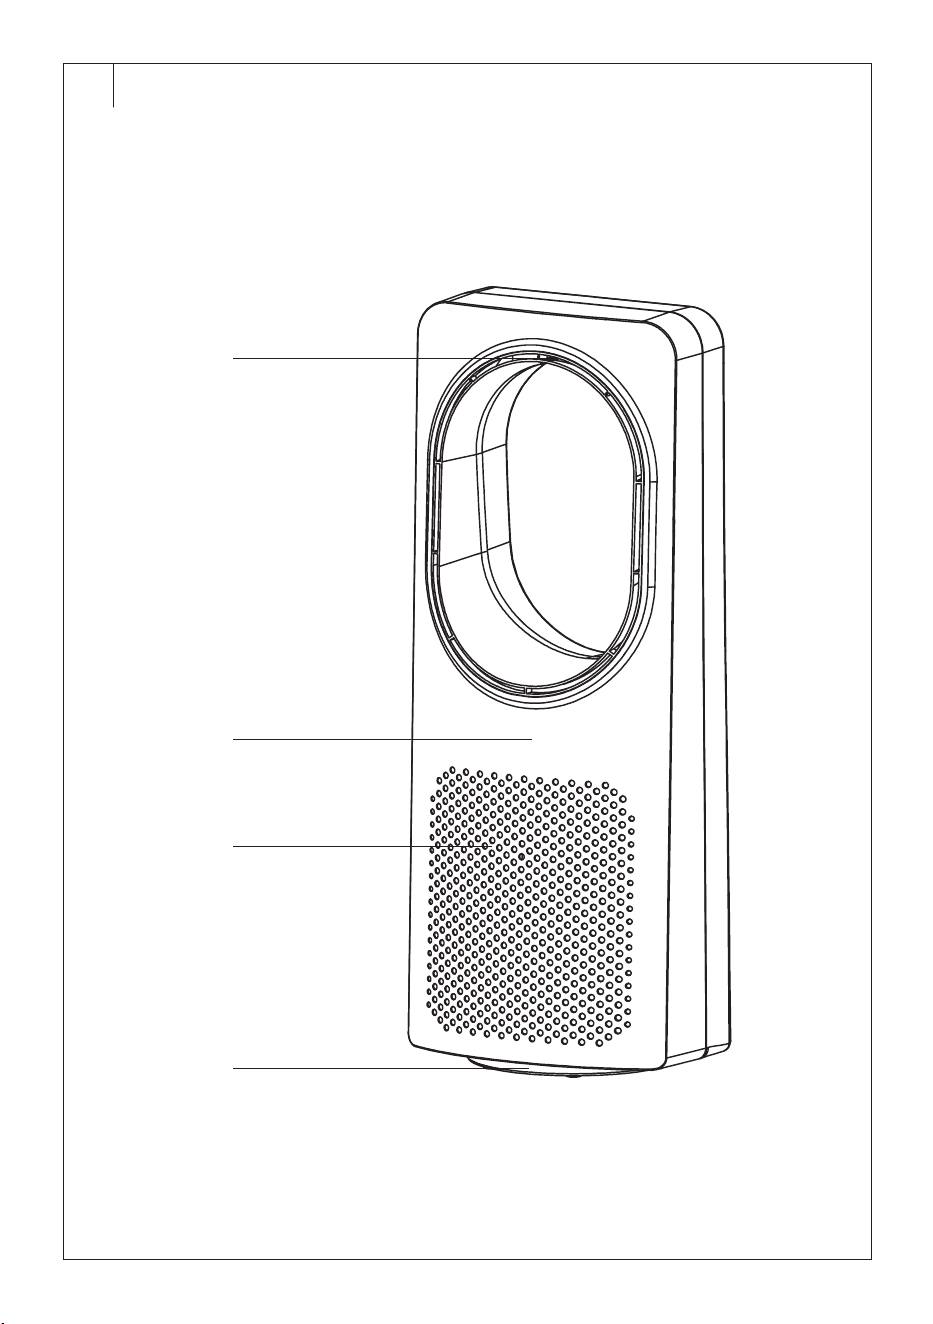
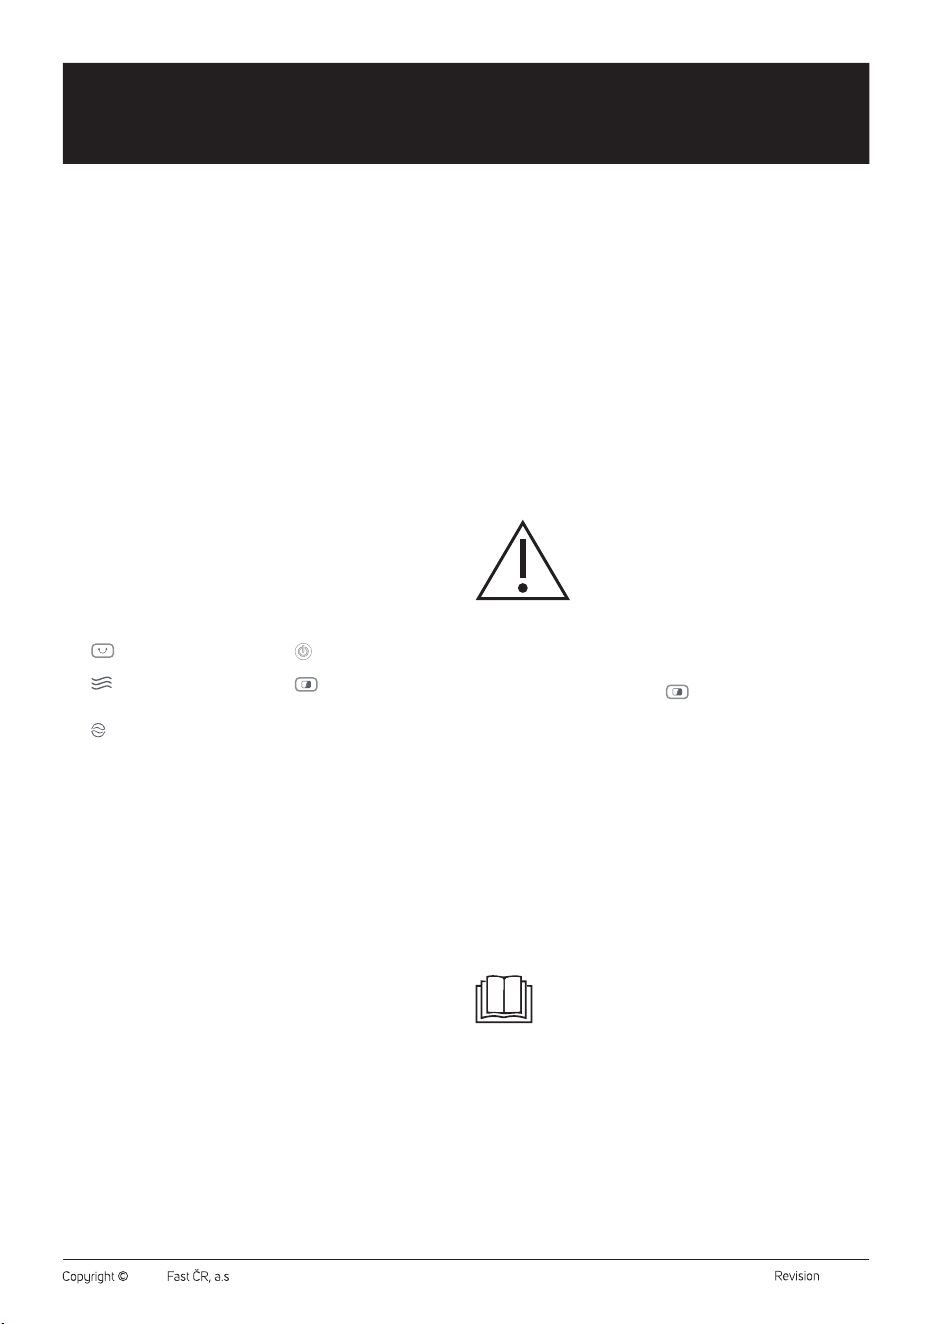
DESCRIPTION OF THE FAN
A1 Air outflow
A2 Control panel
A3 Air inflow openings
A4 Base
. . . . . . . . . . . . . . . . . . . . . . . . . . . . . . . . . . . . . . . . . . . . . . . . . . . . . . . . . . . . . . . . . . . .
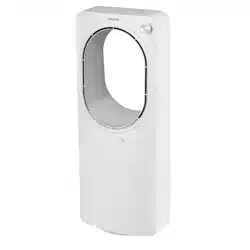
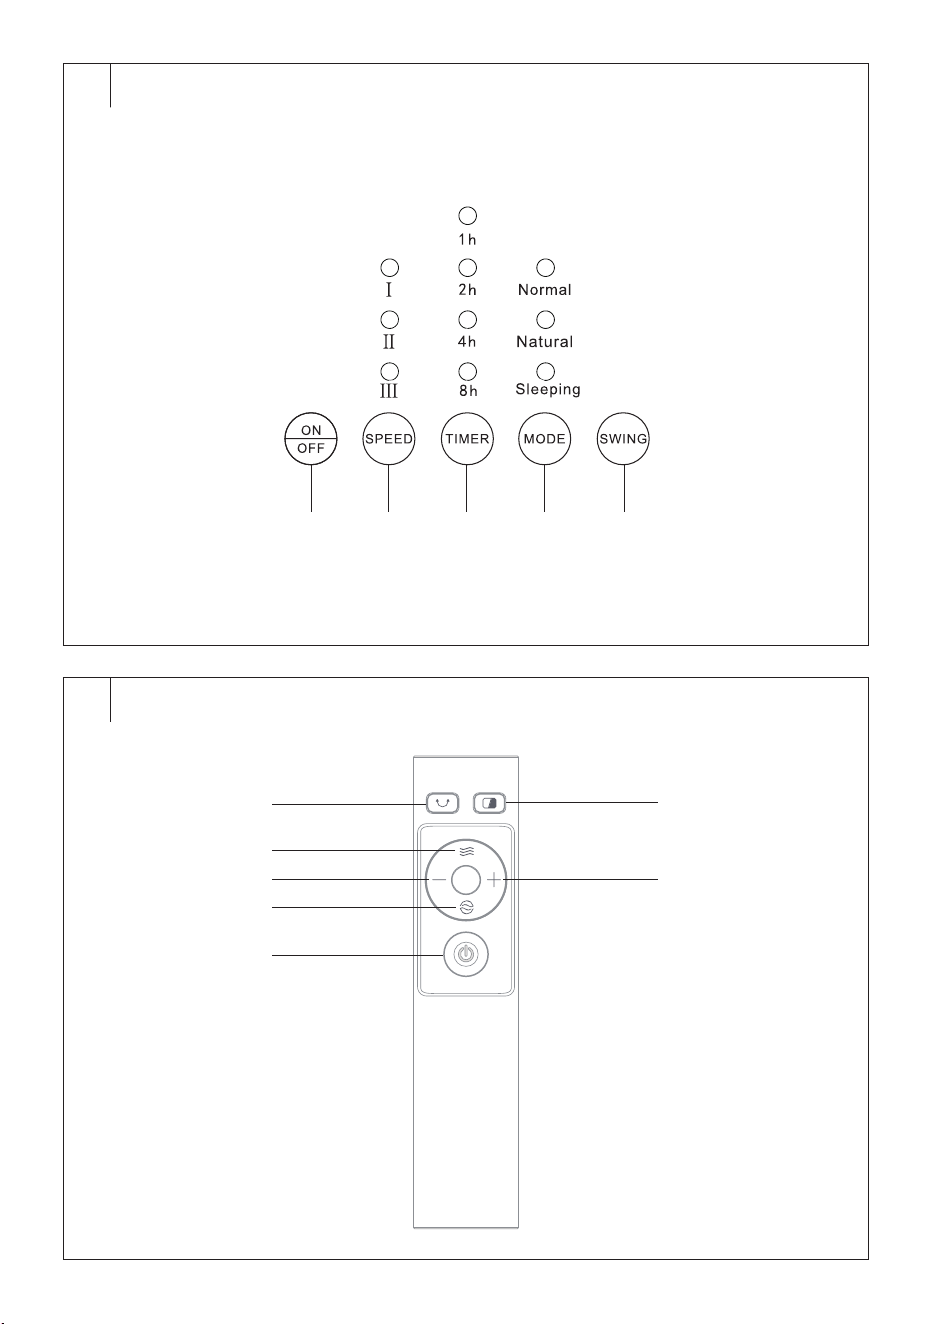
DESCRIPTION OF THE CONTROL PANEL
B1 ON/OFF button to switch the
fan on/off
B2 SPEED button to adjust fan
speed
B3 TIMER button to set the
automatic shutdown time
B4 MODE button to select the
operating mode
B5 OSC button to switch
horizontal oscillation on/off
. . . . . . . . . . . . . . . . . . . . . . . . . . . . . . . . . . . . . . . . . . . . . . . . . . . . . . . . . . . . . . . . . . . .
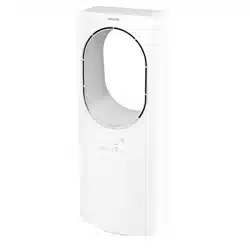
DESCRIPTION OF THE REMOTE CONTROL
C1 button to switch
horizontal oscillation on/off
C2 button to adjust fan speed
C3 – button to shorten the
automatic shutdown time
C4 button to select the
operating mode
C5 button to switch the fan
on/off
C6 to turn off/on the control
panel backlight
C7 + button to extend the
automatic shutdown time
. . . . . . . . . . . . . . . . . . . . . . . . . . . . . . . . . . . . . . . . . . . . . . . . . . . . . . . . . . . . . . . . . . . .
USING THE FAN
• Place the fan on ahorizontal, stable, dry and smooth surface within
easy reach of apower socket. Connect the power cord to the power
socket. Ashort audible warning sounds and the fan switches to
standby mode.
Switching the Fan On/Off
• Press the ON/OFF button briefly to switch the fan on. If you turn
on the fan for the first time or if you have previously disconnected it
from the power supply, the fan speed will start low and the normal
operating mode will start. If you switch on the fan only after switching
it off with the ON/OFFbutton, it will start in the previous operating
mode (except for automatic shutdown).
• While the fan is in operation, press the ON/OFF button. The fan
switches off and enters standby mode. To switch off completely,
disconnect the power cord from the power socket.
Speed Setting
• Press the SPEED button repeatedly to set the fan speed in the
following order: I(low speed) – II (medium speed) – III (high speed).
• Each press illuminates the corresponding indicator light for the
selected speed.
Operating Mode Selection
Press the MODE button repeatedly to select the fan operating mode:
• Normal – normal operating mode
• Natural – natural breeze operating mode
• Sleeping – operating mode suitable for sleep withquiet fan operation
Each press illuminates the corresponding indicator light of the selected
operating mode.
Automatic Shutdown
• The fan allows you to set the time after which it will turn off
automatically.
• Press the TIMER button repeatedly to set the automatic shutdown
time. You can set the automatic shutdown time from 1 to 15 hours by
combining 1, 2, 4 and 8 hours. For example, if you want to set the
automatic shutdown time to 7 hours, the indicator lights 1, 2 and 4
will light up.
• After awhile, the time is saved and the countdown starts. As the time
counts down, the indicator lights will gradually illuminate to show the
remaining time until automatic shutdown.
• The fan automatically switches off when the set time has elapsed.
Horizontal Oscillation
• Press the SWING button to activate the horizontal oscillation function.
The fan starts to rotate from side to side.
• Press the SWING button repeatedly to cancel the horizontal oscillation
function.
Warning:
Do not manually turn the fan to the desired angle by
force. This may damage the lid.
Switching off the Control Panel Backlight
• The control panel backlight automatically switches off 180 seconds
after the last setting or button press. Press any button and the control
panel will light up again.
• Alternatively, you can press the button on the remote control to
turn the backlight off and back on again.
. . . . . . . . . . . . . . . . . . . . . . . . . . . . . . . . . . . . . . . . . . . . . . . . . . . . . . . . . . . . . . . . . . . .
REMOTE CONTROL
Inserting Batteries into the Remote Control
1. Remove the rear cover of the remote control.
2. Insert two new AAA batteries into the battery compartment. Be sure
to observe the correct polarity when inserting. This is marked on the
bottom of the battery compartment.
3. Replace the back cover.
To use the remote control, point it at the fan. The maximum signal range
is 6 m. If you place the remote in such away that the transmission of the
signal is blocked by barrier, the signal may not be transmitted at all.
If you are replacing the batteries, follow the same procedure, but remove
the old batteries first.
Note:
If you will not be using the remote control for an extended
period of time, remove the batteries. Never put batteries in
afire, short-circuit or damage them in any way. Dispose
of them in an environmentally friendly manner at the end
of their useful life. Never dispose of batteries in municipal
waste.
The principle of operating the fan by remote control is the same as that
described in the chapter “Using the Fan”.
. . . . . . . . . . . . . . . . . . . . . . . . . . . . . . . . . . . . . . . . . . . . . . . . . . . . . . . . . . . . . . . . . . . .
CLEANING AND MAINTENANCE
• Before cleaning, make sure the fan is switched off and disconnected
from the power socket. Regularly clean the fan to ensure its long
service life.
EN
Bladeless Fan
User’sManual
- 4 -
12/2023
2023, .
• Do not use abrasive cleaning agents, solvents, or any substances to
clean any parts of the appliance that could damage the surface of the
appliance.
Warning:
To prevent the risk of electric shock, do not submerge
the appliance, plug or power cord in water or any
other liquid.
• Use aclean, slightly damp cloth to clean the outer surface of the fan.
Then wipe everything thoroughly dry. Make sure that moisture has
not penetrated the air outlet or inlet openings inside the fan.
• You can also use avacuum cleaner with abristle brush attached to
remove any dirt from the air outlet or inlet openings.
. . . . . . . . . . . . . . . . . . . . . . . . . . . . . . . . . . . . . . . . . . . . . . . . . . . . . . . . . . . . . . . . . . . .
STORAGE
If you will not be using the fan for alonger period of time, store it in
aclean, dry location that is out of reach of children.
. . . . . . . . . . . . . . . . . . . . . . . . . . . . . . . . . . . . . . . . . . . . . . . . . . . . . . . . . . . . . . . . . . . .
TECHNICAL SPECIFICATIONS
Rated voltage range ..............................................................................220−240 V~
Rated frequency ...........................................................................................50-60 Hz
Rated power input .................................................................................................50 W
Noise level ........................................................................................................ 55 dB(A)
Maximum fan flow rate .................................................................................1 m
3
/min
Operating value ..............................................................................0.02 (m
3
/min)/W
Maximum air velocity ......................................................................................4.3 m/s
Standard for measuring operational value ..........................(EU) No 206/2012
...........................................................................................................+ (EU) 2016/2282
..................................................................................................................ISO 5801-2017
................................................................................................................ EN 50564:2011
........................................................................................EN 60704-1:2010+A11:2012
............................................................................................. EN IEC 60704-2-7:2020
Contact for further information:
FAST ČR, a.s., USanitasu 1621, 251 01 Říčany, Czech Republic
The declared noise emission value of the fan with type designation
SFT2404WH is 55 dB(A), which represents alevel Aof acoustic power
with respect to areference acoustic power of 1 pW.
We reserve the right to change the text and technical specifications.
Safety Class for Electric Shock Protection:
Class II – Electric shock protection is provided by double or
heavy-duty insulation.
. . . . . . . . . . . . . . . . . . . . . . . . . . . . . . . . . . . . . . . . . . . . . . . . . . . . . . . . . . . . . . . . . . . .
INSTRUCTIONS AND INFORMATION ON DISPOSAL OF USED
PACKAGING MATERIAL
Dispose of used packaging material at asite designated for waste in your
municipality.
DISPOSING OF USED ELECTRICAL AND ELECTRONIC EQUIPMENT
This symbol on the products or accompanying documents
indicates that used electrical and electronic products
should not be disposed of with regular municipal waste.
For proper disposal and recycling, take these products to
designated collection points. Or in some European Union
states or other European countries the products can be
returned to the local retailer when buying an equivalent
new product. Disposing of this product correctly helps save
valuable natural resources and prevents damage to the environment by
improper waste disposal. Ask your local authorities or collection facility for
more details. In accordance with national regulations penalties may be
imposed for the incorrect disposal of this type of waste.
For Business Entities in European Union States
If you want to dispose of electric or electronic devices, ask your retailer or
supplier for the necessary information.
Disposal in Other Countries Outside the European Union
This symbol is valid in the European Union. If you wish to dispose of this
product elsewhere, request the necessary information about the correct
disposal method from the local council or from your retailer.
This product complies with all the essential requirements of
the applicable EU directives.