
LANGUAGE
English
Deutsch
Français
Español
Italia
日本語
01-05
06-10
11-15
16-20
21-25
26-30

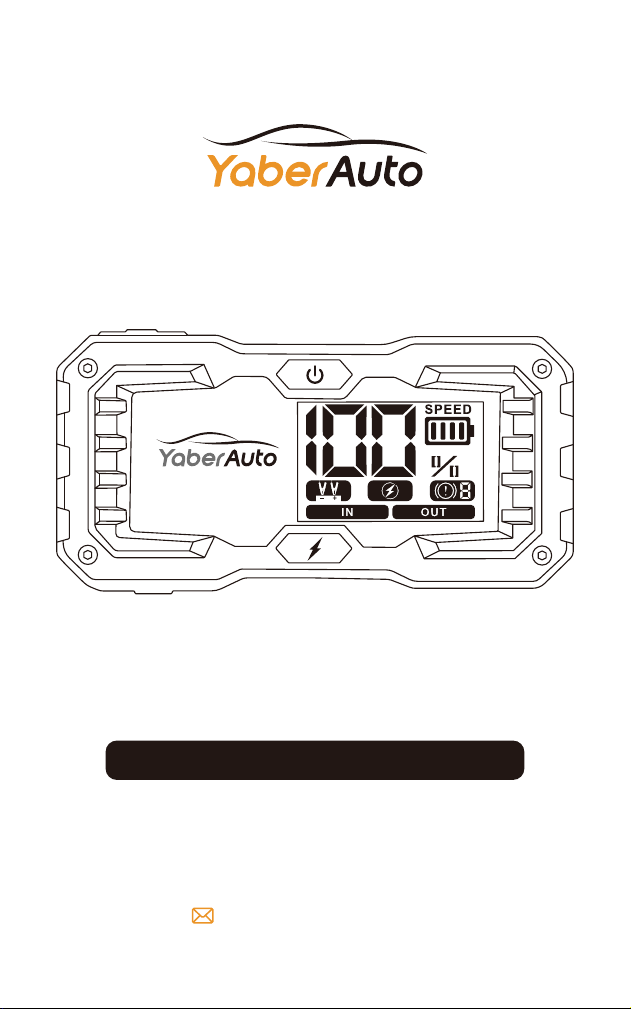
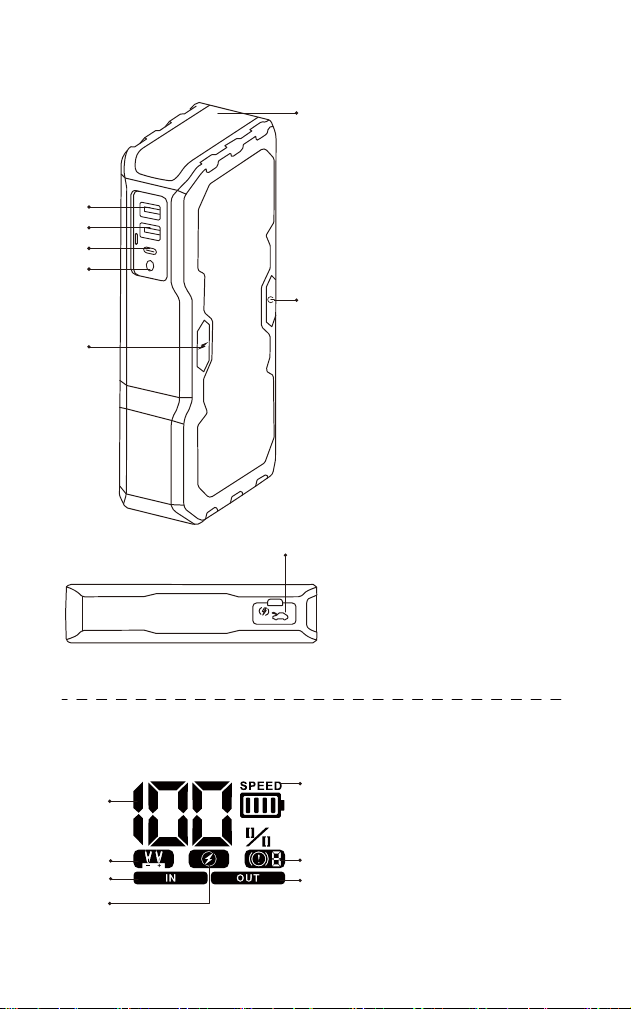
PRODUCT OVERVIEW
①
②
③
④
⑤
⑥
⑦
⑧
LED Light
USB1 Output
USB2 Output
Input
DC Output
Force Start Button
Power Button
Jump-Start Port
①
②
③
④
⑤
⑥
⑦
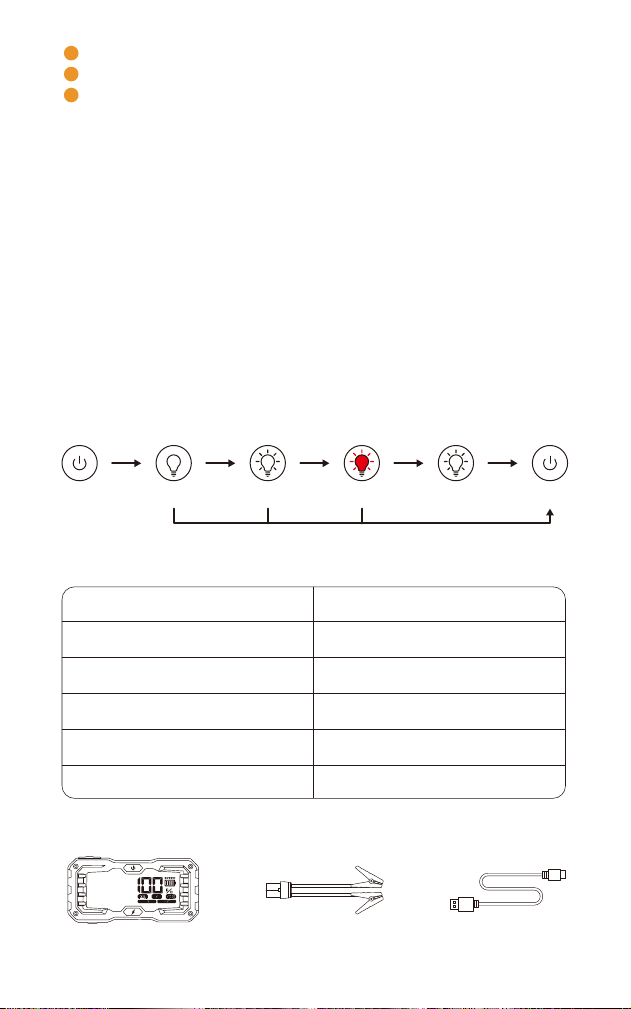
Power Level
Quick Charging
(USB1 Output)
Ready to Work
Force Start Mode
Error Indicator
Charging
Discharging
⑤
⑥
⑦
①
②
③
④
①
②
③
④
⑤
⑥
⑦
⑧
EN 01 02 03 04 05
06 07 08 09 10
11 12 13 14 15
16 17 18 19 20
21 22 23 24 25
26 27 28 29 30

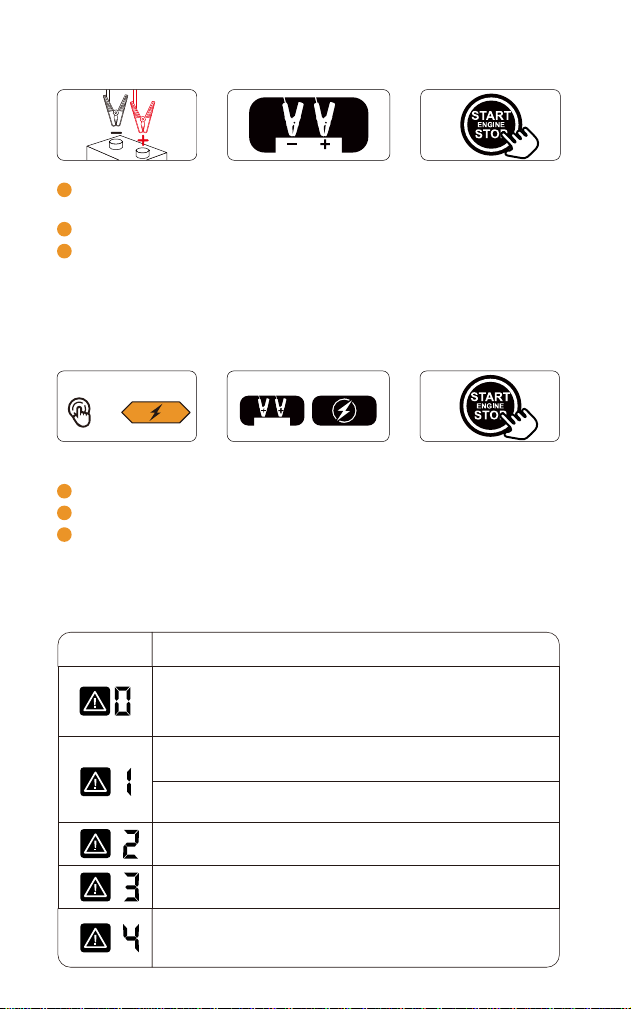
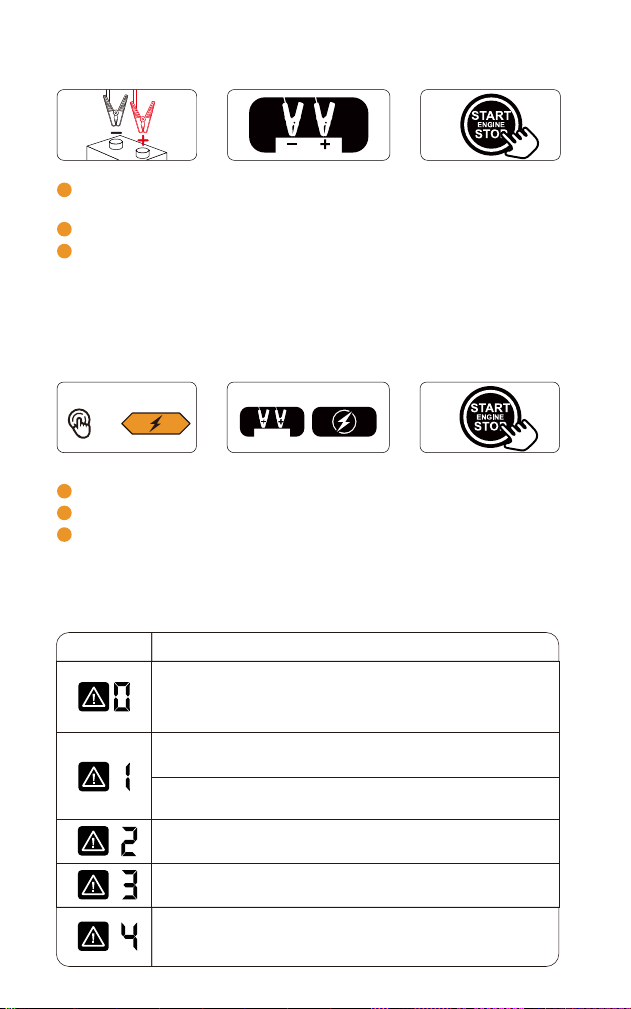
Insert the jumper cable into the jump starter and connect the clamps to car battery.
(Red to “+”, Black to “-”).
The icon shows on the screen.
Start your car engine.
JUMP START YOUR CAR
About The Force Start Function
About The Troubleshooting
①
③②
1
2
3
3 steps to fix the problem:
If the screen doesn’t display any icons when you correctly connected the clamps to
your car battery, you can use the Force Start Function to enter boost mode.
①
*3s
③②
Press the force start button for more than 3 seconds.
The 2 icons show the screen.
Start your car engine.
1
2
3
Warning: When using the Force Start Function, auto-detection and safety protection
will be disabled.
LONG PRESS
Indicator Situations
EC5 Short circuit protection
--Automatically recover when the clamps disconnect
The relay in the host is stuck
--The car can still be started, but product protection is disabled. It is
not recommended to use it in non-emergency situations, and it is
recommended to contact customer service for the replacement
Reverse connection protection
--Reverse the clamps and ensure the correct connection
High temperature protection
--Automatically recover when the temperature drops
Low voltage protection
--Please charge the jump starter
High voltage protection
--This model is only for 12V engine, but the voltage of connected
car battery is far higher than 12V
EN01 02 03 04 05
06 07 08 09 10
11 12 13 14 15
16 17 18 19 20
21 22 23 24 25
26 27 28 29 30
Indicator Situations
Timeout protection
--Connection timed out. Please start the car within 30 seconds
Over-limit protection
--Please fully charge the jump starter
Low temperature protection (chip)
--Automatically recover when the temperature increases
High temperature protection (chip)
--Automatically recover when the temperature drops
H0
H8
RECHARGE
Insert the charging cable into USB C port.
Connect to corresponding adaptor (adaptor not included).
1
2
CHARGE ELECTRONIC DEVICES
CHARGE 12V DC DEVICES
Plug the cable into the corresponding output port.
Connect the electronic products.
Press the power button.
1
2
3
EN01 02 03 04 05
06 07 08 09 10
11 12 13 14 15
16 17 18 19 20
21 22 23 24 25
26 27 28 29 30

Plug the cigarette lighter adapter into the DC output port.
Connect to 12V DC devices.
Press the power button.
1
2
3
Car Electronic products such as car refrigerators and driving recorders work
intermittently during operation. If you need to power such electronic products through
a DC interface, please use the continuous output mode.
1. When the power is on and the flashlight is off, press the power button 3 times to
turn on the continuous output mode. In this mode, all output ports remain open
regardless of whether they are loaded, and the OUT icon will flash slowly. To
release this mode, press the power button 3 times.
2. In this mode, you can press and hold the power button for 3 seconds to turn on the
flashlight. To release the continuous output mode, you need to turn off the flashlight
first, and then press the power button 3 times.
About The Continuous Output Mode
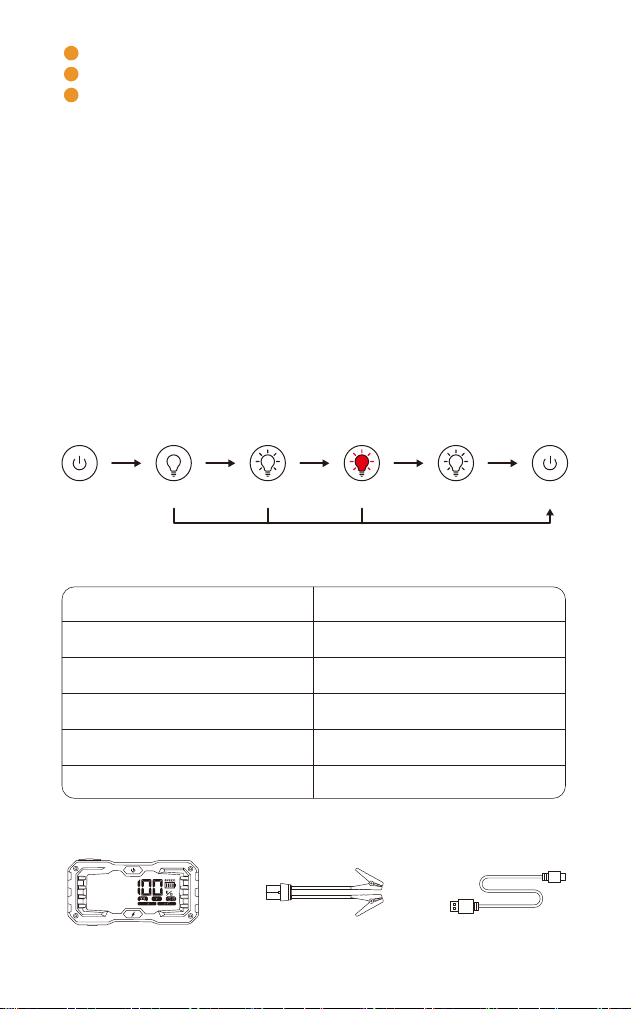
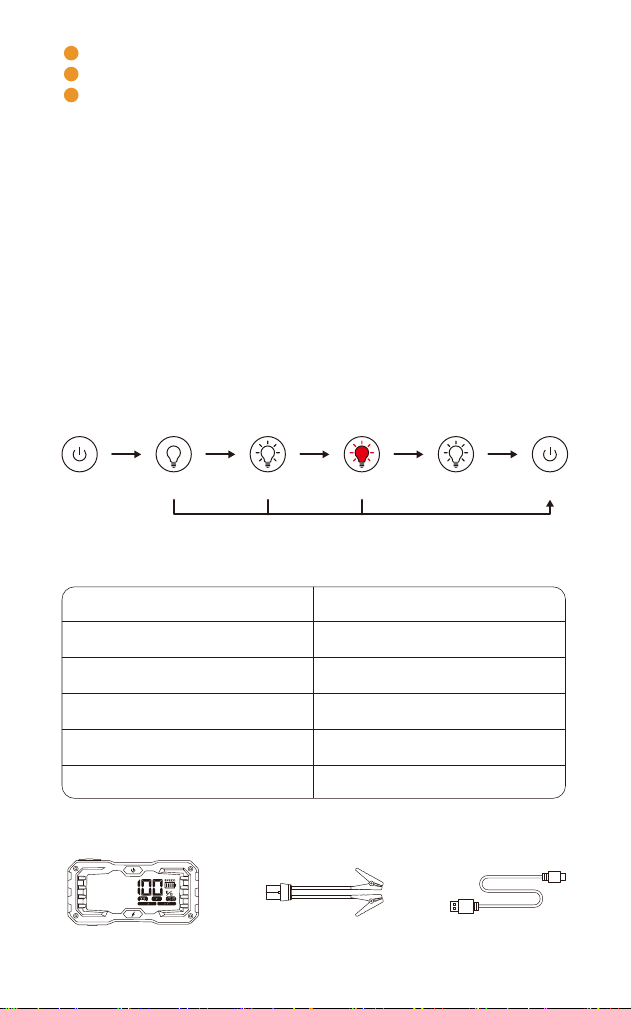
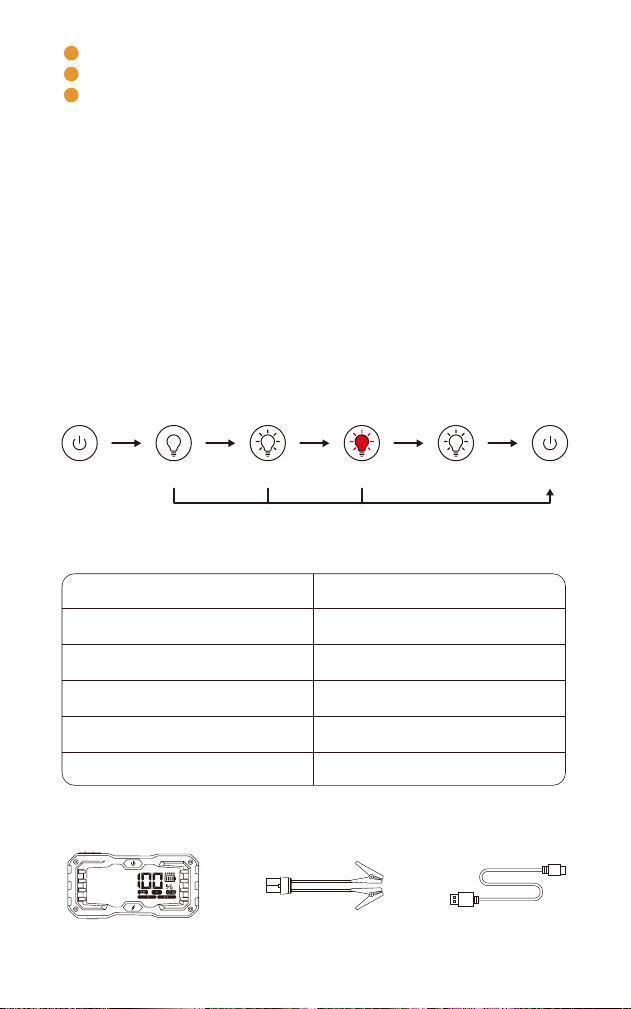
LED LIGHTING
Lighting SOS OFFStrobe(white) Strobe (red)
Press the power
button for 3s
Press shortly
Press the power button for 3s
Press shortly Press shortly Press shortly
SPECIFICATIONS
YaberAuto YA100 Car
Jump Starter
PACKAGE CONTENT
Jumper Cables Clamps
Charging Cable
Model
Input
USB1 Output
USB2 Output
DC Output
Operating Temperature
YA100
5V/2A
5V/3A, 9V/2A, 12V/1.5A
5V/2.4A
12~16V/10A
-20°C~60°C/-4°F~140°F
EN01 02 03 04 05
06 07 08 09 10
11 12 13 14 15
16 17 18 19 20
21 22 23 24 25
26 27 28 29 30

DC Cigarette Lighter
Adapter
User Manual Portable Storage Bag
1.This product is only for 12V lead acid/AGM/Gel batteries/vehicles only.
2.Do not use the product with less than 10% power as this will damage the product.
3.After starting the car, please wait at least 30 minutes before recharging the product.
4.An interval of 60 seconds is recommended between multiple attempts to start the
car, otherwise the product will overheat.
5.Recharge the product every 3 months to prolong the lifespan.
1.Do not use the product to start an already expanded car battery.
2.Please store the product in a cool, well-ventilated place and keep it away from
children and pets.
3.Do not place the product in a high temperature environment for a long time. The
operation temperature of this product is -4-140°F. The storage temperature of the
product should not exceed 122°F.
4.Do not connect the red and black clamps together when the product is outputting.
5.Do not connect the red and black clamps to the same piece of metal.
6.Do not disassemble or modify the product.
7.Do not use detergent to clean the product.
8.Please hold the product carefully and gently so as to avoid dropping or hitting it
repeatedly.
If there is any problem or malfunction during use, please send your question and order
number to our email.
We will provide you a good after-sales service within 24 hours.
MAINTENANCE
WARRANTY
PRECAUTION
EN01 02 03 04 05
06 07 08 09 10
11 12 13 14 15
16 17 18 19 20
21 22 23 24 25
26 27 28 29 30

①
②
③
④
⑤
⑥
⑦
⑧
LED-Licht
USB1 Ausgang
USB2 Ausgang
Eingang
DC-Ausgang
Force Start-Taste
Ein/Aus-Taste
Anschluss für Starthilfe
①
②
③
④
⑤
⑥
⑦
Leistungsstufe
Schnellaufladung
(USB1-Ausgang)
Bereit zur Arbeit
Startmodus erzwingen
Fehlerindikatoren
Eingang
Ausgang
⑤
⑥
⑦
①
②
③
④
①
②
③
④
⑤
⑥
⑦
⑧
PRODUKTÜBERSICHT
DE
01 02 03 04 05
06 07 08 09 10
11 12 13 14 15
16 17 18 19 20
21 22 23 24 25
26 27 28 29 30

Stecken Sie das Starthilfekabel in die Starthilfe und verbinden Sie die Pole mit der
Autobatterie. (Rot an „+“, schwarz an „-“).
Das Symbol wird auf dem Bildschirm angezeigt.
Starten Sie den Motor Ihres Fahrzeugs.
STARTHILFE FÜR IHR AUTO
Über Die Force-start-funktion
Über Die Fehlersuche
①
③②
1
2
3
3 Schritte zur Behebung des Problems:
Wenn auf dem Bildschirm keine Symbole angezeigt werden, wenn Sie die Klemmen
korrekt an die Autobatterie angeschlossen haben, können Sie mit der Force-Start-Funk-
tion den Boost-Modus aktivieren.
①
*3s
③②
Drücken Sie die Starttaste für mehr als 3 Sekunden.
Die 2 Symbole werden auf dem Bildschirm angezeigt.
Starten Sie den Motor Ihres Fahrzeugs.
1
2
3
Warnung: Wenn Sie die Starthilfefunktion verwenden, werden die automatische
Erkennung und der Sicherheitsschutz deaktiviert.
LONG PRESS
Indikator Die Situationen
EC5 Kurzschlussschutz
--Automatische Wiederherstellung, wenn sich die Klemmen trennen
Das Relais im Host ist blockiert.
--Das Fahrzeug kann noch gestartet werden, aber der Produktschutz
ist deaktiviert. Es wird nicht empfohlen, es in Nicht-Notfallsituationen
zu verwenden, und es wird empfohlen, den Kundendienst für den
Austausch zu kontaktieren
Verpolungsschutz
-Umkehrung der Klemmen und Sicherstellung der korrekten Verbindung
Schutz vor hohen Temperaturen
--Automatische Wiederherstellung, wenn die Temperatur sinkt
Schutz vor Unterspannung
--Bitte laden Sie die Starthilfe auf
Schutz vor Hochspannung
--Dieses Modell ist nur für 12V-Motoren geeignet, aber die Spannung
der angeschlossenen Autobatterie ist weit höher als 12V
DE
01 02 03 04 05
06
07 08 09 10
11 12 13 14 15
16 17 18 19 20
21 22 23 24 25
26 27 28 29 30
EINGANG
Stecken Sie das Ladekabel in den USB-C-Anschluss.
Schließen Sie es an den entsprechenden Adapter an (Adapter nicht im
Lieferumfang enthalten).
1
2
ELEKTRONISCHE GERÄTE AUFLADEN
DC AUSGANG
Stecken Sie das Kabel in den entsprechenden Ausgangsanschluss.
Schließen Sie die elektronischen Produkte an.
Drücken Sie die Einschalttaste.
1
2
3
Indikator Die Situationen
Timeout-Schutz
-Verbindung wurde unterbrochen. Bitte starten Sie das Fahrzeug
innerhalb von 30 Sekunden
Überlastungsschutz
--Bitte laden Sie die Starthilfe vollständig auf
Schutz vor niedrigen Temperaturen (Chip)
--Automatische Wiederherstellung, wenn die Temperatur steigt
Schutz vor hohen Temperaturen (Chip)
--Automatische Wiederherstellung, wenn die Temperatur fällt
H0
H8
DE
01 02 03 04 05
06 07
08 09 10
11 12 13 14 15
16 17 18 19 20
21 22 23 24 25
26 27 28 29 30
Stecken Sie den Zigarettenanzünder-Adapter in den DC-Ausgangsanschluss.
Schließen Sie das Gerät an 12V DC an.
Drücken Sie die Einschalttaste.
1
2
3
Elektronische Produkte wie Autokühlschränke und Fahrtenschreiber arbeiten während
des Betriebs mit Unterbrechungen. Wenn Sie solche elektronischen Produkte über eine
DC-Schnittstelle mit Strom versorgen müssen, verwenden Sie bitte den Dauerausgangsmodus.
1. Wenn das Gerät eingeschaltet und die Taschenlampe ausgeschaltet ist, drücken
Sie die Einschalttaste 3 Mal, um den Dauerausgabemodus einzuschalten. In
diesem Modus bleiben alle Ausgangsanschlüsse offen, unabhängig davon, ob sie
geladen sind, und das OUT-Symbol blinkt langsam. Um diesen Modus zu
deaktivieren, drücken Sie 3 Mal auf die Einschalttaste.
2. In diesem Modus können Sie die Einschalttaste 3 Sekunden lang gedrückt halten,
um die Taschenlampe einzuschalten. Um den kontinuierlichen Ausgabemodus
freizugeben, müssen Sie die Taschenlampe zuerst ausschalten und dann die
Einschalttaste 3 Mal drücken.
Über Den Dauerausgabemodus
LED-TASCHENLAMPE
Beleuchtung SOS AusStroboskop (Weiß) Stroboskop (Rot)
Drücken Sie die
Einschalttaste für 3s
Kurz drücken
Drücken Sie die Einschalttaste für 3s
Kurz drücken Kurz drücken Kurz drücken
SPECIFICATIONS
YaberAuto YA100
Starthilfe Powerbank
LIEFERUMFANG
Überbrückungskabel
USB-A-Ladekabel
Modell
Eingang
USB1 Ausgang
USB2 Ausgang
DC Ausgang
Betriebs-Temperatur
YA100
5V/2A
5V/3A, 9V/2A, 12V/1.5A
5V/2.4A
12~16V/10A
-20°C~60°C/-4°F~140°F
DE
01 02 03 04 05
06 07 08
09 10
11 12 13 14 15
16 17 18 19 20
21 22 23 24 25
26 27 28 29 30

DC-Zigarette-
nanzünder-Adapter
Benutzerhandbuch Tragbare
Aufbewahrungstasche
1. Dieses Produkt ist nur für 12V Blei-Säure/AGM/Gel Batterien/Fahrzeuge geeignet.
2. Benutzen Sie das Produkt nicht mit weniger als 10% Leistung, da dies das Produkt
beschädigen wird.
3. Nach dem Starten des Fahrzeugs warten Sie bitte mindestens 30 Minuten, bevor
Sie das Produkt wieder aufladen.
4. Ein Intervall von 60 Sekunden wird zwischen mehreren Versuchen, das Auto zu
starten, empfohlen, da das Produkt sonst überhitzen kann.
5. Laden Sie das Produkt alle 3 Monate vollständig auf, um die Lebensdauer zu
verlängern.
1. Benutzen Sie das Produkt nicht, um eine bereits ausgebaute Autobatterie zu
starten.
2. Bitte lagern Sie das Produkt an einem kühlen, gut belüfteten Ort und halten Sie es
von Kindern und Haustieren fern.
3. Lagern Sie das Produkt nicht über einen längeren Zeitraum in einer Umgebung mit
hohen Temperaturen. Die Betriebstemperatur dieses Produkts beträgt -4-140℉. Die
Lagertemperatur des Produkts sollte 122℉ nicht überschreiten.
4. Verbinden Sie die rote und die schwarze Klemme nicht miteinander, wenn das
Produkt ausgegeben wird.
5. Schließen Sie die roten und schwarzen Klemmen nicht an dasselbe Metallstück an.
6. Das Produkt darf nicht zerlegt oder verändert werden.
7. Benutzen Sie keine Reinigungsmittel, um das Produkt zu reinigen.
8. Bitte halten Sie das Produkt vorsichtig und behutsam, um ein wiederholtes
Fallenlassen oder Stoßen zu vermeiden.
Wir bieten den Kunden eine Garantie von 24 Monaten ab Kaufdatum.
Für Anfragen oder Kommentare zu unseren Produkten senden Sie bitte eine E-Mail an
[email protected], und wir werden Ihnen so schnell wie möglich antworten.
WARTUNG
GARANTIE
VORSICHT
DE
01 02 03 04 05
06 07 08 09
10
11 12 13 14 15
16 17 18 19 20
21 22 23 24 25
26 27 28 29 30

APERÇU DU PRODUIT
①
②
③
④
⑤
⑥
⑦
⑧
Lumière LED
Sortie USB1
Sortie USB2
Entrée
Sortie DC
Bouton de démarrage forcé
Bouton d'alimentation
Port de démarrage rapide
①
②
③
④
⑤
⑥
⑦
Niveau d'énergie
Chargement rapide
(Sortie USB1)
Prêt à travailler
Mode de démarrage forcé
Indicateur d'erreur
Charge
Décharge
⑤
⑥
⑦
①
②
③
④
①
②
③
④
⑤
⑥
⑦
⑧
FR
01 02 03 04 05
06 07 08 09 10
11 12 13 14 15
16 17 18 19 20
21 22 23 24 25
26 27 28 29 30
Insérez le câble de démarrage dans le démarreur et connectez les pinces à la
batterie de la voiture. (Rouge au "+", Noir au "-").
L'icône s'affiche à l'écran.
Démarrez le moteur de votre voiture.
DÉMARRER VOTRE VOITURE
Sur La Fonction De Démarrage De La Force
À Propos Du Dépannage
①
③②
1
2
3
3 étapes pour résoudre le problème:
Si l'écran n'affiche aucune icône lorsque vous avez correctement connecté les pinces
à la batterie de votre voiture, vous pouvez utiliser la fonction de démarrage forcé pour
passer en mode boost.
①
*3s
③②
Appuyez sur le bouton de démarrage forcé pendant plus de 3 secondes.
Les 2 icônes affichent l'écran.
Démarrez le moteur de votre voiture.
1
2
3
Avertissement: Lors de l'utilisation de la fonction de démarrage forcé, la détection
automatique et la protection de la sécurité sont désactivées.
LONG PRESS
Indicateur Situations
EC5 Protection contre les courts-circuits
--Reprise automatique lorsque les pinces se déconnectent
Le relais dans l'hôte est bloqué
--La voiture peut toujours démarrer, mais la protection du produit est
désactivée. Il n'est pas recommandé de l'utiliser dans des situations
non urgentes et il est recommandé de contacter le service client pour
le remplacement
Protection contre les inversions de connexion
--Inverser les pinces et s'assurer que la connexion est correcte
Protection contre les hautes températures
--Récupération automatique en cas de baisse de température
Protection contre les basses tensions
--Veuillez charger le démarreur
Protection contre la haute tension
--Ce modèle n'est prévu que pour un moteur de 12V, mais la tension
de la batterie de la voiture connectée est bien supérieure à 12V
FR
01 02 03 04 05
06 07 08 09 10
11 12 13 14 15
16 17 18 19 20
21 22 23 24 25
26 27 28 29 30
RECHARGE
Insérez le câble de chargement dans le port USB C.
Connecter à l'adaptateur correspondant (adaptateur non inclus).
1
2
CHARGER DES APPAREILS ÉLECTRONIQUES
CHARGER LES APPAREILS 12V DC
Branchez le câble dans le port de sortie correspondant.
Connecter les produits électroniques.
Appuyez sur le bouton d'alimentation.
1
2
3
Indicateur Situations
Protection contre le dépassement de délai
--La connexion a été interrompue. Veuillez démarrer la voiture dans
les 30 secondes
Protection contre les dépassements de limites
--Veuillez charger complètement le démarreur de secours
Protection contre les basses températures (puce)
--Reprise automatique en cas d'augmentation de la température
Protection contre les hautes températures (puce)
--Récupération automatique en cas de baisse de température
H0
H8
FR
01 02 03 04 05
06 07 08 09 10
11 12 13 14 15
16 17 18 19 20
21 22 23 24 25
26 27 28 29 30

Branchez l'adaptateur allume-cigare sur le port de sortie DC.
Connexion à des appareils 12V DC.
Appuyez sur le bouton d'alimentation.
1
2
3
Les produits électroniques automobiles tels que les réfrigérateurs automobiles et les
enregistreurs de conduite fonctionnent par intermittence pendant leur fonctionne-
ment. Si vous devez alimenter de tels produits électroniques via une interface DC,
veuillez utiliser le mode de sortie continue.
1.Lorsque l'appareil est sous tension et que la lampe de poche est éteinte, appuyez 3
fois sur le bouton d'alimentation pour activer le mode de sortie continue. Dans ce
mode, tous les ports de sortie restent ouverts, qu'ils soient chargés ou non, et
l'icône OUT clignote lentement. Pour quitter ce mode, appuyez 3 fois sur le bouton
d'alimentation.
2.Dans ce mode, vous pouvez appuyer et maintenir le bouton d'alimentation pendant
3 secondes pour allumer la lampe de poche. Pour libérer le mode de sortie
continue, vous devez d'abord éteindre la lampe de poche, puis appuyer 3 fois sur
le bouton d'alimentation.
À Propos Du Mode De Sortie Continue
ÉCLAIRAGE LED
Eclairage SOS ArrêtStrobe (Blanc) Strobe (Rouge)
Appuyer sur le bouton
d'alimentation pendant
3 secondes
Appuyer
brièvement
Appuyer sur le bouton d'alimentation pendant 3 secondes
Appuyer
brièvement
Appuyer
brièvement
Appuyer
brièvement
CARACTÉRISTIQUES TECHNIQUES
YaberAuto YA100
Booster batterie voiture
CONTENU DU PAQUET
Pinces de saut
Câble de
chargement
Modèle
Entrée
Sortie USB1
Sortie USB2
Sortie DC
Température de fonctionnement
YA100
5V/2A
5V/3A, 9V/2A, 12V/1.5A
5V/2.4A
12~16V/10A
-20°C~60°C/-4°F~140°F
FR
01 02 03 04 05
06 07 08 09 10
11 12 13 14 15
16 17 18 19 20
21 22 23 24 25
26 27 28 29 30

Adaptateur
allume-cigare DC
Manuel d'utilisation Sac de rangement
portable
1.Ce produit est uniquement destiné aux batteries/véhicules 12V plomb-acide/AGM/-
Gel.
2.N'utilisez pas l'appareil avec une puissance inférieure à 10 %, car cela endommag-
erait l'appareil.
3.Après avoir démarré la voiture, attendez au moins 30 minutes avant de recharger le
produit.
4.Un intervalle de 60 secondes est recommandé entre les tentatives multiples de
démarrage de la voiture, sinon le produit surchauffera.
5.Rechargez le produit tous les 3 mois pour prolonger sa durée de vie.
1.Ne pas utiliser le produit pour démarrer une batterie de voiture déjà chargée.
2.Conservez le produit dans un endroit frais et bien ventilé et tenez-le à l'écart des
enfants et des animaux domestiques.
3.Ne placez pas le produit dans un environnement à haute température pendant une
longue période. La température de fonctionnement de ce produit est comprise entre
-4 et 140℉. La température de stockage du produit ne doit pas dépasser 122℉.
4.Ne pas connecter les pinces rouge et noire ensemble lorsque le produit est en cours
d'émission.
5.Ne pas connecter les pinces rouge et noire à la même pièce de métal.
6.Ne pas démonter ou modifier le produit.
7.Ne pas utiliser de détergent pour nettoyer le produit.
8.Tenez le produit avec précaution et délicatesse afin d'éviter de le faire tomber ou de
le heurter à plusieurs reprises.
En cas de problème ou de dysfonctionnement pendant l'utilisation, veuillez envoyer
votre question et votre numéro de commande à notre adresse électronique.
Nous vous fournirons un bon service après-vente dans les 24 heures.
ENTRETIEN
GARANTIE
PRÉCAUTION
FR
01 02 03 04 05
06 07 08 09 10
11 12 13 14 15
16 17 18 19 20
21 22 23 24 25
26 27 28 29 30
①
②
③
④
⑤
⑥
⑦
⑧
Luz LED
Salida USB1
Salida USB2
Entrada
Salida DC
Botón de arranque forzado
Botón de encendido
Puerto de arranque
①
②
③
④
⑤
⑥
⑦
Nivel de potencia
Carga rápida (Salida
USB1)
Listo para trabajar
Modo de inicio forzado
Indicador de error
Cargando
Descarga
⑤
⑥
⑦
①
②
③
④
①
②
③
④
⑤
⑥
⑦
⑧
RESUMEN DE PRODUCTOS
ES
01 02 03 04 05
06 07 08 09 10
11 12 13 14 15
16 17 18 19 20
21 22 23 24 25
26 27 28 29 30
Inserte el cable de arranque en el arrancador y conecte las pinzas a la batería del
coche. (Rojo a "+", Negro a "-").
El icono aparece en la pantalla.
Arranca el motor de tu coche.
ARRANCA TU COCHE
Sobre La Función De Arranque Forzado
Sobre La Resolución De Problemas
①
③②
1
2
3
3 pasos para solucionar el problema:
Si la pantalla no muestra ningún icono cuando has conectado correctamente las
pinzas a la batería del coche, puedes utilizar la función de arranque forzado para
entrar en el modo de refuerzo.
①
*3s
③②
Pulse el botón de arranque forzado durante más de 3 segundos.
Los 2 iconos muestran la pantalla.
Arranca el motor de tu coche.
1
2
3
Advertencia: Al utilizar la Función de Arranque Forzado, se desactivarán la detección
automática y la protección de seguridad.
LONG PRESS
Indicador Situaciones
EC5 Protección contra cortocircuitos
--Recuperación automática cuando las pinzas se desconectan
Protección de conexión inversa
--Invierta las abrazaderas y asegúrese de que la conexión es correcta
Protección contra altas temperaturas
--Recuperación automática cuando baja la temperatura
Protección contra baja tensión
--Por favor, cargue el arrancador
Protección contra alta tensión
--Este modelo es sólo para el motor de 12V, pero el voltaje de la batería
del coche conectado es mucho mayor que 12V
El relé en el host está atascado
--Aún se puede arrancar el automóvil, pero la protección del producto
está desactivada. No se recomienda utilizarlo en situaciones que no
sean de emergencia y se recomienda ponerse en contacto con el
servicio de atención al cliente para su reemplazo
ES
01 02 03 04 05
06 07 08 09 10
11 12 13 14 15
16 17 18 19 20
21 22 23 24 25
26 27 28 29 30
RECARGA
Inserte el cable de carga en el puerto USB C.
Conectar al adaptador correspondiente (adaptador no incluido).
1
2
CARGAR DISPOSITIVOS ELECTRÓNICOS
CARGA DISPOSITIVOS DE 12V DC
Enchufa el cable en el puerto de salida correspondiente.
Conecte los productos electrónicos.
Pulse el botón de encendido.
1
2
3
Indicador Situaciones
Protección de tiempo de espera
--La conexión se ha interrumpido. Por favor, encienda el coche en
30 segundos
Protección contra sobrecarga
--Cargue completamente el arrancador
Protección contra bajas temperaturas (chip)
--Se recupera automáticamente cuando aumenta la temperatura
Protección contra altas temperaturas (chip)
--Recuperación automática cuando baja la temperatura
H0
H8
ES
01 02 03 04 05
06 07 08 09 10
11 12 13 14 15
16 17 18 19 20
21 22 23 24 25
26 27 28 29 30
Enchufe el adaptador del encendedor en el puerto de salida de DC.
Conectar a dispositivos de 12V DC.
Pulse el botón de encendido.
1
2
3
Los productos electrónicos para automóviles, como refrigeradores y grabadoras de
conducción, funcionan de forma intermitente durante el funcionamiento. Si necesita
alimentar dichos productos electrónicos a través de una interfaz de DC, utilice el
modo de salida continua.
1.Cuando la alimentación esté encendida y la linterna esté apagada, presione el
botón de encendido 3 veces para encender el modo de salida continua. En este
modo, todos los puertos de salida permanecen abiertos independientemente de si
están cargados y el icono de OUT parpadeará lentamente. Para liberar este modo,
presione el botón de encendido 3 veces.
2.En este modo, puedes presionar y mantener presionado el botón de encendido
durante 3 segundos para encender la linterna. Para liberar el modo de salida
continua, primero debe apagar la linterna y luego presionar el botón de encendido 3 veces.
Acerca Del Modo De Salida Continua
ILUMINACIÓN LED
Iluminación
SOS Fuera
Estroboscópico
(Blanco)
Estroboscópico
(Rojo)
Pulsa el botón de
encendido durante 3s
Pulse
brevemente
Pulsa el botón de encendido durante 3s
Pulse
brevemente
Pulse
brevemente
Pulse
brevemente
ESPECIFICACIONES
YaberAuto YA100
Arrancador de coche
CONTENIDO DEL PAQUETE
Abrazaderas de salto
Cable de carga
Modelo
Entrada
Salida USB1
Salida USB2
Salida DC
Temperatura de funcionamiento
YA100
5V/2A
5V/3A, 9V/2A, 12V/1.5A
5V/2.4A
12~16V/10A
-20°C~60°C/-4°F~140°F
ES
01 02 03 04 05
06 07 08 09 10
11 12 13 14 15
16 17 18 19 20
21 22 23 24 25
26 27 28 29 30

Adaptador de encendedor
de cigarrillos DC
Manual de usuario Bolsa de
almacenamiento portátil
1. Este producto es sólo para 12V plomo ácido/AGM/Gel baterías/vehículos
solamente.
2. No utilice el producto con menos del 10% de potencia, ya que se dañaría.
3. Después de arrancar el coche, espere al menos 30 minutos antes de recargar el
producto.
4. Se recomienda un intervalo de 60 segundos entre varios intentos de arrancar el
coche, de lo contrario el producto se sobrecalentará.
5. Recargue el producto cada 3 meses para prolongar su vida útil.
1. No utilice el producto para arrancar una batería de coche ya dilatada.
2. Guarde el producto en un lugar fresco y bien ventilado y manténgalo alejado de
niños y animales domésticos.
3. No coloque el producto en un entorno de alta temperatura durante mucho tiempo.
La temperatura de funcionamiento de este producto es de -4-140℉. La temperatura
de almacenamiento del producto no debe superar los 122℉.
4. No conecte las pinzas roja y negra juntas cuando el producto esté emitiendo.
5. No conecte las pinzas roja y negra a la misma pieza de metal.
6. No desmonte ni modifique el producto.
7. No utilice detergente para limpiar el producto.
8. Sujete el producto con cuidado y suavidad para evitar que se caiga o se golpee
repetidamente.
Si hay algún problema o mal funcionamiento durante el uso, por favor envíe su
pregunta y número de pedido a nuestro correo electrónico.
Le proporcionaremos un buen servicio postventa en 24 horas.
MANTENIMIENTO
GARANTÍA
PRECAUCIÓN
ES
01 02 03 04 05
06 07 08 09 10
11 12 13 14 15
16 17 18 19 20
21 22 23 24 25
26 27 28 29 30

CONOSCERE IL PRODOTTO
①
②
③
④
⑤
⑥
⑦
⑧
Luce LED
Uscita USB1
Uscita USB2
Ingresso
Uscita DC
Pulsante di Avvio della Forza
Pulsante di Alimentazione
Avviate Porta
①
②
③
④
⑤
⑥
⑦
Livello della Batteria
Ricarica Veloce (Uscita
USB1)
Pronti a Lavorare
Forza la Modalità di Avvio
Indicatori di Errore
Carica
Scarico
⑤
⑥
⑦
①
②
③
④
①
②
③
④
⑤
⑥
⑦
⑧
IT
01 02 03 04 05
06 07 08 09 10
11 12 13 14 15
16 17 18 19 20
21 22 23 24 25
26 27 28 29 30

Inserire il cavo di avviamento e collegare i morsetti alla batteria dell'auto. (Cavo
rosso al polo "+" della batteria dell'auto, cavo nero a "-").
Sullo schermo appare l'icona (Pronti a Lavorare).
Cercare di avviare il motore dell'auto.
AVVIARE LA TUA AUTO
Funzione Di Avvio Forzato
La Risoluzione Dei Problemi
①
③②
1
2
3
Come accedere alla modalità di avvio forzato:
Se lo schermo non visualizza alcuna icona quando si collegano correttamente i
morsetti alla batteria dell'auto, è possibile utilizzare la funzione di avvio forzato.
①
*3s
③②
Tenere premuto il pulsante di avvio forzato per più di 3 secondi.
Queste due icone vengono visualizzate sullo schermo.
Avviare il motore dell'auto.
1
2
3
Attenzione: Quando si utilizza la funzione di avviamento forzato, il rilevamento
automatico e la protezione di sicurezza vengono disattivati.
LONG PRESS
Icone di Avviso Situazioni
Protezione da cortocircuito EC5
--Ripristino automatico quando i morsetti sono scollegati
Il relè nell'host è bloccato
--È ancora possibile avviare l'auto, ma la protezione del prodotto è
disabilitata. Si sconsiglia l'utilizzo in situazioni non di emergenza, e si
consiglia di contattare il servizio clienti per la sostituzione
Protezione contro l'inversione del collegamento
--Scollegare i cavi e assicurarsi che i morsetti rossi siano collegati al
polo + della batteria dell'auto
Protezione dalle alte temperature
--Ripristino automatico quando la temperatura si abbassa
Protezione da bassa tensione
--Ricaricare l'avviatore di emergenza
Protezione dall'alta tensione
--la tensione della batteria dell'auto è superiore a 12V
IT
01 02 03 04 05
06 07 08 09 10
11 12 13 14 15
16 17 18 19 20
21 22 23 24 25
26 27 28 29 30

RICARICARE il BOOSTER YA100
Inserire il cavo di ricarica nella porta di ingresso USB C.
Collegare il cavo a un adattatore da 5V 2A (adattatore non incluso).
1
2
CARICARE ALTRI DISPOSITIVI
CARICARE I DISPOSITIVI A 12V CC
Inserire il cavo nella porta di uscita USB.
Collegare i prodotti elettronici.
Premere il pulsante di accensione per avviarlo.
1
2
3
Icone di Avviso Situazioni
Protezione contro il timeout della connessione
--Ripristino automatico quando i morsetti vengono scollegati.
Avviare il motore entro 30 secondi dal collegamento alla batteria
Protezione attivata a causa di numerosi tentativi di avviamento dell'auto
--Caricare completamente il booster
Protezione dalle basse temperature (chip)
--Recupero automatico quando la temperatura aumenta
Protezione dalle alte temperature (chip)
--Recupero automatico quando la temperatura si abbassa
H0
H8
IT
01 02 03 04 05
06 07 08 09 10
11 12 13 14 15
16 17 18 19 20
21 22 23 24 25
26 27 28 29 30
Inserire l'adattatore per accendisigari nella porta di uscita CC.
Collegare i dispositivi a 12 V CC.
Premere il pulsante di accensione per avviarlo.
1
2
3
I prodotti elettronici per auto, come frigoriferi e registratori di guida, funzionano a
intermittenza durante il funzionamento. Se è necessario alimentare tali prodotti
elettronici tramite una porta CC, utilizzare la modalità di uscita continua.
1.Dopo aver acceso il booster e la torcia è spenta, premere il pulsante di accensione
3 volte per attivare la modalità di uscita continua. In questa modalità, tutte le porte
di uscita rimangono aperte indipendentemente dal loro utilizzo e l'icona OUT
lampeggia lentamente. Per disattivare questa modalità, premere 3 volte il pulsante
di accensione.
2.In questa modalità, è possibile tenere premuto il pulsante di accensione per 3
secondi per accendere la torcia. Per rilasciare la modalità di uscita continua, è
necessario prima spegnere la torcia e poi premere il pulsante di accensione 3
volte.
Modalità di Uscita Continua CC
LUCE LED
Illuminazione SOS SpegnereStrobo
(luce bianca)
Strobo
(luce rossa)
Premere il pulsante per
3 secondi
Premere
Premere il pulsante di accensione per 3 secondi per ON/OFF la luce
Premere Premere Premere
SPECIFICHE
YaberAuto Booster
Avviamento Auto YA100
COSA RICEVERETE
Cavo Jumper per
Batteria da 12V
Cavo di Ricarica
Modello
USB-C Ingresso
USB Uscita 1
USB Uscita 2
DC Uscita
Temperatura di Esercizio
YA100
5V/2A
5V/3A, 9V/2A, 12V/1.5A
5V/2.4A
12~16V/10A
-20°C~60°C/-4°F~140°F
IT
01 02 03 04 05
06 07 08 09 10
11 12 13 14 15
16 17 18 19 20
21 22 23 24 25
26 27 28 29 30

Adattatore per
Accendisigari CC
Manuale Utente Borsa Portatile
1.Questo prodotto è destinato esclusivamente a batterie/veicoli al piombo acido/AGM/-
Gel da 12V.
2. Non utilizzare il prodotto con una potenza inferiore al 10% per non danneggiarlo.
3.Dopo aver avviato l'auto, attendere almeno 30 minuti prima di ricaricare il prodotto.
4.Si raccomanda un intervallo di 60 secondi tra più tentativi di avviamento dell'auto,
altrimenti il prodotto si surriscalda.
5. Ricaricare completamente il prodotto ogni 3 mesi per prolungarne la durata.
1.Non utilizzare il prodotto per avviare una batteria per auto già espansa.
2.Conservare il prodotto in un luogo fresco e ben ventilato e tenerlo lontano da
bambini e animali domestici.
3.Non collocare il prodotto in un ambiente ad alta temperatura per lungo tempo. La
temperatura di funzionamento del prodotto è di -4-140℉. La temperatura di
conservazione del prodotto non deve superare i 122℉.
4.Non collegare i morsetti rosso e nero insieme quando il prodotto è in uscita.
5.Non collegare i morsetti rosso e nero allo stesso pezzo di metallo.
6.Non smontare o modificare il prodotto.
7.Non utilizzare detergenti per pulire il prodotto.
8.Tenere il prodotto con attenzione e delicatezza per evitare di farlo cadere o di
colpirlo ripetutamente.
Se c'è qualche problema o malfunzionamento durante l'uso, si prega di inviare la
domanda e il numero d'ordine alla nostra casella e-mail.
Vi forniremo buone soluzioni dopo aver ricevuto i vostri messaggi.
MANUTENZIONE
GARANZIA
ATTENZIONE
IT
01 02 03 04 05
06 07 08 09 10
11 12 13 14 15
16 17 18 19 20
21 22 23 24 25
26 27 28 29 30

本体各部の名称
①
②
③
④
⑤
⑥
⑦
⑧
LEDライト
USB出力1
USB出力2
入力
DC出力
強制起動ボタン
電源キー
ジャンプスタートポート
①
②
③
④
⑤
⑥
⑦
残量
急速充電(USB出力ポー
ト1)
ジャンプスタート可
強制起動モード
エラーインディケーター
入力
出力
⑤
⑥
⑦
①
②
③
④
①
②
③
④
⑤
⑥
⑦
⑧
JP
01 02 03 04 05
06 07 08 09 10
11 12 13 14 15
16 17 18 19 20
21 22 23 24 25
26 27 28 29 30

ジャンプスターターケーブルとジャンプスターターを接続してください。(赤と
プラス極、黒とマイナス極)
ディスプレイに「ジャンプスタート可」と表示されています。
車をジャンプスタートします。
ジャンプスタート
強制起動機能について
故障排除
①
③②
1
2
3
以下の手順で試してください:
正しくジャンプスターターケーブルと接続しても、ディスプレイに無表示となる場
合、強制起動機能で車をジャンプスタートしてみてください。
①
*3s
③②
強制起動ボタンを3秒以上長押ししてください。
ディスプレイに以上の2つのイメージが表示されます。
ジャンプスタートします。
1
2
3
ご注意: 強制起動モードで安全保護電路などが無効になります。
LONG PRESS
ディスプレイ 対策
EC5短絡保護
--ジャンプスターターケーブルを外してください。
ホストのリレーが動かない
--車はまだ始動できますが、安全保護回路は無効です。緊急時以
外での使用は推奨されませんので、カスタマーサービスに連絡し
て交換することをお勧めします。
逆接続保護
--ジャンプスターターケーブルを正しく接続を確認してください。
高温保護
--温度が下がるともう一度試してください。
低電圧保護
--ジャンプスターターを充電してください。
高電圧保護
--このモデルは12Vエンジン専用ですが、接続されているカーバ
ッテリーの電圧は12Vよりはるかに高いです。
JP
01 02 03 04 05
06 07 08 09 10
11 12 13 14 15
16 17 18 19 20
21 22 23 24 25
26
27 28 29 30

ディスプレイ 対策
タイムアウト保護
--ケーブルを外してください。(30秒以内にエンジンをかけてください)
オーバーリミット保護
--ジャンプスターターをフル充電してください。
低温保護(ケーブル)
--温度が上昇すると自動的に回復する。
高温保護(ケーブル)
--温度が下がると自動的に回復する。
H0
H8
ジャンプスターターを充電する
充電ケーブルと接続してください。(USBCポート)
アダプターが付属していません。スマホなどのアダプターで本体を充電してくだ
さい。
1
2
本体で他のデバイスを充電する
DC出力
ケーブルを対応する出力ポートに差し込みます。
電子製品を接続します。
電源キーを押してください。
1
2
3
JP
01 02 03 04 05
06 07 08 09 10
11 12 13 14 15
16 17 18 19 20
21 22 23 24 25
26 27
28 29 30
シガーライターアダプターをDC出力ポートに差し込みます。
DC12V機器に接続します。
電源ボタンを押してください。
1
2
3
車載冷蔵庫やドライブレコーダーなどのカーエレクトロニクス製品は、動作中に断
続的に動作します。そのような電子製品にDCインターフェイスを通して電力を供給
する必要がある場合は、連続出力モードを使用してください。
1.電源がオンでライトがオフの場合、電源ボタンを3回押して連続出力モードをオン
にします。このモードでは、すべての出力ポートは負荷の有無にかかわらず開い
たままになり、OUTアイコンはゆっくりと点滅します。このモードを解除するに
は、電源ボタンを3回押してください。
2.このモードでは、電源ボタンを3秒間長押ししてライトを点灯させることができま
す。連続出力モードを解除するには、まずライトをオフにし、電源ボタンを3回押
す必要があります。
連続出力モードについて
LEDライト
点灯 SOS オフストロボ(白) ストロボ(赤)
電源ボタンを3
秒以上長押す
押す
電源ボタンを3秒以上長押す
押す 押す 押す
製品仕様
YaberAutoYA100ジャ
ンプスターター
パッケージ内容
ジャンプスターターケ
ーブル
充電ケーブル
モデル
入力
USB1出力
USB2出力
DC出力
使用温度
YA100
5V/2A
5V/3A,9V/2A,12V/1.5A
5V/2.4A
12~16V/10A
-20°C~60°C/-4°F~140°F
JP
01 02 03 04 05
06 07 08 09 10
11 12 13 14 15
16 17 18 19 20
21 22 23 24 25
26 27 28
29 30

DC充電ケーブル 取扱説明書 収納ケース
1.この商品は12V 鉛酸/AGM/ゲル電池/車だけ対応しています。
2. 10%未満の電力で使用しないでください。
3. 車を始動させた後、少なくとも 30 分待ってから製品を充電してください。
4. ジャンプスタートした後、もう一度作業するには1分以上間隔してください。、。
5.長時間使用されない場合、定期的に(3か月ごとに)充電を行ってください。
1.膨張したカーバッテリーの始動には使用しないでください。
2.風通しの良い涼しい場所に保管し、子供やペットの手の届かないところに保管して
ください。
3.高温の場所に長時間置かないでください。本製品の動作温度は-4-140℉です。製品
の保管温度は122℉を超えないようにしてください。
4.出力中は赤と黒のクランプを一緒に接続しないでください。
5.赤と黒のクランプを同じ金属片に接続しないでください。
6.製品を分解、改造しないでください。
7.製品の洗浄に洗剤を使用しないでください。
8.本製品を落としたり、何度もぶつけたりしないようにしっかり持ってください。
商品の使用について何かご質問があれば、ご連絡ください。
24時間以内対応いたします。
保管方法
品質保証
ご注意
JP
01 02 03 04 05
06 07 08 09 10
11 12 13 14 15
16 17 18 19 20
21 22 23 24 25
26 27 28 29
30