
Italiano
01 - 14
15 - 23
24 - 32
33 - 42
43 - 50
51 - 57
EN 01
02 03 04 05 06 07 08 09 10 11 12 13 14
15 16 17 18 19 20 21 22 23
24 25 26 27 28 29 30 31 32
33 34 35 36 37 38 39 40 41 42
43 44 45 46 47 48 49 50
51 52 53 54 55 56 57
EC-5 Cigarette
Lighter Adaptor
EN
01 02 03 04 05 06 07 08 09 10 11 12 13 14
15 16 17 18 19 20 21 22 23
24 25 26 27 28 29 30 31 32
33 34 35 36 37 38 39 40 41 42
43 44 45 46 47 48 49 50
51 52 53 54 55 56 57
EN
01 02 03 04 05 06 07 08 09 10 11 12 13 14
15 16 17 18 19 20 21 22 23
24 25 26 27 28 29 30 31 32
33 34 35 36 37 38 39 40 41 42
43 44 45 46 47 48 49 50
51 52 53 54 55 56 57
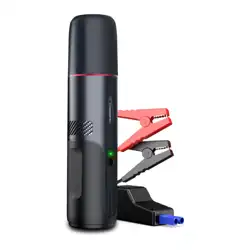
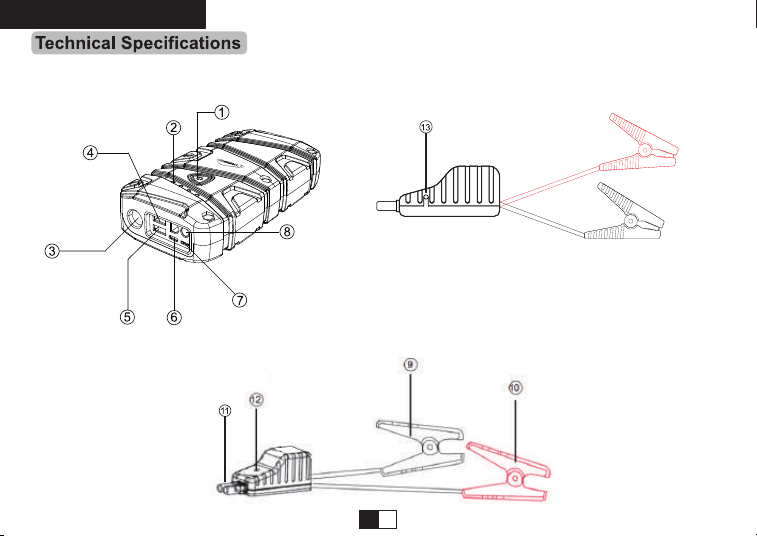
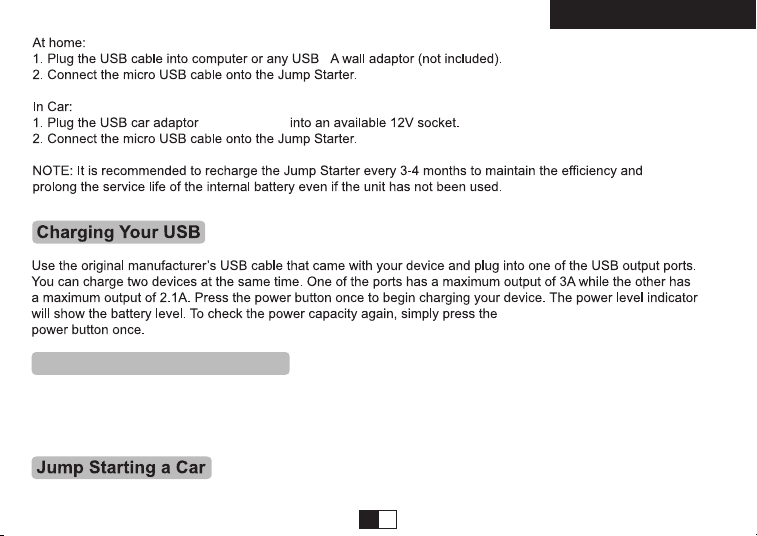
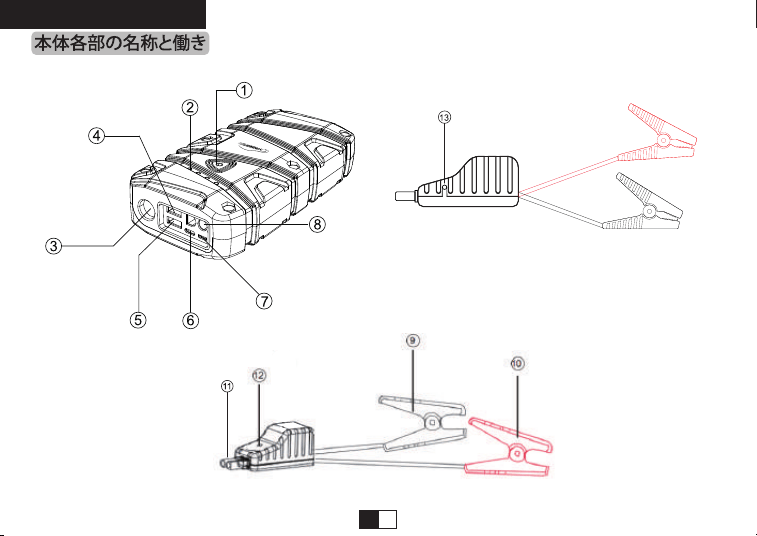
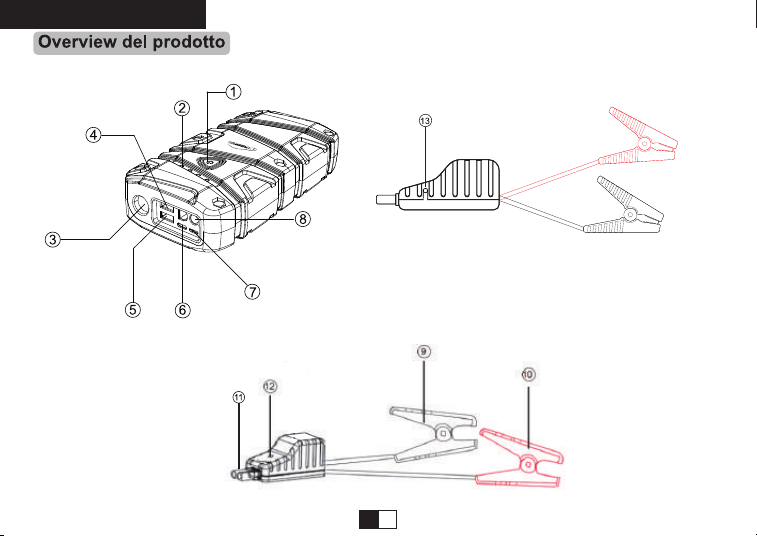
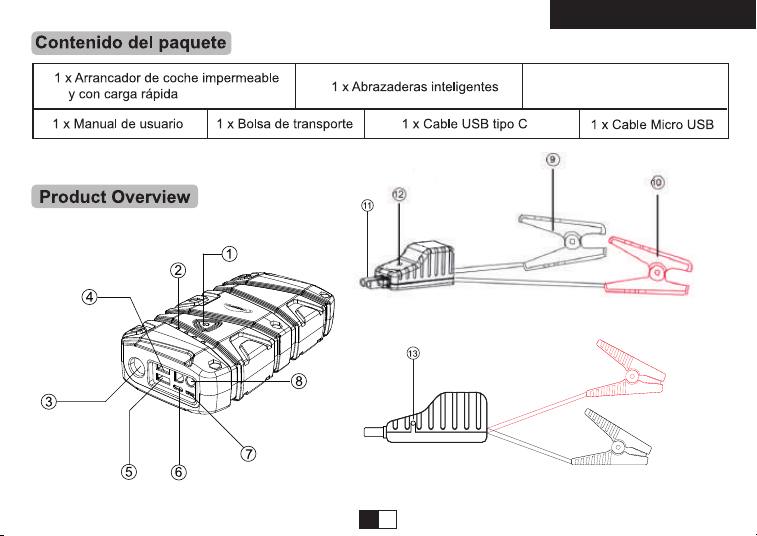
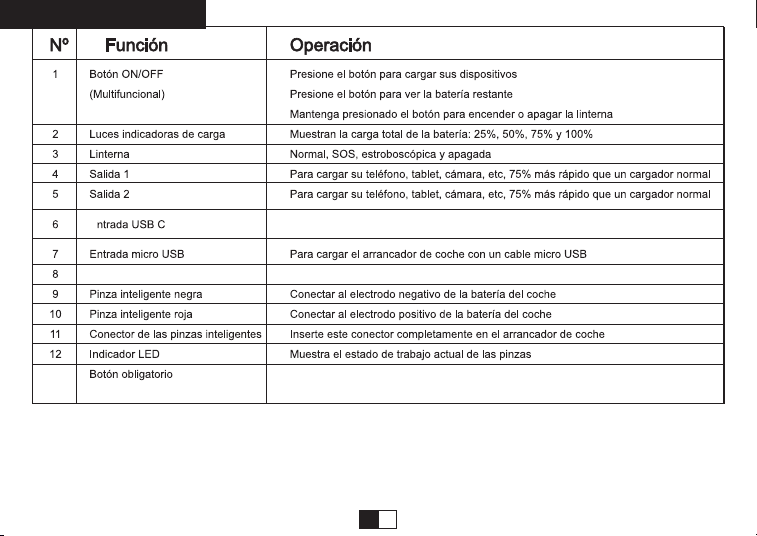
Jump Starting Port Insert the plug into the jump starting port
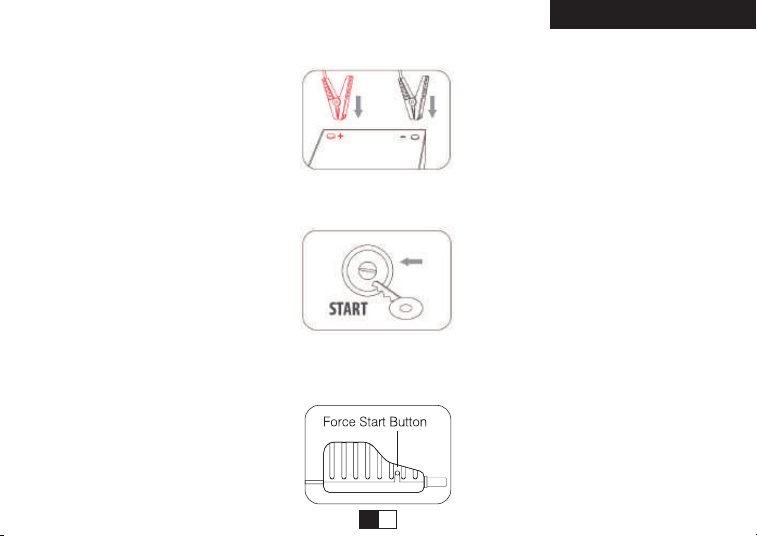
Force Starter Button You need to press this button if the car battery voltage too low13
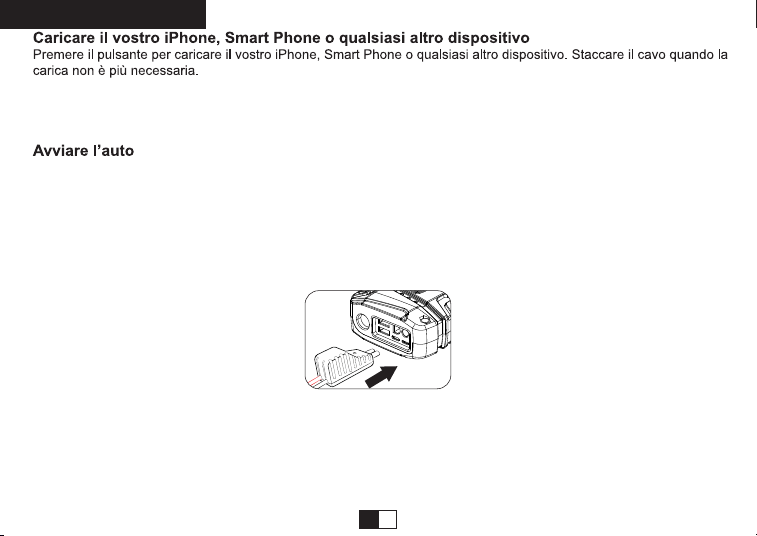
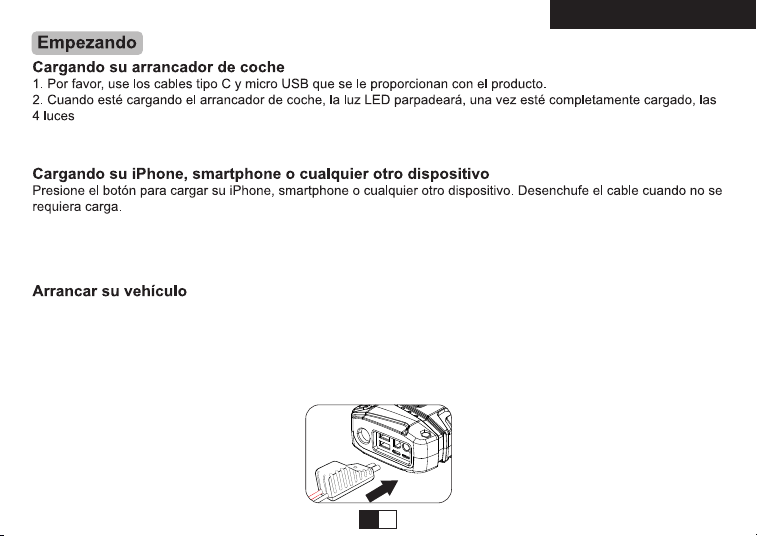
Charge the stater with Type C
EN
01 02 03 04 05 06 07 08 09 10 11 12 13 14
15 16 17 18 19 20 21 22 23
24 25 26 27 28 29 30 31 32
33 34 35 36 37 38 39 40 41 42
43 44 45 46 47 48 49 50
51 52 53 54 55 56 57
EN
01 02 03 04 05 06 07 08 09 10 11 12 13 14
15 16 17 18 19 20 21 22 23
24 25 26 27 28 29 30 31 32
33 34 35 36 37 38 39 40 41 42
43 44 45 46 47 48 49 50
51 52 53 54 55 56 57
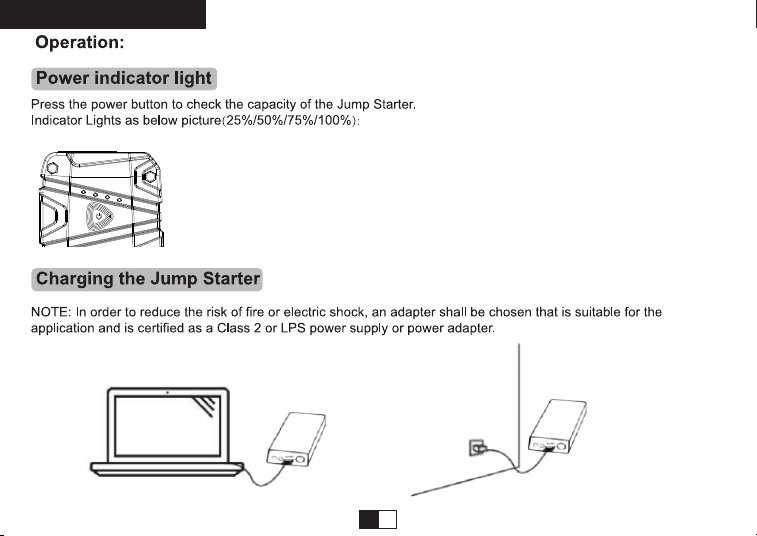
(not included)
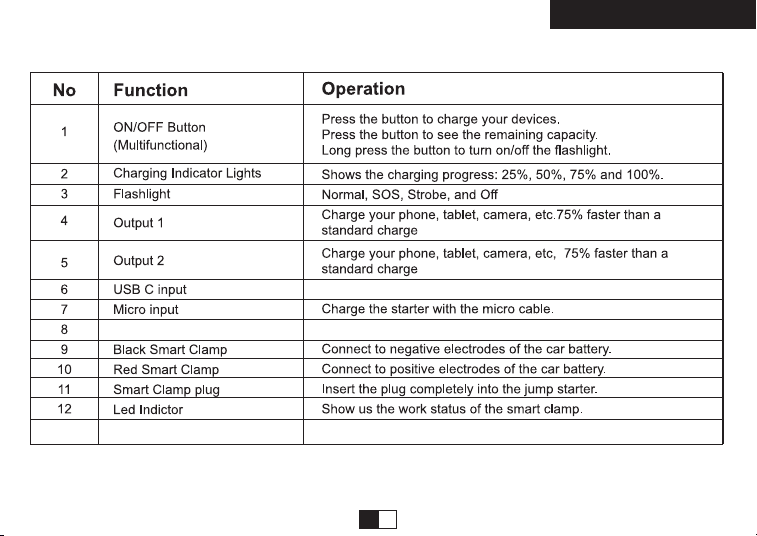
The use step of the flashlight
1: Long press the power button for 3-5S to open/close the flashlight mode.
2: By further pressing the button in this mode, you switch between operating modes "SOS","Stroboscope" and
"Permanent light".
2

EN
01 02 03 04 05 06 07 08 09 10 11 12 13 14
15 16 17 18 19 20 21 22 23
24 25 26 27 28 29 30 31 32
33 34 35 36 37 38 39 40 41 42
43 44 45 46 47 48 49 50
51 52 53 54 55 56 57
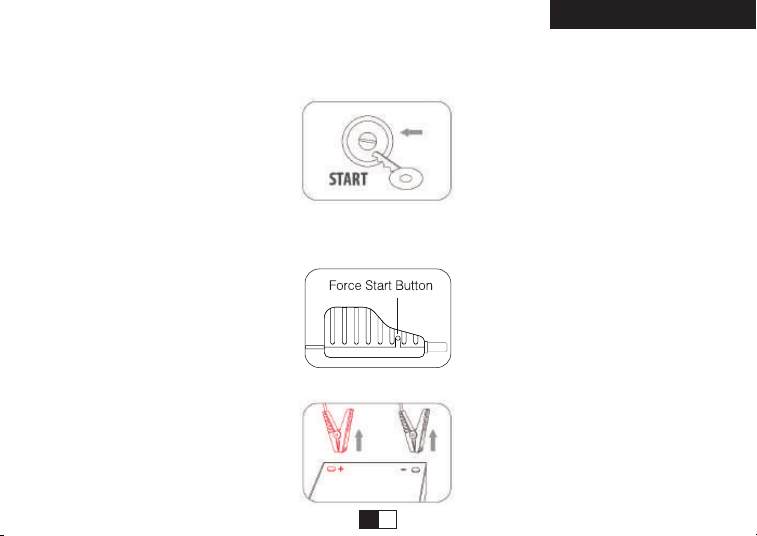
Step 1: Insert the plug of the smart battery clamp completely into the jump starter.
If the green and red light indicators on the battery clamp are flashing alternately,
you are safe to move on to the next step.
Note:
This prodcut is for 12V car only. Check to make sure that 3 to 4 indicator lights are illuminated(battery level is above
50%) before you use it to jump start your car.
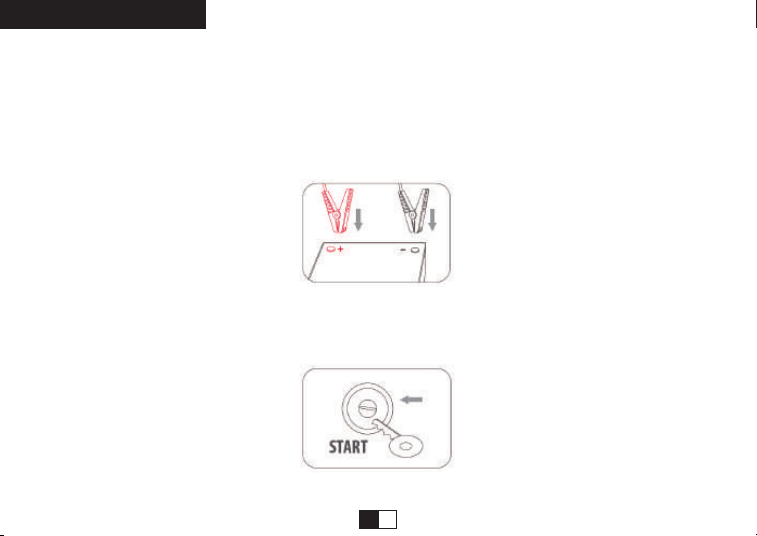
Step 2: Connect the red clamp to the positive terminal(+) of the car battery and connect the black clamp to the
negative terminal(-) of the car battery. If the green and red light indicators on the battery clamp are flashing
alternately, you are safe to move on to the next step.
However, if the red indicator light is on:
1.The battery clamp may be connected in reverse. If so, you need to disconnect
the battery clamp from the vehicle and the jump starter.
2.Adjust the clamps for maximum contact with the battery terminals
EN
01 02 03 04 05 06 07 08 09 10 11 12 13 14
15 16 17 18 19 20 21 22 23
24 25 26 27 28 29 30 31 32
33 34 35 36 37 38 39 40 41 42
43 44 45 46 47 48 49 50
51 52 53 54 55 56 57
Step 3-a: Start your car.
If you failed to start your car, you need to disconnect the battery clamp from the vehicle and the jump starter.
Wait for at least 30 seconds, then try again.If you failed to start your car after 2 attempts, you can use the force start
function. See step 3-b.
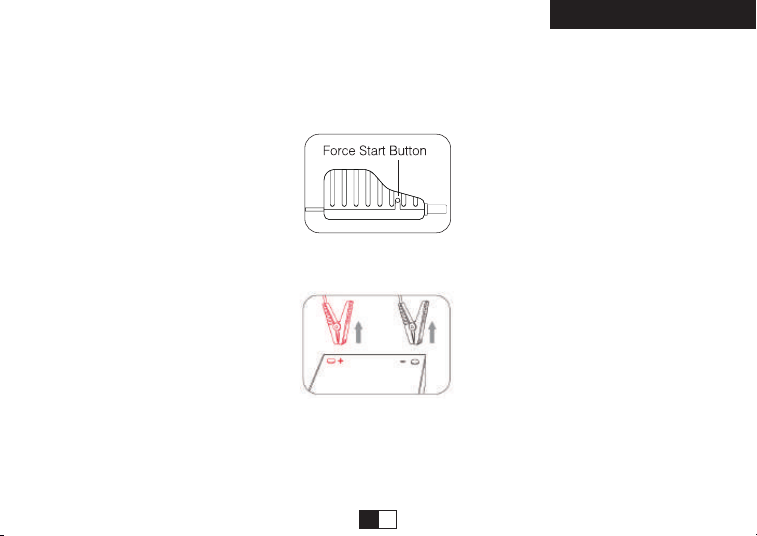
Step 3-b(optional): Force start function. First please make sure that the clamps are connected to the correct polarity
battery terminal. Then, press and hold the force start button for 3 seconds.
When the indicator light of the smart clamp is solid green, you need to start the vehicle within 30s.
Step 4: Once your car is started, remove the battery clamp from the car-battery and the jump starter within 30
seconds.

EN
01 02 03 04 05 06 07 08 09 10 11 12 13 14
15 16 17 18 19 20 21 22 23
24 25 26 27 28 29 30 31 32
33 34 35 36 37 38 39 40 41 42
43 44 45 46 47 48 49 50
51 52 53 54 55 56 57
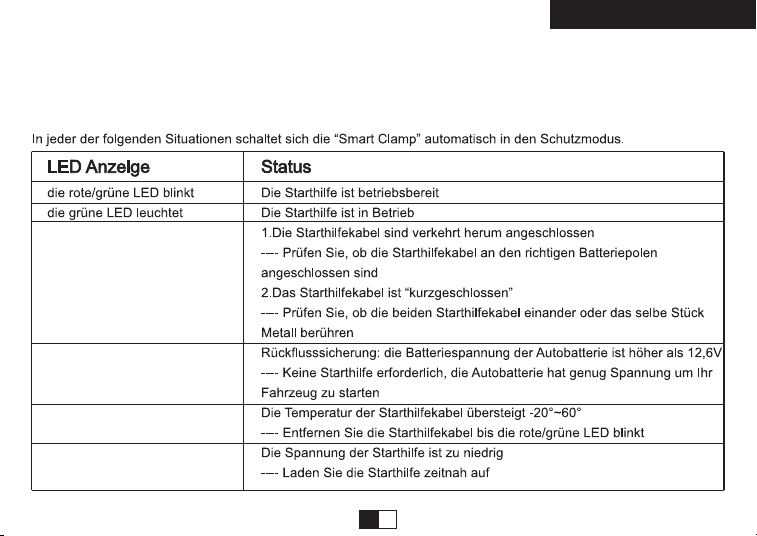
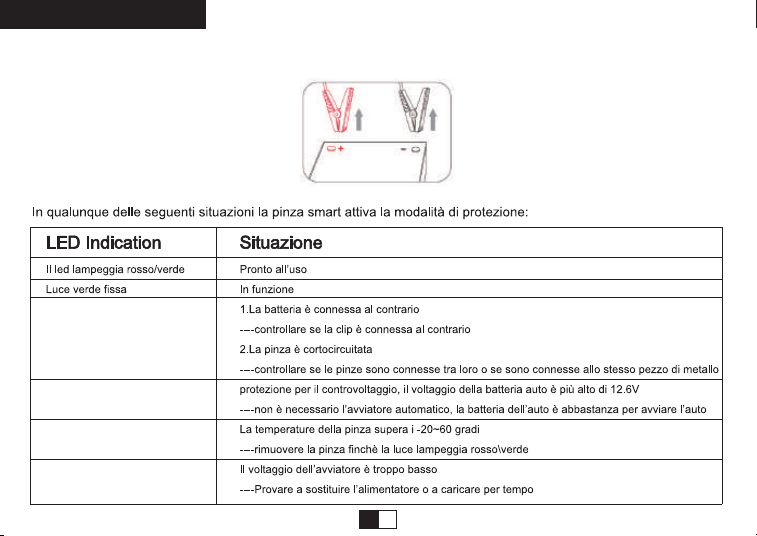
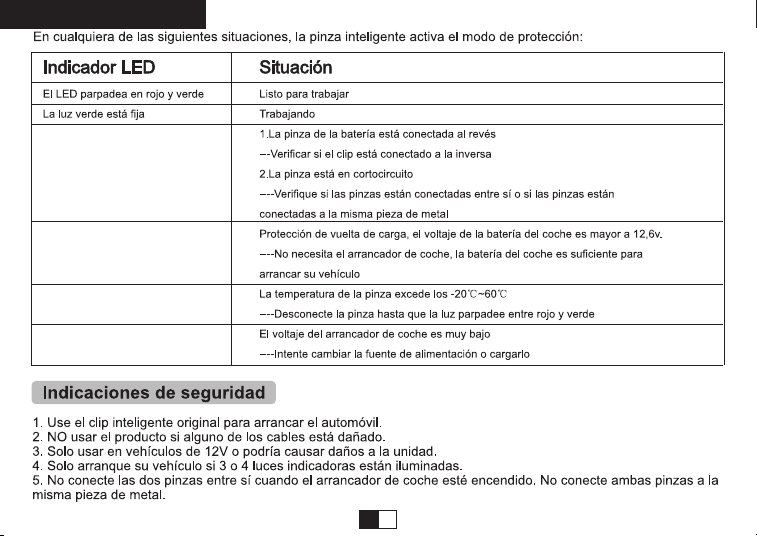
In any of the following situations, the smart clamp turns protection on.
LED Indicator
The red/green led will flash
The green light is always on
The red light is always on with
long audio alarm
The red light flashes with short
audio alarm
The red light is always on with
long audio alarm
The red light is always on with
short audio alarm
The voltage of the starter is too low
-- try to replace the startup power supply or charge it in time
Situations
Ready to work
Work status
1.battery clamp is reversely connected
-- check whether the clip is reversely connected
2.the clamp is short- circuited
-- check whether two clamps together connect or connect both cable
clamps to the same piece of metal
Back charge protection, the voltage of the car battery is higher than 12.6v
-- No jump starter needed, the car battery is enough to start your car
The temperature of the clamp exceeds 65(+/ -5)degrees
-- remove the clamp untill the red green led flash

EN
01 02 03 04 05 06 07 08 09 10 11 12 13 14
15 16 17 18 19 20 21 22 23
24 25 26 27 28 29 30 31 32
33 34 35 36 37 38 39 40 41 42
43 44 45 46 47 48 49 50
51 52 53 54 55 56 57
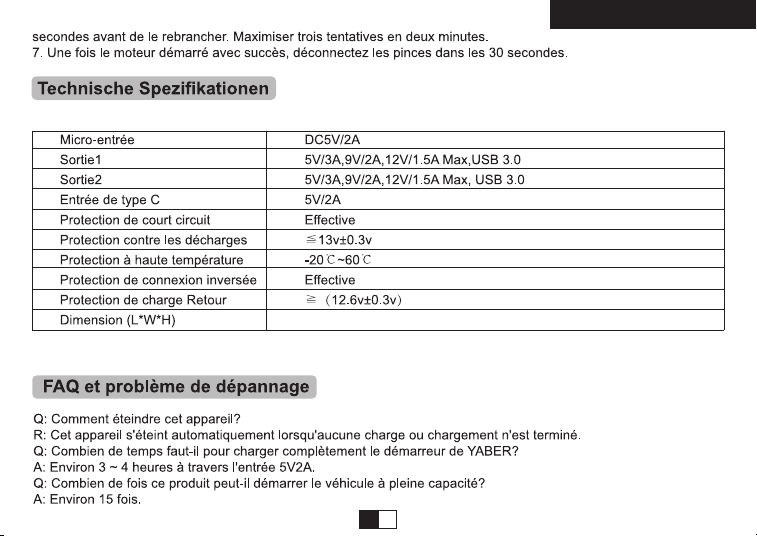
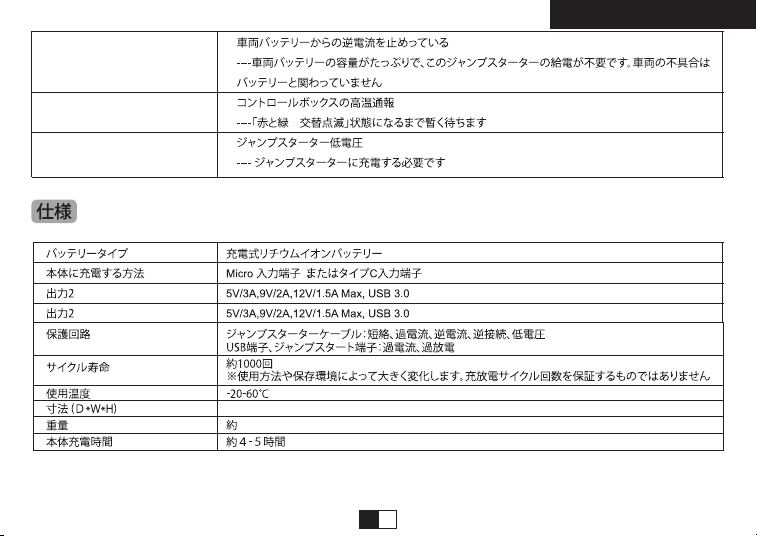
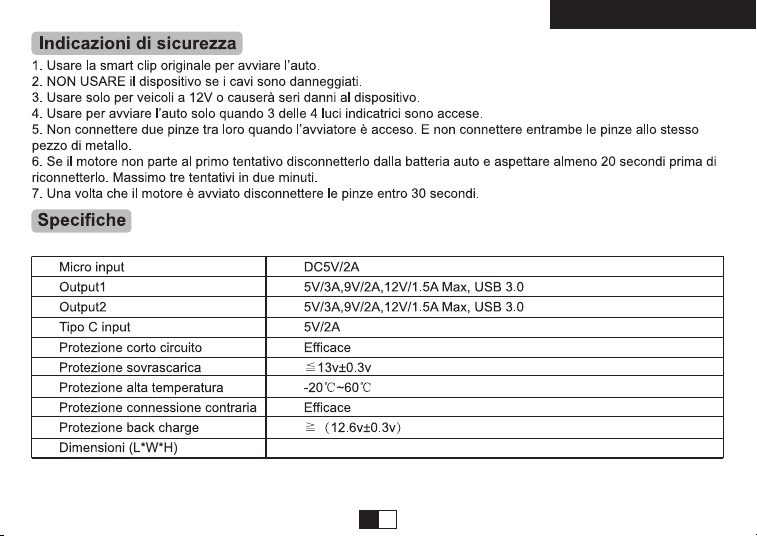
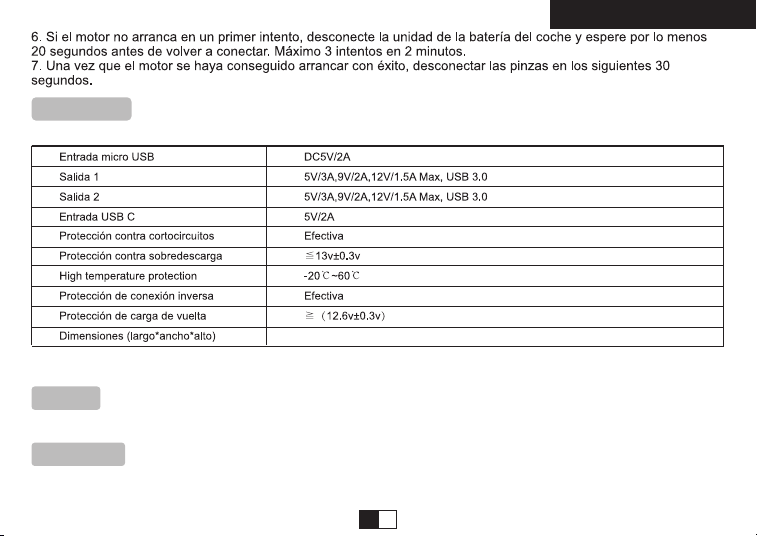
Model
Micro Input
USB-C input
Output1
Output 2
Dimensions (L * W * H)
Overload / Discharge Fuse
Working Temperature
Backflow protection
Short circuit fuse protection
Reverse polarity protection
YR500
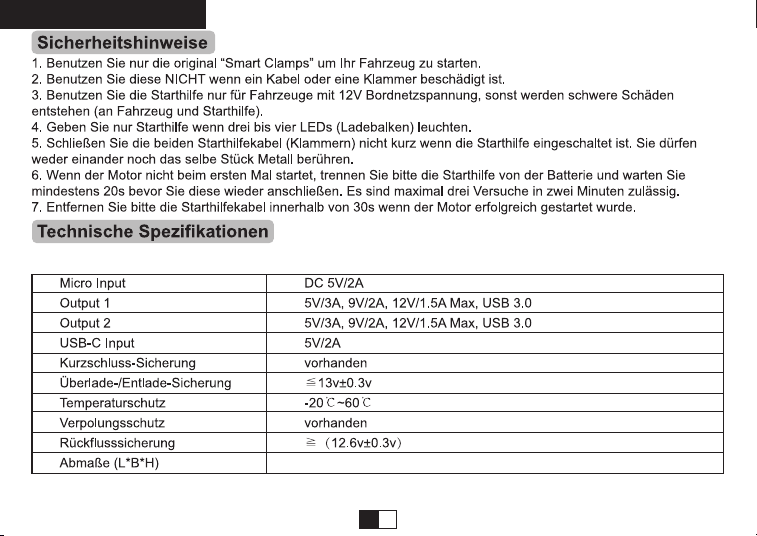
DC 5V / 2A
5V / 2A
5V/3A, 9V/2A, 12V/1.5A Max, USB 3.0
5V/3A, 9V/2A, 12V/1.5A Max, USB 3.0
185*99*45mm
≦ 13v ± 0.3v
65 ℃ ± 5 ℃
≧ (12.6v ± 0.3v)
√
√
Details
EN
01 02 03 04 05 06 07 08 09 10 11 12 13 14
15 16 17 18 19 20 21 22 23
24 25 26 27 28 29 30 31 32
33 34 35 36 37 38 39 40 41 42
43 44 45 46 47 48 49 50
51 52 53 54 55 56 57
EN
01 02 03 04 05 06 07 08 09 10 11 12 13 14
15 16 17 18 19 20 21 22 23
24 25 26 27 28 29 30 31 32
33 34 35 36 37 38 39 40 41 42
43 44 45 46 47 48 49 50
51 52 53 54 55 56 57
74

EN
01 02 03 04 05 06 07 08 09 10 11 12 13 14
15 16 17 18 19 20 21 22 23
24 25 26 27 28 29 30 31 32
33 34 35 36 37 38 39 40 41 42
43 44 45 46 47 48 49 50
51 52 53 54 55 56 57
EN
01 02 03 04 05 06 07 08 09 10 11 12 13 14
15 16 17 18 19 20 21 22 23
24 25 26 27 28 29 30 31 32
33 34 35 36 37 38 39 40 41 42
43 44 45 46 47 48 49 50
51 52 53 54 55 56 57
16. Attach output cables to a battery and chassis as indicated below. Never allow the output clamps to touch one another.
17. Dropping, hitting or other excessive amounts of force to the jumo starter may damage the unit (external and
internal), which may result in loss of operation, electrical fire or cause other serious damage.

EN
01 02 03 04 05 06 07 08 09 10 11 12 13 14
15 16 17 18 19 20 21 22 23
24 25 26 27 28 29 30 31 32
33 34 35 36 37 38 39 40 41 42
43 44 45 46 47 48 49 50
51 52 53 54 55 56 57
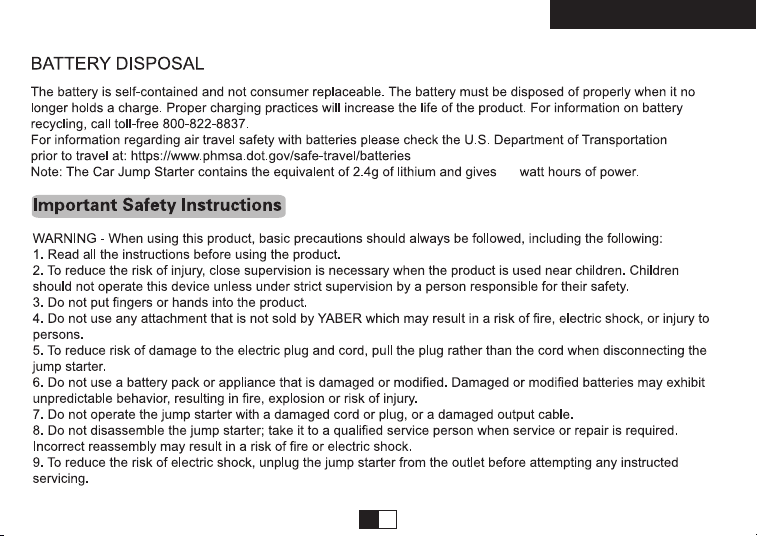
Warranty
Our company provides customers with warranty of 24 months from the date of purchase.
Contact us
For any inquiries or comments concerning our products, please send an email to [email protected], and we will
respond to you as soon as possible.
DE
01 02 03 04 05 06 07 08 09 10 11 12 13 14
15 16 17 18 19 20 21 22 23
24 25 26 27 28 29 30 31 32
33 34 35 36 37 38 39 40 41 42
43 44 45 46 47 48 49 50
51 52 53 54 55 56 57
,
1 x EC-5 Adapter für
Zigarettenanzünder
DE
01 02 03 04 05 06 07 08 09 10 11 12 13 14
15
16 17 18 19 20 21 22 23
24 25 26 27 28 29 30 31 32
33 34 35 36 37 38 39 40 41 42
43 44 45 46 47 48 49 50
51 52 53 54 55 56 57

DE
01 02 03 04 05 06 07 08 09 10 11 12 13 14
15 16
17 18 19 20 21 22 23
24 25 26 27 28 29 30 31 32
33 34 35 36 37 38 39 40 41 42
43 44 45 46 47 48 49 50
51 52 53 54 55 56 57
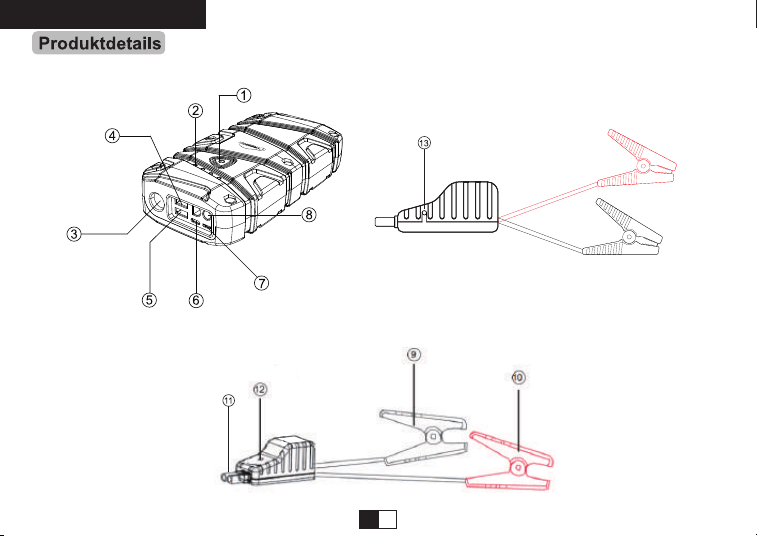
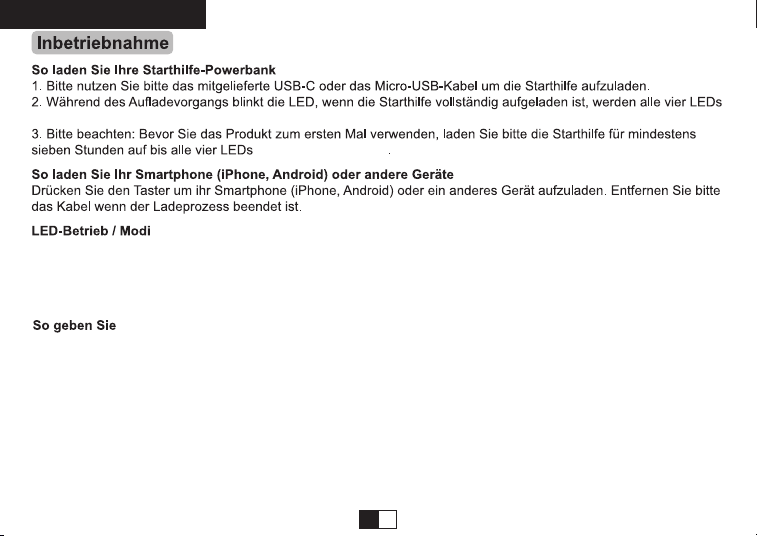
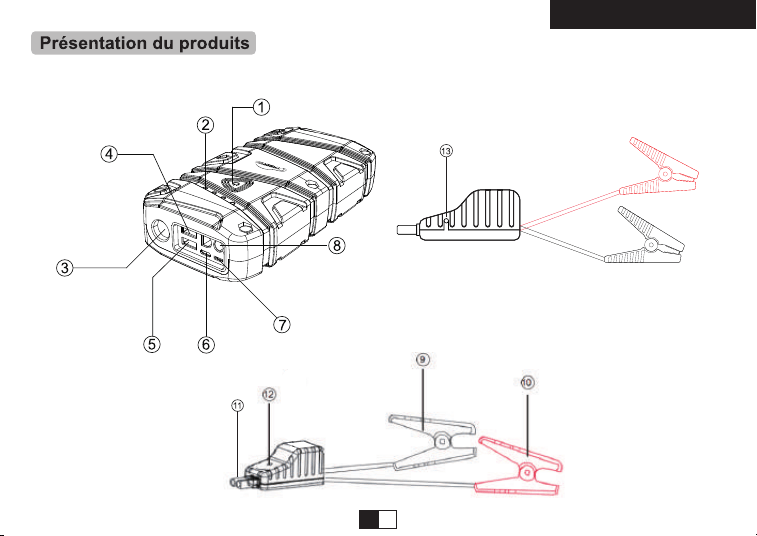
Auto- Starthilfe - Port Stecken Sie den Stecker in dem Auto-Starthilfe-Port
13
Tiefenentladungs-Taster Drücken Sie diesen Taster wenn die Batteriespannung (Autobatterie)zu niedrig ist
Lädt die Powerbank mit dem Typ C Kabel
DE
01 02 03 04 05 06 07 08 09 10 11 12 13 14
15 16 17
18 19 20 21 22 23
24 25 26 27 28 29 30 31 32
33 34 35 36 37 38 39 40 41 42
43 44 45 46 47 48 49 50
51 52 53 54 55 56 57
leuchten, nicht blinken
Drücken Sie die ON-OFF Taste lang um die LED Leuchtung an-/ auszushalten.
Durch weiteres kurzes Drücken des Tasters in diesem Modus wechseln Sie zwischen Betriebsarten “ SOS”,
“Stroboskop” und” Permanentlicht”
leuchten.
Starten Sie das Auto mit Starthilfe
Hinweis:
》Das Produkt ist nur für 12V Fahrzeuge geeignet.
》Stellen Sie sicher, dass 3 bis 4 Anzeigeleuchten leuchten( der Batterieladestand liegt über 50%), bevor Sie damit Ihr
DE
01 02 03 04 05 06 07 08 09 10 11 12 13 14
15 16 17 18
19 20 21 22 23
24 25 26 27 28 29 30 31 32
33 34 35 36 37 38 39 40 41 42
43 44 45 46 47 48 49 50
51 52 53 54 55 56 57
Fahrzeug starten.
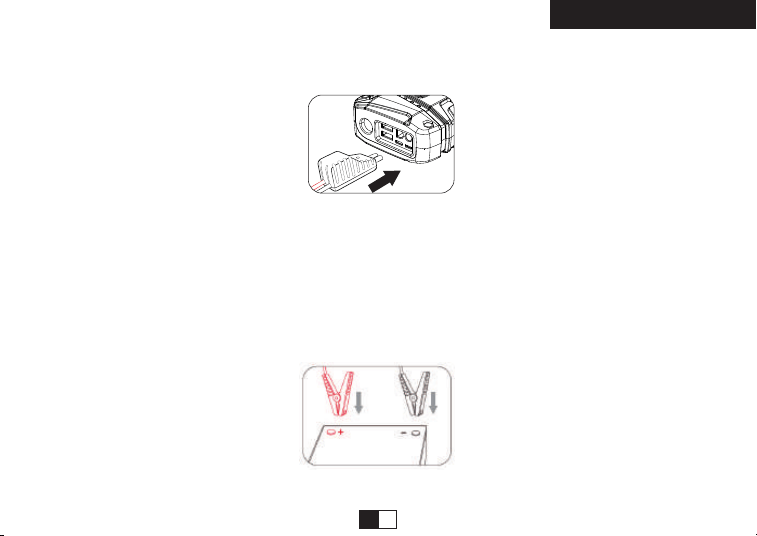
Schritt 1: Stecken Sie den Stecker der Smart Battery Clamp vollständig in den Starthilfe. Wenn die grüne und die rote
Anzeige der Batterieklemme abwechselnd blinken, können Sie mit Sicherheit zum nächsten Schritt übergehen.
Schritt 2: Verbinden Sie die rote Klemme mit dem Pluspol(+) der Autobatterie und verbinden Sie die schwarze Klemme
mit dem Minuspol(-)der Autobatterie. Wenn die grüne und die rote Anzeige der Batterieklemme abwechselnd blinken,
können Sie mit Sicherheit zum nächsten Schritt übergehen.
Wenn jedoch die rote Kontroll Leuchte leuchtet:
1)Die Batterieklemme kann umgekehrt angeschloßen werden. In diesem Fall müssen Sie die Batterieklemme vom
Fahrzeug und vom Starthilfegerät trennen.
2)Stellen Sie die Klemmen für maximalen Kontakt mit den Batterieklemmen ein.
DE
01 02 03 04 05 06 07 08 09 10 11 12 13 14
15 16 17 18 19
20 21 22 23
24 25 26 27 28 29 30 31 32
33 34 35 36 37 38 39 40 41 42
43 44 45 46 47 48 49 50
51 52 53 54 55 56 57
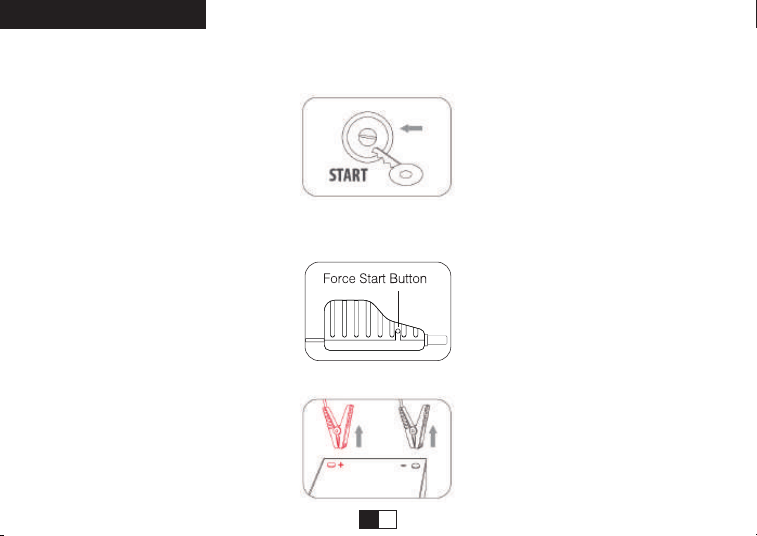
Schritt 3-a: Starten Sie das Auto.
Wenn Sie Ihr Auto nicht starten konnten, müssen Sie die Batterieklemme vom Fahrzeug und vom Starthilfegerät
trennen. Warten Sie mindestens 30 Sekunden und versuchen Sie es erneut.
Wenn Sie Ihr Auto nach 2 Versuchen nicht gestartet haben, können Sie die ZwangsstartFunktion verwenden. Siehe
Schritt 3-b.
Schritt 3-b(wahlweise): ZwangsstartFunktion. Stellen Sie zunächst sicher, dass die Klemmen mit dem Batteriepol der
richtigen Polarität verbunden sind. Dann drücken und halten Sie die Zwangsstarttaste für 3 Sekunden. Wenn die
Anzeigeleuchte der Smart-Klemme grün leuchtet, müssen Sie das Fahrzeug innerhalb von 30 Sekunden starten.
Schritt 4: Sobald Ihr Auto gestartet ist, entfernen Sie die Batterieklemme aus der Autobatterie und der Starthilfe
innerhalb von 30 Sekunden.
DE
01 02 03 04 05 06 07 08 09 10 11 12 13 14
15 16 17 18 19 20
21 22 23
24 25 26 27 28 29 30 31 32
33 34 35 36 37 38 39 40 41 42
43 44 45 46 47 48 49 50
51 52 53 54 55 56 57
Das rote Licht leuchtet immer
mit langem Audioalarm
Das rote Licht blinkt mit einem
kurzen akustischen Alarm
Das rote Licht leuchtet immer mit
langem Audioalarm
Das rote Licht leuchtet immer mit
einem kurzen akustischen Alarm
DE
01 02 03 04 05 06 07 08 09 10 11 12 13 14
15 16 17 18 19 20 21
22 23
24 25 26 27 28 29 30 31 32
33 34 35 36 37 38 39 40 41 42
43 44 45 46 47 48 49 50
51 52 53 54 55 56 57
185*99*45mm
DE
01 02 03 04 05 06 07 08 09 10 11 12 13 14
15 16 17 18 19 20 21 22
23
24 25 26 27 28 29 30 31 32
33 34 35 36 37 38 39 40 41 42
43 44 45 46 47 48 49 50
51 52 53 54 55 56 57
Garantie
Wir bieten den Kunden eine Garantie von 24 Monaten ab Kaufdatum.
Kontaktieren Sie uns
Für Anfragen oder Kommentare zu unseren Produkten senden Sie bitte eine E-Mail an [email protected], und
wir werden Ihnen so schnell wie möglich antworten.
2
FR
01 02 03 04 05 06 07 08 09 10 11 12 13 14
15 16 17 18 19 20 21 22 23
24 25 26 27 28 29 30 31 32
33 34 35 36 37 38 39 40 41 42
43 44 45 46 47 48 49 50
51 52 53 54 55 56 57
1 x Adaptateur d'allume-cigarette EC-5
FR
01 02 03 04 05 06 07 08 09 10 11 12 13 14
15 16 17 18 19 20 21 22 23
24
25 26 27 28 29 30 31 32
33 34 35 36 37 38 39 40 41 42
43 44 45 46 47 48 49 50
51 52 53 54 55 56 57
FR
01 02 03 04 05 06 07 08 09 10 11 12 13 14
15 16 17 18 19 20 21 22 23
24 25
26 27 28 29 30 31 32
33 34 35 36 37 38 39 40 41 42
43 44 45 46 47 48 49 50
51 52 53 54 55 56 57
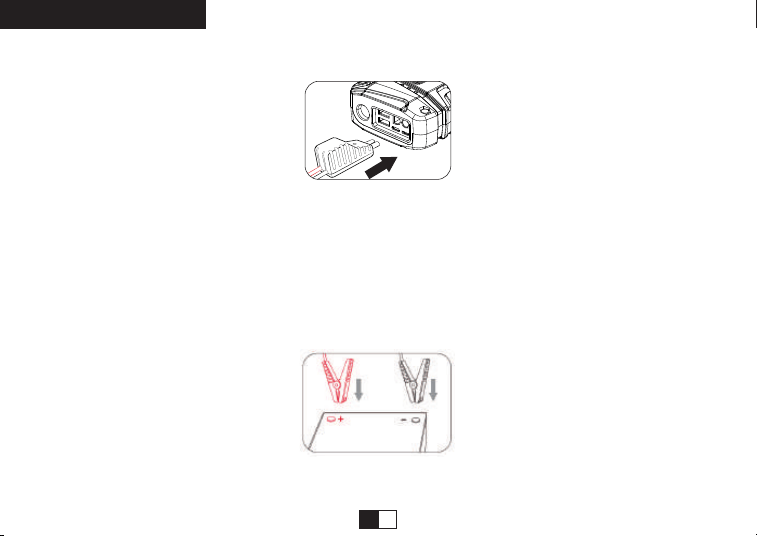
Port de Jump Starter Automatique Insérez la fiche dans le port de départ du saut
Vous devez appuyer sur ce bouton si la tension de la batterie de
la voiture est trop basse
13
Chargez le démarreur avec le type C câble
FR
01 02 03 04 05 06 07 08 09 10 11 12 13 14
15 16 17 18 19 20 21 22 23
24 25 26
27 28 29 30 31 32
33 34 35 36 37 38 39 40 41 42
43 44 45 46 47 48 49 50
51 52 53 54 55 56 57
3.Remarque: Avant d’utiliser le produit pour la première fois,
chargez ce périphérique portable pendant au moins 7 heures ou jusqu’à ce que les 4 voyants soient allumés.
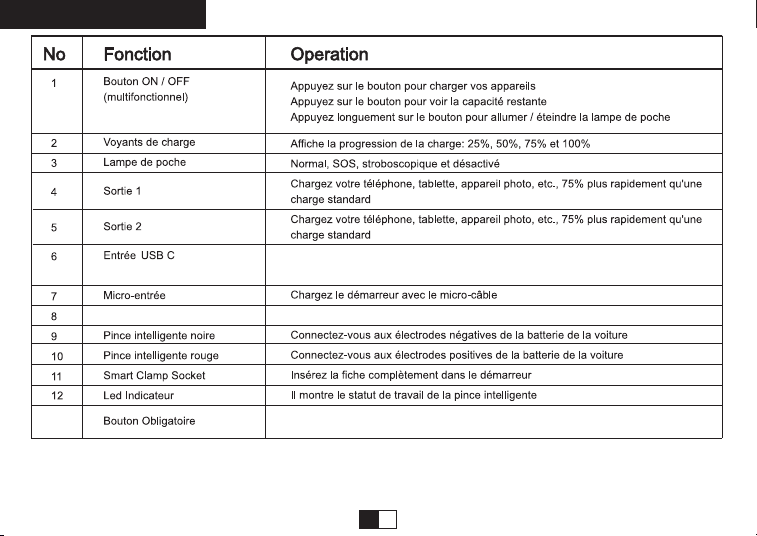
Appuyez sur le bouton ON / OFF pendant 3 secondes pour allumer / éteindre la lumière LED.
En mode lumière, appuyez brièvement sur le bouton pour commuter les modes entre SOS, stroboscope et éclairage.
allumés.
Remarque:
Ce produit est seulement pour la voiture 12V
Assurez-vous que 3 à 4 voyants sont allumés (le niveau de la batterie est supérieur à 50%) avant de l'utiliser pour
démarrer votre voiture.
FR
01 02 03 04 05 06 07 08 09 10 11 12 13 14
15 16 17 18 19 20 21 22 23
24 25 26 27
28 29 30 31 32
33 34 35 36 37 38 39 40 41 42
43 44 45 46 47 48 49 50
51 52 53 54 55 56 57
Éstape 1: Insérez la fiche de la pince de la batterie intelligente complètement dans le démarreur. Si les voyants vert et
rouge de la pince de la batterie clignotent alternativement, vous pouvez passer à l'étape suivante en toute sécurité.
Éstape 2: Connectez la pince rouge à la borne positive (+) de la batterie de la voiture et connectez la pince noire à la
borne négative (-) de la batterie de la voiture. Si les voyants vert et rouge de la pince de la batterie clignotent
alternativement, vous pouvez passer à l'étape suivante en toute sécurité.
Cependant, si le voyant rouge est allumés:
1) La pince de batterie peut être connectée en marche arrière. Si c'est le cas, vous devez débrancher le collier de la
batterie de voiture et le démarreur.
2) Ajuster les pinces pour un contact maximum avec les bornes de la batterie.

FR
01 02 03 04 05 06 07 08 09 10 11 12 13 14
15 16 17 18 19 20 21 22 23
24 25 26 27 28
29 30 31 32
33 34 35 36 37 38 39 40 41 42
43 44 45 46 47 48 49 50
51 52 53 54 55 56 57
Étape 3-a: Démarrer votre voiture
Si vous n'avez pas démarré votre voiture, vous devez déconnecter la pince de la batterie de voiture et du démarreur.
Attendez au moins 30 secondes, puis réessayez.
Si vous n'avez pas réussi à démarrer votre voiture après 2 fois d'essai, vous pouvez utiliser fonction de démarrage
forcé. Voir l'étape 3-b.
Étape 3-b (Optionnel): Forcer la fonction de démarrage.
Tout d'abord, assurez-vous que les pinces sont connectées à la polarité correcte de la pile. Ensuite, appuyez et
maintenez le bouton de démarrage forcé pendant 3 secondes. Lorsque le voyant de la pince intelligente est vert fixe,
vous devez démarrer la voiture dans les 30 secondes.
Bouton de démarrage forcé
Étape 4: Une fois votre voiture démarrée, retirez la pince de la batterie de voiture et la démarreur dans les 30
secondes.
FR
01 02 03 04 05 06 07 08 09 10 11 12 13 14
15 16 17 18 19 20 21 22 23
24 25 26 27 28 29
30 31 32
33 34 35 36 37 38 39 40 41 42
43 44 45 46 47 48 49 50
51 52 53 54 55 56 57
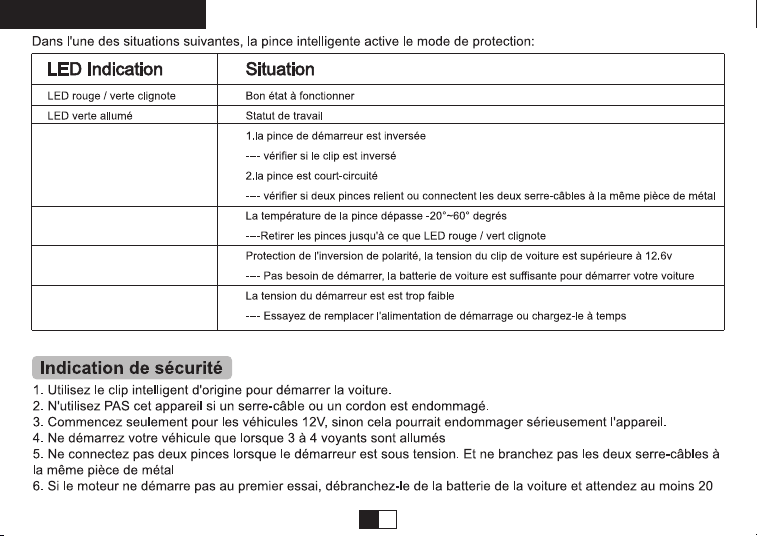
Le voyant rouge est toujours
allumé avec une longue
alarme audio
Le voyant rouge clignote avec
une courte alarme sonore
Le voyant rouge est toujours
allumé avec une longue alarme
audio
Le voyant rouge est toujours
allumé avec une alarme
audio courte
FR
01 02 03 04 05 06 07 08 09 10 11 12 13 14
15 16 17 18 19 20 21 22 23
24 25 26 27 28 29 30
31 32
33 34 35 36 37 38 39 40 41 42
43 44 45 46 47 48 49 50
51 52 53 54 55 56 57
185*99*45mm
FR
01 02 03 04 05 06 07 08 09 10 11 12 13 14
15 16 17 18 19 20 21 22 23
24 25 26 27 28 29 30 31
32
33 34 35 36 37 38 39 40 41 42
43 44 45 46 47 48 49 50
51 52 53 54 55 56 57
Grantie
Notre société fournit aux clients une garantie de 24 mois à compter de la date d'achat.
Contacter nous
Pour toute question ou commentaire concernant nos produits, veuillez envoyer un email à [email protected],
et nous vous répondrons dès que possible.
JP
01 02 03 04 05 06 07 08 09 10 11 12 13 14
15 16 17 18 19 20 21 22 23
24 25 26 27 28 29 30 31 32
33 34 35 36 37 38 39 40 41 42
43 44 45 46 47 48 49 50
51 52 53 54 55 56 57
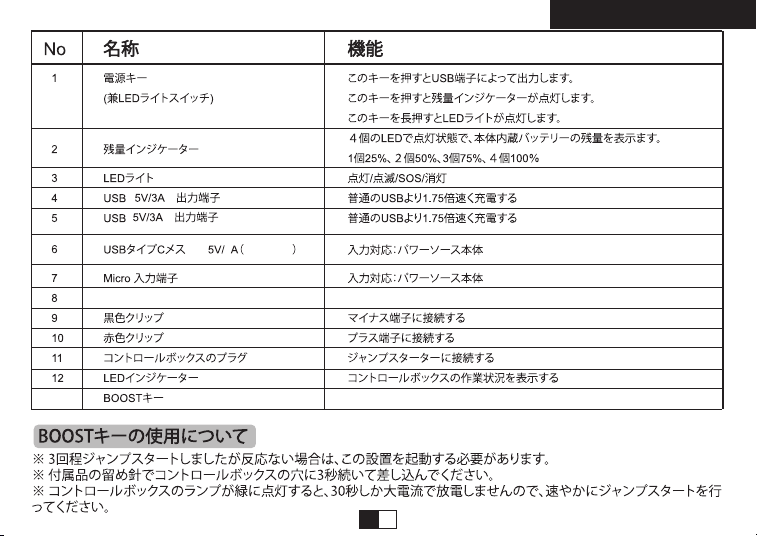
YR500
2 入力端子
JP
01 02 03 04 05 06 07 08 09 10 11 12 13 14
15 16 17 18 19 20 21 22 23
24 25 26 27 28 29 30 31 32
33
34 35 36 37 38 39 40 41 42
43 44 45 46 47 48 49 50
51 52 53 54 55 56 57
JP
01 02 03 04 05 06 07 08 09 10 11 12 13 14
15 16 17 18 19 20 21 22 23
24 25 26 27 28 29 30 31 32
33 34
35 36 37 38 39 40 41 42
43 44 45 46 47 48 49 50
51 52 53 54 55 56 57
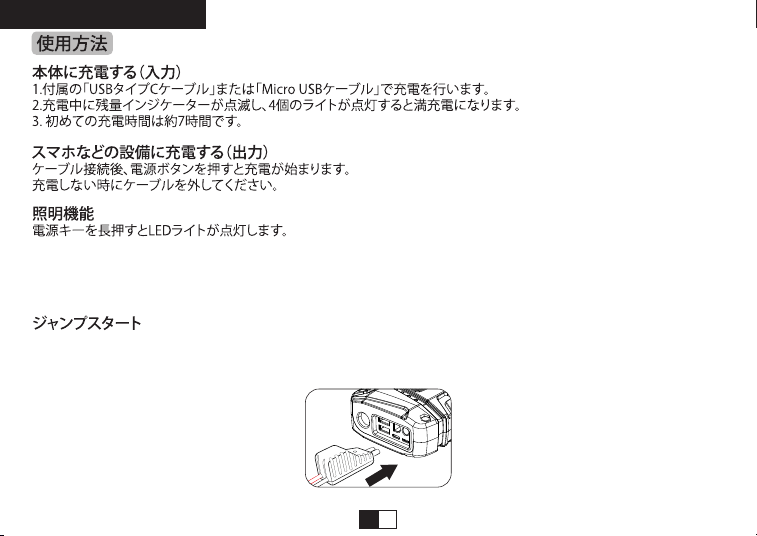
ジャンプポートジャンパーケーブルを本体のジャンプポートに差込みます
車のバッテリー電圧が低すぎる場合は、このボタンを押す必要です
13
2 入力端子
JP
01 02 03 04 05 06 07 08 09 10 11 12 13 14
15 16 17 18 19 20 21 22 23
24 25 26 27 28 29 30 31 32
33 34 35
36 37 38 39 40 41 42
43 44 45 46 47 48 49 50
51 52 53 54 55 56 57
電源キーを短くすると「点滅/SOS/点灯」の順より、三つのモートで切り替えます。電源キーを長押しすると、
LEDライトは消灯になります。
ステップ1 スマートバッテリクランプのプラグを完全にジャンプスタータに挿入します。バッテリクランプの緑色と赤色
のランプが交互に点滅していると、次の手順に進んでください。
JP
01 02 03 04 05 06 07 08 09 10 11 12 13 14
15 16 17 18 19 20 21 22 23
24 25 26 27 28 29 30 31 32
33 34 35 36
37 38 39 40 41 42
43 44 45 46 47 48 49 50
51 52 53 54 55 56 57
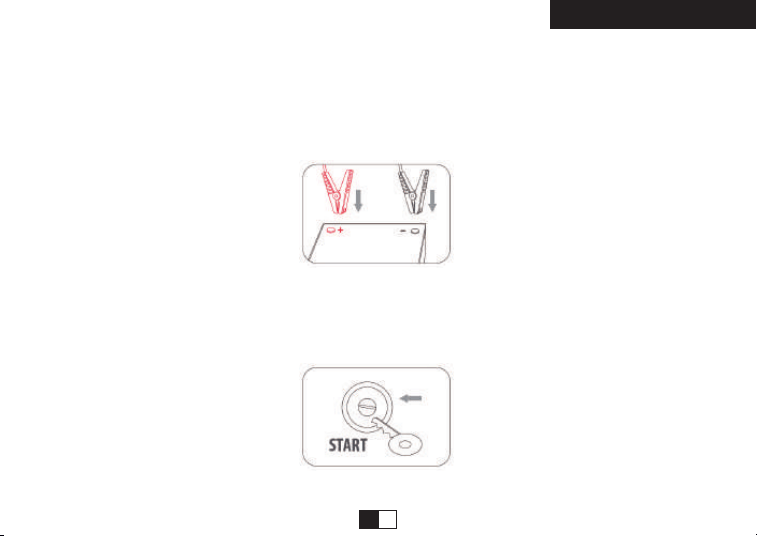
ステップ2:赤クランプを車のバッテリのプラス端子、黒クランプを車のバッテリのマイナス端子に接続します。バッテリクラ
ンプの緑色と赤色のランプが交互に点滅していると、次の手順に進んでください。
ただし、赤色表示灯が点灯する場合:
1 バッテリクランプが逆に接続されている可能性があります。この場合、バッテリクランプを車両とジャンプスタータから
外してください。
2 バッテリ端子と最大限接触するようにクランプを調整します。
ステップ3-A:車を始動する
車の始動に失敗した場合は、バッテリクランプを車両とジャンプスタータから外してください。30秒以上待ってからもう一
度お試してください。
2回お試ししても失敗した場合、強制始動機能をお試してください。
詳細はステップ3-Bを参照してください。
JP
01 02 03 04 05 06 07 08 09 10 11 12 13 14
15 16 17 18 19 20 21 22 23
24 25 26 27 28 29 30 31 32
33 34 35 36 37
38 39 40 41 42
43 44 45 46 47 48 49 50
51 52 53 54 55 56 57
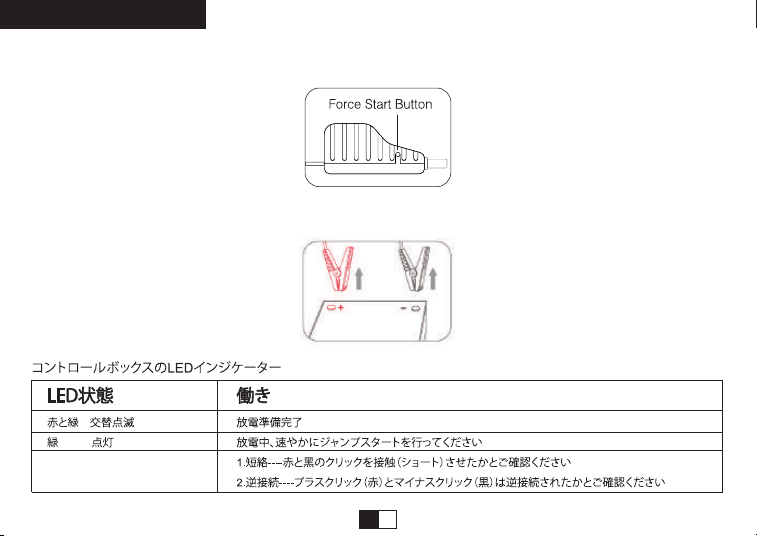
ステップ3-B(オプション):、強制始動機能。まず、クランプとバッテリの極性が正しく接続されていることを確認してくださ
い。次に、小さいピン(パッケージに同梱)で強制始動ボタンを3秒間押し続けます。スマートクランプの表示灯が緑色点灯
すると、30秒以内に車を始動させてください。
ステップ4:車が始動したら、30秒以内に車のバッテリとジャンプスタータからバッテリクランプを取り外してください。
LED赤点灯長警告音
JP
01 02 03 04 05 06 07 08 09 10 11 12 13 14
15 16 17 18 19 20 21 22 23
24 25 26 27 28 29 30 31 32
33 34 35 36 37 38
39 40 41 42
43 44 45 46 47 48 49 50
51 52 53 54 55 56 57
185*99*45mm
640g
赤LED点滅短警告音
LED赤点灯長警告音
LED赤点灯短警告音
JP
01 02 03 04 05 06 07 08 09 10 11 12 13 14
15 16 17 18 19 20 21 22 23
24 25 26 27 28 29 30 31 32
33 34 35 36 37 38 39
40 41 42
43 44 45 46 47 48 49 50
51 52 53 54 55 56 57
JP
01 02 03 04 05 06 07 08 09 10 11 12 13 14
15 16 17 18 19 20 21 22 23
24 25 26 27 28 29 30 31 32
33 34 35 36 37 38 39 40
41 42
43 44 45 46 47 48 49 50
51 52 53 54 55 56 57
JP
01 02 03 04 05 06 07 08 09 10 11 12 13 14
15 16 17 18 19 20 21 22 23
24 25 26 27 28 29 30 31 32
33 34 35 36 37 38 39 40 41
42
43 44 45 46 47 48 49 50
51 52 53 54 55 56 57
製品保証
保証期間は、お買上げ日より24ヶ月となります。
お問い合わせ
弊社製品に関するお問い合わせやご意見については、
までご連絡お願います。なるべく速やかにご対応いたします。
IT
01 02 03 04 05 06 07 08 09 10 11 12 13 14
15 16 17 18 19 20 21 22 23
24 25 26 27 28 29 30 31 32
33 34 35 36 37 38 39 40 41 42
43 44 45 46 47 48 49 50
51 52 53 54 55 56 57
1x Adattatore per accendisigari EC-5
IT
01 02 03 04 05 06 07 08 09 10 11 12 13 14
15 16 17 18 19 20 21 22 23
24 25 26 27 28 29 30 31 32
33 34 35 36 37 38 39 40 41 42
43
44 45 46 47 48 49 50
51 52 53 54 55 56 57

IT
01 02 03 04 05 06 07 08 09 10 11 12 13 14
15 16 17 18 19 20 21 22 23
24 25 26 27 28 29 30 31 32
33 34 35 36 37 38 39 40 41 42
43 44
45 46 47 48 49 50
51 52 53 54 55 56 57
3. Nota: prima di utilizzare il dispositivo per la prima volta, caricare lo starter automatico per almeno 7 ore.
Quando pieno di energia elettrica mostra quattro luci sono tutte accese.
sono tutte accese
Porta di avviazione auto Inserire la spina nella porta di avvio del salto
Ènecessario premere questo pulsante se la tensione della
batteria dell'auto è troppo bassa
13
Carica il dispocitivo con il cavo tipo C
IT
01 02 03 04 05 06 07 08 09 10 11 12 13 14
15 16 17 18 19 20 21 22 23
24 25 26 27 28 29 30 31 32
33 34 35 36 37 38 39 40 41 42
43 44 45
46 47 48 49 50
51 52 53 54 55 56 57
Modalita LED
Premere il tasto ON/OFF per 3 secondi per accendere/spegnere la luce LED In modalita luce, premere il tasto per
cambiare modalita di illuminazione: SOS, torcia e accesa
Nota:
Questo prodotto è solo per auto a 12V
Controllare che le spie da 3 a 4 siano accese (il livello della batteria è superiore al 50%) prima di utilizzarlo per avviare la
propria automobile.
Passo 1: Inserire completamente la spina della pinza della batteria intelligente nell’avviatore auto. Se gli indicatori di luce
verde e rossa sulla pinza della batteria lampeggiano alternativamente, si è sicuri di passare alla fase successiva.
Passo 2: Connettere la pinza rossa al polo positivo(+) della batteria dell’auto e collegare la pinza nera al polo negativo(-)
della batteria dell’auto. Se gli indicatori di luce verde e rossa sul morsetto della batteria lampeggiano alternativamente, si
è sicuri di passare alla fase successiva.
Tuttavia, se la spia rossa è accesa:
1)II morsetto della batteria può essere collegato al contrario. In tal caso, è necessario scollegare il morsetto della batteria
IT
01 02 03 04 05 06 07 08 09 10 11 12 13 14
15 16 17 18 19 20 21 22 23
24 25 26 27 28 29 30 31 32
33 34 35 36 37 38 39 40 41 42
43 44 45 46
47 48 49 50
51 52 53 54 55 56 57
dal veicolo e dal dispositivo di avviatore auto.
2)Regolare i morsetti per il massimo contatto con i terminali della batteria.
Passo 3-a: Avviare I’Auto.
Se non si è riusciti ad avviare I’auto, è necessario scollegare il morsetto della batteria dal veicolo e dal dispositivo di
avviatore auto. Attendere almeno 30 secondi, quindi riprovare.
Se non si riesce ad avviare I’auto dopo 2 tentativi, è possibile utilizzare la funzione di riavvio forzato. Vedi il passo 3-b.
Passo 3-b (opzionale): Funzione di riavvio forzato. Innanzitutto assicurarsi che i morsetti siano collegati al corretto
morsetto del polo della batteria. Quindi, premere e tenere premuto il pulsante di riavvio forzato per 3 secondi. Quando la
spia della pinza intelligente è verde fissa, è necessario avviare il veicolo entro 30 secondi.
IT
01 02 03 04 05 06 07 08 09 10 11 12 13 14
15 16 17 18 19 20 21 22 23
24 25 26 27 28 29 30 31 32
33 34 35 36 37 38 39 40 41 42
43 44 45 46 47
48 49 50
51 52 53 54 55 56 57
Passo 4: Una volta che I’auto è stata avviata, rimuovere la pinza della batteria dalla batteria dell’auto e dall’avviatore auto
entro 30 secondi.
La luce rossa è sempre accesa
con un lungo allarme
acustico
La luce rossa lampeggia con un
breve allarme acustico
La luce rossa è sempre accesa
con un lungo allarme acustico
La luce rossa si accende sempre
con un breve allarme acustico
IT
01 02 03 04 05 06 07 08 09 10 11 12 13 14
15 16 17 18 19 20 21 22 23
24 25 26 27 28 29 30 31 32
33 34 35 36 37 38 39 40 41 42
43 44 45 46 47 48
49 50
51 52 53 54 55 56 57
185*99*45mm
IT
01 02 03 04 05 06 07 08 09 10 11 12 13 14
15 16 17 18 19 20 21 22 23
24 25 26 27 28 29 30 31 32
33 34 35 36 37 38 39 40 41 42
43 44 45 46 47 48 49
50
51 52 53 54 55 56 57
Garanzia
La nostra azienda offre ai clienti una garanzia di 24 mesi dalla data di acquisto.
Contattaci
Per qualsiasi domanda o commento riguardante i nostri prodotti, si prega di inviare una mail a [email protected], e
risponderemo al più presto possibile.
ES
01 02 03 04 05 06 07 08 09 10 11 12 13 14
15 16 17 18 19 20 21 22 23
24 25 26 27 28 29 30 31 32
33 34 35 36 37 38 39 40 41 42
43 44 45 46 47 48 49 50
51 52 53 54 55 56 57
1 x Adaptador para encendedor
de cigarrillos EC-5
ES
01 02 03 04 05 06 07 08 09 10 11 12 13 14
15 16 17 18 19 20 21 22 23
24 25 26 27 28 29 30 31 32
33 34 35 36 37 38 39 40 41 42
43 44 45 46 47 48 49 50
51
52 53 54 55 56 57
Puerto de arrancar Inserte el enchufe en el puerto de arrancar
Debería presionar este botón si el voltaje de la batería del coche es demasiado bajo13
E
Para cargar el arrancador de coche con un cable type C
ES
01 02 03 04 05 06 07 08 09 10 11 12 13 14
15 16 17 18 19 20 21 22 23
24 25 26 27 28 29 30 31 32
33 34 35 36 37 38 39 40 41 42
43 44 45 46 47 48 49 50
51 52
53 54 55 56 57
3.Nota: antes de usar el dispositivo por primera vez, cargue el arranque automático durante al menos 7 horas.
Cuando está lleno de electricidad, aparecen cuatro luces encendidas.
Modo LED
Presione el botón de ENCENDIDO / APAGADO durante 3 segundos para encender o apagar la luz LED. En el modo
de luz, presione el botón para cambiar Modo de iluminación: SOS, linterna e iluminado
encendidas.
Nota:
》Este producto es solo para vehículos de 12V
》Verifique que 3 o 4 luces indicadores estén encendidas (el nivel de la batería está por encima del 50%) antes de
usarlo para arrancar su automóvil.
Paso 1: Inserte el enchufe de la abrazadera de batería inteligente por completo en el arrancador de coche. Si los
indicadores de luz verde y roja en la pinza de la batería parpadean alternativamente, puede pasar al siguiente paso.
ES
01 02 03 04 05 06 07 08 09 10 11 12 13 14
15 16 17 18 19 20 21 22 23
24 25 26 27 28 29 30 31 32
33 34 35 36 37 38 39 40 41 42
43 44 45 46 47 48 49 50
51 52 53
54 55 56 57
Paso 2: Conecte la abrazadera roja al terminal positivo (+) de la batería del automóvil y conecte la abrazadera negra al
terminal negativo (-) de la batería del automóvil. Si los indicadores de luz verde y roja en la pinza de la batería parpadean
alternativamente, puede pasar al siguiente paso.
Sin embargo, si la luz indicadora roja está encendida:
1)La abrazadera de la batería puede estar conectada en reversa. Si es así, debe desconectar la abrazadera de la batería
del vehículo y el arrancador de coche.
2)Ajuste las abrazaderas para un máximo contacto con los terminales de la batería.
Paso 3-a: Arrancar su automóvil.
》Si no pudo arrancar su automóvil, debe desconectar la abrazadera de la batería del vehículo y del arrancador de
coche. Espere al menos 30 segundos, luego inténtelo de nuevo.
》Si no pudo arrancar su automóvil después de 2 intentos, puede usar la función de inicio forzado. Vea el paso 3-b.
ES
01 02 03 04 05 06 07 08 09 10 11 12 13 14
15 16 17 18 19 20 21 22 23
24 25 26 27 28 29 30 31 32
33 34 35 36 37 38 39 40 41 42
43 44 45 46 47 48 49 50
51 52 53 54
55 56 57
Paso 3-b (opcional): La función de inicio forzado. Primero, asegúrese de que las abrazaderas estén conectadas al
terminal de la batería de polaridad correcta. Luego, mantenga presionado el botón de inicio de fuerza con el pequeño
alfiler (incluido en el paquete) durante 3 segundos. Cuando la luz indicadora de la abrazadera inteligente es de color
verde sólido, debe encender el vehículo dentro de los 30 segundos.
Paso 4: Una vez que haya arrancado su automóvil, retire la abrazadera de la batería del automóvil y el arrancador en 30
segundos.
ES
01 02 03 04 05 06 07 08 09 10 11 12 13 14
15 16 17 18 19 20 21 22 23
24 25 26 27 28 29 30 31 32
33 34 35 36 37 38 39 40 41 42
43 44 45 46 47 48 49 50
51 52 53 54 55
56 57
La luz roja está siempre encendida
con una alarma de audio larga
La luz roja parpadea con una alarma
de audio corta
La luz roja está siempre encendida
con una alarma de audio larga
La luz roja siempre está encendida
con una alarma de audio corta
ES
01 02 03 04 05 06 07 08 09 10 11 12 13 14
15 16 17 18 19 20 21 22 23
24 25 26 27 28 29 30 31 32
33 34 35 36 37 38 39 40 41 42
43 44 45 46 47 48 49 50
51 52 53 54 55 56
57
Garantía
Nuestra empresa ofrece a los clientes una garantía de 24 meses a partir de la fecha de compra.
Contáctenos
Para cualquier consulta o comentario sobre nuestros productos, envíe un correo electrónico a [email protected],
y le responderemos lo antes posible.
185*99*45mm
Específico

01 02 03 04 05 06 07 08 09 10 11 12 13 14
15 16 17 18 19 20 21 22 23
24 25 26 27 28 29 30 31 32
33 34 35 36 37 38 39 40 41 42
43 44 45 46 47 48 49 50
51 52 53 54 55 56 57