SKYTOWER 360°
SMART
Luftkühler
Air Cooler
Enfriador de aire
Rafraîchisseur d’air
Rareddatore d’aria
www.klarstein.com
10035818

3
DE
Sehr geehrter Kunde,
wir gratulieren Ihnen zum Erwerb Ihres Gerätes. Lesen Sie
die folgenden Hinweise sorgfältig durch und befolgen Sie
diese, um möglichen Schäden vorzubeugen. Für Schäden,
die durch Missachtung der Hinweise und unsachgemäßen
Gebrauch entstehen, übernehmen wir keine Haftung. Scannen
Sie den folgenden QR-Code, um Zugriff auf die aktuellste
Bedienungsanleitung und weitere Informationen rund um das
Produkt zu erhalten.
INHALTSVERZEICHNIS
Sicherheitshinweise4
Geräteübersicht6
Zubehör7
Bedienfeld und Fernbedienung8
Displayanzeigen9
Inbetriebnahme und Bedienung10
Gerätesteuerung per Smartphone15
Schutzfunktionen16
Wassertank befüllen17
Reinigung und Pege18
Spezielle Entsorgungshinweise für Verbraucher in Deutschland20
Hinweise zur Entsorgung22
Konformitätserklärung22
TECHNISCHE DATEN
Artikelnummer 10035818
Stromversorgung 220-240 V ~ 50 Hz
Leistung 60 W
Fassungsvermögen des Wassertanks 6 Liter
Luftvolumen 450 m
3
/h
Verdampfungsvolumen 950 ml/h
Geräuschpegel ≤ 55 dB
WiFi-Standard
802.11 b/g/n
WiFi-Frequenz
2,4 GHz
WiFi-Sendeleistung (max.)
20 dBm
English 23
Français 41
Español 59
taliano 77

4
DE
SICHERHEITSHINWEISE
• Prüfen Sie vor der Benutzung die Spannungsangabe auf dem Typenschild.
Schließen Sie das Gerät nur an Steckdosen an, die der Spannung des Geräts
entsprechen.
• Halten Sie das Kabel fern von heißen Oberächen und scharfkantigen
Gegenständen.
• Verlegen Sie das Kabel nicht unter einem Teppich und decken Sie es auch nicht mit
anderen Gegenständen oder Stoffen ab. Verlegen Sie das Kabel so, dass keiner
darüber fällt oder daran hängen bleibt.
• Benutzen Sie das Gerät nicht, wenn das Netzkabel oder der Stecker beschädigt
sind.
• Falls das Netzkabel oder der Stecker beschädigt sind, müssen sie vom Hersteller,
einem autorisierten Fachbetrieb oder einer ähnlich qualizierten Person ersetzt
werden.
• Benutzen Sie das Gerät nur in Innenräumen.
• Decken Sie das Gerät nicht ab.
• Stellen Sie das Gerät auf einen ebenen, stabilen Untergrund. Achten Sie darauf,
dass das Gerät gerade steht.
• Versichern Sie sich, dass das Gerät ausgeschaltet ist, bevor Sie den Stecker in die
Steckdose stecken.
• Bedienen Sie das Gerät nicht mit nassen Händen und fassen Sie auch den Stecker
und das Kabel nicht mit nassen Händen an.
• Lassen Sie das Gerät während des Betriebs nicht unbeaufsichtigt. Schalten Sie es
aus und ziehen Sie den Stecker, wenn Sie es nicht benutzen.
• Ziehen Sie den Stecker aus der Steckdose, bevor Sie das Gerät reinigen oder
warten.
• Ziehen Sie den Stecker nicht am Kabel aus der Steckdose, sondern halten Sie ihn
beim Abziehen mit der Hand fest.
• Kinder ab 8 Jahren, psychisch, sensorisch und körperlich eingeschränkte Menschen
dürfen das Gerät nur benutzen, wenn sie vorher von einer für sie verantwortlichen
Aufsichtsperson ausführlich mit den Funktionen und den Sicherheitsvorkehrungen
vertraut gemacht wurden und die damit verbundenen Risiken verstehen.
• Benutzen Sie das Gerät nur so, wie in dieser Anleitung beschrieben.
• Stecken Sie nicht Ihre Finger oder Gegenstände in die Lüftungsöffnungen.
• Stellen Sie das Gerät nicht in die Nähe von Vorhängen, Gardinen, Tischdecken
oder ähnlichen Textilien. Sie könnten in den Lüfter gezogen werden und diesen
beschädigen.
• Benutzen Sie das Gerät nicht in Feuchträumen wie Badezimmern.
• Benutzen Sie das Gerät nicht, bevor die Räder montiert sind oder wenn es auf der
Seite liegt.
• Wickeln Sie das Kabel vor dem Gebrauch komplett ab.

5
DE
• Während des Betriebs befeuchtet das Gerät die Umgebungsluft. Vermeiden Sie
jedoch zu hohe Luftfeuchtigkeit. Wir empfehlen Ihnen eine Luftfeuchtigkeit zwischen
40-50%. Zu hohe Luftfeuchtigkeit kann zu Schimmel oder gesundheitlichen
Problemen führen.
• Stellen Sie das Gerät nur auf Untergründe, die unempndlich gegenüber Nässe
und hoher Luftfeuchtigkeit sind. Es kann immer mal vorkommen, dass beim Ein- und
Ausbau des Wassertanks ein paar Tropfen danebengehen. Sollte das der Fall sein,
wischen Sie die Wassertropfen umgehend weg.
• Wechseln Sie das Wasser im Tank spätestens nach 3 Tagen.
PRODUKTEIGENSCHAFTEN
• Ein-/Ausschalten: Separate EIN/AUS-Taste
• Ventilatorgeschwindigkeit: 3 Geschwindigkeitsstufen: Niedrig, Mittel und Hoch
• Windmodi: Normal, Natürlicher Wind und Schlaf-Wind
• Windrichtung: Automatisches Schwingen der horizontalen und vertikalen
Lüftungsschlitze
• Zeit bis zum automatischen Ausschalten: 1-9 Stunden-Timer ohne Akkumulation
(Timertoleranz im 3%-Bereich).
• Wasserpumpe zur Kühlung/Luftbefeuchtung
• Steuerung über Drucktasten
• „Trockener Wind“-Funktion und automatisches Dimmen der LED-Beleuchtung, wenn
innerhalb von einer Minute keine Taste gedrückt wird
• Fernbedienungsfunktion (Reichweite von mindestens 6 Metern)
• Einfach zu reinigender Wassertank
• Sprühwasserzirkulationskältetechnik, mit hoher Wasserzirkulation und schnellerer
Kühlung
6
DE
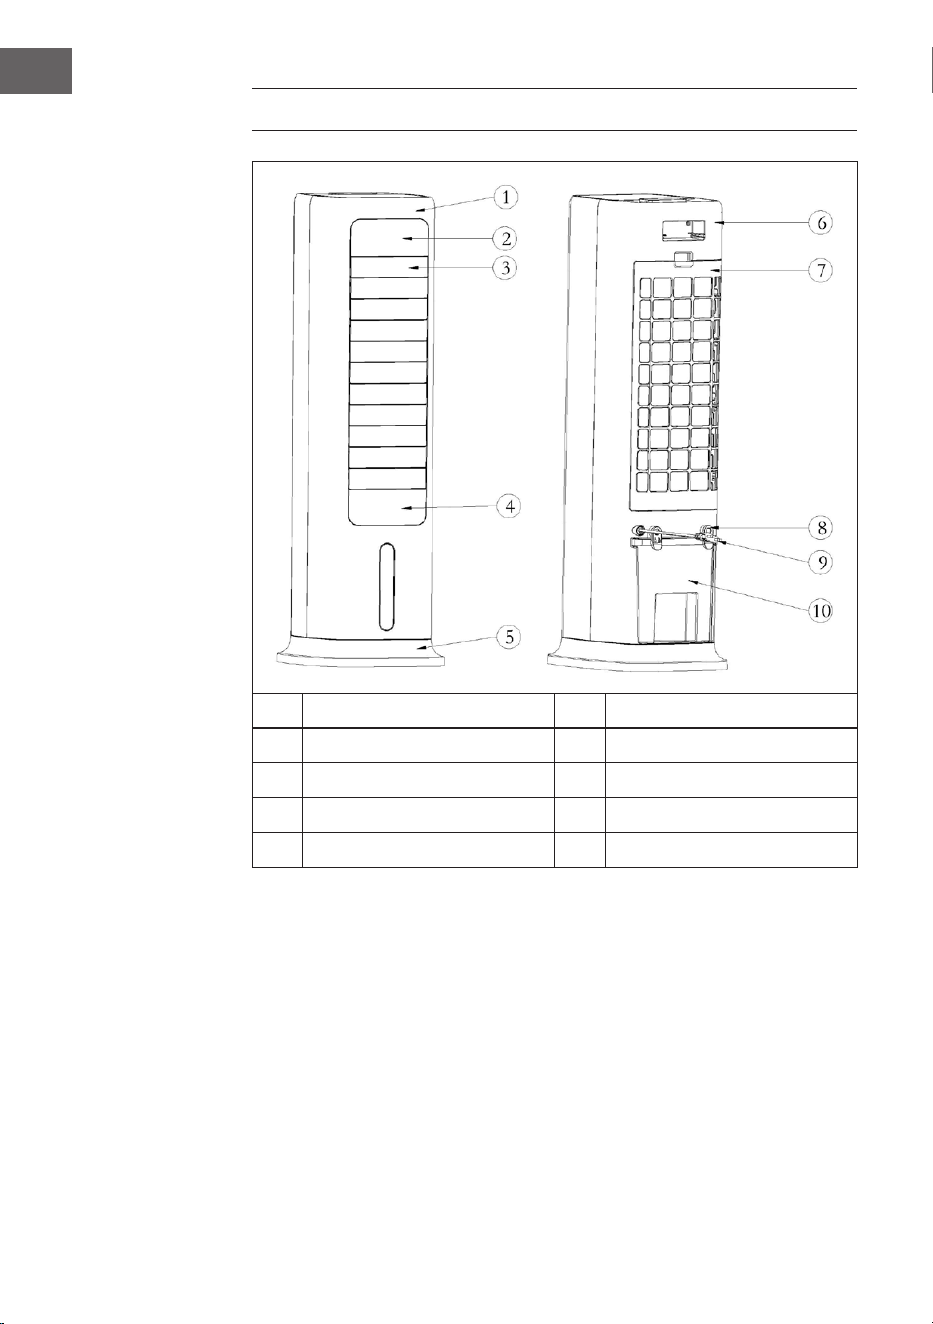
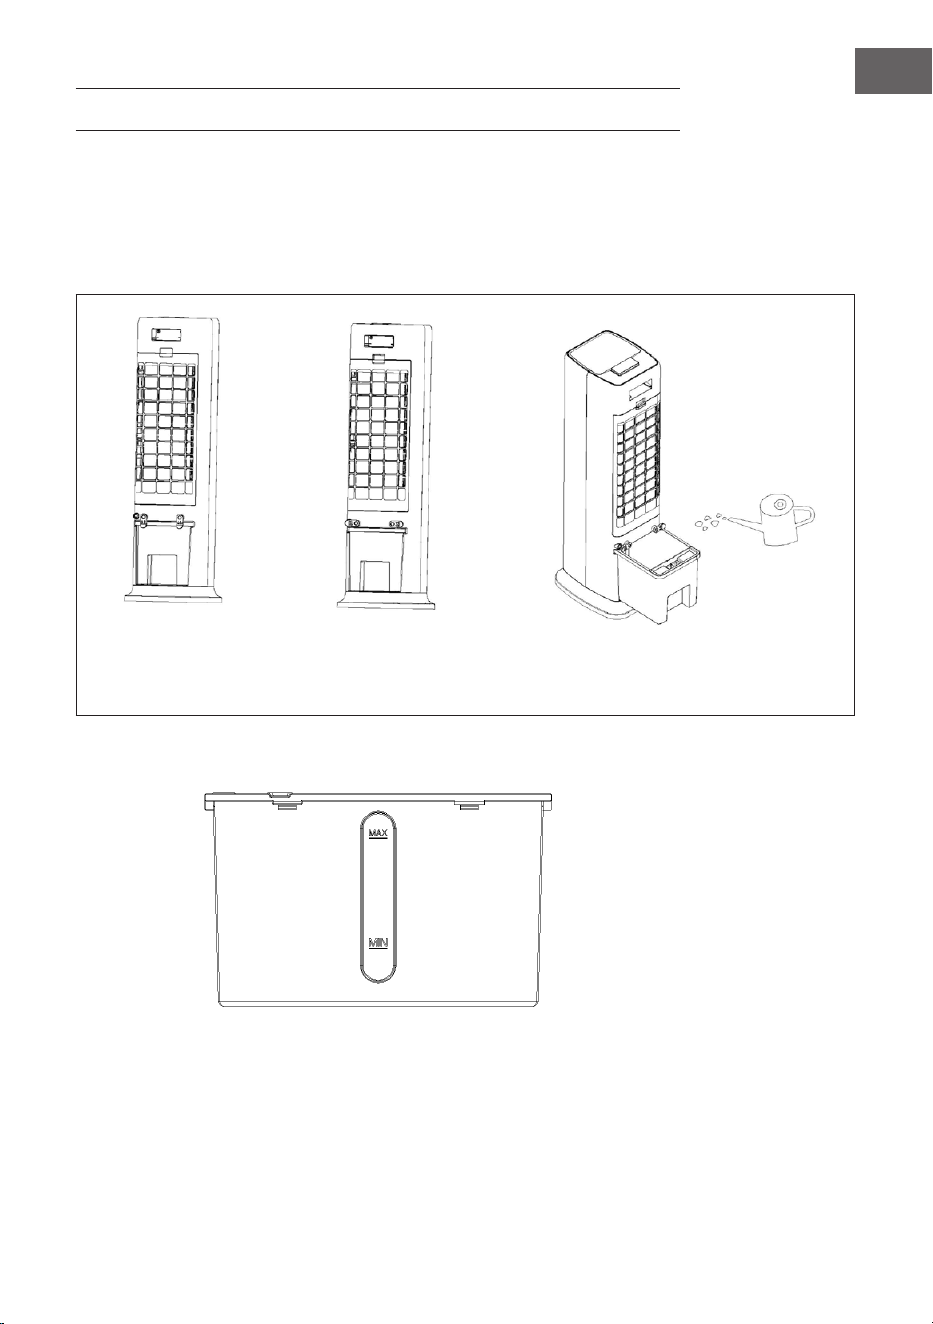
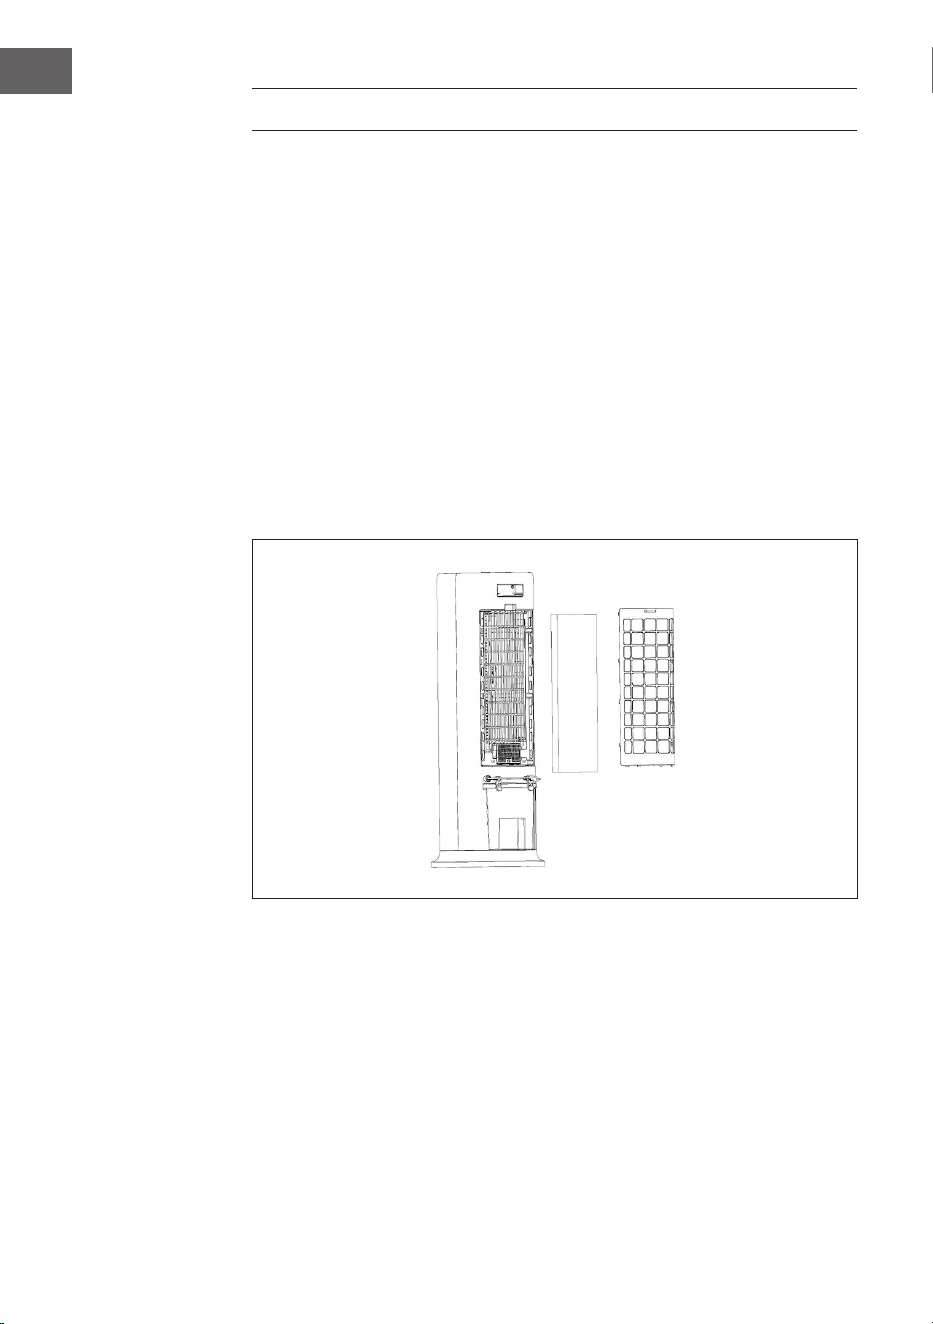
GERÄTEÜBERSICHT
1
Vorderes Gehäuse
6
Hinteres Gehäuse
2
Bedienfeld
7
Hinteres Lüftungsgitter
3
Horizontale Lüftungsschlitze
8
Kabelaufwickelung
4
Dekorative Abdeckung
9
Netzkabel
5
Gerätebasis
10
Wassertank
Hinweis zur Benutzung des Wassertanks
Prinzipiell können Sie Ihren Luftkühler jederzeit ohne Wasser im Tank nutzen. Er
funktioniert dann wie ein ganz normaler Ventilator. Wasser im Tank wird nur für die
Kühl-Funktion benötigt. Der Luftkühler verdunstet dieses über das Vernebleries, dabei
wird der Luft Wärme entzogen und die Lufttemperatur des Ventilators, je nach Kälte des
verwendeten Wassers, um bis zu 3 °C verringert. Wir raten davon ab, die Kühlfunktion
an Tagen mit besonders hoher Luftfeuchtigkeit zu nutzen, da sie diese zusätzlich erhöht
und so zu Kreislaufbeschwerden beitragen kann.
7
DE
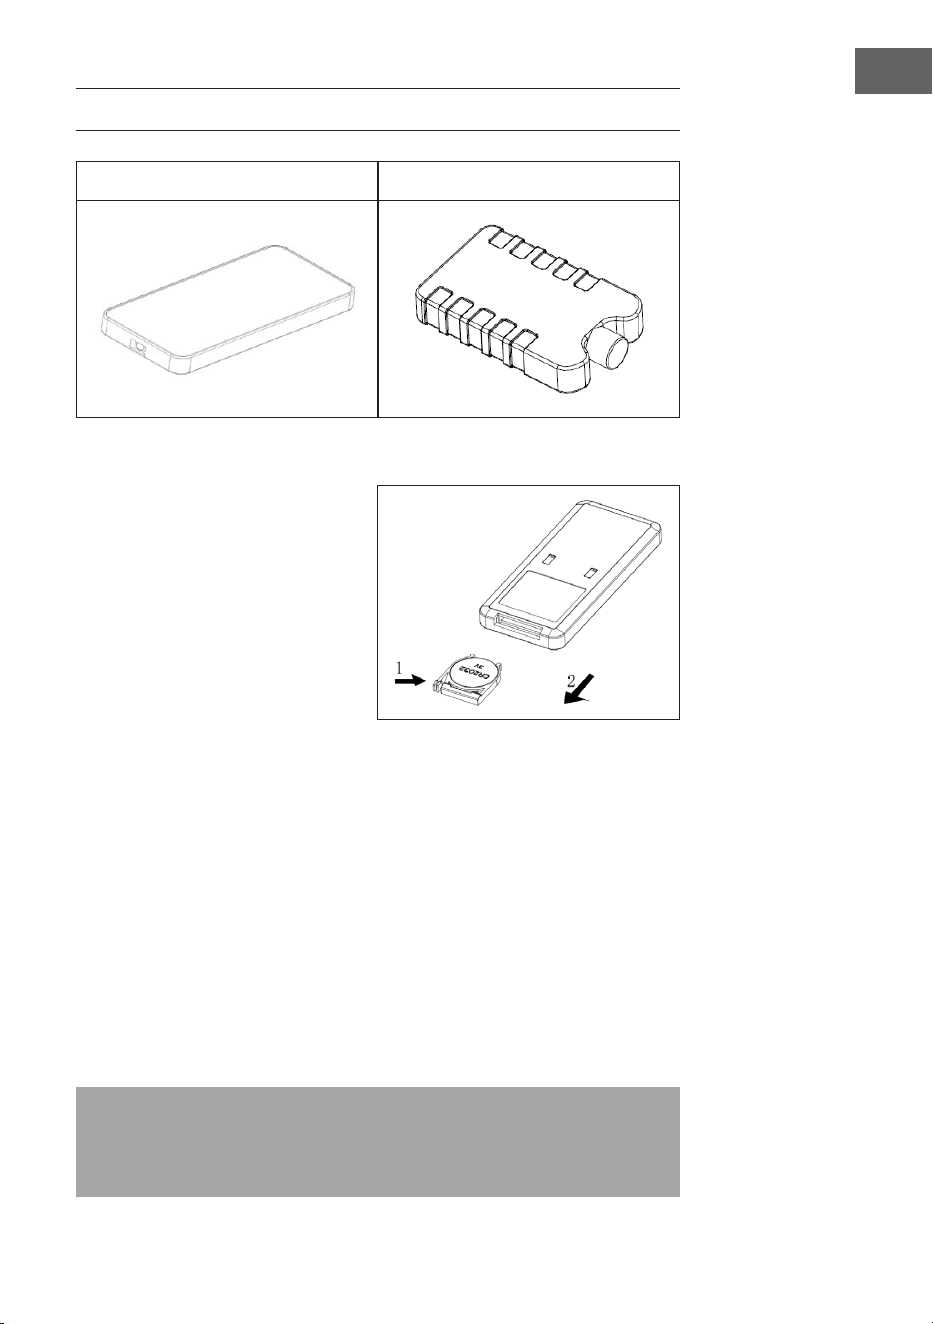
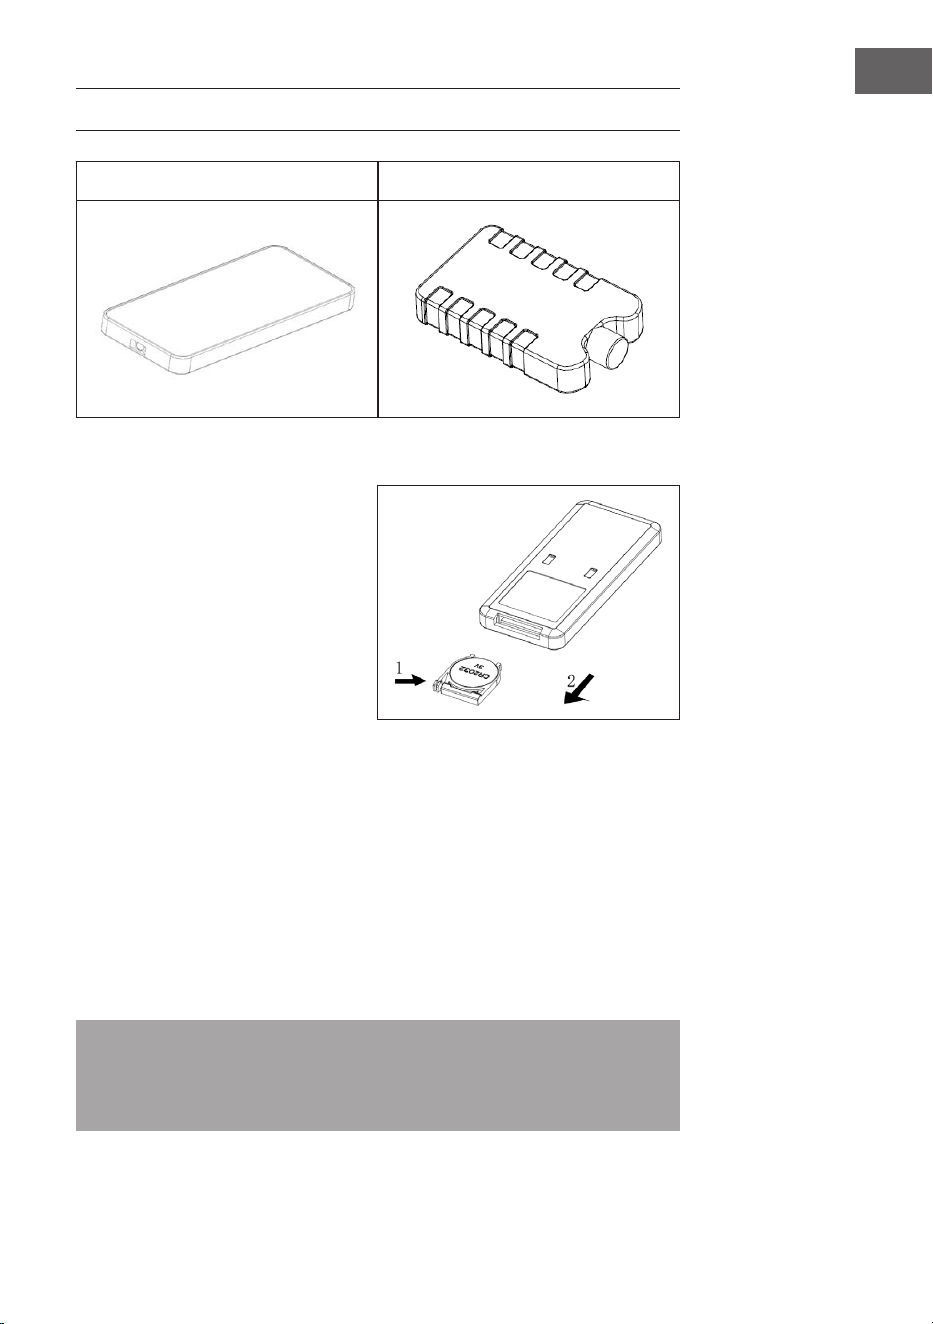
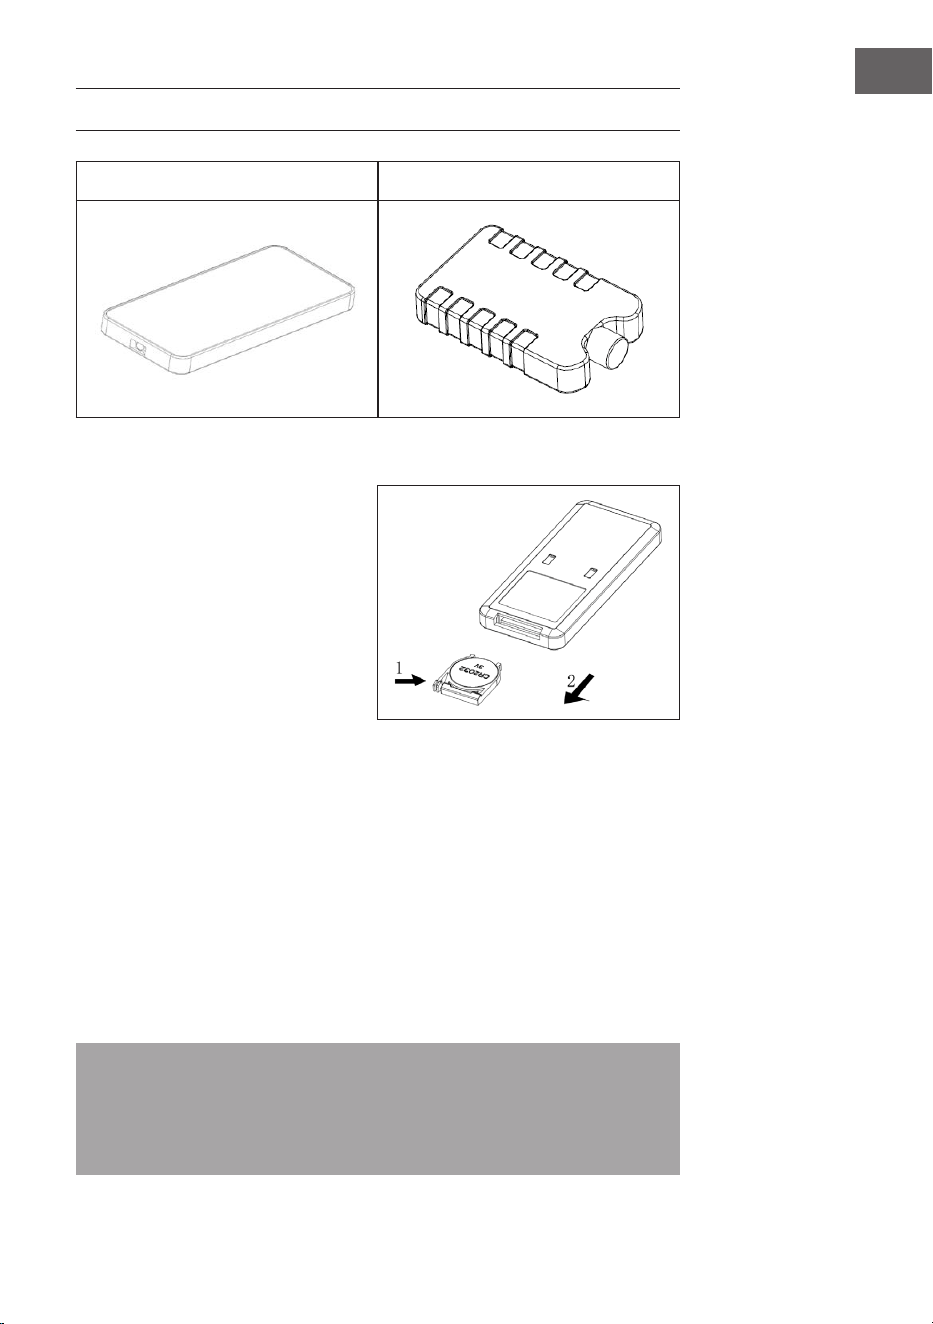
ZUBEHÖR
Fernbedienung Eisbehälter
Verwendung der Fernbedienung
1. Öffnen Sie das Batteriefach der
Fernbedienung und legen Sie eine
3 V CR2032 Batterie ein. Drücken
Sie zum Öffnen des Batteriefachs
die Abdeckung in Pfeilrichtung
(1) herunter und ziehen Sie das
Batteriefach in Pfeilrichtung (2)
heraus.
2. Richten Sie die Fernbedienung
während der Verwendung auf den
Receiver.
3. Ersetzen Sie leere Batterien. Achten Sie beim Einlegen der neuen Batterie auf die
richtige Polarität (+/-). Setzen Sie das Batteriefach anschließend wieder in die
Fernbedienung ein.
Verwendung des Eisbehälters
1. Legen Sie den Eisbehälter so lange in das Gefrierfach, bis dieser vollständig
gefroren ist.
2. Legen Sie den Eisbehälter in den Wassertank des Geräts. Innerhalb von 10min
nach dem Einlegen des Eisbehälters wird die Temperatur im Wassertank unter
Umgebungstemperatur gesenkt.
3. Im Lieferumfang sind zwei Eisbehälter enthalten. Verwenden Sie diese
abwechselnd.
4. Es ist verboten, die Abdeckung der Eisbehälter zu öffnen. Schlucken Sie niemals
den Inhalt der Eisbehälter.
Hinweis: Mit speziellen Kühlspeicher- und Isolierungseigenschaften kann der
Eisbehälter die Wärme im Wasser langsam absorbieren, um die Temperatur im
Wassertank stundenlang unter der Umgebungstemperatur zu halten. Dadurch wird
ein angenehmerer und kühlerer Wind durch den Ventilator der Klimaanlage erzeugt.

8
DE
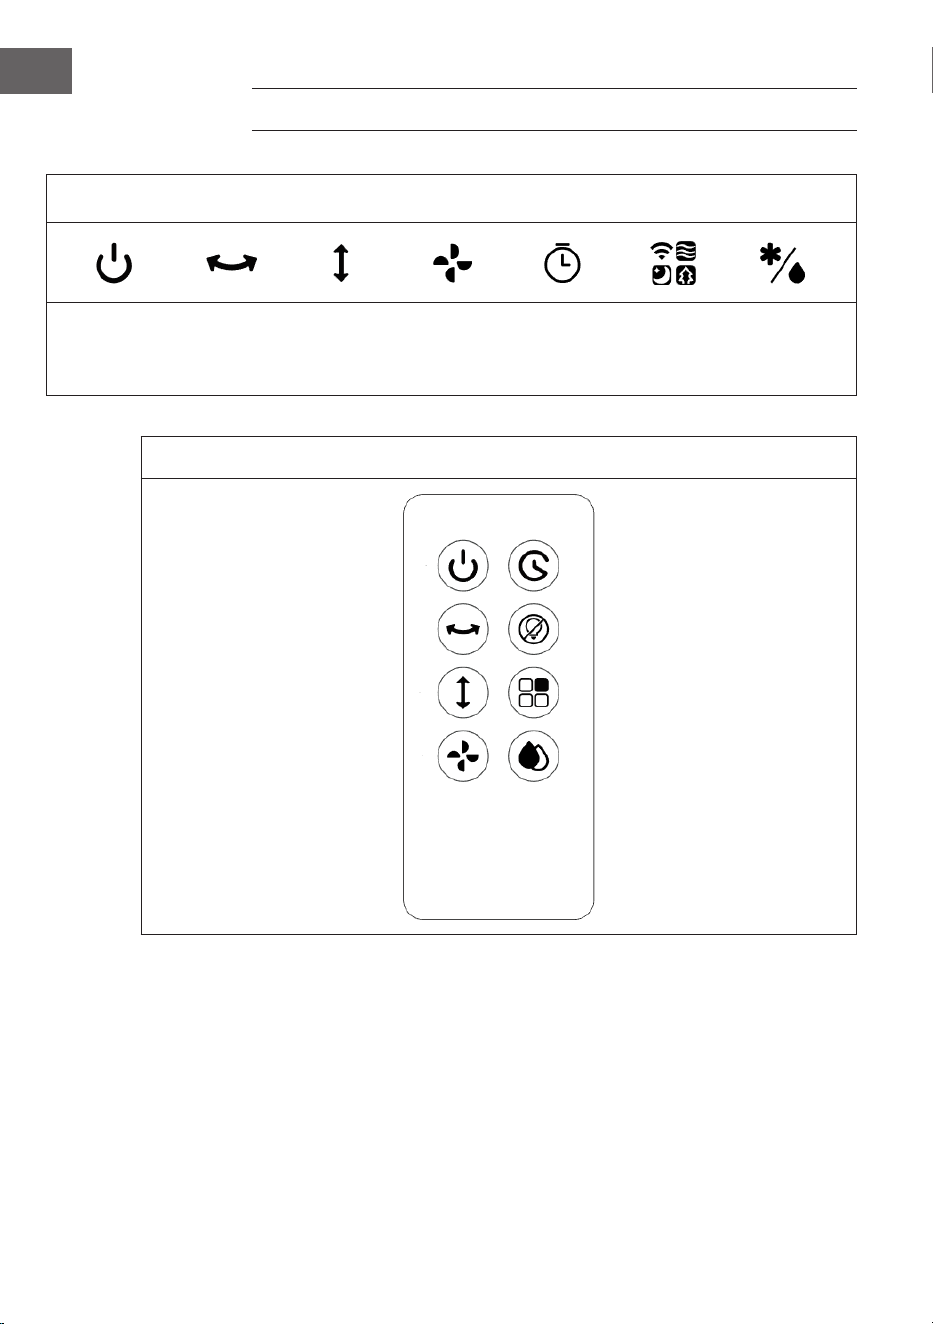
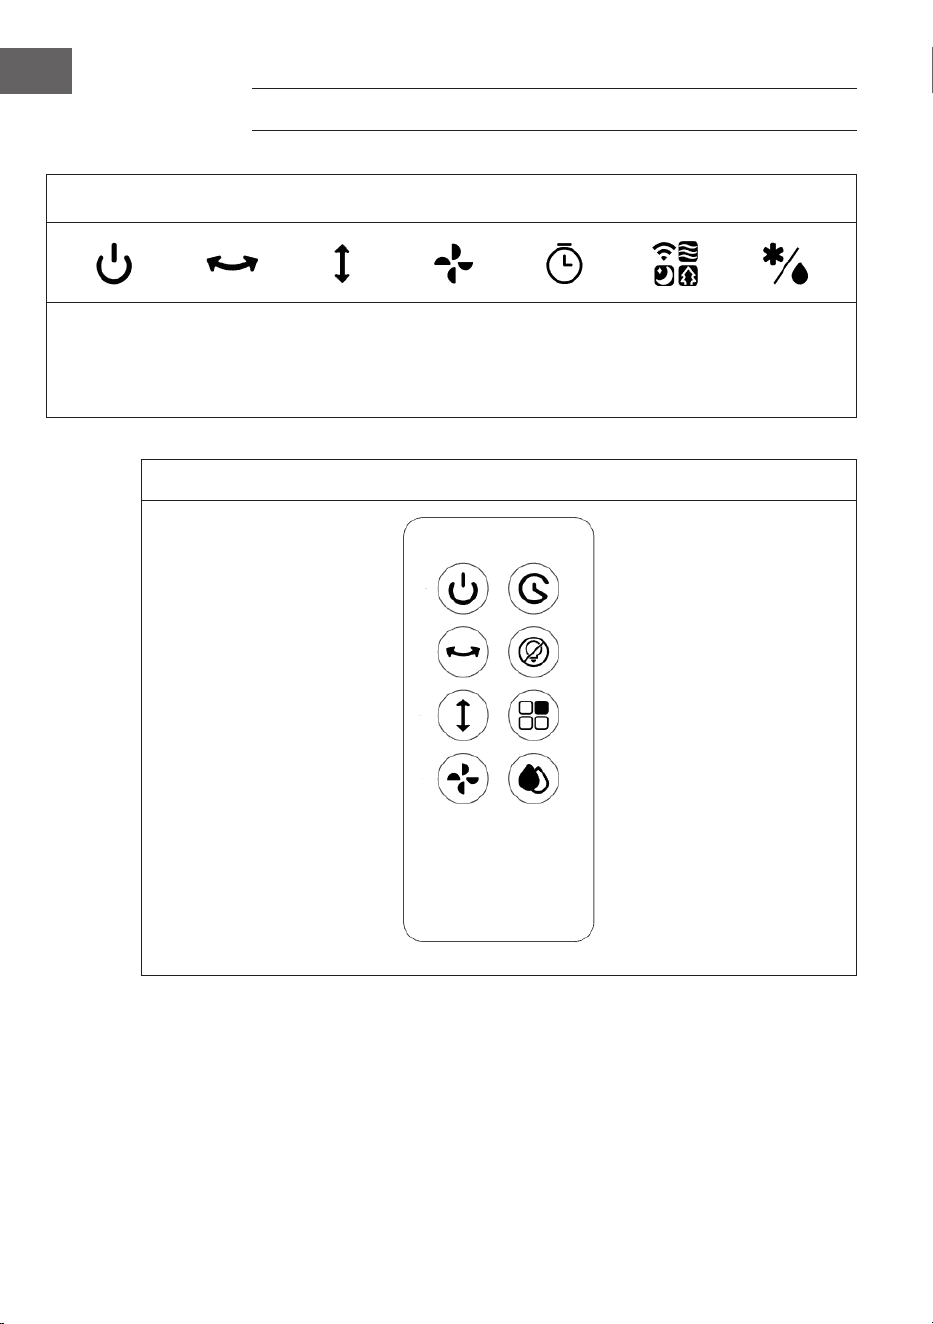
BEDIENFELD UND FERNBEDIENUNG
Bedienfeld (Tasten)
EIN/AUS
Schwing-
funktion
(Links-
Rechts)
Schwing-
funktion
(Auf-Ab)
Wind-
geschwin -
digkeit
Timer
Windmodus/
WLAN
Kühlung/
Luft befeuch-
tung
Fernbedienung (Tasten)
EIN/AUS Timer
Schwingfunktion (Links-Rechts) Bildschirm Aus
Schwingfunktion (Auf-Ab) Windmodus
Windgeschwindigkeit Kühlung/Luftbefeuchtung
9
DE
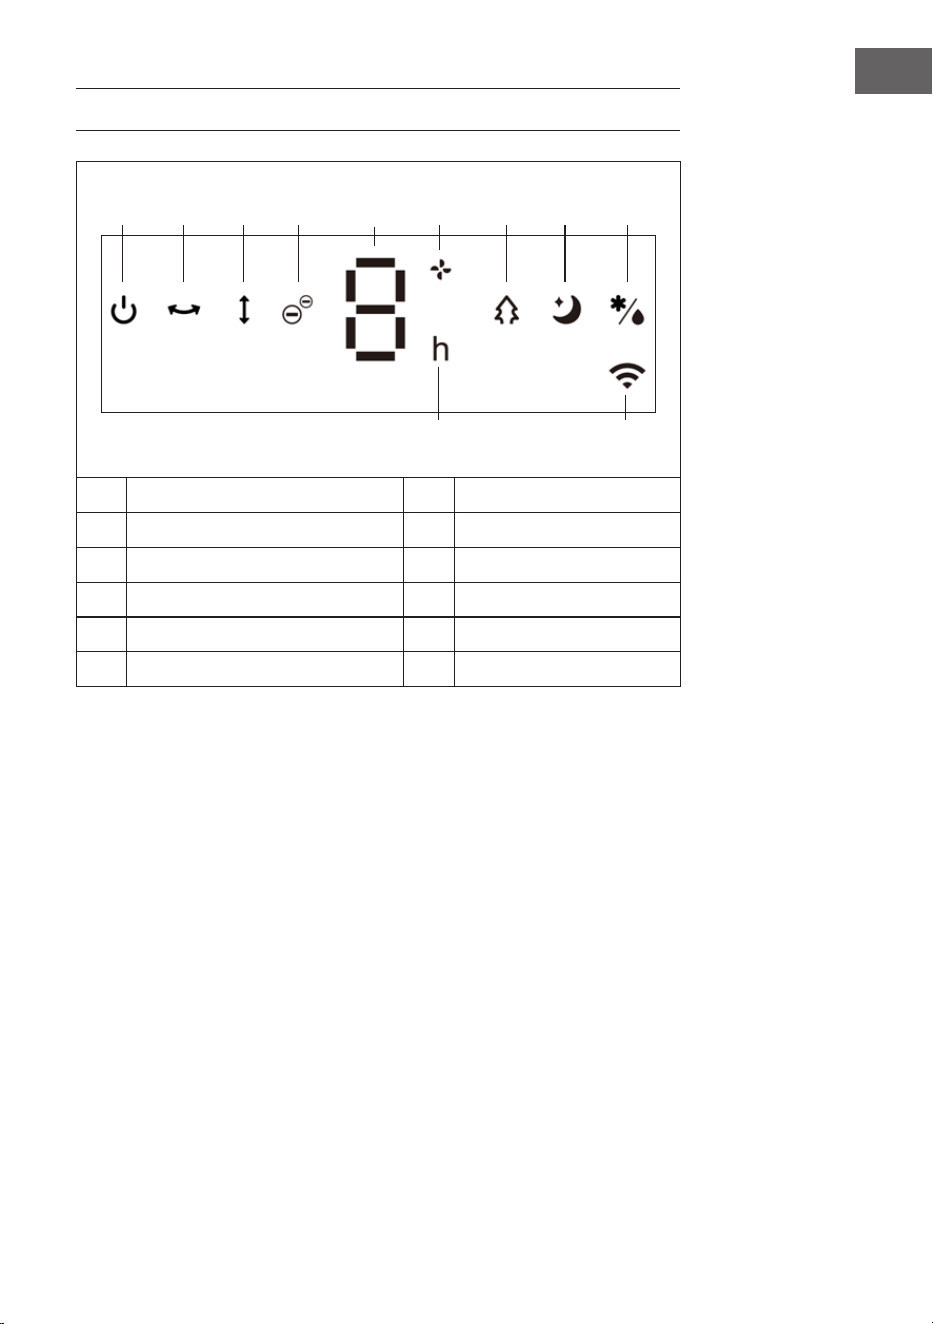
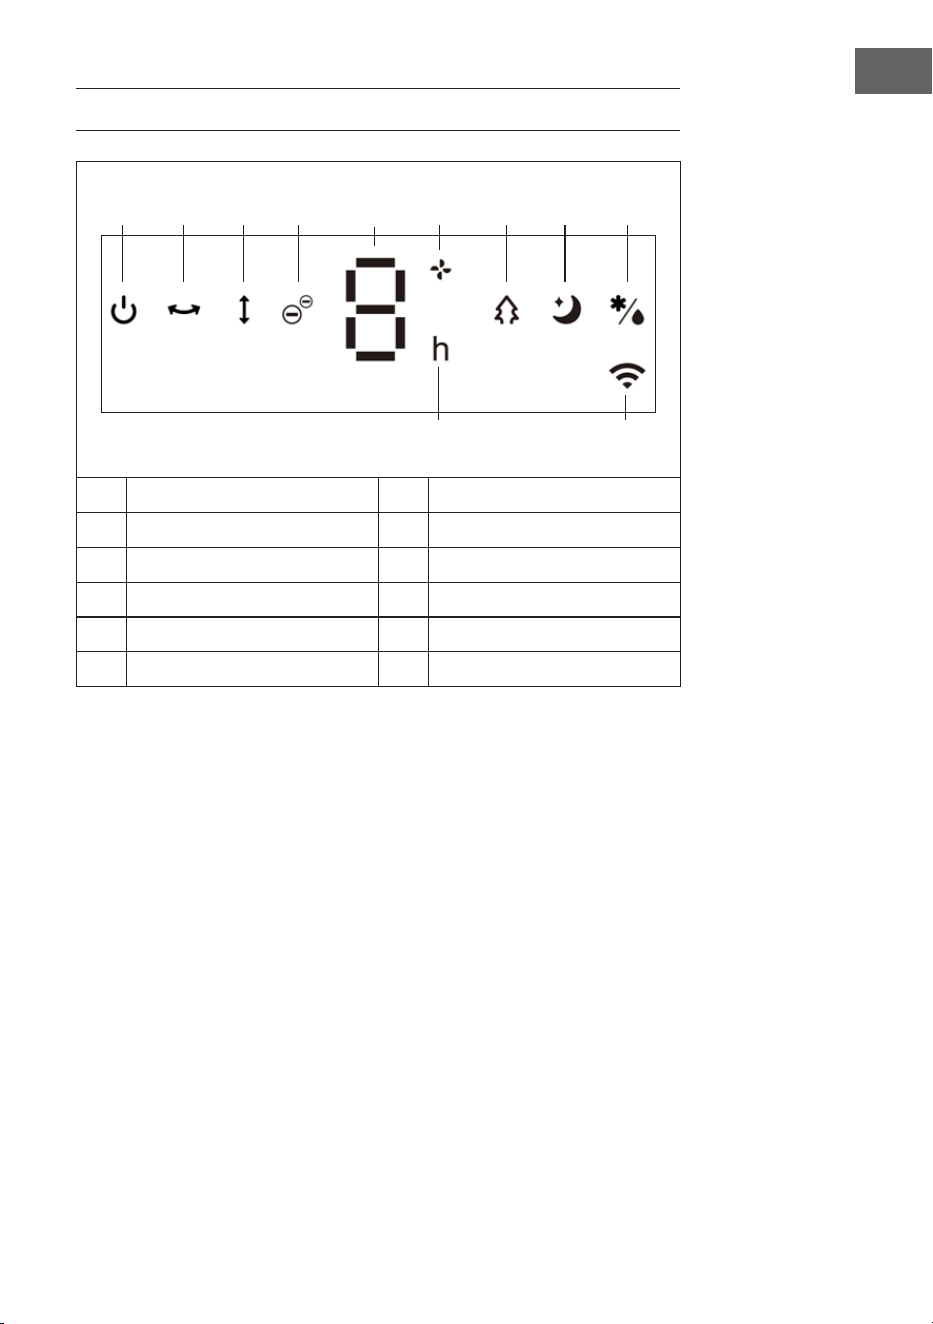
DISPLAYANZEIGEN
1 2 3 4 5 6 7 8 9
11 10
1 EIN/AUS 7 Natürlicher Windmodus
2 Schwingfunktion (Links-Rechts) 8 Schlaf-Windmodus
3 Schwingfunktion (Auf-Ab) 9 Kühlung/Luftbefeuchtung
4 Negativ-Ionen-Funktion 10 WLAN-Funktion
5 Anzeigefenster 11 Timer
6 Windgeschwindigkeit

10
DE
INBETRIEBNAHME UND BEDIENUNG
Vor der Verwendung
• Entnehmen Sie das Gerät aus der Verpackung und entfernen Sie alle
Verpackungsmaterialien.
• Stellen Sie das Gerät auf eine stabile und ebene Oberäche.
• Stecken Sie den Netzstecker in die Steckdose. Das Gerät kann dann direkt
verwendet werden und es ist keine Installation erforderlich.
Inbetriebnahme
Wenn der Netzstecker des Geräts zum ersten Mal in die Steckdose gesteckt wird, piept
das Gerät zweimal und wird in den Standby-Modus versetzt. Alle Leuchtanzeigen sind
aus. Abgesehen von der EIN/AUS-Taste sind alle Tasten inaktiv.
Gerät ein-/ausschalten
Wenn Sie im Standby-Modus die EIN/AUS-Taste drücken, wird das Gerät
eingeschaltet. Wenn das Gerät zum ersten Mal eingeschaltet wird, läuft das Gerät mit
niedriger Geschwindigkeit im normalen Windmodus. Wenn das Gerät ausgeschaltet
wurde und Sie das Gerät wieder einschalten, wird der vor dem Ausschalten verwendete
Modus wiederhergestellt. Dies gilt nicht für die Timereinstellung. Wenn vor dem
Ausschalten der Schlaf-Windmodus eingestellt wurde, wird dies nicht gespeichert. Bei
erneutem Einschalten läuft das Gerät dann im normalen Windmodus.
Wenn während des Betriebs innerhalb von einer Minute keine Taste (Fernbedienungs-
tasten eingeschlossen) gedrückt wird, werden alle Leuchtanzeigen auf 30 % ihrer
ursprünglichen Helligkeit gedimmt. Drücken Sie die gewünschte Taste erneut, um die
Helligkeit wiederherzustellen und die jeweilige Funktion auszuführen.
Drücken Sie zum Ausschalten des Geräts erneut die EIN/AUS-Taste . Das Gerät
piept dann einmal. Wenn das Gerät ausgeschaltet wurde, wird es in den Standby-
Modus versetzt, die Leuchtanzeigen und der Bildschirm gehen aus.
Schwingfunktion
Drücken Sie, wenn das Gerät eingeschaltet ist, die Link-Rechts-Schwing-Taste , um
das Schwingen von links nach rechts zu aktivieren. Die entsprechende Anzeigeleuchte
(2) leuchtet auf.
Drücken Sie, wenn das Gerät eingeschaltet ist, die Auf-Ab-Schwing-Taste , um das
Schwingen von oben nach unten zu aktivieren. Die entsprechende Anzeigeleuchte (3)
leuchtet auf.

11
DE
Der Links-Rechts-Schwingmodus funktioniert folgendermaßen: Die Lamellen schwingen
in einem Winkel von 80° nach links und rechts. Beim Richtungswechsel pausieren die
Lamellen für 1 Sekunde und schwingen dann in die andere Richtung.
Wenn die Auf-Ab-Schwingfunktion nach dem ersten Einschalten aktiviert wird, stellt
das Gerät zunächst die richtige Ausgangsposition ein. Es kann vorkommen, dass die
horizontalen Lamellen für etwa 10 Sekunden geschlossen sind und dann nach oben
schwingen, um sich zu öffnen. Das ist ein normaler Vorgang.
Wenn die Auf-Ab-Schwingfunktion ausgeschaltet wird, schwingen die horizontalen
Lamellen in die horizontale Position und stoppen.
Windgeschwindigkeit einstellen
Mit der Geschwindigkeitstaste kann die Windgeschwindigkeit angepasst
werden. Durch mehrfaches Drücken der Geschwindigkeitstaste werden die
Geschwindigkeitsstufen in der folgenden Reihenfolge durchlaufen:
Niedrig > Mittel > Hoch > Niedrig.
Auf dem Bildschirm werden die Geschwindigkeitsstufen in Zahlen angezeigt:
Geschwindigkeit Anzeige
Niedrig 1
Mittel 2
Hoch 3
Funktion „Trockener Wind“
Wenn Sie die Geschwindigkeitstaste
3 Sekunden lang gedrückt halten, wird die
Funktion „Trockener Wind“ gestartet. Das Gerät läuft mit hoher Windgeschwindigkeit
und auf dem Bildschirm wird „3“ angezeigt und die Anzeige blinkt 20 Minuten lang.
Während der Verwendung dieser Funktion sind alle Tasten, abgesehen von der EIN/
AUS-Taste inaktiv. Halten Sie die Geschwindigkeitstaste drei Sekunden lang
gedrückt, um die Funktion abzubrechen.
Wenn die Funktion „Trockener Wind“ 20 Minuten lang aktiviert war, schaltet sich das
Gerät automatisch aus und geht in den Standby-Modus über.
Timer einstellen
Mit der Timer-Taste kann die Zeit bis zum automatischen Ausschalten des Geräts
eingestellt werden. Sie können eine Zeit zwischen 1-9 Stunden auswählen. Die
Timereinstellung lässt sich in Stundenschritten anpassen und wird auf dem Bildschirm
angezeigt. Drücken Sie, wenn das Gerät eingeschaltet ist, die Timer-Taste . Die
Timeranzeige (11) und die Zeitanzeige blinken auf dem Bildschirm auf. Sie können
nun die gewünschte Zeit bis zum automatischen Ausschalten einstellen. Drücken
Sie anschließend eine beliebige Taste (außer die EIN/AUS-Taste) oder warten Sie
5Sekunden, um die Einstellung zu verlassen.
12
DE
Nachdem der Timer aktiviert wurde, werden auf dem Bildschirm abwechselnd, in
Intervallen von 10 Sekunden, die verbleibende Zeit bis zum Ausschalten und die
aktuell eingestellte Geschwindigkeit angezeigt. Es leuchtet jeweils die entsprechende
Anzeigeleuchte (11/6) auf. Sobald die Zeit abgelaufen ist, schaltet sich das Gerät
automatisch aus und geht in den Standbymodus über.
Windmodus auswählen
Drücken Sie nach dem Einschalten des Geräts zur Einstellung des gewünschten Modus
mehrfach die Windmodus-Taste . Durch mehrfaches Drücken der Windmodus-Taste
werden die Modi in der folgenden Reihenfolge durchlaufen:
Normaler Wind > Natürlicher Wind > Schlaf-Wind > Normaler Wind.
Es leuchtet jeweils die entsprechende Leuchtanzeige (7/8) auf. Für den Modus
Normaler Wind gibt es keine Leuchtanzeige.
Normaler Wind:
Im normalen Windmodus läuft das Gerät ohne Veränderungen mit der eingestellten
Geschwindigkeitsstufe (Niedrig, Mittel oder Hoch).
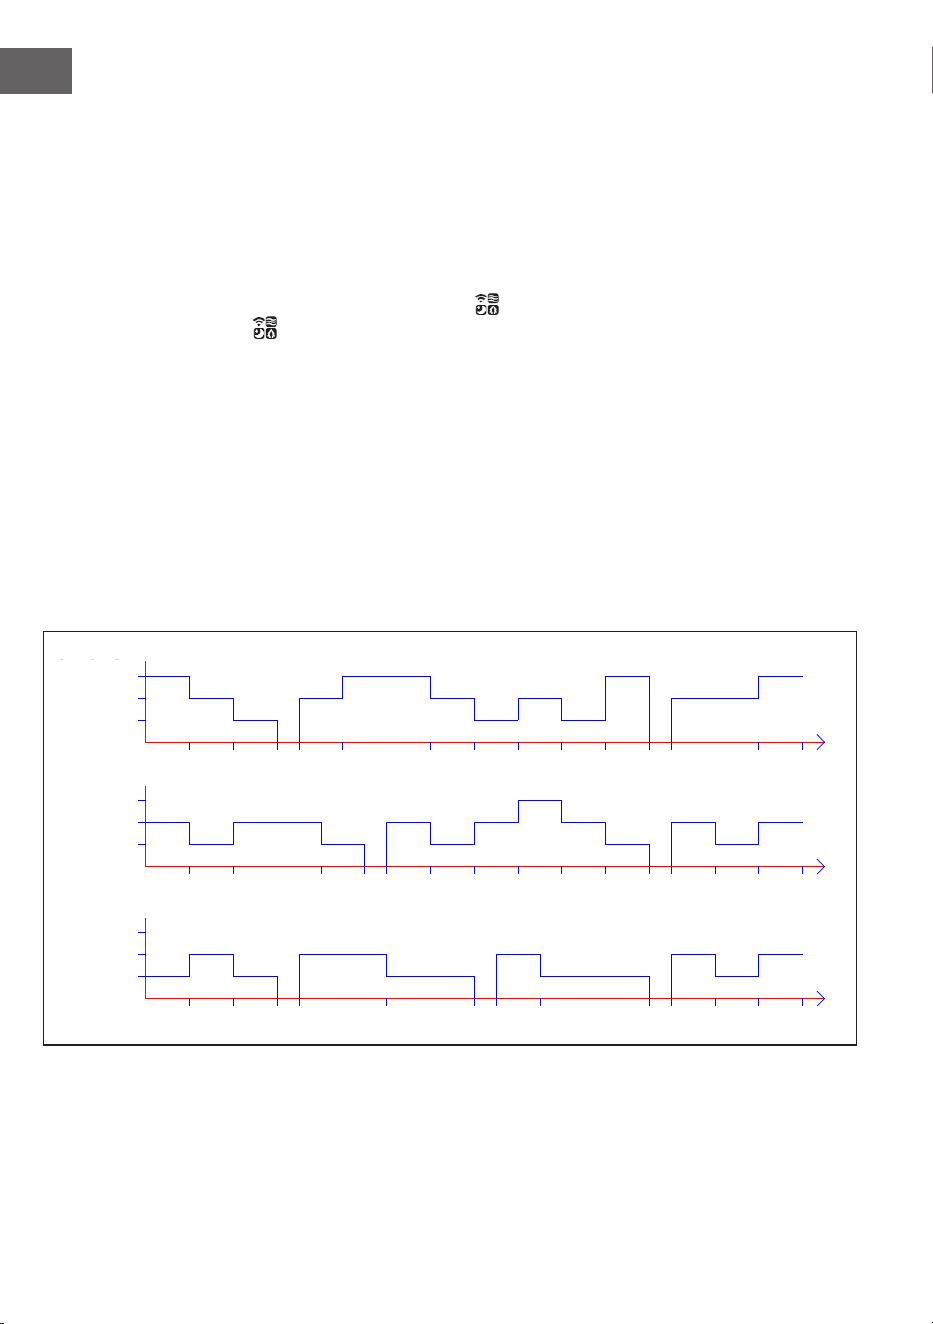
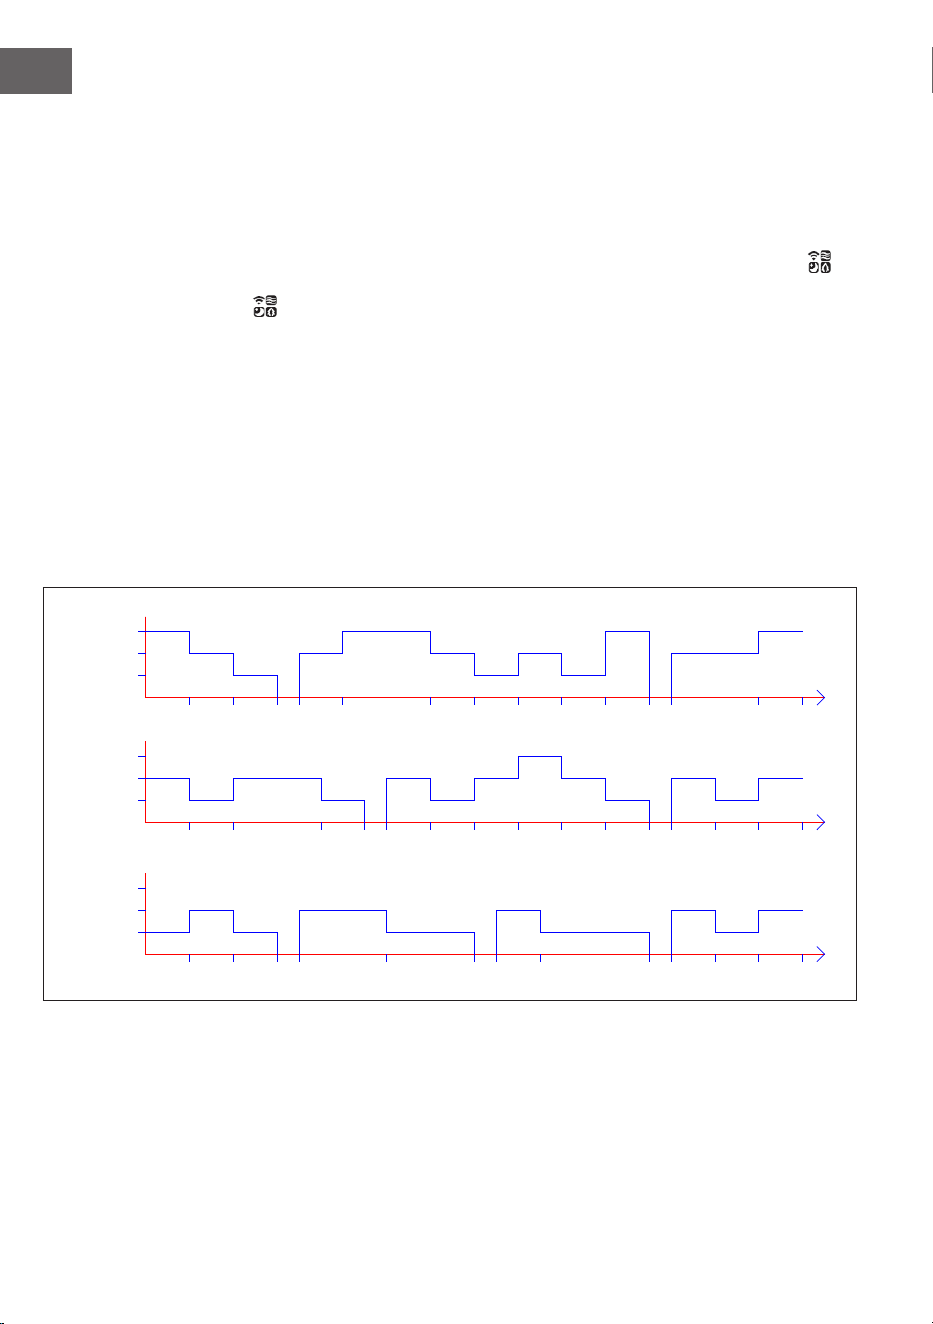
Natürlicher Wind:
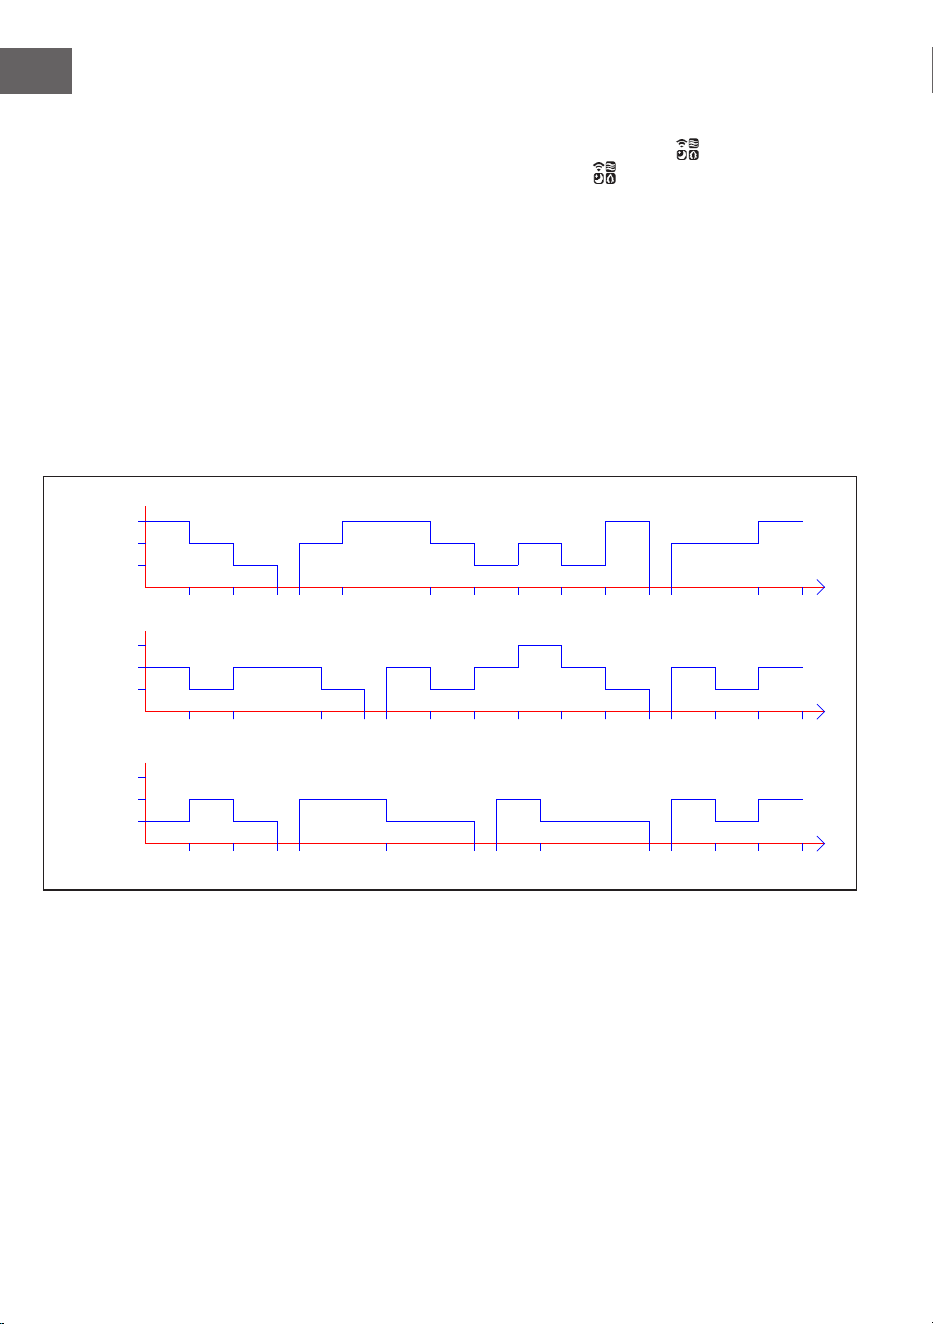
Das Windschema dieses Modus ist in der nachfolgenden Abbildung dargestellt:
6S 6S 6S 3S 12S 12S 3S 6S 3S15S
6S
T=90S
6S 6S 6S 6S 6S 3S 12S
6S 6S 12S 6S6S 6S6S 6S 6S
3S 6S 6S12S 6S
3S 6S 3S
T=90S
T=90S
6S
6S 6S 6S
6S 6S 6S
Low
Medium
High
STRONG
MIDDLE
WEAK
Low
Medium
High
Low
Medium
High
Im natürlichen Windmodus leuchtet die entsprechende Anzeige (7) auf. Der Bildschirm
zeigt nur die ursprüngliche Windgeschwindigkeit an, Änderungen werden nicht
angezeigt. Das heißt, wenn beispielsweise der Natürliche Windmodus mit hoher
Geschwindigkeit aktiviert wurde, wird nur die Geschwindigkeitsstufe „Hoch“ („3“)
angezeigt, ohne zu wechseln.
Mittel
Hoch
Niedrig
Mittel
Hoch
MITTEL
STARK
Niedrig
Mittel
Hoch
Niedrig
SCHWACH
13
DE
Schlaf-Wind:
Wenn der Schlaf-Windmodus aktiviert wird, läuft das Gerät zunächst mit der zuvor
eingestellten Windgeschwindigkeit weiter. Nach 30 Minuten wird in Intervallen von
30Minuten reduziert. Sobald der Timer abgelaufen ist, wird das Gerät automatisch
in den Standby-Modus versetzt. Falls kein Timer eingestellt wurde, läuft das Gerät mit
niedriger Geschwindigkeit weiter.
a) Wenn der Schlaf-Windmodus bei hoher Geschwindigkeit aktiviert wurde,
wechselt das Gerät nach 30 Minuten zur mittleren Geschwindigkeit. Die
entsprechende Anzeige leuchtet auf. Nach weiteren 30 Minuten Laufzeit bei
mittlerer Geschwindigkeit wechselt das Gerät zu niedriger Geschwindigkeit.
Die entsprechende Anzeige leuchtet auf. Das Gerät läuft dann mit niedriger
Geschwindigkeit weiter, bis der Timer abgelaufen ist oder das Gerät ausgeschaltet
wird.
b) Wenn der Schlaf-Windmodus bei mittlerer Geschwindigkeit aktiviert wurde,
wechselt das Gerät nach 30 Minuten zu niedriger Geschwindigkeit. Die
entsprechende Anzeige leuchtet auf. Das Gerät läuft dann mit niedriger
Geschwindigkeit weiter, bis der Timer abgelaufen ist oder das Gerät ausgeschaltet
wird.
c) Wenn der Schlaf-Windmodus bei niedriger Geschwindigkeit aktiviert wurde,
leuchtet die entsprechende Anzeige auf. Das Gerät läuft mit niedriger
Geschwindigkeit weiter, bis der Timer abgelaufen ist oder das Gerät ausgeschaltet
wird.
Kühl-/Luftbefeuchtungsmodus
Drücken Sie, wenn das Gerät eingeschaltet ist, die Kühlung/Lufbefeuchtungs-Taste ,
um die Kühlfunktion ein- und auszuschalten. Die entsprechende Anzeige (9) leuchtet auf.
Bildschirm und Anzeigen aus-/einschalten (Fernbedienung)
Wenn das Gerät eingeschaltet ist, können Sie die Bildschirm-Aus-Taste auf der
Fernbedienung drücken, um den Bildschirm und alle Anzeigeleuchten auszuschalten.
Wenn der Bildschirm aus ist und Sie die Bildschirm-Aus-Taste oder eine beliebige
andere Taste drücken, leuchten die Anzeigeleuchten wieder auf, aber die jeweilige
andere Tastenfunktion wird nicht ausgeführt. Drücken Sie erneut die gewünschte Taste,
um die entspechende Tastenfunktion auszuführen.
Negativ-Ionen-Funktion
Wenn Sie das Gerät einschalten, wird die Negative-Ionen-Funktion aktiviert und die
entsprechende LED-Anzeige (4) leuchtet auf. Beim Ausschalten des Geräts wird die
Negative-Ionen-Funktion deaktiviert.
14
DE
WLAN-Funktion
Drücken Sie, wenn das Gerät eingeschaltet ist, fünf Sekunden lang die Windmodus/
WLAN-Taste . Ein Piepton ist zu hören und die WLAN-Anzeige (10) blinkt fünf
Sekunden lang schnell auf. Apps im Netzwerk können im Standardmodus konguriert
werden. Wenn innerhalb von 3 Minuten keine Verbindung hergestellt wird, erlischt
die WLAN-Anzeige (10). Drücken Sie zur erneuten Verbindungsherstellung erneut
die Windmodus/WLAN-Taste . Ein Piepton ist zu hören, das WLAN-Modul wird
zurückgesetzt, die WLAN-Anzeige (10) blinkt fünf Sekunden lang schnell auf. Apps im
Netzwerk können im Standardmodus konguriert werden. Halten Sie die Windmodus/
WLAN-Taste , sobald die WLAN-Anzeige (10) blinkt, erneut 5 Sekunden lang
gedrückt. Ein Piepton ist zu hören und die WLAN-Anzeige (10) blinkt 5 Sekunden
lang langsam auf. Apps im Netzwerk können nun im Kompatibilitätsmodus konguriert
werden.
Hinweise zur Verwendung der WLAN-Funktion
• Wenn das Gerät innerhalb von 10 Sekunden nach dem Einschalten wieder
ausgeschaltet wird, kehrt die WLAN-Anzeige (10) zu dem Status vor dem
Ausschalten zurück. Wenn das Gerät nach 10 Sekunden ausgeschaltet wird,
erlischt die WLAN-Anzeige (10) und wechselt in den Energiesparmodus. Halten Sie
die Einstelltaste zum Neustarten 5 Sekunden lang gedrückt.
• Wenn das Netzwerk nicht innerhalb von drei Minuten konguriert wird, geht die
WLAN-Anzeige (10) aus. Halten Sie die Einstelltaste zum Neustarten 5 Sekunden
lang gedrückt.
• Wenn der Router ausgeschaltet wird, nachdem die WLAN-Verbindung erfolgreich
hergestellt wurde, erlischt ebenfalls die WLAN-Anzeige (10). Sobald der
Router wieder eingeschaltet wird, wird die Verbindung zum Gerät automatisch
wiederhergestellt.
• Bei der Verwendung der WLAN-Funktion, muss die WLAN-Anzeige (10) schnell
blinken. Ein Router (muss mit externen Netzwerken verbunden werden können) und
ein mobiles Endgerät (z.B. Smartphone) sind zur Verwendung der Klarstein-App
erforderlich. Die Klarstein-App muss auf dem mobilen Endgerät, das ebenfalls mit
dem WLAN-Netzwerk verbunden ist, installiert werden.
15
DE
GERÄTESTEUERUNG PER SMARTPHONE
Wenn Sie Ihr Klarstein-Gerät in Ihr heimisches WLAN einbinden, können Sie es ganz
bequem über die dazugehörige Klarstein-App bedienen. Die App ermöglicht es Ihnen,
nicht nur das Gerät über Ihr Smartphone fernzusteuern, sondern bietet Ihnen zudem
Zugang zu Rezepten und weiterführenden Informationen.
Gehen Sie folgendermaßen vor, um Ihr Smartphone mit Ihrem Klarstein-Gerät zu
verbinden:
1. Laden Sie zuerst die Klarstein-App herunter, indem Sie mit Ihrem Smartphone den
QR-Code scannen (siehe unten) oder laden Sie diese direkt aus dem App Store
oder bei Google Play herunter.
2. Versichern Sie sich, dass Ihr Smartphone mit demselben WLAN-Netzwerk
verbunden ist, mit dem Ihr Klarstein-Gerät verbunden werden soll.
3. Öffnen Sie die Klarstein-App.
4. Melden Sie sich mit Ihrem Konto an. Wenn Sie noch keinen Account haben,
registrieren Sie sich in der Klarstein-App.
5. Folgen Sie den Anweisungen der App.
App-Download
Verwenden Sie die Scan-Funktion Ihres Handys, um den QR-Code zu scannen, und
speichern Sie die App auf Ihrem Smartphone.
Hinweis: Weitere Hinweise zur Bedienung der App und Hilfestellungen zur
Herstellung der Verbindung mit Ihrem Gerät liefert Ihnen die App, sobald Sie sie das
erste Mal öffnen.
iOS Android
16
DE
Fehlerbehebung bei Verbindungsproblemen
Wenn Ihr Klarstein-Gerät im WLAN nicht gefunden werden kann, überprüfen Sie
Folgendes:
• Ist das Gerät eingesteckt?
• Ist die WLAN-Funktion des Smartphones aktiviert?
• Ist die WLAN-Funktion des Klarstein-Gerätes aktiviert? (Befolgen Sie die
Anweisungen in der App.)
• Ist das WLAN-Passwort korrekt eingegeben worden?
• Benden sich Router, Klarstein-Gerät und Smartphone während des
Kopplungsversuches in unmittelbarer Nähe? (Idealerweise nicht mehr als 5 m
voneinander entfernt.)
• Falls Sie in den Einstellungen ihres WLAN-Routers das 2,4-GHz-Band deaktiviert
haben, aktivieren Sie dieses in Ihren Routereinstellungen.
Hinweis: Für weitere Hilfestellungen folgen Sie den Anweisungen der App beim
Verbindungsaufbau.
SCHUTZFUNKTIONEN
Wassermangel-Schutzschalter
Wenn die Wasserpumpe 60 Sekunden läuft und die Software erkennt, dass der
Wasserniveauschalter 5 aufeinanderfolgende Sekunden (insgesamt 65) keine
Verbindung hat (zu wenig Wasser), stellt die Wasserpumpe automatisch den Betrieb ein
und das Gerät piept 10 Mal auf.
Wasserstandserkennung
Halten Sie innerhalb von 10 Sekunden nach dem Einschalten die Kühl-/Befeuchtungs-
modus-Taste gedrückt, nachdem der Piepton zu hören war. Der Wasserstand
wird dann innerhalb von 3 Sekunden ermittelt. Wenn sich kein Wasser im Wassertank
bendet, wird die Kühlfunktion deaktiviert und das Gerät piept 10 Mal auf. Die
Wasserstandserkennung wird nach dem Drücken der EIN/AUS-Taste oder bei
einem Stromausfall deaktiviert.
Speicherfunktion
1. Wenn das Gerät nicht vom Strom getrennt wird, läuft das Gerät beim erneuten
Einschalten in dem Modus weiter, der vor dem Ausschalten eingestellt war. Die
Modi Schlaf-Wind, „Trockener Wind“ und Timer werden nicht gespeichert.
2. Wenn das Gerät nicht vom Strom getrennt wird, läuft es bei erneutem Einschalten
zunächst 3 Sekunden lang bei mittlerer Geschwindigkeit und wechselt dann zur vor
dem Ausschalten eingestellten Geschwindigkeit.
17
DE
WASSERTANK BEFÜLLEN
Füllen Sie bei Verwendung der Kühl- und Luftbefeuchtungsfunktion Wasser in den
Wassertank. Drehen Sie vor dem Befüllen die Kabelaufwicklung um 90°. Ziehen
Sie den Wassertank zur Hälfte heraus. Schütten Sie das Wasser langsam in den
Wassertank. Schieben Sie den Wassertank nach dem Befüllen wieder in das Gerät
hinein. Bringen Sie die Kabelaufwicklung wieder in die ursprüngliche Position.
Wassertank sicherung
ist geschlossen
Wassertank sicherung
ist geöffnet
Wassertank herausziehen,
um Wasser einzufüllen.
Achten Sie beim Einfüllen von Wasser in den Wassertank auf die Wasserstandsanzeige:
1. Achten Sie beim manuellen Befüllen darauf, dass sich der Wasserstand oberhalb
der Minimalanzeige und unterhalb der Maximalanzeige bendet.
2. Verwenden Sie ausschließlich sauberes Trinkwasser.
3. Wenn das Gerät zum ersten Mal verwendet wird kann ein leichter Geruch auftreten
und das Wasser im Wassertank kann leicht verfärbt sein. Dies ist normal und
ungefährlich und hat keinen Einuss auf Ihre Gesundheit.
4. Achten Sie beim Hineinlegen des Eisbehälters darauf, dass die Maximalanzeige
nicht überschritten wird.
18
DE
REINIGUNG UND PFLEGE
Reinigung
• Schalten Sie das Gerät vor der Reinigung aus und ziehen Sie den Netzstecker aus
der Steckdose.
• Verwenden Sie zur Reinigung des Geräts keine Chemikalien, Benzin,
Verdünnungsmittel oder andere Substanzen, durch welche die Geräteoberäche
beschädigt werden könnte.
• Entfernen Sie Staub mit einem weichen Tuch. Verwenden Sie bei hartnäckigen
Flecken etwas Wasser (unter 50 °C) und ein neutrales Reinigungsmittel. Reiben Sie
die Geräteoberäche anschließend mit einem weichen Tuch trocken.
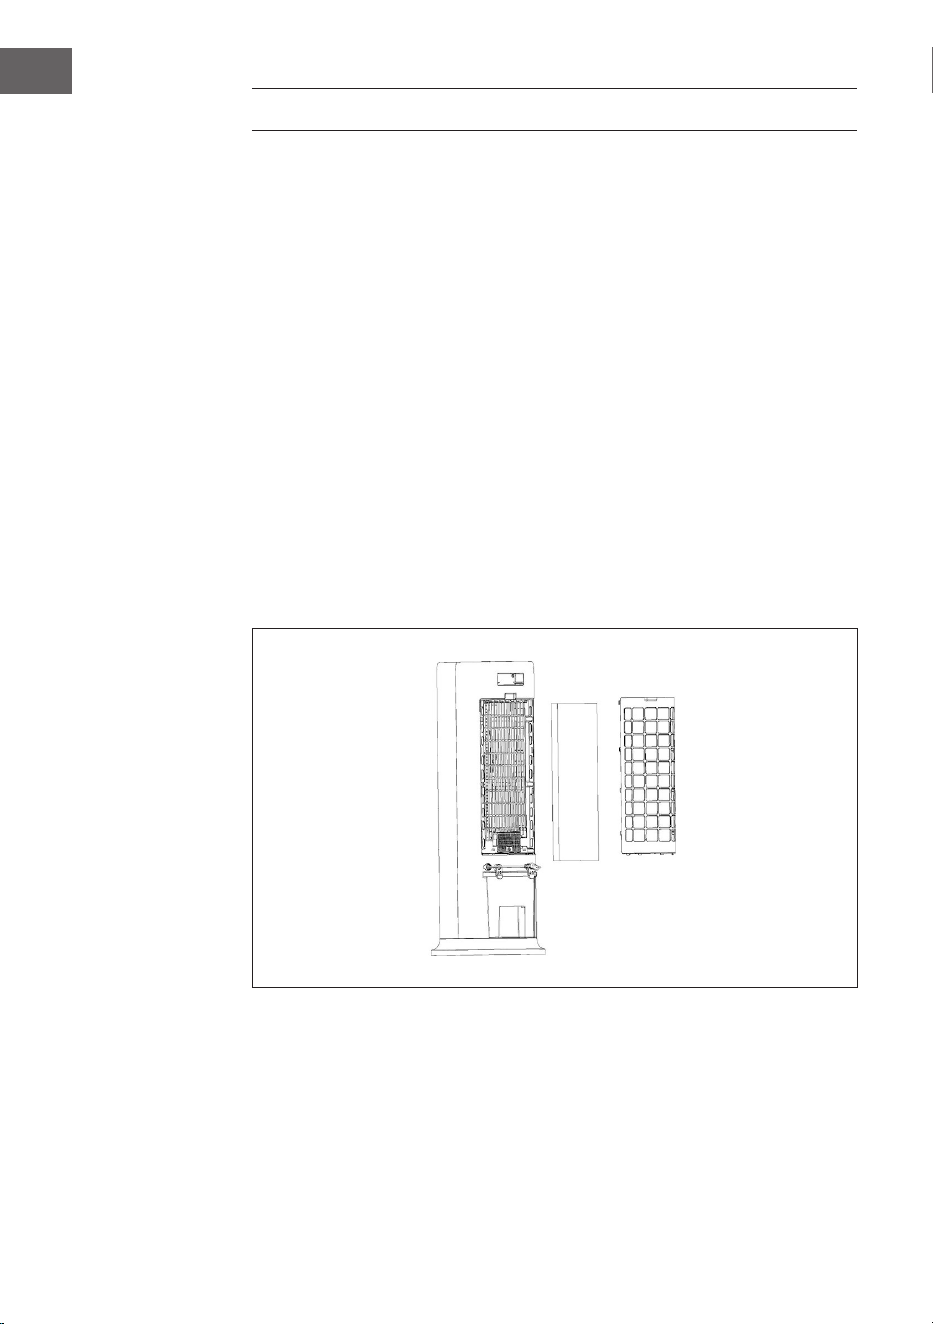
Filterreinigung
Reinigen Sie die Filter mindestens einmal im Monat. Gehen Sie hierfür folgendermaßen
vor:
1. Ziehen Sie den Netzstecker aus der Steckdose.
2. Nehmen Sie zunächst das hintere Lüftungsgitter und anschließend den Filter heraus.
3. Lassen Sie den Filter für einige Minuten in einer Seifenlösung einweichen, reinigen
Sie ihn anschließend und lassen Sie ihn trocknen.
4. Setzen Sie den Filter und das hintere Lüftungsgitter, wenn beides vollständig trocken
ist, wieder in das Gerät ein.

19
DE
Wassertankreinigung
1. Ziehen Sie den Netzstecker aus der Steckdose. Drehen Sie die Kabelaufwicklung in
horizontale Position und ziehen Sie den Wassertank bis zur Hälfte heraus.
2. Gehen Sie mit Ihrer Hand in den Wassertank hinein und drehen Sie die Fixierung
um 90°. Drücken Sie anschließend das Wasserpumpengehäuse nach unten und
nehmen Sie den Wassertank heraus.
3. Entfernen Sie Kalkrückstände im Wassertank mit einem in neutrales Reinigungsmittel
getauchten, feuchten Tuch. Spülen Sie den Wassertank anschließend mit klarem
Wasser aus.
Gehäusereinigung
• Stellen Sie vor der Reinigung des Gerätegehäuses sicher, dass das Gerät
ausgeschaltet ist und der Netzstecker aus der Steckdose gezogen wurde.
• Reinigen Sie das Gerätegehäuse mit einem feuchten Tuch. Spülen Sie es nicht direkt
mit Wasser ab.
• Verwenden Sie keine aggressiven oder scheuernden Reinigungsmittel.
Lagerung
• Wenn das Gerät längere Zeit nicht benutzt wird, ziehen Sie den Netzstecker und
verpacken Sie es, um zu verhindern, dass Staub in das Gehäuse gelangt.
• Stellen Sie vor dem Verpacken sicher, dass das Gerät sauber ist, der Filter trocken
ist und sich kein Wasser im Wassertank bendet.
• Bewahren Sie es nach dem Verpacken an einem trockenen, belüfteten Ort auf.
20
DE
SPEZIELLE ENTSORGUNGSHINWEISE FÜR
VERBRAUCHER IN DEUTSCHLAND
Entsorgen Sie Ihre Altgeräte fachgerecht. Dadurch wird gewährleistet, dass die
Altgeräte umweltgerecht verwertet und negative Auswirkungen auf die Umwelt und
menschliche Gesundheit vermieden werden. Bei der Entsorgung sind folgende Regeln
zu beachten:
• Jeder Verbraucher ist gesetzlich verpichtet, Elektro- und Elektro-
nikaltgeräte (Altgeräte) sowie Batterien und Akkus getrennt vom
Hausmüll zu entsorgen. Sie erkennen die entsprechenden Altgeräte
durch folgendes Symbol der durchgestrichene Mülltonne (WEEE-
Symbol).
• Sie haben Altbatterien und Altakkumulatoren, die nicht vom Altgerät umschlossen
sind, sowie Lampen, die zerstörungsfrei aus dem Altgerät entnommen werden
können, vor der Abgabe an einer Entsorgungsstelle vom Altgerät zerstörungsfrei zu
trennen.
• Bestimmte Lampen und Leuchtmittel fallen ebenso unter das Elektro- und
Elektronikgesetz und sind dementsprechend wie Altgeräte zu behandeln.
Ausgenommen sind Glühbirnen und Halogenlampen. Entsorgen Sie Glühbirnen
und Halogenlampen bitte über den Hausmüll, sofern sie nicht das WEEE-Symbol
tragen.
• Jeder Verbraucher ist für das Löschen von personenbezogenen Daten auf dem
Elektro- bzw. Elektronikgerät selbst verantwortlich.
Rücknahmepicht der Vertreiber
Vertreiber mit einer Verkaufsäche für Elektro- und Elektronikgeräte von mindestens 400
Quadratmetern sowie Vertreiber von Lebensmitteln mit einer Gesamtverkaufsäche von
mindestens 800 Quadratmetern, die mehrmals im Kalenderjahr oder dauerhaft Elektro-
und Elektronikgeräte anbieten und auf dem Markt bereitstellen, sind verpichtet,
1. bei der Abgabe eines neuen Elektro- oder Elektronikgerätes an einen Endnutzer ein
Altgerät des Endnutzers der gleichen Geräteart, das im Wesentlichen die gleichen
Funktionen wie das neue Gerät erfüllt, am Ort der Abgabe oder in unmittelbarer
Nähe hierzu unentgeltlich zurückzunehmen und
2. auf Verlangen des Endnutzers Altgeräte, die in keiner äußeren Abmessung größer
als 25 Zentimeter sind, im Einzelhandelsgeschäft oder in unmittelbarer Nähe hierzu
unentgeltlich zurückzunehmen; die Rücknahme darf nicht an den Kauf eines Elektro-
oder Elektronikgerätes geknüpft werden und ist auf drei Altgeräte pro Geräteart
beschränkt.

21
DE
• Bei einem Vertrieb unter Verwendung von Fernkommunikationsmitteln ist die
unentgeltliche Abholung am Ort der Abgabe auf Elektro- und Elektronikgeräte der
Kategorien 1, 2 und 4 gemäß § 2 Abs. 1 ElektroG, nämlich „Wärmeüberträger“,
„Bildschirmgeräte“ (Oberäche von mehr als 100 cm²) oder „Großgeräte“
(letztere mit mindestens einer äußeren Abmessung über 50 Zentimeter)
beschränkt. Für andere Elektro- und Elektronikgeräte (Kategorien 3, 5, 6) ist eine
Rückgabemöglichkeit in zumutbarer Entfernung zum jeweiligen Endnutzer zu
gewährleisten.
• Altgeräte dürfen kostenlos auf dem lokalen Wertstoffhof oder in folgenden
Sammelstellen in Ihrer Nähe abgegeben werden: www.take-e-back.de
• Für Elektro- und Elektronikgeräte der Kategorien 1, 2 und 4 bieten wir auch die
Möglichkeit einer unentgeltlichen Abholung am Ort der Abgabe. Beim Kauf eines
Neugeräts haben Sie die Möglichkeit, eine Altgerätabholung über die Webseite
auszuwählen.
• Batterien können überall dort kostenfrei zurückgegeben werden, wo sie verkauft
werden (z. B. Super-, Bau-, Drogeriemarkt). Auch Wertstoff- und Recyclinghöfe
nehmen Batterien zurück. Sie können Batterien auch per Post an uns zurücksenden.
Altbatterien in haushaltsüblichen Mengen können Sie direkt bei uns von Montag bis
Freitag zwischen 08:00 und 16:00 Uhr unter der folgenden Adresse unentgeltlich
zurückgeben:
Chal-Tec Fulllment GmbH
Norddeutschlandstr. 3
47475 Kamp-Lintfort
• Wichtig zu beachten ist, dass Lithiumbatterien aus Sicherheitsgründen vor der
Rückgabe gegen Kurzschluss gesichert werden müssen (z. B. durch Abkleben der
Pole).
• Finden sich unter der durchgestrichenen Mülltonne auf der Batterie zusätzlich die
Zeichen Cd, Hg oder Pb ist das ein Hinweis darauf, dass die Batterie gefährliche
Schadstoffe enthält. (»Cd« steht für Cadmium, »Pb« für Blei und »Hg« für
Quecksilber).
Hinweis zur Abfallvermeidung
Indem Sie die Lebensdauer Ihrer Altgeräte verlängern, tragen Sie dazu bei, Ressourcen
efzient zu nutzen und zusätzlichen Müll zu vermeiden. Die Lebensdauer Ihrer Altgeräte
können Sie verlängern, indem Sie defekte Altgeräte reparieren lassen. Wenn sich
Ihr Altgerät in gutem Zustand bendet, könnten Sie es spenden, verschenken oder
verkaufen.

22
DE
HINWEISE ZUR ENTSORGUNG
Wenn es in Ihrem Land eine gesetzliche Regelung zur
Entsorgung von elektrischen und elektronischen Geräten
gibt, weist dieses Symbol auf dem Produkt oder auf der
Verpackung darauf hin, dass dieses Produkt nicht im
Hausmüll entsorgt werden darf. Stattdessen muss es zu
einer Sammelstelle für das Recycling von elektrischen
und elektronischen Geräten gebracht werden. Durch
regelkonforme Entsorgung schützen Sie die Umwelt und die
Gesundheit Ihrer Mitmenschen vor negativen Konsequenzen.
Informationen zum Recycling und zur Entsorgung dieses
Produkts, erhalten Sie von Ihrer örtlichen Verwaltung oder
Ihrem Hausmüllentsorgungsdienst.
Dieses Produkt enthält Batterien. Wenn es in Ihrem Land
eine gesetzliche Regelung zur Entsorgung von Batterien
gibt, dürfen die Batterien nicht im Hausmüll entsorgt werden.
Informieren Sie sich über die örtlichen Bestimmungen zur
Entsorgung von Batterien. Durch regelkonforme Entsorgung
schützen Sie die Umwelt und die Gesundheit Ihrer
Mitmenschen vor negativen Konsequenzen.
KONFORMITÄTSERKLÄRUNG
Hersteller:
Chal-Tec GmbH, Wallstraße 16, 10179 Berlin, Deutschland.
Importeur für Großbritannien:
Berlin Brands Group UK Limited
PO Box 42
272 Kensington High Street
London, W8 6ND
United Kingdom
Hiermit erklärt Chal-Tec GmbH, dass der Funkanlagentyp
Skytower 360° Smart der Richtlinie 2014/53/EU entspricht.
Der vollständige Text der EU-Konformitätserklärung ist
unter der folgenden Internetadresse verfügbar: use.
berlin/10035818

23
EN
Dear Customer,
Congratulations on purchasing this device. Please read the
following instructions carefully and follow them to prevent
possible damages. We assume no liability for damage caused
by disregard of the instructions and improper use. Scan the QR
code to get access to the latest user manual and more product
information.
CONTENT
Safety Instructions24
Device Overview26
Accessories27
Control Panel and Remote Control28
Display Indicators29
Commissioning and Operation30
Device Control by Smartphone35
Protective Functions36
Filling the Water Tank37
Cleaning and Care38
Disposal Considerations40
TECHNICAL DATA
Item number 10035818
Power supply 220-240 V ~ 50 Hz
Power 60 W
Water tank capacity 6 litres
Air volume 450 m
3
/h
Evaporation volume 950 ml/h
Noise level ≤ 55 dB
WiFi standard
802.11 b/g/n
WiFi frequency
2,4 GHz
WiFi radio-frequency power (max.)
20 dBm

24
EN
SAFETY INSTRUCTIONS
• Check the voltage on the rating plate before use. Only connect the appliance
to sockets which correspond to the voltage of the appliance.
• Keep the appliance and cable away from sources of heat, sharp objects or
anything that may cause damage.
• Do not place the cord under carpets. Do not cover the cord with small clothes,
shirts or other similar elements. Place the cord away from trafc areas in order
to avoid any risk of tripping over.
• Do not operate the appliance if the cable or plug is damaged.
• If the supply cord or plug is damaged, it must be replaced by the manufacturer,
its service agent or similarly qualied persons in order to avoid a hazard.
• Indoor use only.
• Do not cover the machine during using.
• Place the appliance on a stable at horizontal surface. Make sure the
appliance is in an upright position during use.
• Ensure the appliance is switched OFF before connecting to the mains power
supply.
• Always ensure that hands are dry before operating or adjusting any switch on
the product or touching the plug and mains supply connections.
• Do not leave this appliance unattended when it’s in use. Turn off and
disconnect the appliance when you leave the room for an extended period.
• Switch off the appliance and unplug from the mains socket when not in use,
before lling, cleaning or other maintain.
• To disconnect the appliance, switch it “OFF”, and then remove the plug from
outlet. Do not pull the cord to disconnect the plug.
• This device may be only used by children 8 years old or older and persons
with limited physical, sensory and mental capabilities and / or lack of
experience and knowledge, provided that they have been instructed in use of
the device by a responsible person who understands the associated risks.
• Use the appliance only as described in this manual.
• Do not insert your ngers in the openings of the guard.
• Do not leave hair, tissue, tablecloths, clothes or curtains near all openings
of the fan, they could be sucked into the fan and be taken within the internal
moving parts that could cause injury or damage.
• Do not use the appliance in wet or damp locations such as bathrooms.
• Do not operate the appliance when it’s not mounted on its wheels or if it’s lying
on the side.
• Make sure the cord is completely extended before use.

25
EN
• When in operation, evaporative coolers moisturize the ambient air. Over-
humidication of residential rooms should be avoided. Recommendation: 40-50%
relative humidity. Excessive humidity of the air can damage the home and cause
health problems.
• The appliance may only be set up on water- and moisture-proof ooring materials
(spilling some drops of water is unavoidable when the content of the tank is
changed).
• With each and every change of tank content, completely remove residual water
from the equipment. To prevent nucleation, remove residual water from the
equipment and water tank every time after three days of use.
PRODUCT FEATURES
• On/Off: Separate ON/OFF button
• Fan speed: 3 speed levels: Low, Medium and High
• Wind modes: Normal, Natural wind and Sleep wind
• Wind direction: Automatic swing of horizontal louvers and vertical louvers
• Time until automatic switch-off: 1-9 hour timer without accumulation (timer tolerance
in the 3 % range).
• Water pump for cooling/air humidication
• Touch button control
• Dry wind function and automatic dimming of LED lighting if no button is pressed
within one minute
• Remote control function (with IR distance greater than or equal to 6 meters)
• Easy to clean water tanks
• Spray water circulation cooling technology, with large water circulation and faster
cooling

26
EN
DEVICE OVERVIEW
1
Front case
6
Rear case
2
Display panel
7
Rear grille
3
Horizontal blade
8
Winding frame
4
Decoration panel
9
Power cord
5
Base
10
Water tank
Note on using the water tank
In principle, you can use your air cooler at any time without water in the tank. It will then
work like a normal fan. Water in the tank is only needed for the cooling function. The
air cooler evaporates this through the nebulizer ow, removing heat from the air and
reducing the air temperature of the fan by up to 3 °C, depending on the coldness of the
water used. We advise against using the cooling function on days with particularly high
humidity, as it increases this further and can thus contribute to circulatory problems.
27
EN
ACCESSORIES
Remote control Ice box
Use of the remote control
1. Open battery cover in the rear of
remote control and install a
3VCR2032 battery for use.
To open the battery compartment,
press down the cover in the direction
of the arrow (1) and pull out the
battery compartment in the direction
of the arrow (2).
2. Point the remote control at the
receiver during use.
3. Replace at batteries. When
inserting the new battery, make sure that the polarity (+/-) is correct. Then put the
battery compartment back into the remote control.
Use of the ice box
1. Place the ice box in the freezer compartment until it is completely frozen.
2. Place the ice box in the water tank of the appliance. Within 10 min after placing
the ice container, the temperature in the water tank is reduced below ambient
temperature.
3. Two ice boxes are included in the delivery. Use them alternately.
4. It is forbidden to open the cover of the ice boxes. Never swallow the contents of the
ice boxes.
Note: With specic cold storage and insulation features, the ice box can slowly
absorb the heat in the water to keep temperature in the water tank lower than
ambient temperature for hours all the time, thus producing more nice and cool wind
by the air conditioner fan.
28
EN
CONTROL PANEL AND REMOTE CONTROL
Control panel (buttons)
ON/OFF
Swing
function
(Left-Right)
Swing
function
(Up-Down)
Wind
speed
Timer
Wind
mode/
WIFI
Cooling/
humidication
mode
Remote control (buttons)
ON/OFF Timer
Swing function (Left-Right) Screen off
Swing function (Up-Down) Wind mode
Wind speed Cooling/humidication mode
29
EN
DISPLAY INDICATORS
1 2 3 4 5 6 7 8 9
11 10
1 ON/OFF 7 Natural wind mode
2 Swing function (Left-Right) 8 Sleep wind mode
3 Swing function (Up-Down) 9 Cooling/humidication mode
4 Negative ion function 10 WIFI function
5 Display window 11 Timer
6 Wind speed
30
EN
COMMISSIONING AND OPERATION
Before use
• Remove the appliance from its packaging and remove all packaging materials.
• Place the appliance on a stable and level surface.
• Insert the mains plug into the socket. The appliance can then be used directly and
no installation is required.
Commissioning
When the appliance’s mains plug is plugged into the socket for the rst time, the
appliance beeps twice and goes into standby mode. All indicator lights are off. Except
for the ON/OFF button, all buttons are inactive.
Switching appliance on/off
If you press the ON/OFF button in standby mode, the appliance is switched on.
When the appliance is switched on for the rst time, the appliance runs at low speed
in normal wind mode. When the appliance has been switched off and you switch it on
again, the mode used before switching off is restored. This does not apply to the timer
setting. If the sleep wind mode was set before switching off, this is not saved. When the
appliance is switched on again, it will run in normal wind mode.
If no button (including remote control buttons) is pressed within one minute during
operation, all light indicators are dimmed to 30 % of their original brightness. Press the
desired button again to restore the brightness and perform the respective function.
To switch off the appliance, press the ON/OFF button again. The appliance will
beep once. When the appliance has been switched off, it goes into standby mode and
the light indicators and screen go out.
Swing function
In the power-on state, press the left-right swing button to switch on/off the left-right
swing function, and the corresponding LED indicator (2) will show its working state.
In the power-on state, press the up-down swing button to switch on/off the up-down
swing function, and the corresponding LED indicator (3) will show its working state.
The left-right swing mode works as follows: the swing head swings left and right at an
80° angle. When switching the direction, the swing head will pause for 1 second and
then swing to the other direction.

31
EN
When turning on the up-down swing function after it is rst powered on, the motor will
nd the original point rst .The horizontal blades may be closed for about 10 seconds
and then swing upwards to open. This is a normal phenomenon.
When the up-down swing button is off, the horizontal blade will swing to the
horizontal position and stop.
Setting the speed
The speed button can be used to adjust the wind speed. Pressing the speed button
several times cycles through the speed levels in the following order:
Low > Medium > High > Low.
The speed levels are displayed in numbers on the screen:
Speed Display
Low 1
Medium 2
High 3
Dry wind function
If you press and hold the speed button
for 3 seconds, the dry wind function is
started. The appliance is running at high wind speed and the screen shows “3” and the
indicator ashes for 20 minutes.
While using this function, all buttons except the ON/OFF button are inactive. Press and
hold the speed button for 3 seconds to cancel the function.
When the dry wind function has been activated for 20 minutes, the appliance
automatically switches off and goes into standby mode.
Setting the timer
The timer button can be used to set the time until the appliance switches off
automatically. You can set a time between 0-9 hours. The time until automatic switch-off
can be adjusted in hourly steps and is displayed on the screen. When the appliance is
switched on, press the timer button . The timer indicator (11) and the time indicator
ash on the screen. You can now set the desired time until automatic switch-off. Then
press any button (except the ON/OFF button) or wait 5 seconds to exit the setting.
After the timer has been activated, the remaining time until switch-off and the currently
set speed are displayed alternately on the screen at intervals of 10 seconds. The
corresponding indicator light (11/6) lights up in each case. As soon as the time has
elapsed, the appliance switches off automatically and goes into standby mode.
32
EN
Selecting wind mode
After switching on the appliance, press the wind mode button several times to set
the desired mode. Pressing the wind mode button several times cycles through the
modes in the following order:
Normal wind > Natural wind > Sleep wind > Normal wind.
The corresponding indicator lights up.
Normal wind:
In normal wind mode, the appliance runs at the set speed level (Low, Medium or High)
without any changes.
Natural wind:
The wind diagram of this mode is shown in the gure below:
6S 6S 6S 3S 12S 12S 3S 6S 3S15S
6S
T=90S
6S 6S 6S 6S 6S 3S 12S
6S 6S 12S 6S6S 6S6S 6S 6S
3S 6S 6S12S 6S
3S 6S 3S
T=90S
T=90S
6S
6S 6S 6S
6S 6S 6S
Low
Medium
High
STRONG
MIDDLE
WEAK
Low
Medium
High
Low
Medium
High
In natural wind mode, the corresponding indicator (7) lights up. The screen only shows
the original wind speed, changes are not displayed. This means that if, for example, the
natural wind mode with high speed has been activated, only the speed level „High“
(„3“) is displayed without changing.

33
EN
Sleep wind:
When the sleep wind mode is activated, the appliance initially continues to run at the
previously set wind speed. After 30 minutes, it is reduced at 30-minute intervals. This
mode is intended to prevent people who fall asleep from feeling uncomfortable due to
the appliance‘s speed setting being too high.
a) If the sleep wind mode has been activated at high speed, the appliance switches
to medium speed after 30 minutes. The corresponding indicator lights up. After
another 30 minutes of running at medium speed, the appliance switches to low
speed. The corresponding indicator lights up. The appliance then continues to run at
low speed until the timer expires or the appliance is switched off.
b) If the sleep wind mode has been activated at medium speed, the appliance
switches to low speed after 30 minutes. The corresponding indicator lights up. The
appliance then continues to run at low speed until the timer expires or the appliance
is switched off.
c) If the low speed sleep wind mode has been activated, the corresponding indicator
lights up. The appliance continues to run at low speed until the timer expires or the
appliance is switched off.
Cooling/humidication mode
While the appliance is switched on, press the cooling/humidication mode button
to switch the cooling function on and off. The corresponding indicator (9) lights up.
Turning the screen and indicators off/on (remote control)
When the appliance is on, you can press the screen off button on the remote control
to turn off the screen and all indicator lights. When the screen is off and you press the
screen off button or any other button, the indicator lights come back on but the
other button function is not performed. Press the desired button again to perform the
corresponding button function.
Negative ion function
When you switch on the appliance, the negative ion function is activated and the
corresponding LED indicator (4) lights up. When you switch off the appliance, the
negative ion function is deactivated.

34
EN
WIFI function
With the appliance switched on, press and hold the wind mode/WIFI button
for ve seconds. A beep is heard and the WIFI indicator (10) ashes rapidly for ve
seconds. Apps on the network can be congured in standard mode. If no connection
is established within 3 minutes, the WIFI indicator (10) goes out. To reconnect, press
the wind mode/WIFI button again. A beep is heard, the WIFI module is reset, the
WIFI indicator ashes rapidly for ve seconds. Apps on the network can be congured
in standard mode. Press and hold the wind mode/WIFI button again for 5 seconds
as soon as the WIFI indicator (10) ashes. A beep is heard and the WIFI indicator
(10) ashes slowly for 5 seconds. Apps on the network can now be congured in
compatibility mode.
Notes on using the WIFI function
• If the appliance is turned off within 10 seconds after it is turned on, the WIFI
indicator (10) returns to the status before it was turned off. If the appliance is turned
off after 10 seconds, the WIFI indicator (10) turns off and enters power-saving
mode. Press and hold the setting button for 5 seconds to restart.
• If the network is not congured within three minutes, the WIFI indicator (10) goes
off. Press and hold the setting button for 5 seconds to restart.
• If the router is switched off after the WIFI connection has been successfully
established, the WIFI indicator (10) also goes out. As soon as the router is switched
on again, the connection to the appliance is automatically re-established.
• When using the WIFI function, the WIFI indicator (10) must ash quickly. A
router (must be able to connect to external networks) and a mobile device (e.g.
smartphone) are required to use the Klarstein app. The Klarstein app must be
installed on the mobile end device that is also connected to the WIFI network.
35
EN
DEVICE CONTROL BY SMARTPHONE
If you integrate the device into your home WiFi, you can conveniently operate it via the
associated Klarstein app. The app not only allows you to remotely control the device via
your smartphone, but also gives you access to recipes and additional information.
Follow these steps to connect your smartphone to your Klarstein device:
1. Download the Klarstein app rst by scanning the QR code with your smartphone
(see below), or download it directly from App Store or Google Play.
2. Make sure your smartphone is connected to the same WiFi network that your
Klarstein device is to be connected to.
3. Open the Klarstein app.
4. Sign in to your account. If you do not have an account, sign up in the Klarstein app.
5. Follow the instructions from the app.
App Download
Use the scan function of your smartphone to scan the QR code and save the app on
your smartphone.
Note: The app provides further information on how to use the app and help on how
to connect to your device as soon as you open it for the rst time.
iOS Android
36
EN
Troubleshooting connection problems
If your Klarstein device cannot be found in the WLAN, check the following:
• Is the device plugged in?
• Is the WiFi feature of my phone enabled?
• Is the WiFi function of the Klarstein device activated? (Follow the instructions in the
app)
• Has the WLAN password been entered correctly?
• Are the router, Klarstein device and smartphone in the immediate vicinity during the
connection attempt? (Ideally no more than 5 m apart)
• If you have deactivated the 2.4 GHz band in the settings of your wireless router,
activate it in your router settings.
Note: For further help, follow the instructions in the app when setting up the
connection.
PROTECTIVE FUNCTIONS
Water shortage protection switch
If the water pump runs for 60 seconds and the software detects that the water level
switch is disconnected (water shortage) for 5 consecutive seconds (65 seconds in total),
the water pump automatically stops running and the appliance beeps 10 times.
Water level detection
Within 10 seconds of switching on, press and hold the cooling/humidication mode
button after hearing the beep. The water level is then detected within 3 seconds. If
there is no water in the water tank, the cooling function is deactivated and the appliance
beeps 10 times. The water level detection is deactivated after pressing the ON/OFF
button or in the event of a power failure.
Memory function
1. If the appliance is not disconnected from the power supply, when it is switched on
again, the appliance will continue to run in the mode that was set before it was
switched off. Sleep wind, dry wind and timer modes are not saved.
2. If the appliance is not disconnected from the power, when it is switched on again, it
rst runs at medium speed for 3 seconds and then changes to the speed set before
it was switched off.

37
EN
FILLING THE WATER TANK
Fill water into the water tank when using the cooling and humidifying function. Before
lling, rotate the winding frame 90° respectively. Pull out the water tank halfway. Pour
the water slowly into the water tank. After lling, push the water tank back into the
appliance. Rotate the winding frame to the original position.
Water tank lock knob
is locked
Water tank lock knob
is unlocked
Water tank is drawn out
for water lling
When lling water into the water tank, pay attention to the water level indicator:
1. When lling manually, make sure that the water level is above the minimum
indicator and below the maximum indicator.
2. Only use clean drinking water.
3. When the appliance is used for the rst time, there may be a slight smell and the
water in the water tank may be slightly discoloured. This is normal and harmless and
has no effect on your health.
4. When inserting the ice box, make sure that the maximum indicator is not exceeded.
38
EN
CLEANING AND CARE
Cleaning
• Before cleaning the appliance, switch it off and disconnect the mains plug from the
socket.
• Do not use chemicals, petrol, thinners or other substances that could damage the
surface of the appliance to clean it.
• Remove dust with a soft cloth. For stubborn stains, use a little water (below 50 °C)
and a neutral detergent. Then rub the surface of the unit dry with a soft cloth.
Filter cleaning
Clean the lters at least once a month. To do this, proceed as follows:
1. Pull the mains plug out of the socket.
2. First remove the rear ventilation grille and then the lter.
3. Let the lter soak in a soap solution for a few minutes, then clean it and let it dry.
4. Put the lter and the rear ventilation grille back into the appliance when both are
completely dry.

39
EN
Cleaning the water tank
• Pull the mains plug out of the socket. Turn the winding frame knob to the horizontal
position and pull the water tank halfway out.
• Put your hand into the water tank, rotate the xing buckle 90°, and then push the
water pump box assembly down to take it out, and nally take out the water tank.
• Remove limescale residues in the water tank with a damp cloth soaked in neutral
detergent. Then rinse the water tank with clear water.
Cleaning the surface
• Before cleaning the appliance housing, make sure that the appliance is switched off
and the mains plug has been removed from the socket.
• Wipe the surface with a damp cloth. Do not rinse it directly with water.
• Do not use aggressive or abrasive cleaning agents.
Storage
• If the appliance will not be used for a long time, unplug it from the mains and pack
it away to prevent dust from getting into the housing.
• Before storing the appliance, make sure that it is clean, the lter is dry and that there
is no water in the water tank.
• After packing, store it in a dry, ventilated place.

40
EN
DISPOSAL CONSIDERATIONS
If there is a legal regulation for the disposal of electrical and
electronic devices in your country, this symbol on the product
or on the packaging indicates that this product must not be
disposed of with household waste. Instead, it must be taken to
a collection point for the recycling of electrical and electronic
equipment. By disposing of it in accordance with the rules, you
are protecting the environment and the health of your fellow
human beings from negative consequences. For information
about the recycling and disposal of this product, please contact
your local authority or your household waste disposal service.
This product contains batteries. If there is a legal regulation for
the disposal of batteries in your country, the batteries must not be
disposed of with household waste. Find out about local regulations
for disposing of batteries. By disposing of them in accordance with
the rules, you are protecting the environment and the health of your
fellow human beings from negative consequences.
DECLARATION OF CONFORMITY
Manufacturer:
Chal-Tec GmbH, Wallstrasse 16, 10179 Berlin, Germany.
Importer for Great Britain:
Berlin Brands Group UK Limited
PO Box 42
272 Kensington High Street
London, W8 6ND
United Kingdom
Hereby, Chal-Tec GmbH declares that the radio equipment type
Skytower 360° Smart is in compliance with Directive 2014/53/
EU. The full text of the EU declaration of conformity is available at
the following internet address: use.berlin/10035818
For Great Britain: Hereby, Chal-Tec GmbH declares that the
radio equipment type Skytower 360° Smart is in compliance with
the relevant statutory requirements. The full text of the declaration
of conformity is available at the following internet address: use.
berlin/10035818
41
FR
Chère cliente, cher client,
Toutes nos félicitations pour l’acquisition de ce nouvel appareil.
Veuillez lire attentivement et respecter les instructions de ce mode
d’emploi an d’éviter d’éventuels dommages. Nous ne saurions
être tenus pour responsables des dommages dus au non-respect
des consignes et à la mauvaise utilisation de l’appareil. Scannez
le QR-Code pour obtenir la dernière version du mode d‘emploi
et des informations supplémentaires concernant le produit.
SOMMAIRE
Declaration of conformity40
Consignes de sécurité42
Aperçu de l‘appareil44
Accessoires45
Panneau de commande et télécommande46
Voyants de l‘afchage47
Mise en marche et utilisation48
Contrôle de l‘appareil par smartphone53
Fonctions de protection54
Remplissage de réservoir d‘eau55
Nettoyage et entretien56
Conseils pour le recyclage58
Déclaration de conformité58
FICHE TECHNIQUE
Numéro d'article 10035818
Alimentation 220-240 V ~ 50 Hz
Puissance 60 W
Capacité du réservoir d'eau 6 Liter
Débit d'air 450 m
3
/h
Volume d'évaporation 950 ml/h
Niveau sonore ≤ 55 dB
WiFi standard
802.11 b/g/n
WiFi fréquence
2,4 GHz
WiFi puissance de radiofréquence (max.)
20 dBm

42
FR
CONSIGNES DE SÉCURITÉ
• Vériez les informations de tension sur la plaque signalétique avant utilisation. Ne
connectez l‘appareil qu‘à des prises qui correspondent à la tension de l‘appareil.
• Éloignez le câble des surfaces chaudes et des objets tranchants.
• Ne faites pas passer le cordon sous un tapis et ne le couvrez pas avec d‘autres
objets ou tissus. Installez le câble de manière à ce qu‘il ne fasse trébucher ni
n‘accroche personne.
• N‘utilisez pas l‘appareil si le cordon d‘alimentation ou la che est endommagé.
• Si le cordon d‘alimentation ou la che sont endommagés, faites-les remplacer par
le fabricant, une entreprise spécialisée agréée ou une personne de qualication
similaire.
• N‘utilisez l‘appareil qu‘à l‘intérieur.
• Ne couvrez pas l‘appareil.
• Placez l‘appareil sur une surface plane et stable. Assurez-vous que l‘appareil est
bien vertical.
• Vériez que l‘appareil est éteint avant d‘insérer la che dans la prise.
• N‘utilisez pas l‘appareil avec les mains mouillées et ne touchez pas la che et le
câble avec les mains mouillées.
• Ne laissez pas l‘appareil sans surveillance pendant son fonctionnement. Éteignez-
le et débranchez-le lorsque vous ne l‘utilisez pas.
• Retirez la che de la prise avant de nettoyer ou de réparer l‘appareil.
• Ne tirez pas sur le câble pour débrancher la che, tirez sur la che elle-même.
• Les enfants à partir de 8 ans, les personnes ayant un handicap mental, sensoriel
et physique ne peuvent utiliser l‘appareil que s‘ils ont été parfaitement familiarisés
avec les fonctions et les précautions de sécurité par un responsable et s‘ils
comprennent les risques associés.
• Utilisez l‘appareil uniquement comme décrit dans ces instructions.
• N‘insérez pas vos doigts ou objets dans les ouvertures de ventilation.
• Ne placez pas l‘appareil à proximité de rideaux, voilages, nappes ou textiles
similaires. Ils pourraient être entraînés dans le ventilateur et l‘endommager.
• N‘utilisez pas l‘appareil dans des pièces humides telles que les salles de bain.
• N‘utilisez pas l‘appareil avant que les roues ne soient montées ou lorsqu‘il est sur
le côté.
• Déroulez complètement le cordon avant utilisation.

43
FR
• L‘appareil humidie l‘air ambiant. Cependant, évitez une humidité excessive. Nous
recommandons une humidité comprise entre 40 et 50 %. Une humidité excessive
peut entraîner des moisissures ou des problèmes de santé.
• Placez l‘appareil uniquement sur des surfaces insensibles à l‘eau et à une
humidité élevée. Il peut toujours arriver que quelques gouttes se renversent lors de
l‘installation et du retrait du réservoir d‘eau. Dans ce cas, essuyez immédiatement
les gouttelettes d‘eau.
• Changez l‘eau du réservoir au plus tard au bout de 3 jours.
CARACTÉRISTIQUES DU PRODUIT
• Mise en marche / arrêt : bouton marche / arrêt séparé
• Vitesse du ventilateur : 3 vitesses : faible, moyenne et élevée
• Modes de ventilation : normal, naturel et veille
• Direction du vent : basculement automatique des fentes de ventilation horizontales
et verticales
• Temps jusqu‘à l‘arrêt automatique : minuterie 1-9 heures sans accumulation
(tolérance de minuterie dans la plage de 3 %).
• Pompe à eau pour refroidissement / humidication de l‘air
• Contrôle par boutons poussoirs
• Fonction „vent sec“ et atténuation automatique de l‘éclairage LED si aucun bouton
n‘est actionné dans la minute
• Fonction de télécommande (portée d‘au moins 6 mètres)
• Réservoir d‘eau facile à nettoyer
• Technologie de refroidissement par pulvérisation d‘eau, avec une circulation d‘eau
élevée et un refroidissement plus rapide.

44
FR
APERÇU DE L‘APPAREIL
1
Boîtier avant
6
Boîtier arrière
2
Panneau de commande
7
Grille de ventilation arrière
3
Fentes de ventilation horizontales
8
Enroulement du câble
4
Cache décoratif
9
Câble d'alimentation
5
Base de l'appareil
10
Réservoir d'eau
Remarques sur l‘utilisation du réservoir d‘eau
En principe, vous pouvez utiliser votre rafraîchisseur d‘air à tout moment sans eau dans
le réservoir. Il fonctionne alors comme un ventilateur normal. L‘eau du réservoir n‘est
nécessaire que pour la fonction de rafraîchissement. Le rafraîchisseur d‘air l‘évapore
par l‘échangeur en cellulose du nébuliseur, extrayant la chaleur de l‘air et réduisant
la température de l‘air du ventilateur de jusqu‘à 3 °C, en fonction de la fraîcheur de
l‘eau utilisée. Nous déconseillons d‘utiliser la fonction de rafraîchissement les jours où
l‘humidité est particulièrement élevée, car l‘appareil l‘augmente et peut ainsi contribuer
à des problèmes circulatoires.
45
FR
ACCESSOIRES
Télécommande Récipient à glace
Utilisation de la télécommande
1. Ouvrez le compartiment à piles de
la télécommande et insérez une
pile 3 V CR2032. Pour ouvrir le
compartiment à pile, appuyez sur le
couvercle dans le sens de la èche
(1) et tirez le compartiment à pile
dans le sens de la èche (2).
2. Pointez la télécommande vers le
récepteur pendant l‘utilisation.
3. Remplacez les piles usées. Faites
attention à respecter la polarité
(+/-) lors de l‘insertion de la nouvelle pile. Insérez ensuite le compartiment à piles
dans la télécommande..
Utilisation du récipient à glace
1. Placez le récipient à glace dans le compartiment congélateur jusqu‘à ce qu‘il soit
complètement congelé.
2. Placez le récipient à glace dans le réservoir d‘eau de la machine. Dans les 10
minutes suivant l‘insertion du récipient à glace, la température du réservoir d‘eau
descend en dessous de la température ambiante.
3. Deux récipients à glace sont inclus dans la livraison. Utilisez-les en alternance.
4. Il est interdit d‘ouvrir le couvercle du récipient à glace. N‘avalez jamais le contenu
du récipient à glace.
Remarque : Avec ses propriétés spéciales de stockage frigorique et d‘isolation,
le récipient à glace absorbe lentement la chaleur de l‘eau an de maintenir la
température du réservoir d‘eau en dessous de la température ambiante pendant
des heures. Cela produit un vent plus agréable et plus frais grâce au ventilateur du
climatiseur.
46
FR
PANNEAU DE COMMANDE ET TÉLÉCOMMANDE
Panneau de commande (touches)
MARCHE/
ARRÊT
Fonction
oscillation
(gauche/
droite)
Fonction
oscillation
(haut/bas)
Vitesse de
ventilation
Minuterie
Ventilation/
Wi
Rafraîchis-
sement/
Humidi-
cation
Télécommande (touches)
Marche/arrêt Minuterie
Fonction oscillation (gauche
droite)
Écran éteint
Fonction oscillation (haut/bas) Mode de ventilation
Vitesse de ventilation Rafraîchissement /
Humidication

47
FR
VOYANTS DE L‘AFFICHAGE
1 2 3 4 5 6 7 8 9
11 10
1 Marche /Arrêt 7 Mode vent naturel
2 Fonction oscillation (gauche
droite)
8 Mode ventilation de nuit
3 Fonction oscillation (haut/bas) 9 Rafraîchissement /
humidication
4 Fonctions ions négatifs 10 Wi
5 Fenêtre d'afchage 11 Minuterie
6 Vitesse de ventilation
48
FR
MISE EN MARCHE ET UTILISATION
Avant l‘utilisation
• Sortez l‘appareil de son emballage et retirez tous les matériaux d‘emballage.
• Placez l‘appareil sur une surface stable et plane.
• Insérez la che d‘alimentation dans la prise. L‘appareil peut alors être utilisé
directement et aucune installation n‘est requise.
Mise en marche
La première fois que vous branchez l‘appareil sur la prise, il émet deux bips et passe en
mode veille. Tous les voyants sont éteints. Hormis le bouton ON / OFF, tous les boutons
sont inactifs.
Pour allumer et éteindre l‘appareil
En mode veille, appuyez sur la touche ON / OFF pour allumer l‘appareil. Lorsque
vous allumez l‘appareil pour la première fois, il fonctionne à basse vitesse en mode vent
normal. Si vous éteignez puis rallumez l‘appareil, le mode utilisé avant sa mise hors
tension est restauré. Cela ne s‘applique pas à la minuterie. Si le mode ventilation de nuit
a été réglé avant la mise hors tension, il ne sera pas enregistré. Lors de sa remise sous
tension, l‘appareil fonctionnera alors en mode vent normal.
Si vous n‘appuyez sur aucun bouton (y compris sur la télécommande) dans la minute
après le démarrage, tous les voyants lumineux baissent à 30 % de leur luminosité
d‘origine. Appuyez à nouveau sur la touche souhaitée pour restaurer la luminosité et
exécuter la fonction correspondante.
Pour éteindre l‘appareil, appuyez à nouveau sur MARCHE / ARRÊT . L‘appareil
émet alors un bip. Lorsque l‘appareil est éteint, il passe en mode veille et les voyants et
l‘écran s‘éteignent.
Fonction oscillation
Avec l‘appareil allumé, appuyez sur le bouton d‘oscillation gauche-droite pour
activer l‘oscillation gauche-droite. Le voyant correspondant (2) s‘allume.
L‘appareil étant allumé, appuyez sur le bouton d‘oscillation haut-bas pour activer
l‘oscillation de haut en bas. Le voyant correspondant (3) s‘allume.
49
FR
Le mode d‘oscillation gauche-droite fonctionne comme suit : les volets pivotent à un
angle de 80° vers la gauche et la droite. Lors du changement de direction, les lamelles
s‘arrêtent pendant 1 seconde puis pivotent dans l‘autre sens.
Si la fonction d‘oscillation haut / bas est activée après la première mise en marche,
l‘appareil règle d‘abord la position de départ correcte. Il peut arriver que les volets
horizontaux soient fermés pendant environ 10 secondes, puis basculent vers le haut
pour s‘ouvrir. Il s‘agit d‘un processus normal.
Lorsque la fonction d‘oscillation de haut en bas est désactivée, les volets horizontaux
basculent en position horizontale et s‘arrêtent.
Réglage de la vitesse de ventilation
La vitesse du vent se règle avec le bouton de vitesse . Appuyez plusieurs fois sur le
bouton de vitesse pour régler la vitesse dans l‘ordre suivant :
Faible > Moyenne > Élevée > Faible.
L‘écran afche les niveaux de vitesse en chiffres :
Vitesse Afchage
Faible 1
Moyenne 2
Élevée 3
Fonction „vent sec“
Appuyez sur la touche de vitesse
et maintenez-la pendant 3 secondes pour
démarrer la fonction Vent sec. L‘appareil fonctionne à des vitesses de vent élevées,
l‘écran afche „3“ et clignotera pendant 20 minutes. Pendant l‘utilisation de cette
fonction, tous les boutons à l‘exception de MARCHE / ARRÊT sont inactifs. Appuyez sur
touche de vitesse et maintenez-la pendant trois secondes pour annuler la fonction.
Si la fonction „vent sec“ est restée activée pendant 20 minutes, l‘appareil s‘éteint
automatiquement et passe en mode veille.
Réglage de la minuterie
Le délai avant arrêt automatique de l‘appareil se règle avec le bouton de minuterie
. Vous pouvez choisir une durée entre 1 et 9 heures. Le réglage de la minuterie se fait
par intervalles d‘une heure et s‘afche à l‘écran. L‘appareil étant allumé, appuyez sur
le bouton de la minuterie . L‘afchage de la minuterie (11) et l‘afchage de l‘heure
clignotent sur l‘écran. Vous pouvez maintenant régler la durée souhaitée jusqu‘à l‘arrêt
automatique. Appuyez ensuite sur n‘importe quel bouton (sauf ON / OFF) ou attendez
5 secondes pour quitter le réglage.
50
FR
Une fois la minuterie activée, le temps restant jusqu‘à l‘arrêt et la vitesse actuelle
s‘afchent en alternance à l‘écran à intervalles de 10 secondes. Le voyant
correspondant (11/6) s‘allume. Dès que le délai est écoulé, l‘appareil s‘éteint
automatiquement et passe en mode veille.
Choix du mode de ventilation
Après avoir allumé l‘appareil, appuyez plusieurs fois sur la touche de mode vent
pour régler le mode souhaité. En appuyant plusieurs fois sur le bouton de mode vent
, les modes sont exécutés dans l‘ordre suivant :
Vent normal> Vent naturel > Vent de nuit > Vent normal. Le voyant correspondant (7/8)
s‘allume. Il n‘y a pas de voyant lumineux pour le mode vent normal.
Vent normal :
En mode vent normal, l‘appareil fonctionne sans aucun changement au niveau de
vitesse réglé (faible, moyen ou élevé).
Vent naturel :
La conguration du vent pour ce mode est illustrée dans la gure ci-dessous :
6S 6S 6S 3S 12S 12S 3S 6S 3S15S
6S
T=90S
6S 6S 6S 6S 6S 3S 12S
6S 6S 12S 6S6S 6S6S 6S 6S
3S 6S 6S12S 6S
3S 6S 3S
T=90S
T=90S
6S
6S 6S 6S
6S 6S 6S
Low
Medium
High
STRONG
MIDDLE
WEAK
Low
Medium
High
Low
Medium
High
En mode vent naturel, le voyant correspondant (7) s‘allume. L‘écran n‘afche que la
vitesse du vent d‘origine, les changements ne sont pas afchés. Si, par exemple, le
mode vent naturel a été activé à grande vitesse, seul le niveau de vitesse „High“ (3)
s‘afche sans changer.
Moyen
Élevé
Lent
Moyen
Élevé
MOYEN
FORT
Lent
Moyen
Élevé
Lent
FAIBLE

51
FR
Vent de nuit :
Lorsque le mode vent de nuit est activé, l‘appareil continue initialement à fonctionner à
la vitesse du vent dénie précédemment. Après 30 minutes, il est réduit par intervalles
de 30 minutes. Dès que la minuterie a expiré, l‘appareil passe automatiquement en
mode veille. Si aucune minuterie n‘a été réglée, l‘appareil continue de fonctionner à
faible vitesse.
a) Si le mode vent de nuit est activé à haute vitesse, l‘appareil passera en vitesse
moyenne après 30 minutes. Le voyant correspondant s‘allume. Après 30 minutes
supplémentaires de fonctionnement à vitesse moyenne, l‘appareil passe à basse
vitesse. Le voyant correspondant s‘allume. L‘appareil continue alors à fonctionner à
basse vitesse jusqu‘à ce que la minuterie expire ou que vous éteigniez l‘appareil.
b) Si le mode vent de nuit est activé à vitesse moyenne, l‘appareil passera en vitesse
lente après 30 minutes. Le voyant correspondant s‘allume. L‘appareil continue
alors à fonctionner à basse vitesse jusqu‘à ce que la minuterie expire ou que vous
éteigniez l‘appareil.
c) Lorsque le mode vent de nuit est activé à basse vitesse, l‘indicateur correspondant
s‘allume. L‘appareil continue de fonctionner à basse vitesse jusqu‘à ce que la
minuterie expire ou que vous éteigniez l‘appareil.
Mode rafraîchissement / humidication
L‘appareil étant allumé, appuyez sur la touche rafraîchissement / humidication
pour activer et désactiver la fonction de rafraîchissement. Le voyant correspondant (9)
s‘allume.
Pour éteindre l‘écran et les voyants (télécommande)
Lorsque l‘appareil est allumé, appuyez sur Éteindre l‘écran sur la télécommande
pour éteindre l‘écran et tous les voyants lumineux. Si l‘écran est éteint et que vous
appuyez sur Éteindre l‘écran ou sur n‘importe quelle autre touche, les voyants
s‘allument à nouveau, mais l‘autre fonction des touches ne sera pas exécutée. Appuyez
à nouveau sur la touche souhaitée pour exécuter la fonction de touche correspondante.
Fonction ions négatifs
Lorsque vous allumez l‘appareil, la fonction ion négatif s‘active et le voyant LED
correspondant (4) s‘allume. La fonction ions négatifs est désactivée lorsque vous
éteignez l‘appareil.
52
FR
Fonction Wi
L‘appareil allumé, appuyez sur Mode vent / WiFi pendant cinq secondes. Vous
entendez un bip et le voyant WiFi (10) clignote rapidement pendant cinq secondes.
Les applications sur le réseau peuvent être congurées en mode standard. Si aucune
connexion n‘est établie dans les 3 minutes, le voyant Wi (10) s‘éteint. Pour vous
reconnecter, appuyez à nouveau sur Mode vent / WiFi . Un bip retentit, le module
Wi est réinitialisé, le voyant Wi (10) clignote rapidement pendant cinq secondes.
Les applications sur le réseau peuvent être congurées en mode standard. Appuyez
de nouveau sur Mode vent / Wi et maintenez-le pendant 5 secondes dès que
le voyant Wi (10) clignote. Un bip retentit et le voyant WiFi (10) clignote lentement
pendant 5 secondes. Les applications du réseau peuvent désormais être congurées en
mode de compatibilité.
Remarques sur l‘utilisation de la fonction Wi
• Si vous éteignez à nouveau l‘appareil dans les 10 secondes après la mise sous
tension, le voyant Wi (10) revient à son état avant l‘arrêt. Si vous éteignez
l‘appareil après 10 secondes, le voyant Wi (10) s‘éteint et passe en mode
d‘économie d‘énergie. Appuyez sur Paramètres et maintenez-le pendant 5
secondes pour redémarrer.
• Si le réseau n‘est pas conguré dans les trois minutes, le voyant Wi (10) s‘éteint.
Appuyez sur Paramètres et maintenez-le pendant 5 secondes pour redémarrer.
• Si le routeur est éteint après que la connexion Wi a été établie avec succès, le
voyant Wi (10) s‘éteint également. Dès que le routeur est remis sous tension, la
connexion à l‘appareil est automatiquement rétablie.
• Lors de l‘utilisation de la fonction Wi, le voyant Wi (10) doit clignoter
rapidement. Un routeur (il doit être possible de se connecter à des réseaux
externes) et un appareil mobile (par exemple un smartphone) sont nécessaires pour
utiliser l‘application Klarstein. L‘application Klarstein doit être installée sur l‘appareil
mobile également connecté au réseau WiFi.

53
FR
CONTRÔLE DE L‘APPAREIL PAR SMARTPHONE
Si vous intégrez votre appareil Klarstein dans votre WiFi domestique, vous pouvez le
contrôler très facilement à l‘aide de l‘application Klarstein associée. L‘application vous
permet non seulement de contrôler l‘appareil à distance depuis votre smartphone, mais
vous donne également accès à des recettes et à d‘autres informations.
Procédez comme suit pour connecter votre smartphone à votre appareil Klarstein :
1. Téléchargez d‘abord l‘application Klarstein en scannant le code QR avec votre
smartphone (voir ci-dessous) ou téléchargez-la directement depuis l‘App Store ou
Google Play.
2. Assurez-vous que votre smartphone est connecté au même réseau WiFi que votre
appareil Klarstein.
3. Ouvrez l‘application Klarstein.
4. Connectez-vous à votre compte. Si vous n‘avez pas encore de compte, inscrivez-
vous dans l‘application Klarstein.
5. Suivez les instructions de l‘application.
Téléchargement de l’application
Utilisez la fonction scanner de votre téléphone portable pour scanner le code QR et
enregistrer l’application sur votre smartphone.
Remarque : A son premier lancement, l‘application vous fournit de plus amples
informations d‘utilisation et une assistance pour établir une connexion avec votre
appareil.
iOS Android
54
FR
Résolution des problèmes de connexion
Si votre appareil Klarstein est introuvable sur le Wi, vériez les points suivants :
• L‘appareil est-il branché ?
• Le Wi est-il activé sur votre smartphone ?
• Le Wi de l‘appareil Klarstein est-il activé ? (Suivez les instructions de l‘application.)
• Le mot de passe WiFi a-t-il été saisi correctement ?
• Le routeur, l‘appareil Klarstein et le smartphone se trouvent-ils à proximité
immédiate lors de la tentative de couplage ? (Idéalement pas plus de 5 m l‘un de
l‘autre.)
• Si vous avez désactivé la bande 2,4 GHz dans les paramètres de votre routeur
sans l, activez-la.
Remarque : Pour obtenir de l‘aide, suivez les instructions de l‘application lors de
l‘établissement de la connexion.
FONCTIONS DE PROTECTION
Protection contre le manque d‘eau
Si la pompe à eau fonctionne pendant 60 secondes et que le logiciel détecte que
l‘interrupteur de niveau d‘eau n‘a pas de connexion pendant 5 secondes consécutives
(65 au total) (trop peu d‘eau), la pompe à eau s‘arrête automatiquement et l‘appareil
émet 10 bips.
Détection du niveau du réservoir
Dans les 10 secondes suivant la mise en marche, appuyez et maintenez la touche Mode
Refroidissement / Humidication après avoir entendu le bip. Le niveau d‘eau est
alors déterminé en 3 secondes. S‘il n‘y a pas d‘eau dans le réservoir, la fonction de
refroidissement est désactivée et l‘appareil émet 10 bips.
La détection du niveau d‘eau est désactivée après appui sur MARCHE/ARRÊT ou
en cas de panne de courant.
Fonction mémorisation
1. Si vous ne débranchez l‘appareil pas de l‘alimentation électrique, il reprend au
démarrage le mode déni avant sa mise hors tension. Les modes vent de nuit, vent
sec et minuterie ne sont pas enregistrés.
2. Si l‘appareil n‘est pas déconnecté de l‘alimentation électrique, il fonctionne à
vitesse moyenne pendant 3 secondes lors de sa remise sous tension, puis passera à
la vitesse réglée avant l‘arrêt.

55
FR
REMPLISSAGE DE RÉSERVOIR D‘EAU
Pour utiliser les fonctions de rafraîchissement et d‘humidication, remplissez le réservoir
d‘eau. Avant le remplissage, tournez le rembobinage du câble de 90°. Sortez le
réservoir d‘eau à moitié. Versez lentement l‘eau dans le réservoir. Après le remplissage,
repoussez le réservoir dans l‘appareil. Remettez l‘enrouleur de cordon dans sa position
d‘origine.
La sécurité du réservoir
d'eau est fermée
La sécurité du réservoir
d'eau est ouverte
Retirez le réservoir pour le
remplir d'eau
Faites attention à l‘indicateur de niveau d‘eau lors du remplissage du réservoir :
1. Lors du remplissage manuel, assurez-vous que le niveau d‘eau est au-dessus du
repère minimum et en dessous du repère maximum.
2. Utilisez uniquement de l‘eau potable propre.
3. Lorsque vous utilisez l‘appareil pour la première fois, il peut y avoir une légère
odeur et l‘eau dans le réservoir d‘eau peut être légèrement décolorée. Ceci est
normal et sans danger et n‘affectera pas votre santé.
4. Lors de l‘insertion du récipient à glace, veillez à ne pas dépasser le repère
maximum.

56
FR
NETTOYAGE ET ENTRETIEN
Nettoyage
• Avant de nettoyer l‘appareil, éteignez-le et débranchez la che de la prise.
• N‘utilisez pas de produits chimiques, de benzène, de diluants ou d‘autres
substances pour nettoyer l‘appareil qui pourraient endommager la surface de
l‘appareil.
• Retirez la poussière avec un chiffon doux. Utilisez de l‘eau (en dessous de 50
°C) et un détergent neutre pour les taches tenaces. Essuyez ensuite la surface de
l‘appareil avec un chiffon doux.
Nettoyage des ltres
Nettoyez les ltres au moins une fois par mois. Procédez comme suit pour ce faire :
1. Retirez la che d‘alimentation de la prise.
2. Retirez d‘abord la grille de ventilation arrière, puis le ltre.
3. Faites tremper le ltre dans une solution savonneuse pendant quelques minutes, puis
nettoyez-le et laissez-le sécher.
4. Remettez le ltre et la grille de ventilation arrière dans l‘appareil lorsqu‘ils sont
complètement secs.

57
FR
Nettoyage du réservoir d‘eau
1. Retirez la che d‘alimentation de la prise. Tournez le rembobinage du cordon en
position horizontale et retirez le réservoir d‘eau à moitié.
2. Mettez votre main dans le réservoir d‘eau et tournez la xation de 90°. Appuyez
ensuite sur le boîtier de la pompe à eau et retirez le réservoir d‘eau.
3. Éliminez les résidus de calcaire du réservoir d‘eau avec un chiffon humide imbibé
d‘un produit de nettoyage neutre. Rincez ensuite le réservoir d‘eau à l‘eau claire.
Nettoyage du corps de l‘appareil
• Avant de nettoyer le boîtier de l‘appareil, assurez-vous que l‘appareil est éteint et
que la che d‘alimentation est retirée de la prise.
• Nettoyez le boîtier de l‘appareil avec un chiffon humide. Ne le rincez pas
directement à l‘eau.
• N‘utilisez pas de produits de nettoyage agressifs ou abrasifs.
Rangement
• Si l‘appareil n‘est pas utilisé pendant une longue période, débranchez-le et
emballez-le pour empêcher la poussière de pénétrer dans le boîtier.
• Avant l‘emballage, assurez-vous que l‘appareil est propre, que le ltre est sec et
qu‘il n‘y a pas d‘eau dans le réservoir.
• Après l‘avoir emballé, conservez-le dans un endroit sec et aéré.

58
FR
CONSEILS POUR LE RECYCLAGE
S‘il existe une réglementation pour l‘élimination ou le
recyclage des appareils électriques et électroniques dans
votre pays, ce symbole sur le produit ou sur l‘emballage
indique que cet appareil ne doit pas être jeté avec les
ordures ménagères. Vous devez le déposer dans un point
de collecte pour le recyclage des équipements électriques
et électroniques. La mise au rebut conforme aux règles
protège l‘environnement et la santé de vos semblables des
conséquences négatives. Pour plus d‘informations sur le
recyclage et l‘élimination de ce produit, veuillez contacter
votre autorité locale ou votre service de recyclage des
déchets ménagers.
Ce produit contient des piles. S‘il existe une réglementation
pour l‘élimination ou le recyclage des piles dans votre pays,
vous ne devez pas les jeter avec les ordures ménagères.
Renseignez-vous sur les dispositions locales relatives à la
collecte des piles usagées. La mise au rebut conforme aux
règles protège l‘environnement et la santé de vos semblables
des conséquences négatives.
DÉCLARATION DE CONFORMITÉ
Fabricant :
Chal-Tec GmbH, Wallstraße 16, 10179 Berlin, Allemagne.
Importateur pour la Grande Bretagne :
Berlin Brands Group UK Limited
PO Box 42
272 Kensington High Street
London, W8 6ND
United Kingdom
Le soussigné, Chal-Tec GmbH, déclare que l’équipement
radioélectrique du type Skytower 360° Smart est conforme à la
directive 2014/53/UE. Le texte complet de la déclaration UE
de conformité est disponible à l’adresse internet suivante : use.
berlin/10035818

59
ES
Estimado cliente:
Le felicitamos por la adquisición de este producto. Lea
atentamente el siguiente manual y siga cuidadosamente las
instrucciones de uso con el n de evitar posibles daños. La
empresa no se responsabiliza de los daños ocasionados por
un uso indebido del producto o por haber desatendido las
indicaciones de seguridad. Escanee el siguiente código QR
para obtener acceso al manual de usuario más reciente y otra
información sobre el producto.
ÍNDICE
Indicaciones de seguridad60
Descripción del aparato62
Accesorio63
Panel de control y mando a distancia64
Anuncios en pantalla65
Puesta en funcionamiento66
Control del dispositivo a través del smartphone71
Funciones de protección72
Llenado del depósito de agua73
Limpieza y cuidado74
Retirada del aparato76
Declaración de conformidad76
DATOS TÉCNICOS
Número de artículo 10035818
Alimentación 220-240 V ~ 50 Hz
Potencia 60 W
Capacidad del depósito de agua 6 litros
Volumen de aire 450 m
3
/h
Volumen de evaporación 950 ml/h
Nivel de ruido ≤ 55 dB
Standard WiFi
802.11 b/g/n
Frecuencia WiFi
2,4 GHz
Potencia de transmisión BT (máx.)
20 dBm

60
ES
INDICACIONES DE SEGURIDAD
• Antes de utilizar el aparato, compruebe la tensión en la placa técnica del mismo.
Conecte el aparato a tomas de corriente que se adecuen a su tensión.
• Mantenga el cable alejado de supercies calientes y objetos alados.
• No pase el cable por debajo de una alfombra ni lo cubra con otros objetos o telas.
Coloca el cable de manera que nadie se caiga o quede atrapado en él.
• No utilice el aparato si el cable de alimentación o el enchufe están dañados.
• Si el cable de alimentación o el enchufe está dañado, deberá ser sustituido por el
fabricante, una empresa autorizada o una persona cualicada.
• Utilice el aparato sólo en habitaciones bien ventiladas.
• No cubra el aparato.
• Coloque el aparato sobre una supercie estable y plana. Asegúrese de que el
dispositivo está colocado recto.
• Asegúrese de que el aparato esté apagado antes de introducir el enchufe en la
toma.
• No toque ni el aparato, ni el enchufe ni el cable con las manos mojadas.
• No deje el aparato sin supervisión durante su funcionamiento. Apáguelo y
desenchúfelo cuando no lo use.
• Desenchufe el aparato antes de limpiarlo o darle mantenimiento.
• No desconecte el enchufe tirando del cable; en su lugar, tire del cuerpo del
enchufe.
• Los niños mayores de 8 años y las personas con discapacidad física, sensorial
o psíquica pueden utilizar el aparato si han sido previamente instruidos por su
tutor o supervisor sobre el funcionamiento del mismo y conocen las funciones, las
indicaciones de seguridad y los riesgos asociados.
• Utilice el aparato sólo como se describe en este manual.
• No introduzca los dedos ni objetos en las aberturas de ventilación.
• No coloque el aparato cerca de cortinas, paños, manteles o tejidos similares.
Podrías ser arrastrado por el ventilador y dañarlo.
• No coloque el aparato en zonas húmedas como los baños.
• No utilice el aparato antes de montar las ruedas o cuando esté tumbado.
• Desenrolle el cable completamente antes de utilizarlo.

61
ES
• Durante el funcionamiento, el aparato humidica el aire ambiente. Sin embargo,
hay que evitar el exceso de humedad. Recomendamos una humedad entre 40-
50%. Un exceso de humedad puede provocar moho o problemas de salud.
• Coloque la unidad sólo en supercies que no sean sensibles a la humedad.
Siempre es posible que se pierdan algunas gotas al instalar o retirar el depósito de
agua. Si esto ocurre, limpie las gotas de agua inmediatamente.
• Cambie el agua del tanque después de 3 días como máximo.
CARACTERÍSTICAS DEL PRODUCTO
• Encendido/apagado: Botón separado de ON/OFF
• Velocidad del ventilador: 3 niveles de velocidad: Bajo, Medio y Alto
• Modos de viento: Normal, Viento natural y Viento dormido
• Dirección del viento: Oscilación automática de las ventilaciones horizontales y
verticales
• Tiempo hasta la desconexión automática: temporizador de 1 a 9 horas sin
acumulación (tolerancia del temporizador en espacio de 3%).
• Bomba de agua para refrigeración/humidicación
• Control por pulsador
• Función "Dry wind" y atenuación automática de la iluminación LED si no se pulsa
ningún botón en un minuto
• Función de control remoto (alcance de al menos 6 metros)
• Depósito de agua fácil de limpiar
• Tecnología de refrigeración con circulación de agua por aspersión, con alta
circulación de agua y enfriamiento más rápido
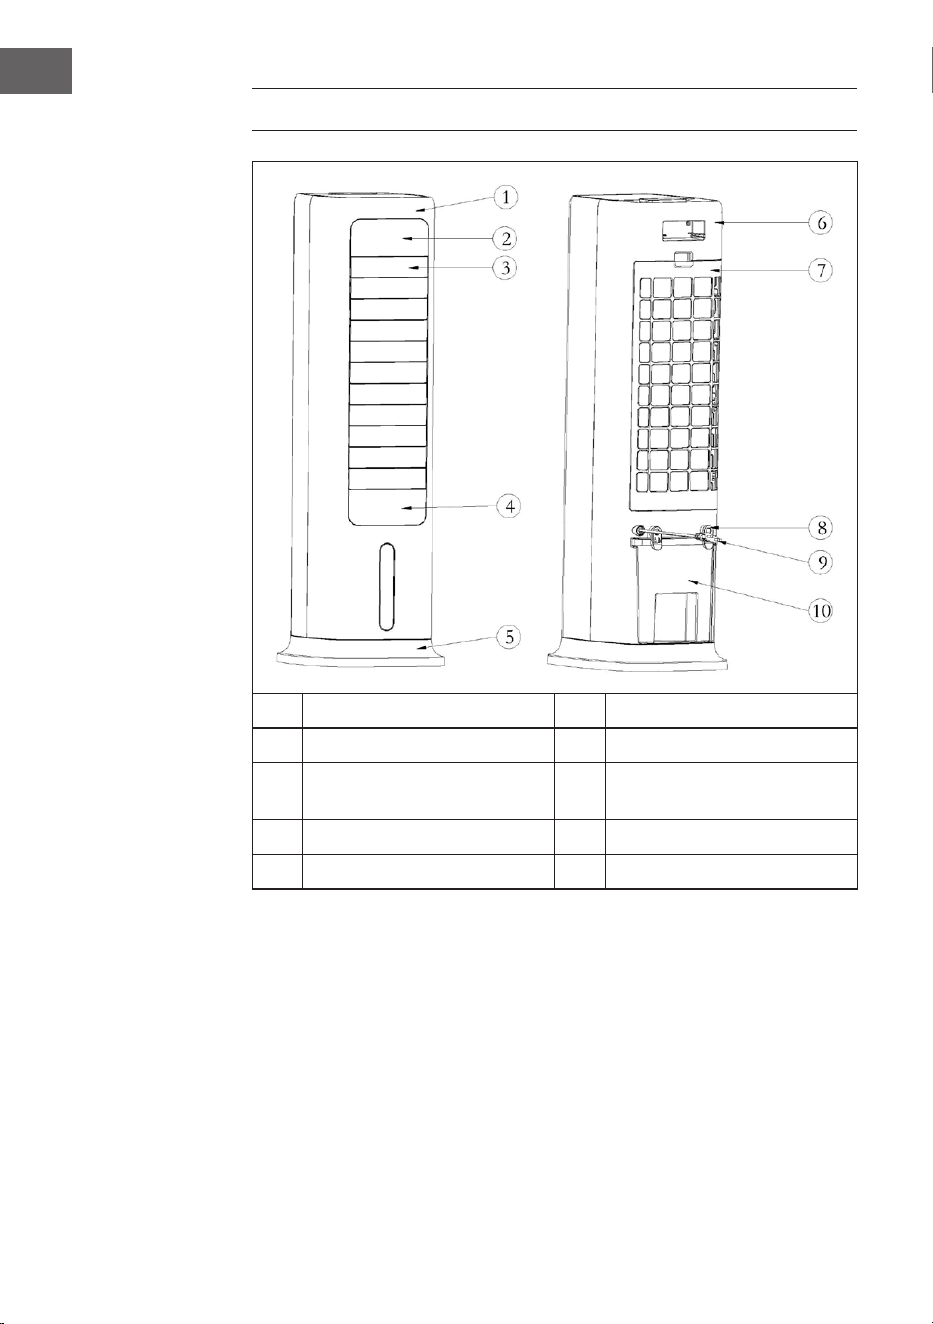
62
ES
DESCRIPCIÓN DEL APARATO
1
Carcasa delantera
6
Carcasa trasera
2
Panel de control
7
Rejilla trasera
3
Ranuras de ventilación
horizontales
8
Rebobinado del cable
4
Tapa decorativa
9
Cable de alimentación
5
Base del aparato
10
Depósito de agua
Notas para el uso del depósito de agua
En principio, puede utilizar su refrigerador de aire en cualquier momento sin agua
en el depósito. Entonces funciona como un ventilador normal. El agua del depósito
sólo es necesaria para la función de refrigeración. El refrigerador de aire lo evapora
a través del vellón del nebulizador, extrayendo así el calor del aire y reduciendo la
temperatura del aire del ventilador hasta 3 °C, dependiendo de la frialdad del agua
utilizada. Aconsejamos no utilizar la función de refrigeración en días con una humedad
especialmente alta, ya que ésta aumenta adicionalmente y puede contribuir así a los
problemas circulatorios.
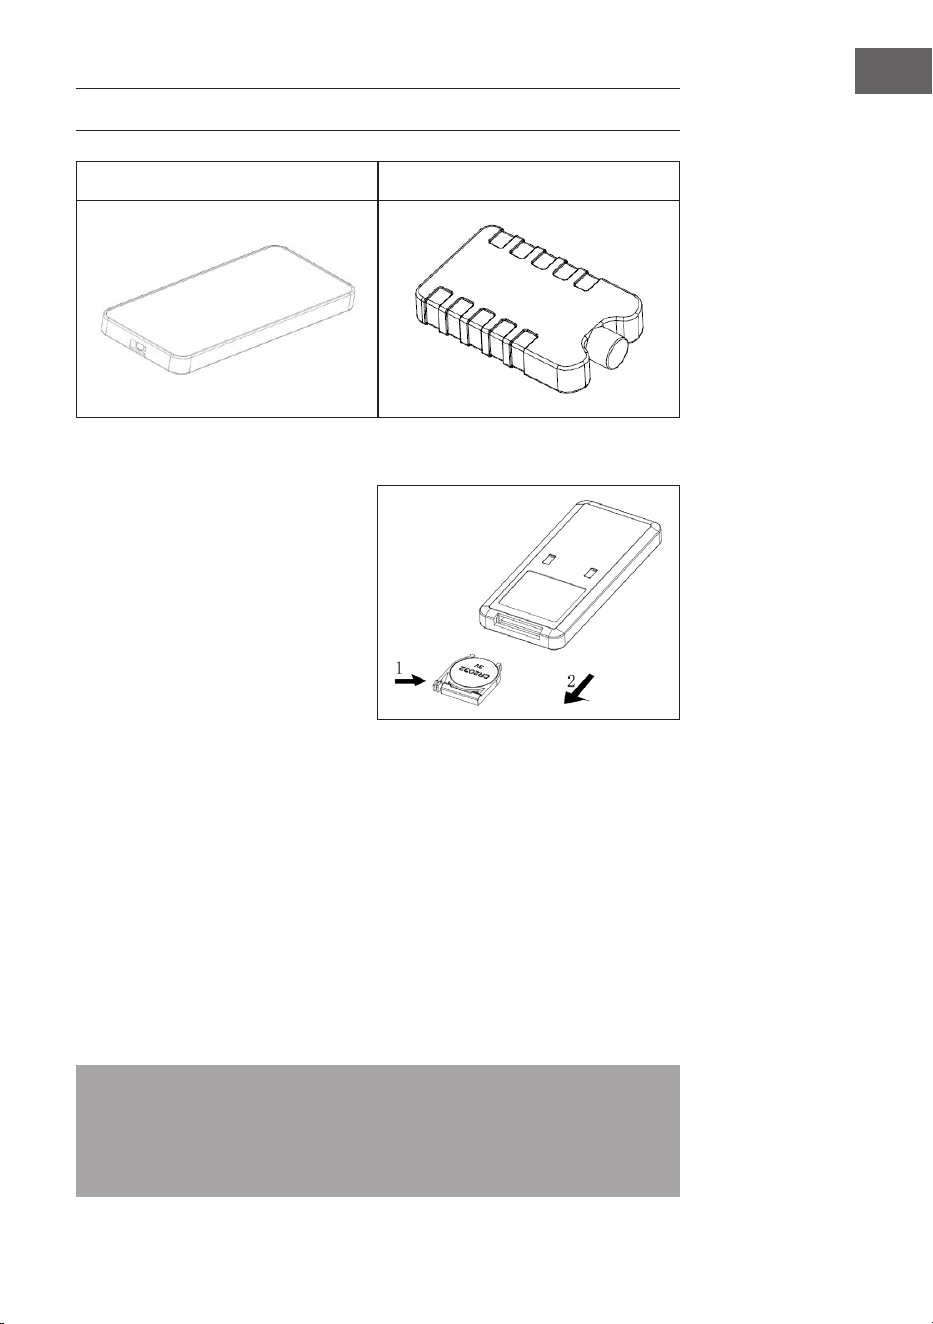
63
ES
ACCESORIO
Mando a distancia Contenedor para hielo
Funcionamiento del mando a distancia
1. Abra el compartimento de las
pilas del mando a distancia e
introduzca una pila CR2032 de
3 V. Para abrir el compartimento
de las pilas, presione la tapa en la
dirección de la echa (1) y extraiga
el compartimento de las pilas en la
dirección de la echa (2).
2. Apunte el mando a distancia hacia
el receptor durante su uso.
3. Sustituye las pilas gastadas.
Asegúrese de que la polaridad (+/-) es correcta al insertar la nueva pila. A
continuación, vuelva a colocar el compartimento de las pilas en el mando a
distancia.
Uso del contenedor de hielo
1. Coloque la bandeja de hielo en el congelador hasta que esté completamente
congelada.
2. Coloque el recipiente de hielo en el depósito de agua del aparato. En 10 min
después de colocar el contenedor de hielo, la temperatura en el tanque de agua
se reduce por debajo de la temperatura ambiente.
3. La entrega incluye dos contenedores de hielo. Utilícelos alternativamente.
4. Está prohibido abrir la tapa del depósito de hielo. No ingiera nunca el contenido
de los contenedores de hielo.
Nota: Gracias a sus propiedades especiales de almacenamiento en frío y
aislamiento, el depósito de hielo puede absorber lentamente el calor del agua
para mantener la temperatura del depósito de agua por debajo de la temperatura
ambiente durante horas. Esto crea una brisa más cómoda y fresca del ventilador del
aire acondicionado.
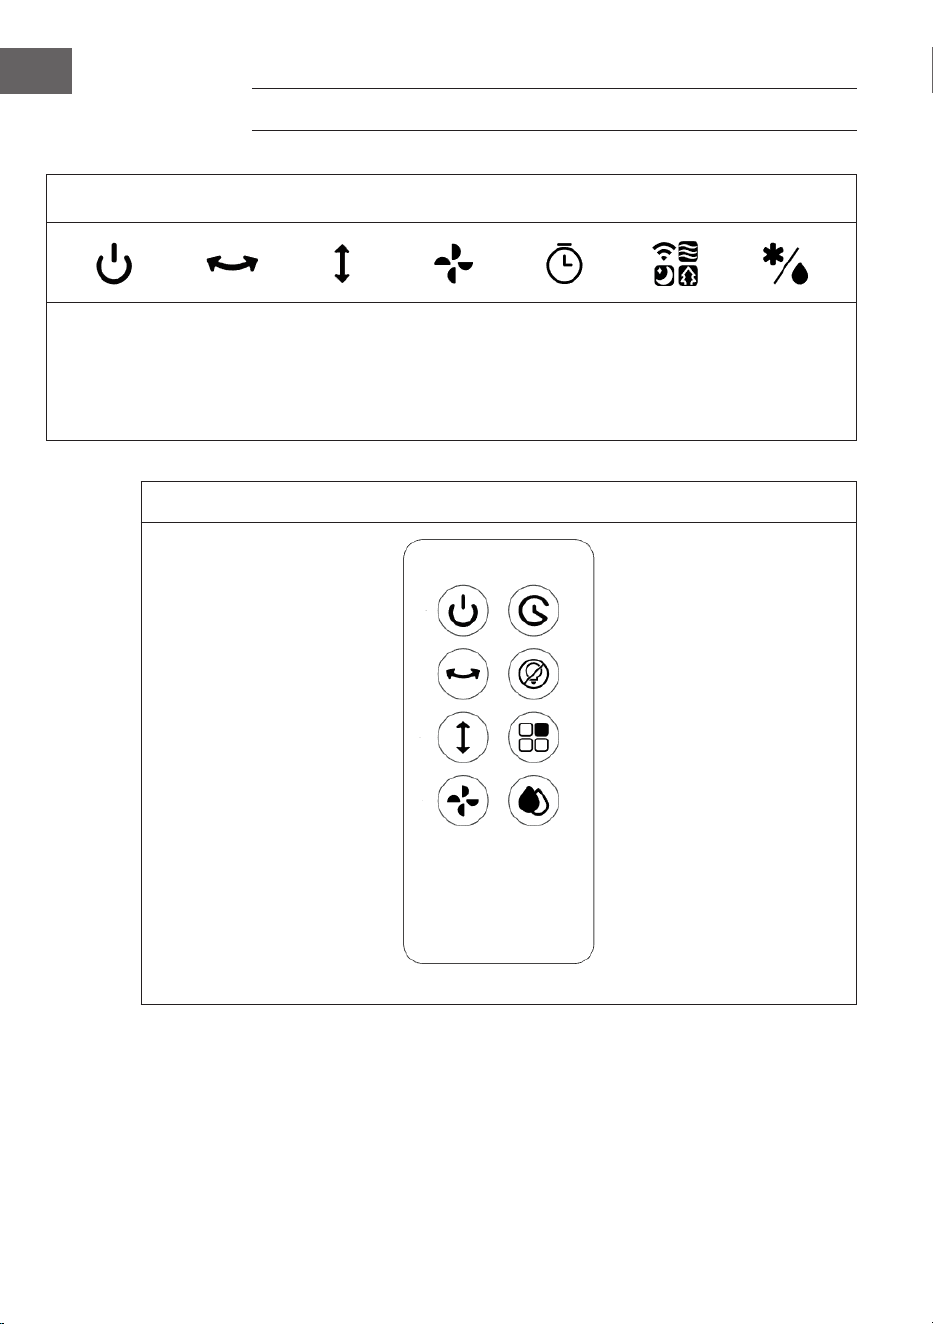
64
ES
PANEL DE CONTROL Y MANDO A DISTANCIA
Panel de control (botones)
ON/OFF
Función
oscilación
(Izquier-
da-de-
recha)
Función
oscilación
(arriba-
abajo)
Velocidad
de venti-
lación
Tempo-
rizador
Modo viento/
WLAN
Enfriamien-
to/humidi-
cación
Mando a distancia
ON/OFF Temporizador
Función oscilación (Izquierda-
derecha)
Apagar pantalla
Función oscilación (arriba-
abajo)
Modo viento
Velocidad de ventilación Enfriamiento/humidicación
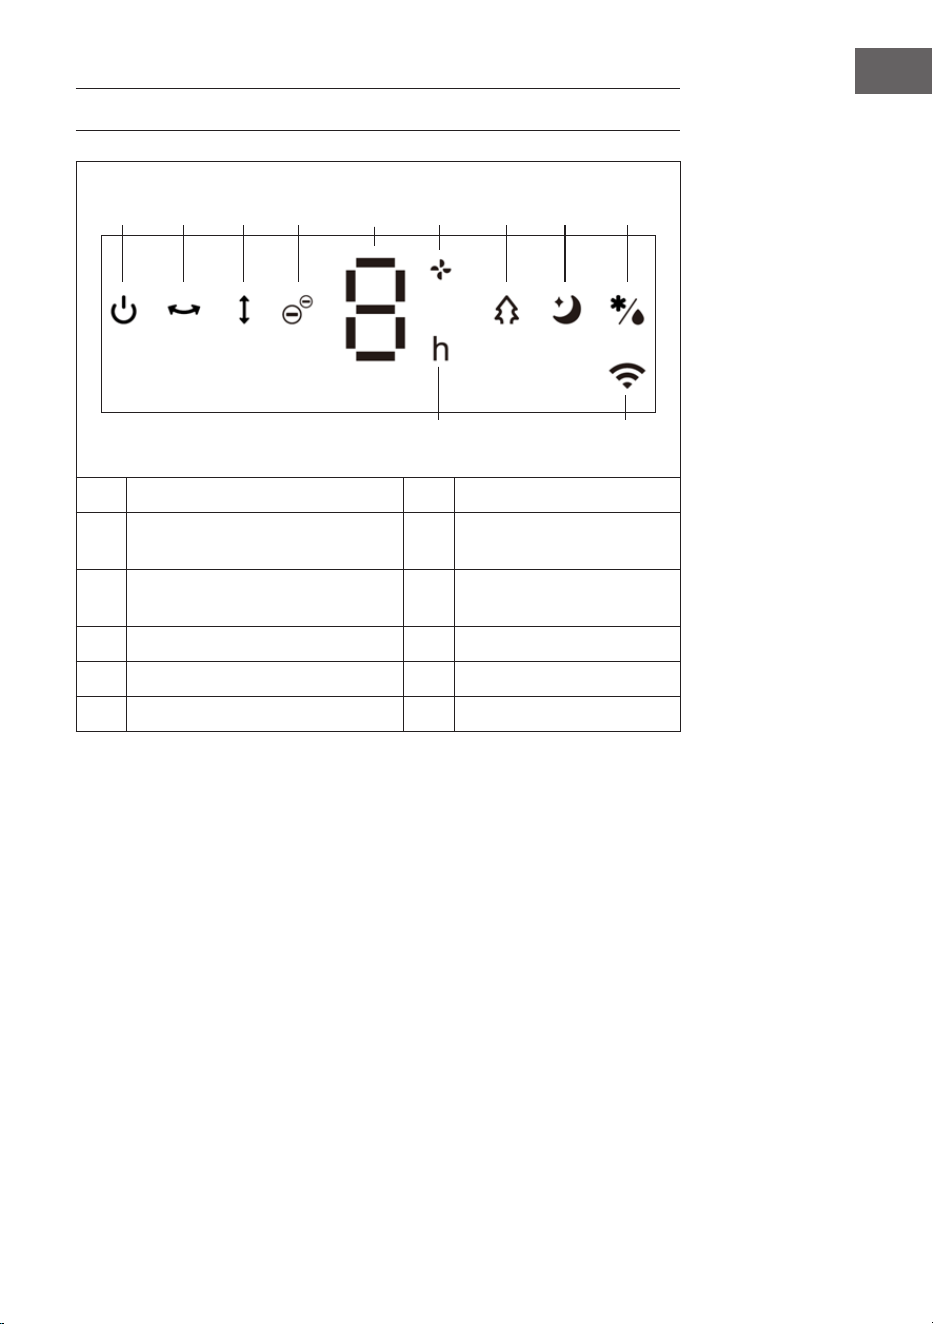
65
ES
ANUNCIOS EN PANTALLA
1 2 3 4 5 6 7 8 9
11 10
1 ON/OFF 7 Modo viento natural
2 Función oscilación (Izquierda-
derecha)
8 Modo viento dormir
3 Función oscilación (arriba-abajo) 9 Enfriamiento/
humidicación
4 Función iones negativos 10 Función WiFi
5 Visor de indicaciones 11 Temporizador
6 Velocidad de ventilación
66
ES
PUESTA EN FUNCIONAMIENTO
Antes del uso
• Saque la unidad del paquete y retire todos los materiales de embalaje.
• Coloque el aparato en una supercie plana y estable.
• Introduzca el cable de alimentación en la toma de corriente. De este modo, el
dispositivo puede utilizarse directamente y no es necesario instalarlo.
Puesta en funcionamiento
Cuando el enchufe de la unidad se conecta a la toma de corriente por primera vez, la
unidad emite dos pitidos y pasa al modo de espera. Todas las luces indicadoras están
apagadas. Todos los botones están inactivos excepto el botón ON/OFF.
Encender/apagar el aparato.
Cuando se pulsa la tecla ON/OFF en el modo de espera, la unidad se enciende.
Cuando la unidad se enciende por primera vez, la unidad funciona a baja velocidad
en modo de viento normal. Cuando la unidad se ha apagado y se vuelve a encender,
se restablece el modo utilizado antes de apagar la unidad. Esto no se aplica al ajuste
del temporizador. Si el modo de viento de reposo se estableció antes de que se
apagara la energía, esto no se guardará. Cuando se vuelva a encender, la unidad
funcionará en modo de viento normal.
Si no se pulsa ninguna tecla (teclas suave del mando a incluidas) en un minuto durante
el funcionamiento, todos los indicadores luminosos se atenúan al 30% de su brillo
original. Pulse de nuevo el botón deseado para restablecer el brillo y realizar la
función correspondiente.
Pulse el botón de encendido/apagado (1 ) para apagar el aparato. La unidad
emitirá un pitido. Cuando la unidad se haya apagado, pasará al modo de espera y las
luces indicadoras y la pantalla se apagarán.
Función oscilación
Cuando la unidad esté encendida, pulse el botón de oscilación izquierda-derecha
para activar la oscilación de izquierda a derecha. El indicador luminoso
correspondiente (2) se enciende.
Con la alimentación encendida, pulse el botón de oscilación arriba-abajo para activar
la oscilación arriba-abajo. El indicador luminoso correspondiente (3) se enciende.
67
ES
El modo de oscilación izquierda-derecha funciona como sigue: Las lamas oscilan a
la izquierda y a la derecha en un ángulo de 80°. Al cambiar de dirección, las lamas
hacen una pausa de 1 segundo y luego oscilan en la otra dirección.
Cuando se activa la función de oscilación arriba-abajo después de encenderla
por primera vez, la unidad establece primero la posición inicial correcta. Las lamas
horizontales pueden estar cerradas durante unos 10 segundos y, a continuación, girar
hacia arriba para abrirse. Esto es algo normal.
Cuando se desactiva la función de oscilación arriba-abajo, las lamas horizontales
oscilan hasta la posición horizontal y se detienen.
Ajuste de velocidad de ventilación
El botón de velocidad se puede utilizar para ajustar la velocidad del viento. Pulse
el botón de velocidad varias veces para pasar por los niveles de velocidad en el
siguiente orden:
Bajo > Medio > Alto > Bajo.
La pantalla muestra los niveles de velocidad en números:
Velocidad Señal
Bajo 1
Medio 2
Alto 3
Función "viento seco"
Si se mantiene pulsado
el botón de velocidad durante 3 segundos, se iniciará la
función de viento seco. La unidad funciona a alta velocidad del viento y la pantalla
muestra "3" y el indicador parpadea durante 20 minutos.
Mientras se utiliza esta función, todos los botones, excepto el botón ON/OFF, están
inactivos. Mantenga pulsado el botón de velocidad durante tres segundos para
cancelar la función.
Cuando la función de viento seco ha estado activada durante 20 minutos, la unidad se
apaga automáticamente y pasa al modo de espera.
Ajustar el temporizador
Con el botón del temporizador se puede ajustar el tiempo hasta que el aparato se
apague automáticamente. Puede seleccionar un tiempo entre 1-9 horas. El ajuste del
temporizador se puede ajustar en incrementos de horas y se muestra en la pantalla.
Cuando el aparato esté encendido, pulse el botón del temporizador. La indicación
del temporizador (11) y la indicación de la hora parpadean en la pantalla. Ahora
puede ajustar el tiempo deseado hasta la desconexión automática. A continuación,
pulse cualquier tecla (excepto la tecla ON/OFF) o espere 5para salir del ajuste.
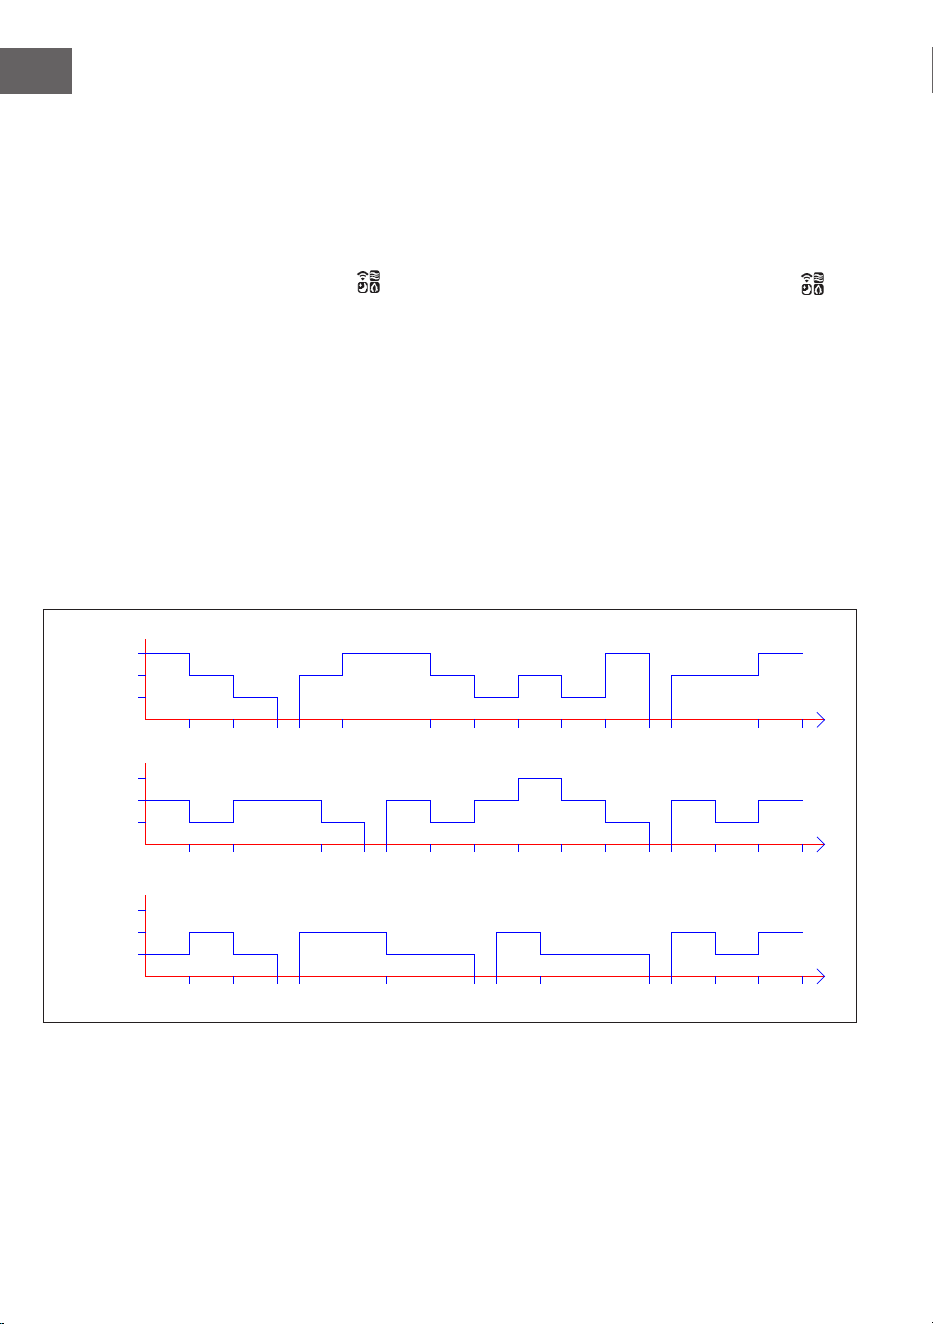
68
ES
Una vez activado el temporizador, la pantalla muestra alternativamente, a intervalos de
10 segundos, el tiempo restante hasta el apagado y la velocidad ajustada actualmente.
El indicador luminoso correspondiente (11/6) se enciende. Una vez transcurrido el
tiempo, el aparato se apaga automáticamente y pasa al modo de espera.
Selección del modo de viento
Después de encender el aparato, pulse repetidamente el botón de modo de viento
para ajustar el modo deseado. Pulse el botón de modo viento varias veces
para pasar por los niveles de velocidad en el siguiente orden:
Viento normal > Viento natural > Viento de sueño > Viento normal.
Se enciende el indicador luminoso correspondiente (7/8). Para el modo viento normal
no existe indicador luminoso.
Viento normal:
En el modo de viento normal, la unidad funciona en el nivel de velocidad establecido
(Bajo, Medio o Alto) sin ningún cambio.
Modo viento natural
El diagrama de viento de este modo se muestra en la siguiente gura:
6S 6S 6S 3S 12S 12S 3S 6S 3S15S
6S
T=90S
6S 6S 6S 6S 6S 3S 12S
6S 6S 12S 6S6S 6S6S 6S 6S
3S 6S 6S12S 6S
3S 6S 3S
T=90S
T=90S
6S
6S 6S 6S
6S 6S 6S
Low
Medium
High
STRONG
MIDDLE
WEAK
Low
Medium
High
Low
Medium
High
En el modo de viento natural, el indicador correspondiente (7) se enciende. La pantalla
sólo muestra la velocidad del viento original, los cambios no se muestran. Esto signica
que si, por ejemplo, se ha activado el modo de viento natural con velocidad alta, sólo
se muestra el nivel de velocidad "Alta" ("3") sin cambiar.
Medio
Alto
Bajo
Medio
Alto
MEDIO
FUERTE
Bajo
Medio
Alto
Bajo
SUAVE

69
ES
Viento en reposo:
Cuando se activa el modo de viento en reposo, la unidad seguirá funcionando
inicialmente a la velocidad de viento previamente establecida. Después de 30 minutos
se reduce en intervalos de 30 minutos. Una vez que el temporizador haya expirado,
la unidad entrará automáticamente en el modo de espera. Si no se ha ajustado ningún
temporizador, el aparato sigue funcionando a baja velocidad.
a) Si se ha activado el modo de viento en reposo a velocidad alta, el aparato pasará
a velocidad media después de 30 minutos. El indicador luminoso correspondiente
se enciende. Después de otros 30 minutos de funcionamiento a velocidad media,
la unidad cambia a velocidad baja. El indicador luminoso correspondiente se
enciende. A continuación, el aparato sigue funcionando a baja velocidad hasta
que el temporizador haya expirado o el aparato se apague.
a) Si se ha activado el modo de viento en reposo a velocidad alta, el aparato pasará
a velocidad media después de 30 minutos. El indicador luminoso correspondiente
(3) se enciende. A continuación, el aparato sigue funcionando a baja velocidad
hasta que el temporizador haya expirado o el aparato se apague.
c) Si se ha activado el modo de viento en reposo a baja velocidad, se enciende el
indicador correspondiente. El aparato sigue funcionando a baja velocidad hasta
que el temporizador haya expirado o el aparato se apague.
Modo de refrigeración/humidicación
Cuando el aparato esté encendido, pulse el botón de refrigeración/humidicación
para activar y desactivar la función de refrigeración. El indicador correspondiente
(9) se enciende.
Apagar y encender la pantalla y las pantallas (mando a distancia)
Cuando la unidad está encendida, puede pulsar el botón de apagado de la pantalla
en el mando a distancia para apagar la pantalla y todas las luces indicadoras.
Cuando la pantalla está apagada y se pulsa el botón de apagado de la pantalla
o cualquier otro botón, las luces indicadoras se vuelven a encender, pero la función del
otro botón respectivo no se realiza. Pulse de nuevo la tecla deseada para realizar la
función correspondiente.
Función iones negativos
Al encender el aparato, se activa la función de iones negativos y se enciende el
indicador LED correspondiente (4). Cuando se apaga el aparato, la función de iones
negativos se desactiva.

70
ES
Función WiFi
Cuando el aparato esté encendido, pulse el botón del modo viento/Wi durante 5
segundos . Se oye un pitido y el indicador WLAN (10) parpadea rápidamente
durante cinco segundos. Las aplicaciones en la red se pueden congurar en modo
estándar. Si no se establece ninguna conexión en 3 minutos, el indicador WLAN (10)
se apaga. Para volver a conectarse, pulse de nuevo el botón Modo viento/Wi
. Se oye un pitido, la conexión Wi se reinicia y el indicador WLAN (10) parpadea
rápidamente durante cinco segundos. Las aplicaciones en la red se pueden congurar
en modo estándar. Mantenga pulsado el botón Modo viento/WLAN , una vez
que el indicador WLAN (10) parpadee, durante 5 segundos de nuevo. Se oye un
pitido y el indicador WLAN (10) parpadea rápidamente durante cinco segundos. Las
aplicaciones en la red se pueden congurar en modo estándar.
Notas sobre el uso de la función WLAN
• Si se apaga antes de que transcurran 10 segundos desde que se encendió la
alimentación, el indicador WLAN (10) vuelve al estado anterior a la desconexión.
Si se apaga la alimentación después de 10 segundos, el indicador de la LAN
inalámbrica (10) se apaga y entra en el modo de ahorro de energía. Mantenga
pulsado el botón de conguración durante 5 segundos para reiniciar.
• Si la red no se congura en tres minutos, el indicador de conexión inalámbrica (10)
se apaga. Mantenga pulsado el botón de conguración durante 5 segundos para
reiniciar.
• Si el router se apaga después de haber establecido con éxito la conexión WLAN,
el indicador WLAN (10) también se apaga. En cuanto el router se enciende de
nuevo, la conexión con el dispositivo se restablece automáticamente.
• Al utilizar la función WLAN, el indicador WLAN (10) debe parpadear
rápidamente. Para utilizar la aplicaciónKlarstein se necesita un router (debe poder
conectarse a redes externas) y un dispositivo móvil (por ejemplo, un móvil). La
aplicación Klarstein debe estar instalada en el dispositivo móvil nal, que también
está conectado a la red WLAN.
71
ES
CONTROL DEL DISPOSITIVO A TRAVÉS DEL
SMARTPHONE
Si conectas tu aparato Klarstein a la red WiFi de tu casa, podrás manejarlo
cómodamente a través de la aplicación Klarstein asociada. La aplicación no solo
permite controlar el aparato a distancia a través del smartphone, sino que también da
acceso a recetas y a más información.
Siga los siguientes pasos para conectar su smartphone a su aparato Klarstein:
1. En primer lugar, descargue la aplicación Klarstein escaneando el código QR con
su smartphone (véase más abajo) o descárguela directamente desde la App Store
o Google Play.
2. Asegúrate de que tu smartphone está conectado a la misma red Wi-Fi a la que
quieres conectar tu dispositivo Klarstein.
3. Abra la aplicación de Klarstein
4. Inicie sesión con su cuenta. Si aún no tienes una cuenta, regístrate en la app de
Klarstein.
5. Sigue las instrucciones de la aplicación.
Descarga la aplicación
Utilice la función de escaneo de su teléfono para escanear el código QR y guardar la
aplicación en su smartphone.
Nota: La aplicación proporciona más instrucciones sobre el uso de la aplicación y
ayuda sobre cómo conectarse a su dispositivo cuando la abre por primera vez.
iOS Android
72
ES
Solución de problemas de conexión
Si su dispositivo Klarstein no puede ser encontrado en el Wi-Fi, compruebe lo siguiente:
• ¿Está el aparato enchufado?
• ¿Está activada la función WLAN del smartphone?
• ¿Está activada la función WLAN del aparato? (Sigue las instrucciones de la
aplicación.)
• ¿Se ha introducido correctamente la contraseña de la WLAN?
• ¿Están el router, el dispositivo Klarstein y el smartphone muy cerca durante el
intento de emparejamiento? (Lo ideal es que no haya más de 5 m de distancia
entre ellos).
• Si ha desactivado la banda de 2,4 GHz en los ajustes de su router WLAN, actívela
en los ajustes de su router.
Nota: Para obtener más ayuda, siga las instrucciones de la aplicación al establecer
una conexión.
FUNCIONES DE PROTECCIÓN
Disyuntor de bajo nivel de agua
Si la bomba de agua funciona durante 60 segundos y el software detecta que el
interruptor de nivel de agua no tiene conexión (agua insuciente) durante 5 segundos
consecutivos (65 en total), la bomba de agua dejará de funcionar automáticamente y
la unidad emitirá 10 pitidos.
Detección del nivel de agua
Antes de que transcurran 10 segundos desde el encendido, mantenga pulsado el botón
de modo de refrigeración/humidicación después de que se oiga el pitido. El
nivel de agua se detectará en 3 segundos. Si no hay agua en el depósito, la función
de refrigeración se desactiva y el aparato emite 10 pitidos. La detección del nivel de
agua se desactiva después de pulsar el botón ON/OFF o en caso de fallo de
alimentación.
Función de memoria
1. Si la unidad no se desconecta de la corriente, cuando se vuelva a encender,
seguirá funcionando en el modo que estaba ajustado antes de apagarse. Los
modos de viento en reposo, viento en seco y temporizador no se guardan.
2. Si la unidad no está desconectada de la corriente, cuando se vuelva a encender,
primero funcionará a velocidad media durante 3 segundos y luego cambiará a la
velocidad establecida antes de apagarse.

73
ES
LLENADO DEL DEPÓSITO DE AGUA
Llene el depósito de agua cuando utilice la función de refrigeración y humidicación.
Gire el enrollador de cordón 90° antes de llenarlo. Saca el depósito de agua hasta
la mitad. Vierta el agua lentamente en el depósito de agua. Tras el llenado, vuelva a
introducir el depósito de agua en la máquina. Vuelva a colocar el enrollador de cable
en su posición original.
El fusible del depósito de
agua
está cerrado
El fusible del depósito de
agua
está abierto
Sacar el depósito,
para rellenarlo de agua.
Cuando llene el depósito de agua, preste atención al indicador de nivel de agua:
1. Al llenar manualmente el depósito, asegúrese de que el nivel de agua está por
encima del indicador de mínimo y por debajo del indicador de máximo.
2. Utilice sólo agua potable.
3. Cuando se utiliza el aparato por primera vez, puede haber un ligero olor y el agua
del depósito puede estar ligeramente descolorida. Esto es normal e inofensivo y no
afectará a su salud.
4. Al introducir el contenedor de hielo, asegúrese de que no se sobrepasa la pantalla
máxima.

74
ES
LIMPIEZA Y CUIDADO
Limpieza
• Apague el aparato y desconecte el enchufe de la toma de corriente antes de
limpiarlo.
• No utilice productos químicos, bencina, diluyente u otras sustancias que puedan
dañar la supercie de la unidad para limpiarla.
• Elimine el polvo con un paño suave. Para las manchas difíciles, utilice un poco
de agua (por debajo de 50 °C) y un detergente neutro. A continuación, frote la
supercie del dispositivo en seco con un paño suave.
Limpieza de ltros
Limpie los ltros al menos una vez al mes. Proceda de este modo:
1. Desconecte el enchufe de la toma de corriente.
2. Primero retire la rejilla de ventilación trasera y luego el ltro.
3. Deje el ltro en remojo en una solución jabonosa durante unos minutos, luego
límpielo y déjelo secar.
4. Cuando ambos estén completamente secos, vuelva a colocar el ltro y la rejilla de
ventilación trasera en el aparato.

75
ES
Limpieza del depósito de agua
1. Desconecte el enchufe de la toma de corriente. Gire el enrollador de cable a la
posición horizontal y saque el depósito de agua hasta la mitad.
2. Introduzca el depósito de agua con la mano y gire el aparato 90°. A
continuación, presione hacia abajo la carcasa de la bomba de agua y retire el
depósito de agua.
3. Elimine los restos de cal en el depósito de agua con un paño húmedo mojado en
detergente neutro. A continuación, enjuague el depósito de agua con agua limpia.
Limpieza de la carcasa
• Antes de limpiar la carcasa del aparato, asegúrese de que el aparato está
apagado y el enchufe desconectado de la toma de corriente.
• Limpie la carcasa del motor únicamente con un paño húmedo. No lo aclare
directamente con agua.
• No utilice productos de limpieza agresivos o abrasivos.
Almacenamiento
• Si el aparato no se va a utilizar durante un largo periodo de tiempo, desenchúfelo
y guárdelo para evitar que entre polvo en el armario.
• Antes de embalar, asegúrese de que el aparato está limpio, el ltro está seco y no
hay agua en el depósito de agua.
• Una vez embalado, guárdelo en un lugar seco y ventilado.

76
ES
RETIRADA DEL APARATO
Si en su país existe una disposición legal relativa a la
eliminación de aparatos eléctricos y electrónicos, este
símbolo estampado en el producto o en el embalaje
advierte que no debe eliminarse como residuo doméstico.
En lugar de ello, debe depositarse en un punto de recogida
de reciclaje de aparatos eléctricos y electrónicos. Una
gestión adecuada de estos residuos previene consecuencias
potencialmente negativas para el medio ambiente y la salud
de las personas. Puede consultar más información sobre el
reciclaje y la eliminación de este producto contactando con
su administración local o con su servicio de recogida de
residuos.
Este producto contiene baterías. Si en su país existe una
disposición legal relativa a la eliminación de baterías, estas
no deben eliminarse como residuo doméstico. Infórmese
sobre la normativa vigente relacionada con la eliminación de
baterías. Una gestión adecuada de estos residuos previene
consecuencias potencialmente negativas para el medio
ambiente y la salud de las personas.
DECLARACIÓN DE CONFORMIDAD
Fabricante:
Chal-Tec GmbH, Wallstraße 16, 10179 Berlín, Alemania.
Importador para Gran Bretaña:
Berlin Brands Group UK Limited
PO Box 42
272 Kensington High Street
London, W8 6ND
United Kingdom
Por la presente, Chal-Tec GmbH declara que el tipo de
equipo radioeléctrico Skytower 360° Smart es conforme con
la Directiva 2014/53/UE. El texto completo de la declaración
UE de conformidad está disponible en la dirección Internet
siguiente: use.berlin/10035818

77
IT
Gentile Cliente,
La ringraziamo per aver acquistato il dispositivo. La preghiamo
di leggere attentamente le seguenti istruzioni per l’uso e di
seguirle per evitare possibili danni. Non ci assumiamo alcuna
responsabilità per danni scaturiti da una mancata osservazione
delle avvertenze di sicurezza e da un uso improprio del
dispositivo. Scansionare il codice QR seguente, per accedere
al manuale d’uso più attuale e per ricevere informazioni sul
prodotto.
INDICE
Avvertenze di sicurezza78
Descrizione del prodotto80
Accessori81
Pannello di controllo e telecomando82
Indicazioni del display83
Messa in funzione e utilizzo84
Controllo del dispositivo con smartphone89
Funzioni protettive90
Riempimento del serbatoio91
Pulizia e manutenzione92
Smaltimento94
Dichiarazione di conformità94
DATI TECNICI
Numero articolo 10035818
Alimentazione 220-240 V ~ 50 Hz
Potenza 60 W
Capacità del serbatoio 6 litri
Volume d'aria 450 m
3
/h
Volume di evaporazione 950 ml/h
Livello di emissione sonora ≤ 55 dB
Standard Wi-Fi
802.11 b/g/n
Frequenza Wi-Fi
2,4 GHz
Potenza di trasmissione Wi-Fi (max.)
20 dBm

78
IT
AVVERTENZE DI SICUREZZA
• Prima dell'utilizzo, controllare la tensione indicata sulla targhetta del dispositivo.
Collegarlo solo a prese elettriche con tensione corrispondente a quella del
dispositivo.
• Tenere il cavo lontano da superci calde e da oggetti appuntiti.
• Non far passare il cavo sotto a tappeti e non coprirlo con altri oggetti o tessuti.
Posarlo in modo tale che nessuno possa inciamparvi o restarvi impigliato.
• Non utilizzare il dispositivo se il cavo, la spina o i singoli pezzi sono danneggiati.
• Se il cavo di alimentazione o la spina sono danneggiati, devono essere sostituiti
dal produttore, da un'azienda tecnica autorizzata o da una persona con qualica
equivalente.
• Usare il dispositivo solo in locali interni.
• Non coprire il dispositivo.
• Posizionare il dispositivo su una supercie stabile e piana e assicurarsi che sia in
posizione verticale.
• Prima di inserire la spina nella presa elettrica, assicurarsi che il dispositivo sia
spento.
• Non usare il dispositivo o toccare la spina e il cavo con le mani bagnate.
• Non lasciare il dispositivo privo di supervisione mentre è in funzione. Spegnerlo e
togliere la spina dalla presa quando non lo si usa.
• Togliere la spina dalla presa prima di pulire il dispositivo o di eseguire una
manutenzione.
• Non tirare dal cavo per staccare la spina, ma impugnare saldamente la spina
stessa.
• I bambini a partire da 8 anni e le persone con limitate capacità siche, psichiche e
sensoriali possono utilizzare il dispositivo solo se sono stati istruiti da una persona
responsabile della loro sicurezza sulle modalità d´uso e sulle procedure di
sicurezza e se questi comprendono i rischi associati.
• Utilizzare il dispositivo solo secondo le modalità descritte in questo manuale.
• Non inserire dita oppure oggetti nelle fessure di aerazione.
• Non posizionare il dispositivo vicino a teloni, tende, tovaglie o prodotti tessili simili,
perché potrebbero venire aspirati e danneggiare il dispositivo.
• Non utilizzare il dispositivo in ambienti umidi come i bagni.
• Non usare il dispositivo prima di aver montato le ruote o se si trova appoggiato su
un lato.
• Svolgere il cavo completamente prima dell'uso.

79
IT
• Durante il funzionamento il dispositivo umidica l'aria dell'ambiente. Evitare tuttavia
un tasso di umidità troppo elevato. Consigliamo un livello tra 40 e 50%. Un'umidità
dell'aria eccessiva può causare muffa o problemi di salute.
• Posizionare il dispositivo solo su superci resistenti al bagnato e all'umidità elevata.
Può sempre capitare che inserendo e togliendo il serbatoio dell'acqua, cada
qualche goccia. Se dovesse succedere, rimuovere immediatamente le gocce.
• Cambiare l'acqua nel serbatoio al massimo dopo 3 giorni.
CARATTERISTICHE DEL PRODOTTO
• Accensione/spegnimento: tasto ON/OFF separato
• Velocità ventilatore: 3 livelli di velocità: basso, medio e alto
• Modalità di ventilazione: normale, naturale e sleep
• Direzione di ventilazione: oscillazione automatica delle feritoie di aerazione
orizzontali e verticali
• Tempo no allo spegnimento automatico: timer da 1 a 9 ore senza accumulo
(tolleranza timer entro il 3%).
• Pompa dell'acqua per raffreddamento/umidicazione
• Gestione tramite tasti
• Funzione "Vento secco" e smorzamento automatico dell'illuminazione a LED se non
si preme alcun tasto nel giro di un minuto
• Funzione telecomando (raggio d'azione di almeno 6 metri)
• Serbatoio dell'acqua facile da pulire
• Tecnologia di raffreddamento per nebulizzazione, con ampia circolazione d'acqua
e raffreddamento più rapido

80
IT
DESCRIZIONE DEL PRODOTTO
1
Scocca anteriore
6
Scocca posteriore
2
Pannello di controllo
7
Griglia di ventilazione posteriore
3
Feritoie di ventilazione orizzontali
8
Avvolgicavo
4
Copertura decorativa
9
Cavo di alimentazione
5
Base del dispositivo
10
Serbatoio dell'acqua
Avvertenza sull'uso del serbatoio
Come linea di principio è possibile usare il raffrescatore evaporativo senz'acqua nel
serbatoio in qualsiasi momento. In questo modo funziona come un normale ventilatore.
L'acqua nel serbatoio occorre solo per la funzione di raffreddamento. Il raffrescatore
evaporativo vaporizza l'acqua tramite il nebulizzatore togliendo calore dall'aria e
abbassando la temperatura dell'aria del ventilatore di 3 °C, a seconda di quanto
sia fredda l'acqua. Si sconsiglia di usare la funzione di raffreddamento nei giorni in
cui il tasso di umidità è particolarmente elevato, in quanto questa funzione lo alza
ulteriormente e può comportare problemi di pressione sanguigna.
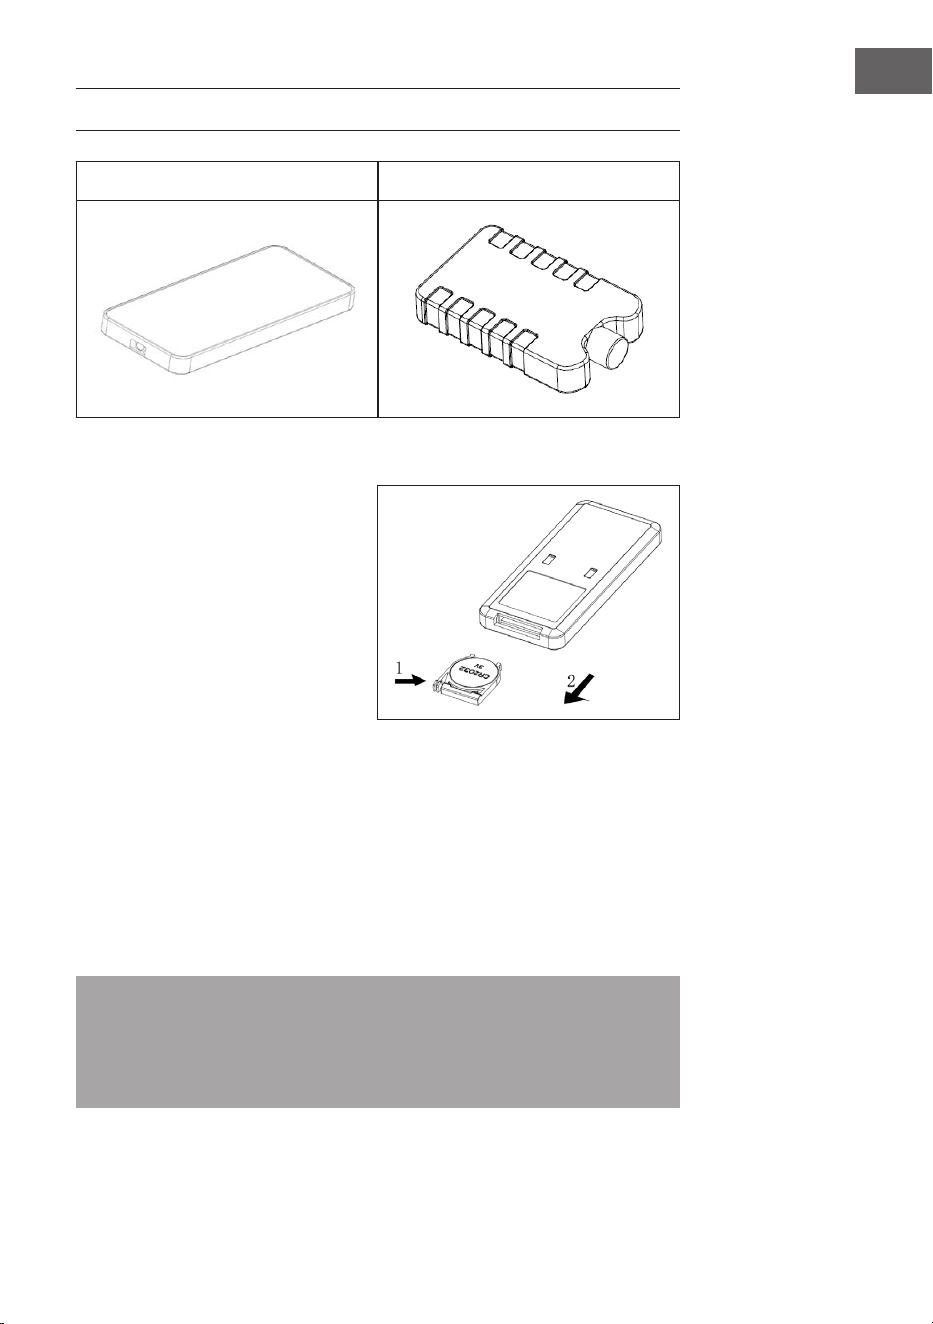
81
IT
ACCESSORI
Telecomando Portaghiaccio
Utilizzo del telecomando
1. Aprire il vano pile del telecomando
e inserirvi una pila CR2032 da 3
V. Per aprire il vano premere sul
coperchio in direzione della freccia
(1) ed estrarlo in direzione della
freccia (2).
2. Durante l'uso indirizzare il
telecomando verso il ricevitore.
3. Sostituire le pile esaurite. Prestare
attenzione alla polarità corretta
(+/-). Inne reinserire il vano pile
nel telecomando.
Utilizzo del portaghiaccio
1. Posizionare il portaghiaccio nel congelatore nché non si è completamente
congelato.
2. Dopodiché inserirlo nel serbatoio del dispositivo. Nel giro di 10 minuti la
temperatura dell'acqua nel serbatoio sarà più fredda rispetto a quella ambiente.
3. Nella consegna sono inclusi due portaghiaccio da utilizzare a rotazione.
4. E' vietato aprire la copertura dei portaghiaccio. Non ingerire il loro contenuto.
Nota: con particolari caratteristiche di immagazzinamento del freddo e di
isolamento, il portaghiaccio può assorbire lentamente il calore dell'acqua per
mantenere per ore la temperatura dell'acqua nel serbatoio al di sotto di quella
ambiente. In questo modo viene prodotta una ventilazione più gradevole e fresca
grazie al ventilatore.
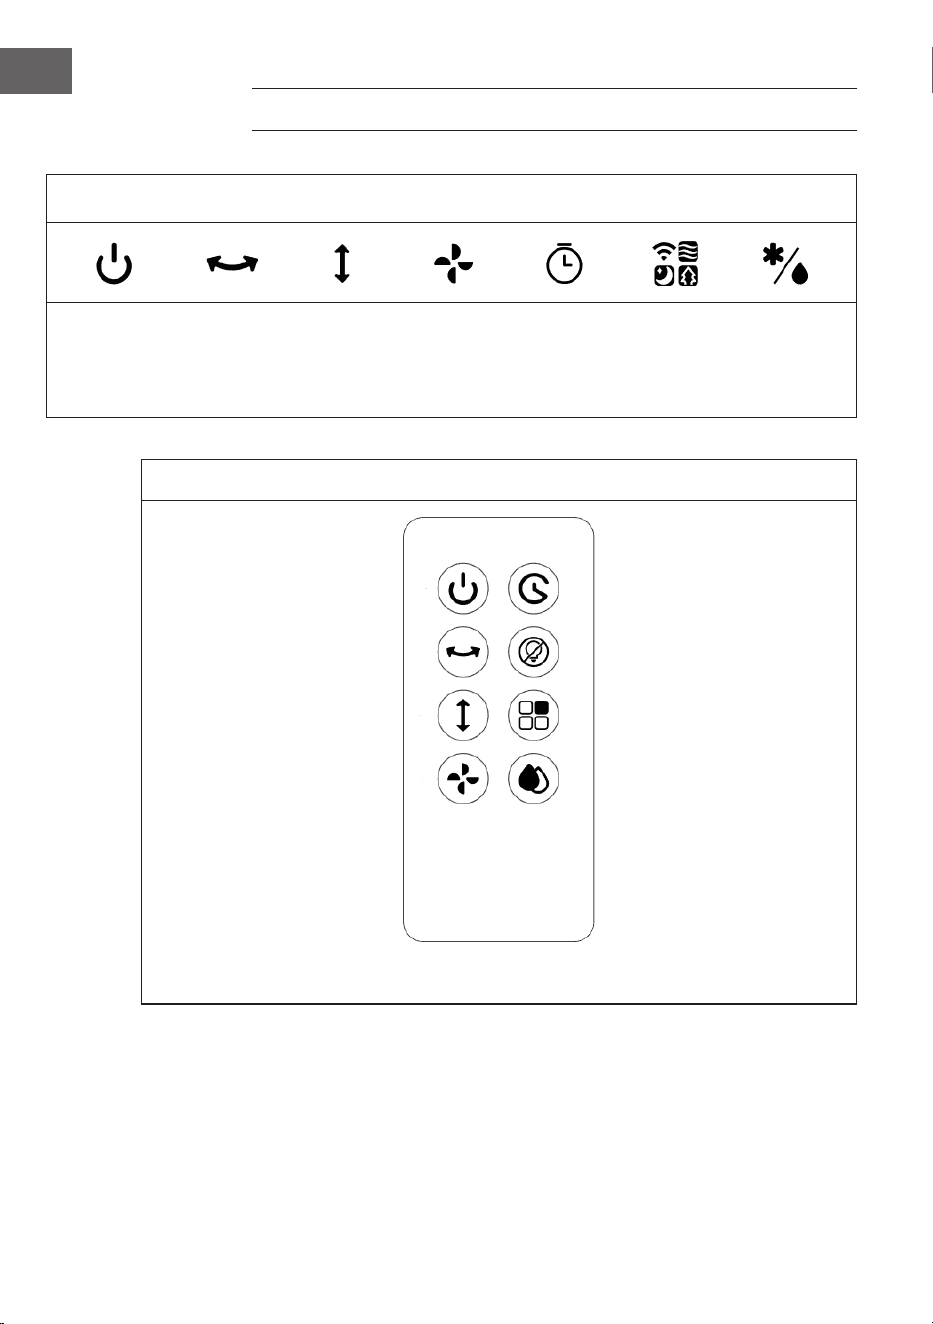
82
IT
PANNELLO DI CONTROLLO E TELECOMANDO
Pannello di controllo (tasti)
ON/OFF
Oscillazi-
one
(sinistra-
destra)
Oscillazi-
one
(su-giù)
Velocità di
ventilazi-
one
Timer
Modalità di
ventilazione /
WiFi
Raffredda-
mento/Umi-
dicazione
Telecomando (tasti)
ON/OFF Timer
Oscillazione (sinistra-destra) Schermo spento
Oscillazione (su-giù) Modalità di ventilazione
Velocità di ventilazione Raffreddamento/
Umidicazione
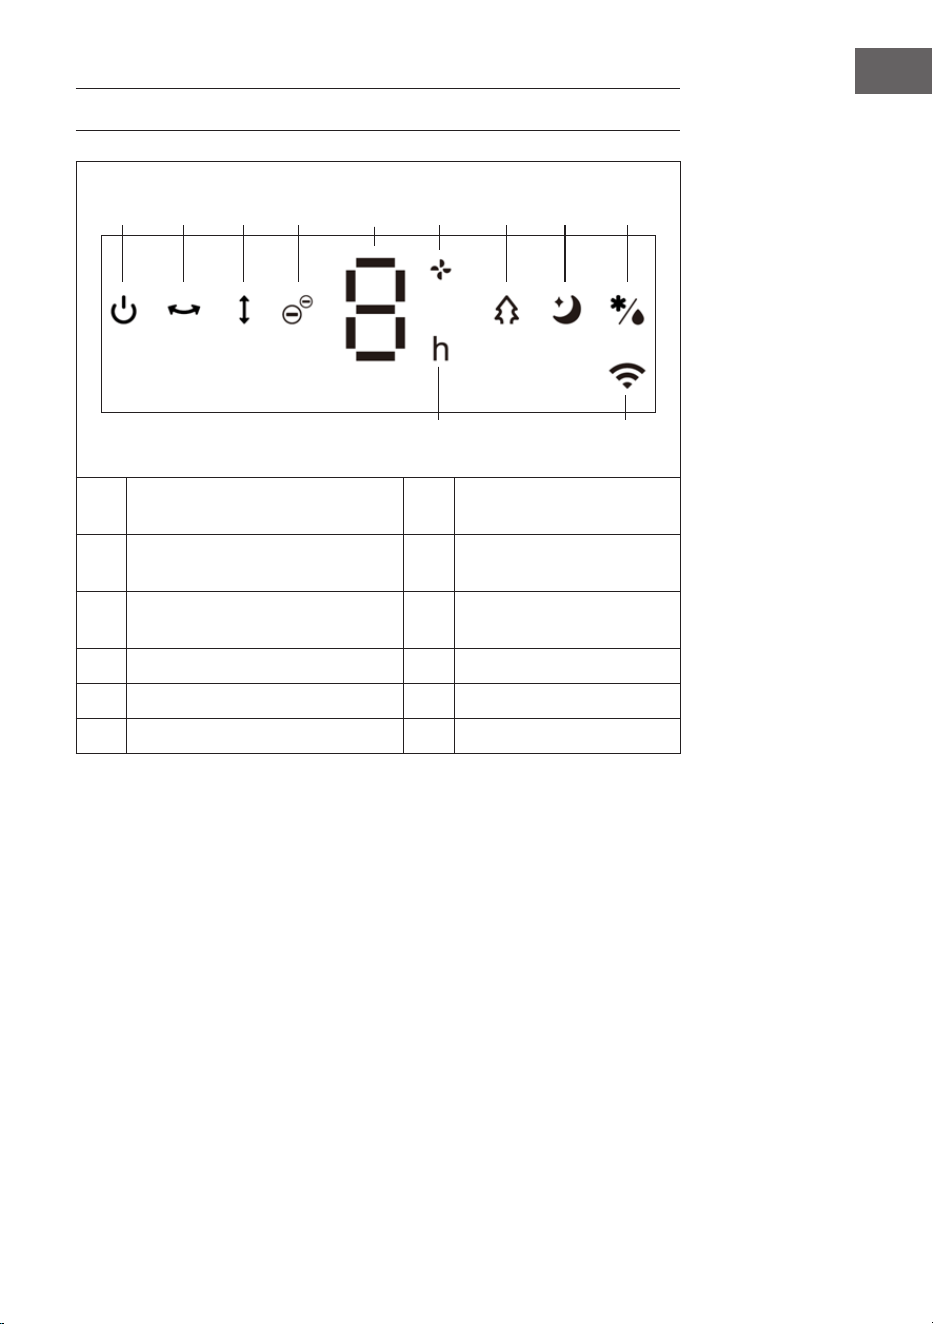
83
IT
INDICAZIONI DEL DISPLAY
1 2 3 4 5 6 7 8 9
11 10
1 ON/OFF 7 Modalità di ventilazione
naturale
2 Oscillazione (sinistra-destra) 8 Modalità di ventilazione
sleep
3 Oscillazione (su-giù) 9 Raffreddamento/
Umidicazione
4 Funzione ioni negativi 10 Funzione WiFi
5 Finestra di visualizzazione 11 Timer
6 Velocità di ventilazione
84
IT
MESSA IN FUNZIONE E UTILIZZO
Prima di procedere all'utilizzo
• Togliere il dispositivo dalla confezione e rimuovere tutto il materiale d’imballaggio.
• Posizionare il dispositivo su una supercie piana e stabile.
• Inserire la spina nella presa elettrica. Il dispositivo può essere utilizzato direttamente
e non è necessaria alcuna installazione.
Messa in funzione
Quando la spina viene inserita per la prima volta nella presa elettrica, il dispositivo
emette un suono per due volte ed entra in modalità standby. Tutte le spie sono spente e
tutti i tasti non funzionano tranne il tasto ON/OFF.
Accendere/spegnere il dispositivo
Se in modalità standby si preme il tasto ON/OFF, il dispositivo si accende. Quando
lo si aziona per la prima volta, il dispositivo funziona a velocità bassa in modalità di
ventilazione normale. Quando il dispositivo è stato spento e viene riacceso, funziona
con la modalità impostata prima dello spegnimento. Ciò non vale per l'impostazione
del timer. Se prima dello spegnimento è stata impostata la modalità sleep, non viene
memorizzata. Quando lo si riaccende di nuovo, il dispositivo funziona in modalità di
ventilazione normale.
Se durante il funzionamento non viene premuto alcun tasto (inclusi quelli del
telecomando) nel giro di un minuto, tutte le spie vengono smorzate del 30 % della
luminosità originaria. Premere nuovamente il tasto desiderato per ripristinare la
luminosità ed eseguire la funziona rispettiva.
Premere il tasto ON/OFF (1 ) per spegnere il dispositivo. Il dispositivo emette un
suono una volta. Quando viene spento entra in modalità standby e le spie e lo schermo
si spengono.
Oscillazione
Quando il dispositivo è acceso premere il tasto di oscillazione sinistra-destra per
attivare l'oscillazione da sinistra a destra. La spia corrispondente (2) si accende.
Quando il dispositivo è acceso premere il tasto di oscillazione su-giù per attivare
l'oscillazione da su a giù. La spia corrispondente (3) si accende.
85
IT
La modalità di oscillazione sinistra-destra funziona nel modo seguente: le lamelle
oscillano di 80° da sinistra a destra. Nel momento in cui cambiano direzione si fermano
per 1 secondo per poi oscillare nella direzione opposta.
Se dopo aver azionato il dispositivo viene attivata l'oscillazione su-giù, il raffrescatore
evaporativo imposta la posizione di partenza corretta. Può succedere che le lamelle
orizzontali restino chiuse per circa 10 secondi per poi oscillare verso l'alto per aprirsi. Si
tratta di un procedimento del tutto normale.
Quando si spegne l'oscillazione su-giù, le lamelle orizzontali oscillano in posizione
orizzontale e si fermano.
Come impostare la velocità di ventilazione
Con il tasto della velocità è possibile regolare la ventilazione. Premendo più volte
questo tasto vengono visualizzati i livelli di velocità nella sequenza seguente:
Basso > Medio > Alto > Basso.
Sullo schermo i livelli di velocità vengono visualizzati con i numeri:
Velocità Visualizzazione
Basso 1
Medio 2
Alto 3
Funzione "Vento secco"
Se si tiene premuto per
3 secondi il tasto della velocità, si accende la funzione
"Vento secco". Il dispositivo funziona a velocità elevata, sullo schermo appare "3" e la
spia lampeggia per 20 minuti.
Durante l'utilizzo di questa funzione tutti i tasti sono disattivati tranne quello ON/OFF.
Tenere premuto per tre secondi il tasto della velocità per interrompere la funzione.
Se la funzione "Vento secco" è stata attiva per 20 minuti, il dispositivo si spegne
automaticamente ed entra in modalità standby.
Impostare il timer
Con il tasto timer si può impostare l'ora no allo spegnimento automatico del
dispositivo. E' possibile impostare una durata da 1 a 9 ore in passaggi di un'ora.
Sullo schermo viene visualizzato l'orario. Quando il dispositivo è acceso, premere
il tasto timer . La spia del timer e dell'ora lampeggiano sullo schermo. Ora è
possibile impostare l'ora desiderata no allo spegnimento automatico. Premere inne
un tasto qualsiasi (tranne il tasto ON/OFF) oppure attendere 5 secondi per uscire
dall'impostazione.
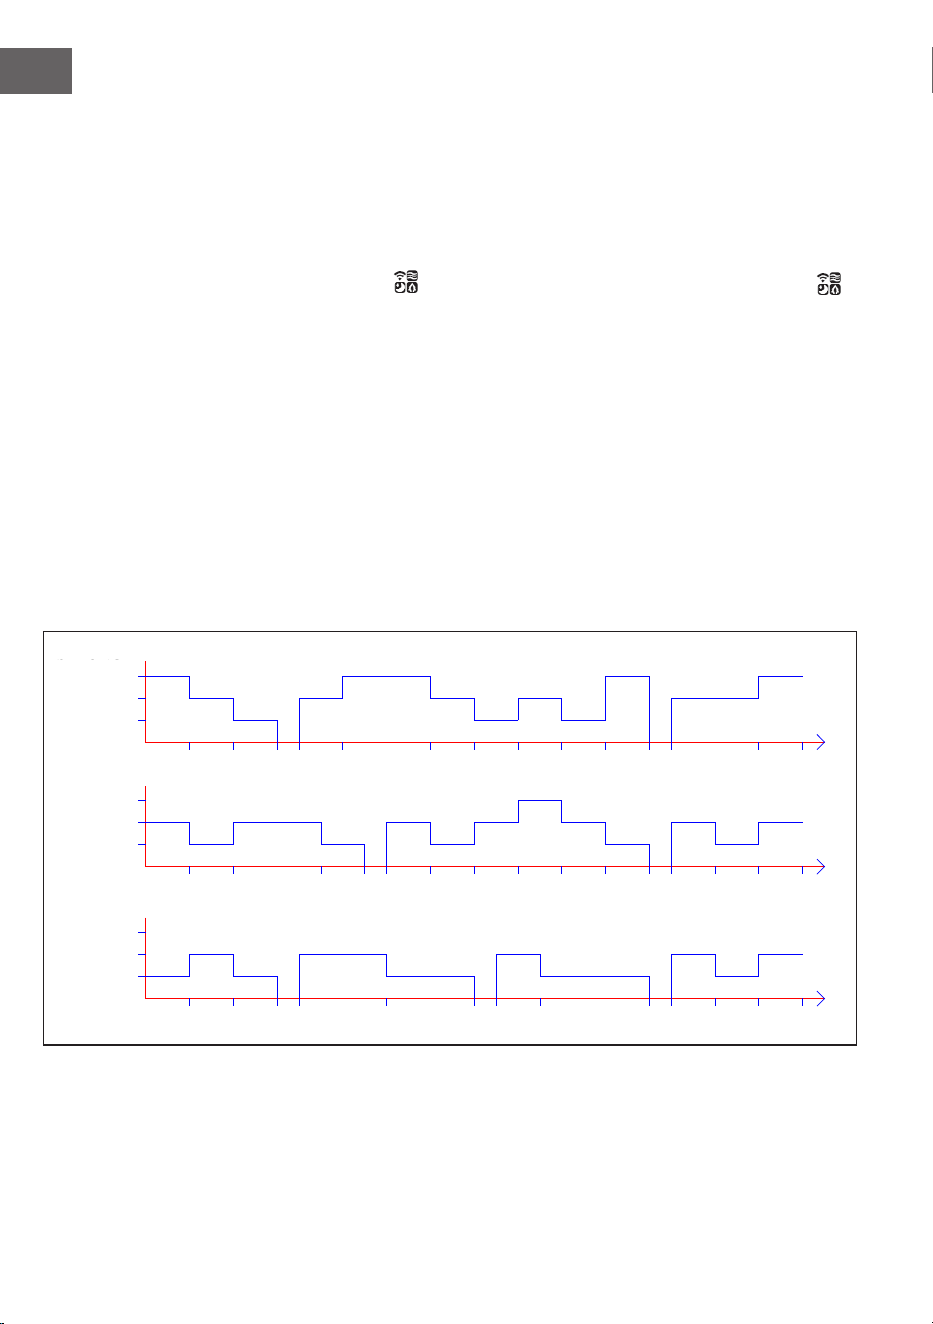
86
IT
Dopo aver attivato il timer, sullo schermo vengono visualizzati in intervalli di 10 secondi
il tempo rimanente no allo spegnimento e la velocità attuale impostata. Le spie
corrispondenti si accendono (11/6). Allo scadere del tempo il dispostivio si spegne
automaticamente ed entra in modalità standby.
Selezionare la modalità di ventilazione
Per impostare la modalità desiderata premere più volte il tasto di ventilazione dopo aver
acceso il dispositivo . Premendo più volte questo tasto vengono visualizzate le
modalità nella sequenza seguente:
Ventilazione normale > Ventilazione naturale > Ventilazione sleep > Ventilazione
normale.
Le spie corrispondenti si accendono (7/8). Per la modalità di ventilazione normale non
c'è una spia.
Ventilazione normale:
Durante la ventilazione normale il dispositivo funziona senza modiche con il livello di
velocità impostato (Basso, Medio o Alto).
Ventilazione naturale:
Lo schema di ventilazione di questa modalità è rappresentato nella gura seguente:
6S 6S 6S 3S 12S 12S 3S 6S 3S15S
6S
T=90S
6S 6S 6S 6S 6S 3S 12S
6S 6S 12S 6S6S 6S6S 6S 6S
3S 6S 6S12S 6S
3S 6S 3S
T=90S
T=90S
6S
6S 6S 6S
6S 6S 6S
Low
Medium
High
STRONG
MIDDLE
WEAK
Low
Medium
High
Low
Medium
High
Durante la modalità di ventilazione naturale la spia corrispondente (7) si accende. Lo
schermo visualizza la velocità di ventilazione originaria e non le modiche. Ciò signica
ad esempio che se è stata attivata la modalità di ventilazione naturale ad alta velocità,
viene visualizzato soltanto il livello di velocità "Alto" ("3") senza cambiare.
Media
Alta
Bassa
Media
Alta
MEDIA
FORTE
Bassa
Media
Alta
Bassa
DEBOLE

87
IT
Ventilazione sleep:
Quando si attiva la modalità di ventilazione sleep, il dispositivo funziona inizialmente
alla velocità precedentemente impostata. Dopo 30 minuti si riduce in intervalli di 30
minuti. Allo scadere del timer il dispositivo entra in modalità standby. Se non è stato
impostato alcun timer, il dispositivo continua a funzionare a velocità minima.
a) Se la modalità di ventilazione sleep è stata attivata con una velocità elevata,
il dispositivo passa in velocità media dopo 30 minuti. La spia corrispondente
si accende. Dopo aver funzionato per 30 minuti a media velocità il dispositivo
passa a quella bassa e la spia corrispondente si accende. Il dispositivo continua
a funzionare a bassa velocità no allo scadere del timer o nché non si spegne il
dispositivo.
b) Se la modalità di ventilazione sleep è stata attivata con una velocità media, il
dispositivo passa in velocità bassa dopo 30 minuti. La spia corrispondente si
accende. Il dispositivo continua a funzionare a bassa velocità no allo scadere del
timer o nché non si spegne il dispositivo.
c) Se la modalità di ventilazione sleep è stata attivata con una velocità bassa, si
accende la spia corrispondente. Il dispositivo continua a funzionare a bassa
velocità no allo scadere del timer o nché non si spegne il dispositivo.
Modalità di raffreddamento/umidicazione
Quando il dispositivo è acceso, premere il tasto di raffreddamento/umidicazione per
attivare e disattivare la funzione di raffreddamento. La spia corrispondente (9) si
accende.
Accendere/Spegnere lo schermo e le spie (telecomando)
Quando il dispositivo è acceso, premere sul telecomando il tasto di spegnimento
dello schermo per spegnere lo schermo e tutte le spie. Quando lo schermo è
spento e si preme il tasto di spegnimento dello schermo o qualsiasi altro tasto, le
spie si accendono di nuovo, ma l'altra funzione del tasto non viene eseguita. Premere
nuovamente il tasto desiderato per eseguire la funzione corrispondente.
Funzione degli ioni negativi
Quando si accende il dispositivo, si aziona la funzione degli ioni negativi e la spia
corrispondente (4) si accende. Quando si spegne il dispositivo la funzione si disattiva.
88
IT
Funzione WiFi
Quando il dispositivo è acceso, premere per cinque secondi il tasto di ventilazione/
WiFi . Viene emesso un suono e la spia WiFi lampeggia velocemente per cinque
secondi. In modalità standard è possibile congurare le app in rete. Se nel giro di 3
minuti non viene instaurato nessun collegamento, la spia WiFi (10) sparisce. Premere
di nuovo il tasto di ventilazione/WiFi per instaurare nuovamente un collegamento.
Viene emesso un suono, il modulo WiFi viene resettato e la spia WiFi (10) lampeggia
velocemente per cinque secondi. In modalità standard è possibile congurare le app in
rete. Tenere premuto per 5 secondi il tasto di ventilazione/WiFi non appena la spia
WiFi (10) lampeggia. Viene emesso un suono e la spia WiFi (10) lampeggia lentamente
per 5 secondi. Ora è possibile congurare le app in rete nella modalità di compatibilità.
Avvertenze inerenti l'utilizzo della funzione WiFi
• Quando il dispositivo viene spento nel giro di 10 secondi dopo l'accensione,
la spia WiFi (10) ritorna nello stato in cui era prima dello spegnimento. Se il
dispositivo viene spento dopo 10 secondi, la spia WiFi (10) sparisce ed entra
in modalità di risparmio energetico. Tenere premuto per 5 secondi il tasto
d'impostazione per riavviare il dispositivo.
• Se la rete non vien congurata nel giro di tre minuti, la spia WiFi (10) si spegne.
Tenere premuto per 5 secondi il tasto d'impostazione per riavviare il dispositivo.
• Quando si spegne il router dopo che è stato stabilito un collegamento WiFi, la
spia WiFi (10) si spegne. Non appena si riaccende il router, il collegamento con il
dispositivo si instaura automaticamente.
• Quando si utilizza la funzione WiFi, la spia WiFi (10) lampeggia velocemente. Per
poter usare l'app Klarstein sono necessari un router (da collegare a reti esterne)
e un dispositivo mobile esterno (p. es. smartphone). L'app Klarstein deve esser
installata sul dispositivo mobile esterno, che deve essere collegato alla rete WiFi.
89
IT
CONTROLLO DEL DISPOSITIVO CON
SMARTPHONE
Se si collega il dispositivo Klarstein con la rete Wi-Fi di casa, è possibile utilizzarlo
comodamente con l’apposita app di Klarstein. La app non permette solo di controllare il
dispositivo a distanza con lo smartphone, ma offre anche accesso a utili informazioni.
Procedere in questo modo per collegare lo smartphone al dispositivo Klarstein:
1. Scaricare la app di Klarstein scansionando il codice QR (v. sotto) con lo
smartphone o scaricandola direttamente dall’App Store o da Google Play.
2. Assicurarsi che lo smartphone sia collegato alla stessa rete Wi-Fi con cui si
desidera connettere il dispositivo Klarstein.
3. Aprire la app di Klarstein.
4. Accedere con il proprio account. Se ancora non si dispone di un account,
effettuare la registrazione nella app di Klarstein.
5. Seguire le istruzioni della app.
Download della app
Utilizzare la funzione di scansione dello smartphone per scansionare il codice QR e
salvare la app sullo smartphone.
Nota: ulteriori informazioni sull’utilizzo della app e supporto per stabilire la
connessione con il dispositivo vengono fornite dalla app non appena la si apre per
la prima volta.
iOS Android
90
IT
Correzione degli errori in caso di problemi di connessione
Se non è possibile trovare il dispositivo Klarstein nella rete Wi-Fi, controllare i seguenti
punti:
• La spina del dispositivo è collegata alla presa elettrica?
• La funzione Wi-Fi dello smartphone è attiva?
• La funzione Wi-Fi del dispositivo Klarstein è attiva? (seguire le indicazioni nell’app)
• La password per la rete Wi-Fi è stata inserita correttamente?
• Router, dispositivo Klarstein e smartphone si trovano vicini tra loro mentre si cerca di
stabilire la connessione? (idealmente a non più di 5 metri l’uno dall’altro)
• Se è stata disattivata la banda da 2,4 GHz nelle impostazioni del router Wi-Fi,
attivarla nelle impostazioni del router.
Nota: per ulteriore supporto, seguire le indicazioni per stabilire la connessione
nell'app.
FUNZIONI PROTETTIVE
Interruttore di protezione da mancanza d'acqua
Se la pompa dell'acqua funziona per 60 secondi e il software si accorge che
l'interruttore di livello dell'acqua non si collega (troppa poca acqua) per 5 secondi
consecutivi (65 totali), la pompa smetta automaticamente di funzionare e il dispositivo
emette un suono per 10 volte.
Rilevamento del livello d'acqua
Dopo aver acceso il dispositivo tenere premuto entro 10 secondi il tasto di
raffreddamento/umidicazione dopo aver sentito un suono. Nel giro di 3
secondi viene rilevato il livello d'acqua. Se non c'è acqua nel serbatoio, la funzione di
raffreddamento si disattiva e il dispositivo suona per 10 volte. Premendo il tasto ON/
OFF o durante un'interruzione di corrente, si disattiva il rilevamento del livello
d'acqua.
Funzione di memorizzazione
1. Se non si stacca il dispositivo dalla corrente, quando lo si accende continua a
funzionare nella modalità impostata prima dello spegnimento. Le modalità di
ventilazione sleep, "Vento secco" e timer non vengono memorizzate.
2. Se non si stacca il dispositivo dalla corrente, quando lo si accende funziona
per 3 secondi a velocità media per poi passare a quella impostata prima dello
spegnimento.
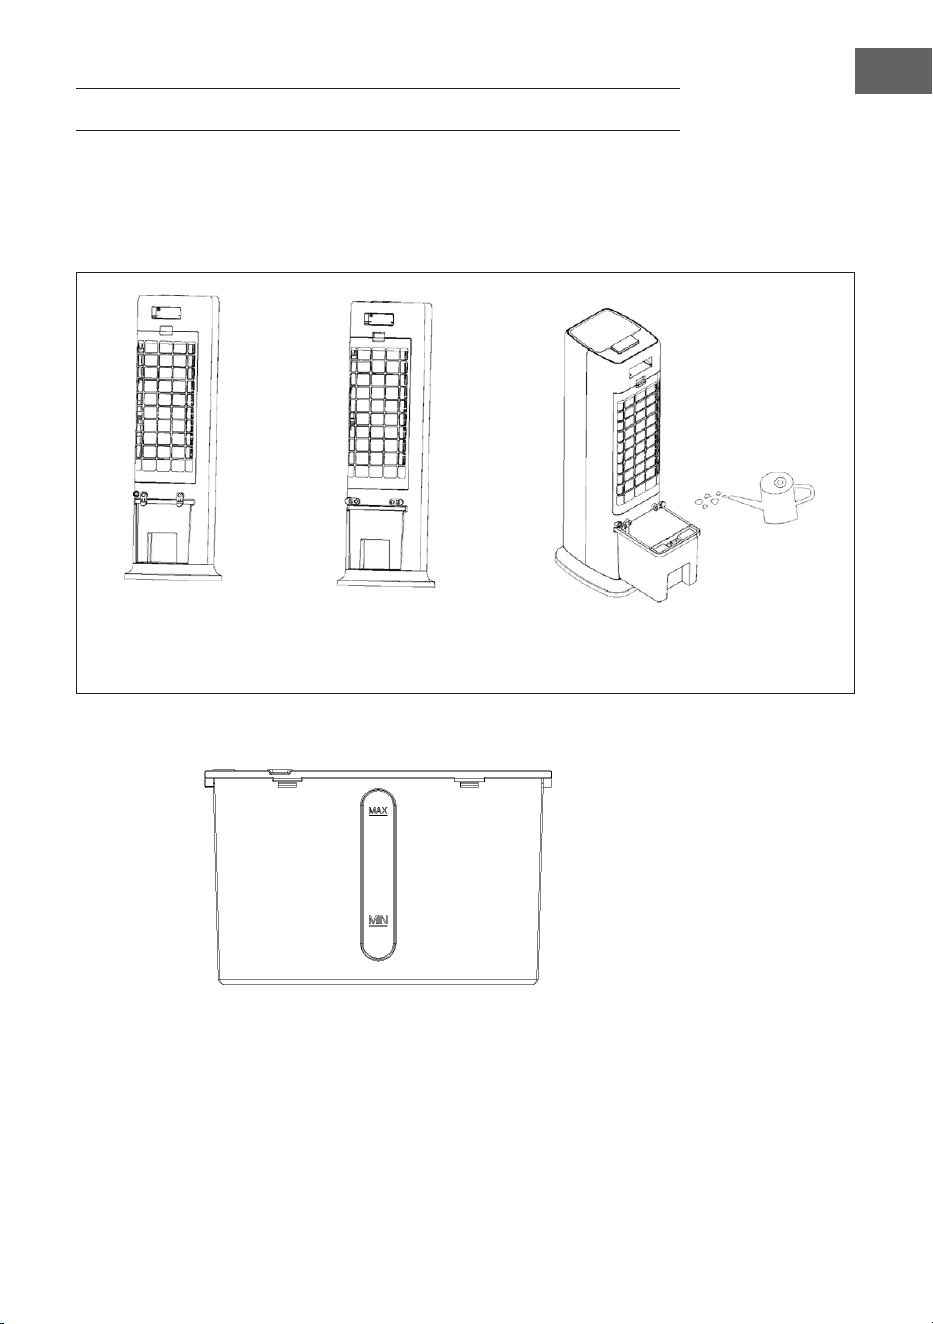
91
IT
RIEMPIMENTO DEL SERBATOIO
Riempire il serbatoio d'acqua durante la funzione di raffreddamento/umidicazione.
Girare l'avvolgicavo di 90° prima di riempire il serbatoio. Estrarlo no a metà e versarvi
dentro l'acqua lentamente. Dopodiché spingerlo nuovamente nel dispositivo. Rimettere
l'avvolgicavo nella posizione originaria.
Il dispositivo di sicurezza
è chiuso
Il dispositivo di sicurezza
è aperto
Estrarre il serbatoio
per versarvi l'acqua.
Fare attenzione all'indicatore di livello dell'acqua durante il riempimento del serbatoio:
1. Durante il riempimento manuale assicurarsi che il livello dell'acqua si trovi sopra la
tacca del minimo e sotto quella del massimo.
2. Usare solo acqua potabile.
3. Se il dispositivo viene usato per la prima volta, è possibile che si senta uno strano
odore e che l'acqua nel serbatoio si colori. Ciò è del tutto normale, non costituisce
nessun pericolo e non ha alcun effetto sulla salute.
4. Quando si inserisce il portaghiaccio nel serbatoio, assicurarsi che l'acqua non
superi la tacca del massimo.
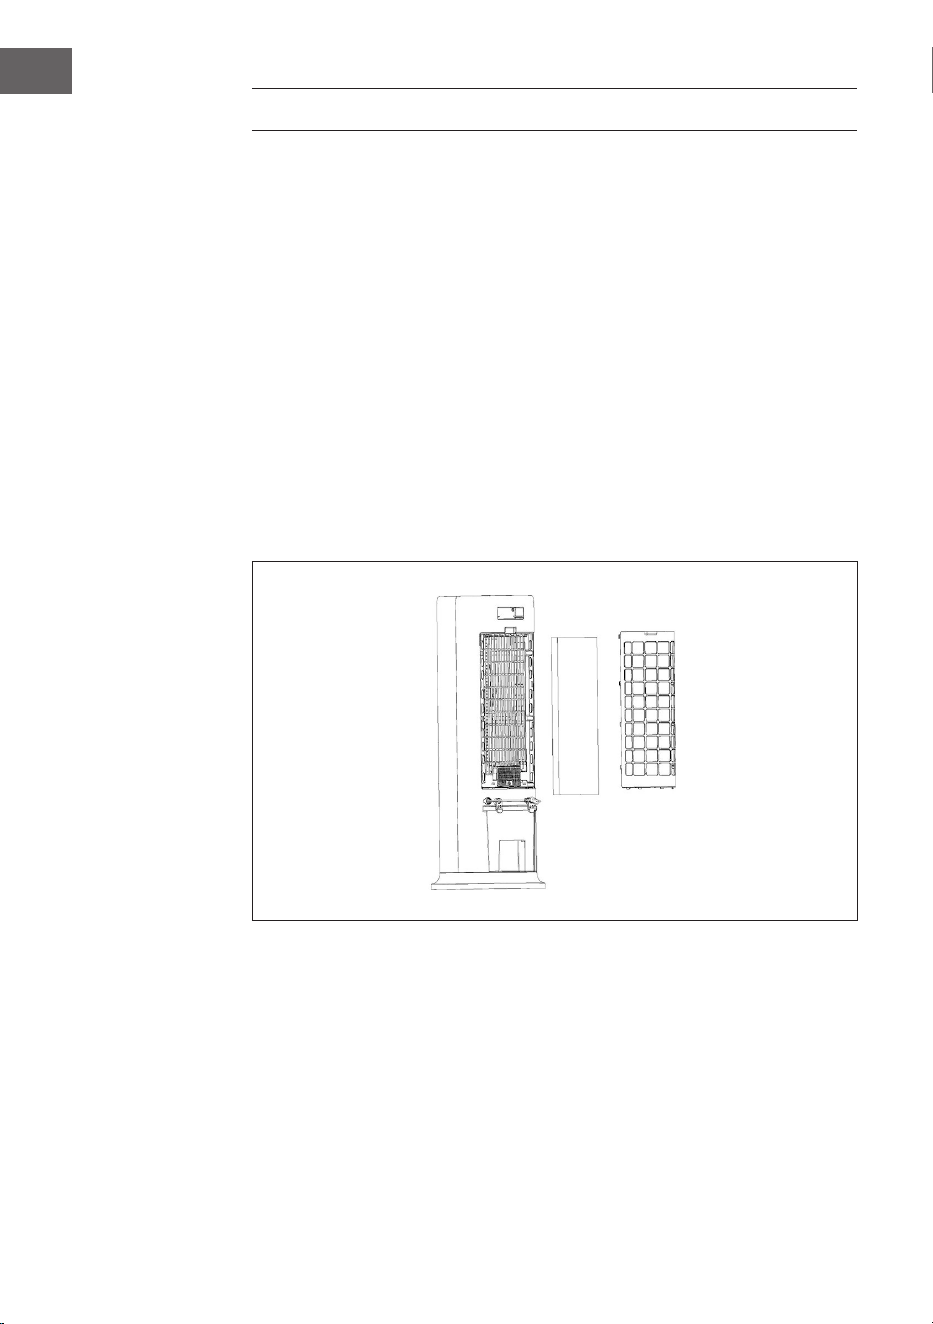
92
IT
PULIZIA E MANUTENZIONE
Pulizia
• Prima della pulizia, spegnere il dispositivo e staccare la spina.
• Non usare sostanze chimiche, benzina, diluenti o altre sostanze che potrebbero
danneggiare la supercie del dispositivo.
• Rimuovere la polvere con un panno morbido. Utilizzare l'acqua (sotto i 50 °C) e un
detergente neutro per togliere le macchie ostinate. Inne asciugare la supercie del
dispositivo con un panno morbido.
Pulizia dei ltri
Pulire i ltri almeno una volta al mese seguendo i passaggi seguenti:
1. Staccare la spina dalla presa elettrica.
2. Estrarre prima la griglia di ventilazione posteriore e poi il ltro.
3. Immergere il ltro in una soluzione a base d'acqua e sapone per qualche minuto.
Pulirlo e lasciarlo asciugare.
4. Reinserire nel dispositivo il ltro e la griglia di ventilazione posteriore quando sono
completamente asciutti.

93
IT
Come pulire il serbatoio dell'acqua
1. Staccare la spina dalla presa elettrica. Girare l'avvolgicavo in posizione
orizzontale ed estrarre il serbatoio no a metà.
2. Inserire la mano nel serbatoio e girare il ssaggio di 90°. Premere inne
l'alloggiamento della pompa dell'acqua verso il basso e prelevare il serbatoio.
3. Eliminare i residui di calcare nel serbatoio con un panno messo a mollo con del
detersivo neutro. Inne sciacquare il serbatoio con dell'acqua pulita.
Come pulire la scocca
• Prima di pulire la scocca, assicurarsi che il dispositivo sia spento e che la spina sia
stata tolta dalla presa elettrica.
• Pulire la scocca con un panno umido. Non sciacquare direttamente con acqua.
• Non usare soluzioni o detergenti corrosivi.
Stoccaggio
• Se il dispositivo non viene usato per un certo periodo di tempo, staccare la spina e
imballarlo per evitare che la polvere si introduca nella scocca.
• Prima dell'imballaggio assicurarsi che il dispositivo sia pulito, il ltro asciutto e che
non ci sia dell'acqua nel serbatoio.
• Conservarlo poi in un luogo asciutto e ventilato.

94
IT
SMALTIMENTO
Se nel proprio paese si applicano le regolamentazioni
inerenti lo smaltimento di dispositivi elettrici ed elettronici,
questo simbolo sul prodotto o sulla confezione segnala che
questi prodotti non possono essere smaltiti con i riuti normali
e devono essere portati a un punto di raccolta di dispositivi
elettrici ed elettronici. Grazie al corretto smaltimento dei
vecchi dispositivi si tutela il pianeta e la salute delle persone
da possibili conseguenze negative. Informazioni riguardanti il
riciclo e lo smaltimento di questi prodotti si ottengono presso
l’amministrazione locale oppure il servizio di gestione dei
riuti domestici.
Il prodotto contiene batterie. Se nel proprio paese si
applicano le regolamentazioni inerenti lo smaltimento di
batterie, non possono essere smaltite con i normali riuti
domestici. Preghiamo di informarvi sulle regolamentazioni
vigenti sullo smaltimento delle batterie. Grazie al corretto
smaltimento dei vecchi dispositivi si tutela l’ambiente e la
salute delle persone da conseguenze negative.
DICHIARAZIONE DI CONFORMITÀ
Produttore:
Chal-Tec GmbH, Wallstraße 16, 10179 Berlino, Germania.
Importatore per la Gran Bretagna:
Berlin Brands Group UK Limited
PO Box 42
272 Kensington High Street
London, W8 6ND
United Kingdom
Il fabbricante, Chal-Tec GmbH, dichiara che il tipo di
apparecchiatura radio Skytower 360° Smart è conforme alla
direttiva 2014/53/UE. Il testo completo della dichiarazione
di conformità UE è disponibile al seguente indirizzo Internet:
use.berlin/10035818


