EN
Owner’s Manual
THANK YOU FOR BUYING A HOTPOINT-ARISTON
PRODUCT
In order to receive a more complete assistance, please
register your product on www . hotpoint . eu/ register
PLEASE SCAN THE QR CODE ON
YOUR APPLIANCE IN ORDER TO
REACH MORE INFORMATION
Before using the appliance carefully read the Safety
Instruction.
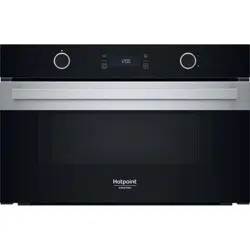
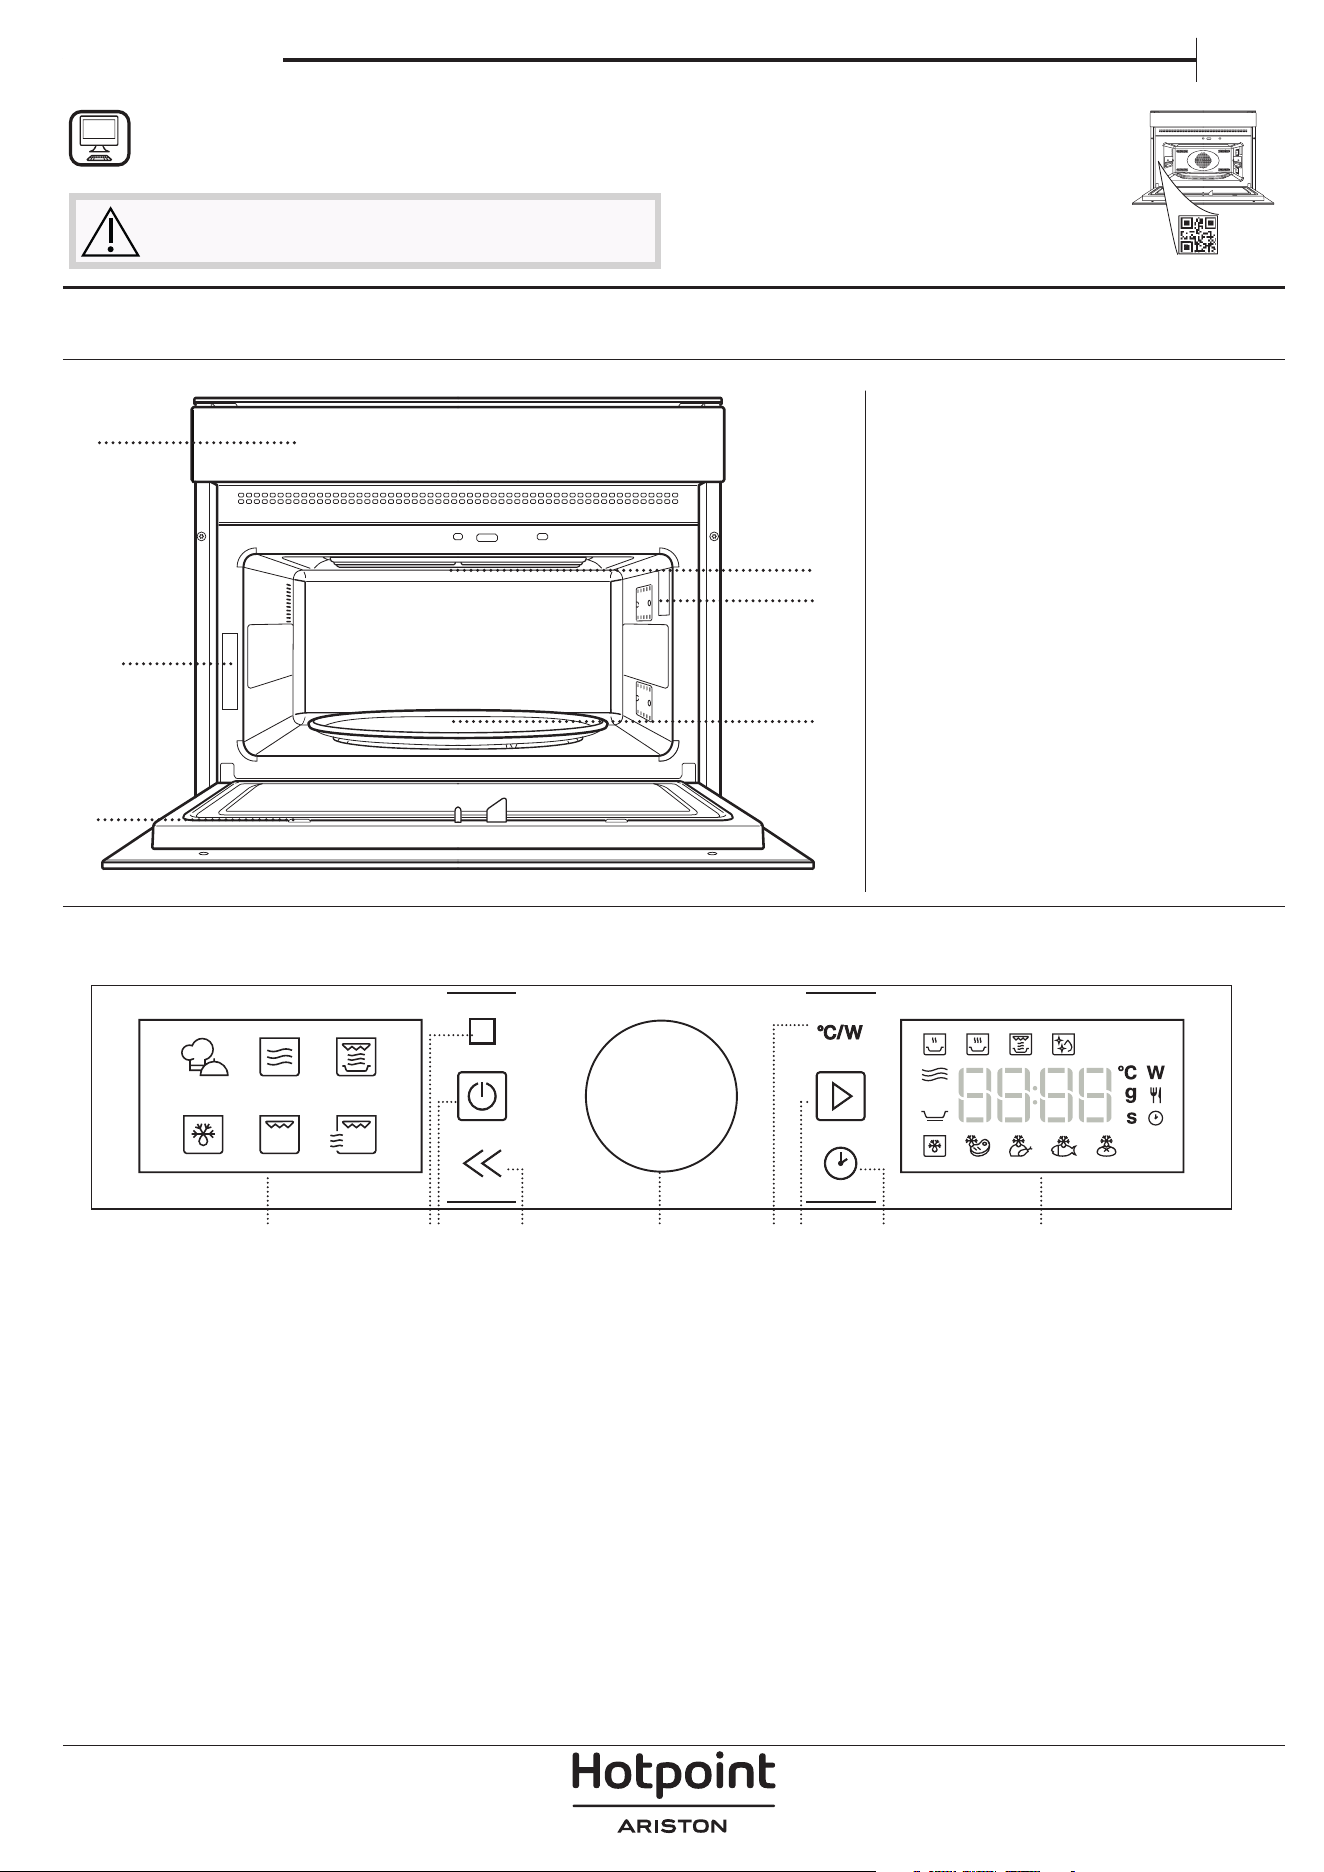
PRODUCT DESCRIPTION
CONTROL PANEL
1. Control panel
2. Identification plate
(do not remove)
3. Door
4. Upper heating element/grill
5. Light
6. Turntable
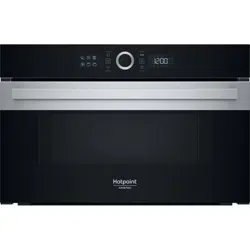
1. LEFT-HAND DISPLAY
2. PAUSE
To pause a cooking cycle
3. ON/OFF
For switching the oven on and off
and for stopping an active function
at any time.
4. BACK
For returning to the previous step.
A long press (5s) enable/disable
the Keylock function.
5. ROTARY KNOB / CENTRAL
BUTTON
Turn this to navigate through
the functions and adjust all of
the cooking parameters. Press it
to select, set, access or confirm
functions or parameters and
eventually start the cooking
program.
6. POWER
To adjust the grill level or
microwave power.
7. START
For starting functions and
confirming settings
8. TIME
For setting the time as well as
setting or adjusting the cooking
time.
9. RIGHT-HAND DISPLAY
1
6
5
4
2
3
1 2 3 54 986 7
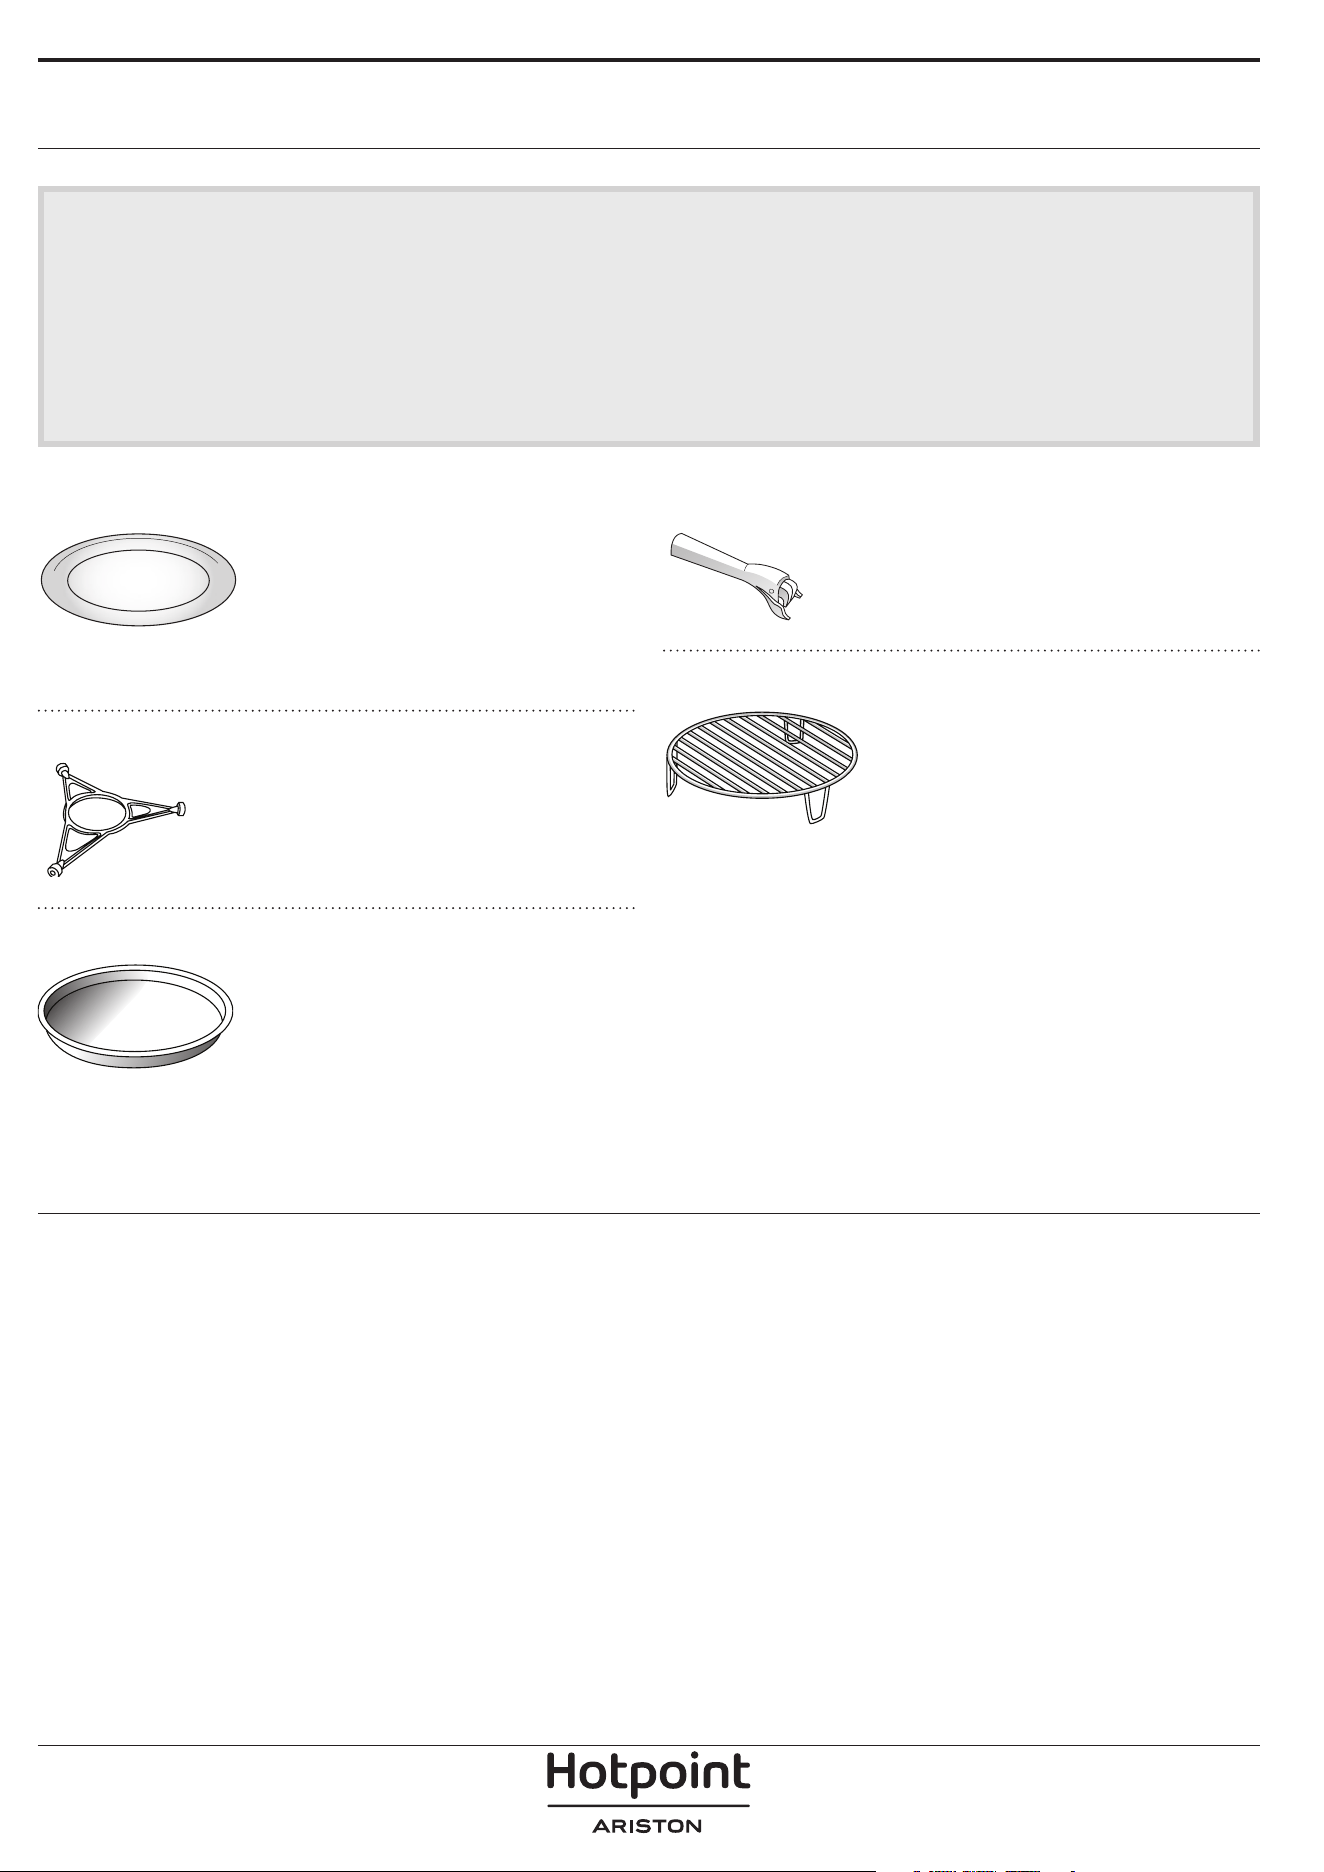
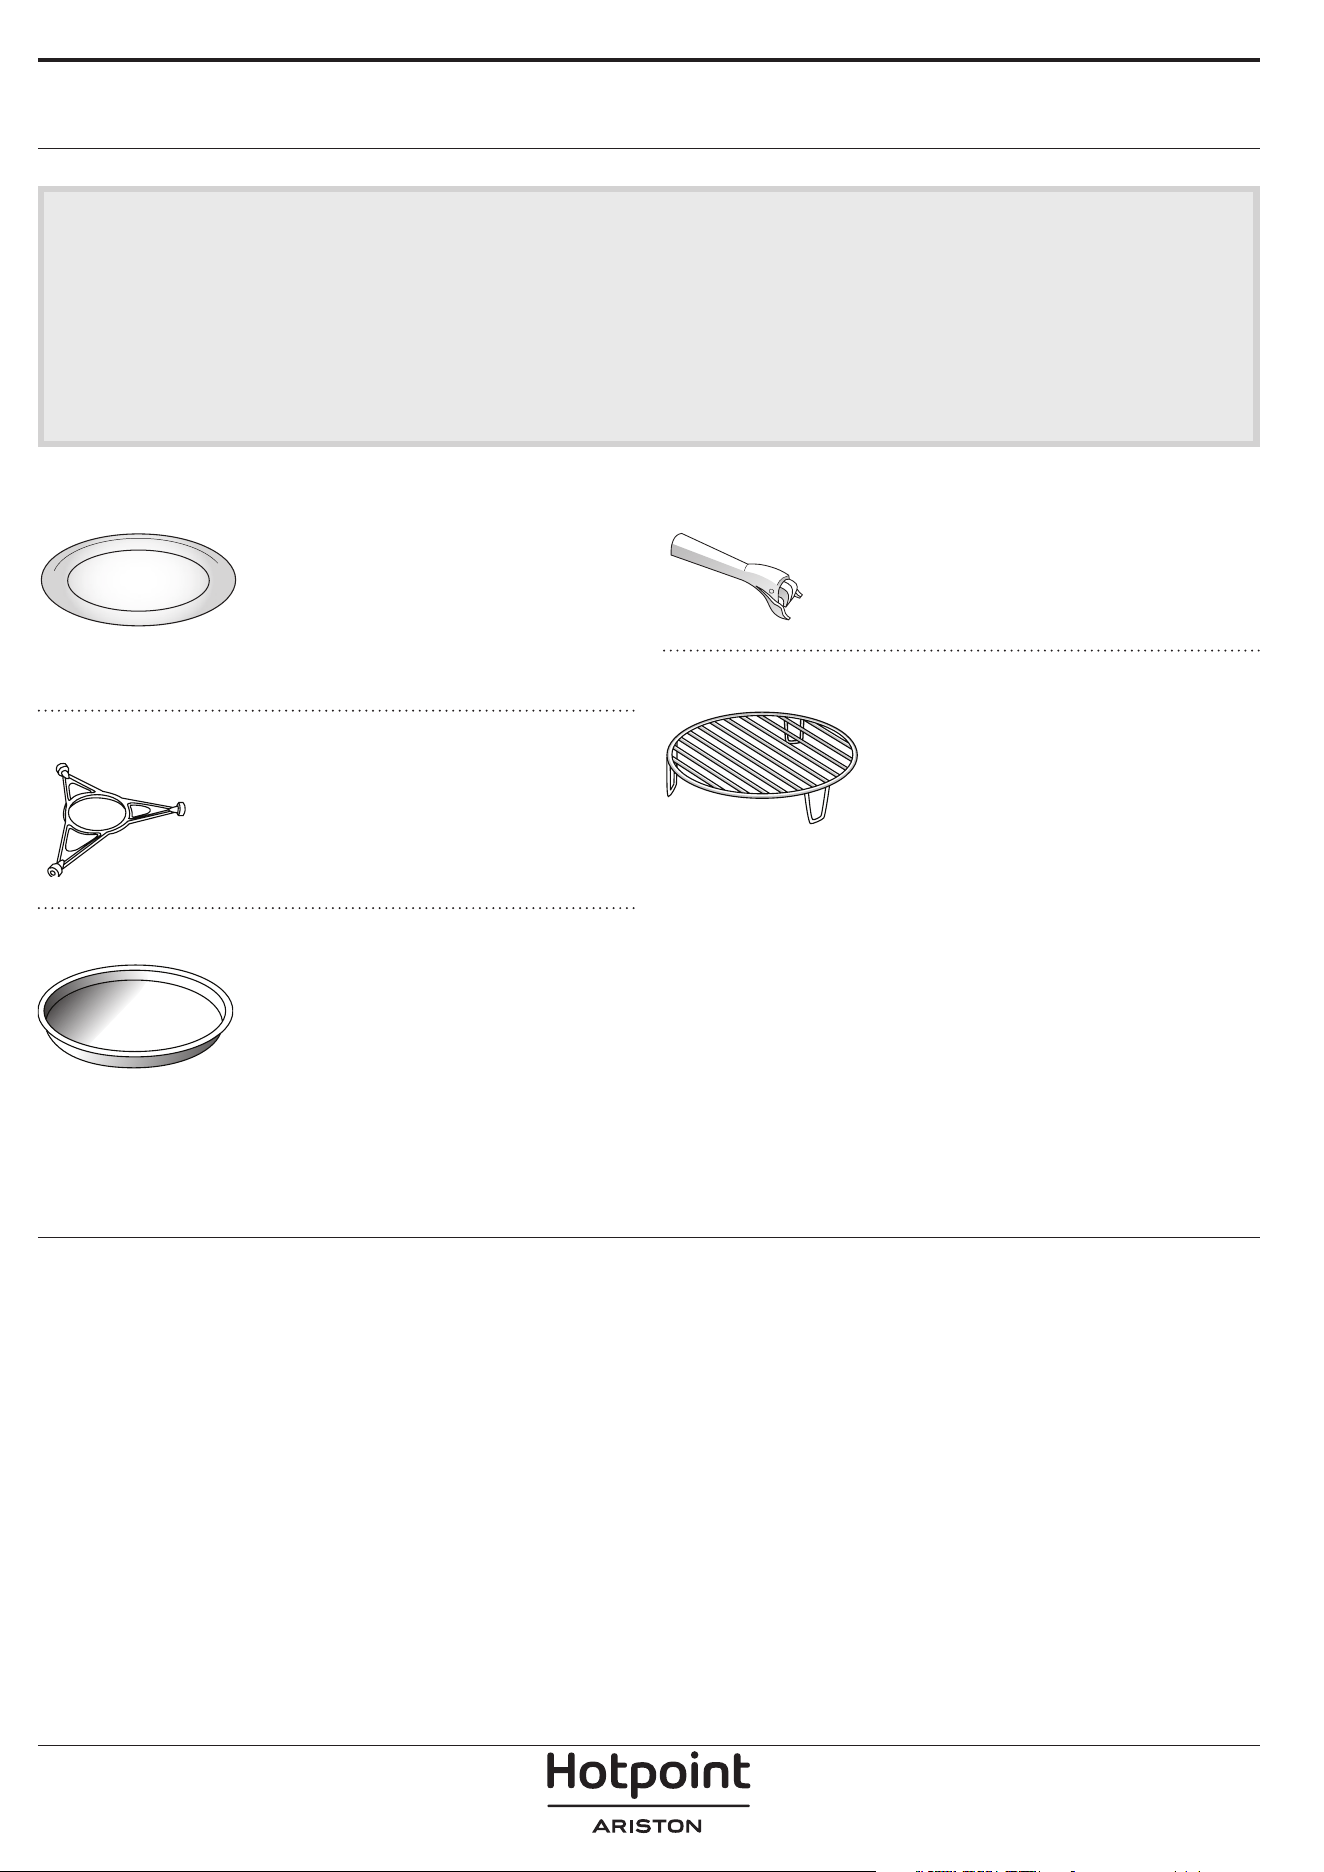
ACCESSORIES
TURNTABLE
Placed on its support, the glass
turntable can be used with all
cooking methods.
The turntable must always be used
as a base for other containers or
accessories, with the exception of the rectangular
baking tray.
TURNTABLE SUPPORT
Only use the support for the glass
turntable.
Do not rest other accessories on
the support.
CRISP PLATE
Only for use with the designated
functions.
The Crisp plate must always be
placed in the center of the glass
turntable or wire rack and can be
pre-heated when empty, using the
special function for this purpose only. Place the food
directly on the Crisp plate.
HANDLE FOR CRISP PLATE
Useful for removing the hot Crisp
plate from the oven.
WIRE RACK
This allows you to place food closer
to the grill, for perfectly browning
your dish and allows an optimal air
circulation.
It must be used as base for the
crisp plate.
Place the wire rack on the turntable, making sure that
it does not come into contact with other surfaces.
The number and type of accessories may vary depending on which model is purchased.
Other accessories that are not supplied can be purchased separately from the After-sales Service.
There are a number of accessories available on
the market. Before you buy, ensure they are
suitable for microwave use and resistant to oven
temperatures.
Metallic containers for food or drink should never
be used during microwave cooking.
Always ensure that foods and accessories do not
come into contact with the inside walls of the oven.
Always ensure that the turntable is able to turn
freely before starting the oven. Take care not to
unseat the turntable whilst inserting or removing
other accessories.
Accessories during microwave function may raise in
temperature. It is recommended to use protection
to handle accessories at the end of the cycle.
FUNCTIONS
AUTOMATIC FUNCTIONS
With the MyMenu Automatic functions, simply select
the type and weight or the quantity of the food items
to obtain the best results. The oven will automatically
calculate the optimum settings and continue to
change them as cooking progresses. To use at best
this function, follow the indications on the relative
cooking table.
AUTOMATIC REHEAT
For reheating ready-made food that is
either frozen or at room temperature. The oven
automatically calculates the settings required to
achieve the best results in the shortest amount of
time. Place food on a microwave-safe and heatproof
dinner plate or dish.
CATEGORY FOOD WEIGHT
1 Plated Meal 250 - 800 g
2* Frozen Lasagna 400 g - 1 kg
3* Frozen Portion 250 - 800 g
4 Milk/Water 100 - 500 g
5 Soup 200 - 800 g
AUTOMATIC COOK
For cooking foods quickly and achieving optimal
result. Place food on a microwave-safe and heatproof
dinner plate or dish.
CATEGORY FOOD WEIGHT
1 Baked Potatoes 200 g - 1 kg
2* Stued Vegetables 600 g - 2.2 kg
3* Chicken Parts 400 - 1.2 kg
4 Scrambled eggs 100 - 500 g
5 Popcorn 80 - 100 g
AUTOMATIC CRISP
For quickly reheating and cooking frozen foods
and giving them a golden, crunchy top. Only use this
function with the crisp plate provided. Turn the food
when prompted.
CATEGORY FOOD WEIGHT
1* Hamburgers 100 - 500 g
2* Chicken Nuggets 100 - 500 g
3* Pizza 350 - 600 g
4* Fish Fingers 100 - 500 g
5* French Fries 100 - 500 g
Required accessories: Crisp plate, handle for crisp plate.
MW SELF CLEAN
The action of the steam released during this
special cleaning cycle allows dirt and food residues to
be removed with ease. Pour a cup of drinking water
into microwave proof container and activate the
function.
MICROWAVE
Use microwave function only with food or
beverages inside to preserve the correct functionality
of the product.
POWER (W) RECOMMENDED FOR
900
Quickly reheating drinks or other foods with a high
water content.
750 Cooking vegetables.
650 Cooking meat and sh.
500
Cooking meaty sauces, or sauces containing cheese
or egg. Finishing o meat pies or pasta bakes.
350
Slow, gently cooking. Perfect for melting butter or
chocolate.
160
Defrosting frozen foods or softening butter and
cheese.
90 Softening ice cream.
ACTION FOOD POWER (W)
DURATION
(MIN.)
Reheat 2 cups 900 1 - 2
Reheat Mashed potatoes 1kg 900 10 - 12
Defrost Minced meat 500g 160 15 - 16
Cook Sponge cake 750 7 - 8
Cook Egg custard 500 13 - 16
Cook Meat loaf 750 17 - 20
CRISP
For perfectly browning a dish, both on the top
and bottom of the food. This function must only be
used with the special Crisp plate.
FOOD
DURATION
(MIN.)
Leavened cake 7 - 8
Hamburger 8 - 10*
* Turn food halfway through cooking.
Required accessories: Crisp plate, handle for the Crisp plate.
DEFROST
For quickly defrosting various different types
of food simply by specifying their weight. Always
place the food directly on the glass turntable for best
results.
CRISP BREAD DEFROST
This exclusive function allows you to defrost
frozen bread. Combining both Defrost and Crisp
technologies, your bread will taste and feel as if
it were freshly baked. Use this function to quickly
defrost and heat frozen rolls, baguettes & croissants.
The Crisp Plate must be used in combination with this
function.
CATEGORY FOOD WEIGHT
Timed Defrost -
Meat 100 g - 2 Kg
Poultry 100 g - 3 Kg
Fish 100 g - 2 Kg
Crisp Bread Defrost 50 - 800 g

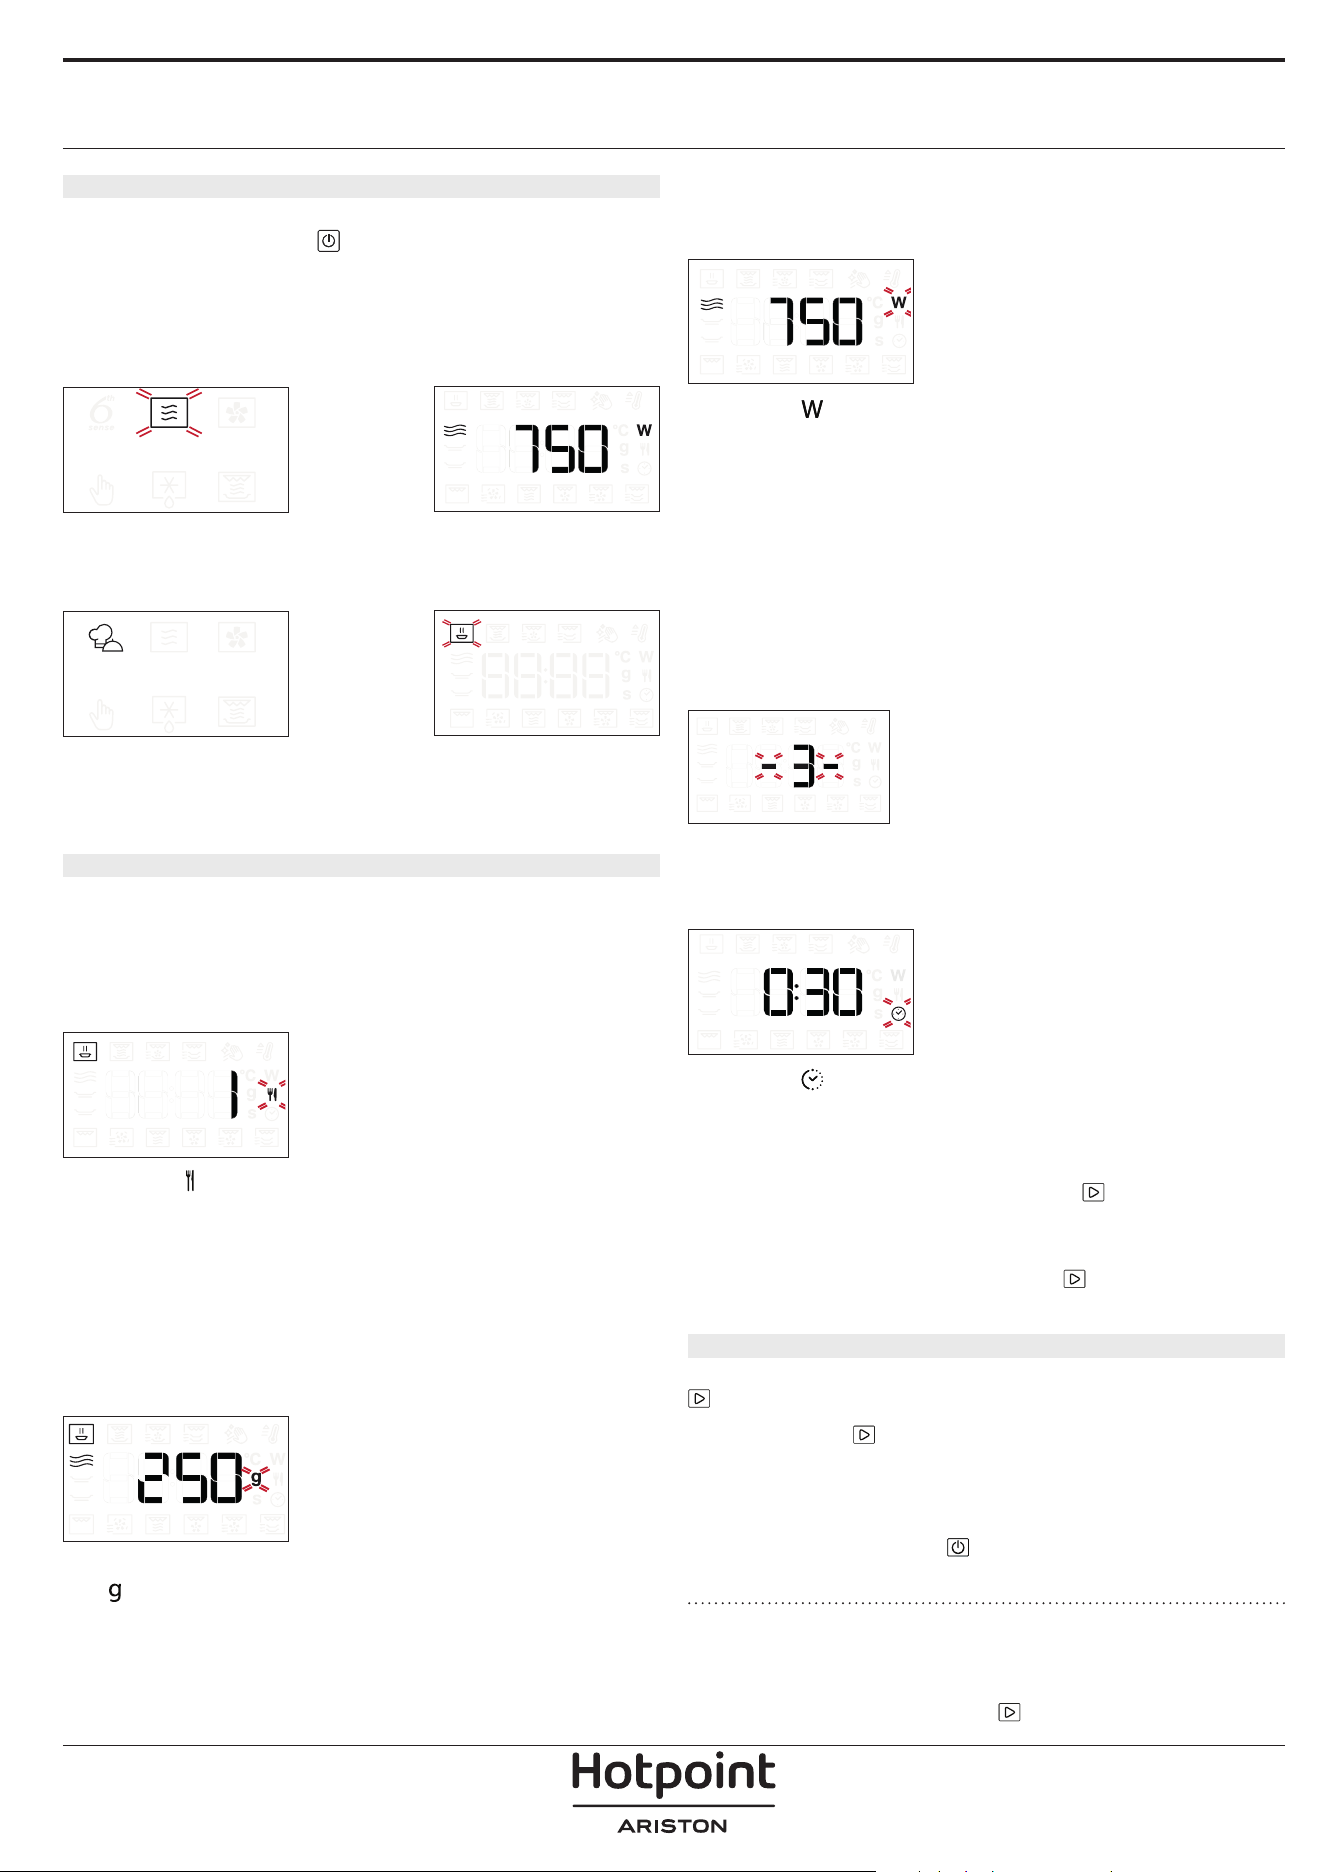
FIRST TIME USE
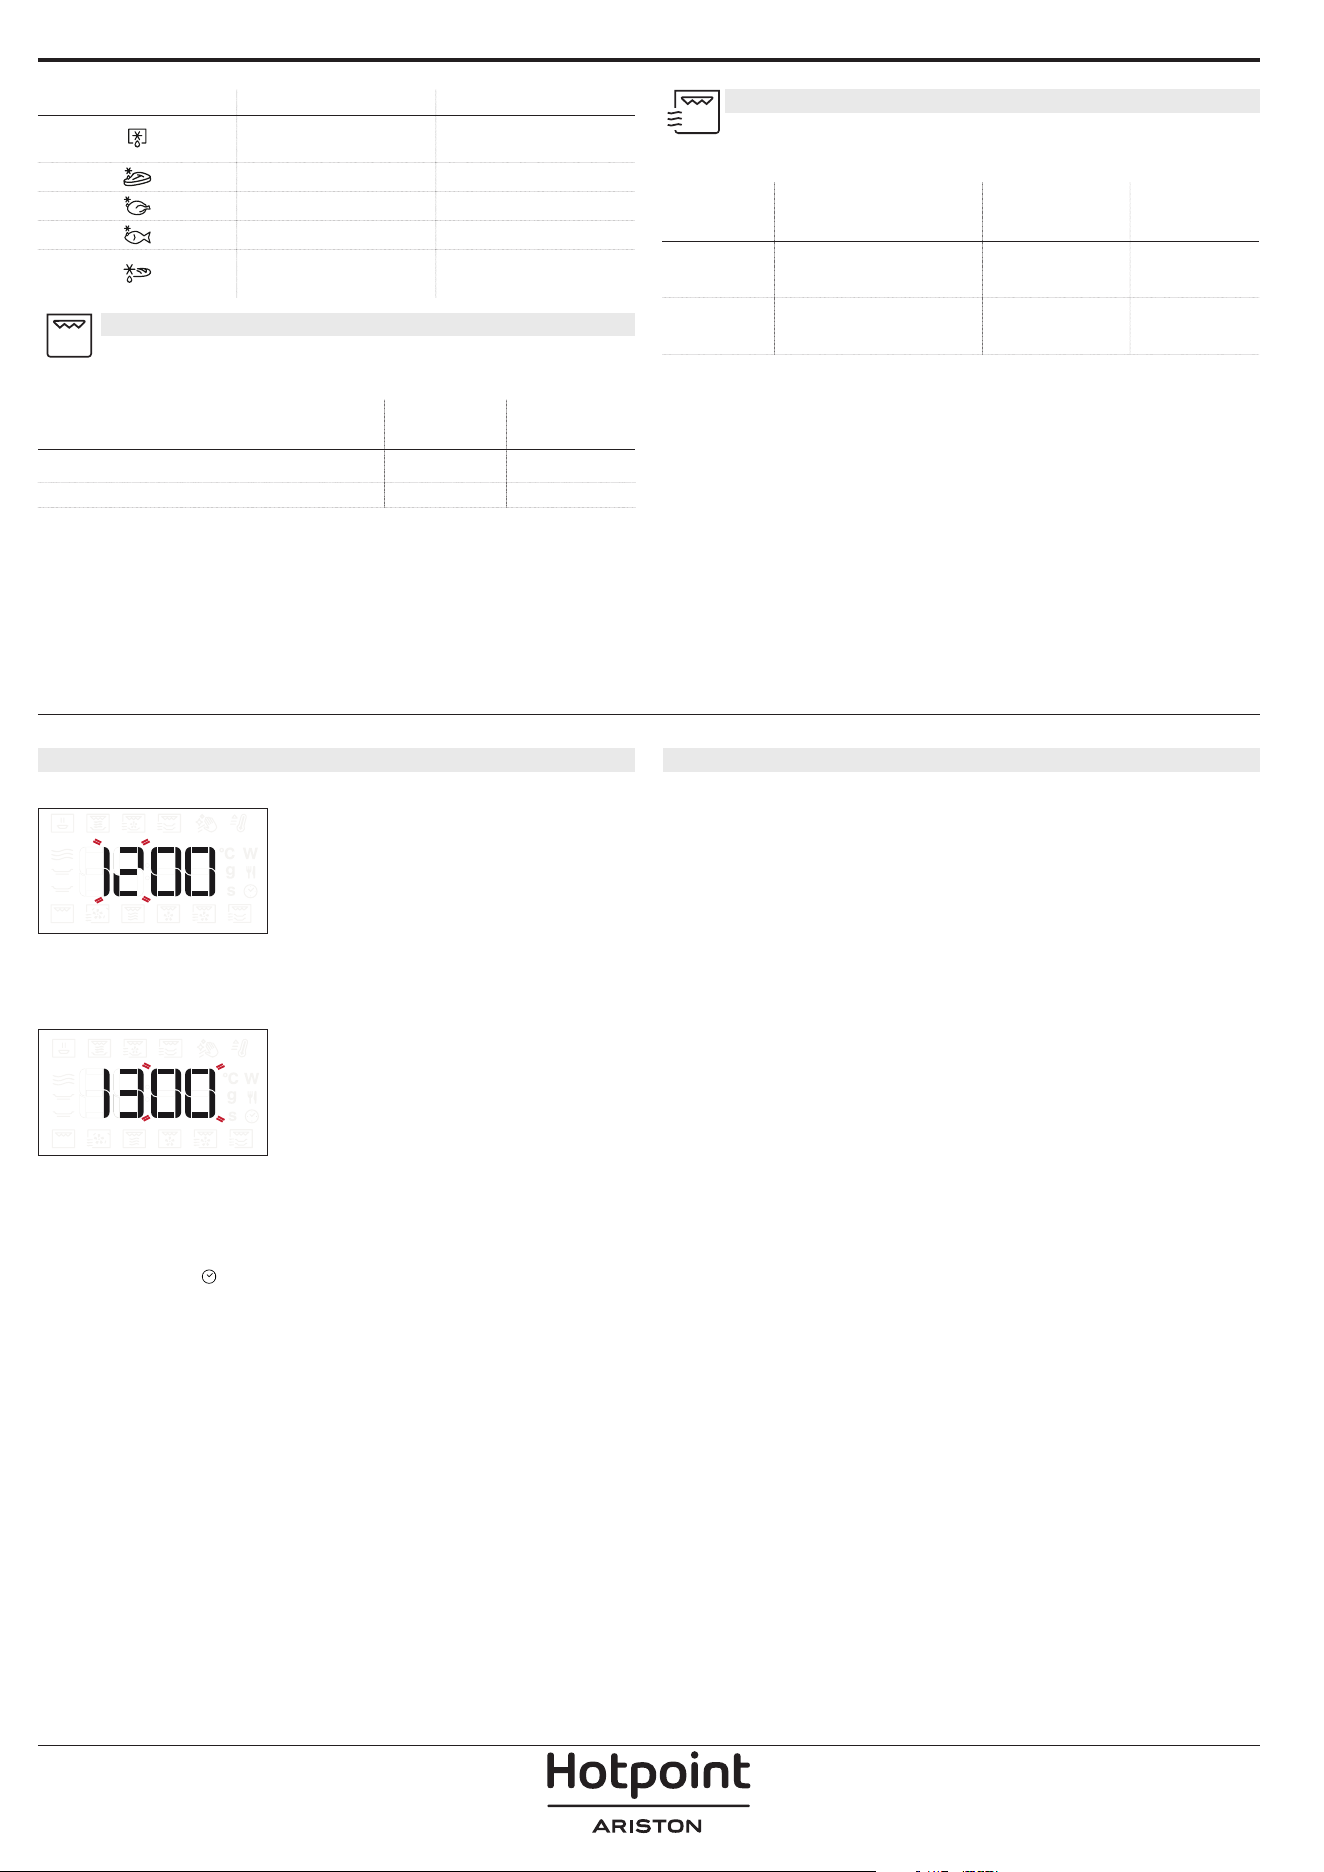
1. SETTING THE TIME
You will need to set the time when you switch on the
oven for the first time.
The two digits for the hour will start flashing: Turn
the knob to set the hour and then press the central
button to confirm.
The two digits for the minutes will start flashing. Turn
the knob to set the minutes and press the central
button to confirm.
Please note: To change the time at a later point, press and
hold for at least one second while the oven is o and
repeat the steps above. You may need to set the time again
following lengthy power outages.
2. HEAT THE OVEN
A new oven may release odours that have been left
behind during manufacturing: this is completely
normal. Before starting to cook food, we therefore
recommend heating the oven with it empty in order to
remove any possible odours. Remove any protective
cardboard or transparent lm from the oven and
remove any accessories from inside it. With the oven
empty, run the GRILL function at the highest level, for
a minimum of 15 minutes. Follow the instructions for
setting the function correctly. Odors and smoke are
normal when the oven is used the rst few times, or
when it is heavily soiled.
Please note: It is advisable to air the room after using the
appliance for the rst time.
GRILL
For browning, grilling and gratins. We
recommend turning the food during cooking.
FOOD
GRILL
LEVEL
DURATION
(MIN.)
Toast High 5 - 6*
Prawns Medium 18 - 22
*For thick bread slices preheat the empty microwave with
gtill high for 3 minutes.
Recommended accessories: Wire rack
GRILL + MW
For quickly cooking and gratinating dishes,
combining the microwave and grill functions.
FOOD POWER (W) GRILL LEVEL
DURATION
(MIN.)
Potatoes
gratin
650 Medium 20 - 22
Jacked
potatoes
650 High 10 - 12
Recommended accessories: Wire rack
DAILY USE
1. SELECT A FUNCTION
When the oven is off, only the time is shown on the
display. Press and hold
to switch the oven on. Turn
the knob to view the main functions available on the
left-hand display. The function currently in selection
will blink, and will stop blinking after the press of the
knob (i.e. after its selection). Select one and press the
central button.
To select a sub-function (where available), select the
main function and then press the central button to
confirm and go to the function menu.
Turn the knob to select from amongst the
subfunctions available on the right-hand display and
then press the central button to confirm. The sub-
function in selection will blink until its confirmation.
2. SET A FUNCTION
. AUTOMATIC FUNCTIONS / JET DEFROST
FOOD CLASS
Once you have chosen one of the automatic
functions, you will need to select a category for the
food you are cooking.
When the icon flashes, turn the knob to select
the category you require and then press the central
button to confirm.
WEIGHT
To achieve the best results, the automatic functions
(and Jet Defrost) require you to enter the weight of
the food, selecting from amongst the default settings:
the oven will calculate the ideal length of time for the
function to run for each category of food.
When the default setting appears on the display and
the
icon flashes, turn the knob to set the weight
and then press the central button to confirm.
. MANUAL FUNCTIONS
After having selected the function you require, you
can change its settings.
The display will show the settings that can be
changed in sequence.
MICROWAVE POWER
When the icon flashes on the display, turn the knob
to adjust the power setting and then press the central
button to confirm and continue to alter the settings
that follow (if possible).
Please note: Once the function has been activated, the
power can be changed by pressing
°C / W
to access the
settings menu, then turning the knob to change the setting.
GRILL POWER
There are three defined power levels for grilling: 1
(low), 2 (mid), 3 (high). The default value is displayed
between two flashing “- -” symbols.
Turn the knob to set the desired grill level, then
pressthe central button to confirm.
DURATION
When the icon flashes on the display, use the knob
to set the cooking time you require and then press
the central button to confirm.
You do not have to set the cooking time if you want
to manage cooking manually: Press
to confirm and
start the function.
Note: During cooking, you can adjust the cooking time by
turning the knob; each time you press , the cooking time
increases by 30seconds.
3. ACTIVATE THE FUNCTION
Once you have applied the settings you require, press
to activate the function.
Every time the
button is pressed again, the cooking
time will be increased by a further 30 seconds (for
Functions using Microwaves) or 5 minutes (for
Functions not using Microwaves).
Please note: You can press at any time to stop the function
that is currently active.
. JET START
When the oven is turned off, it is possible to start
a microwave cycle by pressing the Start button.
Each additional press of the
button will increase
the time by an additional 30 seconds. For example,
it is possible to run a microwave function lasting
90 seconds, by pressing the
button three times,
without even needing to turn on the oven.
. SAFETY LOCK
This function is automatically activated to prevent the
oven from being activated on accidentally.
Open and close the door, then press to start the
function.
4. PAUSE
To pause an active function, for example to stir or turn
the food, simply open the door.
To start it up again, close the door and press
.
AUTOMATIC PAUSE
(STIR OR TURN THE FOOD)
Certain functions will pause to allow you to turn or stir
the food.
Once the oven has paused cooking, open the door
and carry out the action you are prompted to perform
before closing the door again and pressing
to
continue with cooking.
5. COOKING END TIME
An audible signal will sound and the display will
indicate that cooking is complete.
To extend the cooking time without changing the
settings, turn the knob to set a new cooking time and
press
.
. COOLING DOWN
When a function with hot air is finished, the appliance
may carry out a cooling procedure.
The display shows “Cool On”:
After this procedure, the oven automatically switches
off.
Please note: the cooling procedure can be interrupted by
opening the door and will be eventually reactivated, if needs,
by closing it again.
. KEY LOCK
To lock the keypad, press and hold for at least
5seconds.
Do this again to unlock the keypad.
Please note: The key lock can also be activated while cooking
is in progress.
For safety reasons, the oven can be switched o at any time
by pressing and holding .
INTERIOR AND EXTERIOR SURFACES
• Clean the surfaces with a damp microfibre cloth.
If they are very dirty, add a few drops of pH-neutral
detergent. Finish off with a dry cloth.
• Clean the glass in the door with a suitable liquid
detergent.
• Activate the “MW SELF CLEAN” function for an
optimum cleaning of the internal surfaces.
• At regular intervals, or in case of spills, remove the
turntable and its support to clean the bottom of the
oven, removing all food residue.
• The grill does not need to be cleaned as the intense
heat burns away any dirt. Use this function on a
regular basis.
ACCESSORIES
All accessories are dishwasher safe with the exception
of the Crisp plate.
The Crisp plate should be cleaned using water and
a mild detergent. For stubborn dirt, rub gently with
a cloth. Always leave the Crisp plate to cool down
before cleaning.
Make sure that the appliance has cooled down
before carrying out any maintenance or cleaning.
Do not use steam cleaners.
Do not use wire wool, abrasive scourers or abrasive/
corrosive cleaning agents, as these could damage
the surfaces of the appliance.
Problem Possible cause Solution
The oven is not switching on.
Power cut.
Disconnection from the
mains.
Check for the presence of mains electrical power
and whether the oven is connected to the
electricity supply. Turn o the oven and restart it to
see if the fault persists.
The oven makes noises, even
when it is switched off.
Cooling fan active.
Open the door or press
.
The display shows the letter “F”
followed by a letter or number.
Software fault. Contact you nearest After-sales Service Centre and
state the letter or number that follows the letter “F”.
Keypad does not work as
foreseen. The display shows a
strange visualization.
Keylock has been activated
(see Keylock section).
Disable the keylock by following the indications
within Keylock section.
The oven does not heat up.
When “DEMO” is “On” all
commands are active and
menus available but the oven
doesn’t heat up.
To exit DEMO mode, follow this procedure: press
°C/W, , °C/W, , °C/W, in sequence (6 taps in
total). You will hear a beep signal that the operation
has been successful. The clock ashes waiting for
the hour setting.
At this point, the oven is ready to be used.
TROUBLESHOOTING
CLEANING & MAINTENANCE
400011716670
Policies, standard documentation and additional product information can be found by:
• Using the QR code in your appliance
• Visiting our website docs . hotpoint . eu
• Alternatively, contact our After-sales Service (See phone number in the warranty booklet). When contacting our After-
sales Service, please state the codes provided on your product's identication plate.

IT
Manuale d'uso
GRAZIE PER AVERE ACQUISTATO UN PRODOTTO
HOTPOINT‑ARISTON
Per ricevere un'assistenza più completa, registrare il
prodotto su www . hotpoint . eu/ register
SCANSIONARE IL CODICE QR
SUL PROPRIO APPARECCHIO
PER OTTENERE MAGGIORI
INFORMAZIONI
Prima di utilizzare l'apparecchio leggere attentamente
le istruzioni di sicurezza.
DESCRIZIONE DEL PRODOTTO
PANNELLO COMANDI
1. Pannello dei comandi
2. Targhetta matricola
(da non rimuovere)
3. Porta
4. Resistenza superiore / grill
5. Luce
6. Piatto rotante
1. DISPLAY SINISTRA
2. PAUSA
Per sospendere il processo di
cottura
3. ON / OFF
Per accendere e spegnere il forno o
terminare in qualunque momento
una funzione attiva.
4. INDIETRO
Per tornare al passo precedente.
Una pressione prolungata (5s)
abilita/disabilita la funzione di
blocco dei tasti.
5. MANOPOLA ROTANTE /
PULSANTE CENTRALE
Ruotando la manopola è possibile
spostarsi tra le funzioni e regolare i
parametri di cottura. Premerlo per
selezionare, impostare, accedere
o controllare funzioni o parametri
ed eventualmente avviare il
programma di cottura.
6. POTENZA
Per regolare la potenza del grill o
l’intensità delle microonde.
7. AVVIO
Per avviare le funzioni e
confermare i valori impostati
8. TEMPO
Per impostare l'ora e per regolare il
tempo di cottura.
9. DISPLAY DESTRA
1
6
5
4
2
3
1 2 3 54 986 7
ACCESSORI
PIATTO ROTANTE
Appoggiato sull’apposito supporto,
il piatto rotante in vetro può essere
utilizzato in tutte le modalità di
cottura.
Il piatto rotante va sempre
usato come base per altri contenitori o accessori ad
eccezione della teglia rettangolare.
SUPPORTO PER PIATTO ROTANTE
Utilizzare il supporto soltanto per il
piatto rotante in vetro.
Non appoggiare altri accessori sul
supporto.
PIATTO CRISP
Da utilizzare solo con le funzioni
designate.
Il piatto Crisp deve essere sempre
posizionato al centro del piatto
rotante in vetro o della griglia e
può essere preriscaldato quando è
vuoto, utilizzando la funzione speciale solo a questo
scopo. Disporre gli alimenti direttamente sul piatto
Crisp.
IMPUGNATURA PER PIATTO CRISP
Utile per rimuovere il piatto Crisp
caldo dal forno.
GRIGLIA
Permette di avvicinare le pietanze
al grill per ottenere una perfetta
doratura e una circolazione
ottimale dell’aria.
Deve essere utilizzata come base
per il piatto crisp.
Appoggiare la griglia sul piatto rotante, evitando che
venga a contatto con altre superfici.
Il numero e il tipo di accessori può variare a seconda del modello acquistato.
Gli altri accessori non in dotazione possono essere acquistati separatamente presso il Servizio Assistenza Tecnica.
In commercio sono disponibili diversi accessori.
Prima di acquistarli, accertarsi che siano idonei alla
cottura a microonde e in forno.
Contenitori metallici per cibi o bevande non vanno
mai usati durante una cottura a microonde.
Vericare che alimenti e accessori non tocchino le
pareti interne del forno.
Prima di avviare il forno, assicurarsi sempre che
il piatto rotante possa ruotare liberamente. Fare
attenzione a non spostare il piatto rotante dalla
sua sede mentre si inseriscono o rimuovono altri
accessori.
Gli accessori durante la funzione microonde
possono subire un aumento di temperatura. Si
raccomanda di utilizzare una protezione per
maneggiare gli accessori alla ne del ciclo.
FUNZIONI
FUNZIONI AUTOMATICHE
Con le funzioni automatiche MyMenu è sufficiente
selezionare il tipo e il peso o la quantità degli
alimenti per ottenere un risultato ottimale. Il forno
calcolerà automaticamente i valori ideali, adattandosi
continuamente alla cottura in corso. Per utilizzare al
meglio questa funzione si raccomanda di seguire le
indicazioni della tabella di cottura.
RISCALDAMENTO AUTOMATICO
Per riscaldare cibi pronti, sia surgelati
che a temperatura ambiente. Il forno calcolerà
automaticamente i valori necessari per ottenere i
migliori risultati possibili nel minor tempo. Disporre
il cibo su un piatto piano resistente al calore e alle
microonde.
CATEGORIA ALIMENTO PESO
1 Piatto pronto 250 - 800 g
2* Lasagna surgelata 400 g - 1 kg
3* Porzioni surgelate 250 - 800 g
4 Latte/Acqua 100 - 500 g
5 Zuppa 200 - 800 g
COTTURA AUTOMATICA
Per cuocere rapidamente i cibi e ottenere un
risultato ottimale. Disporre il cibo su un piatto piano
resistente al calore e alle microonde.
CATEGORIA ALIMENTO PESO
1 Patate al forno 200 g - 1 kg
2* Verdure ripiene 600 g - 2,2 kg
3* Pollo a pezzi 400 - 1,2 kg
4 Uova strapazzate 100 - 500 g
5 Popcorn 80 - 100 g
CRISP AUTOMATICO
Per riscaldare e cuocere rapidamente alimenti
surgelati, creando una superficie dorata e croccante.
Usare la funzione solo in combinazione con il piatto
Crisp in dotazione. Quando richiesto, girare gli
alimenti.
CATEGORIA ALIMENTO PESO
1* Hamburger 100 - 500 g
2* Bocconcini di pollo 100 - 500 g
3* Pizza 350 - 600 g
4*
Bastoncini di pesce
impanati
100 - 500 g
5* Patate fritte 100 - 500 g
Accessori necessari: piatto Crisp, impugnatura per piatto
Crisp.
AUTO PULIZIA MW
L’azione del vapore rilasciato durante questo
speciale ciclo di pulizia permette di rimuovere
facilmente sporco e residui di cibo. Versare una tazza
di acqua potabile nel contenitore per microonde e
attivare la funzione.
MICROONDE
Utilizzare la funzione microonde solo con
alimenti o bevande all'interno, per preservare la
corretta funzionalità del prodotto.
POTENZA (W) CONSIGLIATA PER
900
Riscaldamento rapido di bevande o altri alimenti ad
alto contenuto di acqua.
750 Cottura di verdure.
650 Cottura di carne e pesce.
500
Cottura di sughi di carne, salse con formaggio o uova.
Finitura di sformati di carne o paste al forno..
350
Cotture lente e delicate. Per fondere burro o
cioccolata.
160
Scongelare alimenti surgelati o ammorbidire burro e
formaggi.
90 Per ammorbidire i gelati.
AZIONE ALIMENTI
POTENZA
(W)
DURATA
(MIN.)
Riscalda-
mento
2 tazze 900 1 - 2
Riscalda-
mento
Puré di patate 1kg 900 10 - 12
Sconge-
lare
Carne macinata 500g 160 15 - 16
Cottura
Sponge cake (Pan di
spagna)
750 7 - 8
Cottura Crema all’uovo 500 13 - 16
Cottura Polpettone 750 17 - 20
CRISP
Per ottenere una doratura perfetta sia sulla
superficie superiore che su quella inferiore del
cibo. Questa funzione deve essere usata solo con lo
speciale piatto Crisp.
ALIMENTO
DURATA
(MIN.)
Torte lievitate 7 - 8
Hamburger 8 - 10*
* Girare il cibo a metà cottura.
Accessori necessari: piatto Crisp, maniglia per piatto Crisp.
SCONGELAMENTO
Per scongelare rapidamente diverse categorie
di alimenti specificandone solamente il peso. Per un
risultato ottimale, disporre sempre gli alimenti sul
piatto rotante in vetro.
SCONGELAMENTO GALLETTE
Questa funzione esclusiva è studiata in modo
specifico per lo scongelamento del pane. L’unione
tra la funzione di scongelamento e la tecnologia
Crisp consente di ottenere un pane freschissimo,
come appena sfornato. Questa funzione è ideale per
scongelare velocemente panini, baguette e croissant
surgelati. Questa funzione richiede l’uso del piatto
crisp.
PRIMO UTILIZZO
1. IMPOSTARE L'ORA
Alla prima accensione è necessario impostare l’ora.
Sul display lampeggiano le due cifre relative alle
ore: Ruotare la manopola per impostare l'ora, quindi
premere il pulsante centrale per confermare.
Le due cifre dei minuti iniziano a lampeggiare.
Ruotare la manopola per impostare i minuti e
premere il pulsante centrale per confermare.
Note: per modicare successivamente l’ora, a forno spento
tenere premuto per almeno un secondo e ripetere le
operazioni sopra descritte. dopo una prolungata interruzione
di corrente potrebbe essere necessario impostare
nuovamente l'ora.
2. RISCALDAMENTO DEL FORNO
Un nuovo forno può rilasciare degli odori dovuti
alla lavorazione di fabbrica: questo è normale. Prima
di cucinare gli alimenti è dunque raccomandato di
riscaldare a vuoto il forno per rimuovere ogni odore.
Rimuovere protezioni di cartone o pellicole trasparenti
e togliere gli accessori dal forno. Con il forno vuoto,
attivare la funzione GRILL al massimo livello, per
almeno 15 minuti. Seguire le istruzioni per impostare
correttamente la funzione. Odori e fumo sono normali
quando il forno viene utilizzato per le prime volte o
quando è molto sporco.
Note: si consiglia di arieggiare il locale dopo il primo utilizzo
dell'apparecchio.
CATEGORIA ALIMENTO PESO
Scongelamento
programmato
-
Carne 100 g - 2 kg
Pollame 100 g - 3 kg
Pesce 100 g - 2 kg
Scongelamento pane
con crisp
50 - 800 g
GRILL
Per dorare, grigliare o gratinare le pietanze. Si
consiglia di girare gli alimenti durante la cottura.
ALIMENTI
POTENZA
GRILL
DURATA
(MIN.)
Pane tostato Alto 5 - 6*
Gamberetti Medio 18 - 22
*Per le fette di pane spesse, preriscaldare il microonde vuoto
con grill alto per 3 minuti.
Accessori consigliati: Griglia
GRILL + MICROONDE
Per cuocere e gratinare rapidamente le pietanze
combinando le microonde con il grill.
ALIMENTO POTENZA (W)
POTENZA
GRILL
DURATA
(MIN.)
Gratin di
patate
650 Medio 20 - 22
Patate al
cartoccio
650 Alto 10 - 12
Accessori consigliati: Griglia

USO QUOTIDIANO
1. SELEZIONARE UNA FUNZIONE
Quando il forno è spento, è visualizzato solo
l’orologio tenere premuto
per accendere il forno.
Ruotare la manopola per visualizzare sul display
sinistro le funzioni principali disponibili. La funzione
attualmente in selezione lampeggia e smette di
lampeggiare dopo la pressione della manopola
(ovvero dopo la relativa selezione). Selezionarne una e
premere il pulsante centrale.
Per selezionare una sottofunzione (se disponibile),
selezionare la funzione principale e premere il
pulsante centrale per confermare e passare al menu
della funzione.
Ruotare la manopola per selezionare una delle
sottofunzioni disponibili sul display di destra e
premere il pulsante centrale per confermare. La
sottofunzione selezionata lampeggerà fino alla
relativa conferma.
2. SELEZIONARE UNA FUNZIONE
. FUNZIONI AUTOMATICHE / JET DEFROST
CATEGORIA DI ALIMENTO
Dopo avere selezionato una funzione automatica,
occorre selezionare la categoria di alimenti
appropriata.
Quando l'icona lampeggia, ruotare la manopola
per selezionare la categoria desiderata e premere il
pulsante centrale per confermare.
PESO
Per ottenere risultati ottimali con le funzioni
automatiche (e Jet Defrost), è necessario inserire il
peso degli alimenti scegliendo tra le impostazioni
predefinite: il forno calcolerà la durata ideale della
funzione per la categoria di alimenti selezionata.
Quando sul display viene visualizzata l'impostazione
predefinita e l'icona
lampeggia, ruotare la
manopola per impostare il peso e premere il pulsante
centrale per confermare.
. FUNZIONI MANUALI
Dopo avere selezionato la funzione desiderata è
possibile modificarne le impostazioni.
Il display mostra in sequenza le impostazioni che è
possibile modificare.
POTENZA MICROONDE
Quando l'icona lampeggia sul display, ruotare la
manopola per regolare il livello di potenza, quindi
premere il pulsante centrale per confermare e
procedere con le impostazioni seguenti (se possibile).
Note: dopo avere attivato la funzione, la potenza può essere
modicata premendo
°C / W
per accedere al menu delle
impostazioni e ruotando la manopola per cambiare il valore
impostato.
POTENZA GRILL
Sono disponibili tre livelli di potenza per il grill: 1
(basso), 2 (medio), 3 (alto). Il valore predefinito è
visualizzato tra due icone “- -” lampeggianti.
Ruotare la manopola per impostare il livello di
grigliatura desiderato, quindi premere il pulsante
centrale per confermare.
DURATA
Quando l'icona lampeggia sul display, utilizzare la
manopola per impostare il tempo di cottura desiderato
e premere il pulsante centrale per confermare.
È possibile non impostare la durata per gestire
manualmente la cottura: Premere
per confermare e
avviare la funzione.
Nota: dopo l'avvio del forno, il tempo di cottura può essere
modicato ruotando la manopola; ad ogni pressione di il
tempo di cottura aumenta di 30 secondi.
3. AVVIARE LA FUNZIONE
Una volta che i valori corrispondono a quelli
desiderati, premere
per avviare la funzione.
Ogni volta che si preme nuovamente il pulsante
, il tempo di cottura aumenta di altri 30 secondi (per
le funzioni che utilizzano le microonde) o di 5 minuti
(per le funzioni che non utilizzano le microonde).
Note: premendo è possibile interrompere in qualsiasi
momento la funzione in corso.

. JET START
Quando il forno è spento, è possibile avviare un
ciclo di microonde premendo il pulsante Avvio.
Ogni ulteriore pressione del pulsante
aumenterà
il tempo di altri 30 secondi. Ad esempio, è possibile
eseguire una funzione di microonde della durata di
90 secondi, premendo tre volte il pulsante
, senza
nemmeno dover accendere il forno.
. BLOCCO DI SICUREZZA
Questa funzione si attiva automaticamente per evitare
che il forno si accenda accidentalmente.
Aprire e chiudere la porta, poi premere per avviare
la funzione.
4. PAUSA
Per sospendere una funzione attiva, per esempio per
mescolare o girare gli alimenti, è sufficiente aprire la
porta.
Per riprendere, chiudere sportello, premere
.
PAUSA AUTOMATICA
(MESCOLARE O GIRARE GLI ALIMENTI)
Alcune funzioni prevedono una pausa per consentire
di girare o mescolare gli alimenti.
Quando il forno interrompe la cottura, aprire la porta
per eseguire le operazioni indicate prima di chiuderla
nuovamente e premere
per riprendere al cottura.
5. TEMPO DI FINE COTTURA
Allo scadere del tempo programmato, un segnale
acustico e il display indicheranno che la cottura è
terminata.
Per prolungare la cottura mantenendo i valori
impostati, ruotare la manopola per impostare un
nuovo tempo di cottura e premere
.
. RAFFREDDAMENTO
Al termine di una funzione con aria calda, il forno può
eseguire una procedura di raffreddamento.
Sul display viene visualizzato "Cool On":
Alla fine del ciclo di raffreddamento, il forno si spegne
automaticamente.
Note: la procedura di rareddamento può essere interrotta
aprendo lo sportello e, all’occorrenza, può essere riattivata
richiudendo lo sportello.
. BLOCCO DEI TASTI
Per bloccare i tasti, tenere premuto per almeno 5
secondi.
Per disattivare, ripetere la stessa procedura.
Note: il blocco a chiave può essere attivato anche durante la
cottura.
Per ragioni di sicurezza, il forno può essere spento in qualsiasi
momento premendo a lungo .

SUPERFICI INTERNE ED ESTERNE
• Pulire le superfici con un panno in microfibra umido.
Se molto sporche, aggiungere qualche goccia di
detergente neutro. Asciugare con un panno.
• Pulire i vetri della porta con detergenti liquidi
specifici.
• Attivare la funzione "MW SELF CLEAN" per una
pulizia ottimale delle superfici interne.
• A intervalli regolari o in caso di traboccamenti,
togliere il piatto rotante e il suo supporto per pulire la
base del forno, rimuovendo tutti i residui di cibo.
• Il grill non necessita di alcuna pulizia perché il calore
intenso brucia direttamente lo sporco. attivare la
funzione a intervalli regolari.
ACCESSORI
È possibile lavare in lavastoviglie tutti gli accessori ad
eccezione del piatto Crisp.
Il piatto Crisp deve essere pulito con acqua e un
detergente neutro. Per lo sporco più tenace, strofinare
delicatamente con un panno. Far raffreddare il piatto
Crisp prima di lavarlo.
Attendere che l’apparecchio si sia rareddato
prima di eseguire qualsiasi operazione di pulizia o
manutenzione.
Non utilizzare pulitori a vapore.
Non utilizzare lana metallica, pagliette abrasive o
detergenti abrasivi/corrosivi, perché potrebbero
danneggiare le superci dell'apparecchio.
Problema Possibile causa Soluzione
Il forno non si accende.
Interruzione di corrente
elettrica.
Disconnessione dalla rete
principale.
Vericare che ci sia tensione in rete e che il forno
sia collegato all'alimentazione elettrica. Spegnere e
riaccendere il forno e vericare se l'inconveniente
persiste.
Il forno fa rumore anche se
spento.
Ventola di rareddamento
attiva.
Aprire la porta o premere
.
Il display mostra la lettera “F”
seguita da una lettera o un
numero.
Guasto software. Contattare il Servizio Assistenza di zona e
comunicare la lettera o il numero che segue la
lettera “F”.
La tastiera non funziona come
previsto. Il display mostra una
strana visualizzazione.
Il blocco tasti è stato attivato
(vedere la sezione Blocco
tasti).
Disattivare il blocco tasti seguendo le indicazioni
della sezione Blocco tasti.
Il forno non si riscalda.
Se la modalità "DEMO" è
impostata su "On", tutti i
comandi sono operativi e i
menu sono disponibili ma il
forno non viene riscaldato.
Per uscire dalla modalità DEMO, eseguire questa
procedura: premere °C/W, , °C/W, , °C/W,
in sequenza (6 tocchi in totale). Un segnale acustico
indica che l'operazione è stata eseguita. L'orologio
lampeggia, in attesa dell'impostazione dell'ora.
A questo punto il forno è pronto per essere
utilizzato.
RISOLUZIONE DEI PROBLEMI
MANUTENZIONE E PULIZIA
400011716670
Per le linee guida, la documentazione standard e altre informazioni sui prodotti:
• Utilizzare il codice QR sul proprio apparecchio
• Visitare il sito web docs . hotpoint . eu
• Oppure, contattare il Servizio Assistenza Tecnica (al numero di telefono riportato sul libretto di garanzia). Prima di
contattare il Servizio Assistenza Clienti, prepararsi a fornire i codici riportati sulla targhetta matricola del prodotto.