EC890
COFFEE MAKER
Instruction for use
DEDICA DUO logo
D D
DU
DU
2
A1
A2
A3
A4
A6
A5
A11 A12
A13
A14 A15 A16 A17
A9
A10
A7
A8
B1B5
B2
B3
B4
3
Before using the appliance, always read the safety warnings.
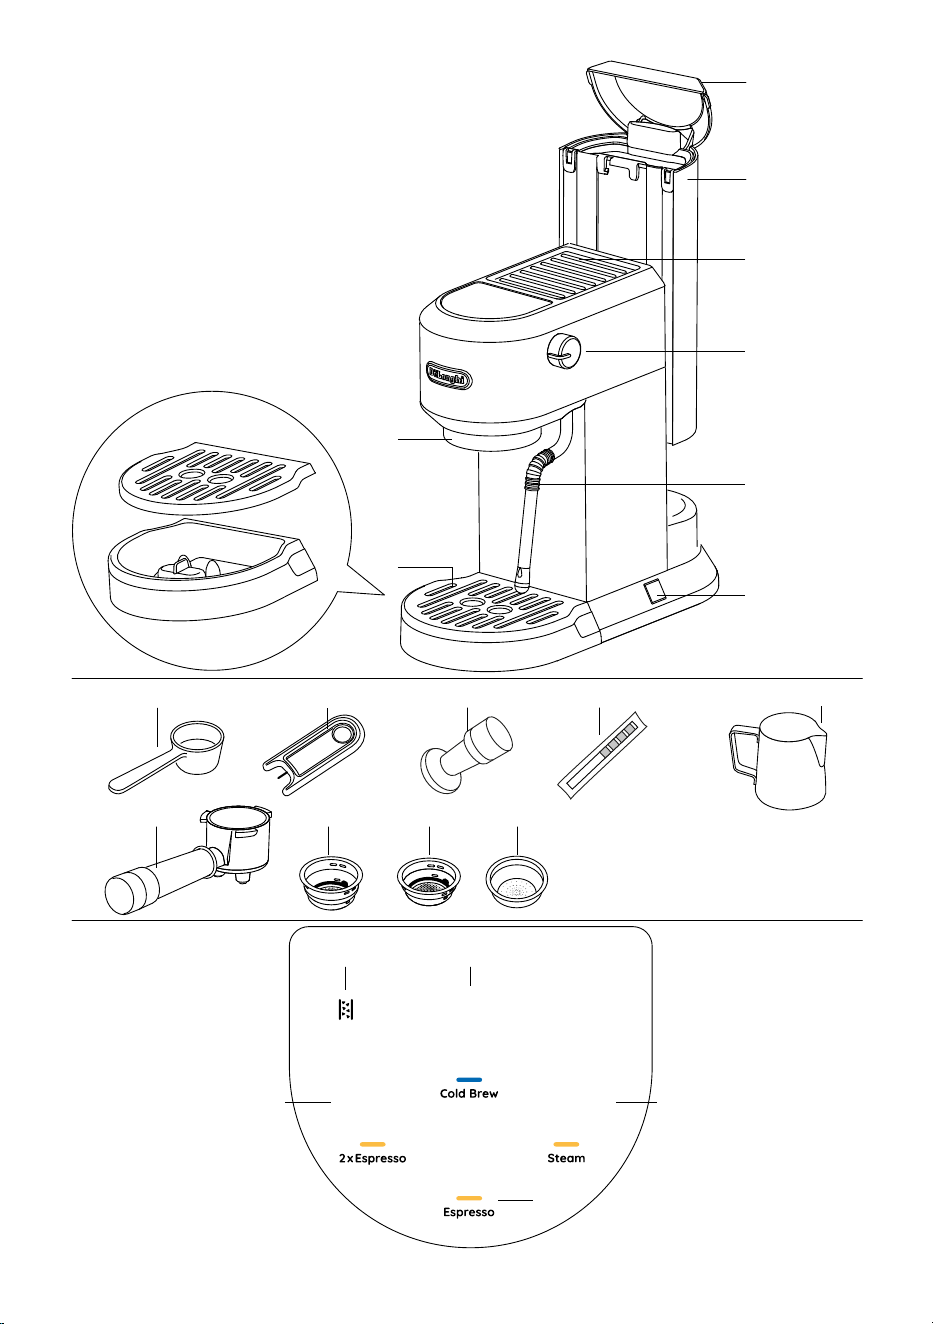
1. DESCRIPTION OF APPLIANCE
A1. Water tank lid
A2. Water tank
A3. Cup warmer
A4. Steam knob
A5. Hot water/steam wand
A6. On/Oswitch
A7. Brew unit
A8. Drip tray
A9. Spoon
A10. Cleaning needle
A11. Tamper
A12. Water hardness test indicator paper
A13. Milk jug (only on some models)
A14.Portalter
A15.2cupslter
A16.1cuplter
A17.Podcoeelter (only on some models)
1.1 Control panel
B1. Cold brew icon with indicator light
B2. Steam icon with indicator light
B3. Espresso icon with indicator light
B4. 2 x Espresso icon with indicator light
B5. Descale indicator light
Please note: The accessories may vary in type and number de-
pending on the model.
Optional cleaning accessories recommended by the manufac-
turer: for more information, visit www.delonghi.com.
2. FIRST USE
Beforeusingthecoeemaker,theinternalcircuitsoftheappli-
ance must be rinsed. Proceed as follows:
• Wash and dry with warm water (40-50°C) the water tank
(A1+A2),portalter(A14),1cuplter(A15),2cupslter
(A16), cleaning needle (A10);
• Wash for at least 30 minutes with warm (40-50°C) and
soap the drip tray (A8), the spoon (A9) and the milk jug
(A13);
• Clean the tamper (A11) with a cloth;
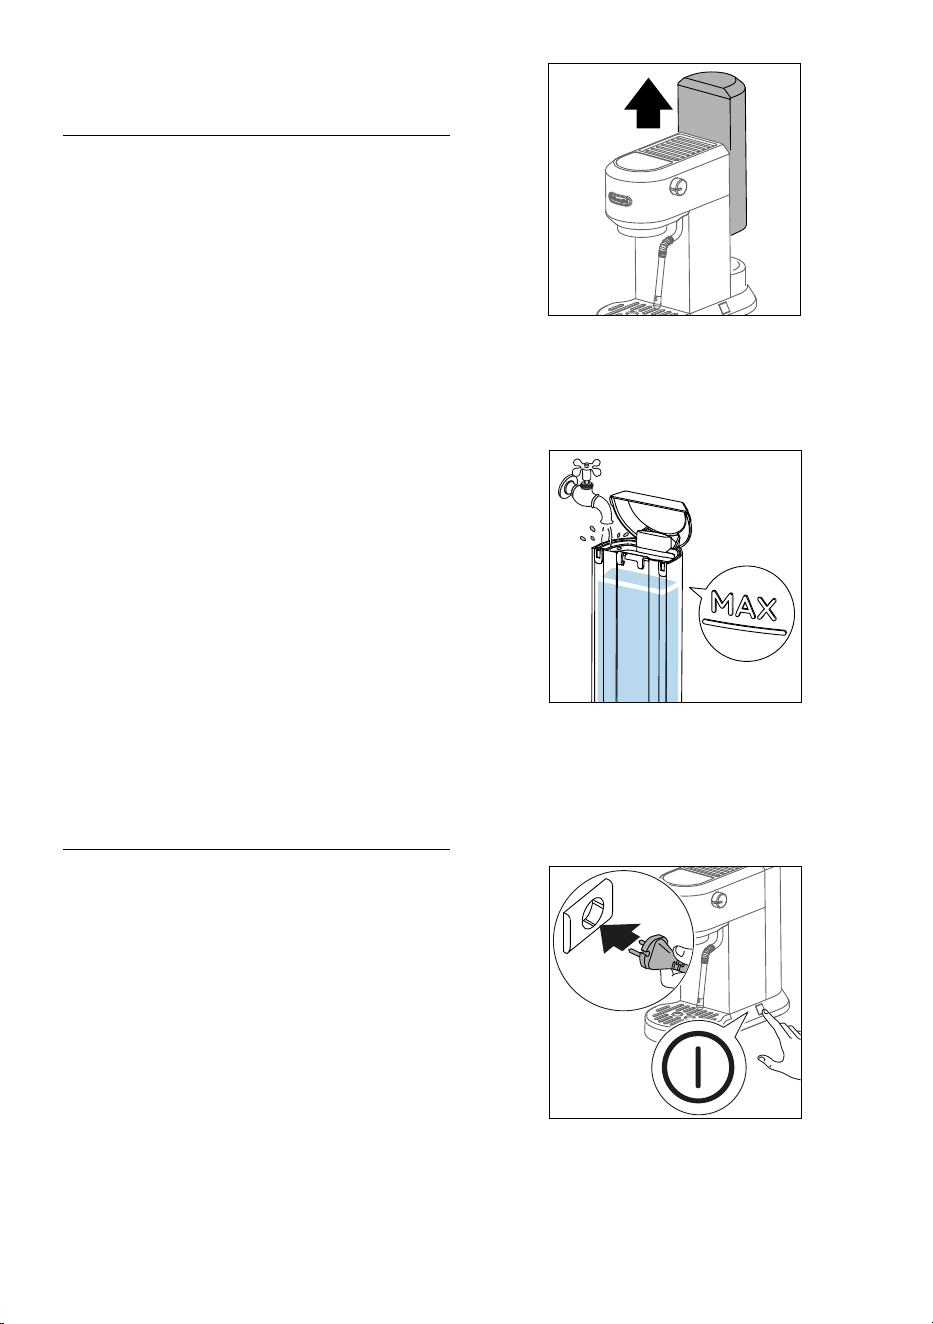
• Removethewatertankbypullingitupwards(g.1).
1
• Openthewatertanklid(A1)andllthewatertank(A2)
with fresh potable water, taking care not to exceed the
MAXlevel(g.2).
Please Note: Fresh potable water is mandatory. Do not use
sparkling (carbonated) or distilled water.
2
Please note: Never operate the appliance without water in the
water tank or without the tank.
• Put the water tank back in the appliance, pressing lightly
to open the valves located on the bottom of the tank.
• Connect the appliance to a mains socket. Turn the appli-
anceonbypressingtheOn/Oswitch(A6)(g.3).
3
• The Cold brew (B1), Steam (B2), Espresso (B3) and 2 x Es-
presso (B4) indicator lights blink (sequential blinking).
• When the Steam indicator light (B2) remain on steadily,
the appliance is ready to perform a rinse cycle.
• Place a container with a minimum capacity of 500 ml un-
4
der the hot water/steam wand (A5).
• Turn the steam knob (A4) to
position(g.4).
4
• The steam indicator light (B2) blinks and the appliance
perform a rinse cycle. Throw away the water after the op-
eration. This is to purge the steam circuit before frothing or
steaming your milk.
• Wait until Espresso (B3) and 2 x Espresso (B4) indicator
lights blink, then turn the steam knob (A4) to “○” position.
• Empty the container. Cold brew (B1) indicator light re-
mains on steadily, while the Espresso (B3), 2x Espresso (B4)
and Steam (B2) indicator lights blink.
•
Attachthe portalter (A14)totheappliance aligningthe
portalterhandlewith“INSERT”,thenturningthehandle
totherightuntilitisalignedinthe“CLOSE”position(g.5).
5
• Placeacontainerundertheportalter(A14).
• When the Espresso (B3), 2 x Espresso (B4) and Steam (B2)
indicator lights stop blinking and all the indicator lights on
the control panel (except B5) remain on steadily, press
2 x Espresso icon (B4). The appliance delivers water from
theportalter.Repeatthisoperation5times.
• Fill the water tank with fresh potable water.
The appliance is ready for use.
3. MAKING ESPRESSO
Please Note: Every three days, empty out the water tank (A2),
rinsethoroughlyandrellwithfreshpotablewater.
• TurntheapplianceonbypressingtheOn/Oswitch(A6).If
the appliance is in stand-by mode, press any icons (B1, B2,
B3 or B4) on the control panel.
• When all the indicator lights on the control panel (except
B5) remain on steadily, the appliance is ready for use.
Barista tips:
we recommend to warm up the cup/cups before
making the espresso by attaching the portalter (A14) to the
appliancewiththecuplter(A15orA16)inplacebutwithout
addinggroundcoee,usingthesamecup/cupsaswilllaterbe
used to make the espresso, press the Espresso (B3) icon and de-
liver hot water into the cup/cups to heat it. This will also rinse the
coeespoutsandstabilizethetemperaturebeforetheextraction.
• Placethe2cupslter(A15)or1cuplter(A16)inthepor-
talter(A14)(g.6).
6
• Beforellingthelterwithgroundcoee,makesurethere
arenocoeeresiduesleftinthelterfromthelasttime
youmadecoee.
Filltheselectedlterwithgroundcoeeusingthespoon
(A9).Makesurethatyouareusinganegrind,specicfor
espresso.
• Tap the portalter severaltimes to distribute the coee
evenlyinthelter.
•
Pressdownrmlywiththetamper(A11).Makesurethecof-
feeisattherecommendeddoselevelaftertamping(g.7).
7
Youmayneedtoaddsomecoee.Tampingcorrectlythe
groundcoeeisessentialtoobtainagoodespresso.Ifyou
presstoormly,thecoeewillbedeliveredslowlyandwill
bestrong.Ifyoupresstoolightly,thecoeewillbedeliv-
5
ered quickly and will be weak.
• Removeanyexcesscoeefromtherimoftheportalter
andattachtheportaltertotheappliance(g.5).
• Place one cup or two cups on the drip tray (A8) under the
portalterspouts.
• Press Espresso (B3) or 2 x Espresso (B4) icon. The appliance
proceeds to
make th
ecoeeanddeliverystopsautomat-
ically.Whiletheapplianceismakingcoee,deliverycan
beinterruptedatanymomentbypressingthecoeeicon
pressed previously.
• Toremovetheportalter,turnthehandlefromrighttoleft.
Toavoidsplashes,neverremovetheportalterwhilethe
applianceisdeliveringcoee.Alwayswaitforafewsec-
onds after delivery.
Please note: The water temperature is controlled during the
entire preparation process to ensure its stability during the ex-
traction step. The appliance has 3 infusion temperatures.
The temperature eectively utilized will depend typically on
the variety of beans and the roast: Robusta beans require a
lower temperature, and Arabica beans a higher temperature.
The same applies for dark roasted beans which require lower
temperatures and for light roasted beans which require high-
er brewing temperatures respectively (see the menù setting to
change the temperature).
At the end of delivery, the indicator light of the previously
pressed icon blinks for 5 seconds. To increase the amount of cof-
feeinthecup,pressthecoeeiconpressedpreviouslyforthe
desired time within 5 seconds.
3.1 How to make espresso coee using ESE Pods
• Placethepodcoeelter(A17)(onlyonsomemodels)in
theportalter(A14).
• Insertthepodinthelter,centeringitasmuchaspossible.
Always follow the instructions on the pod pack to position
thepodontheltercorrectly.
• Attachtheportaltertotheappliance(g.5).
• Placethecupundertheportalterspouts.
• Press Espresso
(B3) icon.
• Theappliance proceedsto makethe coee and delivery
stops automatically.
• Toremovetheportalter,turnthehandlefromrighttoleft.
4.
MAKING MILK OR PLANT BASED MILK BEVERAGES
• TurntheapplianceonbypressingtheOn/Oswitch(A6).If
the appliance is in stand-by mode, press any icons (B1, B2,
B3 or B4) on the control panel.
• When all the indicator lights on the control panel (except
B5) remain on steadily, the appliance is ready for use.
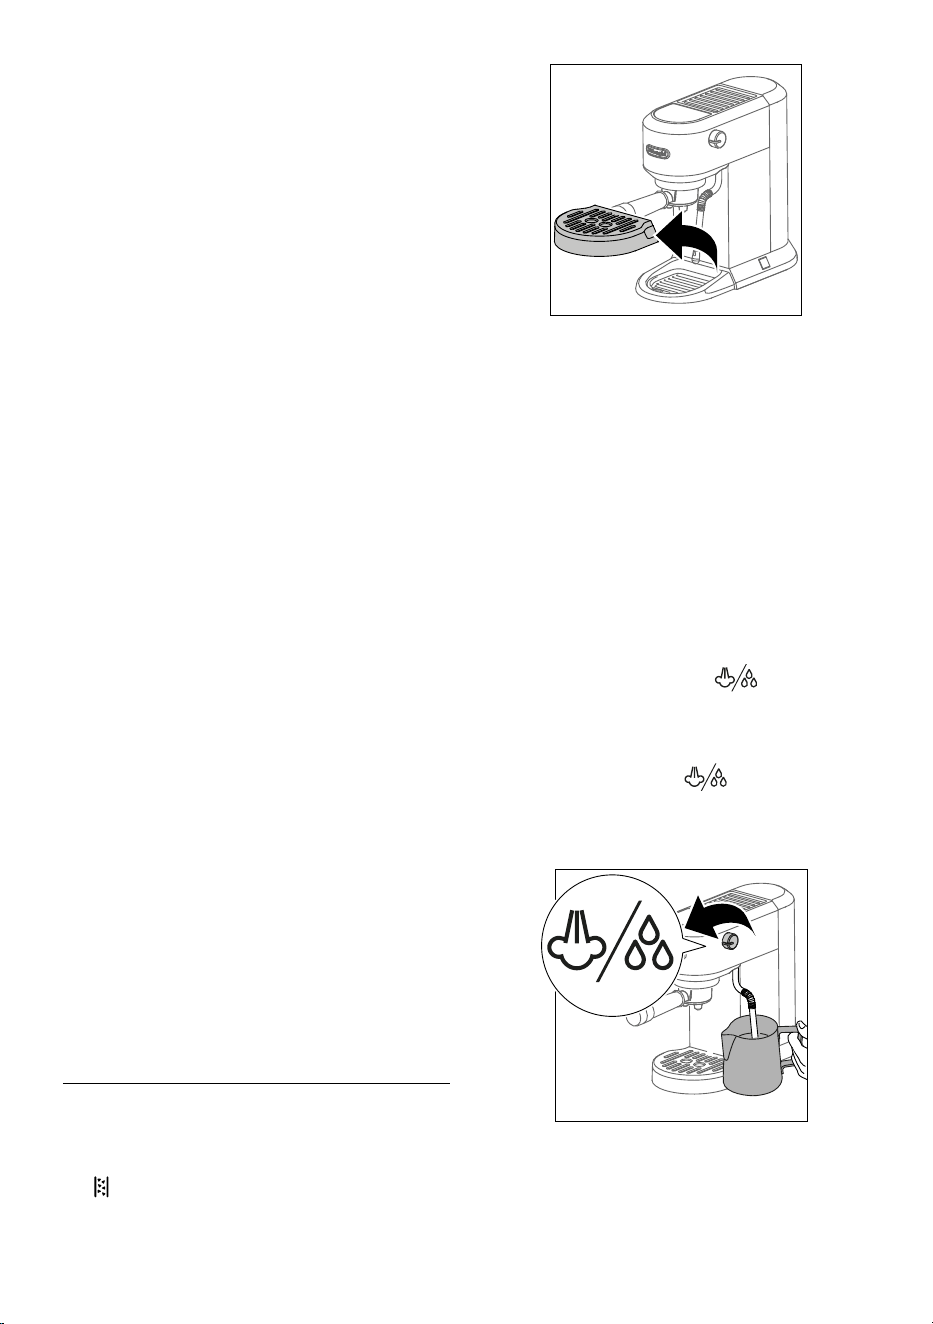
• To use tall cups or glasses, remove the drip tray (A8) and
standtheglassesontray(g.8).
8
• Prepare the espressocoee asdescribedin the previous
sections,usingsucientlylargecups.
• Fill a jug (A13) with fresh cold milk or plant based milk
alternatives. Milk will up to triple in volume. For a denser
more even froth, you must use milk at refrigerator temper-
ature (about 5°C).
Please note: The use of fresh cold milk from the refrigerator
(4- 6°C) is mandatory. Always place the jug in the fridge when
not in use.
• Press the Steam icon (B2). The Steam indicator light blinks.
When the indicator light comes steady, the appliance is
ready to deliver steam.
When steam is ready, before frothing milk, position an
empty container under the hot water/steam wand (A5)
and turn the steam knob (A4) to
position for a few
seconds to eliminate any air left in the circuit. Turn the
steam knob (A4) to “
○” position and proceed.
• Place the jug under the hot water/steam wand (A5).
• Turn the steam knob (A4) to
position; the appliance
proceedstomakethefroth(g.9).
Please note: You should not deliver steam for more than 60
seconds.
9
Please note: Make sure to turn the steam knob completely.
6
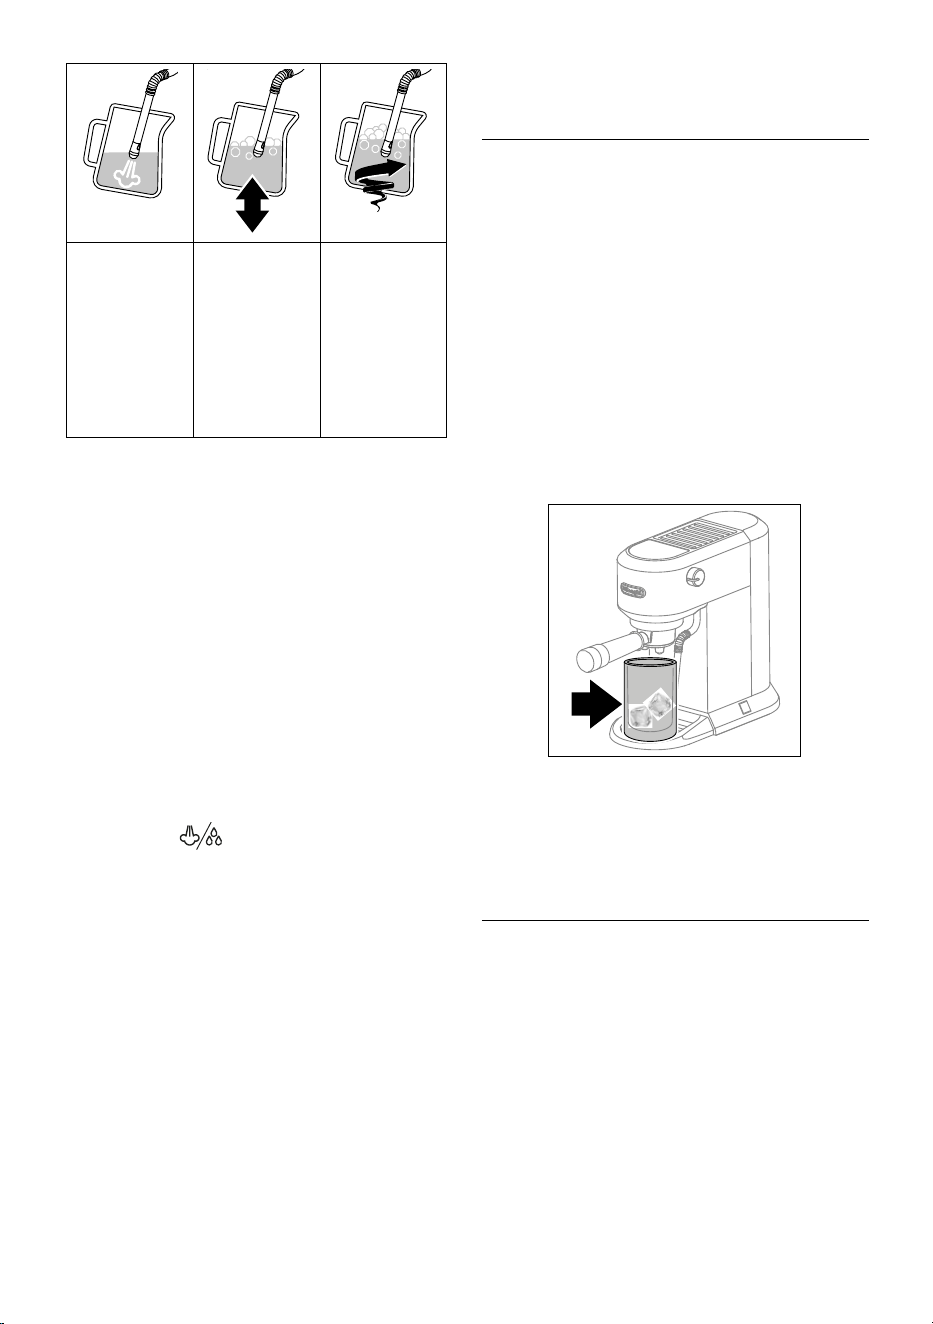
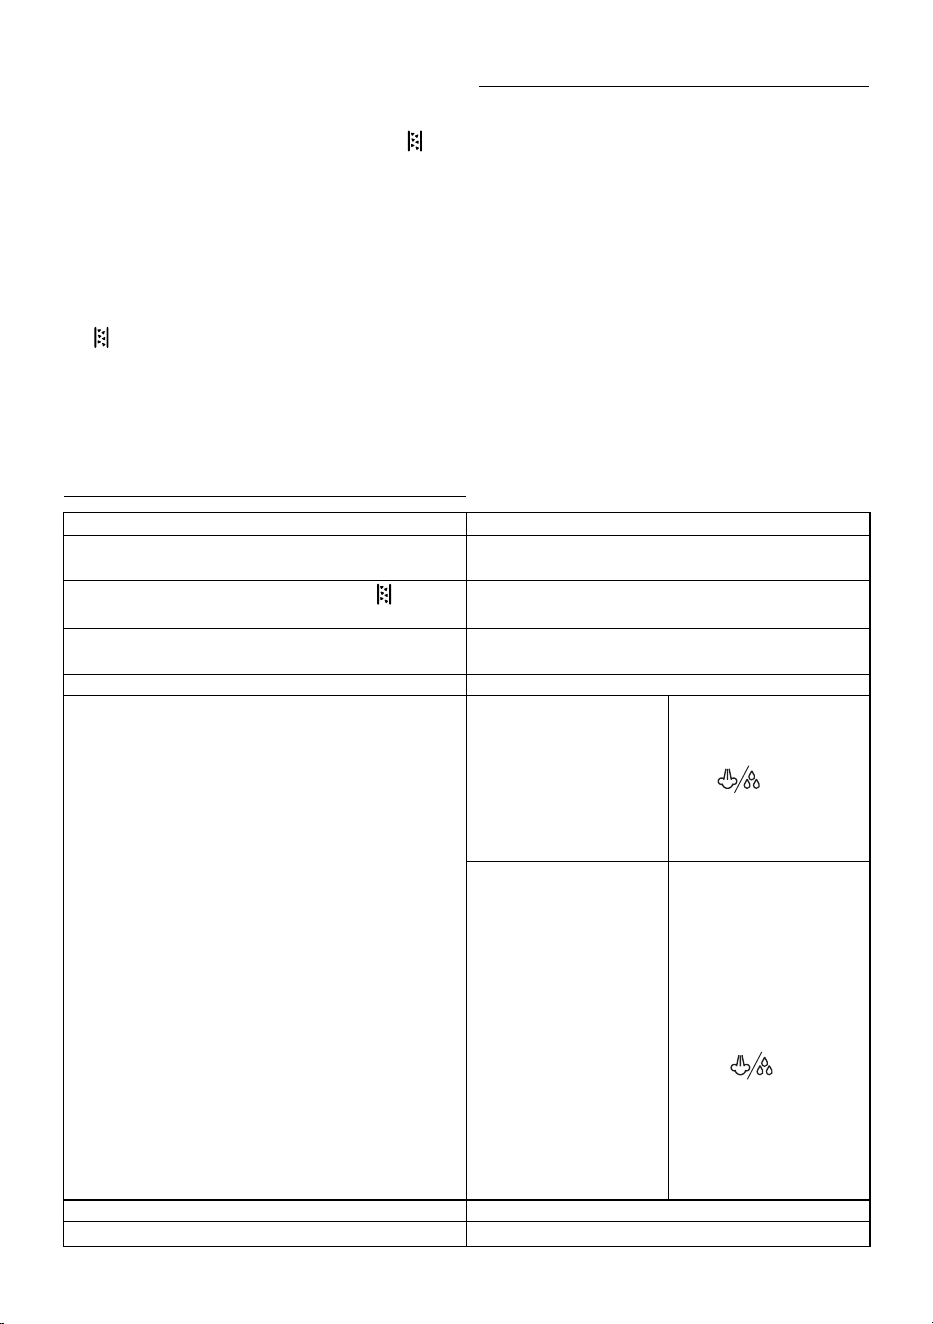
To froth the milk,
rest the hot water/
steam wand on
the surface of the
liquid. This mixes
air with the milk
and steam.
Keep the hot wa-
ter/steam wand in
contact with the
surface, taking care
not to let in too
much air and create
excessively large
bubbles.
Immerse the hot
water/steam
wand below the
surface of the
milk, this creates
a vortex in the
liquid.
• Once the milk is heated to the desired temperature (ideally
60°C) and desired cream density have been reached, turn
the steam knob (A4) to “
○” position.
• Wait till steam stops completely before removing the milk
jug.
• Pour the frothed milk into the cups containing the espresso
coeepreparedpreviously.Thecappuccinoisready.
4.1 Cleaning the hot water/steam wand (A5)
• Wait that the hot water/steam wand cool down. After
every use, remove with a soft damp cloth any milk residues
from the hot water/steam wand. For perfect cleaning, we
recommend Eco MultiClean: it ensures hygiene by remov-
ing milk proteins and fats and can be used to clean the
whole machine.
• Use some steam for a deeper cleaning: turn the steam
knob (A4) to
position for 5-10 seconds and then
close to “
○” position.
• To maintain the better usability of the steam wand, we
suggest to use the cleaning needle (A10) for opening the
holeofthenozzle(g12).
Barista tips: Whole milk is recommended. The appearance and
texture of froth depending on the nature of the dairy milk or
plantbasedmilkalternativeutilized.
Recommended quantity for each cappuccino: 100/150 ml.
After frothing the milk, eliminate unwanted bubbles by swirling
the jug gently.
Please note: Topreparemorethanonecappuccino,rstmake
allthecoeesthenattheendpreparethefrothedmilkforall
the cappuccinos.
To exit the steam function, turn the steam knob (A4) to “
○” po-
sition and press any icons; in this case, the Espresso (B3) and 2
x Espresso (B4) indicator lights blink to indicate that the steam
knob must be closed again (“○” position).
5. MAKING COLD BREW
Please note: before making cold brewed drinks, empty out the
watertank(A2),rinsethoroughlyandrellwithfreshpotable
water.
• TurntheapplianceonbypressingtheOn/Oswitch(A6).If
the appliance is in stand-by mode, press any icons (B1, B2,
B3 or B4) on the control panel.
• To use tall cup or glass, remove the drip tray (A8) and place
the glass on tray.
• Add a few ice cube to the glass.
• Placethe2cupslter(A15)intheportalter(A14)(g.8)
(1cupltercanbeusedchangingthelengthofbeverage).
• Fillthecuplterwithgroundcoeeusingthespoon(A9)
(see“Makingespresso”paragraph)andattachtheportal-
ter to the appliance
(g.5)
.
•
Place
the glass
undertheportalterspouts(
g.10)
.
10
• Press Cold brew (B1) and wait until delivery stops auto-
matically (about 5 minutes).
• The Cold brew is ready.
6. PROGRAMMING THE QUANTITIES OF COFFEE IN
THE CUP
The appliance is set by default to automatically deliver standard
quantities. To change these quantities, proceed as follows:
• Press the Espresso (B3), 2 x Espresso (B4) or Cold brew (B1)
icons and hold for a least 10 seconds, until the indicator
light relative to the selected drink starts to blinks, indicat-
ing that the appliance is in programming mode; the appli-
ance emits a acoustic signal (beep).
• Thecoeemakerstartsdeliveringcoee.
• When the desired quantity has been reached, press the Es-
presso (B3), 2 x Espresso (B4) or Cold brew (B1) icons again:
the quantity is programmed.
7
Default quantity
Programmable
quantity
6
35 ml
from ≃ 15 ml to ≃ 90 ml
6
70 ml
from ≃ 30 ml
to ≃ 180 ml
A1
A2
A3
A4
A6
A5
A11 A12
A13
A14 A15 A16 A17
A9
A10
A7
A8
B1B5
B2
B3
B4
150 ml
from ≃ 80 ml
to ≃ 180 ml
To return to the quantities of default see instructions in section
Default values.
7. MAKING HOT WATER
• TurntheapplianceonbypressingtheOn/Oswitch(A6).If
the appliance is in stand-by mode, press any icons (B1, B2,
B3 or B4) on the control panel.
• When all the indicator lights on the control panel (except
B5) remain on steadily, the appliance is ready for use.
• To use tall cups or glasses, remove the drip tray (A8) and
stand the glasses on tray.
•
Place
the glass
under the
hot water/steam wand (A5).
• Turn the steam knob (A4) to
position. Hot water is
delivered from the hot water/steam wand.
• To exit the hot water function, turn the steam knob (A4) to
“
○” position or press any icons; in this case, the Espresso
(B3) and 2 x Espresso (B4) indicator lights blink to indicate
that the steam knob must be closed again (“
○” position).
Please note: You should not deliver hot water for more than 60
seconds.
8. MENÙ SETTINGS
• Access the menu: to enter the settings menu, press the
Steam (B2) and 2 x Espresso (B4) icons and hold for a least
10 seconds, until the Espresso (B3), 2 x Espresso (B4) and
Steam (B2) indicator lights starts to blinks and Cold brew
(B1) indicator light remain on steadily.
• Select the setting to be adjusted:
Corresponding
setting
Press to select
the setting
Press to change
the setting
Brewing
temperature
6
6
to select
LOW
temperature
6
to select
MEDIUM
temperature
A1
A2
A3
A4
A6
A5
A11 A12
A13
A14 A15 A16 A17
A9
A10
A7
A8
B1B5
B2
B3
B4
to select
HIGH
temperature
Water
hardness
6
6
to select
LOW
hardness
6
to select
MEDIUM
hardness
A1
A2
A3
A4
A6
A5
A11 A12
A13
A14 A15 A16 A17
A9
A10
A7
A8
B1B5
B2
B3
B4
to select
HIGH
hardness
Auto-o
A1
A2
A3
A4
A6
A5
A11 A12
A13
A14 A15 A16 A17
A9
A10
A7
A8
B1B5
B2
B3
B4
6
to select
5 minutes
6
to select
90 minutes
A1
A2
A3
A4
A6
A5
A11 A12
A13
A14 A15 A16 A17
A9
A10
A7
A8
B1B5
B2
B3
B4
to select
3 hours
• Exit the menu: after 15 seconds of inactivity, the machine
automatically exits the settings menu and is ready for use.
Please note: Indicator light remain on steadily indicates the
currently setting, indicator light blinks indicate the available
settings.
8.1 Default values
• To enter the settings menu, press the Steam (B2) and 2 x
Espresso (B4) icons and hold for a least 10 seconds.
• Press Cold brew (B1) icon.
• Press 2 x Espresso (B4) icon.
• Espresso (B3), 2 x Espresso (B4) and Steam (B2) indicator
8
lightsstartsto blinkssimultaneouslyto conrmthatthe
original settings have been restored.
• When all the indicator lights on the control panel (except
B5) remain on steadily, the appliance is ready for use.
8.2 User statistics
• To enter the settings menu, press the Steam (B2) and 2 x
Espresso (B4) icons and hold for a least 10 seconds.
• Press Cold brew (B1) icon.
• Press Espresso (B3) icon.
• All the indicator lights on the control panel (except B5)
blink.
• Bring up the required statistical data by pressing one of the
four icons as illustrated in the following table:
Icons Data
6
Total count of Espresso (single and double)
6
Total count of descale cycles
A1
A2
A3
A4
A6
A5
A11 A12
A13
A14 A15 A16 A17
A9
A10
A7
A8
B1B5
B2
B3
B4
Total count of hot water/steam
A1
A2
A3
A4
A6
A5
A11 A12
A13
A14 A15 A16 A17
A9
A10
A7
A8
B1B5
B2
B3
B4
Total count of Cold brew
• A indicator light remains on for 5 seconds to indicate the
number of operations according to the following table:
Indicator light Number of operations
A1
A2
A3
A4
A6
A5
A11 A12
A13
A14 A15 A16 A17
A9
A10
A7
A8
B1B5
B2
B3
B4
100-999
6
1000-2999
6
3000-5999
A1
A2
A3
A4
A6
A5
A11 A12
A13
A14 A15 A16 A17
A9
A10
A7
A8
B1B5
B2
B3
B4
6000-10999
>11000
8.3 Acoustic signal enable/disable
• To enter the settings menu, press the Steam (B2) and 2 x
Espresso (B4) icons and hold for a least 10 seconds.
• Press Cold brew (B1) icon.
• Press Steam (B2) icon.
• Press Espresso (B3) icon to enable the acoustic signal and 2
x Espresso (B4) icon to disable.
8.4 Measuring water hardness
The (B5) indicator light comes on to require descaling fol-
lowing a predetermined period of operation that depends on a
water hardness setting. The appliance can also be programmed
according to the actual hardness of the local water supply, in
which case descaling may be required less frequently.
• Remove the water hardness test indicator paper (A12)
from its pack.
• Immerse the paper completely in a glass of water for one
second.
• Remove the paper from the water and shake lightly. After
about a minute, 1, 2, 3, or 4 red squares form, depending
on the hardness of the water:
Water Hardness Test
Result
Level
n
1
soft water
nn
2
medium water
nnn
nnnn
3
hard or very hard water
9. CLEANING
Important: Whilecleaning,neverimmersethecoeemakerin
water. It is an electrical appliance. Before maintenance or clean-
ingoftheappliance,turnito,unplugfromthemainsocketand
allow to cool.
Do not use solvents, abrasive detergents or alcohol to clean the
coeeappliance.
None of the components or accessories is dishwasher safe.
Donotusemetalobjectstoremoveencrustationsorcoeede-
posits as they could scratch metal or plastic surfaces.
If the appliance is not used for more than one week, before using
it again, we strongly recommend you perform a rinse cycle.
The following parts of the appliance must be cleaned and dry
regularly:
• drip tray (A8):Thedriptrayisttedwithalevelindicator
(in red) showing the amount of water it contains. Before
the indicator protrudes from the cup grid, the drip tray (A8)
must be emptied and cleaned, otherwise the water may
overowtheedgeanddamagetheappliance,thesurface
it rests on or the surrounding area.
Remove the drip tray, empty the water and clean the drip
tray with a cloth, dry and then reassemble the drip tray un-
til you hear a ‘click’.
• cups lter (A15), (A16): After using the appliance, always
rinsetheltersunderabundantrunningwater.Extractthe
perforatedlterbypullingthetabandrinsetheltersun-
9
der running water.
Make sure the holes are not blocked. If necessary or once a
month,cleanwithaneedle(g.11).Wipedrywithacloth.
Repositionthe perforatedlterinitsseat andpush fully
home.
11
• brew unit (A7):Afterevery200 coees,rinsethebrew
unit by delivering about 0.5 l of water from the brew unit
(pressthe2xEspressoiconwithoutusinggroundcoee).
• cleaning the water tank (A2):
Periodically (about once a
week) clean the water tank (A2). Also whenever you replace
thewatersoftenerlter(ifpresent).
Empty the water tank and clean with warm water (40-50°C
approx), wiping if necessary with a clean, non-abrasive cloth.
Rinse thoroughly under running water.
Fill the water tank with fresh potable water up to the MAX
level and return it to the machine.
• hot water/steam wand (A5): After every use, remove
with a soft damp cloth any milk residues from the hot
water/steam wand. Turn the steam knob (A4) to
position. The appliance delivers water from the hot water/
steam wand.
Wait that the hot water/steam wand cool down and open
theholeofthenozzlewiththecleaningneedle(A10)(g.
12).
12
9.1 Switching o for extended periods (more than
3-4 days)
If the machine is not going to be used for any length of time (e.g.
holidays, periods of absence) empty out and clean the drip tray
and the water tank.
Please note: When turning the machine on again, c
lean the wa-
ter tank as described above (see “cleaning the water tank”).
Fill the water tank and, before making any kind of drink, run 3 rinse
cycles:eachtimerunashortowofwaterthroughthebrewunit
(A7).
10. DESCALING
Before use, read the instructions and the labelling on the des-
caler pack.
It is important to use De’Longhi descaler only (available for pur-
chase at delonghi.com). Using unsuitable descaler and/or per-
forming descaling incorrectly may result in faults not covered by
the manufacturer’s guarantee.
Descaler could damage delicate surfaces. If the product is acci-
dentally spilt, dry immediately.
• Descale the appliance when the (B5) indicator light
turns on. Descaling cycle time: about 30 minutes.
• Remove and empy the drip tray (A8), then reposition it in
the appliance.
• Empty the water tank (A2) (if present, remove the water
softenerlter).
• Pour the descaler into the water tank. Add water up to level
MAX . Now reposition the water tank in the appliance.
• Makesuretheportalter(A14)isnotattachedandposition
a recipient under the hot brew unit (A7) and hot water/
steam wand (A5).
•
Press and hold the
Steam (B2) and 2 x Espresso (B4)
icons for
10 seconds.
• Espresso (B3), 2 x Espresso (B4) and Steam (B2) indicator
lights blink.
• Press Cold brew icon (B1).
• Turn the steam knob (A4) to
position.
• The (B5) and Steam (B2) indicator lights blink.
• The descale programme starts and the descaler liquid
comes out of the hot water/steam wand (A5) and brew unit
(A7). The descale programme removes limescale deposits
from inside the appliance by automatically performing a
series of rinses and pauses until the water tank is empty.
Please note: During descaling, to clean the brew unit, close the
steam knob from time to time to deliver small quantities of des-
calerfromthecoeeoutlet.
• Delivery stops and the (B5) and Steam (B2) indicator
lights stop blinking; (B5) and Cold brew (B2) indicator
lights remain on steadily.
10
• RinseandllthewatertanktoMAXlevelwithfreshwater
and empty the recipient used to collect the descaler solu-
tion and replace it empty.
• Press Cold brew icon (B1) to start the rinse cycle; (B5)
and Cold brew (B2) indicator lights blink.
• When the rinsing process is over, the descaling is complete
and the Espresso (B3) and 2 x Espresso (B4) indicator lights
blink to indicate that the steam knob must be closed (“
○”
position).
• Turn the steam knob (A4) to “
○” position
• When all the indicator lights on the control panel (except
B5) remain on steadily, the appliance is ready for use.
Please note: During rinse cycle to clean the brew unit, close the
steam knob from time to time to deliver small quantities of wa-
terfromthecoeeoutlet.
11. TECHNICAL DATA
Voltage: 220-240V~50-60Hz.
Absorbed power: 1450W
Max. water tank capacity: 1.1 l
SizeLxDxH: 149x330x305mm
Weight: 4.2 kg
12. EXPLANATION OF INDICATOR LIGHTS
Indicator lights Explanation
The Espresso (B3), 2 x Espresso (B4) and Steam (B2) indicator
lights blink.
Theapplianceisheatinguptomakecoee.
All the indicator lights on the control panel (except
B5) remain
on steadily.
Theapplianceisreadytomakecoee.
The Espresso (B3), 2 x Espresso (B4) and Steam (B2) indicator
lights blink
for 3 seconds.
Fill the water tank (A2) up to level MAX.
Steam (B2) indicator light blinks. The appliance is heating up to deliver steam
Steam (B2) indicator light remain on steadily. If Steam (B2) icon previously
pressed: machine is ready to
deliver steam.
Place the jug with fresh cold
milk under the hot water/steam
wand (A5), turn the steam knob
(A4) to
position; the ap-
pliance proceeds to make the
froth (see Par. 4 “Making Milk or
plant based milk Beverages”).
If Steam (B2) icon not previous-
ly pressed: air in the hydraulic
circuit.
Verify water tank position,
waterlter position and water
presence. Check if pre-ground
coee is for espresso coee
makers or reduce the dose in
thelter.
Place a container under steam
wand. Turn the steam knob
(A4) to
position and
wait until delivery from steam
wand stops (Espresso (B3), 2 x
Espresso (B4) indicator lights
blink), then close steam knob to
“
○” position.
On/Oswitchpressedbutallledsturnedo. The appliance is in stand-by mode; press any icons.
The Espresso (B3) and 2 x Espresso (B4) indicator lights blink.
Turn the steam knob (A4) to “
○” position.
11
13. TROUBLESHOOTING
Problem Cause Solution
Noespressocoeeis
delivered.
No water in the water tank (A2). Fill the water tank.
Blockageinthecuplters(A15)or(A16). Rinsethecupltersunderrunningwater;see“Clean-
ingcupslter”.
The water tank (A2) is not properly in place and
the valves at the bottom are not open.
Press down lightly on the tank to open the valves at
the bottom.
Limescale in the water circuit. Descale the appliance.
Thepre-groundcoeeistoone. Useonlypre-groundcoeeforespressocoeemak-
ers or reduce the dose.
Theespressocoeedripsfrom
theedgesoftheportalter
(A14) rather than the spouts.
Theportalterhasbeeninsertedincorrectly
or is dirty.
Attachtheportaltercorrectlyandrotatermlyas
far as it will go.
The brew unit gasket has lost elasticity or is
dirty.
Clean the brew unit gasket. If problem persists,
contact Customer Service.
Theportalter(A14)cannotbe
attached to the appliance.
Toomuchcoeehasbeenplacedinthelter.
Use the spoon (A9) supplied and make sure you are using
thecorrectlterforthetypeofpreparation.
Thecoeecremaistoolight
(delivered from the spouts
too fast).
Thepre-groundcoeeisnottampedrmly
enough.
Tampthepre-groundcoeemorermly.
Thereisnotenoughpre-groundcoee. Increasethequantityofpre-groundcoee.
Thepre-groundcoeeistoocoarse.
Useonlypre-groundcoeeforespressocoeemakers.
Thewrongtypeofpre-groundcoeeisbeingused.
Makesuretousefreshpre-groundcoeegrindedfor
espresso machines.
Thecoeecremaistoodark
(delivered from the spouts
too slowly).
Thereistoomuchpre-groundcoeeinthelter.
Reducethequantityofpre-groundcoee.
The espresso brew unit (A7) is blocked. Clean the brew unit.
Thecuplters(A15)or(A16)areblocked. Cleanthecuplter.
Thepre-groundcoeeistoone.
Useonlypre-groundcoeeforespressocoeemakers.
Afterdeliveringcoee,the
lterremainsattachedtothe
brew unit.
Inserttheportalter(A14)again,delivercoee,
thenremovetheportalter.
The appliance will not make
any drink and the Espresso
(B3), 2xEspresso (B4) and
Steam (B2) indicator lights
blink for a few seconds.
No water in the water tank (A2). Fill the tank with water.
The water tank (A2) is not properly in place and
the valves at the bottom are not open.
Press down lightly on the tank to open the valves at
the bottom.
All the indicator lights on the
control panel (except
B5)
blink.
Overtemperature alarm. Disconnect the appliance immediately and contact
authorised Customer Services.
No milk froth is formed when
making cappuccino.
Milk not cold enough. Always use milk at refrigerator temperature.
Steaming procedure could be wrong . Review the “making milk beverage” paragraph.
Hot water/steam wand dirty. Clean the hot water/steam wand (A5).
The
(B5) indicator light
turns on.
Descaling is required. Perform descaling.

57132C8971 _02_0525
De’Longhi Appliances via Seitz, 47 31100 Treviso Italia delonghi.com