
10033244 10033245
Etude 61 MK II
Keyboard
Teclado
Clavier
Tastiera


3
DE
Sehr geehrter Kunde,
wir gratulieren Ihnen zum Erwerb Ihres Gerätes.
Lesen Sie die folgenden Hinweise sorgfältig durch und
befolgen Sie diese, um möglichen Schäden vorzubeugen.
Für Schäden, die durch Missachtung der Hinweise und
unsachgemäßen Gebrauch entstehen, übernehmen wir
keine Haftung. Scannen Sie den folgenden QR-Code,
um Zugriff auf die aktuellste Bedienungsanleitung
und weitere Informationen rund um das Produkt zu
erhalten.
INHALTSVERZEICHNIS
Technische Daten 4
Sicherheitshinweise 5
Tasten und Anschlüsse 6
Vor dem Gebrauch 7
Bedienung 8
Effekt und Kontrolle 9
Rhythmusbegleitung und ihre Funktionen 11
Automatische Begleitung 12
Reinigung und Pege 14
Tabelle der Instrumente 15
Tabelle der Rhythmen 16
Tabelle der Demos 18
Fehlerbehebung 19
Spezielle Entsorgungshinweise für Verbraucher in Deutschland 20
Hinweise zur Entsorgung 22
Hersteller & Importeur (UK) 22
English 23
Español 41
Français 59
Italiano 77
4
DE
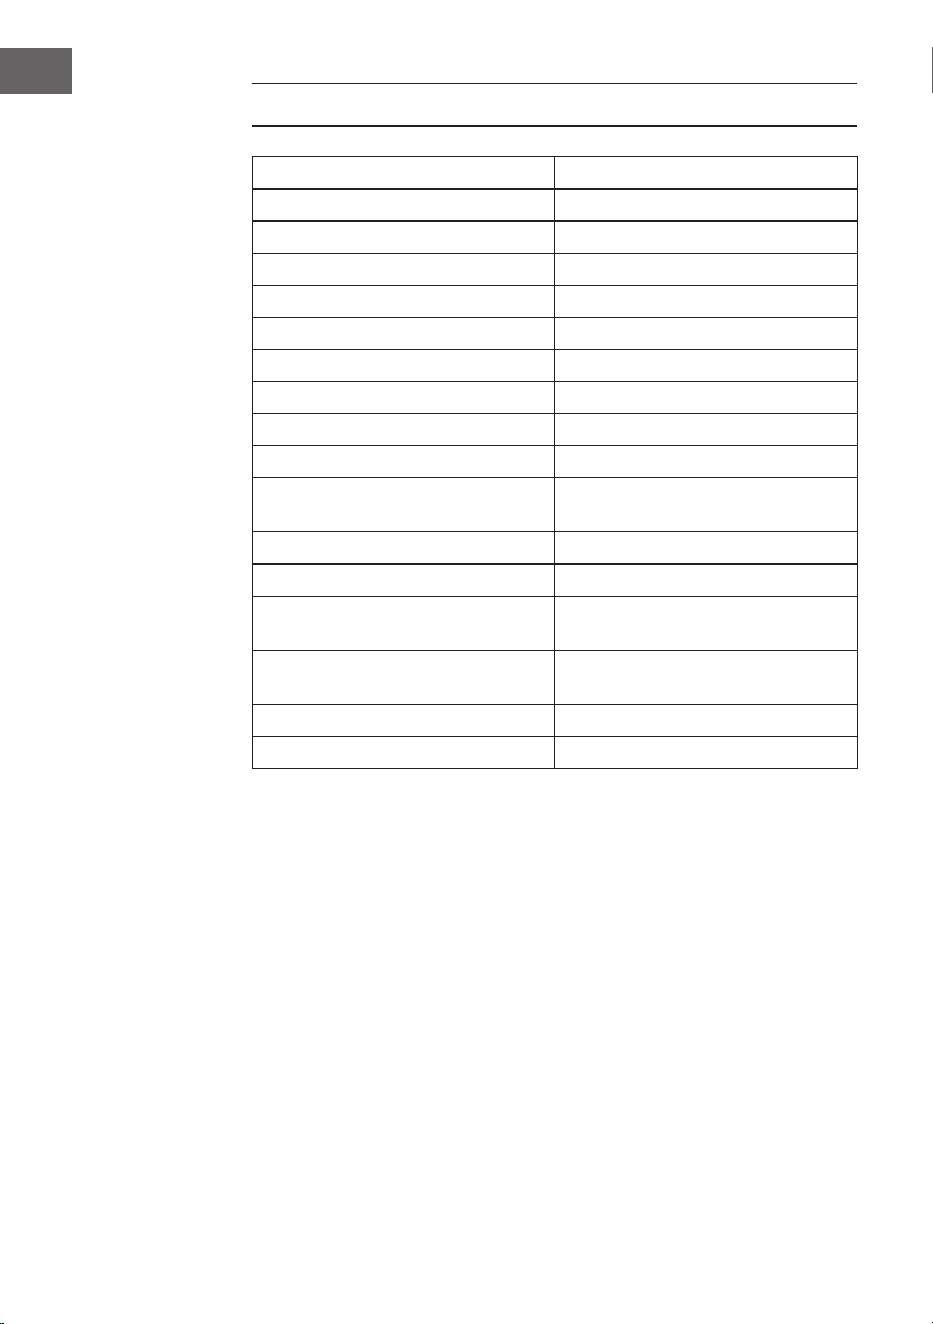
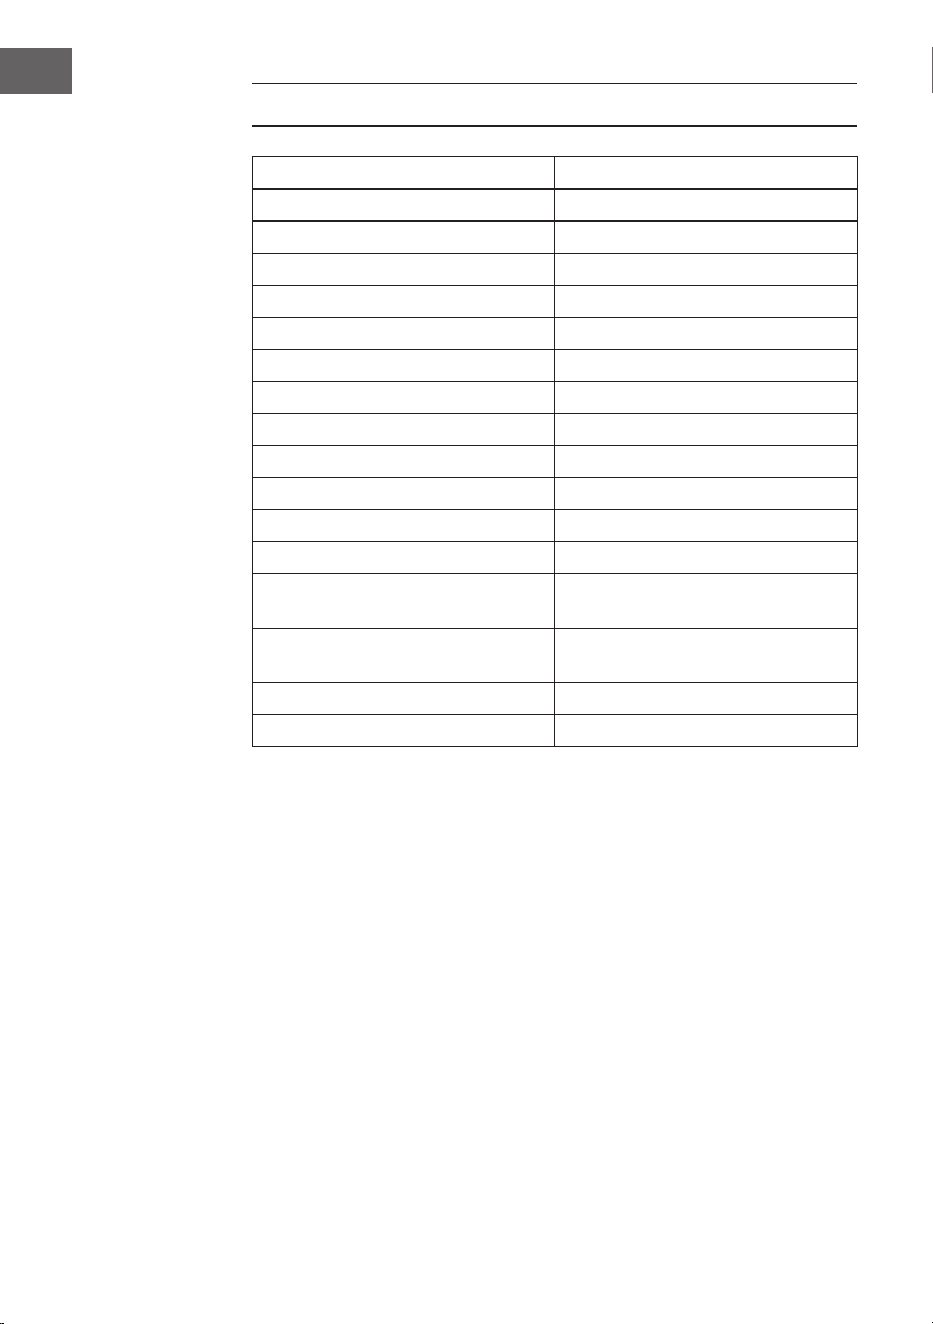
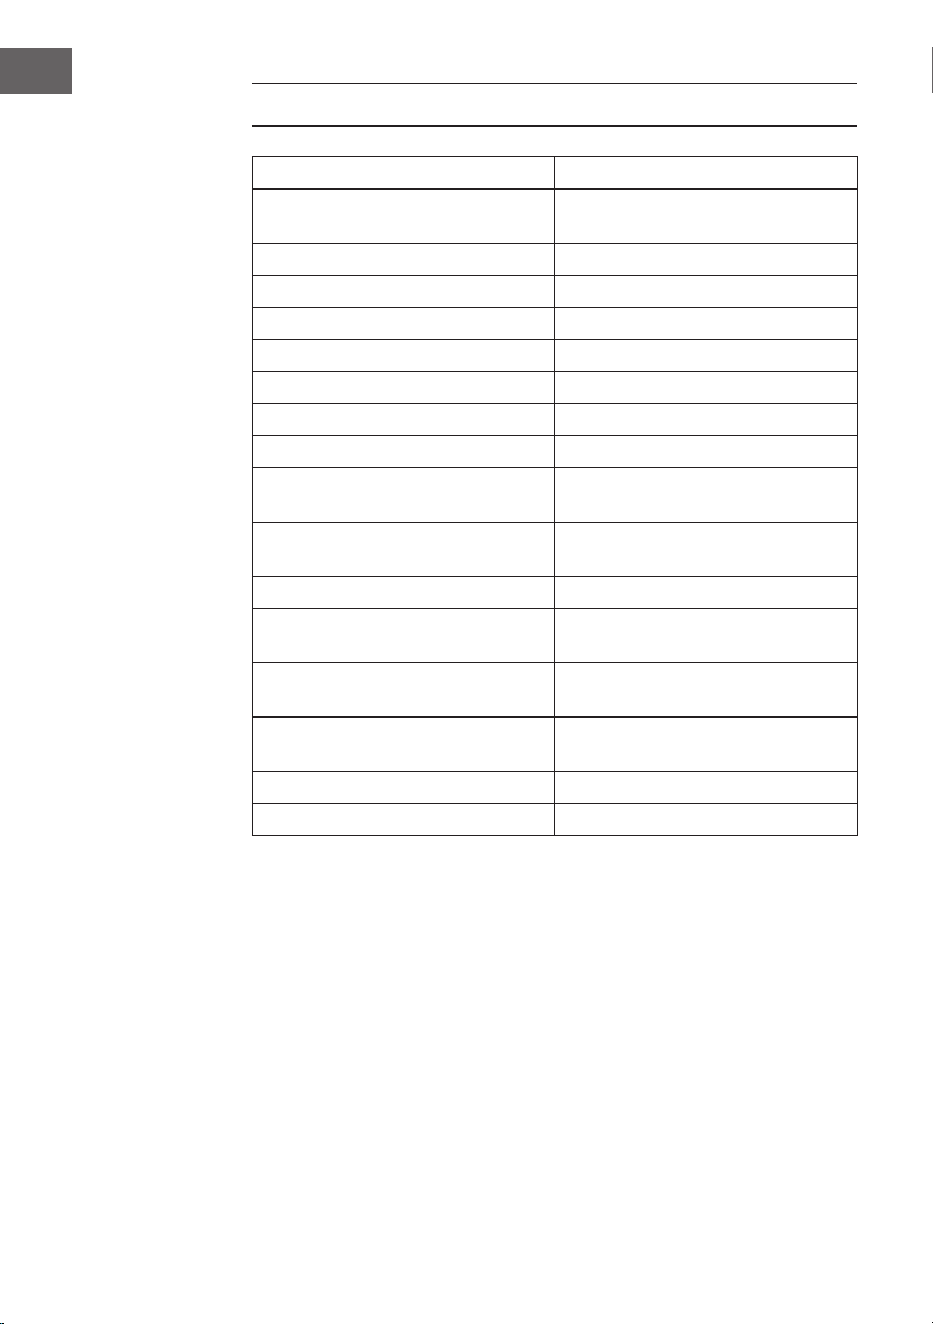
TECHNISCHE DATEN
Artikelnummer 10033244, 10033245
Tastatur 61-Tasten Standard-Pianotastatur
Anzeige LED-Anzeige
Klangfarben 300 verschiedene Klänge
Rhythmen 300 verschiedene Begleitungen
Demo 50 Demosongs
Trommeln 8 Trommeln
Effekte Halten, Vibrato, Versetzen
Aufnahme Aufnahme, Wiedergabe
Programmierung Rhythmusprogrammierfunktion
Begleitung Start/Stop, Synchronisieren,
Einfüllen, Geschwindigkeit
Akkord Einzelnger, Finger
Lernfunktion Demosongs, Leitfaden
Andere Ein-/Ausschalter, Gesamtlautstärke,
Begleitlautstärke
Externe Anschlüsse Stromanschluss, Kopfhörerausgang,
Audio-Ausgang L/R
Netzgerät AC 220 V, DC 9 V
DC Spannungseingang DC 9 V

5
DE
SICHERHEITSHINWEISE
• Lesen Sie sich die Bedienungsanleitung vor der Verwendung des Geräts
aufmerksam durch, um Sach- und/oder Personenschäden zu vermeiden.
• Schließen Sie das Gerät ausschließlich mit dem im Lieferumfang
enthaltenen Netzstromadapter an eine Steckdose an. Durch die
Verwendung von anderen Netzstromadaptern könnte Ihr Gerät
beschädigt werden.
• Öffnen Sie keinesfalls das Gehäuse des Instruments.
• Versuchen Sie nicht, dass Gerät selbst auseinander zu bauen oder Teile im
Geräteinneren selbst auszutauschen. Sollten während der Verwendung
Fehlfunktionen auftreten, verwenden Sie das Gerät nicht weiter und
setzen Sie sich mit dem Kundendienst in Verbindung.
• Stellen Sie das Gerät nicht an Orten ab, wo es extremem Staub,
Vibrationen, niedrigen oder hohen Temperaturen (wie beispielsweise
Orte mit direkter Sonneneinstrahlung, in der Nähe von Wärmequellen,
da dadurch sowohl das äußere Erscheinungsbild so wie die inneren
Gerätekomponenten beschädigt werden könnten.
• Stellen Sie das Gerät niemals auf instabilen oder unebenen Flächen ab, da
es dadurch umfallen oder herunterfallen und beschädigt werden könnte.
• Stellen Sie niemals mit Flüssigkeit gefüllte Behälter auf dem Gerät ab,
da diese Umfallen könnten und die Flüssigkeit dadurch ins Geräteinnere
gelangen könnte.
• Drehen Sie, vor dem Einschalten des Geräts, die Lautstärke auf 0 herunter.
Passen Sie die Lautstärke anschließend stufenweise an, damit die
Lautsprecher nicht beschädigt werden.
• Drehen Sie die Lautstärke niemals auf „Maximum“, um zu verhindern, dass
Sie durch das Spielen einen Hörverlust erleiden.
• Wenden Sie niemals extreme Gewalt gegen das Gerät, die Spieltasten, den
Einschaltknopf und die Anschlüsse an und stellen Sie auch keine schweren
Objekte auf dem Gerät ab.
• Das Gerät muss von einem Erwachsenen ausgepackt werden, da durch
die Verpackungsmaterialien für Babys und Kleinkinder Erstickungsgefahr
besteht. Lagern Sie die Plastikverpackung an einem sicheren Ort oder
entsorgen Sie diese fachgerecht.
• Die kleinen Komponenten im Inneren können für Kinder unter 3 Jahren
eine Gefahr darstellen und sind für diese nicht geeignet.
• Die technischen Eigenschaften des Geräts können ohne Vorankündigung
geändert werden.
• Dieses Gerät kann in allen Klimazonen, außer in tropischem Klima,
verwendet werden.
• Das Gerät kann nur in Gegenden verwendet werden, welche unterhalb
von 2000 Metern über dem Meeresspiegel liegen.
• Achten Sie darauf, dass keine Wassertropfen oder Spritzwasser auf den
Netzstromstecker oder das Netzstromkabel gelangen.
6
DE
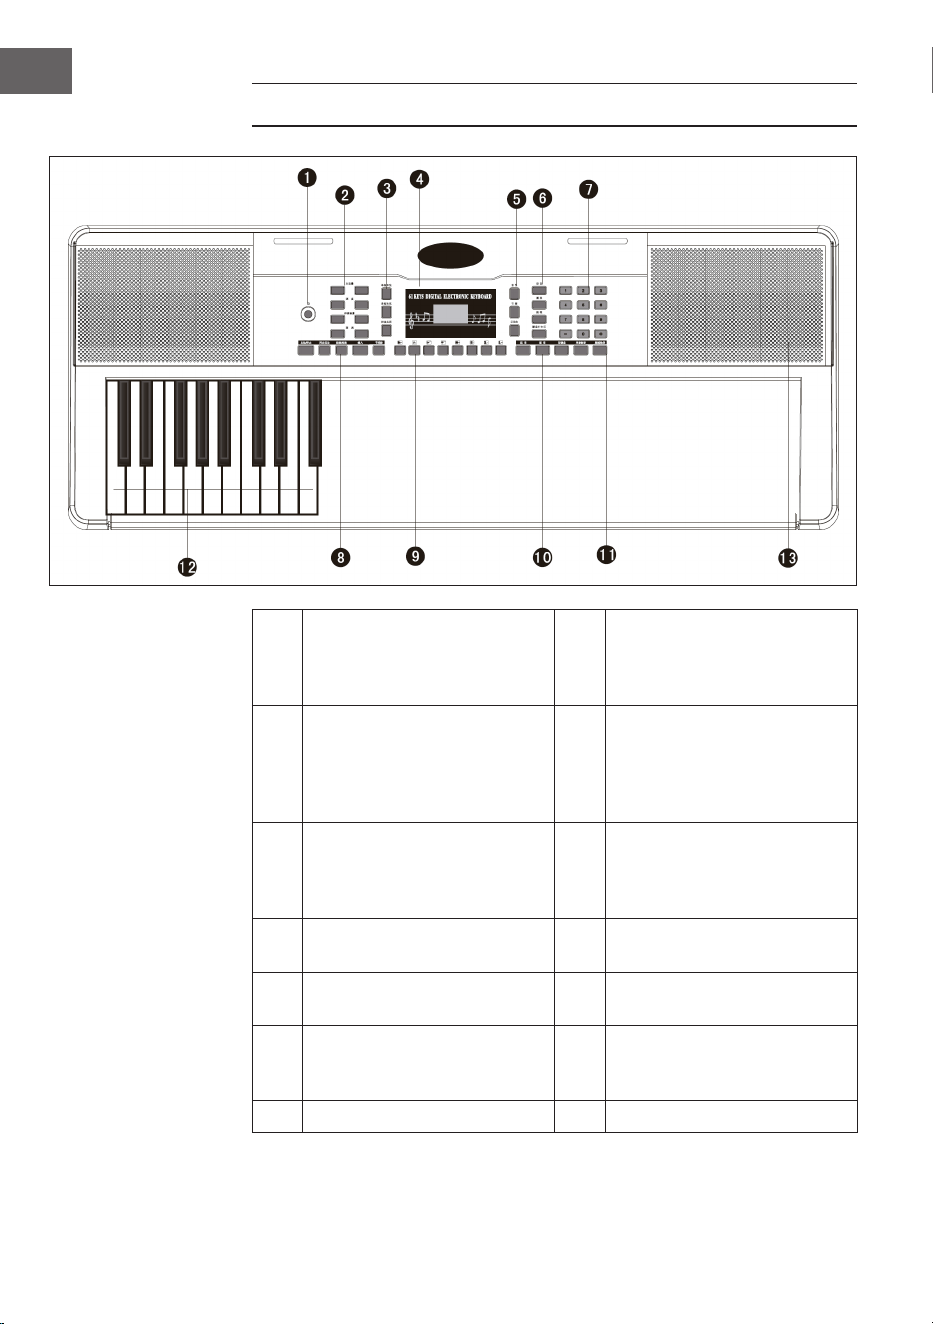
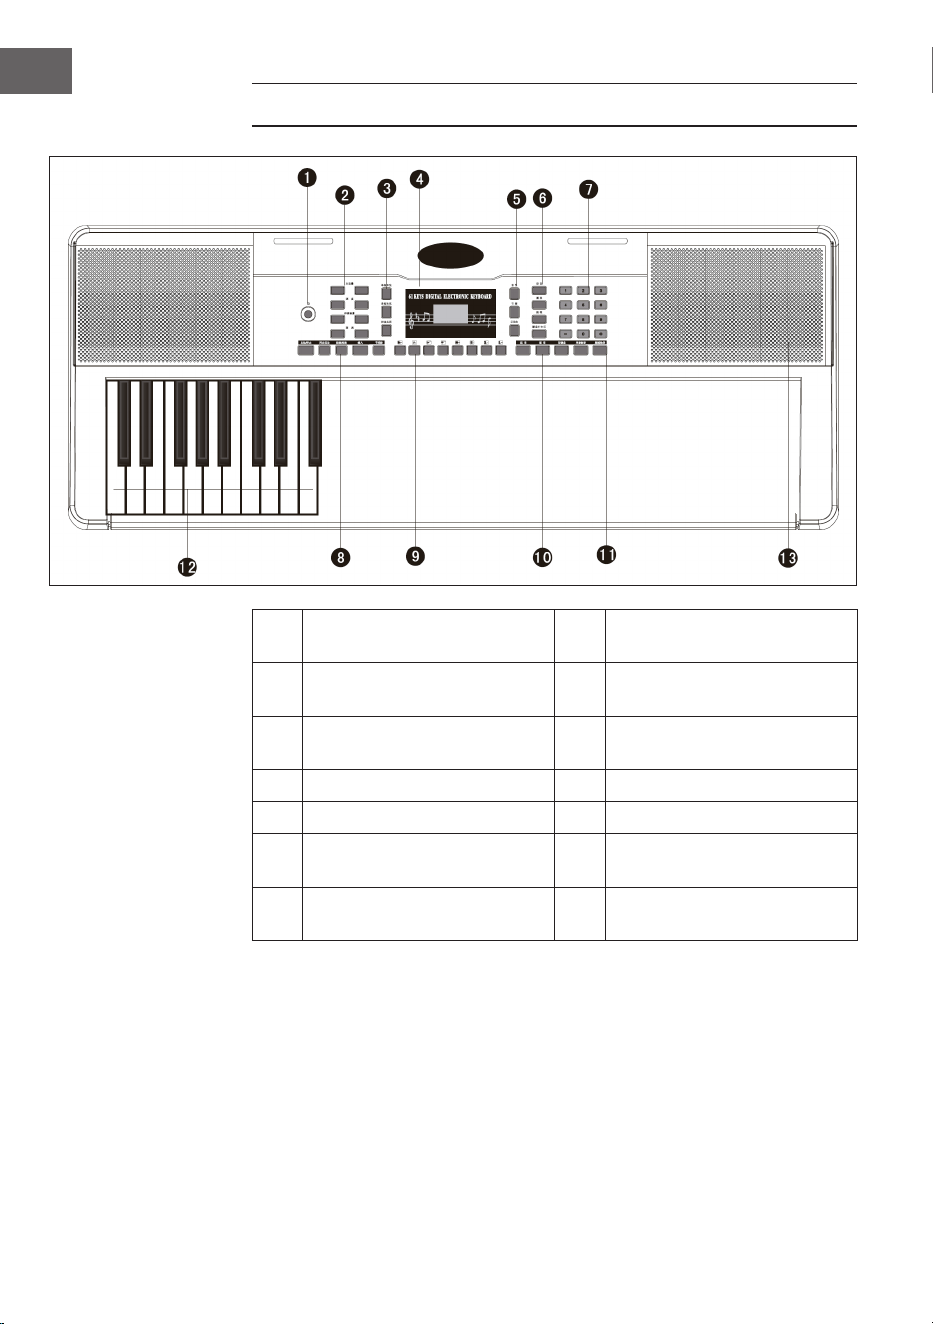
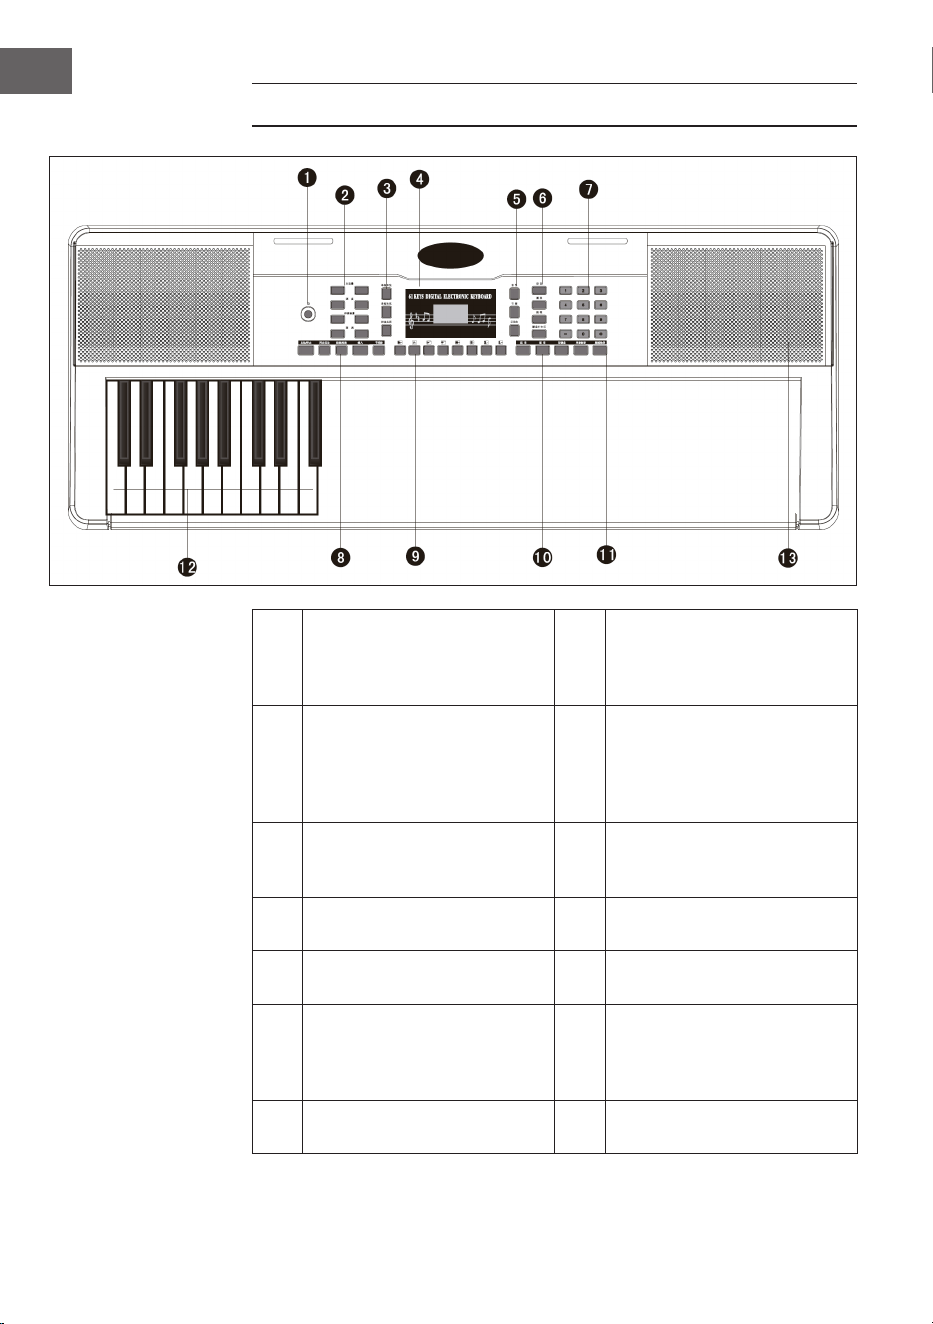
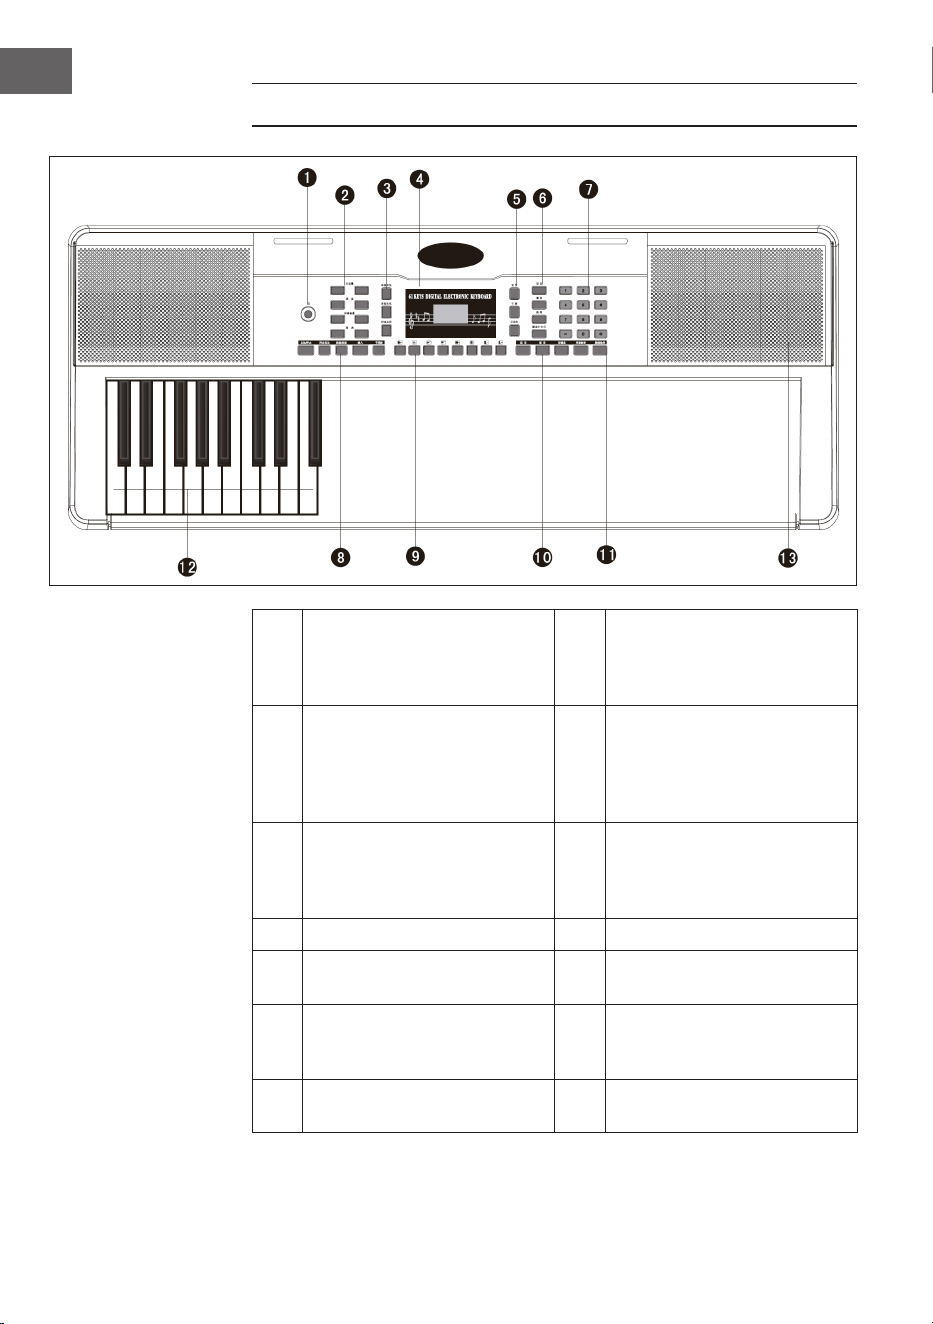
TASTEN UND ANSCHLÜSSE
1
Power - Ein- und
Ausschalttaste
8
Start / Stop / Sync -
Synchronisierung / Intro
/ Ending - Ende / Fill in -
Einfügen / Metronome - Takt
2
Mastervolume -
Hauptlautstärkeregler /
Tempo / Accomp volume
- Begleitlautstärke /
Transponse - Transponierung
9
Panel percussion – Perkussion
des Bedienfeldes
3
Single Chord - Einzelakkord /
Fingered - Fingerbegleitung
/ Chord Clear -
Akkordauösung
10
Sustain - Halten / Vibrato /
Split - Aufteilen
4 LED-Digitalanzeige 11
One key - Tonart / Follow -
befolgen
5
Voice - Klang / Rythm -
Rhythmus / Demo
12
Auto Chord - Automatische
Akkorde
6
Record - Aufnahme / Play -
Wiedergabe / Programm /
Keyboard perc - Tastenschlag
13 Speakers - Lautsprecher
7 Digitale Ziffern 1-9/ +/- Taste
7
DE
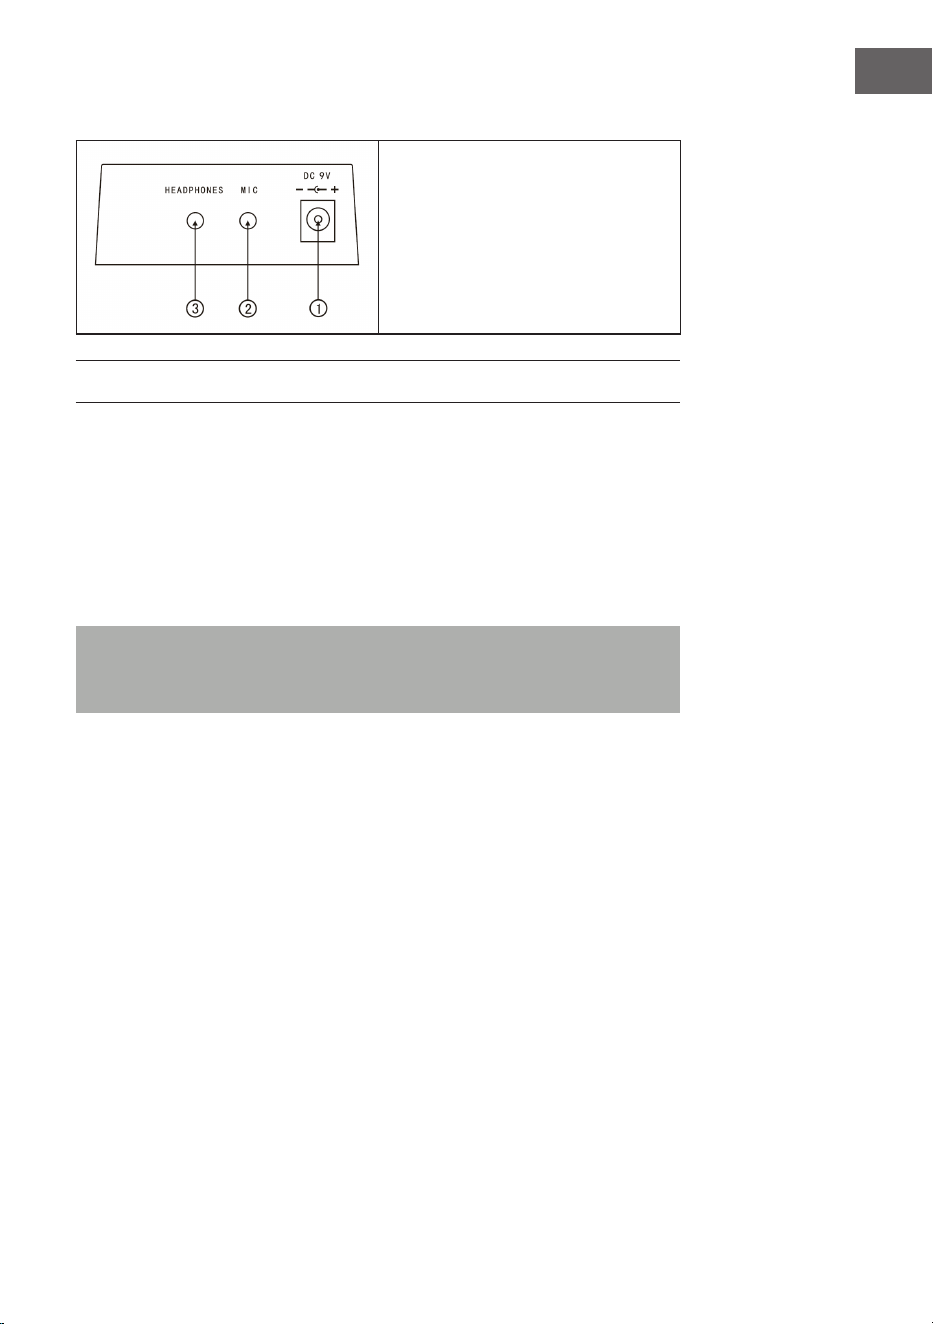
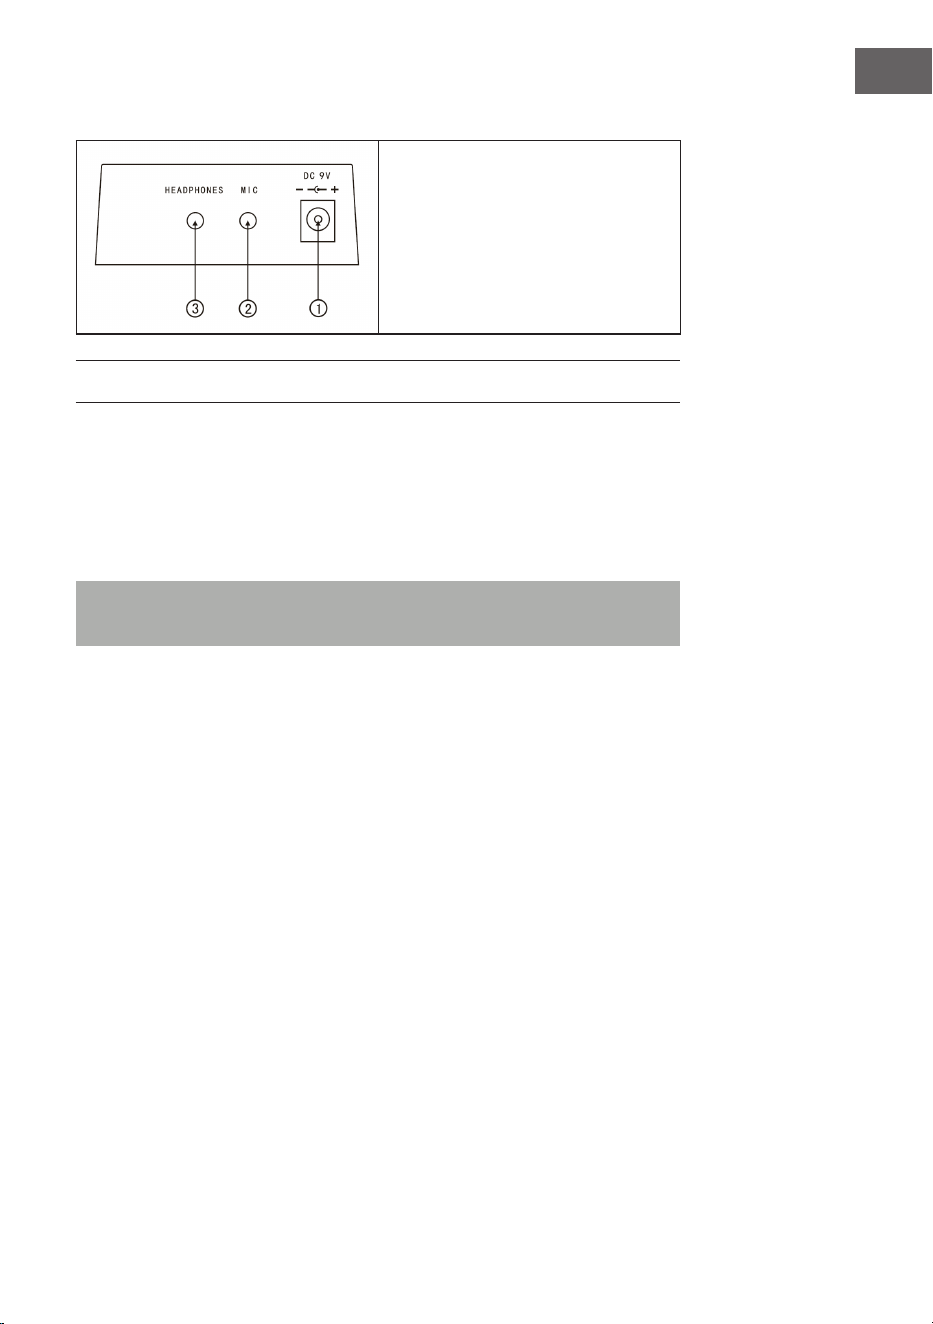
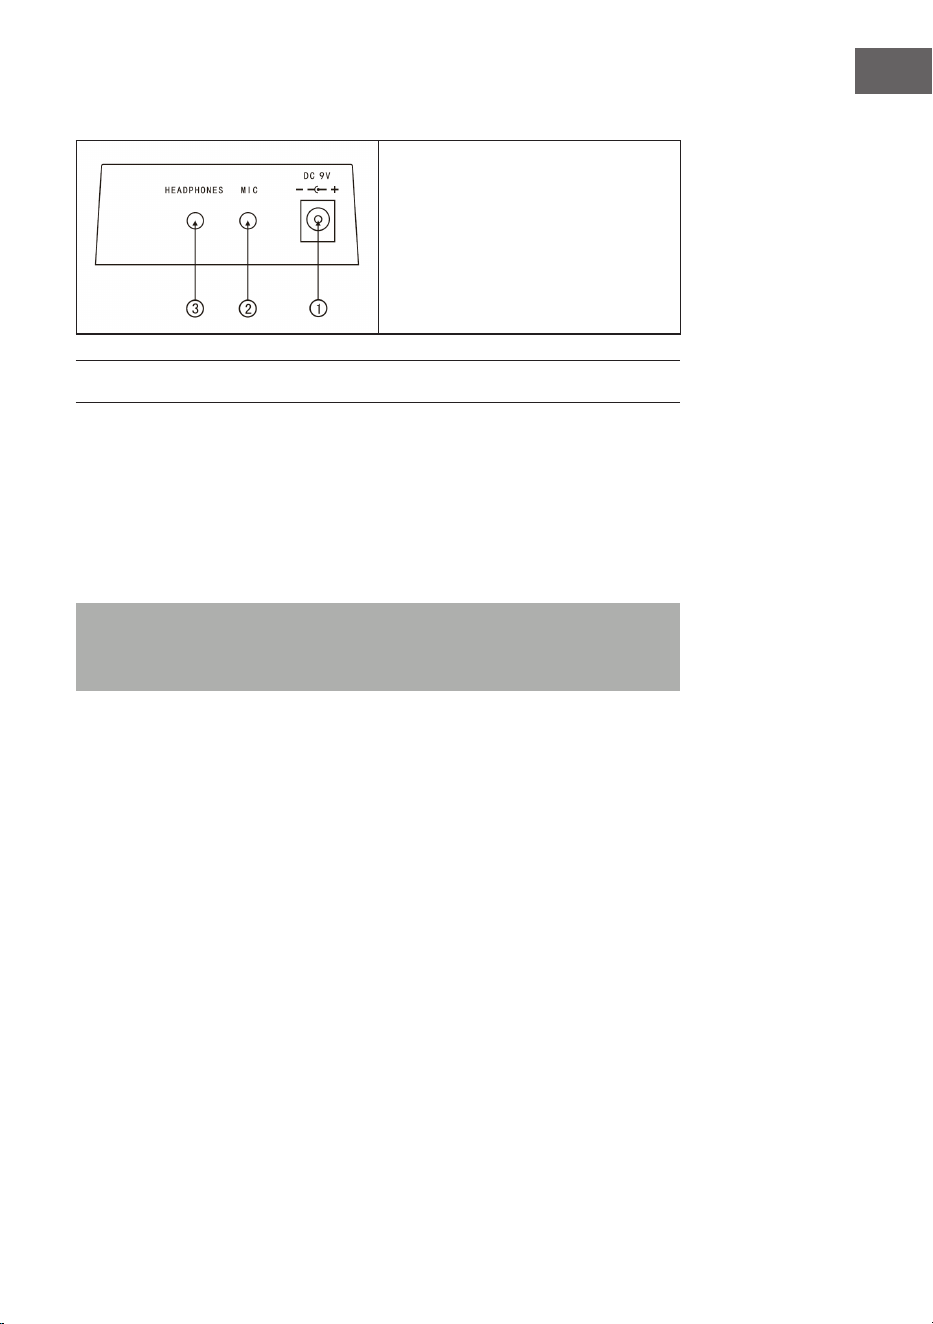
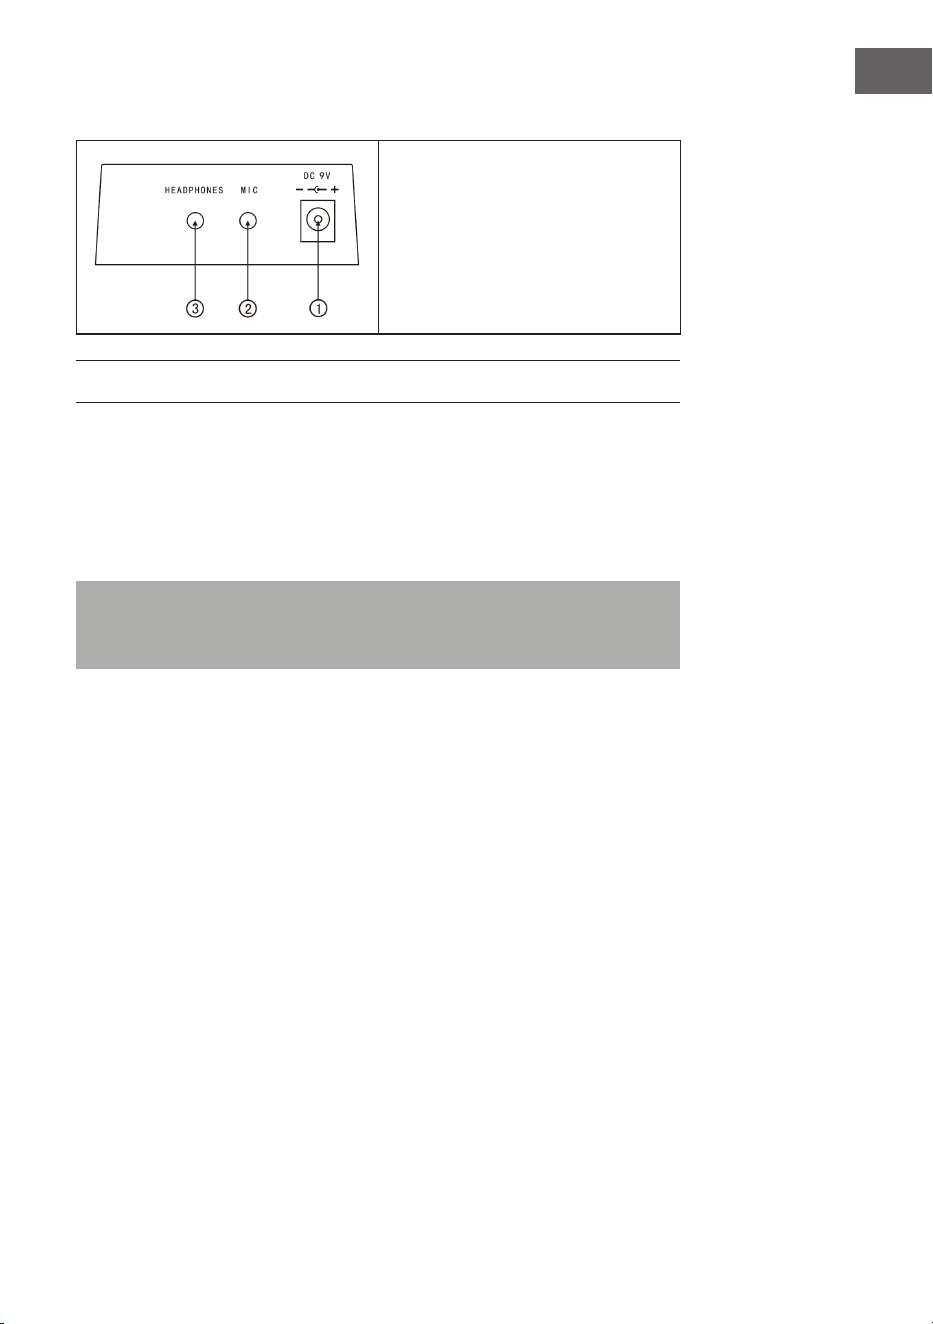
Anschlüsse auf der Rückseite
1. 9 V Netzgerätanschluss
2. Mikrofonausgang
3. Kopfhöreranschluss
VOR DEM GEBRAUCH
Verwendung des Netzstromadapters
• Verwenden Sie ausschließlich den im Lieferumfang enthaltenen DC 9 V
Netzstromadapter, welcher über eine Ausgangsleistung von 500 mA und
einen zentralen Anodenstecker verfügt.
• Stecken Sie den DC-Anschlussstecker in den DC ) V Anschluss auf der
Rückseite des Geräts und stecken Sie den Netzstromstecker in eine
Steckdose.
Hinweis: Die Eingangsleistung des Netzstromadapters muss mit der
Leistung der Steckdose konform sein. Drücken Sie anschließend auf die
Ein- Ausschalttaste, um das Gerät zu verwenden.
Schalten Sie das Gerät, wenn Sie es über einen längeren Zeitraum nicht
verwenden werden, aus und ziehen Sie den Netzstromstecker aus der
Steckdose, um durch eine aufrechterhaltene Stromverbindung verursachte
Schäden zu vermeiden.
Verwendung von Batterien (nicht im Lieferumfang enthalten)
• Öffnen Sie das Batteriefach auf der Unterseite des Bedienfelds Ihres
Instruments.
• Legen Sie acht 1,5 V Batterien der Größe LR-20 in das Batteriefach ein.
Beachten Sie die Polaritätsmarkierung auf dem Gehäuse.
• Setzen Sie die Batteriefachabdeckung wieder ein und vergewissern Sie
sich, dass dieses fest verschlossen ist.

8
DE
Wichtiger Hinweis zur Verwendung von Batterien
• Wenn einige Batterien leer sind, ersetzen Sie alle 8 auf einmal, damit nicht
Batterien verschiedenen Typs zur gleichen Zeit verwendet werden.
• Vermischen Sie niemals alte und neue Batterien.
• Sollte Batteriesäure ausgetreten sein, reinigen Sie das Batteriefach
vollständig, bevor Sie neue Batterien einlegen.
• Entnehmen Sie alle Batterien aus dem Batteriefach, wenn Sie das Gerät
über einen längeren Zeitraum nicht verwenden. Dadurch kann ein
Auslaufen der Batteriesäure in das Batteriefach verhindert werden.
Anschluss eines Mikrofons
Ein Standardmikrofon (3,5 mm) kann über ein Kabel mit dem
Mikrofonanschluss verbunden werden.
Verwendung von Kopfhörern
• Standardkopfhörer können über den Kopfhöreranschluss mit dem Gerät
verbunden werden, um im Stillen oder noch spät in der Nacht zu spielen.
• Die internen Lautsprecher werden automatisch stummgeschaltet, wenn
Kopfhörer mit dem Kopfhöreranschluss verbunden werden.
Hinweis: Mikrofon, Anschlusskabel und Kopfhörer sind nicht im
Lieferumfang enthalten und müssen separat erworben werden.
BEDIENUNG
Einschalten
• Drücken Sie die Ein-/Ausschalttaste, um das Gerät einzuschalten.
• Drücken Sie die Taste erneut, um das Gerät auszuschalten, nachdem Sie
ein Netzstromkabel angeschlossen oder die Batterien ersetzt haben.
Hauptlautstärke
• Das Gerät verfügt über 9 Lautstärkestufen von 00 bis 08. Die
voreingestellte Lautstärke ist 07.
• Durch Drücken der Tasten + und - kann die Lautstärke angepasst werden.
• Wenn Sie die Tasten + und - gleichzeitig gedrückt halten wird die
Lautstärke automatisch wieder auf den voreingestellten Wert
zurückgesetzt.

9
DE
Klangfarben
• Dieses Gerät verfügt über 300 verschiedene Klangfarben. Der
voreingestellte Klang für das Instrument ist
• „Voice“.
• Drücken Sie die Taste Voice, wenn sich das Gerät nicht im Klangmodus
benden sollte.
• Wählen Sie aus der Klangtabelle einen von 300 Klängen aus.
• Geben Sie anschließend die entsprechende Nummer auf dem Zahlenfeld
ein oder drücken Sie die Tasten + oder -, um die aktuell eingegebene
Klangnummer zu ändern.
EFFEKT UND KONTROLLE
Tastenschlag
Wenn Sie die Taste „Keyboard perc“ drücken, wird beim Spielen auf der
Tastatur ein anderes Instrument erklingen. Die Tastatur kann in Ihren
Ursprungszustand zurückversetzt werden, indem die Taste „Keyboard perc“
erneut gedrückt wird.
Sustain – Halten
Drücken Sie einmal die Taste Sustain, hallen die auf der Tastatur gespielten
Töne etwas nach. Wenn Sie die Taste erneut drücken, wird der Effekt
ausgeschaltet.
Vibrato
• Drücken Sie die Taste Vibrato, um den Vibrato-Effekt zu aktivieren.
• Der Vibrato-Effekt wird durch Drücken der schwarzen und weißen Tasten
produziert.
Split – Teilen
• Drücken Sie die Taste Split, um die Tastatur in linke und rechte Klaviatur zu
unterteilen.
• Die 24 Tasten auf der linken Seite werden der linken Klaviatur zugeordnet
und die 24 Tasten auf der rechten Seite werden der rechten Klaviatur
zugeordnet.
• Die Tonart der rechten Klaviatur kann durch Drücken der Zifferntasten
ausgewählt werden.
• Die Tonart der linken Klaviatur wird zunächst vom Hersteller festgelegt.
• Drücken Sie die Taste Split erneut, um die Unterteilung der Tastatur zu
beenden.
10
DE
Tempo
• Drücken Sie die Tempo-Taste und erhöhen Sie das Tempo für Rhythmus,
Metronom und Demosong durch Drücken der Tasten + und -.
• Es gibt 210 verschiedene Geschwindigkeitseinstellungen mit Werten
zwischen 30 und 240 Taktschlägen pro Minute.
• Drücken Sie die Tasten + und - gleichzeitig, um zum voreingestellten Wert
von 120 Taktschlägen pro Minute zurückzukehren.
Transponse
• Drücken Sie Taste Transponse und erhöhen oder senken Sie den
Transponierungswert jeweils um 6 Stufen und verschieben Sie die
Tonhöhe der Tastatur in Halbtonintervallen, indem Sie die Tasten + oder -
drücken.
• Halten Sie die Tasten + und - gleichzeitig gedrückt, um zur werksseitig
eingestellten Einstellung zurückzukehren.
Metronome - Takt
• Drücken Sie die Taste Metronome. Der Takt wird erzeugt.
• Wählen Sie aus 4 Optionen einen 1/4, 2/4, 3/4, oder 4/4 Takt aus, indem
Sie die Taste mehrfach drücken.
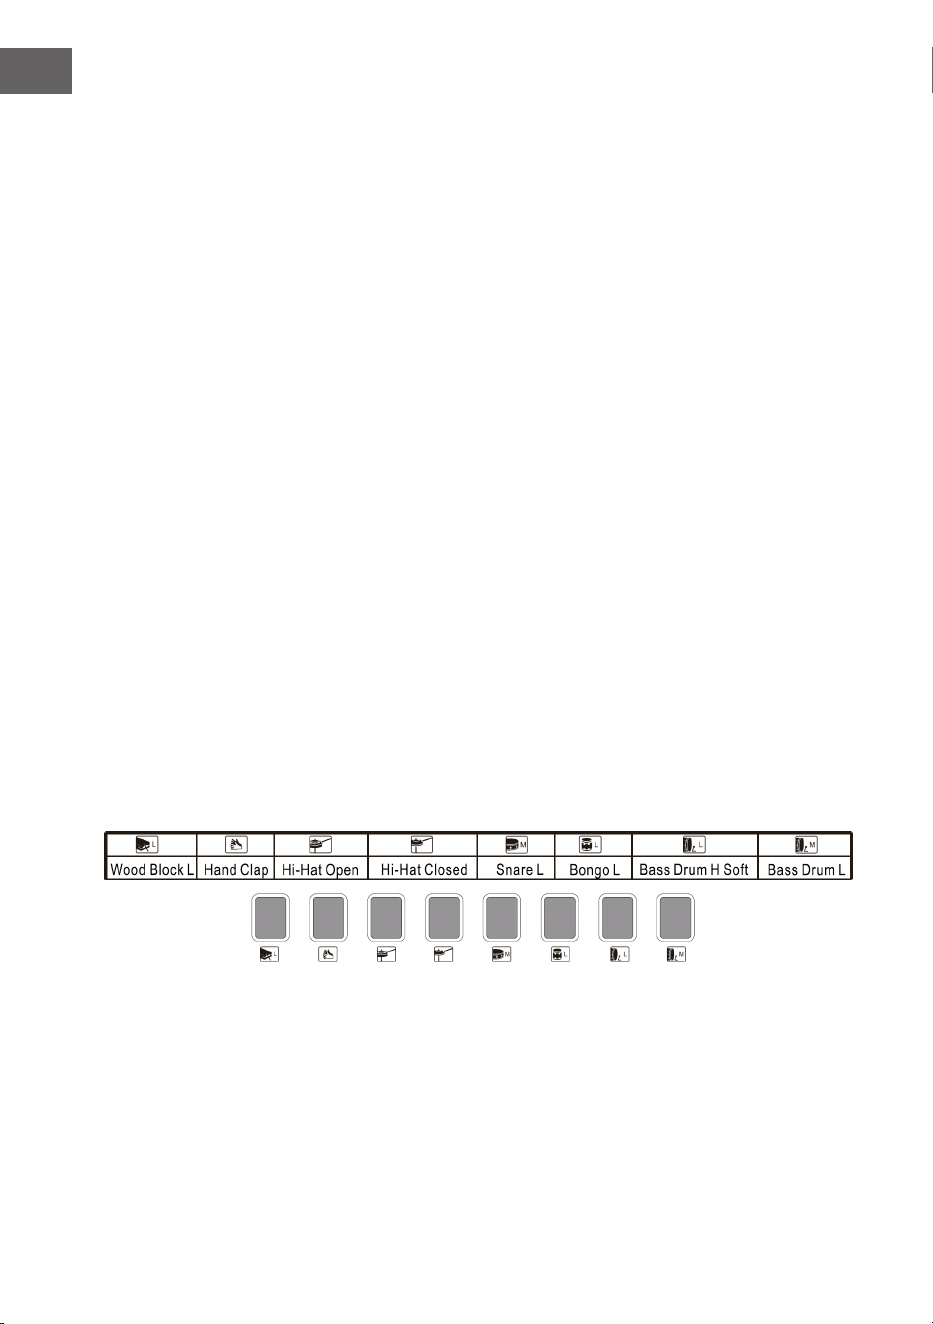
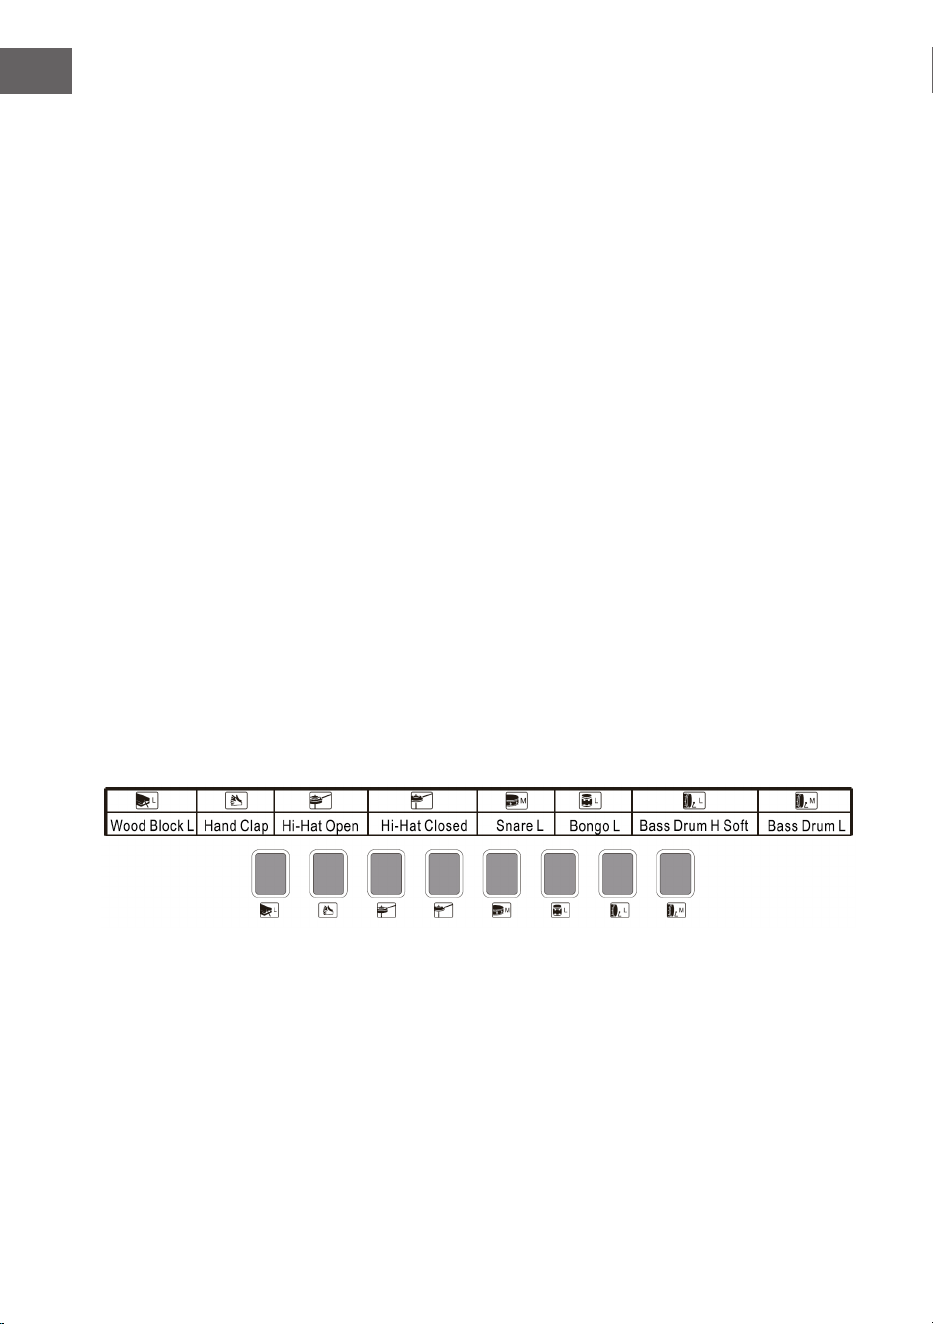
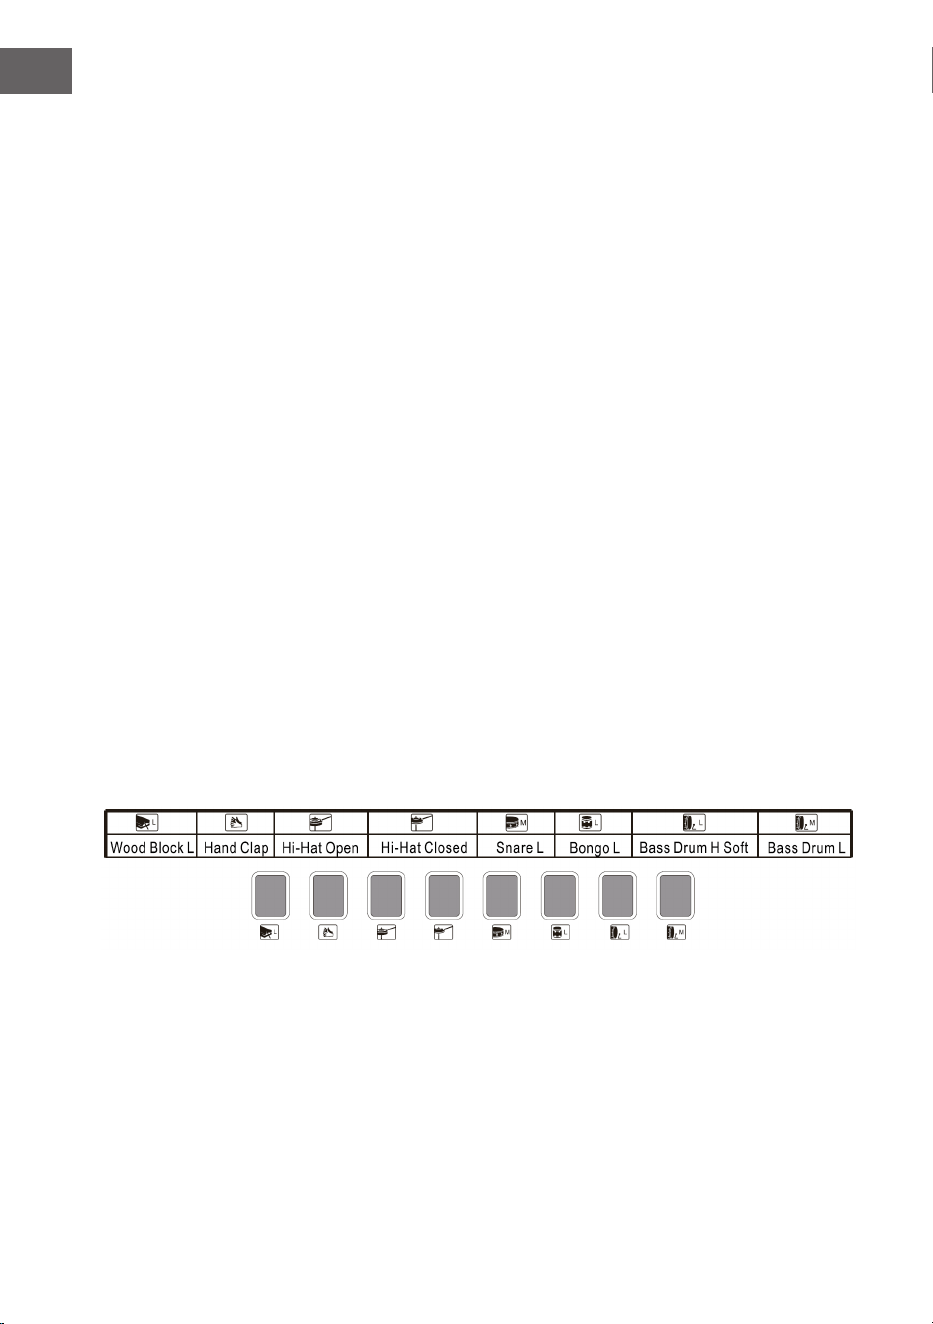
Top panel percussion – Perkussion des oberen Bedienfeldes
Wählen Sie eine der 8 Tasten aus und drücken Sie diese in Übereinstimmung
mit der nachfolgenden Liste (für dieses Instrument sind insgesamt 8
Perkussionsarten verfügbar), um die Perkussion während des Spielens zu
erzeugen.
Perkussionliste des Bedienfeldes

11
DE
RHYTHMUSBEGLEITUNG UND IHRE
FUNKTIONEN
Rhythmusauswahl
Drücken Sie zum Beginnen die Taste Rhythm und wählen Sie durch Drücken
der entsprechenden Ziffer oder der Tasten + und - eine Begleitung von 0 – 299
aus (siehe Tabelle).
Start/ Stopp
Drücken Sie zum Beginnen die Taste Start/Stop und wählen Sie durch Drücken
der entsprechenden Ziffer oder der Tasten + und - eine Begleitung von 0 – 299
aus (siehe Tabelle).
Sync
• Drücken Sie zum Starten des Synchronisierungseffekts die Taste Sync
und drücken Sie für den Rhythmus während des Spielens eine der
verbleibenden 19 Tasten.
• In diesem Fall wird, wenn Sie spielen, die automatische Akkordfunktion
aktiviert, wenn eine der linken 19 Tasten gedrückt wird, und der
Akkordeffekt gestartet wird.
• Drücken Sie zum Beenden des Rhythmuseffekts die Taste Sync und starten
Sie den Synchronisierungseffekt, wenn der Rhythmus gespielt wird.
• Drücken Sie, während der Synchronisierungseffekt aktiv ist, die Taste
Sync, wird dieser beendet.
Intro/ Ende
• Wenn Sie vor dem Starten des Rhythmus die Taste Intro/ Ending drücken,
wird das Gerät ein Intro spielen und anschließend zum normalen
Rhythmus zurückkehren.
• Wenn die Taste Sync nach dem Beginn des Rhythmus gedrückt wird, dann
wird das Gerät eine Endmelodie spielen und die Wiedergabe anschließend
stoppen.
12
DE
Fill in – Einfügen
• Durch Drücken der Taste Fill in, können Sie während der Wiedergabe des
Rhythmus jederzeit eine kleine Rhythmusvariation einfügen.
• Ab dem nächsten Takt wird der Rhythmus wieder normal wiedergegeben.
Accomp volume – Begleitlautstärke
• Es gibt 8 Stufen der Begleitlautstärke. Die voreingestellte
Begleitlautstärke ist 06.
• Durch Drücken der Tasten + oder - kann die Begleitlautstärke angepasst
werden. Die Lautstärke wird auf dem Bildschirm angezeigt.
• Drücken Sie gleichzeitig die Tasten + und -, um die voreingestellte
Begleitlautstärke wiederherzustellen.
AUTOMATISCHE BEGLEITUNG
Single Chord – Einzelakkord
• Drücken Sie zum Beginnen der automatischen Begleitung die Taste Start/
Stop.
• Drücken Sie anschließend die Taste Single Chord, um die
Einzelakkordbegleitung zu starten.
• Drücken Sie eine der 19 Tasten der linken Tastatur, um mit dem Rhythmus
zu beginnen.
• Wenn auf der linken Seite der Tastatur eine andere Taste gedrückt wird,
dann wird ein anderer Akkord ausgewählt, da die Taste, die gedrückt
wurde, immer den Ursprung des Akkords bestimmt.
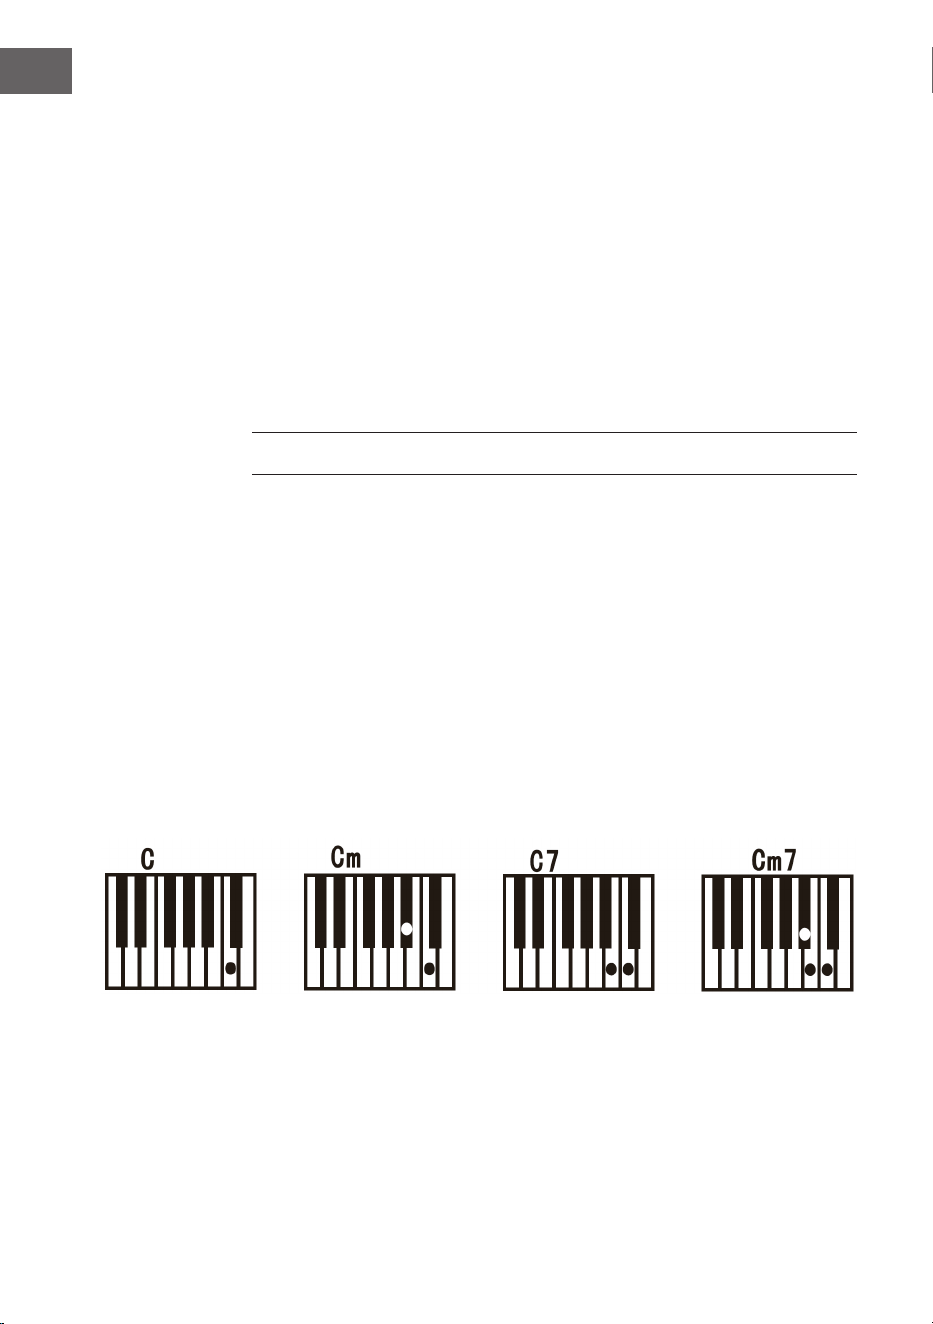
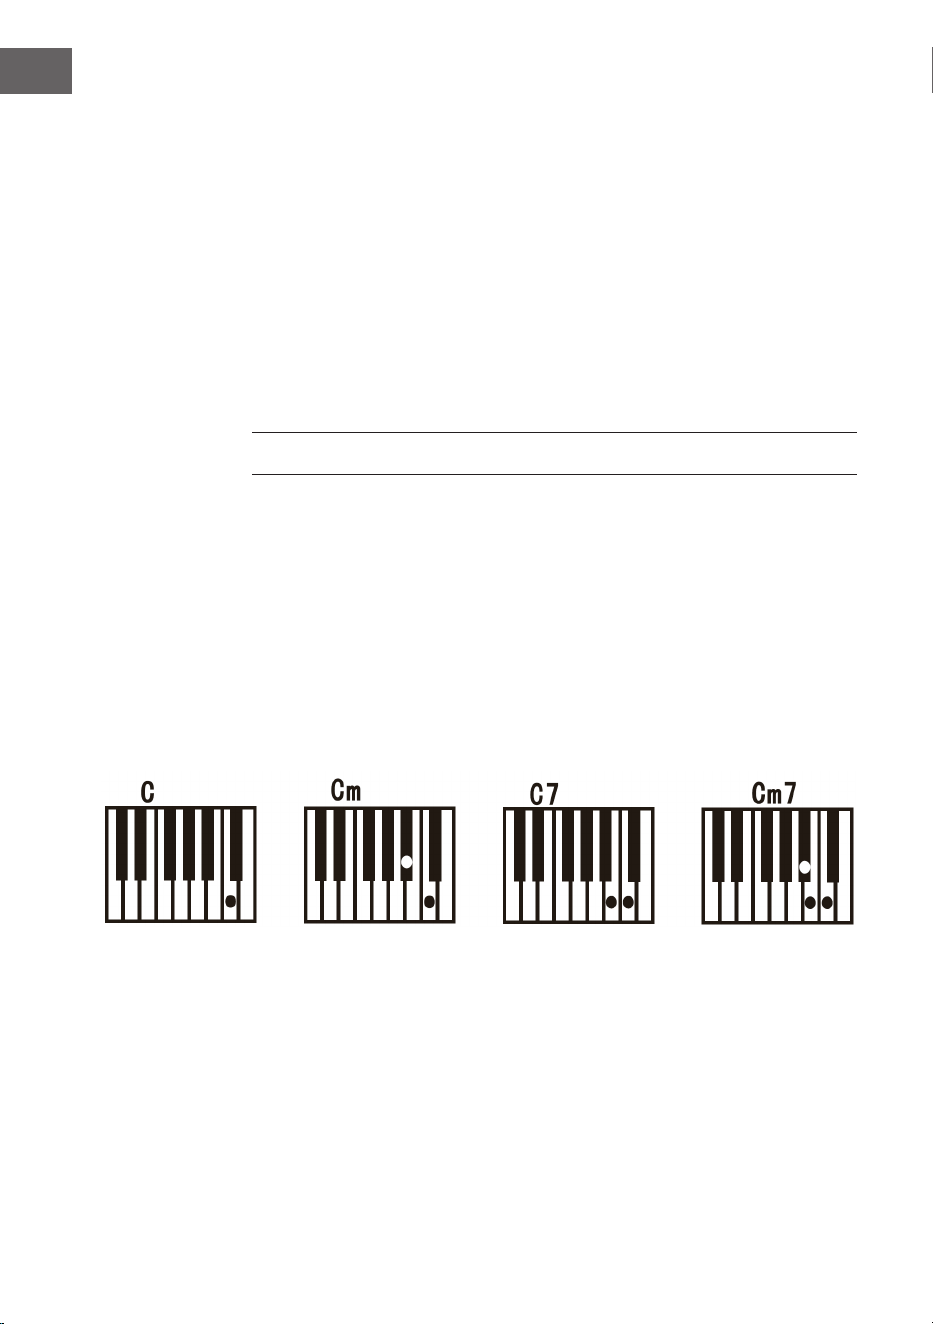
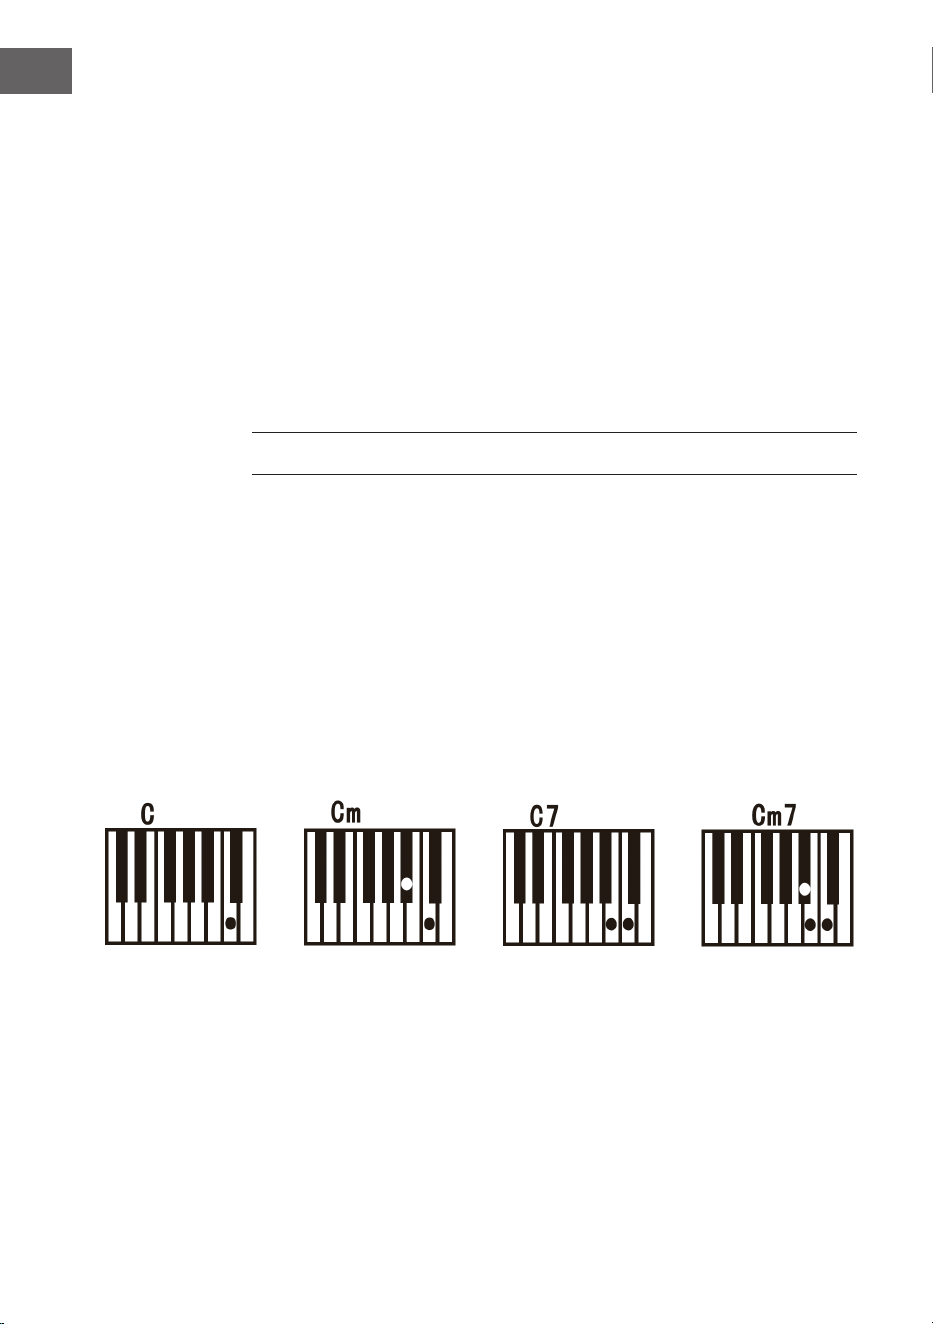
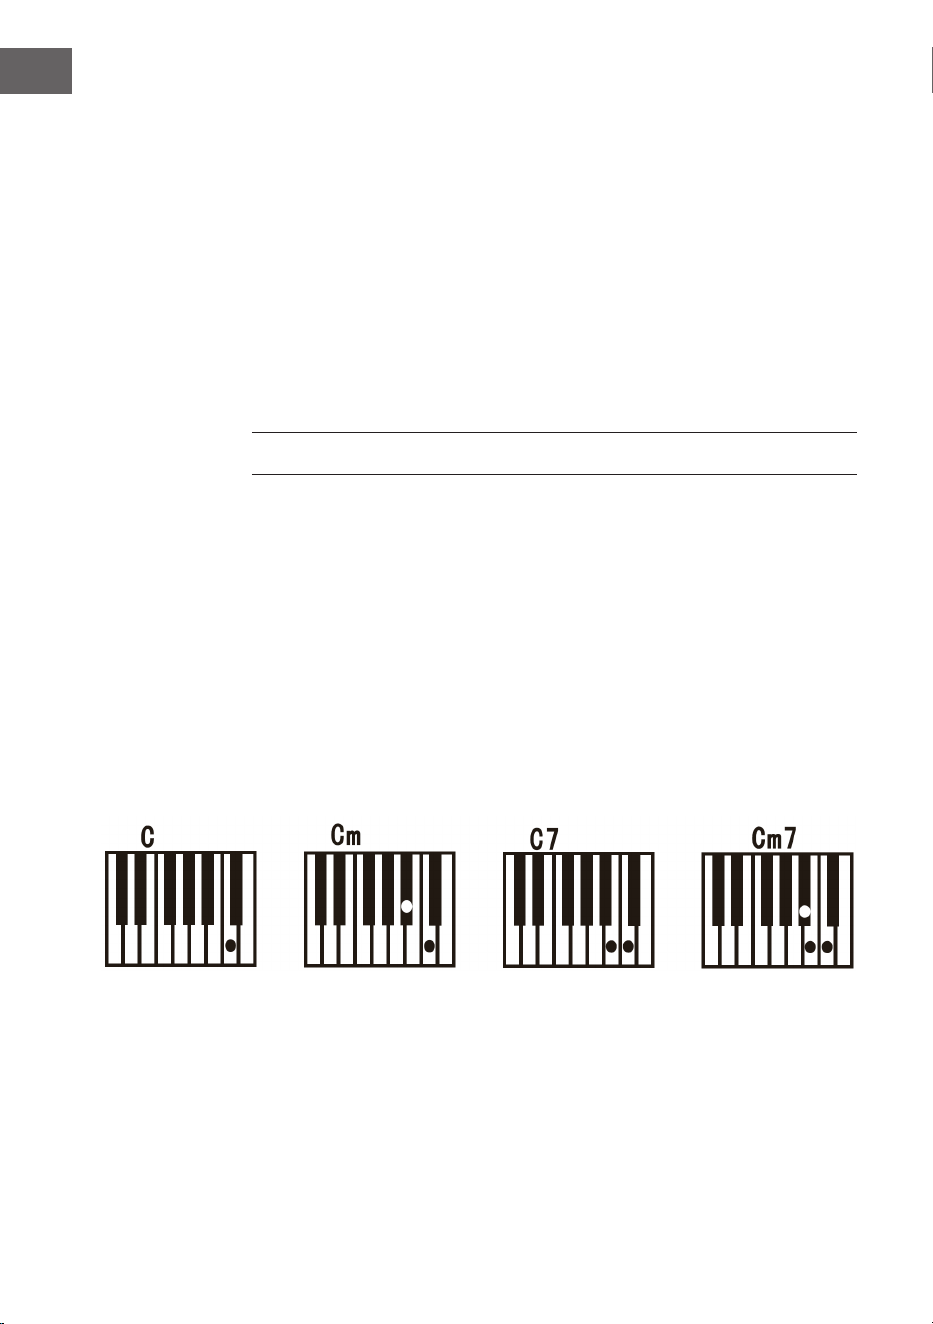
• Beziehen Sie sich auf die folgende Darstellung, wenn Sie im
Einzelngermodus die Akkorde „C“, „C-Moll“, „C-Dominantseptakkord“ und
„C-Moll-Septakkord“.
13
DE
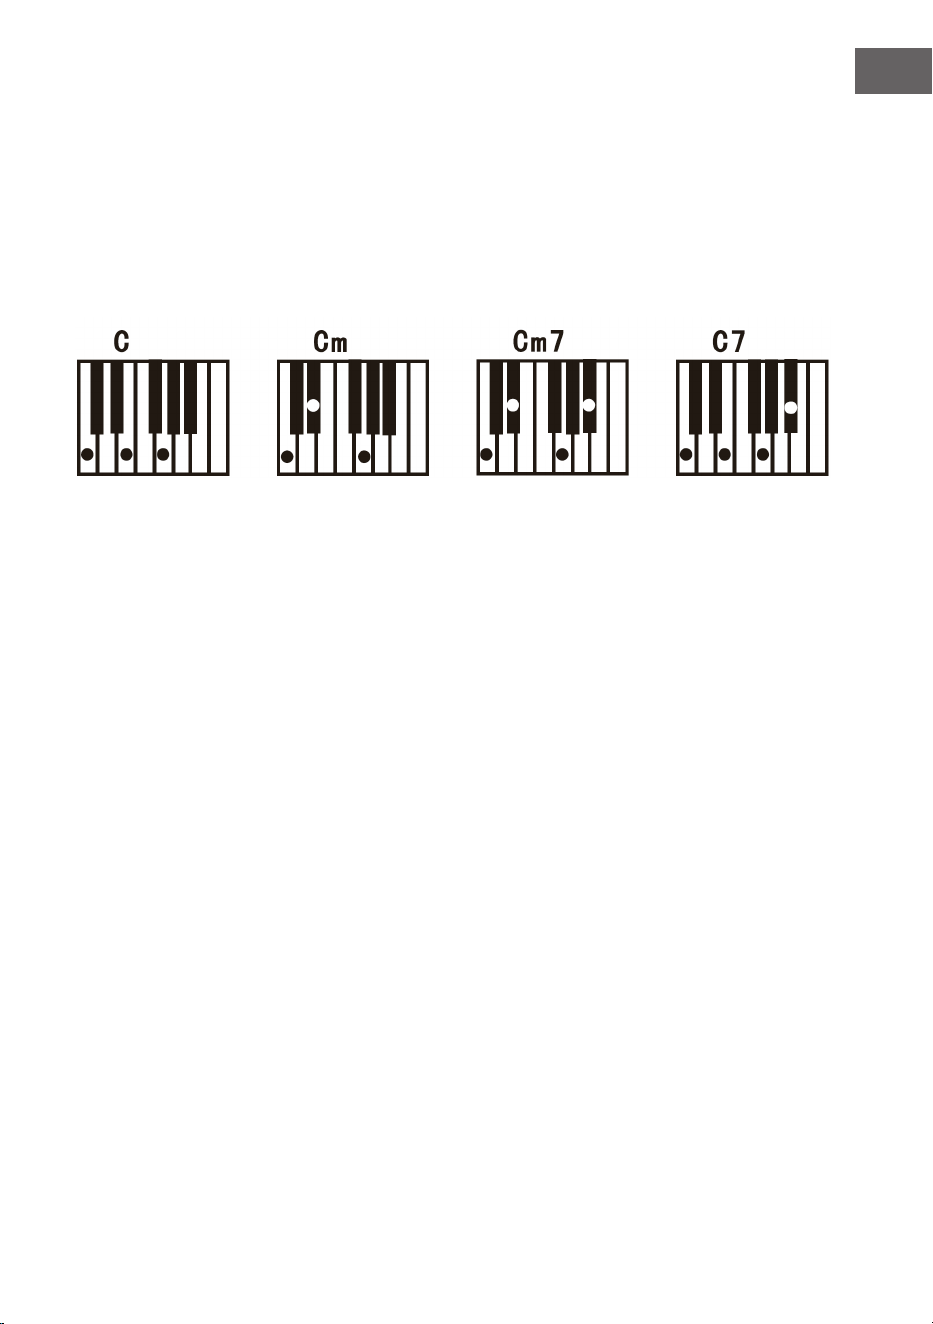
Fingered – Fingerbegleitung
• Drücken Sie zum Beginnen der automatischen Begleitung die Taste Start/
Stop.
• Drücken Sie anschließend die Taste Fingered, um die Fingerbegleitung zu
starten.
• Drücken Sie eine der 19 Tasten der linken Tastatur, um mit dem Rhythmus
zu beginnen.
• Drücken Sie zu Auswahl eines anderen Akkord eine andere Taste auf der
linken Seite der Tastatur.
• Sobald Sie im automatischen Begleitbereich der Tastatur einen Akkord
spielen, wird der Akkord gemeinsam mit dem Rhythmus automatisch
gespielt.
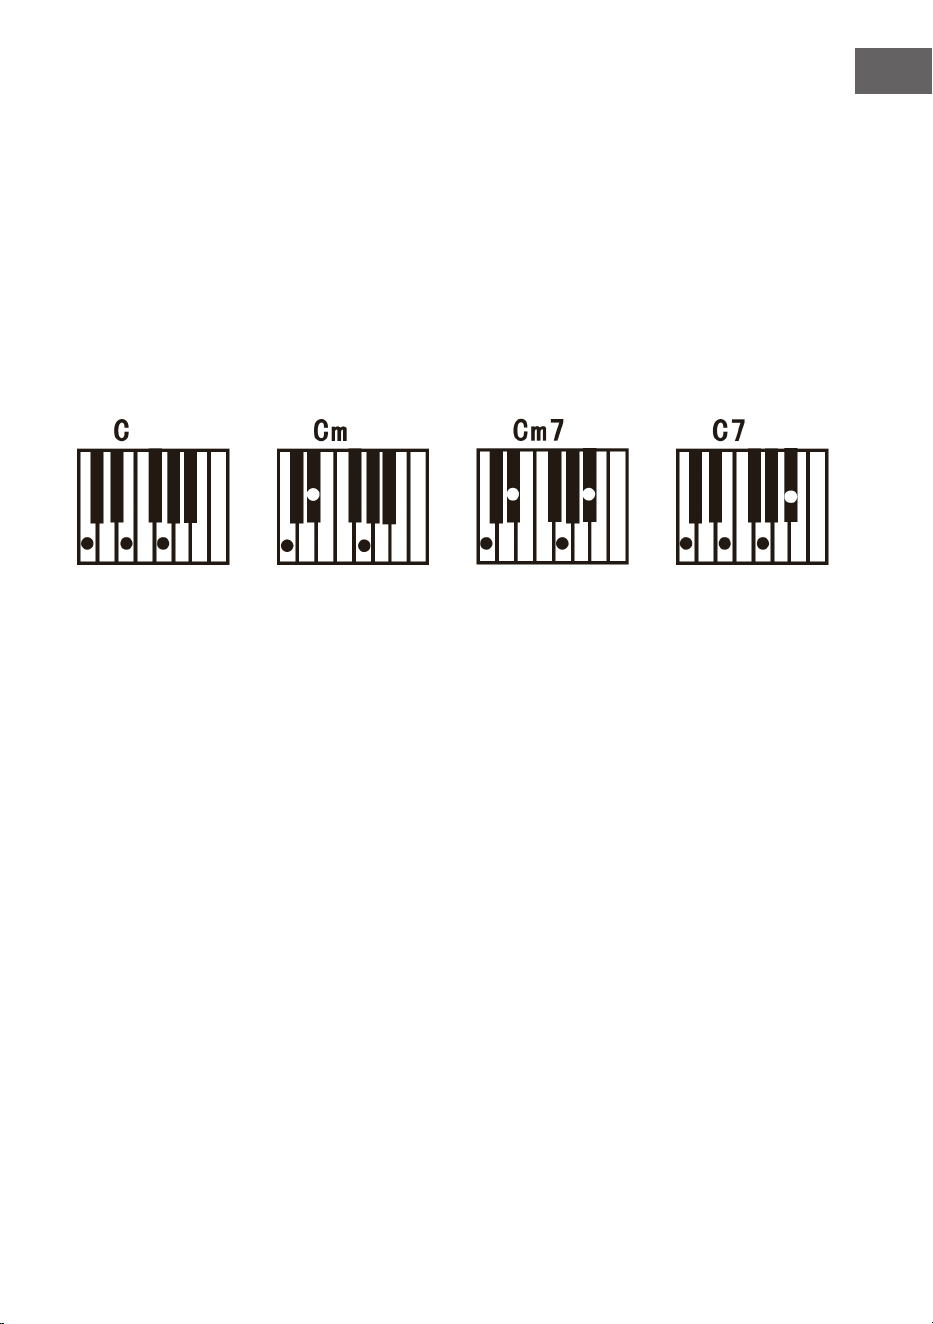
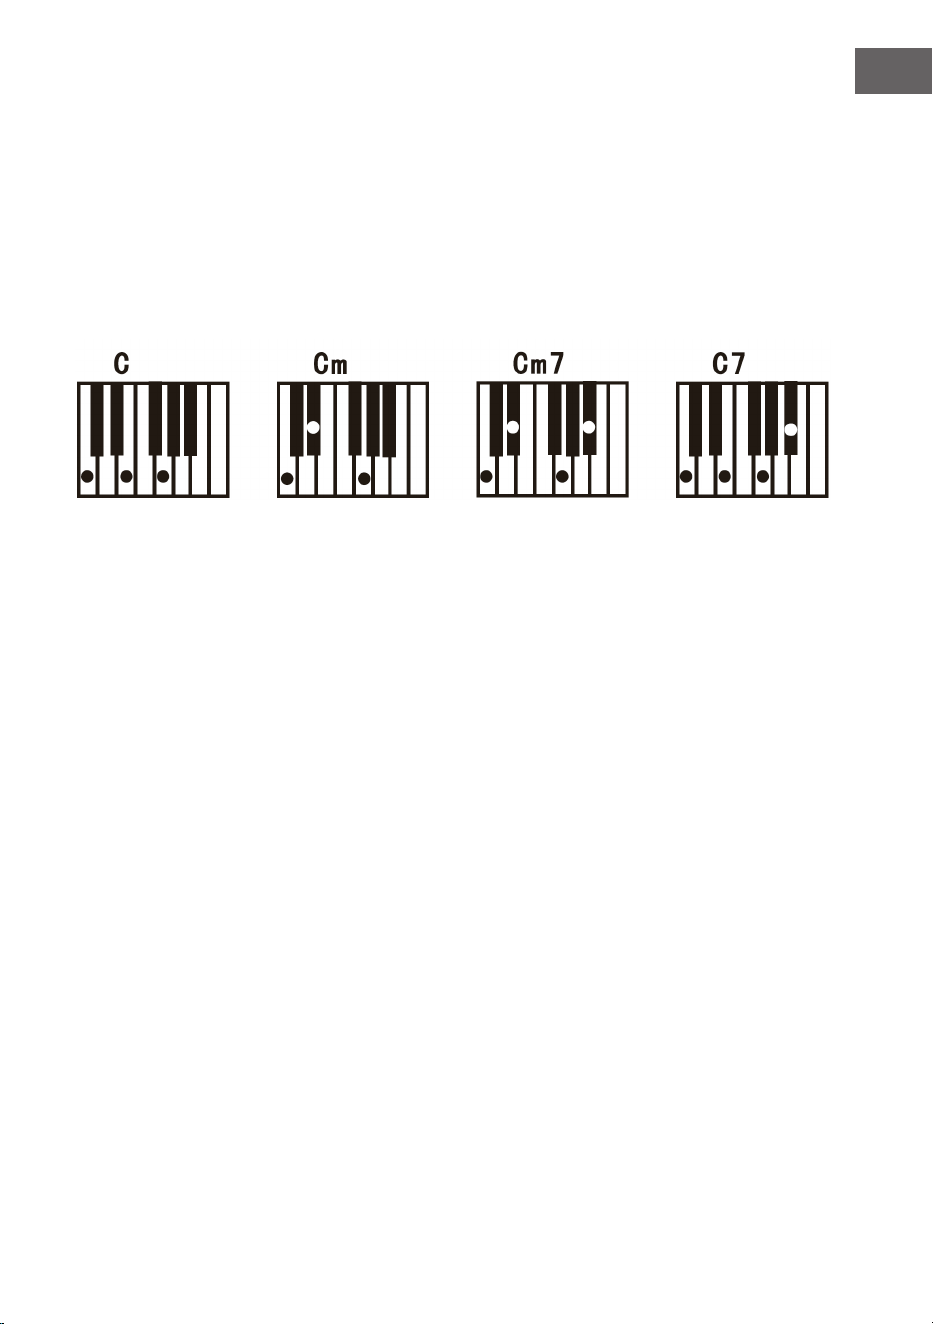
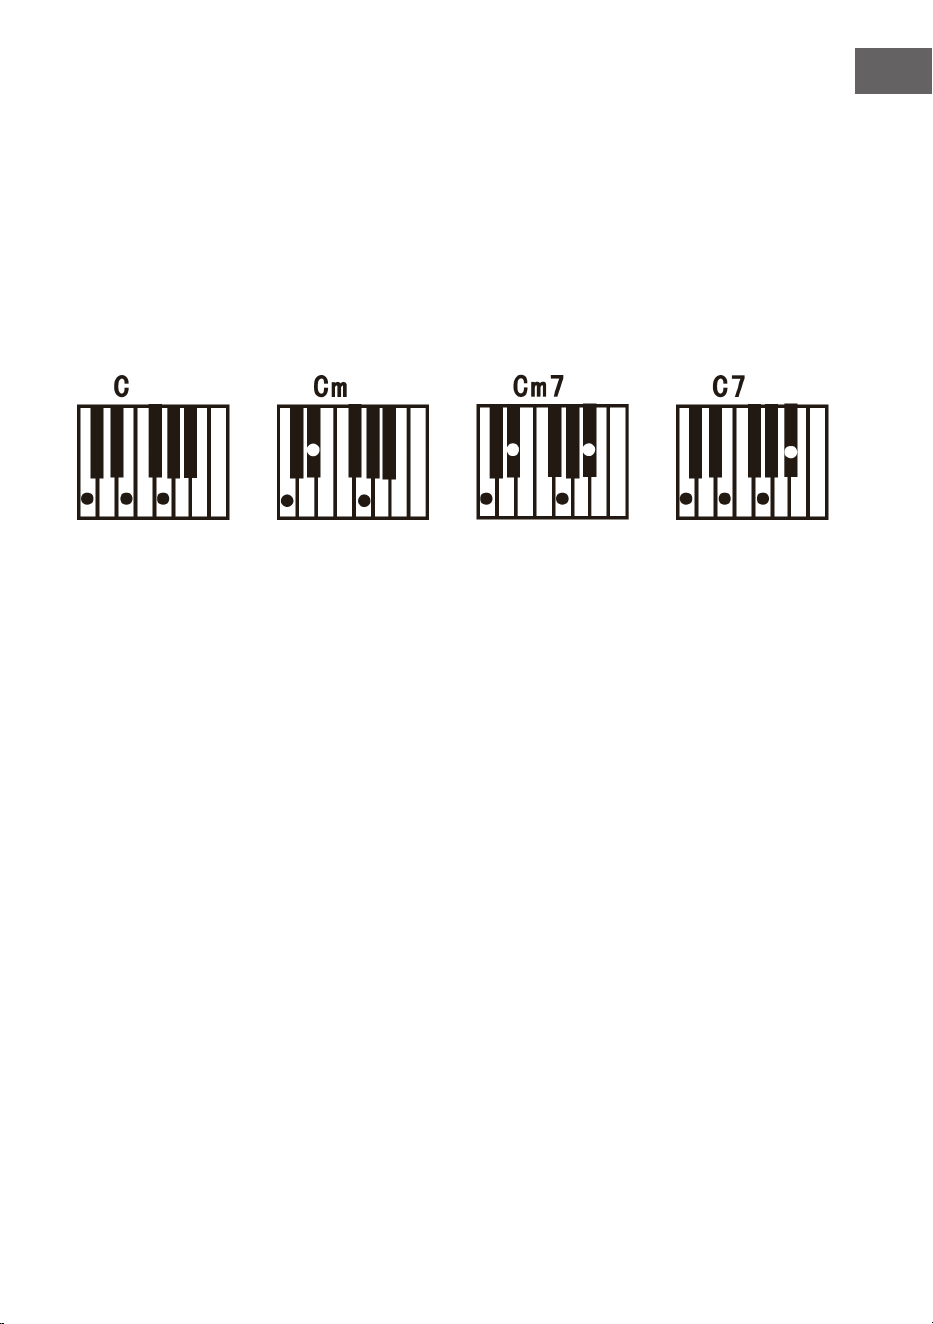
• Beziehen Sie sich hierfür auf die Darstellung zum Spielen der
verschiedenen Akkorde.
• Drücken Sie zum Beenden der Funktion erneut die Taste Start/Stop.
Chord Clear – Akkordauösung
Wenn Sie diese Taste drücken, wird die automatische Begleitung im
Akkordmodus beendet. Der Rhythmus wird weiterhin gespielt.
Recording – Aufnahme
• Drücken Sie die Taste Record, um den Aufnahmemodus zu aktivieren.
• Drücken Sie anschließend eine beliebige Taste auf der Tastatur oder
wählen Sie ein Klangprol aus, um
• die Aufnahme mit maximaler Lautstärke 08 zu starten. Die Ziffer wird auf
der Digitalanzeige angezeigt.
• Die Aufnahme wird automatisch gestoppt, wenn die maximal
Aufnahmezeit erreicht ist. Die Digitalanzeige zeigt dann „FUL“ an.
• Bei einer neuen Aufnahme werden alle vorherigen Aufnahmen
überschrieben und somit gelöscht.
• Drücken Sie die Taste Play, um Ihre Aufnahme abspielen zu lassen.
• Drücken Sie Aktivieren des Programmodus die Taste Program.

14
DE
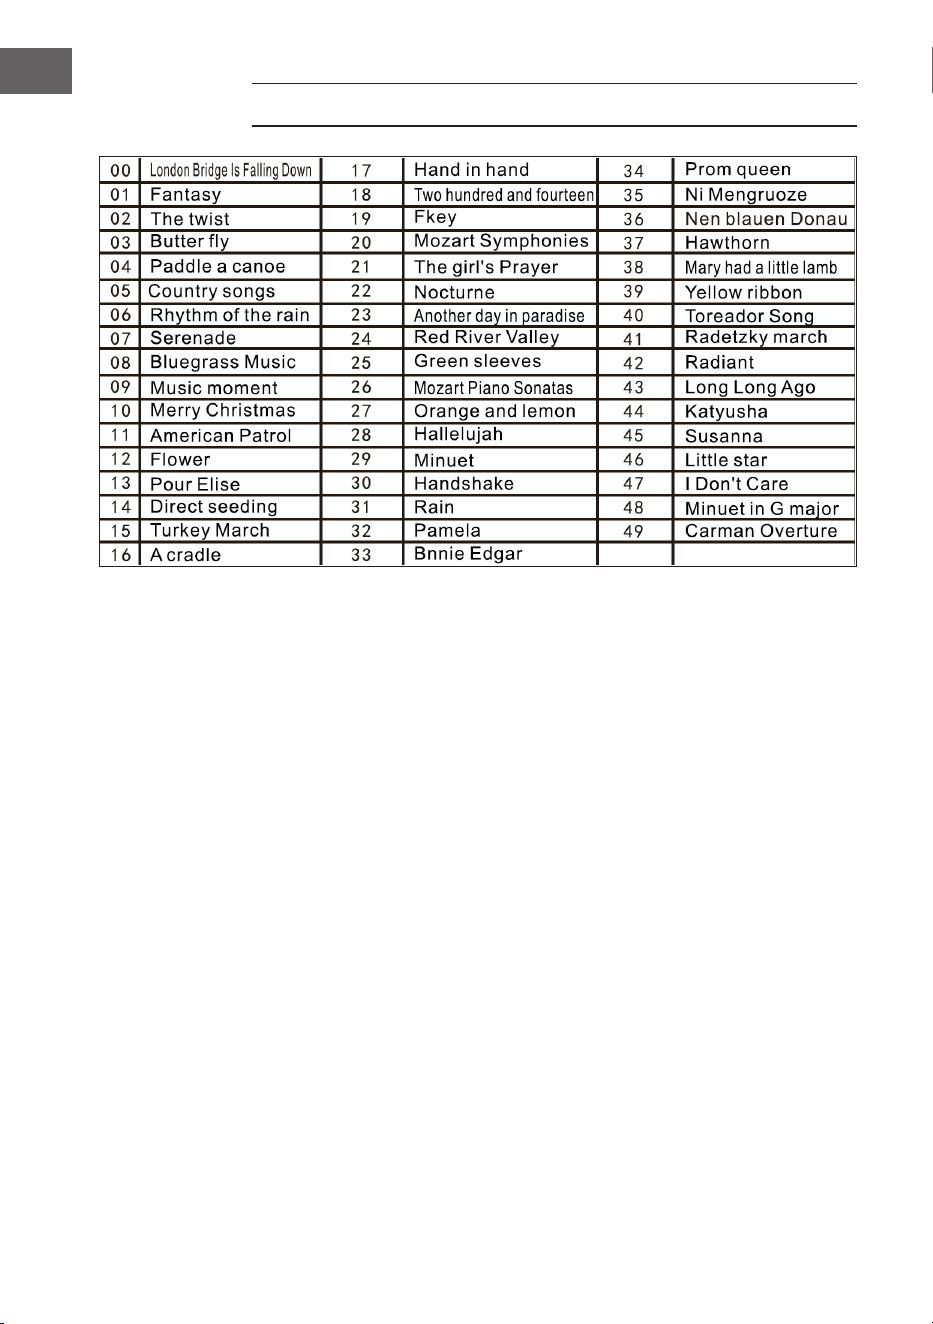
Demo
• Dieses Gerät verfügt über 50 Demoversionen. Siehe Demotabelle für
detaillierte Informationen.
• Drücken Sie die Taste Demo, um die aktuelle Demo abzuspielen.
• Wenn Sie die Taste Demo erneut drücken, wird die nächste Demo
abgespielt.
• Wählen Sie durch Drücken der Tasten + und - eine andere Demo aus.
Unterrichtsfunktion
• Drücken Sie die Taste One Key oder die Taste Follow, um zur
Unterrichtsfunktion zu gelangen.
• Drücken Sie die Tasten + und -, um ein anderes Lied zum Üben
auszuwählen.
• Drücken Sie die Taste One Key erneut, um die Funktion zu schließen.
Hinweis: Egal ob sie richtig oder falsch spielen, das Lied wird automatisch
durchgehend gespielt.
Follow
• Befolgen Sie den Angaben auf dem Bildschirm, um die Note korrekt zu
spielen.
• Die nächste zu spielende Note wird dann automatisch angezeigt.
REINIGUNG UND PFLEGE
Reinigen Sie das Äußere des Geräts mit einem trockenen und weichen
Tuch. Verwenden Sie zur äußeren Reinigung niemals ein in Farbe, Lack oder
organische oder chemische Lösungen getränktes Tuch.

15
DE
TABELLE DER INSTRUMENTE

16
DE
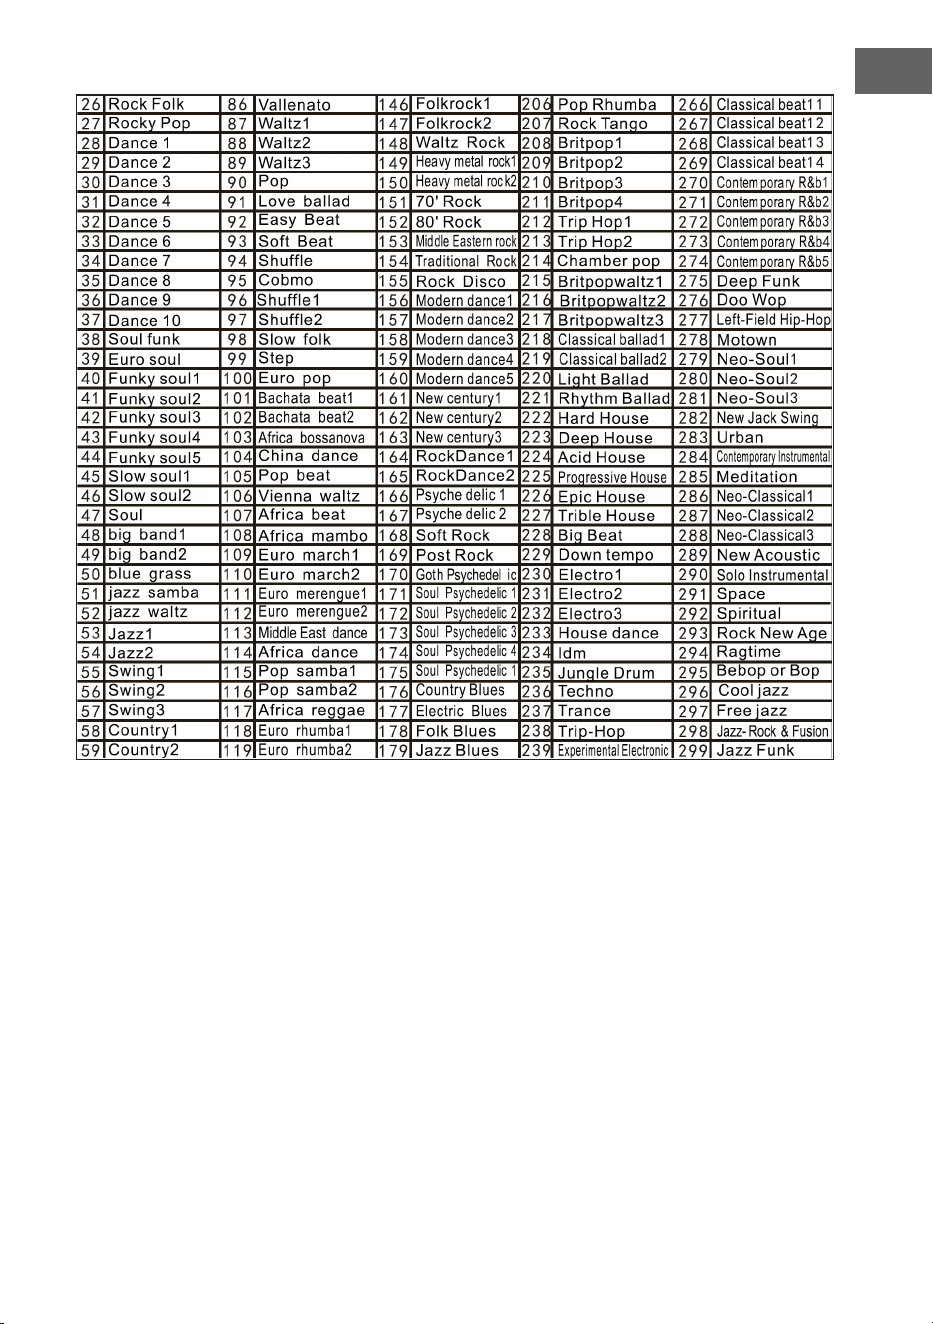
TABELLE DER RHYTHMEN
17
DE

18
DE
TABELLE DER DEMOS

19
DE
FEHLERBEHEBUNG
Problem Mögliche Ursache und Lösung
Ein Ton erklingt immer dann, wenn
das Gerät ein/ausgeschalten wird.
Dies ist normal und kein Grund zu
Besorgnis.
Wenn ich eine Taste drücke
erklingt kein Ton, obwohl das Gerät
eingeschaltet ist.
Überprüfen Sie, ob die Haupt-
und die Begleitlautstärke richtig
eingestellt wurden.
Das interne Lautsprechersystem
wird automatisch deaktiviert,
wenn Kopfhörer an das Gerät
angeschlossen wurden.
Der Ton ist gestört oder
unterbrochen.
Ein nicht geeigneter
Netzstromadapter könnte
angeschlossen sein oder die
Batterien sind leer und müssen
ersetzt werden.
Das Gerät ist abgestürzt.
Die gespielten Noten und die
Notenqualität sind leicht
unterschiedlich.
Dies ist normal.
Der Halleffekt ist bei der
Verwendung manchmal länger oder
kürzer einzeln eingestellt.
Dies ist normal. Der Halleffekt wird
für jede Taste vom Hersteller
Haupt- und Begleitlautstärke haben
sich verändert.
Überprüfen Sie, ob etwas an der
Toneinstellung verändert wurde.
Der Notenschlüssel verändert sich
während des Spielens.
Es könnte sein, dass Sie
versehentlich eine Taste der linken
Tastaturhälfte (linke 19 Tasten)
gedrückt haben.
20
DE
SPEZIELLE ENTSORGUNGSHINWEISE FÜR
VERBRAUCHER IN DEUTSCHLAND
Entsorgen Sie Ihre Altgeräte fachgerecht. Dadurch wird gewährleistet, dass
die Altgeräte umweltgerecht verwertet und negative Auswirkungen auf die
Umwelt und menschliche Gesundheit vermieden werden. Bei der Entsorgung
sind folgende Regeln zu beachten:
• Jeder Verbraucher ist gesetzlich verpichtet, Elektro- und
Elektronikaltgeräte (Altgeräte) sowie Batterien und Akkus
getrennt vom Hausmüll zu entsorgen. Sie erkennen die
entsprechenden Altgeräte durch folgendes Symbol der
durchgestrichene Mülltonne (WEEE-Symbol).
• Sie haben Altbatterien und Altakkumulatoren, die nicht vom Altgerät
umschlossen sind, sowie Lampen, die zerstörungsfrei aus dem Altgerät
entnommen werden können, vor der Abgabe an einer Entsorgungsstelle
vom Altgerät zerstörungsfrei zu trennen.
• Bestimmte Lampen und Leuchtmittel fallen ebenso unter das Elektro- und
Elektronikgesetz und sind dementsprechend wie Altgeräte zu behandeln.
Ausgenommen sind Glühbirnen und Halogenlampen. Entsorgen Sie
Glühbirnen und Halogenlampen bitte über den Hausmüll, sofern sie nicht
das WEEE-Symbol tragen.
• Jeder Verbraucher ist für das Löschen von personenbezogenen Daten auf
dem Elektro- bzw. Elektronikgerät selbst verantwortlich.
Rücknahmepicht der Vertreiber
Vertreiber mit einer Verkaufsäche für Elektro- und Elektronikgeräte von
mindestens 400 Quadratmetern sowie Vertreiber von Lebensmitteln mit einer
Gesamtverkaufsäche von mindestens 800 Quadratmetern, die mehrmals im
Kalenderjahr oder dauerhaft Elektro- und Elektronikgeräte anbieten und auf
dem Markt bereitstellen, sind verpichtet,
1. bei der Abgabe eines neuen Elektro- oder Elektronikgerätes an einen
Endnutzer ein Altgerät des Endnutzers der gleichen Geräteart, das
im Wesentlichen die gleichen Funktionen wie das neue Gerät erfüllt,
am Ort der Abgabe oder in unmittelbarer Nähe hierzu unentgeltlich
zurückzunehmen und
2. auf Verlangen des Endnutzers Altgeräte, die in keiner äußeren
Abmessung größer als 25 Zentimeter sind, im Einzelhandelsgeschäft
oder in unmittelbarer Nähe hierzu unentgeltlich zurückzunehmen; die
Rücknahme darf nicht an den Kauf eines Elektro- oder Elektronikgerätes
geknüpft werden und ist auf drei Altgeräte pro Geräteart beschränkt.

21
DE
• Bei einem Vertrieb unter Verwendung von Fernkommunikationsmitteln
ist die unentgeltliche Abholung am Ort der Abgabe auf Elektro- und
Elektronikgeräte der Kategorien 1, 2 und 4 gemäß § 2 Abs. 1 ElektroG,
nämlich „Wärmeüberträger“, „Bildschirmgeräte“ (Oberäche von mehr
als 100 cm²) oder „Großgeräte“ (letztere mit mindestens einer äußeren
Abmessung über 50 Zentimeter) beschränkt. Für andere Elektro- und
Elektronikgeräte (Kategorien 3, 5, 6) ist eine Rückgabemöglichkeit in
zumutbarer Entfernung zum jeweiligen Endnutzer zu gewährleisten.
• Altgeräte dürfen kostenlos auf dem lokalen Wertstoffhof oder in
folgenden Sammelstellen in Ihrer Nähe abgegeben werden: www.take-e-
back.de
• Für Elektro- und Elektronikgeräte der Kategorien 1, 2 und 4 bieten
wir auch die Möglichkeit einer unentgeltlichen Abholung am Ort der
Abgabe. Beim Kauf eines Neugeräts haben Sie die Möglichkeit, eine
Altgerätabholung über die Webseite auszuwählen.
• Batterien können überall dort kostenfrei zurückgegeben werden, wo sie
verkauft werden (z. B. Super-, Bau-, Drogeriemarkt). Auch Wertstoff- und
Recyclinghöfe nehmen Batterien zurück. Sie können Batterien auch per
Post an uns zurücksenden. Altbatterien in haushaltsüblichen Mengen
können Sie direkt bei uns von Montag bis Freitag zwischen 08:00 und
16:00 Uhr unter der folgenden Adresse unentgeltlich zurückgeben:
Chal-Tec Fulllment GmbH
Norddeutschlandstr. 3
47475 Kamp-Lintfort
• Wichtig zu beachten ist, dass Lithiumbatterien aus Sicherheitsgründen
vor der Rückgabe gegen Kurzschluss gesichert werden müssen (z. B. durch
Abkleben der Pole).
• Finden sich unter der durchgestrichenen Mülltonne auf der Batterie
zusätzlich die Zeichen Cd, Hg oder Pb ist das ein Hinweis darauf, dass die
Batterie gefährliche Schadstoffe enthält. (»Cd« steht für Cadmium, »Pb«
für Blei und »Hg« für Quecksilber).
Hinweis zur Abfallvermeidung
Indem Sie die Lebensdauer Ihrer Altgeräte verlängern, tragen Sie dazu bei,
Ressourcen efzient zu nutzen und zusätzlichen Müll zu vermeiden. Die
Lebensdauer Ihrer Altgeräte können Sie verlängern, indem Sie defekte
Altgeräte reparieren lassen. Wenn sich Ihr Altgerät in gutem Zustand bendet,
könnten Sie es spenden, verschenken oder verkaufen.

22
DE
HINWEISE ZUR ENTSORGUNG
Wenn es in Ihrem Land eine gesetzliche Regelung
zur Entsorgung von elektrischen und elektronischen
Geräten gibt, weist dieses Symbol auf dem Produkt
oder auf der Verpackung darauf hin, dass dieses
Produkt nicht im Hausmüll entsorgt werden darf.
Stattdessen muss es zu einer Sammelstelle für das
Recycling von elektrischen und elektronischen Geräten
gebracht werden. Durch regelkonforme Entsorgung
schützen Sie die Umwelt und die Gesundheit
Ihrer Mitmenschen vor negativen Konsequenzen.
Informationen zum Recycling und zur Entsorgung
dieses Produkts, erhalten Sie von Ihrer örtlichen
Verwaltung oder Ihrem Hausmüllentsorgungsdienst.
Dieses Produkt enthält Batterien. Wenn es in Ihrem
Land eine gesetzliche Regelung zur Entsorgung von
Batterien gibt, dürfen die Batterien nicht im Hausmüll
entsorgt werden. Informieren Sie sich über die
örtlichen Bestimmungen zur Entsorgung von Batterien.
Durch regelkonforme Entsorgung schützen Sie die
Umwelt und die Gesundheit Ihrer Mitmenschen vor
negativen Konsequenzen.
HERSTELLER & IMPORTEUR (UK)
Hersteller:
Chal-Tec GmbH, Wallstraße 16, 10179 Berlin, Deutschland.
Importeur für Großbritannien:
Berlin Brands Group UK Limited
PO Box 42
272 Kensington High Street
London, W8 6ND
United Kingdom

23
EN
Dear customer,
Congratulations on the purchase of your device.
Please read the following instructions carefully and
follow them to prevent potential damage. We accept
no liability for damage caused by disregarding the
instructions and improper use. Please scan the QR code
to access the latest operating instructions and further
information about the product.
CONTENTS
Technical Data 24
Safety Instructions 25
Buttons and Connections 26
Before Use 27
Operation 28
Effect and Control 29
Rhythm Accompaniment and its Functions 31
Automatic Accompaniment 32
Cleaning and Care 34
Table of Instruments 35
Table of Rhythms 36
Table of Demos 38
Troubleshooting 39
Disposal Considerations 40
Manufacturer & Importer (UK) 40
24
EN
TECHNICAL DATA
Article number 10033244, 10033245
Keyboard 61-key standard piano keyboard
Display LED display
Sounds 300 different sounds
Rhythms 300 different accompaniments
Demo 50 demo songs
Drums 8 drums
Effects Sustain, vibrato, offset
Recording Recording, playback
Programming Rhythm programming function
Accompaniment Start/stop, synchronise, ll, speed
Chord Single nger, ngers
Learning function Demo songs, guide
Other On/off switch, overall volume,
accompaniment volume
External connections Power connector, headphone
output, audio output L/R
Power supply unit AC 220 V, DC 9 V
DC voltage input DC 9 V

25
EN
SAFETY INSTRUCTIONS
• Read the user manual carefully before using the device to avoid damage to
property and/or personal injury.
• Only connect the device to an electrical outlet using the provided AC
adapter. Using other power adapters could damage your device.
• Never open the case of the instrument.
• Do not attempt to disassemble the device or replace any internal parts
yourself. If malfunctions occur during use, stop using the device and
contact customer service.
• Do not place the device in places subject to extreme dust, vibration, low
or high temperatures (such as places exposed to direct sunlight or near
heat sources), as this may damage both the external appearance and the
internal components of the device.
• Never place the device on an unstable or uneven surface, as this could
cause it to tip over or fall and become damaged.
• Never place containers lled with liquid on the device, as they could fall
over and the liquid could get inside the device.
• Before turning on the device, turn the volume down to 0. Then gradually
adjust the volume to avoid damaging the speakers.
• To avoid hearing loss from playing, never turn the volume up to
"maximum".
• Never use extreme force against the device, keys, power button, or
connectors, or place heavy objects on the device.
• The device must be unpacked by an adult as the packaging materials
present a choking hazard for babies and small children. Store the plastic
packaging in a safe place or dispose of it properly.
• The small components inside may pose a hazard to children under 3 years
of age and are not suitable for them.
• The technical characteristics of the device are subject to change without
prior notice.
• This device can be used in all climates except tropical climates.
• The device can only be used in areas below 2000 metres above sea level.
• Be careful not to drop or splash water on the power plug or power cord.
26
EN
BUTTONS AND CONNECTIONS
1 Power - on and off button 8
Start / Stop / Sync / Intro /
Ending / Fill in / Metronome
2
Master volume / Tempo /
Accomp volume / Transpose
9 Panel percussion
3
Single chord / Fingered /
Chord clear
10 Sustain / Vibrato / Split
4 LED digital display 11 One key / Follow
5 Voice / Rhythm / Demo 12 Auto chord
6
Record / Play / Program /
Keyboard perc
13 Speakers
7
Digital numbers 1-9/ +/-
button
27
EN
Connections on the back
1. 9V power supply connection
2. Microphone output
3. Headphone connection
BEFORE USE
Using the AC adapter
• Only use the supplied DC 9 V mains power adapter, which has an output
power of 500 mA and a central anode plug.
• Plug the DC power connector into the DC ) V port on the back of the unit
and plug the power cord into a power outlet.
Note: The input power of the AC adapter must conform to the power of the
outlet. Then press the power button to use the device.
If you will not be using the device for a long period of time, turn off the
power and unplug the power cord from the outlet to avoid damage caused by
sustained power connection.
Using batteries (not included in delivery)
• Open the battery compartment on the underside of your instrument's
control panel.
• Insert eight LR-20 size 1.5 V batteries into the battery compartment. Note
the polarity mark on the housing.
• Replace the battery compartment cover and make sure it is securely
closed.

28
EN
Important note on the use of batteries
• If some batteries are dead, replace all 8 at once to avoid using different
types of batteries at the same time.
• Never mix old and new batteries.
• If battery acid leaks out, clean the battery compartment completely before
inserting new batteries.
• Remove all batteries from the battery compartment if you will not be using
the device for a long period of time. This can prevent the battery acid from
leaking into the battery compartment.
Connecting a microphone
A standard microphone (3.5 mm) can be connected to the microphone
connector with a cable.
Using headphones
• Standard headphones can be connected to the unit via the headphone jack
for silent or late night playing.
• The internal speakers are automatically muted when headphones are
connected to the headphone jack.
Note: Microphone, connection cable and headphones are not included in
the scope of delivery and must be purchased separately.
OPERATION
Switching on
• Press the on/off button to switch on the device
• Press the button again to turn off the device after connecting an AC power
cord or replacing the batteries.
Main volume
• The device has 9 volume levels from 00 to 08. The default volume is 07.
• The volume can be adjusted by pressing the + and - buttons.
• If you press and hold the + and - buttons at the same time, the volume will
automatically reset to the preset value.

29
EN
Sounds
• This device has 300 different sounds. The default sound for the instrument
is
• "Voice".
• Press the Voice button if the device is not in sound mode.
• Select one of 300 sounds from the sound table.
• Then enter the corresponding number on the numeric keypad or press the
+ or - buttons to change the currently entered sound number.
EFFECT AND CONTROL
Keystroke
If you press the Keyboard perc button, a different instrument will sound when
you play the keyboard. The keyboard can be restored to its original state by
pressing the "Keyboard perc" button again.
Sustain
If you press the Sustain button once, the notes played on the keyboard will
reverberate a little. Pressing the button again turns off the effect.
Vibrato
• Press the Vibrato button to activate the vibrato effect.
• The vibrato effect is produced by pressing the black and white keys.
Split
• Press the Split button to split the keyboard into left and right keyboards.
• The 24 keys on the left are mapped to the left keyboard and the 24 keys on
the right are mapped to the right keyboard.
• The key of the right keyboard can be selected by pressing the number keys.
• The key of the left keyboard is initially determined by the manufacturer.
• Press the Split button again to stop splitting the keyboard.
30
EN
Tempo
• Press the tempo button and increase the tempo for the rhythm,
metronome and demo song by pressing the + and - buttons.
• There are 210 different speed settings ranging from 30 to 240 beats per
minute.
• Press the + and - buttons simultaneously to return to the default value of
120 beats per minute.
Transpose
• Press the Transpose button and increase or decrease the transpose
value by 6 steps at a time and shift the pitch of the keyboard in semitone
intervals by pressing the + or - buttons.
• Press and hold the + and - buttons at the same time to return to the
factory setting.
Metronome
• Press the Metronome button. The time signature will be displayed.
• Choose from 4 options a 1/4, 2/4, 3/4, or 4/4 bar by repeatedly pressing
the button.
Top panel percussion
Select and press one of the 8 keys according to the list below (a total of 8 types
of percussion are available for this instrument) to produce the percussion as
you play.
Panel percussion list

31
EN
RHYTHM ACCOMPANIMENT AND ITS
FUNCTIONS
Rhythm selection
To start, press the Rhythm button and select an accompaniment from 0 – 299
(see table) by pressing the appropriate number or the + and - buttons.
Start / stop
To start, press the Start / stop button and select an accompaniment from 0 –
299 (see table) by pressing the appropriate number or the + and - buttons.
Sync
• To start the sync effect, press the Sync button and for the rhythm, press
any of the remaining 19 keys while playing.
• In this case, when you play, if one of the left 19 keys is pressed, the
automatic chord function will be activated and the chord effect will start.
• To stop the rhythm effect, press the Sync button and start the sync effect
when the rhythm is played.
• If you press the Sync button while the sync effect is active, it will stop.
Intro / end
• If you press the Intro / ending button before starting the rhythm, the unit
will play an intro and then return to the normal rhythm.
• If the Sync button is pressed after the rhythm has started, the unit will play
an ending melody and then stop playing.
32
EN
Fill in
• You can insert a small rhythm variation at any time while the rhythm is
playing by pressing the Fill in button.
• From the next measure, the rhythm will play normally again.
Accomp volume
• There are 8 levels of accompaniment volume. The default accompaniment
volume is 06.
• The accompaniment volume can be adjusted by pressing the + or - buttons.
The volume is displayed on the screen.
• Simultaneously press the + and - buttons to restore the default
accompaniment volume.
AUTOMATIC ACCOMPANIMENT
Single chord
• To start the auto accompaniment, press the Start / stop button.
• Then press the Single chord button to start single chord accompaniment.
• Press any of the 19 keys on the left keyboard to start the rhythm.
• If another key is pressed on the left side of the keyboard, then a different
chord will be selected since the key that was pressed always determines
the origin of the chord.
• Refer to the illustration below when playing the chords “C”, “C minor”, “C
dominant seventh chord” and “C minor seventh chord” in single nger
mode.
33
EN
Fingered
• To start the auto accompaniment, press the Start / stop button.
• Then press the Fingered button to start nger accompaniment.
• Press any of the 19 keys on the left keyboard to start the rhythm.
• To select a different chord, press a different key on the left side of the
keyboard.
• As soon as you play a chord in the auto accompaniment section of the
keyboard, the chord will play along with the rhythm automatically.
• Refer to the illustration for playing different chords.
• To end the function, press the Start / stop button again.
Chord clear
When you press this button, auto accompaniment stops in chord mode. The
rhythm continues to play.
Recording
• Press the Record button to activate the recording mode.
• Then press any key on the keyboard or select a sound prole to
• start recording at maximum volume 08. The number is shown on the
digital display.
• Recording will stop automatically when the maximum recording time is
reached. The digital display will then show “FUL”.
• When a new recording is made, all previous recordings are overwritten
and thus deleted.
• Press the Play button to play your recording.
• To enter programme mode, press the Program button.

34
EN
Demo
• This device has 50 demo versions. See the demo table for detailed
information.
• Press the Demo button to play the current demo.
• If you press the Demo button again, the next demo will be played.
• Select another demo by pressing the + and - buttons.
Lesson function
• Press the One key button or the Follow button to go to the lesson function.
• Press the + and - buttons to choose another song to practice on.
• Press the One key button again to close the function.
Note: Whether you play correctly or incorrectly, the song will
automatically play through.
Follow
• Follow the on-screen instructions to play the note correctly.
• The next note to be played is then automatically displayed.
CLEANING AND CARE
Clean the outside of the device with a dry and soft cloth. Never use a cloth
soaked in paint, varnish or organic or chemical solutions to clean the outside.

35
EN
TABLE OF INSTRUMENTS

36
EN
TABLE OF RHYTHMS

37
EN
38
EN
TABLE OF DEMOS

39
EN
TROUBLESHOOTING
Problem Possible cause and solution
A tone can be heard whenever the
device is turned on/off.
This is normal and no cause for
concern.
When I press a key, there is no sound
even though the device is switched
on.
Check that the main and
accompaniment volumes are set
correctly.
The internal speaker system is
automatically disabled when
headphones are connected to the
device.
The sound is distorted or
interrupted.
An unsuitable mains adapter may be
connected or the batteries are dead
and need to be replaced.
The device has crashed.
The notes played and the note
quality are slightly
different.
This is normal.
The reverb effect is sometimes set
longer or shorter individually when
used.
This is normal. The reverb effect for
each key is set by the manufacturer.
Main and accompaniment volume
have changed.
Check if something has changed in
the sound setting.
The clef changes as you play. You may have accidentally pressed a
key on the left half of the keyboard
(left 19 keys).

40
EN
DISPOSAL CONSIDERATIONS
If there is a legal regulation in your country regarding
the disposal of electrical and electronic equipment,
this symbol on the product or on the packaging
indicates that this product must not be disposed of
with household waste. Instead, it must be taken to
a collection point for the recycling of electrical and
electronic equipment. By disposing of this product
in accordance with the regulations, you protect the
environment and the health of those around you from
negative consequences. For information on recycling
and disposal of this product, contact your local
government or household waste disposal service.
This product contains batteries. If there is a legal
regulation in your country regarding the disposal of
batteries, the batteries must not be disposed of in
household waste. Consult your local regulations for
the disposal of batteries. By disposing of this product
in accordance with the regulations, you protect the
environment and the health of those around you from
negative consequences.
MANUFACTURER & IMPORTER (UK)
Manufacturer:
Chal-Tec GmbH, Wallstrasse 16, 10179 Berlin, Germany.
Importer for Great Britain:
Berlin Brands Group UK Limited
PO Box 42
272 Kensington High Street
London, W8 6ND
United Kingdom

41
ES
Estimado cliente:
Le felicitamos por la adquisición de este producto. Lea
atentamente el siguiente manual y siga cuidadosamente
las instrucciones de uso con el n de evitar posibles
daños. La empresa no se responsabiliza de los daños
ocasionados por un uso indebido del producto o por
haber desatendido las indicaciones de seguridad.
Escanee el siguiente código QR para obtener acceso al
manual de usuario más reciente e información adicional
sobre el producto.
ÍNDICE
Datos técnicos 42
Indicaciones de seguridad 43
Teclas y conexiones 44
Antes del primer uso 45
Funcionamiento 46
Efectos y controles 47
El acompañamiento rítmico y sus funciones 49
Acompañamiento automático 50
Limpieza y cuidado 52
Tabla de instrumentos 53
Tabla de ritmos 54
Tabla de demos 56
Reparación de anomalías 57
Indicaciones sobre la retirada del aparato 58
Fabricante e importador (Reino Unido) 58

42
ES
DATOS TÉCNICOS
Número del artículo 10033244, 10033245
Teclado 61 teclas estándar de teclado de
piano
Indicador Indicador LED
Tonos 300 sonidos diferentes
Ritmos 300 acompañamientos diferentes
Demo 50 canciones de demostración
Batería 8 Baterías
Efectos Sostenido, vibrato, compás
Grabación Grabación, reproducción
Programación Función de programación de ritmo
Acompañamiento Inicio/n, sincronización, relleno,
velocidad
Acorde Un dedo, dedo
Función de aprendizaje Demo, línea
Otros Botón encender/apagar, volumen
total, volumen acompañamiento
Conexiones externas Conexión de alimentación, Salida de
auriculares, Salida audio L/R
Fuente de alimentación AC 220 V, DC 9 V
Tensión de entrada DC DC 9 V

43
ES
INDICACIONES DE SEGURIDAD
• Lea atentamente el manual de instrucciones antes de utilizar el aparato
para evitar daños personales y/o materiales.
• Conecte el aparato solamente a una toma de corriente con la fuente de
alimentación incluida en el envío. Si utiliza otras fuentes de alimentación
podría averiar el aparato.
• En ningún caso abra la carcasa del instrumento.
• No intente desmontar el aparato ni sustituir piezas del interior por
su cuenta. Si durante su uso aparecen fallos en las funciones, cese la
utilización y contacte con el servicio de atención al cliente.
• No coloque el aparato en zonas donde exista demasiado polvo,
vibraciones, temperaturas muy elevadas o muy bajas (como sitios con
incidencia directa del sol, cerca de fuentes de calor), pues tanto la
apariencia exterior como los componentes internos del aparato podrían
sufrir daños.
• Nunca coloque el aparato sobre supercies inestables o inclinadas, pues
podría caerse o volcarse y averiarse.
• Nunca coloque recipientes con líquido sobre el aparato, pues podrían
volcarse y ltrar el líquido al interior del aparato.
• Antes de encender el aparato, baje el volumen a 0. Adapte el volumen
gradualmente para no dañar los altavoces.
• Nunca regule el volumen al máximo para evitar pérdida auditiva mientras
toca.
• Nunca utilice violencia extrema contra el aparato, las teclas, el botón de
encendido ni las conexiones y tampoco coloque objetos pesados encima.
• El aparato debe ser desembalado por una persona adulta, pues los
materiales de embalaje suponen un riesgo de asxia para bebés y niños
pequeños. Almacene el embalaje de plástico en un lugar seguro o elimínelo
según corresponda.
• Las piezas pequeñas del interior pueden suponer un riesgo para niños
menores de 3 años, por lo que no son aptas para personas menores de esta
edad.
• Las características técnicas del aparato pueden modicarse sin previo
aviso.
• Este aparato puede utilizarse en todas las zonas climáticas, excepto en las
de clima tropical.
• El aparato solo puede utilizarse en zona situadas por debajo de 2000
metros sobre el nivel del mar.
• Asegúrese de que no caigan gotas de agua ni agua pulverizada sobre el
enchufe ni en el cable de alimentación.
44
ES
TECLAS Y CONEXIONES
1
Tecla power, encendido y
apagado
8
Start / Stop / Sync -
Sincronización / Intro / Ending
- n / Fill in - Introducir /
Metronome - ritmo
2
Mastervolume - Volumen
master / Tempo / Accomp
volume - volumen
acompañamiento /
Transponse - Transposición
9
Panel percussion – Percusión
del panel de control
3
Single Chord - acorde único
/ Fingered - punteo / Chord
Clear - Resolución de acordes
10
Sustain - sostenido / Vibrato /
Split - split
4 Indicador LED digital 11
One key - clave / Follow -
seguir
5
Voice - voz / Rythm - ritmo /
Demo
12
Auto Chord - Acorde
automático
6
Record - grabar / Play
- reproducir / Programm -
programa / Keyboard perc
- teclado
13 Speakers - altavoces
7
Teclas de cifras digitales 1 - 9
/+ / -
45
ES
Conexiones traseras
1. Conexión del aparato a la red
9 V
2. Salida de micrófono
3. Entrada para auriculares
ANTES DEL PRIMER USO
Uso del adaptador de corriente
• Utilice únicamente el adaptador de red de 9 V incluido en el suministro,
que tiene una potencia de salida de 500 mA y un enchufe de ánodo central.
• Inserte la clavija del conector de CC en el conector de CC ) V de la parte
posterior de la unidad y enchufe la clavija de la red eléctrica en una toma
de corriente.
Nota: La potencia de entrada del adaptador de red debe ajustarse a
la potencia de la toma de corriente. A continuación, pulse el botón de
encendido/apagado para utilizar la unidad.
Si no va a utilizar el aparato durante un largo periodo de tiempo, apáguelo y
desconecte el enchufe de la toma de corriente para evitar daños causados por
una conexión de corriente mantenida.
Uso de pilas (no incluidas en el envío)
• Abra el compartimento de las pilas en la parte inferior del panel de control
de su instrumento.
• Introduzca ocho pilas LR-20 de 1,5 V en el compartimento de las pilas.
Preste atención a las marcas de polaridad en la tapa.
• Vuelva a colocar la tapa del compartimento de las pilas y asegúrese de que
está bien cerrada.

46
ES
Notas importantes sobre el uso de pilas
• Si algunas pilas están agotadas, sustituya las 8 a la vez para que no se
utilicen al mismo tiempo pilas de distinto tipo.
• No mezcles nunca pilas viejas con nuevas.
• Si el ácido de la batería se ha derramado, limpie el compartimento de la
batería completamente antes de insertar las nuevas baterías.
• Retire todas las pilas del compartimento de las pilas si no va a utilizar el
aparato durante un largo periodo de tiempo. Esto puede evitar que el
ácido de la batería se ltre en el compartimento de la batería.
Conectar un micrófono
A la conexión del micrófono se puede conectar un micrófono estándar (3,5
mm) mediante un cable.
Uso de auriculares
• Los auriculares estándar pueden conectarse a la unidad a través de la toma
de auriculares para tocar en silencio o a altas horas de la noche.
• Los altavoces internos se silencian automáticamente cuando se conectan
los auriculares a la toma de auriculares.
Nota: El micrófono, el cable de conexión y los auriculares no están incluidos
y deben adquirirse por separado.
FUNCIONAMIENTO
Encender el aparato
• Pulse el botón de encender/apagar para activar el aparato.
• Vuelva a pulsar el botón para apagar el aparato después de conectar un
cable de alimentación o sustituir las pilas.
Volumen principal
• La unidad tiene 9 niveles de volumen de 00 a 08. El volumen
preestablecido es 07.
• Pulse los botones + y - para ajustar el volumen.
• Si pulsas simultáneamente las teclas + y -, el volumen se restablece
automáticamente al valor preestablecido.

47
ES
Tonos
• Esta unidad tiene 300 tonos diferentes. El sonido preestablecido para el
instrumento es
• "Voice"
• Pulse el botón de voz si el instrumento no está en modo de sonido.
• Selecciona uno de los 300 sonidos de la tabla de sonidos.
• A continuación, introduzca el número correspondiente en el campo
numérico o pulse las teclas + o - para cambiar el número de sonido
introducido actualmente.
EFECTOS Y CONTROLES
Pulsación de teclas
Si pulsas la tecla "Keyboard perc", sonará otro instrumento cuando toques el
teclado. El teclado puede volver a su estado original pulsando de nuevo la tecla
"Teclado perc".
Sustain - Sostenido
Si pulsa la tecla de sostenido una vez, las notas tocadas en el teclado
reverberarán ligeramente. Si vuelve a pulsar la tecla, el efecto se desactiva.
Vibrato
• Pulse el botón Vibrato para activar el efecto vibrato.
• El efecto de vibrato se produce pulsando las teclas blancas y negras.
Split - split
• Pulse el botón Split para dividir el teclado en teclados izquierdo y derecho.
• Las 24 teclas del lado izquierdo están asignadas al teclado izquierdo y las
24 del lado derecho al teclado derecho.
• La tecla del teclado derecho se puede seleccionar pulsando las teclas
numéricas.
• La tecla del teclado izquierdo la ja inicialmente el fabricante.
• Vuelva a pulsar la tecla Split para salir de la subdivisión del teclado.

48
ES
Ritmo
• Pulsa el botón Tempo y aumenta el tempo para el ritmo, el metrónomo y la
canción de demostración pulsando los botones + y -.
• Hay 210 ajustes de tempo diferentes con valores entre 30 y 240
pulsaciones por minuto.
• Pulse simultáneamente los botones + y - para volver al valor
preestablecido de 120 pulsaciones por minuto.
Transposición
• Pulse el botón Transpose y aumente o disminuya el valor de transposición
en 6 pasos cada vez y desplace el tono del teclado en intervalos de
semitonos pulsando los botones + o -.
• Mantenga pulsados los botones + y - simultáneamente para volver al
ajuste de fábrica.
Metronome - Metrónomo
• Pulse la tecla Metrónomo. Se crea el metrónomo.
• Seleccione un compás de 1/4, 2/4, 3/4 o 4/4 entre 4 opciones pulsando el
botón repetidamente.
Panel percussion – Panel de control de la percusión
Seleccione una de las 8 teclas y púlsela de acuerdo con la lista siguiente (hay un
total de 8 tipos de percusión disponibles para este instrumento) para producir
la percusión mientras toca.
Lista de percusión del panel de control

49
ES
EL ACOMPAÑAMIENTO RÍTMICO Y SUS
FUNCIONES
Selección del ritmo
Para empezar, pulse el botón Rhythm y seleccione un acompañamiento de 0 a
299 pulsando el dígito correspondiente o los botones + y - (véase la tabla).
Start/Stop
Para empezar, pulse el botón Start/stop y seleccione un acompañamiento de 0
a 299 pulsando el dígito correspondiente o los botones + y - (véase la tabla).
Sync - Sincronización
• Para iniciar el efecto de sincronización, pulse el botón Sync y pulse uno de
los 19 botones restantes para el ritmo mientras toca.
• En este caso, al tocar, la función de acorde automático se activa cuando se
pulsa una de las 19 teclas de la izquierda y se inicia el efecto de acorde.
• Para detener el efecto de ritmo, pulse el botón Sync e inicie el efecto de
sincronización cuando se reproduzca el ritmo.
• Si, mientras el efecto de sincronización está activo, pulsas la tecla Sync, se
detendrá.
Intro/nal
• Si pulsa el botón Intro/ Ending antes de comenzar el ritmo, la unidad
reproducirá una introducción y luego volverá al ritmo normal.
• Si se pulsa el botón Sync después de que haya comenzado el ritmo, la
unidad reproducirá una melodía nal y luego detendrá la reproducción.
50
ES
Fill in – Insertar
• Pulsando el botón Fill in, puedes insertar una pequeña variación rítmica en
cualquier momento durante la reproducción del ritmo.
• A partir del siguiente compás, el ritmo se reproduce normalmente.
Volumen de acompañamiento - Volumen de acompañamiento
• Hay 8 niveles de volumen de acompañamiento. El volumen de
acompañamiento por defecto es 06.
• El volumen del acompañamiento se puede ajustar pulsando las teclas + o -.
El volumen se muestra en la pantalla.
• Pulse simultáneamente las teclas + y - para restablecer el volumen de
acompañamiento preestablecido.
ACOMPAÑAMIENTO AUTOMÁTICO
Single Chord – Acompañamiento automático
• Para iniciar el acompañamiento automático, pulse el botón Start/Stop.
• A continuación, pulse el botón Single Chord para iniciar el
acompañamiento de un solo acorde.
• Pulse una de las 19 teclas del teclado izquierdo para iniciar el ritmo.
• Si se pulsa otra tecla en el lado izquierdo del teclado, se selecciona otro
acorde, ya que la tecla que se pulsó siempre determina el origen del
acorde.
• Consulte la siguiente ilustración cuando toque los acordes "Do", "Do
menor", "Acorde de séptima dominante de Do" y "Acorde de séptima
menor de Do" en modo de un solo dedo.
51
ES
Fingered – Acompañamiento con los dedos
• Para iniciar el acompañamiento automático, pulse el botón Start/Stop.
• A continuación, pulse el botón Fingered para iniciar el acompañamiento
con los dedos.
• Pulse una de las 19 teclas del teclado izquierdo para iniciar el ritmo.
• Pulse otra tecla en el lado izquierdo del teclado para seleccionar otro
acorde.
• Una vez que toca un acorde en la sección de acompañamiento automático
del teclado, el acorde se reproduce automáticamente junto con el ritmo.
• Consulte la ilustración para tocar los diferentes acordes.
• Para detener la función, pulse de nuevo el botón Start/Stop.
Chord Clear –Resolución de acordes
Al pulsar este botón se detiene el acompañamiento automático en el modo de
acordes. El ritmo sigue sonando.
Recording – Grabación
• Pulse el botón de grabación para activar el modo de grabación.
• A continuación, pulse cualquier tecla del teclado o seleccione un perl de
sonido para
• empezar a grabar con el volumen máximo 08. El dígito se muestra en la
pantalla digital.
• La grabación se detiene automáticamente cuando se alcanza el tiempo
máximo de grabación. La pantalla digital muestra entonces "FUL".
• Cuando se realiza una nueva grabación, todas las grabaciones anteriores
se sobrescriben y, por tanto, se borran.
• Pulsa la tecla Play para reproducir la grabación.
• Pulse la tecla Programa para activar el modo de programación.

52
ES
Demo
• Esta unidad tiene 50 versiones de demostración. Consulte la tabla de
demostraciones para obtener información detallada.
• Pulsa el botón Demo para reproducir la demo actual.
• Pulsa de nuevo el botón Demo para reproducir la siguiente demo.
• Selecciona otra demo pulsando las teclas + y -.
Función aprendizaje
• Pulse el botón One Key o el botón Follow para ir a la función de enseñanza.
• Pulsa las teclas + y - para seleccionar otra canción para practicar.
• Vuelva a pulsar el botón de una tecla para cerrar la función.
Nota: Tanto si toca correctamente como si no, la canción se reproduce
automáticamente de forma continua.
Acompañamiento
• Sigue las instrucciones de la pantalla para tocar la nota correctamente.
• A continuación, se muestra automáticamente la siguiente nota a
reproducir.
LIMPIEZA Y CUIDADO
Limpie el exterior del aparato con un paño seco y suave. No utilice nunca un
paño empapado en pintura, barniz o soluciones orgánicas o químicas para
limpiar el exterior.

53
ES
TABLA DE INSTRUMENTOS

54
ES
TABLA DE RITMOS

55
ES

56
ES
TABLA DE DEMOS

57
ES
REPARACIÓN DE ANOMALÍAS
Problema Posible causa y solución
Se oye un sonido cada vez que se
enciende o apaga la unidad.
Es normal y no debe preocuparse.
Cuando pulso una tecla, no se oye
ningún sonido aunque la unidad esté
encendida.
Compruebe que el volumen principal
y el volumen de acompañamiento se
han ajustado correctamente.
El sistema de altavoces interno se
desactiva automáticamente cuando
se conectan los auriculares a la
unidad.
El sonido se ve perturbado o
interrumpido.
Es posible que esté conectado un
adaptador de red inadecuado o que
las pilas estén agotadas y deban ser
sustituidas.
La unidad se ha estrellado.
Las notas reproducidas y la calidad
de la nota son ligeramente
diferentes.
Se trata de un fenómeno normal.
El efecto de reverberación a
veces se ajusta más o menos largo
individualmente cuando se utiliza.
Se trata de un fenómeno normal. El
efecto de reverberación lo establece
el fabricante para cada tecla.
El volumen principal y el de
acompañamiento han cambiado.
Comprueba si se ha cambiado algo
en la conguración del sonido.
La clave cambia mientras se toca. Es posible que haya pulsado
accidentalmente una tecla de la
mitad izquierda del teclado (19
teclas izquierdas).
58
ES
INDICACIONES SOBRE LA RETIRADA DEL
APARATO
Si en su país existe una disposición legal relativa a la
eliminación de aparatos eléctricos y electrónicos, este
símbolo estampado en el producto o en el embalaje
advierte de que no debe eliminarse como residuo
doméstico. En lugar de ello, debe depositarse en un
punto de recogida de reciclaje de aparatos eléctricos
y electrónicos. Una retirada de aparatos conforme
a las leyes contribuye a proteger el medio ambiente
y a las personas a su alrededor frente a posibles
consecuencias perjudiciales para la salud. Para obtener
información más detallada sobre el reciclaje de este
producto, póngase en contacto con su ayuntamiento
o con el servicio de eliminación de residuos domésticos.
Este producto contiene baterías. Si en su país existe
una normativa para la eliminación de baterías, estas
no deben ser arrojadas al cubo de la basura común.
Infórmese sobre la legislación de su país sobre la
retirada y eliminación de las pilas y baterías. Una
retirada de aparatos conforme a las leyes contribuye
a proteger el medio ambiente y a las personas a su
alrededor frente a posibles consecuencias perjudiciales
para la salud.
FABRICANTE E IMPORTADOR (REINO UNIDO)
Fabricante:
Chal-Tec GmbH, Wallstraße 16, 10179 Berlín, Alemania.
Importador para Gran Bretaña:
Berlin Brands Group UK Limited
PO Box 42
272 Kensington High Street
London, W8 6ND
United Kingdom

59
FR
Cher client, chère cliente,
Toutes nos félicitations pour l’acquisition de ce nouvel
appareil. Lisez attentivement les indications suivantes
et suivez-les pour éviter d'éventuels dommages.
Nous ne saurions être tenus pour responsables des
dommages dus au non-respect des consignes et à la
mauvaise utilisation de l’appareil. Scannez le QR-Code
pour obtenir la dernière version du mode d'emploi ainsi
que d'autres informations concernant le produit.
SOMMAIRE
Fiche technique 60
Consignes de sécurité 61
Touches et connexions 62
Avant la première utilisation 63
Utilisation 64
Effets et contrôles 65
Accompagnement rythmique et ses fonctions 67
Accompagnement automatique 68
Nettoyage et entretien 70
Tableau des instruments 71
Tableau des rythmes 72
Tableau des démos 74
Résolution des problèmes 75
Informations sur le recyclage 76
Fabricant et importateur (GB) 76
60
FR
FICHE TECHNIQUE
Numéro d'article 10033244, 10033245
Clavier Clavier de piano standard à 61
touches
Afchage Afchage LED
Sons 300 sons différents
Rythmes 300 accompagnements différents
Démo 50 chansons de démonstration
Tambours 8 tambours
Effets Maintien, vibrato, décalage
Enregistrement Enregistrement, lecture
Programmation Fonction de programmation de
rythme
Accompagnement Démarrage / arrêt, synchronisation,
arrangement, vitesse
Accord Doigt unique, doigts
Fonction apprentissage Guide des morceaux de
démonstration
Autres Interrupteur marche/arrêt, volume
général, volume d'accompagnement
Connexions externes Connecteur d'alimentation, sortie
casque, sortie audio L/R
Adaptateur secteur CA 220 V, CC 9 V
Tension d'entrée CC CC 9 V

61
FR
CONSIGNES DE SÉCURITÉ
• Lisez attentivement le mode d'emploi avant d'utiliser l'appareil an
d'éviter des dommages matériels et / ou des blessures corporelles.
• Branchez l'appareil sur une prise électrique uniquement à l'aide de
l'adaptateur secteur fourni. L'utilisation d'autres adaptateurs secteur peut
endommager votre appareil.
• N'ouvrez en aucun cas le boîtier de l'instrument.
• N'essayez pas de démonter l'appareil vous-même ou de remplacer vous-
même des pièces à l'intérieur. En cas de dysfonctionnements, cessez
d'utiliser l'appareil et contactez le service client.
• Ne placez pas l'appareil dans des endroits soumis à une poussière extrême,
à des vibrations, à des températures basses ou élevées (tels que des
endroits exposés à la lumière directe du soleil, à proximité de sources de
chaleur), car l'apparence extérieure ainsi que les composants internes de
l'appareil pourraient être endommagés.
• Ne placez jamais l'appareil sur une surface instable ou inégale car il
pourrait basculer / tomber et être endommagé.
• Ne placez jamais de récipients remplis de liquide sur l'appareil, car ils
pourraient se renverser et le liquide pourrait pénétrer à l'intérieur de
l'appareil.
• Avant d'allumer l'appareil, baissez le volume à 0. Réglez ensuite
progressivement le volume pour éviter d'endommager les enceintes.
• Ne montez jamais le volume au "maximum" pour éviter une perte
d'audition.
• N'exercez jamais une force extrême contre l'appareil, les boutons de jeu,
le bouton d'alimentation et les connexions, et ne placez aucun objet lourd
sur l'appareil.
• L'appareil doit être déballé par un adulte car les matériaux d'emballage
présentent un risque d'étouffement pour les bébés et les jeunes enfants.
Conservez l'emballage en plastique dans un endroit sûr ou éliminez-le de
manière appropriée.
• Les petits composants à l'intérieur peuvent être dangereux pour les
enfants de moins de 3 ans.
• Les caractéristiques techniques de l'appareil sont susceptibles d'être
modiées sans préavis.
• Cet appareil peut être utilisé dans tous les climats sauf les climats
tropicaux.
• L'appareil ne peut être utilisé que dans des zones situées en dessous de
2000 mètres au-dessus du niveau de la mer.
• Veillez à ce qu'il n'y ait jamais d'eau qui s'égoutte ni d'éclaboussures sur la
che d'alimentation ou le cordon d'alimentation.
62
FR
TOUCHES ET CONNEXIONS
1 Touche de marche et arrêt 8
Start / Stop / Sync -
Synchronisation / Intro /
Ending - Fin / Fill in - Insertion
/ Métronome
2
Mastervolume - volume
principal / Tempo /
Accomp volume - volume
de l'accompagmenent /
Transponse - transposition
9
Panel percussion – partie
percussions
3
Single Chord - accord simple /
Fingered - accompagnement
au doigt / Chord Clear -
Effacer l'accord
10
Sustain - Maintenir / Vibrato /
Split - Séparation
4 Afchage numérique à LED 11 One key - Clé / Follow - suivre
5
Voice - Son / Rythm - Rhythme
/ Demo
12
Auto Chord - Accord
automatique
6
Record - enregistrement /
Play - Lecture / Programm /
Keyboard perc - Frappe
13 Speakers - Enceintes
7
Touches numériques touche
1-9/ +/-
63
FR
Connexions arrière
1. Prise de l'adaptateur 9 V
2. Sortie micro
3. Prise casque
AVANT LA PREMIÈRE UTILISATION
Utilisation de l'adaptateur secteur
• Utilisez uniquement l'adaptateur secteur CC 9 V fourni, qui a une
puissance de sortie de 500 mA et une che d'anode centrale.
• Branchez le connecteur d'alimentation CC dans le port CC ) V à l'arrière de
l'appareil et branchez le cordon d'alimentation dans une prise de courant.
Remarque : La valeur nominale d'entrée de l'adaptateur secteur doit
correspondre à la valeur nominale de la prise. Appuyez ensuite sur la
touche de marche arrêt pour utiliser l'appareil.
Si vous n'utilisez pas l'appareil pendant une longue période, éteignez-le et
débranchez le cordon d'alimentation de la prise pour éviter tout dommage
causé par une connexion électrique prolongée.
Utilisation de piles (non fournies)
• Ouvrez le compartiment à piles sous le panneau de commande de votre
instrument.
• Insérez huit piles LR-20 de 1,5 V dans le compartiment à piles. Respectez
la polarité des piles marquée sur le boîtier.
• Replacez le couvercle du compartiment des piles et assurez-vous qu'il est
bien fermé.

64
FR
Remarques importantes sur l'utilisation des piles
• Si certaines piles sont mortes, remplacez les 8 en même temps pour éviter
d'utiliser différents types de piles en même temps.
• Ne mélangez jamais des piles usagées et neuves.
• En cas de fuite d'une pile, nettoyez soigneusement le compartiment à piles
avant d'insérer de nouvelles piles.
• Retirez toutes les piles du compartiment si vous n'utilisez pas l'appareil
pendant une longue période. Vous éviterez ainsi à l'acide de la pile de fuir
dans le compartiment à piles.
Branchement d'un micro
Vous pouvez brancher un micro standard (3,5 mm) sur la prise micro avec un
câble.
Utilisation d'un casque
• Vous pouvez brancher un casque standard à l'appareil sur la prise casque
pour jouer en silence ou tard le soir.
• Les enceintes internes sont automatiquement mises en sourdine lorsqu'un
casque est connecté à la prise casque.
Remarque : Le micro, le câble de connexion et le casque ne sont pas inclus
et doivent être achetés séparément.
UTILISATION
Allumer
• Appuyez sur la touche de marche/arrêt pour allumer l'appareil.
• Appuyez à nouveau sur la touche pour éteindre l'appareil après avoir
branché un cordon d'alimentation secteur ou remplacé les piles.
Volume principal
• L'appareil dispose de 9 niveaux de volume de 00 à 08. Le volume par défaut
est 07.
• Appuyez sur les touches + et - pour ajuster le volume.
• Appuyez simultanément sur les touches + et - pour réinitialiser le volume à
la valeur par défaut.

65
FR
Sons
• Cet appareil dispose de 300 sons différents. Le son réglé par défaut pour
l'instrument est
• « Voix »
• Appuyez sur la touche Voice si l'appareil n'est pas en mode son.
• Sélectionnez l'un des 300 sons de la table des sons.
• Entrez ensuite le numéro approprié sur le pavé numérique ou appuyez sur
les touches + ou - pour modier le numéro de tonalité actuellement entré.
EFFETS ET CONTRÔLES
Frappe
Appuyez sur la touche Keyboard perc pour entendre un instrument différent
au clavier. Vous pouvez restaurer le clavier à son état d'origine en appuyant à
nouveau sur la touche Keyboard perc.
Sustain – Maintenir
Appuyez une fois sur la touche Sustain pour faire résonner légèrement les
notes jouées sur le clavier. Appuyez à nouveau sur la touche pour quitter
l'effet.
Vibrato
• Appuyez sur la touche Vibrato pour activer l'effet Vibrato.
• L'effet vibrato est produit en appuyant sur les touches noires et blanches.
Split – Séparation
• Appuyez sur la touche Split pour diviser le clavier en claviers gauche et
droit.
• Les 24 touches de gauche sont attribuées au clavier gauche et les 24
touches de droite sont attribuées au clavier droit.
• Le son du clavier droit peut être sélectionné en appuyant sur les touches
numériques.
• Le son du clavier gauche est déterminé par le fabricant.
• Appuyez à nouveau sur Split pour quitter la division du clavier.
66
FR
Tempo
• Appuyez sur la touche Tempo pour augmenter le tempo du rythme, du
métronome et du morceau de démonstration en appuyant sur les touches
+ et -.
• Vous disposez de 210 réglages de vitesse différents allant de 30 à 240
battements par minute.
• Appuyez simultanément sur les touches + et - pour revenir à la valeur par
défaut de 120 battements par minute.
Transposer
• Appuyez sur la touche Transponse et augmentez ou diminuez la valeur
de transposition de 6 pas à la fois et changez la hauteur du clavier par
intervalles de demi-tons en appuyant sur les touches + ou -.
• Appuyez simultanément sur les touches + et - et maintenez-les pour
revenir au réglage d'usine.
Métronome
• Appuyez sur la touche Metronome. Le rythme démarre.
• Choisissez parmi 4 options un rythme 1/4, 2/4, 3/4 ou 4/4 en appuyant
plusieurs fois sur la touche.
Top panel percussion – partie percussions du panneau supérieur
Sélectionnez et appuyez sur l'une des 8 touches selon la liste ci-dessous (8
types de percussions sont disponibles pour cet instrument) pour choisir la
percussion à jouer.
Liste des percussions du panneau

67
FR
ACCOMPAGNEMENT RYTHMIQUE ET SES
FONCTIONS
Choix du rythme
Pour commencer, appuyez sur la touche Rhythm et sélectionnez un
accompagnement de 0 à 299 (voir tableau) en appuyant sur le numéro
approprié ou sur les touches + et -.
Start/ Stop
Pour commencer, appuyez sur la touche Start/Stop et sélectionnez un
accompagnement de 0 à 299 (voir tableau) en appuyant sur le numéro
approprié ou sur les touches + et -.
Sync
• Pour démarrer l'effet de synchronisation, appuyez sur la touche Sync et
pour le rythme, appuyez sur l'une des 19 touches restantes pendant la
lecture.
• Dans ce cas, lorsque vous jouez, si vous appuyez sur l'une des 19 touches
de gauche, la fonction d'accord automatique sera activée et l'effet d'accord
commencera.
• Pour arrêter l'effet rythmique, appuyez sur Sync et démarrez l'effet de
synchronisation lorsque le rythme est joué.
• Lorsque l'effet est activé, appuyez sur la touche Sync pour le quitter.
Intro/Fin
• Si vous appuyez sur le bouton Intro/Ending avant de commencer le
rythme, l'appareil jouera une intro puis reviendra au rythme normal.
• Si vous appuyez sur la touche Sync après le début du rythme, l'appareil
jouera une mélodie de n puis s'arrêtera de jouer.
68
FR
Fill in – Insertion
• Appuyez sur la touche Fill in pour insérer une petite variation de rythme à
tout moment pendant la lecture du rythme.
• A partir de la mesure suivante, le rythme reprendra normalement.
Accomp volume - volume de l'accompagnement
• Il y a 8 niveaux de volume d'accompagnement. Le volume
d'accompagnement par défaut est 06.
• Appuyez sur les touches + et - pour ajuster le volume d'accompagnement.
Le volume est afché à l'écran.
• Appuyez simultanément sur les touches + et - pour rétablir le volume
d'accompagnement par défaut.
ACCOMPAGNEMENT AUTOMATIQUE
Single Chord – accord simple
• Pour démarrer l'accompagnement automatique, appuyez sur la touche
Start/Stop.
• Appuyez ensuite sur la touche Single Chord pour lancer
l'accompagnement d'un accord simple.
• Appuyez sur l'une des 19 touches du clavier gauche pour lancer le rythme.
• Si vous appuyez sur une autre touche sur le côté gauche du clavier, un
accord différent sera sélectionné car la touche appuyée détermine
toujours l'origine de l'accord.
• Reportez-vous à l'illustration ci-dessous lorsque vous jouez les accords «
Do », « Do mineur », « Accord de septième de do dominant » et « Accord de
do mineur de septième » en mode à un seul doigt.
69
FR
Fingered – accompagnement au doigt
• Pour démarrer l'accompagnement automatique, appuyez sur la touche
Start/Stop.
• Appuyez ensuite sur la touche Fingered pour lancer l'accompagnement au
doigt.
• Appuyez sur l'une des 19 touches du clavier gauche pour lancer le rythme.
• Pour sélectionner un autre accord, appuyez sur une touche différente sur
le côté gauche du clavier.
• Dès que vous jouez un accord dans la section d'accompagnement
automatique du clavier, l'accord est joué automatiquement avec le rythme.
• Reportez-vous à l'illustration pour jouer les différents accords.
• Pour quitter la fonction, appuyez à nouveau sur START / STOP.
Chord Clear – Effacer l'accord
Lorsque vous appuyez sur cette touche, l'accompagnement automatique
s'arrête en mode accord. Le rythme reste activé.
Recording - enregistrement
• Appuyez sur la touche Record pour activer le mode enregistrement.
• Appuyez ensuite sur n'importe quelle touche du clavier ou sélectionnez un
prol sonore pour
• commencer l'enregistrement au volume maximum 08. Le chiffre s'afche
sur l'écran numérique.
• L'enregistrement s'arrête automatiquement lorsque la durée maximale est
atteinte. L'afchage numérique indique alors « FUL ».
• Lorsque vous effectuez un nouvel enregistrement, tous les
enregistrements précédents sont écrasés et donc supprimés.
• Appuyez sur la touche Play pour lancer la lecture de votre enregistrement.
• Pour entrer en mode programme, appuyez sur la touche Program.

70
FR
Démo
• Cet appareil contient 50 versions de démonstration. Voir le tableau des
démonstrations pour des informations détaillées.
• Appuyez sur la touche Demo pour lire la démo en cours.
• Appuyez à nouveau sur le bouton Demo pour lire la démo suivante.
• Sélectionnez une autre démo en appuyant sur les touches + et -.
Fonction d'apprentissage
• Appuyez sur la touche One Key ou sur la touche Follow pour accéder à la
fonction d'apprentissage.
• Appuyez sur les touches + et - pour choisir une autre chanson sur laquelle
vous entraîner.
• Appuyez une nouvelle fois sur la touche One Key pour quitter la fonction.
Remarque : Le morceau est automatiquement lu en continu, que ce que
vous jouiez soit juste ou faux.
Follow
• Suivez les instructions à l'écran pour jouer la note correctement.
• La prochaine note à jouer est alors automatiquement afchée.
NETTOYAGE ET ENTRETIEN
Nettoyez l'extérieur de l'appareil uniquement avec un chiffon doux et sec.
N'utilisez jamais de chiffon imbibé de peinture, de vernis ou de solutions
organiques ou chimiques pour nettoyer l'extérieur.

71
FR
TABLEAU DES INSTRUMENTS
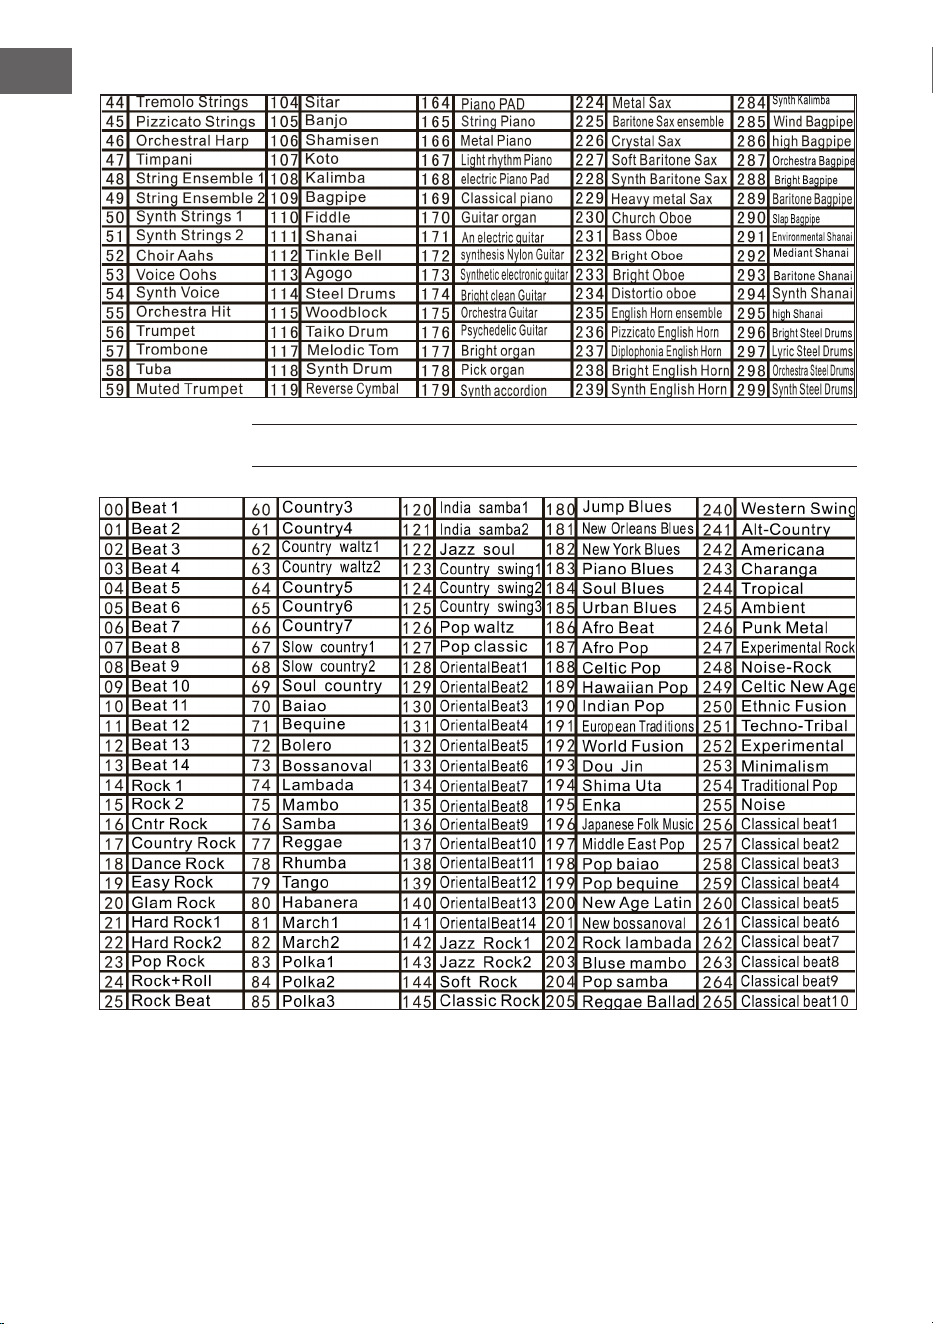
72
FR
TABLEAU DES RYTHMES

73
FR

74
FR
TABLEAU DES DÉMOS

75
FR
RÉSOLUTION DES PROBLÈMES
Problème Cause possible et solution
Un son se fait entendre chaque fois
que l'appareil est allumé/éteint.
Cela est normal et il n'y a pas lieu de
s'inquiéter.
Lorsque j'appuie sur une touche, il
n'y a pas de son alors que l'appareil
est allumé.
Vériez que les volumes principaux
et d'accompagnement sont
correctement réglés.
Le système d'enceintes internes
est automatiquement désactivé
lorsqu'un casque est connecté à
l'appareil.
Le son est perturbé ou interrompu. Un adaptateur secteur inadapté est
peut-être connecté ou les piles sont
épuisées et doivent être remplacées.
L'appareil est tombé en panne.
Les notes jouées et la qualité des
notes sont légèrement
différentes
Cela est normal.
L'effet de réverbération est parfois
réglé plus ou moins long selon les
touches à l'utilisation.
Cela est normal. L'effet de
réverbération est déni par le
fabricant pour chaque touche
Le volume principal et
d'accompagnement a changé.
Vériez si quelque chose a changé
dans le réglage du son.
La clé change au fur et à mesure que
vous jouez.
Vous avez peut-être
accidentellement appuyé sur une
touche de la moitié gauche du clavier
(19 touches de gauche).

76
FR
INFORMATIONS SUR LE RECYCLAGE
Si l'élimination des appareils électriques et
électroniques est réglementée dans votre pays, ce
symbole sur le produit ou sur l'emballage indique
qu'il ne doit pas être mis au rebut avec les ordures
ménagères. Vous devez l'acheminer vers un point de
collecte pour le recyclage des appareils électriques et
électroniques. En respectant des règles de recyclage,
vous protégez l'environnement et la santé de vos
semblables des conséquences négatives. Pour plus
d'informations sur le recyclage et l'élimination de
ce produit, contactez votre autorité locale ou votre
service d'élimination des déchets ménagers.
Ce produit contient des batteries. S'il existe une
réglementation légale pour l'élimination des batteries
dans votre pays, ne les jetez pas avec les ordures
ménagères Renseignez-vous sur les réglementations
locales concernant la mise au rebut des batteries. En
respectant des règles de recyclage, vous protégez
l'environnement et la santé de vos semblables des
conséquences négatives.
FABRICANT ET IMPORTATEUR (GB)
Fabricant :
Chal-Tec GmbH, Wallstraße 16, 10179 Berlin, Allemagne.
Importateur pour la Grande-Bretagne :
Berlin Brands Group UK Limited
PO Box 42
272 Kensington High Street
London, W8 6ND
United Kingdom

77
IT
Gentile cliente,
La ringraziamo per l'acquisto del dispositivo. La
preghiamo di leggere attentamente le seguenti
indicazioni e di seguirle per evitare eventuali danni.
Non ci assumiamo alcuna responsabilità per danni
scaturiti da una mancata osservanza delle avvertenze
di sicurezza e da un uso improprio del dispositivo.
Scansionare il seguente codice QR per accedere al
manuale d'uso più recente e ricevere informazioni sul
prodotto.
INDICE
Dati tecnici 78
Avvertenze di sicurezza 79
Tasti e connessioni 80
Prima dell‘utilizzo 81
Utilizzo 82
Effetto e controllo 83
Accompagnamento ritmico e le sue funzioni 85
Accompagnamento automatico 86
Pulizia e manutenzione 88
Tabella degli strumenti 89
Tabella dei ritmi 90
Tabella delle demo 92
Risoluzione dei problemi 93
Avviso di smaltimento 94
Produttore e importatore (UK) 94
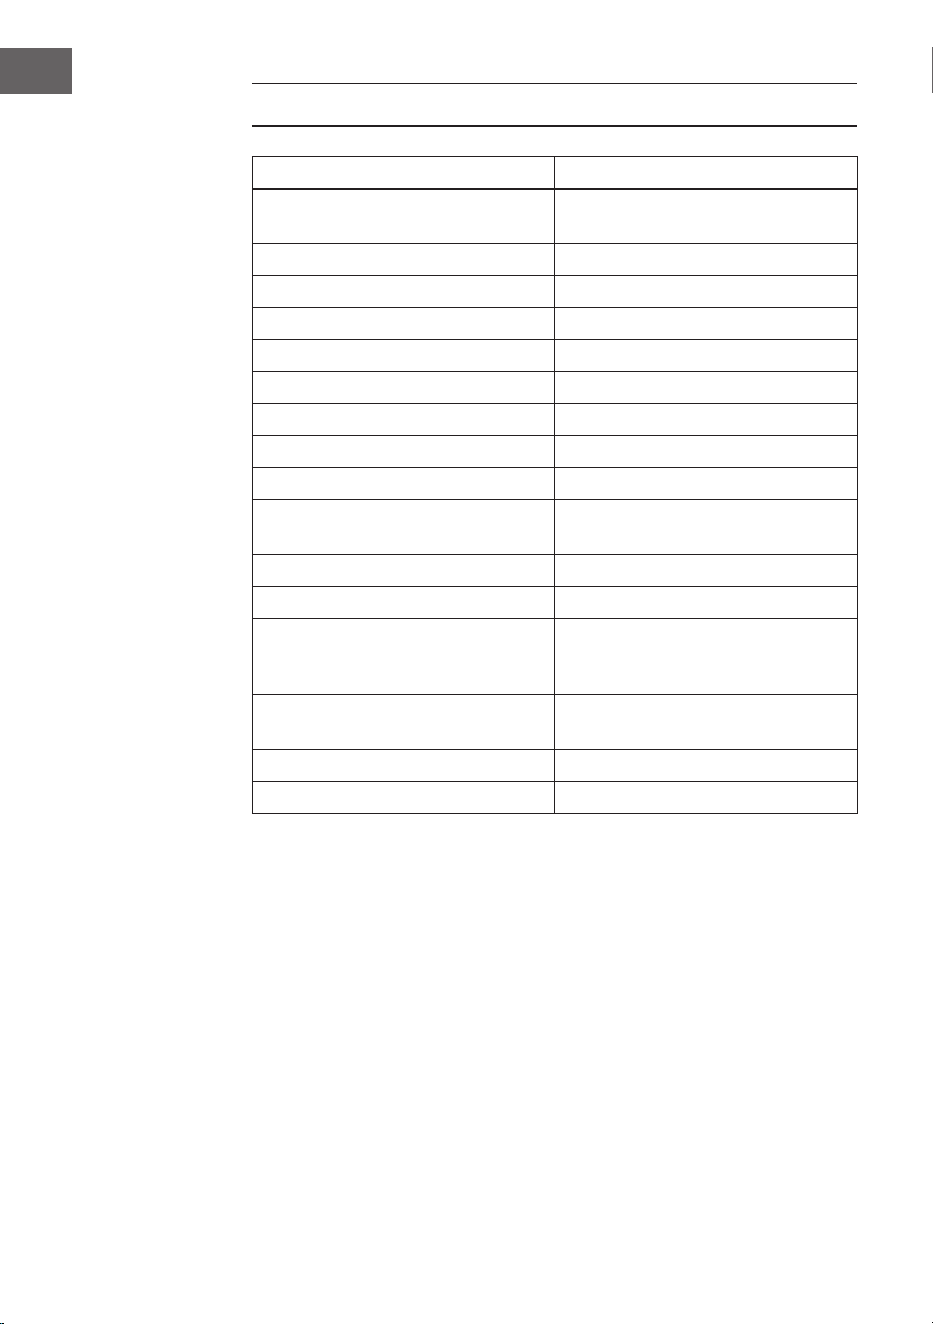
78
IT
DATI TECNICI
Numero articolo 10033244, 10033245
Tastiera Tastiera standard da pianoforte con
61 tasti
Display Indicazione LED
Timbri 300 suoni diversi
Ritmi 300 accompagnamenti diversi
Demo 50 brani demo
Batterie 8 batterie
Effetti Risonanza, vibrato, spostamento
Registrazione Registrazione, riproduzione
Programmazione Funzione di programmazione ritmica
Accompagnamento Start/Stop, sincronizzare,
aggiungere, velocità
Accordo Dito singolo, dita
Funzione di apprendimento Brani demo, guida
Ulteriori Interruttore di accensione/
spegnimento, volume complessivo,
volume dell'accompagnamento
Connessioni esterne Connessione di alimentazione, uscita
per le cufe, uscita audio L/R
Alimentatore AC 220 V, DC 9 V
Ingresso tensione DC DC 9 V

79
IT
AVVERTENZE DI SICUREZZA
• Leggere attentamente il manuale d'uso prima dell'utilizzo per evitare
danni a cose e/o persone.
• Collegare il dispositivo a una presa elettrica utilizzando esclusivamente
l'adattatore incluso in consegna. L'utilizzo di altri adattatori può
danneggiare il dispositivo.
• Non aprire in nessun caso l'alloggiamento dello strumento.
• Non cercare di smontare autonomamente il dispositivo o di sostituire
componenti al suo interno. Se dovessero comparire malfunzionamenti
durante l'uso, smettere di utilizzare il dispositivo e contattare il servizio di
assistenza ai clienti.
• Non posizionare il dispositivo in luoghi estremamente polverosi, dove
sono presenti vibrazioni, temperature basse o alte (come ad esempio
luoghi esposti alla luce solare, vicino a fonti di calore) dato che l'aspetto e i
componenti interni dello strumento potrebbero rovinarsi.
• Non posizionare mai il dispositivo su superci instabili o sconnesse,
altrimenti potrebbe cadere e danneggiarsi.
• Non poggiare oggetti pieni di liquidi sul dispositivo, dato che potrebbero
cadere e il liquido potrebbe nire all'interno della tastiera.
• Impostare il volume su 0 prima di accendere il dispositivo. Procedere poi
a regolare progressivamente il volume, in modo da non danneggiare gli
altoparlanti.
• Non impostare mai il volume su "Massimo" per evitare di perdere l'udito
mentre si suona.
• Non esercitare forza eccessiva sul dispositivo, sui tasti, sul tasto di
accensione, sulle connessioni e non posizionare oggetti pesanti sulla
tastiera.
• Il dispositivo deve essere disimballato da un adulto, dato che bambini e
bebè corrono il rischio di soffocamento a causa dei materiali d'imballaggio.
Conservare la confezione di plastica in un luogo sicuro o smaltirlo nel
rispetto delle leggi.
• I piccoli componenti all'interno del dispositivo possono essere pericolosi
per bambini sotto ai 3 anni e non sono adatti a loro.
• Le caratteristiche tecniche del dispositivo possono essere modicate
senza preavviso.
• Questo dispositivo può essere utilizzato in tutte le zone climatiche, tranne
in zone tropicali.
• Il dispositivo può essere utilizzato solo in luoghi che si trovano al di sotto
dei 2000 metri s.l.m.
• Assicurarsi che gocce e spruzzi d'acqua non niscano sulla spina o sul cavo
d'alimentazione.

80
IT
TASTI E CONNESSIONI
1
Power - Tasto di accensione e
spegnimento
8
Start/Stop/Sync -
Sincronizzazione/Intro/
Ending - Fine/Fill in -
Aggiungere/Metronome -
Metronomo
2
Mastervolume - Volume
principale/Tempo - Velocità/
Accomp volume - Volume
dell'accompagnamento/
Transponse - Trasposizione
9
Panel percussion –
Percussione del pannello di
controllo
3
Single Chord - Accordo
singolo/Fingered -
Accompagnamento delle
dita/Chord Clear - Rimozione
dell'accordo
10
Sustain - Risonanza/Vibrato/
Split - Divisione
4 Schermo digitale LED 11
One key - Tipo di timbro/
Follow - Seguire
5
Voice - Suono/Rythm - Ritmo/
Demo
12
Auto Chord - Accordi
automatici
6
Record - Registrazione/Play
- Riproduzione/Programm -
Programmazione/Keyboard
perc - Percussione dei tasti
13 Speakers - Diffusori
7 Cifre digitali 1-9/Tasto +/-

81
IT
Connessioni sul lato posteriore
1. Connessione per
l'alimentatore da 9 V
2. Uscita del microfono
3. Connessione per le cufe
PRIMA DELL'UTILIZZO
Utilizzare l'adattatore
• Utilizzare esclusivamente l'adattatore DC da 9 V incluso in consegna,
dotato di una potenza di uscita di 500 mA e di un connettore anodico
centrale.
• Inserire il connettore DC nella connessione DC da 9 V sul retro del
dispositivo e collegare la spina di alimentazione alla presa elettrica.
Nota: la potenza di ingresso dell'adattatore deve corrispondere alla
potenza della presa elettrica. Premere poi il tasto di accensione/
spegnimento per utilizzare il dispositivo.
Se non viene utilizzato per un lungo periodo di tempo, spegnere il dispositivo
e staccare la spina dalla presa per evitare danni causati dal collegamento alla
rete elettrica.
Utilizzo con batterie (non incluse nel volume di consegna)
• Aprire il vano delle batterie sul lato inferiore del pannello di controllo dello
strumento.
• Inserire otto batterie LR-20 da 1,5 V nel vano. Fare attenzione ai segni di
polarità sull'alloggiamento.
• Riposizionare il coperchio del vano delle batterie e assicurarsi che sia
chiuso saldamente.

82
IT
Note importanti sull’utilizzo delle batterie
• Se alcune batterie sono scariche, sostituirle tutte e 8 in una volta, in modo
da non utilizzare tipologie diverse contemporaneamente.
• Non mischiare mai batterie vecchie e nuove.
• Se dovesse fuoriuscire acido dalle batterie, pulire a fondo il vano prima di
inserire batterie nuove.
• Se il dispositivo non viene utilizzato per lunghi periodi di tempo, togliere
tutte le batterie dal vano. In questo modo è possibile evitare la fuoriuscita
di acido nel vano delle batterie.
Collegamento di un microfono
È possibile collegare un microfono standard (3,5 mm) all'apposita connessione.
Uso delle cufe
• È possibile collegare cufe standard all'apposita connessione del
dispositivo per suonare in completo silenzio e a tarda notte.
• I diffusori interni vengono disattivati automaticamente quando si
collegano le cufe.
Nota: microfono, cavo di collegamento e cufe non sono inclusi nel volume
di consegna e devono essere acquistati separatamente.
UTILIZZO
Accensione
• Premere il tasto di accensione/spegnimento per accendere il dispositivo.
• Premere nuovamente il tasto per spegnere il dispositivo dopo aver
collegato un cavo di alimentazione o aver sostituito le batterie.
Volume principale
• Il dispositivo è dotato di nove livelli per il volume, da 00 a 08. Il livello
predenito è 07.
• Premendo i tasti + e - è possibile regolare il volume.
• Premendo contemporaneamente i tasti + e -, il volume torna
automaticamente al livello predenito.

83
IT
Timbri
• Il dispositivo è dotato di oltre 300 timbri. Il timbro predenito per lo
strumento è
• "Voice".
• Premere il tasto Voice se il dispositivo non deve trovarsi in modalità
Timbro.
• Scegliere uno dei 300 timbri dall'apposita tabella.
• Inserire poi il numero corrispondente con i tasti numerici o premere i tasti
+ o - per cambiare il numero di timbro attuale.
EFFETTO E CONTROLLO
Percussione dei tasti
Se si preme il tasto "Keyboard perc", si sentirà il suono di un altro strumento
quando si suona la tastiera. Per tornare alla funzione iniziale della tastiera,
premere nuovamente "Keyboard perc".
Sustain - Risonanza
Premere una volta il tasto Sustain per aggiungere una leggera risonanza al
suono della tastiera. Premendo nuovamente il tasto si disattiva l'effetto.
Vibrato
• Premere il tasto Vibrato per attivare questo effetto.
• L'effetto vibrato viene prodotto premendo tasti neri e bianchi.
Split – Divisione
• Premere il tasto Split per dividere la tastiera in sezione sinistra e destra.
• I 24 tasti a sinistra appartengono alla sezione sinistra e i 24 tasti sulla
destra a quella destra.
• Il tipo di tonalità della sezione destra può essere selezionato premendo i
tasti numerici.
• Il tipo di tonalità della sezione sinistra è denito inizialmente dal
produttore.
• Premere nuovamente il tasto Split per terminare la divisione della tastiera.

84
IT
Tempo - Velocità
• Premere il tasto Tempo per aumentare la velocità di ritmo, metronomo e
brano demo con i tasti + e -.
• Ci sono 210 impostazioni diverse per la velocità, con valori tra 30 e 240
battiti al minuto.
• Premere contemporaneamente i tasti + e - per tornare al valore
predenito di 120 battiti al minuto.
Transponse - Trasposizione
• Premere il tasto Transponse e aumentare o diminuire il valore di
trasposizione di 6 livelli e spostare l'altezza della tonalità della tastiera in
intervalli di mezza tonalità con i tasti + e -.
• Tenere premuti contemporaneamente + e - per tornare all'impostazione di
fabbrica.
Metronome - Metronomo
• Premere il tasto Metronome. Viene attivato il metronomo.
• Selezionare tra le 4 opzioni da 1/4, 2/4, 3/4 o 4/4 premendo più volte il
tasto.
Panel percussion – Percussione del pannello di controllo superiore
Scegliere uno degli 8 tasti e premerlo in accordo con la seguente lista (per
questo strumento sono disponibili 8 tipi di percussione totali) per riprodurre la
percussione mentre si suona.
Lista di percussioni del pannello di controllo

85
IT
ACCOMPAGNAMENTO RITMICO E LE SUE
FUNZIONI
Selezione del ritmo
Per iniziare, premere il tasto Rhythm e selezionare un accompagnamento da 0
a 299 (v. tabella) premendo la cifra corrispondente o utilizzando i tasti + e -.
Start/Stop
Per iniziare, premere il tasto Start/Stop e selezionare un accompagnamento da
0 a 299 (v. tabella) premendo la cifra corrispondente o utilizzando i tasti + e -.
Sync - Sincronizzazione
• Per avviare l'effetto di sincronizzazione, premere il tasto Sync e, per il
ritmo, utilizzare uno dei 19 tasti restanti mentre si suona.
• In tal caso, se si preme uno dei 19 tasti a sinistra mentre si suona, vengono
attivati la funzione di accordo automatica e l'effetto dedicato agli accordi.
• Per terminare l'effetto ritmico, premere il tasto Sync e avviare l'effetto di
sincronizzazione quando viene riprodotto il ritmo.
• Quando l'effetto di sincronizzazione è attivato, premere Sync per
disattivarlo.
Intro/Ending - Intro/Fine
• Se si preme Intro/Ending prima che inizi il ritmo, il dispositivo riproduce
un'introduzione e torna poi al ritmo normale.
• Se si preme Sync dopo l'inizio del ritmo, il dispositivo riproduce una
melodia conclusiva e arresta poi la riproduzione.

86
IT
Fill in – Aggiungere
• Premendo il tasto Fill in è possibile aggiungere in qualunque momento una
variazione durante la riproduzione del ritmo.
• Dal battito successivo, il ritmo torna alla normale riproduzione.
Accomp volume – Volume dell'accompagnamento
• Il volume dell'accompagnamento ha 8 livelli. Il volume predenito per
l'accompagnamento è 06.
• Premendo i tasti + e - è possibile regolare il volume
dell'accompagnamento. Il volume viene mostrato sullo schermo.
• Premendo contemporaneamente + e - si torna al volume
dell'accompagnamento predenito.
ACCOMPAGNAMENTO AUTOMATICO
Single Chord – Accordo singolo
• Per avviare l'accompagnamento automatico, premere il tasto Start/Stop.
• Premere poi il tasto Single Chord per avviare l'accompagnamento con
accordo singolo.
• Premere uno dei 19 tasti della sezione sinistra della tastiera per avviare il
ritmo.
• Se si preme un altro tasto sulla sezione sinistra della tastiera, viene
selezionato un altro accordo, dato che il tasto premuto denisce sempre
l'origine dell'accordo.
• Fare sempre riferimento alla rappresentazione seguente quando si
selezionano gli accordi "Do", "Do minore", "Accordo dominante di settima
di Do" e "Accordo di settima di Do".

87
IT
Fingered – Accompagnamento delle dita
• Per avviare l'accompagnamento automatico, premere il tasto Start/Stop.
• Premere poi il tasto Fingered per avviare l'accompagnamento delle dita.
• Premere uno dei 19 tasti della sezione sinistra della tastiera per avviare il
ritmo.
• Per scegliere un altro accordo, premere un altro tasto sulla sezione sinistra
della tastiera.
• Non appena si suona un accordo nella sezione di accompagnamento
automatico della tastiera, l'accordo viene automaticamente suonato
insieme al ritmo.
• A tal ne, fare riferimento alla rappresentazione per suonare i diversi
accordi.
• Per terminare la funzione, premere di nuovo il tasto Start/Stop.
Chord Clear – Rimozione dell'accordo
Premendo questo tasto, viene terminato l'accompagnamento automatico in
modalità accordo. Il ritmo continua a essere riprodotto.
Recording - Registrazione
• Premere il tasto Record per attivare la modalità di registrazione.
• Premere poi un tasto a piacere sulla tastiera o selezionare un prolo
sonoro per
• avviare la registrazione al volume massimo 08. La cifra viene mostrata
sullo schermo digitale.
• La registrazione viene arrestata automaticamente quando si raggiunge la
durata massima. Il display digitale mostra "FUL".
• Se si effettua una nuova registrazione, tutte quelle precedenti vengono
sovrascritte e quindi cancellate.
• Premere il tasto Play per riprodurre la registrazione.
• Premere Program per attivare la modalità di programmazione.

88
IT
Demo
• Questo dispositivo è dotato di 50 versioni demo. Vedere la tabella delle
demo per informazioni più dettagliate.
• Premere il tasto Demo per riprodurre la demo attuale.
• Se si preme di nuovo il tasto Demo, viene riprodotta la demo successiva.
• Selezionare un'altra demo premendo i tasti + e -.
Funzione di apprendimento
• Premere il tasto One Key o il tasto Follow per accedere alla funzione di
apprendimento.
• Premere i tasti + e - per scegliere un altro brano per esercitarsi.
• Premere nuovamente il tasto One Key per chiudere la funzione.
Nota: che si suoni in modo giusto o sbagliato, il brano viene riprodotto in
continuazione automaticamente.
Follow - Seguire
• Seguire le informazioni sullo schermo per suonare la nota giusta.
• La nota seguente che deve essere suonata viene mostrata
automaticamente.
PULIZIA E MANUTENZIONE
Pulire l'esterno del dispositivo esclusivamente con un panno morbido e
asciutto. Per la pulizia, non utilizzare mai panni intrisi di vernici, lacche o
solventi organici o chimici.
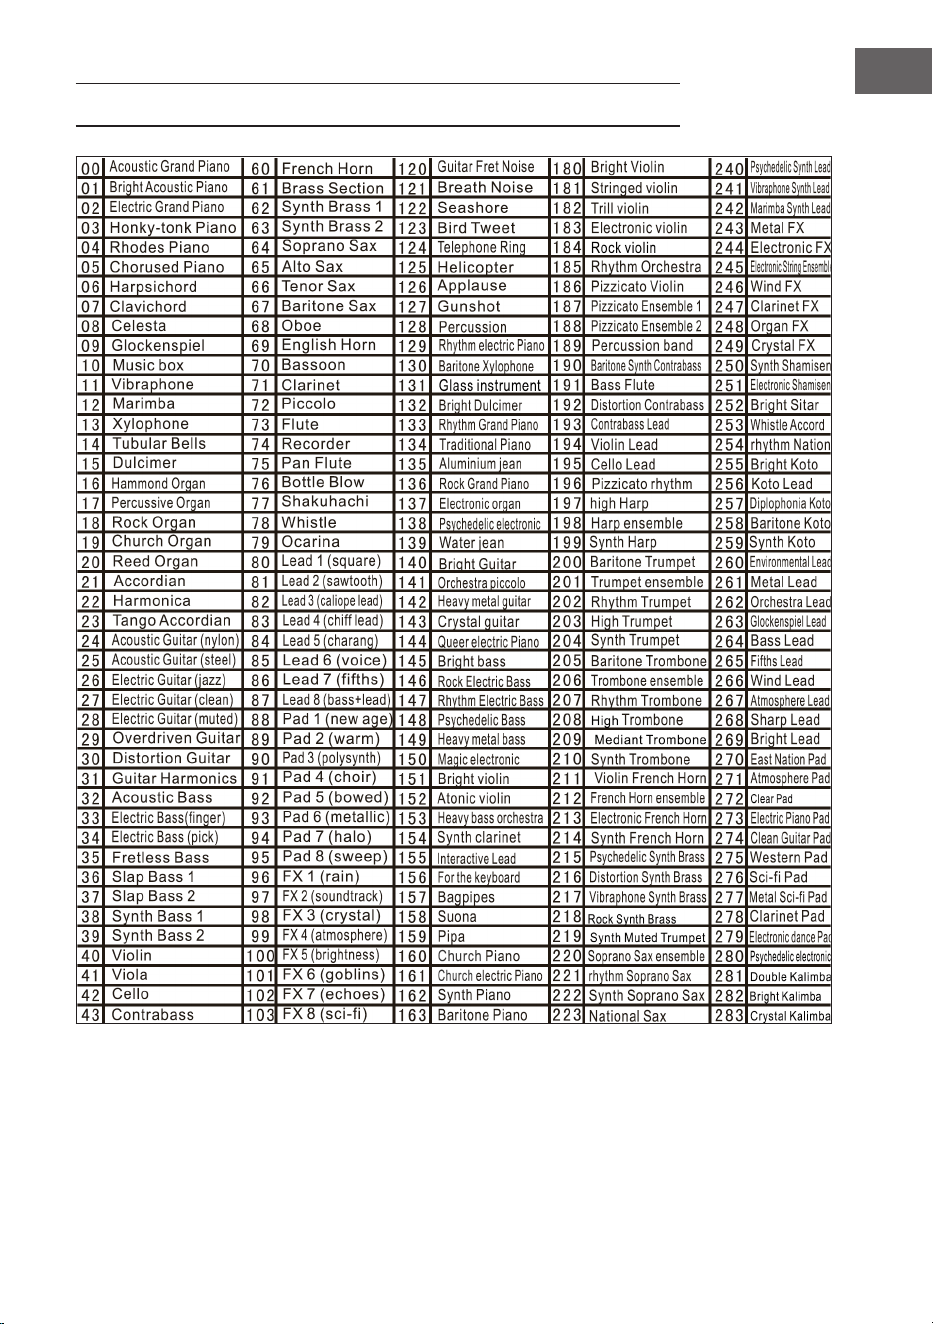
89
IT
TABELLA DEGLI STRUMENTI

90
IT
TABELLA DEI RITMI

91
IT

92
IT
TABELLA DELLE DEMO

93
IT
RISOLUZIONE DEI PROBLEMI
Problema Possibile causa e soluzione
Viene sempre emesso un suono
quando si accende/spegne il
dispositivo.
È normale e non è motivo di
preoccupazione
Quando si preme un tasto non viene
emesso alcun suono, anche se il
dispositivo è acceso.
Controllare se i livelli di volume
principale e dell'accompagnamento
sono impostati correttamente.
Il sistema di diffusori interno viene
disattivato automaticamente se si
connettono le cufe al dispositivo.
Il suono è disturbato o interrotto. Potrebbe essere collegato un
adattatore sbagliato o le batterie
sono scariche e devono essere
cambiate.
Il dispositivo ha un
malfunzionamento.
Le note suonate e la qualità delle
note sono leggermente
diverse.
Questo è del tutto normale.
Quando si usa l'effetto di risonanza,
singole note possono essere
impostate con un riverbero più lungo
e altre con uno più corto.
Questo è del tutto normale. La
risonanza viene impostata dal
produttore per ogni tasto.
I livelli di volume principale e
dell'accompagnamento sono
cambiati.
Controllare se è stato modicato
qualcosa nell'impostazione del
suono.
La chiave cambia mentre si suona. Potrebbe essere stato premuto
involontariamente un tasto della
sezione sinistra della tastiera (19
tasti a sinistra).
94
IT
AVVISO DI SMALTIMENTO
Se nel vostro Paese sono vigenti regolamenti
legislativi relativi allo smaltimento di dispositivi
elettrici ed elettronici, questo simbolo sul prodotto o
sull'imballaggio indica che non è consentito smaltire
questo prodotto insieme ai riuti domestici. Il
dispositivo deve invece essere portato in un centro
di raccolta per il riciclaggio di dispositivi elettrici ed
elettronici. Lo smaltimento conforme tutela l'ambiente
e salvaguarda la salute del prossimo da conseguenze
negative. Informazioni riguardanti il riciclaggio e lo
smaltimento di questo prodotto sono disponibili presso
l'amministrazione locale o il servizio di smaltimento dei
riuti.
Questo prodotto contiene batterie. Se nel vostro
Paese sono presenti regolamenti legislativi per lo
smaltimento di batterie, queste non possono essere
smaltite nei riuti casalinghi. Informarsi in relazione
alle normative locali sullo smaltimento di batterie. Lo
smaltimento conforme tutela l'ambiente e salvaguarda
la salute del prossimo da conseguenze negative.
PRODUTTORE E IMPORTATORE (UK)
Produttore:
Chal-Tec GmbH, Wallstraße 16, 10179 Berlino, Germania.
Importatore per la Gran Bretagna:
Berlin Brands Group UK Limited
PO Box 42
272 Kensington High Street
London, W8 6ND
United Kingdom


