RETEKESS TR640 Portable Internet Radio
User Manual
Apply to TR640
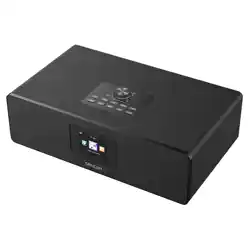
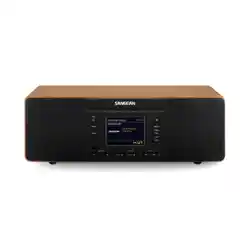
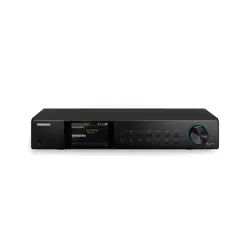
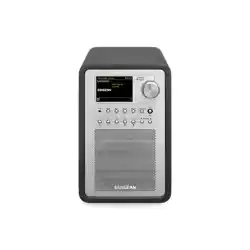
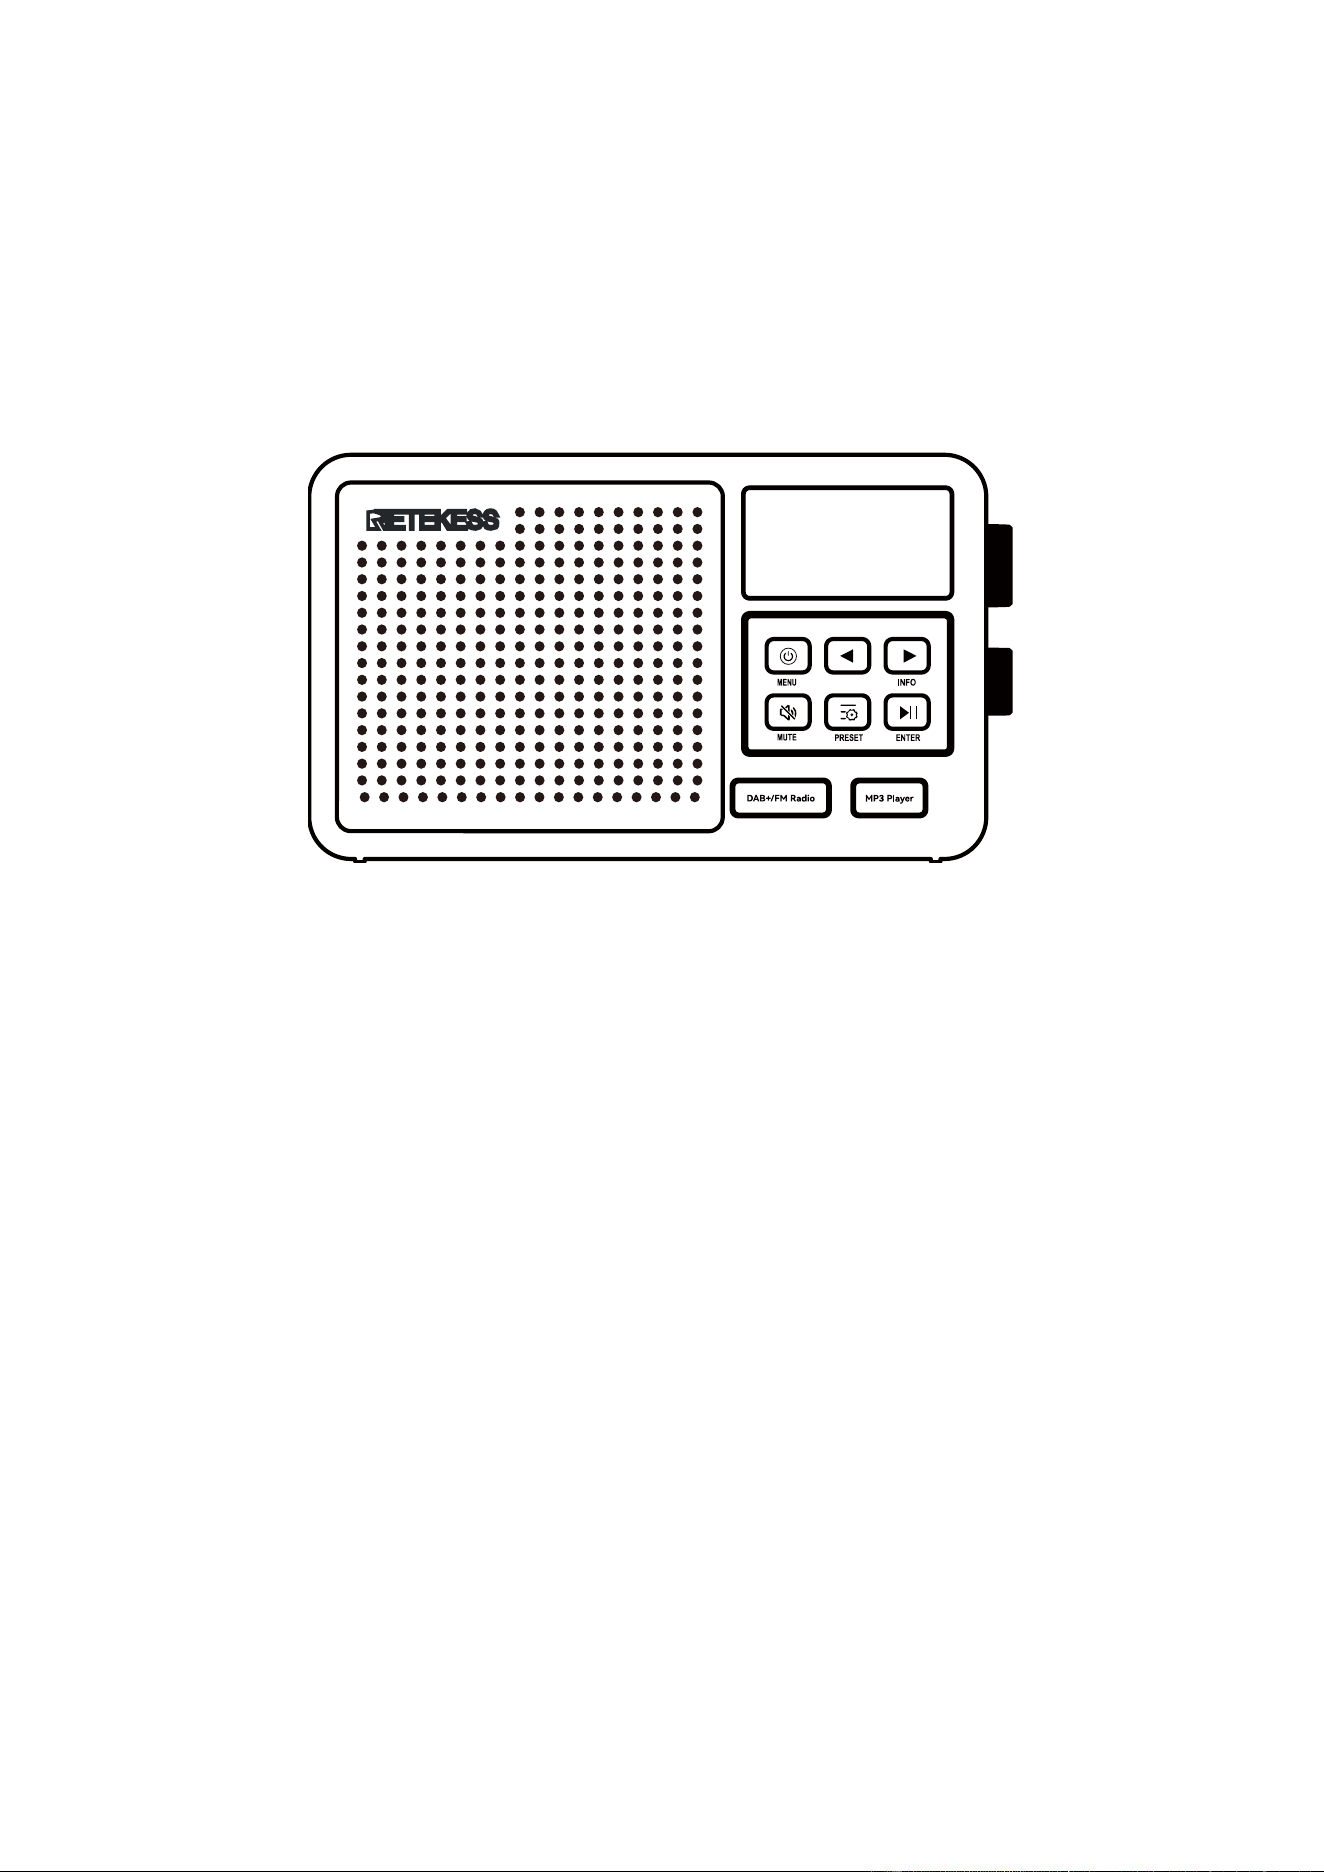
1. Product diagram
Radio Diagram:
1. Display: display radio information
2. Tune/Select: station selection button, select the menu task, and adjust the time, etc.
3. Power/Menu: power on/off, and enter the menu.
4. Left/Move Back: select the previous song when playing music/In USB, TF card play, long press is fast backward
play.
5. Right/Move forward: select the next song when playing the music/In USB, TF card play, long press is
fast-forward play.
6. Tune/Volume: volume button to adjust volume
7. Enter/Play&Pause: start pausing/play switching when playing the music.
8. Setting/Preset: enter station selection list/enter manual station storage mode
9. Mute:start muting or cancel muting
10. AC-IN: plug in AC power cable to power the machine.
11. TF card slot: insert TF card, and play the music of TF card.
12. USB port: insert the USB card, and play the USB music.
13. Headset jack:3.5mmheadset jack.
14. Battery slot: install 4*1.5V AA batteries(Note: connect AC power cable will cut off the power supply to the dry
battery)
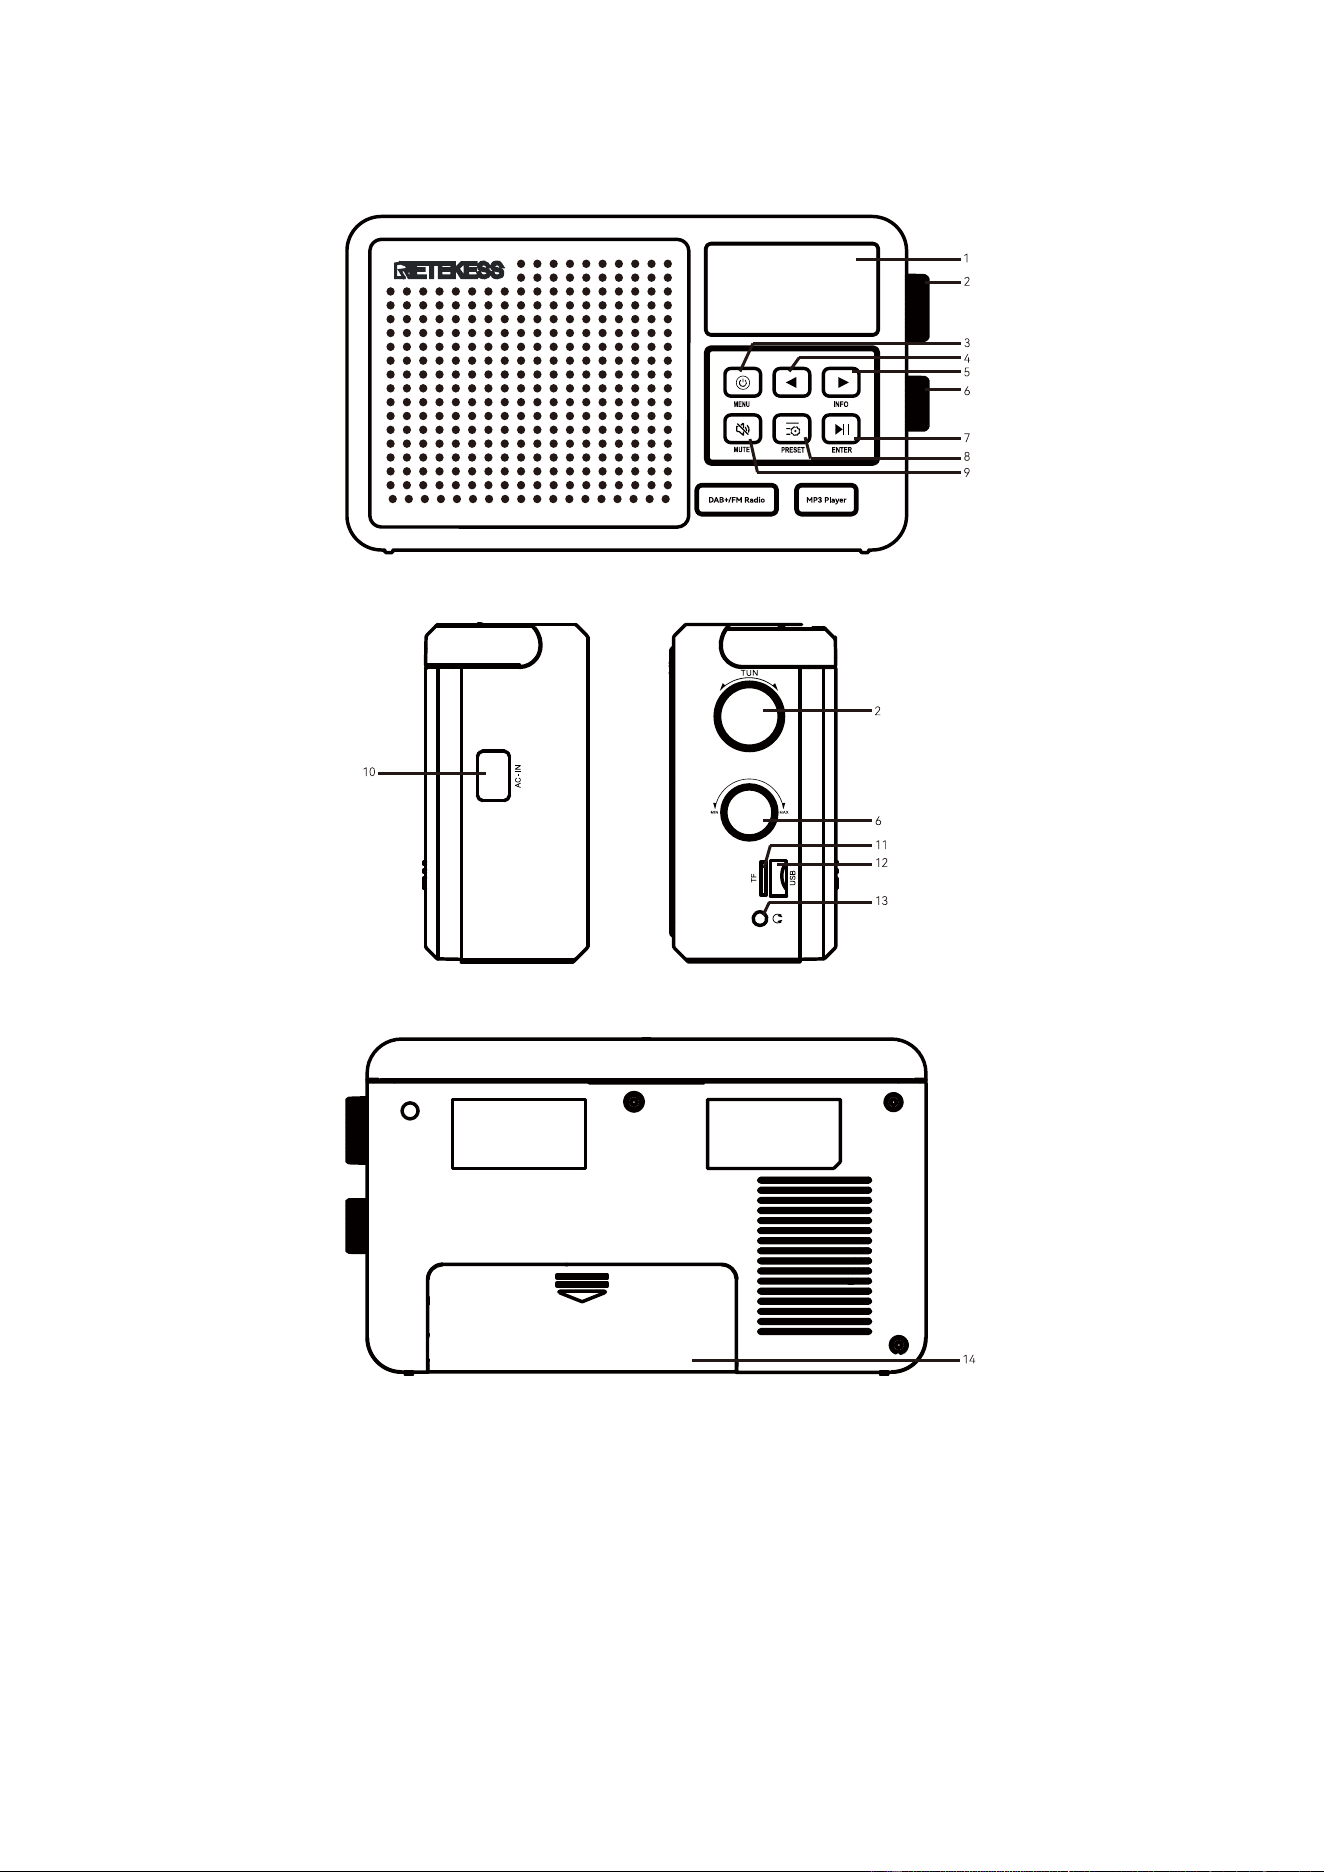
Remote Control Diagram:
1. Up
2. Power On/Off
3. OK/Enter
4. Right/Move forward
5. Down
6. Volume up
7. Select channels
8. Volume down
9. Sleep
10. Home
11. Left/Move Back
12. Mute
2. Specification Parameters
No.
Items
Parameters
1
Reception Range*
FM: 87.5-108MHZ

DAB:174.928MHZ-239.200MHZ
2
Reception sensitivity
FM≦15 dB
DAB≦-48dB
3
Static current
≤200uA
4
Maximum current
≤890MA
5
Speaker
4 寸,4Ω,8W
6
SNR(Signal to Noise Ratio)
40 dB
7
Station storage number*
90(30 network radio mode、30 FM radio mode、30 DAB
radio mode)
8
Bluetooth version
VER 5.0
9
Bluetooth receiving distance
≤10m
10
Bluetooth band
2.400~2.4835GHz
11
Bluetooth RF receiving power
-90 dBm
12
WIFI frequency band
2.412~2.484GHz
13
WIFI RF received power
-108dBm
14
DC
DC 6V(1.5V AA battery × 4pcs)
15
AC
220-240V~50Hz / 110V~60Hz (Check the voltage
information on the body label)
16
TF/USB card play format
Support MP3,WMA,WAV、APE,FLAC play
17
TF card maximum supporting
capacity
256G
18
Size
210X125X60mm
19
Net weight
DAB:783g
Non-DAB:776g
*Note: Only DAB version supports FM and DAB functions, and the storage capacity of non-DAB
stations is 30 (network radio mode).
Accessory List
Name
Number
Radio
1
Remote Control
1
Power Cable
1
User manual
1
3. Power On and Standby
3.1 First power on (without connecting network)

The radio is connected to AC or installed with four batteries.
The screen displays the characters ‘Boot up and connect to network’ (indicating a prompt to start and connect to
the network).
Configure network? (Indicates whether the network needs to be installed)
----YES / NO(Two choices:YES indicates that you need to connect to the network,NO indicates that
no network is required.)
Display prompts:“to previous,→to next,SELECT when done”(press【 】&【 】to choose)
Choose YES/NO. After choosing,press【ENTER 】to confirm,and enter main menu to choose.
Connect network WIFI account operation (see "4.1.1 WI-FI Network Connection")
3.2 If the network WIFI is connected, connect the power supply or install the battery
Tap [POWER], display ‘Boot up and connect to network’ character.
Then, display the current time, about 3 seconds later, the radio is turned on.
3.3 Standby/power off:
Power on, long press [POWER] key, enter into the standby state (display time interface): for the battery
power, automatic shutdown after 1 minute, For the AC power supply, it is in the standby interface for a long
time and does not automatically shut down.
4. Function
Enter【MENU】, lightly press【 】&【 】or rotate【 】to choose work mode, after choosing, and press
【ENTER】to enter.
Network
radio
DAB radio
(DAB
version
only)
FM radio
(DAB
version
only)
Bluetooth
play
USB play
TF card
play
Alarm
setting
Sleep
setting
Configuration
setting
4.1 Network Radio
4.1.1 WI-FI Network Connection
Enter Configuration menu,choose Network,the screen displays the following list of choices, then rotate the
【 】to choose:
Network,<WLAN Scan>
Short press【ENTER】to select a network account.
LCD displays SCANNING......displays the name of the peripheral network, rotate
【 】to choose “ ” the well signal. And press【ENTER】to enter WIFI password.
WLAN(WPS PBC)
Short press【ENTER】to enter WPS auto connection.
SSID:【**】
If a network is connected, the name of the connected network is displayed.
Signal【**】
Displays the network signal strength value
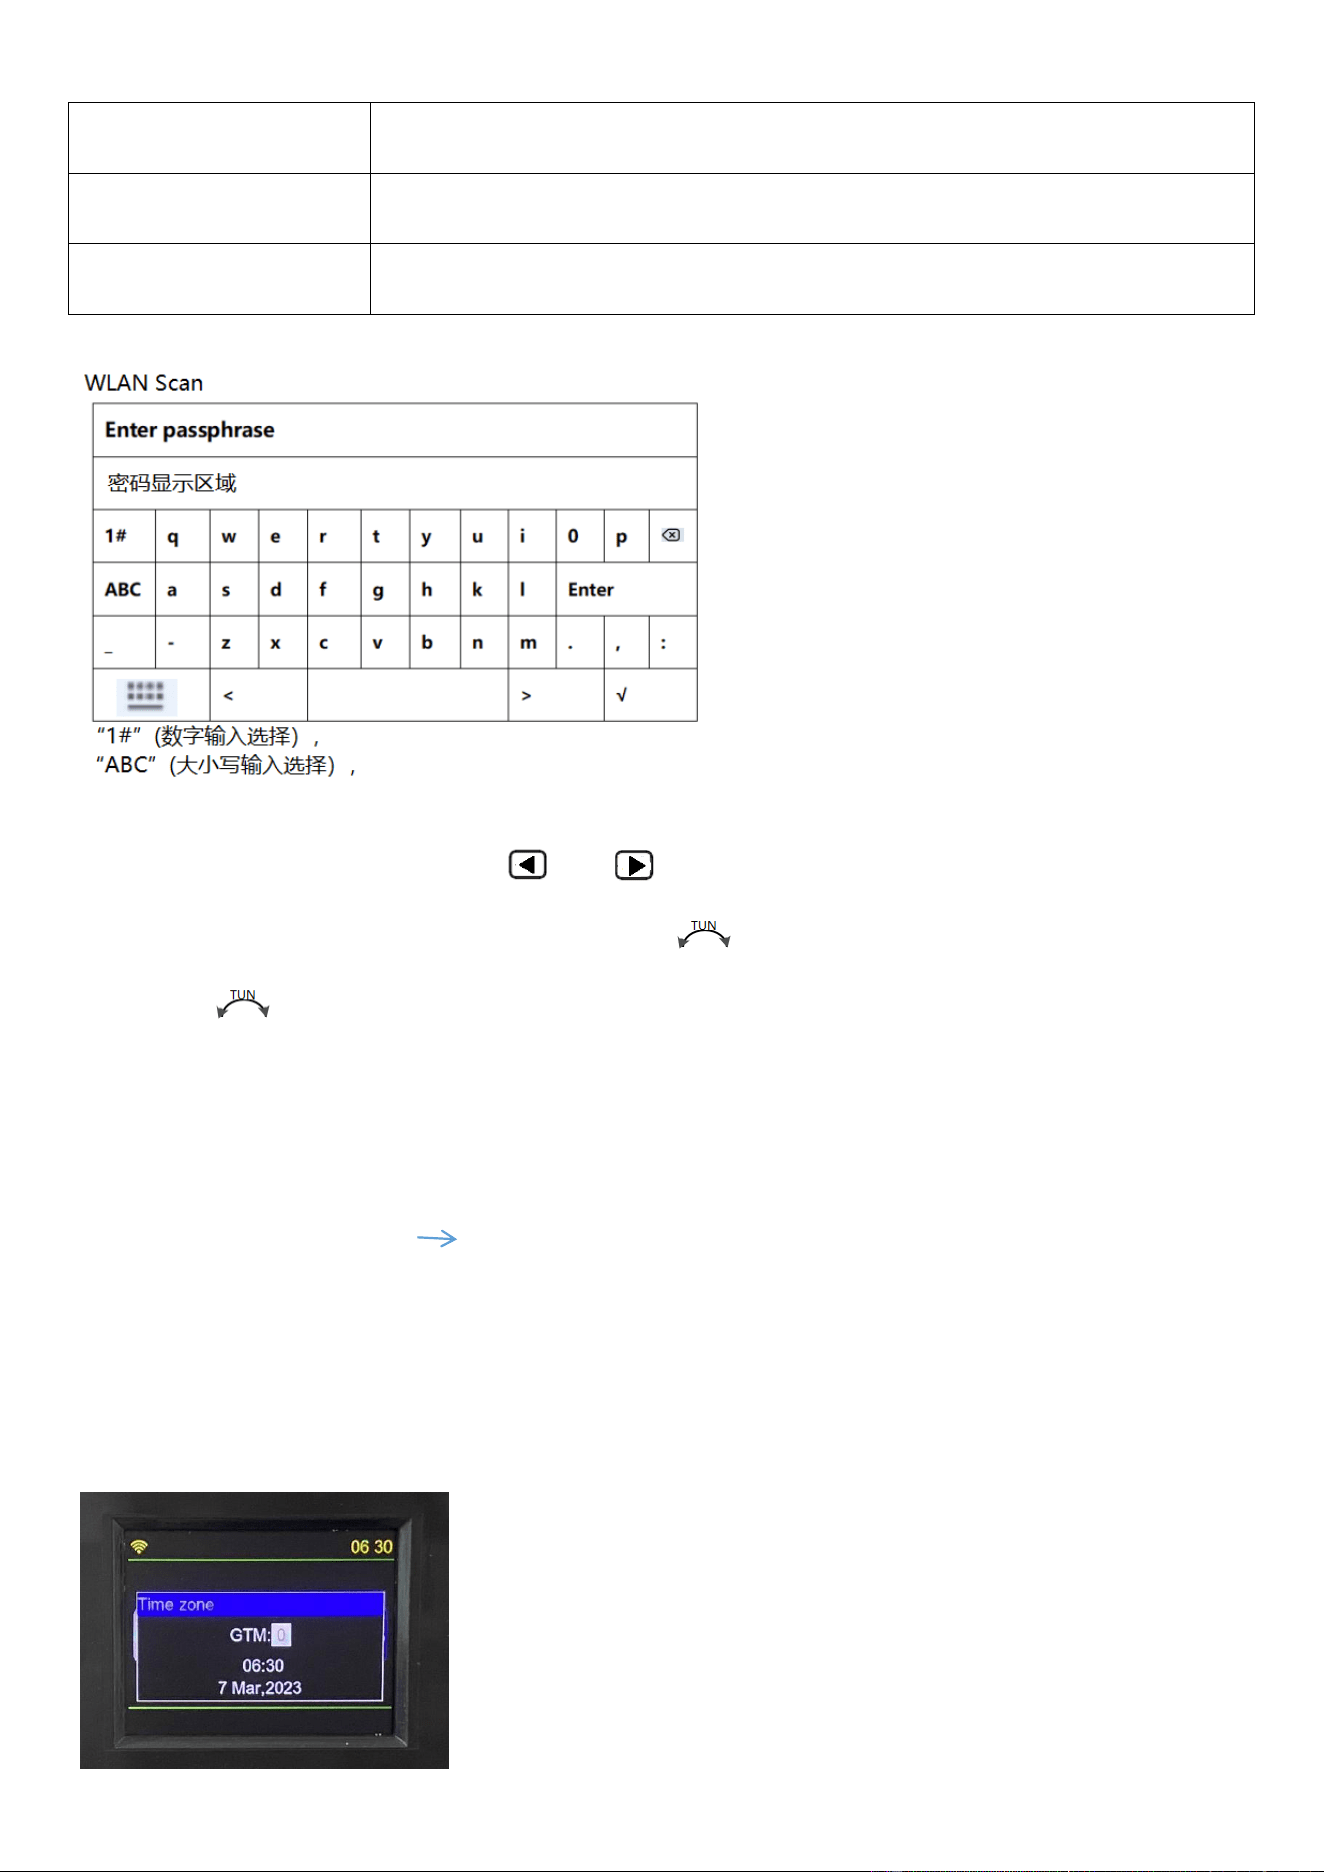
In the password entry area, lightly press【 】&【 】, move left and right, up and down to select a WLAN
password number, letter, or symbol. You can also turn the 【 】 button clockwise to indicate downward selection,
or turn the 【 】button counterclockwise to indicate upward selection, and press the [ENTER] key to confirm.
※ When selecting 1#, ABC, abc, press [ENTER] , keyboard-styled English size word area/various symbols can
be selected.
After filling in the correct password, press [ENTER] to confirm.
LCD displays:“WI-FI connecting.” “WI-FI connection successful” WI-FI is connected successfully.
If the password is not entered correctly, displays ”Ivalid passphrase”.
※WI-FI is connected successfully, about 3-5 seconds, the LCD automatically displays the ‘Time zone’ (Time zone
setting) display window, shown below:
At this time, rotate【 】to choose time zone in GTM:-12.0,-11.0,
-10.0,-9.0,-8.0,-7.0,-6.0,-5.0,-4.0,-3.0,-2.0,-1.0 ,+0,+1.0,+2.0,+3.0,+4.0,+5.0,+6.0,+7.0,+8.0,+9.0,+10.0,
+11.0,+12.0. after choosing time zone, slightly press【ENTER】to confirm.
※: The date displayed is automatically updated with the network connection.
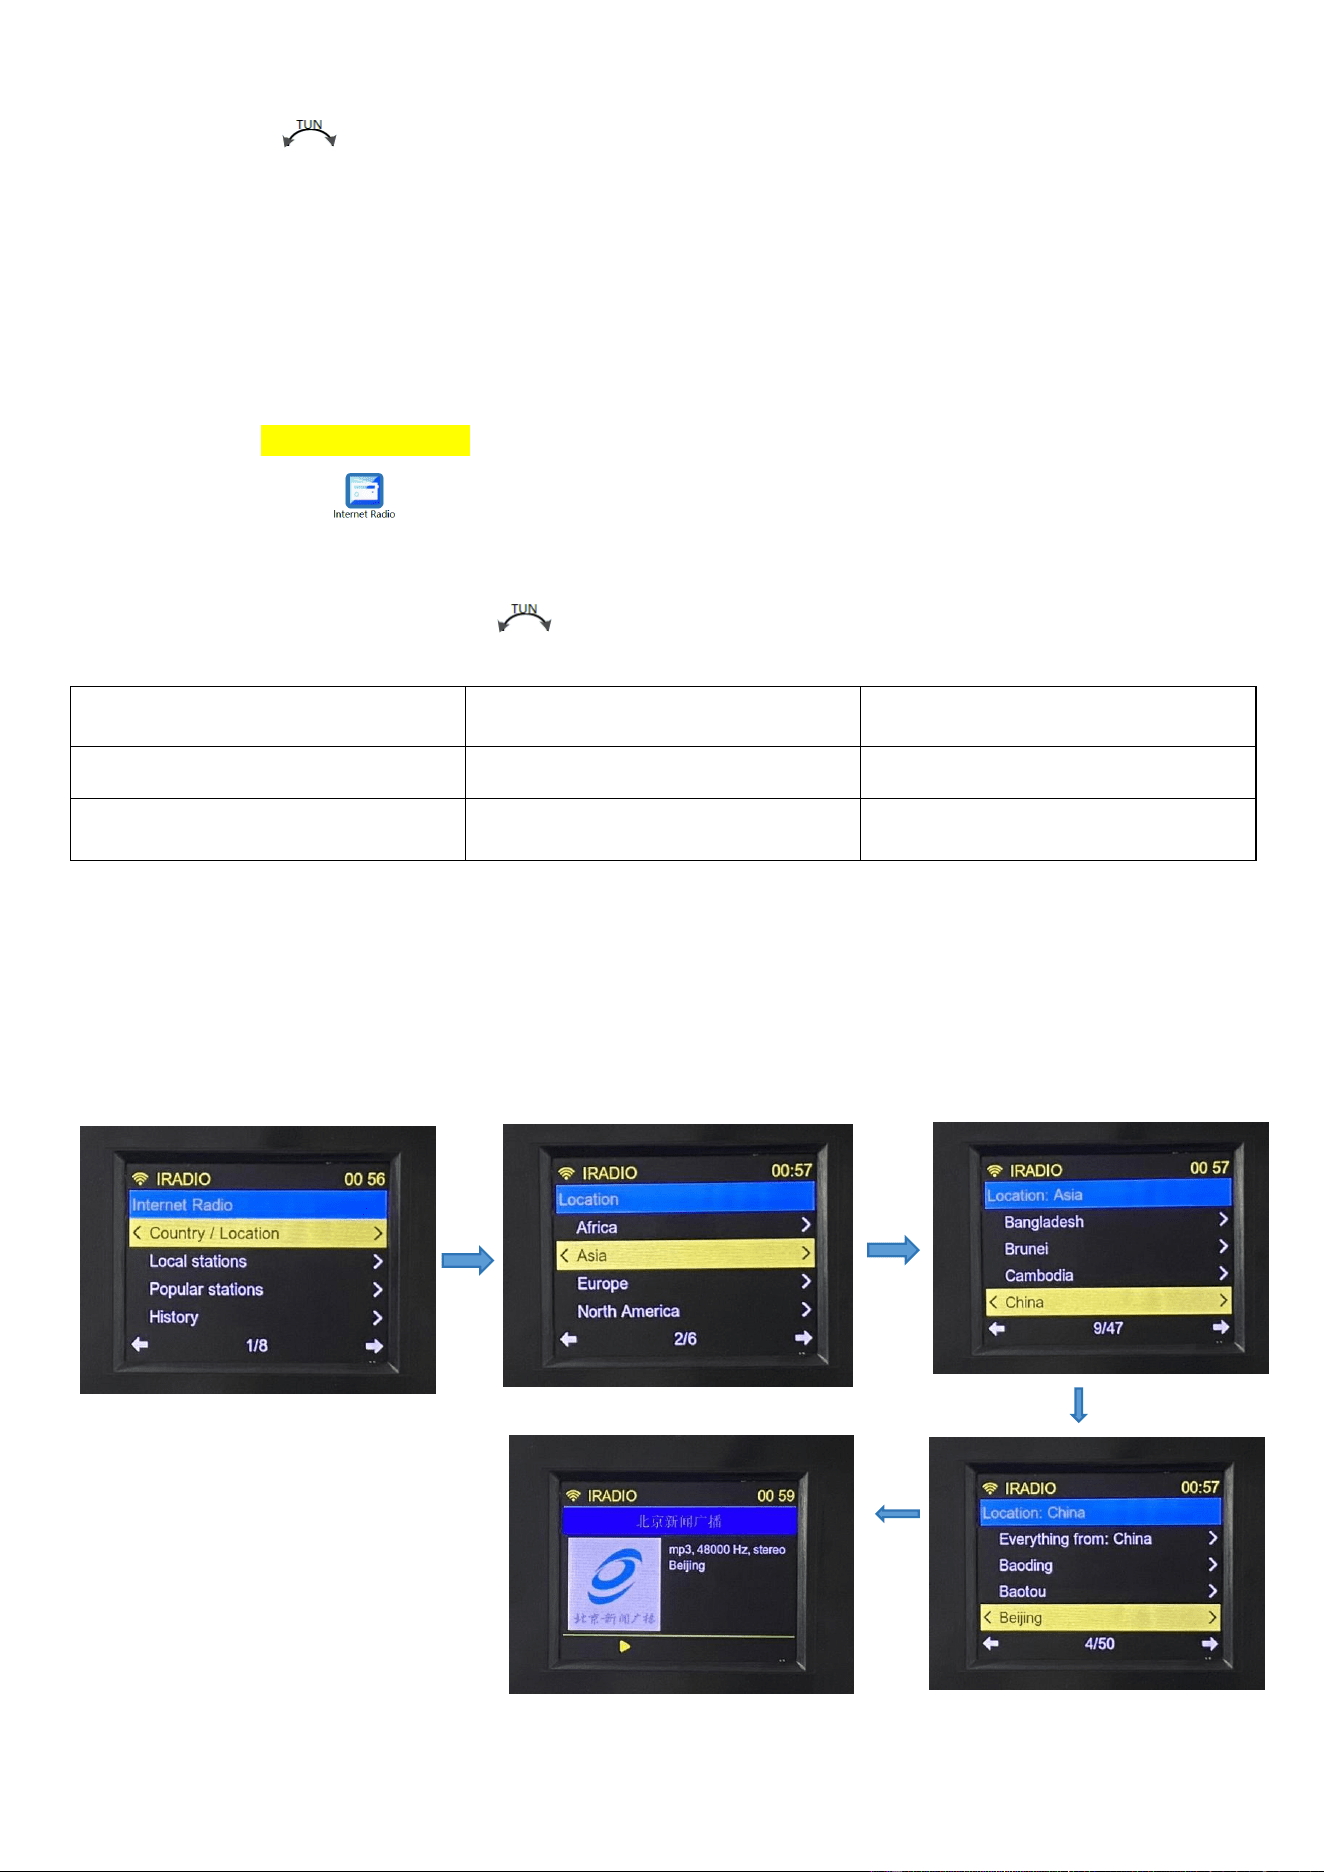
4.1.2 Network Radio Reception
Choose the icon of “ ”, and slightly press【ENTER】to enter.
If the machine is not connected to the network, first prompt to connect to the network.
There is the following list, rotate the【 】button to select and press the [ENTER] key to confirm entry.
For example: to play the ‘Beijing News Broadcast’ radio station, the procedure is as follows:
Choose Country/Location, press【ENTER】to enter continent list,and find Asia, and then press【ENTER】to enter
country list,and find China to press【ENTER】to enter city list,find Beijing, and then press【ENTER】to enter station
list,and find ‘Beijing News Broadcast’ station, and press【ENTER】to play, specific operations are shown as follows:
Country/Location 1/8
Local stations 2/8
Popular stations 3/8
History 4/8
Search 5/8
By language 6/8
By genre 7/8
My favourite 8/8
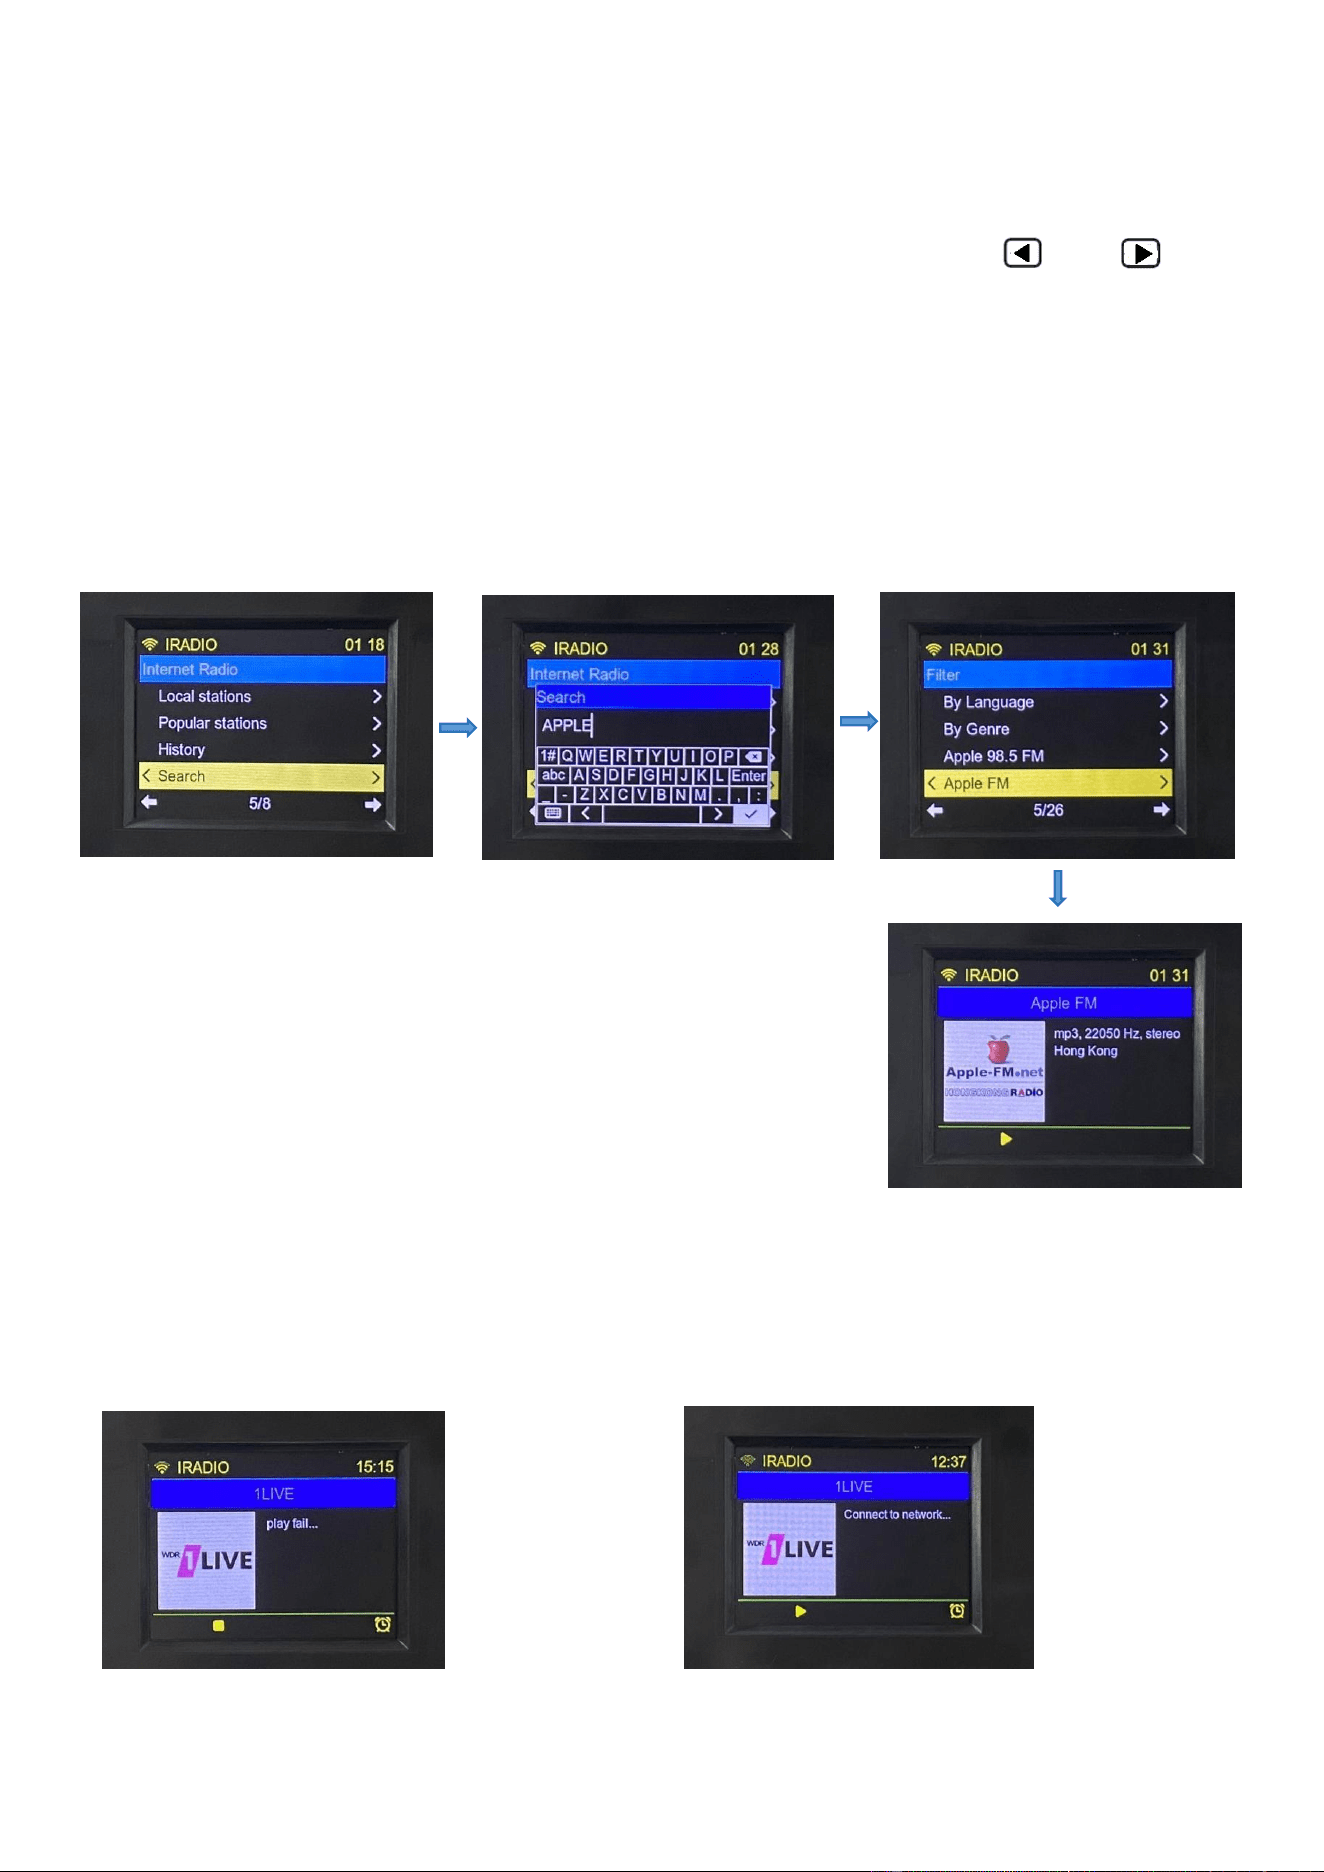
4.1.3 Internet Radio Search Station Operation (Search)
For example, to play ‘Apple FM’, perform the following steps:
Select Search and press 【ENTER】 to enter the search interface. Press 【 】&【 】 to
move left and right , up and down to enter the name of the station, and use it with the key
【ENTER】. After entering the name of the station or keywords, long press【ENTER】to enter the
search. The list of stations is displayed when the station is found. Then select ‘Apple FM’ radio
station, press 【ENTER】key to enter the play, the specific operation is shown as follows:
4.1.4 When the radio fails to be played, ‘play fail’ is displayed. When the network is interrupted, ‘Connect to
network’ is displayed as follows:
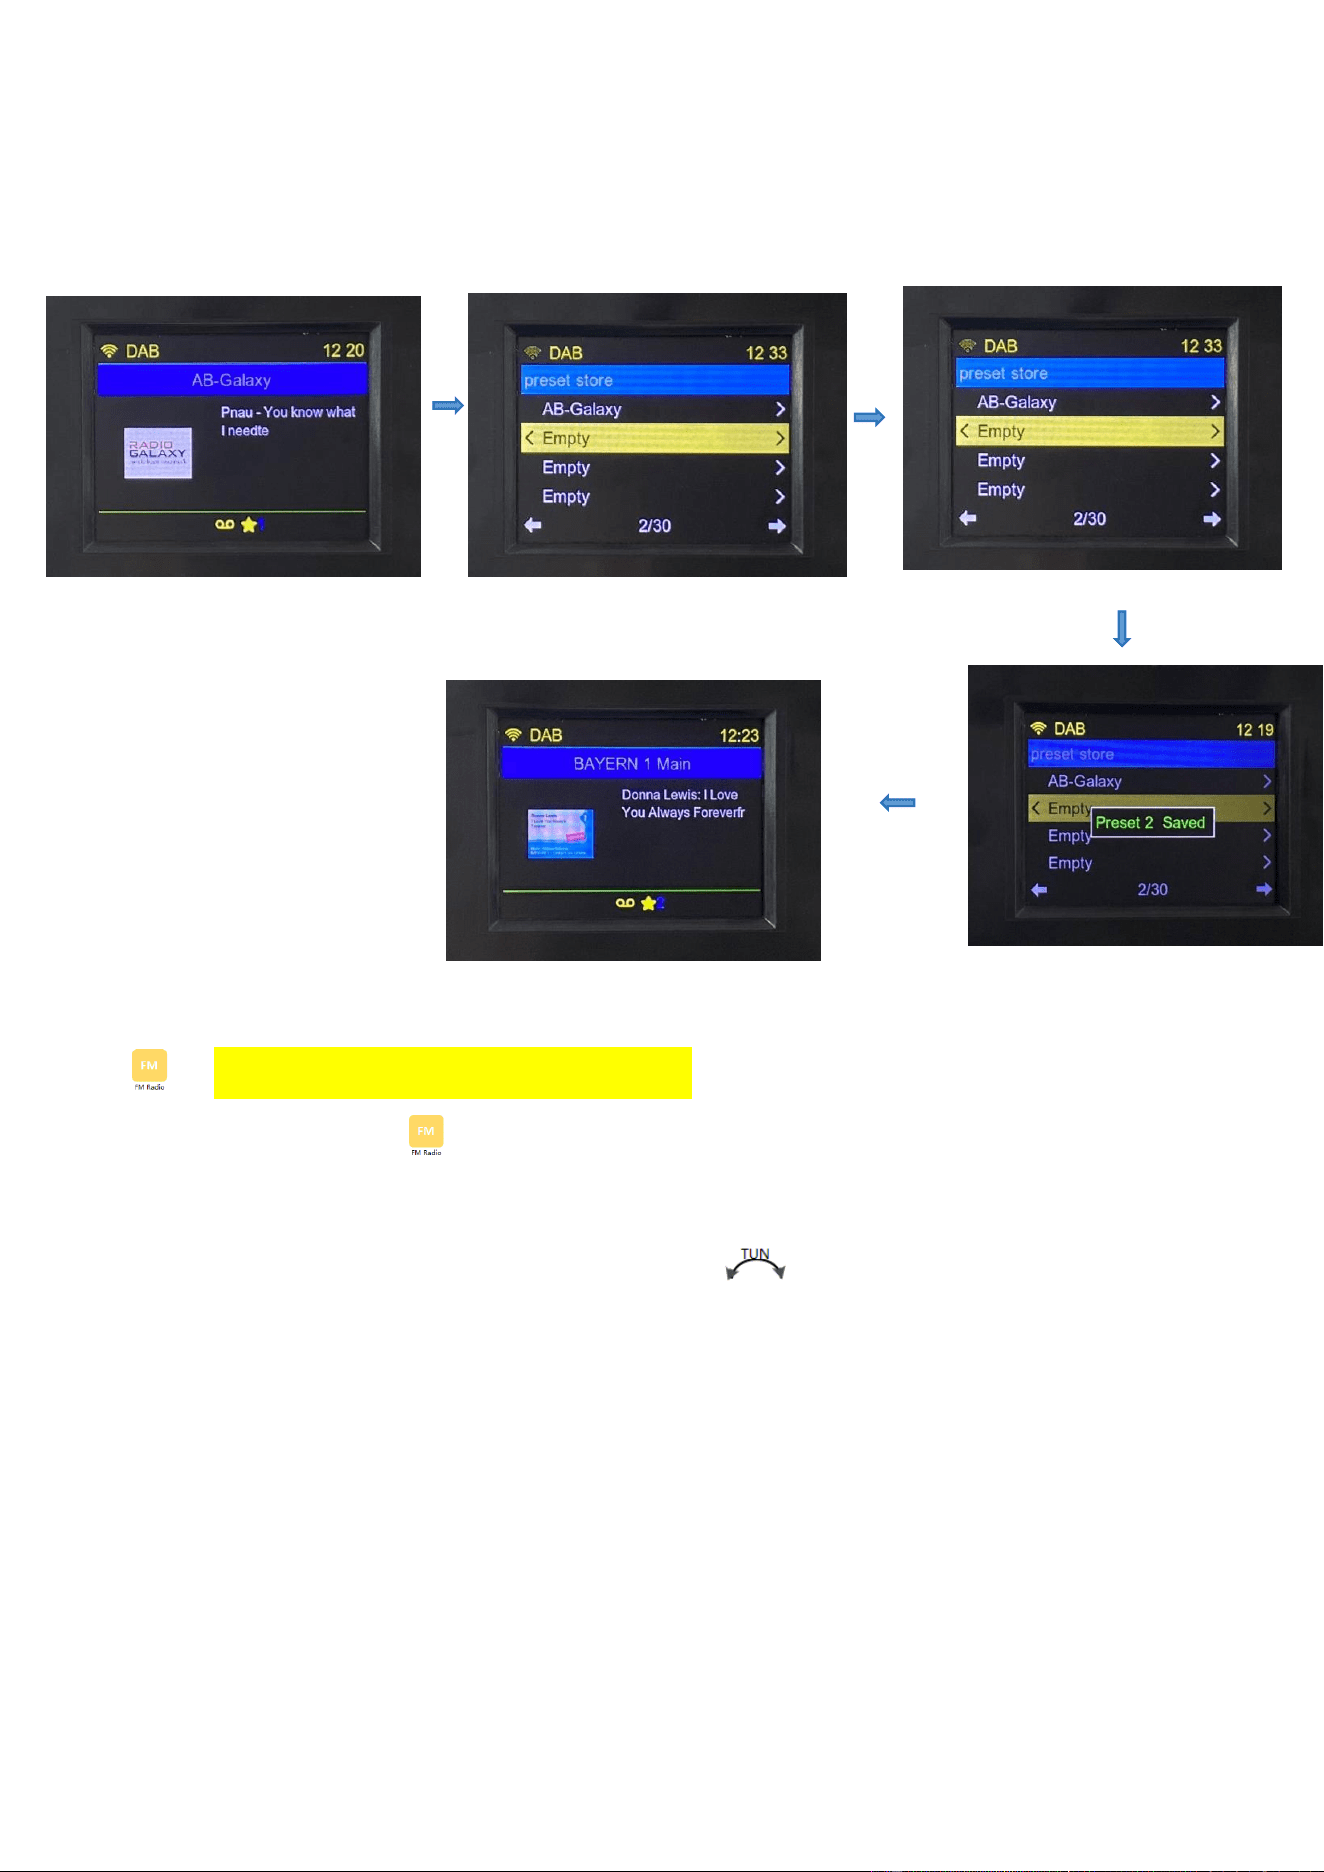
4.1.5. Station storage/station selection:
Station selection: slightly press【PRESET】to enter【preset list】. If there are existing stations, rotate【 】to choose
and switch to the favorite station. If there is no previous station storage, the list displays the character of
【empty】.
Station storage: in the screen of radio play, long press 【PRESET】 to enter 【preset store】list, after rotating 【 】
to choose【Empty】, and then slightly press 【ENTER】to confirm, and displays“PRESET ‘1-30’ SAVED" to indicate the
station has been stored. 【preset store】list can hold 30 stations.
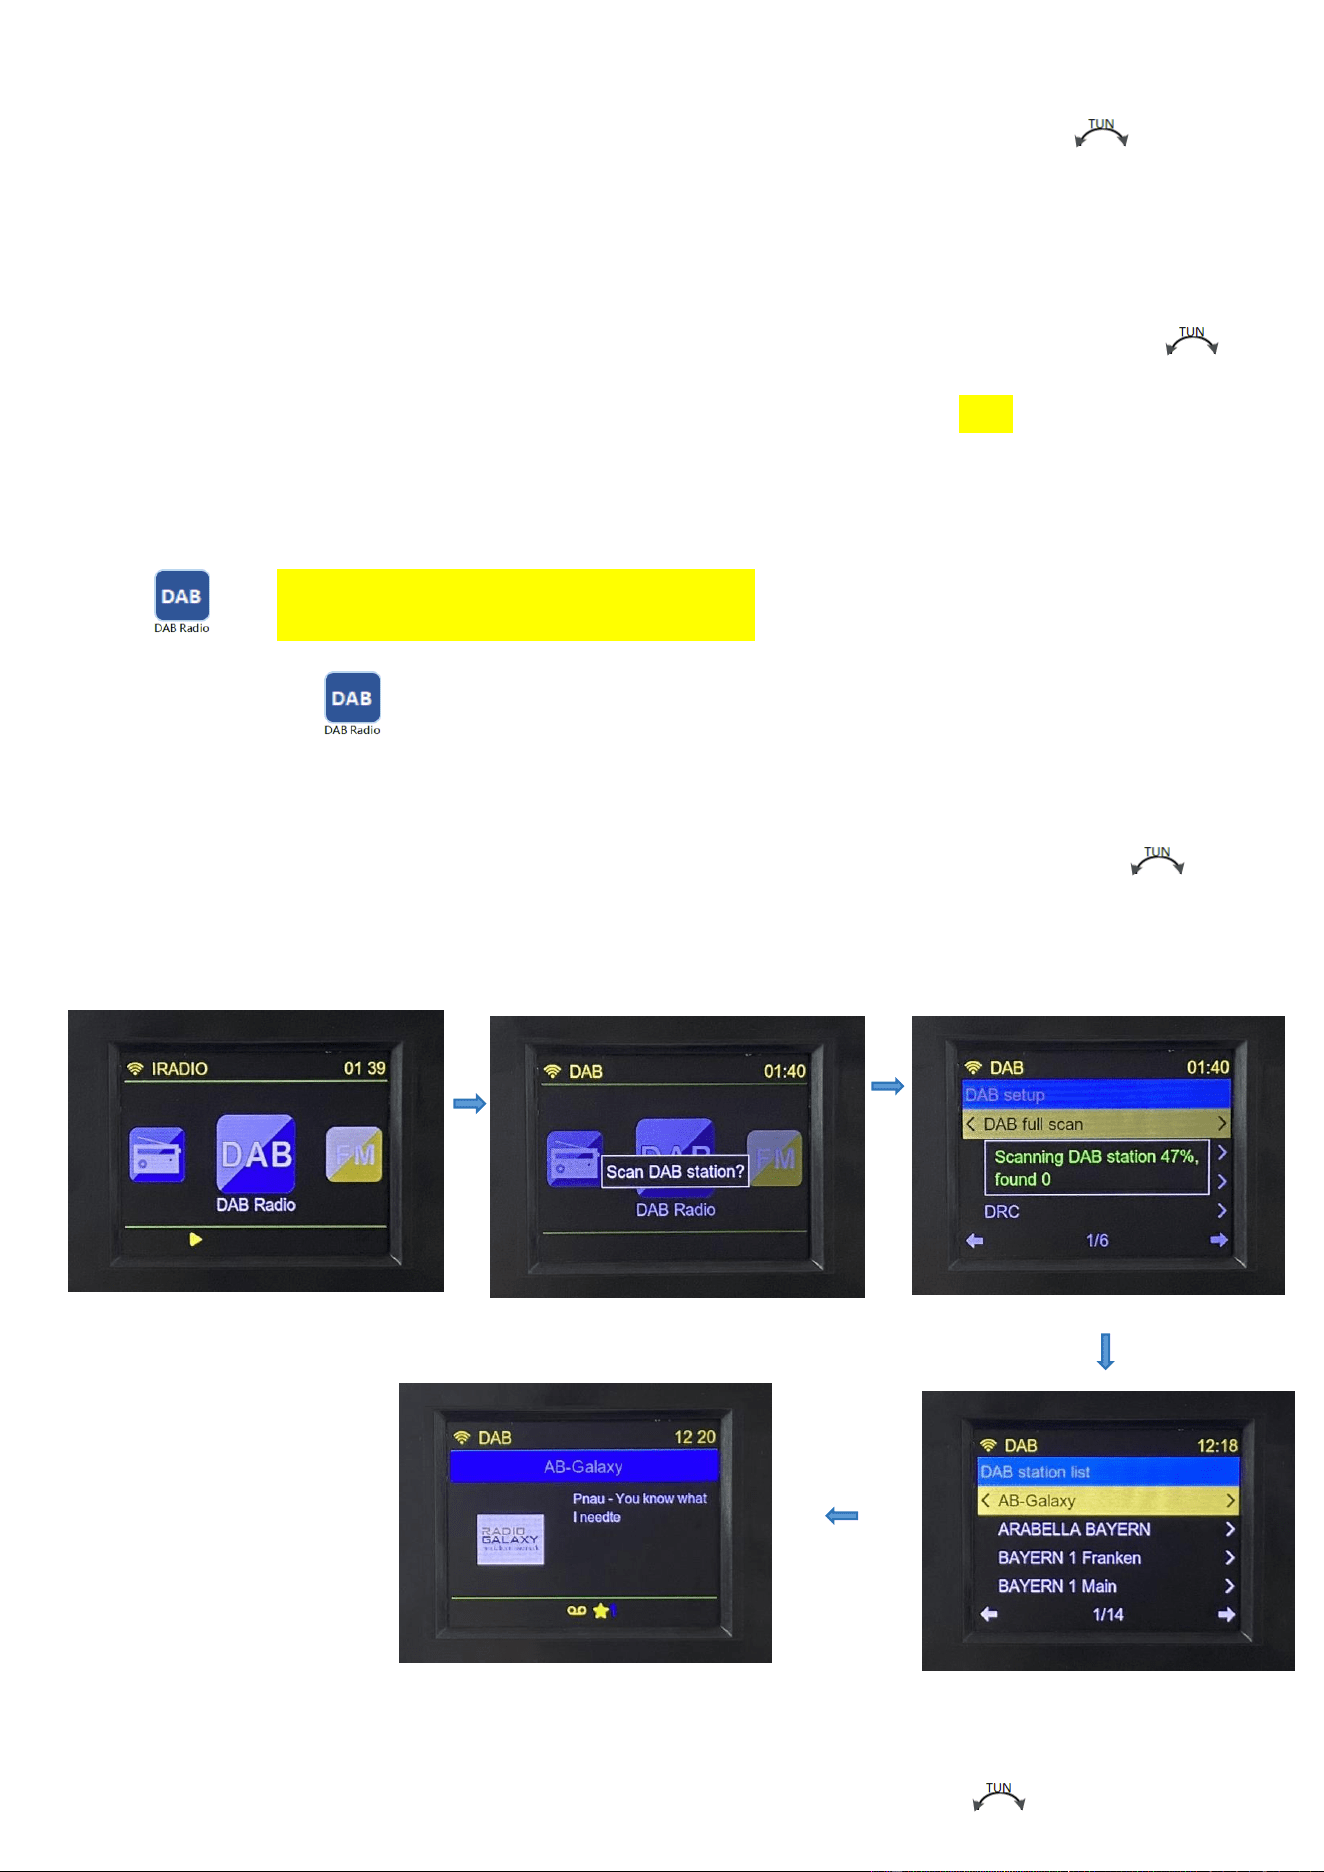
4.2 DAB Radio Reception (DAB version only)
Choose the icon of “ ”, and slightly press【ENTER】to enter.
It will pop up whether to ENTER the DAB automatic station search, press【ENTER】 to confirm, and the station
search interface will be displayed. The station list will be displayed after the station is found, rotate the【 】 to
select the station, press【ENTER】to confirm entering the play interface, the operation will be displayed as follows:
4.2.1 DAB Station Storage
In the DAB play interface, long press 【PRESET】 to enter the station storage list, rotate【 】to choose the station
storage number, and press【ENTER】to enter, displays “PRESET **SAVED”:
4.3 FM Radio Reception (DAB version only)
Choose the icon of “ ”, press【ENTER】to enter:
FM Radio receiving frequency range: 87.50-108.00MHZ(Step value:0.05MHZ)
4.3.1 Manual tuning: in the FM mode, rotate the【 】button in the clockwise direction and
anticlockwise direction according to the minimum step value "0.05MHZ" step, increasing
and decreasing.
* In tune or play... When the LCD displays the "☆" character, it means that the frequency has
been saved to the playlist.
4.3.2:Automatic search station: In FM mode, long press【ENTER】for 2 seconds to enter
automatic scan search station, displays: scan FM station, such as: "Scanning FM station,
frequency 87.5 MHZ, found *" automatically store the stations. From the current receiving band
of the low frequency point search to the highest frequency point, stop automatically scan
search.
* Tips: FM can store up to 30 stations. The number of stations stored in the station depends on
the strength of the local signal.
4.3.3 Manual station storage:choose the favorite station, long press 【PRESET】to enter 【FM Preset Store】
list, rotate 【 】to choose 【Empty】, slightly pres【ENTER】to confirm,displays “PRESET“1-30”SAVED"and
indicates the station has been saved.【FM preset store】list can store up to 30 stations.
4.3.4 Station selection: slightly press 【PRESET】to enter 【preset list】list. If there are existing stations,
rotate【 】to choose and switch the favorite station. If there is no stored stations in advance, the list
displays the character of 【empty】.
Note: When listening to FM (frequency modulation) radio, pull out the antenna and change the antenna length and
find the direction for best reception. If there is strong radio interference, resulting in a string station, and the tie rod
antenna can be shortened.
4.4 Bluetooth Play
Choose the icon of “ ”, and press【ENTER】to enter.
Bluetooth connection code for this radio:‘TR640’. Once connected, turn on your Bluetooth
device to listen to music.
Slightly press【 】&【 】to choose previous song or next song.
Short press【ENTER】to pause/play switch
Long press【ENTER】to disconnect BT.
4.5 USB Play
Choose the icon of ,press【ENTER】to enter.
Insert the USB flash drive correctly, and display playback time/song number/song total prompts.
Maximum support 256G, support MP3,WMA,WAV、APE,FLAC to play the music.
Short press【 】&【 】to choose the previous song or next song.
Long press【 】&【 】for fast backward or fast-forward playback.
Short press【ENTER】to pause/play switch.
If the USB flash drive is not inserted, the ‘No Device’ message is displayed.
4.6 TF Card Play
Choose the icon of ,press【ENTER】to enter TF card playing mode.
Press the TF card icon “ ” to insert TF card.
LCD display: play time/number of songs being played/total number of songs.
Short press【 】&【 】to choose the previous song or next song.
Long press【 】&【 】for fast backward or fast-forward playback.
Short press【ENTER】to pause/play switch.
Maximum support 256G, support MP3,WMA,WAV、APE,FLAC to play the music.
If the TF card is not inserted, the ‘No Device’ message is displayed.
4.7 Alarm Setting
Choose the icon of ,and press【ENTER】to enter alarm setting mode.
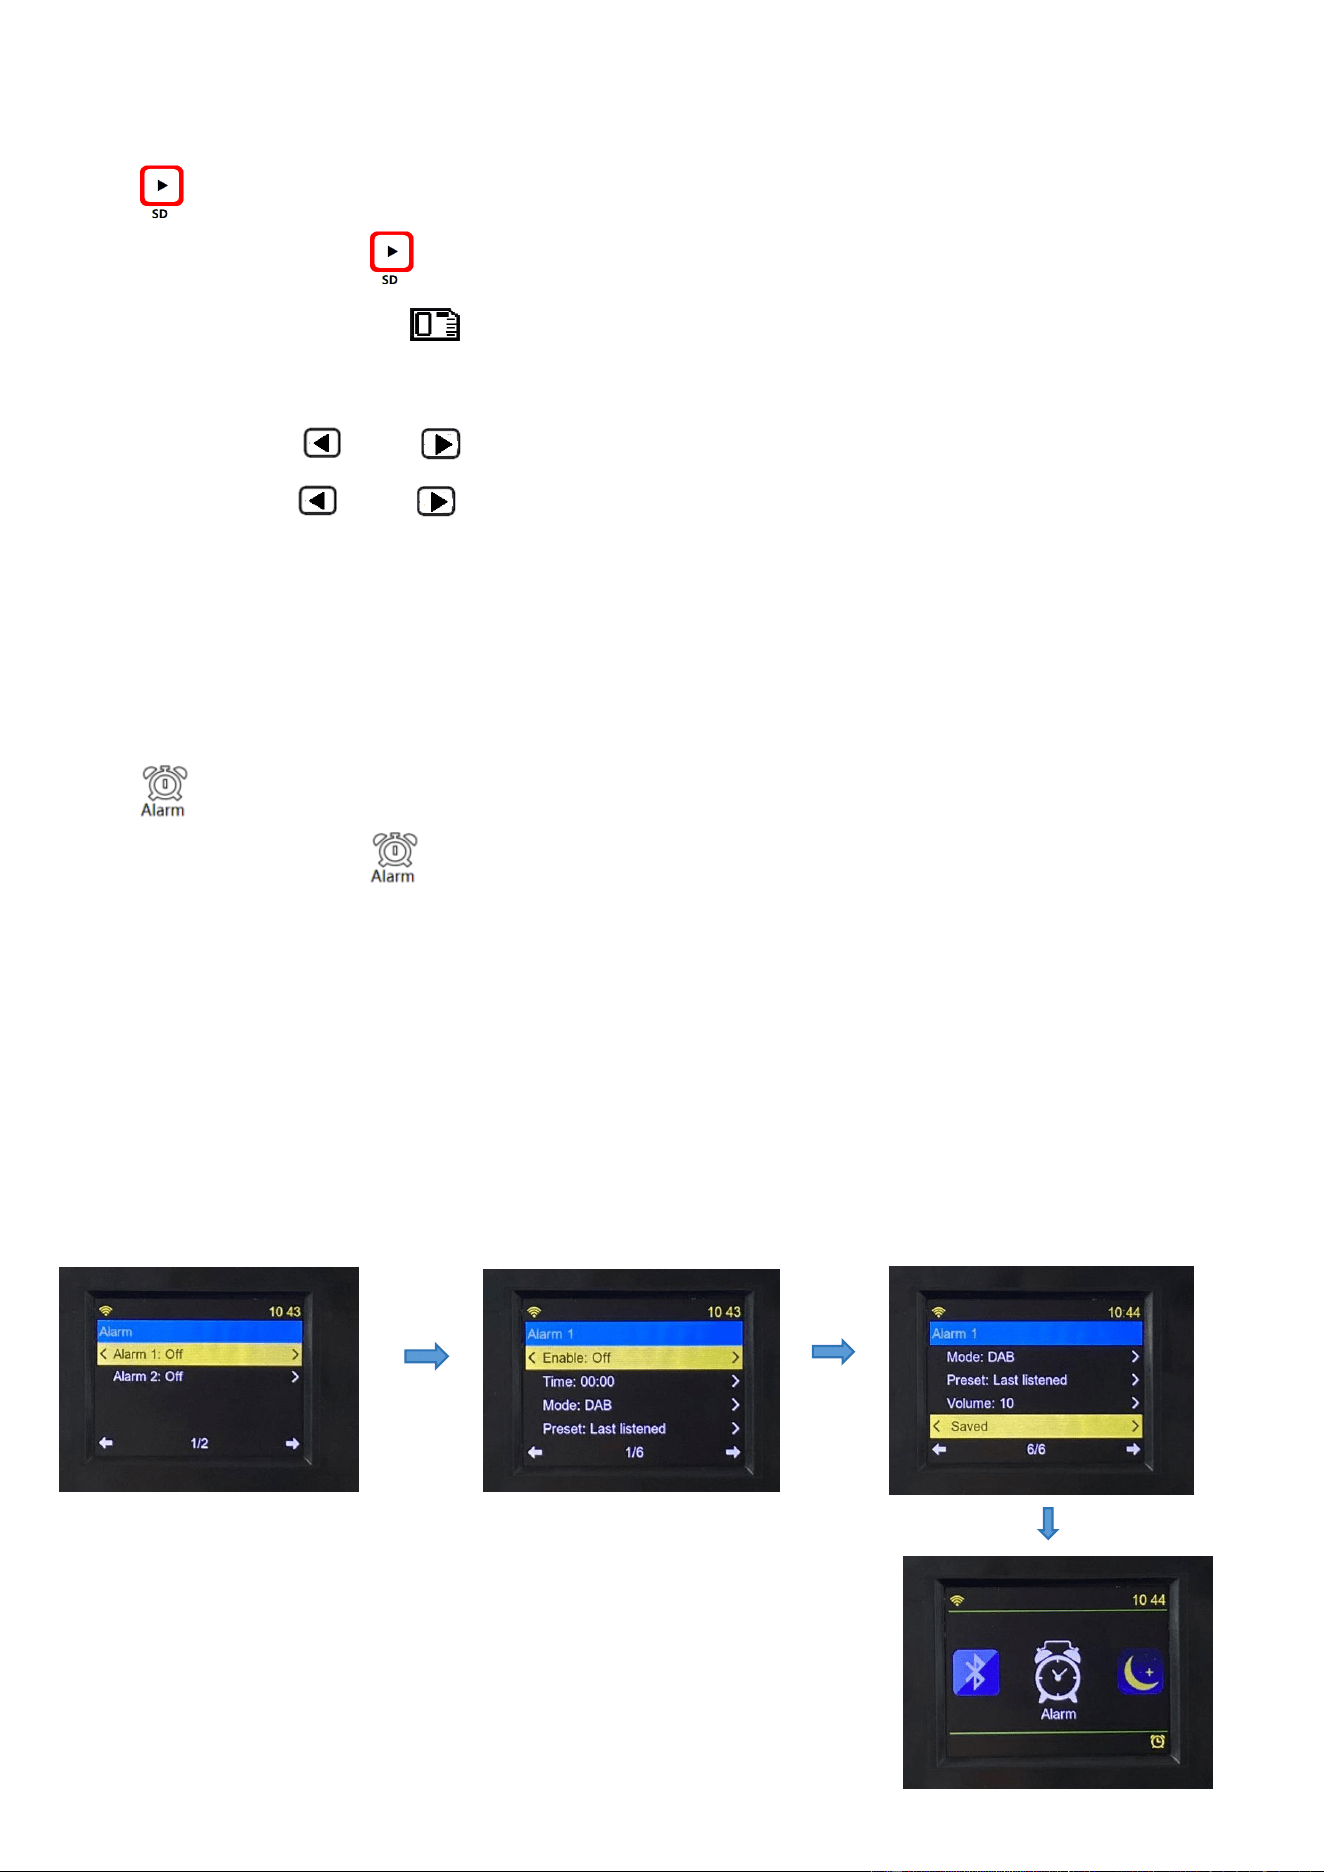
4.7.1 Alarm Setting
After entering the ‘Alarm Setting’ interface, the alarm is off by default and displayed as OFF. Select
Alarm 1 to enter the setting interface. Remember to save the setting after the setting is complete.
When the alarm clock is turned on, the alarm icon will be displayed in the lower right corner, as
shown below:
When the startup alarm rings, the alarm icon flashes.
4.7.2 Snooze Setting
Short press【POWER】to turn off the alarm. Press any key except [POWER] to enter snooze, and
snooze time is 9 minutes, and the alarm will ring again after 9 minutes.
4.7.3 Turn off the ‘Alarm’
Return to the alarm settings, and the alarm is not started if off is selected. Rotate the 【 】
button to the SAVED task bar and press【ENTER】to confirm.
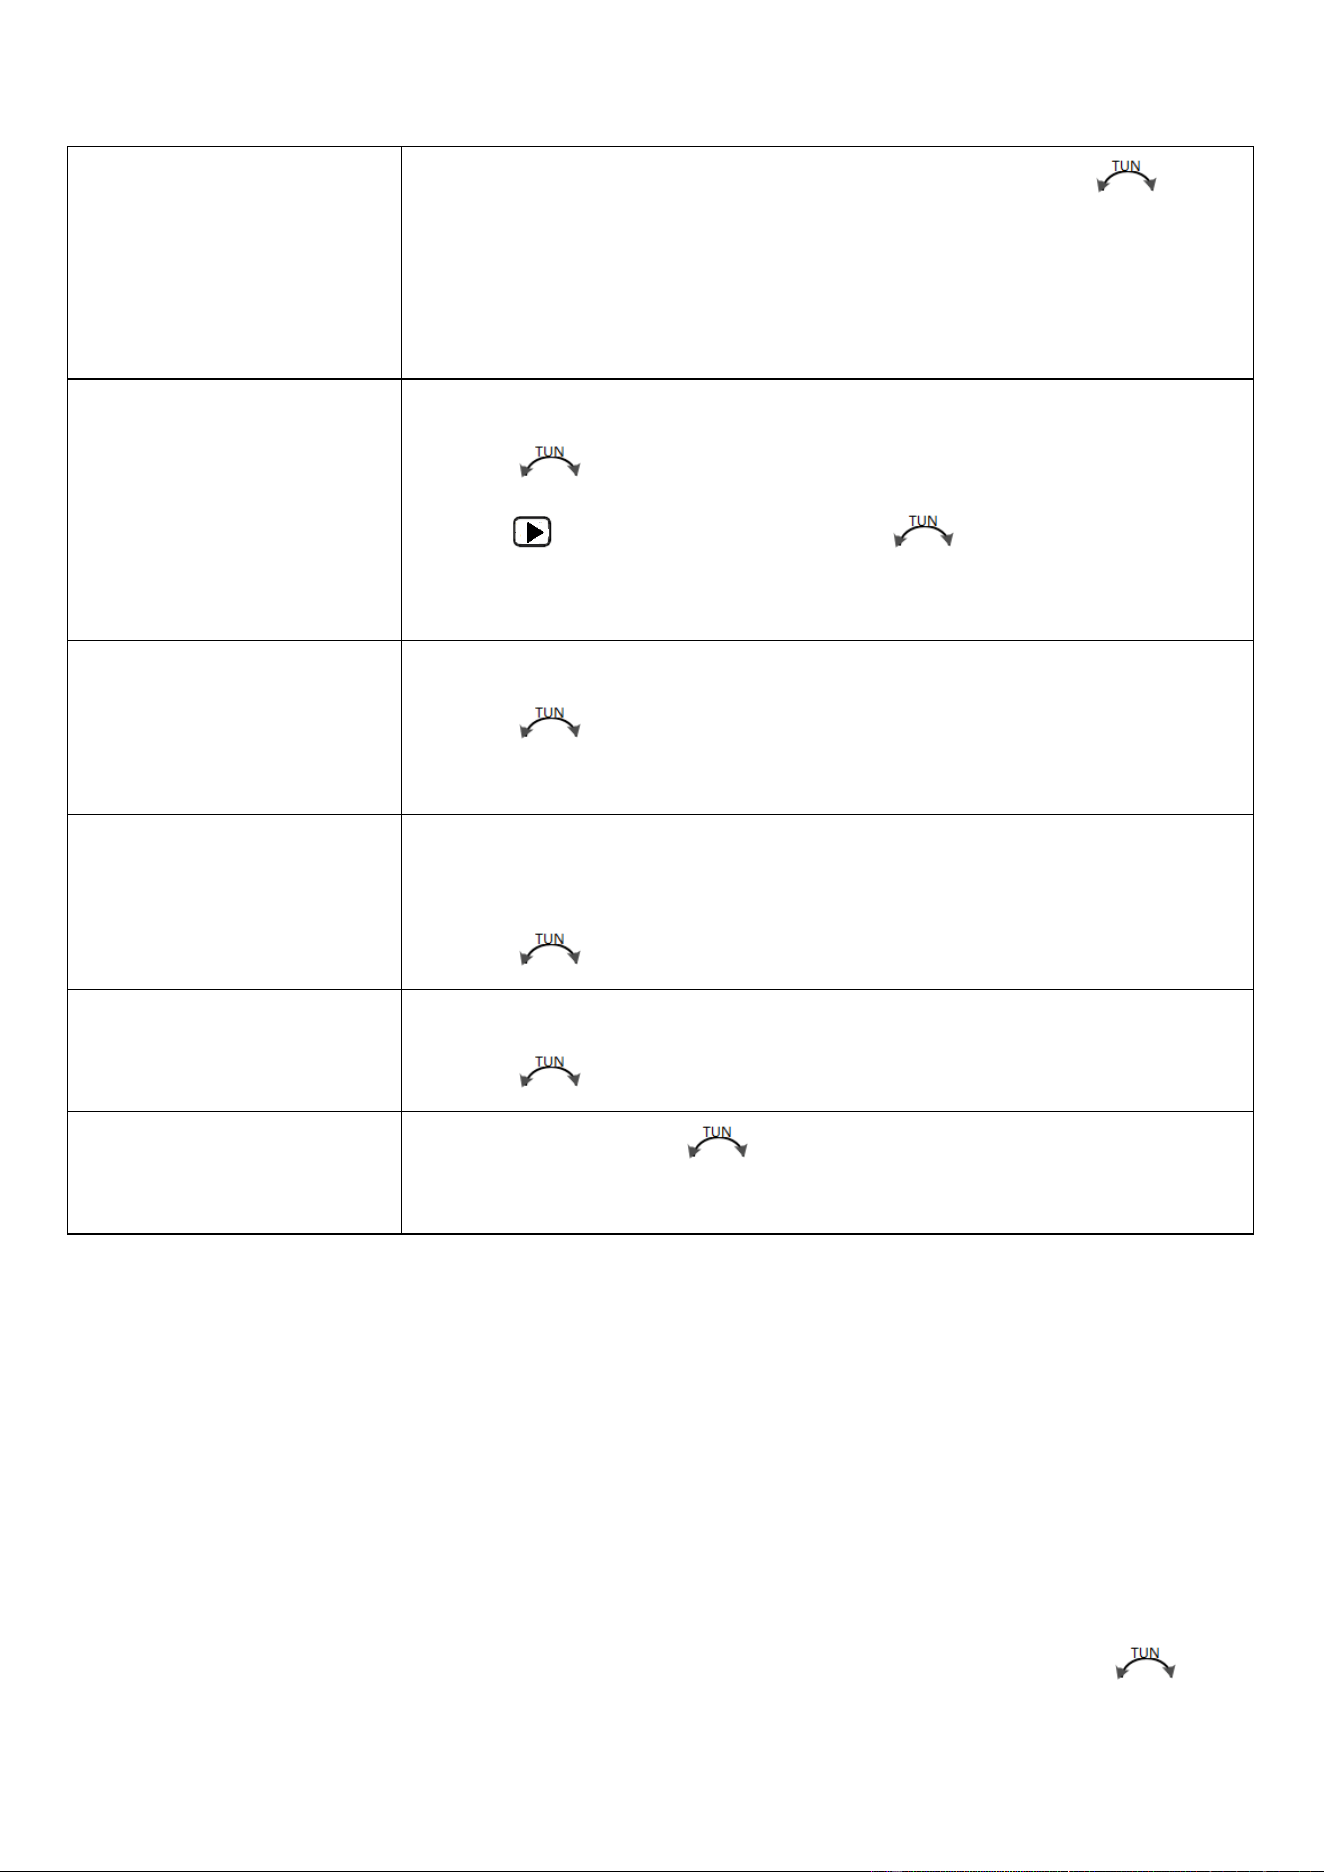
Enable : Off
Press【ENTER】to enter alarm time setting, and rotate【 】to
choose.
Off / Daily / Once /Weekdays / Weekends
After choosing, press【ENTER】to confirm.
Time: 00:00
Set the alarm time.
Rotate【 】to choose the hour of alarm time.
Press【 】, minute flickers, rotate【 】to choose minute, and
press【ENTER】to confirm.
Mode : DAB
Setting method of alarm sounds.
Rotate【 】to choose DAB / FM / BUZZ, and press【ENTER】to
confirm.
Preset last listened
Choose FM as the alarm, can set last listened (last listened station/list
of stored stations) or (select one of the stations in the list)
Rotate【 】to choose, and press to confirm.
Volume:10
Alarm sound setting
Rotate【 】to choose, and press to confirm.
Saved
After choosing, rotate【 】to SAVED task bar, and press【ENTER】
to confirm.
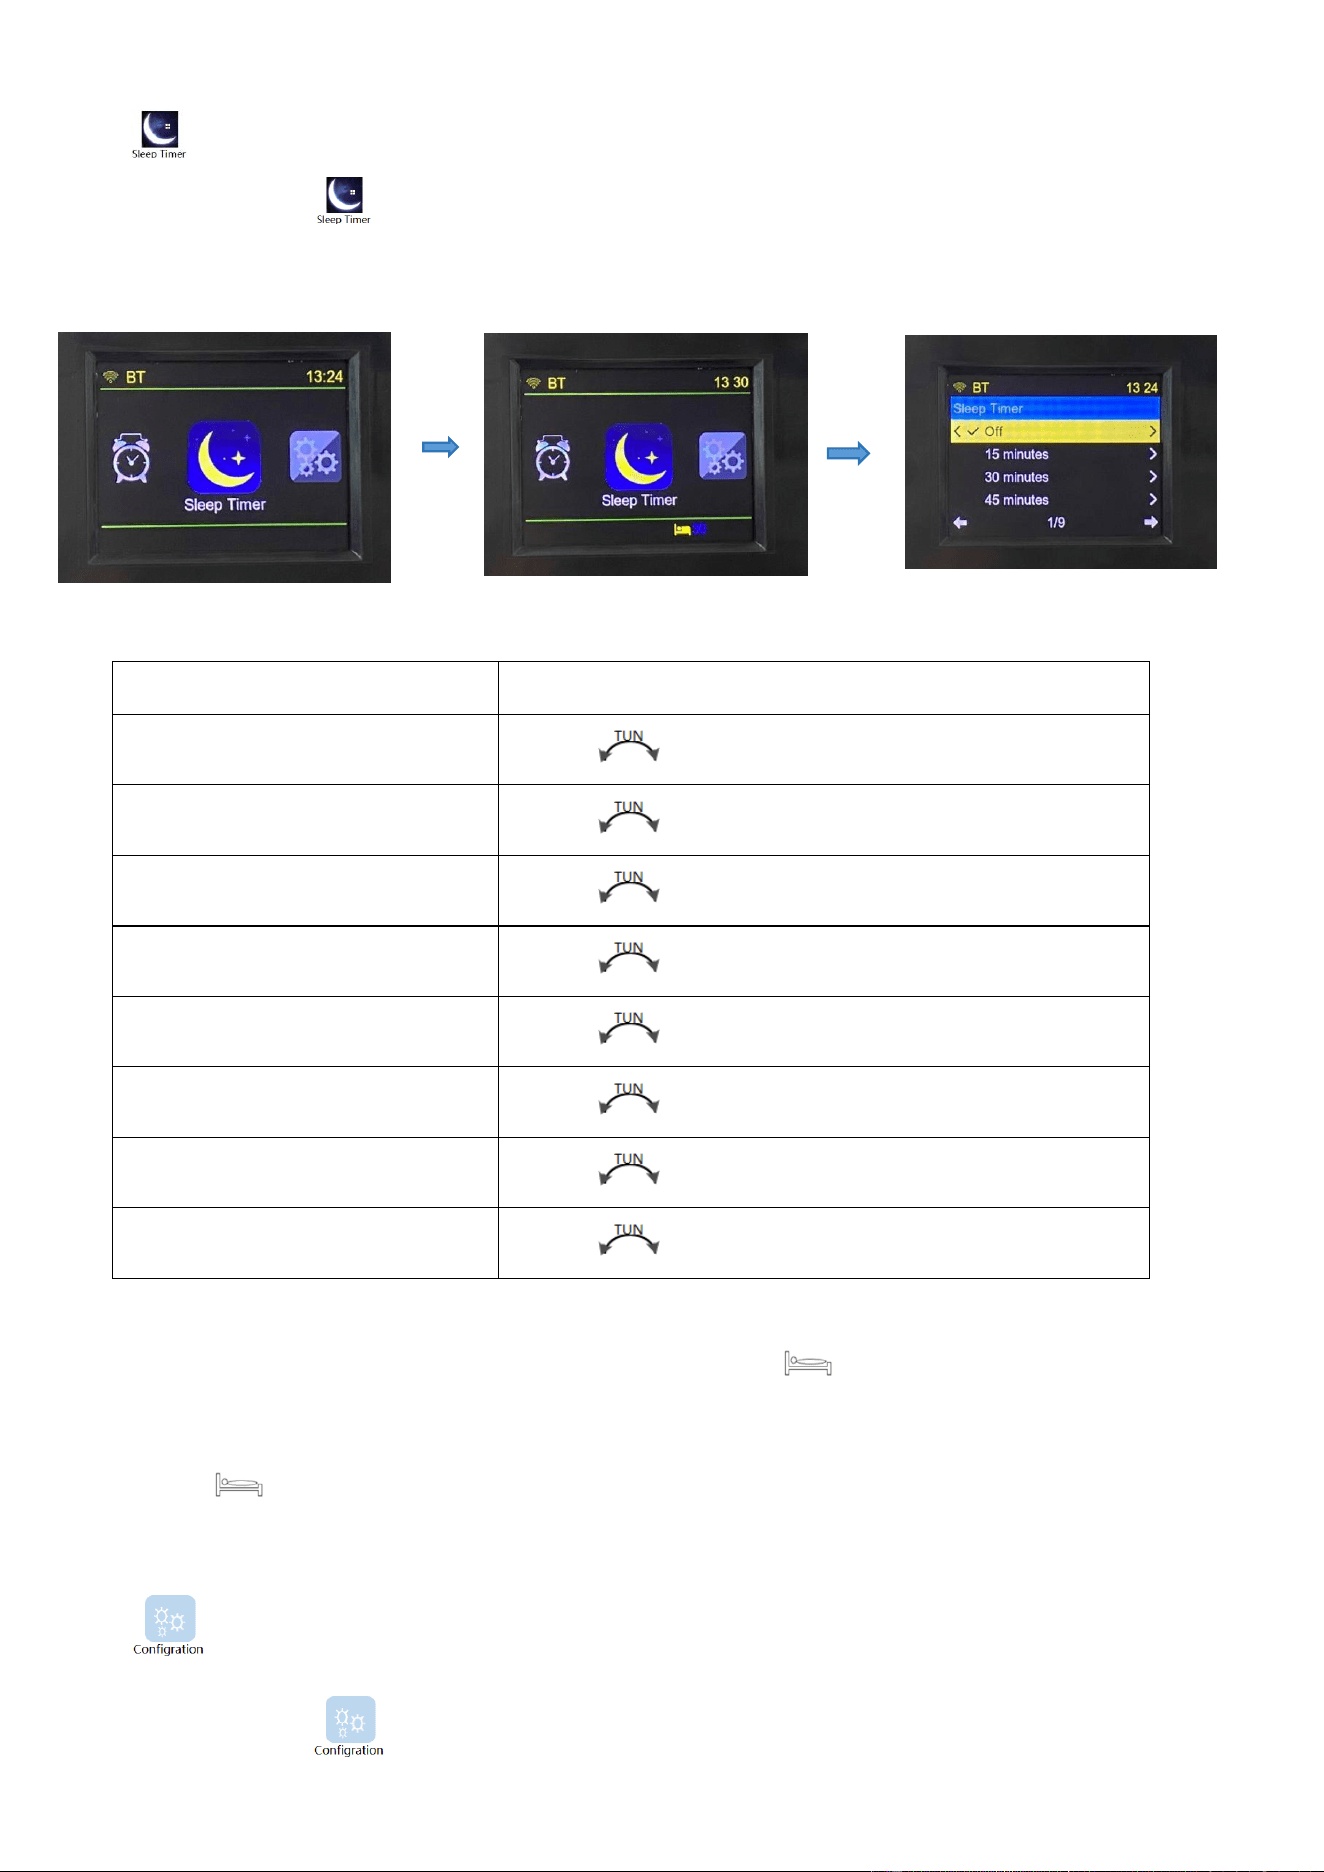
4.8 Sleep Time Settings
Choose the icon of , and press【ENTER】to enter sleep time (auto shutdown time) setting
mode.
After setting, the LCD screen displays the sleep symbol of “ ” and the countdown of shutdown.
※: Automatically shut down within the set automatic sleep shutdown time, and then LCD sleep
symbol of “ ” disappears.
4.9 Operation Introduction of Settings
Choose the icon of ,and press【ENTER】to enter system settings, as shown in the following
pictures:
off
off
15minutes
Rotate【 】to choose, and press ENTER to confirm.
30minutes
Rotate【 】to choose, and press ENTER to confirm.
45minutes
Rotate【 】to choose, and press ENTER to confirm.
60minutes
Rotate【 】to choose, and press ENTER to confirm.
90minutes
Rotate【 】to choose, and press ENTER to confirm.
120minutes
Rotate【 】to choose, and press ENTER to confirm.
150minutes
Rotate【 】to choose, and press ENTER to confirm.
180minutes
Rotate【 】to choose, and press ENTER to confirm.

Rotate【 】button to show the following settings, and press【ENTER】to confirm.
Network
Date &Time
Language
DAB setup (DAB version
only)
FM setup (DAB version only)
Dimmer
EQ
Buffer time: [*seconds]
Information
Software update
Reset to default
4.9.1 Connect the network as detailed in "4.1.1 WI-FI Network Connection", and then automatically
update time and date.
4.9.2 Date & Time
Rotate【 】to show the following settings, and press【ENTER】to confirm.
Set Date and Time
Note: manual time setting, to operate when NTP
is set to DO not use network.
NTP: [Use network time] *
Use network time (Use the network to update
the time automatically)
Do not use network (Update the time
automatically without the network)
Time zone
GTM: ±12(choose time zone)
Set time formal
12/24 hour(choose 12/24 hour schedule)
Set date formal
day/month/year (Format: DD/MM/YYYY)
month/day/year (Format: MM/DD/YYYY)
Set time from DAB:【on】
On/off
Set time from FM:【on】
On/off
* Note: After switching NTP to Use network time, it needs to power off and then power on before it
takes effect.
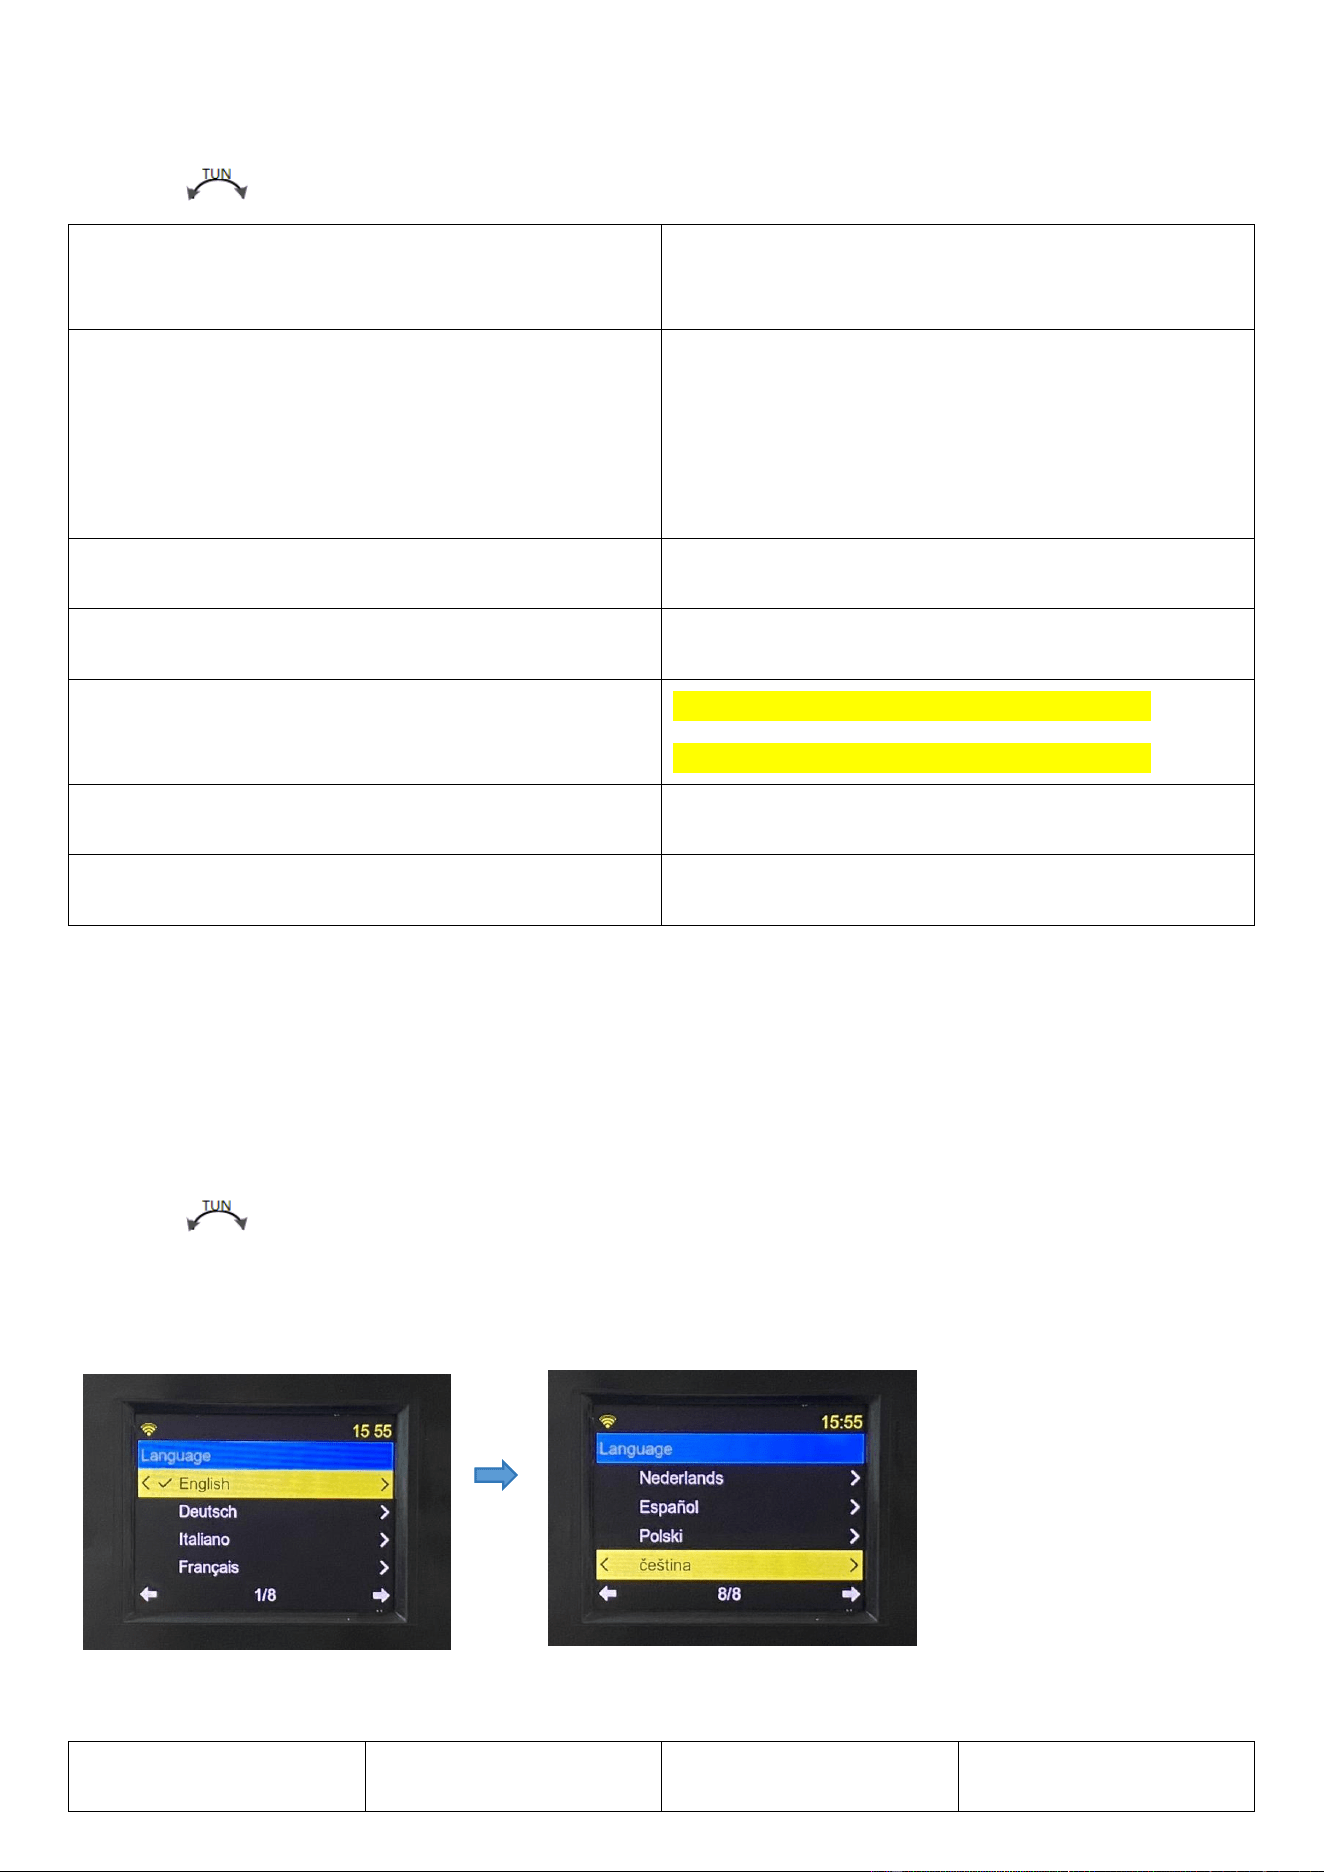
4.9.3 Language Settings
Rotate【 】for the following settings, and press【ENTER】to confirm.
There are eight languages to choose from, select and press [ENTER] to confirm.
English(英语)
Deutsch(德语),
ltaliano(意大利语)
Francais(法语)
Nederlands(荷兰语)
Espanol(西班牙语)
Polski(波兰语)
Русский (俄语)
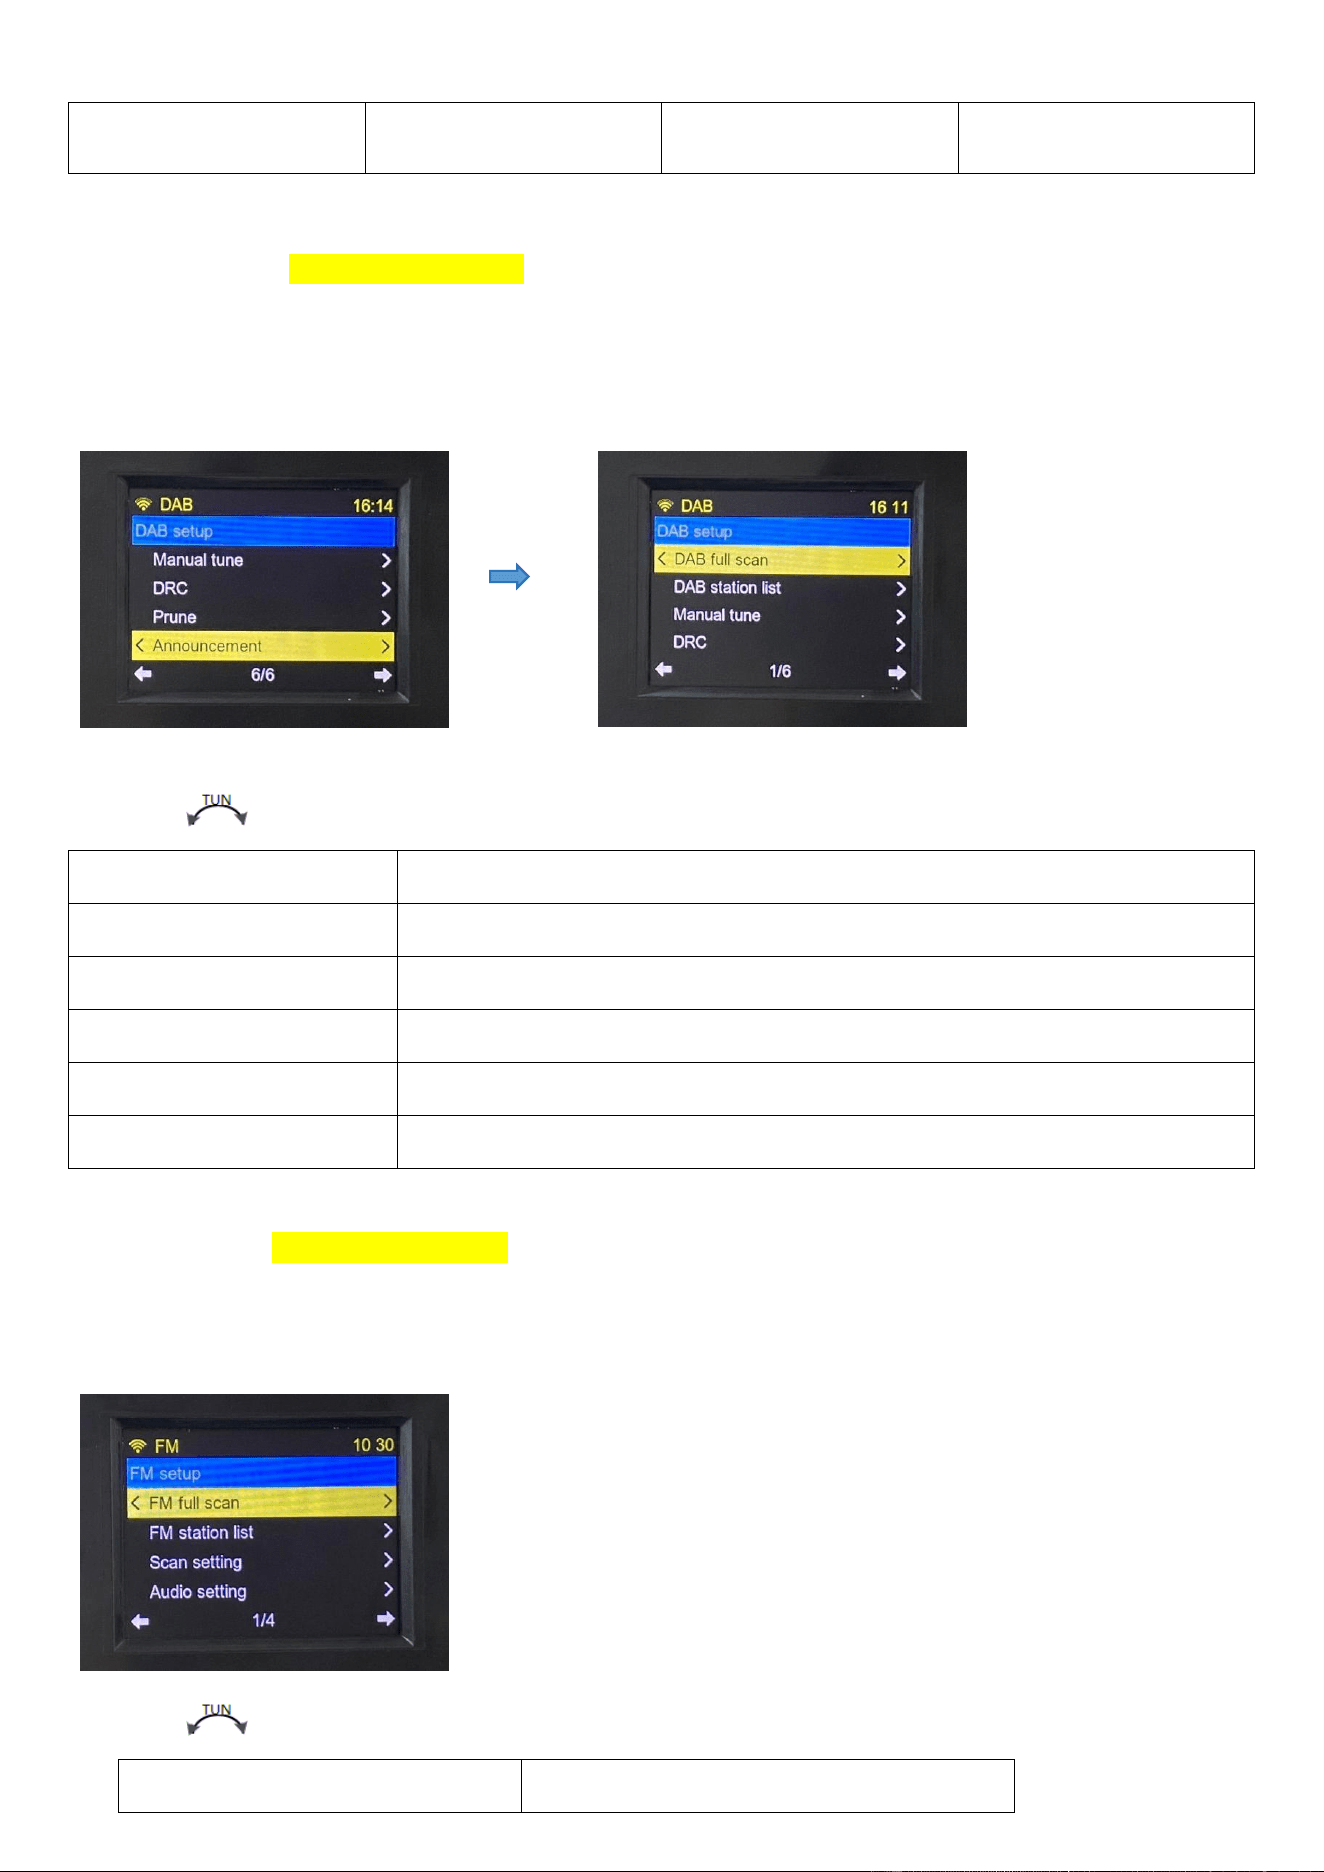
4.9.4 DAB setup (DAB version only)
Note: the full menu is only displayed in DAB playback mode, and the general menu only displays
DAB full scan and DAB station list.
Rotate【 】to get the following settings, and press【ENTER】to confirm.
DAB full scan
Automatic station search
DAB station list
DAB station list
Manual station search
5A 174.928MHZ-13F 239.200MHZ
DRC
Dynamic control range, DRC off/DRC low/DRC high
Prune
YES/NO
Announcement
Off/On/No TA/Only TA
4.9.5 FM setup (DAB version only)
Note: the full menu is just displayed in FM playback mode, and the general menu only shows FM
full scan and FM station list.
Rotate【 】for the following setting, and press【ENTER】to confirm.
FM full scan
Automatic station search
FM station list
Stored radio station
Scan setting
All station / strong station only
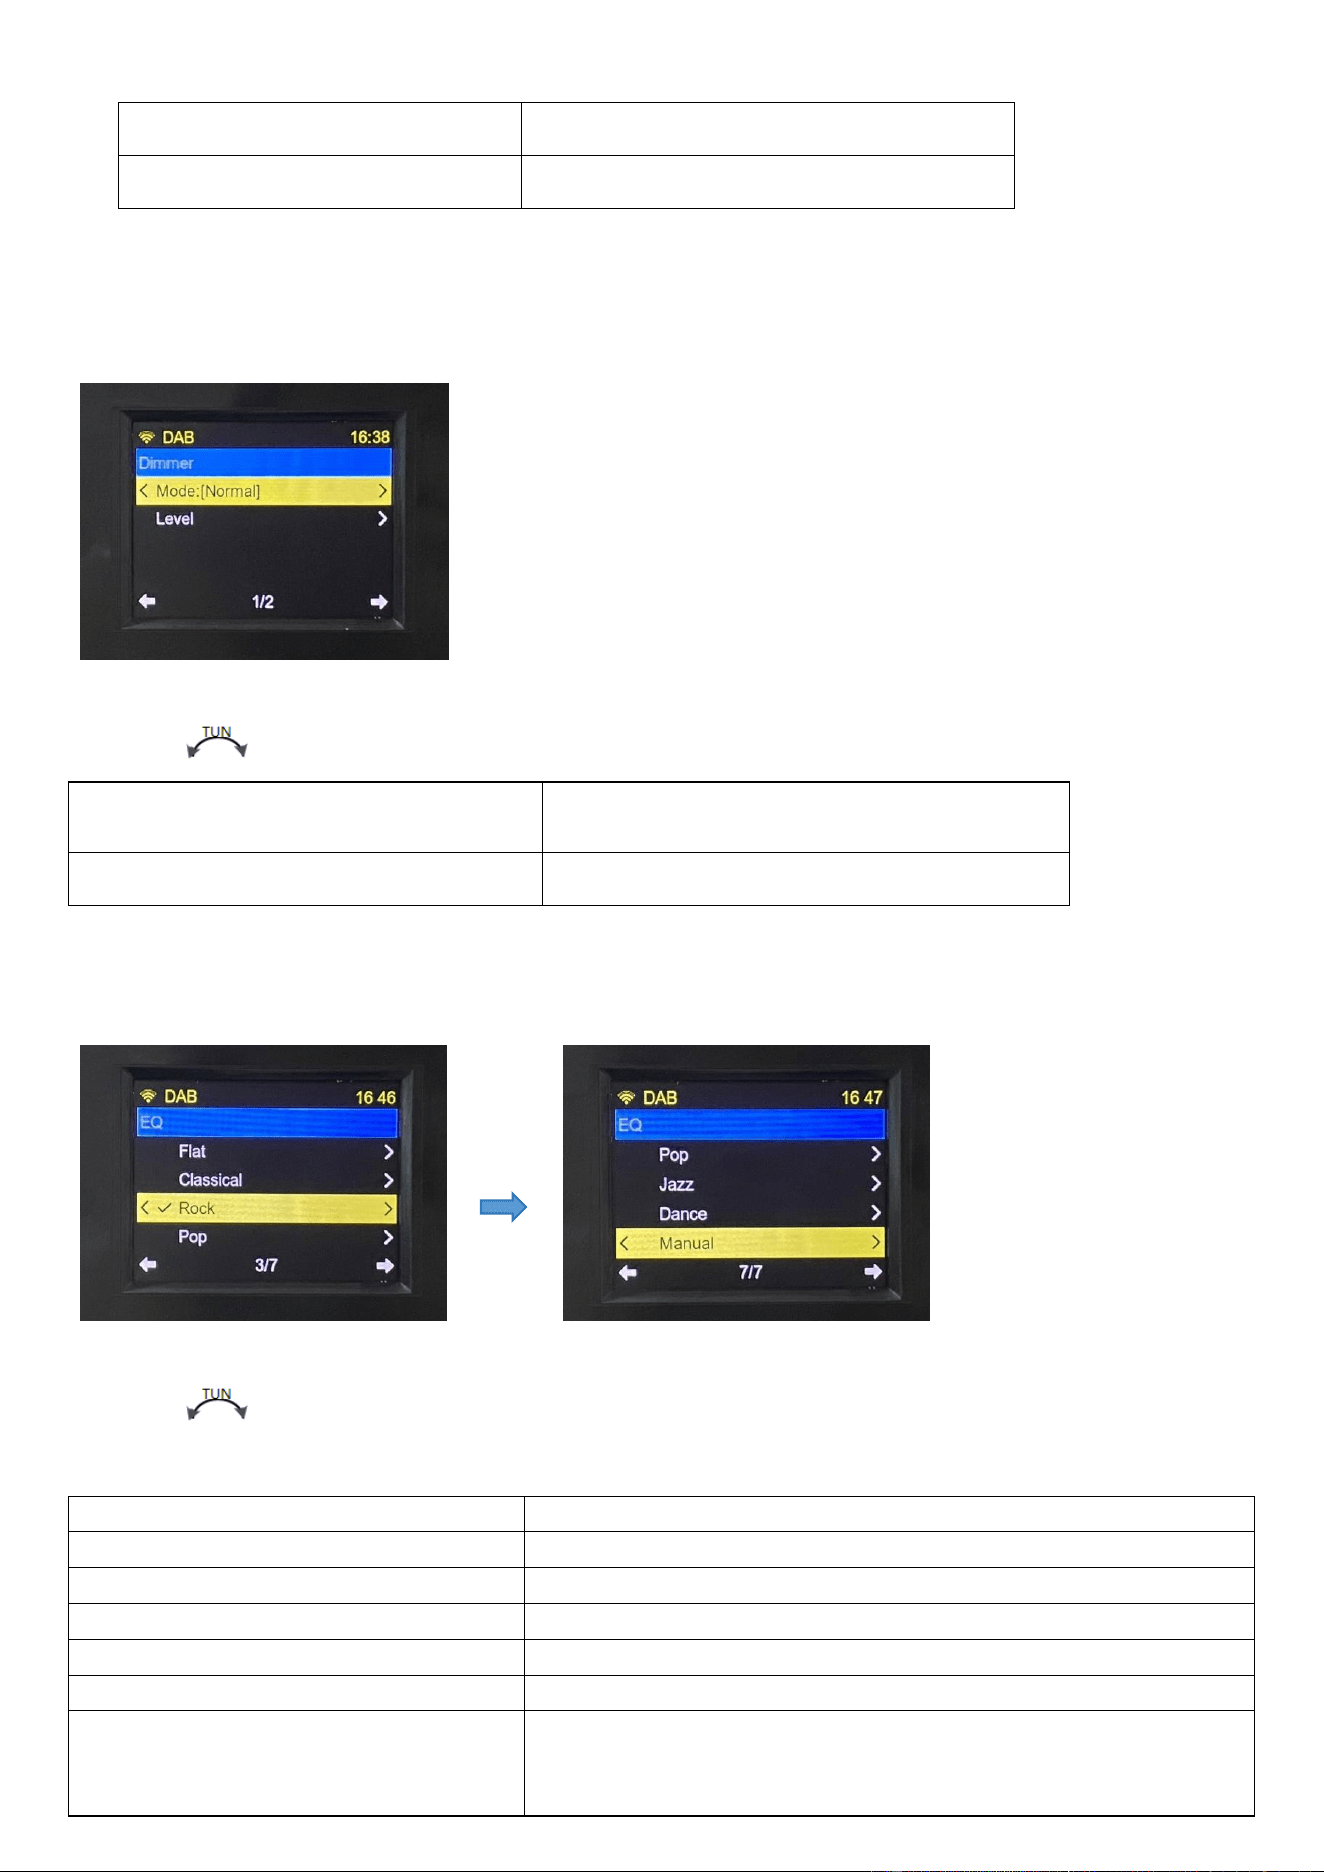
4.9.6 Dimmer Backlight Settings
Rotate【 】to show the following settings, and press【ENTER】to confirm.
Model:【Dim】
Normal/Dim
Level
Bright: [60%] / Dim:[20%]
4.9.7 EQ Sound Effect Setting
Rotate【 】to set the following, and press【ENTER】to confirm.
Flat
Flat
Classical
Classical
Rock
Rock
Pop
Popular
Jazz
Jazz
Dance
Dance
Manual
Manual adjustment
Lightly press【ENTER】to choose
Bass
Treble
After choosing, rotate【 】to select a value of ±14.
Press【ENTER】to confirm the chosen value.
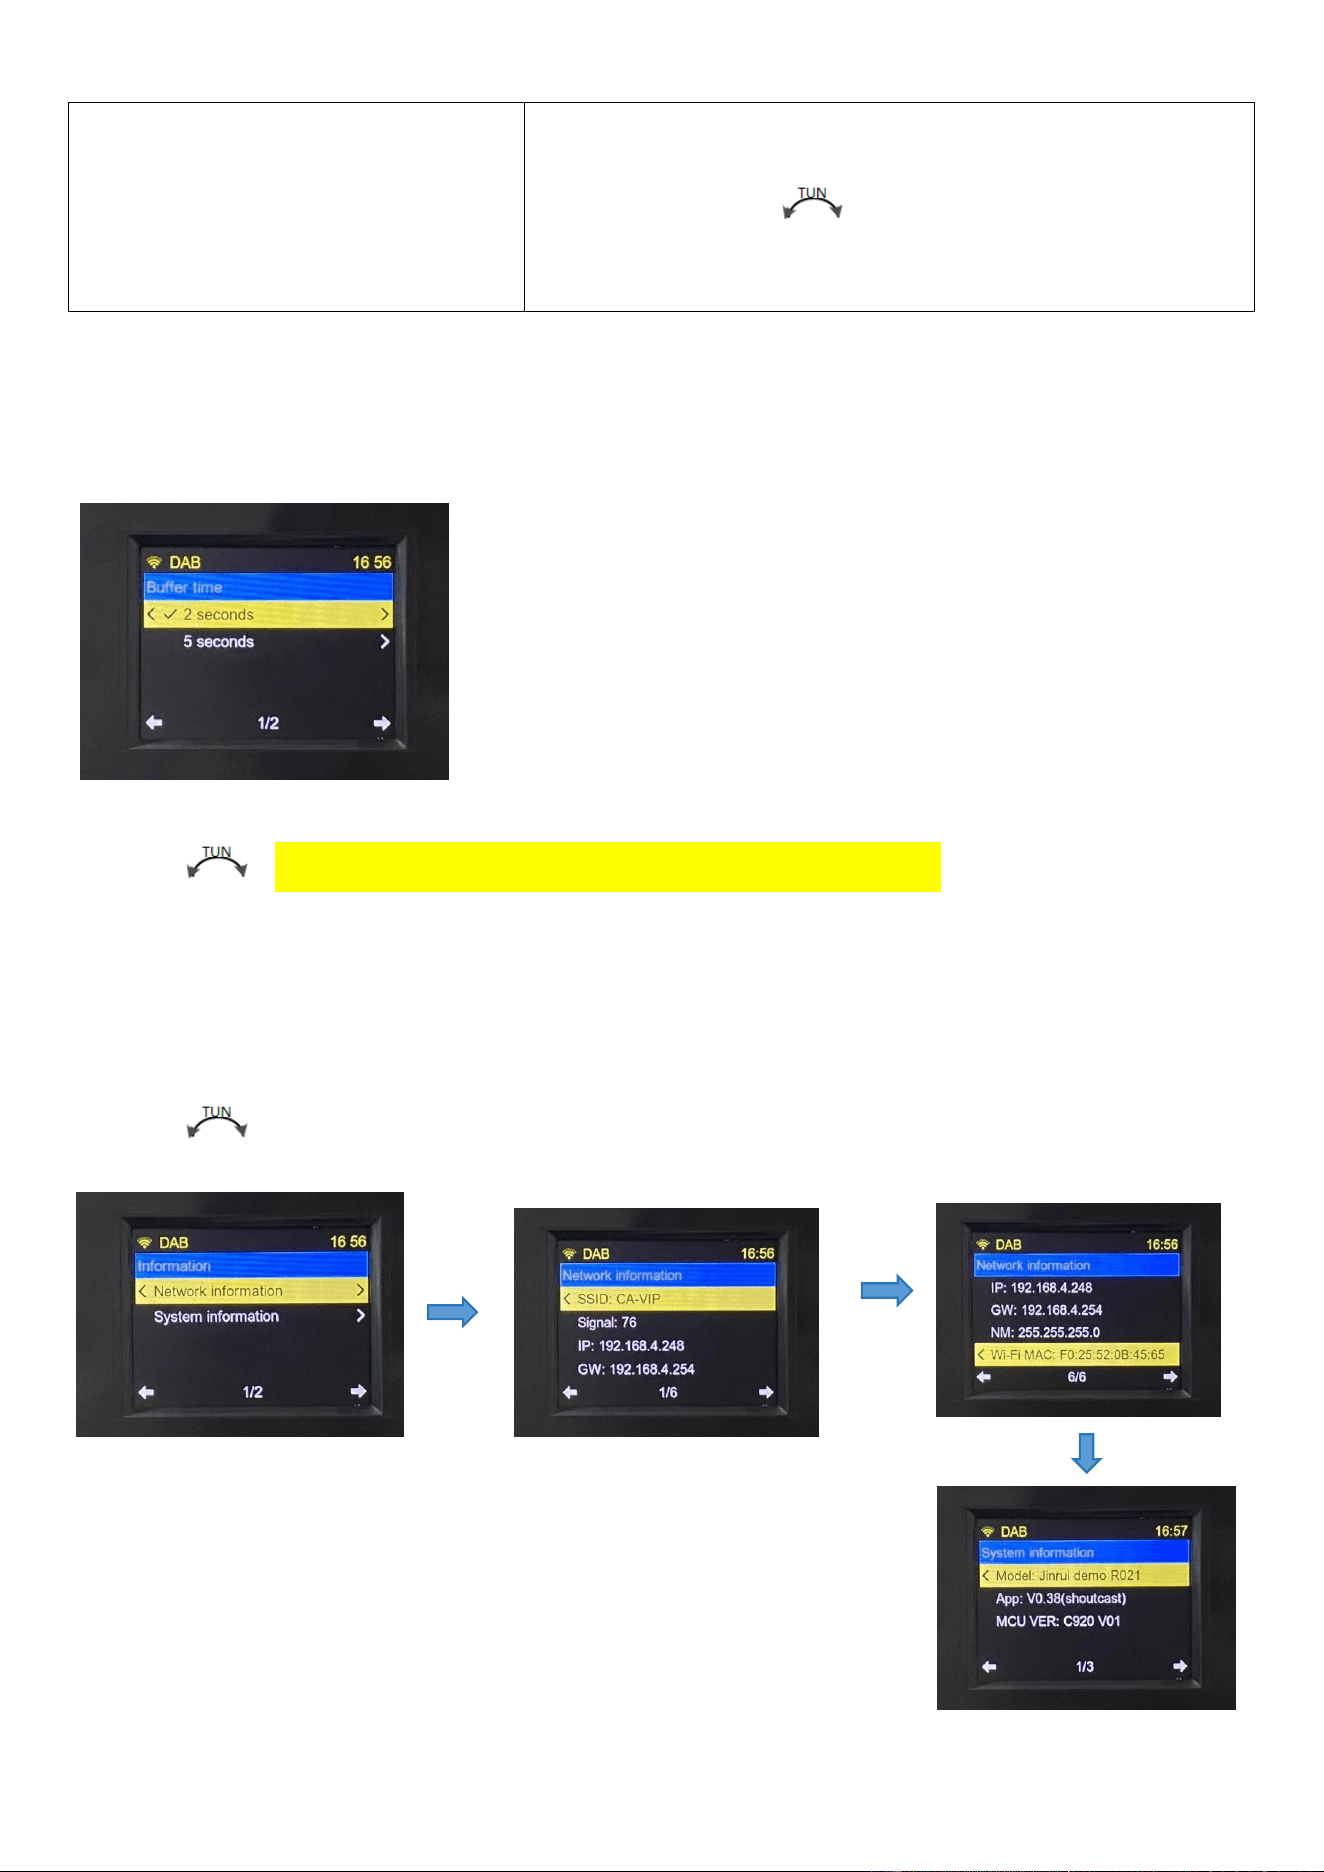
4.9.8 Buffer time: [2 seconds] buffer time
Rotate【 】to choose between the 2-second and 5-second settings, and press【ENTER】to
confirm.
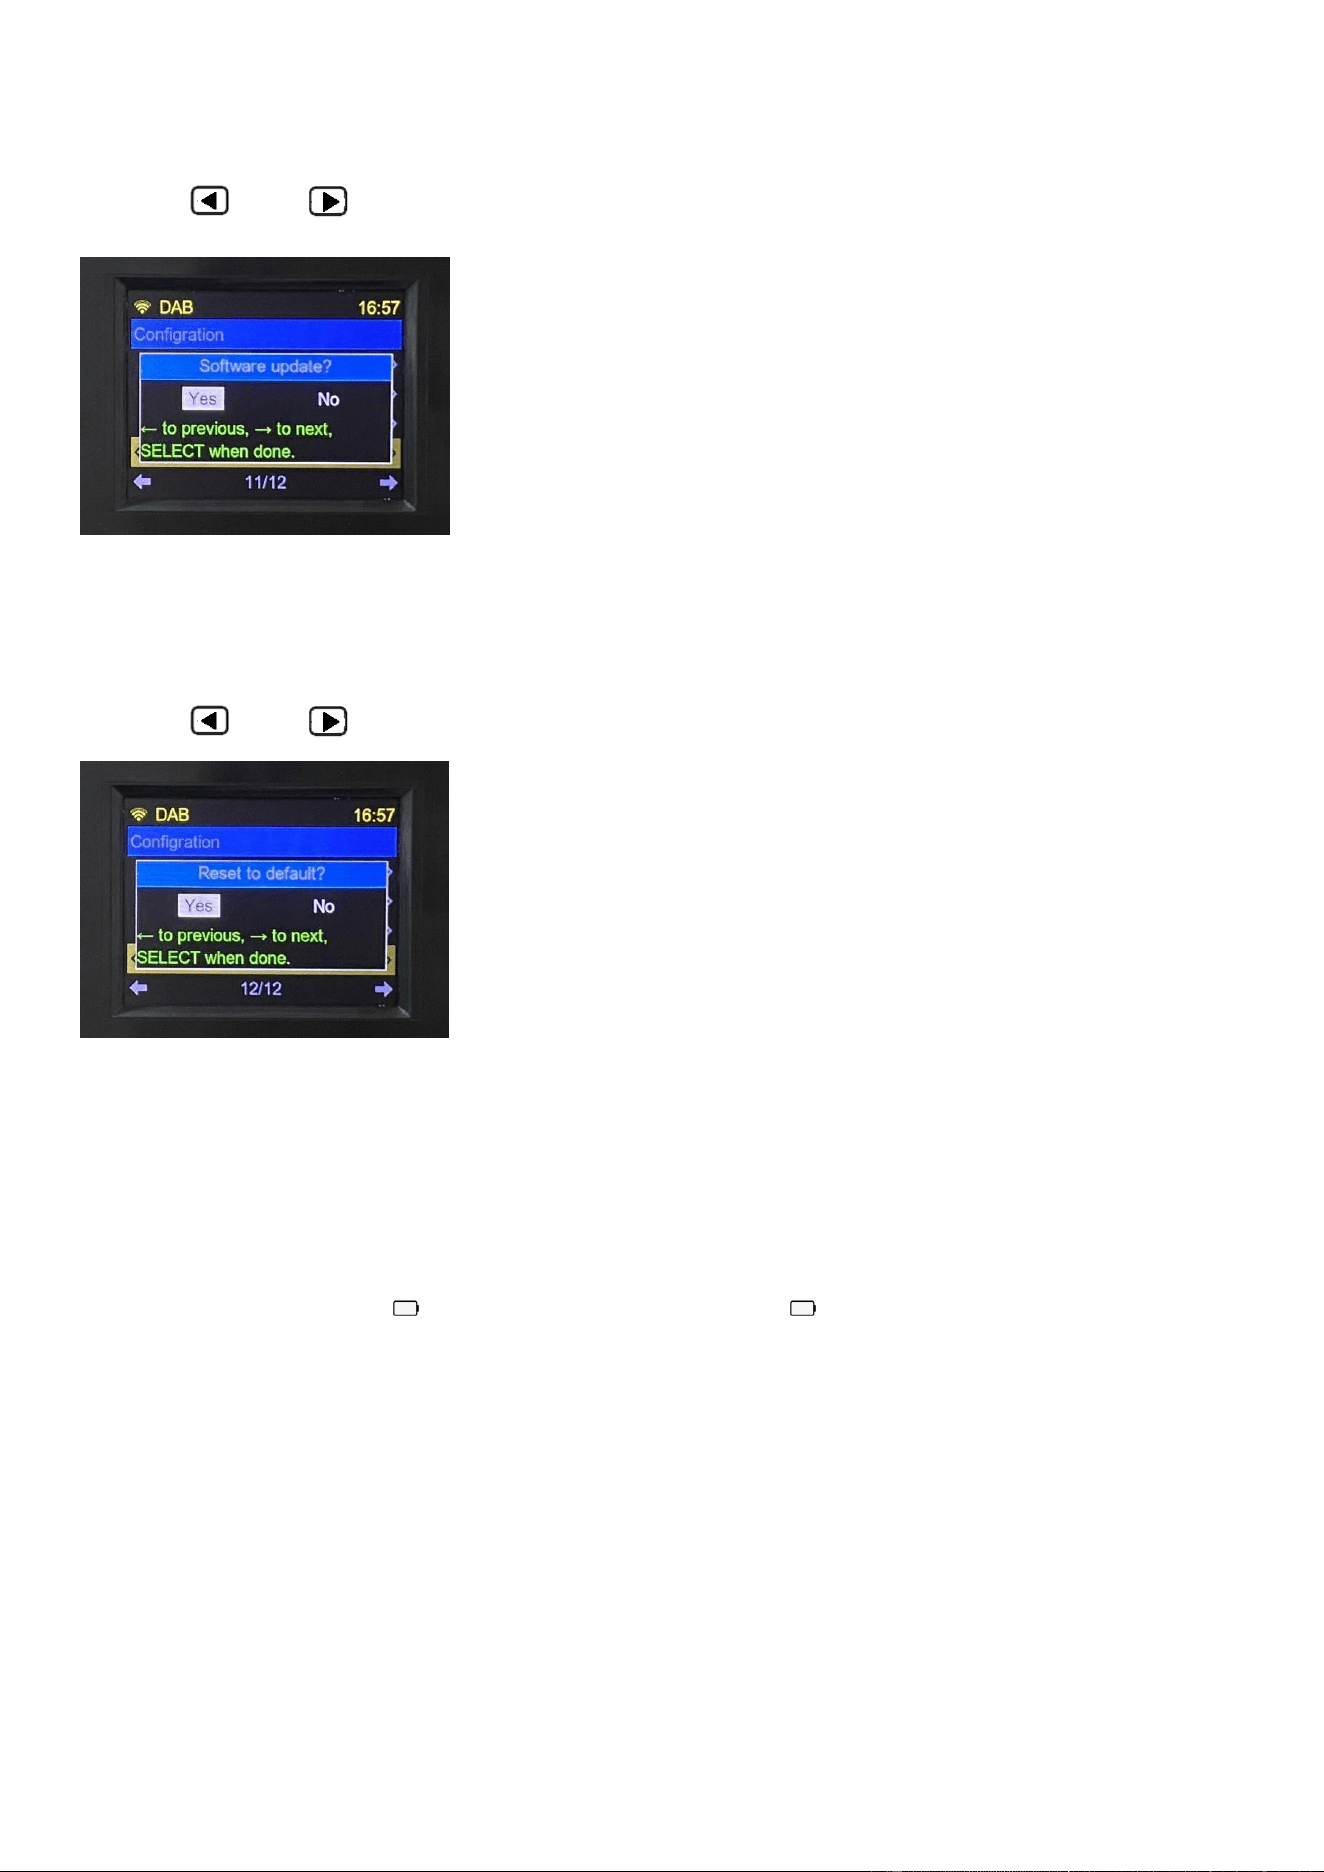
4.9.9 Information (Network Information and System Information)
Rotate【 】to have the following settings, and press【ENTER】to confirm.
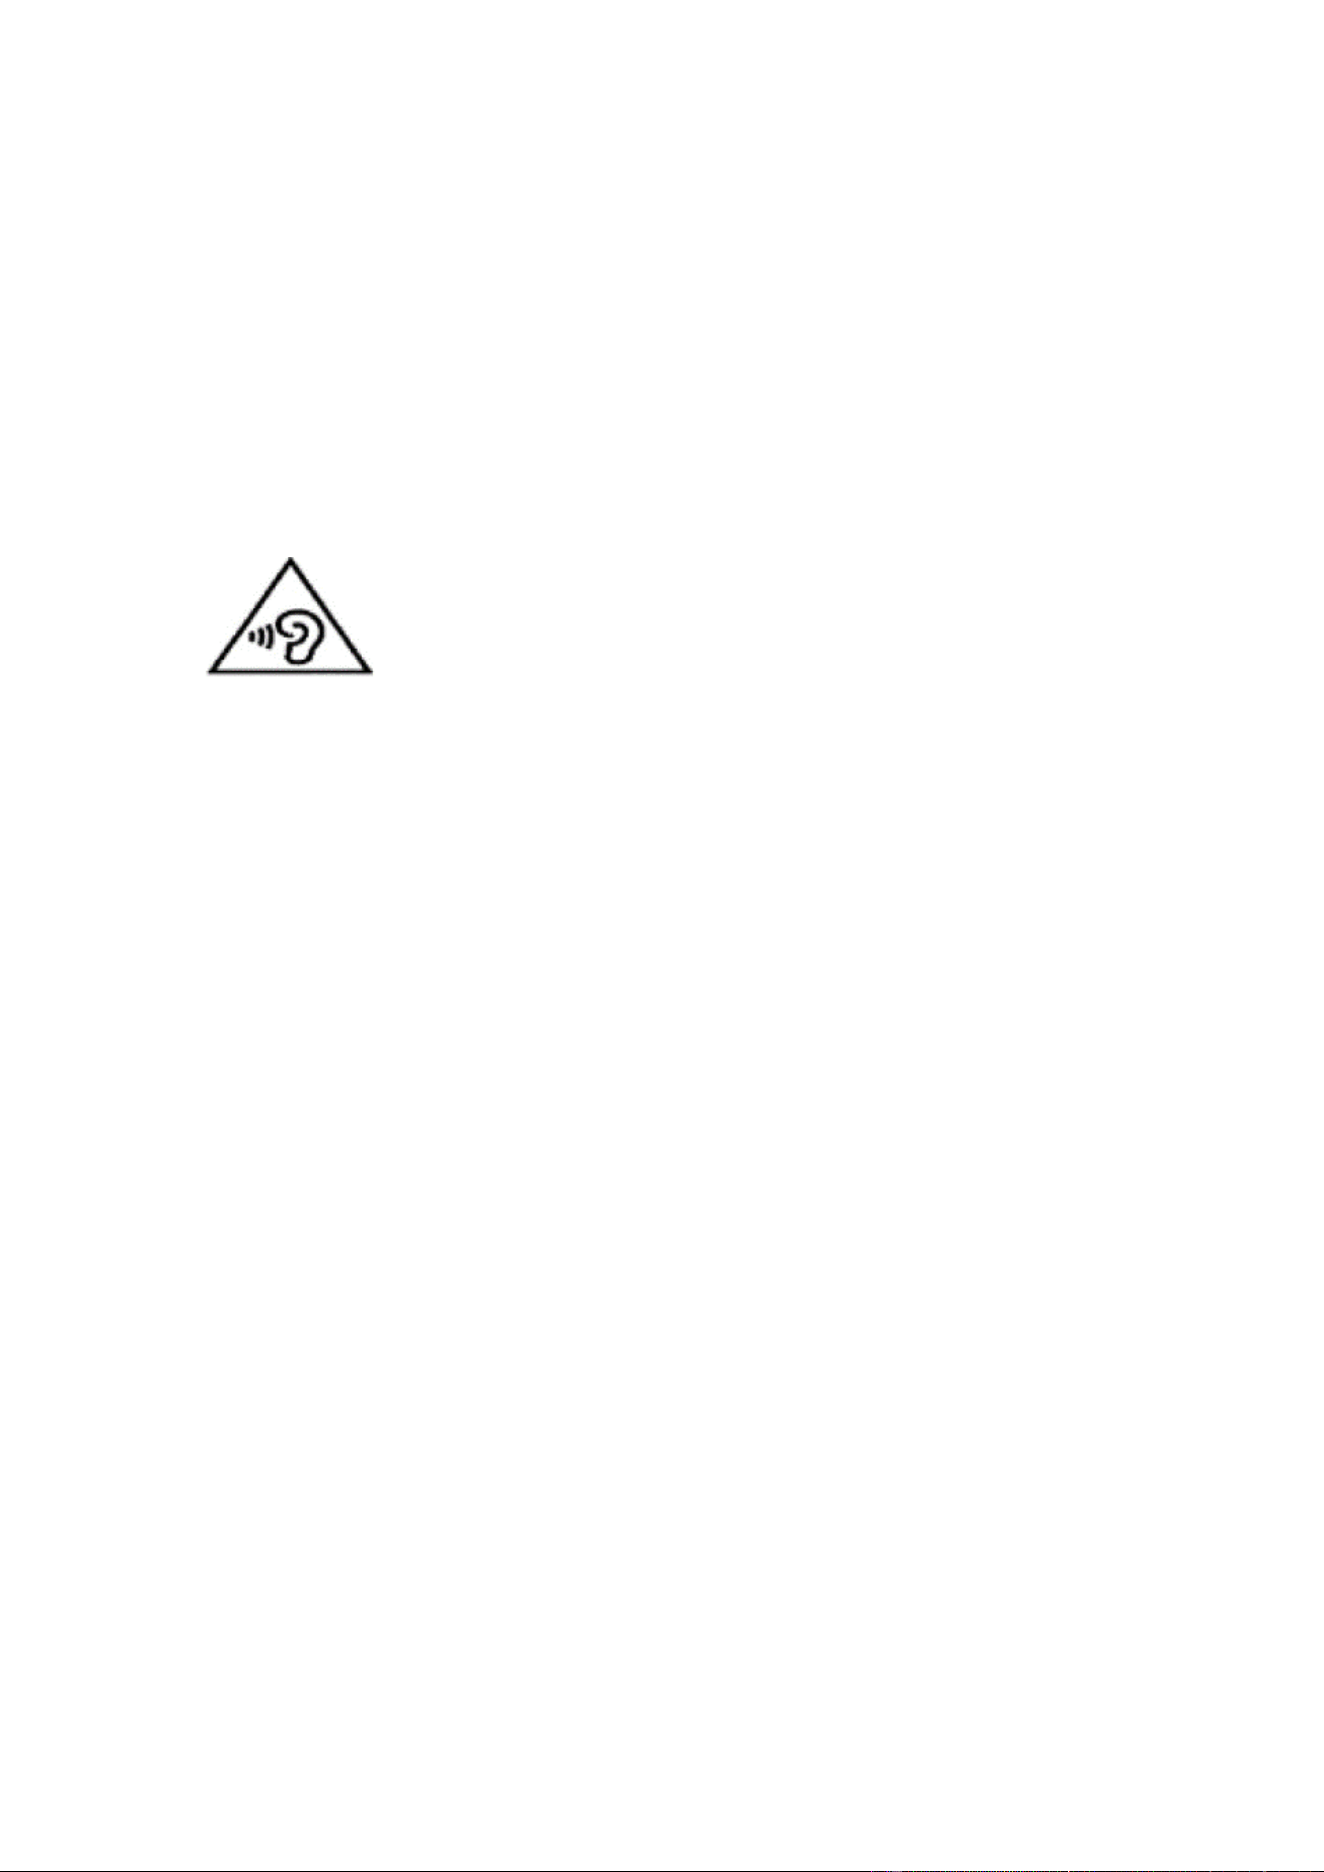
4.9.10 Software update
Press【 】&【 】to choose, and then press【ENTER】to confirm.
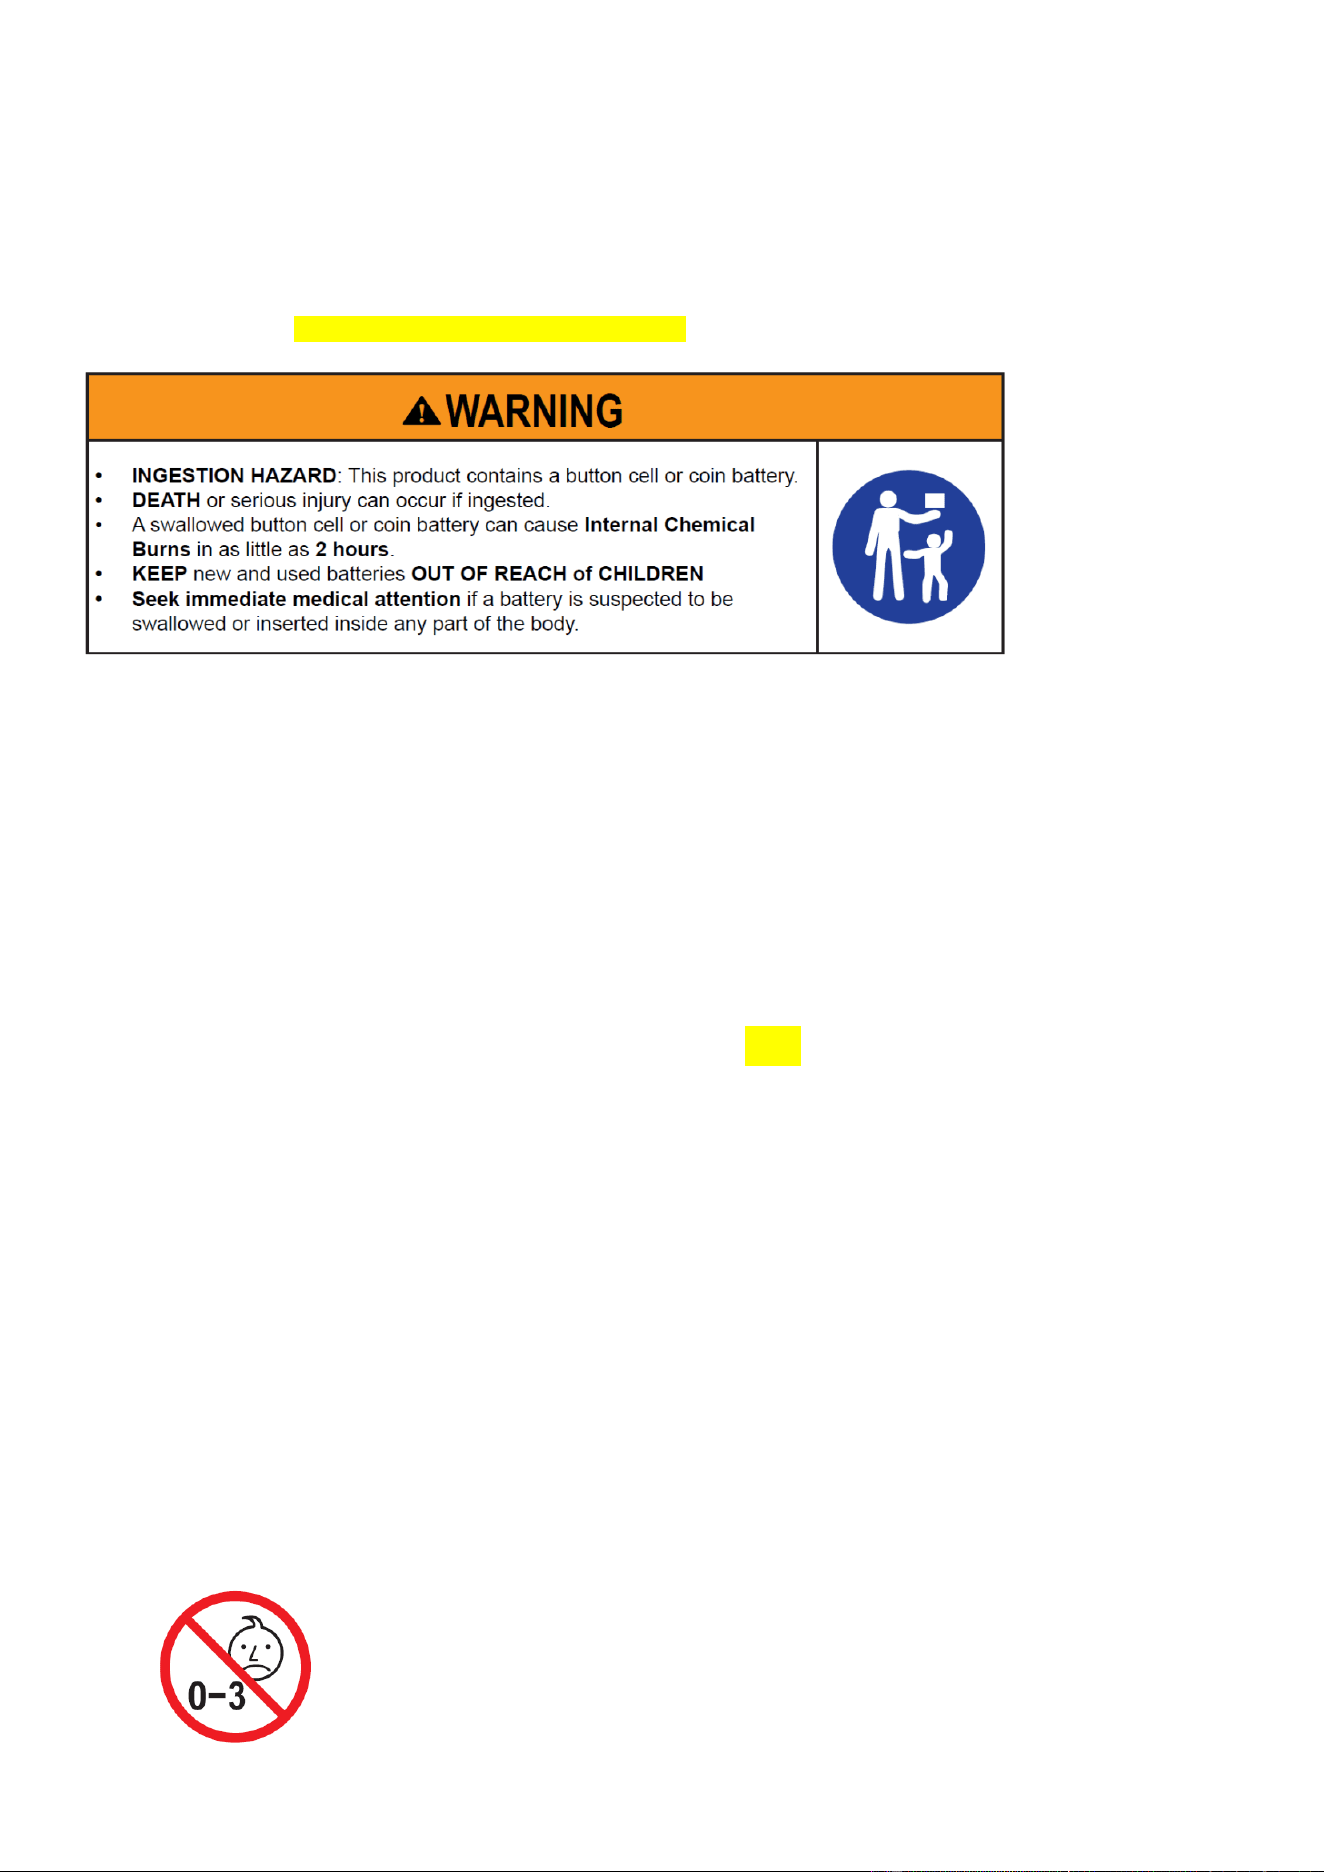
4.9.11 Reset to default
Press【 】&【 】to choose, and then press【ENTER】to confirm.
5. Matters Needing Attention
Before use, it needs to obey the following basic safety tips to ensure the safe and reliable use of the
product:
♦ Read and understand all safety guidelines and usage information.
♦ If the dry battery shows “ ” (blank), or the outer frame of “ ” is flickering, it indicates that the
battery is low. Then, update the battery to ensure the normal operation.
♦ If the machine is not used for a long time, please unplug the AC power supply and remove the dry
battery.
♦ Do not expose this radio in the rain, moisture, dripping or splashing any liquid.
♦ Do not put this radio near high temperature heat source, and do not barbecue or blow bake at
high temperature.
♦ Do not place it in direct sunlight for a long time.
♦ Do not let this radio fall or be hit, and put heavy things on it.

1.CAUTION 告示
RF ENERGY EXPOSURE AND PRODUCT SAFETY GUIDE
Before using this device, please read this guide which contains important operating instructions for safe usage, control information and
operational instructions for compliance with RF Energy Exposure limits in applicable national and international standards.
User’ instructions should accompany the device when transferred to other users.
2. Unauthorized modification and adjustment 禁止非法私改装
Changes or modifications not expressly approved by the party responsible for compliance may void the user’s authority granted by the local
government radio management departments to operate this radio and should not be made. To comply with the corresponding requirements,
transmitter adjustments should be made only by or under the supervision of a person certified as technically qualified to perform transmitter
maintenance and repairs in the private land mobile and fixed services as certified by an organization representative of the user of those services.
Replacement of any transmitter component (crystal, semiconductor, etc.) not authorized by the local government radio management departments
equipment authorization for this radio could violate the rules.
3.1 美国 FCC 要求
3.1.2 This device complies with part 15 of the FCC Rules. Operation is subject to the following two conditions:
(1) This device may not cause harmful interference.
(2) This device must accept any interference received, including interference that may cause undesired operation.
3.1.3 Note: This equipment has been tested and found to comply with the limits for a Class B digital device. These limits are designed to provide
reasonable protection against harmful interference in a residential installation. This equipment generates, uses and can radiate radio frequency
energy and, if not installed and used in accordance with the instructions, may cause harmful interference to radio communications. However, there is
no guarantee that interference will not occur in a particular installation. If this equipment does cause harmful interference to radio or television
reception, which can be determined by turning the equipment off and on, the user is encouraged to try to correct the interference by one or more of
the following measures:
—Reorient or relocate the receiving antenna.
—Increase the separation between the equipment and receiver.
—Connect the equipment into an outlet on a circuit different from that to which the receiver is connected.
—Consult the dealer or an experienced radio/TV technician for help.
3.2 加拿大 IC 要求
3.2.1 Licence-exempt radio apparatus 加拿大免证机
EN:This device contains licence-exempt transmitter(s)/receiver(s) that comply with Innovation, Science and Economic Development Canada’s
licence-exempt RSS(s). Operation is subject to the following two conditions:
(1) This device may not cause interference.
(2) This device must accept any interference, including interference that may cause undesired operation of the device.
下面这一句是对应的法语翻译,美版如有单独的法语版,可去掉这一句
Le présent appareil est conforme aux CNR d’Industrie Canada applicables aux appareils radio exempts de licence. L’exploitation est autorisée aux
deux conditions suivantes :
(1) l’appareil ne doit pas produire de brouillage;
(2) l’utilisateur de l’appareil doit accepter tout brouillage radioélectrique subi, même si le brouillage est susceptible d’en compromettre le
fonctionnement.
4 欧版 CE 要求 European CE Requirements
4.1 简版符合性声明(Simple EU declaration of conformity)
•HENAN ESHOW ELECTRONIC COMMERCE CO., LTD declares that the radio equipment type is in compliance with the essential requirements
and other relevant provisions of RED Directive 2014/53/EU and the ROHS Directive 2011/65/EU and the WEEE Directive 2012/19/EU; the full text of
the EU declaration of conformity is available at the following internet address: www.retekess.com.
5.1 Disposal 环保回收告示

The crossed-out wheeled-bin symbol on your product, literature, or packaging reminds you that all electrical and electronic products, batteries, or
accumulators must be taken to designated collection locations at the end of their working life. Do not dispose of these products as unsorted
municipal waste. Dispose of them according to the laws and rules in your area.Iug
5.2 德国电子产品环保回收专用
德语说明书需增加如下信息(非德语的说明书,记得删除 5.2 节)
(1) Batterien und Akkus
Besitzer von Altgeräten haben Altbatterien und Altakkumulatoren, die nicht vom Altgerät umschlossen sind, im Regelfall vor der Abgabe an einer
Erfassungsstelle von diesem zu trennen. Dies gilt nicht, soweit die Altgeräte bei öffentlich-rechtlichen Entsorgungsträgern abgegeben und dort zum
Zwecke der Vorbereitung zur Wiederverwendung von anderen Altgeräten separiert werden.
a) Batterien können nach Gebrauch unentgeltlich in der Verkaufsstelle zurückgegeben werden.
b) Der Nutzer ist zur Rückgabe gebrauchter Batterien gesetzlich verpflichtet.
(2) Getrennte Erfassung von Altgeräten
Elektro- und Elektronikgeräte, die zu Abfall geworden sind, werden als Altgeräte bezeichnet. Besitzer von Altgeräten haben diese einer vom
unsortierten Siedlungsabfall getrennten Erfassung zuzuführen. Altgeräte gehören insbesondere nicht in den Hausmüll, sondern in spezielle Sammel-
und Rückgabesysteme.
(3) Möglichkeiten der Rückgabe von Altgeräten
Besitzer von Altgeräten aus privaten Haushalten können diese bei den Sammelstellen der öffentlich-rechtlichen Entsorgungsträger oder bei den von
Herstellern oder Vertreibern im Sinne des ElektroG eingerichteten Rücknahmestellen abgeben. Ein Onlineverzeichnis der Sammel- und
Rücknahmestellen finden Sie hier:
https://www.ear-system.de/ear-verzeichnis/sammel-und-ruecknahmestellen.jsf
(4) Datenschutz-Hinweis
Altgeräte enthalten häufig sensible personenbezogene Daten. Dies gilt insbesondere für Geräte der Informationsund Telekommunikationstechnik
wie Computer und Smartphones. Bitte beachten Sie in Ihrem eigenen Interesse,dass für die Löschung der Daten auf den zu entsorgenden
Altgeräten jeder Endnutzer selbst verantwortlich ist.
(5) Hersteller-Registrierungsnummer
Als Hersteller im Sinne des ElektroG sind wir bei der zuständigen Stiftung Elektro-Altgeräte Register (BennoStrauß-Str. 1, 90763 Fürth) unter der
folgenden Registrierungsnummer registriert: DE 83916430
6.1 RF Safety 射频辐射安全(注:TX 产品适用)(Note: TX products are applicable)
RF energy, which when used improperly, can cause biological damage. Please refer to the following websites for more information on what RF
energy exposure is and how to control your exposure to assure compliance with established RF exposure limits: http://www.who.int/en/
For users who wish to further reduce their exposure, some effective measures to reduce RF exposure include:
➢ Reduce the amount of time spent using your wireless device.
➢ Use a speakerphone, earpiece, headset, or other hands-free accessory to reduce proximity to the head (and thus head exposure). While wired
earpieces may conduct some energy to the head and wireless earpieces also emit a small amount of RF energy, both wired and wireless
earpieces remove the greatest source of RF energy (handheld device) from proximity to the head and thus can greatly reduce total exposure to
the head.
➢ Increase the distance between wireless devices and your body.
6.2 免证发射机专用 Dedicated to license-free transmitter
This radio is designed for and classified as “General population/uncontrolled use”. General population/uncontrolled environments are defined as
locations where there is exposure of individuals who have no knowledge or control of RF exposure level.
7.1 Electromagnetic Interference/Compatibility 提醒无线电干扰(电子产品适用)
Nearly every electronic device is susceptible to electromagnetic interference (EMI) if inadequately shielded, designed, or otherwise configured for
electromagnetic compatibility. During transmissions, your radio generates RF energy that can possibly cause interference with other devices or
systems. To avoid such interference, turn off the radio in areas where signs are posted to do so, such as hospitals or healthcare facilities.
9.1 Protect your ears 保护听力
• Use the lowest volume necessary to do your job. Turn up the volume only if you are in noisy surroundings.
• Limit the amount of time you use headsets or earpieces at high volume.
• When using the radio without a headset or earpiece, do not place the radio's speaker directly against your ear.
• Use carefully with the earphone maybe possible excessive sound pressure from earphones and headphones can cause hearing loss.
CAUTION: Exposure to loud noises from any source for extended periods of time may temporarily or permanently affect your hearing. The louder the
radio's volume, the less time is required before your hearing could be affected. Hearing damage from loud noise is sometimes undetectable at first
and can have a cumulative effect.
10.1 Batteries Safety 电池安全使用警示语,
•WARNING: KEEP NEW OR OLD USED BATTERIES OUT OF REACH OF CHILDREN.电池放置到儿童接触不到的地方
•In the event of a battery leaking, do not allow the liquid to come into contact with the skin or eyes. If contact has been made, wash the affected area
with copious amounts of water and seek medical advice immediately. 如果电池泄漏,请不要让液体接触皮肤或眼睛。如果有接触,用大量的水冲洗
受影响的区域,并立即寻求医疗建议。
•If a radio or a battery has been submerged in water, please dry and clean it before use. Do not dry the radio or battery with an appliance or heat
source, such as a hair dryer or microwave oven. If the radio has been submersed in a corrosive substance (e.g. saltwater), rinse the radio and battery
in fresh water, then dry them.如果收音机或电池已浸入水中,请在使用前将其擦干并清洗干净。请勿用吹风机或微波炉等器具或热源吹干收音机或电
池。如果收音机已浸泡在腐蚀性物质(例如盐水)中,请在淡水中冲洗收音机和电池,然后将其干燥。
10.3 电池可由普通用户更换的警示语,
•Turn off your radio before removing or installing a battery. Store spare batteries securely. Dispose of used batteries immediately and safely.在拆卸或
安装电池之前,请先关闭对讲机。请妥善保管备用电池。立即安全地处置用过的电池。
•Batteries should be removed from the appliance when not being used for long periods of time (months). The batteries should be enclosed in special
protective packaging (such as sealed plastic bags or variants) which should be retained to protect them from condensation during the time they are
warming to ambient temperature.长时间(数月)不使用时,应将电池从设备中取出。电池应封装在特殊的保护包装中(如密封的塑料袋或变体),以防止
电池在加热到环境温度时凝结。
•Exhausted batteries are to be removed from the equipment.应将耗尽的电池从设备中取出。
•Do not dismantle, open or shred batteries. Batteries should be dismantled only by trained people. 请勿拆解或粉碎电池。只有经过培训的人员才能拆
卸电池。
•Disposal of a battery into fire, or a hot oven, or mechanically crushing or cutting of a battery, that can result in explosion;将电池放入火中或热烤箱中,
或机械粉碎或切割可能导致电池爆炸;
纽扣电池警告语(Button Battery Safety information)
1. Remove and immediately recycle or dispose of used batteries according to local regulations and keep away
from children. Do NOT dispose of batteries in household trash or incinerate.
2. Even used batteries may cause severe injury or death.
3. Call a local poison control center for treatment information.
4. Battery Type: CR2025
5. Nominal Battery Voltage: 3V
6. Non-rechargeable batteries are not to be recharged.
7. Do not force discharge, recharge, disassemble, heat above 60℃ or incinerate. Doing so may result in injury
due to venting, leakage or explosion resulting in chemical burns. 8. Ensure the batteries are installed correctly according to polarity (+ and -).
9. Do not mix old and new batteries, different brands or types of batteries, such as alkaline, carbon-zinc, or
rechargeable batteries.
10. Remove and immediately recycle or dispose of batteries from equipment not used for an extended period of
time according to local regulations.
11. Always completely secure the battery compartment. If the battery compartment does not close securely, stop
using the product, remove the batteries, and keep them away from children.
11.1 儿童产品专用 (Special for children’s products)
WARINING: CHOKING HAZARD-Small Parts. Not suitable for children under 3 years old.
12.1 Adapter 适配器警示语
12.1.1 附带适配器 Adapter included
The plug of the adapter is considered a disconnect device. The socket-outlet shall be installed near the equipment and shall be easily accessible.
13.1 Authorized Accessories List 机器可选配件列表
•Contact Retekess for assistance regarding repairs and service.
•For a list of Retekess-approved accessories for your radio model, visit the website http://www.retekess.com
法国环保回收标:
1. 说明书
2. 红色框改成 EMBALLAGES A SEPARER ET A DEPOSER DANS LE BAC DE PRI
3. 红色框改成 Cet appareil et ses accessoires se recyclent

FCC Warnning:
This equipment has been tested and found to comply with the limits for a Class B digital device,
pursuant to part 15 of the FCC Rules. These limits are designed to provide
reasonable
protection againstharmful interference in a residential installation. This equipment generates,
uses and can radiateradio
frequency
energy
and,
if
not
installed
and
used
in
accordance
with
the
instructions,
maycause
harmful
interference
to
radio
communications.
However,
there
is
no
guarantee
thatinterference
will
not
occur
in
a
particular
installation.
If
this
equipment
does
cause
harmfulinterference to radio or television reception, which can be
determined by turning the equipmentoff
and
on,
the
user
is
encouraged
to
try
to
correct
the
interference
by
one
or
more
of
thefollowing measures:
•
Reorient or relocate the receiving antenna.
•
Increase the separation between the equipment and receiver.
•
Connect the equipment into an outlet on a circuit different from that to which the receiver is
connected.
• Consult the dealer or an experienced radio/TV technician for help.
Caution:
Any
changes
or
modifications
to
this
device
not
explicitly
approved
by
manufacturer
could void your authority to operate this equipment.
This
device
complies
with
part
15
of
the
FCC
Rules.
Operation
is
subject
to
the
following
two
conditions:
(1)This
device
may
not
cause
harmful
interference,
and
(2)
this
device
must
accept
any
interference received, including interference that may cause undesired operation.
This
equipment
complies
with
FCC
radiation
exposure
limits
set
forth
for
an
uncontrolled
environment.
This
equipment
should
be
installed
and
operated
with
minimum
distance
0cm
between the radiator and your body.