by
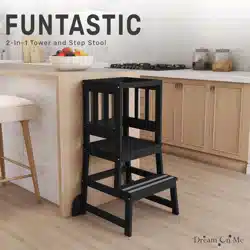
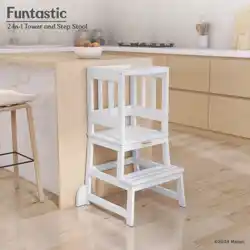
FUNTASTIC 2-IN-1
TODDLER TOWER & STEP STOOL
0124R2-SKU 795FP
Scan the QR code to
register your product
Scannez le code QR pour
enregistrer votre produit
Escanee el código QR para
registrar su producto
Read all instructions before
assembling and using product.
IMPORTANT - Keep instructions
for future use.
Lisez toutes les instructions avant avant
d'assembler et d'utiliser le produit.
IMPORTANT - Conservez les instructions
pour pour une utilisation ultérieure.
Lea todas las instrucciones antes
de montar y utilizar el producto.
IMPORTANTE - Guarde las
instrucciones para uso futuro.
OWNER’S MANUAL
MANUEL DU PROPRIÉTAIRE MANUAL DEL USUARIO
©2024 Mattel.
By
MEETS ASTM F963 STANDARD
RÉPOND À LA NORME ASTM F963
CUMPLE LA NORMA ASTM F963

From mealtime to downtime, step to crawl, the Fisher-Price by Dream On Me collection
enables the modern parent to create experiences with multipurpose pieces.
Offering an entire range of nursery must-haves for infants to toddlers, each piece is playful, fun and aims to
ensure that every child’s imagination is always at play… wherever, whenever.
Say HELLO to the
Collection!
by
From mealtime to downtime, step to crawl, the Fisher-Price by Dream On Me collec
tion
enables the modern parent to create experiences with multipurpose pieces.
Offering an entire range of nursery must-haves for infants to toddlers, each piece is playful, fun and aims to
ensure that every child’s imagination is always at play… wherever, whenever.
2
By

De l'heure du repas à celle du repos, de la marche à la marche à quatre pattes, la collection
Fisher-Price by Dream On Me permet aux parents modernes de créer des expériences avec des
pièces polyvalentes.
La collection !
par
By
Dites bonjour à la
Où
L'imagination
Jeux
3
Proposant une gamme complète d'articles de puériculture pour les nourrissons et les jeunes enfants,
chaque pièce est ludique et amusante et vise à garantir que l'imagination de chaque enfant est toujours à
l'œuvre. l'imagination de chaque enfant... où qu'il soit, quand il le souhaite.

De la hora de comer al tiempo de descanso, del paso al gateo, la colección Fisher-Price by
Dream On Me permite a los padres modernos crear experiencias con piezas multiusos.
Con una gama completa de artículos indispensables para la guardería, desde bebés hasta niños pequeños,
cada pieza es lúdica, divertida y tiene como objetivo garantizar que la imaginación de cada niño esté siem-
pre en juego... donde sea y cuando sea.
¡Colección!
por
4
By
Saluda al
Dónde
Imaginación
Reproduce
SAFE SLEEP TIPS
5
By
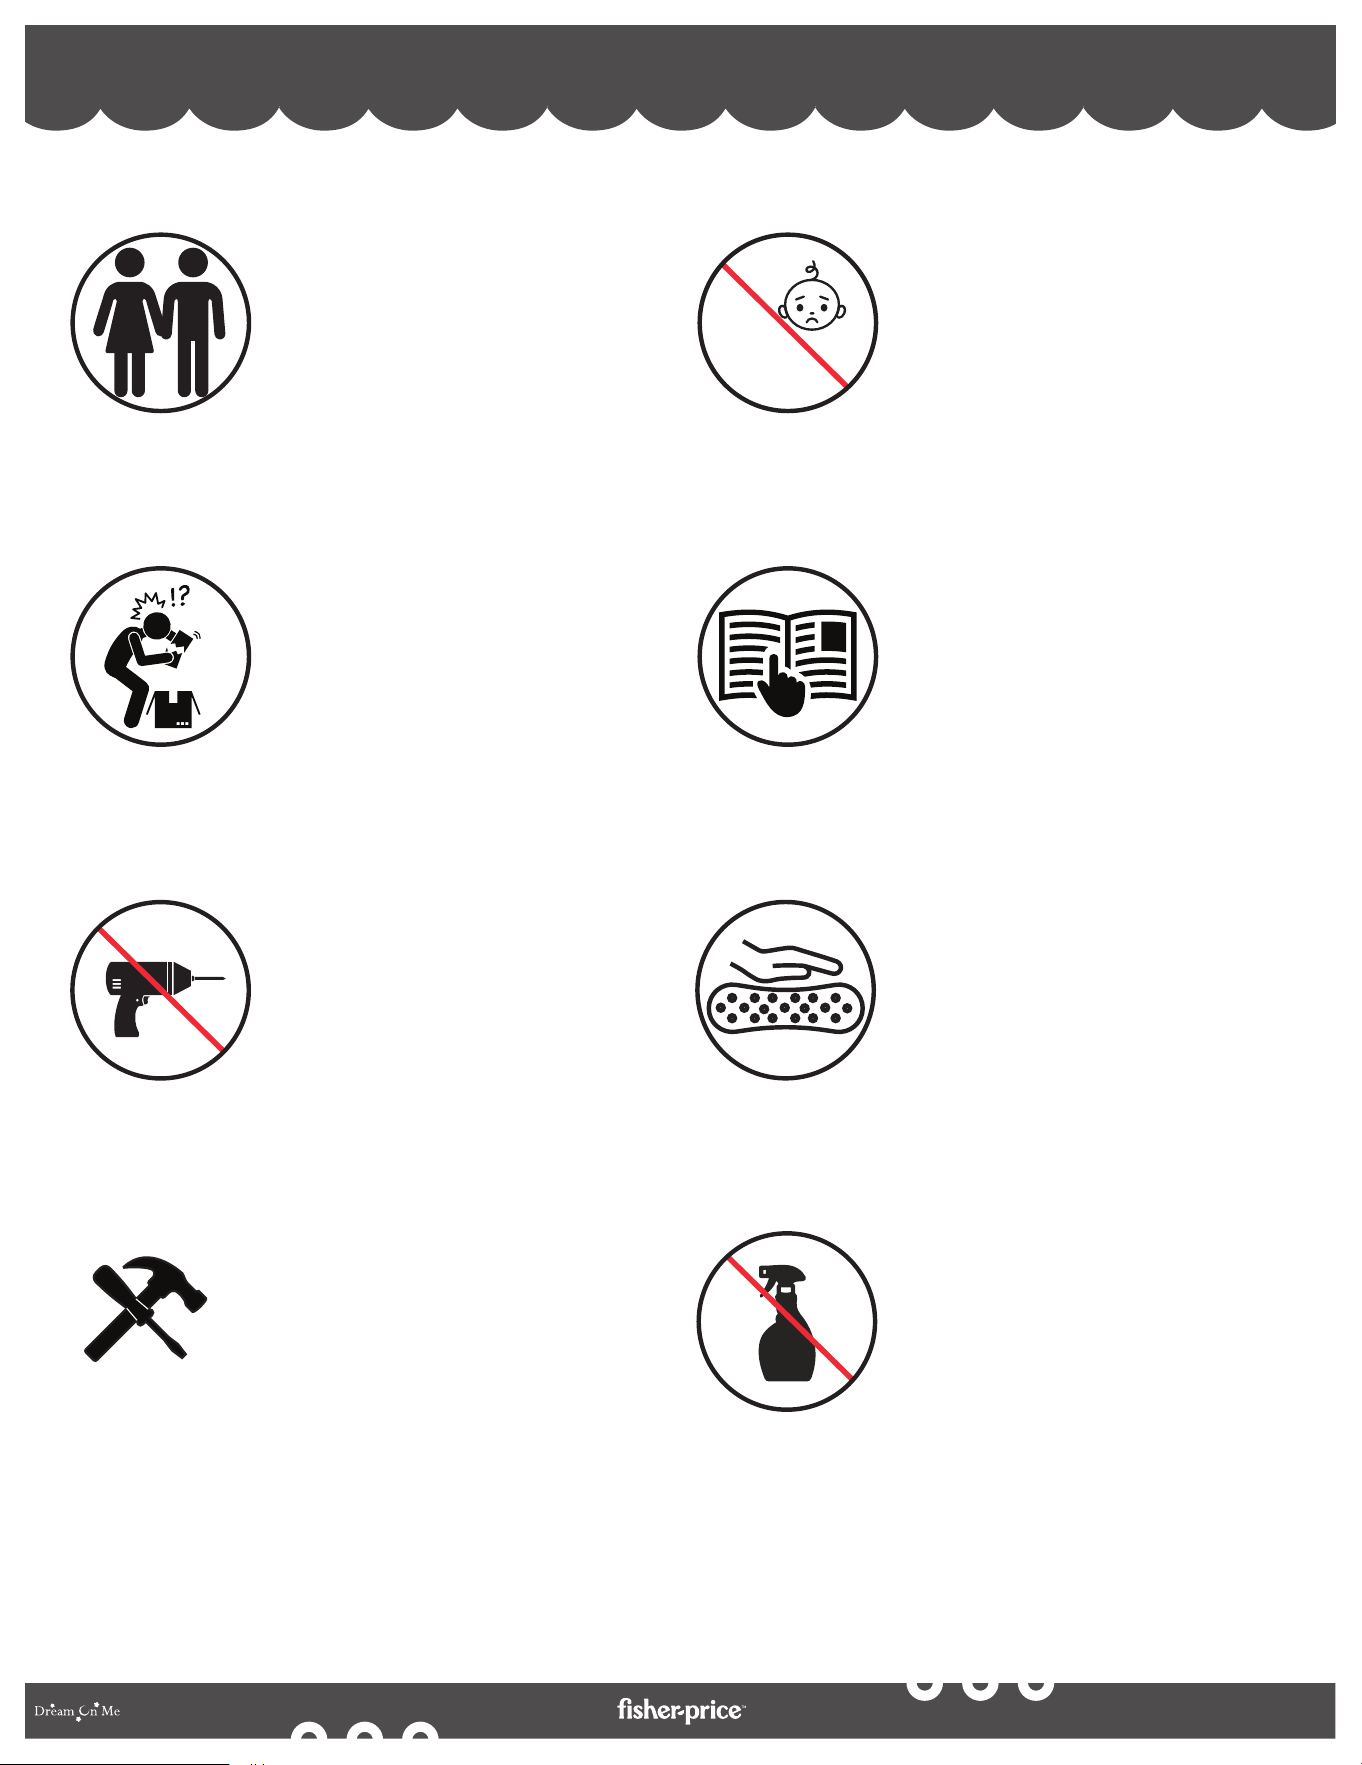
Adult Assembly Required.
DO NOT use the product if
it is damaged, broken,
and/or components are
missing or broken.
To protect your parts during
assembly, please place
them on a soft surface.
Small parts may present
choking hazard prior to
assembly.
Please read the instructions
thoroughly. Identify all parts
& hardware.
Do Not Use Power
Drills or Drivers.
To clean surface, use only
water on a damp cloth. Do
not use window cleaner or
cleaning abrasive as it will
scratch the surface and
could damage the
protective coating.
0-6
You may need to provide
the following tools: (NOT
INCLUDED IN BOX)
1. Philips Head screw driver
2. Flat head screw driver
3. Hammer
CONSEILS POUR UN SOMMEIL SÛR
6
By
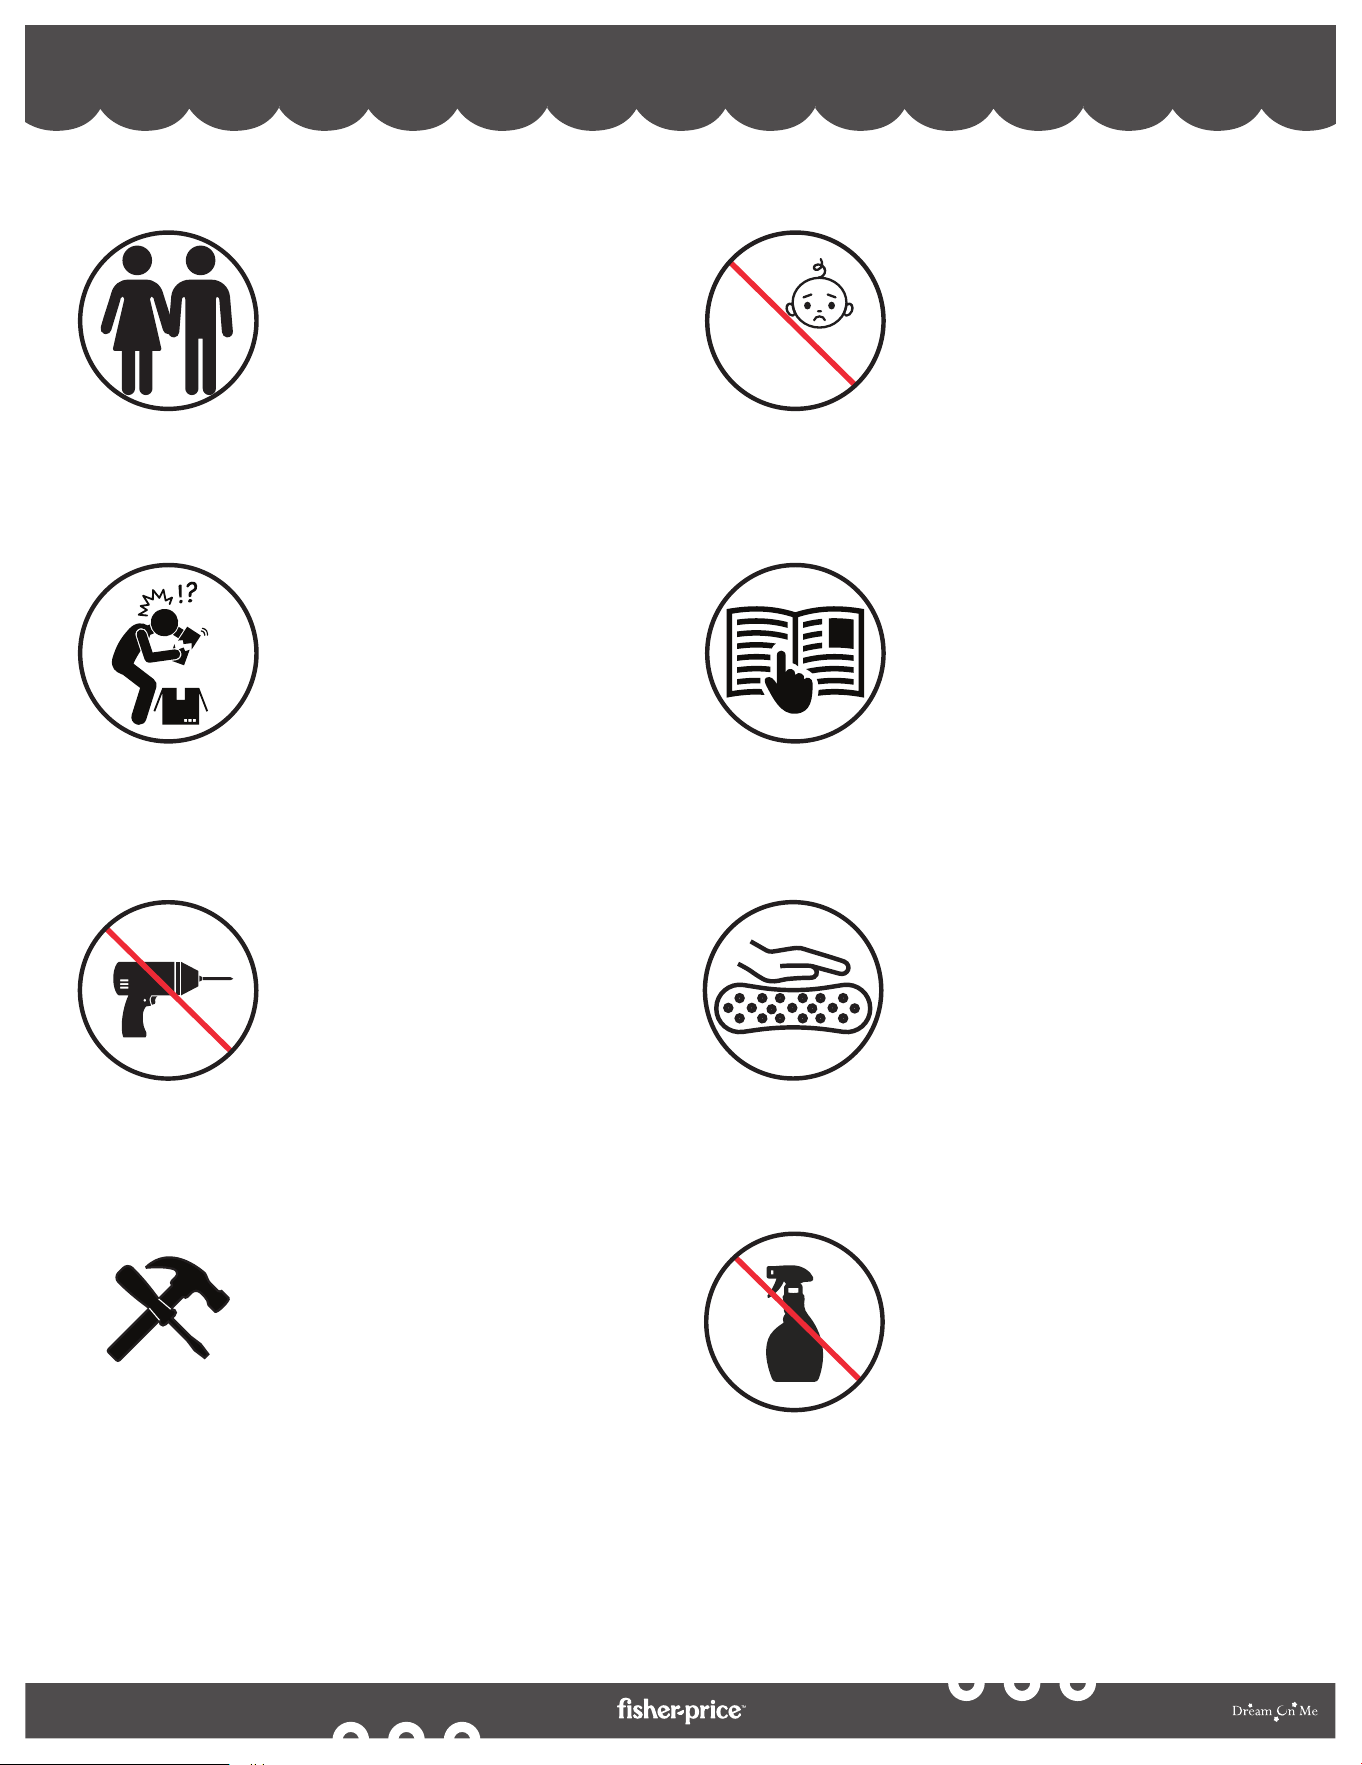
Un assemblage par un
adulte est requis.
NE PAS utiliser le produit
s'il est endommagé, cassé,
et/ou si des composants
sont manquants ou cassés.
Pour protéger vos pièces
pendant l'assemblage,
veuillez les placer sur une
surface souple.
Les petites pièces
peuvent présenter un
risque d'étouffement
avant l'assemblage.
Veuillez lire attentivement
les instructions. Identifiez
toutes les pièces et le
matériel.
N'utilisez pas de
perceuse ou de
visseuse électrique.
Pour nettoyer la surface,
utilisez uniquement de l'eau
sur un chiffon humide.
N'utilisez pas de nettoyant
pour vitres ou d'abrasif de
nettoyage, car cela rayerait
la surface et pourrait
endommager le revêtement
protecteur.
0-6
Vous devrez peut-être fournir
les outils suivants : (NON
INCLUS DANS LA BOÎTE)
1. Tournevis à tête Philips
2. Tournevis à tête plate
3. Marteau
7
CONSEJOS PARA DORMIR CON SEGURIDAD
By
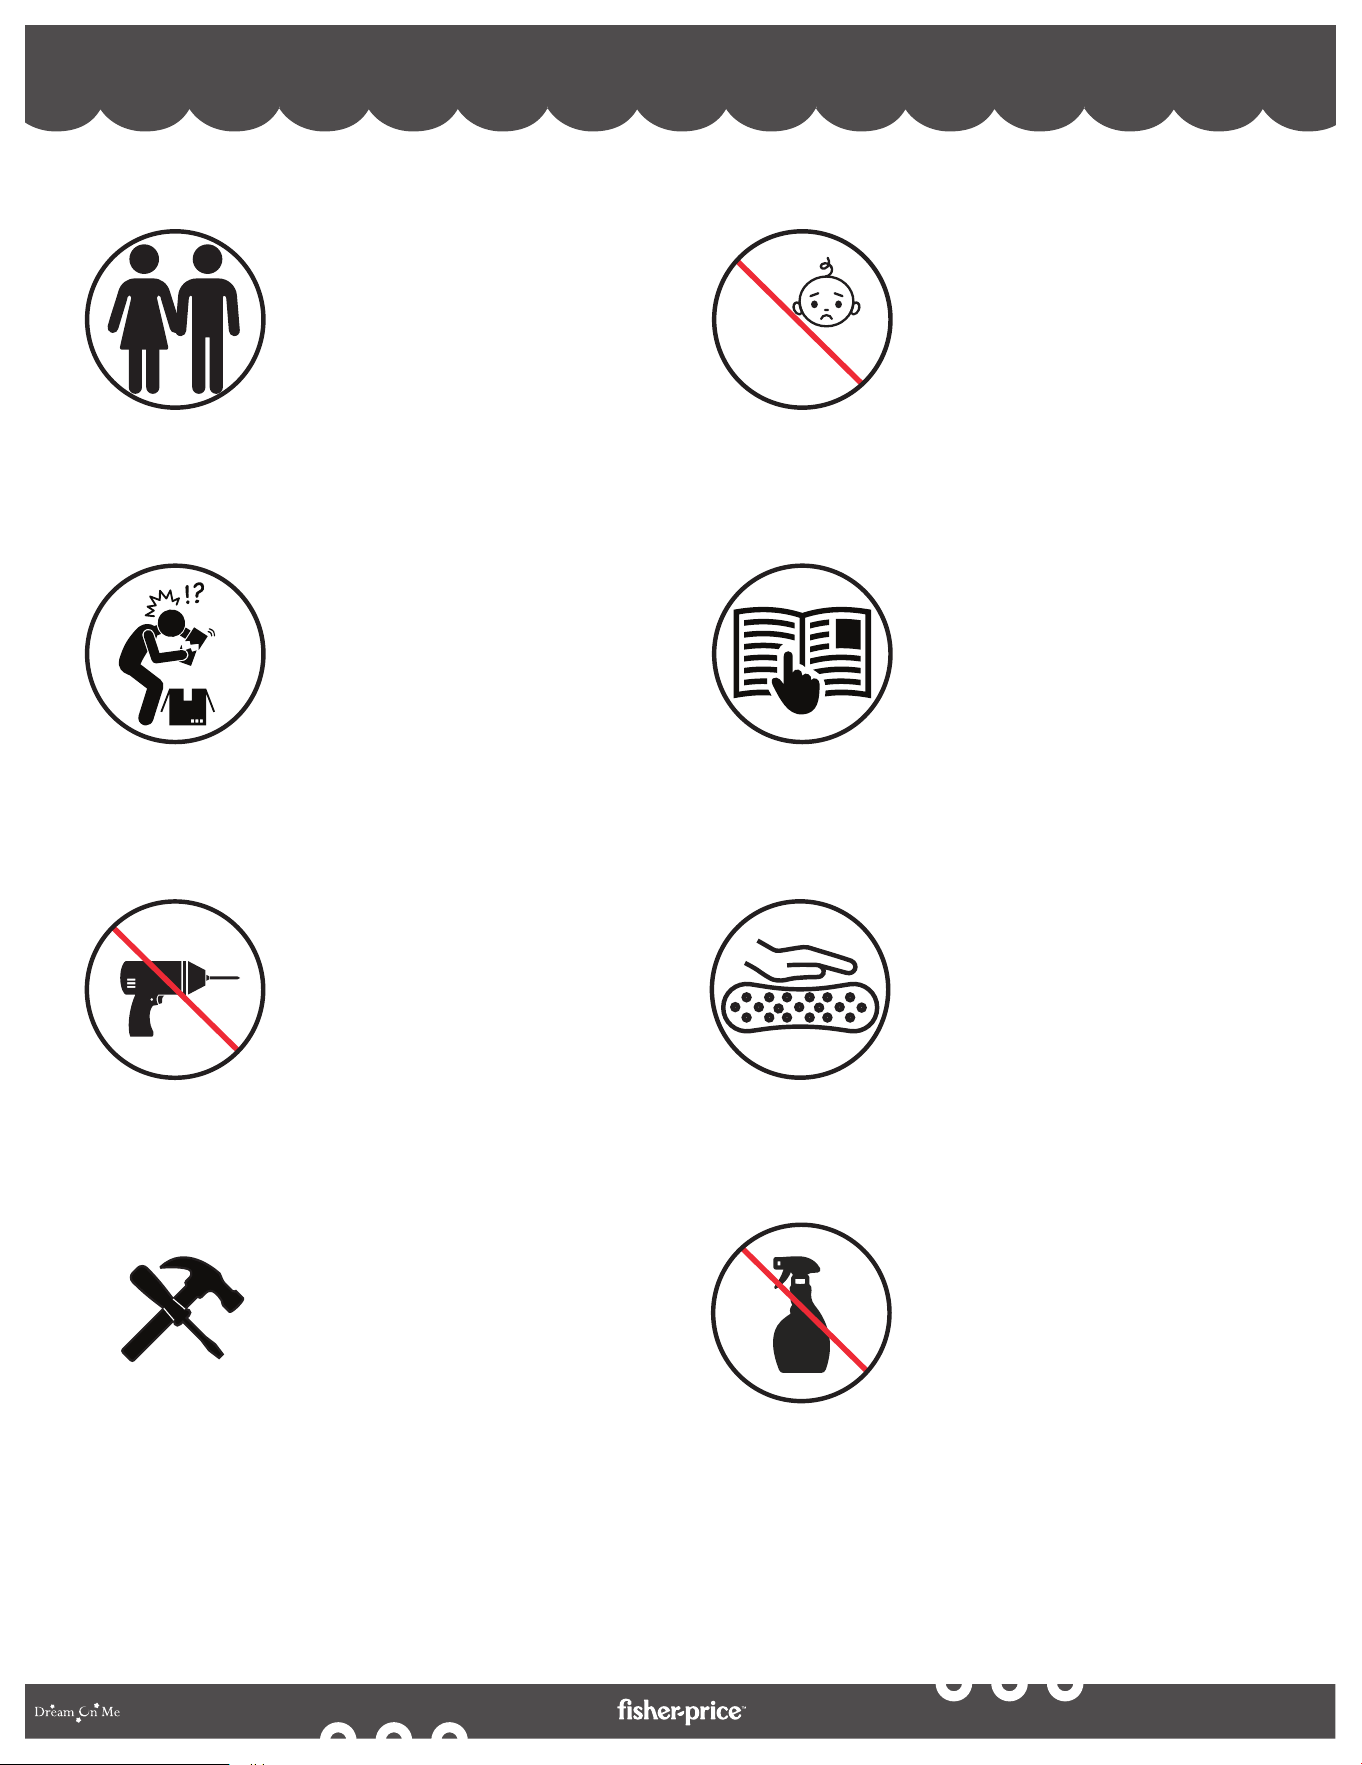
Se requiere el montaje
por parte de un adulto.
NO utilice el producto si
está dañado, roto y/o faltan
componentes o están rotos.
Para proteger las piezas
durante el montaje,
colóquelas sobre una
superficie blanda.
Las piezas pequeñas
pueden presentar peligro
de asfixia antes del
montaje.
Lea detenidamente las
instrucciones. Identifique
todas las piezas y herrajes.
No utilice taladros o
atornilladores
eléctricos.
Para limpiar la superficie,
utilice sólo agua en un paño
húmedo. No utilice
limpiacristales o productos
de limpieza abrasivos, ya
que rayarán la superficie y
podrían dañar el
revestimiento protector.
0-6
Es posible que deba
proporcionar las siguientes
herramientas: (NO
INCLUIDAS EN LA CAJA)
1. Destornillador de cabeza
Philips
2. Destornillador de cabeza
plana
3. Martillo
8
By
WARNINGS
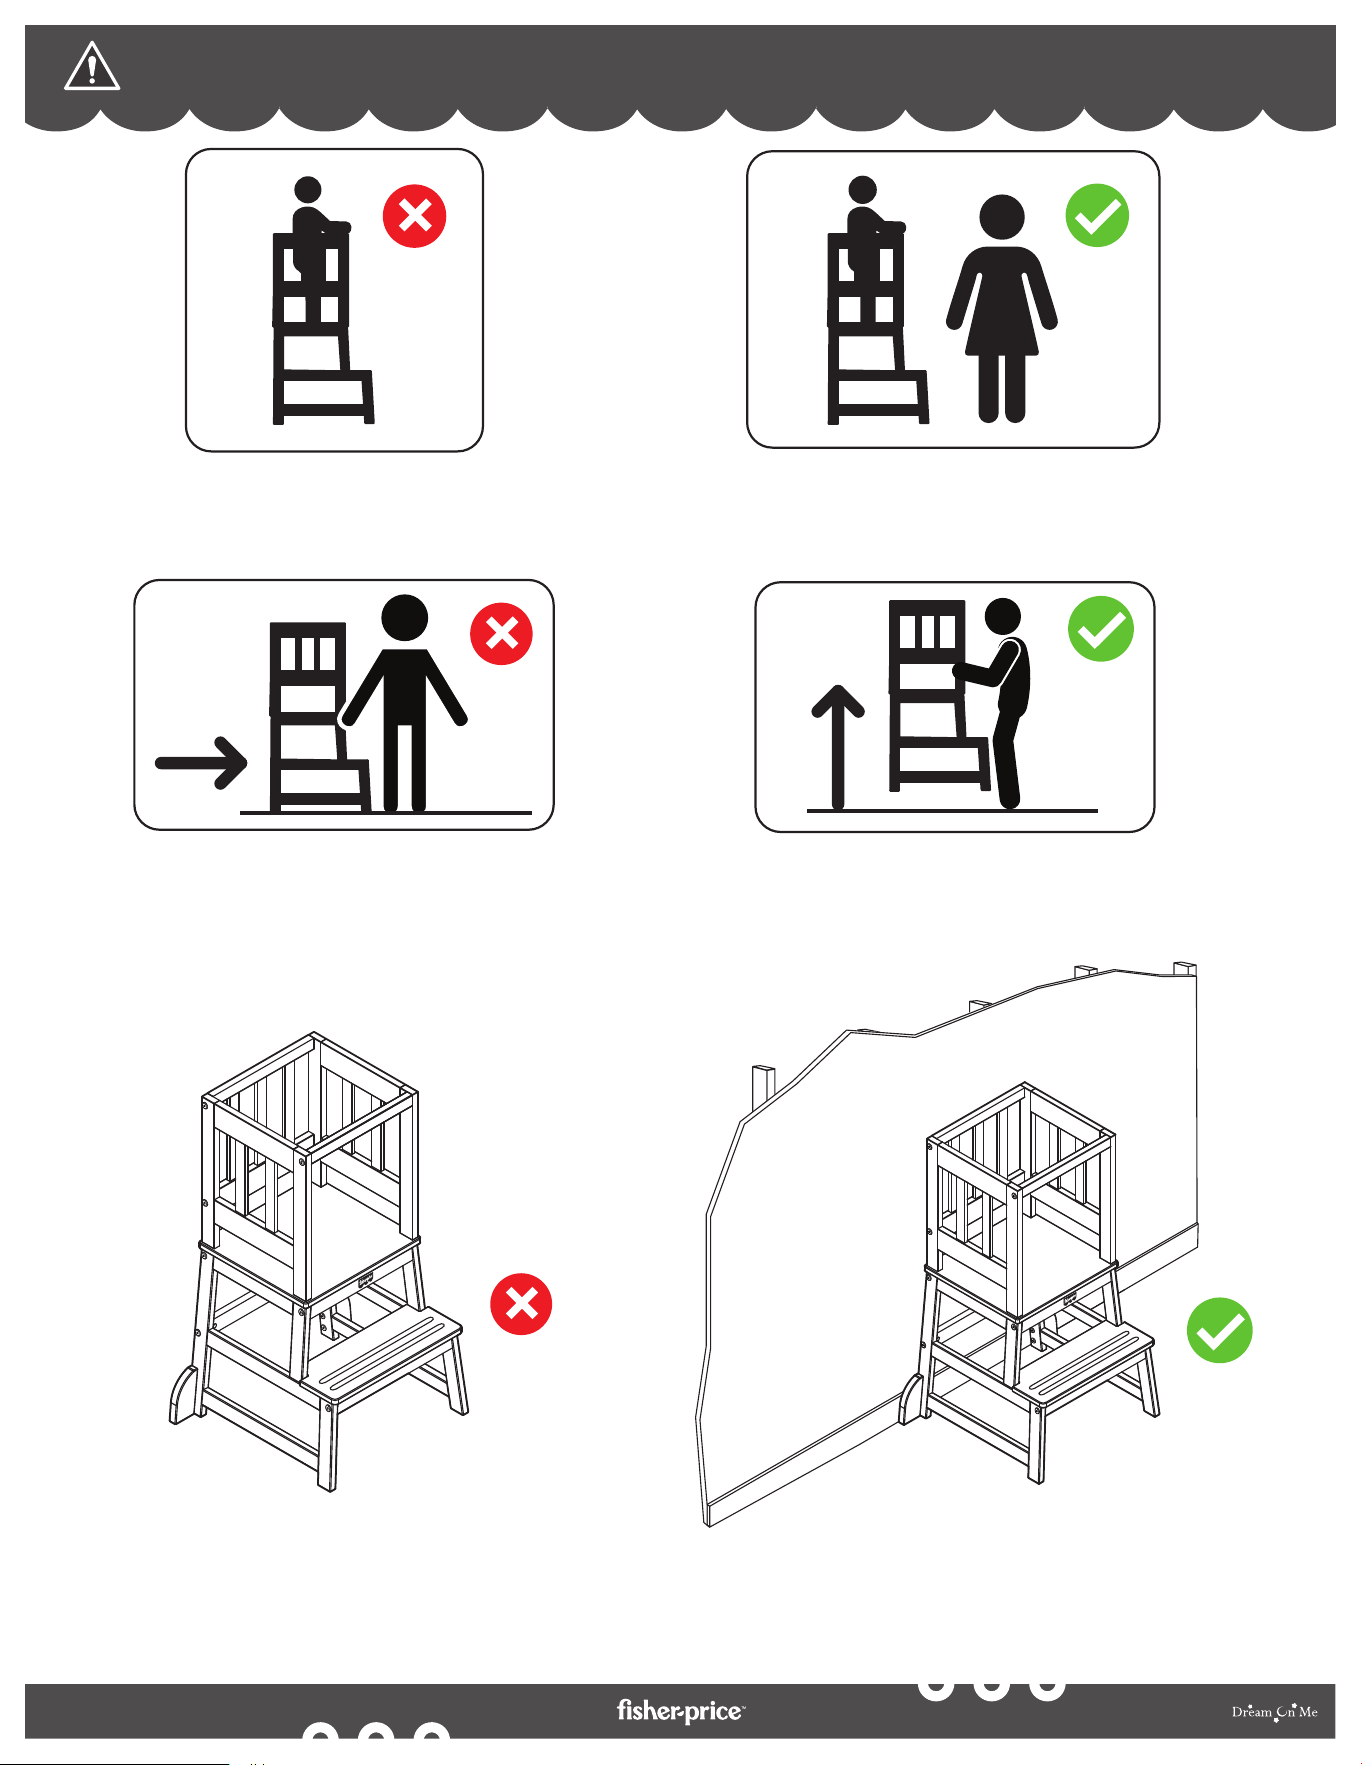
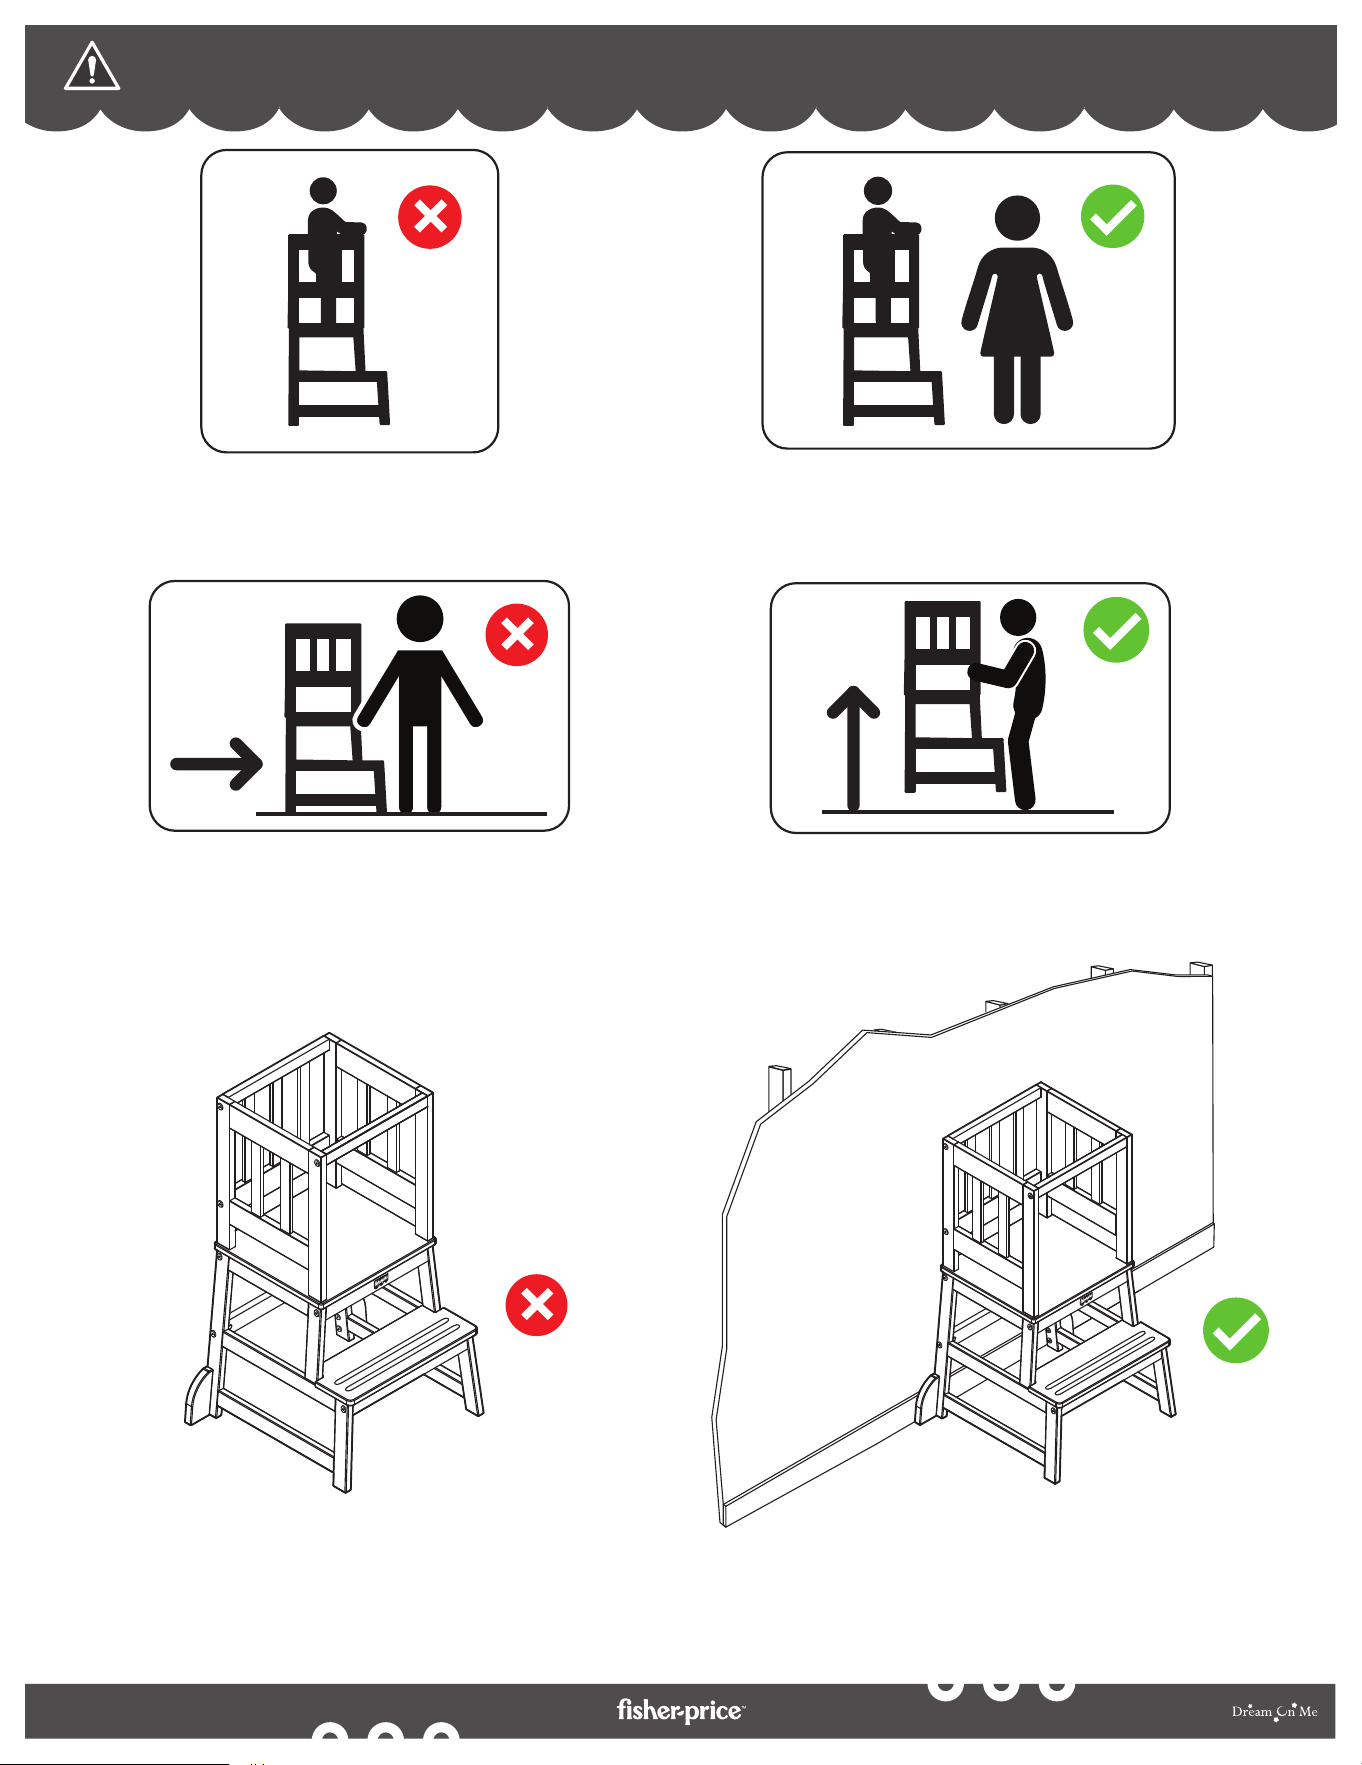
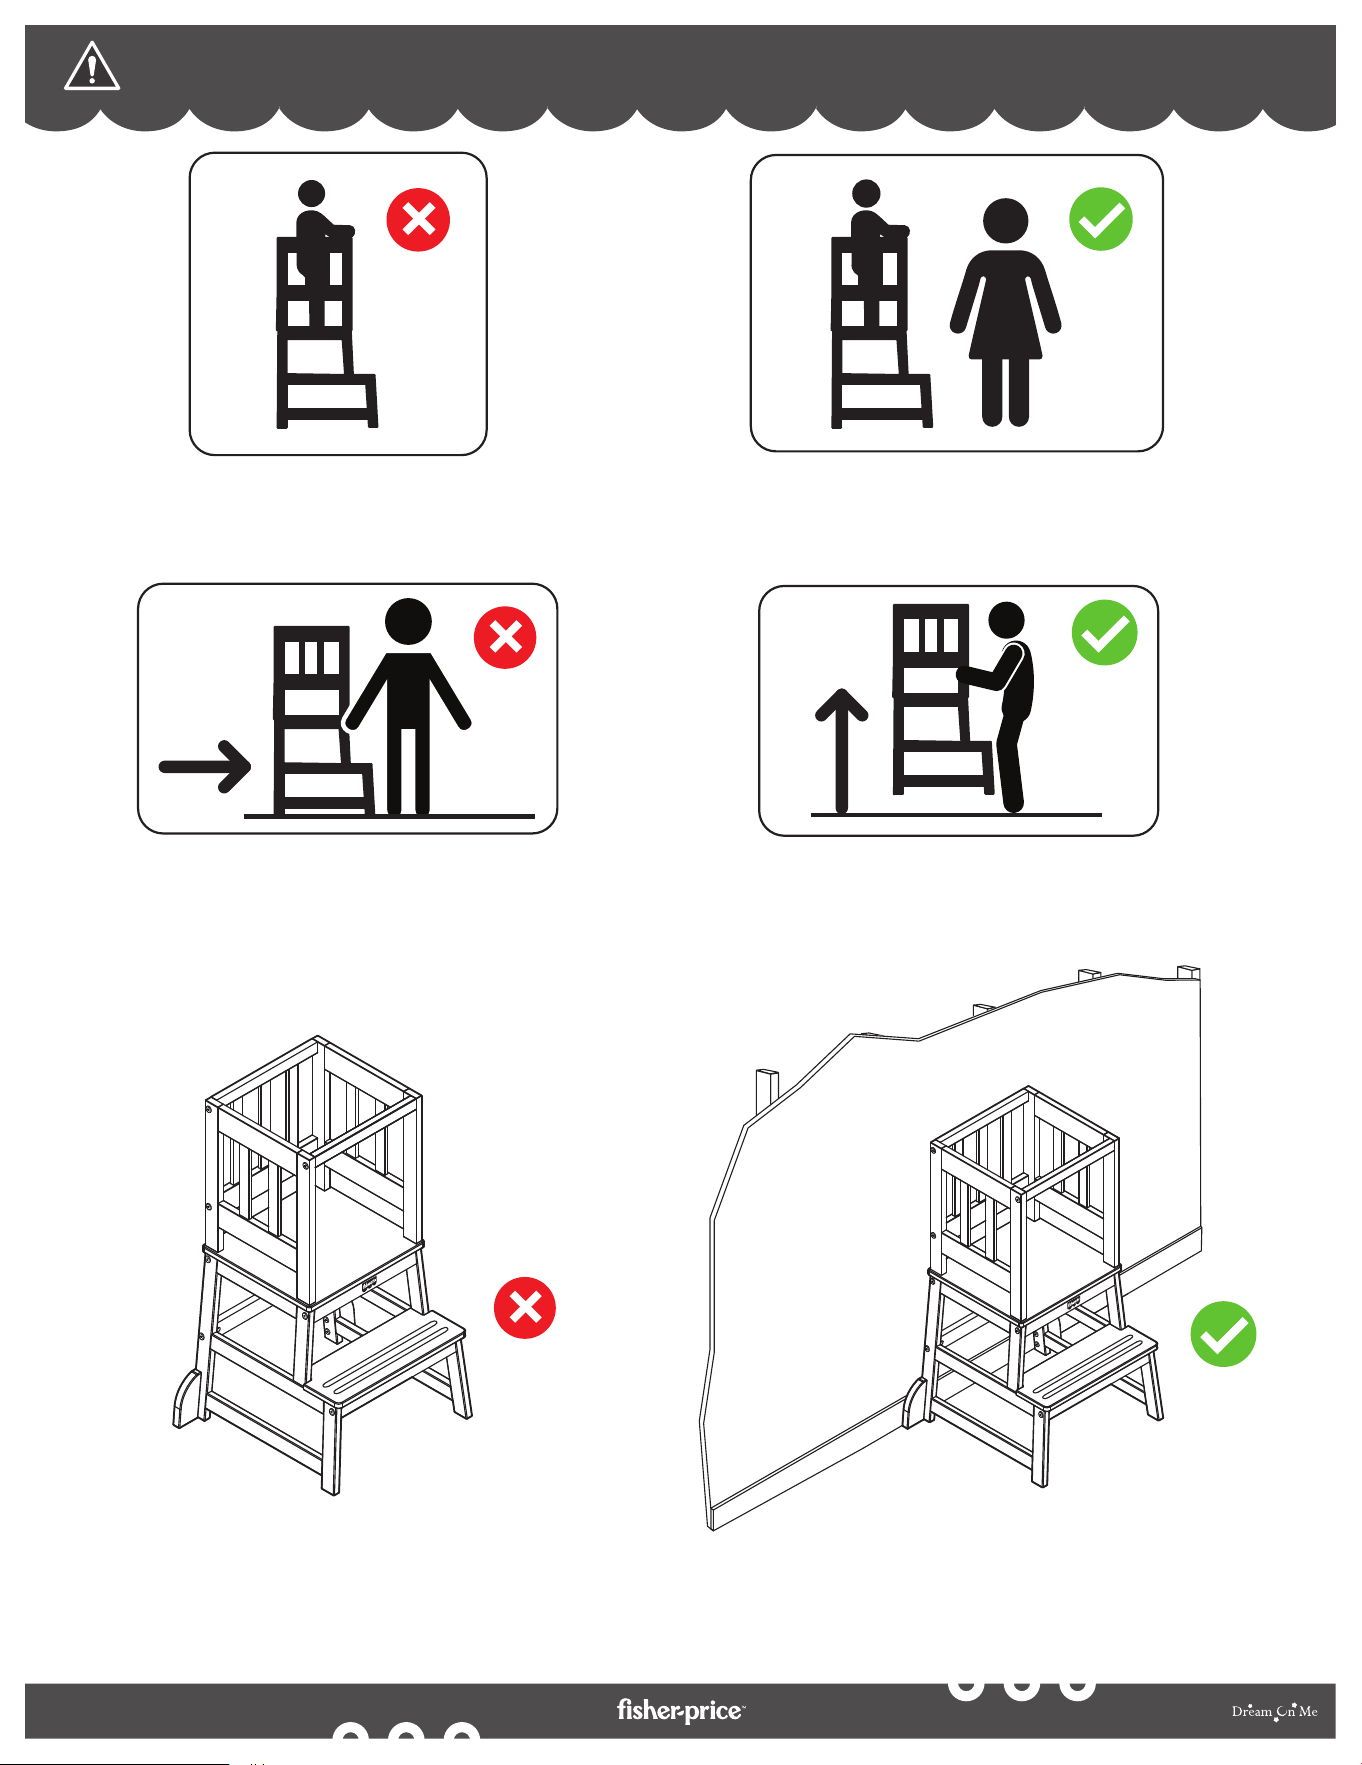
• Never leave a child unattended
on a step stool.
• Never use the step the stool without
support. It should not be used on an
uneven or unstable surfaces to ensure
stability and safety.
• Use the step stool against a wall or other
stable object to provide additional
stability and support.
• Always supervise children when
they are using a step stool.
• Avoid dragging a step stool across
the floor as this can cause the
anti-slip strip on the stool to wear
out more quickly.
• It is recommended to lift the step stool and
move it to the desired location without
dragging it.

9
By
WARNINGS (cont.)
PREVENT SERIOUS INJURY OR DEATH FROM FALLS OR TIPPING OVER: NEVER PLACE CHILD AND
PRODUCT ON AN ELEVATED SURFACE!
• ADULT ASSEMBLY REQUIRED.
• NEVER LEAVE THE CHILD UNATTENDED.
• ALWAYS KEEP THE CHILD WITHIN ARM’S REACH.
• ALWAYS PLACE THE PRODUCT ON A FLAT, LEVEL SURFACE.
• NEVER PLACE THE PRODUCT NEAR THE STAIRS.
• ALWAYS ENSURE THIS UNIT IS PLACED AWAY FROM DANGEROUS OBJECTS OR APPLIANCES,
SUCH AS A STOVE, OVEN, ELECTRICAL OUTLETS, ETC.
• THIS PRODUCT IS NOT SUITABLE IF THE CHILD’S ARM IS BELOW THE SAFETY RAIL AND THE WAIST
IS BELOW THE GUARDRAIL.
• AGE LIMIT: 18 MONTHS - 3 YEARS.
CHOKING HAZARD:
• UNASSEMBLED SMALL PARTS CAN BE A CHOKING HAZARD TO CHILDREN. FOR THE SAFETY OF
YOUR CHILD, IT IS RECOMMENDED NOT TO ASSEMBLE THIS UNIT IN THE SAME ROOM DUE TO
CONCERNS THAT THEY MAY PICK UP AND SWALLOW SMALL PARTS.
• NEVER USE THIS PRODUCT IF THERE ARE ANY LOOSE, MISSING FASTENERS, LOOSE JOINTS, OR
BROKEN PARTS.
• CHECK AFTER ASSEMBLY AND PERIODICALLY USE AT LEAST ONCE A WEEK.
• NEVER SUBSTITUTE PARTS.
OPERATING INSTRUCTIONS:
• CHILDREN MUST NOT USE THIS PRODUCT UNTIL ASSEMBLY IS COMPLETED AND THE PLATFORM IS
SET UP ON A LEVEL SURFACE. FOR THE FIRST USE, AN ADULT SHOULD SHOW THE CHILD HOW TO
USE THIS PRODUCT.
• ADULT SUPERVISION IS REQUIRED. CHILDREN SHOULD BE INSTRUCTED NOT TO USE THIS
PRODUCT IN ANY MANNER OTHER THAN INTENDED.
• CHILDREN SHOULD BE INSTRUCTED NOT TO CLIMB ON PRODUCT WHEN IT IS WET.
• DO NOT ATTACH ITEMS TO THIS PRODUCT THAT MAY BE POTENTIAL STRANGULATION HAZARDS
(SUCH AS, BUT NOT LIMITED TO, PET LEASHES, ROPES, CHAINS, ETC.).
• CHILDREN SHOULD BE DRESSED APPROPRIATELY. AVOID LOOSE-FITTING CLOTHING AND
POTENTIALLY HAZARDOUS ITEMS SUCH AS PONCHOS AND SCARVES.
10
By
AVERTISSEMENTS
• Ne laissez jamais un enfant sans
surveillance sur un escabeau.
• N'utilisez jamais le marchepied du tabouret
sans support. Il ne doit pas être utilisé sur
des surfaces inégales ou instables pour
assurer la stabilité et la sécurité.
• Utilisez le marchepied contre un mur ou
un autre objet stable pour fournir une
stabilité et un soutien supplémentaires.
• Surveillez toujours les enfants
lorsqu'ils utilisent un escabeau.
• Évitez de traîner un tabouret sur
le sol, car la bande antidérapante
du tabouret peut s'user plus
rapidement.
• Il est recommandé de soulever l'escabeau
et de le déplacer à l'endroit souhaité sans
le traîner.

11
By
AVERTISSEMENTS (suite)
ÉVITEZ LES BLESSURES GRAVES OU LA MORT À LA SUITE DES CHUTES OU DES BASCULEMENTS :
NE JAMAIS PLACER L'ENFANT ET LE PRODUIT SUR UNE SURFACE ÉLEVÉE !
• ASSEMBLAGE PAR UN ADULTE REQUIS.
• NE JAMAIS LAISSER L'ENFANT SANS SURVEILLANCE.
• GARDEZ TOUJOURS L'ENFANT À PORTÉE DE MAIN.
• PLACEZ TOUJOURS LE PRODUIT SUR UNE SURFACE PLANE ET DE NIVEAU.
• NE JAMAIS PLACER LE PRODUIT PRÈS DES ESCALIERS.
• ASSUREZ-VOUS TOUJOURS QUE CET APPAREIL EST PLACÉ LOIN D'OBJETS OU D'APPAREILS
DANGEREUX, TELS QU'UNE CUISINIÈRE, UN FOUR, DES PRISES ÉLECTRIQUES, ETC.
• CE PRODUIT NE CONVIENT PAS SI LE BRAS DE L'ENFANT SE TROUVE SOUS LA RAMPE DE
SÉCURITÉ ET LA TAILLE SOUS LA BARRE DE PROTECTION.
• LIMITE D'AGE : 18 MOIS - 3 ANS.
RISQUE D'ÉTOUFFEMENT:
• LES PETITES PIÈCES NON ASSEMBLÉES PEUVENT PRÉSENTER UN RISQUE D'ÉTOUFFEMENT POUR
LES ENFANTS. POUR LA SÉCURITÉ DE VOTRE ENFANT, IL EST RECOMMANDÉ DE NE PAS
ASSEMBLER CET APPAREIL DANS LA MÊME PIÈCE CAR ILS PEUVENT RAMASSER ET AVALER DE
PETITES PIÈCES.
• N'UTILISEZ JAMAIS CE PRODUIT S'IL Y A DES FIXATIONS DESSERRES OU MANQUANTES, DES
JOINTS DESSERRES OU DES PIÈCES CASSÉES.
• VÉRIFIER APRÈS LE MONTAGE ET UTILISER PÉRIODIQUEMENT AU MOINS UNE FOIS PAR SEMAINE.
• NE JAMAIS REMPLACER DE PIÈCES.
MODE D'EMPLOI:
• LES ENFANTS NE DOIVENT PAS UTILISER CE PRODUIT TANT QUE L'ASSEMBLAGE N'EST PAS
TERMINÉ ET LA PLATE-FORME INSTALLÉ SUR UNE SURFACE DE NIVEAU. POUR LA PREMIÈRE
UTILISATION, UN ADULTE DOIT MONTRER À L'ENFANT COMMENT UTILISER CE PRODUIT.
• LA SUPERVISION D'UN ADULTE EST REQUISE. LES ENFANTS DOIVENT ÊTRE INFORMÉS DE NE PAS
UTILISER CE PRODUIT D'UNE MANIÈRE AUTRE QUE CELLE PRÉVUE.
• LES ENFANTS DOIVENT ÊTRE INFORMÉS DE NE PAS MONTER SUR LE PRODUIT LORSQU'IL EST
MOUILLÉ.
• N'ATTACHEZ AUCUN ARTICLE À CE PRODUIT QUI PUISSE POSER UN RISQUE D'ÉTRANGLEMENT
POTENTIEL (COMME, MAIS SANS S'Y LIMITER, LAISSES, CORDES, CHAÎNES, ETC.).
• LES ENFANTS DOIVENT ÊTRE HABILLÉS DE MANIÈRE APPROPRIÉE. ÉVITEZ LES VÊTEMENTS AMPLE
ET LES ARTICLES POTENTIELLEMENT DANGEREUX COMME LES PONCHOS ET LES ÉCHARPES.
12
By
ADVERTENCIAS
• Nunca deje a una niña
desatendida en un taburete.
• Nunca utilice el peldaño del taburete sin
soporte. No debe usarse en superficies
irregulares o inestables para garantizar la
estabilidad y la seguridad.
• Use el taburete contra una pared u
otro objeto estable para brindar
estabilidad y apoyo adicionales.
• Supervise siempre a los niños
cuando utilicen un taburete.
• Evite arrastrar un taburete por el
suelo, ya que esto puede hacer que
la tira antideslizante del taburete se
desgaste más rápidamente.
• Se recomienda levantar el taburete y
moverlo a la ubicación deseada sin
arrastrarlo.

13
By
ADVERTENCIAS (suite)
EVITE LESIONES GRAVES O LA MUERTE POR CAÍDAS O VUELCOS: ¡NUNCA COLOQUE AL NIÑO Y EL
PRODUCTO EN UNA SUPERFICIE ELEVADA!
• SE REQUIERE ASAMBLEA DE ADULTOS.
• NUNCA DEJE AL NIÑO DESATENDIDO.
• MANTENGA SIEMPRE AL NIÑO AL ALCANCE DE SU BRAZO.
• COLOQUE SIEMPRE EL PRODUCTO SOBRE UNA SUPERFICIE PLANA Y NIVELADA.
• NUNCA COLOQUE EL PRODUCTO CERCA DE LAS ESCALERAS.
• ASEGÚRESE SIEMPRE DE QUE ESTA UNIDAD ESTÉ ALEJADA DE OBJETOS O ELECTRODOMÉSTICOS
PELIGROSOS, COMO ESTUFA, HORNO, TOMACORRIENTES, ETC.
• ESTE PRODUCTO NO ES ADECUADO SI EL BRAZO DEL NIÑO ESTÁ DEBAJO DE LA BARANDILLA DE
SEGURIDAD Y LA CINTURA ESTÁ DEBAJO DE LA BARANDILLA.
• LÍMITE DE EDAD: 18 MESES - 3 AÑOS.
PELIGRO DE ASFIXIA:
• LAS PIEZAS PEQUEÑAS SIN MONTAR PUEDEN SER UN PELIGRO DE ASFIXIA PARA LOS NIÑOS.
PARA LA SEGURIDAD DE SU HIJO, SE RECOMIENDA NO MONTAR ESTA UNIDAD EN LA MISMA
HABITACIÓN POR LA PREOCUPACIÓN DE QUE PUEDAN RECOGER Y TRAGAR PIEZAS PEQUEÑAS.
• NUNCA UTILICE ESTE PRODUCTO SI HAY ALGUNOS SUJETADORES SUELTOS, FALTANTES, JUNTAS
SUELTAS O PIEZAS ROTAS.
• CONTROLAR DESPUÉS DEL MONTAJE Y UTILIZAR PERIÓDICAMENTE AL MENOS UNA VEZ A LA
SEMANA.
• NUNCA SUSTITUYA PIEZAS.
INSTRUCCIONES DE OPERACIÓN:
• LOS NIÑOS NO DEBEN UTILIZAR ESTE PRODUCTO HASTA QUE SE COMPLETE EL MONTAJE Y LA
PLATAFORMA SE INSTALE EN UNA SUPERFICIE NIVELADA. PARA EL PRIMER USO, UN ADULTO DEBE
MOSTRAR AL NIÑO CÓMO UTILIZAR ESTE PRODUCTO.
• SE REQUIERE LA SUPERVISIÓN DE UN ADULTO. LOS NIÑOS DEBEN SER INSTRUIDOS PARA NO
UTILIZAR ESTE PRODUCTO DE CUALQUIER MANERA QUE NO SEA PREVISTA.
• SE DEBE INSTRUIR A LOS NIÑOS QUE NO SE SUBAN AL PRODUCTO CUANDO ESTÉ MOJADO.
• NO ADJUNTE ARTÍCULOS A ESTE PRODUCTO QUE PUEDAN CONSTITUIR POSIBLES RIESGOS DE
ESTRANGULACIÓN (COMO, ENTRE OTROS, CORREAS, CUERDAS, CADENAS, ETC.) PARA
MASCOTAS.
• LOS NIÑOS DEBEN ESTAR VESTIDO APROPIADAMENTE. EVITE ROPA AJUSTADA Y ARTÍCULOS
POTENCIALMENTE PELIGROSOS COMO PONCHOS Y BUFANDAS.
14
By
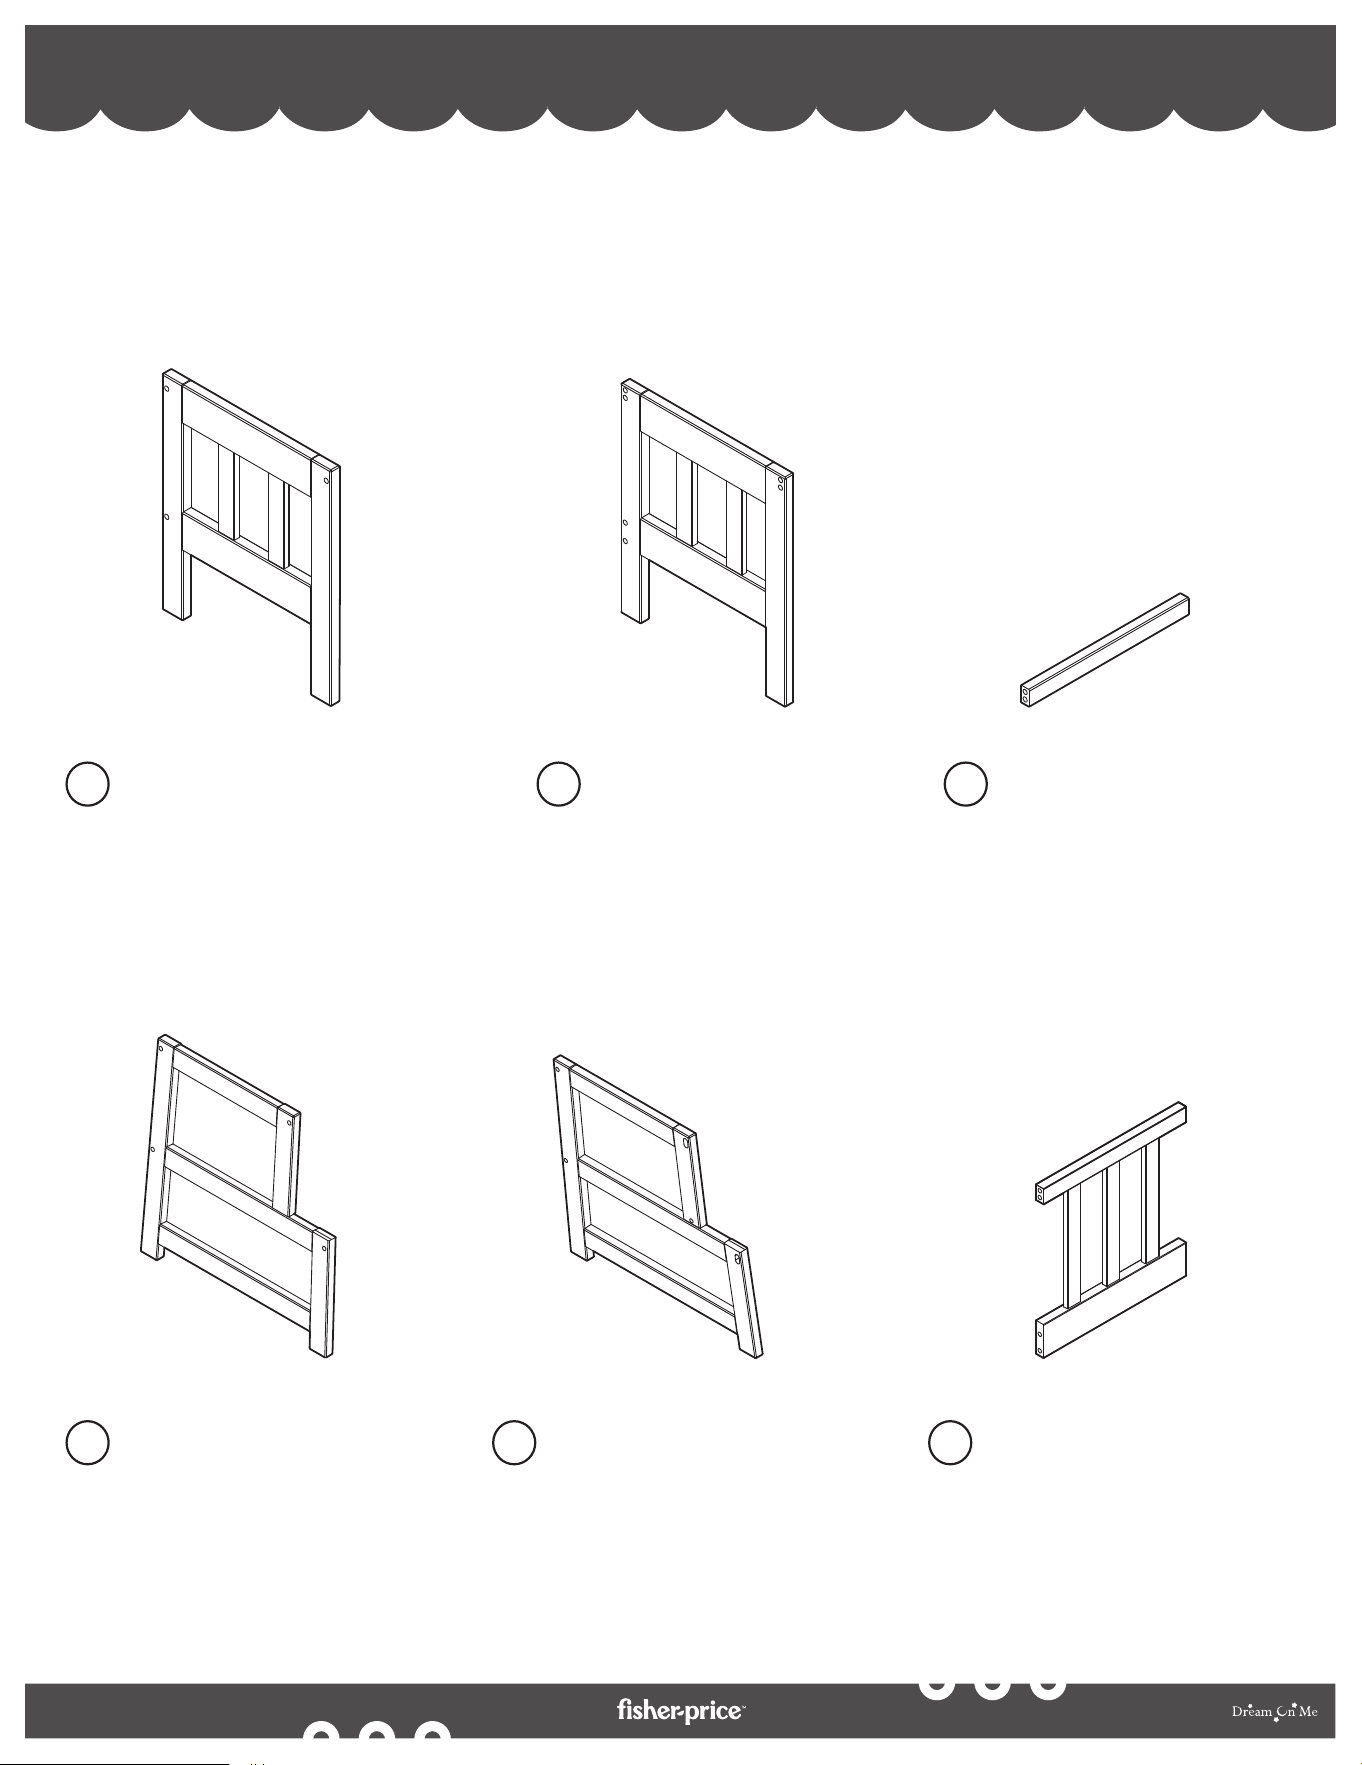
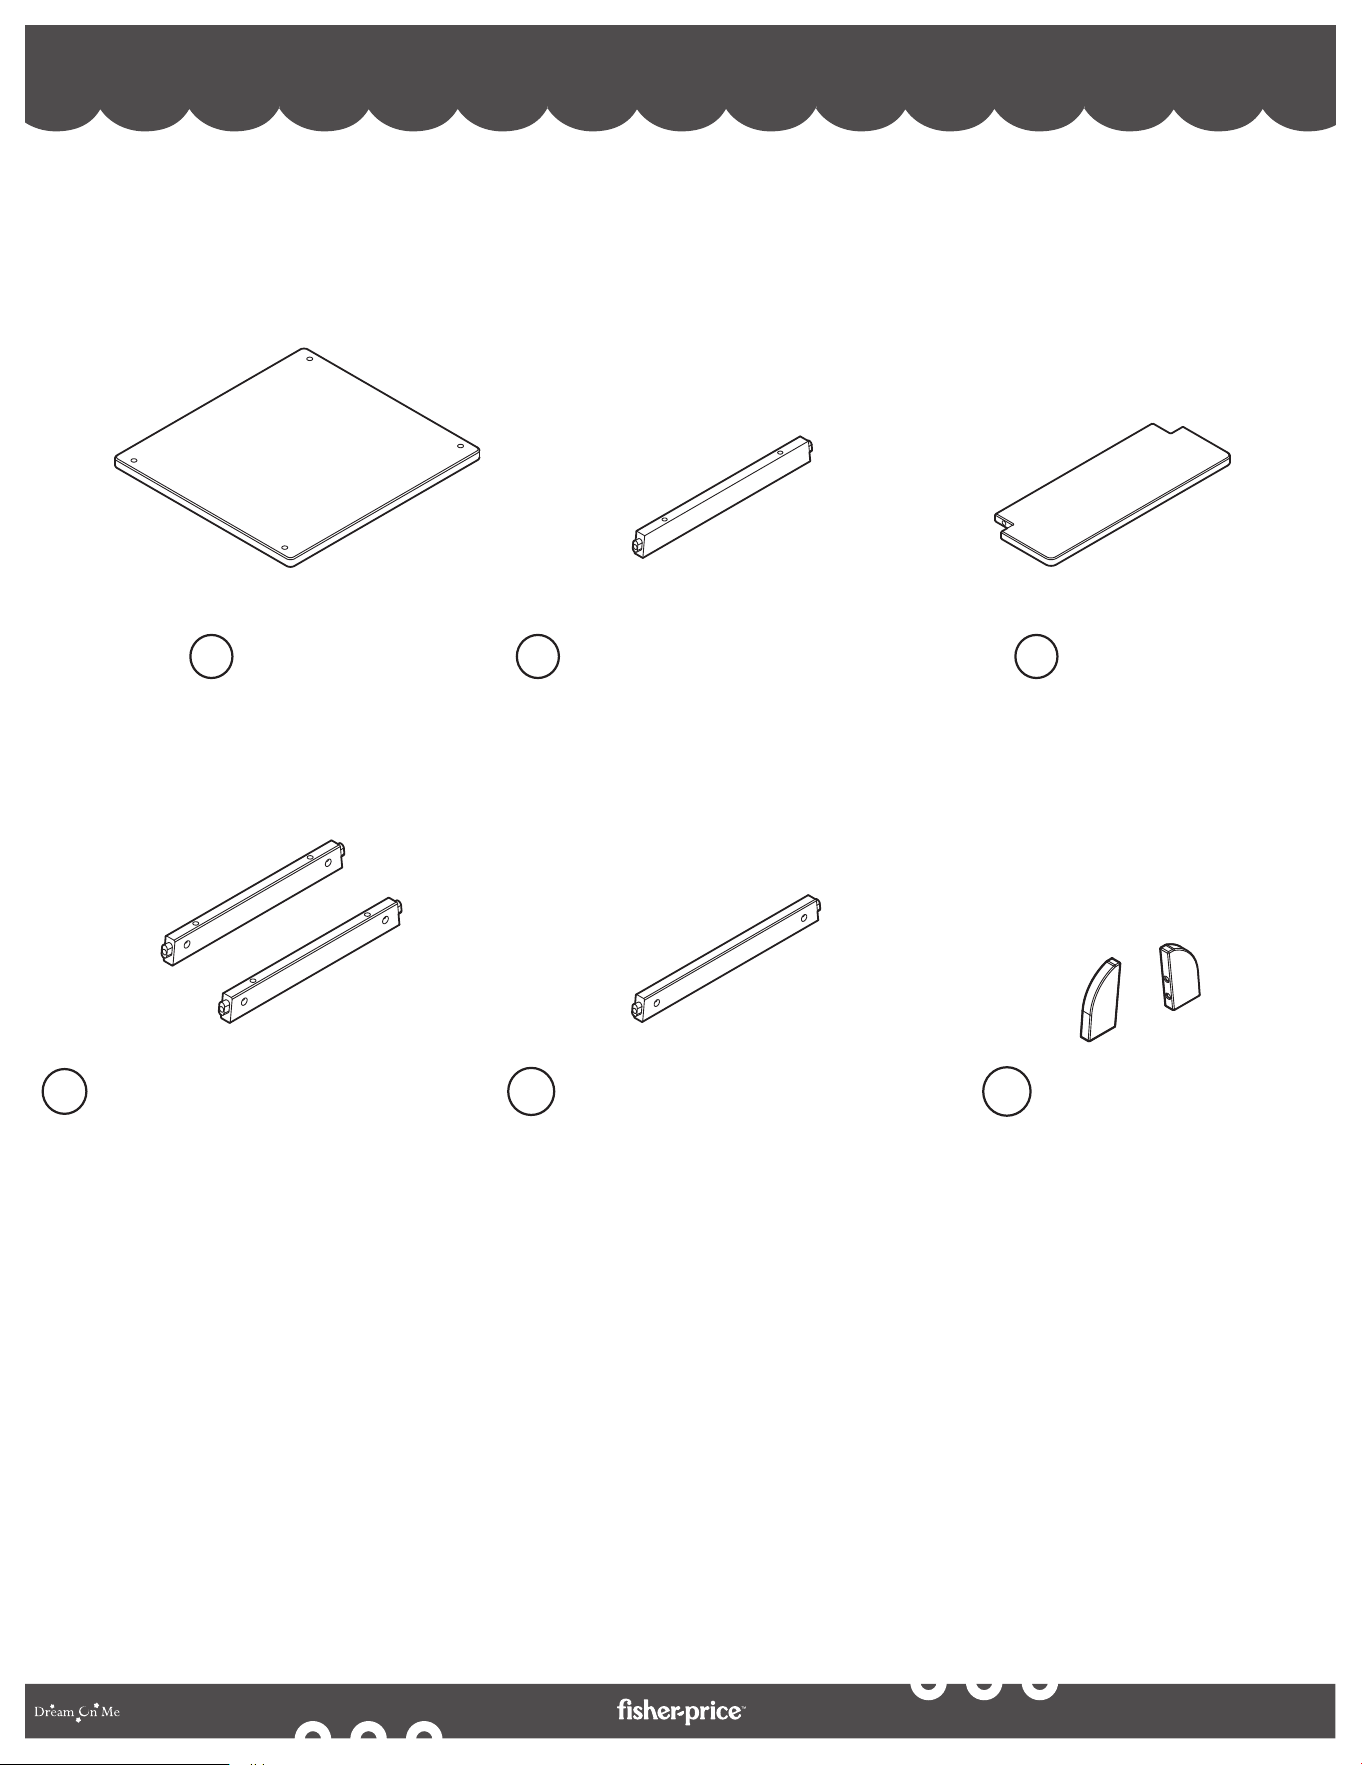
PARTS PIÈCES PARTES
If there are any missing parts, please contact Dream On Me before using the product.
S'il y a des pièces manquantes, veuillez contacter Dream On Me avant d'utiliser le produit.
Si falta alguna pieza, póngase en contacto con Dream On Me antes de utilizar el producto.
Right Guard Rail Frame
Cadre de garde-corps droit
Marco derecho de la barandilla
1
Left Guard Rail Frame
Left Guard Rail Frame
Marco de baranda izquierda
2
Top Guard Rail
Garde-corps supérieur
Barandilla superior
3
Right Stool Frame
Cadre de tabouret droit
Marco del taburete derecho
4
Left Stool Frame
Cadre de tabouret gauche
Marco del taburete izquierdo
5
Top Rear Rail
Rail arrière supérieur
Raíl trasero superior
6
15
By
If there are any missing parts, please contact Dream On Me before using the product.
S'il y a des pièces manquantes, veuillez contacter Dream On Me avant d'utiliser le produit.
Si falta alguna pieza, póngase en contacto con Dream On Me antes de utilizar el producto.
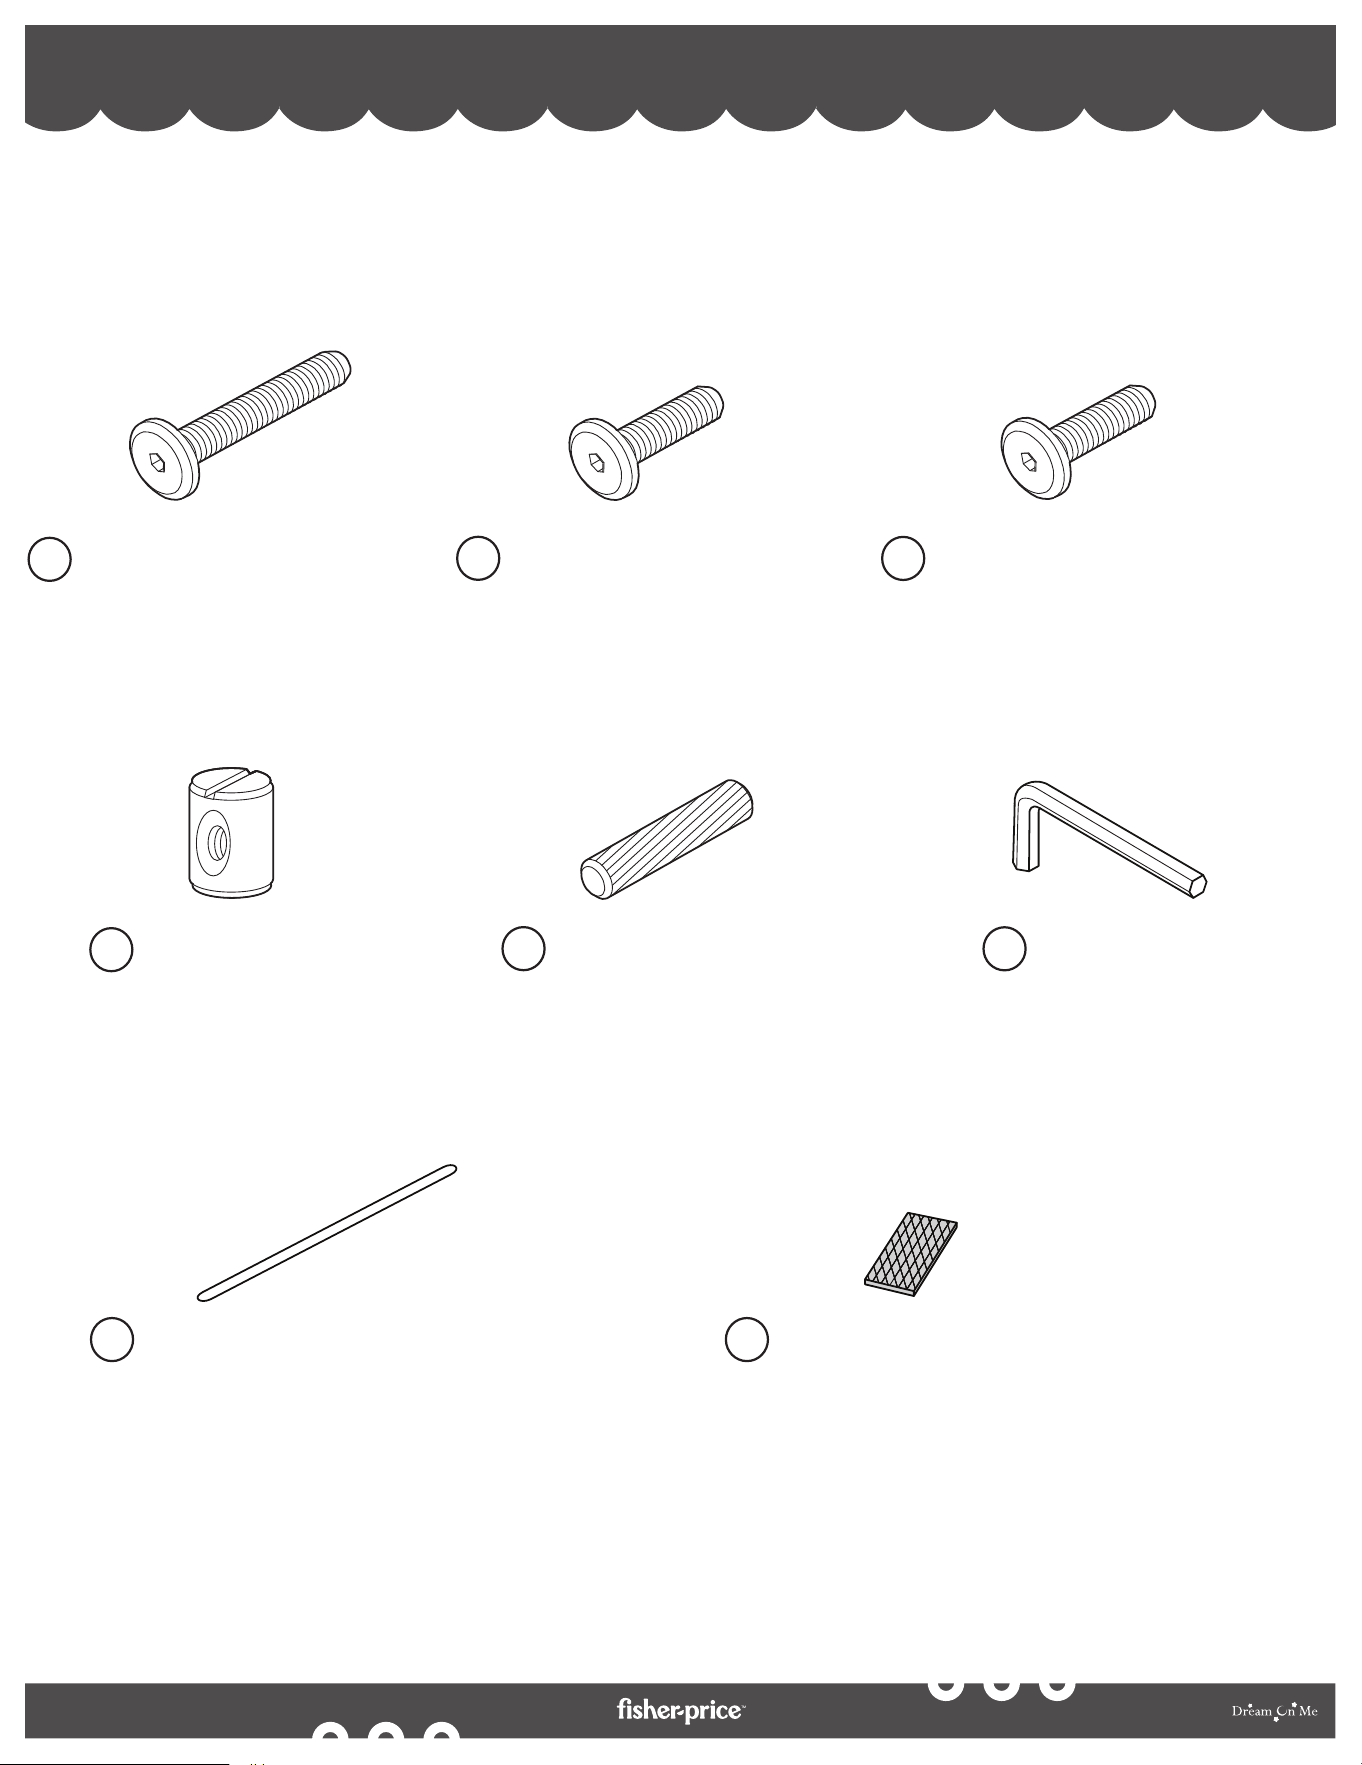
PARTS PIÈCES PARTES
Platform
Plateforme
Plataforma
7
Anti-tipping block
Bloc anti-basculement
Bloque antivuelco
12
Foot Step Support Rail
Rail de support de marchepied
Riel de apoyo para peldaños
8
Foot Step
Pas de pied
Paso de pie
9
Front and Rear Platform
Support Rails
Plate-forme avant et arrière
Rails de support
Plataforma delantera y trasera
Rieles de soporte
10
Rear Lower-end Support Rail
Rail de support inférieur arrière
Riel de soporte inferior trasero
11
16
By
If there are any missing parts, please contact Dream On Me before using the product.
S'il y a des pièces manquantes, veuillez contacter Dream On Me avant d'utiliser le produit.
Si falta alguna pieza, póngase en contacto con Dream On Me antes de utilizar el producto.
HARDWARE MATÉRIEL
Wooden Dowel 1-1/4” (x8)
Cheville en bois 1-1/4” (×8)
Clavija de madera 1-1/4” (×8)
E
Barrel Nut (x14)
Écrou de baril (x14)
Tuerca de barril (x14)
D
Anti-slip Strips (38x2cm) (×2)
Bandes antidérapantes (38x2cm) (×2)
Tiras antideslizantes (38x2cm) (×2)
G
Anti-slip Strips (×4)
Bandes antidérapantes (×4)
Tiras antideslizantes (×4)
H
Allen Key (x1)
Clé Allen (x1)
Llave Allen (x1)
F
Allen Head Bolt 1-3/4”(×6)
Boulon à tête Allen 1-3/4”(×6)
Perno de cabeza Allen 1-3/4”(×6)
B
Allen Head Bolt 2-1/8”(×14)
Boulon à tête Allen 2-1/8"(×14)
Perno de cabeza Allen 2-1/8”(×14)
A
Allen Head Bolt 1-3/16”(×8)
Boulon à tête Allen 1-3/16"(×8)
Perno de cabeza Allen 1-3/16”(×8)
C
17
By
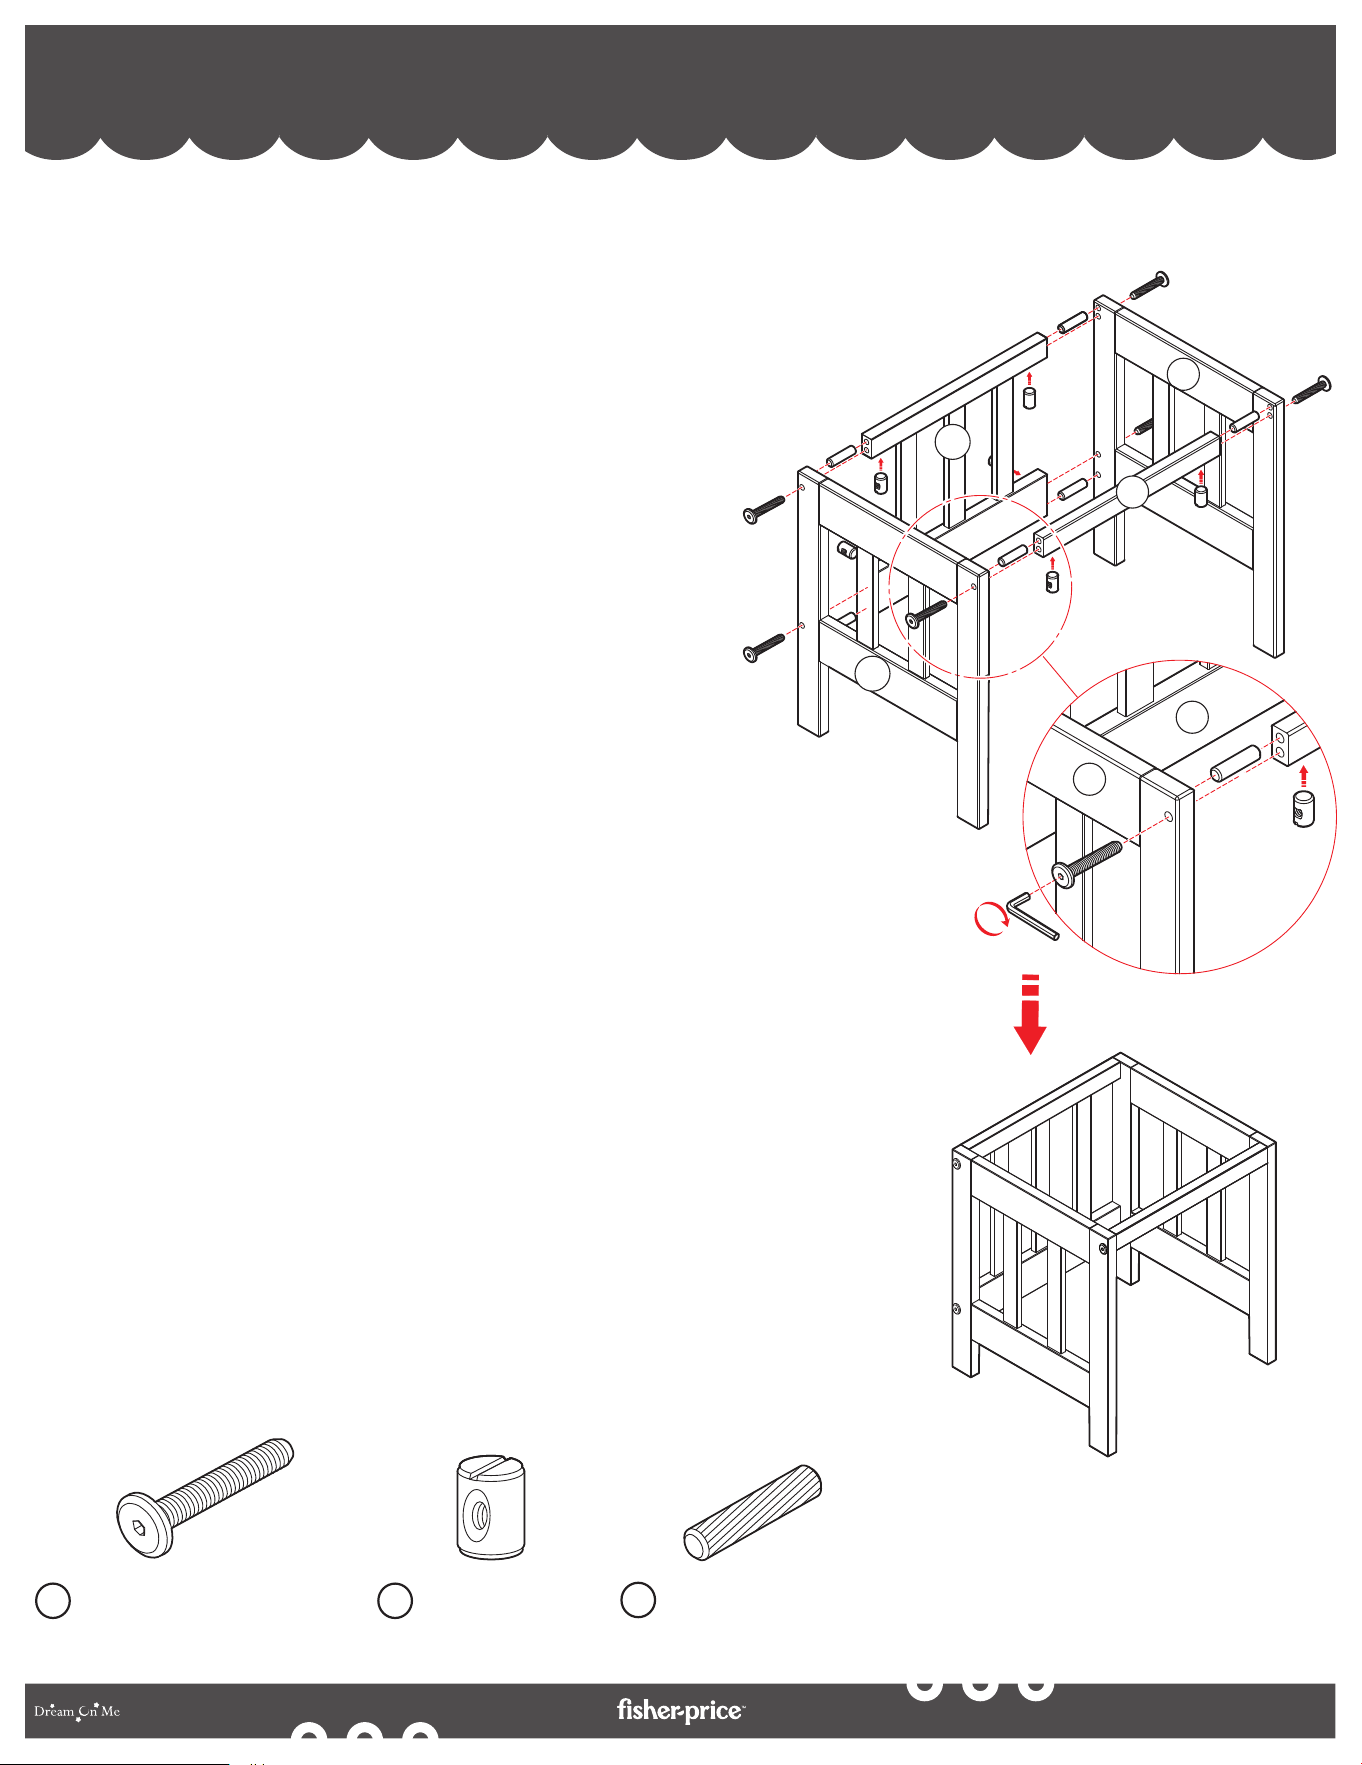
TODDLER TOWER ASSEMBLY - GUARD RAILS ASSEMBLY
ASSEMBLAGE DE LA TOUR POUR TOUT-PETITS - ASSEMBLAGE DES GARDE-CORPS
MONTAJE DE LA TORRE PARA NIÑOS PEQUEÑOS - MONTAJE DE BARANDALES
1
Wooden Dowel 1-1/4” (x6)
Cheville en bois 1-1/4” (×6)
Clavija de madera 1-1/4” (×6)
E
Barrel Nut (x6)
Écrou de baril (x6)
Tuerca de barril (x6)
D
Allen Head Bolt 2-1/8”(×6)
Boulon à tête Allen 2-1/8"(×6)
Perno de cabeza Allen 2-1/8”(×6)
A
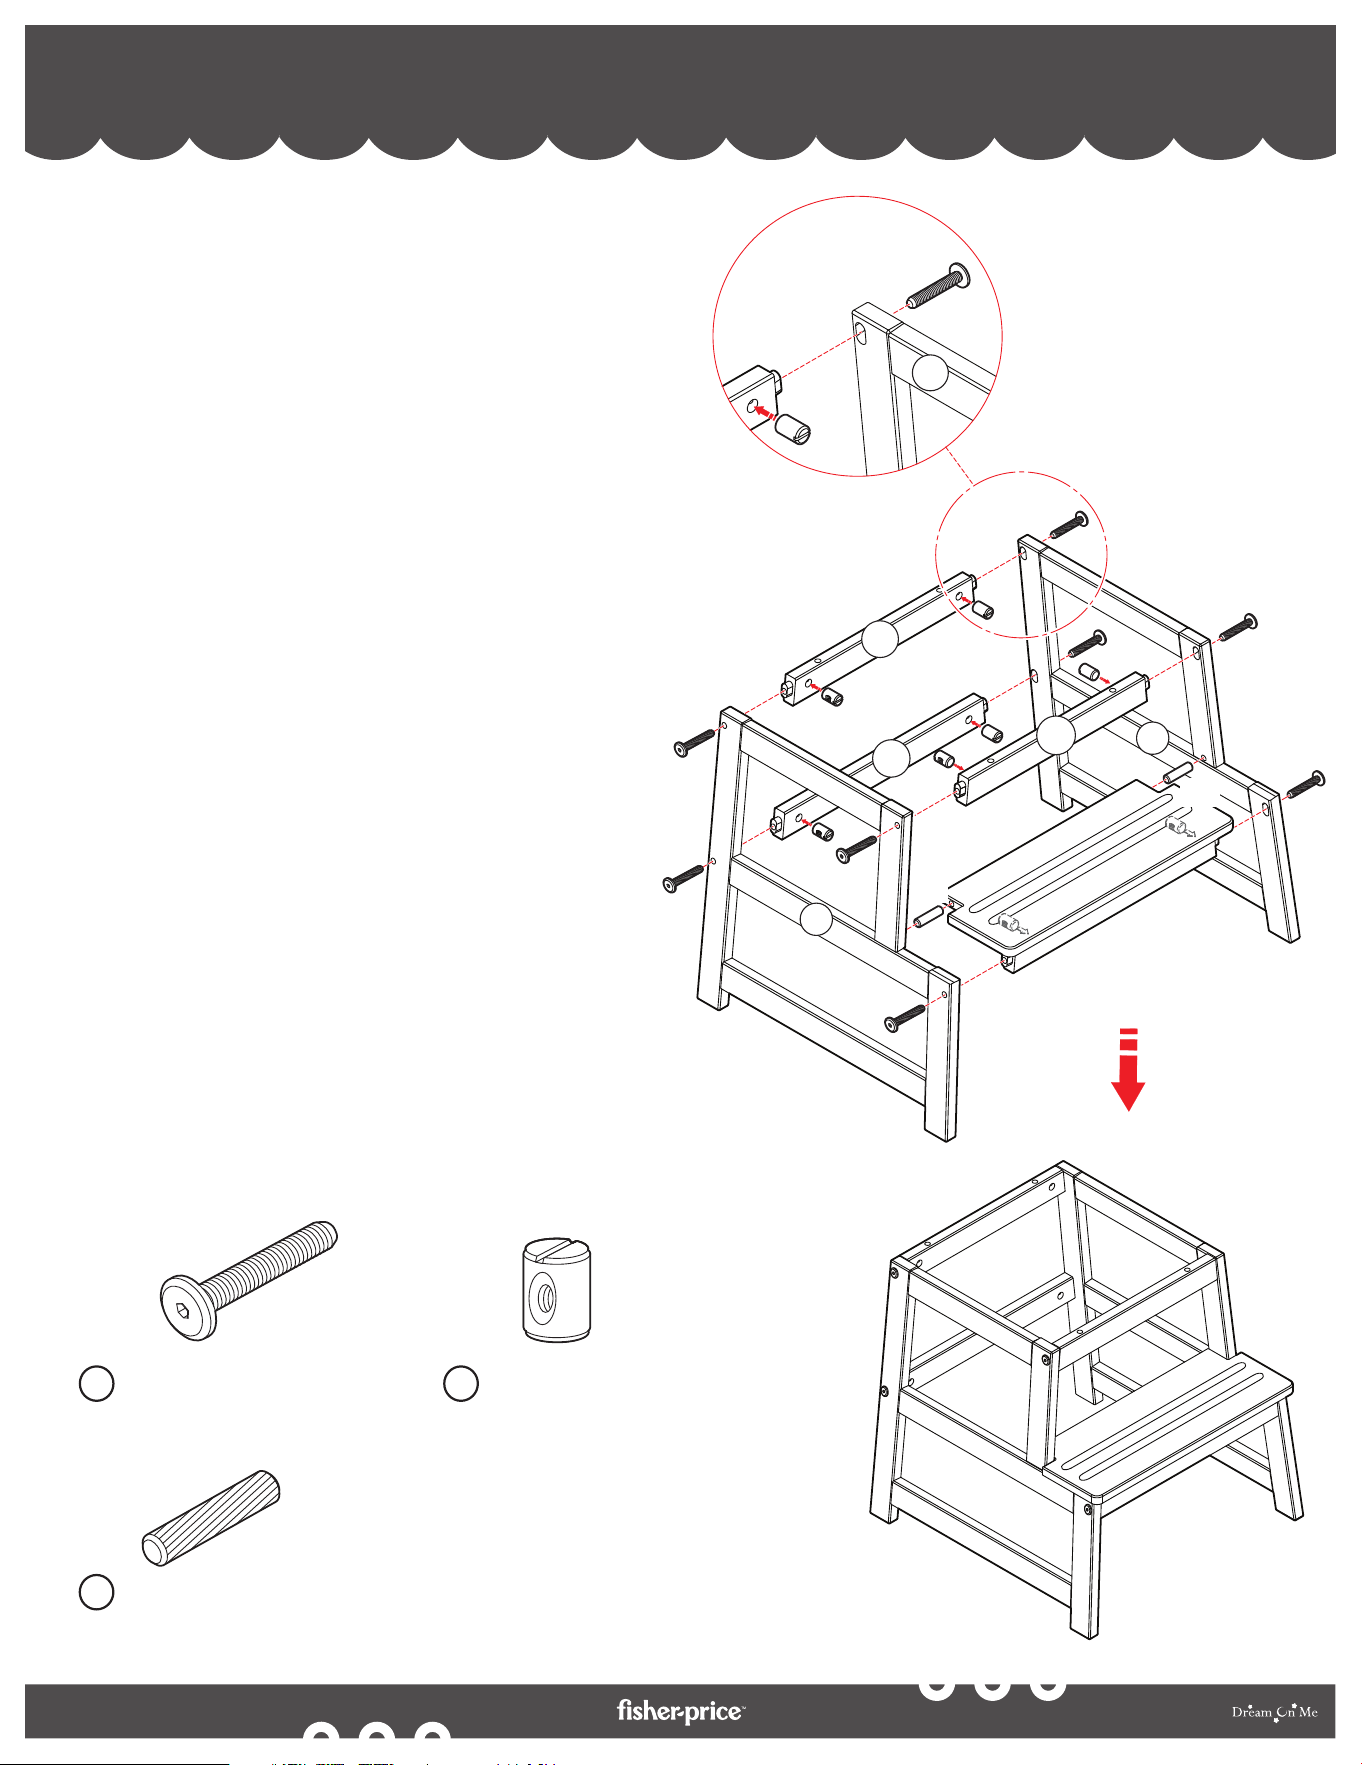
1a. As shown in the illustration, align the Right Guard Rail
Frame (1) with the Left Guard Rail Frame (2). The Top
Guard Rail (3) should also be aligned parallel to the Top
Rear Rail (6), between the side rail frames.
1b. The Wooden Dowels (E) should be positioned between the
top rear rail, the top guard rail, and the side rails.
1c. Position the Barrel Nuts (D) in the insertions provided on
the bottom of the top rear rail and top guard rail as shown
in the illustration.
1d. Position the Allen Head Bolts (A) in the insertions provided
on the side rails. Tighten the bolts into the barrel nuts using
the Allen Key (F).
1e. Guard rails should resemble the second illustration once
they are assembled correctly.
1a. Comme le montre l'illustration, alignez le cadre du garde-corps
droit (1) avec le cadre du garde-corps gauche (2). Le rail de
protection supérieur (3) doit également être aligné parallèlement
au rail arrière supérieur (6), entre les cadres des rails latéraux.
1b. Les chevilles en bois (E) doivent être positionnées entre le rail
arrière supérieur, le rail de protection supérieur et les rails latéraux.
1c. Positionnez les écrous cylindriques (D) dans les insertions prévues
au bas de la traverse arrière supérieure et de la traverse de
protection supérieure, comme indiqué sur l'illustration.
1d. Placez les boulons à tête hexagonale (A) dans les insertions
prévues sur les rails latéraux. Serrez les boulons dans les écrous à
tête cylindrique à l'aide de la clé Allen (F).
1e. Les garde-corps doivent ressembler à la deuxième illustration une
fois qu'ils sont correctement assemblés.
1a. Como se muestra en la ilustración, alinee el marco de la barandilla derecha (1)
con el marco de la barandilla izquierda (2). La barandilla superior (3) también
debe alinearse paralelamente a la barandilla superior trasera (6), entre los
marcos de las barandillas laterales.
1b. Los tacos de madera (E) deben colocarse entre la barandilla trasera superior, la
barandilla superior y las barandillas laterales.
1c. Coloque las tuercas de barril (D) en las inserciones previstas en la parte inferior
de la barandilla trasera superior y de la barandilla superior, tal como se muestra
en la ilustración.
1d. Coloque los tornillos de cabeza cilíndrica (A) en las inserciones de las barandillas
laterales. Apriete los pernos en las tuercas de barril con la llave Allen (F).
1e. Las barandillas deben parecerse a la segunda ilustración una vez ensambladas
correctamente.
(D)
(A)
1
2
3
6
6
1
(E)

18
By
TODDLER TOWER ASSEMBLY - PLATFORM ASSEMBLY
ASSEMBLAGE DE LA TOUR POUR TOUT-PETITS - ASSEMBLAGE DE LA PLATE-FORME
MONTAJE DE LA TORRE PARA NIÑOS PEQUEÑOS - MONTAJE DE LA PLATAFORMA
2
2a. Align the Platform (7) at the bottom of the Right and Left Guard
Rail Frames (1 and 2).
2b. Attach both with the Allen Head Bolt 1-3/16” (C) at all the four
corners of the platform to the Guard Rail Frames.
2a. Alignez la plate-forme (7) au bas des cadres de garde-corps droit
et gauche (1 et 2).
2b. Fixez les deux avec le boulon à tête Allen 1-3/16 po (C) aux quatre
coins de la plate-forme aux cadres de garde-corps.
2a. Alinee la Plataforma (7) en la parte inferior de los Marcos de la Barandilla de
Protección Derecha e Izquierda (1 y 2).
2b. Fije ambos con el perno de cabeza Allen de 1-3/16” (C) en las cuatro esquinas
de la plataforma a los marcos de la baranda de protección.
Allen Head Bolt 1-3/16”(×4)
Boulon à tête Allen 1-3/16"(×4)
Perno de cabeza Allen 1-3/16”(×4)
C
7
(C)
7
19
By
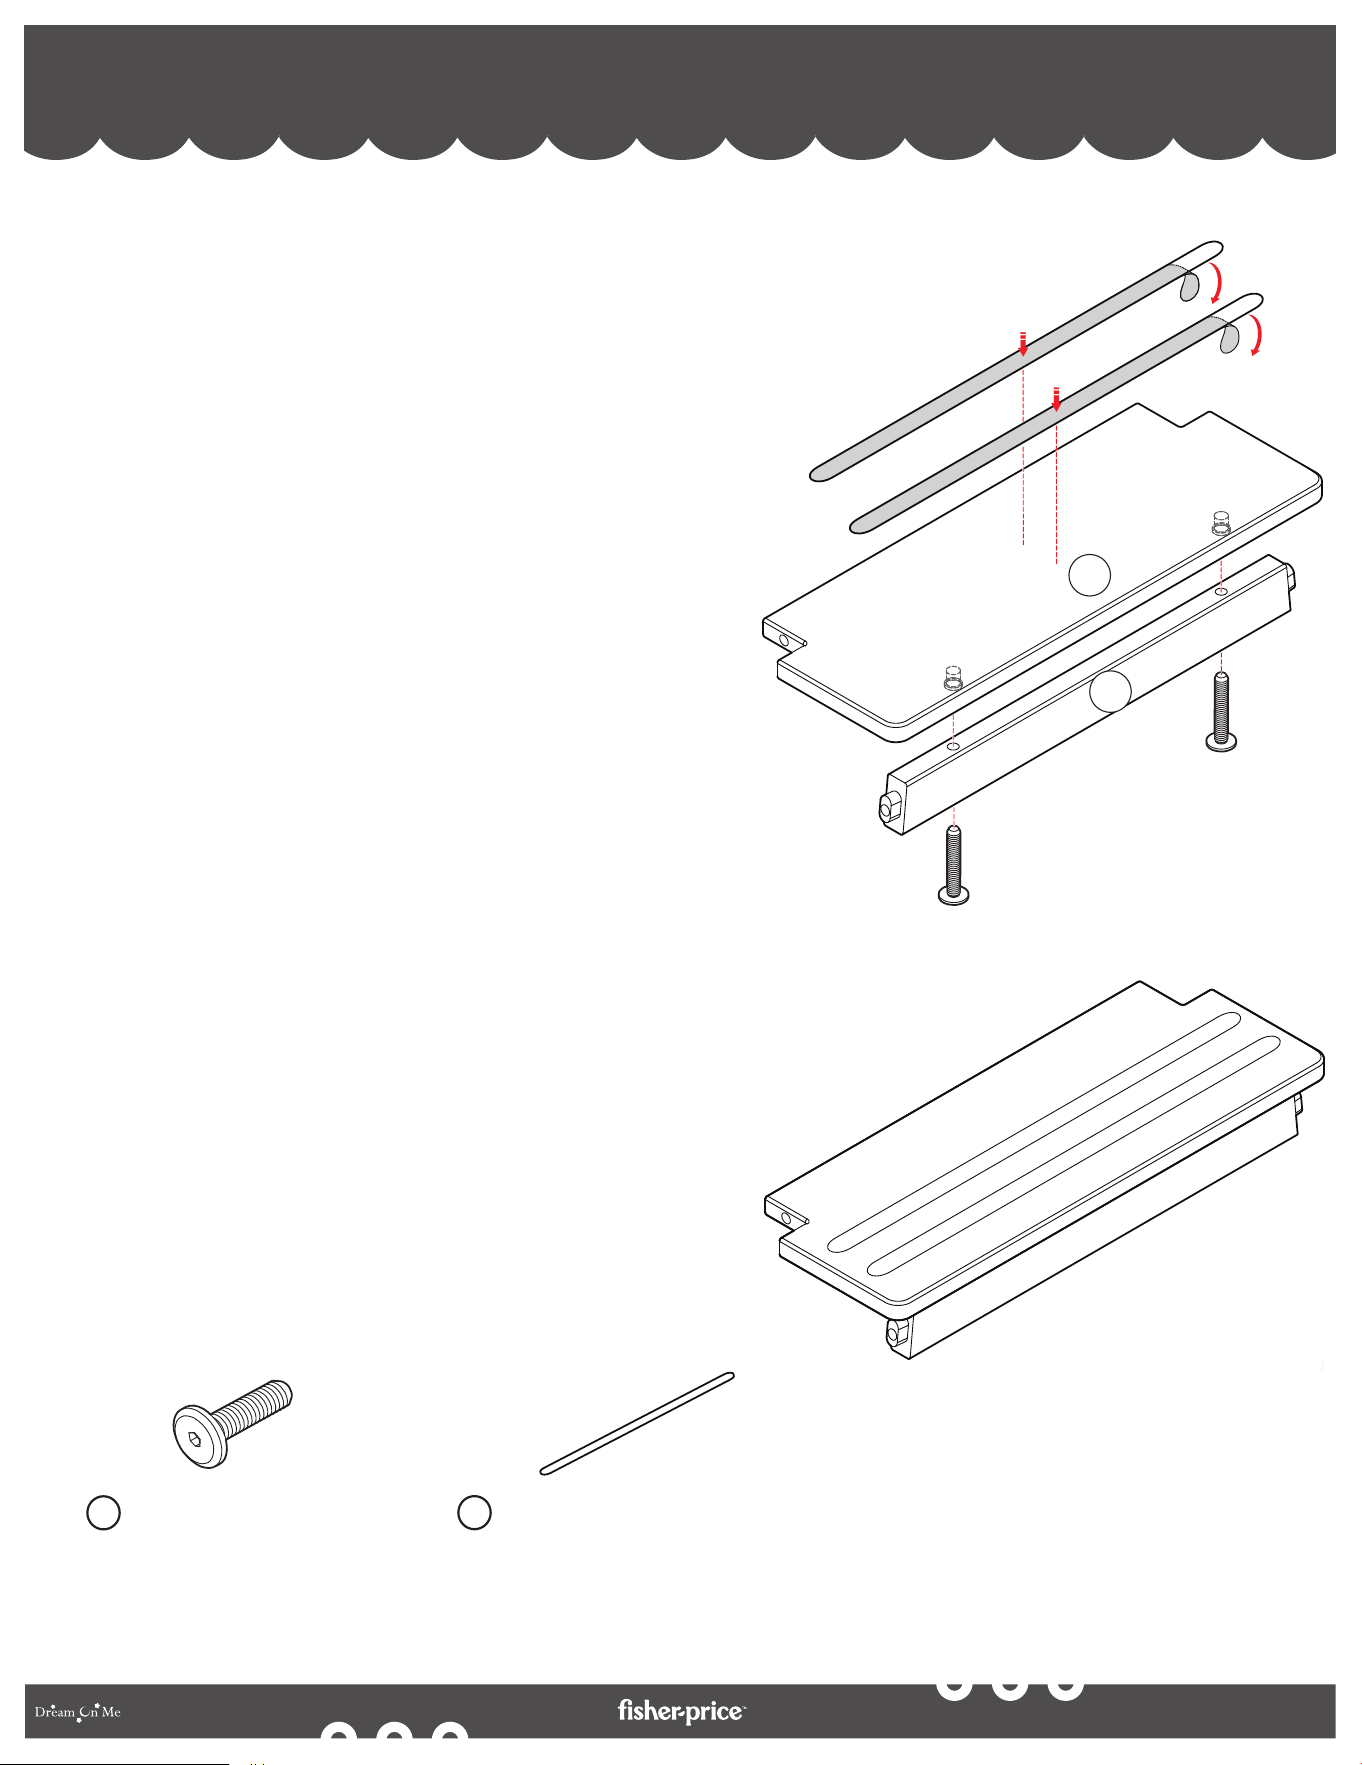
TODDLER TOWER ASSEMBLY - FOOTSTEP ASSEMBLY
ASSEMBLAGE DE LA TOUR POUR TOUT-PETITS - ASSEMBLAGE DU FOOTSTEP
MONTAJE DE LA TORRE PARA NIÑOS PEQUEÑOS - MONTAJE DE PASO A PASO
3
3a. Align the Foot Step (9) and Foot Step Support
Rail (8) as shown in the diagram.
3b. Insert the Allen Head Bolt 1-3/4” (B) from the
bottom of the Foot Step Support Rail (8) and
tighten with the help of the Allen Key (F).
3c. Remove the adhesive sticker from the Anti-Slip
Stripes (G) and paste it on the Foot Step (9) as
shown in the diagram.
3a. Alignez le repose-pieds (9) et le rail de support du
repose-pieds (8) comme indiqué sur le schéma.
3b. Insérez le boulon à tête Allen à 1-3/4 po (B) du bas
du rail de support du marchepied (8) et serrez à
l'aide de la clé Allen (F).
3c. Retirez l'autocollant adhésif des bandes
antidérapantes (G) et collez-le sur le marchepied
(9) comme indiqué sur le schéma.
3a. Alinee el peldaño (9) y el riel de soporte del
peldaño (8) como se muestra en el diagrama.
3b. Inserte el Perno de Cabeza Allen 1-3/4” (B) desde
la parte inferior del Riel de Soporte del Escalón (8)
y apriete con la ayuda de la Llave Allen (F).
3c. Retire la etiqueta adhesiva de las bandas
antideslizantes (G) y péguela en el peldaño (9)
como se muestra en el diagrama.
(B)
(B)
9
8
(G)
Anti-slip Strips (38x2cm) (×2)
Bandes antidérapantes (38x2cm) (×2)
Tiras antideslizantes (38x2cm) (×2)
G
Allen Head Bolt 1-3/4”(×2)
Boulon à tête Allen 1-3/4”(×2)
Perno de cabeza Allen 1-3/4”(×2)
B
20
By
TODDLER TOWER ASSEMBLY- STOOL FRAME ASSEMBLY
ASSEMBLAGE DE LA TOUR POUR TOUT-PETITS - ASSEMBLAGE DU CADRE DE TABOURET
MONTAJE DE LA TORRE PARA NIÑOS PEQUEÑOS - MONTAJE DEL MARCO DEL TABURETE
4
4a. Align the Right Stool Frame (4), Front and
Rear Platform Support Rails (10) and Rear
Lower Support Rail (11), and the Footstep
Assembled above. Insert the Barrel Nuts
(D) as shown in the diagram.
4b. Attach all the above by inserting the Allen
Head Bolt 2-1/8” (A) and securing the
same with Allen Key (F).
4a. Alignez le cadre du tabouret droit (4), les
rails de support de la plate-forme avant et
arrière (10) et le rail de support inférieur
arrière (11) et le marchepied assemblé
au-dessus. Insérez les écrous cylindriques
(D) comme indiqué sur le schéma.
4b. Fixez tout ce qui précède en insérant le
boulon à tête Allen 2-1/8" (A) et en le fixant
avec la clé Allen (F).
4a. Alinee la estructura del taburete derecho
(4), los rieles de soporte delantero y
trasero de la plataforma (10) y el riel de
soporte inferior trasero (11), y el escalón
ensamblado arriba. Inserte las tuercas
cilíndricas (D) como se muestra en el
diagrama.
4b. Fije todo lo anterior insertando el perno de
cabeza Allen de 2-1/8” (A) y asegurándolo
con la llave Allen (F).
Wooden Dowel 1-1/4” (x2)
Cheville en bois 1-1/4” (×2)
Clavija de madera 1-1/4” (×2)
E
Barrel Nut (x8)
Écrou de baril (x8)
Tuerca de barril (x8)
D
Allen Head Bolt 2-1/8”(×8)
Boulon à tête Allen 2-1/8"(×8)
Perno de cabeza Allen 2-1/8”(×8)
A
4
5
5
10
10
11
(D)
(A)
(E)
(E)
21
By
TODDLER TOWER ASSEMBLY - ANTI-TIP BLOCK ASSEMBLY
ASSEMBLAGE DE LA TOUR POUR TOUT-PETITS - ASSEMBLAGE DU BLOC ANTI-BASCULE
MONTAJE DE LA TORRE PARA NIÑOS PEQUEÑOS - CONJUNTO BLOQUE ANTIVUELCO
5
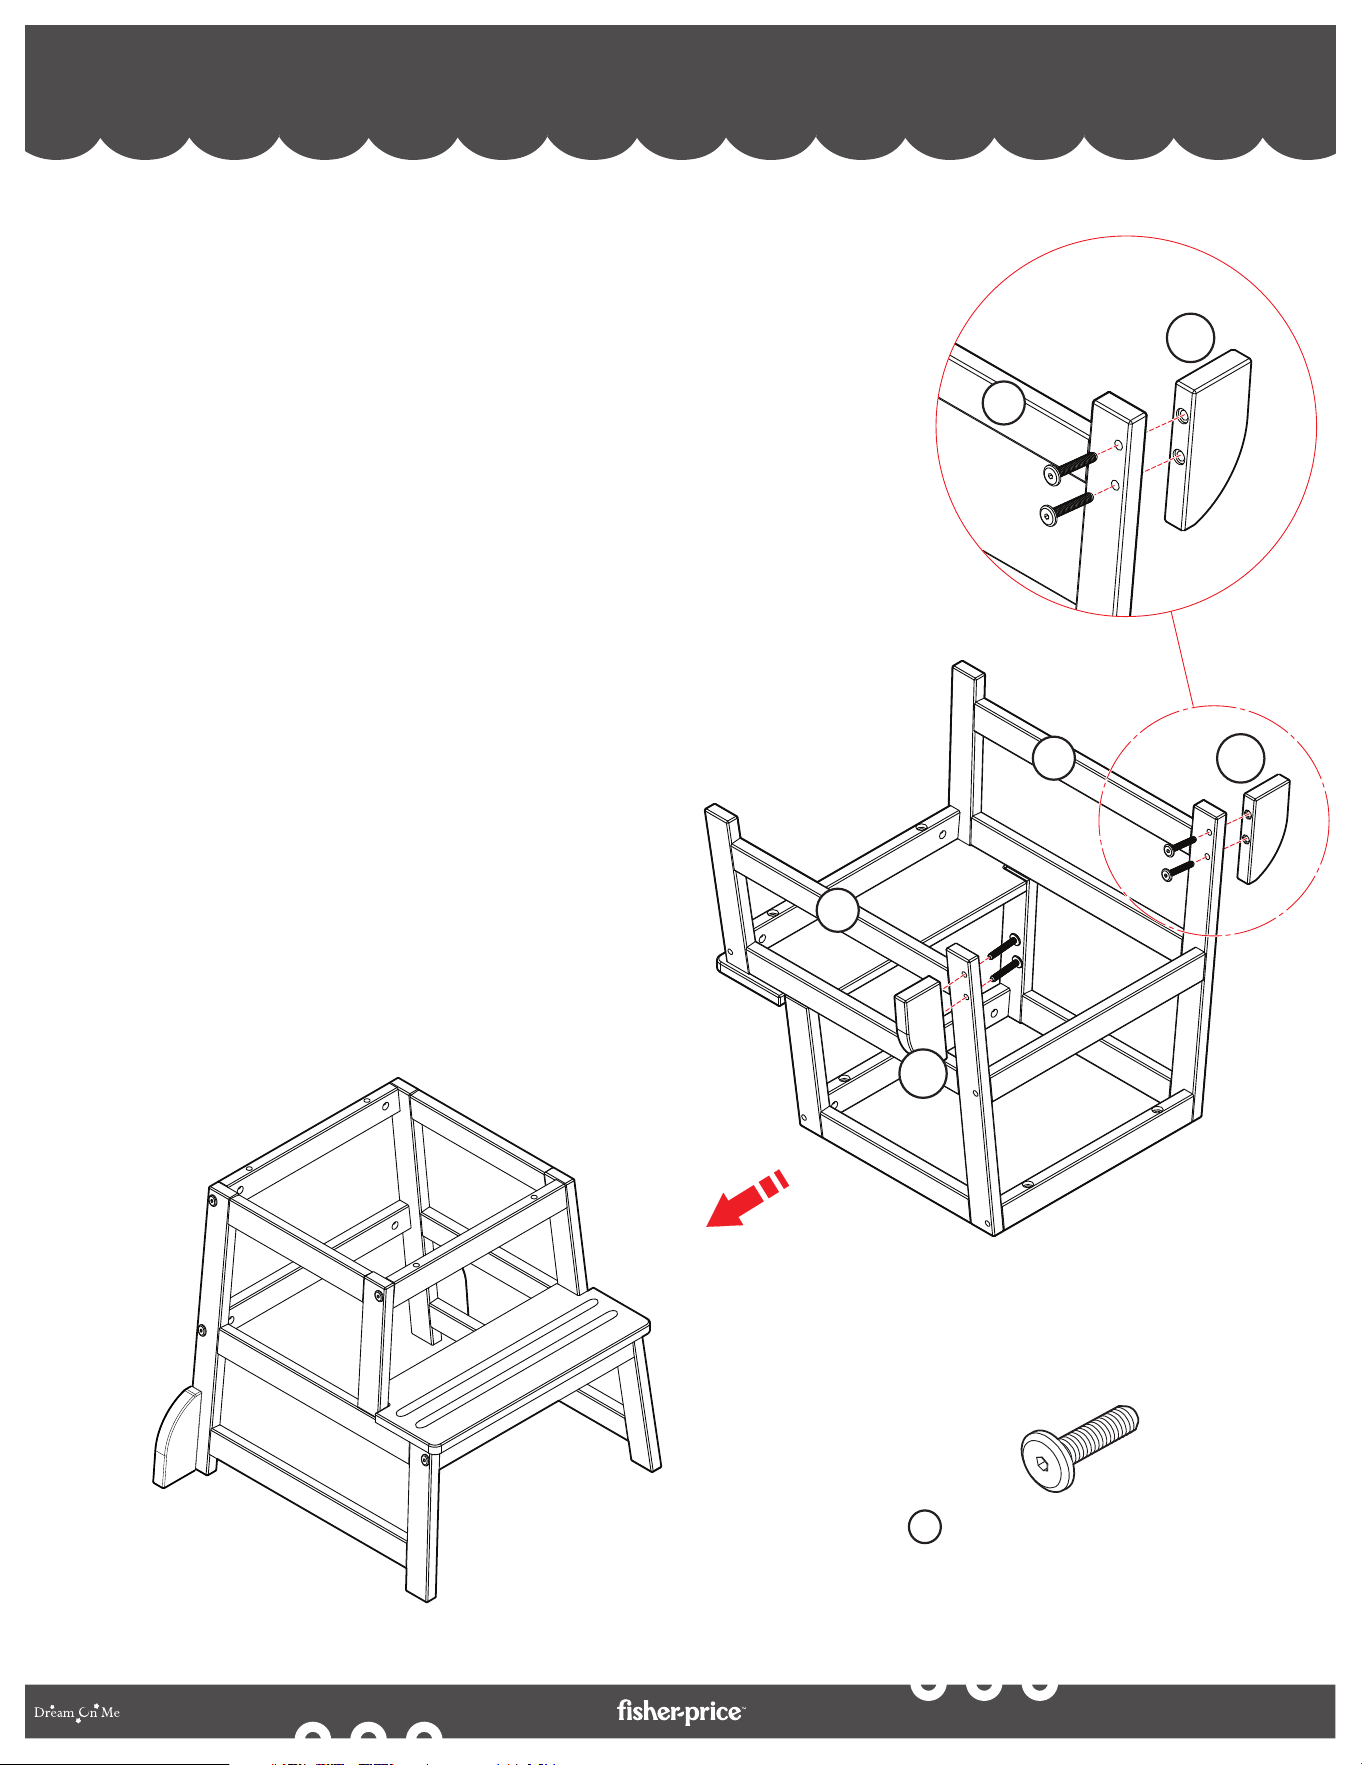
5a. Align the Right Stool Frame (4), Wedge Block
(12), as shown in the diagram.
5b. Attach all the above by inserting the Allen
Head Bolt 1-3/16” (C) and securing the same
with Allen Key (F).
5a. Alignez le cadre du tabouret droit (4), le bloc de coin
(12), comme indiqué sur le schéma.
5b. Fixez tout ce qui précède en insérant le boulon à tête
Allen 1-3/16" (C) et en le fixant avec la clé Allen (F).
5a. Alinee la Armadura del Taburete Derecho
(4), el Bloque de Cuña (12), como se
muestra en el diagrama.
5b. Fije todo lo anterior insertando el perno de
cabeza Allen de 1-3/16” (C) y
asegurándolo con la llave Allen (F).
(C)
(C)
Allen Head Bolt 1-3/16”(×4)
Boulon à tête Allen 1-3/16"(×4)
Perno de cabeza Allen 1-3/16”(×4)
C
12
12
12
4
4
5
22
By
TODDLER TOWER ASSEMBLY - STOOL AND GUARD RAIL ASSEMBLY
ASSEMBLAGE DE LA TOUR POUR TOUT-PETITS - ASSEMBLAGE DU TABOURET ET DE LA GARDE-CORPS
MONTAJE DE LA TORRE PARA NIÑOS PEQUEÑOS - MONTAJE DE TABURETE Y BARANDILLA
6
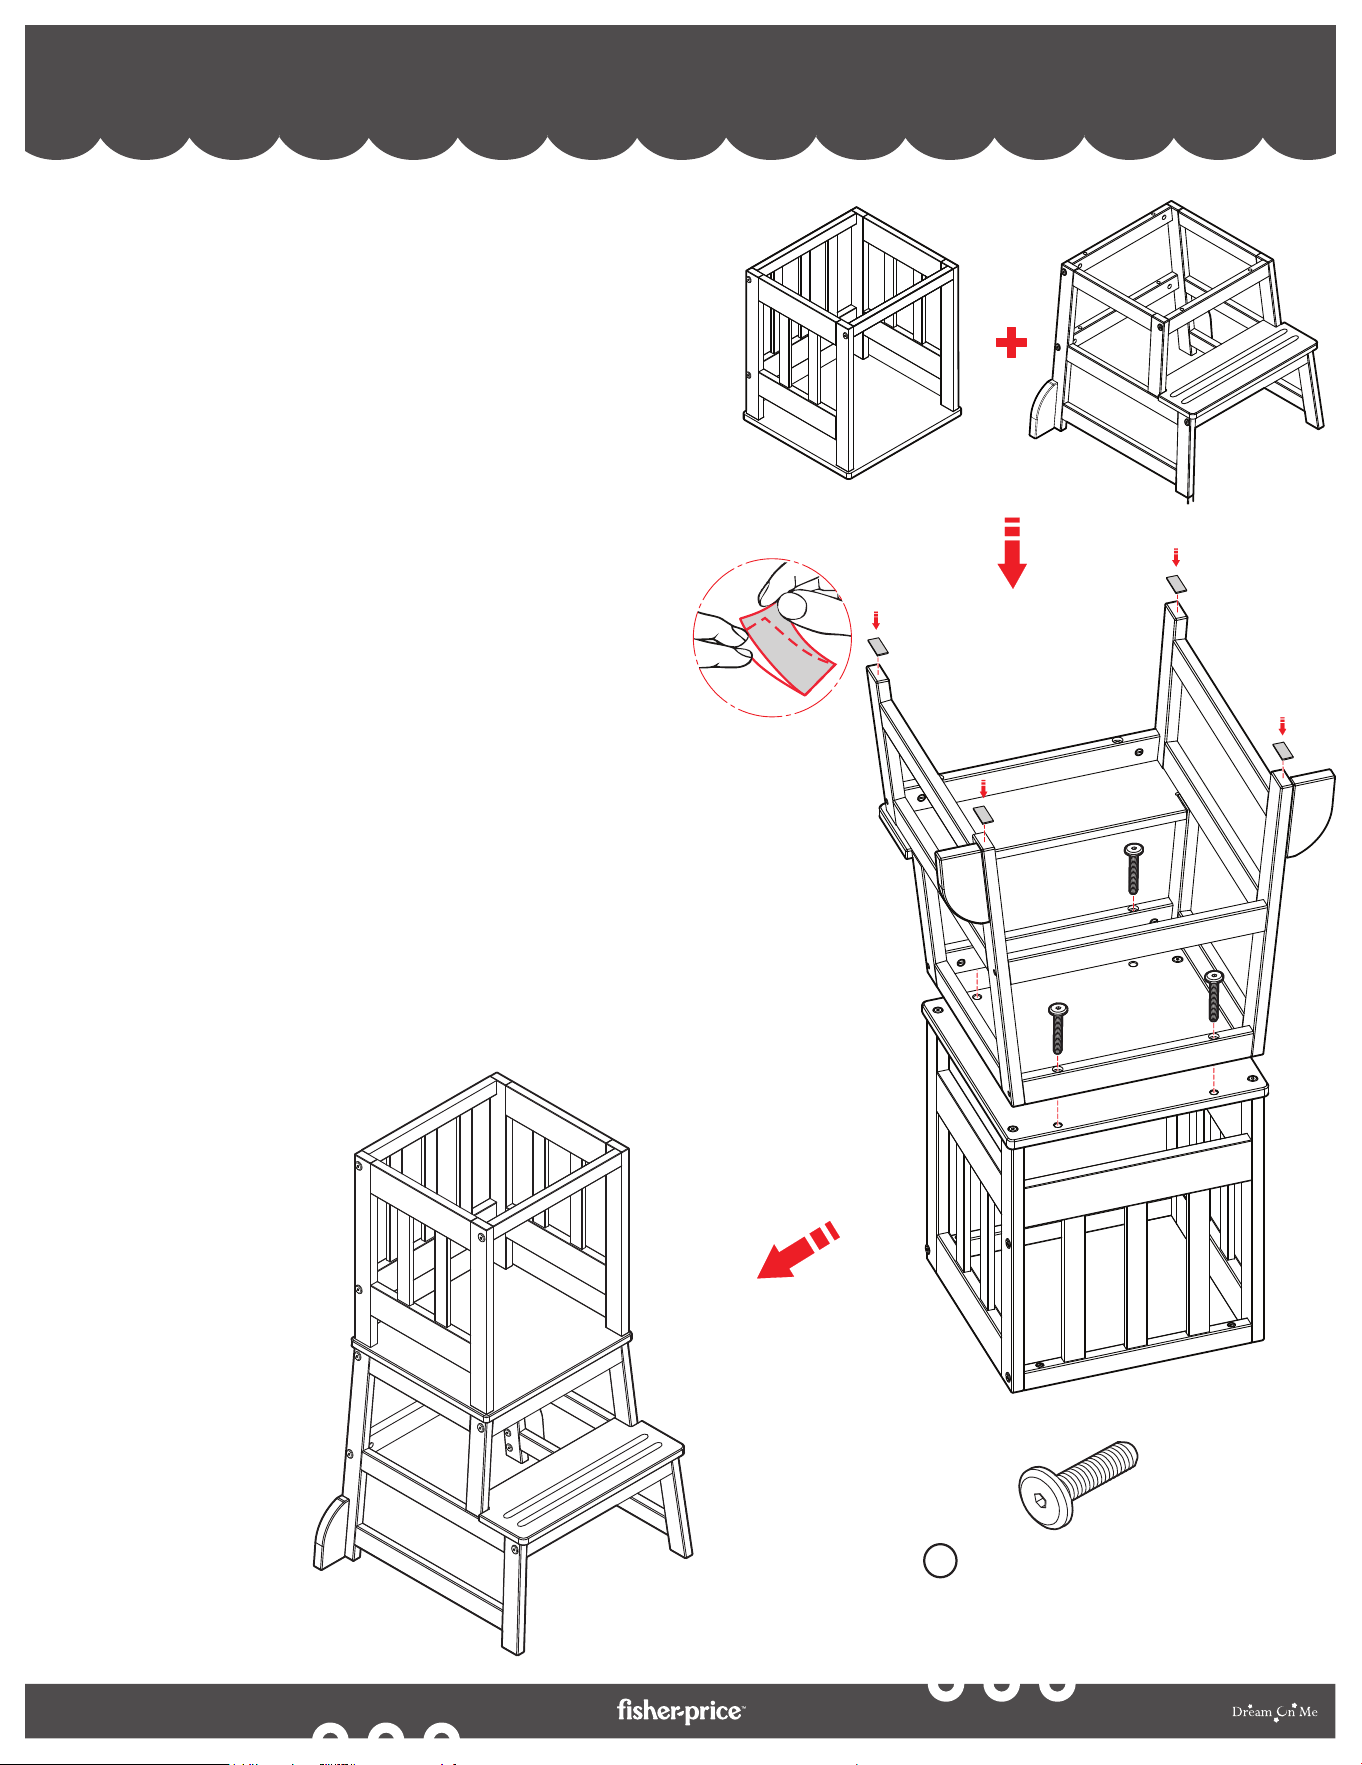
6a. Place the fully assembled Guard Rail upside down, and
place the fully assembled Stool Frame upside-down
above it.
6b. Locate the holes on four corners of the platform, ensure
they are aligned, and insert the Allen Head Bolt 1-3/4”
(B). Secure them with the Allen Key (F) provided.
6c. Remove the adhesive sticker from the Anti-Slip Stripes
(H) and paste them under all four feet as shown in the
diagram.
6a. Placez le garde-corps entièrement assemblé à l'envers et
placez le cadre de tabouret entièrement assemblé à
l'envers au-dessus.
6b. Localisez les trous aux quatre coins de la plate-forme,
assurezous qu'ils sont alignés et insérez le boulon à tête
Allen 1-3/4" (B). Fixez-les avec la clé Allen (F) fournie.
6c. Retirez l'autocollant adhésif des bandes antidérapantes
(H) et collez-les sous les quatre pieds comme indiqué sur
le schéma.
6a. Coloque la barandilla completamente ensamblada boca abajo y coloque
el marco del taburete completamente ensamblado boca abajo encima.
6b. Ubique los orificios en las cuatro esquinas de la plataforma, asegúrese
de que estén alineados e inserte el perno de cabeza Allen de 1-3/4”
(B). Asegúrelos con la llave Allen (F) provista.
6c. Retire la etiqueta adhesiva de las bandas antideslizantes (H) y péguelas
debajo de las cuatro patas como se muestra en el diagrama.
(B)
(B)
(H)
(B)
(B)
Allen Head Bolt 1-3/4”(×4)
Boulon à tête Allen 1-3/4”(×4)
Perno de cabeza Allen 1-3/4”(×4)
B
23
By
STEP STOOL ASSEMBLY - PLATFORM AND STOOL FRAME ASSEMBLY
ASSEMBLAGE DE L'ESCABEAU - ASSEMBLAGE DE LA PLATE-FORME ET DU CADRE DE L'ESCABEAU
MONTAJE DEL TABURETE - MONTAJE DE LA PLATAFORMA Y DEL ARMAZÓN DEL TABURETE
1
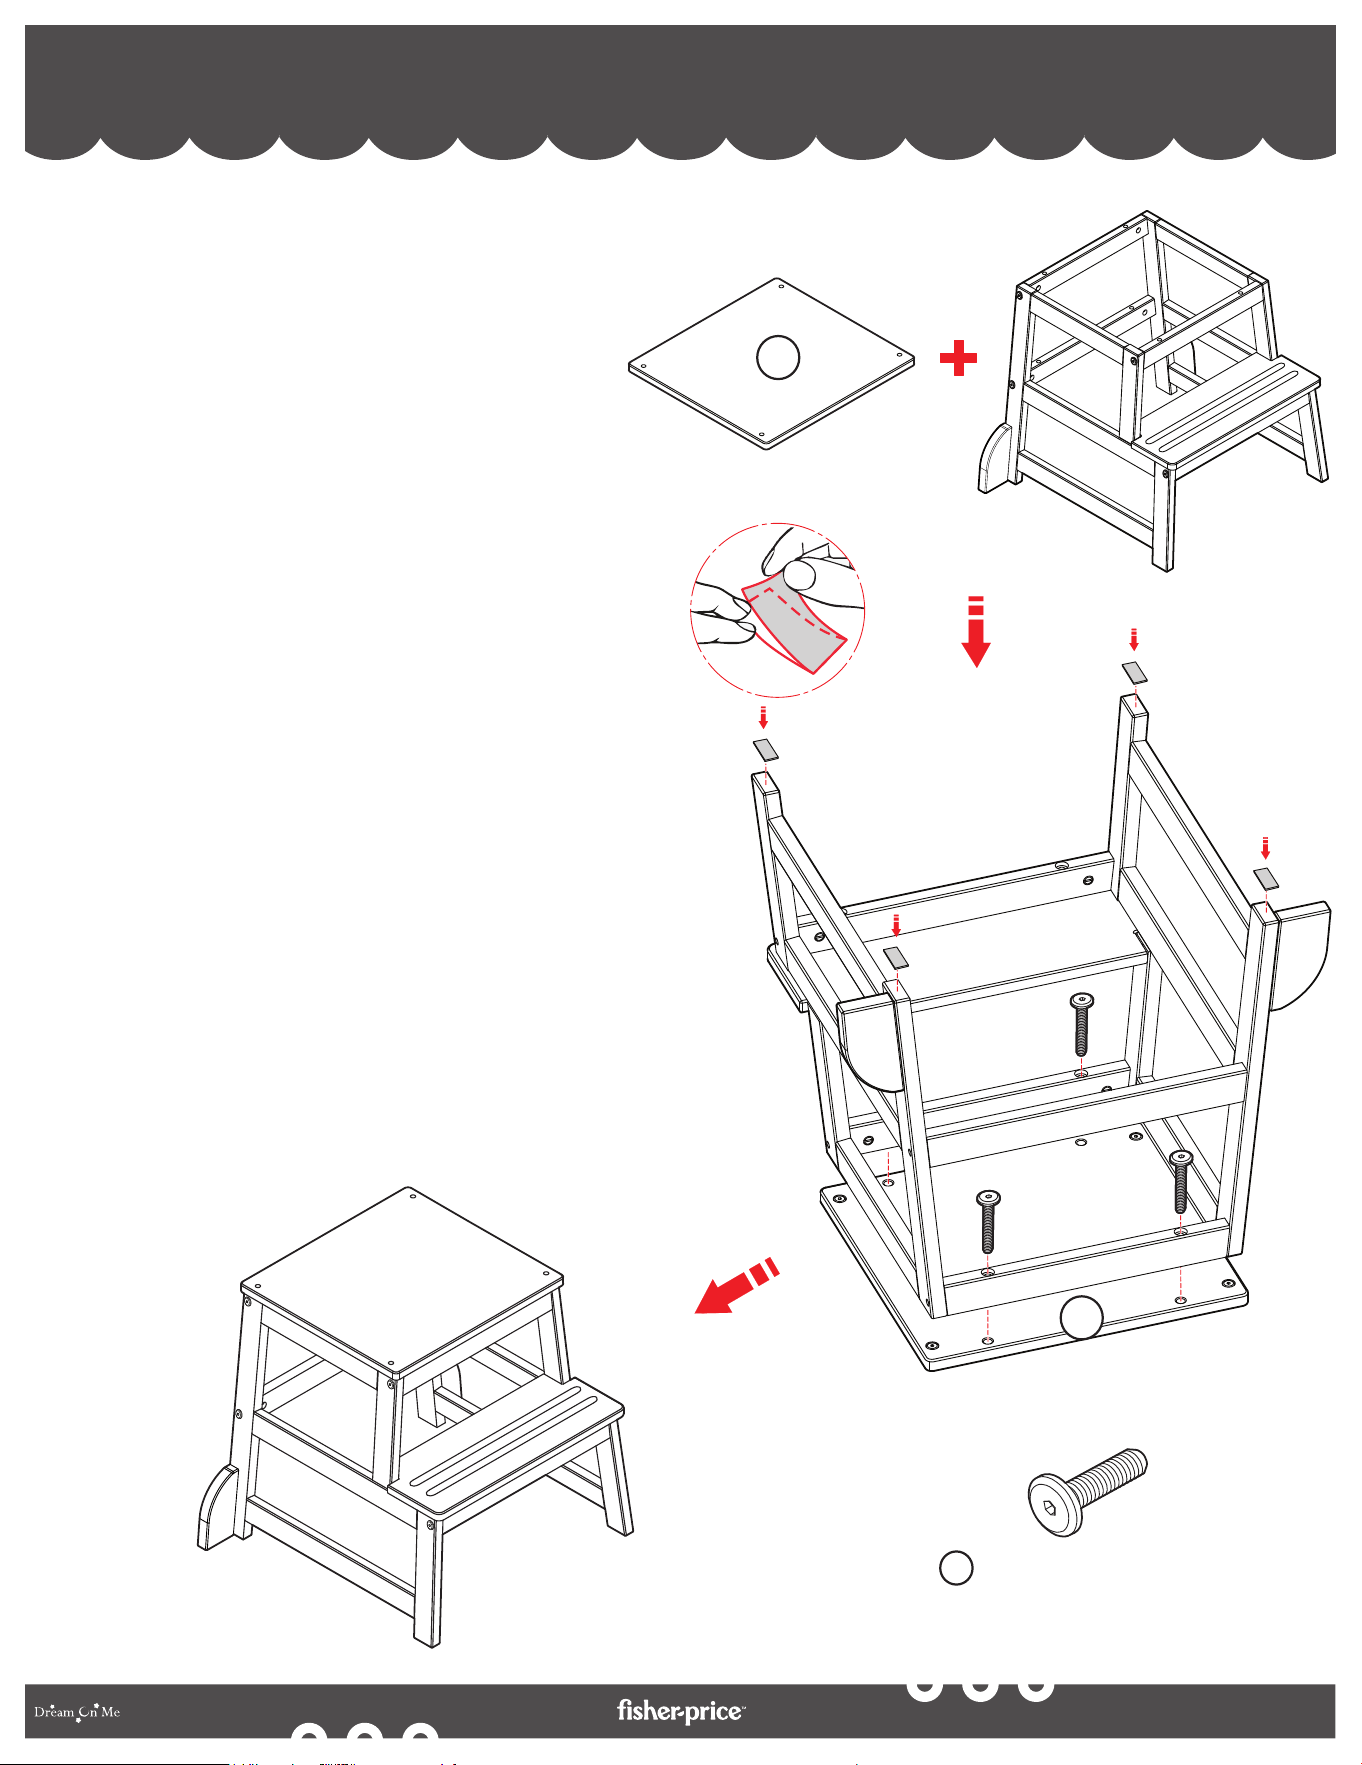
1a. Follow the Stool Frame Assembly along with the
Footstep Assembly explained previously.
1b. Place the Platform (7) upside-down and place the
fully assembled Stool Frame in upside-down position
as shown in diagram.
1c. Locate the holes at the four corners, ensure they are
aligned, and insert the Allen Head Bolt 1-3/4” (B).
Tighten the same with Allen Key (F).
1d. Remove the adhesive sticker from the Anti-Slip
Stripes (H) and paste them under all four feet as
shown in the diagram.
1a. Suivez l'assemblage du cadre du tabouret avec l'assemblage
du marchepied expliqué précédemment.
1b. Placez la plate-forme (7) à l'envers et placez le cadre de
tabouret entièrement assemblé à l'envers comme indiqué sur
le schéma.
1c. Localisez les trous aux quatre coins, assurezous qu'ils sont
alignés et insérez le boulon à tête Allen 1-3/4” (B). Serrez la
même chose avec la clé Allen (F).
1d. Retirez l'autocollant adhésif des bandes antidérapantes (H) et
collez-les sous les quatre pieds comme indiqué sur le schéma.
1a. Siga el montaje del marco del taburete junto con el montaje del
peldaño explicado anteriormente.
1b. Coloque la plataforma (7) boca abajo y coloque la estructura del
taburete completamente ensamblada boca abajo como se muestra
en el diagrama.
1c. Ubique los orificios en las cuatro esquinas, asegúrese de que estén
alineados e inserte el perno de cabeza Allen de 1-3/4” (B). Apriete
lo mismo con la llave Allen (F).
1d. Retire la etiqueta adhesiva de las bandas antideslizantes (H) y
péguelas debajo de las cuatro patas como se muestra en el diagrama.
Allen Head Bolt 1-3/4”(×4)
Boulon à tête Allen 1-3/4”(×4)
Perno de cabeza Allen 1-3/4”(×4)
B
(B)
(B)
(H)
(B)
(B)
7
7

24
By
CARE AND MAINTENANCE:
• ADULTS SHOULD CHECK ALL SCREWS WEEKLY OR IF THE PRODUCT GETS LOOSE AND
OR WOBBLY, AND TIGHTEN AS AND IF NECESSARY. IF THE PRODUCT CONTINUES TO
NOT BE STURDY, THEN HALT USE OF THE PRODUCT IMMEDIATELY AND CONTACT THE
DREAM ON ME CUSTOMER SUPPORT AT THE EARLIEST VIA EMAIL:
[email protected], OR THROUGH THE LIVE CHAT FEATURE ON OUR WEBSITE
(WWW.DREAMONME.COM).
CLEANING INSTRUCTIONS:
• WITH A DAMP CLOTH, USE MILD LIQUID DISH SOAP TO WIPE CLEAN THE PRODUCT. YOU
MAY WANT TO CLEAN THE UNDERSIDE FIRST TO MAKE SURE YOU ARE NOT DAMAGING
THE FINISH.
YOU DID IT!
Congratulations Mom & Dad!
Here's to new milestones and fun with your little ones.

25
By
ENTRETIEN ET MAINTENANCE:
• LES ADULTES DOIVENT VÉRIFIER TOUTES LES VIS CHAQUE SEMAINE OU SI LE PRODUIT
SE LÂCHE ET/OU VAGUE, ET LES SERRER SI NÉCESSAIRE. SI LE PRODUIT CONTINUE
DE NE PAS ÊTRE SOLIDE, ARRÊTEZ IMMÉDIATEMENT L'UTILISATION DU PRODUIT ET
CONTACTEZ LE SERVICE CLIENTÈLE DE DREAM ON ME AU PLUS TÔT PAR COURRIEL :
[email protected], OU VIA LA FONCTION DE CHAT EN DIRECT SUR NOTRE SITE
WEB (WWW.DREAMONME. COM).
INSTRUCTIONS DE NETTOYAGE :
• AVEC UN CHIFFON HUMIDE, UTILISEZ DU SAVON À VAISSELLE LIQUIDE DOUX POUR
NETTOYER LE PRODUIT. VOUS POUVEZ D'ABORD NETTOYER LE DESSOUS POUR VOUS
ASSURER DE NE PAS ENDOMMAGER LA FINITION.
VOUS L'AVEZ FAIT !
Félicitations maman et papa !
Nous vous souhaitons de franchir de nouvelles étapes et de
vous amuser avec vos petits.

26
By
CUIDADO Y MANTENIMIENTO:
• LOS ADULTOS DEBEN COMPROBAR TODOS LOS TORNILLOS SEMANALMENTE O SI EL
PRODUCTO SE SUELTA O BALANCEA, Y APRIETAR SEGÚN SEA NECESARIO. SI EL
PRODUCTO SIGUE SIN SER RESISTENTE, DETENGA EL USO INMEDIATAMENTE Y
COMUNÍQUESE CON EL SERVICIO DE ATENCIÓN AL CLIENTE DE DREAM ON ME LO
ANTES POR CORREO ELECTRÓNICO: [email protected], O A TRAVÉS DE LA
FUNCIÓN DE CHAT EN VIVO EN NUESTRO SITIO WEB (WWW.DREAMONME. COM).
INSTRUCCIONES DE LIMPIEZA:
• CON UN PAÑO HÚMEDO, UTILICE JABÓN LÍQUIDO SUAVE PARA LAVAJILLAS PARA
LIMPIAR EL PRODUCTO. ES POSIBLE QUE QUIERA LIMPIAR LA PARTE INFERIOR
PRIMERO PARA ASEGURARSE DE NO DAÑAR EL ACABADO.
¡LO HAN HECHO!
¡felicidades mamá y papá!
Por los nuevos hitos y la diversión con tus pequeños.
45 VERONICA AVENUE
SOMERSET NEW JERSEY 08873
5375 BOULEVARD DES GRANDES
PRAIRIES ST LEONARD, QUÉBEC H1R 1B1
FISHER-PRICE™ and associated trademarks are owned by
and used under license from Mattel. ©2024 Mattel.
FISHER-PRICEMC ainsi que les marques et les logos
afférents appartiennent à Mattel Europa B.V. et sont utilisés
sous licence. © 2024 Mattel.
FISHER-PRICE™ y las marcas comerciales asociadas son
propiedad de Mattel y se usan bajo licencia de Mattel.
©2024 Mattel.
www.dreamonme.com
by
Scan the QR code to register your product
Scannez le code QR pour enregistrer votre produit
Escanee el código QR para registrar su producto