Read this manual carefully before first use.
Keep this manual for further guidance in case.
Instruction Manual
(brand name)
CORDLESS VACUUM CLEANER
WITH AUTO EMPTYING & CHARGING
STATION


CORDLESS VACUUM CLEANER ............ 5
Ready to Work ............................................................ 16
How to Use .................................................................... 17
How to Clean the Dust Bag ......................................... 19
How to Clean the Filter ............................................... 20
Product Specifications ................................................. 21
Troubleshooting ........................................................... 21
Warranty ...................................................................... 22
STATION ........................................................ 15
TABLE OF CONTENTS
Product Overview ............................................................ 2
Important Safety Instructions ............................................ 1
Assembly & Use ............................................................... 6
Storage & Battery Charge ............................................... 10
How to Clean the Filter .................................................... 11
Product Specifications .................................................... 13
Troubleshooting .............................................................. 14

Important Safety Instructions
READ ALL INSTRUCTIONS BEFORE USING
WARNING
>> Please keep hair, loose clothing, fingers, and all parts of body away
from openings and moving parts. Brush Roll continues to rotate
when in use.
>> Brush Roll continues to turn while product is turned ON.
To avoid damage to carpet, rugs, furniture and flooring, avoid
tipping cleaner or setting it on furniture, fringed area rugs, or
carpeted stairs during tool use.
>> Do not expose to rain. Store indoors.
>> Do not use on wet surfaces.
>> Do not allow to be used as a toy.
>> Close attention is necessary when used by or near children.
>> Children should be supervised to ensure that they do not play with
the appliance.
>> Plastic film can be dangerous. To avoid danger of suffocation,
keep away from children.
>> Do not immerse in water or liquid.
>> Do not use for any purpose other than described in this user guide.
>> Use only manufacturer’ s recommended attachments.
>> lf appliance is not working as it should, has been dropped,damaged,
left outdoors, or dropped into water, have it repaired at an authorized
service center.
>> Do not charge the unit outdoors.
>> Do not incinerate the appliance even if it severely damaged. The
batteries can explode in a fire.
>> Do not put any object into opening.
>> Do not use with any opening blocked.
>> Keep openings free of dust, lint, hair and anything that may reduce
airflow.
>> Use extra care when cleaning stairs.
>> Do not pick up flammable materials (lighter fluid, gasoline, kerosene
etc.) or use in the presence of explosive liquids or vapors.
>> Always turn OFF this appliance before connecting or disconnecting
the motorized nozzle.
>> Do not pick up toxic material (chlorine bleach, ammonia, drain
cleaner, etc.).
>> Do not use vacuum cleaner in an enclosed space filled with vapors
given off by oil-based paint, paint thinner, some moth-proofing
substances, flammable dust, or other explosive or toxic vapors.
>> Do not pick up hard or sharp objects such as glass, nails, screws,
coins, etc.
>> Do not pick up anything that is burning or smoking, such as
cigarettes, matches or hot ashes.
>> Do not use without dust bin or filters in place.
>> Use only on dry, indoor surfaces.
>> Keep appliance on a level surface.
>> Disconnect battery pack before cleaning or servicing.
>> lf the charger supply cord is damaged, it must be replaced by the
manufacturer, its service agent or similarly qualified person in order
to avoid a hazard.
>> Do not pull or carry charger by cord, use cord as a handle, etc.
To reduce the risk of fire, electrical shock or injury, basic
precautions should be observed, including the following:
>> Keep charger cord away from heated surfaces.
>> To unplug, grasp the charger plug, not the cord.
>> Do not handle charger plug or appliance with wet hands.
>> Battery pack, charging port on the hand vac and charger output are
not to be short-circuited.
>> The appliance must be disconnected from the battery charger when
removing the battery.
>> The battery is to be disposed of safely.
>> Do not recharge, disassemble, heat above 60° C/140° F, or incinerate.
>> Keep batteries out of reach of children.
>> Dispose of used batteries promptly.
>> This appliance contains replaceable battery pack, use recommended
battery pack to replace only.
>> Prevent unintentional starting. Ensure the switch is in the OFF position
before picking up or carrying the appliance. Carrying the appliance with
your finger on the switch or energizing appliance that have the switch on
invites accidents.
>> Under abusive conditions, liquid may be ejected from the battery; avoid
contact. lf contact accidentally occurs, flush with water. lf liquid contacts
eyes, additionally seek medical help. Liquid ejected from the battery may
cause irritation or burns.
>> Do not use appliance that is damaged or modified. Damaged or
modified batteries may exhibit unpredictable behavior resulting in fire,
explosion or risk of injury.
>> Do not expose appliance to fire or excessive temperature. Exposure
to fire or temperature above 130° C/ 266° F may cause explosion.
>> Keep the temperature range of between 4-40° C/40-104° F when
charging battery, storing unit or during use.
>> Follow all charging instructions and do not charge the appliance
outside of the temperature range specified in the instructions. Charging
improperly or at temperatures outside of the specified range may damage
the battery and increase the risk of fire.
>> Have servicing performed by a qualified repair person using only
identical replacement parts. This will ensure that the safety of the product
is maintained.
>> Do not modify or attempt to repair the appliance except as indicated
in the instructions for use and care.
>> Recharge only with the charger specified by the manufacturer.
A charger that is suitable for one type of battery pack may create a risk of
fire when used with another battery pack.
>> Unplug charger from electrical socket when not in use, before
cleaning, maintaining or servicing the appliance, and if your appliance
has an accessory tool with a moving brush, before connecting or
disconnecting the tool.
>> The battery must be removed from the appliance before it is scrapped.
>> Do not use with damaged cord or charger. lf appliance is not working
as it should, has been dropped, damaged, left outdoors, or dropped into
water, return it to a service center.
>> Turn OFF all controls before unplugging.
SAVE THESE INSTRUCTIONS
THIS MODELIS FOR HOUSEHOLD USE ONLY
1
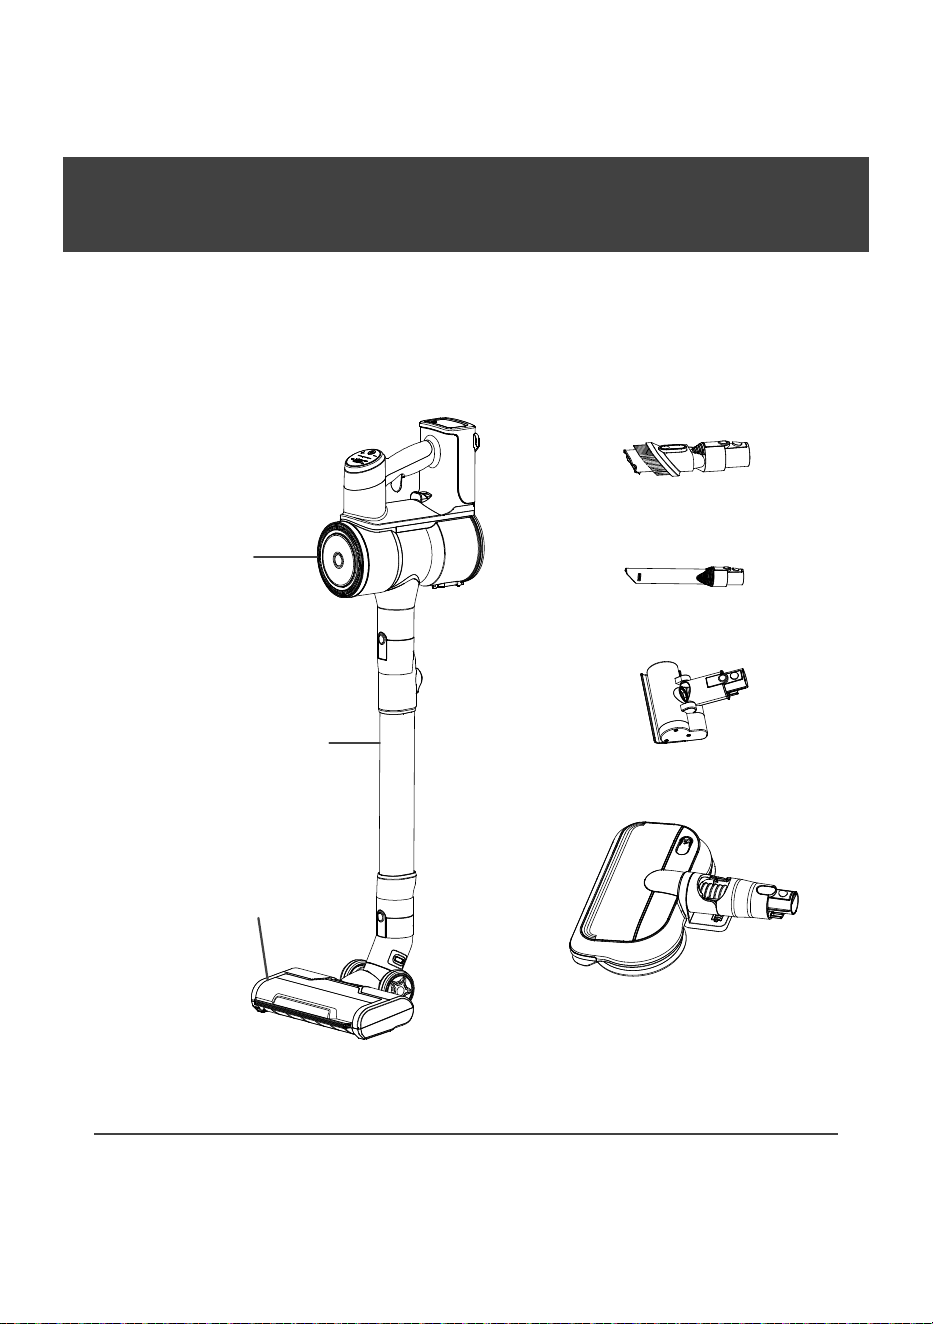
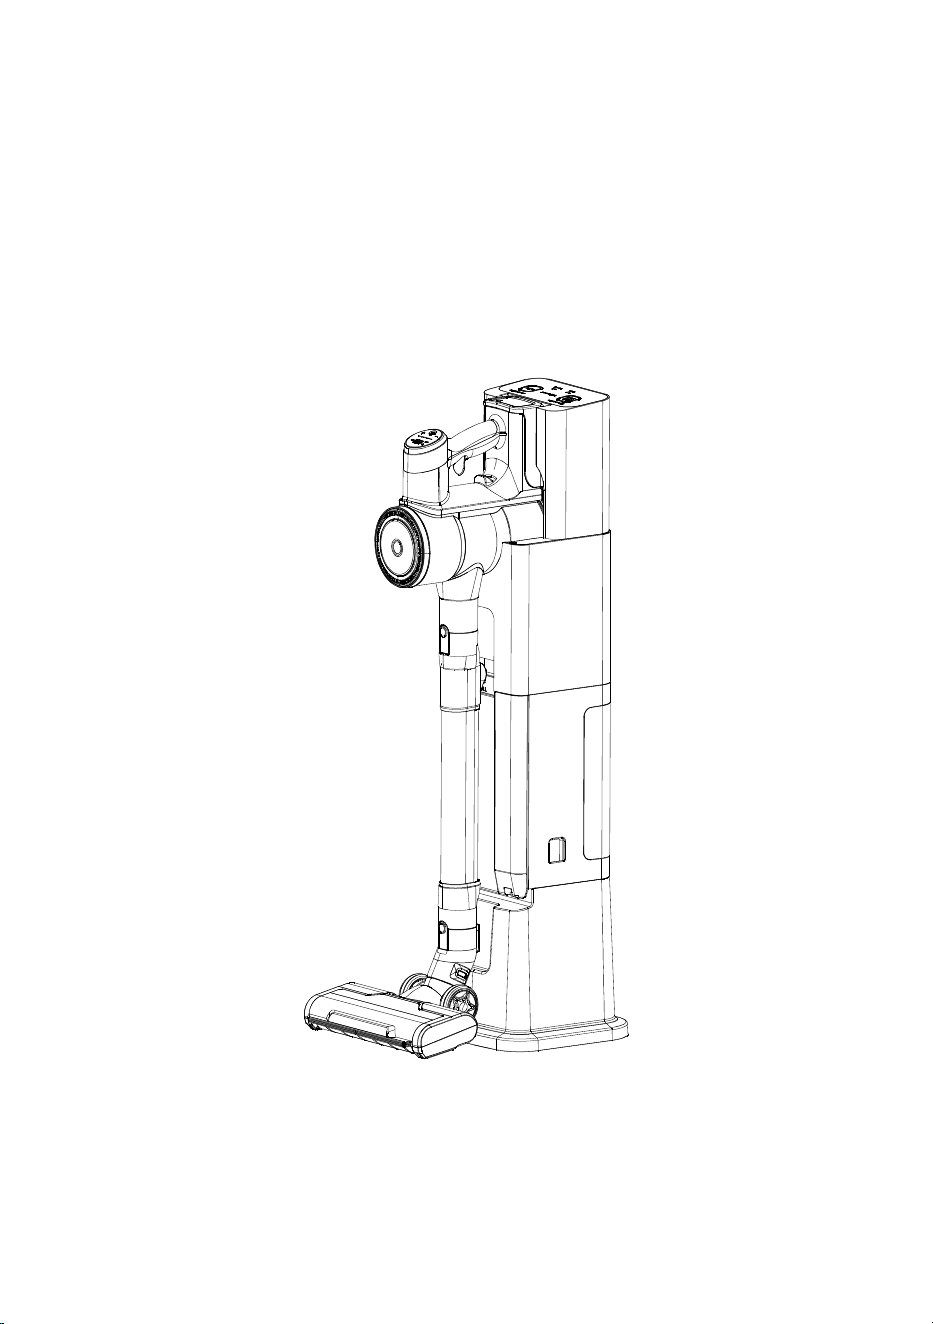
Product Overview
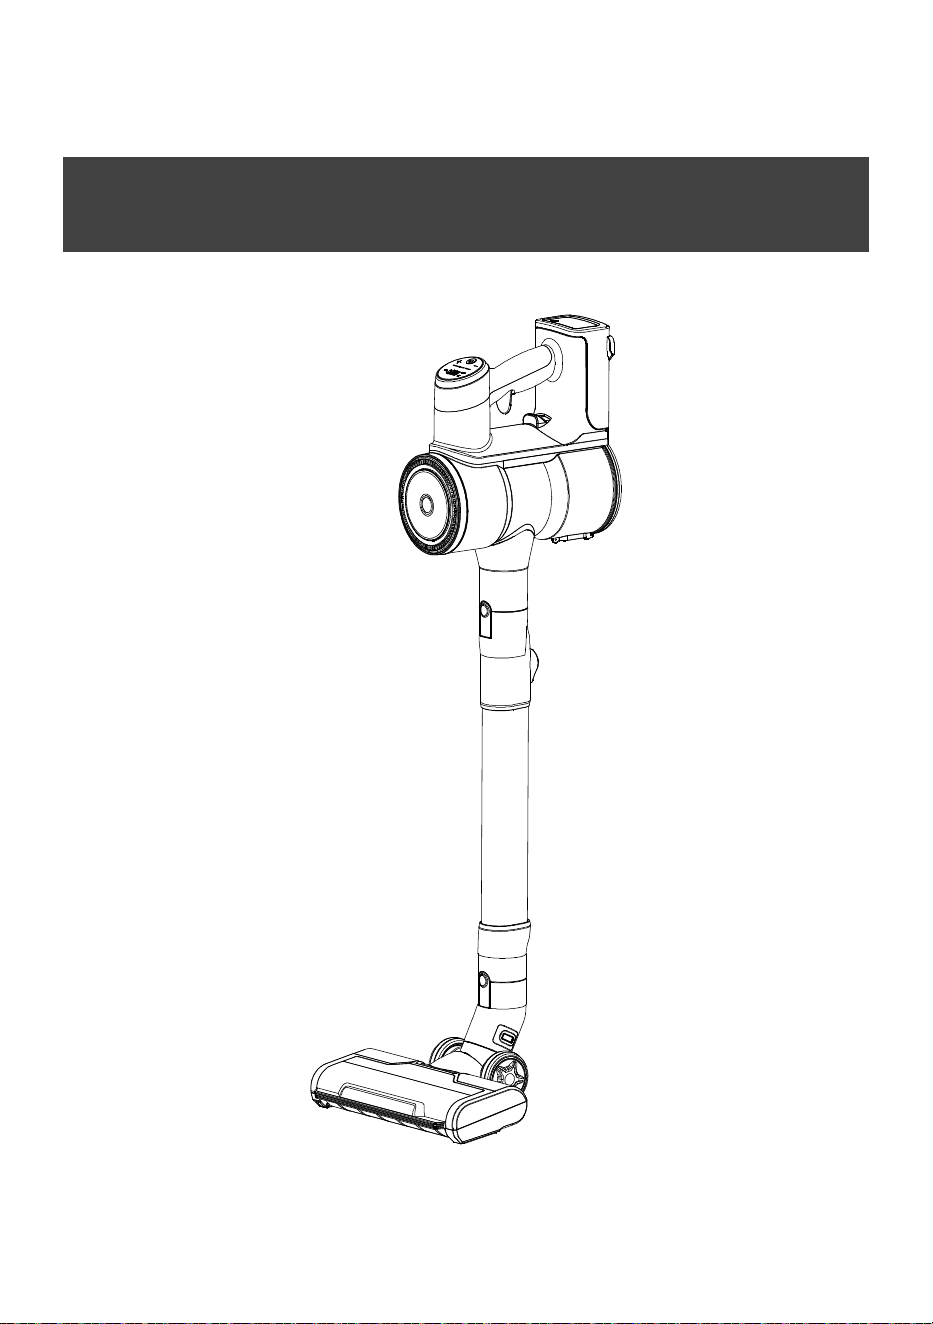
Cordless Vacuum Cleaner
Please check if the accessories are complete.
Main body
Telescope tube
Power brush
Dusting brush
Crevice tool
* Mini motorized tool
* Mop brush
Note: Accessory with “*” is for optional.
2
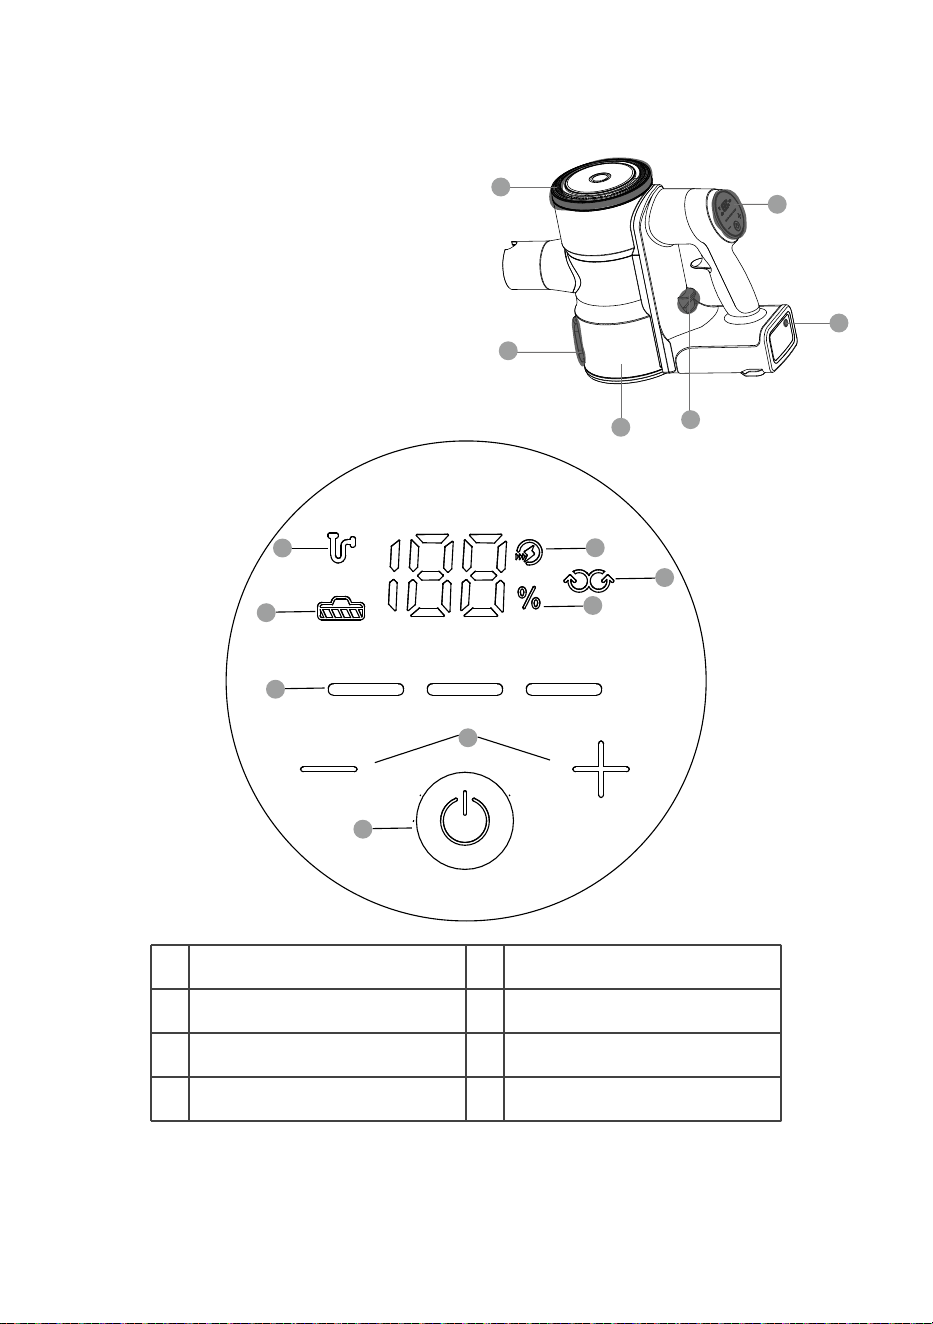
A. Post-Motor Filter
B. Dust Bin Empty Button
C. Dust Bin
D. Dust Bin Release Button
E. Charging Port
F. Control Panel of Hand Vac
A
B
C
D
E
F
G
H
I
K
J
M
N
L
G Dust Full Indicator
H
J Cleaning Mode Button
Brush Blocked Indicator
I Cleaning Mode Indicator
K Power Button
L Battery Level Indicator
M Mopping Mode Indicator
N Charging Indicator
3
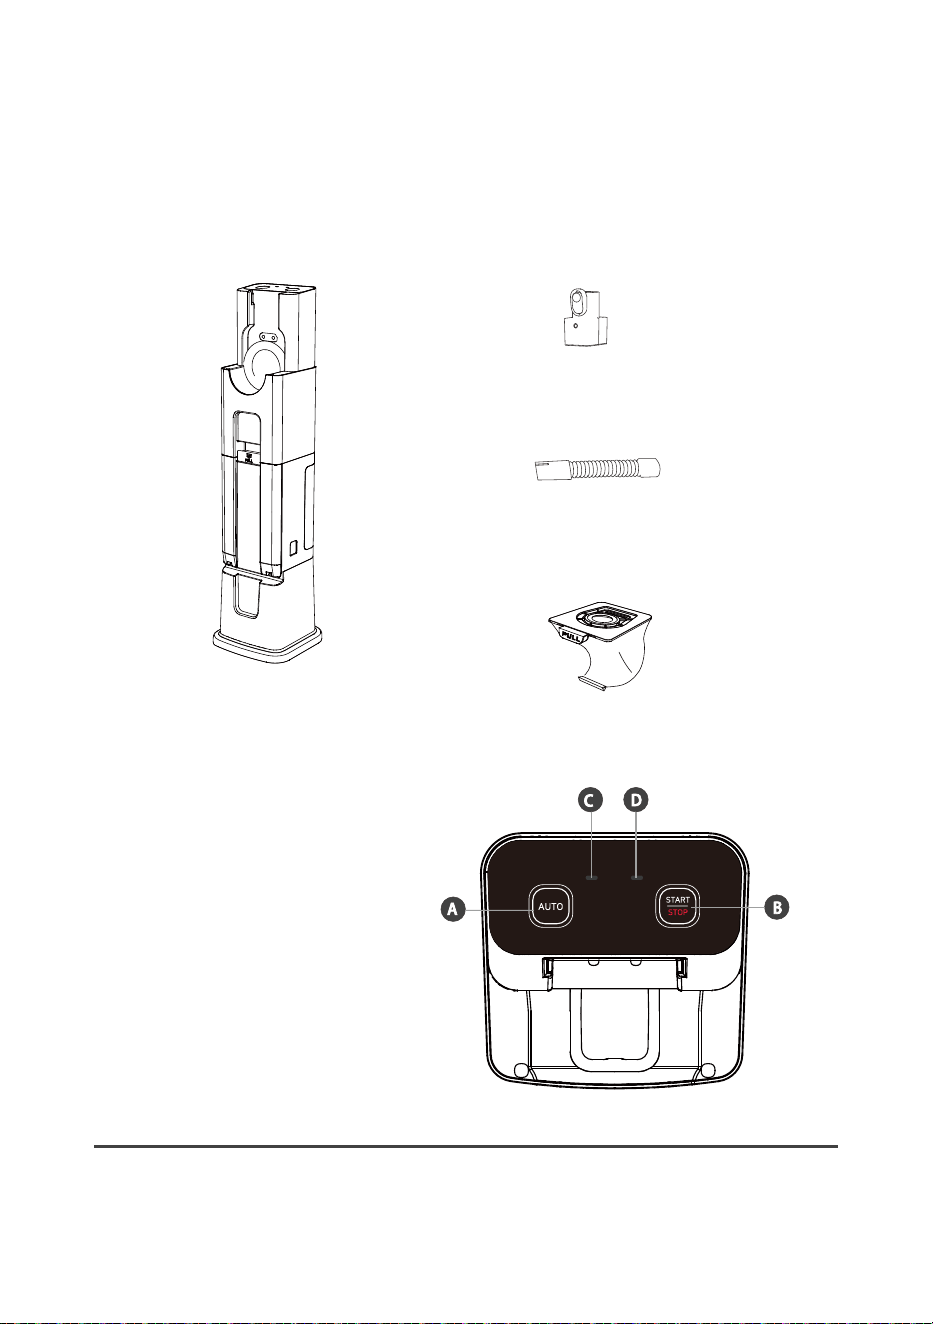
Auto Emptying & Charging Station
Please check if the accessories are complete.
Main body
* Connector
* Hose
Dust bag
A. AUTO Mode
B. START/STOP
C. Dust Bag Indicator
D. Dust Bag Door Indicator
Note: Accessory with “*” is for optional.
4
CORDLESS VACUUM CLEANER
5
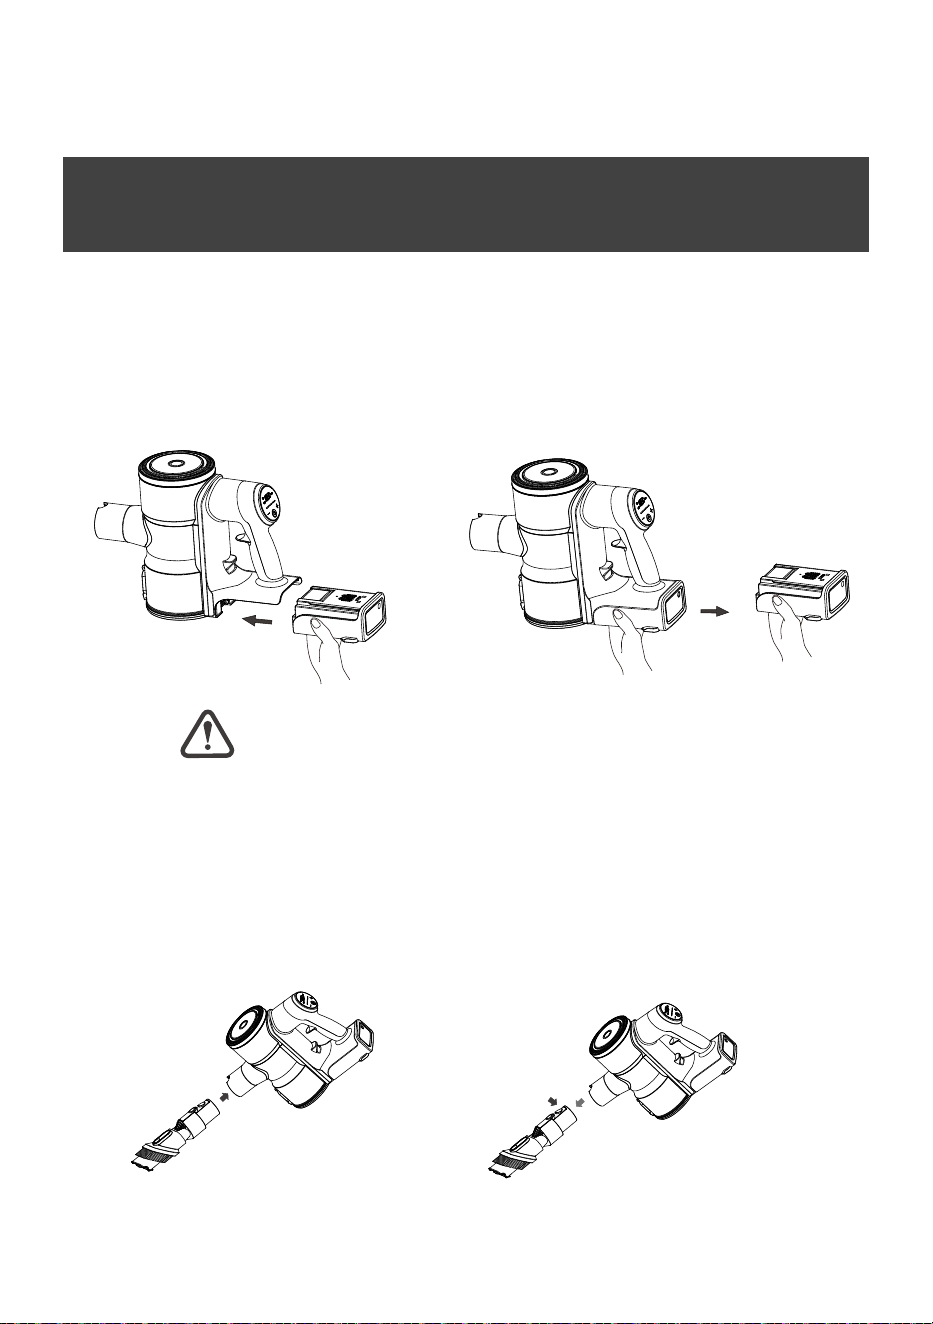
Assembly & Use
(1)Slide the battery pack onto the
main body according to the two
guiding grooves until click. Make
sure the battery is locked well.
1. Battery
(2)Crab the battery pack and pull it out
to disconnect the battery pack from the
main body.
Charge the battery fully before first use.
2. Crevice tool/Dusting brush/* Mini motorized brush
(1)Attach the tool by sliding it
onto the inlet on the product
body until it clicks into place.
(2)Press the release button
(on the accessory) to disconnect the
tool from the main body.
6
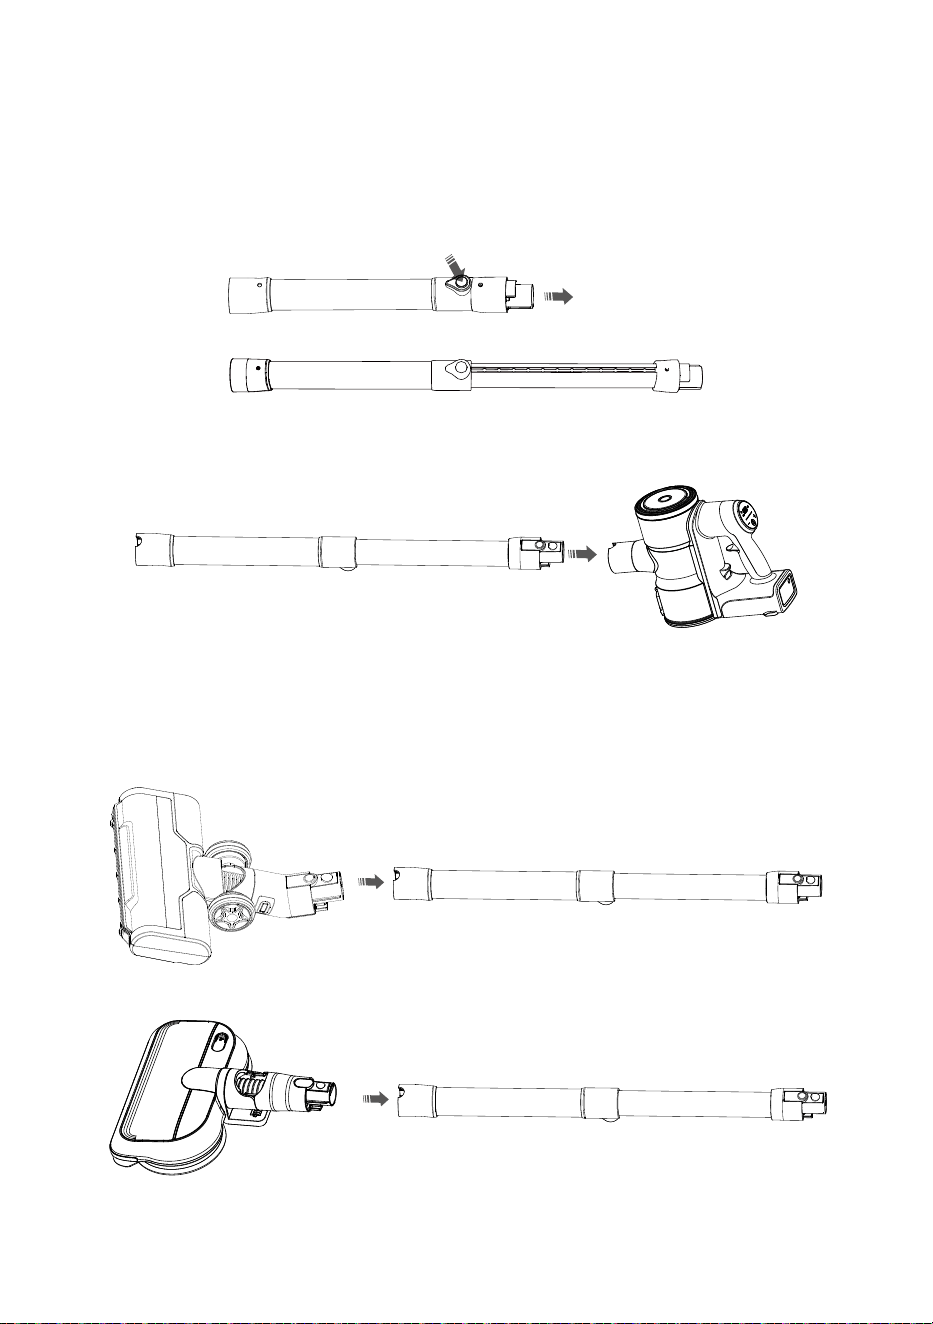
3. Telescope tube
Attach the telescope tube to the main body as below until click.
4. Power brush/* Mop brush
Attach the power brush fo the other end of the tube as below.
7
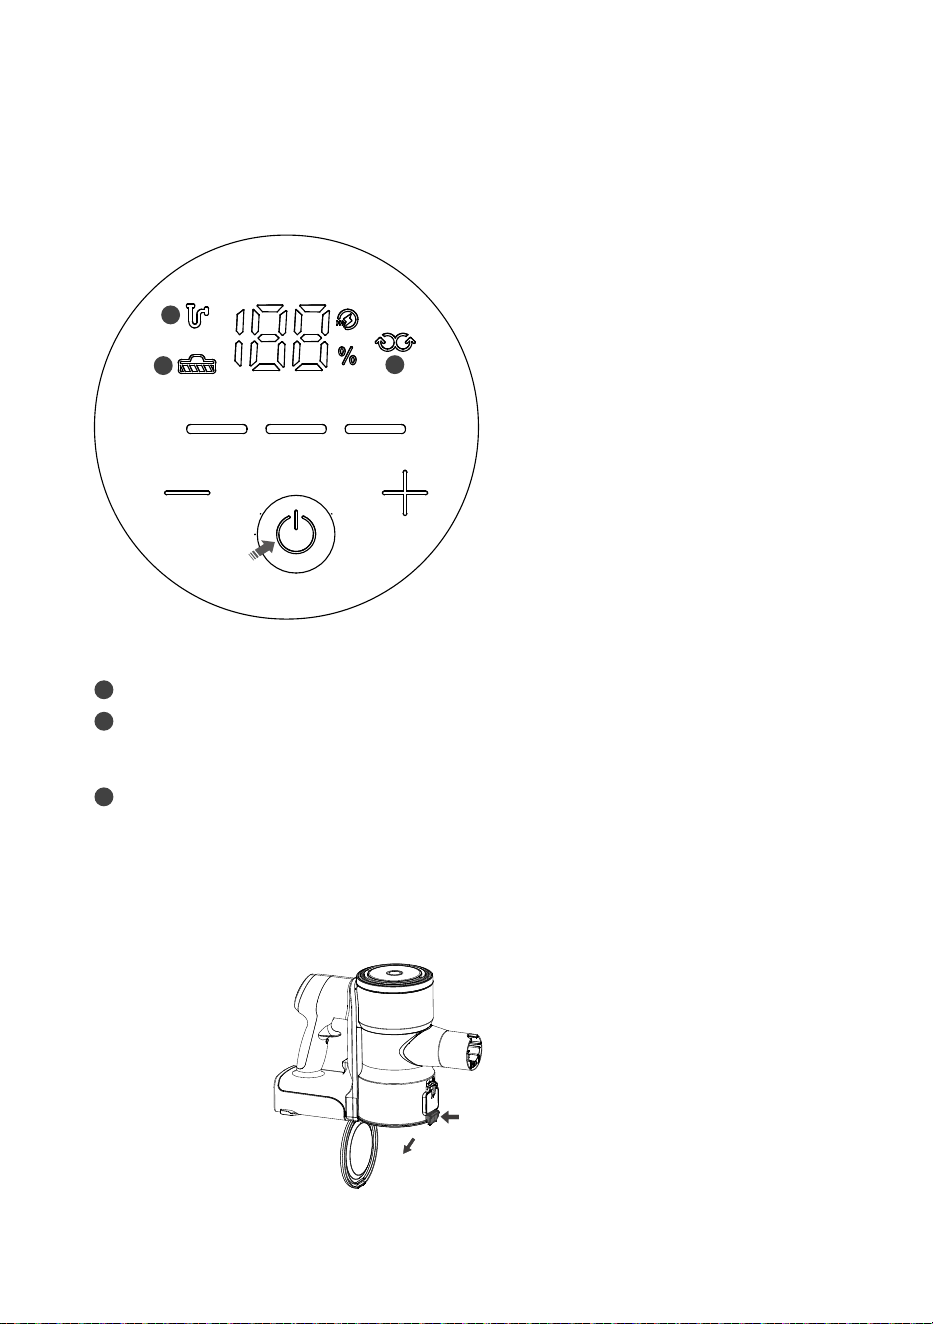
5. Turning on the power and setting the power level.
Press “+” to choose Standard mode,
it is suitable for daily cleaning.
Continue to Press “+” to choose Boost
mode, it is suitable for stubborn dirt.
6. Clean the dust bin
Press the Dust Bin Empty Button to dump the dust.
Short press the Power Button to turn on.
Three modes available for power brush.
It will be Eco mode at start, suitable
for removing pet loose hair.
Press “-” or “+” according to the needs.
1
2
3
Note:
1 Dust Full Indicator: Press Dust Bin Empty Button to empty the dust bin.
2 Brush Blocked Indicator: When this indicator light flashes, it means power brush is blocked
by hair or other subjects. Please turn off the vacuum and diconnect power brush from main
body, take out the brush roller then clear any hair, dirt, etc.
3 * Mopping Mode Indicator: Connect mop brush to main body, long press the Power button
about 2 seconds, this indicator light flashes. Cyclone clone will not work and only mop brush
starts to work. It can be use for mopping floor without vacuum.
8
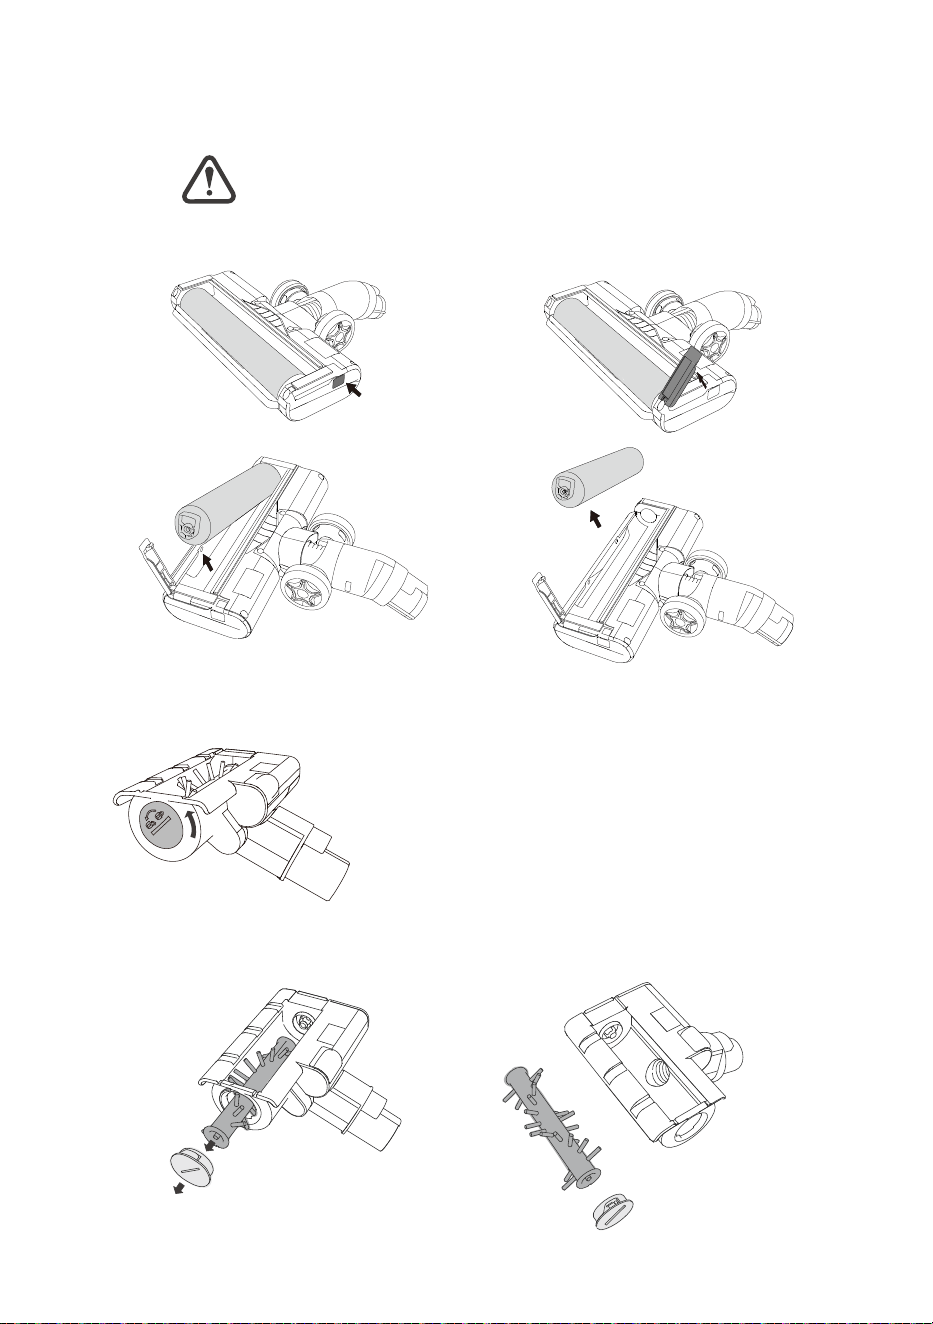
7. Clean the roller of power brush/* mini motorized brush
(1) Press the button as shown below.
(2)Take out the brush bar for cleaning.
Clean Power Brush
Clean Mini motorized tool
Disconnect tools before cleaning them.
(1) Unlock the locker with a round plate as shown below.
(2) Take out the brush bar for cleaning. Assembley it back after cleaning,
lock with a round plate.
9
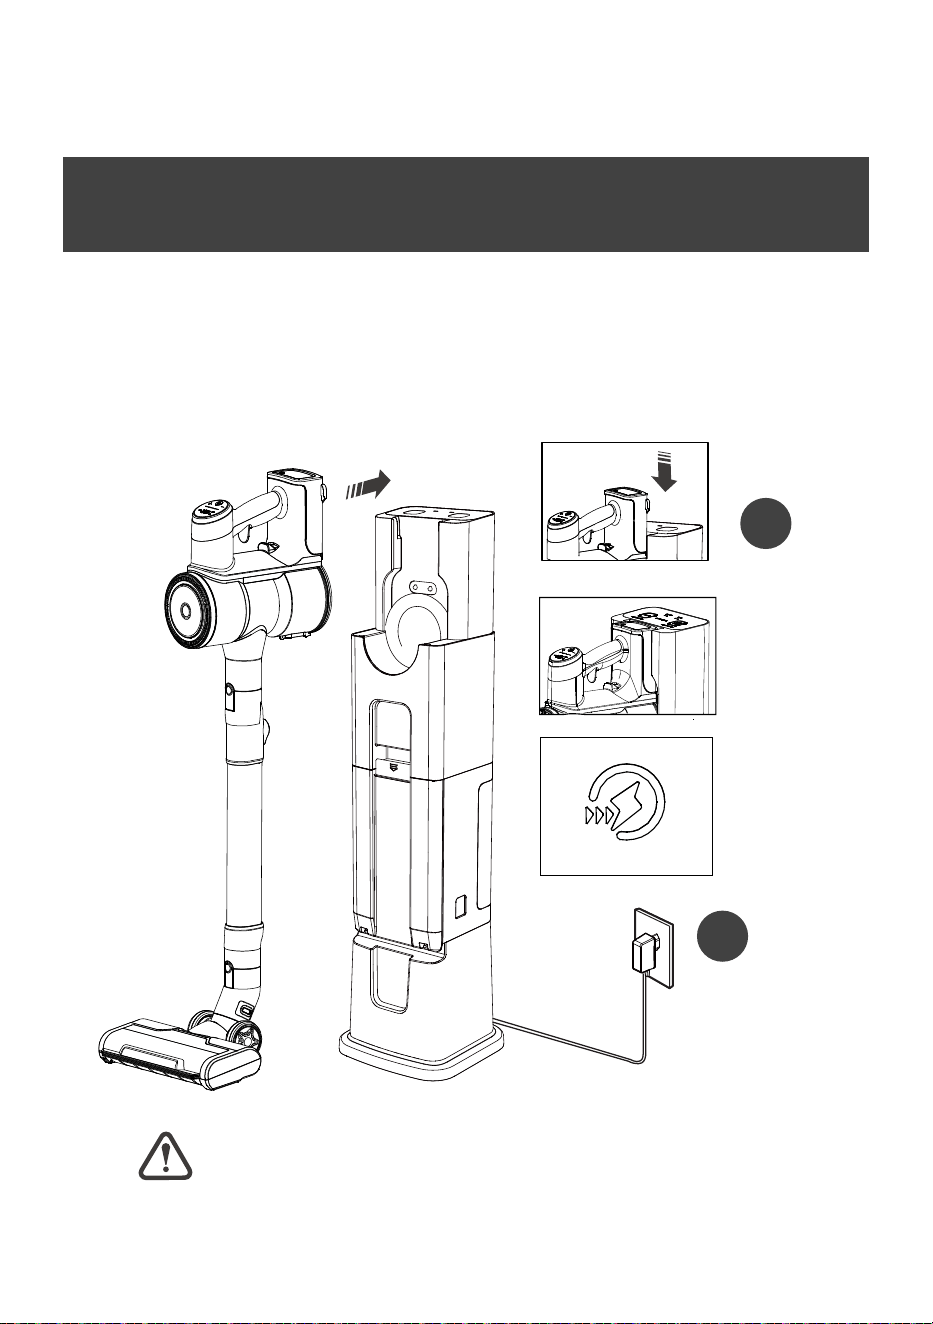
Storage & Battery Charge
(1) Slide the battery pack at the bottom of the vacuum cleaner to the bottom.
(2) When the vacuum cleaner is correctly inserted into STATION, there is an
indication tone, the battery level indicator light on the vacuum cleaner starts
to flash and begins to charge. lf the battery light is not flashing, re-plug the
vacuum.
Vacuum Cleaner will not operate when charging.
WARNING
1
2
10

How to Clean the Filter
For best cleaning performance, always clean your pre-motor filter
after each use.
Pre-Motor Filter
(1)Take out the Pre-Motor Fiter. Twist the cyclone cone anti-cockwise and take
out the cyclone cone as shown below. Clear the dust of pre-motor filter.
Post-Motor Filter
Clean the filter system
(1)Twist and remove the top cover as below. Take out the exhaust filter.
Clear the dust of post-motor filter.
11
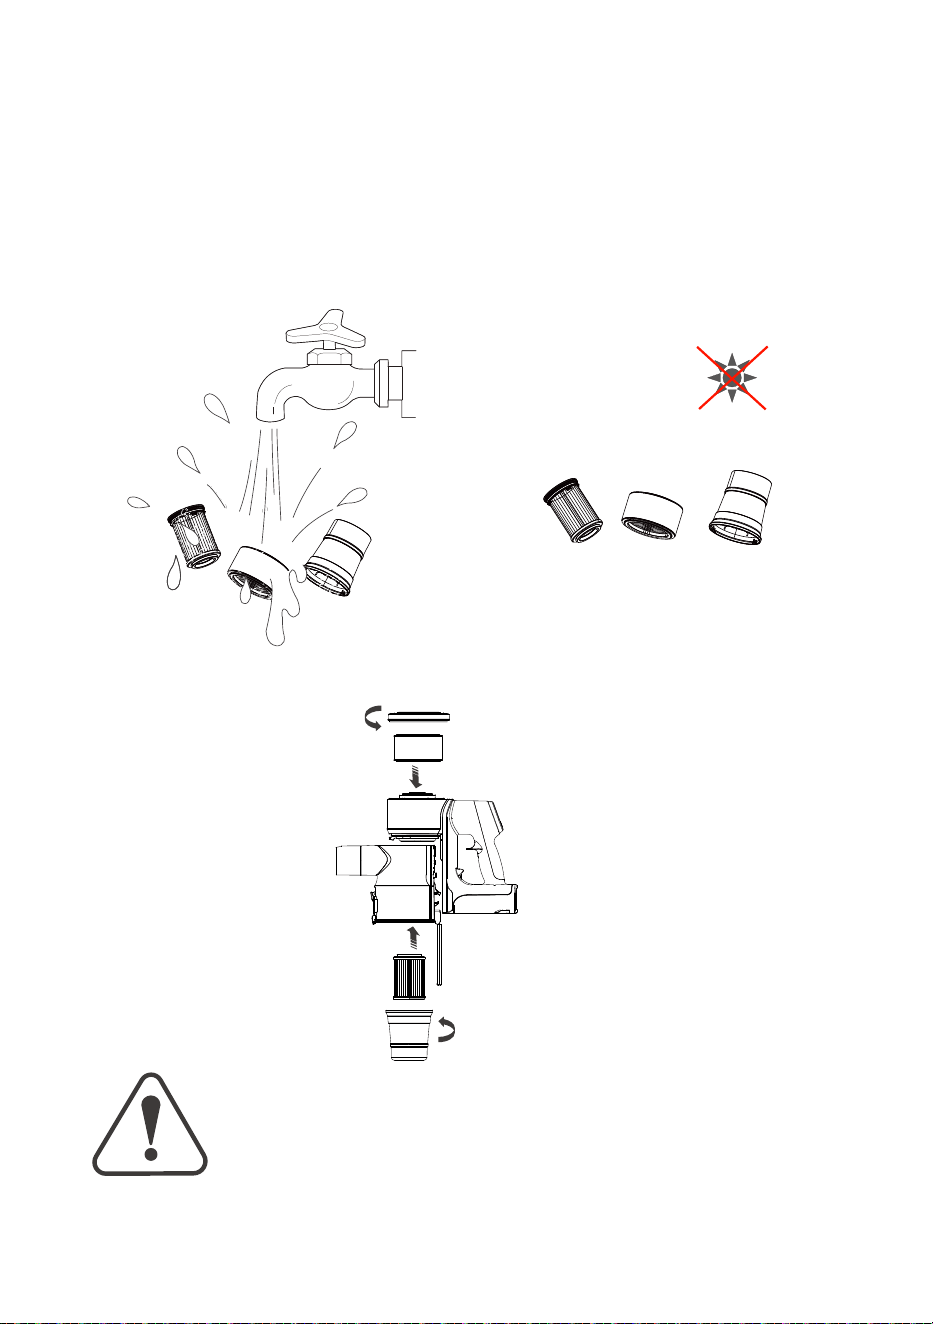
(2)The exhaust filter, Pre-Motor Filter and cyclone cone are washable.
24H
(3) Assemble the parts back shown below.
Please dry them completely in a
place without dierect sunshine
before assemblying back.
Reinse them with running room
temperature water.
Do not soak.
Before using your vacuum, make sure that the dust bin is in
locked position and that all filters both pre and post-filter and
cyclone are in place. DO NOT operate your vacuum without
these filters.
WARNING
12

Product Specifications
Model 720
Voltage 21.6V/25.2V/28.8V
Suctiom Motor Power 300W/450W/450W
Charger Input
100-240V~ 50/60Hz
Power Brush 40W
Battery Pack 2500mA/pc; 6/7/8cells
Charging Time 5H
Dust Bin Capacity 0.5L
Running Time: Eco Mode 60/70/80min
Running Time: Standard Mode
Running Time: Boost Mode
30/35/40min
10/11/12min
Running Time: *Mop Brush Mode
60min
* Mini Motorized Brush 30W
Note: “*” means the accessory is for optional or
the mode need to equip with optional accessory
to use.
13

Troubleshooting
Problem Possible Cause Remedies
Vacuum won’t
pick up dust
Vacuum won't
charge
Dust is
escaping
from the
vacuum
Filters are dirty.
There is a clog in the vacuum.
Dust Bin is not seated correctly.
Dust Bin is full.
Filters are missing or dirty.
There is a clog in the vacuum.
Remove and rinse Pre-Motor Filters. Allow enough time for
them to dry properly before reinserting. Remove and dust
off post-motor filter.(Refer to page 10)
Check for debris buildup or clogs in each of these sections.
Clear any debris or clogs before reassembling.
Remove the bin and reseat properly.(Refer to page 8)
Empty the bin.(Refer to page 8)
Check to see if the Pre-Motor & Post Motor Filters are in
place and clean, if necessary.(Refer to page 10)
Remove the brush tools from the hand vacuum.Check for
debris build up or clogs in each of these sections, Clear
any debris or clogs before reassembling.
Re-plug the hand vacuum properly.(Refer to page 16)
Plug is not plugged into
the socket properly.
Vacuum is not seated correctly.
Remove the plug and reinstall into the socket.
(Refer to page 15)
14
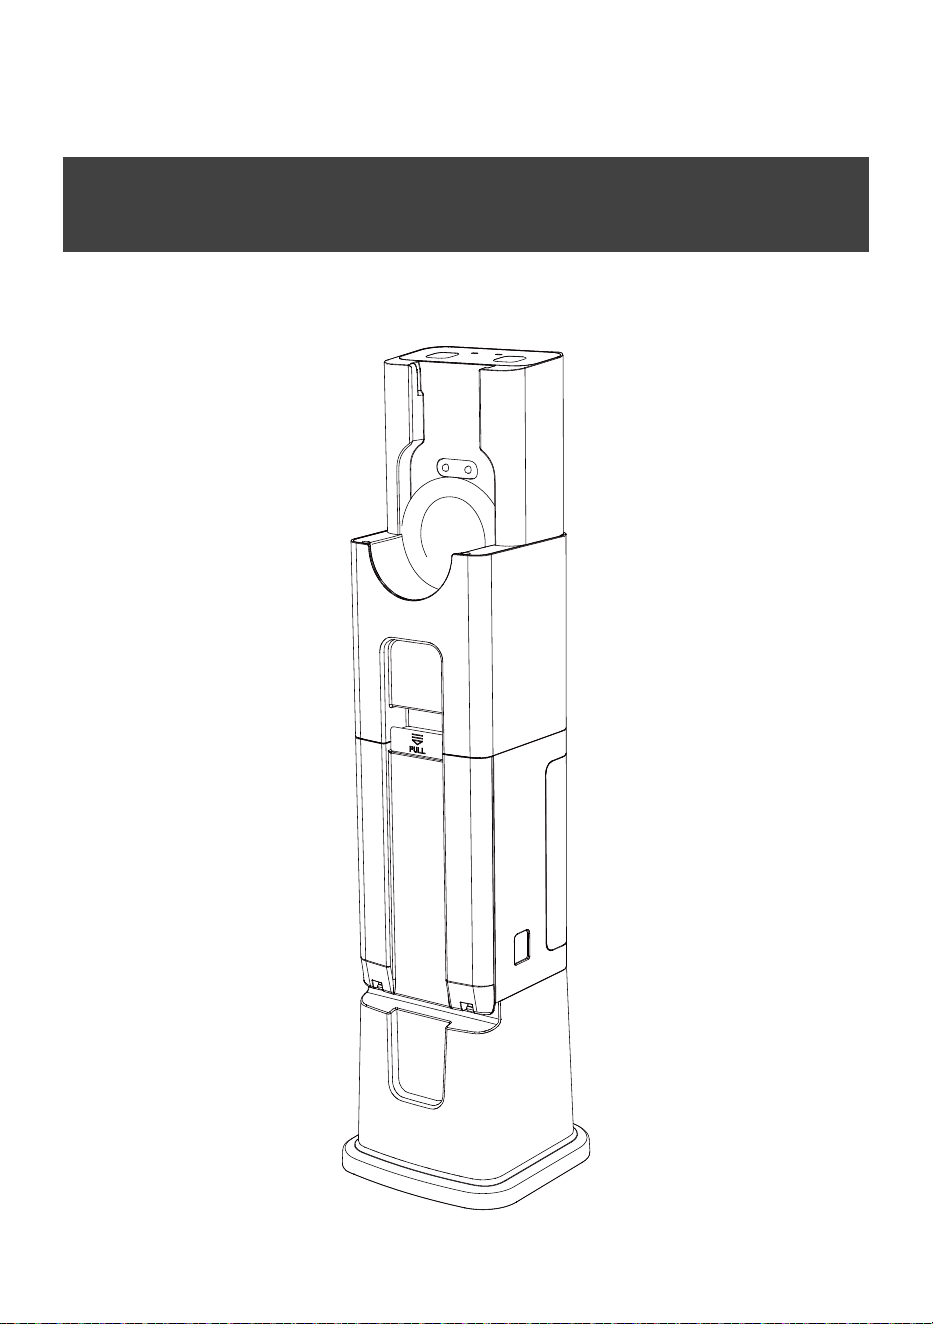
STATION
Auto Emptying & Charging Station
15
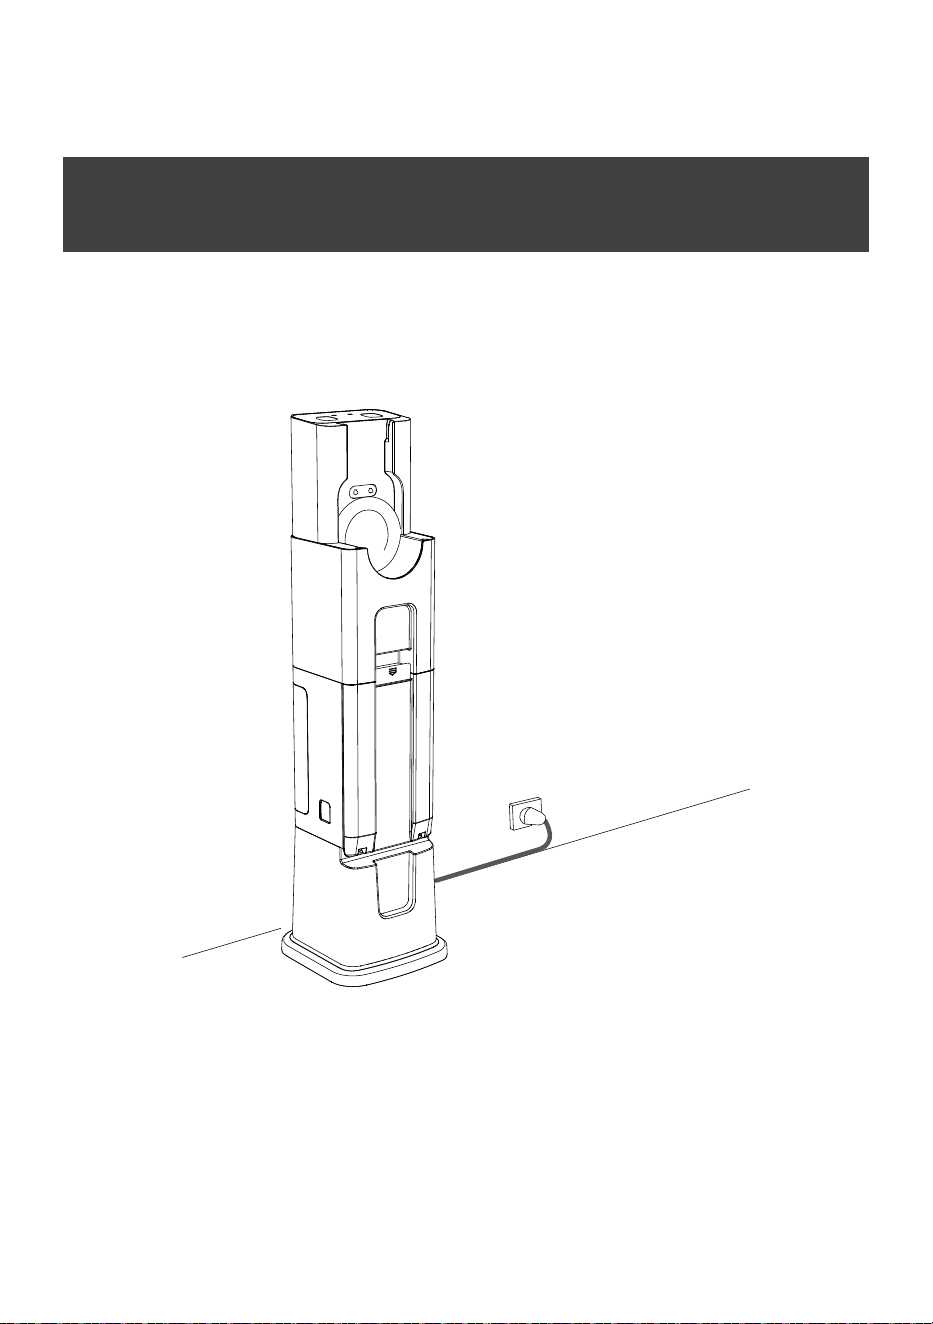
(1) Place the STATION on a flat ground near the socket.
(2) Connect the power plug to the socket.
(3) When the power plug is correctly connected, the indicator lights up.
Ready to Work
16
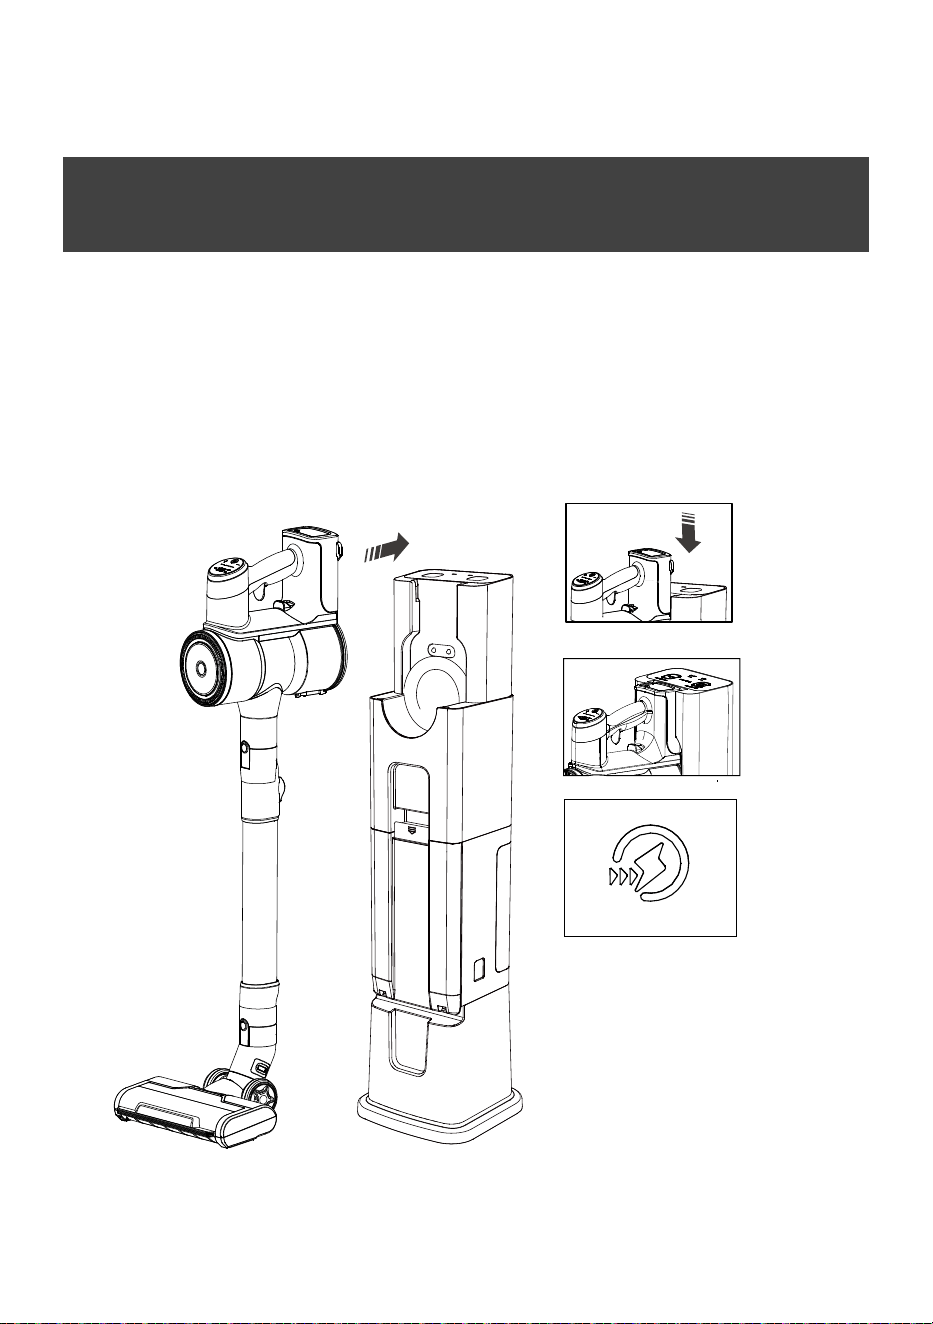
How to Use
Put the vacuum cleaner into the STATION.
(1) Slide the battery pack at the bottom at the vacuum cleaner to the bottom
of the STATION.
(2) When the vacuum cleaner is correctly inserted into the STATION, there is
an indication tone, the battery level indicator light on the vacuum cleaner
starts to flash and begins to charge.
If the battery light is not flashing,re-plug the vacuum.
The STATION is set at Automatical mode at start.
STATION will charge the vacuum cleaner automatically at
both Automatical mode and Manual mode.
17
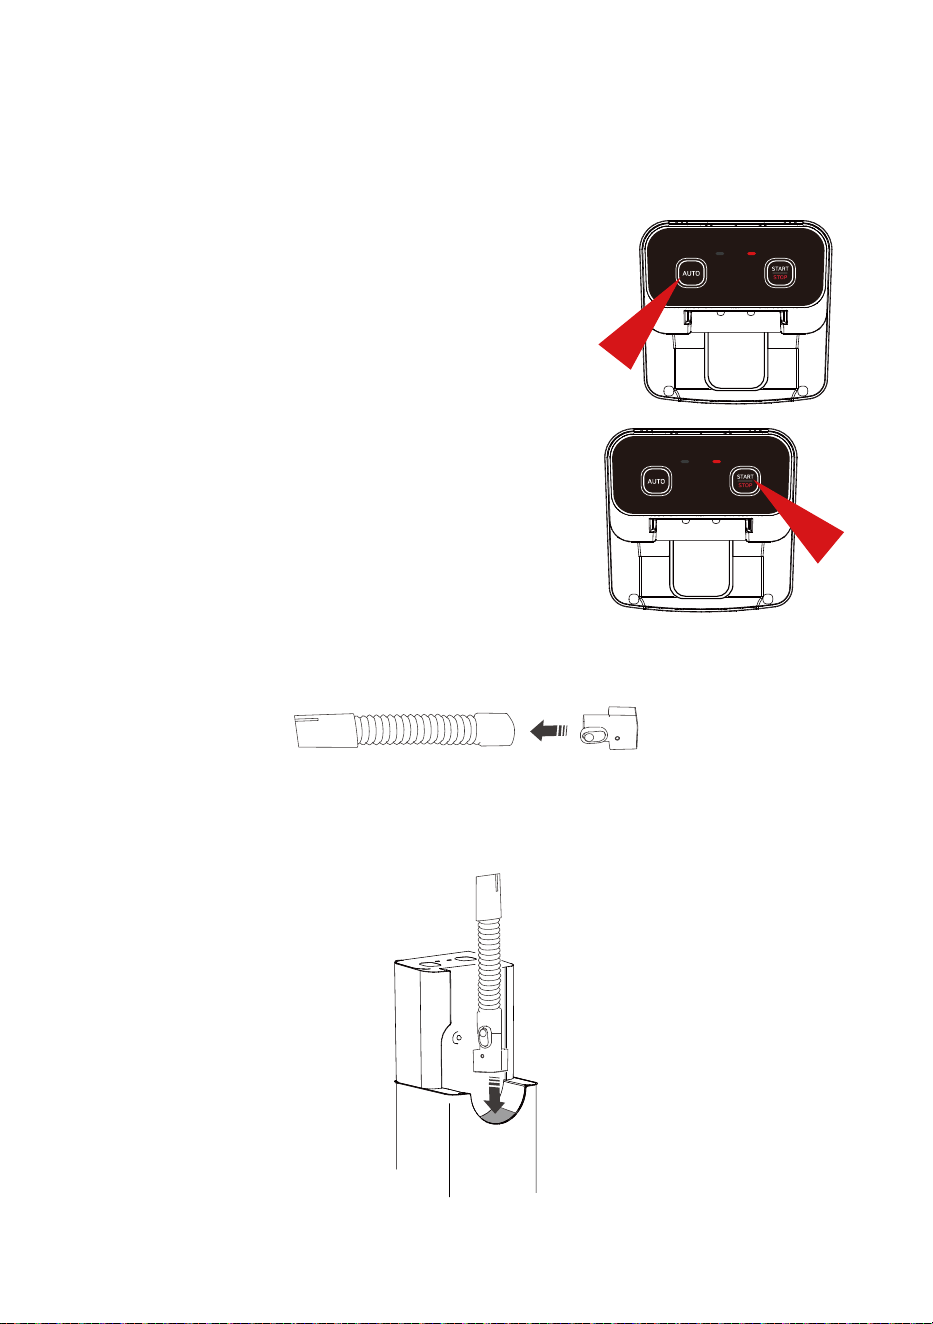
1.Automatic mode
Put the vacuum cleaner onto the STATION,
after 2 beeps, the STATION will
start to empty dust bin, and it will automatically
stop after 20 seconds.
2.Manual mode
Press AUTO botton again at Automatical mode,
botton ‘START/STOP’ will light.
Press START botton, after 2 beeps, the
STATION starts to empty dust bin.
Press STOP botton to stop it.
It will stop after 20 seconds if don’t press ‘STOP’.
There are 3 modes available:
3.* Hose mode
(1) Connect the hose to connector.
(2) Insert the connector onto STATION as shown below.
Press START botton, the STATION starts to vacuum, it will automatically
stop after 60 seconds if do not press STOP button.
18
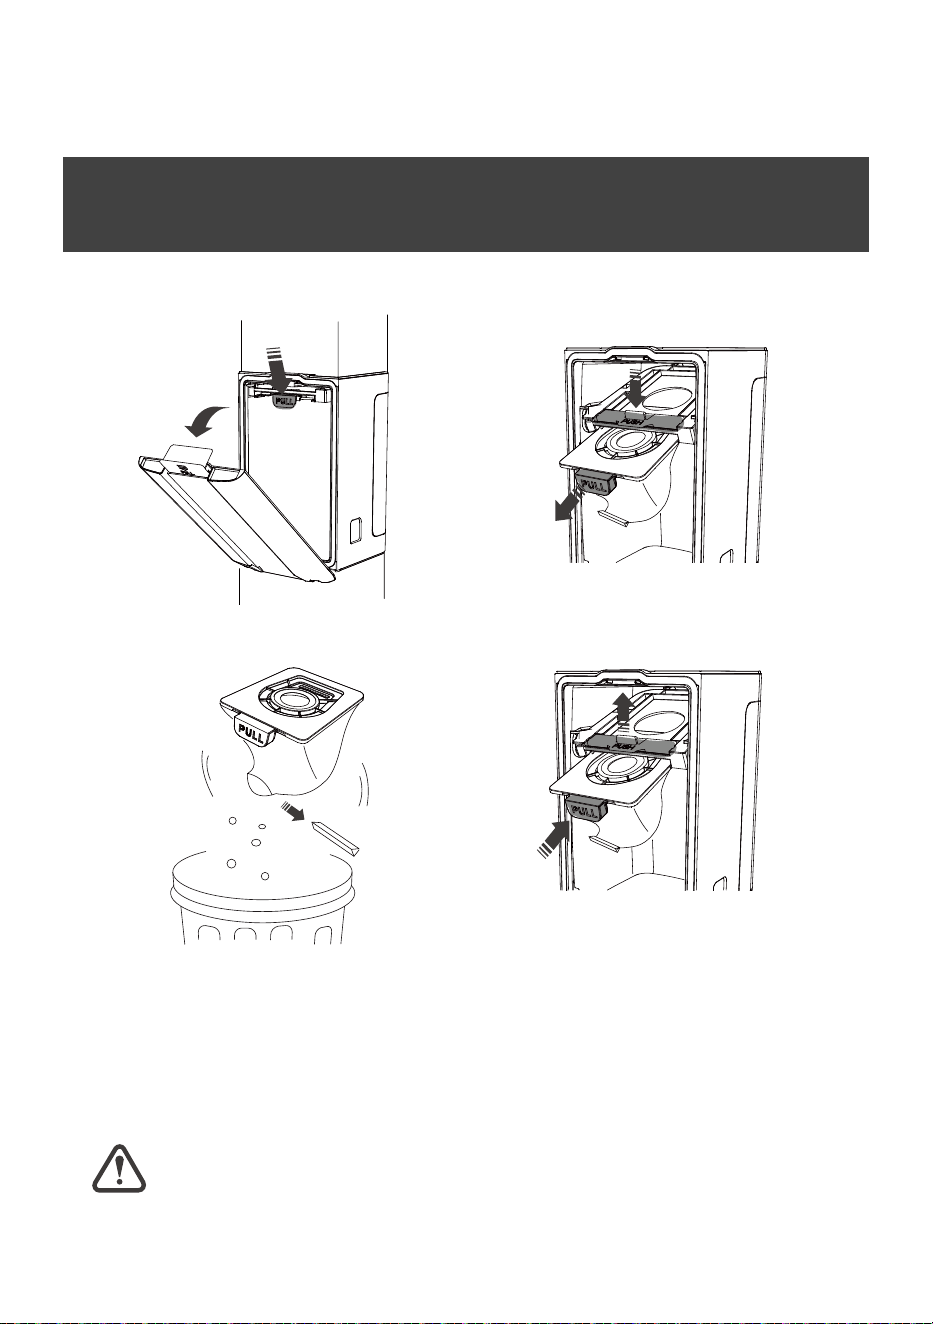
How to Clean the Dust Bag
Dust Bag
(1) Open the dust bucket door and press down on the dust bag holder.
(2) Pull out the dust bag and
empty it.
(3) Put the empty dust bag back into the
dust bag holder as shown in the picture,
lift its dust bag holder and close the dust
bucket door. If the dust bag is not in place
and the door will not close,reinstall the
dust bag.
For best cleaning performance, replace the dust bag every six months.
19
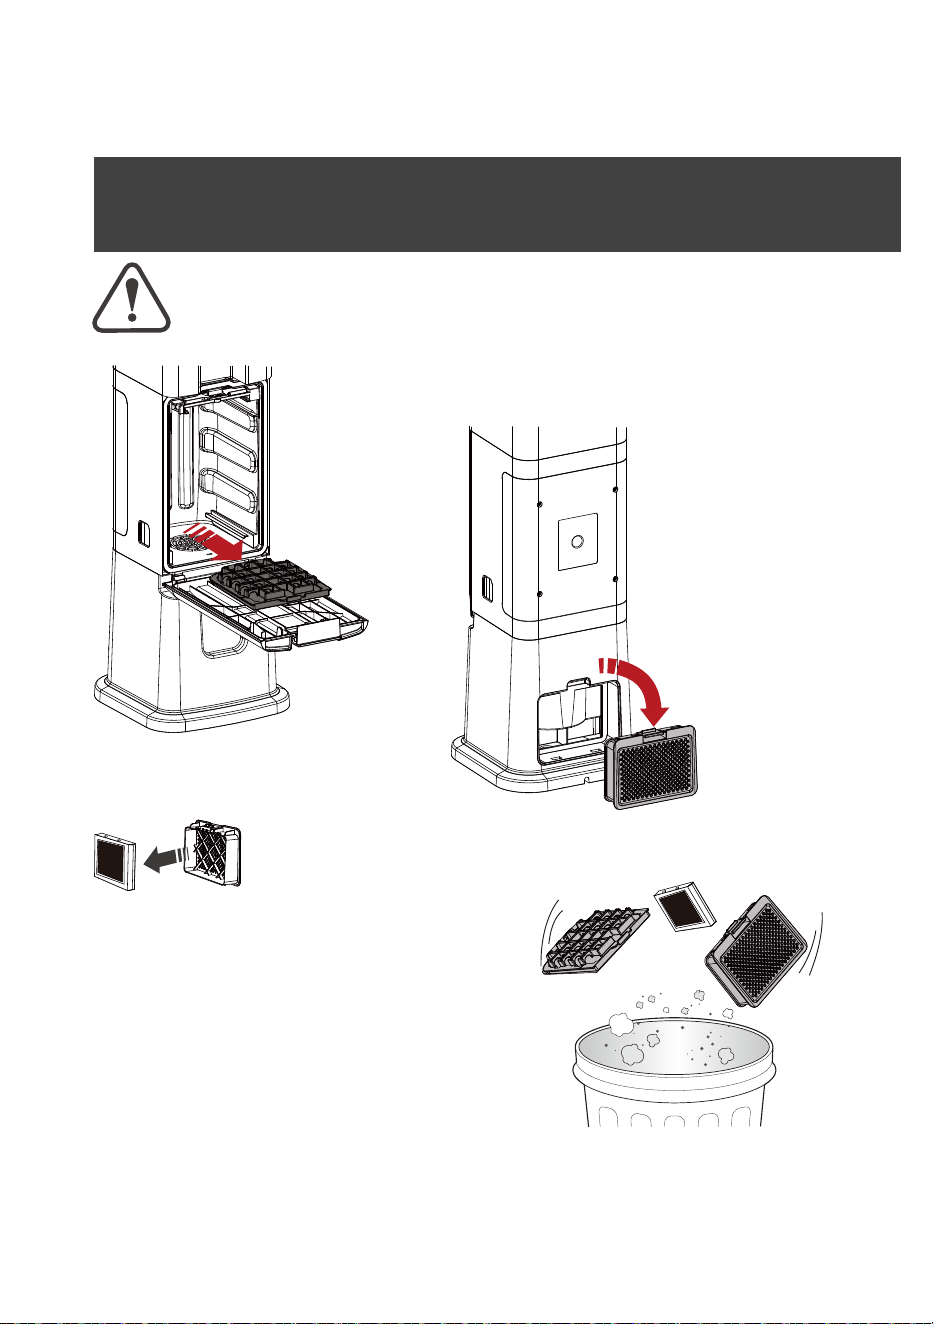
How to Clean the Filter
For best cleaning performance, replace the filter every three months.
Please keep filters dry for them are unwashable.
(5) Put the new Hepa back into the Filter Cover and put the Filter Cover
back into the STATION. If it is not in place, the cover will not close, try
reinstalling it.
(1) Pull out the air
inlet filter after
taking out of
dust bag.
(2) Open the Filter Cover
behind the STATION.
(3) Take out the Hepa from the Filter Cover and take out
the Hepa (or discard the old HEPA).
(4) Clear the dust on the filter/HEPA. They
are unwashable, please keep them dry,
if they were unexpectedly wet, just replace
them with new filters.
20
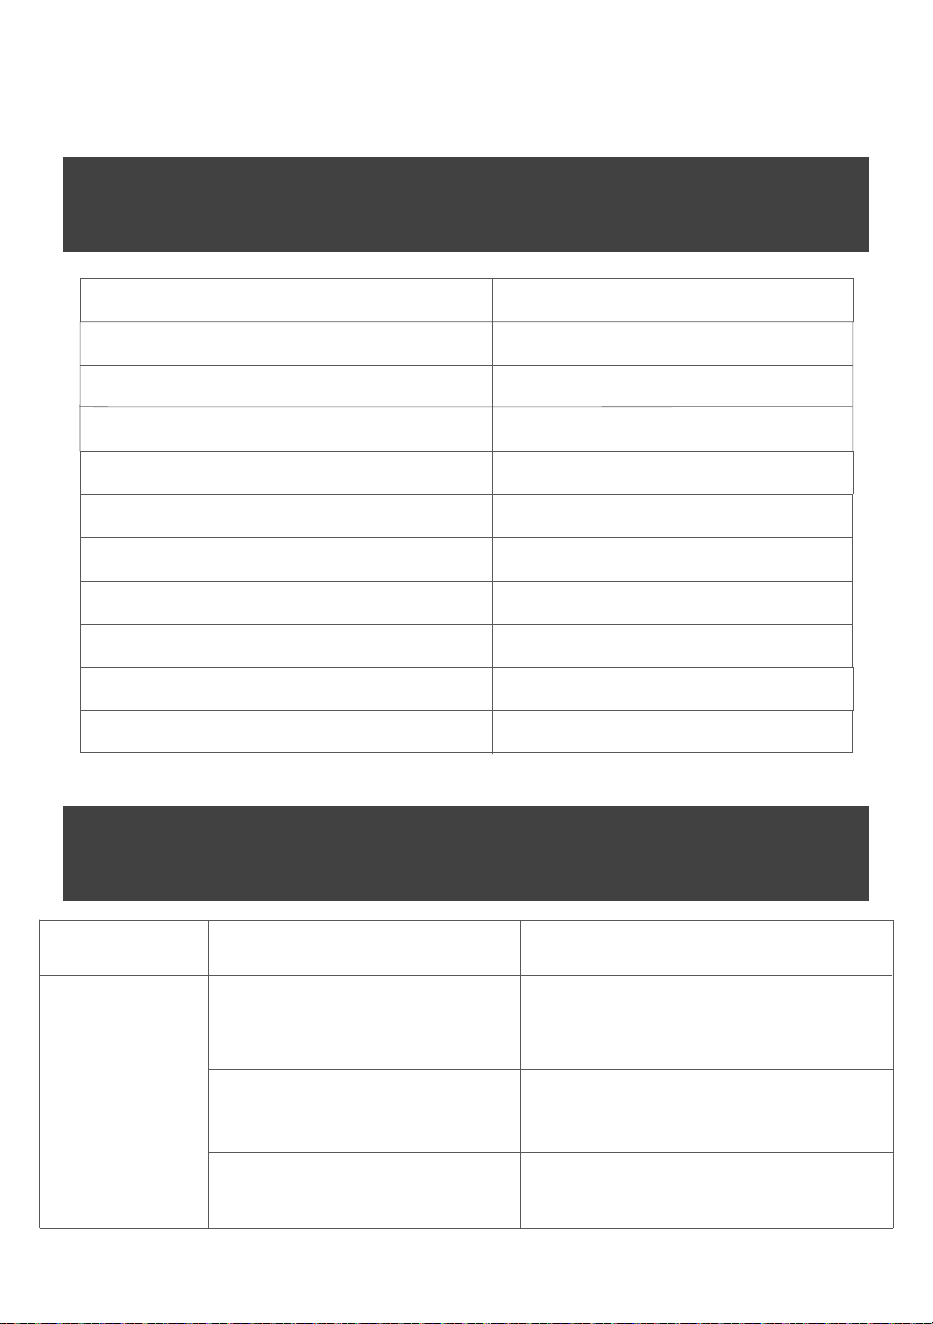
Product Specifications
Model 720
Voltage 220-240V~
Suction motor power 1800W
Vacuum degree (motor) >28Kpa
Vacuum degree (internal) >23Kpa
Pressure sensor 16Kpa
Noise <85dB
Dust bag capacity 3L
Working time: Auto mode 20s
Working time: Manual mode 20s
Product Specifications
STATION is
not running
as it should be.
Problem
Vacuum cleaner or hose not
placed on the STATION.
The dust bag is full of dust.
The front cover door is not closed.
Put the vacuum cleaner or the hose on
the STATION.(Refer to page 16-17)
Clean the dust bag.(Refer to page 18)
The dust bag is missing or the dust bag
is not installed in the correctposition.
(Refer to page 18)
Possible cause Remedies
Working time: * Hose mode 60s
21

Warranty
1.The warranty period is 12 months from the date of ordering the
product.
2.Free warranty is available for damage or failure during normal use.
lf that damage cannotbe repaired up to different area or damage
reasons, it shall be replaced with a new productAfter replacement,
the warranty period of the original product shall be valid for the
new one.
3.In case it falls out of the range of warranty, the freight will be
charged for retuming the product.
4.The warranty content shall be limited to free maintenance of this
product.
5.The following conditions shall be out of warranty even within the
warranty period:
(1)Failure and damage caused by misuse or inattention.
(2)Damage caused by improper protection or other negligence
during transportation.
(3)Product damage caused by scratching, biting, flapping, pressing
of the pet,etc.
(4)Failure and damage caused by fire, earhquake and other natural
disasters.
(5)Failure and damage during use other than normal domestic use
(long-term usefor business purposes, etc.).
6.Repair will be refused in the following cases regardless of whether
they are within thewarranty period or not:
(1)The customer reconstructed or modified the product.
(2)Consumables and attachments of the product.
22