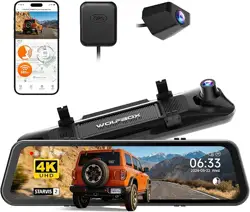

G850 Pro
MIRROR DASH CAM
User Manual
The information in this manual is subject to change without notice.
V1.2

1
Content
Precautions . . . . . . . . . . . . . . . . . . . . . . . . . . .
2
Warnings . . . . . . . . . . . . . . . . . . . . . . . . . . . .
2
Product Oveiew . . . . . . . . . . . . . . . . . . . . . . .
3
Warranty . . . . . . . . . . . . . . . . . . . . . . . . . . . .
3
Product Specications . . . . . . . . . . . . . . . . . . . . .
4
Package Contents . . . . . . . . . . . . . . . . . . . . . . .
5
Appearance . . . . . . . . . . . . . . . . . . . . . . . . . . .
6
User Inteace Oveiew . . . . . . . . . . . . . . . . . . . .
7
Feature Oveiew . . . . . . . . . . . . . . . . . . . . . . .
9
Voice Control Feature . . . . . . . . . . . . . . . . . . . .
15
Sma Drive Feature . . . . . . . . . . . . . . . . . . . . .
16
Play on APP (About Wi-Fi and APP) . . . . . . . . . . . .
20
How to Play Using a Computer . . . . . . . . . . . . . . .
21
Installation . . . . . . . . . . . . . . . . . . . . . . . . . .
23
Trouble Shooting . . . . . . . . . . . . . . . . . . . . . . .
29
Customer Seice Center . . . . . . . . . . . . . . . . . .
30

2
Precautions
1. For fuher inquiries, please contact our customer seice via
email at seice@wolox.com.
2. Please use original accessories to avoid compatibility issues and
insucient current supply from non-compatible accessories.
For example, 2-in-1 or 3-in-1 cigar sockets will not provide
enough current to the device.
3. Please do not tamper or splice the rear camera wire for the
purpose of extension, as the rear image/feed to the display may
be lost. The length of the included cable for the rear camera is
20 feet, and is suitable for most types of cars.
4. If you wish to use a micro SD card with a capacity > 32GB,
Please change the micro SD card [Class10 (10MB/s) required]
format to FAT 32 on PC.
Warnings
• Keep small accessories out of the reach of children. If this
product is damaged or malfunctions, stop using it immediately
and contact WOLFBOX suppo. Continued use may cause re,
electric shock or vehicle failure.
• This product is intended to be used as reference material in
the event of an accident. We do not guarantee its eectiveness
or admission as complete evidence.
• Please note that this product may infringe on privacy and other
rights depending on how it is used. We are not responsible
for any cases where this product infringes on privacy or other
rights.
• This product is for DC12V/24V vehicles only.

3
Product Oveiew
• Thank you for choosing WOLFBOX G850 Pro Mirror Dash
Cam. This product provides a high-quality image and captures
irrefutable evidence in the event of an accident, and records the
beauty along the way for you.
• WOLFBOX is a professional automotive supplies manufacturing
company. We have worked in the eld of dash cams for more
than ten years. We have a team of experienced and imaginative
engineers who are committed to building a reliable and
trustwohy automotive supplies brand.
Warranty
• We are committed to giving customers the best product
experience and after-sale seice.
• Our warranty period is one year. If the machine pas are
damaged or there are any problems during use, we will solve
them in time and provide you with a satisfacto shopping
experience.
Note: The specic warranty period is subject to local laws.
• Please contact us with your online order, and we will provide
free replacement and lifetime technical suppo.
• Free extended warranty seice: After registering information
on WOLFBOX.com, you may extend the warranty for an
additional 6 months free of charge.
URL:https://wolox.com/pages/warranty-form
• The specications and appearance of this product are subject
to change without notice for improvement.

4
Product Specications
RAM DDR3 2GB Display Type IPS
Video Format MP4 Image Format JPG
Front Camera 4K(2160P) Rear Camera 1080P
Display Size 12''
Rear
Lens FPS
25 fps
Power
Inteace
USB Type-C GPS
External,
3.5mm headphone
inteace
ADAS
PCW
;
FCW
;
LDW
;
SNG
;
VB
BSD RCW
;
LCA
Wi-Fi
Connection
Suppoed Voice Control Suppoed
Operating
Temperature
-4°F ~158°F
Full Touch
Screen
Suppoed
SD Card Max Suppo 256GB
5
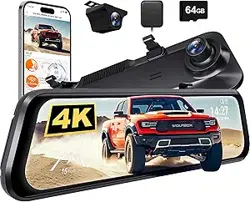
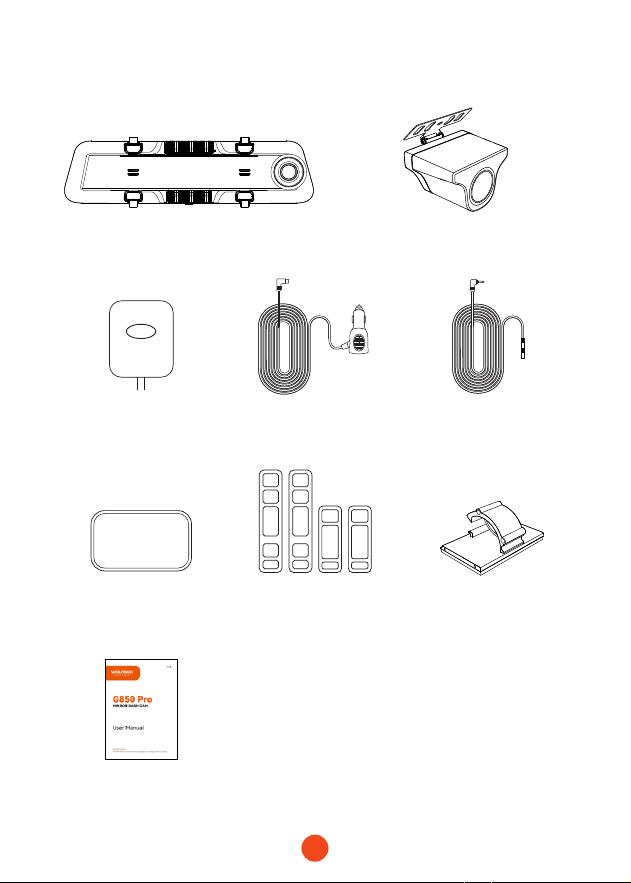
Package Contents
• 1080P Rear Camera
• GPS
• Adhesive
• User Manual
• Power Supply Cable
with Car Charger
• Rubber Straps*4
• Rear Cam Cable
• Cable Clips*5
GPS
•2160P Mirror Dash Cam
6
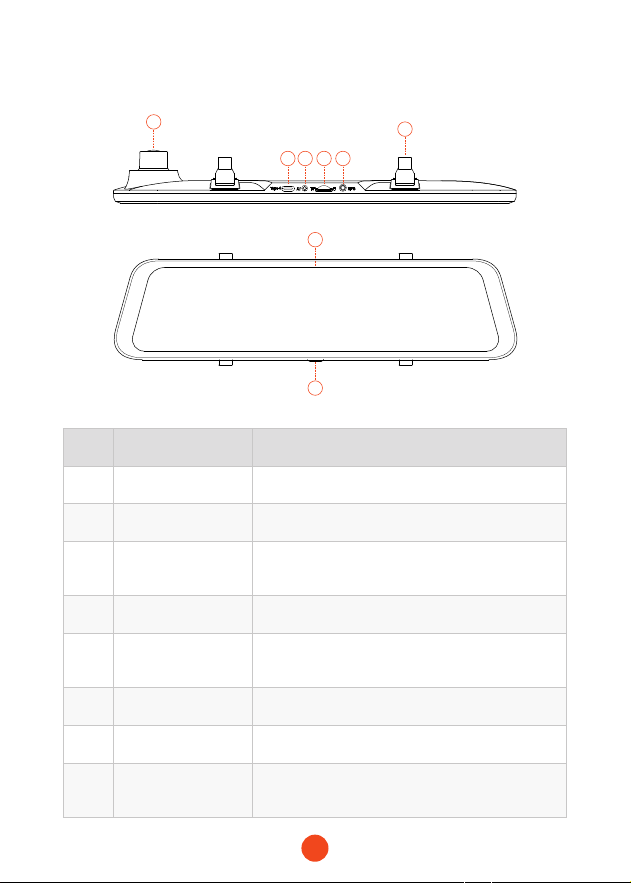
Appearance
1
7
8
2 3 4 5
6
NO. Name Description
1 Lens
Front lens, records the front view of the car
2 USB Type-C Po
Po for power supply/connection
3
Rear camera
connector
Po used to connect the rear camera
4 TF card slot
Provides expandable storage (class 10 Max 256GB)
5 GPS connector
Used to connect GPS module
(GPS function requires optional GPS antenna)
6 Fasteners
The machine can be held in position with 2 straps
7 Display screen 12
" touch screen display
8 Power button
Sho press to wake up/sleep, long press to power
on/o
7
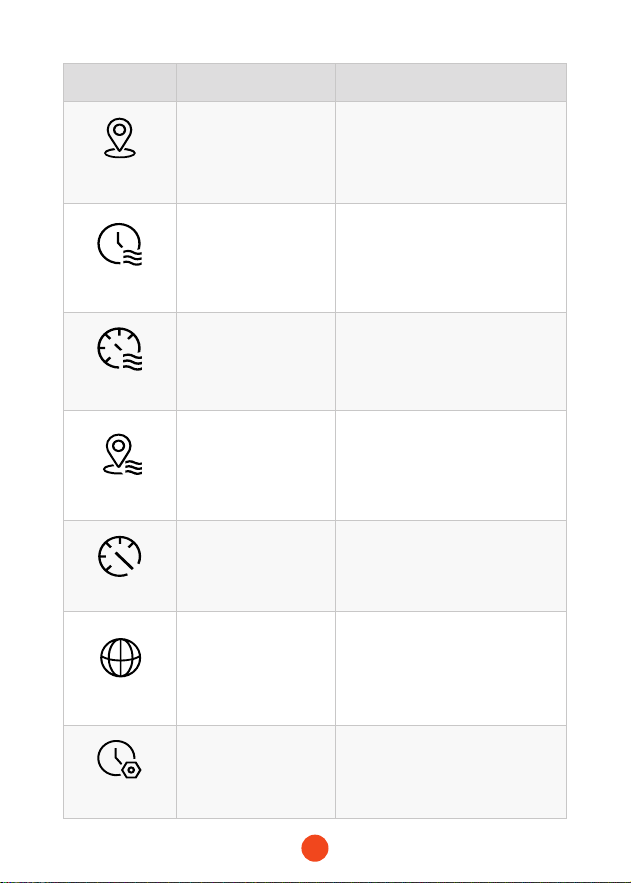
User Inteace Oveiew
icon Description
Speed & Driving Direction: Once GPS is connected,
the proper information will be displayed
Date & Time
Turn on/o the device sound
Turn on/o Wi-Fi
Access specic voice command entries
Turn on/o Sma Drive Display Inteace.
Tap to enter the Sma Drive menu
Sta / Stop Recording
Switching between front,rear and split-screen camera view
Snapshot: Take a Snapshot
Recording Status: Flashing yellow indicates Lock-Recording
(The recorded video will not be overwritten)
8
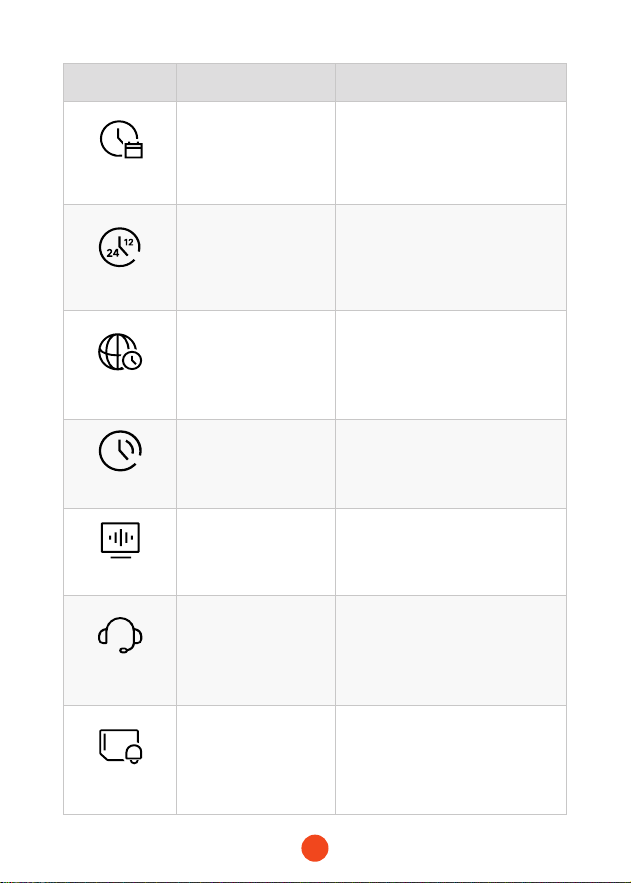
• Playback Mode
When you power on the dash cam, it will sta recording auto-
matically. Click/select to enter playback mode.
icon Description
File Playback: Playback the video & photo
Turn on/o audio recording
Settings: Tap to enter the settings menu
Stores images captured
by the front camera
Stores images captured
by the rear camera
Normal Video:Select it
to view recorded videos
Locked Video:Select it to
check locked videos
Photos:Select it to check
photos
Select
Delete Lock the video
View videos on full
screen
9
Feature Option Description
Resolution
4K+1080P
/2.5K+1080P
/1080P+1080P
Video resolution selection.
Display Modes
F-cam/R-cam
/Split Screen
Set the default video recording
inteace display screen upon
staup.
Sound Record
ON/OFF Set whether to record sound.
Loop Recording
1 Minute/2 Minutes
/3 Minutes
Set the duration for loop recording
of video les.
G-Sensor
OFF/Low/Medium
/High
Set the sensitivity of the G-sensor.
Fatigue
Reminder
OFF/1 Hour
/2 Hours/3 Hours
Set the time for fatigue reminder.
Feature Oveiew
Click the setting icon to enter the function menu, where you can adjust
various functions and parameters of the entire machine.

10
Function Option Description
Wi-Fi
ON/OFF
Set the status of the device's Wi-
Fi connection.
Volunme Setting
OFF/Low/Medium
/High
Set the volume level of the device.
Click Tone
ON/OFF Set the switch for key tones.
Screen Saver
OFF/10 Seconds
/30 Seconds
/2 Minutes
Set the activation time for the
screen saver.
Screen
Brightness
/ Adjust the screen brightness.
Exposure
/
Adjust the contrast of the front
camera.
Voice Control
ON/OFF
/Voice Command
Set the switch for voice control
functionality.
11
Function Option Description
Sma Drive
Forward Collision/
Lane Depaure/
Pedestrian
Collision/...
Manual calibration or specic
Sma Drive feature settings.
Mirror Flip
ON/OFF
Adjust the left-right ip of the
rear camera image.
Rear cam Flip
ON/OFF
Adjust the up-down ip of the
rear camera image.
Reversing Line
ON/OFF
Set the switch for the reversing
line display function.
Parking Mode
ON
/G-Trigger Recording
/12H Time-lapse
recording
/24h Time-lapse
recording
/48h Time-lapse
recording
Monitor the vehicle's status after
the engine is turned o.
GPS
/ Display recorded GPS data.
12
Function Option Description
GPS Display
ON/OFF
Set whether to display GPS
information on the recording
inteace.
Date Stamp
ON/OFF Set the switch for time watermark.
Speed Stamp
ON/OFF
Set the switch for speed
watermark.
GPS Stamp
ON/OFF Set the switch for GPS watermark.
Speed Unit
KM/H / MPH Set the unit for speed display.
Language
English/Français/
Deutsch/Italiano/
Español/...
Set the language for the device.
Clock Setting
/
Adjust the current time displayed
on the device.
13
Function Option Description
Time Format
YY-MM-DD
/DD-MM-Y Y
/MM-DD-Y Y
Set the time display format.
Time Style
12 Hours/24 Hours Set the time display system.
Time Zone
/
Adjust the time zone based on
geographical location.
DST
ON/OFF
Set the switch for daylight saving
time.
Ficker
50 Hz/60 Hz Set the screen refresh rate.
Help Center
/ After-sales contact information.
Format
Reminder
OFF
/Each 15 days
/Each 25 days
Set the reminder for formatting
the SD card.
14
Note:
Parking Mode requires a hardware kit (purchased separately) in
order to activate.
With the hardware kit connected and Parking Mode enabled, the
dash cam will enter Lapse Recording mode when the car turns
o. This mode captures video at 1 frame per second until the set
duration ends or the car batte voltage drops below 12V.
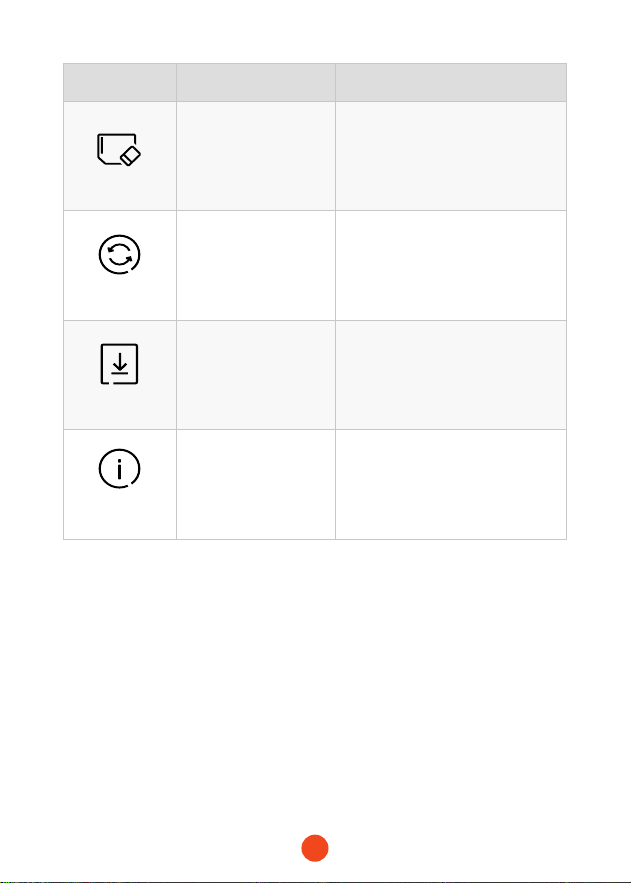
Function Option Description
Format SD Card
/
Format the SD card and delete
videos and photos stored on it.
Reset Setup
/
Restore all settings to facto
defaults.
APP
/
Provide QR code for downloading
the app.
Product
Information
/ Display device information.
15
Note:
You have two ways to view specic voice control commands:
lock the video
take picture
turn on audio turn o audio
turn on screen turn o screen
turn on Wi-Fi turn o Wi-Fi
turn on recording turn o recording
show front camera show rear camera
Tap on the voice control icon on the recording
inteace.
Tap on the "Voice Command" submenu under the
"Voice Control" feature.
1
2
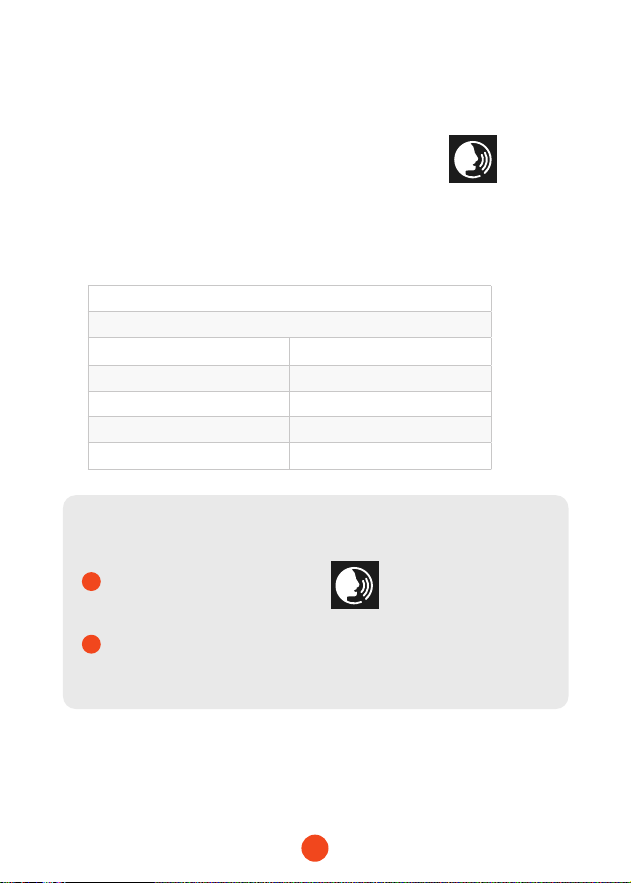
Voice Control Feature
Fast control through simple voice commands.
When the recording inteace displays a white icon , it
means that the Voice Control feature is activated.
You can enable/disable the voice control feature through the
"Voice Control" in the menu.

16
Sma Drive Feature
Sma Drive is designed to enhance safety and convenience
throughout your vehicle's journey.You can customize the settings
of each feature according to your requirements in the menu.
1. Calibrate
Manually calibrate the Sma Drive features. Please refer to
the instructions within the calibration feature for detailed
steps.
2. ON/OFF
Turn on/o the corresponding feature.
3. Setting
Manually adjust the detailed settings for each Sma Drive
feature.
17
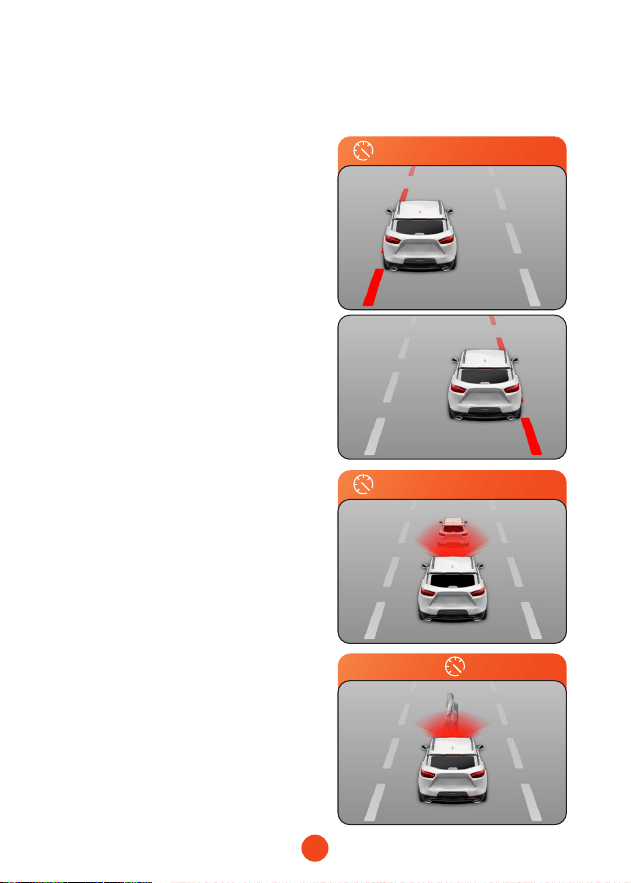
Here is a detailed introduction to the Sma Drive features:
• ADAS
(Front Camera Sma Drive Features)
1. Lane Depaure
Automatically detects lane
markings and ales you when
the vehicle deviates from the
lane.
2. Forward Collision
Accurately calculates the
distance to the vehicle
ahead and warns of potential
collision risks.
3. Pedestrian Collision
Accurately calculates the
distance to pedestrians or
non-motorized vehicles
ahead and warns of potential
collision risks.
>60km/h(37mph)
>30km/h(19mph)
>10km/h(6mph)60km/h(37mph)>
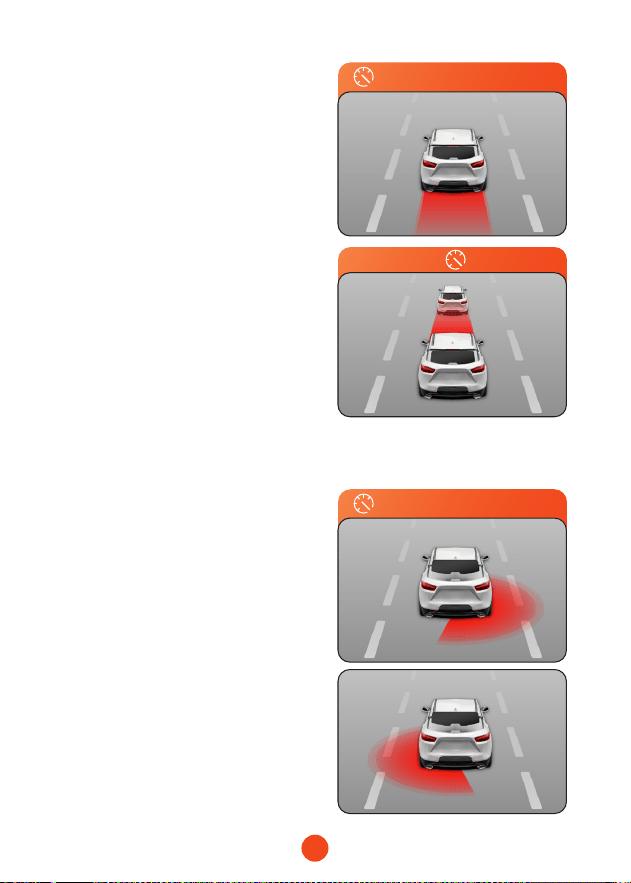
18
=0km/h(0mph)
>10km/h(6mph)
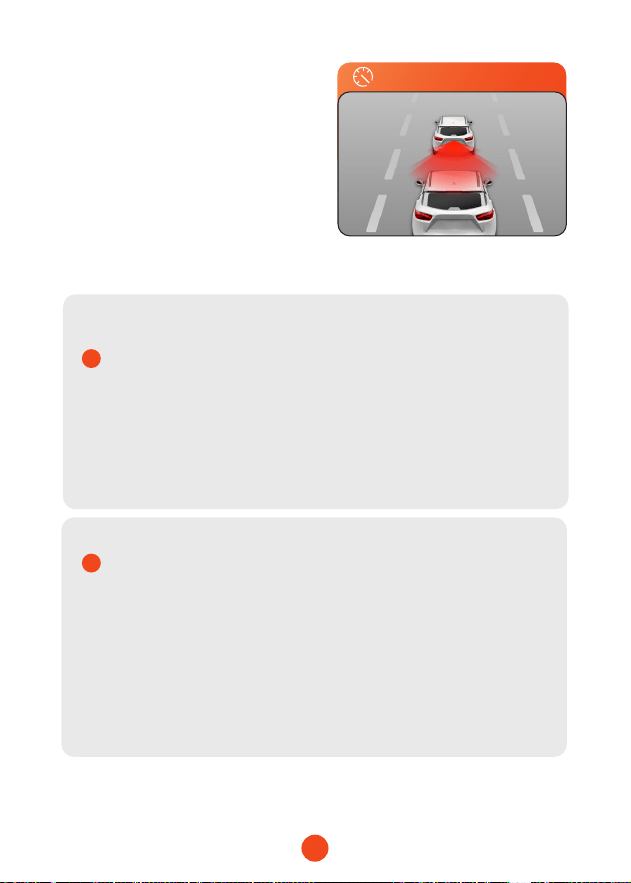
• BSD
(Rear Camera Sma Drive Features)
1. Lane Change Assist
Automatically monitors the
side and rear areas of the
vehicle and provides lane
change assist ales when
the vehicle or rear vehicle
changes lanes.
4. Stop & go
Automatically monitors the
front vehicle's depaure
and reminds you to sta in a
timely manner.
5. Forward Distance
Automatically monitors the
distance to the vehicle ahead
and reminds you to adjust the
following distance.
>1km/h(1mph)30km/h(19mph)>
19
>30km/h(19mph)
Note:
The dashcam will automatically calibrate the Sma
Drive features eve time it stas up. Please drive at
a speed of 20km/h(10mph) or above for 2-3 minutes
on the road to complete the automatic calibration. If
GPS is not positioned or the signal is weak, the speed
measurement may be inaccurate.
1
The Lane Change Assist feature includes both the
vehicle's lane change assist and the rear vehicle's
lane change assist. When using the rear vehicle's
lane change assist, please ensure that the device
has completed the rear calibration. When using
the vehicle's lane change assist, please ensure that
the device has completed both the front and rear
calibration.
2
2. Rear Collision
Accurately calculates the
distance to the vehicle
behind and warns of
potential collision risks.
20
Play on APP (About Wi-Fi and APP)
The Wi-Fi feature has been designed so you can pair your
dash camera wirelessly with your smaphone and access your
recordings instantly from the dash cam. Here you can view,
download and share your videos easily with your friends and
family.
The app “WOLFBOX” is a free app that allows you to operate this
WLAN built-in drive recorder from your smaphone.
• How to connect Wi-Fi?
1. Download the “WOLFBOX ” app
Go to the following address to download
the “ WOLFBOX” app: https://wolox.
com/app/ You may also use your
smaphone to scan the QR code to go to
the download page.
2. Enable Wi-Fi
Go to Settings to turn on Wi-Fi. Go to Settings to turn on the
Wi-Fi. Then, the device screen will display the Wi-Fi name
and password.
3. Connect Wi-Fi
To connect your iPhone or Android phone to the G850 Pro's
Wi-Fi network,go to Settings > Wi-Fi and select G850 Pro Wi-
Fi. Then, enter the default password: 12345678.
4. Open the “WOLFBOX” app
Once your mobile phone is connected to the G850 Pro's Wi-
Fi network,open the WOLFBOX app. The camera will sync
automatically, and you should see the live video feed on your
phone.

21
• Edit and share Your Videos in the App
In the app, you can view and edit downloaded local albums and
share them with others.
How to Play Using a Computer
We recommend the application “GPS Media Player” to watch and
play dash cam videos, and view Google Maps.
You can download it for free on Mac or Windows from the
following link: https://wolox.com/gps-player/
22
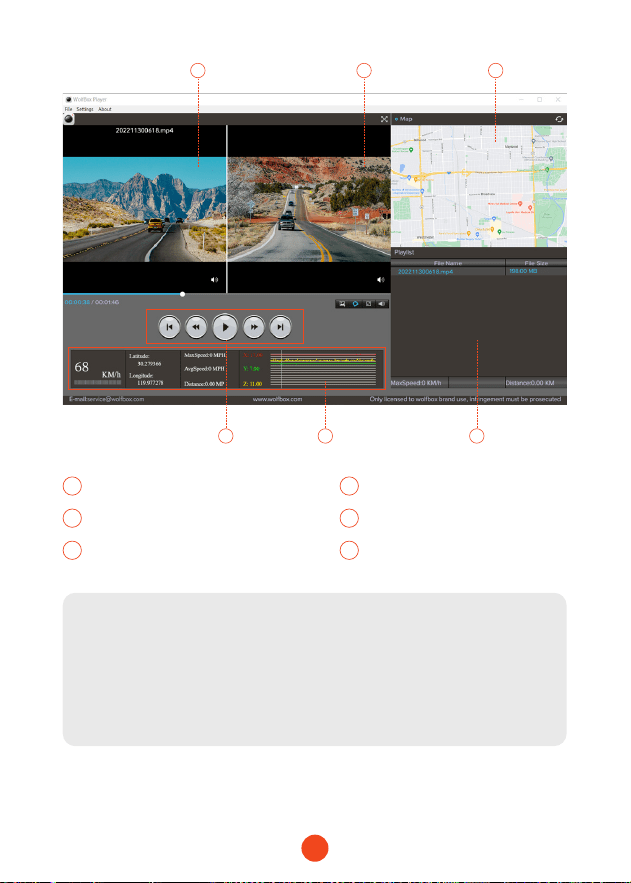
1 2
4 65
3
1 2
Video play window (Front) Video play window (Rear)
3 4
Map and track display Play control panel
5 6
Speed and driving state indication Play list
Note:
If you record the front and rear dash cam videos simultaneously
and add them to the playlist, you can play them side by side in
split-screen mode.
To play a video le, drag and drop it onto the video player.

23
• The Front view of the host • The Back view of the host
64GB
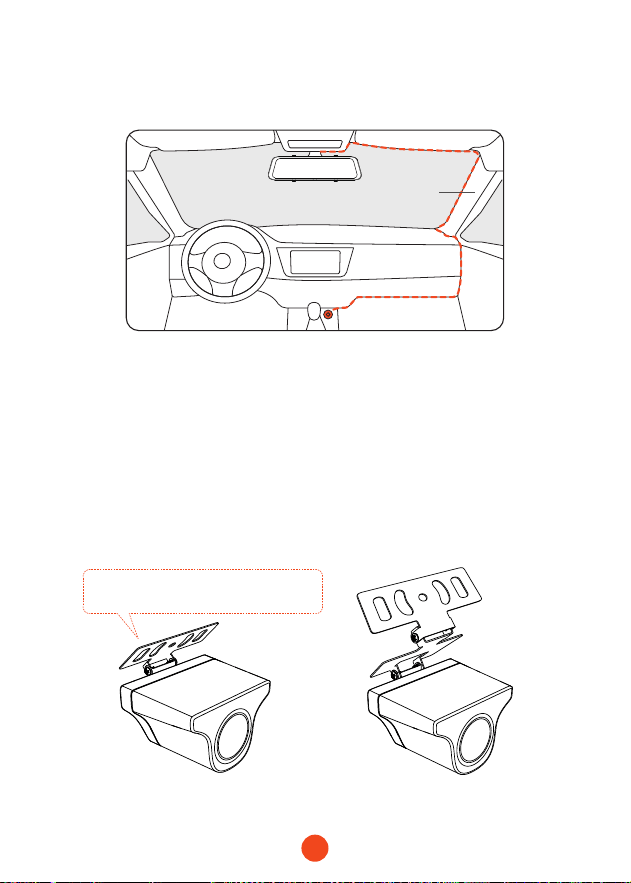
Installation
Before installing your dash cam, please test its functionality with
all accessories and change the default settings to your preference.
•SD card installation
Ensure that the dash cam is powered o when inseing or
ejecting the SD card.
•Unit installation
1. Place the head unit (WOLFBOX Mirror) on the rear-view mirror
by hand, and be sure to separate the silicone brackets on both
sides of the reaiew mirror. Buckle the device to the reaiew
mirror with the rubber straps. Adjust the front lens to a desired
angle.
24
• Power ON/OFF
• Sho press the power button to turn on, long press the power
button to turn o.
• When using the car charger, if the cigarette lighter po is ACC,
the dash cam will automatically turn on when the car is staed.
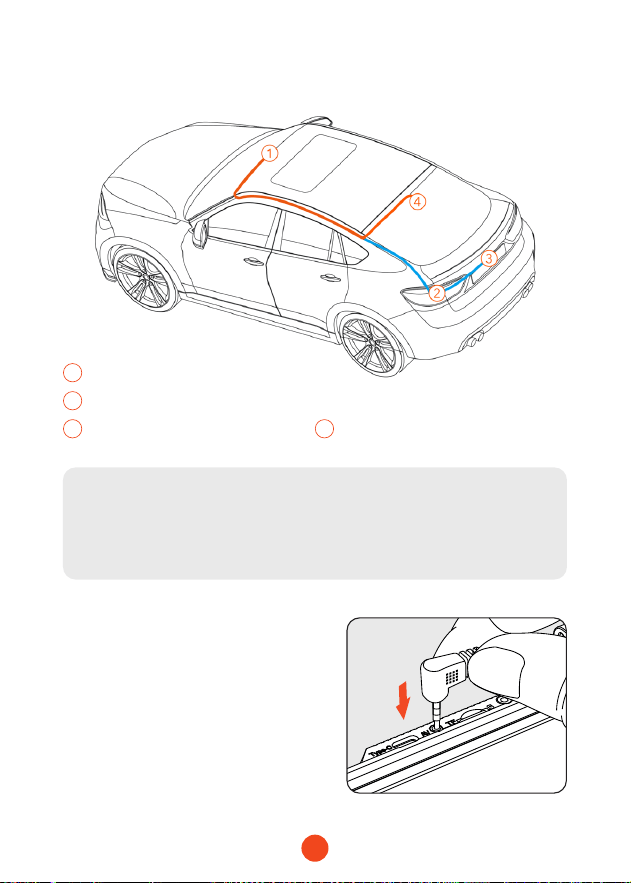
• Rear camera installation
2. Connect the car charger to the charger adapter to supply power
for the dash cam.
Pillar A
• Inside the car bracket• Outside the car bracket
If you don't need to adjust the angle,
you can remove this iron plate.
25
1
Dash camera
2
Connected to reversing light
3
Outside the car bracket
4
Inside the car bracket
・
Rear Camera Wiring Instructions
Note:
The rear camera has two wire routing options, both of which
conceal the wire along the edges of the door.
1. Connect the rear camera
cable to the mirror
Plug the rear camera cable into
the AV inteace of the unit.
26
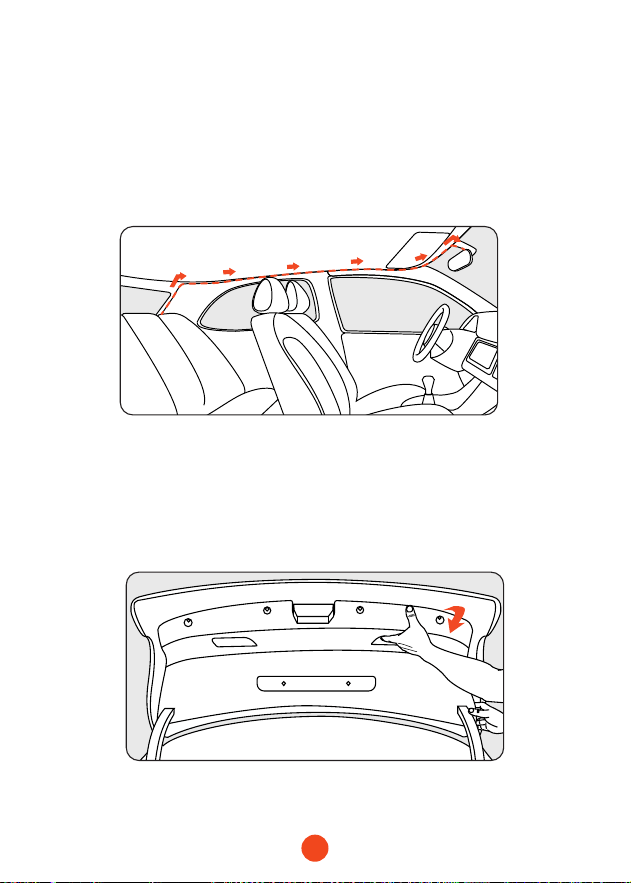
2. Rear camera cable routing
Route the rear camera cable to the rear of the car, leaving some
slack. Inse the cable into the gap in the front windshield and
along the upper end of the door using the included tool.
If you choose to install the rear camera inside your car, x it on
the rear windshield after routing the wiring.
3. Remove the panel
Open the trunk and remove the interior panel that covers the
other side of the license plate mount area. Use a trim removal
tool or other thin device to p the panel open.
27
4. Fix the rear camera and connect the cables
Fix the rear camera near the license plate light with 3M glue,
and connect the rear camera cable through the license plate
light hole to the rear camera cable.
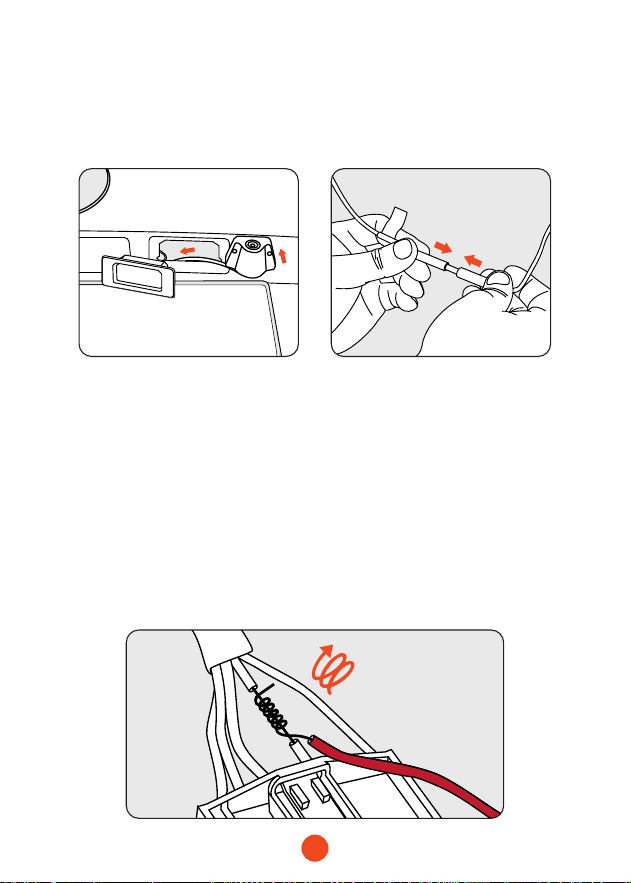
5. Connect the red wire to the reverse light's positive
terminal
Find the positive terminal of the reverse light. This is the
terminal that has voltage when the car is in reverse gear. To nd
it, step on the brakes, put the car in reverse gear and measure
the voltage at each terminal. The terminal with voltage is the
positive terminal. Strip the positive cable and wrap it with the
red cable from the camera. Insulate the connection with
electrical tape. Test the connection by putting the car in reverse
gear and seeing if the dash cam enters reverse mode.

28
•GPS Installation
Position 1:
Install the dash cam in the right corner of the central console
and hide the wiring along the edge of the front windshield using
double-sided tape.
• Considering the use eect and installation convenience, we
usually recommend customers install it at position 1.
• You may also test dierent locations for the dash cam to nd
the one that works best for you. Just make sure that the black
side is facing up to receive the GPS signal.
• Once the GPS is installed, the GPS icon on the home screen will
appear. After the GPS signal has been received, the device's
GPS will show direction and speed.
GPS
1

29
Trouble Shooting
・ Can rear camera images be transmitted wirelessly?
The G850 Pro Wi-Fi comes with a rear camera cable through
which the rear camera video is transmitted. The Wi-Fi feature is
only used to connect the phone to the dash cam.
・ Is it possible to monitor the vehicle remotely via Wi-Fi on the
G850 Pro?
Considering the limited Wi-Fi range, it is not possible to
monitor the vehicle remotely via the App connecting to G850
Pro.
・ Rear camera image blurred or not detected?
For "Blurred rear image" issue, please make sure that the
protective lm on the lens is removed and wipe the lens with a
cleaner. If the focusing issues are caused by high temperatures,
please contact us for suppo.
If you are getting a "Rear camera not detected" error, check the
AV input on the top of the mirror and the rear camera cable for
damage, especially at the connector.
・ How to connect the unit to App via Wi-Fi?
1. Please make sure that Wi-Fi is turned on manually in settings.
2. Search for "WOLFBOX" in the app store to download the
latest version of the app.
3. Check the Wi-Fi list on your smaphone to see if the network
named "WOLFBOX" can be found.
4. If the app displays "Connection Failed", please nd “Get
Suppo” in the app to contact us.
30
For more information:
seice@wolox.com
https://wolox.com/contact-us
www.wolox.com
Customer Seice Center
If you have any problems with the function or installation, please
contact us with any questions.
Help Center WhatsApp
WOLFBOX
www.wolox.com
Email: seice@wolox.com
Phone: +1 888 296 8399
Check us out here!
Product and seice are the foundation of WOLFBOX.