
G900PRO-N
MIRROR DASH CAM
User Manual
wolox.com
The information in this manual is subject to change without notice.
V1.0


Language
English ..............................
2
Español ............................
28


1
Content
Precautions...........................
2
Warnings ............................
2
ProductOveiew.......................
3
Warranty............................
3
SafetyNotice ..........................
4
ProductSpecications .....................
4
PackageContents.......................
5
Appearance ...........................
6
UserInteaceOveiew....................
7
FeatureOveiew .......................
9
VoiceControlFeature....................
15
PlayonAPP(AboutWi-FiandAPP)............
16
HowtoPlayVideoonComputer..............
17
Installation..........................
19
TroubleShooting .......................
26
CustomerSeiceCenter..................
27

2
Precautions
1.Please use original accessories to avoid compatibility issues and
insucient current supply from non-compatible accessories.
For example, 2-in-1 or 3-in-1 cigar sockets will not provide
enough current to the device.
2.Please do not tamper or splice the rear camera wire for the
purpose of extension, as the rear image/feed to the display may
be lost. The length of the included cable for the rear camera is
20 feet, and is suitable for most types of cars.
3.Minimum Micro SD card requirement: Class 10 (10MB/s) micro
SD card over 32GB storage, with FAT 32 format. (MicroSD Card
is NOT included in the package).
4.For fuher inquiries, please contact our customer seice via
email at seice@wolox.com.
Warnings
• Keep small accessories out of the reach of children. If this
product is damaged or malfunctions, stop using it immediately
and contact WOLFBOX suppo. Continue use may cause re,
electric shock or vehicle failure.
• This product is intended to be used as reference material in
the event of an accident. We do not guarantee its eectiveness
or admission as complete evidence.
• Please note that this product may infringe on privacy and other
rights depending on how it is used. We are not responsible
for any cases where this product infringes on privacy or other
rights.
• This product is for DC12V/24V vehicles only.
• The specications and appearance of this product are subject
to change without notice for improvement.

3
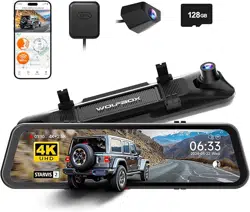
Product Oveiew
• Thank you for choosing WOLFBOX G900PRO-N Mirror Dash
Cam. This product provides a high-quality image and captures
irrefutable evidence in the event of an accident, and records the
beauty along the way for you.
• WOLFBOX is a professional automotive supplies manufacturing
company. We have worked in the eld of dash cams for more
than ten years. We have a team of experienced and imaginative
engineers who are committed to building a reliable and
trustwohy automotive supplies brand.
Warranty
• We are committed to giving customers the best product
experience and after-sale seice.
• Our warranty period is one year. If the machine pas are
damaged or there are any problems during use, we will solve
them in time and provide you with a satisfacto shopping
experience.
Note: The specic warranty period is subject to local laws.
• Please contact us with your online order, and we will provide
free replacement and lifetime technical suppo.
• Free extended warranty seice: After registering information
on WOLFBOX.com, you may extend the warranty for an
additional 6 months free of charge.
URL:https://wolox.com/pages/warranty-form

4
Product Specications
RAM DDR3 8GB DisplayType IPS
VideoFormat MP4 ImageFormat JPG
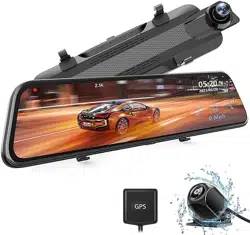
FrontCamera 4K (3840*2160) RearCamera 2.5K
DisplaySize 12''
Rear
Lens FPS
30fps
Power
Inteace
USB-C GPS
External,
3.5mm headphone
inteace
Wi-Fi
Connection
Suppoed VoiceControl Suppoed
Operating
Temperature
-4°F ~158°F
FullTouch
Screen
Suppoed
SDCard Max Suppo 512GB
Safety Notice
To ensure proper peormance and safety, please use only original
accessories and follow the installation instructions carefully.
Damage to the product, vehicle, or related losses caused by the
use of non-original accessories, improper installation, or failure
to follow this manual may not be covered by the warranty or
replacement seice. For assistance, please contact our ocial
suppo.
5
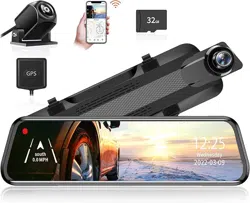
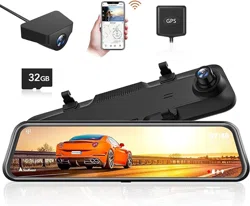
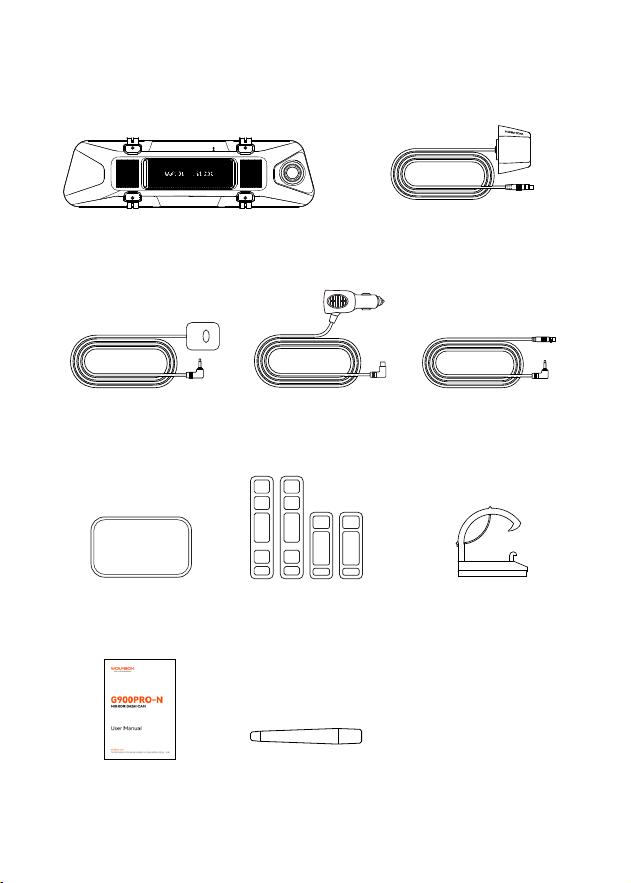
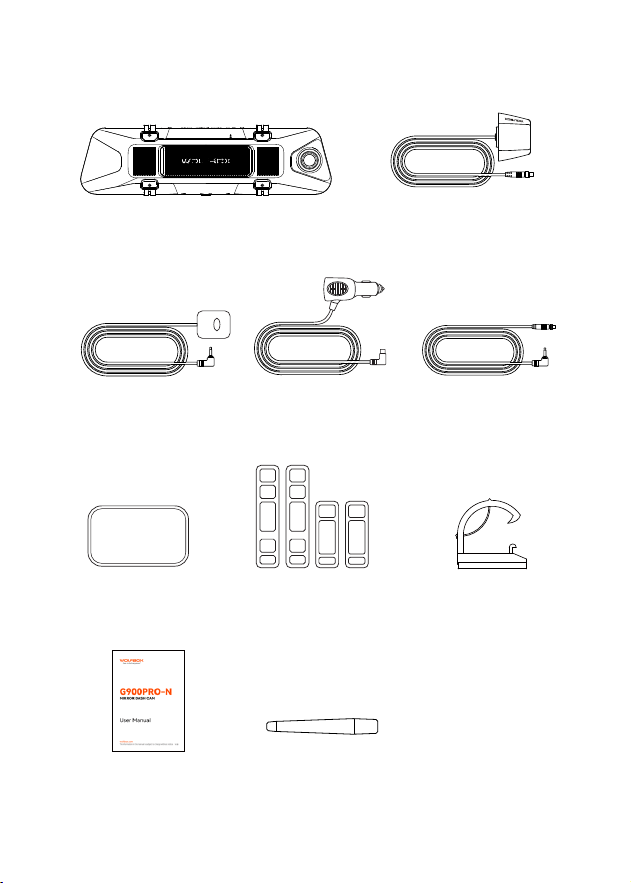
Package Contents
• 2.5K Rear Camera
• GPS
• Adhesive
• User Manual
• Power Supply Cable
with Car Charger
• Rubber Straps*4
• Rear Cam Cable
• Cable Clips*5
•4K Mirror Dash Cam
GPS
• Tool
6
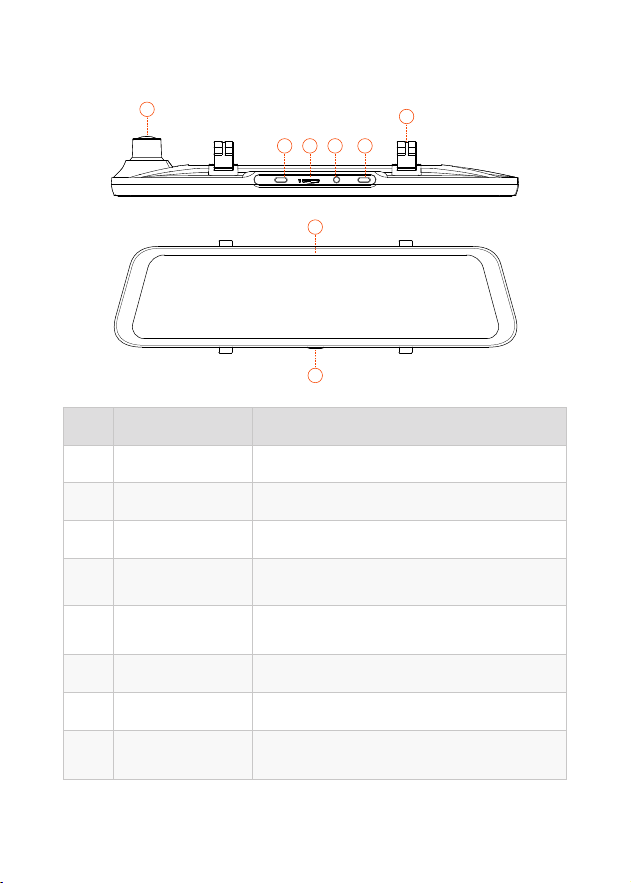
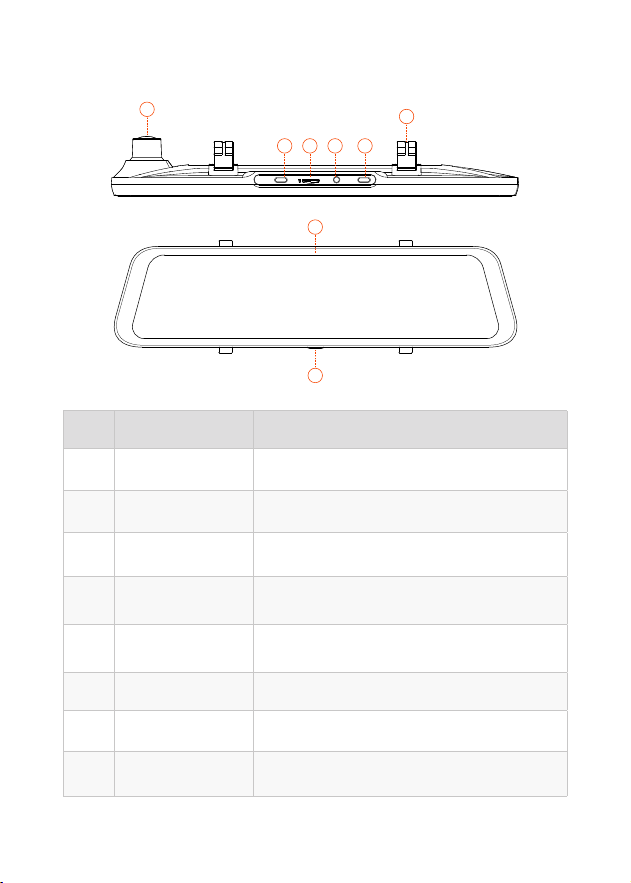
Appearance
POWER REAR
GPS
1
7
8
2 3 4 5
6
NO. Name Description
1 Lens
Main lens, records the main view of the car
2 USB-C
Po for power supply/connection
3 Memocardslot
Provides expandable storage (class 10 Max 512GB)
4 GPSconnector
Used to connect GPS module
(GPS function requires optional GPS antenna)
5
Rearcamera
connector
Po used to connect the Rear Camera
6 Fasteners
The machine can be held in position with 2 straps
7 Displayscreen 12
" touch screen display
8 Powerbutton
Sho press to wake up/sleep, long press to power
on/o
7
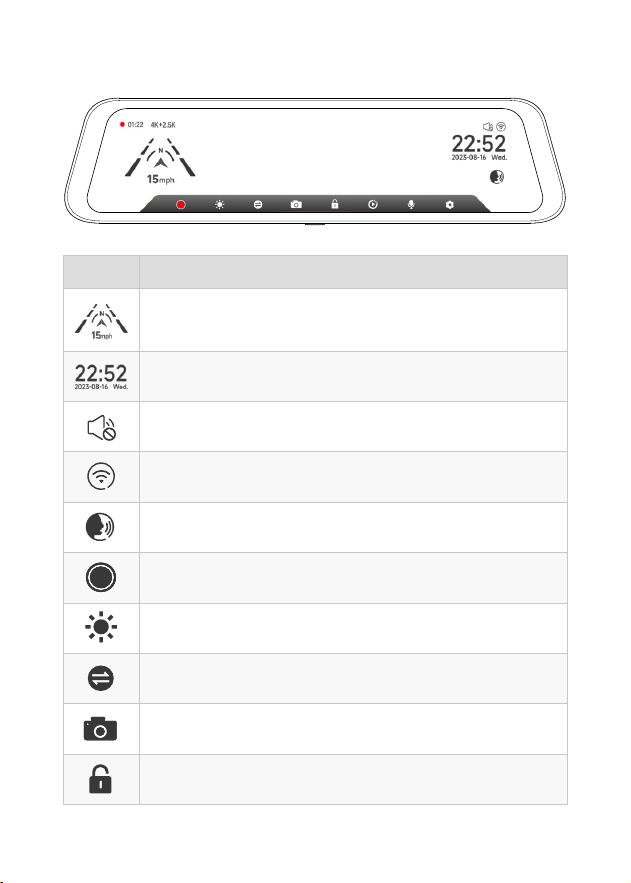
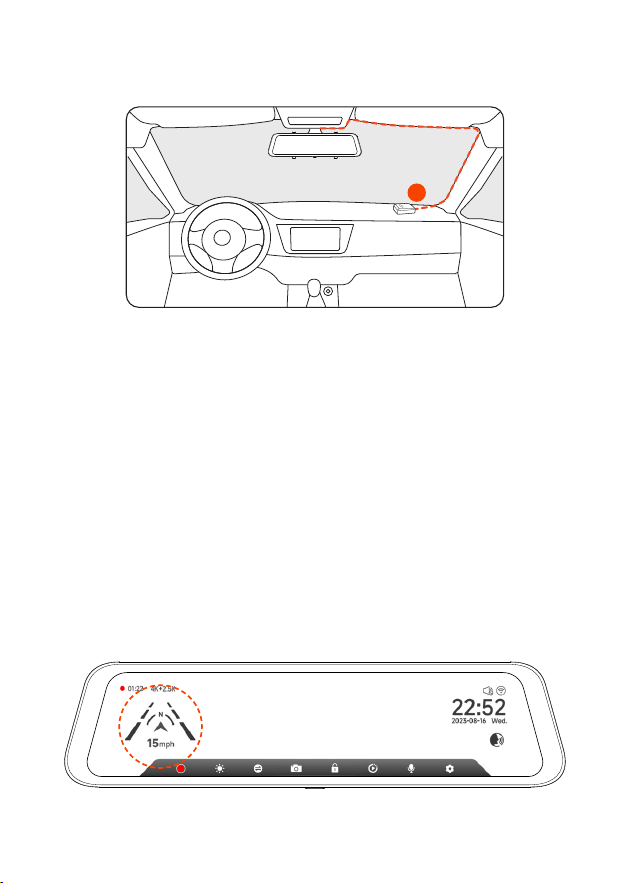
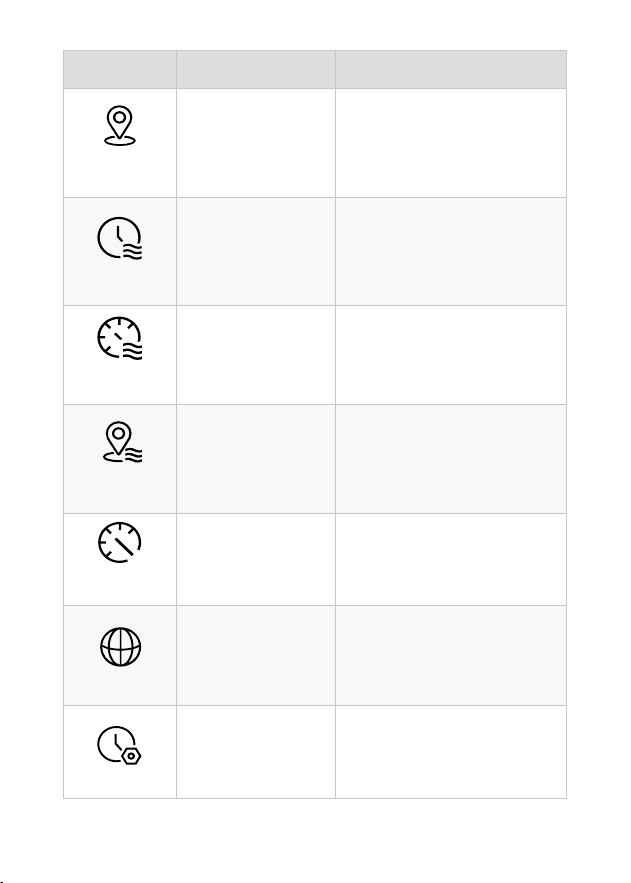
User Inteace Oveiew
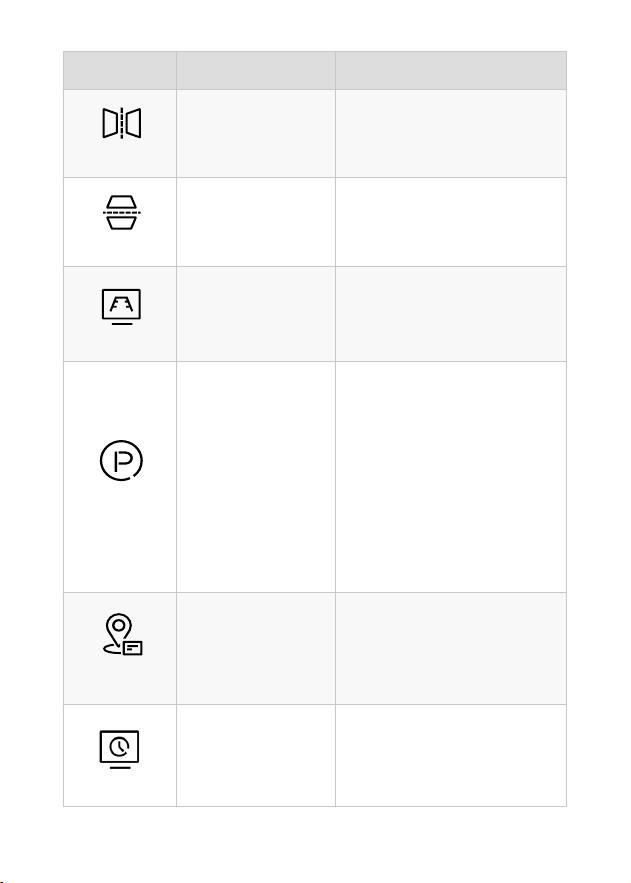
icon Description
Speed & Driving Direction: Once GPS is connected,
the proper information will be displayed
Date & Time
Turn on/o the device sound
Turn on/o Wi-Fi
View voice command entries
Sta / Stop Recording
Adjust the screen brighten
Switching between front,rear and split-screen camera view
Snapshot: Take a Snapshot
Recording Status: Flashing yellow indicates Lock-Recording
(The recorded video will not be overwritten)
8
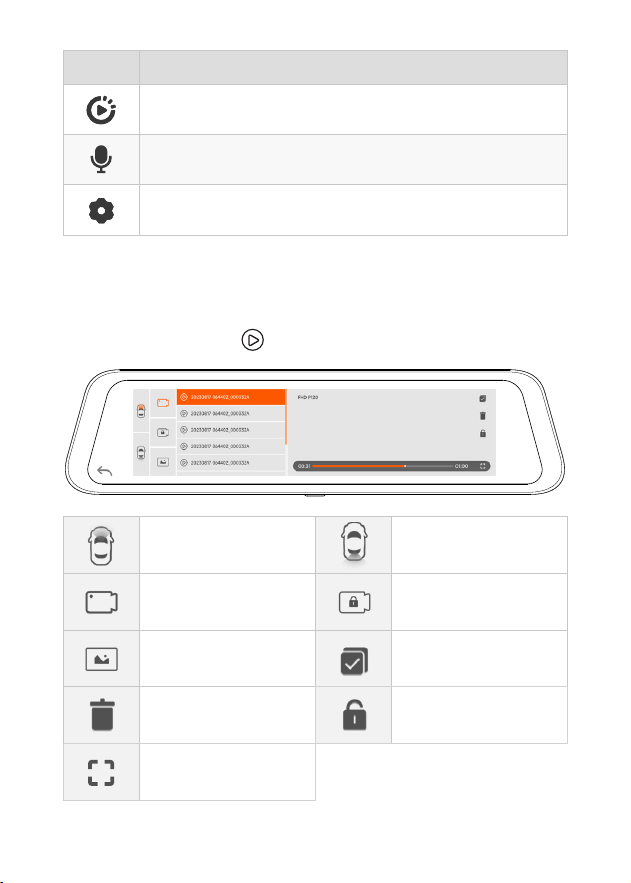
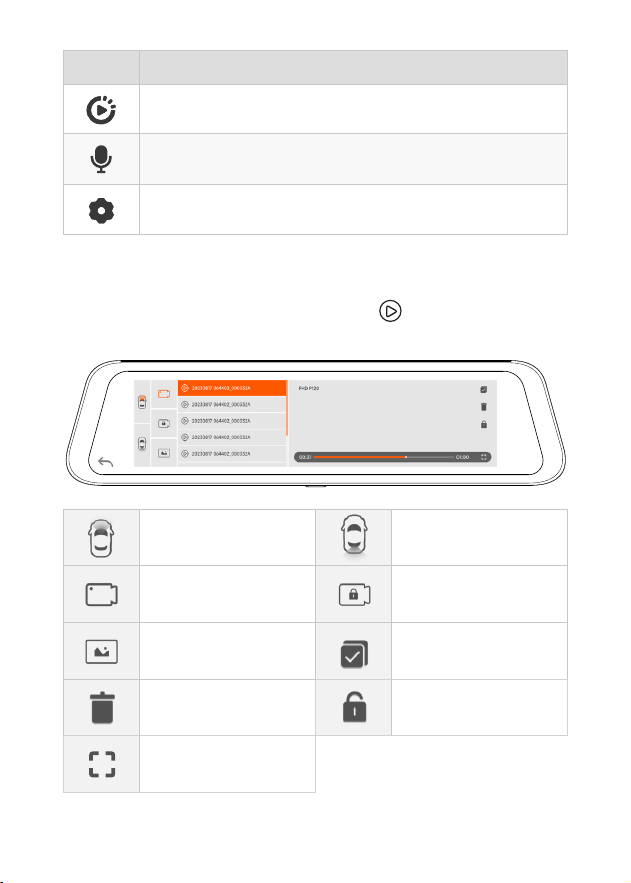
• Playback Mode
When you power on the dash cam, it will sta recording auto-
matically. Click/select to enter playback mode.
icon Description
File Playback: Playback the video & photo
Turn on/o audio recording
Settings: Tap to enter the settings menu
Stores images captured
by the front camera
Stores images captured
by the rear camera
Normal Video:Select to
view recorded videos
Locked Video:Select to
check locked videos
Photos:Select to check
photos
Select
Delete Lock the video
View videos on full
screen
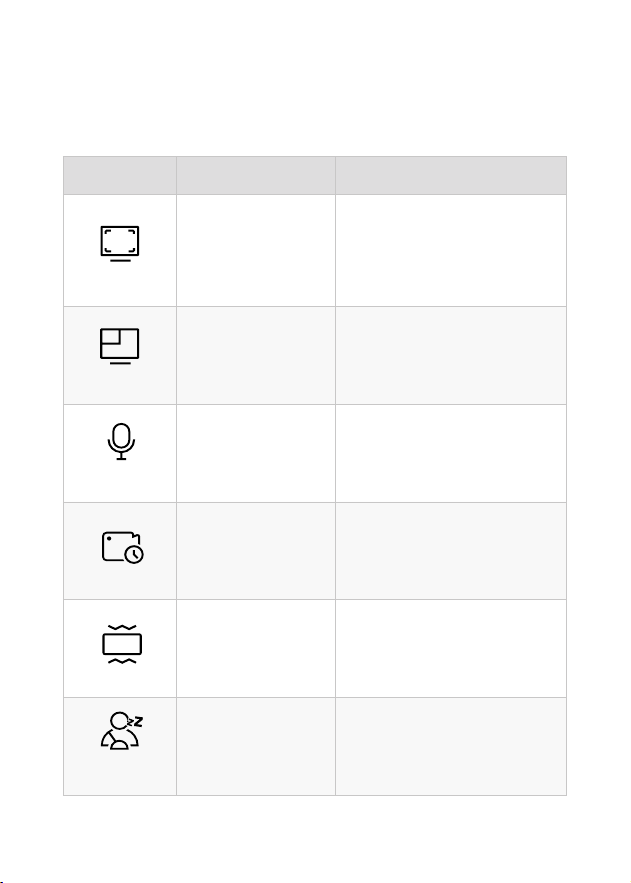
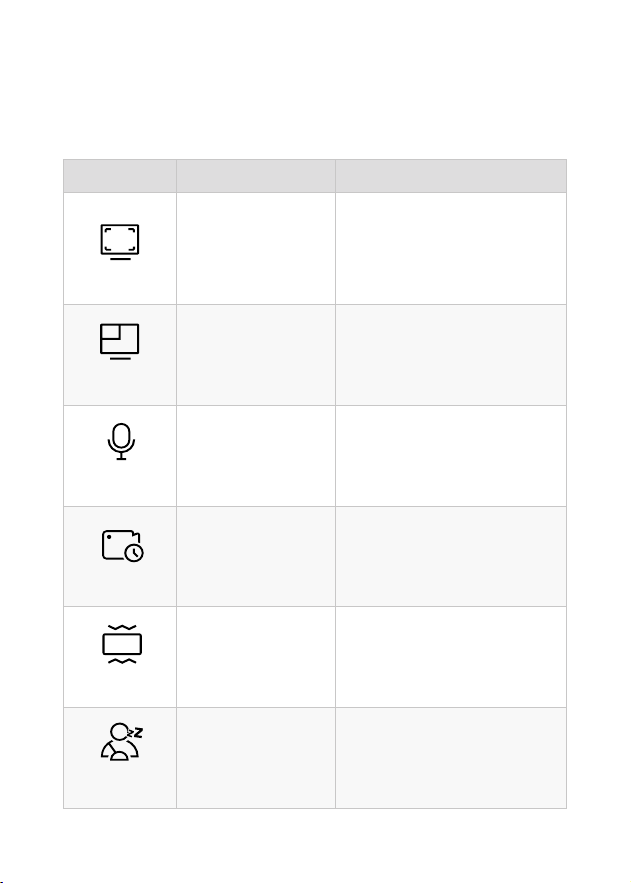
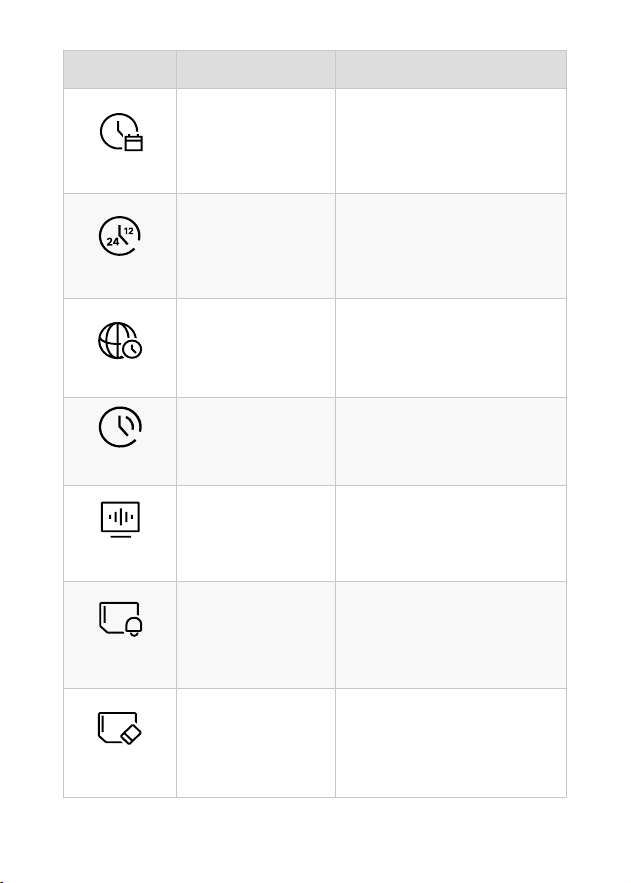
9
Function Option Description
Resolution
4K+2.5K
/4K+1080P
/2.5K+2.5K
/...
Video resolution selection.
DisplayModes
Front Camera /Rear
Camera /Split Screen
Set the default video recording
inteace display screen upon
staup.
SoundRecord
ON/OFF Set whether to record sound.
Loop Recording
1 Minute/2 Minutes
/3 Minutes
Set the duration for loop recording
of video les.
G-Sensor
OFF/Low/Medium
/High
Set the sensitivity of the G-sensor.
Fatigue
Reminder
OFF/1 Hour
/2 Hours/3 Hours
Set the time for fatigue reminder.
Feature Oveiew
Click the setting icon to enter the function menu, where you can adjust
various functions and parameters of the entire machine.
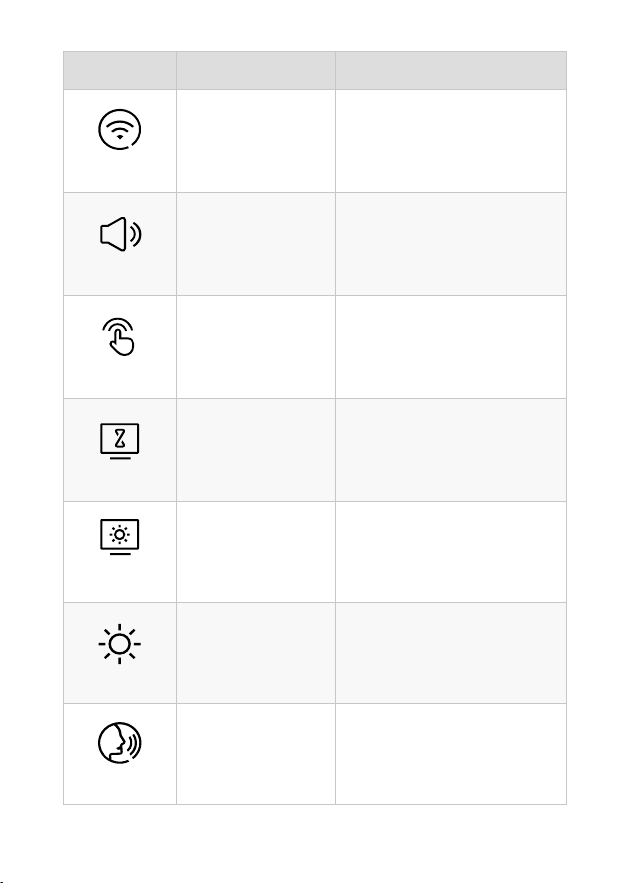
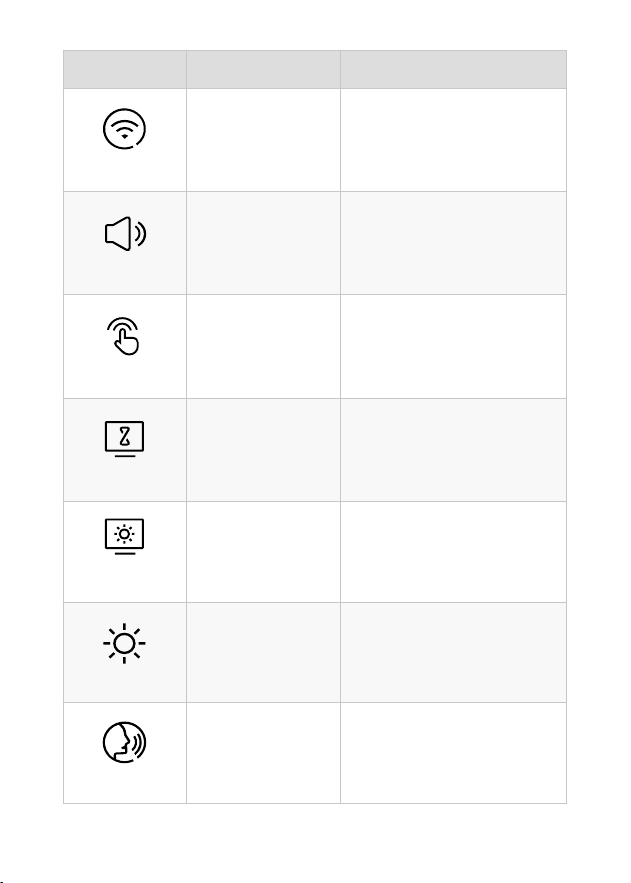
10
Function Option Description
Wi-Fi
OFF
/2.4GHz
/5.8GHz
Set the status of the device's Wi-
Fi connection.
VolunmeSetting
OFF/Low/Medium
/High
Set the volume level of the device.
ClickTone
ON/OFF Set the switch for key tones.
ScreenSaver
OFF/10 Seconds
/30 Seconds
/2 Minutes
Set the activation time for the
screen saver.
Screen
Brightness
/ Adjust the screen brightness.
Exposure
/
Adjust the contrast of the front
camera.
VoiceControl
ON/OFF
/Voice Command
Set the switch for voice control
functionality.
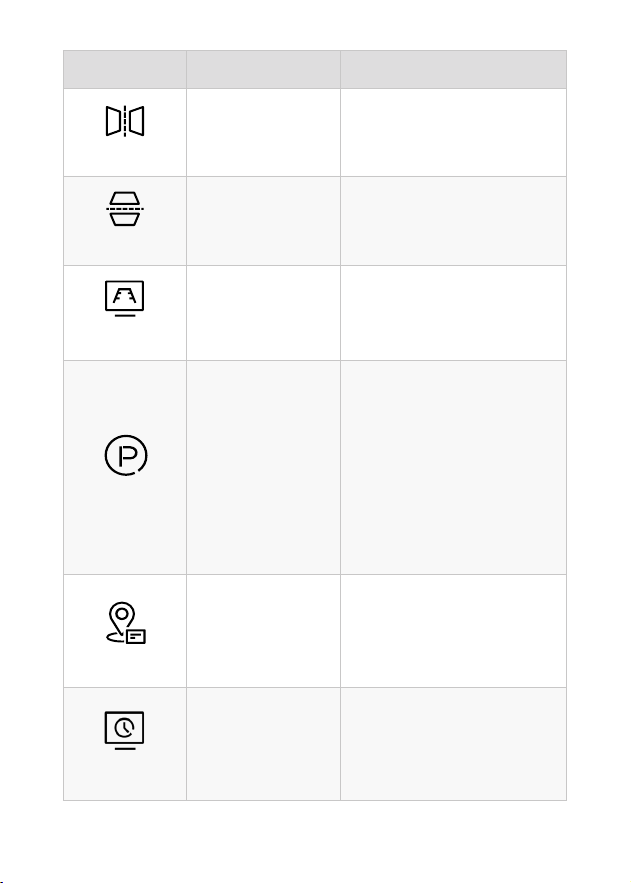
11
Function Option Description
Mirror Flip
ON/OFF
Adjust the veical ip of the rear
camera image.
RearcamFlip
ON/OFF
Adjust the up-down ip of the
rear camera image.
ReversingLine
ON/OFF
Set the switch for the reversing
line display function.
ParkingMode
ON
/G-Trigger Recording
/12H Time-lapse
recording
/24H Time-lapse
recording
/48H Time-lapse
recording
Monitor the vehicle's status after
the engine is turned o.
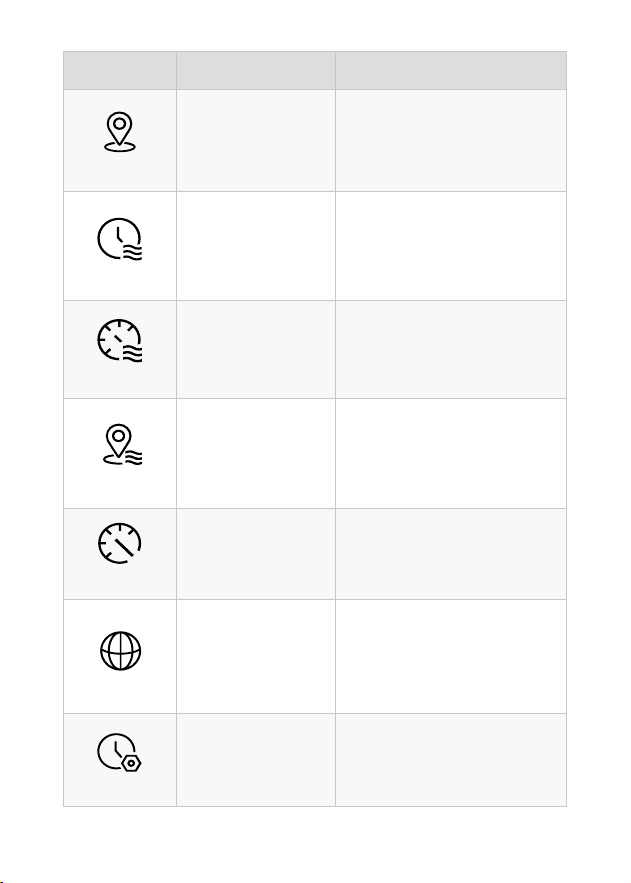
GPS
/ Display recorded GPS data.
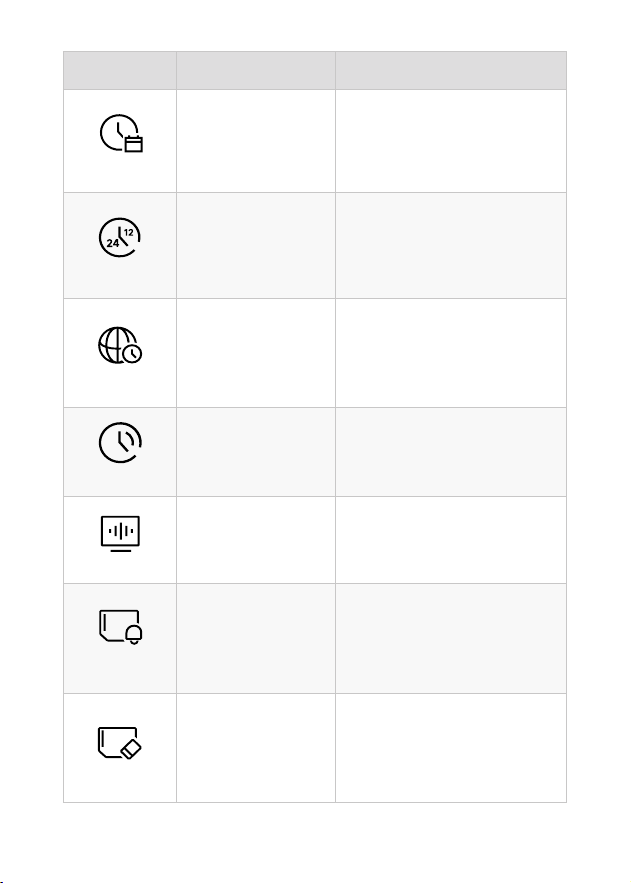
TimeDisplay
ON/OFF
Set whether to display Time
information on the recording
inteace.
12
Function Option Description
GPSDisplay
ON/OFF
Set whether to display GPS
information on the recording
inteace.
DateStamp
ON/OFF Set the switch for time watermark.
SpeedStamp
ON/OFF
Set the switch for speed
watermark.
GPSStamp
ON/OFF Set the switch for GPS watermark.
SpeedUnit
KM/H / MPH Set the unit for speed display.
Language
English/Français/
Deutsch/Italiano/
Español/...
Set the language for the device.
ClockSetting
/
Adjust the current time displayed
on the device.
13
Function Option Description
TimeFormat
YY-MM-DD
/DD-MM-Y Y
/MM-DD-Y Y
Set the time display format.
TimeStyle
12 Hours/24 Hours Set the time display system.
TimeZone
/
Adjust the time zone based on
geographical location.
DST
ON/OFF
Set the switch for daylight saving
time.
Flicker
50 Hz/60 Hz Set the screen refresh rate.
Format
Reminder
OFF
/Each 15 days
/Each 25 days
Set the reminder for formatting
the SD card.
FormatSDCard
/
Format the SD card and delete
videos and photos stored on it.

14
Note:
Parking Mode requires a hardwire kit (purchased separately) in
order to activate.
With the hardwire kit connected and Parking Mode enabled, the
dash cam will enter Lapse Recording mode when the car turns
o. This mode captures video at 1 frame per second until the set
duration ends or the car batte voltage drops below 12V.
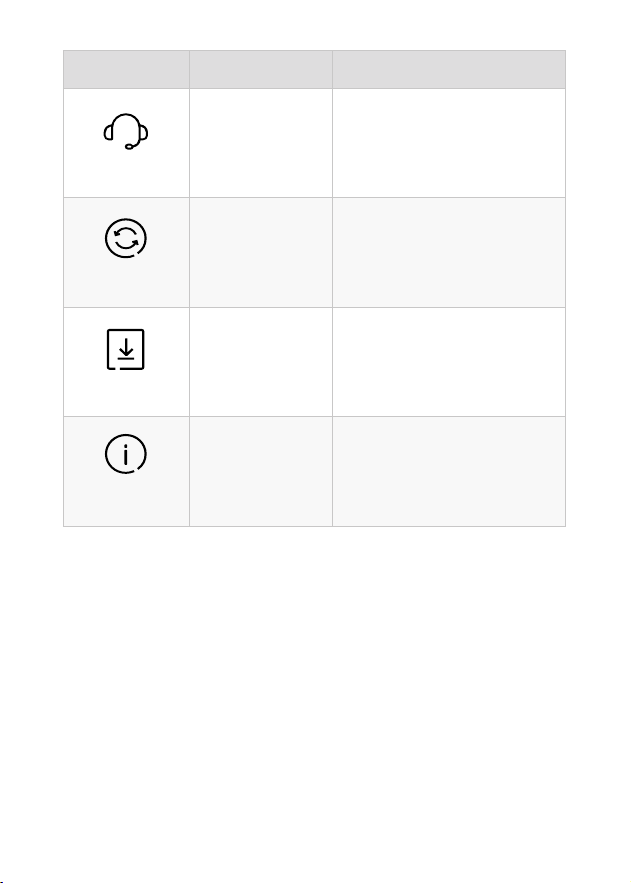
Function Option Description
HelpCenter
/ After-sales contact information.
ResetSetup
/
Restore all settings to facto
defaults.
APP
/
Display QR code for downloading
the app.
Product
Information
/ Display device information.
15
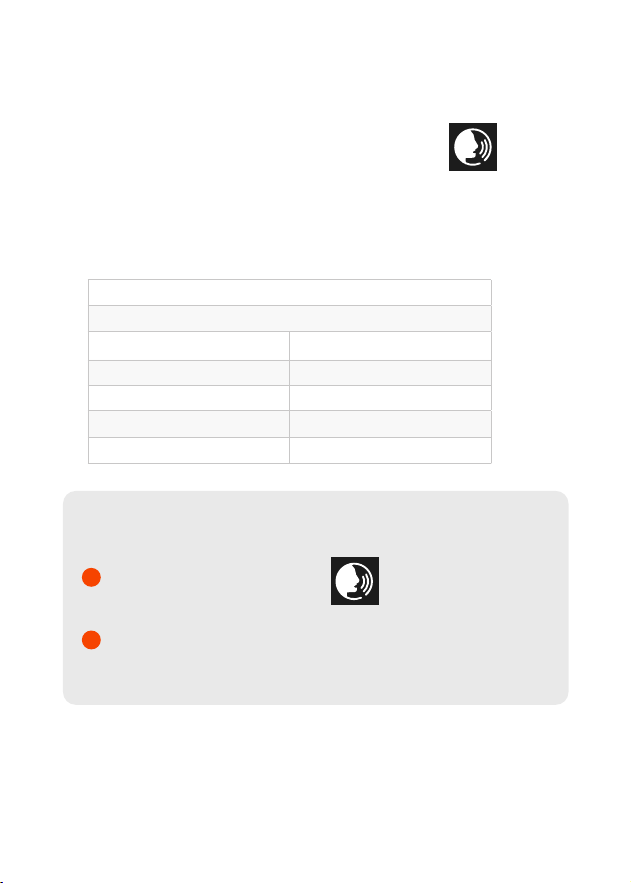
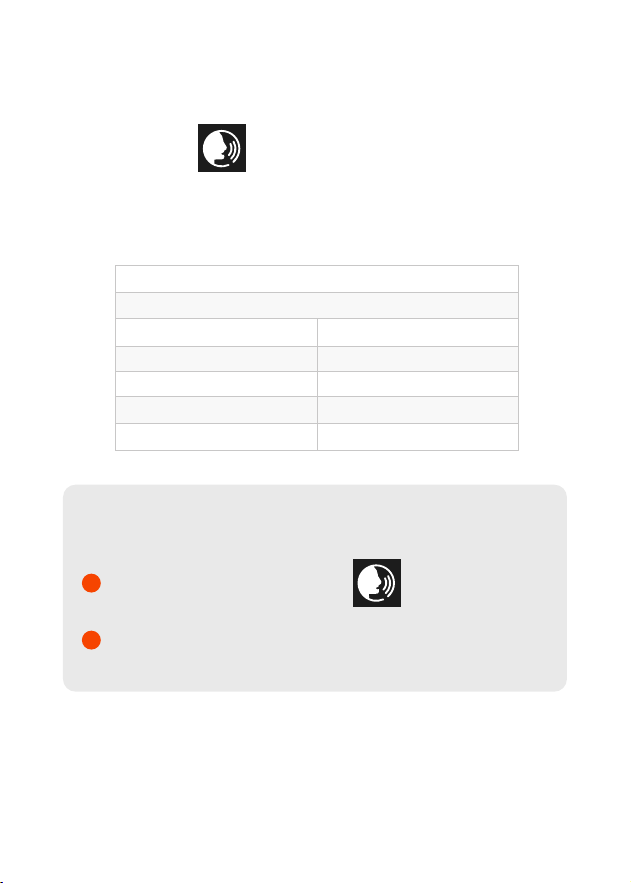
Voice Control Feature
Fast control through simple voice commands.
When the recording inteace displays a white icon , it
means that the Voice Control feature is activated.
You can enable/disable the voice control feature through the
"Voice Control" in the menu.
Note:
You have two ways to view specic voice control commands:
lockthevideo
takepicture
turnonaudio turnoaudio
turnonscreen turnoscreen
turnonWi-Fi turnoWi-Fi
turnonrecording turnorecording
showfrontcamera showrearcamera
Tap on the voice control icon on the recording
inteace.
Tap on the "Voice Command" submenu under the
"Voice Control" feature.
1
2

16
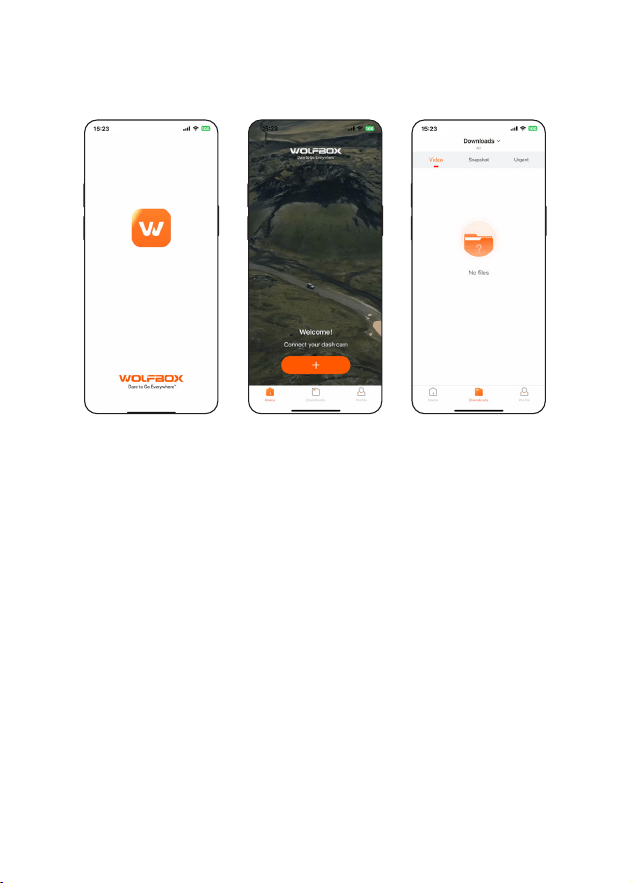
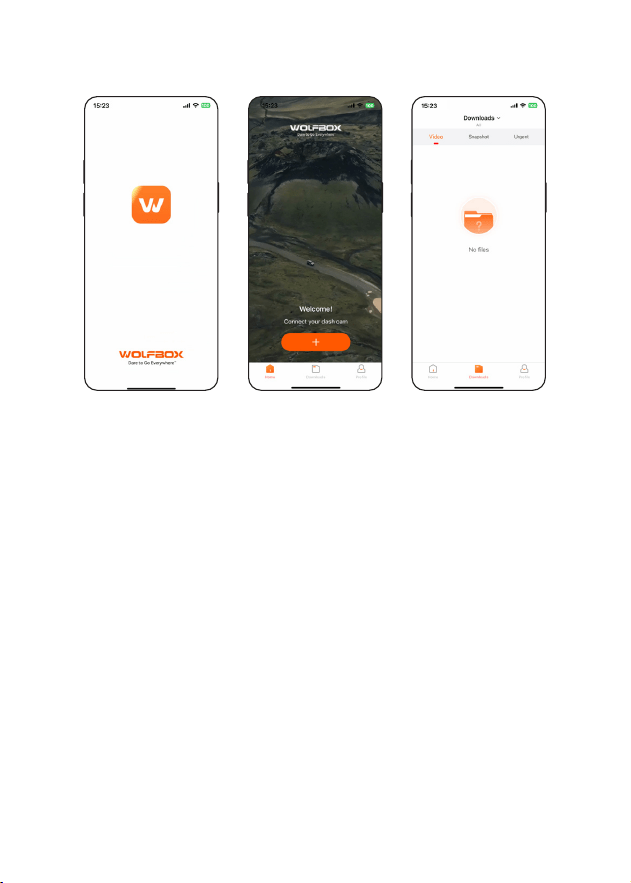
Play on APP (About Wi-Fi and APP)
The Wi-Fi feature has been designed so you can pair your
dash camera wirelessly with your smaphone and access your
recordings instantly from the dash cam. Here you can view,
download and share your videos easily with your friends and
family.
The app “WOLFBOXAuto” is a free app that allows you to
operate this WLAN built-in drive recorder from your smaphone.
• How to connect Wi-Fi?
1. Download the “WOLFBOX Auto” app
Go to the following address to download
the “WOLFBOX Auto” app: https://
h5.wolox.com/qrcodeYou may also use
your smaphone to scan the QR code to
go to the download page.
2. Enable Wi-Fi
Go to Settings to turn on the Wi-Fi. Then, the device screen
will display the Wi-Fi name and password.
3. Connect Wi-Fi
To connect your iPhone or Android phone to the G900PRO-
N's Wi-Fi network, go to Settings > Wi-Fi and select
G900PRO-N Wi-Fi. Then, enter the default password:
12345678.
4. Open the “WOLFBOX Auto” app
Once your mobile phone is connected to theG900PRO-N's
Wi-Fi network,open the WOLFBOXAuto app. The camera will
sync automatically, and you should see the live video feed on
your phone.
17
• Download, edit and share your video clip via
Wolox App
In the app, you can view and edit downloaded local albums and
share them with others.
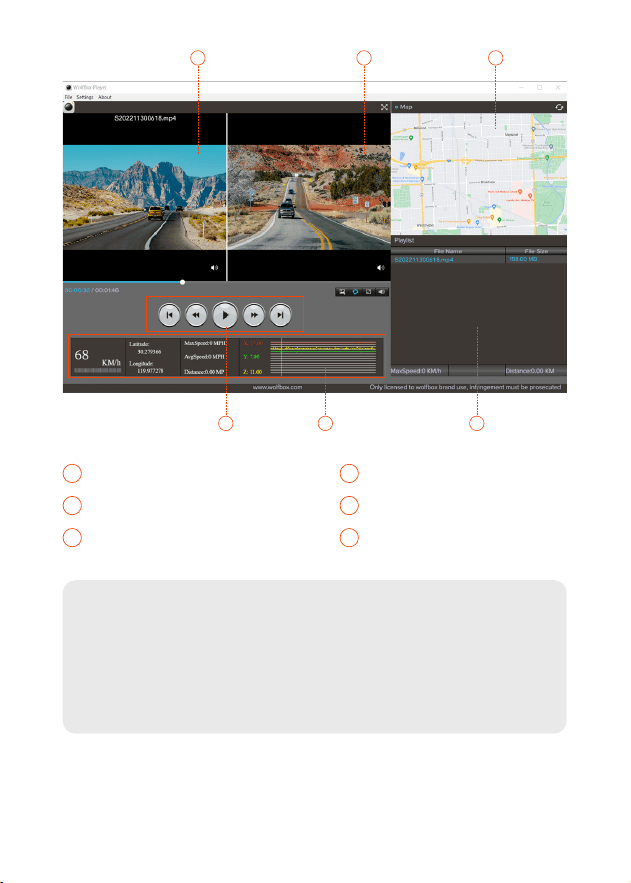
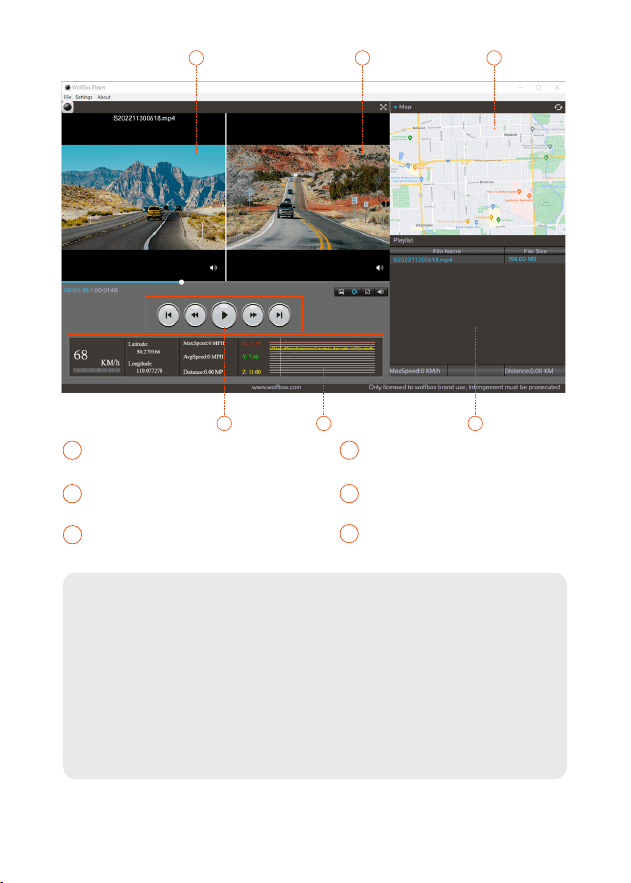
How to Play Video on Computer
We recommend the application “GPS Media Player” to watch and
play dash cam videos, and view Google Maps.
You can download it for free on Mac or Windows from the
following link: https://wolox.com/gps-player/
18
1 2
4 65
3
1 2
Video play window (Front) Video play window (Rear)
3 4
Map and track display Play control panel
5 6
Speed and driving state indication Play list
Note:
If you record the front and rear dash cam videos simultaneously
and add them to the playlist, you can play them side by side in
split-screen mode.
To play a video le, drag and drop it onto the video player.
19
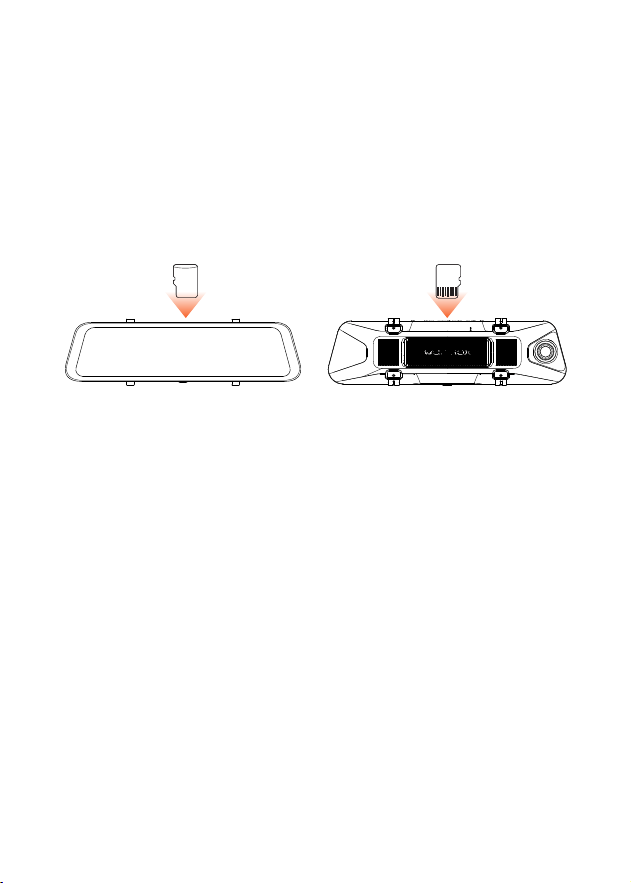
• TheFrontviewofthehost • TheBackviewofthehost
Installation
Before installing your dash cam, please test its functionality with
all accessories and change the default settings to your preference.
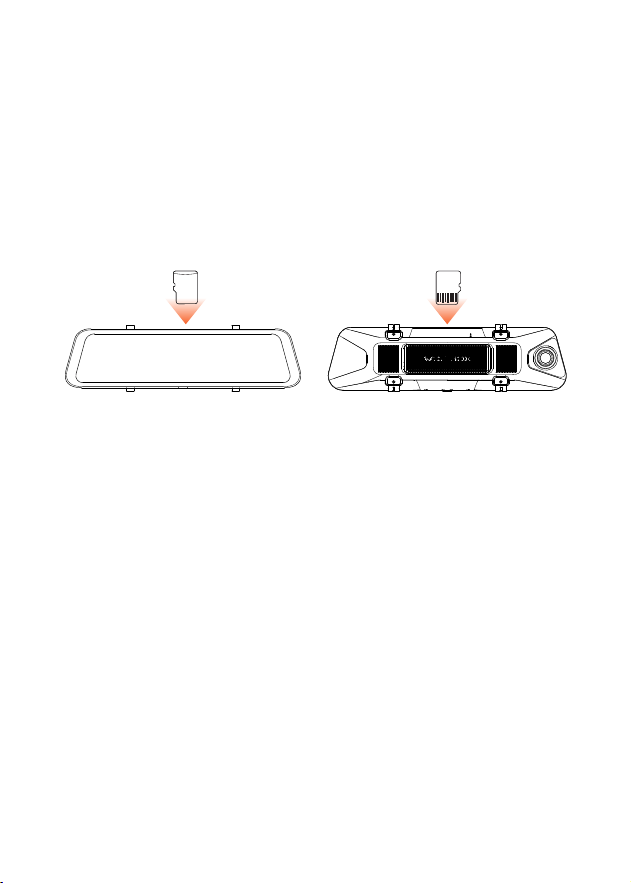
•SD card installation
Ensure that the dash cam is powered o when inseing or
ejecting the SD card.
Note:
1. It is recommended to use a MicroSD card with 64GB or larger
capacity to ensure sucient storage space for continuous loop
recording.
2. For stable writing of high-denition video and smooth loop
recording, a card with a speed rating of U3/V30 or higher is
recommended. Using a slower card may result in video lag,
missed footage, or recording failure.
3. For enhanced reliability and longevity, priority should be given
to memo cards labeled as "High Endurance", which are
designed for sustained write operations.
4. For optimal compatibility and peormance, it is recommended
to purchase the Wolox customized memo card.
20
• Power ON/OFF
• Sho press the power button to turn on, long press the power
button to turn o.
• When using the car charger, if the cigarette lighter po is ACC,
the dash cam will automatically turn on when the car is staed.
2. Connect the car charger to the charger adapter to supply
power for the dash cam.
Pillar A
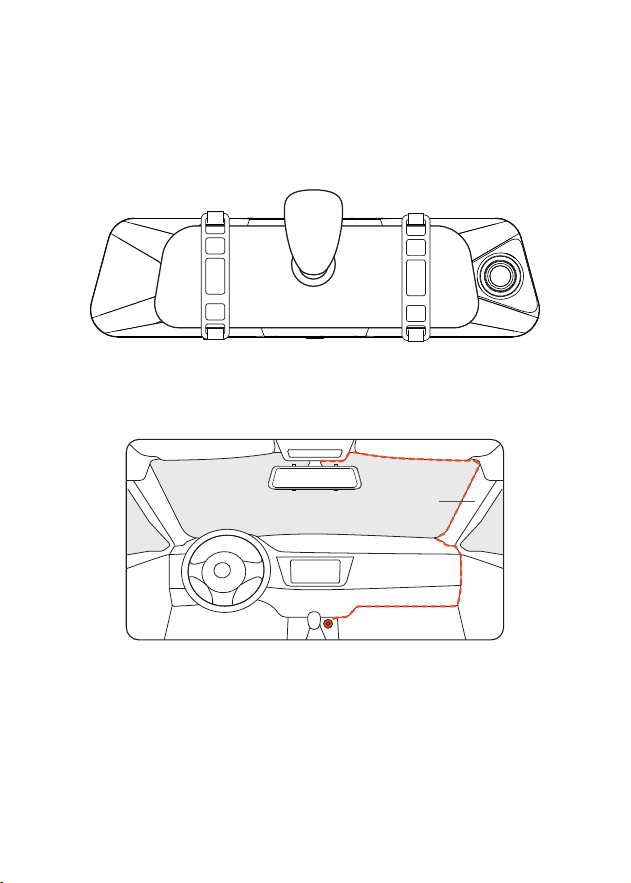
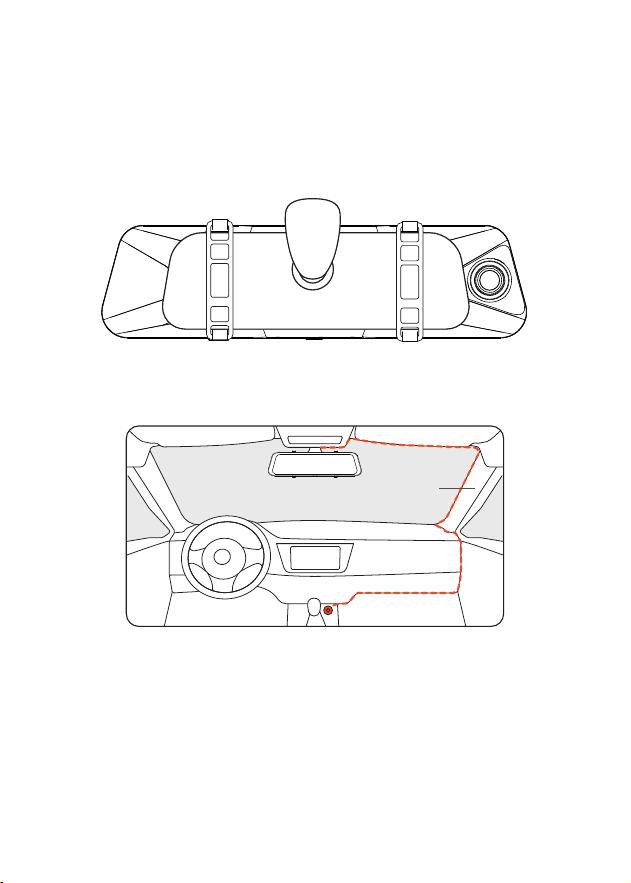
•Unit installation
1. Place the head unit (WOLFBOX Mirror) on the rear-view mirror
by hand, and be sure to separate the silicone brackets on both
sides of the reaiew mirror. Buckle the device to the reaiew
mirror with the rubber straps. Adjust the front lens to a desired
angle.
21
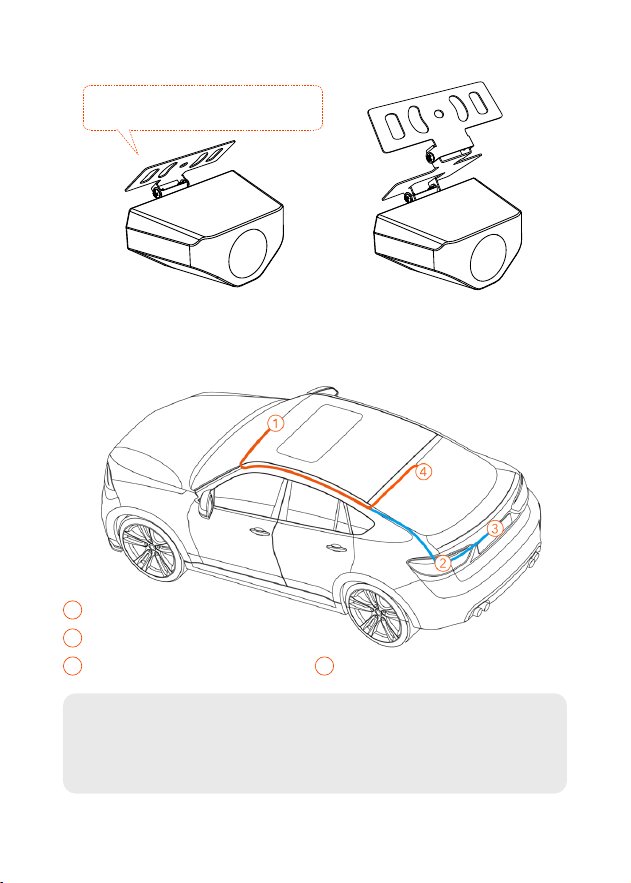
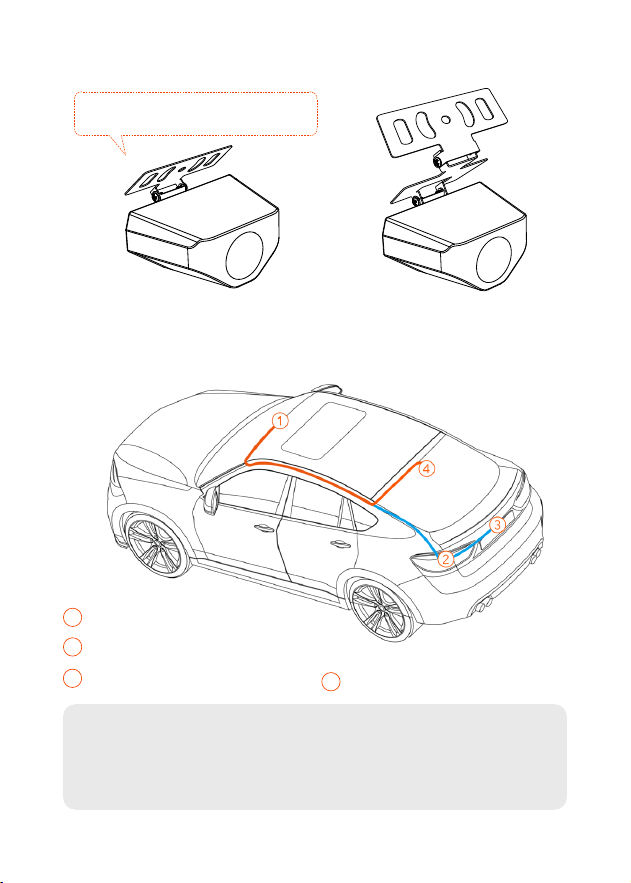
• Inside the car bracket• Outside the car bracket
If you don't need to adjust the angle,
you can remove this iron plate.
• Rear camera installation
1
Dash camera
2
Connected to reversing light
3
Outside the car bracket
4
Inside the car bracket
・
Rear Camera Wiring Instructions
Note:
The rear camera has two wire routing options, both of which
conceal the wire along the edges of the door.
22
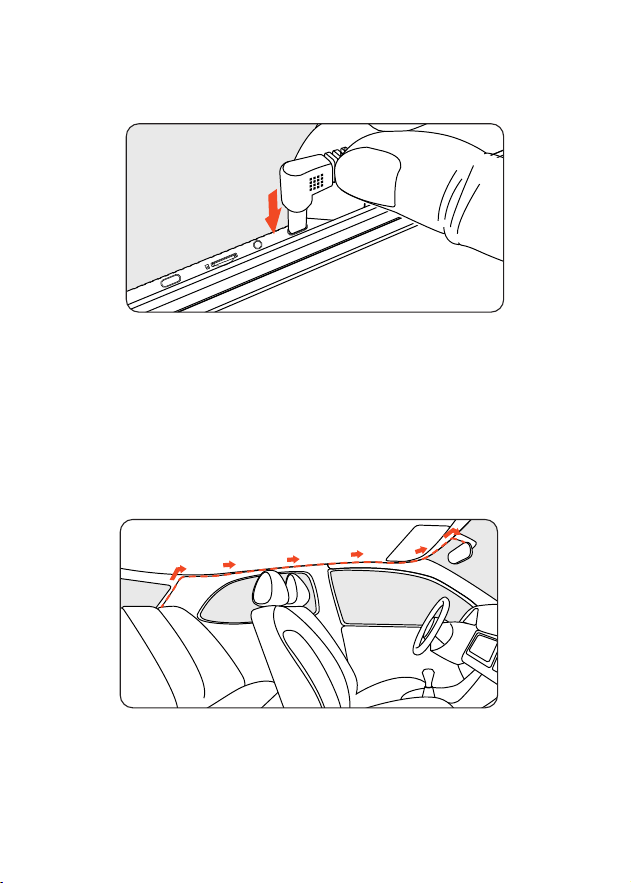
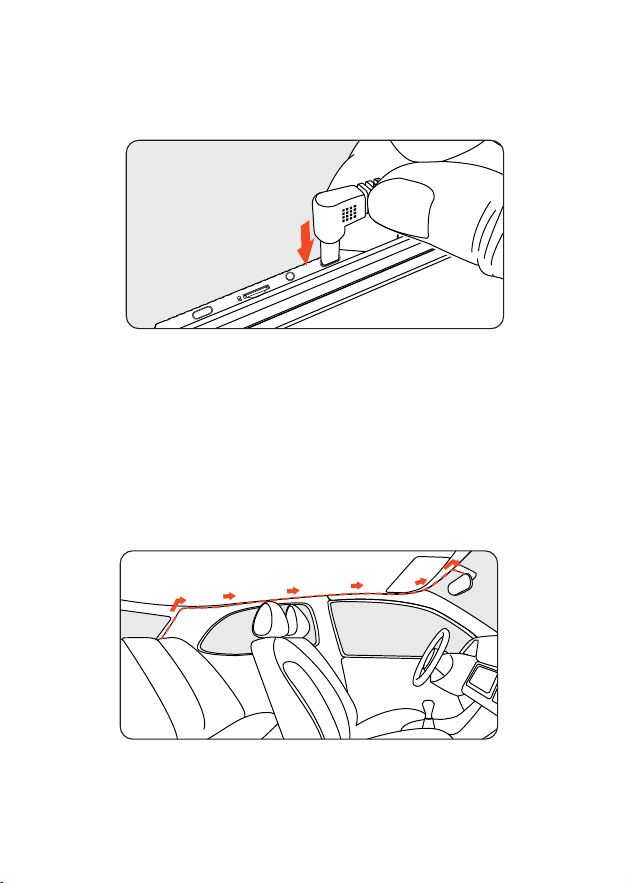
1. Connect the rear camera cable to the mirror
Plug the rear camera cable into the REAR inteace of the unit.
POWER
REAR
GPS
2. Rear camera cable routing
Route the rear camera cable to the rear of the car, leaving some
slack. Inse the cable into the gap in the front windshield and
along the upper end of the door using the included tool.
If you choose to install the rear camera inside your car, x it on
the rear windshield after routing the wiring.
23
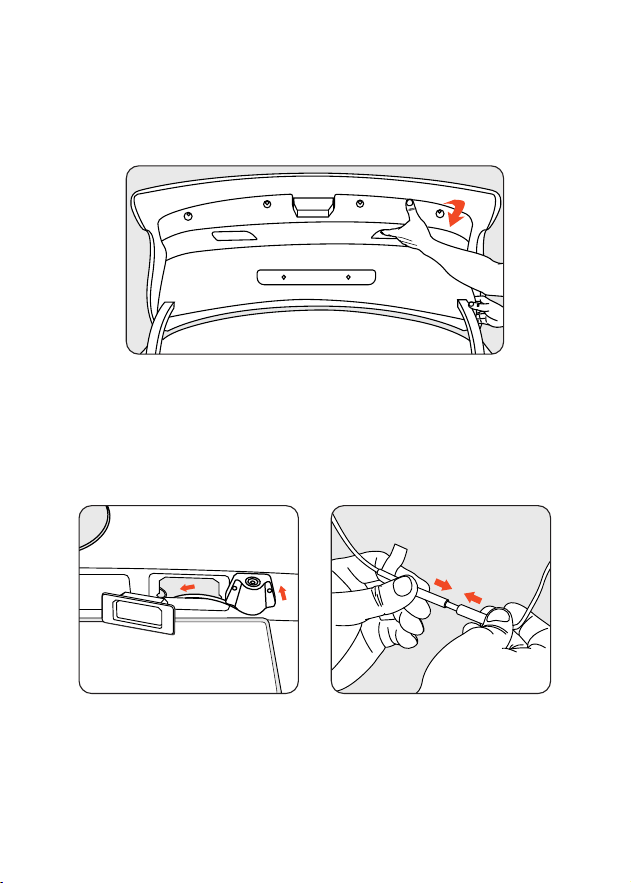
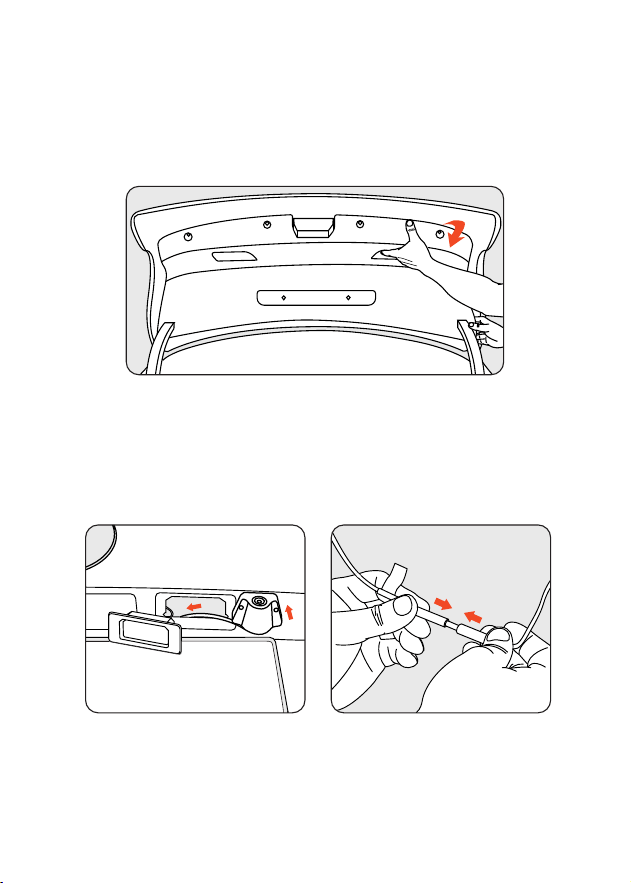
3. Remove the panel
Open the trunk and remove the interior panel that covers the
other side of the license plate mount area. Use a trim removal
tool or other thin device to p the panel open.
4. Fix the rear camera and connect the cables
Fix the rear camera near the license plate light with 3M glue,
and connect the rear camera cable through the license plate
light hole to the rear camera cable.
24
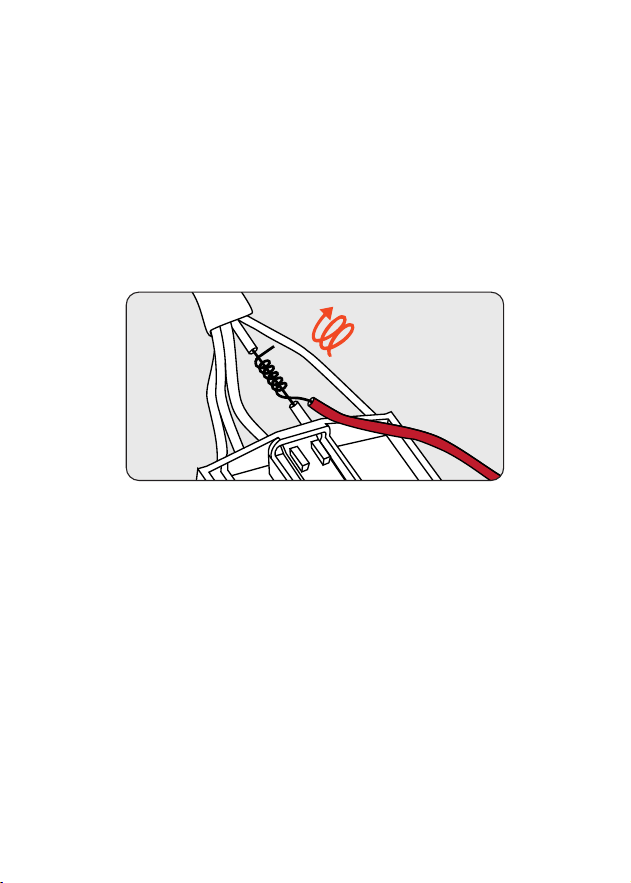
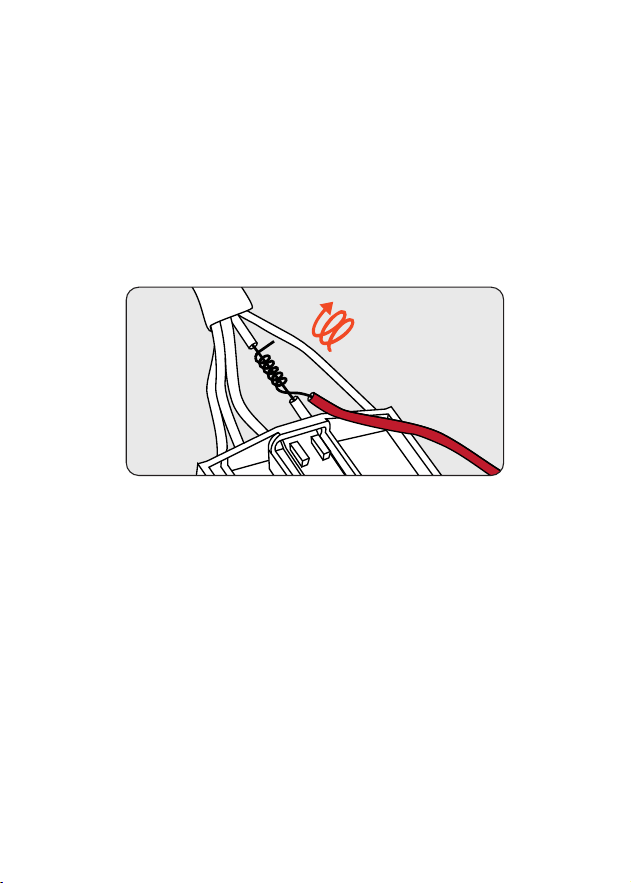
5. Connect the red wire to the reverse light's positive
terminal
Find the positive terminal of the reverse light. This is the
terminal that has voltage when the car is in reverse gear. To nd
it, step on the brakes, put the car in reverse gear and measure
the voltage at each terminal. The terminal with voltage is the
positive terminal. Strip the positive cable and wrap it with the
red cable from the camera. Insulate the connection with
electrical tape. Test the connection by putting the car in reverse
gear and seeing if the dash cam enters reverse mode.
25
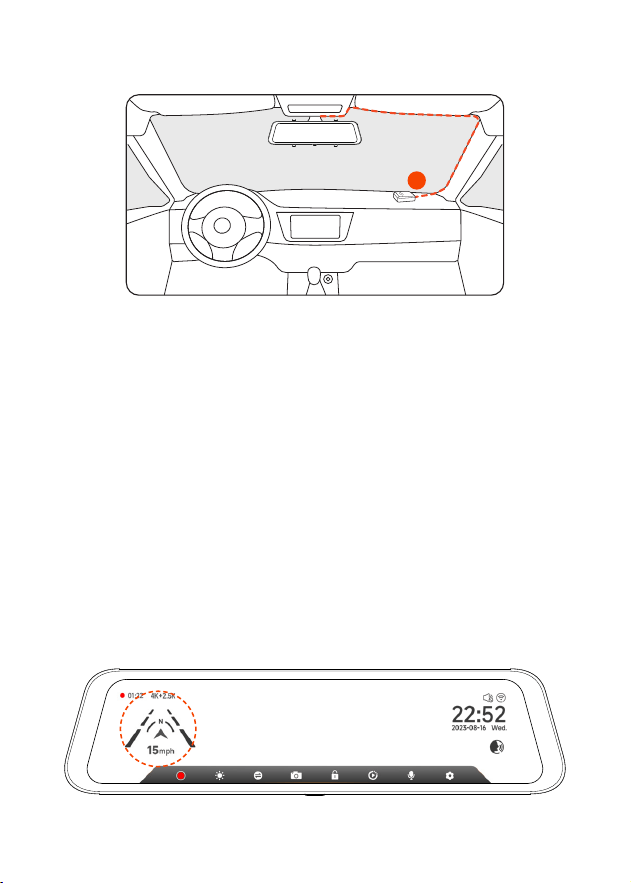
•GPS Installation
Position 1:
Install the dash cam in the right corner of the central console
and hide the wiring along the edge of the front windshield using
double-sided tape.
• Considering the use eect and installation convenience, we
usually recommend customers install it atposition1.
• You may also test dierent locations for the dash cam to nd
the one that works best for you. Just make sure that the black
side is facing up to receive the GPS signal.
• Once the GPS is installed, the GPS icon on the home screen will
appear. After the GPS signal has been received, the device's
GPS will show direction and speed.
GPS
1

26
Trouble Shooting
・ Can rear camera images be transmitted wirelessly?
The G900PRO-N Wi-Fi comes with a rear camera cable through
which the rear camera video is transmitted. The Wi-Fi feature is
only used to connect the phone to the dash cam.
・ Is it possible to monitor the vehicle remotely via Wi-Fi on the
G900PRO-N?
Considering the limited Wi-Fi range, it is not possible to
monitor the vehicle remotely via the App connecting to
G900PRO-N.
・ Rear camera image blurred or not detected?
For "Blurred rear image" issue, please make sure that the
protective lm on the lens is removed and wipe the lens with a
cleaner. If the focusing issues are caused by high temperatures,
please contact us for suppo.
If you are getting a "Rear camera not detected" error, check the
AV input on the top of the mirror and the rear camera cable for
damage, especially at the connector.
・ How to connect the unit to App via Wi-Fi?
1. Please make sure that Wi-Fi is turned on manually in settings.
2. Search for "WOLFBOX Auto" in the app store to download
the latest version of the app.
3. Check the Wi-Fi list on your smaphone to see if the network
named "WOLFBOX Auto" can be found.
4. If the app displays "Connection Failed", please nd “Get
Suppo” in the app to contact us.
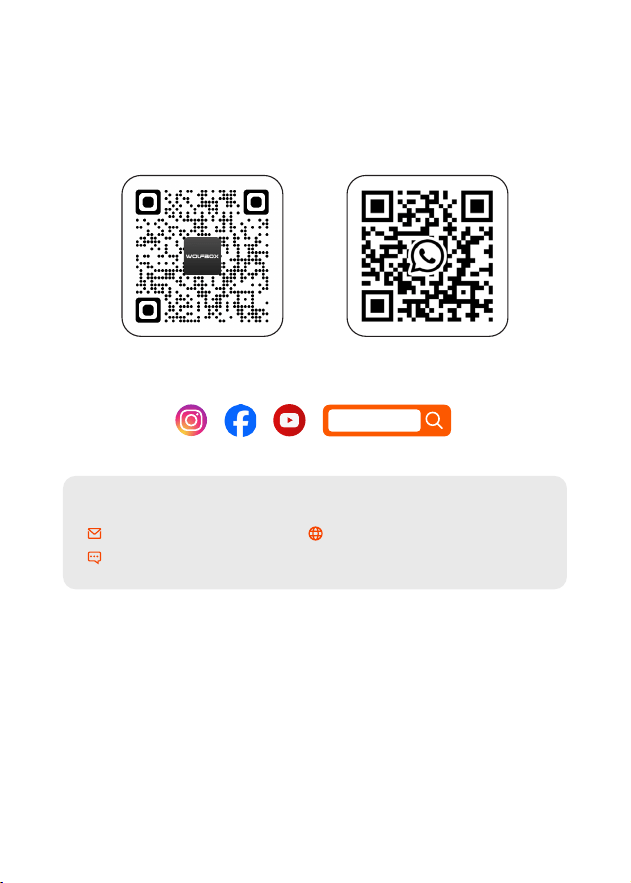
27
For more information:
seice@wolox.com
https://wolox.com/contact-us
www.wolox.com
Customer Seice Center
If you have any problems with the function or installation, please
contact us with any questions.
HelpCenter WhatsApp
WOLFBOX

28
Contenido
Precauciones � � � � � � � � � � � � � � � � � � � � � � � � �
29
Adveencias � � � � � � � � � � � � � � � � � � � � � � � � �
29
Producto Visión General � � � � � � � � � � � � � � � � � � �
30
Garantía � � � � � � � � � � � � � � � � � � � � � � � � � � � �
30
Aviso de Seguridad � � � � � � � � � � � � � � � � � � � � �
31
Producto Especicaciones � � � � � � � � � � � � � � � � �
31
Paquete Contenido � � � � � � � � � � � � � � � � � � � � �
32
Apariencia � � � � � � � � � � � � � � � � � � � � � � � � � � �
33
Inteaz de Usuario � � � � � � � � � � � � � � � � � � � � � �
34
Descripción General de Funciones � � � � � � � � � � � � � �
36
Utiliza la APLICACIÓN (Wi-Fi e INFORMACIÓN SOBRE LA
APLICACIÓN) � � � � � � � � � � � � � � � � � � � � � � � � � �
43
Cómo Reproducir Vídeo en el Ordenador � � � � � � � � � �
44
Instalación � � � � � � � � � � � � � � � � � � � � � � � � � � �
46
Solución de Problemas � � � � � � � � � � � � � � � � � � � �
53
Seicio de Atención al Cliente Center � � � � � � � � � � �
54

29
Precauciones
1.Utilice accesorios originales para evitar problemas de
compatibilidad y suministro de corriente insuciente de
accesorios no compatibles. Por ejemplo, las tomas de cigarros 2
en 1 o 3 en 1 no proporcionarán suciente corriente al dispositivo.
2.
No manipule ni empalme el cable de la cámara trasera con el n
de extenderlo, ya que se puede perder la imagen trasera o la
alimentación a la pantalla. La longitud del cable incluido para la
cámara trasera es de 20 pies y es adecuado para la mayoría de
los tipos de automóviles.
3. Requisito mínimo de tarjeta micro SD: tarjeta micro SD clase 10 (10
MB/s) de más de 32 GB de almacenamiento, con formato FAT 32.
(La tarjeta MicroSD NO está incluida en el paquete).
4.Para más consultas, comuníquese con nuestro seicio de atención
al cliente por correo electrónico a seice@wolox.com.
Adveencias
• Mantenga los accesorios pequeños fuera del alcance de los niños.
Si este producto está dañado o no funciona correctamente,
deje de usarlo inmediatamente y comuníquese con el sopoe
de WOLFBOX. El uso continuo puede causar incendio, descarga
eléctrica o falla del vehículo.
• Este producto está destinado a ser utilizado como material de
referencia en caso de accidente. No garantizamos su efectividad
o admisión como evidencia completa.
• Tenga en cuenta que este producto puede infringir la privacidad
y otros derechos dependiendo de cómo se utilice. No somos
responsables de ningún caso en el que este producto infrinja la
privacidad u otros derechos.
• Este producto es sólo para vehículos DC12V/24V.

30
Producto Visión General
• Gracias por elegir Wolox G900PRO-N 4K Mirror Dash Cam.
Este producto proporciona una imagen de alta calidad y
captura evidencia irrefutable en caso de un accidente, y registra
la belleza a lo largo del camino para usted.
• WOLFBOX es una empresa profesional de fabricación de
suministros para automóviles. Hemos trabajado en el campo
de las cámaras de tablero durante más de diez años. Contamos
con un equipo de ingenieros experimentados e imaginativos
que están comprometidos a construir una marca de suministros
automotrices conable y digna de conanza.
Garantía
• Estamos comprometidos a brindar a los clientes la mejor
experiencia de producto y seicio postventa.
• Nuestro período de garantía es de un año. Si las piezas de la
máquina están dañadas o hay algún problema durante el uso,
lo resolveremos a tiempo y le brindaremos una experiencia de
compra satisfactoria.
Nota: El período de garantía especíco está sujeto a las leyes
locales.
• Comuníquese con nosotros con su pedido en línea y le
brindaremos reemplazo gratuito y sopoe técnico de por vida.
• Seicio gratuito de garantía extendida: Después de registrar
información en wolox.com, puede extender la garantía por 6
meses adicionales sin cargo.
URL: https://wolox.com/pages/warranty-form
• Las especicaciones y apariencia de este producto están
sujetas a cambios sin previo aviso para mejoras.

31
Producto Especicaciones
RAM DDR3 8GB Tipodepantalla IPS
Formatode
vídeo
MP4
Formatode
imagen
JPG
Cámarafrontal 4K (3840*2160) Cámaratrasera 2.5K
Tamañodela
pantalla
12"
Lentetrasera
FPS
30 fps
Inteazde
alimentación
USB-C GPS
Exteriores,Inteaz
para auriculares
de 3,5mm
ConexiónWi-Fi Sopoado Controldevoz Sopoado
Temperaturade
funcionamiento
-4°F ~ 158°F Pantallatáctil Sopoado
TarjetaSD Max Suppok 512GB
Aviso de Seguridad
Para garantizar un rendimiento y una seguridad adecuados,
utilice únicamente accesorios originales y siga atentamente las
instrucciones de instalación. Los daños al producto, al vehículo o
las pérdidas relacionadas causadas por el uso de accesorios no
originales, una instalación incorrecta o el incumplimiento de este
manual pueden no estar cubieos por la garantía o el seicio de
reemplazo. Para obtener ayuda, póngase en contacto con nuestro
sopoe ocial.
32
Paquete Contenido
•4K Dashcam espejo retrovisor
•GPS
•Adhesivo
•Manual del usuario
•Cable de alimentación
con cargador de coche
•Correas de goma*4
GPS
•Abrazaderas de
manguera*5
• 2.5K
Cámara trasera
• Cable de la cámara
trasera
• Herramienta
33
Appearance
NO. Nombre Descripción
1 Lente
Lente frontal, graba la vista frontal del coche
2 PueoUSBC
Pueo para alimentación/conexión
3
Ranuraparatarjeta
dememoria
Proporciona almacenamiento ampliable (clase 10
Máx 512 GB)
4 ConectorGPS
Se utiliza para conectar el módulo GPS(La función
GPS requiere una antena GPS opcional)
5 CámaraTrasera
Pueo utilizado para conectar la cámara adicional
6 Sujetadores
La máquina se puede mantener en posición con 2
correas
7
Pantallade
visualización
Pantalla táctil de 12"
8
Botónde
encendido
Pulsación coa para despear/dormir, pulsación
larga para encender/apagar
POWER REAR
GPS
1
7
8
2 3 4 5
6

34
Inteaz de Usuario
icono Descripción
Velocidad y dirección de conducción: Una vez conectado el GPS,
se mostrará la información adecuada
Fecha y Hora
Activa/Desactiva el sonido del dispositivo
Activa/Desactiva el Wi-Fi
Ver las opciones de los comandos de voz
Iniciar/Detener Grabación
Ajustar el brillo de la pantalla
Basculer entre vista de cámara frontal, cámara trasera y pantalla
dividida.
Instantánea: Tomar una instantánea
Estado de grabación: el amarillo parpadeante indica grabación
bloqueada (el vídeo grabado no se sobrescribirá)
35
icono Descripción
Reproducción de archivos: reproduce videos y fotos
Activar/desactivar la grabación de audio
Conguración: toque para ingresar al menú de conguración
•Modo de reproducción
Cuando enciendas la cámara del tablero, comenzará a grabar
automáticamente. Haga clic/seleccione para ingresar al
modo de reproducción.
Guarda imágenes
capturadas por la
cámara frontal
Guarda imágenes
capturadas por la
cámara trasera
Videos Normales:
Seleccionalo para ver los
videos grabados
Videos Bloqueados:
Seleccionalo para revisar
los videos bloqueados
Fotos: Seleccionalo para
ver las fotos
Selecciona
Elimina Bloquea el video
Ver los videos en
pantalla completa
36
Función Opción
Descripción
Resolución
4K+2.5K
/4K+1080P
/2.5K+2.5K
/...
Selección de la resolución de
video.
Modo de
visualización
Cámara frontal/
Cámara trasera/
Visualización en
pantalla dividida
Congurar la pantalla de
visualización estándar al inicio
para la grabación de video.
Grabaciónde
sonido
Apagado/Encendido Congurar si se graba el audio.
Duraciónde
grabación
1 minuto/2 minutos/
3 minutos
Congurar la duración de la
grabación cíclica.
Sensibilidad a
las colisiones
Apagado/Bajo/
Intermedio/Alto
Después de detectar una colisión/
impacto, el dispositivo bloquea el
video grabado.
Recordatorio de
fatiga
Apagado/1 hora/2
horas/3 horas
Congurar el tiempo para la alea
de fatiga.
Descripción General de Funciones
Haga clic en el icono de conguración para ingresar al menú de
funciones, donde puede ajustar varias funciones y parámetros de toda
la máquina.
37
Función Opción Descripción
Wi-Fi
Apagado
/2.4GHz
/5.8GHz
Congurar el tiempo de
activación del protector de
pantalla.
Volumen
Apagado/Bajo/
Intermedio/Alto
Congurar el volumen.
Sonidodelbotón
Apagado/Encendido
Congurar la opción para los
tonos de teclado.
Protectorde
pantalla
Chiudi/10 secondi/
30 secondi/2 minuti
Congurar el estado de la
conexión Wi-Fi del dispositivo.
Brillo de la
pantalla
/ Congurar el brillo de la pantalla.
Exposición
/
Congurar el contraste de la
cámara frontal.
Controlporvoz
Apagado/
Encendido/Control
por voz
Congurar la opción para la
función de control de voz.
38
Función Opción Descripción
Espejo de la
cámaratrasera
Apagado/Encendido
Congurar la inversión izquierda-
derecha de la imagen de la
cámara trasera.
Inversione
retrocamera
Apagado/Encendido
Congurar la inversión arriba
abajo de la imagen de la cámara
trasera.
Mododelíneade
marchaatrás
Apagado/Encendido
Congurar la opción para la
función de visualización de líneas
de retroceso.
Controlde
aparcamiento
Apagado/Grabación
de disparos G/
Grabación de
intealo de 12
horas/Grabación
de intealo de 24
horas/Grabación de
intealo de 48 horas
Monitorizar el estado del vehículo
después de apagar el motor.
GPS
/ Ver los datos GPS registrados.
Visualizaciónde
la hora
Apagado/Encendido
Establezca si desea mostrar la
información de tiempo en la
inteaz de grabación.
39
Función Opción Descripción
Visualización
GPS
Apagado/Encendido
Congurar si mostrar las
informaciones GPS en la pantalla
de grabación
Marcadeagua
detiempo
Apagado/Encendido
Activar la opción para la marca de
tiempo de la fecha.
Marcadeagua
develocidad
Apagado/Encendido
Activar la opción para la marca de
tiempo de la velocidad.
Marcadeagua
GPS
Apagado/Encendido
Activar la opción para la marca de
tiempo GPS.
Unidad de
velocidad
KM/H / MPH
Congurar la unidad para la
visualización de la velocidad.
Idioma
English/Français/
Deutsch/Italiano/
Español/...
Congurar el idioma para el
dispositivo.
Ajustedelreloj
/
Congurar la hora actual en el
dispositivo.
40
Función Opción Descripción
Formatodehora
YY-MM-DD
/DD-MM-Y Y
/MM-DD-Y Y
Congurar el formato de
visualización de la fecha.
Formatodehora
12 horas/24 horas
Congurar el sistema de
visualización de la hora.
Zonahoraria
/
Congurar la zona horaria según
la ubicación geográca.
Horario de
verano
Apagado/Encendido
Activar/Desactivar la conversión
para el horario de verano.
Frecuencia
estroboscópica
50 Hz/60 Hz
Información de contacto para el
seicio de atención al cliente.
Recordatoriode
formato
Chiudi/Ogni 15
giorni/Ogni 25 giorni
Congurar la frecuencia del
recordatorio para el formateo de
la tarjeta SD.
Formatear
tarjetaSD
/
Formatear la tarjeta SD y borrar
los videos y fotos guardados en
ella.
41
Función Opción Descripción
Centrodeayuda
/
Congurar el recordatorio para el
formateo de la tarjeta SD.
Restaurarajustes
defábrica
/
Restaurar todas las
conguraciones a los ajustes de
fábrica.
APP
/
Proporcionar un código QR para
descargar la aplicación.
Informacióndel
producto
/ Ver la información del dispositivo.
Nota:
El modo de estacionamiento requiere un kit de hardware (se
compra por separado) para poder activarse.
Con el kit de hardware conectado y el modo de estacionamiento
habilitado, la cámara del tablero ingresará al modo de grabación
de intealos cuando el automóvil se apague. Este modo captura
vídeo a 1 fotograma por segundo hasta que naliza la duración
establecida o el voltaje de la batería del coche cae por debajo de
12 V.
42
Función de Control de Voz
Control rápido mediante simples comandos de voz
Cuando el icono es blanco, signica que la función
puede usarse normalmente.
Puedes activar/desactivar la función de control de voz desde el
menú "Control de voz".
Nota:
Tienes dos maneras de ver los comandos de voz especícos:
lockthevideo
takepicture
turnonaudio turnoaudio
turnonscreen turnoscreen
turnonWi-Fi turnoWi-Fi
turnonrecording turnorecording
showfrontcamera showrearcamera
Toca el icono de control de voz en la pantalla de
grabación.
Toca el submenú "Control por voz" debajo de la función
"Control de voz".
1
2

43
Utiliza la APLICACIÓN (Wi-Fi e
INFORMACIÓN SOBRE LA APLICACIÓN)
La función Wi-Fi te permite conectar tu cámara de salpicadero
de forma inalámbrica a tu teléfono inteligente, para acceder
instantáneamente a las grabaciones. Desde aquí, podrás ver,
descargar y compair tus videos fácilmente con amigos y
familiares.
La aplicación "
WOLFBOXAuto
" es gratuita y te permite controlar
esta cámara de conducción con WLAN integrada directamente
desde tu teléfono inteligente.
•¿Cómo conectarse al Wi-Fi?
1. Descarga la aplicación "WOFLBOX Auto"
Visita la siguiente dirección para descargar
la aplicación "WOFLBOX Auto": https://
h5.wolox.com/qrcode. También puedes
escanear el código QR con tu teléfono
inteligente para acceder a la página de
descarga.
2. Activa el Wi-Fi
Ve a los Ajustes de tu dispositivo y activa el Wi-Fi. En la pantalla
del dispositivo aparecerán el nombre y la contraseña de la red
Wi-Fi.
3. Conecta al Wi-Fi
Para conectar tu iPhone o teléfono Android a la red Wi-Fi del
G900PRO-N, ve a Ajustes > Wi-Fi, elige la red "G900PRO-N
Wi-Fi" e introduce la contraseña predeterminada: 12345678.
4. Abre la aplicación "
WOLFBOX Auto
"
Una vez que tu teléfono esté conectado a la red Wi-Fi del
G900PRO-N, abre la aplicación WOLFBOX Auto. La cámara se
sincronizará automáticamente, y podrás ver la transmisión de
video en vivo directamente en tu teléfono.
44
•Modica y compae tus videos en la App
En la app, puedes ver y editar álbumes locales descargados y
compairlos con otros.
Cómo Reproducir Vídeo en el Ordenador
Recomendamos la aplicación "GPS Media Player" para ver y
reproducir vídeos de la cámara del tablero y ver Google Maps.
Puede descargarlo gratuitamente en Mac o Windows desde el
siguiente enlace: https://wolox.com/gps-player/
45
1 2
Ventana de reproducción
de video (frontal)
Ventana de reproducción
de video (
trasera
)
3 4
5
Visualización de mapas y rutas
Panel de control de
reproducción
6
Indicación de velocidad y
estado de conducción
Lista de reproducción
Nota:
Si graba los videos de las cámaras delantera, adicional y trasera
simultáneamente y los carga a la lista de reproducción al mismo
tiempo, podrá reproducirlos por separado en pantallas divididas
izquierda y derecha.
Cuando encuentre el archivo de video deseado, mantenga
presionado el botón izquierdo del ratón y arrastre los archivos
deseados a la ventana de reproducción de video para reproducirlos.
1 2
4 65
3
46
Instalación
Antes de instalar su cámara de tablero, pruebe su funcionalidad
con todos los accesorios y cambie la conguración
predeterminada según sus preferencias.
•Instalación de la tarjeta SD
Asegúrese de que la cámara del tablero esté apagada al insear o
expulsar la tarjeta SD.
• Vista frontal del host • Vista trasera del host
Nota:
1. Se recomienda utilizar una tarjeta MicroSD con una
capacidad de 64 GB o superior para garantizar espacio de
almacenamiento suciente para la grabación en bucle continua.
2. Para una escritura estable de vídeo en alta denición y una
grabación en bucle uida, se recomienda una tarjeta con una
velocidad clasicada U3/V30 o superior. El uso de una tarjeta
más lenta puede provocar retraso en el vídeo, pérdida de
secuencias o fallos en la grabación.
3. Para una mayor abilidad y durabilidad, se debe dar prioridad
a las tarjetas de memoria etiquetadas como "High Endurance"
(Alta Resistencia), diseñadas para operaciones de escritura
sostenidas.
4. Para obtener la compatibilidad y el rendimiento óptimos,
se recomienda adquirir la tarjeta de memoria personalizada
Wolox.
47
•Instalación de la unidad
1. Coloque la unidad principal (Espejo WOLFBOX) en el espejo
retrovisor con la mano y asegúrese de separar los sopoes
de silicona en ambos lados del espejo retrovisor. Abroche el
dispositivo al espejo retrovisor con las correas de goma. Ajuste
la lente frontal al ángulo deseado.
2. Conecte el cargador del automóvil al adaptador del cargador
para suministrar energía a la cámara del tablero.
Pilier A
•Encendido/Apagado
• Presione brevemente el botón de encendido para encender,
presione prolongadamente el botón de encendido para apagar.
• Cuando utilice el cargador del automóvil, si el pueo del
encendedor de cigarrillos es ACC, la cámara del tablero se
encenderá automáticamente cuando se encienda el automóvil.
48
•Dentro del sopoe del coche
•Fuera del sopoe del coche
Si no necesitas ajustar el ángulo,
puedes quitar esta plancha de hierro.
•Adicional camera installation
1
Cámara de tablero
2
Conectada a la luz de marcha atrás
3
Sopoe exterior del coche
・
Instrucciones de Cableado de la Cámara Trasera
Nota:
La cámara trasera tiene dos opciones de enrutamiento de cables,
las cuales ocultan el cable a lo largo de los bordes de la puea.
4
Dentro del sopoe del coche
49
1. Conecta el cable de la cámara trasera al retrovisor
Conecte el cable de la cámara trasera a la inteaz REAR de la
unidad.
POWER
REAR
GPS
2. Enrutamiento del cable de la cámara trasera
Pase el cable de la cámara trasera hacia la pae trasera del
automóvil, dejando algo de holgura. Insee el cable en el
espacio del parabrisas delantero y a lo largo del extremo
superior de la puea con la herramienta incluida.
Si elige instalar la cámara trasera dentro de su automóvil, fíjela
en el parabrisas trasero después de pasar el cableado.
50
3. Retire el panel
Abra el maletero y retire el panel interior que cubre el otro lado
del área de montaje de la matrícula. Utilice una herramienta
para quitar molduras u otro dispositivo delgado para abrir el
panel.
4. Fija la cámara trasera y conecta los cables
Fije la cámara trasera cerca de la luz de la matrícula con
pegamento y conecte el cable de la cámara trasera a través del
oricio de la luz de la matrícula al cable de la cámara trasera.
51
5. Conecte el cable rojo al terminal positivo de la luz de
marcha atrás
Encuentra el terminal positivo de la luz de marcha atrás. Este
es el terminal que tiene voltaje cuando el auto está en marcha
atrás. Para encontrarlo, pise los frenos, ponga el auto en marcha
atrás y mida el voltaje en cada terminal. El terminal con voltaje
es el terminal positivo. Pela el cable positivo y envuélvelo con
el cable rojo de la cámara. Aísle la conexión con cinta aislante.
Pruebe la conexión poniendo el automóvil en marcha atrás y
viendo si la cámara del tablero entra en modo de marcha atrás.
52
GPS
1
•Instalación del GPS
Posición 1:
Instale la cámara del tablero en la esquina derecha de la consola
central y oculte el cableado a lo largo del borde del parabrisas
delantero con cinta adhesiva de doble cara.
• Teniendo en cuenta el efecto de uso y la conveniencia de la
instalación, generalmente recomendamos a los clientes que lo
instalen en la posición 1�
• También puede probar diferentes ubicaciones para la cámara
del tablero para encontrar la que funcione mejor para usted.
Solo asegúrese de que el lado negro esté hacia arriba para
recibir la señal de GPS.
• Una vez instalado el GPS, aparecerá el icono de GPS en la
pantalla de inicio. Una vez recibida la señal de GPS, el GPS del
dispositivo mostrará la dirección y la velocidad.

53
Resolución de Problemas
・
¿Se pueden transmitir las imágenes de la cámara trasera de
forma inalámbrica?
El G900PRO-N Wi-Fi incluye un cable especíco para la cámara
trasera, a través del cual se transmiten los vídeos. La función Wi-
Fi está diseñada exclusivamente para conectar el teléfono a la
cámara del tablero.
・
¿Es posible monitorizar el vehículo de forma remota vía Wi-Fi
en el G900PRO-N?
Debido al alcance limitado de la Wi-Fi, no es posible monitorizar
el vehículo de forma remota a través de la aplicación conectada
al G900PRO-N.
・
¿La imagen de la cámara trasera está borrosa o no se detecta?
Si experimenta "imagen borrosa":
1. Retire la película protectora de la lente y límpiela con un paño
suave o producto de limpieza óptica.
2. Si el problema persiste por altas temperaturas, contacte a
sopoe técnico.
En caso de error "Cámara no detectada":
3. Verique las conexiones REAR en la pae superior del espejo
retrovisor.
4. Inspeccione el cable de la cámara trasera en busca de daños,
especialmente en los conectores.
・
¿Cómo conectar la unidad a la aplicación vía Wi-Fi?
Asegúrese de que la Wi-Fi esté activada manualmente en la
conguración.
Busque "WOLFBOX Auto" en la tienda de aplicaciones para
descargar la última versión de la aplicación.
Revise la lista de Wi-Fi en su teléfono inteligente para ver si
puede encontrar la red llamada "WOLFBOX Auto".
Si la aplicación muestra "Conexión fallida", busque "Obtener
asistencia" en la aplicación para ponerse en contacto con
nosotros.

54
Para más información:
seice@wolox.com
https://wolox.com/contact-us
www.wolox.com
Seicio de Atención al Cliente Center
Si tiene algún problema con el funcionamiento o la instalación,
póngase en contacto con nosotros.
Centrodeayuda WhatsApp
WOLFBOX


www.wolox.com
Email:seice@wolox.com
Phone:+18882968399
Check us out here!
Product and seice are the foundation of WOLFBOX.