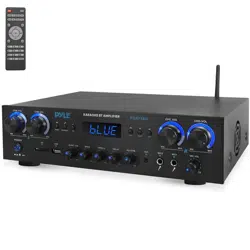
4 Channel Audio Amplifier
PDA77BUEU - PDA77BUUK
USER GUIDE
Visit Our Website
SCAN ME
PyleUSA.com
ENG UK
Please note that reserve the right to make production changes during
the life of our product lines that may impact the information in this manual.

About PyleUSA
Pyle, founded in the 1960s, has evolved into a renowned manufacturer of
high-quality advanced woofers. Our journey started with the iconic Pyle
Driver, becoming a household name in original speakers. In the late 20th
century, we expanded into replacement speakers, car audio, home audio,
marine audio, and professional audio & musical instruments with our
Pyle Pro line.
Pyle Car:
Transform your car into a perfect listening environment with our com-
petitively priced speakers, amplifiers, and head units. Upgrade from
factory speakers to enhance your music experience. Explore accessories
like navigation systems, DVD players, iPod interfaces, and safety-focused
cameras.
Pyle Home:
Discover a range of home entertainment products, including projectors,
TVs, mounts, stands, and HD technology. Pyle Home offers bass-expand-
ing mini speakers, headphones, vintage turntables, power amplifiers,
horn speakers, and more for an enriched media experience at home and
on the go.
Pyle Pro:
As the leading source of audio equipment worldwide, Pyle Pro caters to
musicians, studio engineers, and amateurs. Our PA Systems, featuring
wireless microphones, rechargeable batteries, and iPod/iPhone docks,
are ideal for various events. Explore our emerging guitar line, effects
pedals, and USB-to-analog converters without compromising on quality.
www.PyleUSA.com
2
WARNING!
CAUTION: TO REDUCE THE RISK OF ELECTRIC SHOCK, DO NOT REMOVE
THE COVER OF THIS UNIT. THERE ARE NO USERSERVICEABLE PARTS
INSIDE. REFER ALL SERVICING TO A QUALIFIED TECHNICIAN.
1. Read these instructions thoroughly before using this item.
2. Keep these instructions for future reference.
3. Heed all warnings.
4. Follow all instructions.
5. WARNING:
or moisture. Do not store or operate this product near any liquids.
6. Clean only with a dry cloth.
7. Do not store or operate this product near any heat sources such as radiators, heat
8. Do not defeat the safety purpose of the polarized or grounding-type plug.
A polarized plug has two blades with one wider than the other. A grounding plug
has two blades and a round grounding prong. The wide blade or third prong is
electrician for the replacement of the obsolete outlet.
9. Protect the all wires connected to this unit from being walked on or pinched,
particularly plugs and the point where they exit from the unit. When removing the
cord from the power outlet, remove it by holding the plug not by pulling the cord.
10. Unplug the unit during lighting storms or when unused for long periods of time.
11. When wiring this unit and all other equipment used in connection to this unit
make sure that all of your equipment is turned OFF.
12. Once installation and wiring is complete power on all your equipment with the
volume and level controls turned DOWN. Once all the equipment is ON slowly
raise the volume or level controls to their proper positions.
13. When grounding this unit, be sure to do so correctly, so as not to defeat the
built-in grounding in this unit.
intended to alert the user to the presence of “DANGEROUS” voltage
constitute a risk of electric shock to humans. Users should exhibit extra
safety when this symbol appears in this instruction manual and follow all
precautions as they are stated.
The exclamation point within an equilateral triangle is intended to alert
the user to the presence of important operating and maintenance
(servicing) instructions in this manual.
www.PyleUSA.com
3
www.PyleUSA.com
4
14. Before placing, installing, rigging, or suspending any product, inspect all
hardware, suspension, cabinets, transducers, brackets and associated equipment
for damage. Any missing, corroded, deformed, or non-load rated component
Any such condition severely reduces the safety of the installation and should be
immediately corrected. Use only hardware which is rated for the loading
conditions of the installation and any possible short-term, unexpected
overloading. Never exceed the rating of the hardware or equipment.
15. Consult a licensed, professional engineer regarding physical equipment
installation. Ensure that all local, state and national Regulations regarding the
safety and operation of equipment are understood and adhered to.
apparatus has been damaged in any way, such as power supply cord or plug is
damaged, liquid has been spilled or objects have fallen into the apparatus, the
apparatus has been exposed to rain or moisture, does not operate normally, or
has been dropped.
Introduction
To get the most from our PDA77BU
, it is recommended that you review all of the
information provided in the instruction manual before operating the equipment.
ATTENTION
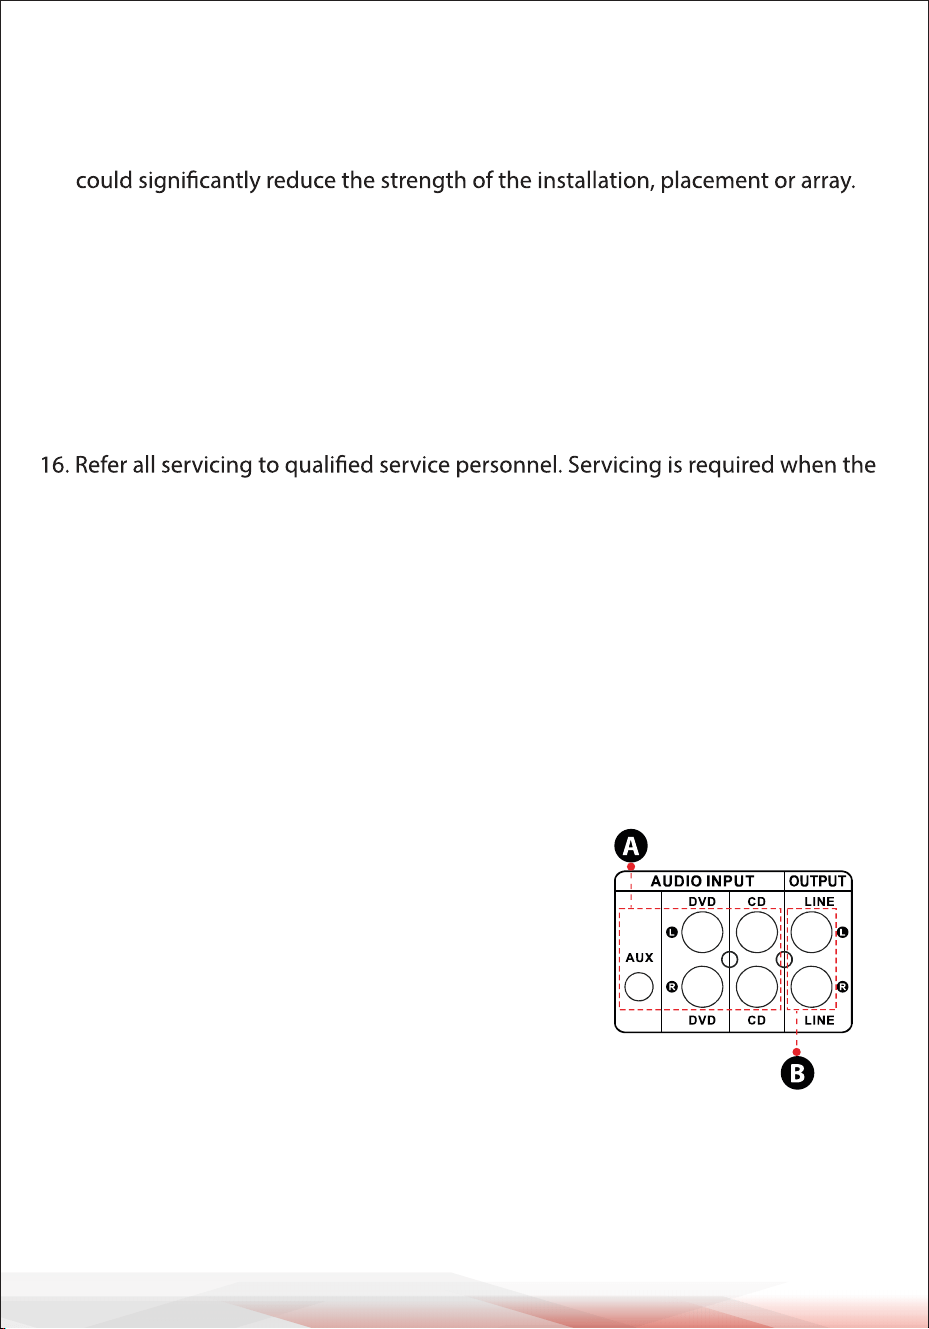
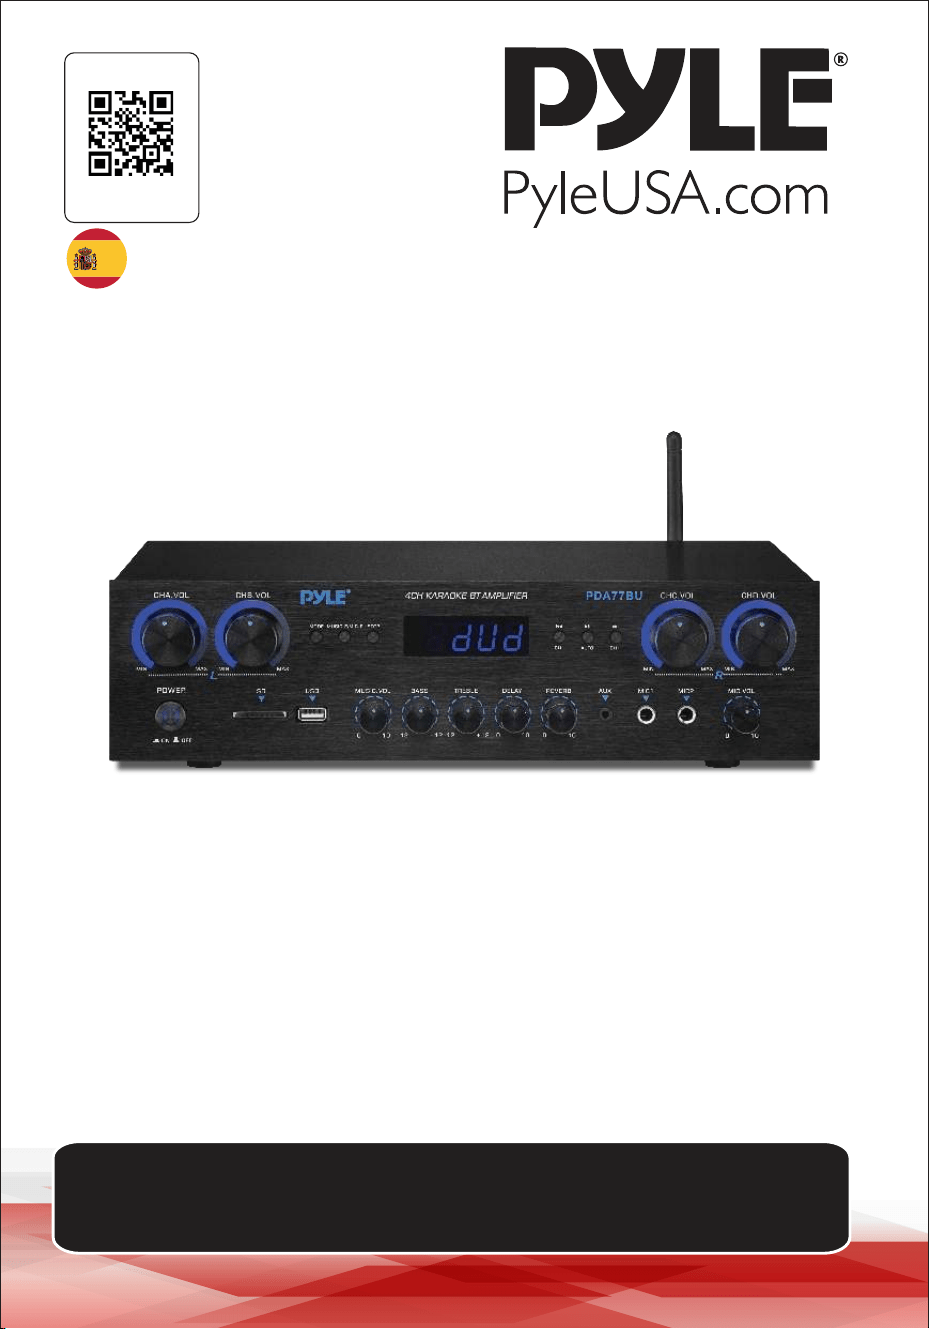
1. A: Connect the audio input with the CD/DVD/TV
audio output.
NOTES:
• These Jacks not support video signal, so make
sure that the CD/DVD/AUX terminal are connected.
• Noise will be heard when you connect the unit with
DVD/TV video output by mistake.
2. B: Signal output that can be connected with other
amplifier or speakers come with Amp.

www.PyleUSA.com
5
3. STEPS FOR FM RADIO CONTROL
A.Connect the FM antenna before using the FM radio.
B. Press MODE button on the front panel or remote control to select FM mode.
C.
Press PLAY/PAUSE button on the front panel or remote control, and will auto
scan and sore FM Radio station from 87.5Mhz to 108Mhz.
D. Press NEXT/PREV button to select the FM station.
4. REMOTE CONTROL
Remote control gives you commanding access to USB/SD, Wireless BT, DVD, CD,
AUX and FM functions.
A. Please install two AAA battery before using the remote control, otherwise the
remote control will not work.
B.
The buttons of HD1,HD2, OPTI and COAX don’t work in PDA70BU model.
5. FILE FORMAT
Only MP3, WMA and WAV format are supported for USB/SD stored files. The unit
may skip the unsupported track files in USB or SD cards.
6. USB PORT
The USB port is only used for playing audio files on your USB flash drive.
DO NOT use usb port for power supply to other devices as it may
damage the unit to Cause smoke.
Folder Searching
• Press the Folder button on the remote to search through all of the folders inside
the USB flash drive or SD Card. Each Folder will appear by the number of the track. It
will show folder chronologically (from when the files were loaded onto the USB
flash drive/SD Card. auto playing the desired track.
• First the tracks on the root file will be displayed and then the tracks that are in
folders.
• Once pressed the Folder button on the remote control, word “F001” will begin
show on the display screen. Then, press next or prev buttum to search the folders
inside the USB flash drive/SD Card.
• Automatically exit after 3 seconds without any action.
• Press the folder button again to exit.

www.PyleUSA.com
6
A B C D E F
A. MODE BUTTON: Press this button to select one input from FM, USB, SD, BT, DVD,
CD and AUX.
Automatically plays the files after inserting a USB flash drive or SD card.
B. MIC/MUSIC BUTTON:
Press this button to select BASS/TREBLE Knob mode.
A-ON----Turn Bass and Treble knobs to adjust the music frequencies.
A-OFF---Turn Bass and Treble knobs to adjust the Microphone frequencies.
Random-- play files in the usb or SD without any regular pattern.
C. EQ BUTTON: Press this button to select one EQ mode from General, Live, Vbass,
POP, Classic, Jazz, Rock and 3D.
D. PREV BUTTON: Use this button to select previous track depending on these
different modes as below.
• In USB/SD mode: Use to select previous track.
• In Wireless BT mode: Use to select previous track.
• In FM mode: Use to select previous radio channel.
• In Folder working Status: Use to select previous Folder.
E. PLAY/PAUSE BUTTON: Each press of the PLAY/PAUSE BUTTON causes the opera-
tion to change from play to pause.
Press the PLAY/PAUSE BUTTON one time to auto scan all frequencies from 87.5MHz
to 108MHz in FM mode. Press the button to auto scan channels when you use FM
radio for the first time. After stoping searching, the unit will auto store all the
radio channels and play from the first radio channel.
You don't need to rescanevery FM radio start up.
F. NEXT BUTTON: Use this buttons to select next track depending on these differ-
ent modes as below.
• In USB/SD mode: Use to select next track.
• In Wireless BT mode: Use to select next track.
• In FM mode: Use to select next radio channel.
• In Folder working Status: Use to select Next Folder.
CONTROL PANEL BUTTON

www.PyleUSA.com
7
STEPS FOR RECEIVE SCAN FM STATIONS
a--Please connect the come with FM Antenna to FM Jack on back Pannel, the other
end is in a relatively open position.
b--Press MODE button to enter into FM mode.
c--Press the PLAY/PAUSE BUTTON one time to auto scan all frequencies from 87.5M-
Hz to 108MHz, after stoping searching, the unit will auto store all the
radio channels
d--Press the PREV BUTTON or NEXT BUTTON to select previous radio channel or
next radio channel.
e--Press the Numeric Keys on the Remote control to select radio channel or
frequencies.
Press two digits to directly select the radio station in the store.
Press three or four digits to directly select the radio station
frequency from 87.0-108.0MHz.
STEPS FOR CONNECTING WITH WIRELESS BT DEVICE
a--Press MODE button or Hold BT button for 3 seconds on remote control to enter
into bluetooth mode.
b--Search for the bluetooth device and find the bluetooth name “PYLEUSA or BT”
c--Select the PYLEUSA or BT bluetooth name and wait for the device to pair.
d--The unit will make a sound confirming that the devices have successfully
paired.
e--Once paired you can play music from your bluetooth device. You can also use the
control buttons on the unit to select the tracks from your bluetooth device.
f-- Use the other controls, play/pause, previous track & next track to play audio from
Wireless BT.

www.PyleUSA.com
8
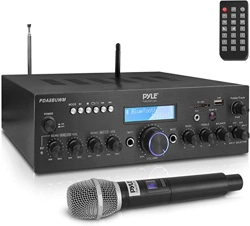
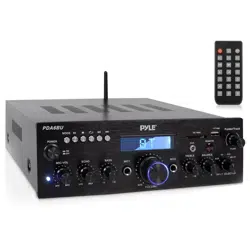
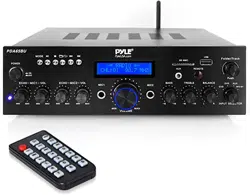
FRONT & BACK PANEL
1
2
6 7 8
9
55
4
10
18
19
20
22 24
25
26
27
23
21
11121314151617
3
USB/SD Card Control Console Display Screen
32
54
1. MODE: The display will show "USB" when set to USB mode, "SD" when set
to SD card mode, "BLUE" when set to BLUETOOTH mode, "87.5-108" when
set to FM mode.
Press the folder keys on remote, "F001" will show on 2. Folder search mode:
LED display screen, and press next and prev to select a folder.
press the previous and next buttons, the current track3. Track search mode:
number will be showed here.
The elapsed time of the current track will show here.4. Elapsed time :
5. Show FM frequency of the current station.
.

www.PyleUSA.com
9
1. Power Swtich: Press this Switch to turn the unit on and off.
2. LED Screen: all information regarding external media or this device will be
displayed from this screen.
3. SD Card Reader: for using external media on this device, just plug your SD into this ports.
4. USB Port: for using external media on this device, just plug your USB into this ports.
5.CONTROL PANEL BUTTON
6. CHA Master Volume Control Knob: Turn this knob to adjust the A-Channel
Volume level (Left Channel).
7. CHB Master Volume Control Knob: Turn this knob to adjust the B-Channel
Volume level (Left Channel).
8. CHC Master Volume Control Knob: Turn this knob to adjust the C-Channel
Volume level (Right Channel).
9. CHD Master Volume Control Knob: Turn this knob to adjust the D-Channel
Volume level (Right Channel).
10. Microphone Volume Control Knob: Turn this knob to adjust the microphone Volume
level.
11. MICROPHONE INPUTS: KARAOKE or EXTERNAL MIC connect to these.
12. AUX Input: IPOD/MP3 JACK-IPOD/MP3 connects to this jack.
13. Microphone Reverb Depth Control Knob: Turn this knob to adjust the microphone
Reverb Depth.
14. Microphone Delay time Control Knob: Turn this knob to adjust the micro
phone delay time.
15. Treble Control: Turn this knob to adjust the high frequencies of Music or Microphone
(The MIC/MUSIC button controls the switching between music and microphone)
16. Bass Control: Turn this knob to adjust the low frequencies of Music or Microphone (The
MIC/MUSIC button controls the switching between music and microphone).
17. Master Volume Knob: adjust the master volume.
18. FM ANTENNA CONNECTOR: Connect for FM antenna.
19. BLUETOOTH ANTENNA: Pease pull the antenna out when using Bluetooth input.
20. AUDIO INPUT: Connect the audio output jacks of DVD/CD to these jacks.
21. LINE OUTPUT: Connect the RECORD input jacks to these jacks.
22. D-Channel SPEAKER OUTPUT: Connect your speaker system to these terminals.
23. C-Channel SPEAKER OUTPUT: Connect your speaker system to these terminals.
24. B-Channel SPEAKER OUTPUT: Connect your speaker system to these terminals.
25. A-Channel SPEAKER OUTPUT: Connect your speaker system to these terminals.
26. The air outlet of a fan: (Do not stack any other objects here to prevent the wind
from blowing out)
27. POWER VOLTAGE SELECTOR: 115V/230V VOLTAGE SELECTOR.

www.PyleUSA.com
10
REMOTE CONTROL
1. Hold this button for 3 seconds to switch Power off the unit.
Press this button to switch Power On the unit.
Press this button to enter folder control model in USB or SD playing status.
Press again to exit folder control.
2. Press these buttons to directly select input source.
ATTENTION: Switch to the USB or SD playing only after inserting USB Flash driver or SD
Card. If USB flash or SD Card are not inserted, press the USB or SD button and the unit will
not respond.
Press EQ MODE to select 8 types Presets EQ effect.
3. Press two buttons to adjust the sound Bass, BASS- is reduce bass output, BASS+ is raise
bass output.
4. Press two buttons to select the previous or
next track in USB or SD or BT working mode,
to select previous or next station in FM
working mode.
5.Press two buttons to adjust the sound Treble,
TREBLE- is reduce TREBLE output, Bass+ is raise
TREBLE output.
6. Press the numbers to select the tracks directly.
The unit takes 2-3 seconds to response
in USB or SD mode.
7.Press this button to reset the unit software.
8. Press this button to mute audio.
9. Play and Pause function for all working modes.
Press this button to auto scan the channel
in FM mode, and auto store channel.
ATTENTION: The unit will automatically search
for FM stations from frequency 88MHz to 108MHz,
this will take 2 minutes to wait, .
10. Press two buttons to up or down the sound
volume.
11. Press this button to select repeat mode.
One-Repeat current play file, All-Repeat all play
files in the USB or SD. Random-the unit choose
any song to play.
1
2
3
5
4
6
10
9
8
11
7

www.PyleUSA.com
11
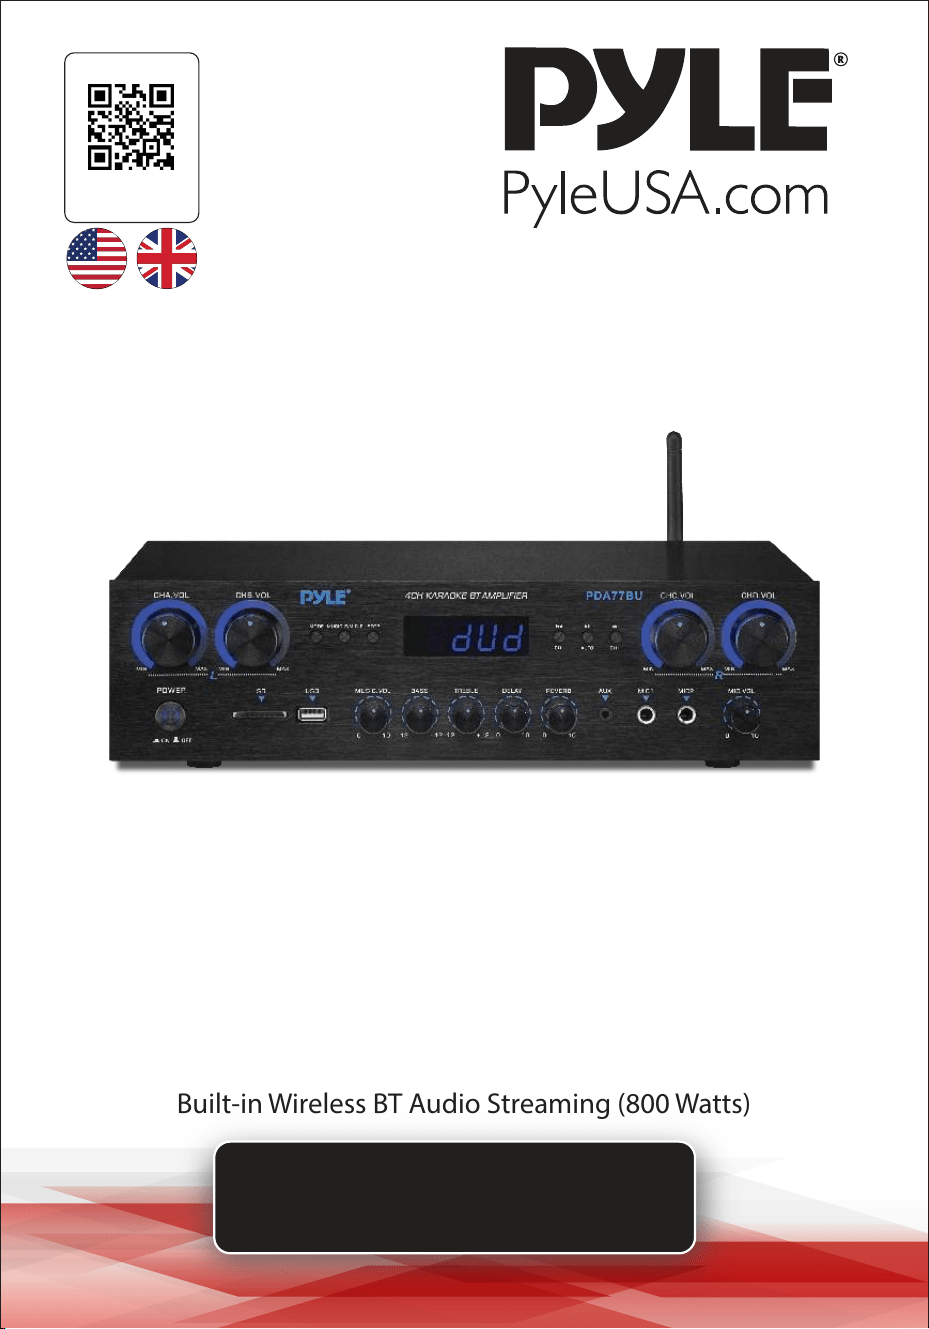
Compact Wireless 4 Channel BT Stereo Amplifier
Desktop Audio Power Amp Receiver with FM Radio, MP3/USB/SD Readers,
Digital LED Display, Microphone Input (800 Watt)
Features:
• Desktop BT 4-Channel Audio Power Stereo Amplifier
• Compact Home Theater Stereo Receiver Style
• Built-in Bluetooth for Wireless Music Streaming
• FM Radio with LED Digital Display
• Multi-Channel Audio Input Selection
• MP3/WAV/WMA/APE Audio File Support
• Connect & Stream Audio from External Devices
• USB Flash Drive & SD Memory Card Readers
• Aux (3.5mm) Input
• (2) 1/4'' Microphone Input Jacks
• (2) Pairs RCA (L/R) Audio Input Connectors
• (8) Pairs Banana Plug Speaker Output Connectors
• (1) Pair RCA (L/R) Audio Output Connectors
• Front Panel Audio Control Center
• Automatic Scan and Store Radio Station
• 'Repeat one, Random & All ' Audio File Functions
• 'Track / Folder' Music Search Control
• Treble, Bass, Master & Microphone Volume Adjustable
What's in the Box:
• Desktop Stereo Amplifier
• Remote Control
• FM Antenna
• User manual

California Prop 65 Warning
WARNING:
This product may expose you to chemicals, which is known to
the state of California to cause cancer, birth defects and other
reproductive harm. Do not ingest.
For more info go to: www.P65warnings.ca.gov
www.PyleUSA.com
12
Bluetooth Connectivity:
• Receives Wireless Signal for Audio Streaming
• Simple & Hassle-Free Pairing Setup
• Integrated Antenna for Extended Wireless Range
• Works with All of Today’s Latest Devices
(Smartphones, Tablets, Laptops, Computers, etc.)
• Bluetooth Version: 5.0
• Bluetooth Network Name: 'PYLEUSA' or “BT”
• Wireless Range: 40'+ Ft.
Technical Specs:
• MAX Power Output: 800 Watt (@ 4 Ohm)
• RMS Power Output: 20 Watt x 4 (@ 8 Ohm)
• Tone Control: Bass, f=100Hz +/-8dB
• Frequency Response: 20Hz-20kHz
• Frequency Adjustment: +/-10dB
• Signal to Noise Ratio: >80dB
• T.H.D.: <0.1%
• Radio Station Presets: Up to 60 Stations
• Battery Operated Remote, Requires (2) x AAA Battery, Not Included.
• Power Supply: 115/230V, Switchable
• Dimensions (L x W x H): 13.8'' x 10.0'' x 3.9'' -inches

Register Product
Thank you for choosing PyleUSA. By registering your product, you
ensure that you receive the full benefits of our exclusive warranty
and personalized customer support. Complete the form to access
expert support and to keep your PyleUSA purchase in perfect
condition.
Start Here
Model Number:
PDA77BU
PyleUSA.com/pages/register
www.PyleUSA.com
13
ICSTATEMENT :
ThisdevicecomplieswithIndustryCanada’slicence-exemptRSSs.Operationis
subjecttothefollowingtwoconditions:
(1)Thisdevicemaynotcauseinterference;and
(2)Thisdevicemustacceptanyinterference,includinginterferencethatmay
causeundesiredoperationofthedevice.
LeprésentappareilestconformeauxCNRd' IndustrieCanadaapplicables
auxappareilsradioexemptsdelicence.L'exploitationestautoriséeauxdeux
conditionssuivantes:
(1)l'appareilnedoitpasproduiredebrouillage,et
(2)l'utilisateurdel'appareildoitacceptertoutbrouillageradioélectriquesubi,
mêmesilebrouillageestsusceptibled'encompromettrelefonctionnement.

Questions? Comments?
We are here to help!
Phone: (1) 718-535-1800
PyleUSA.com/ContactUs
Amplificador de audio de 4 canales
PDA77BUEU - PDA77BUUK
MANUAL DEL USUARIO
Visite nuestro
sitio web
ESCANÉAME
PyleUSA.com
Tenga en cuenta que en PYLEUSA nos reservamos el derecho a realizar cambios de
producción durante la vida de nuestras líneas de productos que pueden afectar a la
información de este manual.
SPA

Acerca de PyleUSA
Pyle, fundada en la década de 1960, ha evolucionado hasta convertirse
en un reconocido fabricante de altavoces de graves (“woofers”) avanza-
dos de alta calidad. Nuestro viaje comenzó con el icónico Pyle Driver,
convirtiéndose en un nombre muy conocido en altavoces originales. A
finales del siglo XX, nos expandimos a los altavoces de repuesto, audio
para automóviles, audio doméstico, audio marino y audio profesional e
instrumentos musicales con nuestra línea Pyle Pro.
Pyle Automóvil:
Transforme su automóvil en un entorno auditivo perfecto con nuestros
altavoces, amplificadores y unidades principales a precios competitivos.
Actualice los altavoces de fábrica para mejorar su experiencia musical.
Explore accesorios como sistemas de navegación, reproductores de DVD,
interfaces para iPod y cámaras orientadas a la seguridad.
Pyle Hogar:
Descubra una gama de productos de entretenimiento doméstico, como
proyectores, televisores, soportes, bases y tecnología HD. Pyle Hogar
ofrece minialtavoces con expansión de graves, auriculares, giradiscos
vintage, amplificadores de potencia, altavoces de bocina y mucho más
para enriquecer la experiencia multimedia en casa y fuera de ella.
Pyle Pro:
Como proveedor líder mundial de equipos de audio, Pyle Pro atiende a
músicos, ingenieros de estudio y aficionados. Nuestros sistemas de
megafonía, con micrófonos inalámbricos, baterías recargables y bases
para iPod/iPhone, son ideales para diversos eventos. Explore nuestra
línea emergente de guitarras, pedales de efectos y convertidores de USB
a analógico sin renunciar a la calidad.
www.PyleUSA.com
2

www.PyleUSA.com
3
2
¡AVISO!
PRECAUCIÓN: PARA REDUCIR EL RIESGO DE DESCARGA ELÉCTRICA, NO RETIRE LA
TAPA DE ESTE APARATO. EN EL INTERIOR DEL APARATO NO HAY PIEZAS QUE
PUEDAN SER REPARADAS POR EL USUARIO. CUALQUIER INTERVENCIÓN DEBE SER
REALIZADA POR UN TÉCNICO CUALIFICADO.
1. Lea atentamente estas instrucciones antes de utilizar este aparato.
2. Conserve estas instrucciones para futuras consultas.
3. Presta atención a todas las advertencias.
4. Siga todas las instrucciones.
5. ADVERTENCIA: Para evitar el riesgo de incendio o descarga eléctrica, no exponga este
aparato a la lluvia ni a la humedad. No almacene ni utilice este producto cerca de
líquidos.
6. Limpiar sólo con un paño seco.
7. No guarde ni utilice este producto cerca de fuentes de calor como radiadores, rejillas
de calefacción, estufas u otros aparatos (incluidos amplificadores) que produzcan
calor.
8. No anule el propósito de seguridad del enchufe polarizado o con toma de tierra. Un
enchufe polarizado tiene dos clavijas, una más ancha que la otra. Un enchufe con
toma de tierra tiene dos clavijas y una redonda. La clavija ancha o tercera clavija se
incluye para su seguridad. Si el enchufe suministrado no se adapta a su toma de
corriente, consulte a un electricista para sustituir la toma obsoleta.
9. Proteja todos los cables conectados a este aparato para evitar que sean pisados o
pellizcados, especialmente en los enchufes y en el punto donde salen del aparato. Al
retirar el cable de la toma de corriente, hágalo sujetando el enchufe y no tirando del
cable.
10. Desenchufe el aparato durante las tormentas eléctricas o cuando no vaya a utilizarlo
durante largos periodos de tiempo.
11. Cuando realice el cableado de este aparato y de cualquier otro equipo utilizado en
conexión con el mismo, asegúrese de que todos sus equipos estén apagados.
12. Una vez finalizada la instalación y el cableado, encienda todos sus equipos con los
controles de volumen y nivel orientados hacia ABAJO. Una vez encendido todo el
equipo, suba lentamente los controles de volumen y nivel a sus posiciones correctas.
13. Cuando conecte el aparato a tierra, asegúrese de hacerlo correctamente para no
neutralizar la toma de tierra incorporada en el aparato.
El símbolo del rayo con punta de flecha, dentro de un triángulo equilátero,
pretende alertar al usuario de la presencia de tensión "PELIGROSA" en el
interior del producto, que puede ser de magnitud suficiente para constituir un
riesgo de descarga eléctrica para las personas. Los usuarios deben extremar las
precauciones cuando aparezca este símbolo en este manual de instrucciones y
seguir todas las precauciones de seguridad.
El signo de exclamación dentro de un triángulo equilátero pretende alertar al
usuario de la presencia en este manual de importantes instrucciones de
funcionamiento y mantenimiento (reparación).
3
www.PyleUSA.com
4
14. Antes de colocar, instalar, aparejar o suspender cualquier producto, compruebe que
todos los herrajes, suspensiones, cajas, transductores, soportes y equipos asociados no
estén dañados. Cualquier elemento que falte, esté corroído, deformado o no cumpla
las normas de carga puede reducir considerablemente la resistencia de la instalación,
colocación o red. Tal estado reduce considerablemente la seguridad de la instalación y
debe repararse inmediatamente. Utilice únicamente equipos diseñados para las
condiciones de carga de la instalación y para cualquier sobrecarga imprevista a corto
plazo. Nunca supere la capacidad nominal del material o del equipo.
15. Consulte a un profesional autorizado para la instalación del equipo físico. Asegúrese
de que se comprenden y cumplen todas las normativas locales, regionales y naciona-
les relativas a la seguridad y el funcionamiento del equipo.
16. Encargue todas las tareas de mantenimiento al personal cualificado. Es necesario
reparar el aparato si éste ha sufrido algún tipo de daño, como daños en el cable de
alimentación o en el enchufe, si se ha derramado líquido o han caído objetos dentro
del aparato, si éste ha estado expuesto a la lluvia o a la humedad, si no funciona con
normalidad o si se ha caído.
3
Introducción
Para sacar el máximo partido a nuestro PDA77BU, le recomendamos que lea toda
la información de las instrucciones de uso antes de utilizarlos
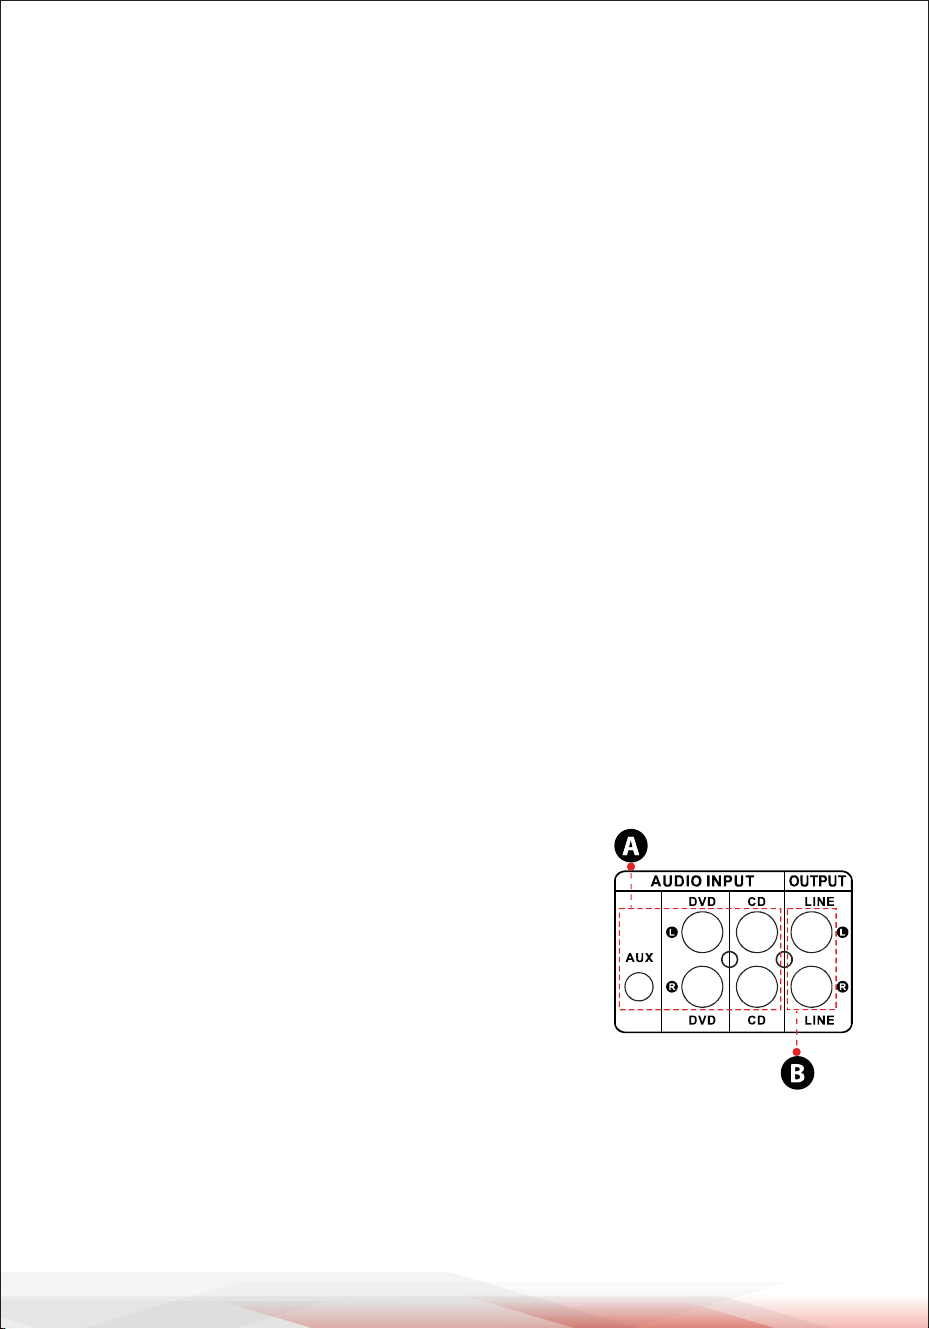
ATENCIÓN
1. A: Conecte la entrada de audio a la salida de
audio del CD/DVD/TV
NOTAS:
• Estas entradas no admiten la señal de vídeo.
Asegúrese de que está conectado el terminal
CD/DVD/TV AUDIO OUTPUT.
• Se oirá ruido si conecta el aparato a la salida
de vídeo de CD/DVD/TV por error
2. B: Salida de señal que puede conectarse a otro amplificador o
altavoces amplificados

www.PyleUSA.com
5
3. RADIO FM
A. Conecte la antena FM antes de utilizar la radio FM.
B. Pulse el botón MODO del panel frontal o del control remoto para seleccionar el
modo FM.
C. Pulse el botón REPRODUCIR/PAUSA en el panel frontal o en el control remoto, y
escaneará automáticamente y buscará emisoras de radio FM de 87,5 Mhz a
108Mhz.
D. Pulse el botón SIGUIENTE/ANTERIOR para seleccionar la emisora FM.
4. CONTROL REMOTO
El mando a distancia te permite acceder a las funciones USB/SD, BT inalámbrico,
DVD, CD, AUX y FM.
A. Por favor, instale dos pilas AAA antes de utilizar el control remoto, de lo contrar-
io el control remoto no funcionará.
B. Los botones de HD1, HD2, OPTI y COAX no funcionan en el modelo PDA70BU.
5. FORMATO DE ARCHIVO
Sólo se admiten los formatos MP3, WMA y WAV para archivos almacenados en
tarjetas USB/SD. El dispositivo puede omitir archivos de pistas no compatibles en
tarjetas USB o SD.
6. PUERTO USB
El puerto USB sólo se utiliza para reproducir archivos de audio desde su memoria USB.
DO NOT use usb port for power supply to other devices as it may
damage the unit to Cause smoke.
Búsqueda por carpetas
• Pulse el botón Carpeta del control remoto para buscar en todas las carpetas de la
unidad USB o de la tarjeta SD. Cada carpeta aparecerá por el número de la pista.
Mostrará las carpetas cronológicamente (desde el momento en que se cargaron
en la unidad USB o tarjeta SD) reproduciendo automáticamente la pista deseada.
• Primero se mostrarán las pistas en el disco raíz y luego las pistas que están en
carpetas.
• Una vez pulsado el botón de carpeta del control remoto, la palabra "F001" comen-
zará a mostrarse en la pantalla. A continuación, pulse el botón siguiente o anterior
para buscar las carpetas dentro de la unidad de disco duro USB/tarjeta SD.
• Saldrá automáticamente después de 3 segundos sin realizar ninguna acción.
• Pulse de nuevo el botón de carpeta para salir.

www.PyleUSA.com
6
A B C D E F
A. BOTÓN DE MODO: Pulse este botón para seleccionar el modo FM, USB, SD, BT,
DVD, CD y AUX. Reproduce automáticamente los archivos después de insertar
una unidad USB o una tarjeta SD.
B. BOTÓN MICROFONO/MUSICA: Pulse este botón para seleccionar el modo
GRAVES/AGUDOS.
A-ENCENDIDO---- Gire los mandos de graves y agudos para ajustar las frecuencias
musicales.
A-APAGADO---Gire los mandos de Graves y Agudos para ajustar las frecuencias
del micrófono.
Aleatorio—reproducir las carpetas en el USB o SD sin ningún patrón regular.
C. BOTÓN EQ: Pulse este botón para seleccionar un modo EQ entre General, Live,
Vbass, POP, Classic, Jazz, Rock y 3D.
D. BOTÓN ANTERIOR: Utilice este botón para seleccionar la pista anterior en
función de los distintos modos, como se indica a continuación.
- En el modo USB/SD: Utilícelo para seleccionar la pista anterior.
- En modo BT inalámbrico: Utilícelo para seleccionar la pista anterior.
- En modo FM: Utilice para seleccionar el canal de radio anterior.
- En Estado de trabajo de la carpeta: Permite seleccionar la carpeta anterior.
E. BOTÓN REPRODUCIR/PAUSAR; Cada pulsación del BOTÓN REPRODUCIR/PAU-
SAR hace que la operación cambie de reproducción a pausa.
Pulse el BOTÓN REPRODUCIR/PAUSAR una vez para escanear automáticamente
todas las frecuencias de 87.5MHz a 108MHz en el modo FM. Pulse el botón para
escanear los canales automáticamente cuando utilice la radio FM por primera
vez. Una vez detenida la exploración, el dispositivo almacena automáticamente
todos los canales de radio y reproduce desde el primer canal de radio. No es
necesario volver a escanear cada vez que se inicia la radio FM.
F. BOTÓN SIGUIENTE: Utilice este botón para seleccionar la pista siguiente en
función de los distintos modos, como se indica a continuación.
- En modo USB/SD: Utilícelo para seleccionar la pista siguiente.
- En modo BT inalámbrico: Utilícelo para seleccionar la pista siguiente.
- En modo FM: Utilice para seleccionar el siguiente canal de radio.
- En Estado de funcionamiento de la carpeta: Utilice para seleccionar Carpeta
siguiente.
BOTÓN DEL PANEL DE CONTROL

www.PyleUSA.com
7
PASOS PARA RECIBIR EMISORAS FM
a-- Por favor, conecte la antena FM al conector FM de la parte posterior del panel, el
otro extremo debe estar en una posición relativamente abierta.
b-- Pulse el botón MODE para entrar en el modo FM.
C-- Pulse el botón REPRODUCIR/PAUSA una vez para buscar automáticamente todas
las frecuencias de 87.5MHz a 108MHz, después de la búsqueda, la unidad
almacenará automáticamente todos los canales de radio.
d--Pulse el BOTÓN PREV o NEXT para seleccionar el canal de radio anterior o
siguiente canal de radio.
Pulse dos dígitos para seleccionar directamente la emisora de
radio en la tienda. Pulse tres o cuatro dígitos para seleccionar
directamente la frecuencia de la emisora de radio entre 87,0-108,0
MHz.
PASOS PARA CONECTARSE A UN DISPOSITIVO BT INALÁM-
BRICO
a--Pulsa el botón MODE o mantenga pulsado el botón BT durante 3 segundos en el
mando a distancia para entrar en modo bluetooth.
b--Busque el dispositivo Bluetooth y encuentra el nombre Bluetooth “PYLEUSA o BT”
c--Seleccione el nombre Bluetooth “PYLEUSA o BT” y espere a que el dispositivo se
empareje.
d--El dispositivo emitirá un sonido confirmando que los dispositivos se han
emparejado correctamente.
e--Una vez emparejado, puede escuchar música desde su dispositivo Bluetooth.
También puede utilizar los botones de control del dispositivo para seleccionar
pistas desde su dispositivo Bluetooth.
f--Utilice los demás controles, reproducción/pausa, pista anterior y pista siguiente
para reproducir audio del BT inalámbrico.

www.PyleUSA.com
8
1.MODO: La pantalla mostrará "USB" cuando esté en modo USB, "SD" cuando
esté en modo tarjeta SD, "BLUE" en modo BLUETOOTH, "87.5-108" en modo FM.
2.Modo de búsqueda de carpetas: Pulse el mando de carpeta/pista, se mostrará
"F001" en la pantalla LED y gire el mando de carpeta/pista para seleccionar una
carpeta.
3.Modo de búsqueda de pista: pulsa los botones anterior y siguiente, el número
de pista actual se mostrará aquí.
4.Tiempo transcurrido: Aquí se muestra el tiempo transcurrido de la pista actual.
5.Muestra la frecuencia FM de la emisora actual.
PANEL FRONTAL Y POSTERIOR
1
2
6 7 8
9
55
4
10
18
19
20
22 24
25
26
27
23
21
11121314151617
3
Pantalla de la consola de control de la USB/tarjeta SD
32
54

www.PyleUSA.com
9
1. Botón de encendido: Este botón enciende y apaga el aparato.
2. Pantalla LCD: Toda la información relativa a los soportes externos o a este dispositivo se
muestran en esta pantalla.
3. Lector de tarjetas SD: Para utilizar unidades externas en este dispositivo, basta con
conectar la tarjeta SD a estos puertos.
4. Puerto USB: Para utilizar unidades externas en este dispositivo, basta con conectar la
memoria USB a estos puertos.
5. BOTÓN DEL PANEL DE CONTROL
6. Mando de control de volumen maestro CHA: Gire este mando para ajustar el nivel de
volumen del canal A (canal izquierdo).
7. Mando de control de volumen maestro CHB: Gire este mando para ajustar el nivel de
volumen del canal B (canal izquierdo).
8. Mando de Control de Volumen Maestro CHC: Gire este mando para ajustar el nivel de
Volumen del Canal C (Canal Derecho).
9. Mando de Control de Volumen Maestro CHD: Gire este mando para ajustar el nivel de
Volumen del Canal D (Canal Derecho).
10. Botón de control del volumen del micrófono: Gire para ajustar el volumen del
micrófono.
11. ENTRADAS DE MICROFONO: KARAOKE o MIC EXTERNO se conectan a estas tomas.
12. Entrada AUX: IPOD/MP3 JACK-IPOD/MP3 se conecta a esta toma.
13. Mando de control de la profundidad de reverberación del micrófono: Gire este
mando para ajustar la profundidad de reverberación del micrófono.
14. Perilla de control del tiempo de retardo del micrófono: Gire esta perilla para ajustar
el tiempo de retardo del micrófono
15. Control de agudos: Gire este mando para ajustar las frecuencias altas de la música. (El
botón MIC/MUSIC controla el cambio entre música y micrófono)
16. Control de graves: Gire este mando para ajustar las frecuencias bajas de la música. (El
botón MIC/MUSIC controla el cambio entre música y micrófono)
17. Regulador del volumen principal: Ajuste el volumen principal.
18. CONECTOR ANTENA FM: Conexión para antena FM.
19. ANTENA BLUETOOTH: Por favor, retire la antena cuando utilice la entrada Bluetooth.
20. ENTRADA DE AUDIO: Conecte las tomas de salida de audio de DVD/CD a estas tomas.
21. ALIDA DE LÍNEA: Conecte las tomas de entrada RECORD a estas tomas.
22. Salida de altavoces de canal D: Conecte su sistema de altavoces a estos terminales.
23. Salida de altavoces del canal C: Conecte su sistema de altavoces a estos terminales.
24. Salida de altavoces del canal B: Conecte su sistema de altavoces a estos terminales.
25. Salida de altavoces del canal A: Conecte su sistema de altavoces a estos terminales.
26. La salida de aire de un ventilador: (No apile ningún otro objeto aquí para evitar que el
viento salga)
27. SELECTOR DE TENSIÓN DE ALIMENTACIÓN: 115V/230V SELECTOR DE TENSIÓN.

www.PyleUSA.com
10
CONTROL REMOTO
1. Mantenga pulsado este botón durante 3 segundos para apagar esta unidad.
Pulse este botón para encender la unidad.
Pulse este botón para entrar al modo de control de carpeta en modo de reproducción
de USB o SD.
2. Pulse de nuevo para salir del control de carpeta.
ATENCIÓN: Cambie a la reproducción USB o SD sólo después de insertar el controlador
Flash USB o la tarjeta SD. Si el flash USB o la Tarjeta SD no están insertados, pulse el
botón USB o SD y la unidad no responderá.
Press EQ MODE to select 8 types Presets EQ effect.
3. Pulse dos botones para ajustar los graves del sonido. GRAVES- reduce la salida de graves,
GRAVES+ aumenta la salida de graves.
4. Pulse dos botones para seleccionar la pista anterior o siguiente en el modo de
funcionamiento USB o SD o BT, para seleccionar la emisora anterior o siguiente en el
modo de funcionamiento FM.
5. Pulse dos botones para ajustar los agudos
del sonido. AGUDOS- reduce la salida de AGUDOS,
GRAVES+ aumenta la salida de AGUDOS.
6. Pulse los números para seleccionar las pistas
directamente. Las unidades tardan 2-3 segundos
en responder en modo USB o SD
7. Pulse este botón para reiniciar el software
de la unidad.
8. Pulse este botón para silenciar el sonido.
9. Función de reproducción y pausa para todos
los modos. Pulse este botón para escanear
automáticamente el canal en modo FM,
y almacenar automáticamente el canal.
ATENCIÓN: La unidad buscará automáticamente
emisoras FM de la frecuencia 88MHz a 108MHz,
esto tomará 2 minutos de espera.
10. Pulse dos botones para subir o bajar el volumen del sonido.
11. Pulse este botón para seleccionar el modo de repetición.
Uno-Repetir el archivo de reproducción actual, Todos-Repetir
todos los archivos de reproducción en el USB o SD. Aleatorio-la
unidad elige cualquier canción para reproducir.
1
2
3
5
4
6
10
9
8
11
7

www.PyleUSA.com
11
Amplificador estéreo BT inalámbrico compacto de 4 canales
Receptor amplificador de audio de escritorio con radio FM, lectores MP3/USB/SD,
pantalla LED digital, entrada de micrófono (800 vatios)
Características:
• Amplificador estéreo de sobremesa BT de 4 canales de potencia de audio
• Receptor estéreo estilo compacto para cine en casa
• Bluetooth integrado para la transmisión inalámbrica de música
• Radio FM con pantalla digital LED
• Selección de entrada de audio multicanal
• Compatible con archivos de audio MP3/WAV/WMA/APE
• Conexión y transmisión de audio desde dispositivos externos
• Unidad flash USB y lector de tarjetas de memoria SD
• Entrada auxiliar de 3,5mm.
• (2) tomas de entrada de micrófono de 1/4''
• (2) pares de conectores de entrada de audio RCA (I/D)
• (8) pares de conectores banana de salida de altavoz
• (1) pares de conectores de salida de audio RCA (I/D)
• Panel frontal del centro de control de audio
• Búsqueda automática y almacenamiento de emisoras de radio
• Funciones de archivo de audio “Repetir uno, Aleatorio y Todo”
• Control de búsqueda de música 'Pista / Carpeta”
• Volumen de agudos, graves, principal y de micrófono ajustable
Contenido de la caja:
• Amplificador estéreo de escritorio
• Control remoto
• Antena FM
• Manual de usuario

www.PyleUSA.com
12
Conectividad Bluetooth:
• Recepción de una señal inalámbrica de radiodifusión sonora
• Configuración sencilla y directa del emparejamiento
• Antena integrada para un mayor alcance inalámbrico
• Funciona con todos los dispositivos más recientes (smartphones, tabletas,
portátiles, ordenadores, etc.)
• Versión Bluetooth: 5.0
• Nombre de la red Bluetooth: 'PYLEUSA o BT'.
• Alcance inalámbrico: 40'+ pies.
Especificaciones técnicas:
• Potencia de salida máxima: 800 vatios (@ 4 Ohmios)
• Potencia de salida RMS: 20 vatios x 4 (@ 8 Ohmios)
• Control de tono: Bajo, frecuencia =100 Hz +/-8 dB
• Respuesta en frecuencia: 20Hz-20kHz
• Ajuste de frecuencia: +/-10 dB
• Relación señal/ruido: >80dB
• T.H.D.: < 0.1%.
• Estaciones de radio sintonizadas: Hasta 60 emisoras
• Control remoto a pilas, requiere dos (2) pilas AAA, no incluidas.
• Grado de separación: >48dB
• Alimentación: 115/230 V, conmutable
• Dimensiones (L x A x A): 35 x 25.4 x 9.9 centímetro
/ 13.8'' x 10.0'' x 3.9'' pulgadas
Advertencia de la Proposición 65 de California
ADVERTENCIA:
Este producto puede exponerlo a sustancias químicas, que el
estado de California reconoce como causantes de cáncer,
defectos congénitos y otros daños reproductivos. No ingerir.
Para obtener más información, visite: www.P65warnings.ca.gov

Registrar Producto
Gracias por elegir PyleUSA. Al registrar su producto, se asegura de
recibir todos los beneficios de nuestra garantía exclusiva y
atención al cliente personalizada. Completa el formulario para
acceder al soporte de expertos y mantener en perfectas condi-
ciones tu compra de PyleUSA.
COMIENCE AQUI
Model Number:
PDA77BU
PyleUSA.com/pages/register
www.PyleUSA.com
13
DECLARACIÓN DE IC:
Este dispositivo cumple con los RSS exentos de licencia de Industry Canada.
Su funcionamiento está sujeto a las dos condiciones siguientes
(1) Este dispositivo no puede causar interferencias; y
(2) Este dispositivo debe aceptar cualquier interferencia, incluidas las
interferencias que puedan causar un funcionamiento no deseado del
dispositivo.
LeprésentappareilestconformeauxCNRd' IndustrieCanadaapplicables
auxappareilsradioexemptsdelicence.L'exploitationestautoriséeauxdeux
conditionssuivantes:
(1)l'appareilnedoitpasproduiredebrouillage,et
(2)l'utilisateurdel'appareildoitacceptertoutbrouillageradioélectriquesubi,
mêmesilebrouillageestsusceptibled'encompromettrelefonctionnement.

Preguntas o comentarios
¡Estamos aquí para ayudar!
Phone: (1) 718-535-1800
PyleUSA.com/ContactUs
Amplificateur audio à 4 canaux
PDA77BUEU - PDA77BUUK
MODE D’EMPLOI
Visitez notre site
Internet
SCANNE MOI
PyleUSA.com
FRE
Veuillez noter que PYLEUSA se réserve le droit d'apporter des modifications à la production
pendant la durée de vie de ses lignes de produits qui peuvent affecter les informations
contenues dans ce manuel.

À propos de PyleUSA
Fondée dans les années 1960, Pyle est devenue un fabricant renommé
de woofers avancés et de haute qualité. Notre aventure a commencé
avec le célèbre Pyle Driver, qui est rapidement devenu un nom incon-
tournable dans le domaine des haut-parleurs d'origine. À la fin du 20e
siècle, nous avons élargi notre gamme pour inclure des haut-parleurs de
remplacement, des équipements audios pour voiture, audio domestique,
audio marin ainsi que des instruments de musique et équipements audio
professionnels sous la marque Pyle Pro.
Pyle Car:
Transformez votre voiture en un environnement d'écoute parfait grâce à
nos haut-parleurs, amplificateurs et unités principales à des prix
compétitifs. Améliorez les haut-parleurs d'usine pour une meilleure
expérience musicale. Découvrez également nos accessoires comme les
systèmes de navigation, lecteurs DVD, interfaces iPod et caméras axées
sur la sécurité.
Pyle Home:
Explorez une gamme de produits pour le divertissement à domicile, y
compris des projecteurs, téléviseurs, supports, et technologies HD.
Pyle Home propose également des mini haut-parleurs à basses améliorées,
des casques, des tourne-disques vintages, des amplificateurs de puissance,
des haut-parleurs à pavillon et bien plus encore pour une expérience
multimédia enrichie, que ce soit à la maison ou en déplacement.
Pyle Pro:
En tant que leader mondial des équipements audio, Pyle Pro répond aux
besoins des musiciens, ingénieurs de studio et amateurs. Nos systèmes de
sonorisation, équipés de microphones sans fil, batteries rechargeables et
stations d'accueil pour iPod/iPhone, sont idéaux pour divers événements.
Découvrez notre nouvelle gamme de guitares, pédales d'effet et conver-
tisseurs USB-analogique, le tout sans jamais compromettre la qualité.
www.PyleUSA.com
2

www.PyleUSA.com
3
2
ATTENTION !
ATTENTION : POUR REDUIRE LE RISQUE DE CHOC ELECTRIQUE, NE RETIREZ PAS LE
COUVERCLE DE CET APPAREIL. L'INTÉRIEUR DE L'APPAREIL NE CONTIENT AUCUNE
PIÈCE RÉPARABLE PAR L'UTILISATEUR. TOUT ENTRETIEN DOIT ÊTRE EFFECTUÉ PAR
UN TECHNICIEN QUALIFIÉ.
1. Lisez attentivement ces instructions avant d'utiliser cet appareil.
2. Conservez ces instructions pour vous y référer ultérieurement.
3. Tenez compte de tous les avertissements.
4. Suivez toutes les instructions.
5. AVERTISSEMENT : Pour éviter tout risque d'incendie ou d'électrocution, n'exposez pas
cet appareil à la pluie ou à l'humidité. Ne pas stocker ou utiliser cet appareil à proxim-
ité de liquides.
6. Nettoyer uniquement avec un chiffon sec.
7. Ne rangez pas et n'utilisez pas ce produit à proximité de sources de chaleur telles que
radiateurs, grilles de chauffage, cuisinières ou autres appareils (y compris les amplifi-
cateurs) produisant de la chaleur.
8. Ne pas aller à l'encontre de l'objectif de sécurité de la prise polarisée ou de la prise de
terre.Une prise polarisée a deux lames, l'une plus large que l'autre. Une prise de terre a
deux lames et une lame ronde. La lame large ou la troisième broche est prévue pour
votre sécurité. Si la prise fournie ne s'adapte pas à votre prise murale, consultez un
électricien pour qu'il remplace la prise obsolète.
9. Protégez tous les câbles connectés à cet appareil contre les piétinements et les
pincements, en particulier au niveau des prises de courant, ainsi qu'à l'endroit où ils
sortent de l'appareil. Lorsque vous retirez le câble d'alimentation de la prise, tirez
directement sur la prise et non sur le câble.
10. Débranchez l'appareil en cas d'orage ou lorsqu'il n'est pas utilisé pendant de longues
périodes.
11. Lors du câblage de cet appareil et de tout autre équipement utilisé en relation avec
lui, assurez-vous que tous vos équipements sont éteints.
12. Une fois l'installation et le câblage terminés, allumez tous vos appareils en orientant
les commandes de volume et de niveau vers le BAS. Une fois que tous les appareils
ont été allumés, relevez lentement les commandes de volume et de niveau jusqu'à
leur position correcte.
13. Lorsque vous raccordez l'appareil à la terre, veillez à le faire correctement afin de ne
pas neutraliser la prise de terre intégrée à l'appareil.
Le symbole de l'éclair avec une flèche, dans un triangle équilatéral, est destiné
à alerter l'utilisateur de la présence d'une tension "DANGEREUSE" à l'intérieur
du produit qui peut être d'une magnitude suffisante pour constituer un risque
d'électrocution pour les personnes. Les utilisateurs doivent faire preuve d'une
extrême prudence lorsque ce symbole apparaît dans ce manuel d'instructions
et respecter toutes les mesures de sécurité.
Le point d'exclamation dans un triangle équilatéral a pour but d'alerter l'utilisa-
teur sur la présence d'importantes instructions d'utilisation et de maintenance
(entretien) dans ce manuel.
www.PyleUSA.com
4
14. Avant de placer, d'installer, de monter ou de suspendre un produit, vérifiez que
l'ensemble du matériel, des suspensions, des boîtiers, des transducteurs, des supports
et de l'équipement associé ne sont pas endommagés. Tout élément manquant,
corrodé, déformé ou non conforme peut réduire considérablement la résistance de
l'installation, du montage ou de la portée. Un tel état réduit considérablement la
sécurité de l'installation et doit être réparé immédiatement. N'utiliser que du matériel
conçu pour les conditions de charge de l'installation et pour toute surcharge imprévue
à court terme. Ne jamais dépasser la capacité nominale du matériel ou de l'équipe-
ment.
15. Consulter un professionnel agréé pour l'installation du matériel. Assurez-vous que
toutes les réglementations locales, régionales et nationales concernant la sécurité et le
fonctionnement de l'équipement sont comprises et respectées.
16. Confiez toutes les réparations à un professionnel qualifié. Une réparation est néces-
saire lorsque l'appareil a été endommagé de quelque manière que ce soit, par exem-
ple lorsque le câble d'alimentation ou la prise sont endommagés, lorsqu'un liquide a
été renversé ou que des objets sont tombés dans l'appareil, lorsque l'appareil a été
exposé à la pluie ou à l'humidité, lorsqu'il ne fonctionne pas normalement ou lorsqu'il
a subi une chute.
Introduction
Pour tirer le meilleur parti de notre PDA77BU, nous vous recommandons de lire
toutes les informations contenues dans le mode d'emploi avant de l'utiliser.
ATTENTION
1. A: Connectez l'entrée audio à la sortie audio du
CD/DVD/TV
NOTAS:
• Ces entrées ne prennent pas en charge les
signaux vidéo. Assurez-vous que la borne
CD/DVD/TVO AUDIO OUTPUT est connectée.
• Des bruits se feront entendre si vous raccordez
par erreur l'appareil à la sortie vidéo CD/DVD/TV.
2. B: Sortie de signal qui peut être connectée à un autre
amplificateur ou à des enceintes amplifiées

www.PyleUSA.com
5
3. RADIO FM
A. Branchez l'antenne FM avant d'utiliser la radio FM.
B. Appuyez sur la touche MODE du panneau avant ou de la télécommande pour
sélectionner le mode FM.
C. Appuyez sur la touche PLAY/PAUSE sur le panneau avant ou sur la télécom-
mande, et l'appareil recherchera automatiquement les stations de radio FM de
87,5 MHz à 108 MHz.
D. Appuyez sur la touche NEXT/PREV pour sélectionner la station FM.
4. TÉLÉCOMMANDE
La télécommande vous permet d'accéder aux fonctions USB/SD, BT sans fil, DVD, CD,
AUX et FM.
A. Veuillez installer deux piles AAA avant d'utiliser la télécommande, sinon elle ne
fonctionnera pas.
B. Les boutons HD1, HD2, OPTI et COAX ne fonctionnent pas sur le modèle PDA70-
BU.
5. FORMAT DU FICHIER
Seuls les formats MP3, WMA et WAV sont pris en charge pour les fichiers stockés sur
les cartes USB/SD. L'appareil peut sauter des fichiers de pistes non prises en charge
sur des cartes USB ou SD.
6. PORT USB
Le port USB est uniquement utilisé pour lire les fichiers audio de votre clé USB.
N'UTILISEZ PAS le port USB pour alimenter d'autres appareils, car cela pour-
rait endommager l'appareil ou même provoquer de la fumée.
Recherche par dossier
• Appuyez sur la touche Dossier de la télécommande pour parcourir tous les dossi-
ers du lecteur USB ou de la carte SD. Chaque dossier est affiché par numéro de
piste. Les dossiers sont affichés chronologiquement (à partir du moment où ils ont
été chargés sur le lecteur USB ou la carte SD) et la piste souhaitée est automa-
tiquement lue.
• Les pistes du disque racine sont d'abord affichées, puis les pistes des dossiers.
• Lorsque vous appuyez sur la touche Dossier de la télécommande, le mot "F001"
commence à s'afficher à l'écran. Appuyez ensuite sur la touche suivante ou précé-
dente pour parcourir les dossiers contenus dans le disque dur USB/la carte SD.
• Il se termine automatiquement après 3 secondes sans aucune action.
• Appuyez à nouveau sur la touche Dossier pour quitter.

www.PyleUSA.com
6
A B C D E F
A. BOUTON MODE : Appuyez sur ce bouton pour sélectionner les modes FM, USB,
SD, BT, DVD, CD et AUX. Lecture automatique des fichiers après l'insertion d'un
lecteur USB ou d'une carte SD.
B. BOUTON MIC/MUSIC : Appuyez sur ce bouton pour sélectionner le mode
BASS/MUSIC.
A-On---- Tournez les boutons des basses et des aigus pour régler les fréquences
musicales.
A-OFF -- Tourner les boutons Bass et Treble pour régler les fréquences du micro-
phone.
Lecture aléatoire : lecture des dossiers sur l'USB ou la carte SD sans schéma
régulier.
C. BOUTON EQ : Appuyez sur ce bouton pour sélectionner un mode d'égalisation
parmi General, Live, Vbass, POP, Classic, Jazz, Rock et 3D.
D. BOUTON PRÉCÉDENT : Utilisez ce bouton pour sélectionner la piste précédente
en fonction des différents modes, comme indiqué ci-dessous.
- En mode USB/SD : Permet de sélectionner la piste précédente.
- En mode sans fil BT : Utilisez cette touche pour sélectionner la piste précédente.
- En mode FM : Utilisez cette touche pour sélectionner le canal radio précédent.
- En mode Dossier en cours : permet de sélectionner le dossier précédent.
E. BOUTON PLAY/PAUSE : Chaque pression sur le bouton PLAY/PAUSE fait passer
l'opération de la lecture à la pause.
Appuyez une fois sur le BOUTON PLAY/PAUSE pour balayer automatiquement
toutes les fréquences de 87,5 MHz à 108 MHz en mode FM. Appuyez sur la touche
pour balayer automatiquement les canaux lorsque vous utilisez la radio FM pour
la première fois. Lorsque le balayage s'arrête, l'appareil mémorise automatique-
ment tous les canaux radio et joue à partir du premier canal radio. Il n'est pas
nécessaire d'effectuer un nouveau balayage à chaque fois que la radio FM
démarre.
F. BOUTON SUIVANT : Utilisez ce bouton pour sélectionner la piste suivante en
fonction des différents modes, comme indiqué ci-dessous.
- En mode USB/SD : Permet de sélectionner la piste suivante.
- En mode BT sans fil : Utilisez cette touche pour sélectionner la piste suivante.
- En mode FM : permet de sélectionner le canal radio suivant.
- En mode dossier en cours : Sélectionnez le Dossier suivant avec.
BOUTON DU PANNEAU DE CONTRÔLE

www.PyleUSA.com
7
ÉTAPES DE LA RÉCEPTION DES STATIONS FM
a-- Connectez l'antenne FM au connecteur FM situé à l'arrière du panneau, l'autre
extrémité doit être dans une position ouverte.
b-- Appuyez sur la touche MODE pour accéder au mode FM.
C-- Appuyez une fois sur le bouton PLAY/PAUSE pour balayer automatiquement
toutes les fréquences de 87.5MHz à 108MHz, après le balayage, l'appareil
mémorisera automatiquement tous les canaux radio.
d-- Appuyez sur le BOUTON PREV ou NEXT pour sélectionner le canal radio
précédent ou suivant.
Appuyez sur deux chiffres pour sélectionner directement la station
de radio. Appuyez sur trois ou quatre chiffres pour sélectionner
directement la fréquence de la station radio entre 87,0 et 108,0
MHz.
TAPES POUR SE CONNECTER À UN APPAREIL BT SANS FIL
a-- Appuyez sur le bouton MODE ou appuyez et maintenez le bouton BT pendant 3
secondes sur la télécommande pour entrer dans le mode Bluetooth.
b-- Cherchez l'appareil Bluetooth et trouvez le nom Bluetooth "PYLEUSA ou BT".
c-- Sélectionnez le nom Bluetooth "PYLEUSA ou BT" et attendez que l'appareil
s'appaire.
d-- L'appareil émet un bip confirmant que les appareils ont été appairés avec succès.
e-- Une fois jumelé, vous pouvez écouter de la musique à partir de votre appareil
Bluetooth. Vous pouvez également utiliser les commandes commande de votre
appareil pour sélectionner des pistes à partir de votre appareil Bluetooth.
f-- Utilisez les autres commandes, lecture/pause, piste précédente et piste suivante
pour lire le son du BT sans fil.

www.PyleUSA.com
8
1.MODE : L'écran affiche "USB" en mode USB, "SD" en mode carte SD, "BLUE" en
mode BLUETOOTH, "87.5-108" en mode FM.
2.Mode de recherche par dossier : Appuyez sur le bouton Folder/Track, "F001"
s'affiche sur l'écran LED et tournez le bouton Folder/Track pour sélectionner un
dossier.
3.Mode de recherche de piste : appuyez sur les boutons précédent et suivant, le
numéro de la piste en cours s'affiche ici.
4.Temps écoulé : Le temps écoulé de la piste en cours est affiché ici.
5.Affiche la fréquence FM de la station actuelle.
PANNEAU AVANT ET ARRIÈRE
1
2
6 7 8
9
55
4
10
18
19
20
22 24
25
26
27
23
21
11121314151617
3
Écran de la console de contrôle de la carte USB/SD
32
54
.

www.PyleUSA.com
9
1. Bouton d'alimentation : ce bouton permet d'allumer et d'éteindre l'appareil.
2. Écran LCD : toutes les informations relatives aux supports externes ou à cet appareil
sont affichées sur cet écran.
3. Lecteur de carte SD : pour utiliser des lecteurs externes dans cet appareil, il suffit de
brancher la carte SD dans ces ports.
4. Port USB : pour utiliser des lecteurs externes dans cet appareil, il suffit de connecter la
clé USB à ces ports.
5. BOUTON DU PANNEAU DE CONTRÔLE
6. Bouton de réglage du volume principal CHA : Tournez ce bouton pour régler le niveau
de volume du canal A (canal gauche).
7. Bouton de réglage du volume principal CHB : Tournez ce bouton pour régler le niveau
de volume du canal B (canal gauche).
8. Bouton de réglage du volume principal CHC : Tournez ce bouton pour régler le niveau
de volume du canal C (canal droit).
9. Bouton de réglage du volume principal CHD : Tournez ce bouton pour régler le
niveau de volume du canal D (canal droit).
10. Bouton de réglage du volume du microphone : tourner pour régler le volume du
microphone.
11. MIC INPUTS : KARAOKE ou EXTERNAL MIC sont connectés à ces prises.
12. Entrée AUX : JACK IPOD/MP3 - L'IPOD/MP3 est connecté à cette prise.
13. Bouton de réglage de la profondeur de l’echo du microphone : Tournez ce bouton
pour régler la profondeur de l’echo du microphone.
14. Bouton de réglage du temps de delai du microphone : Tournez ce bouton pour régler
le temps de delai du microphone.
15. Bouton Treble : Tournez ce bouton pour régler les aigus de la musique. (Le bouton
MIC/MUSIC permet de commuter entre la musique et le microphone).
16. Bouton Bass : Tournez ce bouton pour régler les bass de la musique. (La touche
MIC/MUSIC permet de basculer entre la musique et le microphone).
17. Contrôle du volume principal : permet de régler le volume principal.
18. CONNECTEUR D'ANTENNE FM : Connexion pour l'antenne FM.
19. ANTENNE BLUETOOTH : Veuillez retirer l'antenne lorsque vous utilisez l'entrée
Bluetooth.
20. AUDIO INPUT : Connectez les prises de sortie audio du DVD/CD à ces prises.
21. LINE OUT : Connectez les jacks d'entrée RECORD à ces jacks.
22. Sortie enceinte canal D : Connectez votre système d’enceinte à ces bornes.
23. Sortie enceinte du canal C : Connectez votre système d’enceinte à ces bornes.
24. Sortie enceinte du canal B : Connectez votre système d'enceinte à ces bornes.
25. Sortie enceinte du canal A : Connectez votre système d'enceinte à ces bornes.
26. Sortie d'air d'un ventilateur : (Ne pas empiler d'autres objets à cet endroit pour éviter
que le vent ne s'échappe).
27. SÉLECTEUR DE TENSION D'ALIMENTATION : 115V/230V SÉLECTEUR DE TENSION.

www.PyleUSA.com
10
TÉLÉCOMMANDE
1. Appuyez sur cette touche pendant 3 secondes pour éteindre l'appareil.
Appuyez sur cette touche pour mettre l'appareil en marche.
Appuyez sur cette touche pour accéder au mode de contrôle des dossiers en mode de
lecture USB ou SD.
2. Appuyez à nouveau sur cette touche pour quitter le contrôle des dossiers.
ATTENTION : Ne passez à la lecture USB ou SD qu'après avoir inséré le pilote de la clé
USB ou la carte SD. Si la clé USB ou la carte SD ne sont pas insérée, la touche USB ou SD
et l'appareil ne répondront pas..
Appuyez sur EQ MODE pour sélectionner 8 types d'effets d'égalisation prédéfinis.
3. Appuyez sur deux boutons pour régler les basses du son. BASS- réduit les basses, BASS+
les augmente.
4. Appuyez sur deux boutons pour sélectionner la piste
précédente ou suivante en mode USB, SD ou BT, pour
sélectionner la station précédente ou suivante en mode FM.
5. Appuyez sur ces deux boutons pour régler les
aigus du son. TREBLE- réduit la sortie TREBLE,
TREBLE+ augmente la sortie TREBLE.
6. Appuyez sur les numéros pour sélectionner
directement les pistes. Les appareils mettent
2 à 3 secondes à répondre en mode USB ou SD.
7. Appuyez sur ce bouton pour redémarrer le
logiciel de l'appareil.
8. Appuyez sur ce bouton pour couper le son.
9. Fonction de lecture et de pause pour tous les
modes. Appuyez sur cette touche pour balayer
automatiquement la chaîne en mode FM et la
mémoriser automatiquement.
ATTENTION : L'appareil recherche
automatiquement les stations FM de 88 MHz
à 108 MHz, ce qui prend 2 minutes de temps en veille.
10. Appuyez sur deux boutons pour
augmenter ou diminuer le volume du son.
11. Appuyez sur cette touche pour sélectionner
le mode de répétition. Un : répète le fichier de
lecture en cours, Tous : répète tous les fichiers
de lecture sur USB ou SD. Aléatoire :
l'appareil choisit n'importe quelle musique à lire.
1
2
3
5
4
6
10
9
8
11
7

www.PyleUSA.com
11
Amplificateur stéréo BT sans fil compact à 4 canaux
Récepteur amplificateur audio de bureau avec radio FM, lecteur MP3/USB/SD,
affichage numérique LED, entrée microphone (800 watts)
Caractéristiques :
• Amplificateur de puissance audio stéréo BT de bureau à 4 canaux
• Récepteur stéréo home cinéma compact
• Bluetooth intégré pour la diffusion de musique sans fil
• Radio FM avec affichage numérique à LED
• Sélection de l'entrée audio multicanal
• Compatible avec les fichiers audio MP3/WAV/WMA/APE
• Connexion audio et diffusion en continu à partir d'appareils externes
• Clé USB et lecteur de carte mémoire SD
• Entrée auxiliaire de 3,5 mm.
• (2) prises d'entrée microphone de 1/4 po
• (2) paires de connecteurs d'entrée audio RCA (G/D)
• (8) paires de prises bananes de sortie d’enceinte
• (1) paire de connecteurs de sortie audio RCA (G/D)
• Panneau avant du centre de contrôle audio
• Recherche et mémorisation automatiques des stations de radio
• Fonctions du fichier audio "Répéter un, aléatoire et tous".
• Commande de recherche musicale "Piste / Dossier".
• Volume des aigus et des basses, volume principal et volume du microphone
réglables
Inclus dans le paquet :
• Amplificateur stéréo de bureau
• Télécommande
• Antenne FM
• Mode d’emploi

www.PyleUSA.com
12
Connectivité Bluetooth :
• Réception d'un signal de diffusion sonore sans fil
• Configuration simple et directe de l’appairage
• Antenne intégrée pour une portée sans fil étendue
• Fonctionne avec tous les appareils les plus récents (smartphones, tablettes,
ordinateurs portables, ordinateurs, etc.)
• Version Bluetooth : 5.0
• Nom du réseau Bluetooth : "PYLEUSA ou BT".
• Portée sans fil : 40'+ ft.
Caractéristiques techniques :
• Puissance de sortie maximale : 800 watts (@ 4 Ohms)
• Puissance de sortie RMS : 20 watts x 4 (@ 8 Ohms)
• Réglage de la tonalité : basse, fréquence =100 Hz +/-8 dB
• Réponse en fréquence : 20Hz-20kHz
• Réglage de la fréquence : +/-10 dB
• Rapport signal/bruit : >80dB
• T.H.D. : < 0,1%.
• Stations de radio syntonisées : jusqu'à 60 stations
• Télécommande à piles, nécessite deux (2) piles AAA, non incluses.
• Alimentation : 115/230 V, commutable
• Dimensions (L x L x H) : 35 x 25.4 x 9.9
centimètre
/13.8'' x 10.0'' x 3.9'' pouces
Avertissement Californie Prop 65
AVERTISSEMENT:
Ce produit peut vous exposer à des produits chimiques qui,
selon l'État de Californie, provoquent des cancers, des
anomalies congénitales et d'autres troubles de la
reproduction. Ne pas ingérer.
Pour plus d'informations, voir : www.P65warnings.ca.gov

Enregistrer le produit
Merci d'avoir choisi PyleUSA. En enregistrant votre produit,
vous vous assurez de bénéficier de tous les avantages de notre
garantie exclusive et de notre support client personnalisé.
Remplissez le formulaire pour accéder à l'assistance d'experts et
conserver votre achat PyleUSA en parfait état.
COMMENCEZ ICI
Model Number:
PDA77BU
PyleUSA.com/pages/register
www.PyleUSA.com
13
DÉCLARATION IC :
LeprésentappareilestconformeauxCNRd' IndustrieCanadaapplicables
auxappareilsradioexemptsdelicence.L'exploitationestautoriséeauxdeux
conditionssuivantes:
(1)l'appareilnedoitpasproduiredebrouillage,et
(2)l'utilisateurdel'appareildoitacceptertoutbrouillageradioélectriquesubi,
mêmesilebrouillageestsusceptibled'encompromettrelefonctionnement.

Questions ? Commentaires ?
Nous sommes là pour vous aider !
Téléphone: (1) 718-535-1800
PyleUSA.com/ContactUs
Amplificatore audio a 4 canali
PDA77BUEU - PDA77BUUK
MANUALE UTENTE
VISITA IL
NOSTRO SITO
SCANSIONAMI
PyleUSA.com
Si prega di notare che ci riserviamo il diritto di apportare modifiche alla produzion
durante la vita delle nostre linee di prodotti, che potrebbero influire sulle informazioni
contenute in questo manuale.
ITA

Informazioni su PyleUSA
Pyle è un’Azienda fondata negli anni '60 che si è evoluta fino a diventare
uno dei punti di riferimento nel mercato audio di alta qualità, in particolare
nel campo dei Woofers. Il nostro viaggio è iniziato con l'iconico Pyle Driver,
diventato un nome noto nel settore degli altoparlanti. Alla fine degli anni
2000, abbiamo ampliato la nostra gamma includendo parti di ricambio,
audio per auto, intrattenimento domestico, impianti di bordo infine audio
professionale e strumenti musicali, nella nostra linea Pyle Pro.
Pyle Auto:
Trasforma la tua auto in un ambiente perfetto per un ascolto ai massimi
livelli con i nostri altoparlanti, gli amplificatori ed autoradio a prezzi
competitivi. Porta la tua esperienza musicale a un altro livello sostituen-
do gli altoparlanti di serie con i nostri prodotti di altissima qualità.
Esplora la nostra selezione di accessori, tra cui sistemi di navigazione,
lettori DVD, interfacce per iPod e telecamere di sicurezza.
Pyle Casa:
Immergiti in una nuova dimensione e scopri una vasta gamma di prodot-
ti per l'intrattenimento domestico, tra cui proiettori, TV, supporti e
tecnologie HD. Pyle Home offre mini altoparlanti ad alte prestazioni con
bassi potenti. Inoltre, potrai arricchire la tua esperienza multimediale con
cuffie, giradischi vintage, amplificatori, altoparlanti a tromba e molto
altro per avere sempre il meglio, sia a casa che in viaggio.
Pyle Pro:
Come leader globale nel settore delle attrezzature audio, Pyle Pro ha
pensato specificatamente a musicisti, tecnici del suono ed appassionati
dilettanti. I nostri sistemi PA, dotati di microfoni wireless, batterie ricarica-
bili e dock per iPod/iPhone, sono ideali per l’organizzazione di eventi di
ogni genere e tipologia. Scopri anche la nostra nuovissima linea di
chitarre, pedali per effetti e convertitori da USB ad analogico, sempre con
la massima attenzione alla qualità.
www.PyleUSA.com
2

www.PyleUSA.com
3
2
ATTENZIONE!
AVVISO: PER RIDURRE IL RISCHIO DI SCOSSE ELETTRICHE, NON RIMUOVERE IL
COPERCHIO DI QUESTA UNITÀ. NON CI SONO PARTI RIPARABILI DALL'UTENTE
ALL'INTERNO. RIVOLGERSI AD UN TECNICO QUALIFICATO PER QUALSIASI INTER-
VENTO DI MANUTENZIONE.
1. Leggere attentamente le presenti istruzioni prima di utilizzare questo apparecchio.
2. Conservare queste istruzioni per consultazioni future.
3. Seguire tutte le avvertenze.
4. Seguire tutte le istruzioni.
5. AVVERTENZA: Per evitare scosse elettriche, non esporre l'apparecchio alla pioggia o
all'umidità. Non conservare o utilizzare il prodotto in prossimità di liquidi.
6. Pulire solo con un panno asciutto.
7. Non conservare o utilizzare il prodotto in prossimità di fonti di calore quali radiatori,
termosifoni, stufe o altri apparecchi (compresi gli amplificatori) che producono calore.
8. Non vanificare lo scopo di sicurezza della spina polarizzata o con messa a terra. Una
spina polarizzata ha due lame, una più larga dell'altra. La spina con messa a terra ha
due lame e un polo di messa a terra tondo. La lama larga o il terzo polo sono previsti
per la sicurezza dell'utente. Se la spina in dotazione non è adatta alla presa, rivolgersi
ad un elettricista per la sostituzione della presa obsoleta.
9. Proteggere tutti i cavi collegati a questo apparecchio per evitare che vengano
calpestati o schiacciati, in particolare le spine e il punto in cui escono dall'unità.
Quando si rimuove il cavo dalla presa di corrente, rimuoverlo tenendo la spina e non
tirando il cavo.
10. Scollegare l'apparecchio in caso di temporali o quando rimane inutilizzato per lunghi
periodi di tempo.
11. Durante il cablaggio di questa unità e di tutte le altre apparecchiature utilizzate in
connessione con l'unità stessa, assicurarsi che tutte le apparecchiature siano spente.
12. Una volta completati l'installazione ed il cablaggio, accendere tutte le apparecchia-
ture con i controlli di volume e livello abbassati. Una volta che tutte le apparecchia-
ture sono accese, alzare lentamente i controlli del volume o del livello nella posizione
corretta.
13. Quando si collega l'unità a terra, assicurarsi di farlo correttamente, in modo da non
compromettere la messa a terra incorporata nell'unità.
Il simbolo del fulmine con la freccia in giù all'interno di un triangolo equilatero
è destinato ad avvisare l'utente della presenza di tensione "PERICOLOSA"
all'interno dell'involucro del prodotto che potrebbe essere di entità tale da
costituire un rischio di scossa elettrica per le persone. Gli utenti devono
adottare una maggiore accortezza quando appare questo simbolo nel
manuale di istruzioni e seguire tutte le precauzioni indicate.
Il punto esclamativo all'interno di un triangolo equilatero serve ad avvisare
l'utente della presenza di importanti indicazioni operative per l'uso e la
manutenzione (assistenza) in questo manuale.
www.PyleUSA.com
4
14. Prima di posizionare, installare, armare o sospendere qualsiasi prodotto, ispezionare
tutto l'hardware, le sospensioni, gli armadietti, i trasduttori, le staffe e le attrezzature
associate per verificare che non siano danneggiati. Qualsiasi componente mancante,
corroso, deformato o non idoneo al carico potrebbe ridurre significativamente la
resistenza dell'installazione, del posizionamento o dell'array. Qualsiasi condizione di
questo tipo riduce gravemente la sicurezza dell'installazione e deve essere immediata-
mente corretta. Usare solo ferramenta adatta alle condizioni di carico dell'installazione
e di eventuali sovraccarichi imprevisti e di breve durata. Non superare mai i valori
nominali della ferramenta o dell'apparecchiatura.
15. Consultare un ingegnere professionista autorizzato per quanto riguarda l'installazione
dell'apparecchiatura. Assicurarsi che tutte le norme locali, statali e nazionali relative
alla sicurezza e al funzionamento delle apparecchiature siano comprese e rispettate.
16. Rivolgersi a personale di assistenza qualificato per tutti gli interventi di manutenzione.
L'assistenza è necessaria quando l'apparecchio è stato danneggiato in qualsiasi modo,
ad esempio se il cavo di alimentazione o la spina sono rovinati, se è stato versato del
liquido o sono caduti degli oggetti nell'apparecchio, l'apparecchio è stato esposto alla
pioggia o al sole. l'apparecchio è stato esposto alla pioggia o all'umidità, non funziona
normalmente o è caduto.
Introduzione
Per ottenere il massimo dal nostro PDA77BU, si raccomanda di leggere tutte le
informazioni contenute nel manuale di istruzioni prima di utilizzare l'apparecchia-
tura.
ATTENZIONE
1. A: Collegare l'ingresso audio con l'uscita audio
CD/DVD/TV.
NOTE:
• Non supporta il segnale video, pertanto
assicurarsi che il terminale di uscita audio CD/DVD/
TV sia collegato.
• Se si collega l'unità con l'uscita video
CD/DVD/TV per errore, si sentiranno dei rumori.
2. B: Sortie de signal qui peut être connectée à un autre
amplificateur ou à des enceintes amplifiées

www.PyleUSA.com
5
4
3. PASSAGGI PER IL CONTROLLO DELLA RADIO FM
A. Collegare l'antenna FM prima di utilizzare la radio FM.
B. Premere il pulsante MODE sul pannello frontale o sul telecomando per selezion-
are la modalità FM.
C. Premere il pulsante PLAY/PAUSE sul pannello frontale o sul telecomando per
selezionare la scansione automatica e la stazione radio FM da 87,5Mhz a
108Mhz.
D. Premere il pulsante NEXT/PREV per selezionare la stazione FM.
4. CONTROLLO REMOTO
Il telecomando consente di accedere alle funzioni USB/SD, Wireless BT, DVD, CD,
AUX e FM.
A. Prima di utilizzare il telecomando, installare due batterie AAA, altrimenti il
telecomando non funzionerà.
B. I pulsanti HD1, HD2, OPTI e COAX non funzionano nel modello PDA70BU
5. FORMATO DEI FILE
Per i file memorizzati su USB/SD sono supportati solo i formati MP3, WMA e WAV.
L'unità
potrebbe saltare le tracce non supportate nelle schede USB o SD.
6. PORTA USB
La porta USB viene utilizzata solo per riprodurre i file audio contenuti nella
chiavetta USB
RICERCA CARTELLE
• Premere il pulsante Cartella sul telecomando per cercare tutte le cartelle all'inter-
no dell'unità USB o della scheda SD. Ogni cartella viene visualizzata in base al
numero del brano. La cartella viene visualizzata in ordine cronologico (dal
momento in cui i brani sono stati caricati). Riproduzione automatica della traccia
desiderata.
• Verranno visualizzati prima i brani della cartella principale e poi quelli contenuti
nelle cartelle.
• Una volta premuto il pulsante Cartella sul telecomando, sul display inizierà a
lampeggiare la scritta "F001". Quindi, premere il tasto successivo o precedente per
cercare le cartelle all'interno della chiavetta USB/scheda SD.
• Esce automaticamente dopo 3 secondi senza alcuna azione.
• Premere nuovamente il pulsante della cartella per uscire.
NON utilizzare la porta USB per l'alimentazione di altri dispositivi, in
quanto potrebbe danneggiare l'unità e causare fumo.

www.PyleUSA.com
6
A B C D E F
A. PULSANTE MODALITÀ: premere questo pulsante per selezionare un ingresso
tra FM, USB, SD, BT, DVD, CD e AUX.
Riproduce automaticamente le immagini dopo l'inserimento di una chiavetta
USB o di una scheda SD.
B. PULSANTE MIC/MUSIC:Premere questo pulsante per selezionare la modalità
manopola BASS/TREBLE.
A-ON----Ruotare le manopole Bass e Treble per regolare le frequenze musicali.
A-OFF--Ruotare le manopole dei bassi e degli acuti per regolare le frequenze del
microfono.
Casuale-- riproduce i brani contenuti nell'USB o nella SD senza uno schema
regolare.
C. PULSANTE EQ: premere questo pulsante per selezionare una modalità EQ tra
General, Live, Vbass, POP, Classico, Jazz, Rock e 3D.
D. PULSANTE PRECEDENTE: utilizzare questo pulsante per selezionare la traccia
precedente in base a queste diverse modalità, come indicato di seguito.
- In modalità USB/SD: Utilizzare per selezionare il brano precedente.
- In modalità Wireless BT: Utilizzare per selezionare il brano precedente.
- In modalità FM: Utilizzare per selezionare il canale radio precedente.
- In stato di funzionamento della cartella: Utilizzare per selezionare la cartella
precedente.
E. PULSANTE PLAY/PAUSE: Ogni pressione del PULSANTE PLAY/PAUSE fa passare
l'operazione da riproduzione a pausa.
Premere una volta il PULSANTE PLAY/PAUSE per eseguire la scansione automati-
ca di tutte le frequenze da 87,5MHz a 108 MHz in modalità FM. Premere il
pulsante per eseguire la scansione automatica dei canali quando si usa la radio
FM per la prima volta.
Dopo l'interruzione della ricerca, l'unità memorizza automaticamente tutti i
canali radio e riproduce dal primo canale radio. Non è necessario eseguire
nuovamente la scansione ad ogni avvio della radio FM.
F. PULSANTE SUCCESSIVO: Usare questo pulsante per selezionare il brano
successivo a seconda di queste modalità diverse, come indicato di seguito.
- In modalità USB/SD: Utilizzare per selezionare il brano successivo.
- In modalità Wireless BT: Utilizzare per selezionare il brano successivo.
- In modalità FM: Utilizzare per selezionare il canale radio successivo.
- In Stato di lavoro della cartella: Utilizzare per selezionare la cartella successiva.
PULSANTE DEL PANNELLO DI CONTROLLO

www.PyleUSA.com
7
PASSAGGI PER LA RICEZIONE DELLE STAZIONI
FM DI SCANSIONE
a-- Collegare l'antenna FM alla presa FM sul pannello posteriore, l'altra estremità in
posizione relativamente aperta.
b-- Premere il pulsante MODE per entrare in modalità FM.
c-- Premere una volta il pulsante PLAY/PAUSE per eseguire la scansione automatica
di tutte le frequenze da 87,5 MHz a 108 MHz; dopo la ricerca, l'unità memorizzerà
automaticamente tutti i canali radio.
d-- Premere il PULSANTE PRECEDENTE o il PULSANTE SUCCESSIVO per selezionare il
canale radio precedente o successivo.
Premere due cifre per selezionare direttamente la stazione radio
nel negozio. Premere tre o quattro cifre per selezionare diretta-
mente la frequenza della stazione radio tra 87.0-108.0MHz.
PASSAGGI PER LA CONNESSIONE CON UN DISPOSITIVO BT
WIRELESS
a--Premere il tasto MODE o tenere premuto il tasto BT per 3 secondi sul telecoman-
do per entrare in modalità Bluetooth.
b--Cercare il dispositivo bluetooth e il nome bluetooth "PYLEUSA o BT".
c-Selezionare il nome bluetooth PYLEUSA o BT e attendere che il dispositivo venga
accoppiato.
d- L'unità emetterà un suono per confermare che i dispositivi sono stati accoppiati
con successo.
e--Una volta accoppiato, è possibile riprodurre la musica dal dispositivo bluetooth. È
inoltre possibile utilizzare i pulsanti di controllo dell'unità per selezionare i brani dal
dispositivo bluetooth.
f-- Usare gli altri controlli, play/pausa, traccia precedente e traccia successiva per
riprodurre l'audio da BT senza fili.

www.PyleUSA.com
8
1.MODALITÀ: il display visualizza "USB" quando è impostata la modalità USB, "SD"
quando è impostata la modalità scheda SD, "BLUE" quando è impostata la
modalità BLUETOOTH, "87.5-108" quando è impostata la modalità FM.
2.Modalità di ricerca delle cartelle: Premere i tasti cartella sul telecomando,
"F001" apparirà sul display a LED.
Premere i tasti "next" e "prev" per selezionare una cartella.
3.Modalità di ricerca dei brani: premere i tasti precedente e successivo per
visualizzare il numero del brano corrente.
4.Tempo trascorso: qui viene visualizzato il tempo trascorso della traccia
corrente.
5.Mostra la frequenza FM della stazione corrente.
PANNEAU AVANT ET ARRIÈRE
1
2
6 7 8
9
55
4
10
18
19
20
22 24
25
26
27
23
21
11121314151617
3
Schermo della console di controllo della scheda USB/SD
32
54
.

www.PyleUSA.com
9
1. Interruttore di alimentazione: Premere questo interruttore per accendere e
spegnere l'unità.
2. Schermo LED: tutte le informazioni relative ai supporti esterni o a questo dispositivo
saranno visualizzate da questo schermo.
3. Lettore di schede SD: per utilizzare i supporti esterni su questo dispositivo, è sufficiente
collegare la scheda SD a questa porta.
4. Porta USB: per utilizzare supporti esterni su questo dispositivo, è sufficiente collegare
la USB a questa porta.
5. PULSANTE DEL PANNELLO DI CONTROLLO
6. CHA Manopola di controllo del volume master: ruotare questa manopola per regolare il
livello del volume del canale A (canale sinistro).
7. Manopola di controllo del volume master CHB: ruotare questa manopola per regolare il
livello del volume del canale B (canale sinistro).
8. Manopola di controllo del volume master CHC: ruotare questa manopola per regolare il
livello del volume del canale C (canale destro).
9. Manopola di controllo del volume master CHD: ruotare questa manopola per regolare il
livello del volume del canale D (canale destro).
10. Manopola di controllo del volume del microfono: ruotare questa manopola per
regolare il livello del volume del microfono.
11. INGRESSI PER MICROFONO: A questi si collegano il KARAOKE o il MIC ESTERNO.
12. Ingresso AUX: JACK IPOD/MP3: a questo jack si collega l'iPod/MP3.
13. Manopola di controllo della profondità del riverbero del microfono: ruotare questa
manopola per regolare la profondità del riverbero del microfono.
14. Manopola di controllo del tempo di ritardo del microfono: ruotare questa manopola
per regolare il tempo di ritardo del microfono.
15. Controllo degli acuti: Ruotare questa manopola per regolare le alte frequenze
della musica o del microfono.
(Il pulsante MIC/MUSIC controlla la commutazione tra musica e microfono).
16. Controllo dei bassi: Ruotare questa manopola per regolare le frequenze basse della
musica o del microfono (il pulsante MIC/MUSIC controlla la commutazione tra musica
e microfono).
17. Manopola del volume master: regola il volume master.
18. CONNETTORE ANTENNA FM: consente di collegare l'antenna FM.
19. ANTENNA BLUETOOTH: estrarre l'antenna quando si utilizza l'ingresso Bluetooth.
20. INGRESSO AUDIO: Collegare i jack di uscita audio di DVD/CD a questi jack.
21. USCITA LINEA: Collegare i jack di ingresso RECORD a questi jack.
22. USCITA SPEAKER A CANALE D: Collegare il sistema di altoparlanti a questi terminali.
23. USCITA SPEAKER CANALE C: Collegare il sistema di diffusori a questi terminali.
24. USCITA SPEAKER CANALE B: Collegare il sistema di diffusori a questi terminali.
25. USCITA DI DIFFUSORI DEL CANALE A: Collegare il sistema di diffusori a questi terminali.
26. L'uscita dell'aria di una ventola: (non impilare altri oggetti in questo punto per evitare
al vento di soffiare fuori)
27. SELETTORE DELLA TENSIONE DI ALIMENTAZIONE: 115V/230V SELETTORE DELLA TENSIONE.
www.PyleUSA.com
10
RCONTROLLO A DISTANZA
1. Tenere premuto questo pulsante per 3 secondi per accendere l'unità.
Premere questo pulsante per accendere l'unità. Premere questo pulsante per accedere al
modello di controllo delle cartelle in stato di riproduzione USB o SD.
Premere nuovamente per uscire dal controllo delle cartelle.
2. Premere questi pulsanti per selezionare direttamente la sorgente di ingresso.
ATTENZIONE: Passare alla riproduzione USB o SD solo dopo aver inserito il driver della
memoria USB o la scheda SD. Se l’ USB o la scheda SD non sono inserite, premendo il
pulsante USB o SD l'unità non risponderà.
Premere EQ MODE per selezionare 8 tipi di preset EQ.
3. Premere due pulsanti per regolare i bassi, BASS- riduce l'uscita dei bassi,
BASS+ aumenta l'uscita dei bassi.
4. Appuyez sur deux boutons pour sélectionner la piste précédente ou suivante en mode
USB, SD ou BT, pour sélectionner la station précédente ou suivante en mode FM.
5. Appuyez sur ces deux boutons pour régler les aigus du son. TREBLE- réduit la sortie
TREBLE, TREBLE+ augmente la sortie TREBLE.
6. Appuyez sur les numéros pour sélectionner
directement les pistes. Les appareils mettent
2 à 3 secondes à répondre en mode USB ou SD.
7. Appuyez sur ce bouton pour redémarrer
le logiciel de l'appareil.
8. Appuyez sur ce bouton pour couper le son.
9. Fonction de lecture et de pause pour tous les
modes. Appuyez sur cette touche pour balayer
automatiquement la chaîne en mode FM et
la mémoriser automatiquement.
ATTENTION : L'appareil recherche
automatiquement les stations FM
de 88 MHz à 108 MHz, ce qui prend
2 minutes de temps en veille.
10. Appuyez sur deux boutons pour augmenter
ou diminuer le volume du son.
11. Appuyez sur cette touche pour sélectionner
le mode de répétition. Un : répète le fichier
de lecture en cours, Tous : répète tous les
fichiers de lecture sur USB ou SD. Aléatoire :
l'appareil choisit n'importe quelle musique à lire.
1
2
3
5
4
6
10
9
8
11
7

www.PyleUSA.com
11
Amplificatore stereo wireless compatto a 4 canali BT
Ricevitore amplificatore audio da tavolo con radio FM, lettori MP3/USB/SD,
Display LED digitale, ingresso microfono (800 Watt)
Caratteristiche:
• Amplificatore stereo a 4 canali BT da tavolo
• Ricevitore stereo Home Theater compatto
• Bluetooth integrato per lo streaming musicale senza fili
• Radio FM con display digitale a LED
• Selezione ingresso audio multicanale
• Supporto file audio MP3/WAV/WMA/APE
• Collegamento e streaming audio da dispositivi esterni
• Lettori di unità flash USB e schede di memoria SD
• Ingresso Aux (3,5 mm)
• (2) Jack di ingresso microfonico da 1/4
• (2) coppie di connettori di ingresso audio RCA (L/R)
• (8) Coppie di connettori di uscita per altoparlanti a banana
• (1) Coppia di connettori di uscita audio RCA (L/R)
• Pannello frontale Centro di controllo audio
• Scansione e memorizzazione automatica delle stazioni radio
• Funzioni di file audio: 'Ripeti uno, casuale e tutti'.
• Controllo di ricerca musicale 'Traccia/cartella
• Treble, Bass, Master e volume del microfono regolabili
Cosa contiene la confezione:
• Amplificatore stereo da tavolo
• Telecomando
• Antenna FM
• Manuale d'uso

www.PyleUSA.com
12
Avvertenza California Prop 65
AVVERTENZA:
Questo prodotto può esporre l'utente a sostanze chimiche,
che sono note allo Stato della California per causare cancro,
difetti alla nascita e altri danni alla danni alla riproduzione.
Non ingerire.
Per maggiori informazioni: www.P65warnings.ca.gov
Connettività Bluetooth:
• Riceve il segnale wireless per lo streaming audio
• Impostazione dell'accoppiamento semplice e senza problemi
• Antenna integrata per una maggiore portata wireless
• Funziona con tutti i più recenti dispositivi di oggi
• (smartphone, tablet, laptop, computer, ecc.)
• Versione Bluetooth: 5.0
• Nome della rete Bluetooth: ‘PYLEUSA' o "BT”
• Portata wireless: 12+ Mt.
Specifiche tecniche:
• Potenza di uscita MAX: 800 Watt (@ 4 Ohm)
• Potenza di uscita RMS: 20 Watt x 4 (a 8 Ohm)
• Controllo del tono: Bassi, f=100Hz +/-8dB
• Risposta in frequenza: 20Hz-20kHz
• Regolazione della frequenza: +/-10dB
• Rapporto segnale/rumore: >80dB
• T.H.D.: <0.1%
• Preselezioni di stazioni radio: Fino a 60 stazioni
• Telecomando a batteria, richiede (2) batterie AAA, non incluse.
• Alimentazione: 115/230 V, commutabile
• Dimensioni (L x P x A): 35 x 25.4 x 9.9
centimetro / 13.8'' x 10.0'' x 3.9'' pollici

Registra il prodotto
Grazie per aver scelto PyleUSA. Registrando il vostro prodotto, vi
assicurate di ricevere tutti i vantaggi della nostra garanzia
esclusiva e dell'assistenza clienti personalizzata.
Completate il modulo per accedere all'assistenza di esperti e per
mantenere il vostro acquisto PyleUSA in perfette condizioni.
INIZIA DA QUI
Model Number:
PDA77BU
PyleUSA.com/pages/register
www.PyleUSA.com
13
DECLARACIÓN DE IC:
Este dispositivo cumple con los RSS exentos de licencia de Industry Canada.
Su funcionamiento está sujeto a las dos condiciones siguientes
(1) Este dispositivo no puede causar interferencias; y
(2) Este dispositivo debe aceptar cualquier interferencia, incluidas las
interferencias que puedan causar un funcionamiento no deseado del dispositivo.
LeprésentappareilestconformeauxCNRd' IndustrieCanadaapplicables
auxappareilsradioexemptsdelicence.L'exploitationestautoriséeauxdeux
conditionssuivantes:
(1)l'appareilnedoitpasproduiredebrouillage,et
(2)l'utilisateurdel'appareildoitacceptertoutbrouillageradioélectriquesubi,
mêmesilebrouillageestsusceptibled'encompromettrelefonctionnement..

Domande o Commenti?
Siamo qui per aiutarti!
Phone: (1) 718-535-1800
PyleUSA.com/ContactUs
4-Kanal-Audioverstärker
PDA77BUEU - PDA77BUUK
BENUTZERHANDBUCH
Besuchen Sie
unsere Webseite
SCANNEN
SIE MICH
PyleUSA.com
GER
Bitte beachten Sie, dass sich PYLEUSA das Recht vorbehält, während des Betriebs
unserer Produktlinien Produktionsänderungen vorzunehmen, die die in diesem
Handbuch enthaltenen Informationen beeinflussen können.

Über PyleUSA
Pyle, gegründet in den 1960er Jahren, hat sich zu einem renommierten
Hersteller von hochwertigen, fortschrittlichen Tieftönern entwickelt.
Unsere Reise begann mit dem kultigen Pyle Driver, der zu einem
bekannten Namen für Originallautsprecher wurde. Ende des 20.
Jahrhunderts expandierten wir in die Bereiche Ersatzlautsprecher, Car
Audio, Home Heim-Audio, Marine-Audio und professionelle Audio- und
Musikinstrumente mit unserer unserer Pyle Pro Linie.
Pyle Auto:
Verwandeln Sie Ihr Auto in eine perfekte Hörumgebung mit unseren
preisgünstigen Lautsprechern, Verstärkern und Hauptgeräten. Upgrade
von Werkslautsprechern, um Ihr Musikerlebnis zu verbessern. Entdecken
Sie Zubehör wie Navigationssysteme, DVD-Player, iPod-Schnittstellen
und sicherheitsrelevante Kameras.
Pyle Home:
Entdecken Sie eine Reihe von Home Entertainment-Produkten, darunter
Projektoren, TV-Geräte, Halterungen, Ständer und HD-Technologie.
Pyle Home bietet bassverstärkende Mini-Lautsprecher, Kopfhörer,
Vintage Vintage-Plattenspieler, Leistungsverstärker, Hornlautsprecher
und mehr für ein bereicherndes Medienerlebnis zu Hause und unterwegs.
Pyle Pro:
Als weltweit führender Anbieter von Audiogeräten richtet sich Pyle Pro
an Musiker, Studiotechniker und Amateure. Unsere PA-Systeme,
bestehend aus drahtlose Mikrofone, wiederaufladbare Batterien und
iPod/iPhone-Docks, sind ideal für verschiedene Veranstaltungen.
Entdecken Sie unsere neue Gitarrenlinie, Effektgeräte Pedale und
USB-Analog-Wandler, ohne Kompromisse bei der Qualität einzugehen.
www.PyleUSA.com
2

www.PyleUSA.com
3
2
WARNUNG!
HINWEIS: UM DAS RISIKO EINES STROMSCHLAGS ZU VERRINGERN, DARF DIE
ABDECKUNG DES GERÄTS NICHT ENTFERNT WERDEN. IM INNEREN DES GERÄTS
BEFINDEN SICH KEINE VOM BENUTZER ZU WARTENDEN TEILE. ALLE WARTUNG-
SARBEITEN MÜSSEN VON EINEM QUALIFIZIERTEN TECHNIKER DURCHGEFÜHRT
WERDEN.
1. Lesen Sie diese Anleitung vor der Benutzung des Geräts sorgfältig durch.
2. Bewahren Sie diese Anleitung zum späteren Nachschlagen auf.
3. Achten Sie auf alle Warnhinweise.
4. Befolgen Sie alle Anweisungen.
5. WARNUNG: Um die Gefahr eines Brandes oder elektrischen Schlages zu vermeiden,
setzen Sie dieses Gerät weder Regen noch Feuchtigkeit aus. Lagern oder verwenden
Sie dieses Produkt nicht in der Nähe von Flüssigkeiten.
6. Reinigen Sie es nur mit einem trockenen Tuch.
7. Lagern oder verwenden Sie dieses Produkt nicht in der Nähe von Wärmequellen wie
Heizkörpern, Heizregistern, Herden oder anderen Geräten (einschließlich Verstärkern),
die Wärme erzeugen die Sicherheit eines gepolten oder geerdeten Steckers nicht
gefährden.
8. Ein gepolter Stecker hat zwei Stifte, von denen einer breiter ist als der andere. Ein
geerdeter Stecker hat zwei Stifte und einen runden Stift. Ein breiter Stift oder ein
dritter Stift ist zu Ihrer Sicherheit vorhanden. Wenn der mitgelieferte Stecker nicht in
die Steckdose passt, wenden Sie sich an einen Elektriker, um die veraltete Steckdose
zu ersetzen.
9. Schützen Sie alle Kabel, die an dieses Gerät angeschlossen sind, davor, dass man auf
sie tritt oder sie einklemmt, insbesondere an Steckern, Steckdosen und an der Stelle,
wo sie aus dem Gerät austreten. Wenn Sie den Stecker aus der Steckdose ziehen,
fassen Sie den Stecker an und ziehen Sie nicht am Kabel.
10. Ziehen Sie den Netzstecker bei Gewitter oder wenn Sie das Gerät für längere Zeit
nicht benutzen.
11. Vergewissern Sie sich, dass alle Geräte ausgeschaltet sind, wenn Sie das Gerät und alle
anderen Geräte, die in Verbindung mit dem Gerät verwendet werden, anschließen.
12. Schalten Sie nach Abschluss der Installation und Verkabelung alle Geräte mit den
Lautstärke- und Pegelreglern nach UNTEN gerichtet ein. Sobald alle Geräte einges-
chaltet sind, drehen Sie die Lautstärke- und Pegelregler langsam in die richtige
Position.
13. Achten Sie bei der Erdung des Geräts darauf, dass es korrekt geerdet ist, um den
Zweck der Erdung nicht zu unterlaufen.
Das Blitzsymbol mit einem Pfeil in einem gleichseitigen Dreieck soll den
Benutzer auf das Vorhandensein von "GEFÄHRLICHER" Spannung innerhalb
des Gehäuses des Produkts hinweisen, die hoch genug sein kann, um das
Risiko eines elektrischen Schlags für Personen darzustellen. Wenn dieses
Symbol in diesem Handbuch erscheint, sollten die Benutzer äußerste Vorsicht
walten lassen und alle Sicherheitsvorkehrungen beachten.
Das Ausrufezeichen im gleichseitigen Dreieck soll den Benutzer auf wichtige
Bedienungs- und Wartungsanweisungen in dieser Anleitung aufmerksam
machen.

www.PyleUSA.com
4
14. Bevor Sie ein Produkt aufstellen, installieren, sichern oder aufhängen, überprüfen Sie
alle Geräte, Aufhänger, Gehäuse, Wandler, Halterungen und zugehörige Ausrüstung
auf Schäden. Fehlende, korrodierte, verformte oder nicht konforme Komponenten
können die Festigkeit der Installation, der Aufhängung oder des Netzes erheblich
verringern. Ein solcher Zustand verringert die Sicherheit der Anlage erheblich und
muss sofort behoben werden. Verwenden Sie nur Geräte, die für die Belastungsbedin-
gungen der Anlage und unvorhergesehene kurzfristige Überlastungen ausgelegt sind.
Überschreiten Sie niemals die Nennbelastbarkeit des Materials oder der Ausrüstung.
15. Wenden Sie sich bei der Installation von physikalischen Geräten an einen zugelass-
enen Fachmann. Vergewissern Sie sich, dass alle lokalen, regionalen und nationalen
Vorschriften zur Sicherheit und zum Betrieb der Geräte verstanden und befolgt
werden.
16. Überlassen Sie alle Wartungsarbeiten qualifiziertem Personal. Eine Wartung ist
erforderlich, wenn das Gerät in irgendeiner Weise beschädigt wurde, z. B. wenn das
Netzkabel oder der Stecker beschädigt ist, wenn Flüssigkeit oder Gegenstände in das
Gerät eingedrungen sind, wenn das Gerät Regen oder Feuchtigkeit ausgesetzt war,
wenn es nicht normal funktioniert oder wenn es heruntergefallen ist.
Einführung
Damit Sie unser PDA77BU optimal nutzen können, empfehlen wir Ihnen, alle
Informationen in diesem Handbuch zu lesen, bevor Sie es verwenden.
HINWEIS
1. A: Schließen Sie den Audioeingang an den
Audioausgang des CD/DVD/TV-Players an
WICHTIG:
• Diese Eingänge unterstützen keine Videosignale.
Vergewissern Sie sich, dass der Anschluss CD/DVD/
TV AUDIO OUTPUT angeschlossen ist
• Wenn Sie das Gerät versehentlich an den CD/DVD/
TV-Videoausgang anschließen, ist ein Rauschen zu hören
2. B: Signalausgang, der an einen anderen Verstärker oder
verstärkte Lautsprecher angeschlossen werden kann

www.PyleUSA.com
5
4
3. UKW-RADIO
A. Schließen Sie die UKW-Antenne an, bevor Sie das UKW-Radio benutzen.
B. Drücken Sie die MODE-Taste an der Vorderseite oder auf der Fernbedienung, um
den FM-Modus auszuwählen.
C. Drücken Sie die Taste PLAY/PAUSE an der Vorderseite oder auf der Fernbedi-
enung, um automatisch nach UKW-Radiosendern zwischen 87,5 MHz und 108
MHz zu suchen.
D. Drücken Sie die Taste NEXT/PREV, um einen UKW-Sender auszuwählen.
4. FERNSTEUERUNG
Die Fernbedienung ermöglicht den Zugriff auf die Funktionen USB/SD, BT
Wireless, DVD, CD, AUX und FM.
A. Legen Sie zwei AAA-Batterien ein, bevor Sie die Fernbedienung benutzen, sonst
funktioniert sie nicht.
B. Die Tasten HD1, HD2, OPTI und COAX funktionieren nicht auf dem PDA70BU.
5. DATEIFORMAT
Für Dateien, die auf USB/SD-Karten gespeichert sind, werden nur die Formate
MP3, WMA und WAV unterstützt. Das Gerät überspringt möglicherweise Dateien
von nicht unterstützten Titeln auf USB- oder SD-Karten.
6. USB-ANSCHLUSS
Der USB-Anschluss wird nur für die Wiedergabe von Audiodateien von einem
USB-Stick verwendet.
SUCHE IN ORDNERN
• Drücken Sie die Taste "Ordner" auf der Fernbedienung, um alle Ordner auf dem
USB-Laufwerk oder der SD-Karte zu durchsuchen. Jeder Ordner wird nach
Titelnummer angezeigt. Die Ordner werden chronologisch angezeigt (ab dem
Zeitpunkt, an dem sie auf das USB-Laufwerk oder die SD-Karte geladen wurden),
wobei automatisch der gewünschte Titel abgespielt wird.
• Die Titel auf dem Hauptlaufwerk werden zuerst angezeigt, gefolgt von den Titeln
in den Ordnern.
• Wenn Sie die Ordnertaste auf der Fernbedienung drücken, wird zunächst das Wort
"F001" auf dem Bildschirm angezeigt. Drücken Sie dann die nächste oder vorher-
ige Taste, um die Ordner auf der USB-Festplatte/SD-Karte zu durchsuchen.
• Der Vorgang wird nach 3 Sekunden automatisch beendet, ohne dass eine Aktion
durchgeführt wurde.
• Drücken Sie zum Beenden erneut die Ordnertaste.
Verwenden Sie den USB-Anschluss NICHT, um andere Geräte mit Strom zu
versorgen, da dies zu Schäden am Gerät oder sogar zu Rauch führen kann.

www.PyleUSA.com
6
A B C D E F
A. MODUS-TASTE: Drücken Sie diese Taste, um die Modi FM, USB, SD, BT, DVD, CD und
AUX auszuwählen. Gibt automatisch Dateien wieder, wenn ein USB-Laufwerk oder
eine SD-Karte eingesteckt ist.
B. MIKROFON-/MUSIKTASTE: Drücken Sie diese Taste, um den BASS/TREBLE-Modus
auszuwählen.
-A-ON---- Drehen Sie die Bass- und Treble-Regler, um die Musikfrequenzen einzustel-
len.
-A-OFF---Drehen Sie die BASS- und TREBLE-Regler, um die Mikrofonfrequenzen
einzustellen.
-Shuffle--Wiedergabe von Ordnern auf USB oder SD ohne ein regelmäßiges Muster.
C. ASTE EQ: Drücken Sie diese Taste, um den EQ-Modus aus General, Live, Vbass, POP,
Classic, Jazz, Rock und 3D auszuwählen.
D. VORHERIGE TASTE: Verwenden Sie diese Taste, um den vorherigen Titel in den
verschiedenen Modi auszuwählen (siehe unten).
-Im USB/SD-Modus: Verwenden Sie diese Taste, um den vorherigen Titel auszuwählen.
-Im BT-Wireless-Modus: Verwenden Sie diese Taste, um den vorherigen Titel auszwählen.
-Im FM-Modus: Verwenden Sie diese Taste, um den vorherigen Radiokanal auszwählen.
-Im Ordner-Modus: Zum Auswählen des vorherigen Ordners.
E. PLAY/PAUSE-TASTE: Jedes Mal, wenn die Taste gedrückt wird WIEDERGABE/PAUSE
wechselt der Modus von Wiedergabe auf Pause.
Drücken Sie die Taste PLAY/PAUSE einmal, um im FM-Modus automatisch alle
Frequenzen von 87,5 MHz bis 108 MHz zu durchsuchen. Drücken Sie die Taste, um bei
der ersten Benutzung des UKW-Radios automatisch Kanäle zu suchen. Wenn der
Suchlauf abgeschlossen ist, speichert das Gerät automatisch alle Radiokanäle und
startet die Wiedergabe ab dem ersten Radiokanal. Sie müssen nicht jedes Mal, wenn
Sie das UKW-Radio einschalten, einen neuen Suchlauf durchführen.
F. NÄCHSTE TASTE: Verwenden Sie diese Taste zur Auswahl des nächsten Titels in den
verschiedenen Modi (siehe unten).
-Im USB/SD-Modus: Verwenden Sie diese Taste, um den nächsten Titel auszuwählen.
-Im BT-Wireless-Modus: Verwenden Sie diese Taste, um den nächsten Titel auszuwählen.
-Im FM-Modus: Verwenden Sie diese Taste, um den nächsten Radiokanal auszuwählen.
-Im Ordner-Modus: Mit wählen Sie den nächsten Ordner aus.
BEDIENFELDTASTE

www.PyleUSA.com
7
SCHRITTE FÜR DEN EMPFANG VON UKW-SENDERN
a-- Schließen Sie die UKW-Antenne an den UKW-Anschluss auf der Rückseite des
Geräts an, das andere Ende sollte relativ offen sein.
b-- Drücken Sie die MODE-Taste, um den FM-Modus zu aktivieren.
C-- Drücken Sie die Taste PLAY/PAUSE einmal, um automatisch alle Frequenzen von
87,5 MHz bis 108 MHz zu scannen. Wenn der Scanvorgang abgeschlossen ist,
speichert das Gerät automatisch alle Radiokanäle.
d- Drücken Sie die Taste PREV oder NEXT, um den vorherigen oder nächsten Radi-
okanal zu wählen.
Drücken Sie zwei Ziffern, um einen Radiosender im Geschäft direkt
auszuwählen. Drücken Sie drei oder vier Ziffern, um einen
Radiosender im Frequenzbereich 87,0-108,0 MHz direkt auszu-
wählen.
SCHRITTE ZUR VERBINDUNG MIT EINEM DRAHTLOSEN
BT-GERÄT
a--Drücken Sie die MODE-Taste oder halten Sie die BT-Taste auf der Fernbedienung 3
Sekunden lang gedrückt, um den Bluetooth-Modus zu aktivieren.
b--Suchen Sie nach dem Bluetooth-Gerät und finden Sie den Bluetooth-Namen
"PYLEUSA oder BT".
c--Wählen Sie den Bluetooth-Namen "PYLEUSA oder BT" und warten Sie, bis das
Gerät gekoppelt ist.
d--Das Gerät gibt einen Piepton ab, um die erfolgreiche Kopplung der Geräte zu
bestätigen.
e--Nach der Kopplung können Sie Musik von Ihrem Bluetooth-Gerät hören. Sie
können auch die Bedienelemente auf Ihrem Gerät verwenden, um Titel von Ihrem
Bluetooth-Gerät auszuwählen.
f--Verwenden Sie die anderen Bedienelemente, Wiedergabe/Pause, vorheriger Titel
und nächster Titel, um Audio von Ihrem drahtlosen BT-Gerät abzuspielen.

www.PyleUSA.com
8
1.MODE: Das Display zeigt "USB" im USB-Modus, "SD" im SD-Karten-Modus,
"BLUE" im BLUETOOTH-Modus, "87.5-108" im FM-Modus.
2.Ordnersuchmodus: Drücken Sie den Ordner-/Track-Knopf, auf dem LED-Display
wird "F001" angezeigt, und drehen Sie den Ordner-/Track-Knopf, um einen
Ordner auszuwählen.
3.Song-Suchmodus: Drücken Sie die Tasten Previous und Next, um die aktuelle
Titelnummer anzuzeigen.
4.Wiedergabedauer: Hier wird die Wiedergabedauer des aktuellen Titels
angezeigt.
5.Anzeige der UKW-Frequenz des aktuellen Senders.
VORDER- UND RÜCKWAND
1
2
6 7 8
9
55
4
10
18
19
20
22 24
25
26
27
23
21
11121314151617
3
USB/SD-Karten-Steuerkonsolenanzeige
32
54

www.PyleUSA.com
9
1. Netztaste: Mit dieser Taste wird das Gerät ein- und ausgeschaltet.
2. LCD-Anzeige: Auf diesem Bildschirm werden alle Informationen zu den externen Medien
oder zu diesem Gerät angezeigt.
3. SD-Kartenleser: Um externe Laufwerke an diesem Gerät zu verwenden, schließen Sie
einfach eine SD-Karte an diese Anschlüsse an.
4. USB-Anschluss: Um externe Laufwerke an diesem Gerät zu verwenden, schließen Sie
einfach einen USB-Speicherstick an diese Anschlüsse an.
5. BEDIENFELDTASTE
6. Hauptlautstärkeregler CHA: Drehen Sie diesen Regler, um den Lautstärkepegel
von Kanal A (linker Kanal) einzustellen.
7. Hauptlautstärkeregler CHB: Drehen Sie diesen Regler, um den Lautstärkepegel
von Kanal B (linker Kanal) einzustellen.
8. CHC Hauptlautstärkeregler: Drehen Sie diesen Regler, um die Lautstärke von Kanal C
(rechter Kanal) einzustellen.
9. CHD Master-Lautstärkeregler: Drehen Sie diesen Knopf, um den Lautstärkepegel
von Kanal D (rechter Kanal) einzustellen.
10. Mikrofon-Lautstärkeregler: Drehen, um die Mikrofonlautstärke einzustellen.
11. MIKROFONEINGÄNGE: KARAOKE oder EXTERNES MIKROFON wird an diese
Buchsen angeschlossen.
12. AUX IN: IPOD/MP3 JACK - IPOD/MP3 wird an diese Buchse angeschlossen.
13. Mikrofon-Halltiefen-Einstellknopf: Drehen Sie diesen Knopf, um die Nachhalltiefe
des Mikrofons einzustellen.
14. Einstellknopf für die Mikrofonverzögerungszeit: Drehen Sie diesen Regler,
um die Mikrofonverzögerungszeit einzustellen.
15. Höhenregler: Drehen Sie diesen Regler, um die hohen Frequenzen der Musik einzustellen
(der MIC/MUSIC-Regler steuert die Umschaltung zwischen Musik und Mikrofon).
16. Bass-Regler: Drehen Sie diesen Regler, um die tiefen Frequenzen der Musik einzustellen
(der MIC/MUSIC-Regler steuert das Umschalten zwischen Musik und Mikrofon).
17. MAIN VOLUME ADJUSTMENT: Zum Einstellen der Hauptlautstärke.
18. FM-ANTENNENANSCHLUSS: FM-Antennenanschluss.
19. BLUETOOTH ANTENNA: Ziehen Sie die Antenne ab, wenn Sie den
Bluetooth-Eingang verwenden.
20. AUDIO INPUT: Schließen Sie die DVD/CD-Audioausgangsbuchsen an diese Buchsen an.
21. LINE OUTPUT: Verbinden Sie die RECORD-Eingangsbuchsen mit diesen Buchsen.
22. D CHANNEL SPEAKER OUT: Schließen Sie Ihr Lautsprechersystem an diese Buchsen an.
23. C CHANNEL SPEAKER OUT: Schließen Sie Ihr Lautsprechersystem an diese Buchsen an.
24. B CHANNEL SPEAKER OUT: Schließen Sie Ihr Lautsprechersystem an diese Buchsen an.
25. Kanal A Lautsprecherausgang: Schließen Sie das Lautsprechersystem an
diese Buchsen an.
26. Ventilator-Luftauslass: (Stellen Sie keine anderen Gegenstände in diesen Bereich,
um zu verhindern, dass der Wind die Luft herausbläst).
27. NETZSPANNUNGSSCHALTER: 115V/230V SPANNUNGSSCHALTER

www.PyleUSA.com
10
FERNBEDIENUNG
1. Halten Sie diese Taste 3 Sekunden lang gedrückt, um das Gerät auszuschalten.
Drücken Sie diese Taste, um das Gerät einzuschalten. Drücken Sie diese Taste, um den
Ordnersteuerungsmodus im USB- oder SD-Wiedergabemodus aufzurufen.
2. Drücken Sie erneut, um die Ordnersteuerung zu verlassen.
HINWEIS: Schalten Sie nur dann auf USB- oder SD-Wiedergabe um, wenn ein
USB-Speicherstick oder eine SD-Karte eingesetzt ist. Wenn kein USB-Speicherstick
oder keine SD-Karte eingesteckt ist, drücken Sie die USB- oder SD-Taste, und das Gerät
wird nicht reagieren.
Drücken Sie die EQ MODE-Taste, um 8 voreingestellte EQ-Effekttypen auszuwählen.
3. Drücken Sie die beiden Tasten, um den Bass des Tons einzustellen. BASS- verringert den
Ausgangsbasspegel, BASS+ erhöht den Ausgangsbasspegel.
4. Drücken Sie die beiden Tasten, um den
vorherigen oder nächsten Titel im USB-, SD- oder BT-Modus zu wählen, um den
vorherigen oder nächsten Sender im FM-Modus zu wählen.
5. Drücken Sie die beiden Tasten, um die Höhen einzustellen.
TREBLE- vermindert den TREBLE-Ausgangspegel,
BASS+ erhöht den TREBLE-Ausgangspegel.
6. Drücken Sie die Ziffern, um Titel direkt
auszuwählen. Es dauert 2-3 Sekunden,
bis das Gerät im USB- oder SD-Modus reagiert.
7. Drücken Sie diese Taste, um die Software des
Geräts neu zu starten.
8. Drücken Sie diese Taste, um den Ton
stumm zu schalten.
9. Wiedergabe- und Pausenfunktion für alle Modi.
Drücken Sie diese Taste, um den Kanal im
FM-Modus automatisch zu scannen und den
Kanal automatisch zu speichern.
HINWEIS: Das Gerät sucht automatisch
nach FM-Sendern im Frequenzbereich
von 88 MHz bis 108 MHz, was im
Standby-Modus 2 Minuten dauert.
10. Drücken Sie die beiden Tasten, um die
Lautstärke des Tons zu erhöhen
oder zu verringern.
11.Drücken Sie diese Taste, um den
Wiederholungsmodus auszuwählen.
One - Wiederholung der aktuell abgespielten Datei,
All - Wiederholung aller abgespielten Dateien von
USB oder SD. Shuffle - das Gerät wählt einen
beliebigen Titel zur Wiedergabe aus.
1
2
3
5
4
6
10
9
8
11
7

www.PyleUSA.com
11
Kompakter drahtloser 4-Kanal-BT-Stereo-Verstärker
Audioverstärker-Empfänger mit FM-Radio, MP3/USB/SD-Player, digitaler LED-An-
zeige, Mikrofoneingang (800 W)
Merkmale:
• 4-Kanal-BT-Stereo-Endstufe für Desktop-Computer
• Kompakter Stereo-Verstärker für das Heimkino
• Eingebautes Bluetooth für kabelloses Musikstreaming
• FM-Radio mit digitaler LED-Anzeige
• Mehrkanal-Audioeingangswahl
• Unterstützung von MP3/WAV/WMA/APE-Audiodateien
• Audioverbindung und Streaming von externen Geräten
• USB-Flash-Laufwerk und SD-Speicherkartenleser
• 3,5-mm-Hilfseingang
• (2) 1/4''-Mikrofoneingangsbuchsen
• (2) Paar RCA-Audioeingangsbuchsen (L/R)
• (8) Paare von Bananen-Lautsprecherausgängen
• (1) Paar RCA-Audioausgangsanschlüsse (L/R)
• Frontplatte des Audiokontrollzentrums
• Automatische Suche und Speicherung von Radiosendern
• Wiederholungsfunktionen für einzelne, zufällige und alle Audiodateien
• Steuerung der Musiksuche "Titel/Ordner".
• Einstellung von Höhen, Bässen, Gesamtlautstärke und Mikrofon.
Inhalt der Schachtel:
• Desktop-Stereo-Verstärker
• Fernbedienung
• FM-Antenne
• Benutzerhandbuch

www.PyleUSA.com
12
Warnung zu California Prop 65
WARNUNG:
Dieses Produkt kann Sie Chemikalien aussetzen, von denen im
Bundesstaat Kalifornien bekannt ist, dass sie krebsartige
Geburtsfehler und andere Fortpflanzungsschäden verursachen.
Nicht einnehmen.
Weitere Informationen finden Sie unter: www.P65warnings.ca.gov
Bluetooth-Verbindung:
• Drahtloser Audioempfang
• Einfache und unkomplizierte Pairing-Konfiguration
• Integrierte Antenne für größere kabellose Reichweite
• Funktioniert mit allen aktuellen Geräten (Smartphones, Tablets, Laptops, Comput-
er usw.).
• Bluetooth-Version: 5.0
• Bluetooth-Netzwerkname: "PYLEUSA oder BT".
• Drahtlose Reichweite: 40'+ ft.
Technische Merkmale:
• Maximale Ausgangsleistung: 800 W (an 4 Ohm)
• RMS-Ausgangsleistung: 20 W x 4 (an 8 Ohm)
• Klangregelung: Tief, Frequenz = 100 Hz +/-8 dB
• Frequenzgang: 20 Hz-20 kHz
• Frequenzregler: +/-10 dB
• Signal-Rausch-Verhältnis: >80 dB
• T.H.D.: < 0,1%.
• Abgestimmte Radiosender: bis zu 60 Sender
• Batteriebetriebene Fernbedienung, benötigt zwei (2) AAA-Batterien, nicht im
Lieferumfang enthalten.
• Trennschärfegrad: >48dB
• Stromversorgung: 115/230 V, umschaltbar
• Abmessungen (L x B x H): 35 cm x 25.4 cm x 9.9 Zentimeter
/ 13.8'' x 10.0'' x 3.9'' zoll

Produktregistrierung
Vielen Dank, dass Sie sich für PyleUSA entschieden haben.
Durch die Registrierung Ihres Produkts stellen Sie sicher, dass
Sie die vollen Vorteile unserer exklusiven Garantie und persönli-
chen Kundenunterstützung erhalten. Füllen Sie das Formular
aus, um Zugang zu Expertenunterstützung zu erhalten und
Ihren PyleUSA-Kauf in perfektem Zustand zu halten.
STARTEN SIE HIER
Model Number:
PDA77BU
PyleUSA.com/pages/register
www.PyleUSA.com
13
IC-ERKLÄRUNG:
Dieses Gerät erfüllt die Anforderungen der lizenzfreien RSS von Industry Canada.
Der Betrieb unterliegt den folgenden zwei Bedingungen
(1) Dieses Gerät darf keine Störungen verursachen; und
(2) Dieses Gerät muss alle Interferenzen akzeptieren, einschließlich Interferenzen,
die einen unerwünschten Betrieb des Geräts verursachen können.
LeprésentappareilestconformeauxCNRd' IndustrieCanadaapplicables
auxappareilsradioexemptsdelicence.L'exploitationestautoriséeauxdeux
conditionssuivantes:
(1)l'appareilnedoitpasproduiredebrouillage,et
(2)l'utilisateurdel'appareildoitacceptertoutbrouillageradioélectriquesubi,
mêmesilebrouillageestsusceptibled'encompromettrelefonctionnement..

Fragen oder Kommentare?
Wir sind hier, um zu helfen!
Phone: (1) 718-535-1800
PyleUSA.com/ContactUs
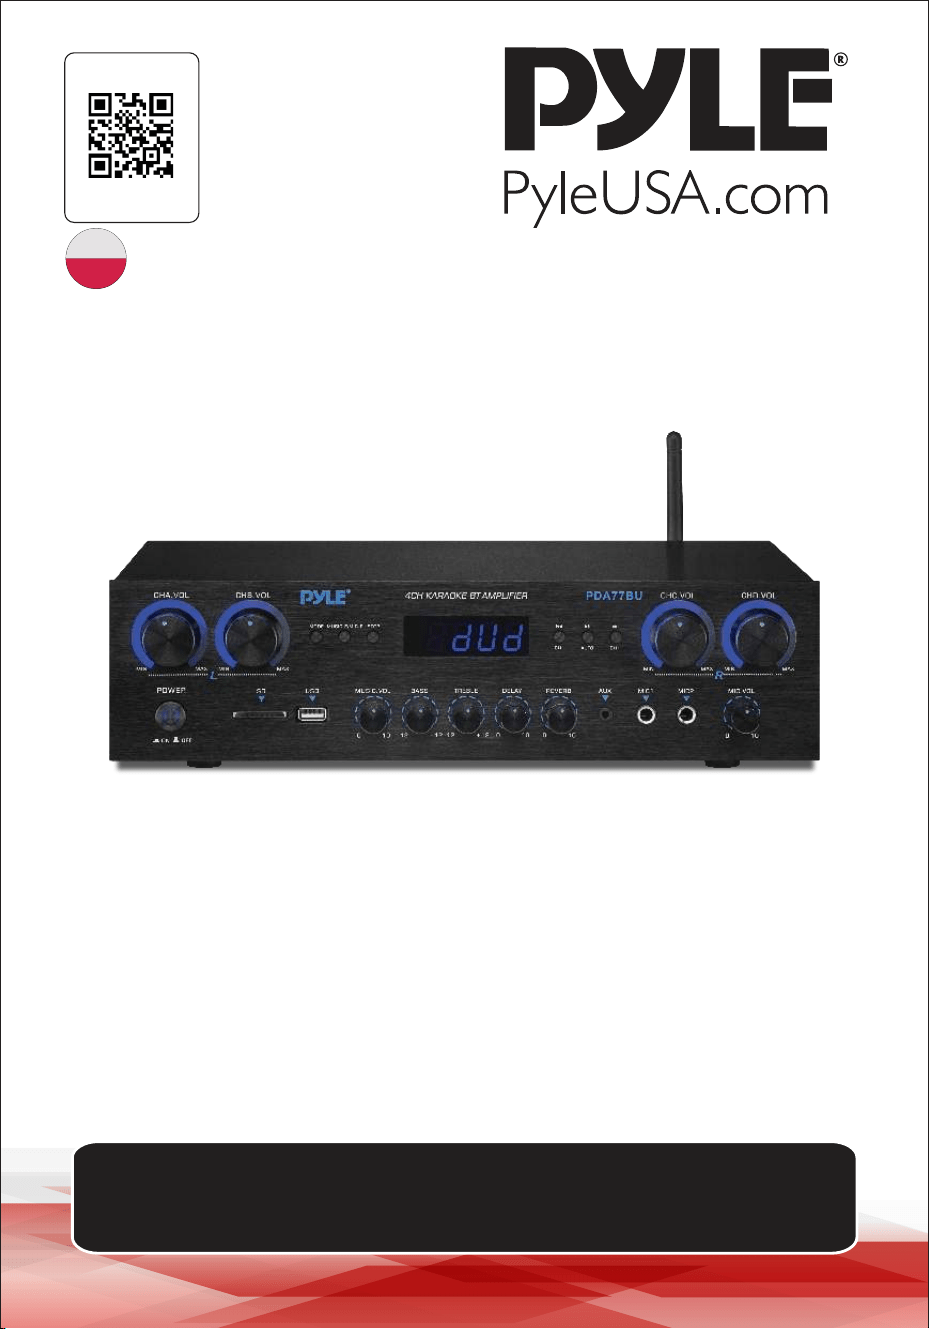
źś
4-kanałowy wzmacniacz audio
PDA77BUEU - PDA77BUUK
INSTRUKCJA OBSŁUGI
ODWIEDŹ NASZĄ
STRONĘ
ZESKANUJ MNIE
PyleUSA.com
POL
Nalezy pamietac, ze PYLEUSA zastrzega sobie prawo do wprowadzania zmian
produkcyjnych w trakcie eksploatacji naszych linii produktów, które moga miec
wpływ na informacje zawarte w niniejszej instrukcji.

O PyleUSA:
Firma Pyle, założona w latach 60-tych XX wieku, stała się renomowanym
producentem wysokiej jakości zaawansowanych głośników niskoto-
nowych. Nasza podróż rozpoczęła się od kultowego głośnika Pyle Driver,
który stał się powszechnie znaną marką oryginalnych głośników. Pod
koniec XX wieku rozszerzyliśmy naszą działalność o głośniki zamienne,
głośniki samochodowe, sprzęt audio do domu, marine audio oraz
profesjonalne audio i instrumenty muzyczne z naszą linią Pyle Pro.
Pyle Car:
Przekształć swój samochód w idealne środowisko odsłuchowe dzięki
naszym konkurencyjnym cenowo głośnikom, wzmacniaczom i radiood-
twarzaczom. Zmodernizuj fabryczne głośniki, aby poprawić swoje wraże-
nia muzyczne. Zapoznaj się z akcesoriami, takimi jak systemy nawigacji,
odtwarzacze DVD, interfejsy iPoda i kamery bezpieczeństwa.
Pyle Home:
Odkryj gamę produktów do domowej rozrywki, w tym projektory, telewi-
zory, uchwyty, stojaki i technologię HD.
Pyle Home oferuje basowe mini głośniki, słuchawki, gramofony vintage,
wzmacniacze mocy, głośniki tubowe i wiele więcej, aby wzbogacić Twoje
wrażenia multimedialne w domu i w podróży.
Pyle Pro:
Jako wiodący dostawca sprzętu audio na świecie, Pyle Pro zaspokaja
potrzeby muzyków, inżynierów studyjnych i amatorów. Nasze systemy
PA, wyposażone w mikrofony bezprzewodowe, akumulatory i stacje
dokujące do iPoda/iPhone'a, są idealne na różne imprezy. Poznaj naszą
nową linię gitar, efektów gitarowych i konwerterów USB-analog. Bez
kompromisów w zakresie jakości.
www.PyleUSA.com
2

www.PyleUSA.com
3
UWAGA:
UWAGA: ABY ZMNIEJSZYĆ RYZYKO PORAŻENIA PRĄDEM, NIE ZDEJMUJ POKRYWY
TEGO URZĄDZENIA. WEWNĄTRZ URZĄDZENIA NIE MA CZĘŚCI, KTÓRE MOGĄ BYĆ
NAPRAWIANE PRZEZ UŻYTKOWNIKA. WSZYSTKIE CZYNNOŚCI SERWISOWE MUSZĄ
BYĆ WYKONYWANE PRZEZ WYKWALIFIKOWANEGO TECHNIKA.
1. Przeczytaj uważnie niniejszą instrukcję przed rozpoczęciem korzystania z urządzenia.
2. Zachowaj niniejszą instrukcję do wykorzystania w przyszłości.
3. Zwróć uwagę na wszystkie ostrzeżenia.
4. Postępuj zgodnie ze wszystkimi instrukcjami.
5. OSTRZEŻENIE: Aby uniknąć ryzyka pożaru lub porażenia prądem, nie wystawiaj
urządzenia na działanie deszczu lub wilgoci. Nie przechowuj ani nie używaj tego
produktu w pobliżu płynów.
6. Czyść tylko suchą szmatką.
7. Nie przechowuj ani nie używaj tego produktu w pobliżu źródeł ciepła, takich jak
grzejniki, rejestratory ciepła, kuchenki lub inne urządzenia (w tym wzmacniacze)
wytwarzające ciepło.
8. Nie naruszaj bezpieczeństwa wtyczki spolaryzowanej lub z uziemieniem.\
Wtyczka spolaryzowana ma dwa ostrza, z których jedno jest szersze od drugiego.
Wtyczka z uziemieniem ma dwa bolce i jeden okrągły. Szeroki bolec lub trzeci bolec
jest przewidziany dla Twojego bezpieczeństwa. Jeśli dostarczona wtyczka nie pasuje
do gniazdka, skonsultuj się z elektrykiem w celu wymiany przestarzałego gniazdka.
9. Chroń wszystkie przewody podłączone do tego urządzenia przed nadepnięciem lub
przytrzaśnięciem, szczególnie przy wtyczkach, gniazdach i w miejscu, w którym
wychodzą z urządzenia. Odłączając przewód zasilający od gniazdka, chwytaj za
wtyczkę, a nie ciągnij za przewód.
10. Odłączaj urządzenie od zasilania podczas burz z wyładowaniami atmosferycznymi lub
gdy nie jest ono używane przez dłuższy czas.
11. Podczas podłączania tego urządzenia i wszelkich innych urządzeń używanych w
związku z nim, upewnij się, że wszystkie urządzenia są wyłączone.
12. Po zakończeniu instalacji i okablowania włącz wszystkie urządzenia z regulatorami
głośności i poziomu skierowanymi w DÓŁ. Po włączeniu wszystkich urządzeń powoli
podnieś regulatory głośności i poziomu do ich prawidłowych pozycji.
13. Podczas uziemiania urządzenia upewnij się, że jest ono prawidłowo uziemione, aby
nie zniweczyć celu uziemienia sprzętu.
Symbol błyskawicy ze strzałką w trójkącie równobocznym ma na celu ostrzeże-
nie użytkownika o obecności "NIEBEZPIECZNEGO" napięcia w obudowie
produktu, które może być wystarczająco duże, aby stanowić ryzyko porażenia
prądem elektrycznym osób. Użytkownicy powinni zachować szczególną
ostrożność, gdy ten symbol pojawia się w niniejszej instrukcji obsługi i
przestrzegać wszystkich środków ostrożności.
Wykrzyknik w trójkącie równobocznym ma na celu zwrócenie uwagi użytkowni-
ka na obecność w niniejszej instrukcji ważnych instrukcji dotyczących obsługi i
konserwacji (serwisowania).
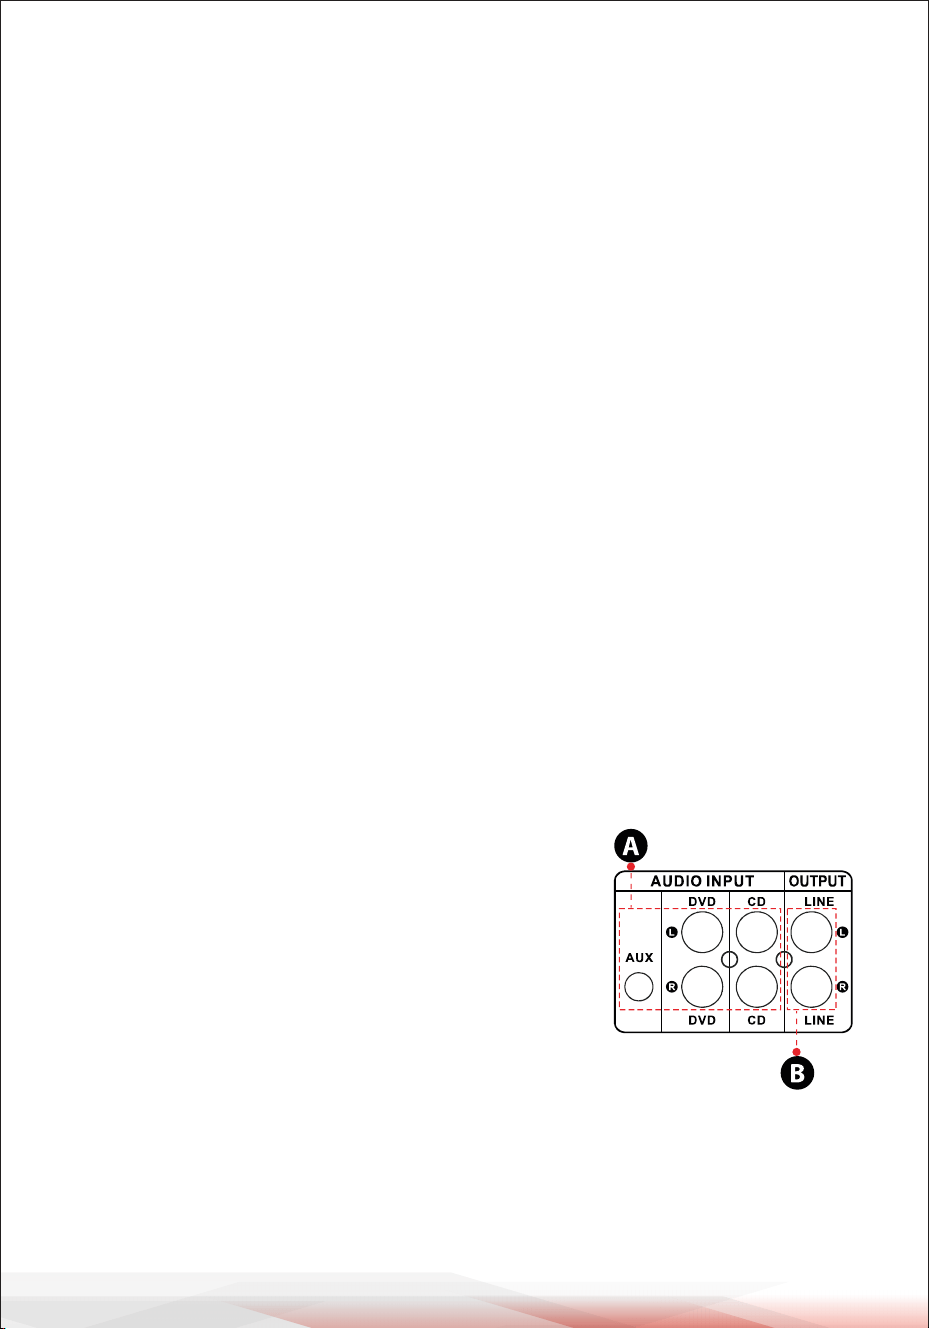
www.PyleUSA.com
4
14. Przed umieszczeniem, zainstalowaniem, zamocowaniem lub zawieszeniem jakiegokol-
wiek produktu, sprawdź cały sprzęt, wieszaki, obudowy, przetworniki, wsporniki i
powiązane wyposażenie pod kątem uszkodzeń. Wszelkie brakujące, skorodowane,
zdeformowane lub niezgodne elementy mogą znacznie zmniejszyć wytrzymałość
instalacji, takielunku lub siatki. Taki stan znacznie zmniejsza bezpieczeństwo instalacji i
musi zostać natychmiast naprawiony. Używaj wyłącznie sprzętu zaprojektowanego z
myślą o warunkach obciążenia instalacji i nieprzewidzianych krótkotrwałych przeciąże-
niach. Nigdy nie przekraczaj znamionowej nośności materiału lub sprzętu.
15. Skonsultuj się z licencjonowanym specjalistą w sprawie instalacji sprzętu fizycznego.
Upewnij się, że wszystkie lokalne, regionalne i krajowe przepisy dotyczące bezpiec-
zeństwa i obsługi sprzętu są zrozumiałe i przestrzegane.
16. Wszelkie czynności serwisowe należy zlecać wykwalifikowanemu personelowi. Serwis-
owanie jest wymagane, gdy urządzenie zostało w jakikolwiek sposób uszkodzone, np.
uszkodzony jest przewód zasilający lub wtyczka, do urządzenia dostała się ciecz lub
przedmioty, urządzenie zostało wystawione na działanie deszczu lub wilgoci, nie działa
normalnie lub zostało upuszczone.
Wprowadzenie
Aby w pełni wykorzystać nasze urządzenie PDA77BU, zalecamy zapoznanie się ze
wszystkimi informacjami zawartymi w instrukcji obsługi przed jego użyciem.
UWAGA
1. A: Podłącz wejście audio do wyjścia audio
odtwarzacza CD/DVD/TV.
WAŻNE:
• Te wejścia nie obsługują sygnału wideo. Upewnij
się, że terminal CD/DVD/TV AUDIO OUTPUT jest
podłączony.
• Jeśli przez pomyłkę podłączysz urządzenie do
wyjścia wideo CD/DVD/TV, słyszalne będą szumy.
2. B: : Wyjście sygnału, które można podłączyć do innego
wzmacniacza lub wzmocnionych głośników.

www.PyleUSA.com
5
3. RADIO FM
A. Przed rozpoczęciem korzystania z radia FM podłącz antenę FM.
B. Naciśnij przycisk MODE na panelu przednim lub pilocie zdalnego sterowania,
aby wybrać tryb FM.
C. Naciśnij przycisk PLAY/PAUSE na panelu przednim lub pilocie zdalnego sterowa-
nia, co spowoduje automatyczne skanowanie i wyszukiwanie stacji radiowych
FM w zakresie od 87,5 MHz do 108 MHz.
D. Naciśnij przycisk NEXT/PREV, aby wybrać stację FM.
4. ZDALNE STEROWANIE
Pilot zdalnego sterowania zapewnia dostęp do funkcji USB/SD, bezprze-
wodowego BT, DVD, CD, AUX i FM.
A. Przed użyciem pilota zainstaluj dwie baterie AAA, w przeciwnym razie pilot nie
będzie działał.
B. Przyciski HD1, HD2, OPTI i COAX nie działają w modelu PDA70BU.
5. FORMAT PLIKU
W przypadku plików zapisanych na kartach USB/SD obsługiwane są wyłącznie
formaty MP3, WMA i WAV. Urządzenie może pomijać pliki z nieobsługiwanych
ścieżek na kartach USB lub SD.
6. PORT USB
Port USB służy wyłącznie do odtwarzania plików audio z pamięci USB.
WYSZUKIWANIE FOLDERÓW
• Naciśnij przycisk Folder na pilocie zdalnego sterowania, aby przeszukać wszystkie
foldery na dysku USB lub karcie SD. Każdy folder zostanie wyświetlony według
numeru ścieżki. Foldery będą wyświetlane chronologicznie (od momentu ich
załadowania do napędu USB lub karty SD), automatycznie odtwarzając żądany
utwór.
• Najpierw zostaną wyświetlone ścieżki na dysku głównym, a następnie ścieżki
znajdujące się w folderach.
• Po naciśnięciu przycisku folderu na pilocie zdalnego sterowania na ekranie
zacznie być wyświetlane słowo "F001". Następnie naciśnij przycisk następny lub
poprzedni, aby przeglądać foldery wewnątrz dysku twardego USB/karty SD.
• Wyjście nastąpi automatycznie po 3 sekundach bez wykonania żadnej czynności.
• Naciśnij ponownie przycisk folderu, aby wyjść.
NIE używaj portu USB do zasilania innych urządzeń, ponieważ może to
spowodować uszkodzenie urządzenia, a nawet dym.
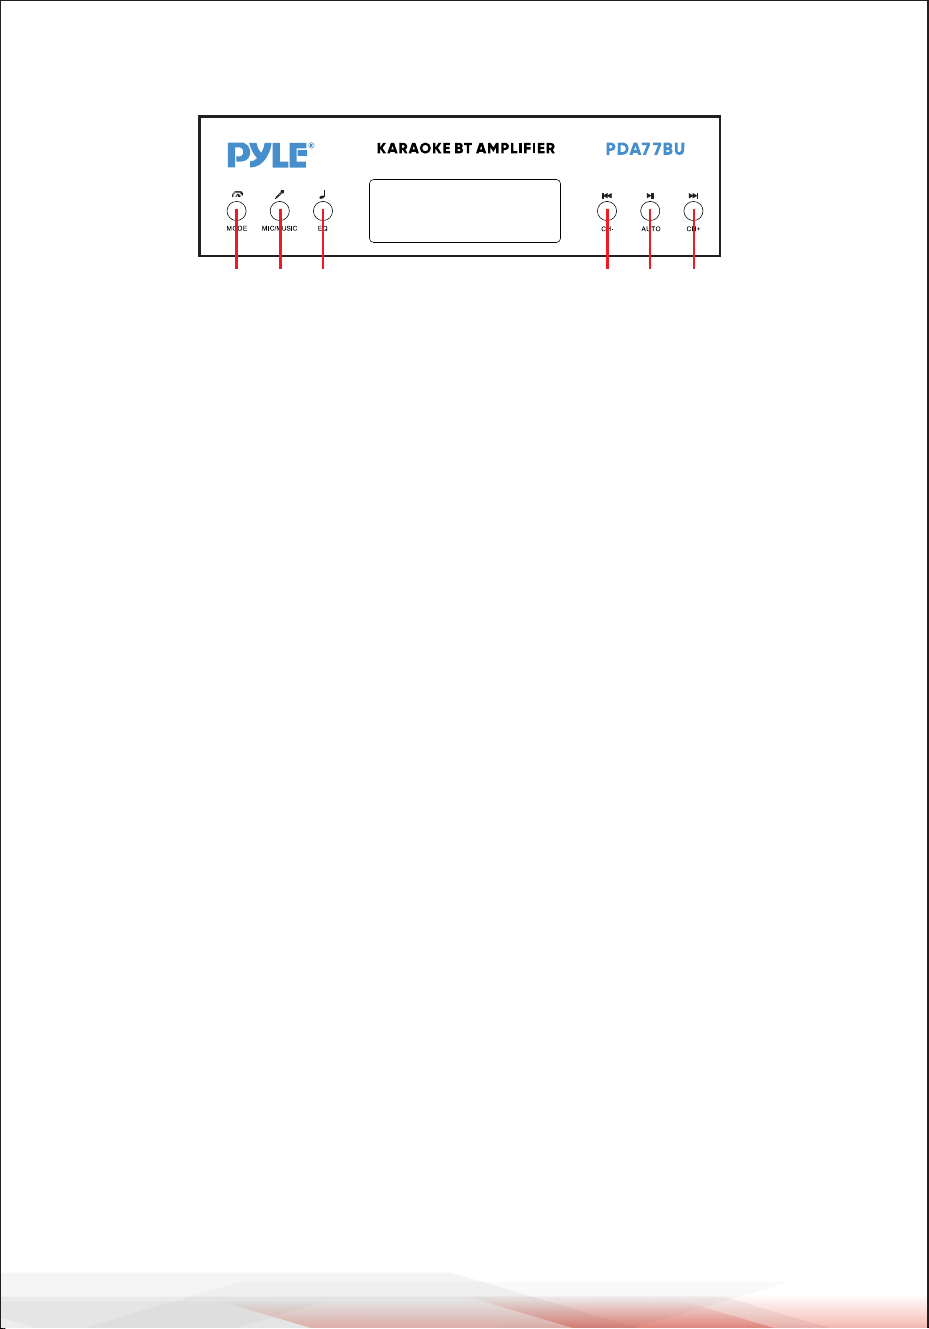
www.PyleUSA.com
6
A B C D E F
A. PRZYCISK TRYBU:Naciśnij ten przycisk, aby wybrać tryb FM, USB, SD, BT, DVD,
CD i AUX. Automatycznie odtwarza pliki po włożeniu napędu USB lub karty SD.
B. PRZYCISK MIKROFONU/MUZYKI: Naciśnij ten przycisk, aby wybrać tryb
BASS/TREBLE.
A-ON---- Obróć pokrętła Bass i Treble, aby wyregulować częstotliwości
muzyczne.
A-OFF---Obróć pokrętła BASS i TREBLE, aby wyregulować częstotliwości
mikrofonu.
Shuffle--Odtwarzaj foldery na USB lub SD bez żadnego regularnego wzorca.
C. PRZYCISK EQ: Naciśnij ten przycisk, aby wybrać tryb EQ spośród General, Live,
Vbass, POP, Classic, Jazz, Rock i 3D.
D. POPRZEDNI PRZYCISK: Użyj tego przycisku, aby wybrać poprzednią ścieżkę
zgodnie z różnymi trybami, jak pokazano poniżej.
- W trybie USB/SD: Użyj, aby wybrać poprzedni utwór.
- W trybie bezprzewodowym BT: Użyj, aby wybrać poprzedni utwór.
- W trybie FM: Użyj, aby wybrać poprzedni kanał radiowy.
- W trybie pracy z folderami: Użyj, aby wybrać poprzedni folder.
E. PRZYCISK ODTWARZANIA/PAUZY; Każde naciśnięcie przycisku ODTWARZA-
NIA/PAUZY powoduje zmianę trybu z odtwarzania na pauzę.
Naciśnij przycisk PLAY/PAUSE jeden raz, aby automatycznie przeskanować
wszystkie częstotliwości od 87,5 MHz do 108 MHz w trybie FM. Naciśnij przycisk,
aby automatycznie przeskanować kanały przy pierwszym użyciu radia FM. Po
zakończeniu skanowania urządzenie automatycznie zapisze wszystkie kanały
radiowe i rozpocznie odtwarzanie od pierwszego kanału radiowego. Nie ma
potrzeby ponownego skanowania przy każdym uruchomieniu radia FM.
F. PRZYCISK NASTĘPNY: Użyj tego przycisku, aby wybrać następną ścieżkę
zgodnie z różnymi trybami, jak pokazano poniżej.
- W trybie USB/SD: Użyj, aby wybrać następny utwór.
- W trybie bezprzewodowym BT: Użyj, aby wybrać następny utwór.
- W trybie FM: Użyj, aby wybrać następny kanał radiowy.
- W trybie folderu: Użyj, aby wybrać następny folder.
PRZYCISK PANELU STEROWANIA

www.PyleUSA.com
7
KROKI DO ODBIORU STACJI FM
a-- Podłącz antenę FM do złącza FM z tyłu panelu, drugi koniec powinien znajdować
się w pozycji względnie otwartej.
b-- Naciśnij przycisk MODE, aby przejść do trybu FM.
C-- Naciśnij przycisk PLAY/PAUSE jeden raz, aby automatycznie przeskanować
wszystkie częstotliwości od 87,5 MHz do 108 MHz, po zakończeniu skanowania
urządzenie automatycznie zapisze wszystkie kanały radiowe.
d- Naciśnij przycisk PREV lub NEXT, aby wybrać poprzedni lub następny kanał
radiowy.
Naciśnij dwie cyfry, aby bezpośrednio wybrać stację radiową w
sklepie. Naciśnij trzy lub cztery cyfry, aby bezpośrednio wybrać
częstotliwość stacji radiowej w zakresie 87,0-108,0 MHz.
KROKI, ABY POŁĄCZYĆ SIĘ Z BEZPRZEWODOWYM
URZĄDZENIEM BT
a--Naciśnij przycisk MODE lub naciśnij i przytrzymaj przycisk BT przez 3 sekundy na
pilocie zdalnego sterowania, aby przejść do trybu Bluetooth.
b--Wyszukaj urządzenie Bluetooth i znajdź nazwę Bluetooth "PYLEUSA lub BT".
c--Wybierz nazwę Bluetooth "PYLEUSA lub BT" i poczekaj na sparowanie urządzenia.
d--Urządzenie wyemituje sygnał dźwiękowy potwierdzający pomyślne sparowanie
urządzeń.
e--Po sparowaniu możesz słuchać muzyki z urządzenia Bluetooth. Możesz także
użyć przycisków sterowania na urządzeniu, aby wybrać utwory z urządzenia Blue-
tooth.
f--Użyj innych elementów sterujących, odtwarzania/pauzy, poprzedniego utworu i
następnego utworu, aby odtwarzać dźwięk z bezprzewodowego urządzenia BT.
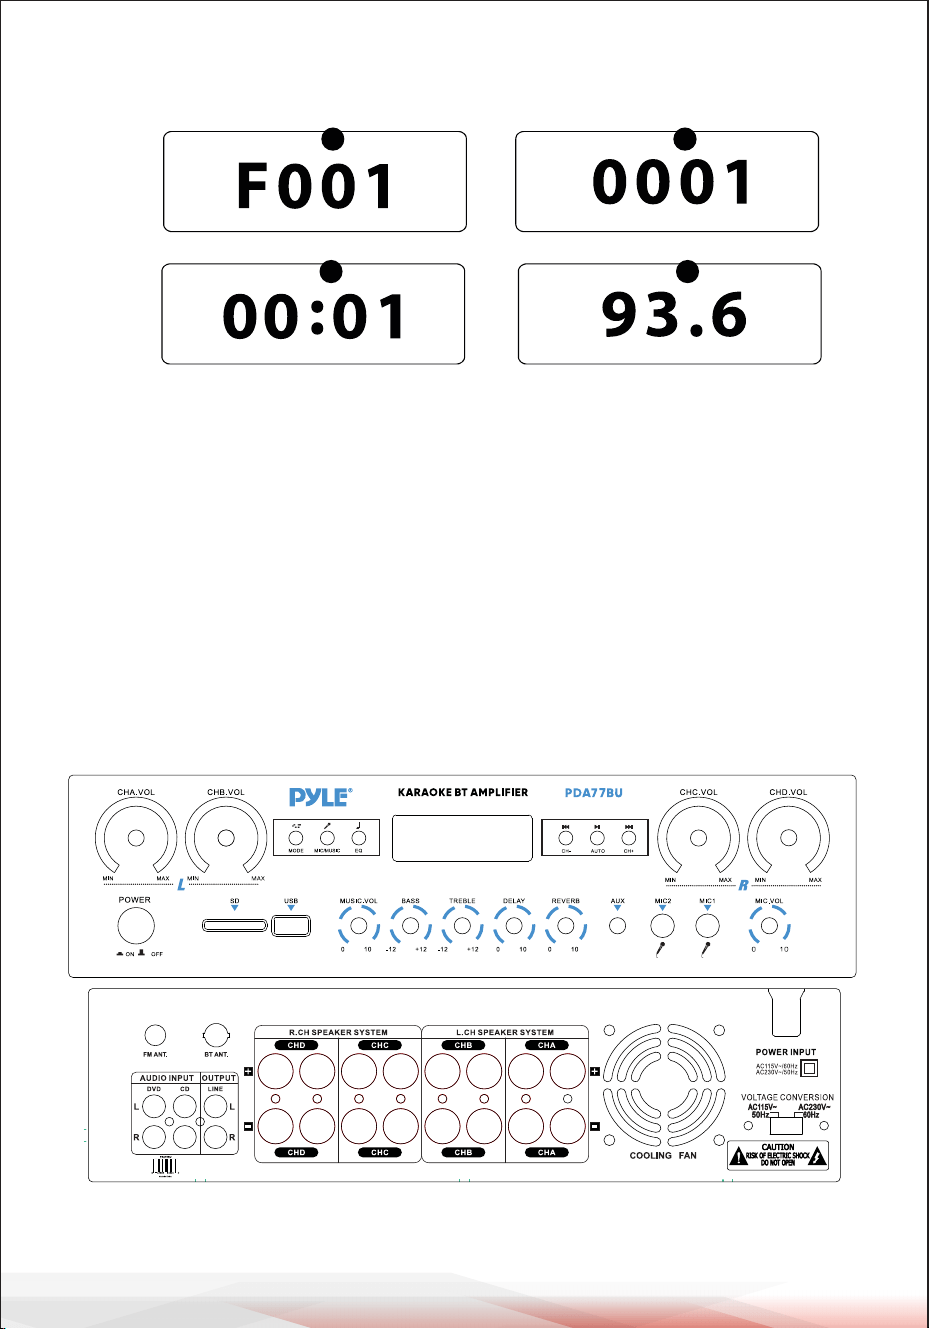
www.PyleUSA.com
8
1.TRYB: Na wyświetlaczu pojawi się "USB" w trybie USB, "SD" w trybie karty SD,
"BLUE" w trybie BLUETOOTH, "87.5-108" w trybie FM.
2.tryb wyszukiwania folderów: Naciśnij pokrętło folderu/ścieżki, na wyświetlaczu
LED pojawi się "F001" i obróć pokrętło folderu/ścieżki, aby wybrać folder.
3.Tryb wyszukiwania utworów: Naciśnij przyciski poprzedni i następny, aby
wyświetlić numer bieżącego utworu.
4.Czas odtwarzania: W tym miejscu wyświetlany jest czas odtwarzania bieżącego
utworu.
5.Wyświetla częstotliwość FM bieżącej stacji.
PANEL PRZEDNI I TYLNY
1
2
6 7 8
9
55
4
10
18
19
20
22 24
25
26
27
23
21
11121314151617
3
Wyświetlacz konsoli sterowania USB/karty SD
32
54

www.PyleUSA.com
9
1. Przycisk zasilania: Ten przycisk włącza i wyłącza urządzenie.
2. Wyświetlacz LCD: Wszystkie informacje dotyczące nośników zewnętrznych lub
tego urządzenia są wyświetlane na tym ekranie.
3. Czytnik kart SD: Aby korzystać z dysków zewnętrznych na tym urządzeniu,
po prostu podłącz kartę SD do tych portów.
4. Port USB: Aby korzystać z dysków zewnętrznych na tym urządzeniu, po prostu
podłącz pamięć USB do tych portów.
5. PRZYCISK PANELU STEROWANIA
6. Główne pokrętło regulacji głośności CHA: Obróć to pokrętło, aby dostosować
poziom głośności kanału A (lewy kanał).
7. Pokrętło regulacji głośności głównej CHB: Obróć to pokrętło, aby wyregulować
poziom głośności kanału B (lewy kanał).
8. Pokrętło regulacji głośności głównej CHC: Obróć to pokrętło, aby wyregulować
poziom głośności kanału C (prawy kanał).
9. Pokrętło regulacji głośności głównej CHD: Obróć to pokrętło, aby wyregulować
poziom głośności kanału D (prawy kanał).
10. Pokrętło regulacji głośności mikrofonu: Obróć, aby wyregulować głośność
mikrofonu.
11. WEJŚCIA MIKROFONÓW: KARAOKE lub ZEWNĘTRZNY MIKROFON podłącza się
do tych gniazd.
12. AUX IN: IPOD/MP3 JACK - IPOD/MP3 jest podłączony do tego gniazda.
13. Pokrętło regulacji głębokości pogłosu mikrofonu: Obróć to pokrętło, aby
wyregulować głębokość pogłosu mikrofonu.
14. Pokrętło regulacji czasu opóźnienia mikrofonu: Obróć to pokrętło, aby
wyregulować czas opóźnienia mikrofonu.
15. Kontrola wysokich tonów: Przekręć to pokrętło, aby wyregulować wysokie
częstotliwości muzyki (pokrętło MIC/MUSIC steruje przełączaniem między
muzyką a mikrofonem).
16. Regulacja tonów niskich: Obróć to pokrętło, aby wyregulować niskie
częstotliwości muzyki (pokrętło MIC/MUSIC steruje przełączaniem między
muzyką a mikrofonem).
17. REGULACJA GŁOŚNOŚCI GŁÓWNEJ: Dostosuj głośność główną.
18. ZŁĄCZE ANTENY FM: Złącze anteny FM.
19. ANTENA BLUETOOTH: Odłącz antenę podczas korzystania z wejścia Bluetooth.
20. AUDIO INPUT: Podłącz gniazda wyjściowe audio DVD/CD do tych gniazd.
21. LINE OUTPUT: Podłącz gniazda wejściowe RECORD do tych gniazd.
22. D CHANNEL SPEAKER OUT: Podłącz swój system głośników do tych gniazd.
23. Wyjście głośnikowe kanału C: Podłącz system głośników do tych gniazd.
24. Wyjście głośnika kanału B: Podłącz zestaw głośników do tych gniazd.
25. Wyjście głośnika kanału A: Podłącz zestaw głośników do tych gniazd.
26. Wylot powietrza wentylatora: (Nie umieszczaj w tym miejscu żadnych innych
przedmiotów, aby zapobiec wydmuchiwaniu powietrza przez wiatr).
27. PRZEŁĄCZNIK NAPIĘCIA ZASILANIA: 115V/230V PRZEŁĄCZNIK NAPIĘCIA.

www.PyleUSA.com
10
ZDALNE STEROWANIE
1. Naciśnij i przytrzymaj ten przycisk przez 3 sekundy, aby wyłączyć urządzenie.
Naciśnij ten przycisk, aby włączyć urządzenie.
Naciśnij ten przycisk, aby przejść do trybu sterowania folderami w trybie odtwarzania z USB
lub SD.
2. Naciśnij ponownie, aby wyjść ze sterowania folderami.
UWAGA: Przełącz na odtwarzanie z USB lub SD tylko po włożeniu sterownika pamięci
USB lub karty SD. Jeśli pamięć USB lub karta SD nie są włożone, naciśnij przycisk USB
lub SD, a urządzenie nie zareaguje.
Naciśnij przycisk EQ MODE, aby wybrać 8 wstępnie ustawionych typów efektów EQ.
3. Naciśnij dwa przyciski, aby dostosować basy dźwięku. BASS- zmniejsza poziom basów na
wyjściu, BASS+ zwiększa poziom basów na wyjściu.
1
2
3
5
4
6
10
9
8
11
7
4. Naciśnij dwa przyciski, aby wybrać poprzedni
lub następny utwór w trybie USB, SD lub BT, aby
wybrać poprzednią lub następną stację w trybie
FM.
5. Naciśnij dwa przyciski, aby wyregulować
wysokie tony dźwięku. TREBLE- zmniejsza
poziom wyjściowy TREBLE, BASS+ zwiększa
poziom wyjściowy TREBLE.
6. Naciskaj cyfry, aby bezpośrednio wybierać
utwory. Odpowiedź urządzenia w trybie USB
lub SD zajmuje 2-3 sekundy.
7. Naciśnij ten przycisk, aby ponownie
uruchomić oprogramowanie urządzenia.
8. Naciśnij ten przycisk, aby wyciszyć dźwięk.
9. Funkcja odtwarzania i pauzy dla wszystkich
trybów. Naciśnij ten przycisk, aby
automatycznie przeskanować kanał w trybie FM
i automatycznie zapisać kanał.
UWAGA: Urządzenie automatycznie wyszuka
stacje FM w zakresie częstotliwości od 88
MHz do 108 MHz, co zajmie 2 minuty w
trybie gotowości.
10.Naciśnij dwa przyciski, aby zwiększyć lub
zmniejszyć głośność dźwięku.
11.Naciśnij ten przycisk, aby wybrać tryb
powtarzania. One - powtórz aktualnie odtwarza-
ny plik, All - powtórz wszystkie odtwarzane pliki
z USB lub SD. Shuffle - urządzenie wybiera
dowolny utwór do odtwarzania.

www.PyleUSA.com
11
Kompaktowy 4-kanałowy bezprzewodowy wzmacniacz stereo BT
Odbiornik wzmacniacza audio z radiem FM, odtwarzaczem MP3/USB/SD,
cyfrowym wyświetlaczem LED, wejściem mikrofonowym (800 W)
Charakterystyka:
• 4-kanałowy stereofoniczny wzmacniacz mocy BT do komputerów stacjonarnych
• Kompaktowy amplituner stereo do kina domowego
• Wbudowany Bluetooth do bezprzewodowego strumieniowania muzyki
• Radio FM z cyfrowym wyświetlaczem LED
• Wybór wielokanałowego wejścia audio
• Obsługa plików audio MP3/WAV/WMA/APE
• Połączenie audio i strumieniowanie z urządzeń zewnętrznych
• Pamięć flash USB i czytnik kart pamięci SD
• Wejście pomocnicze 3,5 mm
• (2) gniazda wejściowe mikrofonu 1/4''
• (2) pary gniazd wejściowych audio RCA (L/R)
• (8) par bananowych wyjść głośnikowych
• (1) pary złączy wyjściowych audio RCA (L/R)
• Panel przedni centrum sterowania audio
• Automatyczne wyszukiwanie i zapisywanie stacji radiowych
• Funkcje powtarzania jednego, losowego i wszystkich plików audio
• Kontrola wyszukiwania muzyki "Ścieżka / Folder".
• Regulacja tonów wysokich, niskich, głośności głównej i mikrofonu
Zawartość pudełka:
• Wzmacniacz stereo do komputera stacjonarnego
• Pilot zdalnego sterowania
• Antena FM
• Instrukcja obsługi

www.PyleUSA.com
12
Łączność Bluetooth:
• Odbiór bezprzewodowego sygnału dźwiękowego
• Prosta i nieskomplikowana konfiguracja parowania
• Zintegrowana antena zapewniająca większy zasięg bezprzewodowy
• Działa ze wszystkimi najnowszymi urządzeniami (smartfony, tablety, laptopy,
komputery itp.)
• Wersja Bluetooth: 5.0
• Nazwa sieci Bluetooth: "PYLEUSA lub BT".
• Zasięg bezprzewodowy: 40'+ ft.
Specyfikacje techniczne:
• Maksymalna moc wyjściowa: 800 W (przy 4 omach)
• Moc wyjściowa RMS: 20 W x 4 (przy 8 Ohm)
• Regulacja barwy dźwięku: Niska, częstotliwość = 100 Hz +/-8 dB
• Pasmo przenoszenia: 20 Hz-20 kHz
• Regulacja częstotliwości: +/-10 dB
• Stosunek sygnału do szumu: >80 dB
• T.H.D.: < 0,1%.
• Dostrojone stacje radiowe: do 60 stacji
• Pilot zdalnego sterowania na baterie, wymaga dwóch (2) baterii AAA, brak w
zestawie.
• Stopień separacji: >48dB
• Zasilanie: 115/230 V, przełączane
• Wymiary (dł. x szer. x wys.): 35 x 25.4 x 9.9 centymetr / 13.8'' x 10.0'' x 3.9'' cale
Ostrzeżenie California Prop 65
OSTRZEŻENIE:
Ten produkt może narazić użytkownika na kontakt z substancjami
chemicznymi, o których wiadomo, że Stanu Kalifornia, że
powodują raka, wady wrodzone i inne szkodliwe działanie na
rozrodczość. Nie połykaj.
Więcej informacji: www.P65warnings.ca.gov

Zarejestruj swój produkt
Dziękujemy za wybranie PyleUSA. Rejestrując swój
produkt, zapewniasz sobie wszystkie korzyści płynące z naszej
ekskluzywnej ekskluzywnej gwarancji i spersonalizowanej
obsługi klienta. Wypełnij formularz, aby uzyskać dostęp do
pomocy ekspertów i utrzymać swój zakup PyleUSA w
idealnym stanie.
ZACZNIJ TUTAJ
Model Number:
PDA77BU
PyleUSA.com/pages/register
www.PyleUSA.com
13
DEKLARACJA IC:
To urządzenie jest zgodne z Industry Canada licence-exempt RSS.
Działanie podlega następującym dwóm warunkom
(1) Urządzenie nie może powodować zakłóceń; oraz
(2) To urządzenie musi akceptować wszelkie zakłócenia, w tym zakłócenia,
które mogą powodować niepożądane działanie urządzenia.
LeprésentappareilestconformeauxCNRd' IndustrieCanadaapplicables
auxappareilsradioexemptsdelicence.L'exploitationestautoriséeauxdeux
conditionssuivantes:
(1)l'appareilnedoitpasproduiredebrouillage,et
(2)l'utilisateurdel'appareildoitacceptertoutbrouillageradioélectriquesubi,
mêmesilebrouillageestsusceptibled'encompromettrelefonctionnement.

Masz pytania lub uwagi?
Jesteśmy tutaj, aby Ci pomóc!
Phone: (1) 718-535-1800
PyleUSA.com/ContactUs
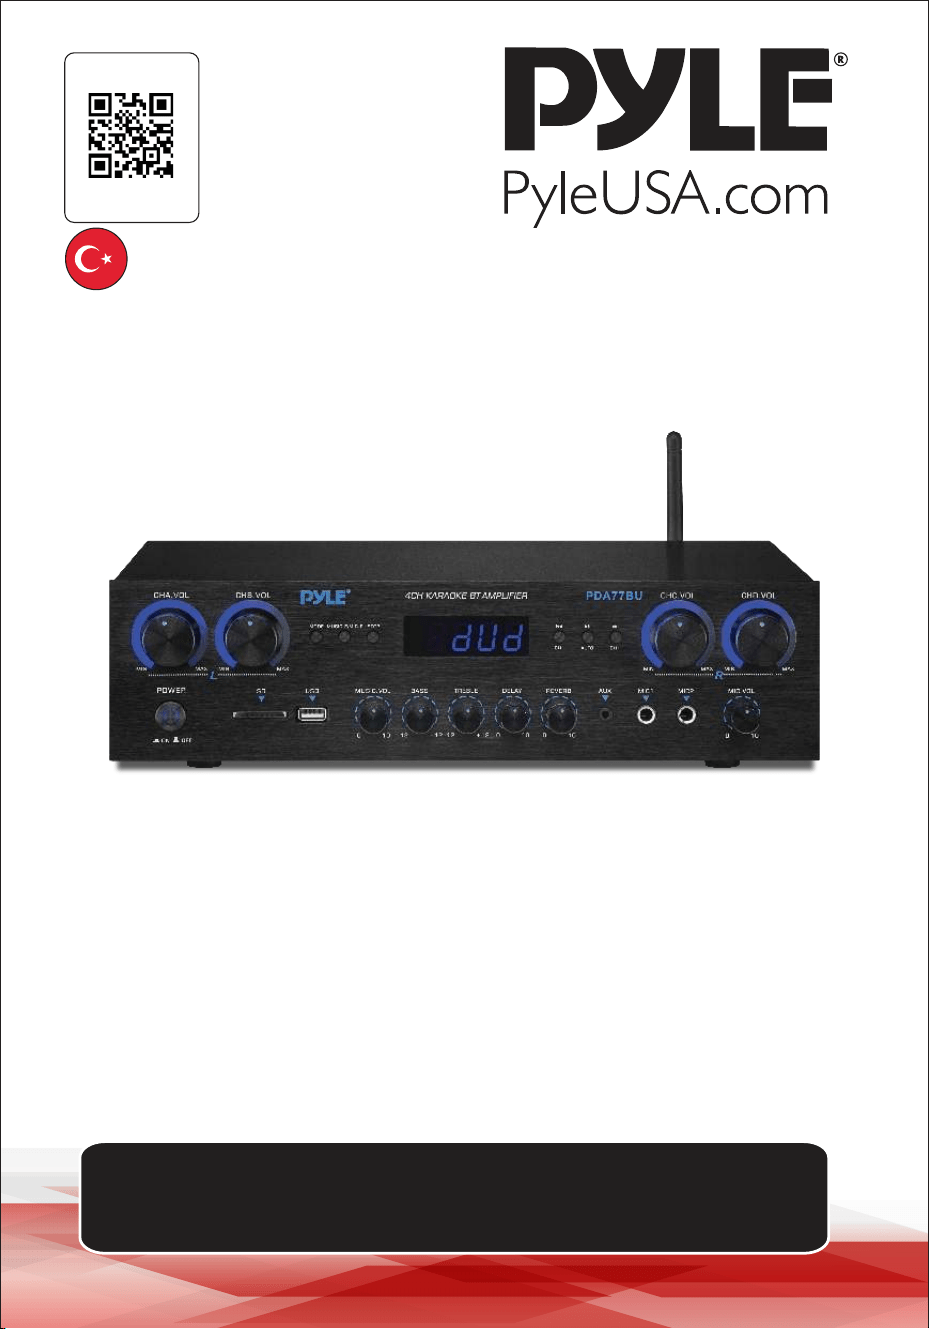
ş
ş
4 Kanallı Ses Amplifikatörü
PDA77BUEU - PDA77BUUK
KULLANICI KILAVUZU
Web Sitemizi
Ziyaret Edin
BENİ TARA
PyleUSA.com
Ürün serilerimizin ömrü boyunca bu kılavuzdaki bilgileri etkileyebilecek
üretim değişiklikleri yapma hakkımızın saklı olduğunu lütfen unutmayın.
TUR

PyleUSA Hakkında
1960'larda kurulan Pyle, yüksek kaliteli modern woofer'ların tanınmış bir
üreticisi haline geldi. Yolculuğumuz, orijinal hoparlör alanında tanınmış
bir isim haline gelen ikonik Pyle Driver ile başladı. 20'nci yüzyılın sonların-
da, Pyle Pro serimizle yedek hoparlörler, araç ses sistemi, ev ses sistemi,
deniz ses sistemi ve profesyonel ses ve müzik enstrümanlarına doğru
genişledik.
Pyle Car:
Uygun fiyatlı hoparlörlerimiz, amplifikatörlerimiz ve ana ünitelerimizle
aracınızı müzik dinlemek için mükemmel bir yere dönüştürün. Müziğiniz-
in kalitesini artırmak için fabrika hoparlörlerinizi yükseltin. Navigasyon
sistemleri, DVD oynatıcılar, iPod arayüzleri ve güvenlik odaklı kameralar
gibi aksesuarları keşfedin.
Pyle Home:
Projektörler, TV'ler, montaj aparatları, standlar ve HD teknolojisi dahil
olmak üzere bir dizi ev eğlence ürününü keşfedin.
Pyle Home, evde ve hareket halindeyken zenginleştirilmiş bir medya
deneyimi için bas genişlemeli mini hoparlörler, kulaklıklar, vintage
pikaplar, güç amplifikatörleri, horn hoparlörler ve daha fazlasını sunar.
Pyle Pro:
Dünya çapında lider ses ekipmanı kaynağı olan Pyle Pro, müzisyenlere,
stüdyo mühendislerine ve amatörlere hitap etmektedir. Kablosuz mikro-
fonlar, şarj edilebilir piller ve iPod/iPhone yuvaları içeren PA Sistemlerimiz
çeşitli etkinlikler için idealdir. Kaliteden ödün vermeden gelişmekte olan
gitar serimizi, efekt pedallarımızı ve USB-analog dönüştürücülerimizi
keşfedin.
www.PyleUSA.com
2

www.PyleUSA.com
3
2
UYARI!
DİKKAT: ELEKTRİK ÇARPMASI RİSKİNİ AZALTMAK İÇİN BU ÜNİTENİN
KAPAĞINI ÇIKARMAYIN. İÇİNDE KULLANICININ BAKIM YAPABİLECEĞİ
PARÇALAR YOKTUR. TÜM SERVİS İŞLEMLERİNİ KALİFİYE BİR TEKNİSYENE
HAVALE EDİN.
1. Bu ürünü kullanmadan önce bu talimatları iyice okuyun.
2. Bu talimatları ileride başvurmak üzere saklayın.
3. Tüm uyarıları dikkate alın.
4. Tüm talimatlara uyun.
5. UYARI: Yangın veya elektrik çarpmasını önlemek için bu ekipmanı yağmura
veya neme maruz bırakmayın. Bu ürünü herhangi bir sıvının yakınında saklam-
ayın veya çalıştırmayın.
6. Sadece kuru bir bezle temizleyin.
7. Bu ürünü radyatör, kalorifer, soba gibi ısı kaynaklarının veya ısı üreten diğer
cihazların (amplifikatörler dahil) yakınında saklamayın veya çalıştırmayın.
8. Polarize veya topraklama tipi fişin güvenlik amacını bozmayın.
Polarize fişin biri diğerinden daha geniş olmak üzere iki kanadı vardır. Topraklı
fişin iki kanadı ve yuvarlak bir topraklama ucu vardır. Geniş bıçak veya üçüncü
uç güvenliğiniz için sağlanmıştır. Sağlanan fiş prizinize uymuyorsa, eski prizin
değiştirilmesi için bir elektrikçiye danışın.
9. Bu üniteye bağlı tüm kabloları, özellikle fişleri ve üniteden çıktıkları noktayı,
üzerinde yürünmekten veya sıkışmaktan koruyun. Kabloyu elektrik prizinden
çıkarırken, kabloyu çekerek değil, fişi tutarak çıkarın.
10. Işık fırtınaları sırasında veya uzun süre kullanılmadığında ünitenin fişini çekin.
11. Bu ünitenin ve bu üniteyle bağlantılı olarak kullanılan diğer tüm ekipmanların
kablo bağlantılarını yaparken tüm ekipmanlarınızın KAPALI olduğundan emin
olun.
12. Kurulum ve kablolama tamamlandıktan sonra, ses ve seviye kontrolleri AŞAĞI
çevrilmiş olarak tüm ekipmanınızı açın. Tüm ekipman AÇIK konuma getirildik-
ten sonra ses ve seviye kontrollerini yavaşça uygun konumlarına yükseltin.
13. Bu üniteyi topraklarken, bu ünitedeki yerleşik topraklamayı bozmamak için
doğru şekilde yaptığınızdan emin olun.
Eşkenar üçgen içinde ok başlı ışıklı flaş sembolü, kullanıcıyı ürünün
muhafazası içinde insanlar için elektrik çarpması riski oluşturabilecek
büyüklükte "TEHLİKELİ" voltajın varlığına karşı uyarmak için tasarlan-
mıştır. Kullanıcılar, bu sembol bu kullanım kılavuzunda göründüğünde
ekstra güvenlik sergilemeli ve belirtilen tüm önlemleri almalıdır.
Eşkenar üçgen içindeki ünlem işareti, kullanıcıyı bu kılavuzdaki önemli
çalıştırma ve bakım (servis) talimatlarının varlığı konusunda uyarmak için
tasarlanmıştır.

www.PyleUSA.com
4
14. Herhangi bir ürünü yerleştirmeden, kurmadan, donatmadan veya askıya
almadan önce, tüm donanımı, askıyı, kabinleri, dönüştürücüleri, braketleri ve ilgili
ekipmanı hasara karşı inceleyin. Eksik, aşınmış, deforme olmuş veya yüke uygun
olmayan herhangi bir bileşen kurulumun, yerleştirmenin veya dizinin gücünü
önemli ölçüde azaltabilir.
Bu tür herhangi bir durum kurulumun güvenliğini ciddi ölçüde azaltır ve derhal
düzeltilmelidir. Yalnızca kurulumun yükleme koşullarına ve olası kısa vadeli,
beklenmedik aşırı yüklemeye göre derecelendirilmiş donanım kullanın. Donanım
veya ekipmanın değerini asla aşmayın.
15. Fiziksel ekipman kurulumu ile ilgili olarak lisanslı, profesyonel bir mühendise
danışın. Ekipmanın güvenliği ve işletimi ile ilgili tüm yerel, eyalet ve ulusal Yönet-
meliklerin anlaşıldığından ve bunlara uyulduğundan emin olun.
16. Tüm servis işlemlerini kalifiye servis personeline yaptırın. Cihaz herhangi bir
şekilde hasar gördüğünde, örneğin güç kaynağı kablosu veya fişi hasar
gördüğünde, sıvı döküldüğünde veya cihazın içine nesneler düştüğünde, cihaz
yağmura veya neme maruz kaldığında, normal çalışmadığında veya
düşürüldüğünde servis gereklidir.
Giriş
PDA77BU cihazımızdan en iyi şekilde yararlanmak için, cihazı çalıştırmadan önce
kullanım kılavuzunda verilen tüm bilgileri gözden geçirmeniz önerilir.
DİKKAT
1. A: Ses girişini CD/DVD/TV ses çıkışına bağlayın.
NOTLAR:
WAŻNE:
• TBu Jaklar video sinyalini desteklemez, bu
nedenle CD/DVD/AUX terminalinin bağlı olduğunda
emin olun.
- Üniteyi yanlışlıkla DVD / TV video çıkışı ile
bağladığınızda gürültü duyulacaktır.
2. B: Amp ile birlikte gelen diğer amplifikatör veya hoparlörlere
bağlanabilen sinyal çıkışı.

www.PyleUSA.com
5
4
3. FM RADYO KONTROLÜ İÇİN ADIMLAR
A. FM radyoyu kullanmadan önce FM antenini bağlayın.
B. FM modunu seçmek için ön paneldeki veya uzaktan kumandadaki MODE
düğmesine basın.
C. Ön paneldeki veya uzaktan kumandadaki PLAY/PAUSE düğmesine basın; FM
Radyo istasyonu 87,5Mhz ila 108Mhz arasında otomatik olarak taranacak ve
kaydedilecektir.
D. FM istasyonunu seçmek için NEXT/PREV düğmesine basın.
4. UZAKTAN KUMANDA
Uzaktan kumanda USB/SD, Kablosuz BT, DVD, CD, AUX ve FM işlevlerine komuta
ederek erişmenizi sağlar.
A. Uzaktan kumandayı kullanmadan önce lütfen iki adet AAA pil takın, aksi takdirde
uzaktan kumanda çalışmayacaktır.
B. HD1, HD2, OPTI ve COAX düğmeleri PDA70BU modelinde çalışmaz.
5. DOSYA FORMATI
USB/SD kayıtlı dosyalar için yalnızca MP3, WMA ve WAV formatı desteklenir.
Ünite USB veya SD kartlardaki desteklenmeyen parça dosyalarını atlayabilir.
6. USB PORTU
USB bağlantı noktası yalnızca USB flash sürücünüzdeki ses dosyalarını çalmak
için kullanılır.
KLASÖR ARAMA
• USB flash sürücü veya SD Kart içindeki tüm klasörler arasında arama yapmak için
uzaktan kumanda üzerindeki Klasör düğmesine basın. Her Klasör parçanın numar-
asına göre görünecektir. Klasörü kronolojik olarak gösterecektir (dosyaların USB
flash sürücüye/SD Karta yüklendiği zamandan itibaren. istenen parçayı otomatik
olarak çalma.
• Önce kök dosyadaki parçalar ve ardından klasörlerdeki parçalar görüntülenecektir.
• Uzaktan kumanda üzerindeki Klasör düğmesine basıldığında, ekranda "F001"
kelimesi gösterilmeye başlayacaktır. Ardından, USB flash sürücü/SD Kart içindeki
klasörleri aramak için ileri veya geri düğmesine basın.
• Herhangi bir işlem yapmadan 3 saniye sonra otomatik olarak çıkar.
• Çıkmak için klasör düğmesine tekrar basın.
Duman nedeniyle üniteye zarar verebileceğinden, ush bağlantı noktasını
başka cihazlara güç sağlamak için KULLANMAYIN.

www.PyleUSA.com
6
A B C D E F
A. MODE DÜĞMESİ: FM, USB, SD, BT, DVD, CD ve AUX girişlerinden birini seçmek
için bu düğmeye basın.
Bir USB flash sürücü veya SD kart takıldıktan sonra dosyaları otomatik olarak
oynatır.
B. MİK/MÜZİK DÜĞMESİ: BASS/TREBLE Knob modunu seçmek için bu düğmeye
basın.
A-AÇIK-Müzik frekanslarını ayarlamak için Bas ve Tiz düğmelerini çevirin.
A-OFF-Mikrofon frekanslarını ayarlamak için Bas ve Tiz düğmelerini çevirin.
Rastgele-- us veya SD'deki dosyaları herhangi bir düzenli desen olmadan
oynatın.
C. EQ DÜĞMESİ: Genel, Canlı, Vass arasından bir EQ modu seçmek için bu düğm-
eye basın,
POP, Klasik, Caz, Rock ve 3D.
D. PREV DÜĞMESİ: Aşağıdaki gibi farklı modlara bağlı olarak önceki parçayı
seçmek için bu düğmeyi kullanın.
- USB/SD modunda: Önceki parçayı seçmek için kullanın.
- Kablosuz BT modunda: Önceki parçayı seçmek için kullanın.
- FM modunda: Önceki radyo kanalını seçmek için kullanın.
- Klasör çalışma durumunda: Önceki Klasörü seçmek için kullanın.
E. PLAY/PAUSE DÜĞMESİ: PLAY/PAUSE DÜĞMESİNE her basış işlemin oynat-
madan duraklatmaya geçmesine neden olur.
FM modunda 87.5MHz ila 108MHz arasındaki tüm frekansları otomatik olarak
taramak için PLAY/PAUSE DÜĞMESİNE bir kez basın. FM radyoyu ilk kez
kullandığınızda kanalları otomatik olarak taramak için düğmeye basın. Aramayı
durdurduktan sonra, ünite tüm radyo kanallarını otomatik olarak kaydedecek ve
ilk radyo kanalından çalacaktır.
Her FM radyo başlangıcında yeniden tarama yapmanıza gerek yoktur.
F. SONRAKİ DÜĞME: Aşağıdaki gibi farklı modlara bağlı olarak sonraki parçayı
seçmek için bu düğmeleri kullanın.
- USB/SD modunda: Sonraki parçayı seçmek için kullanın.
- Kablosuz BT modunda: Sonraki parçayı seçmek için kullanın.
- FM modunda: Sonraki radyo kanalını seçmek için kullanın.
- Klasör çalışma durumunda: Sonraki Klasörü seçmek için kullanın.
KONTROL PANELI DÜĞMESI

www.PyleUSA.com
7
TARAMA FM İSTASYONLARINI ALMAK İÇİN ADIMLAR
a--Lütfen gelen FM Antenini arka Paneldeki FM Jakına bağlayın, diğer ucu nispeten
açık konumda olmalıdır.
b--FM moduna girmek için MODE düğmesine basın.
c--87.5MHz'den 108MHz'e kadar tüm frekansları otomatik olarak taramak için
PLAY/PAUSE TUŞUNA bir kez basın, aramayı durdurduktan sonra ünite tüm
frekansları otomatik olarak kaydedecektir.
radyo kanalları
d--Önceki radyo kanalını veya sonraki radyo kanalını seçmek için ÖNCEKİ DÜĞMEYE
veya SONRAKİ DÜĞMEYE basın.
e--Radyo kanalını veya frekanslarını seçmek için Uzaktan kumanda üzerindeki Sayı
Tuşlarına basın.
Mağazadaki radyo istasyonunu doğrudan seçmek için iki haneye
basın. Radyo istasyonu frekansını 87.0-108.0MHz arasından
doğrudan seçmek için üç veya dört haneye basın.
KABLOSUZ BT CİHAZINA BAĞLANMA ADIMLARI
a--Bluetooth moduna girmek için MODE düğmesine basın veya uzaktan kumanda
üzerindeki BT düğmesini 3 saniye basılı tutun.
b--Bluetooth cihazını arayın ve "PYLEUSA veya BT" bluetooth adını bulun c--PYLEU-
SA veya BT bluetooth adını seçin ve cihazın eşleşmesini bekleyin. d--Ünite, cihazların
başarıyla eşleştiğini onaylayan bir ses çıkaracaktır.
e--Eşleştirildikten sonra bluetooth cihazınızdan müzik çalabilirsiniz. Bluetooth
cihazınızdaki parçaları seçmek için ünite üzerindeki kontrol düğmelerini de kullana-
bilirsiniz.
f-- Kablosuz BT'den ses çalmak için diğer kontrolleri, oynat/duraklat, önceki parça ve
sonraki parçayı kullanın.

www.PyleUSA.com
8
ÖN VE ARKA PANEL
1
2
6 7 8
9
55
4
10
18
19
20
22 24
25
26
27
23
21
11121314151617
3
USB/SD Kart Kontrol Konsolu Ekranı
32
54
.
1.MOD: USB moduna ayarlandığında ekranda "USB", SD kart moduna
ayarlandığında "SD", BLUETOOTH moduna ayarlandığında "BLUE", FM moduna
ayarlandığında "87.5-108" gösterilir.
2.Klasör arama modu: Uzaktan kumanda üzerindeki klasör tuşlarına basın, "F001"
görüntülenecektir. LED ekranını görüntüleyin ve bir klasör seçmek için sonraki
ve önceki tuşlarına basın.
3.Parça arama modu: önceki ve sonraki düğmelerine basın, mevcut parça numar-
ası burada gösterilecektir.
4.Geçen süre: Geçerli parçanın geçen süresi burada gösterilecektir.
5.Geçerli istasyonun FM frekansını gösterir.

www.PyleUSA.com
9
1. Güç Düğmesi: Üniteyi açmak ve kapatmak için bu Düğmeye basın.
2. LED Ekran: Harici medya veya bu cihazla ilgili tüm bilgiler bu ekrandan
görüntülenecektir.
3. SD Kart Okuyucu: Bu cihazda harici medya kullanmak için SD'nizi bu bağlantı
noktalarına takmanız yeterlidir.
4. USB Bağlantı Noktası: Bu cihazda harici medya kullanmak için USB'nizi bu
bağlantı noktalarına takmanız yeterlidir.
5. KONTROL PANELI DÜĞMESI
6. CHA Ana Ses Kontrol Düğmesi: A Kanalını ayarlamak için bu düğmeyi çevirin
Ses seviyesi (Sol Kanal).
7. CHB Ana Ses Kontrol Düğmesi: B Kanalını ayarlamak için bu düğmeyi çevirin
Ses seviyesi (Sol Kanal).
8. CHC Ana Ses Kontrol Düğmesi: C-Kanalını ayarlamak için bu düğmeyi çevirin
Ses seviyesi (Sağ Kanal).
9. CHD Ana Ses Kontrol Düğmesi: D-Kanalını ayarlamak için bu düğmeyi çevirin
Ses seviyesi (Sağ Kanal).
10. Mikrofon Ses Kontrol Düğmesi: Mikrofon Ses seviyesini ayarlamak için bu
düğmeyi çevirin.
11. MİKROFON GİRİŞLERİ: KARAOKE veya HARİCİ MİKROFON bunlara bağlanır.
12. AUX Girişi: IPOD/MP3 JAKI-IPOD/MP3 bu jaka bağlanır.
13. Mikrofon Yankı Derinliği Kontrol Düğmesi: Mikrofon yankı derinliğini
ayarlamak için bu düğmeyi çevirin.
Reverb Derinliği.
14. Mikrofon Gecikme süresi Kontrol Düğmesi: Mikro telefon gecikme süresini
ayarlamak için bu düğmeyi çevirin.
15. Tiz Kontrolü: Müzik veya Mikrofonun yüksek frekanslarını ayarlamak için bu
düğmeyi çevirin (MIC/MUSIC düğmesi müzik ve mikrofon arasındaki geçişi
kontrol eder)
16. Bas Kontrolü: Müzik veya Mikrofonun düşük frekanslarını ayarlamak için bu
düğmeyi çevirin. MIC/MUSIC düğmesi müzik ve mikrofon arasındaki geçişi
kontrol eder).
17. Ana Ses Düğmesi: ana ses seviyesini ayarlar.
18. FM ANTEN KONNEKTÖRÜ: FM anteni için bağlayın.
19. BLUETOOTH ANTENİ: Bluetooth girişini kullanırken anteni dışarı çekin.
20. SES GİRİŞİ: DVD/CD'nin ses çıkış jaklarını bu jaklara bağlayın.
21. LINE ÇIKIŞI: KAYIT giriş jaklarını bu jaklara bağlayın.
22. D-Kanal SPEAKER ÇIKIŞI: Hoparlör sisteminizi bu terminallere bağlayın.
23. C-Kanalı SPEAKER ÇIKIŞI: Hoparlör sisteminizi bu terminallere bağlayın.
24. B-Kanalı HOPARLÖR ÇIKIŞI: Hoparlör sisteminizi bu terminallere bağlayın.
25. A-Kanalı HOPARLÖR ÇIKIŞI: Hoparlör sisteminizi bu terminallere bağlayın.
26. Bir fanın hava çıkışı: (Rüzgarın dışarı üflemesini önlemek için buraya
başka nesneler koymayın)
27. GÜÇ VOLTAJI SEÇICI: 115V/230V VOLTAJ SEÇICI.
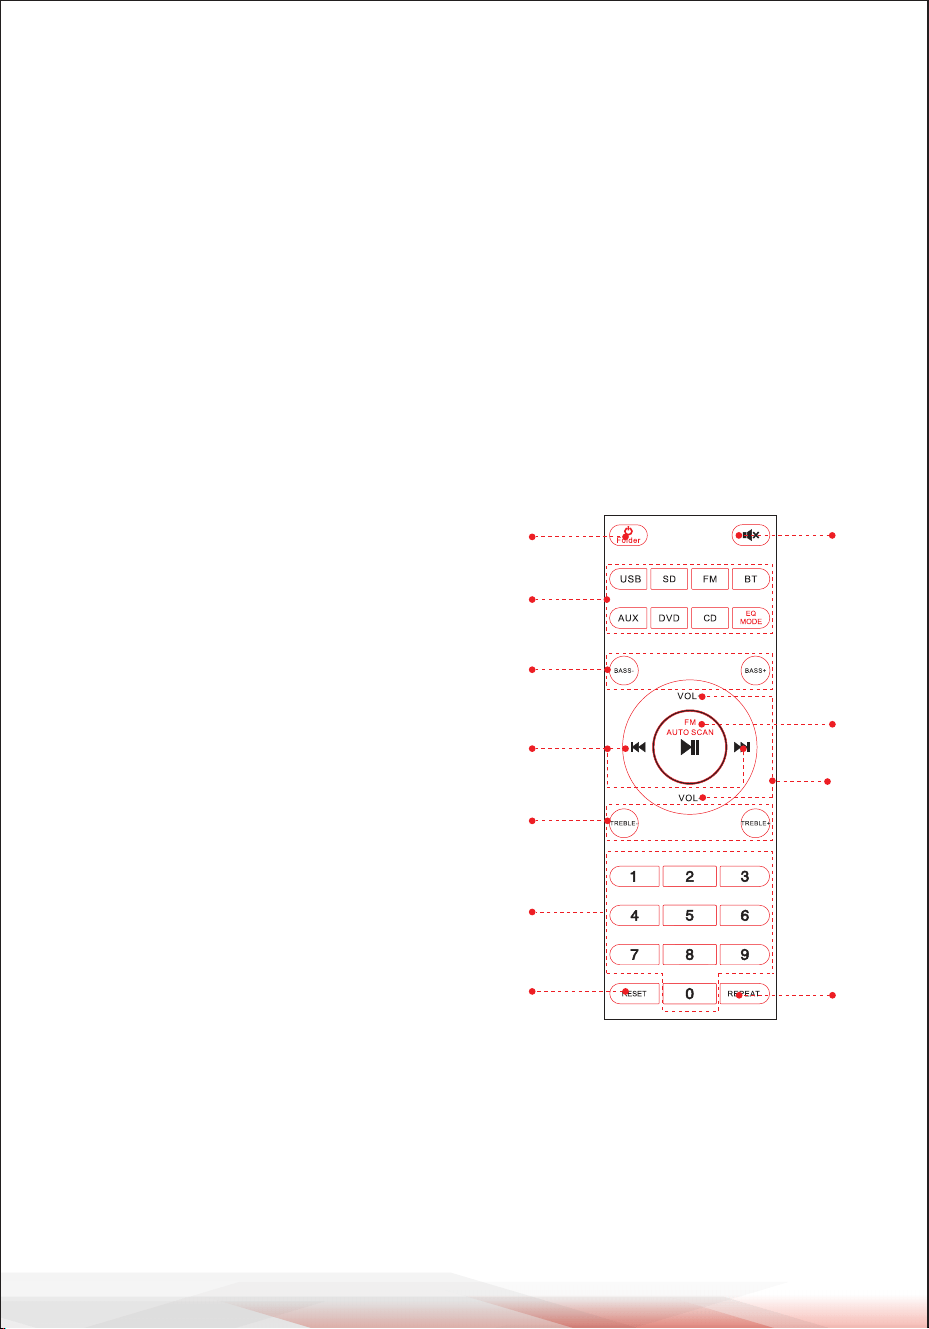
www.PyleUSA.com
10
UZAKTAN KUMANDA
1. Üniteyi kapatmak için bu düğmeyi 3 saniye basılı tutun.
Üniteyi Açmak için bu düğmeye basın.
USB veya SD oynatma durumunda klasör kontrol modeline girmek için bu düğmeye basın.
Klasör kontrolünden çıkmak için tekrar basın.
2. Giriş kaynağını doğrudan seçmek için bu düğmelere basın.
DİKKAT: USB veya SD oynatmaya yalnızca USB Flash sürücüsünü veya SD'yi taktıktan
sonra geçin. Kart. USB flaş veya SD Kart takılı değilse, USB veya SD düğmesine basın ve
ünite yanıt vermeyecektir.
EQ MODE düğmesine basarak 8 tip Ön Ayarlı EQ efekti seçin.
3. Ses Basını ayarlamak için iki düğmeye basın, BASS- bas çıkışını azaltır, BASS+ bas çıkışını
yükseltir.
1
2
3
5
4
6
10
9
8
11
7
4. USB veya SD veya BT çalışma modunda
önceki veya sonraki parçayı seçmek için, FM
çalışma modunda önceki veya sonraki istasyonu
seçmek için iki düğmeye basın.
5.Ses Tizini ayarlamak için iki düğmeye basın,
TREBLE- TİZ çıkışını azaltır, Bass+ TİZ çıkışını
yükseltir.
6. Parçaları doğrudan seçmek için numaralara
basın. Ünitenin USB veya SD modunda yanıt
vermesi 2-3 saniye sürer.
7. Ünite yazılımını sıfırlamak için bu düğmeye
basın.
8. Sesi kapatmak için bu düğmeye basın.
9. Tüm çalışma modları için Oynat ve Duraklat
işlevi.
FM modunda kanalı otomatik olarak taramak ve
kanalı otomatik olarak kaydetmek için bu
düğmeye basın.
DİKKAT: Ünite otomatik olarak 88MHz ile
108MHz frekansları arasındaki FM istasyon-
larını arayacaktır, bu işlem 2 dakika sürecek-
tir.
10. Ses seviyesini artırmak veya azaltmak için iki
düğmeye basın.
11. Tekrar modunu seçmek için bu düğmeye
basın.
Bir-Geçerli çalma dosyasını tekrarla, Tümü-USB
veya SD'deki tüm çalma dosyalarını tekrarla.
Rastgele-ünite çalmak için herhangi bir şarkı
seçer.

www.PyleUSA.com
11
Kompakt Kablosuz 4 Kanal BT Stereo Amplifikatör
FM Radyo, MP3/USB/SD Okuyucular, Dijital LED Ekran, Mikrofon Girişli Masaüstü
Ses Güç Amfisi Alıcısı (800 Watt)
Özellikler:
• Masaüstü BT 4 Kanallı Ses Gücü Stereo Amplifikatör
• Kompakt Ev Sineması Stereo Alıcı Stili
• Kablosuz Müzik Akışı için Dahili Bluetooth
• LED Dijital Ekranlı FM Radyo
• Çok Kanallı Ses Girişi Seçimi
• MP3/WAV/WMA/APE Ses Dosyası Desteği
• Harici Cihazlardan Ses Bağlayın ve Aktarın
• USB Flash Sürücü ve SD Bellek Kartı Okuyucuları
• Aux (3,5 mm) Girişi
• (2) 1/4" Mikrofon Giriş Jakları
• (2) Çift RCA (L/R) Ses Giriş Konnektörü
• (8) Çift Muz Fişli Hoparlör Çıkış Konnektörü
• (1) Çift RCA (L/R) Ses Çıkış Konnektörü
• Ön Panel Ses Kontrol Merkezi
• Otomatik Tarama ve Radyo İstasyonu Kaydetme
• Bir, Rastgele ve Tümünü Tekrarla' Ses Dosyası İşlevleri
• 'Parça / Klasör' Müzik Arama Kontrolü
• Tiz, Bas, Ana ve Mikrofon Ses Seviyesi Ayarlanabilir
Kutunun içinde ne var?
• Masaüstü Stereo Amplifikatör
• Uzaktan Kumanda
• FM Anteni
• Kullanıcı kılavuzu

www.PyleUSA.com
12
Bluetooth Bağlantısı:
• Ses Akışı için Kablosuz Sinyal Alır
• Basit ve Sorunsuz Eşleştirme Kurulumu
• Genişletilmiş Kablosuz Menzil için Entegre Anten
• Günümüzün En Yeni Cihazlarının Tümüyle Çalışır
• (Akıllı Telefonlar, Tabletler, Dizüstü Bilgisayarlar, Bilgisayarlar, vb.)
• Bluetooth Sürümü: 5.0
• Bluetooth Ağ Adı: 'PYLEUSA' veya "BT"
• Kablosuz Menzil: 40'+ Ft.
Teknik Özellikler:
• MAKS Güç Çıkışı: 800 Watt (@ 4 Ohm)
• RMS Güç Çıkışı: 20 Watt × 4 (@ 8 Ohm)
• Ton Kontrolü: Bas, f=100Hz +/-8dB
• Frekans Tepkisi: 20Hz-20kHz
• Frekans Ayarı: +/-10dB
• Sinyal Gürültü Oranı: >80dB
• T.H.D: <0.1%
• Radyo İstasyonu Ön Ayarları: 60 İstasyona Kadar
• Pille Çalışan Uzaktan Kumanda, (2) × AAA Pil Gerektirir, Dahil Değildir.
• Güç Kaynağı: 115/230V, Değiştirilebilir
• Boyutlar (U x G x Y): 35 x 25.4 x 9.9 santimetre
/ 13.8'' x 10.0'' x 3.9'' inc
Kaliforniya Prop 65 Uyarısı
UYARI:
Bu ürün sizi Kaliforniya eyaleti tarafından kansere bağlı doğum
kusurlarına ve üremeyle ilgili diğer zararlara neden olduğu
bilinen kimyasallara maruz bırakabilir. Yemeyin.
Daha fazla bilgi için şu adrese gidin: www.P65warnings.ca.gov

Ürünü Kaydet
PyleUSA'ı seçtiğiniz için teşekkür ederiz. Ürününüzü kaydettir-
erek özel garantimizin ve kişiselleştirilmiş müşteri desteğimizin
tüm avantajlarından yararlandığınızdan emin olursunuz. Uzman
desteğine erişmek ve PyleUSA satın alımınızı mükemmel
durumda tutmak için formu doldurun.
BURADAN BAŞLAYIN
Model Number:
PDA77BU
PyleUSA.com/pages/register
www.PyleUSA.com
13
IC BEYANI:
Bu cihaz Industry Canada'nın lisans muafiyetli RSS'sine uygundur.
Çalıştırılması aşağıdaki iki koşula tabidir:
(1) Bu cihaz parazite neden olmayabilir; ve
(2) Bu cihaz, cihazın istenmeyen çalışmasına neden olabilecek parazitler
de dahil olmak üzere her türlü paraziti kabul etmelidir.
LeprésentappareilestconformeauxCNRd' IndustrieCanadaapplicables
auxappareilsradioexemptsdelicence.L'exploitationestautoriséeauxdeux
conditionssuivantes:
(1)l'appareilnedoitpasproduiredebrouillage,et
(2)l'utilisateurdel'appareildoitacceptertoutbrouillageradioélectriquesubi,
mêmesilebrouillageestsusceptibled'encompromettrelefonctionnement..

Sorularınız veya yorumlarınız var mı?
Yardım etmek için buradayız!
Phone: (1) 718-535-1800
PyleUSA.com/ContactUs