PDA6BUUK/PDA6BU.5UK/PDA5BUUK/PDA5BU.0UK/PDA612BUUK/PDA612BU.5UK
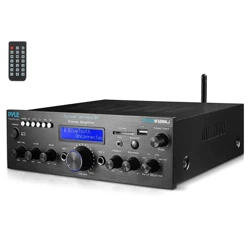
Compact Wireless BT Stereo Amplifier
Desktop Audio Power Amp Receiver with FM Radio,
MP3/USB/SD Readers, Digital LCD Display, Microphone Input
(200 Watt)
/
UK
USA
PDA6BUEU/PDA6BU.5EU/PDA5BUEU/PDA5BU.0EU/PDA612BUEU/PDA612BU.5EU

WARNING!
CAUTION: TO REDUCE THE RISK OF ELECTRIC SHOCK, DO NOT REMOVE
THE COVER OF THIS UNIT. THERE ARE NO USER SERVICEABLE PARTS
INSIDE. REFER ALL SERVICING TO A QUALIFIED TECHNICIAN.
The lighting ash with arrow head symbol within an equilateral triangle is
intended to alert the user to the presence of “DANGEROUS” voltage
within the product’s enclosure that may be of suficient magnitude to
constitute a risk of electric shock to humans. Users should exhibit extra
safety when this symbol appears in this instruction manual and follow all
precautions as they are stated.
The exclamation point within an equilateral triangle is intended to alert
the user to the presence of important operating and maintenance
(servicing) instructions in this manual.
1. Read these instructions thoroughly before using this item.
2. Keep these instructions for future reference.
3. Heed all warnings.
4. Follow all instructions.
5. WARNING: To prevent re or electric shock, do not expose this equipment to rain
or moisture. Do not store or operate this product near any liquids.
6. Clean only with a dry cloth.
7. Do not store or operate this product near any heat sources such as radiators, heat
registers, stoves, or other apparatuses (including amplifiers) that produce heat.
8. Do not defeat the safety purpose of the polarized or grounding-type plug.
A polarized plug has two blades with one wider than the other. A grounding plug
has two blades and a round grounding prong. The wide blade or third prong is
provided for your safety. If the provided plug does not fit your outlet, consult an
electrician for the replacement of the obsolete outlet.
9. Protect the all wires connected to this unit from being walked on or pinched,
particularly plugs and the point where they exit from the unit. When removing the
cord from the power outlet, remove it by holding the plug not by pulling the cord.
10. Unplug the unit during lighting storms or when unused for long periods of time.
11. When wiring this unit and all other equipment used in connection to this unit
make sure that all of your equipment is turned OFF.
12. Once installation and wiring is complete power on all your equipment with the
volume and level controls turned DOWN. Once all the equipment is ON slowly
raise the volume or level controls to their proper positions.
13. When grounding this unit, be sure to do so correctly, so as not to defeat the
built-in grounding in this unit.
www.PyleUSA.com
2
www.PyleUSA.com
3
14. Before placing, installing, rigging, or suspending any product, inspect all
hardware, suspension, cabinets, transducers, brackets and associated equipment
for damage. Any missing, corroded, deformed, or non-load rated component
could significantly reduce the strength of the installation, placement or array.
Any such condition severely reduces the safety of the installation and should be
immediately corrected. Use only hardware which is rated for the loading
conditions of the installation and any possible short-term, unexpected
overloading. Never exceed the rating of the hardware or equipment.
15. Consult a licensed, professional engineer regarding physical equipment
installation. Ensure that all local, state and national Regulations regarding the
safety and operation of equipment are understood and adhered to.
16. Refer all servicing to qualified service personnel. Servicing is required when the
apparatus has been damaged in any way, such as power supply cord or plug is
damaged, liquid has been spilled or objects have fallen into the apparatus, the
apparatus has been exposed to rain or moisture, does not operate normally, or
has been dropped.
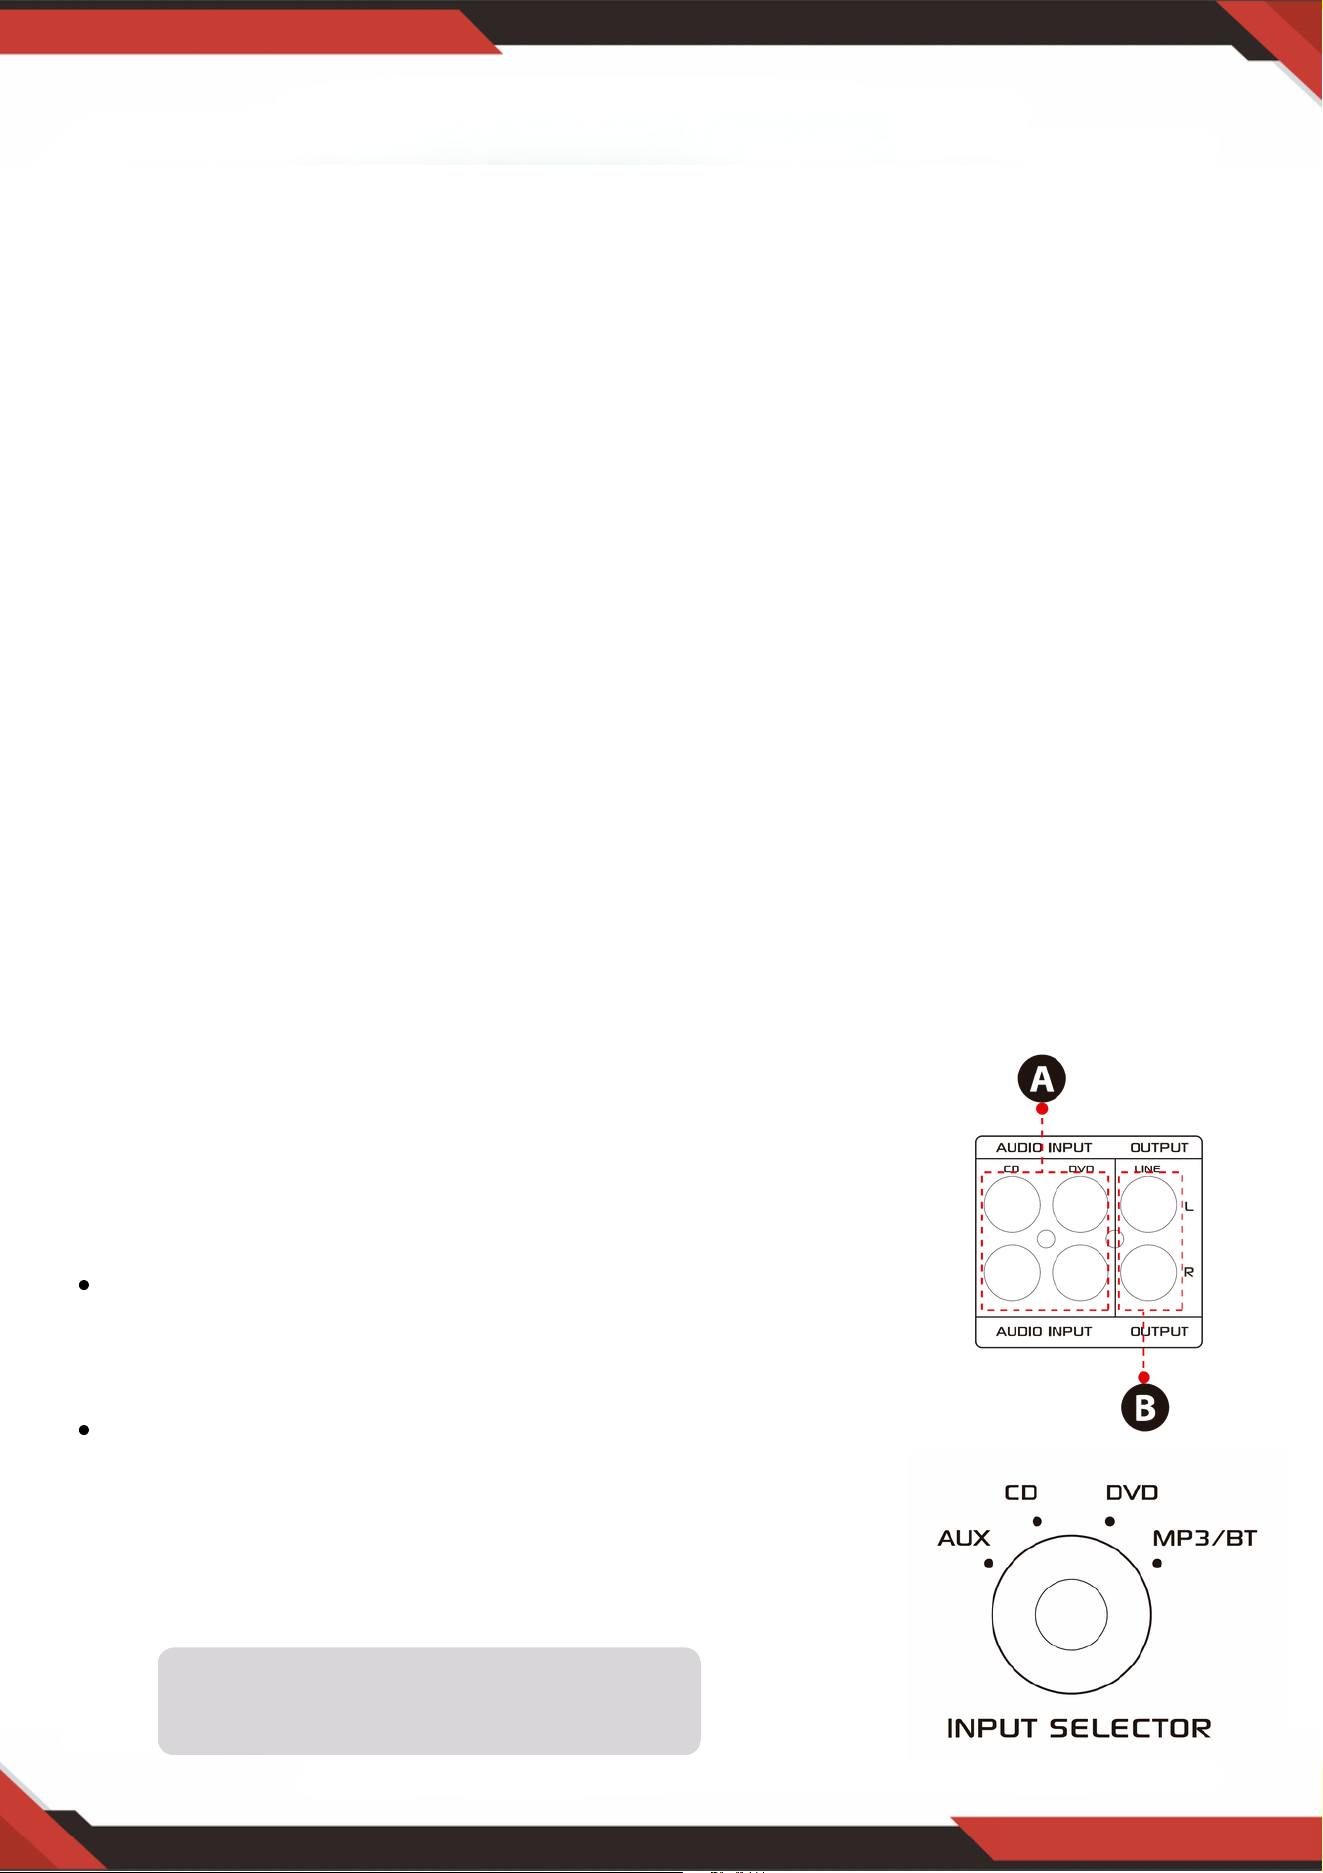
ATTENTION
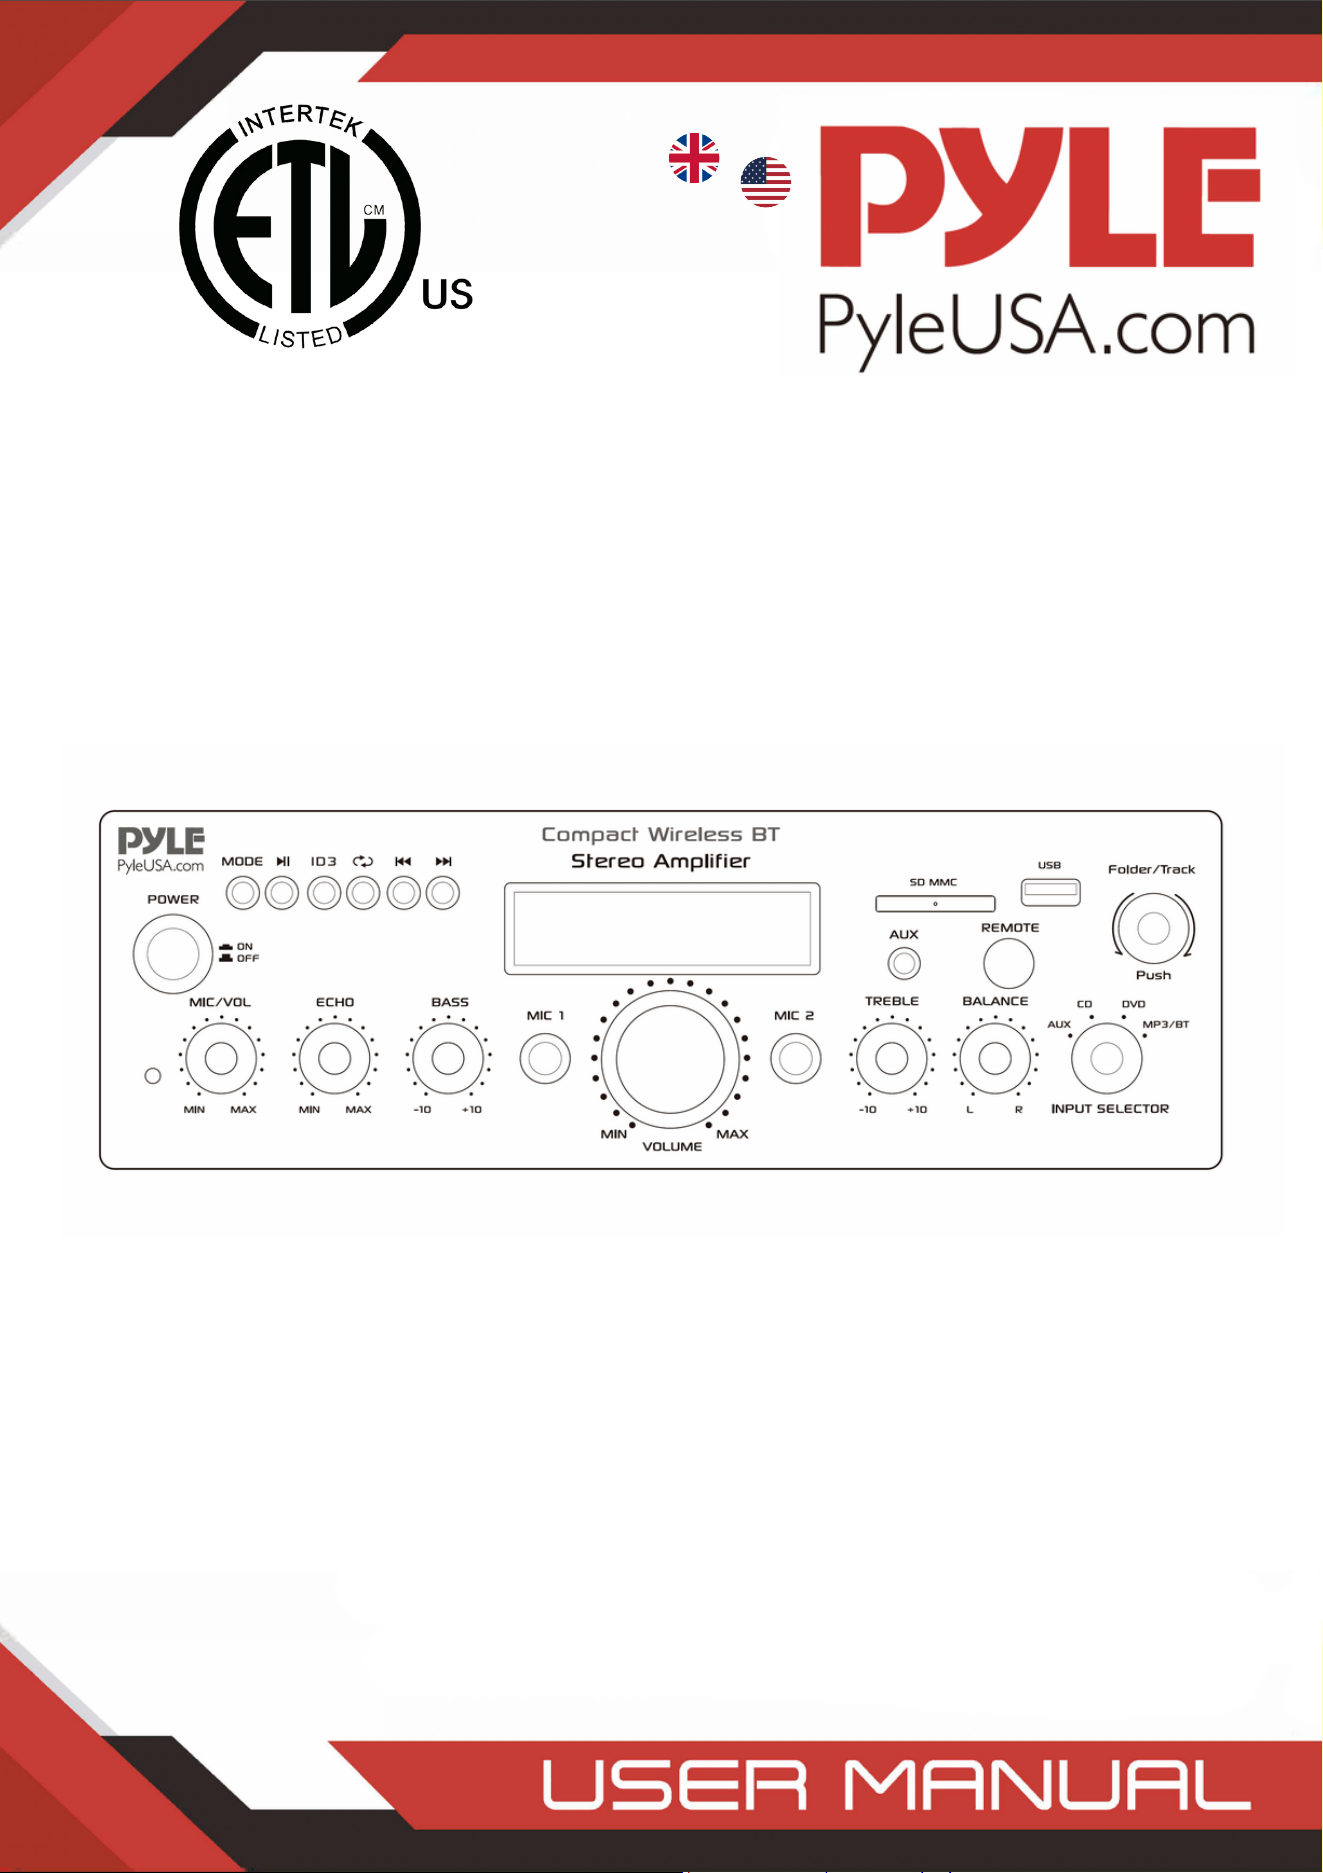
1. A: Connect the audio input with the CD/DVD/TV
audio output.
NOTES:
The unit does not support video signal, so make
sure that the CD/DVD/TV AUDIO OUTPUT terminal
are connected.
Noise will be heard when you connect the unit with
CD/DVD/TV video output by mistake.
2. B: Signal output that can be connected with other
amplifier or powered speakers
Introduction
To get the most from our Units, it is recommended that you review all the
information provided in the instruction manual before operating the equipment.
Input selector will not work if the
signal comes from the Line output.
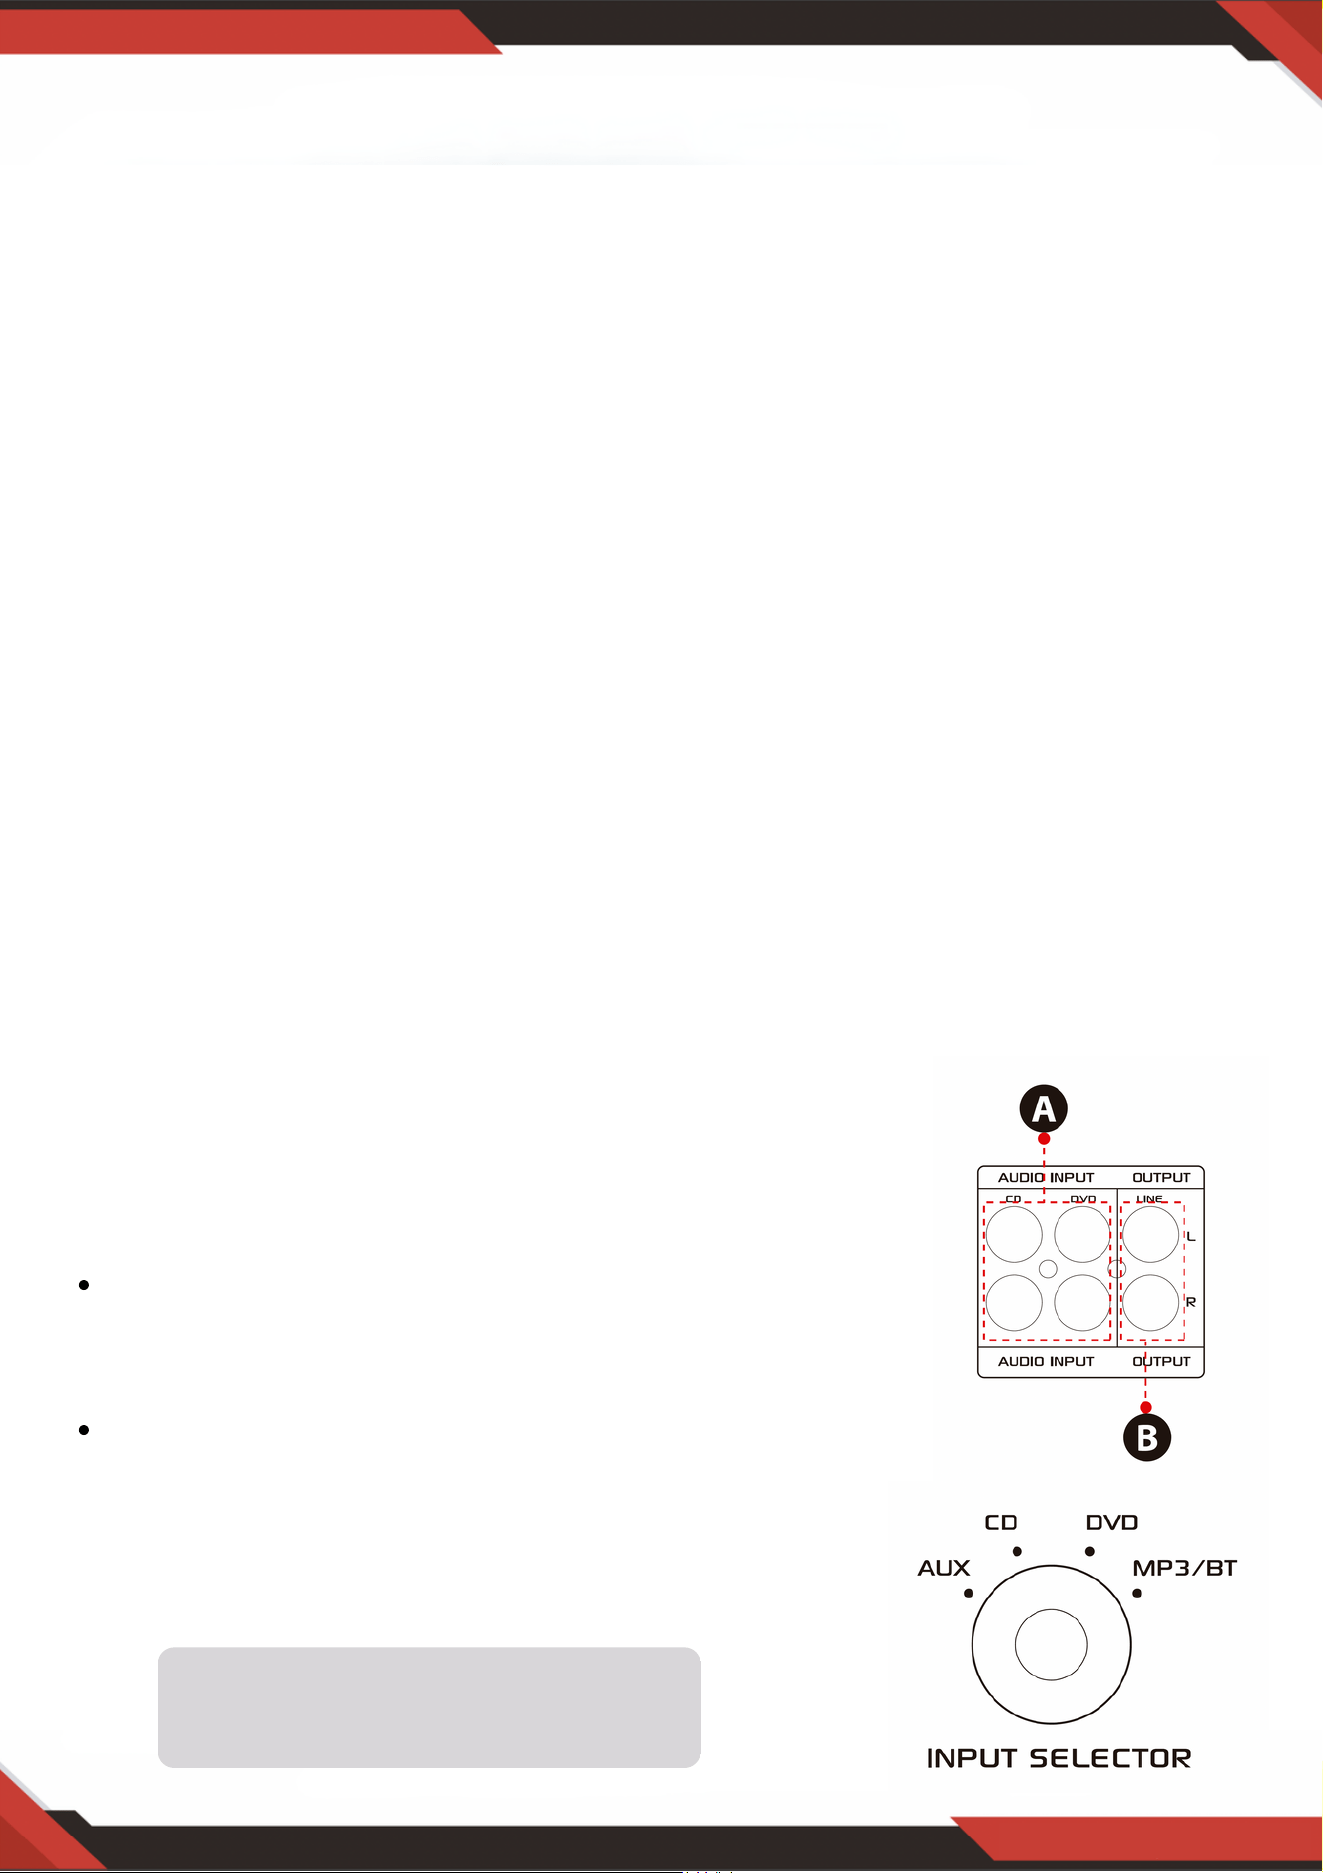
A. Please take out the battery sheet before using the remote control, otherwise the
remote control will not work.
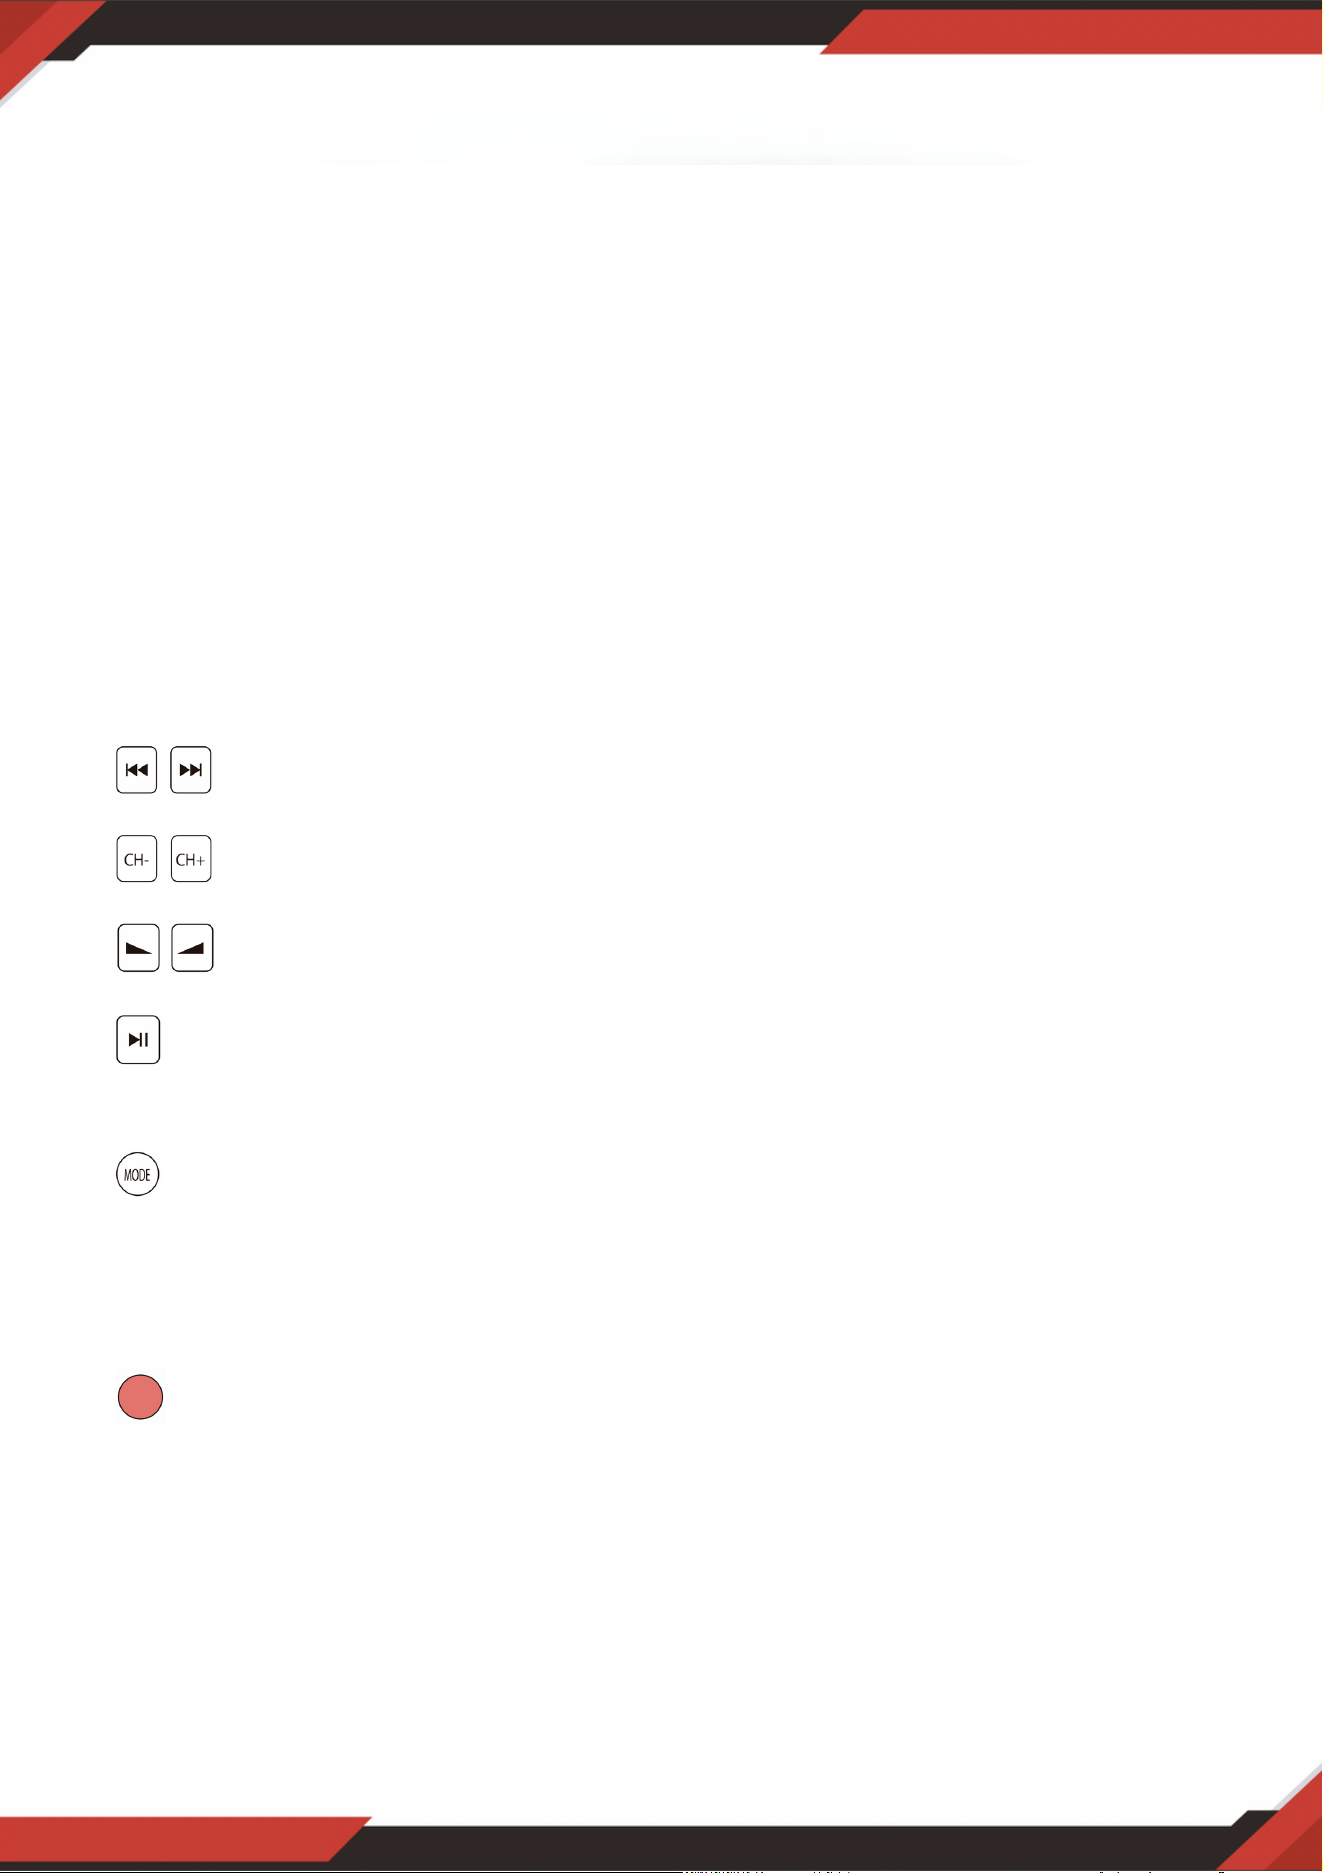
B. Press these two buttons to select the previous or next track in USB/SD or
Wireless BT mode, there is no response in the FM mode.
C. Press this two buttons to select previous or next channel in FM mode,
there is no response in the USB/SD and Bluetooth mode.
D. Press these two buttons to increase or decrease Wireless BT volume,
USB/SD and FM. This buttons doesn’t control the master volume.
E. Press this button to auto scan all frequencies from 87.5MHz to 108MHz, the
unit will auto store the channels in FM mode. Please see 4, C for other details.
F. Press this button to select one from play mode (USB/SD mode, FM mode and
Wireless BT mode). Turning ON the unit will set the USB/SD mode automatically.
MP3 les will be played automatically after inserting USB ash drive or SD card.
You cannot select the AUX, CD and DVD input with this button.
G. Hold this button for 5 second to turn ON or OFF the USB/SD, Wireless BT and
FM mode, but not to power ON/OFF the unit. The unit will output the signal in CD,
DVD, AUX input mode if you turn OFF the USB/SD, Wireless BT and FM.
H. Aim the remote controller at the receiver of the main unit.
www.PyleUSA.com
4
3. STEPS FOR FM RADIO CONTROL
A. Connect the FM antenna before using the FM radio.
B. Press MODE button on the front panel or remote control to select FM mode.
C. Press PLAY/PAUSE button on the front panel or remote control, and will auto
scan and sore FM Radio station from 87.5Mhz to 108Mhz.
D. Press NEXT/PREV button to select the FM station.
4. REMOTE CONTROL
Remote control gives you commanding access only to USB/SD, Wireless BT and
FM functions and not the Master volume, microphone, bass, treble and other
functions.
5. FILE FORMAT
Only MP3 and WAV format are supported for USB/SD stored les. The unit may
skip the unsupported track files in USB or SD cards.

www.PyleUSA.com
5
A. These buttons are only used to control the USB/SD, Wireless BT and FM functions
and doesn’t control other functions.
B. MODE BUTTON: Press this button to select one from USB/SD mode, FM mode or
Wireless BT play mode. USB/SD mode will be set automatically after turning ON
the unit. Automatically plays mp3 les after inserting a USB ash drive or SD card.
You cannot select AUX, CD and DVD input on this button.
C. Each press of the PLAY/PAUSE BUTTON causes the operation to change from play
to pause or from pause to play in the USB/SD mode or Wireless BT mode.
Press the PLAY/PAUSE BUTTON one time to auto scan all frequencies from 87.5MHz
to 108MHz in FM mode. Press the button to auto scan channels when you use FM
radio for the first time. After stop searching, the unit will auto store all the radio
channels and play from the rst radio channel. You don't need to rescan every FM
radio start up.
D. PREV and NEXT BUTTON: Use these two buttons to select previous, next track or
folder, depending on these different modes as below.
In USB/SD mode: Use to select previous or next track, or use to select previous or
next folder in FOLDER working mode.
In Wireless BT mode: Use to select previous or next track.
In FM mode: Use to select previous or next radio channel.
6. USB PORT
The USB port is only used for playing audio files on your USB ash drive.
DO NOT use it for power supply as it may damage the unit.
7. CONTROL PANEL BUTTON
8. INPUT SELECTOR
Select MP3/BT input mode if you want to play USB/SD/Wireless BT/FM Radio.
Select CD input mode if you want to play CD jacks input signal. Select AUX input
mode if you want to play AUX jacks input signal. Select DVD input mode if you
want to play DVD jacks input signal, otherwise the unit output has no signal.

www.PyleUSA.com
6
After inserting a USB ash drive/SD Card into the input terminal, be sure to set the
input selector (13) to USB/SD, then press the mode button to choose between audio
from the USB port, SD Card input, Wireless BT or FM radio. If you want to use the
Wireless BT, check the below steps.
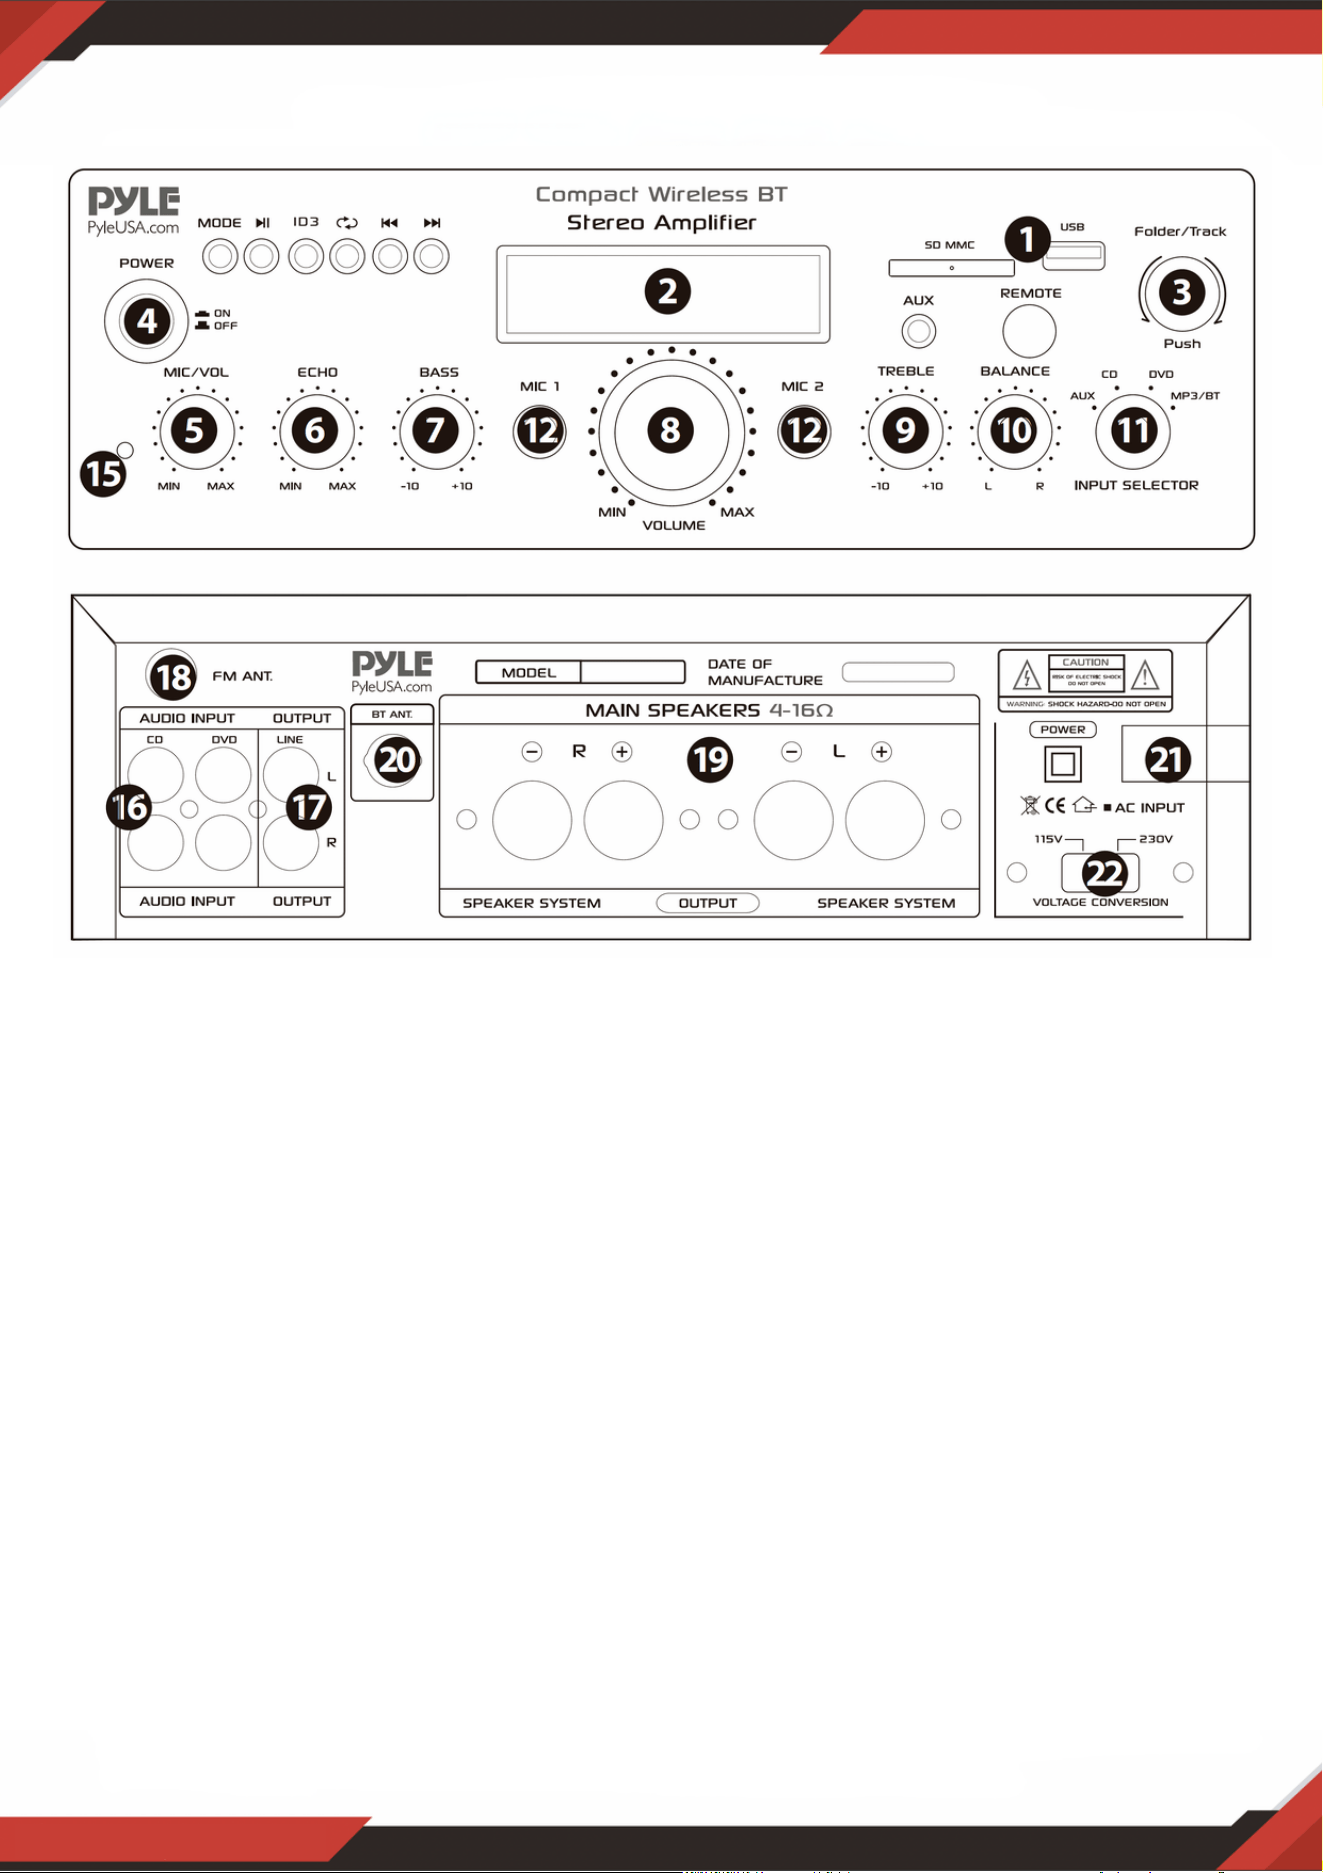
FRONT & BACK PANEL
1. USB/SD Card/Wireless BT Control Console
STEPS FOR CONNECTING WITH WIRELESS BT DEVICE
A. Press MODE button under the ID3 display screen and enter into bluetooth mode.
B. Search for the bluetooth device and the bluetooth name “PYLEUSA or BT”
C. Select the PYLEUSA or BT bluetooth name and wait for the device to pair. The
screen will display “SEARCHING”.
D. The unit will make a sound confirming that the devices have successfully
paired and screen will display “BLUETOOTH CONNECTED”
E. Once paired you can play music from your bluetooth device. You can also use the
control buttons on the unit to select the tracks from your bluetooth device.

www.PyleUSA.com
7
NOTE: The USB input is ONLY meant to connect to a USB ash drive (thumb drive).
Connecting a MP3 player or computer directly to the USB ash drive input will result
the unit failing to play audio from those devices.
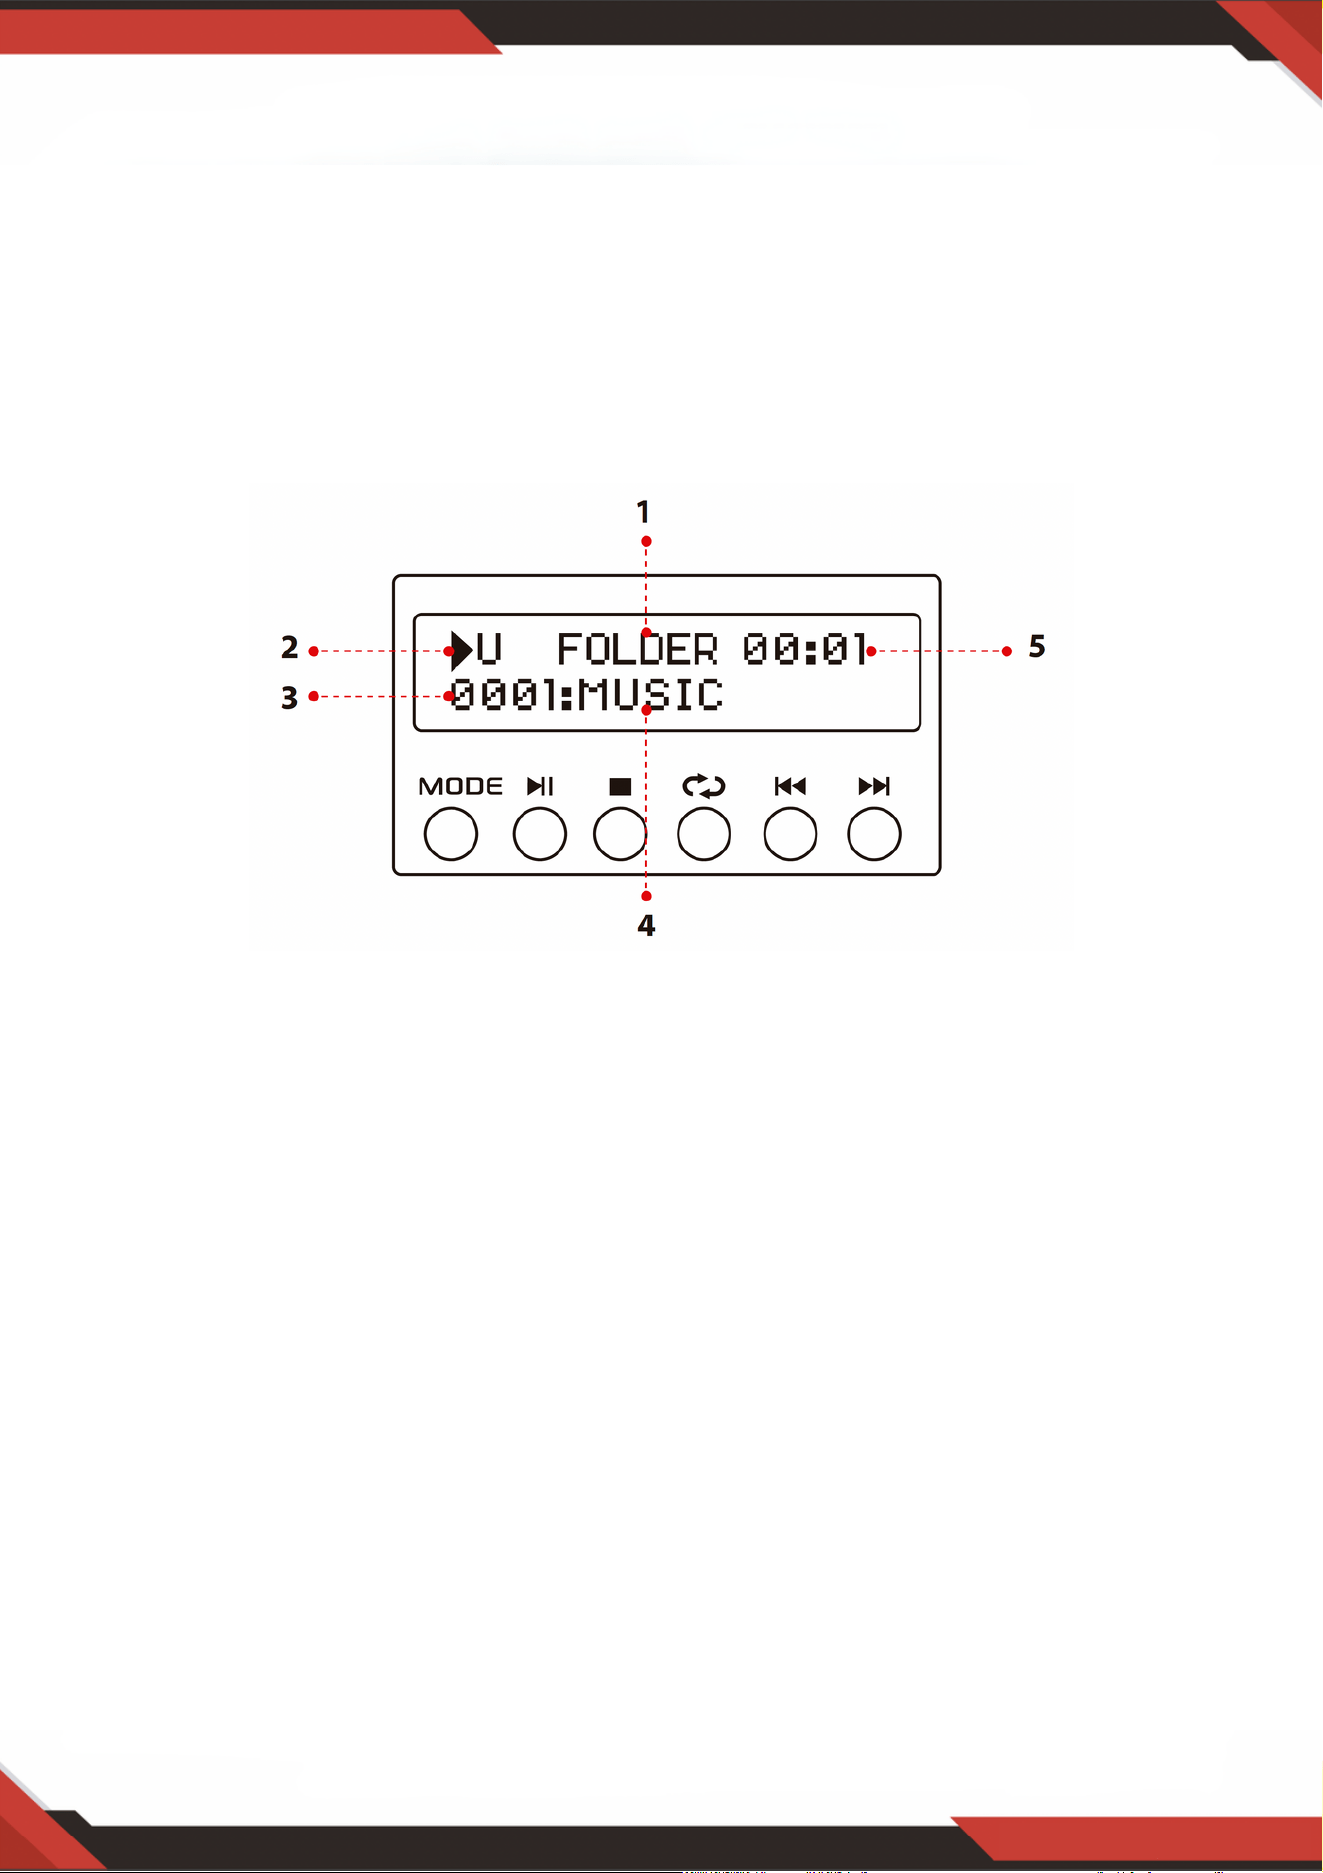
1. Search mode: When the word FOLDER is ashing on the screen, the unit is in
FOLDER SEARCHING mode. Turn the FOLDER/TRACK knob to search through the
folder. Press the FOLDER/TRACK knob to choose a track. Upon exiting the folder
mode, the word ALL will appear on the screen. This indicates that the unit will
play all the tracks from the USB ash drive/SD Card. When the REPEAT button is
pressed, there will be 6 different displays depending on the setting you choose;
ALL/NORMAL /SINGLE / FOLDER / RANDOM / BROWSE. When the ID3 button is.
pressed, there will be 4 different displays depending on the setting you choose.
TITLE/ARTIST/ALBUM/OFF.
2. Input Source: The display will show “U” when set to USB mode and “S” when set
to SD card mode. Press the mode button to switch from one input to the other.
3. Track Number: The track number (for all tracks on the entire ash drive) will
appear here. In the picture above the unit is playing track number 1.
4. Track or Folder Information: The name of the folder will appear here. In the
picture above the folder being played is named MUSIC.
5. Elapsed Time: The elapsed time of the current track will display here.
Use the other controls, play/pause, stop, repeat (ALL/NORMAL/SINGLE/FOLDER/
RANDOM/BROWSE), previous track & next track to play audio from the USB ash
drive/SD Card or Wireless BT.
2. USB/SD Card Control Console Display Screen

3. Track / Folder Searching Knob
Turn this knob clockwise to search through all of the tracks inside the USB ash
drive/SD Card. Each track will appear by the name of the track. It will show the
tracks or folders chronologically (from when the les were loaded onto the USB
flash drive/SD Card. Press the knob to begin playing the desired track.
First the tracks on the root le will be displayed and then the tracks that are in
folders.
Press this knob to activate the folder searching function. Once pressed the word
“FOLDER” will begin ashing on the display screen. Then, turn this knob clockwise
to search the folders inside the USB ash drive/SD Card. Press the knob to begin
playing the tracks from that folder.
www.PyleUSA.com
8
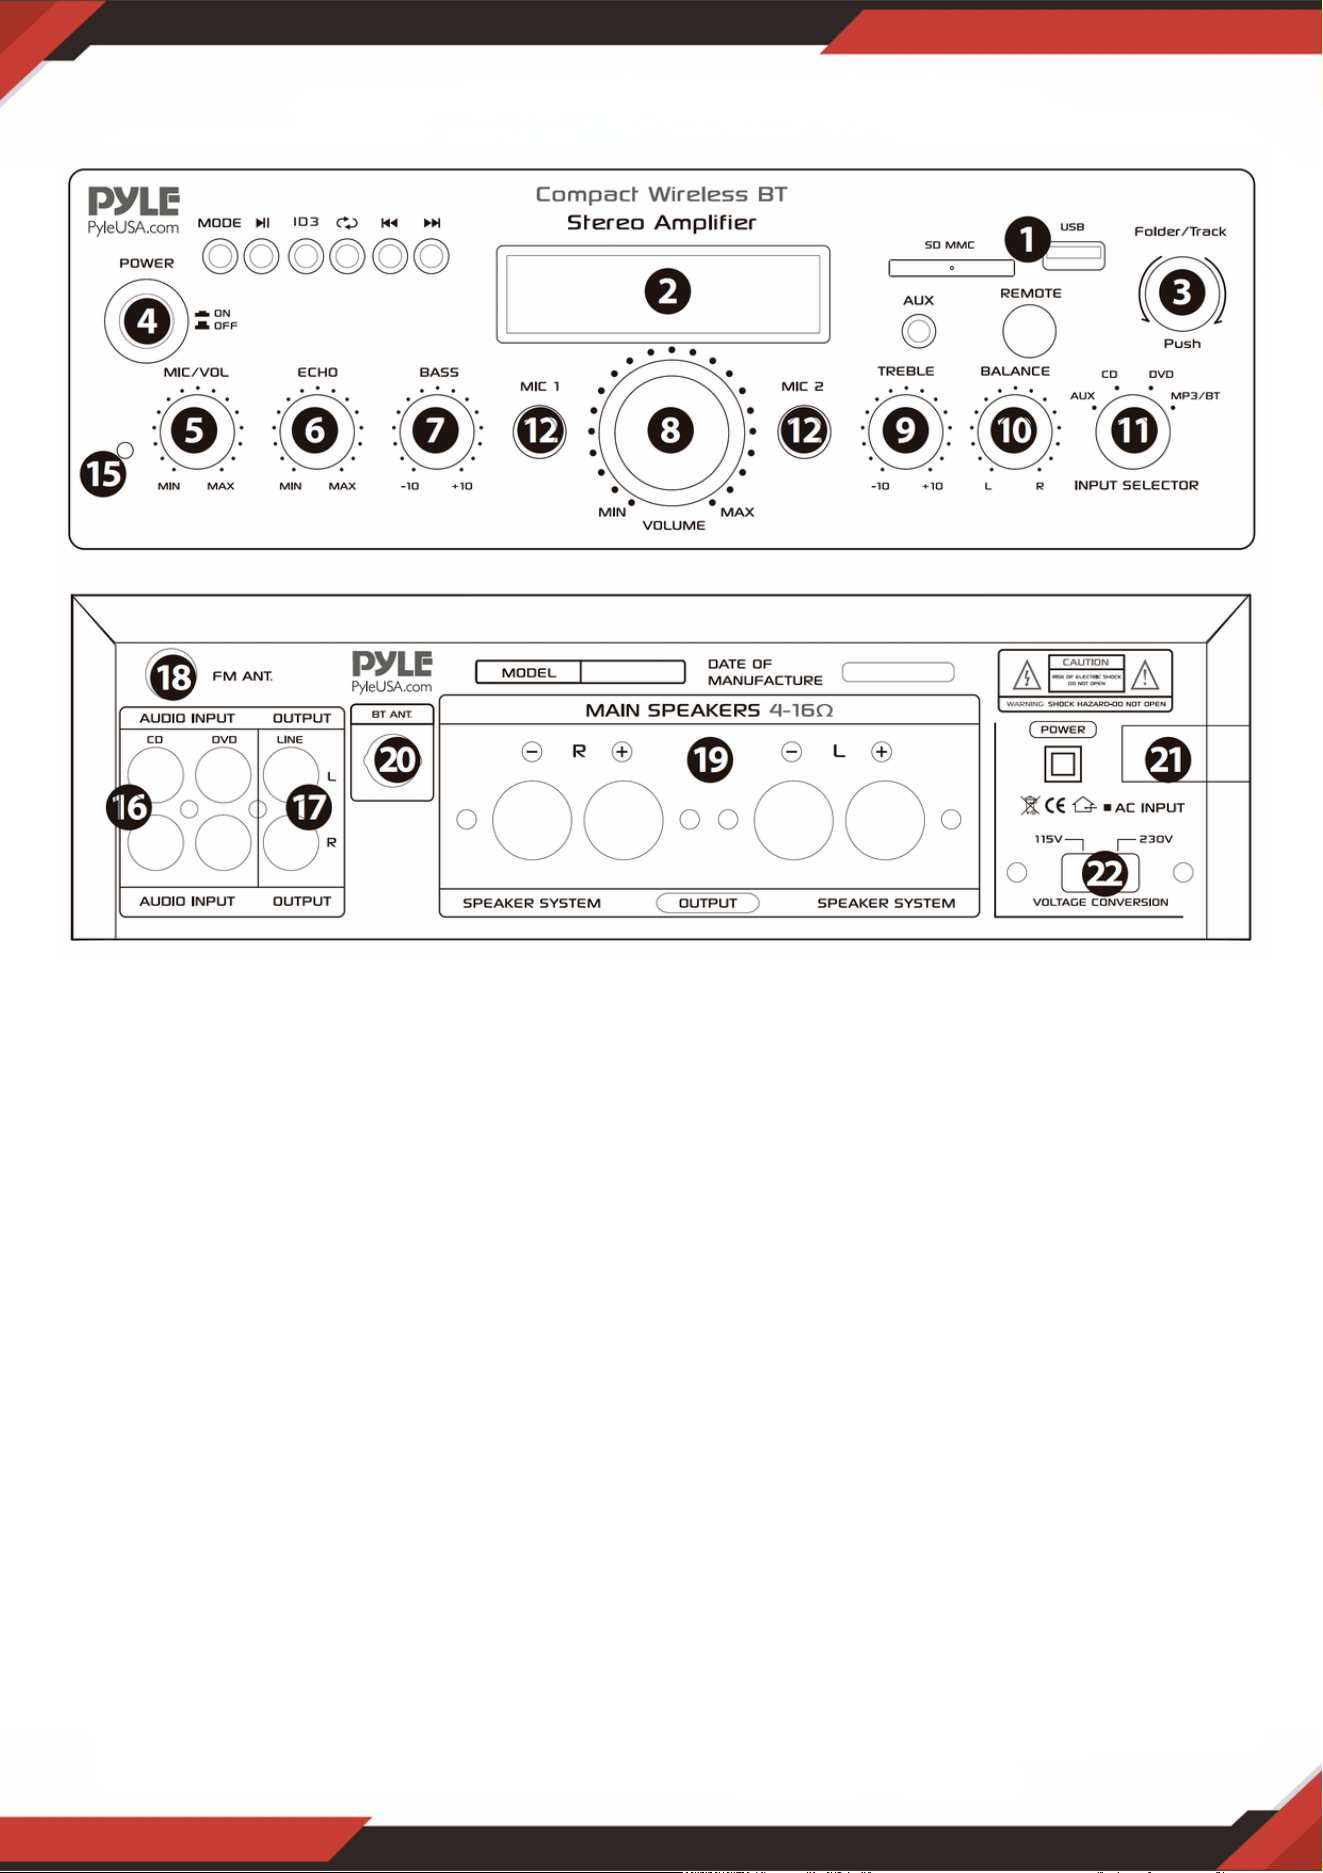
SD Card Reader/USB Port: for using external media on this device, just plug your
SD/USB into these ports.
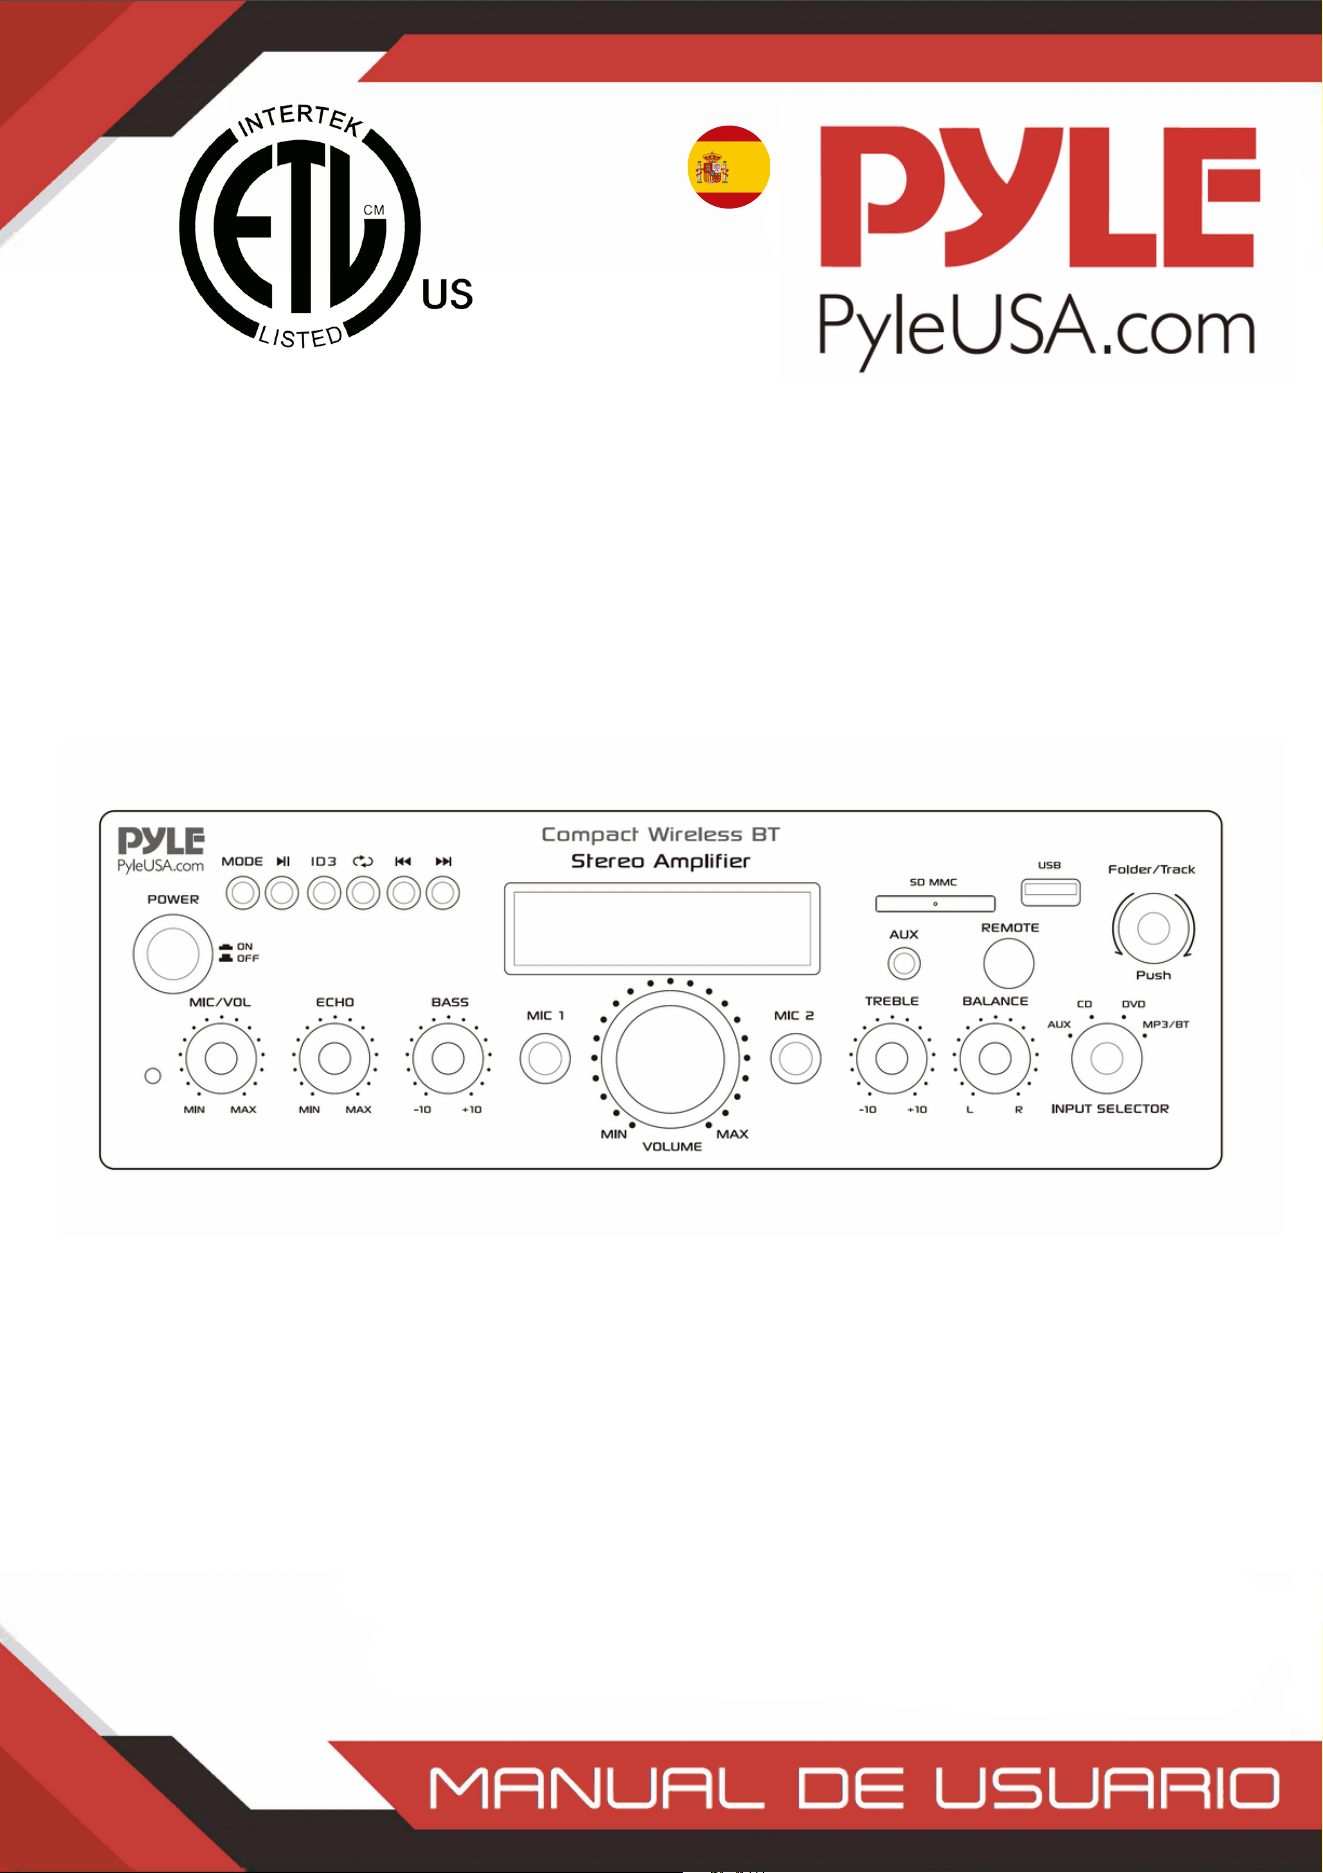
1.
LCD Screen: all information regarding external media or this device will be displayed
from this screen.
2.
Folder and track selection3.
Power Button: Press this button to power the unit on and off.4.
Microphone Volume Control Knob: Turn this knob to adjust the volume of
microphone
5.
Microphone Echo Volume Control Knob: Turn this knob to adjust the microphone
echo volume level.
6.
Bass Control: Turn this knob to adjust the low frequencies of Channel 1 & Channel 2.7.
Master Volume Fader: Move the fader up and down to adjust the master volume.8.
Treble Control: Turn this knob to adjust the high frequencies of Channel 1 and
Channel 2.
9.
Balance: Control the volume balance from left to right.10.
Input Selector: Turn this button to choose the favorable input11.
MICROPHONE INPUTS: KARAOKE or EXTERNAL MIC connect to these jacks.12.
IPOD/MP3 JACK-IPOD/MP3 connects to this jack.13.
REMOTE RECEIVER: To receive the remote control signal14.
POWER LED INDICATOR: When you turn on the unit, the LED will be on.15.
AUDIO INPUT: Connect the audio output jacks of DVD/CD, to these jacks.16.
LINE OUTPUT: Connect the RECORD input jacks to these jacks.17.
www.PyleUSA.com
9
18. FM ANTENNA CONNECTOR: Connect for AM and FM antennas.
19. SPEAKER OUTPUT: Connect your speaker system to these terminals.
20. BLUETOOTH ANTENNA: Please pull the antenna out when using Bluetooth input
21. POWER SUPPLY: Connect to AC 115V/60Hz and 230V/50Hz outlet.
22. POWER VOLTAGE SELECTOR: 115V/230V.
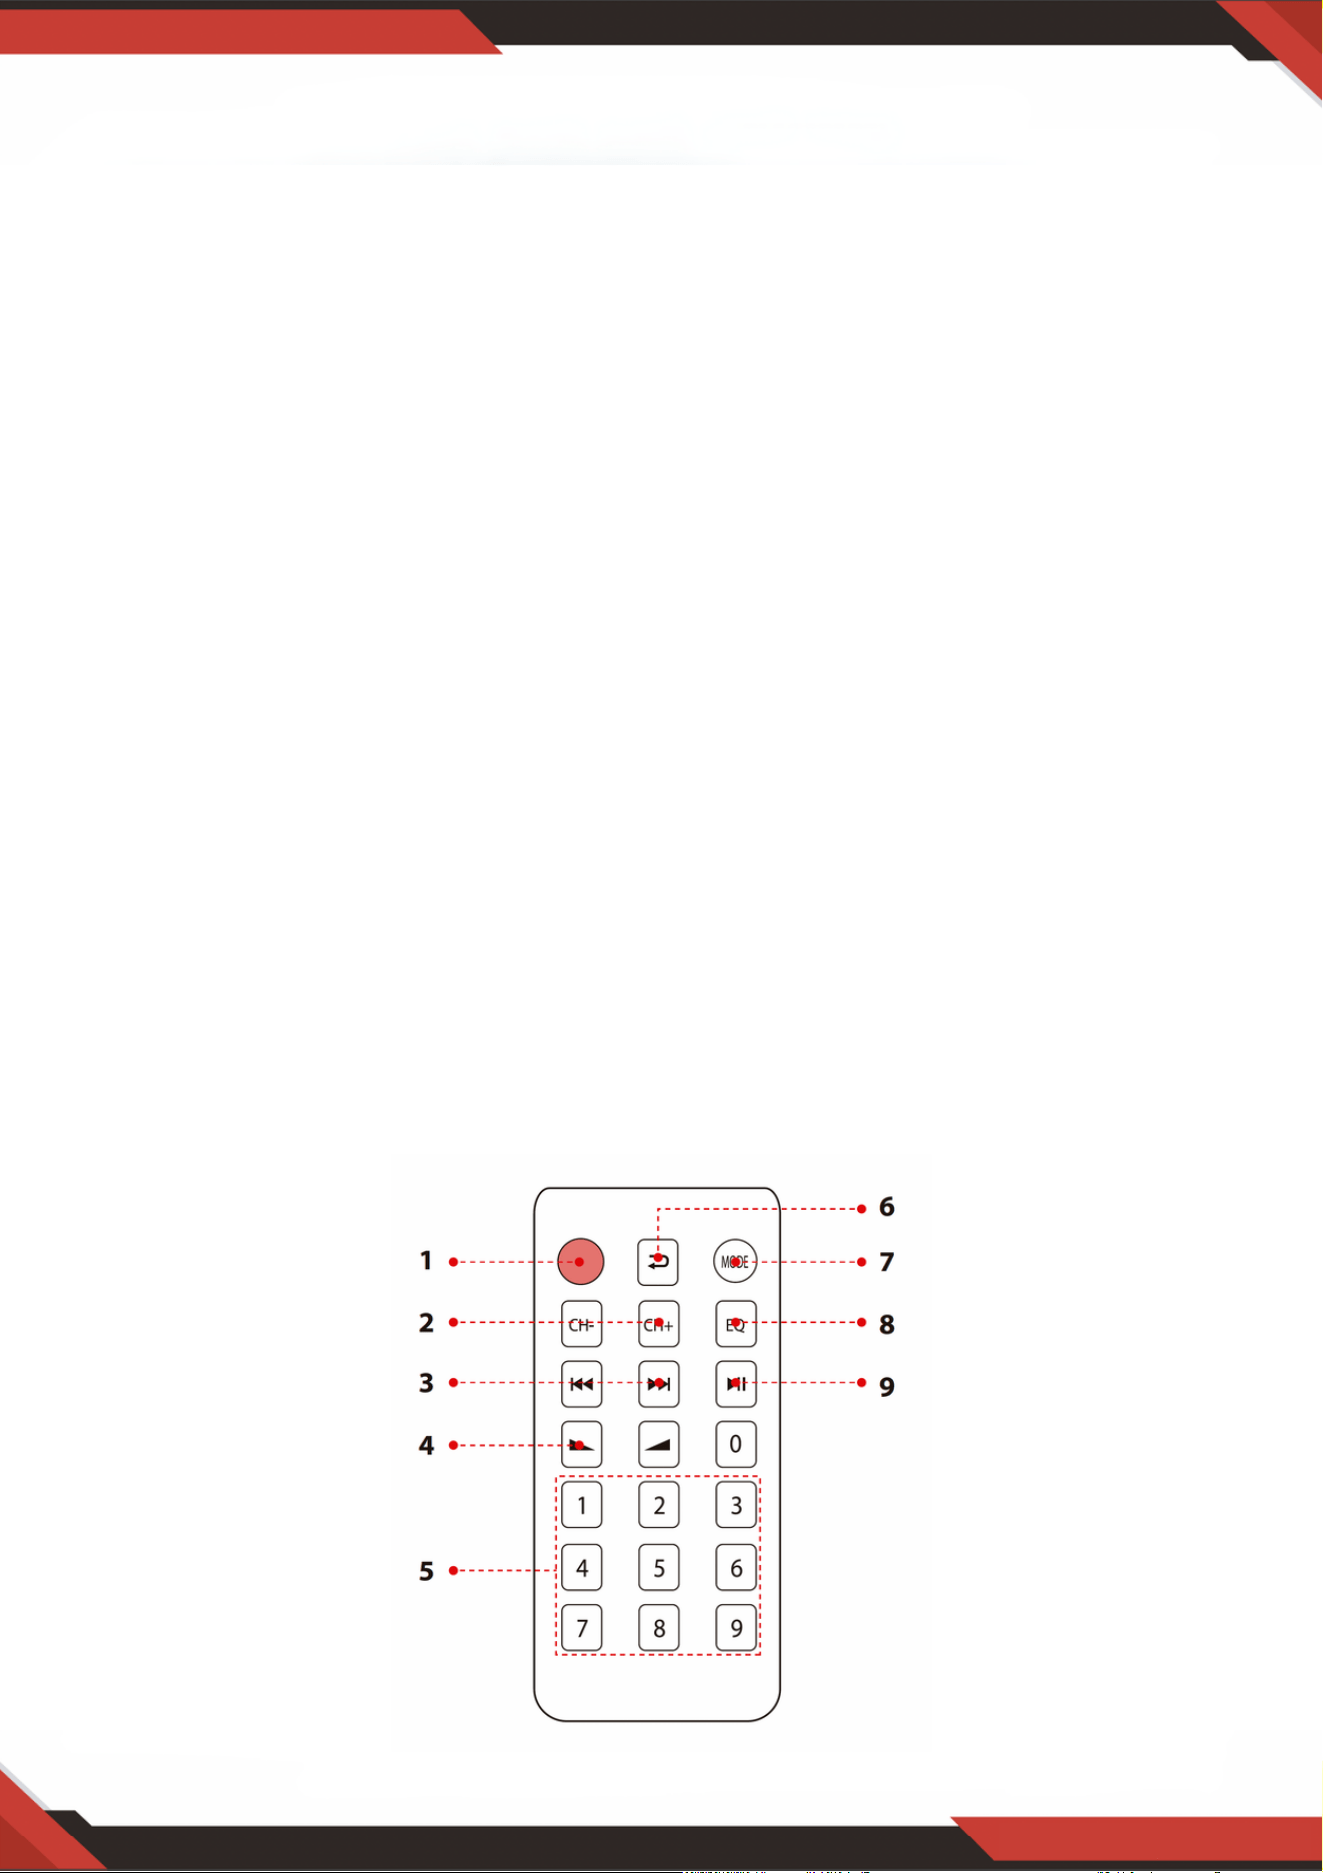
REMOTE CONTROL
Press this button to choose the ID3 display model, will show
TITLE/ARTIST/ALBUM/OFF. Hold this button for 5 second to turn ON or OFF the
MP3.
1.
When in the FM mode, press this two buttons to tune FM Frequency.2.
Press these two buttons to select the previous or next track in USB or SD or
Bluetooth mode, to select previous or next channel in FM model.
3.
Volume up or down.4.
Press the numbers to select the tracks directly. The unit takes 1-2 seconds to
response in USB or SD mode.
5.
Press this button to repeat mode.6.
Press this button to select the playing mode, such as USB/SD/FM/WIRELESS BT7.
EQ function: Select a pre-set mode of the equalizer that is designed accordingly.8.
Play and Pause function for MP3 in USB/SD/BT model. Press this button to auto
scan the channel in FM model, and auto store channel.
9.

www.PyleUSA.com
10
PDA6BU/PDA6BU.5/PDA5BU/PDA5BU.5
Compact Wireless BT Stereo Amplifier
Desktop Audio Power Amp Receiver with FM Radio, MP3/USB/SD Readers,
Digital LCD Display, Microphone Input (200 Watt)
Features:
What’s in the Box:
Desktop Audio Mini Power Amplifier
Compact Home Theater Stereo Receiver Style
Built-in Bluetooth for Wireless Music Streaming
FM Radio with LCD Digital Display
ID3 Tag Song Readout Displays Track Title/Artist/Album/File Name
Multi-Channel Audio Input Selection
MP3 Audio File Support
Connect & Stream Audio from External Devices
USB Flash Drive & SD Memory Card Readers
USB Doubles as Device Charge Port
Aux (3.5mm) Input
(2) 1/4'' Microphone Input Jacks
(2) Pairs RCA (L/R) Audio Input Connectors
(2) Pairs Banana Plug Speaker Output Connectors
(1) Pair RCA (L/R) Audio Output Connectors
Front Panel Audio Control Center
Radio Station Auto Search Scan
'Repeat & Random' Audio File Functions
Unique 'Track / Folder' Music Search Control Knob
Treble, Bass, Master & Microphone Volume Adjustable
Desktop Stereo Amplifier
Remote Control
FM Antenna

www.PyleUSA.com
11
WARNING:
This product can expose you to a chemical or group of chemicals, which
may include "Nickel Carbonate" which is known in the state of California
to cause cancer, birth defects, or other reproductive harm. For more info,
go to https://www.p65warnings.ca.gov/.
Bluetooth Connectivity:
Receives Wireless Signal for Audio Streaming
Simple & Hassle-Free Pairing Setup
Integrated Antenna for Extended Wireless Range
Works with All of Today’s Latest Devices
(Smartphones, Tablets, Laptops, Computers, etc.)
Bluetooth Version: 5.0
Bluetooth Network Name: 'PYLEUSA' or “BT”
Wireless Range: 40'+ Ft. (12 m)
Technical Specs:
MAX Power Output: 200 Watt (@ 4 Ohm)
RMS Power Output: 100 Watt x 2 (@ 8 Ohm)
Tone Control: Bass, f=100Hz +/-8dB
Frequency Response: 20Hz-20kHz
Frequency Adjustment: +/-10dB
Signal to Noise Ratio: >71dB
T.H.D.: <0.1%
Radio Station Presets: Up to 60 Stations
Battery Operated Remote, Requires (1) x CR-2025 Button Cell Battery, Included
Power Supply: 120/240V, Switchable
Dimensions (L x W x H): 9.8'' x 9.8'' x 3.9'' -inches (24.8 x 24.8 x 9.9 -cm)
Questions or Comments
We are here to help!
Phone: 1.718.535.1800
PyleUSA.com/ContactUs
Amplificador estéreo inalámbrico BT compacto
Receptor amplificador de potencia de audio de escritorio con radio FM,
Reproductores MP3/USB/SD, Pantalla LCD Digital, Entrada de Micrófono
(200 vatios)
SPANISH
PDA6BUUK/PDA6BU.5UK/PDA5BUUK/PDA5BU.0UK/PDA612BUUK/PDA612BU.5UK
PDA6BUEU/PDA6BU.5EU/PDA5BUEU/PDA5BU.0EU/PDA612BUEU/PDA612BU.5EU

¡AVISO!
PRECAUCIÓN: PARA REDUCIR EL RIESGO DE DESCARGA ELÉCTRICA, NO RETIRE LA TAPA DE
ESTE APARATO. EN EL INTERIOR DEL APARATO NO HAY PIEZAS QUE PUEDAN SER
REPARADAS POR EL USUARIO. CUALQUIER INTERVENCIÓN DEBE SER REALIZADA POR UN
TÉCNICO CUALIFICADO.
El símbolo del rayo con punta de flecha, dentro de un triángulo equilátero,
pretende alertar al usuario de la presencia de tensión "PELIGROSA" en el
interior del producto, que puede ser de magnitud suficiente para constituir un
riesgo de descarga eléctrica para las personas. Los usuarios deben extremar
las precauciones cuando aparezca este símbolo en este manual de
instrucciones y seguir todas las precauciones de seguridad.
El signo de exclamación dentro de un triángulo equilátero pretende alertar al
usuario de la presencia en este manual de importantes instrucciones de
funcionamiento y mantenimiento (reparación).
Lea atentamente estas instrucciones antes de utilizar este aparato.1.
Conserve estas instrucciones para futuras consultas.2.
Presta atención a todas las advertencias.3.
Siga todas las instrucciones.4.
ADVERTENCIA: Para evitar el riesgo de incendio o descarga eléctrica, no exponga este
aparato a la lluvia ni a la humedad. No almacene ni utilice este producto cerca de líquidos.
5.
Limpiar sólo con un paño seco.6.
No guarde ni utilice este producto cerca de fuentes de calor como radiadores, rejillas de
calefacción, estufas u otros aparatos (incluidos amplificadores) que produzcan calor.
7.
No anule el propósito de seguridad del enchufe polarizado o con toma de tierra. Un
enchufe polarizado tiene dos clavijas, una más ancha que la otra. Un enchufe con toma de
tierra tiene dos clavijas y una redonda. La clavija ancha o tercera clavija se incluye para su
seguridad. Si el enchufe suministrado no se adapta a su toma de corriente, consulte a un
electricista para sustituir la toma obsoleta.
8.
Proteja todos los cables conectados a este aparato para evitar que sean pisados o
pellizcados, especialmente en los enchufes y en el punto donde salen del aparato. Al
retirar el cable de la toma de corriente, hágalo sujetando el enchufe y no tirando del
cable.
9.
Desenchufe el aparato durante las tormentas eléctricas o cuando no vaya a utilizarlo
durante largos periodos de tiempo.
10.
Cuando realice el cableado de este aparato y de cualquier otro equipo utilizado en
conexión con el mismo, asegúrese de que todos sus equipos estén apagados.
11.
Una vez finalizada la instalación y el cableado, encienda todos sus equipos con los
controles de volumen y nivel orientados hacia ABAJO. Una vez encendido todo el equipo,
suba lentamente los controles de volumen y nivel a sus posiciones correctas.
12.
Cuando conecte el aparato a tierra, asegúrese de hacerlo correctamente para no
neutralizar la toma de tierra incorporada en el aparato.
13.
www.PyleUSA.com
2
www.PyleUSA.com
3
14. Antes de colocar, instalar, aparejar o suspender cualquier producto, compruebe que
todos los herrajes, suspensiones, cajas, transductores, soportes y equipos asociados
no estén dañados. Cualquier elemento que falte, esté corroído, deformado o no
cumpla las normas de carga puede reducir considerablemente la resistencia de la
instalación, colocación o red. Tal estado reduce considerablemente la seguridad de la
instalación y debe repararse inmediatamente. Utilice únicamente equipos diseñados
para las condiciones de carga de la instalación y para cualquier sobrecarga imprevista
a corto plazo. Nunca supere la capacidad nominal del material o del equipo.
15. Consulte a un profesional autorizado para la instalación del equipo físico. Asegúrese
de que se comprenden y cumplen todas las normativas locales, regionales y nacionales
relativas a la seguridad y el funcionamiento del equipo.
16. Encargue todas las tareas de mantenimiento al personal cualificado. Es necesario
reparar el aparato si éste ha sufrido algún tipo de daño, como daños en el cable de
alimentación o en el enchufe, si se ha derramado líquido o han caído objetos dentro
del aparato, si éste ha estado expuesto a la lluvia o a la humedad, si no funciona con
normalidad o si se ha caído.
ATENCIÓN
1. A: Conecte la entrada de audio a la salida de audio del
CD/DVD/TV.
NOTAS:
El aparato no admite la señal de vídeo. Asegúrese de
que está conectado el terminal CD/DVD/ TV AUDIO
OUTPUT.
Se oirá ruido si conecta el aparato a la salida de vídeo
de CD/DVD/TV por error.
2. B: Salida de señal que puede conectarse a otro
amplificador o altavoces amplificados
Introducción
Para sacar el máximo partido a nuestros Equipos, le recomendamos que lea toda la
información de las instrucciones de uso antes de utilizarlos.
El selector de entrada no funcionará si
la señal proviene de la salida de línea.
A. Por favor, saque la hoja de las pilas antes de utilizar el mando a distancia, de lo contrario
el mando a distancia no funcionará.
B. Pulse estos dos botones para seleccionar la pista anterior o siguiente en
modo USB/SD o BT inalámbrico; no hay respuesta en modo FM.
C. Pulse estos dos botones para seleccionar el canal anterior o siguiente en el
modo FM; no hay respuesta en los modos USB/SD y Bluetooth.
D. Pulse estos dos botones para subir o bajar el volumen de la radio
inalámbrica, USB/SD y FM. Estos botones no controlan el volumen maestro.
E. Pulse este botón para buscar automáticamente todas las frecuencias de
87.5MHz a 108MHz, y el aparato almacenará automáticamente los canales en modo
FM. Consulte 4, C para obtener más detalles.
F. Pulse este botón para seleccionar uno de los modos de reproducción (modo
USB/SD, modo FM y modo BT inalámbrico). Al ENCENDER la unidad se ajustará
automáticamente el modo USB/SD. Los archivos MP3 se reproducirán
automáticamente después de insertar la unidad rápida de USB o tarjeta SD.
No se puede seleccionar la entrada AUX, CD y DVD con este botón.
G. Mantenga pulsado este botón durante 5 segundos para ACTIVAR o DESACTIVAR los
modos USB/SD, BT inalámbrico y FM, pero no para ENCENDER o APAGAR la unidad. La
unidad emitirá la señal en modo de entrada CD, DVD, AUX si APAGA los modos
USB/SD, BT inalámbrico y FM.
H. Apunte con el control remoto al receptor de la unidad principal.
www.PyleUSA.com
4
3. PASOS PARA EL CONTROL DE LA RADIO FM
A. Conecte la antena FM antes de utilizar la radio FM.
B. Pulse el botón MODO del panel frontal o del control remoto para seleccionar el modo FM.
C. Pulse el botón REPRODUCIR/PAUSAR del panel frontal o del mando a distancia y la unidad
buscará automáticamente emisoras de radio FM de 87.5MHz a 108MHz.
D. Pulse SIGUIENTE/ANTERIOR para seleccionar la emisora FM.
4. CONTROL REMOTO
El control remoto sólo permite acceder a las funciones USB/SD, BT inalámbrico y
FM, pero no al volumen principal, el micrófono, los graves, los agudos y otras
funciones.
5. FORMATO DE ARCHIVO
Sólo se admiten los formatos MP3 y WAV para archivos almacenados en tarjetas USB/SD. El
dispositivo puede omitir archivos de pistas no compatibles en tarjetas USB o SD.

www.PyleUSA.com
5
A. Estos botones sólo se utilizan para controlar las funciones USB/SD, BT inalámbrico y
FM y no controlan ninguna otra función.
B. BOTÓN DE MODO: Pulse este botón para seleccionar el modo USB/SD, el modo FM o
el modo de reproducción inalámbrica BT. El modo USB/SD se ajustará
automáticamente tras encender el aparato. Reproducción automática de archivos mp3
cuando se inserta una memoria USB o una tarjeta SD. Este botón no puede utilizarse
para seleccionar la entrada AUX, CD o DVD.
C. Cada pulsación del BOTÓN REPRODUCIR/PAUSAR cambia de reproducción a pausa o
de pausa a reproducción en modo USB/SD o en modo Wireless BT.
Pulse el BOTÓN REPRODUCIR/PAUSAR una vez para escanear automáticamente
todas las frecuencias de 87.5MHz a 108MHz en el modo FM. Pulse el botón para
escanear los canales automáticamente cuando utilice la radio FM por primera vez. Una
vez detenida la exploración, el dispositivo almacena automáticamente todos los canales
de radio y reproduce desde el primer canal de radio. No es necesario volver a escanear
cada vez que encienda la radio FM.
D. BOTÓN SIGUIENTE/ANTERIOR: Utilice estos dos botones para seleccionar la pista o
carpeta anterior, según los diferentes modos que se indican a continuación.
En el modo USB/SD: Utilícelo para seleccionar la pista anterior o siguiente, o utilícelo
para seleccionar la carpeta anterior o siguiente en el modo CARPETA.
En modo BT inalámbrico: Permite seleccionar la pista anterior o siguiente.
En modo FM: Utilice para seleccionar el canal de radio anterior o siguiente.
6. PUERTO USB
El puerto USB sólo se utiliza para reproducir archivos de audio desde su memoria USB.
NO lo utilice como puerto de carga ya que podría dañar la unidad.
7. BOTÓN DEL PANEL DE CONTROL
8. SELECTOR DE ENTRADA
Seleccione el modo de entrada MP3/BT si desea reproducir radio USB/SD/ BT
inalámbrico/FM. Seleccione el modo de entrada CD para reproducir la señal de entrada de
las tomas de CD. Seleccione el modo de entrada AUX para reproducir la señal de entrada de
las tomas AUX. Seleccione el modo de entrada DVD si desea reproducir la señal de entrada
de las tomas DVD, de lo contrario no habrá señal en la salida de la unidad.
www.PyleUSA.com
6
Después de insertar una memoria USB/tarjeta SD en el terminal de entrada, asegúrate
de que el selector de entrada (13) está en USB/SD y, a continuación, pulse el botón de
modo para elegir entre audio del puerto USB, entrada de tarjeta SD, BT inalámbrica o
radio FM. Si desea utilizar la radio inalámbrica, siga los pasos que se indican a
continuación.
PANEL FRONTAL Y TRASERO
1. Control de consola USB/tarjeta SD/BT inalámbrica
PASOS PARA CONECTARSE A UN DISPOSITIVO BT INALÁMBRICO
A.Pulse el botón MODO situado debajo de la pantalla de visualización ID3 y cambie al modo Bluetooth.
B. Busque el dispositivo Bluetooth y encuentra el nombre Bluetooth "PYLEUSA o BT".
C. Seleccione el nombre Bluetooth PYLEUSA o BT y espere a que el dispositivo se empareje. En la pantalla
aparecerá "BUSCANDO".
D. El dispositivo emite un sonido confirmando que los dispositivos se han emparejado correctamente y la
pantalla muestra "BLUETOOTH CONECTADO".
E. Una vez emparejado, puedes escuchar música desde su dispositivo Bluetooth. También puede utilizar los
botones de control del dispositivo para seleccionar pistas desde su dispositivo Bluetooth.

www.PyleUSA.com
7
NOTA: La entrada USB SOLO sirve para conectar una unidad rápida USB. Conectar
un reproductor MP3 o un ordenador directamente a la entrada de la unidad rápida
USB impedirá que el aparato reproduzca el sonido de estos dispositivos.
Modo búsqueda: Cuando la palabra FOLDER parpadea en la pantalla, el aparato está
en modo BUSCAR CARPETA. Gire el mando CARPETA/PISTA para buscar la carpeta.
Pulse el mando CARPETA/PISTA para seleccionar una pista. Al salir del modo carpeta,
aparece la palabra ALL en la pantalla. Esto indica que el aparato reproducirá todas las
pistas de la memoria USB/tarjeta SD. Cuando pulsa el botón REPETIR, aparecen 6
pantallas diferentes dependiendo de la configuración que haya elegido: ALL/NORMAL
/SINGLE /FOLDER /RANDOM /BROWSE. Cuando pulse el botón ID3, aparecerán 4
pantallas diferentes en función del ajuste elegido: TÍTULO/ARTISTA/
ÁLBUM/APAGADO.
1.
Fuente de entrada: La pantalla muestra "U" en modo USB y "S" en modo tarjeta SD.
Pulse el botón de modo para cambiar de una entrada a otra.
2.
Número de pista: Aquí aparece el número de pista (para todas las pistas de la memoria
USB). En la imagen anterior, el dispositivo está reproduciendo la pista número 1.
3.
Información de la pista o carpeta: Aquí aparece el nombre de la carpeta. En la imagen
anterior, la carpeta que se está reproduciendo se llama MUSIC.
4.
Tiempo transcurrido: Aquí se muestra el tiempo transcurrido de la pista actual.5.
Utilice los demás controles, reproducción/pausa, parada, repetición (TODO/NORMAL/
ÚNICO/CARPETA/ALEATORIO/BUSCAR), pista anterior y pista siguiente para
reproducir sonido desde la memoria USB/tarjeta SD o BT inalámbrico.
2. Pantalla de la consola de control de la USB/tarjeta SD

3. Botón de búsqueda de pistas/carpetas
Gire este mando en el sentido de las agujas del reloj para buscar todas las pistas de la
tarjeta USB/SD. Cada pista aparece por su nombre. Las pistas o carpetas se muestran en
orden cronológico (desde el momento en que se cargaron los archivos en la memoria
USB/tarjeta SD). Pulse el botón para iniciar la reproducción de la pista que desee.
Las pistas del archivo de origen se muestran en primer lugar, seguidas de las de las
carpetas.
Pulse este botón para activar la función de búsqueda de carpetas. Al pulsarlo, la palabra
"FOLDER" empezará a parpadear en la pantalla. A continuación, gire este mando en el
sentido de las agujas del reloj para buscar carpetas dentro de la memoria USB/tarjeta SD.
Pulse el mando para empezar a reproducir las pistas de esa carpeta.
www.PyleUSA.com
8
Lector de tarjetas SD/puerto USB: para utilizar unidades externas en este dispositivo,
basta con conectar la tarjeta SD/USB a estos puertos.
1.
Pantalla LCD: en esta pantalla se muestra toda la información relativa a los soportes
externos o al aparato.
2.
Selección de carpetas y pistas3.
Botón de encendido: Este botón enciende y apaga el aparato.4.
Botón de control del volumen del micrófono: Gírelo para ajustar el volumen del
micrófono.
5.
Mando de control de volumen del eco del micrófono: Gire este mando para ajustar el nivel
de volumen del eco del micrófono.
6.
Control de graves: Gire este mando para ajustar las frecuencias bajas de los canales 1 y 2.7.
Regulador del volumen principal: Mueva el regulador arriba y abajo para ajustar el
volumen principal.
8.
Control de agudos: Gire este mando para ajustar las frecuencias altas del canal 1 y del
canal 2.
9.
Balance: Controla el balance de volumen de izquierda a derecha.10.
Selector de entrada: Gire este mando para elegir la entrada más favorable.11.
ENTRADAS DE MICROFONO: KARAOKE o MIC EXTERNO se conectan a estas tomas.12.
ENCHUFE IPOD/MP3: IPOD/MP3 se conectan a este enchufe.13.
RECEPTOR DE MANDO A DISTANCIA: Para recibir la señal del control remoto.14.
INDICADOR LED DE FUNCIONAMIENTO: Cuando el aparato está encendido, el LED se
ilumina.
15.
ENTRADA DE AUDIO: Conecte las tomas de salida de audio del DVD/CD a estas tomas.16.
SALIDA DE LÍNEA: Conecte las tomas de entrada RECORD a estas tomas.17.

www.PyleUSA.com
9
18. CONECTOR ANTENA FM: Conexión para antenas AM y FM.
19. Salida de altavoces: Conecte su sistema de altavoces a estas terminales.
20. ANTENA BLUETOOTH: Por favor, retire la antena cuando utilice la entrada Bluetooth.
21. FUENTE DE ALIMENTACIÓN: Enchúfelo a una toma de AC 115V/60Hz y 230V/50Hz.
22. SELECTOR DE TENSIÓN DE ALIMENTACIÓN: 115V/230V.
CONTROL REMOTO
Pulse este botón para seleccionar el modelo de visualización ID3, que mostrará
TITLE/ARTIST/ALBUM/OFF. Mantenga pulsado este botón durante 5 segundos para
ACTIVAR o DESACTIVAR el MP3.
1.
En el modo FM, pulse estos dos botones para sintonizar la frecuencia FM.2.
Pulse estos dos botones para seleccionar la pista anterior o siguiente en modo USB, SD o
Bluetooth, o para seleccionar el canal anterior o siguiente en modo FM.
3.
Aumento o disminución del volumen.4.
Pulse los números para seleccionar directamente las pistas. El dispositivo tarda entre 1 y 2
segundos en responder en modo USB o SD.
5.
Pulse para cambiar al modo de repetición.6.
Pulse para seleccionar el modo de reproducción, como USB/SD/FM/BT inalámbrico.7.
Función EQ: Selecciona un modo de ecualizador predefinido diseñado en consecuencia.8.
Función de reproducción y pausa para MP3 en el modelo USB/SD/BT. Pulse para buscar
canales automáticamente en el modelo FM y almacenar canales automáticamente.
9.

www.PyleUSA.com
10
PDA6BU/PDA6BU.5/PDA5BU/PDA5BU.5
Amplificador estéreo BT inalámbrico compacto
Receptor amplificador de audio de escritorio con radio FM, reproductores
MP3/USB/SD, pantalla digital LCD y entrada de micrófono (200 vatios)
Características:
Contenido de la caja:
Mini amplificador de audio de escritorio
Receptor estéreo estilo compacto para cine en casa
Bluetooth integrado para la transmisión inalámbrica de música
Radio FM con pantalla digital LCD
La reproducción de pistas con etiqueta ID3 muestra el título de la pista, el artista, el álbum y el nombre
del archivo.
Selección de entrada de audio multicanal
Admite archivos de audio MP3
Conecta y transmite audio desde dispositivos externos
Lectores de llaves USB y tarjetas de memoria SD
El puerto USB también sirve para cargar dispositivos.
Entrada auxiliar (3,5 mm)
(2) tomas de entrada de micrófono de 1/4''
(2) conectores de entrada de audio RCA (I/D)
(2) conectores banana de salida de altavoz
(1) conectores de salida de audio RCA (I/D)
Panel frontal del centro de control de audio
Búsqueda automática de emisoras de radio
Funciones "Repetición y Aleatorio" para archivos de audio
Un solo botón de control para buscar música en pistas y carpetas
Volumen de agudos, graves, principal y de micrófono ajustable
Amplificador estéreo de escritorio
Control remoto
Antena FM

www.PyleUSA.com
11
WARNING:
Este producto puede exponerle a una sustancia o grupo de sustancias químicas,
que pueden incluir "Carbonato de Níquel", conocidas por el Estado de California
como causantes de cáncer, defectos de nacimiento u otros daños reproductivos.
Para más información, visite https://www.p65warnings.ca.gov/.
Conectividad Bluetooth:
Recepción de una señal inalámbrica de radiodifusión sonora
Configuración sencilla y directa del emparejamiento
Antena integrada para un mayor alcance inalámbrico
Funciona con todos los dispositivos más recientes (smartphones, tabletas, portátiles,
ordenadores, etc.)
Versión Bluetooth: 5.0
Nombre de la red Bluetooth: 'PYLEUSA' o 'BT'.
Alcance inalámbrico: 40'+ pies.
Especificaciones Técnicas:
Potencia de salida máxima: 200 vatios (@ 4 Ohmios)
Potencia de salida RMS: 100 vatios x 2 (@ 8 Ohmios)
Control de tono: Bajo, frecuencia =100 Hz +/-8 dB
Respuesta en frecuencia: 20Hz-20kHz
Ajuste de frecuencia: +/-10 dB
Relación señal/ruido: > 71 dB
T.H.D.: < 0.1%.
Estaciones de radio sintonizadas: Hasta 60 emisoras
Control remoto a pilas, requiere (1) pila de botón CR-2025, incluida
Alimentación: 120/240 V, conmutable
Dimensiones (L x A x A): 9.8'' x 9.8'' x 3.9'' –pulgadas

Preguntas o Comentarios
¡Estamos para ayudarte!
Teléfono: 1.718.535.1800
PyleUSA.com/ContactUs
FRENCH
Amplificateur stéréo BT sans fil compact
Récepteur amplificateur de puissance audio de bureau avec
radio FM, lecteurs MP3/USB/SD, écran LCD numérique, entrée
microphone (200 Watt)
PDA6BUUK/PDA6BU.5UK/PDA5BUUK/PDA5BU.0UK/PDA612BUUK/PDA612BU.5UK
PDA6BUEU/PDA6BU.5EU/PDA5BUEU/PDA5BU.0EU/PDA612BUEU/PDA612BU.5EU

ATTENTION!
ATTENTION : POUR REDUIRE LE RISQUE DE CHOC ELECTRIQUE, NE RETIREZ PAS LE
COUVERCLE DE CET APPAREIL. L'INTÉRIEUR DE L'APPAREIL NE CONTIENT AUCUNE PIÈCE
RÉPARABLE PAR L'UTILISATEUR. TOUTE INTERVENTION DOIT ÊTRE CONFIÉE À UN
TECHNICIEN QUALIFIÉ.
Le symbole de l'éclair avec une flèche à l'intérieur d'un triangle équilatéral est
destiné à alerter l'utilisateur de la présence d'une tension "DANGEREUSE" à
l'intérieur du produit qui peut être d'une magnitude suffisante pour constituer
un risque d'électrocution pour l'homme. Les utilisateurs doivent faire preuve
d'une prudence accrue lorsque ce symbole apparaît dans ce manuel
d'instructions et suivre toutes les précautions énoncées.
Le point d'exclamation dans un triangle équilatéral a pour but d'alerter
l'utilisateur sur la présence d'importantes instructions d'utilisation et de
maintenance (entretien) dans ce manuel.
Lisez attentivement ces instructions avant d'utiliser cet appareil.1.
Conservez ces instructions pour vous y référer ultérieurement.2.
Tenez compte de tous les avertissements.3.
Suivez toutes les instructions.4.
AVERTISSEMENT: Pour éviter tout risque d'incendie ou d'électrocution, n'exposez pas cet
appareil à la pluie ou à l'humidité. Ne pas stocker ou utiliser ce produit à proximité de
liquides.
5.
Nettoyer uniquement avec un chiffon sec.6.
Ne rangez pas et n'utilisez pas ce produit à proximité de sources de chaleur telles que des
radiateurs, des bouches d’aération, des poêles ou d'autres appareils (y compris des
amplificateurs) qui produisent de la chaleur.
7.
Ne pas aller à l'encontre de l'objectif de sécurité de la prise polarisée ou de la prise de terre.
Une prise polarisée possède deux lames, dont l'une est plus large que l'autre. Une prise de
terre possède deux lames et une broche de mise à la terre ronde. La lame large ou la
troisième broche est incluse pour votre sécurité. Si la prise fournie n'est pas adaptée à votre
prise, consultez un électricien pour remplacer la prise obsolète.
8.
Protégez tous les fils connectés à cet appareil contre les piétinements et les pincements, en
particulier les prises et le point où ils sortent de l'appareil. Lorsque vous retirez le câble de la
prise de courant, retirez-le en tenant la prise et non en tirant sur le câble.
9.
Débranchez l'appareil en cas d'orage ou lorsqu'il n'est pas utilisé pendant de longues
périodes.
10.
Lors du câblage de cet appareil et de tout autre équipement utilisé en relation avec cet
appareil, assurez-vous que tous vos équipements sont éteints.
11.
Une fois l'installation et le câblage terminés, mettez en marche tous vos équipements avec
les commandes de volume et de niveau tournées vers le BAS. Une fois que tous les appareils
sont allumés, augmentez lentement les commandes de volume et de niveau jusqu'à leur
position correcte.
12.
Lorsque vous branchez l'appareil à la terre, veillez à le faire correctement afin de ne pas
neutraliser la mise à la terre intégrée à l'appareil.
13.
www.PyleUSA.com
2

www.PyleUSA.com
3
14. Avant de placer, d'installer, de gréer ou de suspendre un produit, vérifiez que l'ensemble
du matériel, des suspensions, des boîtiers, des transducteurs, des supports et de
l'équipement associé n'est pas endommagé. Tout élément manquant, corrodé, déformé ou
non conforme aux normes de charge peut réduire considérablement la résistance de
l'installation, du placement ou du réseau. Une telle condition réduit considérablement la
sécurité de l'installation et doit être immédiatement réparé. N'utilisez que du matériel
prévu pour les conditions de charge de l'installation et pour toute surcharge imprévue à
court terme. Ne jamais dépasser la valeur nominale du matériel ou de l'équipement.
15. Consulter un professionnel agréé pour l'installation de l'équipement physique. S'assurer
que toutes les réglementations locales, régionales et nationales concernant la sécurité et
le fonctionnement de l'équipement sont comprises et respectées.
16. Confiez toutes les réparations à un personnel qualifié. Une réparation est nécessaire
lorsque l'appareil a été endommagé de quelque manière que ce soit, par exemple lorsque
le câble d'alimentation ou la prise est endommagé, lorsqu'un liquide a été renversé ou que
des objets sont tombés dans l'appareil, lorsque l'appareil a été exposé à la pluie ou à
l'humidité, lorsqu'il ne fonctionne pas normalement ou lorsqu'il est tombé.
ATTENTION
1. A: Connectez l'entrée audio à la sortie audio du
CD/DVD/TV.
NOTES:
L'appareil ne prend pas en charge le signal vidéo,
assurez-vous que la borne CD/DVD/SORTIE TV
AUDIO est connectée.
Des bruits se font entendre lorsque vous connectez
l'appareil à la sortie vidéo CD/DVD/TV par erreur.
2. B: Sortie de signal pouvant être connectée à un autre
amplificateur ou à des enceintes amplifiées
Introduction
Pour tirer le meilleur parti de nos appareils, il est recommandé de lire toutes les
informations fournies dans le mode d’emploi avant d'utiliser l'appareil.
Le sélecteur d'entrée ne fonctionne pas si
le signal provient de la sortie Line.

A. Veuillez retirer la feuille de pile avant d'utiliser la télécommande, sinon la télécommande
ne fonctionnera pas.
B. Appuyez sur ces deux boutons pour sélectionner la piste précédente ou suivante
en mode USB/SD ou Wireless BT, il n'y a pas de réponse en mode FM.
C. Appuyez sur ces deux boutons pour sélectionner le canal précédent ou suivant
en mode FM, il n'y a pas de réponse en mode USB/SD et Bluetooth.
D. Appuyez sur ces deux boutons pour augmenter ou diminuer le volume de la radio
sans fil, de l'USB/SD et de la FM. Ces boutons ne contrôlent pas le volume principal.
E. Appuyez sur cette touche pour effectuer un balayage automatique de toutes les
fréquences de 87,5 MHz à 108 MHz, l'appareil mémorisera automatiquement les canaux
en mode FM. Voir 4, C pour plus de détails.
F. Appuyez sur ce bouton pour sélectionner l'un des modes de lecture (mode USB/SD,
mode FM et mode BT sans fil). La mise en marche de l'appareil active automatiquement le
mode USB/SD. Les fichiers MP3 seront lus automatiquement après l'insertion d'une clé
USB ou d'une carte SD. Cette touche ne permet pas de sélectionner l'entrée AUX, CD et
DVD.
G. Maintenez cette touche enfoncée pendant 5 secondes pour ACTIVER ou
DÉSACTIVER les fonctions USB/SD, Wireless BT et FM, mais pas pour ALLUMER/
ÉTEINDRE l'appareil. L'appareil émettra le signal en mode d'entrée CD, DVD, AUX si vous
DÉSACTIVEZ USB/SD, Wireless BT et FM.
H. Diriger la télécommande vers le récepteur de l'unité principale.
www.PyleUSA.com
4
3. ÉTAPES POUR LE CONTRÔLE RADIO FM
A. Branchez l'antenne FM avant d'utiliser la radio FM.
B. Appuyez sur la touche MODE du panneau avant ou de la télécommande pour sélectionner le mode FM.
C. Appuyez sur la touche PLAY/PAUSE du panneau avant ou de la télécommande, et l'appareil effectuera
un balayage automatique des stations de radio FM de 87,5 MHz à 108 MHz.
D. Appuyez sur la touche NEXT/PREV pour sélectionner la station FM.
4. TÉLÉCOMMANDE
La télécommande ne vous donne accès qu'aux fonctions USB/SD, Wireless BT et
FM, mais pas au volume principal, au microphone, aux basses, aux aigus et aux
autres fonctions.
5. FORMAT DU FICHIER
Seuls les formats MP3 et WAV sont pris en charge pour les fichiers stockés sur les cartes USB/SD.
L'appareil peut sauter les fichiers de piste non pris en charge dans les cartes USB ou SD.

www.PyleUSA.com
5
A. Ces boutons sont uniquement utilisés pour contrôler les fonctions USB/SD, Wireless
BT et FM et ne contrôlent pas d'autres fonctions.
B. BOUTON MODE: Appuyez sur ce bouton pour sélectionner le mode USB/SD, le mode
FM ou le mode de lecture BT sans fil. Le mode USB/SD sera réglé automatiquement
après avoir ALLUMÉ l'appareil. Lecture automatique des fichiers mp3 après l'insertion
d'une clé USB ou d'une carte SD. Cette touche ne permet pas de sélectionner l'entrée
AUX, CD et DVD.
C. Chaque pression sur le BOUTON PLAY/PAUSE permet de passer de la lecture à la
pause ou de la pause à la lecture en mode USB/SD ou en mode Wireless BT.
Appuyez une fois sur le BOUTON PLAY/PAUSE pour effectuer un balayage
automatique de toutes les fréquences de 87,5 MHz à 108 MHz en mode FM. Appuyez
sur le bouton pour effectuer un balayage automatique des canaux lorsque vous utilisez
la radio FM pour la première fois. Après l'arrêt de la recherche, l'appareil mémorise
automatiquement tous les canaux radio et joue à partir du premier canal radio. Vous
n'avez pas besoin de refaire le balayage à chaque démarrage de la radio FM.
D. BOUTON PREV et NEXT: Utilisez ces deux boutons pour sélectionner la piste ou le
dossier précédent, suivant les différents modes ci-dessous.
En mode USB/SD: Utiliser pour sélectionner la piste précédente ou suivante, ou
utiliser pour sélectionner le dossier précédent ou suivant en mode de travail DOSSIER.
En mode BT sans fil: Permet de sélectionner la piste précédente ou suivante.
En mode FM: Permet de sélectionner le canal radio précédent ou suivant.
6. PORT USB
Le port USB est uniquement utilisé pour lire les fichiers audios de votre clé USB.
NE PAS l'utiliser pour l'alimentation électrique car cela pourrait endommager l'appareil.
7. BOUTON DU PANNEAU DE CONTRÔLE
8. SÉLECTEUR D'ENTRÉE
Sélectionnez le mode d'entrée MP3/BT si vous souhaitez lire la radio USB/SD/Wireless
BT/FM. Sélectionnez le mode d'entrée CD pour lire le signal d'entrée des prises CD.
Sélectionnez le mode d'entrée AUX pour lire le signal d'entrée des prises AUX. Sélectionnez
le mode d'entrée DVD si vous souhaitez lire le signal d'entrée des prises DVD, sinon la
sortie de l'unité n'a pas de signal.

www.PyleUSA.com
6
Après avoir inséré une clé USB/une carte SD dans la borne d'entrée, veillez à placer le
sélecteur d'entrée (13) sur USB/SD, puis appuyez sur la touche mode pour choisir entre
l'audio provenant du port USB, de l'entrée de la carte SD, de la radio sans fil ou de la
radio FM. Si vous souhaitez utiliser la radio sans fil, suivez les étapes ci-dessous.
PANNEAU AVANT ET ARRIÈRE
1. Console de commande USB/Carte SD/BT Sans fil
ÉTAPES DE LA CONNEXION AVEC UN DISPOSITIF BT SANS FIL
A. Appuyez sur le bouton MODE sous l'écran d'affichage ID3 et passez en mode Bluetooth.
B. Recherchez le périphérique bluetooth et trouvez le nom bluetooth "PYLEUSA ou BT".
C. Sélectionnez le nom bluetooth PYLEUSA ou BT et attendez que l'appareil s’appaire. L'écran affiche
"RECHERCHE".
D. L'appareil émet un son confirmant que les appareils ont été appariés avec succès et l'écran affiche
"BLUETOOTH CONNECTED".
E. Une fois appairé, vous pouvez écouter de la musique à partir de votre appareil Bluetooth. Vous pouvez
également utiliser la fonction de l'appareil pour sélectionner les pistes de votre appareil Bluetooth.
www.PyleUSA.com
7
REMARQUE: L'entrée USB est UNIQUEMENT destinée à la connexion d'une clé
USB. La connexion d'un lecteur MP3 ou d'un ordinateur directement à l'entrée du
lecteur flash USB empêchera l'appareil de lire le son de ces appareils.
Mode de recherche: Lorsque le mot FOLDER clignote à l'écran, l'appareil est en mode
de RECHERCHE DE DOSSIERS. Tournez le bouton FOLDER/TRACK pour effectuer
une recherche dans le dossier. Appuyez sur le bouton FOLDER/TRACK pour choisir
une piste. Lorsque vous quittez le mode dossier, le mot ALL apparaît à l'écran. Cela
indique que l'appareil lira toutes les pistes de la clé USB/de la carte SD. Lorsque vous
appuyez sur le bouton REPEAT, 6 affichages différents apparaissent en fonction du
réglage choisi : ALL/NORMAL /SINGLE / FOLDER / RANDOM / BROWSE. Lorsque
vous appuyez sur la touche ID3, 4 affichages différents s'affichent en fonction du
réglage choisi : ALL/NORMAL /SINGLE / FOLDER / RANDOM / BROWSE.
TITRE/ARTISTE/ALBUM/OFF.
1.
Source d'entrée: L'écran affiche "U" en mode USB et "S" en mode carte SD. Appuyez
sur le bouton de mode pour passer d'une entrée à l'autre.
2.
Numéro de piste: Le numéro de piste (pour toutes les pistes de la clé USB) apparaît ici.
Dans l'image ci-dessus, l'appareil lit la piste numéro 1.
3.
Informations sur la piste ou le dossier: Le nom du dossier apparaît ici. Dans l'image ci-
dessus, le dossier en cours de lecture s'appelle MUSIC.
4.
Temps écoulé: Le temps écoulé de la piste en cours s'affiche ici.5.
Utilisez les autres commandes, lecture/pause, arrêt, répétition
(ALL/NORMAL/SINGLE/FOLDER/ RANDOM/BROWSE), piste précédente et piste
suivante pour lire le son à partir de la clé USB/carte SD ou du Wireless BT.
2. Écran de la console de contrôle de la carte SD/Clé USB

3. Bouton de recherche de piste/dossier
Tournez ce bouton dans le sens des aiguilles d'une montre pour rechercher toutes les pistes à
l'intérieur de la clé USB/carte SD. Chaque piste apparaît par son nom. Les pistes ou les
dossiers sont affichés par ordre chronologique (à partir du moment où les fichiers ont été
chargés sur la clé USB/carte SD). Appuyez sur le bouton pour commencer la lecture de la
piste souhaitée. Les pistes du fichier source sont d'abord affichées, puis celles qui se trouvent
dans les dossiers.
Appuyez sur ce bouton pour activer la fonction de recherche de dossiers. Une fois appuyé, le
mot "FOLDER" commence à clignoter sur l'écran d'affichage. Tournez ensuite ce bouton dans
le sens des aiguilles d'une montre pour rechercher les dossiers à l'intérieur de la clé USB/carte
SD. Appuyer sur le bouton pour commencer à lire les pistes de ce dossier.
www.PyleUSA.com
8
Lecteur de carte SD/port USB: pour utiliser des disques externes sur cet appareil, il
suffit de brancher votre carte SD/USB sur ces ports.
1.
Écran LCD: toutes les informations relatives aux supports externes ou à l'appareil sont
affichées sur cet écran.
2.
Sélection de dossiers et de pistes3.
Bouton d'alimentation: Ce bouton permet d'allumer et d'éteindre l'appareil.4.
Bouton de réglage du volume du microphone : Tournez ce bouton pour régler le
volume du microphone.
5.
Bouton de réglage du volume de l'écho du microphone: Tournez ce bouton pour régler
le niveau du volume de l'écho du microphone.
6.
Contrôle des basses: Tournez ce bouton pour régler les basses fréquences des canaux 1
et 2.
7.
Fader du volume principal: Déplacez le fader vers le haut et vers le bas pour régler le
volume principal.
8.
Commande des aigus: Tournez ce bouton pour régler les hautes fréquences du canal 1
et du canal 2.
9.
Balance: Contrôle l'équilibre du volume de gauche à droite.10.
Sélecteur d'entrée: Tournez ce bouton pour choisir l'entrée la plus favorable11.
ENTRÉES MICROPHONES: KARAOKE ou EXTERNAL MIC se connectent à ces prises.12.
PRISE POUR IPOD/MP3- L'IPOD/MP3 se connecte à cette prise.13.
RÉCEPTEUR DE TÉLÉCOMMANDE: Pour recevoir le signal de la télécommande14.
VOYANT LED FONCTIONNEMENT: Lorsque vous allumez l'appareil, la LED s'allume.15.
AUDIO INPUT: Connectez les prises de sortie audio du DVD/CD à ces prises.16.
LINE OUTPUT: Connectez les jacks d'entrée RECORD à ces jacks.17.

www.PyleUSA.com
9
18. CONNECTEUR D'ANTENNE FM: Connexion pour les antennes AM et FM.
19. SORTIE ENCEINTE: Connectez votre système de haut-parleurs à ces bornes.
20. ANTENNE BLUETOOTH: Veuillez retirer l'antenne lorsque vous utilisez l'entrée
Bluetooth.
21. ALIMENTATION: Brancher sur une prise de courant alternatif 115V/60Hz et 230V/50Hz.
22. SÉLECTEUR DE TENSION D'ALIMENTATION: 115V/230V.
TÉLÉCOMMANDE
Appuyez sur ce bouton pour choisir le modèle d'affichage ID3, qui affichera
TITLE/ARTIST/ALBUM/OFF. Maintenez ce bouton enfoncé pendant 5 secondes pour ACTIVER
ou DÉSACTIVER le MP3.
1.
En mode FM, appuyez sur ces deux boutons pour syntoniser la fréquence FM.2.
Appuyez sur ces deux boutons pour sélectionner la piste précédente ou suivante en mode USB,
SD ou Bluetooth, pour sélectionner le canal précédent ou suivant en mode FM.
3.
Augmentation ou diminution du volume4.
Appuyez sur les numéros pour sélectionner directement les pistes.5.
L'appareil prend 1 à 2 secondes pour répondre en mode USB ou SD.6.
Appuyez sur cette touche pour passer en mode répétition.7.
Appuyez sur cette touche pour sélectionner le mode de lecture, tel que USB/SD/FM/BT sans fil8.
Fonction EQ : Sélectionnez un mode prédéfini de l'égaliseur conçu en conséquence.9.
Fonction de lecture et de pause pour les MP3 dans le modèle USB/SD/BT. Appuyez sur cette
touche pour effectuer un balayage automatique des chaînes sur le modèle FM et mémoriser
automatiquement les chaînes.
10.

www.PyleUSA.com
10
PDA6BU/PDA6BU.5/PDA5BU/PDA5BU.5
Amplificateur stéréo BT sans fil compact
Amplificateur récepteur de puissance audio de bureau avec radio FM, lecteurs
MP3/USB/SD, affichage numérique LCD, entrée microphone (200 Watt)
Caractéristiques:
Contenido de la caja:
Mini amplificateur de puissance Desktop Audio
Récepteur stéréo compact pour home cinéma Style
Bluetooth intégré pour la diffusion de musique sans fil
Radio FM avec affichage numérique LCD
La lecture des morceaux ID3 Tag affiche le titre de la piste, l'artiste, l'album et le nom du fichier.
Sélection de l'entrée audio multicanal
Prise en charge des fichiers audio MP3
Connecter et diffuser de l'audio à partir d'appareils externes
Lecteurs de clés USB et de cartes mémoire SD
Le port USB sert également de port de charge pour les appareils
Entrée auxiliaire (3,5 mm)
(2) Prises d'entrée pour microphone de 1/4 po
(2) connecteurs d'entrée audio RCA (G/D)
(2) connecteurs de sortie de haut-parleur à prise banane
(1) connecteurs de sortie audio RCA (G/D)
Panneau avant du centre de contrôle audio
Recherche automatique des stations de radio Scan
Fonctions 'Repeat & Random' pour les fichiers audios
Bouton de commande unique pour la recherche de musique dans les pistes et les dossiers
Volume réglable des aigus, des basses, du Master et du microphone
Amplificateur stéréo de bureau
Télécommande
Antenne FM

www.PyleUSA.com
11
ATTENTION:
Ce produit peut vous exposer à un produit chimique ou à un groupe de produits chimiques,
qui peut inclure le "Carbonate de Nickel", connu dans l'État de Californie pour provoquer
des cancers, des malformations congénitales ou d'autres troubles de la reproduction. Pour
plus d'informations, consultez le site https://www.p65warnings.ca.gov/.
Connectivité Bluetooth:
Réception d'un signal sans fil pour la diffusion audio
Configuration de l'appairage simple et sans difficultés
Antenne intégrée pour une plus grande portée sans fil
Fonctionne avec tous les appareils les plus récents (smartphones, tablettes, ordinateurs
portables, ordinateurs, etc.)
Version Bluetooth : 5.0
Nom du réseau Bluetooth : PYLEUSA' ou "BT".
Portée sans fil : 40'+ Ft.
Caractéristiques techniques:
Puissance de sortie MAX : 200 Watt (@ 4 Ohm)
Puissance de sortie RMS : 100 Watt x 2 (@ 8 Ohm)
Contrôle de la tonalité : Basse, fréquence =100 Hz +/-8 dB
Réponse en fréquence : 20 Hz-20 kHz
Réglage de la fréquence : +/-10 dB
Rapport signal/bruit : > 71 dB
T.H.D. : < 0,1%
Présélections de stations de radio : Jusqu'à 60 stations
Télécommande à piles, nécessite (1) x pile bouton CR-2025, incluse
Alimentation électrique : 120/240V, commutable
Dimensions (L x L x H) : 9,8'' x 9,8'' x 3,9'' -pouces

Questions ou Commentaires
Nous sommes là pour vous aider!
Téléphone: 1.718.535.1800
PyleUSA.com/ContactUs
ITALIAN
Amplificatore stereo wireless BT compatto
Ricevitore amplificatore audio da tavolo con radio FM,
Lettori MP3/USB/SD, display LCD digitale, ingresso microfono
(200 Watt)
PDA6BUUK/PDA6BU.5UK/PDA5BUUK/PDA5BU.0UK/PDA612BUUK/PDA612BU.5UK
PDA6BUEU/PDA6BU.5EU/PDA5BUEU/PDA5BU.0EU/PDA612BUEU/PDA612BU.5EU

ATTENZIONE!
AVVISO: PER RIDURRE IL RISCHIO DI SCOSSE ELETTRICHE, NON RIMUOVERE IL COPERCHIO
DI QUESTA UNITÀ. NON CI SONO PARTI RIPARABILI DALL'UTENTE ALL'INTERNO. RIVOLGERSI
AD UN TECNICO QUALIFICATO PER QUALSIASI INTERVENTO DI MANUTENZIONE.
Il simbolo del fulmine con la freccia in giù all'interno di un triangolo equilatero
è destinato ad avvisare l'utente della presenza di tensione "PERICOLOSA"
all'interno dell'involucro del prodotto che potrebbe essere di entità tale da
costituire un rischio di scossa elettrica per le persone. Gli utenti devono
adottare una maggiore accortezza quando appare questo simbolo nel manuale
di istruzioni e seguire tutte le precauzioni indicate.
Il punto esclamativo all'interno di un triangolo equilatero serve ad avvisare
l'utente della presenza di importanti indicazioni operative per l'uso e la
manutenzione (assistenza) in questo manuale.
Leggere attentamente le presenti istruzioni prima di utilizzare questo apparecchio.1.
Conservare queste istruzioni per consultazioni future.2.
Seguire tutte le avvertenze.3.
Seguire tutte le istruzioni.4.
AVVERTENZA: Per evitare scosse elettriche, non esporre l'apparecchio alla pioggia o
all'umidità. Non conservare o utilizzare il prodotto in prossimità di liquidi.
5.
Pulire solo con un panno asciutto.6.
Non conservare o utilizzare il prodotto in prossimità di fonti di calore quali radiatori,
termosifoni, stufe o altri apparecchi (compresi gli amplificatori) che producono calore.
7.
Non vanificare lo scopo di sicurezza della spina polarizzata o con messa a terra. Una spina
polarizzata ha due lame, una più larga dell'altra. La spina con messa a terra ha due lame e
un polo di messa a terra tondo. La lama larga o il terzo polo sono previsti per la sicurezza
dell'utente. Se la spina in dotazione non è adatta alla presa, rivolgersi ad un elettricista
per la sostituzione della presa obsoleta.
8.
Proteggere tutti i cavi collegati a questo apparecchio per evitare che vengano calpestati o
schiacciati, in particolare le spine e il punto in cui escono dall'unità. Quando si rimuove il
cavo dalla presa di corrente, rimuoverlo tenendo la spina e non tirando il cavo.
9.
Scollegare l'apparecchio in caso di temporali o quando rimane inutilizzato per lunghi
periodi di tempo.
10.
Durante il cablaggio di questa unità e di tutte le altre apparecchiature utilizzate in
connessione con l'unità stessa, assicurarsi che tutte le apparecchiature siano spente.
11.
Una volta completati l'installazione ed il cablaggio, accendere tutte le apparecchiature
con i controlli di volume e livello abbassati. Una volta che tutte le apparecchiature sono
accese, alzare lentamente i controlli del volume o del livello nella posizione corretta.
12.
Quando si collega l'unità a terra, assicurarsi di farlo correttamente, in modo da non
compromettere la messa a terra incorporata nell'unità.
13.
www.PyleUSA.com
2

www.PyleUSA.com
3
14. Prima di posizionare, installare, armare o sospendere qualsiasi prodotto, ispezionare tutto
l'hardware, le sospensioni, gli armadietti, i trasduttori, le staffe e le attrezzature associate per
verificare che non siano danneggiati. Qualsiasi componente mancante, corroso, deformato o non
idoneo al carico potrebbe ridurre significativamente la resistenza dell'installazione, del
posizionamento o dell'array. Qualsiasi condizione di questo tipo riduce gravemente la sicurezza
dell'installazione e deve essere immediatamente corretta. Usare solo ferramenta adatta alle
condizioni di carico dell'installazione e di eventuali sovraccarichi imprevisti e di breve durata. Non
superare mai i valori nominali della ferramenta o dell'apparecchiatura.
15. Consultare un ingegnere professionista autorizzato per quanto riguarda l'installazione
dell'apparecchiatura. Assicurarsi che tutte le norme locali, statali e nazionali relative alla sicurezza
e al funzionamento delle apparecchiature siano comprese e rispettate.
16. Rivolgersi a personale di assistenza qualificato per tutti gli interventi di manutenzione.
L'assistenza è necessaria quando l'apparecchio è stato danneggiato in qualsiasi modo, ad esempio
se il cavo di alimentazione o la spina sono rovinati, se è stato versato del liquido o sono caduti
degli oggetti nell'apparecchio, l'apparecchio è stato esposto alla pioggia o al sole. l'apparecchio è
stato esposto alla pioggia o all'umidità, non funziona normalmente o è caduto.
ATTENZIONE
1. A: Collegare l'ingresso audio con l'uscita audio
CD/DVD/TV.
NOTE:
L'unità non supporta il segnale video, pertanto
assicurarsi che il terminale di uscita audio
CD/DVD/TV sia collegato.
Se si collega l'unità con l'uscita video CD/DVD/TV
per errore, si sentiranno dei rumori.
2. B: Uscita di segnale che può essere collegata ad altri
amplificatori o diffusori amplificati.
Introduzione
Per ottenere il massimo dai nostri apparecchi, si raccomanda di leggere tutte le
informazioni contenute nel manuale di istruzioni prima di utilizzare l'apparecchiatura.
Il selettore di ingresso non funziona se il
segnale proviene dall'uscita di linea.

A. Prima di utilizzare il telecomando, estrarre il foglio delle batterie, altrimenti il
telecomando non funzionerà.
B. Premere questi due pulsanti per selezionare il brano precedente o successivo in
modalità USB/SD o Wireless BT; in modalità FM non c'è risposta.
C. Premere questi due pulsanti per selezionare il canale precedente o successivo in
modalità FM, non c'è risposta in modalità USB/SD e Bluetooth.
D. Premere questi due pulsanti per aumentare o diminuire il volume del Wireless
BT, USB/SD e FM. Questi pulsanti non controllano il volume principale.
E. Premere questo pulsante per eseguire la scansione automatica di tutte le frequenze
da 87,5 MHz a 108 MHz l'unità memorizzerà automaticamente i canali in modalità FM.
Per ulteriori dettagli, vedere 4, C.
F. Premere questo pulsante per selezionare una delle modalità di riproduzione (modalità
USB/SD, modalità FM e modalità WirelessBT senza fili). Accendendo l'unità si imposta
automaticamente la modalità USB/SD. La riproduzione di file MP3 avviene
automaticamente dopo l'inserimento dell'unità USB o della scheda SD. Con questo
pulsante non è possibile selezionare l'ingresso AUX, CD e DVD.
G. Tenere premuto questo pulsante per 5 secondi per ATTIVARE o DISATTIVARE le
modalità USB/SD, Wireless BT e FM, ma non per ACCENDERE o SPEGNERE l'unità. L'unità
emette il segnale in modalità di ingresso CD,DVD e AUX se si DISATTIVANO le modalità
USB/SD, Wireless BT e FM.
H. Puntare il telecomando verso il ricevitore dell'unità principale.
www.PyleUSA.com
4
3. PASSAGGI PER IL CONTROLLO DELLA RADIO FM
A. Collegare l'antenna FM prima di utilizzare la radio FM.
B. Premere il pulsante MODE sul pannello frontale o sul telecomando per selezionare la modalità FM.
C. Premere il pulsante PLAY/PAUSE sul pannello frontale o sul telecomando per selezionare la scansione
automatica e la stazione radio FM da 87,5Mhz a 108Mhz.
D. Premere il pulsante NEXT/PREV per selezionare la stazione FM.
4. CONTROLLO REMOTO
Il telecomando consente di accedere solo alle funzioni USB/SD, Wireless BT e FM
e non al volume Master, al microfono, ai bassi, agli acuti e ad altre funzioni.
5. FORMATO DEL FILE
Per i file memorizzati su USB/SD sono supportati solo i formati MP3 e WAV. L'unità
potrebbe saltare le tracce non supportate nelle schede USB o SD.

www.PyleUSA.com
5
A. Questi pulsanti sono utilizzati solo per controllare le funzioni USB/SD, Wireless BT e FM.
e non controllano altre funzioni.
B. PULSANTE MODALITÀ: Premere questo pulsante per selezionare una delle modalità
USB/SD, FM o Wireless BT. La modalità USB/SD viene impostata automaticamente dopo
l'accensione dell'unità.
Riproduce automaticamente i file mp3 dopo aver inserito una chiavetta USB o una
scheda SD. Non è possibile selezionare l'ingresso AUX, CD e DVD con questo pulsante.
C. Ogni pressione del PULSANTE PLAY/PAUSE fa passare il funzionamento da riproduzione a
pausa o dalla pausa alla riproduzione in modalità USB/SD o Wireless BT.
Premere una volta il PULSANTE PLAY/PAUSE per eseguire la scansione automatica di
tutte le frequenze da 87,5 MHz a 108 MHz in modalità FM. Premere il pulsante per
eseguire la scansione automatica dei canali quando si usa la radio FM per la prima volta.
Dopo aver interrotto la ricerca, l'unità memorizzerà automaticamente tutti i canali radio e
riprodurrà dal primo canale radio. Non è necessario eseguire di nuovo la scansione dei
canali FM all'avvio.
D. PULSANTE PREV e NEXT: utilizzare questi due pulsanti per selezionare il brano
precedente, successivo o la cartella, a seconda delle diverse modalità, come indicato di
seguito.
In modalità USB/SD: Usare per selezionare la traccia precedente o successiva, o usare per
selezionare la cartella precedente o successiva in modalità FOLDER.
In modalità Wireless BT: Utilizzare per selezionare il brano precedente o successivo.
In modalità FM: Utilizzare per selezionare il canale radio precedente o successivo.
6. PORTA USB
La porta USB viene utilizzata solo per la riproduzione di file audio presenti sul disco USB.
NON utilizzarla per l'alimentazione, perché potrebbe danneggiare l'unità.
7. PULSANTE DEL PANNELLO DI CONTROLLO
8. SELETTORE DI INGRESSO
Selezionare la modalità di ingresso MP3/BT se si desidera riprodurre la radio USB/SD/Wireless
BT/FM. Selezionare la modalità di ingresso CD se si desidera riprodurre il segnale di ingresso
delle prese CD. Selezionare la modalità di ingresso AUX se si desidera riprodurre il segnale di
ingresso dei jack AUX. Selezionare la modalità di ingresso DVD se si desidera riprodurre il
segnale di ingresso dei jack DVD, altrimenti l'uscita dell'unità non ha alcun segnale.
www.PyleUSA.com
6
Dopo aver inserito una chiavetta USB/SD Card nel terminale di ingresso, assicurarsi di
impostare il selettore di ingresso (13) su USB/SD, quindi premere il pulsante di modalità
per scegliere tra audio dalla porta USB, dall'ingresso della scheda SD, da Wireless BT o
dalla radio FM. Se si desidera utilizzare il wireless BT senza fili, verificare la seguente
procedura.
PANNELLO ANTERIORE E POSTERIORE
1. Console di controllo USB/SD Card/Wireless BT
PASSAGGI PER IL COLLEGAMENTO CON IL DISPOSITIVO BT SENZA FILI
A. Premere il pulsante MODE sotto la schermata di visualizzazione ID3 e accedere alla modalità Bluetooth.
B. Cercare il dispositivo bluetooth e selezionare il nome "PYLEUSA o BT".
C. Selezionare il nome bluetooth PYLEUSA o BT e attendere che il dispositivo venga accoppiato. Sullo
schermo si visualizza "RICERCA".
D. L'unità emette un suono per confermare che i dispositivi sono stati accoppiati con successo e lo
schermo verrà visualizzato "BLUETOOTH CONNESSO".
E. Una volta accoppiato, è possibile riprodurre musica dal dispositivo Bluetooth. È inoltre possibile
utilizzare i pulsanti di controllo dell'unità per selezionare i brani dal dispositivo Bluetooth.

www.PyleUSA.com
7
NOTA: l'ingresso USB è destinato esclusivamente al collegamento di un'unità di memoria
USB (unità disco rigido). Se si collega un lettore MP3 o un computer direttamente
all'ingresso USB fash drive, l'unità non sarà in grado di riprodurre l'audio da tali dispositivi.
Modalità di ricerca: Quando sullo schermo compare la parola CARTELLA, l'unità si trova in
modalità di ricerca CARTELLA. Ruotare la manopola CARTELLA/TRACCIA per effettuare la
ricerca nella cartella. Premere la manopola CARTELLA/TRACCIA per scegliere un brano.
Quando si esce dal modo cartella appare sullo schermo la parola TUTTI. Ciò indica che l'unità
riprodurrà tutti i brani della chiavetta USB/scheda SD. Quando si preme il tasto REPETI,
vengono visualizzati 6 diversi display a seconda dell'impostazione scelta;
TUTTI/NORMALE/SINGOLO/CARTELLA/CASUALE/SELEZIONA. Quando si preme il
pulsante ID3, vengono visualizzate 4 diverse visualizzazioni a seconda dell'impostazione scelta.
TITOLO/ARTISTA/ALBUM/OFF.
1.
Sorgente di ingresso: Il display visualizza "U" quando è impostata la modalità USB e "S" quando
è impostata la modalità scheda SD. Premere il pulsante di modalità per passare da un ingresso
all'altro.
2.
Numero di traccia: Il numero di traccia (per tutte le tracce dell'intero disco di cenere) viene
visualizzato qui. Nell'immagine precedente l'unità sta riproducendo la traccia numero 1.
3.
Informazioni sulla traccia o sulla cartella: Qui appare il nome della cartella. Nell'immagine qui
sopra la cartella in riproduzione è denominata MUSIC.
4.
Tempo trascorso: qui viene visualizzato il tempo trascorso della traccia corrente.5.
Utilizzare gli altri controlli, play/pausa, stop, ripetizione
(TUTTI/NORMALE/SINGOLO/CARTELLA/CASUALE/SELEZIONA), traccia precedente
e traccia successiva per riprodurre l'audio dall'unità disco USB/SD Card o Wireless BT.
2. Schermata del display della console di controllo della scheda USB/SD

3. Manopola di ricerca tracce/cartelle
Ruotare questa manopola in senso orario per cercare tutte le tracce all'interno dell'unità
USB/SD Card. Ogni traccia viene visualizzata con il suo nome. Mostra le tracce o le
cartelle in ordine cronologico (a partire dal momento in cui le tracce sono state caricate
sulla chiavetta USB/SD Card). Premere la manopola per avviare la riproduzione del brano
desiderato. Verranno visualizzate prima le tracce presenti nel disco principale e poi quelle
contenute nelle cartelle.
Premere questa manopola per attivare la funzione di ricerca delle cartelle. Una volta
premuta, la parola "FOLDER" inizierà a comparire sul display. Ruotare quindi la manopola
in senso orario per cercare le cartelle all'interno dell'unità di memoria USB/scheda SD.
Premere la manopola per iniziare a riprodurre i brani di quella cartella.
www.PyleUSA.com
8
Lettore di schede SD/Porta USB: per utilizzare supporti esterni su questo dispositivo, è
sufficiente collegare la scheda SD/USB a queste porte.
1.
Schermo LCD: tutte le informazioni relative ai supporti esterni o al dispositivo saranno
visualizzate su questo schermo.
2.
Selezione di cartelle e brani3.
Pulsante di accensione: Premere questo pulsante per accendere e spegnere l'unità.4.
Manopola di controllo del volume del microfono: ruotare questa manopola per regolare il
volume del microfono.
5.
Manopola di controllo del volume dell'eco del microfono: ruotare questa manopola per
regolare il volume dell'eco del microfono.
6.
Controllo dei bassi: Ruotare questa manopola per regolare le basse frequenze del Canale 1 e
del Canale 2.
7.
Fader del volume master: Spostare il fader verso l'alto e verso il basso per regolare il volume
master.
8.
Controllo degli alti: Ruotare questa manopola per regolare le frequenze alte dei canali 1 e 2.9.
Bilanciamento: Controlla il bilanciamento del volume da sinistra a destra.10.
Selettore di ingresso: Ruotare questo pulsante per scegliere l'ingresso desiderato.11.
INGRESSI MICROFONICI: KARAOKE o EXTERNAL MIC si collegano a queste prese.12.
JACK IPOD/MP3: l'iPod/MP3 si collega a questo jack.13.
RICEVITORE REMOTO: per ricevere il segnale del telecomando.14.
INDICATORE LED DI ALIMENTAZIONE: quando si accende l'unità, il LED si accende.15.
INGRESSO AUDIO: Collegare i jack di uscita audio di DVD/CD a questi jack.16.
USCITA LINEA: Collegare i jack di ingresso RECORD a questi jack.17.

www.PyleUSA.com
9
18. CONNETTORE ANTENNA FM: collegare per le antenne AM e FM.
19. USCITA DIFFUSORI: Collegare il sistema di altoparlanti a questi terminali.
20. ANTENNA BLUETOOTH: estrarre l'antenna quando si utilizza l'ingresso Bluetooth.
21. ALIMENTAZIONE: Collegare alla presa di corrente CA 115V/60Hz e 230V/50Hz.
22. SELETTORE DI TENSIONE: 115V/230V.
CONTROLLO A DISTANZA
Premere questo pulsante per scegliere il modello di visualizzazione ID3.
TITOLO/ARTISTA/ALBUM/OFF. Tenere premuto questo pulsante per 5 secondi per ACCENDERE
o SPEGNERE l'MP3.
1.
In modalità FM, premere i due pulsanti per sintonizzare la frequenza FM.2.
Premere questi due pulsanti per selezionare il brano precedente o successivo in modalità USB, SD
o Bluetooth, per selezionare il canale precedente o successivo nel modello FM.
3.
Aumento o diminuzione del volume4.
Premere i numeri per selezionare direttamente i brani. L'unità impiega 1-2 secondi per rispondere
in modalità USB o SD.
5.
Premere questo pulsante per passare alla modalità di ripetizione.6.
Premere questo pulsante per selezionare la modalità di riproduzione, ad esempio
USB/SD/FM/WIRELESS BT.
7.
Funzione EQ: Seleziona una modalità preimpostata dell'equalizzatore, progettata di conseguenza.8.
Funzione di riproduzione e pausa per MP3 nel modello USB/SD/BT. Premere questo pulsante per
eseguire la scansione automatica del canale nel modello FM e memorizzare automaticamente il
canale.
9.

www.PyleUSA.com
10
PDA6BU/PDA6BU.5/PDA5BU/PDA5BU.5
Amplificatore stereo wireless BT compatto
Ricevitore amplificatore audio da tavolo con radio FM, lettori MP3/USB/SD,
Display LCD digitale, ingresso microfono (200 Watt)
Caratteristiche:
Contenuto della confezione:
Mini amplificatore da tavolo
Ricevitore stereo Home Theater compatto
Bluetooth integrato per lo streaming musicale senza fili
Radio FM con display digitale LCD
Lettura del tag ID3 del brano per visualizzare il titolo del brano, l'artista, l'album e il nome del file
Selezione ingresso audio multicanale
Supporto file audio MP3
Collegamento e streaming audio da dispositivi esterni
Lettori di unità flash USB e schede di memoria SD
L'USB funge anche da porta di ricarica del dispositivo
Ingresso Aux (3,5 mm)
(2) Jack di ingresso per microfoni da 1/4
(2) coppie di connettori di ingresso audio RCA (L/R)
(2) Coppie di connettori di uscita per altoparlanti a banana
(1) Coppia di connettori di uscita audio RCA (L/R)
Pannello frontale con Centro di controllo audio
Ricerca automatica delle stazioni radio
Funzioni di ripetizione e ripetizione casuale dei file audio
Manopola di controllo per la ricerca musicale "traccia/cartella" unica nel suo genere
Treble, Bass, Master e volume del microfono regolabili
Amplificatore stereo da tavolo
Telecomando
Antenna FM

www.PyleUSA.com
11
ATTENZIONE:
Questo prodotto può esporre a una sostanza chimica o a un gruppo di sostanze
chimiche, che può includere il "carbonato di nichel" che, nello stato della
California, è noto per causare cancro, difetti di nascita o altri danni riproduttivi.
Per ulteriori informazioni, visitare il sito https://www.p65warnings.ca.gov/.
Connettività Bluetooth:
Riceve il segnale wireless per lo streaming audio
Impostazione dell'accoppiamento semplice e senza problemi
Antenna integrata per una maggiore portata wireless
Funziona con tutti i più moderni dispositivi
(smartphone, tablet, laptop, computer, ecc.)
Versione Bluetooth: 5.0
Nome della rete Bluetooth: PYLEUSA' o "BT”
Portata wireless: 12+ mt.
Specifiche tecniche:
Potenza di uscita MAX: 200 Watt (@ 4 Ohm)
Potenza di uscita RMS: 100 Watt x 2 (a 8 Ohm)
Controllo del tono: Bassi, f=100Hz +/-8dB
Risposta in frequenza: 20Hz-20kHz
Regolazione della frequenza: +/-10dB
Rapporto segnale/rumore: >71dB
T.H.D.: <0.1%
Preselezioni di stazioni radio: Fino a 60 stazioni
Telecomando a batteria, richiede (1) x batteria a bottone CR-2025, in dotazione
Alimentazione: 120/240 V, commutabile
Dimensioni (L x P x A): 25 x 25 x 10 cm

Domande o commenti
Siamo qui per aiutarvi!
Telefono: 1.718.535.1800
PyleUSA.com/ContactUs
GERMAN
Kompakter drahtloser BT Stereo-Verstärker
Desktop-Audio-Verstärker mit FM-Radio,
MP3/USB/SD-Lesern, digitalem LCD-Display, Mikrofoneingang
(200 Watt)
PDA6BUUK/PDA6BU.5UK/PDA5BUUK/PDA5BU.0UK/PDA612BUUK/PDA612BU.5UK
PDA6BUEU/PDA6BU.5EU/PDA5BUEU/PDA5BU.0EU/PDA612BUEU/PDA612BU.5EU

WARNUNG!
VORSICHT: UM DAS RISIKO EINES ELEKTRISCHEN SCHLAGS ZU VERRINGERN, DÜRFEN SIE DIE ABDECKUNG
DIESES GERÄTS NICHT ENTFERNEN. INNEN BEFINDEN SICH KEINE VOM BENUTZER WARTBAREN TEILE.
WENDEN SIE SICH FÜR ALLE WARTUNGSARBEITEN AN EINEN QUALIFIZIERTEN TECHNIKER.
Das Blitzsymbol mit Pfeilspitze in einem gleichseitigen Dreieck soll den
Benutzer auf das Vorhandensein von "GEFÄHRLICHER" Spannung innerhalb
des Gerätegehäuses hinweisen, die so hoch sein kann, dass sie ein Risiko eines
elektrischen Schlags für Menschen darstellt. Benutzer sollten besondere
Vorsicht walten lassen, wenn dieses Symbol in dieser Bedienungsanleitung
erscheint, und alle angegebenen Vorsichtsmaßnahmen befolgen.
Das Ausrufezeichen in einem gleichseitigen Dreieck soll den Benutzer auf das
Vorhandensein wichtiger Betriebs- und Wartungsanweisungen (Service) in
diesem Handbuch hinweisen.
Lesen Sie diese Anweisungen gründlich durch, bevor Sie dieses Produkt verwenden.1.
Bewahren Sie diese Anweisungen zur späteren Bezugnahme auf.2.
Beachten Sie alle Warnungen.3.
Befolgen Sie alle Anweisungen.4.
WARNUNG: Um Feuer oder elektrischen Schlag zu vermeiden, setzen Sie dieses Gerät keinem
Regen oder Feuchtigkeit aus. Lagern oder betreiben Sie dieses Produkt nicht in der Nähe von
Flüssigkeiten.
5.
Reinigen Sie nur mit einem trockenen Tuch.6.
Lagern oder betreiben Sie dieses Produkt nicht in der Nähe von Wärmequellen wie Heizkörpern,
Heizregistern, Ofen oder anderen Geräten (einschließlich Verstärkern), die Wärme erzeugen.
7.
Umgehen Sie nicht den Sicherheitszweck des polarisierten oder geerdeten Steckers. Ein
polarisierter Stecker hat zwei Klingen, wobei eine breiter als die andere ist. Ein geerdeter Stecker
hat zwei Klingen und einen runden Erdungsstift. Die breite Klinge oder der dritte Stift dient Ihrer
Sicherheit. Wenn der mitgelieferte Stecker nicht in Ihre Steckdose passt, konsultieren Sie einen
Elektriker zum Austausch der veralteten Steckdose.
8.
Schützen Sie alle Kabel, die mit diesem Gerät verbunden sind, vor dem Betreten oder
Einklemmen, insbesondere Stecker und die Stellen, an denen sie aus dem Gerät austreten. Beim
Entfernen des Kabels aus der Steckdose, ziehen Sie am Stecker und nicht am Kabel.
9.
Ziehen Sie den Stecker des Geräts bei Gewittern oder wenn es für längere Zeit nicht benutzt
wird.
10.
Achten Sie beim Verkabeln dieses Geräts und aller anderen in Verbindung mit diesem Gerät
verwendeten Geräte darauf, dass alle Ihre Geräte AUSGESCHALTET sind.
11.
Schalten Sie nach Abschluss der Installation und Verkabelung all Ihre Geräte mit
heruntergedrehter Lautstärke und Pegelregler ein. Erhöhen Sie die Lautstärke oder die
Pegelregler langsam auf ihre richtigen Positionen, nachdem alle Geräte eingeschaltet sind.
12.
Wenn Sie dieses Gerät erden, stellen Sie sicher, dass dies korrekt erfolgt, um die integrierte
Erdung in diesem Gerät nicht zu umgehen.
13.
www.PyleUSA.com
2
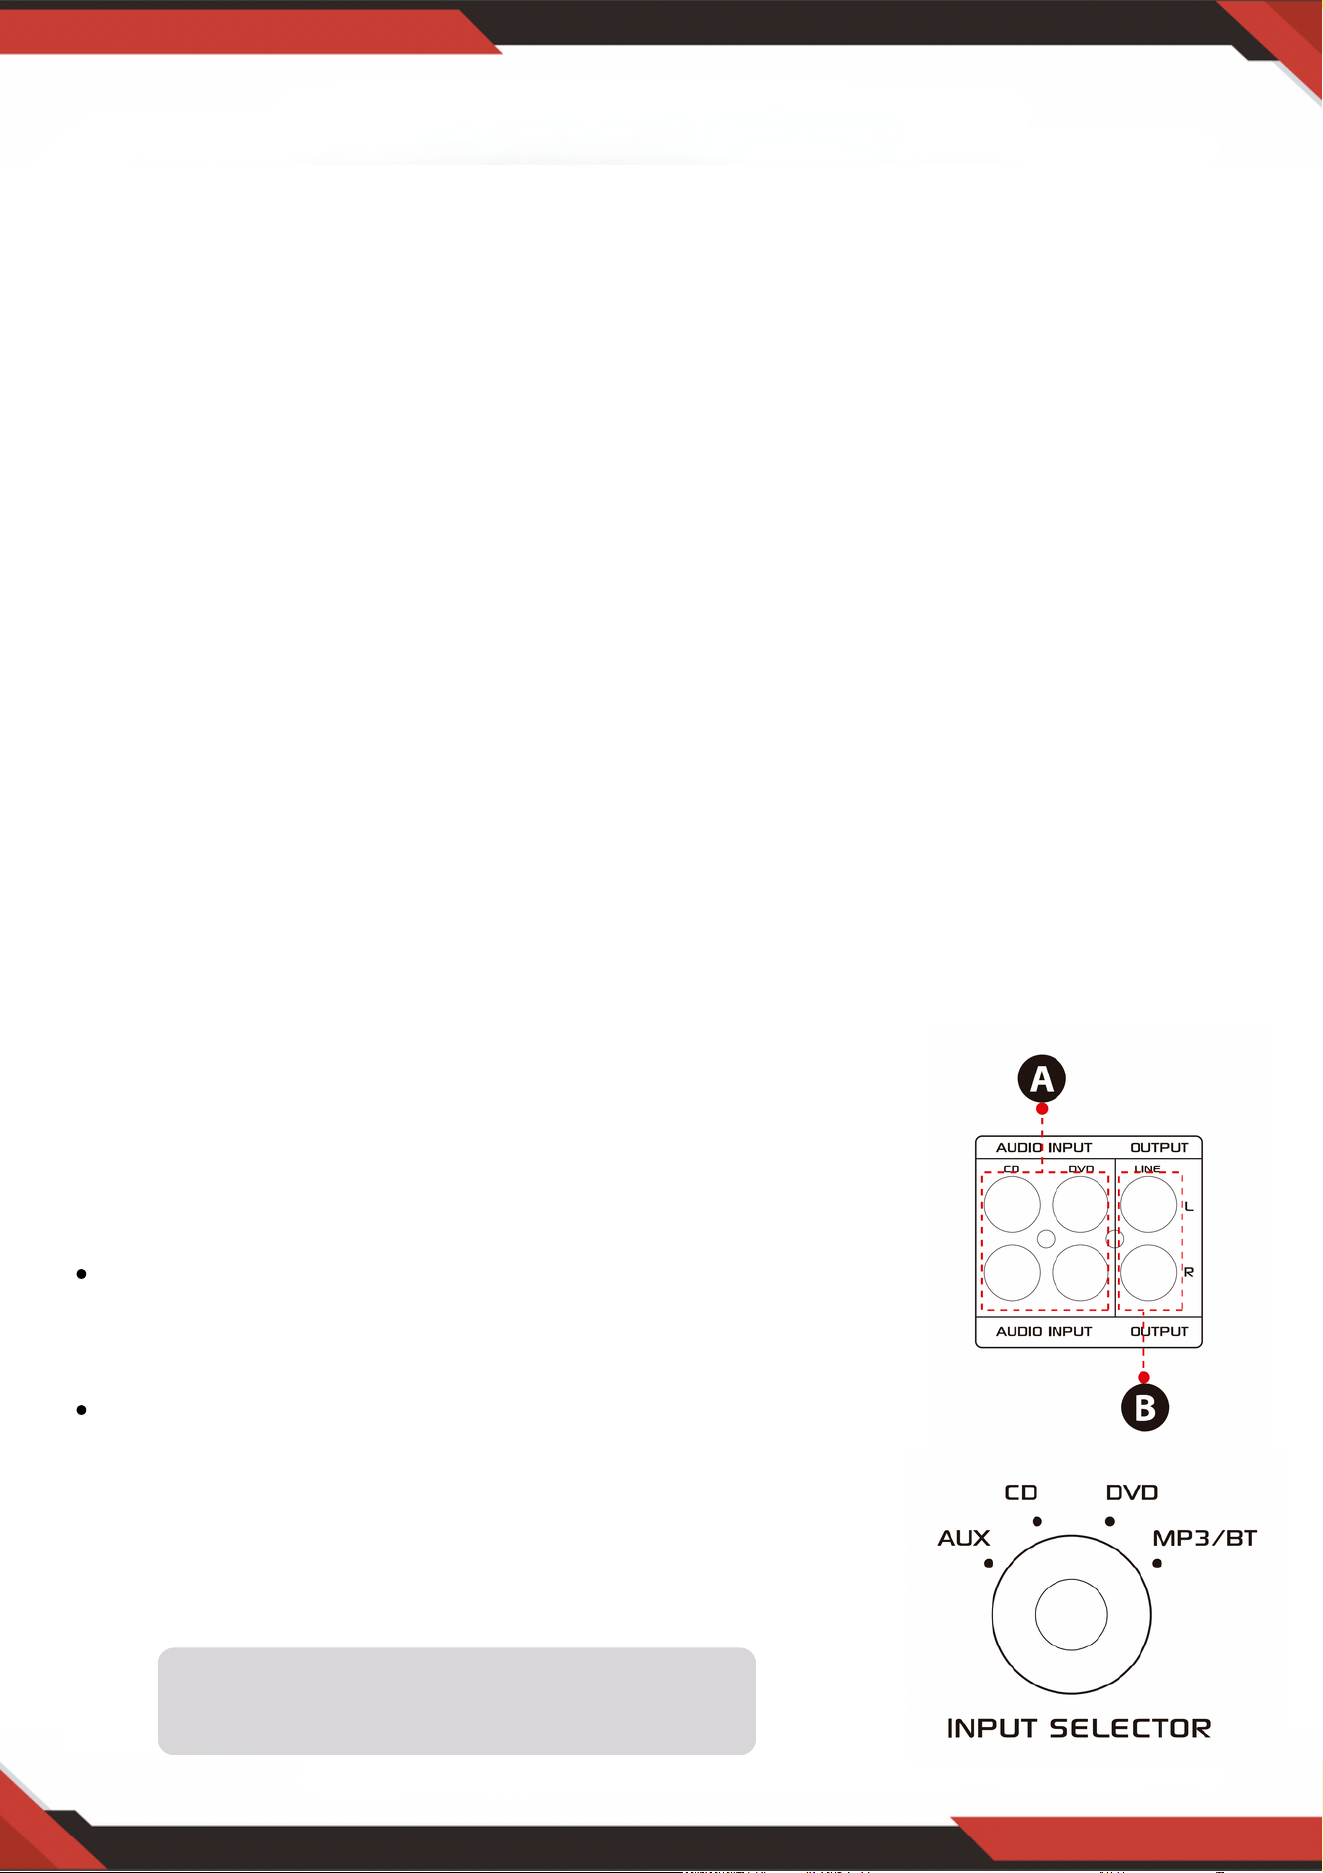
www.PyleUSA.com
3
14. Vor der Platzierung, Installation, Montage oder Aufhängung eines Produkts sollten alle Hardware,
Aufhängungen, Gehäuse, Wandler, Halterungen und zugehörige Ausrüstungen auf Schäden
überprüft werden. Jedes fehlende, korrodierte, deformierte oder nicht belastungsgerechte
Bauteil könnte die Festigkeit der Installation, Platzierung oder Anordnung erheblich mindern. Ein
solcher Zustand reduziert die Sicherheit der Installation erheblich und sollte sofort behoben
werden. Verwenden Sie nur Hardware, die für die Belastungsbedingungen der Installation und
mögliche kurzfristige, unerwartete Überlastungen ausgelegt ist. Überschreiten Sie niemals die
Belastungsgrenze der Hardware oder Ausrüstung.
15. Konsultieren Sie einen lizenzierten, professionellen Ingenieur bezüglich der physischen
Installation der Ausrüstung. Stellen Sie sicher, dass alle lokalen, staatlichen und nationalen
Vorschriften bezüglich der Sicherheit und des Betriebs der Ausrüstung verstanden und
eingehalten werden.
16. Überlassen Sie alle Wartungsarbeiten qualifiziertem Fachpersonal. Eine Wartung ist erforderlich,
wenn das Gerät in irgendeiner Weise beschädigt wurde, wie z.B. wenn das Netzkabel oder der
Stecker beschädigt ist, Flüssigkeit verschüttet oder Gegenstände in das Gerät gefallen sind, das
Gerät Regen oder Feuchtigkeit ausgesetzt wurde, nicht normal funktioniert oder heruntergefallen
ist.
ACHTUNG
1. A: Verbinden Sie den Audioeingang mit dem
Audioausgang von CD/DVD/TV.
HINWEISE:
Das Gerät unterstützt kein Videosignal, daher stellen
Sie sicher, dass die AUDIOAUSGANG-Anschlüsse von
CD/DVD/TV verbunden sind.
Störgeräusche sind zu hören, wenn Sie das Gerät
versehentlich mit einem CD/DVD/TV-Videoausgang
verbinden.
2. B: Signalausgang, der mit einem anderen Verstärker oder
aktiven Lautsprechern verbunden werden kann
Einführung
Um das Beste aus unseren Geräten herauszuholen, empfehlen wir, dass Sie alle Informationen in
der Bedienungsanleitung durchlesen, bevor Sie die Ausrüstung in Betrieb nehmen.
Die Eingangsauswahl funktioniert nicht, wenn
das Signal vom Line-Ausgang kommt.

A. Entnehmen Sie das Batterieblatt, bevor Sie die Fernbedienung verwenden, andernfalls
funktioniert die Fernbedienung nicht.
B. Drücken Sie diese beiden Tasten, um den vorherigen oder nächsten Titel im
USB/SD- oder drahtloses BT-Modus zu wählen. Im FM-Modus erfolgt keine Reaktion.
C. Drücken Sie diese beiden Tasten, um den vorherigen oder nächsten Kanal im
FM-Modus zu wählen. Im USB/SD- und Bluetooth-Modus erfolgt keine Reaktion.
D. Drücken Sie diese beiden Tasten, um die Lautstärke für drahtloses BT, USB/SD
und FM zu erhöhen oder zu verringern. Diese Tasten steuern nicht die Hauptlautstärke.
E. Drücken Sie diese Taste, um alle Frequenzen von 87,5 MHz bis 108 MHz
automatisch zu scannen. Das Gerät speichert die Kanäle im FM-Modus automatisch.
Siehe 4, C für weitere Details.
F. Drücken Sie diese Taste, um einen der Wiedergabemodi (USB/SD-Modus, FM-Modus
und drahtloses BT-Modus) auszuwählen. Beim Einschalten des Geräts wird automatisch
der USB/SD-Modus eingestellt. MP3-Dateien werden automatisch nach dem Einlegen
eines USB-Sticks oder einer SD-Karte abgespielt. Mit dieser Taste können Sie nicht den
AUX-, CD- und DVD-Eingang auswählen.
G. Halten Sie diese Taste 5 Sekunden lang gedrückt, um USB/SD, Wireless BT und den
FM-Modus ein- oder auszuschalten, jedoch nicht, um das Gerät ein- oder auszuschalten.
Das Gerät gibt das Signal im CD-, DVD-, AUX-Eingabemodus aus, wenn Sie USB/SD,
drahtloses BT und FM ausschalten.
H. Richten Sie die Fernbedienung auf den Empfänger der Haupteinheit.
www.PyleUSA.com
4
3. SCHRITTE FÜR DIE FM-RADIOSTEUERUNG
A. Schließen Sie die FM-Antenne an, bevor Sie das FM-Radio benutzen.
B. Drücken Sie die MODE-Taste an der Frontplatte oder der Fernbedienung, um den FM-Modus
auszuwählen.
C. Drücken Sie die PLAY/PAUSE-Taste an der Frontplatte oder der Fernbedienung, um automatisch FM-
Radiosender von 87,5 MHz bis 108 MHz zu suchen und zu speichern.
D. Drücken Sie die NEXT/PREV-Taste, um den FM-Sender auszuwählen.
4. FERNBEDIENUNG
Die Fernbedienung ermöglicht Ihnen nur den Zugriff auf USB/SD, drahtloses BT und FM-
Funktionen, nicht aber auf die Hauptlautstärke, Mikrofon, Bass, Höhen und andere Funktionen.
5. DATEIFORMAT
Nur MP3- und WAV-Dateiformate werden für auf USB/SD gespeicherte Dateien unterstützt.
Das Gerät kann nicht unterstützte Titeldateien auf USB- oder SD-Karten überspringen.

www.PyleUSA.com
5
A. Diese Tasten werden nur zur Steuerung der Funktionen USB/SD, Wireless BT und FM
verwendet und steuern keine anderen Funktionen.
B. MODE-TASTE: Drücken Sie diese Taste, um zwischen dem USB/SD-Modus, dem FM-Modus
und dem Wireless BT-Wiedergabemodus zu wählen. Der USB/SD-Modus wird nach dem
Einschalten des Geräts automatisch eingestellt. Spielt automatisch mp3-Dateien ab, nachdem
ein USB-Aschenlaufwerk oder eine SD-Karte eingesteckt wurde. Sie können den AUX-, CD-
und DVD-Eingang nicht mit dieser Taste auswählen.
C. Mit jedem Druck auf die Taste PLAY/PAUSE wechselt der Betrieb im USB/SD-Modus oder im
Wireless BT-Modus von Wiedergabe auf Pause oder von Pause auf Wiedergabe. Drücken Sie
die PLAY/PAUSE-TASTE einmal, um im FM-Modus automatisch alle Frequenzen von 87,5
MHz bis 108 MHz zu durchsuchen. Drücken Sie die Taste, um die Kanäle automatisch zu
suchen, wenn Sie das FM-Radio zum ersten Mal benutzen. Nach Beendigung des Suchlaufs
speichert das Gerät automatisch alle Radiokanäle und beginnt mit der Wiedergabe des ersten
Radiokanals. Sie müssen nicht bei jedem Start des FM-Radios einen neuen Suchlauf
durchführen.
D. PREV- und NEXT-TASTE: Verwenden Sie diese beiden Tasten, um den vorherigen, nächsten
Titel oder Ordner auszuwählen, je nach den verschiedenen Modi wie unten beschrieben.
Im USB/SD-Modus: Verwenden Sie diese Tasten, um den vorherigen oder nächsten Titel
auszuwählen, oder verwenden Sie diese Tasten, um den vorherigen oder nächsten Ordner im
FOLDER-Arbeitsmodus auszuwählen.
Im Wireless BT-Modus: Verwenden Sie diese Taste, um den vorherigen oder nächsten Titel
auszuwählen.
Im FM-Modus: Mit wählen Sie den vorherigen oder nächsten Radiokanal.
6. USB-ANSCHLUSS
Der USB-Anschluss dient nur zur Wiedergabe von Audiodateien auf Ihrem USB-Stick.
Verwenden Sie ihn nicht als Stromquelle, da dies das Gerät beschädigen kann.
7. STEUERPANEL-TASTE
8. EINGANGSAUSWAHL
Wählen Sie den MP3/BT-Eingangsmodus, wenn Sie USB/SD/Wireless BT/FM-Radio abspielen
möchten. Wählen Sie den CD-Eingangsmodus, wenn Sie das CD-Eingangssignal abspielen
möchten. Wählen Sie den AUX-Eingangsmodus, wenn Sie das AUX-Eingangssignal abspielen
möchten. Wählen Sie den DVD-Eingangsmodus, wenn Sie das DVD-Eingangssignal abspielen
möchten, andernfalls gibt das Gerät kein Signal aus.

www.PyleUSA.com
6
Nach dem Einstecken eines USB-Sticks/SD-Karte in den Eingangsanschluss, stellen Sie
sicher, dass der Eingangswähler (13) auf USB/SD gesetzt ist, dann drücken Sie die
Modus-Taste, um zwischen Audio vom USB-Anschluss, SD-Karteneingang, Wireless BT
oder FM-Radio zu wählen. Wenn Sie das drahtloses BT verwenden möchten, beachten
Sie die folgenden Schritte.
VORDER- UND RÜCKWAND
1. USB/SD-Karte/Drahtloses BT-Steuerkonsole
SCHRITTE ZUM VERBINDEN MIT EINEM WIRELESS BT-GERÄT
A. Drücken Sie die MODE-Taste unter dem ID3-Display und wechseln Sie in den Bluetooth-Modus.
B. Suchen Sie nach dem Bluetooth-Gerät und finden Sie den Bluetooth-Namen „PYLEUSA oder BT“.
C. Wählen Sie den Bluetooth-Namen PYLEUSA oder BT aus und warten Sie, bis das Gerät gekoppelt ist.
Der Bildschirm zeigt „SUCHEN“ an.
D. Das Gerät gibt ein Geräusch zur Bestätigung aus, dass die Geräte erfolgreich gekoppelt wurden, und der
Bildschirm zeigt „BLUETOOTH VERBUNDEN“ an.
E. Nach dem Koppeln können Sie Musik von Ihrem Bluetooth-Gerät abspielen. Sie können auch die
Steuertasten am Gerät verwenden, um die Titel von Ihrem Bluetooth-Gerät auszuwählen.
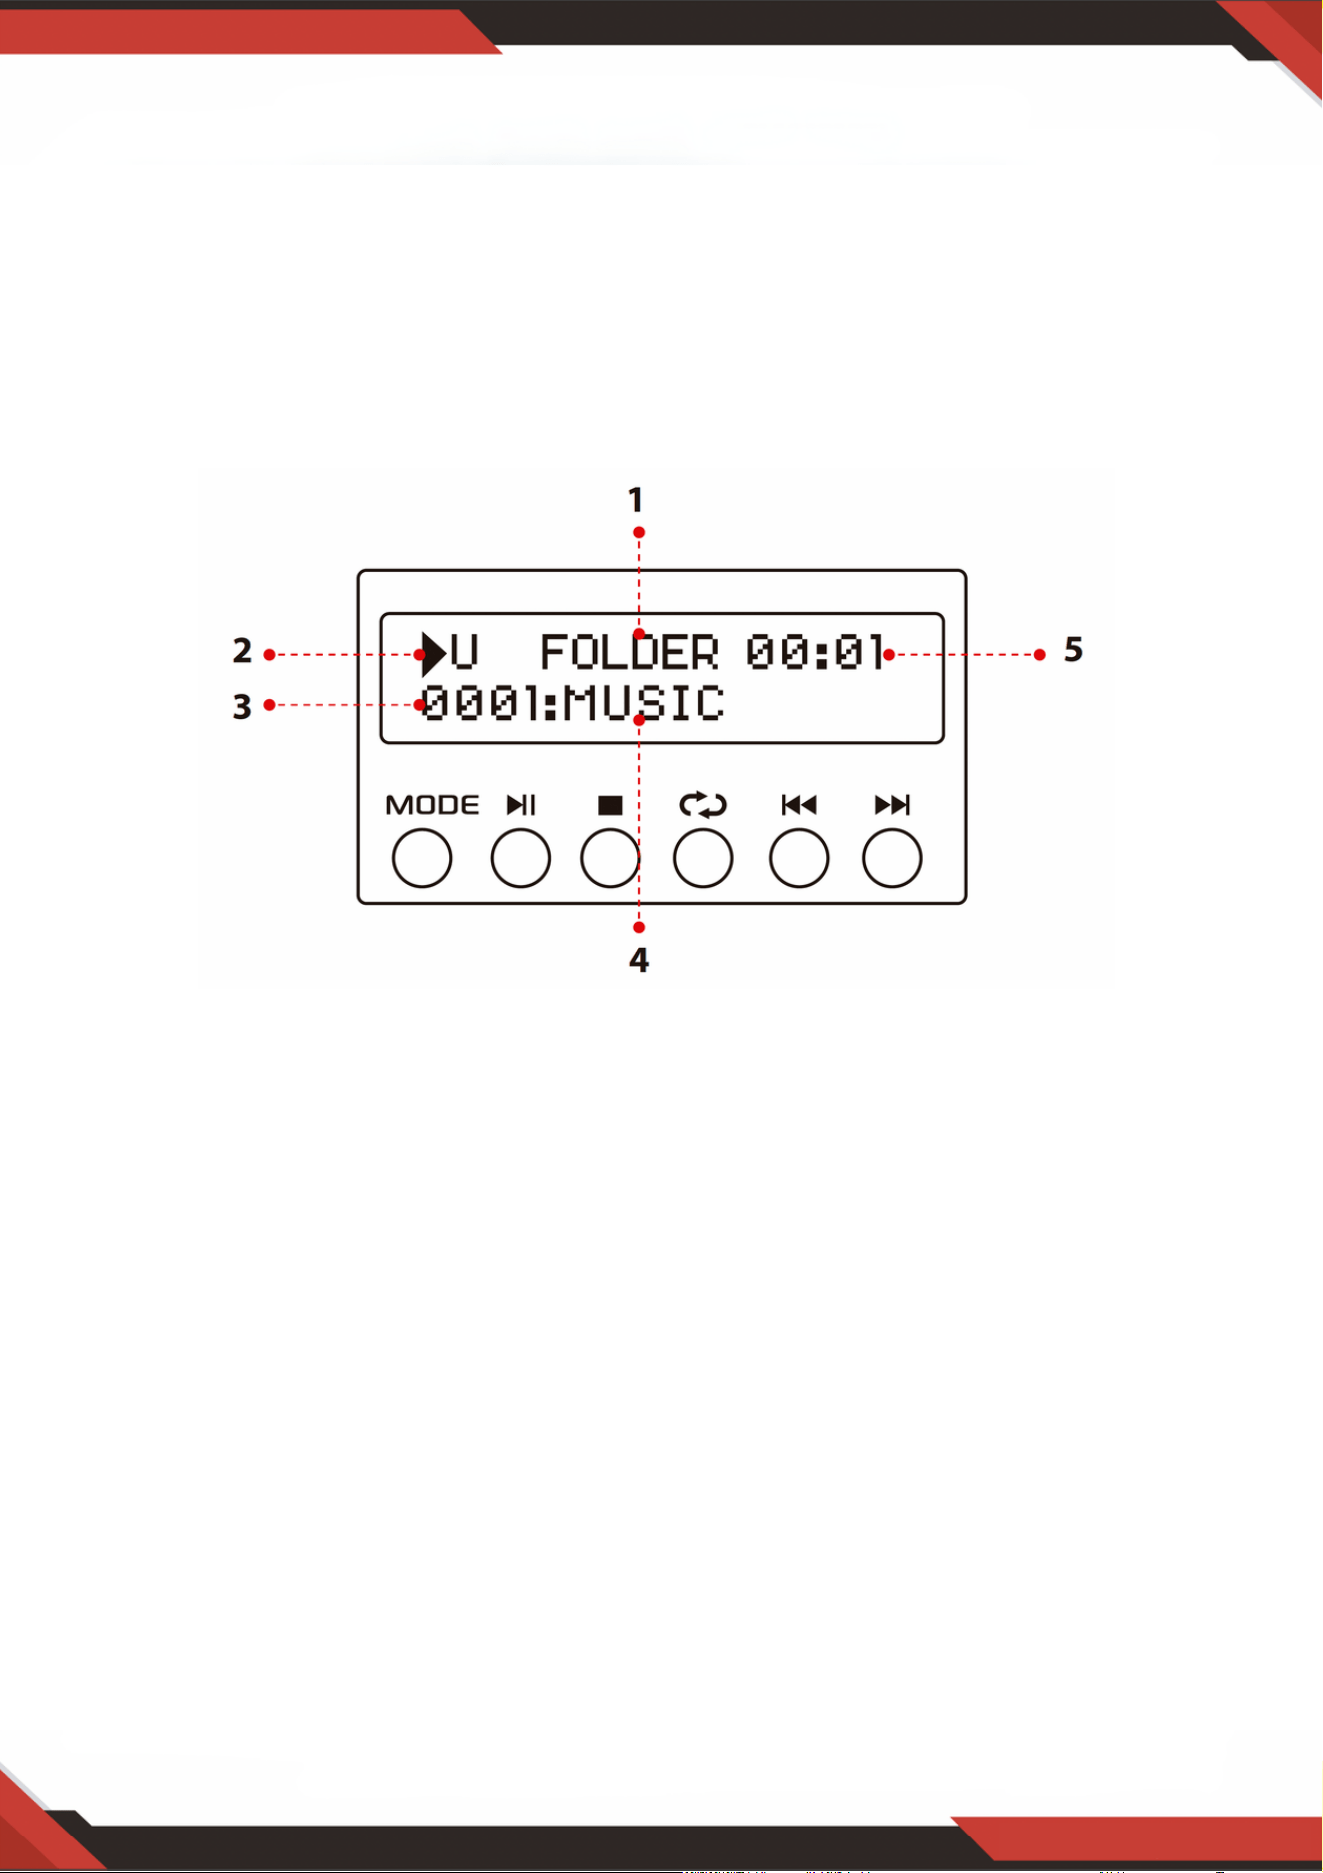
www.PyleUSA.com
7
HINWEIS: Der USB-Eingang ist NUR dafür vorgesehen, einen USB-Stick (Thumb Drive)
anzuschließen. Das direkte Verbinden eines MP3-Players oder Computers mit dem USB-
Stick-Eingang führt dazu, dass das Gerät keine Audioinhalte von diesen Geräten abspielt.
Suchmodus: Wenn das Wort ORDNER auf dem Bildschirm blinkt, befindet sich das Gerät im
ORDNER SUCHMODUS. Drehen Sie den ORDNER/Titel-Knopf, um durch den Ordner zu
suchen. Drücken Sie den ORDNER/Titel-Knopf, um einen Titel auszuwählen. Beim Verlassen
des Ordnermodus erscheint das Wort ALL auf dem Bildschirm. Dies zeigt an, dass das Gerät alle
Titel vom USB-Stick/SD-Karte abspielt. Wenn die REPEAT-Taste gedrückt wird, gibt es je nach
gewählter Einstellung 6 verschiedene Anzeigen;
ALL/NORMAL/EINZELN/ORDNER/ZUFALL/DURCHSUCHEN. Wenn die ID3-Taste
gedrückt wird, gibt es je nach gewählter Einstellung 4 verschiedene Anzeigen.
TITLE/ARTIST/ALBUM/OFF.
1.
Eingangsquelle: Das Display zeigt „U“, wenn auf USB-Modus eingestellt, und „S“, wenn auf SD-
Kartenmodus eingestellt. Drücken Sie die Modus-Taste, um zwischen den Eingängen zu
wechseln.
2.
Titelnummer: Die Titelnummer (für alle Titel auf dem gesamten Flash-Laufwerk) wird hier
angezeigt. Im obigen Bild spielt das Gerät Titelnummer 1.
3.
Titel- oder Ordnerinformation: Hier erscheint der Name des Ordners. Im obigen Bild wird der
Ordner mit dem Namen MUSIC abgespielt.
4.
Verstrichene Zeit: Die verstrichene Zeit des aktuellen Titels wird hier angezeigt.5.
Verwenden Sie die anderen Steuerelemente, Play/Pause, Stop, Repeat
(ALLE/NORMAL/EINZELN/ORDNER/ZUFALL/DURCHSUCHEN), vorheriger Titel und
nächster Titel, um Audio vom USB-Stick/SD-Karte oder drahtloses BT abzuspielen.
2. USB/SD-Kartensteuerkonsole Display-Bildschirm

3. Titel-/Ordnersuchknopf
Drehen Sie diesen Knopf im Uhrzeigersinn, um alle Titel im USB-Stick/SD-Karte zu
durchsuchen. Jeder Titel wird mit seinem Namen angezeigt. Es werden die Titel oder
Ordner chronologisch angezeigt (nach dem Zeitpunkt, zu dem die Dateien auf den USB-
Stick/SD-Karte geladen wurden). Drücken Sie den Knopf, um die Wiedergabe des
gewünschten Titels zu starten. Zuerst werden die Titel in der Hauptdatei angezeigt und
dann die Titel, die sich in Ordnern befinden.
Drücken Sie diesen Knopf, um die Ordnersuchfunktion zu aktivieren. Einmal gedrückt,
beginnt das Wort „ORDNER“ auf dem Display zu blinken. Drehen Sie dann diesen Knopf
im Uhrzeigersinn, um die Ordner im USB-Stick/SD-Karte zu durchsuchen. Drücken Sie
den Knopf, um die Wiedergabe der Titel aus diesem Ordner zu starten.
www.PyleUSA.com
8
SD-Kartenleser/USB-Anschluss: Für die Verwendung externer Medien an diesem Gerät stecken
Sie einfach Ihre SD/USB in diese Anschlüsse.
1.
LCD-Bildschirm: Alle Informationen zu externen Medien oder diesem Gerät werden auf diesem
Bildschirm angezeigt.
2.
Auswahl von Ordner und Titel3.
Ein-/Ausschaltknopf: Drücken Sie diesen Knopf, um das Gerät ein- und auszuschalten.4.
Mikrofonlautstärkeregler: Drehen Sie diesen Knopf, um die Lautstärke des Mikrofons
einzustellen.
5.
Mikrofon-Echo-Lautstärkeregler: Drehen Sie diesen Knopf, um die Echo-Lautstärke des
Mikrofons einzustellen.
6.
Bassregler: Drehen Sie diesen Knopf, um die niedrigen Frequenzen von Kanal 1 & 2 anzupassen.7.
Master-Lautstärkeregler: Bewegen Sie den Regler nach oben und unten, um die Hauptlautstärke
einzustellen.
8.
Diskantregelung: Drehen Sie diesen Regler, um die hohen Frequenzen von Kanal 1 und Kanal 2
anzupassen.
9.
Balance: Steuern Sie die Lautstärkebalance von links nach rechts.10.
Eingangswähler: Drehen Sie diesen Knopf, um den gewünschten Eingang auszuwählen.11.
MIKROFONEINGÄNGE: Für KARAOKE oder EXTERNES MIKRO an diese Buchsen anschließen.12.
IPOD/MP3-BUCHSE: IPOD/MP3 wird an diese Buchse angeschlossen.13.
FERNBEDIENUNGSEMPFÄNGER: Zum Empfang des Signals der Fernbedienung.14.
POWER-LED-ANZEIGE: Wenn Sie das Gerät einschalten, leuchtet die LED.15.
AUDIOEINGANG: Schließen Sie die Audioausgangsbuchsen von DVD/CD an diese Buchsen an.16.
AUSGANG-LINE: Verbinden Sie die AUFZEICHNEN-Eingangsbuchsen mit diesen Buchsen.17.

www.PyleUSA.com
9
18. FM-ANTENNENANSCHLUSS: Anschluss für AM- und FM-Antennen.
19. LAUTSPRECHERAUSGANG: Verbinden Sie Ihr Lautsprechersystem mit diesen Anschlüssen.
20. BLUETOOTH-ANTENNE: Bitte ziehen Sie die Antenne heraus, wenn Sie den Bluetooth-
Eingang verwenden.
21. STROMVERSORGUNG: Anschluss an AC 115V/60Hz und 230V/50Hz Steckdose.
22. SPANNUNGSWÄHLER: 115V/230V.
FERNBEDIENUNG
Drücken Sie diese Taste, um das ID3-Anzeigemodell zu wählen; es zeigt TITLE/ARTIST/ALBUM/OFF
an. Halten Sie diese Taste 5 Sekunden lang gedrückt, um den MP3-Player EIN- oder
AUSZUSCHALTEN.
1.
Im FM-Modus drücken Sie diese beiden Tasten, um die FM-Frequenz einzustellen.2.
Drücken Sie diese beiden Tasten, um im USB-, SD- oder Bluetooth-Modus den vorherigen oder
nächsten Titel und im FM-Modus den vorherigen oder nächsten Kanal auszuwählen.
3.
Lautstärke erhöhen oder verringern.4.
Drücken Sie die Zahlen, um die Titel direkt auszuwählen. Das Gerät reagiert im USB- oder SD-Modus
innerhalb von 1-2 Sekunden.
5.
Drücken Sie diese Taste für den Wiederholungsmodus.6.
Drücken Sie diese Taste, um den Wiedergabemodus auszuwählen, wie USB/SD/FM/DRAHTLOSES
BT.
7.
EQ-Funktion: Wählen Sie einen voreingestellten Modus des Equalizers, der entsprechend gestaltet ist.8.
Play- und Pause-Funktion für MP3 im USB/SD/BT-Modus. Drücken Sie diese Taste, um im FM-
Modus automatisch den Kanal zu scannen und zu speichern.
9.

www.PyleUSA.com
10
PDA6BU/PDA6BU.5/PDA5BU/PDA5BU.5
Kompakter drahtloser BT Stereo-Verstärker
Desktop-Audio-Leistungsverstärker mit FM-Radio, MP3/USB/SD-Lesegeräten,
digitalem LCD-Display, Mikrofoneingang (200 Watt)
Merkmale:
Inhalt der Verpackung:
Desktop-Audio-Miniverstärker
Kompakter Heimkino-Stereo-Receiver-Stil
Integriertes Bluetooth für kabelloses Musikstreaming
FM-Radio mit digitalem LCD-Display
ID3-Tag-Titellesefunktion zeigt Titel/Interpret/Album/Dateinamen an
Mehrkanal-Audioeingangsauswahl
Unterstützung von MP3-Audiodateien
Verbinden & Streamen von Audio von externen Geräten
USB-Stick & SD-Speicherkartenleser
USB dient auch als Ladeanschluss für Geräte
Aux (3,5mm) Eingang
(2) 1/4-Zoll-Mikrofoneingangsbuchsen
(2) Paar RCA (L/R) Audioeingangsstecker
(2) Paar Bananenstecker-Lautsprecherausgangsstecker
(1) Paar RCA (L/R) Audioausgangsstecker
Frontpanel-Audio-Steuerzentrum
Automatische Sendersuche und -scanfunktion des Radios
'Wiederholen & Zufällig' Audiowiedergabefunktionen
Einzigartiger 'Titel/Ordner' Musiksuch-Drehknopf
Einstellbare Höhen, Bässe, Master- & Mikrofonlautstärke
Desktop-Stereo-Verstärker
Fernbedienung
FM-Antenne

www.PyleUSA.com
11
WARNUNG:
Dieses Produkt kann Sie Chemikalien aussetzen, zu denen möglicherweise
„Nickelkarbonat“ gehört, von dem bekannt ist, dass es im US-Bundesstaat
Kalifornien Krebs, Geburtsfehler oder andere reproduktive Schäden verursachen
kann. Weitere Informationen finden Sie unter https://www.p65warnings.ca.gov/.
Bluetooth-Konnektivität:
Empfängt drahtloses Signal für Audio-Streaming
Einfaches und problemloses Pairing-Setup
Integrierte Antenne für erweiterte drahtlose Reichweite
Funktioniert mit allen heutigen modernen Geräten (Smartphones, Tablets, Laptops,
Computer usw.)
Bluetooth-Version: 5.0
Bluetooth-Netzwerkname: „PYLEUSA“ oder „BT“
Drahtlose Reichweite: über 12 Meter
Technische Daten:
Maximale Leistungsausgabe: 200 Watt (@ 40hm)
RMS-Leistungsausgabe: 100 Watt x 2 (@ 80hm)
Klangregelung: Bass, f=100Hz +/-8dB
Frequenzgang: 20Hz-20kHz
Frequenzanpassung: +/-10dB
Signal-Rausch-Verhältnis: >71dB
T.H.D.: <0,1%
Radiosender-Voreinstellungen: Bis zu 60 Sender
Batteriebetriebene Fernbedienung, benötigt (1) x CR-2025-Knopfzellenbatterie, enthalten
Stromversorgung: 120/240V, umschaltbar
Abmessungen (L x B x H): 24,9 x 24,9 x 9,9 cm

Fragen oder Kommentare
Wir sind hier, um Ihnen zu helfen!
Telefon: 1.718.535.1800
PyleUSA.com/ContactUs
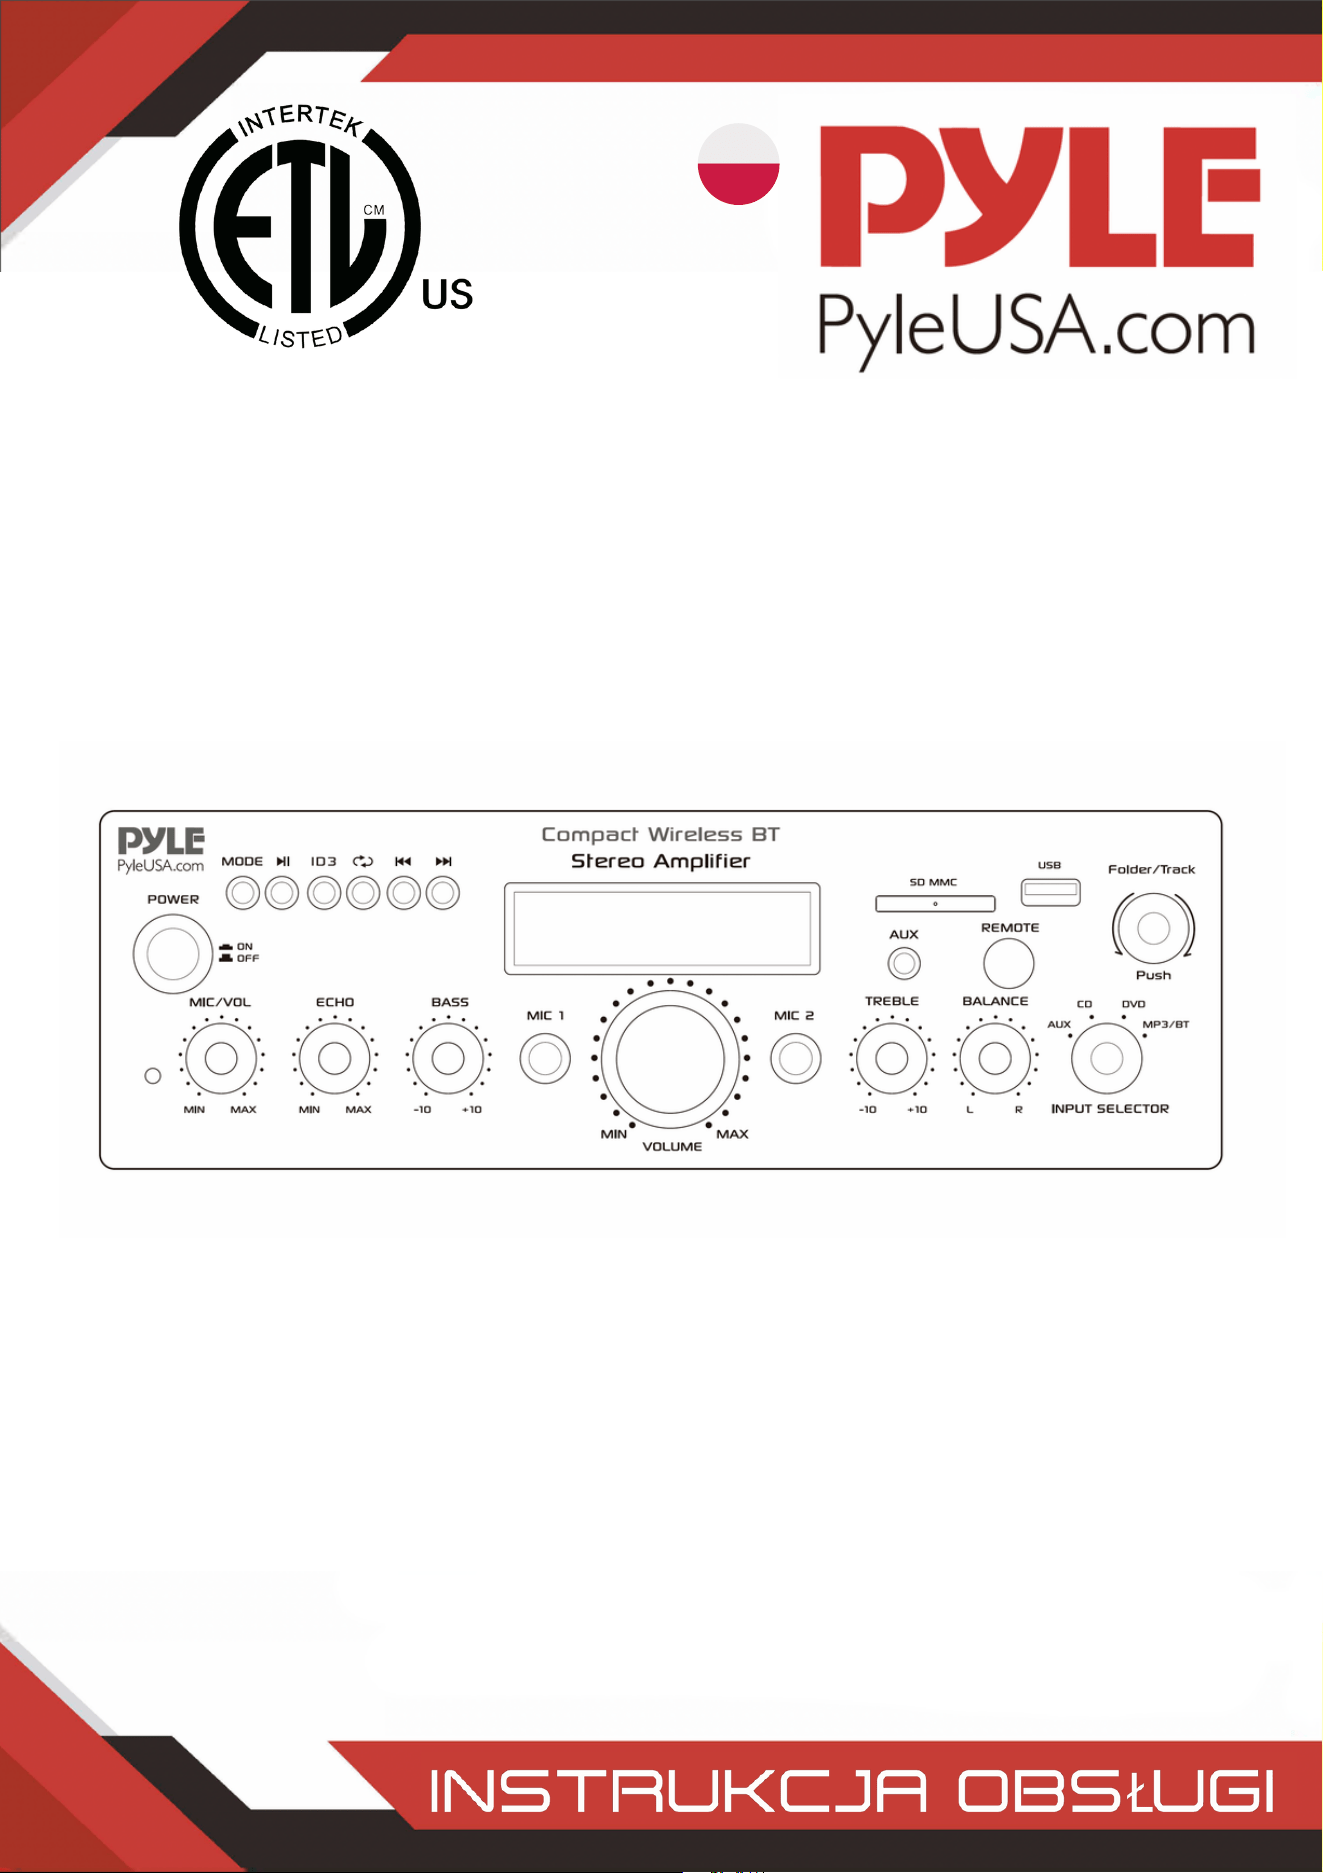
POLISH
Kompaktowy bezprzewodowy wzmacniacz stereo BT
Biurkowy wzmacniacz mocy audio z radiem FM, odtwarzaczem
MP3/USB/SD, cyfrowym wyświetlaczem LCD, wejściem
mikrofonowym (200 W)
PDA6BUUK/PDA6BU.5UK/PDA5BUUK/PDA5BU.0UK/PDA612BUUK/PDA612BU.5UK
PDA6BUEU/PDA6BU.5EU/PDA5BUEU/PDA5BU.0EU/PDA612BUEU/PDA612BU.5EU

OSTRZEŻENIE!
UWAGA: ABY ZMNIEJSZYĆ RYZYKO PORAŻENIA PRĄDEM, NIE ZDEJMUJ POKRYWY TEGO URZĄDZENIA. WEWNĄTRZ
URZĄDZENIA NIE MA CZĘŚCI, KTÓRE MOGĄ BYĆ NAPRAWIANE PRZEZ UŻYTKOWNIKA. WSZYSTKIE CZYNNOŚCI
SERWISOWE MUSZĄ BYĆ WYKONYWANE PRZEZ WYKWALIFIKOWANEGO TECHNIKA.
Symbol błyskawicy ze strzałką w trójkącie równobocznym ma na celu
ostrzeżenie użytkownika o obecności "NIEBEZPIECZNEGO" napięcia w
obudowie produktu, które może być wystarczająco duże, aby stanowić ryzyko
porażenia prądem elektrycznym osób. Użytkownicy powinni zachować
szczególną ostrożność, gdy ten symbol pojawia się w niniejszej instrukcji
obsługi i przestrzegać wszystkich środków ostrożności.
Wykrzyknik w trójkącie równobocznym ma na celu zwrócenie uwagi
użytkownika na obecność w niniejszej instrukcji ważnych instrukcji
dotyczących obsługi i konserwacji (serwisowania).
Przeczytaj uważnie niniejszą instrukcję przed rozpoczęciem korzystania z urządzenia.1.
Zachowaj niniejszą instrukcję do wykorzystania w przyszłości.2.
Zwróć uwagę na wszystkie ostrzeżenia.3.
Postępuj zgodnie ze wszystkimi instrukcjami.4.
OSTRZEŻENIE: Aby uniknąć ryzyka pożaru lub porażenia prądem, nie wystawiaj urządzenia na
działanie deszczu lub wilgoci. Nie przechowuj ani nie używaj tego produktu w pobliżu płynów.
5.
Czyść tylko suchą szmatką.6.
Nie przechowuj ani nie używaj tego produktu w pobliżu źródeł ciepła, takich jak grzejniki,
rejestratory ciepła, kuchenki lub inne urządzenia (w tym wzmacniacze) wytwarzające ciepło.
7.
Nie naruszaj bezpieczeństwa wtyczki spolaryzowanej lub z uziemieniem. Wtyczka
spolaryzowana ma dwa ostrza, z których jedno jest szersze od drugiego. Wtyczka z uziemieniem
ma dwa bolce i jeden okrągły. Szeroki bolec lub trzeci bolec jest przewidziany dla Twojego
bezpieczeństwa. Jeśli dostarczona wtyczka nie pasuje do gniazdka, skonsultuj się z elektrykiem
w celu wymiany przestarzałego gniazdka.
8.
Chroń wszystkie przewody podłączone do tego urządzenia przed nadepnięciem lub
przytrzaśnięciem, szczególnie przy wtyczkach, gniazdach i w miejscu, w którym wychodzą z
urządzenia. Odłączając przewód zasilający od gniazdka, chwytaj za wtyczkę, a nie ciągnij za
przewód.
9.
Odłączaj urządzenie od zasilania podczas burz z wyładowaniami atmosferycznymi lub gdy nie
jest ono używane przez dłuższy czas.
10.
Podczas podłączania tego urządzenia i wszelkich innych urządzeń używanych w związku z nim,
upewnij się, że wszystkie urządzenia są wyłączone.
11.
Po zakończeniu instalacji i okablowania włącz wszystkie urządzenia z regulatorami głośności i
poziomu skierowanymi w DÓŁ. Po włączeniu wszystkich urządzeń powoli podnieś regulatory
głośności i poziomu do ich prawidłowych pozycji.
12.
Podczas uziemiania urządzenia upewnij się, że jest ono prawidłowo uziemione, aby nie
zniweczyć celu uziemienia sprzętu.
13.
www.PyleUSA.com
2

www.PyleUSA.com
3
14. Przed umieszczeniem, zainstalowaniem, zamocowaniem lub zawieszeniem jakiegokolwiek
produktu, sprawdź cały sprzęt, wieszaki, obudowy, przetworniki, wsporniki i powiązane
wyposażenie pod kątem uszkodzeń. Wszelkie brakujące, skorodowane, zdeformowane lub
niezgodne elementy mogą znacznie zmniejszyć wytrzymałość instalacji, takielunku lub siatki. Taki
stan znacznie zmniejsza bezpieczeństwo instalacji i musi zostać natychmiast naprawiony. Używaj
wyłącznie sprzętu zaprojektowanego z myślą o warunkach obciążenia instalacji i
nieprzewidzianych krótkotrwałych przeciążeniach. Nigdy nie przekraczaj znamionowej nośności
materiału lub sprzętu.
15. Skonsultuj się z licencjonowanym specjalistą w sprawie instalacji sprzętu fizycznego. Upewnij się,
że wszystkie lokalne, regionalne i krajowe przepisy dotyczące bezpieczeństwa i obsługi sprzętu są
zrozumiałe i przestrzegane.
16. Wszelkie czynności serwisowe należy zlecać wykwalifikowanemu personelowi. Serwisowanie jest
wymagane, gdy urządzenie zostało w jakikolwiek sposób uszkodzone, np. uszkodzony jest
przewód zasilający lub wtyczka, do urządzenia dostała się ciecz lub przedmioty, urządzenie
zostało wystawione na działanie deszczu lub wilgoci, nie działa normalnie lub zostało
upuszczone.
UWAGA
1. A: Podłącz wejście audio do wyjścia audio odtwarzacza
CD/DVD/TV.
WAŻNE:
Urządzenie nie obsługuje sygnału wideo. Upewnij się,
że terminal CD/DVD/TV AUDIO OUTPUT jest
podłączony.
Jeśli przez pomyłkę podłączysz urządzenie do wyjścia
wideo CD/DVD/TV, słyszalne będą szumy.
2. B: Wyjście sygnału, które można podłączyć do innego
wzmacniacza lub wzmocnionych głośników.
Wprowadzenie
Aby w pełni wykorzystać możliwości naszego sprzętu, zalecamy zapoznanie się ze wszystkimi
informacjami zawartymi w instrukcji obsługi przed jego użyciem.
Selektor wejścia nie będzie działał, jeśli sygnał
pochodzi z wyjścia liniowego.

A. Przed użyciem pilota zdalnego sterowania wyjmij baterię, w przeciwnym razie pilot
zdalnego sterowania nie będzie działać.
B. Naciśnij te dwa przyciski, aby wybrać poprzedni lub następny utwór w trybie
bezprzewodowym USB/SD lub BT; brak reakcji w trybie FM.
C. Naciśnij te dwa przyciski, aby wybrać poprzedni lub następny kanał w trybie FM;
brak reakcji w trybach USB/SD i Bluetooth.
D. Naciśnij te dwa przyciski, aby zwiększyć lub zmniejszyć głośność radia
bezprzewodowego, USB/SD i FM. Przyciski te nie sterują głośnością główną.
E. Naciśnij ten przycisk, aby automatycznie przeskanować wszystkie częstotliwości od
87,5 MHz do 108 MHz, a urządzenie automatycznie zapisze kanały w trybie FM. Aby
uzyskać szczegółowe informacje, patrz 4, C.
F. Naciśnij ten przycisk, aby wybrać jeden z trybów odtwarzania (tryb USB/SD, tryb FM i
tryb bezprzewodowy BT). Tryb USB/SD zostanie ustawiony automatycznie po włączeniu
urządzenia. Pliki MP3 będą odtwarzane automatycznie po włożeniu szybkiego dysku USB
lub karty SD. Za pomocą tego przycisku nie można wybrać wejścia AUX, CD i DVD.
G. Naciśnij i przytrzymaj ten przycisk przez 5 sekund, aby włączyć lub wyłączyć tryby
USB/SD, BT wireless i FM, ale nie aby włączyć lub wyłączyć urządzenie. Urządzenie
będzie wysyłać sygnał w trybie wejścia CD, DVD, AUX, jeśli wyłączysz tryby USB/SD, BT
wireless i FM.
H. Skieruj pilota zdalnego sterowania na odbiornik urządzenia głównego.
www.PyleUSA.com
4
3. KROKI STEROWANIA RADIEM FM
A. Przed rozpoczęciem korzystania z radia FM podłącz antenę FM.
B. Naciśnij przycisk MODE na panelu przednim lub pilocie zdalnego sterowania, aby wybrać tryb FM.
C. Naciśnij przycisk PLAY/PAUSE na panelu przednim lub pilocie zdalnego sterowania, a urządzenie
automatycznie wyszuka stacje radiowe FM z zakresu od 87,5 MHz do 108 MHz.
D. Naciśnij przycisk NEXT/ PREVIOUS, aby wybrać stację FM.
4. ZDALNE STEROWANIE
Pilot zdalnego sterowania umożliwia dostęp tylko do funkcji USB/SD, bezprzewodowego BT i
FM, ale nie do głównej głośności, mikrofonu, tonów niskich i wysokich oraz innych funkcji.
5. FORMAT PLIKU
W przypadku plików zapisanych na kartach USB/SD obsługiwane są wyłącznie formaty MP3 i
WAV. Urządzenie może pomijać pliki z nieobsługiwanych ścieżek na kartach USB lub SD.

www.PyleUSA.com
5
A. Przyciski te służą wyłącznie do sterowania funkcjami USB/SD, BT wireless i FM i nie
sterują żadnymi innymi funkcjami.
B. PRZYCISK TRYBU: Naciśnij ten przycisk, aby wybrać tryb USB/SD, tryb FM lub tryb
odtwarzania bezprzewodowego BT. Tryb USB/SD zostanie ustawiony automatycznie po
włączeniu zasilania. Automatycznie odtwarza pliki mp3 po włożeniu pamięci USB lub
karty SD. Przycisk ten nie może być używany do wyboru wejścia AUX, CD lub DVD.
C. Każde naciśnięcie PRZYCISKU ODTWARZANIA/PAUZY powoduje przejście od
odtwarzania do pauzy lub od pauzy do odtwarzania w trybie USB/SD lub Wireless BT.
Naciśnij przycisk PLAY/PAUSE jeden raz, aby automatycznie przeskanować wszystkie
częstotliwości od 87,5 MHz do 108 MHz w trybie FM. Naciśnij przycisk, aby
automatycznie przeskanować kanały podczas korzystania z radia FM po raz pierwszy. Po
zakończeniu skanowania urządzenie automatycznie zapisze wszystkie kanały radiowe i
rozpocznie odtwarzanie od pierwszego kanału radiowego. Nie ma potrzeby ponownego
skanowania po każdym włączeniu radia FM.
D. PRZYCISK NASTĘPNY/POPRZEDNI:
Użyj tych dwóch przycisków aby: Wybrać poprzedni utwór lub folder zgodnie z
poniższymi trybami.
W trybie USB/SD: Użyj, aby wybrać poprzedni lub następny utwór, lub użyj, aby wybrać
poprzedni lub następny folder w trybie FOLDER.
W trybie bezprzewodowym BT: Użyj, aby wybrać poprzedni lub następny utwór.W
trybie FM: Użyj, aby wybrać poprzedni lub następny kanał radiowy.
6. PORT USB
Port USB służy wyłącznie do odtwarzania plików audio z pamięci USB.
7. PRZYCISK PANELU STEROWANIA
8. SELEKTOR WEJŚCIA
Wybierz tryb wejścia MP3/BT, jeśli chcesz odtwarzać USB/SD/BT bezprzewodowo/radio FM.
Wybierz tryb wejścia CD, aby odtwarzać sygnał wejściowy z gniazd CD. Wybierz tryb wejścia
AUX, aby odtwarzać sygnał wejściowy z gniazd AUX. Wybierz tryb wejścia DVD, jeśli chcesz
odtwarzać sygnał wejściowy z gniazd DVD, w przeciwnym razie na wyjściu urządzenia nie
będzie żadnego sygnału.

www.PyleUSA.com
6
Po włożeniu karty USB/SD do gniazda wejściowego, upewnij się, że przełącznik wyboru
wejścia (13) jest ustawiony na USB/SD, a następnie naciśnij przycisk trybu, aby wybrać
pomiędzy portem USB audio, wejściem karty SD, bezprzewodowym BT lub radiem FM.
Jeśli chcesz korzystać z radia bezprzewodowego, wykonaj poniższe czynności.
PANEL PRZEDNI I TYLNY
1. Sterowanie konsolą USB/karta SD/bezprzewodowe BT/USB
KROKI, ABY POŁĄCZYĆ SIĘ Z BEZPRZEWODOWYM URZĄDZENIEM BT
A. Naciśnij przycisk MODE pod ekranem wyświetlacza ID3 i przełącz na tryb Bluetooth.
B. Wyszukaj urządzenie Bluetooth i znajdź nazwę Bluetooth "PYLEUSA lub BT".
C. Wybierz nazwę Bluetooth PYLEUSA lub BT i poczekaj na sparowanie urządzenia. Na wyświetlaczu
pojawi się komunikat "SEARCHING".
D. Urządzenie wyemituje sygnał dźwiękowy potwierdzający pomyślne sparowanie urządzeń, a na
wyświetlaczu pojawi się komunikat "BLUETOOTH CONNECTED".
E. Po sparowaniu możesz słuchać muzyki z urządzenia Bluetooth. Możesz także użyć przycisków
sterowania urządzeniem, aby wybrać utwory z urządzenia Bluetooth.

www.PyleUSA.com
7
WAŻNE: Wejście USB służy WYŁĄCZNIE do podłączania pamięci USB typu pendrive.
Podłączenie odtwarzacza MP3 lub komputera bezpośrednio do wejścia USB Quickdrive
uniemożliwi odtwarzanie dźwięku z tych urządzeń.
Tryb wyszukiwania: Gdy na wyświetlaczu miga słowo FOLDER, urządzenie znajduje się w
trybie wyszukiwania folderów. Obróć pokrętło FOLDER/TRACK, aby wyszukać folder. Naciśnij
pokrętło FOLDER/TRACK, aby wybrać ścieżkę. Po wyjściu z trybu folderu na wyświetlaczu
pojawi się słowo ALL. Oznacza to, że urządzenie odtworzy wszystkie utwory zapisane w
pamięci USB/karty SD. Po naciśnięciu przycisku REPEAT pojawi się 6 różnych ekranów w
zależności od wybranego ustawienia: ALL/NORMAL /SINGLE /FOLDER /RANDOM
/BROWSE. Po naciśnięciu przycisku ID3 wyświetlane są 4 różne ekrany w zależności od
wybranego ustawienia: TITLE/ARTIST/ALBUM/OFF.
1.
Źródło wejścia: Na wyświetlaczu pojawi się "U" w trybie USB i "S" w trybie karty SD. Naciśnij
przycisk trybu, aby przełączyć z jednego wejścia na drugie.
2.
Numer ścieżki: W tym miejscu wyświetlany jest numer ścieżki (dla wszystkich ścieżek w
pamięci USB). Na powyższym obrazku urządzenie odtwarza utwór numer 1.
3.
Informacje o ścieżce lub folderze: W tym miejscu wyświetlana jest nazwa folderu. Na
powyższym obrazku odtwarzany folder nosi nazwę MUSIC.
4.
Czas odtwarzania: W tym miejscu wyświetlany jest czas odtwarzania bieżącego utworu.5.
Użyj innych elementów sterujących, odtwarzania/pauzy, zatrzymania, powtarzania
(ALL/NORMAL/ SINGLE/CARPETTE/ALARATORY/SEARCH), poprzedniego utworu i
następnego utworu, aby odtwarzać dźwięk z pamięci USB/karty SD lub bezprzewodowo
przez BT.
2. Ekran konsoli sterowania USB/kartą SD

3. Przycisk wyszukiwania utworów/folderów
Obróć to pokrętło w prawo, aby wyszukać wszystkie ścieżki na karcie USB/SD. Każdy
utwór jest wyświetlany według nazwy. Utwory lub foldery są wyświetlane w kolejności
chronologicznej (od momentu załadowania plików na kartę USB/SD). Naciśnij przycisk ,
aby rozpocząć odtwarzanie żądanego utworu. W pierwszej kolejności wyświetlane są
ścieżki w pliku źródłowym, a następnie ścieżki w folderach.
Naciśnij ten przycisk, aby włączyć funkcję wyszukiwania folderów. Po jego naciśnięciu na
wyświetlaczu zacznie migać słowo "FOLDER". Następnie obróć pokrętło zgodnie z
ruchem wskazówek zegara, aby przeszukać foldery w pamięci USB/karty SD. Naciśnij
pokrętło, aby rozpocząć odtwarzanie utworów w danym folderze.
www.PyleUSA.com
8
Czytnik kart SD/port USB: aby korzystać z dysków zewnętrznych w tym urządzeniu, po
prostu podłącz kartę SD/USB do tych portów.
1.
Ekran LCD: ten ekran wyświetla wszystkie informacje związane z nośnikiem zewnętrznym
lub urządzeniem.
2.
Wybór folderu i utworu3.
Przycisk zasilania: ten przycisk włącza i wyłącza urządzenie.4.
Pokrętło regulacji głośności mikrofonu: Obróć to pokrętło, aby wyregulować głośność
mikrofonu.
5.
Pokrętło regulacji głośności echa mikrofonu: Obróć to pokrętło, aby dostosować poziom
głośności echa mikrofonu.
6.
Pokrętło regulacji tonów niskich: Obróć to pokrętło, aby dostosować częstotliwości
tonów niskich kanałów 1 i 2.
7.
Pokrętło głośności głównej: Przesuń pokrętło w górę i w dół, aby wyregulować głośność
główną.
8.
Regulacja wysokich tonów: Obróć to pokrętło, aby wyregulować wysokie częstotliwości
kanału 1 i kanału 2.
9.
Balans: Kontroluje balans głośności od lewej do prawej.10.
Selektor wejścia: Przekręć to pokrętło, aby wybrać najkorzystniejsze wejście.11.
WEJŚCIA MIKROFONÓW: Do tych gniazd podłącza się KARAOKE lub ZEWNĘTRZNY
MIKROFON.
12.
GNIAZDO IPOD/MP3: Do tego gniazda podłącza się urządzenia IPOD/MP3.13.
ODBIORNIK ZDALNEGO STEROWANIA: Służy do odbierania sygnału zdalnego
sterowania.
14.
WSKAŹNIK LED PRACY: Gdy urządzenie jest włączone, dioda LED świeci się.15.
WEJŚCIE AUDIO: Podłącz gniazda wyjściowe audio DVD/CD do tych gniazd.16.
LINE OUT: Podłącz gniazda wejściowe RECORD do tych gniazd.17.

www.PyleUSA.com
9
18. ZŁĄCZE ANTENY FM: Złącze dla anten AM i FM.
19. WYJŚCIE GŁOŚNIKOWE: Podłącz system głośników do tych gniazd.
20. ANTENA BLUETOOTH: Odłącz antenę podczas korzystania z wejścia Bluetooth.
21. ZASILANIE: Podłącz do gniazdka sieciowego 115 V/60 Hz i 230 V/50 Hz.
22. PRZEŁĄCZNIK NAPIĘCIA ZASILANIA: 115V/230V.
ZDALNE STEROWANIE
Naciśnij ten przycisk, aby wybrać wzór wyświetlania ID3, który pokaże
TITLE/ARTIST/ALBUM/OFF. Naciśnij i przytrzymaj ten przycisk przez 5 sekund, aby włączyć lub
wyłączyć MP3.
1.
W trybie FM naciśnij te dwa przyciski, aby dostroić się do częstotliwości FM.2.
Naciśnij te dwa przyciski, aby wybrać poprzedni lub następny utwór w trybie USB, SD lub
Bluetooth, lub aby wybrać poprzedni lub następny kanał w trybie FM.
3.
Zwiększ lub zmniejsz głośność.4.
Naciskaj cyfry, aby bezpośrednio wybierać utwory.5.
W trybie USB lub SD odpowiedź urządzenia zajmuje 1-2 sekundy.6.
Naciśnij, aby przełączyć na tryb powtarzania.7.
Naciśnij, aby wybrać tryb odtwarzania, np. bezprzewodowy USB/SD/FM/BT.8.
Funkcja EQ: Wybiera zaprogramowany tryb korektora dźwięku.9.
Funkcja odtwarzania i pauzy dla plików MP3 w modelach USB/SD/BT. Naciśnij, aby automatycznie
wyszukiwać kanały w modelu FM i automatycznie zapisywać kanały.
10.

www.PyleUSA.com
10
PDA6BU/PDA6BU.5/PDA5BU/PDA5BU.5
Kompaktowy bezprzewodowy wzmacniacz stereo BT
Biurkowy wzmacniacz audio z radiem FM, odtwarzaczem MP3/USB/SD, cyfrowym
wyświetlaczem LCD i wejściem mikrofonowym (200 W)
Charakterystyka:
Zawartość opakowania:
Mini wzmacniacz audio do komputerów stacjonarnych
Kompaktowy amplituner stereo do kina domowego
Wbudowany Bluetooth do bezprzewodowego przesyłania muzyki
Radio FM z cyfrowym wyświetlaczem LCD
Odtwarzanie utworów ze znacznikami ID3 wyświetla tytuł utworu, wykonawcę, album i nazwę pliku.
Wybór wielokanałowego wejścia audio
Obsługa plików audio MP3
Podłącza i przesyła strumieniowo dźwięk z urządzeń zewnętrznych
Czytniki kluczy USB i kart pamięci SD
Port USB może być również używany do ładowania urządzeń.
Wejście pomocnicze (3,5 mm)
(2) Gniazda wejściowe mikrofonu 1/4''
(2) gniazda wejściowe audio RCA (L/R)
(2) gniazda bananowe wyjścia głośnikowego
(1) gniazda wyjściowe audio RCA (L/R)
Panel przedni centrum sterowania audio
Automatyczne wyszukiwanie stacji radiowych
Funkcje "Repeat" i "Shuffle" dla plików audio
Pojedynczy przycisk sterowania do wyszukiwania muzyki w utworach i folderach
Regulacja tonów wysokich, niskich, głośności głównej i mikrofonu
Wzmacniacz stereo do komputerów stacjonarnych
Pilot zdalnego sterowania
Antena FM

www.PyleUSA.com
11
OSTRZEŻENIE:
Ten produkt zawiera węglan niklu, o którym stan Kalifornia wie, że stanu
Kalifornia, że powoduje raka, wady wrodzone i inne uszkodzenia
uszkodzenia reprodukcyjne. Nie połykać. Więcej informacji:
www.P65warnings.ca.gov
Łączność Bluetooth:
Odbiór bezprzewodowego sygnału dźwiękowego
Prosta i nieskomplikowana konfiguracja parowania
Zintegrowana antena zapewniająca większy zasięg bezprzewodowy
Działa ze wszystkimi najnowszymi urządzeniami (smartfony, tablety, laptopy,
komputery itp.)
Wersja Bluetooth: 5.0
Nazwa sieci Bluetooth: "PYLEUSA" lub "BT".
Zasięg bezprzewodowy: 40'+ ft.
Dane techniczne:
Maksymalna moc wyjściowa: 200 W (przy 4 Ohm)
Moc wyjściowa RMS: 100 W x 2 (@ 8 Ohm)
Regulacja barwy dźwięku: Niska, częstotliwość = 100 Hz +/-8 dB
Pasmo przenoszenia: 20 Hz-20 kHz
Regulacja częstotliwości: +/-10 dB
Stosunek sygnału do szumu: > 71 dB
T.H.D.: < 0,1%.
Dostrojone stacje radiowe: do 60 stacji
Pilot zdalnego sterowania zasilany bateryjnie, wymaga (1) baterii guzikowej CR-2025, w
zestawie
Zasilanie: 120/240 V, przełączane
Wymiary (dł. x szer. x wys.): 9,8'' x 9,8'' x 3,9''.

Pytania lub Komentarze
Jesteśmy tutaj, aby Ci pomóc!
Telefon: 1.718.535.1800
PyleUSA.com/ContactUs
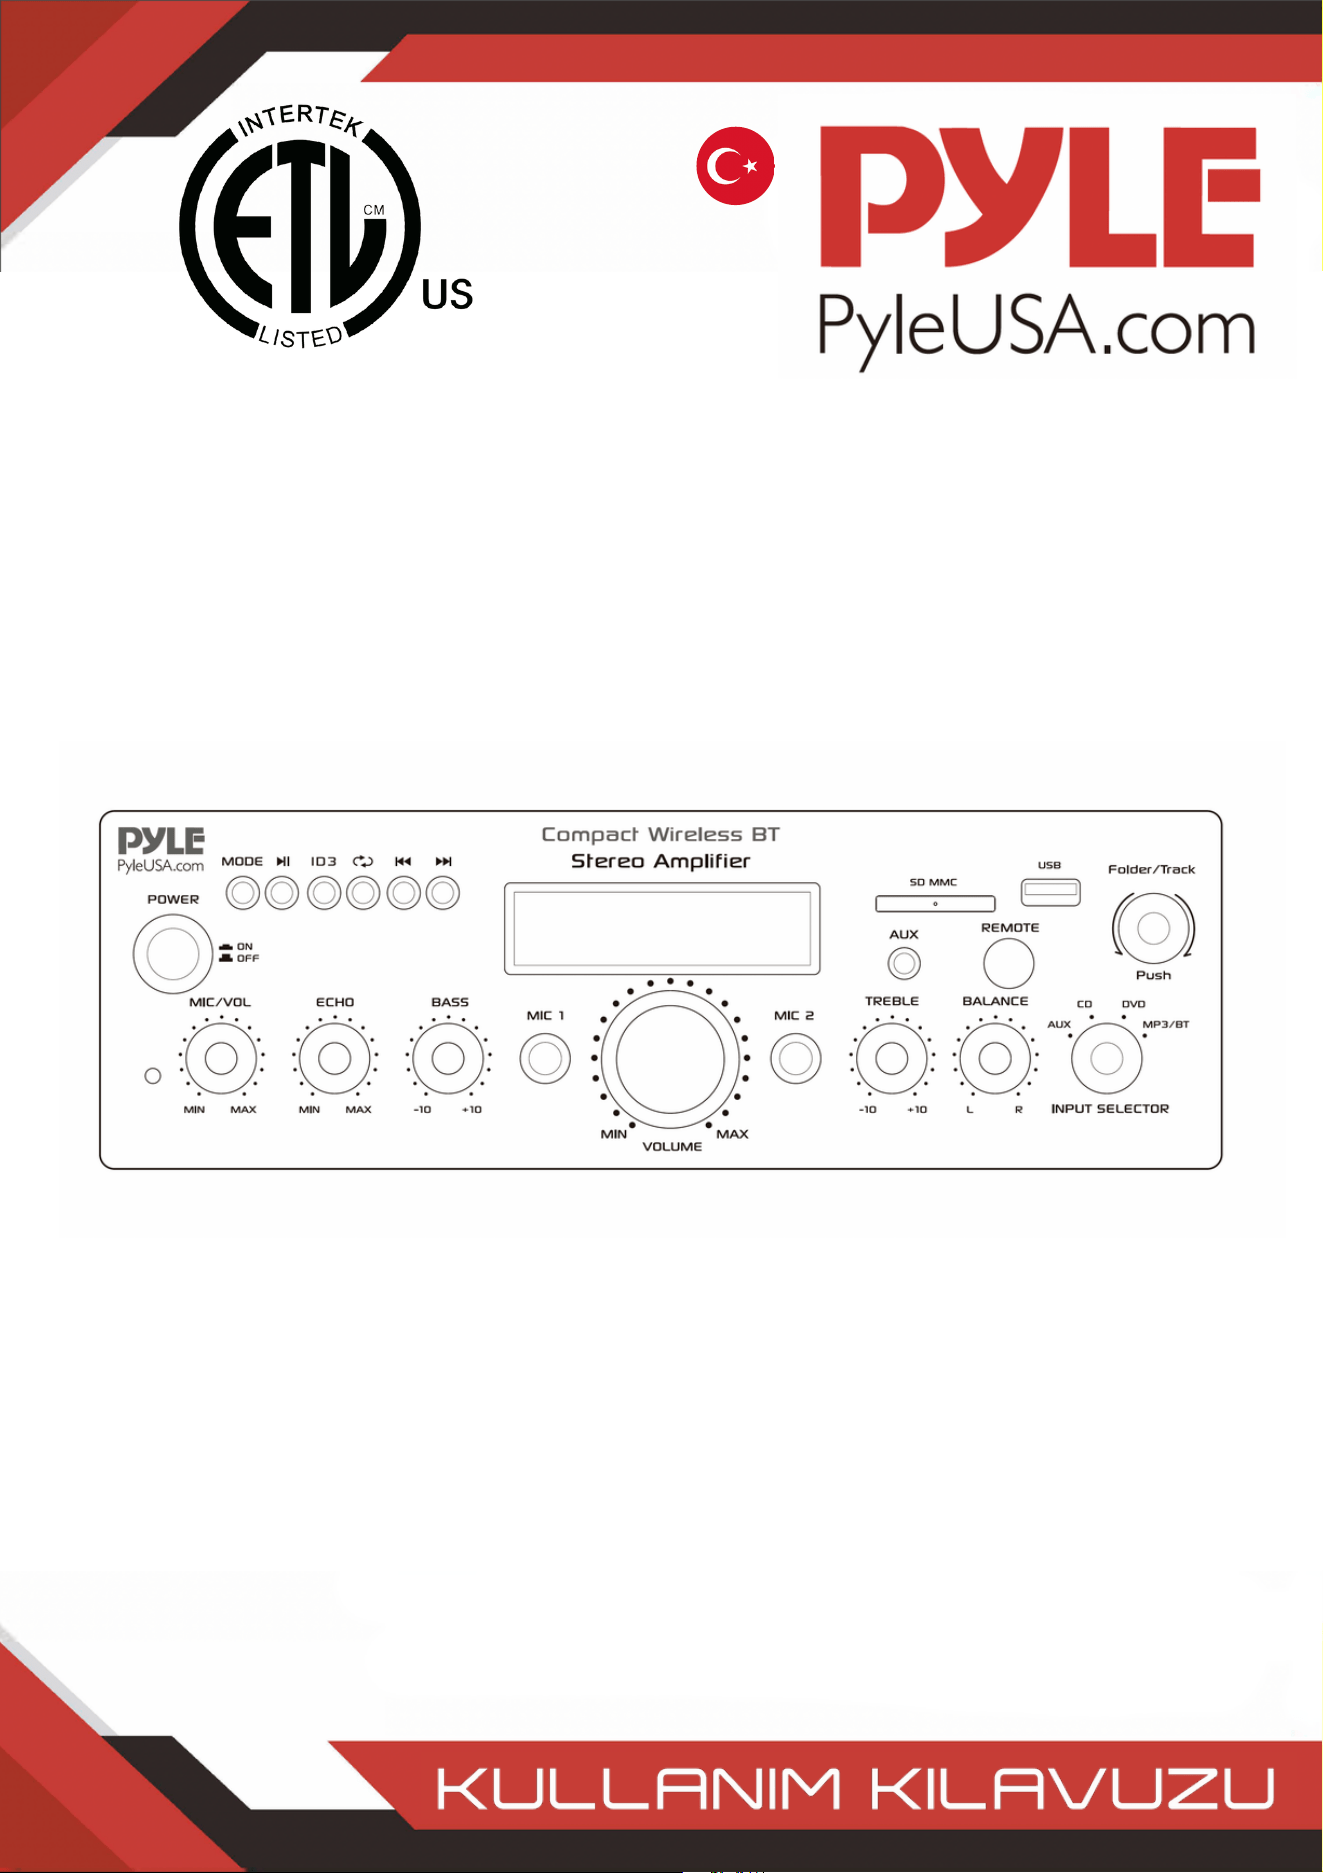
TURKISH
Kompakt Kablosuz BT Stereo Amplifikatör
FM Radyo MP3/USB/SD Okuyuculu, Dijital LED Ekranlı,
Mikrofonlu Masaüstü Ses Güç Amfisi Alıcısı Girişi (200 Watt)
PDA6BUUK/PDA6BU.5UK/PDA5BUUK/PDA5BU.0UK/PDA612BUUK/PDA612BU.5UK
PDA6BUEU/PDA6BU.5EU/PDA5BUEU/PDA5BU.0EU/PDA612BUEU/PDA612BU.5EU

UYARI!
DİKKAT: ELEKTRİK ÇARPMASI RİSKİNİ AZALTMAK İÇİN BU ÜNİTENİN KAPAĞINI ÇIKARMAYIN.
İÇİNDE KULLANICININ BAKIM YAPABİLECEĞİ PARÇALAR YOKTUR. TÜM SERVİS İŞLEMLERİNİ
KALİFİYE BİR TEKNİSYENE HAVALE EDİN.
Eşkenar üçgen içinde ok başlı aydınlatma külü sembolü, kullanıcıyı ürünün
muhafazası içinde insanlar için elektrik çarpması riski oluşturabilecek yeterli
büyüklükte "TEHLİKELİ" voltajın varlığına karşı uyarmak için tasarlanmıştır.
Kullanıcılar, bu sembol bu kullanım kılavuzunda göründüğünde ekstra güvenlik
sergilemeli ve belirtilen tüm önlemleri almalıdır.
Eşkenar üçgen içindeki ünlem işareti, kullanıcıyı bu kılavuzdaki önemli
çalıştırma ve bakım (servis) talimatlarının varlığı konusunda uyarmak için
tasarlanmıştır.
Bu ürünü kullanmadan önce bu talimatları iyice okuyun.1.
Bu talimatları ileride başvurmak üzere saklayın.2.
Tüm uyarıları dikkate alın.3.
Tüm talimatlara uyun.4.
UYARI: Elektrik çarpmasını önlemek için bu ekipmanı yağmura veya neme maruz
bırakmayın. Bu ürünü herhangi bir sıvının yakınında saklamayın veya çalıştırmayın.
5.
Sadece kuru bir bezle temizleyin.6.
Bu ürünü radyatör, kalorifer peteği, soba gibi ısı kaynaklarının veya ısı üreten diğer
cihazların (amplifikatörler dahil) yakınında saklamayın veya çalıştırmayın.
7.
Polarize veya topraklama tipi fişin güvenlik amacını bozmayın. Polarize fişin biri
diğerinden daha geniş olan iki kanadı vardır. Topraklı fişin iki kanadı ve yuvarlak bir
topraklama ucu vardır. Geniş bıçak veya üçüncü uç güvenliğiniz için sağlanmıştır.
Sağlanan fiş prizinize uymuyorsa, eski prizin değiştirilmesi için bir elektrikçiye danışın.
8.
Bu üniteye bağlı tüm kabloları, özellikle fişleri ve üniteden çıktıkları noktayı, üzerinde
yürünmekten veya sıkışmaktan koruyun. Kabloyu elektrik prizinden çıkarırken, kabloyu
çekerek değil, fişi tutarak çıkarın.
9.
Işık fırtınaları sırasında veya uzun süre kullanılmadığında ünitenin fişini çekin.10.
Bu ünitenin ve bu üniteyle bağlantılı olarak kullanılan diğer tüm ekipmanların kablo
bağlantılarını yaparken tüm ekipmanlarınızın KAPALI olduğundan emin olun.
11.
Kurulum ve kablolama tamamlandığında, ses ve seviye kontrolleri AŞAĞI çevrilmiş olarak
tüm ekipmanınızı açın. Tüm ekipman AÇIK konuma getirildikten sonra ses ve seviye
kontrollerini yavaşça uygun konumlarına yükseltin.
12.
Bu üniteyi topraklarken, topraklama sistemini bozmamak için doğru şekilde yaptığınızdan
emin olun. Bu ünitede yerleşik topraklama.
13.
www.PyleUSA.com
2
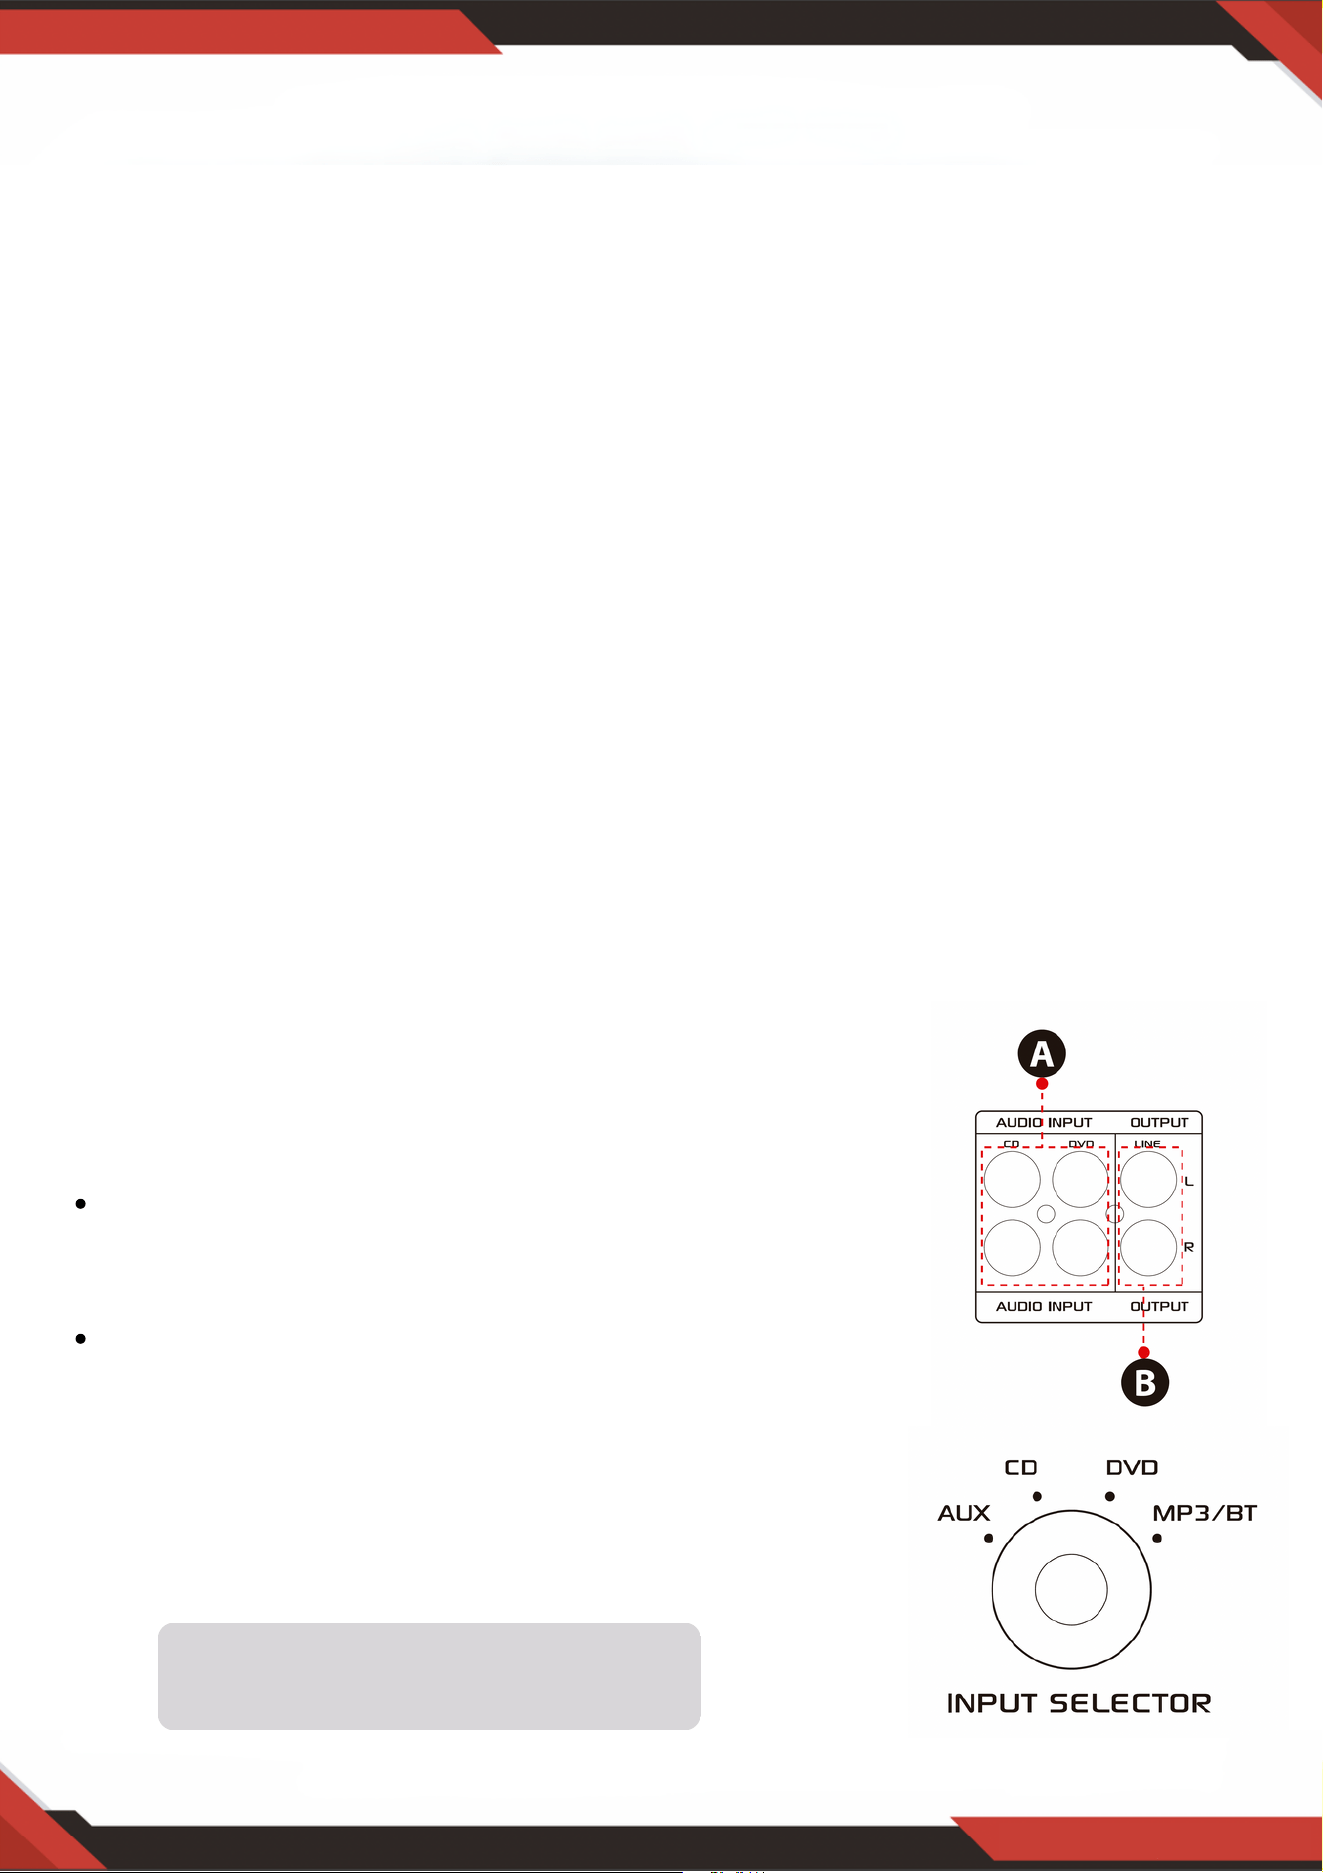
www.PyleUSA.com
3
14. Herhangi bir ürünü yerleştirmeden, kurmadan, donatmadan veya askıya almadan önce, tüm
donanım, süspansiyon, dolaplar, dönüştürücüler, braketler ve ilgili ekipmanlarda hasar olup
olmadığını kontrol edin. Eksik, aşınmış, deforme olmuş veya yüke uygun olmayan herhangi bir
bileşen kurulumun, yerleşimin veya dizinin gücünü önemli ölçüde azaltabilir. Bu tür herhangi bir
durum kurulumun güvenliğini ciddi ölçüde azaltır ve derhal düzeltilmelidir. Yalnızca kurulumun
yükleme koşullarına ve olası kısa vadeli, beklenmedik aşırı yüklemeye göre derecelendirilmiş
donanım kullanın. Donanım veya ekipmanın değerini asla aşmayın.
15.Fiziksel ekipman kurulumu ile ilgili olarak lisanslı, profesyonel bir mühendise danışın. Ekipmanın
güvenliği ve işletimi ile ilgili tüm yerel, eyalet ve ulusal Yönetmeliklerin anlaşıldığından ve bunlara
uyulduğundan emin olun.
16.Tüm servis işlemleri için yetkili servis personeline başvurun. Cihaz herhangi bir şekilde hasar
gördüğünde, örneğin güç kaynağı kablosu veya fişi hasar gördüğünde, sıvı döküldüğünde veya
cihazın içine nesneler düştüğünde, cihaz yağmura veya neme maruz kaldığında, normal
çalışmadığında veya düşürüldüğünde servis gereklidir.
DİKKAT
1. A: Ses girişini CD/DVD/TV ses çıkışına bağlayın.
NOTLAR:
Ünite video sinyalini desteklemez, bu nedenle
CD/DVD/TV AUDIO OUTPUT terminalinin bağlı
olduğundan emin olun.
Üniteyi yanlışlıkla CD/DVD/TV video çıkışına
bağladığınızda gürültü duyulacaktır.
2. B: Diğer ampli er veya elektrikli hoparlörlerle
bağlanabilen sinyal çıkışı.
Giriş
Ünitelerimizden en iyi şekilde yararlanmak için, ekipmanı çalıştırmadan önce kullanım
kılavuzunda verilen tüm bilgileri gözden geçirmeniz önerilir.
Giriş seçici aşağıdaki durumlarda
çalışmayacaktır sinyal Hat çıkışından gelir.
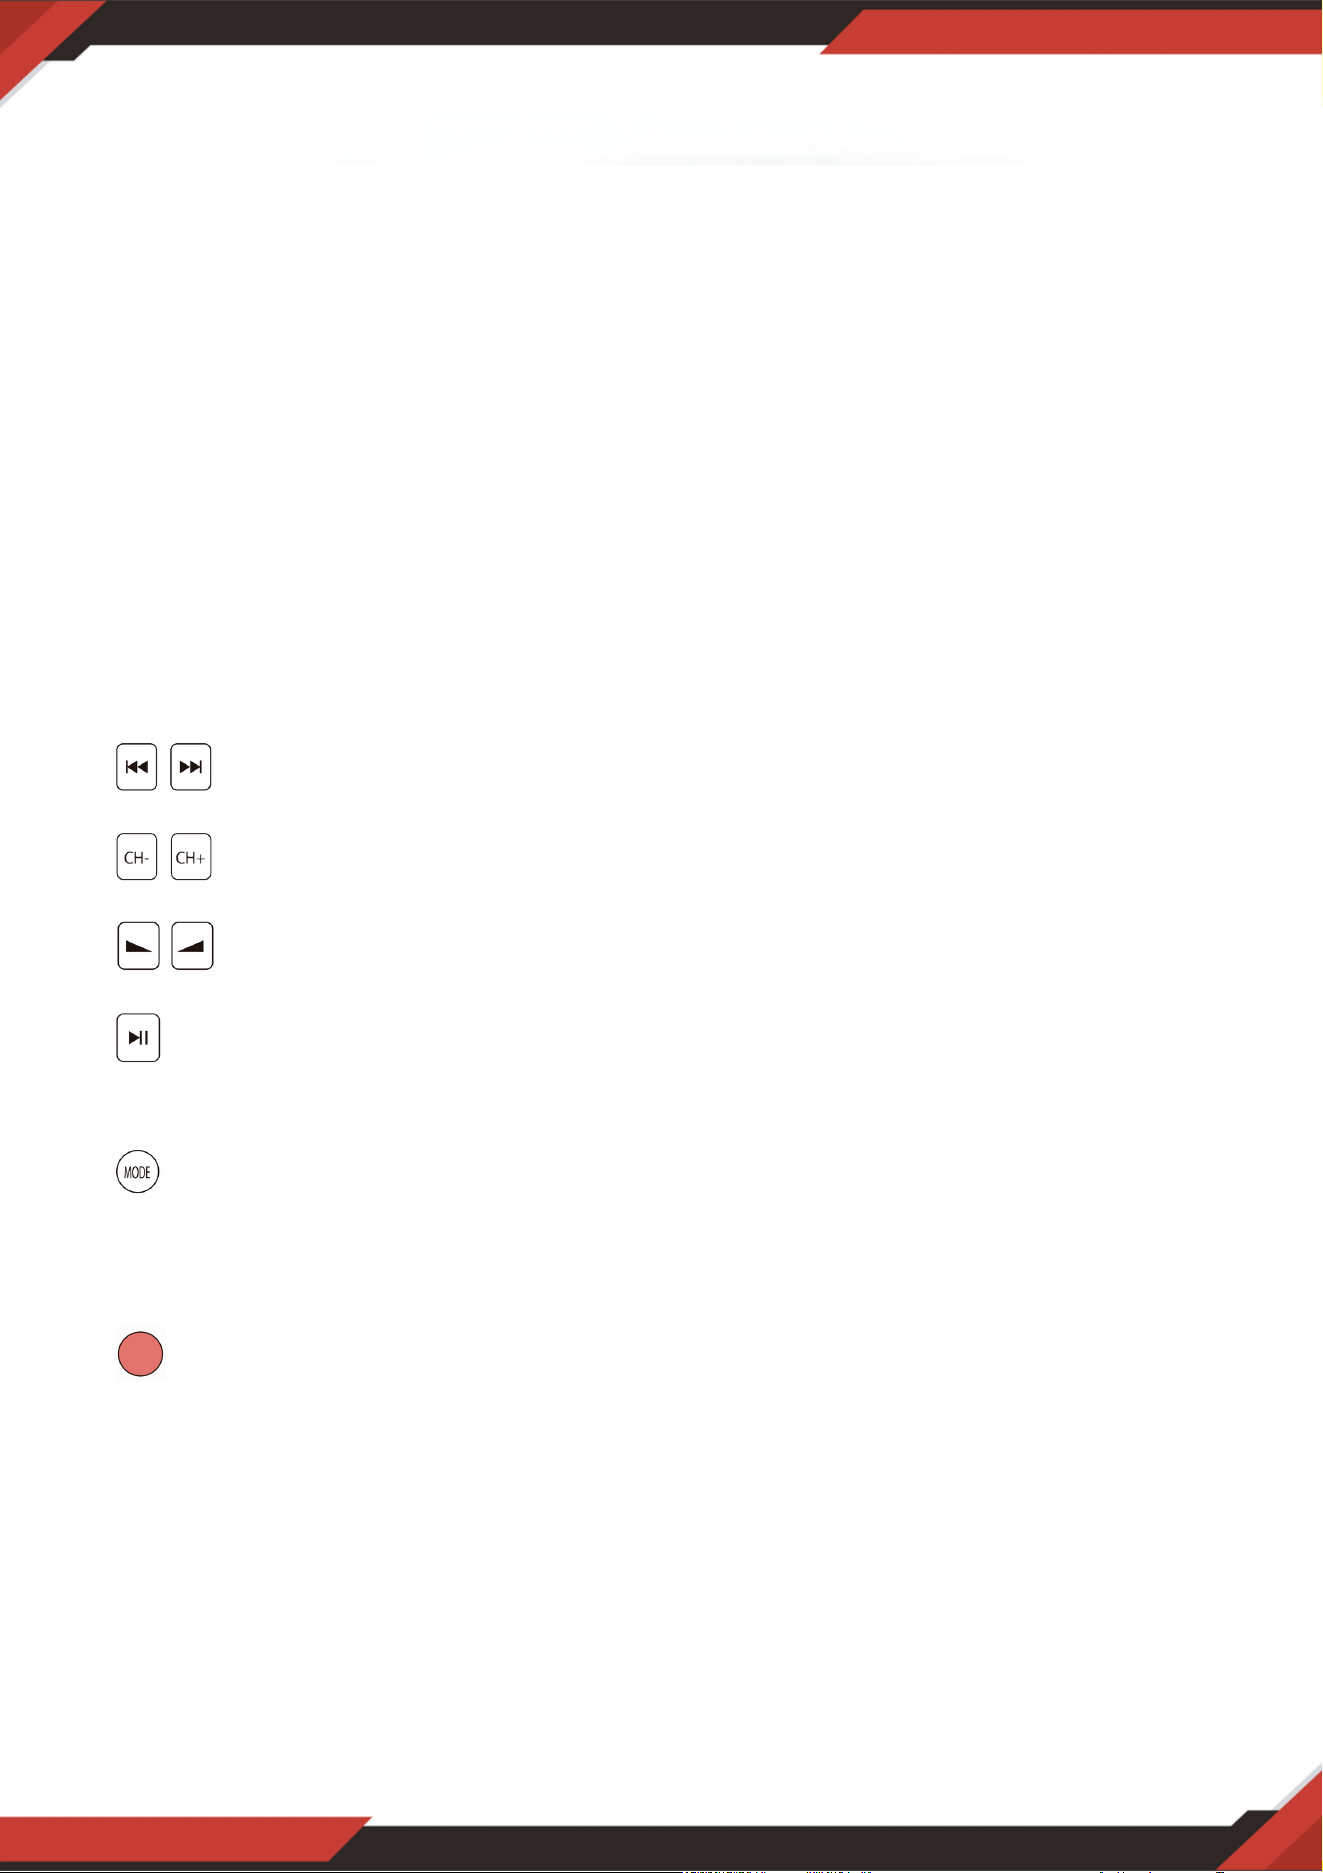
A. Uzaktan kumandayı kullanmadan önce lütfen pil sayfasını çıkarın, aksi takdirde uzaktan
kumanda çalışmaz.
B. USB / SD veya Kablosuz BT modunda önceki veya sonraki parçayı seçmek için bu
iki düğmeye basın, FM modunda yanıt yoktur.
C. FM modunda önceki veya sonraki kanalı seçmek için bu iki düğmeye basın, USB /
SD ve Bluetooth modunda yanıt yoktur.
D. Kablosuz BT ses seviyesini, USB / SD ve fm'yi artırmak veya azaltmak için bu iki
düğmeye basın. Bu düğmeler ana ses seviyesini kontrol etmez.
E. 87.5mhz'den 108 MHz'e kadar tüm frekansları otomatik olarak taramak için bu
düğmeye basın, ünite kanalları FM modunda otomatik olarak saklar. Diğer ayrıntılar için
lütfen 4, C'ye bakın.
F. Oynatma modundan birini seçmek için bu düğmeye basın (USB / SD modu, FM modu
ve Kablosuz BT modu). Üniteyi açmak, USB / SD modunu otomatik olarak ayarlayacaktır.
USB flash sürücü veya SD kart takıldıktan sonra MP3 dosyaları otomatik olarak
oynatılacaktır. Bu düğme ile AUX, CD ve DVD girişini seçemezsiniz.
G. USB / SD, Kablosuz BT ve FM modunu açmak veya kapatmak için bu düğmeyi 5 saniye
basılı tutun, ancak üniteyi açmak / kapatmak için basılı tutun. Ünite, USB / SD, Kablosuz BT
ve fm'yi kapatırsanız sinyali CD, DVD, AUX giriş modunda verecektir.
H. Uzaktan kumandayı ana ünitenin alıcısına doğrultun.
www.PyleUSA.com
4
3. FM RADYO KONTROLÜ İÇİN ADIMLAR
A. FM radyoyu kullanmadan önce FM antenini bağlayın.
B. FM modunu seçmek için ön paneldeki veya uzaktan kumandadaki MODE düğmesine basın.
C. Ön paneldeki veya uzaktan kumandadaki PLAY/PAUSE düğmesine basın, otomatik olarak FM Radyo
istasyonunu 87.5Mhz'den 108Mhz'ye kadar tarar ve sore eder.
D. FM istasyonunu seçmek için NEXT/PREV düğmesine basın.
4. UZAKTAN KUMANDA
Uzaktan kumanda, Ana ses, mikrofon, bas, tiz ve diğer işlevlere değil, yalnızca USB / SD,
Kablosuz BT ve FM işlevlerine komuta erişimi sağlar.
5. DOSYA formatı
USB / SD depolanmış dosyalar için yalnızca MP3 ve WAV formatı desteklenir. Ünite, USB veya
SD kartlardaki desteklenmeyen parça dosyalarını atlayabilir.

www.PyleUSA.com
5
A. Bu düğmeler yalnızca USB/SD, Kablosuz BT ve FM işlevlerini kontrol etmek için
kullanılır ve diğer işlevleri kontrol etmez.
B. MODE DÜĞMESİ: USB/SD modu, FM modu veya Kablosuz BT çalma modundan
birini seçmek için bu düğmeye basın. USB/SD modu ünite AÇIK konuma getirildikten
sonra otomatik olarak ayarlanacaktır. Bir USB kül sürücü veya SD kart takıldıktan
sonra otomatik olarak mp3 çalar. Bu düğmeden AUX, CD ve DVD girişini
seçemezsiniz.
C. PLAY/PAUSE DÜĞMESİNE her basış, USB/SD modunda veya Kablosuz BT
modunda işlemin oynatmadan duraklatmaya veya duraklatmadan oynatmaya
geçmesine neden olur. FM modunda 87.5MHz ila 108MHz arasındaki tüm frekansları
otomatik olarak taramak için PLAY/PAUSE DÜĞMESİNE bir kez basın. FM radyoyu
ilk kez kullandığınızda kanalları otomatik olarak taramak için düğmeye basın.
Aramayı durdurduktan sonra, ünite tüm radyo kanallarını otomatik olarak
kaydedecek ve ilk radyo kanalından çalacaktır. Her FM radyo açılışında yeniden
tarama yapmanıza gerek yoktur.
D. PREV ve NEXT DÜĞMESİ: Aşağıdaki gibi farklı modlara bağlı olarak önceki, sonraki
parçayı veya klasörü seçmek için bu iki düğmeyi kullanın.
USB/SD modunda: Önceki veya sonraki parçayı seçmek için kullanın veya KLASÖR
çalışma modunda önceki veya sonraki klasörü seçmek için kullanın.
Kablosuz BT modunda: Önceki veya sonraki parçayı seçmek için kullanın.
FM modunda: Önceki veya sonraki radyo kanalını seçmek için kullanın.
6. USB bağlantı
USB bağlantı noktası USB bağlantı noktası yalnızca USB flash sürücünüzdeki ses dosyalarını
çalmak için kullanılır. Üniteye zarar verebileceğinden güç kaynağı için kullanmayın.
7. KONTROL PANELI DÜĞMESI
8. GİRİŞ SEÇİCİ
USB/SD/Kablosuz BT/FM çalmak istiyorsanız BT/FM/USB/CD giriş modunu seçin Radyo. CD
jakı giriş sinyalini çalmak istiyorsanız CD giriş modunu seçin. AUX jakı giriş sinyalini çalmak
istiyorsanız AUX giriş modunu seçin. DVD jak giriş sinyalini çalmak istiyorsanız DVD giriş
modunu seçin, aksi takdirde ünite çıkışında sinyal yoktur..
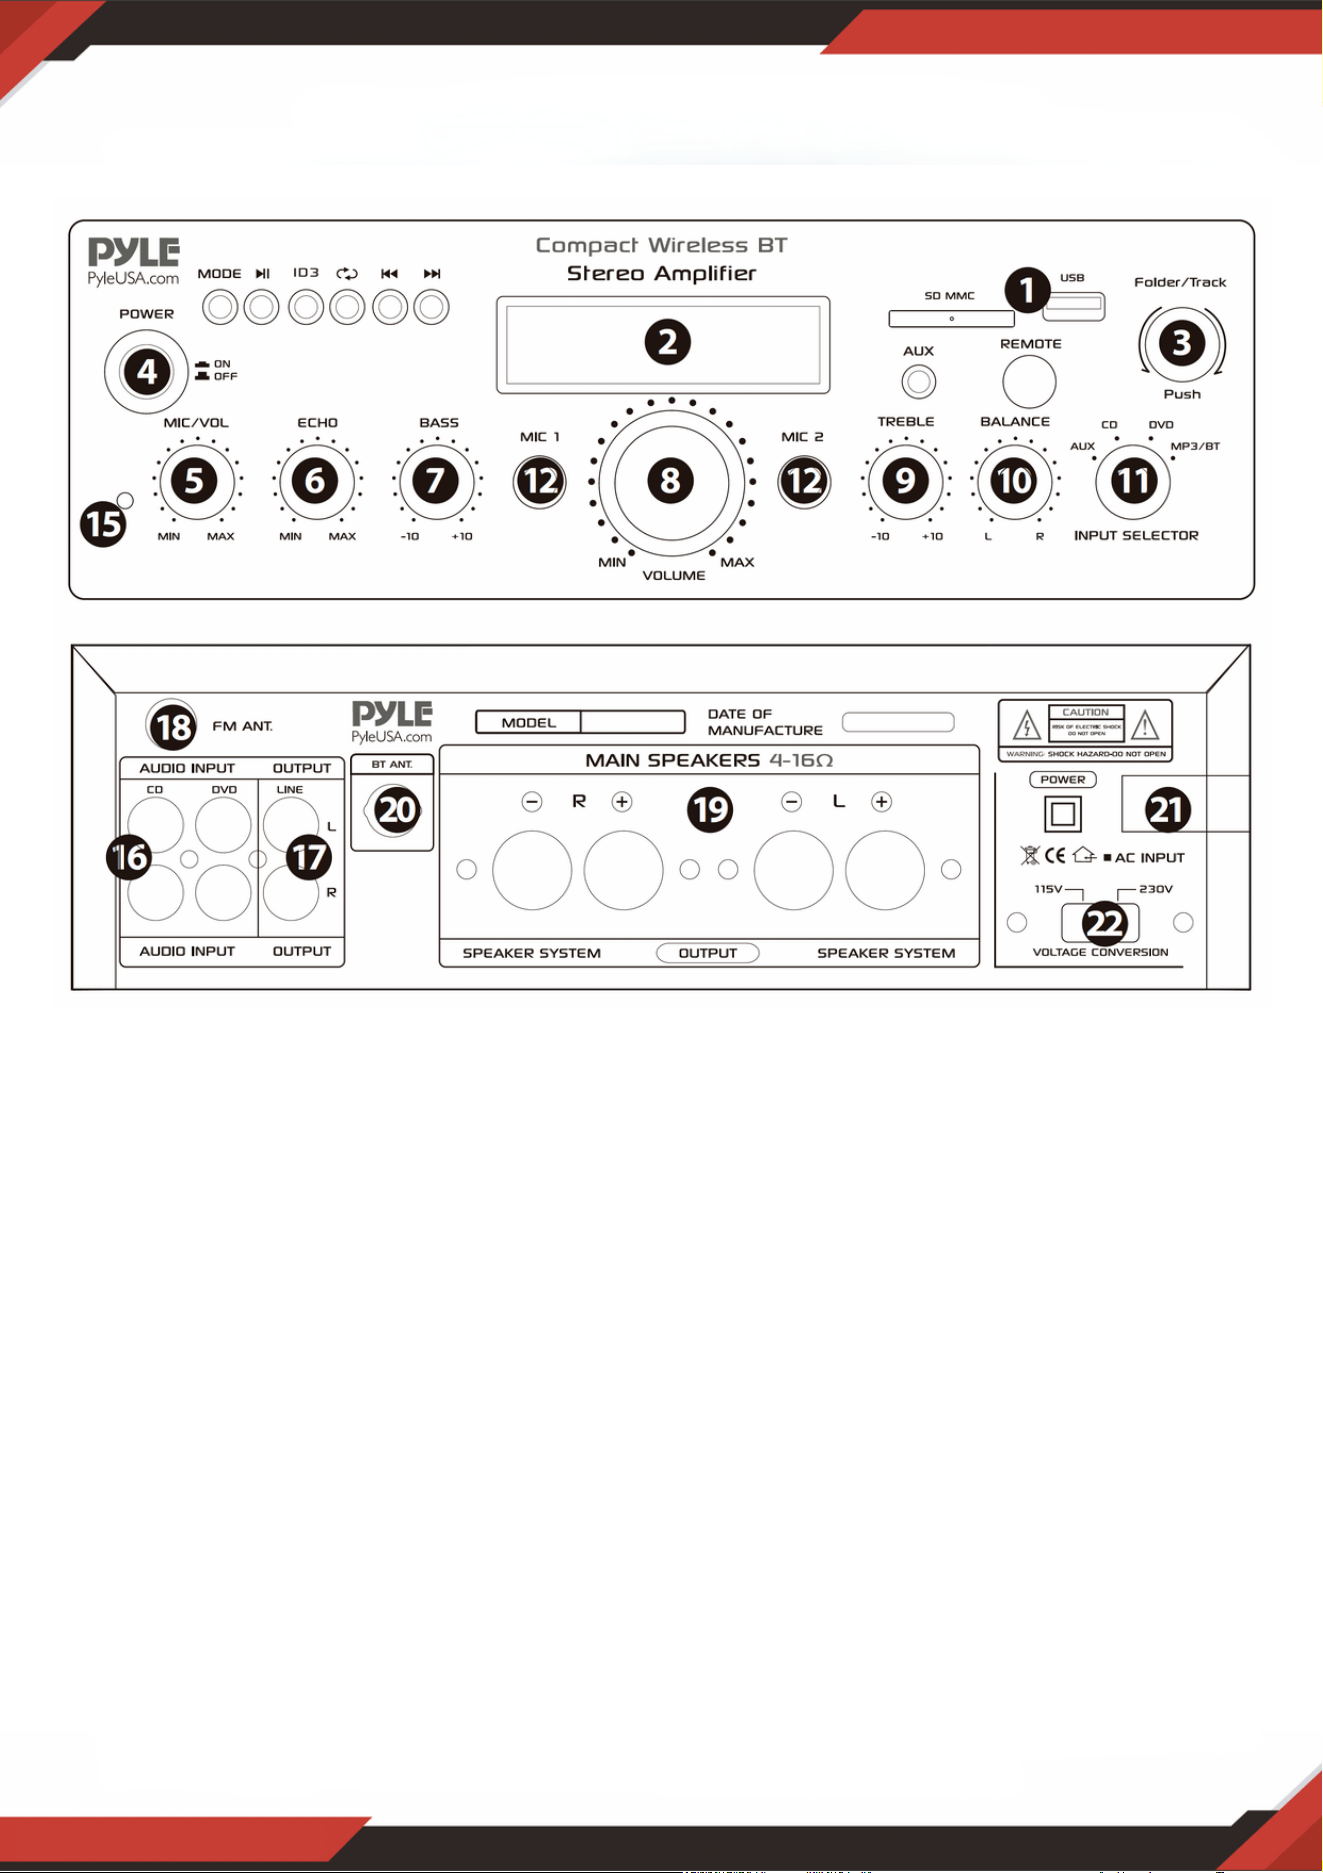
www.PyleUSA.com
6
Giriş portuna bir USB kül sürücü/SD Kart taktıktan sonra, giriş seçiciyi (13) USB/SD
olarak ayarladığınızdan emin olun, ardından USB portundan ses, SD Kart girişi, Kablosuz
BT veya FM radyo arasında seçim yapmak için mod düğmesine basın. Kablosuz BT'yi
kullanmak istiyorsanız, aşağıdaki adımları kontrol edin.
ÖN VE ARKA PANEL
1. USB/SD Kart/Kablosuz BT Kontrol Konsolu
KABLOSUZ BT CİHAZINA BAĞLANMA ADIMLARI
A. MODE düğmesine veya BT düğmesine basın ve bluetooth moduna girin.
B. Bluetooth cihazını arayın ve bluetooth adını "PYLEUSA veya BT" olarak seçin
C. PYLEUSA veya BT bluetooth adını seçin ve cihazın eşleşmesini bekleyin.
D. Ünite, cihazların başarıyla eşleştiğini bildiren bir ses çıkaracaktır.
E. Eşleştirildikten sonra bluetooth cihazınızdan müzik çalabilirsiniz. Bluetooth cihazınızdaki
parçaları seçmek için ünite üzerindeki kontrol düğmelerini de kullanabilirsiniz
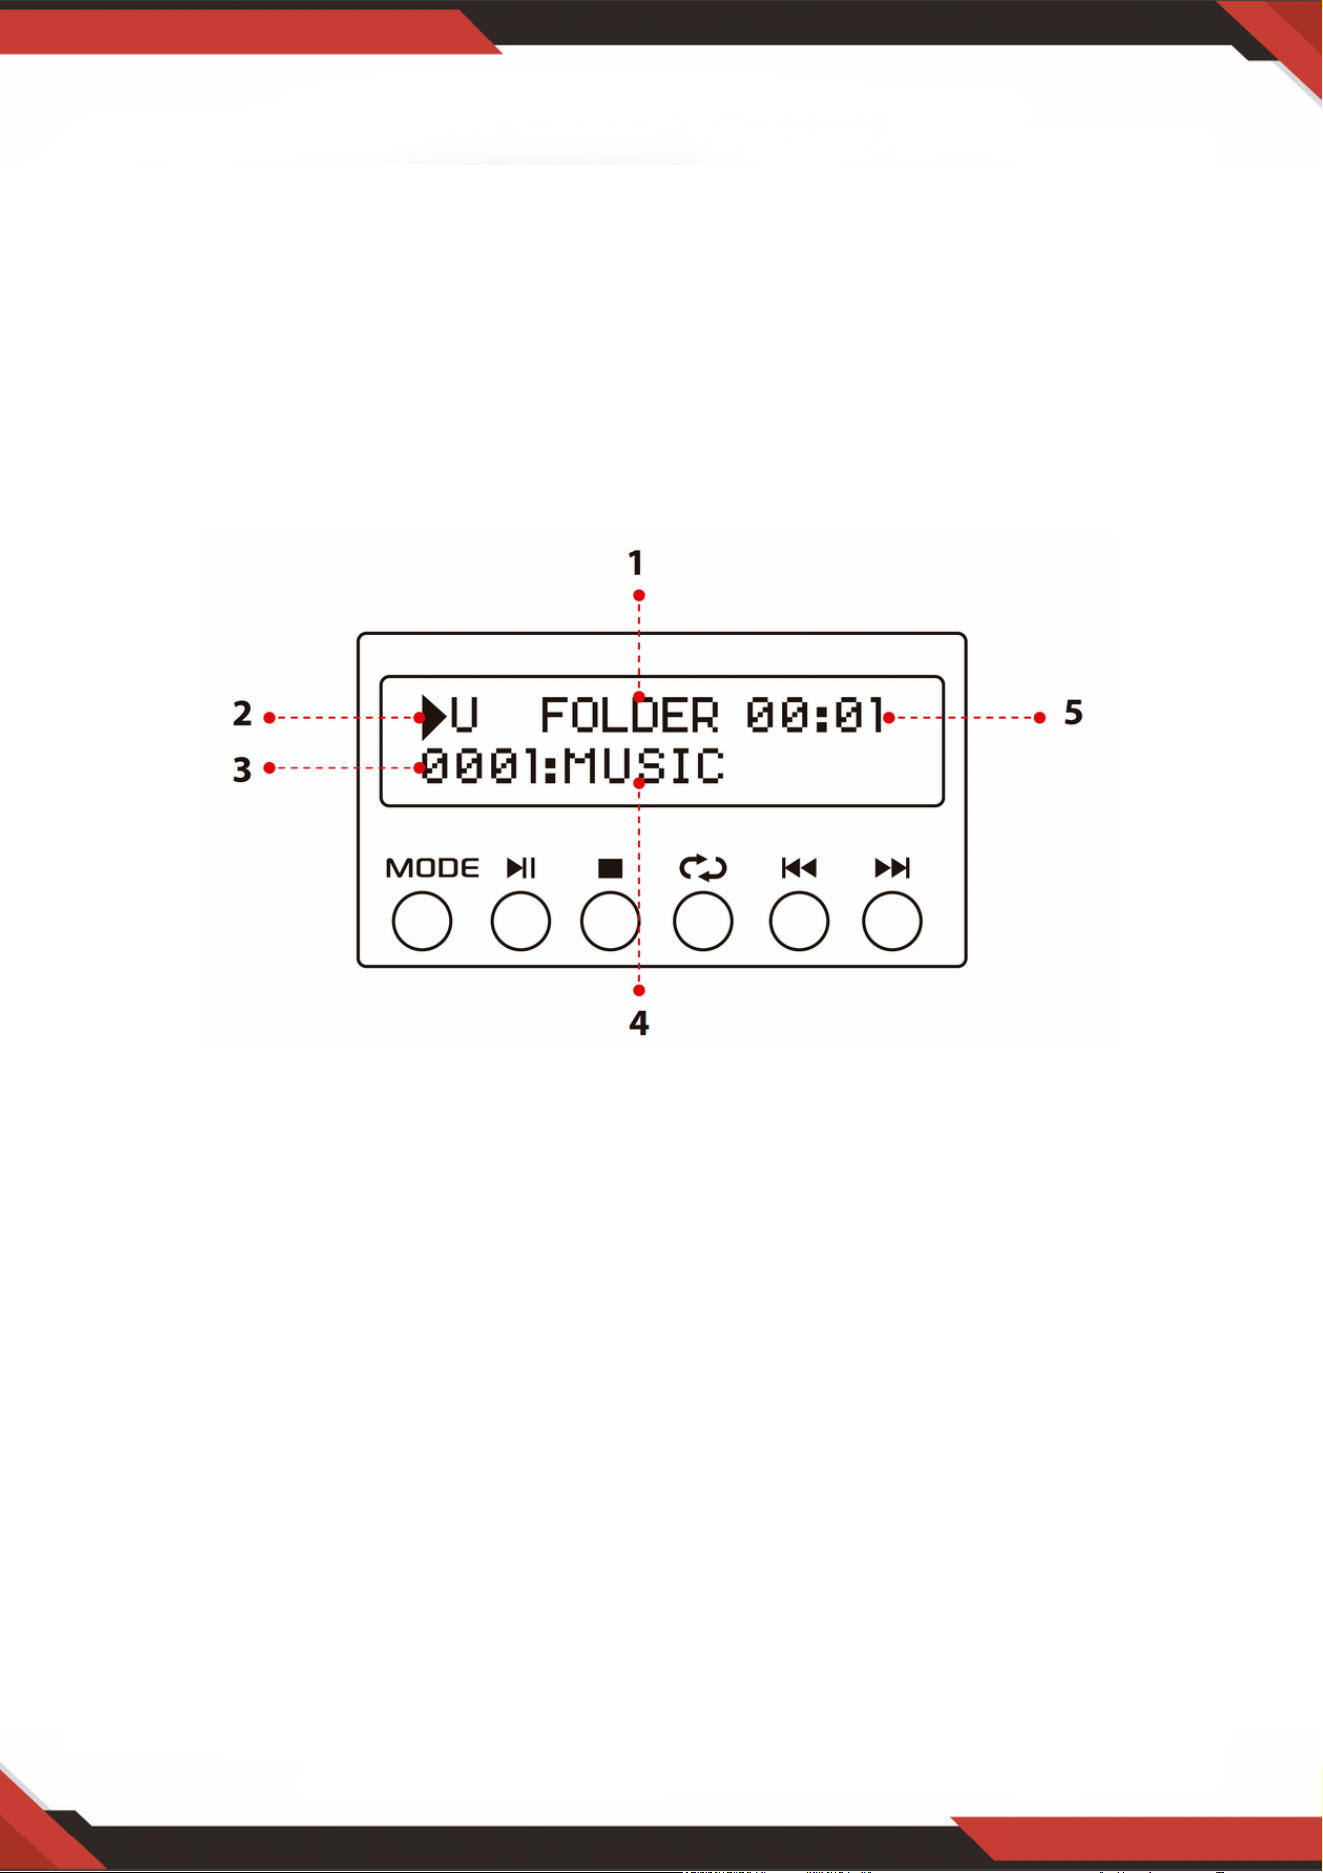
www.PyleUSA.com
7
NOT: USB girişi SADECE bir USB kül sürücüsüne (başparmak sürücüsü) bağlanmak içindir.
USB kül sürücü girişine doğrudan bir MP3 çalar veya bilgisayar bağlamak, ünitenin bu
cihazlardan ses çalamamasına neden olacaktır.
Arama modu: Ekranda word KLASÖRÜ yanıp sönerken, ünite KLASÖR ARAMA modundadır.
Klasörde arama yapmak için KLASÖR / İZLEME düğmesini çevirin. Bir parça seçmek için
KLASÖR / PARÇA düğmesine basın. Klasör modundan çıktıktan sonra, TÜMÜ kelimesi ekranda
görünecektir. Bu, ünitenin tüm parçaları USB flash sürücüden / SD Karttan çalacağını gösterir.
TEKRAR düğmesine basıldığında, seçtiğiniz ayara bağlı olarak 6 farklı ekran olacaktır; TÜMÜ /
NORMAL / TEK / KLASÖR / RASTGELE / GÖZAT. ID3 düğmesine basıldığında, seçtiğiniz
ayara bağlı olarak 4 farklı ekran olacaktır. BAŞLIK / sanatçı / ALBÜM / KAPALI.
1.
Giriş kaynağı: Ekran USB moduna ayarlandığında “U” ve SD kart moduna ayarlandığında “S”
gösterecektir. Bir girişten diğerine geçmek için mod düğmesine basın.
2.
Parça Numarası: Parça numarası (tüm flash sürücüdeki tüm parçalar için) burada görünecektir.
Yukarıdaki resimde ünite 1 numaralı parçayı çalıyor.
3.
Parça veya Klasör Bilgileri: Klasörün adı burada görünecektir. Yukarıdaki resimde çalınan
klasörün adı Müzik'tir.
4.
Geçen Süre: Geçerli parçanın geçen süresi burada görüntülenecektir.5.
USB flash sürücüden / SD Karttan veya Kablosuz bt'den ses çalmak için diğer kontrolleri,
oynat / duraklat, durdur, tekrarla (TÜMÜ / NORMAL / TEK / KLASÖR / RASTGELE /
GÖZAT), önceki parçayı ve sonraki parçayı kullanın.
2. USB/SD Kart Kontrol Konsolu Ekranı

3. Parça / Klasör Arama Düğmesi
USB kül sürücüsü/SD Kart içindeki tüm parçalar arasında arama yapmak için bu düğmeyi
saat yönünde çevirin. Her parça, parçanın numarasına göre görünecektir. Parça veya
klasörleri kronolojik olarak (USB kül sürücüsüne/SD Karta yüklendikleri zamandan
itibaren) gösterecektir. İstediğiniz parçayı çalmaya başlamak için düğmeye basın. Önce kök
le üzerindeki parçalar, ardından klasörlerdeki parçalar görüntülenecektir.
Klasör arama işlevini etkinleştirmek için bu düğmeye basın. Bir kez basıldığında "FOLDER"
kelimesi ekranda gösterilmeye başlayacaktır. Ardından, bu düğmeyi saat USB kül
sürücüsü/SD Kart içindeki klasörleri aramak için akıllıca. Bu klasördeki parçaları çalmaya
başlamak için düğmeye basın.
www.PyleUSA.com
8
SD Kart Okuyucu/USB Portu: Bu cihazda harici medya kullanmak için SD/USB'nizi bu
portlara takmanız yeterlidir.
1.
LED Ekran: harici medya veya bu cihazla ilgili tüm bilgiler bu ekrandan
görüntülenecektir.
2.
Klasör ve parça seçimi3.
Ana Ses Düğmesi: ana ses seviyesini ayarlar.4.
Mikrofon Ses Kontrol Düğmesi: Mikrofonun ses seviyesini ayarlamak için bu düğmeyi
çevirin
5.
Mikrofon Yankı Ses Kontrol Düğmesi: Mikrofon yankı ses seviyesini ayarlamak için bu
düğmeyi çevirin.
6.
Bas Kontrolü: Kanal 1 ve Kanal 2'nin düşük frekanslarını ayarlamak için bu düğmeyi
çevirin.
7.
Ana Ses Faderi: Ana ses seviyesini ayarlamak için faderi yukarı ve aşağı hareket ettirin. 8.
Tiz Kontrolü: Kanal 1 ve Kanal 2'nin yüksek frekanslarını ayarlamak için bu düğmeyi
çevirin.
9.
Denge: Ses dengesini soldan sağa doğru kontrol edin. 10.
Giriş Seçici: Uygun girişi seçmek için bu düğmeyi çevirin 11.
MİKROFON GİRİŞLERİ: KARAOKE veya HARİCİ MİKROFON bu jaklara bağlanır. 12.
İPOD / MP3 JAKI-İPOD / MP3 bu jaka bağlanır. 13.
UZAKTAN ALICI: uzaktan kumanda sinyalini almak için 14.
GÜÇ LED GÖSTERGESİ: Üniteyi açtığınızda, LED yanacaktır. 15.
SES GIRIŞI: DVD/CD'nin ses çıkış jaklarını bu jaklara bağlayın. 16.
HAT ÇIKIŞI: KAYIT giriş jaklarını bu jaklara bağlayın.17.
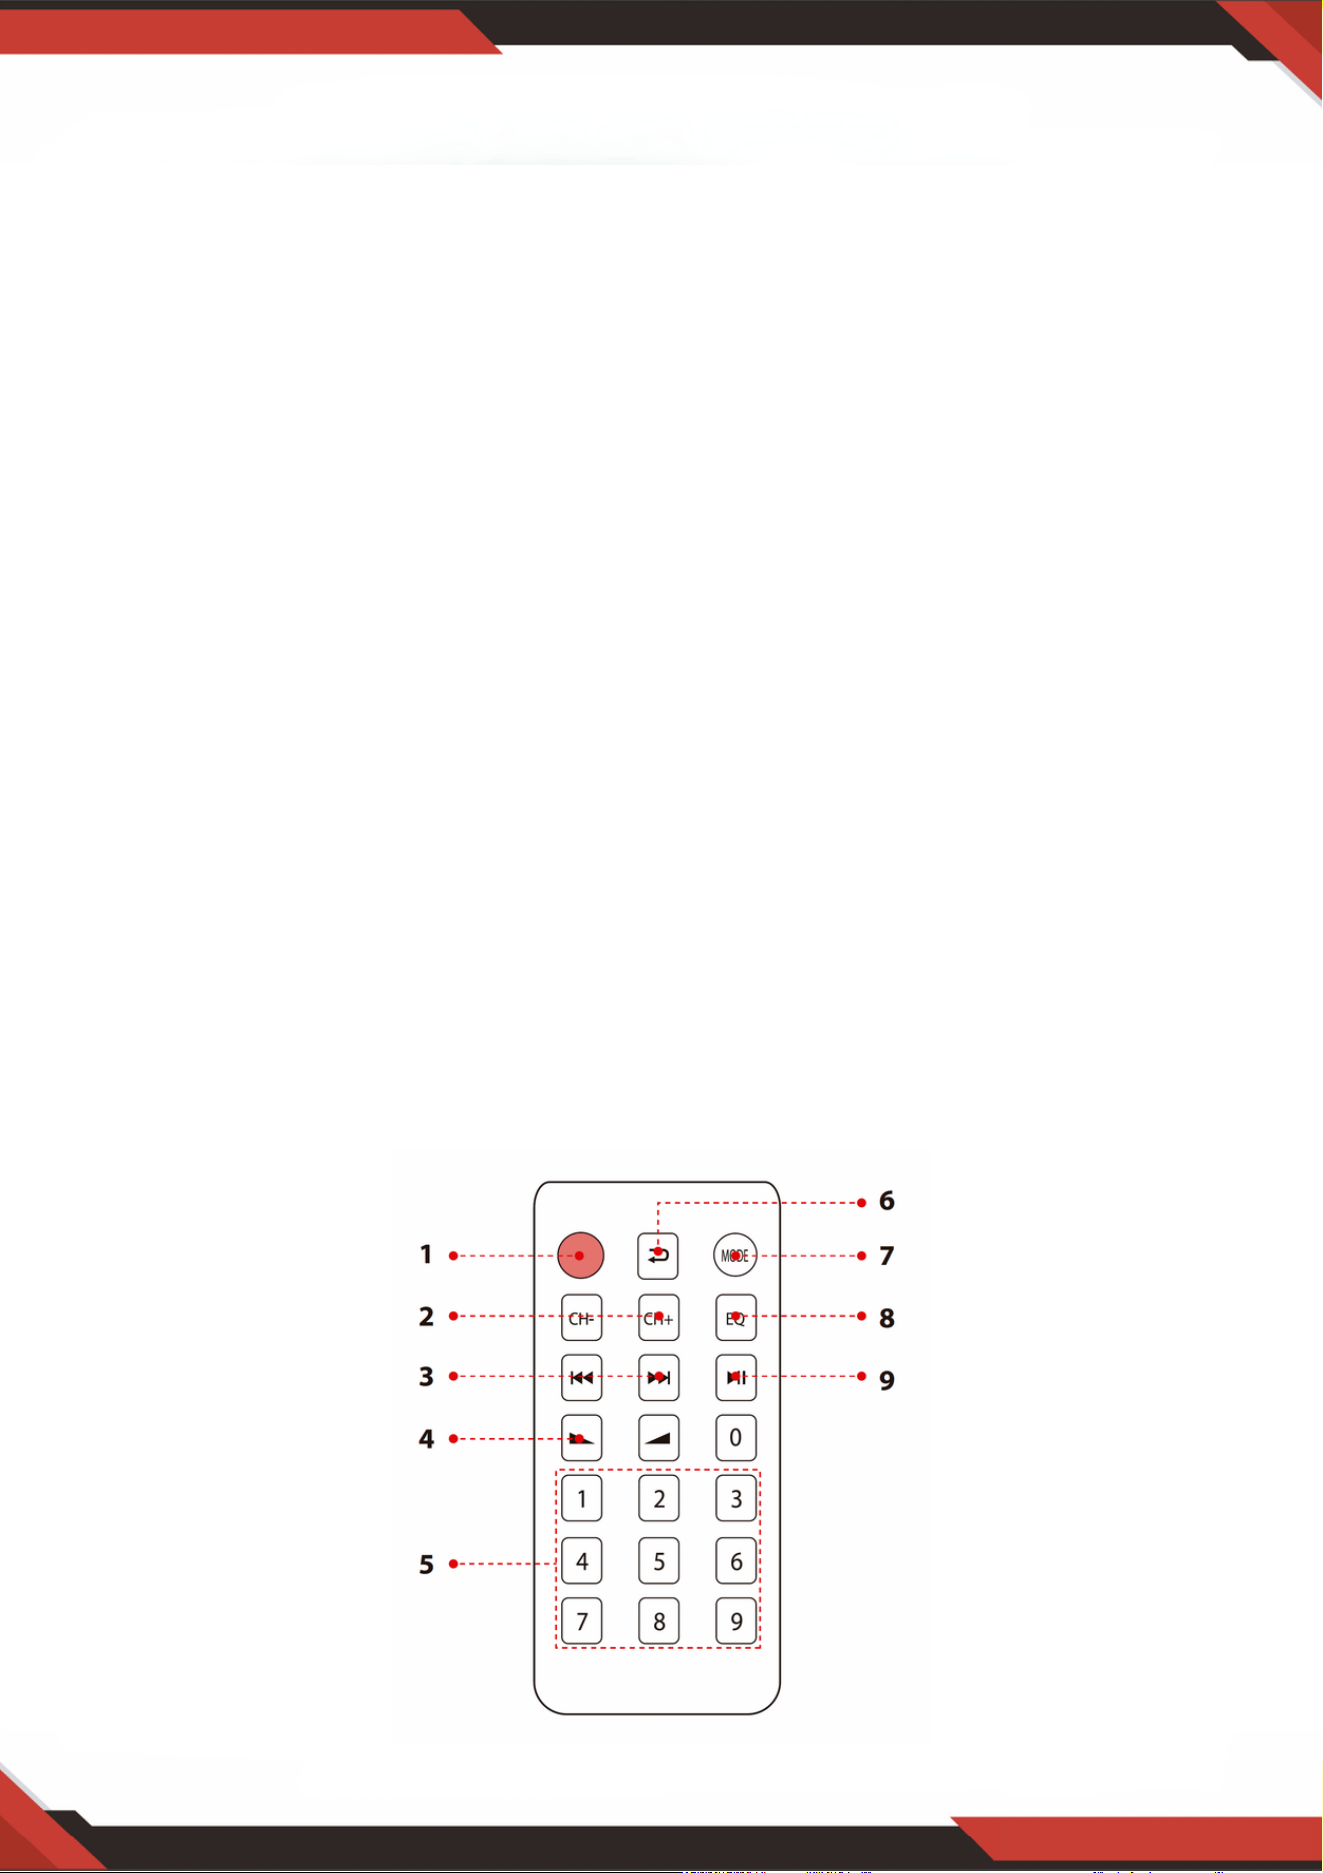
www.PyleUSA.com
9
18. FM ANTENI KONEKTÖRÜ: AM ve FM antenleri için bağlayın.
19. HOPARLÖR ÇIKIŞI: Hoparlör sisteminizi bu terminallere bağlayın.
20. BLUETOOTH ANTENİ: Bluetooth girişini kullanırken lütfen anteni dışarı çekin
21. GÜÇ KAYNAĞI: AC 115V / 60Hz ve 230V / 50Hz çıkışına bağlayın.
22. GÜÇ VOLTAJ SEÇİCİ: 115V / 230V.
UZAKTAN KUMANDA
ID3 ekran modelini seçmek için bu düğmeye basın, başlık / sanatçı / albüm / kapalı
gösterecektir. Mp3'ü açmak veya kapatmak için bu düğmeyi 5 saniye basılı tutun.
1.
FM modundayken, FM Frekansını ayarlamak için bu iki düğmeye basın. 2.
USB veya SD veya Bluetooth modunda önceki veya sonraki parçayı seçmek, FM modelinde
önceki veya sonraki kanalı seçmek için bu iki düğmeye basın.
3.
Ses yukarı veya aşağı 4.
Parçaları doğrudan seçmek için numaralara basın. Ünitenin USB veya SD modunda yanıt
vermesi 1-2 saniye sürer.
5.
Modu tekrarlamak için bu düğmeye basın. 6.
USB / SD / FM / kablosuz BT gibi oynatma modunu seçmek için bu düğmeye basın 7.
EKOLAYZIR işlevi: Ekolayzırın buna göre tasarlanmış önceden ayarlanmış bir modunu seçin. 8.
USB / SD / BT modelinde MP3 için Oynat ve Duraklat işlevi. FM modelinde kanalı otomatik
olarak taramak ve kanalı otomatik olarak saklamak için bu düğmeye basın.
9.

www.PyleUSA.com
10
PDA6BU/PDA6BU.5/PDA5BU/PDA5BU.5
Kompakt Kablosuz BT Stereo Ampli er
FM Radyo, MP3/USB/SD Okuyucular, Dijital LED Ekran,
Mikrofon Girişli Masaüstü Ses Güç Amfisi Alıcısı (200 Watt)
Özellikler:
Kutunun içinde ne var?
Masaüstü Ses Mini Güç Amplisi
Kompakt Ev Sineması Stereo Alıcı Stili
Kablosuz Müzik Akışı için Dahili Bluetooth
LED Dijital Ekranlı FM Radyo
ID3 Etiketi Şarkı Okuması Parça Başlığını / Sanatçısını / Albümünü / Dosya Adını Görüntüler
Çok Kanallı Ses Girişi Seçimi
MP3 Ses Dosyası Desteği
Harici Cihazlardan Ses Bağlayın ve Aktarın
USB Flash Sürücü ve SD Bellek Kartı Okuyucuları
USB, Cihaz Şarj Portu Olarak İki Katına Çıkar
Aux (3,5 mm) Girişi
(2) 1/4'' Mikrofon Giriş Jakları
(2) Çift RCA (L/R) Ses Giriş Konnektörü
(2) Çift Muz Fişli Hoparlör Çıkış Konnektörü
(1) Çift RCA (L/R) Ses Çıkış Konnektörü
Ön Panel Ses Kontrol Merkezi
Radyo İstasyonu Otomatik Arama Tarama
'Birini ve Tümünü Tekrarla' Ses Dosyası İşlevleri
Benzersiz 'Parça / Klasör' Müzik Arama Kontrol Düğmesi
Tiz, Bas, Ana ve Mikrofon Ses Seviyesi Ayarlanabilir
Masaüstü Stereo Ampli
Uzaktan Kumanda
FM Anteni

www.PyleUSA.com
11
UYARI!:
Bu ürün sizi, Kaliforniya eyaletinde kansere, doğum kusurlarına veya diğer
üreme zararlarına neden olduğu bilinen "Nikel Karbonat" içerebilecek bir
kimyasal veya kimyasal grubuna maruz bırakabilir. Daha fazla bilgi için
https://www.p65warnings.ca.gov/ adresine gidin.
Bluetooth Bağlantısı:
Ses Akışı için Kablosuz Sinyal Alır
Basit ve Sorunsuz Eşleştirme Kurulumu
Genişletilmiş Kablosuz Menzil için Entegre Anten
Günümüzün En Yeni Cihazlarının Tümüyle Çalışır (Akıllı Telefonlar, Tabletler, Dizüstü
Bilgisayarlar, Bilgisayarlar, vb.)
Bluetooth Sürümü: 5.0
Bluetooth Ağ Adı: 'PYLEUSA' veya "BT"
Kablosuz Menzil: 40'+ Ft.
Teknik Özellikler:
MAKS Güç Çıkışı: 200 Watt (@ 4 Ohm)
RMS Güç Çıkışı: 100 Watt x 2 (@ 8 Ohm)
Ton Kontrolü: Bas, f=100Hz +/-8dB
Frekans Tepkisi: 20Hz-20kHz
Frekans Ayarı: +/-10dB
Sinyal Gürültü Oranı: >71dB
T.H.D: <0.1%
Radyo İstasyonu Ön Ayarları: 60 İstasyona Kadar
Pil Kumandalı Uzaktan, Gerektirir (1) x CR-2025 Düğme Pil, Dahil
Güç Kaynağı: 120/240V, Değiştirilebilir
Boyutlar (U x G x Y): 9,8'' x 9,8'' x 3,9'' inç
Sorular veya Yorumlar
Size yardım etmek için buradayız!
Telefon: 1.718.535.1800
PyleUSA.com/ContactUs