warranty
01
11
12
13
14
15
04
02 03
05 10
P
In the working state, long press the
button to stop inflating.
Short press the "Power" button to
power on, then long press 2 seconds
to inflating.
5. Press "+/-" button to increase
or decrease the preset tire
6. Long press "Power" button to
start inflating, when it reaches
the preset tire pressure, it will
automatically stop.
pressure value
Long press the light button: turn on the
white light
Shot press again: SOS mode
Shot press again: flashing mode
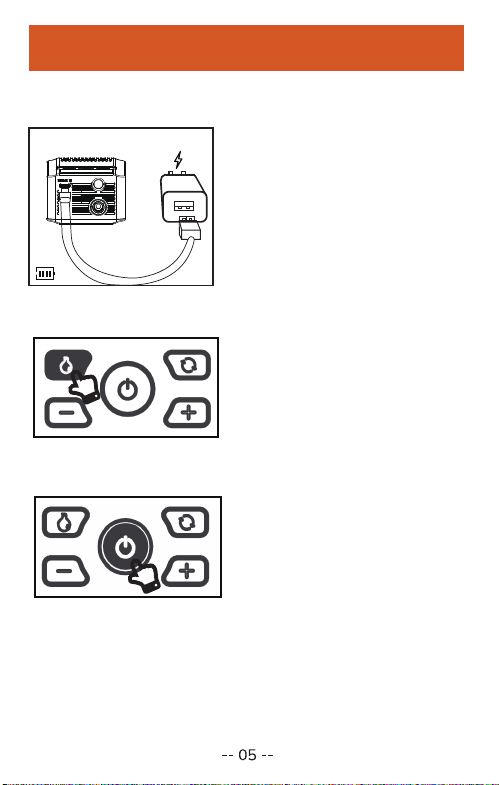
Fully charge the inflator before first using it.
To charge, connect it to a certified 5.0V/2A
USB charger with the charging cable.
While charging:
1 bar flashing = under 25%
1 bar solid, 2nd bar flashing= 25%~50%
2 bars solid, 3rd bar flashing=50%~75%
3 bars solid, 4th bar flashing=75%~100%
All 4 bars solid = fully charged
Long press again to turn off the light
Nozzle
Nozzle
Air Neddle
Air Hose Tube
Charging Cable
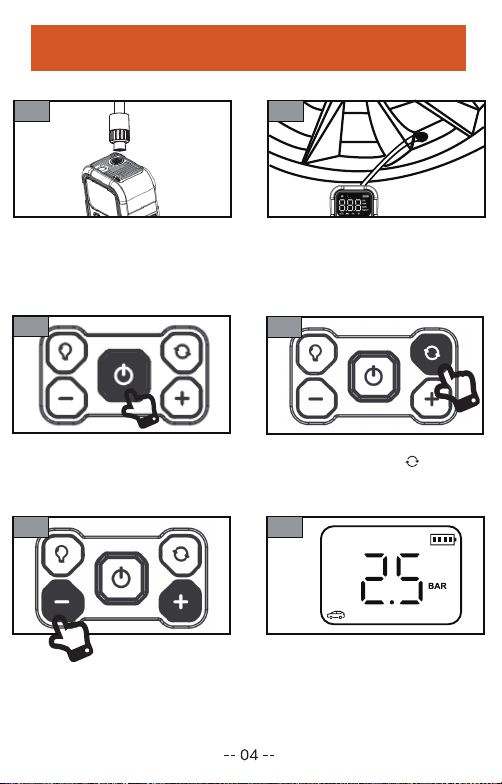
1. Screw the air hose clockwise
2. Connect the air hose to the
car's inflation part
3. Press "Power" button to turn
on the inflator
4. Press the button " " to
switch modes, long press 2
seconds to switch units
Air Inflator
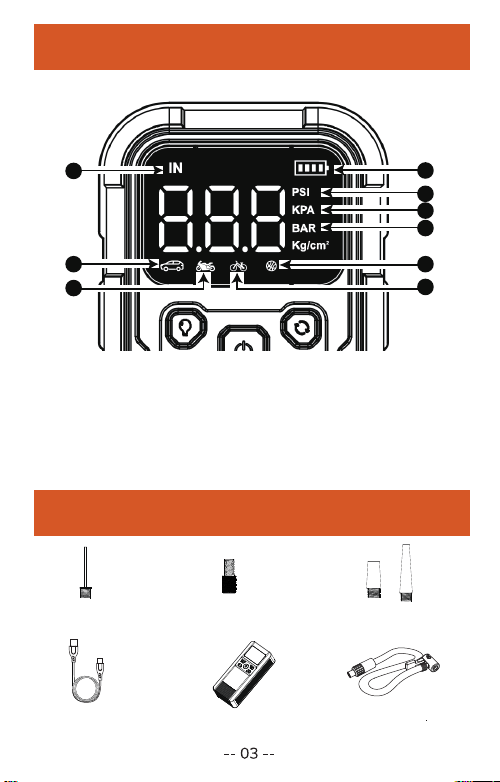
1. Charging indicator
2. Car inflation mode
3. Motorcycle inflation mode
4. Bicycle inflation mode
5. Basketball inflatable mode
6. Barometric pressure unit BAR
7. Barometric pressure unit KPA
8. Pressure unit PSI
9. Battery indicator light
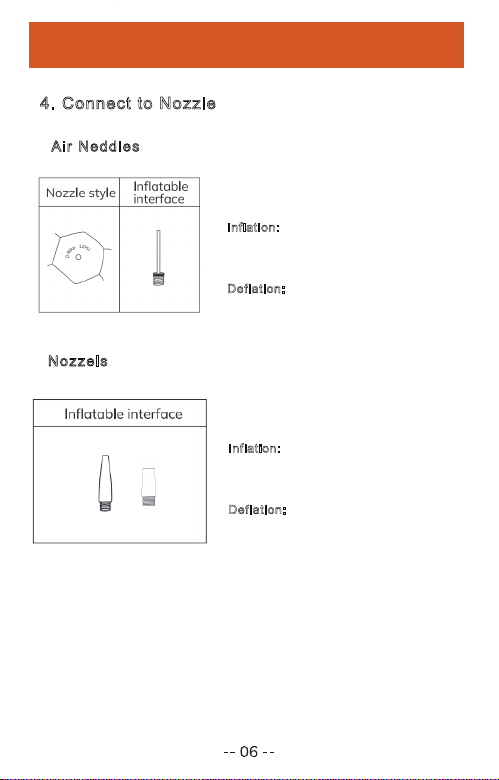
4. Connect to Nozzle
Ai r N edd les
Air needles are required when inflating
balls such as basketballs and soccer
balls.
I
nflation: Screw the needle and American
nozzle interface and insert the needle
into the ball inflation hole to inflate it.
Deflation: Plug the air needle derectly
into the ball inflation hole to delate
No zze ls
Swimming rings or inflatable boats will be
equipped with nozzles as showen here.
Inflation: Screw the nozzle connecter and
insert the it into the swim ring or rubber
boat to inflate it.
D
eflation: Deflate by inserting the nozzle
directly into the swim ring or rubber boat.
In the inflator on state, connect inflator with the
object, the number displayed on the inflatable pump
5
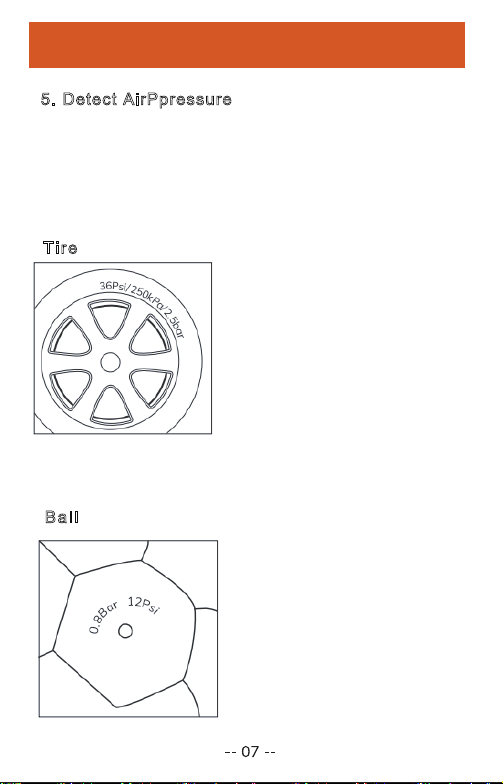
. Detect AirPpressure
display is the current pressure
Tires for cars, bicycles and
motorcycles can withstand air
pressure ranged marked on the
side walls of the tires. The car tire
guidance air pressure is marked
near the inner wall of the driver's
side door. The level of inflation
pressure is related to the weight of
the load. For more details air
pressure recommendations, please
refer to the car manual.
Ti r e
Ba l l
The inflatable pressure of balls
such as football, basketball and
volleyball is marked around the
inflatable port.
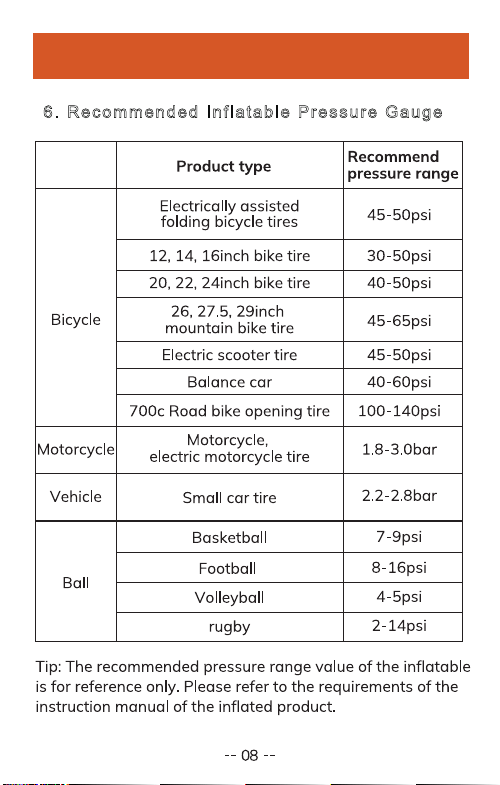
6. Re c om m en d ed In f la t ab l e P re s su r e G au g e
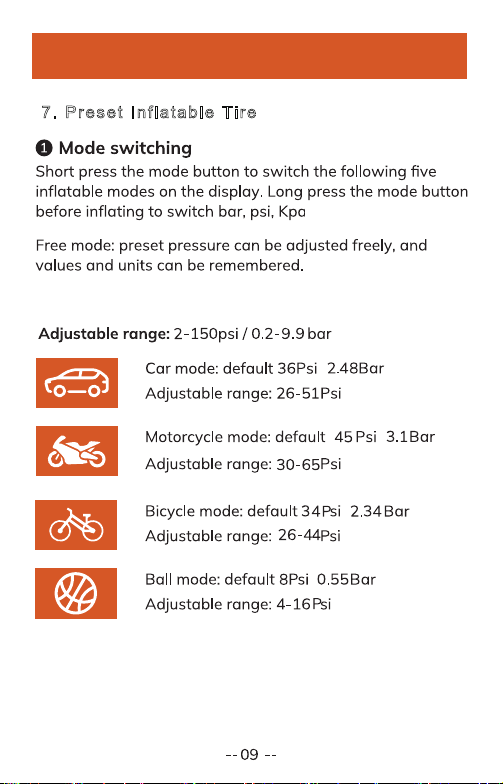
7. Pre se t In fla tab le Tir e
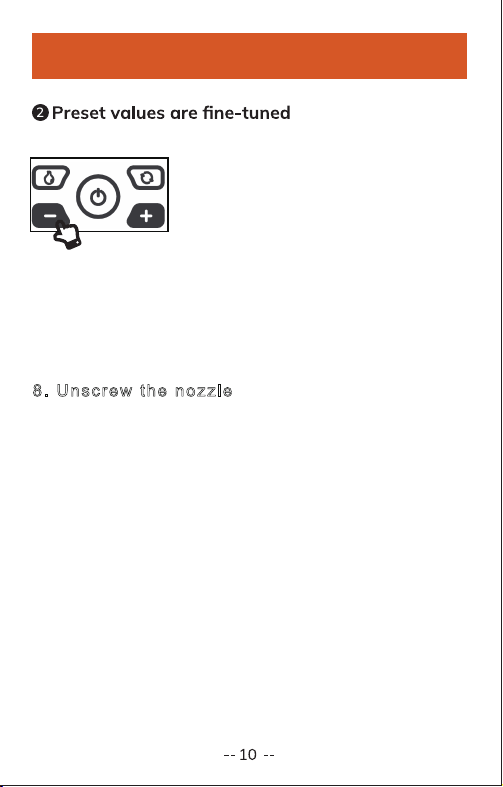
"+""-"Any button represents a manual
increase and decrease of the preset
tire pressure value. Each press
increase 0.1BAR or 1PSI or 10KAR
to the maximum and minimum value
alternatively. Current working states
do not change when setting the
preset pressure.
8. Un s cr e w t he no z zl e
The temperature of the high press air inflation
tube is hight after inflation. Please take the
necessary precaution to protect yourself when
disassembling the nozzle. There will be a slight
air leakage during disassenmly, please
disassemble quickly to reduce the amount of air
outlet
156×67×43
User Manual
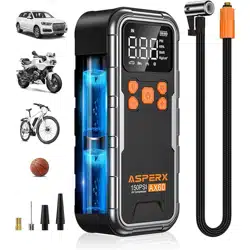
Portable tire inflator
Model:AX60
Air Compressor/
WELCOME
PRODUCT OVERVIEW PRODUCT OVERVIEW HOW TO USE INSTRUCTION MANUAL INSTRUCTION MANUAL INSTRUCTION MANUAL
INSTRUCTION MANUAL INSTRUCTION MANUAL INSTRUCTION MANUAL NOTE TROUBLESHOOTING BASIC PARAMETERS AFTER SELAS SERVICE
NON-WARRANTY REGULATIONS
PACKAGE CONTENTS
Thank you for choosing ASPERX Air Compres-
sor. To ensure a good user experience, person-
al safety, and property security, please read all
of the instructions carefully before using this
product, please keep this manual for reference.
Charge It First !
While reading through the manual, you can start
to charge your AX60 with the wall charger.
While reading through the manual, you can
start to charge your AX60 with the wall
charger and type-c cable provided.
To protect the motor, when the tempera-
ture of the electric core is higher than 55 ° C, it
will stop working, and when the temperature
drops to 45 ° C, it will restart working.
The Air Compressor 's air hose may get very
hot after inflating. To prevent injuries, exercise
caution when disconnecting it from a valve.
Charge It First !
6
1
2
3
4
5
9
7
8
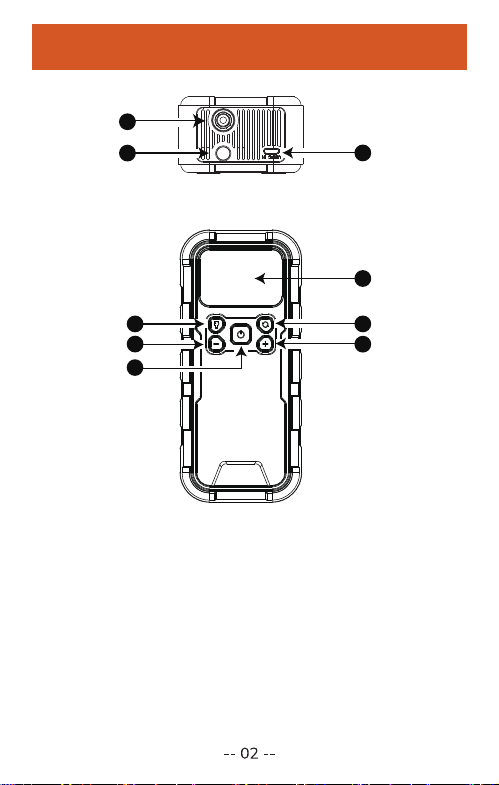
1.LED light button
2."-" Button
3.power button/
start inflation button
4."+" Button
5.Model Button
6.LED Screen
7.Air Outlet
8.LED light
9.Type-C Input
1 2
2
9
7
8
6
5
3
4
1
4
5 6
3
1.USB Charging
2.Lighting
3.Turn On and Turn Off
Turn On
Turn Off
Customer Service
24 Months Limited Warranty Service
Lifetime Technical Service
Feel Free to Contact Us
For FAQ and More Information
WELCOME
PRODUCT OVERVIEW
HOW TO USE
03
PACKAGE CONTENTS
INSTRUCTION MANUAL
NOTE
TROUBLESHOOTING
BASIC PARAMETERS
AFTER SELAS SERVICE
NON-WARRANTY REGULATIONS
COMPANYNAME:MARWAY Consulting UG (haftungsbeschrankt)
ADDRESS:Am Maibusch 108 -110,45883, Gelsenkirchen, Germany
TEL:004917645084650
LUCID-Reg.-Nr.:DE5563631458912
WEEE-Reg.Nr.DE 84758543
COMPANYNAME:GSG CONSULTING GROUP LIMITED
ADDRESS:Montague houses unit 3 Matthew street Manchester m12 5bb
TEL:+44 7850 387628
AX60
/
/
/
/
warranty
01
11
12
13
14
15
04
02 03
05 10
P
In the working state, long press the
button to stop inflating.
Short press the "Power" button to
power on, then long press 2 seconds
to inflating.
5. Press "+/-" button to increase
or decrease the preset tire
6. Long press "Power" button to
start inflating, when it reaches
the preset tire pressure, it will
automatically stop.
pressure value
Long press the light button: turn on the
white light
Shot press again: SOS mode
Shot press again: flashing mode
Fully charge the inflator before first using it.
To charge, connect it to a certified 5.0V/2A
USB charger with the charging cable.
While charging:
1 bar flashing = under 25%
1 bar solid, 2nd bar flashing= 25%~50%
2 bars solid, 3rd bar flashing=50%~75%
3 bars solid, 4th bar flashing=75%~100%
All 4 bars solid = fully charged
Long press again to turn off the light
Nozzle
Nozzle
Air Neddle
Air Hose Tube
Charging Cable
1. Screw the air hose clockwise
2. Connect the air hose to the
car's inflation part
3. Press "Power" button to turn
on the inflator
4. Press the button " " to
switch modes, long press 2
seconds to switch units
Air Inflator
1. Charging indicator
2. Car inflation mode
3. Motorcycle inflation mode
4. Bicycle inflation mode
5. Basketball inflatable mode
6. Barometric pressure unit BAR
7. Barometric pressure unit KPA
8. Pressure unit PSI
9. Battery indicator light
4. Connect to Nozzle
Ai r N edd les
Air needles are required when inflating
balls such as basketballs and soccer
balls.
I
nflation: Screw the needle and American
nozzle interface and insert the needle
into the ball inflation hole to inflate it.
Deflation: Plug the air needle derectly
into the ball inflation hole to delate
No zze ls
Swimming rings or inflatable boats will be
equipped with nozzles as showen here.
Inflation: Screw the nozzle connecter and
insert the it into the swim ring or rubber
boat to inflate it.
D
eflation: Deflate by inserting the nozzle
directly into the swim ring or rubber boat.
In the inflator on state, connect inflator with the
object, the number displayed on the inflatable pump
5
. Detect AirPpressure
display is the current pressure
Tires for cars, bicycles and
motorcycles can withstand air
pressure ranged marked on the
side walls of the tires. The car tire
guidance air pressure is marked
near the inner wall of the driver's
side door. The level of inflation
pressure is related to the weight of
the load. For more details air
pressure recommendations, please
refer to the car manual.
Ti r e
Ba l l
The inflatable pressure of balls
such as football, basketball and
volleyball is marked around the
inflatable port.
6. Re c om m en d ed In f la t ab l e P re s su r e G au g e
7. Pre se t In fla tab le Tir e
"+""-"Any button represents a manual
increase and decrease of the preset
tire pressure value. Each press
increase 0.1BAR or 1PSI or 10KAR
to the maximum and minimum value
alternatively. Current working states
do not change when setting the
preset pressure.
8. Un s cr e w t he no z zl e
The temperature of the high press air inflation
tube is hight after inflation. Please take the
necessary precaution to protect yourself when
disassembling the nozzle. There will be a slight
air leakage during disassenmly, please
disassemble quickly to reduce the amount of air
outlet
156×67×43
User Manual
Portable tire inflator
Model:AX60
Air Compressor/
WELCOME
PRODUCT OVERVIEW PRODUCT OVERVIEW HOW TO USE INSTRUCTION MANUAL INSTRUCTION MANUAL INSTRUCTION MANUAL
INSTRUCTION MANUAL INSTRUCTION MANUAL INSTRUCTION MANUAL NOTE TROUBLESHOOTING BASIC PARAMETERS AFTER SELAS SERVICE
NON-WARRANTY REGULATIONS
PACKAGE CONTENTS
Thank you for choosing ASPERX Air Compres-
sor. To ensure a good user experience, person-
al safety, and property security, please read all
of the instructions carefully before using this
product, please keep this manual for reference.
Charge It First !
While reading through the manual, you can start
to charge your AX60 with the wall charger.
While reading through the manual, you can
start to charge your AX60 with the wall
charger and type-c cable provided.
To protect the motor, when the tempera-
ture of the electric core is higher than 55 ° C, it
will stop working, and when the temperature
drops to 45 ° C, it will restart working.
The Air Compressor 's air hose may get very
hot after inflating. To prevent injuries, exercise
caution when disconnecting it from a valve.
Charge It First !
6
1
2
3
4
5
9
7
8
1.LED light button
2."-" Button
3.power button/
start inflation button
4."+" Button
5.Model Button
6.LED Screen
7.Air Outlet
8.LED light
9.Type-C Input
1 2
2
9
7
8
6
5
3
4
1
4
5 6
3
1.USB Charging
2.Lighting
3.Turn On and Turn Off
Turn On
Turn Off
Customer Service
24 Months Limited Warranty Service
Lifetime Technical Service
Feel Free to Contact Us
For FAQ and More Information
WELCOME
PRODUCT OVERVIEW
HOW TO USE
03
PACKAGE CONTENTS
INSTRUCTION MANUAL
NOTE
TROUBLESHOOTING
BASIC PARAMETERS
AFTER SELAS SERVICE
NON-WARRANTY REGULATIONS
COMPANYNAME:MARWAY Consulting UG (haftungsbeschrankt)
ADDRESS:Am Maibusch 108 -110,45883, Gelsenkirchen, Germany
TEL:004917645084650
LUCID-Reg.-Nr.:DE5563631458912
WEEE-Reg.Nr.DE 84758543
COMPANYNAME:GSG CONSULTING GROUP LIMITED
ADDRESS:Montague houses unit 3 Matthew street Manchester m12 5bb
TEL:+44 7850 387628
AX60
/
/
/
/
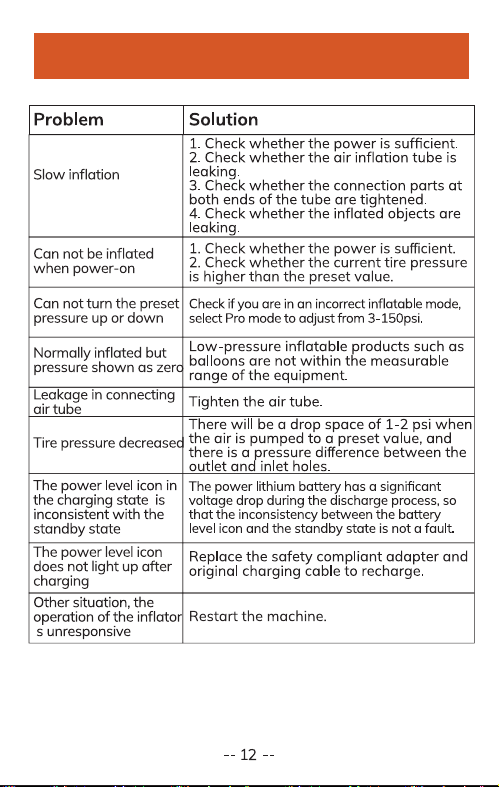
warranty
01
11
12
13
14
15
04
02 03
05 10
P
In the working state, long press the
button to stop inflating.
Short press the "Power" button to
power on, then long press 2 seconds
to inflating.
5. Press "+/-" button to increase
or decrease the preset tire
6. Long press "Power" button to
start inflating, when it reaches
the preset tire pressure, it will
automatically stop.
pressure value
Long press the light button: turn on the
white light
Shot press again: SOS mode
Shot press again: flashing mode
Fully charge the inflator before first using it.
To charge, connect it to a certified 5.0V/2A
USB charger with the charging cable.
While charging:
1 bar flashing = under 25%
1 bar solid, 2nd bar flashing= 25%~50%
2 bars solid, 3rd bar flashing=50%~75%
3 bars solid, 4th bar flashing=75%~100%
All 4 bars solid = fully charged
Long press again to turn off the light
Nozzle
Nozzle
Air Neddle
Air Hose Tube
Charging Cable
1. Screw the air hose clockwise
2. Connect the air hose to the
car's inflation part
3. Press "Power" button to turn
on the inflator
4. Press the button " " to
switch modes, long press 2
seconds to switch units
Air Inflator
1. Charging indicator
2. Car inflation mode
3. Motorcycle inflation mode
4. Bicycle inflation mode
5. Basketball inflatable mode
6. Barometric pressure unit BAR
7. Barometric pressure unit KPA
8. Pressure unit PSI
9. Battery indicator light
4. Connect to Nozzle
Ai r N edd les
Air needles are required when inflating
balls such as basketballs and soccer
balls.
I
nflation: Screw the needle and American
nozzle interface and insert the needle
into the ball inflation hole to inflate it.
Deflation: Plug the air needle derectly
into the ball inflation hole to delate
No zze ls
Swimming rings or inflatable boats will be
equipped with nozzles as showen here.
Inflation: Screw the nozzle connecter and
insert the it into the swim ring or rubber
boat to inflate it.
D
eflation: Deflate by inserting the nozzle
directly into the swim ring or rubber boat.
In the inflator on state, connect inflator with the
object, the number displayed on the inflatable pump
5
. Detect AirPpressure
display is the current pressure
Tires for cars, bicycles and
motorcycles can withstand air
pressure ranged marked on the
side walls of the tires. The car tire
guidance air pressure is marked
near the inner wall of the driver's
side door. The level of inflation
pressure is related to the weight of
the load. For more details air
pressure recommendations, please
refer to the car manual.
Ti r e
Ba l l
The inflatable pressure of balls
such as football, basketball and
volleyball is marked around the
inflatable port.
6. Re c om m en d ed In f la t ab l e P re s su r e G au g e
7. Pre se t In fla tab le Tir e
"+""-"Any button represents a manual
increase and decrease of the preset
tire pressure value. Each press
increase 0.1BAR or 1PSI or 10KAR
to the maximum and minimum value
alternatively. Current working states
do not change when setting the
preset pressure.
8. Un s cr e w t he no z zl e
The temperature of the high press air inflation
tube is hight after inflation. Please take the
necessary precaution to protect yourself when
disassembling the nozzle. There will be a slight
air leakage during disassenmly, please
disassemble quickly to reduce the amount of air
outlet
156×67×43
User Manual
Portable tire inflator
Model:AX60
Air Compressor/
WELCOME
PRODUCT OVERVIEW PRODUCT OVERVIEW HOW TO USE INSTRUCTION MANUAL INSTRUCTION MANUAL INSTRUCTION MANUAL
INSTRUCTION MANUAL INSTRUCTION MANUAL INSTRUCTION MANUAL NOTE TROUBLESHOOTING BASIC PARAMETERS AFTER SELAS SERVICE
NON-WARRANTY REGULATIONS
PACKAGE CONTENTS
Thank you for choosing ASPERX Air Compres-
sor. To ensure a good user experience, person-
al safety, and property security, please read all
of the instructions carefully before using this
product, please keep this manual for reference.
Charge It First !
While reading through the manual, you can start
to charge your AX60 with the wall charger.
While reading through the manual, you can
start to charge your AX60 with the wall
charger and type-c cable provided.
To protect the motor, when the tempera-
ture of the electric core is higher than 55 ° C, it
will stop working, and when the temperature
drops to 45 ° C, it will restart working.
The Air Compressor 's air hose may get very
hot after inflating. To prevent injuries, exercise
caution when disconnecting it from a valve.
Charge It First !
6
1
2
3
4
5
9
7
8
1.LED light button
2."-" Button
3.power button/
start inflation button
4."+" Button
5.Model Button
6.LED Screen
7.Air Outlet
8.LED light
9.Type-C Input
1 2
2
9
7
8
6
5
3
4
1
4
5 6
3
1.USB Charging
2.Lighting
3.Turn On and Turn Off
Turn On
Turn Off
Customer Service
24 Months Limited Warranty Service
Lifetime Technical Service
Feel Free to Contact Us
For FAQ and More Information
WELCOME
PRODUCT OVERVIEW
HOW TO USE
03
PACKAGE CONTENTS
INSTRUCTION MANUAL
NOTE
TROUBLESHOOTING
BASIC PARAMETERS
AFTER SELAS SERVICE
NON-WARRANTY REGULATIONS
COMPANYNAME:MARWAY Consulting UG (haftungsbeschrankt)
ADDRESS:Am Maibusch 108 -110,45883, Gelsenkirchen, Germany
EMAIL:MARWAY[email protected]
TEL:004917645084650
LUCID-Reg.-Nr.:DE5563631458912
WEEE-Reg.Nr.DE 84758543
COMPANYNAME:GSG CONSULTING GROUP LIMITED
ADDRESS:Montague houses unit 3 Matthew street Manchester m12 5bb
EMAIL:[email protected]
TEL:+44 7850 387628
AX60
/
/
/
/
