
RALLY
™
110/210
Owner’s Manual

© 2025 Garmin Ltd. or its subsidiaries
All rights reserved. Under the copyright laws, this manual may not be copied, in whole or in part, without the written consent of Garmin. Garmin reserves the right to change
or improve its products and to make changes in the content of this manual without obligation to notify any person or organization of such changes or improvements. Go to
www.garmin.com for current updates and supplemental information concerning the use of this product.
Garmin
®
, the Garmin logo, ANT+
®
, and Edge
®
are trademarks of Garmin Ltd. or its subsidiaries, registered in the USA and other countries. Garmin Connect
™
and Rally
™
are
trademarks of Garmin Ltd. or its subsidiaries. These trademarks may not be used without the express permission of Garmin.
The Bluetooth
®
word mark and logos are owned by the Bluetooth SIG, Inc. and any use of such marks by Garmin is under license. Training Stress Score
™
(TSS), Intensity Factor
™
(IF), and Normalized Power
™
(NP) are trademarks of Peaksware, LLC. Other trademarks and trade names are those of their respective owners.
The FCC ID is located on the spindle, under the pedal body. FCC ID: IPH-04537
M/N: A04537

Table of Contents
Getting Started................................. 1
Tools and Supplies Needed.................... 1
Pairing the Rally 110/210 Pedals...... 1
Getting Started with the Garmin Connect
App........................................................... 1
Pairing with the Garmin Connect
App........................................................... 2
Pairing the Rally 110/210 Pedals
Securely Without the Garmin Connect
App....................................................... 3
Pairing with a Watch or Cycling
Computer................................................. 5
Allowing Open Connections................6
Entering the Crank Length.................. 6
Installing the Pedals......................... 7
Shoe Cleats..............................................9
Installing the Shoe Cleats for Rally RK
and Rally RS Pedal Bodies.................. 9
Installing the Shoe Cleats for Rally XC
Pedal Bodies...................................... 10
Adjusting the Release Tension.............11
Applying the Reflective Stickers...........12
Charging the Battery.......................13
Charging Status LED............................. 14
Cycling Dynamics........................... 14
Force Data...................................... 15
Pedal IQ™ Smart Calibration........... 15
Calibrating the Pedals Using the Garmin
Connect App.......................................... 15
Data Fields..................................... 16
Changing Pedal Bodies................... 19
System Settings............................. 20
Additional Settings................................ 21
Checking for Software Updates........... 21
Resetting the Pedals to Factory
Defaults..................................................21
Care and Maintenance.................... 21
Preserving Battery Life Using Travel
Mode...................................................... 21
Turning Off Travel Mode................... 22
Cleaning and Greasing the Pedals....... 22
Overhauling the Rally 110/210
Pedals.................................................... 22
Upgrading a Rally 110 System........ 22
Turning On the New Spindle................. 23
Installing the New Spindle.................... 23
Pairing the New Spindle Using the
Garmin Connect App.............................24
Getting More Information............... 25
Specifications................................ 25
Status LED............................................. 25
Charging Requirements........................ 26
Table of Contents i


Getting Started
WARNING
See the Important Safety and Product Information guide in the product box for product warnings and other
important information.
The Rally 110/210 pedals are packaged in travel mode to preserve battery life. Before setting them up, you must
connect them to a power supply to turn off travel mode (Turning Off Travel Mode, page22).
1 If necessary, install the Garmin Connect
™
app on your phone, and log in to your Garmin
®
account (Getting
Started with the Garmin Connect App, page1).
2 Pair the pedals with the Garmin Connect app (Pairing with the Garmin Connect App, page2).
3 Pair the pedals with a compatible watch or cycling computer (Pairing with a Watch or Cycling Computer,
page5).
4 Enter the crank length (Entering the Crank Length, page6).
5 Install the pedals on your bike (Installing the Pedals, page7).
6 Install the included cleats on your cycling shoes (Shoe Cleats, page9).
7 Apply reflective stickers to the pedals (Applying the Reflective Stickers, page12).
Tools and Supplies Needed
• 15mm wrench
• Bike grease
• Bi-directional torque wrench covering from 5 to 10 N-m (44 to 88 lbf-in.), and 5mm hex bit
• Bi-directional torque wrench covering 35 N-m (26 lbf-ft.), and 15mm crowfoot wrench (recommended for
power reading accuracy)
Pairing the Rally 110/210 Pedals
You must pair the pedals with the Garmin Connect app to get the latest software updates and to pair the pedals
securely with other devices.
Getting Started with the Garmin Connect App
1 Scan the QR code with your phone to download and install the Garmin Connect app.
2 Open the Garmin Connect app.
3 Log in or create a new Garmin account.
For more information about the Garmin Connect app, go to garmin.com/garminconnect_help.
Getting Started 1
Pairing with the Garmin Connect App
1 Rotate the cranks to wake up the pedals.
NOTE: If the pedal status LED does not start flashing, the pedals may be in travel mode (Turning Off Travel
Mode, page22).
2 Select an option:
• If the left pedal status LED flashes , they are in secure pairing mode. Go to step 3.
• If the left pedal status LED flashes or , enable secure pairing mode (Pairing the Rally 110/210
Pedals Securely Without the Garmin Connect App, page3).
3 Select an option to start pairing the Rally 110/210 pedals with the Garmin Connect app:
• Scan the QR code with your phone.
• In the Garmin Connect app, select > Garmin Devices > Add Device.
4 Select Connect It.
5 Follow the on-screen instructions.
2 Pairing the Rally 110/210 Pedals
Pairing the Rally 110/210 Pedals Securely Without the Garmin Connect App
If you have already paired the Rally 110/210 pedals with the Garmin Connect app but you have lost access to
your mobile device or are unable to use the Garmin Connect app on it, you can follow the steps to enable secure
pairing mode.
1 Remove the left pedal from your bike.
2 Move and rotate the pedal to activate it.
The status LED flashes or .
TIP: If the pedal status LED does not start flashing, you can connect the pedal to a power supply for a
moment to activate it. You must disconnect the pedal before proceeding to step 3.
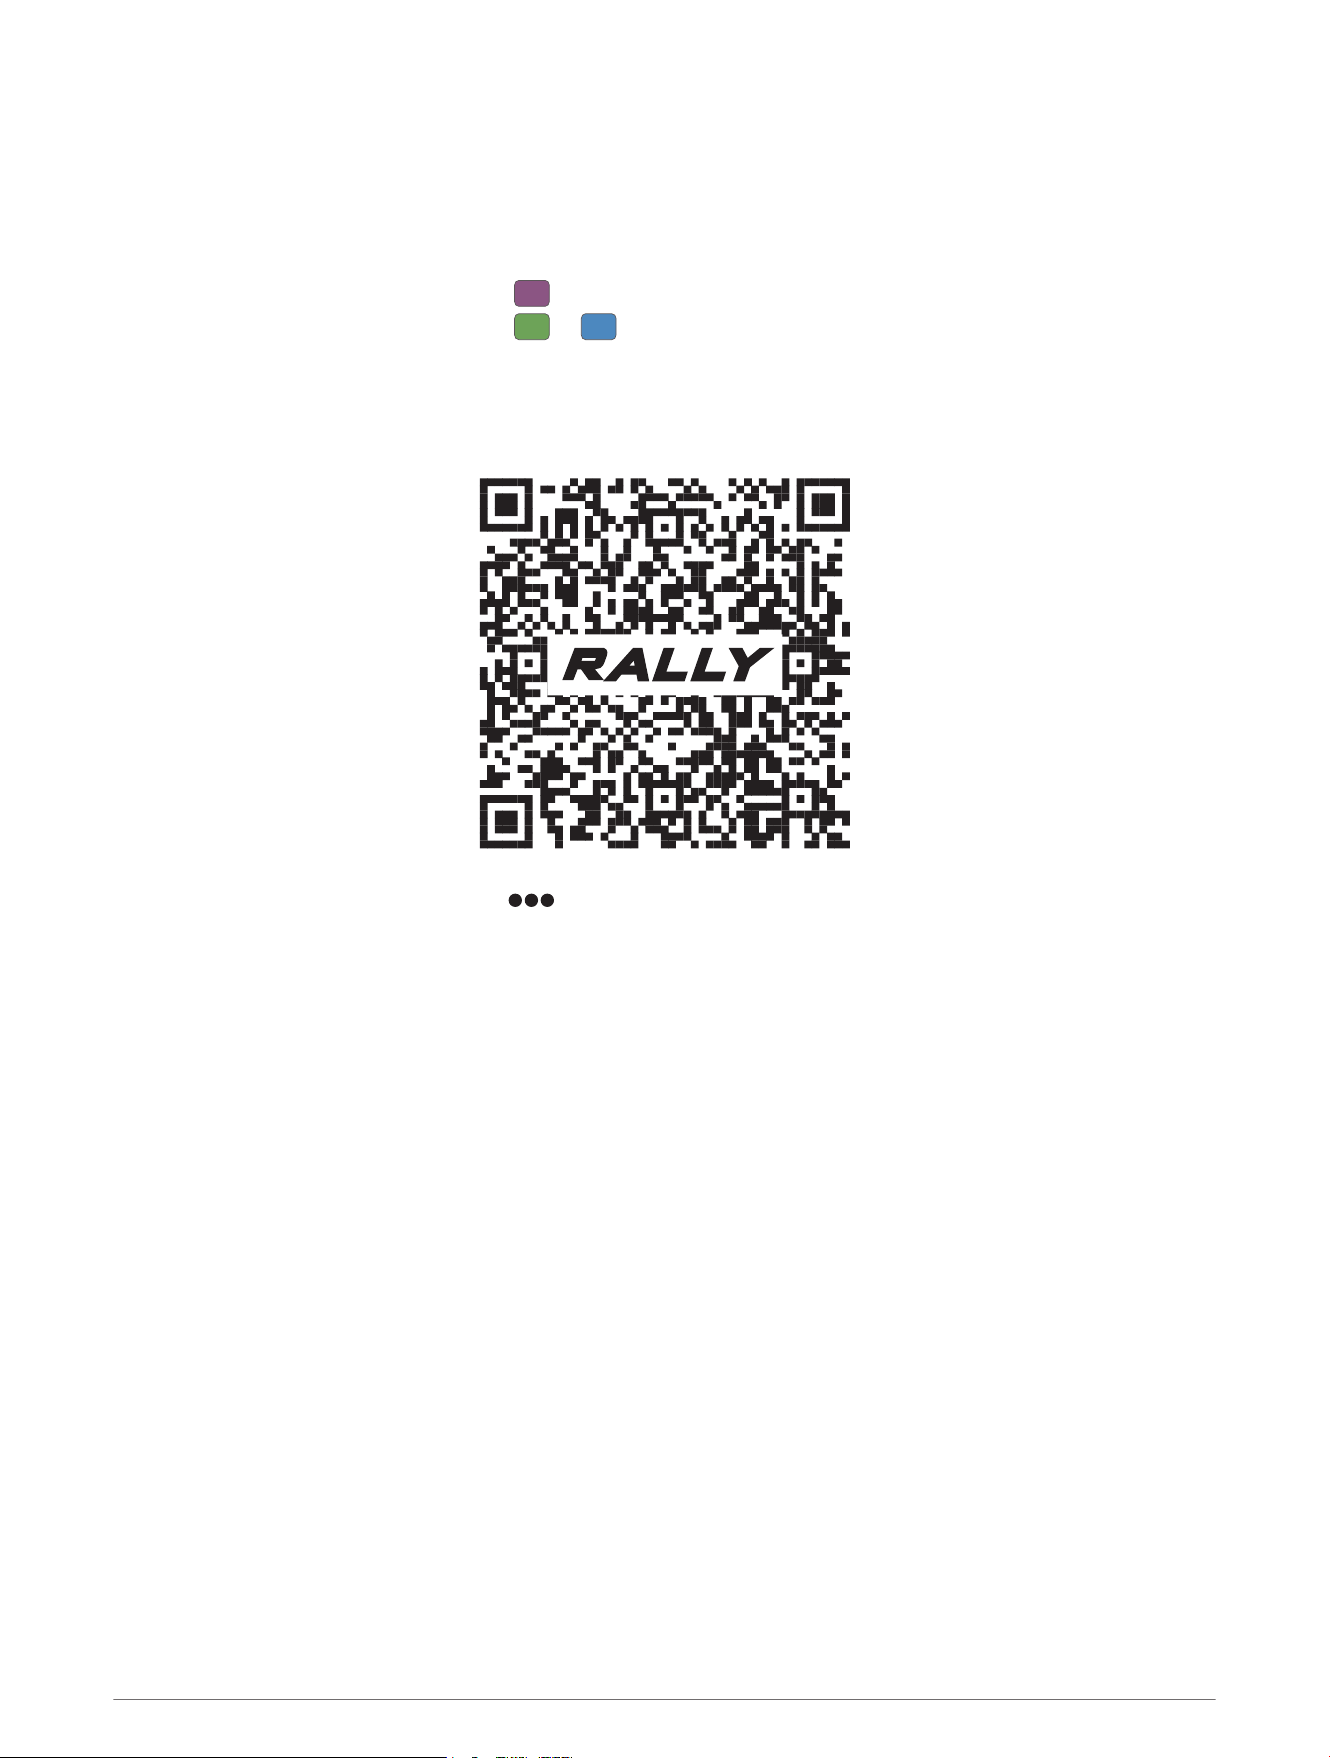
3 Hold the pedal horizontally for 2 seconds.
4 Turn the pedal 90 degrees, and hold it with the threaded end up for 2 seconds.
5 Turn the pedal 90 degrees, and hold it with the threaded end to the side for 2 seconds.
Pairing the Rally 110/210 Pedals 3
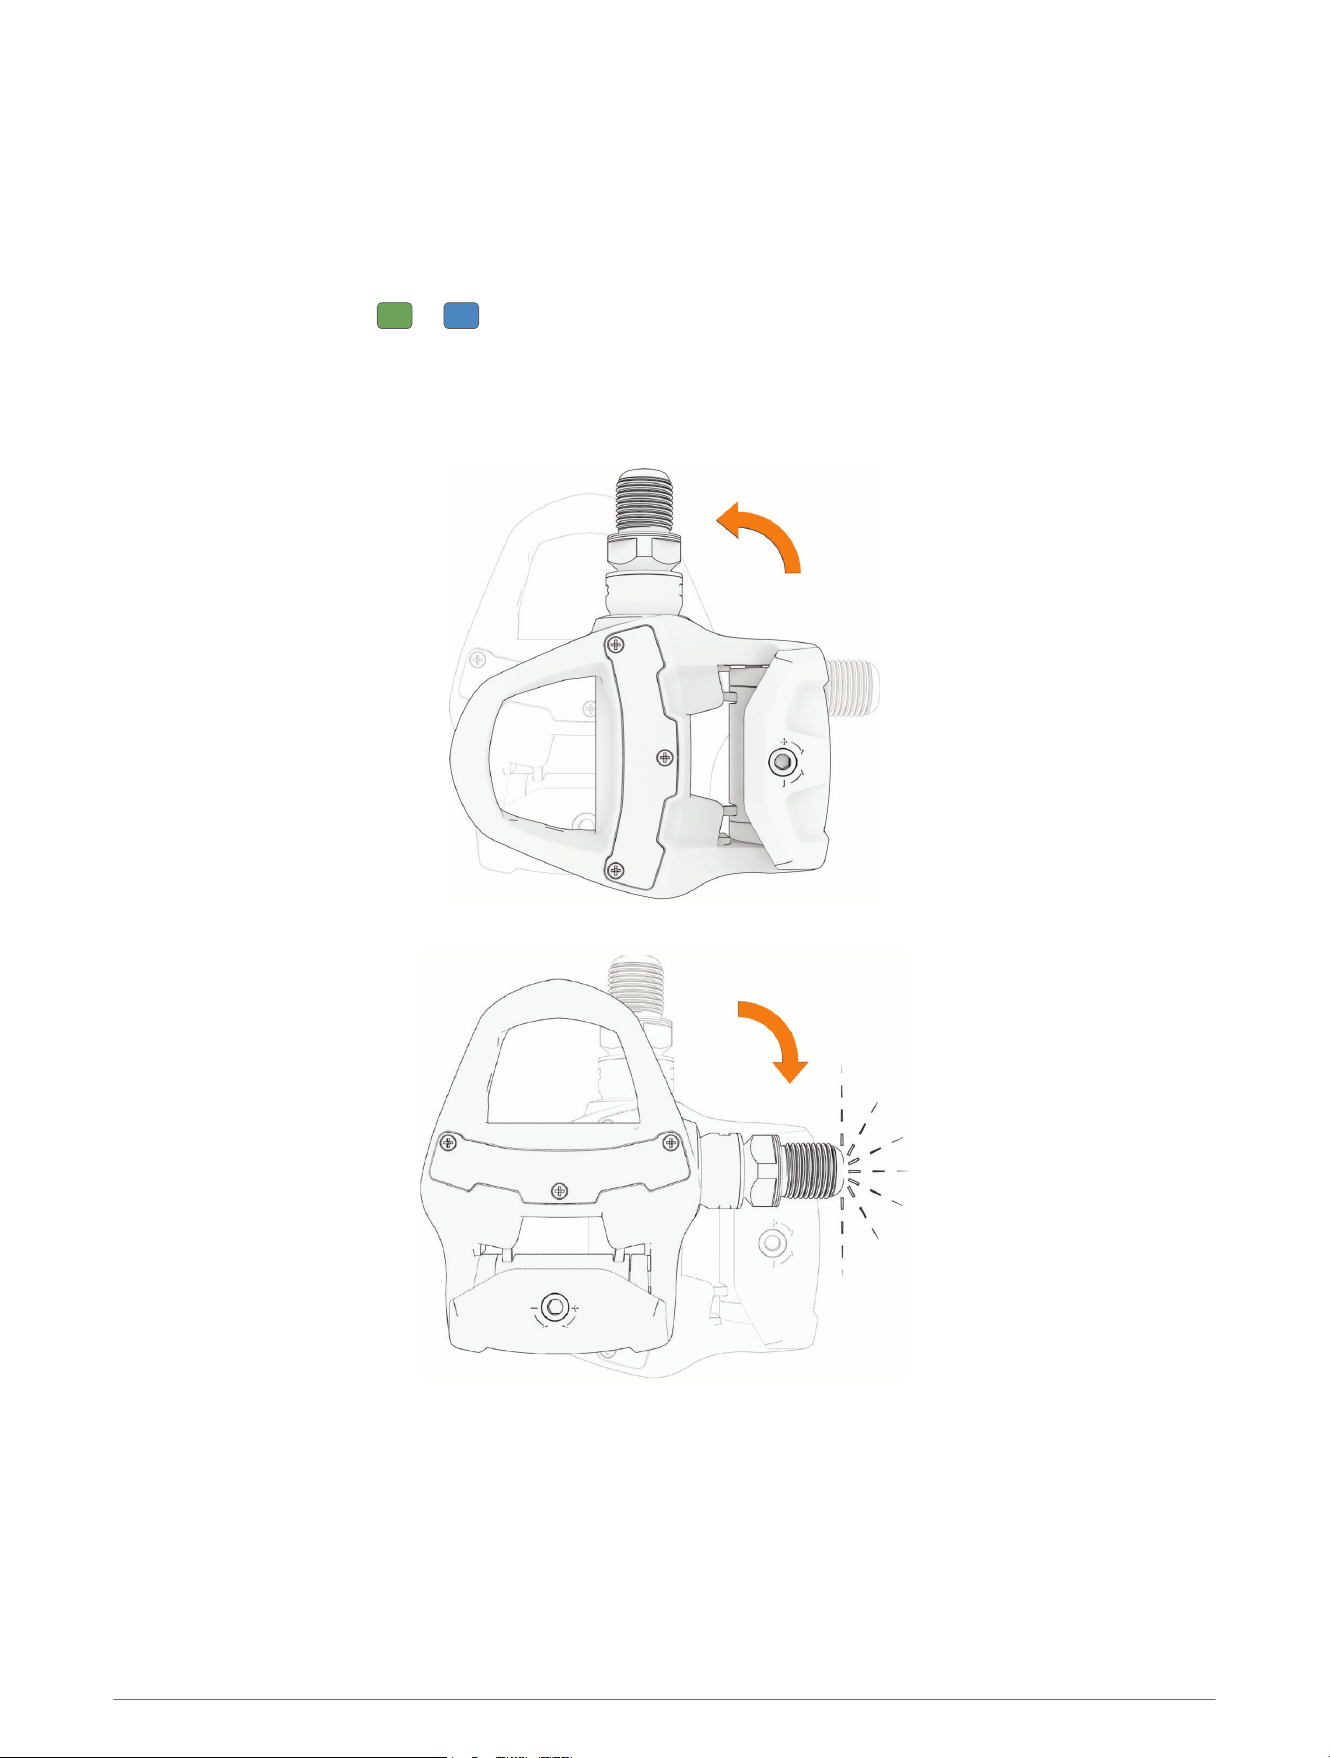
6 Turn the pedal 90 degrees, and hold it with the threaded end down for 2 seconds.
7 Turn the pedal back 90 degrees, with the threaded end to the side again.
The status LED flashes , indicating that it is in secure pairing mode.
4 Pairing the Rally 110/210 Pedals
8 Select an option to start pairing the Rally 110/210 pedals with the Garmin Connect app:
• Scan the QR code with your phone.
• In the Garmin Connect app, select > Garmin Devices > Add Device.
9 Select Connect It.
10 Follow the on-screen instructions.
Pairing with a Watch or Cycling Computer
Before you can pair the Rally 110/210 pedals with a watch or a cycling computer, you must pair the pedals with
the Garmin Connect app (Pairing with the Garmin Connect App, page2).
You can follow these steps to pair your Rally 110/210 pedals with a device that supports secure pairing. To
access an up-to-date list of Garmin devices that support secure connections, and learn more about open and
secure connections, go to garmin.com/connectiontypes.
To pair with a device that does not support secure pairing, you must first set your pedals to allow open
connections (Allowing Open Connections, page6).
1 Rotate the cranks to wake up the pedals.
The status LED flashes .
2 In the Garmin Connect app, select > Garmin Devices > Rally 110/210.
3 Select Pairing Mode > Enable Pairing Mode.
The status LED flashes .
4 Follow the appropriate steps for your watch or cycling computer to connect the Rally 110/210 pedals as a
new sensor.
After you have paired the pedals with a compatible watch or cycling computer, you should set the correct crank
length, to ensure accurate power measurements (Entering the Crank Length, page6).
Pairing the Rally 110/210 Pedals 5

Allowing Open Connections
The Rally 110/210 pedals support secure Bluetooth
®
connections with compatible devices. To pair the Rally
110/210 pedals with older devices that do not support secure pairing, you must configure the pedals to allow
open connections.
1 If necessary, rotate the cranks to wake up the pedals.
The status LED flashes green.
2 In the Garmin Connect app, select > Garmin Devices > Rally 110/210.
3 Select Connection Type > Allow Open Connections.
The status LED on the Rally 110/210 pedal flashes three times when it is idle and allowing open connections.
You can pair your device by adding the Rally 110/210 pedals as a new sensor.
NOTE: While allowing open connections, you can still turn on secure pairing mode and pair securely with
supported devices.
Entering the Crank Length
You must enter the correct crank length to ensure accurate power calculations. If you do not enter a crank
length, the Rally 110/210 pedals use a default crank length of 172.5mm (6.79in.).
1 Rotate the cranks to wake up the pedals.
2 On your Garmin watch or cycling computer, go to the sensor settings for the Rally 110/210 pedals.
For more information, see the owner's manual for the watch or cycling computer.
3 Select Crank Length.
NOTE: If your watch or cycling computer does not support entering the crank length, you can use the Garmin
Connect app to enter the crank length (Entering the Crank Length Using the Garmin Connect App, page6).
4 Enter the crank length.
TIP: The crank length is often printed on the crank arm.
Entering the Crank Length Using the Garmin Connect App
NOTE: If you entered the crank length using your connected watch or cycling computer, a new crank length
setting entered using the Garmin Connect app will not take effect. You must change the setting on the watch or
cycling computer.
1 Rotate the cranks to wake up the pedals.
2 In the Garmin Connect app, select > Garmin Devices > Rally 110/210.
3 Select System > Crank Length.
4 Enter the crank length, and select OK.
TIP: The crank length is often printed on the crank arm.
6 Pairing the Rally 110/210 Pedals

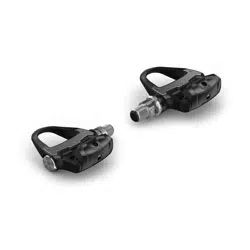
Installing the Pedals
These instructions show the Rally RK pedal body. The steps are the same for any Rally 110/210 pedal body type.
NOTICE
Do not install the Rally 110/210 pedals with pedal boots or extenders. Pedal boots or extenders may damage
the electronics in the spindles, leading to product malfunction.
NOTE: You should install the right pedal first.
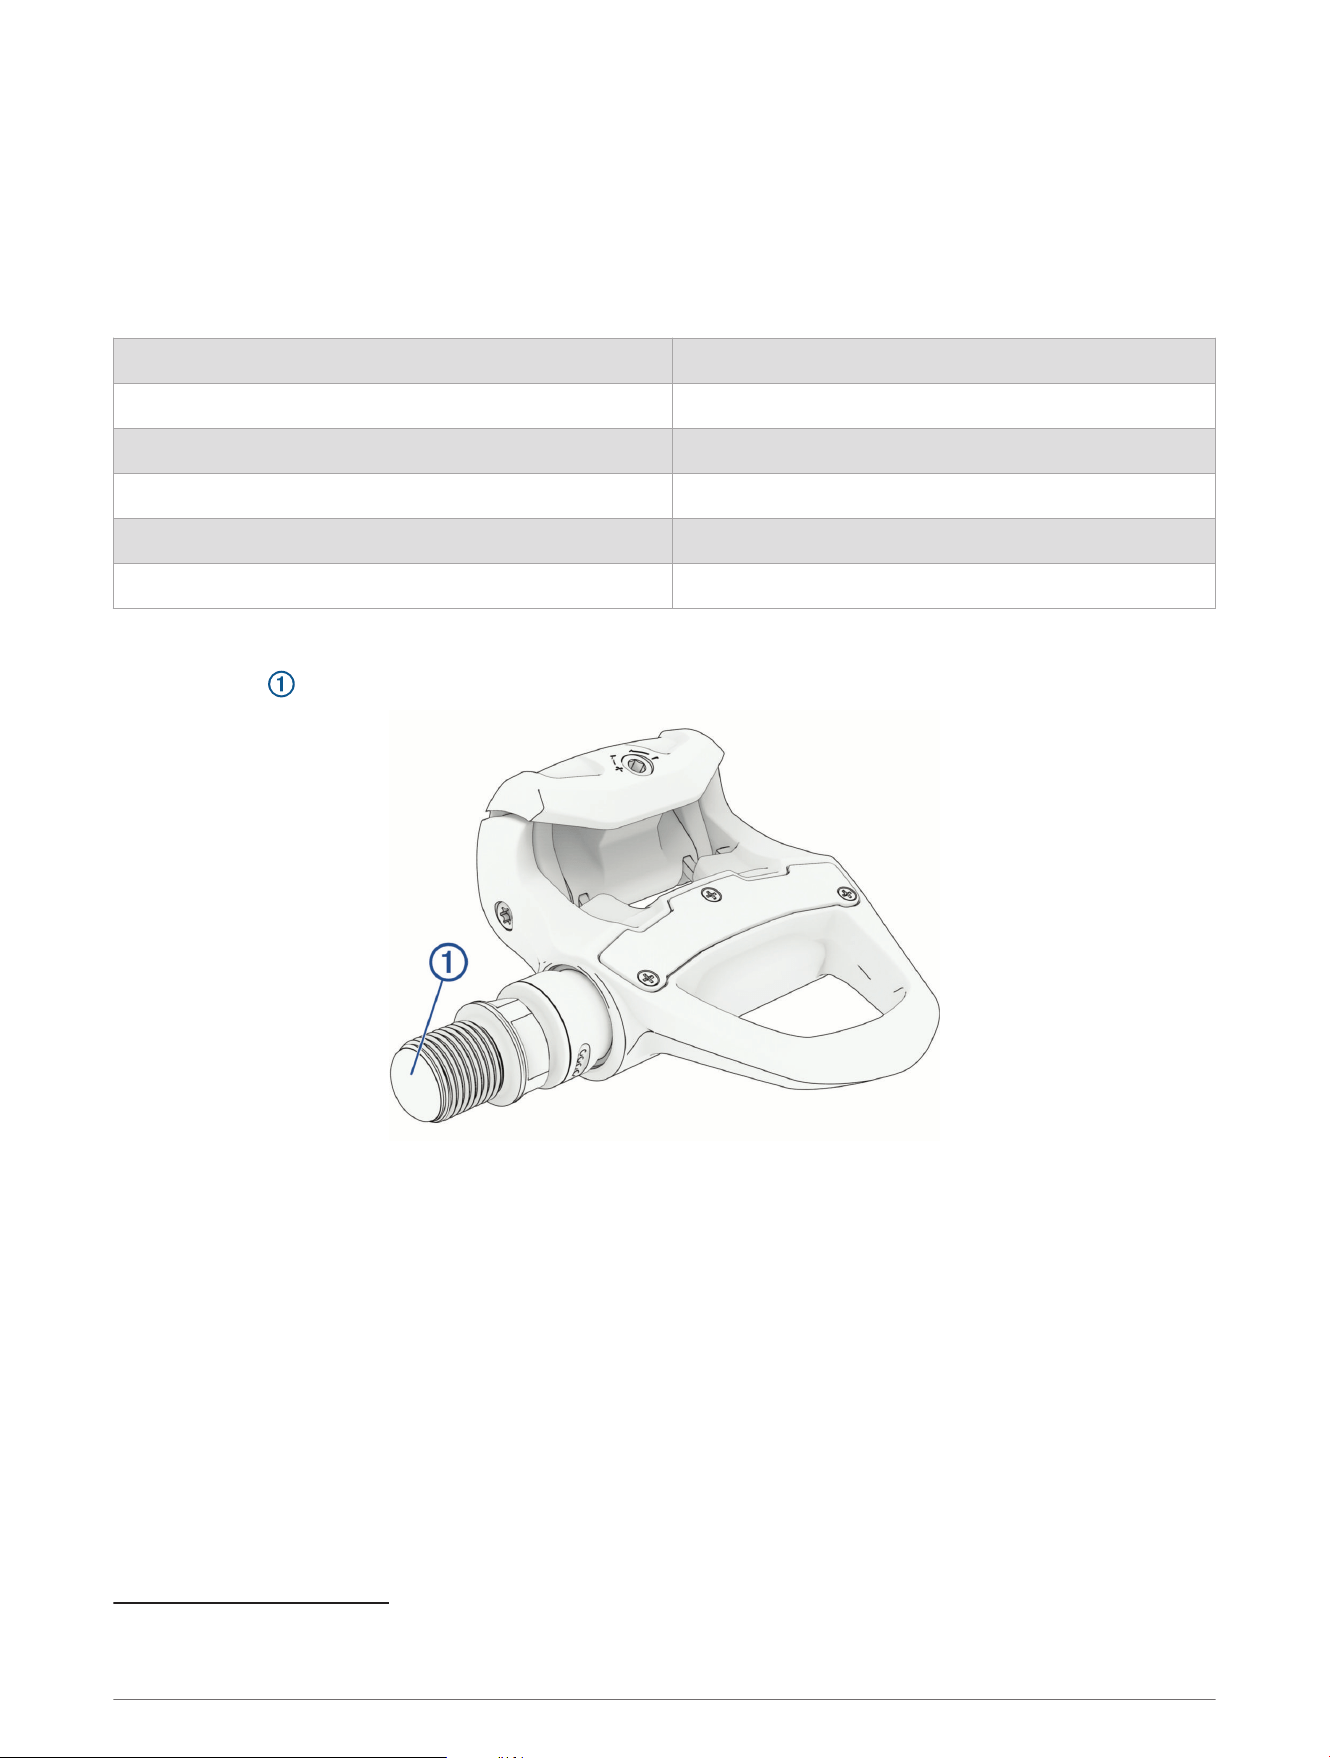
1 Apply a thin layer of grease to the pedal spindle threads.
NOTICE
You must apply grease to the threads on the pedal before installing them. Installing the pedals without grease
may lead to product damage.
2 Insert the spindle into the crank arm.
3 Hand tighten the spindle.
4 Use a 15mm wrench to tighten the spindle.
NOTE: To ensure accurate power measurements, you must tighten the pedals onto the crank arms to the
recommended torque of 35 N-m (26 lbf-ft.).
5 Repeat the previous steps to install the left pedal.
NOTE: The left pedal spindle has a left-handed (reverse) thread.
6 Move your bike chain to the largest chain ring and the smallest cassette gear.
Installing the Pedals 7
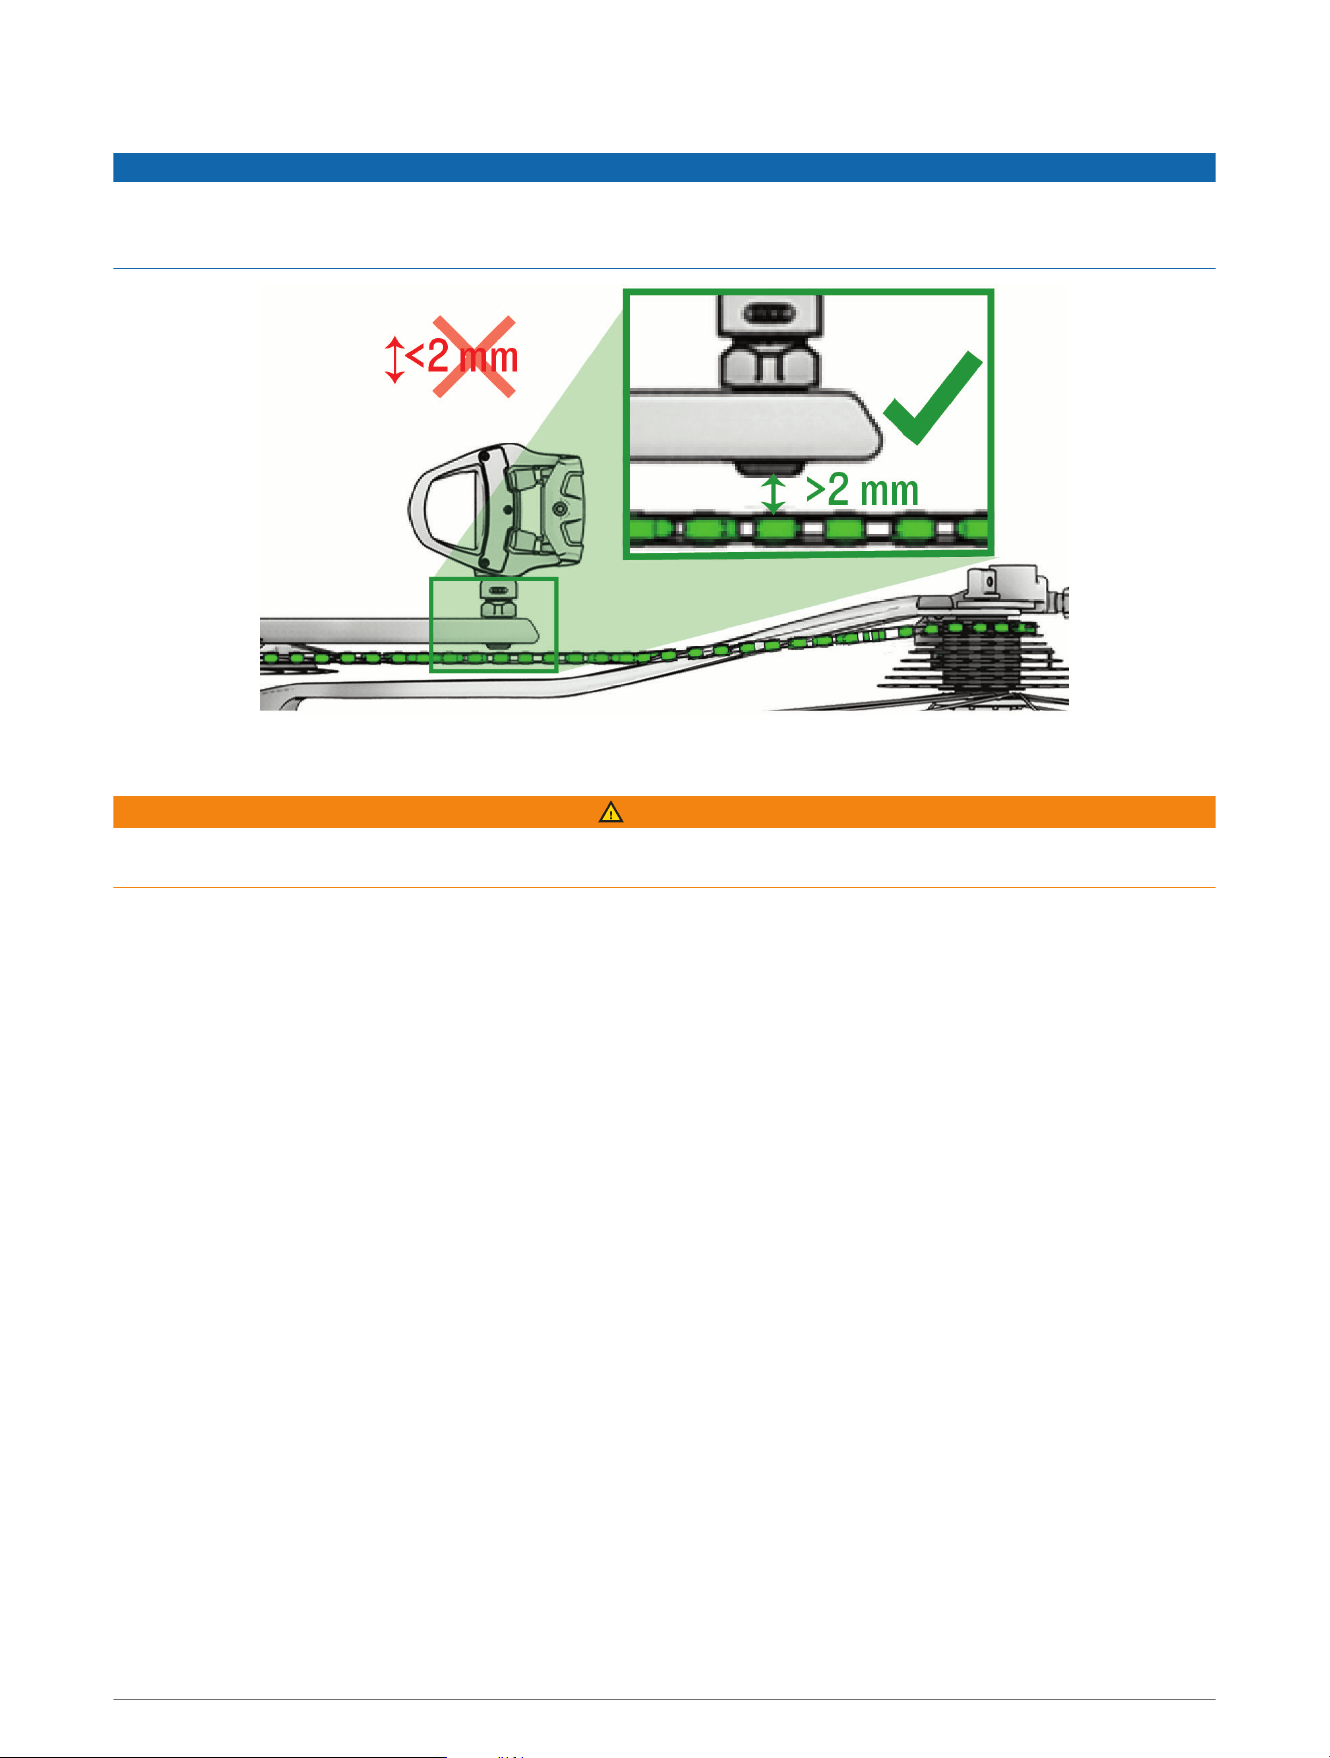
7 Rotate the crank arm to check for clearance.
NOTICE
You must make sure there is at least a 2mm clearance between the pedal spindle and any part of the bike, such
as the chain, groupset or frame. If any part of the bike frame, chain, or groupset touches the spindle while you
are riding, it may damage the electronics in the spindle, causing product malfunction.
8 If necessary, add one washer (included) between the spindle and the crank arm on both sides of the bike, to
increase clearance and ensure evenness between both pedals.
WARNING
Do not add more than one washer to each pedal. Adding more than one washer may cause excess strain on the
pedal spindle and threads, potentially leading to a product failure, property damage, or serious personal injury.
8 Installing the Pedals

Shoe Cleats
Installing the Shoe Cleats for Rally RK and Rally RS Pedal Bodies
NOTE: The left and right cleats are the same.
1 Apply a thin layer of grease on the cleat bolt threads.
2 Align the cleat , washers , and bolts .
3 Use a 4mm hex key to loosely attach each bolt to the sole of the shoe.
4 Adjust the cleat to the shoe in your preferred position.
This can be adjusted after a trial ride.
5 Tighten the cleat firmly to the shoe.
NOTE: Garmin recommends a torque of 4 to 6 lbf-ft. (5 to 8 N-m).
Installing the Pedals 9
Installing the Shoe Cleats for Rally XC Pedal Bodies
NOTE: The left and right cleats are the same.
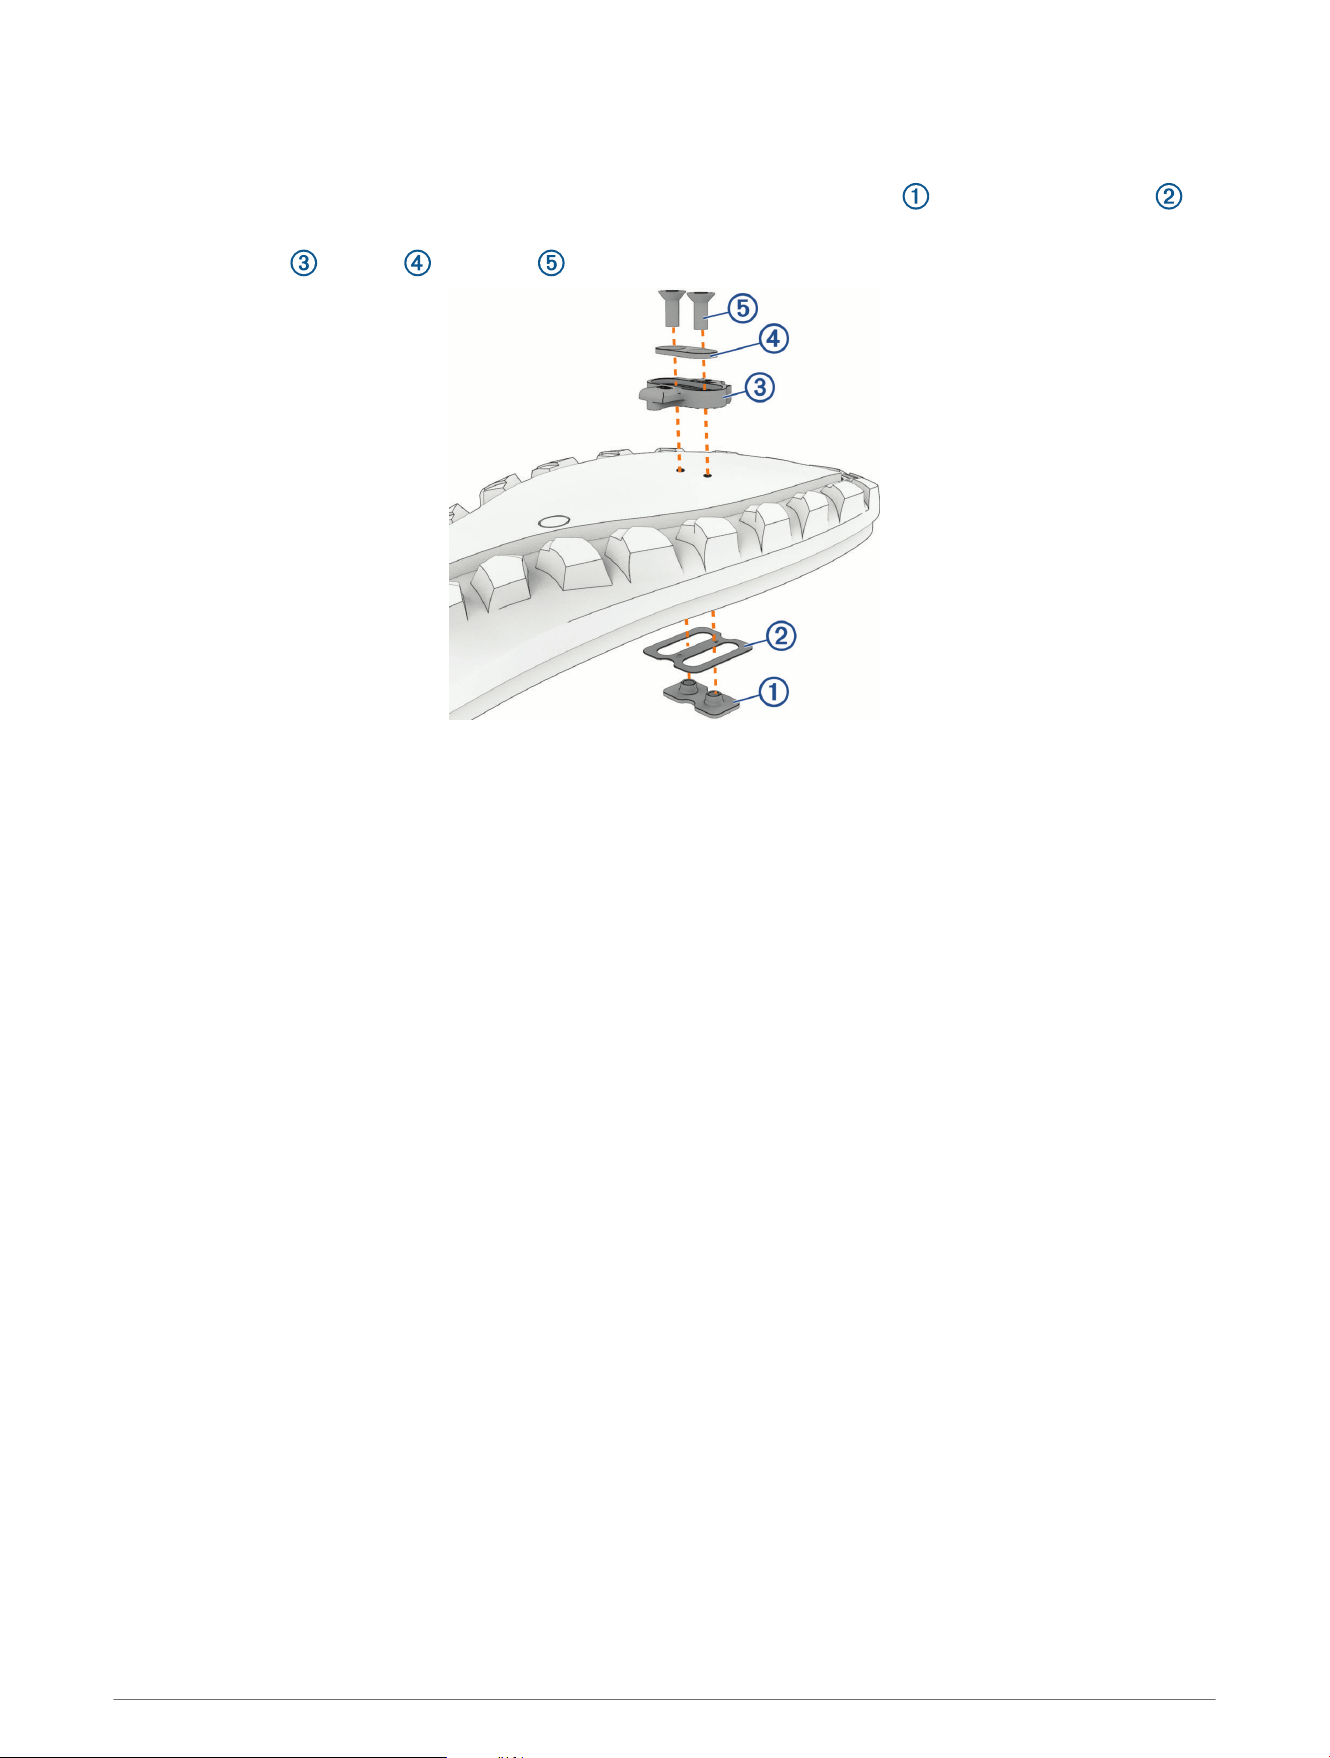
1 If necessary, lift the insole inside your shoe and insert the 2-hole cleat mount and the insole washer .
2 Apply a thin layer of grease on the cleat bolt threads.
3 Align the cleat , washer , and bolts .
4 Use a 4mm hex key to loosely attach each bolt to the sole of the shoe.
5 Adjust the position of the cleat, as needed.
You can adjust the cleat position after a trial ride.
6 Tighten the bolts to attach the cleat firmly to the shoe.
NOTE: Garmin recommends a torque of 5 to 8 N-m (4 to 6 lbf-ft.).
10 Installing the Pedals
Adjusting the Release Tension
WARNING
If you set the release tension too high, it may be difficult to quickly disengage from the pedal, potentially leading
to personal injury in a fall. If you set the release tension too low, you may unintentionally disengage from the
pedal, potentially leading to serious personal injury in a crash. Before riding, place one foot on the ground and
practice engaging and disengaging from the pedal several times.
NOTICE
Do not overtighten the release tension screws. Overtightening the release tension screws may cause product
damage.
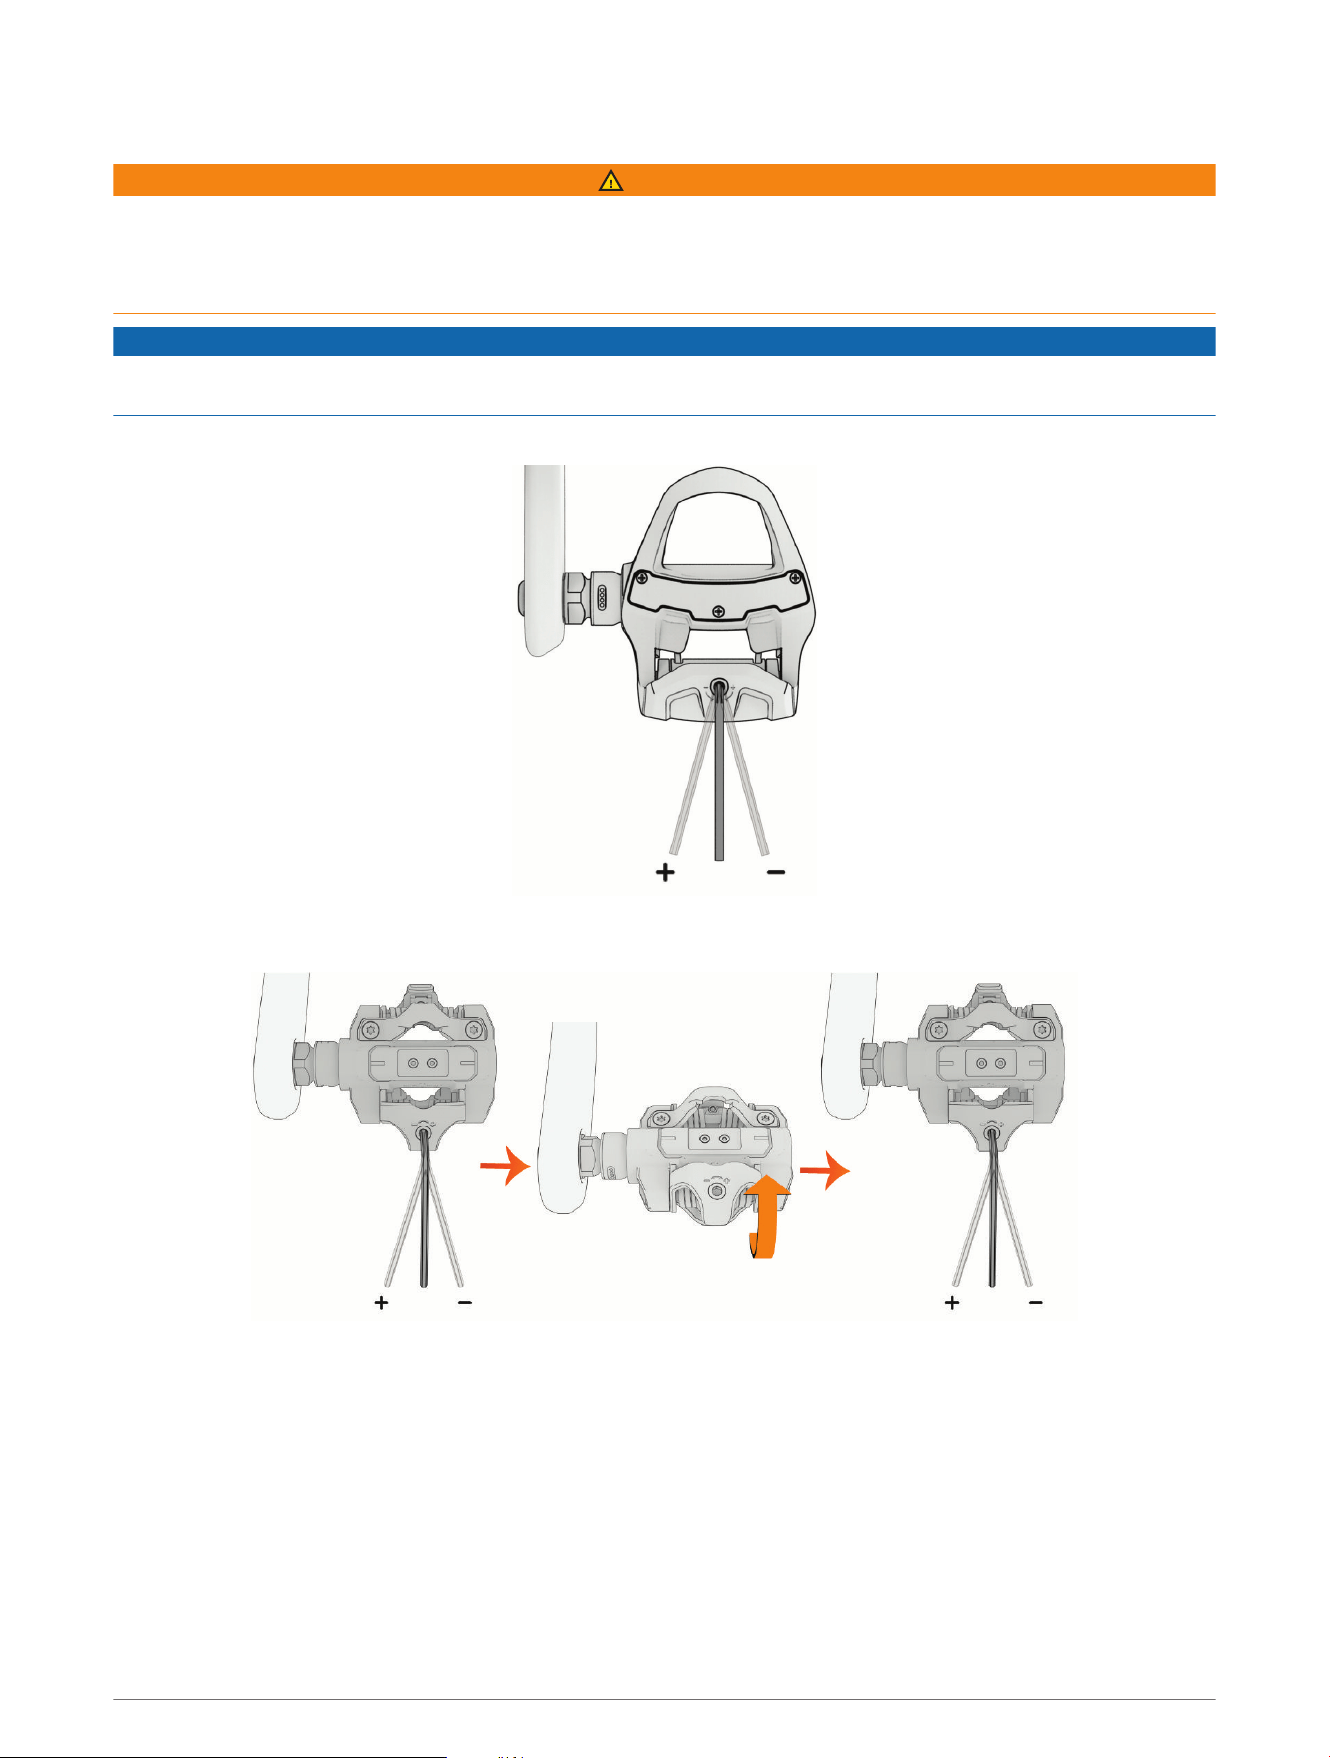
• For the Rally RS or Rally RK pedal bodies, use a 3mm hex key to adjust the release tension screw.
• For the Rally XC pedal bodies, use a 3mm hex key to adjust the release tension screw equally on both sides
of the pedal.
You should set the same release tension on both pedals to make sure you can clip in and out comfortably from
both sides.
Installing the Pedals 11
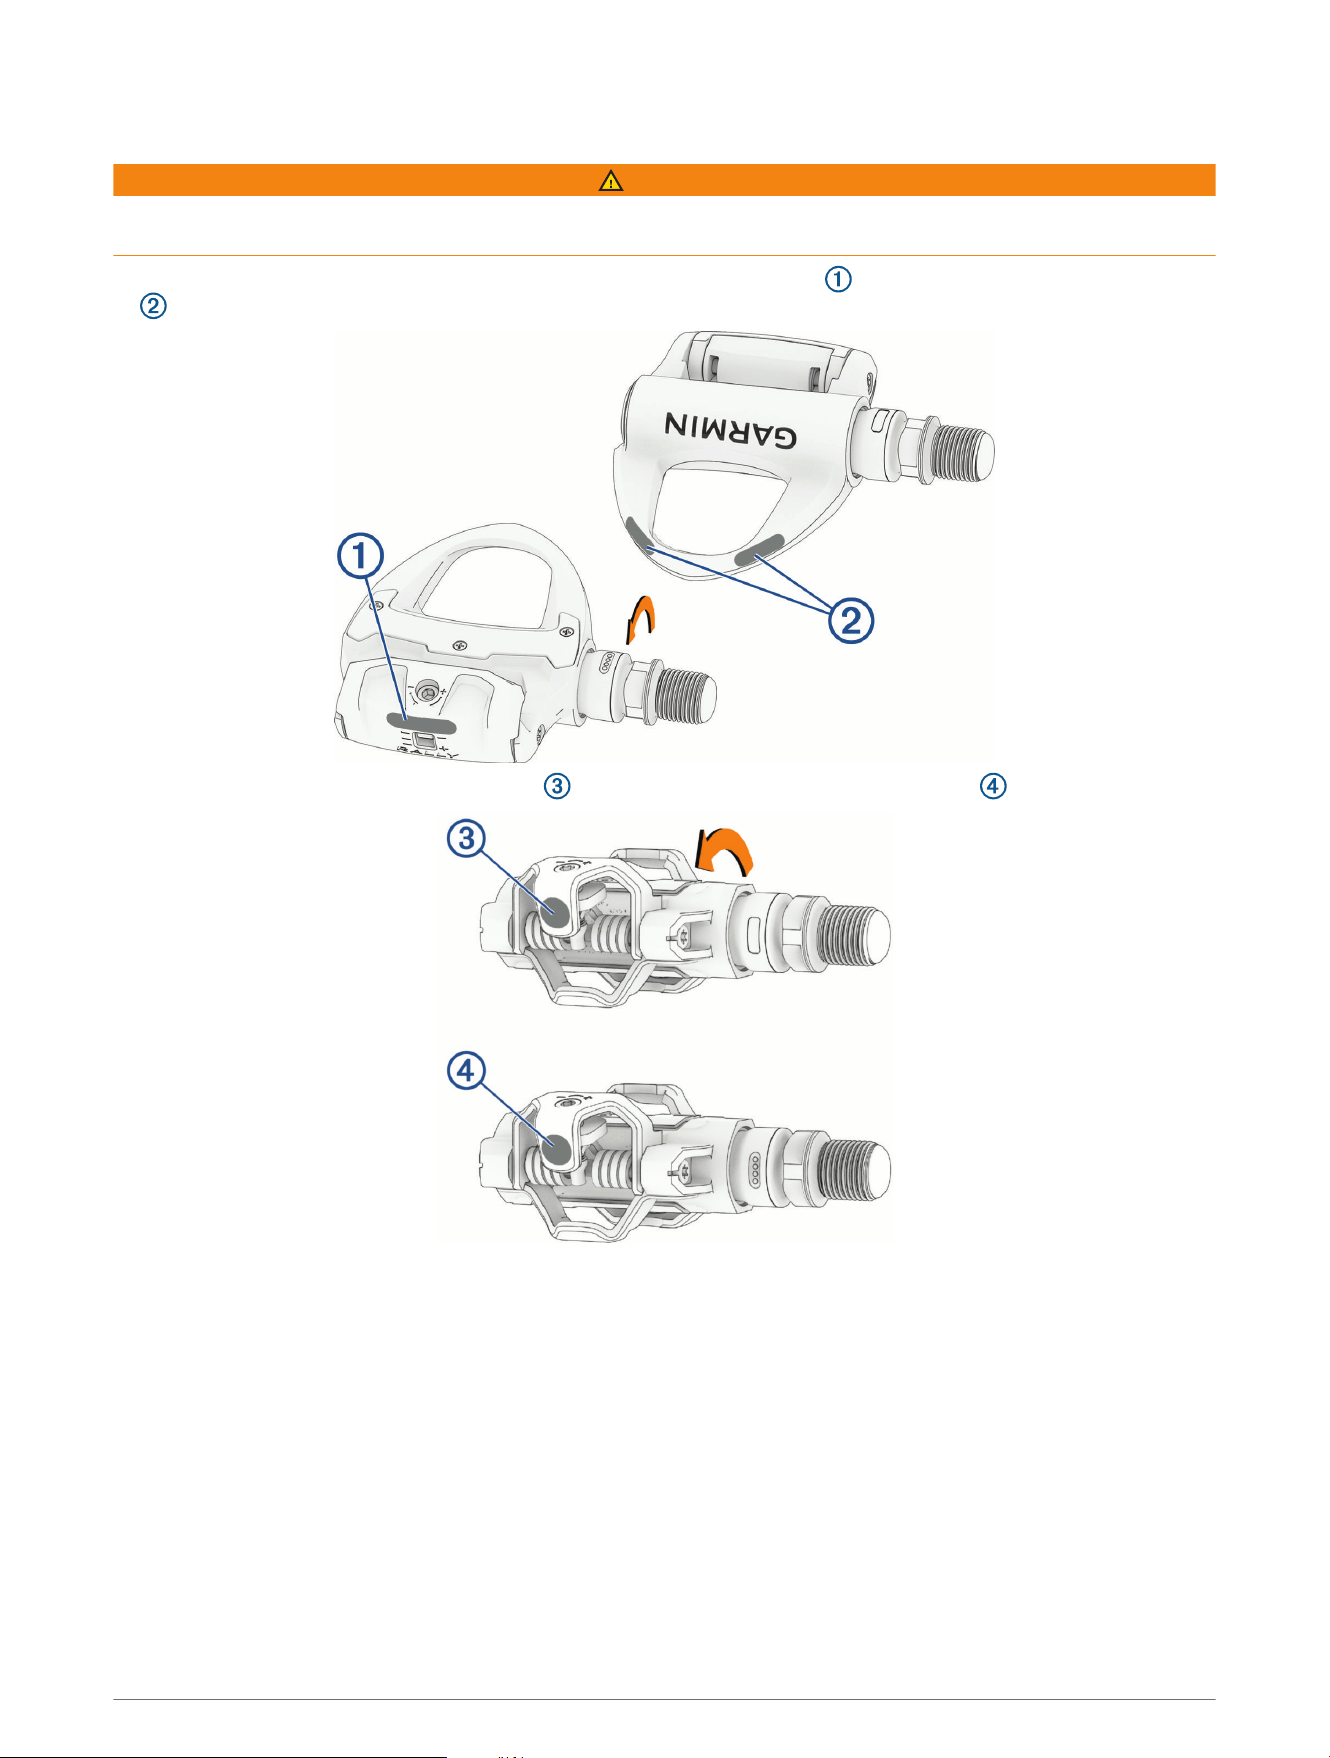
Applying the Reflective Stickers
WARNING
Before riding at night or in low light conditions, attach the reflective stickers (included) to both pedals for
increased visibility and to comply with applicable regulations.
• For the Rally RS and Rally RK pedals, apply one sticker to the heel clip , and two stickers to the pedal body
.
• For the Rally XC pedals, apply the sticker , turn the pedal, and apply another sticker .
12 Installing the Pedals
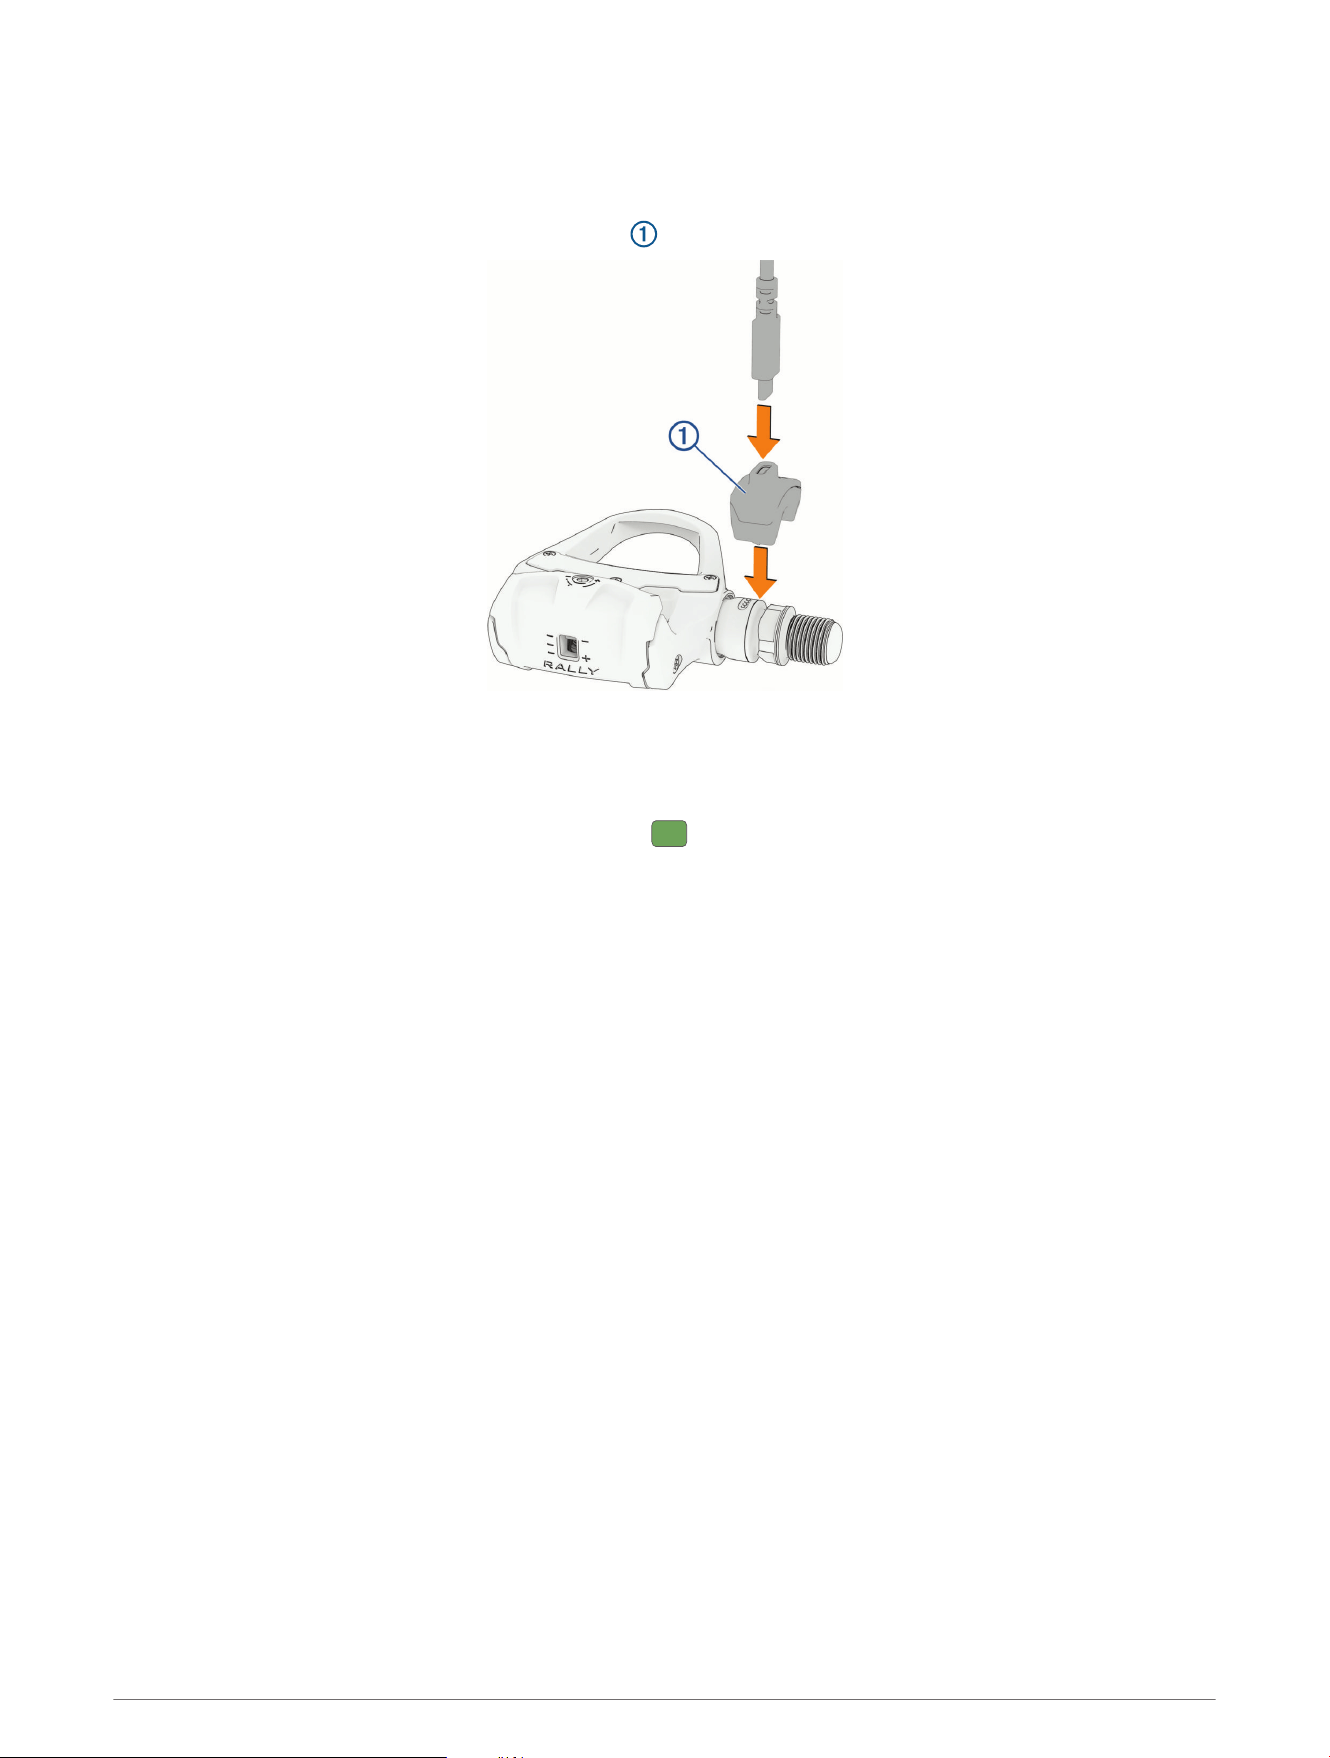
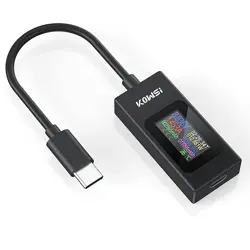
Charging the Battery
NOTE: Garmin recommends charging the device using a USB-C
®
port or AC adapter rated for 2 to 2.5Watts of
power.
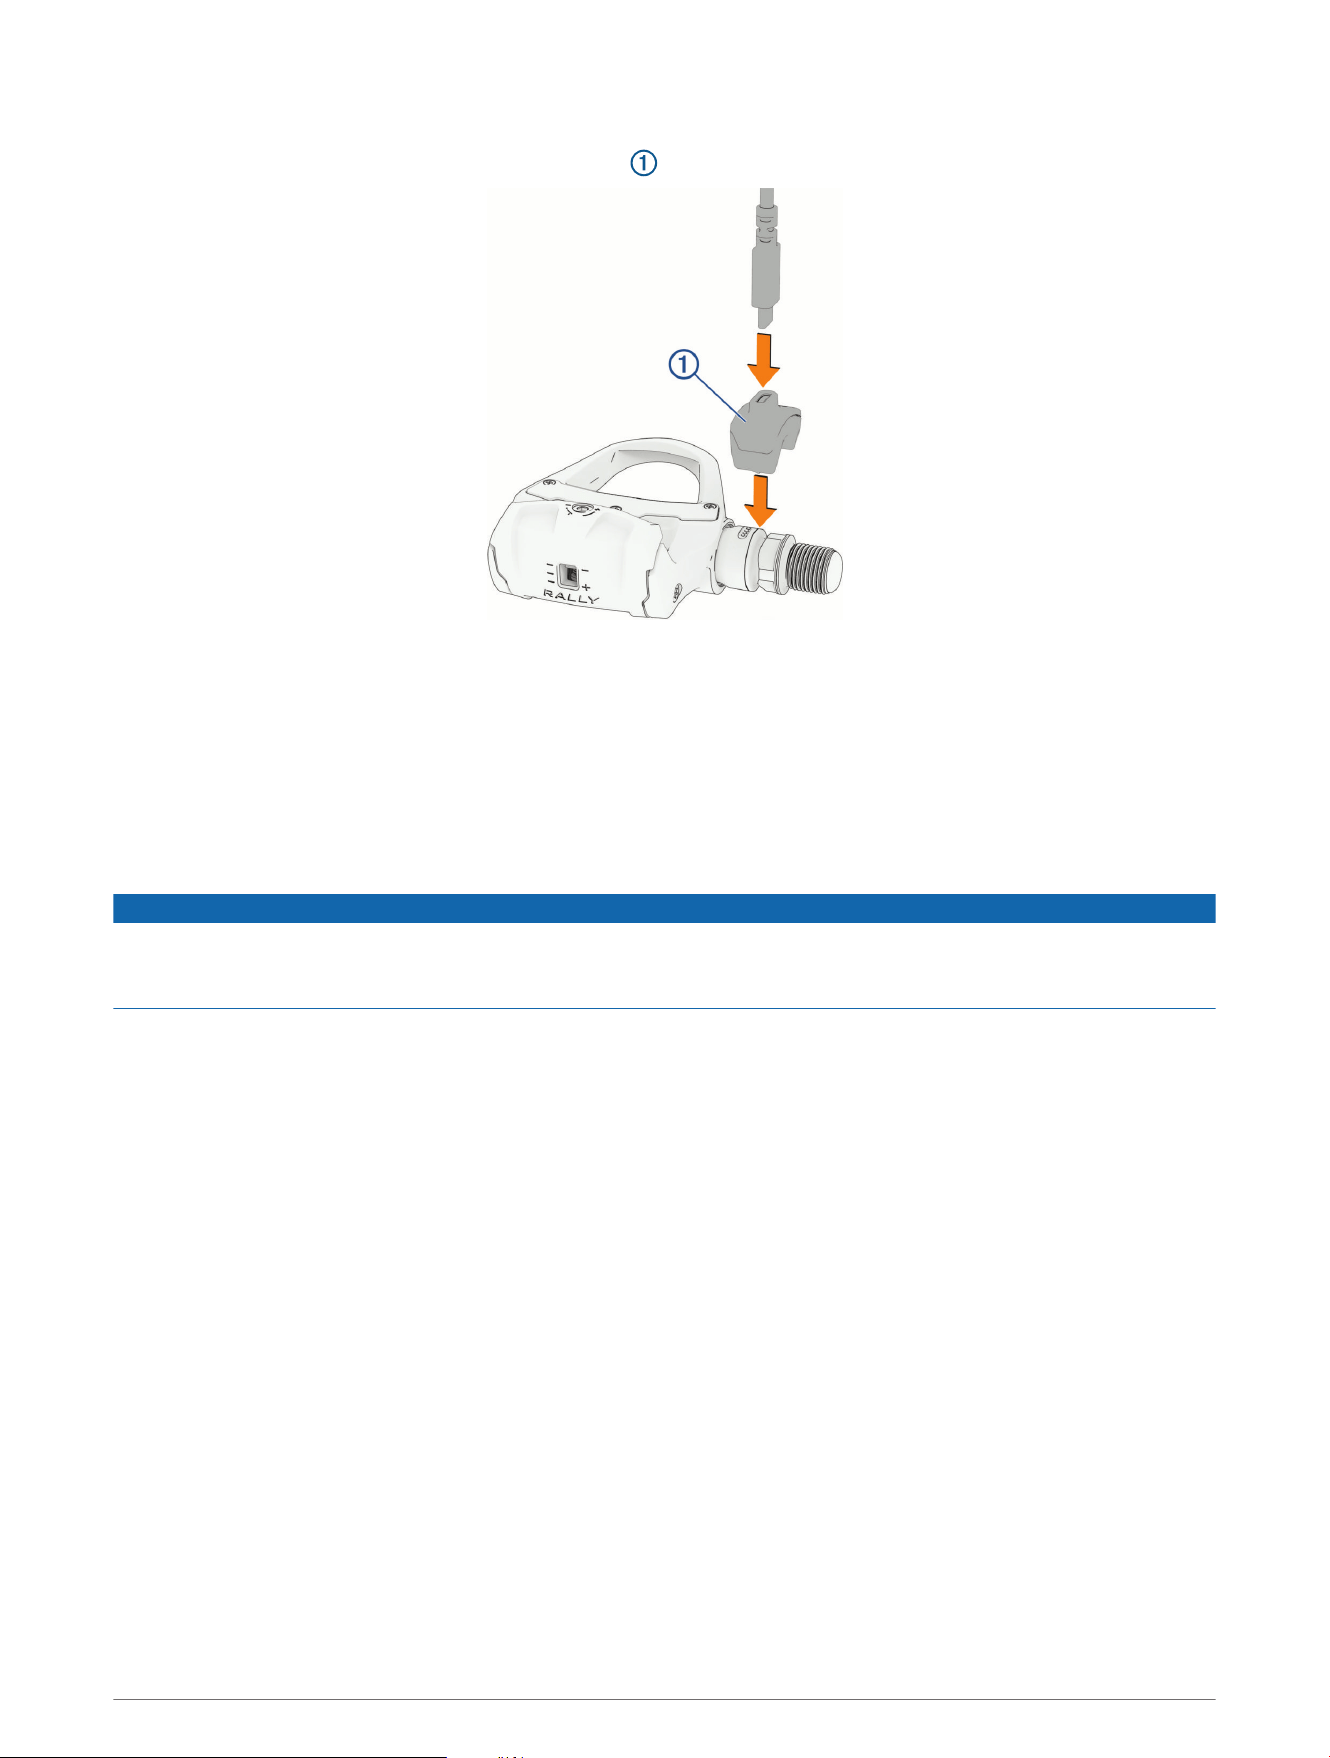
1 Connect the USB-C cable to the charging adapter .
2 Connect the charging adapter to the pedal spindle, aligning the pins on the charging adapter with the
charging contacts on the pedal spindle.
3 Connect the other end of the USB-C cable to a power supply, such as a charging port or AC adapter (not
included).
The LED on the threaded end of the spindle flashes to indicate the charging status.
4 Repeat the steps for the other spindle (Rally 210 models only).
Charging the Battery 13
Charging Status LED
While charging, the status LED indicates the battery charge level.
Flashes rapidly
Below 20% charged.
Flashes every second
Between 20% and 90% charged.
Flashes every two seconds
Above 90% charged.
Solid
Fully charged.
Cycling Dynamics
With a dual-sensing, pedal-based power meter system such as the Rally 210 pedals, you can access advanced
training data known as cycling dynamics. Cycling dynamics can give you detailed insights into how you are
applying power to the pedals, and how your performance changes based on position, bike setup, ride duration,
and more.
Right/Left Balance: Tracks the percentage of total power applied to each pedal.
Power Phase: Tracks the start and end of the power phase (the part of your pedal stroke in which you generate
positive power).
Seated/Standing Position: Tracks your riding position throughout the ride.
Platform Center Offset: Tracks how force is distributed across the pedal platform during the pedal stroke,
measured in millimeters from the center line of the pedal platform.
You can view cycling dynamics in data fields on your compatible Edge
®
device during your ride (Data Fields,
page16). After you save and sync your ride, you can analyze cycling dynamics data on your Garmin Connect
account.
For more details on the cycling performance metrics supported by Garmin devices, go to garmin.com/garmin
-technology/cycling-science/.
14 Cycling Dynamics

Force Data
The Rally 110/210 pedals measure the amount of force you apply to the pedal platforms, measured in Newtons.
Force data can help you understand how various factors affect your ability to produce power. For example, you
can see how much force it takes to produce 300W at 60rpm compared to 100rpm.
You can view force data on your compatible Garmin device during your ride (Data Fields, page16). After you
save and sync your ride, you can analyze cycling dynamics data on your Garmin Connect account.
Pedal IQ
™
Smart Calibration
The Rally 110/210 pedals must be calibrated periodically to ensure the accuracy of power readings. By default,
the pedals are automatically calibrated when idle, such as while you are getting ready for your ride.
When connected to a compatible Garmin watch or cycling computer, the Rally 110/210 pedals can detect when
a calibration is needed and send a notification.
When prompted to manually calibrate the pedals, you should make sure the bike is completely still and upright,
and nothing is touching the pedals, before following the on-screen instructions to complete the calibration.
NOTE: Pedal IQ notifications are not available on all Garmin watches and cycling computers. Some models may
need a software update to enable Pedal IQ notifications.
Calibrating the Pedals Using the Garmin Connect App
1 Make sure the bike is completely still and upright, and nothing is touching the pedals.
2 Select > Garmin Devices > Rally 110/210.
3 Select Calibrate > Next.
The calibration process takes a few seconds.
Force Data 15
Data Fields
The tables contain data fields for the Edge 1050 cycling computer. If you have another compatible device, see
your device owner's manual.
NOTE: Data fields that display pedal smoothness, torque effectiveness, and balance data are not supported by
the Rally 110 system.
Power Fields
Name Description
%FTP The current power output as a percentage of functional threshold power.
3s Balance The 3-second moving average of the left/right power balance.
3s Force The 3-second moving average of force applied to the pedal platforms, in Newtons.
3s Power The 3-second moving average of power output.
3s Watts/kg The 3-second moving average of power output in watts per kilogram.
10s Balance The 10-second moving average of the left/right power balance.
10s Force The 10-second moving average of force applied to the pedal platforms, in Newtons.
10s Power The 10-second moving average of power output.
10s Watts/kg The 10-second moving average of power output in watts per kilogram.
30s Balance The 30-second moving average of the left/right power balance.
30s Force The 30-second moving average of force applied to the pedal platforms, in Newtons.
30s Power The 30-second moving average of power output.
30s Watts/kg The 30-second moving average of power output in watts per kilogram.
Avg Balance The average left/right power balance for the current activity.
Avg Force The average force applied to the pedal platforms during the activity, in Newtons.
Avg Power The average power output for the current activity.
Avg Watts/kg The average power output in watts per kilogram.
Balance The current left/right power balance.
Force The force applied to the pedal platforms, in Newtons.
Intensity Factor The Intensity Factor
™
for the current activity.
Kilojoules The accumulated work performed (power output) in kilojoules.
Lap Balance The average left/right power balance for the current lap.
Lap Force The average force applied to the pedal platforms during the current lap, in Newtons.
Lap Norm. Force The normalized force applied to the pedal platforms during the current lap, in Newtons.
Lap NP The average Normalized Power
™
for the current lap.
Lap Power The average power output for the current lap.
Lap Watts/kg The average power output in watts per kilogram for the current lap.
Last Lap Force The average force applied to the pedal platforms during the previous lap, in Newtons.
16 Data Fields

Name Description
Last Lap Norm. Force
The normalized force applied to the pedal platforms during the previous lap, in
Newtons.
Last Lap NP The average Normalized Power for the last completed lap.
Last Lap Power The average power output for the last completed lap.
Max. Force The maximum force applied to the pedal platforms during the activity, in Newtons.
Max. Lap Force The maximum force applied to the pedal platforms during the current lap, in Newtons.
Max. Lap Power The top power output for the current lap.
Max. Power The top power output for the current activity.
Normalized Force The normalized force applied to the pedal platforms, in Newtons.
Normalized Power The Normalized Power for the current activity.
Pedal Smoothness
The measurement of how evenly a rider is applying force to the pedals throughout each
pedal stroke.
Power The current cycling power output in watts.
Power Zone The current range of power output (1 to 9) based on your FTP or custom settings.
Time in Zone The time elapsed in each power zone.
Torque Effectiveness
The measurement of power lost to negative force applied to the pedals during the back
stroke.
1
TSS The Training Stress Score
™
for the current activity.
Watts/kg The amount of power output in watts per kilogram.
Cycling Dynamics Fields
NOTE: These data fields require a Rally 210 system.
1
Torque Effectiveness and Pedal Smoothness are supported on Rally 210 models only. If your watch or cycling computer is connected to your pedals
using an ANT+ connection, you must turn on Torque Effectiveness and Pedal Smoothness in the sensor settings to enable the corresponding data fields.
Torque Effectiveness and Pedal Smoothness are not supported when using an open Bluetooth connection. For more information on connection types, go to
garmin.com/connectiontypes.
Data Fields 17

Name Description
Avg L. Peak Pwr Phase The average power phase peak angle for the left leg for the current activity.
Avg Left Pwr Phase The average power phase angle for the left leg for the current activity.
Avg PCO The average platform center offset for the current activity.
Avg Right Pwr Phase The average power phase angle for the right leg for the current activity.
Avg R. Peak Pwr Phase The average power phase peak angle for the right leg for the current activity.
Lap L. Peak Pwr Phase The average power phase peak angle for the left leg for the current lap.
Lap Left Pwr Phase The average power phase angle for the left leg for the current lap.
Lap PCO The average platform center offset for the current lap.
Lap R. Peak Pwr Phase The average power phase peak angle for the right leg for the current lap.
Lap Right Pwr Phase The average power phase angle for the right leg for the current lap.
Lap Time Seated The time spent seated while pedaling for the current lap.
Lap Time Standing The time spent standing while pedaling for the current lap.
Left Peak Pwr Phase
The current power phase peak angle for the left leg. Power phase peak is the angle
range over which the rider produces the peak portion of the driving force.
Left Power Phase
The current power phase angle for the left leg. Power phase is the pedal stroke region
where positive power is produced.
Platform Center Offset
The location on the pedal platform where force is applied, relative to the center line of
the pedal platforms.
Right Peak Pwr Phase
The current power phase peak angle for the right leg. Power phase peak is the angle
range over which the rider produces the peak portion of the driving force.
Right Power Phase
The current power phase angle for the right leg. Power phase is the pedal stroke
region where positive power is produced.
Time Seated The time spent seated while pedaling for the current activity.
Time Standing The time spent standing while pedaling for the current activity.
18 Data Fields
Changing Pedal Bodies
WARNING
When changing pedal bodies, you must tighten the spindle nut to 10N-m (88lbf-in.) and the outer cover to
5N-m (44lbf-in.). Too much torque or not enough torque may lead to product damage and a risk of serious
personal injury or death if the pedal body detaches from the spindle during a ride.
NOTICE
Garmin recommends changing one pedal at a time, taking care to keep track of the parts for each pedal. The
spindle nut and the outer cap of the right pedal have left-handed (reverse) threads.
You must apply grease to the spindles and pedal bodies according to the instructions in this topic. Changing the
pedal bodies without appropriate grease application causes product damage.
The Rally RK/XC 210 and Rally RS/XC 210 bundles include a pair of road bike pedal bodies and a pair of
mountain bike pedal bodies. You can purchase additional pedal bodies for the Rally 110/210 spindles from your
Garmin dealer, or you can go to garmin.com.
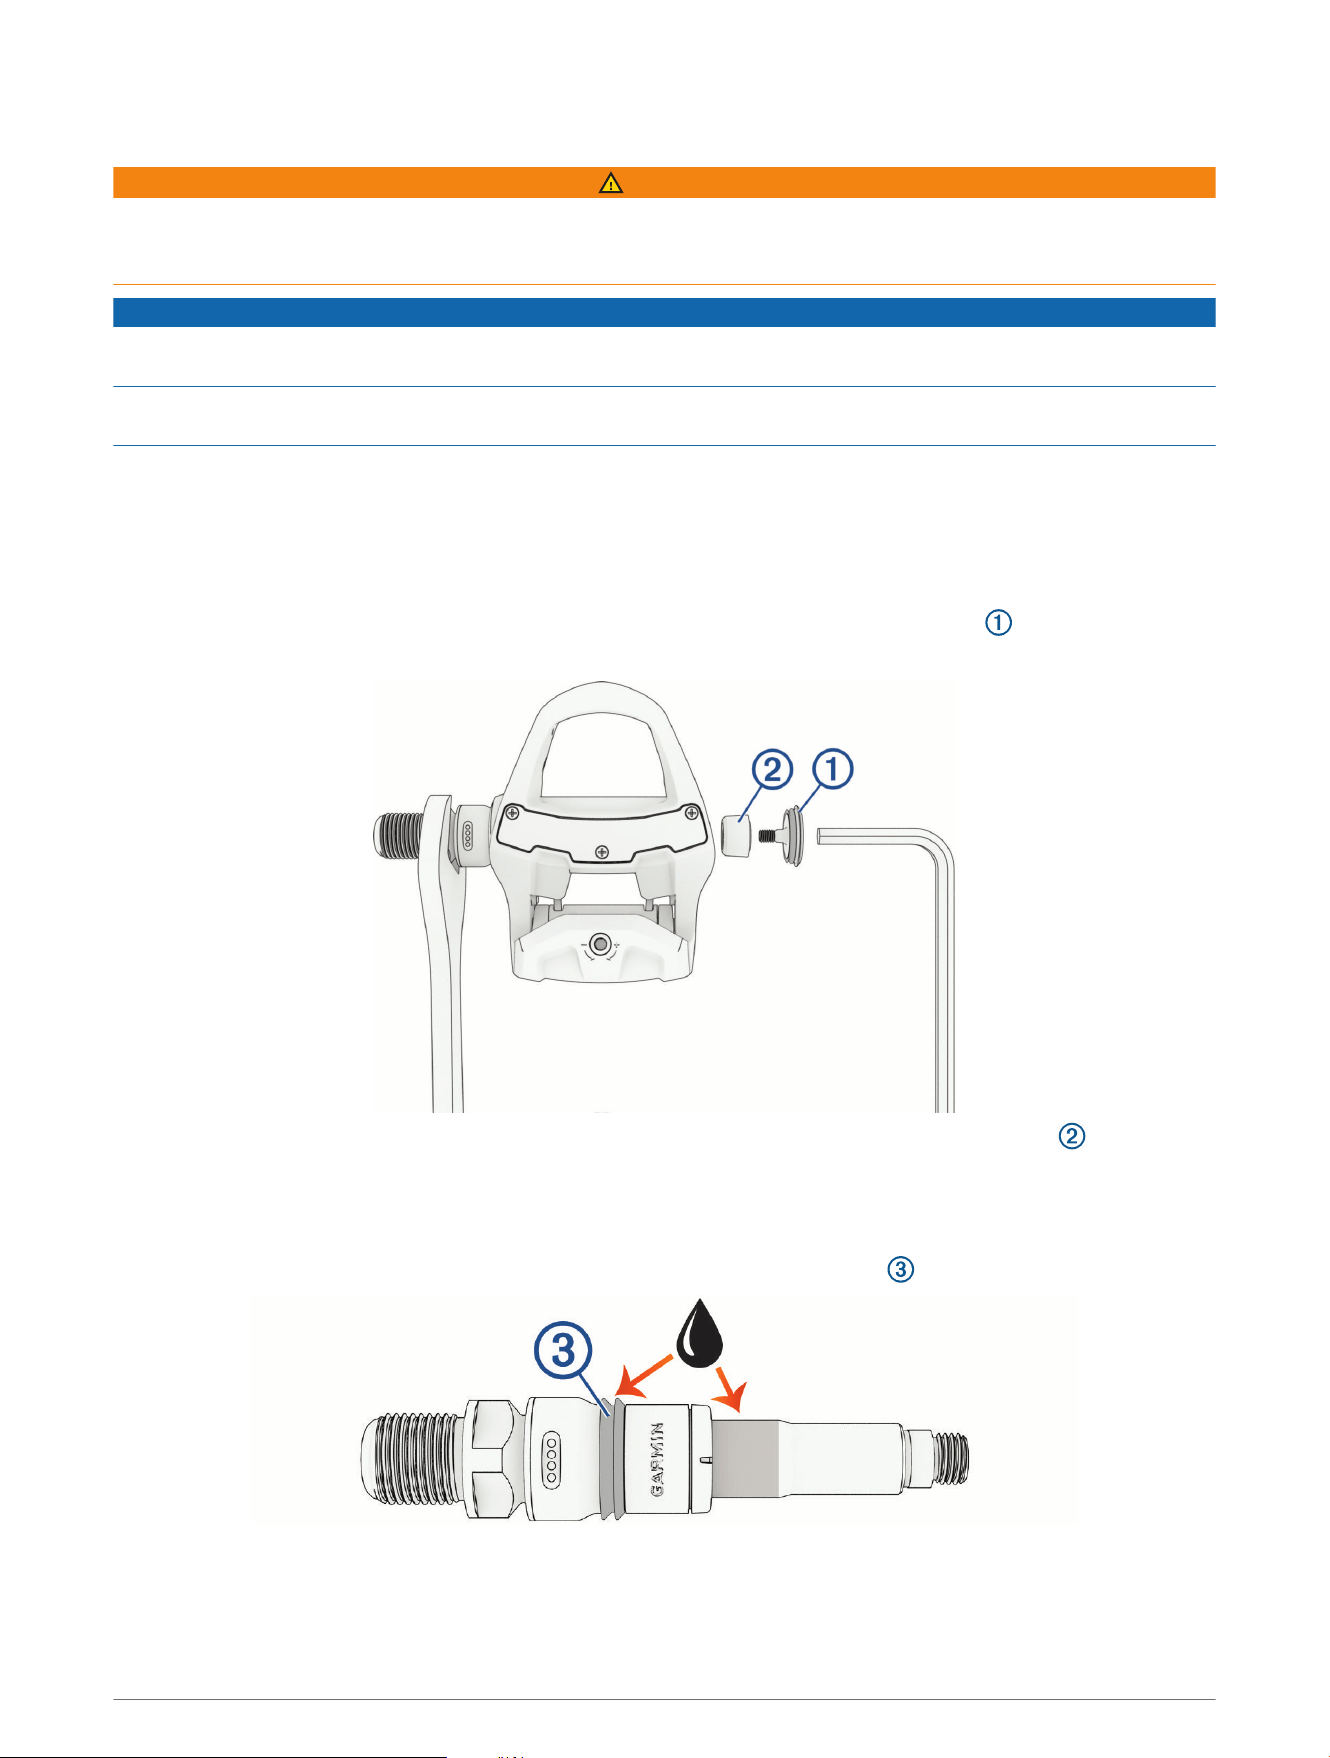
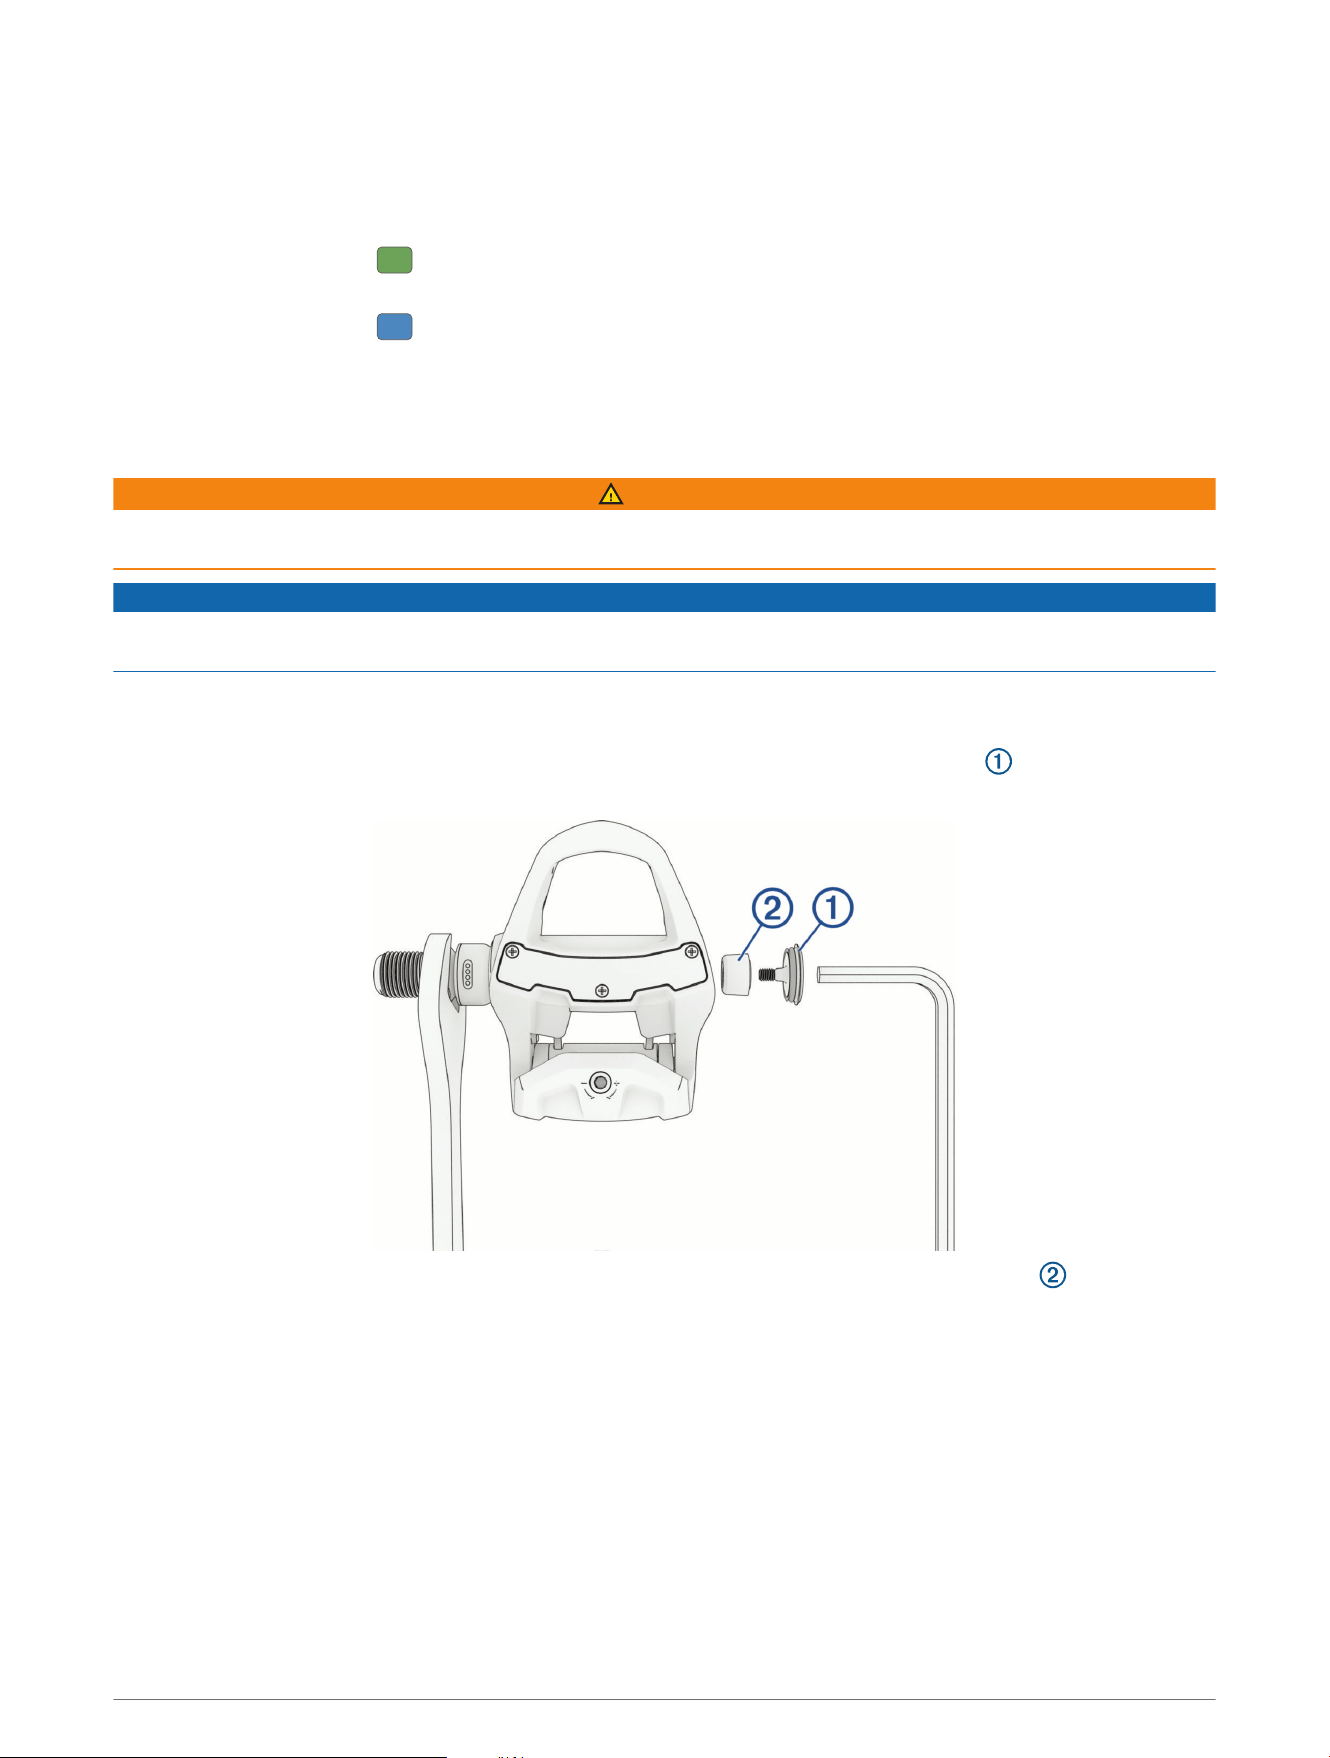
These instructions show the Rally RK pedal body. The steps are the same for any pedal body type.
1 Use a 15 mm wrench to remove the pedal from your bike.
2 Using the wrench to hold the spindle steady, use a 5mm hex key to remove the cover .
NOTE: The cover on the right pedal has a left-handed (reverse) thread.
3 Using the wrench to hold the spindle steady, use the 5 mm hex key to remove the spindle nut .
NOTE: The spindle nut on the right pedal has a left-handed (reverse) thread.
4 Remove the pedal body from the spindle.
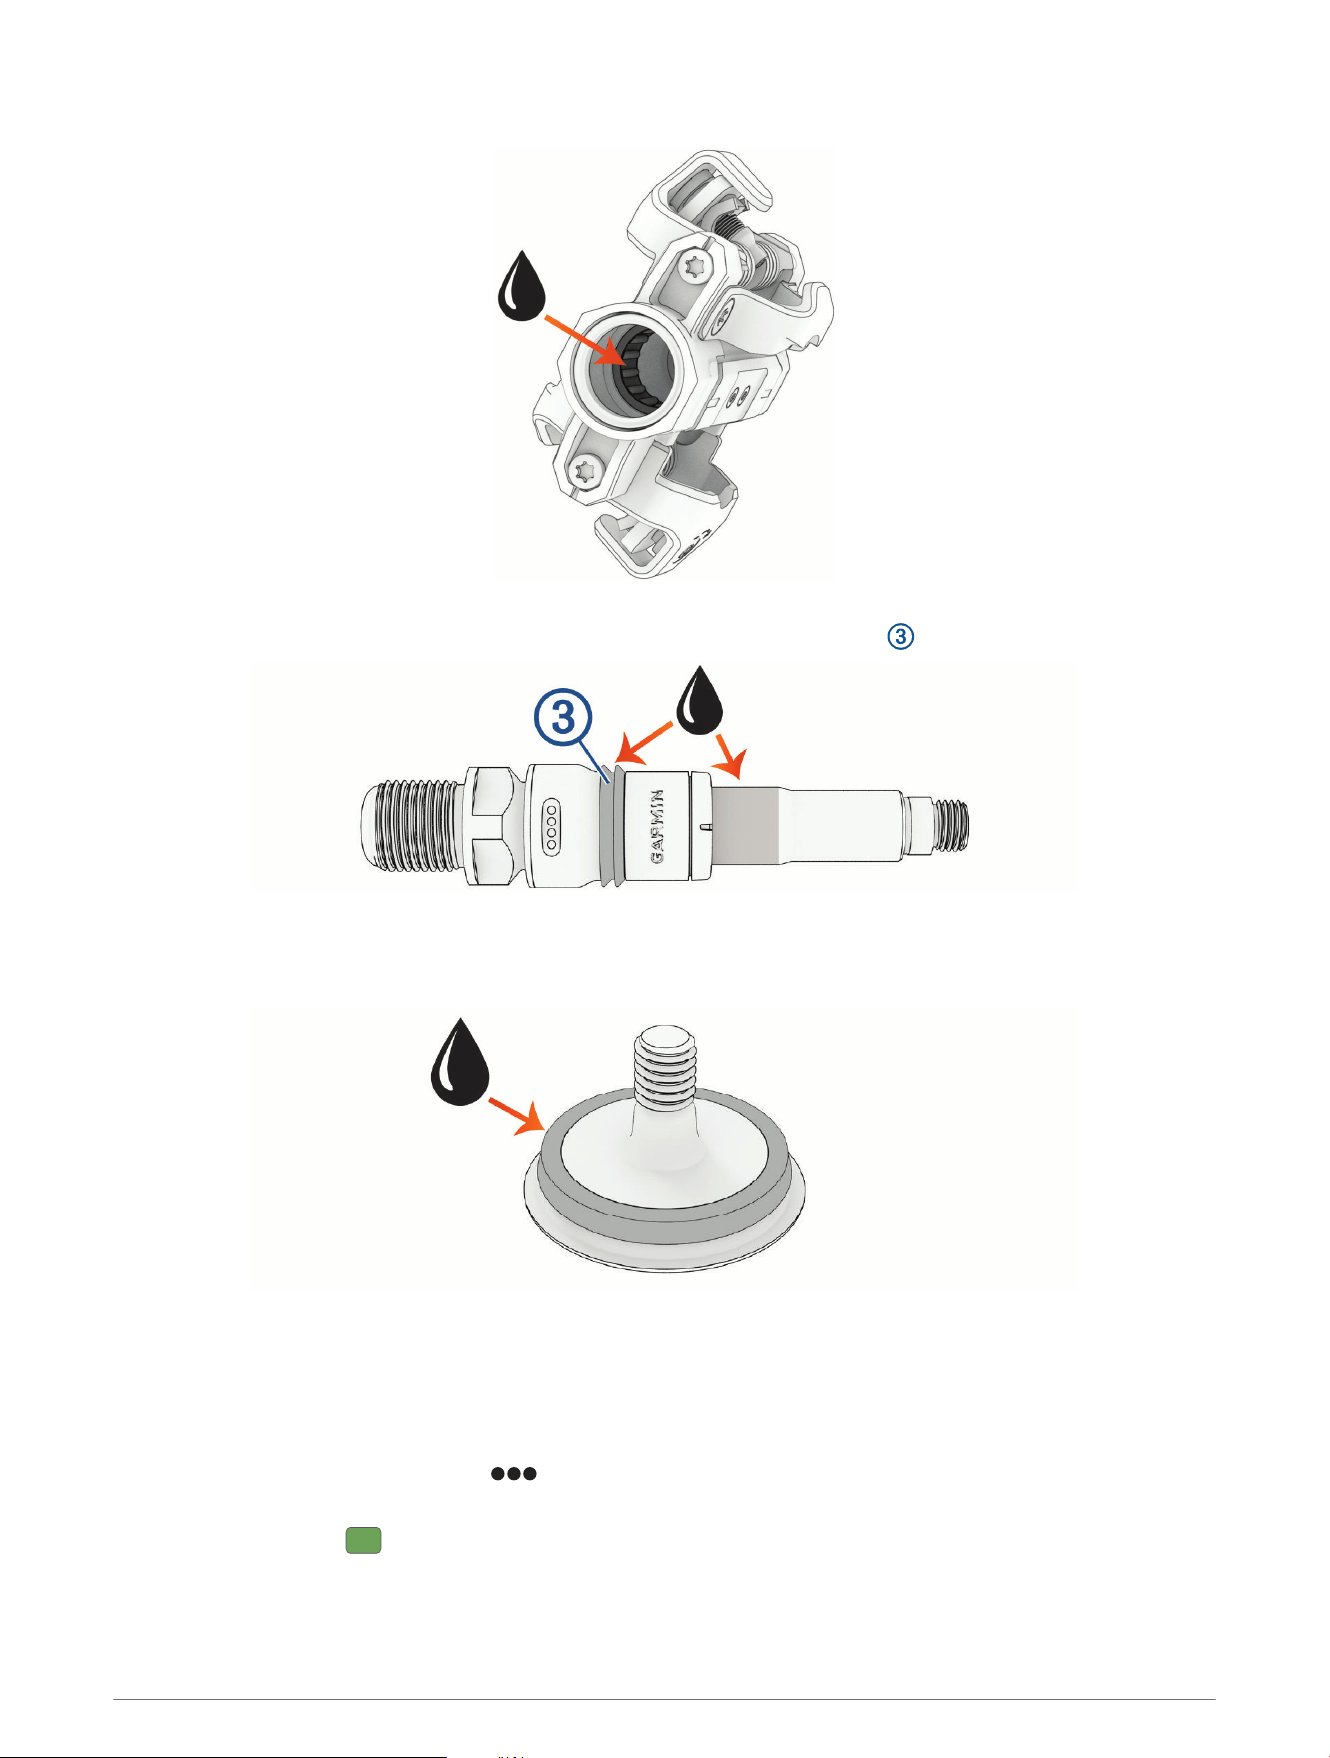
5 Wipe all grease off the spindle, and apply a thin layer of new grease to the highlighted areas.
NOTE: You should apply enough grease to fill the groove on the rubber seal .
Changing Pedal Bodies 19
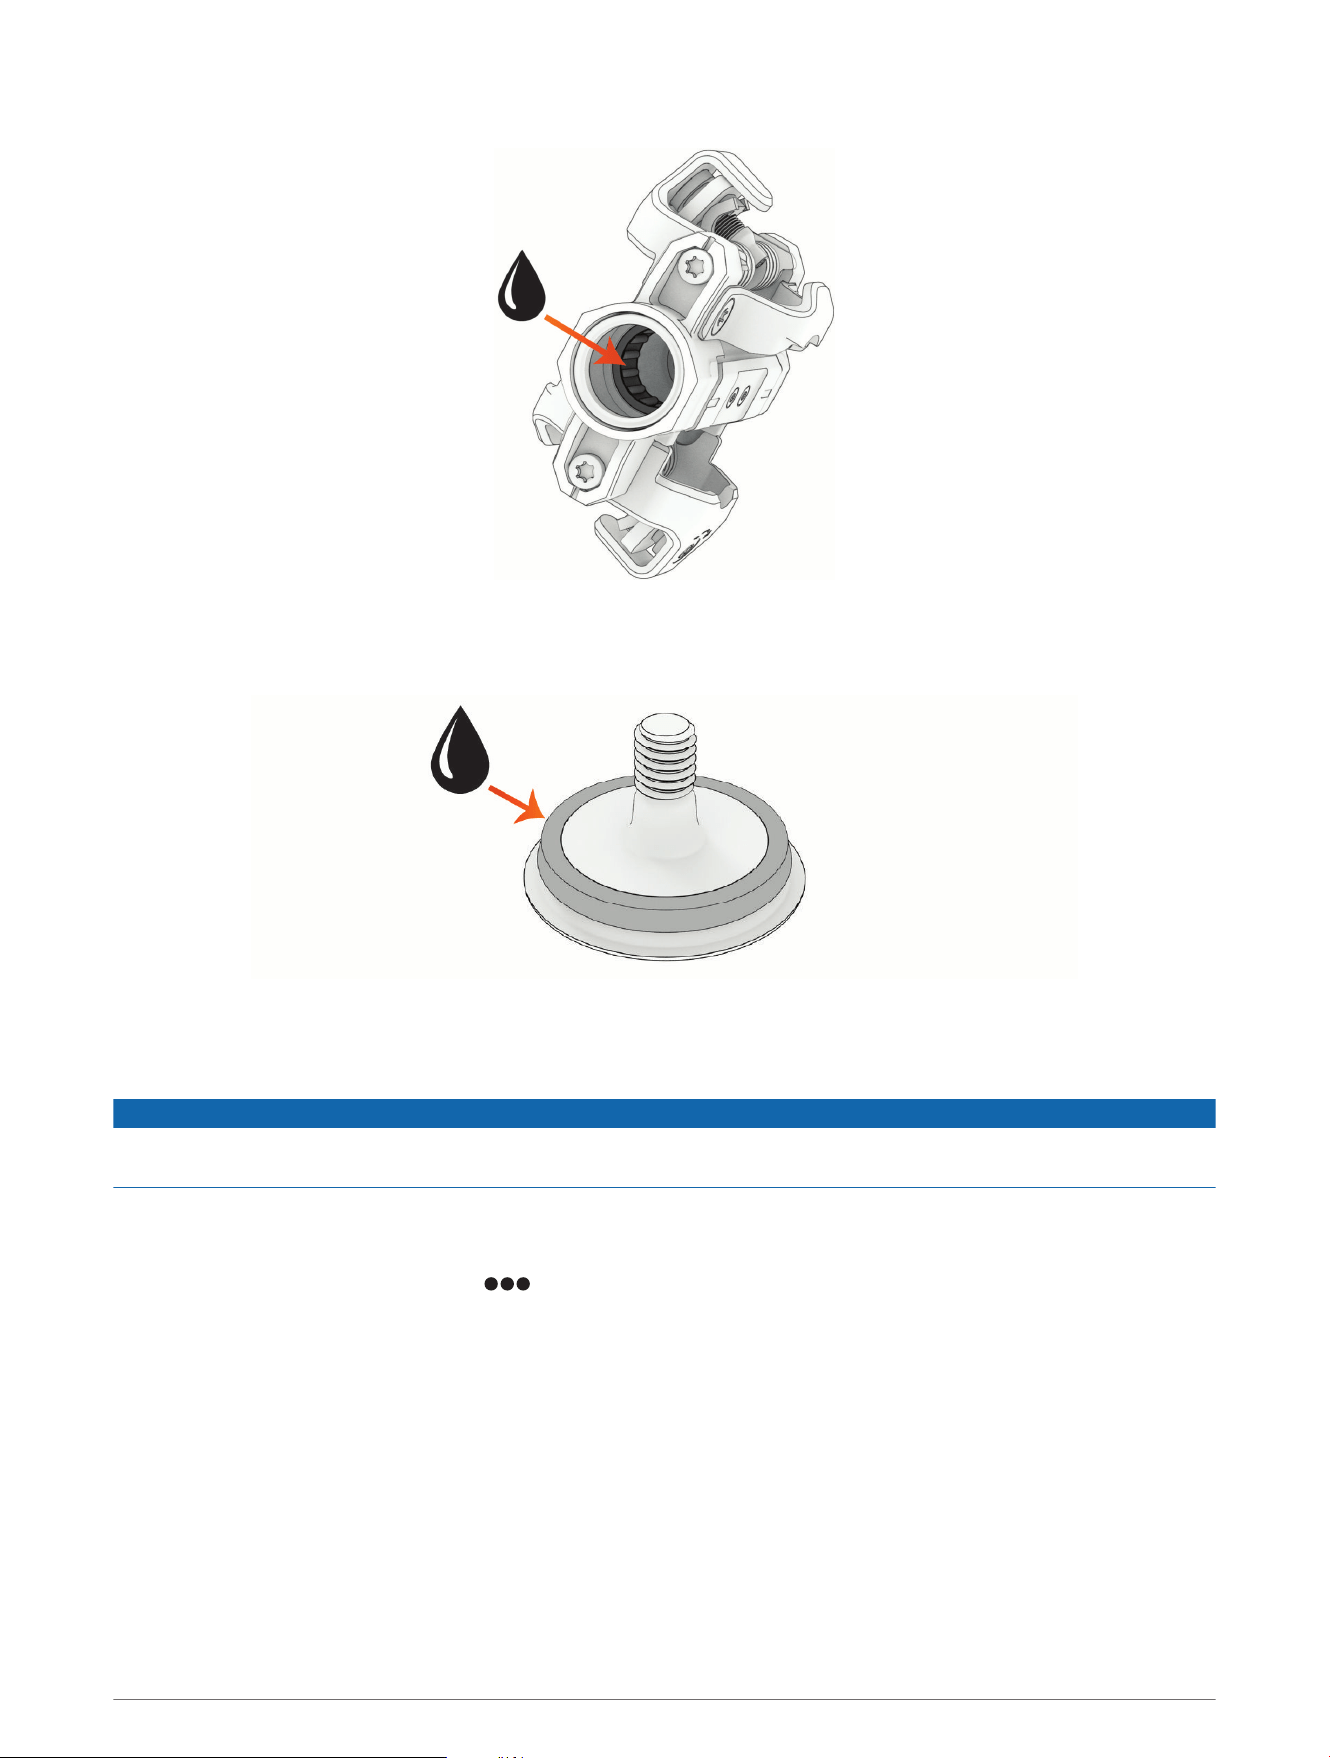
6 Apply a thin layer of grease to the roller bearing inside the new pedal body.
7 Insert the spindle into the new pedal body, and rotate it a few times to distribute the grease.
8 Use a 5mm hex key to install the spindle nut, and tighten it to 10 N-m (88lbf-in.).
9 Apply a thin layer of grease to the O-ring around the cover.
10 Use a 5 mm hex key to install the cover, and tighten it to 5 N-m (44lbf-in.).
11 Wipe off all excess grease.
12 Repeat steps 1 through 11 for the other pedal.
NOTICE
You should wipe off all grease inside the pedal bodies before storing them. Storing the pedals with old grease or
debris inside them may lead to product damage.
System Settings
From the Garmin Connect app, select > Garmin Devices > Rally 110/210 > System.
TIP: You can also change system settings using a compatible Garmin watch or cycling computer.
Crank Length: Sets the crank length to ensure accurate power calculation (Entering the Crank Length, page6).
NOTE: If you enter the crank length using your connected watch or cycling computer, crank length updates on
the Garmin Connect app do not take effect. You must change the setting on the watch or cycling computer.
Peak Power Phase Angle: Sets the percentage used when calculating peak power phase (Cycling Dynamics,
page14).
Auto Zero Offset: Enables or disables automatic calibration.
Right Pedal: Links or unlinks the right pedal in a dual-sensing system.
Factory Reset: Resets the pedals to factory defaults (Resetting the Pedals to Factory Defaults, page21).
20 System Settings
Additional Settings
Additional settings for the Rally 110/210 pedals are available on your compatible watch or cycling computer.
NOTE: Some settings may not be supported depending on your watch or cycling computer model.
Crank Length: Sets the crank length to ensure accurate power calculation (Entering the Crank Length, page6).
Rider Position Transfer Time: Sets the minimum time threshold for the pedals to record a change in riding
position (Rally 210 models only).
Torque Effectiveness and Pedal Smoothness: Turns torque effectiveness and pedal smoothness data
recording on or off (Rally 210 models only).
NOTE: This setting is shown only on devices using an ANT+ connection.
Scale Factor: Applies a modifier to the power calculations.
Checking for Software Updates
You can use the Garmin Connect app to update your Rally 110/210 pedals to the latest software.
1 In the Garmin Connect app, select > Garmin Devices > Rally 110/210.
2 Select Check for Update.
3 If a software update is available, follow the on-screen instructions.
The Garmin Connect app sends the update to the pedals. Updating the software takes several minutes. The
pedal status LED flashes during the update.
NOTE: In a dual-sensing system, the software on both pedals updates at the same time.
Resetting the Pedals to Factory Defaults
1 Rotate the cranks to wake up the pedals.
NOTE: In a Rally 210 system, both pedals must be turned on to perform a factory reset.
2 In the Garmin Connect app, select > Garmin Devices > Rally 110/210 > System.
3 Select Factory Reset.
While resetting the pedals, the status LED flashes .
After completing the factory reset, the pedals go into secure pairing mode, and the status LED flashes .
NOTE: You must delete the pedals from your mobile device Bluetooth settings before pairing the pedals with the
Garmin Connect app again (Pairing with the Garmin Connect App, page2).
Care and Maintenance
Preserving Battery Life Using Travel Mode
Before traveling or storing the Rally 110/210 pedals for an extended period of time, you should enable travel
mode to preserve battery life.
1 In the Garmin Connect app, select > Garmin Devices > Rally 110/210.
2 Select Travel Mode > Enable Travel Mode.
The pedals turn off, and do not wake up automatically when motion is detected.
You must connect the pedals to a power supply to turn them back on.
Care and Maintenance 21
Turning Off Travel Mode
1 Connect the USB-C cable to the charging adapter .
2 Connect the charging adapter to the pedal spindle, aligning the pins on the charging adapter with the
charging contacts on the pedal spindle.
3 Connect the other end of the USB-C cable to a power supply, such as an AC adapter (not included).
The LED on the threaded end of the spindle flashes green.
4 Disconnect the charging adapter from the pedal.
5 Repeat steps 1 through 4 for the other spindle (Rally 210 models only).
Cleaning and Greasing the Pedals
NOTICE
Garmin recommends cleaning and applying new grease to your spindles and pedal bodies after every 100 hours
of riding or after significant exposure to water. Depending on your typical riding conditions, you may need to
clean and apply new grease more often.
Following the instructions for changing pedal bodies, clean and apply new grease to the spindle and the
inside of the pedal body (Changing Pedal Bodies, page19).
Overhauling the Rally 110/210 Pedals
If your Rally 110/210 pedals are showing signs of wear, you can purchase a kit to replace the pedal body and
hardware on one or both spindles.
1 Contact your Garmin dealer or go to garmin.com to purchase the kit.
• To overhaul both pedals, purchase a Rally 110/210 pedal body conversion kit.
• To overhaul only one pedal, purchase a Rally 110/210 left pedal or right pedal rebuild kit.
2 Follow the instructions for changing pedal bodies, and replace the seals, the spindle nut, and the outer cover
with the new parts included in the kit (Changing Pedal Bodies, page19).
Upgrading a Rally 110 System
You can upgrade a single-sensing Rally 110 pedal power meter to a dual-sensing Rally 210 system by adding a
Rally 110 upgrade spindle, to access advanced training data (Cycling Dynamics, page14).
You can purchase a Rally 110 upgrade spindle from your Garmin dealer, or you can go to garmin.com.
22 Upgrading a Rally 110 System
Turning On the New Spindle
The new spindle is packaged in travel mode to preserve battery life. You must briefly connect it to a power
source to turn it on.
1 Use the included charging adapter and USB-C cable to connect the spindle to a power source.
The status LED flashes while charging.
2 Disconnect the spindle from the charging adapter.
The status LED flashes as the right spindle searches for a connection to the left spindle.
TIP: You should write down the seven-digit pairing code located on the new spindle, next to the charging
contacts. You will need it later to pair the new spindle.
Installing the New Spindle
WARNING
You must tighten the spindle nut and cover according to the specified torque requirements. Too much or not
enough torque may lead to product damage or serious personal injury or death.
NOTICE
You must apply grease to the new spindle according to the instructions below. Installing the new spindle
without appropriate grease application causes product damage.
These instructions show the Rally RK pedal body. The steps are the same for any Rally 110 pedal body type.
1 Use a 15 mm wrench to remove the right pedal from your bike.
2 Using the wrench to hold the spindle steady, use a 5mm hex key to remove the cover .
NOTE: The cover on the right pedal has a left-handed (reverse) thread.
3 Using the wrench to hold the spindle steady, use a 5 mm hex key to remove the spindle nut .
NOTE: The spindle nut on the right pedal has a left-handed (reverse) thread.
4 Remove the pedal body from the existing spindle.
Upgrading a Rally 110 System 23
5 Wipe off all grease, and apply a thin layer of new grease to the roller bearing inside the pedal body.
6 Apply a thin layer of grease to the highlighted areas of the new spindle.
NOTE: You should apply enough grease to fill the groove on the rubber seal .
7 Insert the new spindle into the pedal body and rotate it a few times to help distribute the grease.
8 Use a 5mm hex key to install the spindle nut and tighten it to 10 N-m (88lbf-in.).
9 Apply a thin layer of grease to the O-ring around the cover.
10 Use a 5 mm hex key to install the cover and tighten it to 5 N-m (44lbf-in.).
11 Wipe off all excess grease.
Pairing the New Spindle Using the Garmin Connect App
1 Rotate the cranks to wake up the pedals.
2 On the Garmin Connect app, select > Garmin Devices > Rally 110/210 > System > Link Right Pedal.
3 Enter the 7-digit pairing code found on the new spindle.
The status LED flashes on both spindles.
24 Upgrading a Rally 110 System
Getting More Information
• Go to support.garmin.com for additional manuals, articles, and software updates.
• Go to buy.garmin.com, or contact your Garmin dealer for information about optional accessories and
replacement parts.
Specifications
Operating temperature range From -10° to 50°C (from 14° to 122°F)
Battery type Rechargeable, Lithium-Ion
Battery life Up to 90 hr.
Charging temperature range From 15° to 40°C (from 59° to 104°F)
2
Wireless frequency and transmit power 2.4GHz @ 9.95 dBm maximum
Water rating IEC 60529 IPX7
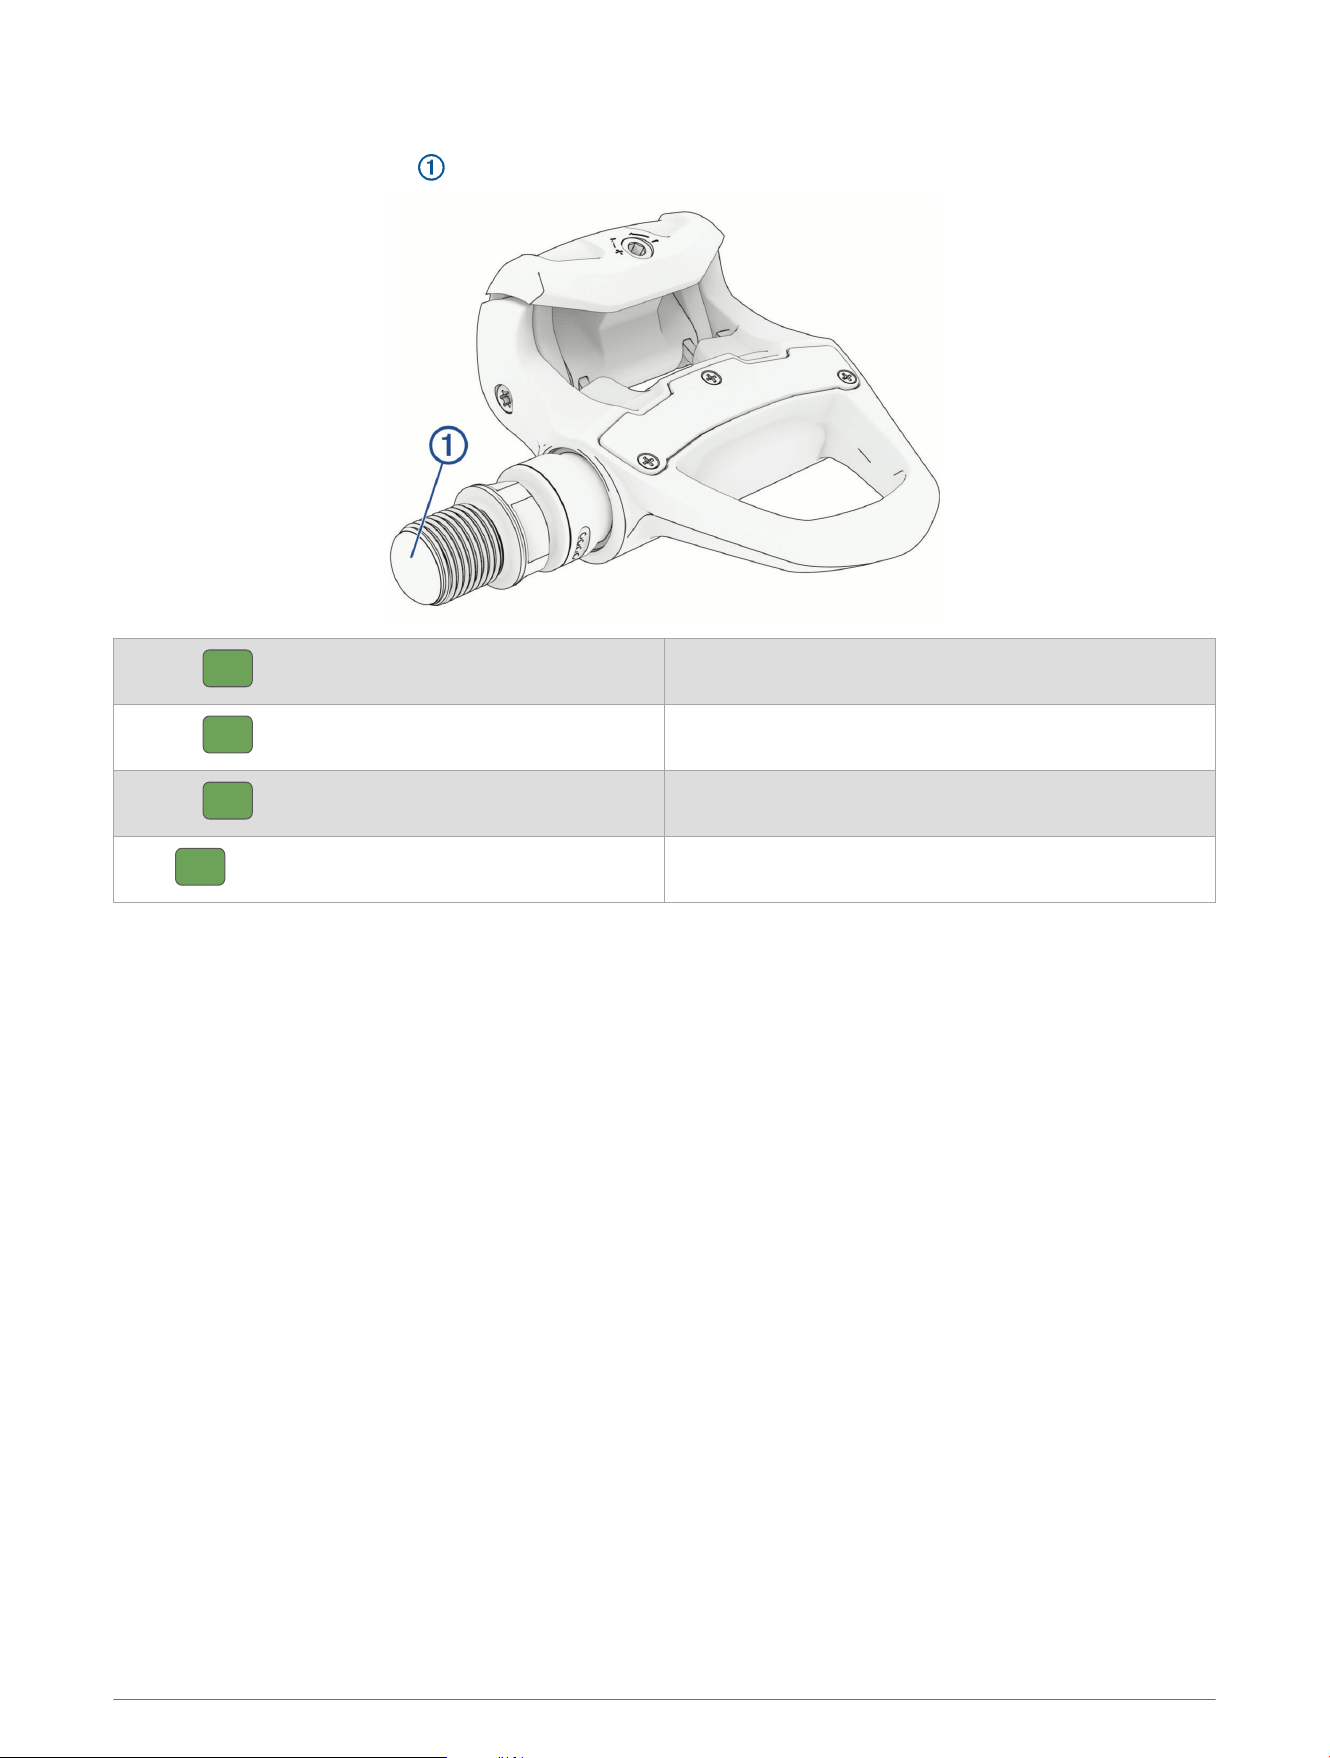
3
Status LED
The status LED is located on the threaded ends of the spindles.
NOTE: On the Rally 110 pedal power meter, only the left pedal has a status LED.
2
The device battery charges more slowly when outside the optimal charging temperature range.
3
The device withstands incidental exposure to water of up to 1m for up to 30min. For more information, go to www.garmin.com/waterrating.
Getting More Information 25
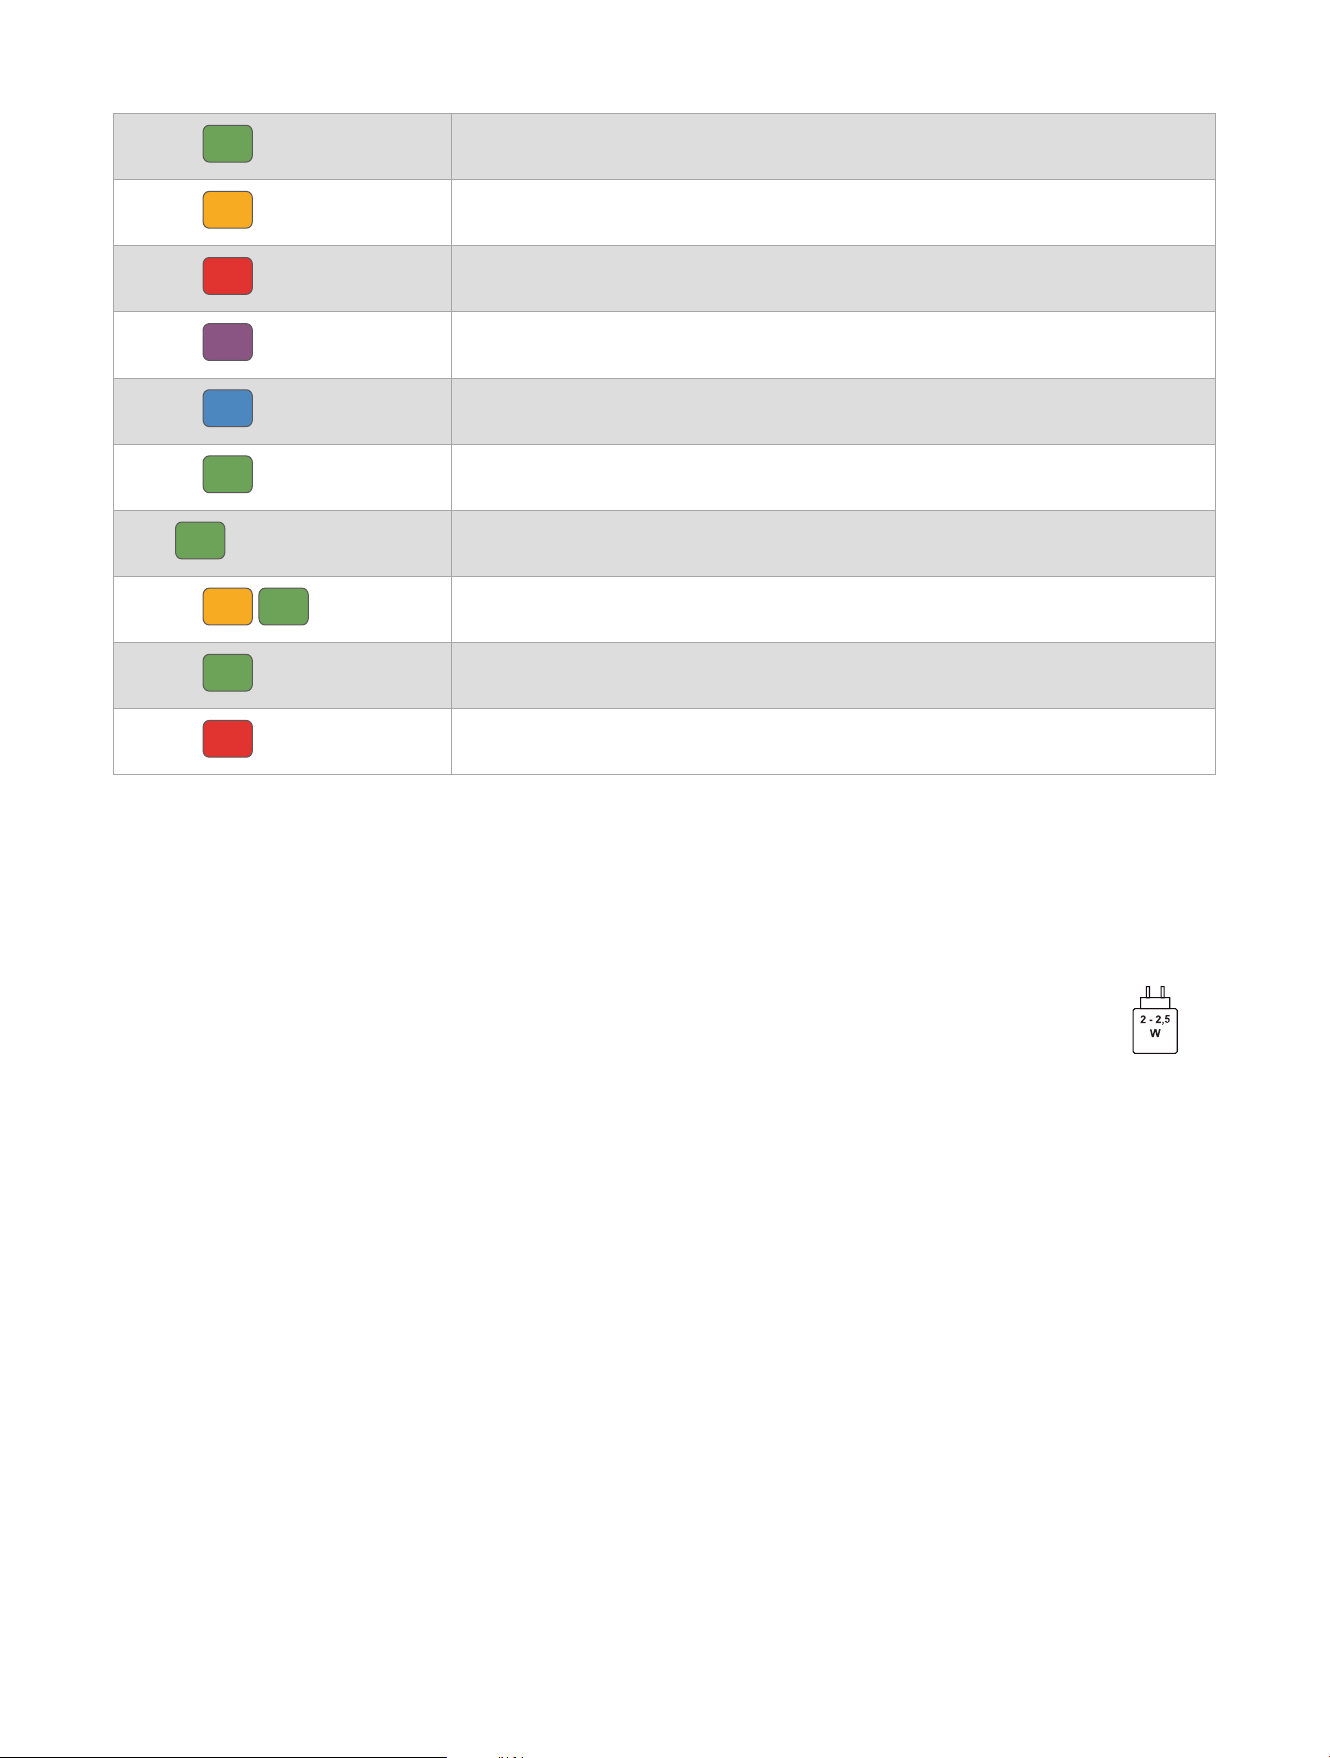
Flashes
The battery level is good (up to 90hr. remaining).
Flashes
The battery level is low (up to 70hr. remaining).
Flashes
The battery level is critical. (less than 12hr. remaining).
Flashes
The pedal is in pairing mode (left pedal only).
Flashes
The pedal is attempting to connect to the other pedal (Rally 210 only).
Flashes continuously
The pedal is charging.
Solid
Charging is complete.
Flashes
Updating the software.
Flashes 20 times rapidly
Software update complete.
Flashes 20 times rapidly
Software update failed.
NOTE: When the pedals are idle and set to allow secure connections only, the LED flashes twice every five
seconds. When set to allow open connections, the LED flashes three times every five seconds (Allowing
Open Connections, page6). For more information on open and secure connections, go to garmin.com
/connectiontypes.
Charging Requirements
The power delivered by the charger must be between min 2 Watts required by the radio equipment,
and max 2,5 Watts in order to achieve the maximum charging speed.


support.garmin.com
GUID-E17670DF-416F-455E-8444-29845F375EBD v1August 2025