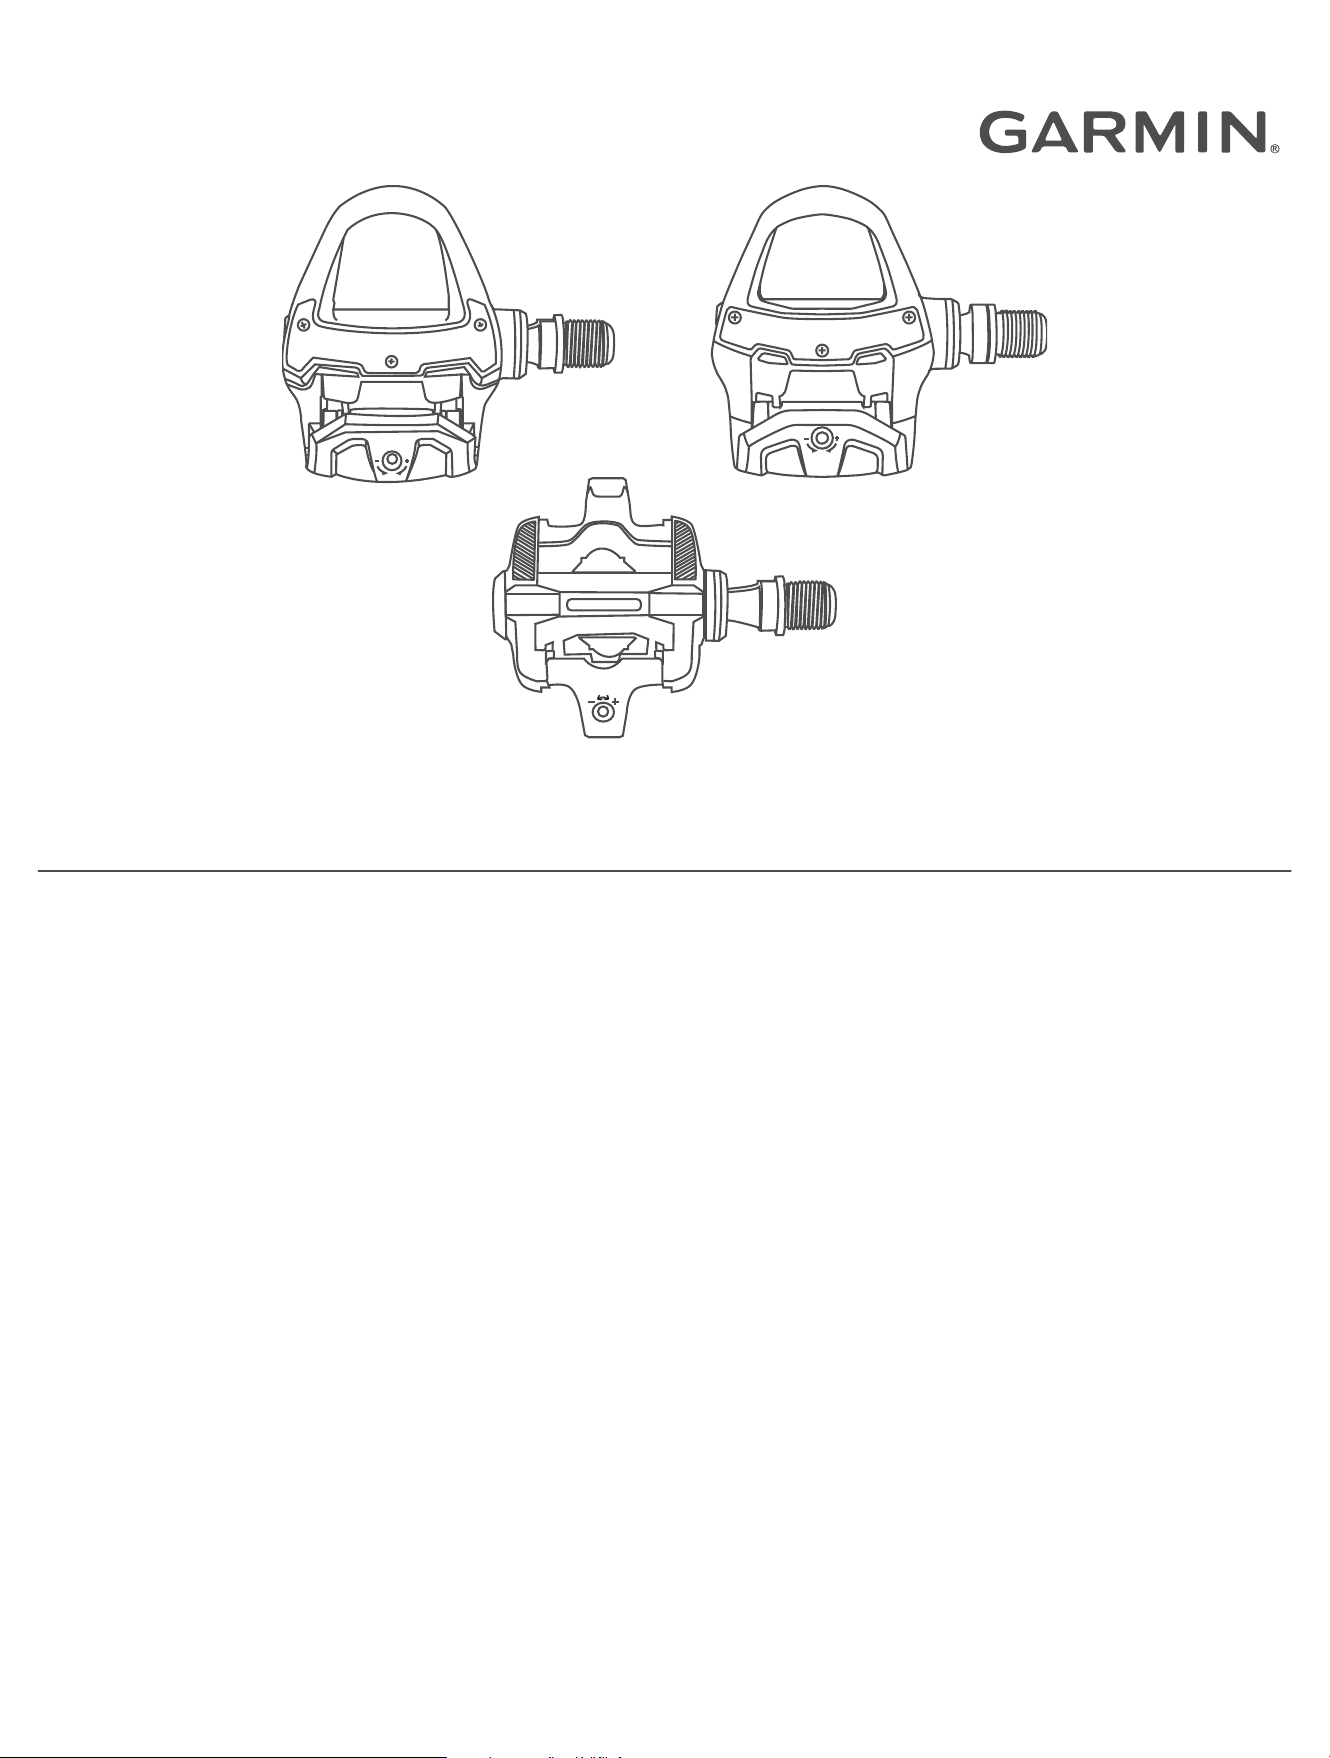
RALLY
™
RS/RK/XC
Owner’s Manual

© 2021 Garmin Ltd. or its subsidiaries
All rights reserved. Under the copyright laws, this manual may not be copied, in whole or in part, without the written consent of Garmin. Garmin reserves the right to change
or improve its products and to make changes in the content of this manual without obligation to notify any person or organization of such changes or improvements. Go to
www.garmin.com for current updates and supplemental information concerning the use of this product.
Garmin
®
, the Garmin logo, ANT+
®
, Edge
®
, fēnix
®
, and Forerunner
®
are trademarks of Garmin Ltd. or its subsidiaries, registered in the USA and other countries. Garmin Connect
™
and
Rally
™
are trademarks of Garmin Ltd. or its subsidiaries. These trademarks may not be used without the express permission of Garmin.
The BLUETOOTH
®
word mark and logos are owned by the Bluetooth SIG, Inc. and any use of such marks by Garmin is under license. Training Stress Score
™
(TSS), Intensity Factor
™
(IF), and Normalized Power
™
(NP) are trademarks of Peaksware, LLC. Other trademarks and trade names are those of their respective owners.
This product is ANT+
®
certified. Visit www.thisisant.com/directory for a list of compatible products and apps.
The FCC ID is located in the battery compartment. FCC ID: IPH-03220
M/N: A03220

Table of Contents
Introduction......................................1
Thank You................................................ 1
Getting Started........................................ 1
Tools Needed.......................................... 1
Installing the Rally Components............ 1
Shoe Cleats..............................................5
Applying the Reflective Stickers............. 7
About the Rally 100 System................... 7
Pairing Rally with Your Edge® 830 or
Edge 1030................................................ 8
Your First Ride......................................... 8
Training............................................8
Pedal-Based Power................................. 8
Cycling Dynamics.................................... 9
Ride Data..........................................9
Pairing Rally with the Garmin Connect
App......................................................... 10
Sending Your Ride to Garmin
Connect..................................................10
Customizing the Settings in the Garmin
Connect App.......................................... 11
Device Information......................... 11
Device Care............................................11
Maintenance Tips................................. 11
Rally Specifications...............................11
Battery Information............................... 12
Overhauling the Rally Pedals................ 13
Rally Storage......................................... 14
Other Compatible Devices.............. 14
Edge 530 Instructions........................... 14
Edge 130 Instructions........................... 15
Forerunner® 945 and fēnix® 6
Series Instructions................................ 15
Appendix........................................ 15
Registering Your Rally System............. 15
Upgrading Your Rally 100 to a Dual
Sensing System.....................................16
Changing Your Rally Pedals................. 16
Power Data Fields................................. 18
Troubleshooting.................................... 19
Table of Contents i


Introduction
WARNING
See the Important Safety and Product Information guide in the product box for product warnings and other
important information.
Read all instructions carefully before installing and using the Rally system. Improper installation or use could
result in property damage or serious personal injury.
NOTICE
Go to support.garmin.com for the latest information including bike compatibility, software updates, and video
tutorials.
Thank You
Thank you for your Rally 200 or Rally 100 purchase. This manual covers all Rally systems.
Rally was designed for cyclists, by cyclists, to provide an outstanding experience of owning a precision power
measurement system for your bike.
Rally is simple, accurate, and easy to use.
Now it's time to put the power under your feet and get out there and ride.
Getting Started
1 Install the Rally components (Installing the Rally Components, page1).
2 Install the shoe cleats (Shoe Cleats, page5).
3 Pair the pedals with a compatible device (Pairing Rally with Your Edge
®
830 or Edge 1030, page8).
4 Go for a ride (Your First Ride, page8).
5 View your ride data (Ride Data, page9).
6 Send your ride data to your Garmin Connect
™
account (Sending Your Ride to Garmin Connect, page10).
Tools Needed
• 15mm pedal wrench
• Bike grease
• 3mm hex key
• 4mm hex key
Installing the Rally Components
This manual covers all Rally systems. The installation steps for the Rally 200 and Rally 100 systems are very
similar. Steps that are specific to the Rally 100 system are noted. This manual also provides tips that are
specific to the Rally XC system.
Preparing for the Installation
1 Remove the existing pedals.
2 Clean the threads, and remove old grease.
Introduction 1
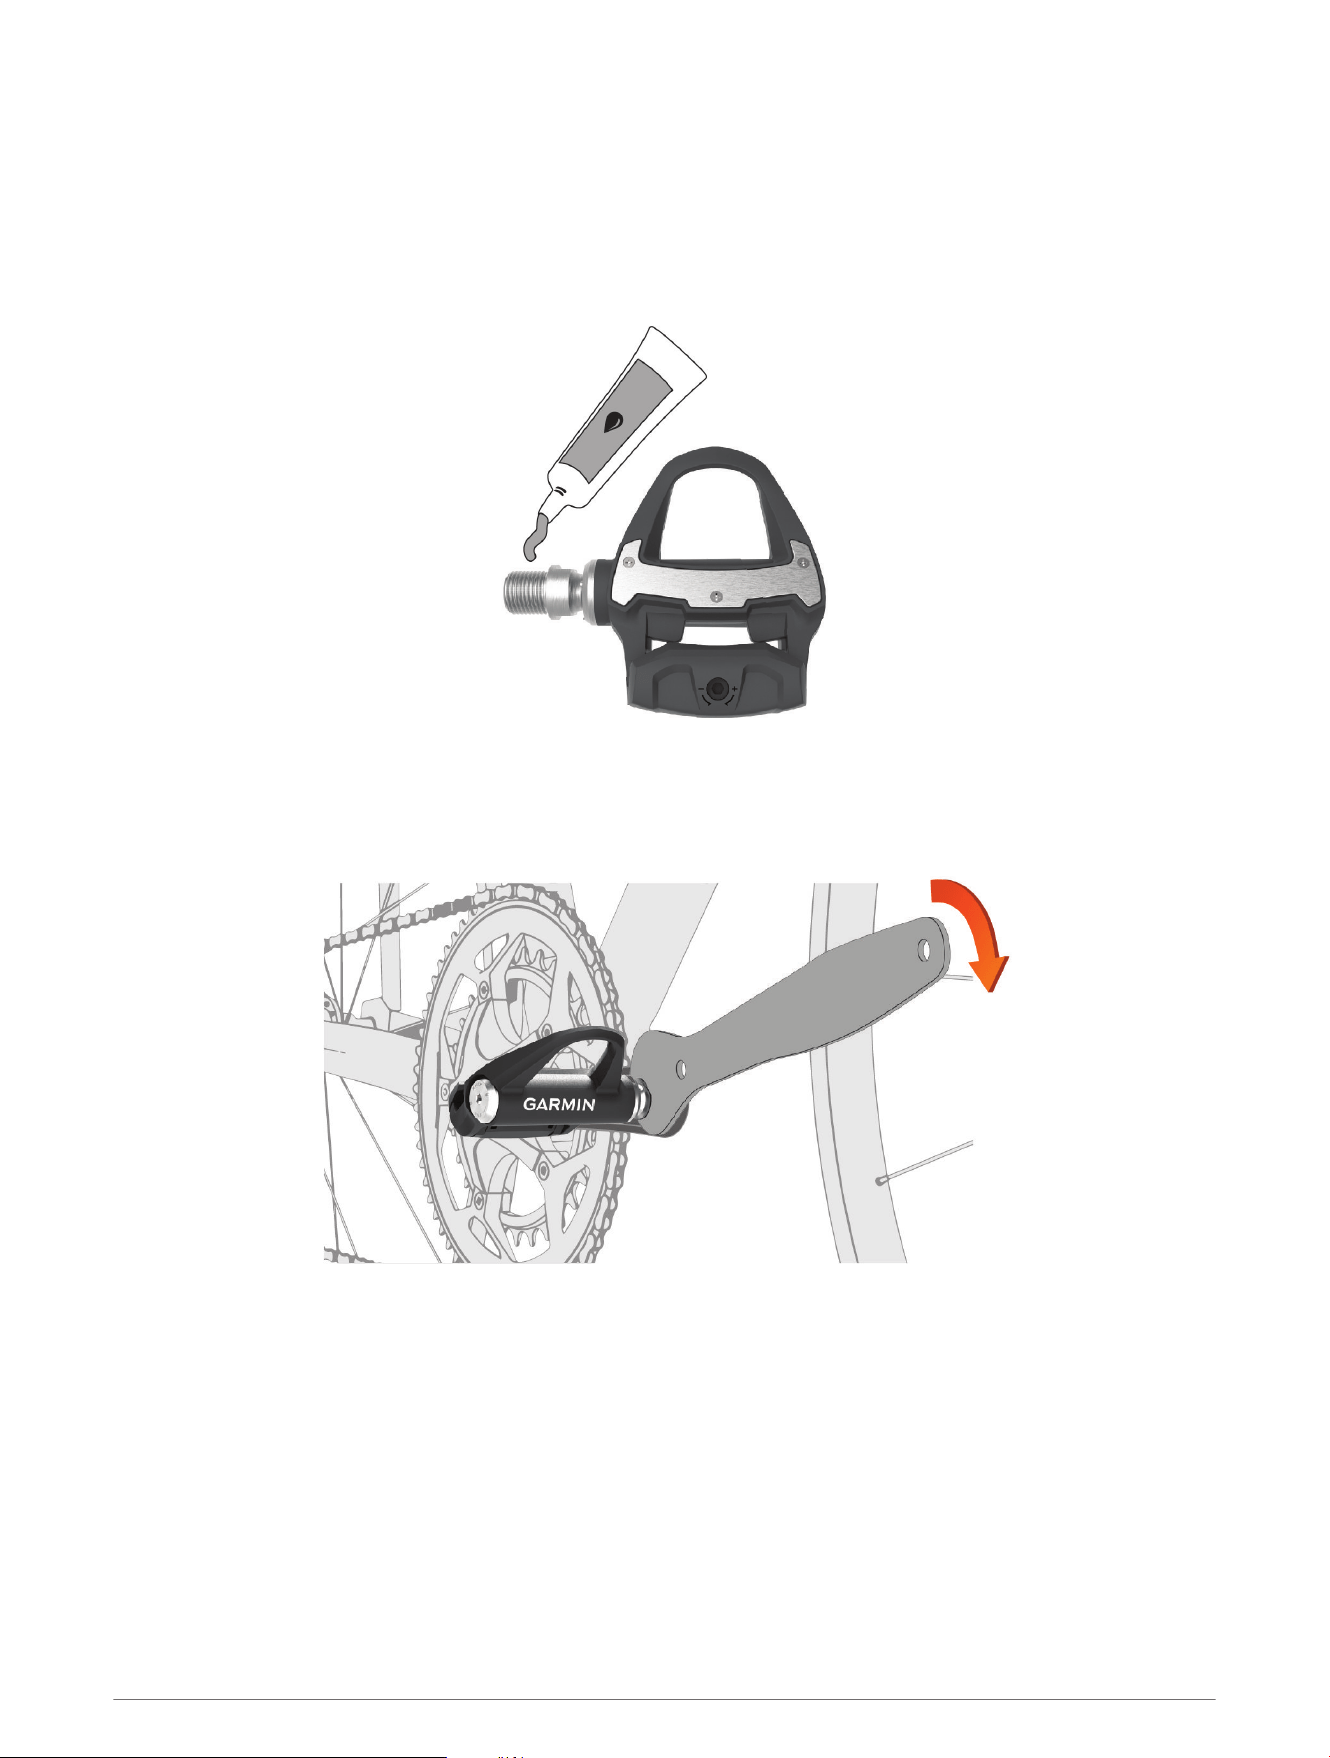
Installing the Pedals
This procedure is for any Rally 200 system and uses images of the Rally RS pedals. The installation for any Rally
100 system is the same, but the power sensor components are in the left pedal only. For more information, see
About the Rally 100 System, page7.
1 Install the right pedal first.
2 Apply a thin layer of grease on the pedal spindle threads.
3 Insert the spindle into the crank arm.
4 Hand tighten the spindle.
5 Use the pedal wrench to tighten the spindle.
NOTE: Garmin
®
recommends torque of 25lbf-ft. (34N-m).
6 Repeat steps 2 through 5 to install the left pedal.
NOTE: The left pedal spindle has a left-handed (reverse) thread.
7 Move your bike chain to the largest chain ring and the smallest cassette gear.
2 Introduction
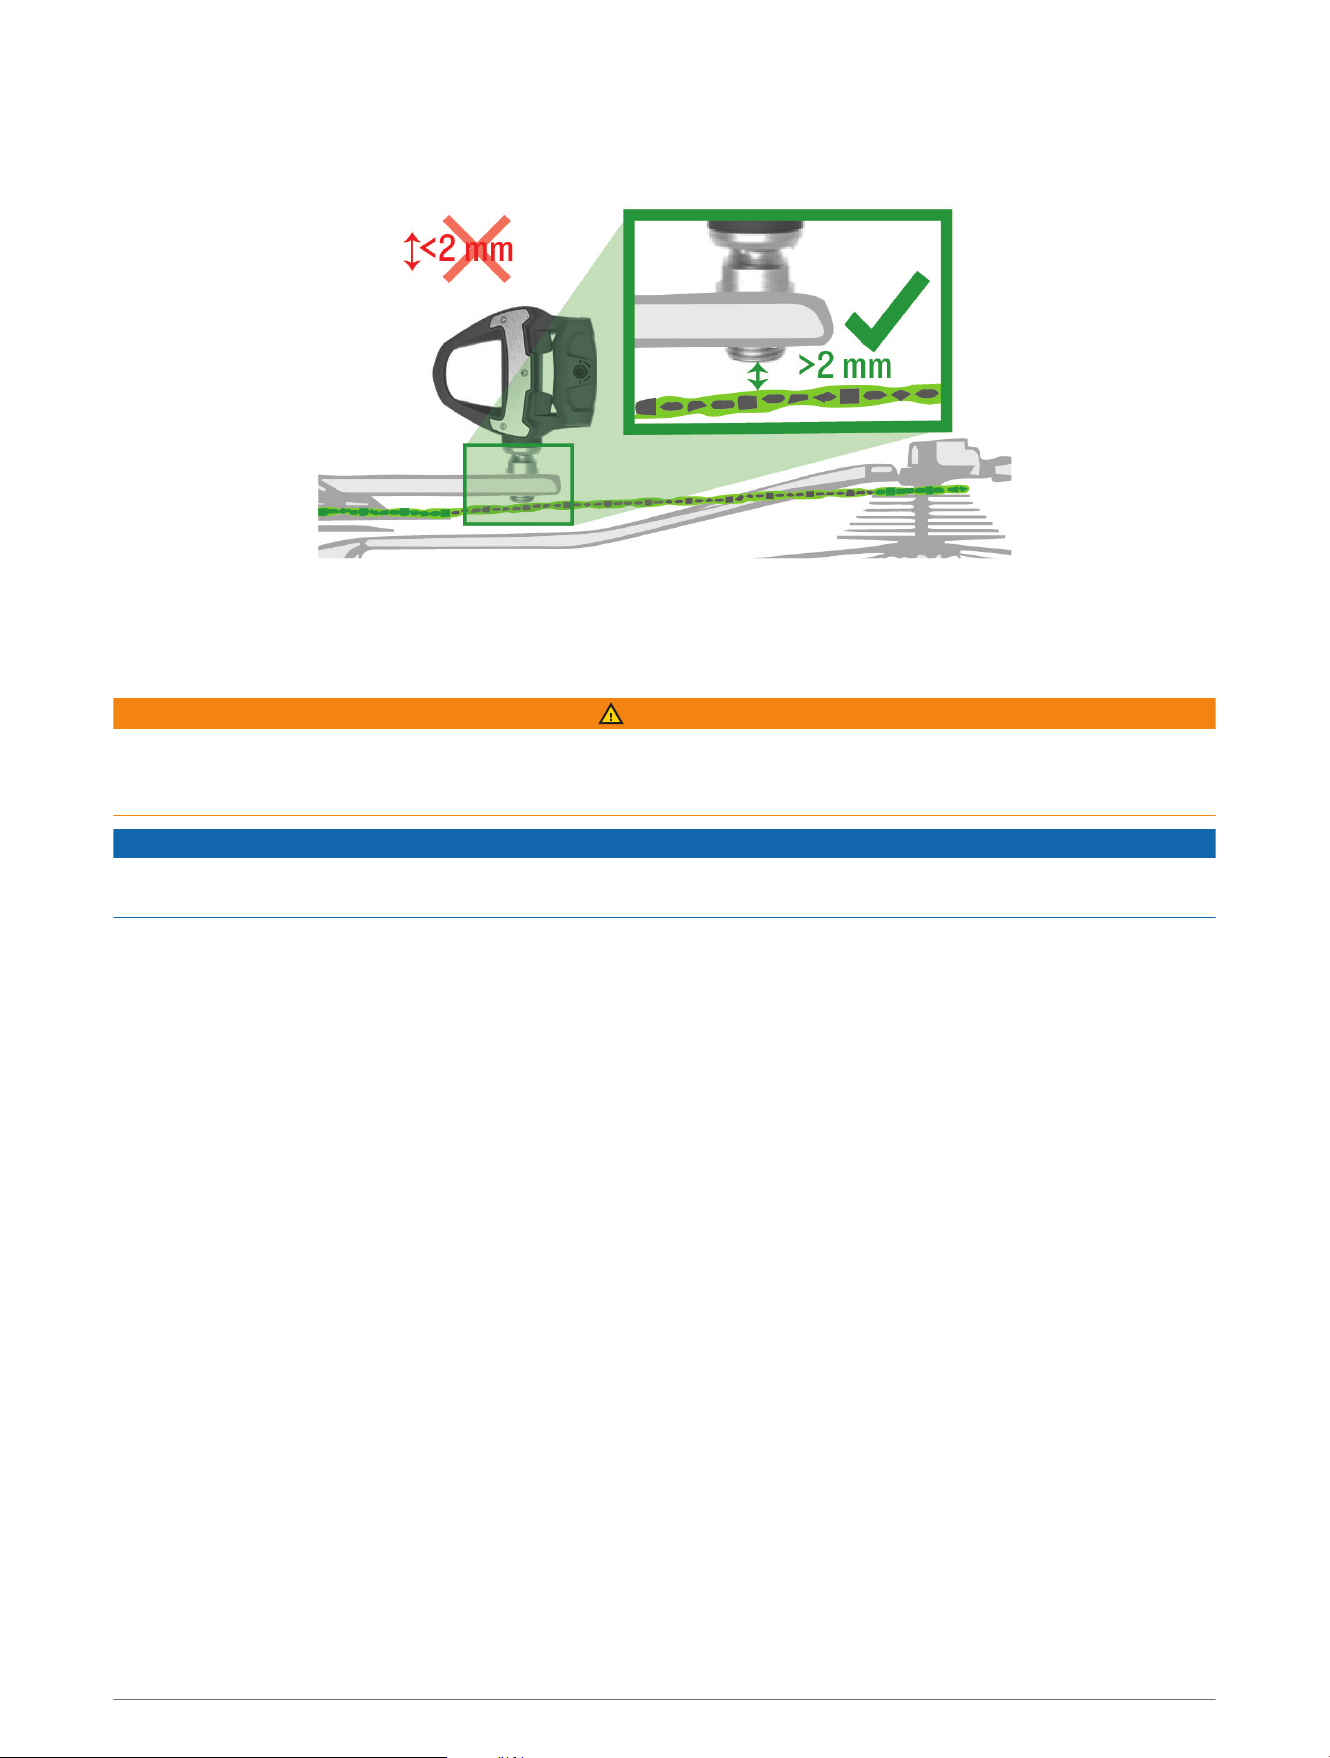
8 Rotate the crank arm to check for clearance.
Garmin recommends 2 mm or more between the pedal and the chain.
9 If the pedal rubs the chain, add one washer (included) between the spindle and the crank arm to increase
clearance.
To maintain an equal q factor, you can add one washer to the left pedal spindle.
WARNING
Do not add more than one washer to each pedal. Doing so could increase the stress on the pedal spindle and
spindle threads causing possible damage to the pedals or bike or a possible crash leading to property damage
or serious personal injury.
NOTICE
Do not install pedal extenders. Doing so could damage the electronics in the pedals, causing the pedals to not
function.
Introduction 3
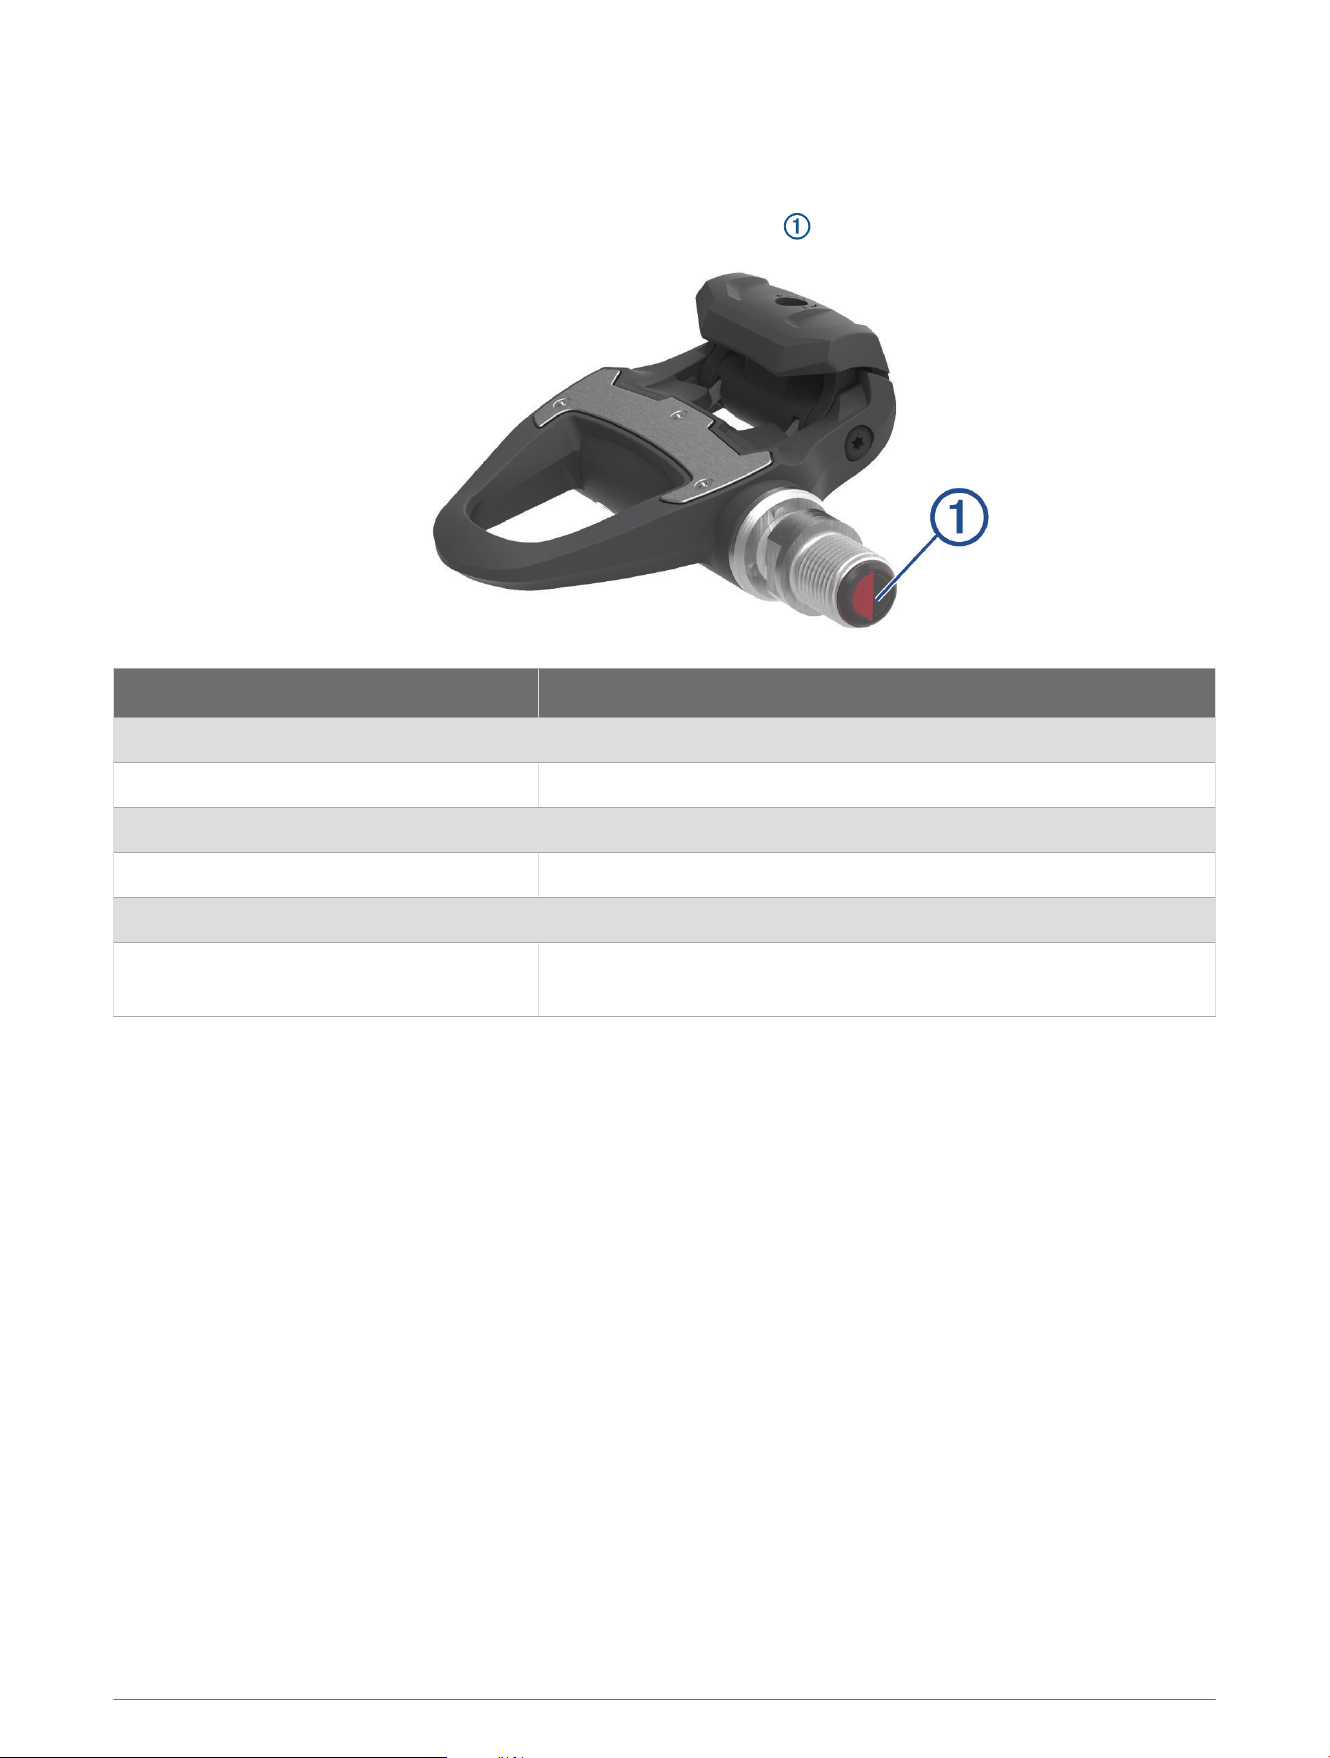
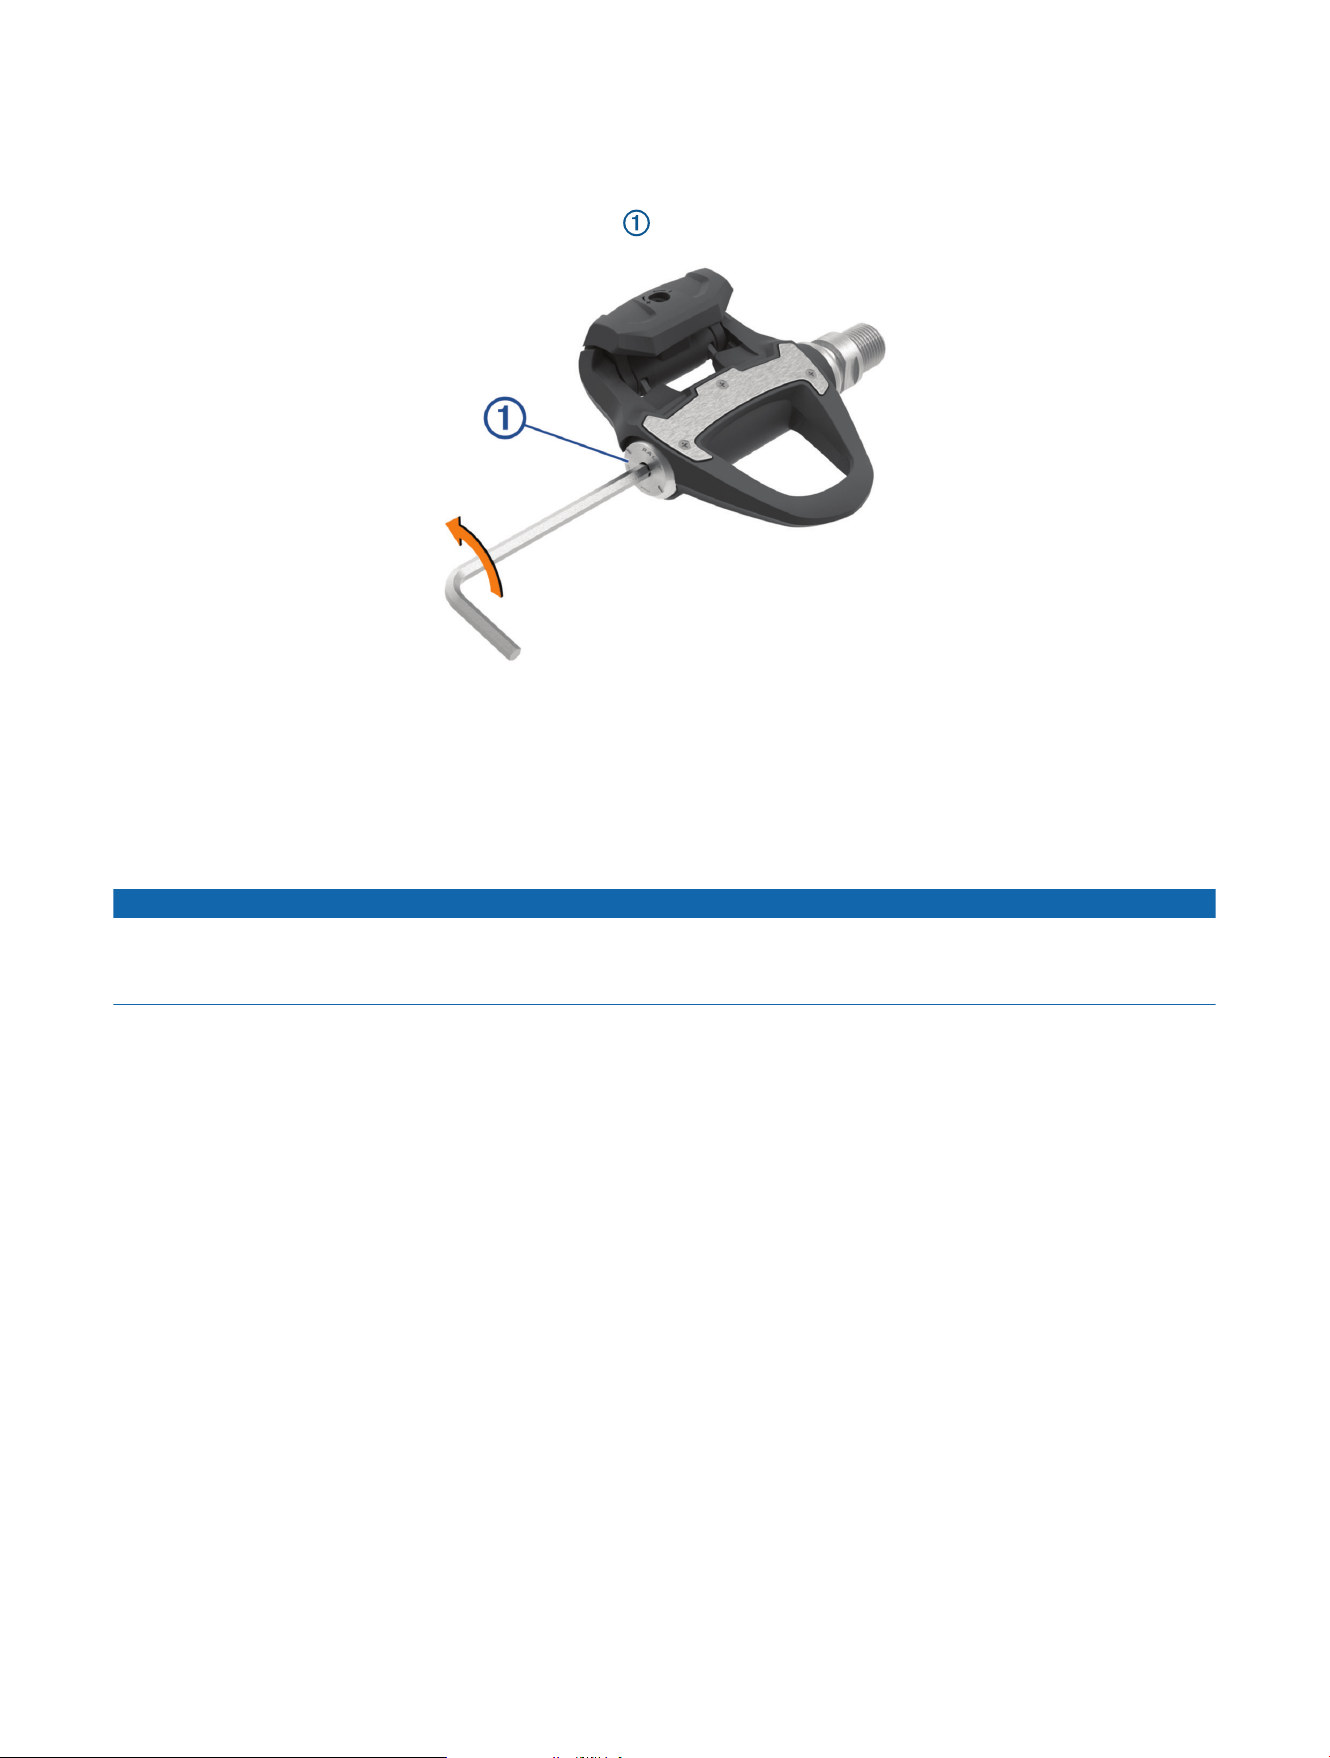
Pedal Status LED
LED flashes indicate the pedal status, including issues that require your attention. Error codes are cleared after
the issue is resolved and you have synced your Rally system with the Garmin Connect app or your compatible
Garmin device. The LED is located on the inboard end of the spindle .
LEDActivity Status
1 red flash The Rally system is active and working properly.
3 green flashes every 5 seconds The pedal is searching for the other paired pedal.
1 long green flash The left pedal is connected to the right pedal.
Alternating red and green flashes A software update or settings sync is in progress.
20 green flashes The software update or settings sync was successful.
20 red flashes
The software update or settings sync has failed.
The left pedal is unable to find the right pedal.
4 Introduction
Shoe Cleats
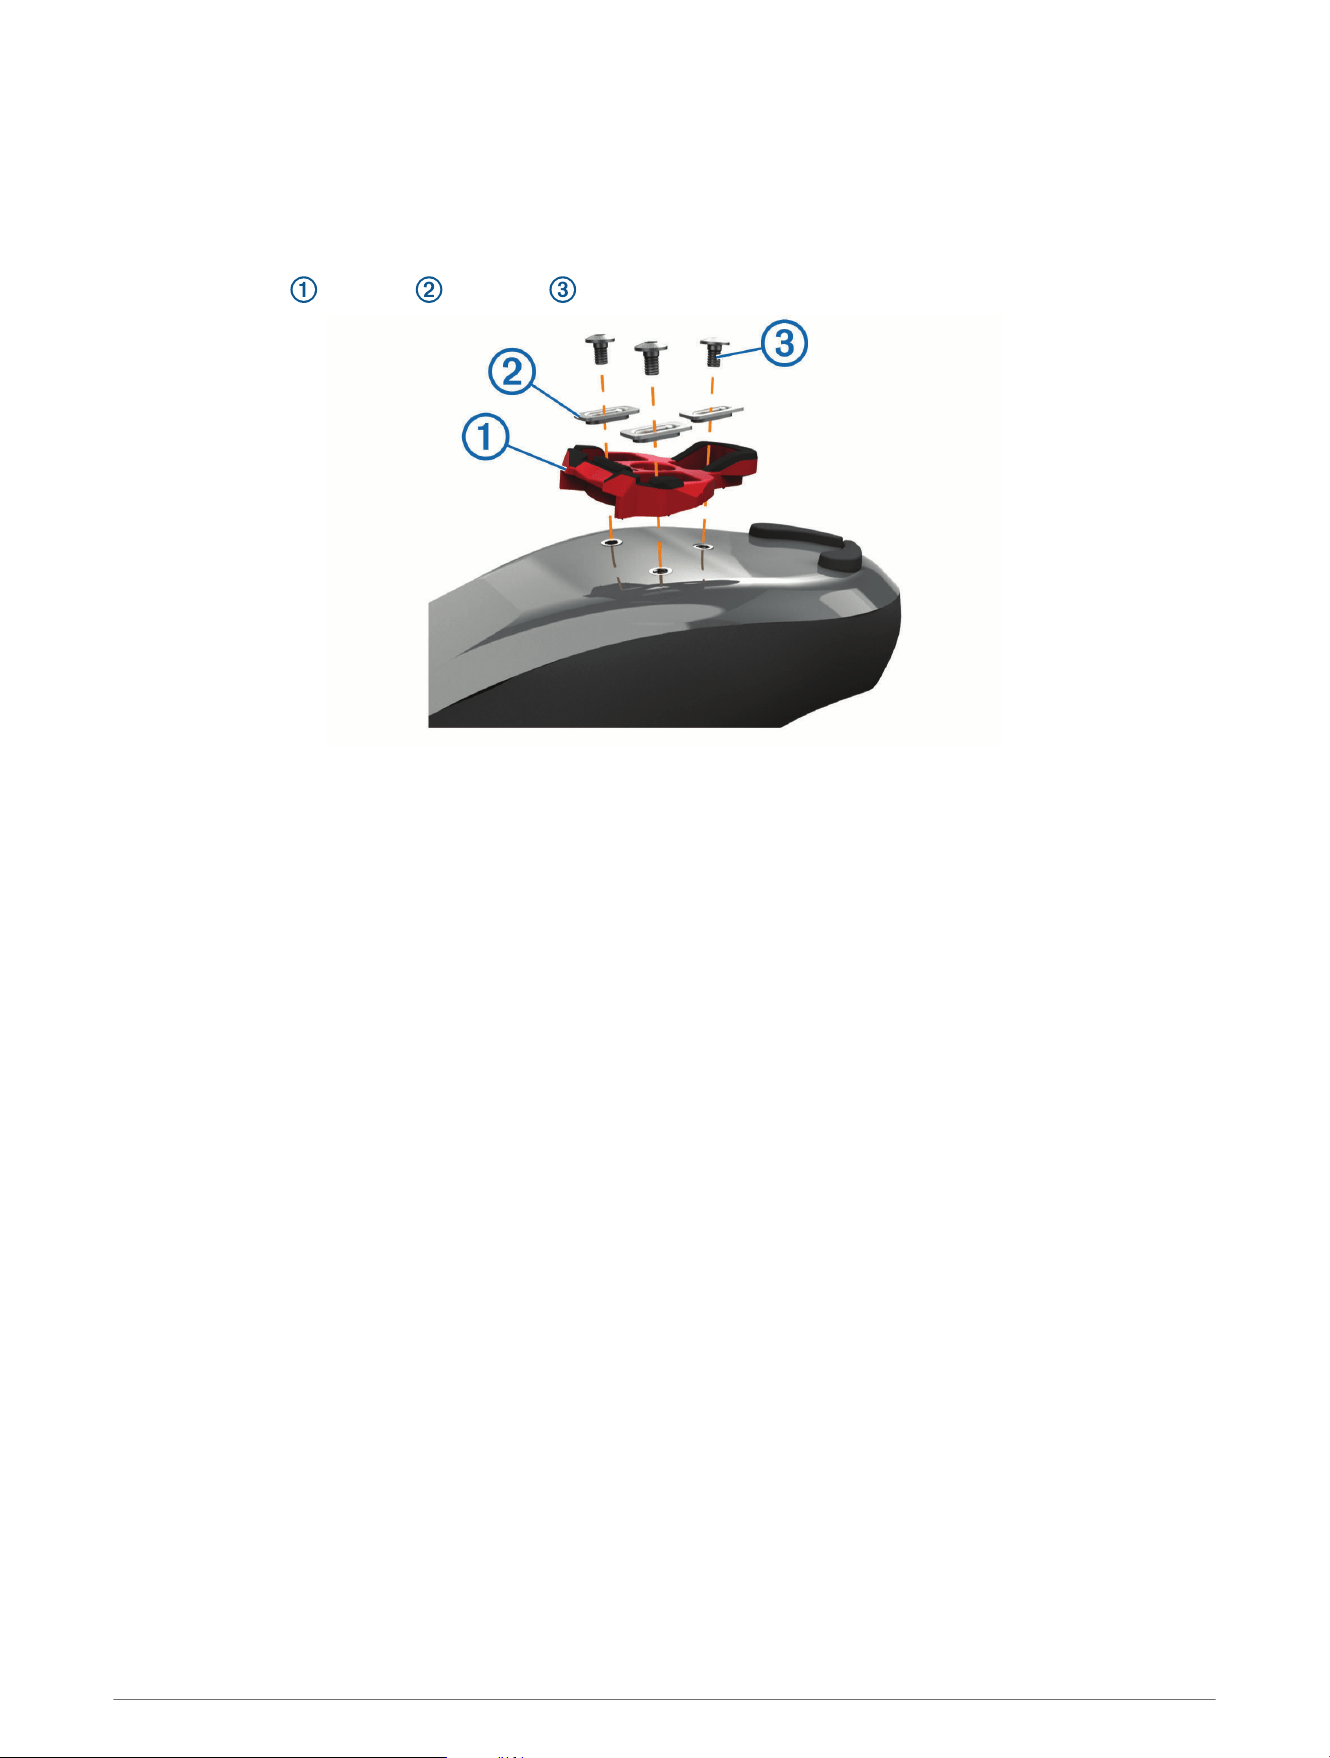
Installing the Shoe Cleats for Rally RS and Rally RK
NOTE: The left and right cleats are the same.
1 Apply a thin layer of grease on the cleat bolt threads.
2 Align the cleat , washers , and bolts .
3 Use a 4mm hex key to loosely attach each bolt to the sole of the shoe.
4 Adjust the cleat to the shoe in your preferred position.
This can be adjusted after a trial ride.
5 Tighten the cleat firmly to the shoe.
NOTE: Garmin recommends a torque of 4 to 6 lbf-ft. (5 to 8 N-m).
Introduction 5
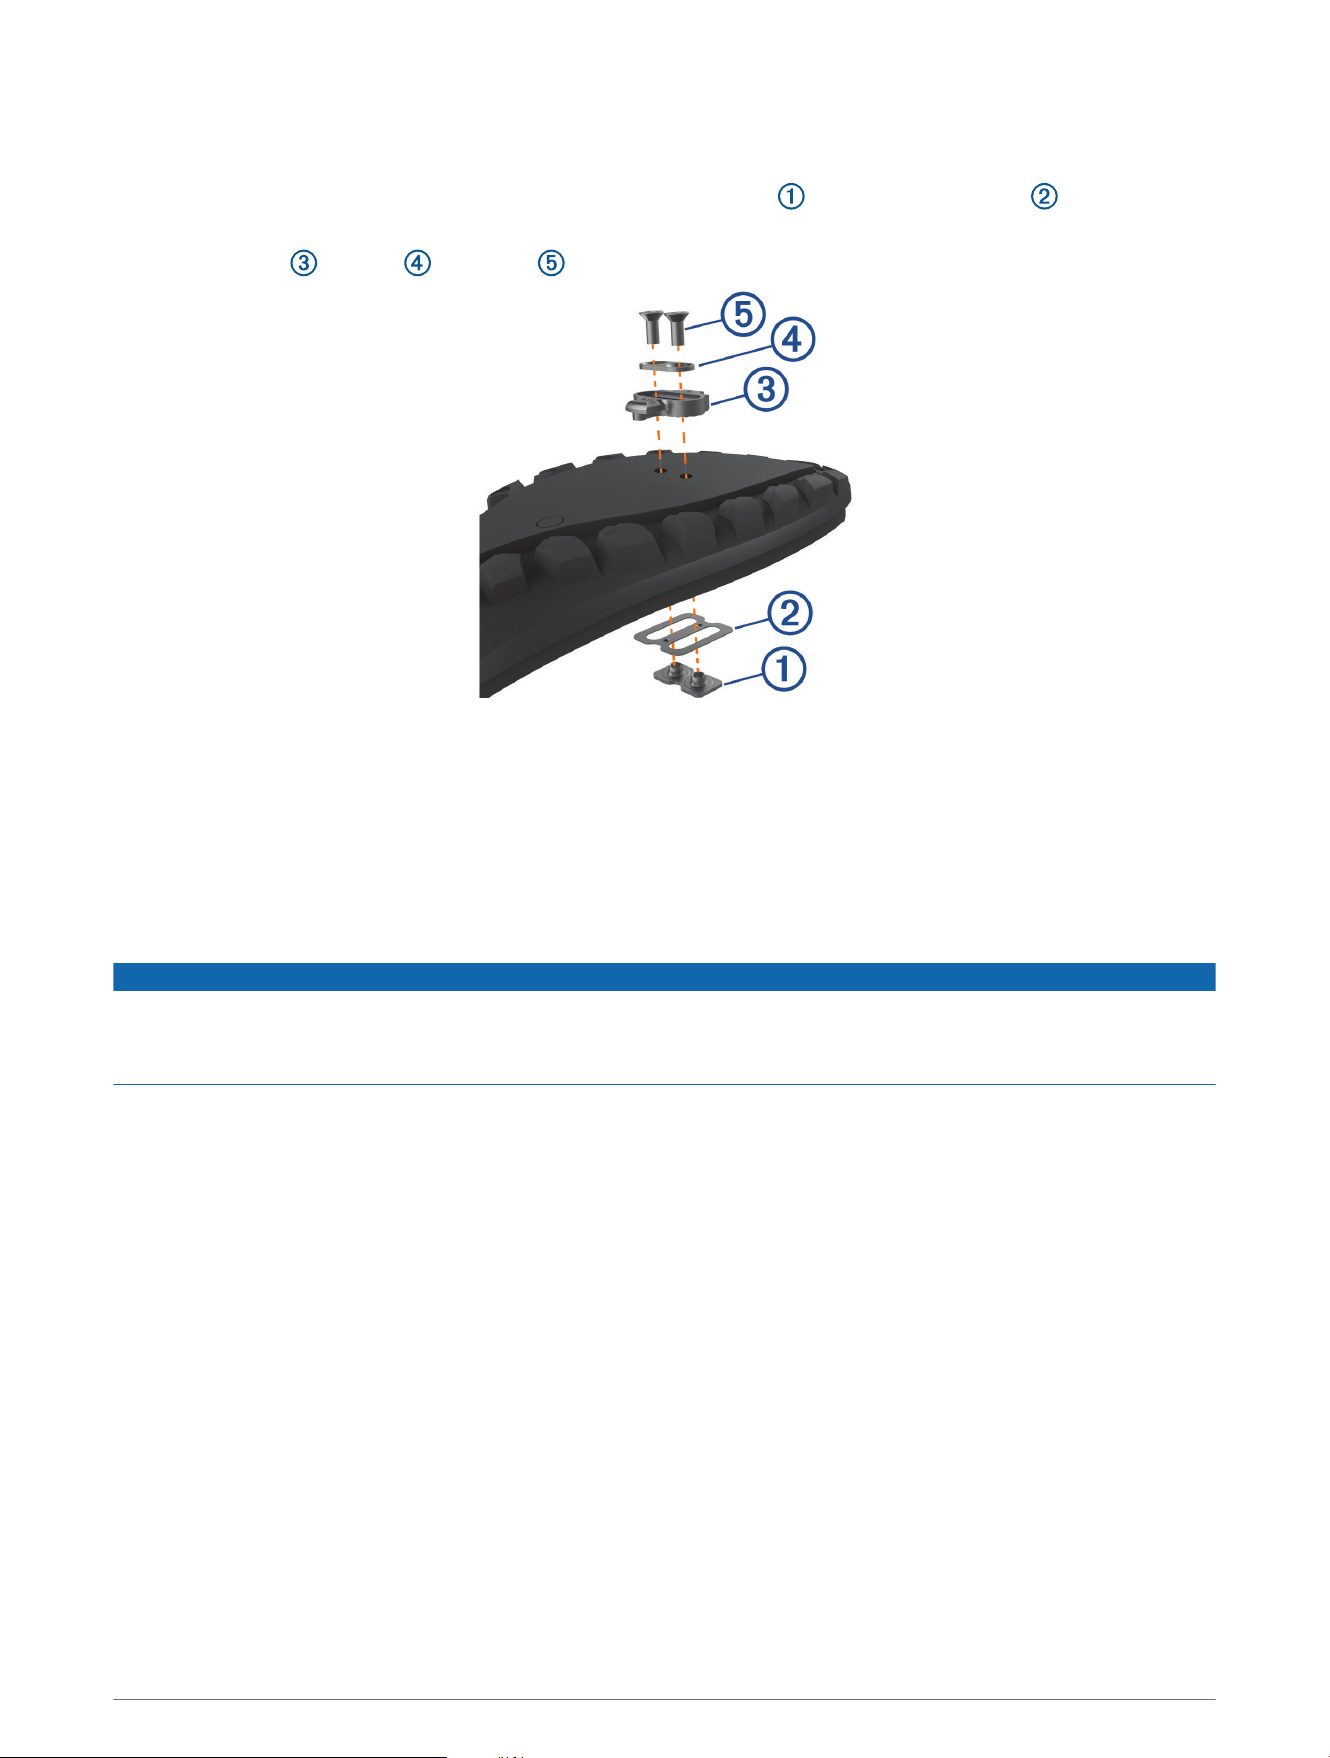
Installing the Shoe Cleats for Rally XC
NOTE: The left and right cleats are the same.
1 Inside your shoe, lift the insole and insert the 2-hole cleat mount and the insole washer .
2 Apply a thin layer of grease on the cleat bolt threads.
3 Align the cleat , washer , and bolts .
4 Use a 4mm hex key to loosely attach each bolt to the sole of the shoe.
5 Adjust the cleat to the shoe in your preferred position.
This can be adjusted after a trial ride.
6 Tighten the cleat firmly to the shoe.
NOTE: Garmin recommends a torque of 4 to 6 lbf-ft. (5 to 8 N-m).
Adjusting the Release Tension
NOTICE
Do not overtighten the release tension screw on the bottom of the pedal. The release tension should be
adjusted equally for both pedals.
The Rally XC pedal tension must be set on both sides of both pedals.
Use a 3mm hex key to adjust the release tension.
6 Introduction
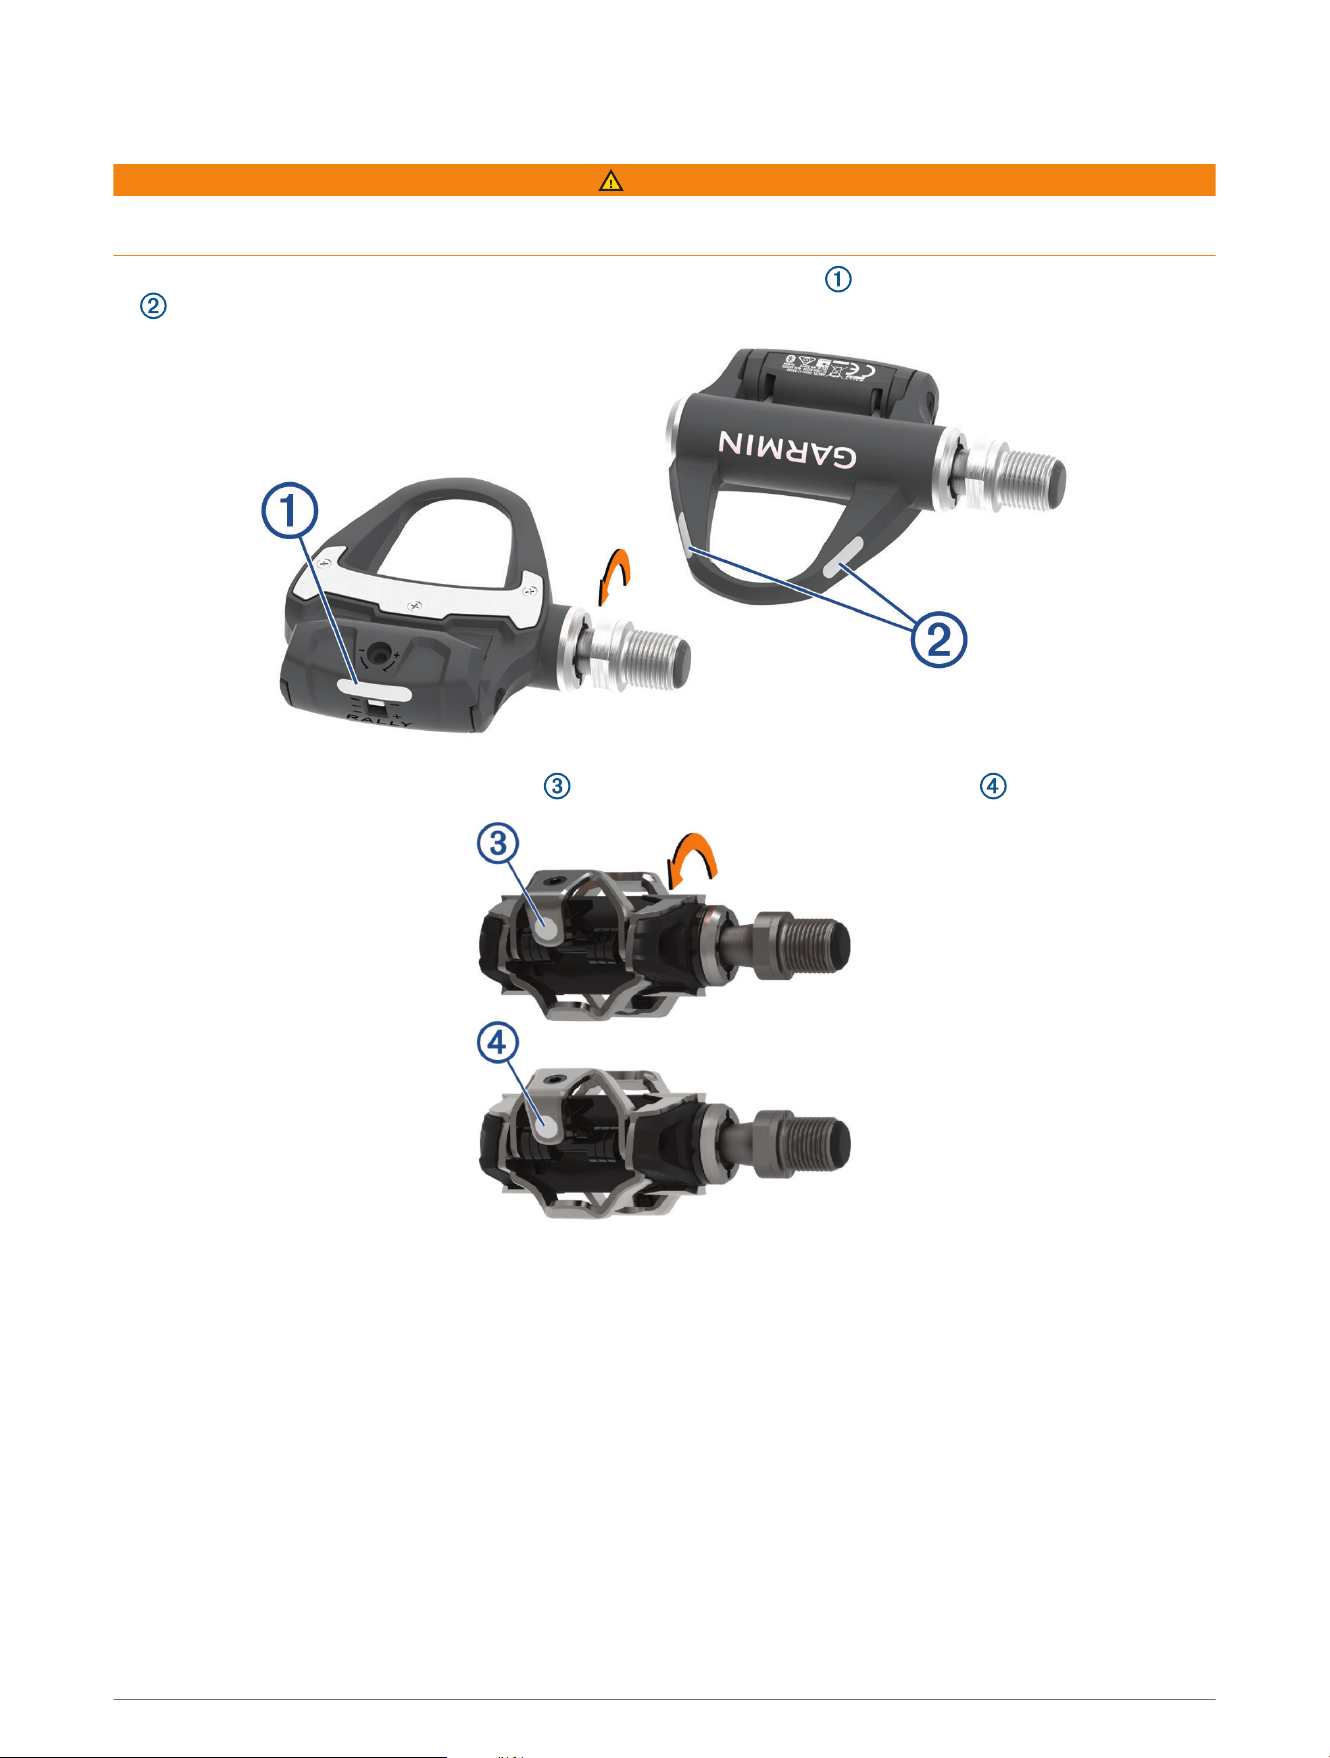
Applying the Reflective Stickers
WARNING
Before riding at night or in low light conditions, attach the reflective stickers (included) to both pedals for
increased visibility and to comply with applicable regulations.
• For the Rally RS and Rally RK pedals, apply one sticker to the heel clip , and two stickers to the pedal body
.
• For the Rally XC pedals, apply the sticker , turn the pedal, and apply another sticker .
About the Rally 100 System
The single-sensing Rally 100 measures forces on the left pedal in order to approximate your total power. For
information about upgrading, see Upgrading Your Rally 100 to a Dual Sensing System, page16.
NOTE: The Rally 100 system does not support cycling dynamics.
Introduction 7

Pairing Rally with Your Edge
®
830 or Edge 1030
Before you can view Rally data on the Edge device, you must pair the devices.
Pairing is the connecting of ANT+
®
or Bluetooth
®
wireless sensors. This procedure contains instructions for the
Edge 830 or 1030 devices. If you have another compatible device, see Other Compatible Devices, page14, or
go to support.garmin.com.
1 Bring the Edge device within 3m (10 ft.) of the sensor.
NOTE: Stay 10m (33 ft.) away from other riders' sensors while pairing.
2 Turn on the Edge device.
3 Select > Sensors > Add Sensor > Power.
4 Rotate the pedals a few times in order to activate the Rally system.
5 Select your sensor.
6 Select Add.
When the sensor is paired with your device, is solid. You can customize the data fields to display power
data (Customizing the Data Fields, page8). You can customize the Rally settings and receive software
updates (Updating the Rally Software Using the Edge 130, 530, 830, or 1030, page19).
Your First Ride
Before you ride with Rally for the first time, you must enter the crank length on your compatible Edge device.
You must also enter the crank length when you move the Rally pedals to a bike that has a different crank length.
This procedure contains instructions for the Edge 830 or 1030 devices. If you have another compatible device,
see Other Compatible Devices, page14, or go to support.garmin.com.
Entering the Crank Length
The crank length is often printed on the crank arm. This procedure contains instructions for the Edge 830 or
1030 devices. If you have another compatible device, see Other Compatible Devices, page14, or go to support
.garmin.com.
1 Rotate the pedals a few times in order to activate the Rally system.
2 Select > Sensors.
3 Select your sensor.
4 Select Sensor Details > Crank Length.
5 Enter the crank length, and select .
Customizing the Data Fields
This procedure contains instructions for the Edge 830 and 1030 devices. If you have another compatible device,
see your owner's manual.
1 Hold a data field to change it.
2 Select a category.
3 Select a data field.
Training
Pedal-Based Power
Rally measures pedal-based power.
Rally measures the force you apply a few hundred times every second. Rally also measures your cadence or
rotational pedaling speed. By measuring the force, the direction of force, the rotation of the crank arm, and time,
Rally can determine power (watts). Because Rally independently measures left and right leg power, it reports
your left-right power balance.
NOTE: The Rally 100 system does not provide left-right power balance.
8 Training
Cycling Dynamics
Cycling dynamics metrics measure how you apply power throughout the pedal stroke, and where you apply
power on the pedal, allowing you to understand your particular way of riding. Understanding how and where you
produce power allows you to train more efficiently and evaluate your bike fit.
NOTE: You must have a dual sensing Rally system connected using ANT+ technology to use cycling dynamics
metrics.
For more information, go to www.garmin.com/cyclingdynamics.
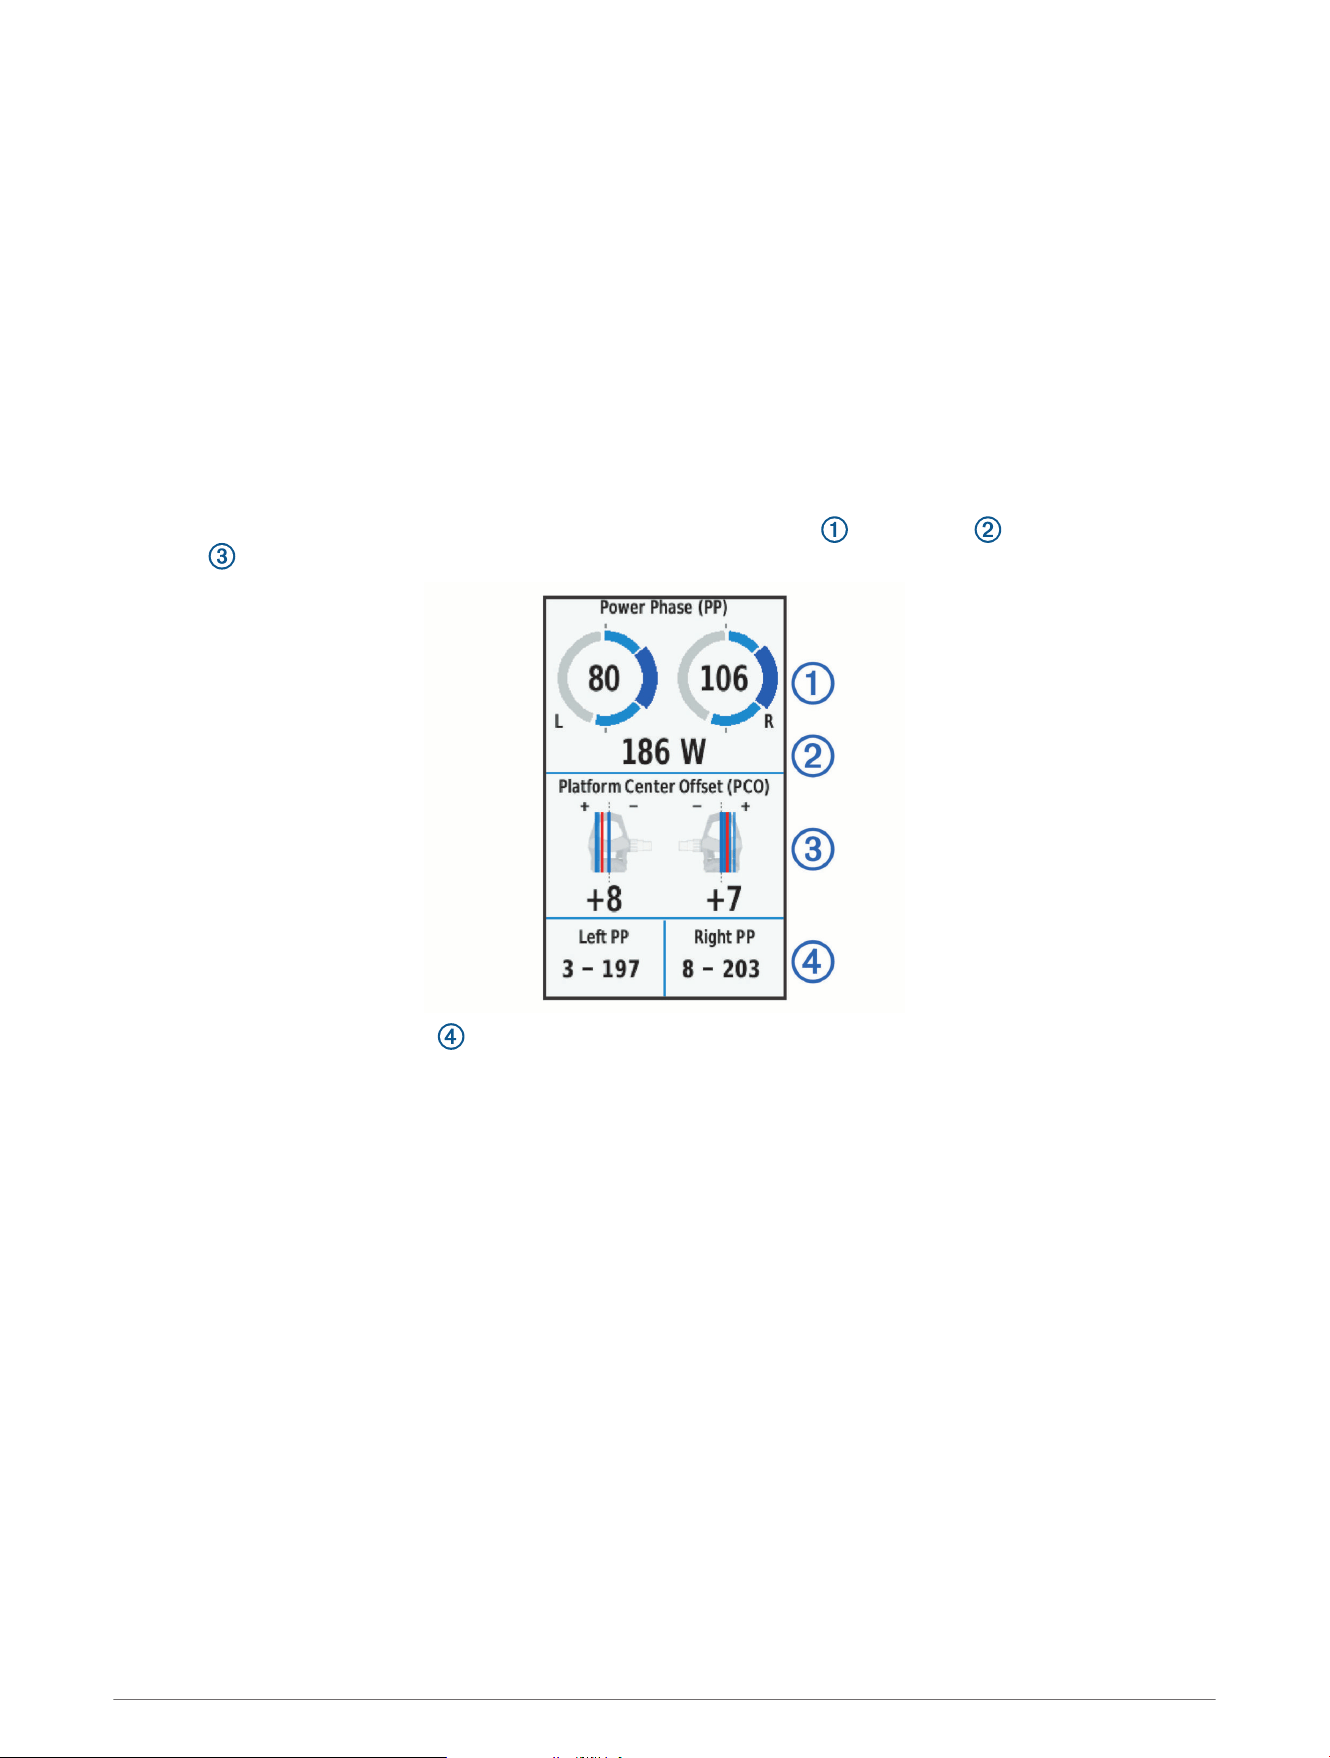
Using Cycling Dynamics
Before you can use cycling dynamics, you must pair the power meter with your device using ANT+ technology
(Pairing Rally with Your Edge
®
830 or Edge 1030, page8).
NOTE: Recording cycling dynamics uses additional device memory.
1 Go for a ride.
2 Scroll to the cycling dynamics screen to view your power phase data , total power , and platform center
offset .
3 If necessary, hold a data field to change it (Customizing the Data Fields, page8).
NOTE: The two data fields at the bottom of the screen can be customized.
You can send the ride to the Garmin Connect app to view additional cycling dynamics data (Sending Your Ride to
Garmin Connect, page10).
Power Phase Data
Power phase is the pedal stroke region (between the start crank angle and the end crank angle) where you
produce positive power.
Platform Center Offset
Platform center offset is the location on the pedal platform where you apply force.
Ride Data
Your ride data or history is recorded to your Edge device or another compatible Garmin device. This section
contains instructions for the Edge 1030.
NOTE: History is not recorded while the timer is stopped or paused.
When the device memory is full, a message appears. The device does not automatically delete or overwrite your
history. You should upload your history to your Garmin Connect account periodically to keep track of all your
ride data.
Ride Data 9
Pairing Rally with the Garmin Connect App
You can update Rally software and settings using the Garmin Connect app.
NOTE: The left pedal receives the software update. The left pedal sends the update to the right pedal.
1 From the app store on your smartphone, install and open the Garmin Connect app.
2 Rotate the crank arm.
3 Select an option to add your device to your Garmin Connect account:
• If this is the first device you have paired with the Garmin Connect app, follow the on-screen instructions.
• If you have already paired another device with the Garmin Connect app, from the settings menu, select
Garmin Devices > Add Device, and follow the on-screen instructions.
Sending Your Ride to Garmin Connect
• Sync your Edge bike computer with the Garmin Connect app on your phone.
• Use the USB cable that came with your Edge bike computer to send ride data to your Garmin Connect
account on your computer.
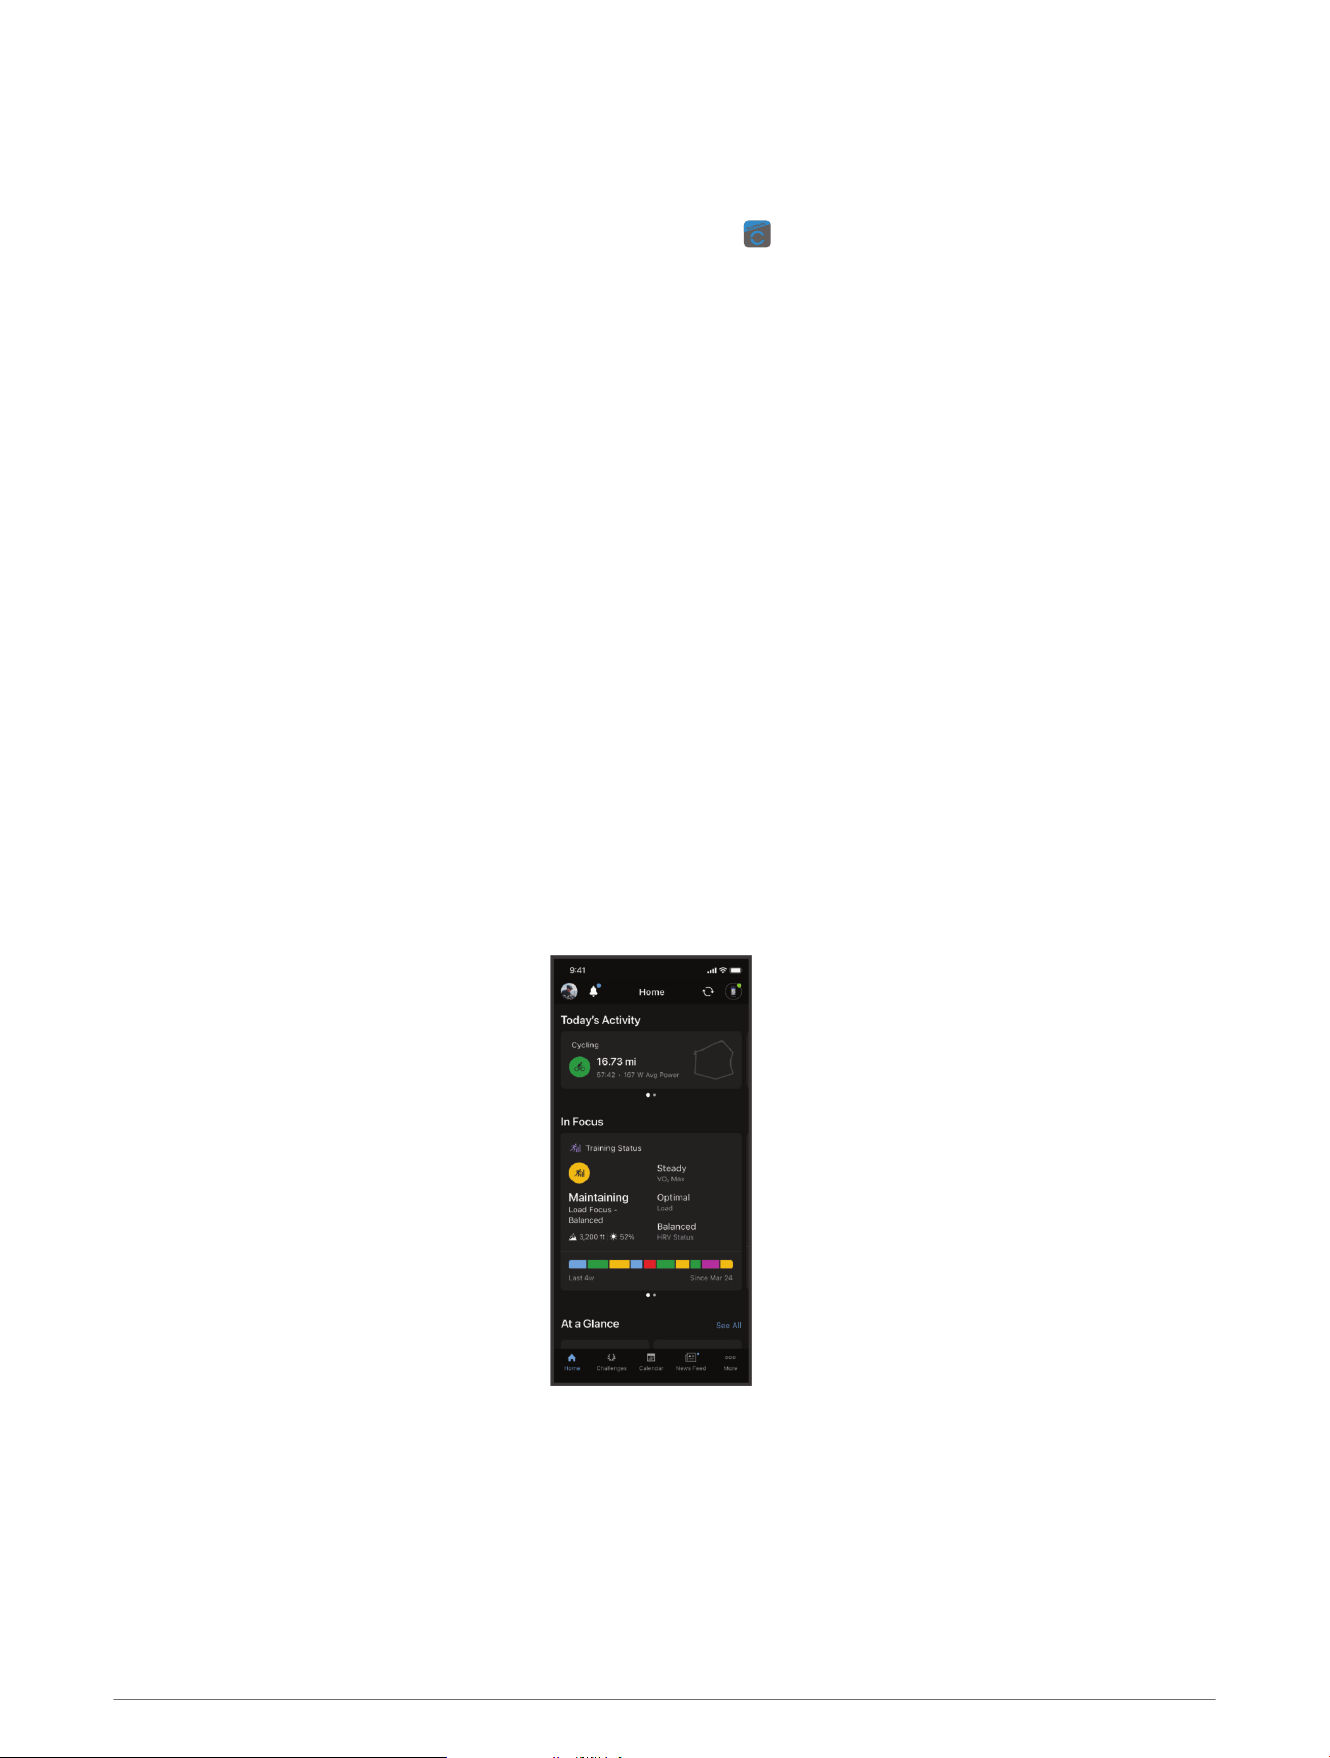
Garmin Connect
You can connect with your friends on Garmin Connect. Garmin Connect gives you the tools to track, analyze,
share, and encourage each other. Record the events of your active lifestyle including runs, walks, rides, swims,
hikes, triathlons, and more.
You can create your free Garmin Connect account when you pair your device with your phone using the Garmin
Connect app, or you can go to garminconnect.com.
Store your activities: After you complete and save an activity with your device, you can upload that activity to
Garmin Connect and keep it as long as you want.
Analyze your data: You can view more detailed information about your activity, including time, distance,
elevation, heart rate, calories burned, cadence, an overhead map view, pace and speed charts, and
customizable reports.
NOTE: Some data requires an optional accessory such as a heart rate monitor.
Plan your training: You can choose a fitness goal and load one of the day-by-day training plans.
Share your activities: You can connect with friends to follow each other's activities or share links to your
activities.
10 Ride Data
Customizing the Settings in the Garmin Connect App
You can customize your crank length, scale factor, and cycling dynamics settings in the Garmin Connect app.
• From the settings menu in the Garmin Connect app, select Garmin Devices, and select your device.
• Sync your Rally system with the Garmin Connect app to apply the changes (Pairing Rally with the Garmin
Connect App, page10).
Device Information
Device Care
NOTICE
Keep the components clean and free of debris.
Do not use a sharp object to clean the device.
Avoid chemical cleaners, solvents, and insect repellents that can damage plastic components and finishes.
Do not submerge or pressure wash the components.
Do not store the device where prolonged exposure to extreme temperatures can occur, because it can cause
permanent damage.
Replace components with Garmin parts only. See your Garmin dealer or the Garmin website.
Maintenance Tips
NOTICE
Some bike tools may scratch the finish of Rally components.
• Use wax paper or a towel between the tool and the hardware.
• After any bike adjustments, rotate the crank arm to check for clearance.
• Keep Rally components clean.
• When moving Rally pedals to another bike, clean the threads and surfaces thoroughly.
• Go to support.garmin.com for the latest updates and information.
Rally Specifications
This table covers all Rally series products.
Battery type
User-replaceable, 3 options:
CR1/3N or 2L76, 3 V, 1 per pedal
LR44 or SR44, 1.5 V, 2 per pedal
NOTE: Garmin recommends replacing all of the batteries at the same time. Do not mix
the battery types.
Battery life Up to 120 hr. of riding time, with cycling dynamics
Operating temperature
range
From -10° to 50°C (from 14° to 122°F)
SR44 batteries may perform better in cold temperatures.
Wireless frequencies/
protocols
ANT+ 2.4 GHz @ 3 dBm maximum
Bluetooth 2.4 GHz @ 3 dBm maximum
Water rating IEC 60529 IPX7
1
1
The device withstands incidental exposure to water of up to 1m for up to 30min. For more information, go to www.garmin.com/waterrating.
Device Information 11
Battery Information
The Rally system monitors the battery level of both pedals and sends status information to your Garmin device.
NOTE: When you receive a low battery warning, you have approximately 10–20 hours of operation time
remaining.
Replacing the Batteries
WARNING
See the Important Safety and Product Information guide in the product box for product warnings and other
important information.
Each Rally 200 pedal uses one CR1/3N or 2L76 battery.
NOTE: Garmin recommends replacing all of the batteries at the same time. Do not mix the battery types.
1 Use a 4 mm hex key to remove the battery cover .
2 Remove the battery.
3 Wait 5 to 10 seconds.
4 Insert the new battery into the battery cover, observing polarity.
5 Replace the battery cover, and hand tighten it.
NOTE: Do not damage or lose the O-ring gasket.
6 Use a 4 mm hex key to tighten the battery cover to 3.6 lbf-ft. (5 N-m).
The LED displays one short green flash followed by one long red flash.
12 Device Information

Overhauling the Rally Pedals
You can disassemble and reassemble the pedal spindles to clean and grease the components.
NOTICE
Garmin recommends changing one pedal at a time taking care to keep track of the small screws and seals. You
must obtain a 4 mm hex key, PH 00 screwdriver, 15 mm pedal wrench, 12 mm socket with an outer diameter
that is less than 17 mm (typically a
1
/
4
in. drive) on a torque wrench, and bike grease. Use care not to damage
any of the Rally components.
NOTE: If you have the single-sided Rally system, the right pedal has no battery carriage.
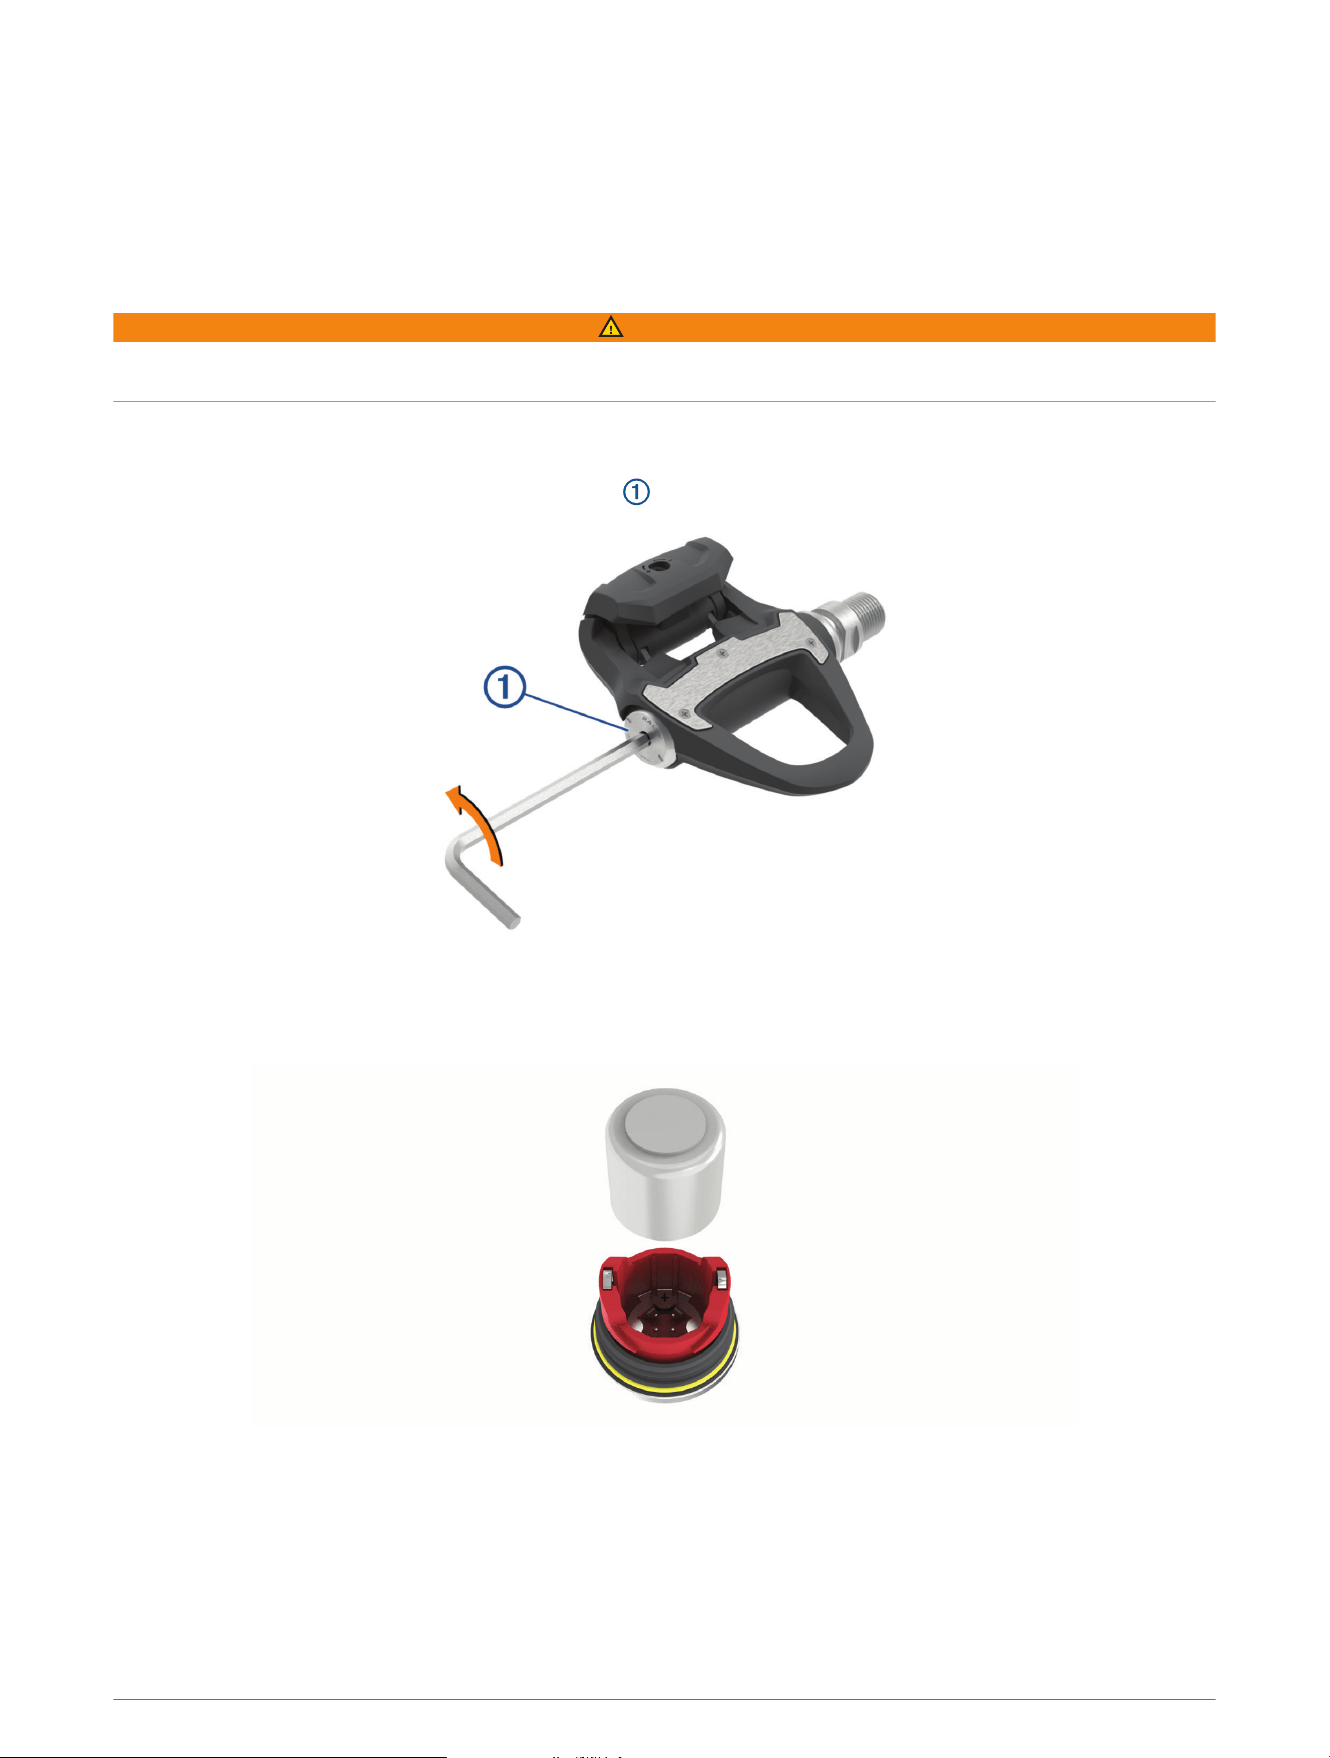
1 Use a 15 mm pedal wrench to remove the pedals.
NOTE: The left pedal spindle has a left-handed (reverse) thread attaching it to the crank arm.
2 Use a 4 mm hex key to remove the battery cover .
3 Set the battery cover and battery aside.
4 Use a small Phillips screwdriver (PH 00) to remove the two screws from inside the battery carriage .
5 Remove the battery carriage.
6 While securely holding the wrench flats with a pedal wrench, use the 12 mm socket wrench to unscrew the
spindle nut .
NOTE: The right pedal has a black spindle nut and a reverse thread. The left pedal has a silver spindle nut.
The left spindle has a line on the wrench flats.
7 Slide the spindle out of the pedal body.
8 Remove the inner seal and outer seal from inside the pedal body.
NOTE: Both seals are cone shaped to fit the tapered spindle .
9 Remove all old grease from the components.
Device Information 13

10 Insert the inner seal into the pedal body.
You should press it down so it is flush with the bearing.
11 Slide the outer seal on to the spindle.
12 Apply bike grease to the bearing inside the pedal body.
13 Apply a layer of bike grease to the spindle.
14 Insert the spindle into the pedal body.
The outer seal and the top of the spindle should be flush with the pedal body cartridge.
15 Replace the spindle nut.
16 While securely holding the wrench flats with a pedal wrench, use the 12 mm socket wrench to torque the
spindle nut to 7 lbf-ft. (10 N-m).
WARNING
To ensure that the spindle nut stays in place, you must tighten it to the recommended torque specification.
Failure to properly tighten the nut could cause the pedal to fall off during a ride, which could result in property
damage or serious bodily injury or death.
17 Replace the battery carriage and two screws.
18 Replace the battery and battery cover, and hand tighten it.
NOTE: Do not damage or lose the O-ring gasket.
19 Use a 4 mm hex key to tighten the battery cover to 3.6 lbf-ft. (5 N-m).
The LED displays one short green flash followed by one long red flash.
20 Install the pedals on your bike (Installing the Pedals, page2).
Rally Storage
If you are transporting your bicycle or not using Rally for an extended period of time, Garmin recommends
removing Rally and storing it in the product box.
Other Compatible Devices
Edge 530 Instructions
Pairing Rally with the Edge 530
1 Bring the Edge device within 3m (10ft.) of the sensor.
NOTE: Stay 10m (33ft.) away from other riders' sensors while pairing.
2 Select Menu > Settings > Sensors > Add Sensor.
3 Rotate the pedals a few times in order to activate the Rally system.
4 Select your sensor.
5 Select Add Sensor.
When the sensor is paired with your device, the sensor status is Connected. You can customize a data field
to display power data.
Entering the Crank Length with the Edge 530
The crank length is often printed on the crank arm.
1 Rotate the pedals a few times in order to activate the Rally system.
2 Select Menu > Settings > Sensors.
3 Select your sensor.
4 Select Sensor Details > Crank Length.
5 Enter the crank length, and select .
14 Other Compatible Devices
Edge 130 Instructions
Pairing Rally with the Edge 130
1 Bring the Edge device within 3m (10ft.) of the sensor.
NOTE: Stay 10m (33ft.) away from other riders' sensors while pairing.
2 Hold .
3 Select Sensors > Add Sensor.
4 Rotate the pedals a few times in order to activate the Rally system.
5 Select your sensor.
You can customize a data field to display power data.
Entering the Crank Length with the Edge 130
The crank length is often printed on the crank arm.
1 Rotate the pedals a few times in order to activate the Rally system.
2 Hold .
3 Select Sensors.
4 Select your sensor.
5 Select Crank Length.
6 Enter the crank length, and select .
Forerunner
®
945 and fēnix
®
6 Series Instructions
Pairing Rally with the Forerunner 945 and fēnix 6 Series
1 Bring your compatible watch within 3m (10ft.) of the sensor.
NOTE: Stay 10m (33ft.) away from other riders' sensors while pairing.
2 Hold or MENU.
3 Select Settings > Sensors & Accessories > Add New > Power.
4 Rotate the pedals a few times in order to activate the Rally system.
5 Select your sensor.
After the sensor is paired with your device, the sensor status changes from Searching to Connected. You can
customize the data fields to display power data.
Entering the Crank Length with the Forerunner 945 and fēnix 6 Series
The crank length is often printed on the crank arm.
1 Rotate the pedals a few times in order to activate the Rally system.
2 Hold or MENU.
3 Select Settings > Sensors & Accessories > Power.
4 Select your sensor.
5 Select Crank Length.
6 Enter the crank length, and select .
Appendix
Registering Your Rally System
Help us better support you by completing our online registration today.
• Go to the Garmin Connect app.
• Keep the original sales receipt, or a photocopy, in a safe place.
Appendix 15
Upgrading Your Rally 100 to a Dual Sensing System
Before you install the new right pedal, the left pedal must be paired and connected to a compatible Edge device
or the Garmin Connect app.
1 Review the Rally installation instructions (Installing the Rally Components, page1).
2 Remove the existing right pedal.
3 Install the new right pedal (Installing the Pedals, page2).
4 Rotate the crank arm.
5 Select an option to connect the right pedal to the left pedal:
• From your compatible Edge device, select > Sensors, select your sensor, select Sensor Details > Pair
Right Power Sensor, and enter the sensor ID found on the pedal.
• From the Garmin Connect app device settings, enable the Right Pedal, and enter the sensor ID found on
the pedal.
Changing Your Rally Pedals
NOTICE
Garmin recommends changing one pedal at a time taking care to keep track of the small screws and seals. You
must obtain a 4 mm hex key, PH 00 screwdriver, 15 mm pedal wrench, 12 mm socket with an outer diameter
that is less than 17 mm (typically a
1
/
4
in. drive) on a torque wrench, and bike grease. Use care not to damage
any of the Rally components.
This procedure shows the Rally RS and the Rally XC pedals. The procedure is the same for any Rally series pedal
conversion.
NOTE: If you have the single-sided Rally system, the right pedal has no battery carriage.
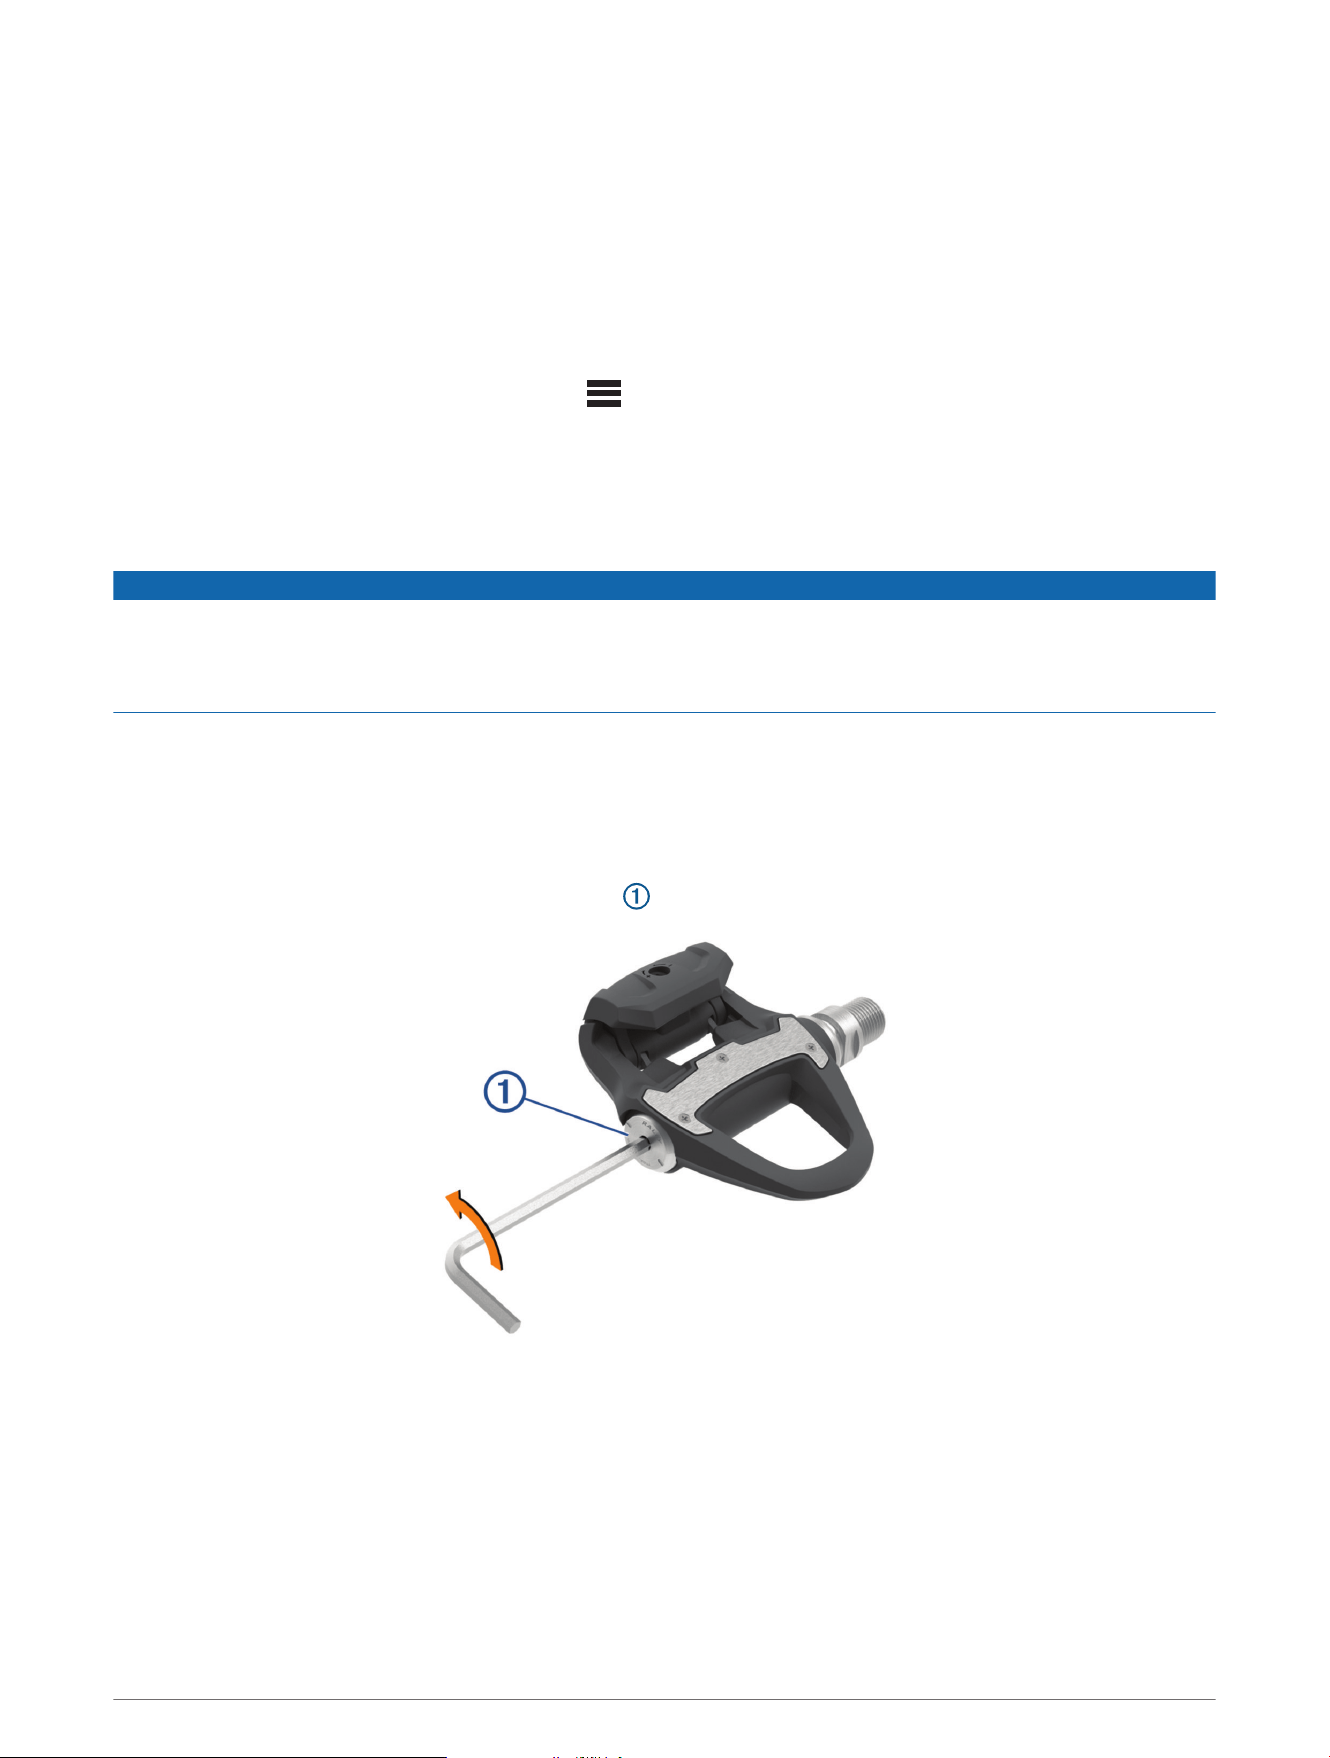
1 Use a 15 mm pedal wrench to remove the Rally RS pedals.
NOTE: The left pedal spindle has a left-handed (reverse) thread attaching it to the crank arm.
2 Use a 4 mm hex key to remove the battery cover .
16 Appendix
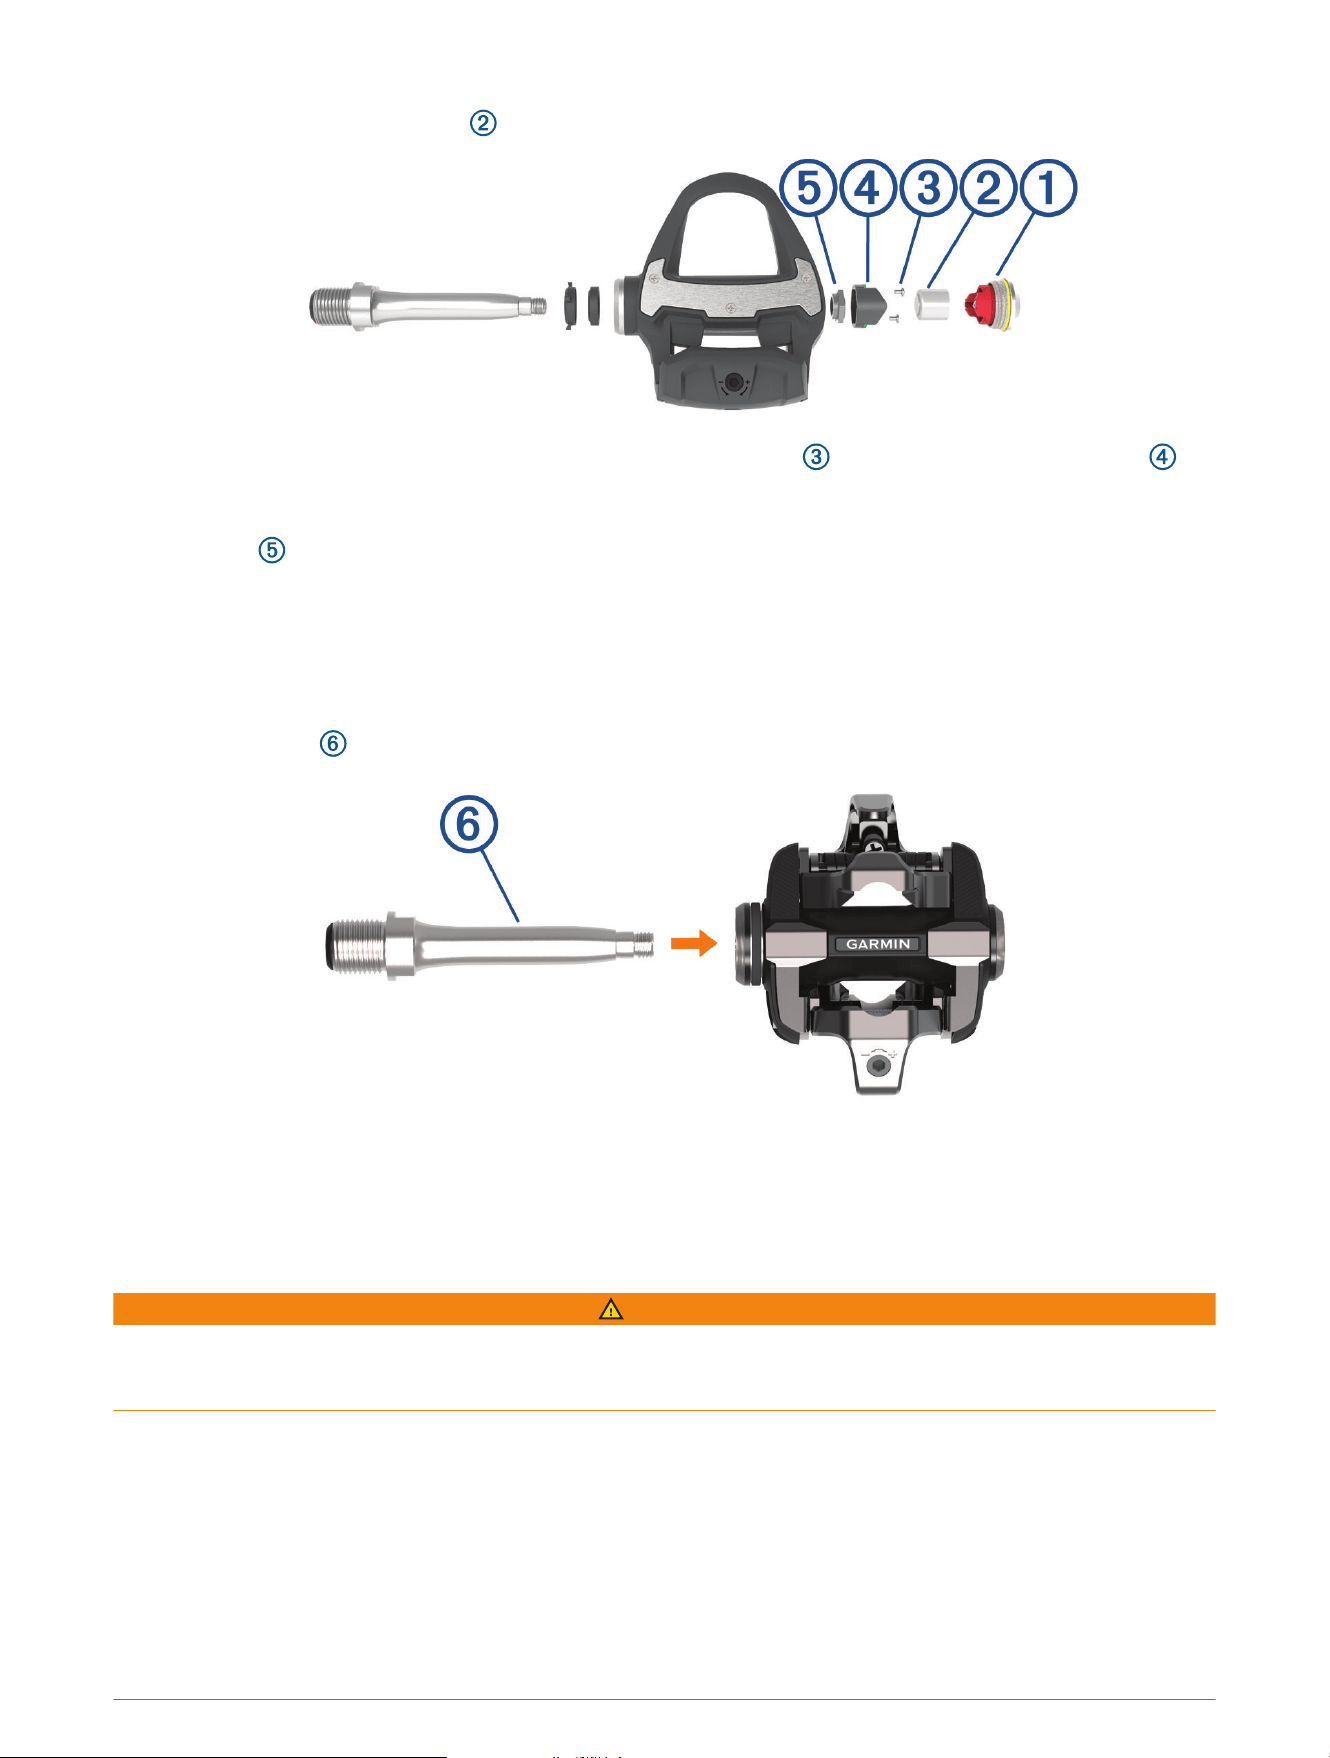
3 Set the battery cover and battery aside.
4 Use a small Phillips screwdriver (PH 00) to remove the two screws from inside the battery carriage .
5 Remove the battery carriage.
6 While securely holding the wrench flats with a pedal wrench, use a 12 mm socket wrench to unscrew the
spindle nut .
NOTE: The right pedal has a black spindle nut and a reverse thread. The left pedal has a silver spindle nut
and a standard thread. The left spindle has a line on the wrench flats.
7 Slide the spindle out of the pedal body.
8 Remove all old grease from the spindle.
9 Apply a layer of bike grease to the spindle.
10 Insert the spindle into the new pedal body.
The new pedal body has factory-installed dust seals. The outer dust seal should be flush with the top of the
cartridge.
11 Replace the spindle nut.
12 While securely holding the wrench flats with a pedal wrench, use a 12 mm socket wrench to torque the
spindle nut to 7 lbf-ft. (10 N-m).
WARNING
To ensure that the spindle nut stays in place, you must tighten it to the recommended torque specification.
Failure to properly tighten the nut could cause the pedal to fall off during a ride, which could result in property
damage or serious bodily injury or death.
13 Replace the battery carriage and two screws.
14 Replace the battery and battery cover, and hand tighten it.
NOTE: Do not damage or lose the O-ring gasket.
15 Use a 4 mm hex key to tighten the battery cover to 3.6 lbf-ft. (5 N-m).
The LED displays one short green flash followed by one long red flash.
16 Install the pedals on your bike (Installing the Pedals, page2).
Appendix 17

Power Data Fields
NOTE: This list contains power data fields for the Edge 1030 device. If you have another compatible device, see
your device owner's manual.
NOTE: Data fields that display pedal smoothness, torque effectiveness, and balance data are not supported by
the Rally 100 system.
Balance: The current left/right power balance.
Balance - 10s Avg.: The 10-second moving average of the left/right power balance.
Balance - 30s Avg.: The 30-second moving average of the left/right power balance.
Balance - 3s Avg.: The three-second moving average of the left/right power balance.
Balance - Avg.: The average left/right power balance for the current activity.
Balance - Lap: The average left/right power balance for the current lap.
Cadence: The number of revolutions of the crank arm.
Cadence - Avg.: Cycling. The average cadence for the current activity.
Cadence Bars: A bar graph showing your cycling cadence values for the current activity.
Cadence Graph: A line graph showing your cycling cadence values for the current activity.
Cadence - Lap: Cycling. The average cadence for the current lap.
PCO: The platform center offset. Platform center offset is the location on the pedal platform where force is
applied.
PCO - Avg.: The average platform center offset for the current activity.
PCO - Lap: The average platform center offset for the current lap.
Pedal Smoothness: The measurement of how evenly a rider is applying force to the pedals throughout each
pedal stroke.
Power: The current power output in watts.
Power - %FTP: The current power output as a percentage of functional threshold power.
Power - 10s Avg.: The 10-second moving average of power output.
Power - 10s Avg. watts/kg: The 10-second moving average of power output in watts per kilogram.
Power - 30s Avg.: The 30-second moving average of power output.
Power - 30s Avg. watts/kg: The 30-second moving average of power output in watts per kilogram.
Power - 3s Avg.: The 3-second moving average of power output.
Power - 3s Avg. watts/kg: The 3-second moving average of power output in watts per kilogram.
Power - Avg.: The average power output for the current activity.
Power Bars: A bar graph showing your power output.
Power Graph: A line graph showing your power output for the current activity.
Power - IF: The Intensity Factor
™
for the current activity.
Power - kJ: The accumulated work performed (power output) in kilojoules.
Power - Lap: The average power output for the current lap.
Power - Lap Max.: The top power output for the current lap.
Power - Last Lap: The average power output for the last completed lap.
Power - Max.: The top power output for the current activity.
Power - NP: The Normalized Power
™
for the current activity.
Power - NP Lap: The average Normalized Power for the current lap.
Power - NP Last Lap: The average Normalized Power for the last completed lap.
Power Phase - L.: The current power phase angle for the left leg. Power phase is the pedal stroke region where
positive power is produced.
Power Phase - L. Avg.: The average power phase angle for the left leg for the current activity.
Power Phase - L. Lap: The average power phase angle for the left leg for the current lap.
18 Appendix

Power Phase - L. Peak: The current power phase peak angle for the left leg. Power phase peak is the angle
range over which the rider produces the peak portion of the driving force.
Power Phase - L. Peak Avg.: The average power phase peak angle for the left leg for the current activity.
Power Phase - L. Peak Lap: The average power phase peak angle for the left leg for the current lap.
Power Phase - R.: The current power phase angle for the right leg. Power phase is the pedal stroke region where
positive power is produced.
Power Phase - R. Avg.: The average power phase angle for the right leg for the current activity.
Power Phase - R. Lap: The average power phase angle for the right leg for the current lap.
Power Phase - R. Peak: The current power phase peak angle for the right leg. Power phase peak is the angle
range over which the rider produces the peak portion of the driving force.
Power Phase - R. Peak Avg.: The average power phase peak angle for the right leg for the current activity.
Power Phase - R. Peak Lap: The average power phase peak angle for the right leg for the current lap.
Power - TSS: The Training Stress Score
™
for the current activity.
Power - watts/kg: The amount of power output in watts per kilogram.
Power - watts/kg Avg.: The average power output in watts per kilogram.
Power - watts/kg Lap: The average power output in watts per kilogram for the current lap.
Power Zone: The current range of power output (1 to 7) based on your FTP or custom settings.
Target Power: The target power output during an activity.
Time in Zone: The time elapsed in each power zone.
Time Seated: The time spent seated while pedaling for the current activity.
Time Seated Lap: The time spent seated while pedaling for the current lap.
Time Standing: The time spent standing while pedaling for the current activity.
Time Standing Lap: The time spent standing while pedaling for the current lap.
Torque Effectiveness: The measurement of how efficiently a rider is pedaling.
Trainer Resistance: The resistance force applied by an indoor trainer.
Troubleshooting
Updating the Rally Software Using the Edge 130, 530, 830, or 1030
Before you can update the software, you must pair your Edge device to your Rally system using ANT+
technology.
NOTE: The left pedal receives the software update. The left pedal sends the update to the right pedal.
1 Send your ride data to your Garmin Connect account.
Garmin Connect automatically looks for software updates and sends them to your Edge device.
2 Bring the Edge device within 3m (10ft.) of the sensor.
3 Rotate the crank arm a few times.
The Edge device prompts you to install any pending software updates.
4 Follow the on-screen instructions.
The Rally LED flashes red and green while the software update is in progress.
I cannot see cycling dynamics metrics on my Garmin device
Pair the Rally pedals with your compatible Garmin device using the ANT+ connection instead of the
Bluetooth connection.
Appendix 19
Resetting the Rally Pedals
If the device stops responding, you may need to reset it by disconnecting and reconnecting the battery cover.
This does not erase any of your data.
1 Use a 4 mm hex key to remove the battery cover and battery.
2 Replace the battery and battery cover, and hand tighten it.
NOTE: Do not damage or lose the O-ring gasket.
3 Use a 4 mm hex key to tighten the battery cover to 3.6 lbf-ft. (5 N-m).
The pedal LED flashes red once.
Performing a Static Torque Test
NOTICE
The static torque test is intended for advanced cyclists and installation experts. This test is not required under
normal circumstances to achieve good results with the Rally system. This test is available for compatible Edge
devices.
Garmin recommends performing the static torque test a minimum of three times and averaging the reported
torque values.
1 Go to support.garmin.com.
2 Enter your product name.
3 Enter "torque test" to view the FAQ topic.
Following repeated static torque tests, if the reported torque value is consistently different than the expected
value, you can enter a scale factor for one or both pedals. The scale factor is stored in the pedal and adjusts
the power value that is calculated on the pedal. The scale factor is sent to the Edge device and stored on Edge
device.
Getting More Information
• Go to support.garmin.com for additional manuals, articles, and software updates.
• Go to buy.garmin.com, or contact your Garmin dealer for information about optional accessories and
replacement parts.


support.garmin.com
GUID-F384D11E-79B0-4D97-BB69-DD8922C20299 v5July 2024