
Technical Support and E-Warranty Certificate www.vevor.com/support
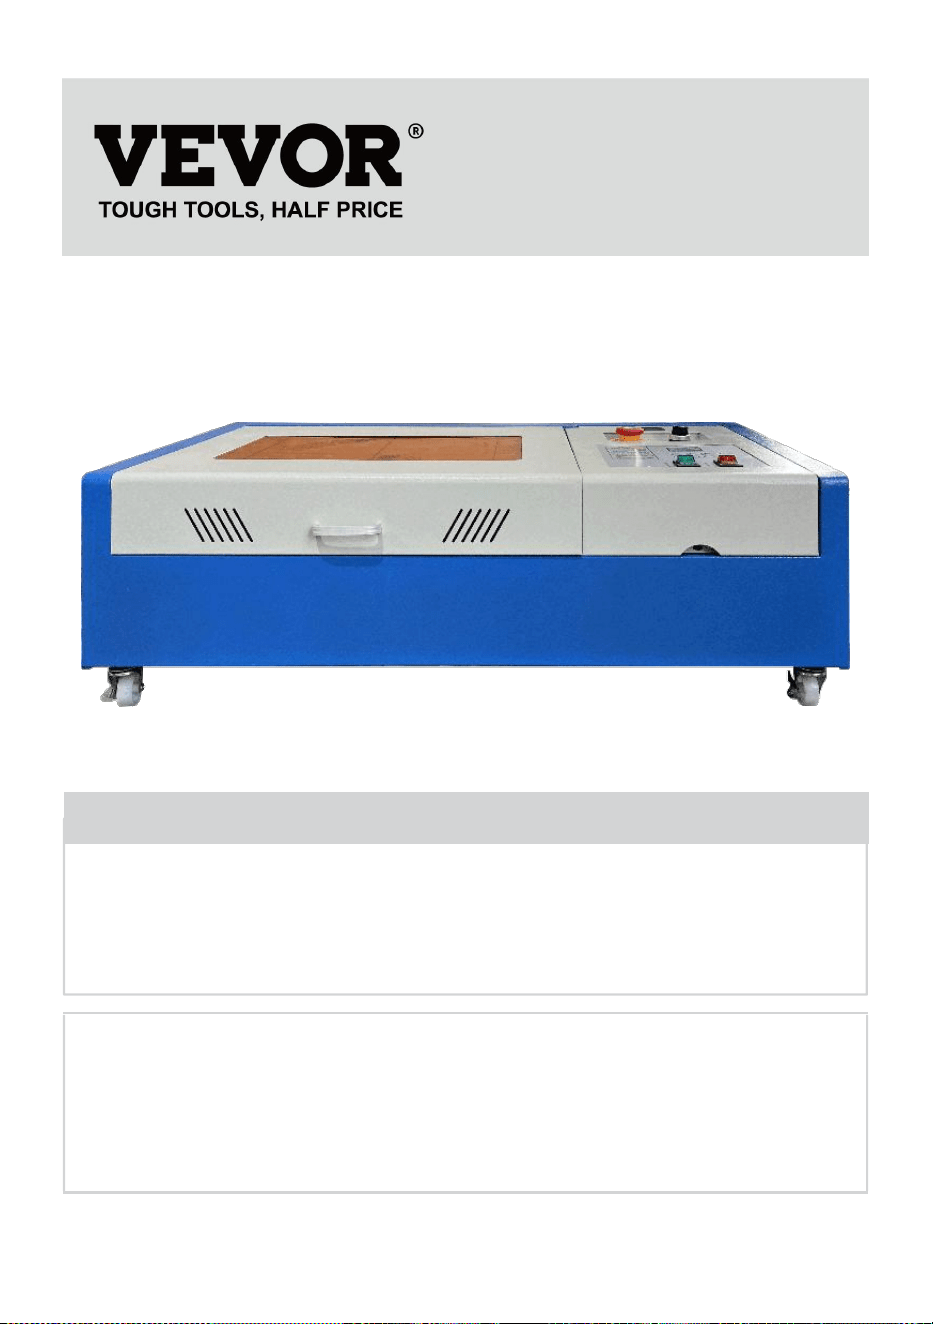
LASER ENGRAVING MACHINE
INSTRUCTION MANUAL
MODEL:KH3020/KH-3020
We continue to be committed to provide you tools with competitive price.
"Save Half", "Half Price" or any other similar expressions used by us only represents an
estimate of savings you might benefit from buying certain tools with us compared to the major
top brands and does not necessarily mean to cover all categories of tools offered by us. You
are kindly reminded to verify carefully when you are placing an order with us if you are
actually saving half in comparison with the top major brands.
- 1 -
MODEL:KH3020/KH-3020
Have product questions? Need technical support? Please feel free to
contact us:
Technical Support and E-Warranty Certificate
www.vevor.com/support
NEED HELP? CONTACT US!
This is the original instruction, please read all manual instructions
carefully before operating. VEVOR reserves a clear interpretation of our
user manual. The appearance of the product shall be subject to the
product you received. Please forgive us that we won't inform you again if
there are any technology or software updates on our product.
LASER ENGRAVING MACHINE
- 2 -
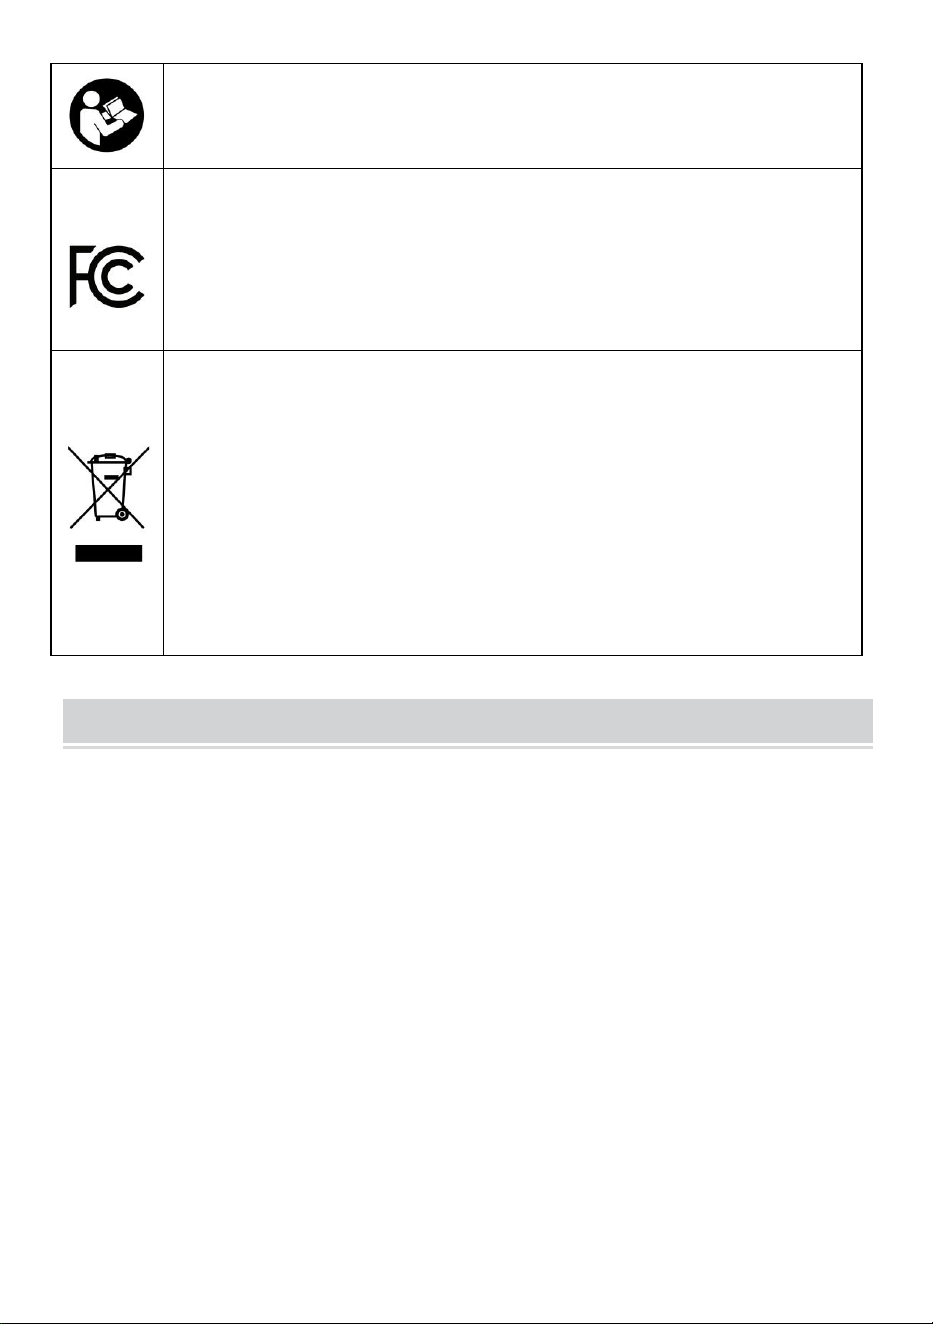
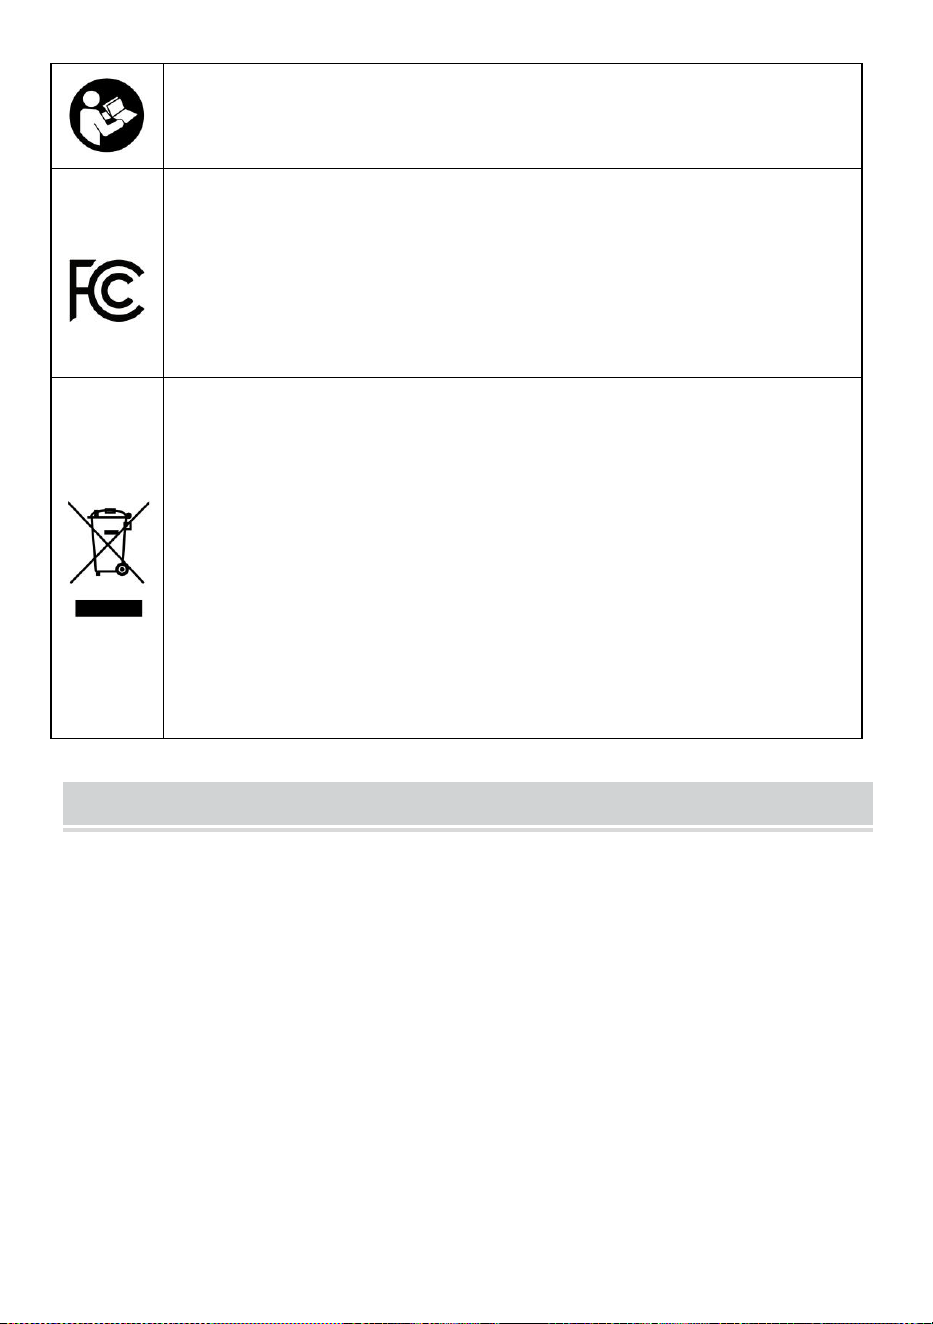
Warning-To reduce the risk of injury, user must read
instructions manual carefully.
This device complies with Part 15 of the FCC Rules. Operation
is subject to the following two conditions:(1)This device may
not cause harmful interference, and (2)this device must accept
any interference received, including interference that may
cause undesired operation.
This product is subject to the provision of European Directive
2012/19/EC. The symbol showing a wheelie bin crossed
through indicates that the product requires separate refuse
collection in the European Union. This applies to the product
and all accessories marked with this symbol. Products marked
as such may not be discarded with normal domestic waste, but
must be taken to a collection point for recycling electrical and
electronic devices
IMPORTANT NOTES
Before operating the equipment, the user must carefully read the
operation manual and strictly abide by it. This manual is applicable to
multiple models of products.
This equipment uses international standard four types of lasers (strong
laser radiation). Laser radiation may cause the following events:
1.ignite surrounding combustibles.
2.During the laser pro-cessing, due to different processed objects, other
radiation and other toxics may be generated Harmful gas.
3.Direct laser radiation may cause personal injury. Therefore, the
equipment must be equipped with fire-fighting equipment. It is strictly
forbidden to stack flammable and explosive materials on the
workbench and around the equipment. At the same time, ensure good
ventilation. Non-professional operators are not allowed to approach
the equipment.

- 3 -
Laser processing objects and emissions should comply with local laws
and regulations.
Laser processing may have high risks, so you should carefully consider
whether the object is suitable for laser processing.
The internal laser equipment has high voltage and other dangers, except
for equipment operators, it is strictly prohibited to disassemble.
When the equipment is turned on, someone must be guarded,
unauthorized leaving is forbidden, and all power must be cut off before
personnel leave.
It is forbidden to open any door when the equipment is working.
Before starting operation, this equipment and other equipment must be
safely and effectively grounded.
Do not place any irrelevant total reflection or diffuse reflection ob-
jects in the equipment to prevent the laser from being reflected on the
human body or flammable objects.
During the operation of the equipment, the operator must always
observe the operation of the equipment. If an abnormal situation occurs,
please immediately.
The equipment should be in a dry, pollution-free, vibration-free and strong
electromagnetic interference environment, with a working temperature of
5-40 degrees Celsius and a humidity of 5-95%(non condensing water
environment).
The equipment should always be far away from electrical equipment
sensitive to electromagnetic interference, otherwise it may cause
electromagnetic interference.
The working voltage of the device is: European AC220V or North
American AC120V (please confirm the working voltage of the device
before use).
The most important carbon dioxide glass laser in the equipment is a
consumable and a vulnerable item. Please take care of it during use The
carbon dioxide glass laser needs pure cold water to cool down Please
pay attention to the water temperature not to exceed 30 degrees Celsius
during use, otherwise the laser will be damaged. When the am-bient
temperature is about to drop below 0 degrees Celsius, please re-place it
- 4 -
with an antifreeze liquid to avoid damage to the carbon dioxide glass
laser.
It is forbidden to turn on the equipment when the grid voltage is unstable
or mismatched. The manufacturer and seller are not responsible for any
loss caused by incorrect use or non-compliance with the above
regulations.
USE THE PROCEDURE TO DO SO
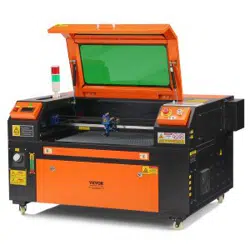
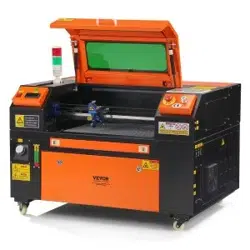
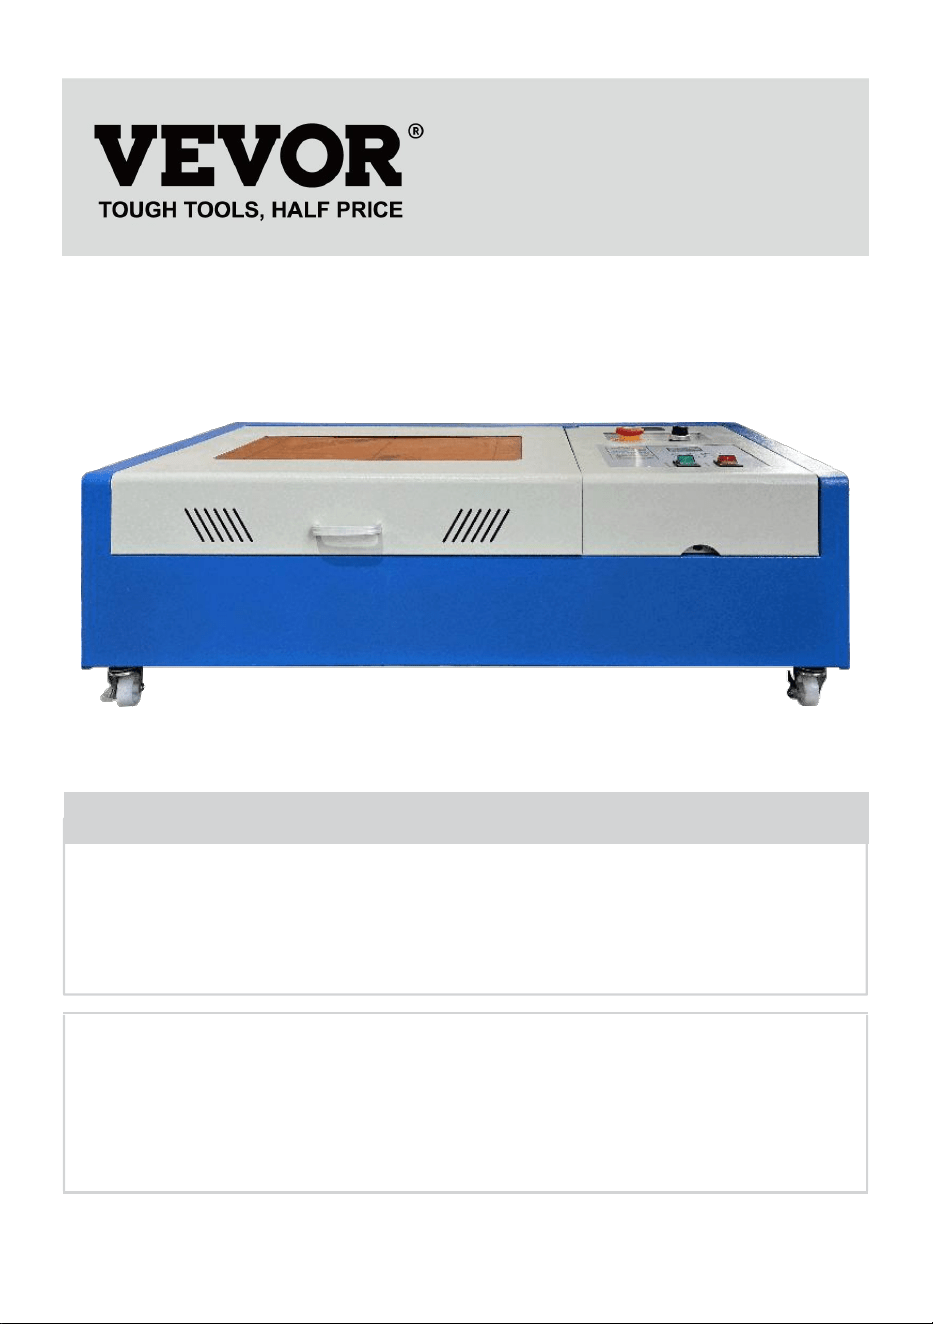
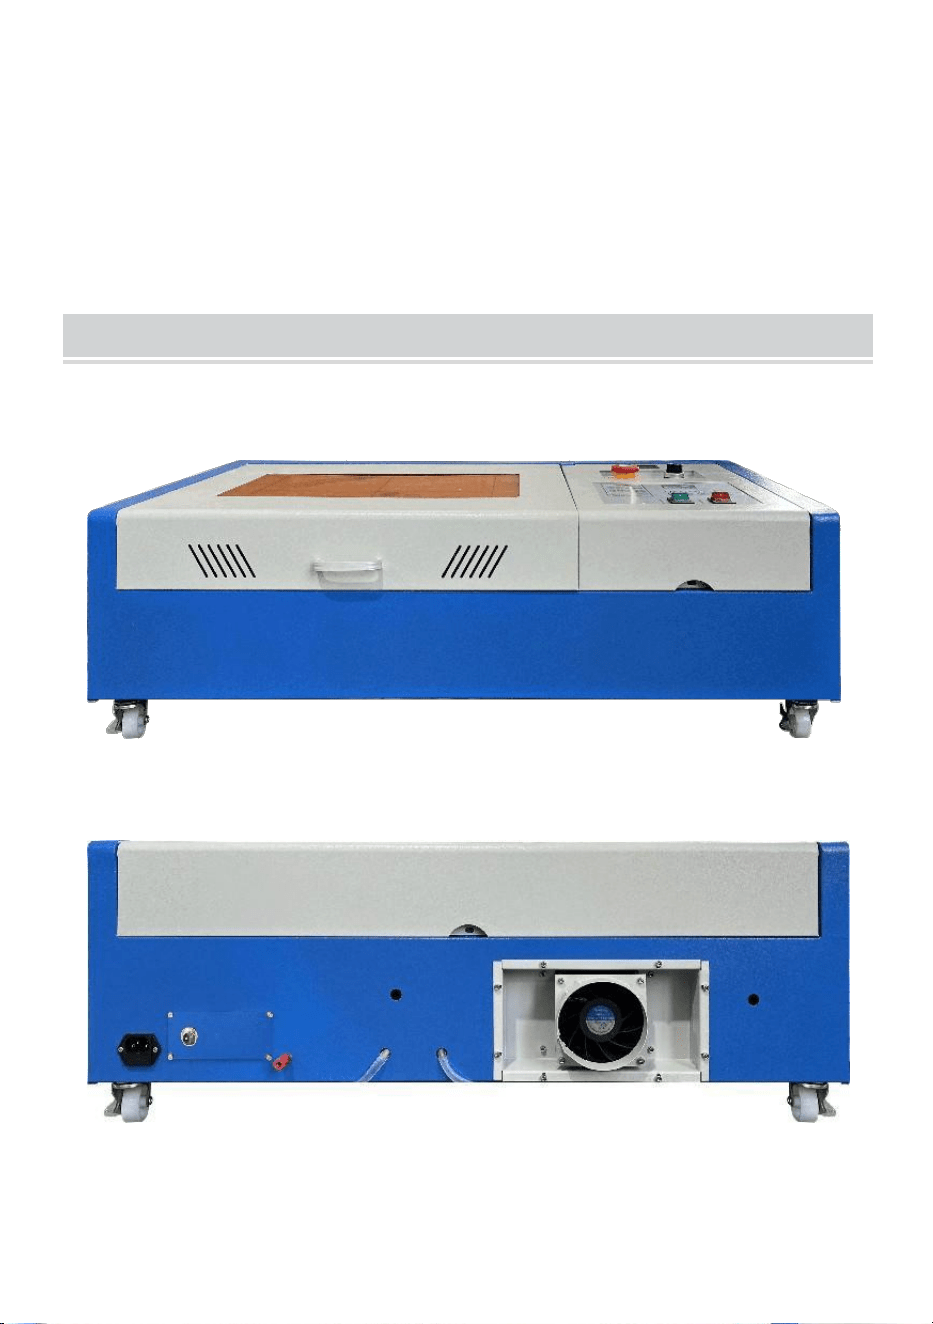
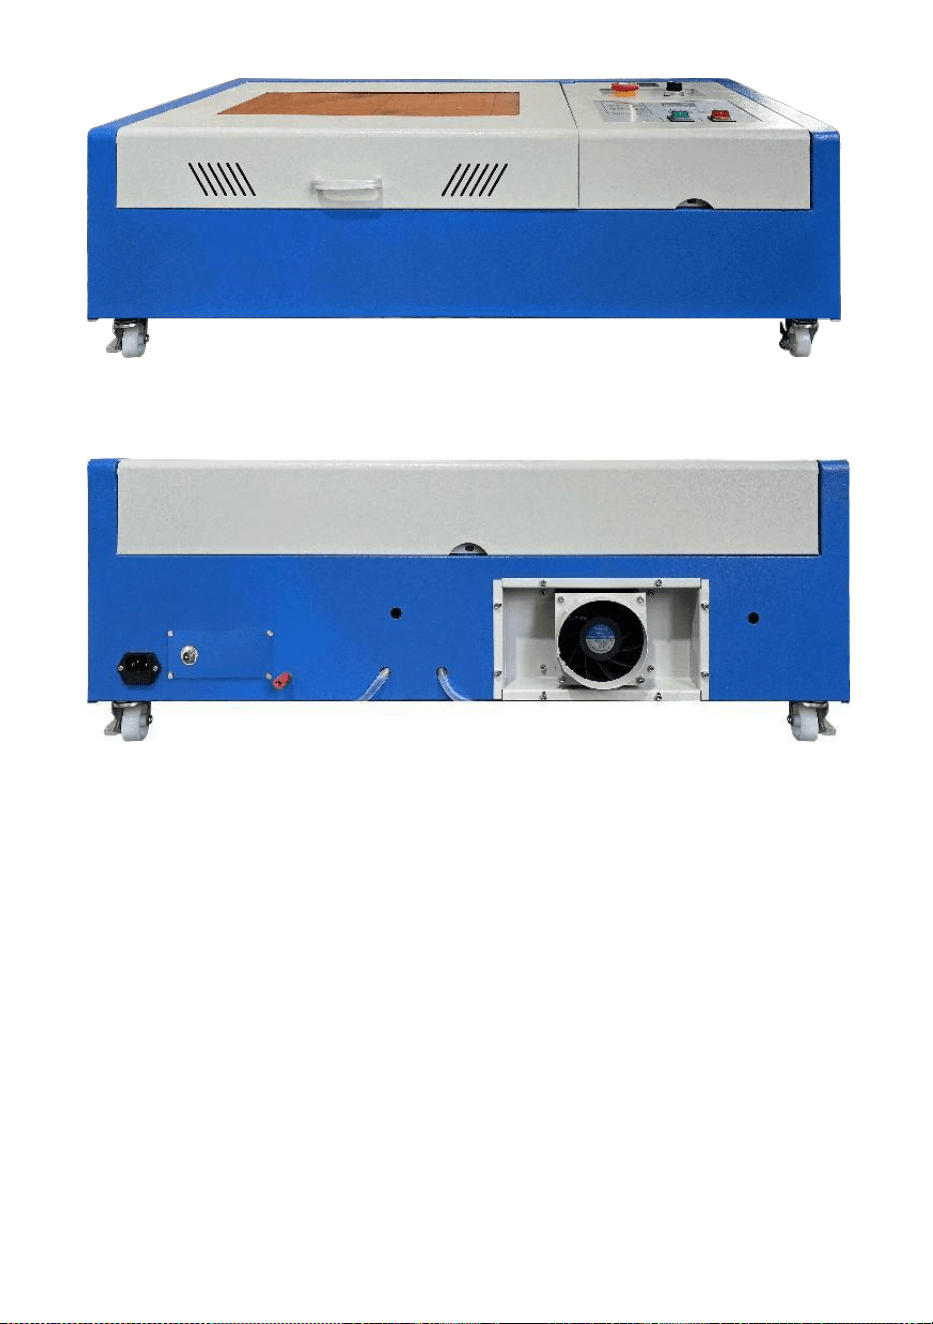
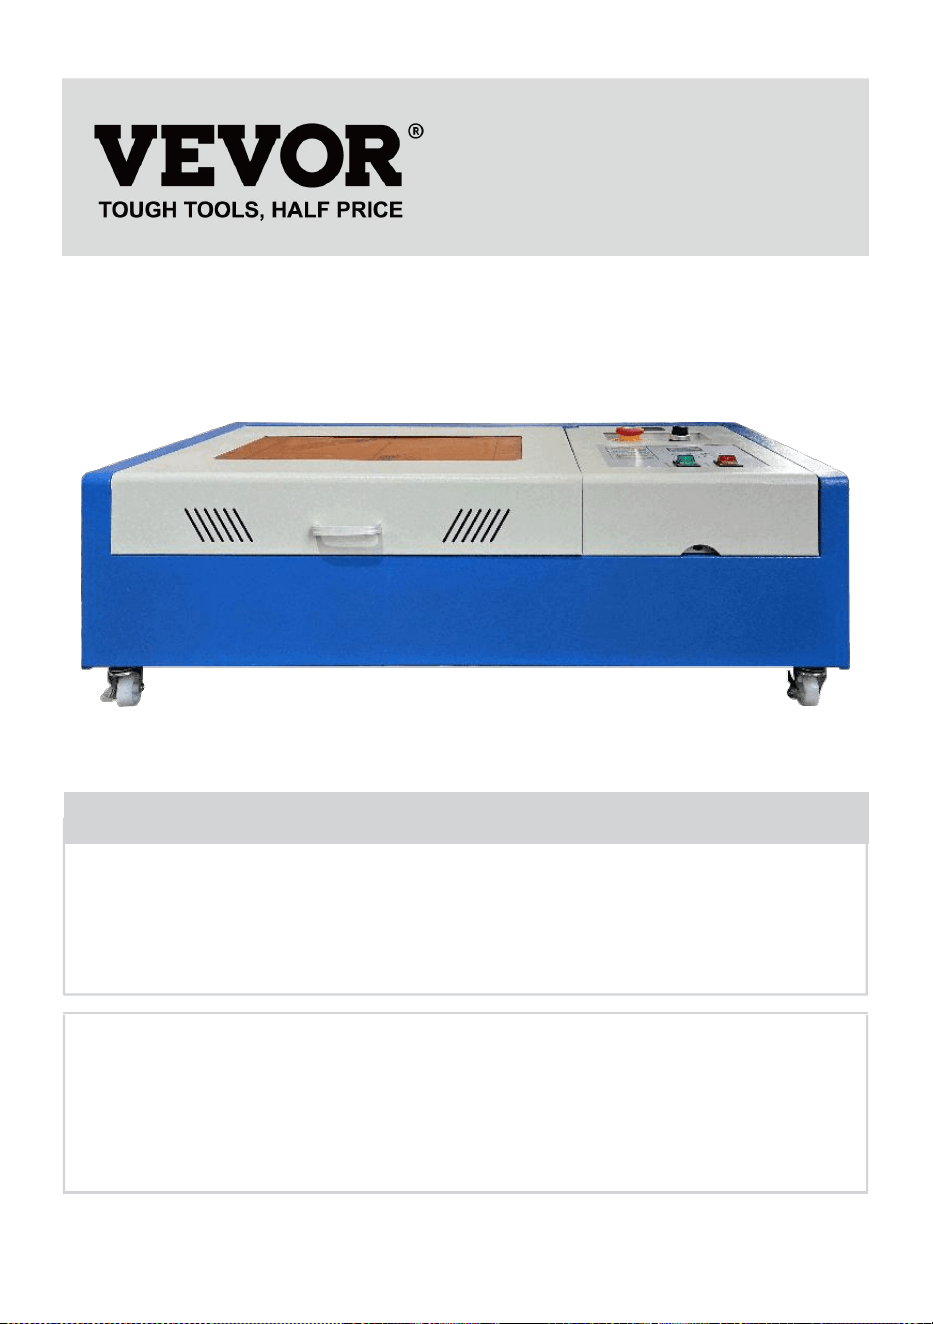
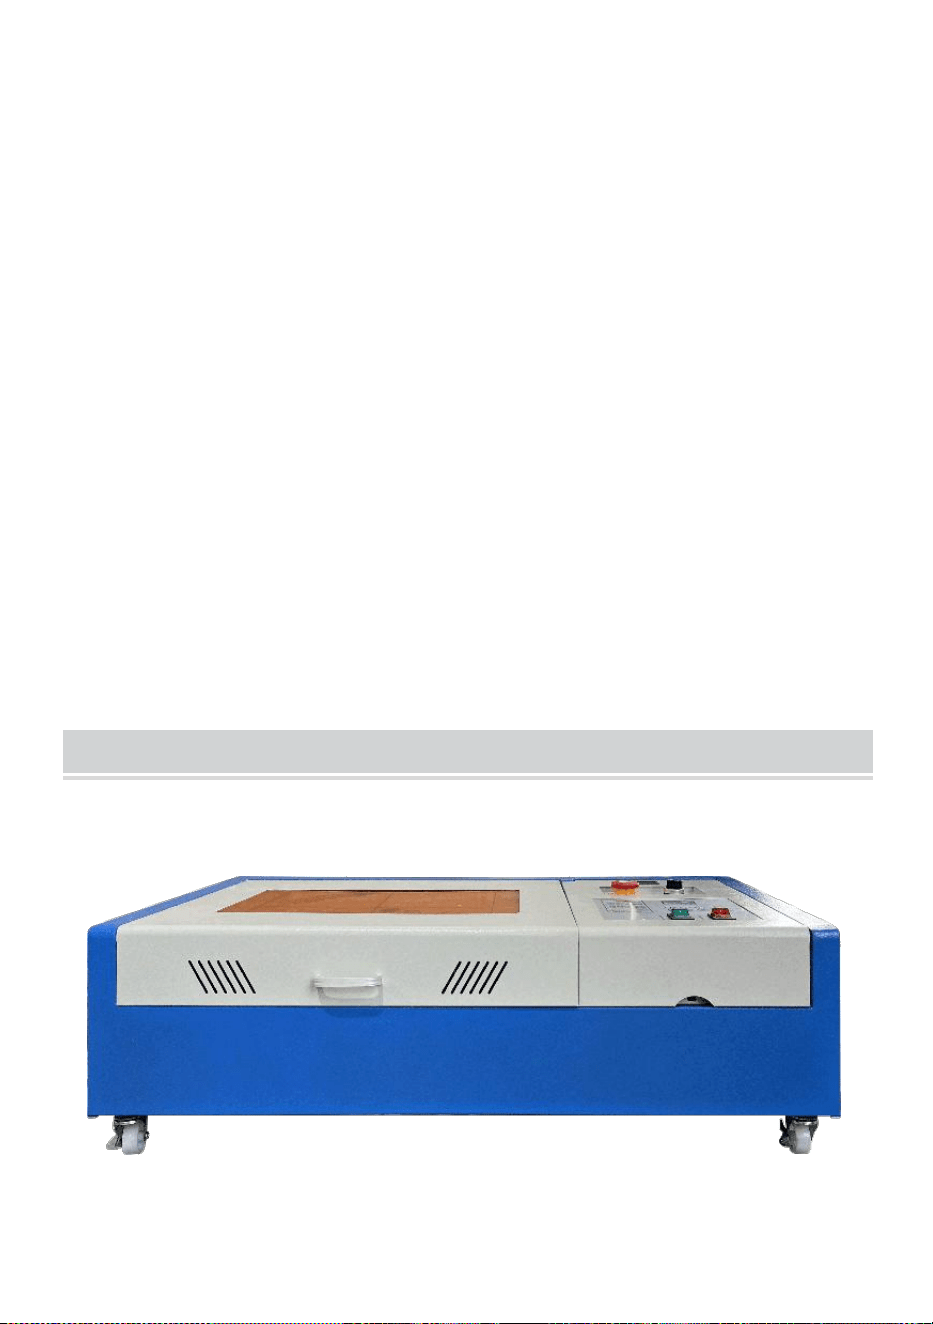
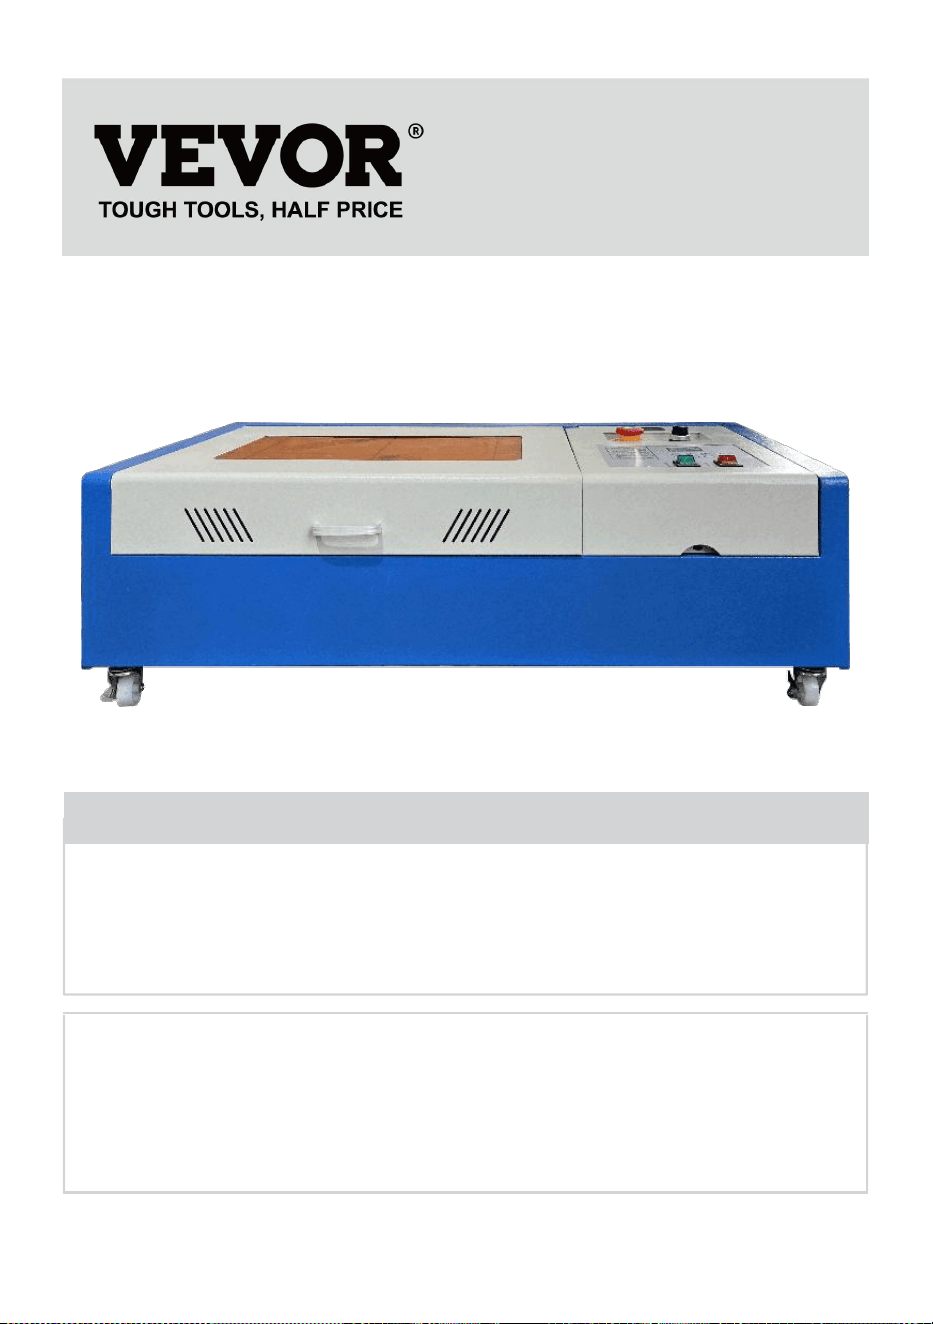
1.Please open the package to confirm the appearance of the product is
intact. The following is a reference picture(Figure 1).
Front
back
Figure 1
- 5 -
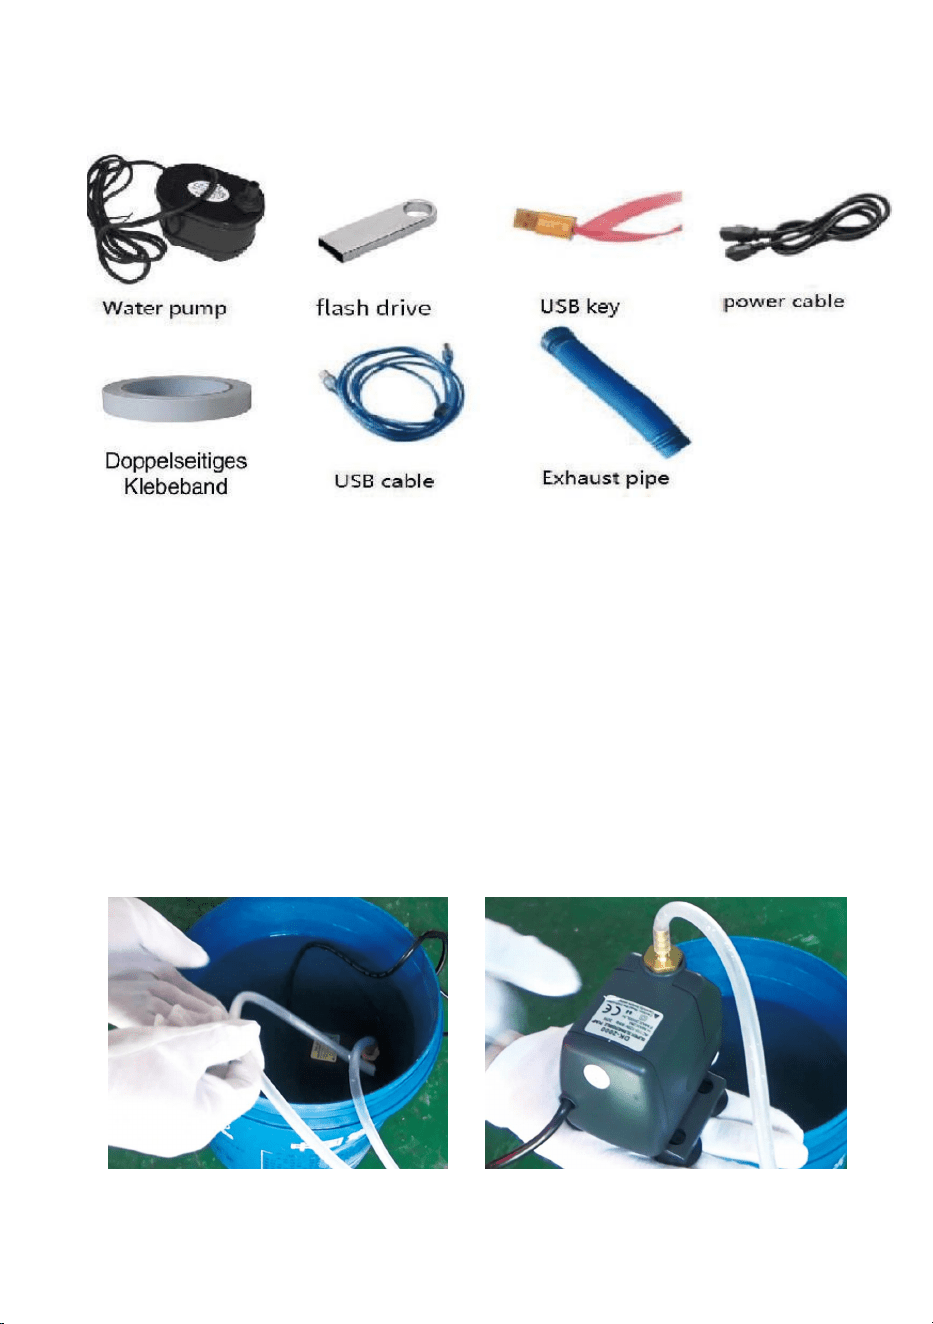
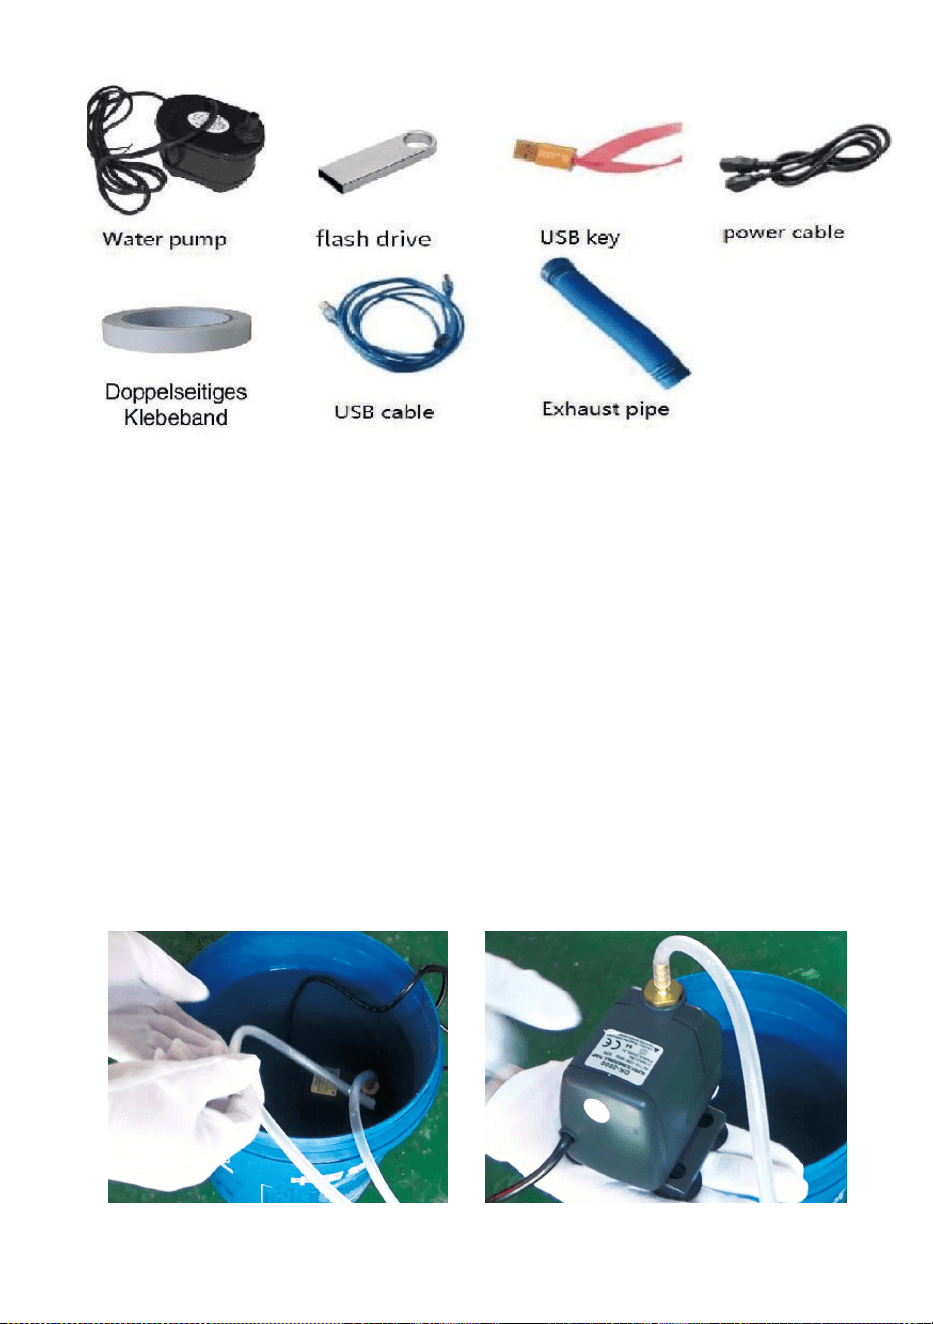
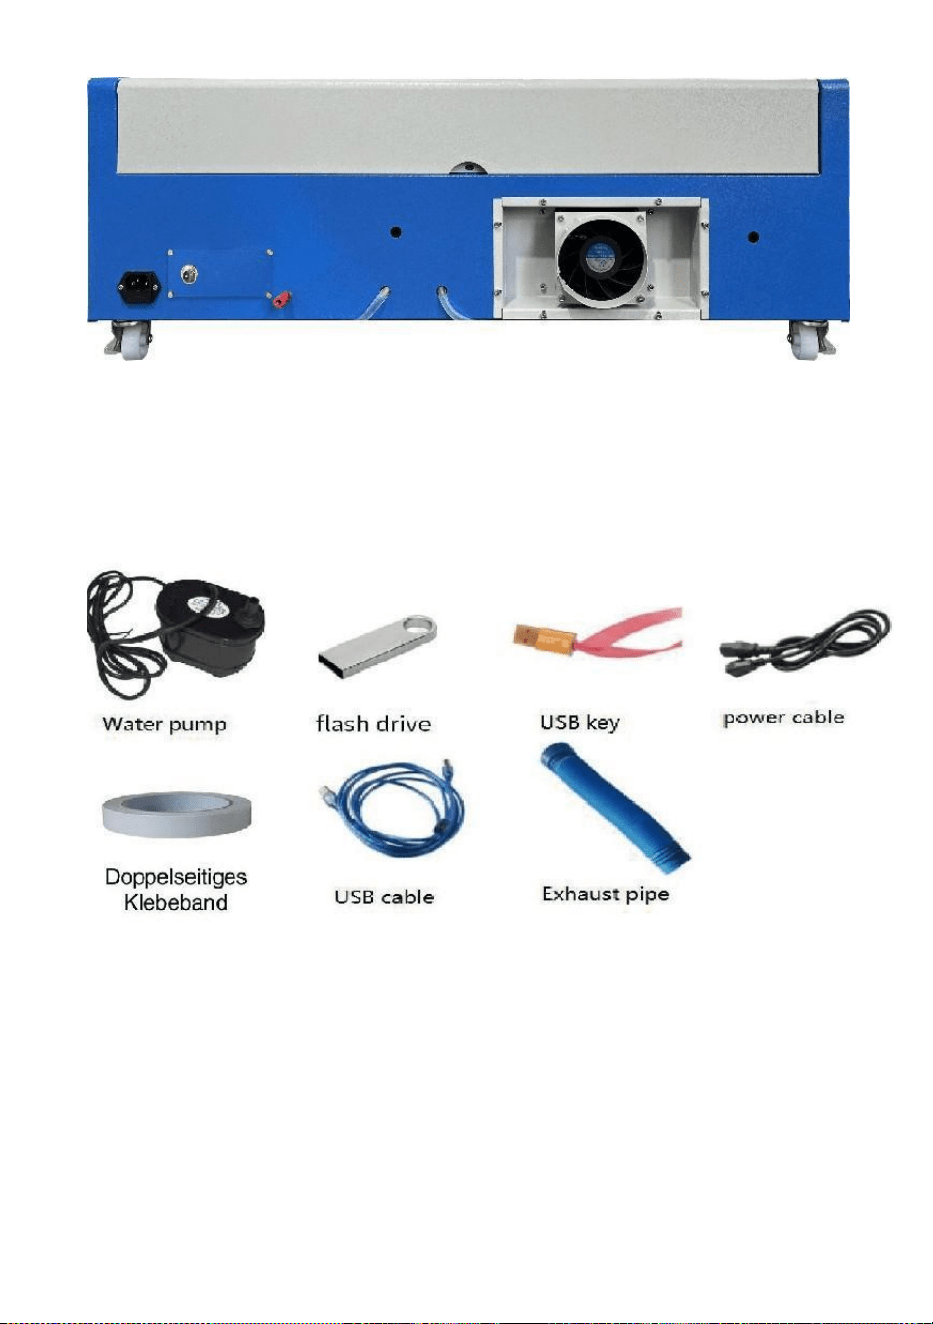
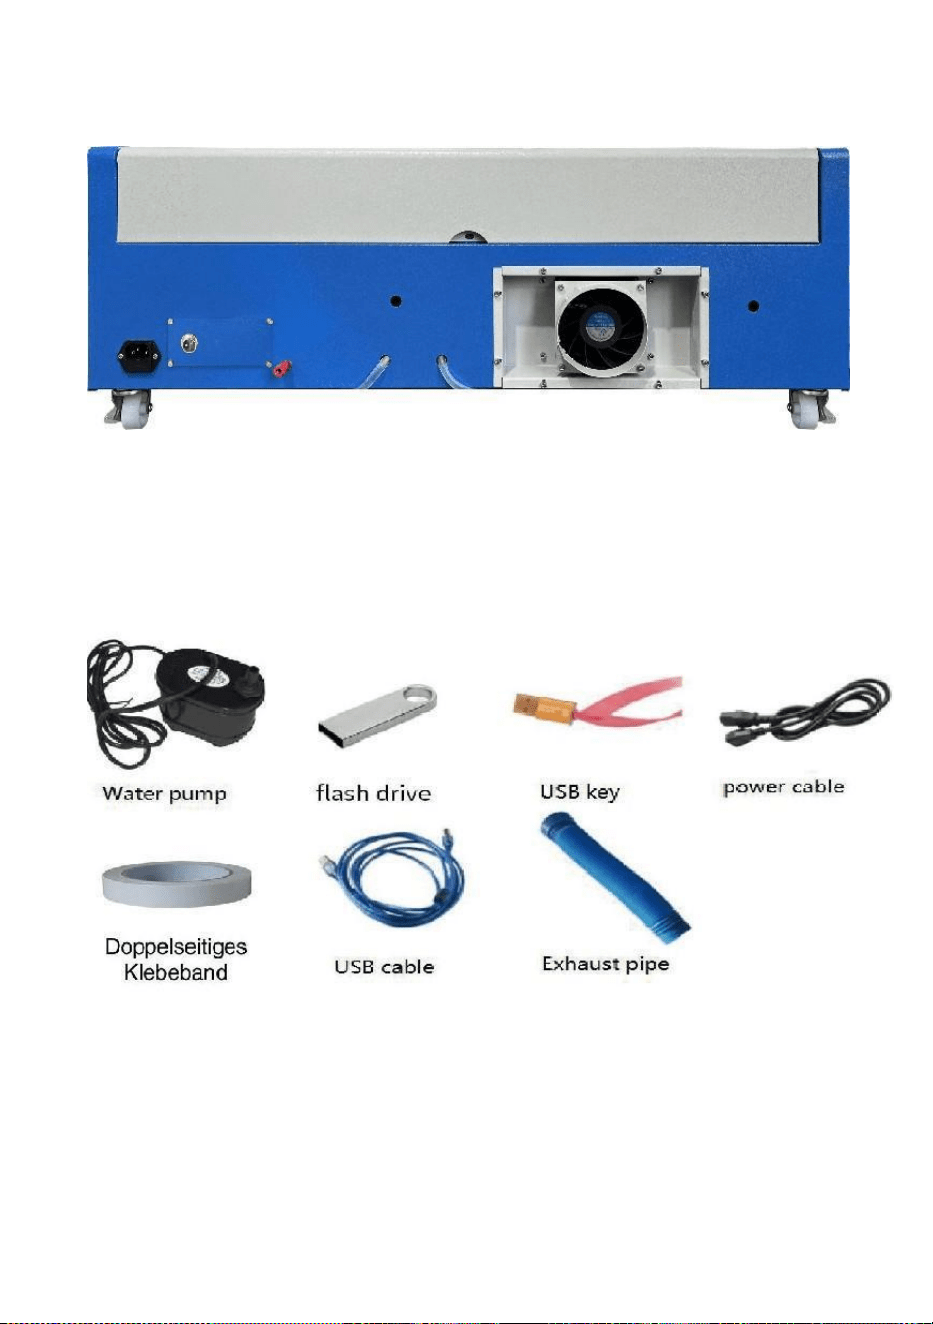
2.Please take out the supporting devices and tools from the packing box or
inside the equipment(Figure 2)
Figure 2
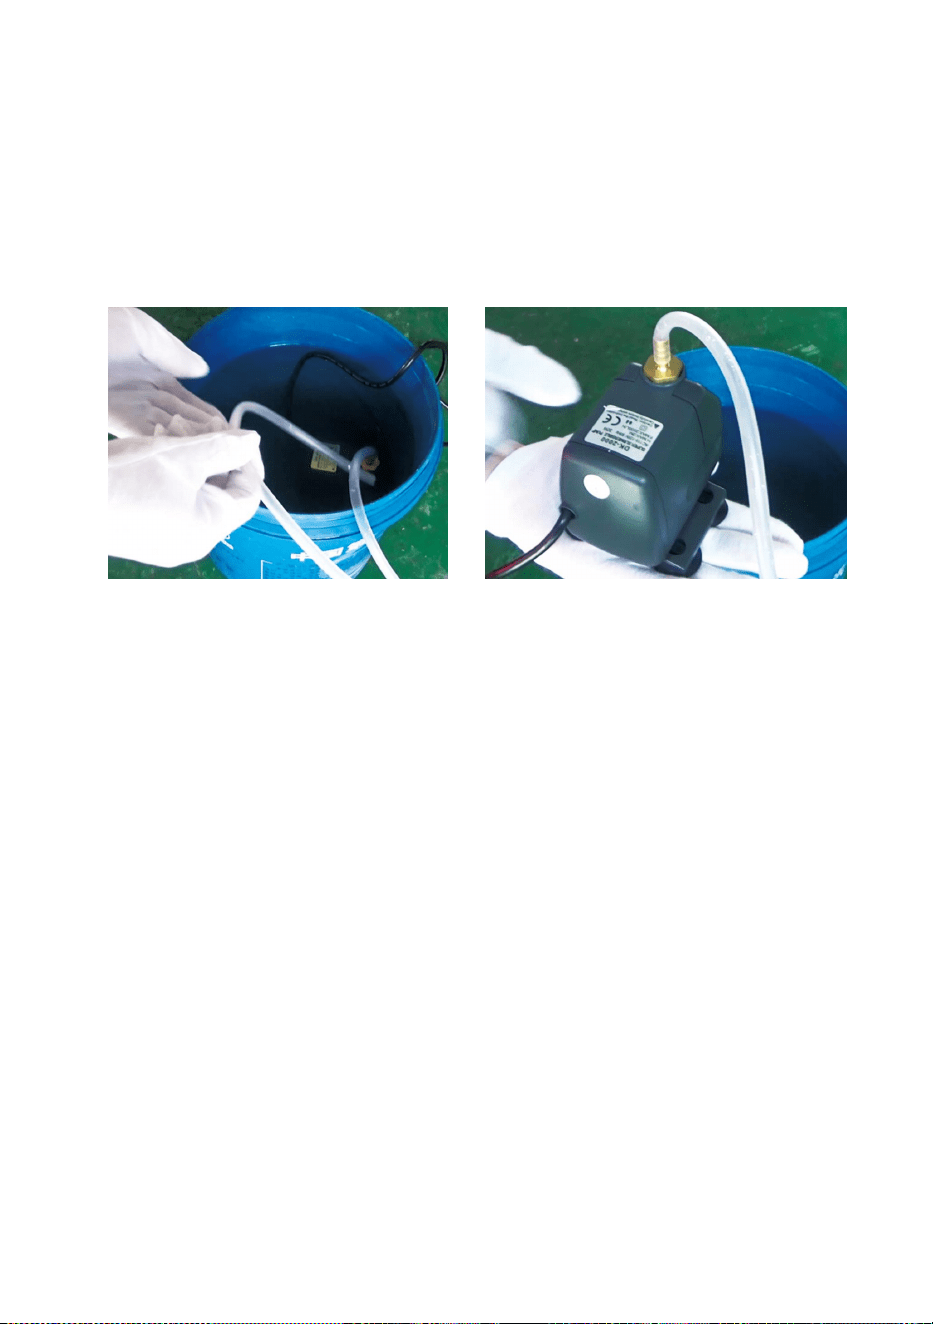
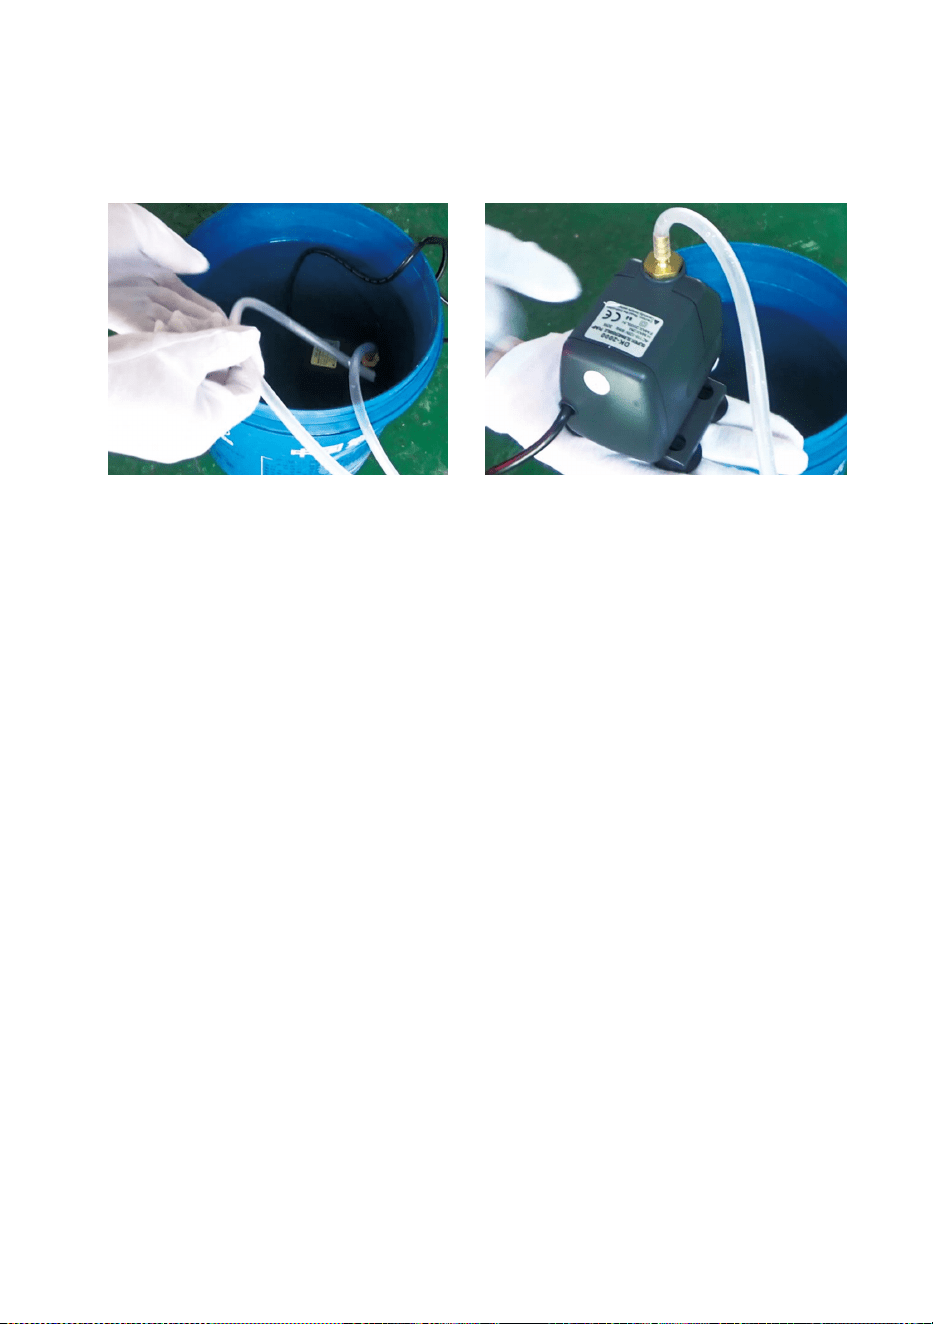
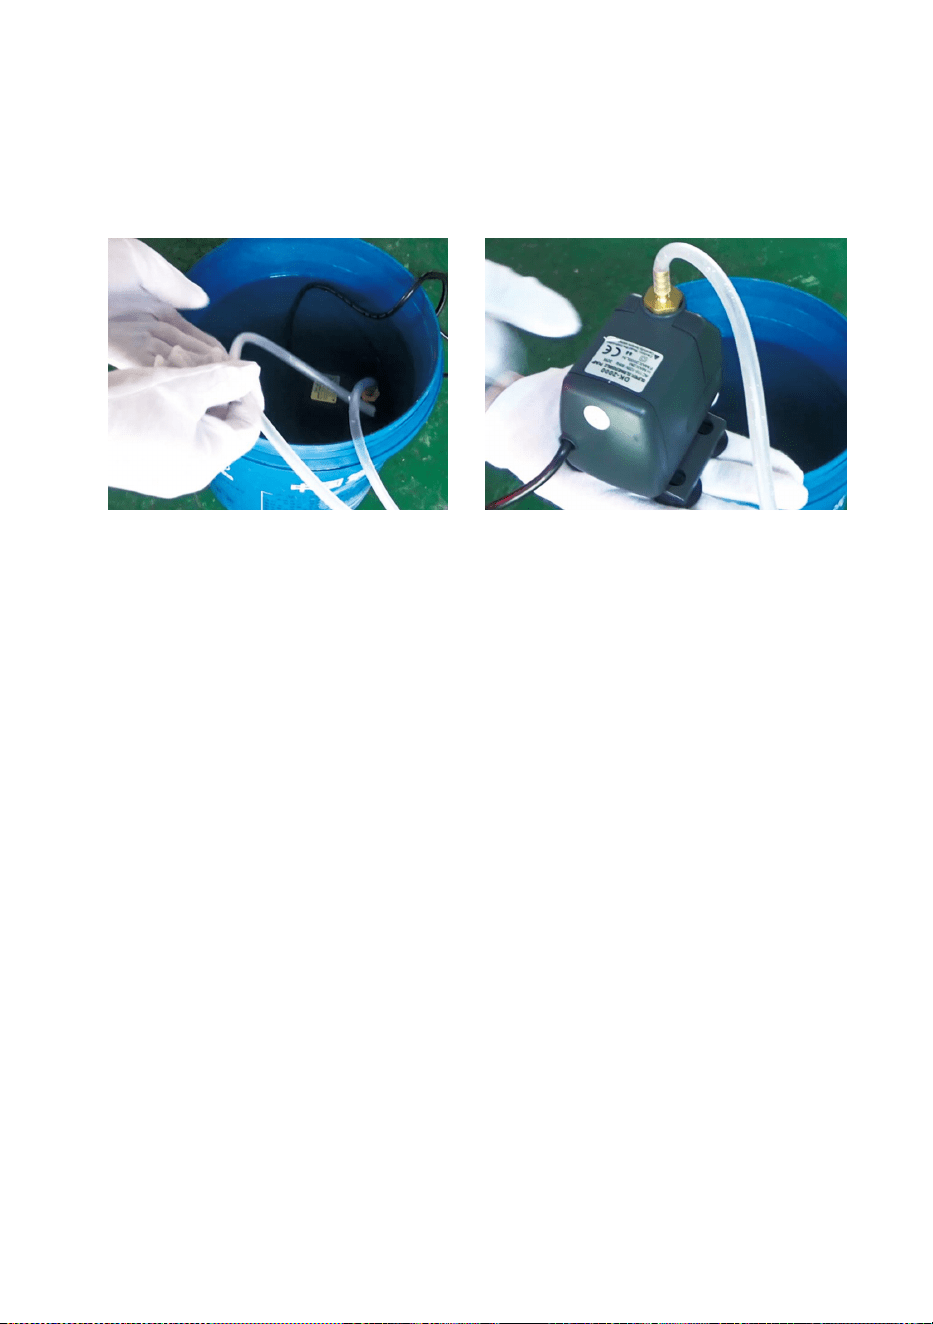
3.Please connect the supporting equipment and tools to the laser
equipment and power on. (The detailed steps may not be shown in the
manual, you can also refer to the video in the CD/USB).
Please connect the water circulation pump to the water inlet pipe of the
laser equipment, put the water circulation pump into a bucket filled with
pure water and put the equipment outlet pipe directly into the bucket.
(Figure 3)
Figure 3

- 6 -
Note: Please add purified or distilled water to the bucket, and it is
strictly forbidden to add tap water or sewage. And the water
level should be higher than the circulating water pump. See
Figure 3.
Note: If tap water or sewage is added, it will block the heat
dissipation circulation system, resulting in serious
attenuation or damage to the power of the laser tube, thus
shortening the service life of the product.
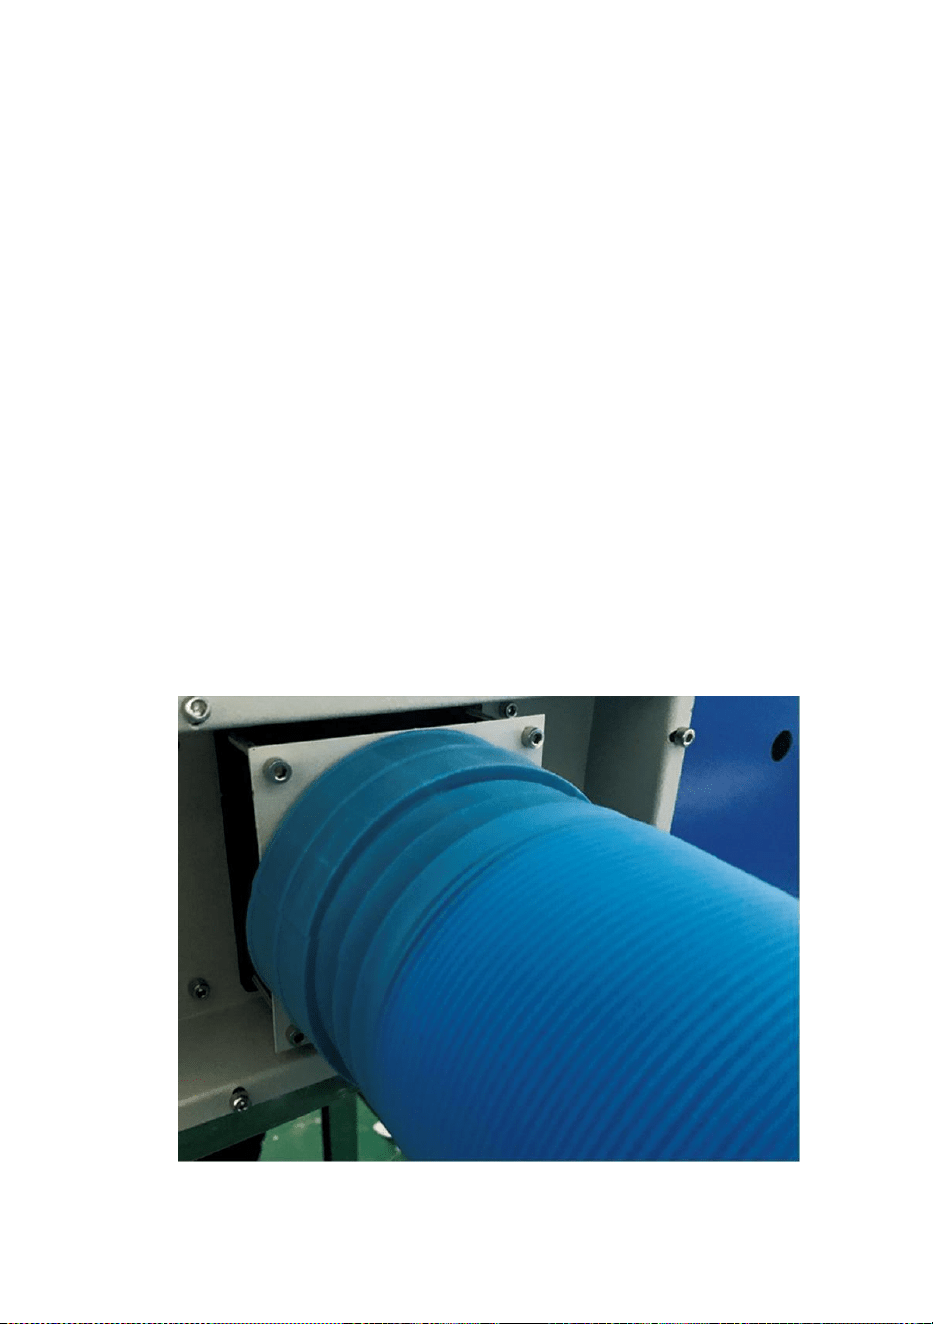
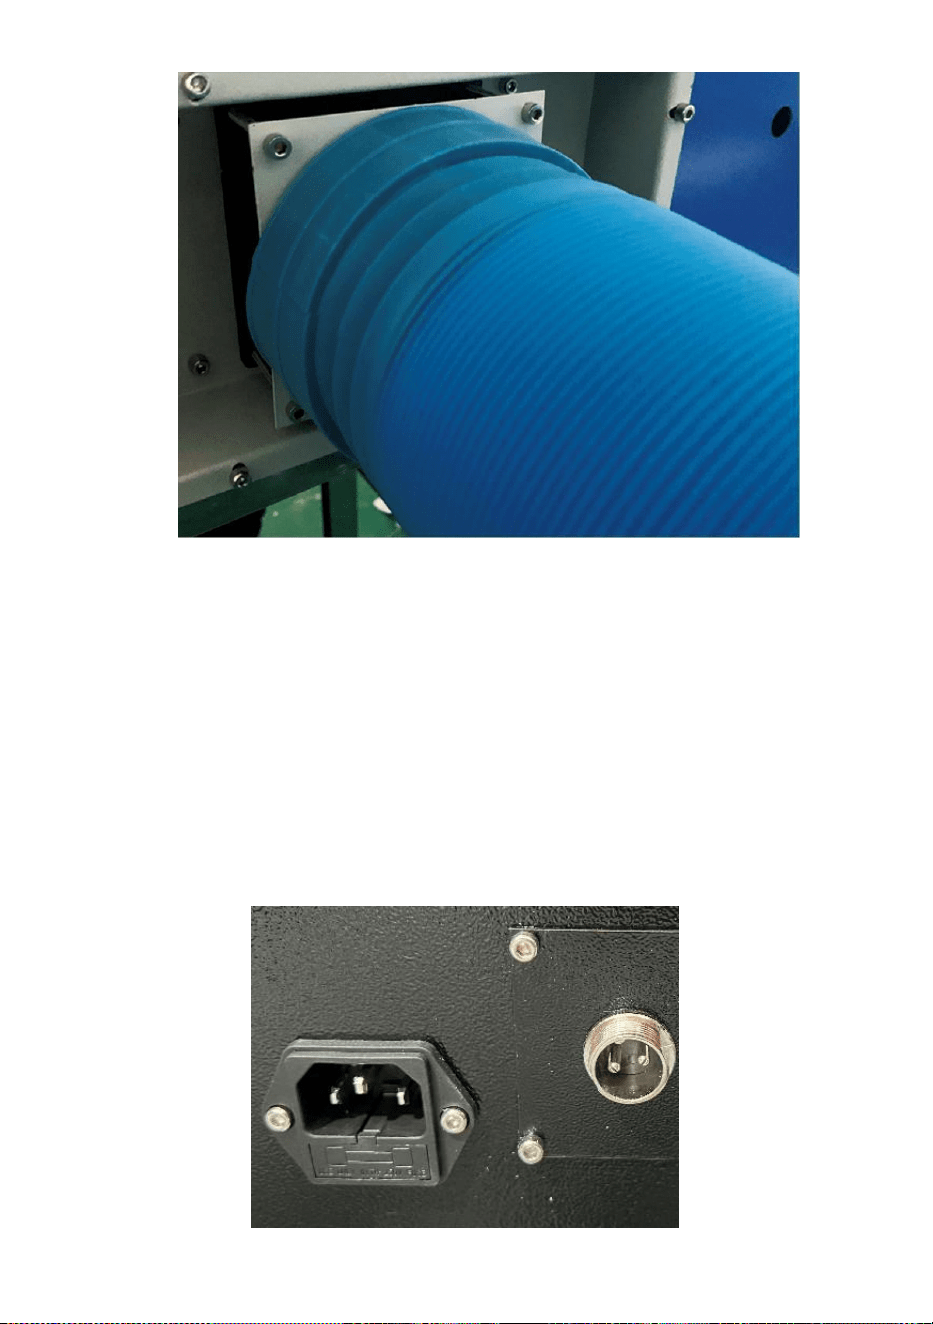
4.Please take out the exhaust pipe. One end of the exhaust pipe is
connected to the equipment exhaust port, and one end is connected to
the outdoor or auxiliary smoke exhaust device. Note: Use tools to fix
the connection to prevent it from falling off.(See Figure 4).
Figure 4
- 7 -
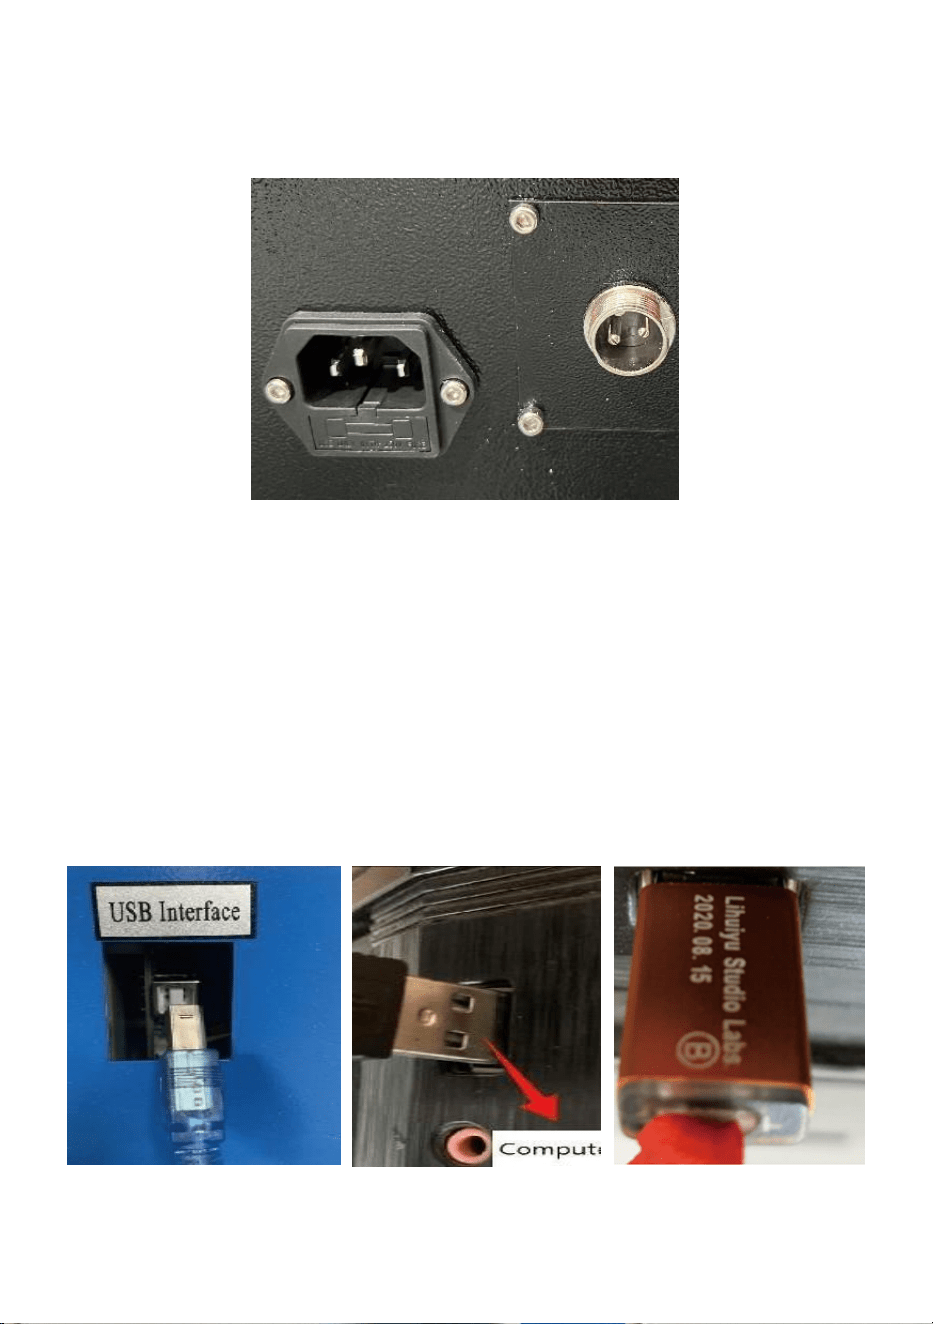
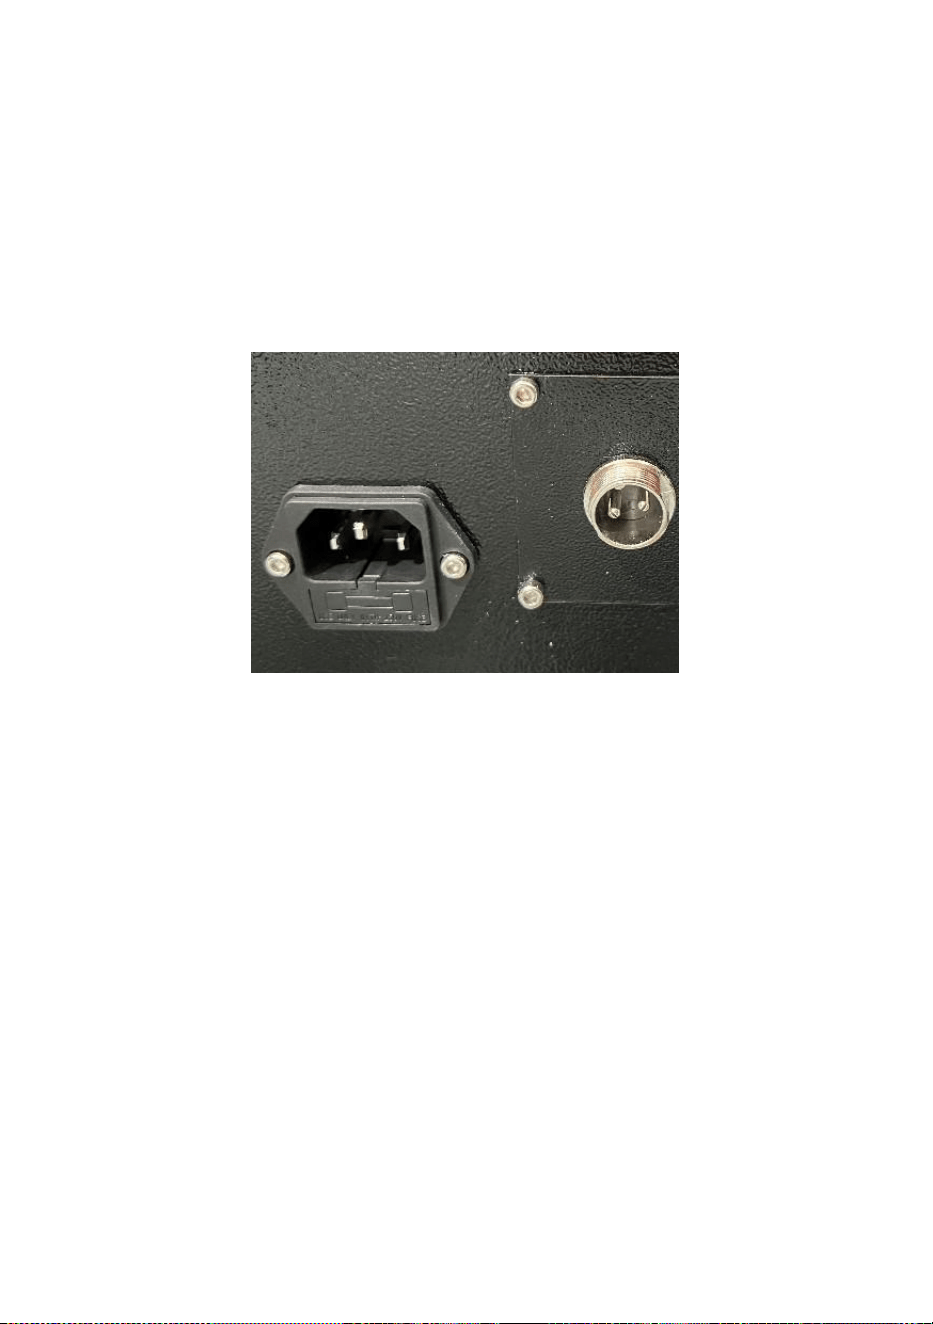
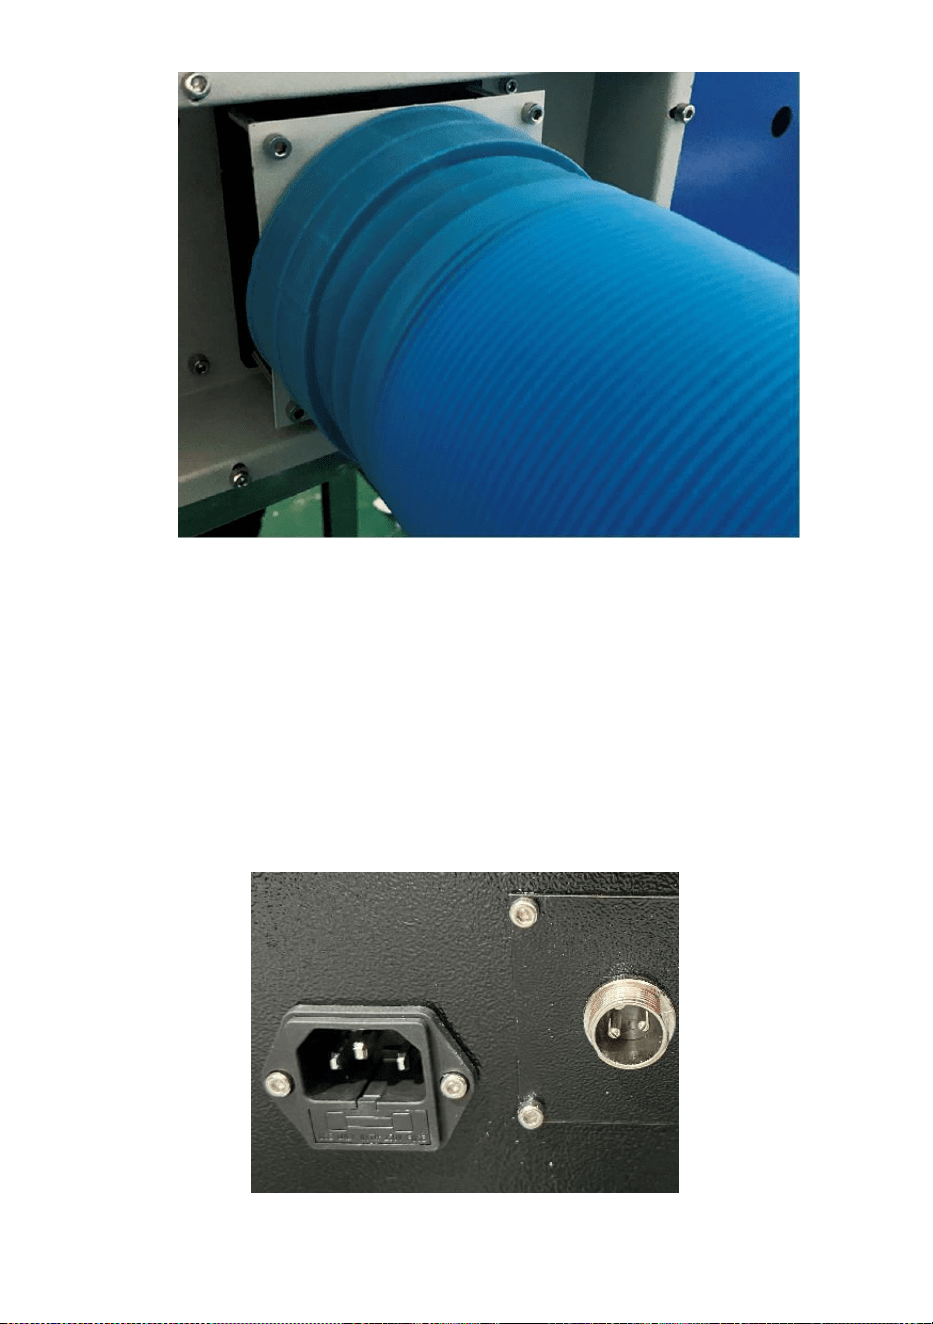
5.Please take out the power cord to power on the product, and check that
the product is running normally without any fault.(See Figure 5)
Figure 5
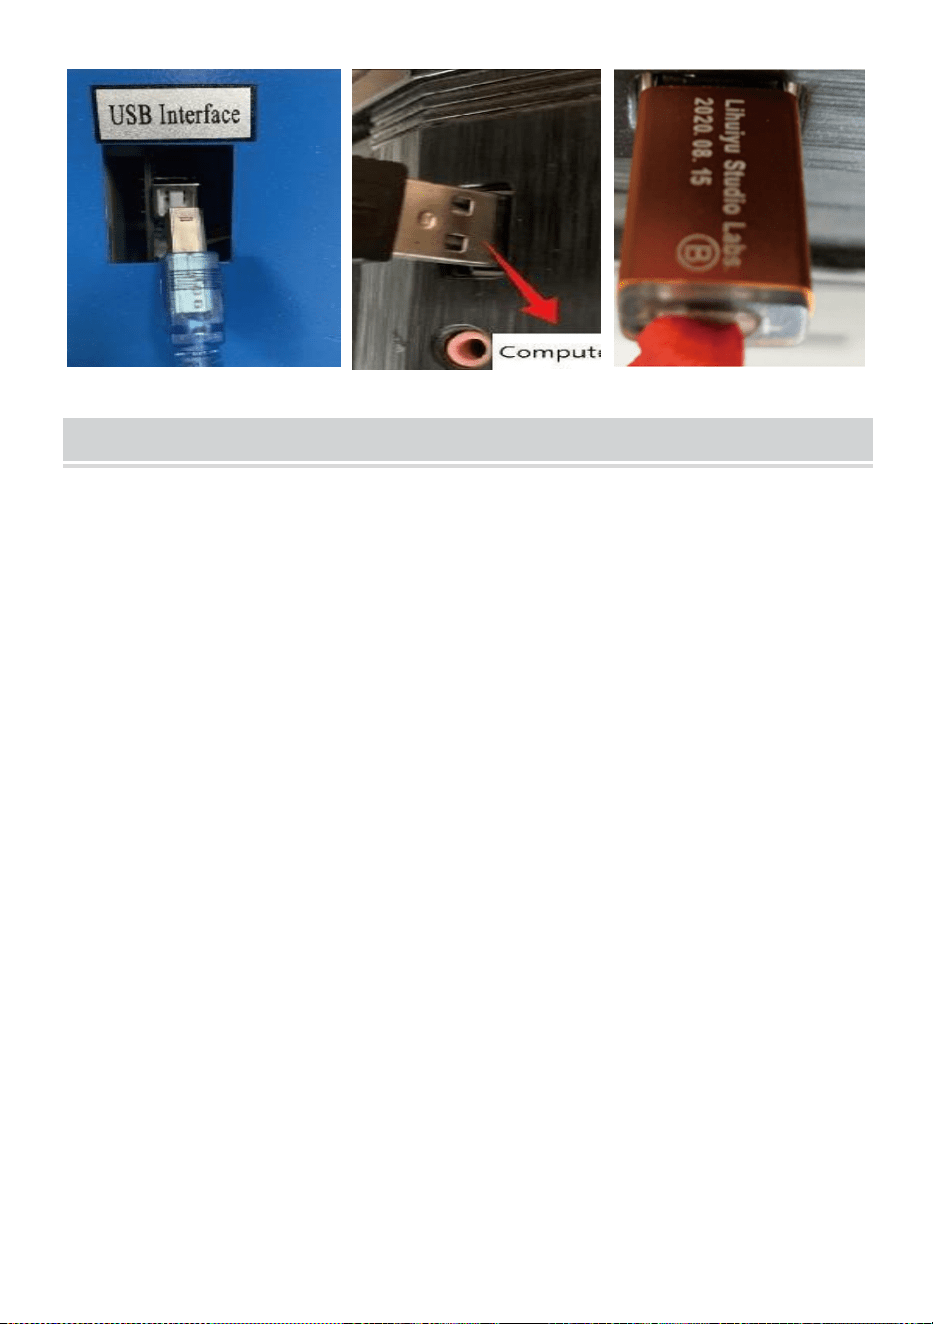
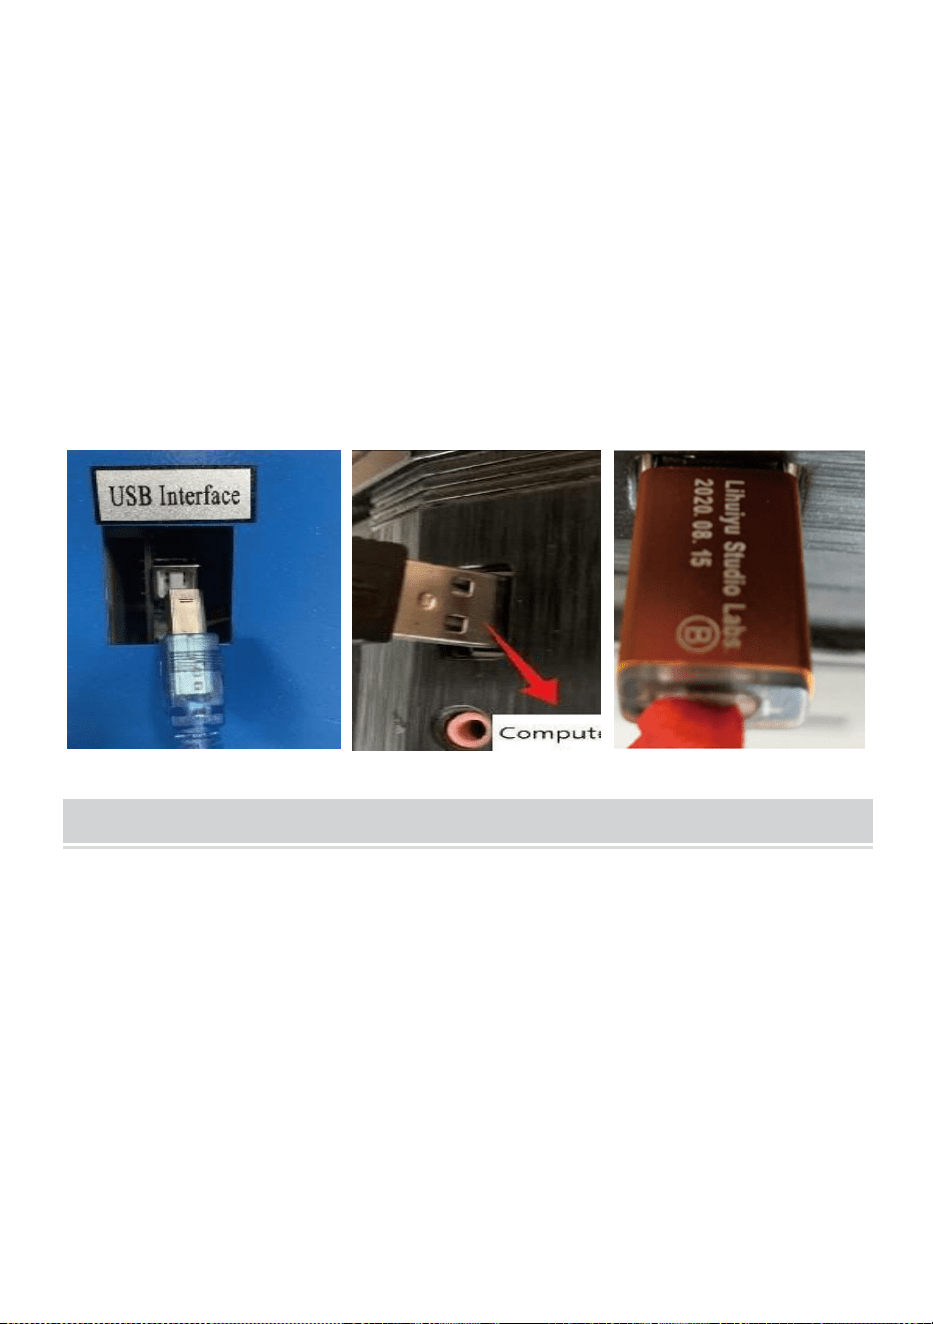
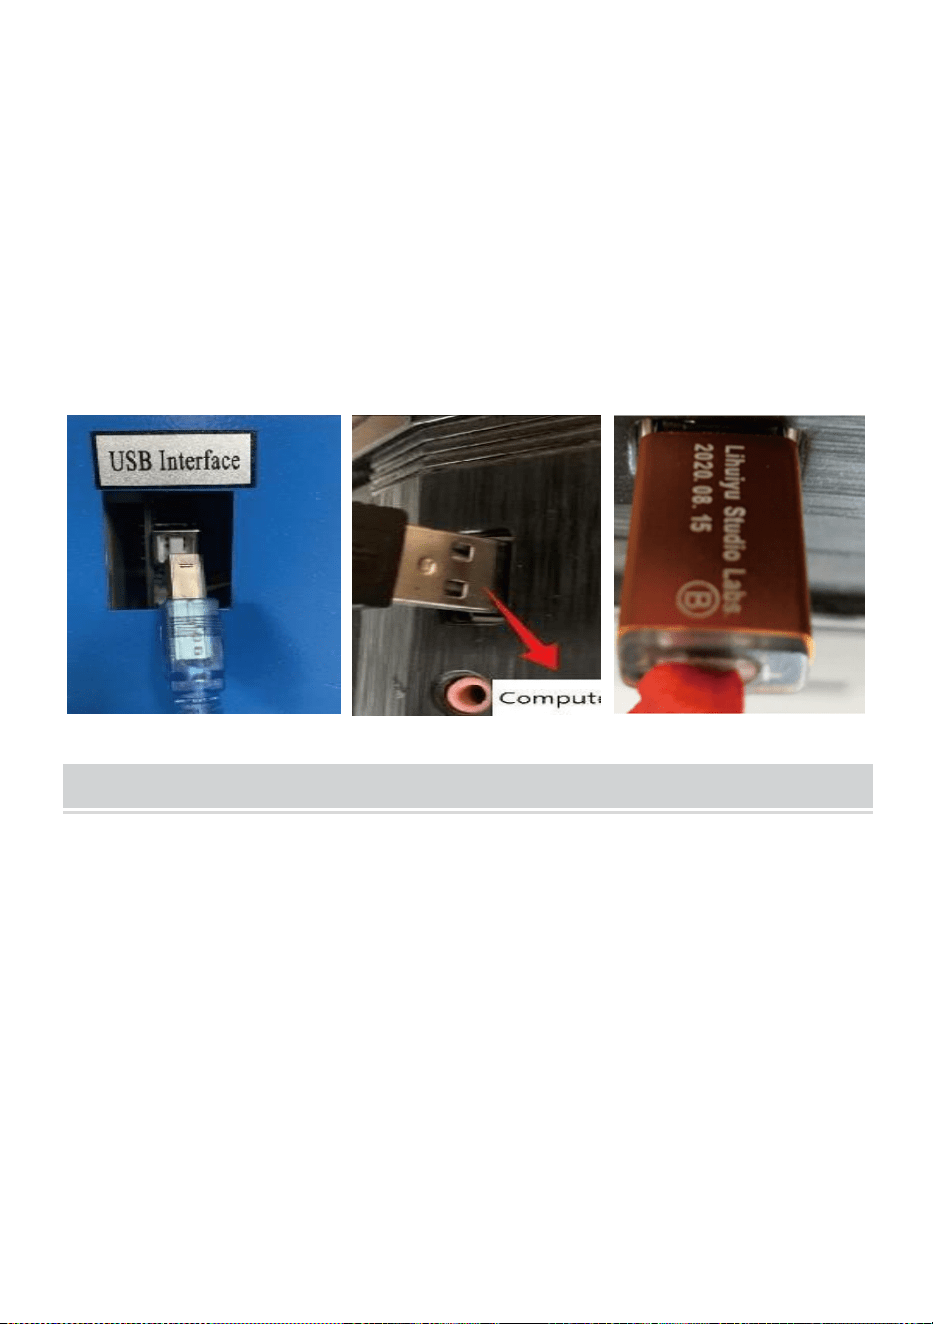
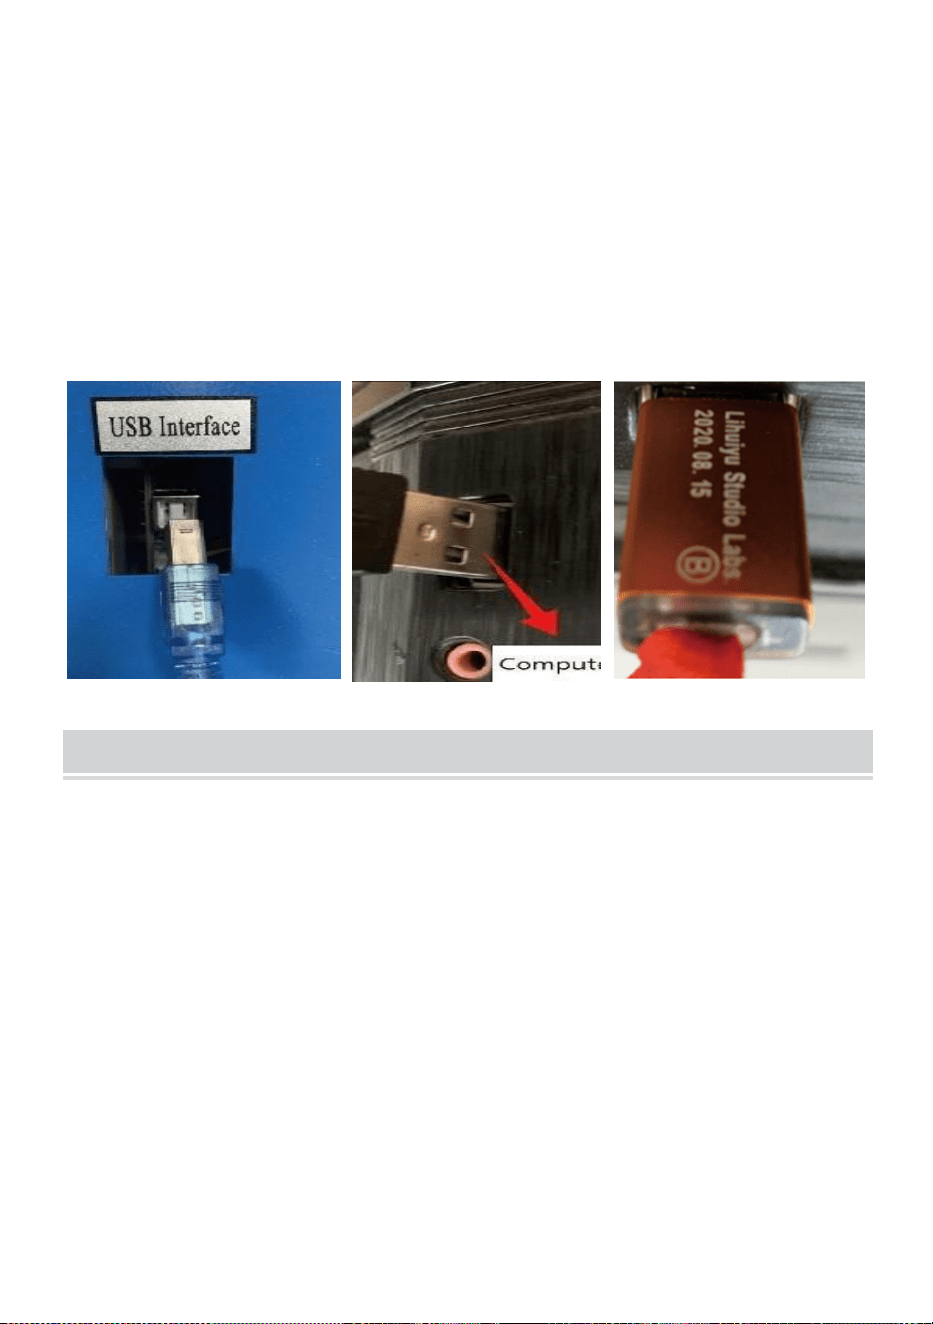
6.Please prepare the computer (Windows system), and install the software
by referring to the 11Software Installation Video11 in the CD/USB Disk.
After the software is installed, please take out the USB cable, connect
one end to the computer USB port and the other end to the device USB
input port. Note:Please take out the software key and plug it into the
computer USB port, oth-erwise the software cannot be used.(See
Figure 6)
Figure 6
- 8 -
SOFTWARE INSTALLATION
Note: please install Coreldraw before installing our software,
Coreldraw 12,X3.X4,X5 are supported; Win XP, Win 7, Win 8 are
supported.
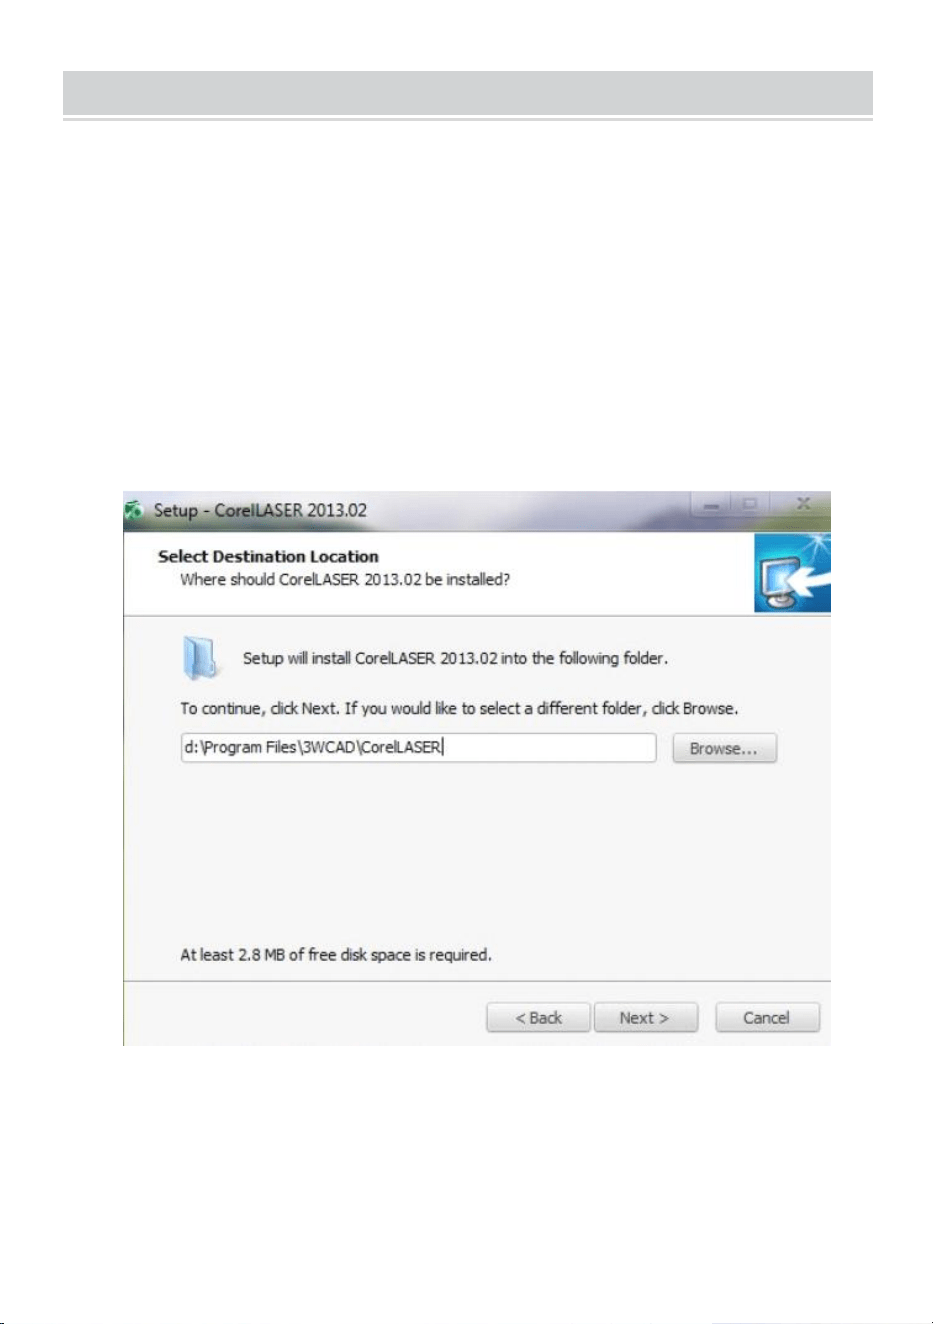
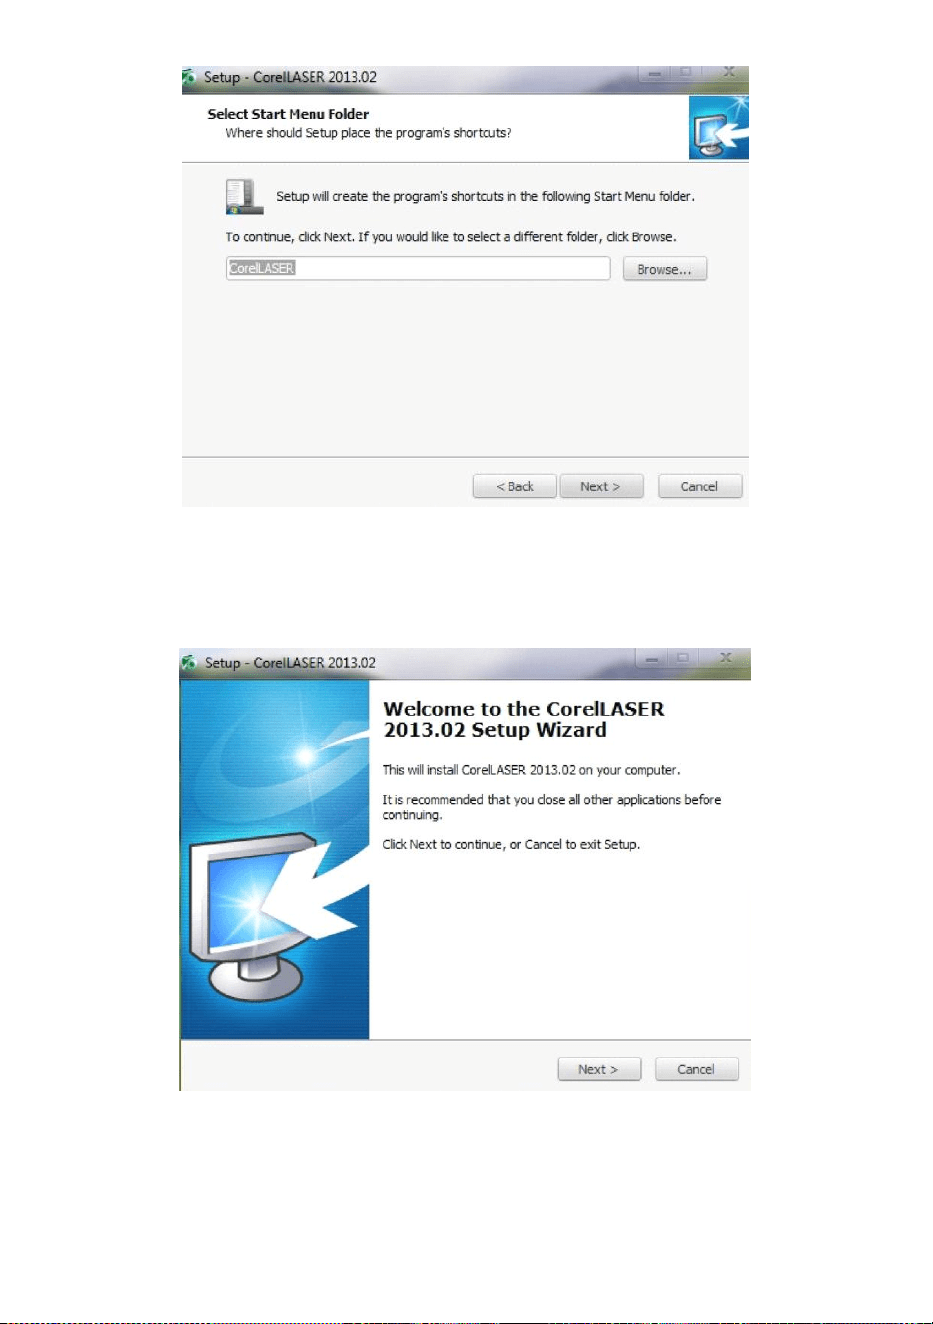
1.Double-click the CorelLASER.exe under the installation directory,
Select a language in the dialog box that pops up,Choose English
language Click Next the following dialog box appears:(See Figure 7)
Figure 7

- 9 -
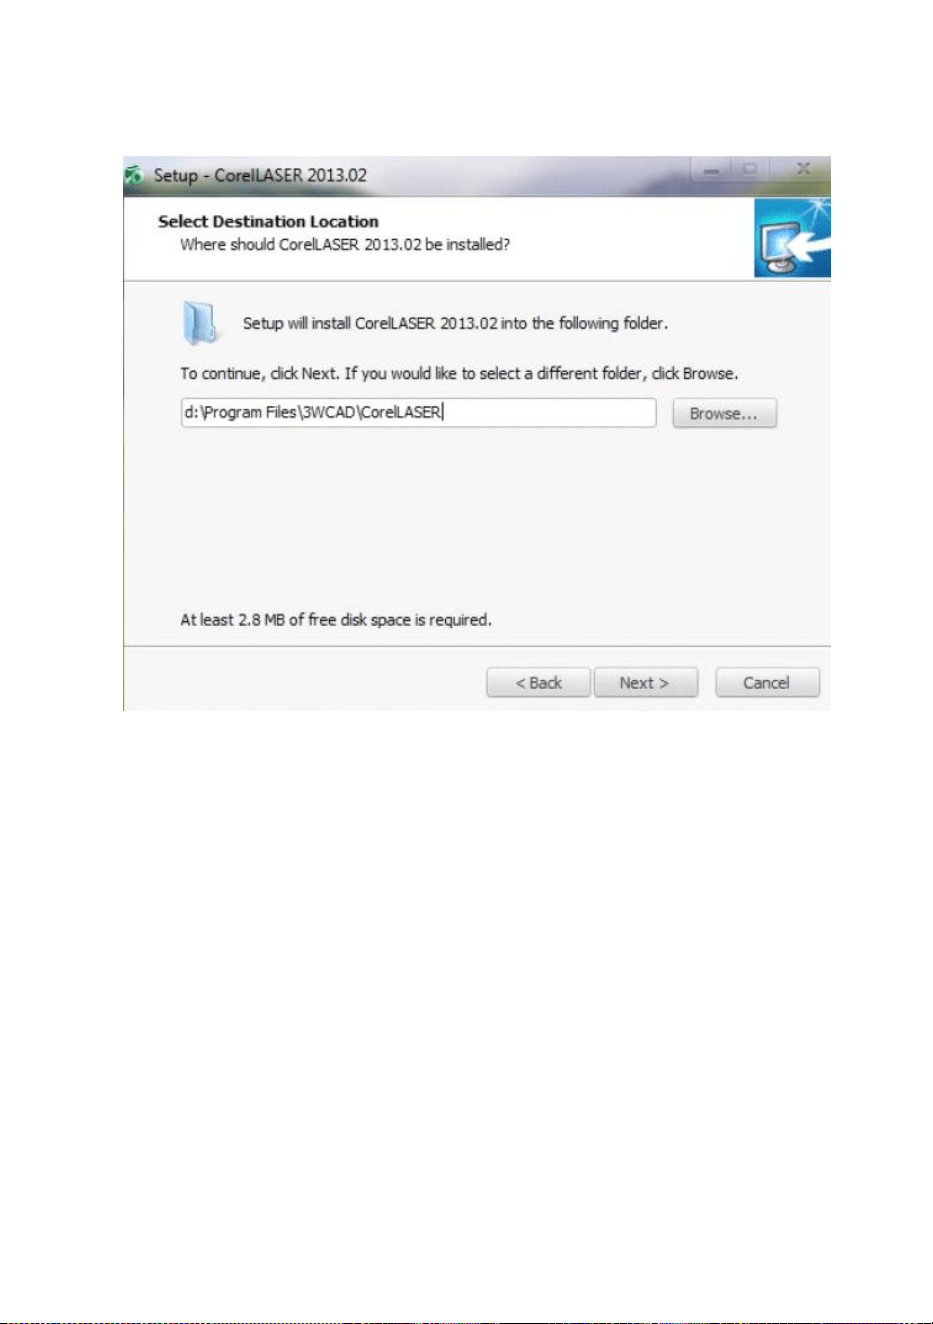
Select the installation path, we suggest d:\Program
Files\3WCAD\CorelLASER ,Then click Next:(See Figure 8)
Figure 8
Click Next:(See Figure 9)
Figure 9
- 10 -
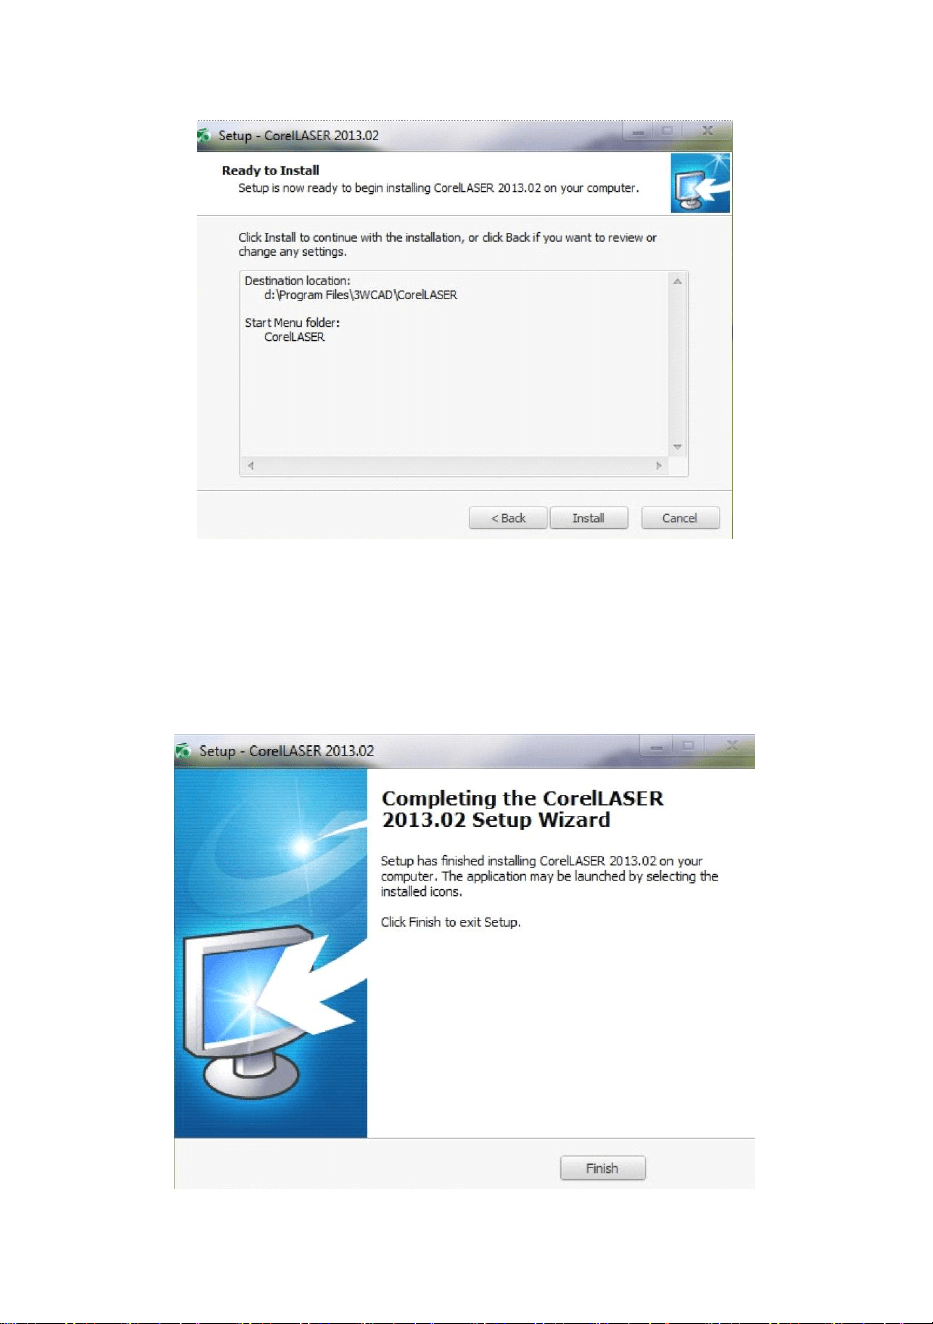
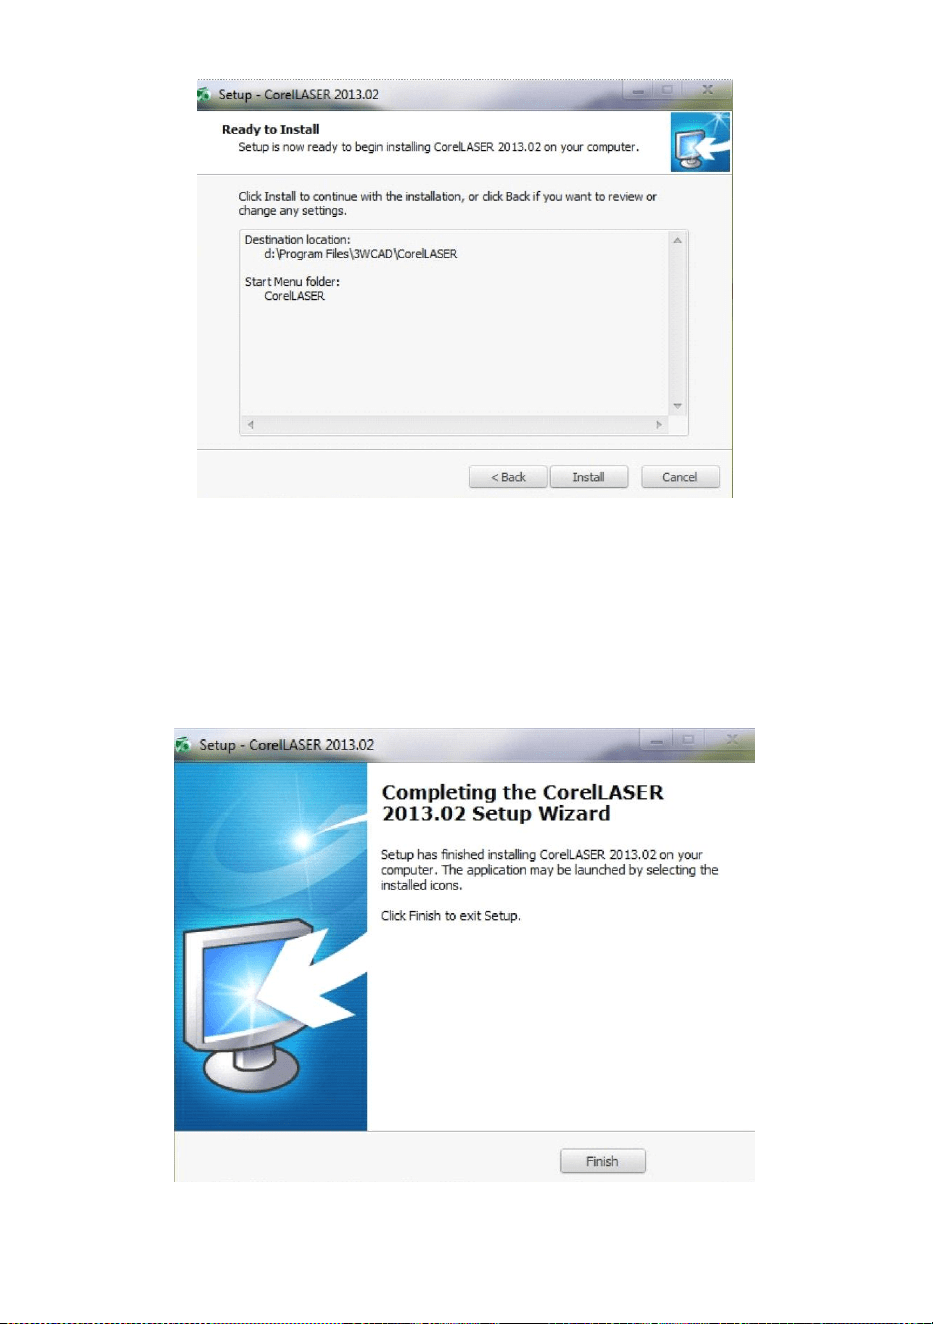
Click Next:(See Figure 10)
Figure 10
Click【Install】,when extract copy is to be completed, the installation will
be finished.(See Figure 10)
Figure 11
- 11 -
Click Finish, then the software was installed.(See Figure 11)
2.Engraving machine properties.
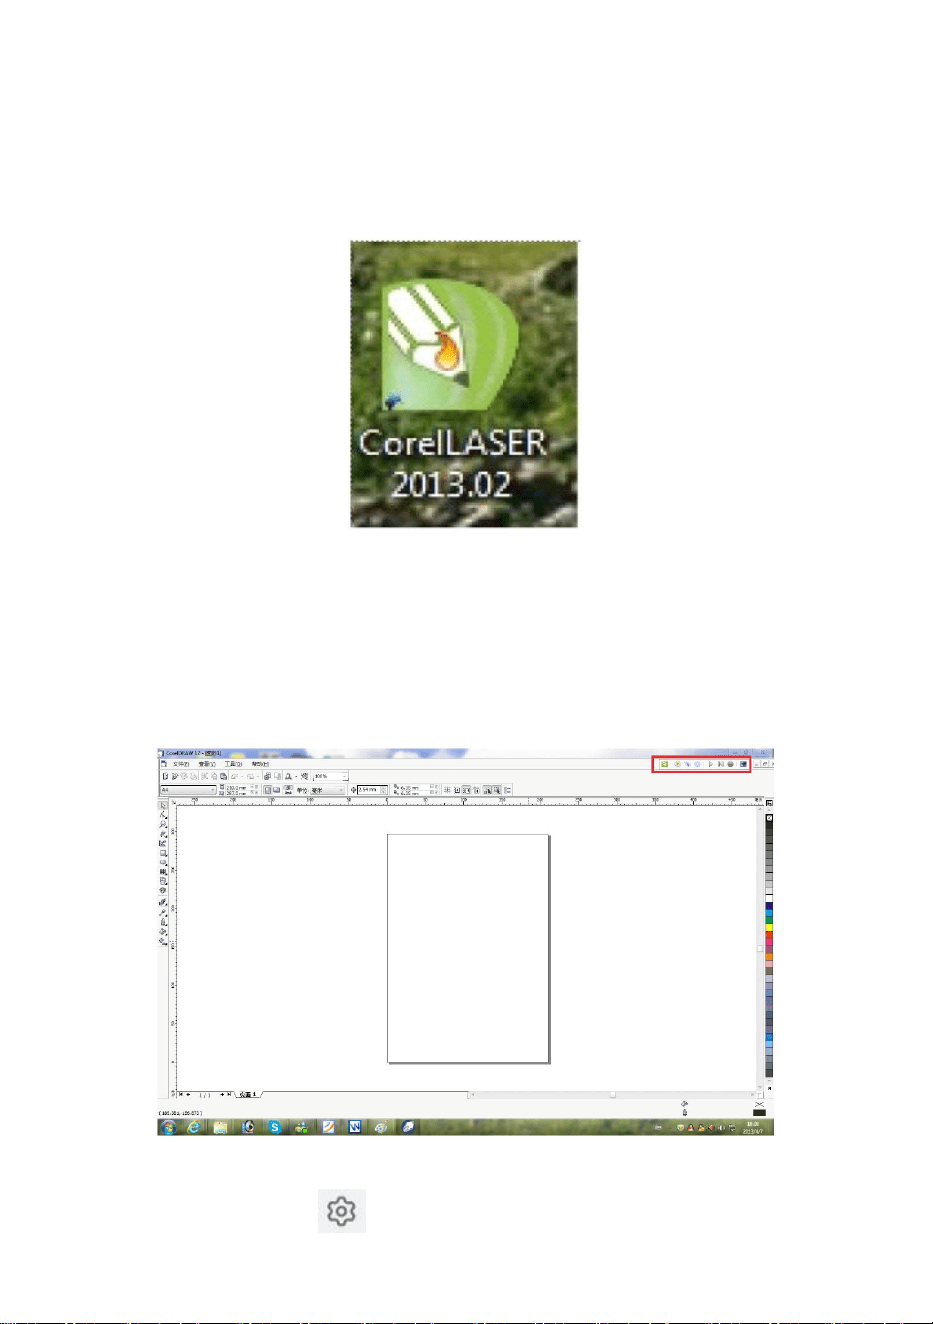
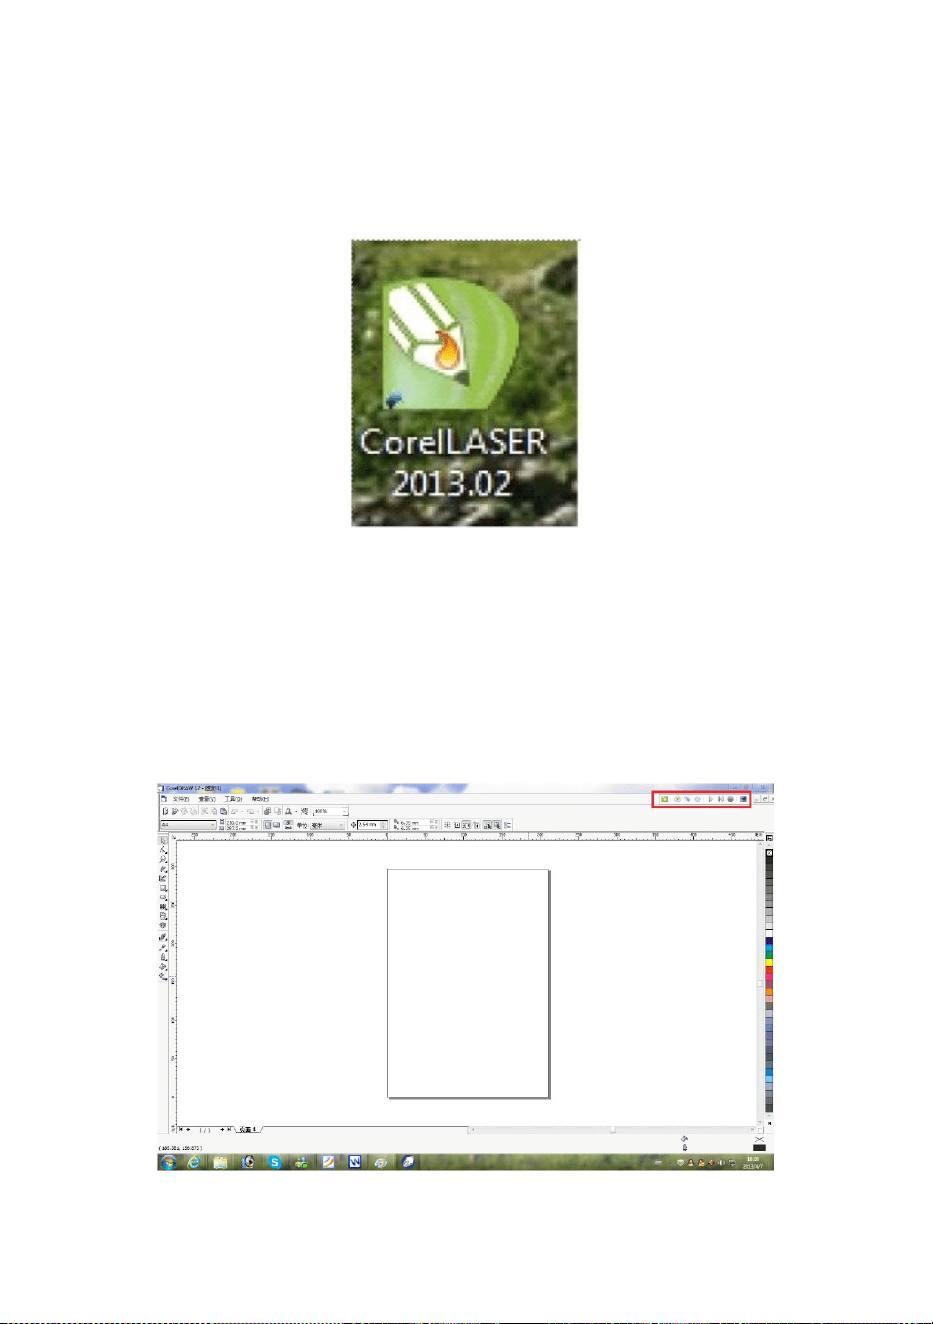
After the installation ,there will be a icon on your desktop ,as
showing.(See Figure 12)
Figure 12
Double click this icon to open the software , it will open Coreldraw ,
then you can see our software tool bar in Coreldraw ,as showing.(See
Figure 13)
Figure 13
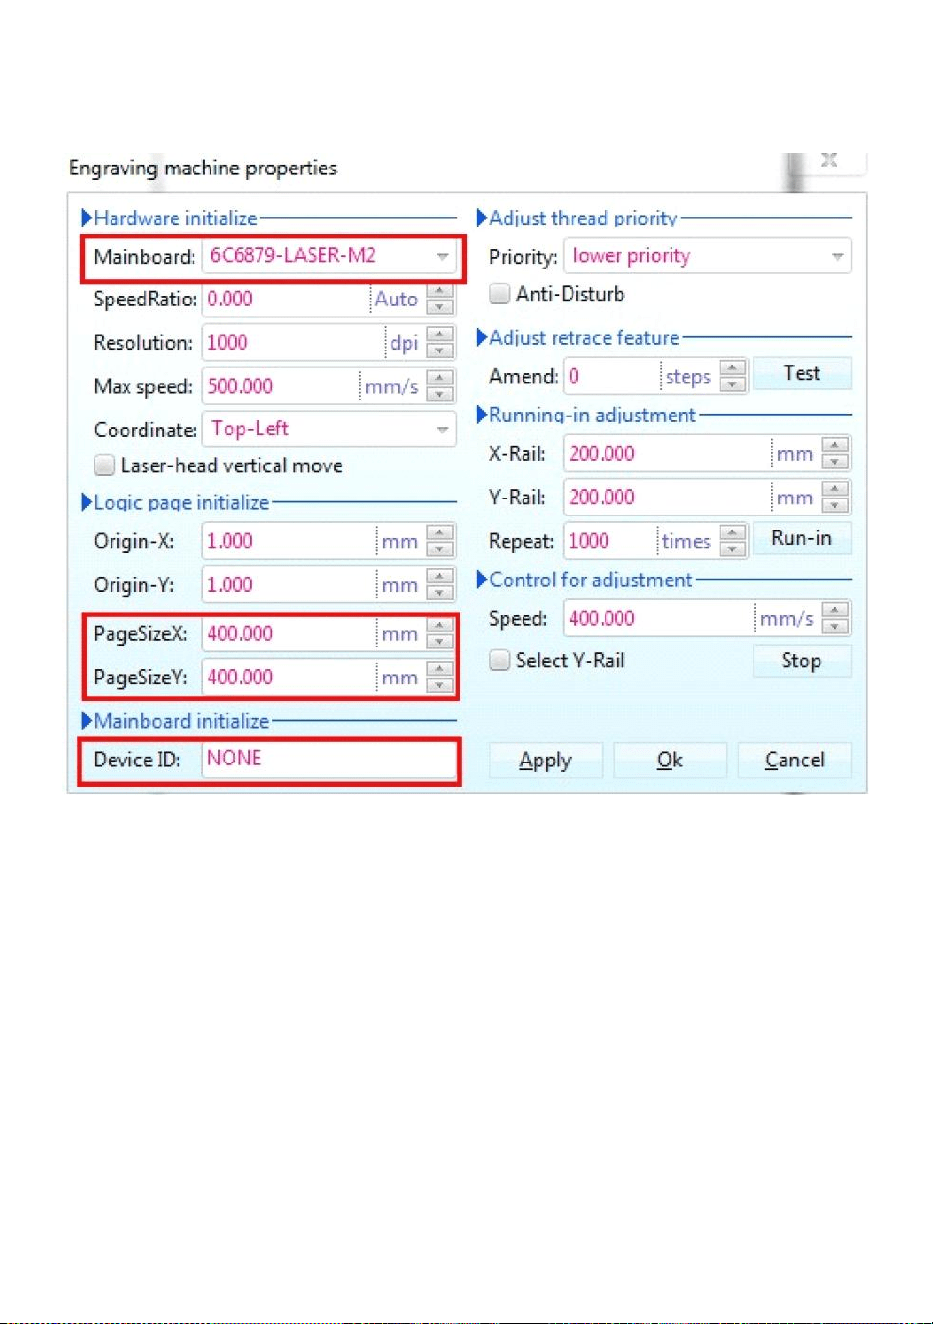
Then click this button Set the engraving machine properties as
- 12 -
shown in Figure 14.
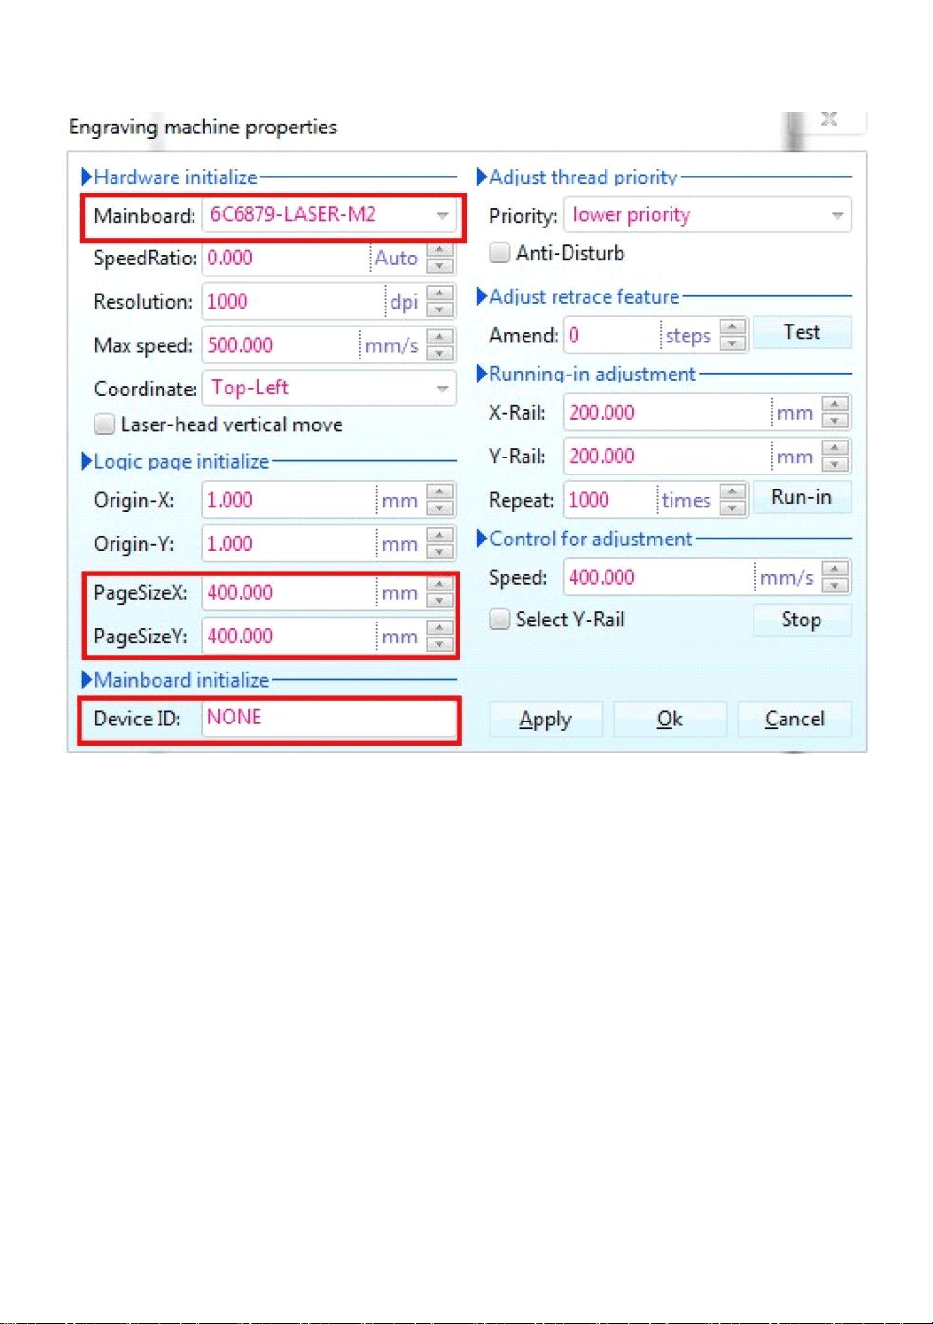
Figure 14
Here we need to set the same settings for the motherboard as in the
picture above, setting the Page Size Depending on the size of your
machine's working area, fill in the blanks for the 6 device IDs on the
motherboard, click Apply “Page Size X:300mm/Page Size Y:200mm” and
then click OK.
3.Software instruction.
- 13 -
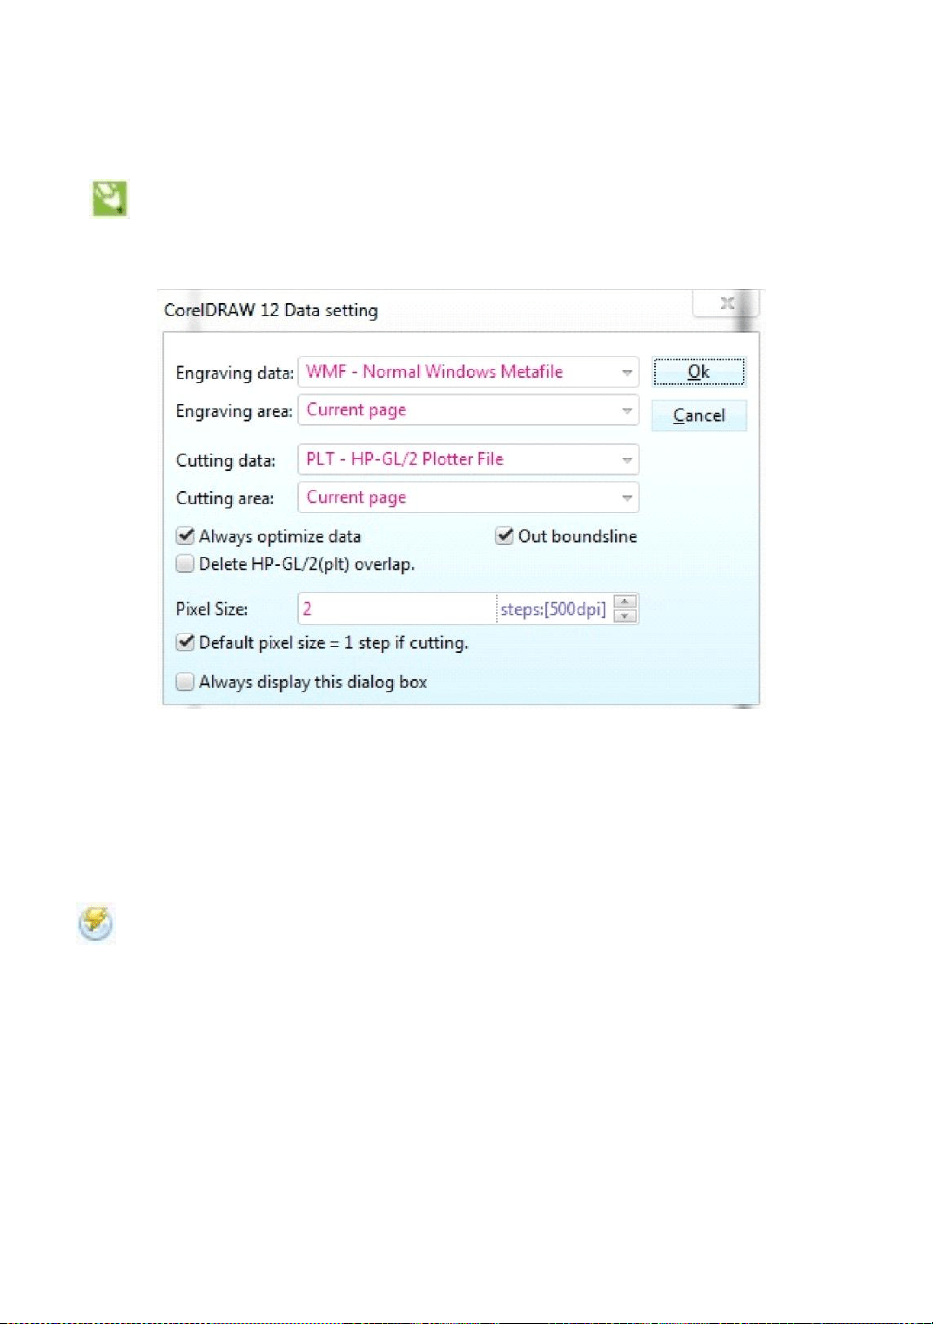
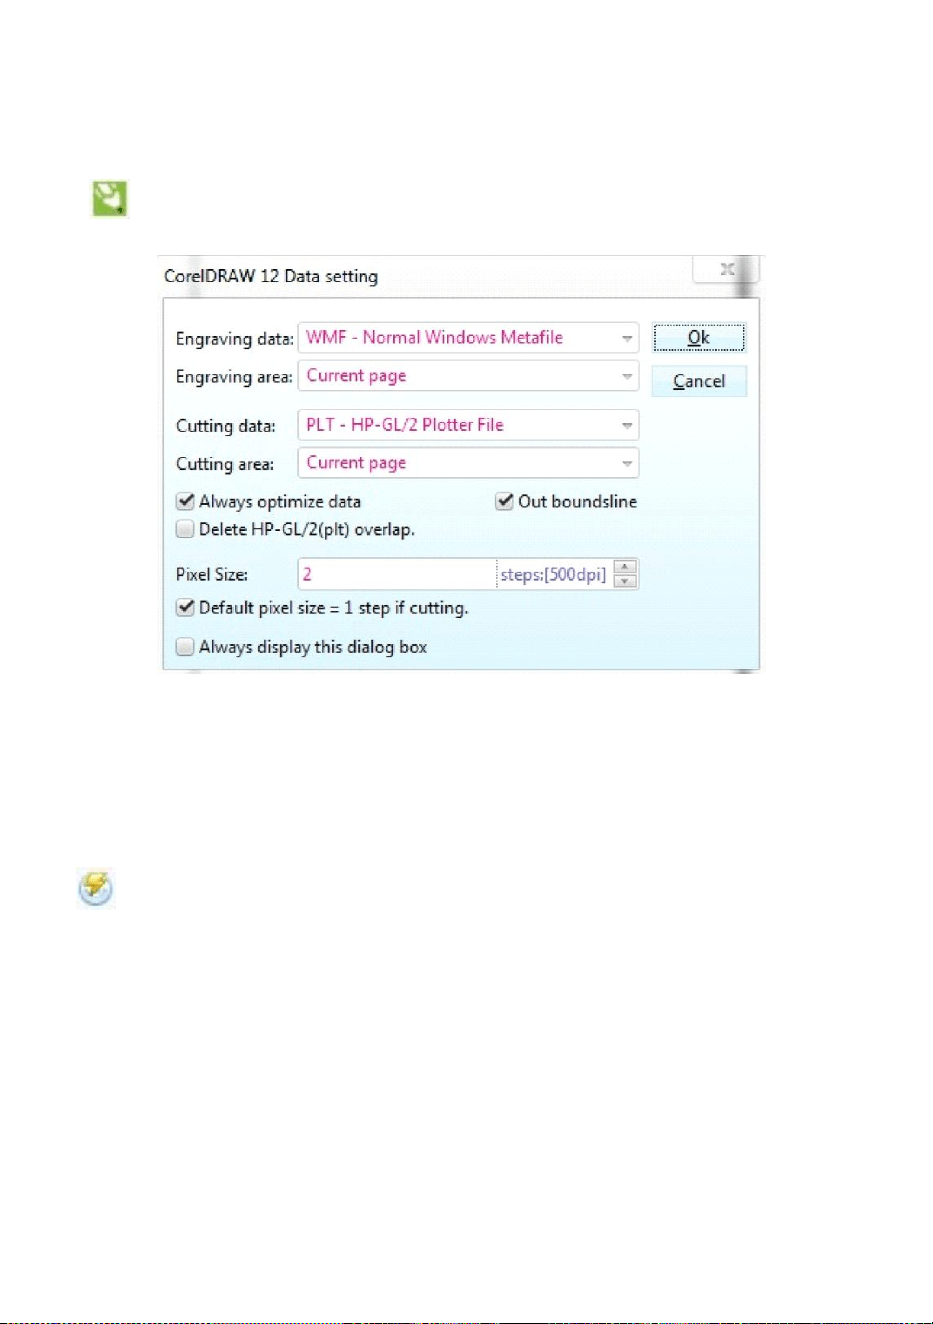
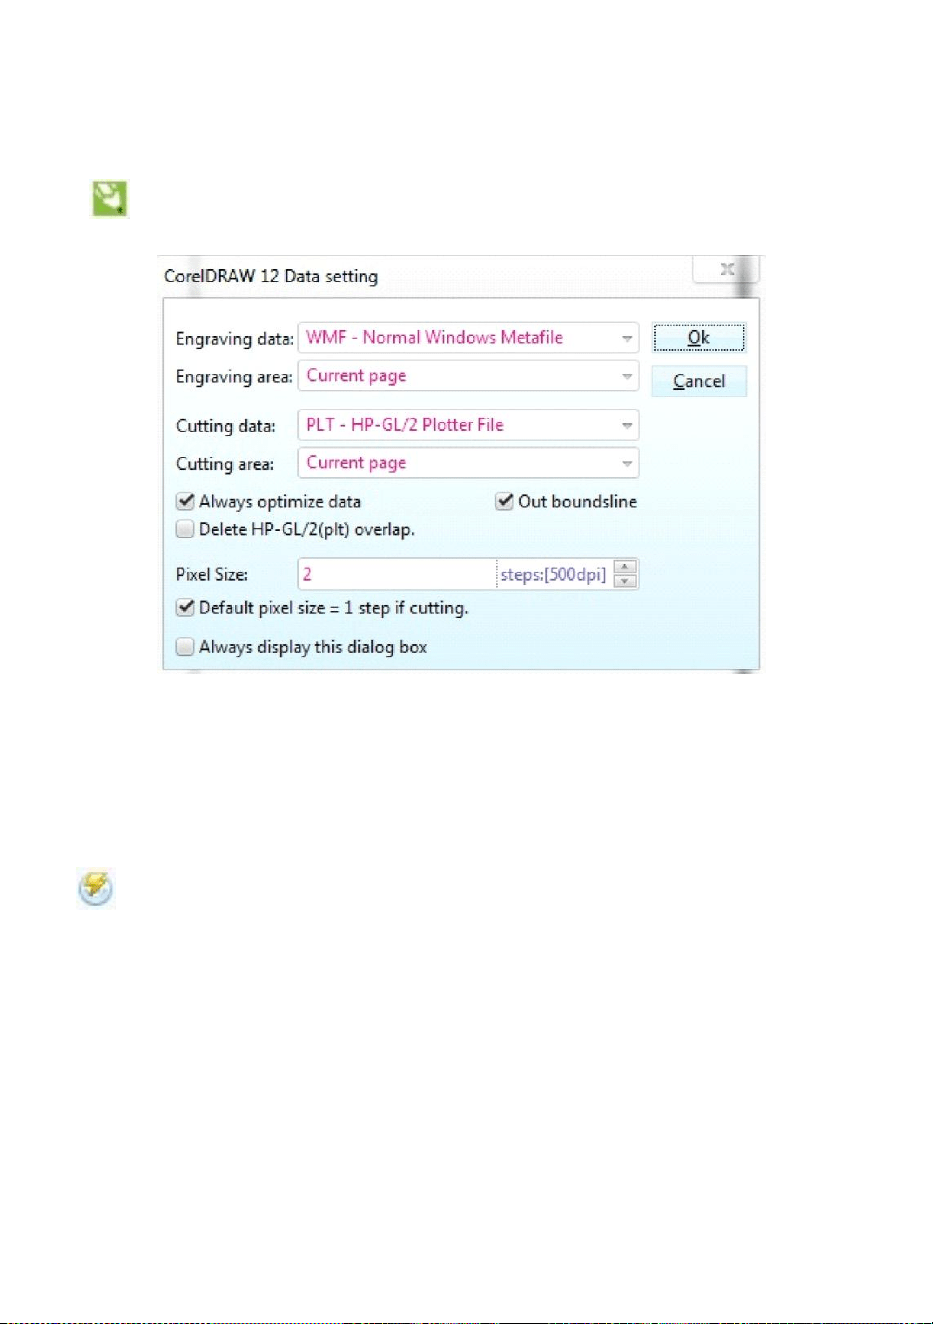
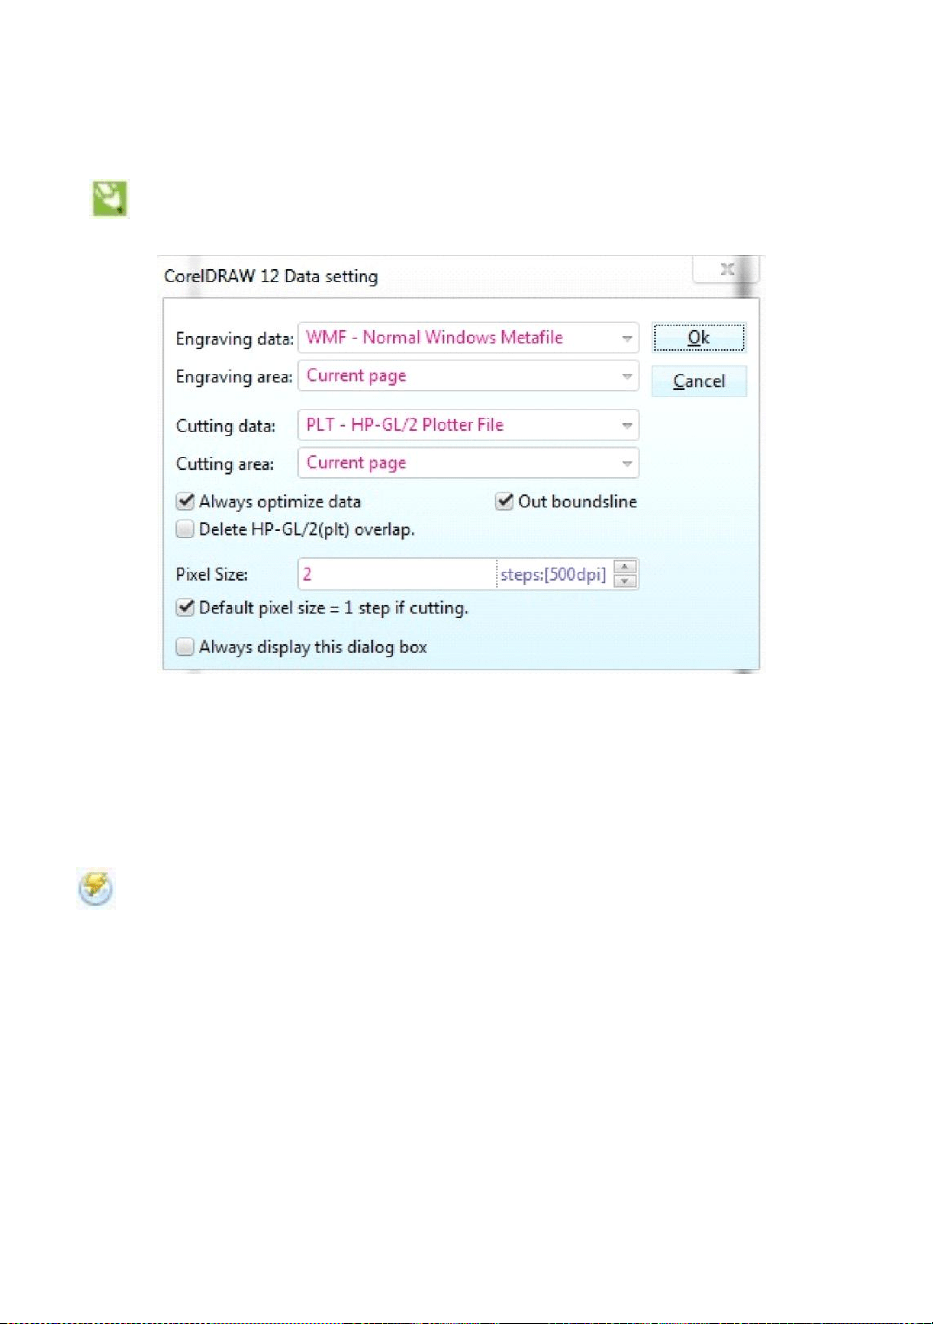
CorelDRAW Setting.
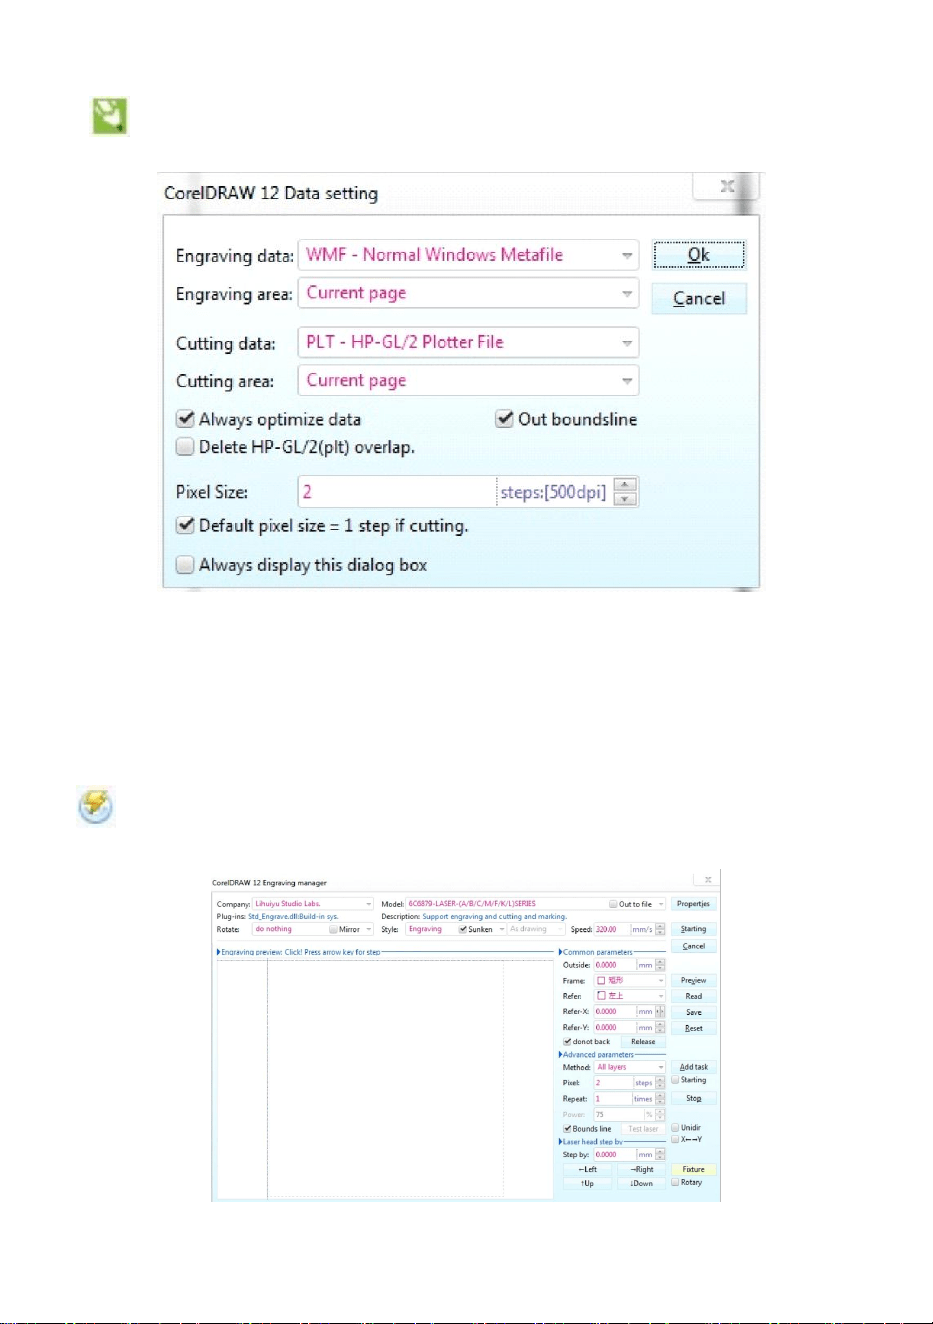
is CorelDRAW setting button, click this button, the pop-up interface
is as shown:(See Figure 15).
Figure 15
Please set the settings on Data setting interface the same as we did
above.
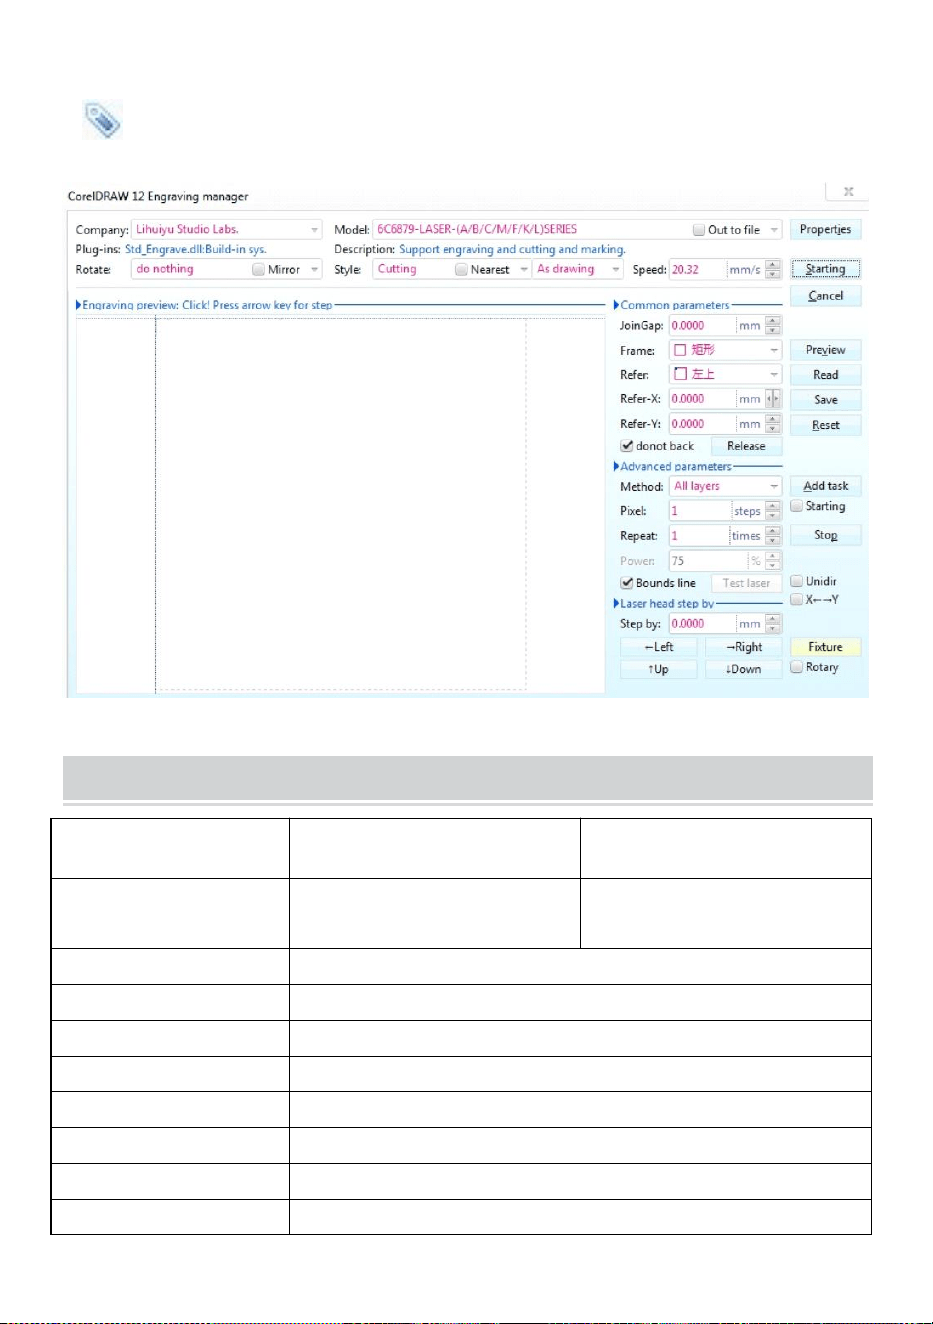
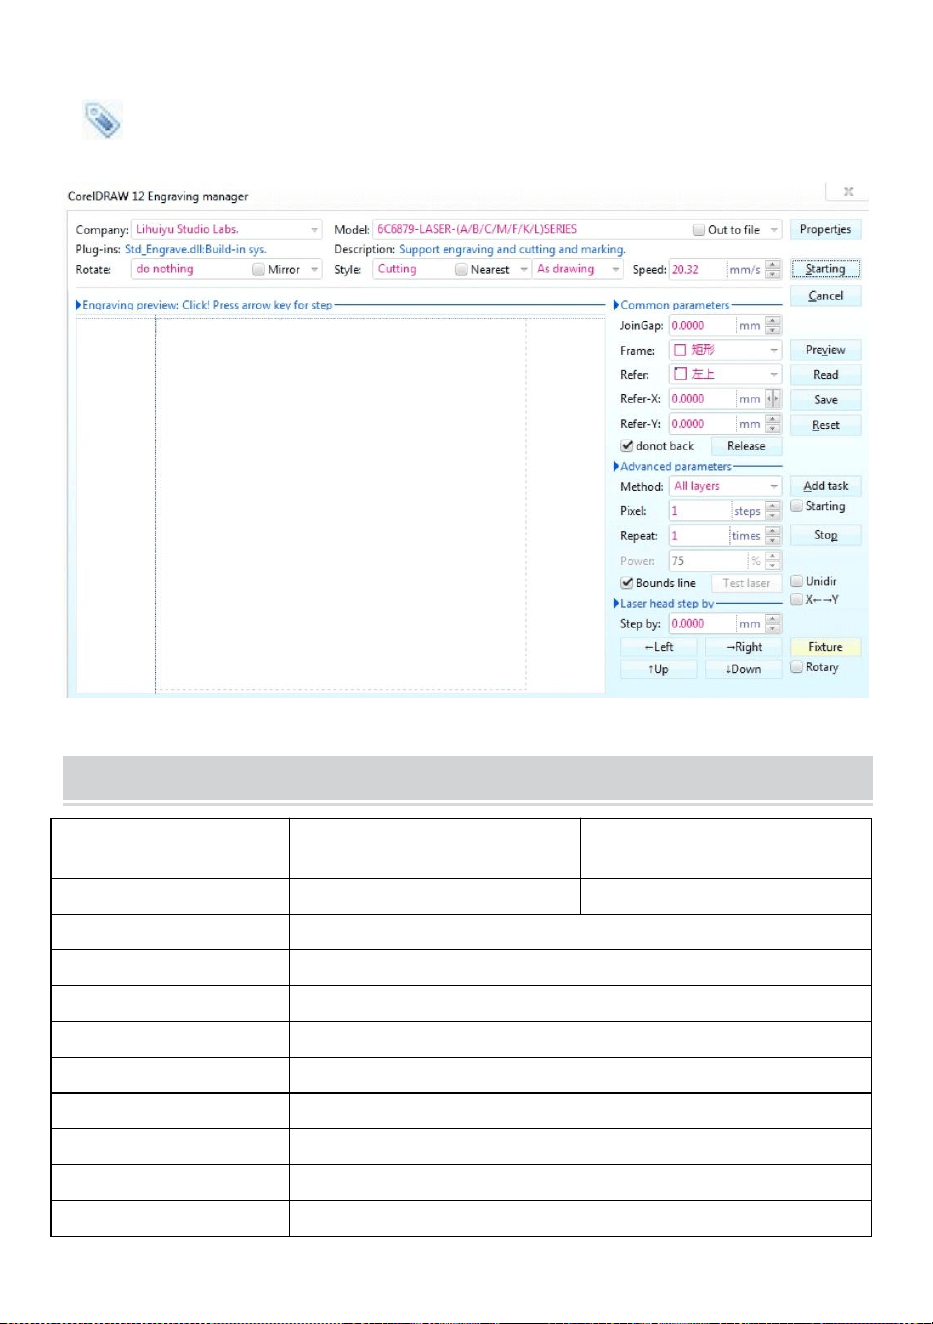
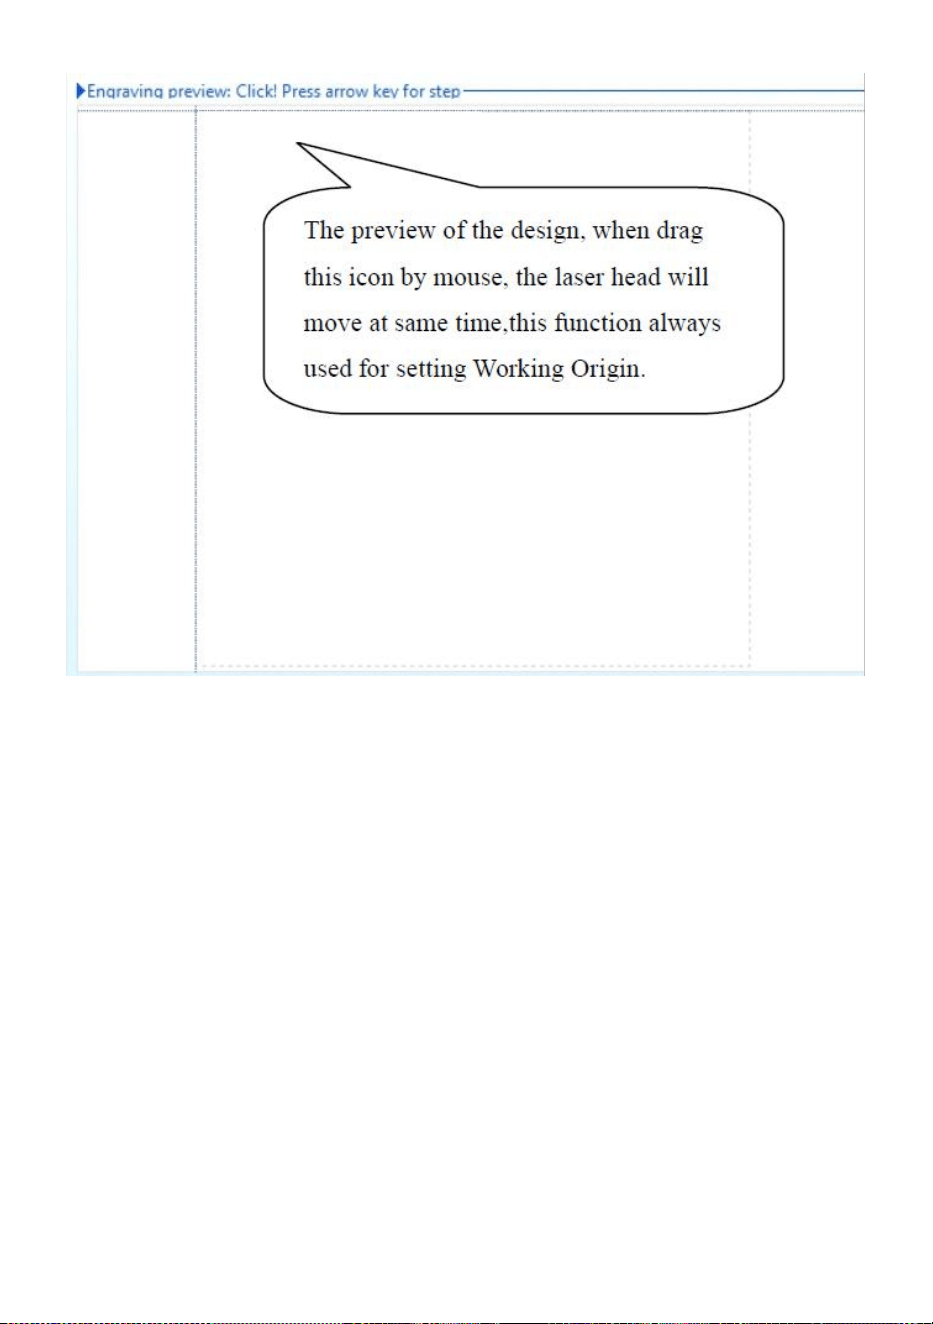
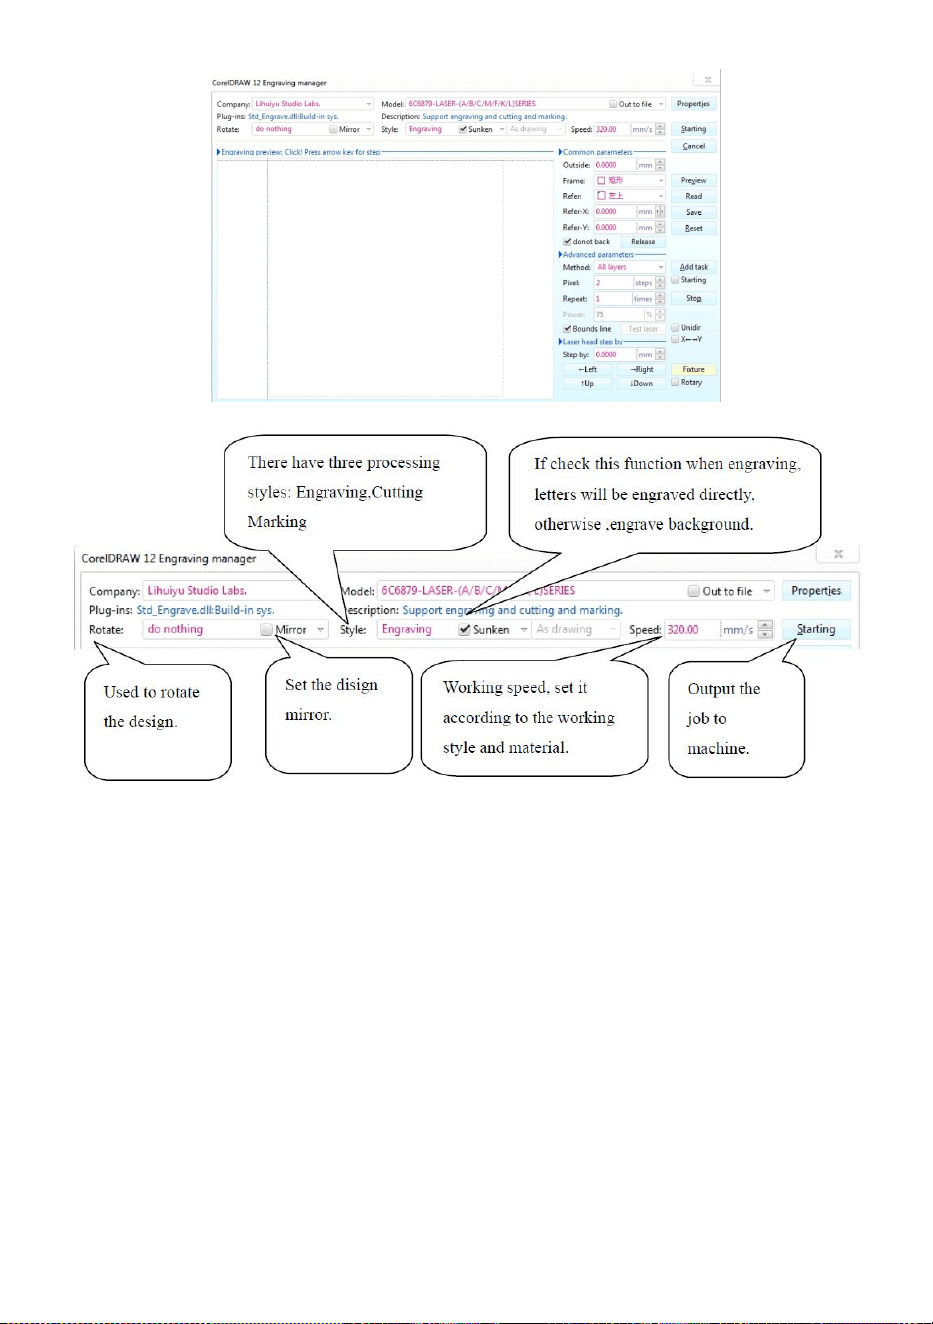
Engraving.
is Engraving button,click this button, the pop-up interface will be as
shown(See Figure 16).
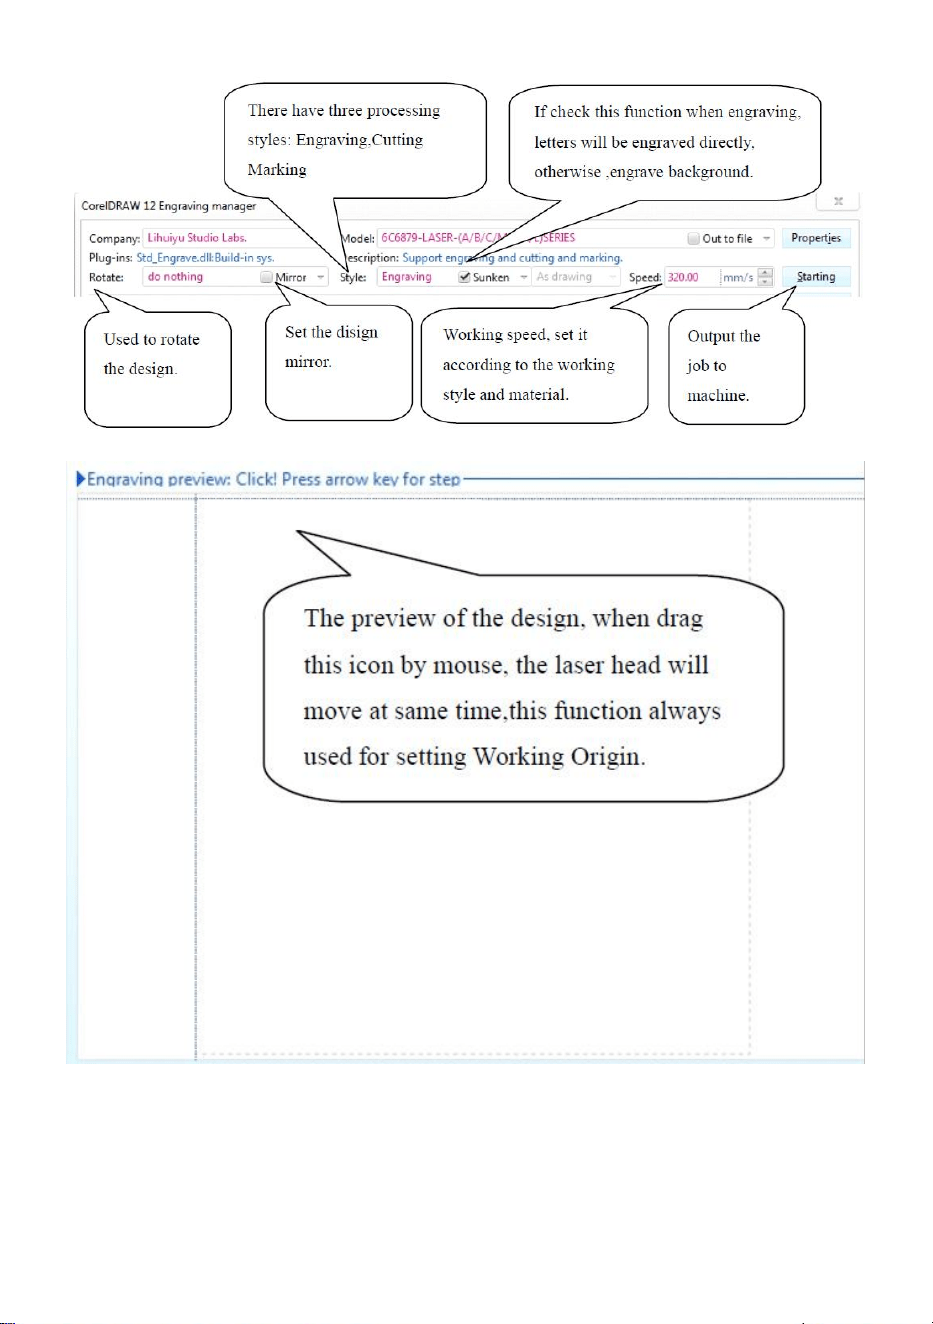
- 14 -
Figure 16
- 15 -
Figure 16

- 16 -
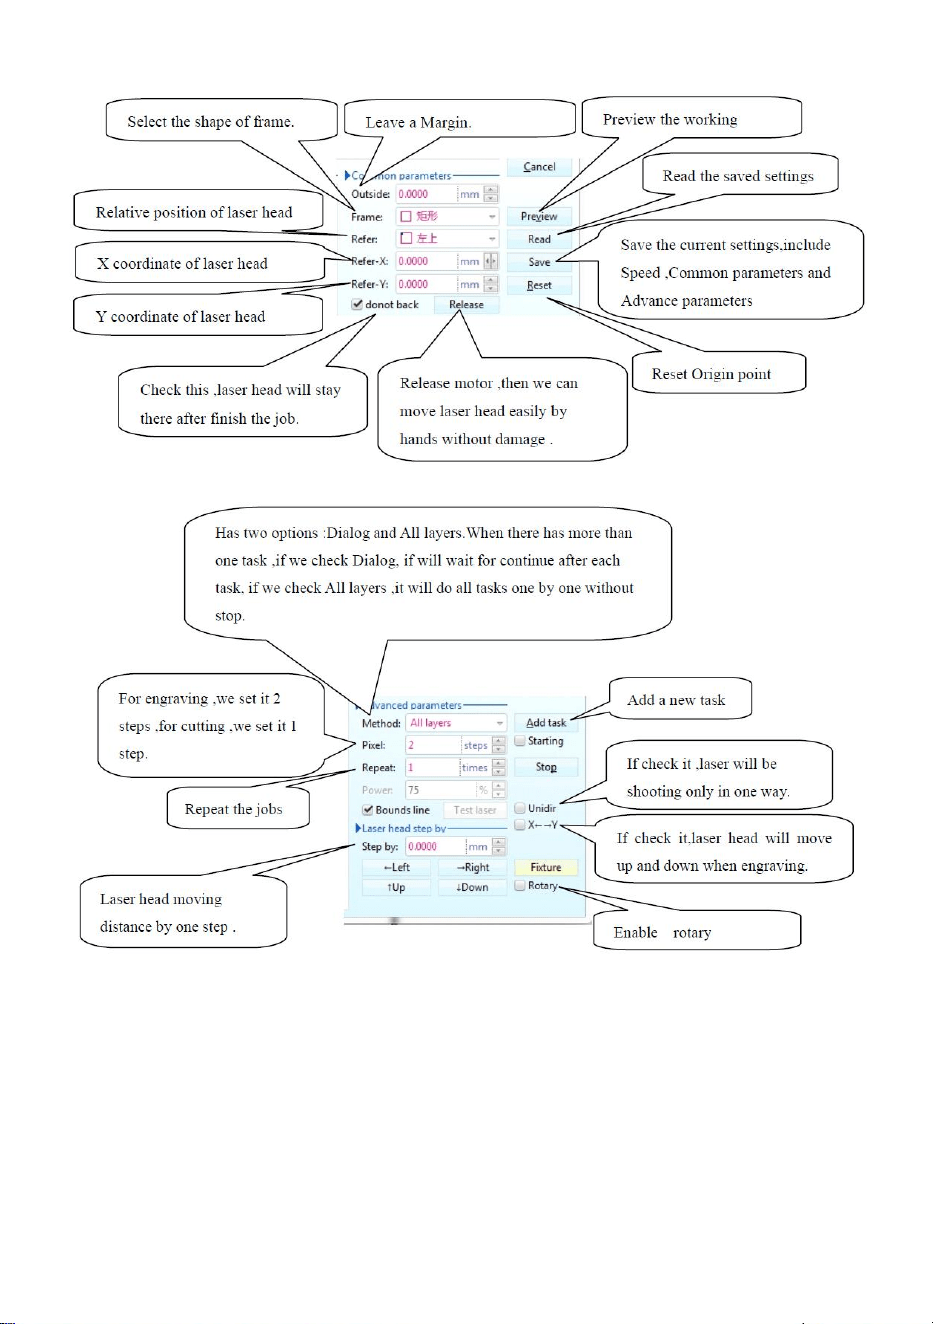
Cutting
is cutting button, click it the pop-up interface is as shown.(See
Figure 17)
Figure 17
TECHNICAL SPECIFICATIONS
Model
KH-3020
KH3020
Input voltage
Europe: 230V 50Hz
North America: 120V 60Hz
Total power
330W
Laser power
40W
Working area
300mm*200mm
temperature
5-50 ℃
humidity
5%-95% non-condensate
Laser type
CO2 glass lasers
Laser model
KH-LT40
Suitable for the materia
Stone, wood, ceramic, metal, cloth, paper, etc
Workbench style
Cellular platform

- 17 -
TROUBLESHOOTING

- 18 -
1. Instructions *1
2. workbench *1
3. M3 screws *4
4. Double-sided tape *1
5. Data cable *1
6. flash drive *1
7. Power cord *1
8. water pump *1
Address: Shuangchenglu 803nong11hao1602A-1609shi, baoshanqu,
shanghai 200000 CN.
Imported to AUS: SIHAO PTY LTD, 1 ROKEVA STREETEASTWOOD NSW
2122 Australia
Imported to USA: Sanven Technology Ltd., Suite 250, 9166 Anaheim Place,
Rancho Cucamonga, CA 91730
REP
EC
E-CrossStu GmbH
Mainzer Landstr.69, 60329 Frankfurt am Main.
REP
UK
YH CONSULTING LIMITED.
C/O YH Consulting Limited Office 147, Centurion House,
London Road, Staines-upon-Thames, Surrey, TW18 4AX


- 2 -
Technique Certificat d'assistance et de garantie électronique
www.vevor.com/support
MACHINE DE GRAVURE LASER
MANUEL D'INSTRUCTIONS
MODÈLE : KH3020/KH-3020
We continue to be committed to provide you tools with competitive price.
"Save Half", "Half Price" or any other similar expressions used by us only represents an
estimate of savings you might benefit from buying certain tools with us compared to the major
top brands and does not necessarily mean to cover all categories of tools offered by us. You
are kindly reminded to verify carefully when you are placing an order with us if you are
actually saving half in comparison with the top major brands.

- 1 -
MODÈLE : KH3020/KH-3020
Have product questions? Need technical support? Please feel free to
contact us:
Technical Support and E-Warranty Certificate
www.vevor.com/support
NEED HELP? CONTACT US!
This is the original instruction, please read all manual instructions
carefully before operating. VEVOR reserves a clear interpretation of our
user manual. The appearance of the product shall be subject to the
product you received. Please forgive us that we won't inform you again if
there are any technology or software updates on our product.
LASER ENGRAVING MACHINE

- 2 -
Avertissement - Pour réduire le risque de blessure, l'utilisateur
doit lire attentivement le manuel d'instructions.
Cet appareil est conforme à la partie 15 des règles de la FCC.
Son fonctionnement est soumis aux deux conditions
suivantes : (1) Cet appareil ne doit pas provoquer
d'interférences nuisibles et (2) Cet appareil doit accepter toute
interférence reçue, y compris les interférences pouvant
entraîner un fonctionnement indésirable.
Ce produit est soumis aux dispositions de la directive
européenne 2012/19/CE. Le symbole représentant une
poubelle à roulettes barrée indique que le produit doit faire
l'objet d'une collecte sélective des déchets dans l'Union
européenne. Cela s'applique au produit et à tous les
accessoires marqués de ce symbole. Les produits marqués
comme tels ne peuvent pas être jetés avec les déchets
ménagers normaux, mais doivent être déposés dans un point
de collecte pour le recyclage des appareils électriques et
électroniques.
IMPORTANT NOTES
Avant d'utiliser l'équipement, l'utilisateur doit lire attentivement les
manuel d'utilisation et respectez-le strictement. Ce manuel s'applique à
plusieurs modèles de produits.
Cet équipement utilise quatre types de lasers standards internationaux
(fort
rayonnement laser). Le rayonnement laser peut provoquer les
événements suivants :
1. enflammer les combustibles environnants.
2. Pendant le traitement au laser, en raison des différents objets traités,
d'autres
des radiations et d'autres substances toxiques peuvent être générées.
Gaz nocif.

- 3 -
3. Le rayonnement laser direct peut provoquer des blessures corporelles.
Par conséquent, l'équipement doit être équipé d'un équipement de
lutte contre l'incendie. Il est strictement interdit d'empiler des
matériaux inflammables et explosifs sur l'établi et autour de
l'équipement. Dans le même temps, assurez une bonne ventilation.
Les opérateurs non professionnels ne sont pas autorisés à
s'approcher de l'équipement.
Les objets et les émissions de traitement au laser doivent être conformes
aux lois locales
et règlements.
Le traitement au laser peut comporter des risques élevés, vous devez
donc y réfléchir attentivement.
si l'objet est adapté au traitement au laser.
L'équipement laser interne présente une haute tension et d'autres
dangers, sauf
pour les opérateurs de matériel, il est strictement interdit de le démonter.
Lorsque l'équipement est allumé, quelqu'un doit être surveillé,
il est interdit de quitter les lieux sans autorisation et toute alimentation
électrique doit être coupée avant le départ du personnel.
Il est interdit d'ouvrir une porte lorsque l'équipement fonctionne.
Avant de commencer l'opération, cet équipement et d'autres
équipements doivent être
mis à la terre de manière sûre et efficace.
Ne placez pas d'objets de réflexion totale ou de réflexion diffuse non
pertinents
des objets dans l'équipement pour empêcher que le laser ne se reflète
sur le corps humain ou sur des objets inflammables.
Pendant le fonctionnement de l'équipement, l'opérateur doit toujours
surveiller le fonctionnement de l'équipement. Si une situation anormale
se produit, veuillez immédiatement.
L'équipement doit être dans un endroit sec, sans pollution, sans
vibrations et solide.
environnement d'interférence électromagnétique, avec une température
de fonctionnement de 5 à 40 degrés Celsius et une humidité de 5 à 95 %

- 4 -
(environnement d'eau sans condensation).
L'équipement doit toujours être éloigné des équipements électriques
sensible aux interférences électromagnétiques, sinon cela peut
provoquer des interférences électromagnétiques.
La tension de fonctionnement de l'appareil est : AC220V européenne ou
nord
AC 120 V américain (veuillez confirmer la tension de fonctionnement de
l'appareil avant utilisation).
Le laser à verre au dioxyde de carbone le plus important de l'équipement
est un
Consommable et article vulnérable. Veuillez en prendre soin pendant
l'utilisation Le laser en verre au dioxyde de carbone a besoin d'eau froide
pure pour refroidir. Veuillez faire attention à la température de l'eau pour
ne pas dépasser 30 degrés Celsius pendant l'utilisation, sinon le laser
sera endommagé. Lorsque la température ambiante est sur le point de
descendre en dessous de 0 degrés Celsius, veuillez le remplacer par un
liquide antigel pour éviter d'endommager le laser en verre au dioxyde de
carbone.
Il est interdit d'allumer l'équipement lorsque la tension du réseau est
instable
ou dépareillés. Le fabricant et le vendeur ne sont pas responsables de
toute perte causée par une utilisation incorrecte ou le non-respect des
réglementations ci-dessus.
USE THE PROCEDURE TO DO SO
1. Veuillez ouvrir l'emballage pour confirmer que l'apparence du produit est
intacte. Voici une image de référence (Figure 1).
- 5 -
Devant
dos
Figure 1
2. Veuillez retirer les dispositifs et outils de support du carton d'emballage
ou de l'intérieur de l'équipement (Figure 2)
- 6 -
Figure 2
3. Veuillez connecter l'équipement et les outils de support à l'équipement
laser et mettre sous tension. (Les étapes détaillées peuvent ne pas être
indiquées dans le manuel, vous pouvez également vous référer à la
vidéo sur le CD/USB).
Veuillez connecter la pompe de circulation d'eau au tuyau d'arrivée d'eau
de l'
équipement laser, placez la pompe de circulation d'eau dans un seau
rempli d'eau pure et placez le tuyau de sortie de l'équipement
directement dans le seau.
( Figure 3)
Figure 3
- 7 -
Remarque : veuillez ajouter de l'eau purifiée ou distillée dans le
seau. Il est strictement interdit d'ajouter de l'eau du robinet
ou des eaux usées. Le niveau d'eau doit être supérieur à
celui de la pompe à eau de circulation. Voir la figure 3.
Remarque : Si de l'eau du robinet ou des eaux usées sont ajoutées,
cela bloquera le système de circulation de dissipation de la
chaleur, ce qui entraînera une atténuation ou des dommages
graves à la puissance du tube laser, raccourcissant ainsi la
durée de vie du produit.
5.Veuillez retirer le tuyau d'échappement. Une extrémité du tuyau
d'échappement est
raccordé à l'orifice d'évacuation de l'équipement et une extrémité est
raccordée au dispositif d'évacuation de fumée extérieur ou auxiliaire.
Remarque : utilisez des outils pour fixer la connexion afin d'éviter
qu'elle ne tombe. ( Voir Figure 4).
Figure 4
- 8 -
5. Veuillez débrancher le cordon d'alimentation pour allumer le produit et
vérifier que le produit fonctionne normalement sans aucun défaut. ( Voir
Figure 5)
Figure 5
6.Veuillez préparer l'ordinateur (système Windows) et installer le logiciel en
vous référant à la vidéo d'installation du logiciel 11 sur le CD/disque USB.
Une fois le logiciel installé, retirez le câble USB, connectez une
extrémité au port USB de l'ordinateur et l'autre extrémité au port d'entrée
USB de l'appareil. Remarque : veuillez retirer la clé du logiciel et la
brancher sur le port USB de l'ordinateur, sinon le logiciel ne peut pas
être utilisé. ( Voir Figure 6)
- 9 -
Figure 6
SOFTWARE INSTALLATION
Remarque : veuillez installer Coreldraw avant d'installer notre
logiciel,
Coreldraw 12, X3.X4, X5 sont pris en charge ; Win XP, Win 7, Win 8
sont pris en charge.
4.Double-cliquez sur CorelLASER.exe sous le répertoire
d'installation,
Sélectionnez une langue dans la boîte de dialogue qui apparaît,
choisissez l'anglais
Cliquez sur Suivant, la boîte de dialogue suivante apparaît : ( Voir Figure 7)

- 10 -
Figure 7
Sélectionnez le chemin d'installation, nous vous suggérons d:\Program
Fichiers\3WCAD\CorelLASER , puis cliquez sur Suivant : ( voir la figure 8)

- 11 -
Figure 8
Cliquez sur Suivant : ( Voir Figure 9)
Figure 9
Cliquez sur Suivant : ( Voir Figure 10)

- 12 -
Figure 10
Cliquez sur 【Installer】, une fois la copie d'extraction terminée,
l'installation commencera
être terminé. ( Voir Figure 10)
Figure 11

- 13 -
Cliquez sur Terminer, le logiciel est alors installé. ( Voir Figure 11)
5.Propriétés de la machine à graver.
Après l'installation, il y aura une icône sur votre bureau, comme
montrant. ( Voir Figure 12)
Figure 12
Double-cliquez sur cette icône pour ouvrir le logiciel, il ouvrira Coreldraw,
alors vous pouvez voir notre barre d'outils du logiciel dans Coreldraw,
comme indiqué . (Voir Figure 13)
Figure 13
Cliquez ensuite sur ce bouton pour définir les propriétés de la machine à
- 14 -
graver comme
illustré à la Figure 14 .
Figure 14
Ici, nous devons définir les mêmes paramètres pour la carte mère que
dans l'image ci-dessus, en définissant la taille de la page en fonction de la
taille de la zone de travail de votre machine, remplissez les espaces vides
pour les 6 ID de périphérique sur la carte mère, cliquez sur Appliquer «
Taille de page X : 300 mm/Taille de page Y : 200 mm », puis cliquez sur
OK.

- 15 -
6.Instruction du logiciel.
Paramètre CorelDRAW.
c'est le bouton de configuration de CorelDRAW, cliquez sur ce
bouton, l'interface contextuelle est comme indiqué : (Voir Figure 15).
Figure 15
Veuillez définir les paramètres sur l'interface de configuration des
données de la même manière que nous l'avons fait ci-dessus.
Gravure.
c'est le bouton Gravure, cliquez sur ce bouton, l'interface contextuelle sera
comme indiqué (voir Figure 16).

- 16 -

- 17 -
Figure 16

- 18 -
Figure 16
- 19 -
Coupe
est un bouton de coupe, cliquez dessus et l'interface contextuelle est
comme indiqué. ( Voir Figure 17)
Figure 17
TECHNICAL SPECIFICATIONS
Modèle
KH-3020
KH3020
Tension d'entrée
Europe : 230 V 50 Hz
Amérique du Nord : 120 V 60
Hz
Puissance totale
330 W
Puissance laser
40 W
Espace de travail
300mm*200mm
température
5-50 ℃
humidité
5%-95% sans condensation
Type de laser
Lasers CO2 pour verre
Modèle laser
KH-LT40
Adapté au matériau
Pierre, bois, céramique, métal, tissu, papier, etc.

- 20 -
Style établi
Plateforme cellulaire
TROUBLESHOOTING

- 21 -
- 22 -
9. Instructions *1
10. établi *1
11. Vis M3 *4
12. Ruban adhésif double face *1
13. Câble de données *1
14. clé USB *1
15. Cordon d'alimentation *1
16. pompe à eau *1
Adresse : Shuangchenglu 803nong11hao1602A-1609shi, baoshanqu,
Shanghai 200000 CN.
Importé en Australie : SIHAO PTY LTD, 1 ROKEVA STREET, ASTWOOD
NSW 2122 Australie
Importé aux États-Unis : Sanven Technology Ltd., Suite 250, 9166 Anaheim
Place, Rancho Cucamonga, CA 91730
REP
EC
E-CrossStu GmbH
Mainzer Landstr.69, 60329 Frankfurt am Main.
REP
UK
YH CONSULTING LIMITED.
C/O YH Consulting Limited Office 147, Centurion House,
London Road, Staines-upon-Thames, Surrey, TW18 4AX


- 2 -
Technisch Support und E-Garantie-Zertifikat www.vevor.com/support
LASERGRAVIERMASCHINE
BEDIENUNGSANLEITUNG
MODELL: KH3020/KH-3020
We continue to be committed to provide you tools with competitive price.
"Save Half", "Half Price" or any other similar expressions used by us only represents an
estimate of savings you might benefit from buying certain tools with us compared to the major
top brands and does not necessarily mean to cover all categories of tools offered by us. You
are kindly reminded to verify carefully when you are placing an order with us if you are
actually saving half in comparison with the top major brands.
- 1 -
MODELL: KH3020/KH-3020
Have product questions? Need technical support? Please feel free to
contact us:
Technical Support and E-Warranty Certificate
www.vevor.com/support
NEED HELP? CONTACT US!
This is the original instruction, please read all manual instructions
carefully before operating. VEVOR reserves a clear interpretation of our
user manual. The appearance of the product shall be subject to the
product you received. Please forgive us that we won't inform you again if
there are any technology or software updates on our product.
LASER ENGRAVING MACHINE

- 2 -
Warnung: Um das Verletzungsrisiko zu verringern, muss der
Benutzer die Bedienungsanleitung sorgfältig lesen.
Dieses Gerät entspricht Teil 15 der FCC-Bestimmungen. Der
Betrieb unterliegt den folgenden beiden Bedingungen: (1)
Dieses Gerät darf keine schädlichen Störungen verursachen
und (2) dieses Gerät muss alle empfangenen Störungen
akzeptieren, einschließlich Störungen, die einen
unerwünschten Betrieb verursachen können.
Dieses Produkt unterliegt den Bestimmungen der
europäischen Richtlinie 2012/19/EU. Das Symbol einer
durchgestrichenen Mülltonne weist darauf hin, dass das
Produkt in der Europäischen Union einer getrennten
Müllentsorgung unterliegt. Dies gilt für das Produkt und alle mit
diesem Symbol gekennzeichneten Zubehörteile. So
gekennzeichnete Produkte dürfen nicht im normalen Hausmüll
entsorgt werden, sondern müssen an einer Sammelstelle für
das Recycling von elektrischen und elektronischen Geräten
abgegeben werden.
IMPORTANT NOTES
Vor Inbetriebnahme des Gerätes muss der Benutzer die
Bedienungsanleitung und halten Sie sich strikt daran. Diese Anleitung gilt
für mehrere Produktmodelle.
Dieses Gerät verwendet vier internationale Standard-Lasertypen (stark
Laserstrahlung). Laserstrahlung kann folgende Ereignisse verursachen:
1. Brennbare Stoffe in der Umgebung entzünden.
2.Während der Laserbearbeitung, aufgrund unterschiedlicher
verarbeiteter Objekte, andere
Es können Strahlung und andere Giftstoffe sowie schädliche Gase
entstehen.
3. Direkte Laserstrahlung kann zu Verletzungen führen. Daher muss das
Gerät mit Feuerlöschgeräten ausgestattet sein. Es ist strengstens

- 3 -
verboten, brennbare und explosive Materialien auf der Werkbank und
um das Gerät herum zu stapeln. Sorgen Sie gleichzeitig für eine gute
Belüftung. Laien dürfen sich dem Gerät nicht nähern.
Laserbearbeitungsobjekte und -emissionen müssen den örtlichen
Gesetzen entsprechen
und Vorschriften.
Die Laserbearbeitung kann hohe Risiken bergen, daher sollten Sie
sorgfältig überlegen
ob das Objekt für die Laserbearbeitung geeignet ist.
Die interne Laserausrüstung steht unter Hochspannung und anderen
Gefahren, außer
für Gerätebediener ist die Demontage strengstens untersagt.
Wenn das Gerät eingeschaltet ist, muss jemand bewacht werden,
Unbefugtes Verlassen des Gebäudes ist verboten und vor dem
Verlassen des Gebäudes muss die gesamte Stromversorgung
abgeschaltet werden.
Das Öffnen von Türen während des Betriebs des Geräts ist verboten.
Vor Inbetriebnahme dieses Gerätes und anderer Ausrüstungen müssen
sicher und effektiv geerdet.
Platzieren Sie keine irrelevanten Totalreflexions- oder
Diffusreflexionsobjekte
Gegenstände im Gerät, um zu verhindern, dass der Laser auf den
menschlichen Körper oder auf brennbare Gegenstände reflektiert wird.
Während des Betriebs des Geräts muss der Bediener stets
Beobachten Sie den Betrieb des Geräts. Wenn eine ungewöhnliche
Situation auftritt, benachrichtigen Sie sie bitte sofort.
Das Gerät sollte an einem trockenen, schadstofffreien, vibrationsfreien
und stabilen Ort aufgestellt werden.
Umgebung mit elektromagnetischen Störungen, mit einer
Betriebstemperatur von 5 – 40 Grad Celsius und einer Luftfeuchtigkeit
von 5 – 95 % (Umgebung ohne Kondenswasser).
Das Gerät sollte immer weit entfernt von elektrischen Geräten aufgestellt
werden
empfindlich gegenüber elektromagnetischen Störungen, da es sonst zu
- 4 -
elektromagnetischen Störungen kommen kann.
Die Betriebsspannung des Gerätes beträgt: Europäische AC220V oder
Nord
Amerikanischer AC 120 V (bitte bestätigen Sie die Betriebsspannung
des Geräts vor der Verwendung).
Der wichtigste Kohlendioxid-Glaslaser in der Anlage ist ein
Verbrauchsmaterial und ein empfindlicher Gegenstand. Bitte gehen Sie
während des Gebrauchs vorsichtig damit um. Der Kohlendioxidglaslaser
benötigt reines kaltes Wasser zum Abkühlen. Bitte achten Sie darauf,
dass die Wassertemperatur während des Gebrauchs 30 Grad Celsius
nicht überschreitet, da der Laser sonst beschädigt wird. Wenn die
Umgebungstemperatur unter 0 Grad Celsius fällt, ersetzen Sie ihn bitte
durch eine Frostschutzflüssigkeit, um Schäden am
Kohlendioxidglaslaser zu vermeiden.
Das Einschalten der Geräte bei instabiler Netzspannung ist verboten.
oder nicht übereinstimmen. Hersteller und Verkäufer haften nicht für
Schäden, die durch unsachgemäße Verwendung oder Nichtbeachtung
der oben genannten Vorschriften entstehen.
USE THE PROCEDURE TO DO SO
1. Bitte öffnen Sie die Verpackung, um sicherzustellen, dass das Produkt
unbeschädigt ist. Nachfolgend sehen Sie ein Referenzbild (Abbildung 1).
Front
- 5 -
zurück
Abbildung 1
2. Bitte nehmen Sie die Hilfsmittel und Werkzeuge aus der Verpackung
oder aus dem Gerät (Abbildung 2).
Abbildung 2
3. Bitte schließen Sie die unterstützenden Geräte und Werkzeuge an das
Lasergerät an und schalten Sie es ein. (Die detaillierten Schritte werden
möglicherweise nicht im Handbuch gezeigt, Sie können auch das Video
auf der CD/dem USB-Stick zu Rate ziehen).
Bitte schließen Sie die Wasserumwälzpumpe an die Wasserzulaufleitung
des

- 6 -
Laserausrüstung: Stellen Sie die Wasserumwälzpumpe in einen mit
reinem Wasser gefüllten Eimer und stecken Sie das Auslassrohr der
Ausrüstung direkt in den Eimer.
( Abbildung 3)
Abbildung 3
Hinweis: Bitte geben Sie gereinigtes oder destilliertes Wasser in
den Eimer. Das Hinzufügen von Leitungswasser oder
Abwasser ist strengstens verboten. Der Wasserstand sollte
höher sein als die Umwälzpumpe. Siehe Abbildung 3.
Hinweis: Wenn Leitungswasser oder Abwasser hinzugefügt wird,
blockiert dies das Wärmeableitungs-Zirkulationssystem, was
zu einer starken Dämpfung oder Beschädigung der Leistung
der Laserröhre führt und somit die Lebensdauer des
Produkts verkürzt.
6.Bitte nehmen Sie das Auspuffrohr heraus. Ein Ende des Auspuffrohrs
ist
An den Abluftanschluss des Geräts angeschlossen und ein Ende an
das Außen- oder Zusatzrauchabzugsgerät angeschlossen. Hinweis:
Befestigen Sie die Verbindung mit Werkzeug, damit sie nicht abfällt
( siehe Abbildung 4).
- 7 -
Abbildung 4
5. Ziehen Sie zum Einschalten des Produkts das Netzkabel heraus und
prüfen Sie, ob das Produkt normal und fehlerfrei läuft. ( Siehe
Abbildung 5)
- 8 -
Abbildung 5
6. Bereiten Sie den Computer (Windows-System) vor und installieren Sie
die Software gemäß dem 11Softwareinstallationsvideo11 auf der
CD/USB-Disk. Nachdem die Software installiert ist, nehmen Sie bitte das
USB-Kabel heraus, verbinden Sie ein Ende mit dem USB-Anschluss des
Computers und das andere Ende mit dem USB-Eingang des Geräts.
Hinweis: Nehmen Sie bitte den Softwareschlüssel heraus und stecken
Sie ihn in den USB-Anschluss des Computers, sonst kann die Software
nicht verwendet werden. ( Siehe Abbildung 6)
Abbildung 6
SOFTWARE INSTALLATION
Hinweis: Bitte installieren Sie Coreldraw, bevor Sie unsere Software
installieren.
Coreldraw 12, X3, X4, X5 werden unterstützt; Win XP, Win 7, Win 8
werden unterstützt.
7.Doppelklicken Sie im Installationsverzeichnis auf CorelLASER.exe.
Wählen Sie im angezeigten Dialogfeld eine Sprache aus. Wählen Sie
Englisch
Sprache Klicken Sie auf Weiter. Das folgende Dialogfeld wird angezeigt:
- 9 -
( siehe Abbildung 7)
Abbildung 7
Wählen Sie den Installationspfad, wir empfehlen d:\Program
Files\3WCAD\CorelLASER, dann auf Weiter klicken : ( siehe Abbildung 8)
- 10 -
Abbildung 8
Klicken Sie auf „Weiter“: ( siehe Abbildung 9)
Abbildung 9
Klicken Sie auf „Weiter“: ( siehe Abbildung 10)

- 11 -
Abbildung 10
Klicken Sie auf 【Installieren】, wenn die Extraktionskopie abgeschlossen
ist, wird die Installation
abgeschlossen sein. ( Siehe Abbildung 10)
Abbildung 11
- 12 -
Klicken Sie auf „Fertig“. Die Software wurde installiert. ( Siehe Abbildung
11.)
8.Eigenschaften der Graviermaschine.
Nach der Installation erscheint auf Ihrem Desktop ein Symbol,
angezeigt. ( Siehe Abbildung 12)
Abbildung 12
Doppelklicken Sie auf dieses Symbol, um die Software zu öffnen. Es
öffnet sich Coreldraw.
dann können Sie sehen unsere Software-Symbolleiste in Coreldraw, wie
gezeigt . (Siehe Abbildung 13)
Abbildung 13

- 13 -
Klicken Sie dann auf diese Schaltfläche. Stellen Sie die Eigenschaften
der Graviermaschine wie folgt ein:
wie in Abbildung 14 dargestellt .
Abbildung 14
Hier müssen wir für die Hauptplatine dieselben Einstellungen
vornehmen wie im Bild oben. Stellen Sie die Seitengröße abhängig von der
Größe des Arbeitsbereichs Ihrer Maschine ein. Füllen Sie die Lücken für
die 6 Geräte-IDs auf der Hauptplatine aus, klicken Sie auf „Seitengröße X:
300 mm/Seitengröße Y: 200 mm“ und anschließend auf „OK“.
- 14 -
9.Softwareanleitung.
CorelDRAW-Einstellung.
ist die CorelDRAW-Einstellungsschaltfläche. Klicken Sie auf diese
Schaltfläche. Die Popup-Oberfläche wird wie folgt angezeigt: (Siehe
Abbildung 15).
Abbildung 15
Nehmen Sie die Einstellungen in der Dateneinstellungsoberfläche bitte
wie oben beschrieben vor.
Gravur.
ist die Schaltfläche „Gravieren“. Klicken Sie auf diese Schaltfläche. Die
Popup-Oberfläche wird wie gezeigt angezeigt (siehe Abbildung 16).

- 15 -

- 16 -
Abbildung 16

- 17 -
Abbildung 16
- 18 -
Schneiden
ist die Schaltfläche „Ausschneiden“. Klicken Sie darauf. Das
Popup-Fenster wird wie gezeigt angezeigt ( siehe Abbildung 17) .
Abbildung 17
TECHNICAL SPECIFICATIONS
Modell
KH-3020
KH3020
Eingangsspannung
Europa: 230 V 50 Hz
Nordamerika: 120 V, 60 Hz
Gesamtleistung
330 W
Laserleistung
40 W
Arbeitsbereich
300 mm x 200 mm
Temperatur
5-50 ℃
Luftfeuchtigkeit
5 % - 95 % kondensfrei
Lasertyp
CO2-Glaslaser
Lasermodell
KH-LT40
Passend zum Material
Stein, Holz, Keramik, Metall, Stoff, Papier usw.
Workbench-Stil
Zelluläre Plattform

- 19 -
TROUBLESHOOTING

- 20 -
17. Anleitung *1
18. Werkbank *1
19. M3 Schrauben *4
20. Doppelseitiges Klebeband *1
21. Datenkabel *1
22. Flash-Laufwerk *1
23. Netzkabel *1
24. Wasserpumpe * 1
Adresse : Shuangchenglu 803nong11hao1602A-1609shi, Baoshanqu,
Shanghai 200000 CN.
Nach AUS importiert: SIHAO PTY LTD, 1 ROKEVA STREETEASTWOOD
NSW 2122 Australien
Importiert in die USA: Sanven Technology Ltd., Suite 250, 9166 Anaheim
Place, Rancho Cucamonga, CA 91730
REP
EC
E-CrossStu GmbH
Mainzer Landstr.69, 60329 Frankfurt am Main.
REP
UK
YH CONSULTING LIMITED.
C/O YH Consulting Limited Office 147, Centurion House,
London Road, Staines-upon-Thames, Surrey, TW18 4AX


- 2 -
Tecnico Supporto e certificato di garanzia elettronica www.vevor.com/support
MACCHINA PER INCISIONE LASER
MANUALE DI ISTRUZIONI
MODELLO:KH3020/KH-3020
We continue to be committed to provide you tools with competitive price.
"Save Half", "Half Price" or any other similar expressions used by us only represents an
estimate of savings you might benefit from buying certain tools with us compared to the major
top brands and does not necessarily mean to cover all categories of tools offered by us. You
are kindly reminded to verify carefully when you are placing an order with us if you are
actually saving half in comparison with the top major brands.
- 1 -
MODELLO:KH3020/KH-3020
Have product questions? Need technical support? Please feel free to
contact us:
Technical Support and E-Warranty Certificate
www.vevor.com/support
NEED HELP? CONTACT US!
This is the original instruction, please read all manual instructions
carefully before operating. VEVOR reserves a clear interpretation of our
user manual. The appearance of the product shall be subject to the
product you received. Please forgive us that we won't inform you again if
there are any technology or software updates on our product.
LASER ENGRAVING MACHINE
- 2 -
Attenzione: per ridurre il rischio di lesioni, l'utente deve leggere
attentamente il manuale di istruzioni.
Questo dispositivo è conforme alla Parte 15 delle Norme FCC.
Il funzionamento è soggetto alle due condizioni seguenti: (1)
Questo dispositivo non può causare interferenze dannose e
(2) Questo dispositivo deve accettare qualsiasi interferenza
ricevuta, comprese le interferenze che possono causare un
funzionamento indesiderato.
Questo prodotto è soggetto alle disposizioni della Direttiva
Europea 2012/19/CE. Il simbolo raffigurante un bidone della
spazzatura barrato indica che il prodotto richiede la raccolta
differenziata dei rifiuti nell'Unione Europea. Ciò si applica al
prodotto e a tutti gli accessori contrassegnati con questo
simbolo. I prodotti contrassegnati come tali non possono
essere smaltiti con i normali rifiuti domestici, ma devono
essere portati in un punto di raccolta per il riciclaggio di
dispositivi elettrici ed elettronici
IMPORTANT NOTES
Prima di utilizzare l'apparecchiatura, l'utente deve leggere
attentamente le istruzioni per l'uso.
manuale operativo e rispettarlo rigorosamente. Questo manuale è
applicabile a più modelli di prodotti.
Questa apparecchiatura utilizza quattro tipi di laser standard
internazionali (potenti
radiazione laser). La radiazione laser può causare i seguenti eventi:
1. incendiare i combustibili circostanti.
2.Durante la lavorazione laser, a causa dei diversi oggetti lavorati, altri
potrebbero essere generate radiazioni e altre sostanze tossiche Gas
nocivo.
3. La radiazione laser diretta può causare lesioni personali. Pertanto,
l'attrezzatura deve essere dotata di attrezzatura antincendio. È

- 3 -
severamente vietato accatastare materiali infiammabili ed esplosivi sul
banco di lavoro e attorno all'attrezzatura. Allo stesso tempo, garantire
una buona ventilazione. Gli operatori non professionisti non sono
autorizzati ad avvicinarsi all'attrezzatura.
Gli oggetti e le emissioni di elaborazione laser devono essere conformi
alle leggi locali
e regolamenti.
L'elaborazione laser può presentare rischi elevati, pertanto è opportuno
valutare attentamente
se l'oggetto è adatto alla lavorazione laser.
L'apparecchiatura laser interna presenta alta tensione e altri pericoli, ad
eccezione
per gli operatori delle attrezzature è severamente vietato lo smontaggio.
Quando l'apparecchiatura è accesa, qualcuno deve essere sorvegliato,
è vietato l'allontanamento non autorizzato e prima che il personale se ne
vada è necessario interrompere l'alimentazione elettrica.
È vietato aprire qualsiasi porta mentre l'apparecchiatura è in funzione.
Prima di iniziare il funzionamento, questa e altre apparecchiature devono
essere
messa a terra in modo sicuro ed efficace.
Non posizionare alcuna riflessione totale o diffusa irrilevante
dispositivi nell'apparecchiatura per evitare che il laser venga riflesso sul
corpo umano o su oggetti infiammabili.
Durante il funzionamento dell'attrezzatura, l'operatore deve sempre
osservare il funzionamento dell'apparecchiatura. Se si verifica una
situazione anomala, si prega di
L'attrezzatura deve essere posizionata in un luogo asciutto, privo di
inquinamento, privo di vibrazioni e robusto.
ambiente privo di interferenze elettromagnetiche, con temperatura di
esercizio compresa tra 5 e 40 gradi Celsius e umidità compresa tra 5 e
95% (ambiente con acqua senza condensa).
L'apparecchiatura deve essere sempre lontana dalle apparecchiature
elettriche
sensibile alle interferenze elettromagnetiche, altrimenti potrebbe

- 4 -
causare interferenze elettromagnetiche.
La tensione di lavoro del dispositivo è: AC220V europea o nord
AC120V americano (si prega di confermare la tensione di
funzionamento del dispositivo prima dell'uso).
Il laser a vetro ad anidride carbonica più importante nell'apparecchiatura
è un
consumabile e un articolo vulnerabile. Si prega di prendersene cura
durante l'uso Il laser in vetro ad anidride carbonica ha bisogno di acqua
fredda pura per raffreddarsi Si prega di prestare attenzione alla
temperatura dell'acqua che non deve superare i 30 gradi Celsius
durante l'uso, altrimenti il laser verrà danneggiato. Quando la
temperatura ambiente sta per scendere sotto 0 gradi Celsius, si prega di
sostituirla con un liquido antigelo per evitare danni al laser in vetro ad
anidride carbonica.
È vietato accendere l'apparecchiatura quando la tensione di rete è
instabile
o non corrispondenti. Il produttore e il venditore non sono responsabili
per eventuali perdite causate da un uso non corretto o dalla mancata
osservanza delle suddette normative.
USE THE PROCEDURE TO DO SO
1. Si prega di aprire la confezione per confermare che l'aspetto del
prodotto sia intatto. Di seguito è riportata un'immagine di riferimento
(Figura 1).
- 5 -
Davanti
Indietro
Figura 1
2. Estrarre i dispositivi di supporto e gli utensili dalla scatola di imballaggio
o dall'interno dell'apparecchiatura (Figura 2)
Figura 2
3. Collegare l'attrezzatura e gli strumenti di supporto all'apparecchiatura
laser e accenderla. (I passaggi dettagliati potrebbero non essere
mostrati nel manuale, è possibile fare riferimento anche al video sul
CD/USB).
- 6 -
Collegare la pompa di circolazione dell'acqua al tubo di ingresso
dell'acqua del
attrezzatura laser, posizionare la pompa di circolazione dell'acqua in un
secchio pieno di acqua pura e posizionare il tubo di uscita
dell'attrezzatura direttamente nel secchio.
( Figura 3)
Figura 3
Nota: aggiungere acqua purificata o distillata al secchio ed è
severamente vietato aggiungere acqua di rubinetto o liquami.
Il livello dell'acqua deve essere superiore alla pompa
dell'acqua di circolazione. Vedere Figura 3.
Nota: se si aggiunge acqua del rubinetto o di fogna, il sistema di
circolazione della dissipazione del calore verrà bloccato, con
conseguente grave attenuazione o danneggiamento della
potenza del tubo laser, riducendo così la durata utile del
prodotto.
7.Si prega di rimuovere il tubo di scarico. Un'estremità del tubo di
scarico è
collegato alla porta di scarico dell'apparecchiatura e un'estremità è
collegata al dispositivo di scarico fumi esterno o ausiliario. Nota:
utilizzare degli utensili per fissare la connessione per evitare che cada.
( Vedere Figura 4).

- 7 -
Figura 4
5. Si prega di scollegare il cavo di alimentazione per accendere il prodotto
e verificare che il prodotto funzioni normalmente senza alcun guasto.
( Vedere Figura 5)

- 8 -
Figura 5
6.Preparare il computer (sistema Windows) e installare il software facendo
riferimento al 11Software Installation Video11 nel CD/disco USB. Dopo
aver installato il software, estrarre il cavo USB, collegare un'estremità
alla porta USB del computer e l'altra estremità alla porta di ingresso USB
del dispositivo. Nota: estrarre la chiave software e inserirla nella porta
USB del computer, altrimenti il software non può essere utilizzato.
( Vedere Figura 6)
Figura 6
SOFTWARE INSTALLATION
Nota: installare Coreldraw prima di installare il nostro software,
Sono supportati Coreldraw 12,X3.X4,X5; sono supportati Win XP, Win
7, Win 8.
10.Fare doppio clic su CorelLASER.exe nella directory di
installazione,
Seleziona una lingua nella finestra di dialogo che si apre, scegli Inglese
lingua Fare clic su Avanti, viene visualizzata la seguente finestra di dialogo:
( vedere Figura 7)

- 9 -
Figura 7
Selezionare il percorso di installazione, suggeriamo d:\Program
File\3WCAD\CorelLASER, quindi fare clic su Avanti : ( vedere Figura 8)

- 10 -
Figura 8
Fare clic su Avanti: ( vedere Figura 9)
Figura 9
Fare clic su Avanti: ( vedere Figura 10)
- 11 -
Figura 10
Fare clic su【Installa】, quando la copia estratta deve essere completata,
l'installazione verrà
essere finito. ( Vedi Figura 10)
Figura 11
- 12 -
Fare clic su Fine, quindi il software è stato installato. ( Vedi Figura 11)
11.Proprietà della macchina per incisione.
Dopo l'installazione, sul desktop apparirà un'icona, come
mostrando. ( Vedi Figura 12)
Figura 12
Fare doppio clic su questa icona per aprire il software, si aprirà
Coreldraw,
allora puoi vedere il nostro barra degli strumenti del software in
Coreldraw, come mostrato . (Vedi Figura 13)
Figura 13

- 13 -
Quindi fare clic su questo pulsante Imposta le proprietà della macchina
per incisione come
mostrato nella Figura 14 .
Figura 14
Qui dobbiamo configurare le stesse impostazioni per la scheda madre
come nell'immagine sopra, impostando le dimensioni della pagina in base
alle dimensioni dell'area di lavoro della macchina, compilando gli spazi
vuoti per i 6 ID dispositivo sulla scheda madre, facendo clic su Applica
"Dimensioni pagina X:300 mm/Dimensioni pagina Y:200 mm" e quindi
facendo clic su OK.
- 14 -
12.Istruzioni software.
Impostazione CorelDRAW.
è il pulsante di impostazione di CorelDRAW, fare clic su questo
pulsante, l'interfaccia pop-up è come mostrato: (vedere Figura 15).
Figura 15
Si prega di configurare le impostazioni nell'interfaccia delle impostazioni
dati come abbiamo fatto sopra.
Incisione.
è il pulsante Incisione, cliccando su questo pulsante, l'interfaccia pop-up
sarà come mostrato (vedere Figura 16).

- 15 -
- 16 -
Figura 16

- 17 -
Figura 16

- 18 -
Taglio
è il pulsante di taglio, cliccaci sopra e si aprirà l'interfaccia pop-up come
mostrato. ( Vedi Figura 17)
Figura 17
TECHNICAL SPECIFICATIONS
Modello
Modello KH-3020
KH3020
Tensione di ingresso
Europa: 230V 50Hz
Nord America: 120 V 60 Hz
Potenza totale
330W
Potenza laser
40W
Area di lavoro
300mm*200mm
temperatura
5-50 ℃
umidità
5%-95% non condensato
Tipo di laser
Laser a vetro CO2
Modello laser
Modello KH-LT40
Adatto alla materia
Pietra, legno, ceramica, metallo, stoffa, carta, ecc.
Stile banco da lavoro
Piattaforma cellulare

- 19 -
TROUBLESHOOTING

- 20 -
25. Istruzioni *1
26. banco da lavoro *1
27. Viti M3 *4
28. Nastro biadesivo *1
29. Cavo dati *1
30. chiavetta USB *1
31. Cavo di alimentazione *1
32. pompa dell'acqua *1
Indirizzo : Shuangchenglu 803nong11hao1602A-1609shi, baoshanqu,
shanghai 200000 CN.
Importato in AUS: SIHAO PTY LTD, 1 ROKEVA STREETEASTWOOD NSW
2122 Australia
Importato negli USA: Sanven Technology Ltd., Suite 250, 9166 Anaheim
Place, Rancho Cucamonga, CA 91730
REP
EC
E-CrossStu GmbH
Mainzer Landstr.69, 60329 Frankfurt am Main.
REP
UK
YH CONSULTING LIMITED.
C/O YH Consulting Limited Office 147, Centurion House,
London Road, Staines-upon-Thames, Surrey, TW18 4AX


- 2 -
Técnico Soporte y certificado de garantía electrónica www.vevor.com/support
MÁQUINA DE GRABADO LÁSER
MANUAL DE INSTRUCCIONES
MODELO: KH3020/KH-3020
We continue to be committed to provide you tools with competitive price.
"Save Half", "Half Price" or any other similar expressions used by us only represents an
estimate of savings you might benefit from buying certain tools with us compared to the major
top brands and does not necessarily mean to cover all categories of tools offered by us. You
are kindly reminded to verify carefully when you are placing an order with us if you are
actually saving half in comparison with the top major brands.

- 1 -
MODELO: KH3020/KH-3020
Have product questions? Need technical support? Please feel free to
contact us:
Technical Support and E-Warranty Certificate
www.vevor.com/support
NEED HELP? CONTACT US!
This is the original instruction, please read all manual instructions
carefully before operating. VEVOR reserves a clear interpretation of our
user manual. The appearance of the product shall be subject to the
product you received. Please forgive us that we won't inform you again if
there are any technology or software updates on our product.
LASER ENGRAVING MACHINE

- 2 -
Advertencia: Para reducir el riesgo de lesiones, el usuario
debe leer atentamente el manual de instrucciones.
Este dispositivo cumple con la Parte 15 de las Normas de la
FCC. Su funcionamiento está sujeto a las dos condiciones
siguientes: (1) Este dispositivo no puede causar interferencias
perjudiciales y (2) Este dispositivo debe aceptar cualquier
interferencia que reciba, incluidas las interferencias que
puedan causar un funcionamiento no deseado.
Este producto está sujeto a las disposiciones de la Directiva
Europea 2012/19/CE. El símbolo que muestra un contenedor
de basura tachado indica que el producto requiere una
recogida selectiva de residuos en la Unión Europea. Esto se
aplica al producto y a todos los accesorios marcados con este
símbolo. Los productos marcados como tales no pueden
desecharse con los residuos domésticos normales, sino que
deben llevarse a un punto de recogida para reciclar
dispositivos eléctricos y electrónicos.
IMPORTANT NOTES
Antes de operar el equipo, el usuario debe leer atentamente las
Manual de instrucciones y cúmplalo estrictamente. Este manual es
aplicable a varios modelos de productos.
Este equipo utiliza cuatro tipos de láseres estándar internacionales
(fuerte
radiación láser). La radiación láser puede provocar los siguientes
eventos:
1. encender los materiales combustibles circundantes.
2. Durante el procesamiento láser, debido a los diferentes objetos
procesados, otros
Se pueden generar radiaciones y otros gases tóxicos nocivos.
3. La radiación láser directa puede provocar lesiones personales. Por lo
tanto, el equipo debe estar equipado con equipo contra incendios.

- 3 -
Está estrictamente prohibido apilar materiales inflamables y
explosivos en el banco de trabajo y alrededor del equipo. Al mismo
tiempo, asegúrese de que haya una buena ventilación. No se permite
que los operadores no profesionales se acerquen al equipo.
Los objetos y emisiones que se procesen con láser deben cumplir con
las leyes locales.
y reglamentos.
El procesamiento láser puede tener altos riesgos, por lo que debe
considerarlo cuidadosamente
si el objeto es adecuado para el procesamiento láser.
El equipo láser interno tiene alto voltaje y otros peligros, excepto
Para los operadores del equipo, está estrictamente prohibido
desmontarlo.
Al encender el equipo, alguien debe estar vigilado,
Está prohibido salir sin autorización y se debe cortar toda la energía
antes de que el personal salga.
Está prohibido abrir cualquier puerta cuando el equipo esté en
funcionamiento.
Antes de iniciar la operación, este equipo y otros equipos deben
conectado a tierra de forma segura y eficaz.
No coloque ninguna reflexión total irrelevante o reflexión difusa en el
objeto.
objetos en el equipo para evitar que el láser se refleje en el cuerpo
humano o en objetos inflamables.
Durante el funcionamiento del equipo, el operador deberá siempre:
Observe el funcionamiento del equipo. Si ocurre una situación anormal,
por favor, póngase en contacto con el servicio técnico de inmediato.
El equipo debe estar en un lugar seco, libre de contaminación, libre de
vibraciones y resistente.
Entorno de interferencia electromagnética, con una temperatura de
trabajo de 5 a 40 grados Celsius y una humedad del 5 al 95 % (entorno
de agua sin condensación).
El equipo debe estar siempre alejado de equipos eléctricos.
sensible a las interferencias electromagnéticas, de lo contrario podría

- 4 -
causar interferencias electromagnéticas.
El voltaje de funcionamiento del dispositivo es: CA 220 V europea o CA
240 V norteamericana.
AC120V americano (confirme el voltaje de funcionamiento del
dispositivo antes de usarlo).
El láser de vidrio de dióxido de carbono más importante del equipo es un
Consumible y un elemento vulnerable. Por favor, cuídelo durante el uso.
El láser de vidrio de dióxido de carbono necesita agua fría pura para
enfriarse. Preste atención a que la temperatura del agua no supere los
30 grados Celsius durante el uso, de lo contrario, el láser se dañará.
Cuando la temperatura ambiente esté a punto de caer por debajo de los
0 grados Celsius, vuelva a colocarlo con un líquido anticongelante para
evitar dañar el láser de vidrio de dióxido de carbono.
Está prohibido encender el equipo cuando el voltaje de la red sea
inestable.
o no coinciden. El fabricante y el vendedor no son responsables de
ninguna pérdida causada por un uso incorrecto o por el incumplimiento
de las normas anteriores.
USE THE PROCEDURE TO DO SO
1. Abra el paquete para confirmar que el producto se encuentra intacto. La
siguiente es una imagen de referencia (Figura 1).
Frente

- 5 -
atrás
Figura 1
2. Saque los dispositivos y herramientas de soporte de la caja de embalaje
o del interior del equipo (Figura 2)
Figura 2
3. Conecte el equipo y las herramientas de apoyo al equipo láser y
enciéndalo. (Es posible que los pasos detallados no se muestren en el
manual; también puede consultar el video en el CD/USB).
Conecte la bomba de circulación de agua a la tubería de entrada de
agua del
Equipo láser, coloque la bomba de circulación de agua en un balde lleno
- 6 -
de agua pura y coloque el tubo de salida del equipo directamente en el
balde.
( Figura 3)
Figura 3
Nota: agregue agua purificada o destilada al balde. Está
estrictamente prohibido agregar agua del grifo o de aguas
residuales. El nivel del agua debe ser más alto que el de la
bomba de agua circulante. Consulte la Figura 3.
Nota: Si se agrega agua del grifo o aguas residuales, se bloqueará
el sistema de circulación de disipación de calor, lo que
provocará una atenuación o daño grave a la potencia del
tubo láser, acortando así la vida útil del producto.
8.Por favor, saque el tubo de escape. Un extremo del tubo de escape
está
Se conecta al puerto de escape del equipo y un extremo se conecta al
dispositivo de escape de humos auxiliar o exterior. Nota: Utilice
herramientas para fijar la conexión para evitar que se caiga. ( Ver
Figura 4).

- 7 -
Figura 4
5. Retire el cable de alimentación para encender el producto y verifique
que el producto funcione normalmente sin fallas ( consulte la Figura
5) .
- 8 -
Figura 5
6. Prepare la computadora (sistema Windows) e instale el software
consultando el video de instalación del software 11 que se encuentra en
el CD/disco USB. Una vez instalado el software, extraiga el cable USB,
conecte un extremo al puerto USB de la computadora y el otro extremo
al puerto de entrada USB del dispositivo. Nota: extraiga la clave del
software y conéctela al puerto USB de la computadora; de lo contrario,
no podrá utilizar el software ( consulte la Figura 6) .
Figura 6
SOFTWARE INSTALLATION
Nota: instale Coreldraw antes de instalar nuestro software.
Se admiten Coreldraw 12, X3, X4, X5; se admiten Win XP, Win 7, Win 8.
13.Haga doble clic en CorelLASER.exe en el directorio de instalación,
Seleccione un idioma en el cuadro de diálogo que aparece. Elija inglés.
Idioma Haga clic en Siguiente y aparecerá el siguiente cuadro de diálogo:
( Ver Figura 7)

- 9 -
Figura 7
Seleccione la ruta de instalación, le sugerimos d:\Program
Archivos\3WCAD\CorelLASER, luego haga clic en Siguiente : ( Ver Figura
8)

- 10 -
Figura 8
Haga clic en Siguiente: ( Ver Figura 9)
Figura 9
Haga clic en Siguiente: ( Ver Figura 10)

- 11 -
Figura 10
Haga clic en【Instalar】, cuando se complete la copia extraída, se iniciará
la instalación.
Estará terminado. ( Ver Figura 10)
Figura 11

- 12 -
Haga clic en Finalizar y el software quedará instalado. ( Ver Figura 11)
14.Propiedades de la máquina de grabado.
Después de la instalación, aparecerá un ícono en su escritorio, como
mostrando. ( Ver Figura 12)
Figura 12
Haga doble clic en este icono para abrir el software; se abrirá Coreldraw.
Entonces podrás ver nuestro Barra de herramientas de software en
Coreldraw, como se muestra . (Ver Figura 13)
Figura 13
A continuación, haga clic en este botón Establecer las propiedades de la

- 13 -
máquina de grabado como
se muestra en la Figura 14 .
Figura 14
Aquí debemos establecer la misma configuración para la placa base
como en la imagen de arriba, estableciendo el Tamaño de página
dependiendo del tamaño del área de trabajo de su máquina, complete los
espacios en blanco para los 6 ID de dispositivo en la placa base, haga clic
en Aplicar “Tamaño de página X: 300 mm / Tamaño de página Y: 200 mm”
y luego haga clic en Aceptar.
- 14 -
15.Instrucciones de software.
Configuración de CorelDRAW.
Es el botón de configuración de CorelDRAW, haga clic en este
botón, la interfaz emergente es como se muestra: (Ver Figura 15).
Figura 15
Establezca la configuración en la interfaz de configuración de datos
igual que lo hicimos anteriormente.
Grabado.
Es el botón Grabado, haga clic en este botón, la interfaz emergente será
como se muestra (Ver Figura 16).
- 15 -
- 16 -
Figura 16
- 17 -
Figura 16

- 18 -
Corte
Es el botón de corte, haga clic en él y aparecerá una interfaz emergente
como la que se muestra ( consulte la Figura 17) .
Figura 17
TECHNICAL SPECIFICATIONS
Modelo
KH-3020
KH3020
Voltaje de entrada
Europa: 230 V 50 Hz
América del Norte: 120 V 60
Hz
Potencia total
330 W
Potencia del láser
40 W
Área de trabajo
300 mm x 200 mm
temperatura
5-50 ℃
humedad
5%-95% sin condensación
Tipo de láser
Láseres de vidrio de CO2
Modelo láser
KH-LT40
Adecuado para la
Piedra, madera, cerámica, metal, tela, papel, etc.

- 19 -
materia.
Estilo de banco de
trabajo
Plataforma celular
TROUBLESHOOTING

- 20 -

- 21 -
33. Instrucciones *1
34. banco de trabajo *1
35. Tornillos M3 *4
36. Cinta adhesiva de doble cara *1
37. Cable de datos *1
38. unidad flash *1
39. Cable de alimentación *1
40. bomba de agua *1
Dirección : Shuangchenglu 803nong11hao1602A-1609shi, baoshanqu,
shanghai 200000 CN.
Importado a AUS: SIHAO PTY LTD, 1 ROKEVA STREETEASTWOOD NSW
2122 Australia
Importado a EE. UU.: Sanven Technology Ltd., Suite 250, 9166 Anaheim
Place, Rancho Cucamonga, CA 91730
REP
EC
E-CrossStu GmbH
Mainzer Landstr.69, 60329 Frankfurt am Main.
REP
UK
YH CONSULTING LIMITED.
C/O YH Consulting Limited Office 147, Centurion House,
London Road, Staines-upon-Thames, Surrey, TW18 4AX


- 2 -
Techniczny Wsparcie i certyfikat gwarancji elektronicznej www.vevor.com/support
MASZYNA DO GRAWEROWANIA LASEROWEGO
INSTRUKCJA OBSŁUGI
MODELE:KH3020/KH-3020
We continue to be committed to provide you tools with competitive price.
"Save Half", "Half Price" or any other similar expressions used by us only represents an
estimate of savings you might benefit from buying certain tools with us compared to the major
top brands and does not necessarily mean to cover all categories of tools offered by us. You
are kindly reminded to verify carefully when you are placing an order with us if you are
actually saving half in comparison with the top major brands.
- 1 -
MODELE:KH3020/KH-3020
Have product questions? Need technical support? Please feel free to
contact us:
Technical Support and E-Warranty Certificate
www.vevor.com/support
NEED HELP? CONTACT US!
This is the original instruction, please read all manual instructions
carefully before operating. VEVOR reserves a clear interpretation of our
user manual. The appearance of the product shall be subject to the
product you received. Please forgive us that we won't inform you again if
there are any technology or software updates on our product.
LASER ENGRAVING MACHINE

- 2 -
Ostrzeżenie: Aby zminimalizować ryzyko obrażeń, użytkownik
powinien uważnie przeczytać instrukcję obsługi.
To urządzenie jest zgodne z częścią 15 przepisów FCC. Jego
działanie podlega następującym dwóm warunkom: (1) To
urządzenie nie może powodować szkodliwych zakłóceń i (2) to
urządzenie musi akceptować wszelkie odbierane zakłócenia,
w tym zakłócenia, które mogą powodować niepożądane
działanie.
Ten produkt podlega postanowieniom Dyrektywy Europejskiej
2012/19/WE. Symbol przedstawiający przekreślony kosz na
śmieci na kółkach oznacza, że produkt wymaga oddzielnej
zbiórki odpadów w Unii Europejskiej. Dotyczy to produktu i
wszystkich akcesoriów oznaczonych tym symbolem.
Produktów oznaczonych w ten sposób nie można wyrzucać
razem ze zwykłymi odpadami domowymi, ale należy je oddać
do punktu zbiórki w celu recyklingu urządzeń elektrycznych i
elektronicznych.
IMPORTANT NOTES
Przed przystąpieniem do eksploatacji urządzenia użytkownik powinien
uważnie zapoznać się z treścią instrukcji.
instrukcji obsługi i ściśle jej przestrzegać. Niniejsza instrukcja dotyczy
wielu modeli produktów.
W tym sprzęcie zastosowano cztery typy laserów zgodnych z
międzynarodowym standardem (mocne
promieniowanie laserowe). Promieniowanie laserowe może powodować
następujące zdarzenia:
1.zapalić otaczające materiały palne.
2. Podczas obróbki laserowej, ze względu na różne obrabiane obiekty,
inne
mogą wydzielać się promieniowanie i inne toksyny. Szkodliwy gaz.
3. Bezpośrednie promieniowanie laserowe może spowodować obrażenia

- 3 -
ciała. Dlatego sprzęt musi być wyposażony w sprzęt przeciwpożarowy.
Surowo zabrania się składowania materiałów łatwopalnych i
wybuchowych na stole warsztatowym i wokół sprzętu. Jednocześnie
należy zapewnić dobrą wentylację. Operatorzy nieprofesjonalni nie
mają prawa zbliżać się do sprzętu.
Obiekty i emisje poddawane obróbce laserowej powinny być zgodne z
lokalnymi przepisami
i przepisów.
Obróbka laserowa może wiązać się z dużym ryzykiem, dlatego należy ją
dokładnie rozważyć
czy obiekt nadaje się do obróbki laserowej.
Wewnętrzny sprzęt laserowy jest pod wysokim napięciem i stwarza inne
zagrożenia, z wyjątkiem
dla operatorów sprzętu kategorycznie zabrania się demontażu.
Gdy sprzęt jest włączony, ktoś musi być strzeżony,
Zabrania się wychodzenia bez upoważnienia. Przed opuszczeniem
obiektu przez personel należy odciąć zasilanie.
Zabrania się otwierania jakichkolwiek drzwi podczas pracy urządzenia.
Przed rozpoczęciem eksploatacji należy przeprowadzić kontrolę tego i
innych urządzeń.
bezpiecznie i skutecznie uziemione.
Nie umieszczaj żadnego nieistotnego całkowitego odbicia lub
rozproszonego odbicia
przedmiotów w urządzeniu, aby zapobiec odbiciu wiązki lasera od ciała
człowieka lub przedmiotów łatwopalnych.
Podczas obsługi urządzenia operator musi zawsze:
obserwować działanie sprzętu. Jeśli wystąpi nietypowa sytuacja, należy
natychmiast.
Sprzęt powinien znajdować się w miejscu suchym, wolnym od
zanieczyszczeń, wibracji i mocnym.
środowisko zakłóceń elektromagnetycznych, przy temperaturze
roboczej 5-40 stopni Celsjusza i wilgotności 5-95% (środowisko wody
bez kondensacji).
Sprzęt powinien być zawsze umieszczony z dala od urządzeń

- 4 -
elektrycznych
wrażliwy na zakłócenia elektromagnetyczne, w przeciwnym razie może
powodować zakłócenia elektromagnetyczne.
Napięcie robocze urządzenia wynosi: europejskie AC220V lub północne
Amerykańskie napięcie AC120V (przed użyciem należy sprawdzić
napięcie robocze urządzenia).
Najważniejszym laserem szklanym na dwutlenku węgla w sprzęcie jest
materiał eksploatacyjny i przedmiot podatny na uszkodzenia. Proszę
dbać o niego podczas użytkowania. Laser ze szkła węglowego
potrzebuje czystej zimnej wody do schłodzenia. Proszę zwrócić uwagę,
aby temperatura wody nie przekraczała 30 stopni Celsjusza podczas
użytkowania, w przeciwnym razie laser zostanie uszkodzony. Gdy
temperatura otoczenia spadnie poniżej 0 stopni Celsjusza, proszę
wymienić go na płyn niezamarzający, aby uniknąć uszkodzenia lasera ze
szkła węglowego.
Zabrania się włączania urządzenia, gdy napięcie sieciowe jest
niestabilne.
lub niedopasowane. Producent i sprzedawca nie ponoszą
odpowiedzialności za jakiekolwiek straty spowodowane nieprawidłowym
użyciem lub nieprzestrzeganiem powyższych przepisów.
USE THE PROCEDURE TO DO SO
1. Otwórz opakowanie, aby sprawdzić, czy wygląd produktu jest
nienaruszony. Poniżej znajduje się zdjęcie referencyjne (Rysunek 1).

- 5 -
Przód
z powrotem
Rysunek 1
2. Wyjmij urządzenia pomocnicze i narzędzia z opakowania lub wnętrza
urządzenia (rysunek 2)
Rysunek 2
3. Podłącz sprzęt pomocniczy i narzędzia do sprzętu laserowego i włącz
zasilanie. (Szczegółowe kroki mogą nie być pokazane w instrukcji,
możesz również zapoznać się z filmem na płycie CD/USB).
Proszę podłączyć pompę cyrkulacyjną wody do rury wlotowej wody
- 6 -
W przypadku sprzętu laserowego należy umieścić pompę cyrkulacyjną
wody w wiadrze wypełnionym czystą wodą i umieścić rurę wylotową
urządzenia bezpośrednio w wiadrze.
( Rysunek 3)
Rysunek 3
Uwaga: Proszę dodać oczyszczoną lub destylowaną wodę do
wiadra, surowo zabrania się dodawania wody z kranu lub
ścieków. Poziom wody powinien być wyższy niż pompa wody
obiegowej. Zobacz rysunek 3.
Uwaga: Dodanie wody z kranu lub ścieków spowoduje
zablokowanie układu cyrkulacji ciepła. Może to skutkować
poważnym osłabieniem lub uszkodzeniem mocy lampy
laserowej, a tym samym skróceniem żywotności produktu.
9.Proszę wyjąć rurę wydechową. Jeden koniec rury wydechowej jest
podłączony do portu wydechowego urządzenia, a jeden koniec jest
podłączony do zewnętrznego lub pomocniczego urządzenia
wydechowego dymu. Uwaga: Użyj narzędzi, aby naprawić połączenie,
aby zapobiec jego odpadnięciu. ( Zobacz Rysunek 4).
- 7 -
Rysunek 4
5. Wyjmij przewód zasilający, aby włączyć produkt i sprawdź, czy produkt
działa normalnie, bez żadnych usterek. ( Zobacz rysunek 5)
Rysunek 5
- 8 -
6. Przygotuj komputer (system Windows) i zainstaluj oprogramowanie,
korzystając z 11Video instalacji oprogramowania11 na płycie CD/dysku
USB. Po zainstalowaniu oprogramowania wyjmij kabel USB, podłącz
jeden koniec do portu USB komputera, a drugi koniec do portu
wejściowego USB urządzenia. Uwaga: Wyjmij klucz oprogramowania i
podłącz go do portu USB komputera, w przeciwnym razie nie będzie
można korzystać z oprogramowania. ( Zobacz rysunek 6)
Rysunek 6
SOFTWARE INSTALLATION
Uwaga: przed zainstalowaniem naszego oprogramowania
zainstaluj program Coreldraw,
Obsługiwane są Coreldraw 12,X3.X4,X5; obsługiwane są Win XP, Win
7, Win 8.
16.Kliknij dwukrotnie plik CorelLASER.exe znajdujący się w katalogu
instalacyjnym,
Wybierz język w wyświetlonym oknie dialogowym, Wybierz język
angielski
język Kliknij Dalej, pojawi się następujące okno dialogowe: ( Zobacz
Rysunek 7)

- 9 -
Rysunek 7
Wybierz ścieżkę instalacji, sugerujemy d:\Program
Pliki\3WCAD\CorelLASER ,Następnie kliknij Dalej : ( patrz Rysunek 8)

- 10 -
Rysunek 8
Kliknij Dalej: ( patrz Rysunek 9)
Rysunek 9
Kliknij Dalej: ( patrz Rysunek 10)

- 11 -
Rysunek 10
Kliknij 【Instaluj】, gdy kopiowanie rozpakowywania zostanie ukończone,
instalacja zostanie uruchomiona.
zostać ukończone. ( Zobacz rysunek 10)
Rysunek 11

- 12 -
Kliknij Zakończ, a oprogramowanie zostanie zainstalowane. ( Zobacz
Rysunek 11)
17.Właściwości maszyny grawerującej.
Po instalacji na pulpicie pojawi się ikona
pokazano. ( Zobacz rysunek 12)
Rysunek 12
Kliknij dwukrotnie tę ikonę, aby otworzyć oprogramowanie. Zostanie
uruchomiony program Coreldraw,
wtedy możesz zobaczyć nasze pasek narzędzi oprogramowania w
programie Coreldraw, jak pokazano . (Zobacz rysunek 13)
Rysunek 13

- 13 -
Następnie kliknij ten przycisk Ustaw właściwości maszyny do
grawerowania jako
pokazano na rysunku 14 .
Rysunek 14
Tutaj musimy ustawić te same ustawienia dla płyty głównej, co na
powyższym obrazku, ustawiając Rozmiar strony. W zależności od rozmiaru
obszaru roboczego komputera, wypełnij puste pola dla 6 identyfikatorów
urządzeń na płycie głównej, kliknij Zastosuj „Rozmiar strony X:300
mm/Rozmiar strony Y:200 mm”, a następnie kliknij OK.
- 14 -
18.Instrukcja oprogramowania.
Ustawienia programu CorelDRAW.
Kliknij przycisk ustawień programu CorelDRAW, a wyświetli się
interfejs podręczny, taki jak pokazano na rysunku 15:
Rysunek 15
Proszę skonfigurować ustawienia w interfejsie ustawień danych w taki
sam sposób, jak zrobiliśmy to powyżej.
Rytownictwo.
Kliknij przycisk Grawerowanie, a wyświetli się interfejs, który będzie
wyglądał tak jak na zdjęciu (patrz Rysunek 16).

- 15 -

- 16 -
Rysunek 16

- 17 -
Rysunek 16

- 18 -
Cięcie
Kliknij przycisk cięcia, a pojawi się interfejs pop-up, jak pokazano na
rysunku 17.
Rysunek 17
TECHNICAL SPECIFICATIONS
Model
KH-3020
KH3020
Napięcie wejściowe
Europa: 230V 50Hz
Ameryka Północna: 120 V 60
Hz
Całkowita moc
330 W
Moc lasera
40 W
Obszar roboczy
300mm*200mm
temperatura
5-50 ℃
wilgotność
5%-95% bez kondensatu
Typ lasera
Lasery szklane CO2
Model laserowy
KH-LT40
Nadaje się do materiału
Kamień, drewno, ceramika, metal, tkanina, papier itp.

- 19 -
Styl stołu
warsztatowego
Platforma komórkowa
TROUBLESHOOTING

- 20 -

- 21 -
41. Instrukcje *1
42. stół warsztatowy *1
43. Śruby M3 *4
44. Taśma dwustronna *1
45. Kabel danych *1
46. dysk flash *1
47. Przewód zasilający *1
48. pompa wodna *1
Adres : Shuangchenglu 803nong11hao1602A-1609shi, baoshanqu, szanghaj
200000 CN.
Importowane do AUS: SIHAO PTY LTD, 1 ROKEVA STREETEASTWOOD
NSW 2122 Australia
Importowane do USA: Sanven Technology Ltd., Suite 250, 9166 Anaheim
Place, Rancho Cucamonga, CA 91730
REP
EC
E-CrossStu GmbH
Mainzer Landstr.69, 60329 Frankfurt am Main.
REP
UK
YH CONSULTING LIMITED.
C/O YH Consulting Limited Office 147, Centurion House,
London Road, Staines-upon-Thames, Surrey, TW18 4AX


- 2 -
Technisch Ondersteuning en E-garantiecertificaat www.vevor.com/support
LASERGRAVERMACHINE
GEBRUIKSAANWIJZING
MODEL:KH3020/KH-3020
We continue to be committed to provide you tools with competitive price.
"Save Half", "Half Price" or any other similar expressions used by us only represents an
estimate of savings you might benefit from buying certain tools with us compared to the major
top brands and does not necessarily mean to cover all categories of tools offered by us. You
are kindly reminded to verify carefully when you are placing an order with us if you are
actually saving half in comparison with the top major brands.

- 1 -
MODEL:KH3020/KH-3020
Have product questions? Need technical support? Please feel free to
contact us:
Technical Support and E-Warranty Certificate
www.vevor.com/support
NEED HELP? CONTACT US!
This is the original instruction, please read all manual instructions
carefully before operating. VEVOR reserves a clear interpretation of our
user manual. The appearance of the product shall be subject to the
product you received. Please forgive us that we won't inform you again if
there are any technology or software updates on our product.
LASER ENGRAVING MACHINE
- 2 -
Waarschuwing: om het risico op letsel te verkleinen, moet de
gebruiker de gebruiksaanwijzing zorgvuldig lezen.
Dit apparaat voldoet aan Deel 15 van de FCC-regels. De
werking is onderworpen aan de volgende twee voorwaarden:
(1) Dit apparaat mag geen schadelijke interferentie
veroorzaken, en (2) dit apparaat moet alle ontvangen
interferentie accepteren, inclusief interferentie die ongewenste
werking kan veroorzaken.
Dit product is onderworpen aan de bepalingen van de
Europese richtlijn 2012/19/EG. Het symbool met een
doorgestreepte afvalbak geeft aan dat het product in de
Europese Unie gescheiden afvalinzameling vereist. Dit geldt
voor het product en alle accessoires die met dit symbool zijn
gemarkeerd. Producten die als zodanig zijn gemarkeerd,
mogen niet met het normale huishoudelijke afval worden
weggegooid, maar moeten worden ingeleverd bij een
inzamelpunt voor recycling van elektrische en elektronische
apparaten.
IMPORTANT NOTES
Voordat de gebruiker het apparaat bedient, moet hij de
gebruiksaanwijzing zorgvuldig doorlezen.
gebruiksaanwijzing en houd u er strikt aan. Deze handleiding is van
toepassing op meerdere productmodellen.
Deze apparatuur maakt gebruik van vier internationale standaardtypes
lasers (sterke
Laserstraling kan de volgende gebeurtenissen veroorzaken:
1. Omliggende brandbare stoffen ontsteken.
2. Tijdens de laserbewerking kunnen er, vanwege de verschillende
bewerkte objecten, andere
Er kunnen straling en andere giftige stoffen vrijkomen. Schadelijk gas.
3. Directe laserstraling kan persoonlijk letsel veroorzaken. Daarom moet

- 3 -
de apparatuur zijn uitgerust met brandbestrijdingsapparatuur. Het is
ten strengste verboden om ontvlambare en explosieve materialen op
de werkbank en rond de apparatuur te stapelen. Zorg tegelijkertijd
voor goede ventilatie. Niet-professionele operators mogen de
apparatuur niet naderen.
Laserbewerkingsobjecten en emissies moeten voldoen aan de lokale
wetgeving
en regelgeving.
Laserbewerking kan grote risico's met zich meebrengen, dus u moet er
goed over nadenken
of het object geschikt is voor laserbewerking.
De interne laserapparatuur heeft een hoge spanning en andere gevaren,
behalve
Voor operators van apparatuur is het ten strengste verboden om deze te
demonteren.
Wanneer de apparatuur wordt ingeschakeld, moet er iemand worden
bewaakt,
Ongeoorloofd verlaten is verboden en alle stroom moet worden
afgesloten voordat het personeel vertrekt.
Het is verboden om deuren te openen terwijl de apparatuur in werking is.
Voordat u met de werkzaamheden begint, moet deze apparatuur en
andere apparatuur worden
veilig en effectief geaard.
Plaats geen irrelevante totale reflectie of diffuse reflectie op
projecties in de apparatuur om te voorkomen dat de laser op het
menselijk lichaam of op brandbare voorwerpen wordt weerkaatst.
Tijdens de bediening van de apparatuur moet de bediener altijd:
observeer de werking van de apparatuur. Als er een abnormale situatie
optreedt, neem dan onmiddellijk contact op.
De apparatuur moet zich in een droge, vervuilingsvrije, trillingsvrije en
sterke omgeving bevinden
elektromagnetische interferentie-omgeving, met een werktemperatuur
van 5-40 graden Celsius en een luchtvochtigheid van 5-95%
(niet-condenserend wateromgeving).
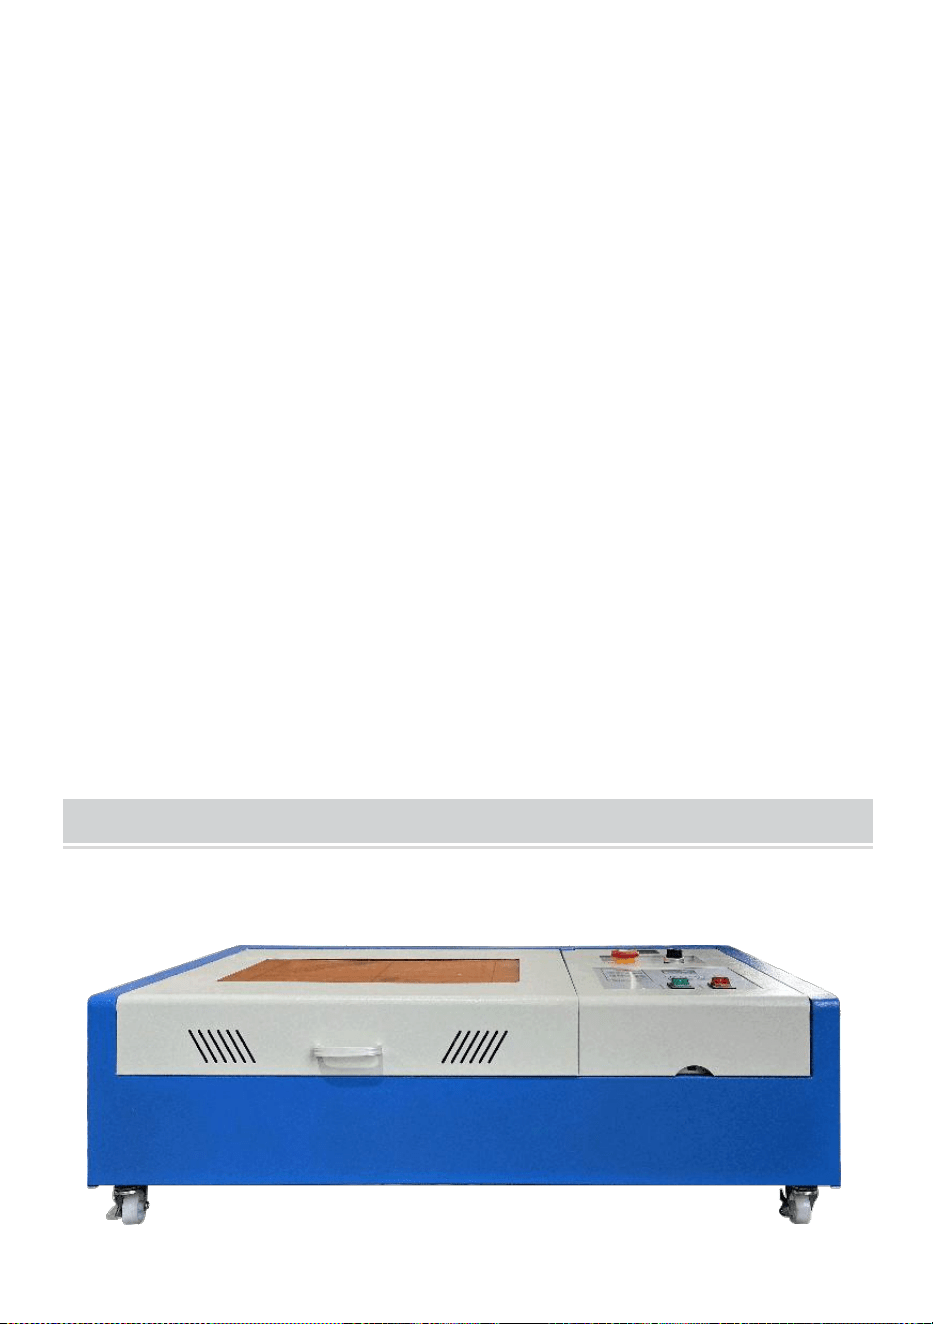
- 4 -
De apparatuur moet altijd ver van elektrische apparatuur worden
geplaatst
gevoelig zijn voor elektromagnetische interferentie, anders kan er
elektromagnetische interferentie optreden.
De werkspanning van het apparaat is: Europees AC220V of Noord
Amerikaanse AC120V (controleer de werkspanning van het apparaat
vóór gebruik).
De belangrijkste koolstofdioxideglaslaser in de apparatuur is een
verbruiksartikel en kwetsbaar item. Wees er voorzichtig mee tijdens
gebruik De koolstofdioxideglaslaser heeft puur koud water nodig om af
te koelen Let op dat de watertemperatuur niet hoger is dan 30 graden
Celsius tijdens gebruik, anders raakt de laser beschadigd. Wanneer de
omgevingstemperatuur onder de 0 graden Celsius daalt, vervang deze
dan met een antivriesvloeistof om schade aan de
koolstofdioxideglaslaser te voorkomen.
Het is verboden om de apparatuur in te schakelen als de netspanning
onstabiel is
of niet-passend. De fabrikant en verkoper zijn niet aansprakelijk voor
enig verlies veroorzaakt door onjuist gebruik of niet-naleving van de
bovenstaande voorschriften.
USE THE PROCEDURE TO DO SO
1. Open de verpakking om te bevestigen dat het uiterlijk van het product
intact is. Hieronder ziet u een referentiefoto (Figuur 1).

- 5 -
Voorkant
rug
Figuur 1
2. Haal de ondersteunende apparaten en gereedschappen uit de
verpakking of uit de apparatuur (Figuur 2)
Figuur 2
3. Sluit de ondersteunende apparatuur en gereedschappen aan op de
laserapparatuur en schakel het apparaat in. (De gedetailleerde stappen
worden mogelijk niet in de handleiding weergegeven, u kunt ook de
video op de cd/USB raadplegen).
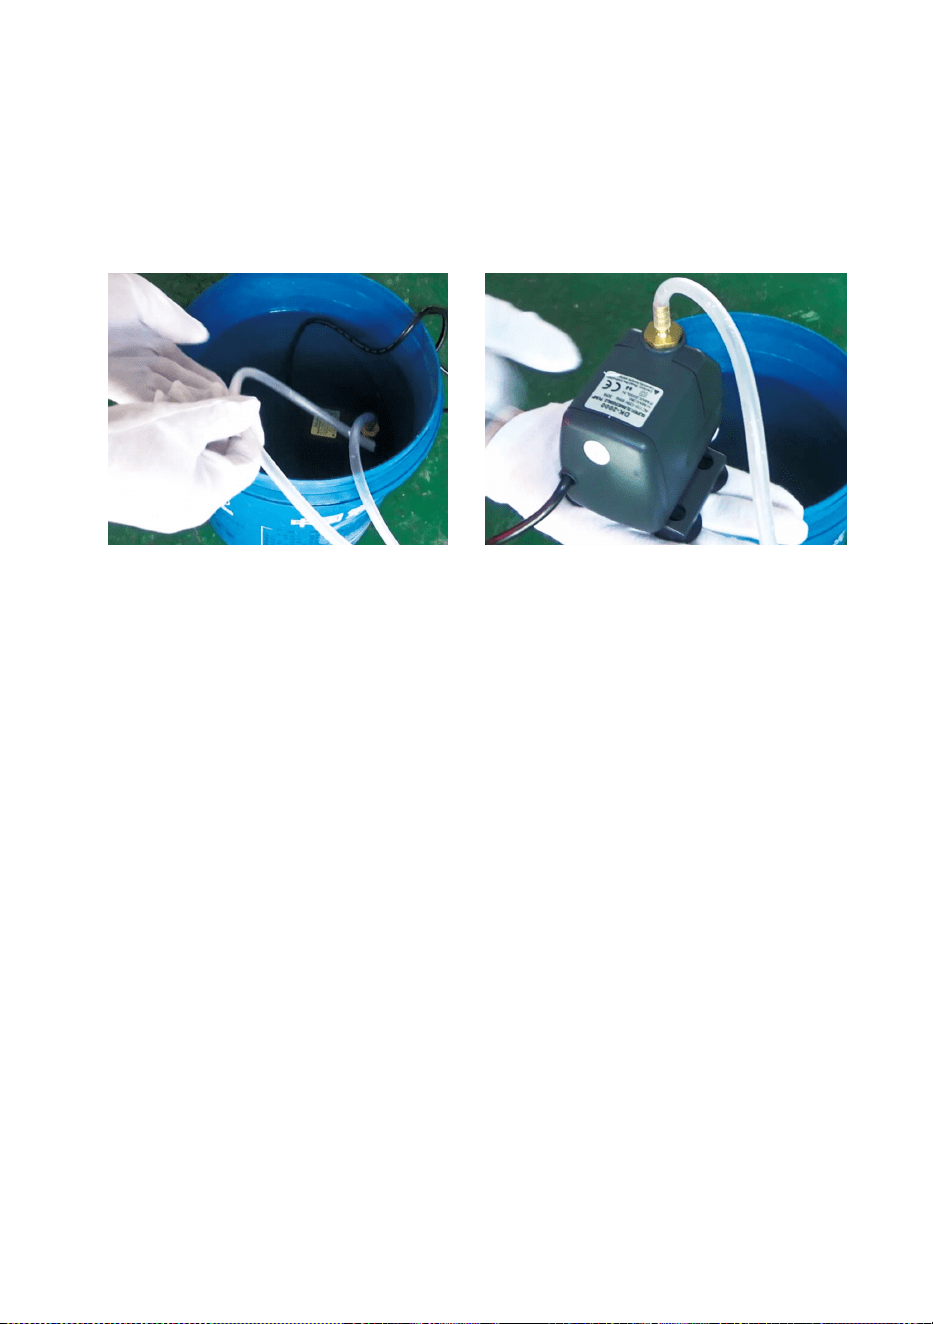
- 6 -
Sluit de watercirculatiepomp aan op de waterinlaatleiding van de
Bij laserapparatuur plaatst u de watercirculatiepomp in een emmer
gevuld met zuiver water en sluit u de uitlaatbuis van de apparatuur
rechtstreeks aan op de emmer.
( Figuur 3)
Figuur 3
Let op: Voeg gezuiverd of gedestilleerd water toe aan de emmer, en
het is ten strengste verboden om kraanwater of rioolwater
toe te voegen. En het waterniveau moet hoger zijn dan de
circulerende waterpomp. Zie Afbeelding 3.
Let op: Als er kraanwater of rioolwater wordt toegevoegd, wordt het
warmteafvoersysteem geblokkeerd. Dit kan leiden tot
ernstige demping of beschadiging van het vermogen van de
laserbuis, waardoor de levensduur van het product wordt
verkort.
10. Haal de uitlaatpijp eruit. Eén uiteinde van de uitlaatpijp is
aangesloten op de uitlaatpoort van de apparatuur en één uiteinde is
aangesloten op het buiten- of hulprookafzuigapparaat. Let op: Gebruik
gereedschap om de verbinding te repareren om te voorkomen dat
deze eraf valt. ( Zie Afbeelding 4).

- 7 -
Figuur 4
5. Haal de stekker uit het stopcontact om het product in te schakelen en
controleer of het product normaal werkt, zonder dat er storingen
optreden. ( Zie afbeelding 5)

- 8 -
Figuur 5
6. Bereid de computer voor (Windows-systeem) en installeer de software
door te verwijzen naar de 11Software-installatievideo11 op de
cd/USB-schijf. Nadat de software is geïnstalleerd, verwijdert u de
USB-kabel, sluit u het ene uiteinde aan op de USB-poort van de
computer en het andere uiteinde op de USB-ingangspoort van het
apparaat. Let op: verwijder de softwaresleutel en sluit deze aan op de
USB-poort van de computer, anders kan de software niet worden
gebruikt. ( Zie afbeelding 6)
Figuur 6
SOFTWARE INSTALLATION
Let op: installeer Coreldraw voordat u onze software installeert,
Coreldraw 12,X3.X4,X5 worden ondersteund; Win XP, Win 7, Win 8
worden ondersteund.
19.Dubbelklik op CorelLASER.exe onder de installatiemap,
Selecteer een taal in het dialoogvenster dat verschijnt,Kies Engels
Taal Klik op Volgende, het volgende dialoogvenster verschijnt: ( Zie
Afbeelding 7)
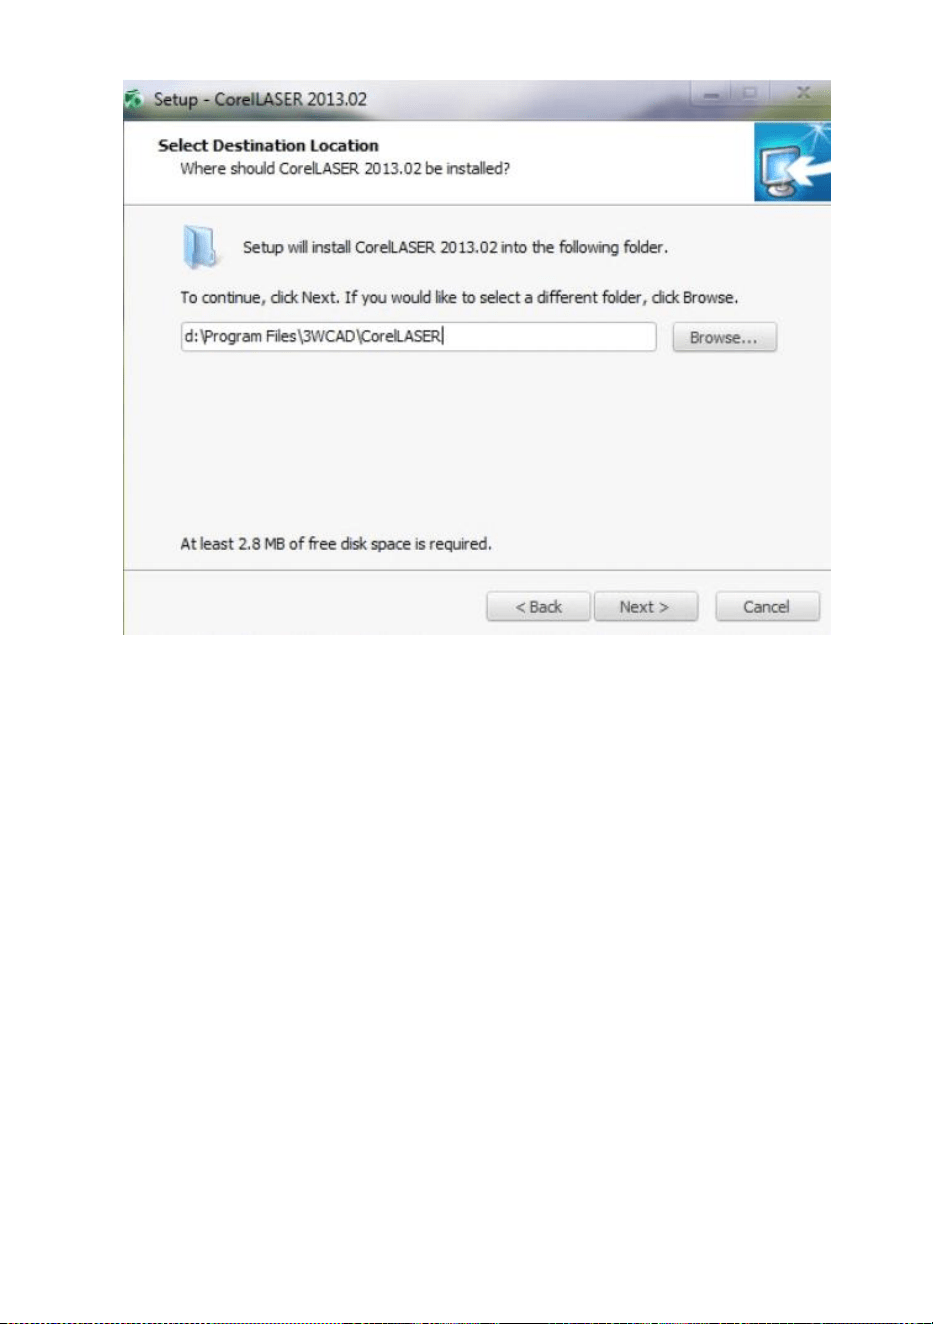
- 9 -
Figuur 7
Selecteer het installatiepad, wij raden d:\Program aan
Files\3WCAD\CorelLASER, klik vervolgens op Volgende : ( zie Afbeelding
8)
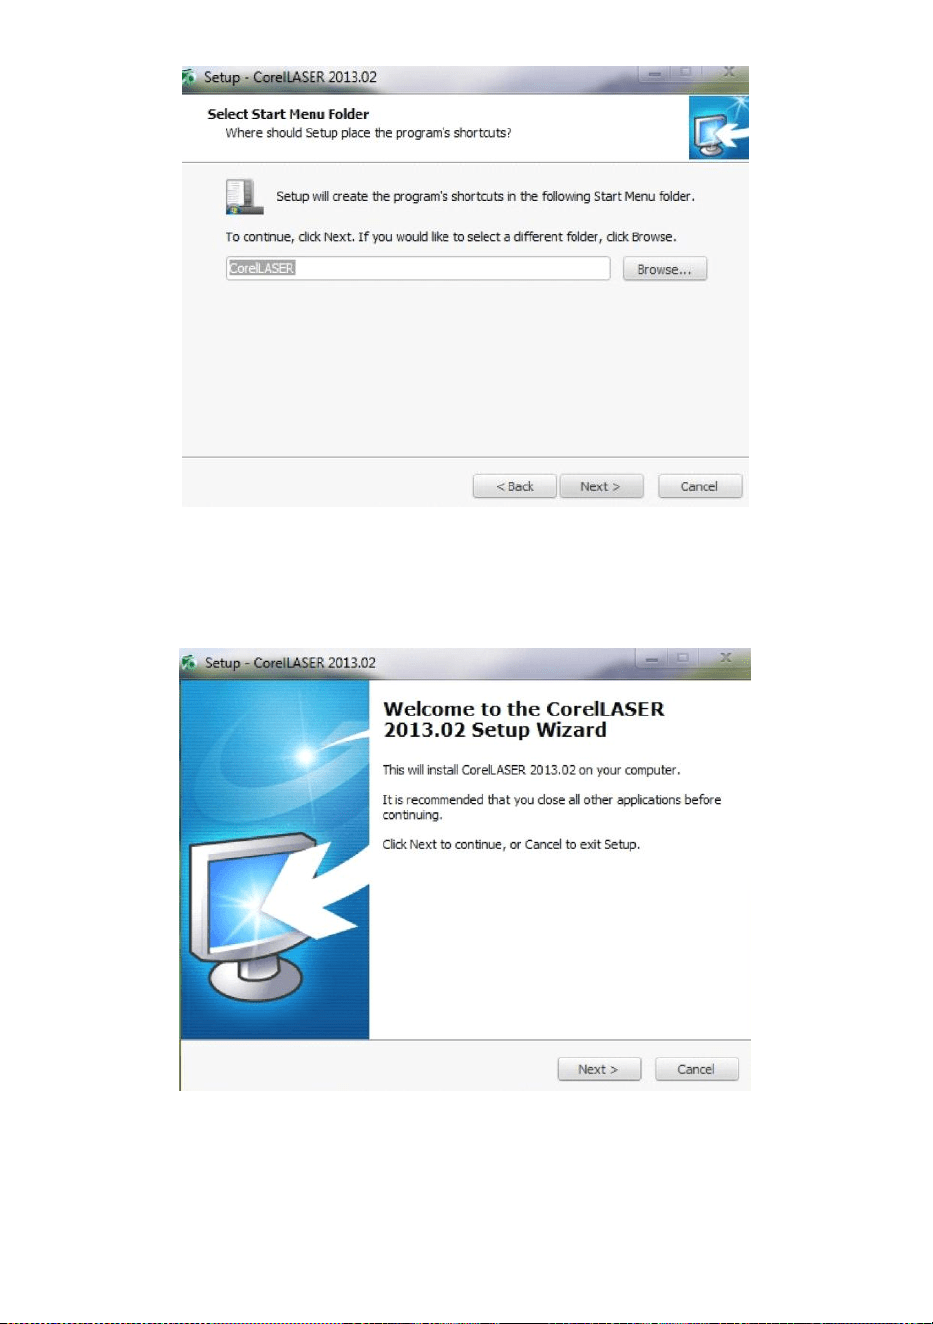
- 10 -
Figuur 8
Klik op Volgende: ( zie afbeelding 9)
Figuur 9
Klik op Volgende: ( zie afbeelding 10)

- 11 -
Figuur 10
Klik op 【Installeren】, wanneer de extractiekopie voltooid moet zijn, zal
de installatie starten.
voltooid zijn. ( Zie Figuur 10)
Figuur 11
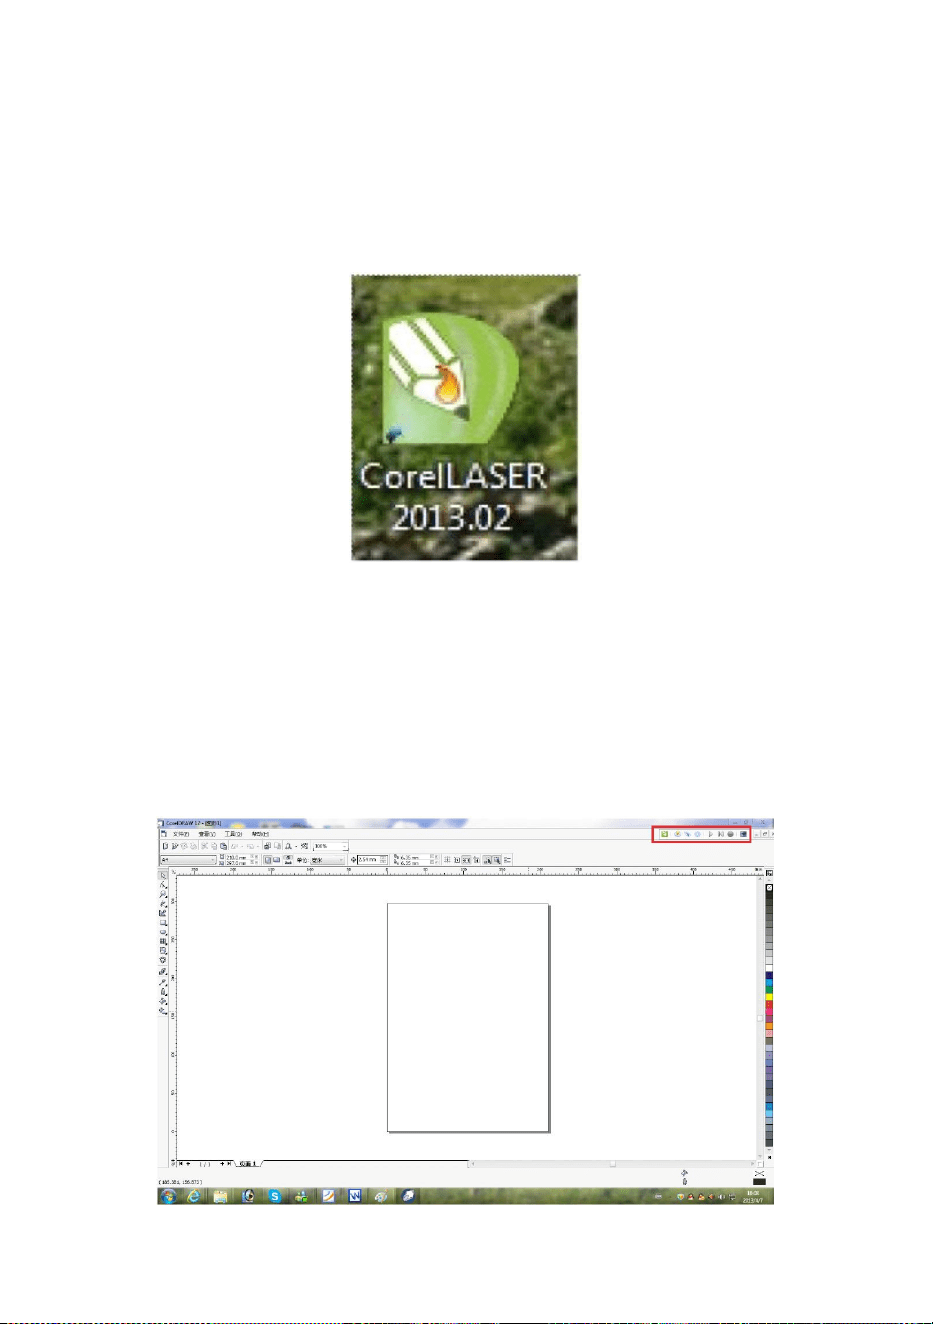
- 12 -
Klik op Voltooien. De software is geïnstalleerd. ( Zie Afbeelding 11)
20.Eigenschappen van graveermachines.
Na de installatie zal er een pictogram op uw bureaublad verschijnen,
zoals
tonen. ( Zie Figuur 12)
Figuur 12
Dubbelklik op dit pictogram om de software te openen, Coreldraw wordt
geopend,
dan kun je onze zien softwarewerkbalk in Coreldraw, zoals
weergegeven . (Zie Afbeelding 13)
Figuur 13
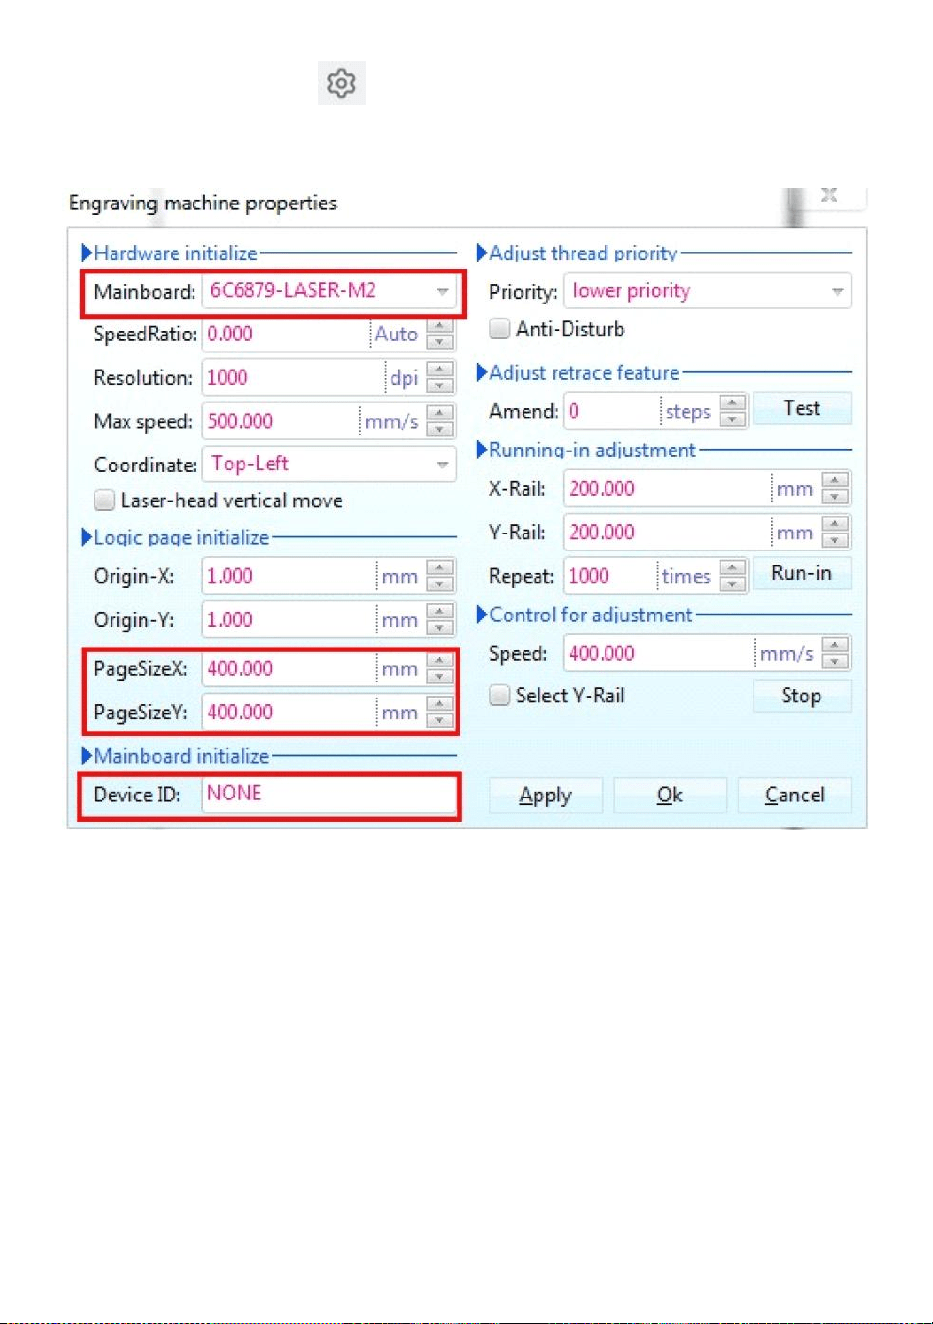
- 13 -
Klik vervolgens op deze knop Stel de eigenschappen van de
graveermachine in als
weergegeven in Figuur 14 .
Figuur 14
Hier moeten we dezelfde instellingen voor het moederbord instellen als
in de afbeelding hierboven, waarbij we de paginagrootte instellen op basis
van de grootte van het werkgebied van uw machine. Vul de lege velden in
voor de 6 apparaat-ID's op het moederbord, klik op Toepassen
"Paginagrootte X:300mm/Paginagrootte Y:200mm" en klik vervolgens op
OK.

- 14 -
21.Software-instructies.
CorelDRAW-instelling.
is de CorelDRAW-instellingenknop. Klik op deze knop, de
pop-upinterface ziet eruit zoals weergegeven: (zie Afbeelding 15).
Figuur 15
Stel de instellingen in de interface Gegevensinstellingen op dezelfde
manier in als hierboven.
Gravure.
Als u op de knop Graveren klikt, verschijnt de pop-upinterface zoals
afgebeeld (zie Afbeelding 16).

- 15 -

- 16 -
Figuur 16
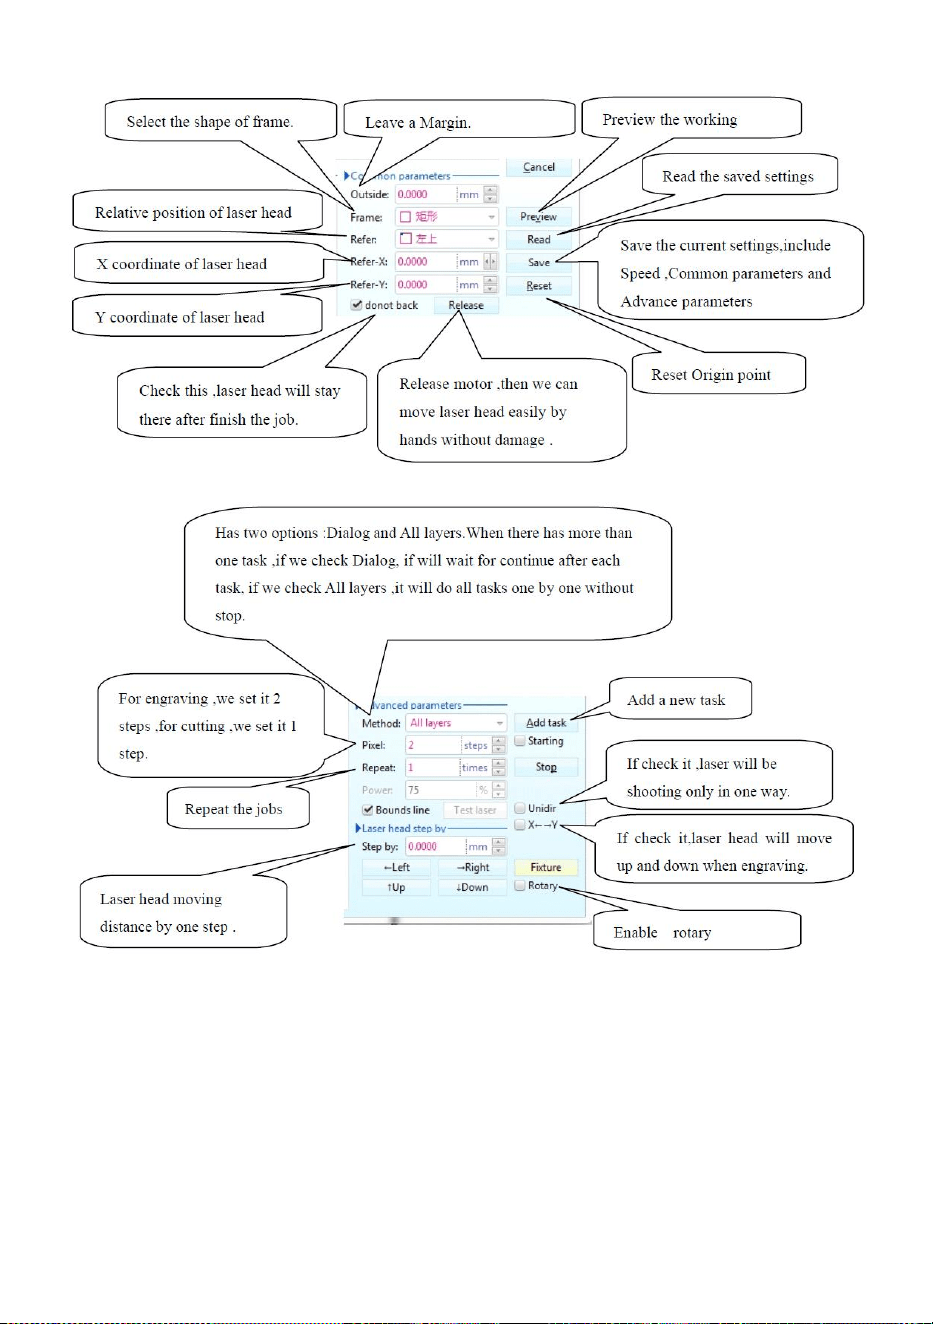
- 17 -
Figuur 16
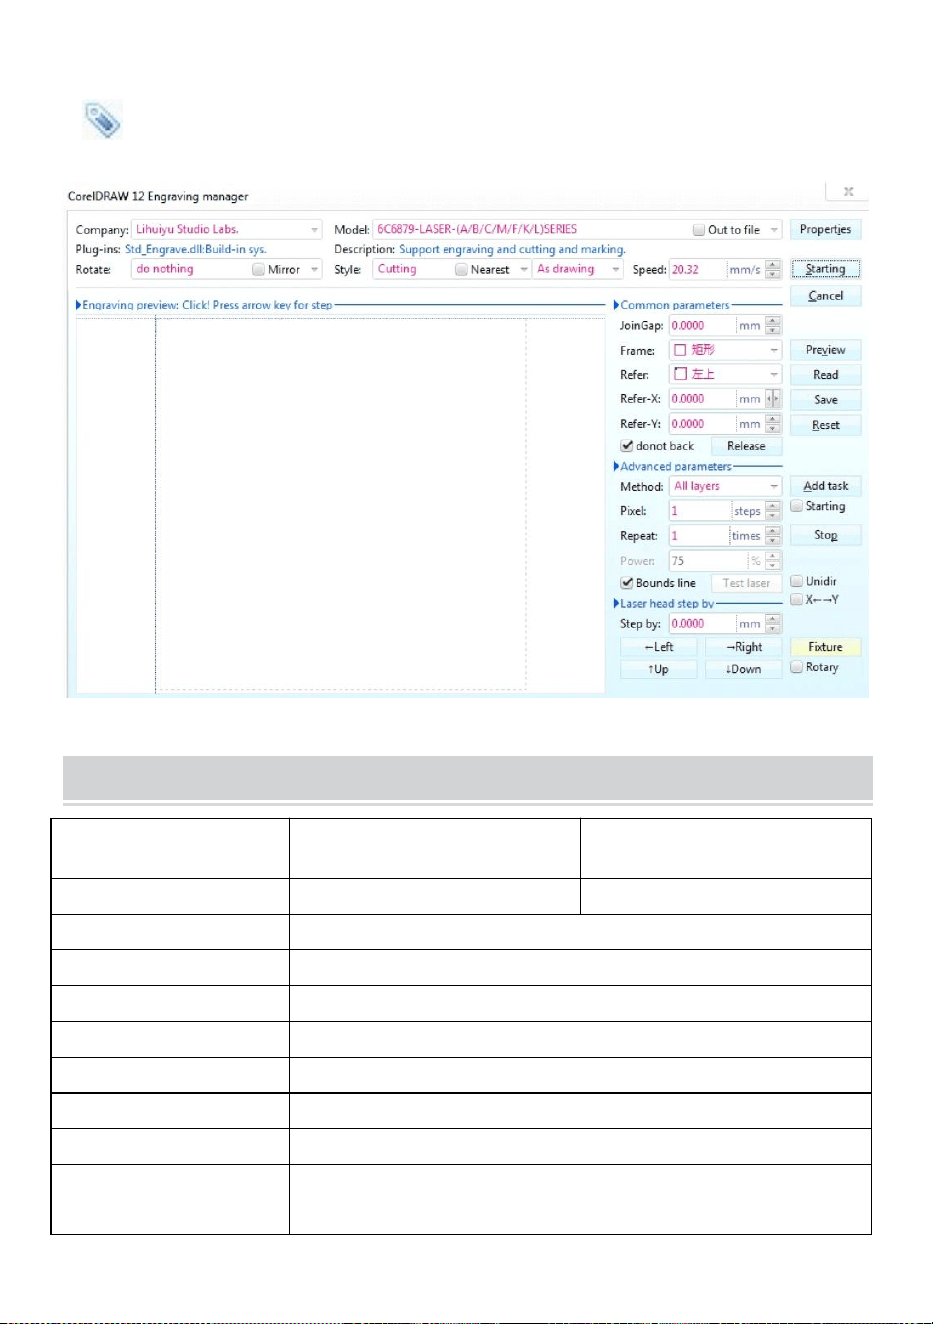
- 18 -
Snijden
is de knipknop, klik erop en de pop-upinterface ziet eruit zoals afgebeeld.
( Zie Afbeelding 17)
Figuur 17
TECHNICAL SPECIFICATIONS
Model
KH-3020
KH3020
Ingangsspanning
Europa: 230V 50Hz
Noord-Amerika: 120V 60Hz
Totaal vermogen
330W
Laservermogen
40W
Werkgebied
300mm*200mm
temperatuur
5-50℃
vochtigheid
5%-95% niet-condenserend
Lasertype
CO2-glaslasers
Lasermodel
KH-LT40
Geschikt voor het
materiaal
Steen, hout, keramiek, metaal, stof, papier, etc.

- 19 -
Werkbank stijl
Mobiel platform
TROUBLESHOOTING
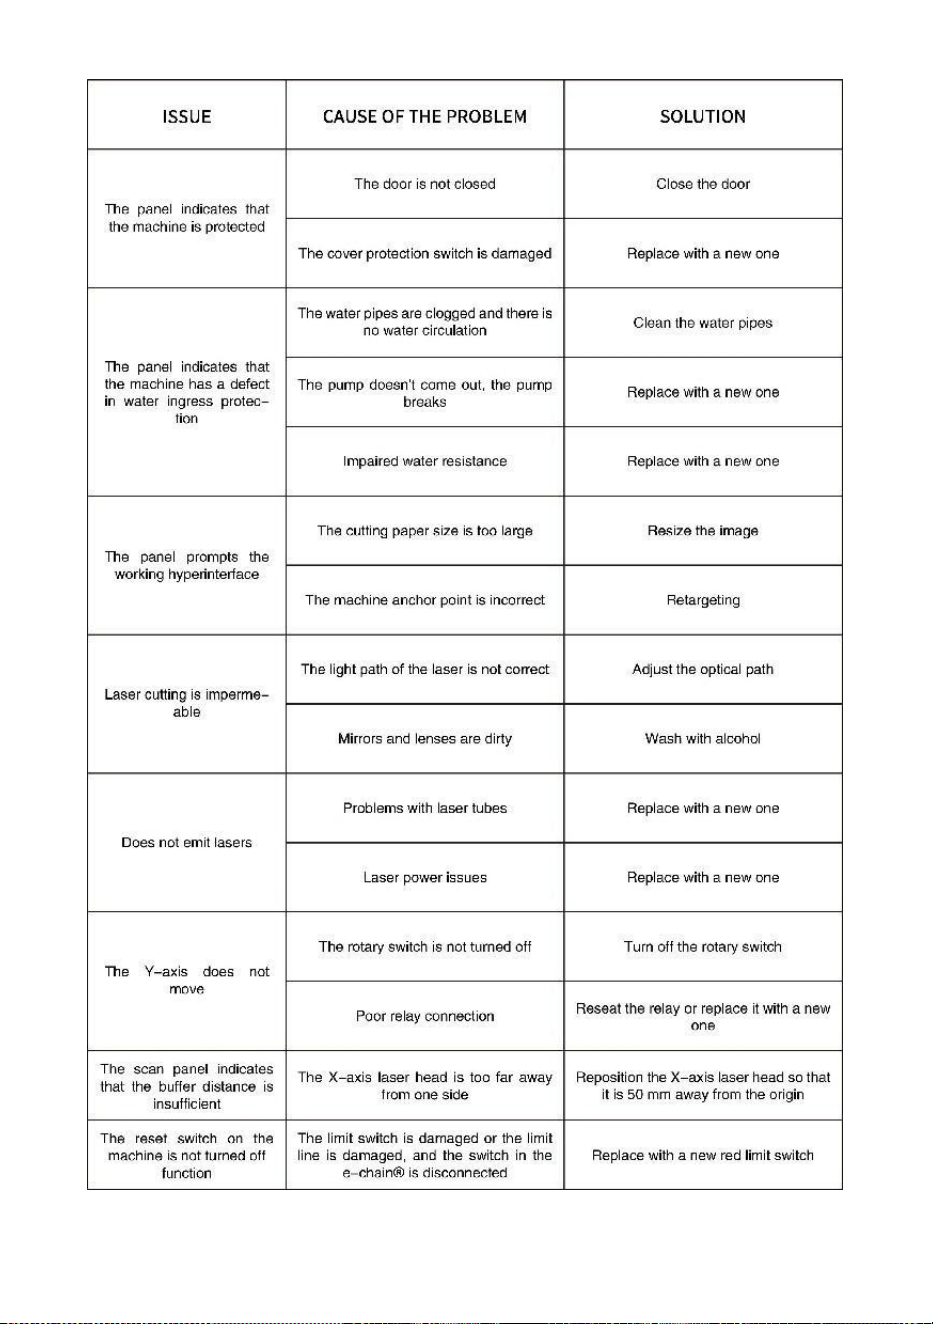
- 20 -

- 21 -
49. Instructies *1
50. werkbank *1
51. M3-schroeven *4
52. Dubbelzijdige tape *1
53. Datakabel *1
54. flashstation *1
55. Stroomkabel *1
56. waterpomp *1
Adres : Shuangchenglu 803nong11hao1602A-1609shi, baoshanqu, shanghai
200000 CN.
Geïmporteerd naar AUS: SIHAO PTY LTD, 1 ROKEVA
STREETEASTWOOD NSW 2122 Australië
Geïmporteerd naar de VS: Sanven Technology Ltd., Suite 250, 9166
Anaheim Place, Rancho Cucamonga, CA 91730
REP
EC
E-CrossStu GmbH
Mainzer Landstr.69, 60329 Frankfurt am Main.
REP
UK
YH CONSULTING LIMITED.
C/O YH Consulting Limited Office 147, Centurion House,
London Road, Staines-upon-Thames, Surrey, TW18 4AX


- 2 -
Teknisk Support och e-garanticertifikat www.vevor.com/support
MASKIN FÖR LASERGRAVER
BRUKSANVISNING
MODELL: KH3020/KH-3020
We continue to be committed to provide you tools with competitive price.
"Save Half", "Half Price" or any other similar expressions used by us only represents an
estimate of savings you might benefit from buying certain tools with us compared to the major
top brands and does not necessarily mean to cover all categories of tools offered by us. You
are kindly reminded to verify carefully when you are placing an order with us if you are
actually saving half in comparison with the top major brands.
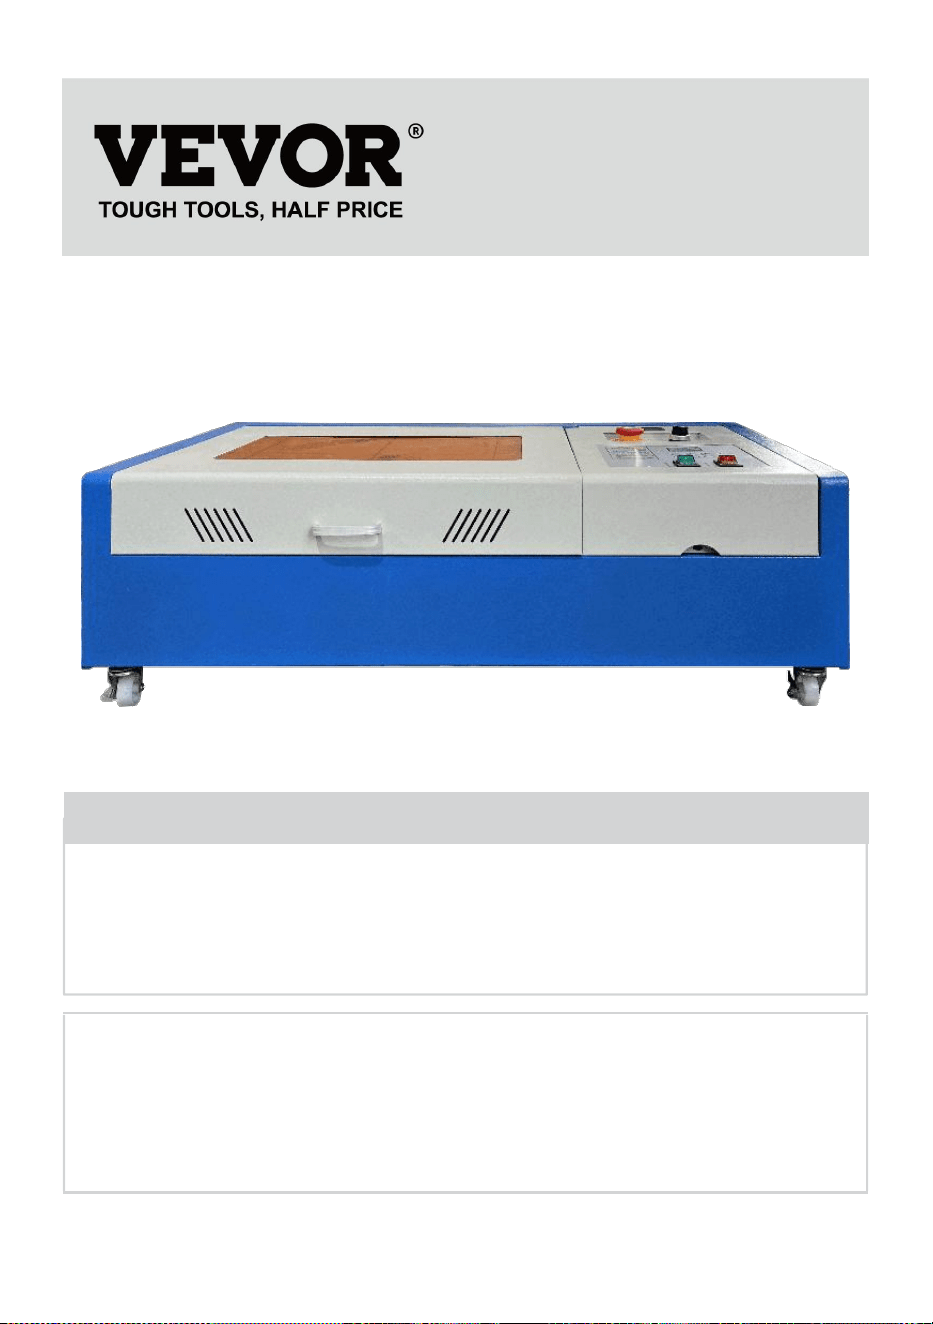
- 1 -
MODELL: KH3020/KH-3020
Have product questions? Need technical support? Please feel free to
contact us:
Technical Support and E-Warranty Certificate
www.vevor.com/support
NEED HELP? CONTACT US!
This is the original instruction, please read all manual instructions
carefully before operating. VEVOR reserves a clear interpretation of our
user manual. The appearance of the product shall be subject to the
product you received. Please forgive us that we won't inform you again if
there are any technology or software updates on our product.
LASER ENGRAVING MACHINE
- 2 -
Varning - För att minska risken för skada måste användaren
läsa instruktionerna noggrant.
Denna enhet uppfyller del 15 av FCC-reglerna. Driften är
föremål för följande två villkor: (1) Den här enheten får inte
orsaka skadliga störningar och (2) den här enheten måste
acceptera alla mottagna störningar, inklusive störningar som
kan orsaka oönskad funktion.
Denna produkt omfattas av bestämmelserna i det europeiska
direktivet 2012/19/EC. Symbolen som visar en soptunna
korsad anger att produkten kräver separat sophämtning i EU.
Detta gäller för produkten och alla tillbehör märkta med denna
symbol. Produkter märkta som sådana får inte slängas
tillsammans med vanligt hushållsavfall, utan måste lämnas till
en insamlingsplats för återvinning av elektriska och
elektroniska apparater
IMPORTANT NOTES
Innan du använder utrustningen måste användaren noggrant läsa
igenom
bruksanvisning och följ den strikt. Denna manual är tillämplig på flera
modeller av produkter.
Denna utrustning använder internationell standard fyra typer av lasrar
(starka
laserstrålning). Laserstrålning kan orsaka följande händelser:
1.antänd omgivande brännbart material.
2. Under laserbehandlingen, på grund av olika bearbetade föremål,
andra
strålning och andra gifter kan genereras Skadlig gas.
3. Direkt laserstrålning kan orsaka personskada. Därför ska utrustningen
vara utrustad med brandsläckningsutrustning. Det är strängt förbjudet
att stapla brandfarliga och explosiva material på arbetsbänken och

- 3 -
runt utrustningen. Se samtidigt till god ventilation. Icke-professionella
operatörer får inte närma sig utrustningen.
Laserbearbetningsobjekt och emissioner bör följa lokala lagar
och föreskrifter.
Laserbehandling kan ha höga risker, så du bör noga överväga
om föremålet är lämpligt för laserbearbetning.
Den interna laserutrustningen har hög spänning och andra faror, förutom
för utrustningsoperatörer är det strängt förbjudet att demontera.
När utrustningen slås på måste någon bevakas,
obehörig lämnande är förbjudet och all ström måste brytas innan
personal lämnar.
Det är förbjudet att öppna någon dörr när utrustningen fungerar.
Innan driftstart måste denna utrustning och annan utrustning vara
säkert och effektivt jordat.
Placera inte någon irrelevant totalreflektion eller diffus reflektion ob
föremål i utrustningen för att förhindra att lasern reflekteras på
människokroppen eller brännbara föremål.
Under driften av utrustningen måste operatören alltid
observera utrustningens funktion. Om en onormal situation uppstår,
vänligen omedelbart.
Utrustningen ska vara torr, föroreningsfri, vibrationsfri och stark
elektromagnetisk interferensmiljö, med en arbetstemperatur på 5-40
grader Celsius och en luftfuktighet på 5-95% (icke-kondenserande
vattenmiljö).
Utrustningen ska alltid vara långt borta från elektrisk utrustning
känslig för elektromagnetiska störningar, annars kan det orsaka
elektromagnetiska störningar.
Enhetens arbetsspänning är: European AC220V eller North
American AC120V (bekräfta enhetens arbetsspänning före användning).
Den viktigaste koldioxidglaslasern i utrustningen är en
förbrukningsmaterial och ett sårbart föremål. Var vänlig ta hand om den
under användning. Koldioxidglaslasern behöver rent kallt vatten för att
svalna. Var uppmärksam på att vattentemperaturen inte överstiger 30
grader Celsius under användning, annars kommer lasern att skadas.
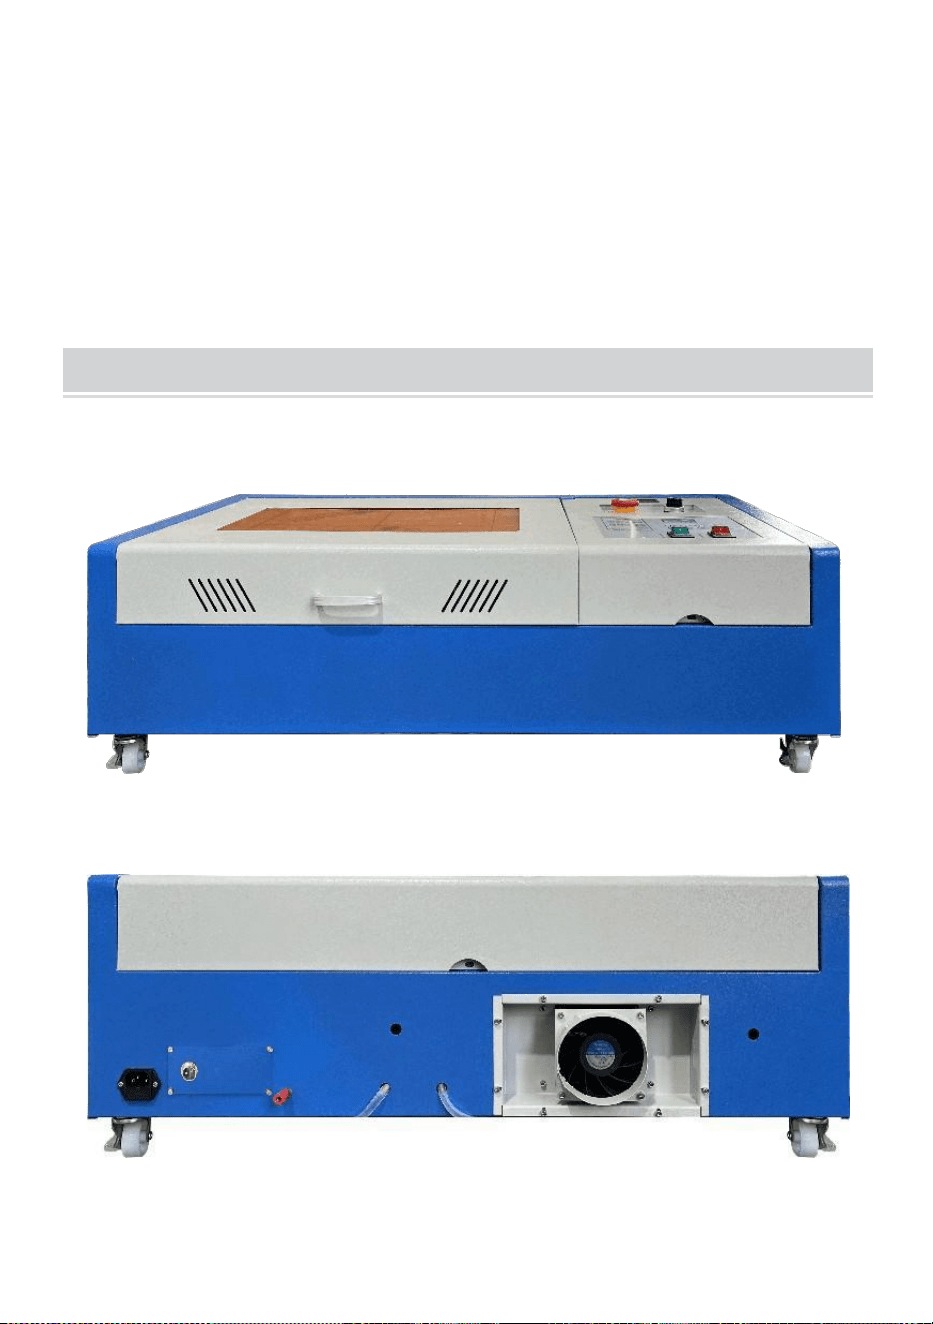
- 4 -
När omgivningstemperaturen är på väg att sjunka under 0 grader
Celsius, vänligen ersätt den med en frostskyddsvätska för att undvika
skador på koldioxidglaslasern.
Det är förbjudet att slå på utrustningen när nätspänningen är instabil
eller inte matchade. Tillverkaren och säljaren ansvarar inte för eventuella
förluster som orsakas av felaktig användning eller bristande efterlevnad
av ovanstående regler.
USE THE PROCEDURE TO DO SO
1. Öppna förpackningen för att bekräfta att produktens utseende är intakt.
Följande är en referensbild (Figur 1).
Främre
tillbaka
Bild 1
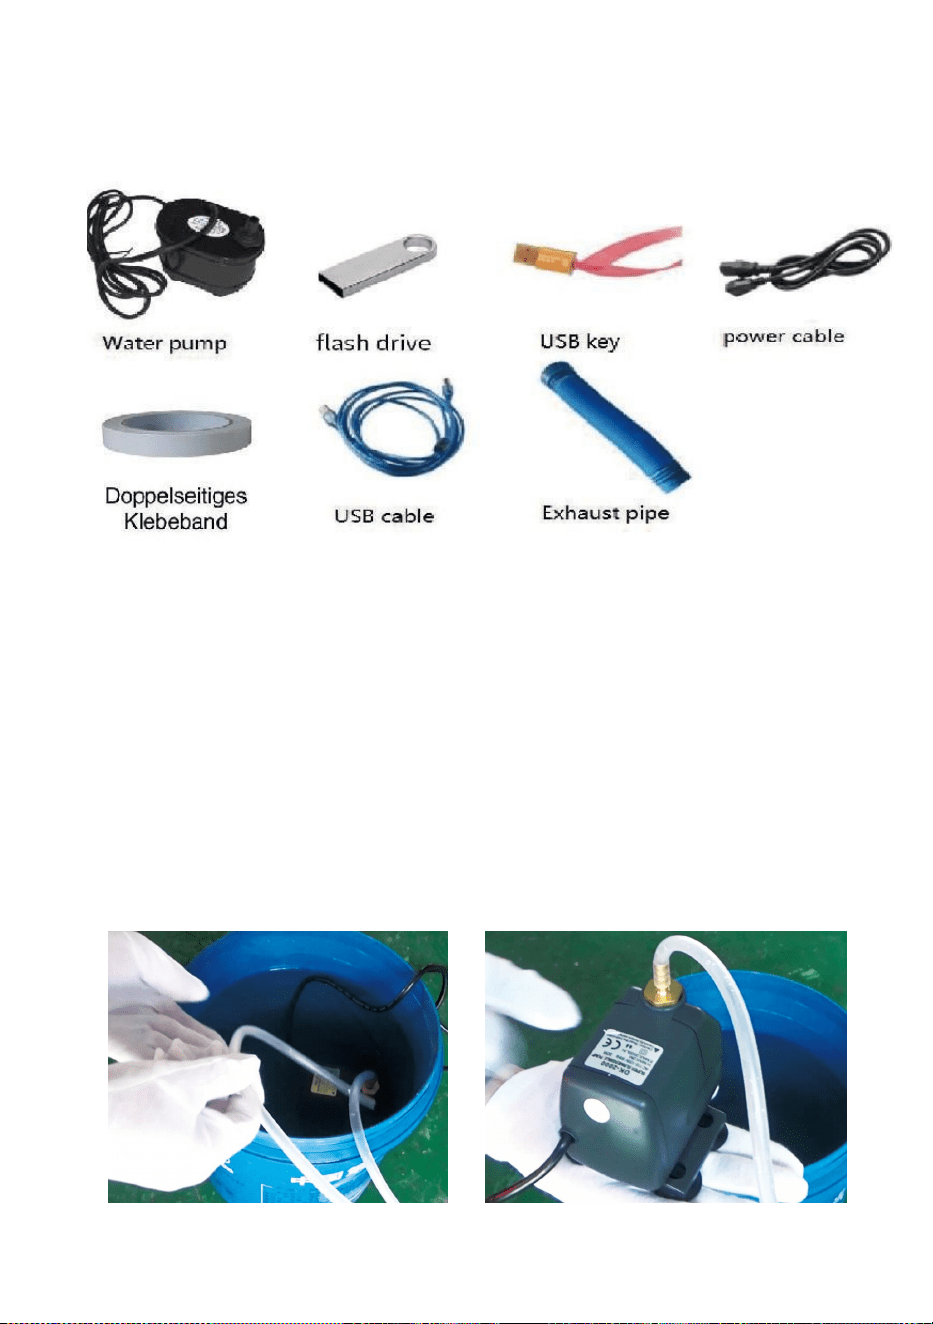
- 5 -
2. Ta ut de stödjande enheterna och verktygen från förpackningen eller
inuti utrustningen (Figur 2)
Figur 2
3. Anslut den stödjande utrustningen och verktygen till laserutrustningen
och slå på den. (De detaljerade stegen kanske inte visas i manualen, du
kan också hänvisa till videon på CD/USB-skivan).
Anslut vattencirkulationspumpen till vatteninloppsröret
laserutrustning, sätt vattencirkulationspumpen i en hink fylld med rent
vatten och sätt utrustningens utloppsrör direkt i hinken.
( Figur 3)
Figur 3
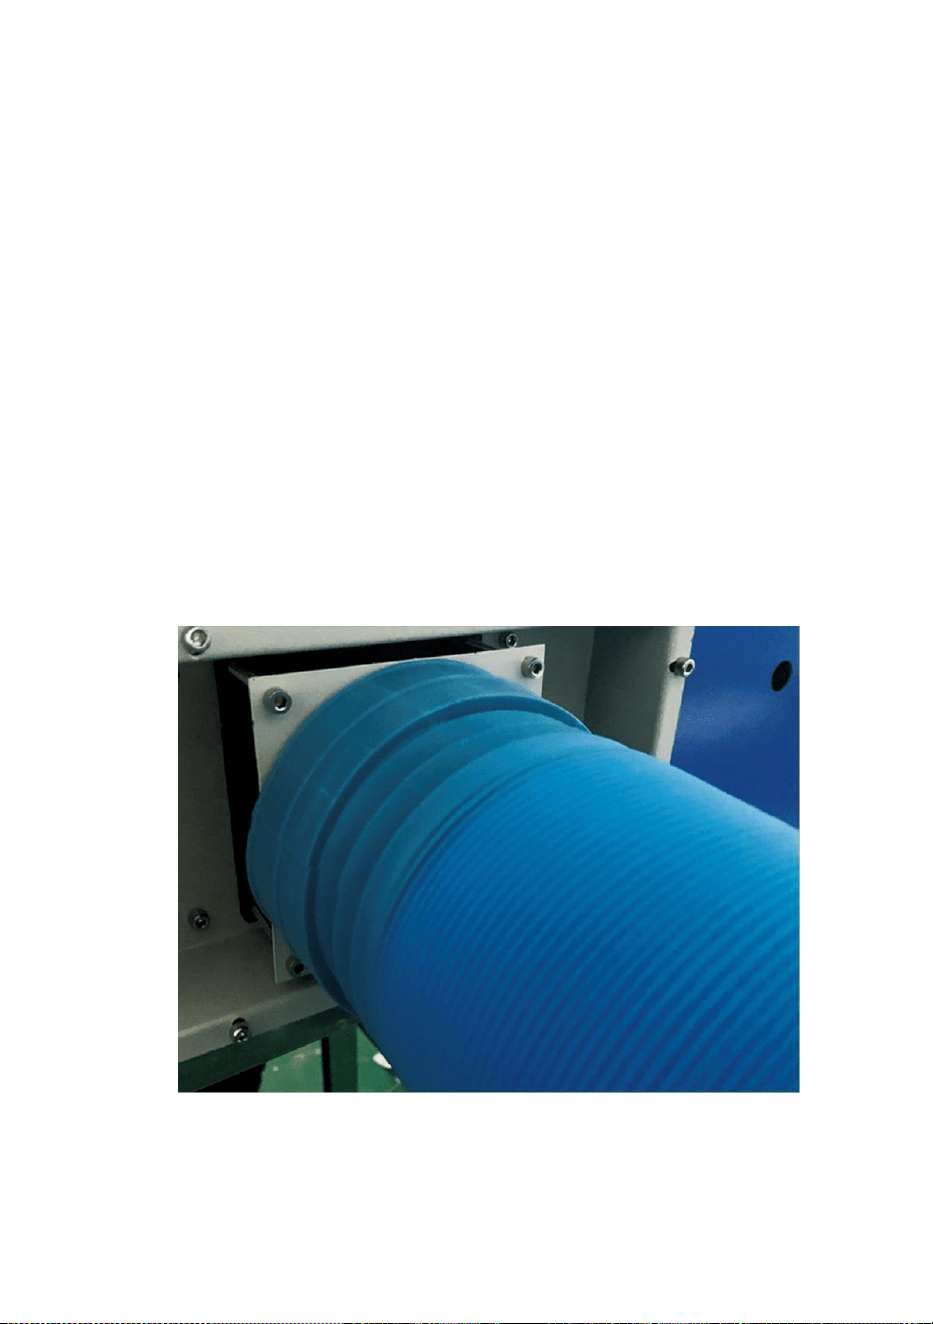
- 6 -
Obs: Vänligen tillsätt renat eller destillerat vatten till hinken, och
det är strängt förbjudet att tillsätta kranvatten eller
avloppsvatten. Och vattennivån bör vara högre än den
cirkulerande vattenpumpen. Se figur 3.
Obs: Om kranvatten eller avlopp tillsätts kommer det att blockera
värmeavledningscirkulationssystemet, vilket resulterar i
allvarlig dämpning eller skada på laserrörets kraft, vilket
förkortar produktens livslängd.
11. Ta ut avgasröret. Ena änden av avgasröret är
ansluten till utrustningens avgasport, och ena änden är ansluten till
utomhus- eller extra rökutblåsningsanordning. Obs: Använd verktyg
för att fixera anslutningen för att förhindra att den faller av.( Se figur
4).
Figur 4

- 7 -
5. Ta ut nätsladden för att slå på produkten och kontrollera att produkten
fungerar normalt utan några fel.( Se bild 5)
Figur 5
6. Förbered datorn (Windows-system) och installera programvaran genom
att se 11 Software Installation Video11 på CD/USB-skivan. Efter att
programvaran har installerats, ta ut USB-kabeln, anslut ena änden till
datorns USB-port och den andra änden till enhetens USB-ingång. Obs:
Ta ut mjukvarunyckeln och anslut den till datorns USB-port, annars kan
programvaran inte användas.( Se figur 6)
Bild 6
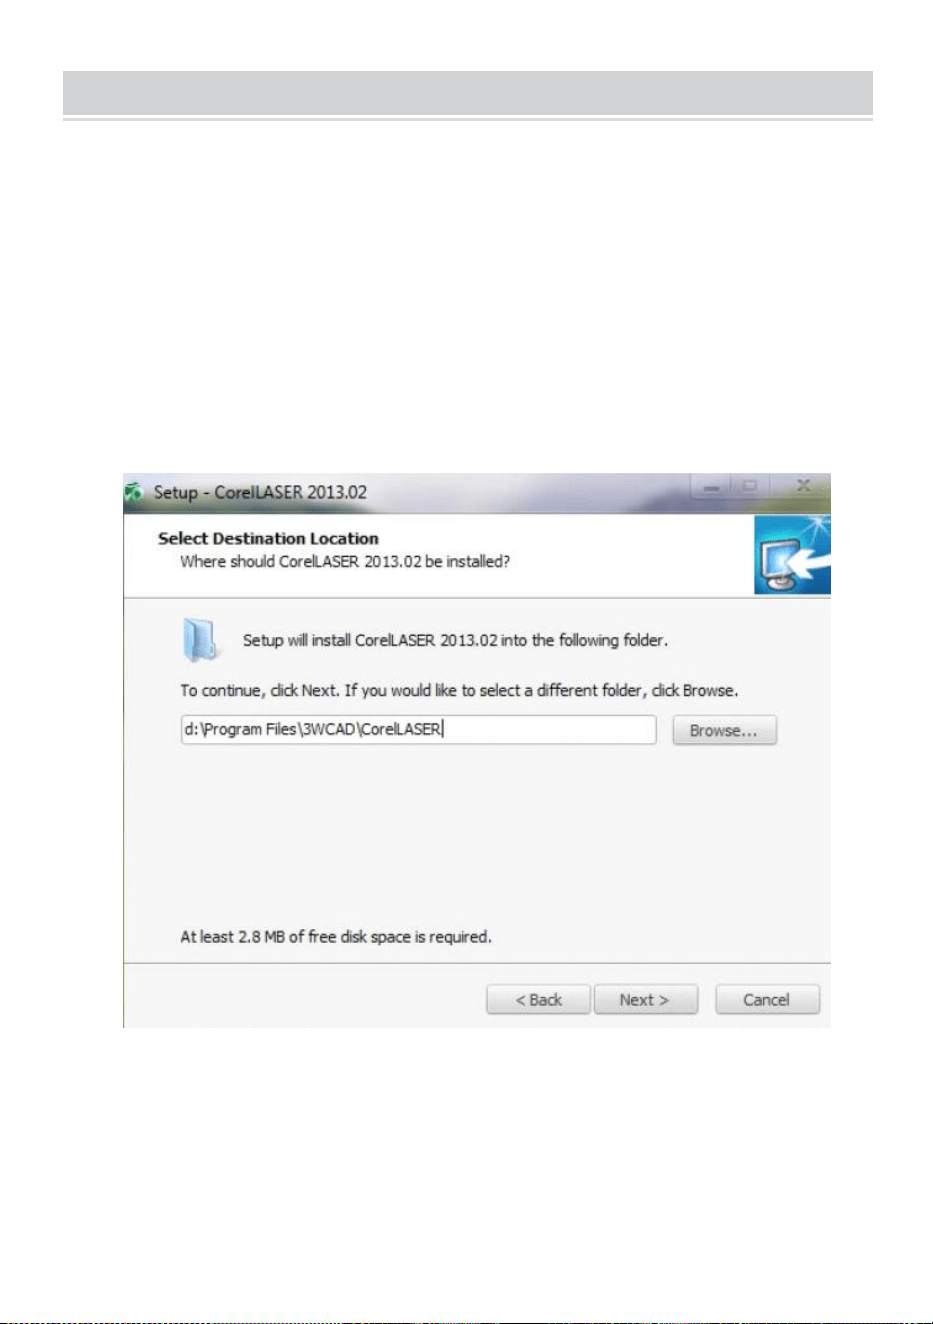
- 8 -
SOFTWARE INSTALLATION
Obs: installera Coreldraw innan du installerar vår programvara,
Coreldraw 12,X3.X4,X5 stöds; Win XP, Win 7, Win 8 stöds.
22.Dubbelklicka på CorelLASER.exe under installationskatalogen,
Välj ett språk i dialogrutan som dyker upp, Välj engelska
språk Klicka på Nästa, följande dialogruta visas: ( Se bild 7)
Bild 7
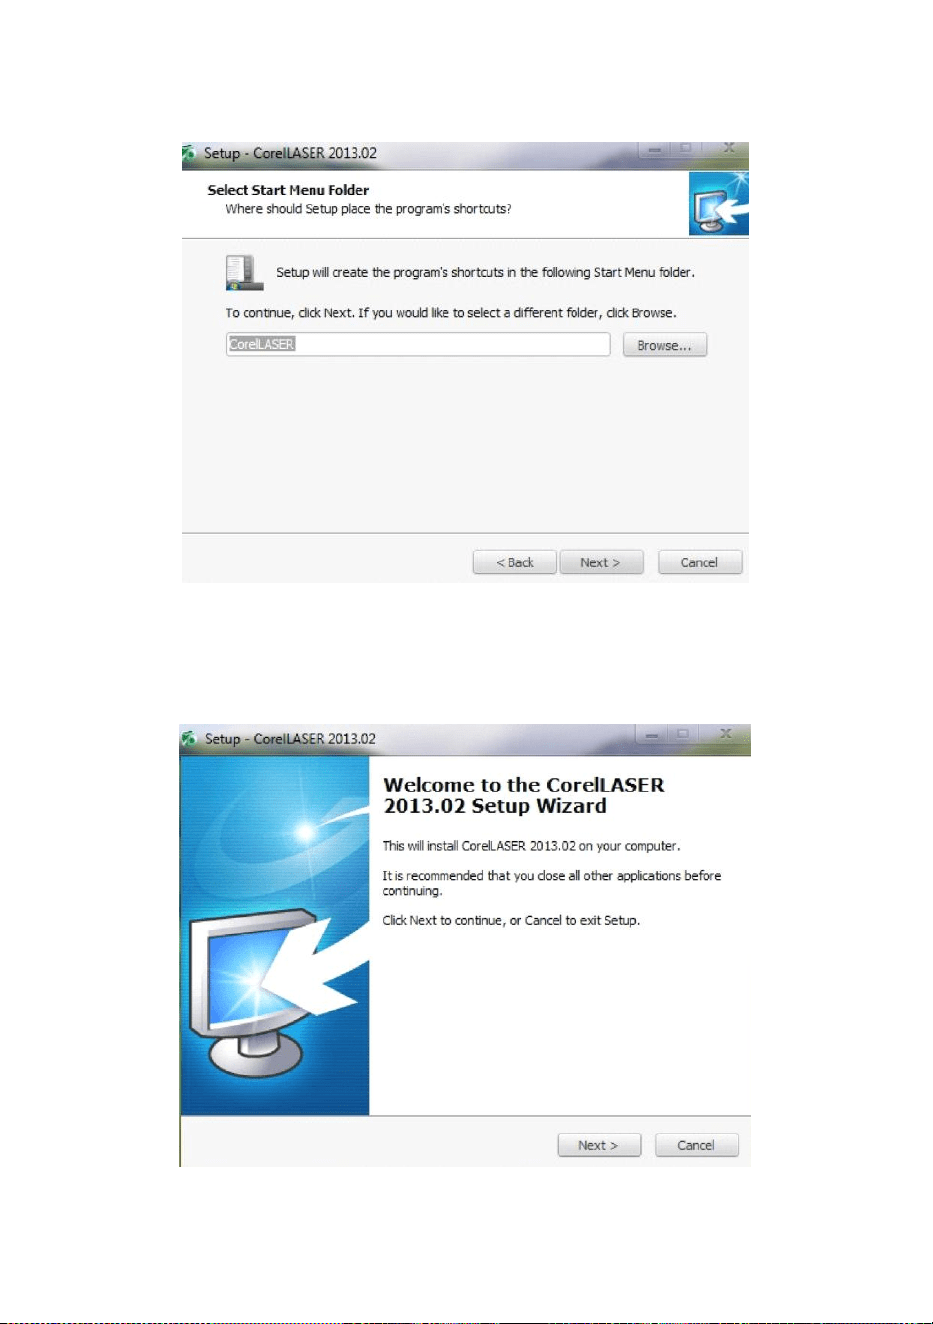
- 9 -
Välj installationssökväg, vi föreslår d:\Program
Filer\3WCAD\CorelLASER ,Klicka sedan på Nästa : ( Se bild 8)
Bild 8
Klicka på Nästa: ( Se bild 9)
Figur 9
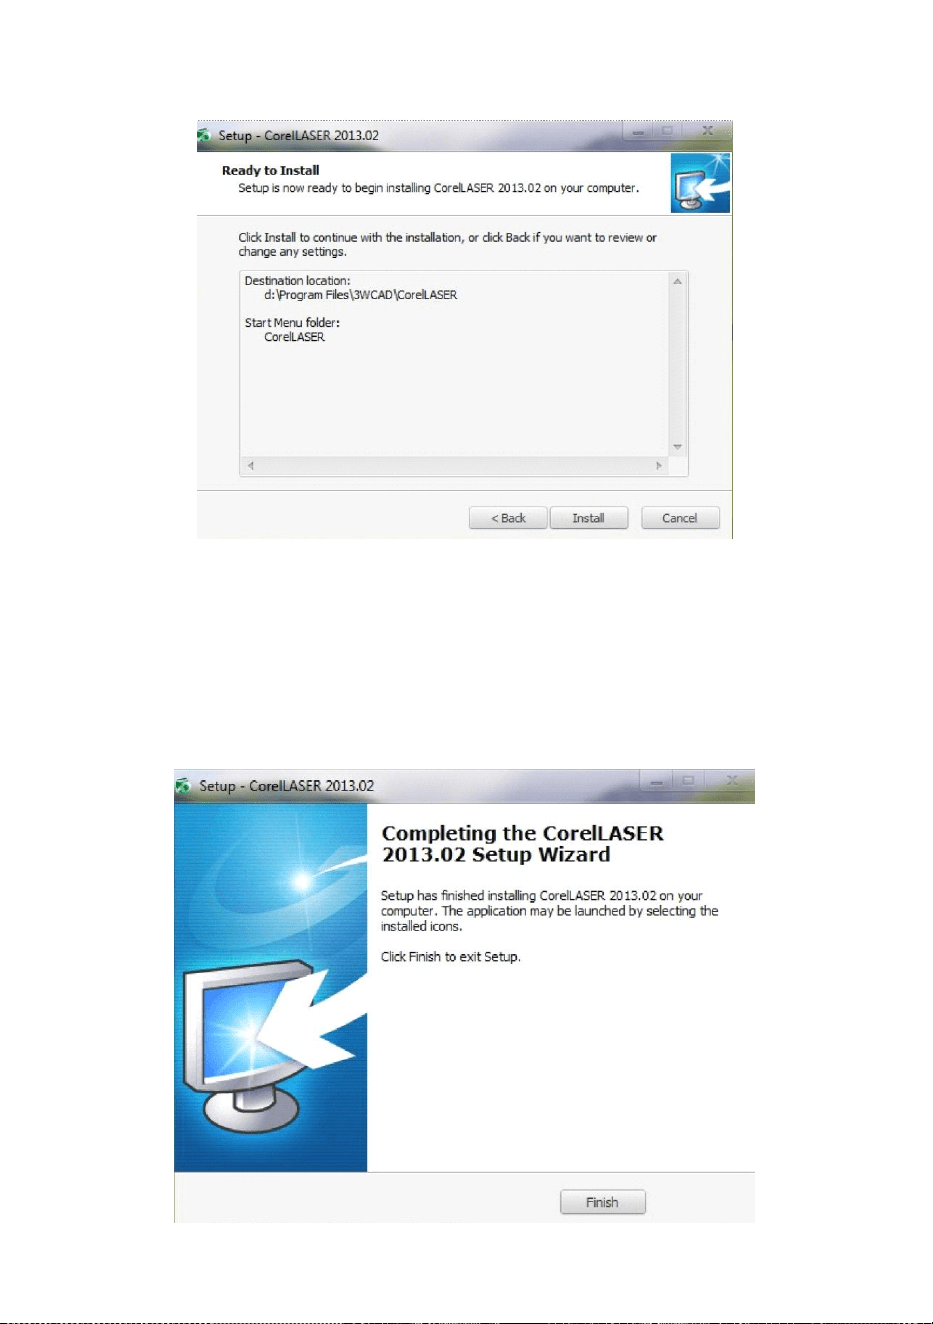
- 10 -
Klicka på Nästa: ( Se bild 10)
Bild 10
Klicka på【Installera】,när extrahera kopia ska slutföras kommer
installationen
vara färdig. ( Se bild 10)
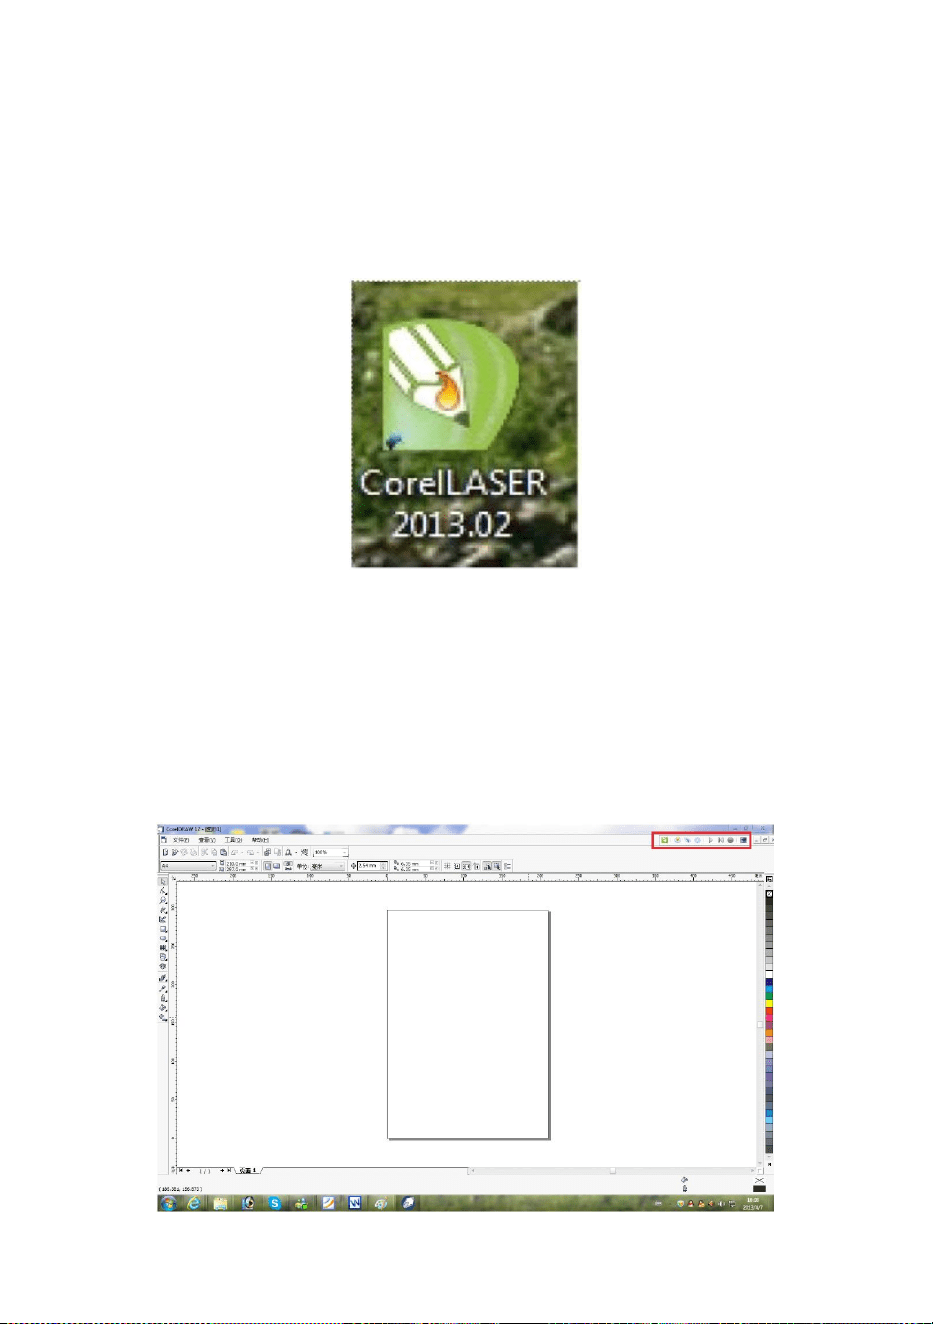
- 11 -
Bild 11
Klicka på Slutför och sedan installerades programvaran. ( Se bild 11)
23.Gravyrmaskinens egenskaper.
Efter installationen kommer det att finnas en ikon på skrivbordet ,as
visande. ( Se bild 12)
Bild 12
Dubbelklicka på den här ikonen för att öppna programvaran, den öppnar
Coreldraw,
då kan du se vår programvarans verktygsfält i Coreldraw, som visar . (Se
bild 13)
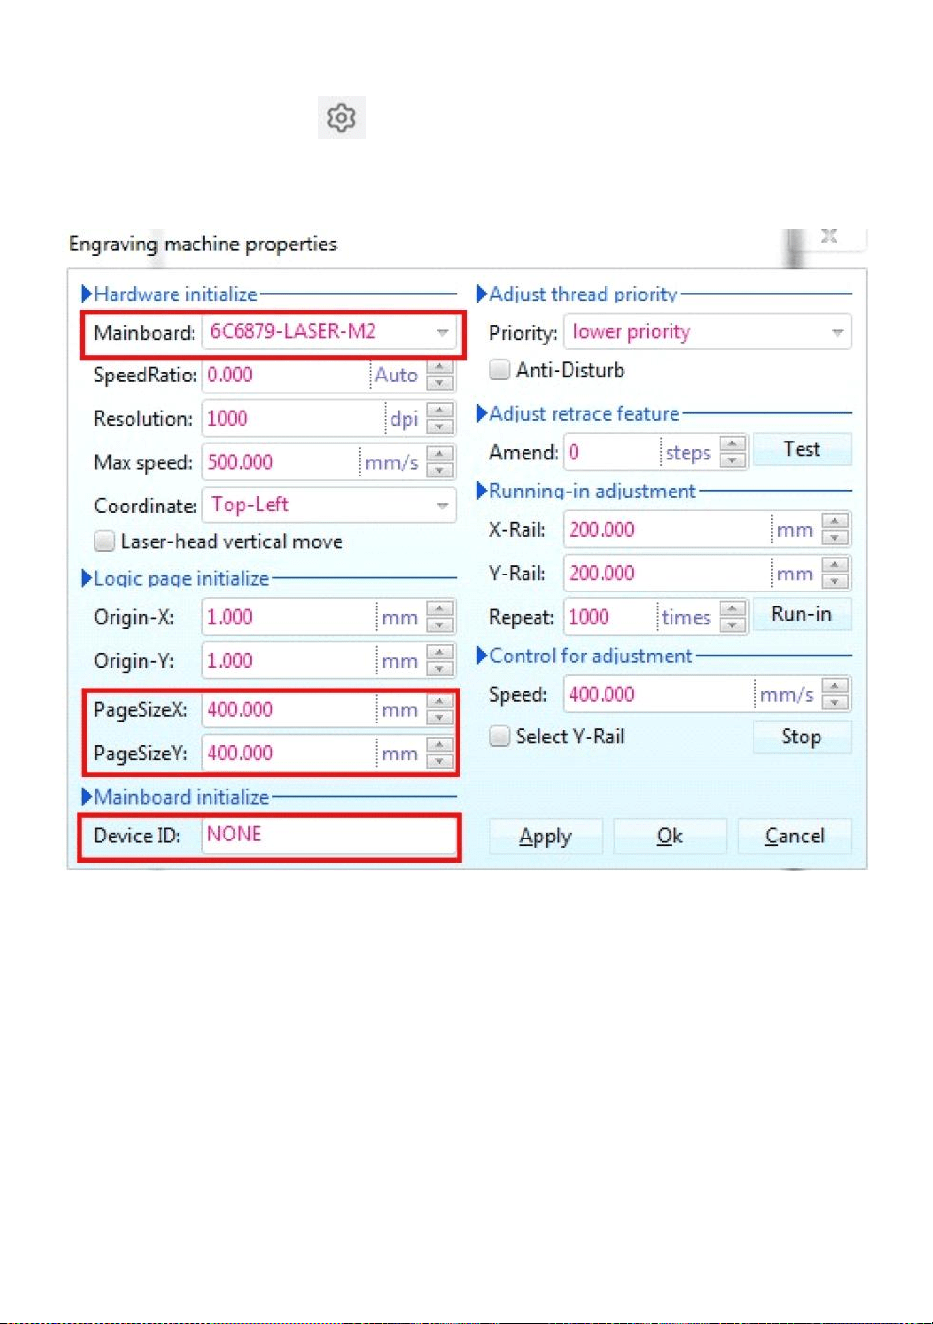
- 12 -
Bild 13
Klicka sedan på den här knappen Ställ in gravyrmaskinens egenskaper
som
visas i figur 14 .
Bild 14
Här måste vi ställa in samma inställningar för moderkortet som på bilden
ovan, ställa in sidstorlek Beroende på storleken på din maskins
arbetsområde, fyll i de tomma fälten för de 6 enhets-ID:n på moderkortet,
klicka på Använd "Sidstorlek X :300mm/Sidstorlek Y:200mm” och klicka
sedan på OK.
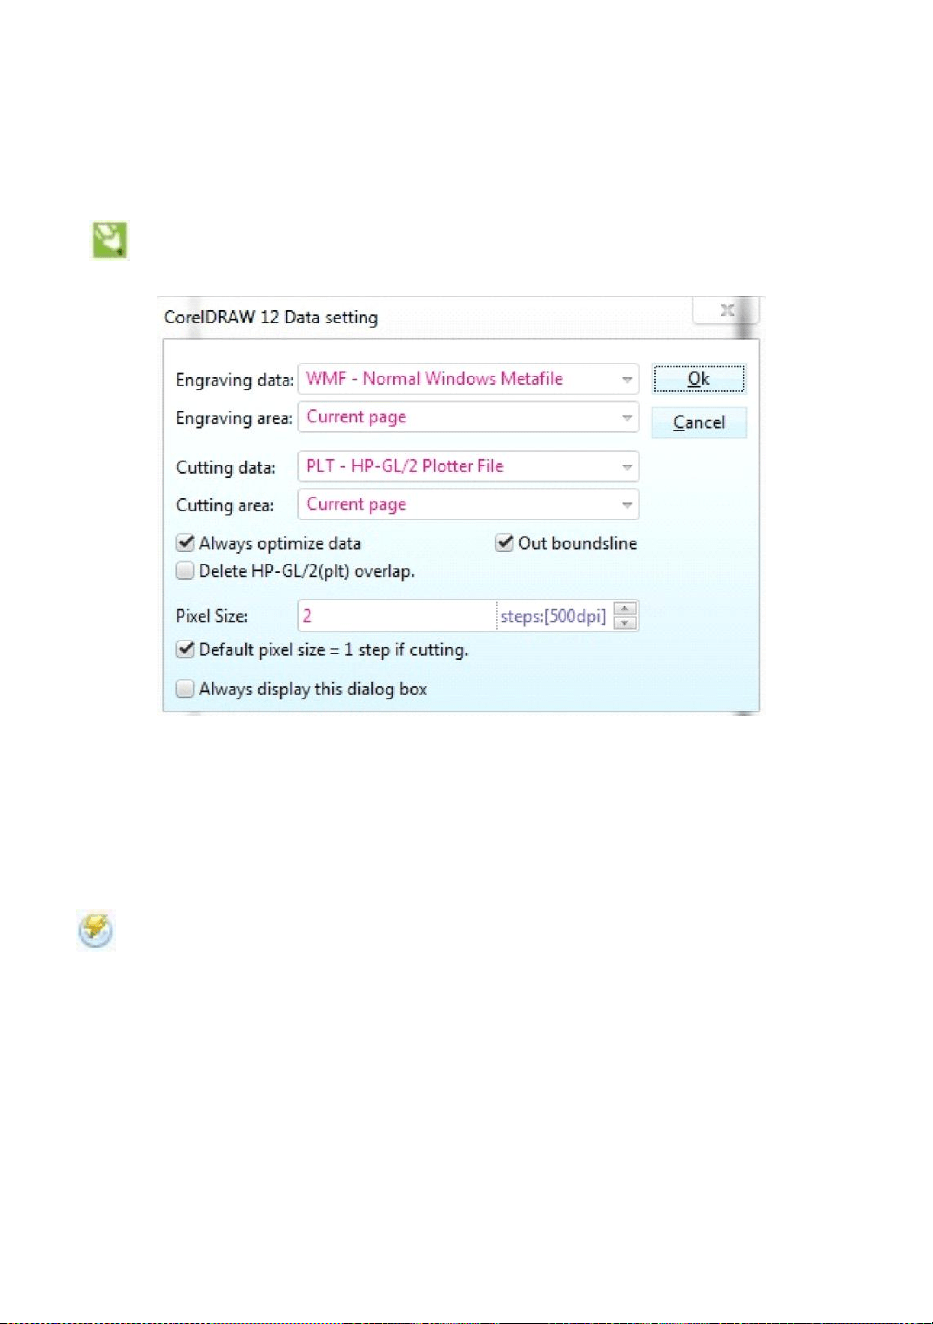
- 13 -
24.Programvaruinstruktion.
CorelDRAW-inställning.
är CorelDRAW-inställningsknappen, klicka på den här knappen,
popup-gränssnittet är som visas: (Se figur 15).
Bild 15
Vänligen ställ in inställningarna på datainställningsgränssnittet på
samma sätt som vi gjorde ovan.
Gravyr.
är Gravyr-knappen, klicka på den här knappen, popup-gränssnittet
kommer att se ut som visas (se figur 16).

- 14 -

- 15 -
Bild 16

- 16 -
Bild 16

- 17 -
Skärande
är skärningsknappen, klicka på den, popup-gränssnittet är som visas.( Se
bild 17)
Bild 17
TECHNICAL SPECIFICATIONS
Modell
KH-3020
KH3020
Ingångsspänning
Europa: 230V 50Hz
Nordamerika: 120V 60Hz
Total kraft
330W
Laserkraft
40W
Arbetsområde
300mm*200mm
temperatur
5-50 ℃
fuktighet
5%-95% icke-kondensat
Laser typ
CO2-glaslasrar
Laser modell
KH-LT40
Lämplig för materia
Sten, trä, keramik, metall, tyg, papper, etc
Arbetsbänk stil
Mobilplattform
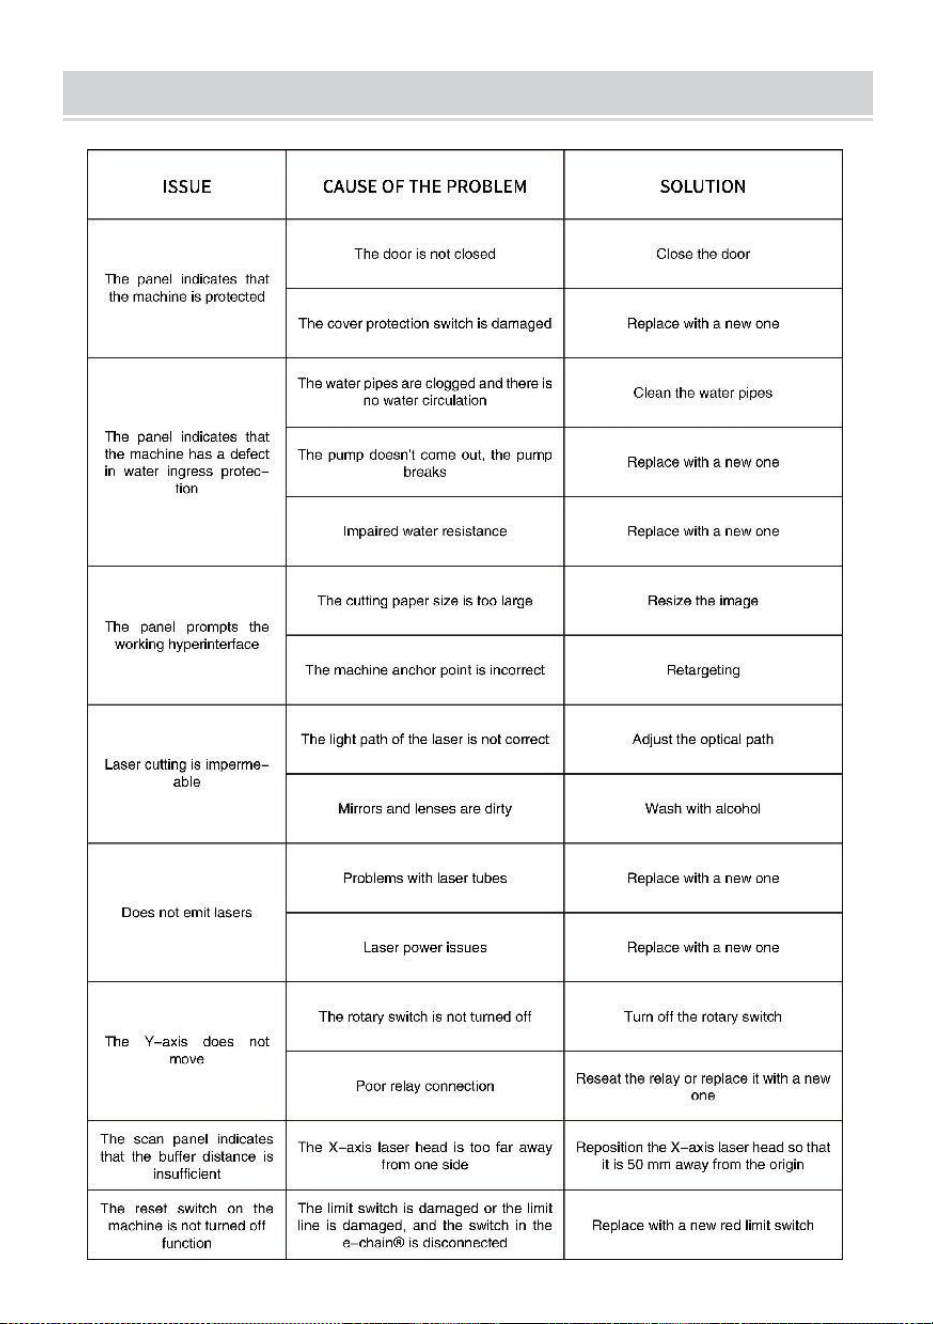
- 18 -
TROUBLESHOOTING

- 19 -
57. Instruktioner *1
58. arbetsbänk *1
59. M3 skruvar *4
60. Dubbelhäftande tejp *1
61. Datakabel *1
62. flash-enhet *1
63. Nätsladd *1
64. vattenpump *1
Adress : Shuangchenglu 803nong11hao1602A-1609shi, baoshanqu,
shanghai 200000 CN.
Importerad till AUS: SIHAO PTY LTD, 1 ROKEVA STREETEASTWOOD
NSW 2122 Australien
Importerad till USA: Sanven Technology Ltd., Suite 250, 9166 Anaheim
Place, Rancho Cucamonga, CA 91730
REP
EC
E-CrossStu GmbH
Mainzer Landstr.69, 60329 Frankfurt am Main.
REP
UK
YH CONSULTING LIMITED.
C/O YH Consulting Limited Office 147, Centurion House,
London Road, Staines-upon-Thames, Surrey, TW18 4AX