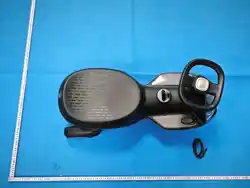
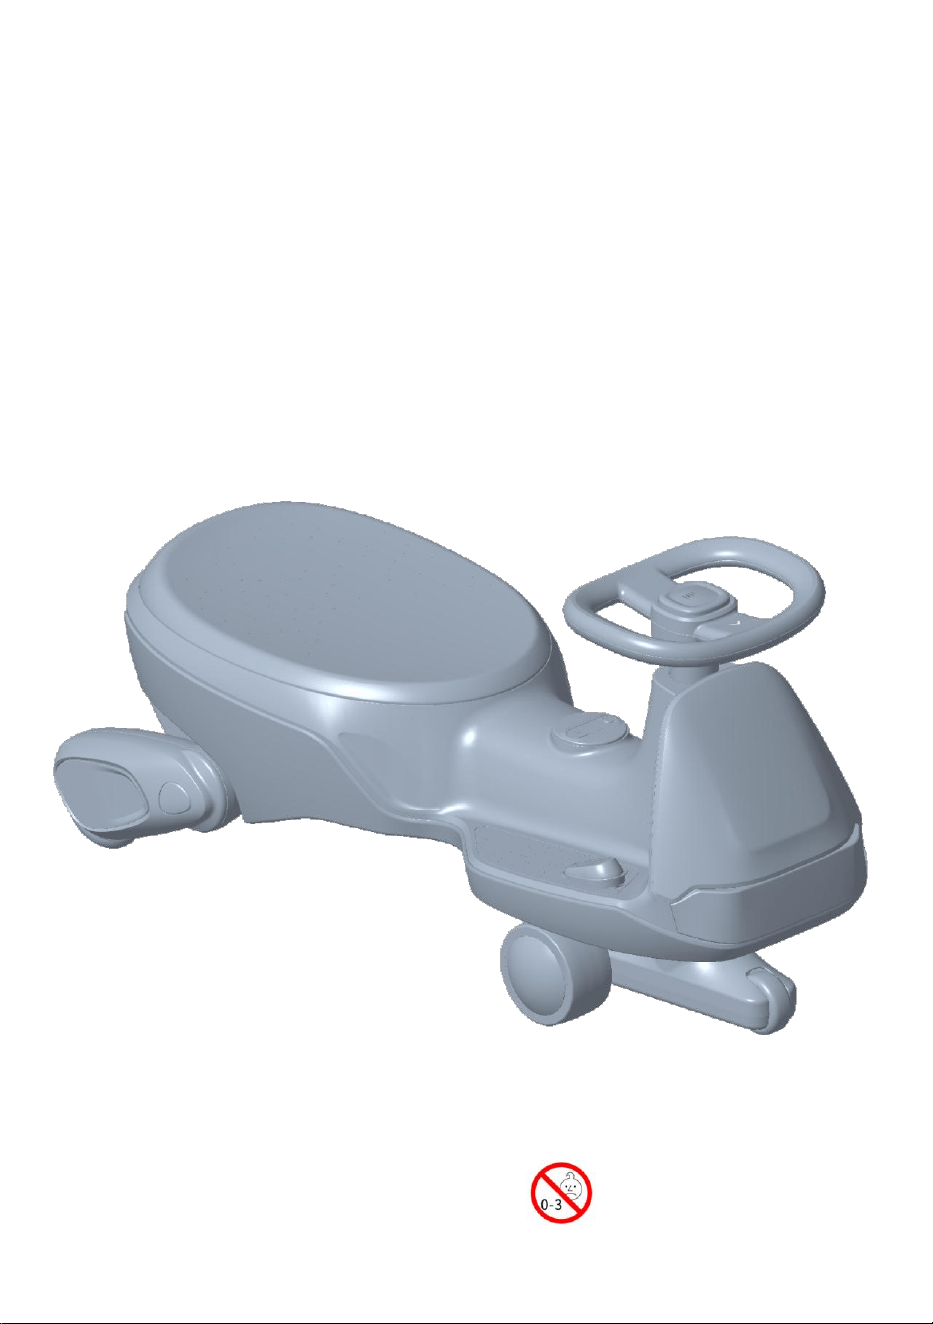
FanttikRide
PixDrive
TM
N10 Ultra+
Electric Wiggle Car
Read this manual carefully before use and keep it for future reference.
WARNING: CHOKING
HAZARD-Small parts. Not
for children under 3 years.
ASTM F963,CPSIA

Catalogue
Safety Notice.........................................................................1
Product Information...........................................................5
Parts List................................................................................6
Parts Diagram.......................................................................7
Assembly Step.....................................................................8
Instructions For Use......................................................... 10
App User Guide....................................................................11
Fault Analysis......................................................................21

1
Safety Notice
WARNING!
-CAUTION--ELECTRIC TOY
As with all electric products, precautions should be observed during handling and use to
prevent electric shock.
-Adult assembly required. Keep small parts away from children during assembly.
-This product is intended for children aged 3 years and older only.
-Adult supervision is required at all times during use.
-Never allow more than one rider at a time.
-Maximum user weight: 150 lb / 68 kg.
-Always wear shoes when using this product.
-Protective equipment such as a helmet, knee pads, and elbow pads is recommended.
-This toy should be used with care. Skill is required to avoid falls, collisions, or injury to the
rider or others.
-This product does not have a brake.
Safe Riding Area
-Use this product on flat, stable, dry surfaces with enough open space. An adult must
choose a safe riding area and supervise the child at all times.
-Do not ride downhill or use on slopes, ramps, uneven ground, loose gravel, sand, wet
surfaces, grass, or soft ground. Since this product has no brake, these areas may make
the vehicle hard to stop, tip over, or collide with people or objects.
-Do not use in any area with traffic or moving vehicles. Driveways, parking areas, or other
open paved areas may be used only when an adult confirms they are flat, dry, free of
traffic, and safe for riding.
-Keep away from stairs, steps, swimming pools, ponds, and other bodies of water. PU
wheels may mark or scratch some floors, especially hardwood floors. This product may
not be suitable for carpet.
Before First Use
-Fully charge the vehicle before first use. Charging must be performed by an adult only.
-Make sure the vehicle is turned off before charging.
-Before allowing a child to ride, check that all parts are correctly assembled and securely
fastened.
-Use the vehicle in low-speed mode for the first ride until the child becomes familiar with
starting, steering, slowing down, and stopping.

2
Safety Notice
Before Each Use
-Check that all parts are correctly assembled and securely fastened before each use.
-Inspect all screws, nuts, bolts, wheels, and other fasteners. Tighten them if necessary.
-Parents should periodically examine this toy for potential hazards, including damaged
parts, worn wheels, exposed wiring, or damaged charging components.
-Do not use the product if any part is damaged, loose, cracked, missing, or if any electrical
or charging component is damaged.
-Any potentially hazardous parts must be repaired or replaced before further use.
-Keep hands, feet, hair, clothing, and loose items away from the wheels and moving parts.
During Use
-Children must remain seated properly while riding.
-Do not allow the child to stand on the vehicle while it is moving.
-Stop using the product immediately if it slows down abnormally, does not operate
properly, or shows signs of damage.
Battery and Charging Safety
-All charging and recharging must be carried out by an adult only.
-Switch the vehicle off before charging.
-Do not use the product while it is charging.
Charge the product in a dry, well-ventilated area, away from heat, sparks, open flames,
and flammable materials.
-Use only the supplied USB Type-C charging cable and a suitable USB power adapter that
meets applicable safety requirements.
-Do not use a damaged charging cable, USB adapter, battery, or connector.
-The battery and charging cable may become warm during charging. This is normal. Do not
cover them during charging.
-Disconnect the charging cable after charging is complete.
-Recharge the battery promptly after it is discharged.
-If the product will not be used for a long period, recharge the battery at least once every
month to help maintain battery performance.
-Never short-circuit the battery terminals or electrical connections.
-Keep children away from the battery and charging components.
-For best charging performance, a 5V DC USB power adapter with an output current of 2A
or higher is recommended.

3
Safety Notice
How to Stop the Vehicle
-This product does not have a brake.
-Pressing the foot pedal will power the vehicle.
-Releasing the foot pedal will stop motor power, but the vehicle will not stop immediately.
-The vehicle may continue to roll or move for a short distance after the foot pedal is
released.
-To slow down or stop, release the foot pedal in advance and allow the vehicle to come to
a gradual stop.
-An adult should assist the child when stopping, especially during first use.
Care and Maintenance
-Clean the vehicle with a soft, dry or slightly damp cloth.
-Do not wash the vehicle with water.
-Do not spray water directly onto the vehicle, control panel, charging port, battery
compartment, motor, or electrical parts.
-Keep the charging port dry and clean.
-Store the vehicle indoors in a cool, dry place when not in use.
-Do not leave the vehicle outdoors for long periods.
-Keep the vehicle away from direct sunlight, rain, snow, heat sources, and open flames.
Battery Service, Disposal and Recycling
-This product contains a rechargeable lithium-ion battery.
-Do not remove or replace the battery unless instructed by customer support.
-Battery service must be performed by an adult only.
-Use only the battery pack specified or supplied by the manufacturer.
-Do not use a damaged, leaking, swollen, overheated, deformed, or modified battery.
-Do not puncture, crush, disassemble, modify, or short-circuit the battery.
-Do not dispose of the battery or product in fire.
-Do not expose the battery to water, excessive heat, direct sunlight, or open flames.
-Dispose of used batteries according to local laws and regulations.
-Do not dispose of lithium batteries with household waste where prohibited.
-Contact your local recycling center or waste disposal authority for proper battery
recycling instructions.

4
Safety Notice
FCC Statement
This device complies with part 15 of the FCC Rules. Operation is subject to the following
two conditions: (1) This device may not cause harmful interference, and (2) this device
must accept any interference received, including interference that may cause undesired
operation.
NOTE: This equipment has been tested and found to comply with the limits for a Class B
digital device, pursuant to part 15 of the FCC Rules. These limits are designed to provide
reasonable protection against harmful interference in a residential installation. This
equipment generates, uses and can radiate radio frequency energy and, if not installed and
used in accordance with the instructions, may cause harmful interference to radio
communications. However, there is no guarantee that interference will not occur in a
particular installation. If this equipment does cause harmful interference to radio or
television reception, which can be determined by turning the equipment off and on, the
user is encouraged to try to correct the interference by one or more of the following
measures:
--Reorient or relocate the receiving antenna.
--Increase the separation between the equipment and receiver.
--Connect the equipment into an outlet on a circuit different from that to which the
receiver is connected.
--Consult the dealer or an experienced radio/TV technician for help.
MODIFICATION: Any changes or modifications not expressly approved by the grantee of
this device could void the user
'
s authority to operate the device.
This device has been evaluated to meet the general RF exposure requirements. This
device can be used in portable exposure conditions without restriction.
FCC ID: 2BMPX-N10ULTRA

5
Product Information
Model number
N10 Ultra+
Battery
Lithium battery 11.1v 2500mAh
Material
PP、ABS、PU
Suitable age
More than 36 months
Load capacity
Max 150 lbs
Size of car
76 X 34 X 41.5 cm
Speed
1.7~4 mph
Battery life
60~120 minutes
(The battery life will vary due to changes in weight and
environment, please refer to the actual situation)
Charging time
3~4 hours
(The product comes with a USB charging cable, please bring your
own qualified adapter)
Charging mode
USB charging cable
Charging Input: 5V DC, 2A min / 3A max
[Please bring your own USB adapter that meets safety standards]
6
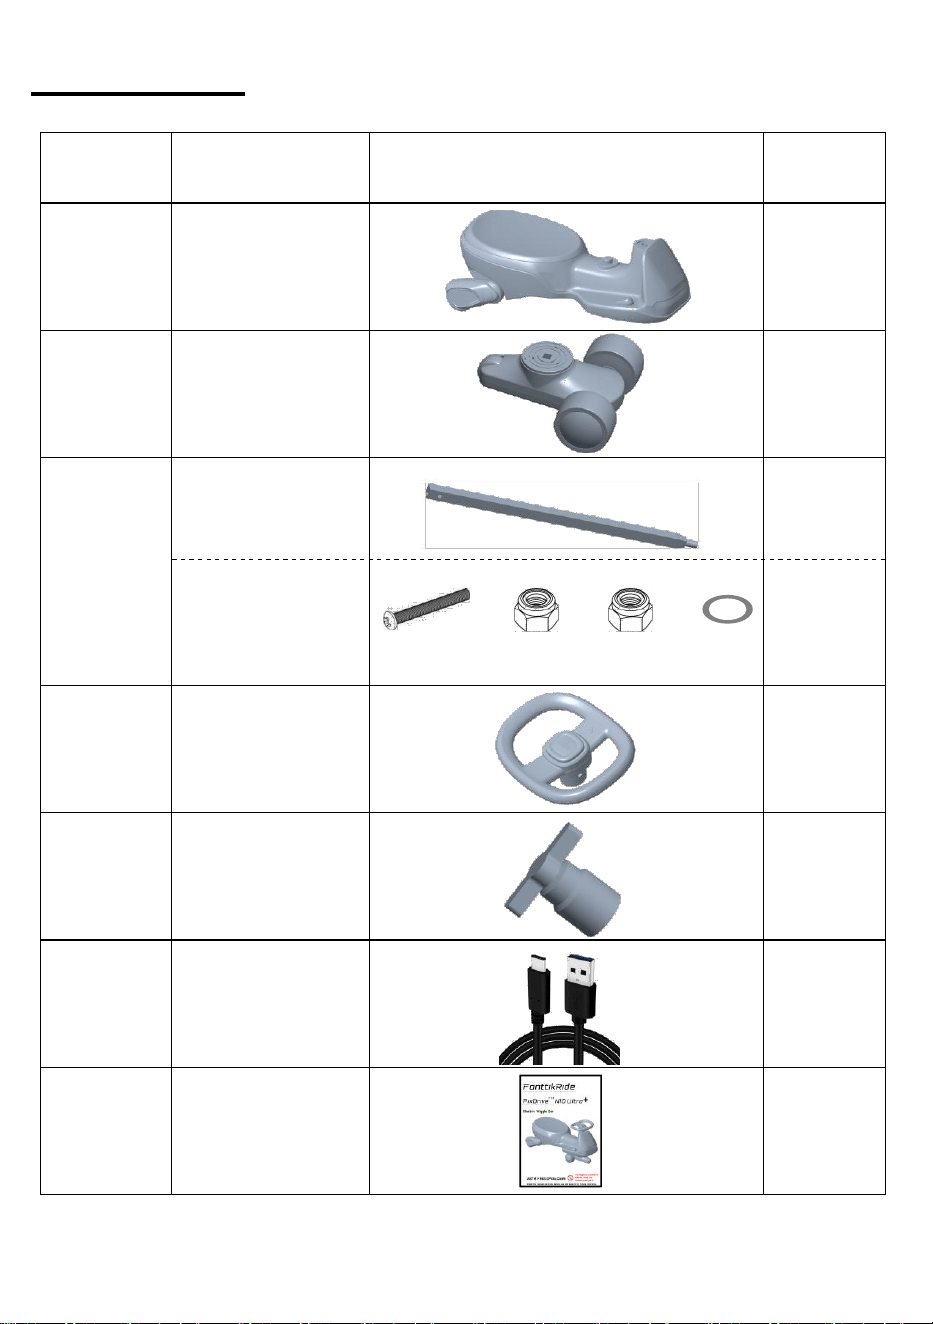
Parts List
Sequence
Part name
Picture
Quantity
1
Vehicle body
1
2
Drive device
1
3
Square tube
1
Bolt-Nut-Washer
(Installed on
the square pipe)
4
4
Steering wheel
1
5
Nut locking tool
1
6
USB charging
cable
1
7
Instruction
manual
1
M5X38
M5
M8
M8
7
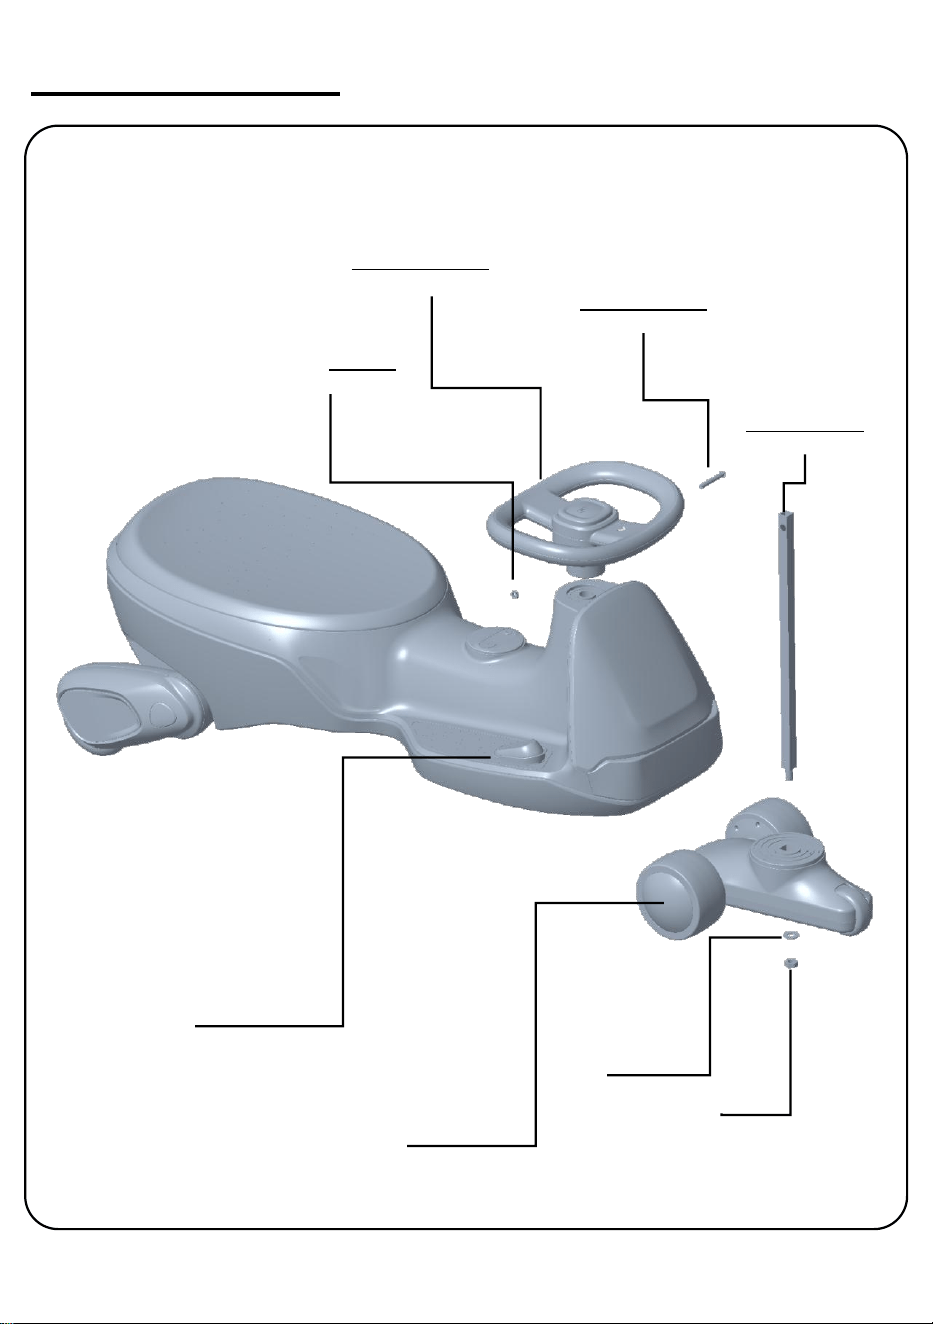
Parts Diagram
M5 Nut
Steering Whee
M5X38 Bolt
Vehicle Body
Drive Device
Square Tube
M8 Nut
M8 Washer
8
Assembly Step
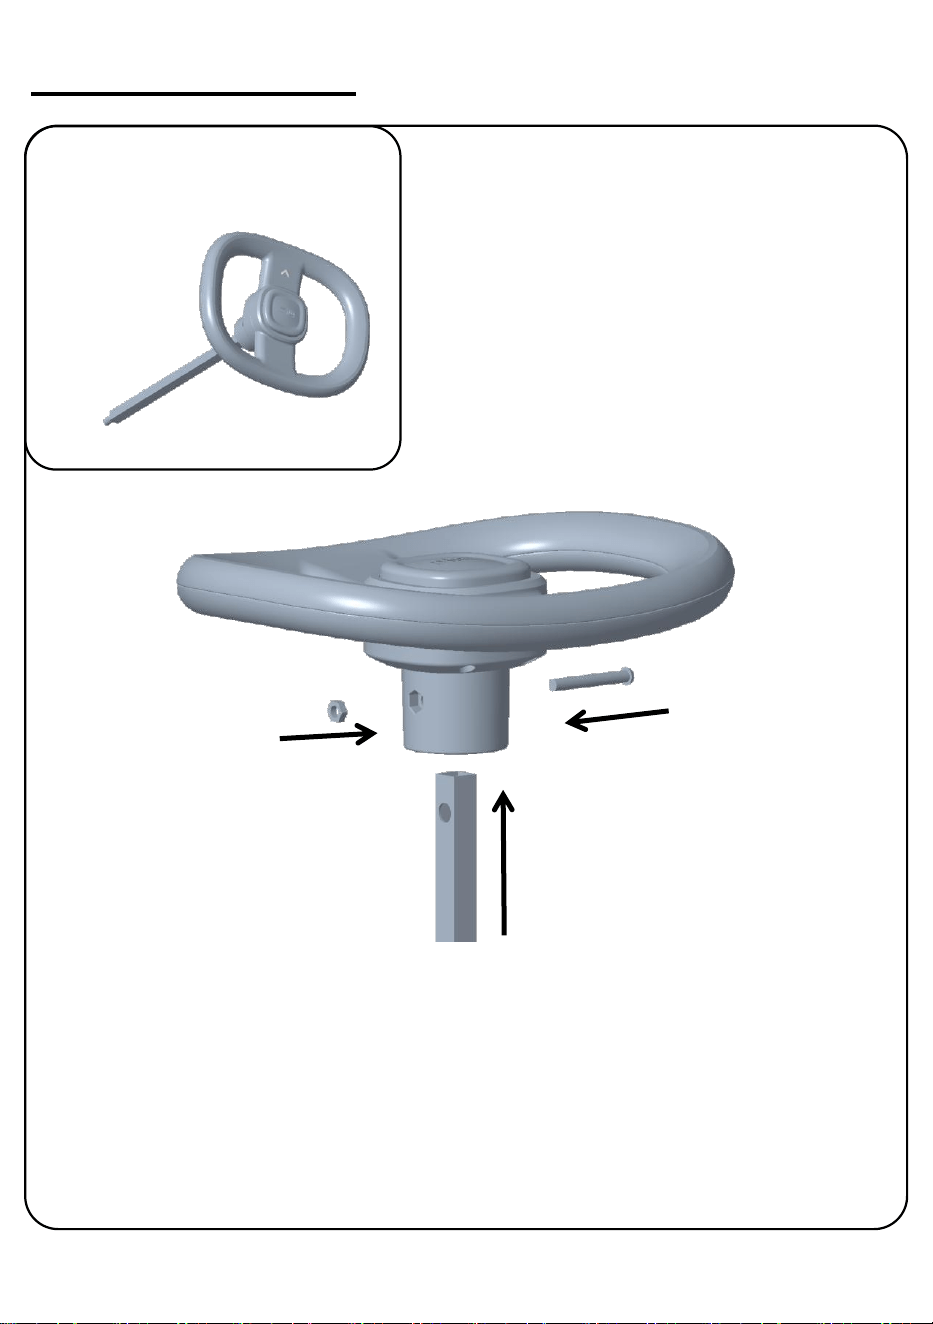
1、Insert the square tube into the steering wheel, aligning the holes.
2、Place the M5 nut into the hexagonal slot in the steering wheel.
3、Insert the M5 bolt through both holes.
4、Tighten with a screwdriver (not included) until secure.
1
①
③
②
9
Assembly Step
2
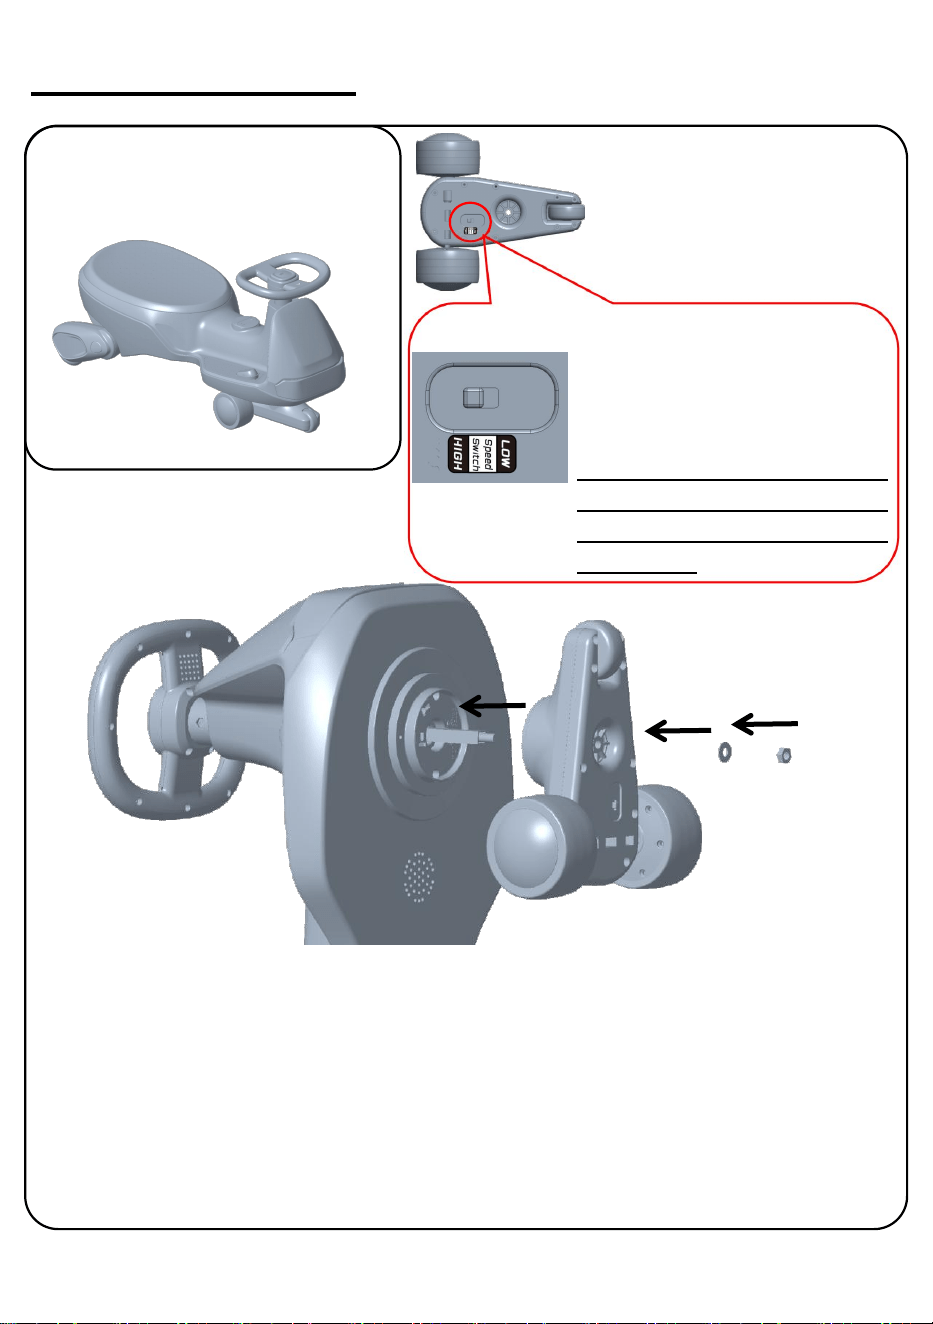
1、Insert the square tube with the assembled steering wheel through the body, making
sure the arrow on the steering wheel points toward the front of the vehicle.
2、Attach the motor drive module to the bolt at the other end of the square tube, with
the small wheel facing toward the front of the vehicle.
3、Place the M8 washer onto the bolt.
4 、 Use the included wrench to tighten the M8 nut until the motor drive module is
securely fixed to the square tube and cannot wobble.
5、Assembly is now complete.
①
②
③
Speed Control Switch
When the switch is in Low gear,
the vehicle can reach 1.7mph.
When the switch is in high gear,
the vehicle can reach 4mph.
If the power is insufficient or
the weight of the load is too
large, the speed of the vehicle
will decrease
10
Instructions For Use
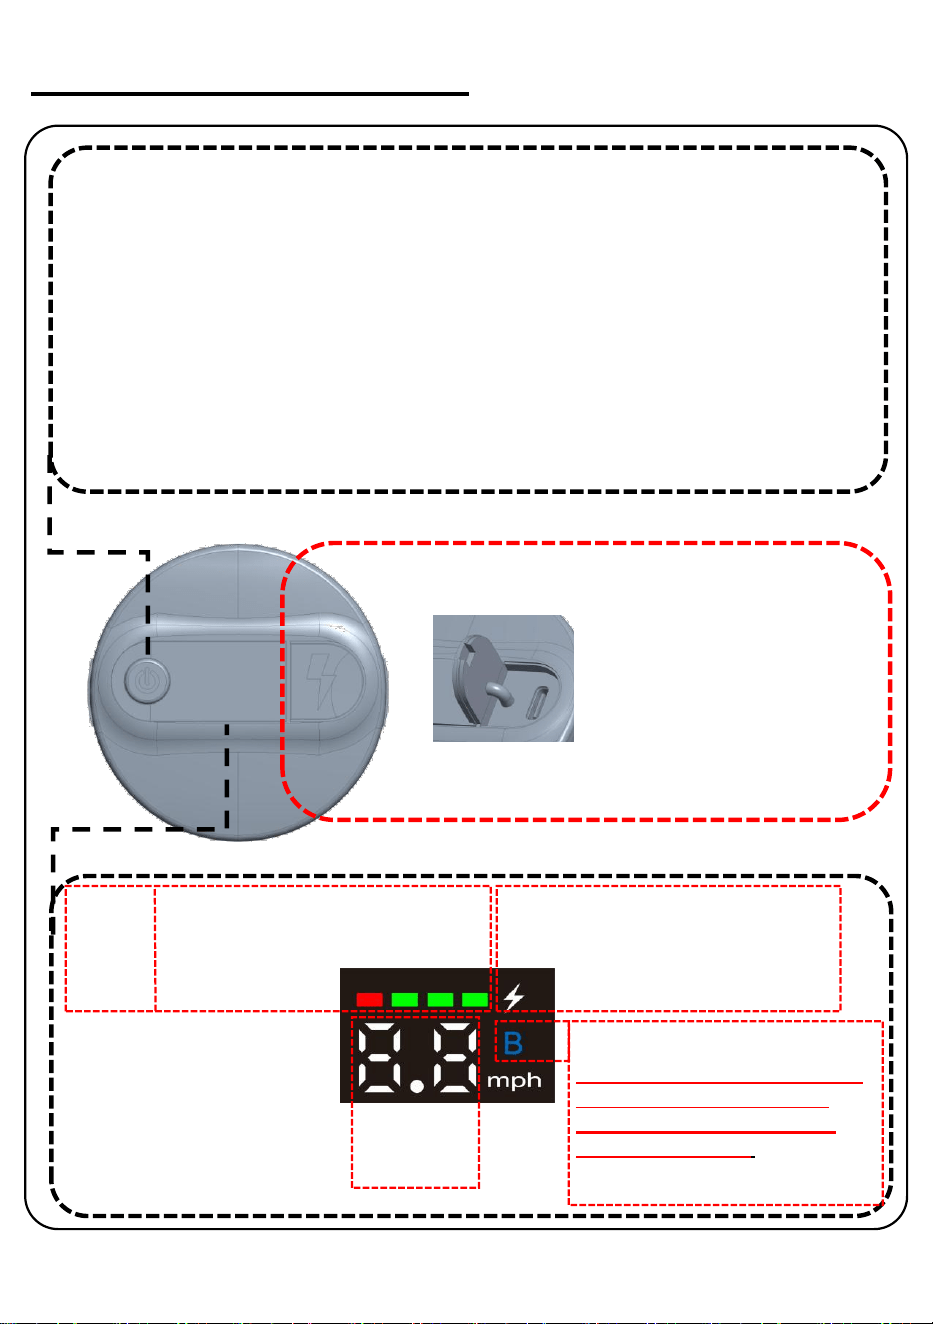
Start the vehicle:
Long press the switch for 2 seconds in the off state. When the vehicle makes a
start sound and the screen displays, it means that the vehicle is on normally.
Turn off the vehicle:
In the vehicle starting state, long press the switch for 2 seconds, the screen will be
turned off, the vehicle will make a shutdown sound, then the vehicle has been
closed
Toggle lighting effects:
After the vehicle is started, each time the switch is clicked, one kind of lamp effect
will be changed.
Battery
Display
When the red box keeps flashing,
it means that only 10% of the
electricity is left, please charge it
in time.
Speed
Display
The indicator light will light
up when charging.
After the device is turned on,
Bluetooth is automatically
turned on. Search for "N10
Ultra+
"
connection.If the
indicator is on, the Bluetooth
connection is successful
Charging Type C port
After lifting the dustproof
silicone cover,you can use the
complimentary USB TypeC
charging cable to charge,
please bring your own adapter
that meets the safety
specifications
Bluetooth Indicator
Rechargeable Light
11
App User Guide
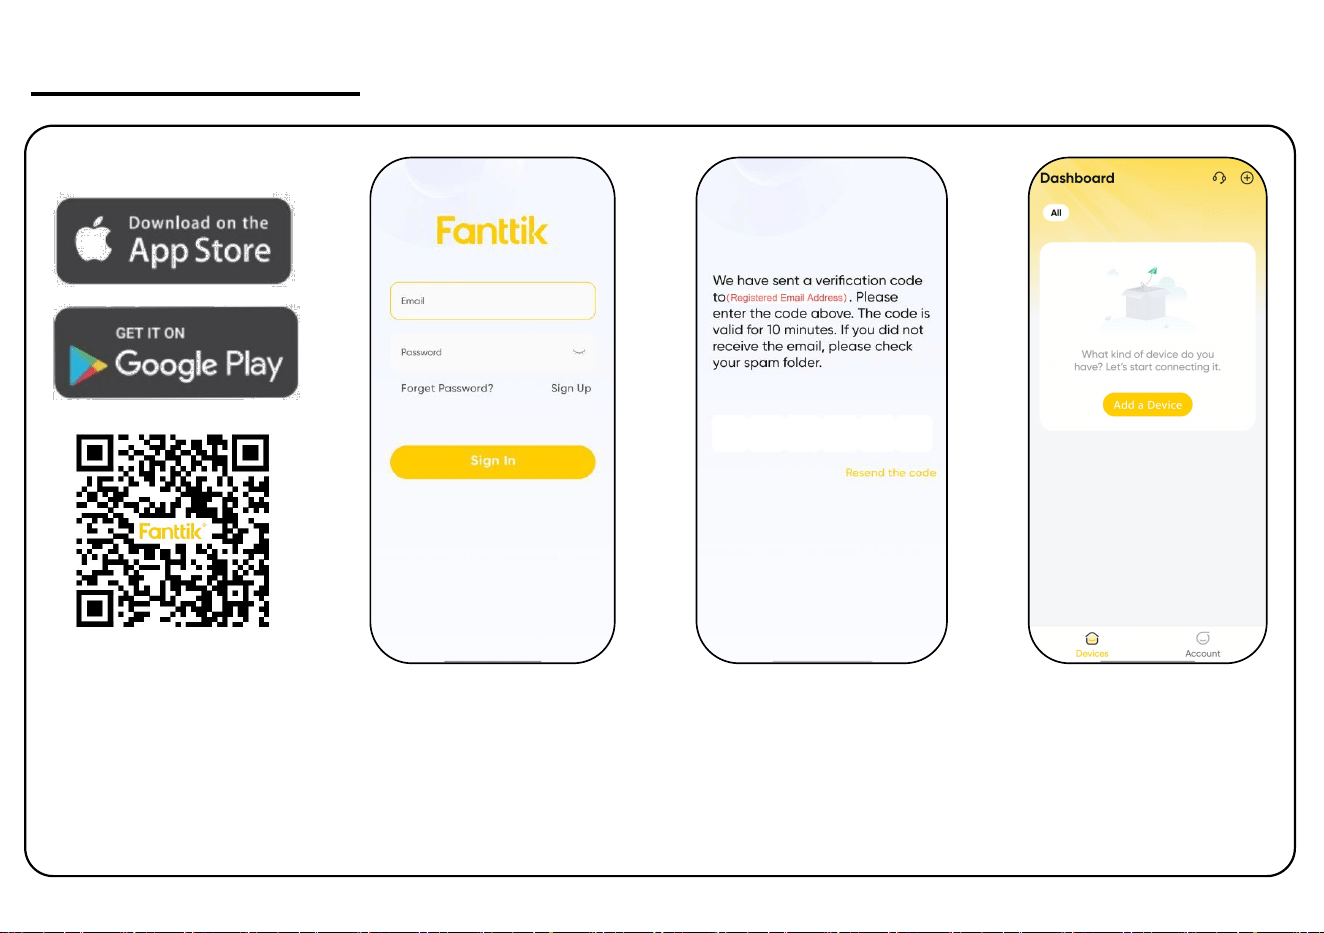
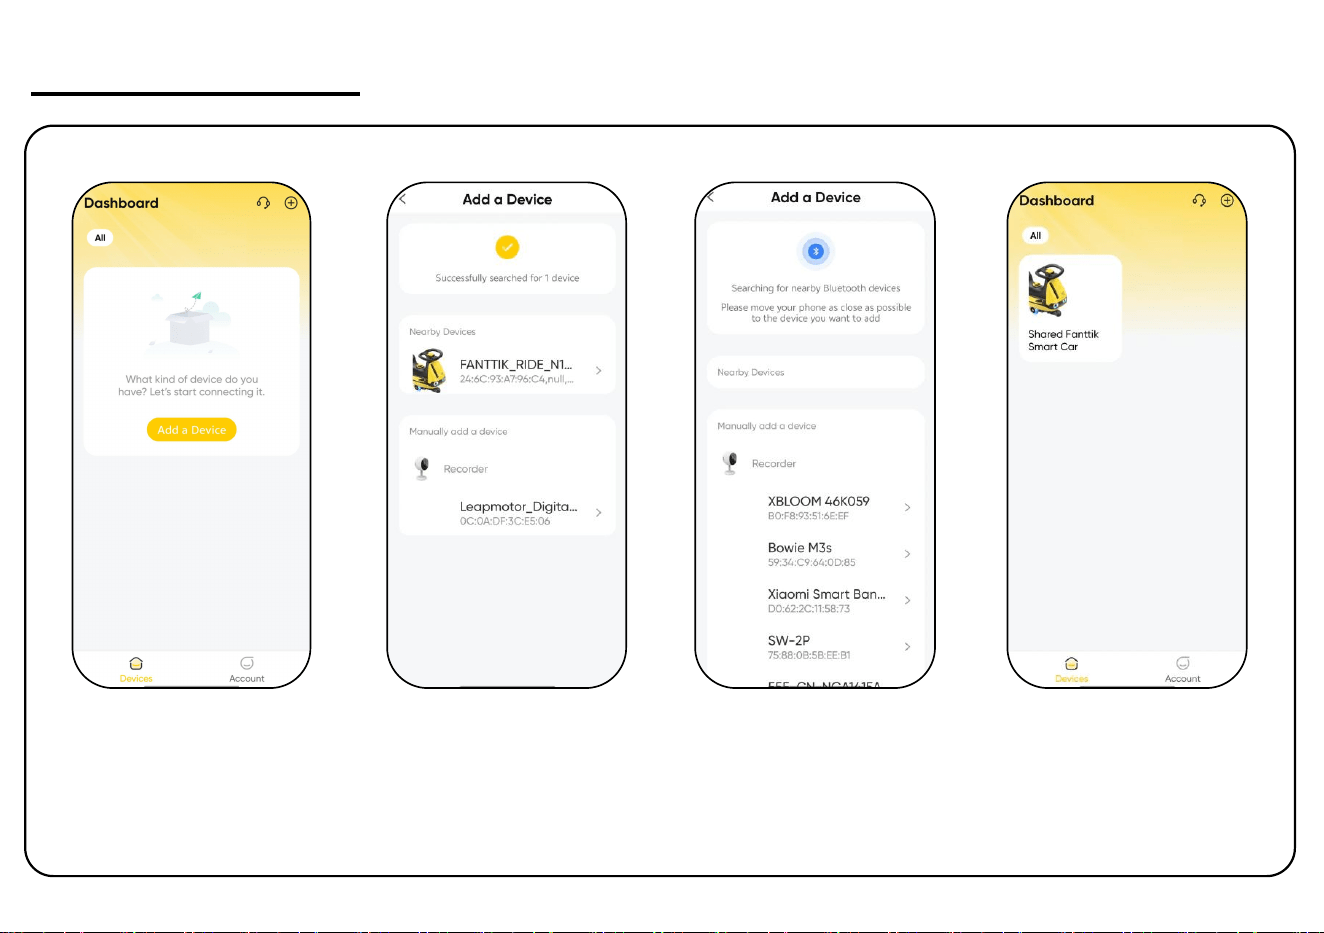
Download the Fanttik app
from the App Store (iOS
devices)
or Google Play Store (Android
devices).
Please use your email
address to create an
account.
Enter the verification code
sent to your registered
email address in the app. If
you do not see the email,
check your spam or junk
folder.
Once you have successfully
registered and logged in, you
will be taken automatically to
the main home screen, where
you can start connecting your
device.
12
App User Guide
Before connecting the device, press and hold the dashboard button for 2 seconds to turn it on.
You can add your device by
tapping the
"
Add a Device
"
button in the center of the
screen or the
"
+
"
icon in the
upper-right corner.
Once you enter the product
selection page, the app will
automatically detect your
device.
If the product does not
appear on the product
selection page, turn it off
and then turn it back on.
Once the product is detected
on the product selection page,
tap “Pair” to add it to the
ecosystem home screen.
13
App User Guide
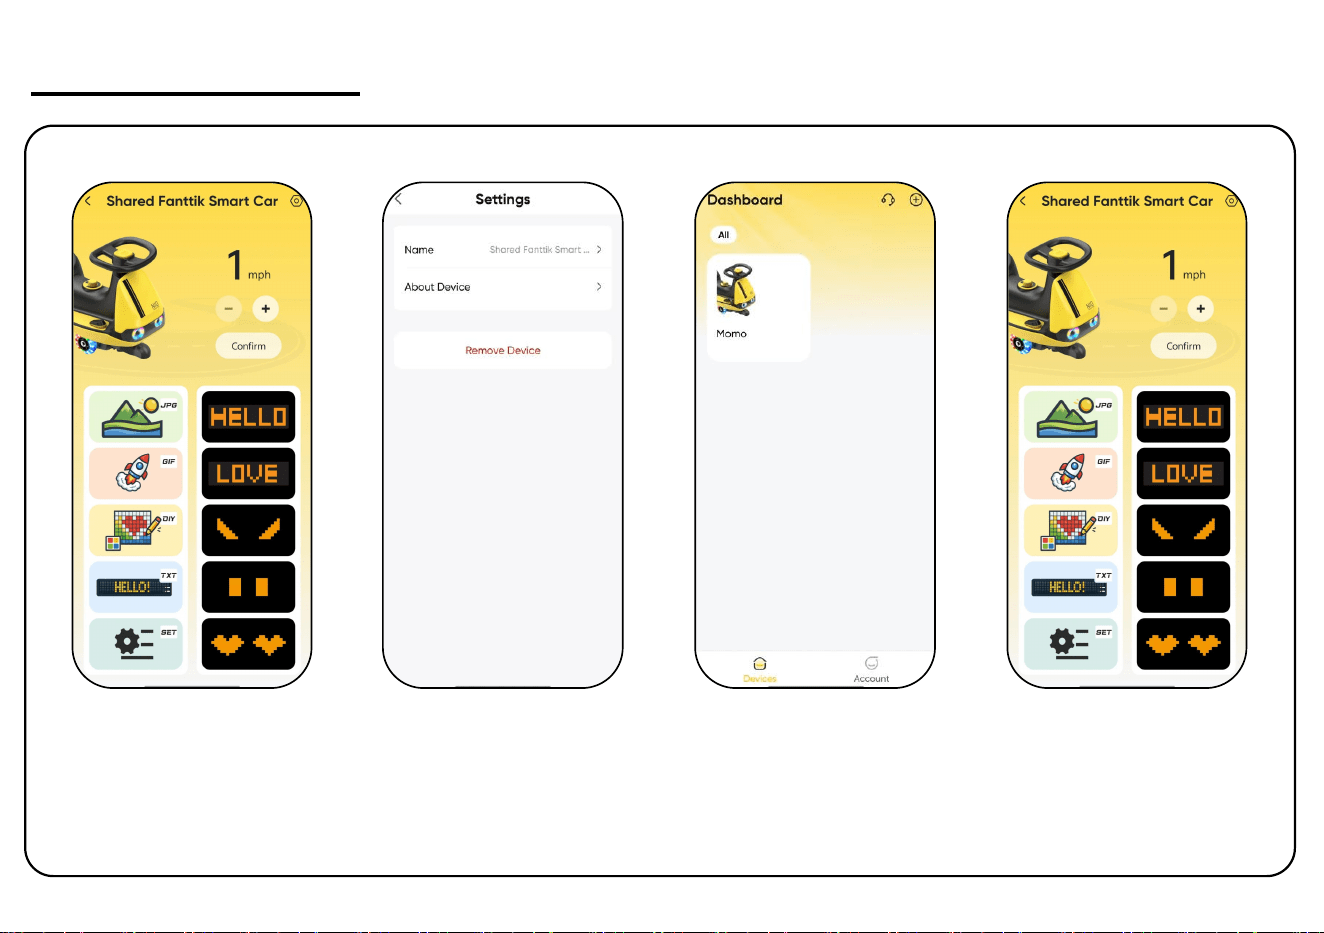
Tap the product card on the
ecosystem home screen to
enter the product control
page.
To avoid confusion when using
multiple products, tap the Settings
button in the top right corner and
rename the product to your
preferred name, such as “Mono.”
After renaming the product, the updated
name will appear on both the ecosystem
home screen and the product control page.
14
App User Guide
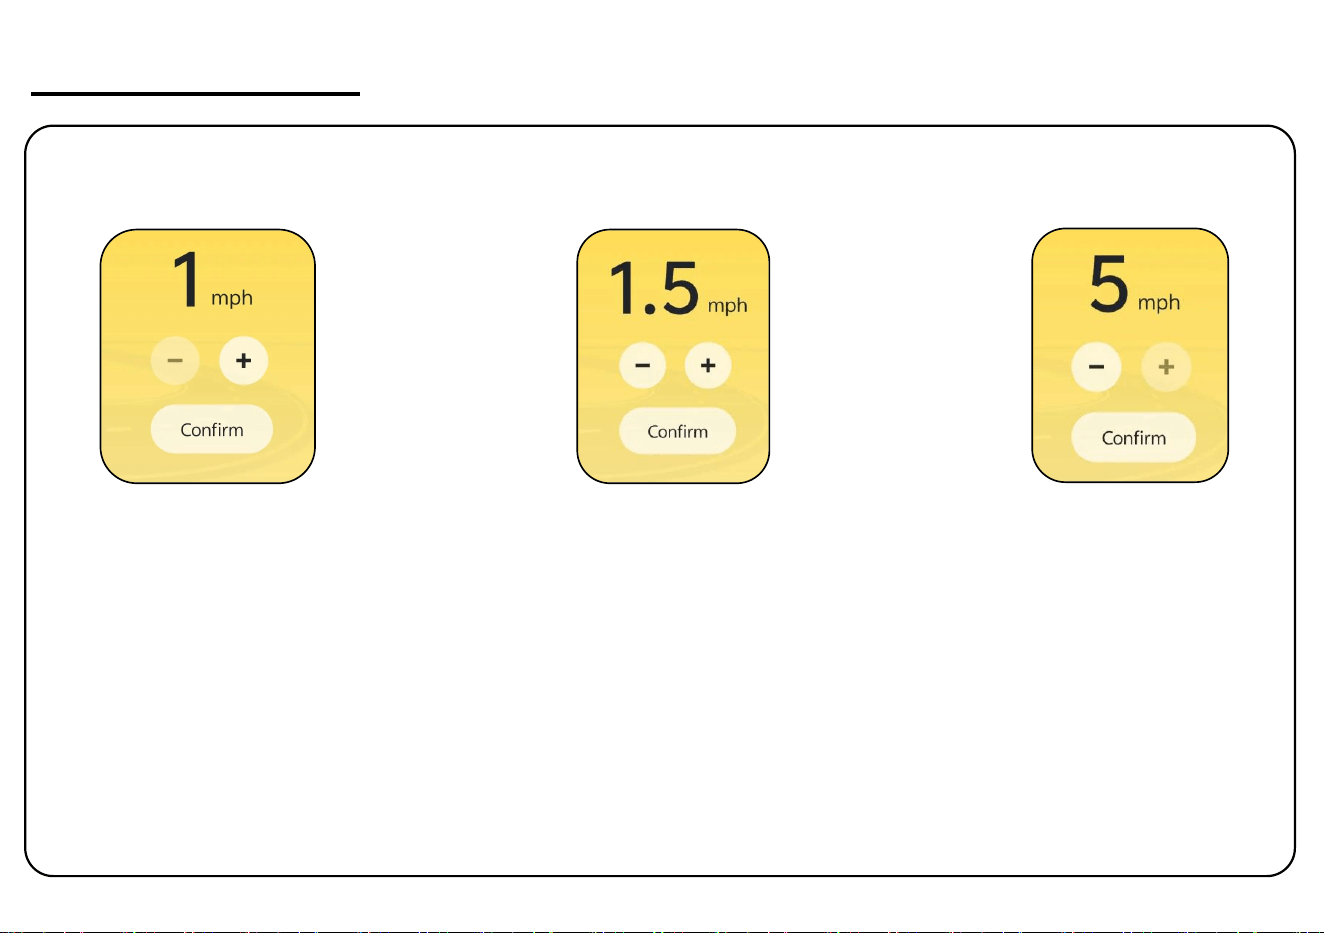
Use the app to adjust the speed limit in multiple levels. The lowest speed setting is 1 mph. Each time you tap the “+” button,
the speed limit increases by 0.5 mph. The highest speed setting is 5 mph. To lower the speed, tap the “–” button. After
selecting the desired speed, tap “Confirm” to save the setting.
Note:
1. This function only changes the speed limit. Actual riding speed may vary depending on terrain, rider weight, battery level, and
other conditions. For example, even if the speed limit is set to 1 mph, the product may still go faster than 1 mph when riding
downhill. Likewise, even if the speed limit is set to 5 mph, the product may not reach 5 mph when riding uphill or when the
battery is low. Under test conditions, a 100 lb rider on a fully charged product was able to quickly reach 5 mph on a flat, level
surface.
2. If you want to return to the vehicle’s original speed limit after setting the speed in the app, simply toggle the speed switch
on the bottom of the vehicle again after powering it on to reset it.
15
App User Guide
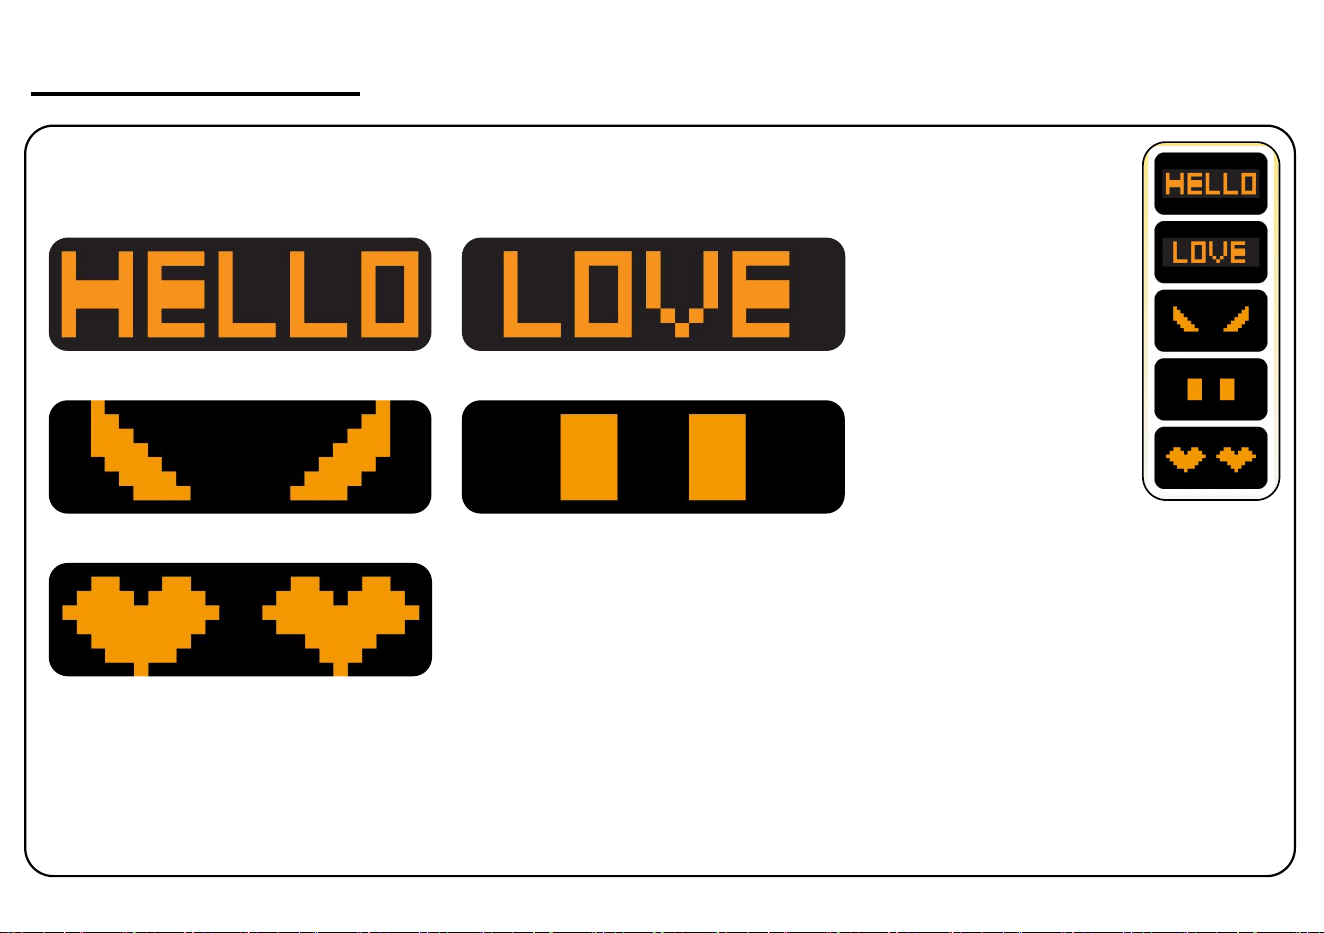
Feature 2: One-Tap Projection
We have placed 5 fun projection patterns on the main
product page. Simply tap the pattern you like to
instantly project it through the vehicle light.
16
App User Guide
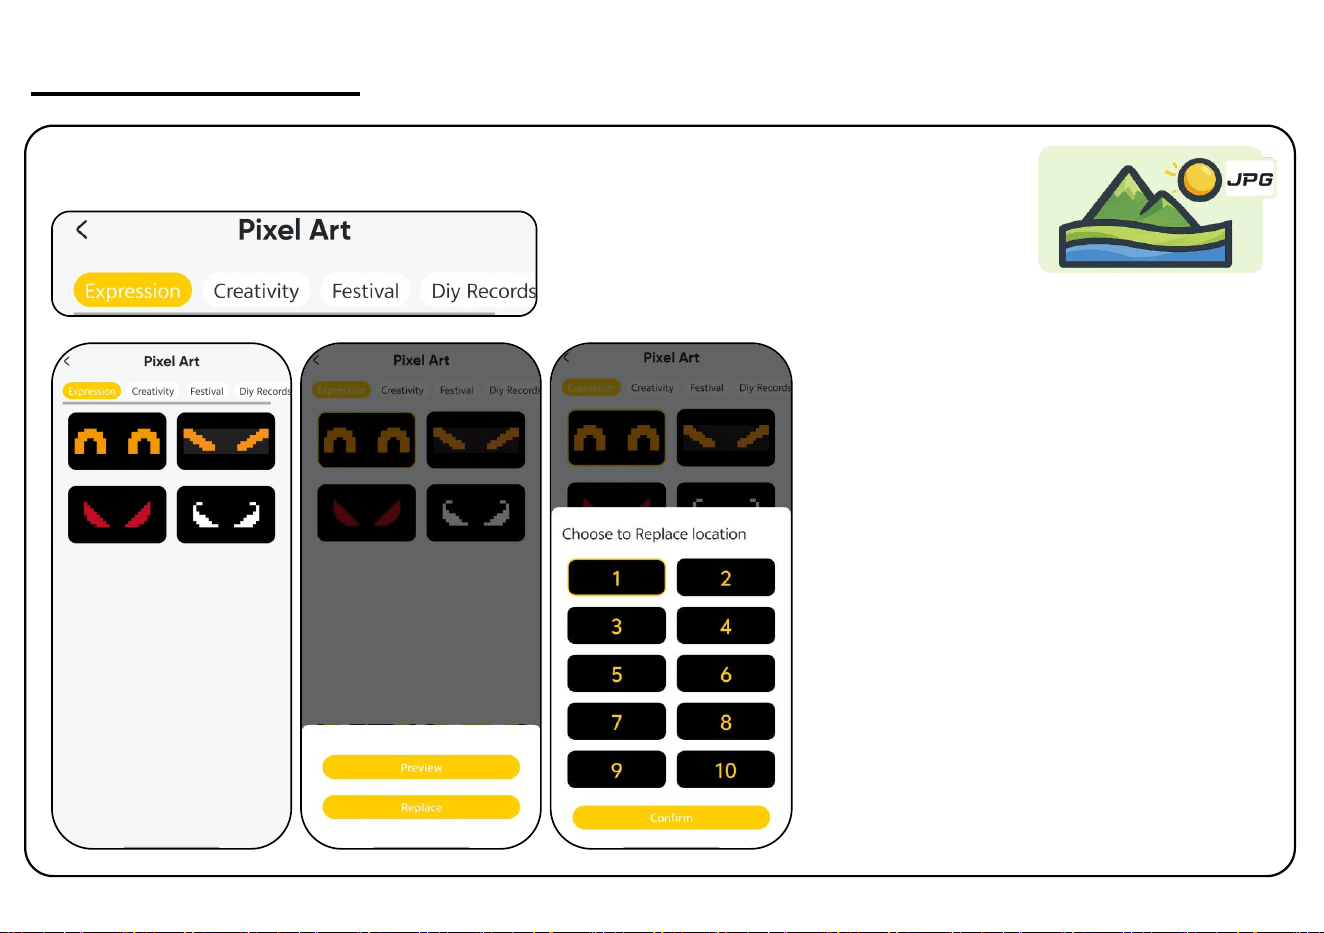
After entering the static content library, you
can choose the content you want to project.
There are two options:
1. Project Now
2. Replace
If you select “Project Now,” the selected pattern
will be displayed directly through the vehicle
light. If you select “Replace,” you can choose
which existing pattern stored in the vehicle you
want to replace. After confirming, the selected
pattern will be saved to the vehicle and can be
switched using the button on the dashboard. The
content library includes different categories for
you to explore.
Feature 3: Static Projection
17
App User Guide
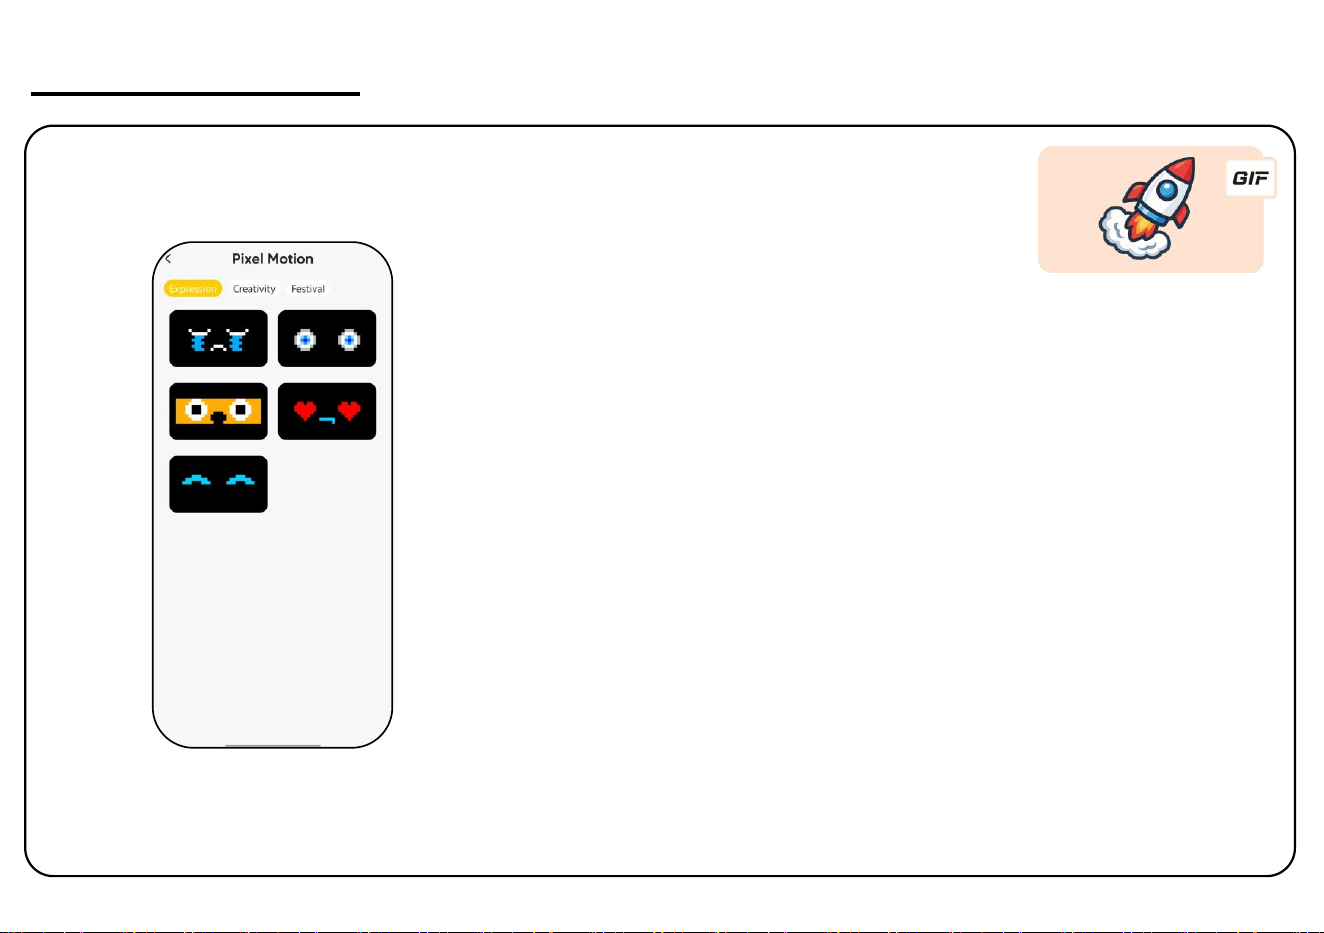
Feature 4: Dynamic Projection
Dynamic projection works the same way as
static projection. You can either project the
selected content directly through the vehicle
light or replace one of the 10 preset contents
with the one you want. Different content
categories are also available to explore.
18
App User Guide
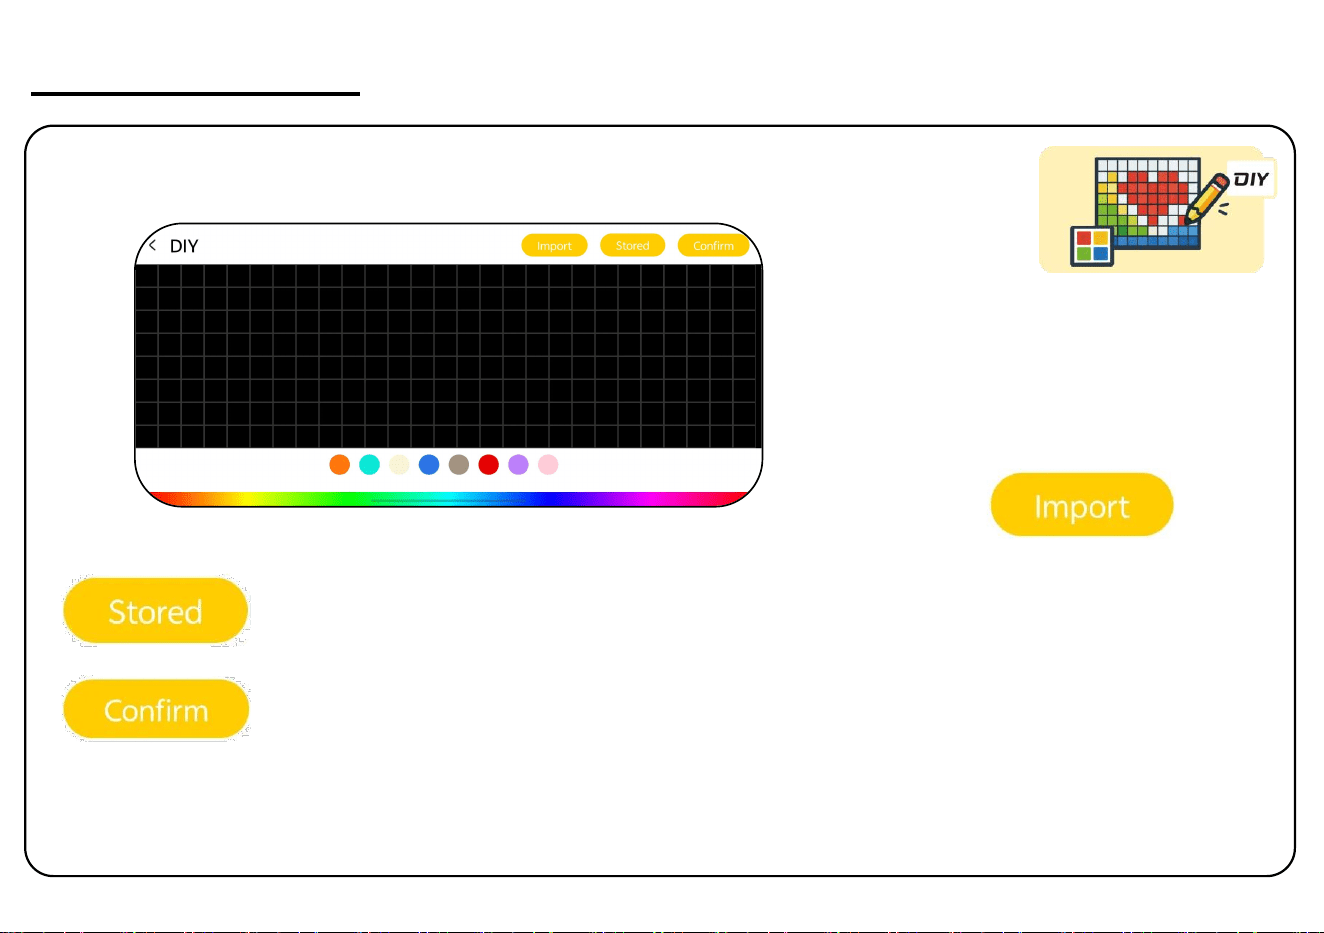
Feature 5: DIY
In DIY mode, select a color block at the bottom and draw
in the black area above. When finished, tap “Confirm” to
project your drawing through the vehicle light. If you like
the design, tap “Stored” to save it under the DIY tab in
the static content library. You can then project the saved
design at any time or store it in the vehicle.
The Import function is a more
advanced feature. You can create a
drawing in an 8-row by 27-column
spreadsheet file, then upload it to
the app using the Import function
to project the spreadsheet content
through the vehicle light.
19
App User Guide
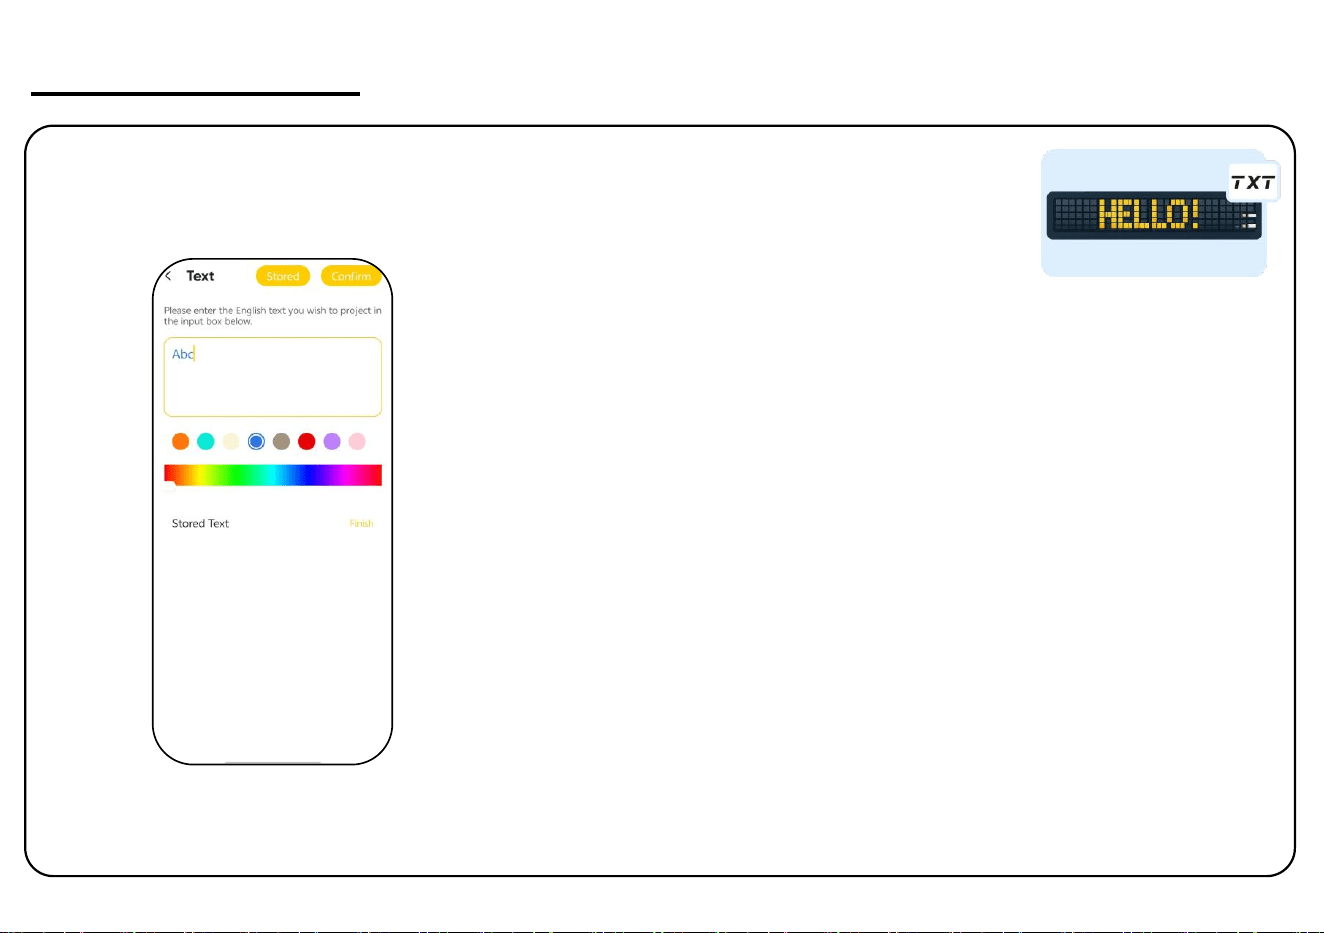
Enter the letters or words you want to display in the text
box, then select your preferred color. After entering the text,
tap “Confirm” to make the content scroll across the vehicle
light. If the displayed content is incorrect, the input may
contain unsupported special characters. Please revise the text
and try again. In addition to scrolling display, you can also tap
“Stored” to save the entered content below for quick use
next time.
Feature 6: Text
20
App User Guide
Feature 7:
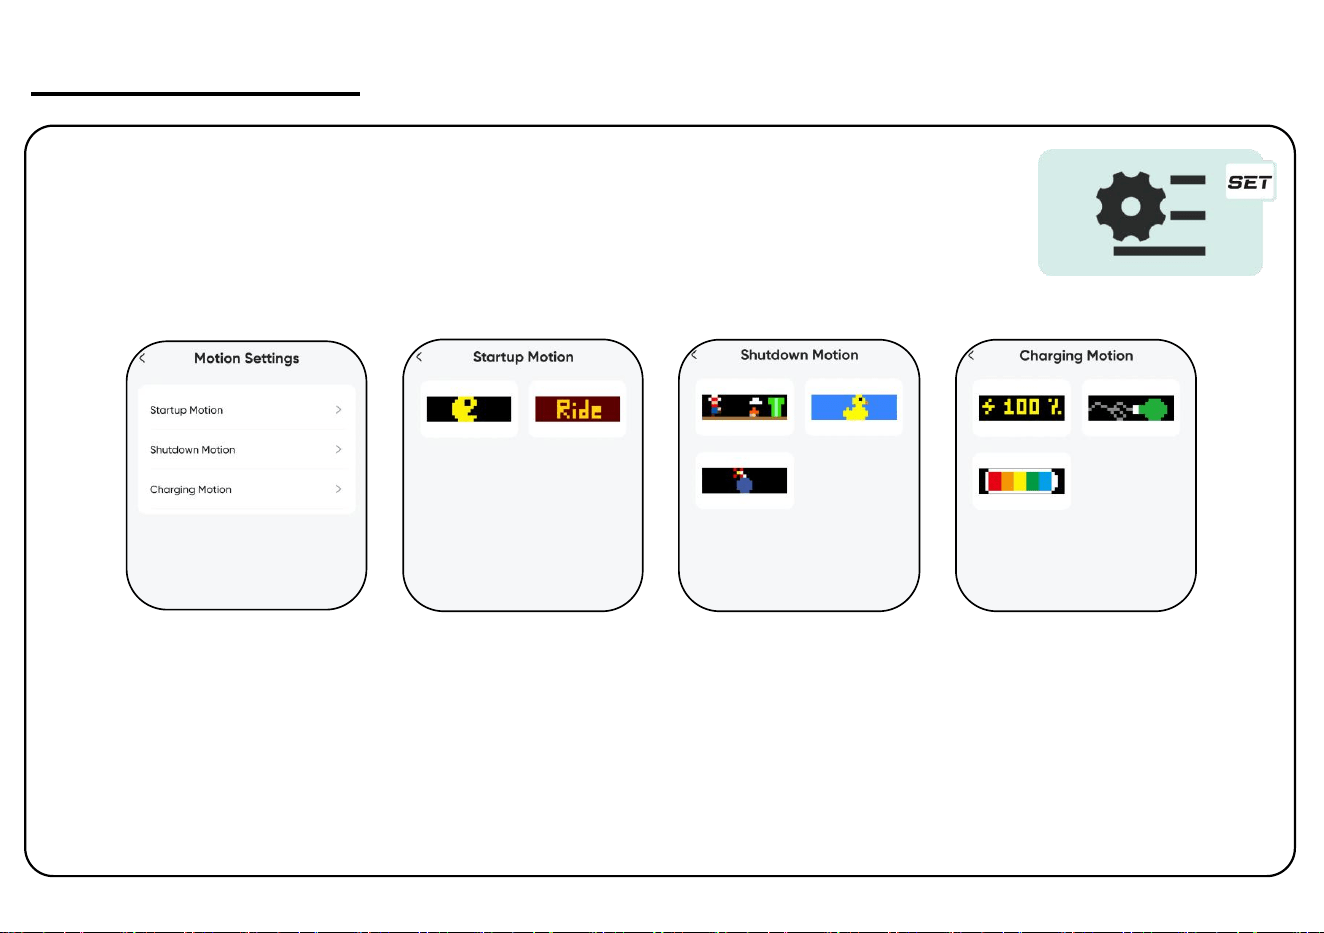
Power On/Power Off/Charging Animation Settings
On the animation settings page, you can select the display animations for power on,
power off, and charging. Different animations have different sound effects.
21
Fault Analysis
Vehicle not starting
1、Open the seat and check that the battery wiring is
secure;
2、Pry open the function button panel and check
whether the cables on the back are abnormal;
3
、
Consult after-sales personnel;
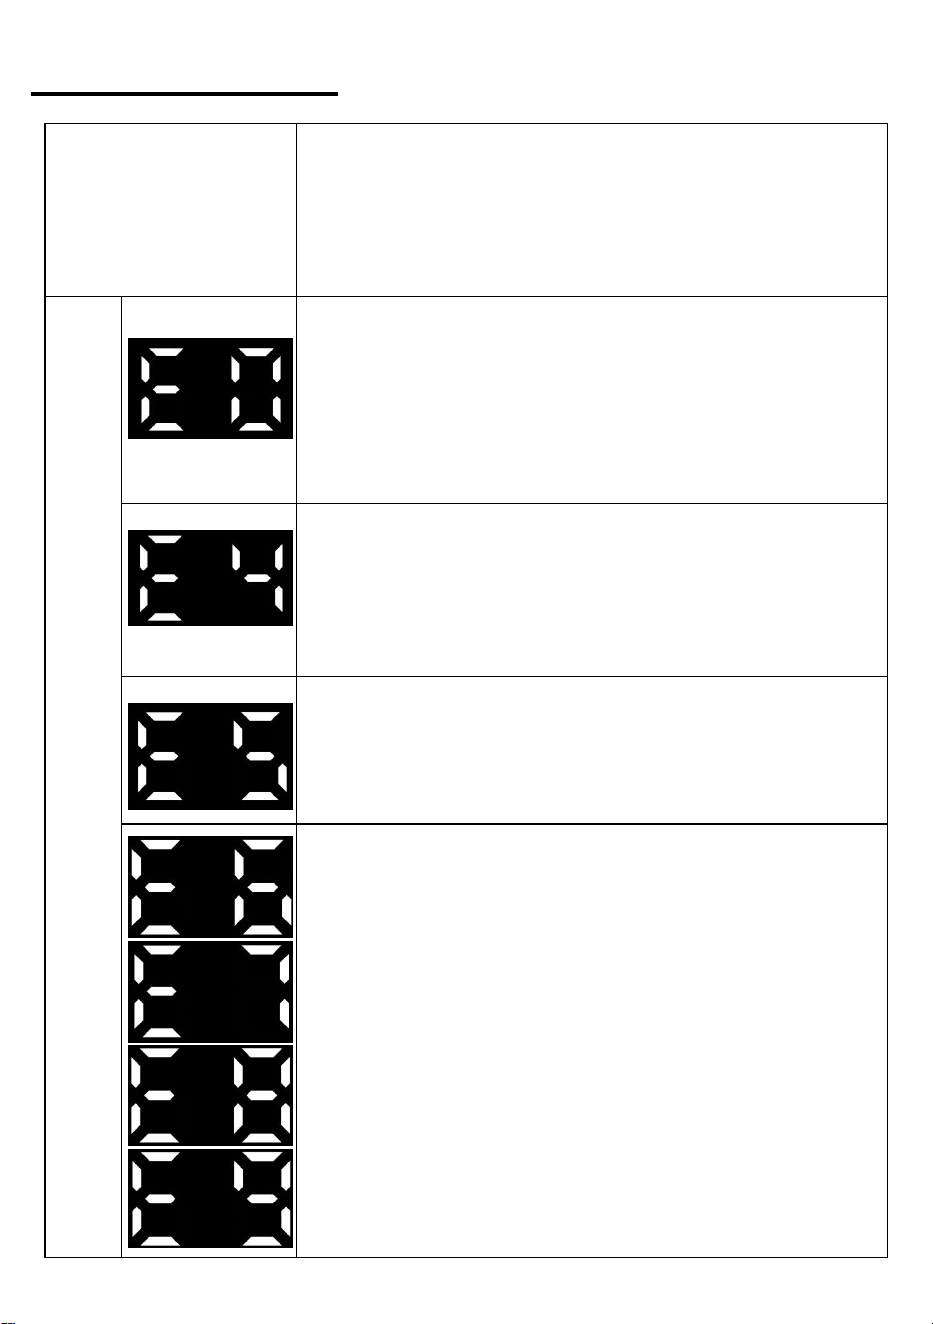
Fault
code
1、The nut fixing the drive device is not fully installed.
Please try to tighten it a few more turns.
2、Drive is not installed properly,Reinstall;
3、Pry open the function button panel and check
whether the cables on the back are abnormal;
4、Consult after-sales personnel;
When the load is too large or the motor is stopped by
external force for up to 15 seconds, the vehicle will start
self-protection, and the vehicle will shut down within 3
seconds after prompting the E4 fault, and return to normal
after restarting.
The drive device is faulty. Contact after-sales service
personnel to replace it
1、Abnormal battery connection: Use a screwdriver to open
the seat cushion, disconnect the battery interface, and
then reconnect it.
2、Battery failure, please contact customer service to
replace.

www.fanttik.com
METASEE LLC
12 GREENWAY PLZ STE 1161A HOUSTON,TX 77046-1203
Made in China