P10 PRO
Read this manual carefully before use and keep it
for future reference.
PORTABLE CAR POLISHER

Contents
1.SAFETY INSTRUCTIONS
2.PRODUCT OVERVIEW
3.PACKAGE CONTENTS
4.BATTERY LEVEL INDICATOR & CHARGING
5.FUNCTIONS AND OPERATIONS
6.SPECIFICATIONS
7.TROUBLESHOOTING
02
04
05
06
07
12
13

1. SAFETY INSTRUCTIONS
This product is not a toy and is prohibited for children. The recommended user age is above 18 years
old.
Keep hair, loose clothing, jewelry and other items away from the polishing disc when using the product.
The appropriate car wax should be selected in conjunction with this product and the car.
The product contains a non-removable lithium-ion battery. Do not throw the product into a fire or
dispose of it arbitrarily. Overheating, impacting, or submerging the lithium-ion battery poses risks of fire,
spontaneous combustion, and explosion. Please avoid exposing it to high-temperature environments
such as inside vehicles.
The storage temperature of the product should not be below -10°C or above 45°C. Excessive cold or
heat can shorten the product's lifespan and damage the battery.
Do not disassemble, hit, squeeze, or cut the battery; otherwise, it may explode.
Do not place the battery at extremely low pressure; otherwise, the battery may explode or leak
flammable liquids and gases.
If the battery is severely expanded, do not continue to use.
Do not swallow the battery, otherwise it may cause chemical burns.
If you think the battery may have been swallowed or placed in any part of your body, seek medical
attention immediately.
Please do not throw the battery into the domestic waste for disposal, and please comply with the
•
•
•
•
•
•
•
•
•
•
•

•
•
•
•
corresponding national regulations to safely dispose of the used battery.
Long-term idling of the product may damage the battery. It is recommended to charge it at least once
every three months.
If abnormal sounds or excessive temperature are detected during operation, please immediately
turn off the power.
Use in a dry and clean environment. The ingress of dirt and dust may cause product damage. The
product is not waterproof, and rinsing with water is prohibited.
Please use a safe and compliant adapter and original charging cable to charge this product. Faults
caused by not following these instructions are not covered by the warranty.

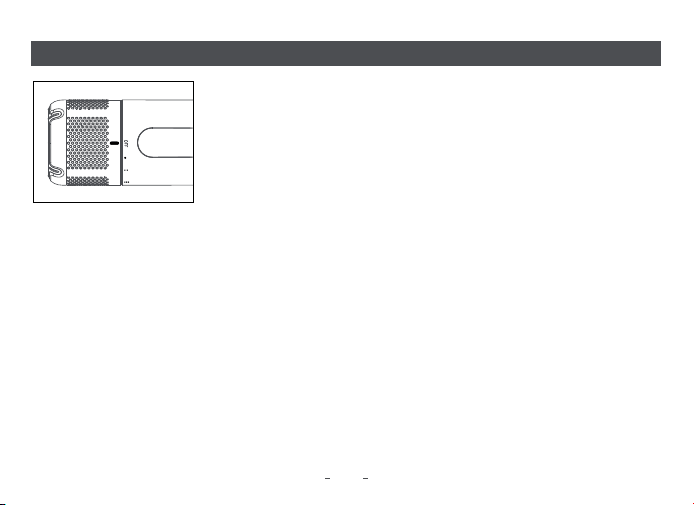
2.PRODUCT OVERVIEW
1.Quick release parts
2.Gear indicator light
3.Knob switch
5.Battery indicator
4.Charging port
1
2
3
4
5
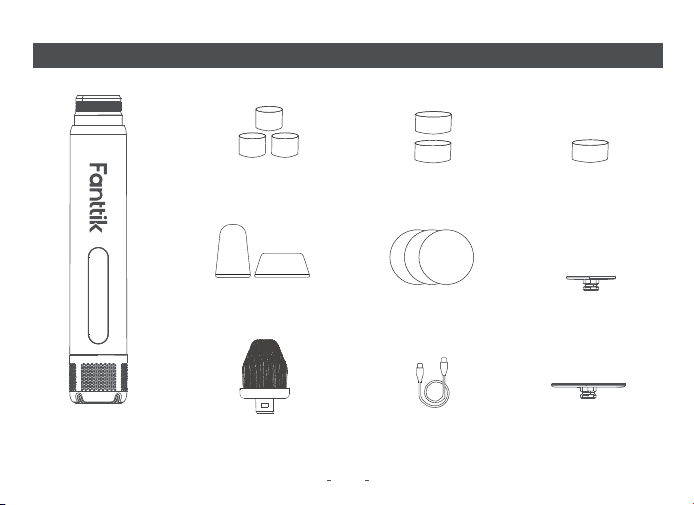
3. CONTENTS
05
P10 Pro cordless
car polisher×1
2″ Polishing
Sponge x 3
3″ Polishing
Sponge x 2
(deep orange)
Shaped Polishing
Sponge × 2
3″ Sandpaper
x 3
2″ Nylon Cleaning
Brush x 1
2″ Velcro
Base x 1
3″ Velcro
Base x 1
C-C
Cable x 1
3″ Polishing
Sponge x 1
(light orange)

4. BATTERY LEVEL INDICATOR & CHARGING
06
Battery Level Indicator
Red light flashing = below 10%
Red light steady on = between 10% and 15%
Orange light steady on = between 15% and 30%
Green light steady on = between 30% and 100%
Charging
• Tips:You need to purchase a safe and compliant adapter yourself.
Please fully charge before first use. Use a charging cable to connect a 5V/3A.
USB adapter to the polisher for charging.
Fully charge the polisher before using it for the first time.
While charging:
The indicator will blink green slowly. When the battery is fully charged, the indicator will
display solid green.
between 0%
and15%
between 15%
and 30%
between 30%
and 100%
Red
Orange
Green
Green
5. FUNCTIONS AND OPERATIONS
07
On
Rotate the knob from the "OFF" position through three gear settings to
progressively increase the speed.
Off
Rotate any gear counterclockwise to "OFF" and the device will shut down.
Gear Usage Guide
1st Gear (Low Speed) Recommended Applications:
Used with nylon brush for cleaning exhaust pipes and standard aluminum alloy wheels
Note: When polishing, do not stay at the same spot for too long to avoid the temperature rising and
damaging the paint surface. Always ensure proper pad/brush attachment before operation and allow the
machine to cool between extended uses.
2nd Gear (Medium Speed) Recommended Applications:
Use a medium-hard sponge pad (light orange) to polish minor scratches and dings.
3rd Gear (High Speed) Recommended Applications:
Combined with a low-hardness polishing sponge (deep orange), it is used for the shiny surface treatment
after polishing.

Selecting polishing accessory
Select the appropriate polishing accessory according to the purpose of use. Improper use may damage
Paste the polishing sponge to the Velcro, apply the polish or liquid wax
directly to the car paint surface.
Start the polishing machine (gently stick to the paint surface to prevent
dumping and splashing before turning on the machine) and move in a
circle at a constant speed.
Wipe the residue with a soft cloth after polishing.
Note: The 3inch sponge pad is recommended to be used in conjunction with the second gear or higher.
1.
2.
3.
Reference Applications
Polishing Sponge
Scenarios: car paint surface polishing, waxing.
Operation Steps:
the polished surface. Please test the accessory in an inconspicuous place first.
Clean and dry the surface completely before operation.
There are two types of cutting available for the polishing sponge. The light orange one is of medium cut,
while the deep orange one is of light cut.
2″ Polishing
Sponge x 3
3″ Polishing
Sponge x 2
(deep orange)
3″ Polishing
Sponge x 1
(light orange)
08

09
Apply a small amount of polishing paste with a sponge or finger directly to
the dead center area (avoid contaminating the surrounding paint).
Install the shaped disk, turn on the machine and apply light pressure to the
dead space with a point and click (keep the disk at the same angle as the gap).
1.
2.
Shaped polishing sponge
Scenarios: emblems, air intake grilles, door handle recesses.
Operation Steps:
Operate for no more than 10 seconds per spot to avoid overheating,
and promptly clean up debris with a soft cloth.
3.
Sandpaper
Scenario: localized shallow scratches, orange peel pre-treatment.
Operation Steps:
Wet construction: spray water mist on the sandpaper and paint surface first
(keep wet to reduce friction damage).
Unidirectional sanding: Lightly sand in a straight line along the direction of
the scratches (no drawing circles), check the progress every 30 seconds.
Cleaning verification: rinse out the sanding area, no bumpy feeling after
fingertip touch, change the polishing disk to deal with it.
Shaped Polishing
Sponge × 2
3″ Sandpaper
x 3

10
Nylon Cleaning Brush
Brushing technique: install the nylon brush and spot clean (avoid continuous
rotation to damage the plating).
Note: When plastic parts such as lights or bumpers are used, the speed is reduced to a low gear to avoid
high temperature deformation.
2″ Nylon Cleaning
Brush x 1
11
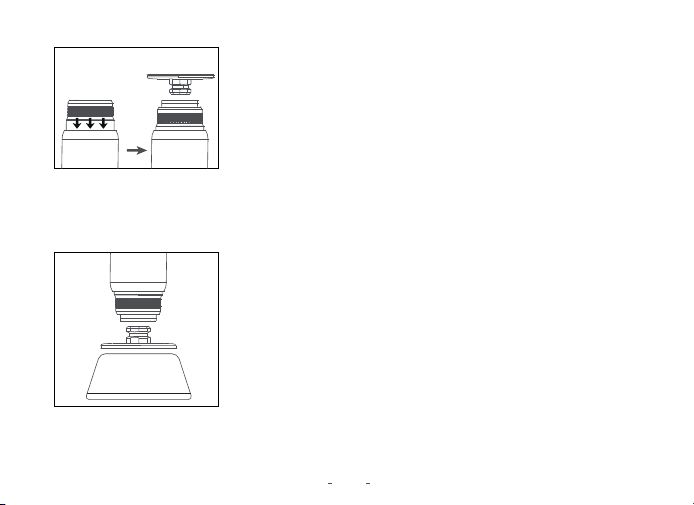
Accessory Installation and Replacement
Velcro Base Installation
Pull down the position shown in the diagram, align the polisher arbor
with the Velcro base slot and release.
NOTE:
Make sure the base fits perfectly to avoid dislodging at high speeds.
Polishing sponge /Cleaning Brush Replacement
Flat sponge/ Shaped sponge/ Sandpaper: press directly to the Velcro
base, make sure the fit is flat.
Brushes: Pull down and align the polisher arbor with the slot in the
brush base.
Still need to pull down to remove velcro base or brush.

6. SPECIFICATIONS
Name
Model
Item Dimensions
Max.Rotation Speed(Unloated)
Working Temperature
Storage Temperature
Battery Capacity
Input parameter
Charging Port
Charging Time
Noise
Fanttik P10 Pro portable car polisher
P10 Pro
0
o
C~45
o
C
-10
o
C~45
o
C
4000mAh/3.6V
5V/3A
USB Type-C
Less than 2.5 hours
<
65dB
12
205mm×38mm ×38mm
950RPM
1.6N.m±10%Troque

7. TROUBLESHOOTING
Problems
Polisher won't start
Machine overheating during use
Uneven polishing results
Accessories becoming loose or detached
New scratches appearing on surface
Abnormal noise or vibration
High Temp Alert: Light strip flashesred (10 sec)
Solutions
13
Check if battery is fully charged
Confirm power switch is turned on
Immediately stop using and let cool for 15 minutes
Reduce speed setting and avoid applying excessive pressure
Stop use immediately
Inspect polishing pad for embedded debris
lf the temperature exceeds the range, let the device
cool at room temperature for one hour before use.
Verify polishing compound is evenly applied
Ensure polishing pad is clean without residue
Maintain consistent movement speed, avoid lingering in one spot
Power off and reinstall accessories
Check if hook-and-loop backing is clean (dust affects adhesion)
Ensure accessories are fully locked in place
Power off and check accessory installation
Remove any foreign objects that may be caught
Contact after-sales service if problem persists
Low Temp Alert: Light strip flashesblue (10 sec)

14
This product is covered by a 12-month limited warranty for
manufacturing defects.

929-693-6066 MON-FRI 9AM-5PM (ET)
www.fanttik.com
METASEE LLC
12 GREENWAY PLZ STE 1161A HOUSTON, TX 77046-1203
CAN ICES(B)/NMB (B)