Version: 2.0
Operation and Maintenanc
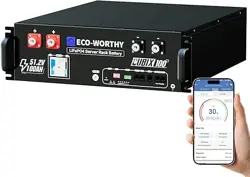
PowerMega 314
APP & HOST COMPUTER
User Manual
e
SUPPORT
·
LiFePO4
If you are experiencing technical problems and cannot find a
solution in this manual, please contact ECO-WORTHY for
further assistance.
Call:1-866-939-8222(US&CA)
+49 6175 6514 999(DE)
+44 7553 406988(UK)
Web:www.eco-worthy.com/
E-mail: [email protected]
314

Contents
I. APP User Guid
....................................................1
1.1 Download and Install the App
......................................1
1.2 App Permissions Settings
.............................................1
1.3 Battery Connection Mode
.............................................1
1.4 Device Information Viewing and Control
.....................9
1.5 OTA Upgrade
................................................................12
1.6 Account logout and cancellation
...............................13
II. Host Computer User Guide
............................14
2.1 Download
....................................................................14
2.2 Connect the Battery
....................................................14
2.3 Advanced Account Login
............................................18
2.4 Modifying the Communication Protocol
...................19

I. APP User Guid
-1-
1.1 Download and Install the App
Based on your mobile system, select the download link:
Android: For phones that support GMS, you can download
iOS: Search for the BMS-TOOL
do not support GMS, you can directly install the APK
BMS-TOOL through the Google Play Store. For Android phones that
.
in the App Store,or scan the QR
code below to download and install.
1.2 App Permissions Settings
1.3 Battery Connection Mode
After installing the app, click the launch button to start. Upon first
launch, the app will request the user to confirm and grant the
following permissions:
▪Camera Permission: Used for scanning QR codes to add Wi-Fi
devices in remote control mode.
▪Location Permission: Used to search for nearby Bluetooth devices
in local control mode and to identify the current network informa-
tion in remote control mode.
▪Device Status Information: Used to detect the device's operating
status.
▪Photos and Audio Permission: Allows the QR code scanning
interface in remote control mode to directly access the local photo
album.
Local Control: This refers to Bluetooth communication, where the
app directly searches for nearby Bluetooth signals. Once paired, the
connection remains constant, allowing control of the device without
the need for account login or binding records. It is ready to use
immediately.
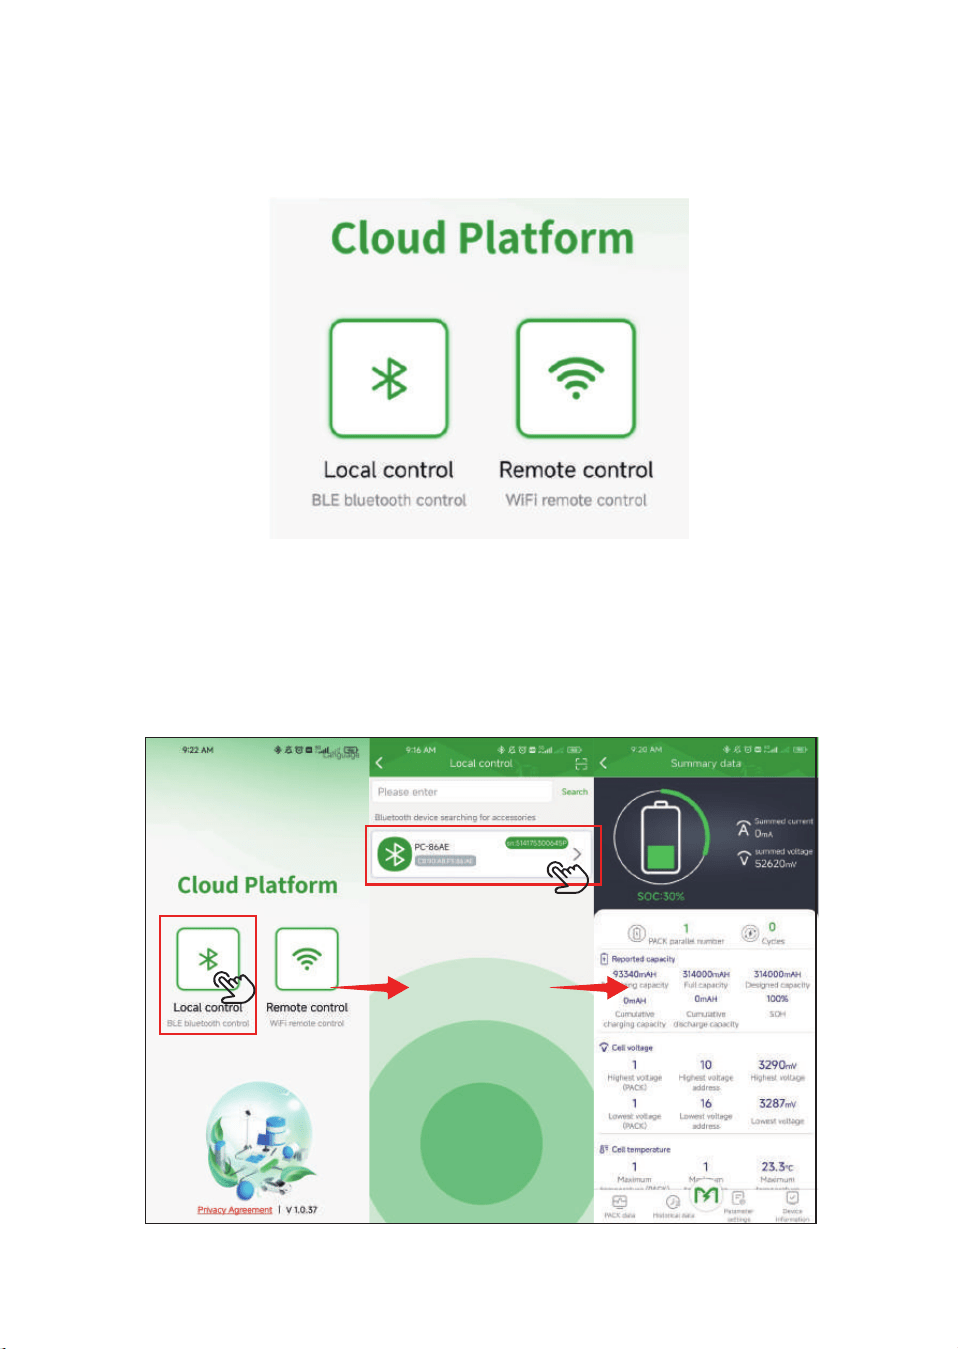
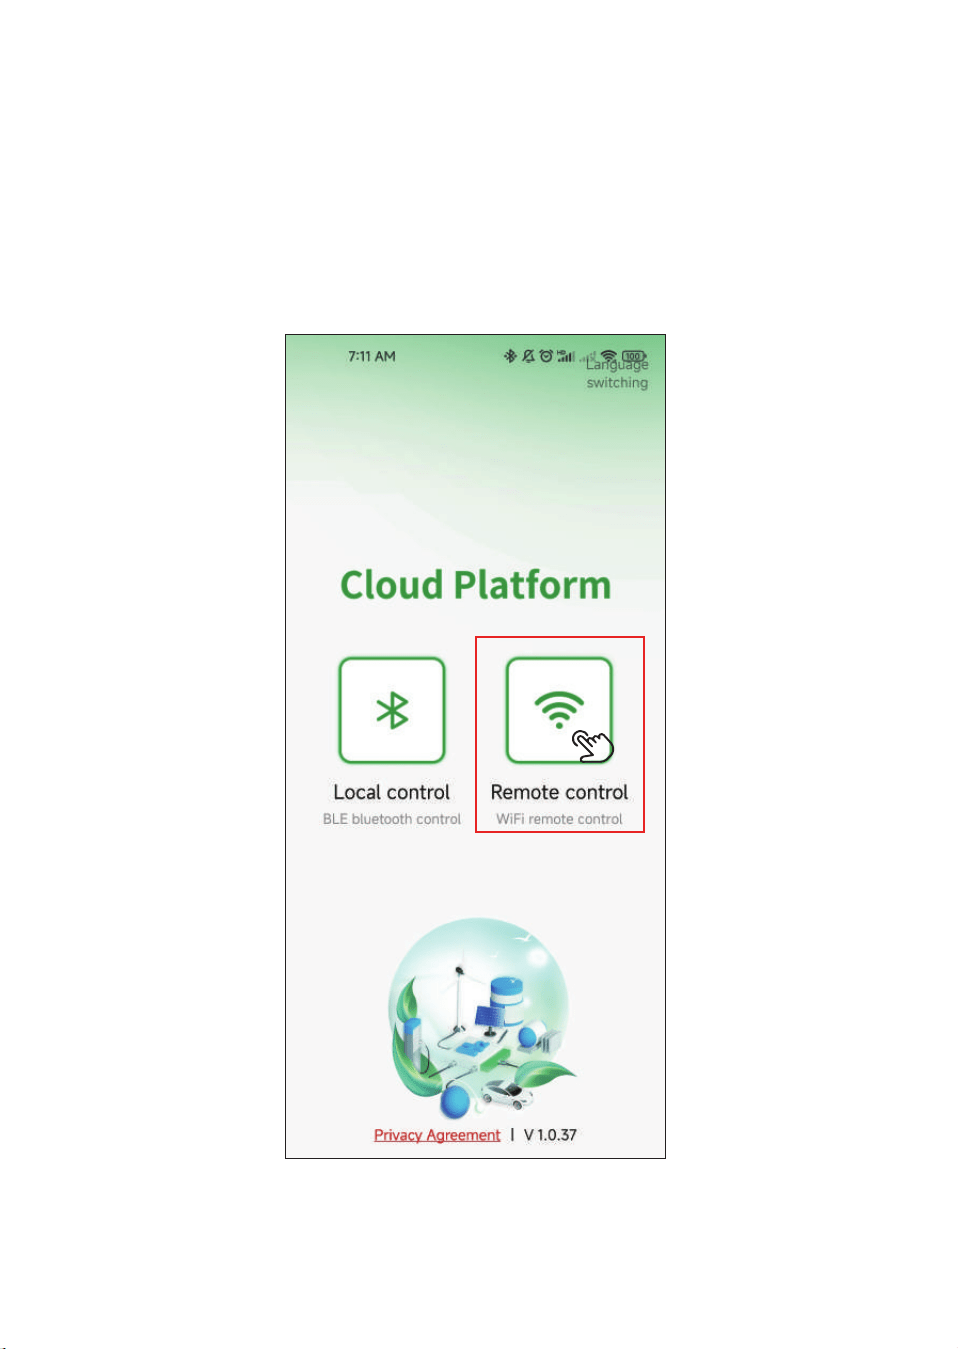
Remote Control: This refers to WiFi communication, enabling
control of devices even when not in the same geographic loca-
tion. It requires account registration and login, with device-ac-
count binding records. Network configuration is also required.
1.3.1 Bluetooth Control
When the device is in network configuration mode, click the Local
Control button. On the Local Control page, you can search for the
device. Once found, click on the device to enter the device control
page.
-2-
Settings
1.3.2.1 Account Registration and Login
Register Account & Login
STEP 1 Select Remote Control:
1.3.2 Wi-Fi Control
-3-
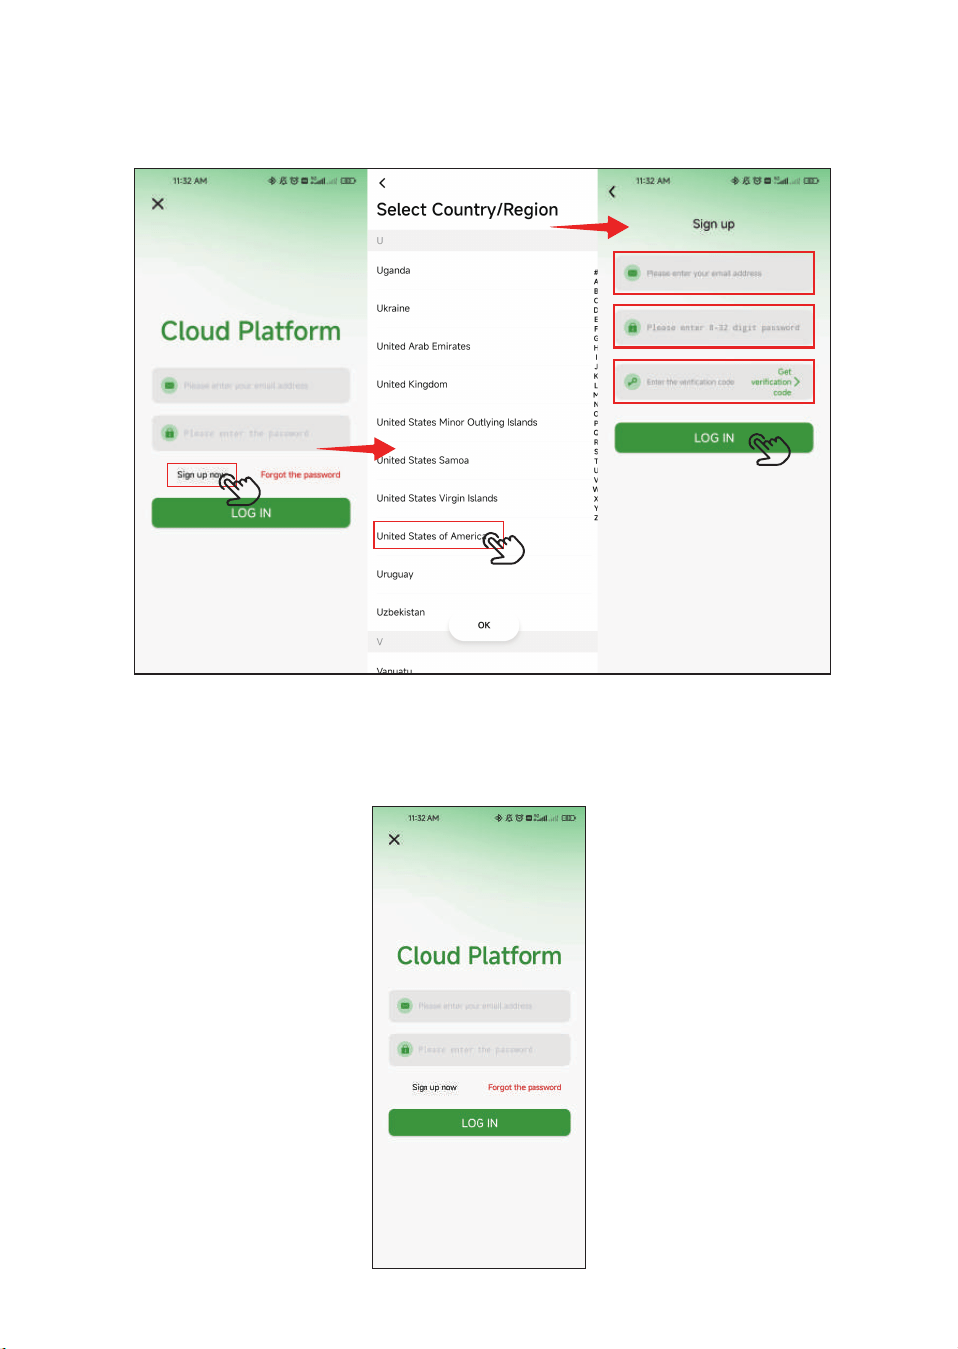
STEP 2 Click “Sign up now”, then enter your email and pass-
word.After that, retrieve the verification code sent to your email and
enter it to complete registration.
Log in directly
Simply enter your email address and password to log in.
-4-
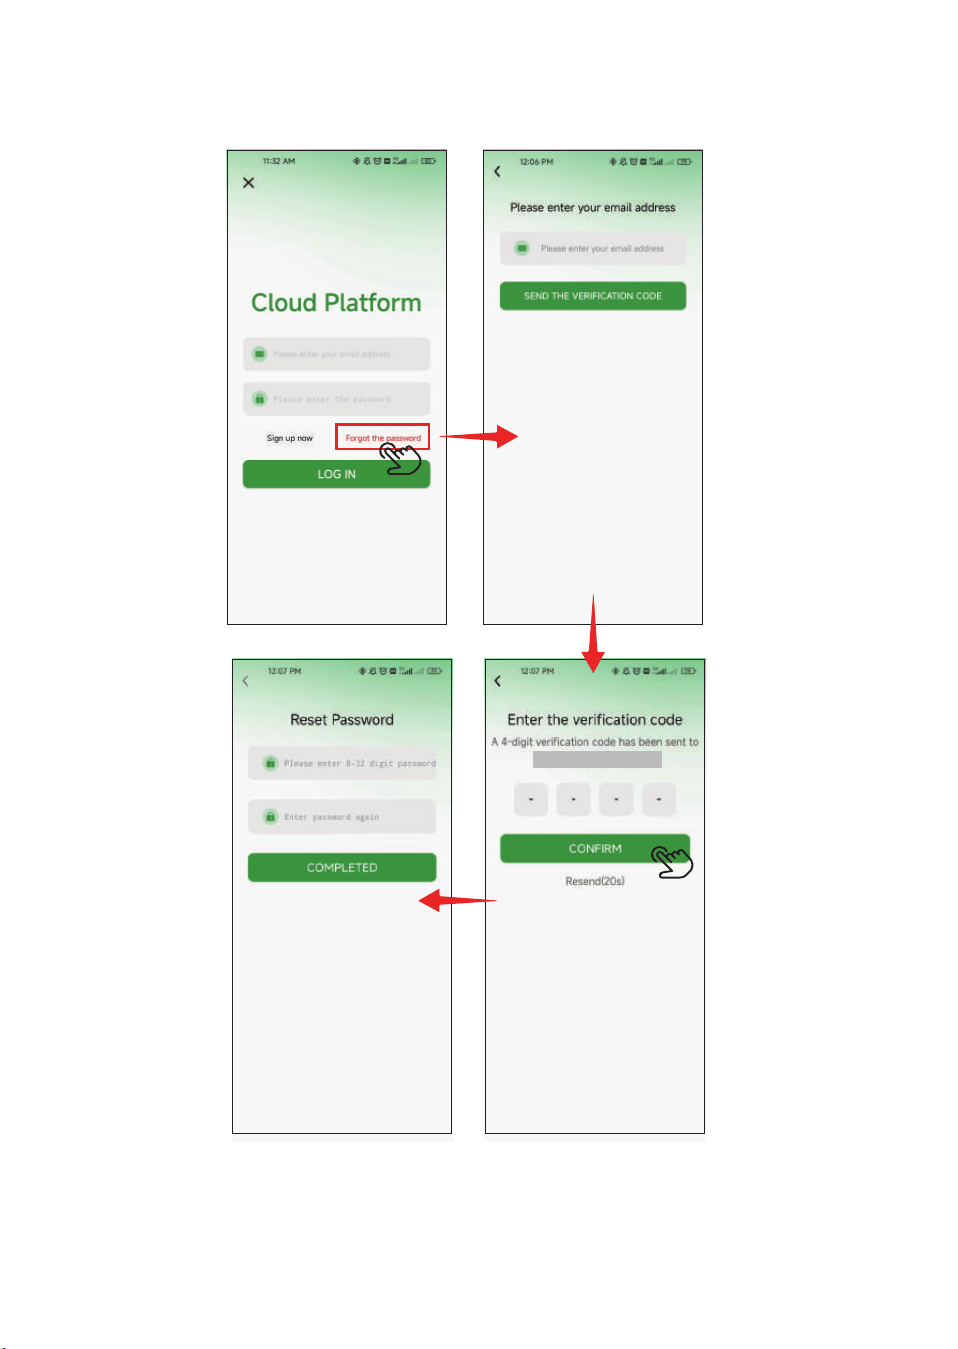
If you forgot your password, you can reset it via your email.
-5-
Emial
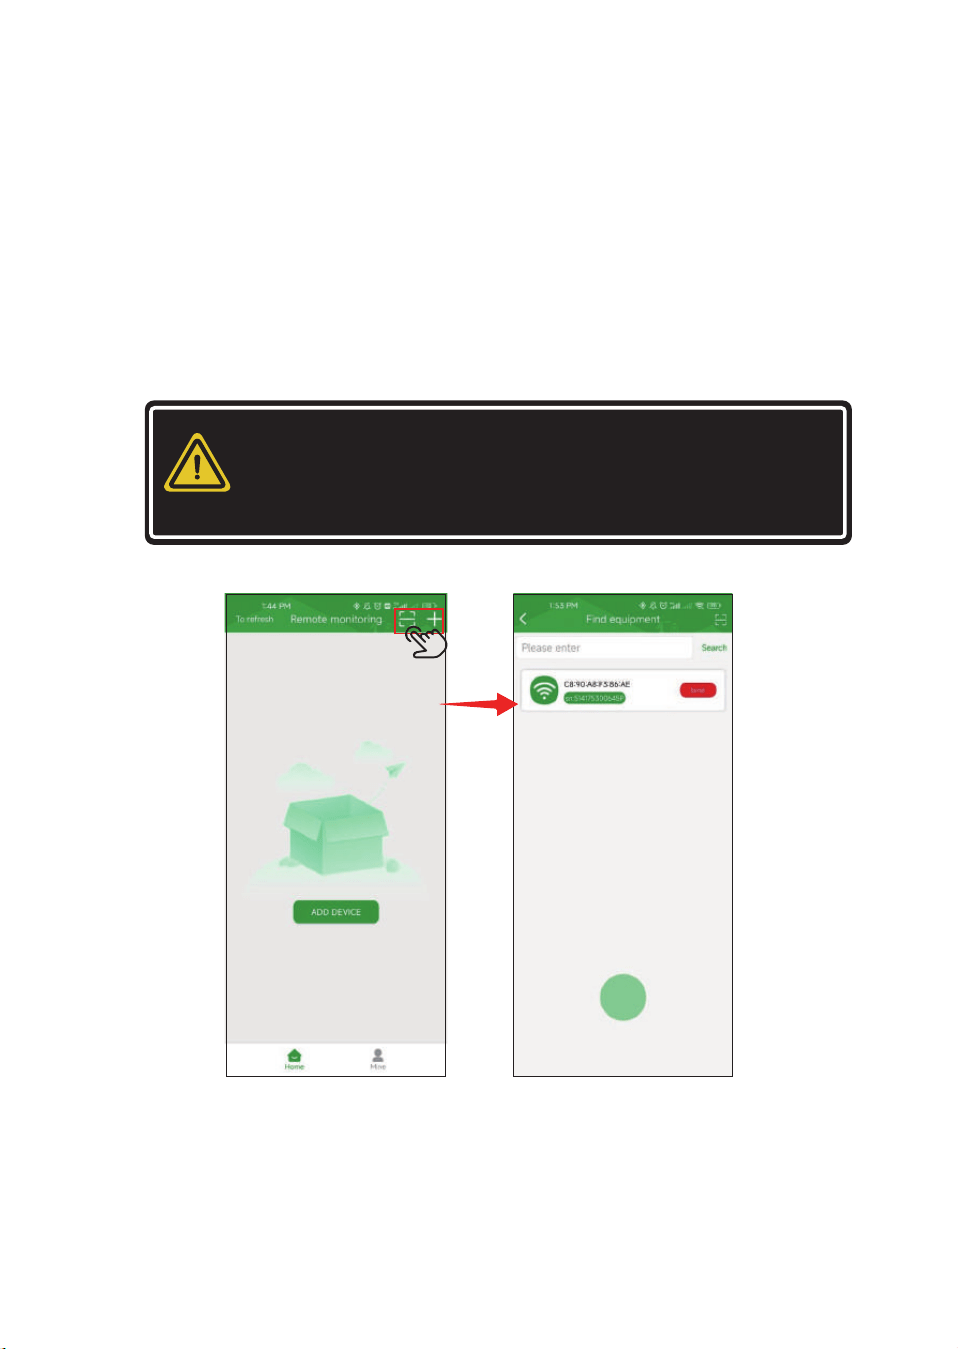
STEP 1 WiFi module factory reset.
Press and hold the reset button for 10-13 seconds. The SOC and
other indicators will light up in sequence. Release the button when
all the lights stay on for 5 seconds and then turn off.
Step 2 Add the device.
Simply click ADD DEVICE or the “+” in the top-right corner to add a
device.
1.3.2.2 Add device under the account.
-6-
NOTE
This step requires your phone to have Bluetooth,
Location, and Wi-Fi enabled, otherwise, the device
search and subsequent network configuration cannot
be completed.
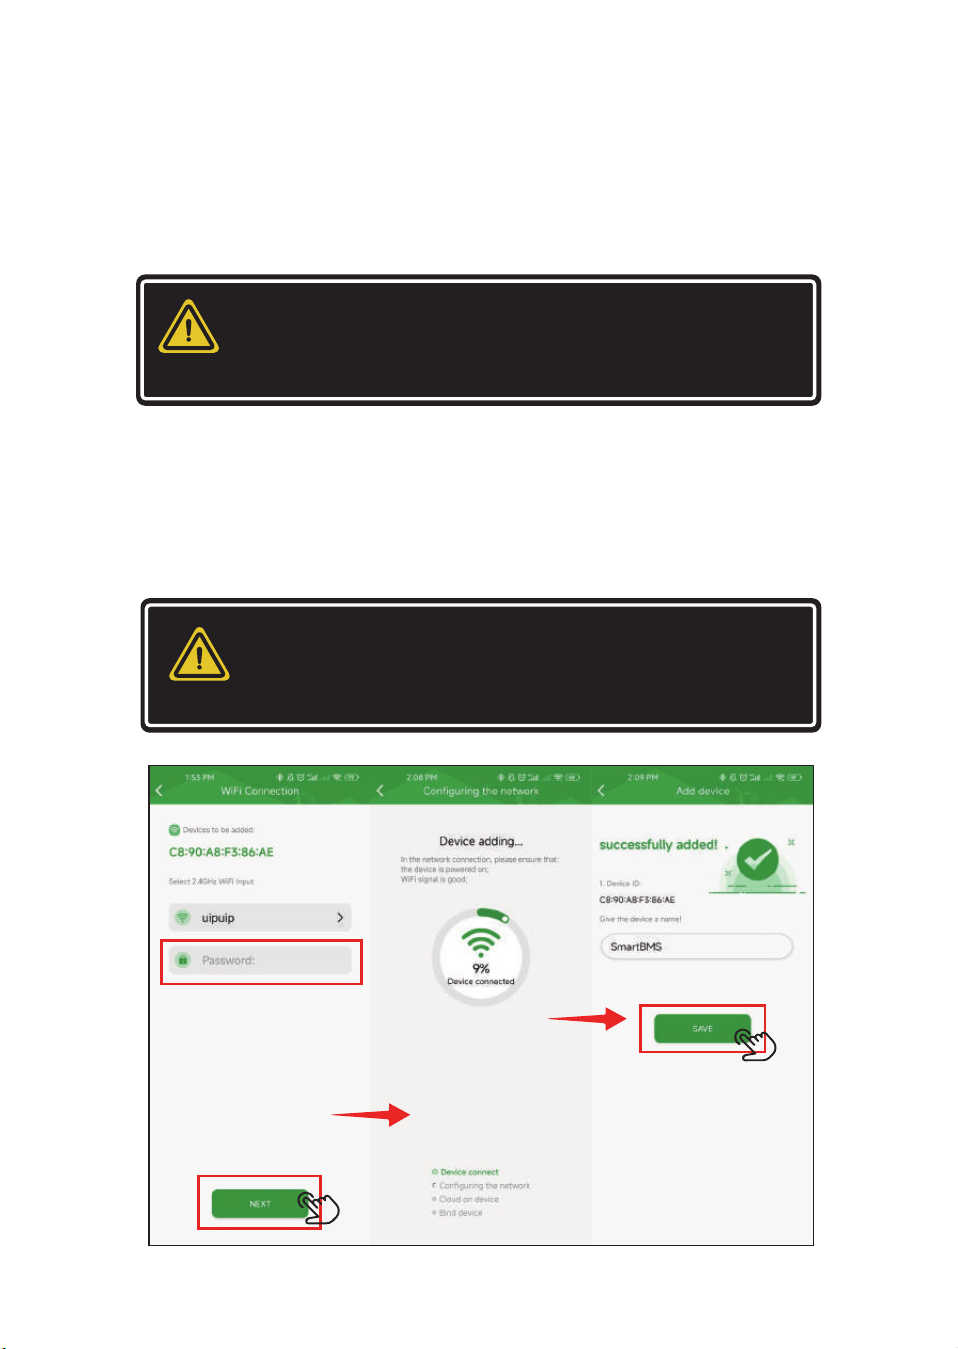
STEP 3 Proceed with the network configuration setup.
▪Click on the device found in Step 2 to go to the network configura-
tion page. Enter the WiFi account and password for the device to
connect to. You can also change the WiFi if needed. After confirming
the password is correct, click Next to proceed to the network config-
uration waiting page.
▪The app and device will automatically perform the following steps:
Connect device, Configure network, Upload device to the cloud, and
Bind device. Please wait patiently.When the network configuration is
complete, it will redirect to this page. Click Save to successfully add
the device and automatically return to the device list page.
-7-
NOTE
The phone must connect to the WiFi first, and the
module only supports 2.4G WiFi. Please verify accord-
ingly.
NOTE
If the network configuration fails, follow the app's
prompt instructions to check the steps and try again.
If it still fails after multiple attempts, save the error
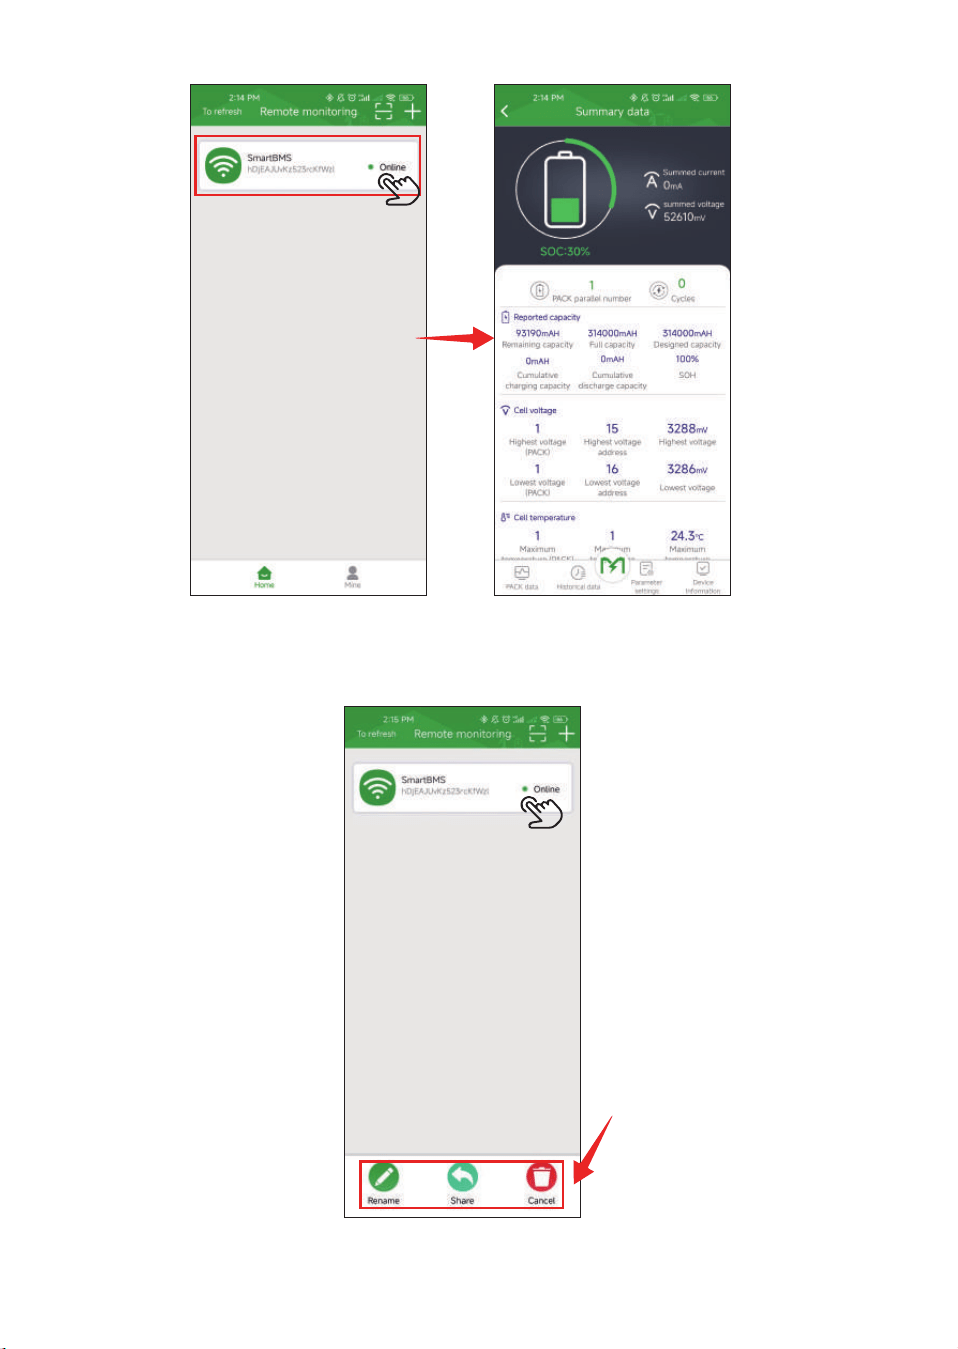
1.3.2.3 To edit or share the device.
-8-
Long press the device button
1.4 Device Information Viewing and Control
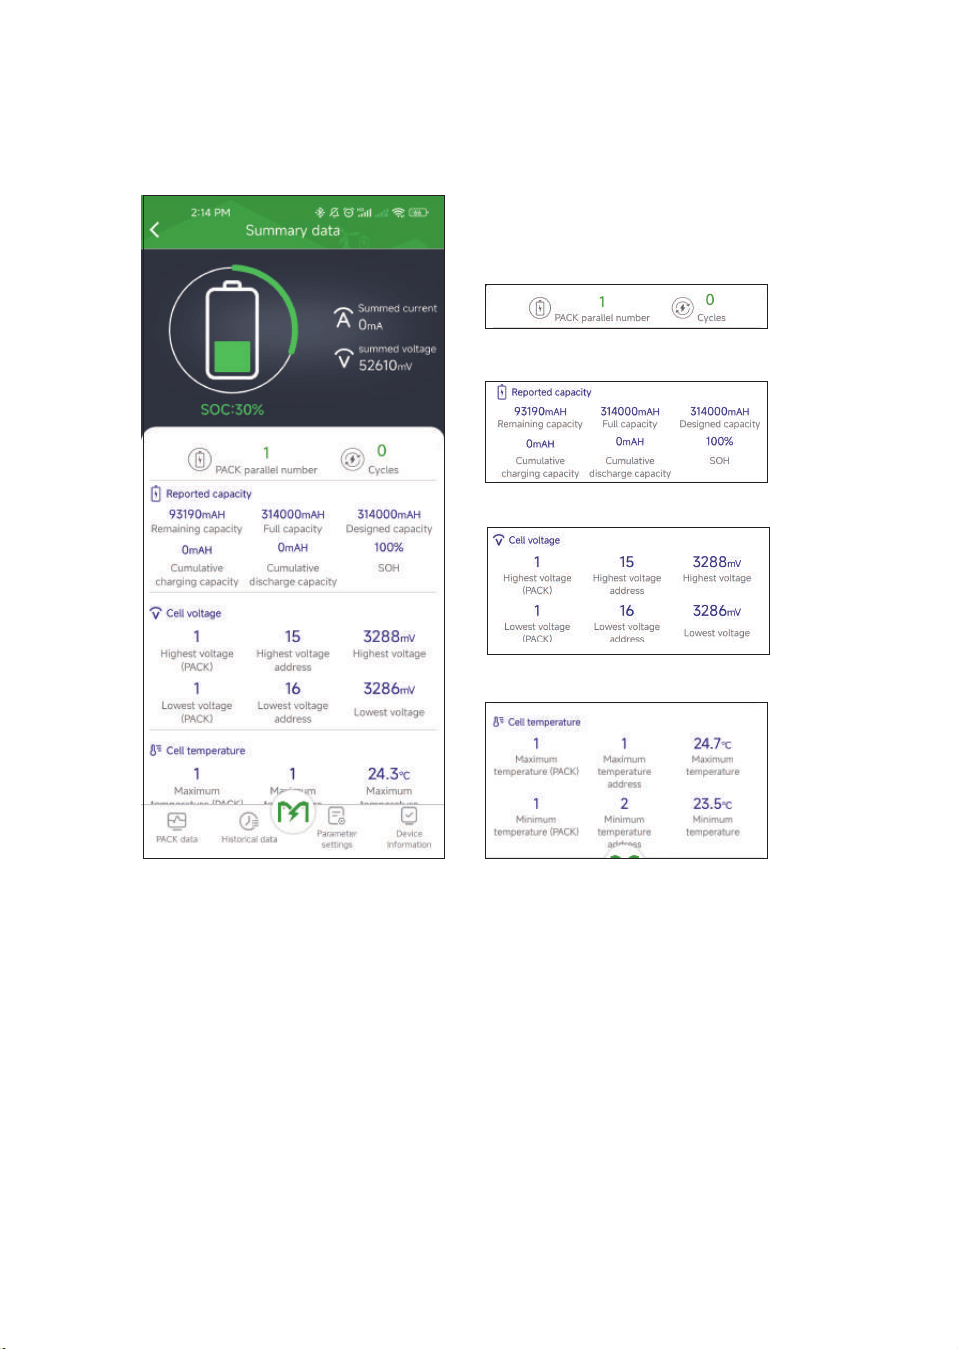
1.4.1 View Summary Data
View the Number of Battery Parallels
View the Battery Capacity
View the Cell voltage
View the Cell temperature
-9-
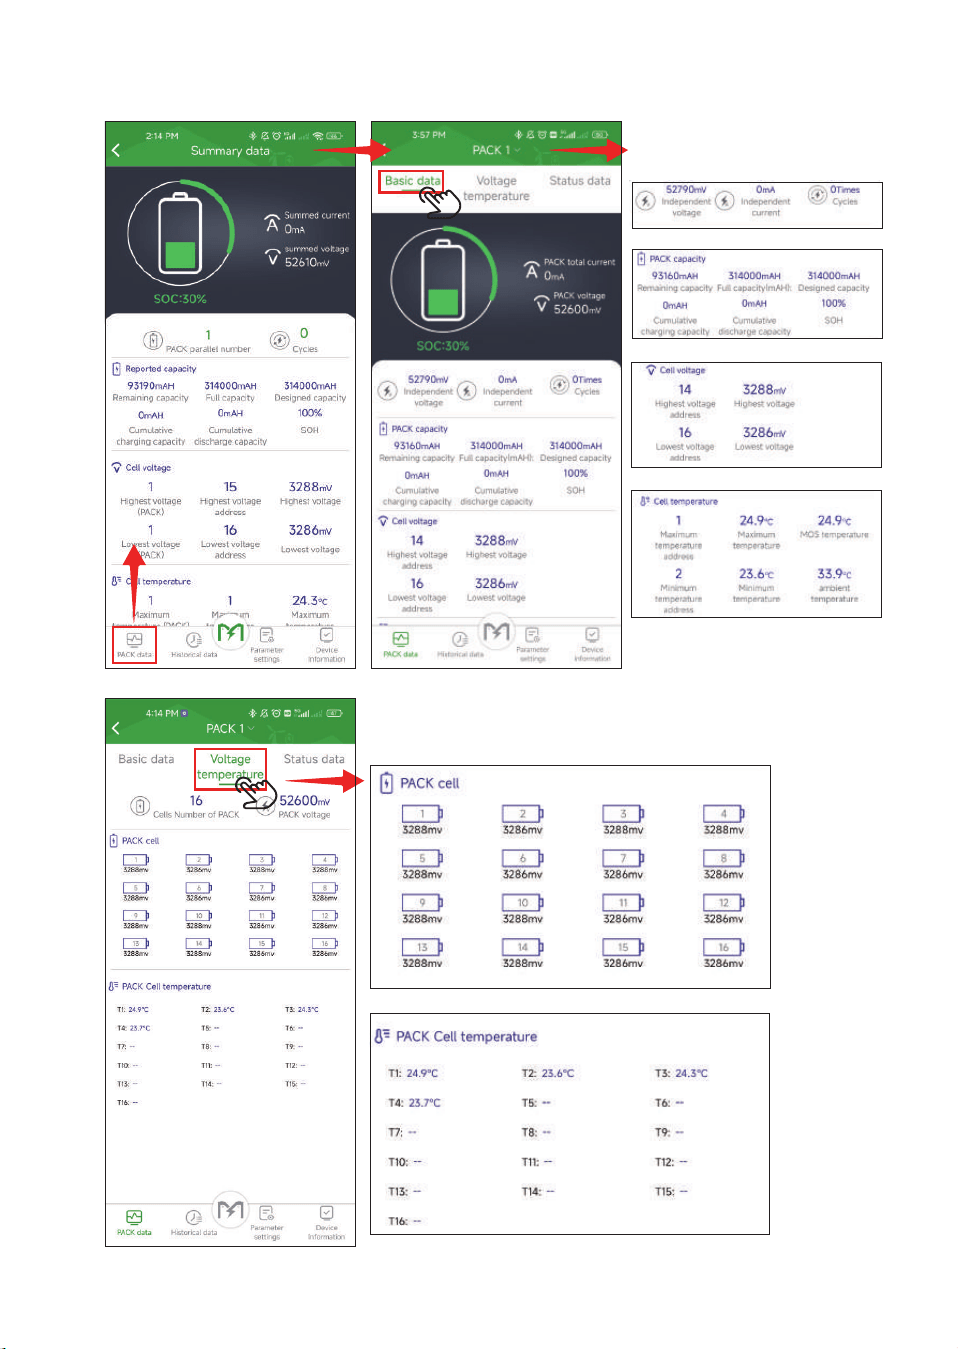
View the basic data of
the individual Pack.
View the more detailed temperature and voltage data
of the individual Pack.
-10-
Click on Pack Data to switch
the interface
1.4.2 View individual packet data
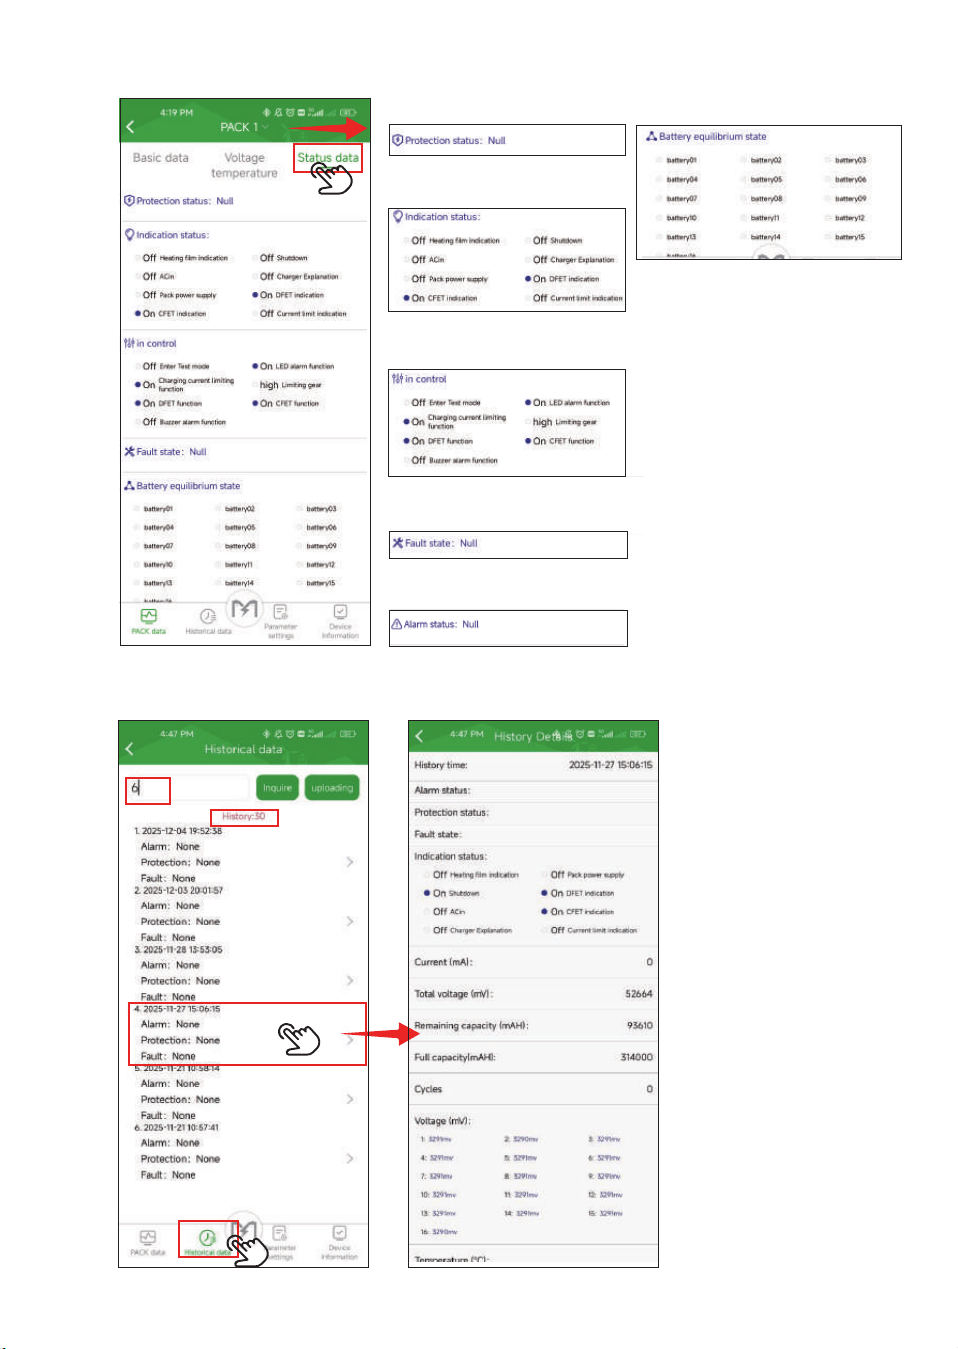
View�protection�
View Indication status.
View the cell balancing status.
View Control Status.
View Fault Status.
View Alarm Status.
-11-
Enter the number of records
to query.
The total number of
records currently
available.
Click on the record to view
detailed information.
Click on Historical Data to
switch the interface.
1.4.3 View historical record data
①
②
③
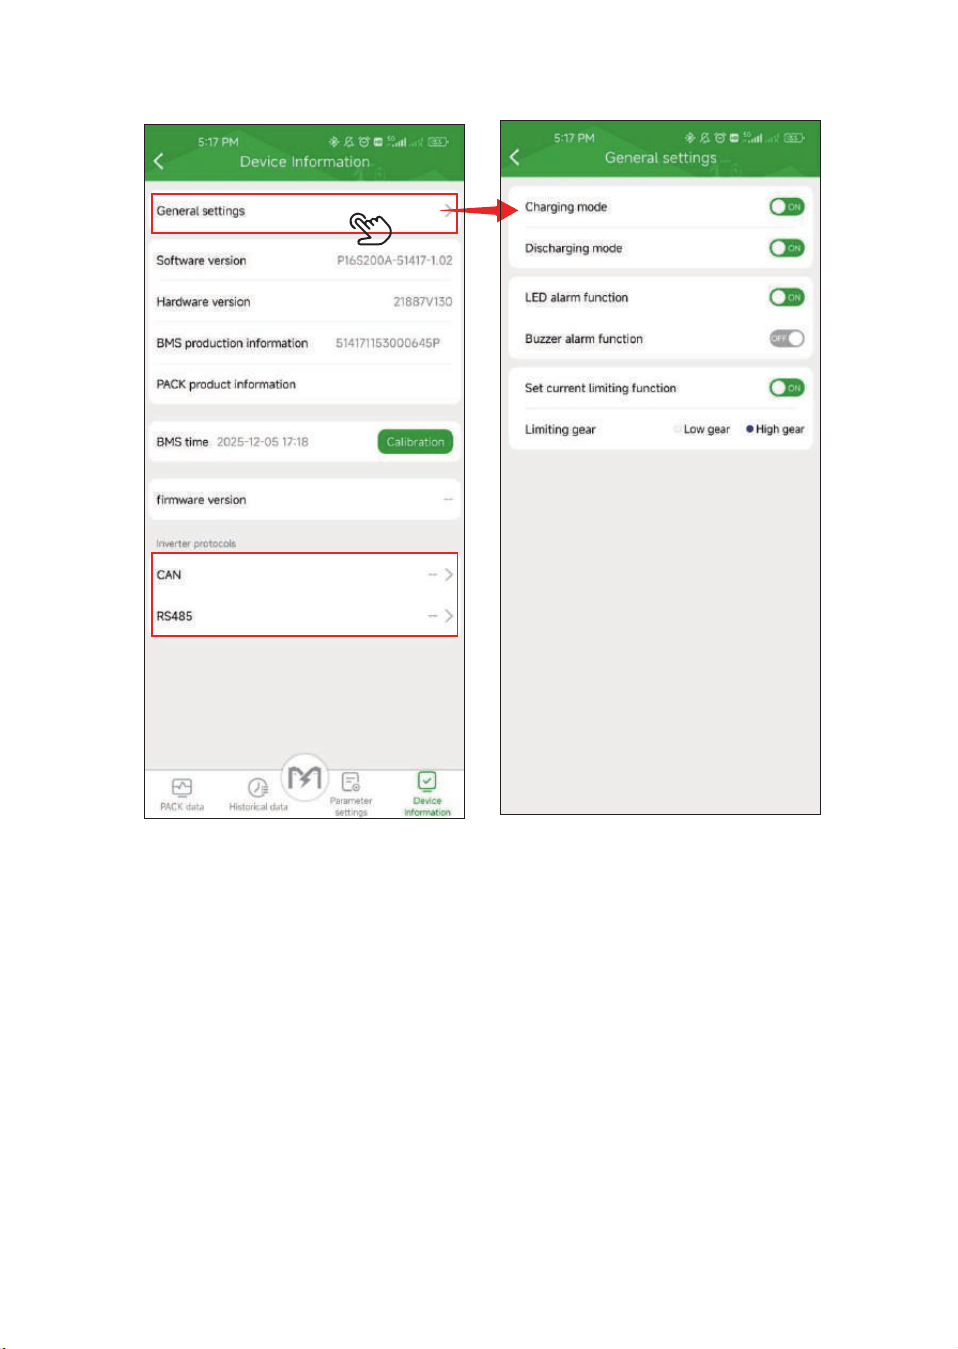
1.4.4 View Device Information
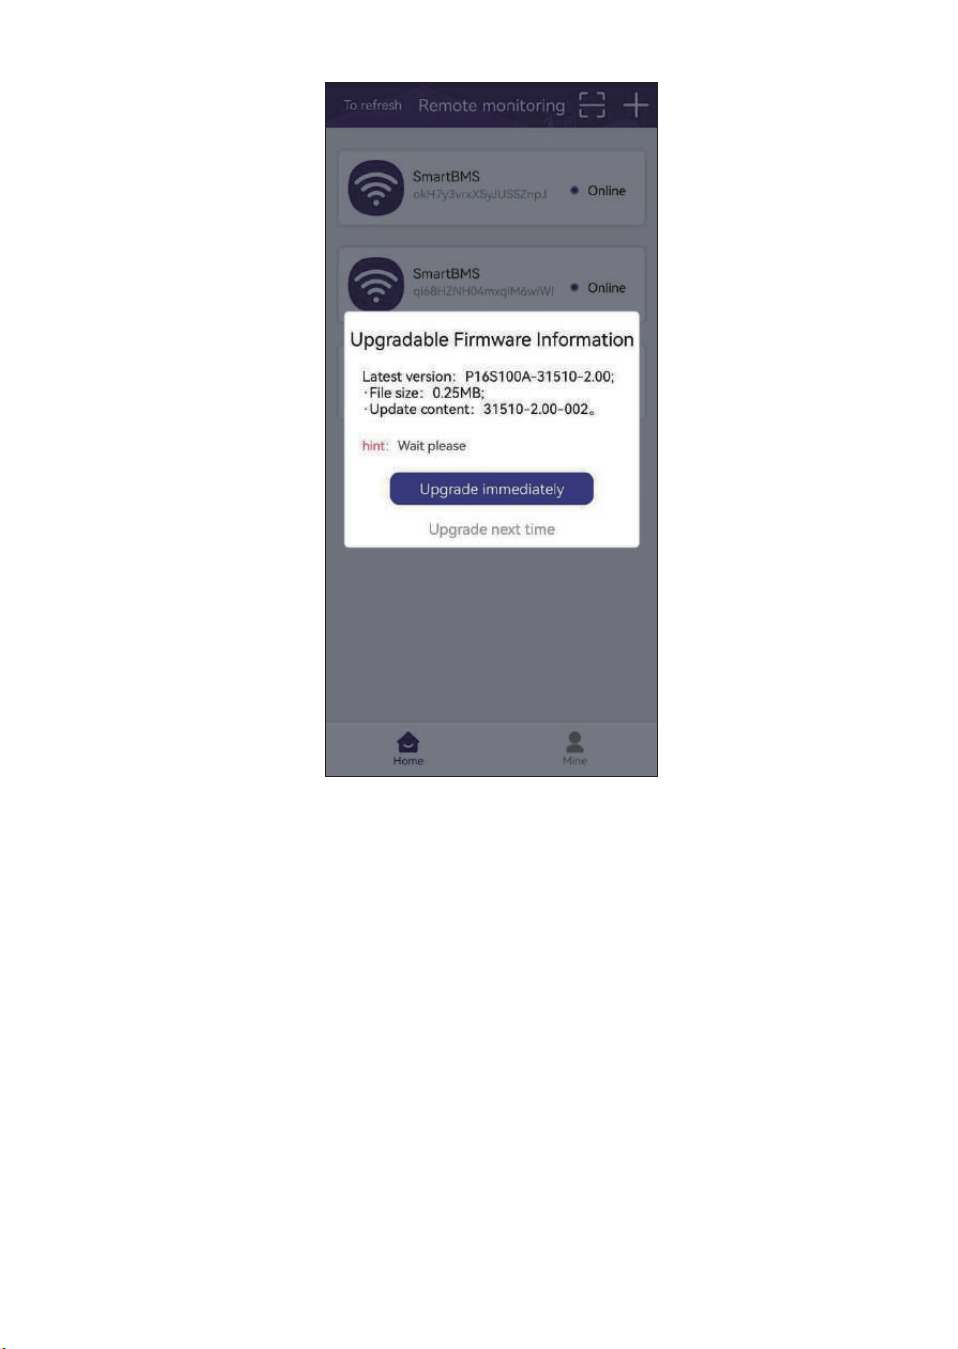
1.5 OTA Upgrade
When a new firmware version is available in the backend, the
APP will display an upgrade pop-up prompt. Here are the two
actions users can take:
▪Click "Upgrade Now": The device will start the firmware upgrade
process.
▪Click "Remind Me Later": The user is taken to the device parame-
ter display and settings pages as usual, without initiating the firm-
ware upgrade.
-12-
Set the communication with
the inverter.
1.6 Account logout and cancellation.
Account logout: After logging out, you can switch to another account
to log in and use it.
Account cancellation: Once canceled, all information and binding
relationships of the account will be cleared, and re-registration will
be required for future use.
-13-
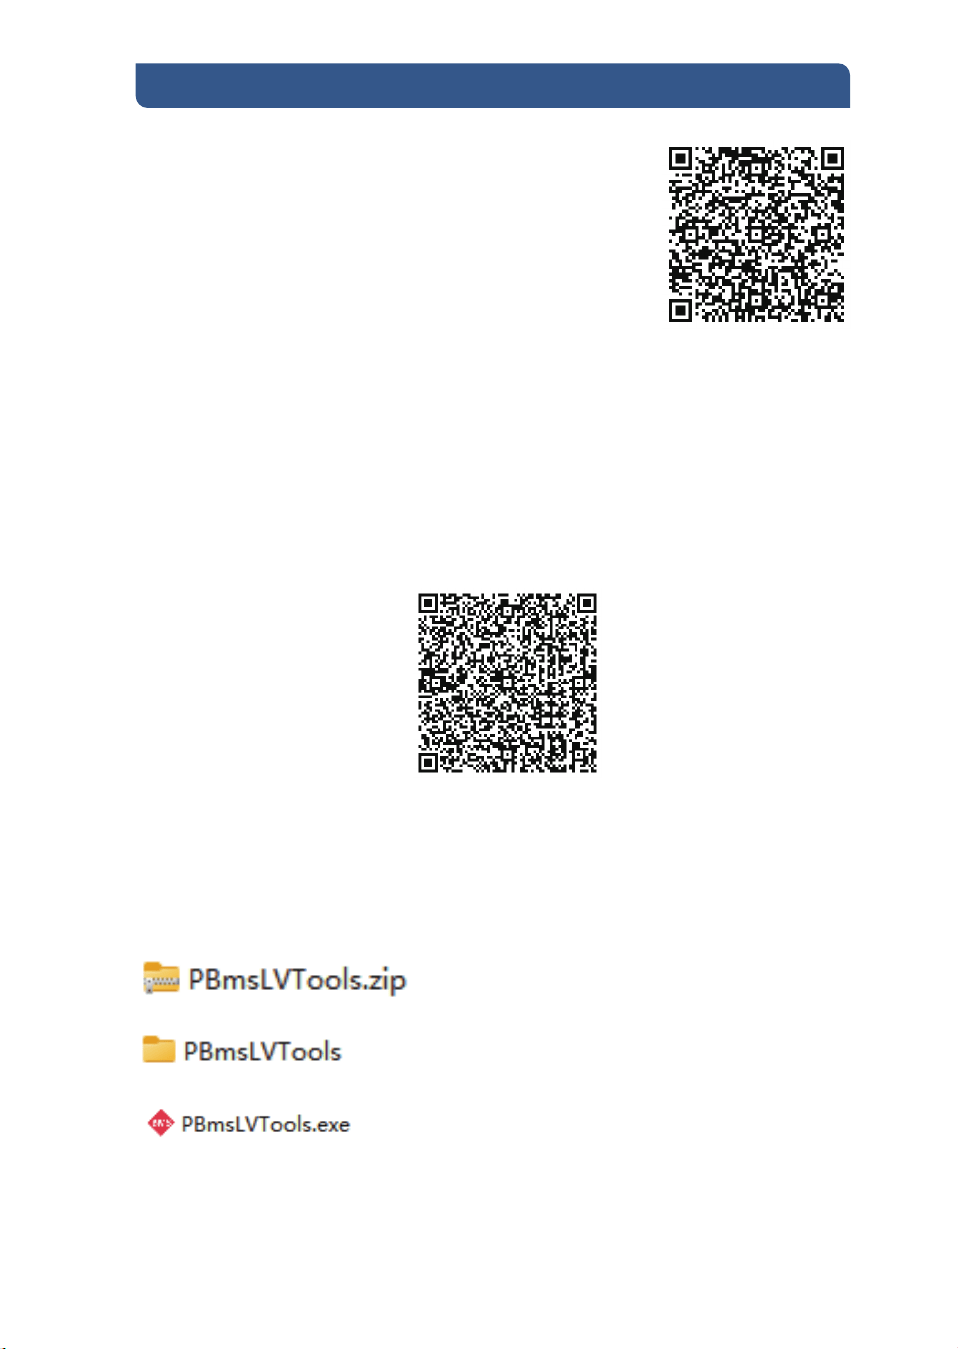
2.1 Download
2.2 Connect the Battery
II. Host Computer User Guide
-14-
Download the file from:
https://app.eco-worthy.com:9008/common/i
dentifier/static/86052e23-5cc9-4a02-bb5a-46
513d551e1c
Preparations
Connect the battery to the PC
Prepare the communication cable in advance; it can be purchased
from the official website(RS232 to USB Adapt Cable).
Connect the RS232-to-USB cable between the battery and the PC.
Unzip:
Click the folder: PBmsLVTools
Locate and double-click: PBmsLVTools.exe
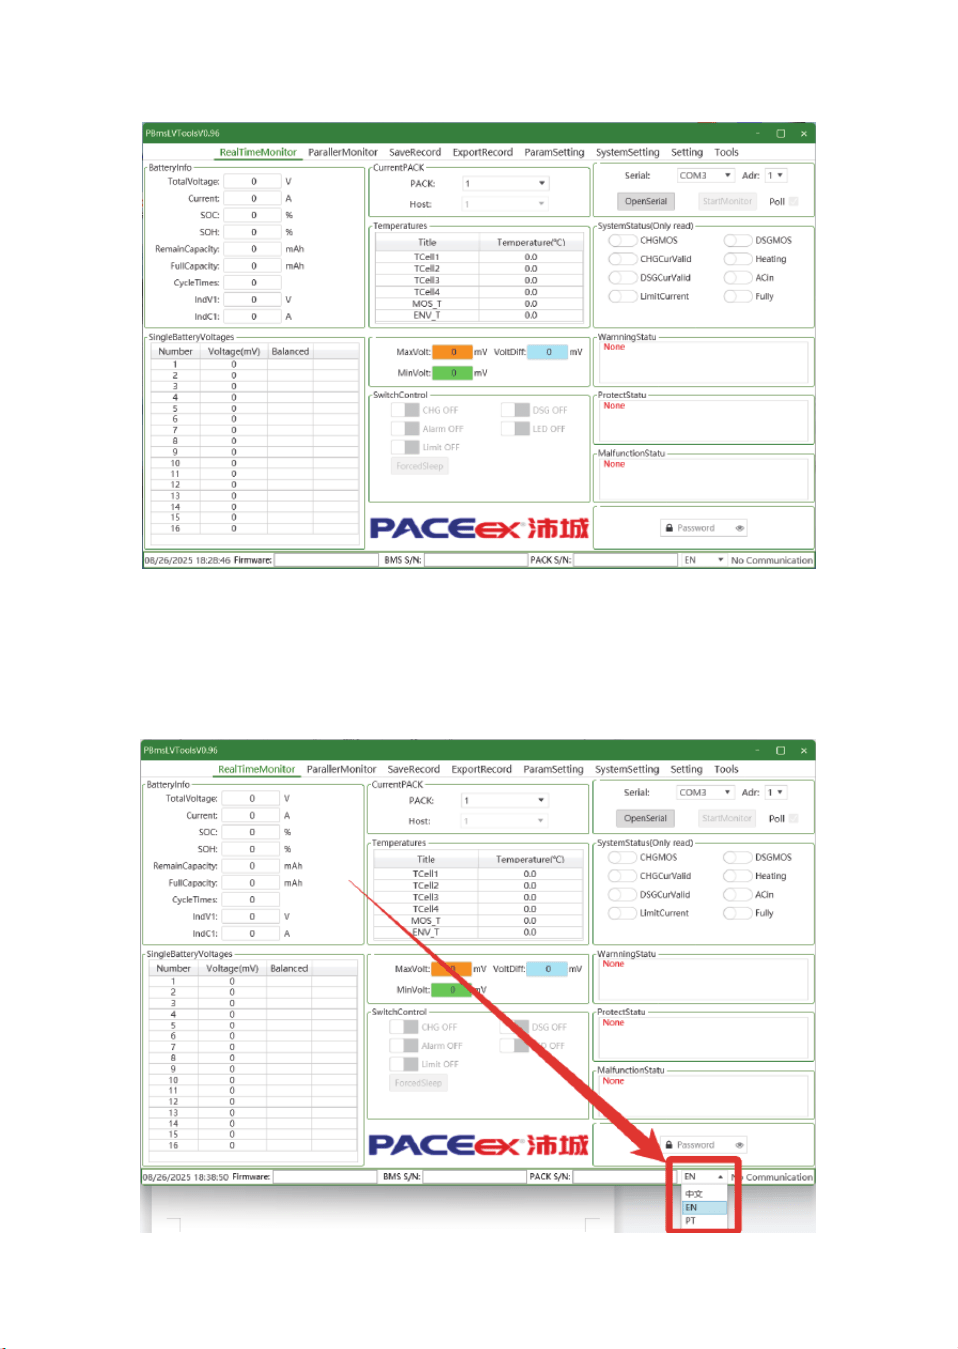
Set Language
In the bottom-right corner of the interface, select your preferred
language.
Initial interface
-15-
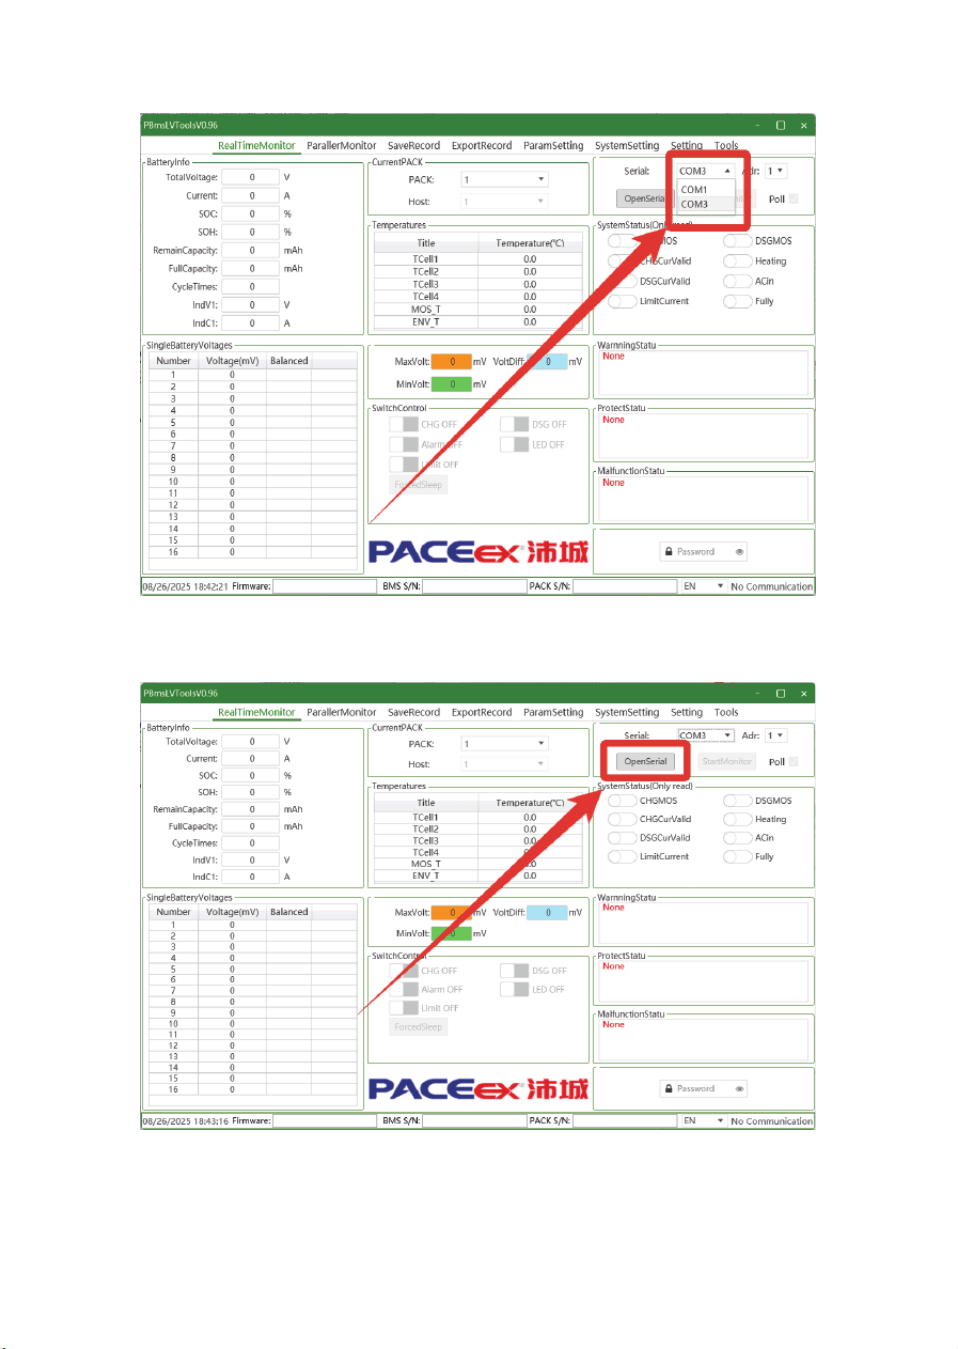
Choose the corresponding COM port:
Then click OpenSerial:
-16-
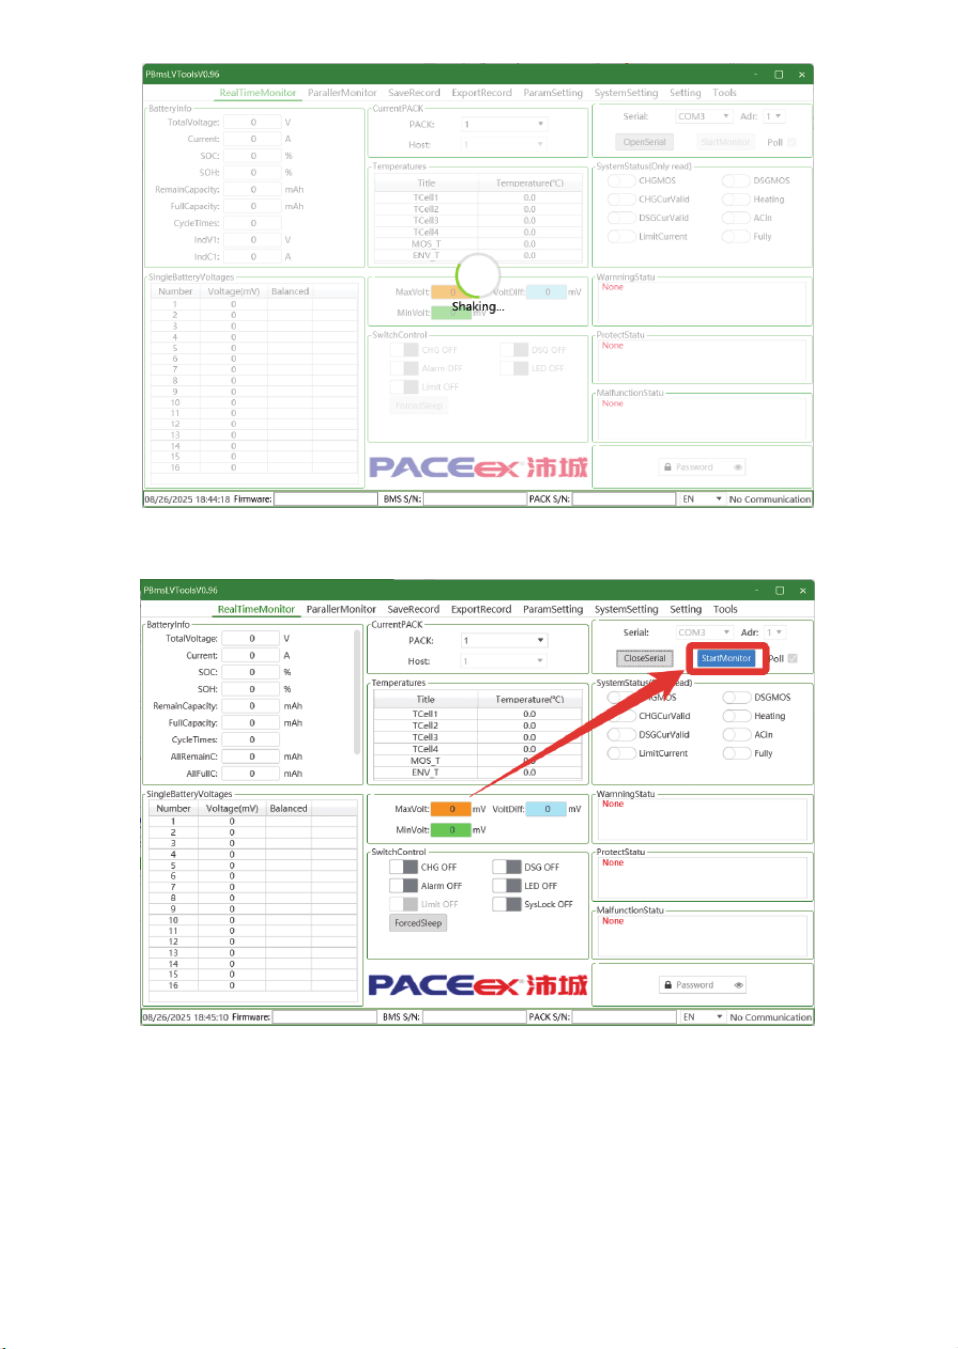
Once connected, click StartMonitor to view the parameters.
-17-
-
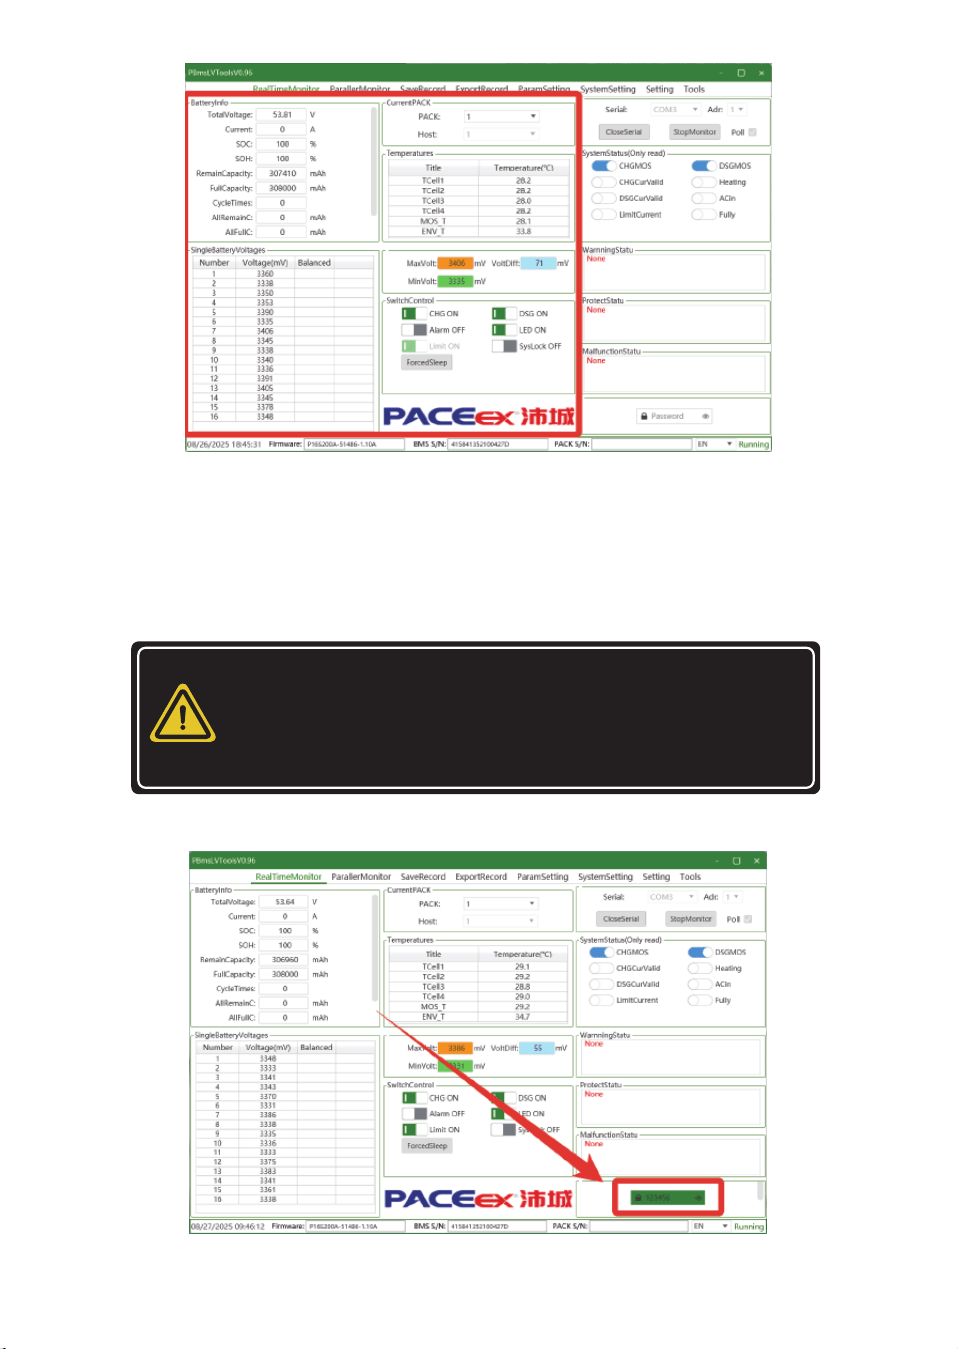
Modifying BMS parameters with the upper computer
software requires authorisation from ECO-WORTHY.
Otherwise, it will be considered an illegal modification
and will result in the loss of warranty eligibility.
WARNING
Logging in with a high-privilege account allows you to modify
various settings and parameters.
Enter the high-privilege password in the bottom-right corner:123456
2.3.1 Log in with a high-privilege account
2.3 Advanced Account Login
-18-
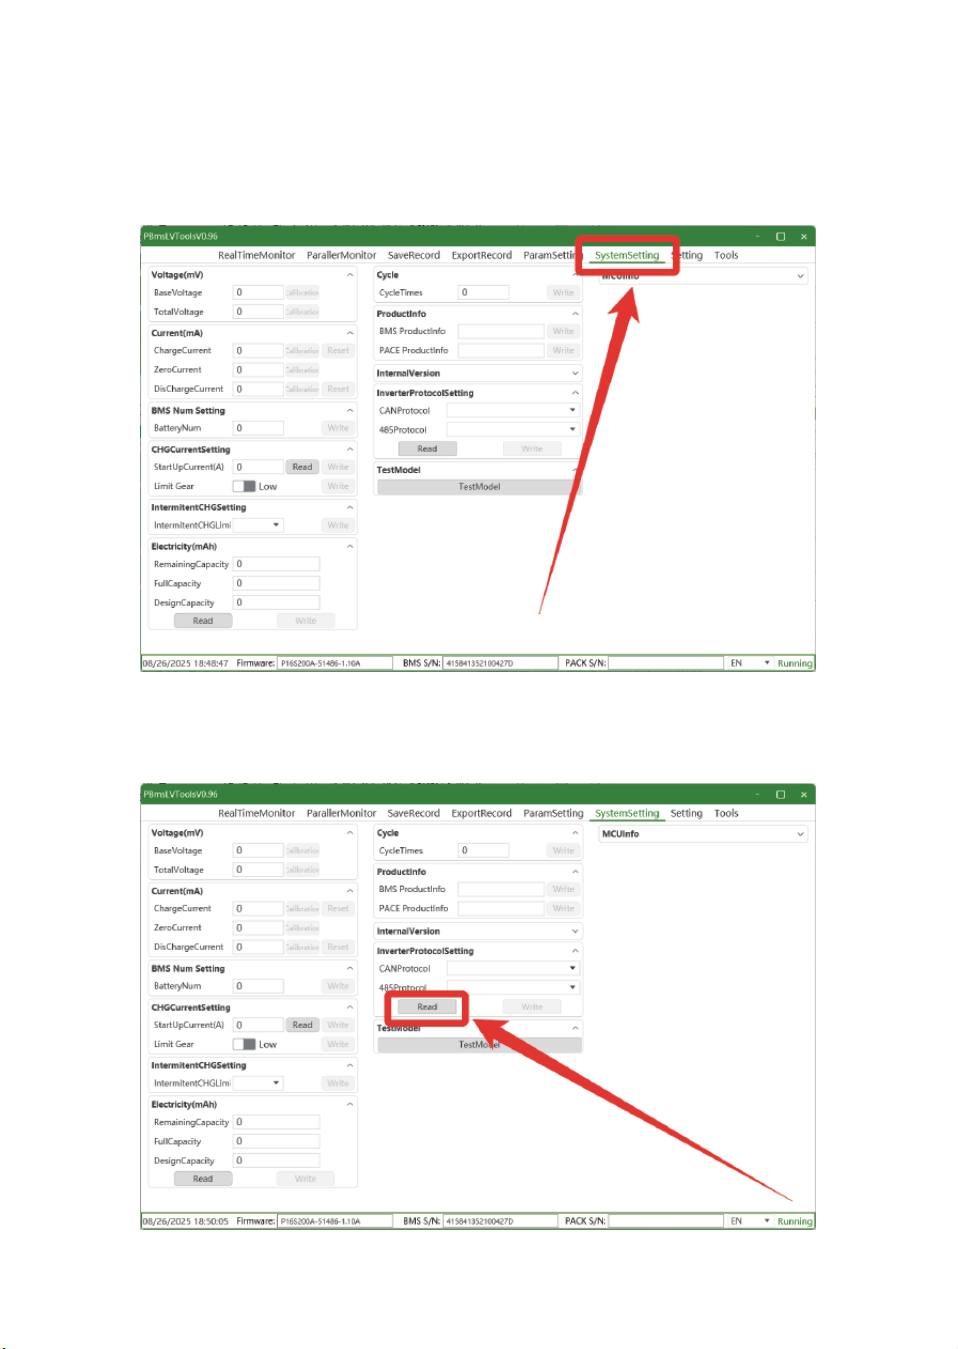
2.4.1 Change the communication protocol
2.4 Modifying the Communication Protocol
Click SystemSetting at the top to open the SystemSetting page.
Click Read to retrieve the current protocol:
-19-
-20-
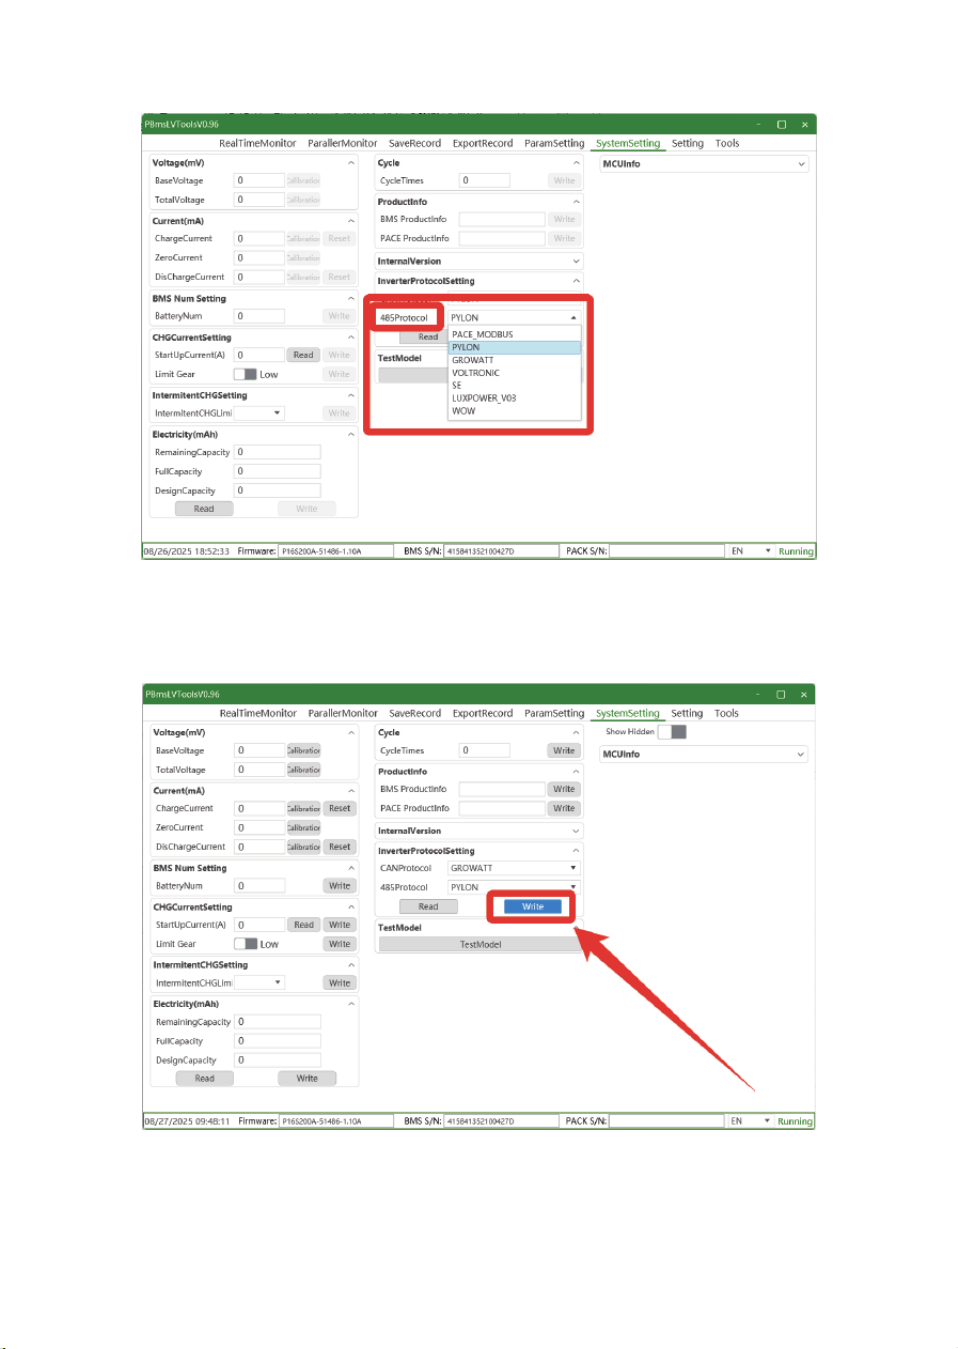
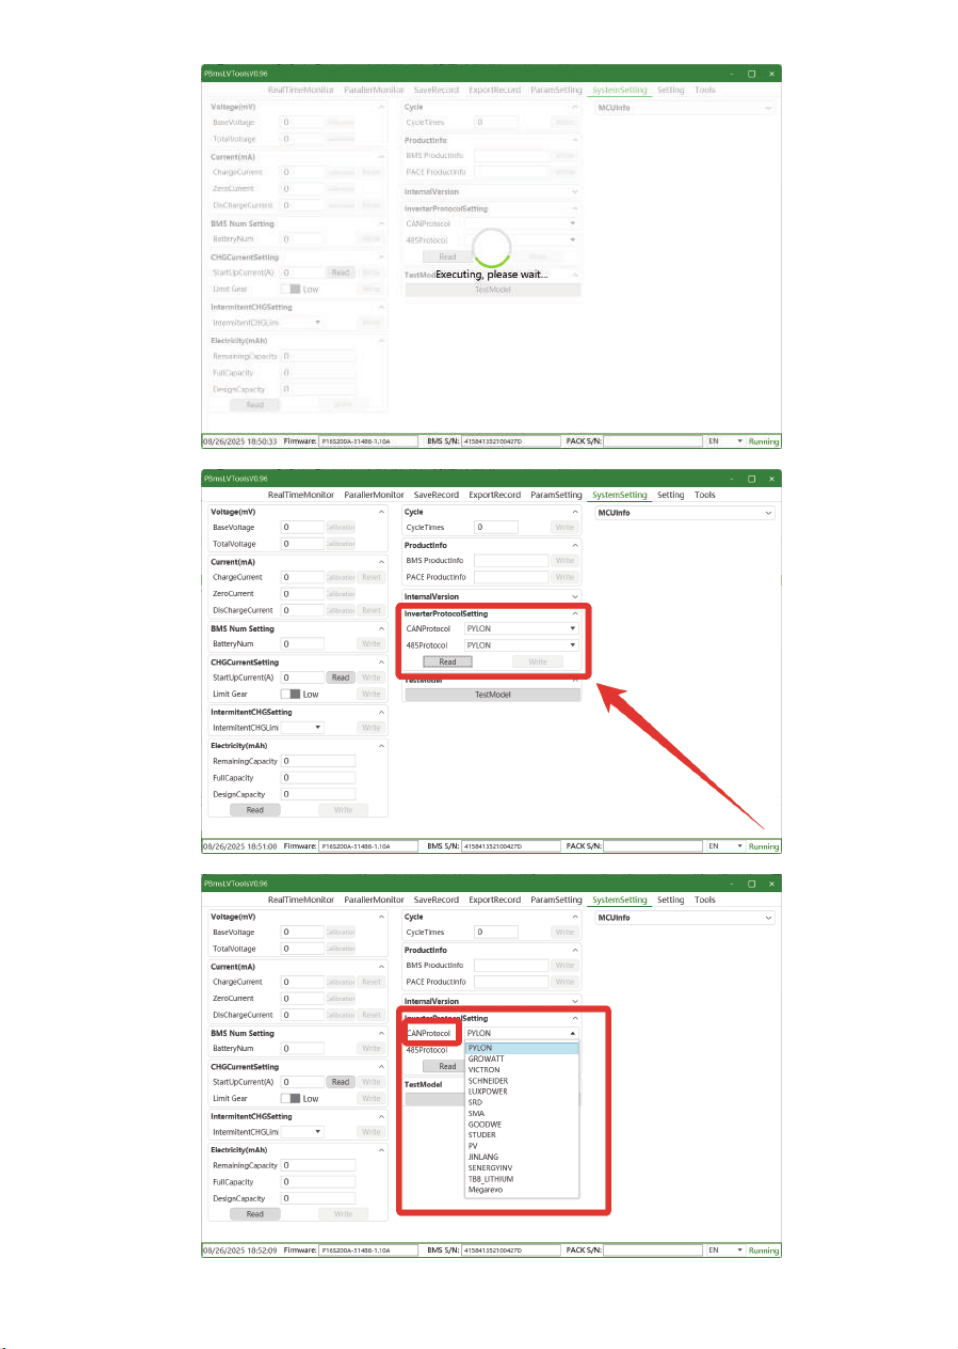
RS485 protocol:
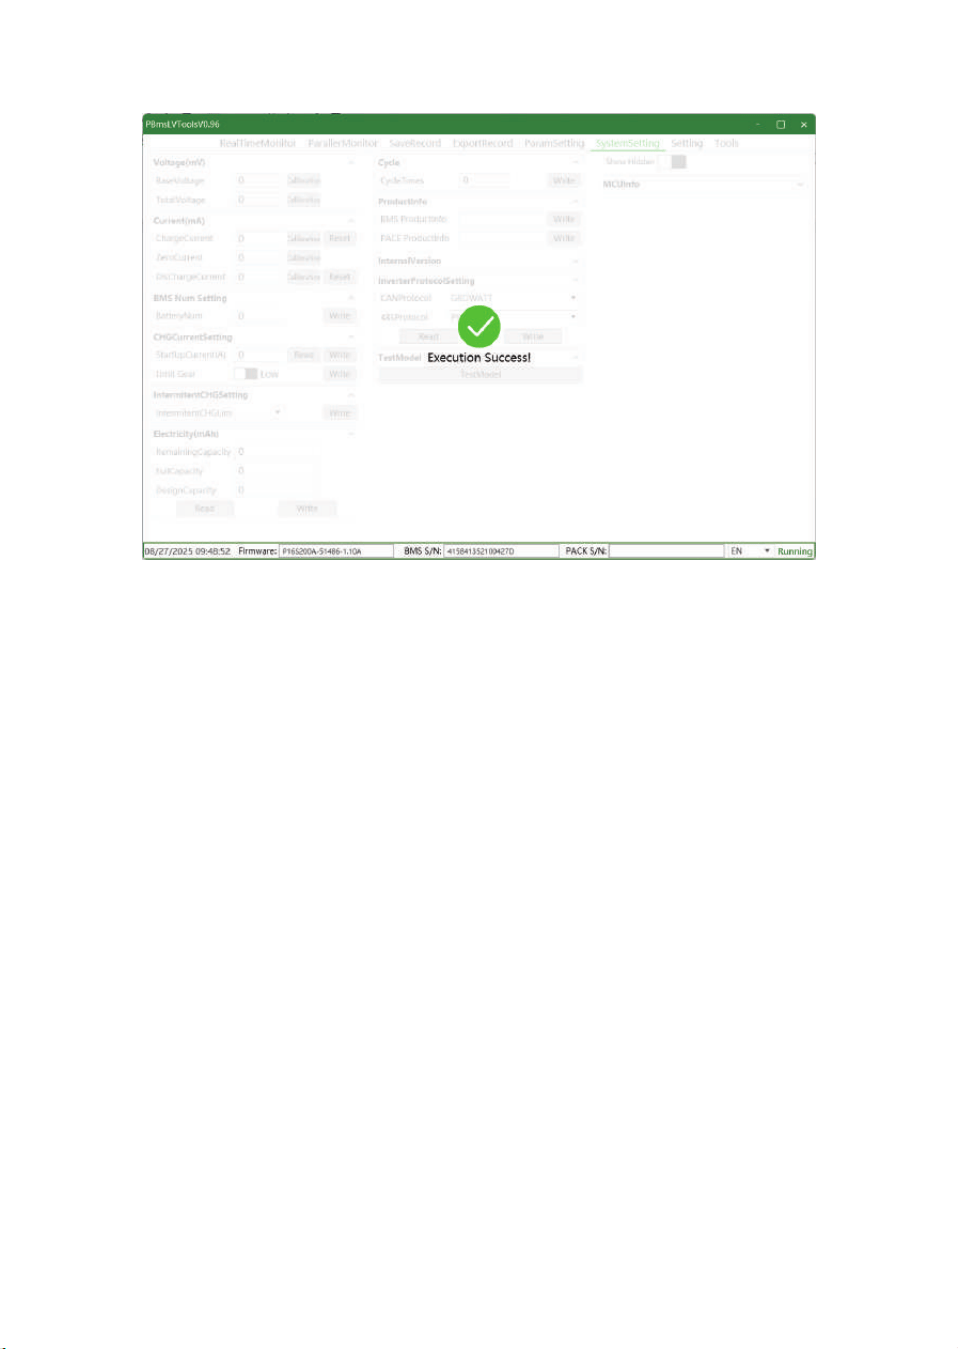
Select the required protocol and click Write:
-21-
-22-
ECO-WORTHY