Portable
Vacuum Cleaner and
Jump Starter
User Manual
IMPORTANT INFORMATION
1. Make sure to keep away from children when using.
2. Do NOT aim the suction nozzle at the eyes or ears during use.
3. Do NOT immerse in or rinse with water the battery pack or
vacuum housing.
4. This vacuum’s jump starter is designed to jump-start 12V vehicle
lead-acid batteries only. Do not use with other types of batteries.
Read all safety instructions before use. Failure to follow the safety
instructions may result in property damage, personal injury or re.
80242 Manual v1
01/24
IMPORTANT SAFETY INSTRUCTIONS -
KEEP MANUAL FOR FUTURE REFERENCE
MADE IN CHINA
Distributed by Jasco Products Company LLC,
10 E. Memorial Rd., Oklahoma City, OK 73114.
This Jasco product has a 5-year limited warranty.
Visit www.byjasco.com for warranty details.
Questions? Contact our U.S.-based Consumer
Care at 1-800-654-8483, M-F, 7AM-8PM Central Time.
For product patent information,
visit www.byjasco.com/patents.
Thank you for your purchase!
Instructions
made easy
Register your
product
Discover charging
cables and other mobile
device accessories at
www.byjasco.com
Like our product?
Leave a review
on your favorite
retailer website or
amazon.com.
Having problems?
Let us know how
we can help.
Call 1-800-654-8483,
M-F, 7AM-8PM
Central Time.
Read instructions or watch
an easy-to-follow video.
Scan code or visit
byjasco.com/80242i
Receive exclusive deals and
register your product.
Scan code or visit
byjasco.com/deals
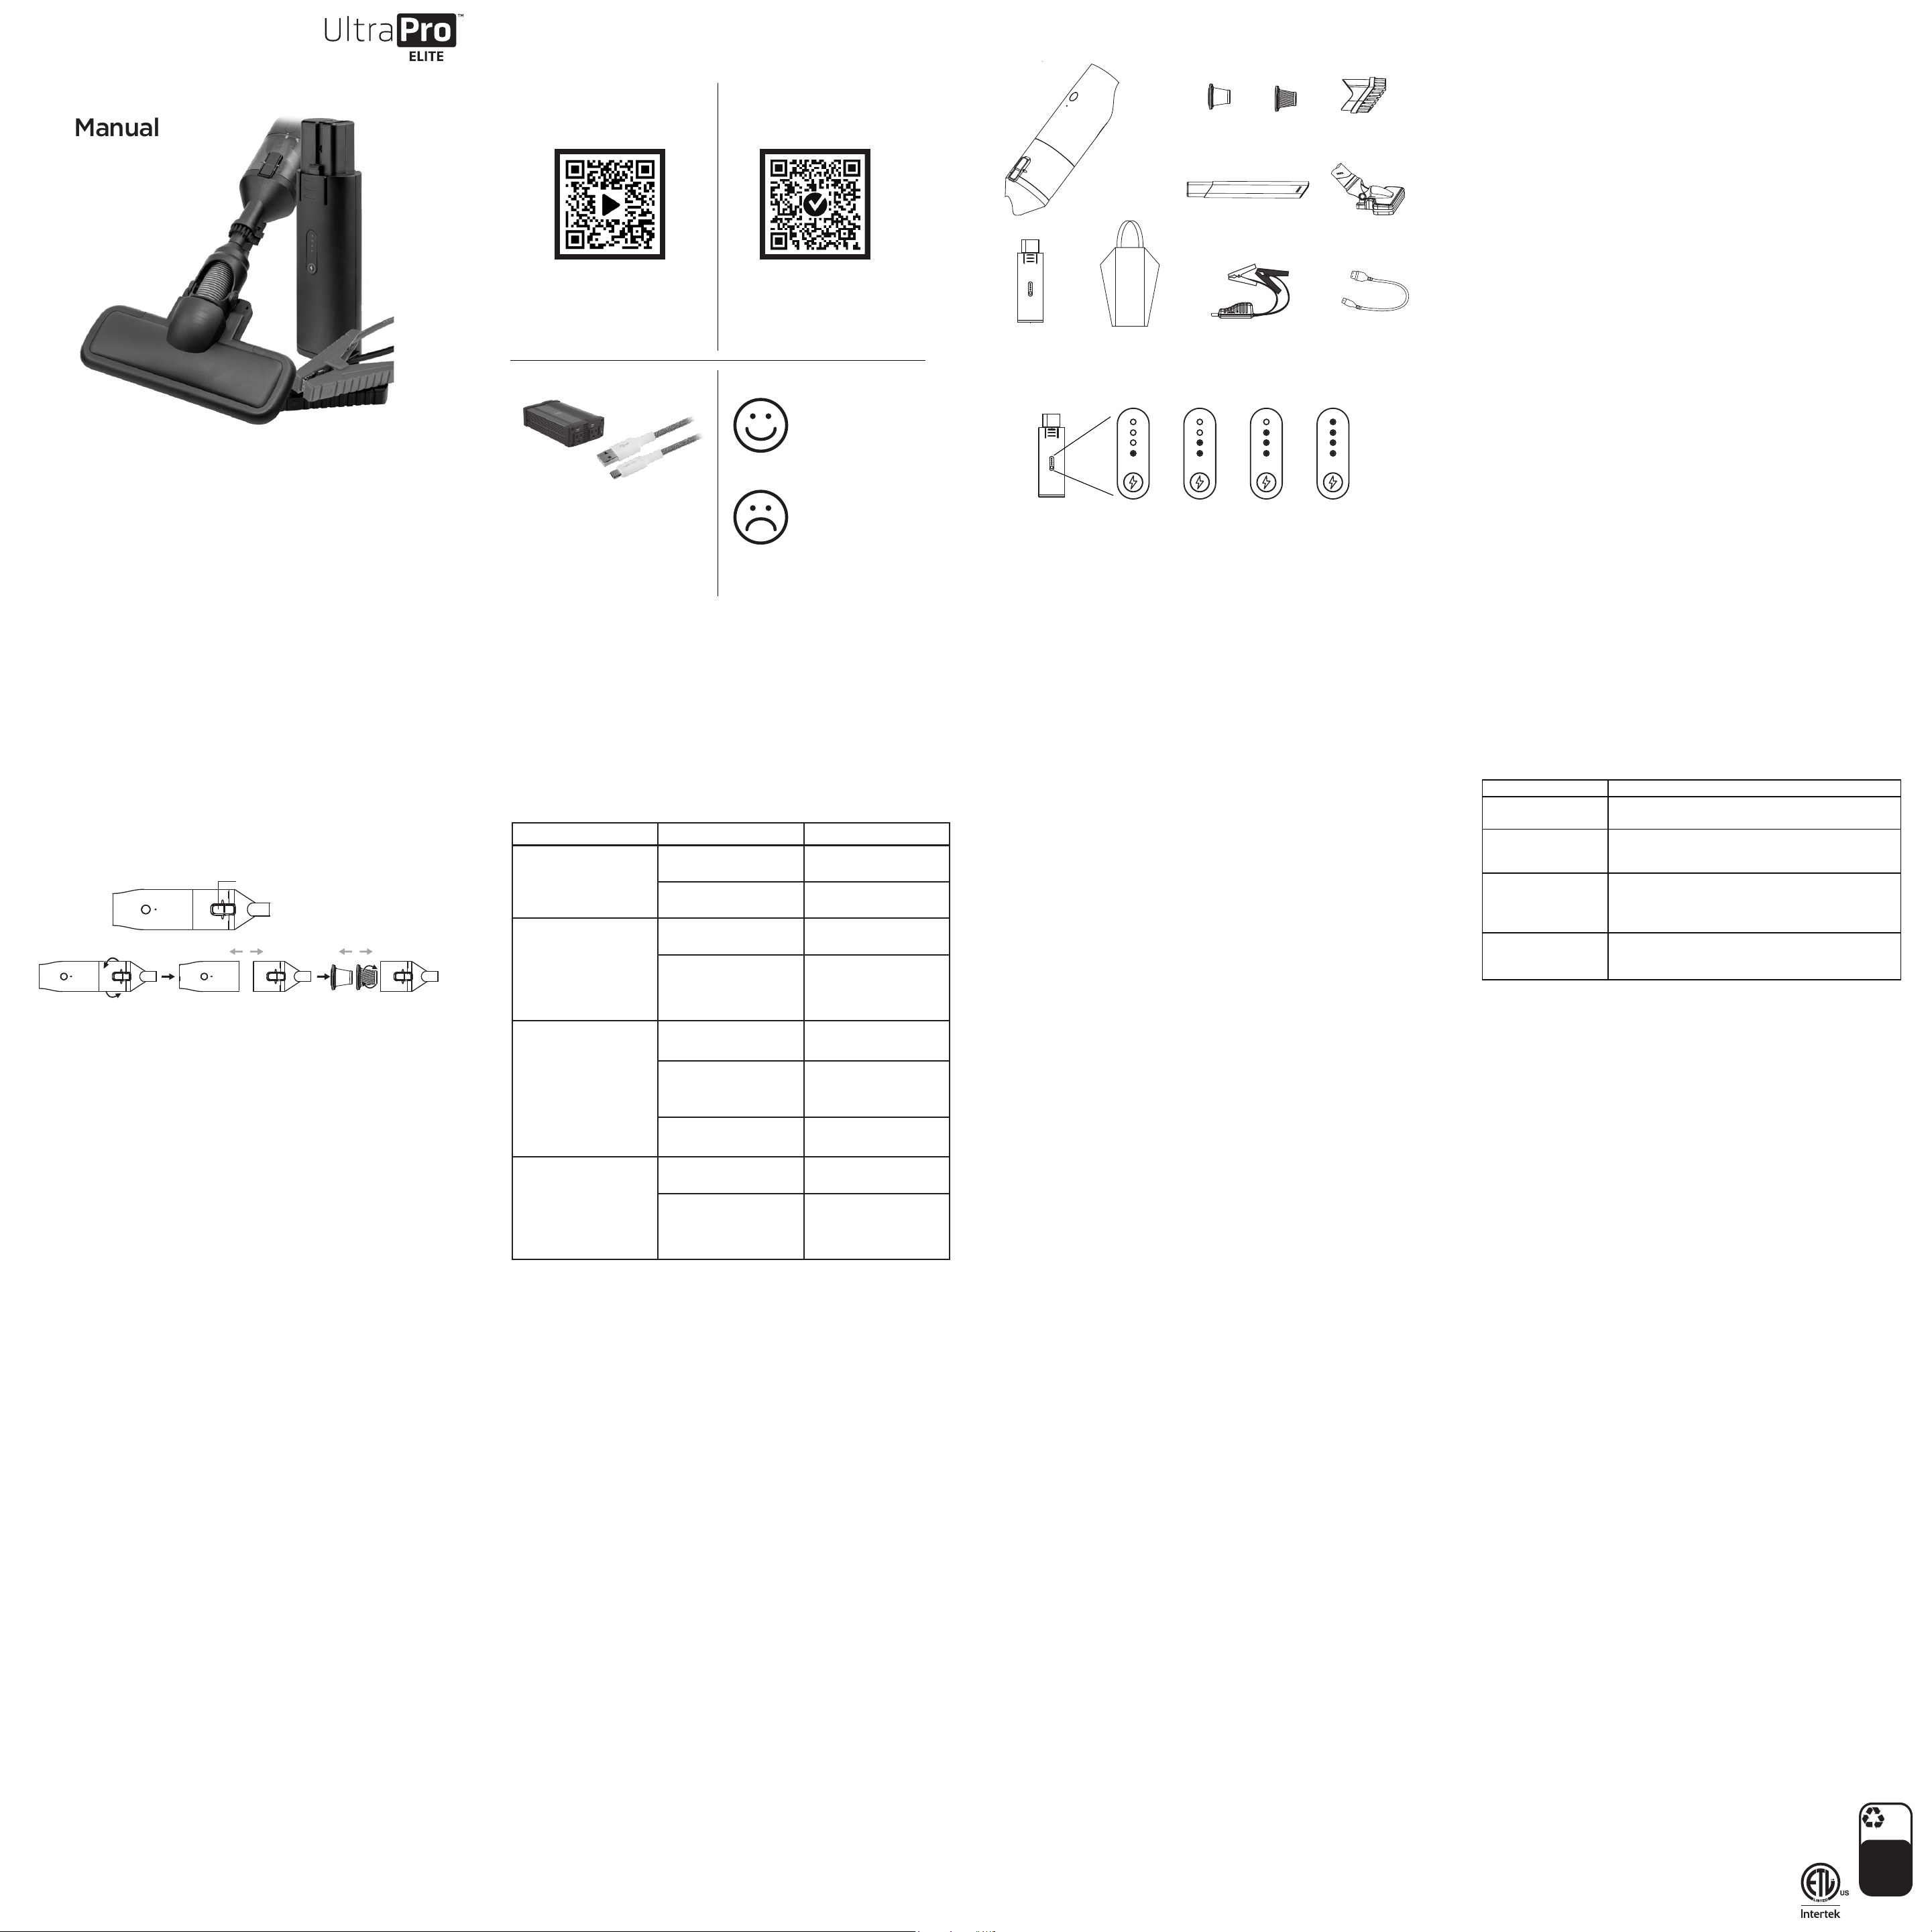
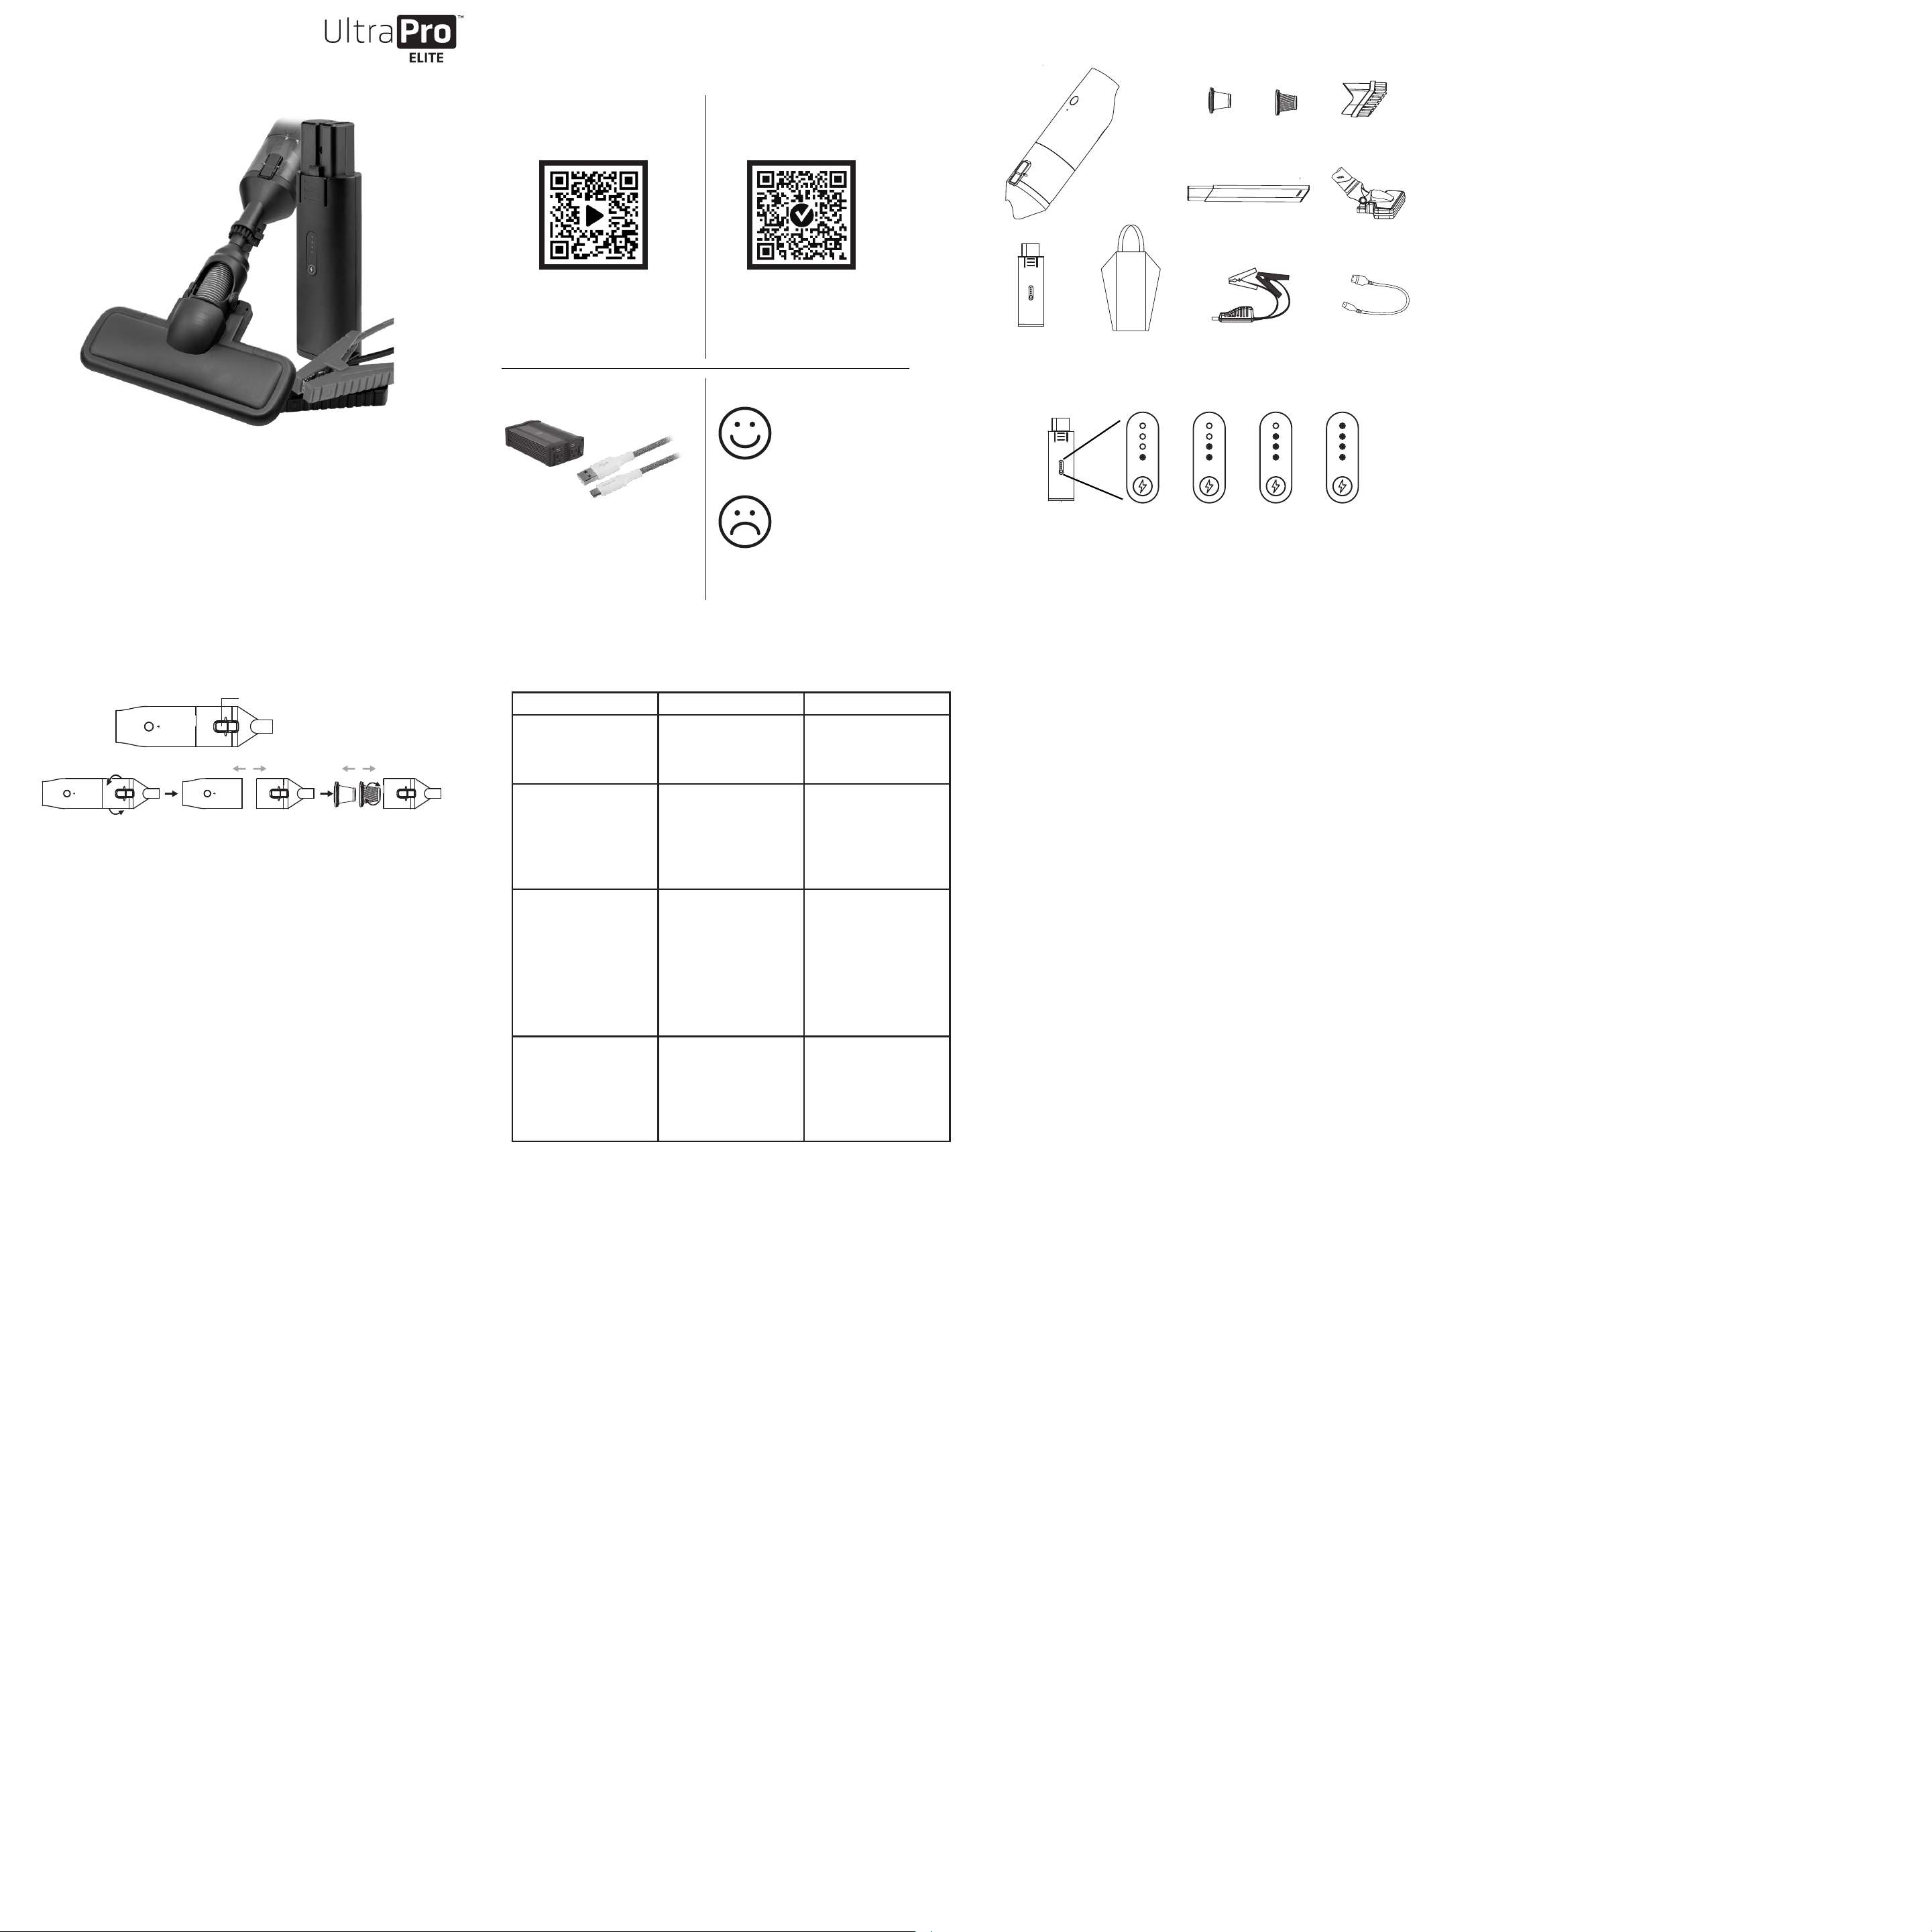
Package contents
Charging the battery pack
1. This lithium-ion battery comes partially charged. Be sure
to fully charge the battery pack before use. To charge the
battery pack, connect the included USB cable to a USB-A
power supply (not included) and the battery pack’s
USB-C port.
2. The battery’s blue indicator light will blink while charging and
change to a steady glow when the battery is charged at 25%,
50%, 75% and 100%. Battery is fully charged when all four
blue indicator lights are lit but no longer blinking.
3. To check the battery level, press and release the power
button on the battery pack. The blue indicator lights will
illuminate.
Vacuum Cleaner
Assembly
1. Align the battery pack’s ON/OFF button and blue indicator
lights with the top of the vacuum housing.
2. Insert the battery pack into the vacuum housing, making
sure it snaps rmly into place on the front and back. You’ll
hear a click when the connection is secure.
3. To remove the battery pack from the vacuum housing,
press the ridged areas located on the front and back of the
battery pack and pull apart the battery pack and vacuum
housing.
Insert the vacuum attachments
1. Dust brush: This attachment is located on the vacuum.
Slide the dust brush downward until you hear a click,
which indicates it’s locked into place. Slide the dust brush
up and out of the way when using other attachments.
2. Floor brush: Insert the oor brush into the vacuum’s air
inlet, making sure it ts snuggly into place. The oor brush
can also be used with the vacuum extender by inserting it
into the end of the extender in the same manner.
3. Extender/crevice tool: To extend the reach of the vacuum,
you may use one or both of the extenders. Insert the
extender, labeled “1,” into the vacuum’s air inlet. When
using both extenders, insert the second extender/crevice
tool, labeled “2,” into the rst extender. Both should be
inserted fully and t snugly.
Operation
1. To turn on the vacuum, press and hold the vacuum’s ON/
OFF button for 1 second. The blue indicator light will turn
on and the vacuum will power on at low speed.
2. To increase suction power, press and release the ON/OFF
button to advance from low speed (12kPa) to high
speed (22kPa).
3. To turn o the vacuum, press and hold the ON/OFF
button for 1 second. The blue indicator light and vacuum
will turn o.
Cleaning the dust cup and steel mesh filter
1. Turn o the vacuum and wait until it has completely
stopped.
2. Press the dust cup’s latch to open the dust cup. Empty
debris into a trash receptacle. Emptying the dust cup is
recommended after each use.
3. To clean the dust cup’s steel mesh filter, remove the dust
cup by rotating it from the locked to unlocked position
using the dust cup’s padlock icons as a guide.
4. Grasp the filter’s crossbar and pull out the filter.
5. To separate the steel mesh filter from the paper filter, hold
the black rubber ring of the paper filter, then follow the
padlock icons on the bottom of the orange steel mesh
filter and twist the steel mesh filter to the unlock position.
Both filters should come apart easily.
6. Clean steel mesh filter with water, then allow it to dry
completely before reassembly.
7. Insert replacement paper filter, if needed, into the steel
mesh filter and twist to the lock position.
8. Insert filter into the dust cup.
9. Align the dust cup and vacuum, then twist to the lock
position.
Troubleshooting
PROBLEM CAUSE SOLUTION
Reduced suction Dust cup is full
Filter is dirty
Empty then clean
dust cup
Clean or replace
filter/cup
Abnormal noise
during use
Vacuum inhaled
large particles
Displacement of
internal parts
Turn o vacuum and
remove debris
Turn o vacuum
and contact service
technician for repair
and/or replacement
Stopped working Insucient
battery charge
Overheat protection
due to air duct
blockage
Battery pack
is damaged
Charge battery pack
Clean air duct
Restart vacuum after
motor cools
Contact service
technician for repair
Automatic
shutdown
Battery pack
error signal
Temperature of air
outlet is too high
Re-plug or replace
the battery pack
Allow temperature
to drop before
turning on the
vacuum
Mobile Device Charging
1. Connect your mobile device to the USB-C port using a
USB cable.
2. Press and release the battery’s power button to turn on the
battery pack. The battery pack will automatically turn o
after mobile device charging is complete.
Emergency Jump Starter
Jump-starting a 12V vehicle
1. Before beginning, verify the battery you wish to jump is a
12V lead-acid battery.
2. Press and release the power button to turn on the battery
pack. The battery pack will automatically turn off following
inactivity.
3. Insert the jumper cable plug into the battery pack.
4. Connect the battery clamps based on the vehicle’s
ground system:
a. Negative-ground system (common) – Connect the
red clamp to the vehicle’s positive battery terminal.
Then, connect the black clamp to the negative battery
terminal or a stationary area of the vehicle chassis.
b. Positive-ground system (rare) – Connect the black
clamp to the vehicle’s negative battery terminal. Then,
connect the red clamp to the positive battery terminal
or a stationary area of the vehicle chassis.
5. Check the LED indicator chart on the next page to ensure
the cable connection is correct before proceeding.
6. Start the vehicle.
7. Allow the engine to run and remove the battery clamps
based on the vehicle’s ground system:
a. Negative-ground system (common) – Disconnect
the black clamp followed by the red clamp from the
vehicle battery.
Lithium-ion
battery pack
Intelligent
jumper cables
USB cable
25% 50% 75% 100%
b. Positive-ground system (rare) – Disconnect the red
clamp followed by the black clamp from the vehicle
battery.
8. If your vehicle does not start after four attempts, stop the
jump-starting process and contact a qualied technician
for assistance.
2. Once a correct connection is conrmed, press the boost
button and attempt to start the vehicle.
CAUTION
NEVER press the boost button before connecting the battery
clamps to the vehicle battery. This can cause dangerous
sparks when connecting the clamps to the battery or if the
clamps contact each other. ONLY press the boost button
after properly connecting the battery clamps to your
vehicle battery.
USE the boost mode with extreme caution. If you are
uncomfortable, contact a qualied technician for assistance.
Battery care and maintenance
Charge the battery pack every three months and inspect the
condition of the jumper cables and battery clamps. Do not use
the battery pack or cables if they are damaged. Clean with a
soft, dry cloth.
Battery disposal
The battery pack contains a lithium-ion battery. Follow all
applicable state and federal laws for battery disposal and
recycling. Do not dispose of the battery pack in the garbage.
FCC STATEMENT:
Suppliers Declaration of Conformity | Model #: 80242 | Jasco Products Co., 10 E.
Memorial Rd., Oklahoma City, OK 73114, www.byjasco.com
This device complies with Part 15 of the FCC Rules. Operation is subject to the
following two conditions: (1) this device may not cause harmful interference,
and (2) this device must accept any interference received, including interference
that may cause undesired operation.
FCC NOTE: The manufacturer is not responsible for any radio or TV interference
caused by unauthorized modifications to this equipment. Such modifications
could void the user’s authority to operate the equipment.
NOTE: This equipment has been tested and found to comply with the limits
for a Class B digital device, pursuant to Part 15 of the FCC Rules. These limits
are designed to provide reasonable protecton against harmful interference
in a residential installation. This equipment generates, uses and can radiate
radio frequency energy and, if not installed and used in accordance with the
instructions, may cause harmful interference to radio communications. However,
there is no guarantee that interference will not occur in a particular installation.
If this equipment does not cause harmful interference to radio or television
reception, which can be determined by turning the equipment o and on, the
user is encouraged to try to correct the interference by one or more of the
following measures:
• Reorient or relocate the receiving antenna.
• Increase the separation between the equipment and receiver.
• Connect the equipment into an outlet on a circuit dierent from that to
which the receiver is connected.
• Consult the dealer or an experienced radio/TV technician for help.
INSTRUCTIONS PERTAINING TO RISK OF FIRE, ELECTRIC SHOCK
OR INJURY TO PERSONS
IMPORTANT SAFETY INSTRUCTIONS
WARNING – When using this product, basic precautions should always
be followed.
1. Read all instructions before using the product.
2. To reduce the risk of injury, close supervision is necessary when the
product is used near children.
3. Do not put fingers or hands in the product.
4. Never vacuum materials that are burning or smoking, such as hot coals,
cigarette butts, matches or smoking ashes, etc.
5. This product is for dry vacuuming only. Do not use to clean up liquids.
6. Do not use to vacuum flammable or combustible liquids, such as gasoline,
or use in areas where they may be present.
7. Do not use the vacuum without the filter in place.
8. Do not use to vacuum hard objects such as nails, screws, coins, etc.
Damage or injury could result.
9. Do not block or cover the exhaust vents during use.
10. Do not use or store near hazardous or flammable materials or chemicals.
11. Use of an attachment not recommended or sold by the battery pack’s
manufacturer may result in a risk of fire, electric shock or injury. Use only
the battery clamps provided with this jump starter.
12. To reduce risk of damage to the jumper cable plug and cord, grasp the
plug rather than the cord when disconnecting the battery pack.
13. Do not use a battery pack or appliance that is damaged or modified.
Damaged or modified batteries may exhibit unpredictable behavior
resulting in fire, explosion or risk of injury.
14. Do not operate the battery pack with a damaged cord, plug or output
cable.
15. Do not disassemble the battery pack or vacuum housing. Incorrect
reassembly may result in a risk of fire or electric shock.
16. To reduce the risk of electric shock, unplug the battery pack from the
outlet before attempting any instructed servicing.
17. Store the product indoors when not in use. This device is intended for
temporary use outdoors, and reasonable care should be exercised in wet
conditions.
18. Do not place the battery pack in areas exceeding temperatures of 60°C
(140°F). Avoid prolonged exposure to direct sunlight.
19. Charge the device within the temperature range of 5°–45°C (41°–113°F).
20. Do not expose the battery pack to extreme heat or fire.
21. Do not jump-start a vehicle or use other functions of the battery pack while
the device is charging.
22. Disconnect the battery pack from the vehicle battery within 30 seconds
after the vehicle starts.
23. Do not use the battery pack as a vehicle battery replacement.
24. To avoid overheating or other damage to the battery pack, do not try to
jump-start your vehicle more than four consecutive times.
25. This battery pack is only for use with 12V vehicle lead-acid batteries. Do not
use with other types of batteries.
26. Do not drop the unit. If the unit receives a sharp blow or is otherwise
damaged, consult a qualified technician.
27. Never allow the red and black clamps to touch each other or other
common metal objects.
28. Determine whether the vehicle has a positive or negative grounding system
to dictate the order of disconnecting and connecting the clamps per the
instructions under Jump-starting a 12V vehicle.
WARNING – RISK OF EXPLOSIVE GASES
1. WORKING IN THE VICINITY OF A LEAD-ACID BATTERY IS DANGEROUS.
BATTERIES GENERATE EXPLOSIVE GASES DURING NORMAL BATTERY
OPERATION. FOR THIS REASON, IT IS OF THE UTMOST IMPORTANCE
THAT YOU FOLLOW THE INSTRUCTIONS EACH TIME YOU USE THE
BATTERY PACK.
2. To reduce risk of battery explosion, follow these instructions and those
published by the battery manufacturer and the manufacturer of any
equipment you intend to use in the vicinity of the battery. Review
cautionary markings on these products and on the vehicle’s engine.
a. The device shall be stored indoors and protected from the elements.
b. This unit shall not be charged outdoors.
c. When in use, steps should be taken to reduce exposure to rain, sleet,
snow and the like.
PERSONAL PRECAUTIONS
1. When working near a lead-acid battery, consider having someone
nearby to come to your aid, if needed.
2. Have plenty of fresh water and soap nearby in case battery acid
contacts skin, clothing or eyes.
3. Wear complete eye protection and clothing protection. Avoid touching
eyes while working near the battery.
4. If battery acid contacts skin or clothing, wash immediately with soap
and water. If acid enters eye, immediately flood eye with running cold
water for at least 10 minutes and get medical attention immediately.
5. NEVER smoke or allow a spark or flame in the vicinity of the battery or
engine.
6. Be extra cautious to reduce risk of dropping a metal tool onto the
battery. It might spark or short-circuit the battery or other electrical
part, which may cause an explosion.
7. Remove personal metal items, such as rings, bracelets, necklaces and
watches when working with a lead-acid battery. A lead-acid battery
can produce a short-circuit current high enough to weld a ring, or the
like, to metal, causing a severe burn.
8. When charging the internal battery, work in a well-ventilated area and
do not restrict ventilation in any way.
9. Under abusive conditions, liquid may be ejected from the battery;
avoid contact. If contact accidentally occurs, flush with water. If liquid
contacts eyes, additionally seek medical help. Liquid ejected from the
battery may cause irritation or burns.
10. Do not expose a battery pack to fire or excessive temperature.
Exposure to fire or temperatures above 130°C (265°F) may cause an
explosion.
11. Have servicing performed by a qualified repair technician using only
identical replacement parts. This will ensure that the safety of the
product is maintained.
12. Attach output cables to a battery and chassis as indicated in the
operating instructions. Never allow the output clamps to touch one
another.
100%
recyclable
Separate
paper
from plastic
before
recycling
byjasco.com/recycle
paper made from 25%
post consumer waste
Vacuum with
up to 22kPa
suction power
LED INDICATOR
Solid green LED
Red LED and buzzing
Blinking green LED
No lights and no
buzzing
OPERATION
The connection is correct and working.
You can safely power the engine.
The polarity connection is reversed. Correct
the polarity and wait for the solid green LED
before powering the vehicle.
The vehicle battery power is too low.
Press the “BOOST” button next to indicator lights,
then wait for the solid green LED. Once the LED is
solid, turn on the engine within 30 seconds.
Ensure the clamp connection is correct. Then, press the
“BOOST” button next to indicator lights. If the LED is
solid green, turn on the engine within 30 seconds.
Dust brushHEPA
filter (2)
Floor brush
Steel
mesh filter
Extender/
crevice tool (2)
Storage
bag
Dust cup latch
Low-voltage batteries and boost feature:
The jump starter has safety features to ensure a proper
connection before supplying power. If the LED indicator
blinks green or does not display after connecting the jump
starter, battery voltage is too low to detect. If this occurs,
follow the instructions below to use the boost button on the
jumper cables to jump-start your vehicle.
WARNING: Exercise extreme caution. Using the boost
button disables key safety features.
Using the boost button:
1. Properly connect the battery clamps to the jump starter
and your vehicle battery per the instructions under Jump-
starting a 12V vehicle. Ensure the clamps are correctly
connected to the battery per the LED indicator chart
included in that section of the manual.
¡Gracias por su compra!
Instrucciones
fáciles
Registre su
producto
Descubra cables de carga y
otros accesorios para
dispositivos móviles en
www.byjasco.com
¿Le gusta nuestro
producto?
Deje una reseña en el
sitio web de su
distribuidor favorito o
en amazon.com.
¿Tiene algún
problema?
Díganos cómo
podemos ayudar.
Llame al 1-800-654-8483,
de lunes a viernes, de 7 a. m.
a las 8 p. m., hora central.
Lea las instrucciones o mire el
video con el paso a paso.
Escanee el código o visite
byjasco.com/80242i
Recibe ofertas exclusivas y
registra tu producto.
Escanee el código o visite
byjasco.com/deals
50 %, 75 % y 100 %. La batería está completamente cargada cuando las
cuatro luces indicadoras azules están encendidas pero ya no parpadean.
3. Para vericar el nivel del paquete de baterías, presione y suelte el botón
de encendido en el paquete de baterías. Las luces indicadoras azules se
iluminarán.
Aspiradora
Montaje
1. Alinee el botón de ENCENDIDO/APAGADO de la batería y las luces
indicadoras azules con la parte superior de la carcasa de la aspiradora.
2. Inserte el paquete de baterías en la carcasa de la aspiradora,
asegurándose de que encaje rmemente en su lugar en la parte
delantera y trasera. Escucharás un clic cuando la conexión sea segura.
3. Para retirar el paquete de baterías de la carcasa de la aspiradora,
presione las áreas estriadas ubicadas en la parte delantera y trasera
del paquete de baterías y separe el paquete de baterías y la carcasa
de la aspiradora.
Inserte los accesorios de aspiradora
1. Cepillo para polvo: Este accesorio está ubicado en la aspiradora. Deslice
el cepillo para polvo hacia abajo hasta que escuche un clic, lo que indica
que está encajado en su lugar. Deslice el cepillo para polvo hacia arriba y
apartándolo cuando use otros accesorios.
2. Cepillo para suelo: Inserte el cepillo para pisos en la entrada de aire de
la aspiradora, asegurándose de que encaje rmemente en su lugar. El
cepillo para pisos también se puede usar con el extensor de aspiradora/
herramienta para rincones insertándolo en el extremo del extensor de la
misma manera.
3. Extensor/boquilla rinconera: Para ampliar el alcance de la aspiradora,
puede usar uno o ambos extensores. Inserte el extensor, etiquetado
como “1,” en la entrada de aire de la aspiradora. Cuando use ambos
extensores, inserte el segundo extensor, etiquetado como “2,” en el
primer extensor. Ambos deben insertarse completamente y encajar
perfectamente.
Operación
1. Para encender la aspiradora, mantenga presionado el botón ON/OFF de
la aspiradora durante 1 segundo. La luz indicadora azul se encenderá y la
aspiradora funcionará a baja velocidad.
2. Para aumentar la potencia de succión, presione y suelte el botón ON/
OFF para avanzar de baja velocidad (12 kPa) a alta velocidad (22 kPa).
3. Para apagar la aspiradora, mantenga presionado el botón ON/OFF
durante 1 segundo. La luz indicadora azul y la aspiradora se apagarán.
Limpieza del recipiente para el polvo y del filtro de malla de acero
Solución de problemas
PROBLEMA CAUSA SOLUCIÓN
Succión reducida El recipiente para el
polvo está lleno
El filtro está sucio
Vacíe y luego limpie el
recipiente para el polvo
Limpie o reemplace el
filtro/recipiente
Ruido anormal durante
el uso
La aspiradora inhaló
partículas grandes
Desplazamiento de
piezas internas
Apague la aspiradora y
retire los residuos
Apague la aspiradora
y comuníquese con
el técnico de servicio
para reparación y/o
reemplazo
Dejó de funcionar Carga de batería
insuficiente
Protección contra
sobrecalentamiento
debido al bloqueo del
conducto de aire
El paquete de baterías
está dañado
Cargar la batería
Limpie el conducto
de aire. Reinicie la
aspiradora después de
que el motor se enfríe
Póngase en contacto
con el técnico de
servicio para la
reparación
Apagado automático Señal de error del
paquete de baterías
La temperatura de
la salida de aire es
demasiado alta
Vuelva a enchufar o
reemplace el paquete
de baterías
Deje que la
temperatura baje
antes de encender la
aspiradora
Carga de dispositivos móviles
1. Conecte su dispositivo móvil al puerto USB-C mediante un cable USB.
2. Presione y suelte el botón de encendido de las baterías para encender el
paquete de baterías. La batería se apagará automáticamente después de
que se complete el dispositivo móvil de carga.
Arrancador de emergencia
Arrancar un vehículo de 12 V
1. Antes de comenzar, verique que la batería que desea arrancar sea una
batería de plomo-ácido de 12 V.
2. Presione y suelte el botón de encendido para encender la fuente de
alimentación. La fuente de alimentación se apagará automáticamente
después de inactividad.
3. Inserte el enchufe de los cables de puente en el arrancador auxiliar.
4. Conecte las pinzas para batería según el sistema de tierra del vehículo:
a. Sistema de conexión a tierra negativa (común): conecte la pinza
roja al terminal positivo de la batería del vehículo. Luego, conecte
la pinza negra al terminal negativo de la batería o a un área
estacionaria del chasis del vehículo.
b. Sistema de conexión a tierra positiva (infrecuente): conecte la
pinza negra al terminal negativo de la batería del vehículo. Luego,
conecte la pinza roja al terminal positivo de la batería o a un área
estacionaria del chasis del vehículo.
5. Revise la tabla de indicadores LED en la página siguiente para
asegurarse de que la conexión del cable sea correcta antes de
continuar.
6. Arranque el vehículo.
7. Deje el motor encendido y retire las abrazaderas de la batería según el
sistema de tierra del vehículo:
a. Sistema de conexión a tierra negativa (común): desconecte la pinza
negra seguida de la pinza roja de la batería del vehículo.
b. Sistema de conexión a tierra positiva (infrecuente): desconecte la
pinza roja seguida de la pinza negra de la batería del vehículo.
8. Si su vehículo no arranca después de cuatro intentos, detenga el
proceso de arranque auxiliar y comuníquese con un técnico calicado
para obtener ayuda.
Baterías de bajo voltaje y función de refuerzo
El arranque auxiliar tiene características de seguridad para garantizar
una conexión adecuada antes de suministrar energía. Si el indicador LED
parpadea en verde o no se muestra después de conectar el arranque
auxiliar, es indicación de que el voltaje de la batería es demasiado bajo para
detectarlo. Si esto sucede, siga las instrucciones a continuación para usar el
botón de refuerzo en los cables de puente para arrancar su vehículo.
ADVERTENCIA: Extreme las precauciones. El uso del botón de
refuerzo desactiva las funciones clave de seguridad.
Uso del botón de refuerzo:
1. Conecte correctamente las pinzas para batería al arranque auxiliar y a la
batería de su vehículo según las instrucciones en Arrancar un vehículo
de 12 V. Asegúrese de que las pinzas estén correctamente conectadas a
la batería según la tabla de indicadores LED incluida en esa sección del
manual.
2. Una vez que se conrme una conexión correcta, presione el botón de
refuerzo e intente arrancar el vehículo.
PRECAUCIÓN
NUNCA presione el botón de refuerzo antes de conectar las pinzas para
batería a la batería del vehículo. Esto puede provocar chispas peligrosas
al conectar las pinzas a la batería o si las pinzas entran en contacto entre
sí. SOLAMENTE presione el botón de refuerzo después de conectar
correctamente las pinzas para batería a la batería de su vehículo.
USE el modo de refuerzo con extrema precaución. Si no se siente cómodo,
comuníquese con un técnico calicado para que lo ayude.
Cuidado y mantenimiento de la batería
Cargue el paquete de baterías cada tres meses e inspeccione el estado de los
cables de puente y las pinzas para batería. No utilice el paquete de baterías ni
los cables si están dañados. Limpie el dispositivo con un paño suave seco.
Eliminación de la batería
El paquete de baterías contiene una batería de ion de litio. Cumpla todas las
leyes estatales y federales aplicables para la eliminación y reciclaje de baterías.
No deseche el paquete de baterías en la basura.
DECLARACIÓN DE LA COMISIÓN FEDERAL DE
COMUNICACIONES (FCC):
Declaración de conformidad del proveedor | Modelo #: 80242 | Jasco Products Co., 10 E.
Memorial Rd., Oklahoma City, OK 73114, www.byjasco.com
Este dispositivo cumple con las Especificaciones del apartado 15 de las normas de la FCC.
El funcionamiento está sujeto a las siguientes dos condiciones: (1) este dispositivo no debe
provocar interferencia perjudicial, y (2) este dispositivo debe aceptar toda interferencia
que reciba, incluso la que pudiera causar un funcionamiento no deseado.
NOTA DE LA FCC: El fabricante no se hace responsable de ninguna interferencia de radio
o TV ocasionada por modificaciones no autorizadas efectuadas a este equipo. Dichas
modificaciones podrían anular la autoridad del usuario para utilizar el equipo.
NOTA: Este equipo ha sido probado y cumple con los límites para aparatos digitales
de Clase B, de conformidad con el apartado 15 de las normas de la FCC. Estos límites
están diseñados para proveer protección razonable contra interferencias perjudiciales
en una instalación residencial. Este equipo genera, usa y puede irradiar energía de
radiofrecuencias y, si no se instala y usa según las instrucciones, puede provocar
interferencia perjudicial a las radiocomunicaciones. No obstante, no hay garantías de
que no ocurrirá interferencia en una instalación en particular. Si este equipo provoca
interferencia perjudicial a la recepción de radio o televisión, lo que puede determinarse
encendiendo y apagando el equipo, se recomienda que el usuario intente corregir la
interferencia por medio de la implementación de una o más de las siguientes medidas:
• Reorientar o reubicar la antena receptora.
• Incrementar la separación entre el equipo y el receptor.
• Conectar el equipo a un tomacorriente de un circuito diferente del circuito al que
está conectado el receptor.
• Consultar al distribuidor o a un técnico con experiencia en radio/televisión para
solicitar asistencia.
INSTRUCCIONES RELATIVAS AL RIESGO DE INCENDIO, DESCARGA
ELÉCTRICA O LESIONES A PERSONAS
INSTRUCCIONES DE SEGURIDAD IMPORTANTES
ADVERTENCIA – Al usar este producto, siempre se deben seguir precauciones básicas.
1. Lea todas las instrucciones antes de usar el producto.
2. Para reducir el riesgo de lesiones, es necesaria una estrecha supervisión cuando el
producto se usa cerca de niños.
3. No introduzca los dedos ni las manos en el producto.
4. Nunca aspire materiales que estén ardiendo o humeando, como brasas, colillas,
cerillas o cenizas humeantes, etc.
5. Este producto es sólo para aspiración en seco. No lo use para limpiar líquidos.
6. No lo use para aspirar líquidos inflamables o combustibles, como gasolina, ni lo use
en áreas donde puedan estar presentes.
7. No use la aspiradora sin el filtro colocado.
8. No lo use para aspirar objetos duros como clavos, tornillos, monedas, etc. Podrían
producirse daños o lesiones.
9. No bloquee ni cubra las rejillas de ventilación durante el uso.
10. No use ni almacene cerca de materiales o productos químicos peligrosos o
inflamables.
11. El uso de un accesorio no recomendado ni vendido por el fabricante del paquete
de baterías puede provocar riesgo de incendio, descarga eléctrica o lesiones. Use
únicamente las abrazaderas de batería proporcionadas con este arrancador.
12. Para reducir el riesgo de daños en el enchufe y el cable del puente, sujete el
enchufe en lugar del cable cuando desconecte el paquete de baterías.
13. No use una batería o aparato que esté dañado o modificado. Las baterías dañadas
o modificadas pueden exhibir un comportamiento impredecible que resulte en
incendio, explosión o riesgo de lesiones.
14. No opere el paquete de baterías con un cable, enchufe o cable de salida dañado.
15. No desarme el paquete de baterías o carcasa de aspirador. Un reensamblaje
incorrecto puede generar riesgo de incendio o descarga eléctrica.
16. Para reducir el riesgo de descarga eléctrica, desenchufe el paquete de baterías del
tomacorriente antes de intentar cualquier servicio indicado.
17. Guarde el producto en interiores cuando no esté en uso. Este dispositivo está
diseñado para uso temporal al aire libre, y se debe tener un cuidado razonable en
condiciones húmedas.
18. No coloque el paquete de baterías en áreas donde las temperaturas superen los
60 °C (140 °F). Evite la exposición prolongada a la luz solar directa.
19. Cargue el dispositivo dentro del rango de temperatura de 5–45 °C (41–113 °F).
20. No exponga la batería al calor extremo ni al fuego.
21. No arranque un vehículo con puente ni use otras funciones del paquete de baterías
mientras el dispositivo se está cargando.
22. Desconecte el paquete de baterías de la batería del vehículo dentro de los 30
segundos posteriores al arranque del vehículo.
23. No use la batería como reemplazo de la batería del vehículo.
24. Para evitar el sobrecalentamiento u otros daños al paquete de baterías, no intente
arrancar su vehículo con puente más de cuatro veces consecutivas.
25. Este paquete de baterías es solo para uso con baterías de plomo-ácido de 12 V para
vehículos. No lo use con otros tipos de baterías.
26. No deje caer la unidad. Si la unidad recibe un golpe fuerte o sufre algún daño,
consulte a un técnico calificado.
27. Nunca permita que las abrazaderas roja y negra se toquen entre sí ni con otros
objetos metálicos comunes.
28. Determine si el vehículo tiene un sistema de conexión a tierra positiva o negativa
para definir el orden de desconexión y conexión de las pinzas según las
instrucciones en Arrancar un vehículo de 12 V.
ADVERTENCIA: RIESGO DE GASES EXPLOSIVOS
1. TRABAJAR EN LAS PROXIMIDADES DE UNA BATERÍA DE PLOMO-ÁCIDO ES
PELIGROSO. LAS BATERÍAS GENERAN GASES EXPLOSIVOS DURANTE EL
FUNCIONAMIENTO NORMAL DE LA BATERÍA. POR ESTA RAZÓN, ES DE LA
MAYOR IMPORTANCIA QUE SIGA LAS INSTRUCCIONES CADA VEZ QUE UTILICE
EL PAQUETE DE BATERÍAS.
2. Para reducir el riesgo de explosión de la batería, siga estas instrucciones y las
publicadas por el fabricante de la batería y el fabricante de cualquier equipo que
pretenda utilizar cerca de la batería. Revise las marcas de precaución en estos
productos y en el motor del vehículo.
a. El dispositivo se debe almacenar bajo techo y protegido de la intemperie.
b. Esta unidad no debe cargarse al aire libre.
c. Cuando esté en uso, se deben tomar medidas para reducir la exposición a la lluvia,
aguanieve, nieve y similares.
PRECAUCIONES PERSONALES
1. Cuando trabaje cerca de una batería de plomo-ácido, considere tener a alguien cerca
para que lo ayude, si es necesario.
2. Tenga cerca suficiente agua fresca y jabón en caso de que el ácido de la batería
entre en contacto con la piel, la ropa o los ojos.
3. Use protección completa para los ojos y ropa de protección. Evite tocarse los ojos
mientras trabaja cerca de la batería.
4. Si el ácido de la batería entra en contacto con la piel o la ropa, lávese
inmediatamente con agua y jabón. Si el ácido entra en el ojo, enjuáguelo
inmediatamente con abundante agua fría durante al menos 10 minutos y obtenga
atención médica de inmediato.
5. NUNCA fume ni permita que haya chispas o llamas cerca de la batería o del motor.
6. Tenga mucho cuidado para reducir el riesgo de dejar caer una herramienta de metal
sobre la batería. Podría provocar una chispa o un cortocircuito en la batería u otra
parte eléctrica, lo que podría causar una explosión.
7. Quítese los artículos personales de metal, como anillos, pulseras, collares y relojes
cuando trabaje con una batería de plomo-ácido. Una batería de plomo-ácido puede
producir una corriente de cortocircuito lo suficientemente alta como para soldar un
anillo, u objetos similares, al metal, con una consecuente quemadura grave.
8. Cuando cargue la batería interna, trabaje en un área bien ventilada y no restrinja la
ventilación de ninguna manera.
9. En condiciones de uso indebido, es posible que salga líquido de la batería; evite el
contacto. Si ocurre contacto accidentalmente, enjuague con agua. Si el líquido entra
en contacto con los ojos, busque además ayuda médica. El líquido expulsado de la
batería puede causar irritación o quemaduras.
10. No exponga la fuente de alimentación al fuego ni a temperaturas excesivas. La
exposición al fuego o temperaturas superiores a 130 ºC (265 ºF) puede causar una
explosión.
11. Entregue a un técnico de reparación calificado para que realice el servicio utilizando
solo piezas de repuesto idénticas. Esto asegurará que se mantenga la seguridad del
producto.
12. Conecte los cables de salida a la batería y al chasis como se indica en las
instrucciones de funcionamiento. Nunca permita que las pinzas de salida se toquen
entre sí.
HECHO EN CHINA
Distribuido por Jasco Products Company LLC,
10 E. Memorial Rd., Oklahoma City, Oklahoma 73114.
Este producto de Jasco tiene una garantía limitada
de 5 años. Visite www.byjasco.com para conocer los
detalles de la garantía.
¿Tiene preguntas? Comuníquese con nuestro servicio de
atención al consumidor de EE. UU. al 1-800-654-8483,
de lunes a viernes, de 7AM a 8PM (hora central).
Visite www.byjasco.com/patents para información sobre
la patente del producto.
Portátil
Aspirador y Arrancador
Manual de usuario
INFORMACIÓN IMPORTANTE
1. Asegúrese de mantenerlo alejado de los niños cuando lo use.
2. NO apunte la boquilla de succión a los ojos ni a los oídos durante el uso.
3. NO sumerja ni enjuague con agua el paquete de baterías ni la carcasa de
la aspiradora.
4. El arrancador auxiliar de esta aspiradora está diseñado para arrancar
baterías de plomo-ácido de vehículos de 12 V únicamente. No lo use con
otros tipos de baterías. Lea todas las instrucciones de seguridad antes
de usar. El incumplimiento de las instrucciones de seguridad puede
provocar daños a la propiedad, lesiones personales o incendios.
INSTRUCCIONES DE SEGURIDAD IMPORTANTES
CONSERVE EL MANUAL PARA FUTURAS CONSULTAS
Contenidos del paquete
Cómo cargar el paquete de baterías
1. Esta batería de iones de litio viene parcialmente cargada. Asegúrese de
cargar completamente la batería antes de usarla. Para cargar la batería,
conecte el cable USB incluido a una fuente de alimentación USB-A (no
incluida) y al puerto USB-C de la batería.
2. La luz indicadora azul de la batería parpadeará mientras se carga y
cambiará a una luz constante cuando la batería esté cargada al 25 %,
Paquete de
baterías de
iones de litio
Cables de arranque
inteligentes
Cable USB
25 % 50 % 75 % 100 %
Aspiradora
con potencia
de succión de
hasta 22 kPa
Cepillo para
polvo
Filtro
HEPA (2)
Cepillo de piso
Filtro de
malla de
acero
Extensor/boquilla
rinconera (2)
Bolsa de
almacenamiento
1. Apague la aspiradora y espere hasta que se detenga por completo.
2. Presione el pestillo del recipiente para el polvo para soltar el recipiente
para el polvo. Vacíe los residuos en un recipiente para basura. Se
recomienda vaciar el recipiente para el polvo después de cada uso.
3. Para limpiar el filtro de malla de acero del recipiente para el polvo, retire
el recipiente para el polvo girándolo desde la posición de bloqueado
a desbloqueado usando los íconos del candado del recipiente para el
polvo como guía.
4. Sujete la barra transversal del filtro y extráigalo.
5. Para separar el filtro de malla de acero del filtro de papel, sostenga
el anillo de goma negro del filtro de papel, luego siga los íconos del
candado en la parte inferior del filtro de malla de acero naranja y gire el
filtro de malla de acero hasta la posición de desbloqueo. Ambos filtros
deberían separarse fácilmente.
6. Limpie el filtro de malla de acero con agua y luego déjelo secar
completamente antes de volver a ensamblarlo.
7. Inserte el filtro de papel de repuesto, si es necesario, en el filtro de malla
de acero y gírelo hasta la posición de bloqueo.
8. Inserte el filtro en el recipiente para el polvo.
9. Alinee el recipiente para el polvo y la aspiradora, luego gírelos hasta la
posición de bloqueo.
Dust cup latch
El pestillo del recipiente