Commercial Dual-Port
Pedestal AC Charger
User Manual
TABLE OF CONTENTS
1. IMPORTANT SAFETY INSTRUCTIONS
1.Important Safety Instructions................................................................02
2.Federal Communication Commission Interference Statement..............03
3.Industry Canada Statement....................................................................04
4.Appearance.............................................................................................06
5.Specification Sheet.................................................................................07
6. Recommendation For Breaker & Cable Type Usage..............................07
7. Status Description of the Charger Indication Lights..............................08
8. Safety Requirements..............................................................................08
9. Packing List............................................................................................09
10. Tools and Materials Required...............................................................09
11. Installation Steps.................................................................................10
12. Operating Instructions.........................................................................11
13. Maintebance And Repair......................................................................15
14. Service.................................................................................................16
CAUTION
Please read all Important Safety Instructions as well as charging instructions in
your vehicle owner's manual before attempting to charge your electric vehicl.
Failure to do so can result in death or severe injury. Save this user manual for
future reference. There are many safety features built into the charger. Read all
the safety information and warnings in this manual to avoid any risks or hazards
and risks associated with using this charger.
WARNING
When using electric products, basic precautions should always be followed. This
manual contains important instructions, including the following, which must be
followed during installation, operation and maintenance.
·Do not install or use the charger near flammable, explosive, corrosive, or
combustible materials, chemicals, or vapors.
·Turn off the input power of the charger before performing any maintenance on
the charger.
·The device is designed only for vehicles that are compatible with the SAE J1772
or NACS Level 2 charging standard.
·Do not use the charger if it is defective, of if it appears cracked, frayed, broken,
or damaged.
·Do not attempt to open, disassemble, repair, tamper with, or modify the
charger. Contact our Customer Service department if you have any questions or
require the replacement or repair of any parts.
·Do not use the charger when either you, the vehicle or charger is exposed to
severe rain, snow, or other severe weather.
·When transporting the charger, handle it with care and do not drag or step on
the device.
·Do not touch the charging connector terminal with any sharp metal objects, in
order to prevent damage. Do not forcefully pull the charging cable, damage it
with sharp objects, or place fingers or insert foreign objects into any part of the
charging connector.
·Risk of explosion. This device has arcing or sparking parts that should not be
exposed to flammable Vapors.
·Risk of electric shock. Do not remove the cover or attempt to open the enclosure
of this device. There are no user-serviceable parts inside. Contact a qualified
service company if you require any service repairs.
·To reduce the risk of fire, connect only to a circuit provided with 100 amperes
maximum branch circuit over current protection in accordance with the national
Electrical Code, ANSI/NFPA70, and the Canadian Electrical Code, Part I, C22.1.
02
2. FEDERAL COMMUNICATION COMMISSION
INTERFERENCE STATEMENT
3. INDUSTRY CANADA STATEMENT
FCC CAUTION
Changes or modifications not expressly approved by the party responsible for
compliance could void the user's authority to operate this equipment.
This transmitter must not be co-located or operating in conjunction with any other
antenna or transmitter.
RADIATION EXPOSURE STATEMENT
To satisfy FCC / IC RF exposure requirements, a separation distance of 20 cm or more
should be maintained between the antenna of this device and persons during device
operation.
To ensure compliance, operations at closer than this distance is not recommended.
Les antennes installées doivent être situées de facon à ce que la population ne puisse
y être exposée à une distance de moin de 20 cm. Installer les antennes de facon à ce
que le personnel ne puisse approcher à 20 cm ou moins de la position centrale de l’
antenne.
La FCC des éltats-unis stipule que cet appareil doit être en tout temps éloigné d’au
moins 20 cm des personnes pendant son functionnement.
- This charger should be installed, adjusted, and serviced by a qualified electrician or
a person familiar with the construction and operation of this type of charger and the
dangers involved. Failure to observe this precaution could result in damage to the
charger, or even severe injury or death.
·Incorrect installation and testing of the charger could potentially damage either the
vehicle's battery and the charger. This type is damage is not covered by our warranty
policy.
·Ensure that the charging cable is well-positioned during the charging process, to
avoid the cable getting stepped on, tripped over, or subjected to damage or stress.
·Do not use this charger with a frayed charging cable having damaged insulation or
any other sign of damage.
·Ensure that the wire type, diameter, current rating, and temperature rating comply
with the local electrical standards and requirements in your local area.
·Before starting the installation, turn off all power.
·For permanently connected equipment, protective grounding and bonding termi-
nals-field wiring terminals for connection of equipment-grounding conductors are
identified by: "G," "GR", "GND", "Ground", "Grounding"or the ground symbol, either on
a wiring diagram provided on the unit, or a marking on the wiring diagram attached
to the unit.
·This device should be supervised when used around children.
·Do not put fingers into the electric vehicle connector.
·The device is not to be lifted or carried by either the flexible cord or the EV cable.
-Reorient or relocate the receiving antenna.
-Increase the separation between the equipment and receiver.
-Connect the equipment into an outlet on a circuit different from that to which the
receiver is connected.
-Consult the dealer or an experienced radio/TV technician for help.
This device complies with Industry Canada licence-exempt RSS standard(s). Operation
is subject to the following two conditions:
(1)This device may not cause harmful interference, and (2) this device must accept any
interference received, including interference that may cause undesired operation.
This device complies with Part 15 of the FCC Rules. Operation is subject to the
following two conditions: (1) This device may not cause harmful interference, and
(2)This device must accept any interference received including interference that may
cause undesired operation.
Le présent appareil est conforme aux reglas de FCC . L'exploitation est autorisée aux
deux conditions suivantes : (1) l'appareil ne doit pas produire de brouillage, et (2)
l'appareil de l'appareil doit accepter tout brouillage radioélectrique subi, même si le
brouillage est susceptible d'en compromettre le fonctionnement.
This equipment has been tested and found to comply with the limits for a Class B
digital device, pursuant to Part 15 of the FCC Rules. These limits are designed to
provide reasonable protection against harmful interference in a residential installa-
tion. This equipment generates, uses and can radiate radio frequency energy and, if
not installed and used in accordance with the instructions, may cause harmful
interference to radio communications. However, there is no guarantee that interfer-
ence will not occur in a particular installation. If this equipment does cause harmful
interference to radio or television reception, which can be determined by turning the
equipment off and on, the user is encouraged to try to correct the interference by one
of the following measures:
0403
1.Important Safety Instructions................................................................02
2.Federal Communication Commission Interference Statement..............03
3.Industry Canada Statement....................................................................04
4.Appearance.............................................................................................06
5.Specification Sheet.................................................................................07
6. Recommendation For Breaker & Cable Type Usage..............................07
7. Status Description of the Charger Indication Lights..............................08
8. Safety Requirements..............................................................................08
9. Packing List............................................................................................09
10. Tools and Materials Required...............................................................09
11. Installation Steps.................................................................................10
12. Operating Instructions.........................................................................11
13. Maintebance And Repair......................................................................15
14. Service.................................................................................................16
IMPORTANT NOTE:
In the event that these conditions cannot be met (for example certain laptop configu-
rations or co-location with another transmitter), then the Canada authorization is no
longer considered valid and the IC ID can not be used on the final product. In these
circumstances, the OEM integrator will be responsible for re-evaluating the end
product (including the transmitter) and obtaining a separate Canada authorization.
NOTE IMPORTANTE:
Dans le cas où ces conditions ne peuvent etre satisfaites (par exemplepour certaines
configurations d'ordinateur portable ou decertaines co-localisation avec un autre
émetteur), FPautorisation du Canada n'est plusconsidére commevalide et ID IC ne
peut pas etre utilisé sur le produit final. Dans ces circonstances, Iintégrateur OEM sera
chargé de reevaluer le produit final (y compris lémetteur) et'obtention d'une autorisa-
tion distincte au Canada.
REGION SELECTION:
Limited by local law regulations, version for North America does not have region
selection option.
Le présent appareil est conforme aux CNR d'Industrie Canada applicables aux
appareils radio exempts de licence. L'exploitation est autorisée aux deux conditions
suivantes : (1) l'appareil ne doit pas produire de brouillage, et (2) l'utilisateur de
l'appareil doit accepter tout brouillage radioélectrique subi, même si le brouillage est
susceptible d'en compromettre le fonctionnement.
RADIATION EXPOSURE STATEMENT
This equipment complies with ISED radiation exposure limits set forth for an uncon-
trolled environment. This equipment should be installed and operated with greater
than 20cm between the radiator and your body.
A DECLARATION D'EXPOSITION AUX RADIATIONS
Cet équipement est conforme aux limites d'exposition aux rayonnements Industry
Canada établies pour un environne-ment non controlé. Cet équipement doit etre
installé et utilisé à plus de 20 cm entre le radiateur et votre corps.
0605
4. Status Description of the Charger Indication Lights
5. Safety Requirements
·Read this user manual thoroughly and make sure to review all local building and
electrical codes before installing the AC charger. A qualified technician should install
the AC charger according to the user manual and local safety regulations.
·Use appropriate protection when connecting to the main power distribution cable.
·Select and install the appropriate circuit breaker as required by local regulations.
·Disconnect switch for each ungrounded conductor of AC input shall be provided by
others in accordance with the National Electric Code, ANSI/NFPA 70.
·Verify that the Wall Connector is properly grounded. The ground connection must be
bonded in the upstream power supply for proper operation. Check all physical
connections, including the wire box terminals, electric panel(s), and wire box. In
residential power supplies, check the bond between ground and neutral at the main
panel. If connected to a step-down transformer, contact the transformer's manufac-
turer for direction on how to bond the ground connection.
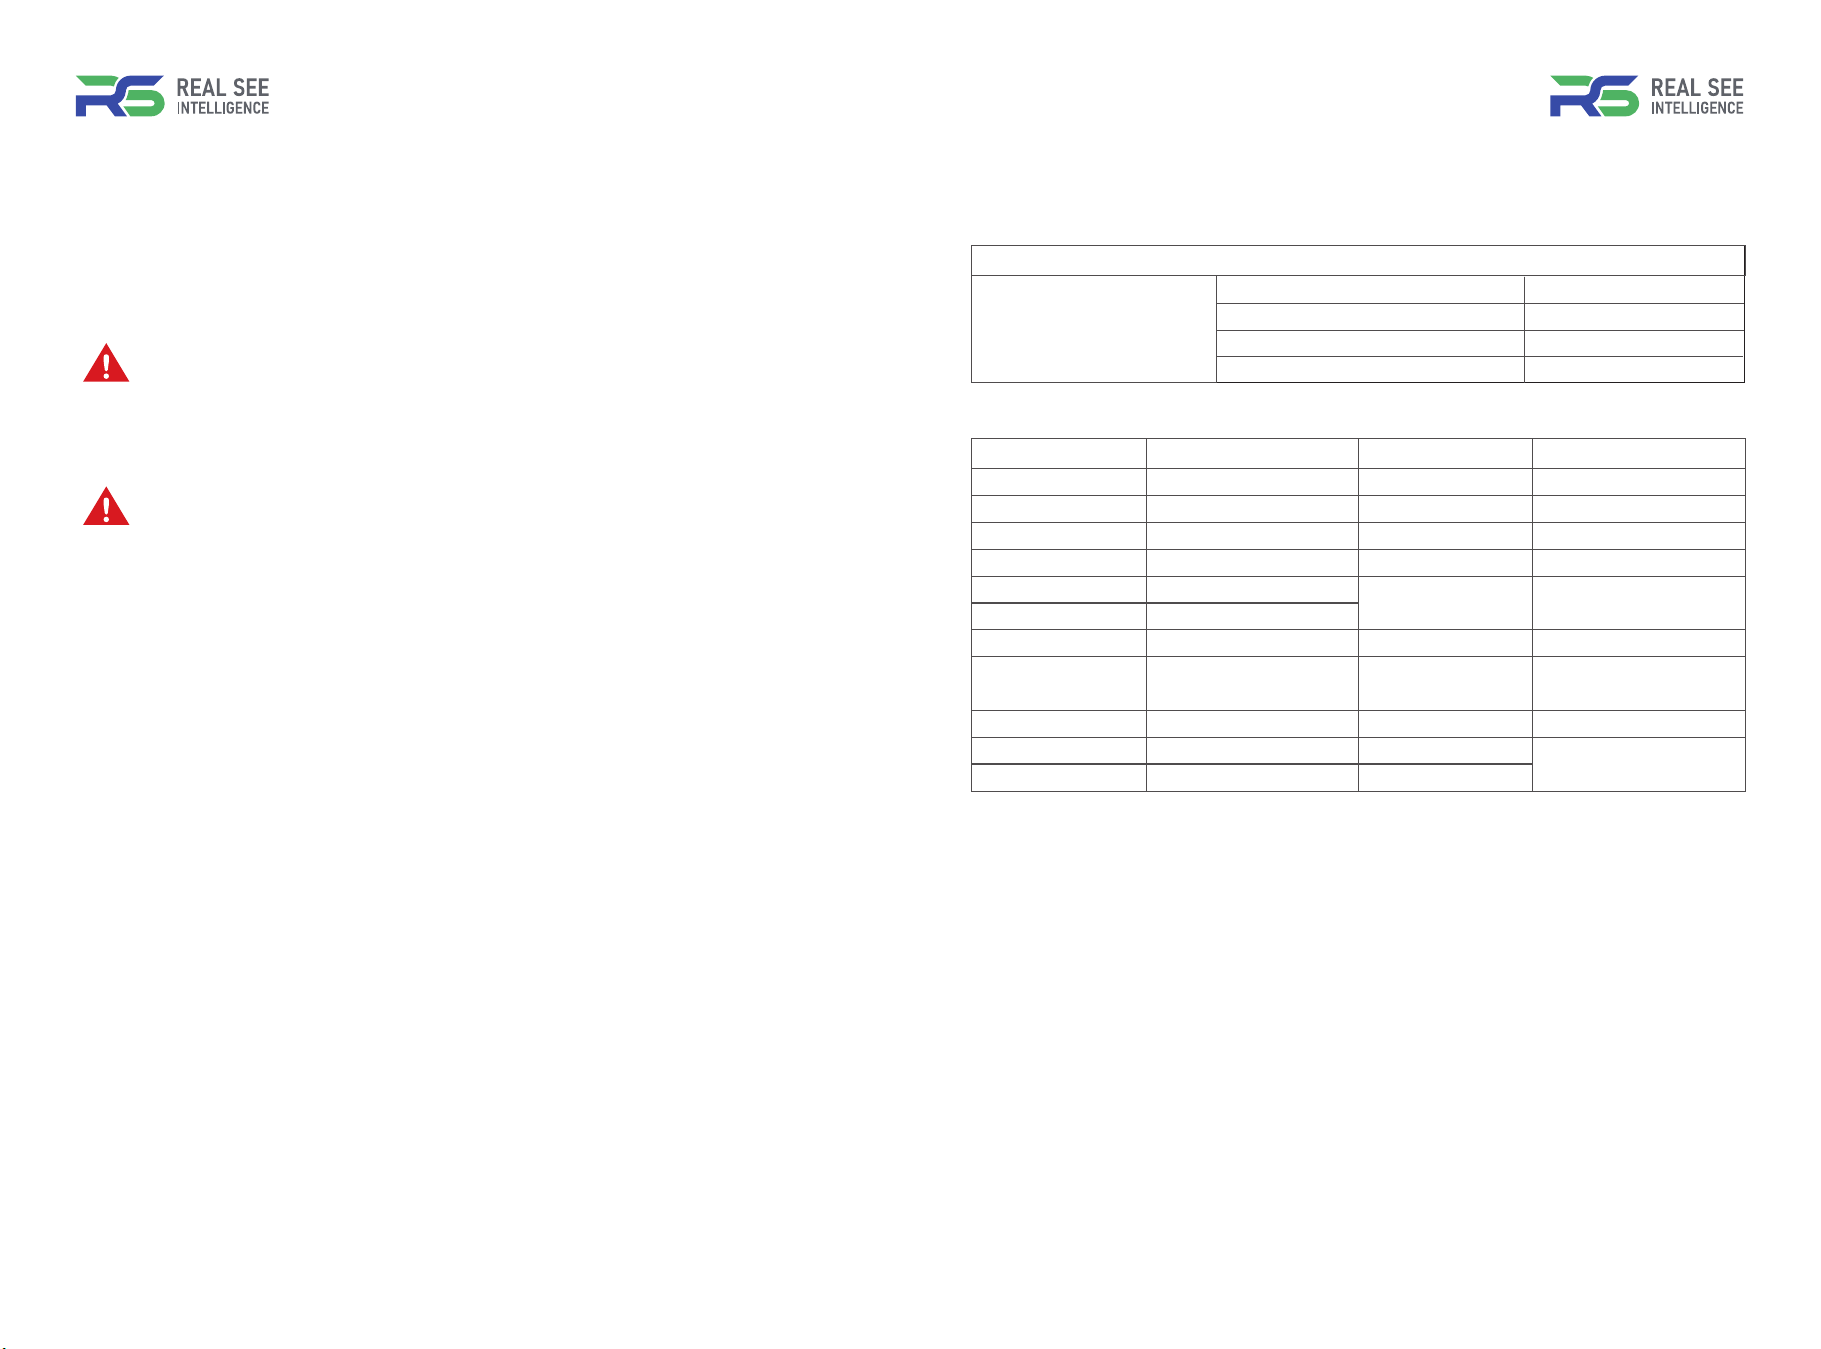
Charging Status Indicator Light
Standby
Insert gun not charged/Charging complete
Charging
Failure
Solid Blue
Solid Green
Flash Green
Solid Red
Status
Fault code Status Fault code Status
00000001
00000002
00000004
00000008
00000010
00000020
00000040
00000100
00000200
00000800
00000080
Emergency stop status
Ground fault
Overvoltage fault
Under voltage fault
Failure of access control
Meter failure
Over-temperature fault
CP fault
Overcurrent fault
Electric leakage fault
Communication failure of
communication board
00001000
00002000
00010000
00020000
02000000
08000000
10000000
20000000
04000000
01000000
Relay failure
Failure of arrester
Leakage self-inspection failed
Relay BIT failed
State of AC contactor
CC Status
Charging interface
electronic lock status
Connection status of
charging conector
CP Status
4.1 Status indicator lights
4.2 Fault indicator light
6. Installation Steps
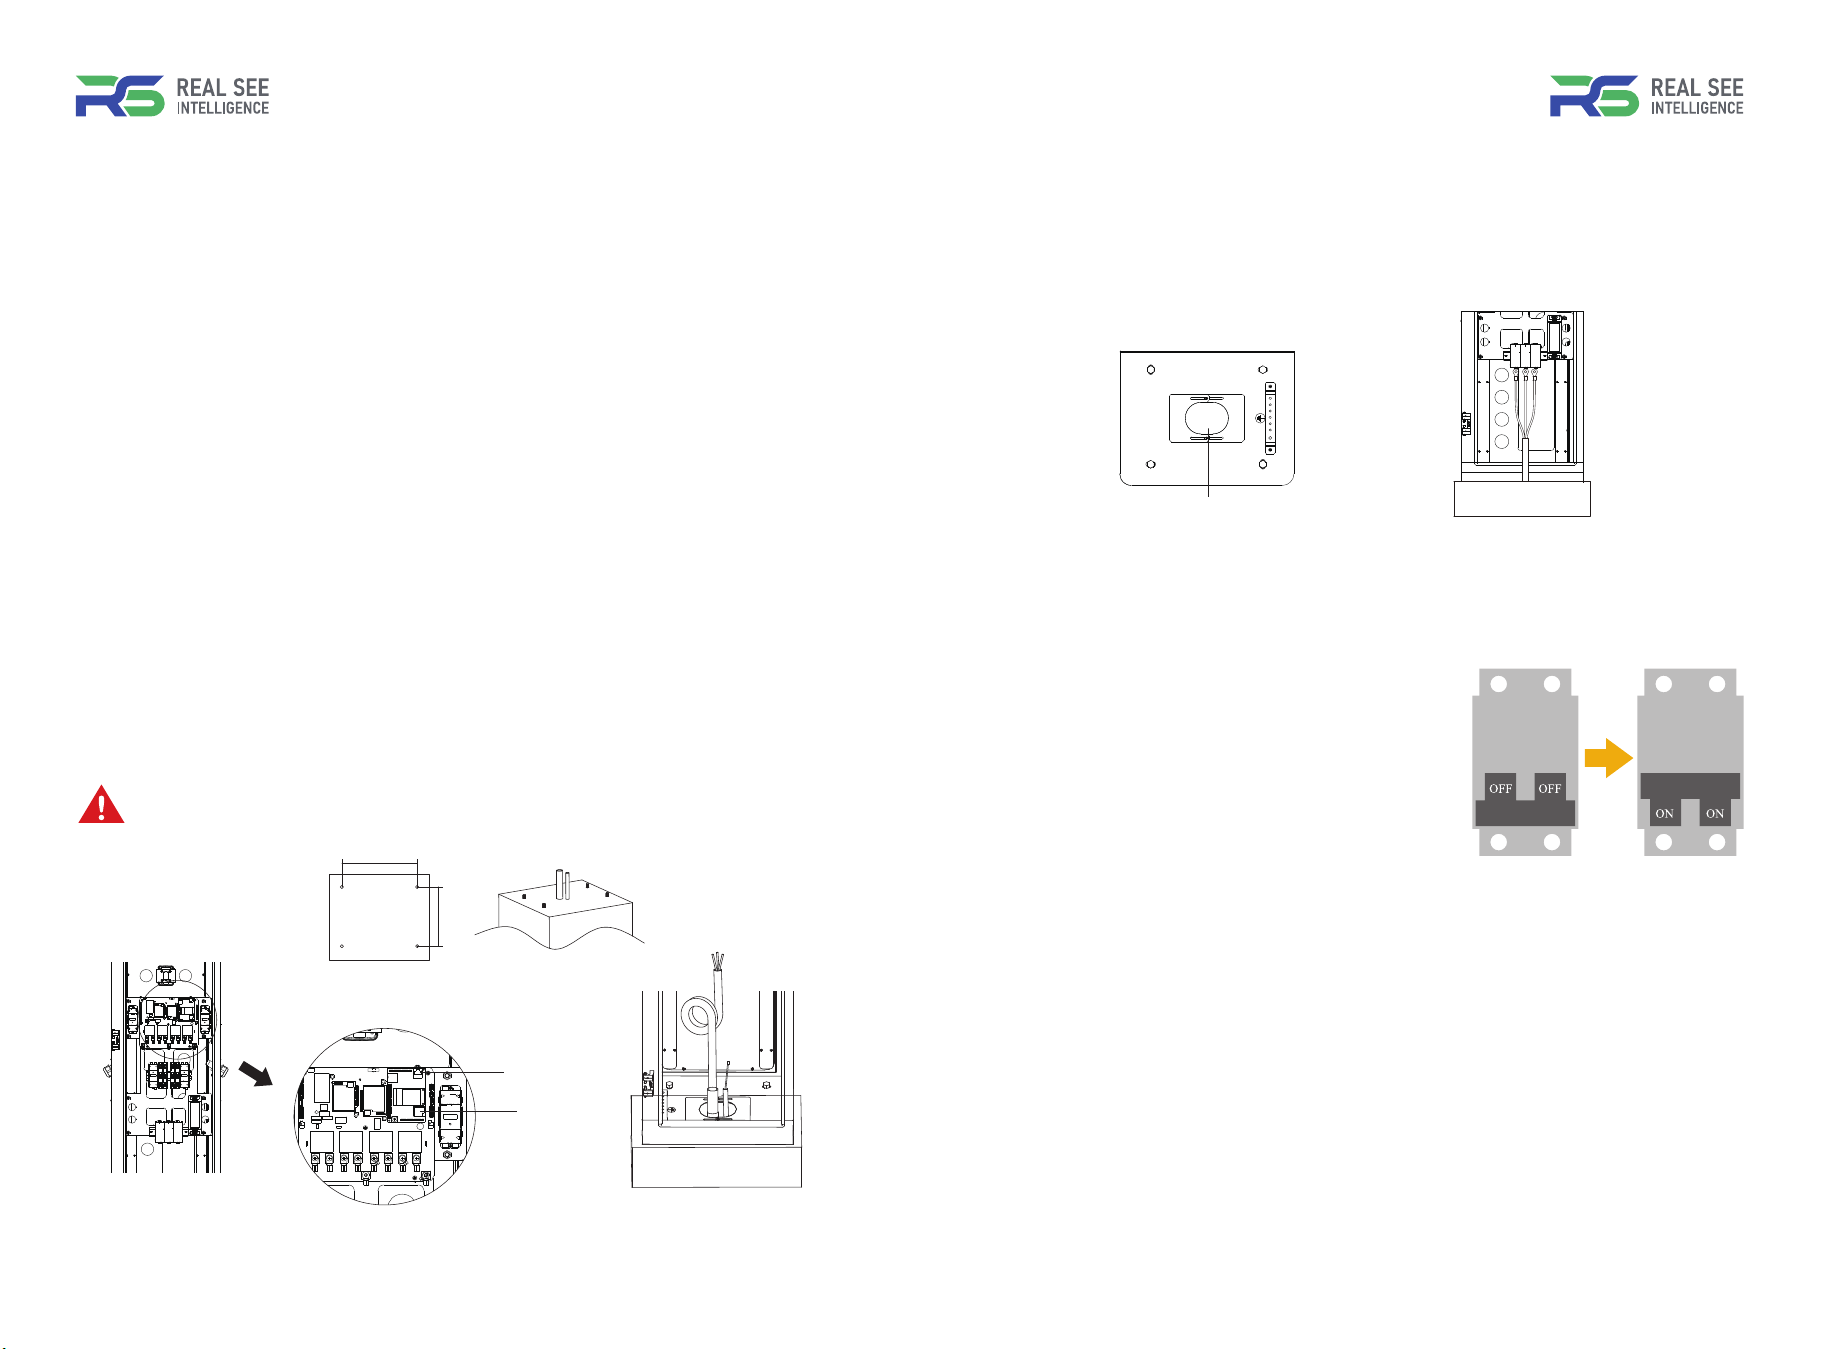
STEP1: Mainpart Installation/ Network Configuration.
As shown in Figure 1, please use the positioning paper, to drill four 0.47in diameter
holes at corresponding positions of the cement pile with a drill.
Screw down the nuts and spacers of the expansion bolts, put the main body of the
charging station onto the cement pile, and open the door of the operation area at the
lower part of the station; let the 4 expansion screws go through the holes correspond-
ingly; make sure that the cable is threaded through the hole in the middle of the base;
and lock the nuts and spacers tightly.
* (Optional) Use Ethernet for Communication: Pass the Ethenet cable through the
hole along with hardwire cable, connect Ethenet cable to the port.(Figure 2)
* (Optional) Use 4G for Communication: Insert Micro SIM card in the slot to access 4G
net. (Figure 2)
STEP2. Output Cable Management
After the main body installation is completed, loosen the screw in the hose clamp,
attach the cables to the retractor, then fasten the screws securely.
• For correct cable mnanagement, make sure there is no loop and little sag between
the charging station and the retractor hose clamp.
• The hose clamp should not be moved once it is clamped onto to the cables. Do not
try to pull or force the hose clamps into another position. If repositioning is required,
remove the hose clamp completely and repeat the steps above.
The hose clamp is prohibited for use on other cables.
0807
Figure 1
Figure 2
Figure 3
282mm
238mm
Ethernet
4G card
STEP3: Electrical Connection of Charging Stations
Use cold pressed terminal and heat shrinkable tubes to connect the wires to the
terminal block, as shown in Figure 5.
Close the hole as tight as possible by adjusting the inlet protection plate, and use
foam sealant to seal it if needed.
L1 PE L2
7. Operating Instructions
Floodlight
The charger has night mode. The light can be automatically triggered by photocell
sensor.
When the surrounding environment becomes dark and the light is unclear, the
illuminated sign will light up until dawn.
Automatically light up the floodlight when the PIR sensor detects proximity move-
ment.
- When motion detected, it 100% light up;
- When no movements, it only 30% light up;
After 1 hour without any movements, it will totally turn dark, 0% light up.
STEP4. Energized Test
Insert the charging gun into the simulation
device or car, turn on the air circuit-breaker and
confirm the charger is charging properly.
Your EV charger now is ready to charge your
vehicle.
* The air switche needs to meet the require-
ments of UL489 standard.
Insert the charging connector into the connector holder on the front side of the EV
charging station.
Figure 4
Figure 5
The entrance of the input wire
LCD SCREEN: USER INTERFACE
1009
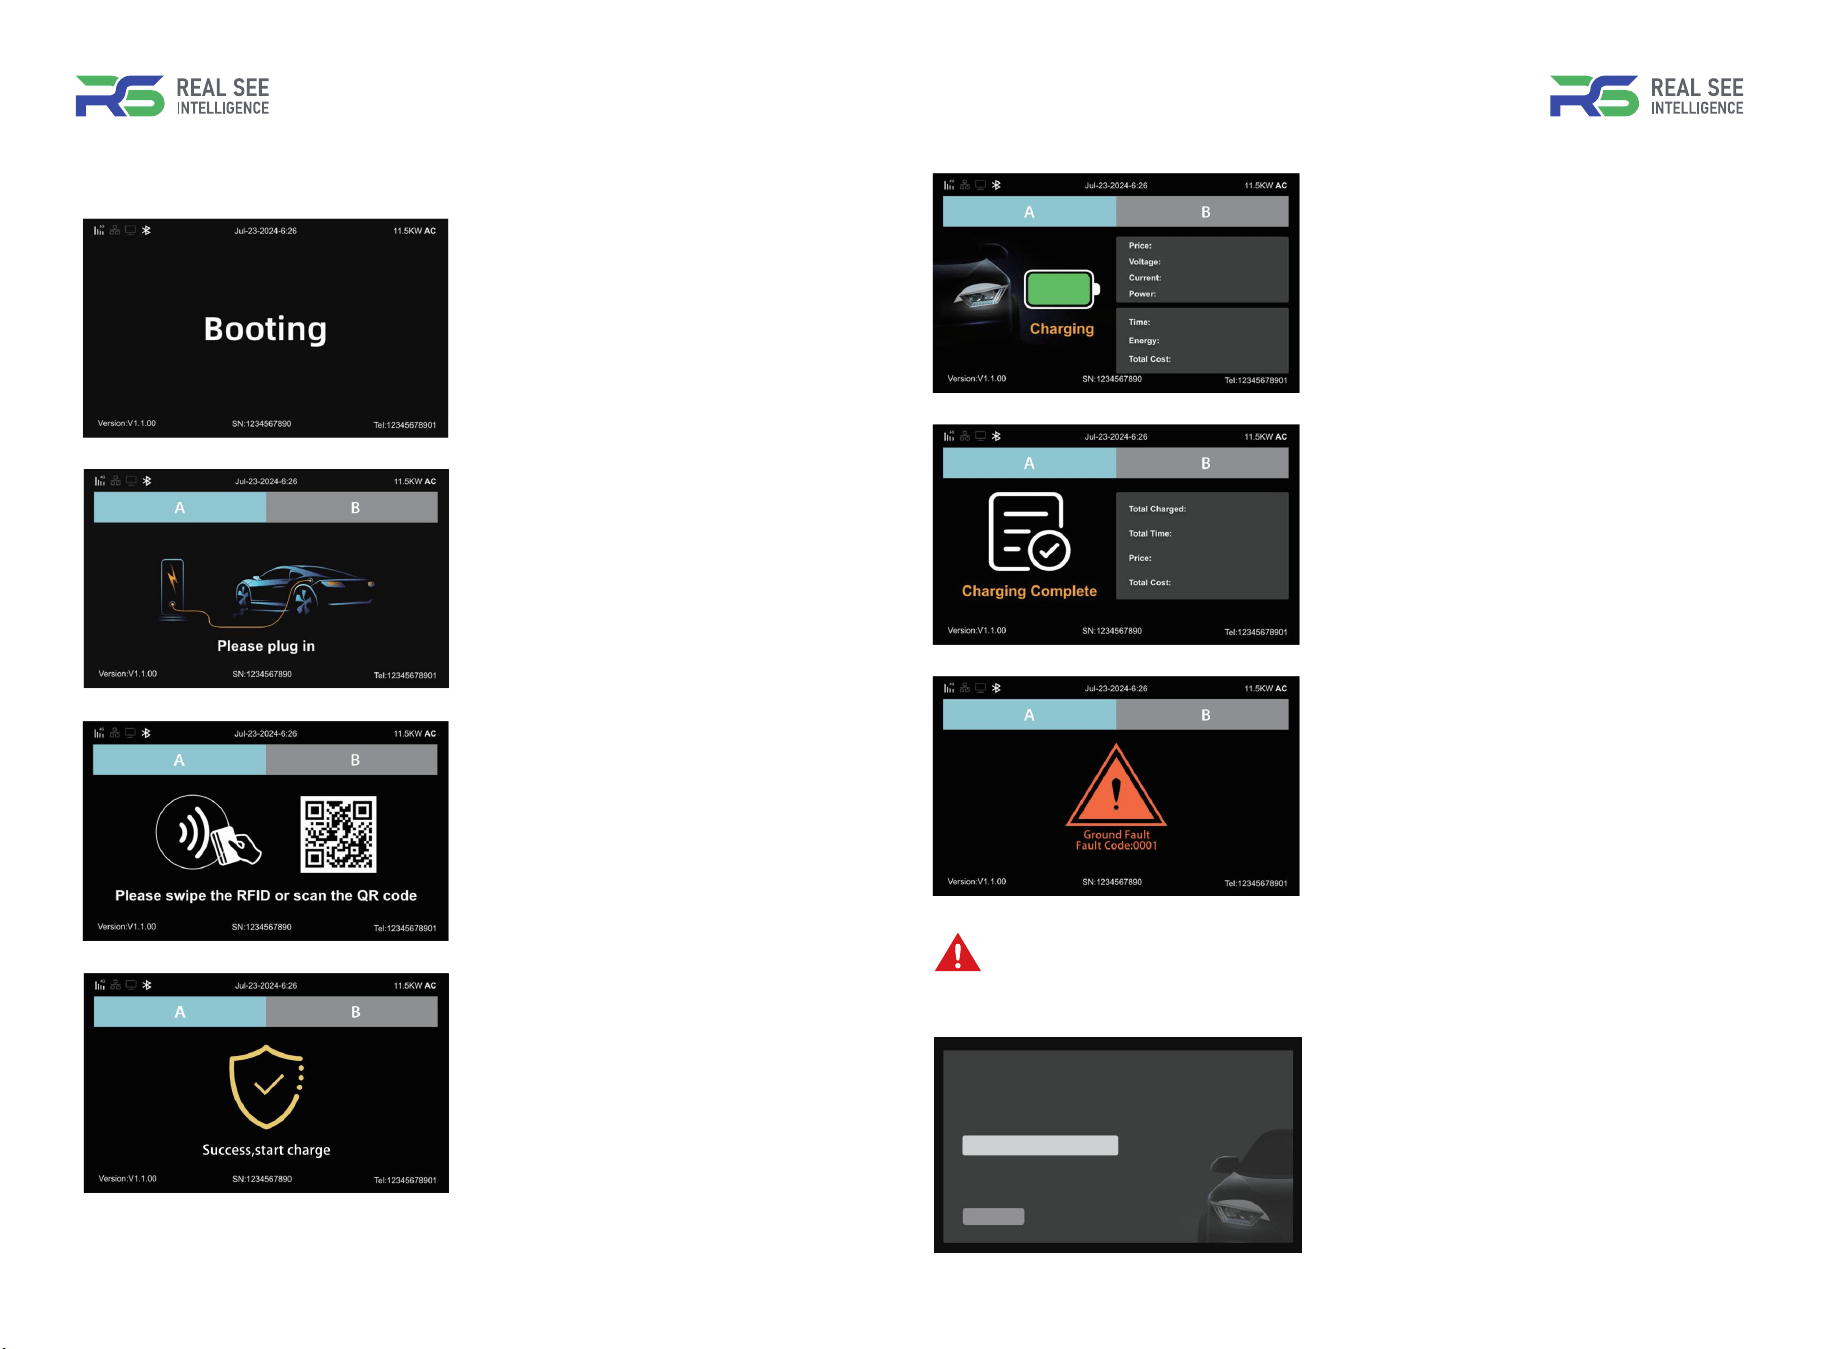
1. Booting
Display the EV charger serial number and
service contact number.
3. After plug in the gun, prompted to
scan the QR code
Status 1: Plug in gun A, prompt to scan
code A.
Status 2: Plug in gun B, prompt to scan
code B.
4.Successful startup, charging is about
to begin
After scanning the code, the charging
station start to charge.
2. Remind to plug in the gun for charging
Remind to insert the charging gun.
LCD SCREEN: ADMINISTRATOR INTERFACE
5. Charging
Display information on price, voltage,
current, power, etc.
6. Charging Complete
After pulling out the charging gun from EV,
screen displays the data of this charging, to
check invoice.
1. Password Verification
Click on the password entry box and use the
on-screen numeric keypad to enter the
administrator password.
7. Failures Occur
The status of the charger appears “!”
Error message and error code appear,
check the error code to understand the error
situation.
Administrator Password
Return
In the 4G icon position on the screen, click 3 times in a row within 1 second, after the “beep”
sound, the screen can automatically jump to the system administrator login interface.
11
12
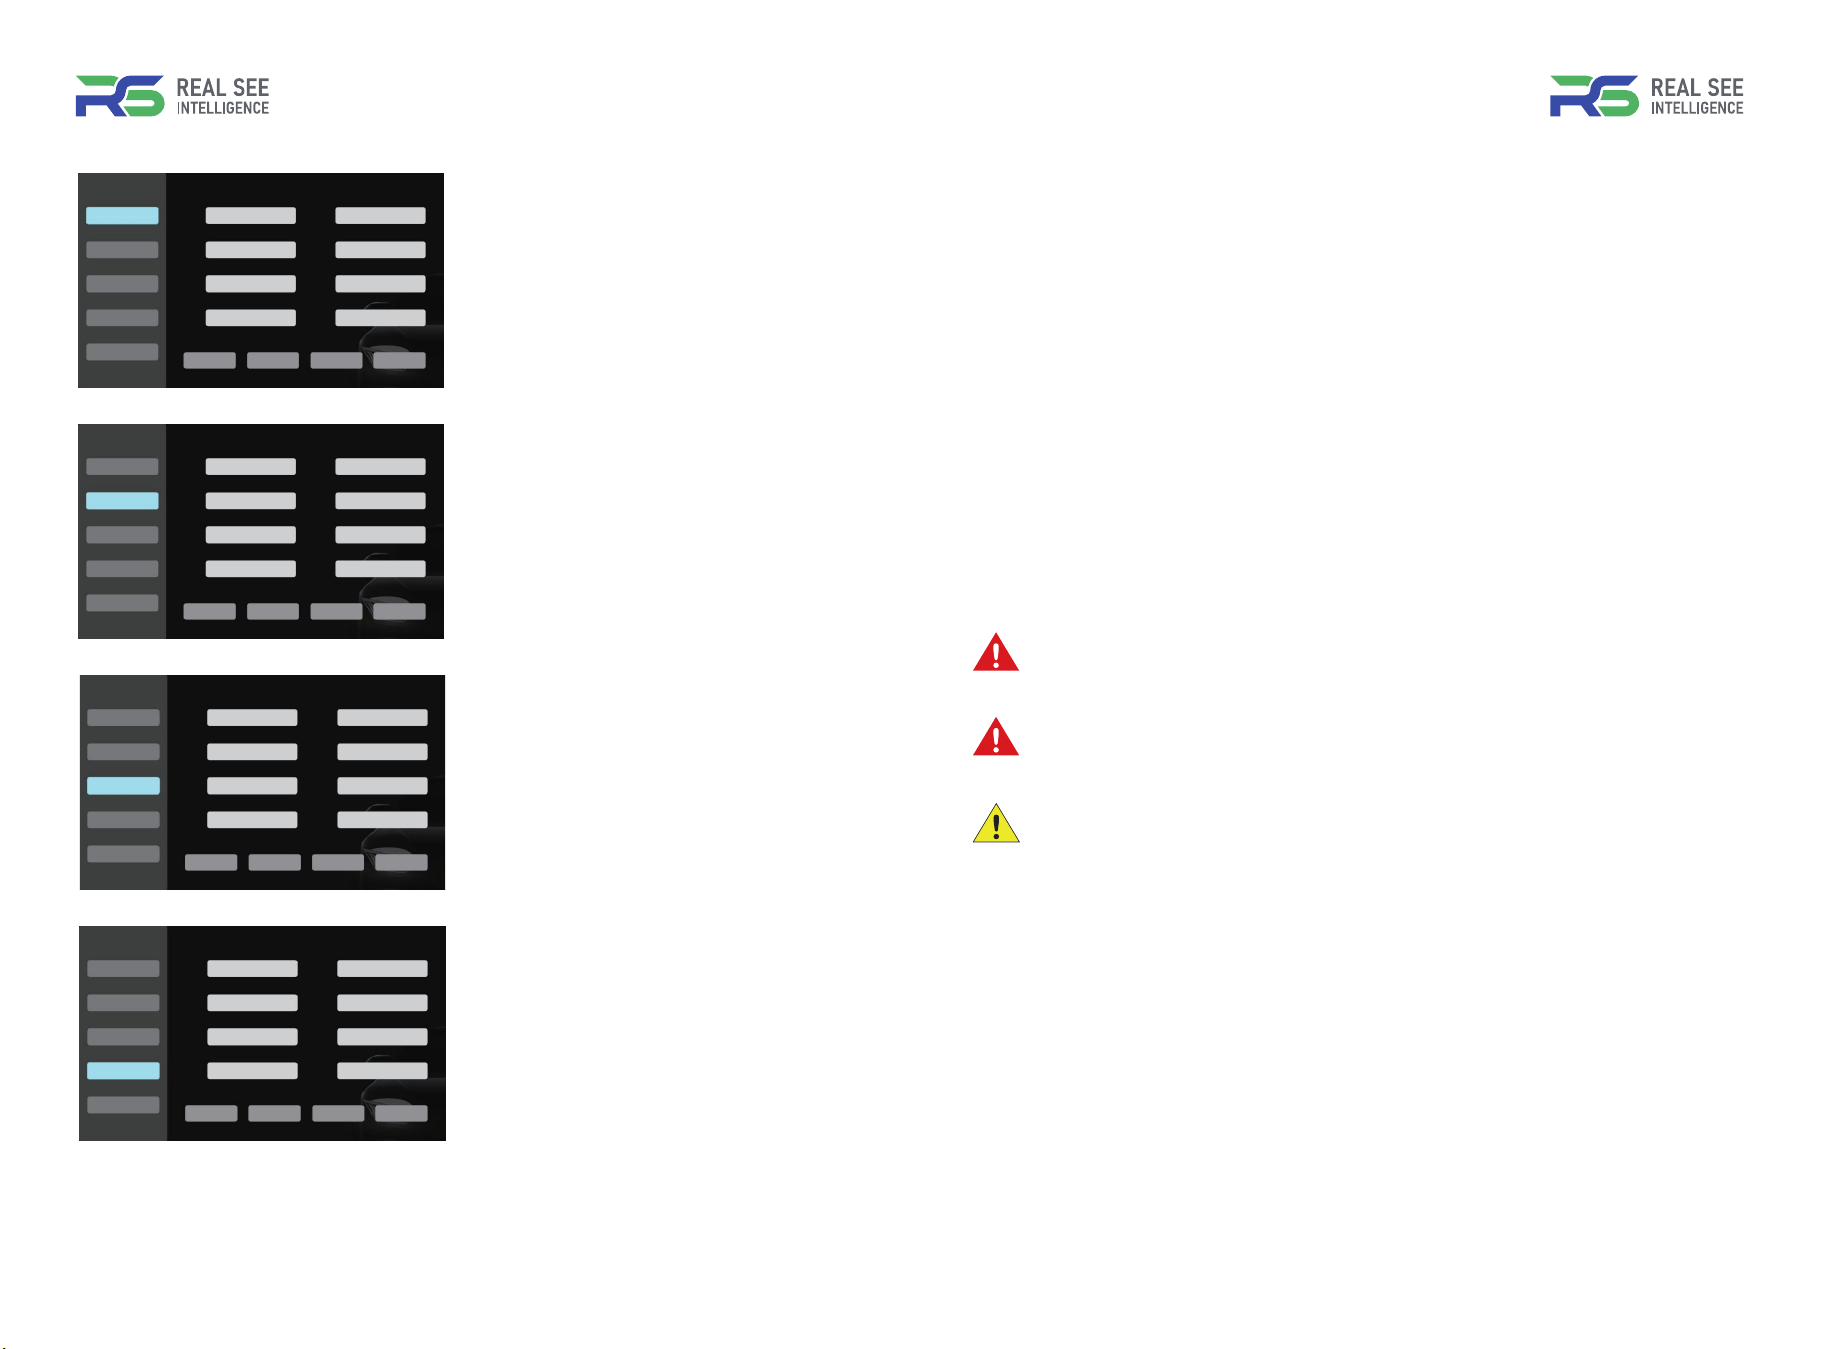
5. Card Settings
Set up the card-related items on this screen.
3. Basic Information Settings
Set up the network on this screen.
4.Parameter Settings
Set up the parameters on this screen.
2.Server settings
Fill in the relevant information in the input
box and save.
Server
Base info
Set param
Card
Other
Reset Reboot Return Save
Server: url0 Mqtt: password
Server: protocal0 Mqtt: username
Server: protocal1 Webserver: password
Server: url1 Authorization Key
Server
Base info
Set param
Card
Other
Reset Reboot Return Save
Cardvendor Card: type
Card: customer Add Card
Card: mode Delete All Card
Cardath Delete Card
Server
Base info
Set param
Card
Other
Reset Reboot Return Save
WIFI:ssid 4G: password
WIFI: password SN
4G: username vendor
4G: apn PN
Server
Base info
Set param
Card
Other
Reset Reboot Return Save
Ccm: maxpower Ccm: min_vol
Ccm: overtemp Ccm: min_rcvr_vol
Ccm: max_rcvr_vol Ccm: output1
Ccm: max_vol Ccm: output0
8. MAINTENANCE AND REPAIR
Daily Maintenance
Please keep the charger clean and keep the charger in a dean area with low humidity.
Do not install it in an environment near the sea, with high oil, high humidity or high
dust.
1.Avoid moisture or water in the charger. If water or excess moisture gets into the
charger, immediately power off the charger to avoid immediate danger. Proceed to
contact the appropriate maintenance personnel before the next use.
2.If there is any damage on the vehicle connector, charging cable, or vehicle connec-
tor holder, please contact the maintenance personnel immediately.
3.Please use the charger correctly. Do not hit or press hard on the case if the case is
damaged, please contact a professional technician.
4.Avoid placing the charger near hot objects and at high temperature locations and
away from dangerous substances such as flammable gases and corrosive materials.
5.Do not place external objects or heavy objects on the charger to avoid danger.
WARNING: Turn off input power at the circuit breaker before cleaning the
charger.
WARNING: Do not use cleaning solvents, scouring, powder, or any type of
abrasive pad to clean the charger, its charging cable, or the vehicle's charging port.
CAUTION: To reduce the risk of electrical shock or equipment damage, do not
allow liquid to enter the charger while cleaning it.
Warranty and Maintenance
1.The warranty period for this charger is 2 years and covers parts only.
2.During the warranty period, if any malfunction is caused by regular use in accor-
dance with the user manual and service instructions, the parts shall be repaired free
of charge. Except for the following situations, the charger shall be subject to the above
warranty terms:
- Unable to provide valid proof of purchase.
- Product that is out of warranty.
3.Those who damage the product due to not following the product service instruction
for use, maintenance and storage.
4.Damage or contamination caused by the entry of foreign objects.
8.1
8.2
5.Unauthorized repair, disassembly or modification.
6.Damage caused by force majeure (such as lightning, excessive voltage, earthquake,
fire, flood, etc.)
7.Malfunction and damage caused by other unavoidable external factors. Malfunction
and damage caused by improper use of equipment, such as water or other solutions
entering into the equipment.
8.Malfunction and damage caused by the grid power supply and voltage which is not
specified for use with the charger equipment.
Need more assistance? Contact Customer Service.
+86-592-6092028
info@realsee.net
https://www.realseecharger.com
9. Service
1413