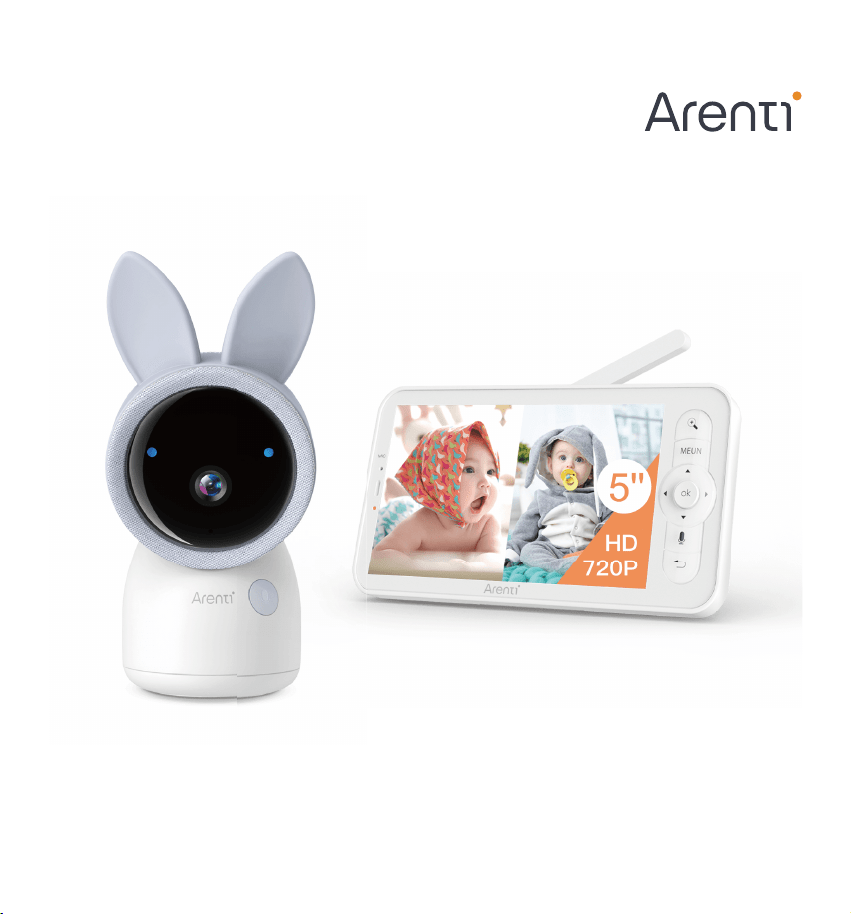
AInanny A4 Kit Plus
Sma baby monitor
User manual
Email: suppo@arenti.com
Phone: 1-866-999-7868, Mon-Fri 9AM-5PM (PT)
Toll free for USA&Canada, subject to charges for other regions
Phone Seice Language only available in English

suppo@arenti.com
EN
Product description
Please read this manual carefully before using the product and keep it properly. Label information is located
on the side of the camera.
Packing list
OK
UP
L
O
C
K
U
N
L
O
C
K
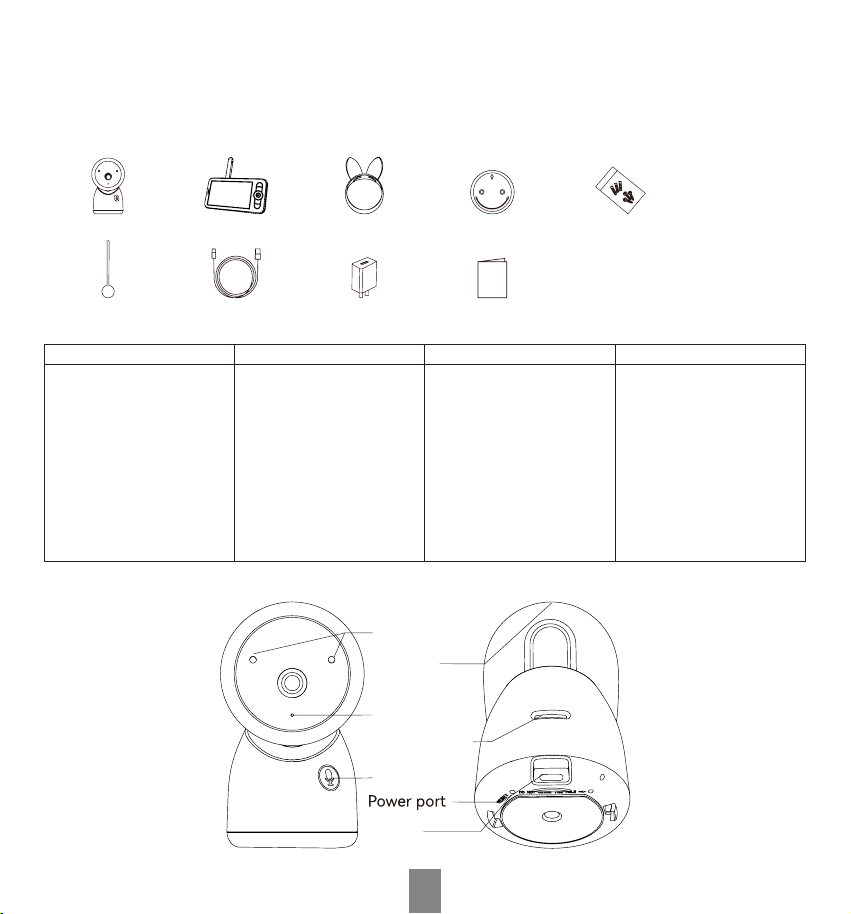
Camera Monitor Headgear Bracket Screw package
Reset pin Power cable Power adapter Quick guide
Product name AInanny A4 Kit Plus AInanny A4-2Cam Kit Plus AInanny A4-4Cam Kit Plus
Packing list
Camera X1
Monitor X1
Headgear X1
Bracket X1
Screw package X1
Reset pin X1
Power cable X2
Power adapter X2
Quick guide X1
Camera X2
Monitor X1
Headgear X2
Bracket X2
Screw package X2
Reset pin X1
Power cable X3
Power adapter X3
Quick guide X1
Camera X4
Monitor X1
Headgear X4
Bracket X4
Screw package X4
Reset pin X1
Power cable X5
Power adapter X5
Quick guide X1
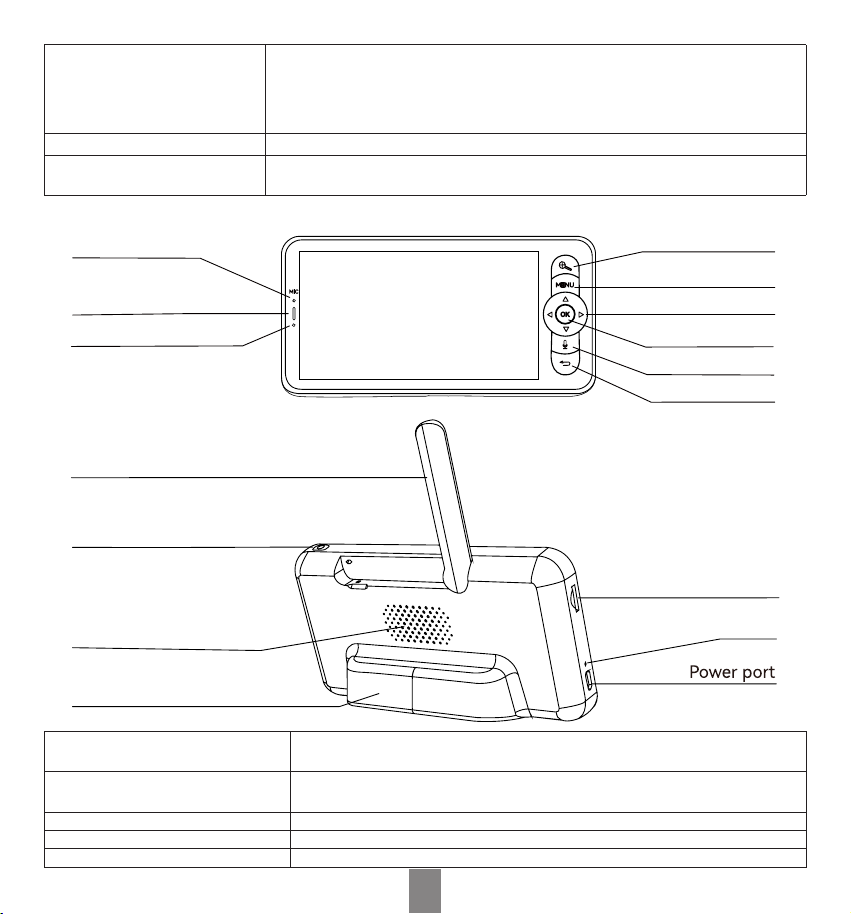
Speaker
Microphone
Call/Pairing
Status light
RESET
TF card slot
suppo@arenti.com
EN
Status light • Flashing red light (slow): wait for network conguration
• Flashing red light(fast): connecting the network
• Fixed blue light on: camera is working correctly
• Fixed red light on: network is malfunctional
Call/Pairing Press to make a call; long press to pair
RESET Press and hold for 5s to reset the camera (if you have modied settings, they will return
to facto defaults)
Microphone
Status light of charging
Status light of using
Zoom in/out
Menu
Direction
OK
Call
Back
Speaker
ON/OFF button
Antenna
Stand
TF card slot
RESET
Status light of charging • Orange light: charging
• Green light: fully charged
Status light of using • Yellow light: monitor on
• No light: monitor o
Antenna Adjust the angle to get better signals
ON/OFF button Long press 5s to turn on/turn o the monitor
Zoom in/out Zoom the image in 1X, 2X or 4X
suppo@arenti.com
EN
Menu On the homepage, press to enter the menu inteace;
On the homepage, long press to enter the setting inteace
Direction Control the rotation directions; select the menu items
OK Conrm or awake the screen
Call Make a call after pressing the button
Back Press to back up;
On the homepage, long press to stop playing music
Installation
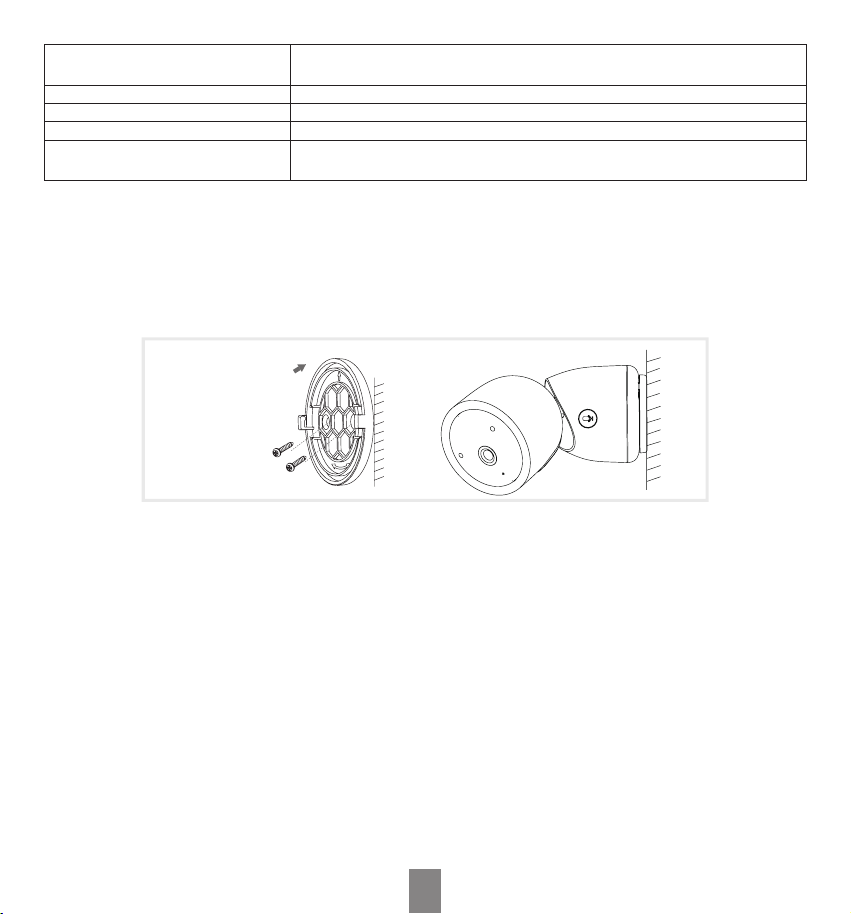
Find a position where you can get the desired eld of view. You can put the camera on a at suace or
mount it on the wall.
Mounting on the wall
Tips:
• The installation wall needs to be able to bear at least 3 times the total weight of the camera.
• In case your camera is mounted upside down, its picture shall be ipped as well. Please set from Arenti
App >> Device (tap device to live video page) >> Settings >> Basic Function >> Image Setting >> Screen
Flip.
• Do not point the camera toward a glass window. Or it may result in poor image peormance because of
the window glare by infrared LEDs, ambient lights, or status light.
Camera using tips
• Work indicator:
The blue light indicator can be turned o manually when the camera is in working condition.
Set from: App>> Device (tap device to live video page) >> Settings >> Work Indicator.
• Live video viewing:
In the camera control inteace of the App you can view the camera monitoring in real-time, adjust the
resolution, capture images, record video, and make 2-way talking.
• Infrared night vision:

suppo@arenti.com
EN
The camera can automatically switch to night vision mode (black&white view) at night according to the
degree of change in surrounding light. With built-in invisible red Infrared LED lights, the night vision
distance can reach 10 meters, and it can be viewed super clearly in the dark.
• Motion detection:
The camera can detect movement changes in the camera view and you will receive push ales from App
when movement is detected.
Set from: App >> Device (tap device to live video page) >> Settings >> Ale Settings >> Motion Detection.
Specications
Model AInanny A4
Angle of view 100°
Working temp 0℃to 40℃
Local storage TF card(up to 256GB)
Resolution 2560x1440
Size 70x63x120 mm
Power input DC 5V/1A
Consumption Up to 4.5W
Suppoed phone OS iOS 9 / Android 5.0 or later
2.4GHz Wi-Fi 2412-2462MHz (Max. power<30dBm )
5GHz Wi-Fi 5150-5850MHz (Max. power<23dBm )
Wi-Fi Halow 905-925MHz (Max. power<30dBm )
Bluetooth 2400-2483.5MHz (Max. power<20dBm )
Model AInanny-Screen2
Batte capacity 3350mAh
Working temp 0℃to 40℃
Local storage TF card(up to 128GB)
Resolution 720P (1280x720)
Size 157x81x40mm
Power input DC 5V/1A
Wi-Fi Halow 905-925MHz (Max. power<30dBm )
suppo@arenti.com
EN
Product conguration
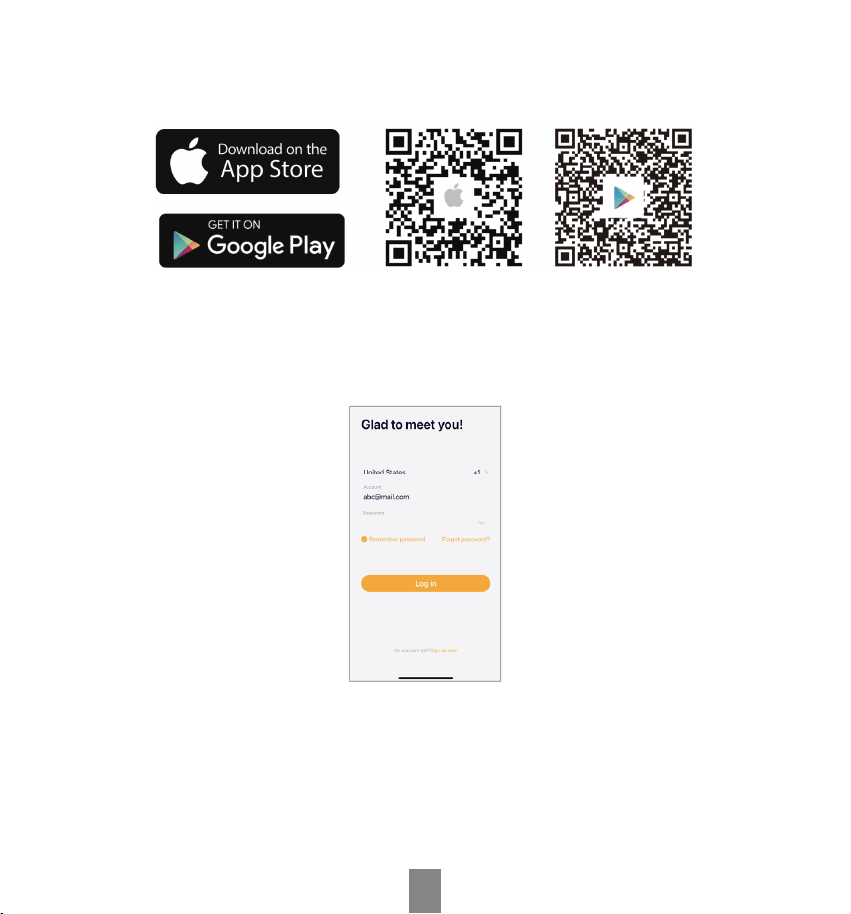
Scan QR code to download and install the Arenti App. Or you can search "Arenti" on App Store (iOS) or
Google Play (Android).
Registration
Open the App. If you are a new user, tap to create a new account and follow the prompts to complete
account setup.
Note:
Before creating a new account, please read the Privacy Policy and Terms of Use carefully.
• Set up a router
Make sure the router is connected to the Wi-Fi network. Please set the parameters of the router before
connecting to the Wi-Fi network, and record the SSID and password of your Wi-Fi.
suppo@arenti.com
EN
Please keep the network available
• Power on the device
Power on the camera. Status light ashing red indicates that the camera is ready for pairing.
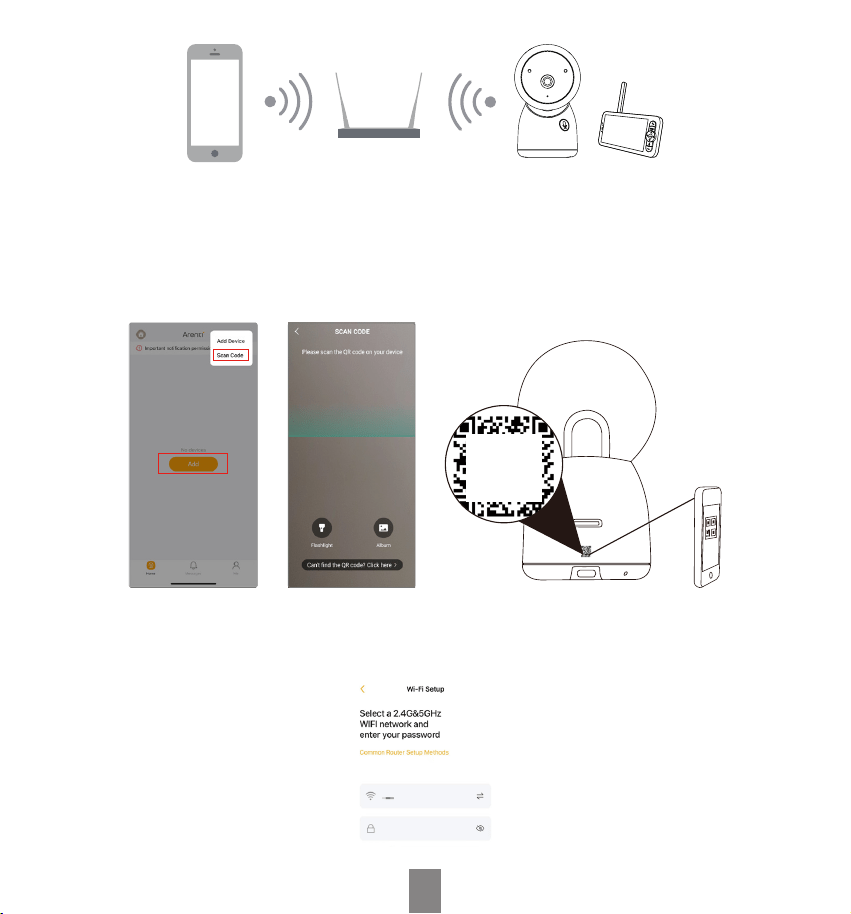
Pairing method 1: pairing via QR code on device
Open App home page, click "+" >> "Scan Code", then scan the QR code pasted on the device casing with
the App of your phone. The device will then appear on the page, click the device.
Scan the
QR code
on device
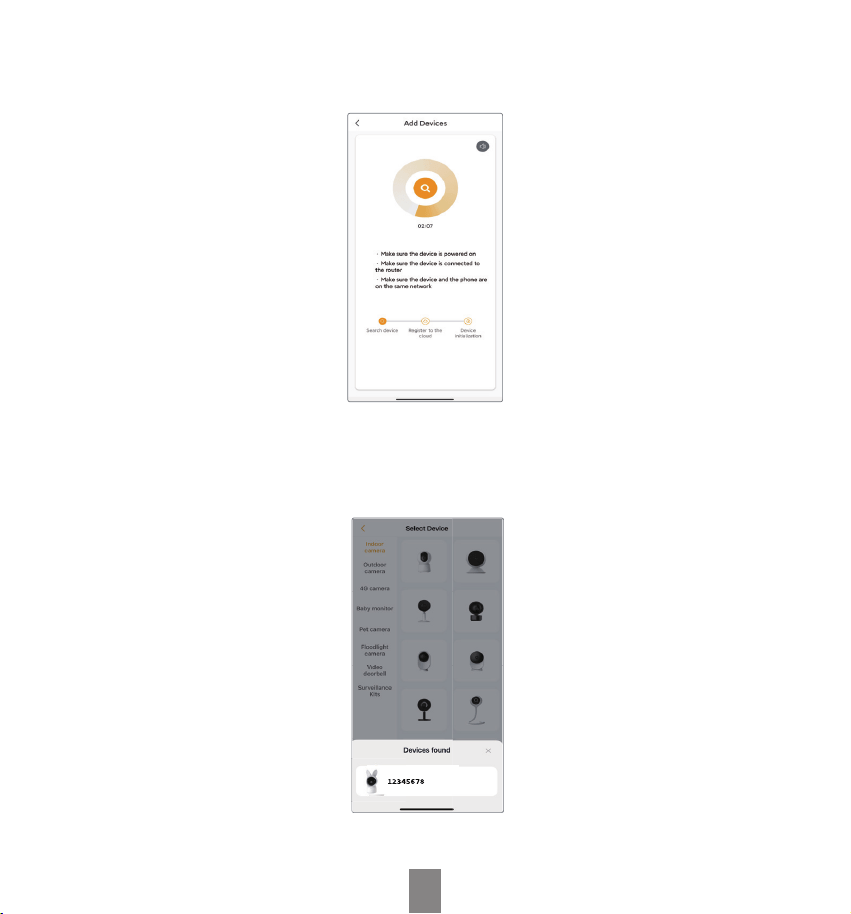
Select the Wi-Fi network and input the password, and press "Next". Make sure that your phone has
connected to a uent and steady Wi-Fi already.
Note:
The number of bits in the SSID and passwords of the router should not exceed 31 digits.
suppo@arenti.com
EN
The device can be added to App after the network connection.
Note:
When pairing, please put the camera and mobile phone close to the router. If camera is not in the red slow blinking after 30s
of powering on, press and hold the reset button for 5s to reset, and then resta to pair the camera with the App
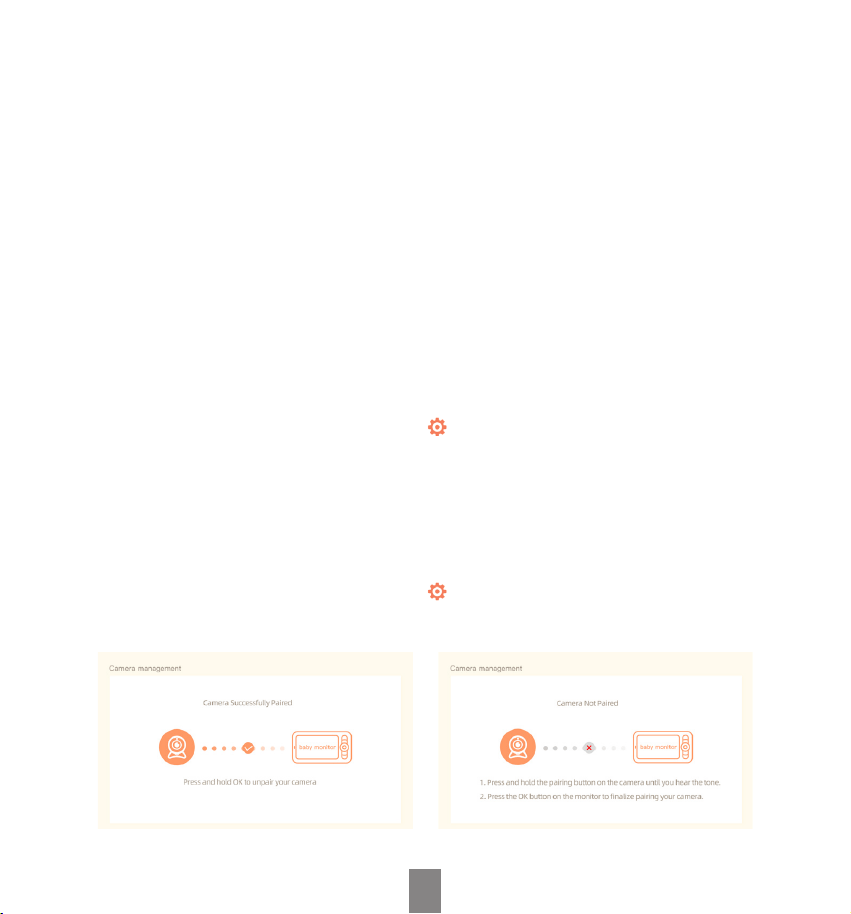
Pairing method 2: pairing via Bluetooth
Turn on your phone's Bluetooth.
Open App home page, click "+" >>"Add Device" or "Add", the device will be searched for by bluetooth and
appears on the page. Conrm the serial number(SN) of the device, then click the device and follow the
notes to pair the camera with App.
If no device is found and the pairing process is not successful, please check below instrutions:
• Verify that the entered Wi-Fi password is correct and that the mobile device is connected to the same
suppo@arenti.com
EN
Wi-Fi network.
• Make sure the camera is in pairing mode.
• Check for network activity on your Wi-Fi.
If none of the solutions works or you have any other problems, please call 1-866-999-7868 (Mon-Fri 9AM-
5PM (PT), toll free for USA&Canada, subject to charges for other regions, Phone Seice Language only
available in English) or contact suppo@arenti.com to get help.
Note:
If you have multiple cameras, please follow steps again to adddevices one by one. To change Wi-Fi network, please restore
the camera to facto settings and follow steps to add the camera.
Monitor Using tips
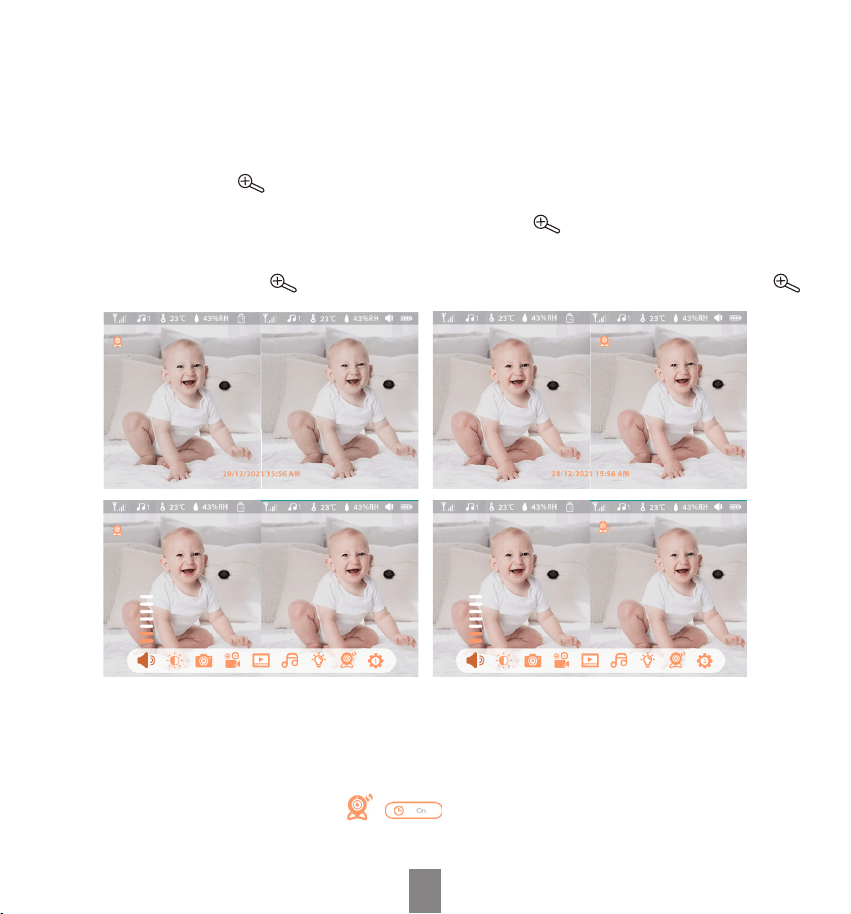
• Pairing of camera and monitor:
Power on the camera and the monitor, and they will automatically connect. If the connection fails, please
follow the steps below to pair. The pairing is distance limited, so please make sure that the distance
between the camera and the monitor is no more than 200m.
• Bind the monitor and camera:
1. Press the Menu button on the monitor, and select > Camera.
2. Select Camera 1 or Camera 2/3/4 which you need to pair.
3. Long press the camera pairing button until you hear the prompt tone.
4. Press the OK button on the monitor to sta pairing.
5. If you need pair 2 or more than 2 cameras, please repeat step 2~ step 4.
• Unbind the monitor and camera:
1. Press the Menu button on the monitor, and select > Camera.
2. Select Camera 1 or Camera 2/3/4 which you need to unbind.
3. Long press the OK button to release the binding.
suppo@arenti.com
EN
• Camera switching method:
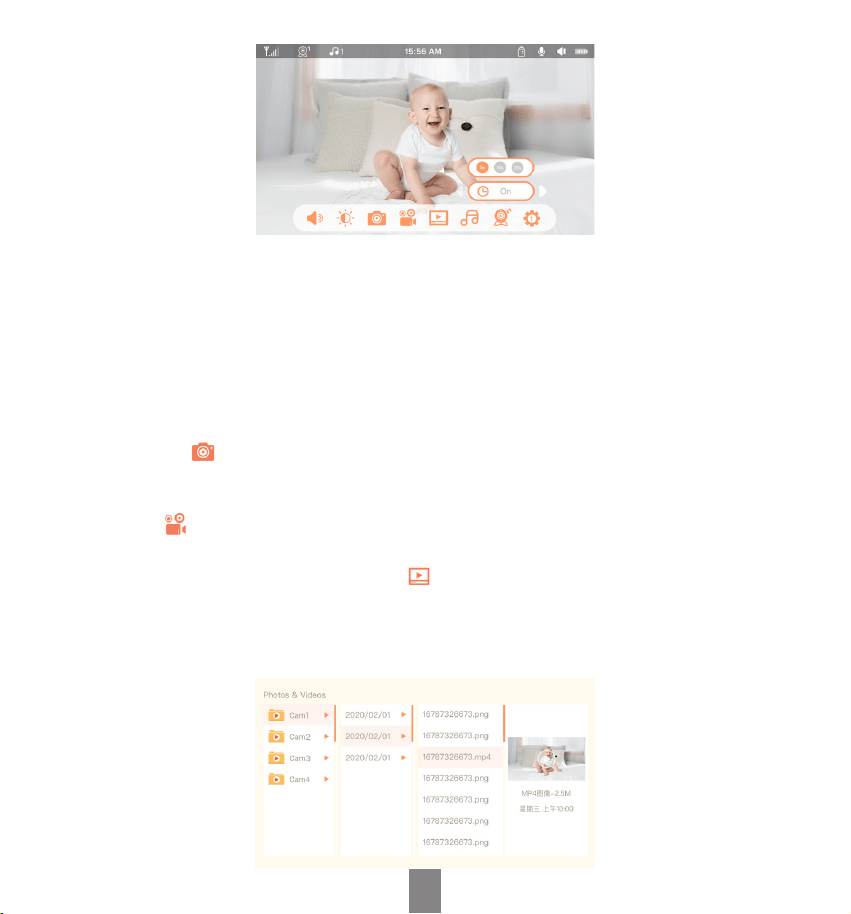
For dierent products, you may add 1,2 or 4 cameras. If you have added multiple cameras, the monitor
will display 2 live views at the same time. If you want to set parameters or enable functions of one of the
cameras, you need to select and switch to the camera rst.
• Camera switching method 1: manual switching
On the home page, press button and use the Direction button to switch the camera between Cam1, 2,
3 or 4 if you have added multiple cameras.Select one camera you need and press the OK button on the
monitor to enter full-screen viewing mode. And then you can press button again to zoom in and zoom
out. (Zooming function does not work when the screen is not in full screen.)
Note:
When you add 3(or 4) cameras,press button to enter the selection mode. Camera 1, 2 are selected by default, press
button again to switch to camear 2, 3( or 3, 4).
• Camera switching method 2: timed cycle switching
We also oer the option of switching each camera in a timed cycle, making it easy for you to set up
monitoring rounds as needed.
1. Press Menu on the monitor and select > .
2. Press UP direction button to the mode of timed cycle selection.
3. Press LEFT and RIGHT direction buttons to select option of dierent timed cycle.
suppo@arenti.com
EN
• Rotate the camera
You can adjust the monitoring angle for better vision.
The direction buttons on the monitor are available when the camera is powered on. Press the direction
buttons to rotate the camera horizontally and veically for better vision.
• Photo & video
• Take a photo:
You can take a photo when you want to capture an interesting scene of the baby. Press Menu button on
the monitor, select and press OK to take a photo.
• Record a video:
You can record a video when you want to capture a meaningful time for the baby. Press Menu on the
monitor, select and press OK to record a video.
• View the taken photos and recorded videos:
1. Press the Menu button on the monitor, select and press OK to enter the inteace.
2. Select the camera and date, select the photo or video you want to view and press OK to enter preview
mode.
* Press OK to play or pause the vedio in the preview mode.
* Press the Return button to the quit preview or return to the main menu.
suppo@arenti.com
EN
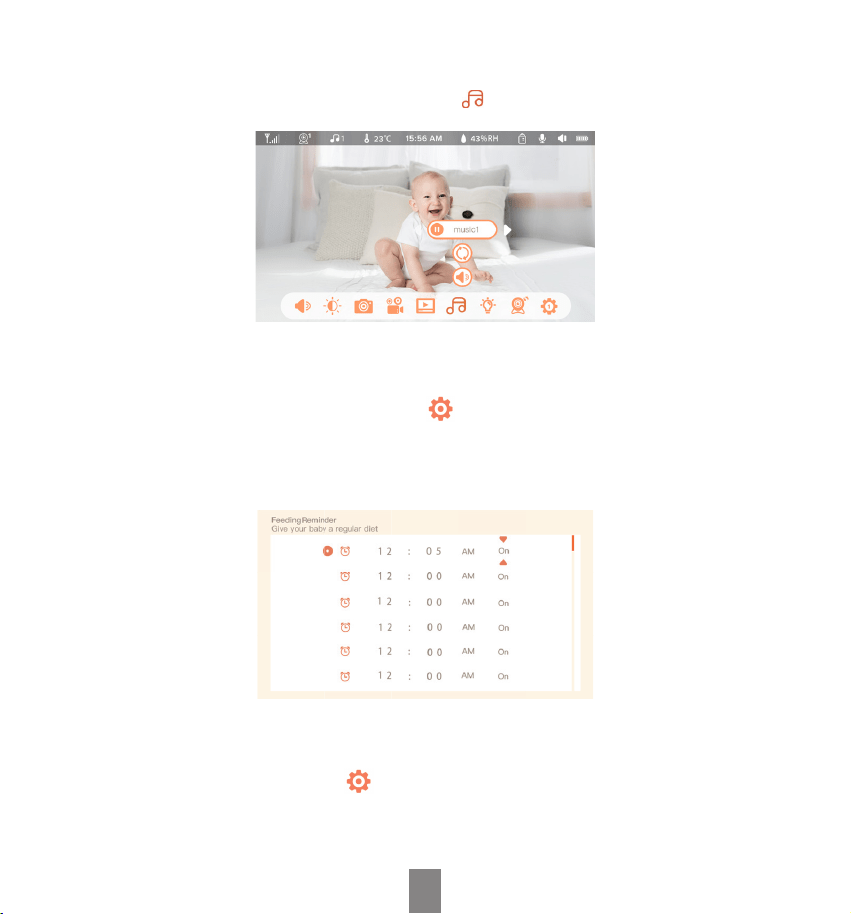
• Play music
You can play music when your baby needs to be soothed. There are various soft music to select.
Press the Menu button on the monitor screen, and select and press OK to enter the music inteace.
You can select dierent music, change the music cycle mode, or adjust the music volume.
• Feeding reminder
Remind you to feed your baby when you are too busy, or when you want to give your baby a regular diet.
1. Press the Menu button on the monitor, and select > Feeding Reminder.
2. Select on or o to open or close feeding reminders. You can set up to 10 feeding times one day. And
when the set time is up, a feeding alarm will appear on the monitor screen.
3. Press UP and DOWN direction buttons to select between 10 time options, and press OK to sta the
time setting.
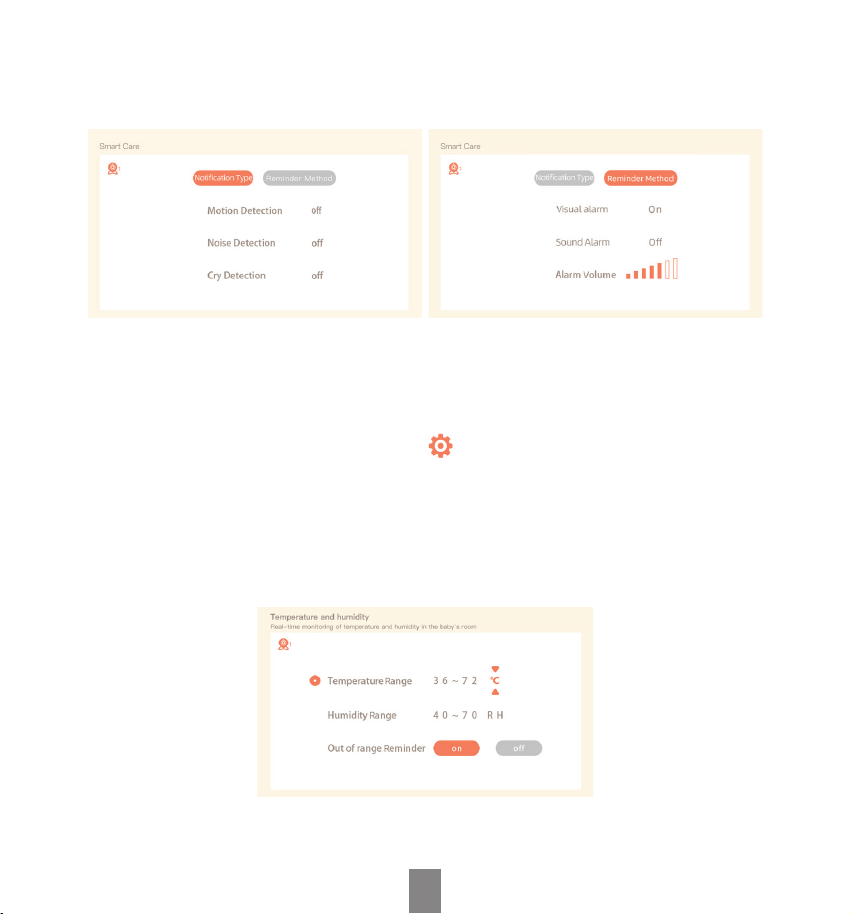
• Sma care
You can turn on functions of motion detection, noise detection, and c detection, so that you can know
the baby's status immediately, no matter what you are doing.
1. Press Menu on the monitor and select > Sma Care.
2. Press UP and DOWN direction buttons to select options between motion detection, noise detection,
and alarm volume, then press OK to save.
3. When set up one detection mode, please press LEFT and RIGHT direction buttons to change options,
suppo@arenti.com
EN
and press UP and DOWN direction buttons to adjust the sensitivity.
* You can select dierent sensitivity according to your needs. Low refers to low sensitivity, and high
refers to high sensitivity.
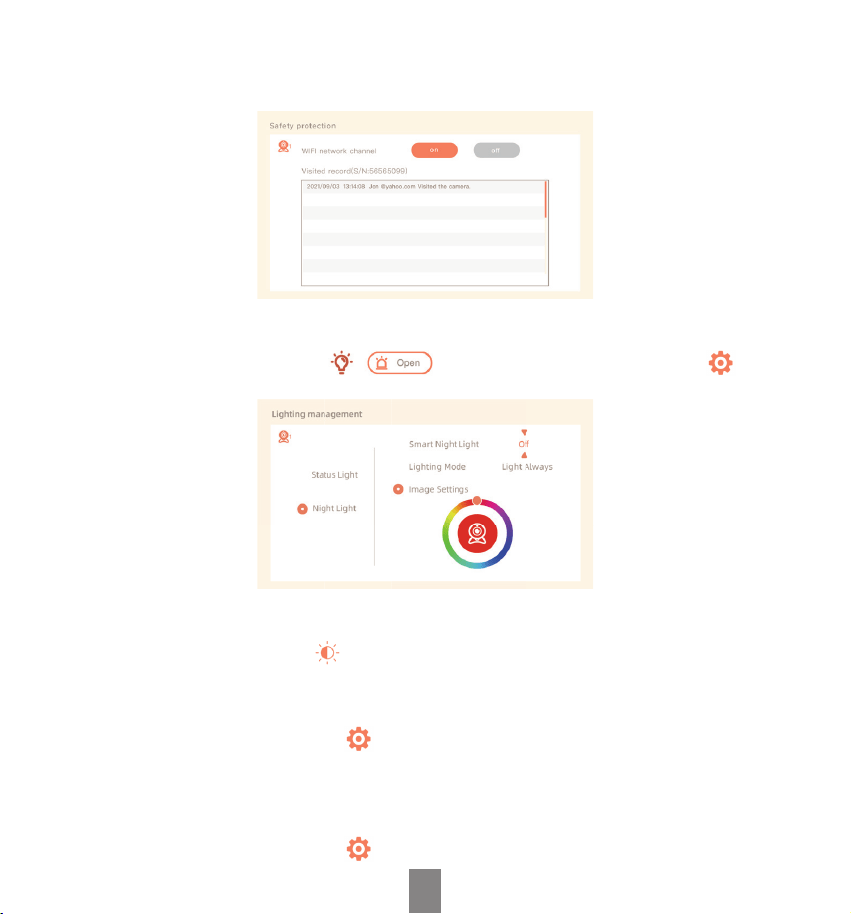
• Temperature and humidity detection
You can monitor the temperature and humidity of your baby's room in real-time. When the temperature
and humidity are out of range, you will recieve the alarms immediately, so that you can take measures.
1. Press the Menu button on the monitor, and select > Temperature and humidity.
2. Press UP and DOWN direction buttons to select options between temperature range, humidity range
and out-of-range reminder, then press OK to set up.
3. Press LEFT and RIGHT buttons to change options, then press UP and DOWN buttons to change values
and units.
4. In the Out of range reminder option, select to turn on or o the alarm when the temperature and
humidity are out of range.
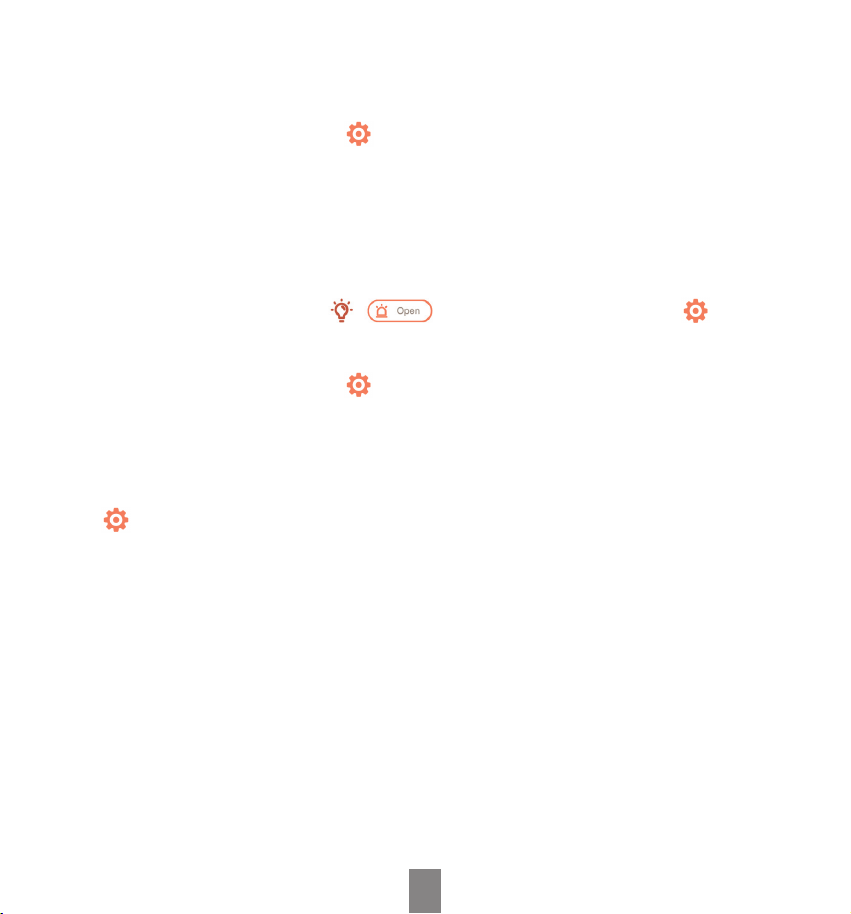
• Safety Protection
• Wi-Fi network channel
suppo@arenti.com
EN
If you turn o the Wi-Fi network channel, the App will not be able to view the camera.
• Visited records
You can also view the visited records as all visits through the App will be recorded.
• Night light
You can turn on the night light if needed, and you can set lighting mode and light color.
Press Menu on the monitor and select > .Or press the Menu button, and select > Light >
Night light.
• General setting
• Set up brightness:
1. Press Menu on the monitor, select and press OK to enter.
2. Press UP and DOWN buttons to adjust brightness.
• Set up time:
1. Press Menu on the monitor and select > Time setting.
2. Press the direction buttons to change the date, time, and time displaying mode.
• Set up language:
1. Press Menu on the monitor and select > Language.
suppo@arenti.com
EN
2. Select the language you need.
• Set up sleep mode:
You can set up sleep mode to increase standby time.
1. Press Menu on the monitor and select > Sleep mode.
2. In default mode(Audio o), the audio from the camera can not be heard after the display is o, so the
standby time is long. In Audio on mode, the audio from camera can still be heard even after the screen
is turned o, and you can choose the time(1,5,10,30 or 60min), but the standby time is shoer. In
Always on mode, the monitor remains on unless the power button is pressed, with sho standby time.
• Turn on and o status indicator:
If you turn on the status indicator, you can get the working status of the camera. You can also turn o the
status indicator if you think it will aect your baby's sleep.
Press Menu on the monitor and select > . (Or Press the Menu button, select >Light >
Status light.).
• SD card:
1. Press Menu on the monitor and select > SD card management. Then you can view the total capacity
and remaining capacity of your SD card.
2. (Optional) You can format the SD card as you needed, but make sure that the impoant data is backed
up.
• Upgrade:
You can upgrade your camera when the upgrade alarm appears. Or press Menu on the monitor and
select > Device information to check whether there is an upgrade.
• Low batte alarm:
When the camera is low on batte, the low batte alarm will appear on the monitor screen. Please
charge the monitor as soon as possible.
FAQ
Camera
Q: How to disable the LED indicator/blue light in my camera?
A: Arenti App >> Device (turn to live video page) >> Settings >> Basic Function >> Network Indicator:
Disable it.
Q: How to turn o the camera real-time monitor, and stop recording?
A: Arenti App >> Device (turn to live video page) >> Settings >> Basic Function >> Privacy Protection >>
Lens OFF.

suppo@arenti.com
EN
Q: How to change the Wi-Fi or update the Wi-Fi password for the device?
A: Please delete the camera on App, click "Add" and follow the steps to use the new Wi-Fi network to add
the camera again.
Q: How to share Arenti devices with friends and family?
A: Arenti App >> Device (turn to live video page) >> Settings >> Device Share >> Add, follow the tips to
share your device.
Q: Failed to access the live video, prompts oine?
A:
• Please ensure the camera is in the power-on status: the camera network indicator should be on.
• Check the Wi-Fi network is in good condition or resta the router.
• T to move the camera closer to the router.
• Delete the camera from Arenti App and add it again. Conrm the App and camera rmware are the latest
versions.
Q: Cannot nd the pairing button?
A: The pairing button is the call button of the camera. Long press the button for 3 seconds, and follow the
step instructions of the monitor.
Monitor
Q: What should I do if the monitor is stuck?
A: Press the reset button located near the power po on the monitor, or long press the power button to
turn on the monitor again.
Q: How can I change the wallpaper of monitor screen?
A: Press Menu on the monitor and select > Wallpaper.
Q: How can I upgrade the version of the monitor?
A: Firstly, add the camera to the App. Then press Menu on the monitor and select > Device Information,
then check for available upgrades.
Q: The monitor cannot be previewed properly?
A: Check whether the monitor has connected to the camera. If not, pair the camera and the monitor rstly.
Q: Why the camera or the monitor cannot identify the TF card?
suppo@arenti.com
EN
A: Conrm whether the TF card is normally available and the format is FAT32.
If none of the solutions works or you have any other problems, please call 1-866-999-7868 (Mon-Fri 9AM-
5PM (PT), toll free for USA&Canada, subject to charges for other regions, Phone Seice Language only
available in English) or contact suppo@arenti.com to get help.
Precautions
• The applicable working temperature of this product is 0℃~40℃, please do not use it in an environment
where the temperature is too high or too low.
• To use this product better, avoid the front and side of the lens close to the glass, white walls, light objects
etc., so as not to cause the picture to be bright near, dark, or whitish in the distance.
• Please make sure that the camera is installed within the range covered by the Wi-Fi signal, and placed
as far as possible on the location where the signal is better, and t to install it away from metal and
microwave ovens that may aect the signal.
After-Sale Seice and Technical Suppo
• Access Suppo Aicles, Videos, and Documentation. www.arenti.com/suppo/
• Access Suppo from the Arenti App, log in to your Arenti App and tap to get suppo.
• You can send an email to suppo@arenti.com. Describe the camera issue, and inform us of the camera
model and SN from the camera body. We will t to reply you in 24h.
Legal notice
Symbols: Direct current (DC)
Don't throw batteries or out of order products with household waste (garbage). The
dangerous substances that they are likely to include may harm health or the environment.
Make your retailer take back these products or use the selective collection of garbage
proposed by your city.
Hereby, Arenti, declares the radio equipment type 'AInanny A4,AInanny-Screen2' complies
with the Directive 2014/53/EU
The full test of the EU declaration of conformity is available on the Internet address: www.
arenti.com
suppo@arenti.com
ES
Descripción del producto
Lea atentamente este manual antes de utilizar el producto y conséelo adecuadamente. La información de
la etiqueta se encuentra en el lateral de la cámara.
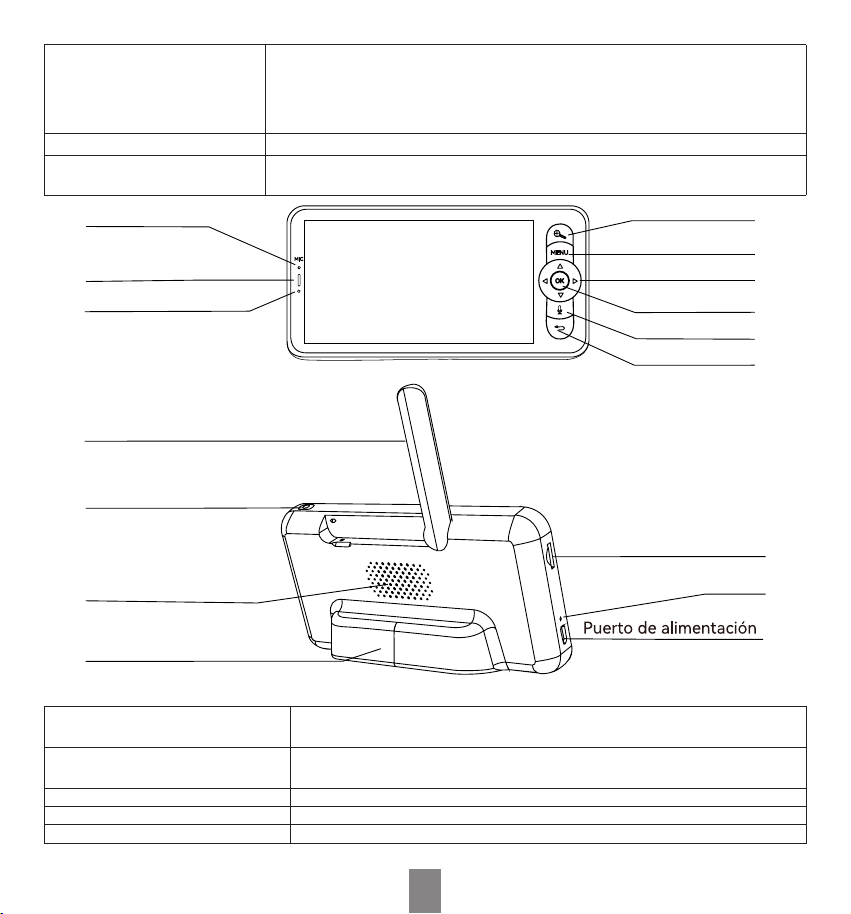
Lista de embalaje
OK
UP
L
O
C
K
U
N
L
O
C
K
Cámara Monitor Hoofddeksel Sopoe
Paquete de tornillos
Pin de reinicio
Cable de
alimentación
Adaptador de
alimentación
Guía rápida
Nombre del producto AInanny A4 Kit Plus AInanny A4-2Cam Kit Plus AInanny A4-4Cam Kit Plus
Lista de embalaje
Cámara X1
Monitor X1
Hoofddeksel X1
Sopoe X1
Paquete de tornillos X1
Pin de reinicio X1
Cable de alimentación X2
Adaptador de
alimentación X2
Guía rápida X1
Cámara X2
Monitor X1
Hoofddeksel X2
Sopoe X2
Paquete de tornillos X2
Pin de reinicio X1
Cable de alimentación X3
Adaptador de
alimentación X3
Guía rápida X1
Cámara X4
Monitor X1
Hoofddeksel X4
Sopoe X4
Paquete de tornillos X4
RPin de reinicio X1
Cable de alimentación X5
Adaptador de
alimentación X5
Guía rápida X1
Altavoz
Micrófono
Llamada/
Acoplamiento
Luz de estado
RESET
Ranura para
tarjetas TF
suppo@arenti.com
ES
Luz de estado • Luz roja intermitente (lenta): espere a la conguración de la red
• Luz roja intermitente (rápida): conexión a la red
• Luz azul ja encendida: la cámara funciona correctamente
• Luz roja ja encendida: la red no funciona correctamente
Llamada/Acoplamiento Pulse para realizar una llamada; pulse prolongadamente para emparejar
RESET Mantenga pulsado durante 5s para reiniciar la cámara (si ha modicado los ajustes,
volverán a los valores predeterminados de fábrica)
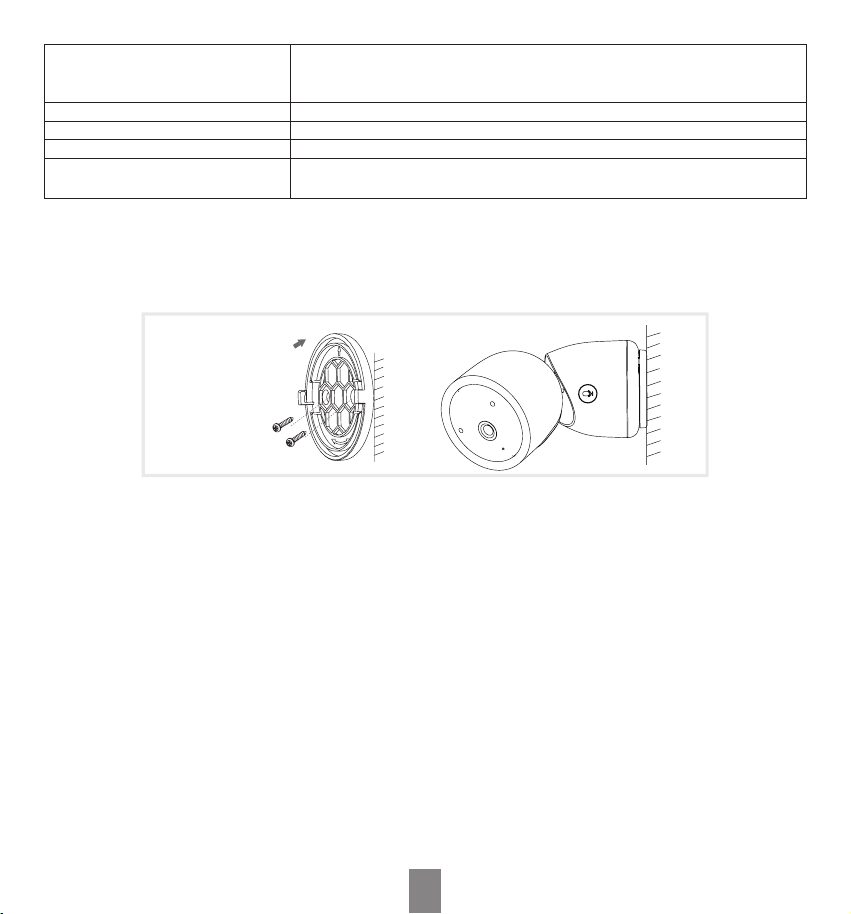
Micrófono
Luz de estado de carga
Luz de estado de uso
Acercar / alejar
Menú
Dirección
OK
Llamar
Atrás
RESET
Altavoz
Botón ON/OFF
Antena
Stand
Ranura para tarjeta TF
Luz de estado de carga • Luz naranja: cargando
• Luz verde: carga completa
Luz de estado de uso • Luz amarilla: monitor encendido
• Sin luz: monitor apagado
Antena Ajusta el ángulo para obtener mejores señales
Botón ON/OFF Pulsación larga 5s para encender/apagar el monitor
Ampliar/reducir Ampliar la imagen en 1X, 2X o 4X
suppo@arenti.com
ES
Menú En la página de inicio, pulse para acceder a la inteaz de menú;
En la página de inicio, pulse prolongadamente para acceder a la inteaz de
conguración.
Dirección Controla las direcciones de rotación; selecciona los elementos del menú
OK Conrmar o despear la pantalla
Llamar Realizar una llamada tras pulsar el botón
Atrás Pulsa para retroceder;
En la página de inicio, pulsación larga para detener la reproducción de música.
Instalación
Encuentra una posición en la que puedas obtener el campo de visión deseado. Puedes colocar la cámara
sobre una supeicie plana o montarla en la pared.
Montaje en la pared
Consejos:
• La pared de instalación debe poder sopoar al menos 3 veces el peso total de la cámara.
• En caso de que su cámara esté montada al revés, su imagen también se volteará. Por favor, congure
desde Arenti App >> Dispositivo (toque dispositivo a la página de vídeo en directo) >> Conguración >>
Función Básica >> Conguración de Imagen >> Screen Flip.
• No apunte la cámara hacia una ventana de cristal. O puede resultar en un rendimiento pobre de la
imagen debido al resplandor de la ventana por LEDs infrarrojos, luces ambientales, o el estado.
Consejos para usar la cámara
• Indicador de trabajo:
El indicador de luz azul se puede apagar manualmente cuando la cámara está en condiciones de trabajo.
Establecer desde: App>> Dispositivo (toque dispositivo a la página de vídeo en directo) >> Conguración
>> Indicador de trabajo.
• Visualización de vídeo en directo:
En la inteaz de control de la cámara de la App puede ver la monitorización de la cámara en tiempo real,
ajustar la resolución, capturar imágenes, grabar vídeo y realizar conversaciones bidireccionales.
• Visión nocturna por infrarrojos:

suppo@arenti.com
ES
La cámara puede cambiar automáticamente al modo de visión nocturna (vista en blanco y negro) por
la noche según el grado de cambio de la luz circundante. Con luces LED infrarrojas rojas invisibles
incorporadas, la distancia de visión nocturna puede alcanzar los 10 metros, y se puede ver con gran
claridad en la oscuridad.
• Detección de movimiento:
La cámara puede detectar cambios de movimiento en la vista de la cámara y usted recibirá aleas push
desde la App cuando se detecte movimiento.
Congurar desde: App >> Dispositivo (toque dispositivo a la página de vídeo en directo) >> Conguración
>> Conguración de Aleas >> Detección de Movimiento.
Especicaciones
Modelo AInanny A4
Lente&FOV(H/V/D) 100°
Temperatura de trabajo 0℃a 40℃
Almacenamiento local Tarjeta TF (hasta 256 GB)
Resolución 2560x1440
Talla 70x63x120 mm
Entrada de alimentación CC 5V/1A
Consumo Hasta 4,5 W
Sistema operativo del teléfono compatible iOS 9 / Android 5.0 o posterior
Wi-Fi de 2,4GHz 2412-2462MHz (Potencia máxima<30dBm )
Wi-Fi de 5GHz 5150-5850MHz (potencia máxima<23dBm )
Wi-Fi Halow 905-925MHz (Potencia máxima<30dBm )
Bluetooth 2400-2483.5MHz (Potencia máxima<20dBm )
Modelo AInanny-Screen2
Capacidad de la batería 3350mAh
Temperatura de trabajo 0℃a 40℃
Almacenamiento local Tarjeta TF (hasta 128 GB)
Resolución 720P (1280x720)
Talla 157x81x40mm
Entrada de alimentación CC 5V/1A
Wi-Fi Halow 905-925MHz (Potencia máxima<30dBm )
suppo@arenti.com
ES
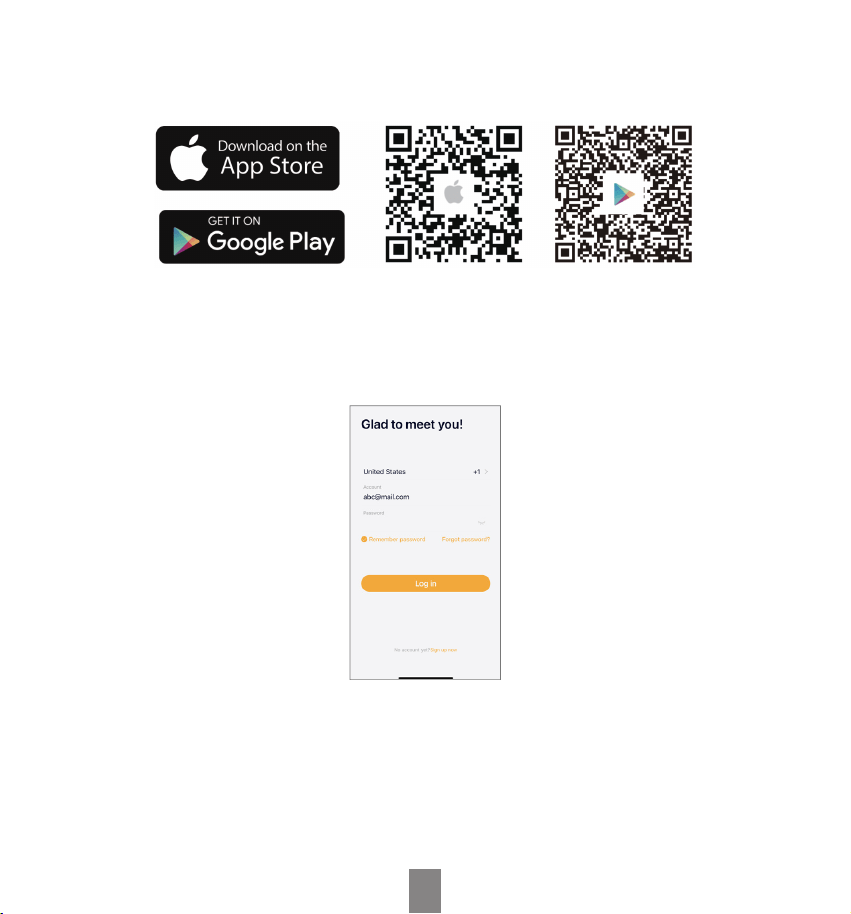
Conguración del producto
Escanee el código QR para descargar e instalar la aplicación Arenti. O puede buscar "Arenti" en App Store
(iOS) o Google Play (Android).
Inscripción
Abra la aplicación. Si es un usuario nuevo, pulse para crear una cuenta nueva y siga las instrucciones para
completar la conguración de la cuenta.
Nota:
Antes de crear una nueva cuenta, lea atentamente la Política de privacidad y las Condiciones de uso.
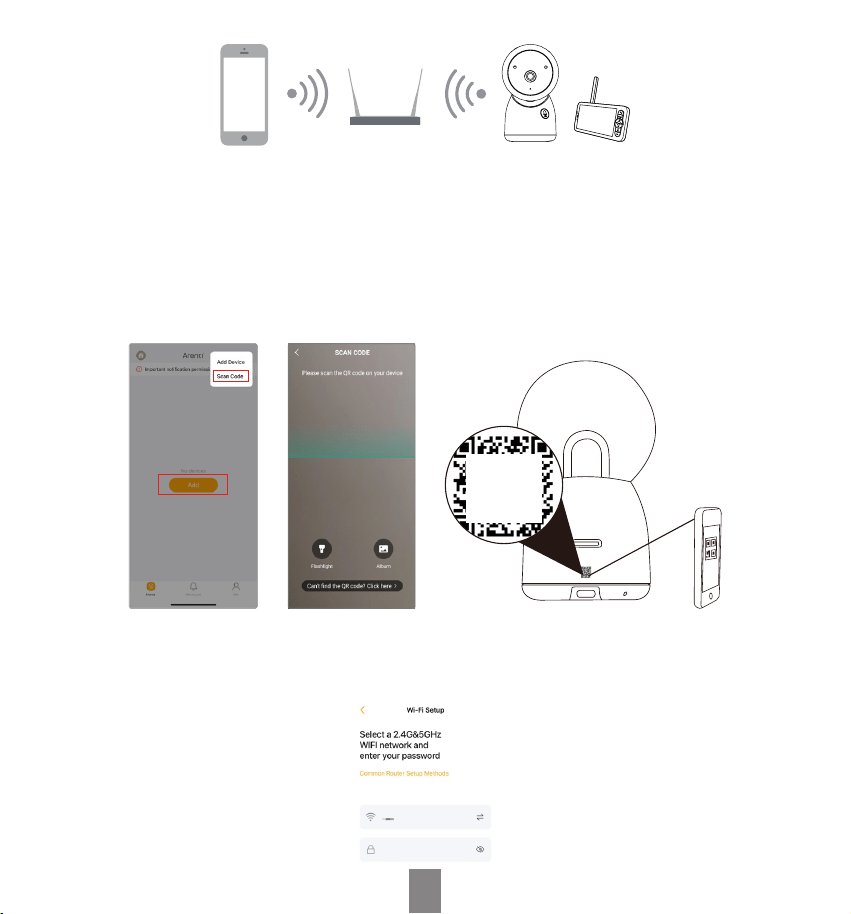
• Congurar un router
Asegúrate de que el router está conectado a la red Wi-Fi. Congure los parámetros del router antes de
conectarse a la red Wi-Fi y registre el SSID y la contraseña de su Wi-Fi.
suppo@arenti.com
ES
Por favor, mantenga la red disponible
• Encender el dispositivo
Encienda la cámara. La luz de estado parpadeando en rojo indica que la cámara está lista para el
emparejamiento.
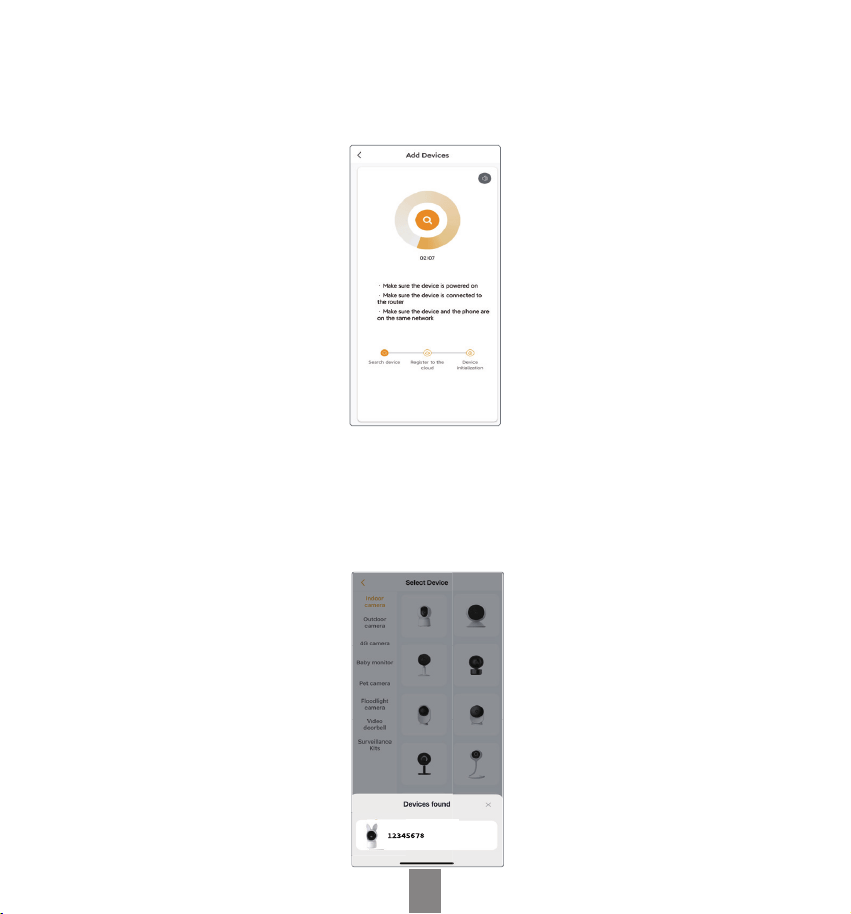
Método de emparejamiento 1: emparejamiento mediante código QR en el dispositivo
Abra la página de inicio de la aplicación, haga clic en "+" >> "Escanear código" y, a continuación, escanee el
código QR pegado en la carcasa del dispositivo con la aplicación de su teléfono. El dispositivo aparecerá en
la página, haga clic en el dispositivo.
Escanee el
código QR
en el
dispositivo
Seleccione la red Wi-Fi, introduzca la contraseña y pulse "Siguiente". Asegúrese de que su teléfono ya se ha
conectado a una red Wi-Fi uida y estable.
Nota:
El número de bits del SSID y de las contraseñas del router no debe superar los 31 dígitos
suppo@arenti.com
ES
El dispositivo se puede añadir a la aplicación después de la conexión a la red.
Nota:
Durante el emparejamiento, coloque la cámara y el teléfono móvil cerca del router. Si la cámara no parpadea lentamente en
rojo después de 30 segundos de encenderla, mantenga pulsado el botón de reinicio durante 5 segundos para reiniciarla y, a
continuación, reiníciela para emparejarla con la aplicación.
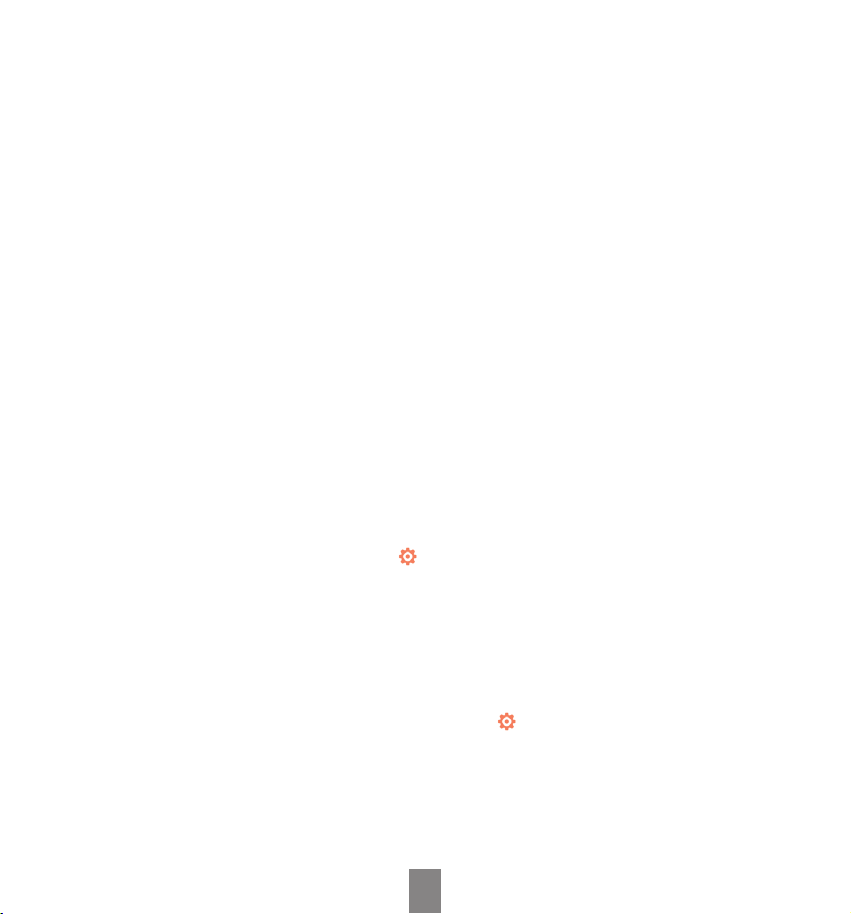
Método de emparejamiento 2: emparejamiento mediante Bluetooth
Enciende el Bluetooth de tu teléfono.
Abre la página de inicio de la App, pulsa «+» >>«Añadir Dispositivo» o «Añadir», el dispositivo será buscado
por bluetooth y aparecerá en la página. Conrme el número de serie(SN) del dispositivo, a continuación,
haga clic en el dispositivo y siga las notas para emparejar la cámara con App.
suppo@arenti.com
ES
Si no se encuentra ningún dispositivo y el proceso de emparejamiento no se realiza correctamente,
compruebe las siguientes instrucciones:
• Compruebe que la contraseña Wi-Fi introducida es correcta y que el dispositivo móvil está conectado a
la misma red Wi-Fi.
• Asegúrate de que la cámara está en modo de emparejamiento.
• Compruebe si hay actividad en la red Wi-Fi.
Si ninguna de las soluciones funciona o tiene algún otro problema, llame al 1-866-999-7868 (de lunes a
viernes, de 9 a 17 h (PT), gratuito para EE.UU. y Canadá, sujeto a cargos para otras regiones, el idioma del
seicio telefónico sólo está disponible en inglés) o póngase en contacto con suppo@arenti.com para
obtener ayuda.
Nota:
Si tiene varias cámaras, vuelva a seguir los pasos para añadir los dispositivos uno a uno. Para cambiar la red Wi-Fi, restaure la
cámara a los ajustes de fábrica y siga los pasos para añadir la cámara.
Monitor consejos de uso
• Emparejamiento de cámara y monitor:
Encienda la cámara y el monitor y se conectarán automáticamente. Si la conexión falla, siga los pasos
que se indican a continuación para realizar el emparejamiento. El emparejamiento está limitado por la
distancia, así que asegúrese de que la distancia entre la cámara y el monitor no es superior a 200 m.
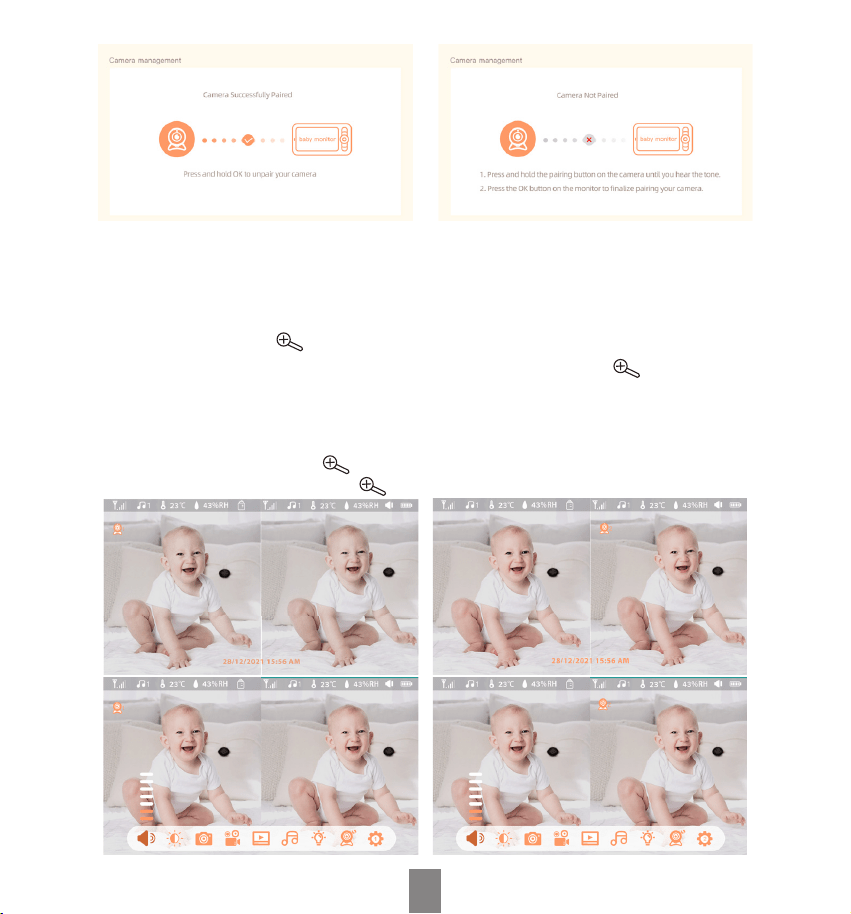
• Enlaza el monitor y la cámara:
1. Pulse el botón Menú del monitor y seleccione > Cámara.
2. Seleccione la cámara 1 o la cámara 2/3/4 que desea emparejar.
3. Mantenga pulsado el botón de emparejamiento de la cámara hasta que oiga el tono de aviso.
4. Pulse el botón OK en el monitor para iniciar el emparejamiento.
5. SSi necesitas emparejar 2 o más de 2 cámaras, repita los pasos 2~ 4.
• Desenganche el monitor y la cámara:
1. Pulse el botón Menú en la pantalla del monitor y seleccione > Cámara.
2. Seleccione la cámara 1 o la cámara 2/3/4 que desea desvincular.
3. Mantenga pulsado el botón OK para liberar la vinculación.
suppo@arenti.com
ES
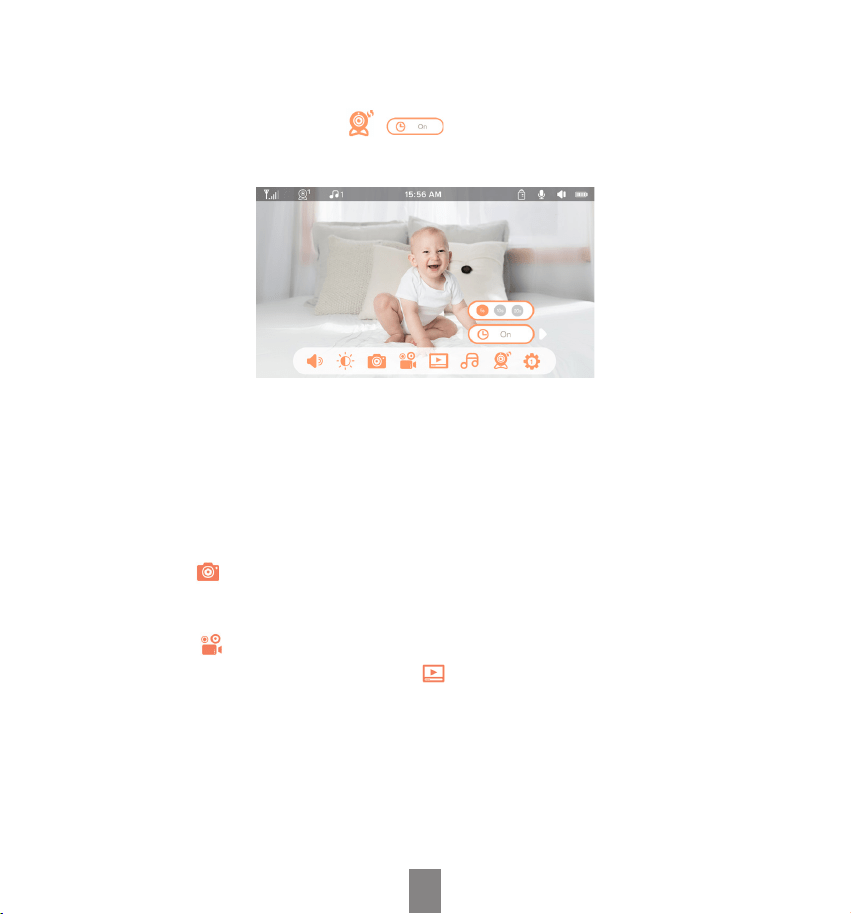
• Método de cambio de cámara:
Para diferentes productos, puede añadir 1, 2, 3 o 4 cámaras. Si ha añadido varias cámaras, el monitor
mostrará 2 vistas en directo al mismo tiempo. Si desea congurar los parámetros o activar las funciones
de una de las cámaras, primero debe seleccionarla y cambiar a ella.
• Método de cambio de cámara 1: cambio manual
En la página de inicio, pulsa el utiliza el botón de dirección para cambiar la cámara entre Cam1, 2, 3 o
4 si has añadido varias cámaras.Selecciona la cámara que necesites y pulsa el botón OK en el monitor
para entrar en el modo de visualización a pantalla completa. A continuación, puede volver a pulsar el
botón para acercar o alejar la imagen. (La función de zoom no funciona cuando la pantalla no está en
pantalla completa).
Nota:
Cuando añada 3(o 4) cámaras, pulse el botón para entrar en el modo de selección. Las cámaras 1 y 2 están
seleccionadas por defecto, pulse de nuevo el botón para cambiar a las cámaras 2 y 3 (o 3 y 4).
suppo@arenti.com
ES
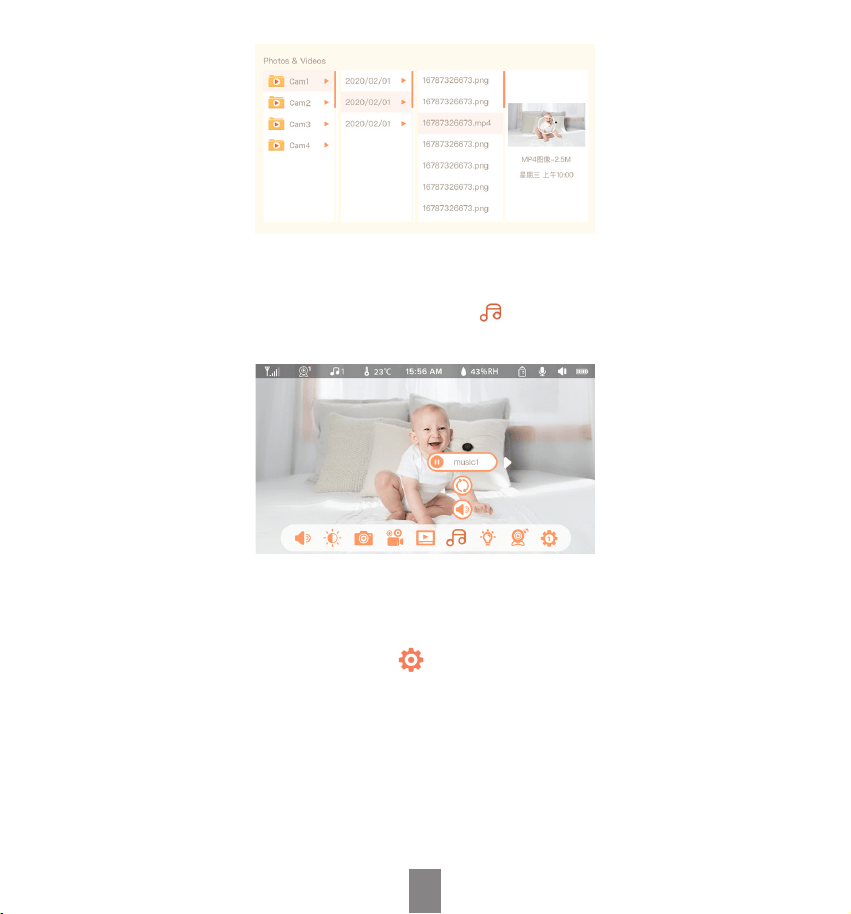
• Método de conmutación de cámaras 2: conmutación cíclica temporizada
También ofrecemos la opción de conmutar cada cámara en un ciclo temporizado, lo que facilita la
conguración de rondas de vigilancia según sea necesario.
1. Pulse Menú en el monitor y seleccione > .
2. Pulse el botón direccional ARRIBA para acceder al modo de selección de ciclo temporizado.
3. Pulse los botones de dirección IZQUIERDA y DERECHA para seleccionar la opción de ciclo temporizado.
• Girar la cámara
Puede ajustar el ángulo de monitorización para una mejor visión.
Los botones de dirección de la pantalla del monitor están disponibles cuando la cámara está encendida.
Pulse los botones de dirección para girar la cámara horizontal y veicalmente para una mejor visión.
• Foto y vídeo
• Haz una foto:
Puede hacer una foto cuando desee capturar una escena interesante del bebé. Pulse el botón Menú del
monitor, seleccione y pulse OK para hacer una foto.
• Graba un vídeo:
Puede grabar un vídeo cuando desee capturar un momento signicativo para el bebé. Pulse Menú en el
monitor, seleccione y pulse OK para grabar un vídeo.
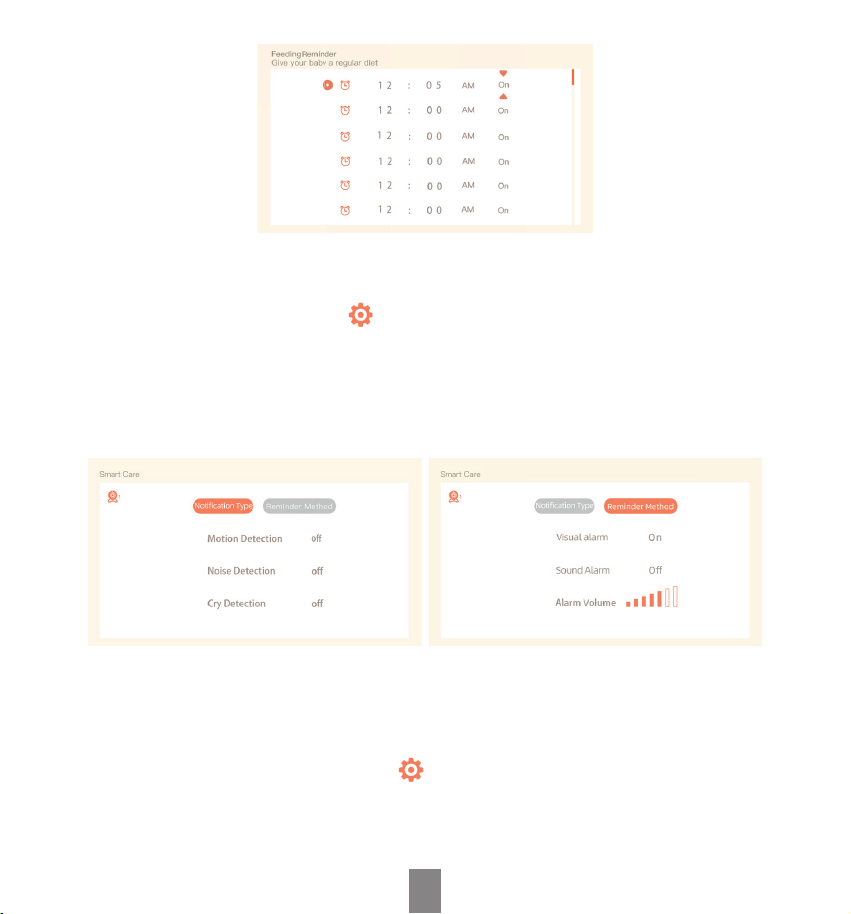
• Visualiza las fotos tomadas y los vídeos grabados:
1. Pulse el botón Menú en el monitor, seleccione y pulse OK para entrar en la inteaz.
2. Seleccione la cámara y la fecha, seleccione la foto o el vídeo que desea ver y pulse OK para entrar en el
modo de vista previa.
* Pulse OK para reproducir o pausar el vedio en el modo de vista previa.
* Pulse el botón Retorno para salir de la vista previa o volver al menú principal.
suppo@arenti.com
ES
• Reproducir música
Puedes poner música cuando tu bebé necesite tranquilizarse. Hay varias músicas suaves para seleccionar.
Pulse el botón Menú en la pantalla del monitor y seleccione y pulse OK para acceder a la inteaz de
música. Puede seleccionar música diferente, cambiar el modo de ciclo de la música o ajustar el volumen
de la música.
• Recordatorio de alimentación
Recordae que debes alimentar a tu bebé cuando estés demasiado ocupada o cuando quieras darle una
dieta regular.
1. Pulse el botón Menú del monitor y seleccione > Recordatorio de alimentación.
2. Seleccione activar o desactivar para abrir o cerrar los recordatorios de alimentación. Puede establecer
hasta 10 horas de alimentación al día. Cuando nalice el tiempo establecido, aparecerá una alarma de
alimentación en la pantalla del monitor.
3. Pulse los botones direccionales ARRIBA y ABAJO para seleccionar entre 10 opciones de hora y pulse
OK para iniciar la conguración de la hora.
suppo@arenti.com
ES
• Atención inteligente
Puede activar las funciones de detección de movimiento, detección de ruido y detección de llanto, para
conocer de inmediato el estado del bebé, independientemente de lo que esté haciendo.
1. Pulse Menú en el monitor y seleccione > Cuidado inteligente.
2. Pulse los botones direccionales ARRIBA y ABAJO para seleccionar las opciones de detección de
movimiento, detección de ruido y volumen de la alarma.
3. Cuando congure un modo de detección, pulse los botones de dirección IZQUIERDA y DERECHA para
cambiar las opciones y pulse los botones de dirección ARRIBA y ABAJO para ajustar la sensibilidad.
* Puede seleccionar diferentes sensibilidades según sus necesidades. Baja se reere a baja sensibilidad, y
alta se reere a alta sensibilidad.
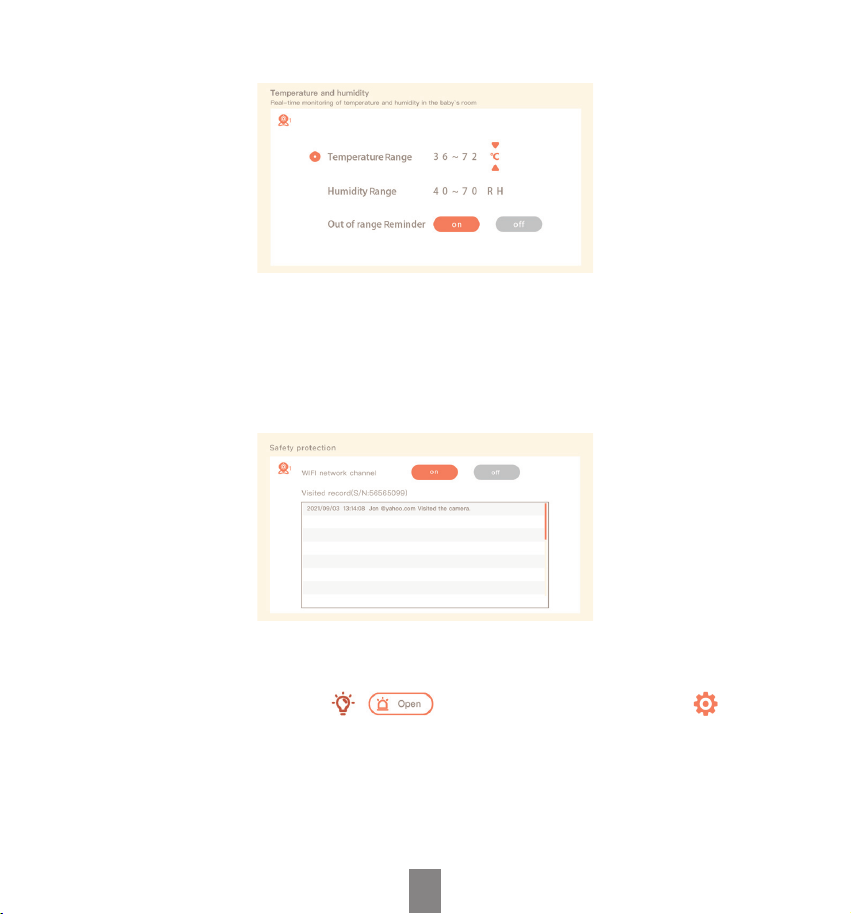
• Detección de temperatura y humedad
Puedes controlar la temperatura y la humedad de la habitación de tu bebé en tiempo real. Cuando la
temperatura y la humedad estén fuera de rango, recibirás las alarmas inmediatamente, para que puedas
tomar medidas.
1. Pulse el botón Menú del monitor y seleccione > Temperatura y humedad.
2. Pulse los botones direccionales ARRIBA y ABAJO para seleccionar las opciones entre rango de
temperatura, rango de humedad y recordatorio de fuera de rango, después pulse OK para congurar.
3. Pulse los botones IZQUIERDA y DERECHA para cambiar las opciones y, a continuación, pulse los
botones ARRIBA y ABAJO para cambiar los valores y las unidades.
suppo@arenti.com
ES
4. En la opción Recordatorio de fuera de rango, seleccione para activar o desactivar la alarma cuando la
temperatura y la humedad estén fuera de rango.
• Protección de la seguridad
• Canal de red Wi-Fi
Si desactiva el canal de red Wi-Fi, la App no podrá ver la cámara.
• Registros visitados
También puede ver los registros visitados, ya que todas las visitas a través de la App quedarán
registradas.
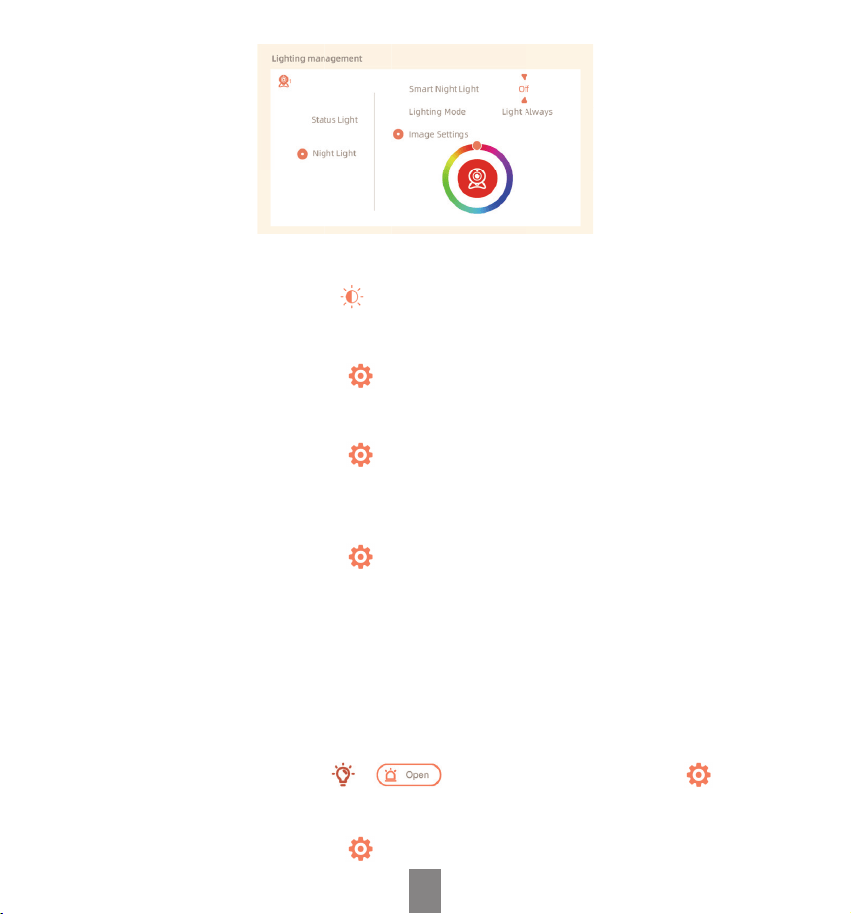
• Luz nocturna
Puede encender la luz nocturna si es necesario, y puede congurar el modo de iluminación y el color de
la luz.
Pulse Menú en el monitor y seleccione > .O pulse el botón Menú y seleccione > Luz > Luz
nocturna.
suppo@arenti.com
ES
• Conguración general
• Congura el brillo:
1. Pulse Menú en el monitor, seleccione y pulse OK para entrar.
2. Pulse los botones ARRIBA y ABAJO para ajustar el brillo.
• Tiempo de preparación:
1. Pulse Menú en el monitor y seleccione > Ajuste de hora.
2. Pulse los botones direccionales para cambiar la fecha, la hora y el modo de visualización de la hora.
• Congura el idioma:
1. Pulse Menú en el monitor y seleccione > Idioma.
2. Selecciona el idioma que necesites.
• Congura el modo de reposo:
Puedes congurar el modo de reposo para aumentar el tiempo en espera.
1. Pulse Menú en el monitor y seleccione > Modo reposo.
2. En el modo predeterminado (Audio desactivado), el audio de la cámara no se puede escuchar después
de apagar la pantalla, por lo que el tiempo de espera es largo. En el modo Audio activado, el audio de
la cámara se puede seguir escuchando incluso después de apagar la pantalla, y puede elegir el tiempo
(1,5,10,30 o 60min), pero el tiempo de espera es más coo. En el modo Siempre encendido, la pantalla
permanece encendida a menos que se pulse el botón de encendido, con un tiempo de espera coo.
• Enciende y apaga el indicador de estado:
Si enciendes el indicador de estado, podrás conocer el estado de funcionamiento de la cámara. También
puedes apagar el indicador de estado si crees que puede afectar al sueño de tu bebé.
Pulse Menú en el monitor y seleccione >. (O pulse el botón Menúseleccione >Luz > Luz
de estado).
• Tarjeta Micro SD:
1. Pulse Menú en el monitor y seleccione > Gestión de la tarjeta Micro SD. A continuación, puede ver la

suppo@arenti.com
ES
capacidad total y la capacidad restante de su tarjeta Micro SD.
2. (Opcional) Puede formatear la tarjeta Micro SD según sus necesidades, pero asegúrese de que los
datos impoantes están respaldados.
• Mejora:
Puede actualizar la cámara cuando aparezca la alarma de actualización. O pulse Menú en el monitor y
seleccione > Información del dispositivo para comprobar si hay una actualización.
• Alarma de batería baja:
Cuando la batería de la cámara esté baja, aparecerá la alarma de batería baja en la pantalla del monitor.
Por favor, cargue el monitor lo antes posible.
FAQ
Cámara
P: ¿Cómo desactivar el indicador LED/luz azul de mi cámara?
R: Arenti App >> Dispositivo (a su vez a la página de vídeo en directo) >> Conguración >> Función básica
>> Indicador de red: Desactivarlo.
P: ¿Cómo apagar la cámara de monitor en tiempo real, y detener la grabación?
R: Arenti App >> Dispositivo (a su vez a la página de vídeo en directo) >> Conguración >> Función básica
>> Protección de la privacidad >> Lente OFF.
P: ¿Cómo cambiar el Wi-Fi o actualizar la contraseña Wi-Fi del dispositivo?
R: Por favor, elimine la cámara en la aplicación, haga clic en "Añadir" y siga los pasos para utilizar la nueva
red Wi-Fi para agregar la cámara de nuevo.
P: ¿Cómo compair dispositivos Arenti con amigos y familiares?
R: Arenti App >> Dispositivo (a su vez a la página de vídeo en directo) >> Conguración >> Compair
dispositivo >> Añadir, siga los consejos para compair su dispositivo.
P: ¿No se puede acceder al vídeo en directo?
R:
• Asegúrese de que la cámara está encendida: el indicador de red de la cámara debe estar encendido.
• Compruebe que la red Wi-Fi está en buenas condiciones o reinicie el router.
• Intente acercar la cámara al router.
• Elimine la cámara de la App Arenti y vuelva a añadirla. 5. Conrme que la App y el rmware de la cámara
son las últimas versiones.

suppo@arenti.com
ES
P: ¿No encuentro el botón de emparejamiento?
R: El botón de emparejamiento es el botón de llamada de la cámara. Mantenga pulsado el botón durante 3
segundos y siga las instrucciones del monitor.
Monitor
P: ¿Qué debo hacer si el monitor se atasca?
R: Pulsa el botón de reinicio situado cerca del pueo de alimentación del monitor o mantén pulsado el
botón de encendido para volver a encender el monitor.
P: ¿Cómo puedo cambiar el fondo de pantalla del monitor?
R: Pulse Menú en el monitor y seleccione > Fondo de pantalla.
P: ¿Cómo puedo actualizar la versión del monitor?
R: En primer lugar, añada la cámara a la App. A continuación, pulse Menú en el monitor y seleccione >
Información del dispositivo, a continuación, compruebe si hay actualizaciones disponibles.
P: ¿No se puede previsualizar correctamente el monitor?
R: Compruebe si el monitor está conectado a la cámara. Si no es así, empareje primero la cámara y el
monitor.
P: ¿Por qué la cámara o el monitor no pueden identicar la tarjeta TF?
R: Conrme si la tarjeta TF está normalmente disponible y el formato es FAT32.
Si ninguna de las soluciones funciona o tienes algún otro problema, llama al 1-866-999-7868 (de lunes
a viernes, de 9 a 17 h (PT), gratuito para EE.UU. y Canadá, sujeto a cargos para otras regiones, el idioma
del seicio telefónico sólo está disponible en inglés) o ponte en contacto con suppo@arenti.com para
obtener ayuda.
Precauciones
• La temperatura de trabajo aplicable de este producto es 0℃~40℃, por favor no lo utilice en un ambiente
donde la temperatura es demasiado alta o demasiado baja.
• Para utilizar mejor este producto, evite acercar la pae frontal y lateral del objetivo al cristal, paredes
blancas, objetos luminosos, etc., para que la imagen no salga brillante de cerca, oscura o blanquecina de
lejos.
suppo@arenti.com
ES
• Por favor, asegúrese de que la cámara está instalada dentro del rango cubieo por la señal Wi-Fi, y
colóquela lo más lejos posible en el lugar donde la señal es mejor, e intente instalarla lejos de metal y
hornos microondas que puedan afectar a la señal.
Seicio posventa y asistencia técnica
• Acceda a aículos, vídeos y documentación de apoyo. www.arenti.com/suppo/
• Acceda a Asistencia desde la App Arenti, inicie sesión en su App Arenti y pulse para obtener asistencia.
• Puede enviar un correo electrónico a suppo@arenti.com. Describa el problema de la cámara, e
infórmenos del modelo de cámara y SN del cuerpo de la cámara. Intentaremos responderle en 24 horas.
Menciones legales
Símbolos: Corriente continua (CC)
No tire pilas ni productos fuera de uso con los residuos domésticos (basura). Las sustancias
peligrosas que pueden contener pueden dañar la salud o el medio ambiente. Haz que tu
comercio retire estos productos o recurre a la recogida selectiva de basuras que propone tu
ciudad.
Por la presente, Arenti, declara que el equipo de radio tipo 'AInanny A4, AInanny-Screen2'
cumple con la Directiva 2014/53/UE.
La prueba completa de la declaración de conformidad de la UE está disponible en la
dirección de Internet: www.arenti.com

FCC Statement
This equipment has been tested and found to comply with the limits for a Class B digital device, pursuant
to pa 15 of the FCC Rules. These limits are designed to provide reasonable protection against harmful
inteerence in a residential installation. This equipment generates, uses and can radiate radio frequency
energy and, if not installed and used in accordance with the instructions, may cause harmful inteerence
to radio communications. However, there is no guarantee that inteerence will not occur in a paicular
installation. If this equipment does cause harmful inteerence to radio or television reception, which can be
determined by turning the equipment o and on, the user is encouraged to t to correct the inteerence
by one or more of the following measures:
• Reorient or relocate the receiving antenna.
• Increase the separation between the equipment and receiver.
• Connect the equipment into an outlet on a circuit dierent from that to which the receiver is connected.
• Consult the dealer or an experienced radio/TV technician for help.
FCC Radiation Exposure Statement:
This device complies with FCC radiation exposure limits set foh for an uncontrolled environment and
it also complies with Pa 15 of the FCC RF Rules. This equipment must be installed and operated in
accordance with provided instructions and the antenna(s) used for this transmitter must be installed to
provide a separation distance of at least 20 cm from all persons and must not be co-located or operating in
conjunction with any other antenna or transmitter. End-users and installers must be provide with antenna
installation instructions and consider removing the no-collocation statement.
This device complies with Pa 15 of the FCC Rules. Operation is subject to the following two conditions:
(1) this device may not cause harmful inteerence, and
(2) this device must accept any inteerence received, including inteerence that may cause undesired
operation.
Caution!
Any changes or modications not expressly approved by the pay responsible for compliance could void
the user's authority to operate the equipment.
Safety Information
• Power Adapter Safety
1.The power plug is intended to see as a disconnect device.Do not drop or cause an impact to the power
adapter.
2.If the power cable is damaged (for example, the cord is exposed or broken), or the plug loosens, stop
using it at once. Continued use may lead to electric shocks, sho circuits, or re.

3.Do not touch the device or the power adapter with wet hands. Doing so may lead to sho circuits,
malfunctions, or electric shocks.
• Child's Safety
1. Comply with all precautions with regard to child's safety. Letting children play with the device or its
accessories may be dangerous.
2. The device and its accessories are not intended for use by children. Children should only use the device
with adult supeision.
• Operation Safety
1. Use the device under allowed humidity and temperature conditions.
2. Do not aim the device at strong light sources (such as lamplight, and sunlight) when focusing it, to avoid
reducing the lifespan of the CMOS sensor, and causing overbrightness and ickering.
3. Obsee local laws and regulations, and respect the privacy and legal rights of others.
Indust Canada (ISED) Compliance Statement
This device complies with Indust Canada's licence-exempt RSS(s). Operation is subject to the following
two conditions:
(1) This device may not cause inteerence; and
(2) This device must accept any inteerence, including inteerence that may cause undesired operation of
the device.
Le présent appareil est conforme aux CNR d’Industrie Canada applicables aux appareils radio exempts de
licence.L’exploitation est autorisée aux deux conditions suivantes :
(1) l’appareil ne doit pas produire de brouillage;
(2) l’utilisateur de l’appareil doit accepter tout brouillage radioélectrique subi, même si le brouillage est
susceptibled’en compromettre le fonctionnement.
The device meets the exemption from the routine evaluation limits in section 2.5 of RSS 102 and compliance
with RSS-102 RF exposure, users can obtain Canadian information on RF exposure and compliance.
Le dispositif rencontre l'exemption des limites courantes d'évaluation dans la section 2.5 de RSS 102 et la
conformité à l'exposition de RSS-102 , utilisateurs peut obtenir l'information canadienne sur l'exposition et
la conformité de .
This transmitter must not be co-located or operating in conjunction with any other antenna or transmitter.
This equipment should be installed a nd operated with a minimum distance of 20 centimeters between the

radiator and your body.
Cet émetteur ne doit pas être Co-placé ou ne fonctionnant en même temps qu'aucune autre antenne ou
émetteur. Cet équipement devrait être ins tallé et actionné avec une distance minimum de 20 centimètres
entre le radiateur et votre corps.
Batte Safety
1.Your device contains a rechargeable lithium-ion batte and should be replaced only by a qualied seice
provider. Do not disassemble, open, crush, bend, deform, puncture, shred or attempt toaccess the batte
in your device
2.Do not modify or remanufacture the batte, attempt to inse foreign objects into the batte, or immerse
or expose it to water or other liquids, expose to re, explosion or other hazard.
3.Do not use a batte if its case appears damaged, swollen, or compromised. Examples include, but are not
limited to, leaking, odors, dents, corrosion, rust, cracks, swelling,melting, and scratches.
4.Do not put the batte in trash that is disposed of in landlls. When disposing of the batte, complywith
local ordinances or regulations.
© 2024. All rights reseed. All trade names are registered trademarks of respective companies Apple, the
Apple logo, iPhone are trademarks of Apple Inc. registered in the U.S. and other countries. Google, the
Google logo, Android are trademarks of Google Inc. App Store is a seice mark of Apple Inc. Google Play is
a seice mark of Google Inc.
V1.0 202407