1
Hearth & Home Technologies • GL-36M , GL-36MX, GL-42M, GL-42MX Installation Instructions • 2581-937 Rev. B • 12/22
REQUIRED TOOLS
• Screw gun equipped with 1/4 in (6 mm) socket
• 1/4 in. (6 mm) wrench
Leave this manual with party responsible for use
and operation.
CAUTION! Risk of Cuts or Abrasions. Wear protective
gloves and safety glasses during installation.
NOTICE: Handle refractory panels with care. Refractory
may chip or crack if dropped or impacted.
CAUTION! Do not install damaged components.
DANGER
HOT GLASS WILL
CAUSE BURNS.
DO NOT TOUCH GLASS
UNTIL COOLED.
NEVER ALLOW CHILDREN
TO TOUCH GLASS.
A barrier designed to reduce the risk of
burns from the hot viewing glass is provided
with this appliance and must be installed for
the protection of children and other at-risk
individuals.
CAUTION! Risk of Burns! Install this refractory only af-
ter the appliance has cooled and the gas and electricity
have been shut o.
Black Glass Refractory Kit
GL-36M, GL-42M, GL-36MX, GL-42MX
Models: 6K, 8K, 6KL, 8KL, 6KX, 6KX-AU, 8KX, CAL36, CAL42, CAL36X, CAL42X, MER36, MER42, MER36P, MER42P
- Installation Instructions -
KIT COMPONENTS
(1) Glass Refractory Assembly (Back, Left, Right)
(1) Side Refractory Bracket Assembly (See Figure 1)
(1) Back Insulation Board
(2) Side Insulation Board
(1) Back Refractory Support (See Figure 2)
(1) Base Refractory (See Table 1)
GL-36MX & GL-42MX Only:
(1) Top Refractory Panel
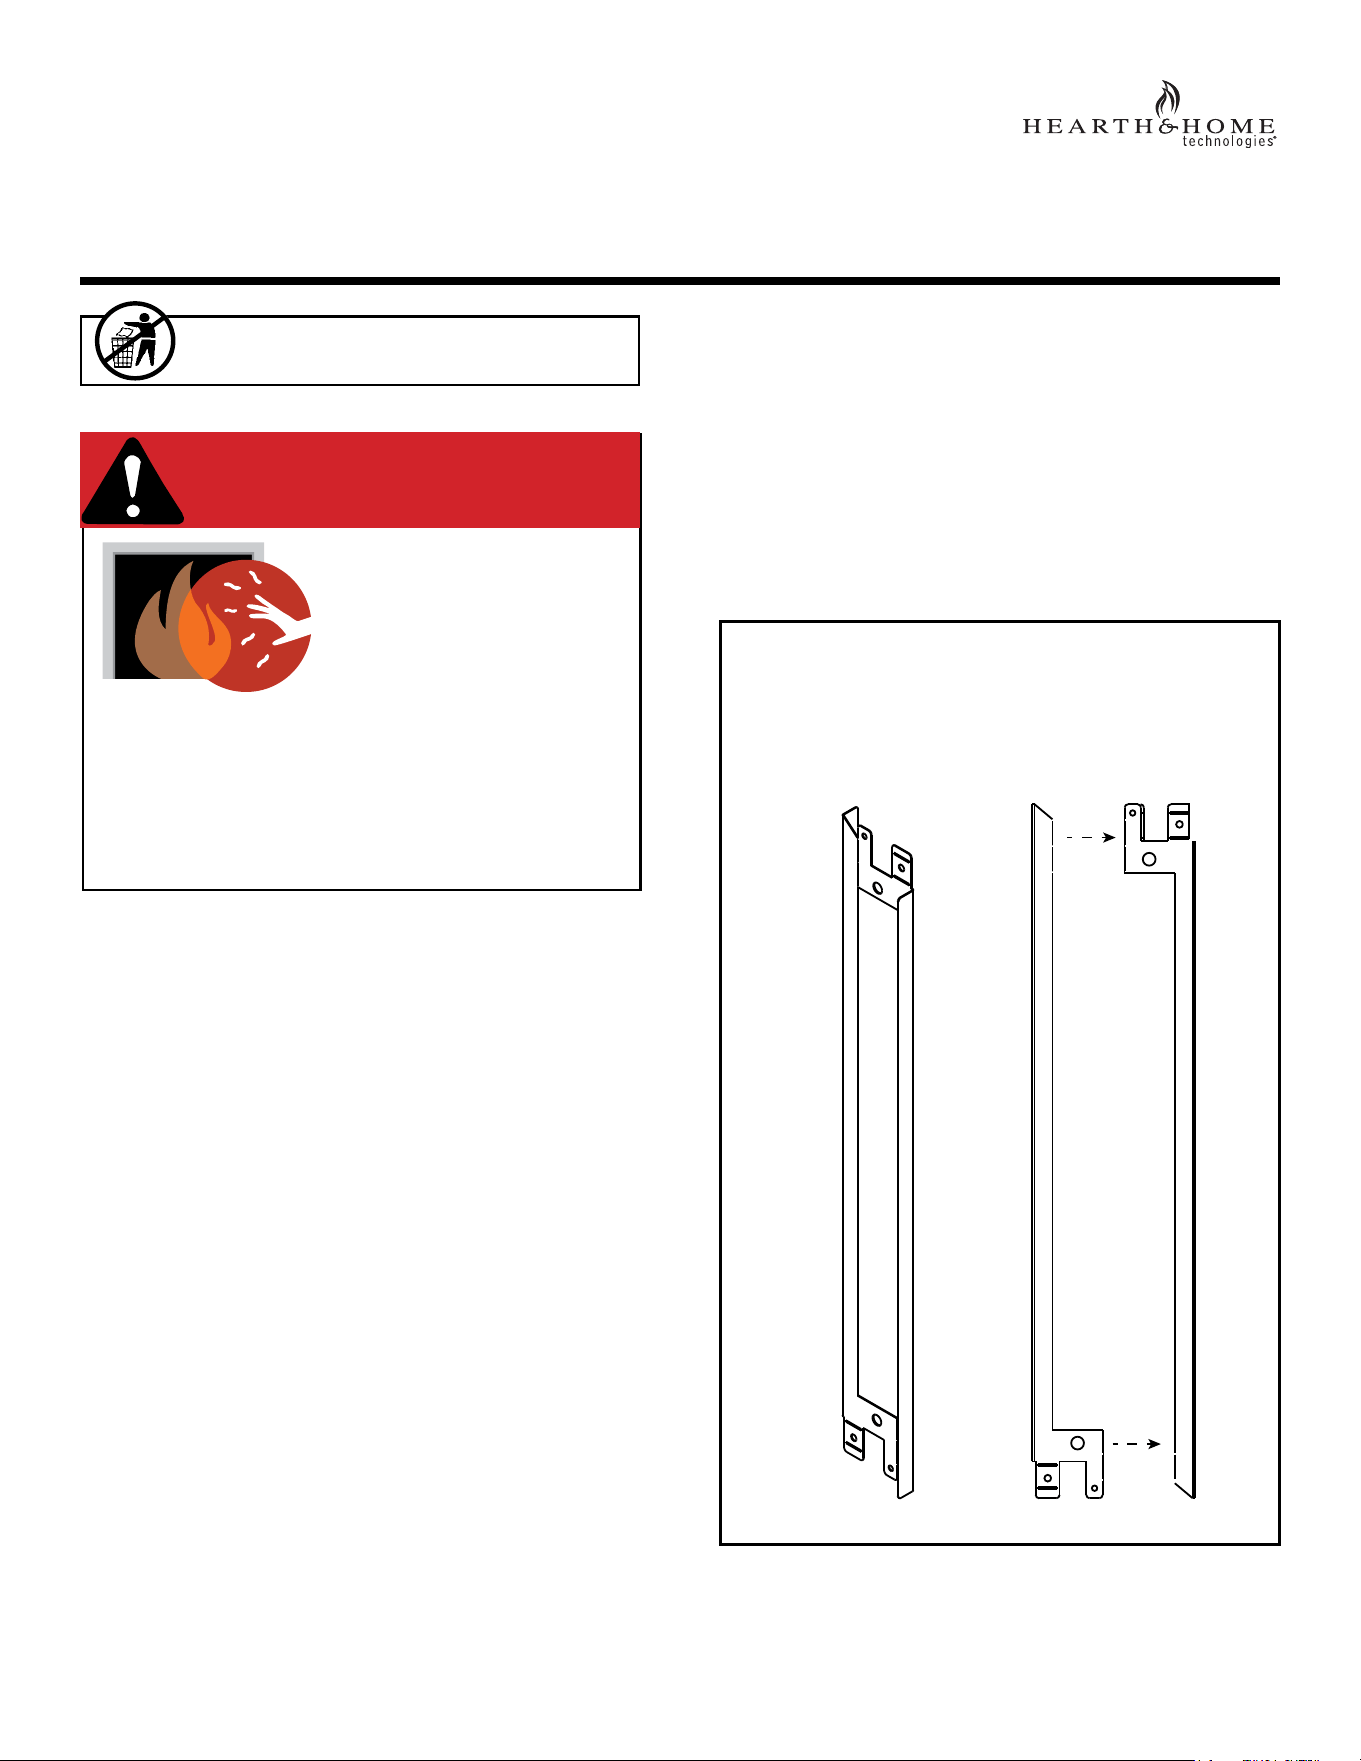
Figure 1 Side Refractory Bracket
SIDE REFRACTORY BRACKET
(Assembly breaks into two pieces)
2
Hearth & Home Technologies • GL-36M , GL-36MX, GL-42M, GL-42MX Installation Instructions • 2581-937 Rev. B • 12/22
6. GL-36MX & GL-42MX Only:
This step is not applicable for 6KX-AU models.
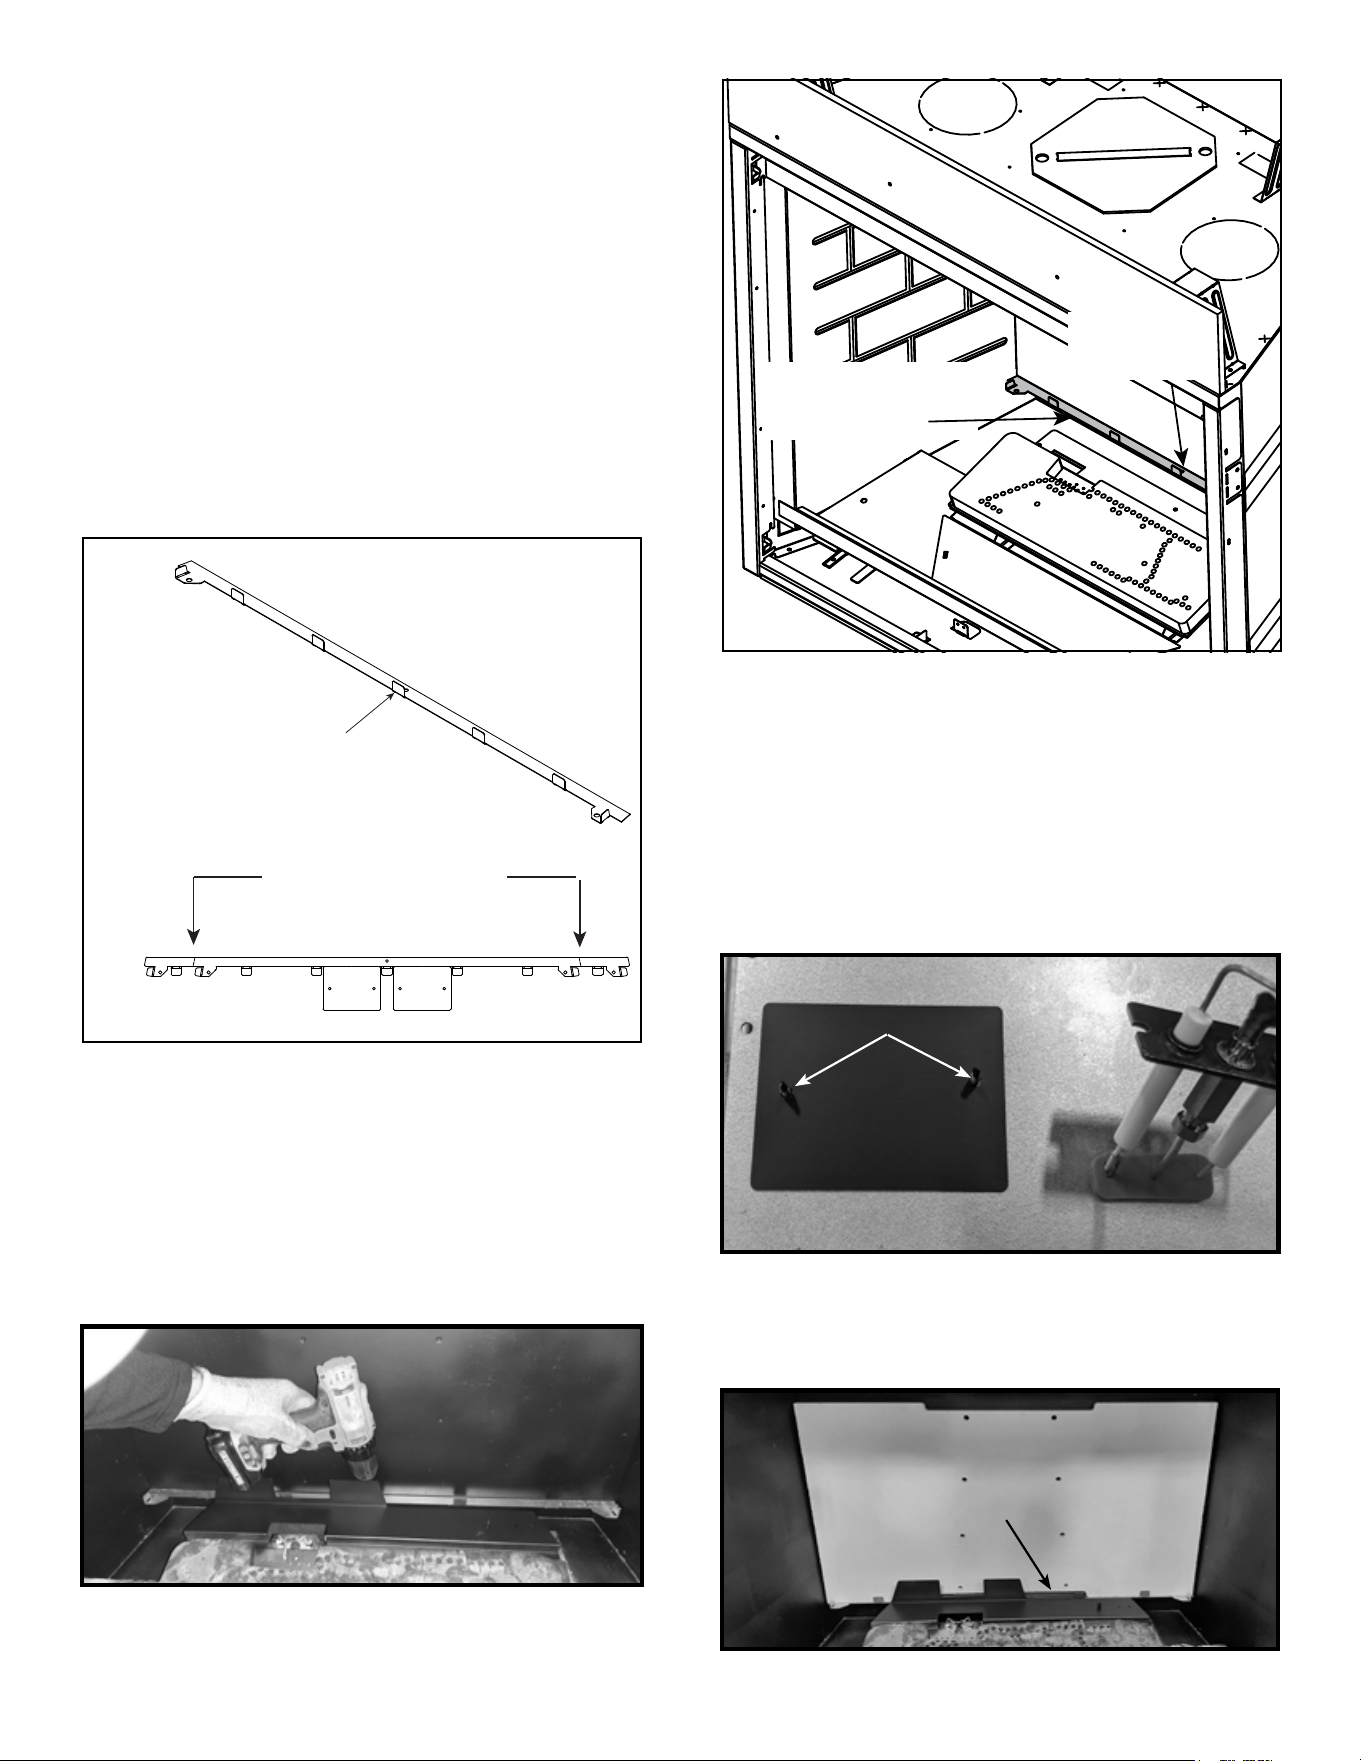
Locate the LED lights in the back left and right corners
of the rebox and install LED covers. The LED cov-
ers prevent reections from the glass refractory from
detracting from the overall viewing experience. Place
LED cover over the screws as shown in Figure 5.
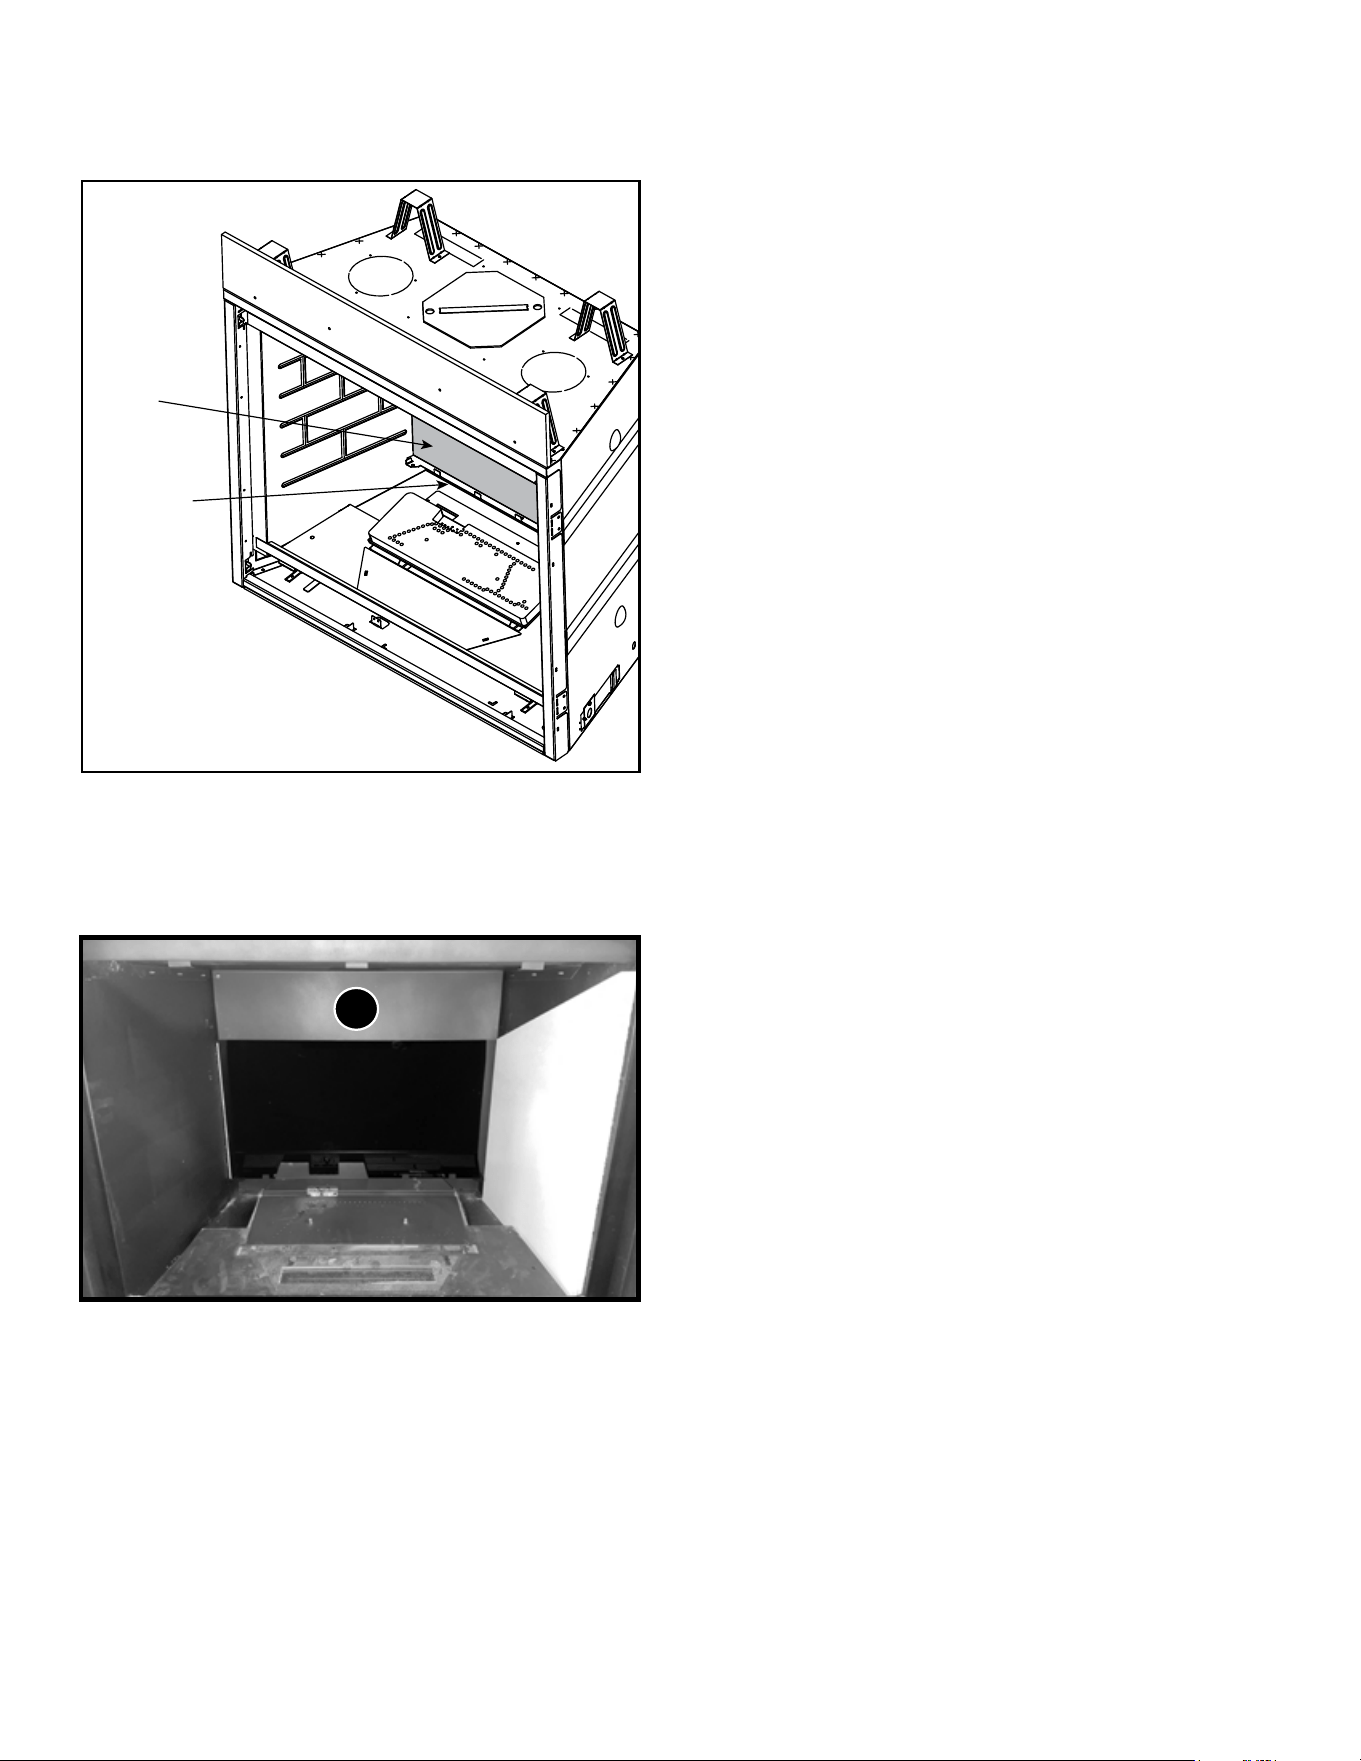
Figure 5 LED Cover Installed (GL-36MX/GL-42MX Only)
Figure 4 Back Refractory Support Installed
5. Place back refractory support on back air passage re-
turn bend, align holes and install with one screw as
shown in Figure 3 and Figure 4.
7. Install back insulation board by positioning it at the
rear of the rebox and behind the refractory support
tabs as shown in Figure 6.
REFRACTORY
SUPPORT
INSTALL
SCREW
SCREWSSCREWS
LED COVERLED COVER
Installation Instructions
1. Remove decorative front, appliance glass assembly
and logs, if installed.
2. Remove existing refractory, if installed.
3. Locate back refractory support, included in manual
bag assembly shipped with the kit. Remove LED cov-
ers from refractory support by bending at perforations.
GL-36MX & GL-42MX Only:
Retain LED covers for later use.
4. Bend all tabs on back refractory support as shown in
Figure 2.
36 Inch Models Only:
Bend at perforations and remove.
Figure 2 Back Refractory Support
Figure 6 Back Insulation Board Installed
BACK REFRACTORY BACK REFRACTORY
SUPPORTSUPPORT
Figure 3 Install Back Refractory Support
36 INCH MODELS:
BEND AT PERFORATION AND REMOVE
BEND ALL TABS 90 DEGREES
36 INCH MODELS: 7
42 INCH MODELS: 11
3
Hearth & Home Technologies • GL-36M , GL-36MX, GL-42M, GL-42MX Installation Instructions • 2581-937 Rev. B • 12/22
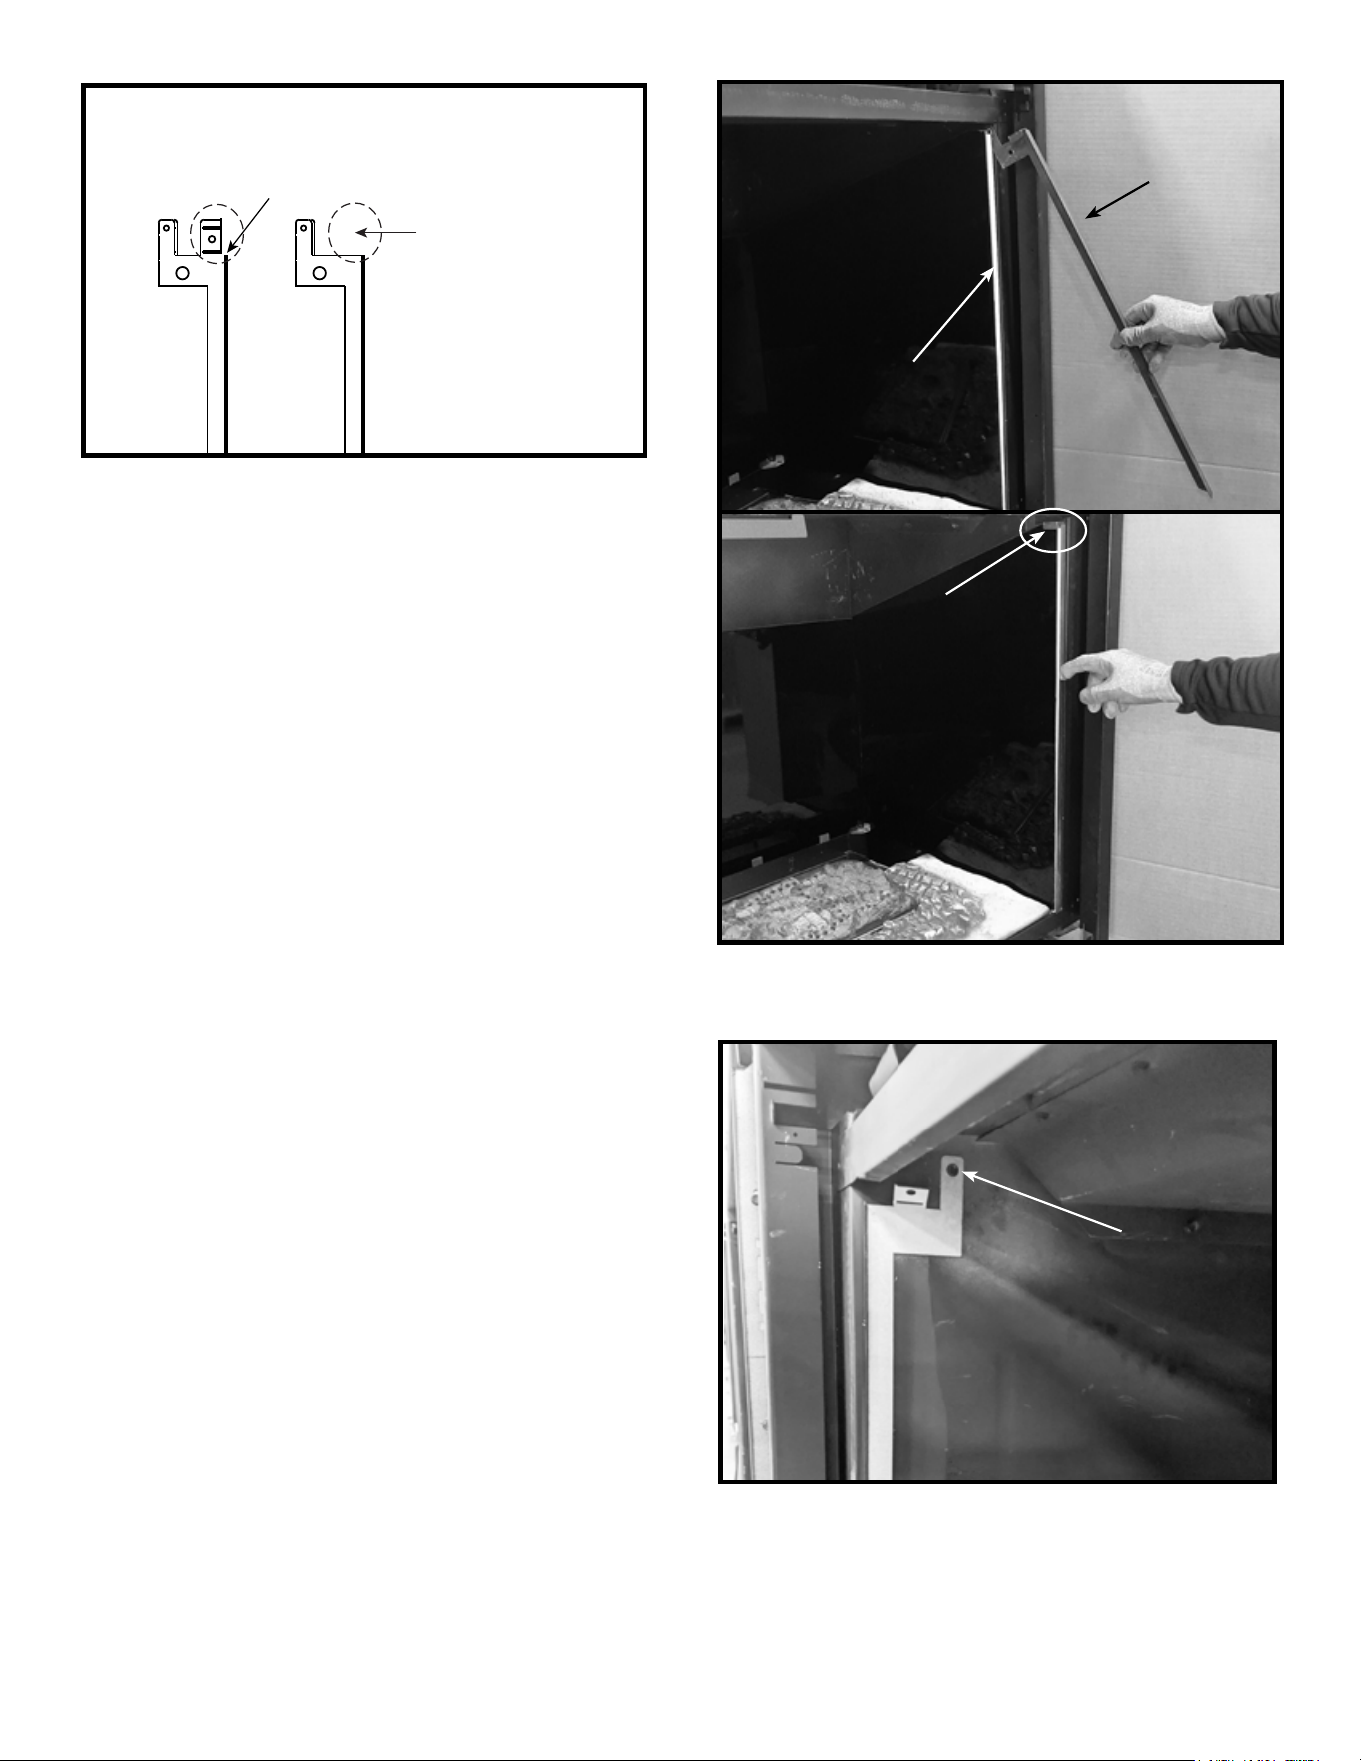
Figure 7 Back Glass Panel Installed
Figure 8 Rear Glass Panel and Side Insulation Board Installed
8. Install the back glass panel in front of the insulation
board and bend/secure the tabs on the back refractory
support.
9. Hold rear glass panel in place and slide one side
insulation board into position as shown in Figure 8.
REFRACTORY
SUPPORT
BACK
REFRACTORY
PANEL
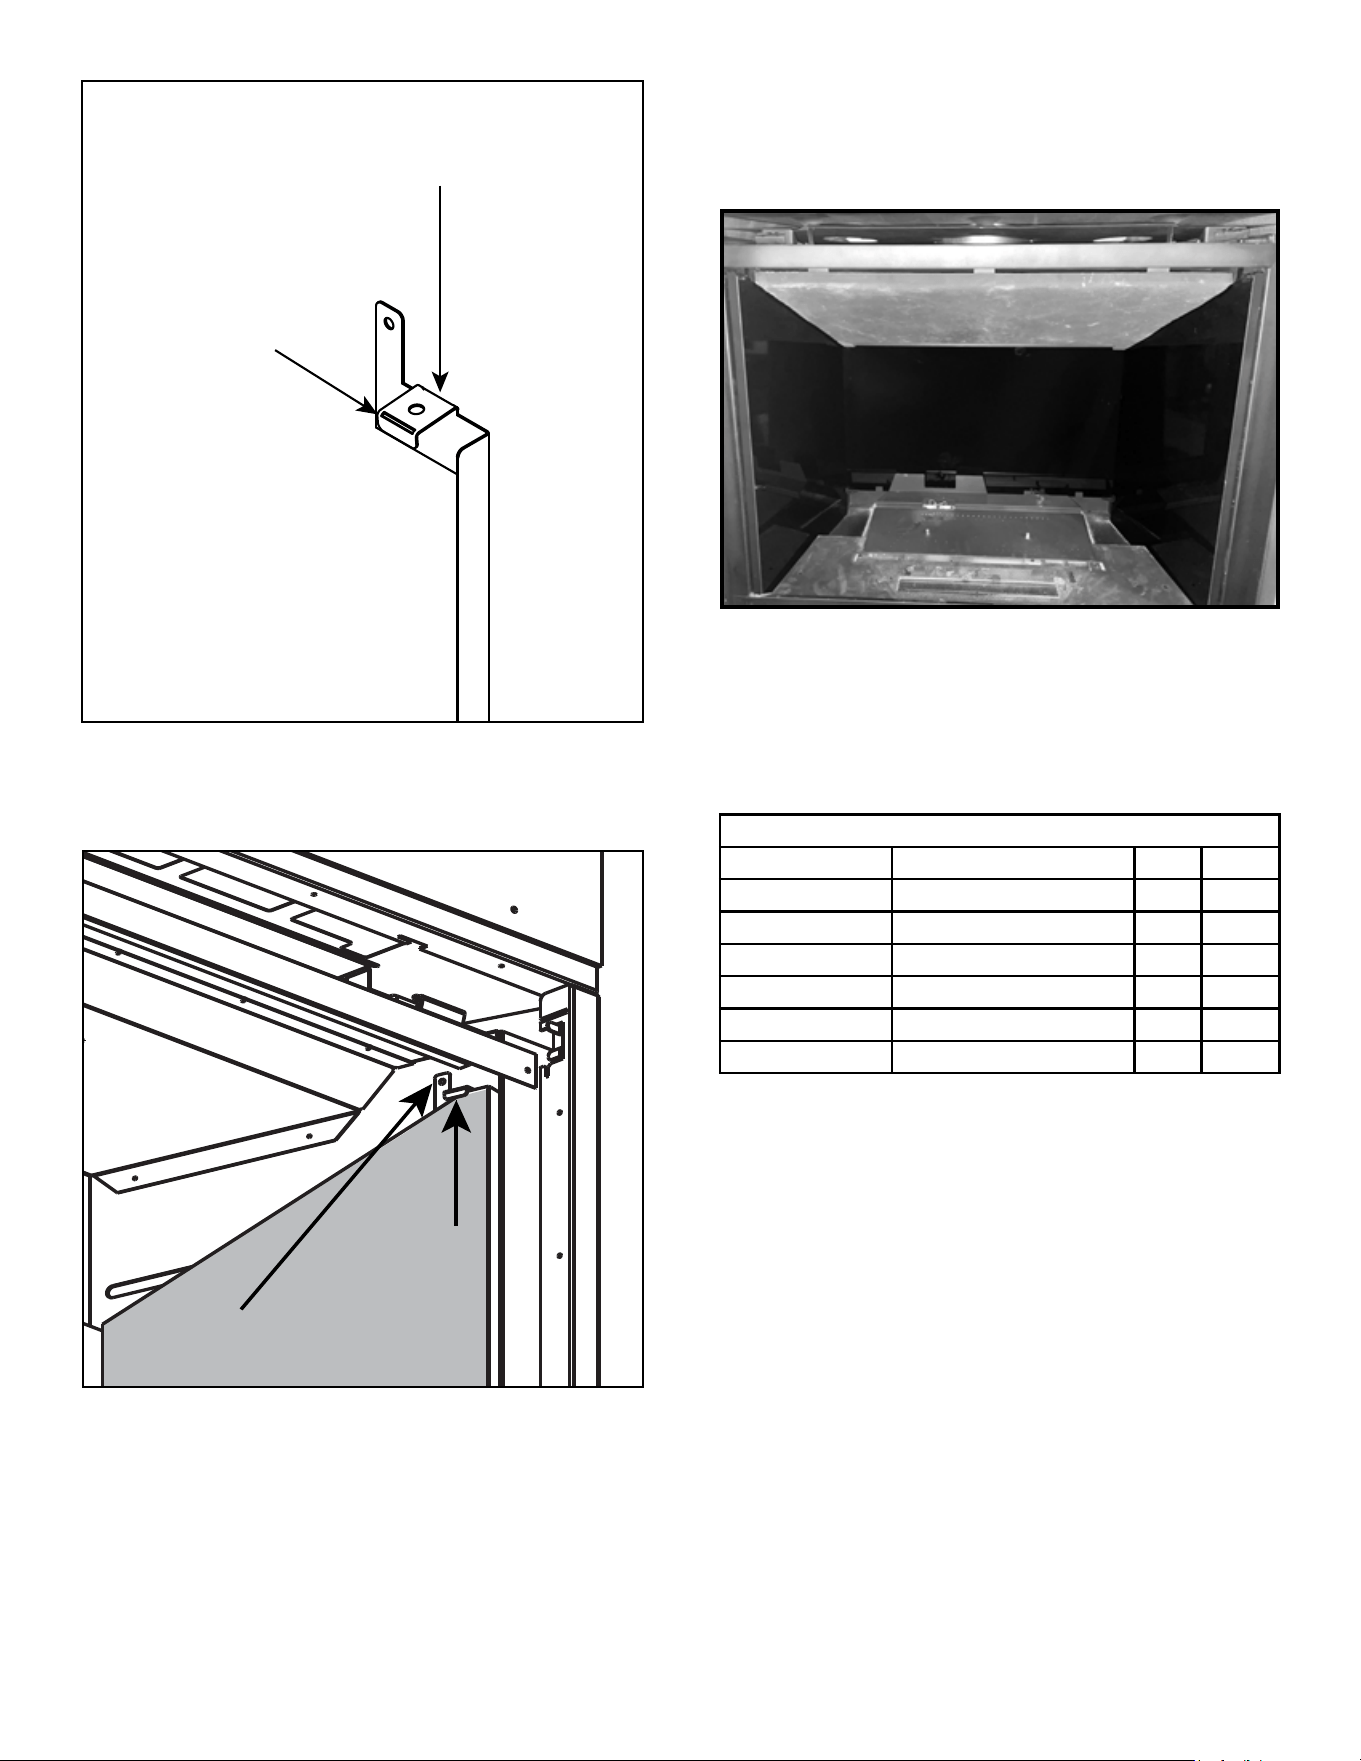
10. Install side glass panel in front of insulation board as
shown in Figure 10.
NOTICE: Refractory bracket is positioned so that the
edge of the white insulation board is completely covered.
NOTICE: Ensure the side glass and insulation board
are positioned ush against the rebox to allow the base
refractory to t properly.
13. Install side insulation board on opposite side and
repeat steps 9-12 for other side.
GL-36MX / GL-42MX Only:
11. Bend the side refractory bracket tab down as shown
in Figure 11, labeled Bend 1. Place the side refrac-
tory bracket into position. Put the top in rst and ori-
ent it as shown in Figure 10.
12. Install side refractory bracket between the insulation
board and the side of the rebox. Position the side
refractory bracket, insulation board and side glass
panel upright against the inside wall of the rebox as
shown in Figure 10. Secure side refractory bracket
with one self-tapping screw as shown in Figure 11.
Bend side refractory bracket tab over glass panel
as shown in Figure 12, labeled Bend 2. Refractory
bracket is shown installed, with the tab bent correctly,
in Figure 13.
All Refractory Kits:
GL-36M / GL-42M Only:
11. Bend the side refractory bracket tab to break it o
and discard. See Figure 9. Place the side refractory
bracket into position. Put the top in rst and orient it
as shown in Figure 10.
12. Install side refractory bracket between the insulation
board and the side of the rebox. Position the side
refractory bracket, insulation board and side glass
panel upright against the inside wall of the rebox as
shown in Figure 10.
Note: The self-tapping screw, illustrated in Figure 11, is
not required for GL-36M / GL-42M models.
4
Hearth & Home Technologies • GL-36M , GL-36MX, GL-42M, GL-42MX Installation Instructions • 2581-937 Rev. B • 12/22
Figure 11 Side Refractory Bracket in Position
(GL-36MX / GL-42MX Only)
Figure 10 Install Side Refractory Bracket with Side Insulation
Board and Side Glass Panel
Note: This gure is intended solely
to illustrate the location of bracket.
The insulation board and glass panel
are installed prior to the installation
of the side refractory bracket.
SCREWSCREW
SIDE SIDE
REFRACTORY REFRACTORY
BRACKETBRACKET
REFRACTORY
SUPPORT
INSTALLED
SIDE GLASS
(BLACK)
INSULATION
BOARD
(WHITE)
Break off Tab
Both left and right brackets)
Tab Removed
Figure 9 Break O Tab (GL-36M/GL-42M Only)
5
Hearth & Home Technologies • GL-36M , GL-36MX, GL-42M, GL-42MX Installation Instructions • 2581-937 Rev. B • 12/22
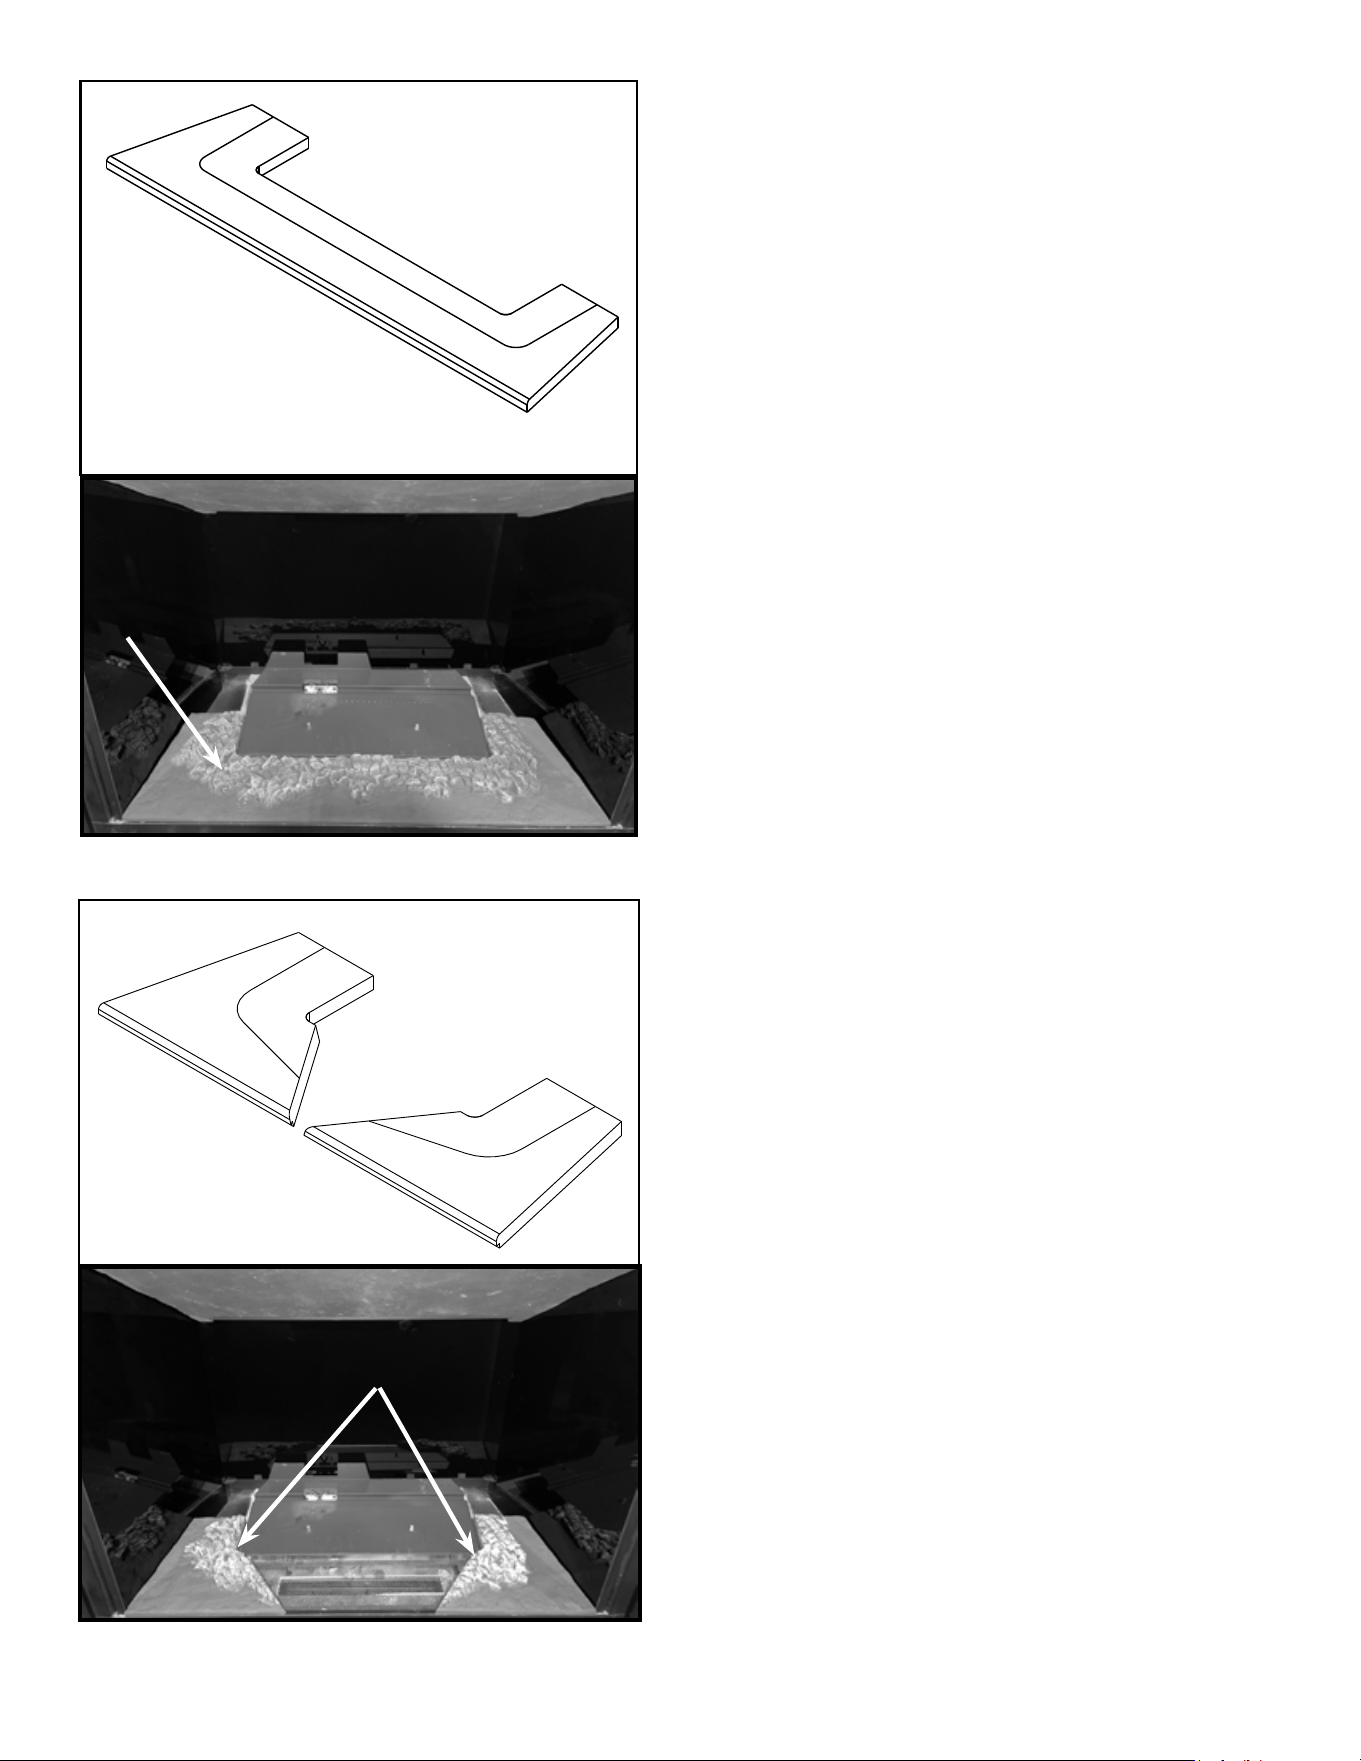
Figure 13 Install Side Glass Refractory Bracket
(Tab on GL-36MX/GL-42MX Only)
TAB DOWN
SCREW
Figure 12 Bend Side Refractory Bracket Tabs
(GL-36MX/GL-42MX Only)
BEND 2
BEND 1
15. Set new base refractory piece(s) in place as shown
in Figure 15 or Figure 16. Refer to Table 1 for type of
base refractory per model.
Black Glass Refractory Kit Base Refractory Piece Count
Refractory Kit Appliance Model Type Ref.
GL-36M MER36 / CAL36 / 6K 1 Fig.15
GL-42M MER42 / CAL42 / 8K 1 Fig.15
GL-36MX CAL36X / 6KL 1 Fig. 15
GL-42MX CAL42X / 8KL 1 Fig. 15
GL-36MX MER36P / 6KX / 6KX-AU 2 Fig. 16
GL-42MX MER42P / 8KX 2 Fig. 16
14. GL-36MX & GL-42MX Only:
Install top refractory panel. Rest it on top of the side
glass panels and gently push to the back of rebox
until it rests on back refractory panel. See Figure 14.
Figure 14 Top Refractory Installed
Table 1 Base Refractory Types
TOP REFRACTORYTOP REFRACTORY
6
Hearth & Home Technologies • GL-36M , GL-36MX, GL-42M, GL-42MX Installation Instructions • 2581-937 Rev. B • 12/22
16. Reinstall logs using log placement instructions in
appliance installation manual.
17. Reinstall appliance glass assembly using instructions
in appliance installation manual.
18. Install decorative front according to instructions
included with decorative front.
Please contact your Hearth & Home Technologies
dealer with any questions or concerns.
For the location of your nearest Hearth & Home Technologies
dealer,
please visit www.hearthnhome.com.
Hearth & Home Technologies
7571 215th Street West, Lakeville, MN 55044
www.hearthnhome.com
Figure 16 Type 2 Base Refractory Installed (Two Piece Model)
Figure 15 Type 1 Base Refractory Installed (One Piece Model)
BASE REFRACTORYBASE REFRACTORY
BASE REFRACTORIESBASE REFRACTORIES