24
AUTHORISED DEALER
30
Ver. 001 Ed. 08.2022
VERTICAL VACUUM PACKAGING MACHINE
TOUCH
USE AND MAINTENANCE MANUAL

2 23

22 3
English
CONTENTS
1. Delivery and warranty 5
1.1 Introduction
1.2 Storing and using this manual
1.3 Warranty
1.4 General warnings and manufacturer’s liability limits
1.5 Machine description
1.6 Intended use
1.7 Improper use
1.7.1 Safety rules
1.7.2 Lighting
1.8 Specific equipment details
1.8.1 Warning and danger signs
2. Technical specifications 9
2.1 Main parts
2.2 Technical characteristics
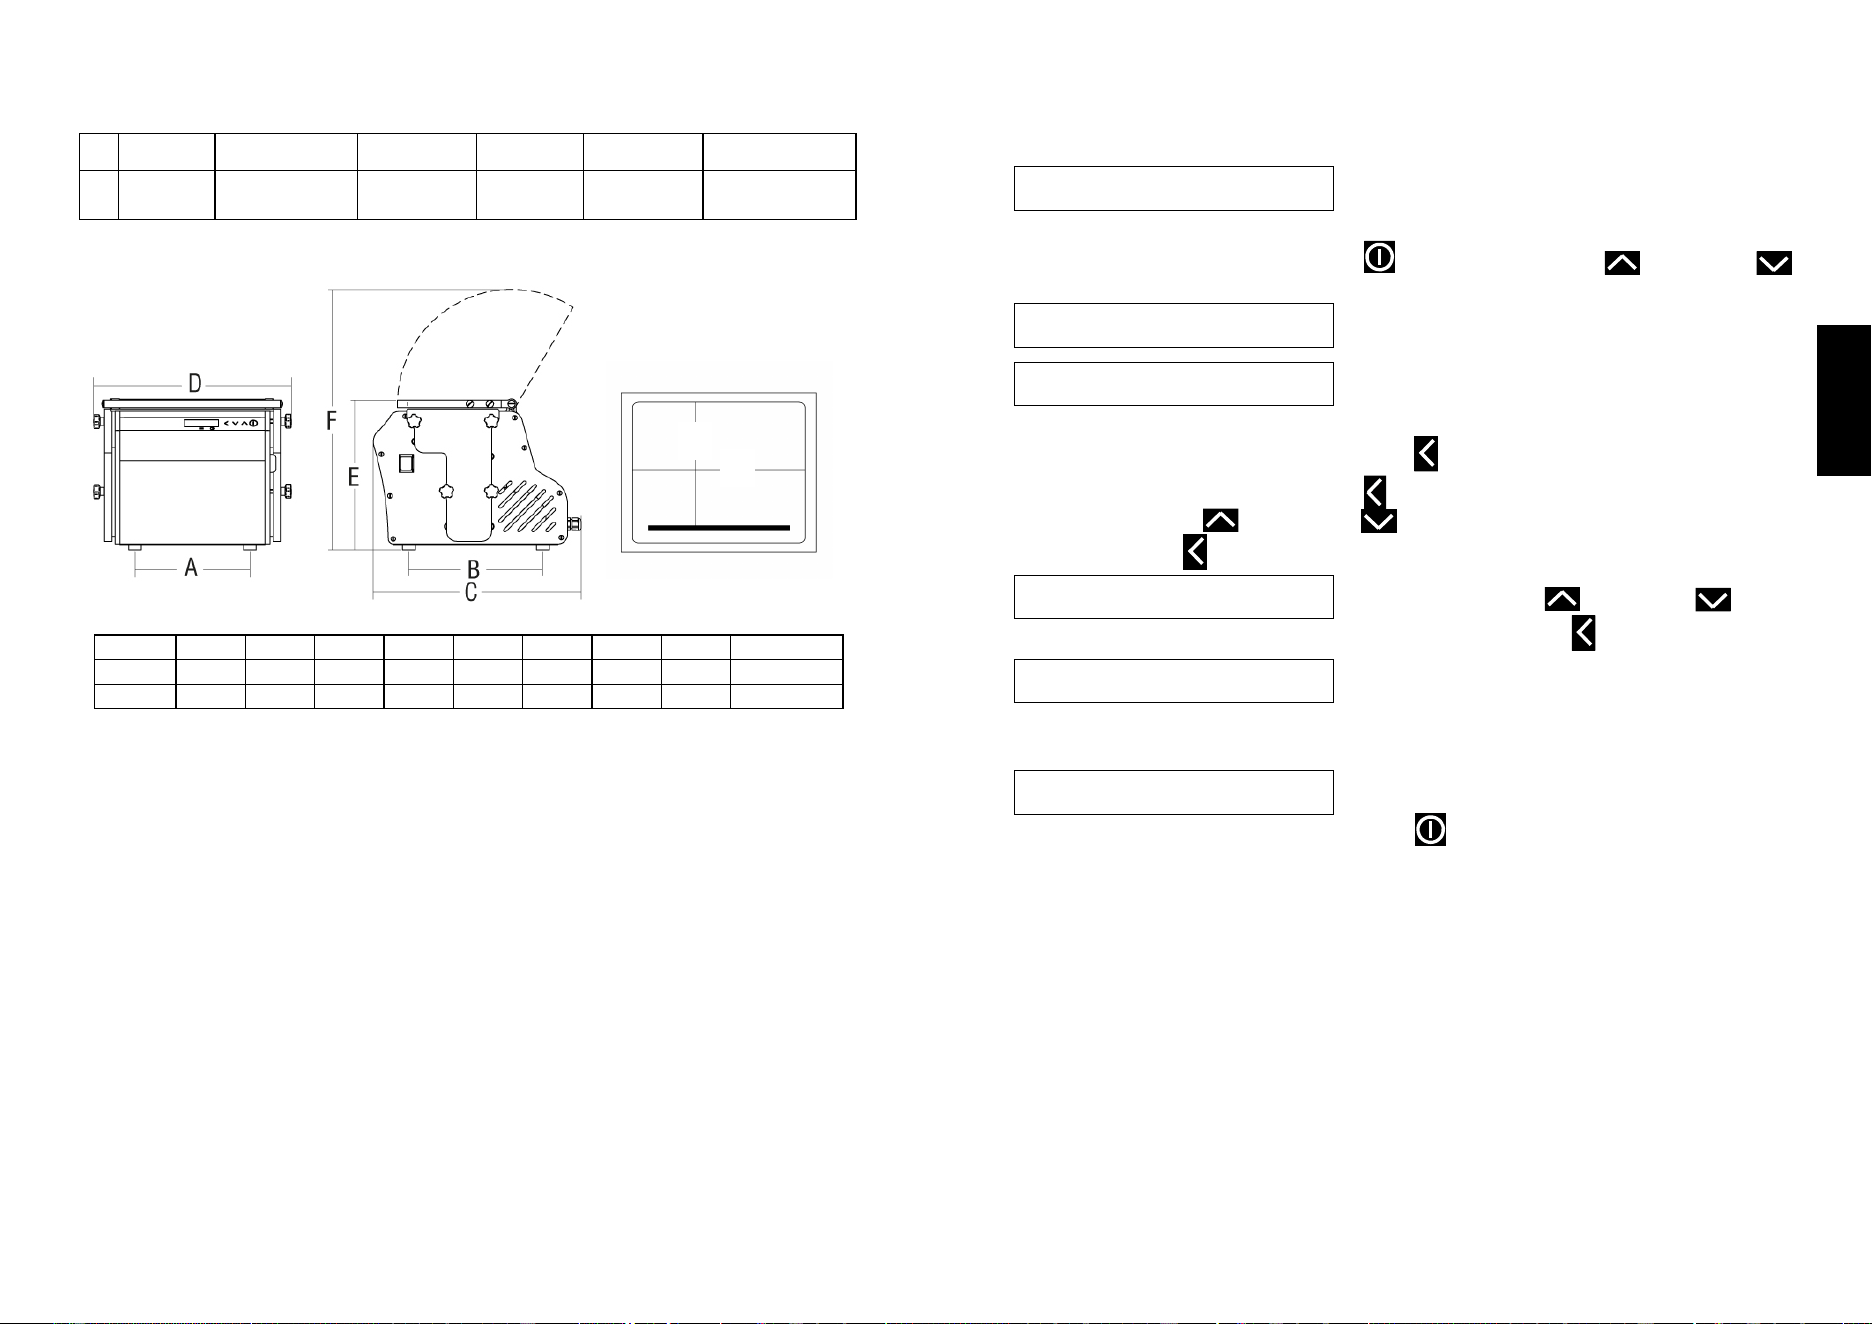
2.3 Machine dimensions and weight
2.4 Wiring diagram
3. Factory testing, shipping, delivery and installation 12
3.1 Factory testing
3.2 Delivery and handling
3.3 Installation
3.3.1 Disposal of packaging
3.4 Connections
3.5 Electrical connections
3.5.1 220 V 50 Hz single-phase machine
4. Using the machine 14
4.1 Control key
4.2 Programme menu
4.3 User menu
4.3.1 Oil heating and cleaning
4.3.2 Vacuum management
4.3.3 Wi-Fi
4.3.4 Language
4.4 Vacuum packing
4.5 Packing of liquid or semi-liquid products
4.6 Packing products using the inclined profile supplied
4.7 Cleaning the machine
4.8 Machine in stand-by
4.9 Alarms
5. Checks and maintenance 20
5.1 Checks and maintenance
5.2 Maintenance
5.2.1 Vacuum pump
4
6. Obligations in case of malfunctions and/or potential hazards 21
6.1 User obligations
7. Troubleshooting 21
7.1 Troubleshooting
7.2 WEEE (Waste Electrical and Electronic Equipment)
21
English
6 - Obligations in case of malfunctions and/or potential hazards
The operators are obliged to signal to their line managers any deficiency and/or
potentially hazardous situation that should arise.
6.1 - User obligations
The user is obliged to timely inform the manufacturer if any defects and/or malfunc-
tions emerge on the accident-prevention systems, and on any other potentially dan-
gerous situation of which it may come to know.
The user and/or third parties (excluding the manufacturer’s duly authorised personnel)
are strictly forbidden from making changes of any type and entity to the machine and
its functions, as well as to this technical document. In the event of malfunctions and/or
dangers due to failure to comply with that stated above, the manufacturer declines all
responsibility for the resulting consequences. We suggest requesting any changes
directly to the manufacturer.
7 - Troubleshooting
7.1 - Troubleshooting
Problems Solutions
After pressing the main switch the machine
fails to start
Verify that the plug is properly inserted into the
power outlet and check the internal contacts of
the plug itself, where required
The machine works properly, but when the
cover is re-opened the package is not sealed
Lift the Teflon and check that the heating ele-
ment does not have any interruptions and that
it is secured to the side clamps
7.2 - WEEE (Waste Electrical and Electronic Equipment) regulations
The crossed-out wheelie bin symbol on the equipment or on its packaging indicates
that the product must be disposed of separately from other waste at the end of its
useful life. The separate waste collection of this device at the end of its life is or-
ganised and managed by the manufacturer. The user who wishes to dispose of this device
must contact the manufacturer and follow the given instructions to ensure that the separate
waste collection procedure is observed at the end of the equipment’s useful life.
The correct disposal of the device for the subsequent recycling, management and treat-
ment of its parts in an environment-friendly way helps to prevent possible adverse effects
on the environment and promotes the reuse and/or recycling of its constituent materials.
Unlawful disposal of the product by the user shall imply the application of adminis-
trative penalties under current law.

20
5 - Checks and maintenance
5.1 - Checks and maintenance
The machine’s internal mechanism must be accessed exclusively by our specialised
technician. If anybody else accesses the inside of the machine on their own initiative,
the manufacturer declines all civil and criminal liability for any accidents to people and
damages caused to objects. All electrical components are protected inside the ma-
chine body and can only be accessed by unscrewing the protective guard: to access
the inside, pull the plug out of the electrical panel.
5.2 - Maintenance
1. Clean the sealing bar and the silicone counter-bar every 15 days using methylated
spirits.
2. Change the oil as during the initial start-up setting.
For Easy models, as set by the manufacturer, the display will show the “change
oil” message after every 2,000 cycles.
The user must contact the dealer, who will check the efficiency of the oil and re-
place it if necessary.
3. Replace the heating element, Teflon, sealing bar and the seals of the cover roughly
every 200 hours of operation.
4. Replace the silicone counter-bar roughly every 100 hours of operation.
5. Check the pump vane, filters and the tightness of the pneumatic solenoid valves
roughly every 35,000 hours of operation.
5.2.1 - Vacuum pump
To protect the vacuum pump and prolong its service life, strictly observe the following
instructions:
- Do not suck up water vapour, liquids or any type of flour. This will deteriorate the
pump oil’s viscosity and damage the pump itself.
- Periodically check the level of the pump oil through the oil level indicator.
a level below the minimum can damage the pump
a level above the maximum can damage the pump filter and the pump itself
- Periodically check the colour of the pump oil.
It the oil appears cloudy, dark or emulsified, it must be replaced immediately.
- Replace the pump oil every 2 / 4 / 6 or 12 months depending on use and the appli-
ance’s location, or when the “change oil” message appears on the display.
It may even be necessary to change the pump oil every month.
- Replace the pump oil before an extended shutdown.
WARNING!! Given that the vacuum packing machine is almost always installed in the
kitchen, an environment dense with water vapour and humidity, the level and quality of
the pump oil must be checked constantly and the oil replaced frequently and regularly.
5
English
1 - Delivery and warranty
1.1 - Foreword
WARNING! The symbols used in this manual draw the reader’s attention to points and
operations that are hazardous to the operator’s personal safety or that risk damaging
the machine. Do not use the machine unless you have read and properly understood
these notes.
WARNING!
For reasons of clarity, some of the illustrations appearing in this manual show the
machine or parts of it with its panels or guards removed.
Never use the machine in this condition; only use it when it is fully equipped with the
guards and in good working order.
The manufacturer forbids the reproduction, even partial, of this manual or the use of
its contents for purposes other than those expressly allowed.
Any breach in this regard shall be punishable by law.
1.2 - Storing and using this manual
This manual uses text and illustrations to familiarise users with the machine and
explain the instructions and essential criteria for its transport, handling, use and
maintenance.
Read this manual carefully before using the machine.
Store this manual with care near the machine so that it can be readily available for
future reference.
If the manual is lost or damaged, you can request a copy from your dealer or directly
from the manufacturer.
If the machine is transferred to a new owner, the latter’s identification and contact
details must be notified to the manufacturer.
The manual reflects the state of knowledge at the time of sale of the machine, and
cannot be considered inadequate in the light of more recent experience and updates.
The manufacturer reserves the right to update the products and manuals without
being obliged to update previous products and manuals, except in exceptional
circumstances.
In case of doubt, contact your local service centre or the manufacturer.
The manufacturer is committed to continuously improving its products.
To this end, the manufacturer is glad to receive any reports or proposals relating to the
improvement of the machine and the manual.
The machine is delivered to the customer with the warranty conditions applicable at
the time of sale.
Please contact your dealer for any further information.
6
1.3 - Warranty
The manufacturer undertakes to guarantee to the customer or to the dealer, for the
duration of 12 (twelve) months from the date of shipment and direct delivery of the
product, the integrity and efficient operation of the components relative to the
machine.
The warranty does not cover all parts of the machine subject to normal wear, nor
components for which use generates constant and unrelenting wear:
A. Heating elements - Teflon - seals - bell opening pistons - sealing membrane - air
filters - oil filters - oil change - pump vane.
B. If the manufacturer receives a vacuum pump relative to a machine under warranty
for suction-related issues and malfunctions, the manufacturer reserves the right to
check whether any foreign bodies (liquids, solids, sauces, condiments, etc.) were
sucked up; if this is the case, material repairs and labour will be charged as the
problem is not due to manufacturing defects, but to the Customer’s negligence
during use.
C. Any problems involving the electronic circuit boards must be inspected by the
manufacturer before the replacement part is shipped under warranty. Power
surges, overvoltage and disturbances on the external network could cause
damages not ascribable to the manufacturer and the product’s sound construction.
D. Any problems linked to pneumatic, structural and mechanical parts will be regularly
resolved within the warranty terms without any charge whatsoever.
E. During the warranty’s validity period, for interventions covered by warranty, the
replaced materials will not be charged, while the labour costs will.
During the warranty’s validity period, for interventions that for various reasons are
not covered by the warranty, the costs for replaced materials and labour will be
charged.
F. If any external interventions by our technicians are requested during the warranty
period, the transfer costs (there and back) will be charged fully regardless of the
reason for the intervention.
1.4 - General warnings and manufacturer’s liability limits
Every man-machine interaction in the context of the machine’s intended use and along
its entire life has been carefully and thoroughly analysed by the manufacturer during
the design, construction and instruction manual drafting phases. Nevertheless, nothing
can replace the experience, adequate training and, above all, “common sense” of the
people who interact with the machine. These requirements are deemed indispensable
both during every operating phase of the machine and when reading this manual.
Failure to observe the precautions or specific warnings given in this manual and use of
the machine by inadequate personnel breach all the safety rules concerning the
design, construction and intended use of the supply and releases the manufacturer
from any responsibility in case of harm to people or damage to objects.
The manufacturer therefore shall not be held liable for any consequences
stemming from the user’s failure to observe the safety precautions given in this
manual.
19
English
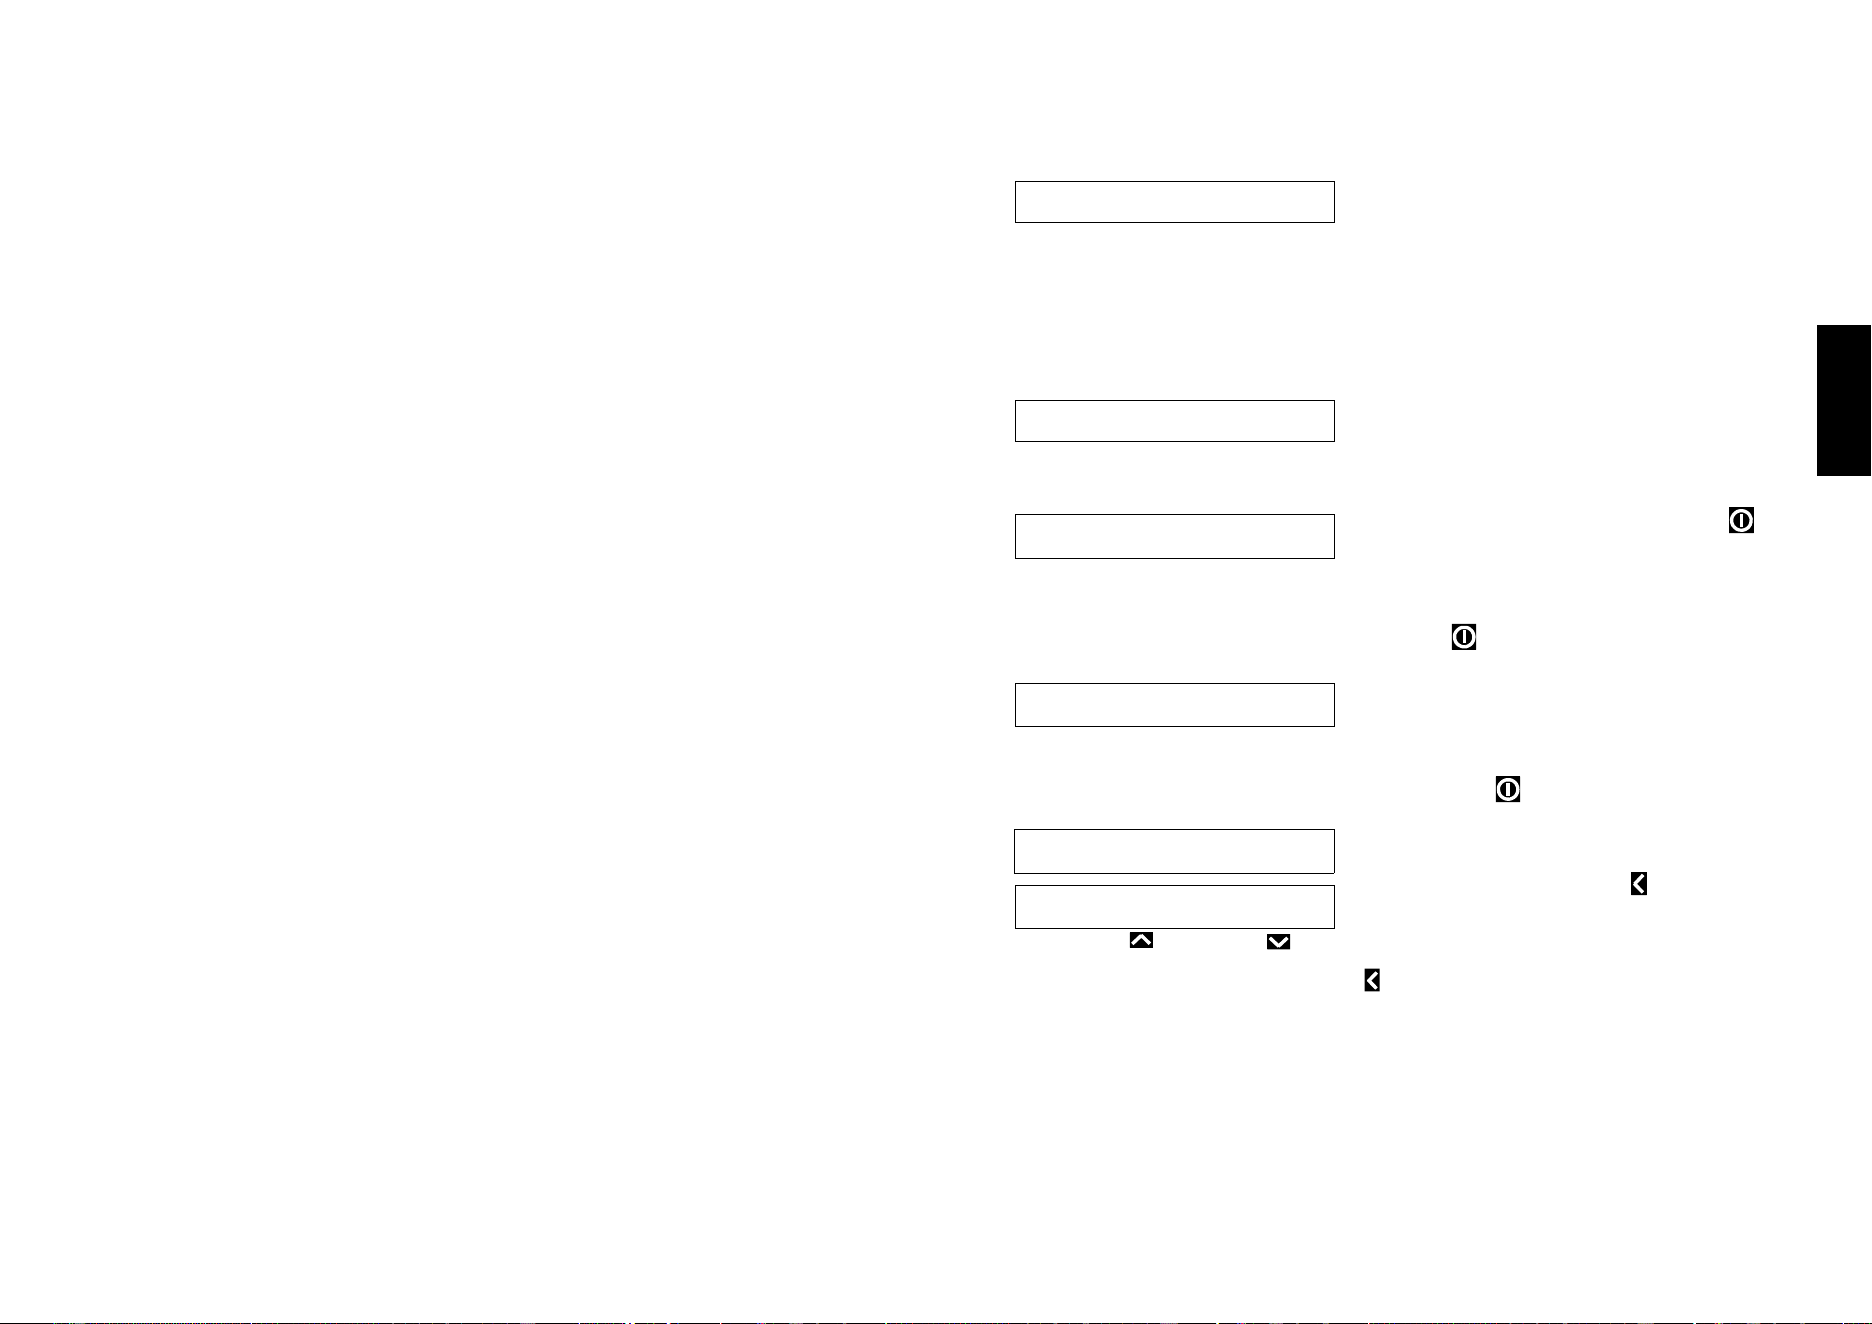
The operator can stop the cycle before it ends by pressing ON.
N.B.: this operation must be performed strictly with the suction cap closed.
4.10 - Alarms
OIL CHANGE
If the number of cycles for the oil change is
reached during the job, the display will show the
message “CHANGE PUMP OIL”, inviting the user to change the pump oil.
The machine will stop and this message will remain visible for 10 seconds, to allow the
operator enough time to read it. The display will then return to the previous situation/
screen (same programme that was being used).
If the machine is switched off, the message “CHANGE PUMP OIL” will appear for 30
seconds then the machine will start normally.
If the machine is used for a further 200 cycles, it will stop and the message “CHANGE
PUMP OIL” will appear for 60 seconds then the
machine will start normally.
OIL CLEANING CYCLE
Once the limit of cycles is reached, the message “OIL HEATING CYCLE” will
appear: select Immediately and press ON
to
proceed.
The following instructions will appear on the
display:
“Close black plug or chamber lid and press ON.
C H A
O I L
N G E P U M P
3 0
O I L
I m m
H E
e d i
A T I N G
a t e l y
C Y C L
O I L
C l o
H E
s e
A T I N G
b l a c k
C Y C L
c a p
The message “READY TO USE Thank you!” will
appear.
The machine will automatically return to the situation preceding the alarm.
The oil heating cycle can be stopped by pressing ON while it is running, but it will
not be considered completed.
The oil cleaning cycle can be postponed when the
message appears.
To modify it press the LH arrow.
Immediately will start flashing.
Use the UP and DOWN arrows to select Postpone.
Wait 5 seconds or press the LH arrow to confirm.
The selection will stop flashing.
A new message will remind the user to perform the operation after 50 cycles.
O I L
P o s
H E
t p o
A T I N G
n e
C Y C L
R E A D Y
T h a
T O U S
n k y o u
E
!
O I L
I m m
H E
e d i
A T I N G
a t e l y
C Y C L
18
4.7 - Cleaning the machine
WARNING! Disconnect the machine from the mains power supply before
cleaning it.
Do not clean the machine using a water jet.
Only use non-toxic detergents specifically formulated for cleaning components used
with foodstuffs. Do NOT use detergents containing chloride.
Do NOT use ethyl alcohol to clean the cover.
It can be cleaned regularly using a soft damp cloth wetted with cold or lukewarm
water, with a slight addition of neutral detergent.
We recommend avoiding:
- The use of products containing: denatured ethyl alcohol, solvents in general,
benzene, trichloroethylene.
- The use of abrasive materials and contact with sharp objects.
Drying: Once the cover has been cleaned, it
can be dried with slightly dampened chamois
leather, without rubbing.
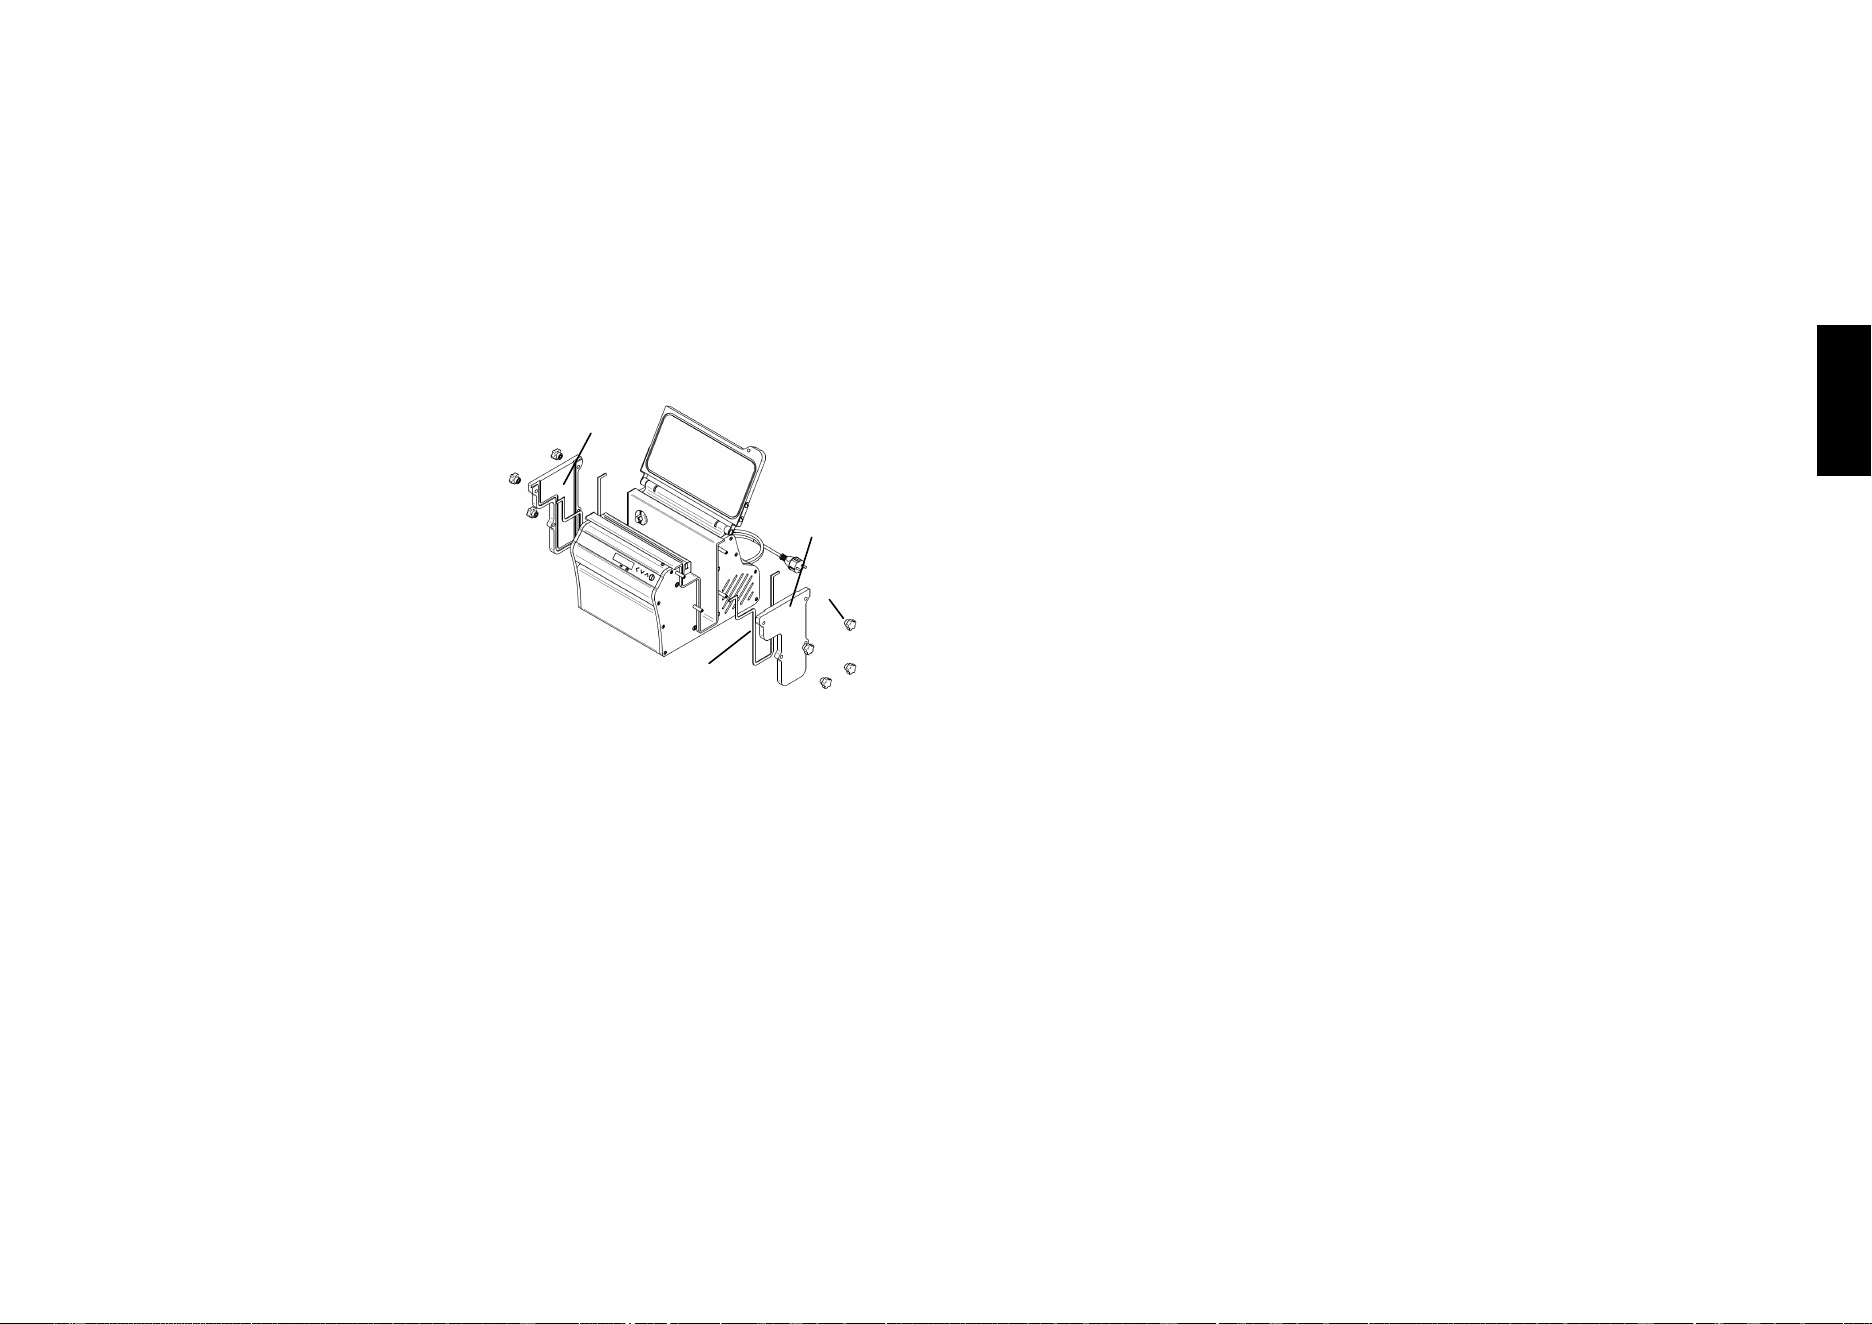
To facilitate cleaning operations, it is possible
to remove the side panels to easily reach all
points of the vacuum chamber.
To remove the sides, proceed as follows:
- Unscrew the knobs "3"
- Remove the sides "1" and "2" taking care not
to lose the gasket "4"
- Carry out cleaning operations
- Reassemble everything taking care to tighten
the knobs well.
ATTENTION! Before tightening the knobs, make sure that the sides are correctly
assembled. The gasket must be level with the aluminum top.
4.8 - Machine in stand-by
WARNING! If the machine is not used for extended periods of time, to prevent dirt or
dust from building up inside the chamber, we suggest closing the bell and fastening it
with the bell fixing knob.
If the machine is not expected to be used for more than one week, before it is taken
out of service the oil should be replaced, even if this was already done recently.
4.9 - Vacuum pump heating
During winter we suggest pre-heating the pump briefly in the morning to fluidify the oil
before it starts circulating:
- Put the main switch to ON.
- Close the lid (as shown on the display)
- Press the UP button 3 times.
The machine will run the oil heating cycle until it reaches the time, then it will stop
automatically.
Fig. 4.7.1
1
4
3
2
7
English
1.5 - Machine description
The vacuum packing machines we manufacture are state-of-the-art and feature an
interchangeable modular board with fully electronic controls, which are therefore not
subject to wear. The electronically controlled sealing unit consists of a stainless-steel
bar with flat heating element (5 mm) which, thanks to the excellent pneumatic system
installed, guarantees balanced and uniform sealing on any type of bag used (nylon,
polyethylene, Cryovac).
The vacuum pumps adopted are highly up-to-date and guarantee, along with an
extremely high degree of final vacuum, an astonishingly low level of noise despite
working with uninterrupted cycles.
The models appearing in this manual are manufactured in conformity to UL and CSA
norms and subsequent amendments.
If any accident occurs, the manufacturer shall not be held liable if the machine has
been modified, tampered with, had its safety guards removed or is used for purposes
other than the intended use specified by the manufacturer.
1.6 - Intended use
The machine is designed and manufactured for vacuum packing of products according
to the instructions given in this manual and must be used solely for this purpose. Any
other use must be regarded as improper and thus dangerous. The manufacture shall
not be held liable for any damages deriving from improper, incorrect and unreasonable
use. The machine must be used in a professional setting by qualified operators who
work in the sector and have read and understood this manual.
1.7 - Improper use
1.7.1 - Safety rules
The following points should be observed in particular:
1. avoid touching metal parts of the machine with wet or damp hands;
2. do not pull the power cord or the appliance itself to detach it from the power outlet;
3. do not allow children or personnel lacking proper training from using the packing
machine;
4. electrical safety is only ensured when the appliance is properly connected to an
efficient earthing device, as specified in the applicable electrical safety regulations;
this essential requirement must be verified and, in case of doubts, a thorough
inspection of the system by professionally qualified personnel must be requested;
the manufacturer shall not be held liable for any damages caused by the absence
of an earthing system;
5. if the earthing system is potentially damaged, the machine must be put out of
service so as to prevent undesired and/or involuntary activations;
6. always use protective fuses conforming to the safety regulations in force, having the
correct value and with suitable mechanical characteristics;
7. keep the cord far away from hot parts;
8. always switch the machine off and disconnect it from the mains power supply
before starting general cleaning operations or washing;
9. clean the machine’s coatings, panels and controls using soft cloths either dry or
slightly wetted with a mild detergent or methylated spirits solution;
8
1.7.2 - Lighting
The packing machine must be installed in a place that ensures adequate natural and
artificial lighting as required by local regulations.
In any case, the lighting must be uniform and ensure good visibility of every part of the
machine and must not generate dangerous reflections. The lighting must ensure clear
reading of the control panels and the emergency buttons must be clearly identifiable.
1.8 - Specific equipment details
Citing the “Model”, “Serial number” and “Year of manufacture” of the machine will help
our technical assistance service to respond to your requests rapidly and effectively.
We recommend specifying the machine model and serial number whenever you
contact the technical assistance service.
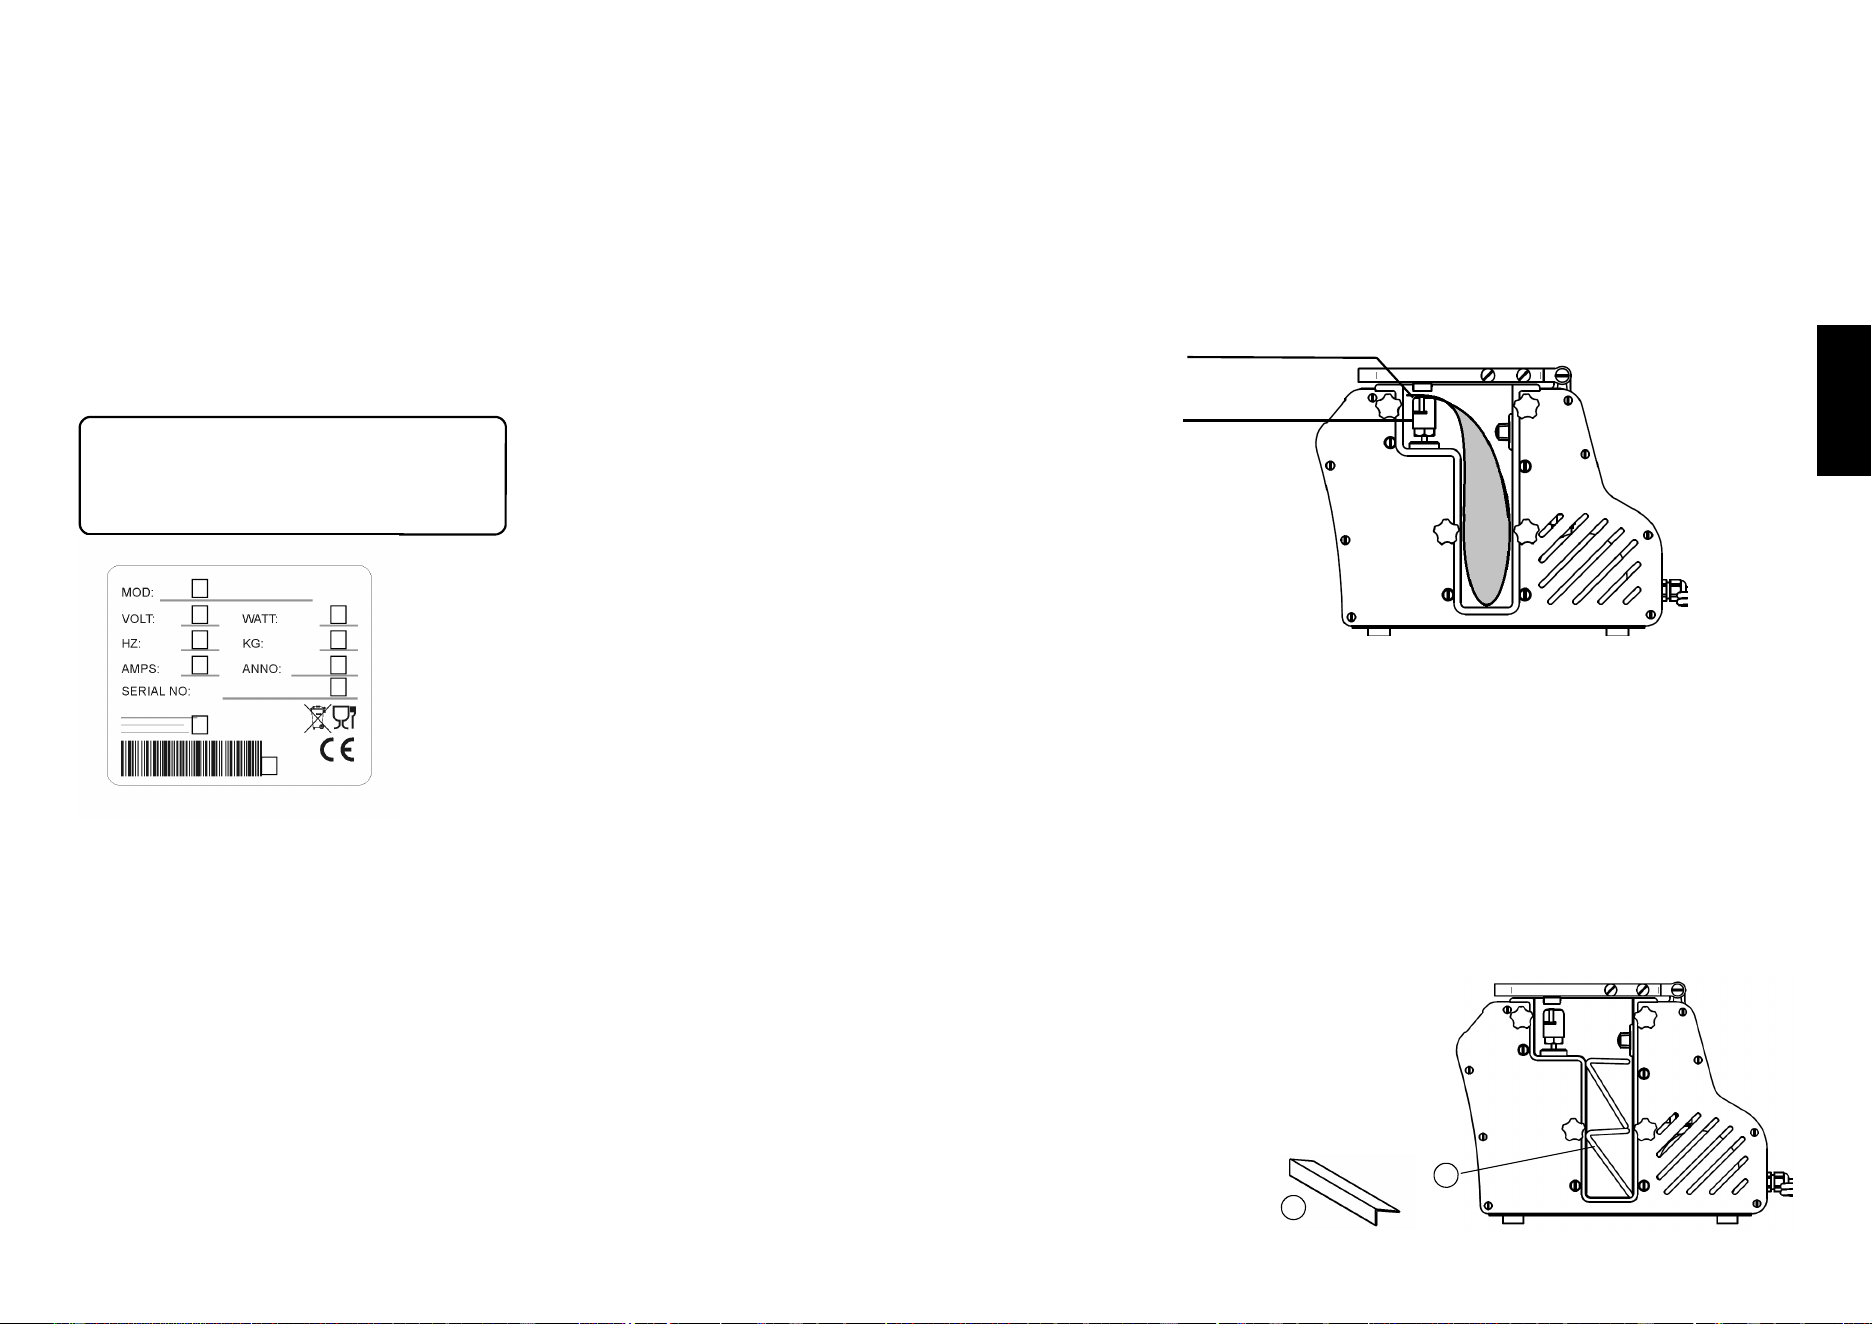
This information appears on the rating plate shown in Fig. 1.8.1.
As a reminder, we suggest writing the data of the machine you have purchased in the
table below.
Packing machine model………………………….
Serial no.…………………………………………..
Year of manufacture……………………………...
Type………………………………………………..
Fig. 1.8.1
E
A = Model
B = Power supply
C = Motor power
D = Motor frequency Hz
E = Weight
F = Amperage
G = Year of manufacture
H = Serial no.
I = Manufacturer
L = Barcode
A
B C
D E
F G
H
I
L
17
English
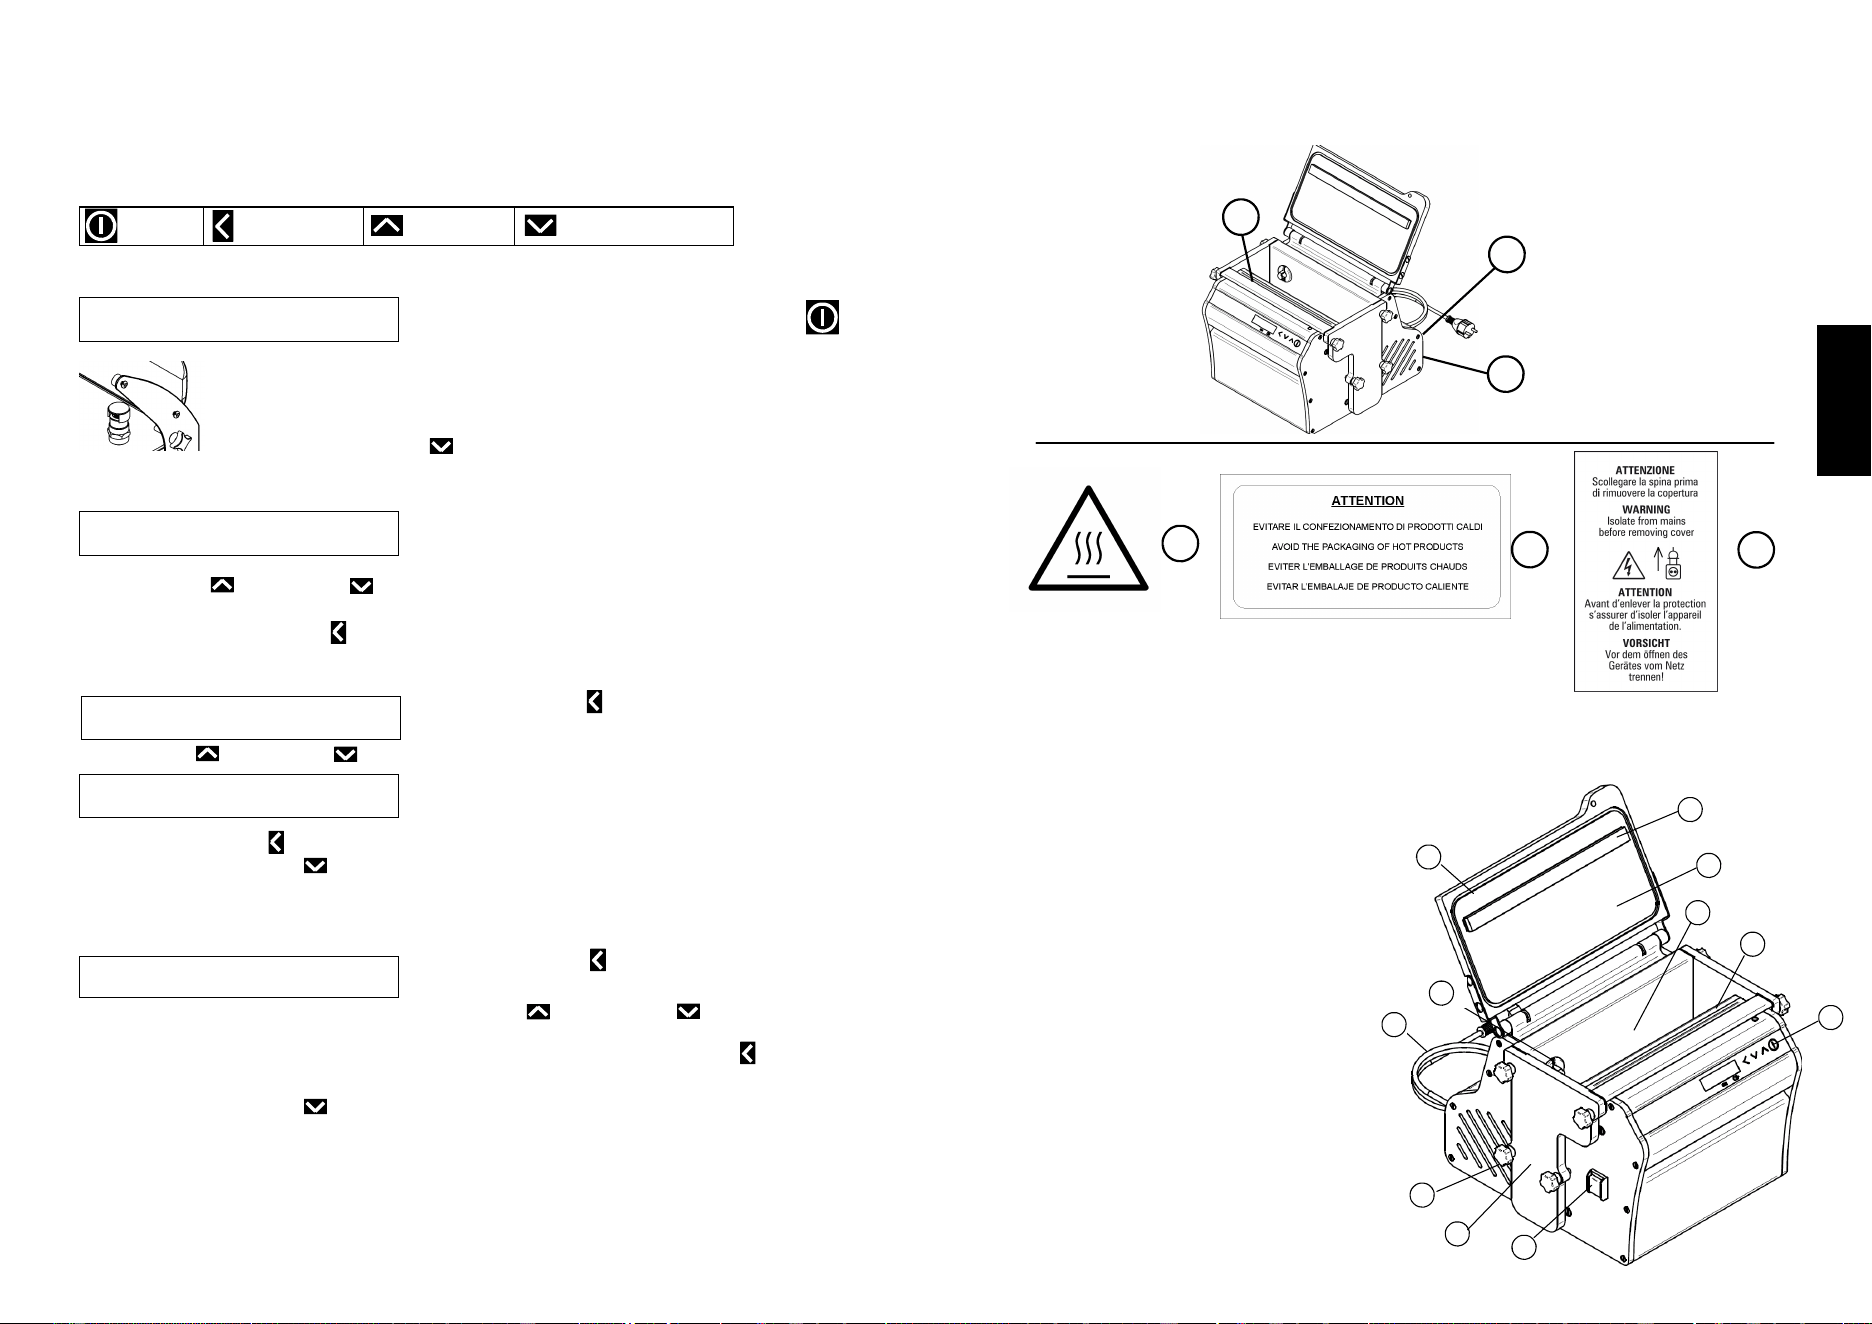
4.5 - Packing of liquid or semi-liquid products
With our vacuum packing machines it is possible to
vacuum-pack liquid or semi-liquid products (soups, sauces, condiments, etc.),
extending their life and preserving their flavours and hygiene.
In these cases, it is important to remember that the bags must never be filled all the
way but only to 50% of their capacity, taking care to keep the edge at a different height
with respect to the sealing bar.
1. The vacuum cycle is programmed as described in the USING THE PACKING
MACHINE chapter.
2. Since liquids cannot be compressed, they do not need to be packed in a modified
environment, that is, with the addition of inert gases.
3. All the packages can be stored in a cold room and stacked normally on top of one
another.
4.6 - Packaging of products with the
use of the inclined profiles provided
If the bag does not touch the bottom, it is
possible to insert up to 2 shims (1) to raise the
depth of the tank.
SURPLUS BAG
SEALING BAR
Fig. 4.3.1
4.4 - Vacuum packing
- Connect the machine to the mains power supply.
- Power the machine by pressing the switch on the right-hand side. The display will
switch on showing the main screen.
- Press the ON button.
- Use the UP and DOWN buttons to scroll through the list of pre-set programmes.
- Put the bag on the vacuum chamber by placing the open side on the sealing bar so
that it lies perfectly flat.
- Lower the cover by applying a certain amount of pressure so that it stays closed and
the processing cycle can start.
1
Fig. 4.6.1
1
16
4.3.3 - WiFi
Press the LH arrow to enter the Wi-Fi menu.
The message e.g. WIFI on line will start flashing.
Use the UP and DOWN arrows.
Wifi om line / Wifi AP mode / Deactivated will
appear in succession; if Wifi AP mode is chosen, to
confirm and exit the edit mode, wait 5 seconds or
press the LH arrow.
Touch the DOWN arrow to skip to the next function.
W I F
O n
I
l i n e
W I F
A P
I
m o d e
4.3 - User menu
With the main switch set to ON (Fig. 4.1.1), press and hold for 3 seconds the ON/OFF
button (Fig. 4.1.2) to enter the user menu. Use the arrow commands to view the list of
machine functions that can be set and to modify the relevant values.
4.3.1 - Oil heating and cleaning
The message “Close black plug or chamber
lid and press ON” will scroll on the second
line of the display. Follow the instructions.
The machine will start the oil heating process to reach the pre-set tem-
perature of around 50°C.
The cycle can be stopped by pressing the ON-OFF button.
Touch the DOWN arrow to skip to the next function.
ON-OFF
LEFT arrow UP arrow DOWN arrow
O I L
C l o
H E
s e
A T I N G
b l a c k
C Y C L
c a p
4.3.4 - Language
Press the LH arrow to enter the menu dedi-
cated to languages.
The word Italiano will start flashing. Use the UP and DOWN arrows to scroll
the languages in the system and select the desired language.
To confirm and exit the edit mode, wait 5 seconds or press the LH arrow until noth-
ing more flashes.
Touch the DOWN arrow to skip to the next function.
L A N
E n g
G U A
l i s
G E
h
4.3.2 - Vacuum control
The second screen of the display shows the mes-
sage “VACUUM CONTROL” for setting the
suction based on the percentage or the duration.
Press the UP and DOWN arrows to set the % or the duration with “TIME VAC-
UUM CTRL”.
Confirm with the LH arrow.
V a c
T I M
u u m
E V
C t r l
A C U U M
1 0 0 %
C T R L
9
English
1.8.1 - Warning and danger signs (Fig. 1.8.2)
2 - Technical specifications
2.1 - Main parts
To aid comprehension of the manual, the
main components of the machine are listed
below and shown in Fig. 2.1.1.
A
B
C
1. Control panel
2. Vacuum chambre
3. Power cable
4. Main switch
5. Transparent cover
6. Silicone counter-bar
7. Seal
8. Vacuum suction duct
9. Sealing bar
10. Removable plexiglass side
11. Side fixing knob
Fig. 1.8.2
A
B
C
9
2
1
4
6
7
5
8
10
3
11
Fig. 2.1.1
10
2.2 - Caratteristiche tecniche
2.3 - Machine dimen-
sions and weight
Power (kW) Vacuum pump Sealing bar
Chamber
dimensions
Power supply Oil tank capacity
30 0,15 4 mc/h 310 mm 324x60x250
mm
120V/60Hz 0,125 L
A B C D E F G H Net weight
mm mm mm mm mm mm mm mm Kg
230 268 416 398 300 520 86 324 22
Fig. 2.3.1
G
H
15
English
P R O G R A M 1
4 . 0 s 4 0 s
X X X
H W
X X
2 . 0
X X X X
F W 1 . 2
M A R I N A T I O N
5 . 0 S
8 M S
1 9 0 s
P R O G R A M 1
4 . 0 s 4 0 s
P R O G R A M 1
4 . 0 s 4 0 s
C
E N D
Y C L E
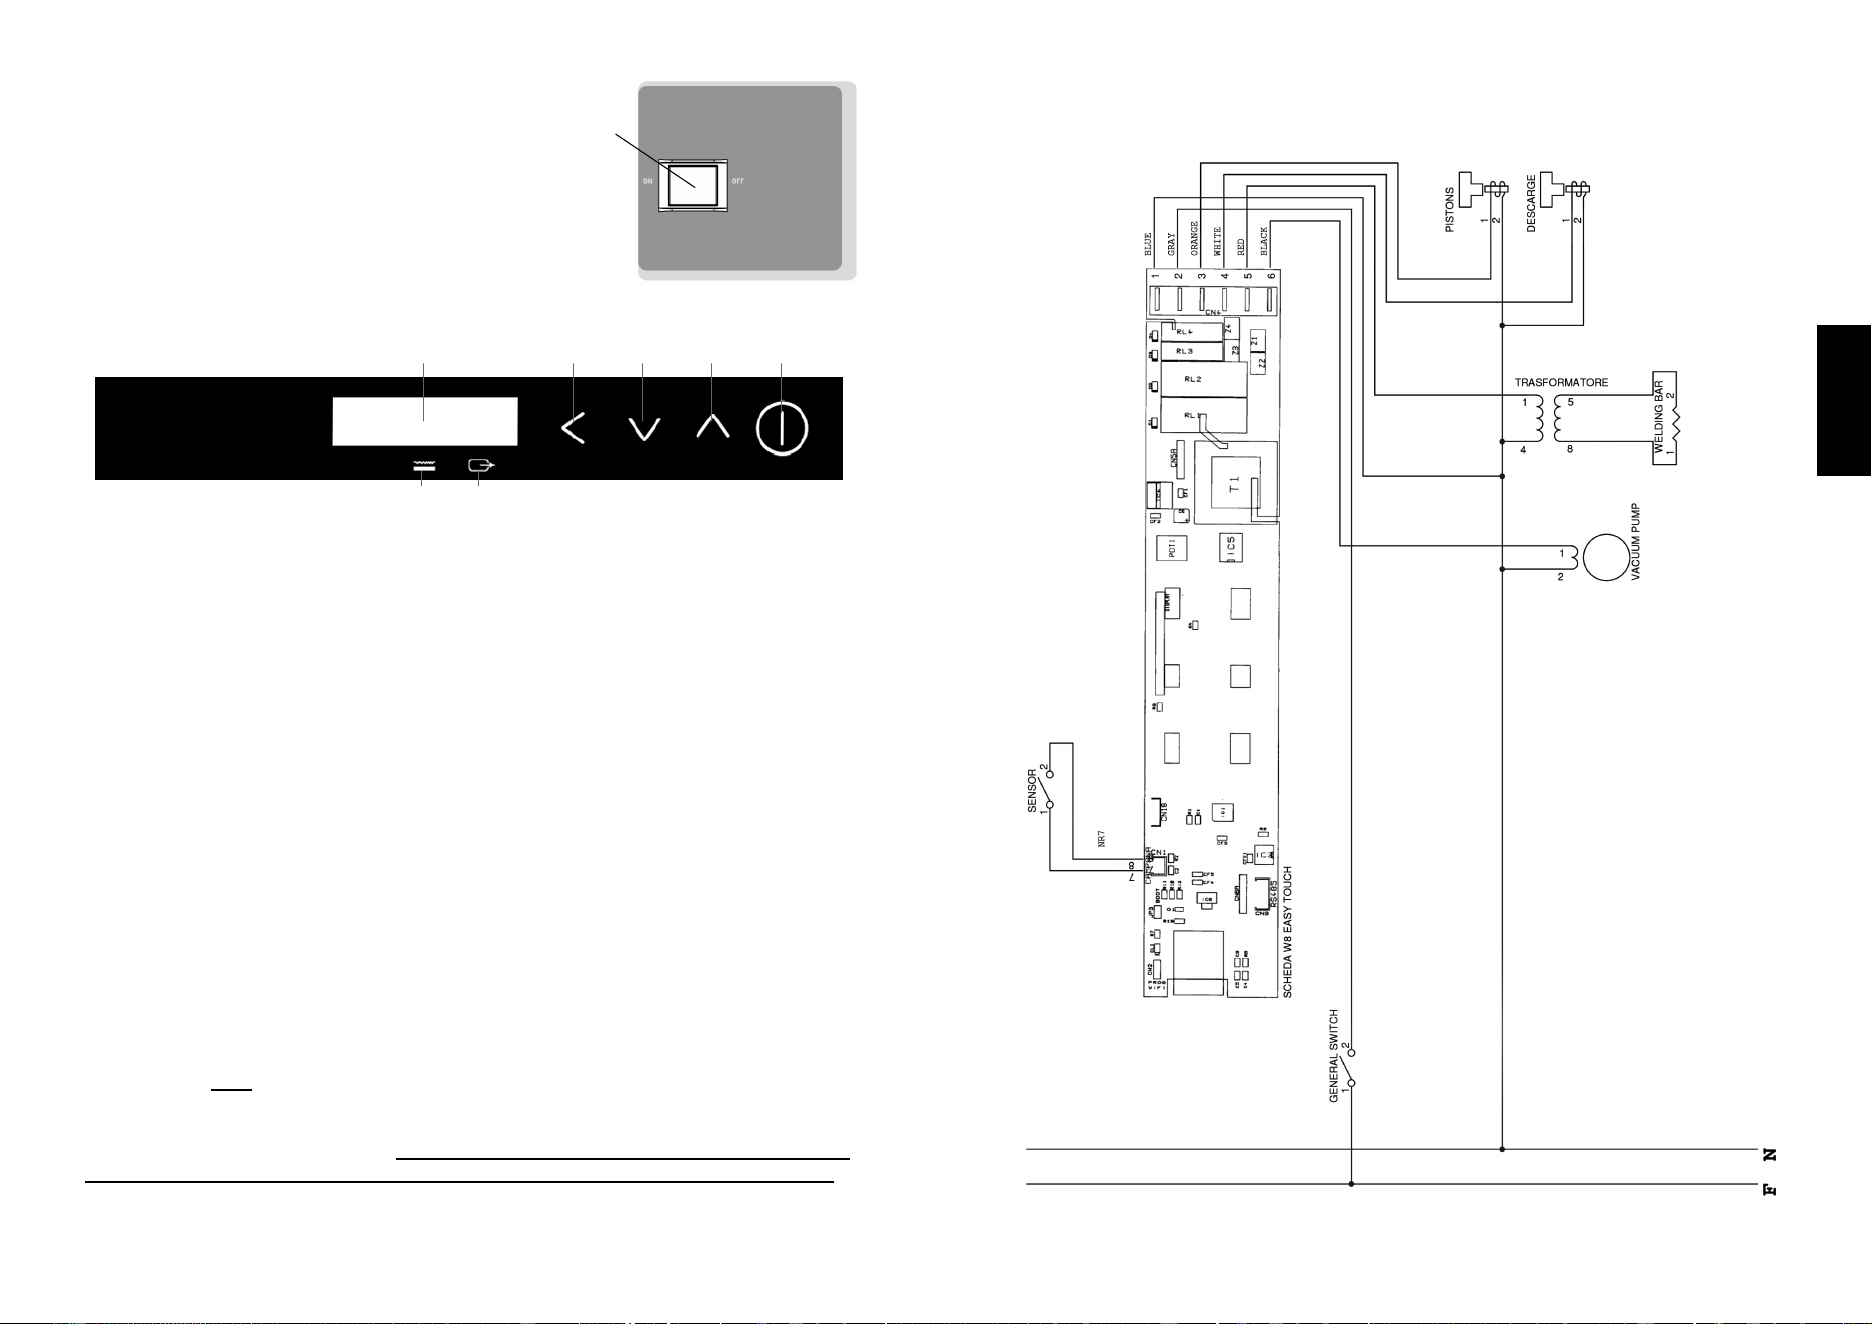
4.2 - Programme menu
Switch on the machine by putting the main switch to ON (Fig. 4.1.1 - Ref. 1).
The display will switch on and show:
Lift the lid.
To access the programmes, press the button and use the UP and DOWN
arrows to scroll the various programmes.
There are 10 pre-set programmes from 0 to 9,
which can be modified
1 non-modifiable multi-step marination program,
on a bag
To select a programme, press the LH arrow.
To modify a value, press the LH arrow again: the suction duration value will start
flashing, use the UP and DOWN arrows to set the desired value and confirm
with the LH arrow or wait 5 seconds.
Subsequently, the sealing duration value will
flash, then use the UP and DOWN
arrows to set the desired value and confirm with the LH arrow or wait 5 seconds.
After defining the programme to be used, close
the cover and the machine will start working.
The following message will appear at the end of the process:
To interrupt a process under way, press the button:
Press it once to seal.
Press it twice to open the cover.
14
4 - Using the machine
4.1 - Control key
1. ON-OFF Main switch of the machine.
Used to switch the machine on and off.
It is located on the side of the machine.
2. START/STOP, functions:
If pressed once, after switching the machine on with the ON/OFF button (Ref. 1)
and closing the cover, the machine will start with the last programme executed.
To access to programme menu.
To access to the user menu, press and hold for 3 seconds.
To exit the menus, press and hold for 3 seconds.
To start/stop the selected programme.
3-4. To scroll the software menu.
To select the memorised programmes.
To increase or decrease the selected values (where allowed):
suction percentage, vacuum duration, sealing duration.
5. To access to the programme menus and confirm the selection.
6. Analogue display.
A = Sealing time.
B = Suction time.
WARNING! The changes are memorised automatically. After 5 seconds of inactivity
from the change, the value stops flashing to confirm.
We recommend switching the power switch or the line main switch off or pulling
the plug out only for performing maintenance or specific operations described
in the manual. The machine does not need to be switched off after every use
since it automatically goes into stand-by and thus into energy saving mode
without having to disconnect it. If the machine remains powered, all the control
functions will be active and this guarantees improved efficiency and durability.
1
Fig. 4.1.1
Fig. 4.1.2
2
A B
3 4 5 6
11
English
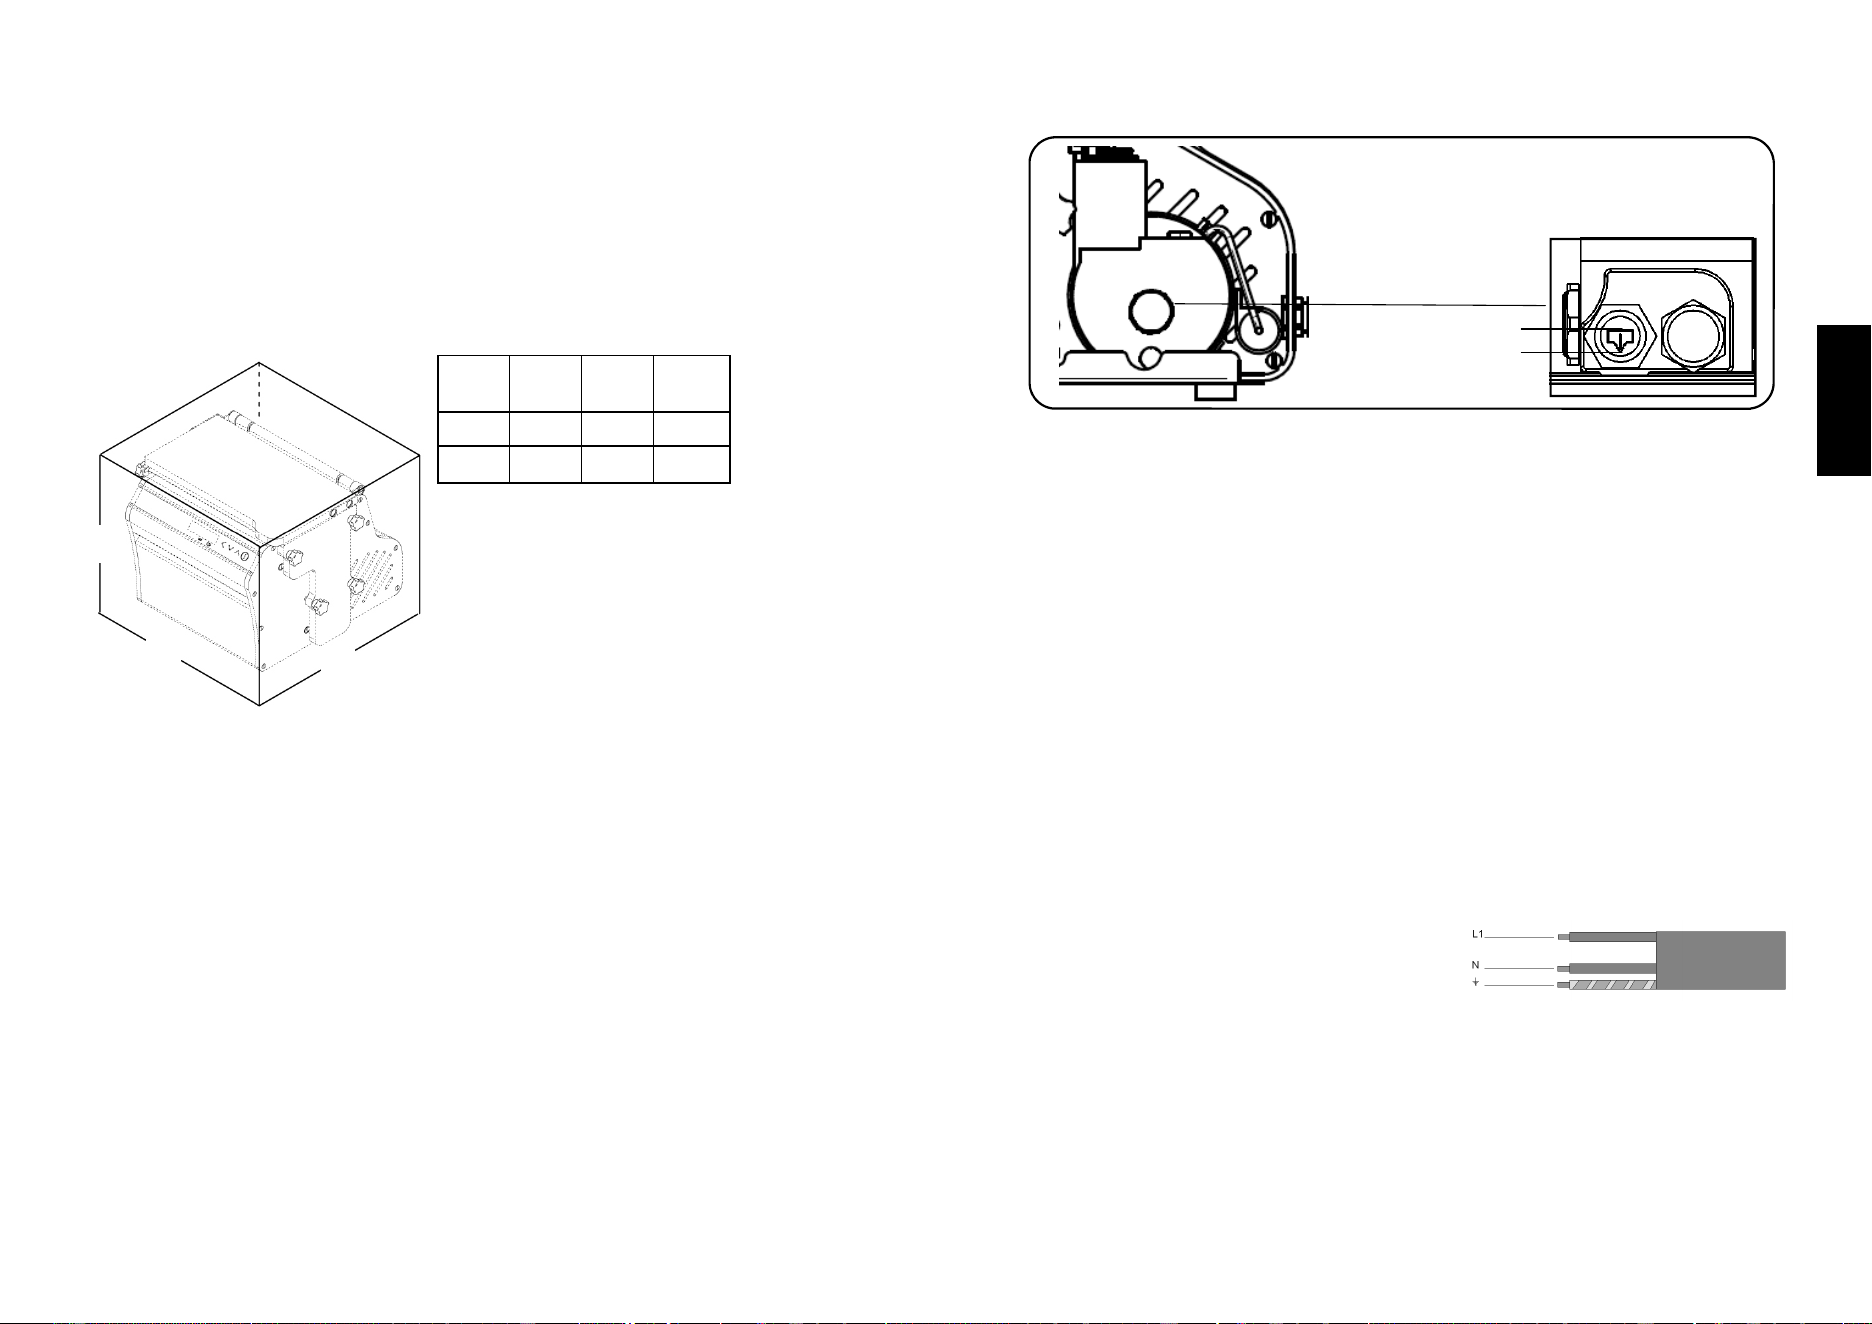
2.4 - Wiring diagram
Fig. 2.4.1
12
3 - Factory testing, shipping, delivery and installation
3.1 - Factory testing
The machine you have purchased was tested at our plants to verify its efficient opera-
tion and correct adjustment.
3.2 - Delivery and handling
All shipped material is carefully checked prior to being handed over to the shipping
agent.
Unless otherwise agreed with the Customer, and unless the shipping conditions de-
mand special packaging, the machine is wrapped in nylon and cardboard. The dimen-
sions of the
package are
shown in the
table below.
When you receive the machine, check the
condition of its packaging.
If you notice any damage to the packaging,
sign the delivery note with the following word-
ing:
“Goods accepted with reservation...” and the
reason.
If you notice any damage to the components of the machine after opening the pack-
age, report it to the shipping agent within three days from the date shown on the docu-
ments.
3.3 - Installation
After removing the packaging, verify that the packing machine is intact.
In particular, check that the machine is intact and without any visible damages that
could have been caused by the transport.
In case of doubts, do not use the appliance and contact the manufacturer.
Installation site
Install the packing machine in a place with low humidity and far from heat sources.
WARNING! Prior to performing any check that implies the dismantling of certain parts,
pull the plug out of the power outlet.
3.3.1 - Disposing of packaging material
The packaging materials (cardboard, nylon, wood, etc.) can be regarded as solid ur-
ban waste. As a result, they can be disposed of freely.
Nylon is a polluting substance that releases toxic fumes when burnt.
Do not burn or dump it, but dispose of it according to the law.
If the machine is delivered to a country where special regulations apply, dispose of the
A B C
Gross
weight
mm mm mm Kg
515 435 385 24
Fig. 3.2.1
A
B
C
13
English
3.4 - Connections
Before starting up the machine, check the oil level through the indicator on the pump.
Prior to connecting the packing machine, check that the rating plate data
matches the power supply network data.
The rating plate is located at the back of the machine.
After checking the level and closing everything, insert the plug back into the 230 V
power outlet.
If the machine’s plug is not compatible with the power outlet, contact professionally
qualified personnel to replace the plug with a suitable one.
Said personnel must ascertain in particular that the cross-sectional size of the outlet’s
cables is suitable for the appliance’s power input. In general, it is not advisable to use
adapters, multiple sockets and/or extensions.
If these devices are indispensable, only use simple or multiple adapters and exten-
sions conforming to the safety regulations in force, taking care not to exceed the cur-
rent load limit and the maximum power limit marked on the multiple adapter.
3.5 - Electrical connections
WARNING! Check that the power supply line has the same specifications as those
shown on the machine’s rating plate. All interventions must be carried out solely by
specialised personnel expressly authorised by the relevant supervisor. Make the con-
nection to a power line equipped with an efficient earthing socket.
3.5.2 - 120 V / 60 Hz single-phase machine
In this configuration, the machine is supplied with
a power cable with 3 x 1.5 mm gauge.
This cable is connected to a single-phase plug
with three pins. Attach the cable to the 120 V-60
Hz single-phase power supply line by installing a
16 A residual current circuit breaker in between.
Consult the manufacturer for configurations differing from those
mentioned above. If the power cable needs to be extended, use a cable of the same
gauge as the original cable installed by the
manufacturer.
Fig. 3.4.1
MAX
MIN