16
SERVICE CENTRE
AUTHORISED DEALER
1
INSTRUCTION MANUAL, FOR USE AND MAINTENANCE
CE Graters
GF DKT
Ed. 02/2012

2 15
CHAP. 8 - DISPOSAL
8.1 - DECOMMISSIONING
If for any reason you decide to decommission the machine, be sure that it cannot be used
by anyone: disconnect the electrical connections.
8.2 - WEEE Waste Electrical and Electronic Equipment
Pursuant to Art. 13 of Legislative Decree No. 151 dated 25 July 2001, "Implementation
of Directives 2002/95/EC, 2002/96/EC and 2003/108/EC, regarding the reduction of the
use of hazardous substances in electrical and electronic equipment as well as waste
disposal"
The barred garbage bin symbol on the device and its packaging indicate that at the end of
its useful life the product must be collected separately from other waste.
Separate collection of this equipment once it has reached the end of its life is organized
and managed by the manufacturer. The user who wishes to dispose of this equipment must
thus contact the manufacturer and follow the system that it has adopted to allow for
separate collection of the equipment once it has reached the end of its life.
Separate collection for recycling of the equipment, its treatment and environmentally
compatible disposable prevents any possible negative effects on health and the
environment and promotes the reuse and/or recycling of the materials used to make the
equipment.
Illegal waste disposal on the part of the user will result in administrative sanctions
provided for in the current regulations.

14
CHAP. 6 - ORDINARY CLEANING
6.1 - GENERAL INFORMATION
Cleaning the machine should be performed at least once a day or, if necessary, more
frequently.
Cleaning must be carefully performed on all parts of the grater that come in direct or
indirect contact with food.
The grater must not be cleaned with pressure washers, jets of water or dishwashers;
utensils, brushes and anything else that might damage the surface of the machine must
not be used.
Before any type of cleaning, always disconnect the power plug in order to completely
isolate the machine from the rest of the electrical system.
ATTENTION! to residual risks from sharp and/or pointed parts.
ATTENTION!
DO NOT PUT ANY COMPONENTS IN THE DISHWASHER.
6.2 - PROCEDURE
Cleaning the body of the machine at the workplace can be done with a damp cloth that is
frequently rinsed in water.
ATTENTION: Clean the grater roller with a brush, paying close attention to the teeth.
CHAP. 7 - MAINTENANCE
7.1 - GENERAL INFORMATION
Before any type of maintenance, always disconnect the power plug in order to
completely isolate the machine from the rest of the electrical system.
7.2 - FEET
The feet, over time, could deteriorate and lose their elasticity, reducing the machine's
stability. They then must be replaced.
7.3 - POWER CABLE
Periodically check the condition of the cable and, if necessary, call the "SERVICE
CENTRE" for a replacement.
3
INTRODUCTION
This manual was developed to provide the customer with all information about the
machine and the regulations applied to it, as well as use and maintenance instructions
which allow it to be used in the best manner and maintain its efficiency over time.
This manual is to be delivered to those who will use the machine and perform periodic
maintenance.
INDEX
CHAP. 1 - INFORMATION ON THE MACHINE page 5
1.1 - GENERAL PRECAUTIONS
1.2 - SAFETY DEVICES INSTALLED ON THE MACHINE
1.3 - DESCRIPTION OF THE MACHINE
1.3.1 - General description
1.3.2 - Construction characteristics
1.3.3 - Machine composition
CHAP. 2 - TECHNICAL DATA page 8
2.1 - DIMENSIONS, WEIGHT, CHARACTERISTICS...
CHAP. 3 - RECEIPT OF THE MACHINE page 9
3.1 - SHIPPING THE MACHINE
3.2 - CHECKING THE PACKAGE UPON RECEIPT
3.3 - PACKAGING DISPOSAL
CHAP. 4 - INSTALLATION page 10
4.1 - LOCATION OF THE MACHINE
4.2 - ELECTRICAL CONNECTION
4.2.1 - Grater with monophase motor
4.2.2 - Grater with threephase motor
4.3 - ELECTRICAL DIAGRAMS
4.3.1 - Monophase and threephase electrical diagram
4.4 - OPERATIONAL INSPECTION
CHAP. 5 - USING THE MACHINE page 12
5.1 - CONTROLS
5.2 - LOADING THE PRODUCT
CHAP. 6 - ORDINARY CLEANING page 14
6.1 - GENERAL INFORMATION
6.2 - PROCEDURE FOR CLEANING THE MACHINE
CHAP. 7 - MAINTENANCE page 14
7.1 - GENERAL INFORMATION
7.2 - FEET
7.3 - POWER CABLE
4
CHAP. 8 - DISPOSAL page 15
8.1 - DECOMMISSIONING
8.2 - WEEE Waste Electrical and Electronic Equipment
13
1
FIG. No. 8 - Loading the product
FIG. No. 10 - Correct position
FIG. No. 9 - Pay close attention to...
Do not insert metal or other objects inside the
grater hopper and the outlet for grated material.
Do not wear clothing that could snag during use.
2
12
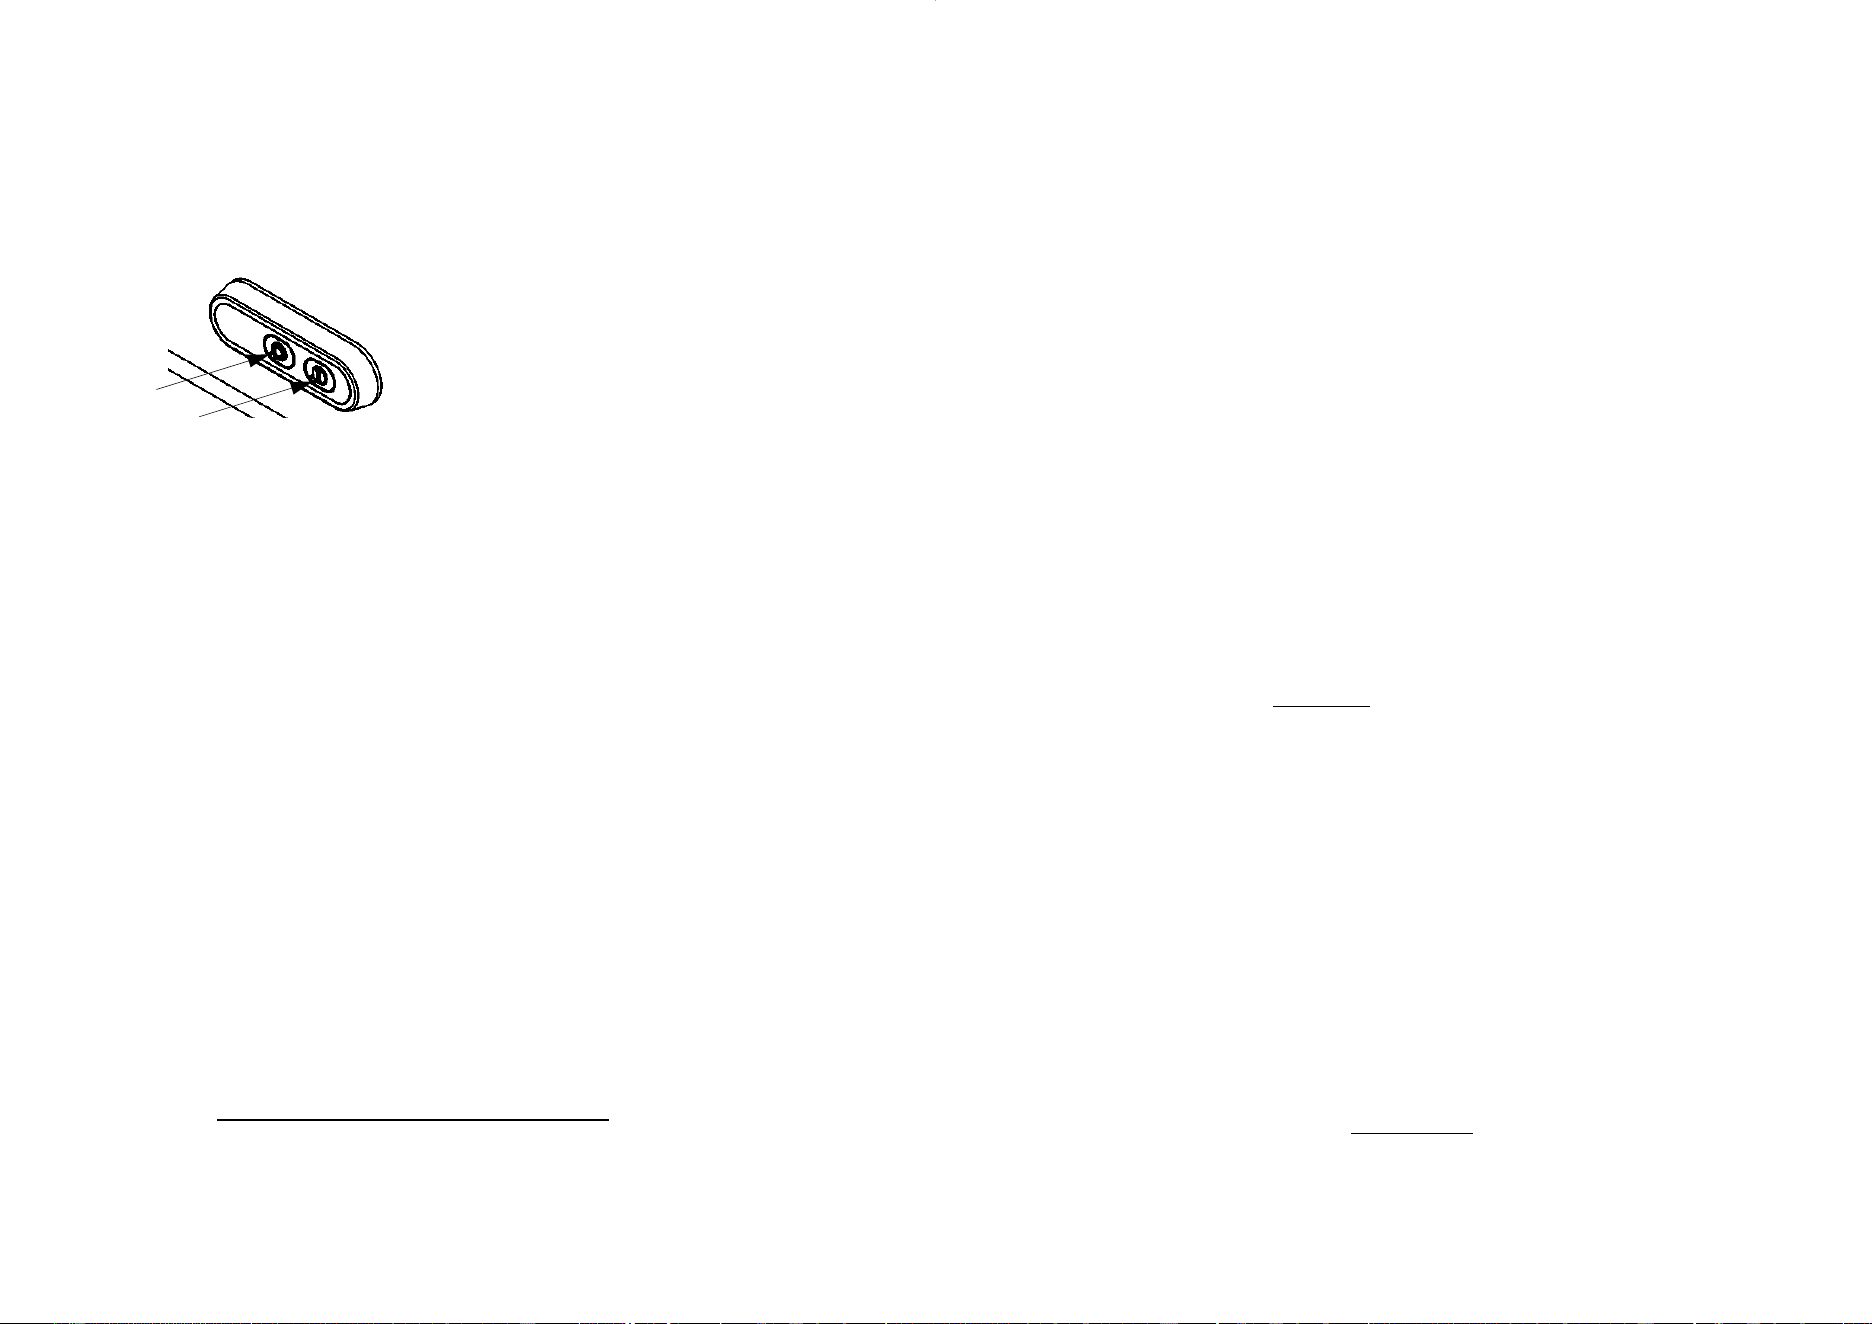
1 - "I" On button.
2 - "0" Off button.
FIG. No. 7 - Control locations
CHAP. 5 - USING THE MACHINE
5.1 - CONTROLS
The controls are located on the body of the machine as shown in FIG. No. 7.
5.2 - LOADING THE PRODUCT (see FIG. No. 9-10)
Please Note: The food to be processed is only loaded when the motor is off.
The procedure is as follows:
1. ATTENTION! Never, for any reason, put your hands in the hopper grater
when it is running, shut the machine off and carefully make sure to avoid any
contact with the grater roller.
2. The food to be processed is always loaded with the motor off;
3. Lift the grater lever (1) and place the product in the grater hopper, blocking it
with the grater lever. The amount of product loaded in the hopper must allow
for the lever to be closed.
4. Ensure that the collection bowl (2) is correctly in place (or inserted completely
until it touches the body of the machine) so that the micro connects and allows
the machine to be turned on.
Please Note: If the lever is not closed and the collection bowl is not in place,
the machine will not function.
5. Turn the machine on using the "I" button (ref. 1 - FIG. No. 7);
6. When finished, turn the machine off by pushing the "0" off button (ref. 2 - FIG.
No. 7), then dismantle and carefully clean the hopper and all components (see
Par. 6.2).
Whenever the bowl is removed and repositioned, you must restart the machine by pressing
the "I" on button.
Please Note: Avoid running the machine while empty.
2
1
5
CHAP. 1 - INFORMATION ON THE MACHINE
1.1 - GENERAL PRECAUTIONS
The machine must only be used by trained personnel who must be perfectly
knowledgeable of the safety regulations contained in this manual.
In the event of personnel turnover, provide for training time.
Even though safety devices are installed on the machine's danger zones, avoid getting
hands close to moving parts or touching the machine with wet or damp hands.
Before performing any cleaning or maintenance, disconnect the machine's power plug
from the electrical supply.
When conducting maintenance or cleaning of the machine (and the safety devices are
removed), carefully evaluate the residual risks.
During maintenance or cleaning, maintain concentration on the operation underway.
Regularly inspect the condition of the power cable (in order to avoid danger, be sure to
uncoil the entire length of the power cable, preventing any twisting); avoid putting
pressure on the cable with any kind of weight, leaving it in contact with hot or sharp
surfaces and pulling on it to unplug it from power.
If you suspect a malfunction or the machine demonstrates one, do not use it or make
repairs; contact the "Help Centre" on the back of this manual.
Do not use the machine for frozen goods or for non-alimentary products.
Do not put metal or other objects inside the grater hopper.
Never grate food without using the press lever.
The manufacturer is absolved of all responsibility in the following cases:
tampering with the machine or installed safety devices by unauthorised personnel;
replacement of parts with non original ones;
failure to carefully follow the instructions in this manual;
treatment of the surfaces of the machine with inappropriate products (inflammable,
corrosive or harmful substances).
1.2 - SAFETY DEVICES INSTALLED ON THE MACHINE
Safety devices that protect against electrical hazards have been made in compliance with
Directive 2006/95/EEC and 2006/108/EEC, while mechanical safety devices were made
in compliance with Directive 2006/42/EEC.
The grater is thus provided with:
a relay in the control circuit that requires a voluntary restart of the machine in the event
of accidental power outage.
micro-magnet which stops the machine when the grater lever is lifted;
micro-magnet which stops the machine when the bowl is removed and allows it to be
restarted only if contact is restored between the magnet and micro.
The grater is equipped with regulatory measures for electrical and mechanical protection
during operation as well as during cleaning and maintenance.
There are, however, RESIDUAL RISKS that cannot be completely eliminated, which are
highlighted this manual under the title, ATTENTION!
.
These refer to cutting danger from handling the roller while cleaning the machine.
6
1.3 - DESCRIPTION OF THE MACHINE
1.3.1 - General description
The grater was designed and manufactured by our company with the precise goal of
ensuring:
- maximum safety during use, cleaning and maintenance;
- maximum hygiene, obtained due to meticulous selection of the materials that come in
contact with the food and by the elimination of rough edges in the part of the machine
that comes in contact with food in order to obtain easy and complete cleaning as well as
to facilitate dismantling;
- sturdiness and stability of all components;
- great manageability.
1.3.2 - Construction characteristics
The grater was manufactured using the following materials:
- body of the machine in extruded aluminium;
- side coverings in ABS;
- grater roller in stainless steel;
- collection bowl in thermoformed alimentary plastic.
These guarantee contact with the food (cleanliness) and its invulnerability to acids and salts
as well as a high resistance to oxidation.
11
Counter-clockwise rotation of the
grater roller
FIG. no. 6 - Rotation of the grater roller
4.4 - OPERATIONAL INSPECTION
To check that the machine is functioning correctly, follow the following procedure:
- press the "I" on button and the "0" off button, making sure the grater roller turns counter-
clockwise. Looking at this from above the hopper (see FIG. no. 6) you should see the
roller teeth move from left to right.
- check that the machine starts when the press lever is lowered and stops when it is lifted.
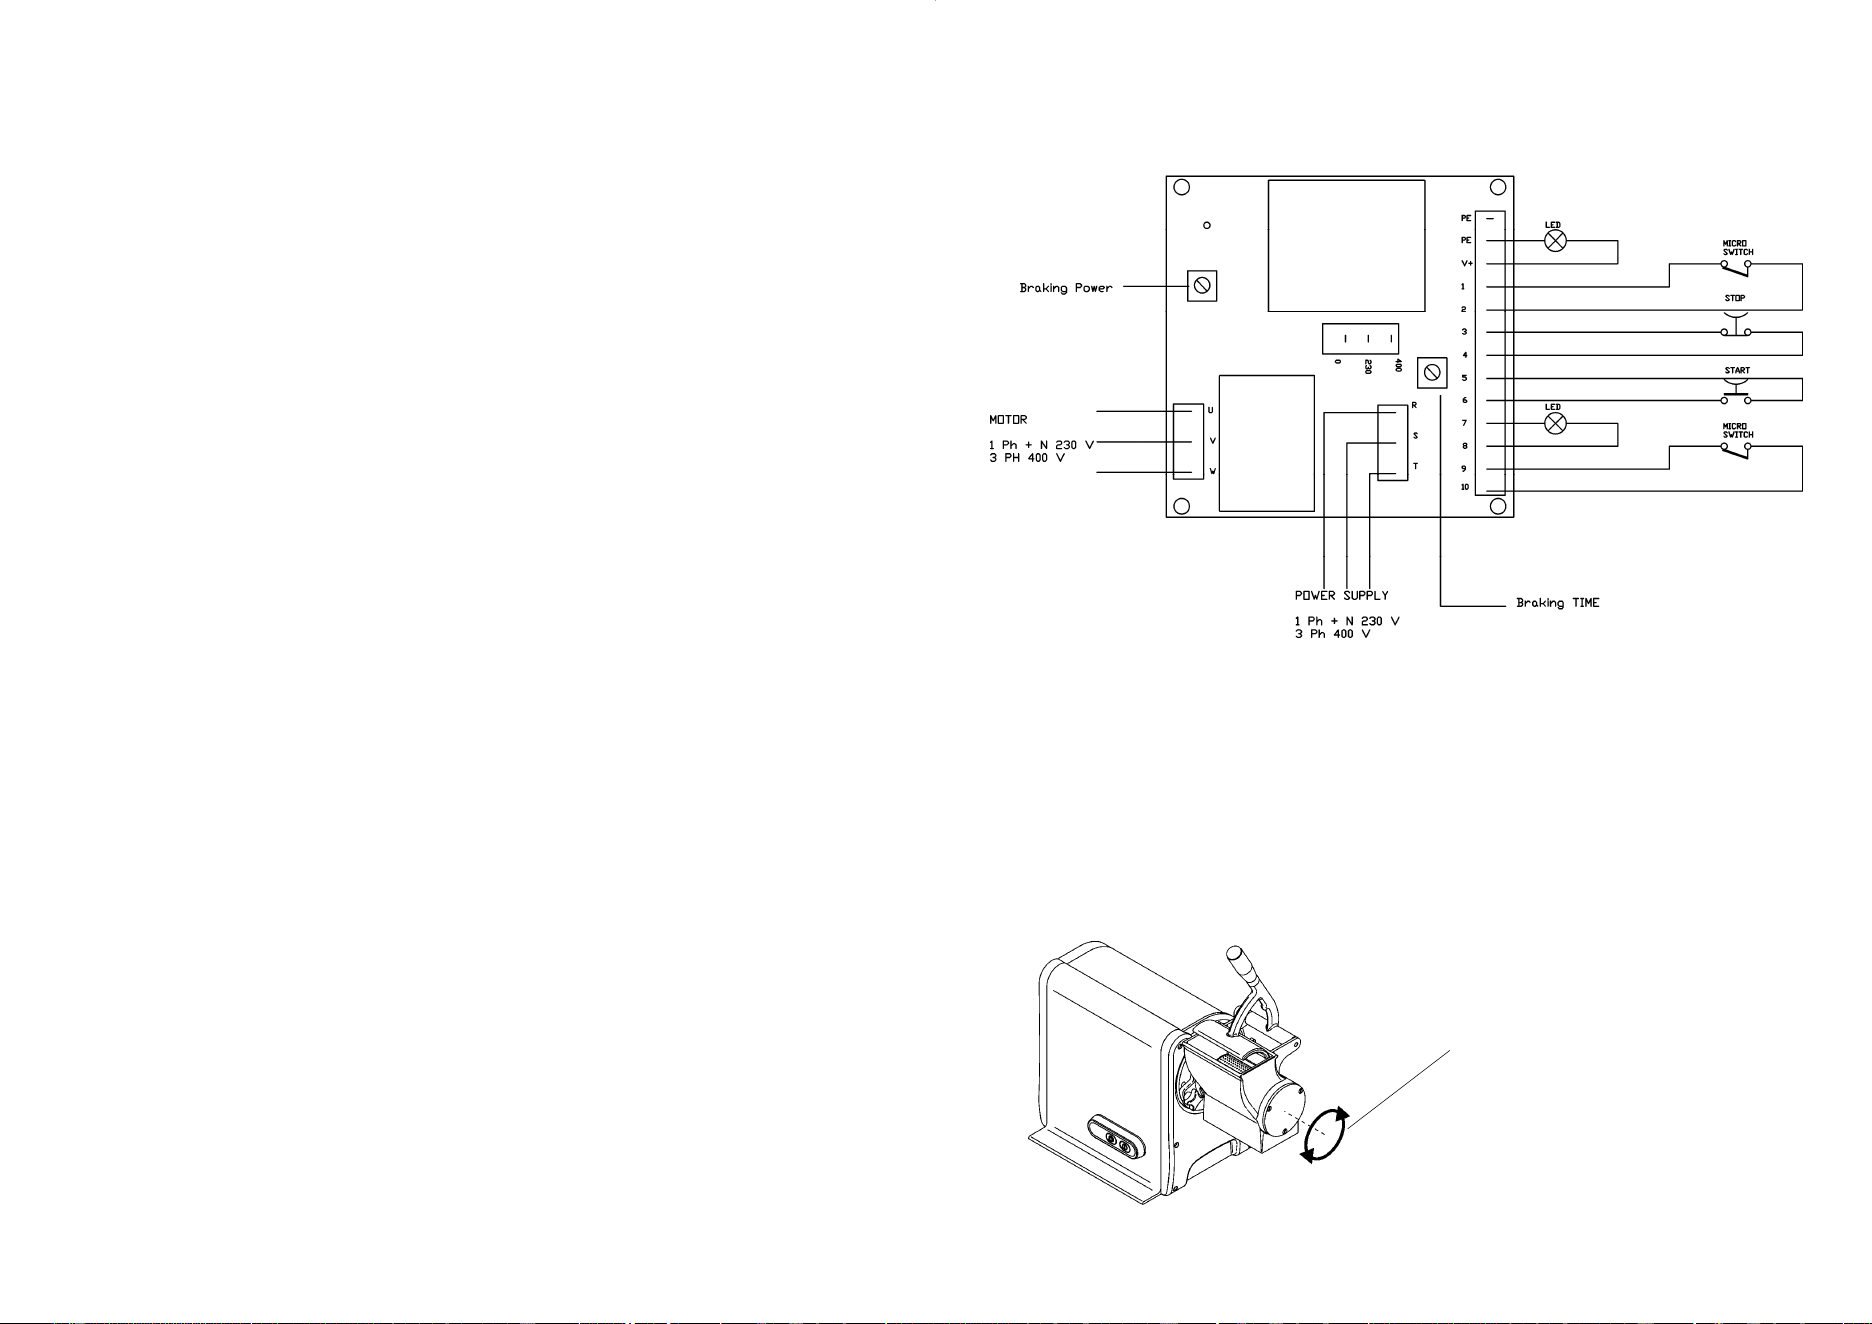
FIG. no. 5 - Electrical diagram
4.3 - ELECTRICAL DIAGRAMS
4.3.1 - Monophase and threephase electrical diagram
10
the packaging according to the current regulations.
CHAP. 4 - INSTALLATION
4.1 - LOCATION OF THE MACHINE
The location where the machine will be located must take into account the dimensions
indicated in Table 1 and thus must be large enough, level, dry, smooth, sturdy, stable and at
a height of 80 cm. from the ground. The machine must also be situated in a non-saline
environment with a max. humidity of 75% and a temperature between +5°C and +35°C; or
in environments that do not lead to its malfunction.
4.2 - ELECTRICAL CONNECTION
4.2.1 - Grater with monophase motor
The grater is supplied with a 3x1mm.² power cord; 1.5m long and a "SHUKO" plug.
Connect the machine to 230 Volt 50 Hz, with a magnetothermic 10A circuit breaker, I =
0.03A. Make certain at this point that the grounding device is functioning correctly.
Also make sure that the data reported on the technical/serial number label (FIG no. 4)
correspond with the data reported on the delivery and lading documents.
4.2.2 - Grater with threephase motor
The grater comes supplied with a 5 x 1 mm² section (thickness) and m. long power
cable.
Use a CEI (red) plug to connect the grater to a three-phase supply 400V./50Hz source,
interposing a differential thermo-magnetic switch type 10 A, I = 0.03A.
At this point make sure the earth circuit functions correctly.
Before actually connecting the appliance to the three-phase power supply, check that the
roller turns in the right direction. To do this, press the “I” button (see FIG. n.°8) and then
immediately press the “0” button.
The roller should turn in an anti-clockwise direction when looking at it from the opening
(see FIG. 7): if rotation is incorrect invert two of the three power supply wires either in the
plug or in the socket
The motor mounted on the grater can run off a 380 V. three-phase tension or off a 230V
tension supply.
Unless otherwise specified, all connections are for a 400V supply. If the appliance has to
be adapted to a 230 V three-phase circuit call the “SERVICE CENTRE ” for assistance.
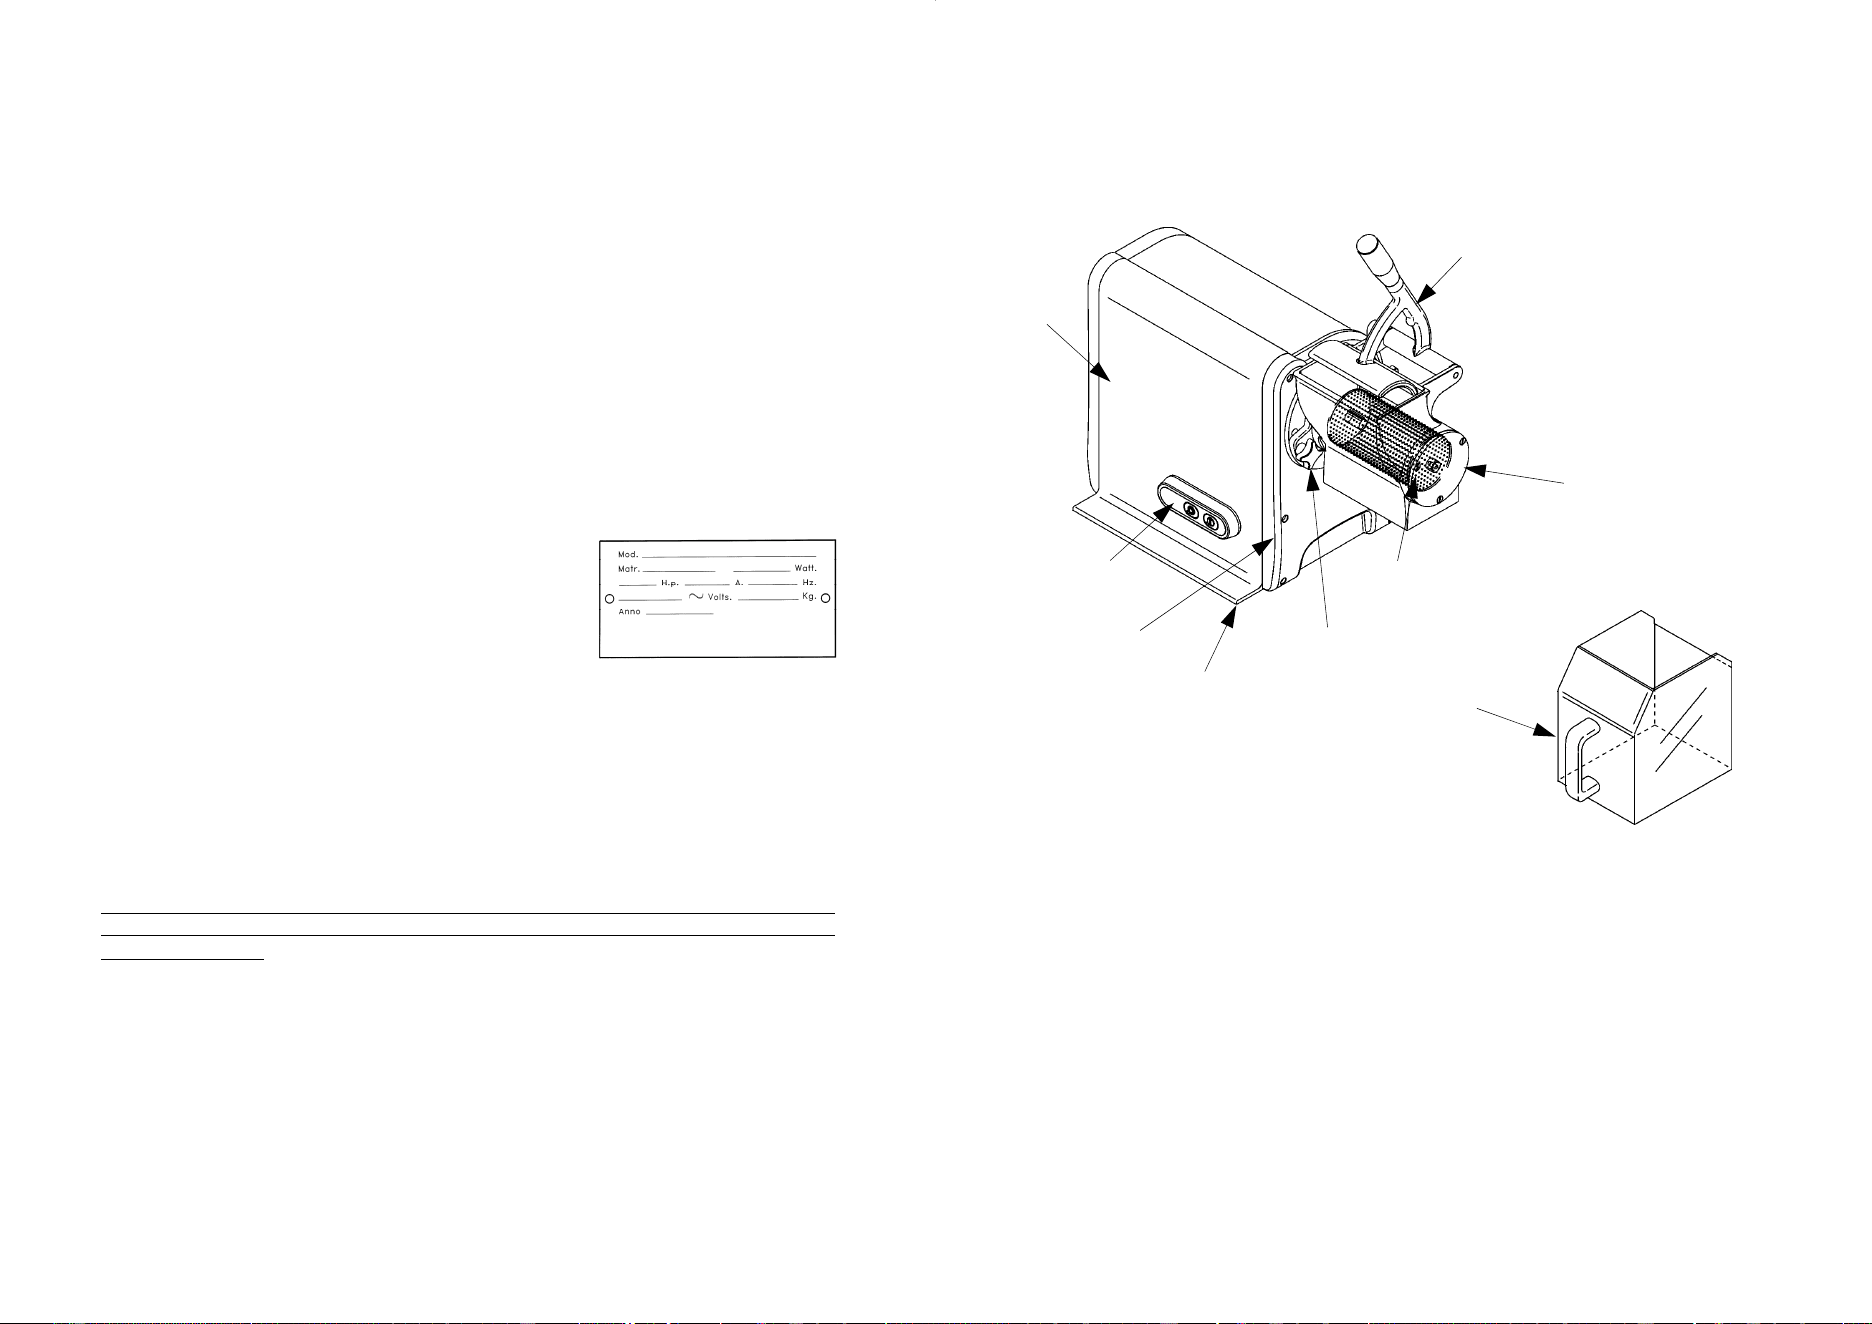
FIG. no. 4 - Technical/serial number label
7
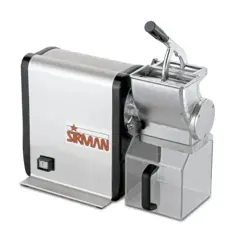
1.3.3 - Machine composition
FIG. No. 1 - General view of the machine
9
7
2
4
8
3
1
6
5
LEGEND:
1 - Machine body
2 - Controls
3 - side covers
4 - Pushin lever of the grater
5 - Grater opening
6 -
Knob to fix the openings
7 - Feet
8 - Grating roller
9 - Collecting cup
8
CHAP. 2 - TECHNICAL DATA
2.1 - DIMENSIONS, WEIGHT, CHARACTERISTICS ...
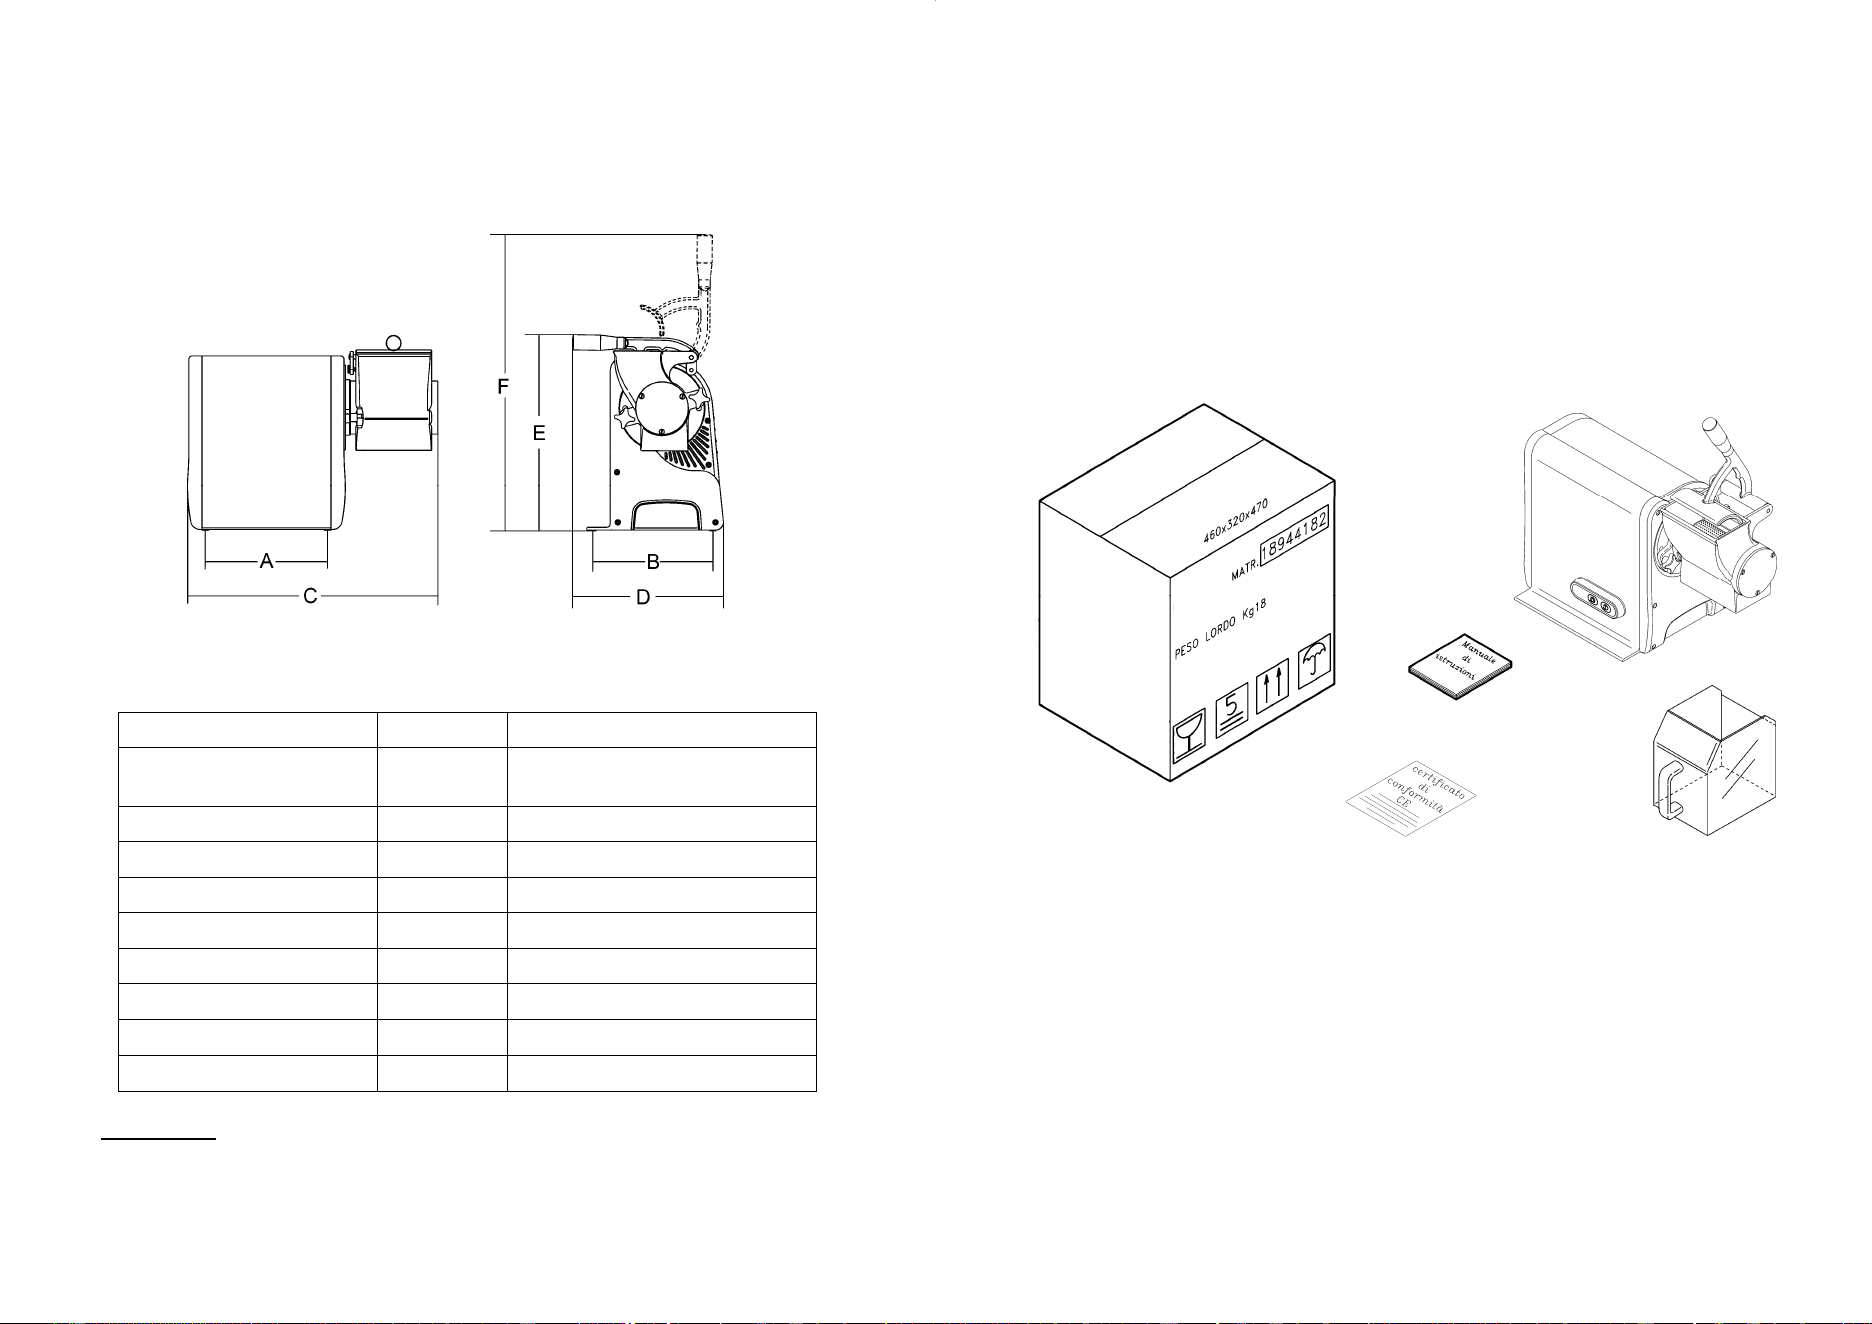
FIG. no. 2 - Dimension drawings
TAB. no. 1 - DIMENSIONS AND TECHNICAL CHARACTERISTICS
ATTENTION: The electrical characteristics for the machine are indicated on one of the
labels attached to the back of the machine; before connecting it to power, see 4.2 electrical
connection.
Model u.m. GF DKT
Power
Watt/Hp 1ph 750/1
3ph 1100/1,5
Power source
230-400V / 50 Hz
Mouth dimensions
mm 140x80
Drum revolutions
r.p.m. 1.400
A x B
mm 225x215
C x D x E
mm 500x300x400
F
mm 580
Net weight
Kg 20
Noise level
dB
9
3.2 - CHECKING THE PACKAGE UPON RECEIPT
Upon receipt of the parcel, if there is no external damage, proceed with opening it, making
sure that all of the material is inside (see FIG. No. 3). If, on the other hand, upon delivery
of the parcel it shows signs of mistreatment, impact or being dropped, you must bring the
damage to the courier's attention and, within 3 days of the date of delivery indicated on the
documents, make a precise report of any damage to the machine. Do not overturn the
package!! When transporting, make sure it is firmly held at the 4 fundamental points
(keeping it parallel to the ground).
3.3 - PACKAGING DISPOSAL
The package components (cardboard, any pallets, plastic straps and polyurethane foam) are
solid urban waste and thus can be disposed of without difficulty.
In the event that the machine is installed in countries with special regulations, dispose of
CHAP. 3 - RECEIPT OF THE MACHINE
3.1 - SHIPPING THE MACHINE (see FIG. no. 3)
The machine leaves our warehouses carefully packaged, the package includes:
a) external box in heavy cardboard;
b) the machine;
c) this manual;
d) bowl;
e) EC certificate of compliance.
FIG. no. 3 - Package description
b)
d)
a)
c)
e)