16
CHAP. 8 - SCRAPPING AND DISPOSAL
8.1 - Decommissioning
If you decide to put the product out of service for any reason, make sure that it cannot
be used by other persons: disconnect and cut the electrical connections.
8.2 - Disposal
Once the machine has been decommissioned, it can be disposed of. This should be
done by a waste management company, and its materials sorted for disposal.
8.3 - WEEE Waste Electrical and Electronic Equipment
Pursuant to Art. 13 of Italian Legislative Decree no. 151 of 25 July 2005
“Implementation of the Directives 2002/95/EC, 2002/96/EC and 2003/108/EC -
related to the reduced use of hazardous substances in electrical and electronic
devices, and to waste disposal”.
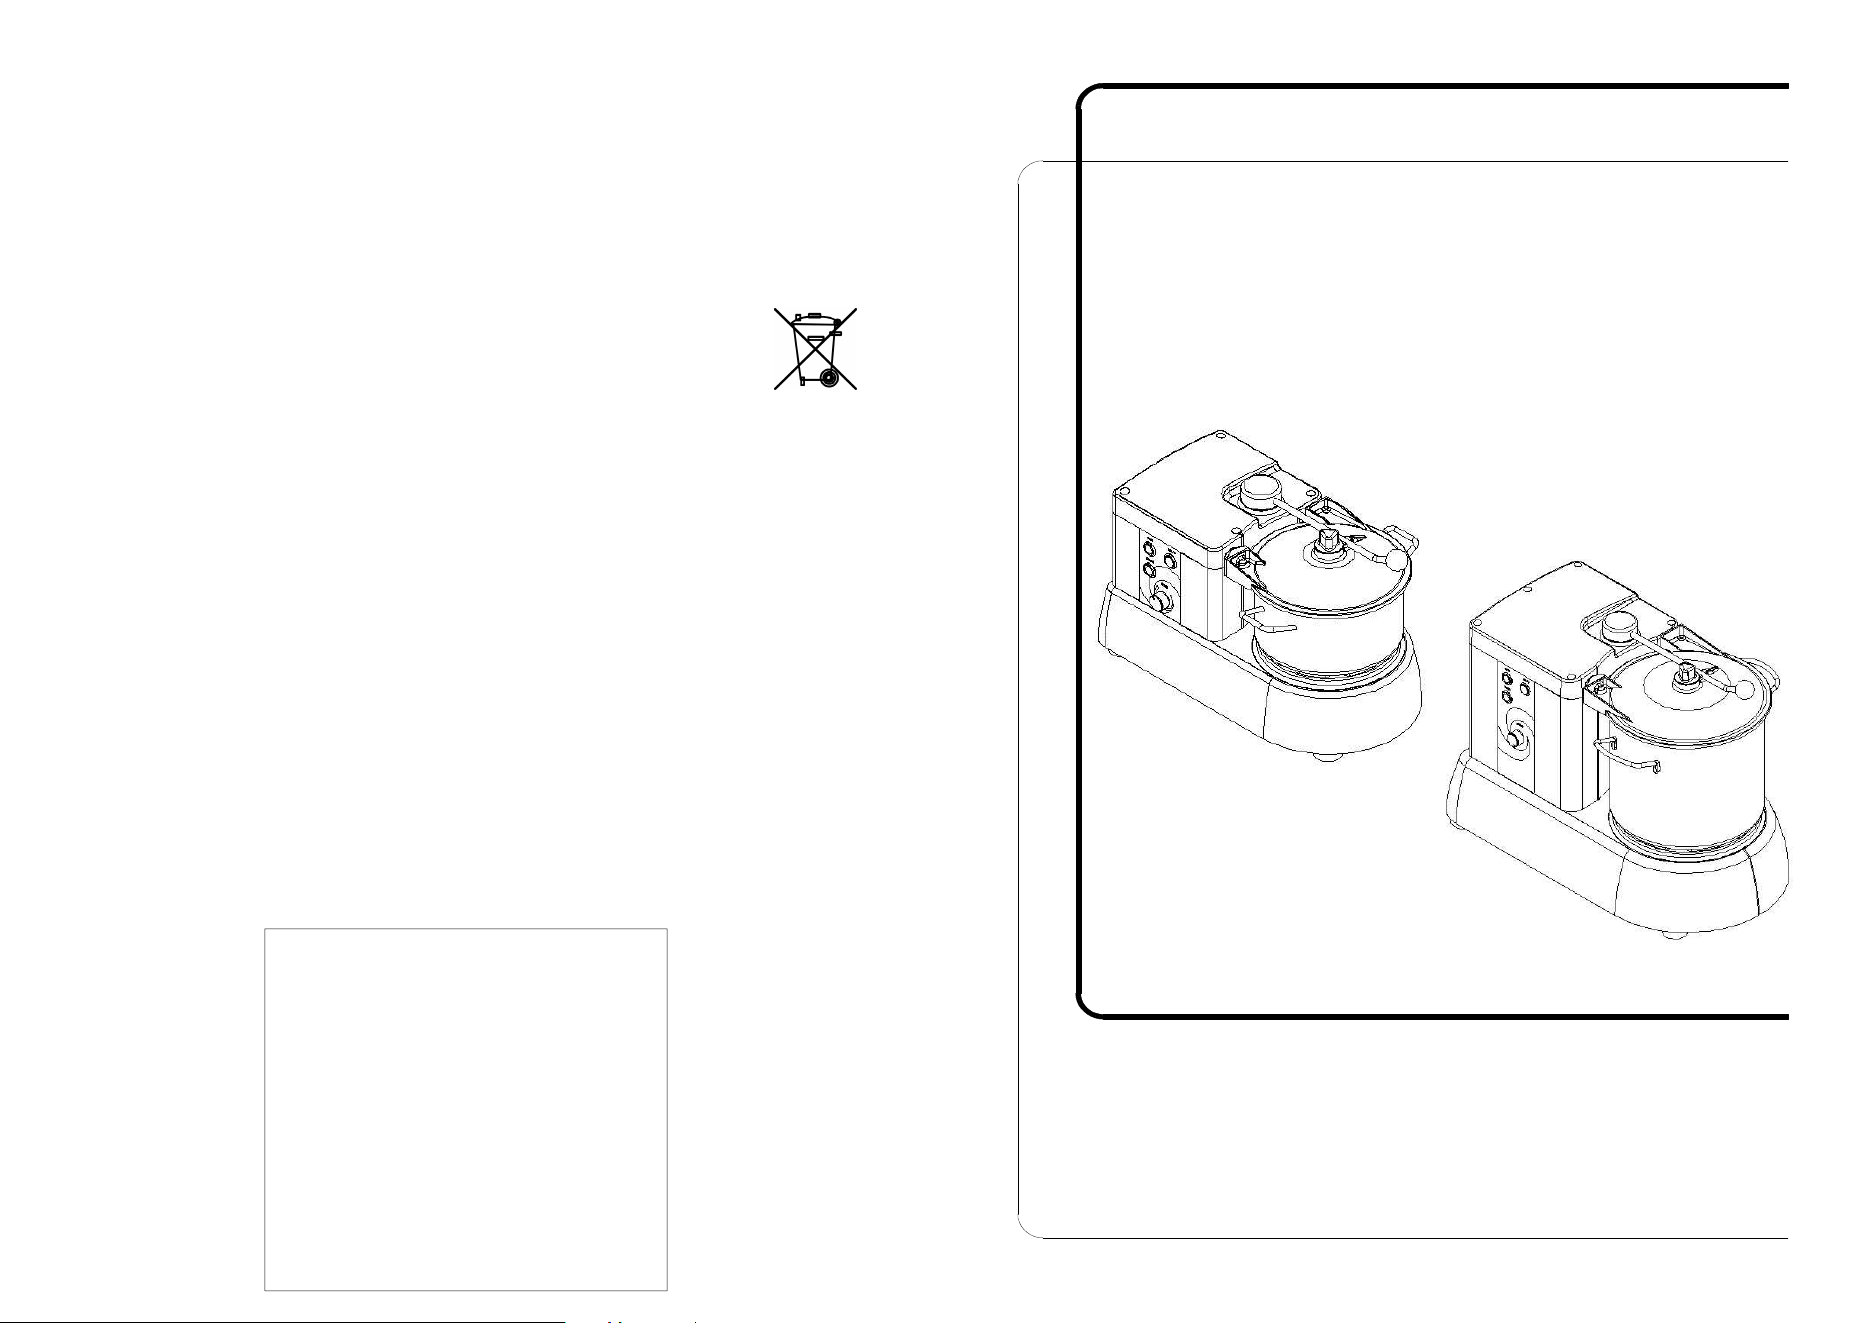
The rubbish bin symbol on the machine or on its package indicates that the product
must be disposed separately from other waste, at the end of its useful life.
The recycling waste collection of this machine is organised and managed by the
manufacturer. If the user wishes to dispose of this machine, they must contact the
manufacturer and follow the given procedure to make sure the recycling waste
collection process is used at the end of the machine's useful life.
The correct disposal of the machine for subsequent recycling, management and
treatment of its parts in an environmentally-friendly way, contributes towards avoiding
any possible adverse effects on the environment and promotes the reuse and/or
recycling of the machine materials.
Unlawful disposal of the product by the user will lead to the application of
administrative penalties under current law.
SERVICE CENTRE
AUTHORISED RETAILER
Ed. 09/2018 - ver.002
Cutter
CT 4 - 6 - 9 - VT - 2V
CT 9 Plus
USER AND MAINTENANCE
MANUAL

2 15
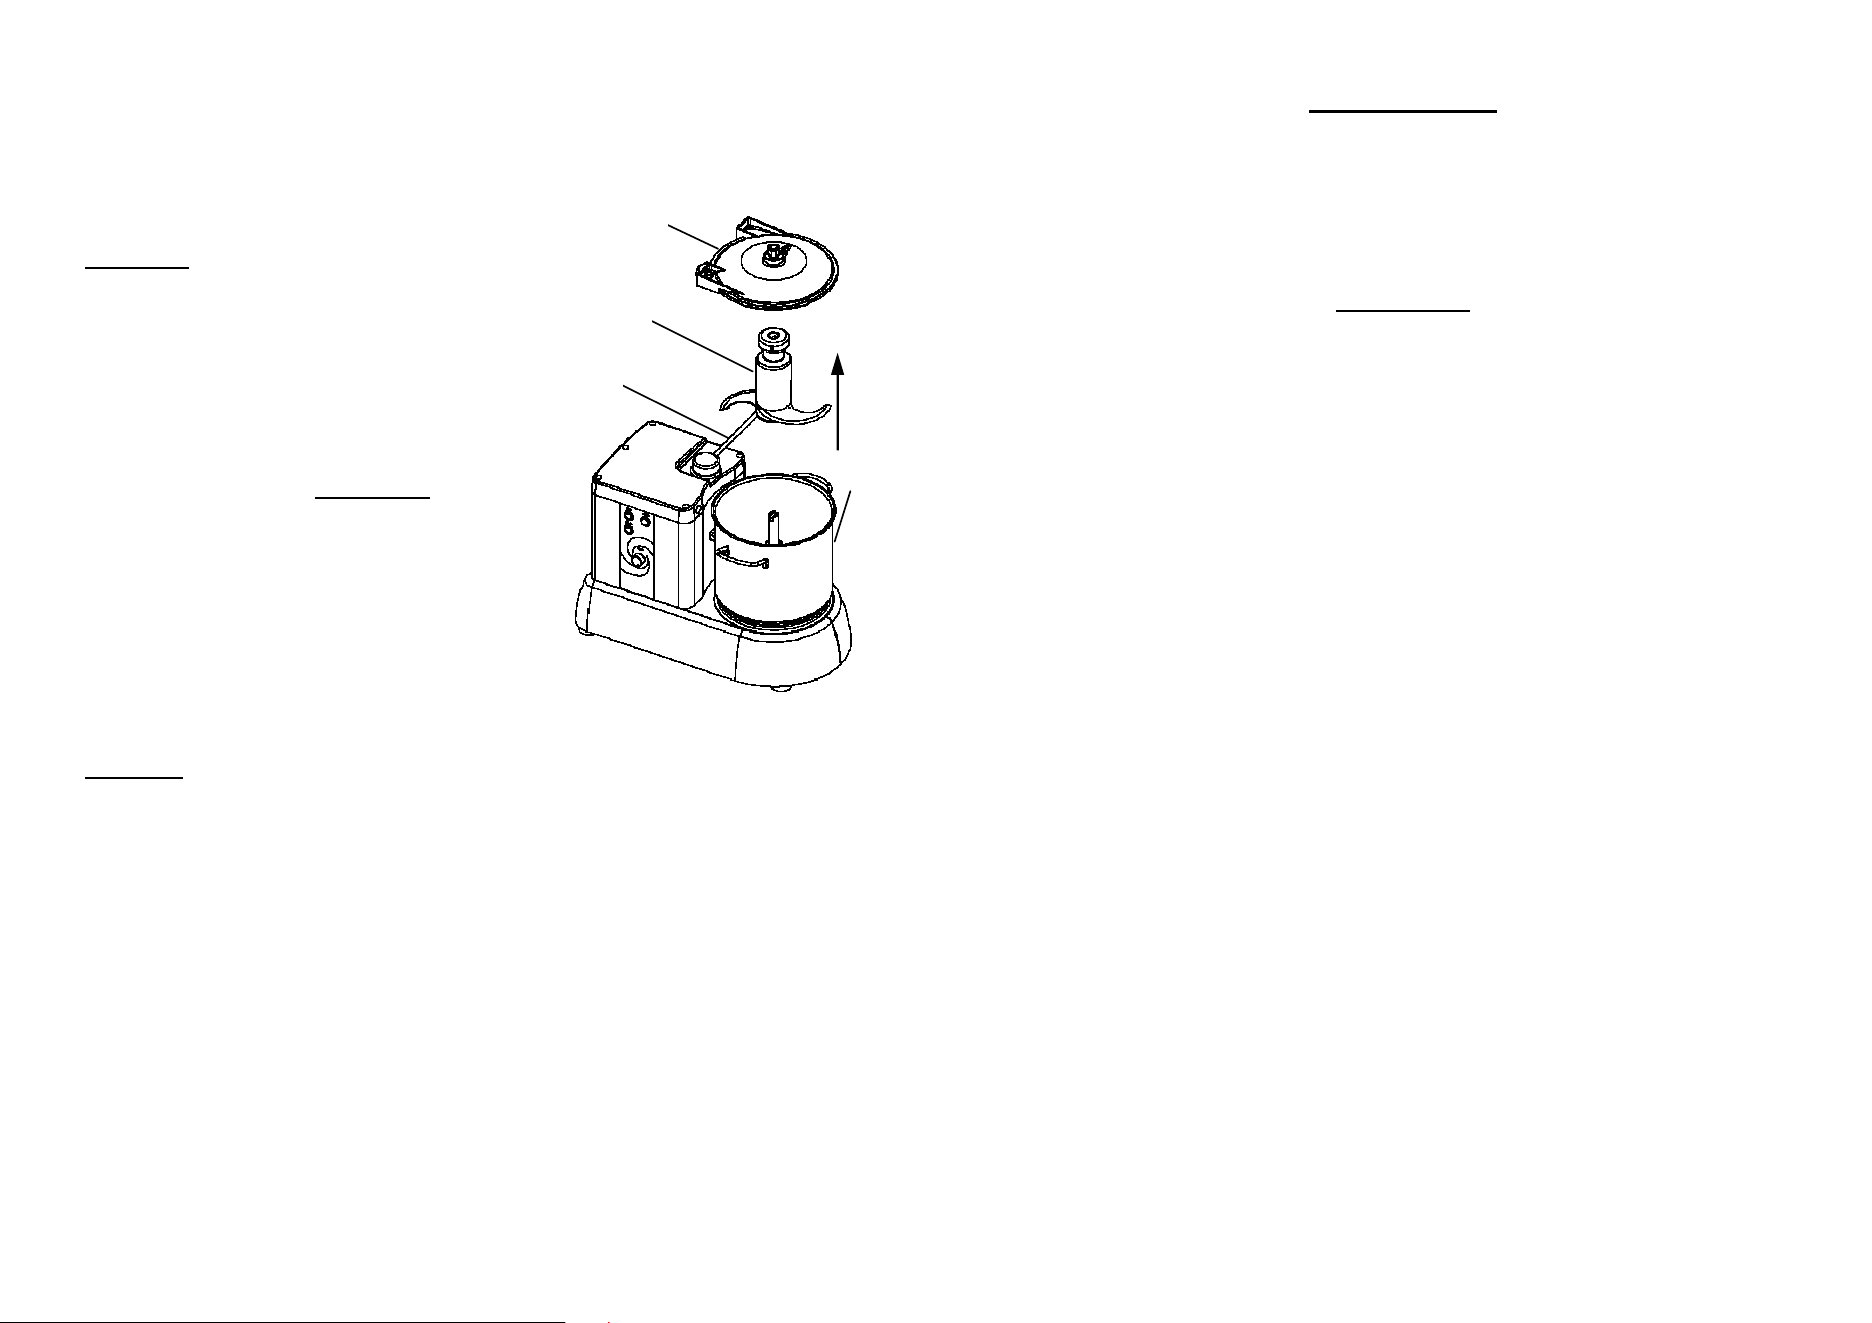
6.2 - Cleaning the lid, blade holder and tank
Rotate the closing arm (ref. 1 - Fig.8) to remove the lid.
You can now easily remove the blade holder (ref. 3 - Fig.8) and tank (ref. 4 - Fig.8) by
pulling them upwards (ref.(a) - Fig.8).
Once the parts have been removed, clean them with water and neutral detergents.
CAUTION! Carry out these operations with protective gloves on.
CHAP. 7 - MAINTENANCE
7.1 - General information
CAUTION! Before servicing the product, disconnect its power plug from the
mains to isolate the product completely from the rest of the system.
7.2 - Power cable
Check the condition of the cable regularly and call the SERVICE CENTRE if it needs
replacing.
7.3 - Belt
The belt does not need adjusting; generally it needs to be replaced after 3/4 years, in
that case, contact the “SERVICE CENTRE”
7.4 - Feet
The feet may deteriorate or lose elasticity, thus reducing stability of the cutter. Replace
them contacting the “SERVICE CENTRE”.
7.5 - Coltelli
Verificare le condizioni della lama, dopo le tante affilature non deve ridursi più di 5
mm. Per la sostituzione contattare il “CENTRO DI ASSISTENZA”.
CAUTION! For any anomaly/malfunction, contact the “SERVICE CENTRE”, any
operation carried out by unauthorised personnel may compromise the correct
functioning of the machine and invalidate the warranty.
14
8. The machine is provided with a device which switches it off after 30 seconds of use
at minimum speed. The device is used to preserve the machine and stop the motor
from overheating. If you use the machine at low speed, allow the machine to rest
for at least 30 seconds.
5.3 - Blade sharpening
CAUTION!!
Blades need to be sharpened if you notice a
reduction in cutting performance.
Proceed as follows (Fig.8):
1. Rotate the lever (ref. 1) in a clockwise direction to
the position in which you can remove the lid (ref.
2)
2. remove (a) the blade holder (ref. 3)
3. take the sharpening stone provided (ref. (d) -
Fig.3), and being very CAREFUL!!! pass it
uniformly over the cutting side of the blades
towards the outside until the blade is sharpened.
CHAP. 6 - CLEANING
CAUTION! Before performing any cleaning operations you must set the speed
knob to minimum (ref. 4 - Fig.7) and disconnect the power plug from the mains
to completely isolate the machine from the rest of the system.
6.1 - General information
-
The machine needs to be cleaned at least once a day, or if necessary, more
frequently.
-
The machine must be washed with neutral detergents at room temperature, using
a soft cloth.
-
The machine must be cleaned carefully in all its parts, especially those that come
into contact with food.
-
Do not use pressurised water cleaners or jets of pressurised water to clean the
machine.
-
Do not use tools, brushes or anything that may damage the machine's surfaces.
-
Do not clean the cutter in a dishwasher.
-
Make sure that no residual liquids can get inside the cutter and compromise its
functioning and increase electroshock risks.
-
After cleaning, carefully dry all parts part of the cutter and put them back together
again.
4
Fig. n°8
2
3
(a)
1
3
INTRODUCTION
-
This manual provides the client with information about the machine and applicable
regulations, as well as the user and maintenance instructions required to use the
machine properly and keep it in good working order.
-
The manual must be made available to all users and maintenance
technicians.
CONTENTS
CHAP. 1 -
INFORMATION ABOUT THE MACHINE
5
1.1 - GENERAL PRECAUTIONS
1.2 - SAFETY EQUIPMENT
1.2.1 - mechanical safety equipment
1.2.2 - electrical safety equipment
1.3 - DESCRIPTION OF THE MACHINE
1.3.1 - general description
1.3.2 - construction
1.3.3 - Structure of the machine:
CHAP. 2 - TECHNICAL DATA 8
2.1
- Overall dimensions, weight, specifications
CHAP. 3 - DELIVERY 9
3.1 - Shipping (see Fig.no. 3)
3.2 - Checks on delivery
3.3 - Disposing of packaging
CHAP. 4 - INSTALLATION 10
4.1 - Positioning
4.2 - Electrical connection
4.3 - Wiring diagram
4.4 - Preliminary check
CHAP. 5 - USE 13
5.1 - Controls
5.2 - Loading
5.3 - Blade sharpening
CHAP. 6 - CLEANING 14
6.1 - General information
6.2 - Cleaning the lid, blade holder and tank
CHAP. 7 - MAINTENANCE 15
7.1 - General information

4
7.2 - Power cable
7.3 - Belt
7.4 - Feet
7.5 - Blades
CHAP. 8 - SCRAPPING AND DISPOSAL 16
8.1 - Decommissioning
8.2 - Disposal
8.3 - WEEE Waste Electrical and Electronic Equipment
13
4.4 - Preliminary check
4.4 - Preliminary check
Check the integrity and correct position of all the
components of the cutter before any operation.
Then check the correct functioning of all its
components.
Proceed as follows:
1. Press the ON button (ref. 1 - Fig.7) and the OFF
button (ref. 2 - Fig.7)
2. Verify that the machine stops if the tank-locking
arm is rotated anti-clockwise (ref. 10 - Fig.1)
3. Verify that the revolution speed increases and
decreases by rotating the SPEED knob (ref. 4 -
Fig.7) clockwise and anti-clockwise
4. Press the PULSE button (ref. 3 - Fig.7) with brief
pulses.
CAP. 5 - USE
5.1 - Controls
The commands are placed on the body of the cutter (ref. 2 - Fig.1).
These include the ON button (1), the OFF button (2), the PULSE button (3) and the
SPEED knob to regulate the speed (4) (Fig.7).
Use the ON button to switch the machine on, and OFF to switch the machine off,
rotate the speed knob clockwise to increase the revolutions and anti-clockwise to
reduce them.
Press the PULSE command for the pulse functioning of the machine.
5.2 - Loading
CAUTION! Food must only be loaded into the tank when the motor is not running and
with the speed knob at minimum.
Proceed as follows:
1. Rotate the arm in a clockwise direction (ref. 10 - Fig.1) until the lid can be removed
(ref. 9 - Fig.1)
2. CAUTION!! Put the product inside the tank (ref. 8 - Fig.1), paying attention not to
touch the blades with your hands; if very large pieces of food are used, dice them
into small pieces manually before putting them inside the tank
CAUTION!! Do not fill the tank more than 1/2 full
3. Avoid direct contact with the machine during use;
4. Put the lid back (ref. 9 - Fig.1) and rotate the arm to the closing position
5. Do not use the cutter at low speed for prolonged periods of time
6. Add any additional food during the process by removing the cover (ref. 6 - Fig.1) on
the lid (ref. 9 - Fig.1)
7. At the end of the process, set the speed knob (ref. 4 - Fig.1) to minimum and then
stop the machine
Fig. n°7
(1) (2)
(3)
(4)
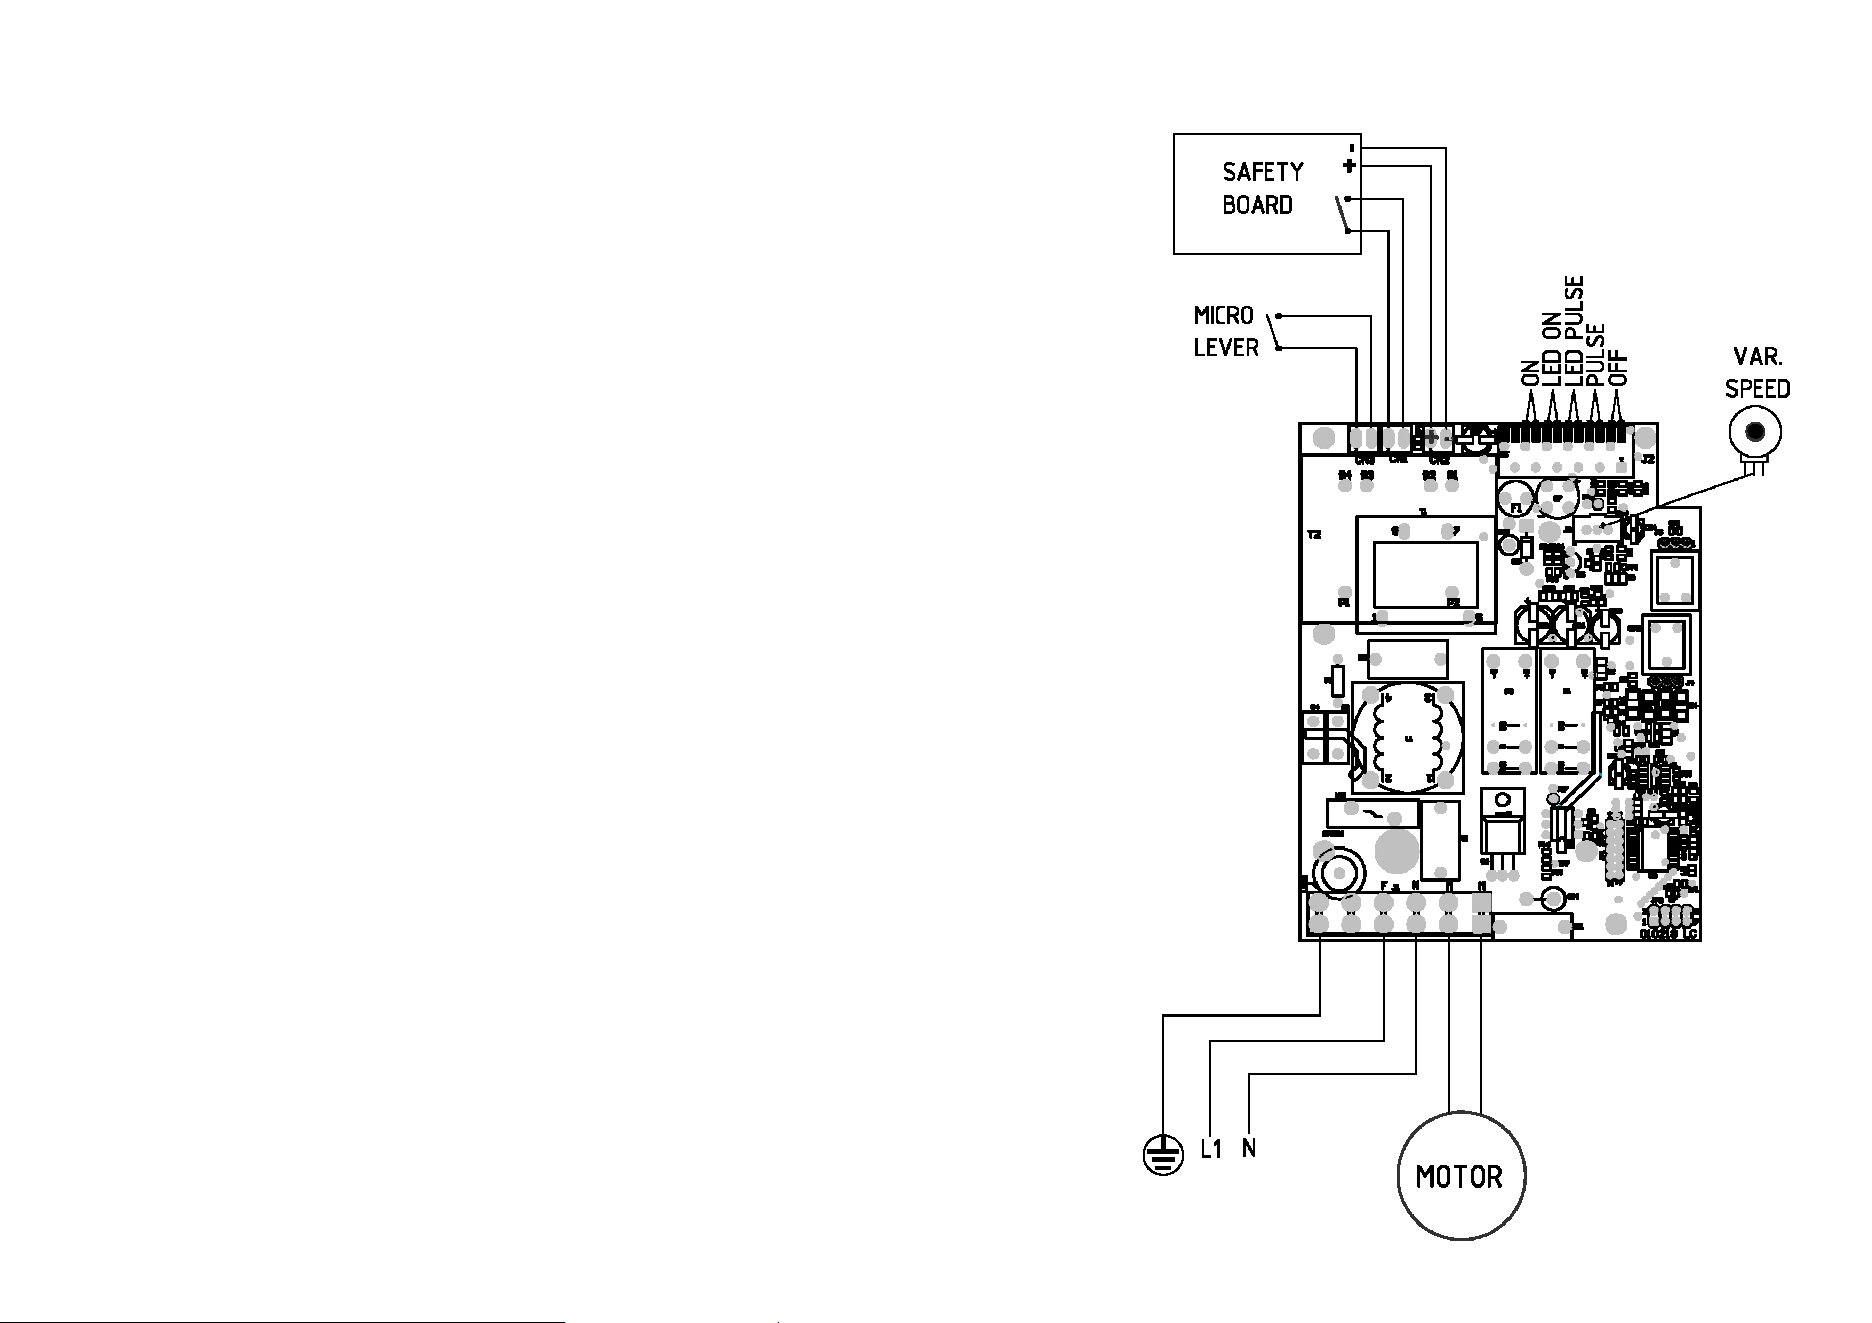
12
•
CT 9 Plus
Fig. n°6
5
CHAP. 1 - INFORMATION ABOUT THE MACHINE
1.1 - GENERAL PRECAUTIONS
-
The machine may be used only by trained staff familiar with the safety information
given in this manual.
-
New staff must be trained in the use of the machine before using it.
-
Before cleaning or servicing the machine, disconnect it from its power supply.
-
The residual risks must be assessed when servicing or cleaning the machine with
the guards removed.
-
When servicing or cleaning the machine, concentrate on the job in hand.
-
Regularly check the condition of the power cable; damaged or worn power cables
pose a serious electrical hazard.
-
If the machine appears to be or is malfunctioning, do not use it or try to fix it
yourself; contact the “Service Centre” immediately.
-
Do not use the machine for frozen products, meat and fish with bones or any non-
food products.
-
Do not put your fingers inside the bowl when the machine is working.
-
The manufacturer cannot be held responsible in the following cases:
the machine is tampered by unauthorised personnel;
components are replaced with non original spare parts;
the instructions in this manual are not followed carefully;
the surfaces of the machine are treated with unsuitable products.
1.2 - SAFETY EQUIPMENT
1.2.1 - mechanical safety equipment
As for mechanical safety equipment, the machine described in this manual complies
with the UL and CSA standard.
Safety requirements are ensured with (see 1.3.3) the lid which can only be removed if
the tank-locking arm is rotated anti-clockwise on the side of the lid itself.
1.2.2 - electrical safety equipment
As for electrical safety equipment, the machine described in this manual complies with
the UL and CSA standards.
The machine is provided with:
-
coded micro-switch which stops the machine if the lid is removed (see FIG. no.1),
and prevents the machine from being restarted until the lid is correctly closed;
-
relay in the command circuit which requires a voluntary restart of the machine after
a power blackout.
Even if professional cutters are equipped with electrical and mechanical safety
devices (during normal use and during cleaning and maintenance operations), there
are residual risks which cannot be completely eliminated; these are referred to in this
manual with the wording CAUTION.
These risks may arise when handling the blades while loading the machine or during
cleaning or sharpening operations of the blades.
6
1.3 - DESCRIPTION OF THE MACHINE
1.3.1 - general description
Professional cutters are designed and manufactured by our company, for the purpose
of cutting, mincing, whisking and mixing food products (such as vegetables, meat,
bread, etc.), ensuring:
-
maximum safety during use, cleaning and maintenance operations;
-
maximum hygiene, thanks to the meticulous selection of the materials that come
into contact with food, and to the edge-less and corner-less design, for easy and
thorough cleaning and simple dismantling;
-
all parts are stable and robustly constructed;
-
it is extremely silent thanks to the belt transmission;
-
it is very easy to handle.
1.3.2 - construction
Professional cutters are made entirely of AISI 304 stainless steel.
This material is suitable for food (hygiene) and is perfectly resistant to acids and salts,
and has high resistance against oxidation.
Blades are rectified and tempered and made with cutlery steel (ASI 420); they are
designed to cut, mince, whisk and mix without ever having to change utensils.
Tank in 18/10 stainless steel with heat-diffusing bottom, provided with handles for an
excellent handling and easy removal during cleaning and maintenance.
There are nevertheless “RESIDUAL RISKS” which cannot be completely eliminated,
which are highlighted in this manual by the wording “CAUTION”; they are related to
the risks of contusion or electroshock during loading and unloading the product,
cleaning or when using the machine improperly.
11
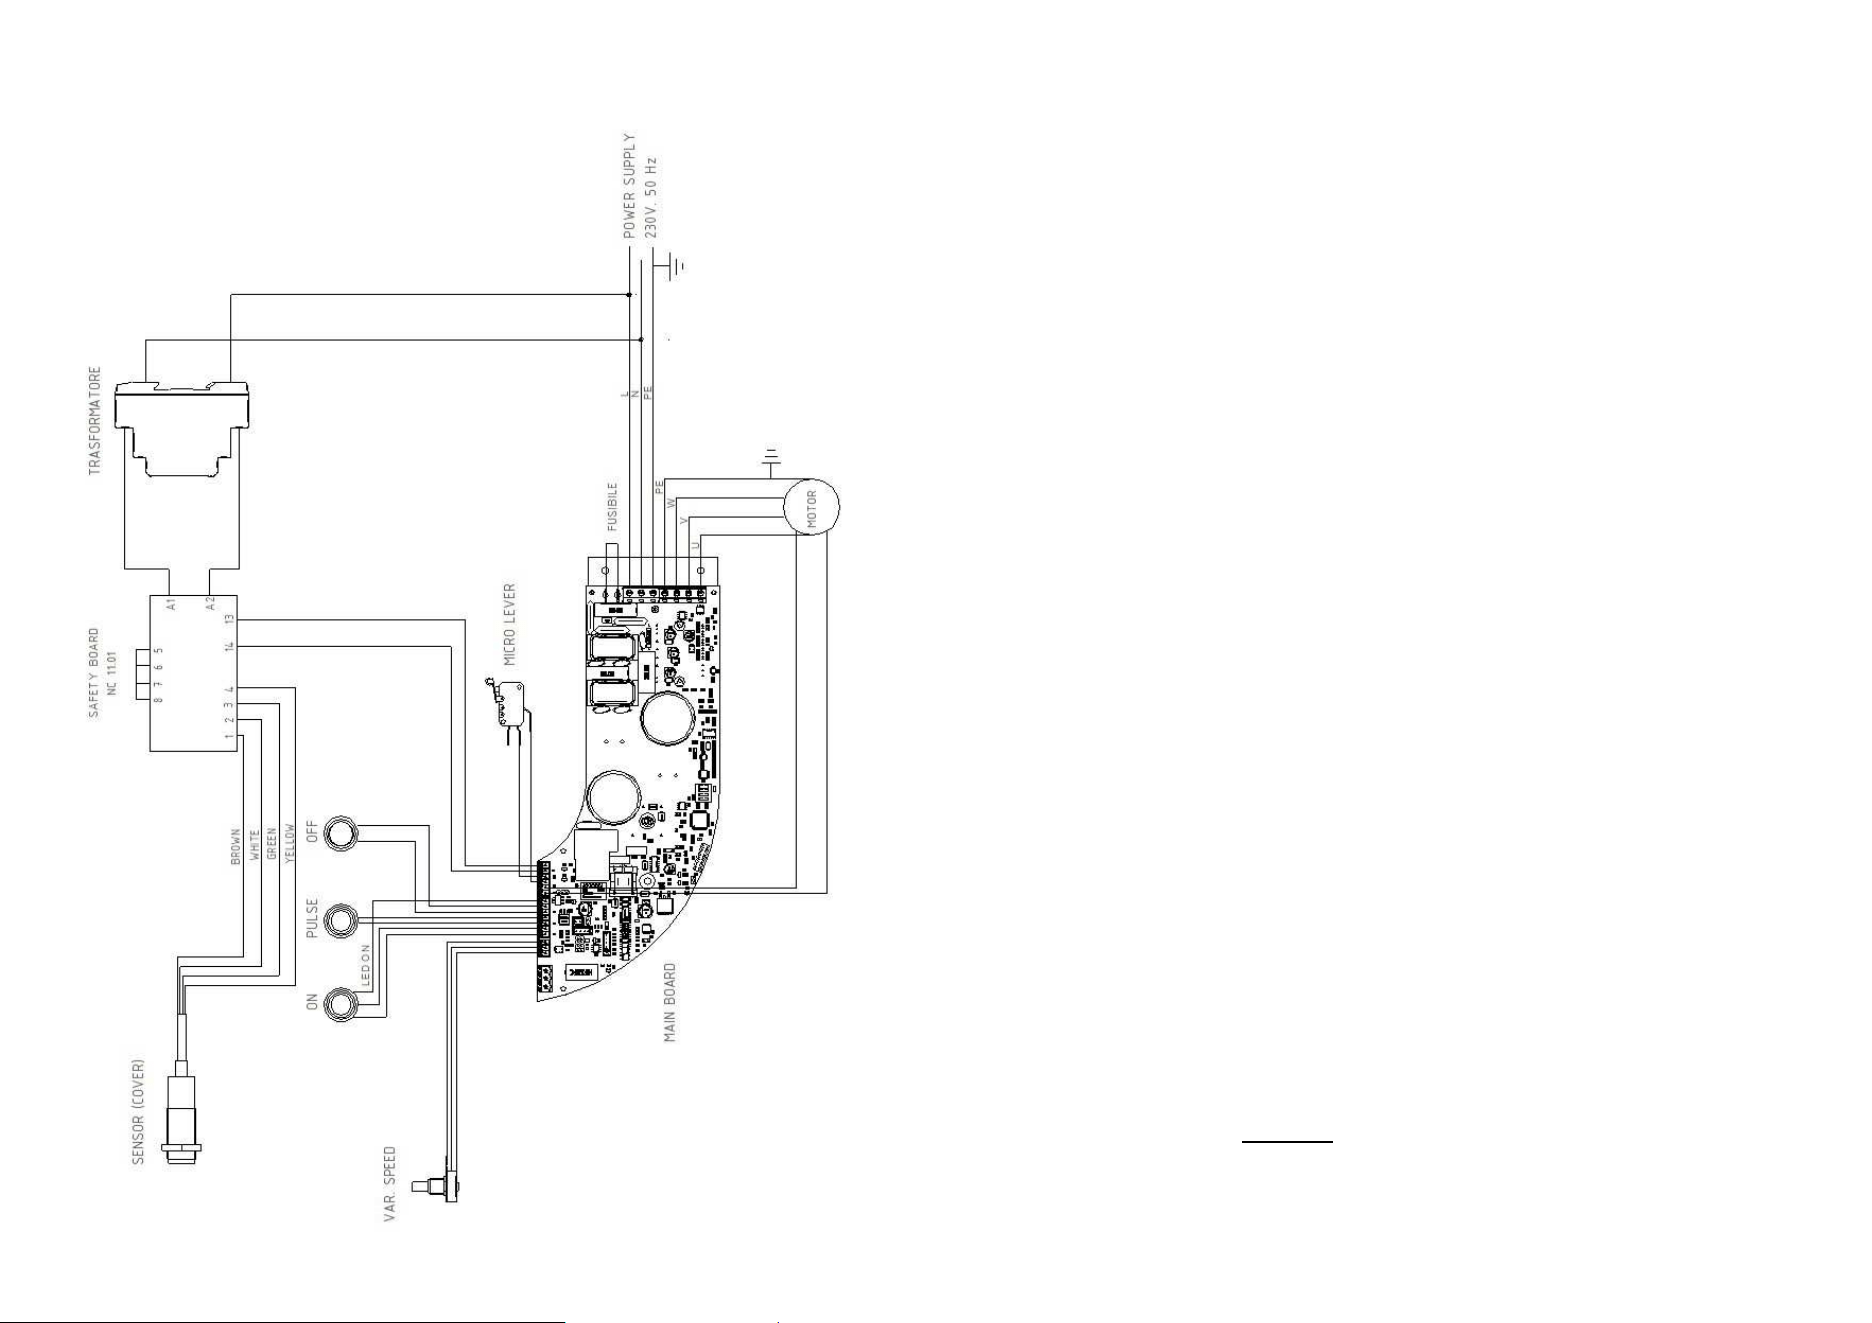
4.3 - Wiring diagram
• CT 4 VT
• CT 6 VT
• CT 9 VT
Fig. n°5
10
3.3 - Disposing of packaging
The packaging materials (cardboard box, plastic strap and polyurethane foam) can be
disposed of as normal domestic waste; there is no difficulty in disposing of them.
If the machine is installed in a country in which special regulations apply, dispose of
the material in a regulatory manner.
CHAP. 4 - INSTALLATION
4.1 - Positioning
Place the product on a solid surface following the surface dimensions indicated in the
table (par. 2.1); the surface must be smooth, non-slippery, dry, robust and solid and it
must be placed at a height of 80 cm above the ground.
Furthermore, the cutter must be placed in an environment with a max. non-saline
humidity of 75% and a temperature between +5°C and +35°C; and, in any case, in an
environment which does not lead to any machine malfunctions.
4.2 - Electrical connection
The machine has a power cable with a cross section of 3x1.5 mm², a length of 2.5 m
and a NEMA plug.
Connect the machine to a 120 or 230 Volt 60 Hz power supply.
Check that the earth system functions perfectly and make sure the connection is
provided with a thermo-magnetic 0.03A circuit breaker.
Also check that the information on the machine's nameplate matches the
specifications given in the delivery and shipping documents, and that both the master
switch and cable are easily accessible while the machine is in use.
Fig. n°4
7
1
9
7
8
10
5
4
3
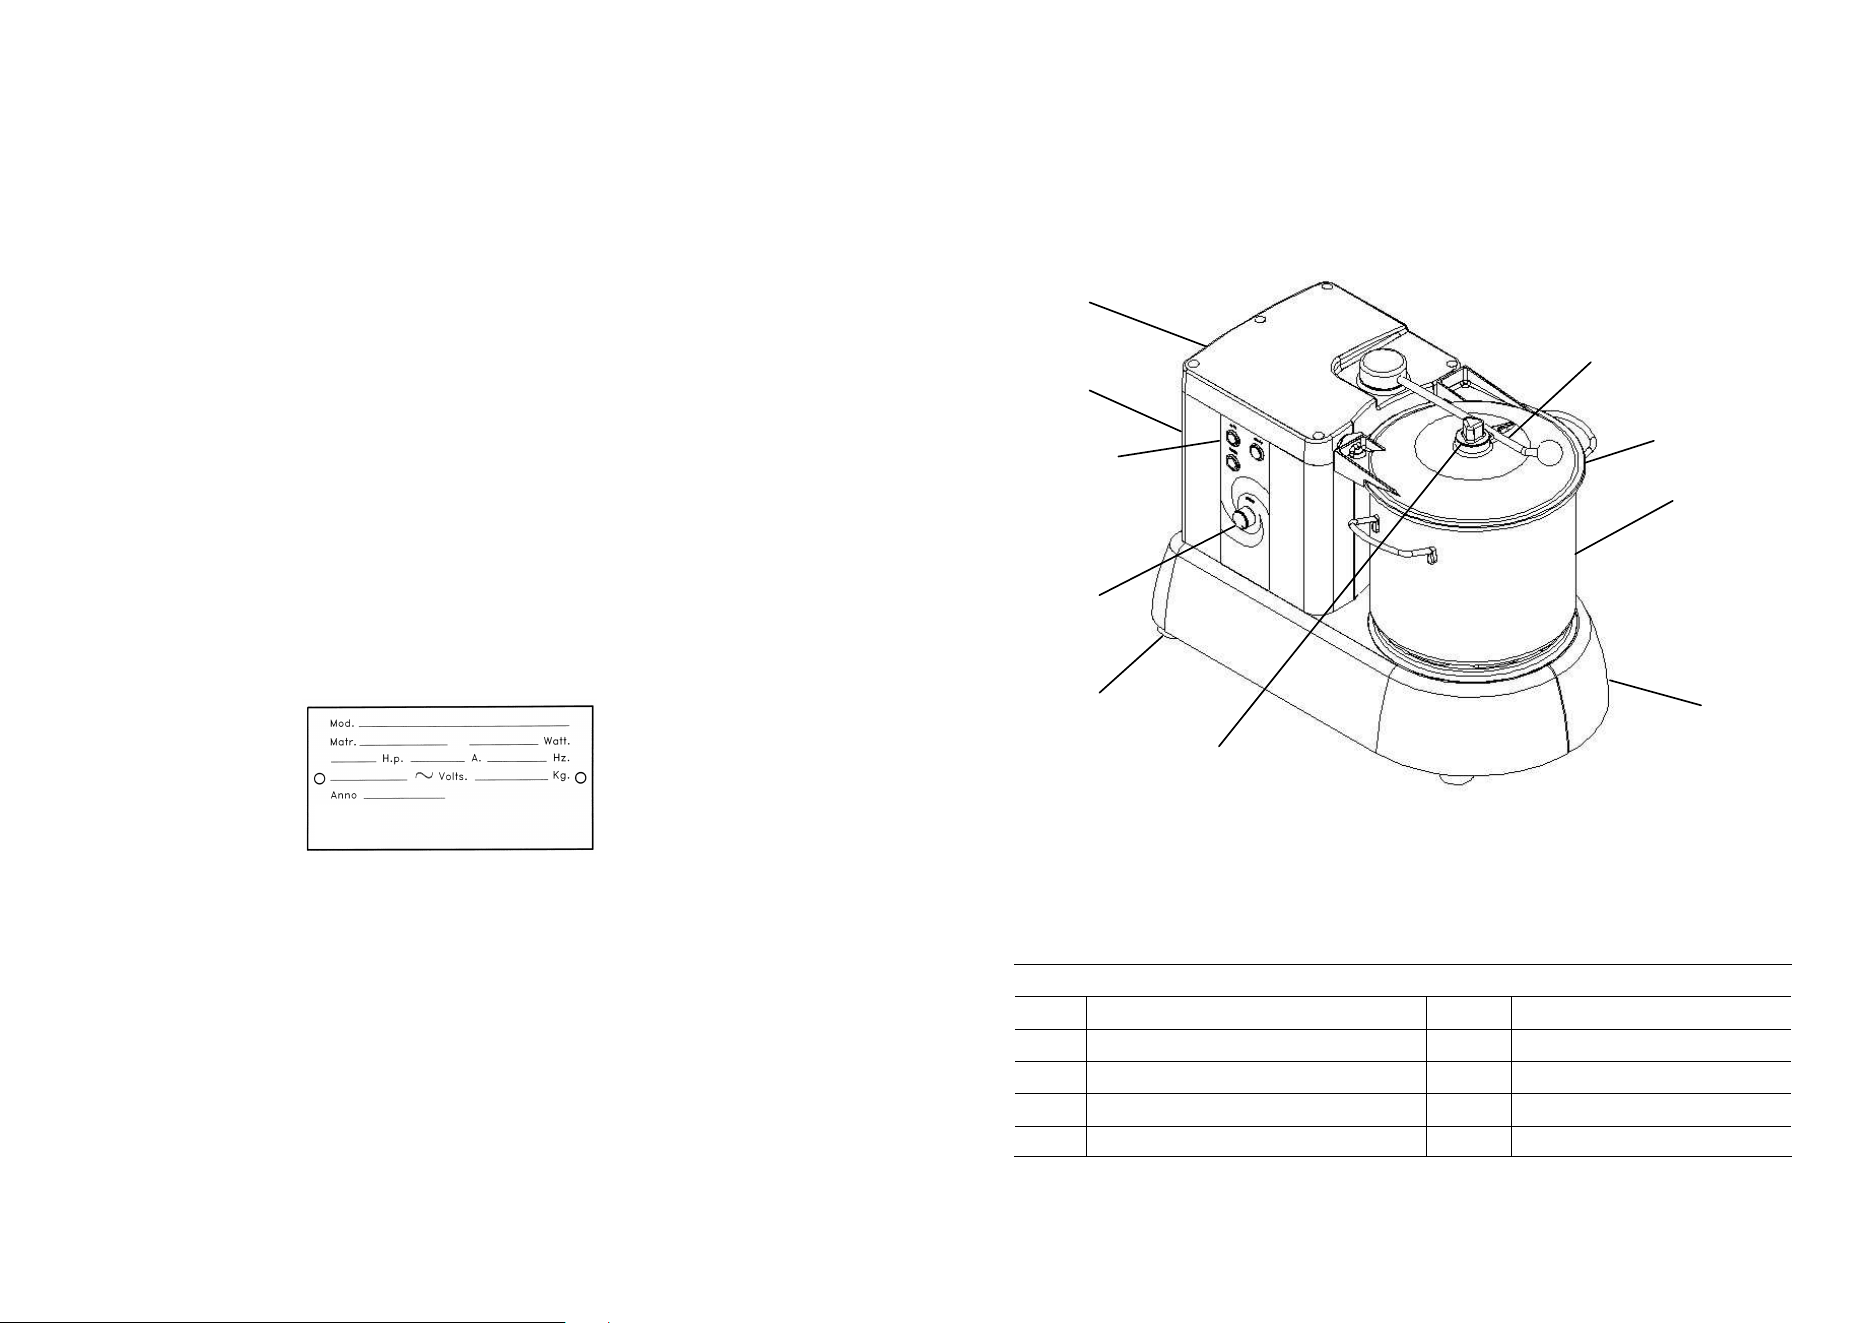
1.3.3 - Structure of the machine:
KEY
1 Lid
6 Lid cover
2 Body
7 Base
3 Commands
8 Tank
4 Speed regulation knob
9 Lid
5 Foot
10 Tank-locking arm
Fig. n°1
2
6
8
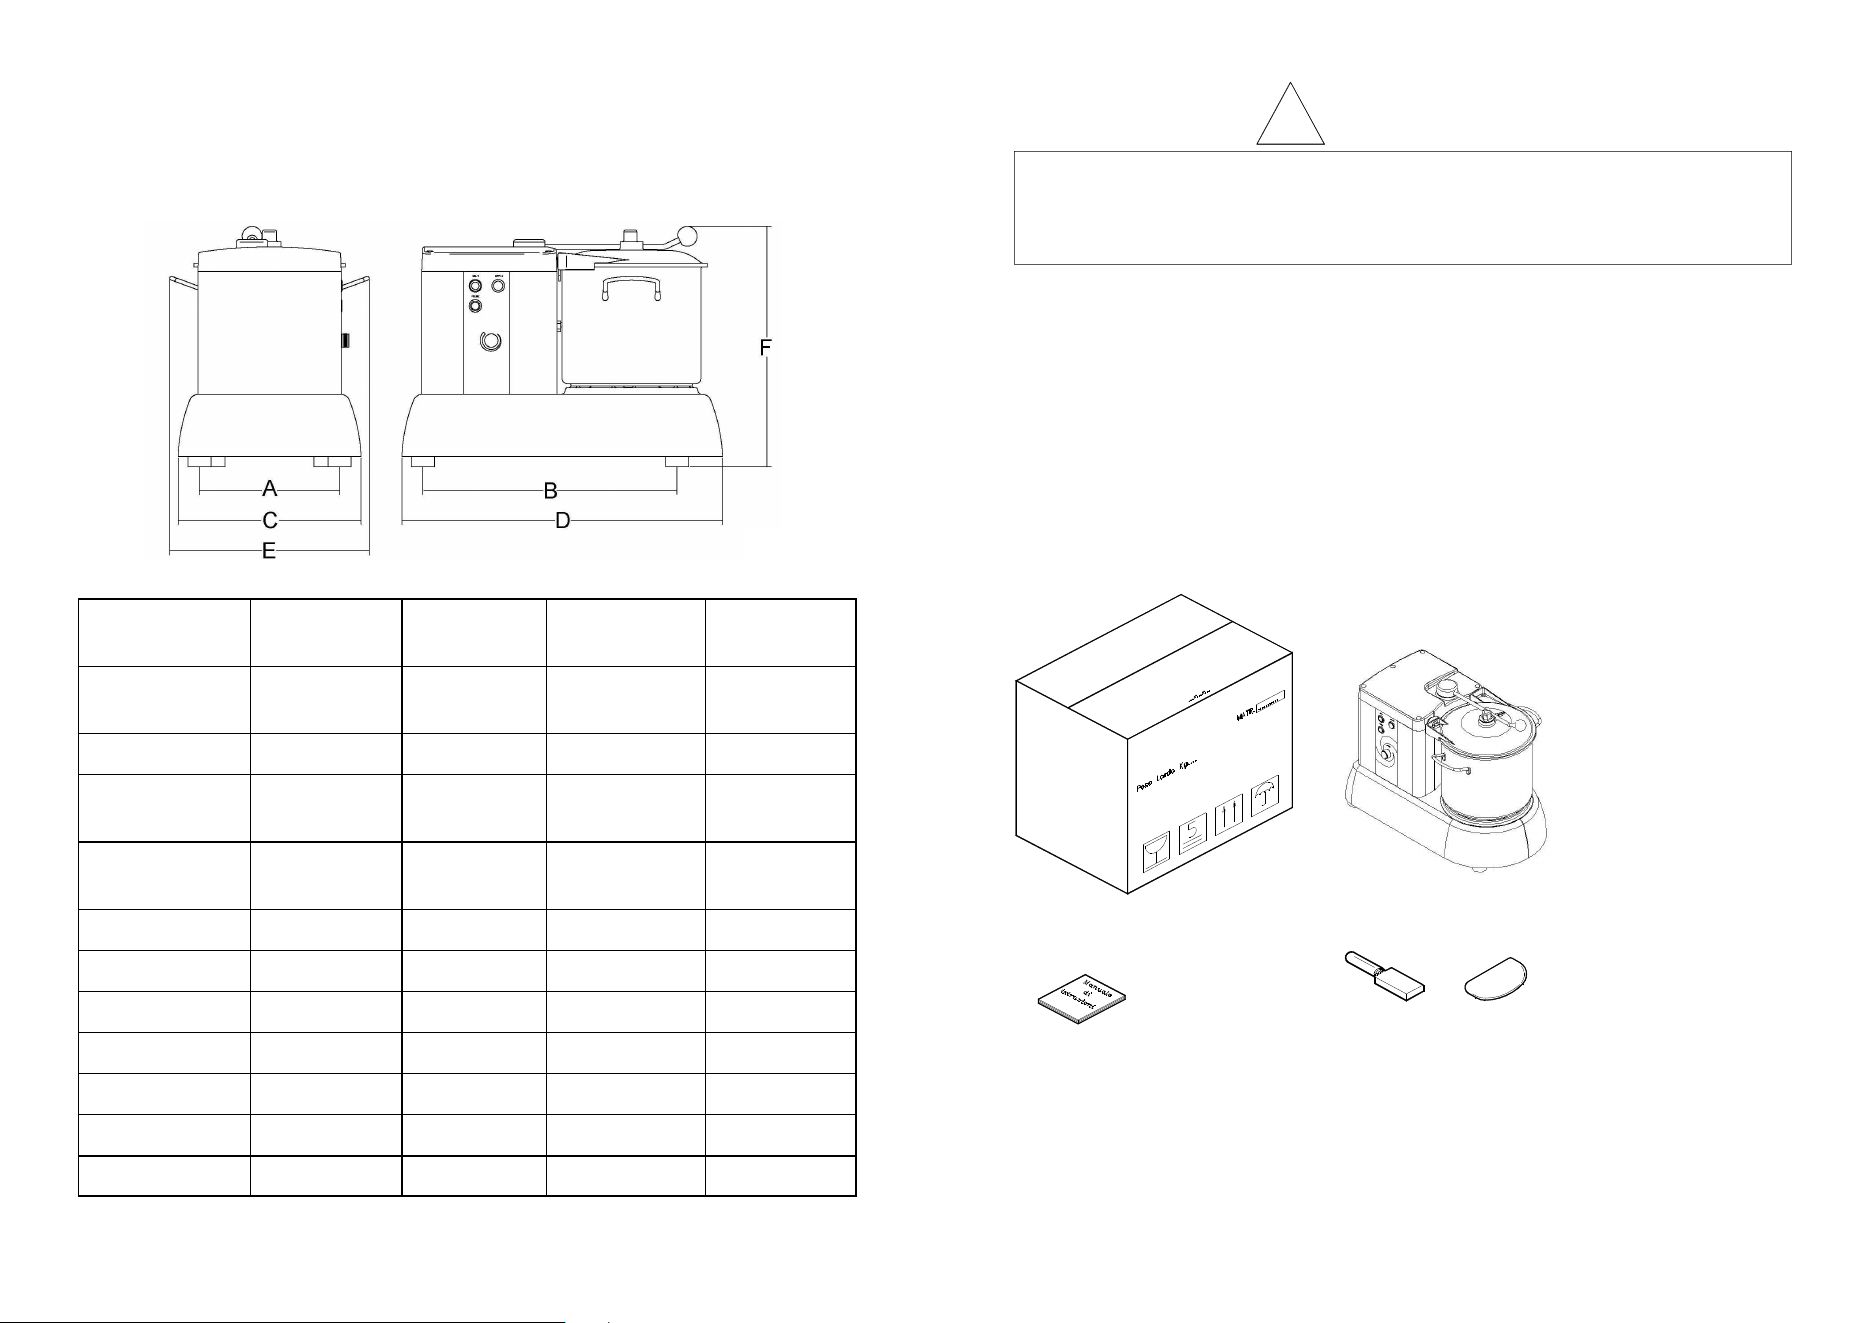
CHAP. 2 - TECHNICAL DATA
2.1 - Overall dimensions, weight, specifications
Model
CT 4
VT
CT 6
VT - 2V
CT 9
VT - 2V
CT 9
Plus
Power supply
watt 350
hp 0,5
watt 350
hp 0,5
watt 350 + 350
hp 0,5 + 0,5
watt 1100
hp 1,5
Tank capacity
lt 3,3 lt 5,3 lt 9,4 lt 9,4
Tank
useful capacity
lt 1,5 lt 3,1 lt 5,4 lt 5,4
Revs
rpm
600 ÷ 2800
rpm
600 ÷ 2.800
rpm
600 ÷ 2.800
rpm
600 ÷ 3500
A
mm 185 mm 185 mm 244 mm 244
B
mm 369 mm 369 mm 443 mm 443
C
mm 251 mm 251 mm 319 mm 319
D
mm 457 mm 457 mm 560 mm 560
E
mm 296 mm 304 mm 348 mm 348
F
mm 300 mm 362 mm 420 mm 420
Net weight
kg 13,5 kg 14,5 kg 23 kg 30
Fig. n°2
9
CAUTION!
CHAP. 3 - DELIVERY
3.1 - Shipping (see Fig.no. 3)
The machines are carefully packed before shipping.
The consignment is composed of:
-
robust cardboard external box with internal supports (a);
-
the machine (b);
-
the spatula (c);
-
blade sharpening plate (d);
-
this manual (e).
3.2 - Checks on delivery
When you receive the package containing the machine, carefully check the packaging
for signs of damage during shipping.
If the packaging shows signs of mishandling, impacts or dropping, report the damage
to the shipping agent within three days of the date of delivery indicated on the
documents and draw up a detailed report on any damage to the product.
!
The electrical features of the machine are indicated on a plate on the rear of the
product.
Before connecting the machine to the power supply see par. “4.2 Electrical
connection”.
Fig. n°3
a)
d)
e)
c)
b)