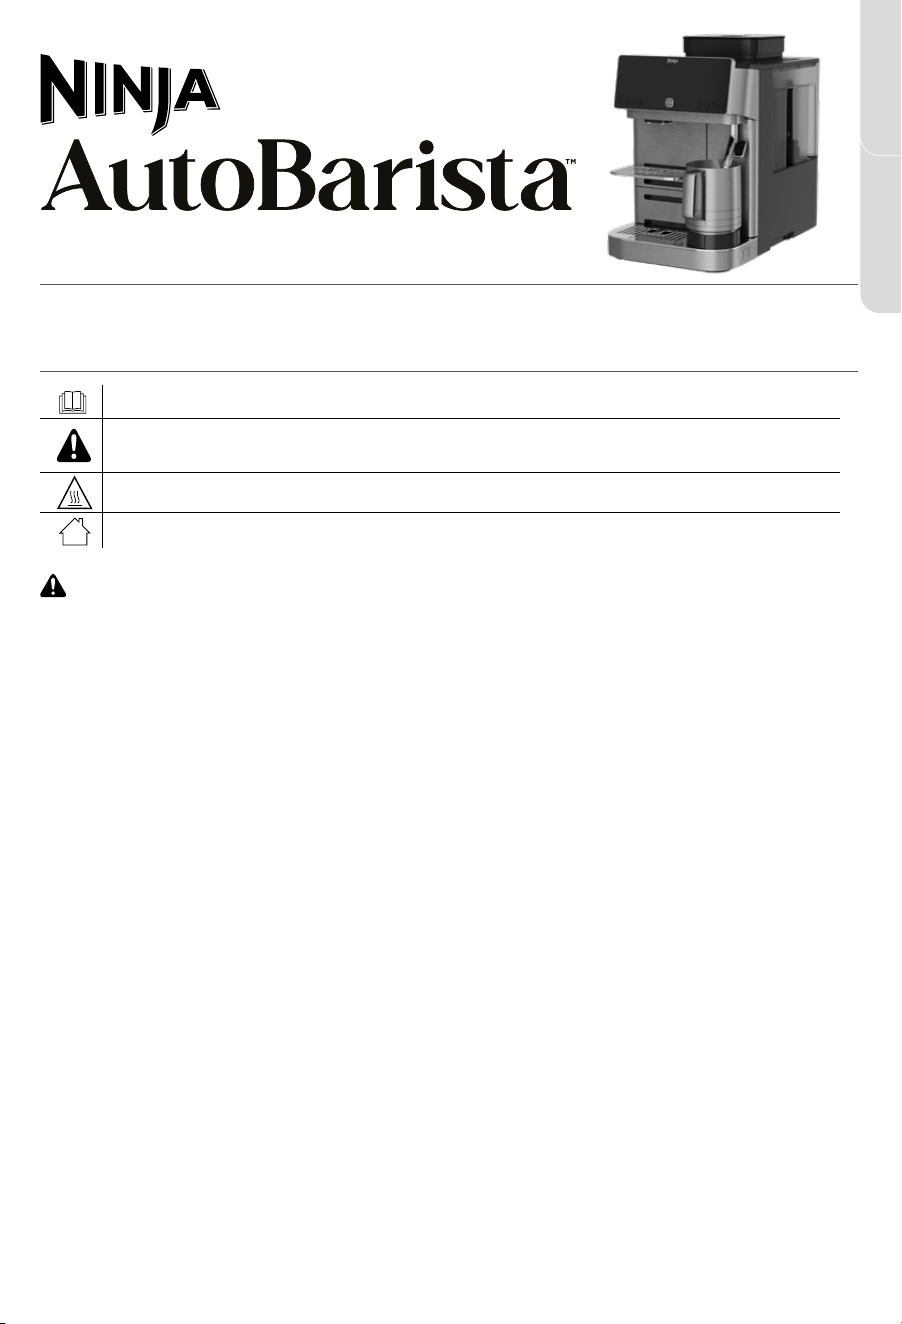
AE1055CO | Owner’s Guide
General Precautions
• To eliminate a choking hazard for young children, discard all packaging materials immediately upon unpacking.
• This machine can be used by persons with reduced physical, sensory, or mental capabilities or lack of experience
and knowledge if they have been given supervision or instruction concerning use of the machine in a safe way
and understand the hazards involved.
• Keep the machine and its cord out of reach of children. DO NOT allow the machine to be played with or be used by
children. Close supervision is necessary when used near children.
• To protect against fire, electric shock, and injury to persons, DO NOT immerse cord, plugs, or body of machine in
water or other liquid.
• NEVER carry the machine by the power cord or pull it to disconnect from electrical socket; instead grasp the plug
and pull to disconnect.
• DO NOT operate any machine with a damaged cord or plug, or after the machine malfunctions or has been
dropped or damaged in any manner. Contact SharkNinja Operating LLC for service.
• For household and countertop use only. DO NOT let the power cord hang over the edge or touch hot surfaces such as a
stove.
• NEVER use an electrical socket below a counter.
• To avoid risk of fire, electrical shock, or damage to the machine, DO NOT use machine in a machine garage or
under a wall cabinet.
• Unplug the appliance from the power outlet when not in use and before cleaning. Allow to cool before putting on
or taking o parts, and before cleaning the appliance.
• NEVER leave machine unattended while in use.
• Machine is not intended to be operated by means of an external timer or separate remote-control system.
IMPORTANT SAFETY INSTRUCTIONS
PLEASE READ CAREFULLY BEFORE USE • FOR HOUSEHOLD USE ONLY
WARNING
To reduce the risk of injury, fire, electrical shock or property damage, basic safety precautions must always be followed,
including the following numbered warnings and subsequent instructions. Do not use machine for other than intended use.
Read all instructions before using your Ninja AutoBarista.
Indicates the presence of a hazard that can cause personal injury, death, or substantial property damage if the warning
included with this symbol is ignored.
Avoid contact with hot surface. Always use hand protection to avoid burns.
For indoor and household use only.
READ AND SAVE THESE INSTRUCTIONS
ESPAÑOL ENGLISH
3
sharkninja.mx
2
sharkninja.mx
IMPORTANT SAFETY INSTRUCTIONS
PLEASE READ CAREFULLY BEFORE USE • FOR HOUSEHOLD USE ONLY
WARNING
To reduce the risk of injury, fire, electrical shock or property damage, basic safety precautions must always be followed,
including the following numbered warnings and subsequent instructions. Do not use machine for other than intended use.
READ AND SAVE THESE INSTRUCTIONS
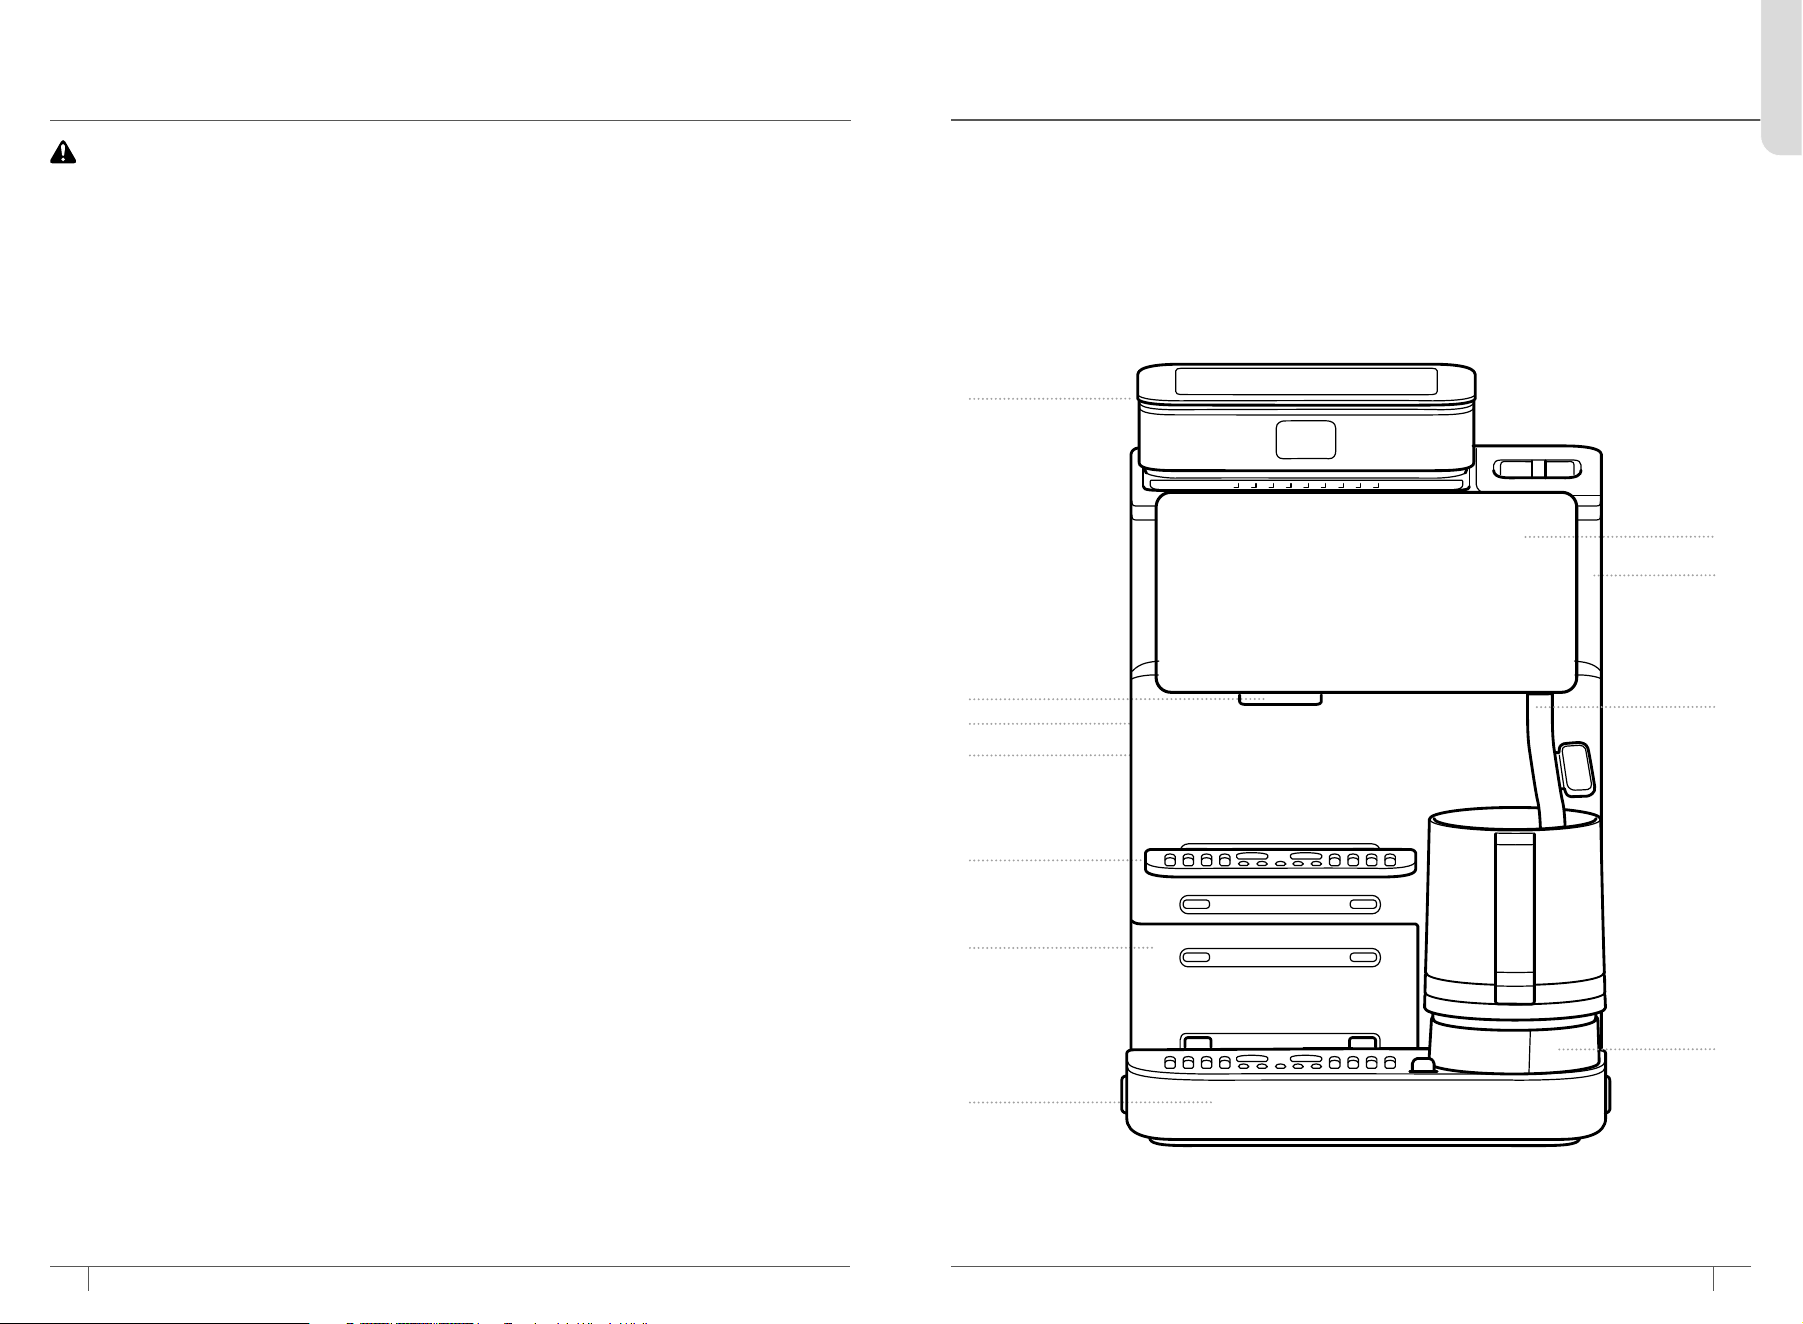
PARTS
A
K
J
I
G
B
C
D
E
F
A Bean Hopper
B Coee Spouts
C Maintenance Door
D Brew Unit and Internal Cavity
(behind Maintenance Door)
E Adjustable Cup Tray
F Puck Bin
G Drip Tray
H Milk Jug Platform
I Steam Wand
J Water Reservoir
K Display
H
• DO NOT place on top of any other machine.
• The machine should not be placed in a cabinet when in use.
• DO NOT use any accessory not recommended by the manufacturer, as this may result in injury or damage to the
machine.
Operating Notice
• To disconnect, switch all controls to the OFF position, then remove the plug from the wall outlet.
• The use of an accessory not recommended by the manufacturer may create an overflow condition and scalding hazard,
or result in fire, electric shock, or personal injury.
• ALWAYS use machine on a clean, dry, level surface.
• DO NOT place on or near a hot gas or electric burner or in a heated oven.
• DO NOT use this machine for anything other than its intended use.
• DO NOT use outdoors.
• DO NOT touch hot surfaces. Use handles or knobs. Avoid contacting moving parts.
• ALWAYS place a cup or vessel appropriate for output volume selection beneath the coee spouts when brewing.
• DO NOT run the machine without water.
• DO NOT overfill the water reservoir. Fill water only to the maximum fill line.
• Keep lid on water reservoir when brewing.
• Keep bean hopper lid on when grinding to prevent access to moving parts.
• DO NOT reach in or touch steam wand or frother jug when in operation. Hot steam and hot liquids will cause burns
and scalds.
Care & Maintenance
• To prevent illness from bacterial growth in the machine, follow all cleaning instructions in the Cleaning & Maintenance
section of this Owner’s Guide.
• For best results, ensure you are using a clean machine.
• If the product is not operating properly, visit sharkninja.mx or contact SharkNinja Operating LLC for examination, repair,
or adjustment.
• Children should not engage with cleaning and maintenance activities.
• Turn OFF, unplug, and allow to cool before cleaning or moving.
• Avoid eye contact and prolonged skin contact with the Brew Unit Silicone Lubricant
• Wash hands thoroughly after handling the Brew Unit Silicone Lubricant
• Store Brew Unit Silicone Lubricant indoors, away from heat, flames and direct sunlight.
• Dispose of Brew Unit Silicone Lubricant according to local regulations.
Cord Statement
• A short power-supply cord is provided to reduce the risks resulting from becoming entangled in or tripping over a
longer cord.
• DO NOT use extension cords with this product.
ENGLISH
*Parts and accessories may vary by model.
5
sharkninja.mx
USING THE CONTROL PANEL
*
4
sharkninja.mx
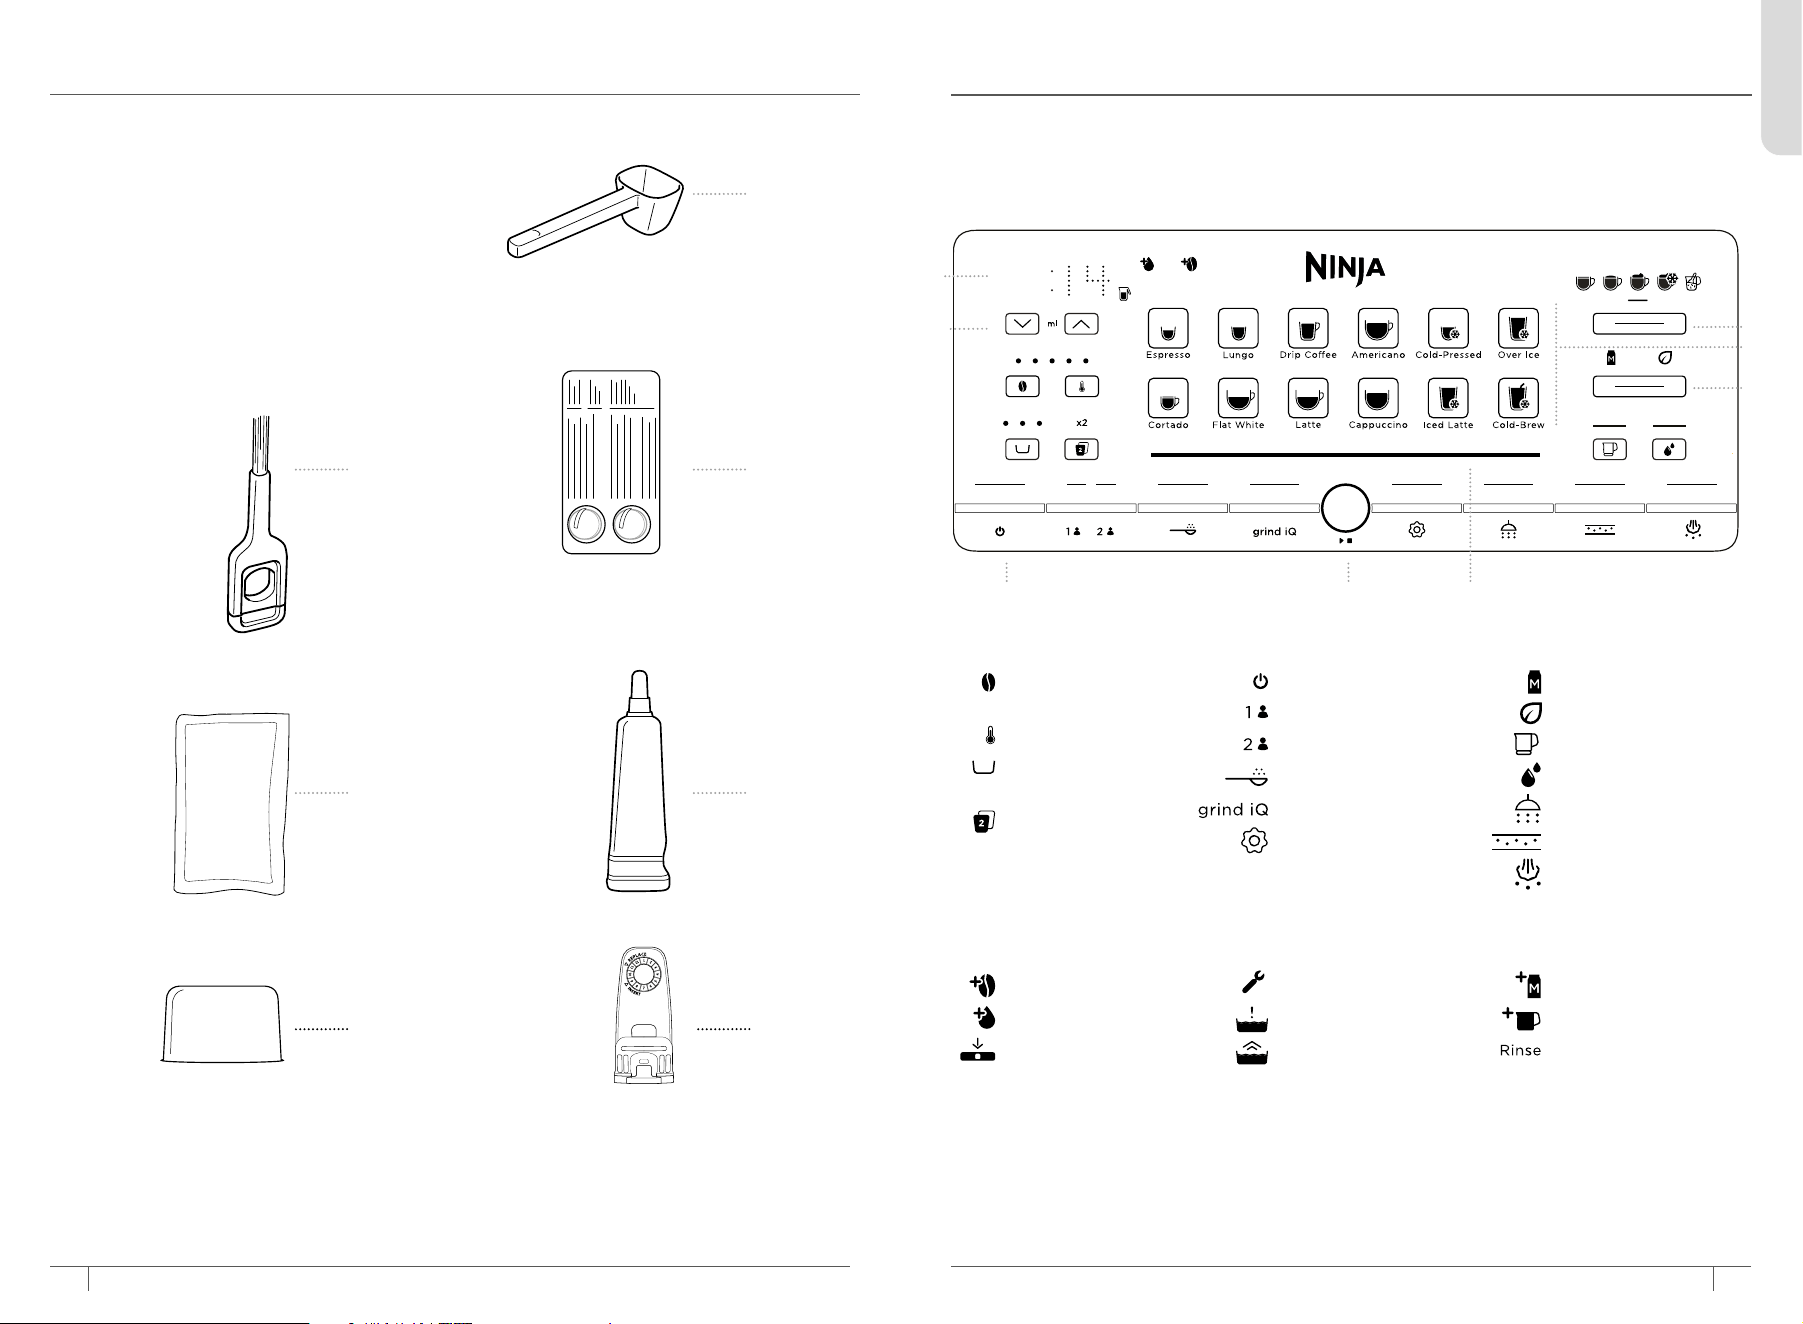
1 Scoop
2 Cleaning Brush
3 Cleaning Tablets
4 Descale Powder
5 Brew Unit
Silicone Lubricant
6 Water Filter Insert*
7 Water Filter Housing*
*Not available on all machines
ACCESSORIES
2
1
3
4 5
76
ENGLISH
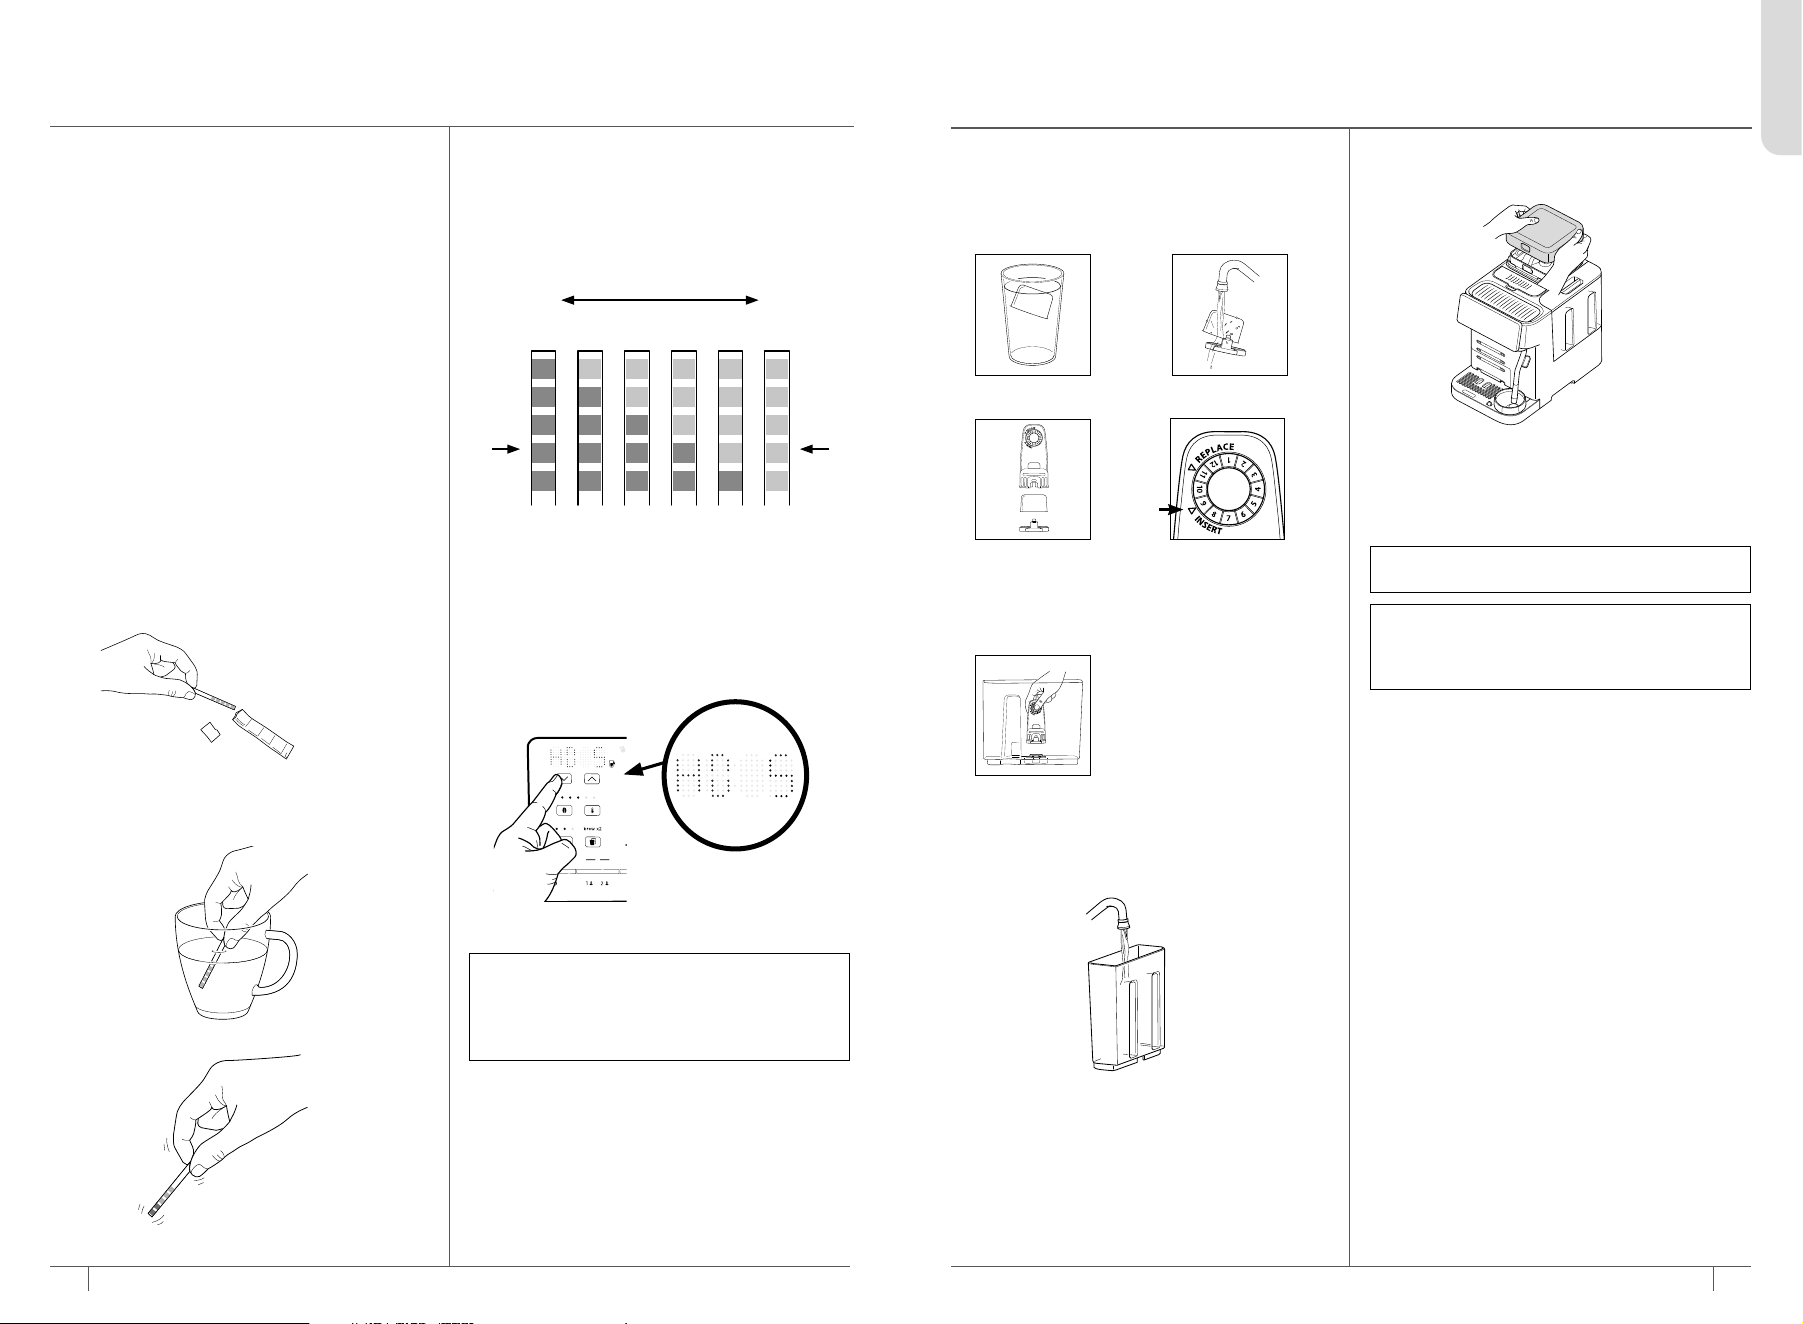
*The CLEAN, DESCALE, and GRIND IQ buttons will illuminate to let you know you need to run the
respective cycle.
BREW STRENGTH
button
TEMP button
SHOTS selection
button
BREW x2 button
POWER button
PROFILE 1 button
PROFILE 2 button
PREGROUND button
GRIND IQ button
SETTINGS button
DAIRY
PLANT-BASED
FROTH ONLY button
HOT WATER button
CLEAN button
DESCALE button
PURGE button
A BREW SIZE readout
B SIZE SELECTION arrows
C POWER button
D START button
E Progress bar
F FROTH TYPE button
G Drink Menu Options
H MILK TYPE button
B
A
G
H
C D
*Functions may vary by model.*Accessories may vary by model.
F
E
INTELLIGENT NOTIFICATIONS
The machine will display an intelligent notification if an action is needed:
ICON KEY
ADD BEANS
ADD WATER
INSTALL HOPPER
BREW UNIT ALERT
EMPT Y TR AY
INSTALL TRAY
ADD MILK
INSTALL JUG
RINSE
76
sharkninja.mx
sharkninja.mx
REMOVE ACCESSORIES & PARTS FROM
PACKAGING
• To start, remove all accessories and parts from
packaging. Ensure that all accessories and
parts are removed from the packaging before
discarding it.
• When removing the machine from packaging,
be sure to remove all tape from machine. Tape
will be on all sides of the machine.
CLEAN ACCESSORIES BEFORE USE
• After removing all accessories and parts from
the packaging, thoroughly clean all parts by
hand-washing and dry thoroughly.
GETTING STARTED:
BEFORE YOUR FIRST BREW
FILL THE WATER RESERVOIR
• Before you begin, make sure the water
reservoir is full of room-temperature or cold
water. Be sure to fill up to, but not exceeding,
the maximum fill line.
If at any point before a brew there's not enough
water in the reservoir to brew your selected
drink, the machine will indicate that you must
ADD WATER. If you get an ADD WATER
notification while brewing, add water to the
reservoir and press START to resume.
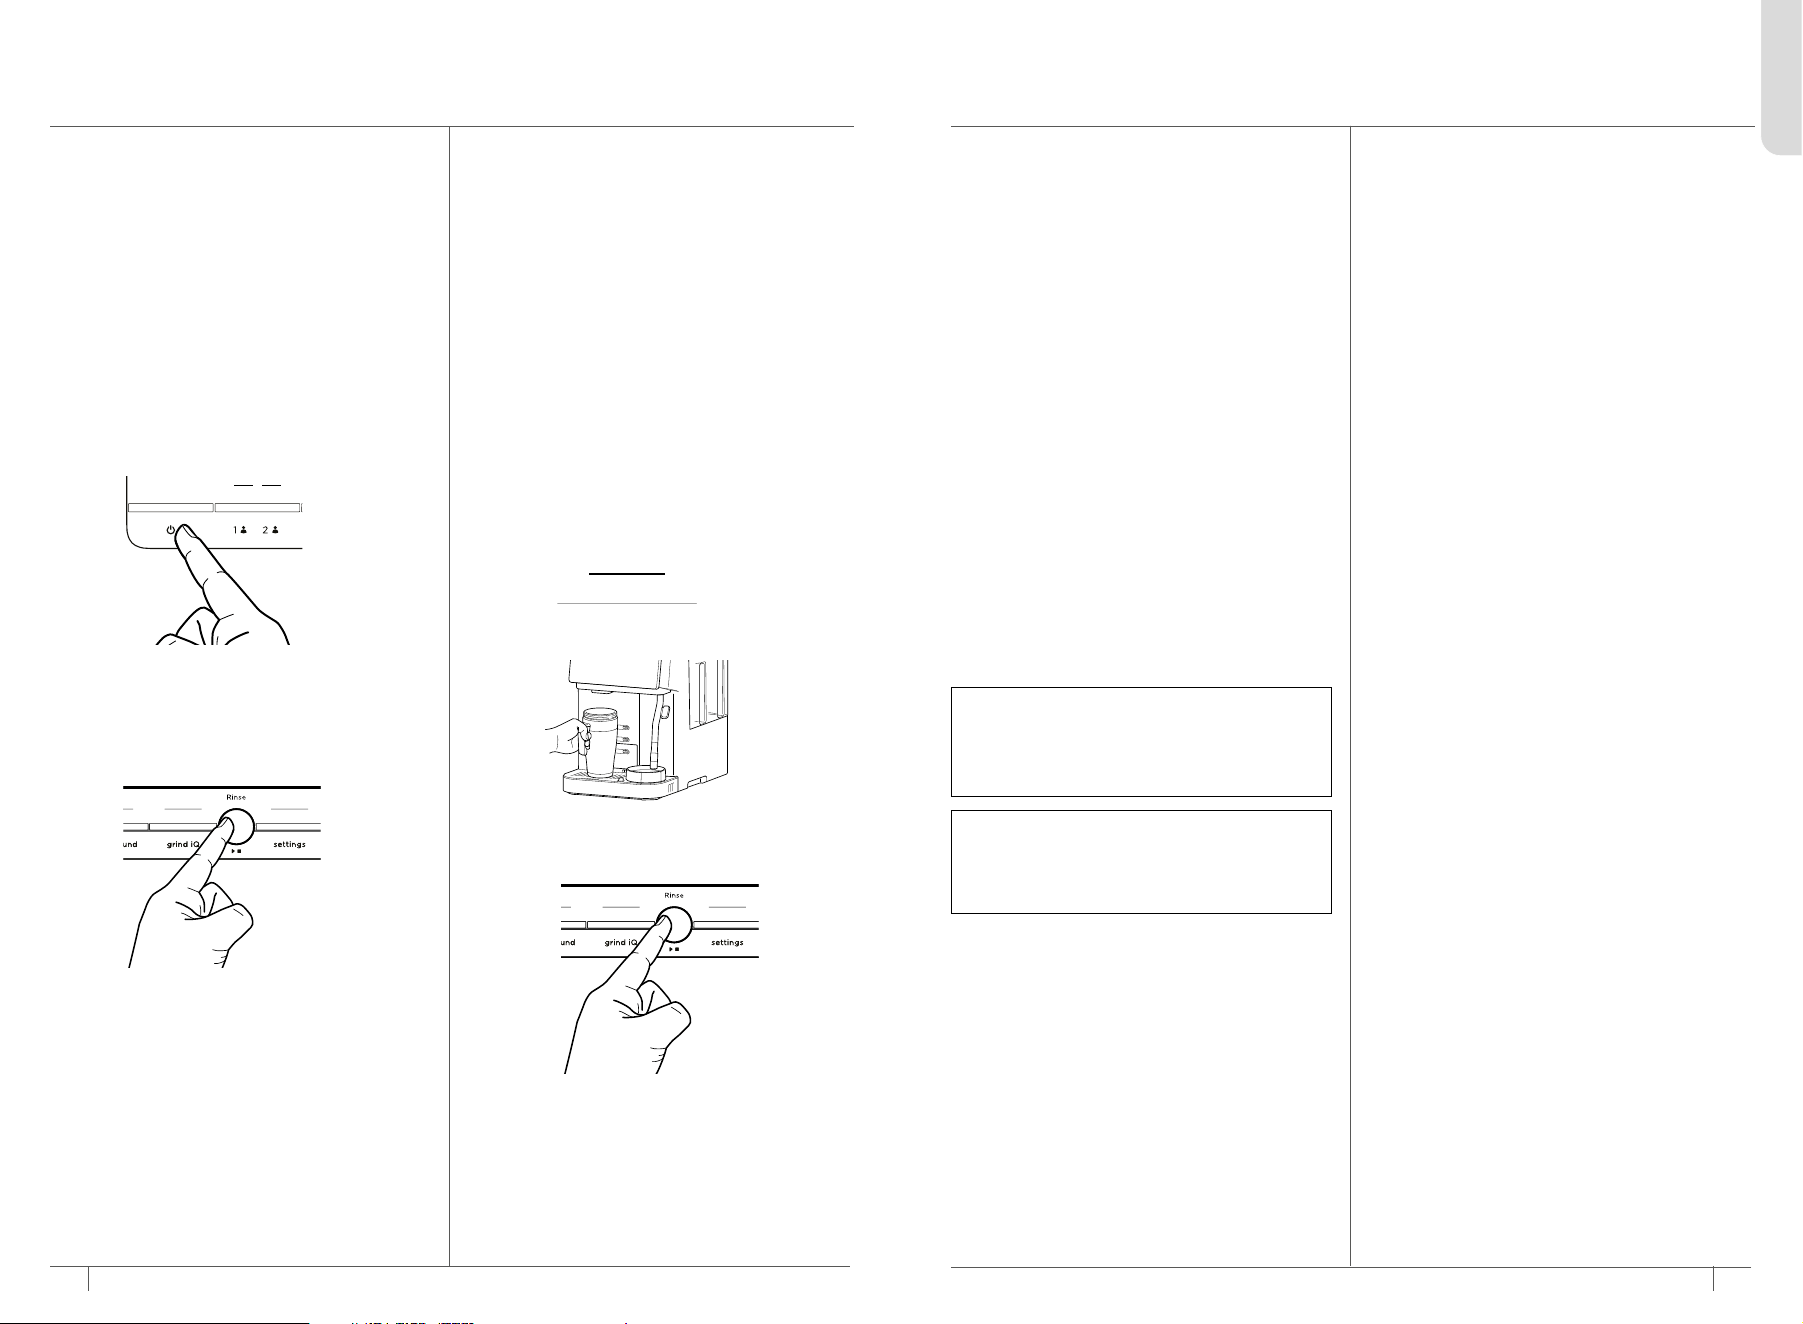
1 Soak water filter
for 5 minutes.
3 Remove end cap
from filter housing
and insert filter. Clip
end cap back onto
filter housing to
secure filter in place.
5 Install filter housing
into reservoir.
2 Rinse water filter and
mesh for 60 seconds.
4 Set INSERT date to
current month.
WATER FILTER INSTALLATION
• Great-tasting coee starts with great water.
Water filters help remove chlorine, odors, and
other impurities that may be in your water to
give you great tasting coee.
BEAN EDUCATION
• For best results, use freshly roasted coee
beans.
• When purchasing coee beans, it’s best to
buy a bag with a “Roasted On” date rather
than a “Best Before” date to ensure quality
and freshness.
• We recommend you use any coee beans
within 20 days of the “Roasted On” date.
• When changing to a dierent bean, fully
remove previous beans before proceeding. It
is not recommended to top up a hopper with
new beans. See the Switching Out Beans and
Hoppers section for more information.
• DO NOT use green, caramelized, or flavored
coee beans because they can jam the
grinder. Add flavoring to your beverage using
syrups and sugars. Reference the Drink Guide
for recipes.
FILL BEAN HOPPER
1 Remove the lid of the hopper.
2. Fill hopper with whole beans. DO NOT add
pre-ground beans to bean hopper. For more
info on using pre-ground coee, refer to the
Using Pre-Ground Coee section.
3. Replace the lid.
NOTE: Never add beans while the machine is
in the middle of a brew. For more information,
refer to the Switching Out Beans and Hoppers
section.
NOTE: Level out the beans and ensure they do
not exceed the MAX line in the hopper.
NOTE: If you need to change the hardness level,
purchase another test strip at sharkninja.mx/
accessories. For more instructions on how to
reset the water hardness, refer to the Additional
Settings section.
WATER HARDNESS TEST
All water has minerals that can cause buildup in the
machine over time. These minerals are referred to
as water hardness, and will impact how often you
will need to descale the machine. Doing this test
will ensure the machine recommends a descale at
the right time.
1 Remove test strip from pack.
3 Pull test strip out and lightly shake it.
4 Place test strip on a dry, flat surface and wait 1
minute for test strip to display results.
5 After 1 minute, you will see 0–5 purple squares
appear. This will indicate the water hardness
level of the water (0 purple squares=level 0,
5 purple squares=level 5, etc.).
6 After identifying the water hardness, plug in the
machine.
7 The left side of the control panel will display “hd
05” by default.
8 Press the up or down arrows to program the
water hardness level by matching the number of
purple squares on the test strip to the number
displayed (e.g., if the result is level 1, change the
setting to hd 01).
9 Press START to confirm the setting
Green
Squares
Purple
Squares
Very
Soft
Very
Hard
hd 0 hd 1 hd 2 hd 3 hd 4 hd 5
2 Completely submerge the water test strip for
5–10 seconds in the water you plan on using
with the machine.
ENGLISH
98
sharkninja.mx
sharkninja.mx
GETTING STARTED:
BEFORE YOUR FIRST BREW, CONT.
BREWING ESPRESSO, AMERICANO, LUNGO*
& COLD PRESSED
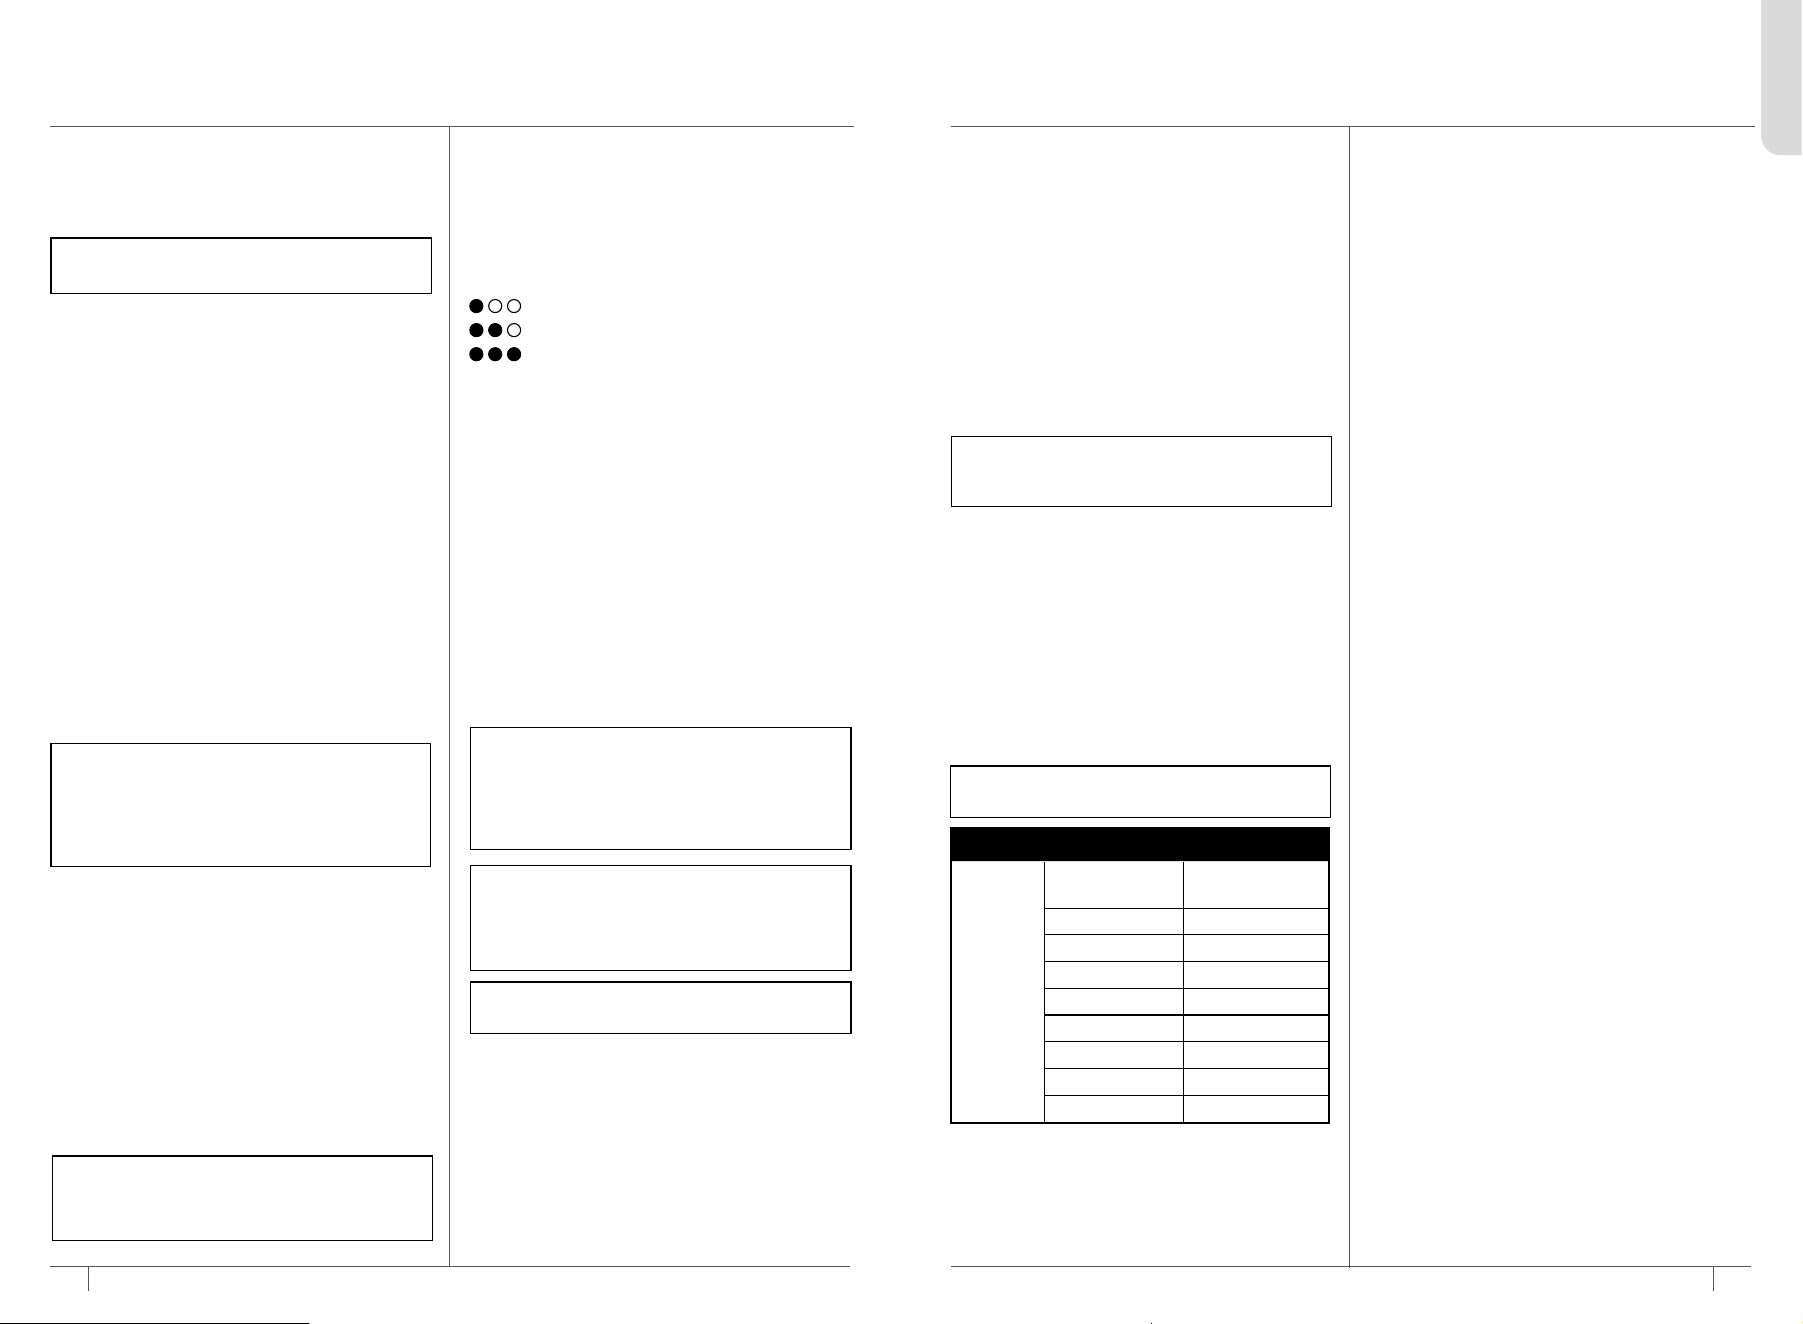
FIRST-USE RINSE
Before you make your first drink, you must flush
the machine.
When the machine is powered on for the first
time, the RINSE alert will illuminate orange,
indicating that a rinse is required. This rinse is
user initiated and requires pressing START.
The machine will automatically run a rinse each
time upon start up and shut down, indicated
by the white RINSE alert. No user action is
required.
It’s optional to place a cup under the coee
spouts for any of the rinses. The machine is built
to hold the rinse water in the drip tray.
1. Plug in the machine and press POWER.
2. The control panel will illuminate the RINSE
alert orange to indicate that a rinse is needed
to proceed.
3. Press START to begin the rinse cycle. The
machine will beep to signal it has started. The
water will rinse directly into the drip tray.
4. When finished, the machine will beep again
indicating the cycle is complete.
GRIND IQ CYCLE
GRIND iQ uses AutoBarista-iQ technology to
automatically determine the best grind size
for your beans to get the perfect espresso
extraction for your drink. The GRIND iQ light
will illuminate yellow whenever the machine
recommends running a cycle.
• On first use the button will be illuminated
yellow to indicate that a calibration cycle is
recommended. This is not necessary if you
would like to use pre-ground coee or brew
a drip, over ice, or cold brew.
• When using new beans for the first time or
adding more beans, it may take 2–3 brews to
reach the optimal grind setting. The machine
will do this for you with a Grind iQ cycle.
• To learn more about Grind iQ, refer to the
Grind iQ section.
1. The Grind iQ light will illuminate yellow to
indicate a cycle is recommended. Press the
GRIND IQ button.
2. Place a 14 oz (414 ml) or greater cup under
the coee spouts.
3. Press START. The machine will beep to signal
the cycle has started. The progress bar will
illuminate to indicate the status of the cycle.
4. When finished, the machine will beep again
and the Grind iQ light will turn o. The Grind
iQ light will remain o as long as it is within
the correct grind size range for your beans.
5. Discard the brewed espresso.
6. Empty the drip tray and puck bin once the
cycle is complete.
NOTE: These are the preset espresso
outputs. Changing your espresso strength
will impact your output volume. To adjust
output, please refer to Adjusting Brew
Strength & Temperature section.
NOTE: If you are using a smaller cup, use the
adjustable cup tray to lift your cup closer to
the coee spouts to reduce splatter. If you
are using a taller mug or travel mug, remove
the cup tray to create space.
PROPER EXTRACTION
• Drink will pour out at a slow, consistent rate.
• You will see a caramel-colored liquid pouring
out. That is the crema.
• There will be a layer of crema on top of your
drink. If you tilt your cup and still just see the
crema layer, you have a properly extracted
espresso shot.
LED COLOR KEY
The GRIND iQ LED will illuminate during daily
use to show the status of GRIND iQ and how
close you are to the best tasting espresso.
OFF: The grinder is calibrated.
YELLOW: GRIND iQ cycle is required to
calibrate the grinder.
1. Tap the corresponding drink icon to select
your drink.
2. Use the SHOTS button to select the number
of espresso shots desired.
3. If desired, adjust the strength and temperature
of your brew. For more information on how
this impacts your brew, refer to Adjusting Brew
Strength & Temperature.
You can save customizations made to your
drinks. For more information, refer to the
Profiles & Saving Customizations section.
4. Place a cup under the coee spouts and
press START.
5. The machine will beep to indicate that the
brew has started. The progress bar will
illuminate indicating the status of the brew.
When finished, the machine will beep again
signifying the brew is complete.
ENGLISH
BREW X2
The Brew x2 function on the machine allows for
2 drinks to be made simultaneously side by side
without having to run an additional brew.
1. Select your drink on the main menu.
2. Adjust your drink using the buttons on the
left side of the display.
3. Press BREW X2 on the display; the button
will illuminate to show it is active.
4. Place 2 cups on the cup tray, ensuring that
one cup is aligned to each of the coee
spouts. Press START.
5. If a milk drink is selected, the unit will only
run 1 frothing cycle; add more milk than usual
(not exceeding the max fill line) to froth
enough for two drinks.
6. The machine will beep to indicate that the
brew has started. The progress bar will
illuminate indicating the status of the brews.
For double shot drinks and larger, the
machine will need to brew multiple shots.
The progress bar will illuminate again for
each brew. When finished, the machine
will beep again signifying the brews are
complete.
1110
BREWING ESPRESSO, AMERICANO, LUNGO*
& COLD PRESSED, CONT.
NOTE: Coee sizes over 12 oz (355 ml) will
brew in multiple rounds. You will hear the
grinder turn on again depending on how many
rounds it needs to brew.
NOTE: Brew x2 is only available for espresso
and espresso-based drinks.
NOTE: For adding additional milk to these
drinks, you can select ADD MILK TYPE or
FROTH TYPE to add a frothing cycle to
your brew cycle. See the Adding Froth to a
Non-Milk Drink section of this guide for more
information.
sharkninja.mx
sharkninja.mx
NOTE: Over Ice, Cold Brew, and Cold-Pressed
are designed to produce a concentrated brew
into a vessel filled with ice. It is normal for
some ice in the vessel to melt as the coee is
brewed, and this will produce a cold beverage
with the ideal strength and flavor.
NOTE: Coee sizes over 12 oz (355 ml) will
brew in multiple rounds.
NOTE: When brewing a cold-brew of cold-
pressed drink immediately after a hot drink,
the machine will perform an internal rinse to
cool the brew chamber. The brew will start
automatically once the rinse is complete.
BREWING DRIP COFFEE & ICED DRINKS
Drip Coee & Hot Water
1. Tap the corresponding drink icon to select
your drink.
2. Tap the arrows to select your desired volume.
3. Place a cup under the coee spouts and
press START.
4. The machine will beep to indicate that the
brew has started. The progress bar will
illuminate indicating the status of the brew.
When finished, the machine will beep again
signifying the brew is complete.
ADDING HOT WATER*
*Not available on all machines
Your machine has a hot water feature that
allows you to dispense hot water on demand.
1. Press HOT WATER button.
2. Use the TEMP button on the left of the
display to adjust the hot water temperature.
Low Temperature
Medium Temperature (default)
High Temperature
3. Select the amount of hot water using the
arrows on the left of the display.
4. Press START to begin dispensing hot water.
Press START again to stop dispensing when you
have the desired amount of hot water or wait for
the program to finish.
Cold and Iced Drinks
1. Tap the corresponding drink icon to select
your drink.
2. Tap the arrows to select your desired volume.
3. Fill a cup up with ice and place under the
coee spouts. Press START.
4. The machine will beep to indicate that the
brew has started. The progress bar will
illuminate indicating the status of the brew.
When finished, the machine will beep again
signifying the brew is complete.
ENGLISH
USING PRE-GROUND COFFEE
IMPORTANT: ONLY add pre-ground coee when
the machine is turned on and has completed the
start up cycle. Adding pre-ground coee while the
machine is turned o, in standby, during a start up/
shut down rinse, or after a brew has already started
allows grounds into the internal cavity and can
cause jams and damage.
1. Tap the corresponding drink icon to select
your drink. If brewing espresso, ensure you
select the correct number of shots based on
the amount of scoops you will put in.
2. Press the PRE-GROUND button to put the
machine into pre-ground coee mode.
NOTE: Do not remove the pre-ground chute
funnel when pouring in grounds. Only remove
for cleaning.
NOTE: You cannot brew more than 12 oz (355 ml)
of drip coee when using pre-ground coee.
SCOOPS
SIZES
Coee Scoops
6 oz (177 ml)
2–4
8 oz (237 ml)
2–4
10 oz (296 ml)
4–6
12 oz (355 ml)
4–6
Espresso Scoops
Single 2
Double 4
Triple 6
WARNING: NEVER put more than 6 scoops of
pre-ground coee into the pre-ground chute. This
will overflow the brew unit and the machine will be
unable to complete the brew. If this happens, turn
o the machine and refer to the Cleaning: Deeper
Cleaning section for instructions on cleaning the
brew unit and the internal cavity.
3.
Open the pre-ground chute to access the scoop.
4. Scoop pre-ground coee into the pre-ground
chute. Refer to the table below for the correct
number of scoops for your brew. NEVER
exceed more than 6 scoops for one brew.
5. Place a cup under the coee spouts and
press START.
6. The machine will beep to indicate that the
brew has started. The progress bar will
illuminate indicating the status of the brew.
When finished, the machine will beep again
signifying the brew is complete.
FROTHING BEST PRACTICES
■
Milk Types
•
For dairy milk, we recommend using
whole milk.
•
For best results with plant-based milk, use
the barista or full-fat version.
•
For best plant-based froth, use the PLANT-
BASED setting.
•
Milks that are UHT-treated (i.e., shelf stable
milks) may have varying results.
•
Coconut milk can be heated up but will not
make stable froth.
•
For best foams and latte art, tap and swirl
the milk jug to remove large bubbles prior
to pouring milk.
■
Temperature
•
If you would like to adjust froth temperature,
please see Additional Settings section.
•
For best results, use cold milk or milk out of
the refrigerator.
•
For best results make sure the milk jug is at
room temperature before frothing.
■
Cleaning
•
Ensure both the milk jug platform and the
bottom of the milk jug are dry and clean
before placing on the milk jug platform.
•
Wipe steam wand with a damp cloth
immediately after use to prevent milk from
sticking.
•
Before turning o the machine, push the
steam wand back into the down position to
allow it to auto-purge.
•
For a deeper clean of the whisk and steam
wand, fill milk jug to the max line with water
and a drop of dish soap and run the THIN
FROTH program.
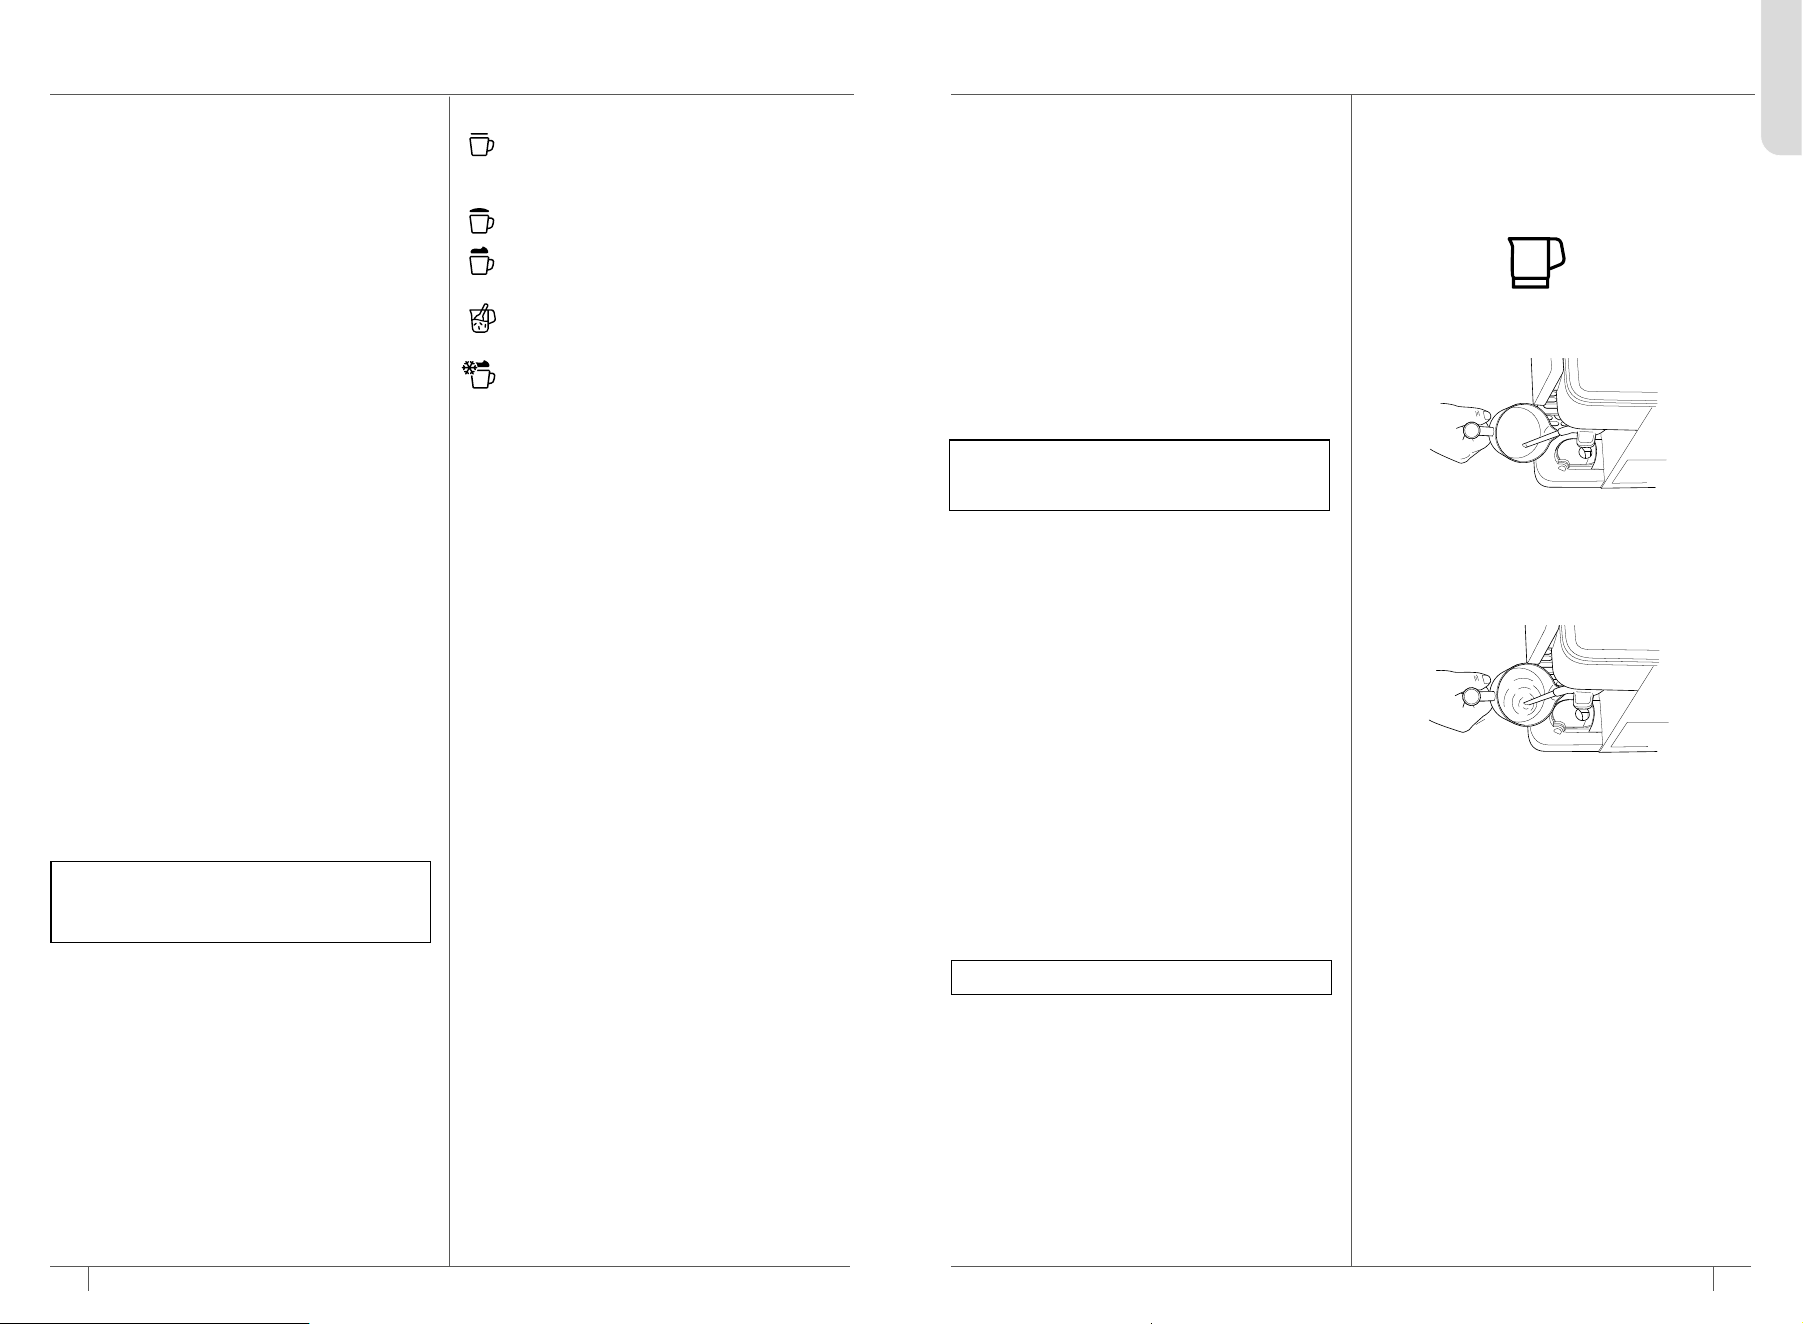
13
sharkninja.mx
12
sharkninja.mx
BREWING MILK-BASED DRINKS
NOTE: DO NOT froth milk directly into the
espresso or coee; always froth in the milk
jug and pour the froth into the espresso or
coee base afterwards.
FROTH STYLES
Steamed Milk
Gently steam milk to an ideal drinking
temperature without whisking.
Great for coee.
Thin Froth
A thin layer of foam for lattes.
Thick Froth
A classic layer of fluy froth to top any drink.
Great for cappuccinos.
Mix-In Froth*
A large layer of froth, ideal for dry cappuccinos
and other drinks with less volume.
Cold Foam
A classic layer of cold froth to top any iced
coee or espresso drink.
*Not available on all models
NOTE: When out of water, the machine will
not purge. Press PURGE once you’ve added
more water.
NOTE: To exit this menu, press another drink style.
MILK RECIPES
1. Tap the corresponding drink icon to select your
drink.
2. Use the SHOTS button to select the number of
espresso shots desired.
3. If desired, adjust the strength and temperature
of your brew. For more information on how
this impacts your brew, refer to Adjusting Brew
Strength & Temperature section.
4. Place a cup large enough for your drink under
the coee spouts.
5. Select DAIRY or PLANT-BASED milk with the
MILK TYPE button based on the milk that you’re
using.
6. When selecting a milk recipe program, the
recommended froth type for your drink will be
underlined. To change the froth type selected,
press the FROTH TYPE button.
7. Ensure that the whisk is installed in the milk jug.
Fill the jug with your desired amount of milk, but
do not exceed the max fill line.
8. Ensure that the bottom of the milk jug is dry.
Place the milk jug on the milk jug platform with
the steam wand inserted into the milk jug.
9. Press START. The machine will beep to signal
that the program has started. The machine will
first grind the beans, then run the froth program
and brew the espresso last. This is to ensure the
freshest espresso for your drink. The progress
bar will illuminate to indicate the status of the
program. The machine will beep again to signify
the program is complete.
FROTH ONLY
Press the FROTH ONLY button to set up a cycle
that will only use the frother to froth milk, with no
grinding or brewing involved. Froth Only can be
used for hot chocolate, matcha, or simply heating
up milk.
AFTER YOU FINISH FROTHING
1. Once you remove the milk jug, immediately
wipe the steam wand with a damp cloth before
pushing it back into its down position.
2. When the steam wand is pushed back into its
down position, auto-purging will occur. This
is to clean the inside of the steam wand. The
machine will beep to signal that the purge has
started. When finished, the machine will beep
again. You can purge at any time by pressing
the PURGE button when the steam wand is in
the down position.
3. Before pouring milk, tap the jug on a flat surface
and swirl around to remove large bubbles. Pour
frothed milk over espresso and enjoy.
ADDING FROTH TO A NON-MILK DRINK
If a drink does not already have milk in it, it is
possible to add milk by pressing FROTH TYPE
or MILK TYPE.
1. Ensure that the whisk is installed in the milk jug.
Fill the milk jug with the desired amount of milk,
but do not exceed the max fill line.
2. After selecting your desired drink, press
FROTH TYPE or MILK TYPE to activate the
milk settings.
3. Ensure that the bottom of the milk jug is dry.
Place the milk jug on the milk jug platform with
the steam wand inserted into the milk jug.
4. Select DAIRY or PLANT-BASED milk with the
MILK TYPE button.
5. Select the desired froth with the FROTH TYPE
button.
6. Press START. The machine will beep to signal
that the program has started. The machine
will first brew, then froth. The progress bar will
illuminate to indicate the status of the program.
ENGLISH
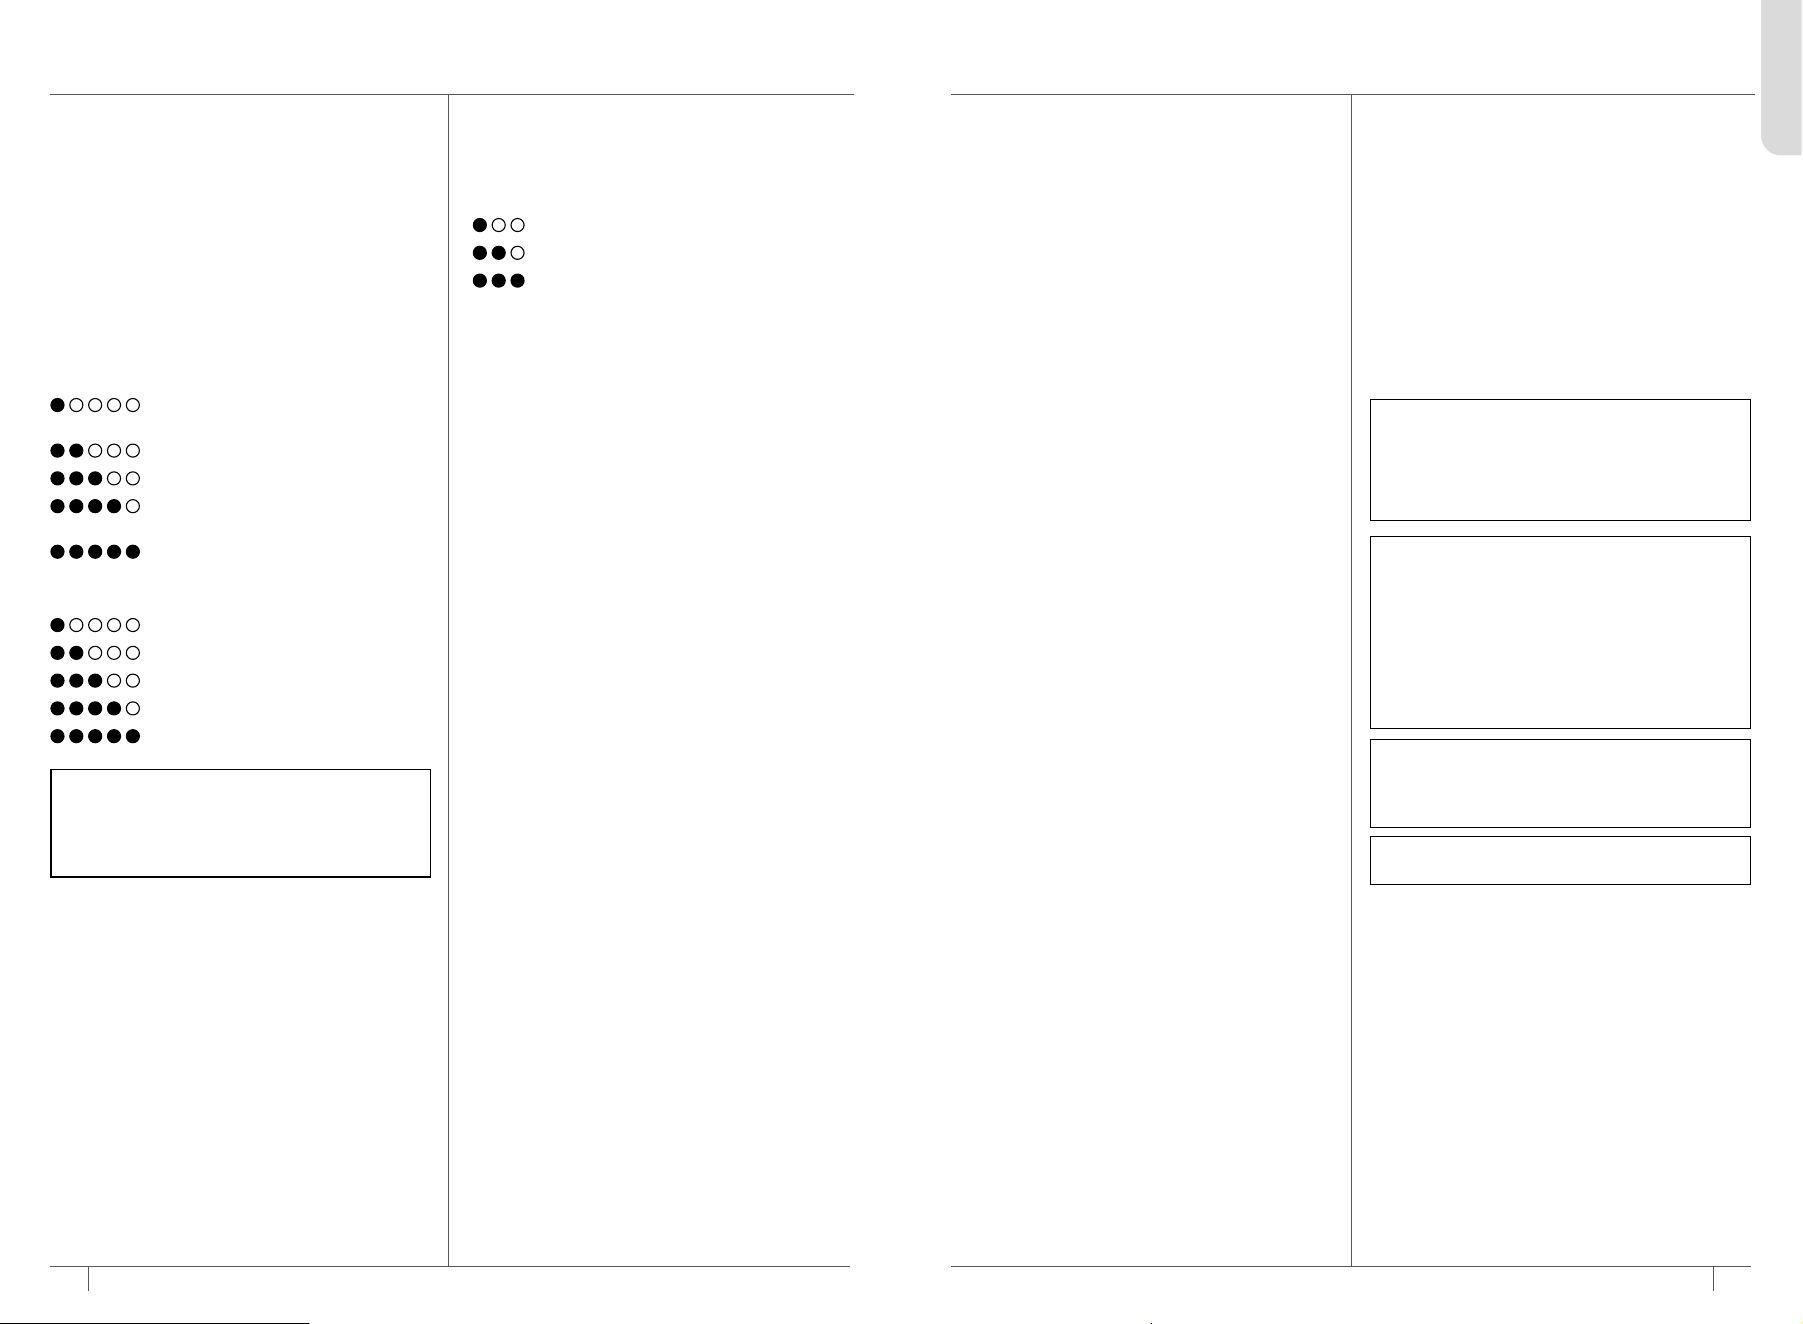
MANUAL FROTHING
1. Fill the milk jug as desired in between the min
and max fill lines.
2. Press FROTH ONLY.
3. Make sure you are on the steamed milk setting.
4. Angle the milk jug slightly to the left or right
so that the steam wand is about a finger
width away from the wall of the milk jug.
5. Hold START for 3 seconds. The machine will
beep to indicate that frothing has started and
steam will start to generate from the wand.
6. Place wand just below the surface of the milk
to incorporate air into it. A whirlpool will start
to form.
7. Once you have the volume of froth you want,
move the jug up so the steam wand is further
below the surface. This is to heat the milk.
8. Keep the milk jug in that position until it is too
hot to hold with your hand, the press START
to turn the function o.
1514
ADJUSTING BREW STRENGTH & TEMPERATURE
sharkninja.mx
sharkninja.mx
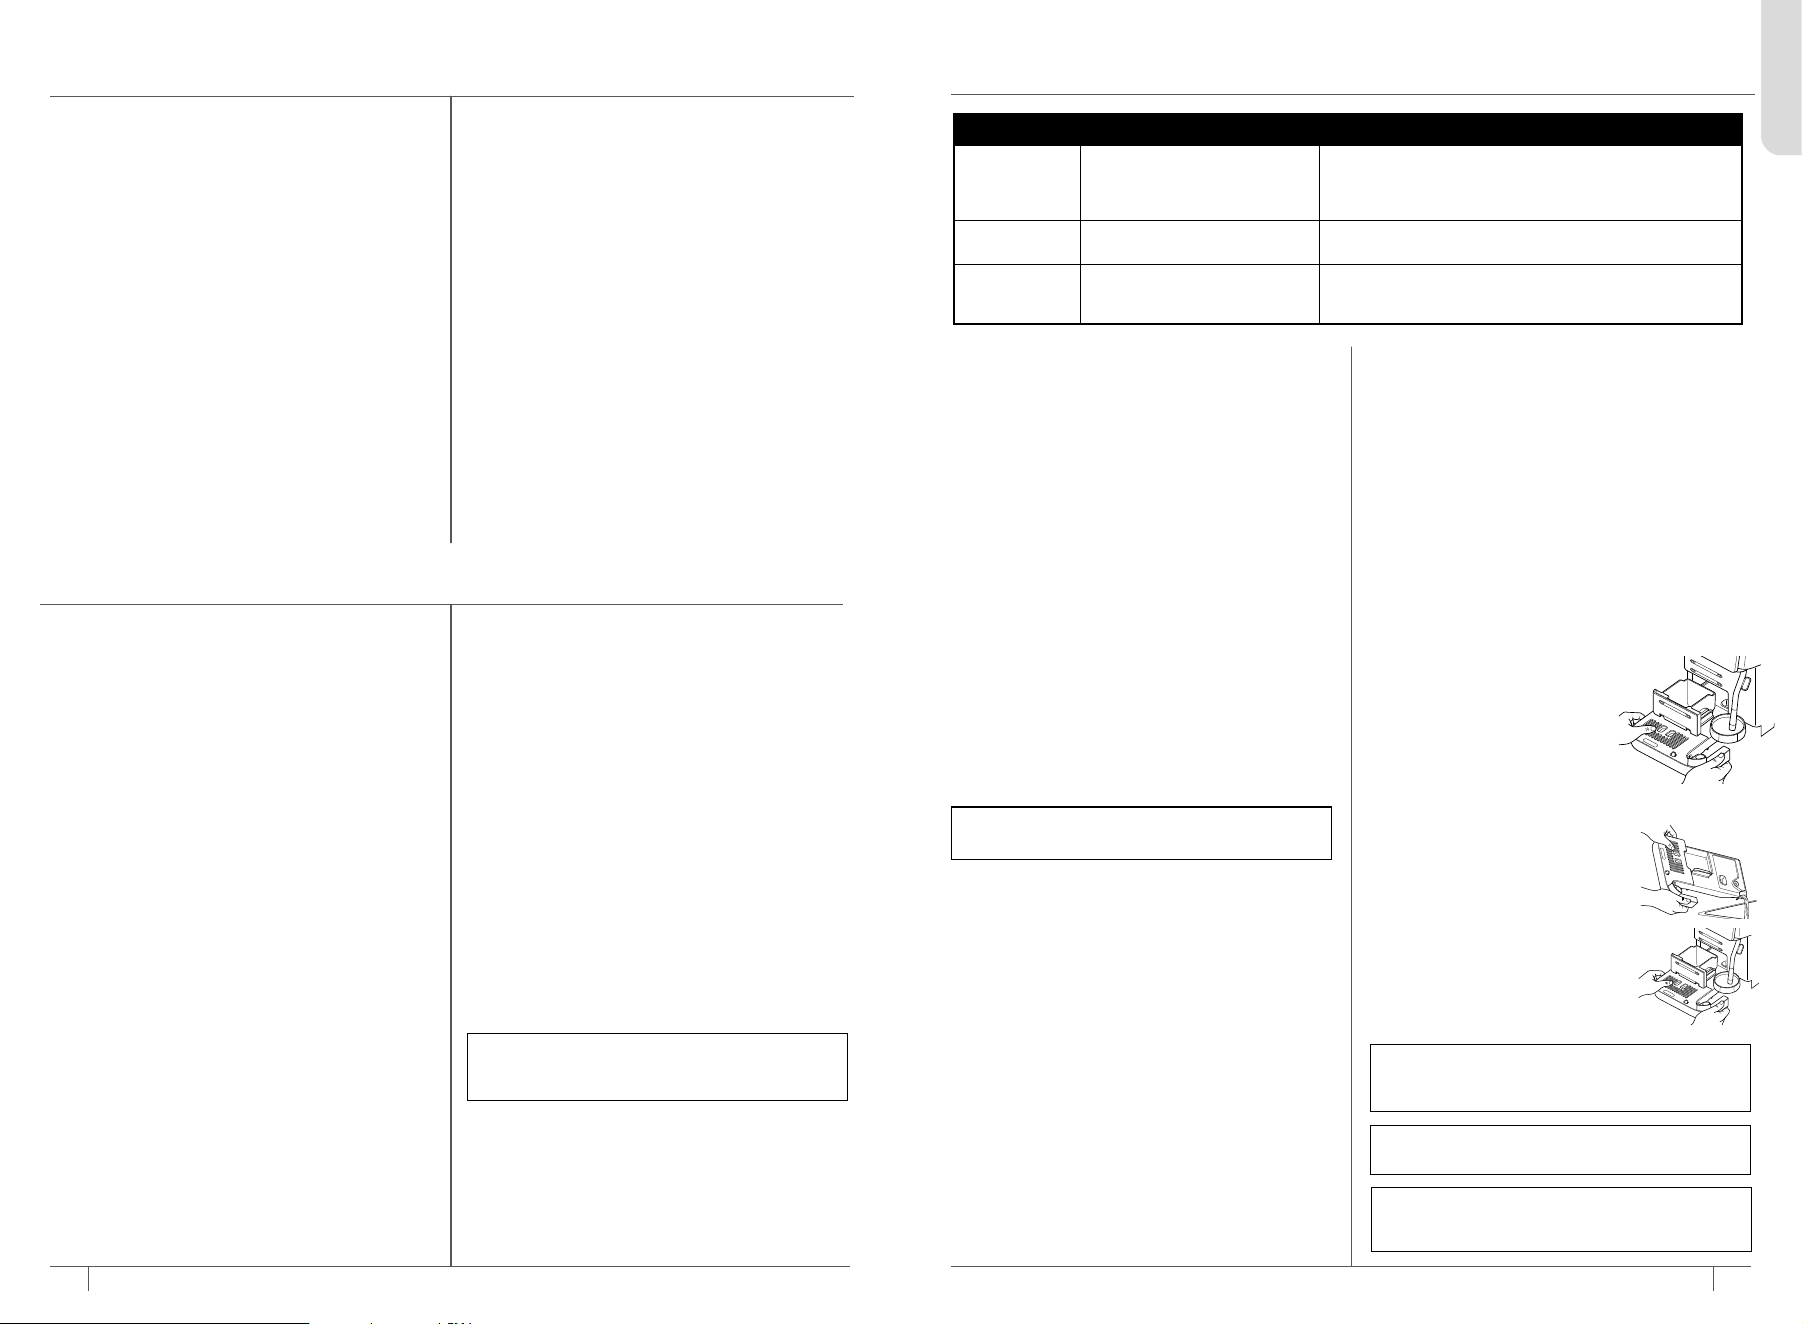
TEMPERATURE
There are several methods and practices to help
get your preferred temperature.
Temperature Adjustments
Low Temperature
Medium Temperature (default)
High Temperature
The temperature of the drink will aect the
extraction of the espresso and the flavor of your
drink. For best results and proper extraction,
we recommend a low or medium temperature
for darker roasts, and a medium or high
temperature for light roasts. If unsure of your
bean type, select Low Temperature.
CHOOSING THE RIGHT CUP
Ensure the cup you are using is appropriate for
the size of your drink. For a hotter drink, use
a cup that is a similar size to your drink. The
thickness of the material your cup is made of
will also aect the temperature of your drink.
For a hotter drink, use a cup made of thinner
material.
STRENGTH
If you find the brew is too weak or too strong for
your liking, you can use the strength adjustment
button.
Espresso Strength and Size Adjustments
Tallest, less concentrated:
4:1 water to grounds ratio
Taller: 3:5 water to grounds ratio
Tall: 3:1 water to grounds ratio
Default: 2.5:1 water to
grounds ratio
Short, more concentrated:
2:1 water to grounds ratio
Coee Strength Adjustments
Mild: Fewer beans will be ground
Default
Full Bodied
Strong
Bold: More beans will be ground
NOTE: It’s not recommended to top up your
beans (adding fresh beans on top of current
beans), as this can impact Grind iQ. Instead,
use all the beans currently in the hopper
and refill when empty, or switch to a second
hopper.*
NOTE: DO NOT add pre-ground coee to
bean hopper. For more info on using pre-
ground coee, refer to the Using Pre-Ground
Coee section.
NOTE: Take care to not overfill the hopper
with beans. Fill only to MAX line.
NOTE: You may notice when fitting your
hopper that it feels unsteady, or wobbles easily.
The hopper sits on the arm of a scale, which
has to be free moving so that the machine can
accurately measure how much coee is being
ground.
This wobbling is normal, however refrain from
pushing down too hard to avoid damaging the
delicate scale below the arm.
REMOVING THE SWAPPABLE HOPPER
1. Remove the lid.
2. Unlock the hopper and remove from the top
of the machine by lifting straight up (if using
a removable hopper*).
3. Before refilling, wipe down the inside of the
hopper with a microfiber cloth to remove any
residual oils. Do not use water.
4. If refilling, fill the hopper with whole beans.
5. Place the selected hopper back on the
machine and lock to secure, then replace
the lid.
PROFILES & SAVING CUSTOMIZATIONS
User profiles to save your customizations and
quickly get to your favorite drinks.
Each drink profile can save your customizations
for each individual drinks.
The machine will default to Profile 1 on first use.
To select the second profile, press the PROFILE
button. To enter guest mode (factory default
settings), press the PROFILE button again.
If you have made customizations to a drink that
you would like to save, they can be saved to the
active profile by holding down the PROFILE
button for 2 seconds until a confirmation beep
sounds.
Any time you save a customization for the same
drink, it will overwrite what is already saved in
that profile.
Any customizations that have been made and
not saved to a profile will not be remembered
if that drink is navigated away from or the
machine is switched o.
ENGLISH
NOTE: Adjusting your espresso brew
strength will aect your brew volume
output. Strengths 1 and 2 will have a larger
output than the default setting; use a larger
cup than normal.
1716
DAY-TO-DAY MAINTENANCE
sharkninja.mx
sharkninja.mx
IMMEDIATELY AFTER BREW CLEANING
•
Empty the drip tray and puck bin when the
orange empty indicator rises enough to
become visible, or whenever the machine
prompts on the control panel.
•
After you froth, wipe the wand with a damp
cloth before pushing it back into its down
position to initiate an auto-purge.
•
Periodically hand-wash or dishwash the drip
tray and puck bin and air dry thoroughly.
•
Periodically clean the outside of the machine
with a damp cloth.
CLEANING THE ACCESSORIES
Top-rack Dishwasher-safe Parts: Milk jug,
whisk, cup tray, and water reservoir.
Hand Wash Only: All drip tray components,
carafe
Brew unit: RINSE ONLY. DO NOT wash with soap.
Wipe to clean: bean hopper, internal cavity,
external surfaces.
CYCLE WHEN TO CLEAN HOW TO RUN
Purge
After every milk brew or steam
wand use (automatic start) or
as needed (manual start)
After a milk brew, push steam wand back into place to start
the auto-purge.
Press the PURGE button to initiate a manual purge.
Clean
Monthly or whenever the clean
light illuminates
Place a cleaning tablet in the pre-ground chute and run a
clean cycle by pressing the CLEAN button.
Descale When the descale light illuminates
Dissolve a packet of descale solution according to the
packaging instructions. Then run a descale cycle by pressing
the DESCALE button.
NOTE: DO NOT submerge non-dishwasher-
safe parts/accessories in water.
NOTE: The manual adjustment range may be
limited to safeguard against excessive motor
load caused by setting the grind too fine.
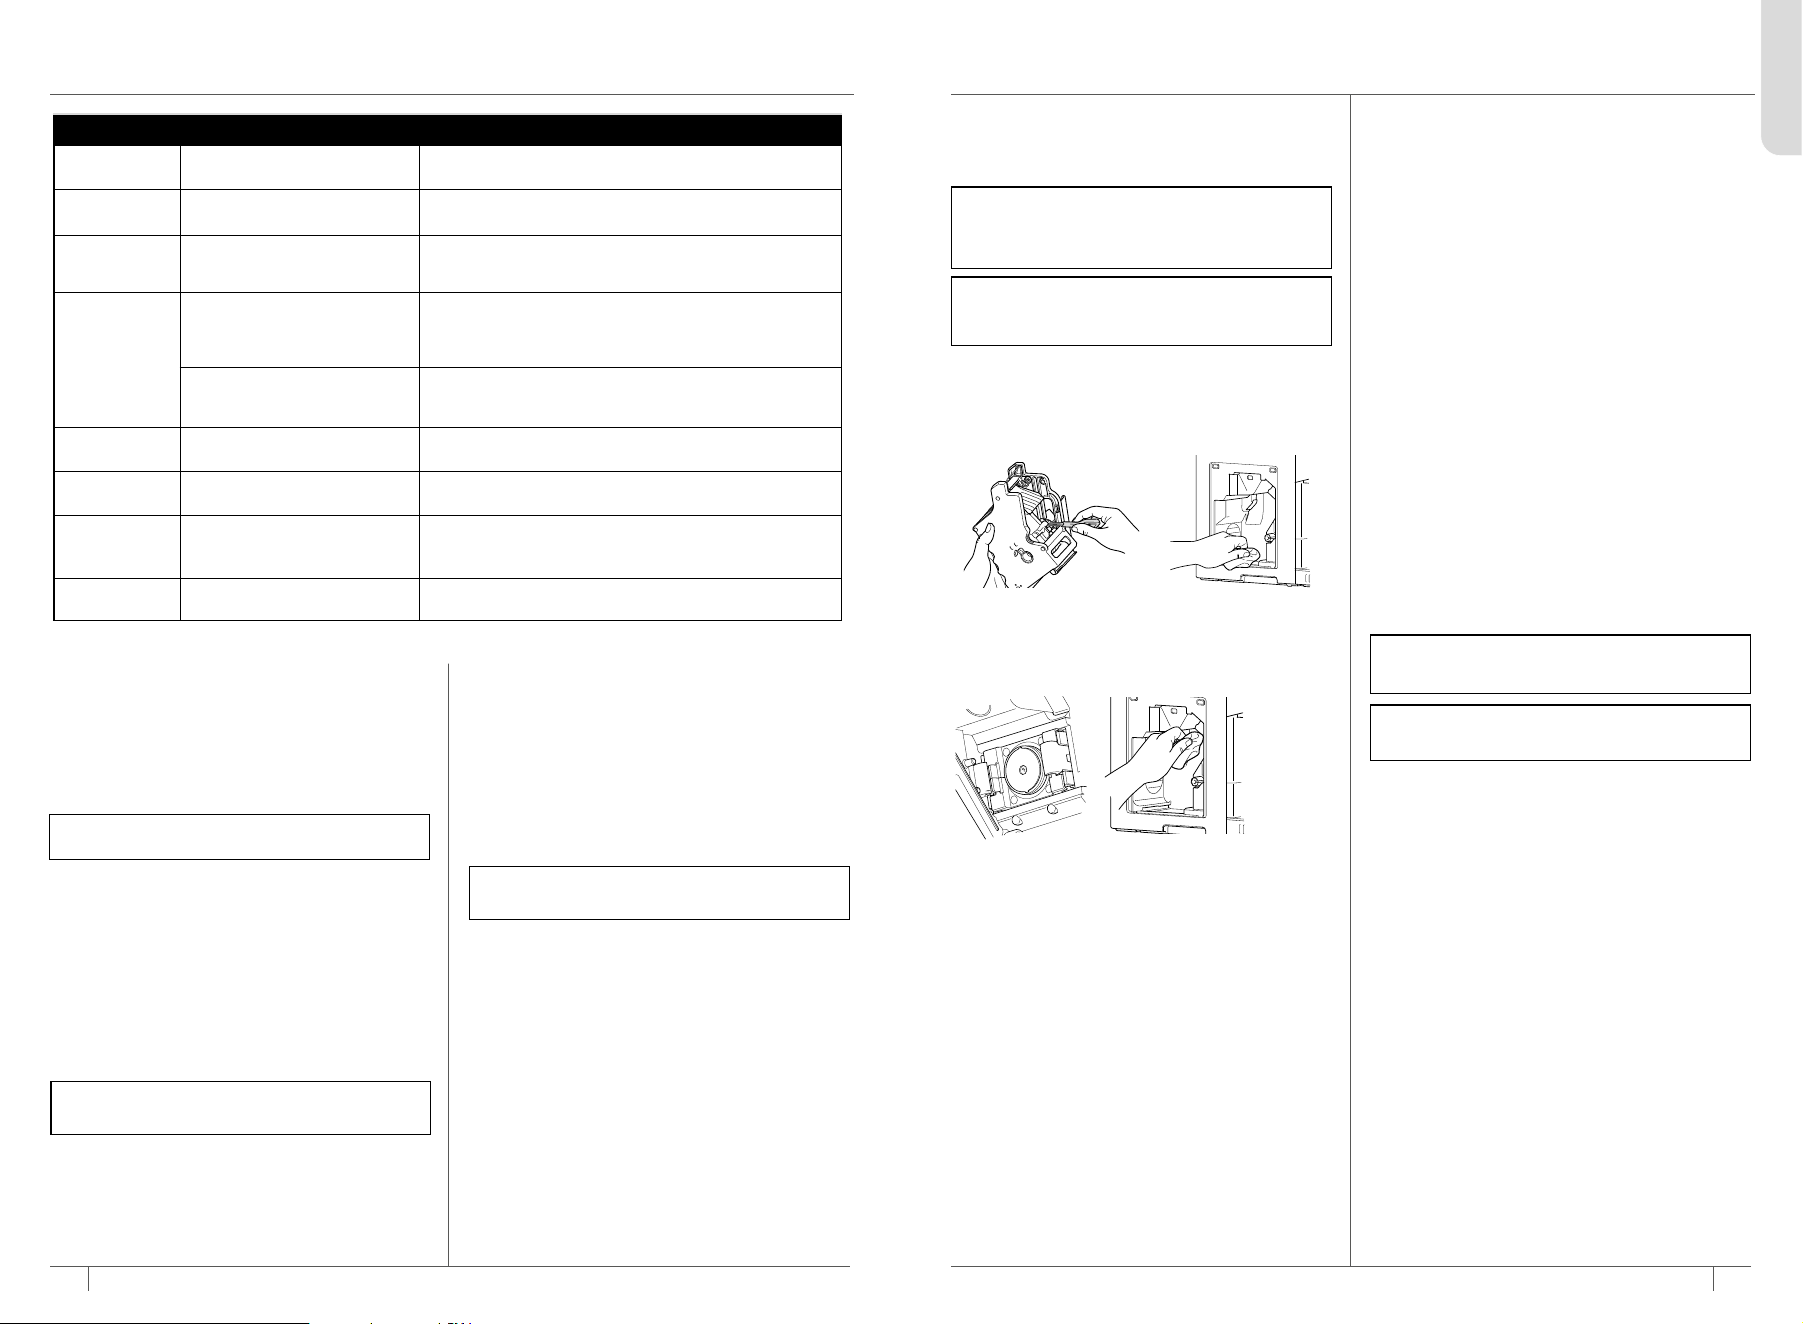
EMPTYING THE DRIP TRAY & PUCK BIN
As you brew, the drip tray will fill up. When the
orange empty indicator rises enough to be visible,
or the machine alerts to EMPTY TRAY, it is time
to empty the drip tray and puck bin. Always
empty and clean both the drip tray and puck
bin at the same time for optimal performance
and cleanliness.
Empty both the drip tray and the puck bin after
your last brew of the day.
The machine will enter standby 30 minutes after
the last brew and will perform a shutdown rinse.
Always empty drip tray after last brew if the float
is visible or the control panel indicates to empty.
Optionally, a vessel may be placed underneath
the coee spouts to capture the shutdown rinse.
1. Remove the drip tray and
puck bin assembly from
the machine by pulling tray
toward you.
2. Remove the puck bin from
the drip tray; empty and
clean out the puck bin.
Hand-wash the puck bin
after each empty to discourage any chance of
mold growth.
3. Carefully move the drip tray
to the sink and pour water out
through the pour spout.
4. Place the puck bin back on the
drip tray and insert drip tray
and puck bin assembly back
into the machine.
NOTE: Empty indicator is removable for
cleaning.
NOTE: When emptying the drip tray, wait at
least 5 seconds before re-inserting to clear
the alert.
NOTE: NEVER remove the drip tray when a
brew is in progress. This will cancel the brew
and may result in flooding.
SWITCHING OUT BEANS & HOPPERS
HOPPER SELECTION
These instructions only apply to a machine with a
removable hopper. Second hopper not included
with all models. Available for purchase on
sharkninja.mx.
When swapping to a second hopper, store the
first hopper with the lid on either in the storage
base (available for purchase at sharkninja.mx) or
in a cool, dry place.
Whenever a hopper is locked on the machine,
you’ll be prompted to confirm which hopper
is present. The hopper name is labeled on the
front of the hopper.
1. When a hopper is placed on the machine, the
control panel will display the last installed
hopper.
2. If needed, press the arrows to change the
hopper between HOP1 and HOP2.
3. Press the START button to confirm. The
machine will beep to confirm the selection.
It is recommended to run a Grind iQ cycle
whenever filling a hopper with new beans.
Refer to the GRIND iQ Cycle section to learn
more.
REMOVABLE HOPPER LABELLING
These instructions are only applicable to machines
with removable hoppers.
Your machine will come with 2 reversible labels,
with 1 & 2 on each side.
These labels slide into the front of the removable
hopper.
GRIND IQ
Run a GRIND iQ cycle whenever:
•
Current beans are outside of the optimal grind
size range
•
New beans are added to an empty hopper
•
Hoppers have been swapped
The GRIND iQ LED will illuminate during daily
use to show the status of GRIND iQ and how
close you are to the best-tasting espresso.
OFF: The grinder is calibrated
YELLOW: GRIND iQ cycle is required to
calibrate the grinder
The GRIND iQ cycle will run 2–3 espresso shots
to dial in the correct grind size for your beans.
This may take a few minutes.
1. Place a 14 oz (414 ml) cup underneath the
coee spouts.
2. Press the GRIND iQ button, then press
the START to begin a cycle; the LED will
illuminate yellow.
3. The machine will beep to indicate that
the cycle has started. The progress bar
will illuminate indicating the status of the
calibration. When finished, the machine will
beep again to indicate the cycle is complete;
remove the cup and dispose of the espresso.
After the machine beeps a second time,
remove the cup and dispose of the espresso.
4. The GRIND iQ LED will turn o to indicate it
has successfully calibrated.
ADJUSTING THE GRIND SIZE:
GRIND iQ will constantly monitor and adjust
the grind size to ensure the best-tasting brew.
However, if you are not happy with the taste of
your brew, you can oset the grind size to try
to improve it. This oset will be stored in the
machine memory and GRIND iQ will continue
to monitor and adjust as normal with this oset.
The oset is only saved for the drink style that is
currently selected on the display. To change for
multiple drink styles, the process needs to be
repeated with each one.
Taste is too bitter: Decrease grind size.
Taste is too sour: Increase the grind size.
1. Press SETTINGS button.
2. Use arrows to navigate to 11: Grind Size and
press START.
3. Use the arrow keys to select the oset you
like; +/-2 grind sizes are the options.
4. Press the START button to confirm the
selection.
ENGLISH
19
sharkninja.mx
18
sharkninja.mx
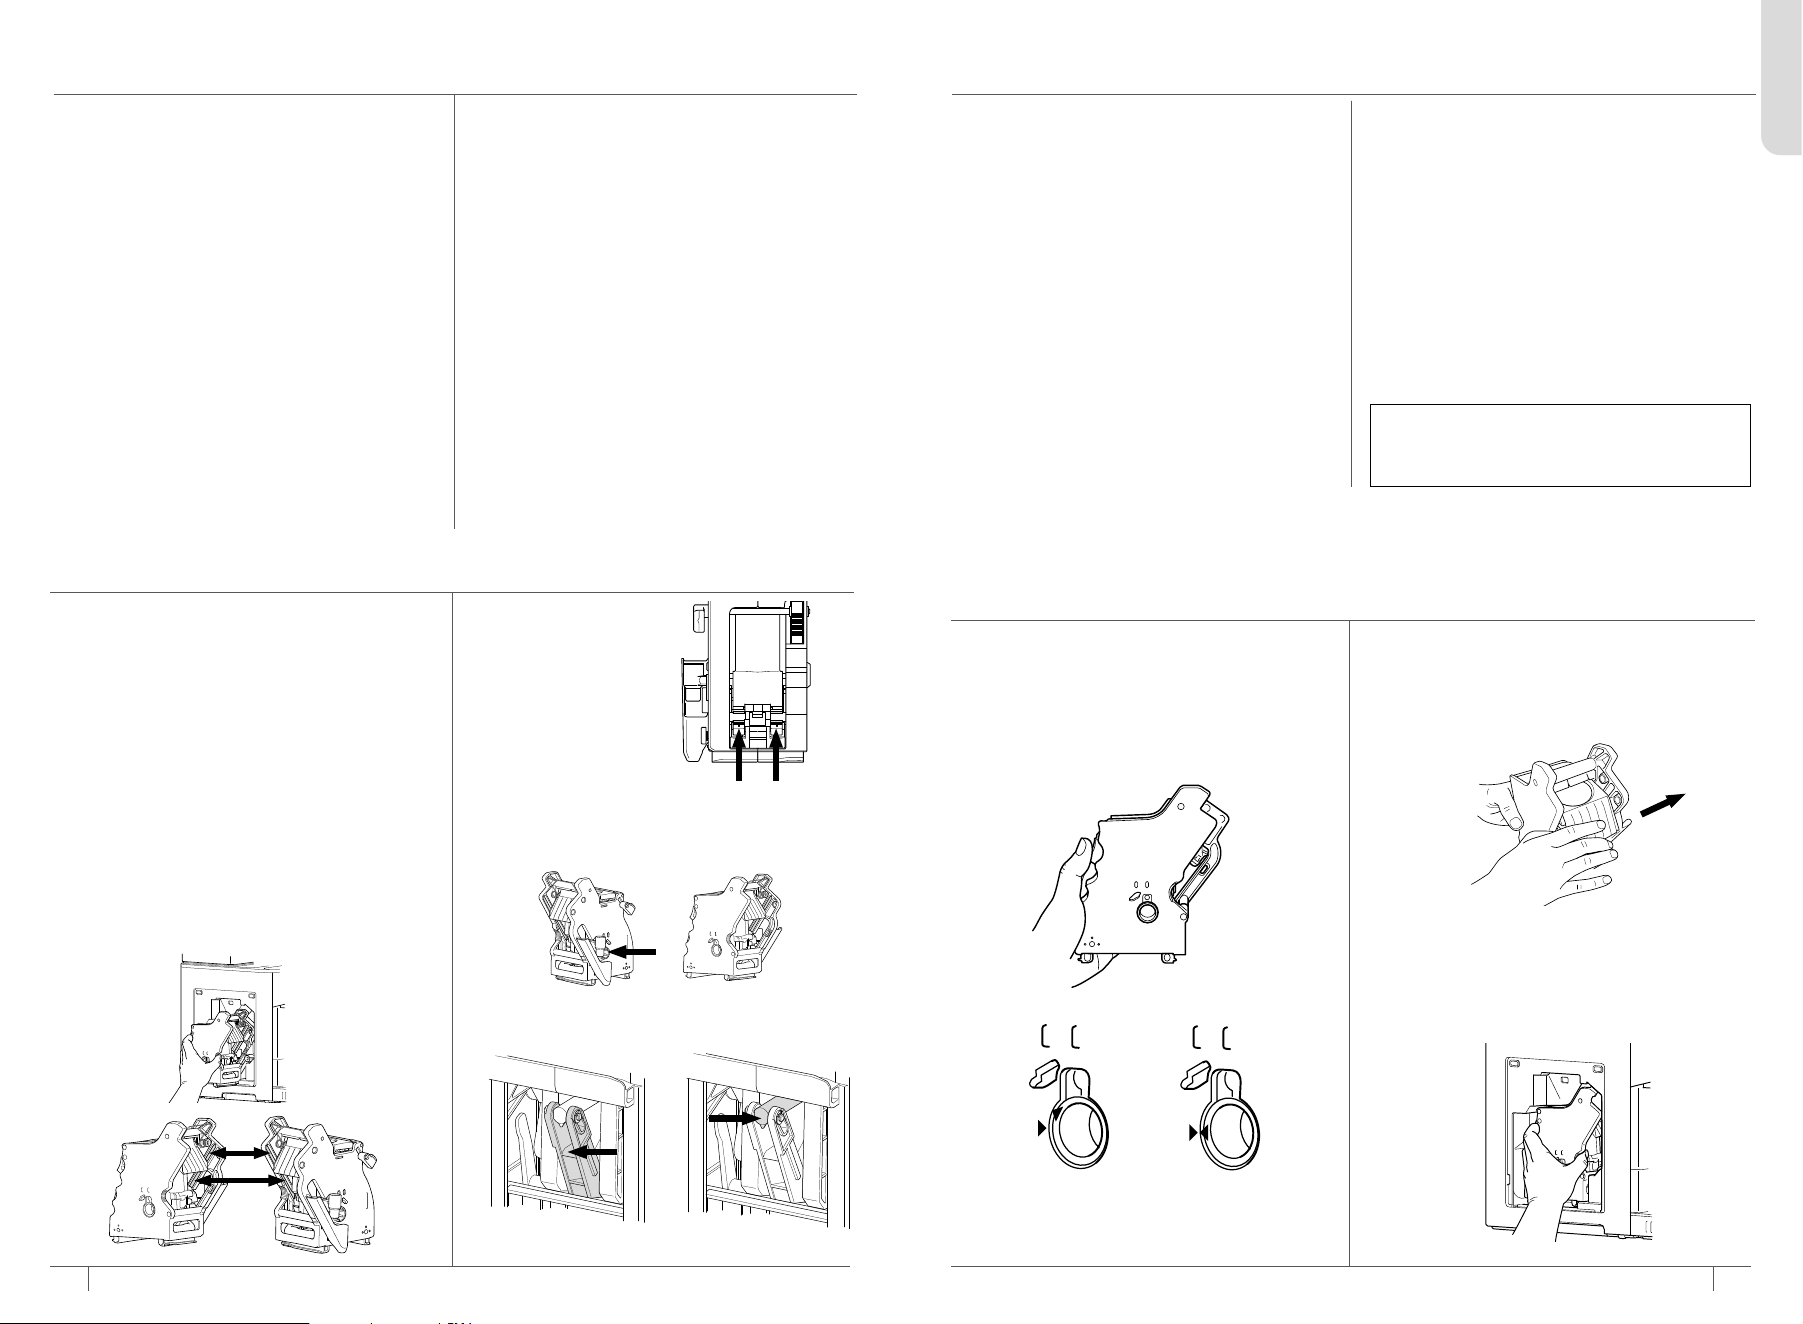
CLEANING & MAINTAINING
THE BREW UNIT
Rinse the brew unit once a month to maintain
cleanliness and avoid grounds buildup that could
lead to jams. The brew unit alert will illuminate
white whenever a cleaning is recommended.
Cleaning the Brew Unit
1. Open the maintenance door on the left side
of the machine to access the brew unit.
2. Align your fingers with the red outlined grip
points. Press the orange tab to release the
brew unit, then pull toward you. Continue
holding the brew unit by the defined grips for
the best handhold while cleaning.
3. Rinse the brew unit with water to clean away
any built-up grounds. DO NOT use soap, as
this will aect the lubrication.
4. Use the brush to dislodge any built-up
grounds still on the shower screen or the
rails. Rinse again if needed.
5. Allow the brew unit to fully air-dry before
replacing. For best results, let the brew unit
dry overnight. DO NOT dry with a cloth to
prevent fibers from collecting inside the brew
unit.
6. Replace the brew unit back into the machine
and replace the door.
To get a deeper clean of the brew unit, once a
month run a Clean Cycle after reinserting. For
more information, see the Clean Cycle section in
Descaling & Clean Cycle.
NOTE: It is safe to rinse the entirety of the
brew unit with water. DO NOT use soap.
NOTE: Turn o the machine and wait for the
shutdown rinse to complete.
NOTE: Brew unit and maintenance door
MUST be installed to operate the machine.
CLEANING THE INTERNAL CAVITY
Clean the internal cavity of the machine every
time you remove the brew unit for cleaning.
1. Remove the maintenance door and brew unit.
2. Use a dry cloth or the cleaning brush to
remove any residual grounds. Be sure to check
the side walls and top face of the cavity for
accumulated grounds.
3. Use a dry cloth to clean any grounds from
the tamper face; this is the perforated screen
located on the roof toward the front of the unit
(see diagram).
4. Replace brew unit and maintenance door.
NOTE: DO NOT allow either of the burrs to
come into contact with water.
NOTE: The screws only need to be snug.
DO NOT overtighten.
CLEANING THE CONICAL BURR GRINDER:
To prevent clogging and ensure the highest
quality output for daily use, it is recommended
to clean your conical burr grinder.
Removable Hopper
These instructions only apply to a machine with
has a removable hopper.
We recommend cleaning your conical burr
grinder weekly at a minimum. For dark
roast, decaf, and other oily bean types, it is
recommended to clean the grinder more often.
For less than daily use, clean your grinder
monthly at minimum or anytime you change
your beans.
1. Remove the protective hopper lid.
2. Unlock the hopper by turning the lock handle
counterclockwise and removing the hopper
from the machine.
3. Grip both ends of the arch on the burr carrier.
Then, turn the carrier counterclockwise and
lift out.
WARNING: Be careful when handling the burr
carrier. The burr grinder is sharp.
4. Clean the conical burr inside the machine
with the brush to remove any residual
grounds.
5. Refit the burr carrier into the machine by
inserting and turning clockwise.
6. Refit the hopper and lock by turning the lock
handle clockwise. Refit the protective hopper
lid.
7. Switch on the unit and allow it to run a rinse
cycle; this will ensure any dislodged grounds
are cleared out of the brew chamber.
CLEANING: PERIODIC MAINTENANCE
PART WHEN TO CLEAN HOW TO CLEAN
Milk Jug After each use
Hand-wash with warm, soapy water. Remove the whisk and
rinse.
*
Drip Tray
Every 3 days or when prompted
by the machine
Remove the drip tray by pulling it toward you, then tilt to pour
from the rear spout into the sink.
Puck Bin
Every 3 days or when prompted
by the machine
Remove from the drip tray and empty out the grounds.
Hand-wash with warm, soapy water.
Removable
Brew Unit
Monthly or when prompted by the
brew unit white LED alert
Rinse the brew unit under running water to dislodge any
residual grounds. Use the cleaning brush for any hard to reach
areas. After rinsing, run a clean cycle. See Descaling & Clean
Cycle section for instructions.
Every 2 months
Lubricate brew unit with food-safe grease after cleaning.
See Lubricating the Brew Unit section for more instructions.
Internal Cavity Monthly
Wipe down the inside of the machine with a damp cloth
whenever removing the brew unit to clean.
Pre-Ground
Chute
Check weekly if used
Check the chute for any buildup and clean with the
cleaning brush.
Bean Hopper
Before putting in a new bag of
beans
Wipe inside of the hopper with a cloth to remove oils from
beans. DO NOT use water, and ensure fully dry before refilling
and inserting on the machine.
Water Reservoir
Once or twice per month, or as
needed
Rinse with running water.*
NOTE: Always ensure the machine has been
switched o and it has completed a shutdown
rinse before opening the maintenance door
and going inside the machine.
NOTE: DO NOT use water or cleaning liquids to
clean the inside of the brew cavity as this may
damage the machine; use a dry cloth only.
ENGLISH
*These parts are also top-rack dishwasher safe.
2120
sharkninja.mx
sharkninja.mx
CLEANING THE HOPPER
NOTE: DO NOT use water or cleaning liquids
to clean the hopper as this may damage the
machine; use a dry cloth only.
Clean the hopper whenever refilling with new
beans to help ensure freshness and maintain
flavor quality.
Fixed Hopper
These instructions only apply to a machine with
a fixed hopper.
1. Turn o the machine and wait for the
shutdown rinse to complete.
2. Remove the hopper lid.
3. Use a dry cloth or the cleaning brush to
remove any residual grounds from inside the
hopper.
4. Replace hopper lid.
Removable Hopper
These instructions only apply to a machine with
a removable hopper.
1. Turn o the machine and wait for the
shutdown rinse to complete.
2. Remove the protective hopper lid.
3. Unlock the hopper by turning the lock handle
counterclockwise and removing the hopper
from the machine.
4. Use a dry cloth or the cleaning brush to
remove any residual grounds from inside the
hopper.
5. Use a dry cloth or the cleaning brush to
remove any residual grounds from inside the
hopper cavity.
6. Refit the hopper and lock by turning the lock
handle clockwise. Refit the protective hopper
lid.
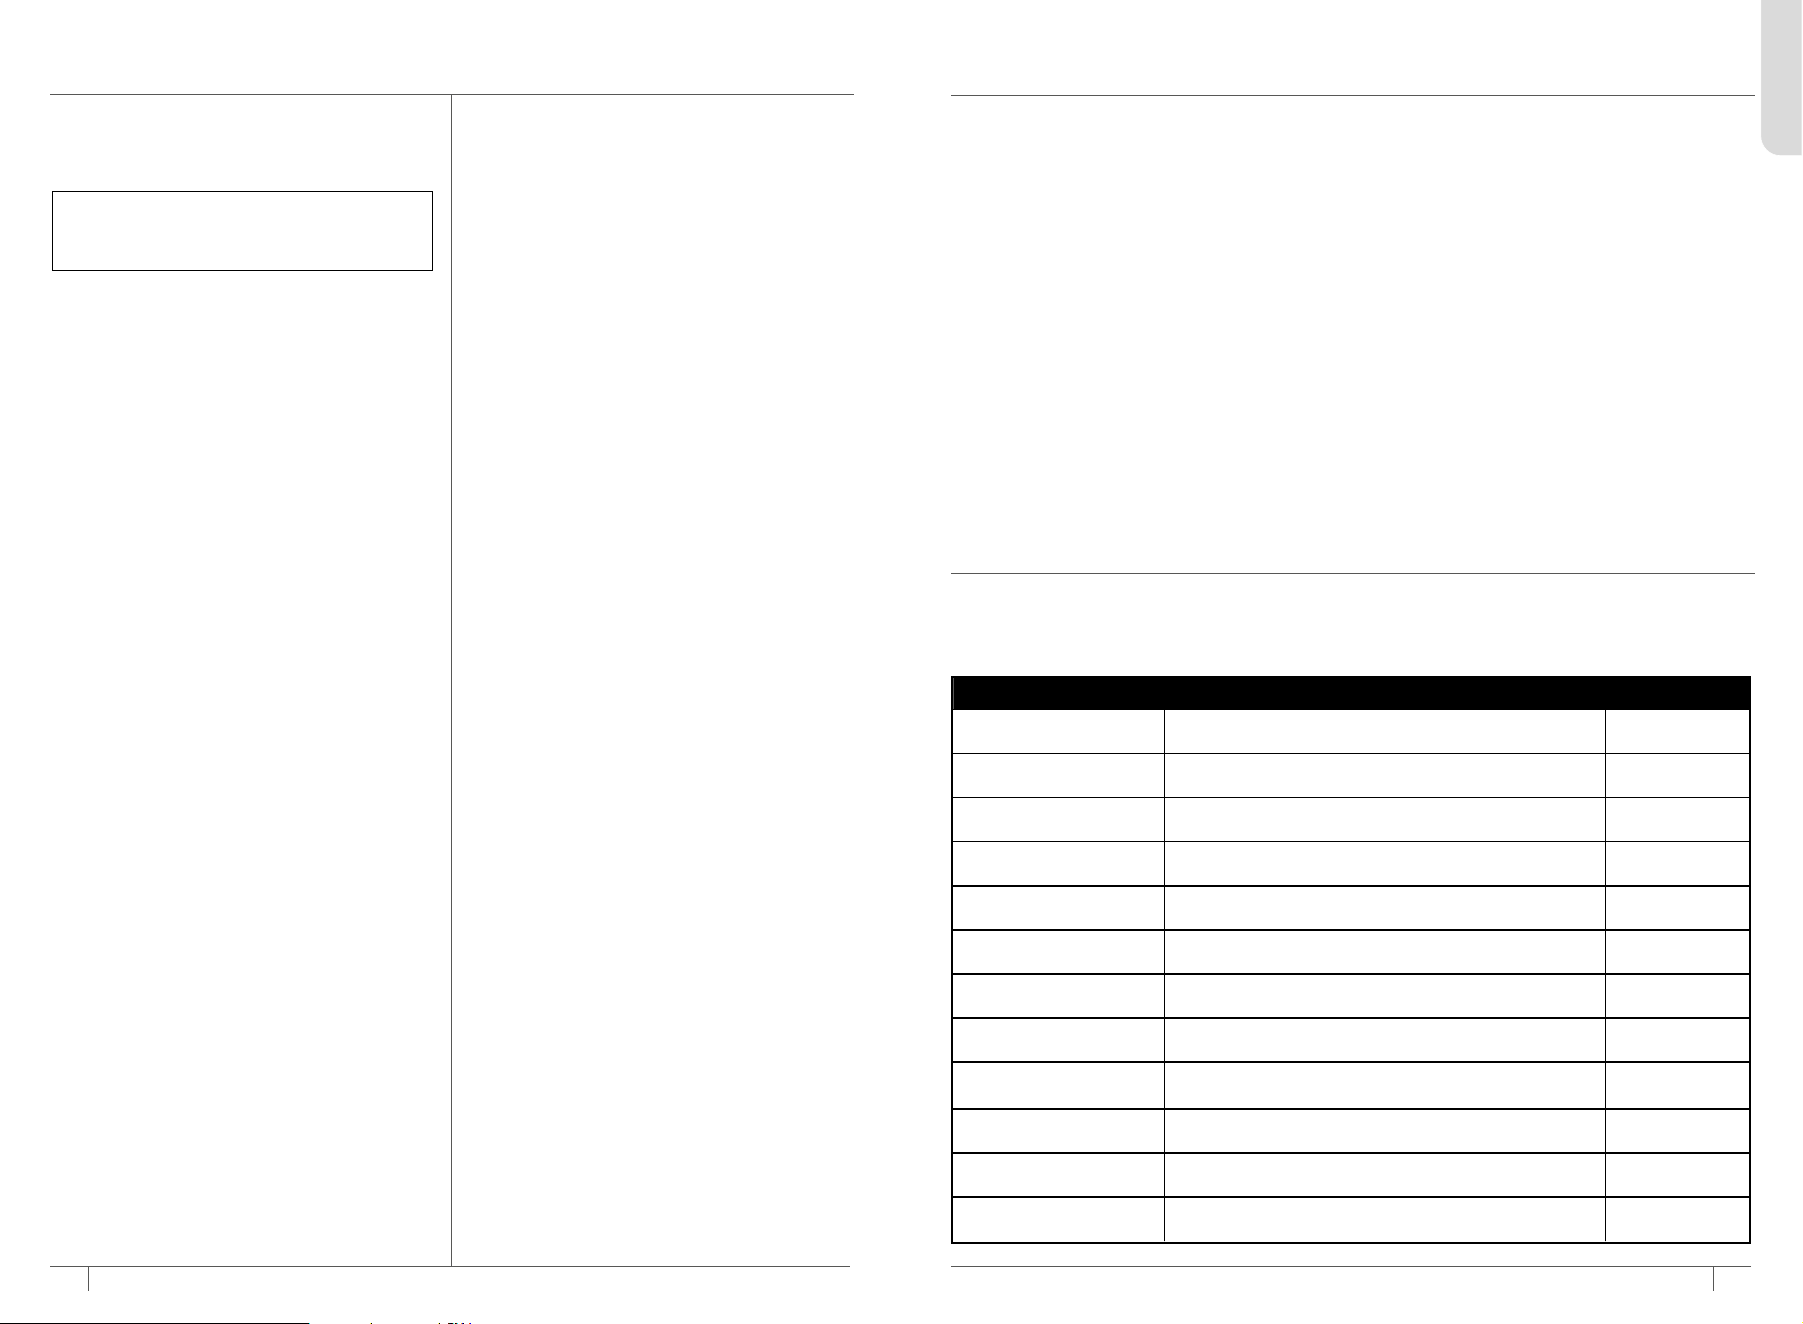
BREW UNIT HOME POSITION
The brew unit fits into the machine in only one
position. If you find that the brew unit won’t
seat properly, check first that it is in the “home”
position.
To confirm the brew unit is in the home position,
use the alignment arrows on the left side of the
brew unit:
Arrows Not Aligned
NOT IN HOME
POSITION
Arrows Aligned
IN HOME
POSITION
If you find the brew unit is not in the home
position, follow these steps to reset it.
2. If the shower screen is at the top of the
chamber, you may have to push more firmly
to get the arrows to align.
3. Refit the brew unit into the machine, ensuring
you hear a click as it latches into place.
1. Gently push the front part of the brew
chamber in the direction shown to
move it back.
BREW UNIT LUBRICATION
Every 2 months it is advised to lubricate the
brew unit. This is to ensure proper function to
deliver great coee and prevent any jamming or
other issues with the machine.
After rinsing the brew unit and dislodging any
grounds with the brush, allow the brew unit to
air-dry fully before lubricating.
Lubricate the brew unit using only the provided
grease by applying 3–5 small dots across the
highlighted surfaces in each of the 4 areas
shown below. (Replacement tubes are available
at www.sharkninja.mx.)
1. Left and Right Side Rails
Located on the inside faces when looking at
the front of the brew unit
LUBRICATING THE BREW UNIT
2. Rear Clips
Located on the rear of
the brew unit.
3. Socket (Left and Right Side)
These are the small holes on the left and
right sides of the brew unit.
4. Piston and Shaft
Located on the bottom of the brew unit
CLEANING: PERIODIC MAINTENANCE, CONT.
CLEANING THE STEAM WAND
Over time, material can build up in the steam
wand. This can slow down frothing and cause a
reduction in quality.
1. Remove the cap on the bottom of the
cleaning brush to access the needle.
2. Use the needle to remove any material from
the 4 holes in the steam wand tip.
3. For a deeper clean, unscrew the steam wand
tip. It can be soaked in water to help dislodge
any residue.
4. Use the needle to remove any material from
inside the steam wand and steam wand tip.
5. After cleaning, run a purge to clear out any
excess material.
Alternately, the wand and whisk can be
cleaned by filling the milk jug with water,
adding a drop of dish soap, and then
running a froth-only program on the THIN
froth setting. Be sure to wipe and rinse all
components after cleaning to remove any
soap residue.
CLEANING THE PRE-GROUND CHUTE
Check the pre-ground chute weekly for any
buildup that could enter the brew chamber and
aect brew quality.
1. Turn o the machine and wait for the
shutdown rinse to complete.
2. Open the pre-ground chute lid and remove
the scoop.
3. There is also a removable sleeve that can be
taken out to aid with cleaning.
4. Remove any residual grounds from the
scoop, sleeve, and chute area with a dry cloth
or the cleaning brush.
5. Replace the sleeve and scoop and shut the
lid.
6. Turn the machine on and allow it to run a
rinse cycle; this will ensure any dislodged
grounds are cleared fromthe brew chamber.
ENGLISH
23
sharkninja.mx
22
sharkninja.mx
DESCALING & CLEAN CYCLE
NOTE: If using a filter in your water reservoir,
please remove it before starting the descale
cycle. Water filter housing and inserts sold
separately at sharkninja.mx/accessories.
CLEANING: DEEPER CLEANING
Descaling
Time to complete: approximately 90 minutes
When the DESCALE light illuminates, you must
run a descale cycle. If a descale isn’t performed
after the light turns on, drink quality will diminish
and the machine may clog and stop working.
Descaling breaks down and removes limescale
and mineral buildup inside the machine. Doing
this will help maintain peak performance if
routinely performed with a descale solution
whenever the DESCALE light turns on.
1. Ensure the drip tray is completely emptied, as
some of the water brewed from the descale
cycle will be deposited into the drip tray. Not
emptying the drip tray may cause overflow.
2. Dissolve the provided Ninja descale powder
in a separate container with 37 fl oz (1 094 ml)
of water. Pour solution mixture into water
reservoir. OR Fill the water reservoir with
16 oz of white vinegar, then fill the reservoir
to the descale line with water.
3. Ensure milk jug is placed on the milk jug
platform with the steam wand inside.
4. Place an empty cup (at least 18 oz [532ml])
under the coee spouts. You may have to
remove the cup tray.
5. Press the DESCALE button, then press the
START button to start the descale cycle.
6. The machine will start the descale cycle.
The machine will flush solution through
the steam wand and coee spouts for
approximately 90 minutes. The machine
will count down the remaining time on the
control panel.
7. The machine will beep indicating when the
descale cycle is complete.
8. Handle the drip tray and milk jug with
caution, as there will be water in each.
9. Empty the contents of each and hand-wash
with warm, soapy water to remove any
solution that could aect the flavor of your
coee.
10. Fill the reservoir with fresh water up to, but
not exceeding, the max fill line.
11. Reinsert the drip tray back on the machine.
Do not install the milk jug.
12. Flush the coee spouts by running a pre-
ground 12 oz (355 ml) DRIP COFFEE brew.
DO NOT put any grounds in the machine.
This will flush the system with clean hot
water. Discard the contents.
13 . Then, with the milk jug uninstalled, flush the
steam wand by pressing the PURGE button.
Clean Cycle
Time to complete: approximately 3 minutes
A clean cycle flushes out residual oils or
grounds that are built up in and around the
coee spouts and brew unit. The CLEAN light
will automatically illuminate to indicate when a
clean cycle is required. You may also run a clean
cycle if you notice a change in brew quality.
The clean cycle requires a cleaning tablet
(also included and available for purchase on
sharkninja.mx/accessories).
Follow these steps to run a clean cycle:
1. Ensure the drip tray is completely empty as
the water brewed from the clean cycle will
be deposited into the main drip tray. Not
emptying the drip tray may cause overflow.
2. Fill the water reservoir up to, but not
exceeding, the max fill line.
3. Press CLEAN on the control panel.
There may be some noise as the brew unit
moves into position.
4. Open the pre-ground chute and place
one cleaning tablet in, ensuring that it falls
down into the brew chamber.
5. Close the pre-ground chute lid.
6. Press the START button to begin the
clean cycle.
7. The machine will start the process of
dissolving the tablet to clean the brew unit
and depositing the water and sediment from
the clean cycle into the drip tray.
8. The clean cycle will take approximately 3
minutes to complete. The machine will beep
when the clean cycle is complete.
9. Remove the drip tray with caution and
empty. Hand-wash with warm, soapy water.
10. Switch o the machine and allow it to
perform a shutdown rinse. Then remove the
brew unit and rinse with clean water. Allow
to air-dry fully before refitting.
ADDITIONAL SETTINGS
SETTINGS FUNCTION SUB MENU
1. BEEPS Turns sound on or o ON / OFF
2. ECO
Turning this on stops the machine from keeping warm
after a brew
ON / OFF
3. RESET UNIT Restores all variables to factory reset YES / NO
4. FROTH TEMP Adjust steam temperature during froth LOW / MID / HIGH
5. CLEAR PROFILE 1
Clears all saved drinks and resets to
default variables
YES / NO
6. CLEAR PROFILE 2
Clears all saved drinks and resets to
default variables
YES / NO
7. MANUAL RINSE Forces a Rinse Cycle to run YES / NO
8. RESET GRIND iQ Resets GRIND iQ YES / NO
9. HARD WATER Changed the water hardness setting HD 0-5
10. GRINDER PURGE Grind all of the beans left in the hopper YES / NO
11. GRIND SIZE Adjusts grind size +/-2 from the current size based o GRIND iQ +/- GRIND SIZE
12. HOPPER SELECT Enables hopper select ON/OFF
The additional settings menu oers additional cleaning cycles and options to customize your machine.
The additional settings menu is found by pressing the SETTINGS button. Navigation and selection is
with the arrow keys, and confirmation is with the START button.
BREWING BEST PRACTICES
• For best results, use freshly roasted coee beans.
• When purchasing coee beans, it’s best to buy a bag with a “Roasted On” date rather than a
“Best Before” date to ensure quality and freshness.
• We recommend you use any coee beans within 20 days of the “Roasted On” date.
• When changing to a dierent bean, fully remove previous beans before proceeding. See the
Switching Out Beans section for more information.
• To increase the brew temperature, run a water flush before making your drink.
• Keep your machine clean by using the brush to wipe o any debris.
• Use filtered water.
• Run a GRIND iQ cycle whenever switching out beans.
• Keep machine on a stable surface.
• Empty drip tray frequently.
• After you grind and before you start brewing, the machine will start to heat up. Place your mug on
the heated cup tray to warm it up.
ENGLISH
25
sharkninja.mx
24
sharkninja.mx
ALERTS & ERROR CODES
ERROR # ALERT ISSUE DESCRIPTION POTENTIAL FIX
DOOR
Brew
unit icon
Door
The mainte-
nance door is
removed
Check to see that the brew unit door on the left-hand
side of the machine is correctly fitted.
HOP JAM
Install
Hopper
Icon
Hopper
Jam
The dosing
mechanism
is jammed
Remove the hopper and empty out all of the beans.
Ensure that the dosing ring (the segmented wheel at
the bottom of the hopper) is free to rotate.
BURR JAM
Add
Beans
Icon
Burr Jam
The grinder
is jammed
Remove the hopper and attempt to unblock the
burrs—refer to the Cleaning the Conical Burr Grinder
section.
ERROR # FUNCTION INDICATION POTENTIAL FIX
Er: 33 Grinding
Beep to warn user but
no alert icon
Check for any other alerts. If none are shown and the
grinder does not start, and you do not hear any
noise from the machine, turn o your machine
and allow the grinder motor to cool for 5 minutes
before attempting to initiate another grind.
Er: 38 Grinding
Beep to warn user
but no alert icon
If you touch the bean hopper during grinding, the
machine will beep and pause the process. The
machine will auto-start again when it detects it is
no longer being touched. If the error will not clear,
the grinder may be clogged or blocked and requires
cleaning. Refer to Cleaning the Conical Burr Grinder for
instructions.
Er: 54 Frothing
Beep to warn user
but no alert icon
If the steam wand is moved during frothing, the ma-
chine will pause. Ensure the steam wand is in the down
position. Once the machine detects this, it will resume
the process.
OTHER ALERTS
ERROR CODES
For any other Er codes, switch o the machine and contact Customer Service at +52 800 283 3473.
ENGLISH
ALERT COLOR MEANING ACTIONS
ADD
WATER
Orange
Machine has
detected there
is not enough
water in the
reservoir.
• Ensure there is water in the reservoir. If the reservoir
is empty, add fresh water to the reservoir and then
press START to resume the brew.
• If the reservoir is filled with water, remove and
reseat the reservoir and then press START to
resume the brew.
ADD
BEANS
Orange
Machine has
detected there
are not enough
beans in the bean
hopper.
• Check if there are enough beans in the bean hopper to
make your drink.
• If there are beans in the bean hopper, and you are
getting an ADD BEANS notification, unplug the machine
and gently push the beans down toward the burrs.
BREW
UNIT
Orange Brew unit error
Step 1: Check that maintenance door is completely
shut. If shut continue to step 2.
Step 2: Remove and reinstall brew unit, ensuring that
it is fully locked in place.
INSTALL
TRAY
Orange
Machine not
detecting the
drip tray
• Ensure that the drip tray is fitted and pushed all the
way into place.
EMPTY
TRAY
Orange
The drip tray and
puck bin require
emptying
• Remove and empty the drip tray and puck bin.
INSTALL
HOPPER
Orange
The machine is
not detecting
the bean hopper
• Lock bean hopper in by rotating handle clockwise.
• If issue continues, unlock the hopper by turning the
handle counterclockwise. Lift the bean hopper o
the base and reseat it firmly onto the base. You may
need to clear beans from the top of the grinder to
seat the hopper properly. Lock the bean hopper by
turning the handle clockwise.
INSTALL
JUG
Orange
The machine is
not detecting
the milk jug
• Ensure milk jug is on platform when frothing.
• Make sure both the bottom of the jug and milk jug
platform are dry and clean.
RINSE
White
Machine is
performing
a startup or
shutdown rinse
No action required, this is an automatic program.
ALERTS
ALERT COLOR MEANING ACTIONS
GRIND iQ *
Yellow
Grinder needs to be
calibrated
• Run a GRIND iQ cycle. Refer to the Grind iQ
section.
CLEAN*
Orange
Machine requires a
clean cycle
• It is time to run a clean cycle. Refer to Running
a Clean Cycle in the Cleaning & Maintenance
section.
DESCALE*
Orange
Machine requires
descaling
• It is time to descale the machine. Refer to
Descaling in the Cleaning & Maintenance
section.
PURGE*
White
Steam wand purge
is needed or in
progress
• A solid white light indicates a purge is needed,
press PURGE to start.
• A pulsing light indicates a purge is in progress.
ALERTS (CONT.)

26 27
sharkninja.mx
sharkninja.mx
2726
Why is there no water coming out of the spouts?
Several factors could aect the volume of water dispensing from the spouts:
• The machine prepares the froth before dispensing the brew.
• The machine is warming up/reaching the operating temperature: Please allow a short time for the
machine to warm up before it dispenses.
• The grind size is too fine: run a Grind iQ cycle to ensure the machine is properly calibrated.
• Brew chamber cleanliness: remove and clean the brew unit to remove any residual grounds that could
impede the flow.
• Check the display to see if there is an alert for fill water / descale / clean.
• Check to see if there is water in the reservoir.
• The machine needs to be descaled: Follow the instructions in the Cleaning & Maintenance section.
Why is the espresso stream small/flowing slowly?
There could be several reasons behind this.
• The grind size is too fine: run a Grind iQ cycle to ensure the machine is properly calibrated.
• Brew chamber cleanliness: remove and clean the brew unit to remove any residual grounds that could
impede the flow.
• The machine needs to be descaled: Follow the instructions under the Cleaning & Maintenance section.
Why is the espresso stream flowing very fast?
• The grind size is too coarse: run a Grind iQ cycle to ensure the machine is properly calibrated.
Frothing does not start.
• Machine has not reached operating temperature: Please allow a short time for the machine
to warm up before frothing begins.
• Check for any alerts on the display; these could indicate the following:
- Not enough water in the reservoir: Ensure the water reservoir is filled up to the min. line.
- The water reservoir is not seated firmly: Check that the water reservoir is firmly seated in its place
on the side of the machine.
- Wand is in correct position: Ensure the steam wand is inserted into the milk jug, with the milk jug
properly seated on the platform.
- Not enough milk in the milk jug: Ensure milk is filled up to the min. line.
Little to no output.
• Use brush to clean the grinder outlet above brew unit, clean pre-ground chute, and clean burrs if the
unit has a removeable hopper. See Cleaning the Conical Burr Grinder section for reference.
My grinder is jammed.
• The grinder becomes jammed when the machine is unable to grind due to an obstruction.
• See the Cleaning the Conical Burr Grinder section on how to clean the burrs.
My grinder is clogged.
• The grinder may have a buildup of residue or grounds.
• See the Cleaning the Conical Burr Grinder section on how to clean the burrs.
Why am I not getting any crema?
• The grind size is too coarse: Run a Grind iQ cycle to ensure correct calibration.
• Coee beans are not fresh: Bean freshness will impact the crema quality. When purchasing coee
beans, it’s best to buy a bag with a “Roasted On” date rather than a “Best Before” date to ensure
quality and freshness. Use coee beans within 20 days of the “Roasted On” date.
• Brew machine may be clogged/holes are blocked: Remove and clean the brew machine.
• Run a clean cycle to flush out the system.
Why does the drip tray fill quickly?
• To ensure the machine maintains the ideal pressure for espresso, some water will bypass into the main
drip tray during a brew. This is normal.
• The machine will automatically purge water from the steam wand into the main drip tray after each
froth. This is to clean the inside of the steam wand.
• On start up and shut down, the machine will perform a short rinse to clean and prime the system.
TROUBLESHOOTING GUIDE
Why does the machine make a pulsing/thumping sound while brewing?
• Not enough water in the reservoir: Ensure the water reservoir is filled up to the min. line.
• The water reservoir is not seated firmly: Check that the water reservoir is firmly seated in its place on
the back of the machine.
• If the reservoir has water filled over the min. line and is seated firmly, some water pump noise is
considered normal.
• You may also hear this noise while frothing. This is normal.
Machine is leaking.
• The machine will automatically purge water from the steam wand into the main drip tray after each
froth. This is to clean the inside of the steam wand.
• The machine will automatically run a short start up and shutdown rinse.
• Drip tray is full: Check the empty indicator to see if you need to empty the main drip tray. Follow the
instructions in the Cleaning & Maintenance section.
• The drip tray is not installed correctly, ensure it is fully inserted.
• The water reservoir is not seated firmly: Check that the water reservoir is firmly seated in its place on
the back of the machine.
• Check for any errors on the display.
• O-ring seals need to be replaced: Call Customer Service at +52 800 283 3473.
Machine has no power.
• Ensure the machine is plugged into a working socket.
• After plugging the machine in, press the POWER button.
• To save power, the machine will automatically shut o after 30 minutes.
There is no coee coming from the spouts, only water.
• Check if you have beans in the bean hopper.
• If there are beans in the bean hopper and you are getting an ADD BEANS notification, unplug the
machine and gently push the beans down toward the burrs.
• Ensure the bean hopper is securely and properly inserted.
• The grinder is clogged or blocked and requires cleaning—refer to the Cleaning the Conical Burr
Grinder section.
• Remove and clean the brew unit to clear any obstruction.
Grinder is making a loud / unusual noise.
• If the grinder is making a loud noise, it could be due to unintended debris. Use only whole beans in
the grinder and avoid putting cold or frozen beans in.
• Dierent roast types and dierent beans will create dierent grinding noises.
Milk froth is not hot enough.
• The milk froth temperature is dependent on the froth style selected. COLD FOAM, denoted by a
snowflake next to the milk jug, will not get hot.
• Steam wand is clogged.
- Remove tip of wand with the wrench on the brush.
- Use needle on the bottom of cleaning brush to clean inside of wand.
• The Additional Settings menu oers options to customize the froth temperature and is accessible
through menu 4: FROTH TEMP. See the Additional Settings section for more information.
Milk froth is too thin or thick.
• Check that the whisk is fitted in the bottom of the jug.
• Change the froth setting using the froth dial. Refer to the Frothing section for more information on
froth settings.
• Milk type: Dierent milks have dierent fat contents. The higher the fat content of the milk, the thicker
the froth will be.
• Dairy vs. Plant-Based: To improve the overall quality of the froth, select MILK (dairy) or PLANT-BASED
with the MILK TYPE button to match the milk type you’re using.
• For additional froth information, refer to the Best Frothing Practices section.
ENGLISH
2928
TROUBLESHOOTING GUIDE, CONT.
sharkninja.mx
sharkninja.mx
To order additional parts and accessories, visit sharkninja.mx/ninja-parts-accessories or contact
Customer Service at +52 800 283 3473.
REPLACEMENT PARTS
My drink is smaller/larger than expected.
• If you’re brewing an espresso drink, you can change the grounds-to-water ratio by using the strength
settings. Please refer to the Additional Settings section.
• If you’re brewing a drip coee drink, select the desired size using the SIZE button before grinding.
• Brew unit may be clogged. Ensure you are removing and cleaning your brew unit on a monthly basis
to prevent blockages.
• The machine needs to be descaled: Follow the instructions in the “Descaling & Clean Cycle” section.
My drink is too bitter.
• Decrease the grind size oset. See the Adjusting the Grind Size section.
• Decrease the brew temperature: Use the TEMP button on the display to increase the temperature
setting of your brew.
• Try experimenting with dierent roasts and bean types to find one that suits your taste.
My drink is too acidic.
• Increase the grind size oset. See the Adjusting the Grind Size section.
• Increase the brew temperature: Use the TEMP button on the display to increase the temperature
setting of your brew.
• Try experimenting with dierent roasts and bean types to find one that suits your taste.
Coee is not hot enough.
• Preheat the machine: run a pre-ground coee brew without putting any pre-ground coee in.
This will run hot water through the system.
• Preheat the cup: Rinse the cup under hot water before brewing to increase the temperature
of the brew.
• Adjust temperature: Increase the temperature of the brew by using the TEMP button on the control panel.
• Use heated froth settings: All froth settings are heated except cold foam, which is denoted with a
snowflake.
• The machine needs to be descaled: Follow the instructions in the Cleaning & Maintenance section.
Brew unit won’t install into machine.
• Ensure the brew unit is in the “home” position. See the Brew Unit Home Position section.
• The tamper is in the incorrect position. Do not use the machine, and contact Customer Service.
Er
• If the control panel displays “Er” and then a number (ex. “Er 03”), contact Customer Service at
+52 800 283 3473
.
ENGLISH
ONE (1) YEAR LIMITED WARRANTY
NJA_1_YR_LMTD_WRNTY_MX_ENG_CO
The One (1) Year Limited Warranty applies to purchases made of the product (“Original
Product”) in Mexico from authorized retailers of SharkNinja Mexico S. de R.L. de C.V.
(Av. Paseo de la Reforma No. 265 piso 16-1601 301, Colonia Cuauhtemoc, Cuauhtemoc,
C.P. 06500, Mexico City).
You can make the warranty e ective with SharkNinja Mexico S. de R.L. de C.V. located at
Av. Paseo de la Reforma No. 265 piso 16-1601 301, Colonia Cuauhtemoc, Cuauhtemoc,
C.P. 06500, Mexico City.
You can obtain the parts, components, consumables (if applicable) and accessories of
the Original Product through SharkNinja Mexico S. de R.L. de C.V located at Av. Paseo de
la Reforma No. 265 piso 16-1601 301, Colonia Cuauhtemoc, Cuauhtemoc, C.P. 06500, Mexico
City.
SharkNinja warrants that the Original Product shall be free from defects in material and
workmanship for a period of one (1) year from the date of purchase when it is used
under normal household conditions and maintained according to the requirements
outlined in the Owner’s Guide, subject to the following conditions and exclusions:
What is covered by this warranty?
The Original Product and/or non-wearable parts and components deemed defective, in
SharkNinja’s sole discretion, will be repaired or replaced up to one (1) year from the
original purchase date.
In case of repair or replacement of only some of the parts, the warranty period for these
parts is one (1) year from the time of replacement, and the rest of the Original Product
continues with the original warranty period.
What is not covered by this warranty?
Normal wear and tear of wearable parts (such as blending vessels, lids, cups, blades,
blender bases, removable pots, racks, pans, etc.), which require regular maintenance
and/ or replacement to ensure the proper functioning of your Original Product, are not
covered by this warranty.
Damages caused when the unit has been used in conditions di erent from normal.
Damages caused when the unit has not been operated in accordance with the
instructions.
Defects caused by repair persons not authorized by SharkNinja. These defects include
damages caused in the process of shipping, altering, or repairing the SharkNinja product
(or any of its parts) when the repair is performed by a repair person not authorized by
SharkNinja.
PRODUCT: MODEL:
INVOICE #: BRAND:
NO. SERIES: PURCHASE DATE: BRAND SEAL:
How to get service and initiate a warranty claim
If your Original Product fails to operate properly while in use under normal household
conditions within the warranty period, visit https://www.ninjakitchen.mx/ for product
care and maintenance self-help. Our Customer Service Specialists are also available
at +52 800 283 3473 to assist with product support and warranty service options.
SharkNinja will cover the cost for the customer to send in the unit to us for repair or
replacement.
This warranty gives you specifi c legal rights, but does not exclude you from asserting
other rights you may have under any applicable law.
ADVERTENCIA
Para reducir el riesgo de lesiones, incendios, descargas eléctricas o daños a la propiedad, siempre se deben acatar las precauciones
básicas de seguridad, incluidas las siguientes advertencias numeradas e instrucciones posteriores. No utilices la máquina para otro
uso que no sea el previsto.
LEE Y GUARDA ESTAS INSTRUCCIONES
NOTES • NOTAS
sharkninja.com
ESPAÑOL
INSTRUCCIONES IMPORTANTES DE SEGURIDAD
LEE DETENIDAMENTE ANTES DE USAR • SOLO PARA USO DOMÉSTICO
Lee todas las instrucciones antes de usar tu Ninja AutoBarista.
Indica la presencia de un riesgo que podría causar lesiones, la muerte o daños materiales considerables si se ignora la advertencia
incluida con este símbolo.
Evita el contacto con superficies calientes. Use siempre protección para las manos para evitar quemaduras.
Solo para uso doméstico y en interiores.
AE1055CO
| Guía del propietario
Precauciones generales
• Para eliminar el riesgo de asfixia en niños pequeños, desecha todos los materiales de embalaje inmediatamente
después de desempacar el producto.
• Esta máquina la pueden utilizar personas con capacidades físicas, sensoriales o mentales disminuidas, o que
carecen de experiencia y conocimientos, si han recibido la supervisión o las instrucciones relacionadas con el uso
de la máquina de forma segura y si comprenden los peligros asociados.
• Mantén la máquina y el cable fuera del alcance de los niños. NO permitas que los niños jueguen con la máquina o
la utilicen. Es necesaria una supervisión estricta cuando se use donde hay niños cerca.
• Para evitar incendios, descargas eléctricas y lesiones a personas, NO sumerjas el cable, los enchufes ni el cuerpo
de la máquina en agua u otros líquidos.
• NUNCA traslades la máquina sujetándola del cable de alimentación ni tires de este para desconectarlo de la toma
de corriente. En lugar de eso, toma el enchufe y tira de este para desconectarlo.
• NO operes ninguna máquina cuyo cable o enchufe estén dañados ni después de que la máquina haya tenido fallas, se
haya caído o se haya dañado de alguna manera. Comunícate con SharkNinja Operating LLC para recibir asistencia.
• Únicamente para uso doméstico y sobre la encimera. NO dejes que el cable cuelgue del borde ni toque superficies
calientes como una estufa.
• NUNCA utilices una toma de corriente debajo del mostrador.
• Para evitar el riesgo de incendio, descarga eléctrica o daños a la máquina, NO uses la máquina en un
compartimiento para máquina ni debajo de un gabinete en la pared.
• Desconecta la máquina de la toma de corriente cuando no la estés usando y antes de limpiarla. Deja que se enfríe
el aparato antes de colocar o retirar piezas, y antes de limpiarlo.
• NUNCA dejes la máquina desatendida mientras está en uso.
• La máquina no está diseñada para ser operada por medio de un temporizador externo o un sistema de control
remoto independiente.
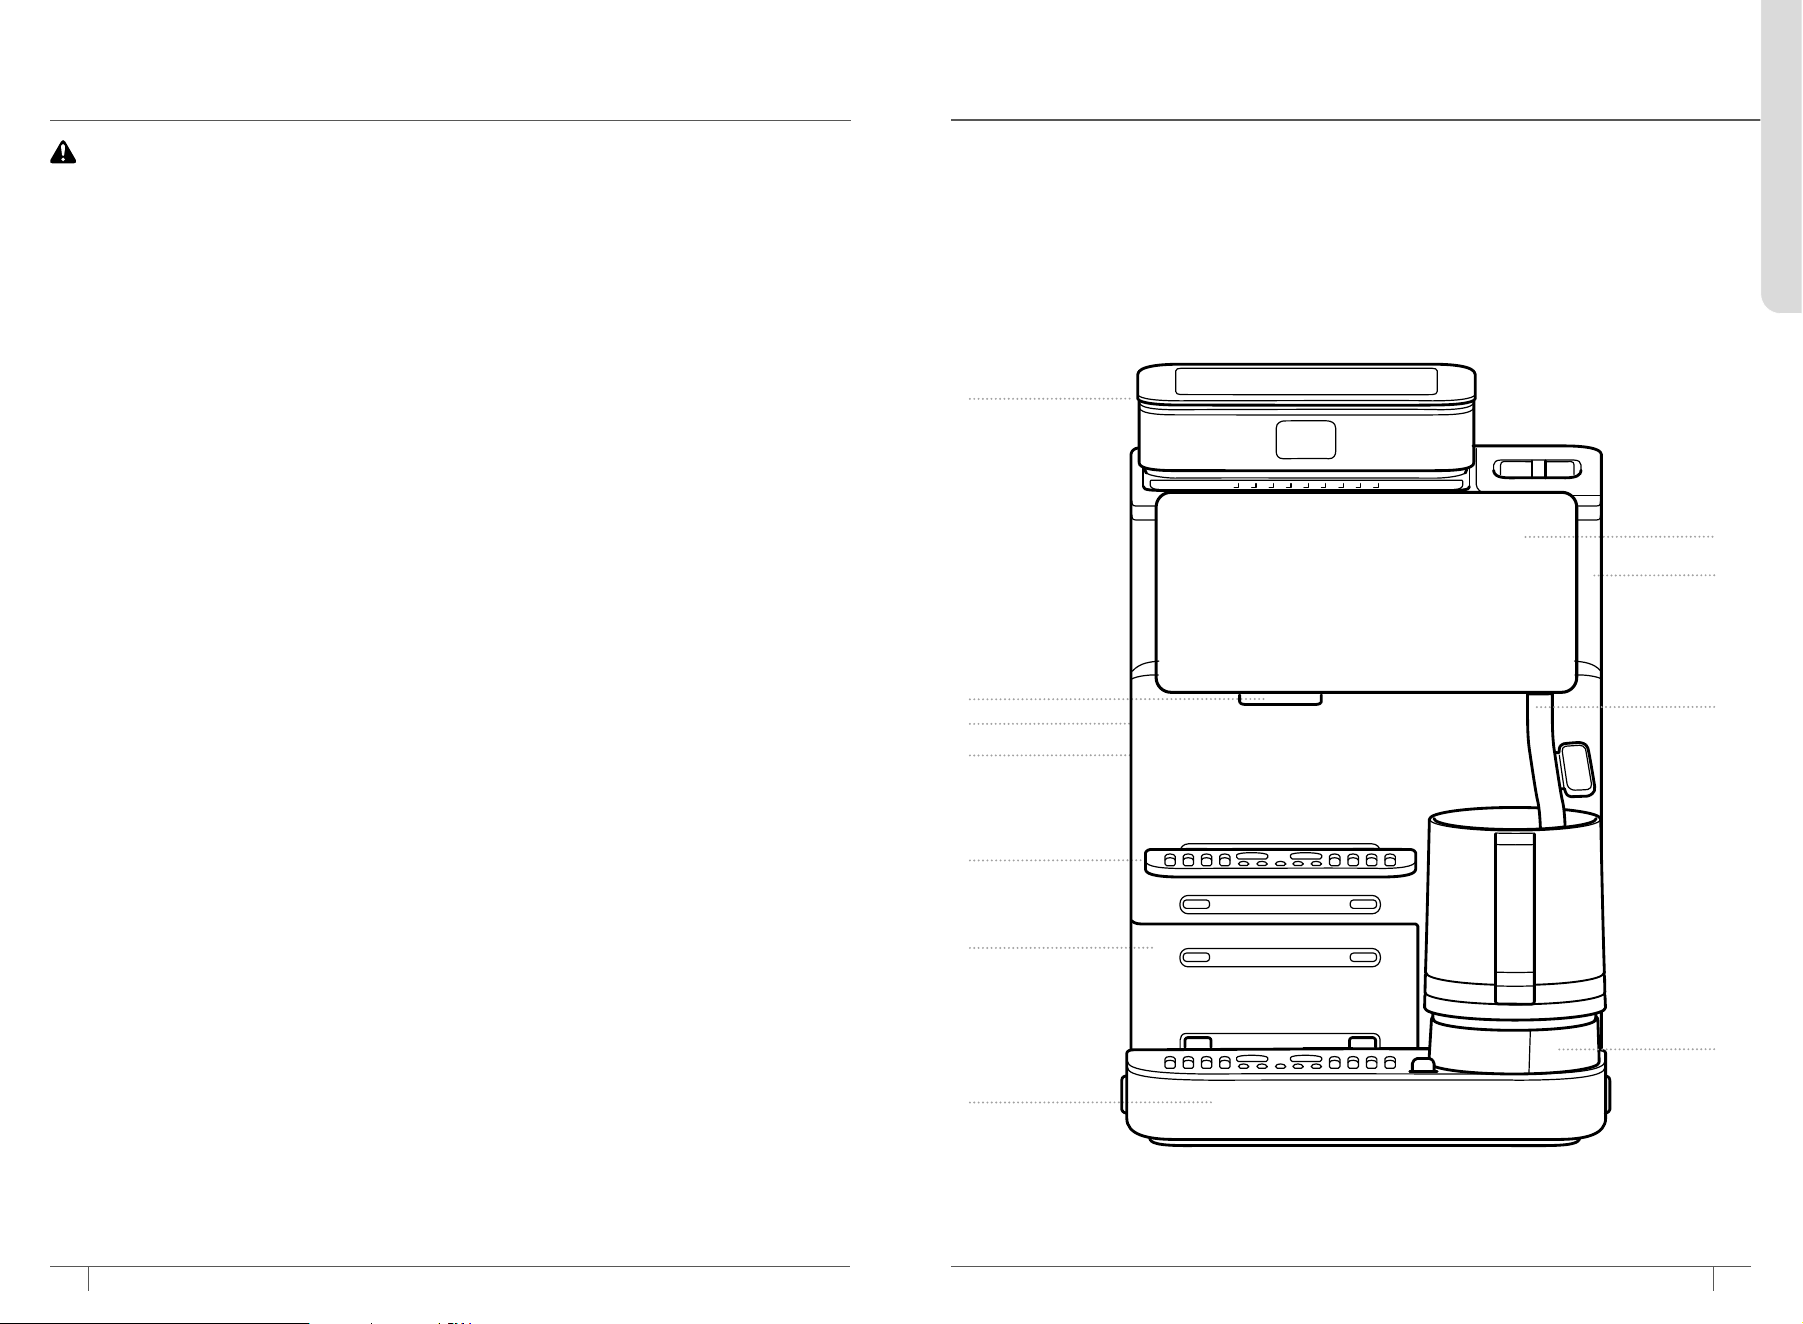
33
sharkninja.mx
32
sharkninja.mx
ADVERTENCIA
Para reducir el riesgo de lesiones, incendios, descargas eléctricas o daños a la propiedad, siempre se deben acatar las
precauciones básicas de seguridad, incluidas las siguientes advertencias numeradas e instrucciones posteriores. No utilices la
máquina para otro uso que no sea el previsto.
LEE Y GUARDA ESTAS INSTRUCCIONES
PIEZAS
A
K
J
I
G
B
C
D
E
F
A Recipiente de granos
B Boquillas de café
C Puerta de mantenimiento
D Unidad de preparación y
cavidad interna (detrás de la
puerta de mantenimiento)
E Bandeja ajustable para taza
F Depósito de posos de café
G Bandeja de goteo
H Plataforma para jarra
deleche
I Varilla de vapor
J Depósito de agua
K Pantalla
H
ESPAÑOL
INSTRUCCIONES IMPORTANTES DE SEGURIDAD
LEE DETENIDAMENTE ANTES DE USAR • SOLO PARA USO DOMÉSTICO
*Las partes y los accesorios pueden variar según el modelo.
• NO la coloques sobre ninguna otra máquina.
• La máquina no se debe colocar dentro de un gabinete cuando se esté usando.
• NO utilices ningún accesorio que no recomiende el fabricante, ya que esto puede ocasionar lesiones o daños a
lamáquina.
Aviso de operación
•
Para desconectarla, coloca todos los controles en la posición de APAGADO y luego retira el enchufe de la toma de
corriente de la pared.
• El uso de accesorios no recomendados por el fabricante puede generar una condición de desborde y riesgo de sufrir
quemaduras o provocar incendios, descargas eléctricas o lesiones personales.
• SIEMPRE utiliza la máquina sobre una superficie limpia, seca y nivelada.
• NO la coloques sobre un quemador eléctrico o de gas caliente, en un horno caliente, ni la coloques cerca de ellos.
• NO utilices esta máquina para otros usos que no sean los previstos.
• NO la utilice al aire libre.
• NO toques las superficies calientes. Utiliza las manijas o las perillas. Evita el contacto con piezas móviles.
•
SIEMPRE coloca una taza o recipiente adecuado para el volumen resultante elegido, debajo de las boquillas de café
durante la preparación.
• NO utilices la máquina sin agua.
• NO llenes el depósito de agua en exceso. Llena con agua solo hasta la línea de llenado máximo.
• Mantén la tapa en el depósito de agua durante la preparación.
• Mantén puesta la tapa del recipiente de granos durante el molido para evitar el acceso a las piezas móviles.
• NO introduzcas la mano ni toques la varilla de vapor ni la jarra del espumador cuando estén en funcionamiento. El vapor
caliente y los líquidos calientes causarán quemaduras y escaldaduras.
Cuidados y mantenimiento
• Para prevenir enfermedades por crecimiento de bacterias en la máquina, sigue todas las instrucciones de limpieza de la
sección Limpieza y mantenimiento de esta guía del propietario.
• Para obtener los mejores resultados, asegúrate de utilizar una máquina limpia.
• Si el producto no funciona correctamente, visita sharkninja.mx o comunícate con SharkNinja Operating LLC para una
revisión, una reparación o un ajuste.
• Los niños no deben realizar actividades de limpieza ni de mantenimiento.
• APAGA y desconecta la máquina y deja que se enfríe antes de limpiarla o transportarla.
• Evita el contacto con los ojos y el contacto prolongado con la piel con el lubricante de silicona de la unidad de preparación
• Lávate bien las manos antes de manipular el lubricante de silicona de la unidad de preparación
• Guarda el lubricante de silicona de la unidad de preparación en un lugar cerrado, lejos del calor, las llamas y la luz solar
directa.
• Desecha el lubricante de silicona de la unidad de preparación según las reglamentaciones locales.
Declaración sobre el cable
• Se proporciona un cable de alimentación corto para reducir los riesgos derivados de enredarse o tropezarse con un
cable más largo.
• NO utilices cables de extensión con este producto.
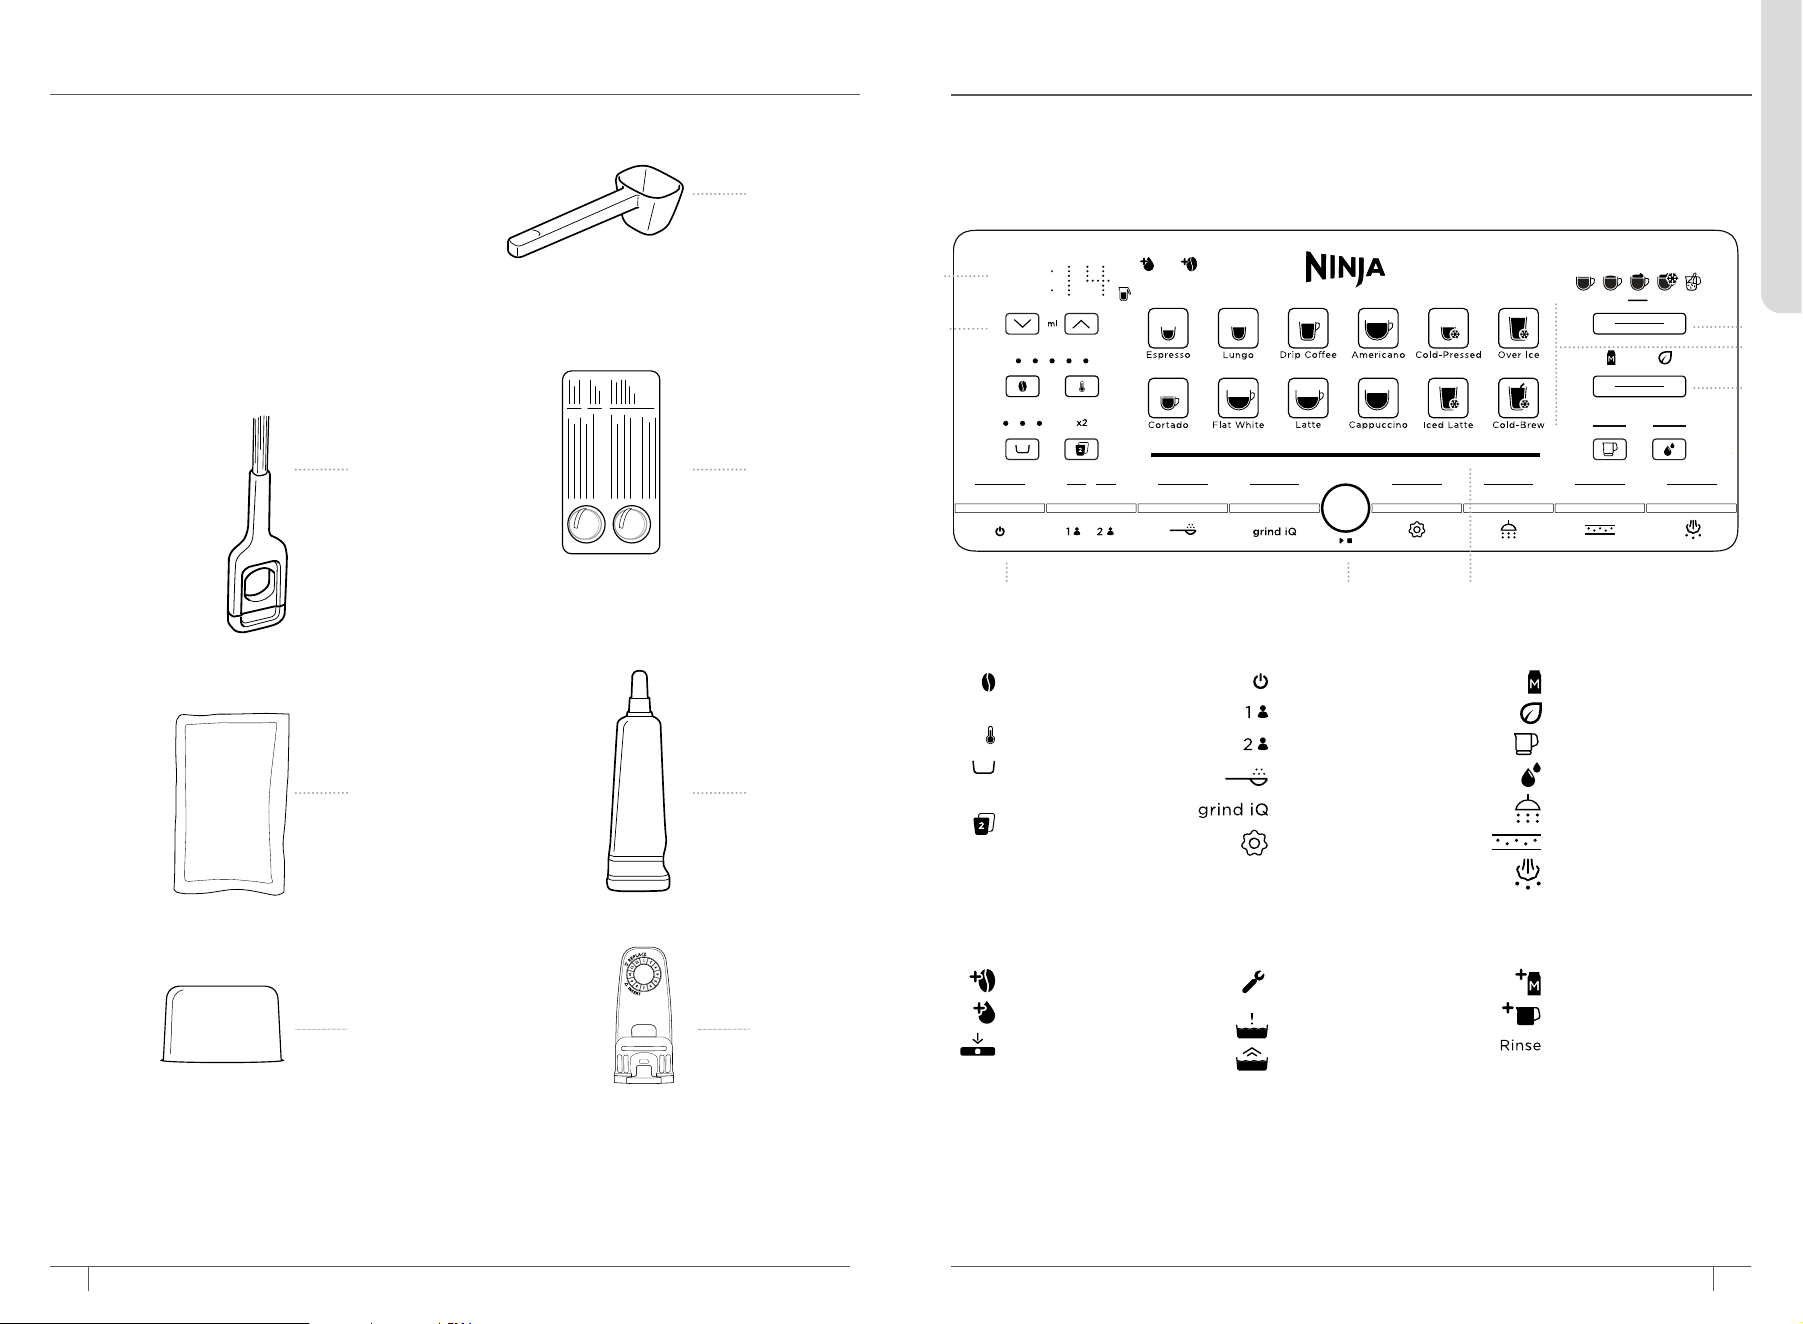
35
sharkninja.mx
ESPAÑOL
*Los botones CLEAN (LIMPIAR), DESCALE (DESCALCIFICAR) y GRIND IQ se encenderán para
indicarte que debes ejecutar el ciclo respectivo.
Botón de INTENSIDAD
DE LA PREPARACIÓN
Botón de TEMPERATURA
Botón de selección de
SHOTS
BOTÓN PREPARAR 2
BOTÓN DE ENCENDIDO
BOTÓN PERFIL 1
BOTÓN PERFIL 2
BOTÓN DE MOLIDO
BOTÓN DE MOLER IQ
BOTÓN DE AJUSTES
DE VACA
VEGETAL
Botón SOLO ESPUMADO
BOTÓN AGUA CALIENTE
Botón LIMPIAR
Botón DESCALCIFICAR
Botón PURGAR
A Lectura de TAMAÑO DE LA
PREPARACIÓN
B Flechas DE SELECCIÓN DE
TAMAÑO
C BOTÓN DE ENCENDIDO
D Botón de INICIAR
E Barra de avance
F Botón de TIPO DE
ESPUMADO
G Opciones de menú de
bebidas
H Botón de TIPO DE LECHE
B
A
G
H
C D
*Las funciones pueden variar según el modelo.
F
E
NOTIFICACIONES INTELIGENTES
La máquina mostrará una notificación inteligente si necesita que realices alguna acción:
SIGNIFICADO DE LOS ÍCONOS
AGREGAR GRANOS
AGREGAR AGUA
INSTALAR RECIPIENTE
ALERTA DE UNIDAD DE
PREPARACIÓN
VACIAR BANDEJA
INSTALAR BANDEJA
AGREGAR LECHE
INSTALAR JARRA
ENJUAGAR
34
sharkninja.mx
1 Cuchara medidora
2 Cepillo de limpieza
3 Tabletas limpiadoras
4 Polvo descalcificante
5 Lubricante de silicona para
unidadde preparación
6 Inserto de filtro de agua*
7 Carcasa del filtro de agua*
*No está disponible en todas las máquinas
ACCESORIOS
2
1
3
4 5
76
USO DEL PANEL DE CONTROL
*
*Los accesorios pueden variar según el modelo.
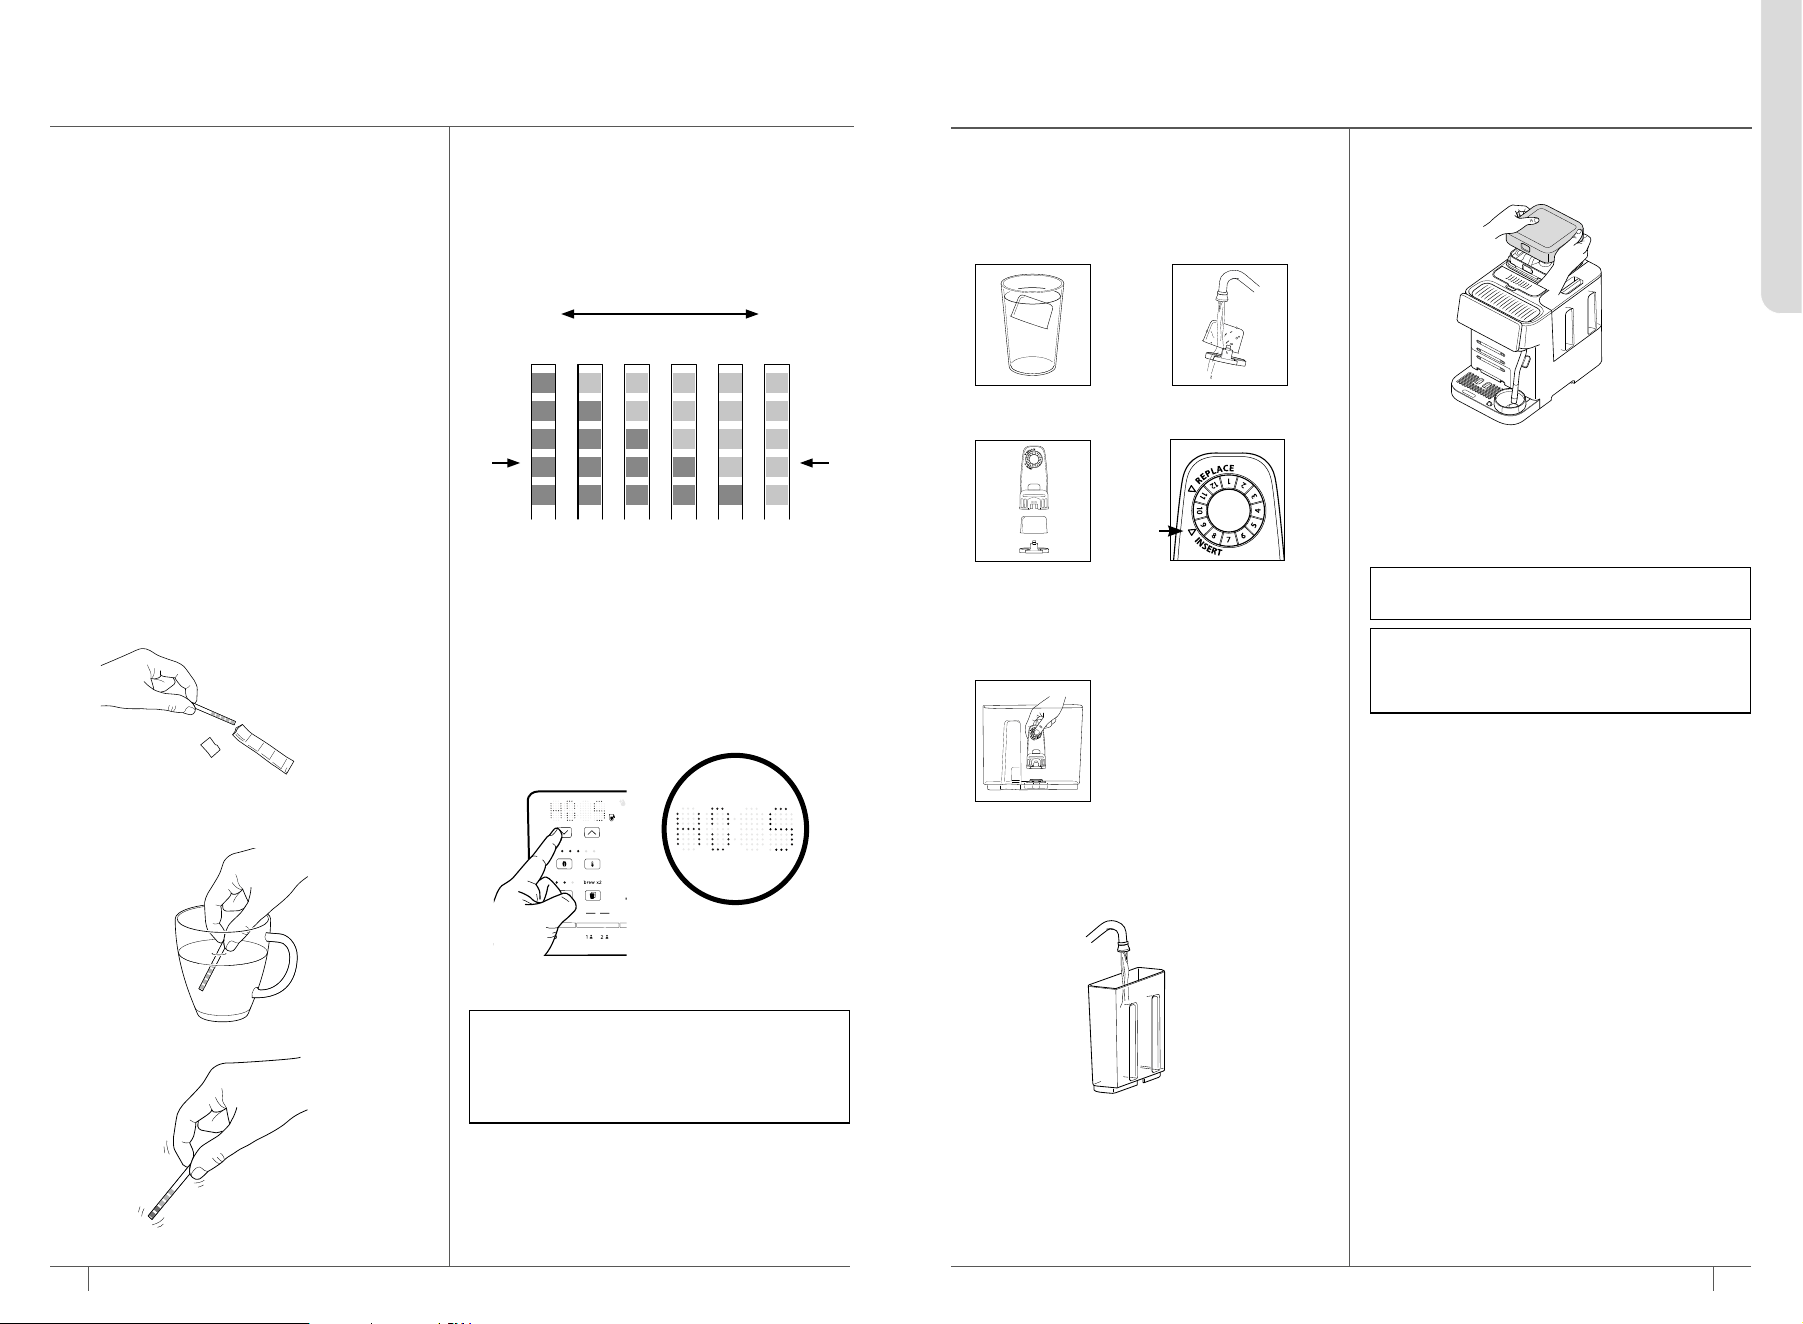
3736
sharkninja.mx
sharkninja.mx
RETIRA LAS PIEZAS Y LOS ACCESORIOS DEL
EMBALAJE
• Para iniciar, retira todas las piezas y los
accesorios del embalaje. Asegúrate de retirar
todos los accesorios y las piezas del embalaje
antes de desecharlo.
• Cuando saques la máquina del embalaje,
asegúrate de quitar toda la cinta de la máquina.
La cinta estará en todos los lados de la
máquina.
LIMPIA LOS ACCESORIOS ANTES DE USARLOS
• Después de sacar todos los accesorios y las
piezas del embalaje, lávalos todos a mano y
sécalos muy bien.
PRIMEROS PASOS:
ANTES DE TU PRIMER CAFÉ
LLENA EL DEPÓSITO DE AGUA
•
Antes de comenzar, asegúrate de que el depósito
de agua esté lleno con agua fría o a temperatura
templada. Asegúrate de llenar hasta la línea de
llenado máximo, pero sin sobrepasarla.
Si en algún momento antes de preparar una bebida
no hay suficiente agua en el depósito para preparar la
bebida seleccionada, la máquina indicará que debes
agregar agua con el mensaje ADD WATER (Agregar
agua). Si recibes una notificación de ADD WATER
(Agregar agua) durante la preparación, agrega agua
al depósito y presiona START (Iniciar) para reanudar.
1 Remoja el filtro
de agua durante
5 minutos.
5 Instala la carcasa del
filtro en el depósito.
2 Enjuaga el filtro de agua
y la malla durante 60
segundos.
4 Selecciona el n.º de
mes actual como
fecha del INSERT
(Inserto).
INSTALACIÓN DEL FILTRO DE AGUA
• Un café con sabor excelente comienza con
agua de excelente calidad. Los filtros de
agua ayudan a eliminar cloro, olores y otras
impurezas que pueden estar presentes en el
agua, para ofrecerte café de sabor excelente.
SOBRE LOS GRANOS
• Para obtener los mejores resultados,
usagranos de café recién tostados.
• Al comprar granos de café, es mejor comprar
una bolsa que indique “Fecha de tostado”
enlugar de “Fecha de consumo preferente”
para garantizar la calidad y frescura.
• Te recomendamos usar granos de café
dentro de los 20días de la “Fecha de
tostado”.
• Cuando cambies a un grano diferente,
retiracompletamente los granos anteriores
antes de continuar. No se recomienda
agregar nuevos granos a un recipiente
que aún tiene granos. Para obtener más
información, consulta la sección Cambio
degranos y recipientes.
• NO uses granos de café verdes,
caramelizados o saborizados, porque pueden
atascarse en el molino. Añade sabores a tu
bebida con jarabes y endulzantes. Consulta la
Guía de bebidas para ver recetas.
LLENA EL RECIPIENTE DE GRANOS
1 Quita la tapa del recipiente.
2. Llena el recipiente con granos enteros de café.
NO agregues granos previamente molidos
al recipiente de granos. Para obtener más
información sobre cómo usar café molido,
consulta la sección Uso de café molido.
3. Vuelve a colocar la tapa.
NOTA: Nunca añadas granos mientras la
máquina esté preparando una bebida. Para
obtener más información, consulta la sección
Cambio de granos y recipientes.
NOTA: Nivela los granos y asegúrate de que
nosuperen la línea MAX (MÁX.) del recipiente.
NOTA: Si necesitas cambiar el nivel de dureza,
compra otra tira de prueba en sharkninja.mx/
accessories. Para obtener más instrucciones
sobre cómo restablecer la dureza del agua,
consulta la sección Ajustesadicionales.
PRUEBA DE DUREZA DEL AGUA
Toda el agua tiene minerales que, con el tiempo,
provocan calcificación en la máquina. Estos
minerales se conocen como dureza del agua
y afectarán la frecuencia con la que deberás
descalcificar la máquina. Hacer esta prueba
garantizará que la máquina recomiende una
descalcificación en el momento adecuado.
1 Retira la tira de prueba del paquete.
3 Saca la tira de prueba y agítala ligeramente.
4 Coloca la tira de prueba sobre una superficie
seca y plana, y espera 1minuto para que la tira
de prueba muestre los resultados.
5 Después de 1 minuto, verás que aparecen de
0 a 5 cuadros morados. Esto indica el nivel de
dureza del agua (0 cuadros morados = nivel 0,
5 cuadros morados = nivel 5, etc.).
6 Después de identificar la dureza del agua,
conecta la máquina.
7 El lado izquierdo del panel de control
mostrará “hd 05” (Dureza 05) de manera
predeterminada.
8
Presiona las flechas hacia arriba o hacia abajo
para programar el nivel de dureza del agua de
modo que coincida con el número de cuadros
morados obtenidos en la tira de prueba (p.ej.,
siel resultado es nivel 1, cambia el valor a hd 01).
Cuadros
verdes
Cuadros
morados
Muy
suave
Muy
dura
hd 0 hd 1 hd 2 hd 3 hd 4 hd 5
2 Sumerge por completo la tira de prueba de
agua por 5 a 10 segundos en el agua que vas a
usar con la máquina.
3 Retira la tapa del
extremo de la carcasa
del filtro e inserta el
filtro. Asegura la tapa
del extremo sobre la
carcasa del filtro para
fijarlo en su sitio.
ESPAÑOL
9 Presiona START (Comenzar) para confirmar
los ajustes.
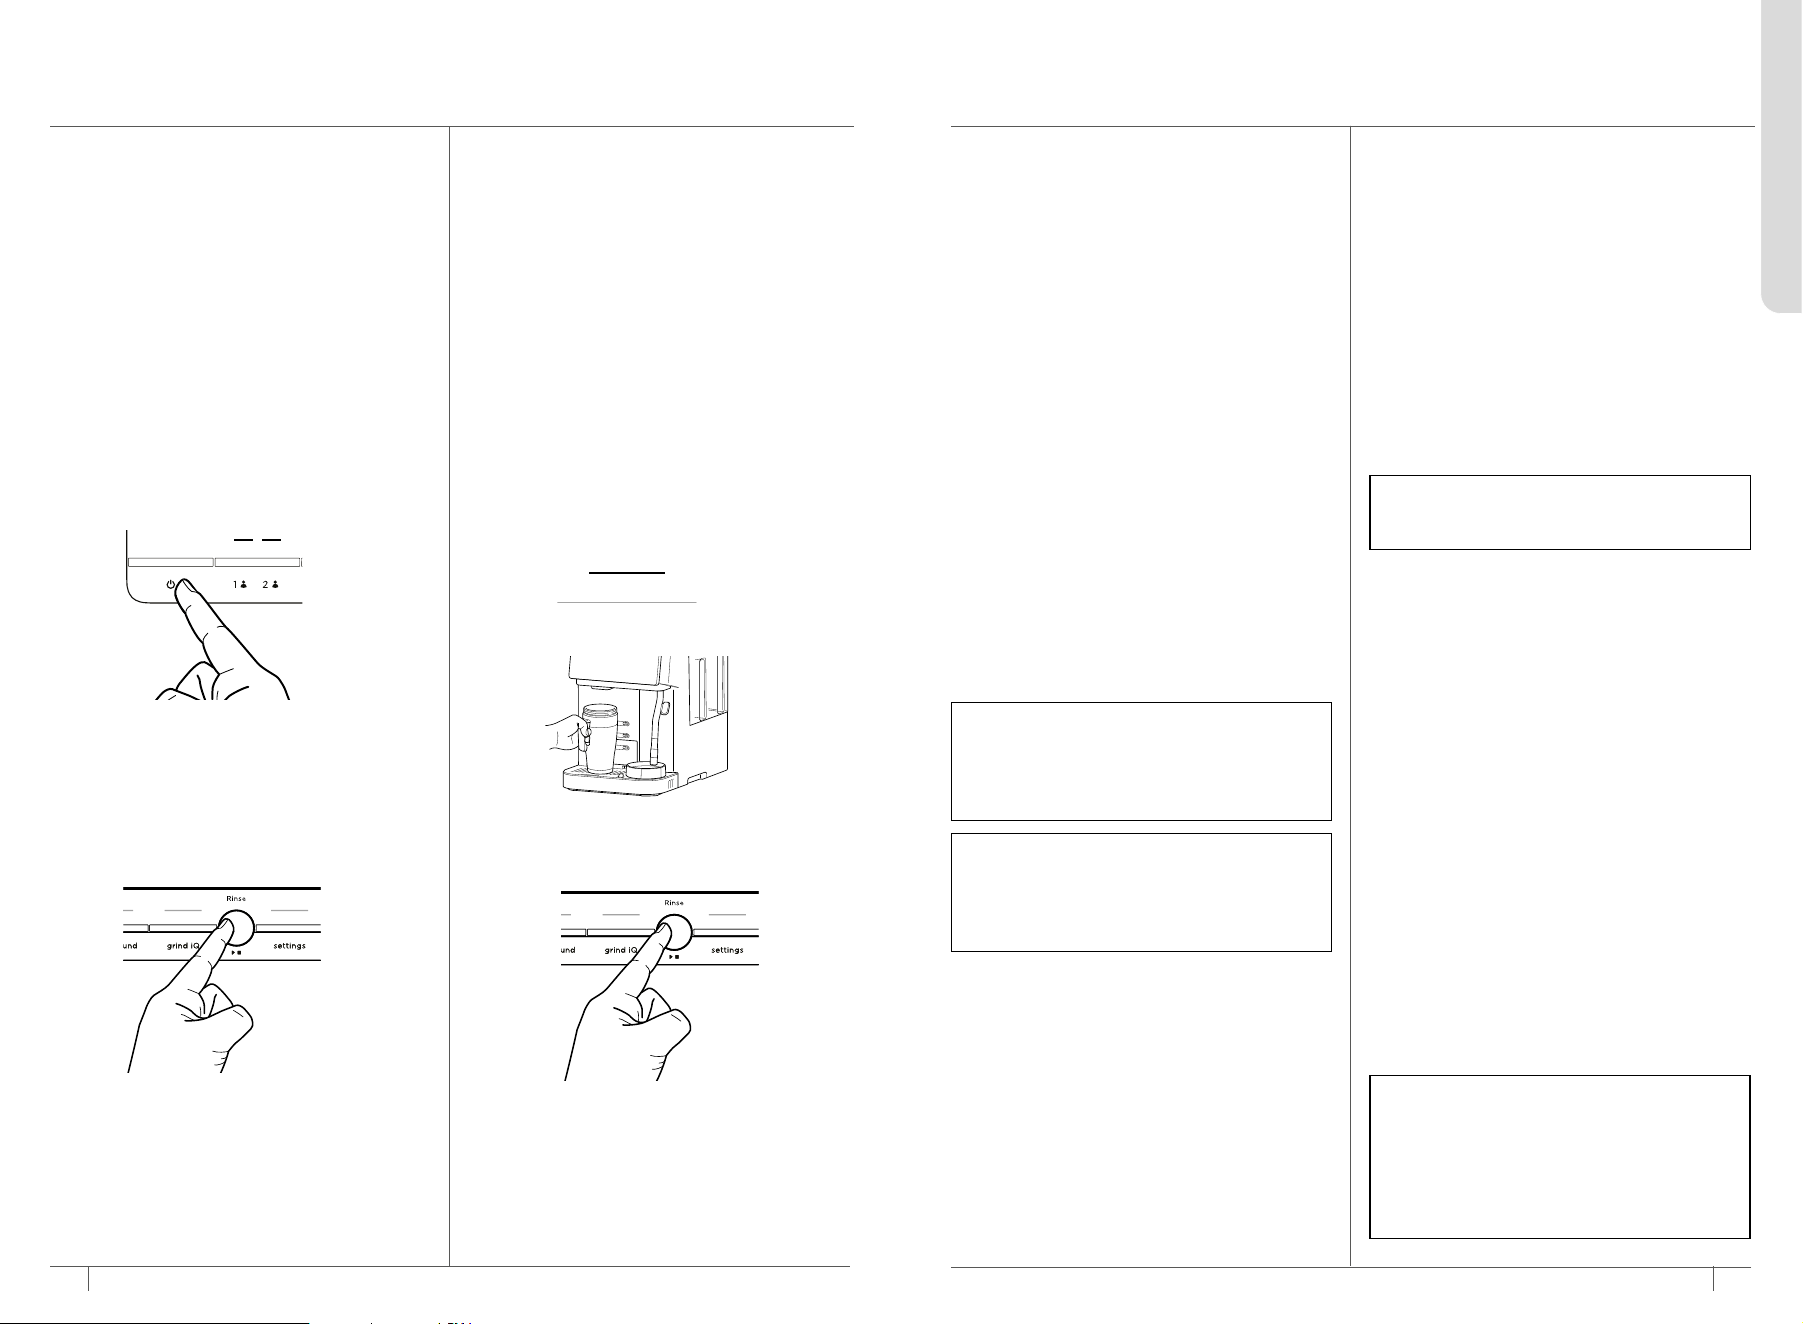
3938
sharkninja.mx
sharkninja.mx
PRIMEROS PASOS:
ANTES DE TU PRIMER CAFÉ (CONT.)
ENJUAGUE PARA EL PRIMER USO
Antes de preparar tu primera bebida, debes
enjuagar la máquina.
Cuando la máquina se encienda por primera
vez, se encenderá la alerta RINSE (Enjuagar)
en naranja, lo que indica que se requiere un
enjuague. Este enjuague lo inicia el usuario y
requiere que se presione START (Iniciar).
La máquina realizará un enjuague
automáticamente cada vez al encenderse y
apagarse, y esto se indicará con la alerta RINSE
(Enjuagar) en color blanco. No se requiere
intervención del usuario.
Es opcional colocar una taza debajo de las
boquillas de café para los enjuagues. La
máquina está diseñada para captar el agua del
enjuague en la bandeja de goteo.
1. Conecta la máquina y presiona ENCENDER.
2. En el panel de control se encenderá la
alerta RINSE (Enjuagar) en color naranja
para indicar que necesita un enjuague para
continuar.
3. Presiona START (Iniciar) para comenzar el
ciclo de enjuague. La máquina emitirá un
pitido para indicar que comenzó. El agua del
enjuague saldrá directamente a la bandeja
degoteo.
4. Al terminar, la máquina volverá a emitir un
pitido para indicar que terminó el ciclo.
SIGNIFICADO DE LOS COLORES DEL LED
El LED GRIND iQ se encenderá durante el uso
diario para mostrar el estado de GRIND iQ y
cuán cerca estás del sabor óptimo del espresso.
APAGADO: El molino está calibrado.
AMARILLO: El ciclo de GRIND iQ es necesario para
calibrar el molino.
1. Toca el ícono de la bebida correspondiente
para seleccionar tu bebida.
2. Usa el botón SHOTS para seleccionar el
número deseado de shots de espresso.
3. Si así lo deseas, ajusta la intensidad y la
temperatura de tu bebida. Para obtener
más información sobre cómo esto afecta tu
preparación, consulta Ajuste de la intensidad y
temperatura de preparación.
Puedes guardar los cambios personalizados
de tus bebidas. Para obtener más información,
consulta la sección Perfiles y cómo guardar
personalizaciones.
4. Coloca una taza debajo de las boquillas de
café y presiona START (Iniciar).
5. La máquina emitirá un pitido para indicar que
se inició la preparación. La barra de avance
se encenderá para indicar el estado de la
preparación. Al terminar, la máquina emitirá
nuevamente un pitido que indica que la
preparación finalizó.
PREPARACIÓN DE ESPRESSO, AMERICANO,
LUNGO* Y CAFÉ EN FRÍO
NOTA: Estos son los resultados de +
predeterminados. Cambiar la intensidad de
tu espresso afectará el volumen resultante.
Para ajustar los resultados, consulta la sección
Ajuste de la intensidad y temperatura de
preparación.
NOTA: Si vas a usar una taza pequeña, utiliza la
bandeja ajustable para taza para acercar tu taza a
las boquillas de café y así reducir las salpicaduras.
Si vas a usar una taza alta o de viaje, retira la
bandeja para taza para así crear espacio.
EXTRACCIÓN CORRECTA
• La bebida saldrá a una velocidad baja y
uniforme.
• Verás salir un líquido color caramelo oscuro.
Esa es la crema.
• La parte superior de la bebida tendrá una
capa de crema. Si inclinas tu taza y aún ves la
capa de crema, has obtenido correctamente
un shot de espresso.
ESPAÑOL
BREW X2 (Preparar 2)
La función de la máquina Brew X2 (Preparar 2)
permite preparar 2 bebidas simultáneamente
lado a lado sin tener que ejecutar una
preparación adicional.
1. Selecciona tu bebida en el menú principal.
2. Ajusta tu bebida con los botones a la
izquierda de la pantalla.
3. Presiona BREW X2 (Preparar 2) en la
pantalla; el botón se encenderá para mostrar
que está activo.
4. Coloca 2 tazas en la bandeja para taza,
asegurándote de que una taza esté alineada
con cada una de las boquillas de café.
Presiona START (Iniciar).
5. Si se seleccionó una bebida de leche, la
unidad ejecutará solo 1 ciclo de espumado;
agrega más leche de lo normal (sin superar
la línea de llenado máximo) para generar
suficiente espuma para las dos bebidas.
6. La máquina emitirá un pitido para indicar que
se inició la preparación. La barra de avance
se encenderá para indicar el estado de las
preparaciones. Para bebidas de shot doble
y más grandes, la máquina deberá preparar
varios shots. La barra de avance se volverá a
encender para cada preparación. Al terminar,
la máquina emitirá nuevamente un pitido que
indica que la preparación finalizó.
NOTA: LA FUNCIÓN Brew x2 (Preparar 2)
solo está disponible para espresso y bebidas
basadas en espresso.
NOTA: Para agregar más leche a estas
bebidas, puedes seleccionar ADD MILK TYPE
(Agregar tipo de leche) o FROTH TYPE
(Tipo de espumado) para agregar un ciclo de
espumado a tu ciclo de preparación. Consulta
la sección Cómo añadir espumado a una
bebida sin leche de esta guía para obtener
más información.
CICLO DE Grind iQ
GRIND iQ utiliza la tecnología AutoBarista-iQ
para determinar automáticamente el mejor
tamaño de molienda para extraer de tus granos
el expreso perfecto para tu bebida. La luz
GRIND iQ se encenderá en amarillo siempre que
la máquina recomiende ejecutar un ciclo.
•
En el primero uso, el botón se iluminará en
amarillo para indicar que se recomienda un
ciclo de calibración. Esto no es necesario si
deseas usar café molido o preparar una bebida
de café por goteo, con hielo o cold brew.
• Al usar granos nuevos por primera vez o
agregar más granos, pueden requerirse de
2a 3 preparaciones para alcanzar el ajuste
de molido óptimo. La máquina lo hará por ti
con un ciclo de Grind iQ.
• Para obtener más información sobre Grind
iQ, consulta la sección Grind iQ.
1. La luz Grind iQ se encenderá en
amarillo
para
indicar que se recomienda un ciclo. Presiona
el botón GRIND IQ.
2. Coloca una taza de 14 oz (414ml) o más
debajo de las boquillas de café.
3. Presiona START (Iniciar). La máquina emitirá
un pitido para indicar que comenzó el ciclo.
La barra de avance se encenderá para
indicar el estado del ciclo.
4. Al terminar, la máquina volverá a emitir un
pitido y la luz Grind iQ se apagará. La luz
Grind iQ se quedará apagada siempre que
se encuentre dentro del rango correcto de
tamaño de molienda para tus granos.
5. Desecha el espresso preparado.
6. Vacía la bandeja de goteo y el depósito de
posos de café cuando el ciclo haya terminado
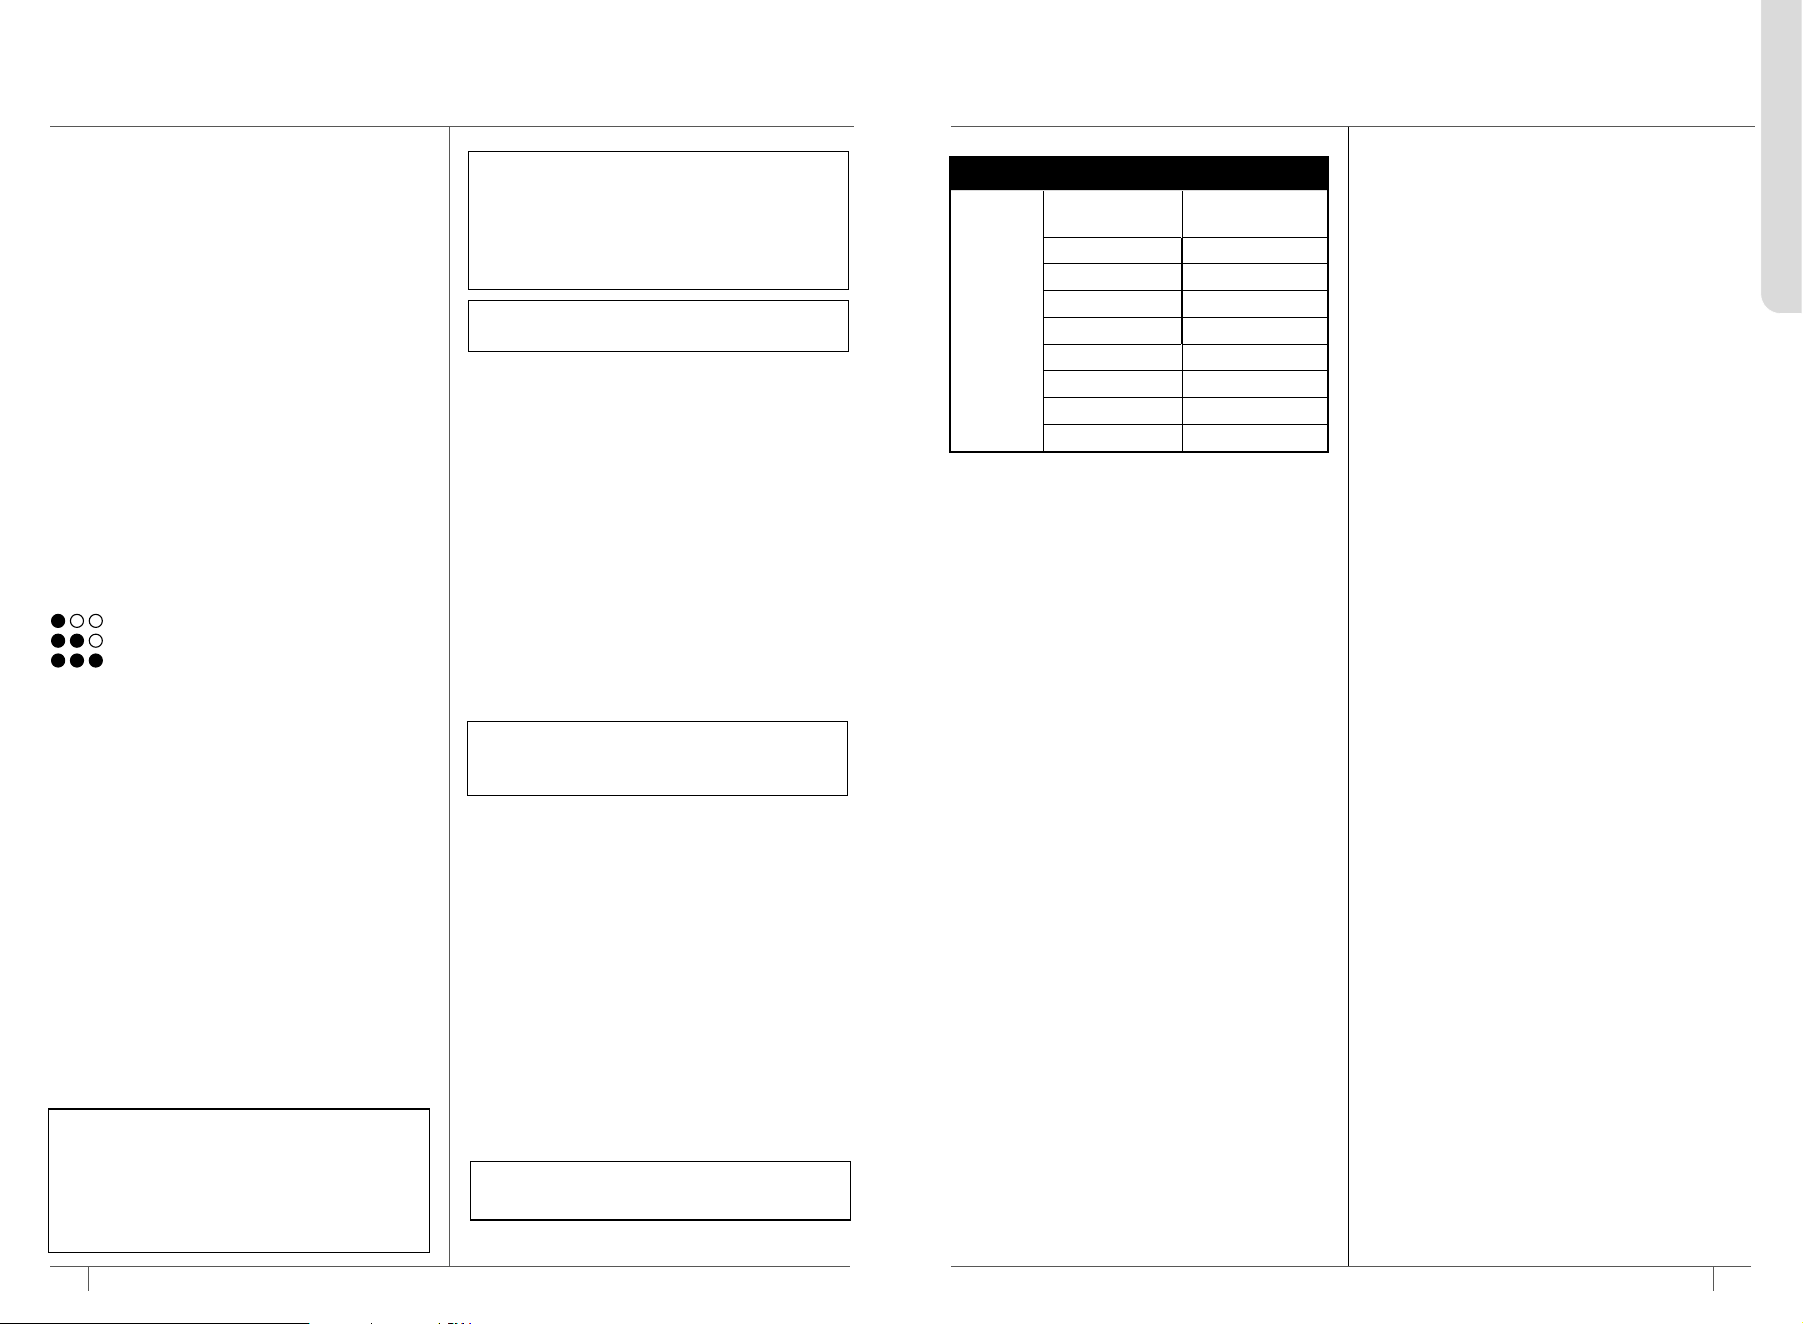
4140
PREPARACIÓN DE ESPRESSO, AMERICANO,
LUNGO* Y CAFÉ EN FRÍO (CONT.)
sharkninja.mx
sharkninja.mx
PREPARACIÓN DE CAFÉ POR GOTEO Y
BEBIDAS HELADAS
Drip Coee (Café por goteo) y Hot Water
(Agua caliente)
1. Toca el ícono de la bebida correspondiente
para seleccionar tu bebida.
2. Toca las flechas para seleccionar el volumen
deseado.
3. Coloca una taza debajo de las boquillas de
café y presiona START (Iniciar).
4. La máquina emitirá un pitido para indicar que
se inició la preparación. La barra de avance
se encenderá para indicar el estado de la
preparación. Al terminar, la máquina emitirá
nuevamente un pitido que indica que la
preparación finalizó.
AGREGAR AGUA CALIENTE*
*No está disponible en todas las máquinas
Tu máquina tiene una función de agua caliente
que te permite dispensar agua caliente al gusto.
1.
Presiona el botón HOT WATER (Agua caliente).
2. Usa el botón TEMPERATURA a la izquierda
de la pantalla para ajustar la temperatura del
agua caliente.
Temperatura baja
Temperatura media (valor predeterminado)
Temperatura alta
3. Selecciona la cantidad de agua caliente con
las flechas a la izquierda de la pantalla.
4. Presiona START (Iniciar) para comenzar a
dispensar agua caliente.
Presiona START (Iniciar) nuevamente para
detener la dispensación cuando tengas la
cantidad deseada de agua caliente o espera a
que termine el programa.
Bebidas frías y heladas
1. Toca el ícono de la bebida correspondiente
para seleccionar tu bebida.
2. Toca las flechas para seleccionar el volumen
deseado.
3. Llena una taza con hielo y colócala debajo
de las boquillas de café. Presiona START
(Iniciar).
4. La máquina emitirá un pitido para indicar que
se inició la preparación. La barra de avance
se encenderá para indicar el estado de la
preparación. Al terminar, la máquina emitirá
nuevamente un pitido que indica que la
preparación finalizó.
ESPAÑOL
USO DE CAFÉ MOLIDO
IMPORTANTE: SOLO agrega café molido
cuando la máquina esté encendida y haya
terminado el ciclo de encendido. Agregar café
ya molido mientras la máquina está apagada,
en espera, durante el enjuague de encendido/
apagado, o después de que ya ha iniciado una
preparación dejará entrar café molido en la
cavidad interna y puede provocar atascos y
daños.
1. Toca el ícono de la bebida correspondiente
para seleccionar tu bebida. Si vas a preparar
espresso, asegúrate de seleccionar el número
correcto de shots con base en la cantidad de
medidas que vas a agregar.
2. Presiona el botón PRE-GROUND (Molido)
para poner la máquina en el modo de café
molido.
3. Abre la compuerta para café molido para
colocar la medida.
4. Coloca una medida de café molido en la
compuerta para café molido. Consulta la
tabla siguiente para ver el número correcto
de medidas para tu preparación. NUNCA
superes más de 6 medidas para una
preparación.
5. Coloca una taza debajo de las boquillas de
café y presiona START (Iniciar).
6. La máquina emitirá un pitido para indicar que
se inició la preparación. La barra de avance
se encenderá para indicar el estado de la
preparación. Al terminar, la máquina emitirá
nuevamente un pitido que indica que la
preparación finalizó.
NOTA: No retires el embudo de la compuerta
para café molido cuando viertas el café molido.
Solo retíralo para la limpieza.
NOTA: No puedes preparar más de 12 oz (355ml)
de café por goteo cuando usas café molido.
*No está disponible en todas las máquinas
MEDIDAS
TAMAÑOS
Café Medidas
6 oz (177ml)
2–4
8 oz (237ml)
2–4
10 oz (296ml)
4–6
12 oz (355ml)
4–6
Espresso Medidas
Sencillo 2
Doble 4
Triple 6
ADVERTENCIA: NUNCA pongas más de 6
medidas de café molido en la compuerta para
café molido. Esto hará que se desborde la unidad
de preparación y la máquina no podrá terminar la
preparación. Si esto ocurre, apaga la máquina y
consulta la sección Limpieza: Sección de Limpieza
profunda para ver instrucciones de cómo limpiar
la unidad de preparación y la cavidad interna.
PRÁCTICAS RECOMENDADAS DE ESPUMADO
■
Tipos de leche
•
En el caso de la leche de vaca, te
recomendamos usar leche entera.
•
Para obtener los mejores resultados con
leche vegetal, utiliza la versión barista o
entera.
•
Para obtener la mejor espuma vegetal,
utiliza la configuración PLANT-BASED
(Vegetal).
•
Las leches tratadas por UHT (es decir,
leches de larga duración) pueden generar
resultados variables.
•
La leche de coco puede calentarse, pero no
producirá espuma estable.
•
Para obtener las mejores espumas y arte en
latte, golpea suavemente y menea la jarra
de leche para eliminar las burbujas grandes
antes de verter la leche.
PRÁCTICAS RECOMENDADAS DE ESPUMADO
•
Si quieres ajustar la temperatura de la
espuma, consulta la sección Ajustes
adicionales.
•
Para obtener mejores resultados, utiliza
leche fría o leche directa del refrigerador.
•
Para obtener mejores resultados, asegúrate
de que la jarra de leche esté a temperatura
ambiente antes de espumar.
■
Limpieza
•
Asegúrate de que tanto la plataforma para
la jarra de leche como la parte inferior de la
jarra estén secas y limpias antes de colocar
la jarra sobre la plataforma.
•
Limpia la varilla de vapor con un paño
húmedo inmediatamente después de
utilizarla para evitar que la leche se pegue.
•
Antes de apagar la máquina, empuja la
varilla de vapor de vuelta a la posición
hacia abajo para permitir que se purgue
automáticamente.
•
Para una limpieza más profunda del batidor
y la varilla de vapor, llena la jarra de leche
hasta la línea de llenado máximo con agua
y una gota de detergente para platos y
ejecuta el programa de ESPUMA LIGERA.
NOTA: Las funciones Over Ice (Con hielo),
Cold Brew, Prensado en frío están diseñadas
para producir una bebida concentrada en un
recipiente lleno con hielo. Es normal que parte
del hielo del recipiente se derrita a medida que
se prepara el café, lo cual producirá una bebida
fría con la intensidad y el sabor ideales.
NOTA: Al preparar una bebida prensada en
frío inmediatamente después de una bebida
caliente, la máquina realizará un enjuague
interno para enfriar la cámara de preparación.
Cuando el enjuague haya terminado, la
preparación de prensado en frío iniciará
automáticamente.
NOTA: Las bebidas de café de más de 12oz
(355ml) se prepararán en varias rondas.
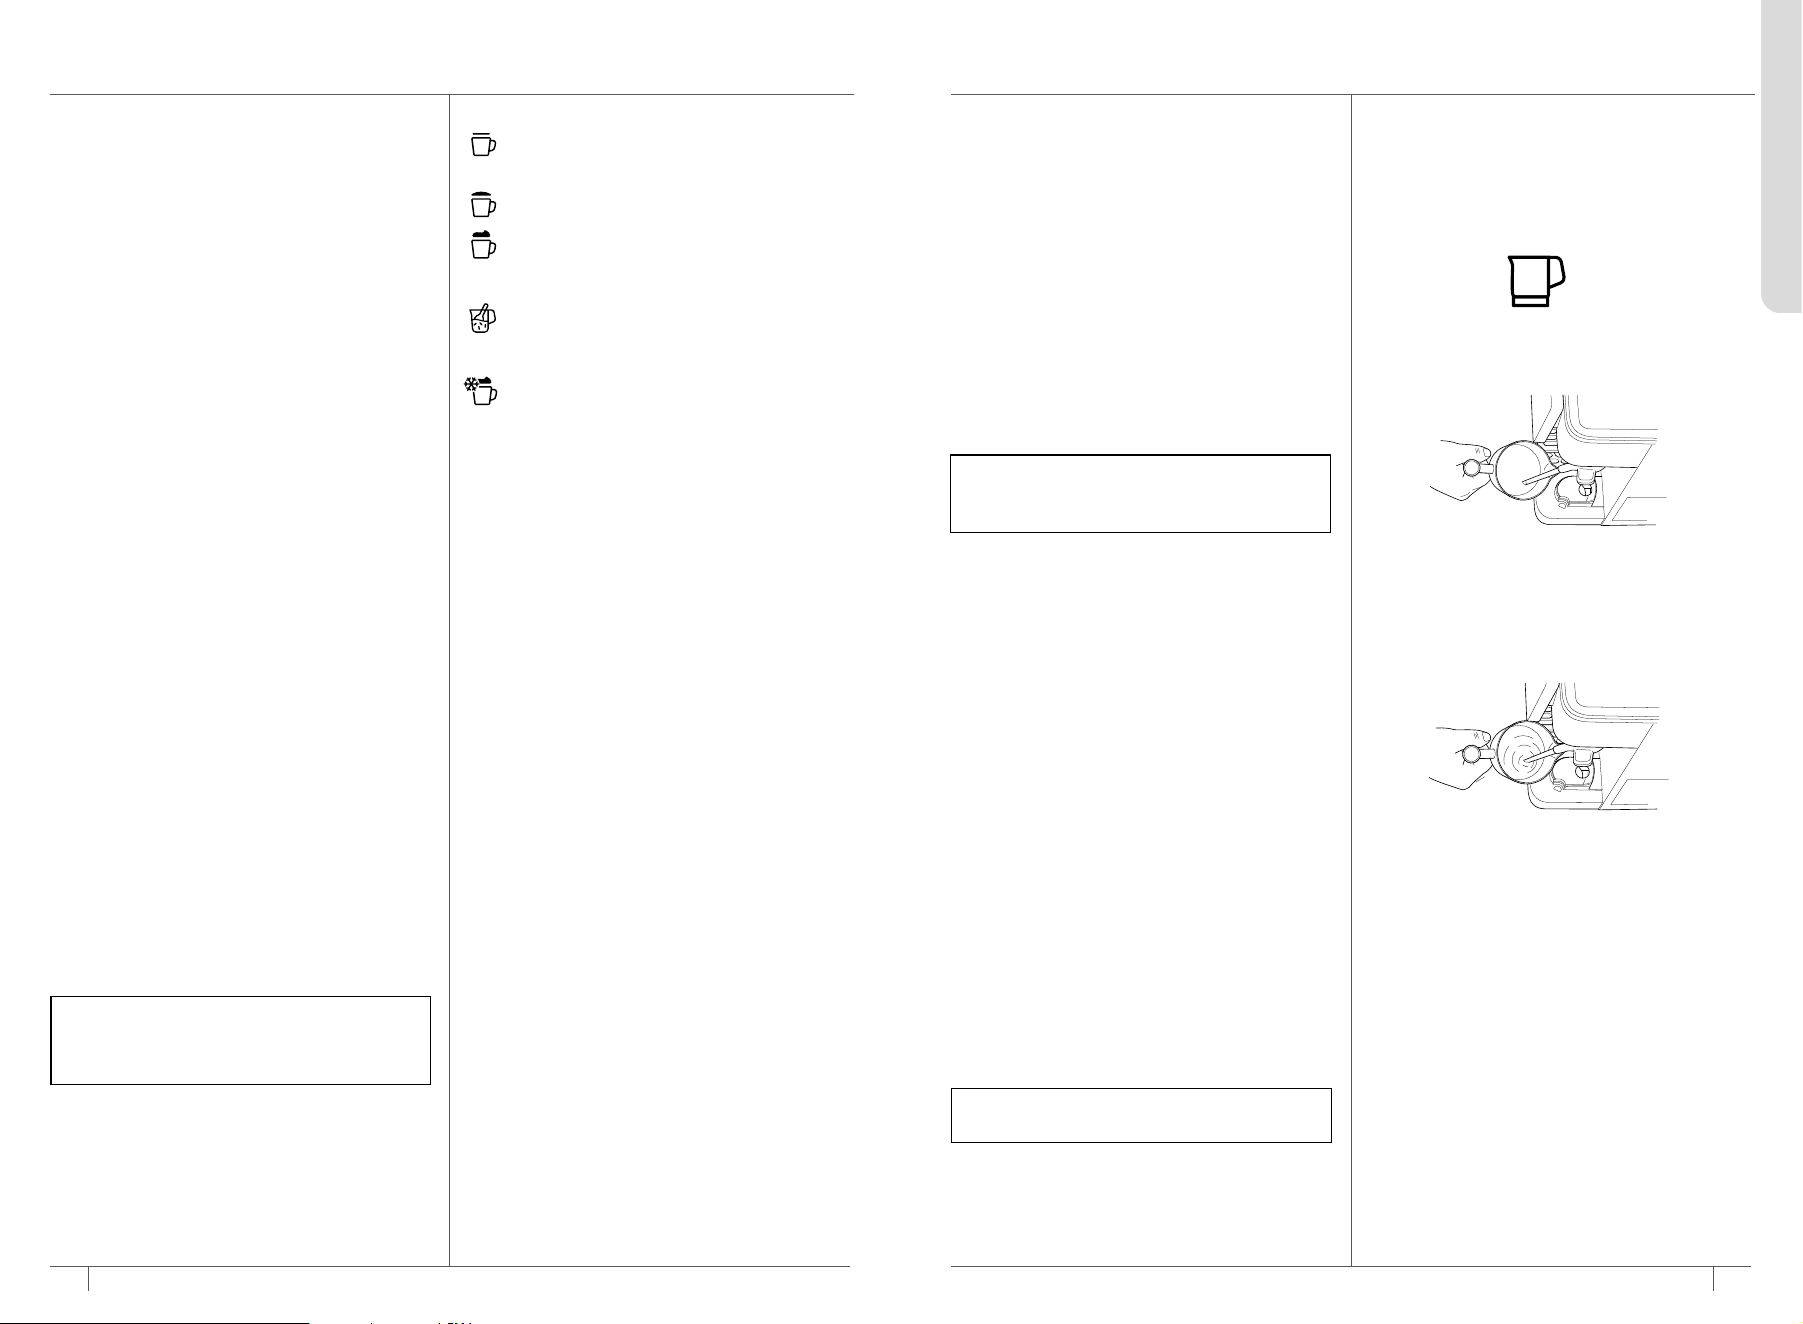
43
sharkninja.mx
42
sharkninja.mx
PREPARACIÓN DE BEBIDAS CON LECHE
NOTA: NO prepares la espuma la leche
directamente en el espresso o el café; siempre
prepárala en la jarra de leche y luego viértela
en la base de espresso o café.
NOTA: Cuando la máquina no tenga agua, no
realizará la purga. Presiona PURGE (Purgar)
después de agregar más agua.
NOTA: Para salir de este menú, presiona otro
tipo de bebida.
RECETAS CON LECHE
1. Toca el ícono de la bebida correspondiente para
seleccionar tu bebida.
2. Usa el botón SHOTS para seleccionar el número
deseado de shots de espresso.
3. Si así lo deseas, ajusta la intensidad y la
temperatura de tu bebida. Para obtener
más información sobre cómo esto afecta tu
preparación, consulta la sección Ajuste de la
intensidad y temperatura de preparación.
4. Coloca una taza lo suficientemente grande para
tu bebida debajo de las boquillas de café.
5. Selecciona leche DAIRY (Vaca) o PLANT-
BASED (Vegetal) con el botón MILK TYPE
(Tipo de leche) según la leche que vas a usar.
6. Al seleccionar un programa de receta con
leche, se subrayará el tipo de espumado
recomendado para tu bebida. Para cambiar el
tipo de espumado, presiona el botón FROTH
TYPE (Tipo de espumado).
7. Asegúrate de que el batidor esté instalado en
la jarra de leche. Llena la jarra con la cantidad
deseada de leche, pero no superes la línea de
llenado máximo.
8. Asegúrate de que la parte inferior de la jarra
de leche esté seca. Coloca la jarra de leche en
la plataforma correspondiente con la varilla de
vapor introducida en la jarra.
9. PresionaSTART (Iniciar). La máquina emitirá
un sonido para indicar que inició el programa.
La máquina molerá primero los granos,
luego ejecutará el programa de espumado y
preparará el espresso al último. Esto es para
garantizar el espresso más fresco para tu
bebida. La barra de avance se encenderá para
indicar el estado del programa. La máquina
volverá a emitir un pitido para indicar que el
programa terminó.
FROTH ONLY (Solo espumado)
Presiona el botón FROTH ONLY (Solo
espumado) para definir un ciclo que solo
utilizará el espumador para espumar leche,
sininvolucrar molido ni preparación. La función
Froth Only (Solo espumado) se puede usar
para chocolate caliente, matcha o para calentar
leche.
DESPUÉS DE TERMINAR EL ESPUMADO
1. Una vez retirada la jarra de leche, limpia
inmediatamente la varilla de vapor con un
paño húmedo antes de volver a colocarla en su
posición hacia abajo.
2. Cuando la varilla de vapor vuelve a su posición
hacia abajo, se produce la purga automática.
Esto es para limpiar el interior de la varilla de
vapor. La máquina emitirá un pitido para indicar
que el purgado ha iniciado. Cuando termine, la
máquina emitirá un pitido nuevamente. Puedes
purgar en cualquier momento si presionas el
botón PURGE (Purgar) cuando la varilla de
vapor esté en la posición hacia abajo.
3. Antes de verter la leche, golpea suavemente la
jarra sobre una superficie plana y menéala para
eliminar las burbujas grandes. Vierte la leche
espumada sobre el espresso y disfruta.
CÓMO AGREGAR ESPUMA A UNA BEBIDA
SIN LECHE
Si una bebida no tiene leche, es posible agregar
leche si presionas FROTH TYPE (Tipo de
espumado) o MILK TYPE (Tipo de leche).
1. Asegúrate de que el batidor esté instalado en
la jarra de leche. Llena la jarra de leche con la
cantidad deseada de leche, pero no excedas la
línea de llenado máximo.
2. Tras seleccionar la leche deseada, presiona
FROTH TYPE (Tipo de espumado) o MILK
TYPE (Tipo de leche) para activar los ajustes
de leche.
3. Asegúrate de que la parte inferior de la jarra
de leche esté seca. Coloca la jarra de leche en
la plataforma correspondiente con la varilla de
vapor introducida en la jarra.
4. Selecciona leche DAIRY (Vaca) o PLANT-
BASED (Vegetal) con el botón MILK TYPE
(Tipo de leche).
5. Selecciona el espumado deseado con el botón
FROTH TYPE (Tipo de espumado).
6. Presiona START (Iniciar). La máquina emitirá
un sonido para indicar que inició el programa.
La máquina hará primero la preparación y luego
el espumado. La barra de avance se encenderá
para indicar el estado del programa.
ESPAÑOL
ESPUMADO MANUAL
1. Llena la jarra de leche según lo desees, entre
las líneas de llenado mínimo y máximo.
2. Presiona FROTH ONLY (Solo espumado).
3. Asegúrate de estar en la configuración de
leche vaporizada.
4. Inclina la jarra de leche ligeramente hacia la
izquierda o hacia la derecha, de modo que la
varilla de vapor quede a un dedo de distancia
de la pared de la jarra de leche.
5. Mantén presionado START (Iniciar) por
3 segundos. La máquina emitirá un pitido
para indicar que se inició el espumado y que
comenzará a generar vapor desde la varilla.
6. Coloca la varilla justo debajo de la superficie
de la leche para incorporarle aire. Comenzará
a formarse un remolino.
7. Una vez que tengas el volumen de espuma
deseado, levanta la jarra para que la varilla de
vapor se sumerja más. Esto es para calentar
la leche.
8. Mantén la jarra de leche en esa posición hasta
que esté demasiado caliente para sostenerla
con la mano y presiona START (Iniciar) para
desactivar la función.
TIPOS DE ESPUMADO
Leche vaporizada
Vaporiza ligeramente la leche a una temperatura
ideal para beberla sin batirla. Ideal para el café.
Espuma ligera
Una capa delgada de espuma para lattes.
Espuma espesa
Una capa clásica de espuma esponjosa para
colocar sobre cualquier bebida. Ideal para
capuchinos.
Mezcla y espuma*
Una gran capa de espuma, ideal para
dry
cappuccinos
y otras bebidas con menos
volumen.
Espuma fría
Una clásica capa de espuma fría para cubrir
cualquier café helado o espresso.
*No disponible en todos los modelos
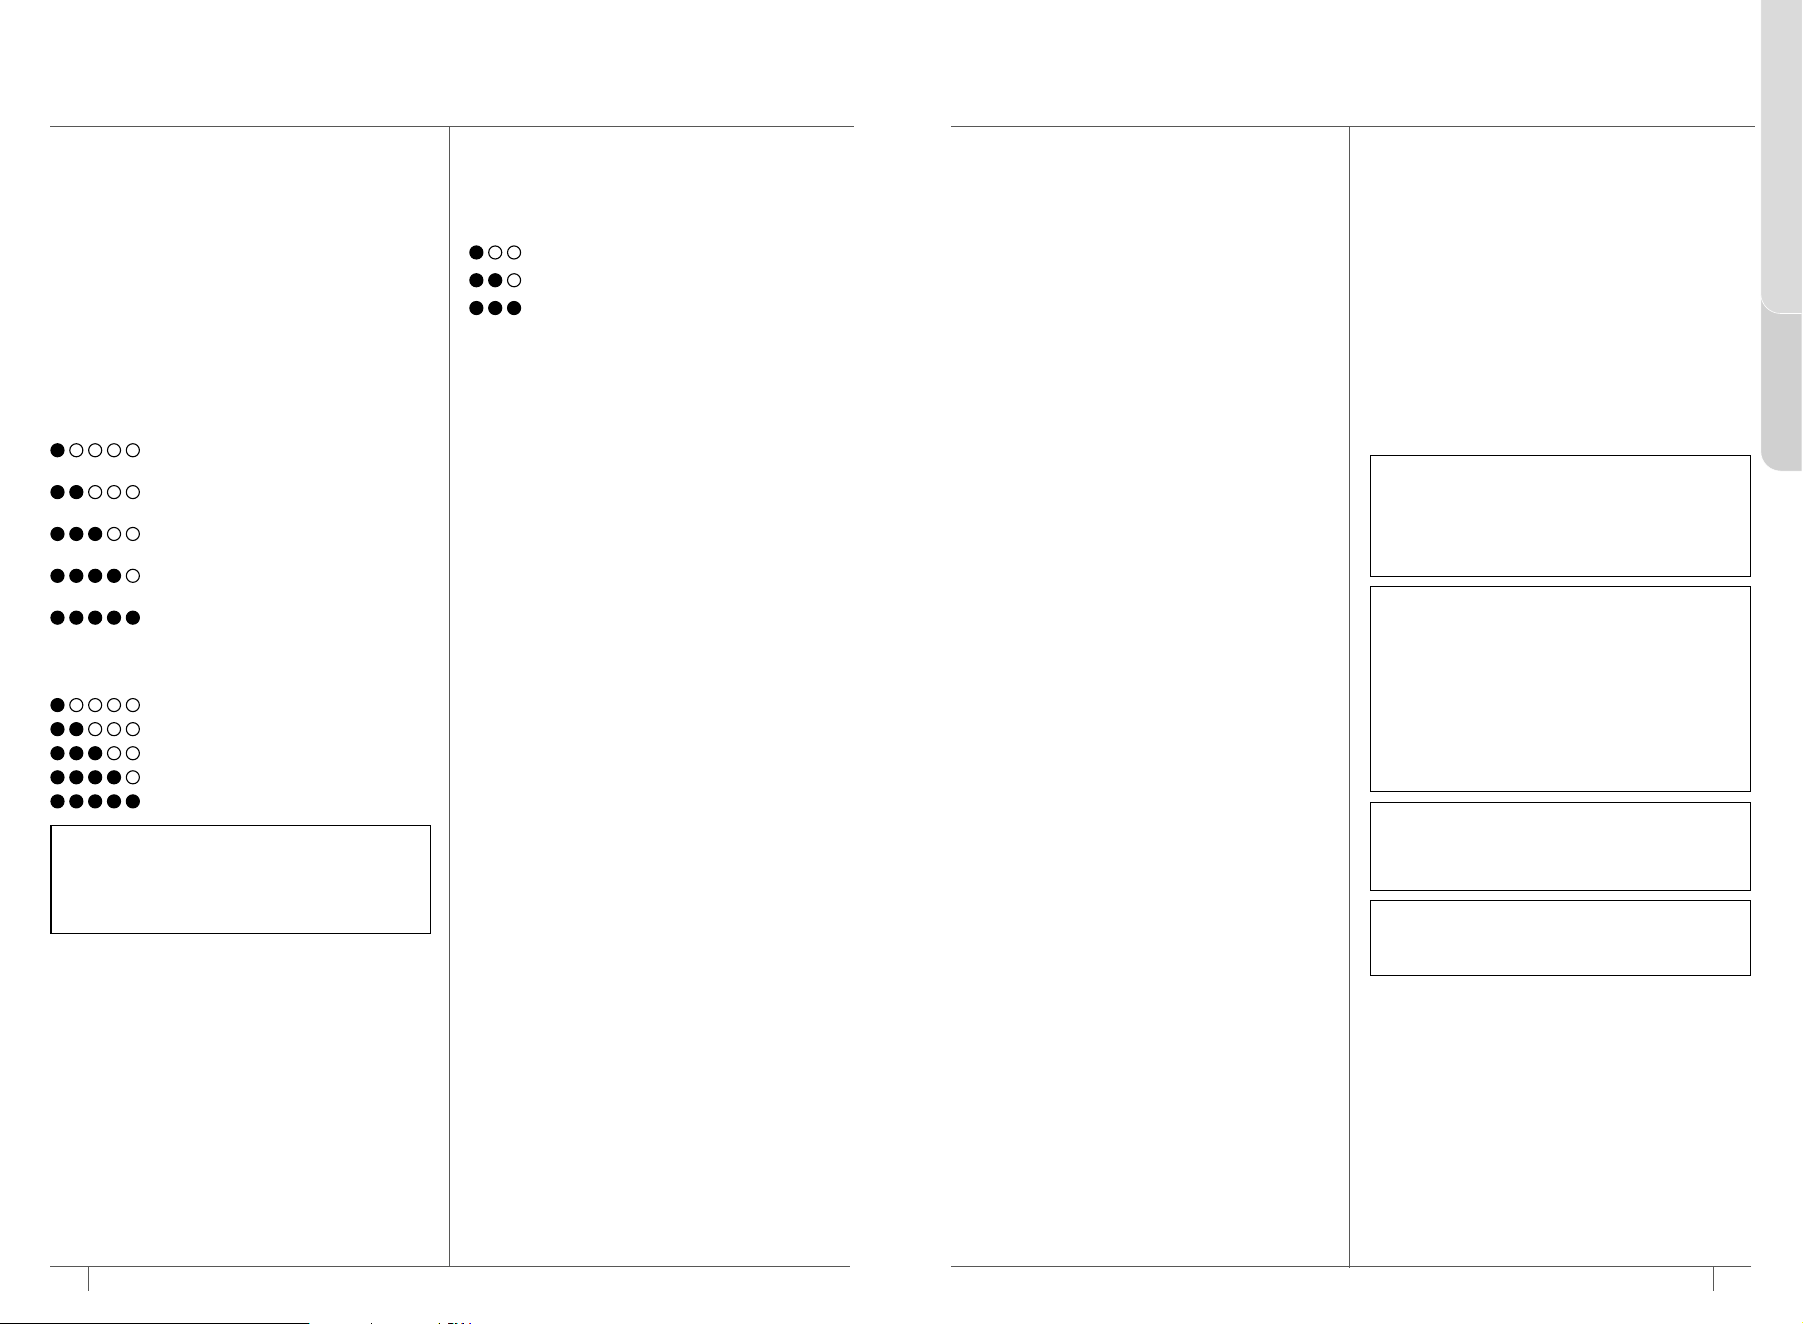
44 45
ninjakitchen.com
ninjakitchen.com
ESPAÑOL
AJUSTE DE LA INTENSIDAD Y
TEMPERATURA DE PREPARACIÓN
4544
sharkninja.mx
sharkninja.mx
TEMPERATURA
Hay varios métodos y prácticas para ayudar a
lograr tu temperatura preferida.
Ajustes de temperatura
Temperatura baja
Temperatura media (valor predeterminado
Temperatura alta
La temperatura de la bebida afectará la
extracción del espresso y el sabor de tu bebida.
Para lograr los mejores resultados y la extracción
adecuada, recomendamos una temperatura de
baja a media para los tostados más oscuros,
yuna temperatura media o alta para los tostados
más claros. Si no estás seguro del tipo del grano,
selecciona la temperatura baja.
NOTA: No se recomienda agregar granos
frescos encima de los granos restantes,
yaque esto puede afectar a Grind iQ. En vez
de eso, usa todos los granos que están en
el recipiente y rellénalo cuando esté vacío,
ocámbialo por otro recipiente.*
NOTA: NO agregues granos ya molidos
al recipiente de granos. Para obtener más
información sobre cómo usar café molido,
consulta la sección Uso de café molido.
NOTA: Ten cuidado de no sobrellenar el
recipiente de granos. Llénalo únicamente
hasta la línea MAX (MÁX.).
NOTA: Quizá notes al colocar el recipiente que
se siente inestable o que se tambalea fácilmente.
El recipiente se apoya sobre el brazo de la
báscula, y debe tener libertad de movimiento
para que la máquina pueda pesar con precisión
el café que se va a moler.
Este tambaleo es normal, sin embargo, evita
empujar hacia abajo con demasiada fuerza para
evitar dañar la delicada báscula situada debajo
el brazo.
RETIRO DEL RECIPIENTE INTERCAMBIABLE
1. Retira la tapa.
2. Libera el recipiente y retíralo de la parte
superior de la máquina levantándolo
directamente hacia arriba (si usas un
recipiente desmontable*).
3. Antes de rellenar, limpia el interior del
recipiente con un paño de microfibra para
eliminar los aceites residuales. No uses agua.
4. Si vas a rellenar, llena el recipiente con granos
enteros.
5. Coloca el recipiente seleccionado
nuevamente en la máquina y ponle el seguro,
luego vuelve a colocar la tapa.
ESPAÑOL
NOTA: Ajustar la intensidad de preparación del
espresso afectará el volumen resultante de la
preparación. Las intensidades 1 y 2 tendrán un
mayor volumen que el ajuste predeterminado;
utiliza una taza más grande de lo normal.
PERFILES Y CÓMO GUARDAR
PERSONALIZACIONES
Usa los perfiles para guardar tus
personalizaciones y acceder rápidamente
atusbebidas favoritas.
Cada perfil de bebida puede guardar tus
personalizaciones para cada bebida.
Al usarla por primera vez, la máquina usará
el perfil 1 de manera predeterminada. Para
seleccionar el segundo perfil, presiona el botón
de perfil. Para entrar en el modo de invitado
(ajustes predeterminados de fábrica), presiona
nuevamente el botón de perfil.
Si hiciste personalizaciones a un bebida y
quieres guardarlas, se pueden guardar en el
perfil activo si mantienes presionado el botón
de perfil por 2 segundos hasta oír un pitido de
confirmación.
Cada vez que guardas una personalización para
la misma bebida, esta sobrescribirá la que ya
está guardada en ese perfil.
Todas las personalizaciones que se hayan hecho
y no se hayan guardado en un perfil se perderán
al salir de esa configuración de bebida o al
apagar la máquina.
CÓMO ELEGIR LA TAZA CORRECTA
Asegúrate de que la taza que vas a usar tenga
el tamaño adecuado para la bebida. Para una
bebida caliente, usa una taza de tamaño similar
a la misma. El grosor del material de la taza
también afectará la temperatura de tu bebida.
Para una bebida caliente, usa una taza de
material más delgado.
INTENSIDAD
Si la preparación te parece muy suave o muy
intensa, puedes usar el botón de ajuste de
intensidad.
Intensidad del espresso y ajustes de tamaño
El más alto, menos concentrado:
relación de 4:1 de agua y café molido
Más alto: relación de 3:5 de agua
ycafé molido
Alto: relación de 3:1 de agua y café
molido
Predeterminado: relación de 2.5:1
de agua y café molido
Bajo, más concentrado:
relación de 2:1 de agua y café
molido
Ajustes de intensidad del café
Suave: se molerán menos granos
Predeterminado
Cuerpo completo
Fuerte
Intenso: se molerán más granos
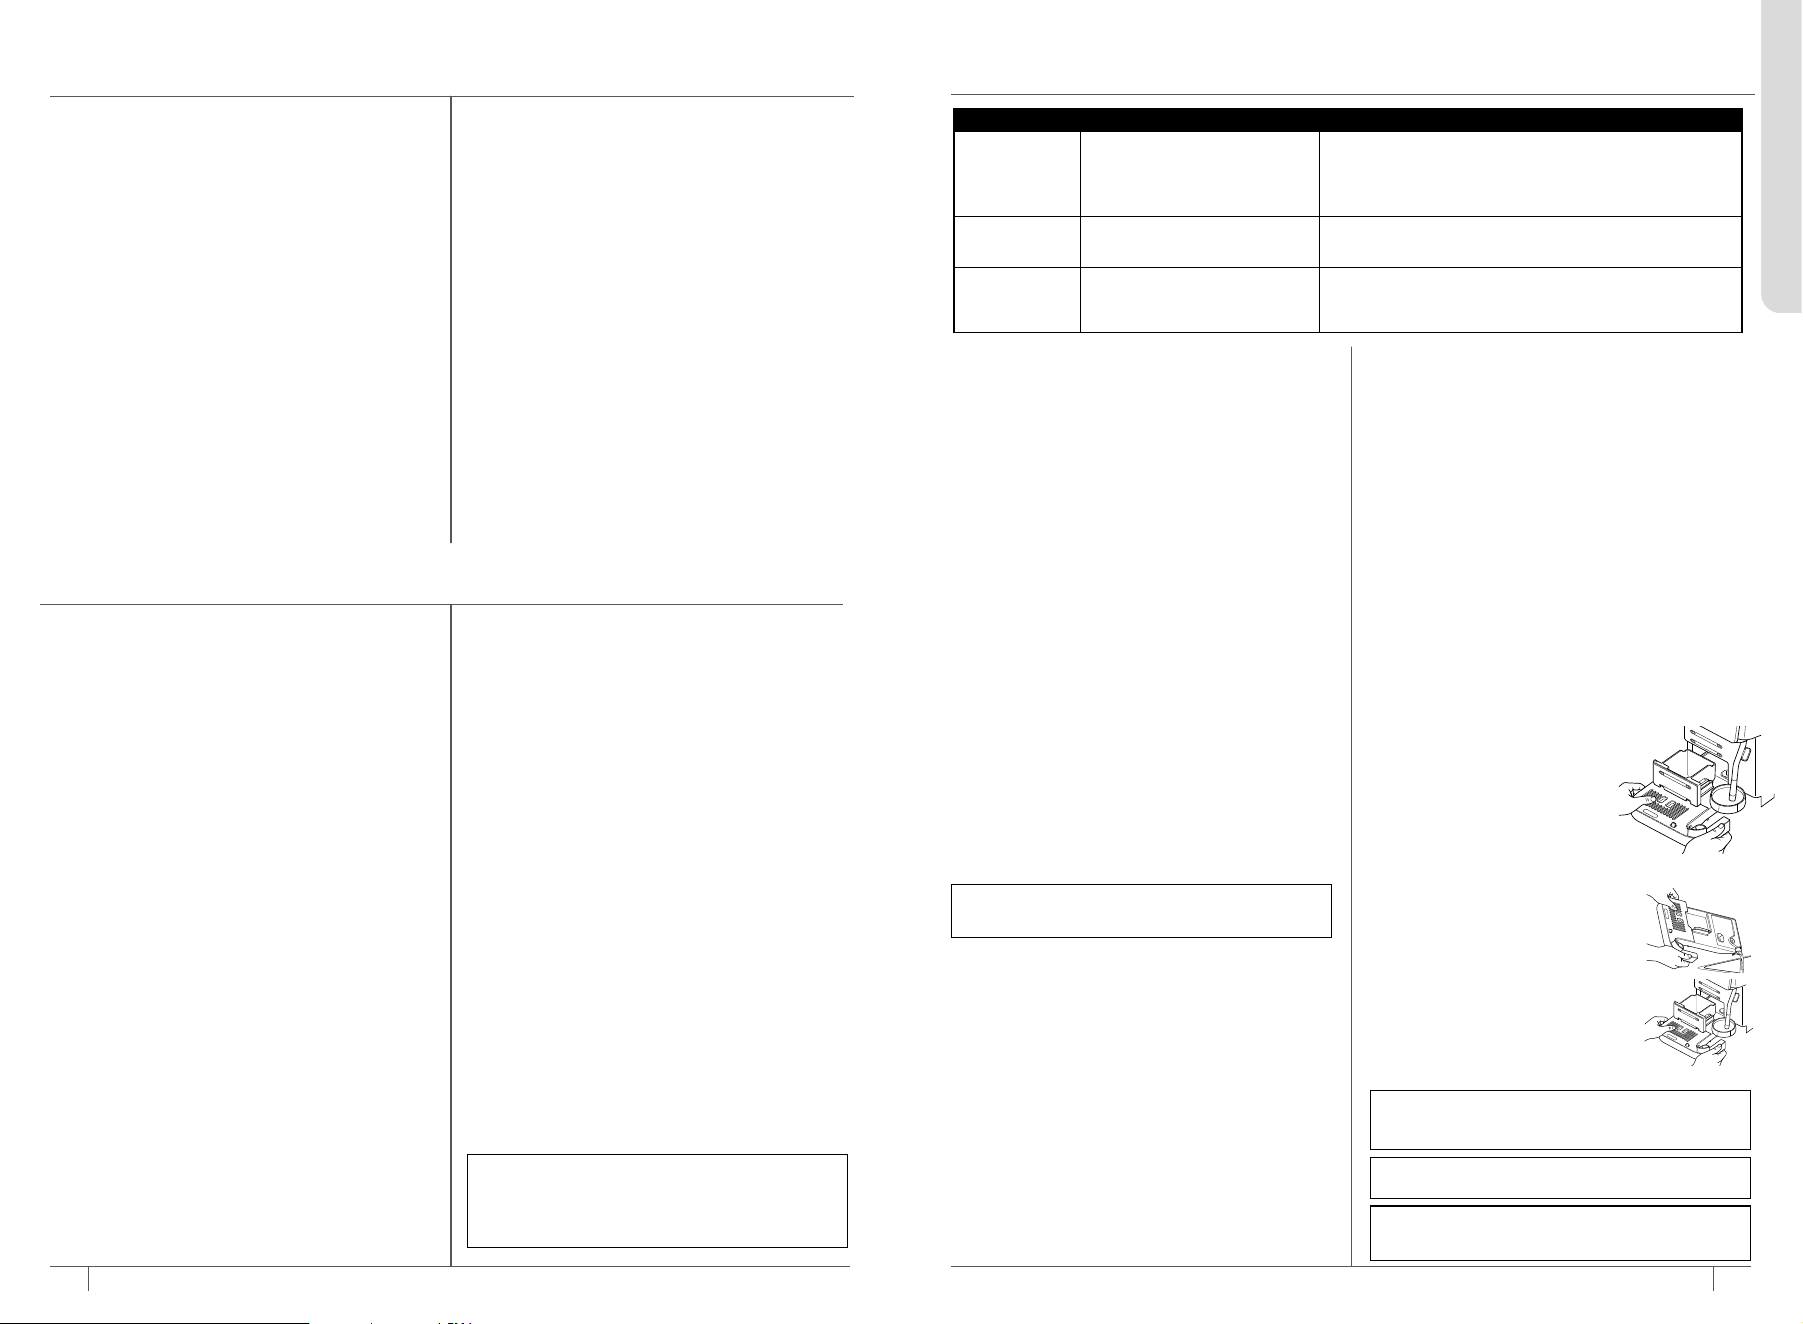
4746
sharkninja.mx
sharkninja.mx
NOTA: NO sumerjas en agua las piezas/los
accesorios que no sean aptos para lavavajillas.
CAMBIO DE GRANOS Y RECIPIENTES
3. Presiona el botón START (Iniciar) para
confirmar. La máquina emitirá un pitido para
confirmar la selección.
Se recomienda ejecutar un ciclo de Grind iQ
al llenar un recipiente con nuevos granos.
Consulta la sección Ciclo de GRIND iQ para
obtener más información.
ETIQUETADO DE RECIPIENTES
DESMONTABLES
Estas instrucciones solo se aplican a las
máquinas con recipientes desmontables.
Tu máquina viene con 2 etiquetas reversibles,
con 1 y 2 en cada lado.
Estas etiquetas se insertan en el frente del
recipiente desmontable.
GRIND IQ
AJUSTE DEL TAMAÑO DE MOLIENDA:
GRIND iQ monitoreará y ajustará
constantemente el tamaño de molienda para
garantizar el mejor sabor de las preparaciones.
Sin embargo, si te complace el sabor de
tu preparación, puedes ajustar el tamaño
de molienda para mejorarlo. Este ajuste se
guardará en la memoria de la máquina y
GRIND iQ seguirá monitoreando y ajustando
con este ajuste de manera normal. El ajuste
solo se guarda para el tipo de bebida que esté
seleccionado en la pantalla en ese momento.
Para cambiarlo para varios tipos de bebida, es
necesario repetir el proceso para cada uno.
El sabor es demasiado amargo: Reduce el
tamaño de molienda.
El sabor es demasiado ácido: Aumenta el
tamaño de molienda.
1. Presiona el botón SETTINGS.
2. Usa las flechas para navegar a la opción
11: tamaño de molienda y presiona START
(Iniciar).
3. Usa las teclas de flecha para seleccionar
el ajuste deseado; las opciones son +/-2
tamaños de molienda.
4. Presiona el botón START (Iniciar) para
confirmar la selección.
NOTA: El rango de ajuste manual puede
limitarse para proteger contra una carga
excesiva del motor provocada por ajustar un
molido demasiado fino.
MANTENIMIENTO DIARIO
ESPAÑOL
VACIADO DE LA BANDEJA DE GOTEO Y EL
DEPÓSITO DE POSOS DE CAFÉ
Mientras haces una preparación, la bandeja
de goteo se llenará. Cuando el indicador de
vaciado de color naranja se eleve lo suficiente
como para ser visible, o cuando la máquina
indique EMPTY TRAY (Vaciar bandeja), debes
vaciar la bandeja de goteo y el depósito de
posos de café. Vaciar y limpiar siempre la
bandeja de goteo y el depósito de posos de
café al mismo tiempo para una limpieza y
rendimiento óptimos.
Vaciar la bandeja de goteo y el depósito de
posos de café después de la última preparación
del día.
La máquina pasará al modo de espera 30minutos
después de la última preparación y realizará un
enjuague de apagado. Vacía siempre la bandeja de
goteo después de cada preparación si el elemento
de flotación es visible o el panel de control indica
que se vacíe. De manera opcional, se puede
colocar un recipiente debajo de las boquillas de
café para recibir el enjuague de apagado.
1. Retira la bandeja de goteo
yel conjunto de depósito de
posos de café de la máquina
jalando la bandeja hacia ti.
2. Retira el depósito de posos
de café de la bandeja de
goteo; vacía y limpia el
depósito de posos de café.
Lavar a mano el depósito
de posos de café después de cada vaciado
para eliminar la posibilidad de
crecimiento de moho.
3. Lleva con cuidado la bandeja de
goteo al fregadero y vierte agua
por la boquilla vertedora.
4. Coloca nuevamente el depósito
de posos de café en la bandeja
de goteo e inserta el conjunto
de bandeja y depósito en la
máquina.
NOTA: El indicador de vaciar se desmonta
para la limpieza.
NOTA: Al vaciar la bandeja de goteo, espera
al menos 5 segundos antes de volver a
insertarla para borrar la alerta.
NOTA: NUNCA retires la bandeja de goteo cuando
una preparación esté en curso. Esto cancelará la
preparación y puede provocar derrames.
CICLO CUÁNDO LIMPIAR CÓMO EJECUTARLO
Purgar
Después de cada preparación de
leche o el uso del vaporizador
(inicio automático) o según sea
necesario (inicio manual)
Después de una preparación de leche, empuja la varilla
de vapor en su posición original para iniciar el purgado
automático.
Presiona el botón PURGE (PURGAR) para iniciar una purga
manual.
Limpiar
De manera mensual o siempre que
se encienda la luz de limpieza
Coloca una tableta limpiadora en la compuerta de café molido
y presiona el botón CLEAN (Limpiar) para ejecutar un ciclo
de limpieza.
Descalcificar
Cuando se encienda la luz de
descalcificar
Disuelve un paquete de solución descalcificadora de
acuerdo a las instrucciones del paquete. Luego presiona el
botón DESCALE (Descalcificar) para ejecutar un ciclo de
descalcificación.
LIMPIEZA INMEDIATAMENTE DESPUÉS DE LA
PREPARACIÓN
•
Vacía la bandeja de goteo y el depósito de
posos de café cuando el indicador naranja
de vacío suba lo suficiente para ser visible o
siempre que la máquina lo indique en el panel
de control.
•
Después de hacer espumado, limpia la varilla
con un paño húmedo antes de empujarla de
regreso a su posición hacia abajo para iniciar
un purgado automático.
•
Lava la bandeja de goteo y el depósito de
posos de café a mano o en lavavajillas y deja
que se sequen bien al aire.
•
Limpia periódicamente el exterior de la
máquina con un paño húmedo.
LIMPIEZA DE LOS ACCESORIOS
Piezas aptas para la rejilla superior del
lavavajillas: Jarra de leche, batidor, bandeja
para tazas y depósito de agua.
Lavar únicamente a mano: Todos los
componentes de la bandeja para goteo y la jarra.
Unidad de preparación: ENJUAGARLA
SOLAMENTE. NO lavarla con jabón.
Limpiar con paño: recipiente de granos,
cavidad interna, superficies externas.
Se recomienda ejecutar un ciclo de GRIND iQ
siempre que:
•
Los granos actuales estén fuera del rango
óptimo de tamaño de molienda
•
Se hayan agregado granos nuevos a un
recipiente vacío
•
Se hayan cambiado los recipientes
El LED de GRIND iQ se encenderá durante el
uso diario para mostrar el estado de GRIND iQ y
cuán cerca estás del mejor sabor de espresso.
APAGADO: El molino se calibra
AMARILLO: El ciclo de GRIND iQ es necesario
para calibrar el molino.
El ciclo de GRIND iQ preparará 2 o 3 shots de
espresso para ajustar el tamaño de molienda
correcto para tus granos. Esto tardará unos
minutos.
1. Coloca una taza de 14 oz (414ml) debajo de
las boquillas de café.
2. Presiona el botón GRIND iQ y luego presiona
INICIAR para comenzar un ciclo; el LED se
encenderá en amarillo.
3. La máquina emitirá un pitido para indicar
que se inició el ciclo. La barra de avance
se encenderá para indicar el estado de la
calibración. Al terminar, la máquina sonará
el bip de nuevo para indicar que se ha
completado el ciclo; quita el vaso y desecha
el espresso. Después de que la máquina
emita un pitido por segunda vez, quita la taza
y desecha el espresso.
4. El LED de GRIND iQ se apagará para indicar
que se calibró correctamente.
SELECCIÓN DE RECIPIENTES
Estas instrucciones solo aplican a una máquina con
recipiente desomntable. El segundo reci[piente no
se incluye con todos los modelos. Está disponible
para la compra en sharkninja.mx.
Al intercambiar el primer recipiente por otro,
guarda el primero con la tapa puesta, ya sea en
la base de almacenamiento (disponible para su
compra en sharkninja.mx) o en un lugar fresco
y seco.
Cada vez que se fije una tolva en la máquina,
se te pedirá que confirmes qué tolva está en la
máquina. El nombre del recipiente está inscrito
en el frente de este.
1. Cuando la máquina tenga un recipiente
colocado, el panel de control mostrará el
último recipiente instalado.
2. De ser necesario, presiona las flechas para
cambiar el recipiente entre HOP1 y HOP2.
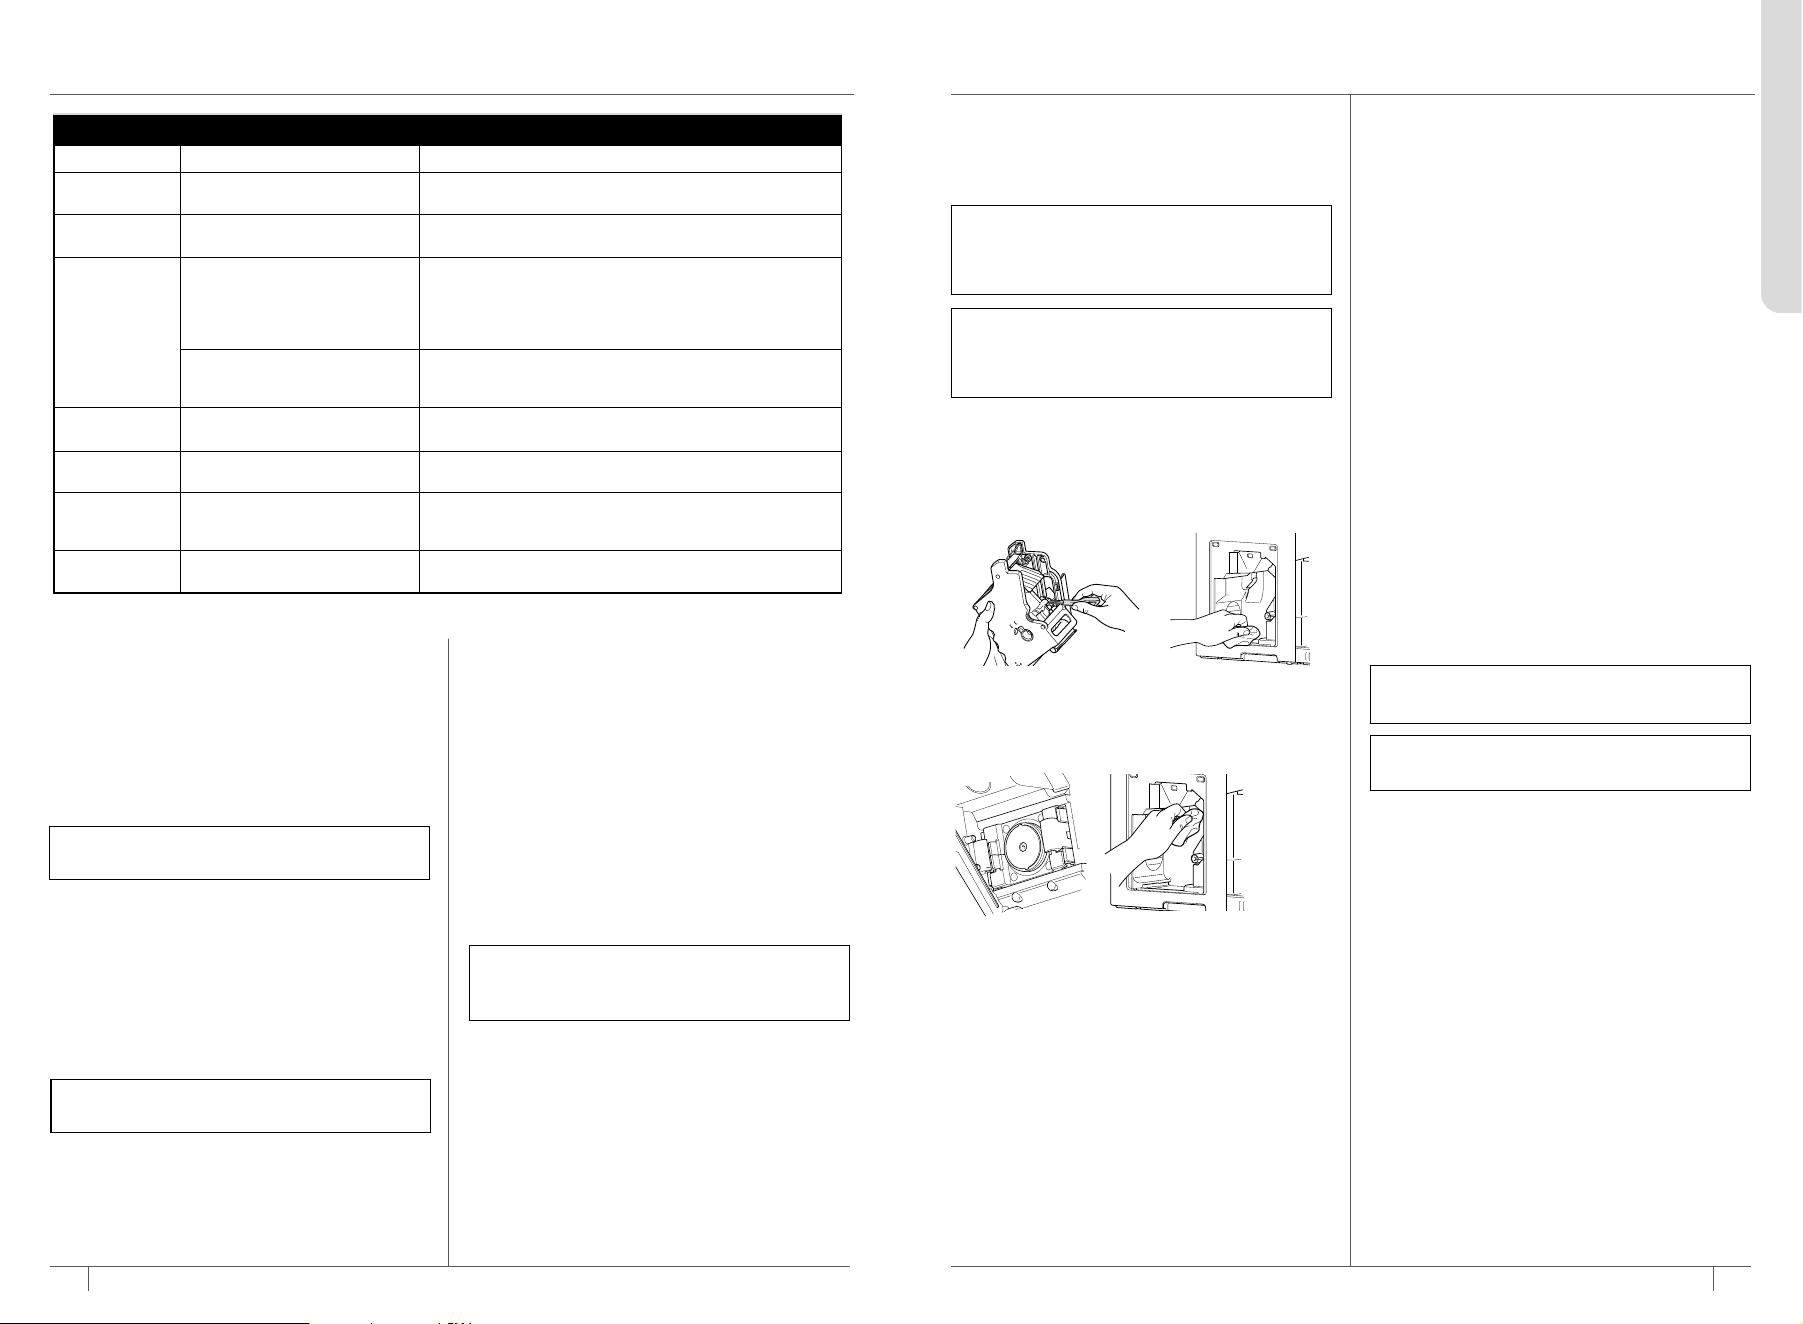
48
sharkninja.mx
LIMPIEZA Y MANTENIMIENTO DE
LA UNIDAD DE PREPARACIÓN
Enjuagar la unidad de preparación una vez
al mes para mantener la limpieza y evitar
la acumulación de café molido que podría
provocar atascos. La alerta de la unidad de
preparación se encenderá en color blanco
siempre que se recomiende una limpieza.
Limpieza de la unidad de preparación
1. Abre la puerta de mantenimiento del lado
izquierdo de la máquina para acceder a la
unidad de preparación.
2. Alinea tus dedos con los puntos de agarre
resaltados con rojo. Presiona la lengüeta
naranja para liberar la unidad de preparación,
luego jálala hacia ti. Sigue sujetando la
unidad de preparación por las asas definidas
para un mejor control mientras limpias.
3. Enjuaga la unidad de preparación con agua
para eliminar el café molido acumulado. NO
uses jabón, ya que afectará la lubricación.
4. Usa el cepillo para desprender el café molido
acumulado en la malla de filtro o los rieles.
Vuelve a enjuagar, si es necesario.
5. Deja que la unidad de preparación se
seque al aire completamente antes de
volver a colocarla. Para obtener los mejores
resultados, deja que la unidad de preparación
se seque toda la noche. NO la seques con un
paño para evitar que las fibras se acumulen
en el interior de la unidad de preparación.
6. Vuelve a colocar la unidad de preparación en
la máquina y coloca la puerta.
Para una limpieza más profunda de la unidad de
preparación, ejecuta el ciclo de limpieza una vez
al mes después de reinsertarla. Para obtener
más información, consulta la sección Ciclo de
limpieza en Descalcificación y ciclo de limpieza.
49
sharkninja.mx
LIMPIEZA DE LA CAVIDAD INTERNA
Limpiar la cavidad interna de la máquina cada
vez que retires la unidad de preparación para
limpiarla.
1. Retira la puerta de mantenimiento y la unidad
de preparación.
2. Usa un paño seco o el cepillo de limpieza para
eliminar el café molido residual. Asegúrate
de revisar si hay café molido acumulado en
las paredes laterales y la cara superior de la
cavidad.
3. Usa un paño seco para limpiar el café molido
de la cara del compactador; es la malla
perforada que se encuentra en el techo, hacia
el frente de la unidad (ve el diagrama).
4. Vuelve a colocar la unidad de preparación y la
puerta de mantenimiento.
NOTA: NO permitas que las muelas entren en
contacto con el agua.
NOTA: Los tornillos solo deben estar
ajustados, NO los aprietes excesivamente.
NOTA: Asegúrate siempre de que la máquina
se haya apagado y que haya terminado un
enjuague de apagado antes de abrir la puerta de
mantenimiento y trabajar al interior de la máquina.
NOTA: NO uses agua o líquidos limpiadores
para limpiar el interior de la cavidad de
preparación, ya que esto puede dañar la
máquina; usa solo un paño seco.
ESPAÑOL
LIMPIEZA: MANTENIMIENTO PERIÓDICO
NOTA: Es seguro enjuagar toda la unidad de
preparación con agua. NO utilices jabón.
NOTA: Apaga la máquina y espera a que termine
el enjuague de apagado.
NOTA: La unidad de preparación y la puerta
de mantenimiento DEBEN estar instaladas
para hacer funcionar la máquina.
LIMPIEZA DEL MOLINO DE MUELAS CÓNICAS:
Para evitar obstrucciones y garantizar el resultado
de la más alta calidad en el uso diario, se
recomienda limpiar el molino de muelas cónicas.
Recipiente desmontable
Estas instrucciones solo se aplican a las
máquinas con recipiente desmontable.
Recomendamos limpiar el molino de muelas
cónicas al menos cada semana. En el caso de
los granos con tostado oscuro, descafeinados
yotros tipos de granos aceitosos, se
recomienda limpiar el molino con más
frecuencia. Si no se usa diariamente, limpia
el molino por lo menos cada mes o cuando
cambies los granos.
1. Retira la tapa protectora del recipiente.
2. Libera el recipiente girando la manija del
seguro hacia la izquierda y retira el recipiente
de la máquina.
3. Agarra cada extremo del arco del cargador
del molino. Voltéalo en sentido contrario a las
manecillas del reloj y levántalo para sacarlo.
ADVERTENCIA: Ten cuidado al manipular
el cargador del molino. Las asas están muy
afiladas.
4. Limpia la muela cónica dentro de la máquina
con el cepillo para eliminar el café molido
residual.
6. Vuelve a instalar el portamuelas en la
máquina insertándolo y girándolo a la
derecha.
7. Vuelve a colocar el recipiente y asegúralo
girando la manija de seguro hacia la derecha.
Vuelve a instalar la tapa protectora del
recipiente.
8. Enciende la unidad y deja que ejecute el ciclo
de enjuague; esto garantizará la eliminación
del café molido desprendido en la cámara de
preparación.
*Estas partes también son aptas para lavaplatos (estante superior).
PIEZA CUÁNDO LIMPIAR CÓMO LIMPIAR
Jarra de leche Después de cada uso
Lava a mano con agua jabonosa tibia. Retira el batidor y enjuaga.*
Bandeja de
goteo
Cada 3 días o cuando la máquina
lo indique
Jala la bandeja de goteo hacia ti para retirarla, luego inclínala
para vaciarla en el fregadero por la boquilla trasera.
Depósito de
posos de café
Cada 3 días o cuando la máquina
lo indique
Retíralo de la bandeja de goteo y vacía el café molido.
Lava a mano con agua jabonosa tibia.
Unidad de
preparación
desmontable
Cada mes o cuando la alerta
de LED blanco de la unidad de
preparación lo indique
Enjuaga la unidad de preparación con agua corriente para
desprender el café molido residual. Usa el cepillo para limpiar
las áreas difíciles de alcanzar.
Luego de enjuagar, ejecuta un ciclo de limpieza. Consulta la sección
Descalcificación y ciclo de limpieza para ver las instrucciones.
Cada 2 meses
Lubrica la unidad de preparación con grasa de grado alimenticio
después de la limpieza. Consulta la sección Lubricación de la
unidad de preparación para obtener más instrucciones.
Cavidad interna Cada mes
Limpia el interior de la máquina con un paño húmedo cada
vez que retires la unidad de preparación para limpiarla.
Compuerta para
café molido
Revísala cada semana, si se utilizó
Revisa si la compuerta tiene residuos acumulados y límpialo
con el cepillo.
Recipiente de
granos
Antes de colocarle una nueva
bolsa de granos
Limpia dentro del recipiente con un paño para eliminar el
aceite de los granos. NO uses agua, y asegúrate de secarlo por
completo antes de rellenarlo y volverlo a insertar en la máquina.
Depósito de
agua
Una o dos veces por mes, o según
sea necesario
Enjuaga con agua corriente.*
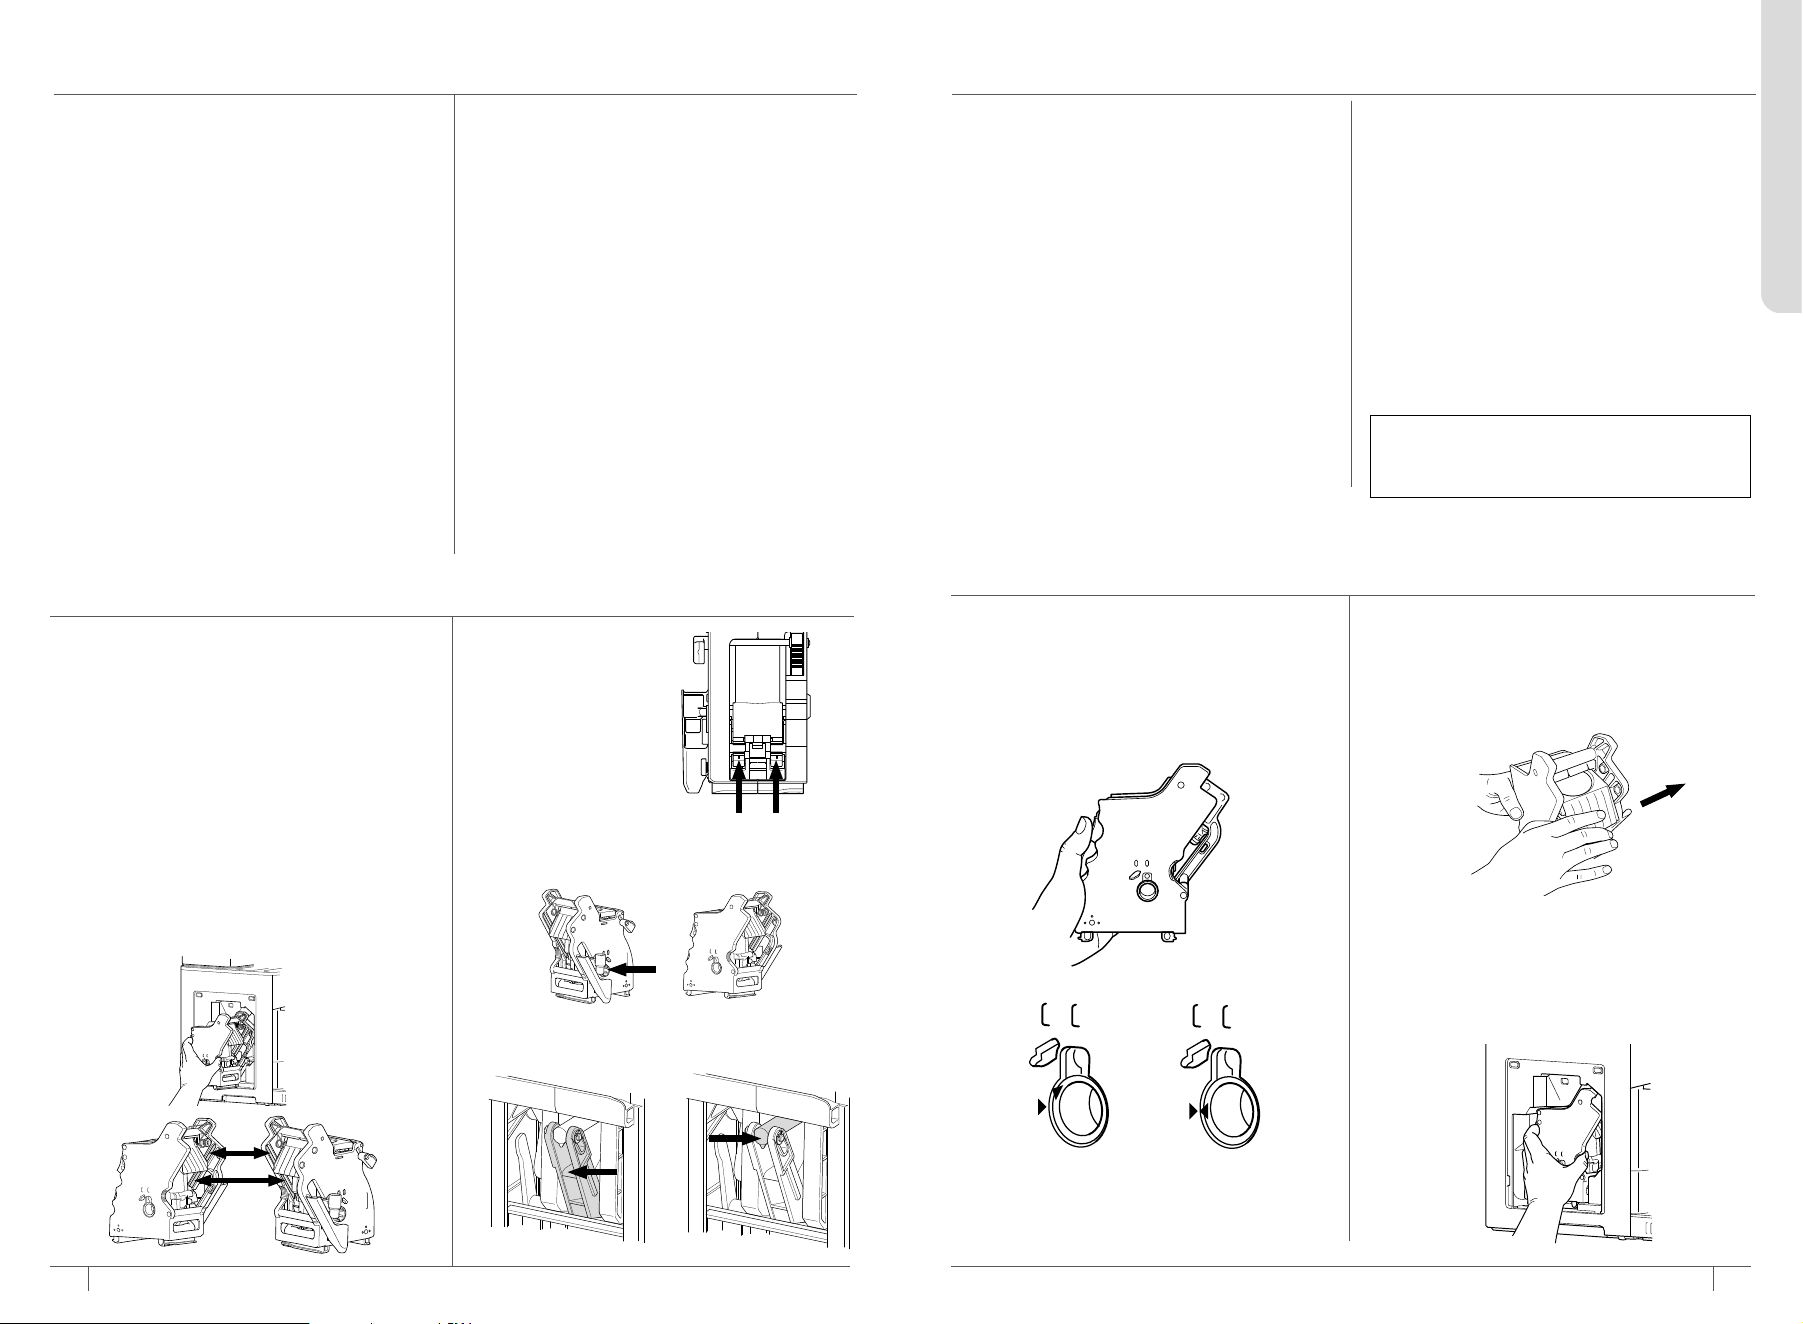
5150
sharkninja.mx
sharkninja.mx
LIMPIEZA DEL RECIPIENTE
NOTA: NO uses agua o líquidos limpiadores
para limpiar el recipiente, ya que esto puede
dañar la máquina; usa solo un paño seco.
Clean the hopper whenever refilling with new
beans to help ensure freshness and maintain
flavor quality.
Recipiente fijo
Estas instrucciones solo se aplican a la máquina
con recipiente fijo.
1. Apaga la máquina y espera a que termine el
enjuague de apagado.
2. Retira la tapa del recipiente.
3. Utiliza un paño seco o el cepillo de limpieza
para quitar el café molido residual del interior
del recipiente.
4. Vuelve a colocar la tapa del recipiente.
Recipiente desmontable
Estas instrucciones solo se aplican a las
máquinas con recipiente desmontable.
1. Apaga la máquina y espera a que termine el
enjuague de apagado.
2. Retira la tapa protectora del recipiente.
3. Libera el recipiente girando la manija del
seguro hacia la izquierda y retira el recipiente
de la máquina.
4. Utiliza un paño seco o el cepillo de limpieza
para quitar el café molido residual del interior
del recipiente.
5. Utiliza un paño seco o el cepillo de limpieza
para quitar el café molido residual del interior
de la cavidad del recipiente.
6. Vuelve a colocar el recipiente y asegúralo
girando la manija de seguro hacia la derecha.
Vuelve a instalar la tapa protectora del
recipiente.
POSICIÓN INICIAL DE LA UNIDAD DE PREPARACIÓN
La unidad de preparación entra en la máquina
solo en una posición. Si notas que la unidad
de preparación no se asienta adecuadamente,
revisa primero que esté en la posición “inicial”.
Para confirmar que la unidad de preparación
está en la posición inicial, utiliza las flechas de
alineación en el lado izquierdo de la unidad de
preparación:
Flechas desalineadas
NO ESTÁ EN
POSICIÓN INICIAL
Flechas alineadas
EN POSICIÓN
INICIAL
Si notas que la unidad de preparación no está
en la posición inicial, sigue estos pasos para
acomodarla.
2. Si la malla de filtro está en la parte superior
de la cámara, tal vez sea necesario empujarla
con mayor firmeza para que las flechas se
alineen.
3. Vuelve a instalar la unidad de preparación
en la máquina, asegurándote de oír un
chasquido cuando se acople.
1. Empuja con suavidad la parte delantera de la
cámara de preparación en la dirección que se
muestra para moverla hacia atrás.
Lubricación de la unidad de preparación
Se recomienda lubricar la unidad de
preparación cada 2 meses. Esto es para
garantizar el funcionamiento adecuado para
producir café excelente y prevenir atascos
yotros problemas con la máquina.
Después de enjuagar la unidad de preparación
y desprender el café molido con el cepillo,
deja que la unidad de preparación se seque
completamente al aire antes de lubricarla.
Lubrica la unidad de preparación únicamente
con la grasa proporcionada y aplica de 3 a 5
gotas pequeñas en las superficies resaltadas
en cada una de las 4 áreas que se muestran
a continuación. (Hay tubos de reemplazo
disponibles en www.sharkninja.mx.)
1. Rieles laterales izquierdo y derecho
Se encuentran en las caras interiores viendo
al frente de la unidad de preparación
LUBRICACIÓN DE LA UNIDAD DE PREPARACIÓN
2. Broches traseros
Se encuentran en la
parte trasera de la
unidad de preparación.
3. Conector (lados izquierdo y derecho)
Son orificios pequeños en los lados izquierdo
y derecho de la unidad de preparación.
4. Pistón y eje
Se encuentran en la parte inferior de la
unidad de preparación
LIMPIEZA: MANTENIMIENTO PERIÓDICO (CONT.)
LIMPIEZA DE LA VARILLA DE VAPOR
Con el tiempo, puede acumularse material en la
varilla de vapor. Esto puede hacer más lento el
espumado y causar una menor calidad.
1. Retira la tapa de la parte inferior del cepillo
de limpieza para acceder a la aguja.
2. Utiliza la aguja para quitar cualquier material
del de los 4 orificios de la punta de la varilla
de vapor.
3.
Para una limpieza más profunda, destornilla la
punta de la varilla de vapor. Puedes remojarla
en agua para ayudar a desprender los residuos.
4. Utiliza la aguja para quitar cualquier material
del interior de la varilla de vapor y de la punta
de esta.
5. Después de la limpieza, ejecuta una purga
para eliminar cualquier exceso de material.
La varilla y el batidor se pueden limpiar con
este método alternativo: llena con agua la
jarra de leche agrega una gota de jabón
lavatrastes y luego ejecuta un programa de
solo vapor en el ajuste de espuma LIGERA.
Para eliminar los residuos de jabón, asegúrate
de limpiar con un paño y enjuagar todos los
componentes después de la limpieza.
LIMPIEZA DE LA COMPUERTA PARA CAFÉ
MOLIDO
Revisar cada semana si la compuerta para café
molido tiene residuos acumulados que puedan
entrar en la cámara de preparación y afectar la
calidad de la preparación.
1. Apaga la máquina y espera a que termine el
enjuague de apagado.
2. Abre la tapa de la compuerta para café
molido y retira la medida.
3. También hay una manga desmontable que se
puede sacar para facilitar la limpieza.
4. Retira el café molido residual de la medida,
la manga y el área de la compuerta con un
paño seco o el cepillo de limpieza.
5. Vuelve a colocar la manga y la medida,
ycierra la tapa.
6. Enciende la máquina y deja que ejecute
el ciclo de enjuague; esto garantizará la
eliminación del café molido desprendido en
la cámara de preparación.
ESPAÑOL
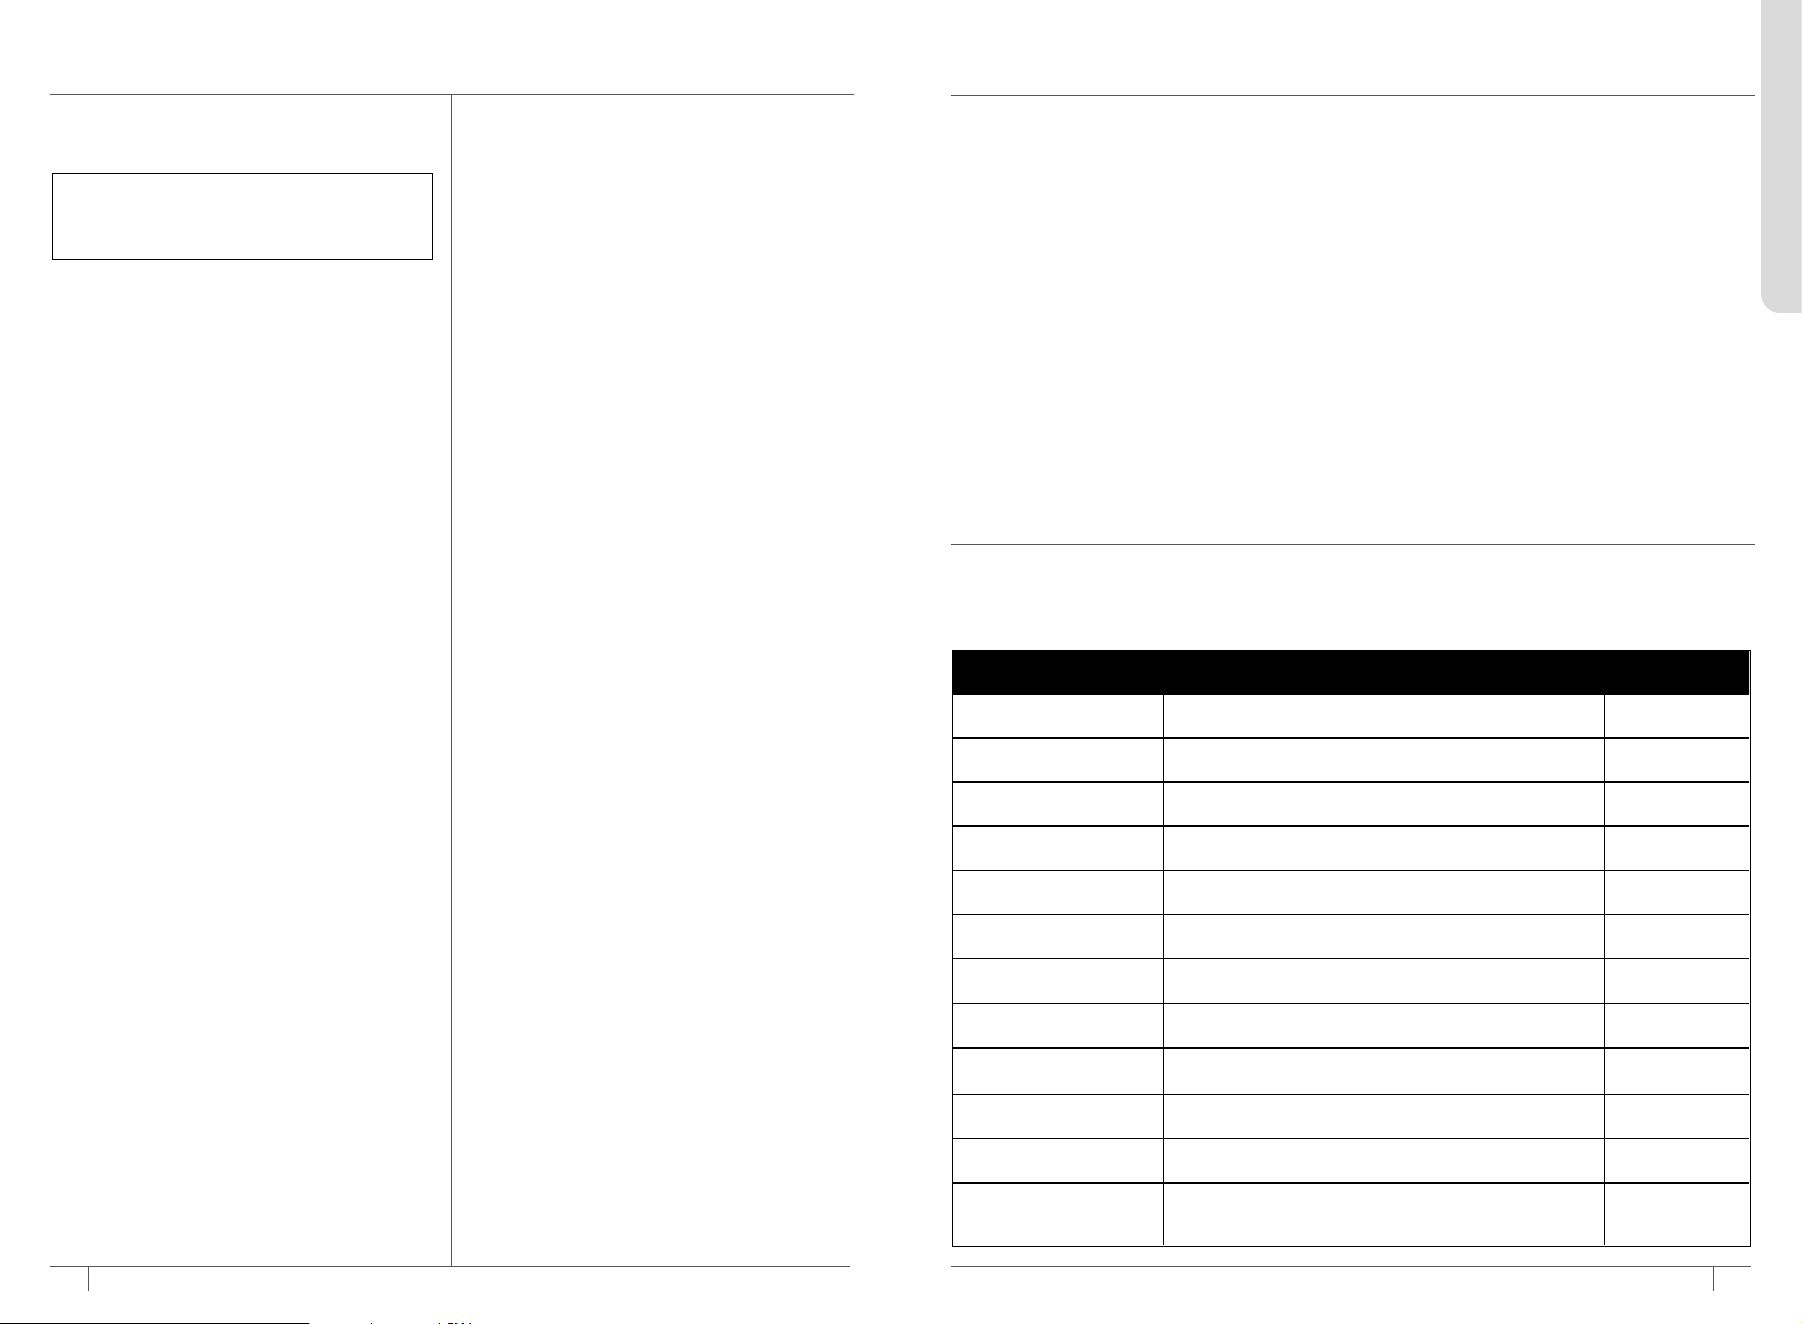
53
sharkninja.mx
52
sharkninja.mx
SETTINGS (Ajustes) FUNCIÓN
SUB MENU
(Submenú)
1. BEEPS (Pitidos) Activa o desactiva el sonido
ON (Encendido)/
OFF (Apagado)
2. ECO
Activarlo evita que la máquina se mantenga caliente después
deuna preparación
ON (Encendido)/
OFF (Apagado)
3. RESET UNIT
(Restablecerunidad)
Restaura los valores de fábrica de todas las variables YES (SÍ)/NO
4. FROTH TEMP
(Temperatura de espumado)
Ajusta la temperatura del vapor durante el espumado
LOW / MID / HIGH
(Baja/Media/Alta)
5. CLEAR PROFILE 1
(Borrarperfil 1)
Borra todas las bebidas guardadas y restablece las variables
predeterminadas
YES (SÍ)/NO
6. CLEAR PROFILE 2
(Borrarperfil 2)
Borra todas las bebidas guardadas y restablece las variables
predeterminadas
YES (SÍ)/NO
7. MANUAL RINSE
(Enjuaguemanual)
Fuerza la ejecución de un ciclo de enjuague YES (SÍ)/NO
8. RESET GRIND iQ
(Restablecer GRIND iQ)
Restablece GRIND iQ YES (SÍ)/NO
9. HARD WATER (Agua
dura)
Se cambió el ajuste de dureza del agua
ON (Encendido)/
OFF (Apagado)
10. GRINDER PURGE
(Purgarel molino)
Muele todos los granos que quedan en el recipiente
ON (Encendido)/
OFF (Apagado)
11. GRIND SIZE
(Tamaño de molienda)
Ajusta el tamaño de molienda +/-2 a partir del tamaño actual de
GRIND iQ
YES (SÍ)/NO
12. HOPPER SELECT
(Selección de recipiente)
Activa la selección de recipiente
+/- GRIND SIZE
(+/- TAMAÑO DE
MOLIENDA)
DESCALCIFICACIÓN Y CICLO DE LIMPIEZA
NOTA: Si utilizas un filtro en el depósito
de agua, retíralo antes de iniciar el ciclo de
descalcificación. La carcasa y los insertos
del filtro de agua se venden por separado en
sharkninja.mx/accessories.
Ciclo de limpieza
Tiempo necesario: aproximadamente 3minutos
Un ciclo de limpieza saca el café molido o los
aceites residuales que se acumulan dentro y
alrededor de las boquillas de café y la unidad
de preparación. La luz CLEAN (Limpiar) se
encenderá automáticamente para indicar
que se necesita un ciclo de limpieza. También
puedes ejecutar un ciclo de limpieza si notas un
cambio en la calidad de la preparación. El ciclo
de limpieza requiere una tableta limpiadora
(también se incluye, y está disponible para su
compra en sharkninja.mx/accessories).
Sigue estos pasos para ejecutar un ciclo de
limpieza:
1. Asegúrate de que la bandeja de goteo
esté completamente vacía, ya que el agua
resultante del ciclo de limpieza se depositará
en esta. No vaciar la bandeja de goteo
puede provocar un desbordamiento.
2. Llena el depósito de agua hasta la línea de
llenado máximo, sin sobrepasarla.
3. Presiona CLEAN (Limpiar) en el panel de
control. Es posible que escuches ruidos
mientras la unidad de preparación se coloca
en posición.
4. Abre la compuerta para café molido
ycoloca una tableta limpiadora en el interior,
asegurándote de que caiga al interior de la
cámara de preparación.
5. Cierra la tapa de la compuerta para café
molido.
6. Presiona el botón START (Iniciar) para
comenzar el ciclo de limpieza.
7. La máquina iniciará el proceso de disolución
de la tableta para limpiar la unidad de
preparación y depositará el agua y los
sedimentos del ciclo de limpieza en la
bandeja de goteo.
8. El ciclo de limpieza tardará unos 3 minutos
en terminar. La máquina emitirá un pitido
cuando el ciclo de limpieza termine.
9. Retira la bandeja de goteo con precaución
y vacíala. Lava a mano con agua jabonosa
tibia.
10. Apaga la máquina y deja que realice un
enjuague de apagado. Luego retira la unidad
de preparación y enjuágala con agua limpia.
Deja que se seque al aire completamente
antes de volver instalarla.
AJUSTES ADICIONALES
El menú de ajustes adicionales ofrece ciclos de limpieza y opciones adicionales para personalizar tu
máquina.
El menú de ajustes adicionales se accede al presionar el botón SETTINGS (Ajustes). La navegación y
la selección se hace con las teclas de flechas, y la confirmación se hace con el botón START (Iniciar).
PRÁCTICAS RECOMENDADAS DE PREPARACIÓN
• Para obtener los mejores resultados, usa granos de café recién tostados.
• Al comprar granos de café, es mejor comprar una bolsa que indique “Fecha de tostado” en lugar de
“Fecha de consumo preferente” para garantizar la calidad y frescura.
• Te recomendamos usar granos de café dentro de los 20días de la “Fecha de tostado”.
• Cuando cambies a un grano diferente, retira completamente los granos anteriores antes de
continuar. Para obtener más información, consulta la sección Cambio de granos.
• Para aumentar la temperatura de preparación, enjuaga con agua antes de preparar la bebida.
• Mantén la máquina limpia con el cepillo para eliminar cualquier residuo.
• Utiliza agua filtrada.
• Ejecuta un ciclo de GRIND iQ siempre que cambies de granos.
• Mantén la máquina sobre una superficie estable.
• Vacía la bandeja de goteo con frecuencia.
• Después de moler y antes de comenzar a preparar, la máquina comenzará a calentarse. Coloca la
taza en la bandeja calentada para tazas para calentarla.
ESPAÑOL
LIMPIEZA: LIMPIEZA MÁS PROFUNDA
Descalcificación
Tiempo necesario: aproximadamente 90minutos
Cuando se encienda la luz DESCALE (Descalcificar)
debes ejecutar un ciclo de descalcificación.
Si la descalcificación no se realiza después de
encenderse la luz, la calidad de la bebida disminuirá
y la máquina puede obstruirse y dejar de funcionar.
La descalcificación descompone y elimina el
sarro y los depósitos de minerales del interior
de la máquina. Realizarla ayudará a mantener el
desempeño óptimo si se hace rutinariamente con
una solución descalcificadora siempre que la luz
DESCALE (Descalcificar) se encienda.
1.
Asegúrate de que la bandeja de goteo se haya
vaciado completamente, ya que parte del
agua resultante del ciclo de descalcificación
se depositará en ella. No vaciar la bandeja de
goteo puede provocar un desbordamiento.
2.
Disuelve el polvo descalcificador proporcionado
por Ninja en otro recipiente con 37 oz (1litro)
de agua. Vierte la mezcla de la solución en el
depósito de agua. O Llena el depósito de agua
con 16 oz (473ml) de vinagre blanco y luego
llena con agua el depósito hasta la línea Descale
(Descalcificar).
3. Asegúrate de que la jarra de leche esté
colocada en la plataforma correspondiente
con la varilla de vapor dentro.
4. Coloca una taza vacía (de al menos 18 oz
[532ml]) debajo de las boquillas de café.
Quizá debas retirar la bandeja para la taza.
5. Presiona el botón DESCALE (Descalcificar)
y luego presiona el botón START (Iniciar)
para iniciar el ciclo de descalcificación.
6.
La máquina iniciará el ciclo de descalcificación.
La máquina hará pasar la solución por la varilla
de vapor y las boquillas de café durante unos
90minutos. La máquina mostrará una cuenta
regresiva del tiempo restante en el panel decontrol.
7.
La máquina emitirá un pitido para indicar cuando
el ciclo de descalcificación haya terminado.
8. Maneja la bandeja para goteo y la jarra de
leche con cuidado porque cada una va a
contener agua.
9. Vacía el contenido de cada una y lávalas a
mano con agua jabonosa tibia para eliminar la
solución que pueda afectar el sabor del café.
10. Llena el depósito con agua fresca hasta la
línea de llenado máximo, sin sobrepasarla.
11. Reinserta la bandeja de goteo en la máquina.
No instales la jarra de leche.
12. Enjuaga las boquillas de café ejecutando una
preparación de 12 oz (355 ml) de CAFÉ POR
GOTEO de café ya molido. NO pongas nada de café
molido en la máquina. Esto enjuagará el sistema
con agua caliente limpia. Desecha el contenido.
13 . Luego, tras retirar la jarra de leche, enjuaga
la varilla de vapor presionando el botón
PURGE (Purgar).
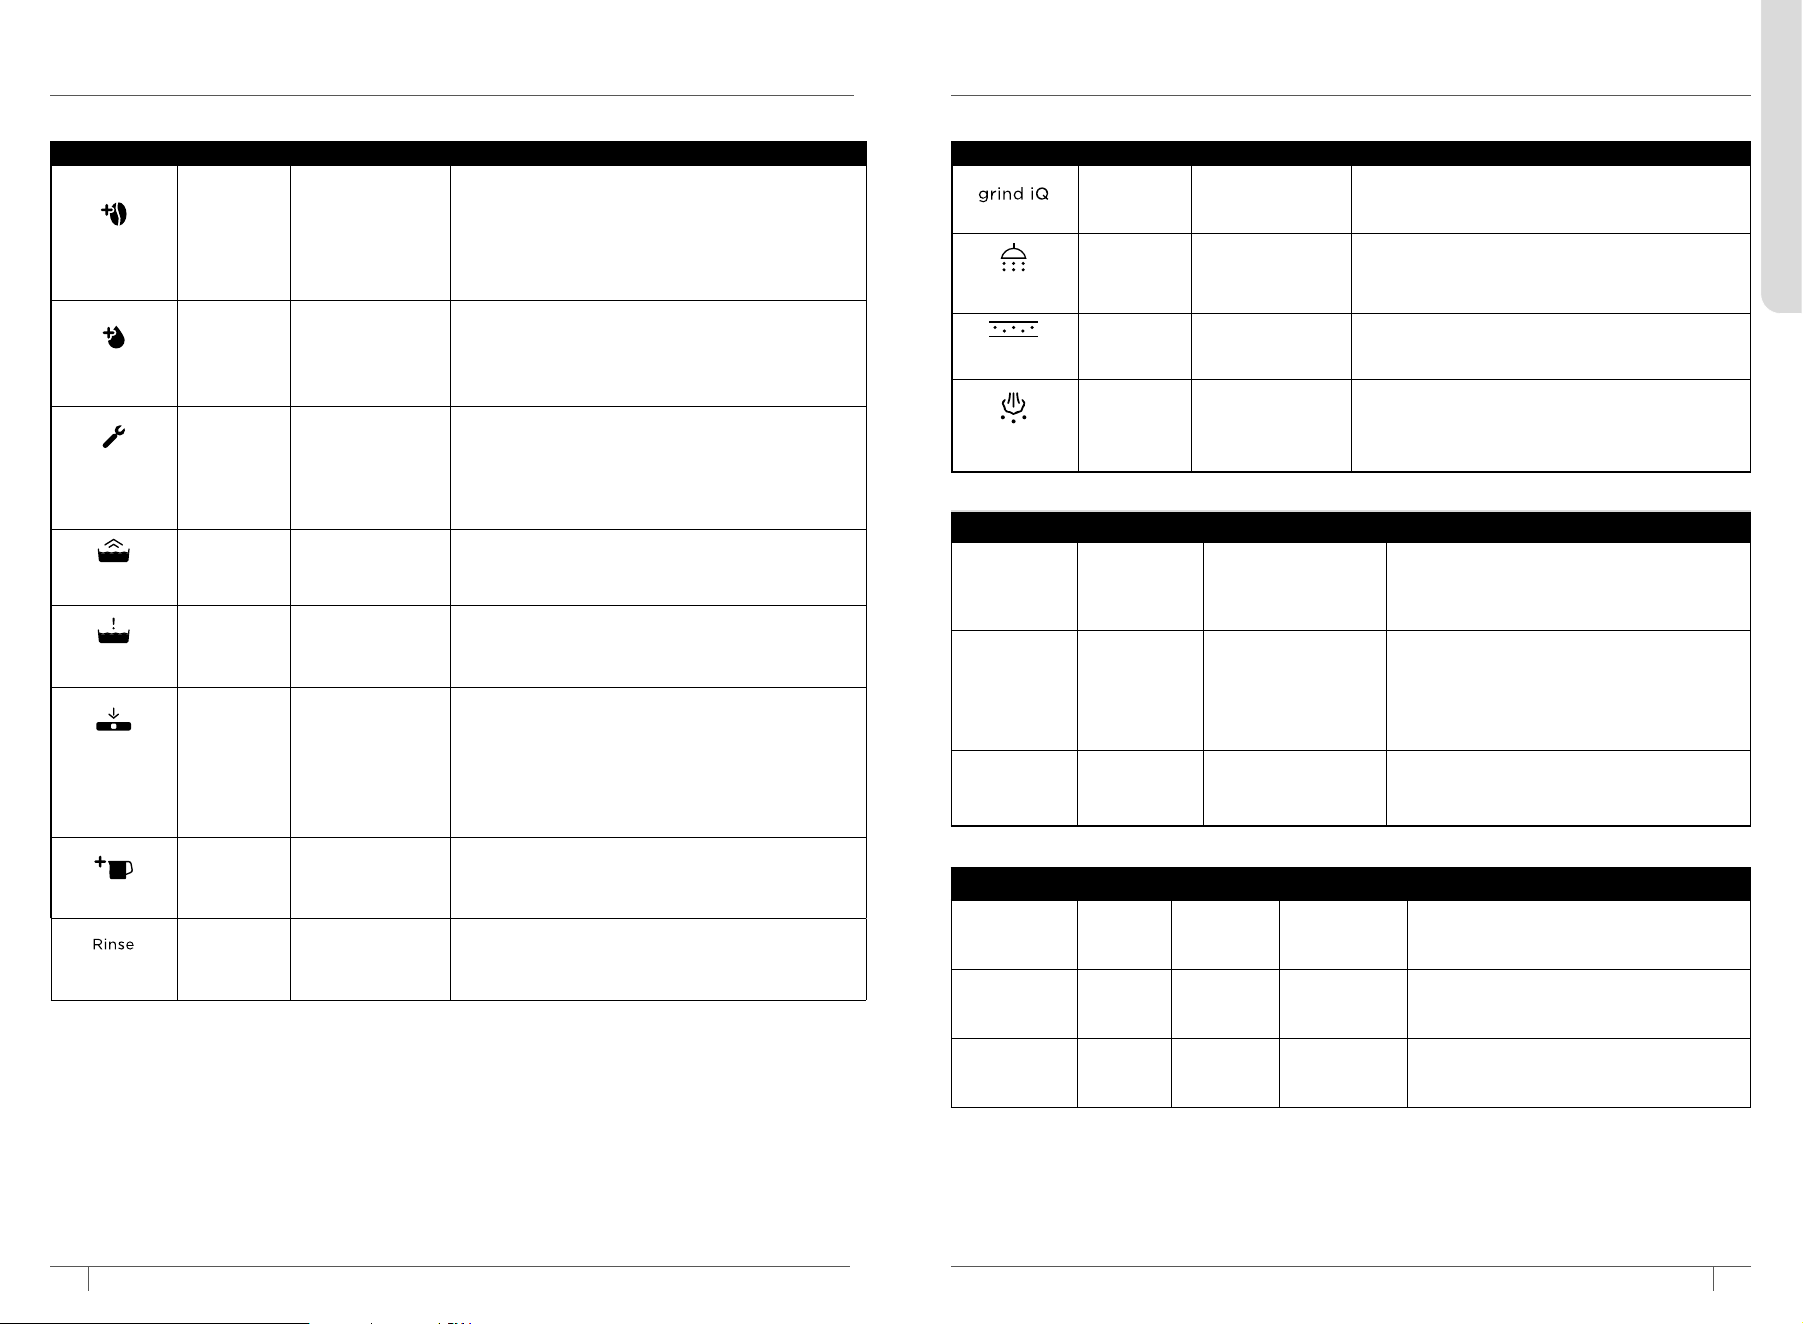
55
sharkninja.mx
ALERTA COLOR SIGNIFICADO ACCIONES
GRIND iQ *
Amarillo
Es necesario
calibrar el molino
• Ejecuta un ciclo de GRIND iQ. Consulta la sección
Grind iQ.
CLEAN
(Limpiar)*
Naranja
La máquina
necesita un ciclo
de limpieza
• Es el momento de ejecutar un ciclo de limpieza.
Consulta Ejecución de un ciclo de limpieza en la
sección Limpieza y mantenimiento.
DESCALE
(Descalcificar)*
Naranja
La máquina
necesita
descalcificación
• Es hora de descalcificar la máquina. Consulta
Descalcificación en la sección Limpieza y
mantenimiento.
PURGE
(Purgar)*
Blanco
Se necesita
purgar la varilla
de vapor, o la
purga ya está en
curso
•
Una luz blanca que no parpadea indica que es necesario
purgar, presiona PURGE (Purgar) para iniciar.
• Una luz parpadeante indica que hay una purga en curso.
54
sharkninja.mx
ALERTA COLOR SIGNIFICADO ACCIONES
ADD WATER
(Agregar agua)
Naranja
La máquina
detectó que no
hay suficiente
agua en el
depósito.
• Asegúrate de que haya agua en el depósito. Si el
depósito está vacío, agrega agua fresca al depósito
y luego presiona START (Iniciar) para reanudar la
preparación.
• Si el depósito está lleno de agua, retira y vuelve a
insertar el depósito y luego presiona START (Iniciar)
para reanudar la preparación.
ADD BEANS
(Agregar granos)
Naranja
La máquina
detectó que no hay
suficientes granos
en el recipiente de
granos.
• Verifica si hay suficientes granos en el recipiente de granos
para preparar tu bebida.
•
Si hay granos en el recipiente de granos y recibes la
notificación ADD BEANS (Agregar granos), desconecta la
máquina y empuja suavemente los granos hacia las muelas.
BREW UNIT
(Unidad de
preparación)
Naranja
Error de la unidad
de preparación
Paso 1: Revisa que la puerta de mantenimiento esté
completamente cerrada. Si está cerrada, continúa
con el paso 2.
Paso 2: Retira y vuelve a instalar la unidad de
preparación, asegurándote de que esté
totalmente asegurada.
INSTALL TRAY
(Instalar bandeja)
Naranja
La máquina no
detecta la bandeja
de goteo
• Asegúrate de que la bandeja de goteo esté instalada e
insertada totalmente en su lugar.
EMPTY TRAY
(Vaciar bandeja)
Naranja
Es necesario vaciar
la bandeja de
goteo y el depósito
de posos de café
• Retira y vacía la bandeja de goteo y el depósito de
posos de café.
INSTALL
HOPPER
(Instalar
recipiente)
Naranja
La máquina
no detecta el
recipiente de
granos
• Asegurar el recipiente de granos girando la manija hacia
la derecha.
•
Si el problema continúa, libera el recipiente girando la
manija hacia la izquierda. Levanta el recipiente de granos
de la base y vuelve a insertarlo firmemente en la base.
Quizá debas retirar los granos de la parte superior del
molino para asentar el recipiente adecuadamente. Asegura
el recipiente de granos girando la manija hacia la derecha.
INSTALL JUG
(Instalar jarra)
Naranja
La máquina no
detecta la jarra de
leche
• Asegúrate de que la jarra de leche esté en la plataforma
cuando hagas la espuma.
• Asegúrate de que la parte inferior de la jarra y la
plataforma correspondiente estén secas y limpias.
RINSE
(Enjuagar)
Blanco
La máquina se está
encendiendo o
realiza un enjuague
de apagado
No se requiere ninguna acción, este es un programa
automático.
ALERTAS Y CÓDIGOS DE ERROR
ALERTAS
N.º DE ERROR ALERTA PROBLEMA DESCRIPCIÓN POSIBLE SOLUCIÓN
DOOR
(Puerta)
Ícono de
unidad de
preparación
Puerta
La puerta de
mantenimiento
se retiró
Comprueba que la puerta de la unidad de
preparación en el lado izquierdo de la máquina
estéinstalada correctamente.
HOP JAM
(Atasco del
recipiente)
Ícono de
instalar
recipiente
Atasco del
recipiente
El mecanismo
dedosificación
está atascado
Retira el recipiente y vacía todos los granos.
Asegúrate de que el anillo dosificador (la rueda
segmentada en la parte inferior del recipiente)
girelibremente.
BURR JAM
(Atasco de la
muela)
Ícono de
agregar
granos
Atasco de
lamuela
El molino está
atascado
Retira el recipiente y trata de desbloquear las
muelas; consulta la sección Limpieza del molino de
muelas cónicas.
N.º DE ERROR FUNCIÓN INDICACIÓN POSIBLE SOLUCIÓN
Er: 33 Molido
Pitido para avisar al
usuario pero sin ícono
de alerta
Revisa si hay alguna otra alerta. Si no se muestra nin-
guna y el molino no inicia, y no oyes ningún ruido de
la máquina, apágala y deja que el motor del molino
se enfríe durante 5 minutos antes de tratar de iniciar
otra molienda.
Er: 38 Molido
Pitido para avisar al
usuario pero sin ícono
de alerta
Si tocas el recipiente de granos durante la molienda,
la máquina emitirá un pitido y pausará el proceso.
Lamáquina volverá a iniciar automáticamente cuan-
do detecte que ya no se está tocando. Si el error no
desaparece, es posible que el molino esté obstruido
o bloqueado y necesite limpiarse. Consulta Limpieza
del molino de muelas cónicas para ver instrucciones.
Er: 54 Espumado
Pitido para avisar al
usuario pero sin ícono
de alerta
Si la varilla de vapor se mueve durante el espumado,
lamáquina hará una pausa. Asegúrate de que la va-
rilla de vapor está en la posición hacia abajo. Una vez
que la máquina detecte esto, reanudará el proceso.
OTRAS ALERTAS
CÓDIGOS DE ERROR
En el caso de otros códigos de error, apaga la máquina y comunícate con Servicio al cliente al +52 800 283 3473.
ESPAÑOL
ALERTAS (CONT.)

5756
GUÍA DE SOLUCIÓN DE PROBLEMAS
sharkninja.mx
sharkninja.mx
¿Por qué la máquina emite un sonido vibrante mientras hace preparaciones?
• No hay suficiente agua en el depósito: asegúrate de que el depósito de agua esté lleno hasta la línea
de nivel mínimo.
• El depósito de agua no está firmemente asentado: comprueba que el depósito de agua esté
firmemente asentado en su lugar en la parte posterior de la máquina.
• Si el depósito se llenó con agua por encima del nivel mínimo y está firmemente asentado,
seconsidera normal que se produzca algún ruido de la bomba de agua.
• Es posible que también oigas este ruido durante el espumado. Esto es normal.
La máquina tiene fugas.
• La máquina purgará automáticamente el agua de la varilla de vapor en la bandeja de goteo principal
después de cada espumado. Esto es para limpiar el interior de la varilla de vapor.
• La máquina ejecutará automáticamente un breve enjuague de encendido y apagado.
• La bandeja de goteo está llena: revisa el indicador de vaciado para ver si necesitas vaciar la bandeja
de goteo principal. sigue las instrucciones que se indican en la sección Limpieza y mantenimiento.
• La bandeja de goteo no está instalada correctamente, asegúrate de que esté totalmente insertada.
• El depósito de agua no está firmemente asentado: comprueba que el depósito de agua esté
firmemente asentado en su lugar en la parte posterior de la máquina.
• Revisa si hay errores en la pantalla.
• Los sellos de junta tórica deben reemplazarse: llama a Servicio al cliente al +52 800 283 3473.
La máquina no tiene energía.
• Asegúrate de que la máquina esté enchufada en una toma de corriente que funcione.
• Después de enchufar la máquina, presiona el botón de ENCENDIDO.
• Para ahorrar energía, la máquina se apagará automáticamente después de 30minutos.
No sale café de las boquillas, solo agua.
• Verifica que haya granos en el recipiente de granos.
• Si hay granos en el recipiente de granos y recibes una notificación de ADD BEANS (Agregar granos),
desenchufa la máquina y empuja suavemente los granos hacia las muelas.
• Asegúrate de que el recipiente de granos esté bien insertado.
• El molino está obstruido o bloqueado y debe limpiarse; consulta la sección Limpieza del molino de
muelas cónicas.
• Retira y limpia la unidad de preparación para eliminar las obstrucciones.
El molino hace un ruido fuerte o inusual.
• Si el molino hace un ruido fuerte, podría deberse a residuos no deseados. Utiliza solo granos enteros
en el molino y evita colocar granos fríos o congelados.
• Los distintos tipos de tostado y de granos producirán diferentes ruidos durante la molienda.
La espuma de leche no está lo suficientemente caliente.
• La temperatura de la espuma de leche depende del tipo de espuma seleccionado. La ESPUMA FRÍA,
que se indica con un copo de nieve junto a la jarra de leche, no se calienta.
• La varilla de vapor está obstruida.
• Desmonta la punta de la varilla con la llave del cepillo.
• Utiliza la aguja en la parte inferior del cepillo de limpieza para limpiar el interior de la varilla.
• El menú Ajustes adicionales ofrece opciones para personalizar la temperatura de la espuma y se
puede acceder a él desde el menú 4: FROTH TEMP (Temperatura de espumado). Consulta la sección
Ajustes adicionales para obtener más información.
La espuma de leche es demasiado ligera o espesa.
• Verifica que el batidor esté instalado en el fondo de la jarra.
• Cambia el ajuste de espuma con el indicador de espuma. Consulta la sección de Espumado para
obtener más información sobre el ajuste de espuma.
• Tipo de leche: los diferentes tipos de leche tienen distintos contenidos de grasa. Entre mayor sea el
contenido de grasa de la leche, más espesa será la espuma.
• Leche de vaca frente a leche vegetal: para mejorar la calidad general de la espuma, selecciona
LECHE(Láctea) o PLANT-BASED (Vegetal) con el botón MILK TYPE (Tipo de leche) según sea el tipo
de leche que utilizas.
•
Para obtener información adicional sobre la espuma, consulta la sección Prácticas recomendadas
deespumado.
ESPAÑOL
¿Por qué no sale agua de las boquillas?
Existen varios factores que pueden afectar el volumen de agua que sale de las boquillas:
• La máquina prepara la espuma antes de entregar la preparación.
• La máquina se está calentando o está alcanzando la temperatura de operación: Espera un poco para
que la máquina se caliente antes de que produzca la bebida.
• El tamaño de molienda es demasiado fino: ejecuta un ciclo de Grind iQ para asegurarte de que la
máquina esté calibrada correctamente.
• Limpieza de la cámara de preparación: retira y limpia la unidad de preparación para eliminar el café
molido residual que pueda obstaculizar el flujo.
• Revisa la pantalla para ver si hay alguna alerta de agregar agua/descalcificar/limpiar.
• Revisa si hay agua en el depósito.
• Es necesario descalcificar la máquina: sigue las instrucciones que se indican en la sección Limpieza y
mantenimiento.
¿Por qué el chorro de espresso es pequeño o fluye lentamente?
Puede haber varios motivos de esto.
• El tamaño de molienda es demasiado fino: ejecuta un ciclo de Grind iQ para asegurarte de que la
máquina esté calibrada correctamente.
• Limpieza de la cámara de preparación: retira y limpia la unidad de preparación para eliminar el café
molido residual que pueda obstaculizar el flujo.
• Es necesario descalcificar la máquina: Sigue las instrucciones que se indican en la sección Limpieza
ymantenimiento.
¿Por qué el chorro de espresso fluye muy rápido?
• El tamaño de molienda es demasiado grueso: ejecuta un ciclo de Grind iQ para asegurarte de que la
máquina está calibrada correctamente.
El espumado no inicia.
• La máquina no ha alcanzado la temperatura de operación: espera un poco para que la máquina
se caliente antes de que comience el espumado.
• Revisa si hay alertas en la pantalla; estas podrían indicar lo siguiente:
- No hay suficiente agua en el depósito: asegúrate de que el depósito de agua esté lleno hasta la
línea de nivel mínimo.
- El depósito de agua no está firmemente asentado: comprueba que el depósito de agua esté
firmemente asentado en su lugar en el lado de la máquina.
- La varilla está en la posición correcta: asegúrate de que la varilla de vapor esté insertada en la jarra
de leche y que esta última esté asentada correctamente en la plataforma.
-
No hay suficiente leche en la jarra de leche: asegúrate de que la leche llegue hasta la línea de nivel mínimo
Poca o nada de espuma.
• Utiliza un cepillo para limpiar la salida del molinillo situada encima de la unidad de preparación y
limpia la tolva y el molino de muelas cónicas si la unidad tiene una tolva extraíble. Consulta la sección
‘limpieza del molino de muelas cónicas’ como referencia.
El molino está atascado.
• El molino se atasca cuando la máquina no puede moler debido a una obstrucción.
• Consulta la sección Limpieza del molino de muelas cónicas para saber cómo limpiar las muelas.
Mi molino está obstruido.
• El molino puede tener acumulación de residuos o café molido.
• Consulta la sección Limpieza del molino de muelas cónicas para saber cómo limpiar las muelas.
¿Por qué la máquina no genera crema?
• El tamaño de molienda es demasiado grueso: ejecuta un ciclo de Grind iQ para garantizar la
calibración correcta.
• Los granos de café no son frescos: la frescura de los granos afectará la calidad de la crema. Al
comprar granos de café, es mejor comprar una bolsa que indique “Fecha de tostado” en lugar de
“Fecha de consumo preferente” para garantizar la calidad y frescura. Usa granos de café dentro de los
20días de la “Fecha de tostado”.
• La máquina de preparación puede estar obstruida o los orificios están bloqueados: retira y limpia la
máquina de preparación.
• Ejecuta un ciclo de limpieza para enjuagar el sistema.
¿Por qué la bandeja de goteo se llena rápidamente?
• Para garantizar que la máquina mantenga la presión ideal para el espresso, un poco de agua pasará a
la bandeja de goteo principal durante la preparación. Esto es normal.
• La máquina purgará automáticamente el agua de la varilla de vapor en la bandeja de goteo principal
después de cada espumado. Esto es para limpiar el interior de la varilla de vapor.
• Al encenderse y apagarse, la máquina realizará un enjuague breve para limpiar y preparar el sistema.
5958
GUÍA DE SOLUCIÓN DE PROBLEMAS (CONT.)
sharkninja.mx
sharkninja.mx
Para pedir piezas y accesorios adicionales, visita sharkninja.mx/ninja-parts-accessories o comunícate
con Servicio al Cliente al +52 800 283 3473.
PIEZAS DE REPUESTO
Mi bebida es más pequeña o más grande de lo esperado.
• Si estás preparando una bebida de espresso, puedes cambiar la relación café molido-agua mediante
los ajustes de intensidad. Consulta la sección Ajustes adicionales.
•
Si vas a preparar una bebida de café por goteo, selecciona el tamaño deseado con el botón SIZE
(Tamaño) antes la molienda.
• La unidad de preparación puede estar obstruida. Asegúrate de retirar y limpiar la unidad de
preparación cada mes para prevenir obstrucciones.
•
Es necesario descalcificar la máquina: sigue las instrucciones en la sección “Descalcificación y ciclo de
limpieza”.
Mi bebida es demasiado amarga.
• Reduce el ajuste de tamaño de molienda. Consulta la sección Ajuste del tamaño de molienda.
• Reduce la temperatura de preparación: usa el botón TEMP (Temperatura) en la pantalla para
aumentar la temperatura de la preparación.
• Experimenta con distintos tostados y tipos de grano para encontrar uno que te guste.
Mi bebida es demasiado ácida.
• Aumenta el ajuste de tamaño de molienda. Consulta la sección Ajuste del tamaño de molienda.
• Aumenta la temperatura de preparación: usa el botón TEMP (Temperatura) en la pantalla para
aumentar la temperatura de la preparación.
• Experimenta con distintos tostados y tipos de grano para encontrar uno que te guste.
El café no está lo suficientemente caliente.
• Precalienta la máquina: ejecuta una preparación de café ya molido sin poner café molido.
Esto hará pasar agua caliente por el sistema.
• Precalienta la taza: enjuaga la taza con agua caliente antes de la preparación para aumentar la
temperatura de preparación.
• Ajusta la temperatura del agua: aumenta la temperatura de preparación por medio del botón de
TEMP en el panel de control.
• Utiliza los ajustes de espuma caliente: todos los ajustes de espuma son calientes, excepto la espuma
fría, que se indica con un copo de nieve.
•
Es necesario descalcificar la máquina: sigue las instrucciones que se indican en la sección Limpieza y
mantenimiento.
La unidad de preparación no se instala en la máquina.
• Asegúrate de que la unidad de preparación está en la posición “inicial”. Consulta la sección Posición
inicial de la unidad de preparación.
•
El compactador está en una posición incorrecta. No utilices la máquina y comunícate con Servicio al
cliente.
Er
• Si el panel de control muestra “Er” seguido de un número (p. ej., “Er 03”), comunícate con Servicio al
cliente al +52 800 283 3473.
ESPAÑOL
GARANTÍA LIMITADA DE UN (1) AÑO
NJA_1_YR_LMTD_WRNTY_MX_SP_CO
La Garantía Limitada de Un (1) Año aplica a las compras realizadas del producto (“Producto
Original”) en México de minoristas autorizados de SharkNinja Mexico S. de R.L. de C.V. (Av.
Paseo de la Reforma No. 265 piso 16-1601 301, Colonia Cuauhtémoc, Cuauhtémoc, C.P. 06500,
en la Ciudad de México).
Puede hacer efectiva la garantía con SharkNinja México S. de R.L. de C.V. ubicada en Av.
Paseo de la Reforma No. 265 piso 16-1601 301, Colonia Cuauhtémoc, Cuauhtémoc, C.P. 06500,
en la Ciudad de México.
Puede obtener las piezas, componentes, consumibles (si aplica) y accesorios del Producto
Original a través de SharkNinja México S. de R.L. de C.V ubicada en Av. Paseo de la Reforma
No. 265 piso 16-1601 301, Colonia Cuauhtémoc, Cuauhtémoc, C.P. 06500, en la Ciudad de
México.
SharkNinja garantiza que el Producto Original estará libre de defectos en material y mano de
obra por un período de un (1) año a partir de la fecha de compra cuando sea utiliza bajo
condiciones normales de hogar y se mantienga de acuerdo con los requisitos establecidos en
la Guía del Propietario, sujeto a las siguientes condiciones y exclusiones:
¿Qué cubre esta garantía?
El Producto Original y/o partes no desgastables y componentes considerados defectuosos,
criterio exclusivo de sharkNinja’s, serán reparados o reemplazados hasta por un (1) año a
partir de la fecha original de compra.
En caso de reparación o reemplazo de solo algunas de las partes, el período de garantía para
estas partes es de un (1) año desde el momento del reemplazo, y el resto del Producto
Original continúa con el período de garantía original.
Qué no está cubierto por esta garantía?
Desgaste normal de las piezas de desgaste (como recipientes de licuadora, tapas, vasos,
cuchillas, bases de licuadora, ollas removibles, rejillas, sartenes, etc.), que requieren
mantenimiento regular y/o reemplazo para asegurar el funcionamiento adecuado de su
Producto Original, no están cubiertos por esta garantía.
Daños causados cuando la unidad ha sido utilizada en condiciones diferentes a las normales.
Daños causados cuando la unidad no ha sido operada de acuerdo con las instrucciones.
Defectos causados por personas de reparación no autorizadas por SharkNinja. Estos
defectos incluyen daños causados en el proceso de envío, alteración, o reparación el
producto SharkNinja (o cualquiera de sus partes) cuando la reparación es realizada por una
persona no autorizada por SharkNinja.
PRODUCTO: MODELO:
MARCA: NO. DE FACTURA:
NO. DE SERIE: FECHA DE COMPRA: SELLO DE LA MARCA:
Cómo obtener servicio e iniciar una reclamación de garantía
Si su Producto Original no funciona correctamente mientras se usa en condiciones
domésticas normales dentro del período de garantía, visite https://www.ninjakitchen.mx/
para obtener ayuda de autoservicio sobre el cuidado y mantenimiento del producto.
Nuestros Especialistas de Servicio al Cliente también están disponibles en +52 800 283 3473
para ayudar con el soporte del producto y las opciones de servicio de garantía.
SharkNinja cubrirá el costo para que el cliente nos envíe la unidad para su reparación
o reemplazo.
Esta garantía le otorga derechos legales específi cos pero no le excluye de hacer valer
otros derechos que pueda tener según la ley aplicable.
REGISTRA ESTA INFORMACIÓN
Número de modelo: ����������������������
Número de serie: ������������������������
Fecha de compra: �����������������������
(guarda el recibo)
Tienda donde se hizo la compra: ������������
REGISTRA TU COMPRA
sharkninja.mx
+52 800 283 3473
Escanea el código
QR con un dispositivo móvil
THANK YOU
for purchasing the Ninja AutoBarista
TM
PLEASE READ CAREFULLY AND KEEP FOR
FUTURE REFERENCE.
These instructions are designed to help you get
a complete understanding of your new Ninja
AutoBarista. If you have any questions, please call
our Customer Service line at +52 800 283 3473.
TECHNICAL SPECIFICATIONS
Voltage: 120 V~, 60 Hz
Power: 1 650 W
Water Reservoir
Capacity: 70 oz (2 L)
The standby power consumption is 0.5 W.
The appliance enters Standby mode
automatically after 30 minutes of inactivity.
TIP: You can find the model and serial numbers
on the QR code label located on the back of the
machine by the power cord.
RECORD THIS INFORMATION
Model Number: �������������������������
Serial Number: ��������������������������
Date of Purchase: �����������������������
(Keep receipt)
Store of Purchase: �����������������������
GRACIAS
por comprar la Ninja AutoBarista
TM
CONSEJO: Puedes encontrar los números de modelo
y de serie en la etiqueta del código QR en la parte
posterior de la máquina, cerca del cable de alimentación.
LEE ATENTAMENTE EL CONTENIDO Y GUÁRDALO
COMO REFERENCIA FUTURA.
Estas instrucciones están diseñadas para ayudarte
a tener un entendimiento pleno de tu nueva Ninja
AutoBarista. Si tienes alguna pregunta, llama a nuestra
línea de Servicio al cliente al +52 800 283 3473.
NinjaMex@ninjamexico
REGISTER YOUR PURCHASE
sharkninja.mx
+52 800 283 3473
Scan QR code using
mobile device
AE1055CO�MX�IB�E�S�MP�Mv1
Distribuido en Mexico por:
SharkNinjaMexico, S. de R.L. de C.V.
Av. Paseo de la Reforma No. 265 piso 16-1601 301,
Colonia Cuauhtémoc, Cuauhtémoc, C.P.06500,
en la Ciudad de México
Importado en Mexico por:
SharkNinjaMexico Imports, S. de R.L. de C.V.
Av. Paseo de la Reforma No. 265 piso 16-1601 306,
Colonia Cuauhtémoc, Cuauhtémoc, C.P.06500,
en la Ciudad de México
Illustrations may dier from actual product. We are constantly striving to improve our products, therefore the
specifications contained herein are subject to change withoutnotice.
NINJA AUTOBARISTA is a trademark of SharkNinja Operating LLC.
Las ilustraciones pueden diferir del producto real. Nos esforzamos constantemente por mejorar nuestros productos;
por lo tanto, las especificaciones contenidas en este documento están sujetas a cambios sin previo aviso.
NINJA AUTOBARISTA es una marca comercial de SharkNinja Operating LLC.
© 2026 SharkNinja Operating LLC
ESPECIFICACIONES TÉCNICAS
Voltage: 120 V~, 60 Hz
Potencia: 1 650W
Capacidad del
depósito de agua: 70 oz (2 L)
El consumo de energía en modo de espera es de 0,5 W.
El aparato entra automáticamente en modo de
espera después de 30 minutos de inactividad.