STEP 1: MEET YOUR TOOLS REQUIRED TO GET STARTED
SCAN HERE
for how-to videos,
recipes, and cleaning
& maintenance.
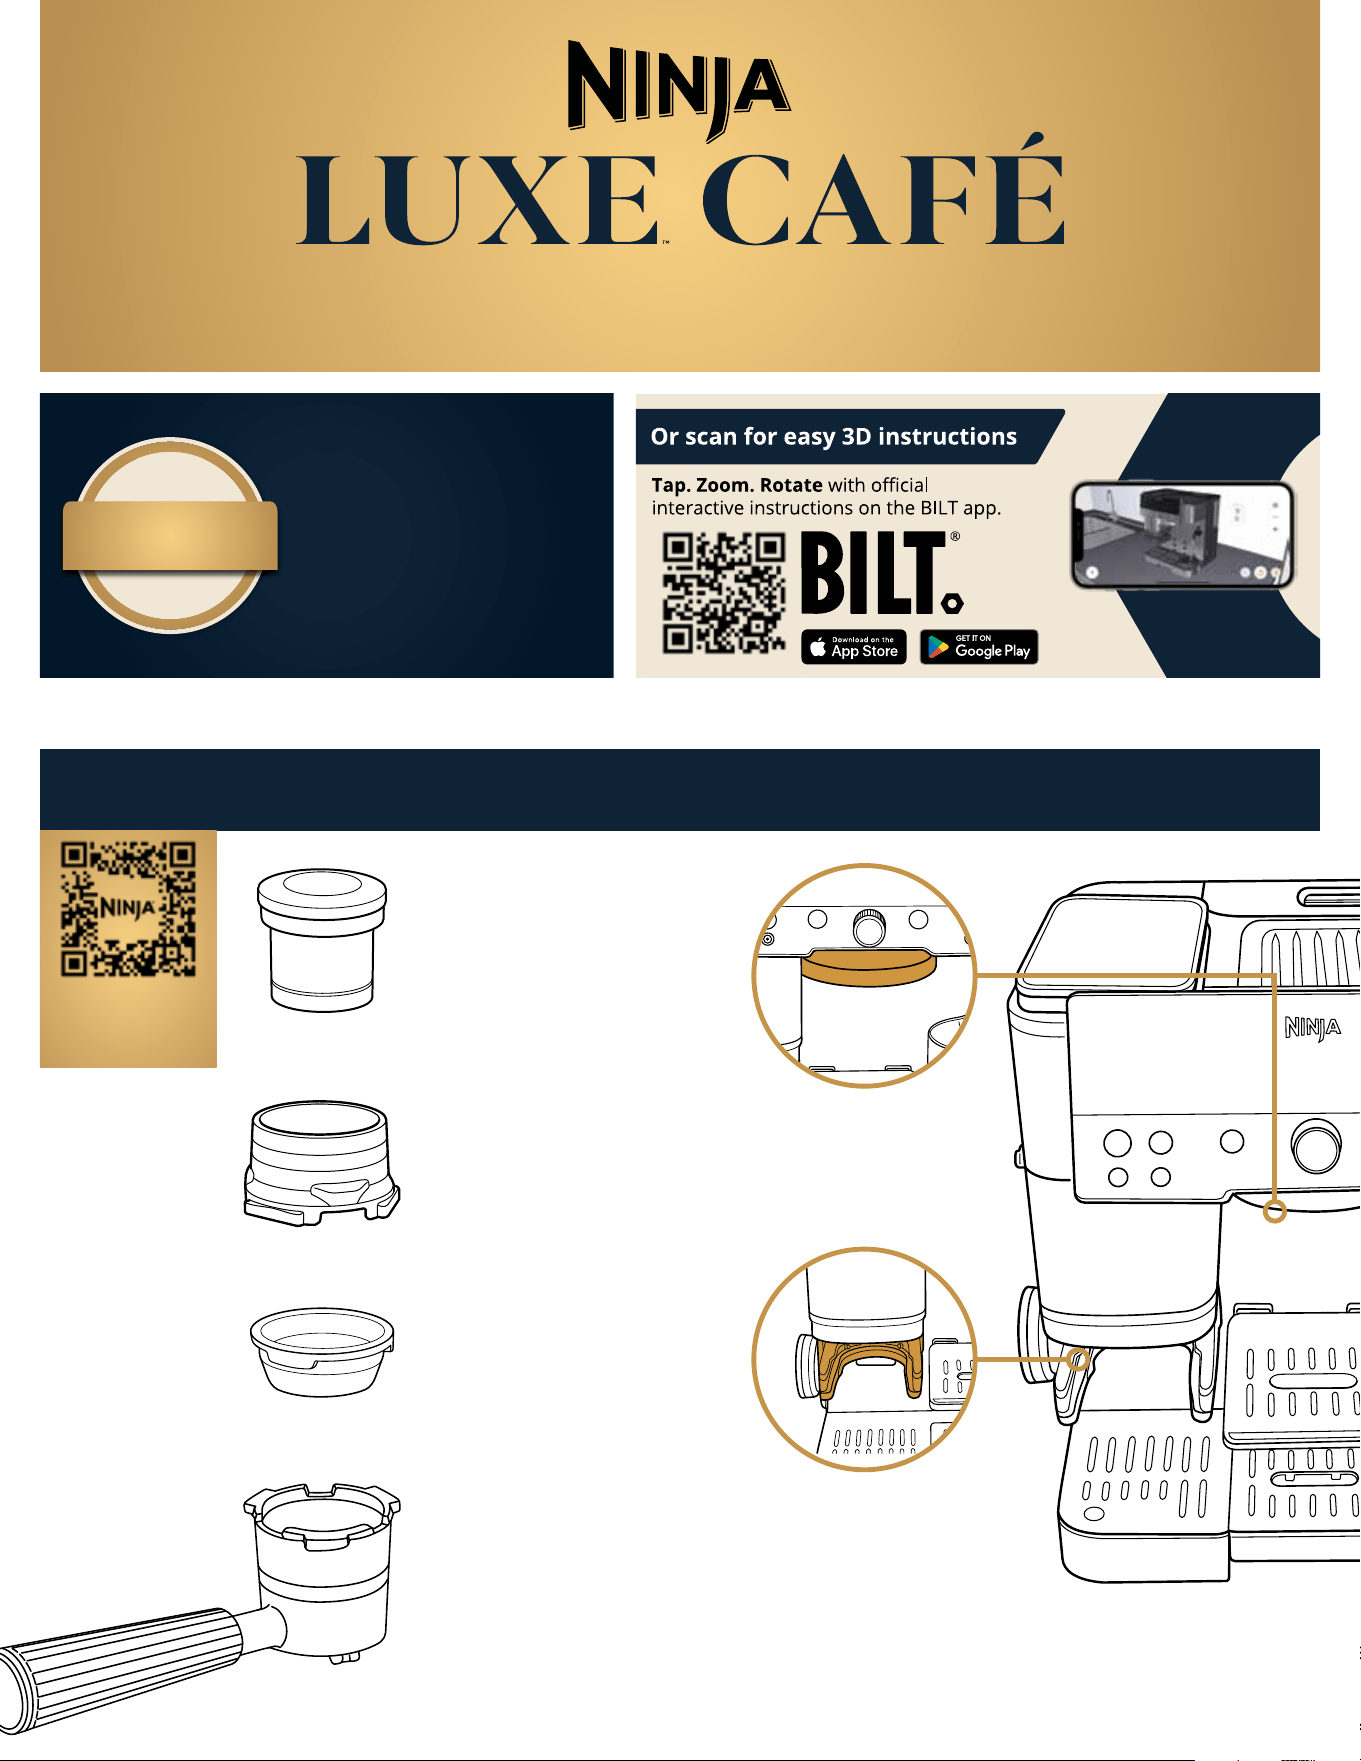
PORTAFILTER
Holds basket in place
for grinding and
brewing.
DOUBLE BASKET
Used to brew standard
volume of espresso for
cafe quality beverages.
Comes installed in the
portafilter.
ASSISTED TAMPER
Designed to apply the right
amount of even pressure
for the perfect puck.
FUNNEL
Prevents grounds from
overflowing when grinding
and assists tamping.
Always install funnel
before grinding.
GROUP HEAD
Install portafilter
here for brewing.
GRINDING
CRADLE
Install portafilter and
funnel here when
grinding beans.
To ensure optimal performance,
we rigorously test each individual
machine before it gets to you.
All machines are cleaned after
testing, but some water or grounds
may still be present. If needed,
simply brush and wipe clean
before use.
NINJA
®
CERTIFIED
TESTED
INDIVIDUALLY
QUALITY
ASSURED
QUICK START GUIDE
Follow these steps to get set up, make your first drink, and care for your machine.
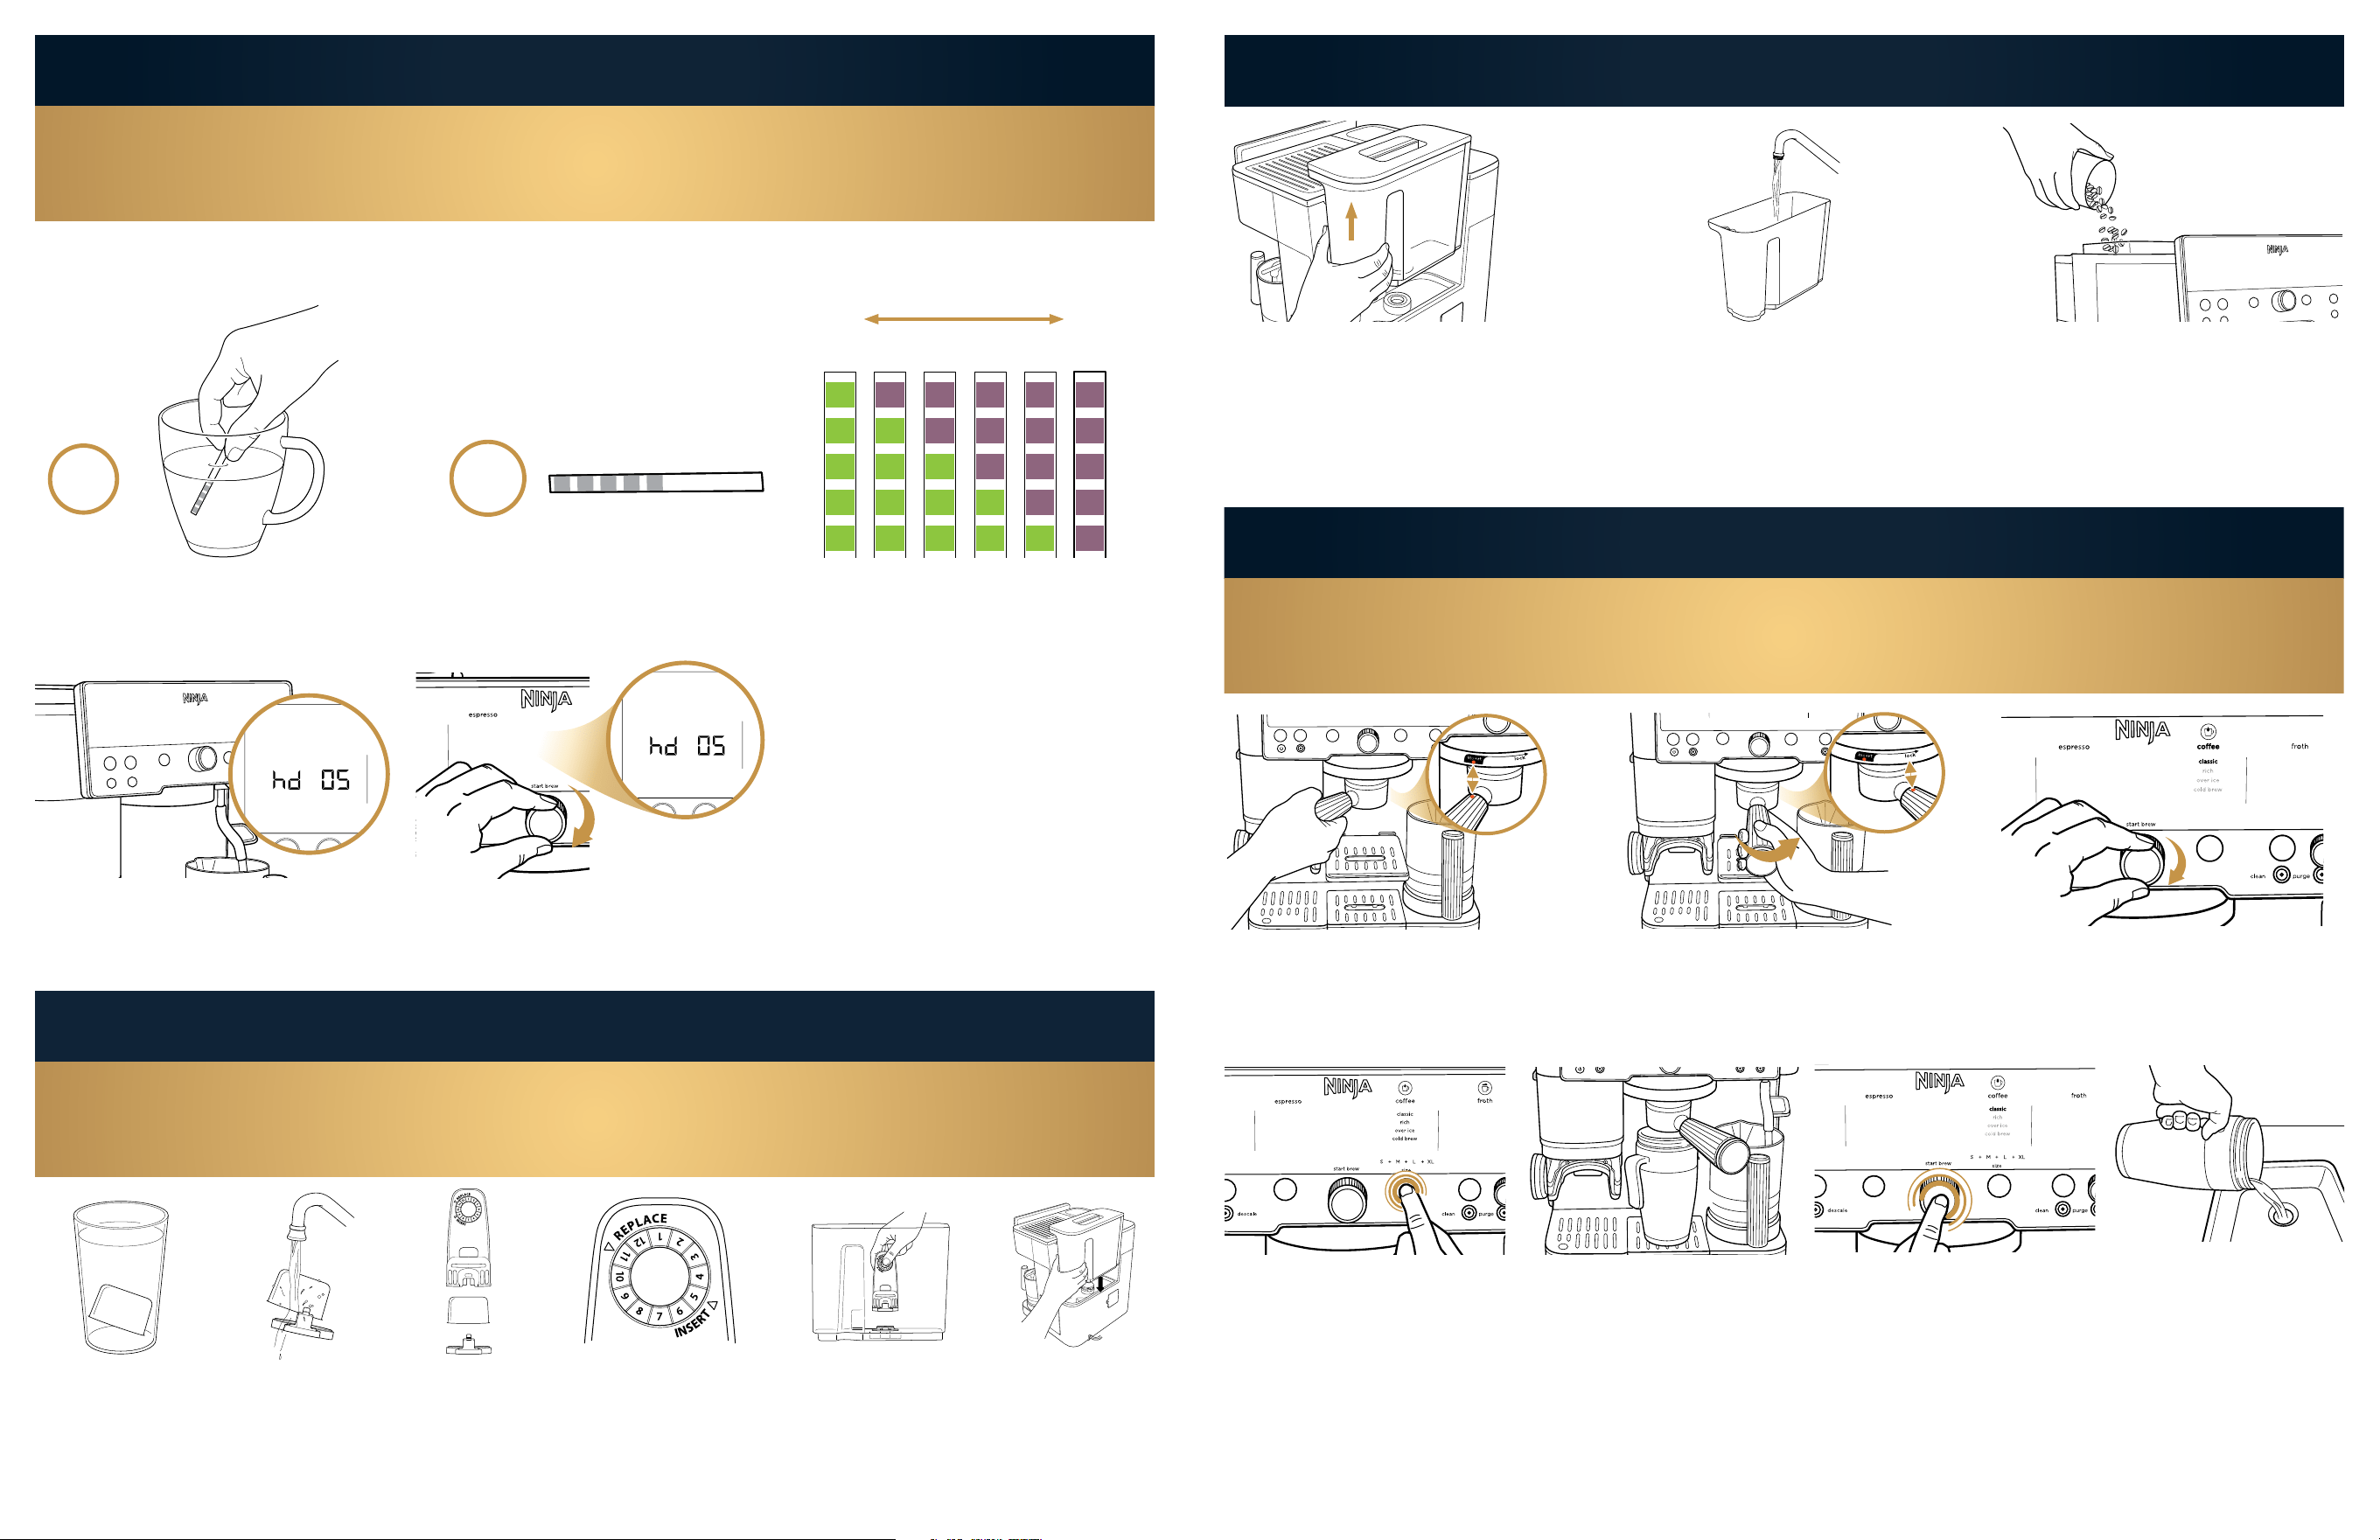
Fill with room-temperature or cold water up
to, but not exceeding, the max line. Place
reservoir back on machine.
Fill bean hopper with whole beans*. You may
fill the hopper as much as you desire. Be sure
the bean hopper is secured to the machine
before brewing. DO NOT add pre-ground
beans to bean hopper.
*
For more information on beans, see Best Bean Practices.
STEP 4: FILL WATER RESERVOIR & BEAN HOPPER
Remove water reservoir from back of machine.
After 1 minute, you will see 0–5 purple squares
appear. This will indicate the water hardness
level of your water (0 purple squares=level 0,
5 purple squares=level 5, etc.).
STEP 2: TEST WATER HARDNESS
All water has minerals that can build up in the machine over time. These minerals are referred
to as water hardness and can impact how often you need to descale your machine.
Locate test strip provided in starter kit.
Completely submerge test strip in the water
you plan on using with your machine for 5–10
seconds, ensuring all squares are underwater.
5–10
SECONDS
Remove from water and place on a flat surface.
Wait 1 minute and check results.
1
MINUTE
Turn the centre dial to set your water hardness
by matching your setting to how many purple
squares you see (will range from 0–5 squares).
Press centre dial to confirm your setting.*
*IF YOU NEED TO SET YOUR WATER HARDNESS LEVEL
AGAIN, SEE OWNER’S GUIDE.
Plug in machine. The control panel will display
a water hardness of hd 05.
3
hd 0 hd 01 hd 02 hd 03 hd 04 hd 05
Very
Soft
Very
Hard
BE SURE TO THOROUGHLY CLEAN AND DRY ALL
ITEMS BEFORE PROCEEDING.
Turn the centre dial to select CLASSIC.
Press the SIZE button to adjust
drink size to M+.
With the double basket installed in the
portafilter, place the portafilter in group head
(angled to the left) by aligning orange dot on
portafilter with orange dot on group head.
Fasten portafilter into group head until
orange dot on portafilter aligns with lock
arrow on group head.
STEP 5: FLUSH YOUR MACHINE
YOU MUST RUN A WATER FLUSH BEFORE FIRST USE.
DO THIS ONLY ONCE.
Place a 420ml or greater cup under
the portafilter.
When finished, the machine
will beep again, signifying the
brew is complete. Discard the
water, then rinse and dry the
portafilter.
Press START BREW. The machine will
beep to signal the brew has started.
The progress bar will illuminate,
indicating the status of the brew.
WATER FILTER AND WATER FILTER HOUSING ARE
LOCATED IN THE WATER RESERVOIR
STEP 3: WATER FILTER INSTALLATION
Soak Water Filter for
5 minutes.
Remove end cap
from filter housing
by pressing-in the
two tabs and pulling.
Rinse end cap and
water filter for 60
seconds.
Insert filter into
filter housing.
Clip end-cap
back onto filter
housing to
secure filter in
place.
Set INSERT date
to current month.
Install filter housing
into reservoir.
Return water
reservoir to
machine.
2
AU 02 8801 7666 | NZ 0800 112 660
AU ninjakitchen.com.au | NZ ninjakitchen.co.nz
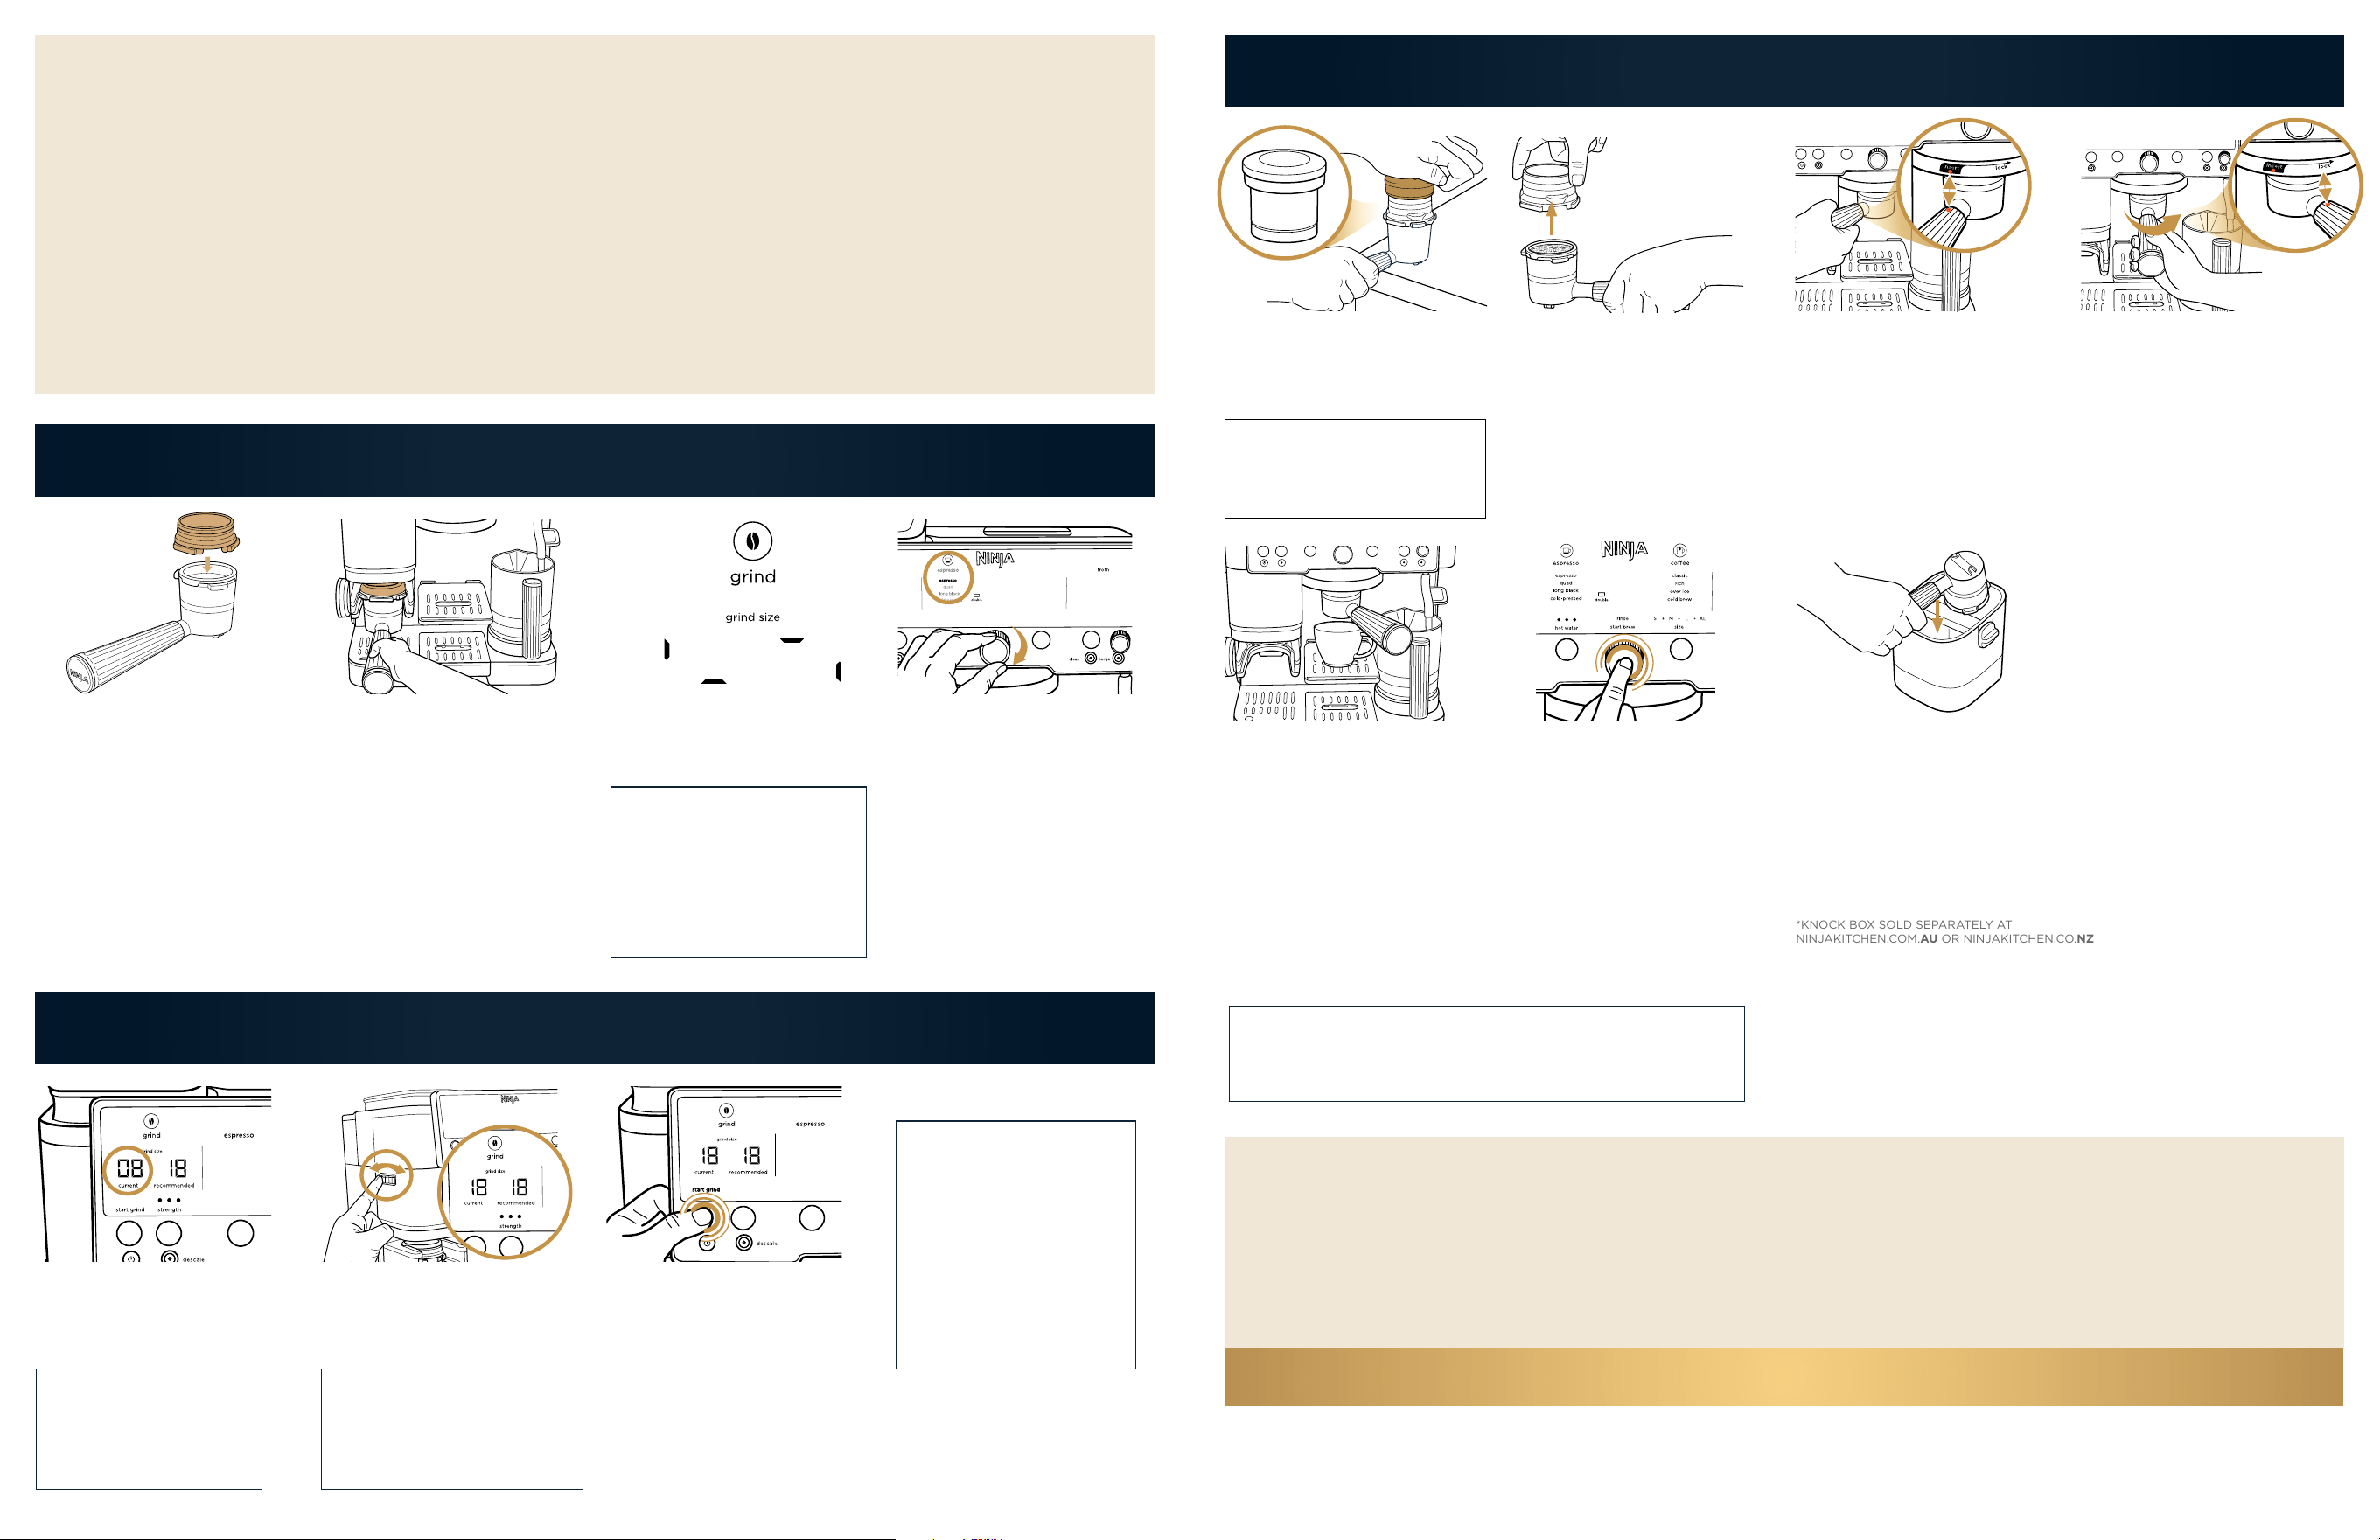
"Dialling in" means calibrating the grind size for your beans to get
the perfect espresso extraction for your drink.
Barista Assist Technology™ automatically does this for you. All you
have to do is run through the steps below twice, and the machine
should be calibrated for your current beans.
NOTE: Once a grind is
complete, the machine
will be set to the brew
style and size that was
selected for that grind.
To change style and
size, pour grounds out
of portafilter, power
the machine o and on,
and restart from Step 1,
selecting desired style
and size before grinding.
NOTE: The numbers
displayed in the images
are for reference only
and may not match
what is displayed on
your machine.
NOTE: When turning the
grind dial, turn in small
increments to allow the
machine to register the
change in grinder setting.
NOTE: If you do not see
this animation, remove the
portafilter from the grinding
cradle, power the machine
o and on, and reinstall the
portafilter in the grinding
cradle, ensuring it is level
and pushed all the way in.
Once portafilter is properly
installed, the machine will display
an animation and drink options
available for that basket.
Check to see if the current
grind setting matches the
recommended setting.
Turn the centre dial to select
ESPRESSO.
Press START GRIND. Do not
touch portafilter until grinding is
complete.
With the funnel on top of the
portafilter, insert portafilter in
the grinding cradle. Make sure
it is level and fits securely. Once
portafilter is installed in grinding
cradle, it will be weighed.
To ensure accurate weight, let go
of portafilter.
If they don’t match, adjust
current grind size by turning
the grind dial on left side of
machine until it matches the
recommended setting.
STEP 1: PREP YOUR DRINK
STEP 2: GRIND THE BEANS
STEP 3: BREW ESPRESSO
After grinding, remove portafilter
from the grinding cradle. On a
solid level surface with funnel still
attached, press the tamper all the
way down until it meets funnel.
Place a cup under the portafilter.
*KNOCK BOX SOLD SEPARATELY AT
NINJAKITCHEN.COM.AU OR NINJAKITCHEN.CO.NZ
When finished, the machine will
beep again to signify the brew
is complete. Carefully remove
portafilter from group head.
Dispose of grounds by knocking
the surface of the basket over
a container or knock box*.
Place portafilter in group head
(angled to the left) by aligning
orange dot on portafilter with
orange dot on group head.
PLEASE USE CAUTION AS PORTAFILTER WILL BE HOT.
Fasten portafilter into group
head until orange dot on
portafilter aligns with lock
arrow on group head.
Press START BREW. The machine
will beep to signal the brew has
started. The progress bar will
illuminate, indicating the status of
the brew.
Remove tamper and funnel from
portafilter. Place funnel and
tamper in storage on left side of
machine.
Now that your first brew is complete, discard the drink and repeat steps 1–3. Once
your second brew is complete, Barista Assist Technology™ will have dialed in the
recommended grind setting to get perfect extraction. The machine is now ready
to make espresso. Please note that you will have to do this whenever you are
switching the type of beans you are putting in the hopper.
FOR MORE INFORMATION, REFER TO UNDERSTANDING BARISTA ASSIST TECHNOLOGY.
DIALLING IN
YOUR ESPRESSO
Place funnel on portafilter with
double basket*, aligning the
notches on the funnel with the
notches on the portafilter. Push
down until funnel locks into place
in the portafilter.
*THE DOUBLE BASKET COMES INSTALLED
IN THE PORTAFILTER.
NOTE: If tamping on top of a
wooden or delicate material
countertop, put towel down
for protection.
NOTE: For optimal coee temperature, run a water-only
double shot into your mug. This preheats both the machine
and your mug to ensure minimal heat loss. After this, dry your
mug and portafilter and proceed with brewing as normal.
4
AU 02 8801 7666 | NZ 0800 112 660
5
AU ninjakitchen.com.au | NZ ninjakitchen.co.nz
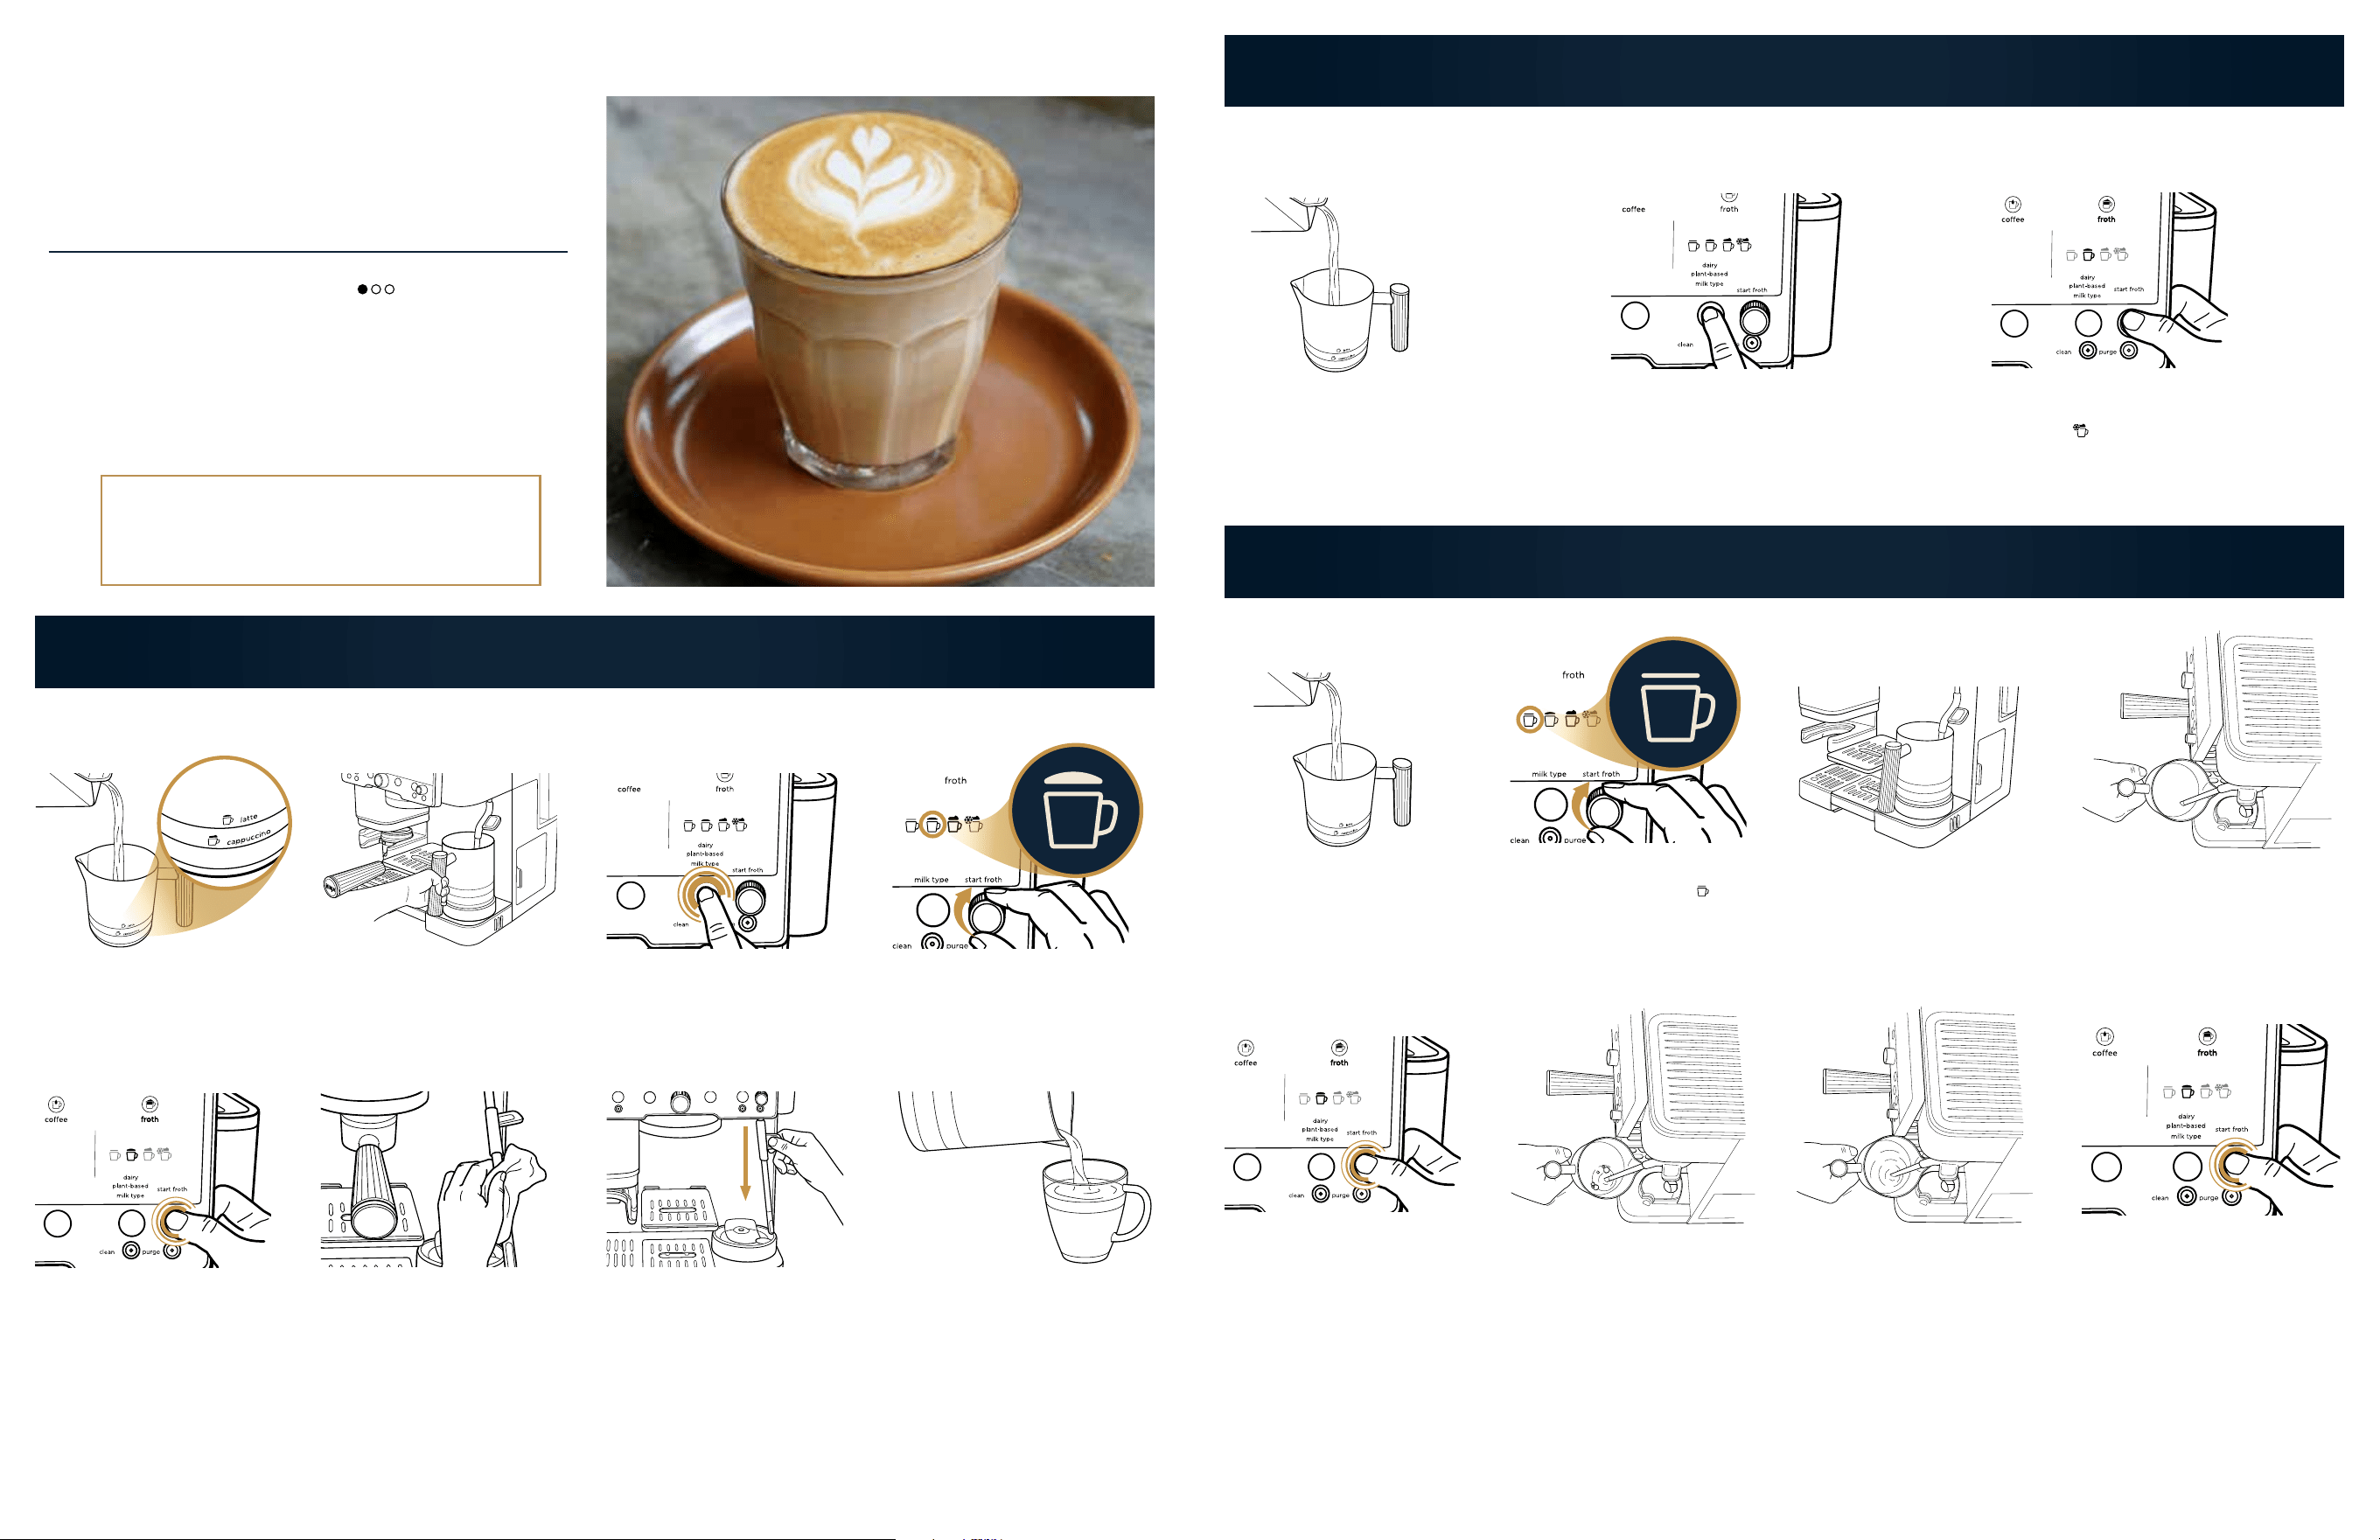
Fill the milk jug to the line
labelled LATTE with dairy or
plant-based milk.
Press START FROTH to begin
frothing. The machine will beep
to signal the froth has started.
The progress bar will illuminate,
indicating the status of the froth.
*
Push steam wand into its down
position. The machine will
automatically purge to clean
inside of wand.
Press MILK TYPE button
based on the milk in the jug.
Before pouring milk, tap
the jug on a flat surface and
swirl around to remove large
bubbles. Pour frothed milk
over espresso and enjoy.
Turn froth dial to MICROFOAM.
When finished, the machine will
beep again to signify the froth
is complete. Remove jug and
immediately wipe steam wand
with a damp cloth until there is
no milk residue.†
Place milk jug on milk jug
platform with steam wand inside.
INGREDIENTS
Double shot espresso
230 ml milk
PREP YOUR DRINK,
grind your beans and brew espresso
following steps 1-3 on the
"Dialling In Your Espresso" section.
ESPRESSO 101:
BREW A LATTE
MAKES: 1 SERVING (280 ML)
BEGINNER RECIPE
FROTH DAIRY OR PLANT-BASED MILK
FROTH QUEING
MANUAL FROTHING
*FROTH SETTINGS MAY VARY BY MODEL.
†PLEASE USE CAUTION, AS STEAM WAND WILL BE HOT.
1 Fill the milk jug with the desired amount of
milk, but do not exceed the max fill line.
2 While brewing, select DAIRY or PLANT-
BASED milk with the MILK TYPE button
and froth setting with the froth dial.
3 Press START FROTH.
Cold foam
does not need to be queued
and can froth while the machine is brewing.
1 Fill the milk jug as desired in
between the min and max fill
lines.
2 Make sure you are on the
steamed milk setting
.
3 Pull the steam wand out.
Place the steam wand inside
the milk jug so that the wand
is resting within the milk jug
spout.
4 Angle the milk jug slightly to
the left or right so that the
steam wand is about a finger’s
width away from the wall of
the milk jug.
5 Hold START FROTH for 3
seconds. The machine will
beep to indicate that frothing
has started and steam will
start to generate from the
wand.
6 Place wand just below the
surface of the milk to start
incorporating air to stretch
the milk. This should start to
create a vortex with the milk.
7 As the volume of milk increases
in size, move the jug up so the
steam wand is lower in the milk
jug. This will heat up the milk.
8 Stay in that position until the
jug is too hot to hold with your
hand for 3 seconds, then press
START FROTH to turn the
function o. Wipe steam wand
with damp cloth. Return steam
wand to down position.
After you have started your brew, you are able to queue up your froth to start immediately after the brew is finished.
6
AU 02 8801 7666 | NZ 0800 112 660
7
AU ninjakitchen.com.au | NZ ninjakitchen.co.nz

You may notice your recommended grind setting change. This is
Barista Assist Technology adjusting the recommended grind setting
to help you get the proper espresso extraction. When adding more
beans, it may take 2–3 brews to reach the optimal grind setting. The
grind setting may also change to accommodate dierent brew types,
strengths and sizes. Over time, you may notice your recommended
grind setting change to account for ageing beans. This is normal.
Ensure your current grind size matches the recommended grind size
for proper espresso extraction.
An accurate dose of coee grounds is also important for proper
espresso extraction. Barista Assist Technology features a built-
in scale that will grind until you have the proper dose of coee
grounds in your portafilter. Once the portafilter is installed in the
grinding cradle, immediately let go to allow it to properly weigh and
dose the coee grounds.
UNDERSTANDING
BARISTA ASSIST
TECHNOLOGY
™
Note that grind recommendation will only adjust over time for espresso brews.
For coee brews, grind recommendations will stay the same.
THIS IS WHAT PROPER
ESPRESSO EXTRACTION
LOOKS LIKE
• Espresso will pour out at
a steady, consistent rate.
• You will see a caramel-coloured
liquid pouring out. That is
your crema.
• There will be a layer of crema
on top of your drink. Feel free
to tilt your cup to see if the
layer of crema is still completely
visible. If you can still only see
that caramel colour, you have a
properly extracted espresso shot.
CONGRATULATIONS, YOU'VE MADE A LATTE! KEEP READING FOR MORE INFORMATION ON HOW THE MACHINE WORKS, TIPS & TRICKS, AND CLEANING & MAINTENANCE.
RECIPE INSPIRATION
DOUBLE SHOT
ESPRESS0
LATTE
MICROFOAM
60ml
150ml
240ml
MILK OF CHOICE,
up to latte line
DOUBLE SHOT
ESPRESS0
MILK OF CHOICE,
up to minimum
fill line
MICROFOAM
MACCHIATO
60ml
150ml
240ml
Espresso with steamed milk and microfoam.
Espresso topped with a silky layer
of microfoam.
DOUBLE SHOT
ESPRESS0
CAPPUCCINO
MICROFOAM
MILK OF CHOICE,
up to latte line
60ml
150ml
240ml
Espresso with steamed milk,
microfoam and cocoa powder.
DOUBLE SHOT
ESPRESS0
FLAT WHITE
60ml
150ml
240ml
MICROFOAM
120ML MILK
OF CHOICE
Similar to a latte, with less milk
and a thinner layer of froth.
We know preferences vary for the amount of milk
desired in your cup. You can adjust the quantity of milk
in the milk jug depending on your preference.
8
AU 02 8801 7666 | NZ 0800 112 660
9
AU ninjakitchen.com.au | NZ ninjakitchen.co.nz
10
CHECK OUT THE INSPIRATION GUIDE FOR MORE RECIPES AND INFORMATION.
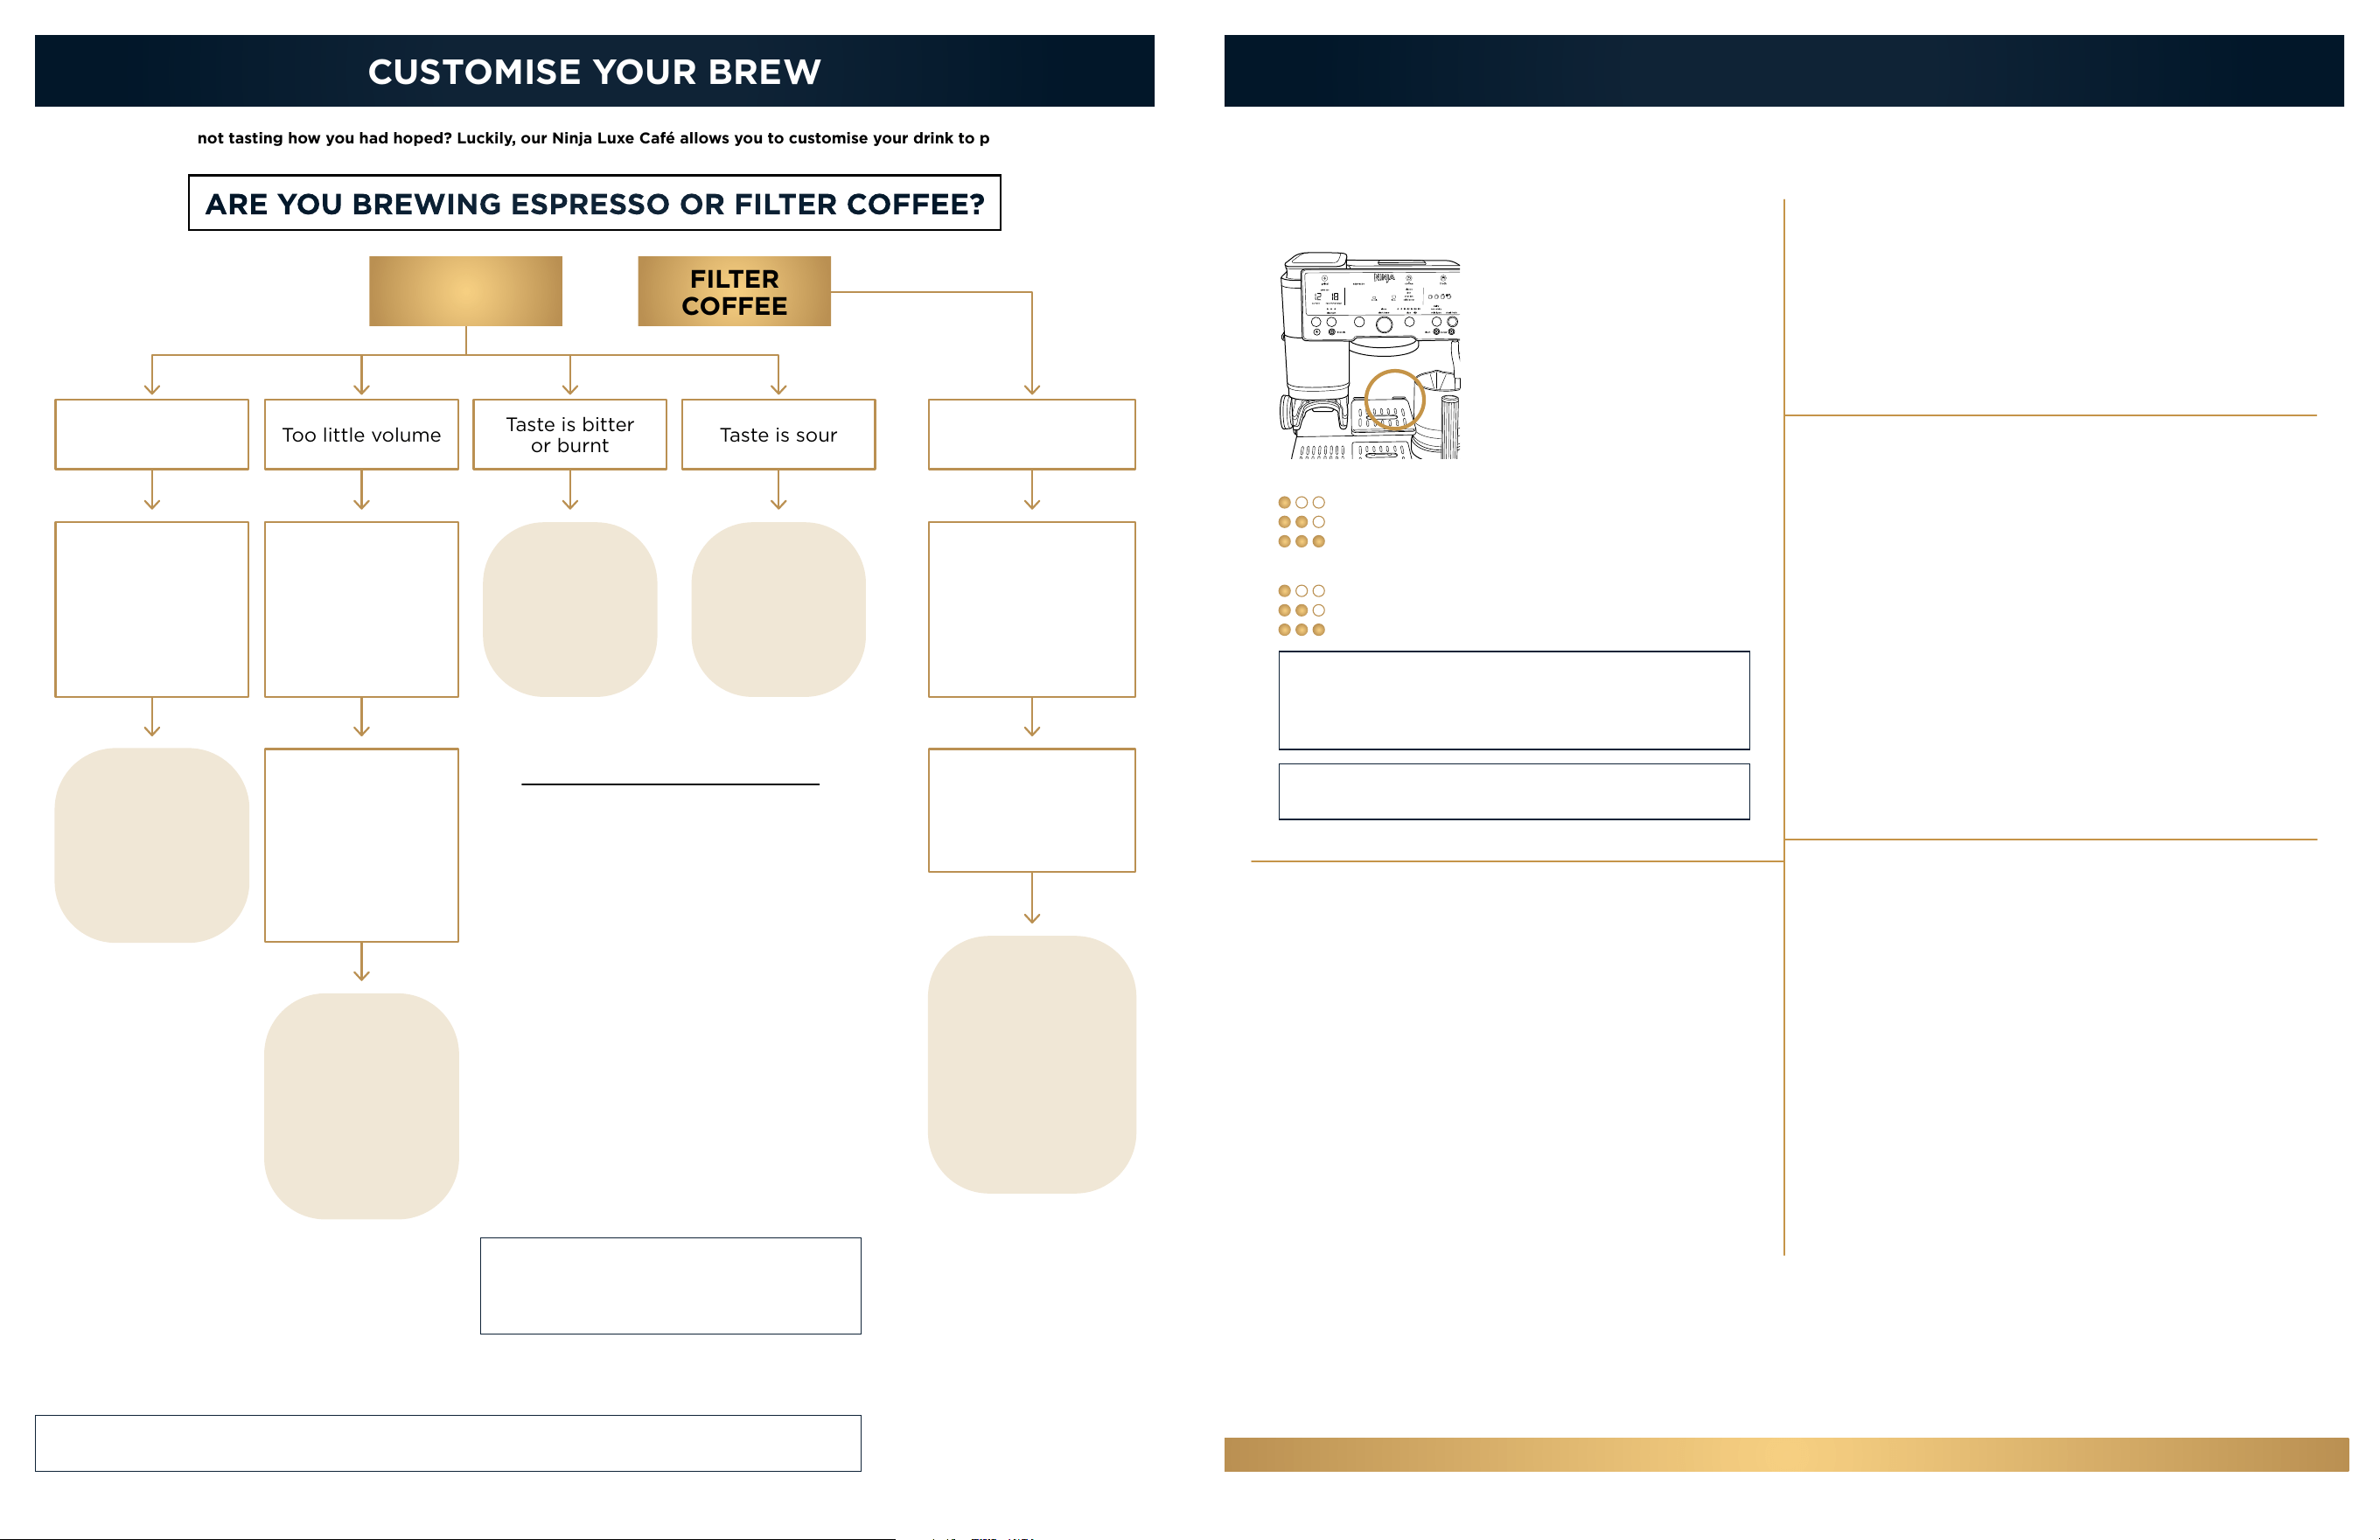
CUSTOMISE YOUR BREW
Espresso or coee not tasting how you had hoped? Luckily, our Ninja Luxe Café allows you to customise your drink to personal preference!
ADVANCED SETTINGS
ADJUSTING BREW STRENGTH AND TEMPERATURE
CHOOSING THE RIGHT CUP
Ensure the cup you are using is appropriate for the size of
your drink. For a hotter drink, use a cup that is a similar
size to your drink.
The thickness of the material your cup is made of will also
aect the temperature of your drink. For a hotter drink,
use a cup made of thinner material.
MILK TEMPERATURE ADJUSTMENT
The default milk temperature is 72°C for dairy
and 69°C for plant based.
Adjust milk temperature in the additional settings.
1 Hold the SIZE button for 3 seconds.
2 Rotate the centre dial to _h07, then press the centre dial
to select.
3 Rotate the centre dial to select your desired
temperature, then press the centre dial to select.
Low: Select this setting if your froth is coming out too
hot or if you would like your froth to be slightly thinner.
Medium: Our barista-recommended default setting.
High: Select this setting if your froth is coming out too
cold or if you would like your froth slightly thicker.
To leave the additional settings menu, press the SIZE button.
COFFEE FLAVOUR ADJUSTMENT
Barista Assist will recommend a grind size depending on
brew style and size. Because not all beans are roasted the
same, with the grind dial you have the opportunity to adjust
the flavour profile.
Taste is Too Bitter or Burnt Tasting: Increase Grind Size
Taste is Too Sour: Decrease Grind Size
BREW TEMP ADJUSTMENT
1 Hold the SIZE button for 3 seconds.
2 Rotate the centre dial to _h06, then press the centre dial
to select.
3 Rotate the centre dial to select your desired setting,
then press the centre dial to select.
LO: Low temperature
M: Medium temperature
HI: High temperature
To leave the additional settings menu, press the SIZE button.
The temperature setting will aect the extraction of
espresso and the flavour of your drink. For best results
and proper extraction, we recommend a low or medium
temperature for darker roasts, and a medium or high
temperature for lighter roasts.
CHANGING BREW STRENGTH
Espresso Strength Options:
Taller, less concentrated: 4:1 water to grounds ratio
Default: 2.5:1 water to grounds ratio
Shorter, more concentrated: 2:1 water to grounds ratio
Filter Coee Strength Options:
Mild: Fewer beans will be ground
Default
Bold: More beans will be ground
Adjusting Brew Strength:
To adjust brew strength,
press the STRENGTH button.
NOTE: Barista Assist Technology may adjust your grind
size when adjusting brew strength.
NOTE: Adjusting your espresso brew strength will
aect your brew volume output. Strength 1 will have
a larger output than the default setting. Use a larger
cup than normal.
Increase
or decrease
strength
Adjust to a
dierent mode -
"classic" or "rich"
Taste is too strong
or too weak
FILTER
COFFEE
Match grind
size with
recommendation
and ensure
beans are dialed
in correctly
Too much volume
Only getting
drops of
espresso? Try
increasing grind
size in increments
of +1 to increase
water flow
Match grind
size with
recommendation
and ensure
beans are dialed
in correctly
Too little volume
Taste is bitter
or burnt
Taste is sour
ARE YOU BREWING ESPRESSO OR FILTER COFFEE?
ESPRESSO
Change
grind setting
in increments
of +/-1. If taste is
still bitter or
burnt, increase
grind size.
If it is weak or
sour, decrease
grind size
Decreasing
espresso strength
will produce
more volume
OR
Try brewing a
quad shot
Increasing
espresso strength
will produce
less volume
Decrease
brew
temperature
Increase
brew
temperature
NOTE: Avoid using flavoured beans. Added
oils and sugars on the beans can increase
residue buildup in the grinder, increasing the
recommended frequency of cleaning.
BEST BEAN
PRACTICES
For best results, use
freshly roasted coee beans.
When purchasing coee
beans, it’s best to buy a bag
with a "Roasted On" date
rather than a "Best Before"
date to ensure quality
and freshness.
We recommend you
use any coee beans
within 20 days of
the "Roasted On" date.
Buying smaller bags of
beans will help ensure
optimal freshness
for every brew.
NOTE: While we recommend always following Barista Assist Technology, if the above does not work
to improve your espresso brew, try one setting coarser for bitter taste, one setting finer for sour taste.
AU 02 8801 7666 | NZ 0800 112 660
11
AU ninjakitchen.com.au | NZ ninjakitchen.co.nz
ADDITIONAL SETTINGS
CUSTOMISE
Be sure that the machine is turned o and unplugged before
proceeding.
1 Remove all beans from the bean hopper. See Switching Out
Beans for reference.
2 Ensure the bean hopper is installed and locked. Clear out any
leftover beans on top of the grinder by performing a "purge",
following these instructions. First, set the grind size to 25, and
with the portafilter in the grinding cradle, press and hold "start
grind". Once grinding begins, continue holding the button for
about 10 seconds or until there is a noticeable change in noise.
This will grind away and remove any material left in the grinder.
If there is still residue left on the burr, sweep it o with the
included cleaning brush and perform another purge if necessary.
3 Turn o and unplug the machine. Remove bean hopper by lifting
handle and turning to anticlockwise.
CLEANING & MAINTENANCE
DAY-TO -DAY MAINTENANCE
NOTE: DO NOT allow burrs to come into contact with water.
NOTE: When cleaning the burr grinder attached to the machine,
only use the cleaning brush.
5 Clean removed burr grinder with brush.
6 Then, clean burr grinder attached to machine with cleaning
brush.
7 Be sure to clean the inside of the grinding cradle as well.
DISHWASHER-SAFE PARTS
Funnel, whisk, cleaning disc, water reservoir, bean hopper, and
all drip tray components.
CLEANING THE BASKETS
AND PORTAFILTER
Remember to clean these after each brew.
Remove the basket from the portafilter and
handwash both thoroughly.
CLEANING THE FROTHER
Wipe with damp cloth: Do this immediately after frothing to
prevent any milk from getting stuck to the steam wand.
Auto purge: After every froth, push the steam wand back into the
down position without the jug installed to initiate an auto purge.
This will help clean the inside of the steam wand after frothing.
You can purge any time by pressing the PURGE button.
Removable whisk: Remove the whisk from the milk jug and
handwash with soapy water after each use.
For a deeper clean of the whisk and steam wand, fill milk jug with
water and a drop of dish soap and run the MICROFOAM
froth
program.
EMPTYING THE DRIP TRAY
When the orange empty
indicator rises enough to be
visible, it’s time to empty the
main drip tray.
NOTE: Remove centre drip tray before emptying. Wipe o
with a damp cloth separately.
CLEANING THE CONICAL BURR GRINDER
To prevent clogging and ensure the highest quality output, it is recommended to clean your
conical burr grinder weekly at a minimum for daily use. For dark roast, decaf and other oily bean types,
it is recommended to clean the grinder more often. For less than daily use, clean your grinder monthly at
minimum or anytime you swap out or refill the beans.
4 Remove upper burr by rotating anticlockwise, aligning the
orange arrow on the burr grinder with the orange arrow labeled
ALIGN on the machine. Once aligned, lift upper burr out.
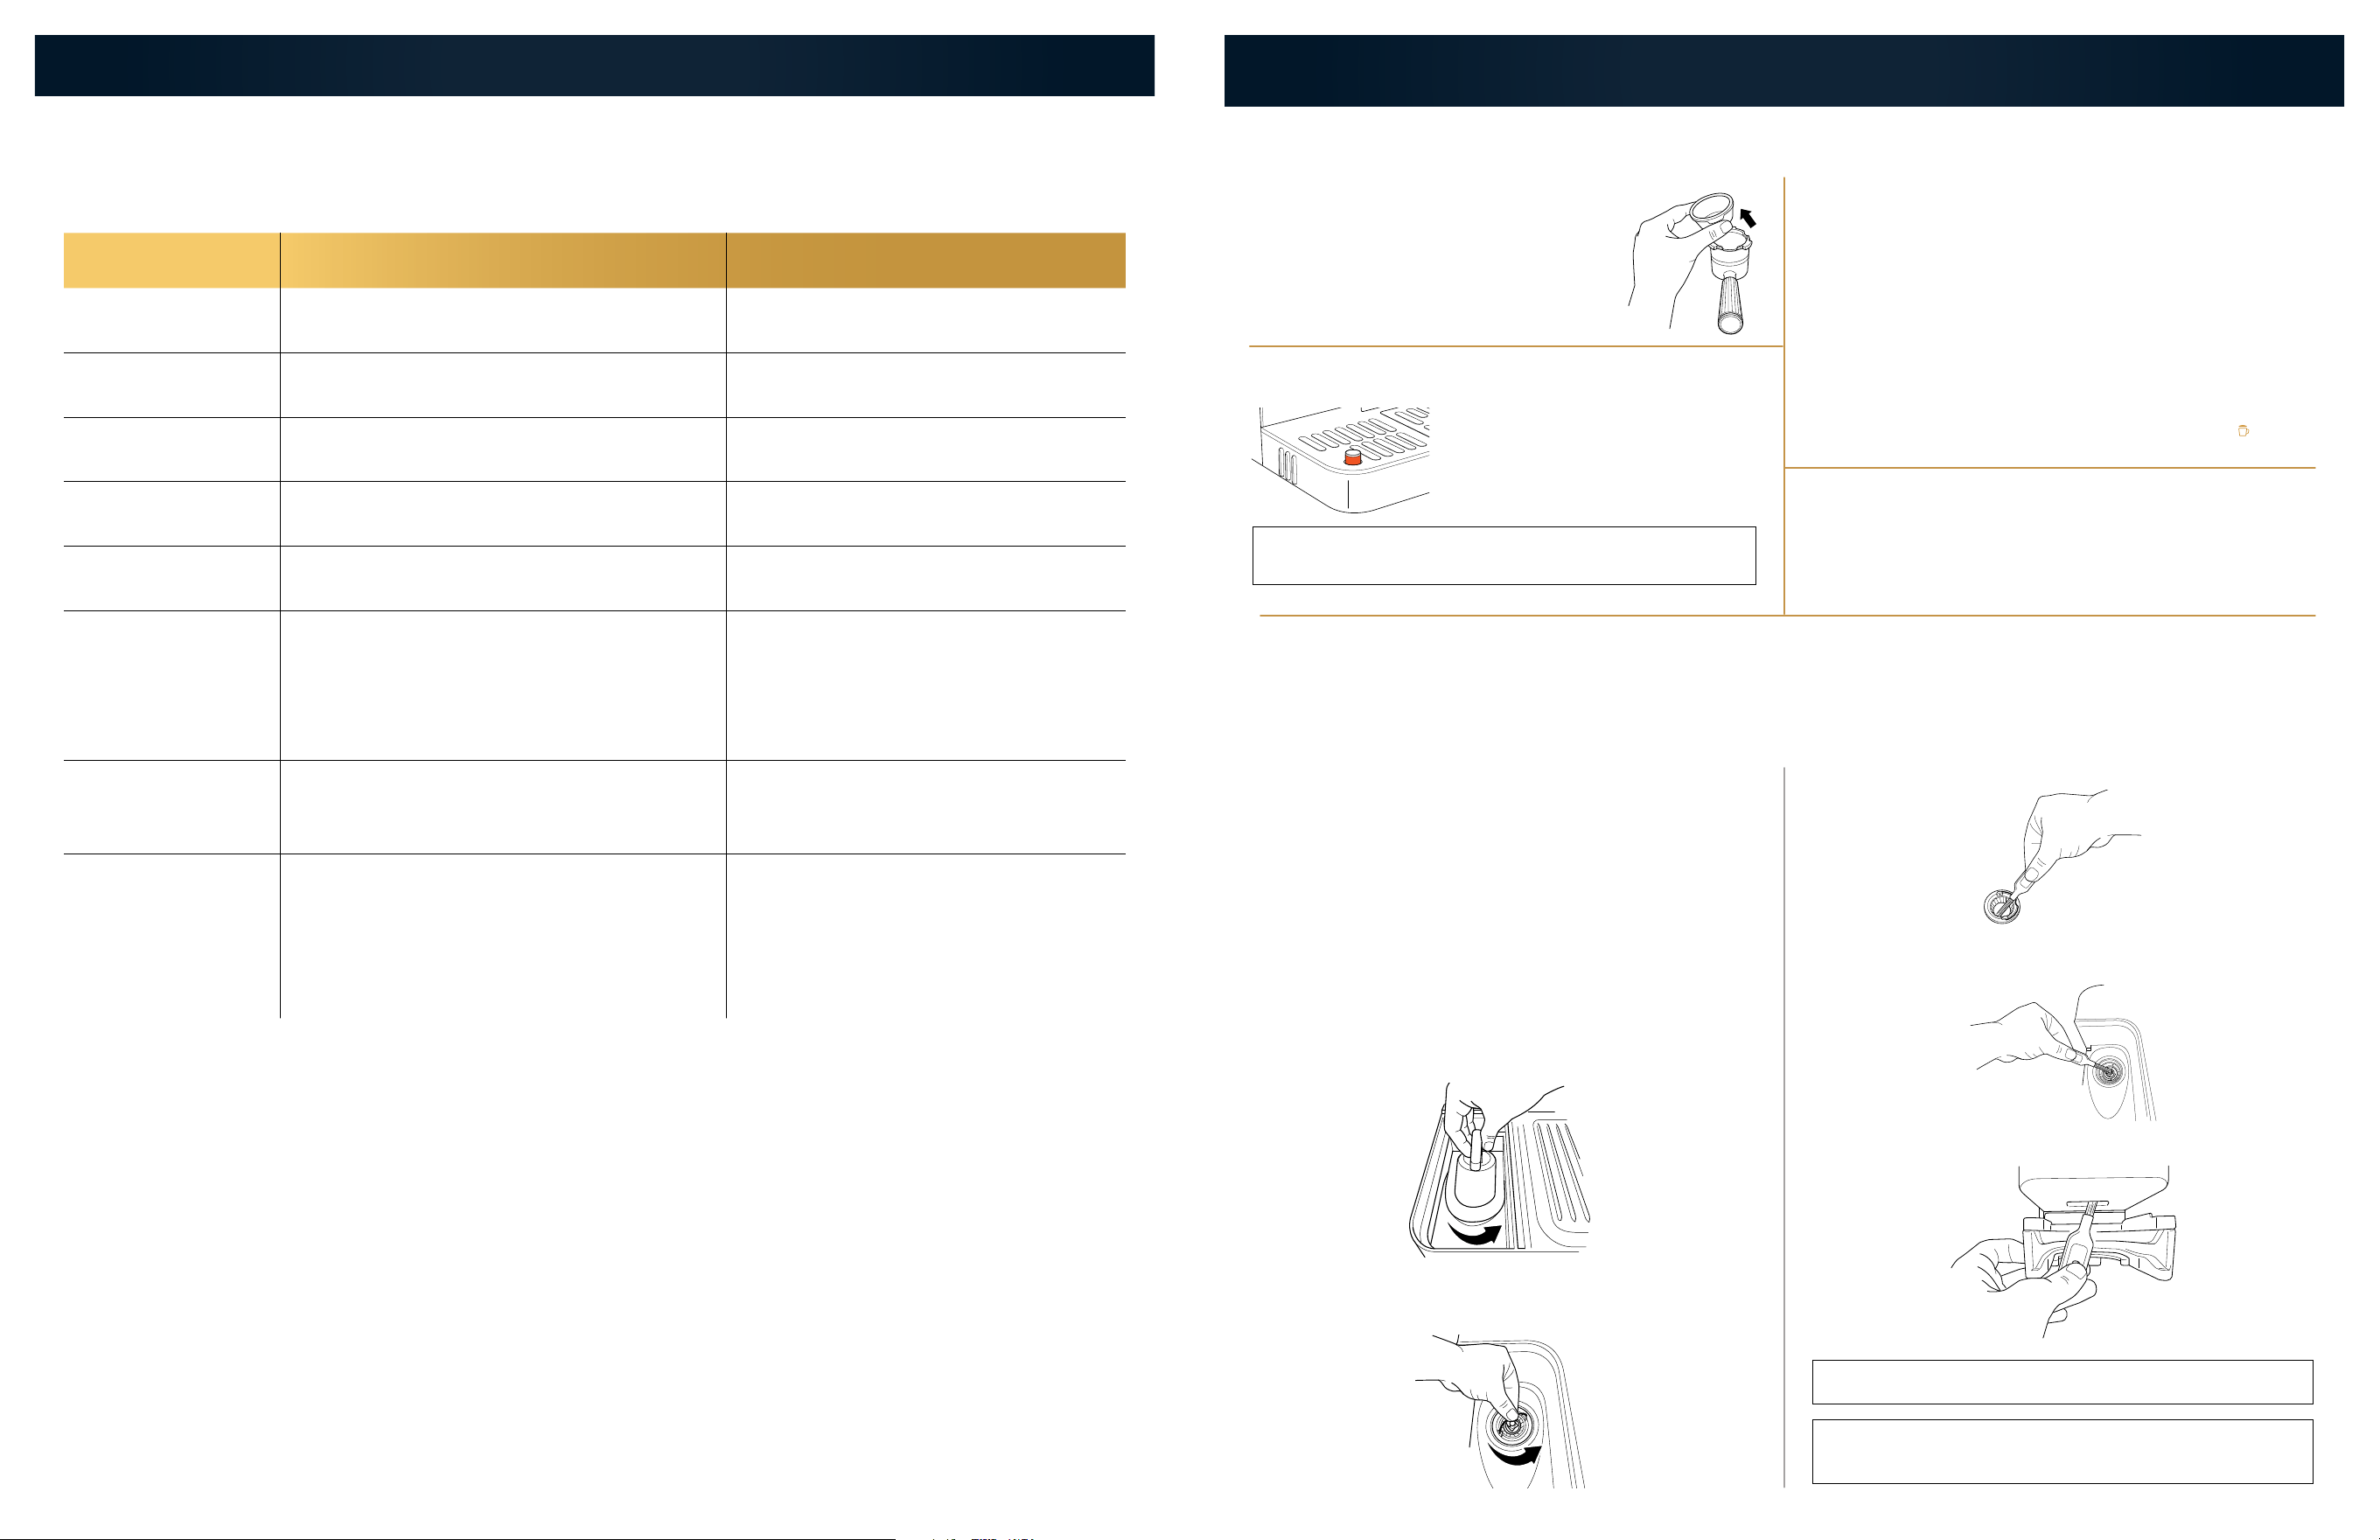
The additional settings menu oers additional options to customise your machine and is accessible by pressing and
holding the SIZE button for 3 seconds.
1 Navigate through these topics by turning the centre dial. Press START BREW to select your desired topic.
2 Once you select into a topic, turn the centre dial to get to your desired option and press
START BREW to make your selection.
3 After a selection is made, you will hear a beep and return to the menu screen. Please note that the machine will
not beep if beeps are turned o.
4 You can exit the menu by pressing the SIZE button again.
ITEM NUMBER TOPIC OPTIONS
_h01 Beeps: Turns all beeps on or o.
ON: Leaves beeps on (Default)
OFF: Turns beeps o
_h02
Eco Mode: Saves power by turning boiler o after
brewing.
ON: Turns Eco Mode on
OFF: Leaves Eco Mode o (Default)
_h03
Recommended Grind Size: Turns recommended
grind setting display on or o.
ON: Leaves display on (Default)
OFF: Turns display o
_h04
Barista Assist Technology Reset: Resets
recommended grind setting to default setting.
NO: Keeps your current settings (Default)
YES: Resets your settings
_h05
Factory Settings Reset: Reset all variables on the
machine to default settings.
NO: Keeps your current settings
YES: Resets your settings
_h06
Brew Temperature: Adjusts the
temperature of your drink.
LO: Low temperature
M: Medium temperature (default)
HI: High temperature
_h07
Froth Temperature: Adjusts the temperature of
your froth.
LO: Low temperature
M: Medium temperature (default)
HI: High temperature
_h08
Hard Water: Brings the hard water test menu up
to reset your water hardness
hd 0: Strip has 0 purple boxes
hd 1: Strip has 1 purple box
hd 2: Strip has 2 purple boxes
hd 3: Strip has 3 purple boxes
hd 4: Strip has 4 purple boxes
hd 5: Strip has 5 purple boxes
12
AU 02 8801 7666 | NZ 0800 112 660
13
AU ninjakitchen.com.au | NZ ninjakitchen.co.nz
CLEANING & MAINTENANCE
NOTES
PERIODIC MAINTENANCE
The following are instructions for the descale and cleaning cycles. These are separate procedures
and should be done whenever the corresponding light is illuminated on the control panel.
DESCALING
Time to complete: approximately 90 minutes
When the descale light illuminates, you must run a descale cycle. If
a descale isn’t performed after the light turns on, drink quality will
diminish and your machine may clog and stop working.
Descaling breaks down and removes limescale and mineral buildup
inside the machine. Doing this will help maintain peak performance if
routinely performed with a descale solution whenever the DESCALE
light turns on.
1 Ensure the main drip tray is completely emptied, as some of the
water brewed from the descale cycle will be deposited into the
drip tray. Not emptying the main drip tray may cause overflow.
3 Insert the double basket into the portafilter.
4 Fasten the portafilter into the group head.
5 Ensure milk jug is placed on the milk jug platform with the steam
wand inside.
6 Place an empty cup (at least 530 ml) under the portafilter. You
may have to remove the centre drip tray.
7 Press the DESCALE button, then press the centre dial to start the
descale cycle.
8 The machine will start the descale cycle. The machine will
flush solution through the steam wand and portafilter for
approximately 90 minutes. The machine will count down the
remaining time on the control panel.
9 The machine will beep indicating when the descale cycle is
complete.
10 After the cycle is complete, remove the portafilter, main drip tray,
and milk jug with caution, as there will be water in each.
11 Empty the contents of each and handwash with warm, soapy
water to remove any solution that could aect the flavour of your
coee.
12 Fill the reservoir with fresh water up to, but not exceeding, the
Max Fill line.
13 Install the main drip tray back on the machine and install the
portafilter in the group head. Do not install the milk jug.
14 Flush the group head by running an M+ classic brew.
15 Then, with the milk jug uninstalled, flush the steam wand by
pressing the PURGE button.
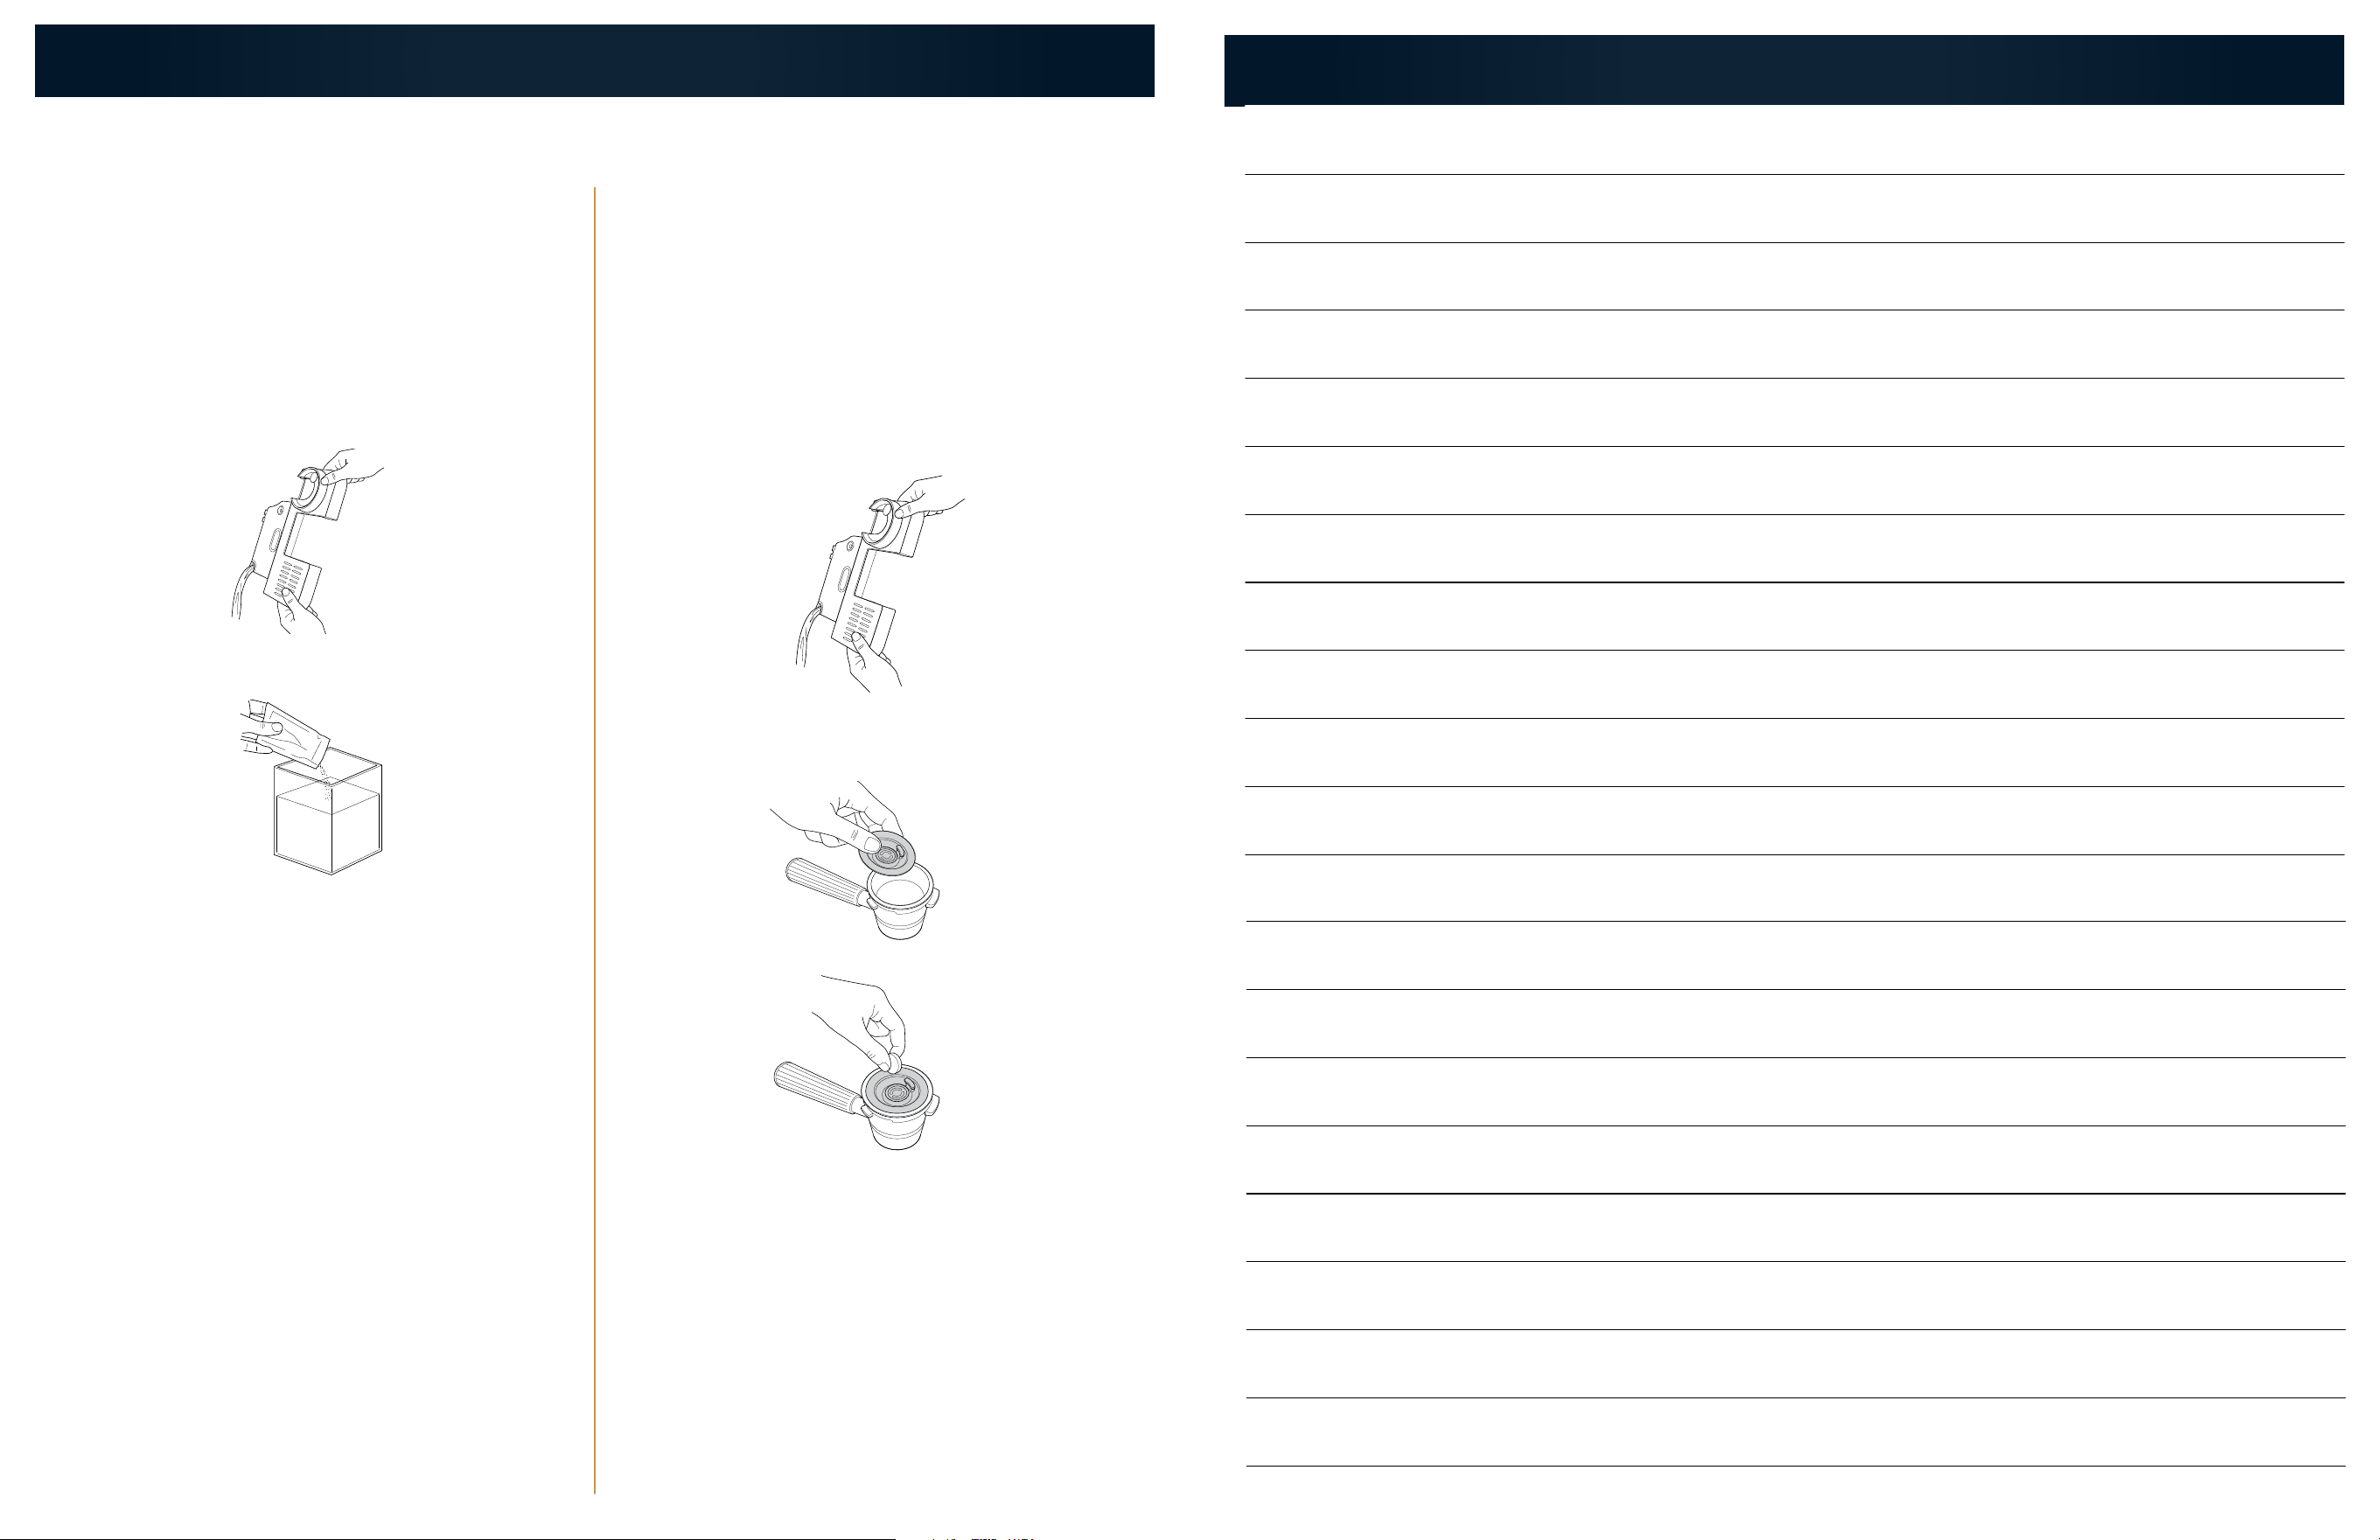
2 Dissolve the provided Ninja descale powder in a separate container
with 1 L of water. Pour solution mixture into water reservoir.
RUNNING A CLEAN CYCLE
Time to complete: approximately 6 minutes
A clean cycle flushes out residual oils or grounds that build up in and
around the group head. The CLEAN light will automatically illuminate
to indicate when a clean cycle is required. You may also run a clean
cycle if you notice a change in brew quality. The clean cycle requires
the cleaning disc (included with the machine and storable in the
accessory storage) and a cleaning tablet (also included and available
for purchase on AU: ninjakitchen.com.au or NZ: ninjakitchen.co.nz.
Follow these steps to run a clean cycle:
1 Ensure the main drip tray is completely empty as the water
brewed from the clean cycle will be deposited into the main drip
tray. Not emptying the main drip tray may cause overflow.
2 Fill the water reservoir up to but not exceeding the Max Fill line.
3 Insert the double basket in the portafilter.
4 Place the cleaning disc on top of the double basket, with the
handle facing up.
5 Place 1 cleaning tablet in the centre of the cleaning disc.
6 Fasten the portafilter in the group head.
7 Press the CLEAN button, then press the centre dial to start the
clean cycle.
8 The machine will start the process of backflushing the shower
screen and group head and depositing the water and sediment
from the clean cycle into the main drip tray.
9 The clean cycle will take approximately 6 minutes to complete.
The machine will beep when the clean cycle is complete.
10 After the clean cycle is complete, remove both the portafilter
and main drip tray with caution, as there may be water in both.
Handwash with warm soapy water.
14
AU 02 8801 7666 | NZ 0800 112 660
15
AU ninjakitchen.com.au | NZ ninjakitchen.co.nz

For recipes, accessories and replacement parts,
visit AU ninjakitchen.com.au | NZ ninjakitchen.co.nz
BARISTA ASSIST TECHNOLOGY and NINJA LUXE are trademarks of SharkNinja Operating LLC.
© 2025 SharkNinja Operating LLC
ES601ANZ_QSG_MP_Mv10