EN
Contents
Product Overview
01
01
03
04
05
08
10
Package Contents
Product Illustration
Installation
Battery
M Manual Flash Mode
Operating Instructions
1. TTL Mode
2. High-Speed Sync
1. Adjusting Flash Output
2. Setting S1 Optical Unit
3. Setting S2 Optical Unit
2. Delay Shooting
1. App Control
3. Mask Shooting
4. Continuous Shooting
4. Flash Duration Display
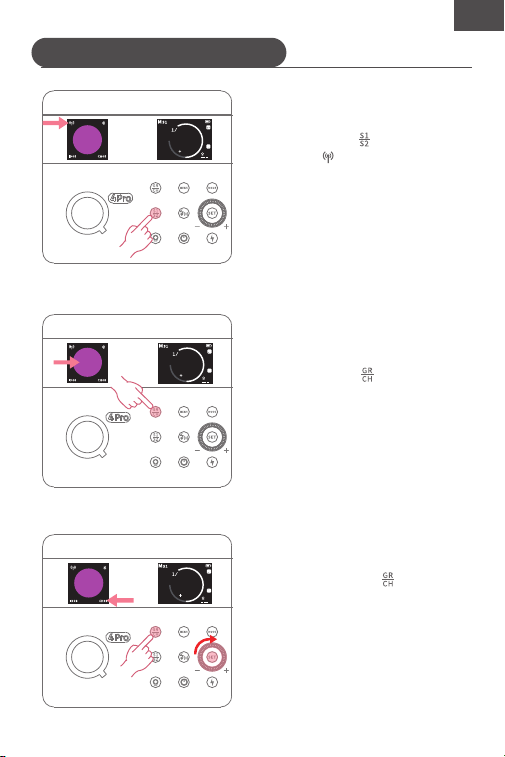
1. Enabling 2.4G Wireless
2. Setting Groups
3. Setting Channels
4. Setting IDs
5. 2.4G Wireless Q / X System Triggering (RX COMPAT)
6. Wireless Sync (WL SYNC)
7. Wireless Flash Shooting
8. Wireless Multi-Flash Shooting
9. Causes and Solutions for 2.4G Wireless Misfires
08
TTL Auto Flash Mode
12
MULTI Stroboscopic Flash Mode
13
2.4G Wireless Transmission
19
C.Fn: Custom Functions
20
Custom Functions
22
Flash Modes
22
Modeling Lamp
23
Other Functions
25
Protection Functions
26
Troubleshooting
26
Maintenance
27
Sync Jack Triggering
27
Firmware Upgrade
27
Specifications
29
Safety Precautions
Package Contents
Product Overview
The NEEWER Q4 Pro Outdoor Flash retains the classic square design of the
Q Series. It features dual color displays and Bluetooth app control for
intuitive operation, with built-in NEEWER Q wireless system and X system
compatibility for flexible control. The integrated lithium battery provides
fast recycling and extended runtime, while 1/8000s HSS precisely capture
fast-moving subjects. Compatible with Canon, Nikon, Sony, and Fujifilm
cameras, as well as a wide range of Bowens mount accessories, the Q4 Pro
is a powerful tool for creative and professional photography.
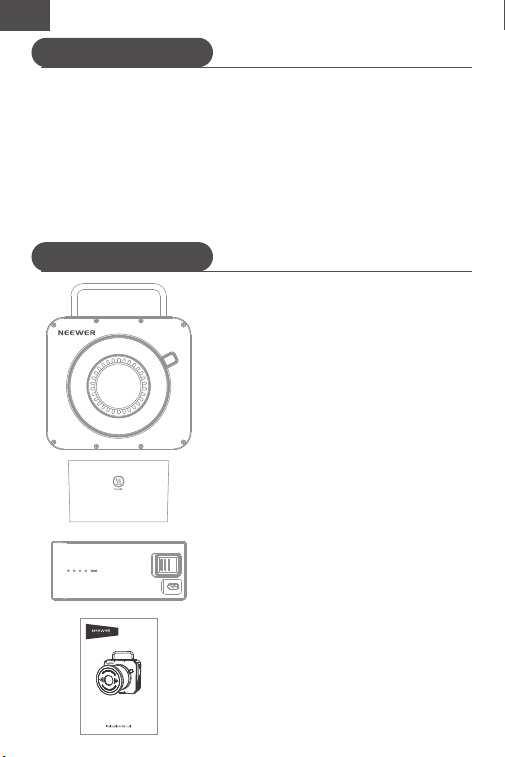
Q4 Pro Flash X1
Reflector X1
Battery X1
User Manual X1
01
EN
Q4 Pro
Outdoor Strobe Flash with Lithium Battery
Package Contents
02
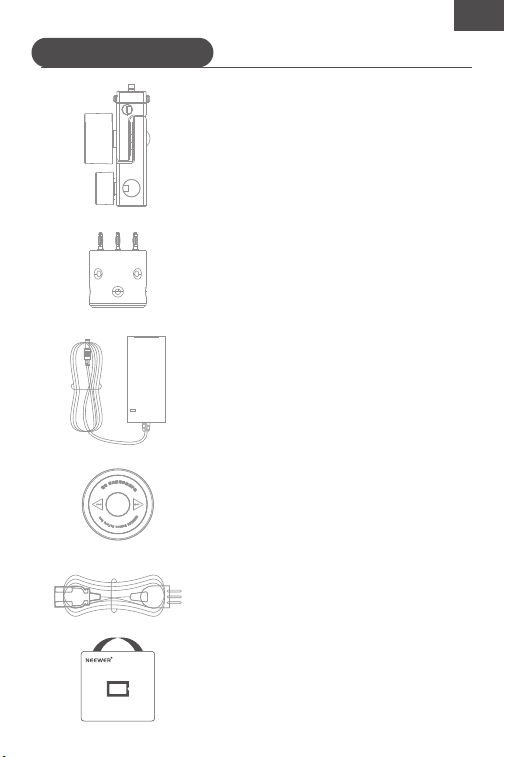
Handle X1
Flash Tube X1
Power Adapter X1
Reflector Cover X1
Power Cable X1
Storage Bag X1
EN
EN
Package Contents
Product Illustration
03
Recommended accessories: Users can separately purchase
other NEEWER accessories for better results, including Qz
triggers, QPro triggers, light stands, and Bowens mount
reflectors, diffusers, and umbrellas.
S1
S2
①
②
③
④
⑤
⑥
⑦
⑧
⑨
⑩
⑪
⑫
⑬
⑭
⑮
⑯
⑰
⑱
⑲
⑳
04
EN
Product Illustration
Installation
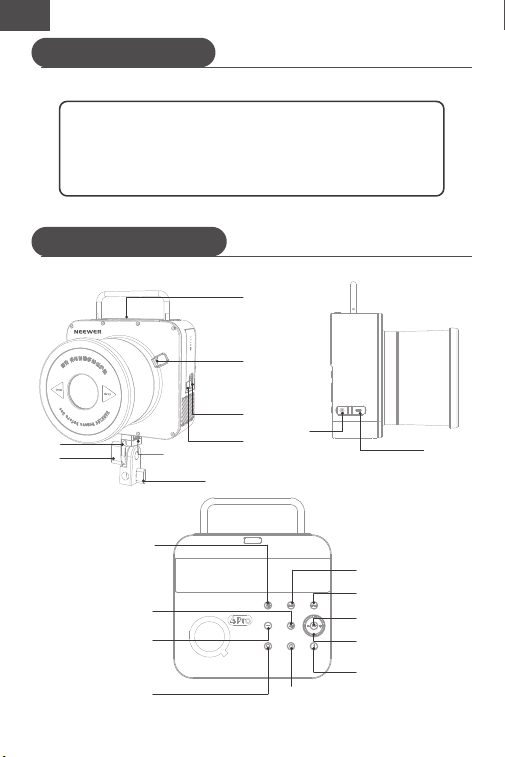
① Optical Receiver ② Reflector Lock
③ Battery Latch ④ Battery Charging Port
⑤ Umbrella Hole ⑥ Angle Lock Knob
⑦ Lock Knob ⑧ Light Stand Lock Knob
⑨ Sync Port ⑩ Firmware Upgrade Port
⑪ Short Press: Group/Long Press: Channel
⑫ HSS Switch ⑬ S1/S2 Button
⑭ Modeling Lamp Switch ⑮ Menu Button
⑯ Mode Button ⑰ Set Button
⑱ Control Dial ⑲ Test/Trigger Button
⑳ Power Button
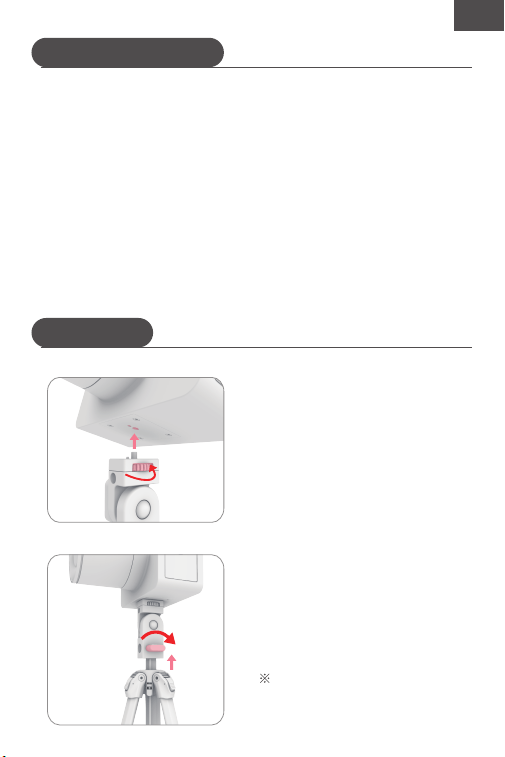
Installing the Handle:
Align the screw and locating pin of
the handle with the screw hole and
locating hole of the flash, then tighten
the Lock Knob until the handle is
securely attached.
Installing the Light Stand:
Insert the top of the light stand into
the socket at the bottom of the handle,
then tighten the Light Stand Lock
Knob to secure.
Note: Light stand is sold separately.
05
EN
Installation
Battery
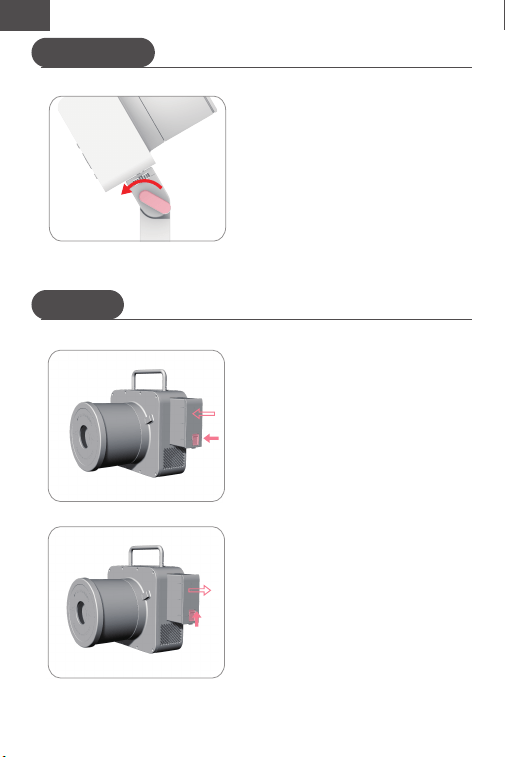
Adjusting the Flash Angle:
Loosen the Angle Lock Knob on the
handle, adjust the flash to the desired
angle, then tighten the knob to secure.
Install the Battery:
As shown in the picture, insert the
battery into the battery slot with the
latch facing outward. Push the battery
until the latch clicks into place.
Remove the Battery:
Push the battery latch upward and
the battery will automatically eject,
then remove the battery.
06
Battery
EN
Battery Management:
Short press the battery level button to check the current charge level via
the battery indicators.
This product is designed with an auto power-off function.
Battery Characteristics:
1. This product is powered by a lithium battery that supports 500 full
charge/discharge cycles, compliant with GB31241 standards.
2. Safe and reliable. The built-in circuit protection includes temperature
protection, overcharge protection, overdischarge protection, and short
circuit protection.
3. Supports PD 65W fast charging and fully charges in approximately
2 hours.
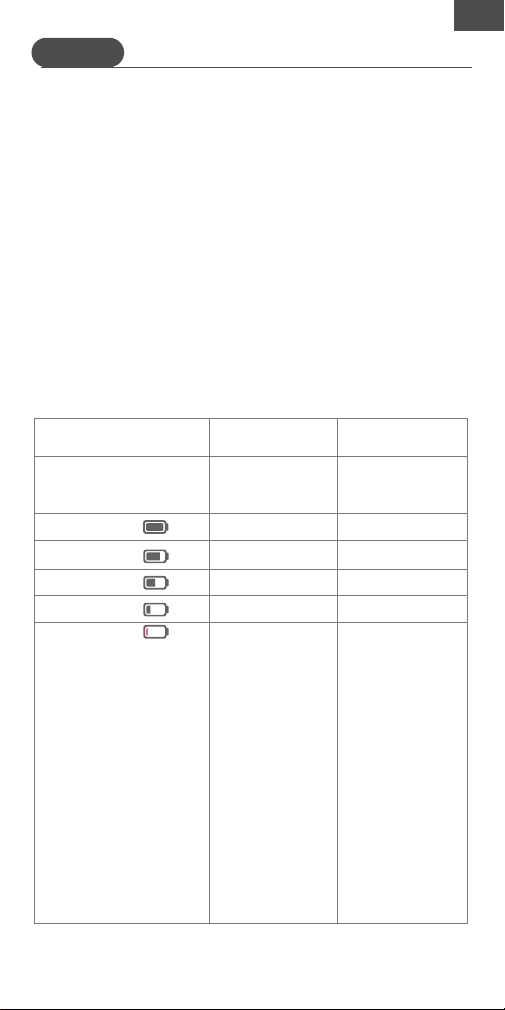
Battery Indicators:
Once the battery is correctly installed, it will power the flash. Check the
battery icon on the flash screen during use to monitor the battery level
anytime.
Note: Displays are generally consistent but may vary
slightly during output level transitions.
(Indicates the system
-wide battery level)
(Indicate battery
level under no
load)
4 blue indicators on
100%
50%~75%
3%~20%
<2% indicates the
battery is nearly
depleted. The flash
cannot work in this
state. A warning
alert will sound one
minute before it,
and the flash will
automatically power
off after 3 minutes.
50%
3 blue indicators on
2 blue indicators on
1 blue indicator on
2%: blue indicators
flashing
1%: indicator off
Full
High
Mid
Low
Charge Now
Battery Icon on LCD
Screen
LED Indicators on
Battery
Note: In this state,
charge the battery
as soon as possible
(within 10 days) to
ensure normal use
or safe storage.
Meaning/
Percentage
07
Battery
EN
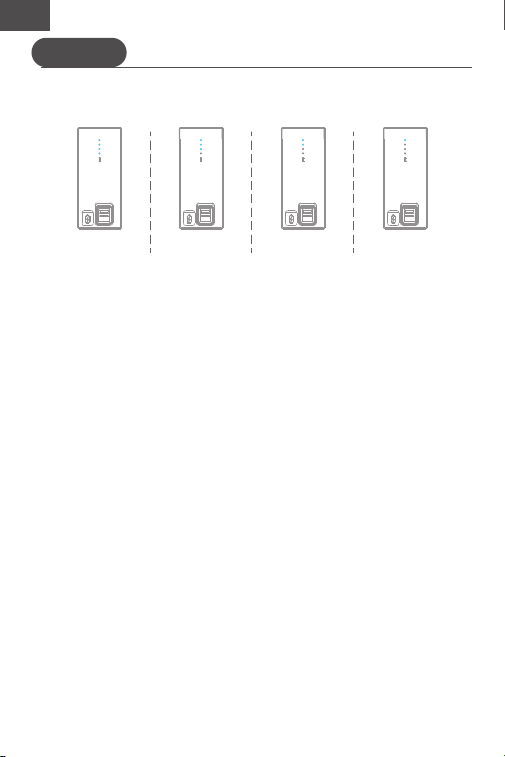
LED Indicators on Battery:
Battery Precautions:
01. Avoid short-circuiting the positive and negative terminals.
02. The battery is not waterproof — do not submerge it in water.
03. Keep out of reach of children.
04. Do not charge for more than 24 hours. Use the original charger only.
05. If the battery has not been used for more than 3 months, charge it
before use.
06. Keep the battery away from fire and heat sources.
07. Dispose of used batteries in accordance with local regulations.
08. For long-term storage, charge the battery to approximately 60%.
09. For long-term storage, keep the battery in good condition at a
half-charged state. Wrap the battery in non-conductive material to
prevent direct metal contact and store in a cool, dry place.
10. Do not use the flash while the battery is charging.
11. The battery is equipped with overheat protection. If the internal
temperature reaches 55°C, overheat protection will activate and the
battery must cool down before further use.
4 blue
indicators on
3 blue
indicators on
2 blue
indicators on
1 blue
indicators on
08
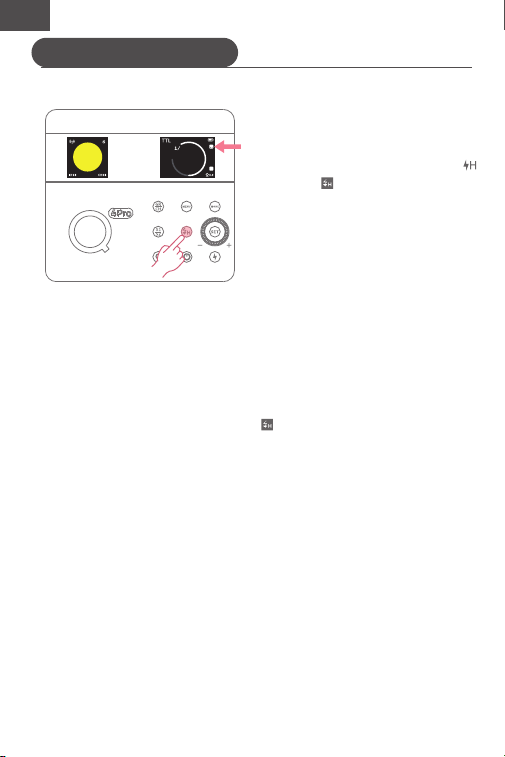
Short press the Mode Button. When
"TTL" appears on the screen, the
flash is in TTL mode.
EN
Operating Instructions
NEEW ER
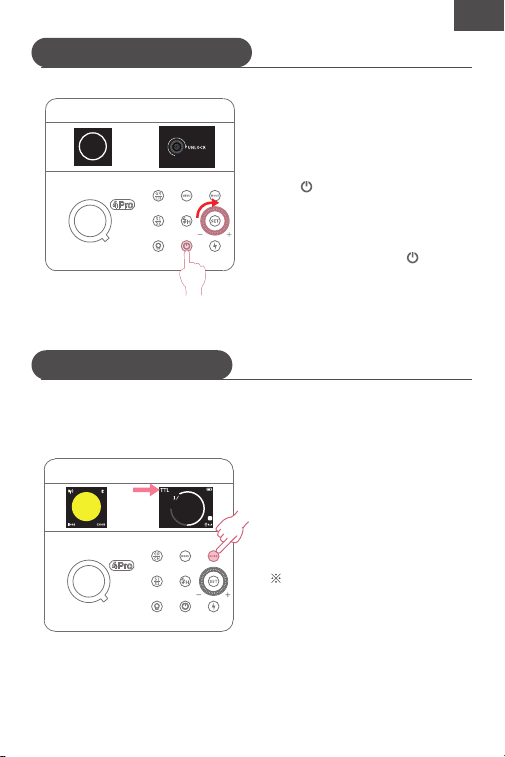
Power On/Off & Screen Unlock:
①Short press the Power Button
" ", the screen lights up. Rotate
the Control Dial clockwise to
unlock the screen.
②When the flash is on, long press
the Power Button " ", the flash
will power off.
TTL Auto Flash Mode
This product supports three flash modes: TTL, M, and MULTI. Short
press the Mode Button to cycle through the three modes.
TTL Mode:
+0.3
B
Note: TTL mode is only available
when 2.4G wireless is enabled.
09
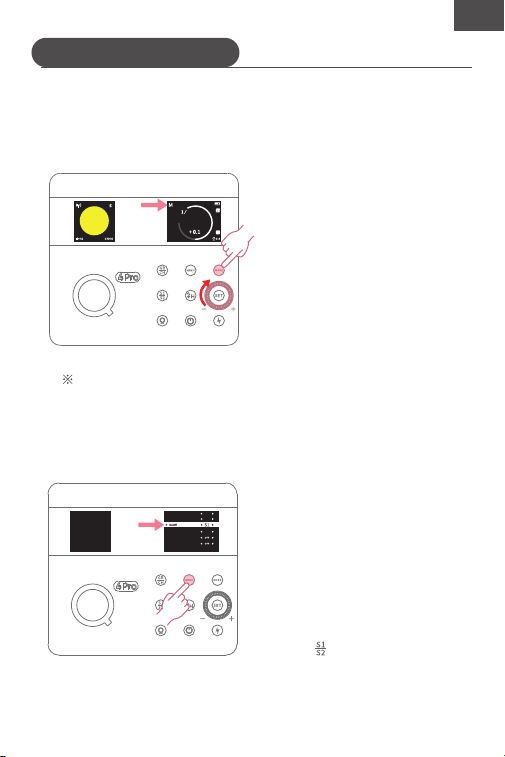
HSS allows you to sync the flash at any shutter speed, which is
particularly useful when using aperture priority mode for fill-flash in
portrait photography.
EN
TTL Auto Flash Mode
Notes:
1. If the shutter speed is set to equal or slower than the camera's
maximum flash sync speed, the " " icon will not appear in the
viewfinder.
2. When using HSS, the higher the shutter speed, the shorter the
effective flash range.
3. In wireless mode, the sync method of Q4 Pro follows the primary
unit, such as QPro/Qz.
4. HSS is not available in MULTI mode.
5. After 50 consecutive HSS flashes, the flash's overheat protection
may activate.
B
+0.3
Short press the HSS Switch " " ,
the " " icon will appear on the
screen. A wireless trigger is
required to use HSS, such as
QPro/Qz triggers.
High-Speed Sync (HSS):
10
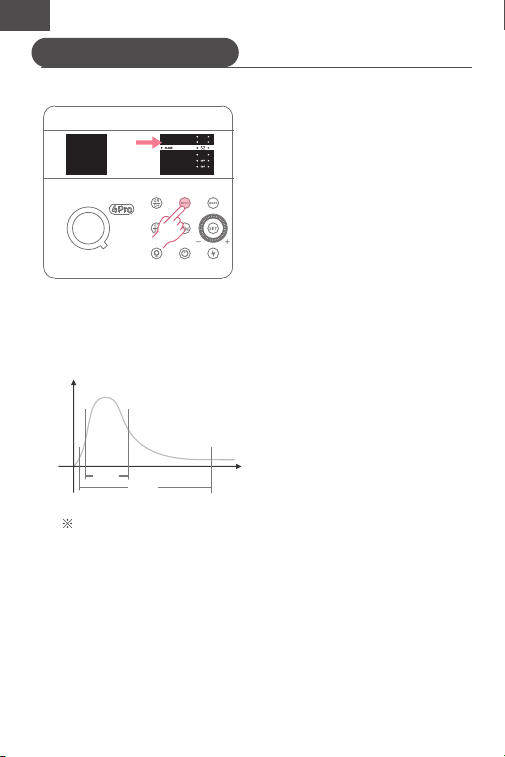
In M mode, flash output can be set from 1/512 to 1/1 (full power) in 0.1-stop
increments. Use a handheld flash meter (sold separately) to determine the
required flash output.
Short press the Mode Button,
when "M" appears on the screen,
the flash is in M mode. Rotate
the Control Dial to adjust the
flash output level, then press
the Set Button to confirm.
EN
M Manual Flash Mode
In M mode, press the Menu Button
to enter the menu. Select S1 under
"SLAVE", the flash now work as a
secondary unit in manual flash
setups. It triggers in sync with the
first flash from the primary unit that
functions as the wireless trigger.
With wireless disabled: Short
press " " to switch between
S1/S2/OFF.
Setting S1 Optical Unit:
Adjusting Flash Output:
Short press the Mode Button, when "M" appears on the screen,
the flash is in M mode. Rotate the Control Dial to adjust the
flash output level, then press the Set Button to confirm.
+1.5
B
MENU
V1.0.3
FLASH MODE
Freeze
OFF
INTER
WIRELESS SYNC
MODEL
STANDBY
AUTO OFF
11
EN
M Manual Flash Mode
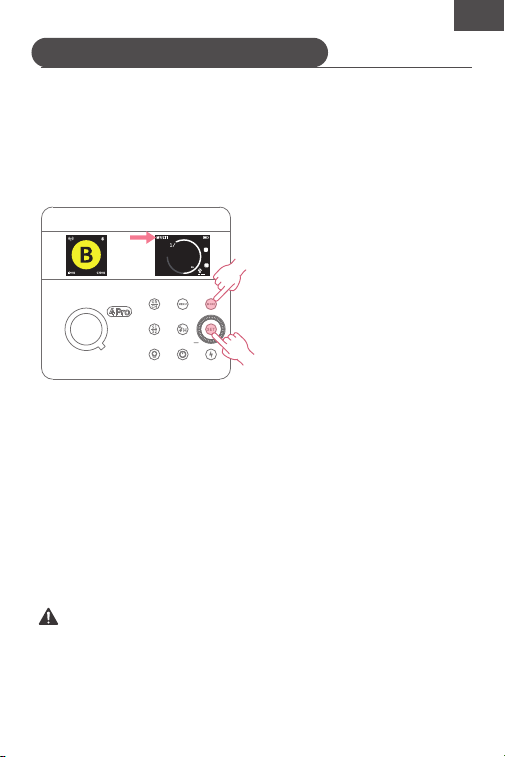
In M mode, press the Menu Button
to enter the menu. Select S2
under "SLAVE", the flash now
works as a secondary unit in TTL
flash setups. It features preflash
prevention and supports optical
sync shooting with cameras that
emit one preflash. It triggers in
sync with the second flash from
the primary unit.
Setting S2 Optical:
Flash duration is the length of time
from when the flash begins to fire
to it reaches half-peak output.
Half-peak output is expressed a
s t=0.5. To provide photographers
with more precise data, this
product uses t=0.1. S
ee diagram: difference
between t=0.5 and t=0.1.
Flash Duration Display:
Note: Flash duration is only
displayed in M mode.
MENU
V1.0.3
FLASH MODE
Freeze
OFF
INTER
WIRELESS SYNC
MODEL
STANDBY
AUTO OFF
A
t
50%
10%
t=0.5
t=0.1
12
EN
MULTI Stroboscopic Flash Mode
Use stroboscopic flash to emit a rapid series of flashes and capture
multiple images of a moving subject in a single frame. You can set the flash
frequency (number of flashes per second, expressed in Hz), number of
flashes, and flash output level.
① Short press the Mode Button,
when "MULTI" appears on the
screen, the flash is in the
stroboscopic flash mode. Rotate
the Control Dial to set the flash
output level.
② Short press the Set Button to
select the number of flashes,
then rotate the Control Dial to
set the value. Press Set Button
again to select the flash
frequency, then rotate the
Control Dial to set the value.
③ Press Set Button once again
to confirm all values.
Setting MULTI Flash:
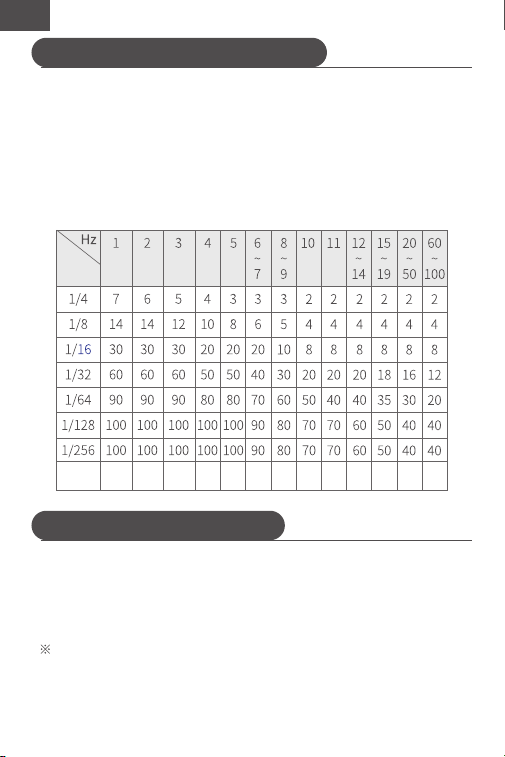
Calculating Shutter Speed:
The shutter must remain open until all stroboscopic flashes have fired. Use
the following formula to calculate the required shutter speed, then set it
on the camera.
Number of flashes ÷ Flash frequency = Shutter speed
Example: If the number of flashes is 10 and the frequency is 5Hz, the
shutter speed should be at least 2 seconds.
To prevent overheating and damage to the flash head, do not fire
more than 10 consecutive stroboscopic flashes. After 10 flashes,
allow the flash to cool for at least 15 minutes. If more than 10
consecutive flashes are fired, the flash may automatically stop
firing to prevent overheating. If this occurs, allow the flash to cool
for at least 15 minutes before resuming use.
002-008
4
OFF
F
13
MULTI Stroboscopic Flash Mode
2.4G Wireless Transmission
EN
The Q4 Pro uses the 2.4G Q wireless system and is fully compatible with
other NEEWER models. As a secondary unit, it supports Canon E-TTL II,
Nikon i-TTL, Sony, and Fujifilm. It can automatically switch based on the
primary unit and requires no manual setup.
Notes:
1. Stroboscopic flash is most effective when photographing highly
reflective subjects against a dark background.
2. Use of a tripod and remote shutter release is recommended.
3. Stroboscopic flash is not available at 1/1 or 1/2 output.
4. "Bulb" is also available during stroboscopic flash.
Maximum Stroboscopic Flash Count:
As a secondary unit, Q4 Pro can be triggered by the following
primary units.
Models: Qz, QPro, Z3R, Z3, Z2Pro, Z2, Z1, Z760, Z880 series,
and others.
Out
put
1/512 100 100 100 100 100 90 80 70 70 60 50 40 40
14
2.4G Wireless Transmission
EN
Long press the " " button or 2
seconds to select the channel,
rotate the Control Dial to set the
channel values (1‒32), then press
Set Button to confirm.
Enabling 2.4G Wireless:
Setting the Group:
Setting the Channel:
8
0.7
OFF
E
8
0.7
OFF
E
E
8
0.7
OFF
Long press " " button,
then " " will appear in the
secondary screen.
Short press " " button to cycle
through groups (A‒E).
15
EN
2.4G Wireless Transmission
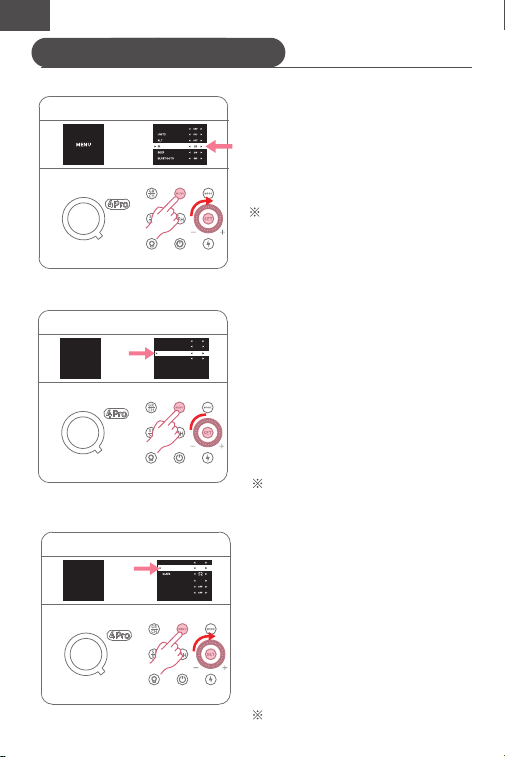
Short press the Menu Button to enter
the menu, rotate the Control Dial to s
elect the ID function (01‒99), then
press Set Button to confirm. Select OFF
to disable the ID.
This flash uses the NEEWER 2.4G
wireless Q system by default and can
be triggered by Q system wireless
triggers. It is also compatible with the
Godox 2.4G X system and can be
triggered by Godox Xpro/X3/X2 and
other X system triggers. Enter the menu
and rotate the Control Dial to enable
RX COMPAT.
Short press the Menu Button to enter
the menu. Rotate the Control Dial to
select "WIRELESS SYNC", then press the
Set Button to confirm. Under "WIRELESS
SYNC", rotate the Control Dial to select
"ON". The flash will now wait to pair
with the trigger. Once paired, it will
automatically exit the pairing screen, or
press any button to exit.
Setting the ID:
2.4G Wireless Q / X System Triggering
(RX COMPAT):
The primary unit and Q4 Pro must
be set to the same CH and ID for
proper wireless communication.
Note: The Q and X wireless systems
cannot be used simultaneously.
Wireless Sync is available for both
Q and X systems.
MENU
V1.0.3
FLASH MODE
Freeze
OFF
INTER
WIRELESS SYNC
MODEL
STANDBY
AUTO OFF
V1.0.3
DELAY
Wireless Sync (WL SYNC):
MENU
V1.0.3
TYP
1/512
OFF
OFF
BURST MODE
RX COMPAT
ONMODEL
16
EN
2.4G Wireless Transmission
Wireless Sync (WL SYNC):
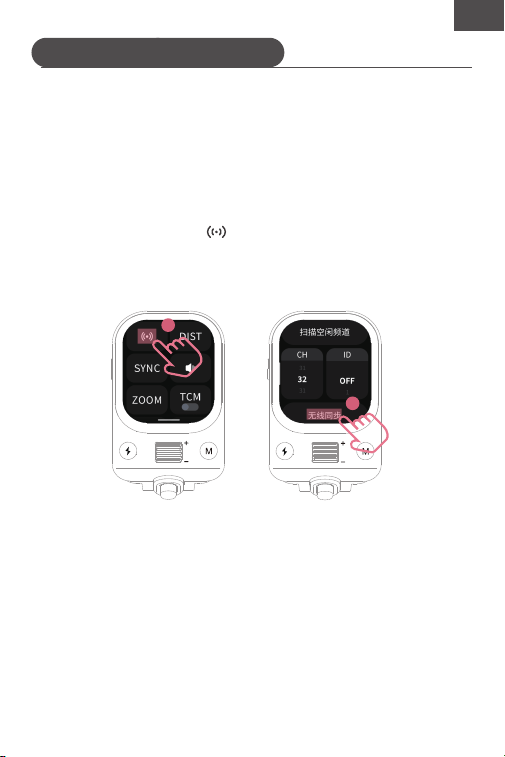
Wireless Sync: Quickly matches the channel and ID of the trigger
(primary unit).
Wireless Trigger: Works with the Qz wireless trigger for off-camera use
(Qz sold separately).
Example: Using a Qz wireless trigger.
① Enter the trigger menu < > and press SYNC.
② Enable Wireless Sync on the flash. Note: Wireless Sync must also be
enabled on the receiver. The channel and ID of the trigger will be
automatically synced to the flash for quick wireless pairing.
SET
SET
1
2
17
EN
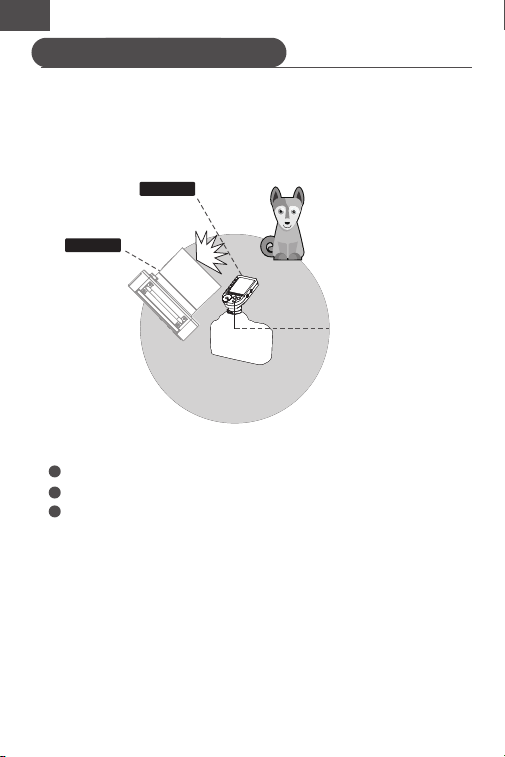
Positioning and transmission range (example):
Use a primary unit with wireless triggering function as the trigger.
Perform a test flash and take a test shot before shooting.
Actual transmission range may be shorter depending on flash
positioning, surrounding environment, and weather conditions.
Wireless Flash Shooting:
① Use a secondary unit for auto flash shooting.
Transmission
range: ≈100m
(Secondary)
(Primary)
RX
TX
2.4G Wireless Transmission
18
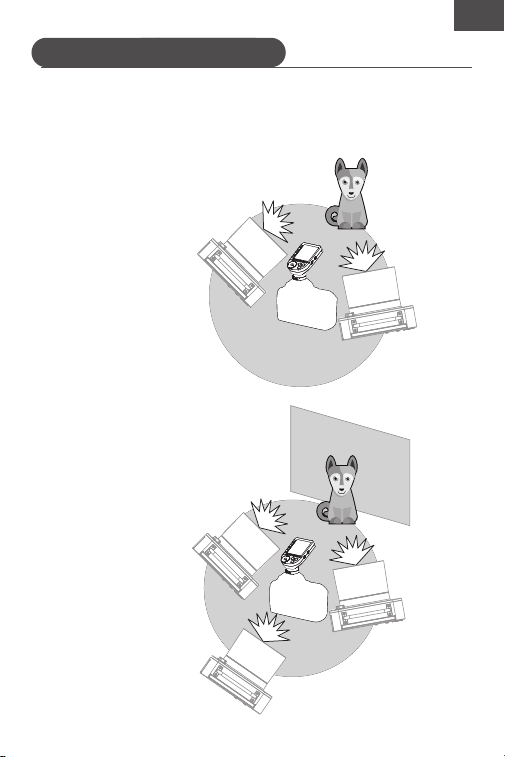
Wireless Multi-Flash Shooting: Secondary units can be divided into two or
three groups for TTL auto flash shooting while adjusting the flash ratio
between groups. Different flash modes can be assigned to each group
as well.
A
A
B
B
C
EN
② Auto flash shooting with two
secondary groups.
③ Auto flash shooting with
three secondary groups.
2.4G Wireless Transmission
19
EN
1. Interference from external 2.4G signals (e.g. wireless base stations, 2.4G
Wi-Fi routers, Bluetooth devices, etc.).
→Adjust the channel on the trigger (increase or decrease by 10) to find an
interference-free channel, or turn off other 2.4G devices during shooting.
2. Check whether the flash is fully recycled (ready indicator on) and
whether the recycle time matches the continuous shooting speed.
Ensure the flash is not in overheat protection or another abnormal
states.
→ Try to reduce the flash output level. If using TTL mode, consider
switching to M mode, as TTL requires a preflash.
3. Check whether the flash and trigger are too close (<0.5m).
→Enable "Short-Distance Wireless Mode" on the trigger. For QPro series,
set "C.Fn-DIST" to 0-30m.
4. Check whether the flash or trigger has a low battery.
→Replace the batteries (1.5V disposable alkaline batteries are
recommended for the trigger).
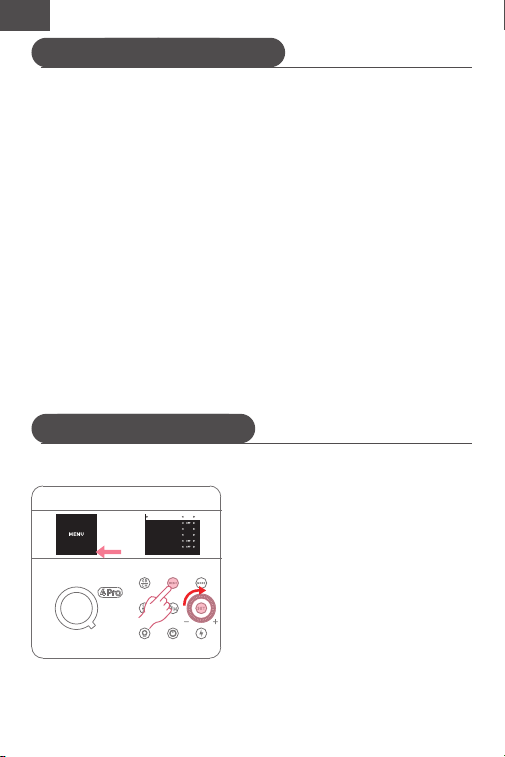
① Short press the Menu Button to enter
the C.Fn menu. "V.x.x.x" in the lower right
corner of the secondary screen
represents the firmware version number.
② Rotate the Control Dial to select a
custom function, then press the Set
Button to confirm.
③ Rotate the Control Dial to adjust the
settings of the selected function, then
press the Set Button to confirm.
④ Press the Menu Button again to exit
the menu.
Causes and Solutions for 2.4G Wireless Flash Misfires
Menu Mode (C.Fn: Custom Functions):
2.4G Wireless Transmission
C.Fn: Custom Functions
V1.0.3
FLASH MODE
WIRELESS SYNC
SLAVE
MODEL
STANDBY
AUTO OFF
Freeze
S1
CONT
20
EN
FLASH MODE
WIRELESS SYNC
SLAVE
MODEL
Standby
Auto off
DELAY
UNITS
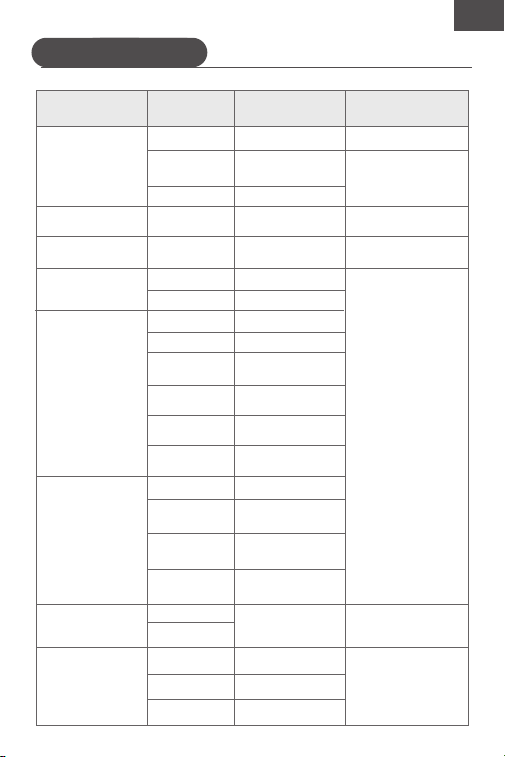
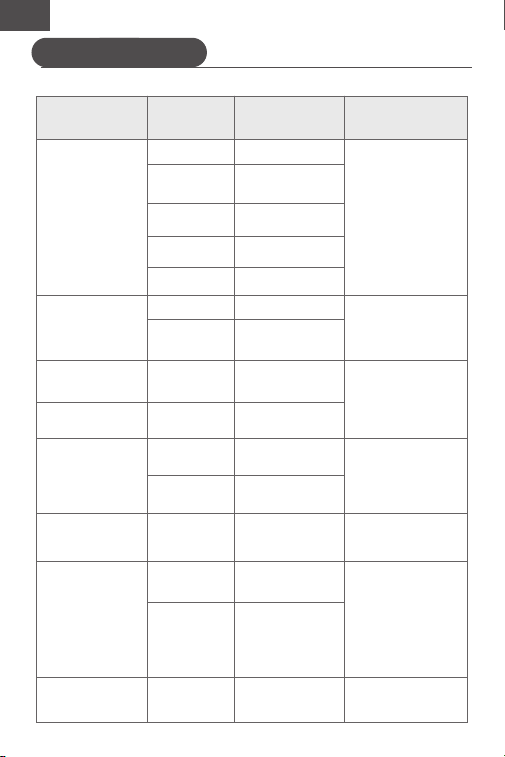
Normal Normal mode For all modes
For M mode
(HSS off)
For Qz trigger
pairing
For M mode
For all modes
For M/MULTI
modes
For M mode
Color
Constant color
temperature
Freeze
OFF/ON
OFF
OFF
30S
1. 5min
2min
2.5min
Auto sleep in
2.5 min
Auto sleep in
3 min
3min
30min
60min
90min
OFF
0. 01~30S
2 MASK
3 ALT
4 ALT
OFF/S1/S2
CONT Continuous light
Flash recycling off
Standby off
Off
Auto power off in
30 min
Auto power off in
60 min
Auto power off in
90 min
Rear-curtain
sync
2 flash groups
3 flash groups
4 flash groups
Auto sleep in 30s
Auto sleep in
1.5 min
Auto sleep in
2 min
INTER
Instant freeze
Off/On
Off/S1 mode/
S2 mode
Custom Functions
Function: Selection: Explanation: Application
21
EN
ALT
ID
BEEP
TYPE
选项
Custom Functions
BLUETOOTH
BURST MODE
RX Compat
RESET
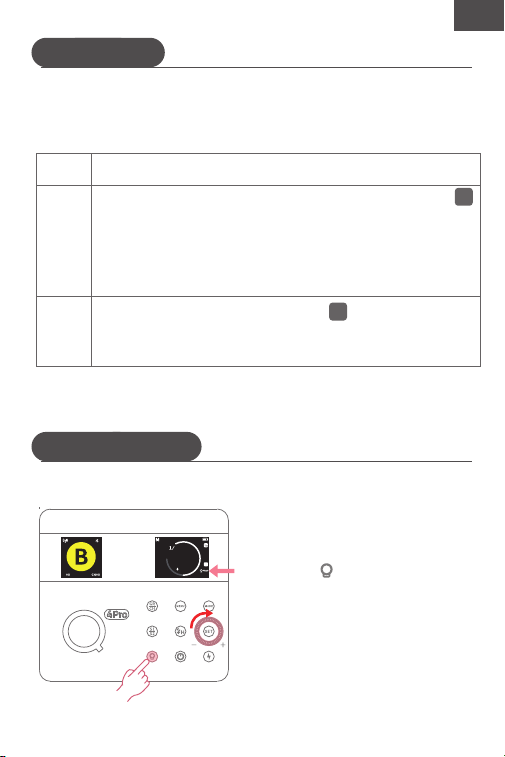
OFF Off
For M mode
For 2.4G
For all modes
For M/MULTI
modes
For M mode
For RX mode
For all modes
1 1st trigger
2
OFF
OFF/ON
01~99
2nd trigger
ID disabled
Set any ID
(01‒99)
Buzzer off / on
OFF/ON
1/512
1
YES/NO
OFF
OFF/ON Reset to factory
settings
NEEWER Q
wireless mode
Godox X wireless
mode
NO
Continuous
shooting off / on
Bluetooth off /
on
Output displayed
as 1/1‒1/512
Output displayed
as 10‒1.0
3 3rd trigger
4 4th trigger
Selection: Explanation: ApplicationFunction:
22
EN
Flash Modes
Normal Normal flash mode. No icon displayed on the main screen.
Constant color temperature mode. Once enabled, the icon ( )
will appear on the main screen, the group indicator will flash,
and the buzzer will continuously sound "DD" if enabled. Press
the Test Button to discharge before use. Only available in M
mode with HSS disabled. Color temperature variation across
the entire power output range is within ±100K.
Freeze mode. Once enabled, the icon ( ) will appear on the
main screen. Flash duration and output are shorter and lower
than in Normal mode. Only available in M and MULTI modes.
Color
Freeze
Short press the Menu Button to enter the menu. Rotate the Control Dial to
select "FLASH MODE", then press the Set Button to confirm. Rotate the
Control Dial to select "Normal/Color/Freeze".
F
Modeling Lamp
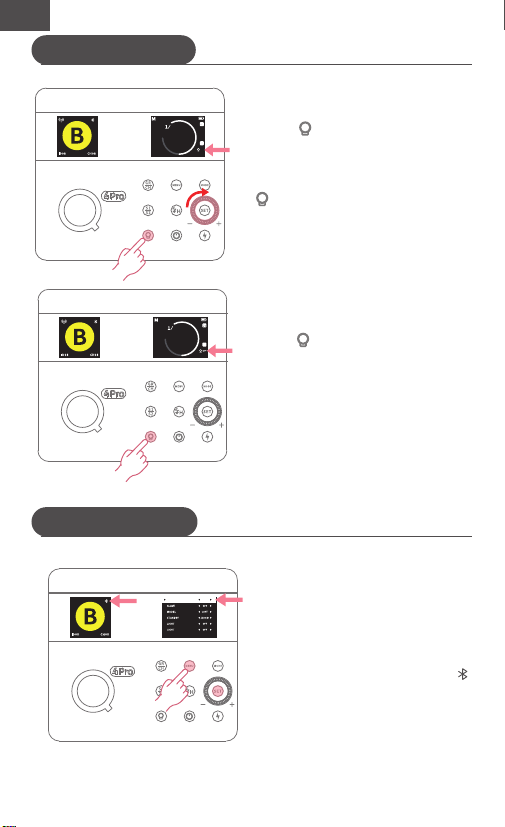
① Short press the Modeling Lamp
Switch " ". The modeling lamp
icon and "PROP" will appear in the
lower right corner of the main screen.
Rotate the Control Dial to adjust the
output power. The higher the power,
the brighter the modeling lamp.
Modeling Lamp Mode:
CONT
8
0.6
C
23
EN
Modeling Lamp
② Short press the Modeling Lamp
Switch " ". The modeling lamp status
and power level will appear in the
lower right corner of the main screen.
Long press the Modeling Lamp Switch
" " for 2 seconds to start adjustment,
then rotate the Control Dial to adjust
the power level (01‒10).
③ Short press the Modeling Lamp
Switch " ". When the modeling lamp
icon and "OFF" appear in the lower
right corner of the main screen, the
modeling lamp is off.
8
CONT
02
_ _ _
8
Other Functions
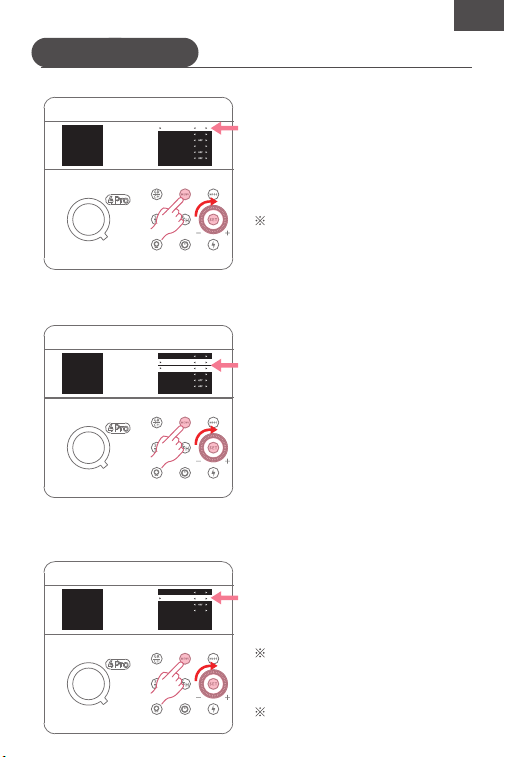
① Short press the Menu Button to
enter the menu. Rotate the Control
Dial to select "BLUETOOTH", then
press the Set Button to confirm and
enable Bluetooth.
② Connect via your phone's
Bluetooth settings. When the " "
icon stops flashing, Bluetooth is
connected and the flash can be
controlled via the NEEWER app.
BLUETOOTH
ON
③ Scan the QR code on the "App
Guide Card" for instructions on how
to use the app.
1. App Control:
24
EN
Other Functions
DELAY
UNITS
ALT
ID
BEEP
BLUETOOTH
0.01s
3 ALT
12
MENU
V1.0.3
Short press the Menu Button to enter
the menu. Rotate the Control Dial to
select "DELAY", then press the Set
Button to enable.
2. Delay Shooting:
② Rotate the Control Dial to select
"ALT" and short press the Set Button
to set the triggering order for this
unit: OFF/1/2/3/4.
① Short press the Menu Button to
enter the menu. Rotate the Control
Dial to select "UNITS", then press the
Set Button to select the number of
groups (up to 4 groups): 2MASK/3ALT/
4ALT. Press the Set Button to confirm.
3. Mask Shooting:
Can be used as rear-curtain sync.
DELAY
UNITS
ALT
ID
BEEP
BLUETOOTH
0.01s
3 ALT
3
12
MENU
V1.0.3
TYPE
BURST MODE
RX COMPAT
RESET
1.0
ON
NO
MENU
V1.0.3
① Short press the Menu Button to enter
the menu. Rotate the Control Dial to
select "BURST MODE", then press the
Set Button to enable.
4. Continuous Shooting Mode:
Continuous shooting mode is only
available in M mode with HSS
disabled.
Flash output must be ≤1/16.
25
EN
6S
5S
3S
3S
2S
1.5S
1.5S
1S
1S
1S
Protection Functions
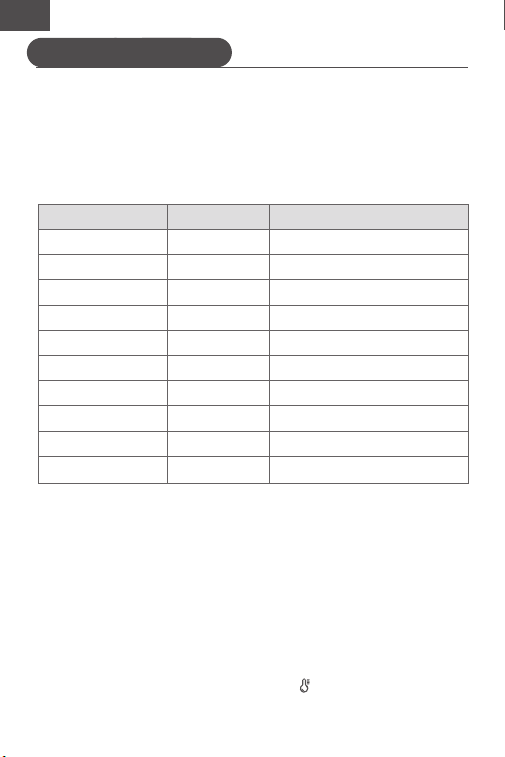
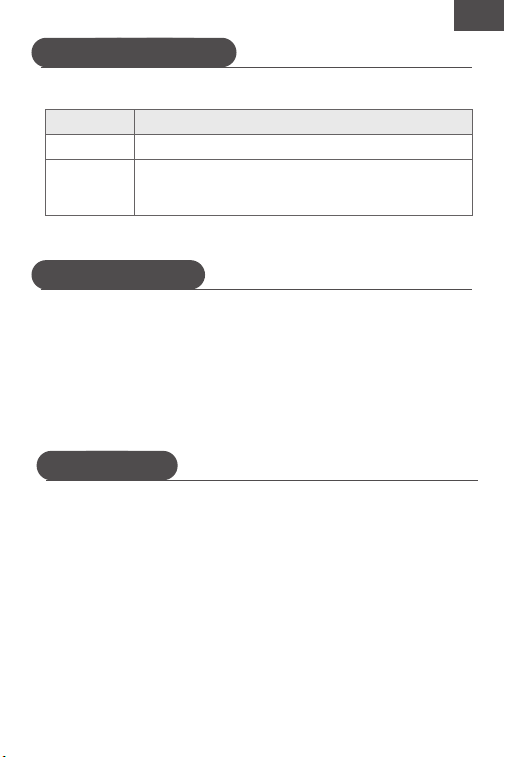
The table below displays the number of consecutive flashes that will
activate the overheat protection activates at 30°C (actual number may
vary depending on hardware design):
After the hot shoe triggers protection, recycle time will be extended as
follows:
1/1
1/2
1/4
1/8
1/16
1/32
1/64
1/128
1/256
1/512
90
180
200
300
400
500
1000
1000
1000
1000
Power Count Extended Recycle Time
Software Protection:
Overheat Protection
To prevent the flash head from overheating and damage, do not fire more
than 90 consecutive flashes at 1/1 power. Allow the flash to cool for at least
15 minutes after 90 consecutive flashes.
If you continue firing after 90 consecutive flashes, the built-in overheat
protection may activate, extending the recycle time to 6 seconds or more.
If this happens, allow the flash to cool for at least 15 minutes before
resuming use.
When overheat protection is activated, the " " icon will appear
on the screen.
26
EN
Protection Functions
Other Protection:
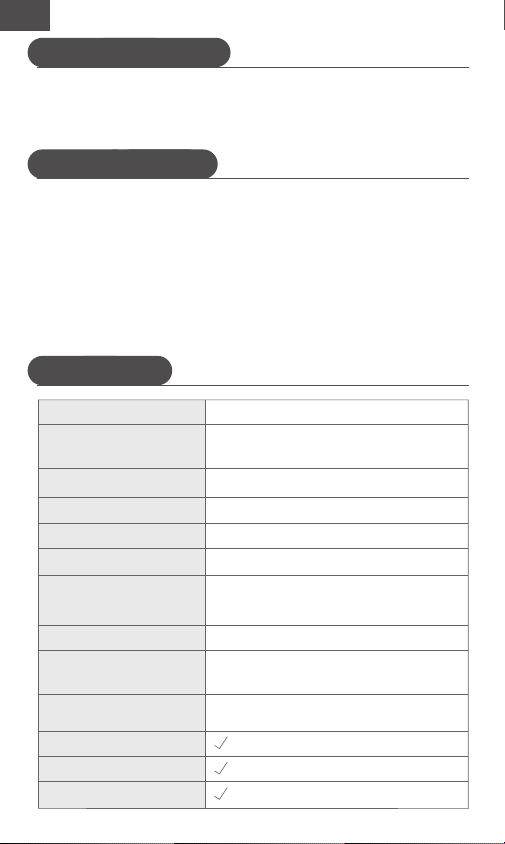
Error Code
E5
E6
Fan malfunction
Temperature sensor malfunction (disconnected or
open circuit)
Cause
Troubleshooting
Maintenance
Flash underexposure or overexposure.
▪Use HSS (high-speed sync).
→HSS reduces the effective flash range and ensures the subject is
within the effective flash range.
▪ Flash is in M (manual) mode.
→Switch to TTL mode or adjust the flash output.
• When detecting any abnormality during use, disconnect the power
immediately and identify the cause.
• Avoid shaking the flash and keep the surface clean and rust-free.
• It is normal for the flash to become slightly warm during use. Do not fire
flashes continuously unless necessary.
• Send the flash only to our authorized service centers for repairs.
• If the flash malfunctions or gets wet, take it to a qualified technician
before resuming use.
• Specifications are subject to change without prior notice.
27
EN
Sync Jack Triggering
The sync port accepts a 3.5mm sync cable or trigger plug for flash sync.
※Disable 2.4G wireless mode and S1/S2 mode when using the sync port.
※Sync speed is ≤1/200s when using the sync port.
Firmware Upgrade
Specifications
The flash supports firmware upgrades via the USB port. The latest firmware
updates and release notes are available on our official website.
• This flash uses a USB-C port. Please purchase a USB-C cable separately.
• Firmware upgrades require the "Neewer_Firmware_Update" software.
Please download and install it before selecting the corresponding firmware
file.
• As the product firmware may be updated, please refer to the latest digital
version of this manual for the up-to-date information.
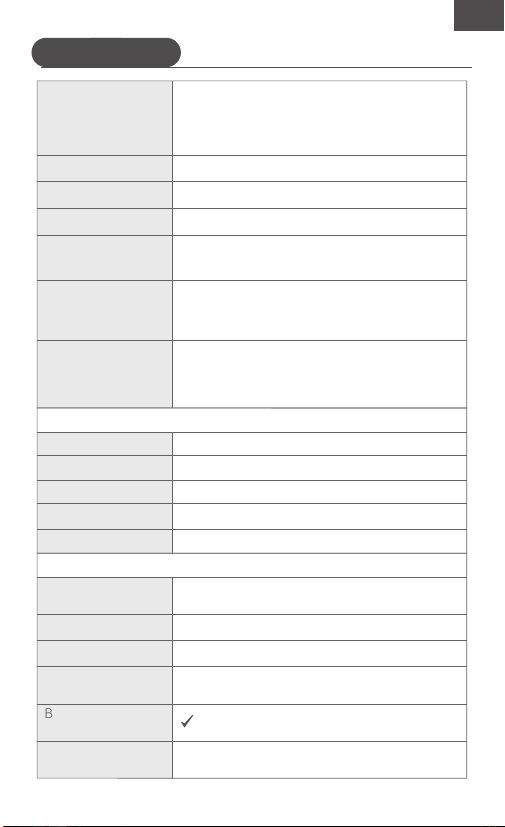
Model:
Flash Output
Flash Modes
Stroboscopic Flash
Sync Mode
Delay Trigger
Mask Mode
Fan
Buzzer
Q4 Pro
400Ws
Power Levels
10 stops (1/512‒1/1, increments: 0.1 stop)
TTL / M / MULTI
Frequency: 1‒100Hz; Count: 1‒100
Front-curtain sync, rear-curtain
sync, HSS (up to 1/8000s)
0.01~30 S
Wireless Secondary Unit
Mode
Radio mode (compatible with Canon
E-TTL II, Nikon i-TTL, Sony, Fujifilm)
Continuous Shooting
Mode
Constant Color
Temperature Mode
6000K±100K
On/Off
28
EN
Specifications
Display
5600K
Flash Duration:
Dual color screens
Power 30W
Dimming Range 0%-100%
CCT
Optical / 3.5mm sync port / 2.4G wireless
Trigger Method
Modeling Lamp
Power
Power Source
Lithium battery / AC dummy battery (sold
separately)
CRI 95+
98+TLCI
Control Method Panel / App / 2.4G
Flash Tube Color
Temperature
6000±200K
Dimensions (with
battery, flash tube,
and reflector)
186*171*170mm
Net Weight (with
battery, flash tube,
and reflector)
≈2.57kg
Normal mode: 1/188‒1/15625s
Constant color temperature mode: 1/181‒1/
8333s
Freeze mode: 1/2340‒1/28570s
Recycle Time
Number of
Full-Power Flashes
≈425次
Auto power off after 30‒90 minutes of
inactivity.
✔
Battery Level
Indicator
Energy Saving
0.01~1S
Battery 86.4Wh, rated voltage 28.8V / 3000mAh
29
Specifications
EN
1. Do not store the product in environments exceeding 50°C.
2. Do not operate the product in environments exceeding 40°C.
3. Do not drop, bump, or subject the product to strong impacts.
4. Do not fire the flash directly at human eyes, especially infants, as this
may cause vision impairment.
5. This product is not waterproof. Beware not to get moisture when in
rainy or humid conditions.
6. Do not attempt to disassemble the product. Any repairs must be carried
out by our authorized technicians.
7. Do not disassemble, hit, crush, or dispose of the battery in fire. Stop
using when the battery swells.
8. If any malfunction occurs, turn off the flash immediately.
9. Do not use the flash near chemicals, flammable gases, or other
hazardous substances. In certain conditions, these materials may be
sensitive to the strong light emitted by the flash, potentially causing fire
or electromagnetic interference. Observe relevant warning signs in such
conditions.
Safety Precautions
2.4G Wireless System
Secondary unit / off
A\B\C\D\E
100m
CH1-CH32
OFF,1-99
Wireless Function
Groups
Wireless Range
Channel
Wireless ID