Thank you for your purchase of a product.
Precautions
Foreword
1. Always keep this product dry.
3. Do not disassemble or modify the product.
2. Keep this product out of reach of children.
4. Do not subject to any form of physical shock. The product
shouldn't be exposed to fire or an environment where the
temperature exceeds 50 degrees.
5. Do not fire the flash directly into the eyes which could result in
visual impairment.
6. Do not use the product near chemicals, flammable gases or
other volatile substances which may cause fire or
electromagnetic interference.
7. Do not use in the rain or in damp conditions.
8. Turn off the product immediately, if it appears to be operating
abnormally, and try to troubleshoot the likely cause.
9. Failure to comply with the recommendations and warnings
listed in the manual will invalidate the warranty.
Firmware will be upgraded as the camera is updated.
Stable output, High speed continuous flash and color temperature
with good even lighting.
Supports manual frequency flash mode, HSS/second curtain sync
/FEC and other i-TTL functions.
Built-in 2.4GHz wireless transmission, Integrated transmitter and
receiver with a large radius.
Full-color touchscreen for easier operation.
Supports i-TTL auto flash, which can be used as the master or
slave unit of a wireless multi-lamp flash system - making shooting
easier and faster.
Removable Li-ion battery, 500 full-power flashes, 1.7s recycling
time, and incomparable portability.
Built-in upper and lower modeling lamps allows independent
lighting adjustment for precise flash previews.
Maximum flash power of 100Ws, 81 levels of dimming (1/1~1/256)
ENEN
0201
Foreword
02
02
03
03
06
07
08
08
11
12
13
22
23
25
27
28
26
30
30
30
Precautions
Package Contents
Name of components
Battery
Power Management
Mount / Unmount flash
M: Manual Flash
RPT: Stroboscopic Flash
Catalog
Flash Mode: i-TTL Autoflash
1. i-TTL Mode
2. FEC(Flash Exposure Compensation)
3. HSS: High Speed Sync
4. Second-Curtain Sync
1. Wireless Settings
Wireless Flash Shooting: Wireless (2.4G) Transmission
2. Flash Group Mode Selection
3. Setting the communication channel
4. Wireless ID Settings
5. Scan for a free, unused channel
8. i-TTL: Automatic wireless flash photography
9. M: Manual Wireless Flash Shooting
10. RPT: Wireless Flash Shooting with Manual Flash
Wireless Flash Shooting: Wireless (2.4G) Transmission
1. Sync Triggering
2. Auto Focus Assist Beam
4. Bounce Flash
5. ZOOM: Set the flash coverage
6. Modeling Lamp
7. Modeling Flash
3. TCM - One key switching i-TTL/M mode
Other Applications
C.Fn: Setting Custom Functions
Restore factory settings
Protection Function
Technical Data
Firmware upgrade
Troubleshooting
Compatible Cameras
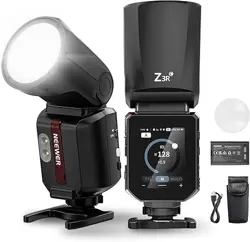
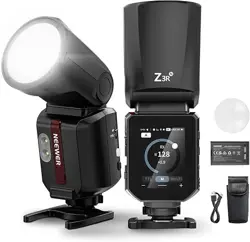
Z3R-N is a i-TTL speedlite flash designed for Nikon cameras. With
i-TTL auto flash, you will automatically get the accurate amount of
flash exposure for variable lighting conditions, thereby improving
your overall shooting experience. The following features set it apart
from the competition:
The upgraded quartz tube supports up to 100,000 flashes during
its lifespan.
6. Built in 2.4G Wireless Q and X Systems
7. Wireless Sync
ZOOM:105
+1.0
MULTI
03
EN EN
04
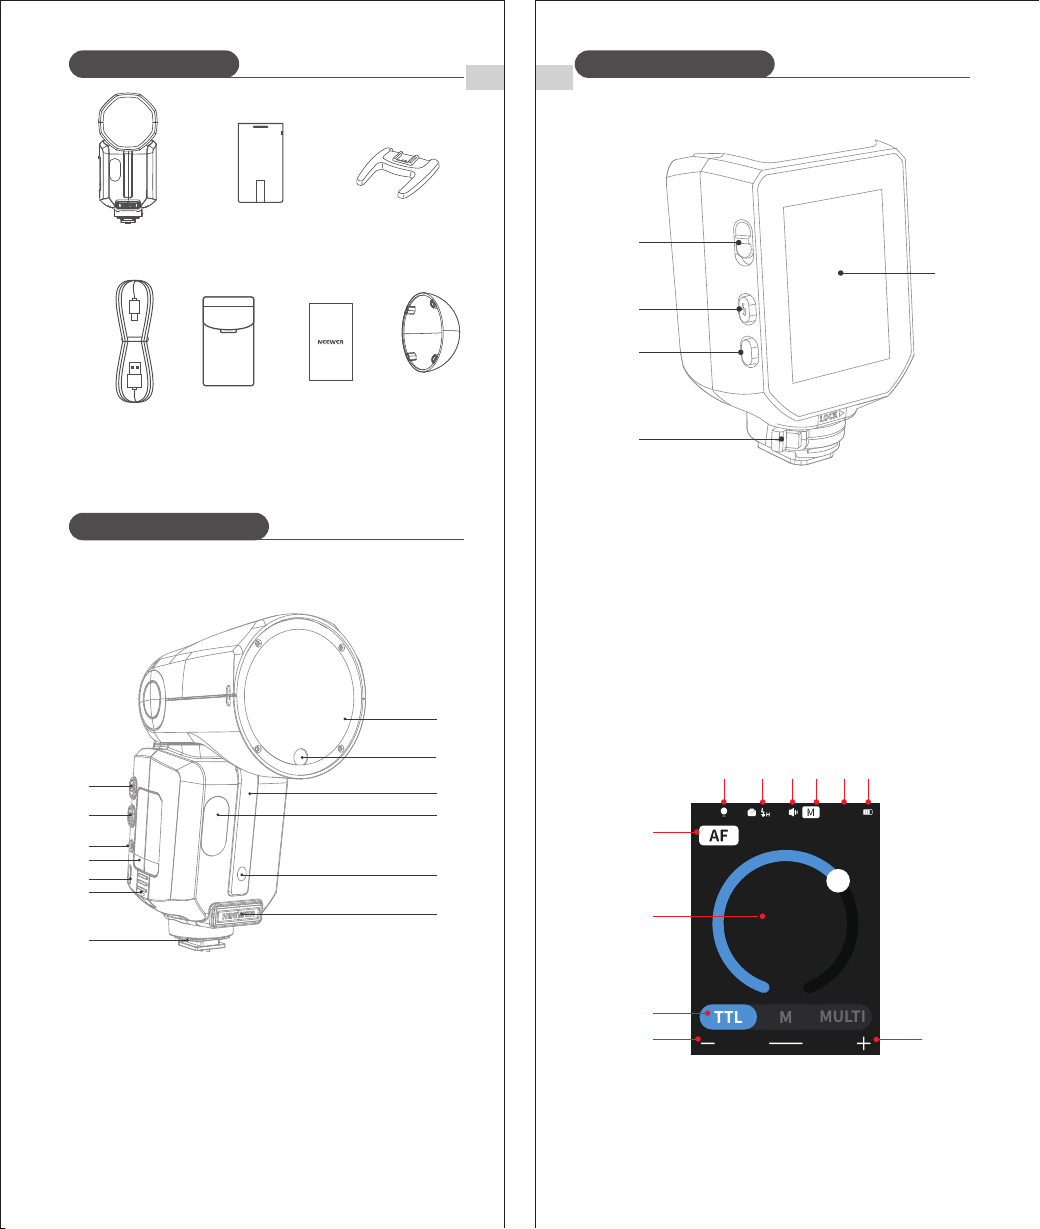
Name of components
2. Control Panel
3. Display
(1) i-TTL Autoflash(Page 08)
1. Flash Body
※ The USB Type-C port is exclusively intended for flash firmware
upgrades and is not designed for charging purposes.
① Modeling Light ② High-Speed Sync (Page 9) ③ Beep
④ Zoom (A: Auto, M: Manual) ⑤ Focal Length (Page 24)
⑥ Battery Level ⑦ AF Assist ⑧ Flash Exposure Compensation
⑨ i-TTL Auto Flash ⑩ Value ‒ ⑪ Value +
Protective
Case ×1
USB power
cord ×1
Flash unit ×1
Mini stand ×1
Diffuser ×1User Manual×1
Lithium
Battery ×1
Package Contents
Name of components
⑤
③
①
④
②
① TCM switch
② Test flash button/recycling indicator
③ Main UI return button: Short press
④ Hot shoe lock
⑤ Display
① ② ③
⑧
④
⑩
⑥
⑨
⑤
⑪
⑦
① Power switch: Long press for 2s
② Modeling lamp switch: Short press ③ Sync jack
④ Li-ion battery ⑤ USB-C upgrading port ⑥ Battery lock
⑦ Hot shoe ⑧ Flash head ⑨ Modeling lamp
⑩Wireless sensor ⑪Modeling lamp ⑫ Focus assistant lamp
⑬(CP-E4) External power input (CP-E4)
①
②
③
⑧
④
⑩
⑥
⑨
⑤
⑪
⑦
⑫
⑬
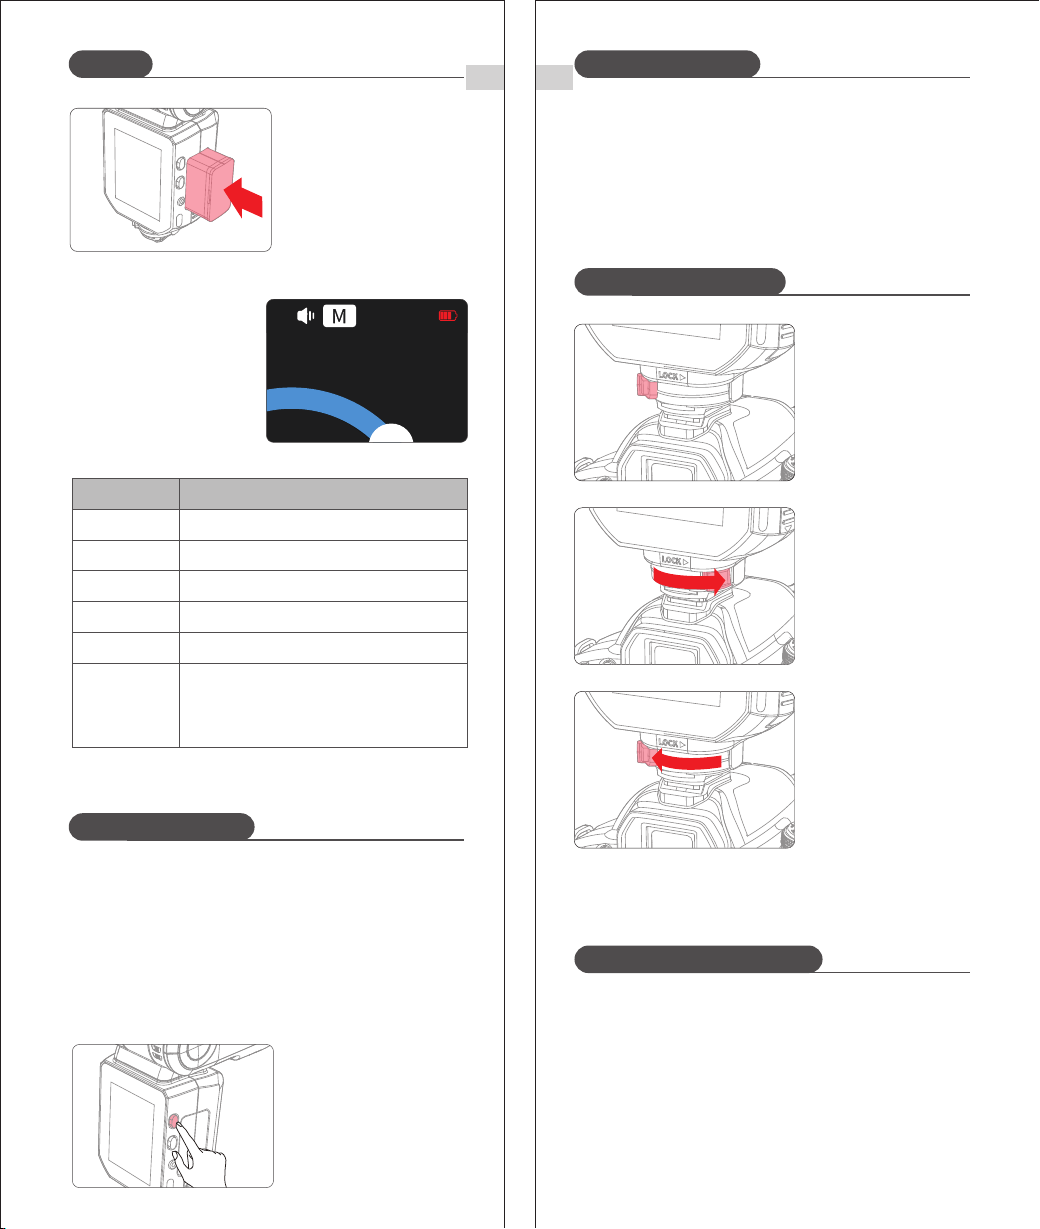
3. Inserting and Removing the Battery
① Removing the battery
Slide the button in the
direction shown to remove
the battery.
Name of components
EN
05
EN
1. Features
① This flash unit uses Li-ion polymer battery which boasts a long
service life and can be charged / discharged up to 500 times.
② Safe and reliable, the built-in circuit protects against overcharge,
overdischarge, overcurrent, and short circuit.
2. Caution
① Do not short circuit.
② Do not immerse the battery in water.
③ Keep the battery out of reach of children.
④ Do not exceed 24 hours of continuous charging.
⑤ Store the battery in a dry, cool and ventilated environment.
⑥ Do not place the battery near or in a fire.
⑦ Dead batteries should be disposed according to local regulations.
⑧ If the battery isn't to be used for some time, please ensure it is
charged at least every 3 months.
Battery
S1/S2
mode
06
Name of components
② RX unit
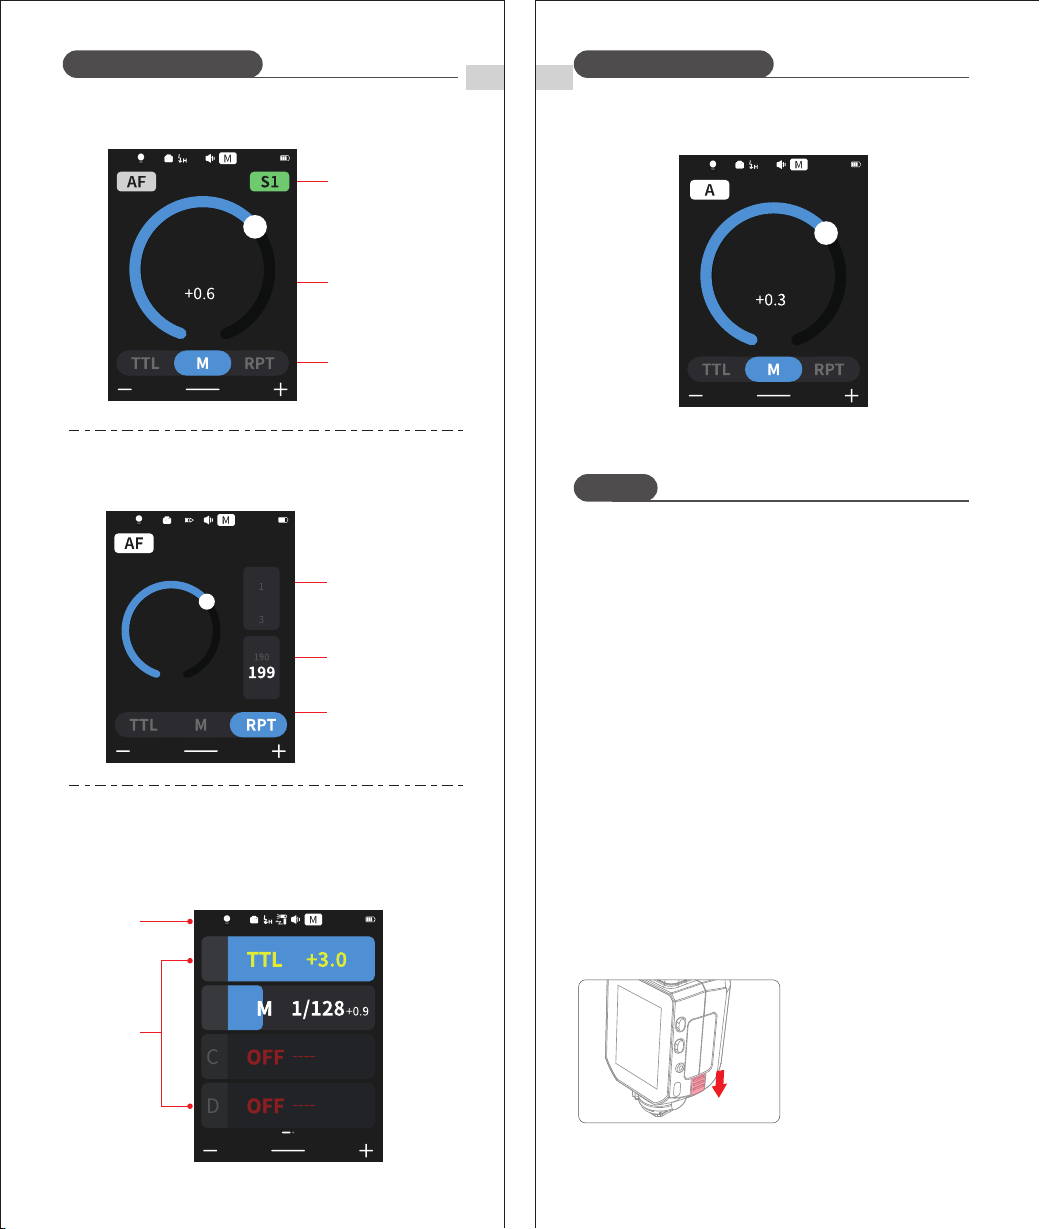
(2) M Manual Flash(Page 11)
Manual
flash
output
(3) RPT Flash(Page 12)
(4) Wireless Transmission Shooting(Page 13)
① Transmitter Unit
Flash
group
Channel
M : Manual Flash
RPT(Stroboscopic)
flash
Number
of flashes
Flash
frequency
ZOOM:105
A
B
C
D
CH11
ZOOM:35
1/8
times
Hz
1
3
2
ZOOM:35
1/8
ZOOM:35
1/8
CH11
RX
Battery
EN
Mount / Unmount flash
Flash Mode: i-TTL Autoflash
1. Mount the Camera Flash
Turn the locking ring to
the left to fully insert the
camera's hot shoe.
3. Unmount the Camera
Flash.
Press the button and rotate
the hotshoe locking ring to
the left to loosen.
2. Secure the Camera
Flash
Rotate the locking ring to the
right until secure.
08
EN
4. Battery Level Indicator
Make sure the battery is
securely inserted in the
flash. Check the battery
level indication on the
LCD panel to see the
remaining battery level.
Medium
Low
Very low
Low battery. Please charge as soon as possible
Battery is about to run out. The flash will no
longer work.
Please recharge the battery as soon as possible
(within 10 days). the battery can then be used or
stored for a long period.
电池电量显示
Full
3 bars
2 bars
1 bars
Empty bar
Flashing
4 bars
Battery Level
Indicator
Indicates
② Inserting the battery
Insert the lithium battery
into the battery
compartment in the
direction indicated by the
battery until the fastener
snaps into place.
07
Use ON/OFF Power Switch to power the flash unit on or off. Please
turn off the power if the flash won't be used for a long period. When
setting as a transmitter (TX) flash, the flash will turn the power
off automatically after a certain period (approx. 90 seconds) of
inactivity. Pressing the camera shutter halfway or pressing any flash
button will wake up the flash unit. When setting as a receiver (RX)
flash, it will enter sleep mode after a certain period (adjustable, 60
minutes by default) of idle use. Pressing any flash button will
reactivate device.
Note: ① When used off the camera, it is recommended that you
customize the function to disable "automatic power off ".
② Receiver Auto Power Off Timer is set to 60 minutes by
default. A 30 minute timer can also be applied.
Power Management
Power Management
Press and hold the power
button for 2s to turn the
flash on/off.
The flash had three flash modes: auto flash(i-TTL), manual flash(M),
andstroboscopic flash (RPT). When used in i-TTL mode, the flash
will use your camera's metering system to read the light exposure
from the subject and automatically adjust flash output to get even
exposure of the subject and background. It features flash exposure
compensation, high-speed sync, second-curtain shutter sync, etc.
+1.0
ZOOM:35
EN
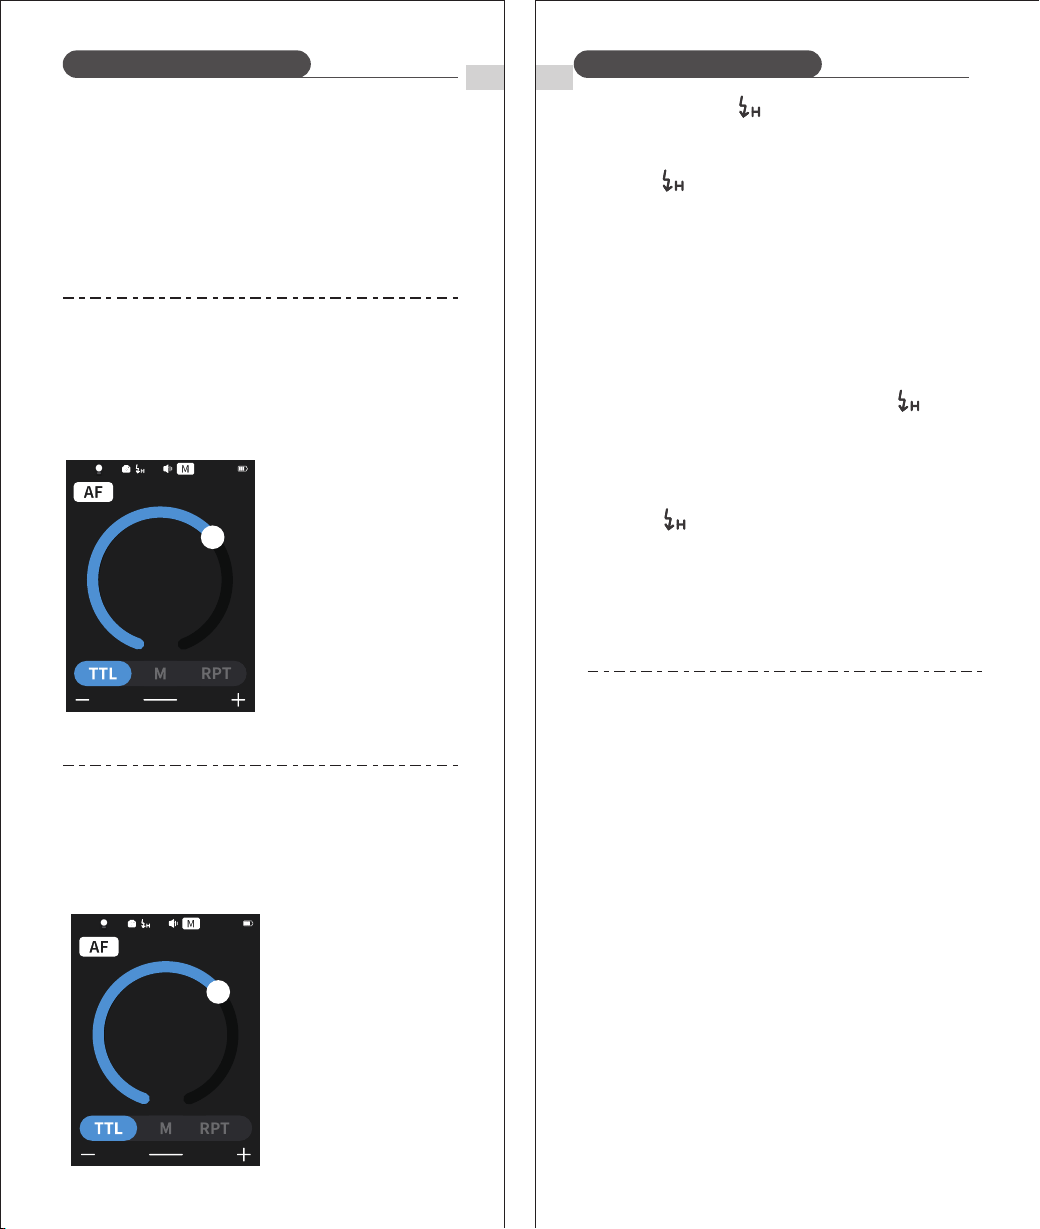
1. i-TTL Mode
Tap <TTL> at the bottom of the screen to set the flash to i-TTL and
enable i-TTL flash mode.
① Press the camera release button halfway to focus.
② A pre-flash is fired moments before the shutter is released, and
the flash receives camera information for the main flash.
2. FEC(Flash Exposure Compensation)
In FEC mode, the flash can adjust flash exposure compensation in
1/3-stop increments between ±3 stops. This feature is useful when
the i-TTL system needs to be fine-tuned to accommodate the
shooting environment.
Set the flash exposure
compensation amount.
① Drag the circle or tap < + > /
< - > to adjust flash exposure
compensation.
② "0.3" indicates 1/3 step, "0.7"
indicates 2/3 step.
③ To cancel the flash exposure
compensation, set the
amount to "0.0".
09
EN
10
3. HSS: High Speed Sync
High Speed Sync (FP flash) enables the flash to synchronize with
all camera shutter speeds. This is convenient when you want to
use aperture priority for fill-flash portraits.
Flash Mode: i-TTL Autoflash Flash Mode: i-TTL Autoflash
① Set the Flash Sync Speed of your Nikon camera to 1/320s(Auto FP)
or 1/250s(Auto FP). Half press the camera shutter, and the HSS
symbol < > will appear on the flash display to indicate that
flash high speed sync is enabled.
Select High Speed Sync " "
② Rotate the camera dial to set shutter speed to 1/250s or higher.
③ Please ensure the FP high speed sync has been activated by
checking the shutter speed on camera viewfinder. If the camera
shutter speed is set at 1/250s or higher, then high speed sync has
been successfully enabled.
* If the Flash Sync Speed of your Nikon camera is set as OFF (Auto FP),
then the < > symbol won't appear on flash display when the
camera shutter is half pressed.
* If you have set the Flash Sync Speed to 1/320s(Auto FP) or 1/250s
(Auto FP) on a Nikon camera, rotate the camera dial with the
shutter speed configured at 1/250s or above, The < > icon will
appear on the flash screen.
* With high-speed sync, the faster the shutter speed, the shorter the
effective flash range.
* RPT flash mode cannot be set in high-speed sync mode.
* Over-temperature protection may be activated after 100 consecutive
high-speed sync flashes.
4. Second-Curtain Sync
With a slow shutter speed, you can create a trail of light following the
subject. The flash fires right before the shutter closes.
* Select REAR flash mode on your Nikon camera to enable
rear-curtain flash sync.
ZOOM:105
+1.0
RPT
ZOOM:105
+1.0
RPT
EN
11
EN
12
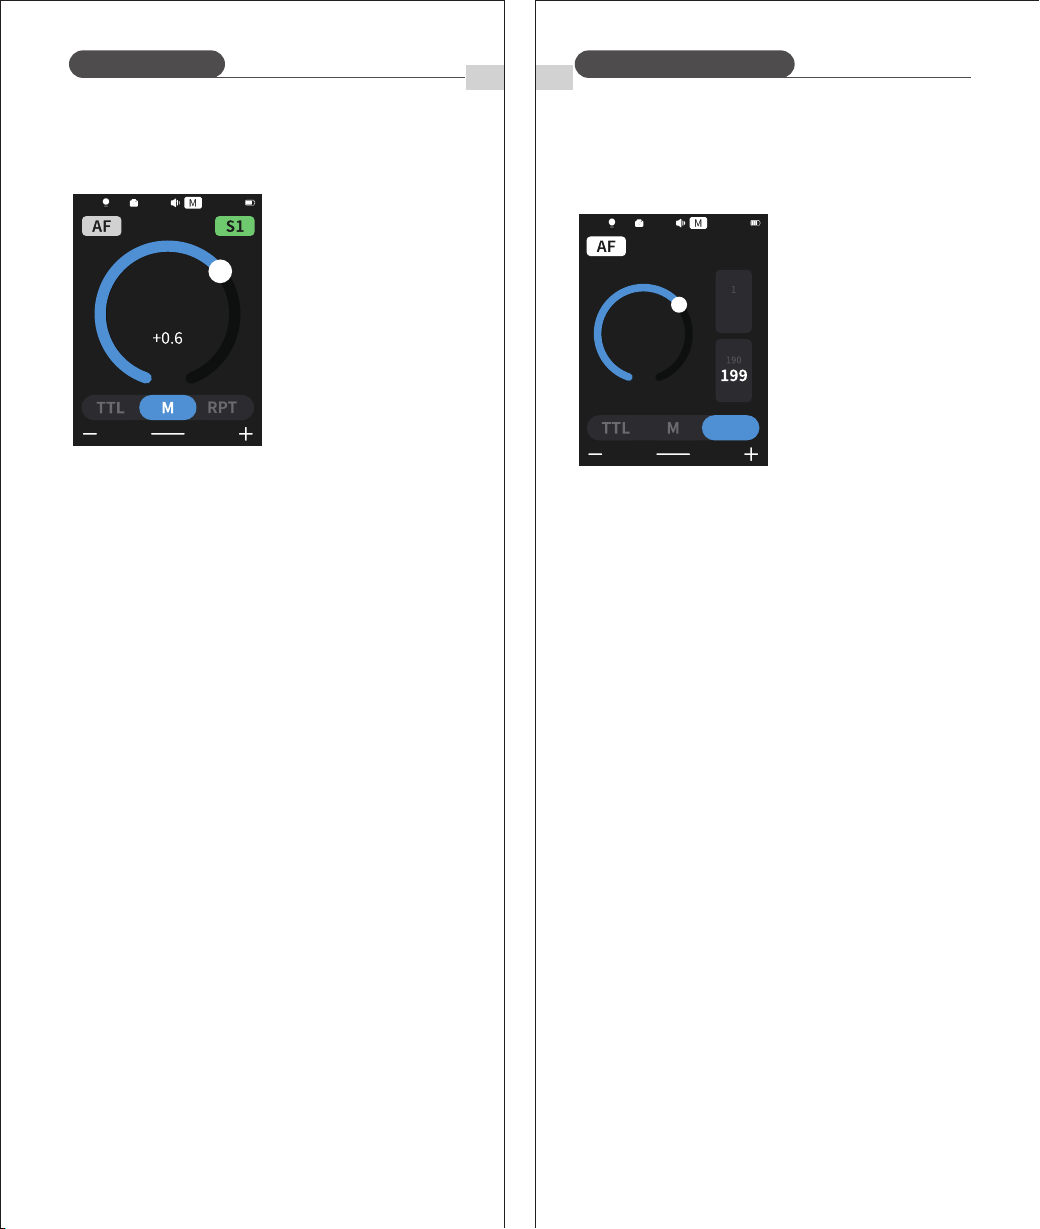
M: Manual Flash
* S1 Optical control unit setting
In M manual flash mode, the S1 function can be used and the
flash unit can function as an optical secondary flash. It will fire
synchronously when the main flash fires, the same effect as that
obtained by the use of radio triggers. This helps the photographer
create multiple lighting effects.
Tap <S1/S2> at the top right corner of the screen to
adjust S1/S2 modes.
* S2 Optical control unit setting
Note: S1 and S2 optical triggering is only available in M manual flash
mode.
In M manual flash mode, the S2 function can be used and the flash
unit can function as an optical S2 secondary flash. In this mode, it
will ignore the pre-flash emitted by the TTL flash and will only fire in
response to the second flash from the main unit.
① Tap <M> at the bottom of
the screen.
② Drag the circle or tap <+, ->
to adjust flash output power.
The flash output is adjustable from 1/1 full power to 1/256th
power in 1/10th stop increments.
To obtain a correct flash exposure, use a hand-held flash meter to
determine the required flash output.
* To avoid overheating and deterioration of the flash head, do not
use the stroboscopic flash more than 10 times in succession. After
10 times, allow the camera flash to rest for at least 15 minutes. If
you try to use the stroboscopic flash more than 10 times in
succession, the flash may stop flashing automatically. This is to
protect the flash head. Should this happen, please allow the
camera to rest for 15 minutes.
* Stroboscopic flash is most effective with a highly reflective subject
against a dark background.
* It is recommended to use a tripod and a remote control.
* A flash output of 1/1 and 1/2 cannot be set for stroboscopic flash
mode.
* Stroboscopic flashes can be used with the “buLb” function.
⑶ Drag the circle or tap <+, -> to
adjust flash output power.
⑵ Set the flash frequency and the
number of flashes.
① Scroll the number below
<Times> to set the number of
flashes.
② Scroll the number below <Hz>
to set the flash frequency.
⑴ Tap <PRT> at the bottom of the
screen.
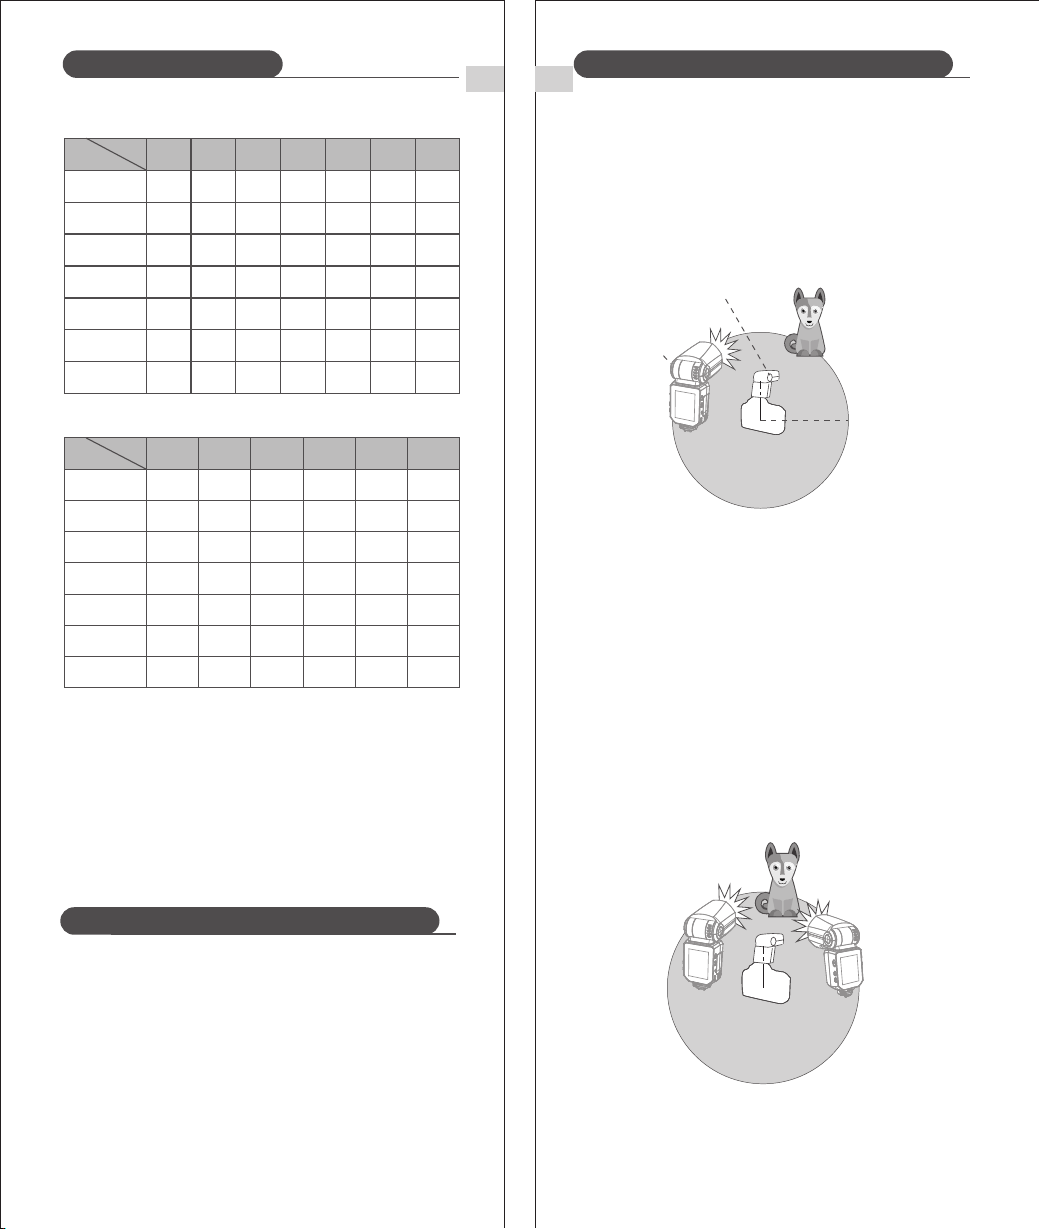
The term stroboscopic flash relates to a rapid series of flashes being
fired. It can be used to capture multiple images of a moving subject
in a single photograph.
You can set the firing frequency (number of flashes per sec. expressed
as Hz), the number of flashes, and the flash output.
RPT: Stroboscopic Flash
Calculating the Shutter Speed:
During a stroboscopic flash, the shutter remains open until the firing
stops. Use the formula below to calculate the shutter speed and set
it with the camera.
Number of Flashes / Flash Frequency = Shutter Speed
For example, if the number of flashes is 10 and the firing frequency
is 5 Hz, the shutter speed should be at least 2 seconds.
* If the flash count is displayed as --, the flash will fire continuously
until the shutter release or the battery is exhausted. The number
of flashes will be limited as shown in the table below.
ZOOM:35
1/8
RPT
ZOOM:105
1/8
times
Hz
1
2
RPT
13
Maximum number of strobe flashes
1/4
1/8
1/16
1/32
1/64
1/128
1/256
1
8
14
30
60
90
100
100
2
6
14
30
60
90
100
100
3
4
12
30
60
90
100
100
4
3
10
20
50
80
100
100
5
3
8
20
50
80
100
100
6-7
2
6
20
40
70
90
90
8-9
2
5
10
30
60
80
80
Flash
output
Hz
1/4
1/8
1/16
1/32
1/64
1/128
1/256
10
2 2 2 2 2
4 4 4 4 4 4
8 88 88 8
20
50
70
70
11
20
40
70
70
12-14
20
40
60
60
15-19
18
35
50
50
20-50
16
30
40
40
60-199
2
12
20
40
40
Flash
output
Hz
14
EN EN
RPT: Stroboscopic Flash
Wireless Flash Shooting: Wireless (2.4G) Transmission
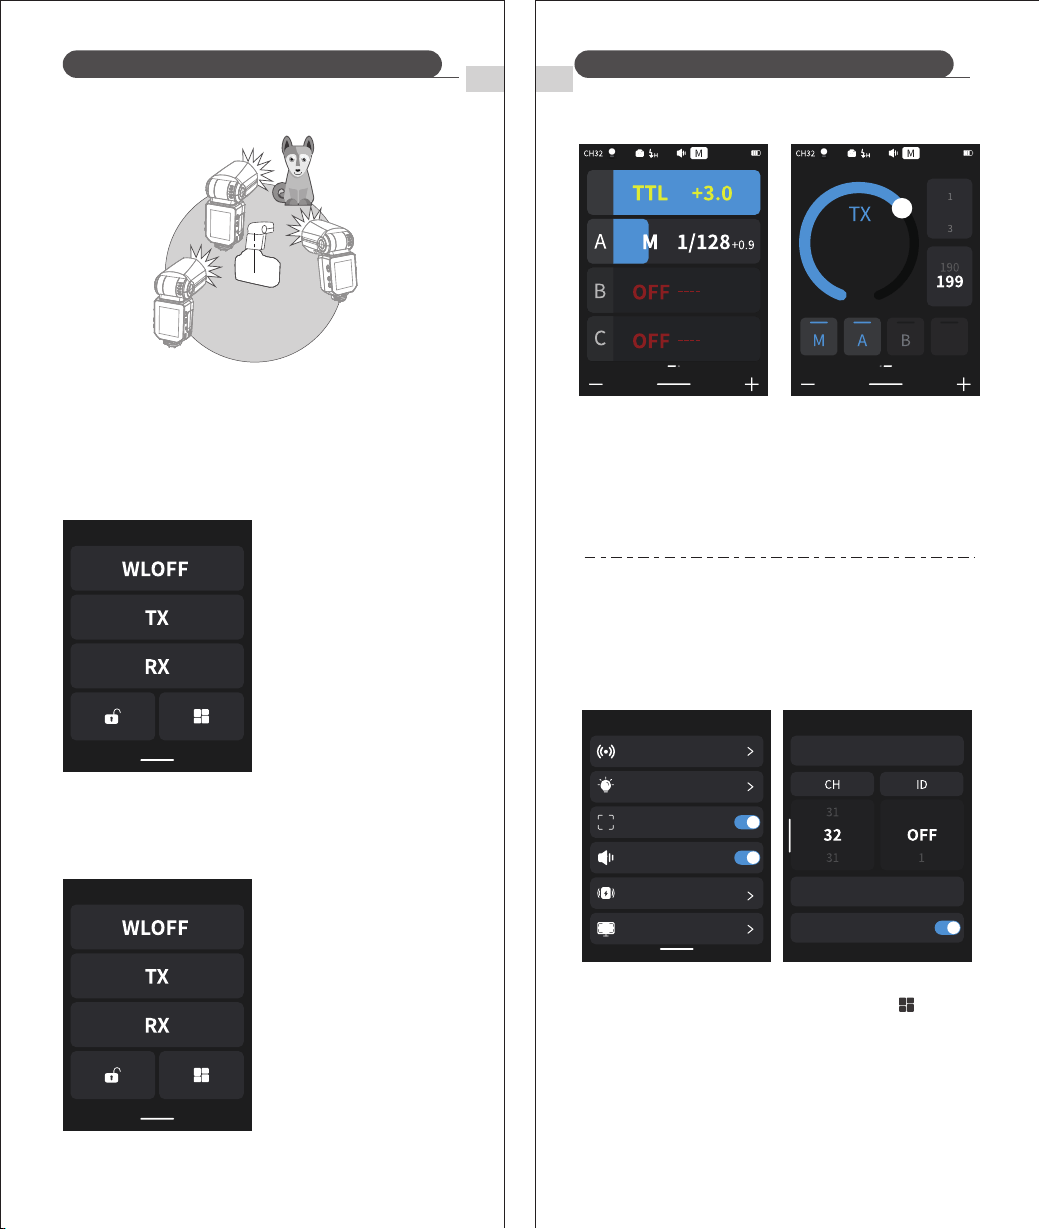
* With creative radio control system, the speedlite supports 5 RX
flash groups in i-TTL auto flash mode. Use the i-TTL auto flash to
obtain multiple lighting effects.
* Any group flash settings on the TX flash unit, whether in i-TTL
auto flash, manual flash or multi flash mode, will all be transmitted
to the corresponding RX flash units. Therefore, you will only
need to change settings on the TX unit to control each RX
flash group, without having to individually set the RX units one
by one.
Wireless Flash Shooting: Wireless (2.4G) Transmission
Positioning and Operation Range (Example of wireless flash
shooting):
Autoflash Shooting with One Receiver Unit
(Transmitter)
(Receiver)
Transmission
distance
is about 100m.
TX
RX
You can split the RX unit into two or three groups and shoot
i-TTL Auto Flash while changing the flash ratio (focus). In addition,
each flash group (up to 5 groups) can be set and shot with
different flash modes.
* Use the supplied mini stand to position the Receiver unit.
* Perform a test flash and test shot before shooting.
* The transmission distance might be shorter depending on the
conditions such as the positioning of the Receiver units, the
surrounding environment and weather conditions.
① Auto flash shooting with two RX groups.
Wireless Multiple Flash Shooting
A
B
* When the Z3R-N is set as a TX flash unit, it supports operation in
4 flash modes: i-TTL/M/RPT/OFF.
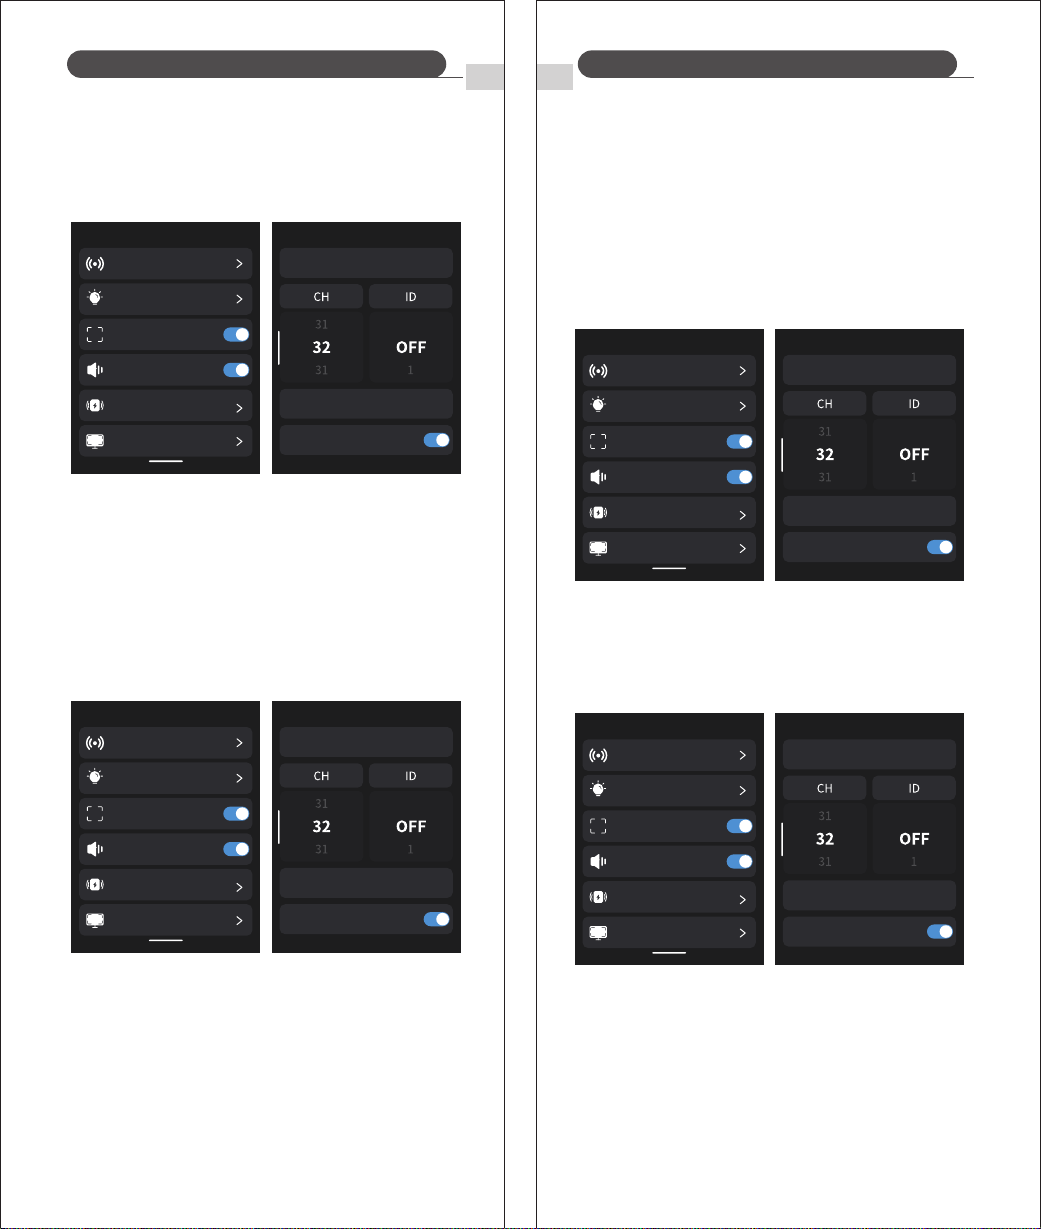
If there is more than one wireless flash system nearby, you can
change the communication channel to prevent signal interference.
Ensure that the channel of the transmitter and receiver units are
matching.
① Swipe down from the top of the screen and tap < > to enter
the menu.
② Tap <RF Wireless>.
③ Scroll the number below <CH> to select a channel.
3. Setting the communication channel
15
Wireless Flash Shooting: Wireless (2.4G) Transmission Wireless Flash Shooting: Wireless (2.4G) Transmission
EN
EN
② Auto flash Shooting with three RX groups
16
Receiver (RX) Unit Setting
You can switch between normal flash and wireless flash. For
normal flash, make sure to set it to <WL OFF>.
Transmitter (TX) Unit Setting
1. Wireless Settings
Swipe down from the top of
the screen and select <TX>.
① Swipe down from the top
of the screen and select
<RX>.
② The <RX> icon will appear
on the screen, indicating
the flash is now in RX Mode.
2. Flash Group Mode Selection
① Tap the group icon on the left side of the screen to switch
between TTL / M / OFF. Select one as the master unit’s flash
mode.
② Swipe the screen from right to left to switch to RPT Mode.
A
B
C
ZOOM:105
M
ZOOM:105
C
1/4
RPT
times
Hz
1
3
2
1
3
2
Menu
RF Wireless
Flash Triggering Distance
Screen Settings
Modeling Light
Sound Prompt
Auto Focus
A
Scan Free Channel
Wireless Sync
Rx compatible
EN
17
EN
18
To avoid signal interference, change the channel and wireless ID.
Set the master and slave units to the same channel and wireless
ID. Go to the <RF Wireless> menu and scroll the number below ID
to adjust it. Select OFF to disable wireless ID.
To prevent interference from others using the same channel, you
can use the “Scan Free Channels” function: go to the <RF
Wireless> menu, tap <Scan Free Channels>, and after scanning, 8
available channels will be displayed.
4. Wireless ID Settings
5. Scan for a free, unused channel
Wireless Flash Shooting: Wireless (2.4G) Transmission Wireless Flash Shooting: Wireless (2.4G) Transmission
This flash uses the 2.4G wireless Q system by default and can
function as a master or slave unit. It is compatible with the NEEWER
QPRO-N TTL transmitter (sold separately). Additionally, it supports
the 2.4G wireless X system: by entering the custom menu and
enabling <Slave Compatibility>, it can operate only as a slave unit
and is compatible with Godox Xpro/X3/X2 transmitters and other
X-system master flashes.
6. Built in 2.4G Wireless Q and X Systems
When you need to trigger the flash wirelessly, the wireless sync
function helps you quickly set the same channel and ID on both
units.
① Set the flash to TX or RX.
② Go to the <RF Wireless> menu and tap <Wireless Sync>.
※ The wireless sync function must be used on both the transmitter
and receiver. It will automatically synchronize the transmitter’s
wireless CH and ID to the receiver for quick wireless pairing.
※ The wireless sync function does not work in On-Camera Mode.
7. Wireless Sync
Note: The Q and X triggers cannot be used simultaneously.
Menu
RF Wireless
Flash Triggering Distance
Screen Settings
Modeling Light
Sound Prompt
Auto Focus
A
Scan Free Channel
Wireless Sync
Rx compatible
Menu
RF Wireless
Flash Triggering Distance
Screen Settings
Modeling Light
Sound Prompt
Auto Focus
A
Scan Free Channel
Wireless Sync
Rx compatible
Menu
RF Wireless
Flash Triggering Distance
Screen Settings
Modeling Light
Sound Prompt
Auto Focus
A
Scan Free Channel
Wireless Sync
Rx compatible
Menu
RF Wireless
Flash Triggering Distance
Screen Settings
Modeling Light
Sound Prompt
Auto Focus
A
Scan Free Channel
Wireless Sync
Rx compatible
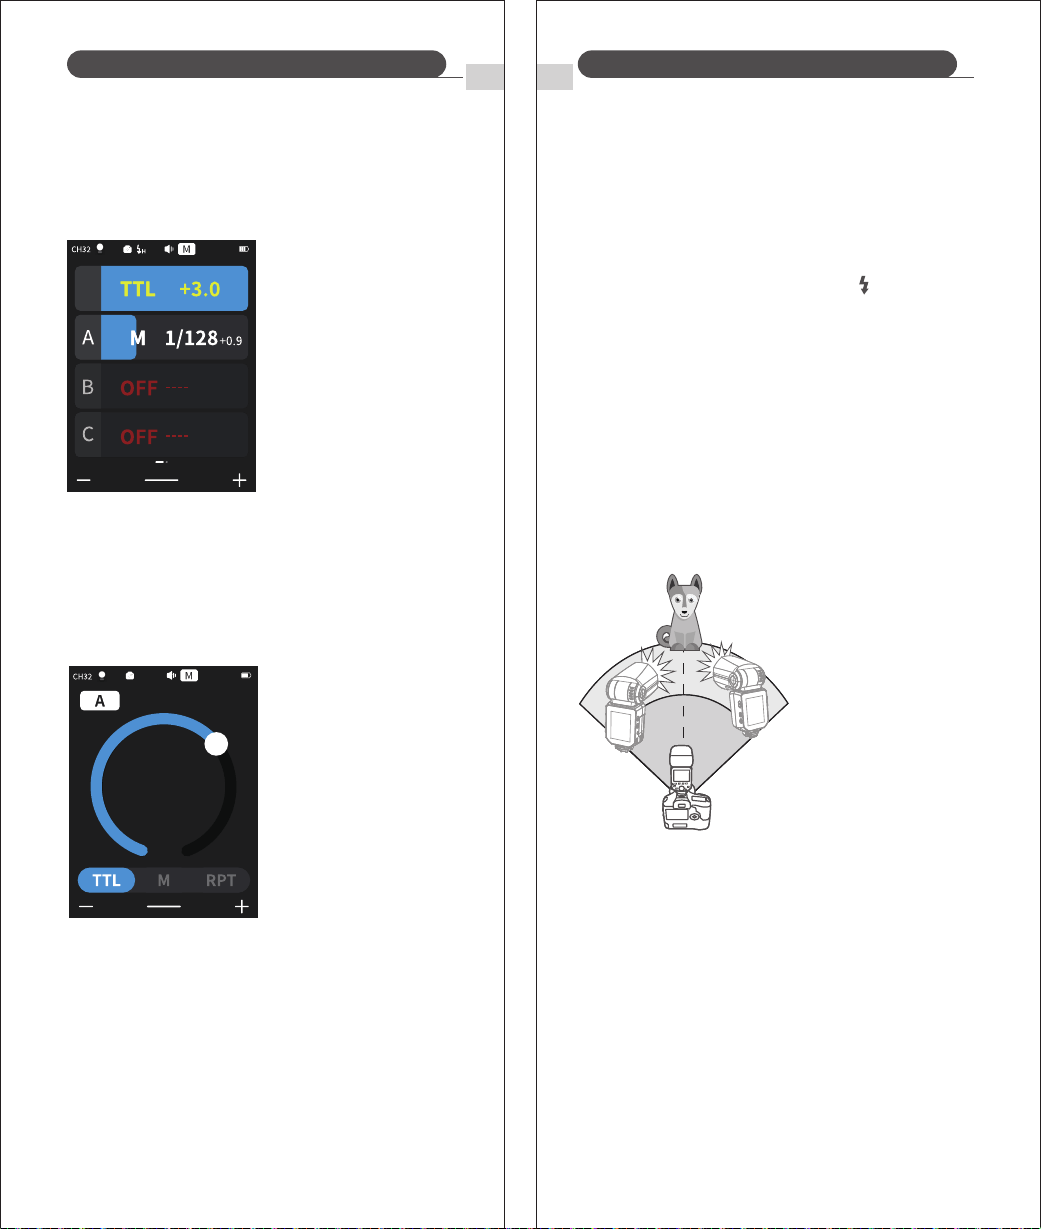
When the number of RX
units is increased or the
TX flash is setto ON,
automatic control ensures
that all flashes fire at the
same flash output so that the
total flash output meets the
standard exposure.
When a larger flash output is required, you can increase the
number of RX units and flash them as a single flash.
To add receiver (RX) units, use the same steps as setting
"automatic wireless flash with a single Receiver unit " . Any
flash group can be set (A/B/C/D/E).
Using Automatic Wireless Flash with Multiple
Receiver (RX) Units
① Press the Transmitter unit’s Test Button < >.
② The Receiver unit should then flash. If it doesn't, check the
receiver is placed within the operating range.
(6) Check the flash operation.
The flash exposure compensation (FEC) and other settings set on
the TX unit are also set automatically in the RX unit.
Operation of the RX unit is not required. The following settings
can be used for shooting with no line flash in the same way as for
normal flash shooting.
Using a fully automatic wireless flash
* If the auto power off of the RX unit has kicked in, press the test
button on the TX unit to trigger a flash button enables the
RX unit. Please note that the flash cannot be tested during the
camera's metering time.
* You can change the delay setting for when the RX flash unit
automatically enters sleep mode.
EN
19
EN
20
Wireless Flash Shooting: Wireless (2.4G) Transmission Wireless Flash Shooting: Wireless (2.4G) Transmission
Using Automatic Wireless Flash with a Single Receiver Unit.
Note: The transmitter (TX) unit and the receiver (RX) unit must
have the same wireless ID, channel and group before the
flashes can be fired wirelessly.
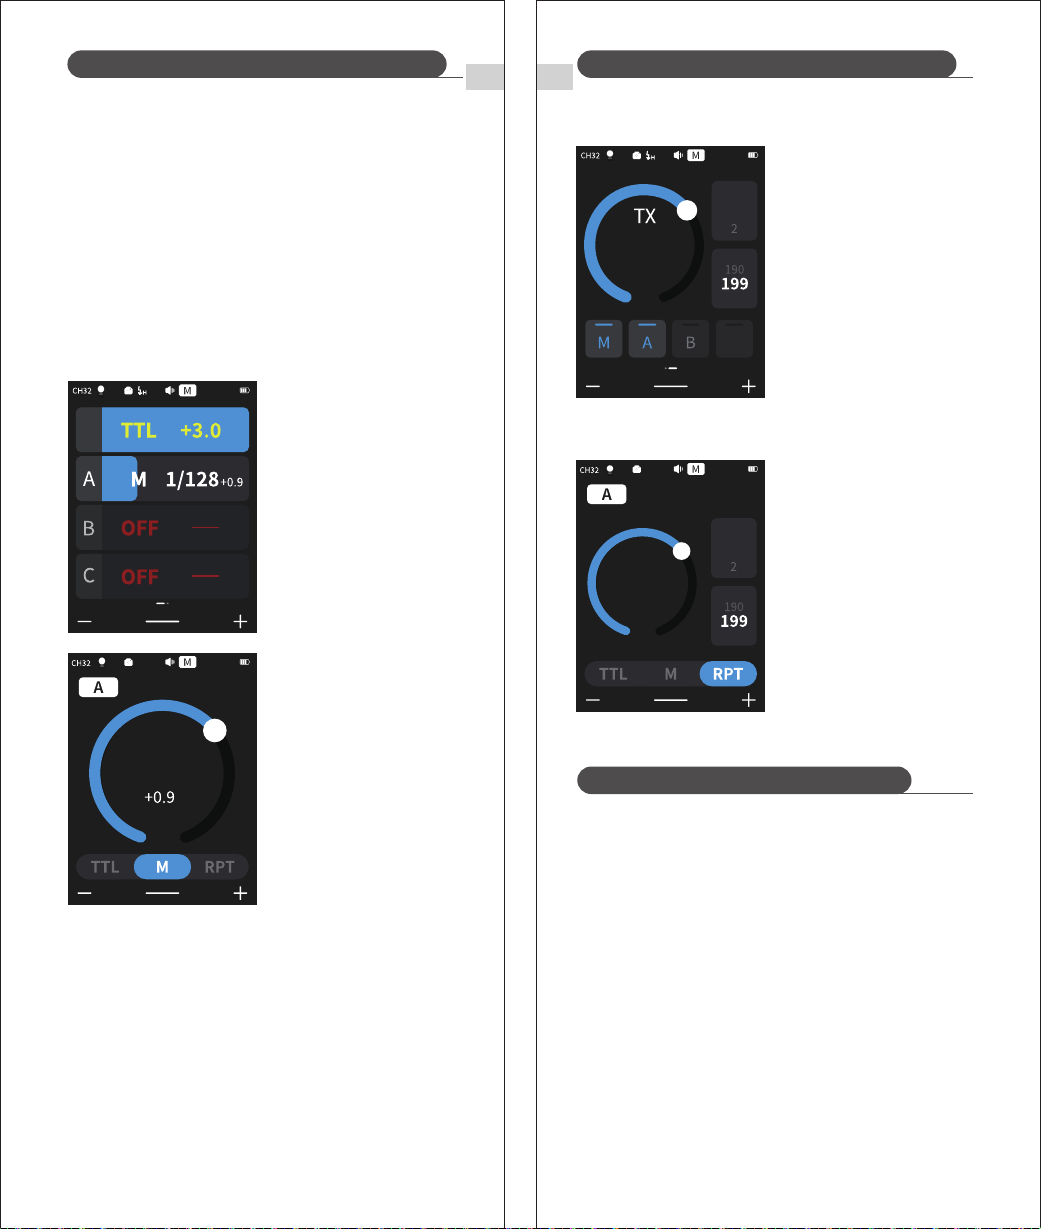
TX Control Unit:
8. i-TTL: Automatic wireless flash photography
① Tap the group on the left side of the screen and select TTL.
② Drag the bar to adjust the exposure compensation for the
selected group.
③ Tap <+, ‒> at the bottom of the screen to set the exposure
compensation for all groups.
RX Unit
Set the TX unit and the RX unit to the same channel.
(Page 16)
Position the TX and the RX unit at close range as shown
on Page 14.
⑶ Receiver Unit Setting
⑷ Position the camera and flashes.
Check that the Transmitter flash ready indicator is lit.
(5) Check if the flash is ready.
⑴ Transmitter Unit Setting
Set the Z3R-N flash mounted on camera as the TX unit.
(Page 15) The M/A/B/C groups all support TTL.
Set the Z3R-N to be controlled wirelessly as a RX unit.
(page 15) Choose from groups A/B/C/D/E.
⑵ Receiver Unit Setting
ZOOM:105
M
ZOOM:105
+1.0
RX
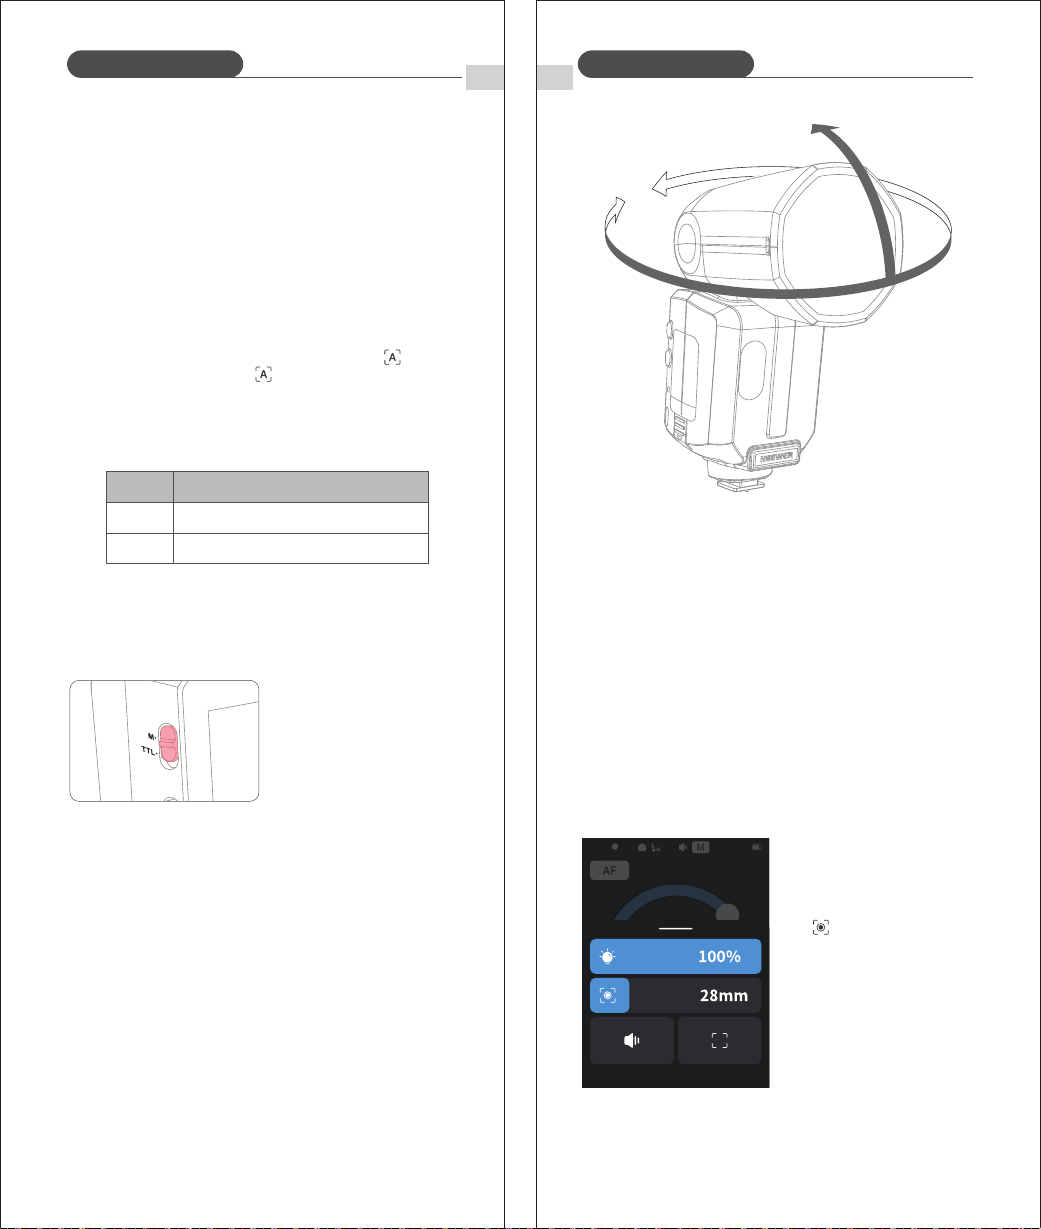
10. RPT: Wireless Flash Shooting with Manual Flash
Setting <M> Flash Mode
You can directly operate the
Receiver unit to manually set
the manual flash or
stroboscopic flash.
⑴ Setting the Receiver unit.
⑵ Setting flash mode to <M>.
① Tap <M> at the bottom of
the screen.
② Slide the progress bar to
set the flash output.
To set the <RPT> strobe mode.
① In TX Mode, swipe the screen
from right to left until <RPT>
appears.
② Set the strobe flash setting
in the main control screen
mode.
In RX Mode, tap <RPT> at the
bottom of the screen.
1. Interference of the 2.4g signal resulting from external factors
(such as a wireless hub, 2.4G Wi-Fi routing, Bluetooth equipment,
etc.)
2. Please ensure that the flash is fully recycled, the flash ready
indicator is on and that the overheat protection feature hasn't
been triggered.
3. Please check whether the flash detector and the receiving device
are running low on power
→ Please replace the batteries (1.5V disposable alkaline batteries
are recommended for the flash receiver battery)
→ Please adjust the channel CH setting of the transmitter(+10 is
recommended) to find a channel without interference, or turn
off other 2.4G devices in close proximity whilst working.
→ Please lower the flash setting by changing to manual mode (M)
If the device is in i-TTL mode, you need to fire a preflash)
Troubleshooting: 2.4G wireless flash misfiring
③ Taking pictures. Each group
fired at the set flash ratio.
EN
21
EN
22
Wireless Flash Shooting: Wireless (2.4G) Transmission Wireless Flash Shooting: Wireless (2.4G) Transmission
9. M: Manual Wireless Flash Shooting
Shooting with manual flash with no line (multi-flash) allows you
to set different flash outputs for each RX unit (flash group) for
shooting. All parameters need to be set on the TX control unit.
① Tap the group on the left
side of the screen and
select M.
② Drag the bar to adjust
exposure compensation
for the selected group.
About Transmitter Unit
Two or more TX units can be used. By configuring multiple
cameras with TX units, you can change the cameras used for
shooting while maintaining the same lighting (RX units).
* Flash Exposure Compensation (Page 09)
ZOOM:105
M
ZOOM:105
1/8
RX
ZOOM:105
C
1/4
RPT
1
2
times
Hz
ZOOM:105
1/8
RX
1
2
times
Hz
EN
Other Applications
24
1. Sync Triggering
2. Auto Focus Assist Beam
The Sync Cord Jack is a Φ2.5mm connector. Insert a trigger plug
here and the flash will be fired in sync with the camera shutter.
In low-brightness or low-contrast shooting situations, the flash's
built-in autofocus assist lamp turns on to make autofocusing easier.
When focusing is difficult, the red autofocus assist light comes on.
To turn off the AF Assist function:
① Tap the <AF> icon at the top left of the screen.
② Swipe up from the bottom of the screen and tap < >.
③ Enter the menu and select < > to disable it.
* If the user finds that the assisted focus light is not on when using
it, it is because the camera is already accurately focused.
Position
Center
Periphery
Operating range
0.6-10m / 2.0-32.8 feet
0.6-5m / 2.0-16.4 feet
EN
23
Other Applications
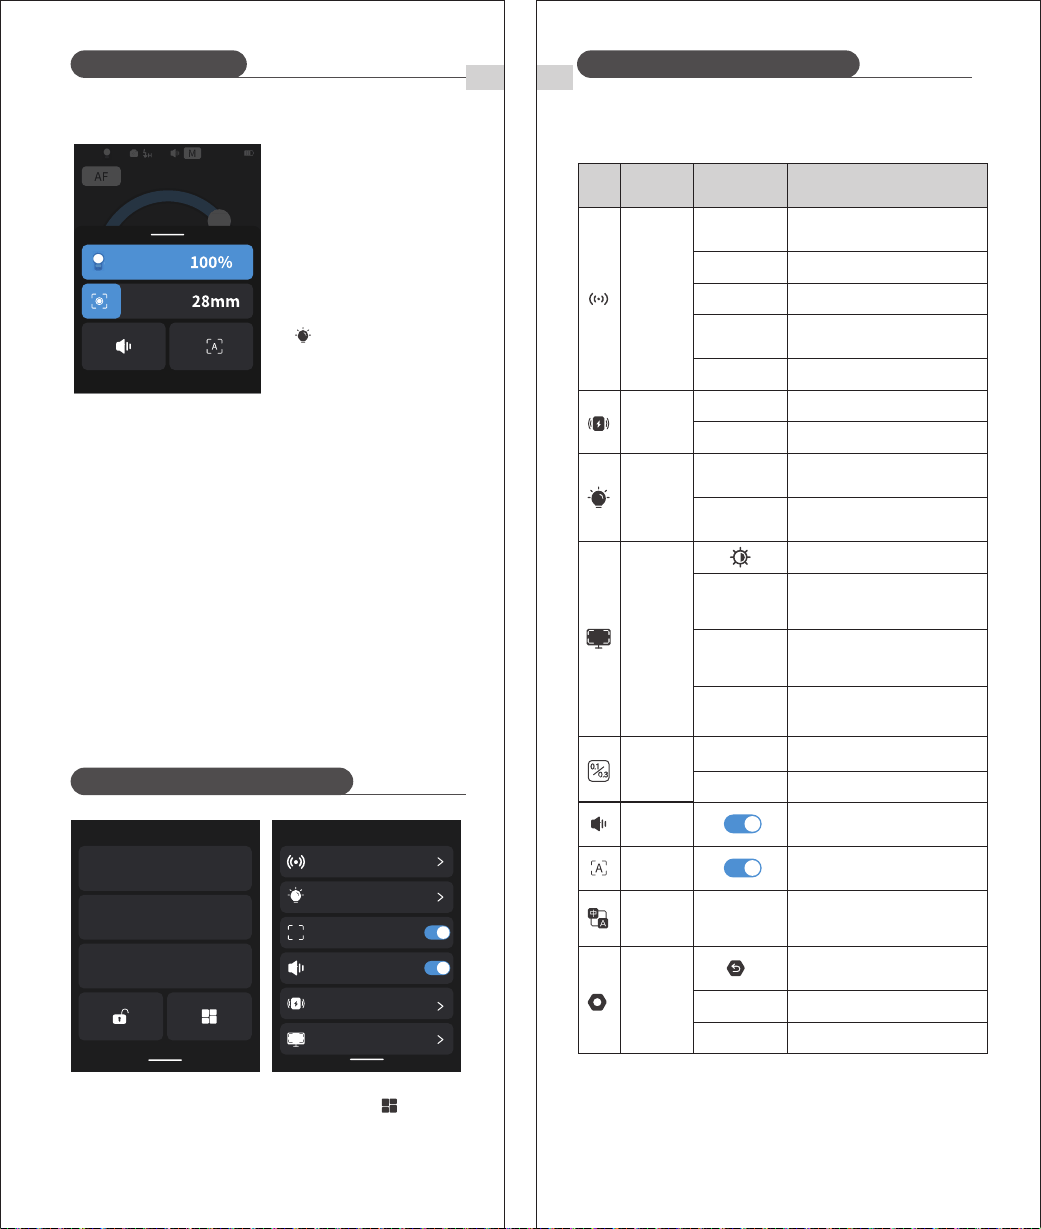
5. ZOOM: Set the flash coverage
The flash coverage can be set automatically or manually. It can be
set to match the lens focal length from 28mm to 105mm. In auto
zoom, the focal length changes with the camera's zoom lens to
provide the best flash effect.
* If you set the flash coverage manually, make sure it covers the lens
focal length so that the picture will not have a dark periphery.
① When using manual zoom,
swipe up from the bottom of
the screen and adjust the
flash coverage by sliding the
< > bar.
② Automatic flash coverage
adjustment in <AUTO> mode.
4. Bounce Flash
By pointing the flash head toward a wall or ceiling, the flash will
bounce off the surface before illuminating the subject. This can
soften shadows behind the subject for a more natural-looking
shot. This is commonly known as a 'bounce flash'.
Position the flash head to set the bounce direction.
* If the wall or ceiling is too far away, the bounced flash might
be too weak and result in underexposure
* The wall or ceiling should be a plain, white color for high
reflectance. If the bounce surface isn't white it will result in
"off color" photos.
Utilize i-TTL auto mode for quick
metering while retaining metering
data, and seamlessly switch to
manual mode for precise
adjustments.
Toggle the TCM button to 'M' for
one-touch switching.
3. TCM - One key switching i-TTL/M mode:
-7-120°
360°
ZOOM:28
A
EN
25
EN
26
Other Applications
C.Fn: Setting Custom Functions
① Swipe down from the top of the screen and tap < > to enter
the menu.
② Tap any item to access its settings.
6. Modeling Lamp
7. Modeling Flash
If your camera has a depth-of-field preview button, pressing it
activates a 1-second continuous flash, known as modeling flash.
This feature helps you observe the effect of the light and shadow
on your subject and evaluate the illumination balance, whether
you're using wireless or standard flash
* Avoid triggering the modeling flash more than 10 times in quick
succession. If you've performed 10 consecutive modeling flashes,
please allow the flash to cool down for at least 10 minutes to
prevent overheating or damage to the flash head.
① Swipe up from the bottom
of the screen and tap the
modeling lamp bar to switch
between upper and lower
modeling lamps.
② Slide the bar to adjust
modeling lamp brightness.
③ Enter the menu and tap
< Modeling Lamp> to
switch between <CONT> and
<INTER>.
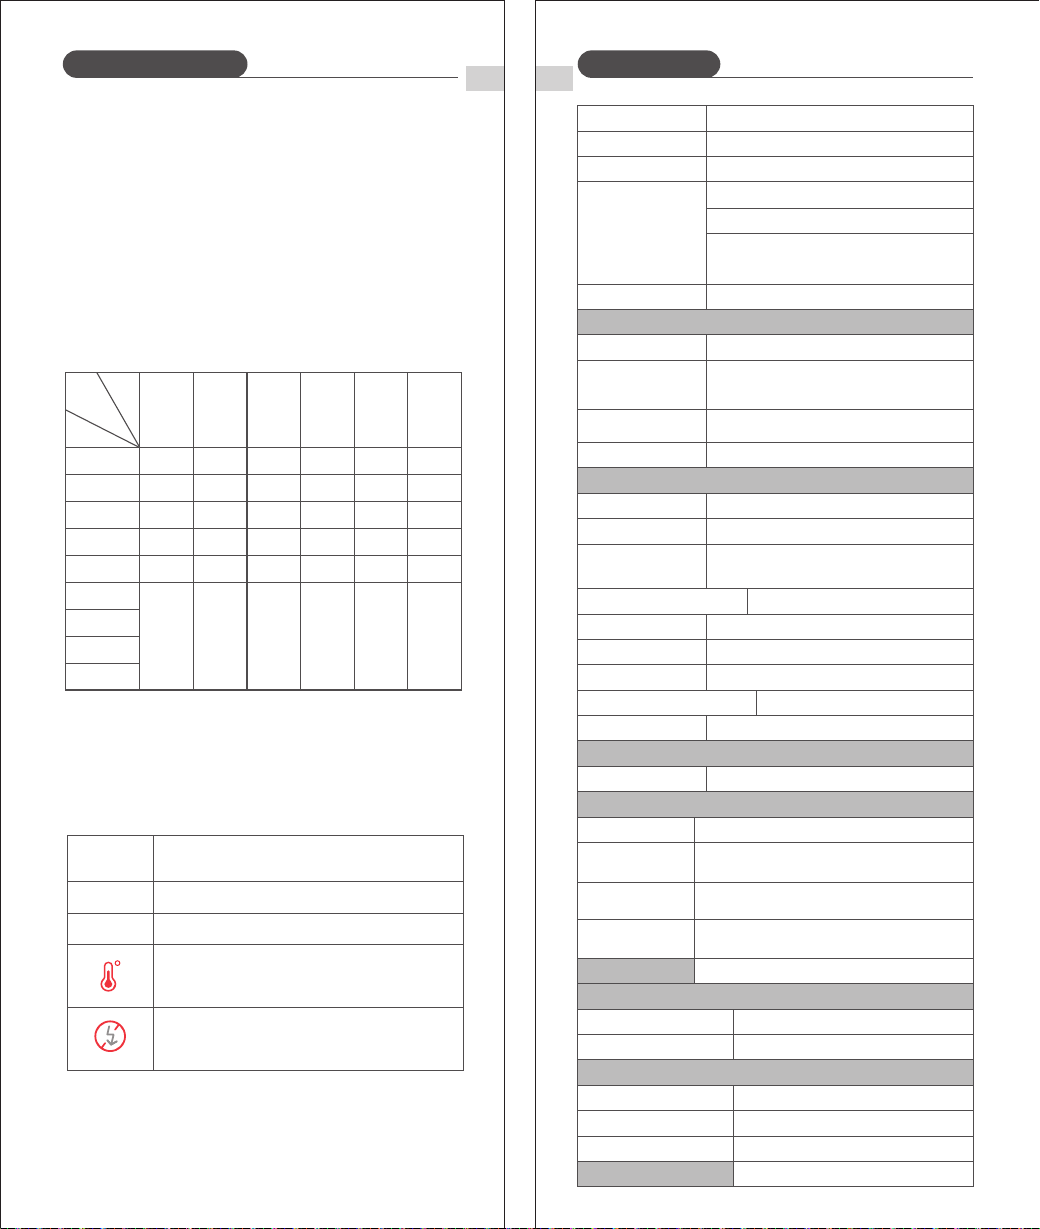
Use the Customize function to complete settings according to the
following chart.
C.Fn: Setting Custom Functions
Modeling light stays on during flash
Modeling light turns off during flash
FunctionSymbol Parameters Description
Scan Free
Channels
RF Wireless
Flash
Triggering
Distance
Start scanning for free channels
CH Channel (1‒32)
ID Wireless ID (OFF, 1‒99)
RX Compatibility Turn RX Compatibility On or Off
Tap to enable Wireless Sync
0-10m Flash triggering distance: 0‒10m
Wireless Sync
1-100m Flash triggering distance: 1‒100m
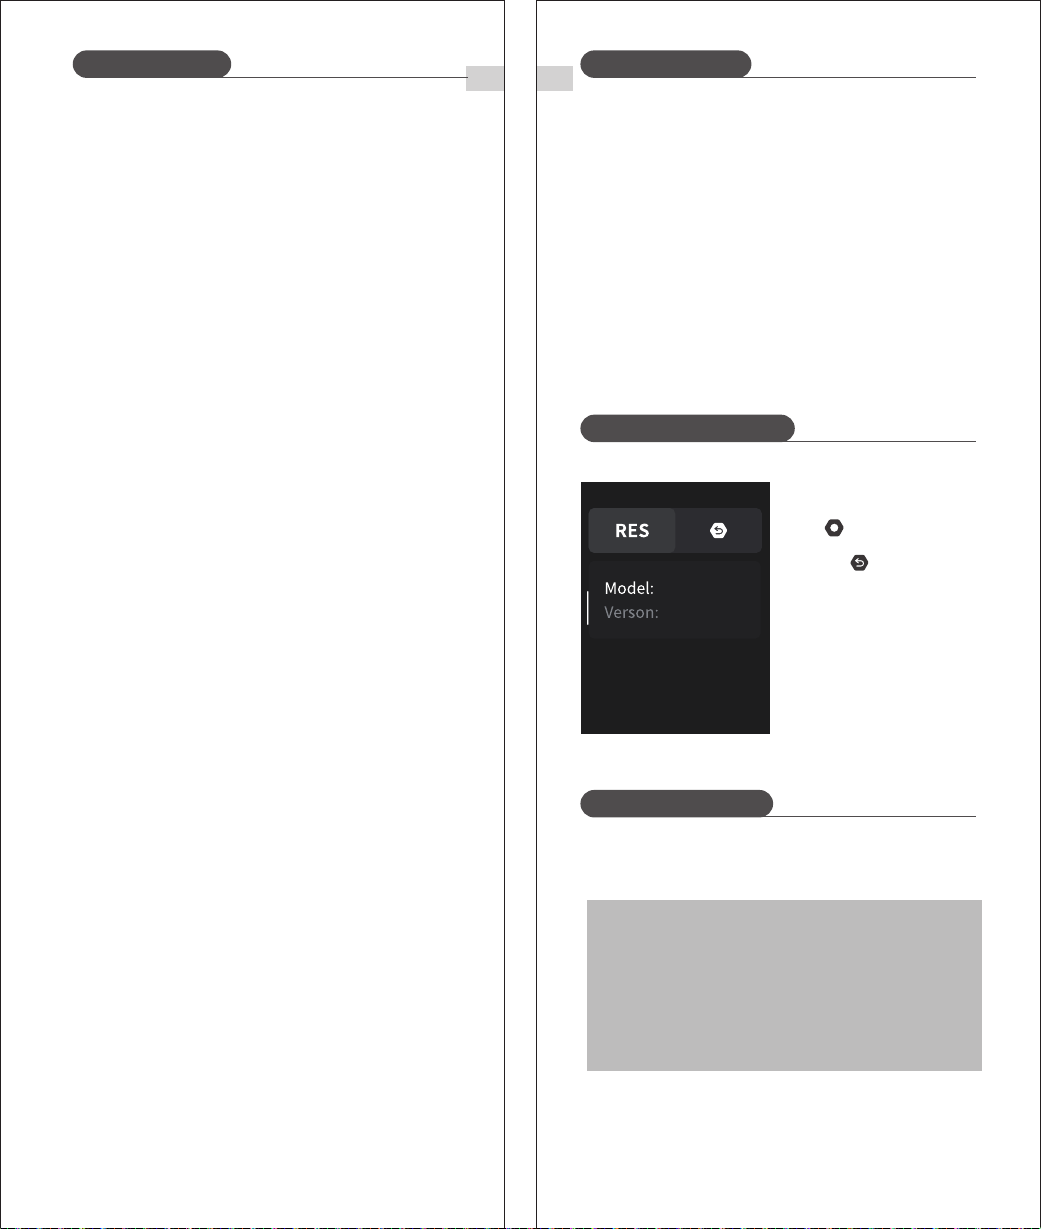
Model Model
Version Current software version
Screen
Settings
Sound
Prompt
Display brightness
TX/WLOFF
Standby
TX/On-Camera Mode standby time
(60s, 90s, 120s, OFF)
RX/S1/S2
Standby
RX/S1/S2 Mode standby time
(30min, 60min, 90min, OFF)
OFF Time
Power Off
Auto power-off time
(30min, 60min, 90min, OFF)
Beep on/off
Modeling
Light
CONT
INTER
Auto Focus
Language
Selection
System
Settings
Auto focus on/off
Language
CH/EN/DE/
ES/IT/FR/RU
KO/JP/NI/VM
Restore factory settings
Menu
RF Wireless
Flash Triggering Distance
Screen Settings
Modeling Light
Sound Prompt
Auto Focus
A
ZOOM:28
WOLF
TX
RX
Increment
0.1
For precise adjustment
For efficient adjustment
0.3
EN
27
Number of flashes that will activate over-temperature protection:
2. Other Safety Functions
* The system provides real-time protection to secure the device and
your safety. The following lists prompts for your reference:
Indicates
Prompts on
LCD Panel
Protection Function
1. Over-Temperature Protection
① To prevent the flash head from deteriorating and overheating, it
is recommended not to fire more than 100 continuous flashes in
fast succession at 1/1 full power. After 100 continuous flashes,
pause the use of the flash for at least 10 minutes.
② If you fire more than 100 continuous flashes and then fire more
flashes in short intervals, the inner over-temperature protection
function may be activated. The recycling time will be longer
(over 10s). If this occurs, the use of the device should be paused
for at least 10 minutes for the flash unit to operate as normal.
EN
28
Technical Data
Wireless flash function Transmitter, Receiver, Off
A, B, C, D, E (E group can be controlled by QPRO
series flash trigger available on Neewer.com)
Transmitter groups
Controllable Receiver
groups
Transmission range (approx.)
Channels
ID
100m
32 Groups:01~32
01~99
Modeling Flash
Using the camera's depth-of-field preview button
M, A, B, C
Z3R-N
100Ws
Auto zoom 、Manual zoom
Swinging/tilting flash head (bounce flash):
0 to 360° horizontally and -7° to 120° vertically
1/180 to 1/20000 seconds
i-TTL autoflash and manual flash
Manual. FEB: ±3 stops in 1/3 stop increments
(Manual FEC and FEB can be combined.)
High-speed sync (up to 1/8000 seconds),
first-curtain sync, and second-curtain sync
Autonomy(up to 100 times, 199Hz)
Center: 0.6~10m / Periphery: 0.6~5m
Model
Compatible Cameras
Power(1/1 output)
Flash Coverage
Flash Duration
Exposure Control
Exposure control system
Flash exposure
compensation (FEC)
Sync mode
RPT flash
Wireless flash (radio 2.4G transmission)
Auto Focus Assist Beam
Effective range (approx.)
7.2V/3000mAh Li-ion battery
Approx 1.7 seconds. Red LED indicator
will light up when the flash is ready.
Approx. 500
Auto Power off after approx. 90 seconds of
idle operation. (60 minutes if set as Receiver)
Hotshoe, 2.5mm sync line
Power source
Built-in Li-ion battery
Recycle time
Number of flash
in full power
Energy-saving
Sync Triggering Mode
Dimensions
Volume
Net weight without battery
Weight with battery
Modeling Lamp
Power
Color Temperature
28 -105 mm
Upper: 2W / Lower: 2W
3300K±200K
Nikon Digital Single Lens Reflex Camera (i-TTL auto flash)
0℃ ~ 40℃Operating Temperature
Frequency Range
Maximum radio-frequency power
2412.75MHz-2464.25MHz
5.30dBm
ZOOM
1/1
1/2
1/4
1/8
1/16
1/32
1/64
1/128
1/256
100
150
300
300
1200
3500
100
150
300
300
1200
3500
90
134
273
300
1200
3500
80
120
240
300
1200
3500
75
114
231
300
1200
3500
70
28mm 35mm 50mm 70mm 80mm 105mm
106
215
300
1200
3500
Power
Number
76*76*215 mm
505g
625g
IGBT damaged
High-voltage capacitor overvoltage
Level 1 overheat protection: Internal
temperature too high. Flash disabled.
Stop triggering for 10 minutes.
E1
E3
Level 2 overheat protection: Internal
temperature too high. Flash disabled.
Stop triggering for 10 minutes.
EN
29
EN
30
Troubleshooting
If you experience a problem with the device, please refer to this
Troubleshooting Guide.
1. The Camera Flash does not fire
2. Auto power off
① After 90 seconds of idle operation, auto power off will have
activated if the flash is set as Transmitter (Master).
→Press the shutter button halfway or press any flash button to wake
up.
② After 60 minutes (or 30 minutes) of idle operation, the flash unit
will enter sleep mode if it is set as Receiver (Slave).
→Press any flash button to wake up.
3. Auto zoom does not work.
The camera flash is not attached securely to the camera.
→Attach the camera flash's mounting base to the camera.
4. The flash exposure is underexposed or overexposed.
① There was a highly reflective object (e.g. glass window) in the
picture.
→Use FE lock (FEL).
② You used high-speed sync.
→With high-speed sync, the effective flash range will be shorter.
Make sure the subject is within the effective flash range
displayed.
③ Use Manual Flash mode.
→Set the flash mode to i-TTL or modify the flash output.
5. Photos have dark corners or only parts of the target
subject are illuminated.
The focal length of lens exceeds the flash coverage.
→Check the focal length that has been set. This flash unit has the
flash coverage between 28 and 105mm, which fits medium-
format cameras.
6. Screen displays: ZOOM: ***
Engine freeze
→Restart
① The camera flash is not attached securely to the camera.
→Attach the hot shoe base mount of the flash securely to the
camera.
② The electrical contacts of the camera flash and camera are dirty.
→Clean the contacts.
Restore factory settings
Firmware upgrade
The firmware of this product can be upgraded through the USB
port. The latest software announcements and instructions will be
published on the official website.
※ This product does not come with a USB cable for the firmware
upgrade. Please purchase separately. The USB port of this
product is a Type-C port. Please use only a USB Type-C cable.
※ Upgrading the firmware requires Neewer Firmware software
support. Please download and install "Neewer Firmware
Update", and then select the corresponding firmware file before
updating.
※ As the product is undergoing a firmware upgrade, please refer
to the latest electronic version of the manual.
Compatible Cameras
This camera is compatible with the following models of Nikon
digital single mirror reflex camera series:
Note: This table only lists the camera models that have been tested
at present, and does not cover all Nikon series cameras. Other
camera models can be tested by users.
D4、D5、D60、D70S、D90、D100、D200、D300S、
D300、D500、D610、D700、D750、D780、D800、
D810、D850、D3100、D3200、D3300、D3400、
D3500、D5000、D5100、D5200、D5300、D5600、
D7000、D7100、D7200、D7500、Z5、Z6、Z6ii、
Z30、Z9、Z8、Z7ii、Z7、Z50
① Enter the menu and tap
< > for System Settings.
② Tap < > to enter and
confirm.
Z3R-N
V1.0.6