XHDATA
D808 Radio Manual
FM Stereo/LW/MW/SW SSB AIR RDS
Portable Digital Radio

Radio - Front View...........................................................................................................................................................2
Radio - Display.................................................................................................................................................................3
Warning.............................................................................................................................................................................5
QUICK START GUIDE......................................................................................................................................................5
FUNCTIONS & OPERATIONS EXPLAINED..............................................................................................................5
1. FM Tuning range—— [ FM ] button.................................................................................................... 5
2. Medium Wave Step
——
[ 9/10 kHz ] button
..................................................................................6
3.
Long wave
——
[ LW / MW ] button
..................................................................................................6
4. Temperature —— [ DISPLAY ] Button and [ number 3 ] .............................................................6
5. Setting the time —— [ TIME SET ] Button........................................................................................6
6. Setting the alarm —— [ ALARM ] Button......................................................................................... 6
7. Setting the sleep timer —— [ POWER ] Button............................................................................. 7
8. Beep —— [ BEEP ] Button.........................................................................................................................7
9. Display light —— [ LIGHT ] Button........................................................................................................7
10. Lock —— [ INFO ] Button .......................................................................................................................7
11. Antennas
........................................................................................................................................................7
Radio Operation .............................................................................................................................................................7
1. Search Radio Frequency.................................................................................................................................... 7
① Manual Search............................................................................................................................................... 7
② Auto Search.....................................................................................................................................................8
· ATS Function.............................................................................................................................................. 8
· Up and Down Tuning Arrow............................................................................................................... 8
③ Directly input the radio frequency........................................................................................................8
2. Memory System........................................................................................................................................................ 8
① Manual.................................................................................................................................................................8
②Auto Tune Storage (ATS)..............................................................................................................................8
3. Bandwidth (BW) ......................................................................................................................................................9
4. Squelch Function................................................................................................................................................... 9
5. Display Mode.........................................................................................................................................................10
6. FM Reception.........................................................................................................................................................10
7. FM RDS (Radio Data System) .........................................................................................................................10
8. MW (Medium Wave) ..........................................................................................................................................11
9. LW (Long Wave) .....................................................................................................................................................11
10. SW (Shortwave) ..................................................................................................................................................11
11. Single Side band (SSB) ................................................................................................................................... 13
12. Fine Tuning.......................................................................................................................................................... 13
13. AIR Band................................................................................................................................................................13
14. Reset.......................................................................................................................................................................13
Oth
er Operations .......................................................................................................................................................13
1. Earphone Jack ..............................................................................................................................................13
2. DC Jack...........................................................................................................................................................13
3. External Antenna Jack..............................................................................................................................13
4. Back Stand....................................................................................................................................................13
Specifications................................................................................................................................................................14
1
TABLE OF CONTENTS
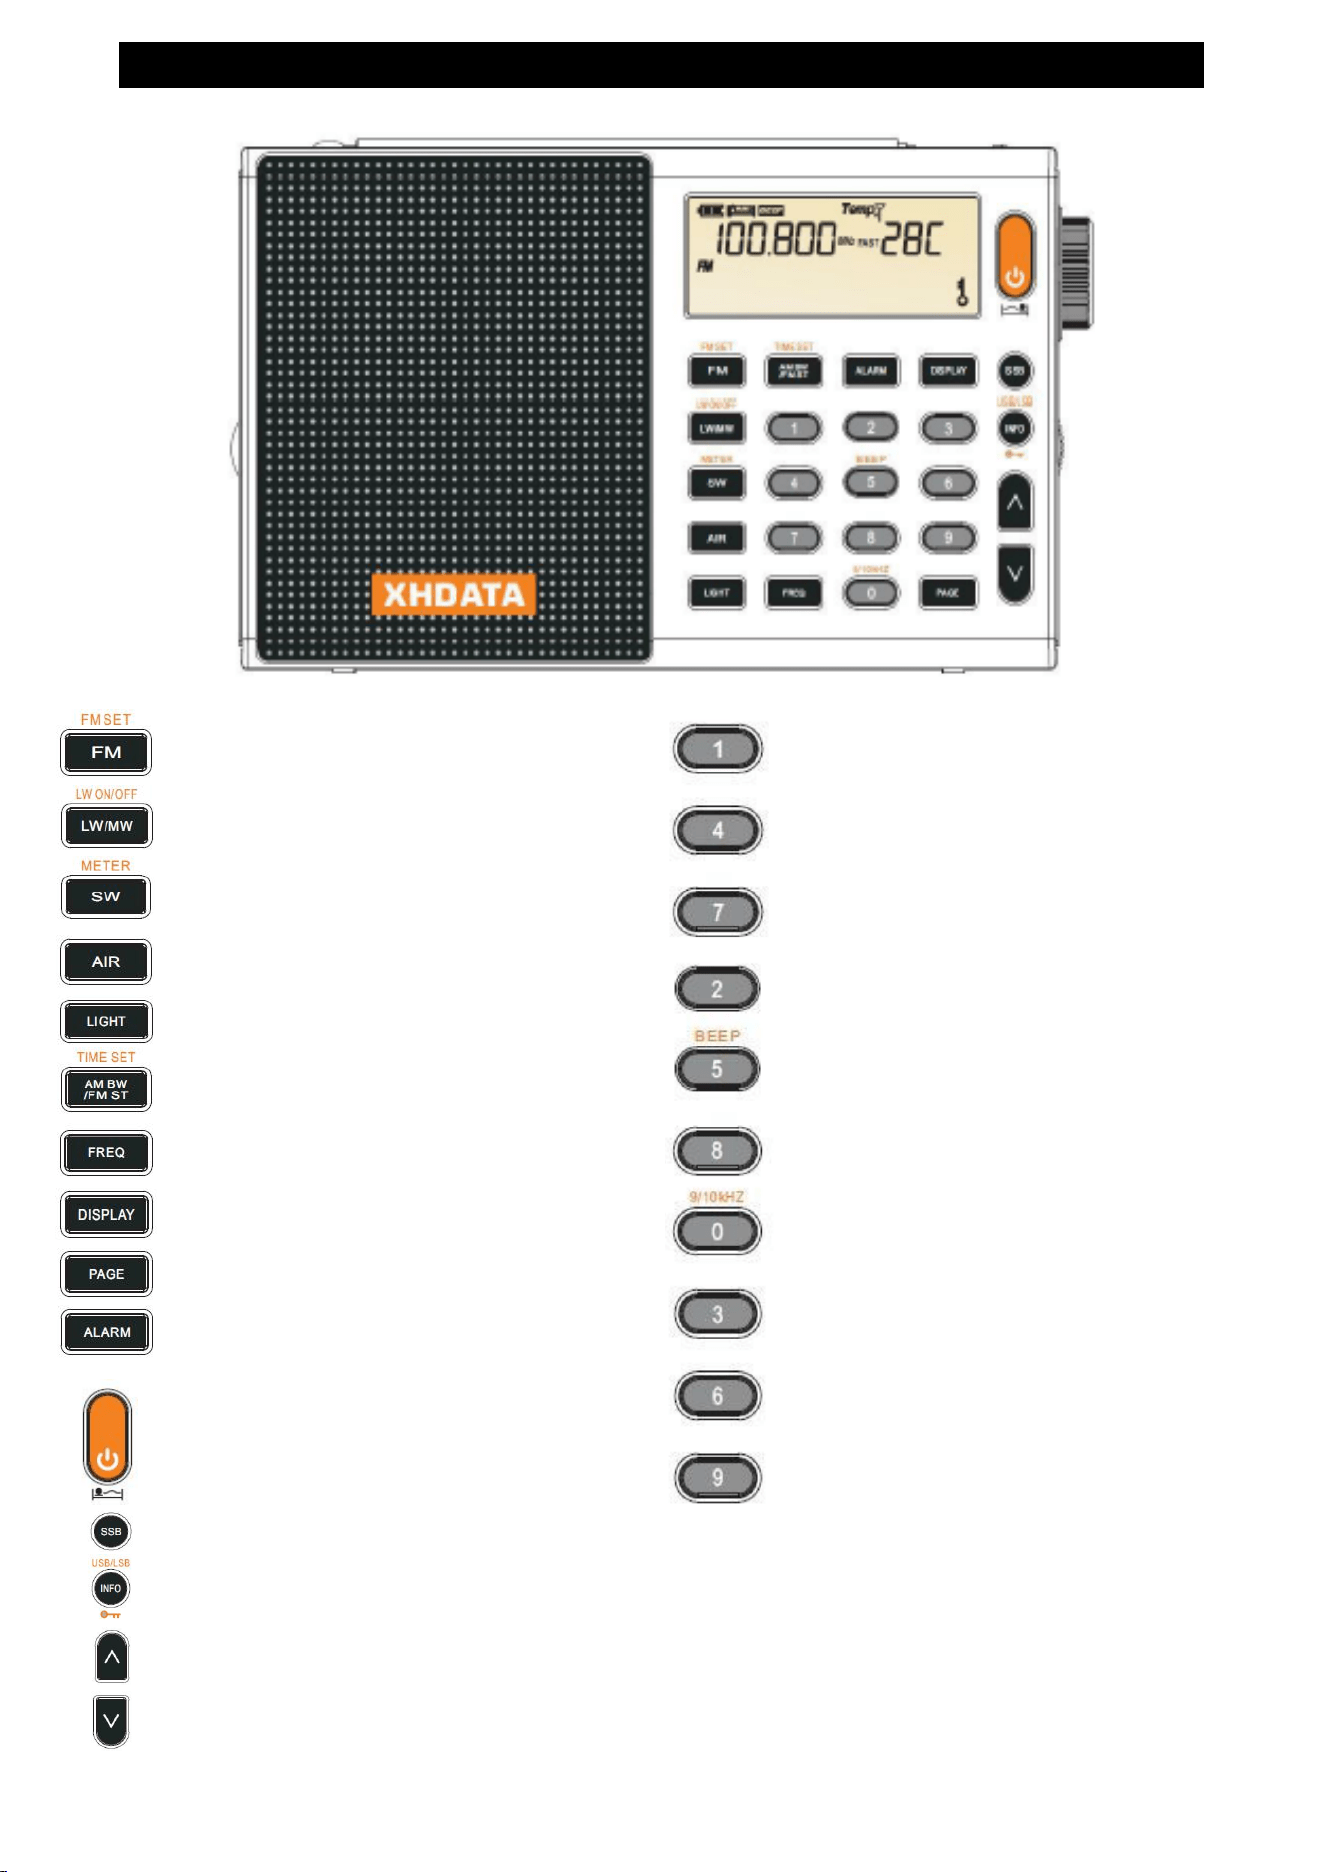
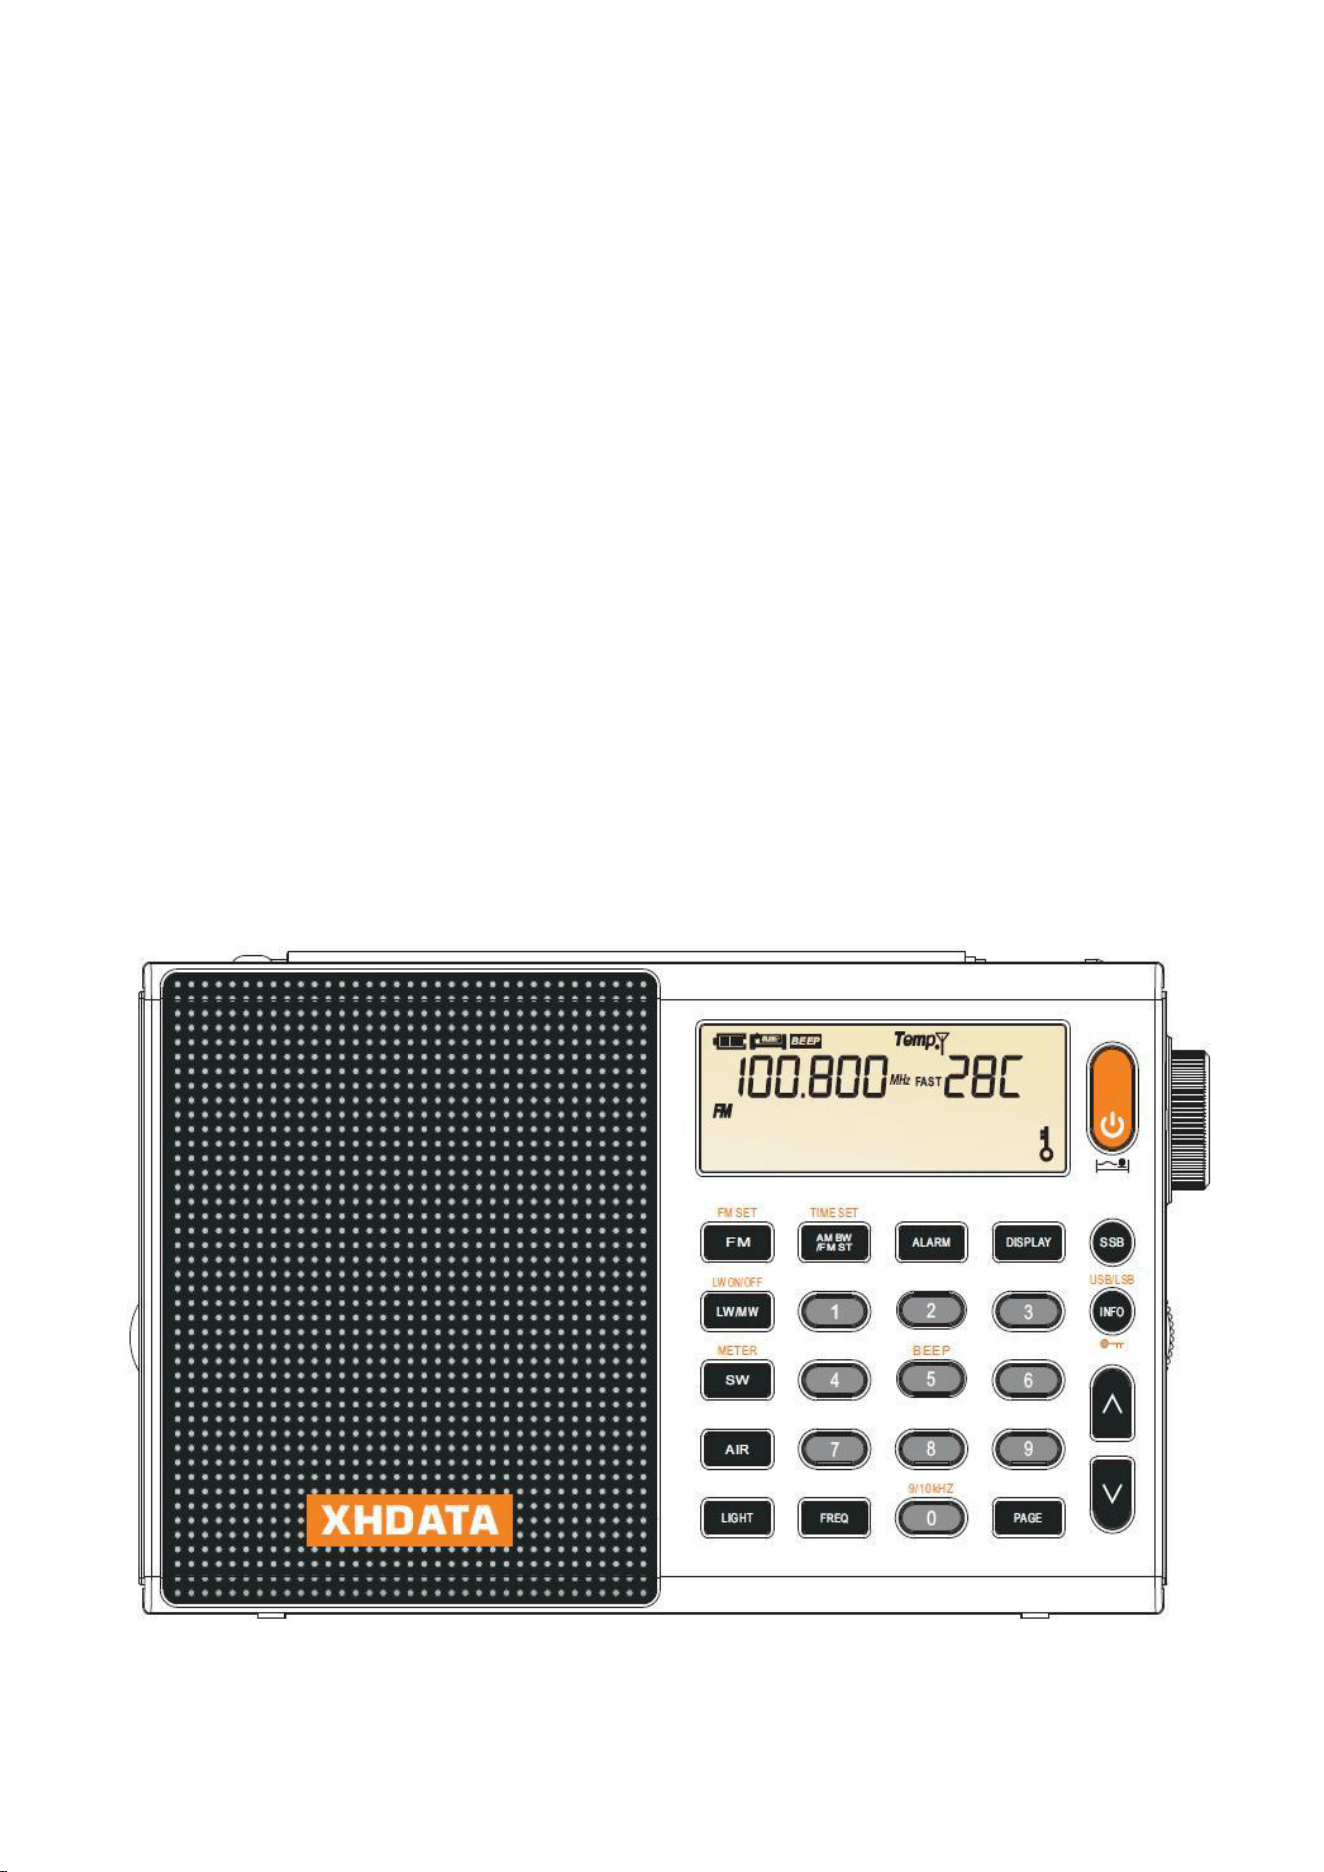
Radio - Front View
2
FM Band Select/ATS/Set FM Range
MW/LW Band select / ATS / Enable LW
SW Band select / ATS / Scroll through
Meter bands
Air Band select / ATS
Display light on/off
AM Bandwidth/FM Stereo/ Time set
Frequency entry follows
Display option: Clock, Alarm, Signal
strength, Temperature
Memory page selection
Alarm on / Alarm set
Power / Sleep timer
Single Sideband (SSB)
Upper / Lower Sideband select / RDS Info / Lock
Frequency up / Scan
Frequency down / Scan
Frequency / Page / Memory
Frequency / Page / Memory
/ Beep
set
Frequency / Page / Memory
Frequency / Page / Memory
Frequency / Page / Memory
Frequency / Page / Memory
Frequency / Page / Memory
Frequency / Page / Memory
Frequency / Page / Memory/ MW step
Frequency / Page / Memory/Temp scale
setting
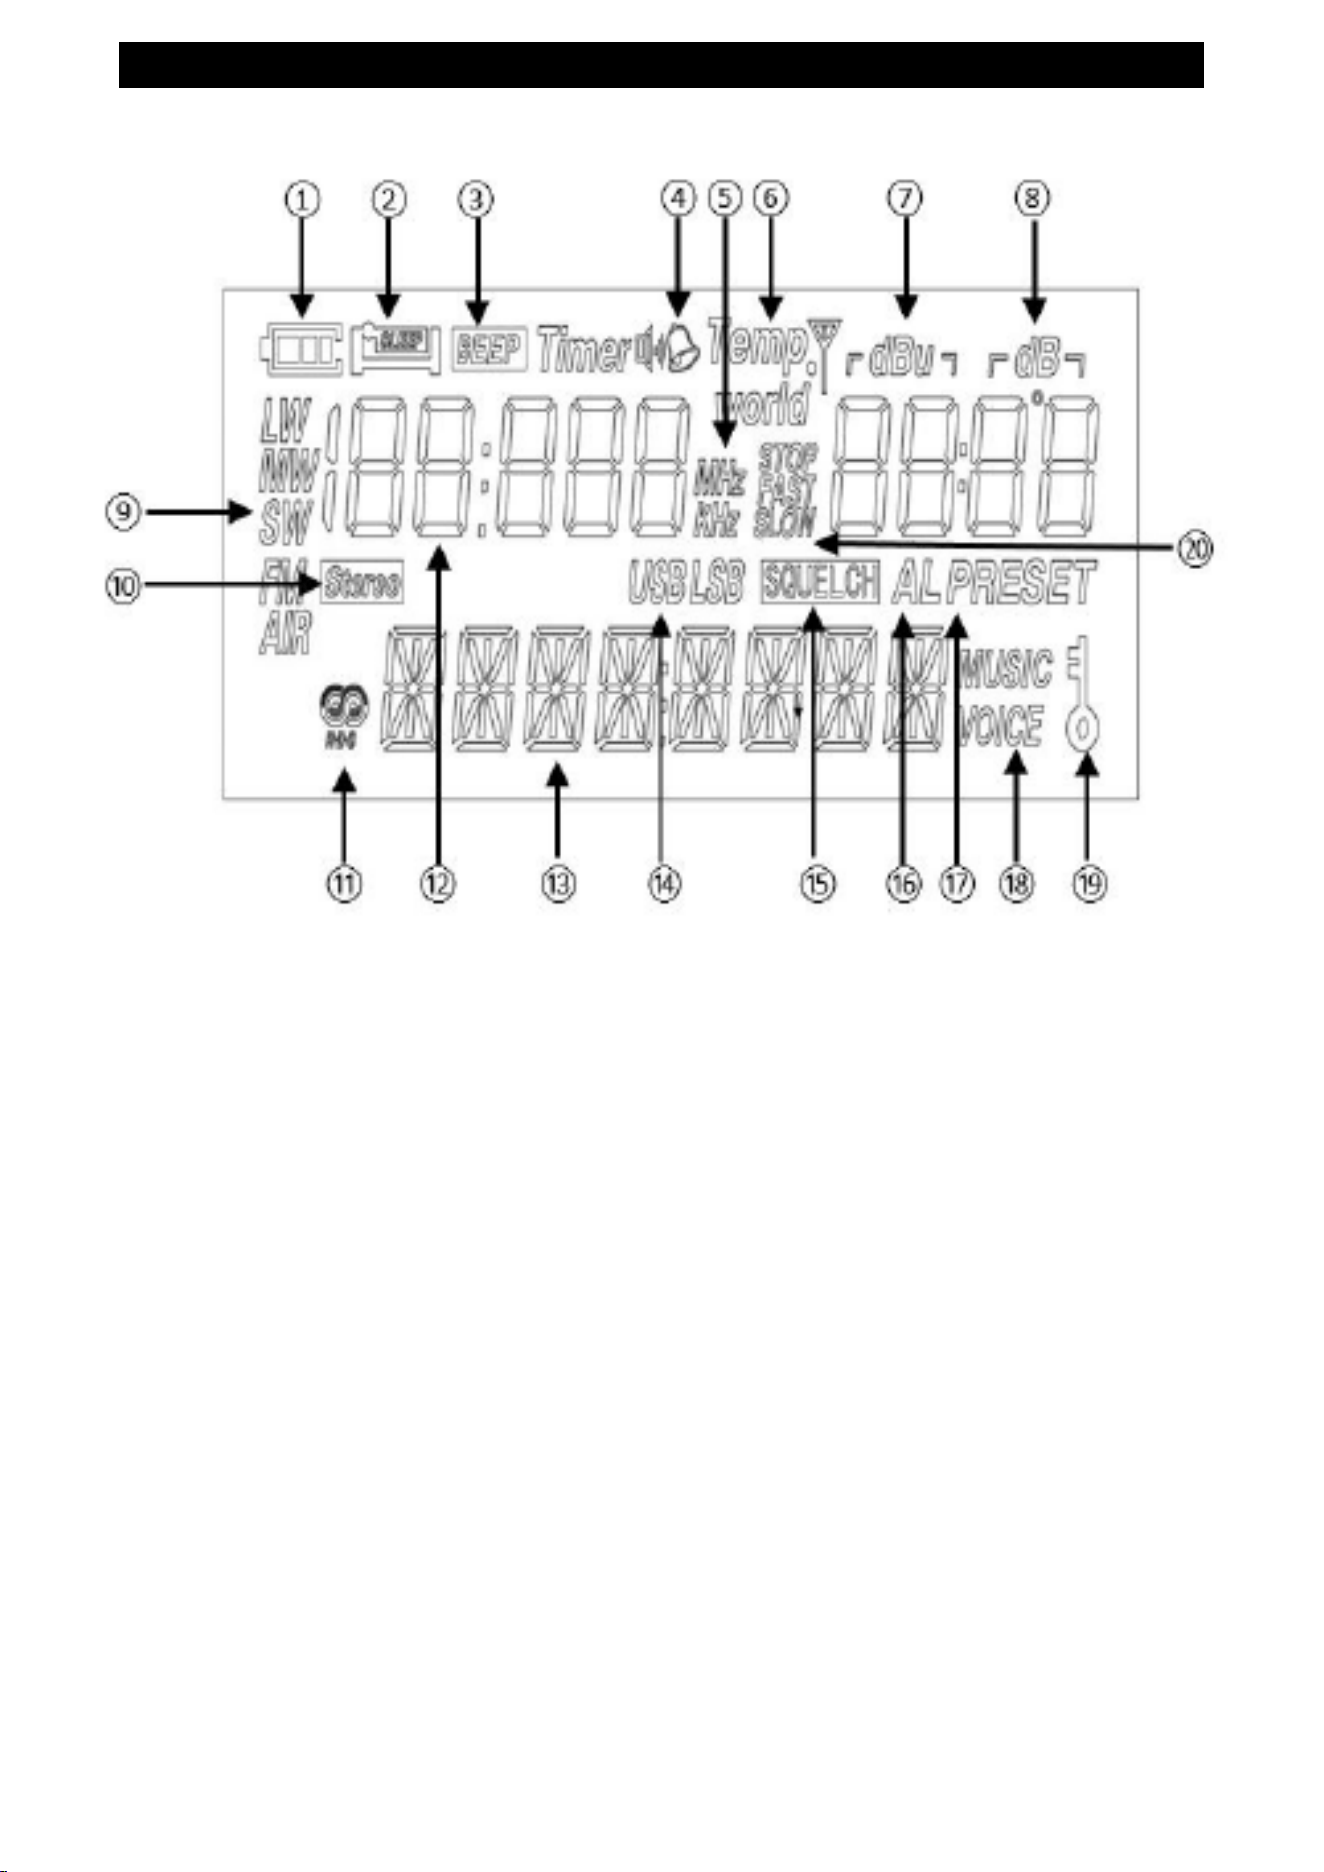
Radio - Display
① Battery charge indicator
② Sleep timer active
③ Key press beep active
④ Alarm on
⑤ Frequency Display is kHz or MHz
⑥ Display temperature mode
⑦ Signal strength
⑧ Noise level
⑨ Band selection
⑩ FM Stereo signal
⑪ FM RDS available
⑫ Frequency
⑬ RDS Information
⑭ USB / LSB mode
⑮ Squelch active
⑯ Alarm active
⑰ Station Memory Mode
⑱ Not available on this radio
⑲ Radio keys locked
⑳ Tuning knob speed
3
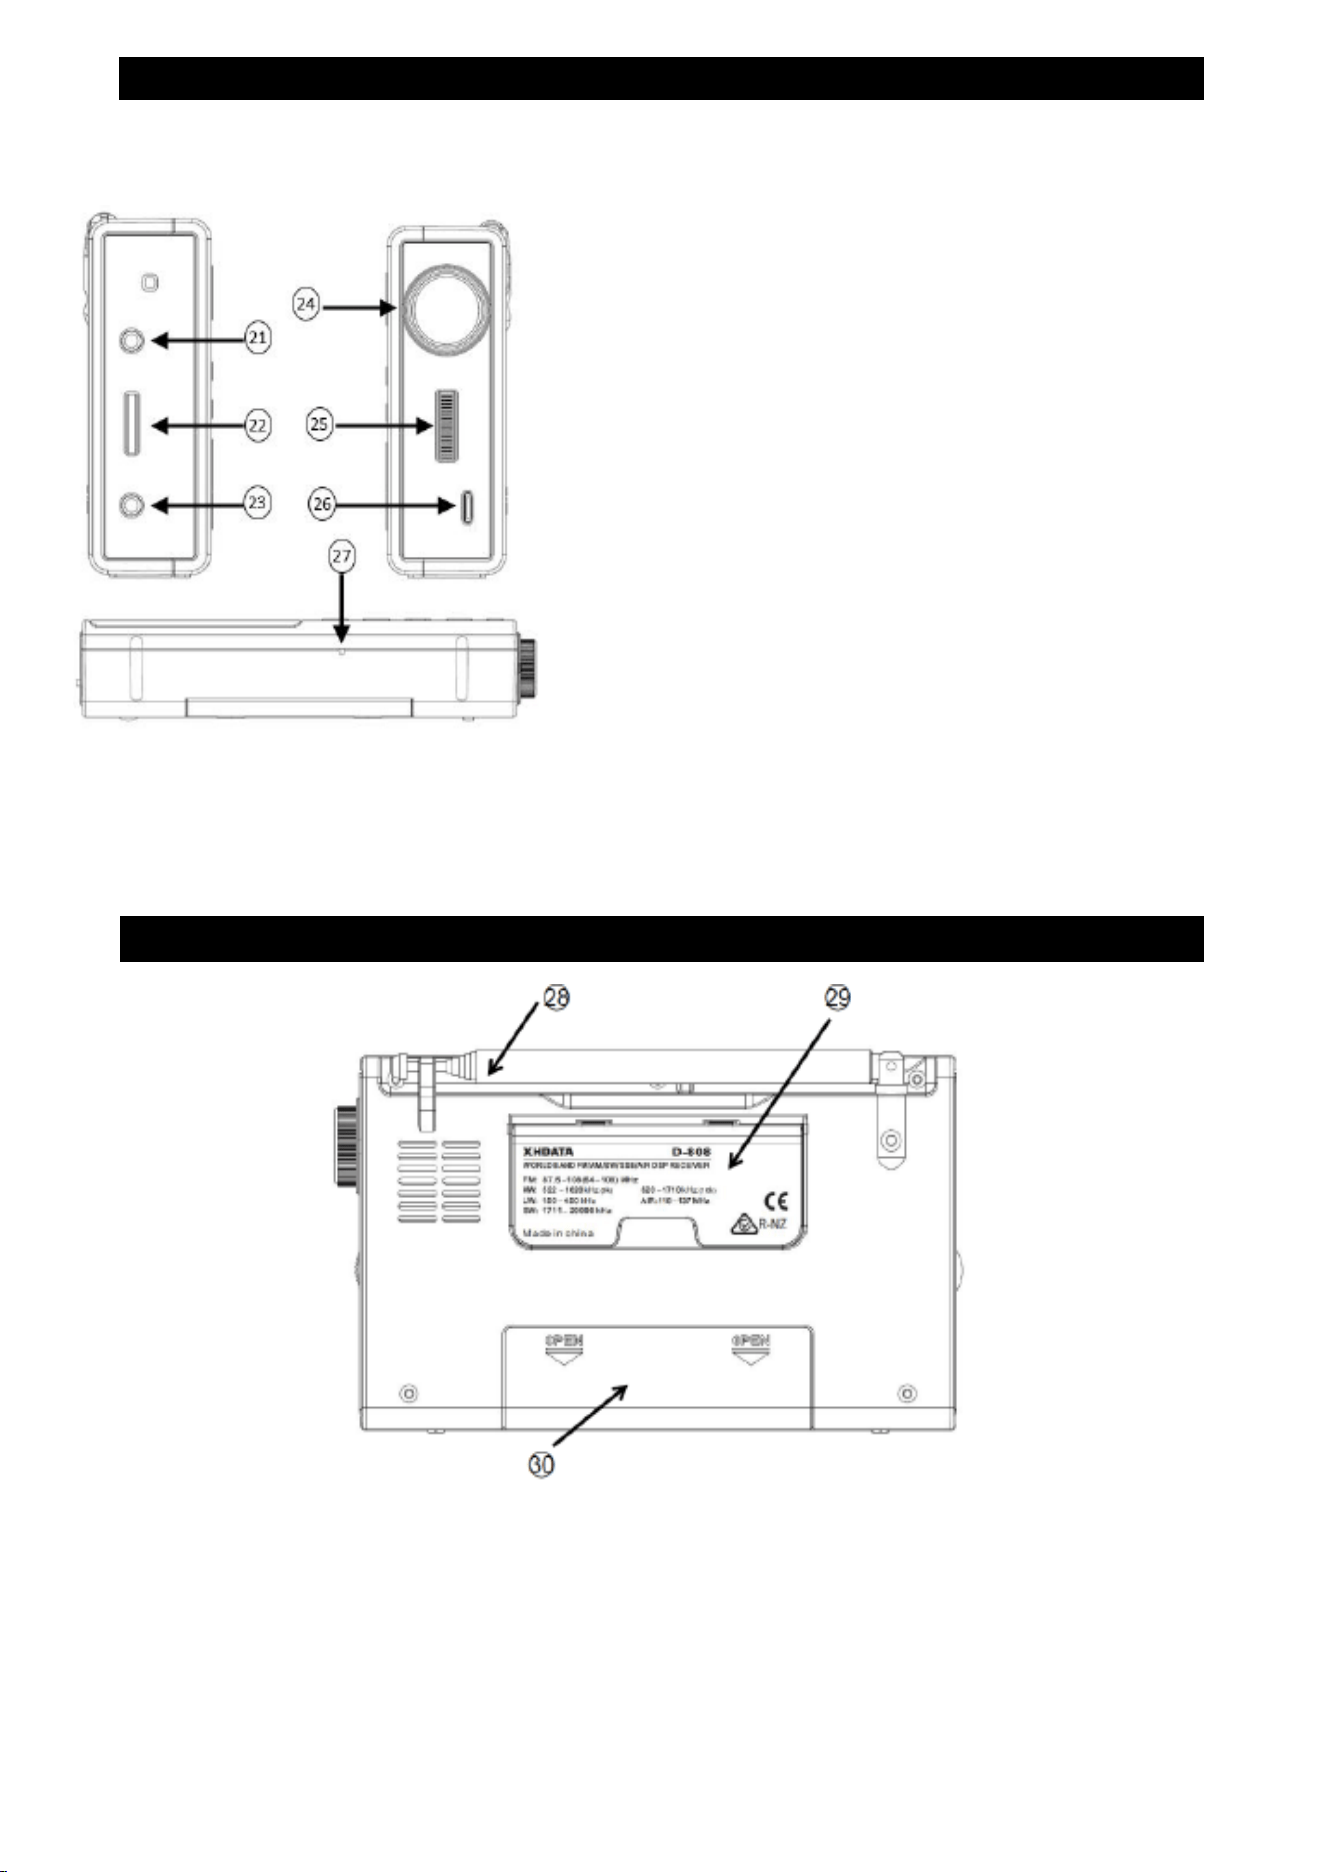
Radio - Side Controls
㉑ External antenna jack (3.5mm)
㉒ Volume control
㉓ Headphone jack (3.5mm)
㉔ Main Tuning knob(push in for
FAST / SLOW / STOP)
㉕ Fine tuning / clarify control
for SSB
㉖ USB Charging port
㉗ Radio reset button access hole
Radio-Rear
4
㉘ Whip antenna used for FM, SW and AIR bands
㉙ Kickstand
㉚ Battery door (18650 battery included)

5
WARNUNG
• Do not expose the radio to water, moisture or excessive humidity.
• Operating temperature range is 0°- 40°C (32°—104°F).
• Remove the battery immediately if liquid has been spilled or debris have fallen into
the unit.
• Clean with a dry cloth. Don’ t use detergents or chemical solvents.
• Do not attempt to open the unit. This prevents damage to sensitive components.
QUICK START GUIDE
• When the battery is fully charged, the battery will power off automatically.If the
screen doesn’t display,please take the battery out and install again,or charge for the
radio until the screen display.
• In this manual, the terms “press” and “long press” are used. "Press" means to press
the button briefly."Long press" means to press the button and hold it for 2 seconds.
When making settings,wait a few seconds after making the setting and the radio will
save the setting and exit setting mode.
FUNCTIONS & OPERATIONS EXPLAINED
Options and Setup
1.FM Tuning range—— [ FM ] bu�on
The radio can be set for different tuning ranges that are convenient for FM
broadcasting in different regions of the world. With the radio off, long-press the [FM]
button. The current setting, showing the lowest frequency of the band, is displayed.
To change the setting, press the FM button again to cycle through the four options:
1.Install 1 x 18650 battery in the battery compartment, taking care to align the polarity
of the battery (+/-) .
2.Turn on the radio by pressing the [POWER] button and then press any button to
skip the sleep time setting.
3.Adjust the volume by rotating the [VOLUME] knob on the left side ofthe radio.
Rotate the small wheel up for more volume and down for less volume.
4.Select band by pressing the band button —— FM, MW, SW or AIR Band.
5.Rotating the [TUNING] knob on the upper right side to locate a desired station or by
directly tuning to a station:
a) First, select a band — FM,MW,SW or Air Band.
b) Quick press the [FREQ] button
c) Enter the frequency on the keyboard
d) If the radio does not tune to the frequency, press [FREQ] button again to
complete the entry.

6
• 64.0 MHz
• 76.0 MHz
• 87.0 MHz
• 87.5 MHz
2. Medium Wave Step——[ 9/10 kHz ] bu�on
The tuning step for medium wave (MW) can be set for 9 kHz or 10 kHz. To change
the setting, turn the radio off and long-press the [9/10 kHz] button (number 0) ,and
then press the button again to switch the two options, the current setting is displayed.
3. Long wave——[ LW / MW ] Bu�on
The LW band is not enabled by default.To enable it, turn the radio off and long press
the [LW/MW] button. The radio will display the current status of the setting, “LW ON”
or “LW OFF”.To change the setting, press the [LW/MW] button.
When LW is enabled , pressing the [LW/ MW ] with the radio on selects either the LW
or MW band.When it is disabled, the LW option is not available.
4. Temperature——[ DISPLAY ] Bu�on and [ number 3 ]
The temperature scale for display, Fahrenheit or Centigrade, may be selected. With
the radio off,repeatedly press the [DISPLAY] button until the temperature is displayed,
then long-press the [number 3] to change the setting. Repeatedly press the button to
toggle between °F and °C.
5. Se�ng the �me——[ TIME SET ] Bu�on
The radio clock supports 24-hour time display only.
To set the clock, turn the radio off and long press [TIME SET] button.The radio will
display“TIME”Key in the 4-digit time to set.Note that time setting mode automatically
exits after about 5 seconds with no key pressed.
The radio has the option to automatically set the time from an FM broadcast station
that provides it (refer to the RDS topic for more on this). To enable automatic setting,
press the [TIMESET] button with the radio off. Use the [UP arrow] key to switch
between Auto and Manual modes.
(Note: Many FM stations do not broadcast time,and those that do may not be
accurate. You must manually tune the station with time information for the time to be
set from RDS.)
6. Se�ng the alarm——[ ALARM ] Bu�on
With the radio turned off, long press the [ALARM] button. Use the 0-9 keys to directly
enter the alarm time.
Quickly press the [ALARM] button, then the "ALARM" icon will flash. Press the [Up
Arrow] or [Down Arrow] button to select the way the alarm rings:
① Radio Broadcast Alarm ② Buzzer Alarm ③ Alarm off.
· Buzzer Alarm:By default, the radio will sound a buzzer when the alarm time is
reached.

7
· Radio Broadcast Alarm :A speaker icon will appear on the screen, indicating that
the alarm will play the last radio station tuned when the alarm time is reached.
When the alarm goes off, press the [Power] button to turn off the alarm or press any
other button to sleep for another 10 minutes.
7. Se�ng the sleep �mer——[ POWER ] Bu�on
To use the Sleep Timer, quick press the [POWER] button. The Sleep Timer will
automatically shut off the radio after the set amount of time expires. The display will
cycle through minutes 120, 90,60, 45,30, 15. Setting the value to “ON” turns off the
Sleep Timer.
8. Beep——[ BEEP ] bu�on
The radio as it comes from the factory beeps after each key press.To disable this,turn
the radio off and long-press the [BEEP] button (number 5). Long press the button to
change the option.
9. Display light——[ LIGHT ] bu�on
The display is automatically illuminated for about 10 seconds when you press a key or
turn the tuning knob.Pressing the [LIGHT] button turns it on indefinitely. When set,the
light stays on even when the radio is turned off. Press [LIGHT] button again to turn
the display lighting off.
10. Lock——[ INFO ] bu�on
With the radio on or off, long press the [INFO] button to disable the other keys on the
radio. Long press again to re-enable them. This feature is useful to prevent the radio
from being turned on accidentally.
11. Antennas
Antennas capture radio signals that are processed by the radio. This radio has 3
antenna options:
• Internal ferrite bar antenna used for LW/MW
• A 25.5” telescopic whip antenna for SW/FM/AIR
• A 3.5mm jack to connect an external antenna of your choice for SW/FM/AIR
Caution: Ensure that an external antenna is clearfrom power lines.
The internal ferrite bar antenna is directional. Physically turn the radio for best
reception. You may find that moving the radio to a different location, even slightly,
greatly improves reception on all bands.
Radio operation
1. Search Radio Frequency
① Manual Search
Turn the [Tuning] knob to change the frequency,Turn the [Fine Tuning] thumb wheel
to fine-tune the frequency in smaller steps, or press the [Up or Down Tuning Arrow]
to change the frequency.
Note: Tuning speed

The tuning knob has FAST, SLOW and STOP modes. Switch between them by
pressing the [ Tuning ]
knob in towards the radio. The display shows the mode in small print.
· Fast - advance 5 kHz (3 kHz on LW, 9/10 kHz on MW, 25kH on AIR and 100 kHz
on FM)
· Slow - advance 1 kHz (10 kHz on FM)
· Stop - does not advance
② Auto Search
• ATS Func�on
Avoid areas with high electromagnetic interference when using the ATS function to
obtain more
accurate search results.Noise,such as from desktop computers can be confused with
a radio station.
Long press a band button ([FM],[LW/MW],[SW],[AIR]) and the screen displays"ATS_
_ _" to enter the automatic search mode. In this mode, the radio will automatically
search all frequencies in the band and store all strong signals in the memory station.
(Note:strong signals are not necessarily generated by broadcast towers,they may also
be strong interference signals.)
• Up and Down Tuning Arrow
To search the frequency band starting with the current frequency:
Select the desired frequency band, then long press the [Up or Down Tuning Arrow],
the radio will start searching the selected frequency band,forward or backward, and
stop searching after locating for a strong signal. Short pressing the [Up or Down
Tuning Arrow] will also stop the search.
( Note: Stations found in this search are not stored in the station memory. )
③ Directly input the radio frequency
Press [FREQ] button to enter the keyboard input radio mode, enter the radio station
you want to search through the numeric keypad, and press [FREQ] button again to
confirm. The frequency band will jump to the frequency band you entered.
( Note: If the entered radio frequency does not exist in this band, the screen will
display an Error symbol.)
2. Memory System
· Manual
A memory location stores the station frequency along with the stereo setting for FM
and the bandwidth for LW/MW/SW.
This radio has 500 memory locations,100 for each band,organized into 10 pages with
10 memory locations each. Therefore, the storage location of each radio station is "
page (0-9) -code number (0-9)", for example "P18" refers to the 8th slot on page 1.
Select the desired band(FM, MW, LW,SW or AIR) first.Then to save or retrieve a
station in memory, first establish the current memory page by pressing the [PAGE]
button and then pressing the page number button (0-9). Once a page is selected,
8

9
a frequency is stored to a memory
location within the page by long pressing the position number button (0-9). After the
station is successfully saved, the radio will display “PAGE—SAVE”.
(NOTE: To recall a saved station, just press the number button (0-9) of the memory
position within the current page. After the station is successfully retrieved, the radio
will display “ PAGE—LOAD”.)
• Auto Tune Storage (ATS)
This radio has the capability to scan the bands and automatically store stations into
memory.It loads them sequentially by page,and by position within the page,
overwriting any previously stored stations. ATS is invoked by first selecting the band
and then with a long press of the band button, FM,LW, MW, SW or AIR. ATS stores
relatively stronger stations, and may skip some that are barely audible.
Note that for shortwave, the radio only scans within the international broadcast
frequencies, not amateur radio or commercial bands. Refer to the SW topic.
3. Bandwidth (BW)
While radio signals are centered on one frequency, they actually occupy a range of
frequencies.Sometimes two stations with adjacent frequencies can interfere with each
other.This problem can be lessened by reducing the frequency range (bandwidth) the
radio tunes.This feature is available on LW,MW and SW on this radio,but typically only
used on SW.
The bandwidth is selected by pressing the [ AM BW ] button. The width is shown on
the display ,and repeated presses of the button will cycle through the values:6,4,3,2.5,
2,1.8 and 1 kHz.The bandwidths in SSB mode are 4, 2, 2.2, 1.2, 1, and 0.5 kHz.
Generally, the higher the bandwidth, the better the audio fidelity and the lower the
bandwidth, the lower the interference and noise.
4. Squelch Func�on
Press the [ Tuning ] knob for about 5 seconds,squelch mode will start.Squelch Mode
works on all bands.
When set, the radio remains silent until a transmission stronger than the set level is
received. To activate the feature, long press the tuning knob inwards, and when the
word “Squelch” appears in the display immediately rotate the tuning knob to begin
setting the squelch level. The values are 1-9 and OFF. The higher the number, the
stronger the signal must be to activate the radio. The optimum level is usually the
highest number without background noise. Turning squelch off may enable reception
of weak signals that would otherwise not be heard.
(Note: If you find your radio not receiving any signals,check to make sure the squelch
is not turned on unintentionally. )

5. Display Mode
The display can be set to show different information;press the [ DISPLAY ] button to
cycle between signal strength/signal to noise ratio, time, temperature and alarm time.
Signal strength is expressed in dBu units, the larger the number, the stronger the
signal. The signal to noise radio is expressed in dB units; the larger the number, the
greater the signal quality, with a value of 0 indicating that signal and noise are equal.
The value is also shown as 0 when there is no signal at all.
6. FM Recep�on
To receive FM broadcasts, fully extend the whip antenna and press the [ FM ] button.
Here are your tuning options:
1. Press [FREQ] button, enter the frequency of the station,and press [FREQ] button
again.
2. Long press the [FM] button to activate ATS to store all strong stations into
memory (see section on the Memory system for how to access them).
3. Press the [Up or down arrow] keys to go to the next frequency.
4. Long press the [Up or down arrow] to scan for the next strong station.
5. Rotate the tuning knob to tune stations.
FM STEREO
Some FM stations broadcast in stereo.In this case,STEREO appears on the display.
Listening to the two stereo channels requires stereo headphones.Stereo can be
turned off and on with the [FM ST] button. It may be automatically disabled for a
weak signal.In some situations, you may get improved reception by turning stereo off.
The stereo setting is stored in the station memory when the frequency is saved.
7. FM RDS (radio data system)
RDS is a means for FM radio stations to transmit data along with their programming.
Not all FM
stations employ RDS,but the ones that do typically transmit the station name,the
station type, the song artist and title when playing music, and occasionally the time.
When RDS is present, the RDS icon on the display is shown and the RDS data
information appears at the bottom of the display. Use the [INFO] button to cycle
through the RDS data options. This radio supports the following RDS information:
•PS—Program Service Name
• DATE—Date and Time (“NO DATE” if not present)
• PTY—Program type: News, Drama, Rock music… (“NONE” if not present)
• RT— Radio Text may contain artist and title information for music (“NO RT” if not
present) RDS date information can be used to automatically set the radio clock.
Refer to the Clock Setting topic for additional information.
10

8. MW (medium wave)
To receive MW broadcasts, press the [ LW/MW ] button. Here are your tuning options:
1. Press [FREQ] button, enter the frequency of the station, either 3 or 4 digits.
2. Long press the [LW/MW] button to activate ATS and store all strong stations i nto
memory (see section on the Memory system for how to access them).
3. Press the [ Up or down arrow ] to go to the next frequency.
4. Long press the [ Up or down arrow ] to scan for the next strong station.
5. Rotate the tuning knob to tune stations.Rotate the radio for the best reception.
Refer to the Antenna topic for more information.
9. LW (long wave)
Long wave reception initially defaults to 'off'.Refer to the Settings topic to learn how to
enable it. With the radio turned off, pressing the [LW/MW] button when long wave is
enabled switches between the two bands. The display shows the selected band.
Here are your tuning options:
1. Press FREQ, enter the frequency of the station.
2. Long press the [ LW/MW ] button to activate ATS to store all strong stations into
memory (see Memory system topic for how to access them).
3. Press the [ Up or down arrow ] to go to the next frequency.
4. Long press the [ Up or down arrow ] to scan for the next strong station.
5. Rotate the tuning knob to tune stations.
Rotate the radio horizontally for the best reception. Refer to the Antenna topic for
more information.
10. SW (shortwave)
Fully extend the whip antenna and press the [SW] button to select the shortwave
function and tune to the previously accessed shortwave frequency.Repeated presses
of the button cycle through the 14 international shortwave broadcast bands The
display shows which meter band is selected briefly after the button is pressed.
The bands are:
• 120m (2300 - 2495kHz)
• 90m (3200 - 3400 kHz)
• 75m (3900 - 4000 kHz)
• 60m (4750 - 5060 kHz)
• 49m (5730 - 6200 kHz)
• 41m (7100 - 7300 kHz)
• 31m (9250 - 9900 kHz)
• 25m (11500 - 12160 kHz)
• 22m (13570 - 13870 kHz)
• 19m (15300 - 15800 kHz)
• 16m (17480 - 17900 kHz)
• 15m (18900 - 19020 kHz)
11

• 13m (21450 - 21850 kHz)
• 11m (25670 - 26100 kHz)
Note: The frequency range of the shortwave band is stipulated by international
organizations such as the International Telecommunication Union (ITU). Although
these ranges are relatively fixed, they may be adjusted according to the needs of
different countries and regions.
Here are your tuning options:
1. Press [FREQ] button and enter the frequency of the station.You may need to press
[FREQ] button again to complete.
2. Long press the [SW] button to activate ATS to store all strong stations into memory
(see Memory System topic for how to access them). Note that only the stations within
the 14 international shortwave bands are scanned.
3. Press the [ Up or down arrow keys ] to go to the next frequency.
4. Long press the [ Up or down arrow keys] to scan for the next strong station.
Note that only the 14 international shortwave bands are scanned.
5. Rotate the tuning knob to tune stations. Position the radio for the best reception.
Refer to theAntenna topic for more information.
11. Single Side band (SSB)
To decode shortwave SSB signals on this radio, first tune the station for the strongest
signal. Then press the SSB button, the display will show the side band setting, either
upper side band (USB) or lower side band (LSB). In SSB mode, the INFO button
switches between the two side bands. LSB is most often used for frequencies below
7300 kHz and USB for those over 14000 kHz, with exceptions.
Refer to the Bandwidth topic for how to improve shortwave reception.
To exit SSB mode, press the SSB button again and the radio will display “ NORMAL”.
12. Fine Tuning
In SSB mode, use the [FINE TUNE] knob on the right side of the radio.Turn it upward
and the screen will display "FINE 1+99"; turn it downward and the screen will display
"FINE 1-99", which is a function for fine-tuning the frequency.The numeric value is the
offset +/- from the displayed frequency.
In other band modes, rotate the [FINE TUNE] knob to make slight adjustments to the
frequency or totry to reduce interference from adjacent stations.
13. AIR Band
To receive aviation transmissions,fully extend the whip antenna and press the AIR
button. Here are your tuning options:
1. Press [ FREQ ] ,enter the frequency of the station, and press [FREQ] again if
necessary.
2. Long press the [ AIR ] button to activate ATS to store all strong stations into
memory (see section on the Memory system for how to access them).
3. Press the [ Up or down arrow ] to go to the next frequency.
12

4. Long press the [ Up or down arrow ] to scan for the next strong station.
5. Rotate the [Tuning] knob to tune stations. Air band is best received near airports.
You can look up the approach frequency for your closest airports online and set
the radio for these frequencies.
14. Reset
Should the radio become inoperable,you may attempt to reset the radio by pushing a
small object such as a paperclip into the Reset hole until you feel a click.
Take care not to press too hard and damage the radio.
Note: The reset hole is located on the bottom of the radio.
·Other Operations
1. Earphone Jack
For private listening, use headphones or earbuds.
2. DC Jack
You can power your radio with a correct pins and polarity of AC wall adapter via this
DC jack.
Please make sure the DC volt is the same as marking on the radio.Otherwise the
radio will not work or may be damaged.
3. External Antenna Jack
Connect an external antenna with this 3.5 mm phone jack to improve the reception
on FM, SW and AIR Bands.
4. Back Stand
Flip the panel out to prop up your radio for easy use of control, best audio and for
viewing positioning.
13
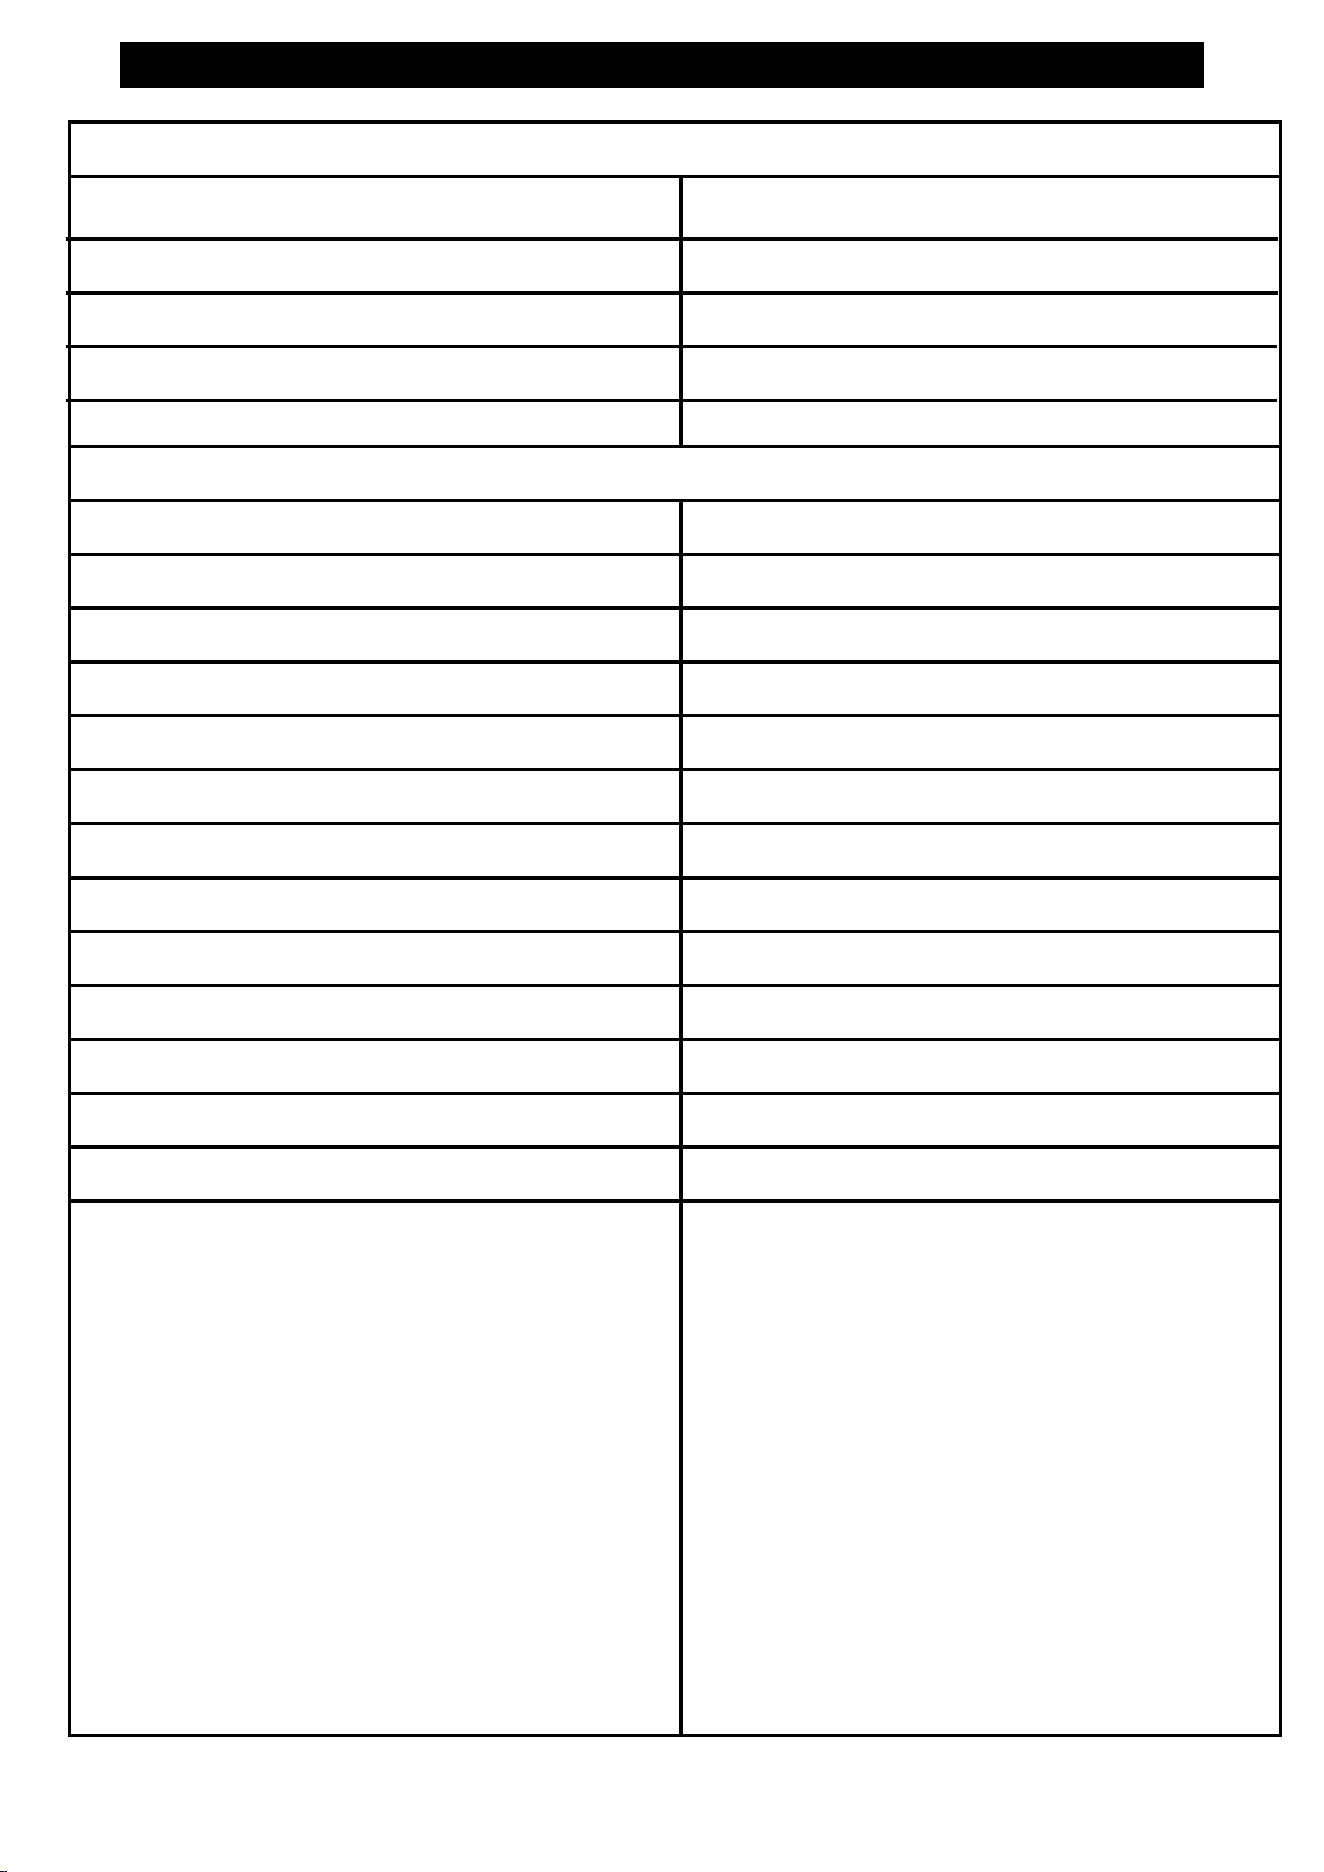
LW:
SW:
Specifications
Radio bands:
Accessories: 1 x storage bag
1 x external antenna
1 x Type-C charging cable
1 x 18650 battery
1 x English user manual
Weight:
Speaker:
Earphone Jack:
Battery:
DC input voltage:
Number of memories:
AM Selectivity:
LW:
AIR:
SW:
Dimensions:
AM(MW):
8Ω 1 W
3.5mm
1 x 18650
>80dB
500 (100 per band)
5V
0.5 mV/m
10 mV/m
0.5 µV
10 µV
AM(MW):
FM:
FM:
AIR:
265g (without battery
157(W) x 92(H) x 32(D) mm
Sensitivity:
>3 µV
64 - 108 MHz
520 - 1710 kHz
1711 - 29999 kHz
150 - 450 kHz
118 - 137 MHz
14

XHDATA
Skype: radiwow
TikTok: XHDATAradio
YouTube:Xhdata Radio
Facebook: Xhdata Radios
Web:www.xhdata.com.cn
E-mail: [email protected]
Whatsapp: +86 18025193267