VOICE CHANGER
User Guide
Thank you for choosing i9 Pro!
This guide will help you set up and
start using your device quickly.
Real-Time Voice Changing
Multiple voice effects
Plug & Play
No driver required
Multi-Platform Compatibility
Phone / PC / Console
P
rofessional Sound
High-quality, Low-noise audio
Gaming Live Streaming Voice Chat
Karaoke
& Fun
PERFECT FOR
QUICK START
Get started in 3 easy steps!
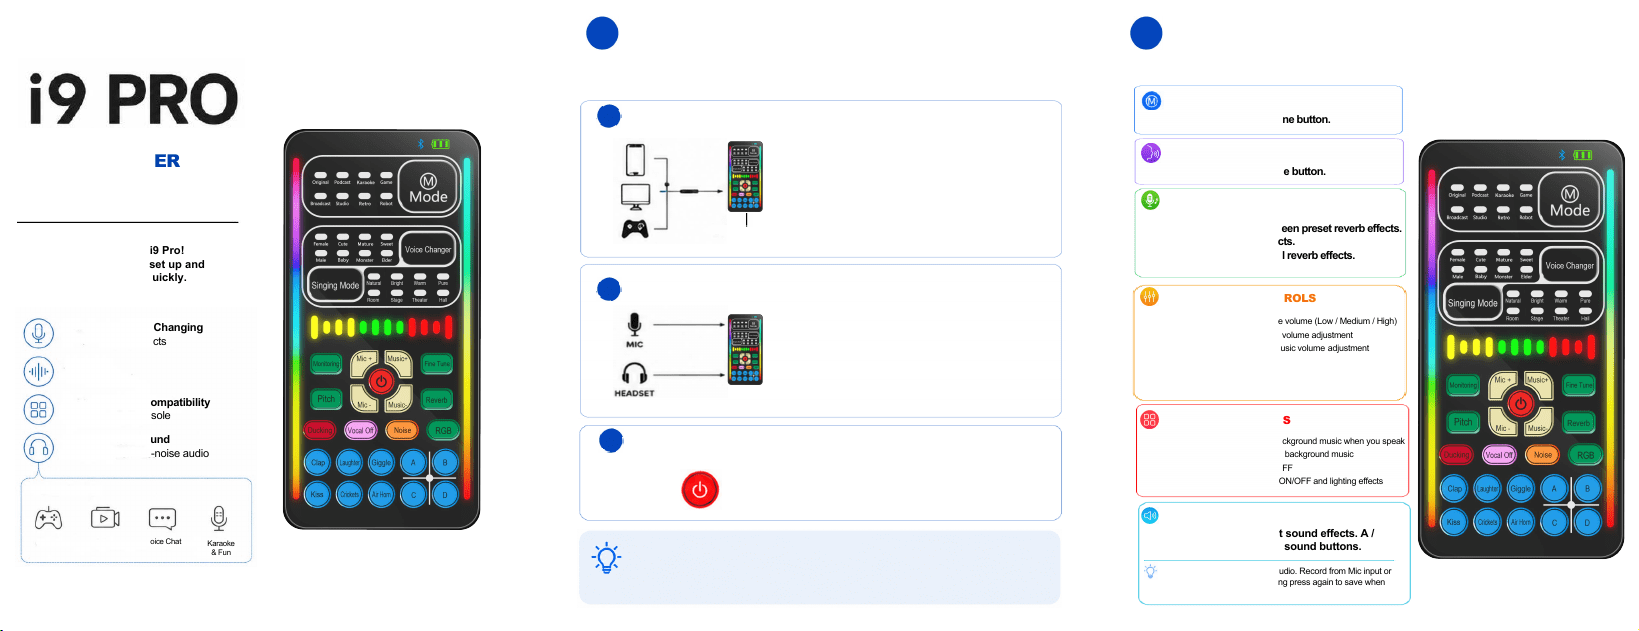
CONTROL PANEL OVERVIEW
All-in-one control for professional sound.
VOICE CHANGE
SINGING MODE
Fine Tune
Pitch
Reverb
FUNCTION BUTTONS
Ducking Automatically lowers background music when you speak
Vocal Off Removes vocals from background music
Noise Noise reduction ON / OFF
RGB Controls RGB lighting ON/OFF and lighting effects
SOUND EFFECTS
Short press to play preset sound effects. A /
B / C / D are customizable sound buttons.
MODE SELECTION
Switch sound modes with one button.
Switch voice modes with one button.
One-button switching between preset reverb effects.
Top row: Vocal reverb effects.
Bottom row: Environmental reverb effects.
ADJUSTMENT CONTROLS
Monitoring 3-level headphone volume (Low / Medium / High)
Mic+ / Mic- Microphone input volume adjustment
Music+ / Music- Background music volume adjustm
ent
Long press to record custom audio. Record from Mic input or
Music input — your choice. Long press again to save when
the lights stop flashing.
1 2
POWER ON
Press and hold the Power button for 2
seconds to turn it on.
CONNECT MIC & HEADPHONES
Plug your microphone into
•
the MIC port.
Plug your headphones or
headset into the
HEADSET jack for real-
time monitoring.
•
Use a TRRS or USB-C cable
for a phone, PC, or gaming
device.
Connect to the AUX OUT /
OTG port.
•
•
AUX OUT / OTG
CONNECT YOUR DEVICES
Note: Search for “i9 Pro” to connect via Bluetooth. After successful pairing, Bluetooth is
used for music input only. Audio output depends on the connected device—please select
the appropriate output port and cable accordingly.
1
2
3
Fine-tunes the voice effect. Voice-changing mode only.
Voice pitch adjustment
3-level reverb effect control
CONNECTION GUIDE
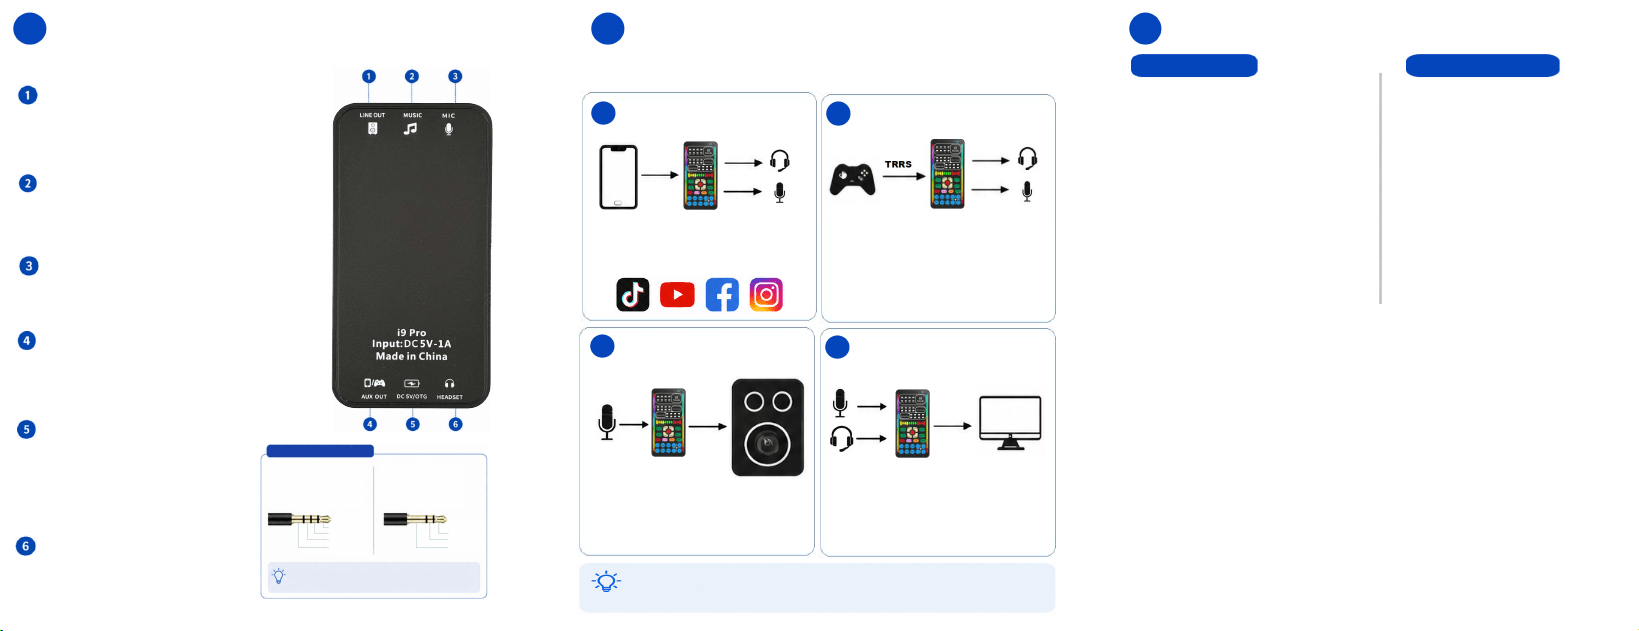
Know your ports
USAGE SCENARIOS
TRS / TRRS CABLE GUIDE
TRRS (4-POLE)
TRS (3-POLE)
4 sections – Audio + Microphone
For smartphones, computers,
cameras, and headsets.
3 sections – Audio Only
For speakers, amplifiers,
recording devices.
Left Audio
Right Audio
Ground
Microphone
Left Audio
Right Audio
Ground
NOTE: Please use the correct cable type for
each port to ensure optimal performance.
Multiple ways to use i9 Pro
1
2
3
4
MOBILE LIVE STREAMING /
VOICE CHAT
GAMING VOICE CHAT
EXTERNAL SPEAKER MODE
PODCAST/RECORDING
•Connect to the OTG or AUX OUT port
•Perfect for TikTok, YouTube,
Facebook Live, Instagram, and more.
TRRS
USB-C
•Connect to the controller headphone jack
on PS4 / PS5 / Xbox / Switch.
•Real-time voice changing for epic gaming!
TRS
USB-C
•Connect background music via Bluetooth
or TRRS cable to the MUSIC input.
•Connect to active speakers via TRS
cable for audio output.
•Perfect for parties, events, and karaoke.
•Connect to a computer via the OTG
port.
•High-quality audio for podcasting,
streaming, and recording.
3 4 5
TROUBLESHOOTING & NOTES
USAGE TIPS
•Use a TRRS cable when voice input is
required (phones, game consoles).
•Use a TRS cable when connecting external
speakers.
•Fully insert all cables before powering on the
device.
•Start with low volume levels and increase
gradually to avoid noise or distortion.
•If noise or distortion occurs, lower the MIC
volume and check that all cables are fully
inserted.
•Enable Noise Reduction in noisy
environments for clearer voice.
•Ducking Mode is recommended when using
background music during live streaming.
COMPATIBILITY NOTES
•Voice changing performance depends on
the connected device and application.
•Some phones, games, or apps may not
support third-party voice effects due to
system limitations.
•Game console voice chat support may
vary by platform, game, and system
settings.
•Nintendo Switch voice chat support
depends on the game and system mode
(Handheld or Dock mode).
•For devices without a 3.5 mm audio jack,
an appropriate adapter is required.
Note: Use the correct cable and port for each device to avoid connection failure.
If your device is not listed, contact us via the purchase platform for support.
LINE OUT
audio output port for connecting speakers,
amplifiers, or recording devices to output
sound.
Recommended: TRS cable connection.
MUSIC
Background music input port for connecting
smartphones, computers, or other audio
devices to input accompaniment audio.
Recommended: TTRS cable connection.
MIC
Microphone input port for connecting
condenser microphones or external
microphones for vocal input.
AUX OUT
3.5mm audio output port for connecting
smartphones, cameras, or other devices for
monitoring or recording.
Recommended: TRRS cable connection.
DC5V/OTG
Power and OTG data interface for charging
the device or connecting to a computer or
Type-C mobile phone for sound card / live
streaming use.
Recommended to use a data transmission
cable for cleaner and more stable signal
performance.
HEADSET
3.5mm headphone port for connecting
headphones or headsets for real-time
monitoring.
FCC Caution.
This device complies with part 15 of the FCC Rules. Operation is subject to the following two
conditions: (1) This device may not cause harmful interference, and (2) this device must accept
any interference received, including interference that may cause undesired operation.
Any Changes or modifications not expressly approved by the party responsible for compliance
could void the user's authority to operate the equipment.
Note: This equipment has been tested and found to comply with the limits for a Class B digital
device, pursuant to part 15 of the FCC Rules. These limits are designed to provide reasonable
protection against harmful interference in a residential installation. This equipment generates uses
and can radiate radio frequency energy and, if not installed and used in accordance with the
instructions, may cause harmful interference to radio communications. However, there is no
guarantee that interference will not occur in a particular installation. If this equipment does cause
harmful interference to radio or television reception, which can be determined by turning the
equipment off and on, the user is encouraged to try to correct the interference by one or more of
the following measures:
-Reorient or relocate the receiving antenna.
-Increase the separation between the equipment and receiver.
-Connect the equipment into an outlet on a circuit different from that to which the receiver is
connected.
-Consult the dealer or an experienced radio/TV technician for help.
*RF warning for Portable device:
The device has been evaluated to meet general RF exposure requirement. The device can be
used in portable exposure condition without restriction.