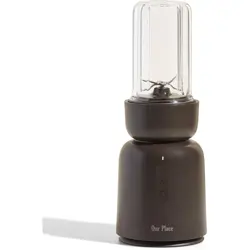
APL.MCK.ESN
120V 60Hz 1000W
750mL / 3 cups
Blender Base: 5.3lbs
Blender Base + 750mL Blending Vessel and Blade
Base: 6.3lbs
Contents
Important Safeguards
Safety Precautions
Parts and Accessories
Control Panel
Before First Use
Instructions for Use
Helpful Tips
Cleaning and Maintenance
Troubleshooting
Replacement Parts
Warranty
1
3
7
8
9
10
13
14
15
17
18
IMPORTANT
SAVE THESE
INSTRUCTIONS
Please read and keep these instructions
handy. These instructions will help you
learn to use your Splendor Blender
properly and thoroughly so that you can
achieve consistent, professional results.
FOR HOUSEHOLD USE ONLY. NOT
INTENDED FOR COMMERCIAL USE.
Happiness, from Beginning To Blend
It’s your smooth operator, morning manager, and sous chef. From making your
must-have daily smoothie, to aiolis, dips, pesto, milkshakes, and more, the
Splendor Blender will delight you every day (and sometimes multiple times a
day). It’s got a pulse on exactly what you need to take on the world. Happy
blending!
Splendor Blender
User Manual
TM
Read all instructions prior to using the blender and its accessories.
1. This product is only suitable for home use; please do not use it for other
purposes.
2. DO NOT run this product unattended.
3. This product is not intended to be used by people (including children) who
have physical, sensory or mental impairments or lack of experience and
knowledge, unless they are supervised or instructed by a person
responsible for their safety in relation to the use of the appliance. Close
supervision is necessary when any appliance is used by or near children.
Children should be supervised to ensure they do not play with this product.
4. This product is limited to use with matching components (including the
product itself and the company's independent sales) connectors, main
bodies and other components. DO NOT use non-matching components to
5. Please check whether the Blender Base, Blending Vessels and other parts
are in good condition before use. If any damage is found, please stop using
it and contact Our Place at [email protected]. DO NOT disassemble
personal injury.
6. DO NOT use this product empty (with no ingredients in the Blending
Vessel) or overloaded (the amount of ingredients exceeds the MAX fill line).
7. The running speed of this product has been set to an ideal state, and no
adjustment is required.
8. When installing the Blade Base, please confirm that the sealing ring is
installed properly to avoid leakage; please confirm that the Blending Vessel
and the Blade Base are installed in place; DO NOT install the Blade Base on
IMPORTANT SAFEGUARDS
When using electrical appliances, especially when children are present, basic
safety precautions should always be followed to reduce the risk of fire, electric
shock, personal injury and/or property damage, including the following:
SAVE THESE INSTRUCTIONS.
FOR HOUSEHOLD USE ONLY. NOT INTENDED FOR COMMERCIAL USE.
WARNING
1
the Blender Base alone. See page 10 for instructions on how to install the
Blade Base to the Blending Vessel.
Blending Vessel and other parts have been properly installed in place, so as
touching moving parts.
11. When the appliance is in use, DO NOT move the appliance, lift the Blending
Vessel or touch the Blade Base, motor and other movable parts. Doing so
may cause personal injury or damage the appliance.
12. Before removing, adjusting or cleaning any parts of this product, please
disconnect the power supply to avoid leakage, accidental activation of the
product, and personal injury.
13. The continuous working time of the mixing function of this product should
not exceed 1 minute. If you need to blend for longer than one minute, blend
for 1-minute intervals. After each 1-minute interval, allow the motor base to
cycle. Do not run for more than 3 consecutive 1-minute intervals to prevent
the contents from overheating. After 3 consecutive working cycles,
disconnect the power supply and cool down for 15-20 minutes before
blending again.
appliance, and then clean up to avoid injury or damage to the product.
15. When blending, it is recommended to add an appropriate amount of liquid
to the Blending Vessel before using.
SAVE THESE INSTRUCTIONS.
FOR HOUSEHOLD USE ONLY. NOT INTENDED FOR COMMERCIAL USE.
SAVE THESE INSTRUCTIONS.
FOR HOUSEHOLD USE ONLY. NOT INTENDED FOR COMMERCIAL USE.
SAVE THESE INSTRUCTIONS.
FOR HOUSEHOLD USE ONLY. NOT INTENDED FOR COMMERCIAL USE.
2
3
1. Carefully observe and follow all warnings and instructions. This appliance
contains electrical connections and moving parts that potentially present
risk to the user.
2. Take your time and exercise care during unpacking and setup. This
appliance contains sharp, loose blades that can cause injury if mishandled.
3. Take inventory of all contents to ensure you have all parts needed to
properly and safely operate your appliance.
4. DO NOT use the appliance for anything other than its intended use. DO
NOT use this appliance outdoors.
5. BLADES ARE SHARP! HANDLE WITH CARE. To avoid injury, do not handle
or touch any blade edge. ONLY grasp blades by the outer perimeter of the
Blade Base. Failure to use care when handling the blades will result in
laceration.
6. NEVER store the Blade Base in the Blender Base unattached to any
Blending Vessel. An exposed blade can present a laceration hazard.
7. ALWAYS use the appliance on a dry, stable, and level surface.
8. DO NOT operate the appliance within 12 inches of the edge of the work
surface or counter.
9. Vents on the bottom of the appliance are provided for ventilation to ensure
reliable motor operation and to prevent overheating.
10. To prevent a fire hazard, v
ent openings (on the underside of the Blender
Base) should be free of dust and lint and never obstructed with flammable
materials such as newspapers, tablecloths, napkins, dishtowels, place mats
or other similar type materials.
11. DO NOT allow the appliance or the cord to hang over the edges of tables or
work surface.
12. ONLY use attachments and accessories that are provided with the
appliance or recommended by Our Place. The use of attachments
(including canning jars) not recommended or sold by Our Place may cause
fire, electric shock, or injury.
13. DO NOT place any Our Place parts and accessories (including the Blending
Vessels) in a microwave, oven, or in a stovetop pot, or immerse in boiling
water, as this may result in damage to the part.
14. Before each use, inspect the Blade Base and other parts for damage. DO
NOT operate the appliance with any damaged parts. DO NOT operate the
SAFETY PRECAUTIONS
4
appliance with a damaged cord or plug, or after it has been dropped or
damaged in any manner. If any damage is found, please stop use and
contact Our Place at [email protected]. DO NOT disassemble the
or cause accidents.
15. Before use, wash all parts. Following cleaning and maintenance instructions
on page 14.
16. DO NOT attempt to sharpen blades.
17. DO NOT overfill the Blending Vessel. Fill only to the MAX line in each
respective Blending Vessel. Exceeding the indicated MAX lines can result in
leakage, and may lead to dangerous pressurization.
18. NEVER operate the appliance without the Blade Base in place. DO NOT
attempt to defeat the interlock mechanism. Ensure that the Blending Vessel
is properly installed before operation.
19. AVOID CONTACT WITH MOVING PARTS! Keep hands, hair, clothing, and
utensils out of and away from blades while blending to reduce the risk of
severe personal injury.
20. DO NOT allow any part of the appliance to contact hot surfaces, including
stoves and other heating appliances. DO NOT place the appliance near a
hot gas or electric burner.
21. DO NOT expose the Blending Vessels to extreme heat temperature
changes. They may experience damage.
22. Risk of thermal burn injury due to excessive pressure in the container. Do
not blend hot liquids.
23. NEVER turn the power on while using the Pitcher without the Vented Lid
Cap inserted and locked into the Pitcher Lid, as ingredients can splash, and
if hot or warm, could potentially cause injury and/or property damage.
24.
DO NOT perform grinding operations (e.g. on spices or beans), as this may
damage the motor and/or the blades.
25. DO NOT
adding liquid. The appliance is not intended to be used as a grinder. Doing
so may damage the motor and/or the blades. Vegetables with high water
content or soft herbs may be used for dry blending without liquid.
26. DO NOT
baking soda, baking powder, vinegar, citric acid, yeast, etc.). Pressure from
released gasses can cause a sealed Blending Vessel to burst or separate,
resulting in possible injury and/or property damage.
27. To reduce the risk of injury, NEVER place the Blade Base on the Blender
Base without the Blending Vessel properly attached.

motor. To reset, unplug the appliance and let it cool down for approximately
one hour before using again.
the appliance. You can either remove the Blade Base and use a silicone
utensil to dislodge the ingredients; remove the Blade Base and add more
liquid; or keep the Blade Base on the Blending Vessel and shake it lightly.
30. Remove the Blade Base upon completion of blending. DO NOT store
ingredients before or after blending them in the Blending Vessel with the
Blade Base attached. Some foods may contain active ingredients or release
gasses that will expand if left in a sealed container, resulting in excessive
pressure buildup that can pose a risk of injury. To safely store ingredients in
either the 450mL vessel or 750mL vessel, use the storage lid (sold
separately) to cover and store in the refrigerator.
31. To protect against electrical shock, DO NOT submerge the appliance or
allow the power cord or Blender Base to come into contact with water or
liquids.
32. DO NOT remove the Blending Vessel from the Blender Base while it is
operating. Wait until the motor powers down completely, the blades stop
spinning, and the ingredients settle to remove the Blending Vessel and then
unplug the appliance.
33. DO NOT wash the Blender Base in the dishwasher. Hand wash the Blade
Base with warm, soapy water and allow it to air dry, or place on the top rack
of a dishwasher. The Blending Vessels and lids may be washed on the top
rack of a dishwasher or with warm, soapy
water.
34. DO NOT modify the appliance in any way.
35. Turn the appliance OFF, then unplug from the outlet when not in use, before
assembling or disassembling parts and before cleaning. To unplug, grasp
the plug and pull from the outlet. Never pull from the power cord.
36. To protect against risk of electrical shock, do not put the blender in water
or other liquid.
37. Keep hands and utensils out of the container while blending to reduce the
risk of severe injury to persons or damage to the blender. A scraper may be
used but must be used only when the blender is not running.
38. Always operate the blender with the cover in place.
5
Special Cord Instructions
1. This appliance has a polarized plug (one prong is wider than the other). To
reduce the risk of electric shock, this plug will fit in a polarized outlet only
one way. If the plug does not fit fully in the outlet, reverse the plug. If it still
does not fit, contact a qualified electrician. DO NOT modify the plug in any
way.
2. DO NOT use the appliance with a voltage or electricity converter, as these
may cause electrical shorting, fire, electric shock, personal injury, or product
damage. DO NOT
specifications or plug types.
3. Extension cords should NOT be used with this appliance.
4. DO NOT abuse the power cord. Never carry the appliance by the power
cord or pull on it to disconnect from the electrical outlet. Instead, grasp the
plug itself and pull to disconnect.
5. This appliance has important markings on the plug blade. The attachment
plug or entire cord set is not suitable for replacement. If damaged, the
appliance should be replaced.
SAVE THESE INSTRUCTIONS.
FOR HOUSEHOLD USE ONLY. NOT INTENDED FOR COMMERCIAL USE.
6
XAM
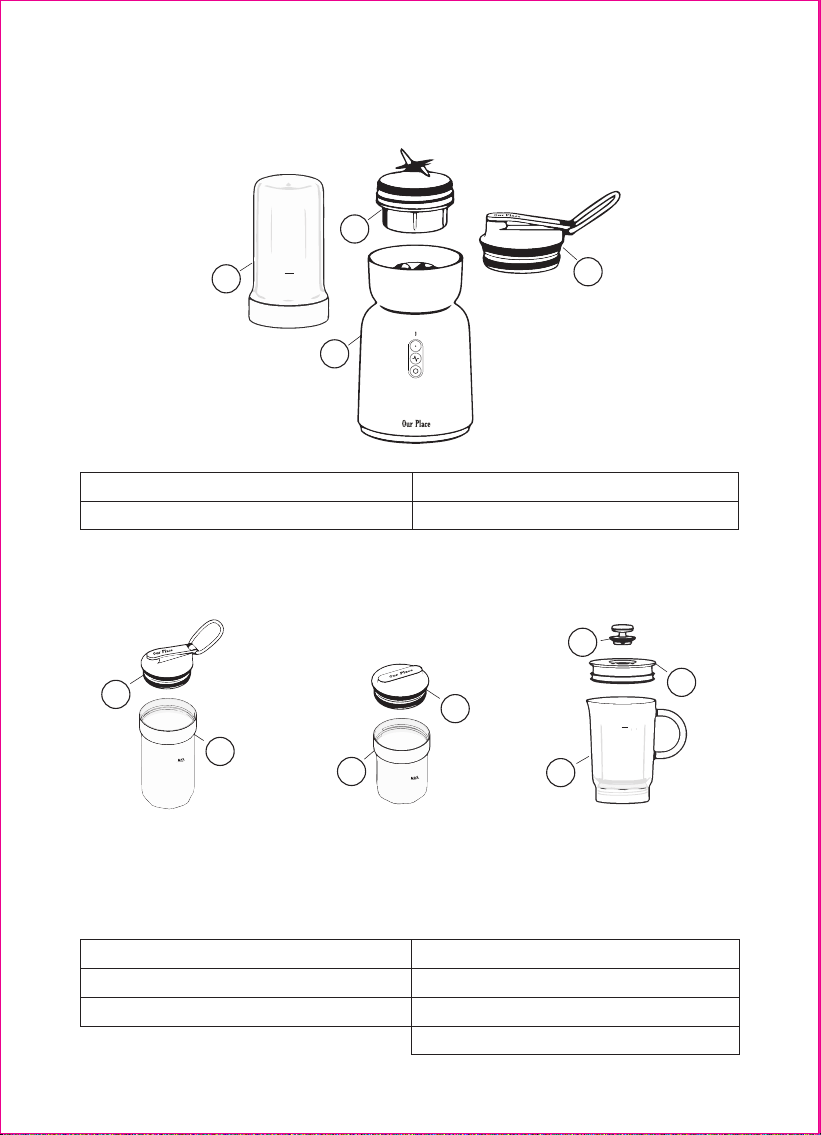
1. Blender Base
2. Blade Base
*Attached power cord not shown
You can buy these components separately. Visit fromourplace.com to purchase.
PARTS AND ACCESSORIES
ACCESSORY KITS
MAIN CONFIGURATION
1
2
6
8
11
9
10
5
7
3
4
750mL + Drinking Lid
The 750mL Blending Vessel and
Drinking Lid are perfect for
making smoothies and taking
things on the go.
450mL + Storage Lid
The 450mL Blending Vessel and
Storage Lid are the right size to
make and store dips, spreads and
sauces.
Pitcher + Pitcher Lid
The Pitcher is our 32oz family size
Blending Vessel, perfect for recipes
calling for more ingredients.
3. 750mL Vessel
4. Drinking Lid
5. Drinking Lid
6. 750mL Vessel
7. Storage Lid
8. 450mL Vessel
9. Pitcher Lid
10. Pitcher Lid Vented Cap
11. Pitcher
MAX
7
A
B
C
D
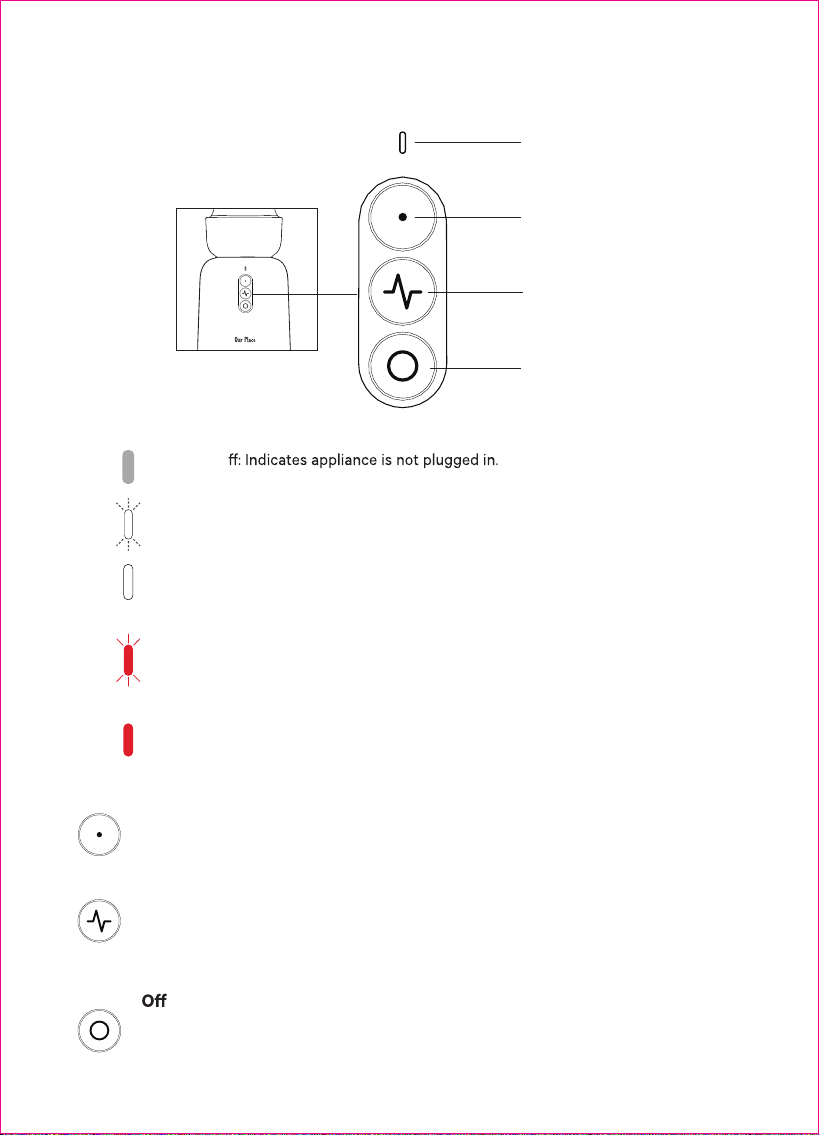
CONTROL PANEL
A. LED Light
1. Light O
2. Flashing White: Indicates appliance is plugged in, but the Blending Vessel and
Blade Base are not properly locked into place on the Blender Base.
3. Solid White Light: Indicates the Blending Vessel and Blade Base are locked into
place on the Blender Base and the appliance is in standby mode and ready to
blend.
4. Flashing Red: Motor is stalled or overheated. Remove Blade Base and Blending
Vessel from Blender Base. See Instructions for Use on page 10 for information on
loosening stuck ingredients.
5. Solid Red Light: Product failure. For help, contact
B. Blend
1. Press once to begin blending on a 45 second blend cycle.
2. Press again to stop the motor and end the blending cycle early.
C. Pulse
1. Press this button in quick short pulses, or keep it engaged to break down
ingredients quickly before moving on to a full blend. The motor only runs when
the button is pressed and it stops once the button is released.
D.
1. Press this button to stop blending and go into standby mode. The LED light will
remain a solid white light.
8
BEFORE FIRST USE
9
IMPORTANT: Review all important safeguards on pages 1 - 6 before proceeding.
1. Remove all packaging materials from the appliance. Use caution when
handling the Blade Base, as blades are extremely sharp.
2. Before using the product for the first time, remove and thoroughly wash
and dry Blending Vessels and the Blade Base in warm, soapy water. See
“Cleaning and Maintenance” on page 14 for more information.
3. Place the Blender Base on a clean, dry, level surface, such as a counter
or table.
NOTE: The Blending Vessels and Blade Base are dishwasher safe on the top
rack. DO NOT immerse the Blender Base or power cord in water or other liquids.
DO NOT place the Blender Base into a dishwasher or extremely hot water. DO
NOT use abrasive cleaners to clean any part of the product.
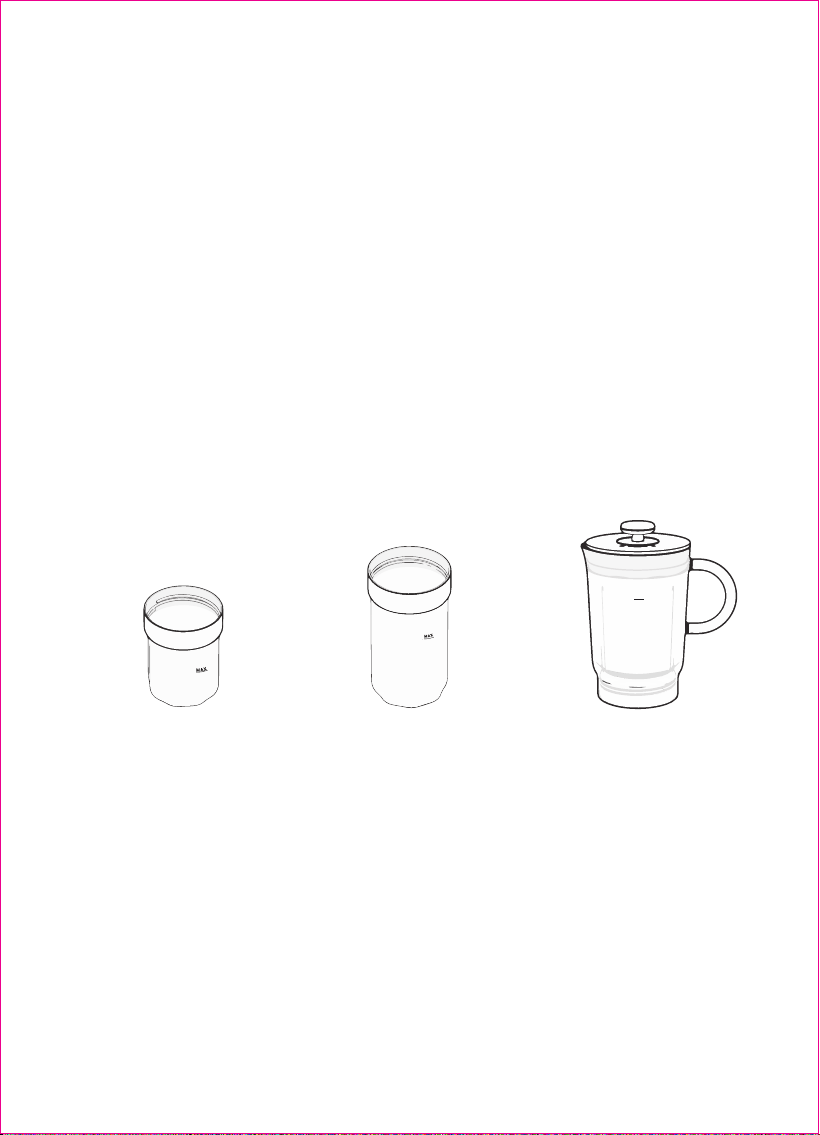
NOTE: DO NOT fill the Blending Vessels over capacity (designated as the “MAX”
line), as overfilling may easily cause damage to the appliance, shorten the life of
the appliance, and impact its performance. Please look at the Blending Vessel
carefully to note where the MAX line is.
• 450mL Blending Vessel has a maximum fill volume of 300mL when using for
blending.
• 750mL Blending Vessel has a maximum fill volume of 500mL when using for
blending.
• The Pitcher has a maximum fill volume of 32oz when using for blending.
Max Fill Lines for Blending
Pitcher
(sold separately)
750mL
(Main configuration or purchase an
additional blending vessel separately)
450mL
(sold separately)
MAX
INSTRUCTIONS FOR USE
10
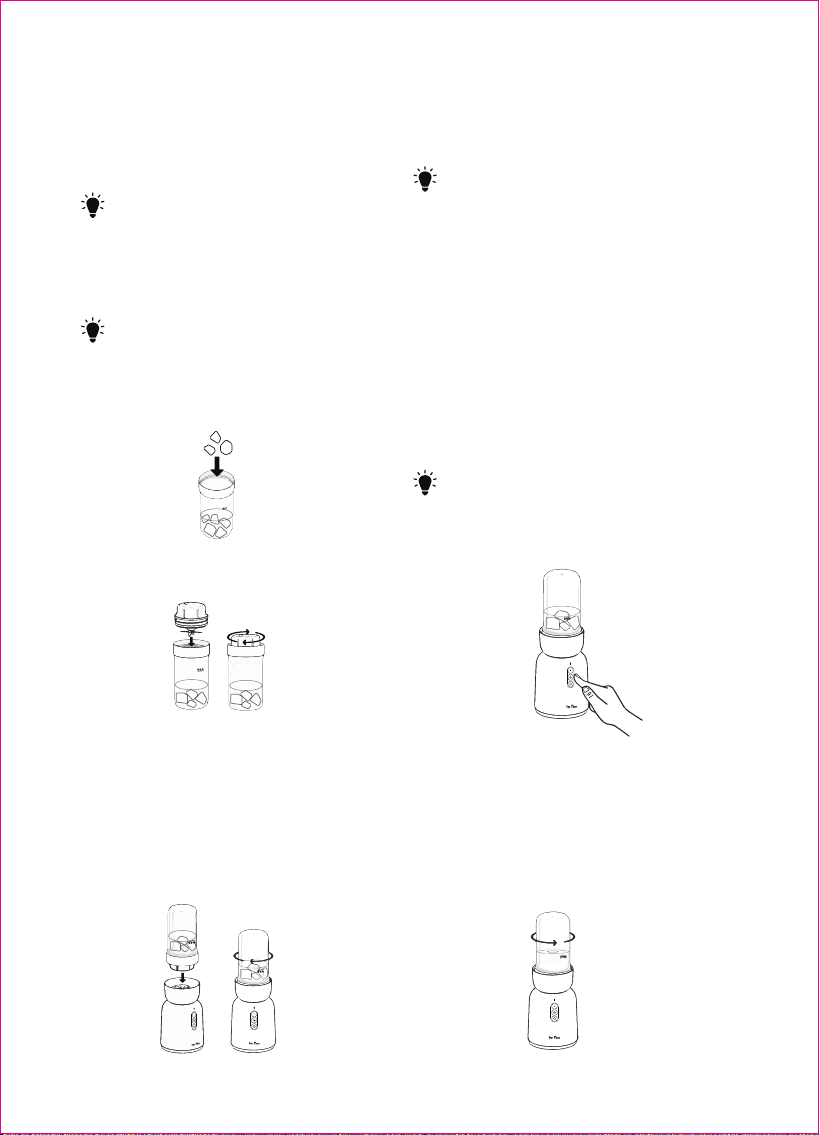
450mL and 750mL Blending Vessels:
Plug the power cord into an outlet.
1.
Tip: The LED indicator will be a
flashing white light.
Tip: The LED indicator will be a solid white
light, indicating the appliance is ready to
blend.
Tip: You can also press the OFF button to
stop blending and go into standby mode.
The LED light will remain a solid white
light.
Tip: Cut any large ingredients into 1”
or smaller pieces to help prevent the
motor stalling. For best results, the
Blending Vessel should contain at
least 25% liquid.
2. Fill your desired Blending Vessel with
ingredients. DO NOT add ingredients past
the MAX line.
5. Select your desired blending function.
a. For blending: The total blend time is 45
seconds and can’t be adjusted. If you
need to stop blending at any time, press
the blend button again.
b. For pulse: You can press this button in
quick short pulses, or keep it engaged to
break down ingredients quickly before
moving on to blend. The motor only runs
when the button is pressed, and it stops
once the button is released.
3. Place the Blade Base on top of the
Blending Vessel and turn clockwise to seal.
4. Turn the Blending Vessel upside down
and install on the motor base by twisting
clockwise and pushing downward to lock
into the Blender Base. It will click into place
to signal the interlock is engaged. If no
click occurs, this means the Blending
Vessel is not locked into place, and you
should twist it further.
6. When you have reached your desired
consistency and you have stopped blending
based on the instructions above, unlock by
gently twisting the Blending Vessel counter-
clockwise.
7. Unplug the appliance.
*450mL Blending Vessel sold separately

11
Tip: You can drink directly from the 450mL and 750mL Blending Vessels by
securing the Drinking Lid to the top of the Blending Vessel. Make sure the
Drinking Lid is securely in place before carrying the Blending Vessel. You
can also attach the Storage Lid (sold separately) to the 450mL and 750mL
Blending Vessels to store in the refrigerator. The Storage Lid does not have
a carrying handle.
CAUTION: Never blend hot ingredients or carbonated ingredients.
CAUTION: Do not remove the Blade Base until blending has completely
stopped. Always point contents away from your body when unsealing.
Pitcher
1. Plug the power cord into an outlet.
Tip: The LED indicator will be a flashing white light.
2. Attach the Blade Base to the Pitcher, making sure the components are
properly aligned and securely fastened.
3. Fill the Pitcher with ingredients. DO NOT add ingredients past the MAX line.
Tip: Cut any large ingredients into 1” or smaller pieces to help prevent
the motor stalling. For best results, the Blending Vessel should contain
at least 25% liquid.
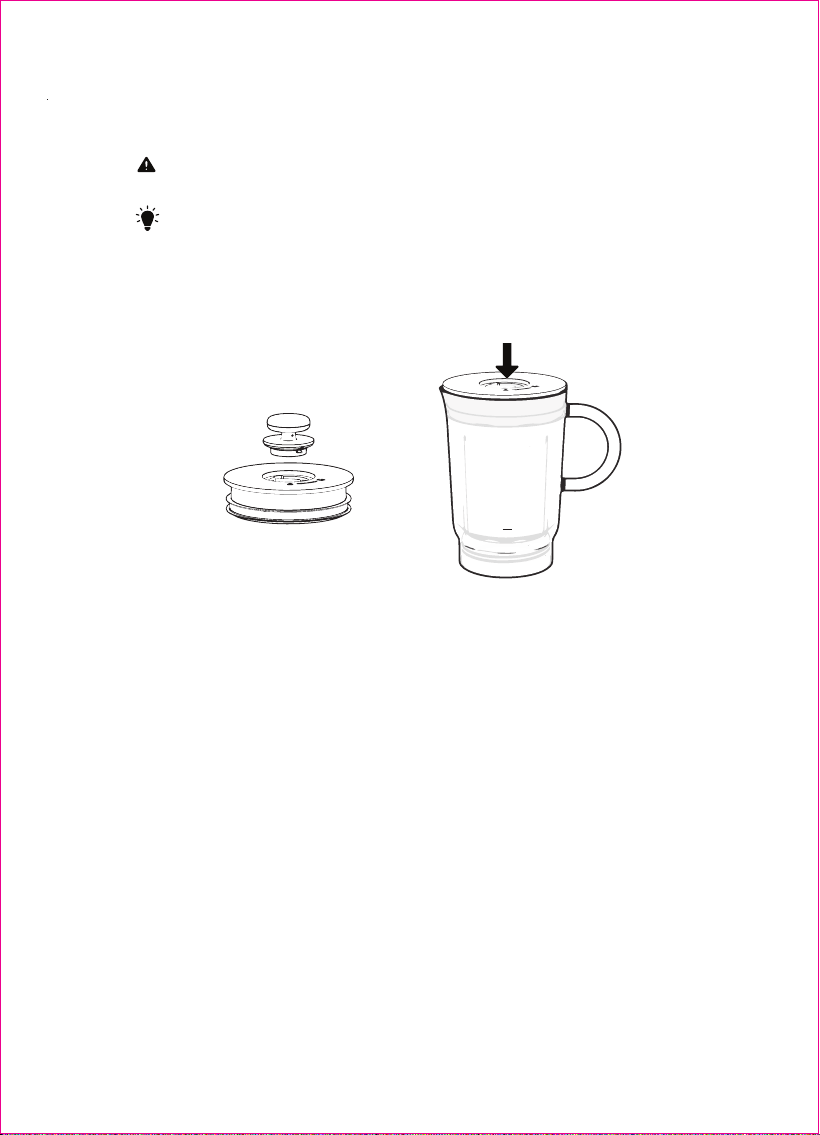
4. Attach the Pitcher Lid with the Vented Lid Cap onto the Pitcher.
5. Place the Pitcher on top of the Blender Base and turn clockwise to lock into
place. It will click into place to signal the interlock is engaged. If no click
occurs, this means the blending vessel is not locked into place, and you
should twist it further.
Tip: The LED indicat
or will be a solid white light, indicating the
appliance is ready to blend.
6. Select the desired blending speed.
a. For blending: The total blend time is 45 seconds and can’t be adjusted.
If you need to stop blending at any time, press the blend button again.
b. For pulse: You can press this button in quick short pulses, or keep it
engaged to break down ingredients quickly before moving on to
blending. The motor only runs when the button is pressed, and it stops
once the button is released.
Tip: You can also press the OFF button to stop blending and go into
standby mode. The LED light will remain a solid white light.
*Pitcher sold separately
12
Resetting the Motor Thermostat:
Tip: Liquid may be added through the lid vent during blending. After
the ingredients are lightly blended, remove the lid vent and slowly
pour liquid directly into the Pitcher. Remember to place the Lid Vent
back on to prevent the ingredients from splashing out. NEVER fill past
the MAX fill line.
This appliance features a safety system that prevents damage to the motor
system should it become overloaded or overheated. If the appliance overloads
or overheats, the LED light will be a flashing red light, and the motor will be
temporarily disabled. If this happens, follow the reset procedure below:
1. Unplug the appliance from the electrical outlet.
2. Allow the appliance to cool for approximately 15 minutes.
3. Remove the blade base from the Blending Vessel. Empty the Blending
Vessel and ensure no ingredients are jamming the blades.
Important: Ensure that the maximum capacity has not been exceeded. This is
the most typical cause of the appliance being overloaded or overheated.
7. When you have reached your desired consistency and you have stopped
blending based on the instructions above, unlock by gently twisting the
Pitcher counterclockwise.
Warning: Blades are sharp. Never insert your hands into the Pitcher!
8. Unplug the appliance.
MAX
Blending Tips
If during the blending process the motor stops and the light flashes red, the
motor has stalled and the ingredients need to be mixed or more liquid is needed.
Loosening Stuck Ingredients
When blending tough foods or large ingredients, the contents of the Blending
Vessel may become stuck and require a manual method to free contents in order
to continue the blending process.
450mL and 750mL Blending Vessels:
1. Remove the Blending Vessel from the Blender Base, with the Blade
Base still attached.
2. With the Blending Vessel in your hand (and the Blade Base
attached), shake it up and down lightly to free up contents. You
with a silicone utensil or add more liquid.
3. Reattach to the Blender Base to finish blending.
Pitcher:
1. Remove the Pitcher from the Blender Base, with the Blade Base
and Pitcher Lid still attached.
2. With the Blending Vessel in your hand (and the Blade Base
attached), remove the lid and stir with a silicone utensil to free up
contents.
3. Reattach the lid and place back on the Blender Base to finish
blending.
Pulsing
Pulsing helps to coarsely chop ingredients without totally emulsifying them. This
method is particularly useful for making chunky foods, chopping vegetables, and
adding ingredients to an already smooth mixture for additional texture.
HELPFUL TIPS
WARNING: NEVER store the blades on the Blade Base without a Blending
Vessel attached as the exposed blades can cause a serious laceration hazard.
13

CLEANING AND MAINTENANCE
CAUTION: Make sure that the Blender Base is unplugged from the power
source before inserting or removing any attachment and before cleaning. Do not
attempt to handle the appliance until all parts have stopped moving! This
includes during assembly and disassembly, while changing accessories during
cleaning, and any time you leave the appliance unattended.
1. Separate all parts from each other.
2. Clean the Blender Base with a damp cloth and wipe dry.
3. Hand wash the Blade Base with warm, soapy water and allow it to air dry, or
place on the top rack of your dishwasher. Use caution when handling the
Blade Base as the blades are very sharp.
4. Place Blending Vessels and lids in the dishwasher. Make sure to place them
on the top rack. You can also wash components by hand with warm, soapy
water.
NOTE: You may also wash the Blending Vessels by filling the Blending Vessel to
the MAX fill line with warm water (not hot!) and a drop of dishwashing detergent,
placing the Blade Base on the Blending Vessel and pulsing a few times. Do not fill
the Blending Vessel more than MAX fill line with water because it will overflow.
Once clean, remove the Blending Vessel from the Blender Base. Rinse the
Blending Vessel and Blade Base under warm, running water. Allow all the parts to
dry before storing in a cool, dry place. This self-cleaning method works best
immediately after use (do not let ingredients dry in the Blending Vessel before
cleaning). If ingredient residue remains, hand wash the Blending Vessel with
warm, soapy water and allow it to air dry, or place on the top rack of your
dishwasher
.
Tip: Use a small brush (not included), like a toothbrush, to remove stuck-on
food particles underneath the blades.
Tip: The Blender Base is susceptible to staining and should not come in
direct contact with ingredients prone to causing stains. If this does happen,
immediately wipe the Blender Base with a damp cloth and wipe dry. Staining
does not impact the functionality of the appliance.
CAUTION: DO NOT immerse the Blender Base into water or any other liquid.
14

Troubleshooting
PROBLEM POSSIBLE REASON POSSIBLE SOLUTION
After plugging in and
attaching a Blending
Vessel, the appliance
does not start.
The Blending Vessel
and the Blade Base are
not attached correctly
to the Blender Base.
Ensure that the Blending
Vessel and Blade Base are
attached correctly and
securely to the Blender Base.
The motor emits an
unpleasant smell the
first few times I use
the product.
This is not abnormal. If the product still emits this
smell after repeated use,
contact customer support at
help.
The appliance stops
working.
1. Voltage is too low.
2. Motor is overheated
and a solid red LED
light is showing.
3. The Blending Vessel
has disengaged with
the interlock. A red
LED light is flashing.
1. Check if the voltage is too
low.
2. Contact customer support
for help.
3. Tighten the Blending
Vessel in the interlock until a
solid white light appears. You
can then restart the blending
process.
The Blending
Vessel is leaking.
1. Tighten the Blending
Vessel and Blade Base.
2. Replace the Blending
Vessel. Contact customer
support at
for help.
1. The Blending Vessel
and Blade Base are
not tightened.
2. The Blending Vessel
is broken.
Warning: To reduce the risk of shock and unintended operation, always
unplug the appliance before troubleshooting.
15

Abnormal vibration
or loud noise.
LED indicator does
not illuminate.
Doesn't mix well;
ingredients get stuck.
PROBLEM POSSIBLE REASON POSSIBLE SOLUTION
Troubleshooting
1. Tighten the Blending
Vessel and Blade Base.
2. Place the product on a
flat, stable surface and
ensure the base pad is not
damaged.
3. Check whether the
voltage is too high.
4. Unplug the appliance,
disconnect the power cord
and take out excess
ingredients to ensure
contents are below the MAX
fill line.
5. Unplug the appliance,
disconnect the power cord
and take out the ingredients.
Cut them into smaller pieces
before using the appliance
again.
1. The Blending Vessel
and Blade Base are not
fully sealed.
2. The appliance is on
an unstable surface or
the base pad on the
underside of the
blender is damaged.
3. The voltage is too
high.
4. Ingredients have
exceeded the MAX fill
line.
5. The Blade Base is
stuck.
1. Ensure the plug is fully
plugged in.
2. Reset the outlet to ensure
it is properly working.
1. Appliance is not
plugged in.
2. There is no power to
the outlet.
1. Cut ingredients into
smaller pieces.
2. Add more liquid to the
Blending Vessel.
3. Remove the Blending
Vessel lid or Blade Base and
stir ingredients with a
silicone utensil.
1. Ingredients are too
large.
2. There is not enough
liquid in the Blending
Vessel.
16

Scan this QR code to purchase accessory kits. You can find recipes, FAQs and
more information on replacement parts there, too.
Replacement Parts
17

We stand by our products. We want you to have the best experience with your
Splendor Blender, so our team is here to help. Please contact us at hello@fro-
mourplace.com if you have any questions regarding our warranty program or
need advice on using your product. Lagom Kitchen Company, d/b/a “Our Place”
purchased and used in the United States. This Limited Warranty is made solely
conditions set forth in this Limited Warranty, also available on www.fromour-
place.com/warranty.
What does this warranty cover?
This warranty covers defects in materials and workmanship for the Splendor
Blender when used normally in accordance with Our Place’s user manual.
What does this warranty not cover?
• This warranty does not cover any damages due to:
• Use of the product not for regular household purposes;
• Misuse, abuse, or negligent handling;
• Failure to follow the user manual (e.g. use, warning, maintenance, and care
instruction);
• Normal wear and tear;
• Modifications to the product or use with products or parts not approved by
Our Place;
• Cosmetic changes, including stains and discolorations;
• Glass parts and other accessory items that are packed with the unit;
• Installation with an incorrect electric current, voltage, circuit breaker rating,
extension cord, or power supply;
• Damages or defects caused by service or repair of the product performed
by an unauthorized service provider;
• Loss or damage in transit after initial delivery; and
• Accidents or other actions beyond our reasonable control.
Who is covered by this warranty?
This limited warranty covers the original retail consumer purchaser of a covered
product or a consumer th
at receives the product new and unused as a gift from
the original retail purchaser. Coverage terminates if a covered consumer sells or
otherwise transfers the product. This limited warranty applies only to products
Warranty
18

purchased directly from Our Place or an Our Place authorized retailer.
This limited warranty is not transferable.
How long does this warranty last?
The warranty period for the Splendor Blender is limited to one (1) year from the
date of delivery to the purchaser.
How do you exercise your rights under the Limited Warranty program?
Please complete our Warranty Claim form available at fromourplace.com/pag-
es/warranty to submit a claim for evaluation. Proof of purchase is required for all
claims, including gifted products. As part of the investigation into the claim, we
may require you to submit photos, answer questions about the product and your
use of the product, and/or try recommended techniques to rectify the issue first.
If your claim is approved, Our Place will either repair, replace or refund the
purchase price of the product, as determined by Our Place in its sole discretion.
If we require the defective item to be returned to us, we will pay for return
shipping if the item is returned within the country of purchase for our non-appli-
ance products. For appliances, you will be responsible for the costs incurred to
mail the returned product to us, including an
y applicable accessories.
While we will strive to exchange your product for the same make, color and
model as your original purchase, we cannot make any guarantees. If an Our
Place product, component or product color has been discontinued at the time of
repair or replacement or if Our Place determines, in its sole discretion, that such
repair or replacement is not commercially practicable or cannot be timely made,
Our Place reserves the right to repair or replace such product or product
component with a product model or color that is similar but not exactly the same
as the product or component model originally purchased. Replacement with the
same color cannot be guaranteed. At its sole discretion, Our Place is entitled to
replace each defective component individually, as opposed to the entire product,
and some assembly may be required by you. For example, if you purchase the
Splendor Blender and only one component is found defective, Our Place may, at
its discretion, opt to replace either the defective component or the entire
Splendor Blender. Our Place reserves the right to utilize comparable recondi-
tioned, refurbished, repaired, or re-manufactured products or parts in the
warranty repair or replacement process. Such products and parts will be
comparable in function and performance to an original product or part
. The
19

original warranty period will remain and will not restart with this replacement
item, regardless of the time remaining under the original warranty period.
Disclaimer of Implied Warranties
EXCEPT AS EXPRESSLY PROVIDED HEREIN AND TO THE EXTENT PERMIT-
TED BY LAW, THIS WARRANTY AND THE REMEDIES SET FORTH ARE
EXCLUSIVE AND IN LIEU OF ALL OTHER WARRANTIES, REMEDIES AND
CONDITIONS, WHETHER ORAL, WRITTEN, STATUTORY, EXPRESS OR IMPLIED.
OUR PLACE DISCLAIMS ALL STATUTORY AND IMPLIED WARRANTIES
INCLUDING, WITHOUT LIMITATION, WARRANTIES OF MERCHANTABILITY
AND FITNESS FOR A PARTICULAR PURPOSE, WORKMANSHIP, MERCHANT-
ABILITY, MERCHANTABLE QUALITY, DURABILITY AND WARRANTIES
AGAINST HIDDEN OR LATENT DEFECTS, TO THE MAXIMUM EXTENT
PERMITTED BY LAW. IN SO FAR AS SUCH WARRANTIES CANNOT BE
DISCLAIMED, OUR PLACE LIMITS THE DURATION AND REMEDIES OF SUCH
WARRANTIES TO THE DURATION OF THIS EXPRESS WARRANTY AND, AT
OUR PLACE'S OPTION, THE REPAIR OR REPLACEMENT SERVICES DESCRIBED
HEREIN. SOME STATES DO NOT ALLOW LIMITATIONS ON HOW LONG AN
IMPLIED WARRANTY (OR CONDITION) MAY LAST, SO THE LIMITATION
DESCRIBED ABOVE MAY NOT APPLY TO YOU.
Limitation of Liability
THE REMEDIES DESCRIBED ABOVE ARE YOUR SOLE AND EXCLUSIVE
REMEDIES AND OUR PLACE’S ENTIRE LIABILITY FOR ANY BREACH OF THIS
WARRANTY. This warranty gives you specific legal rights, and you may also have
other rights which vary from state to state, or country to country.
OUR PLACE’S LIABILITY WILL UNDER NO CIRCUMSTANCES EXCEED THE
ACTUAL AMOUNT PAID BY YOU FOR THE DEFECTIVE PRODUCT. OUR PLACE
WILL NOT UNDER ANY CIRCUMSTANCES BE LIABLE FOR ANY CONSEQUEN-
TIAL, INCIDENTAL, SPECIAL OR PUNITIVE
DAMAGES OR LOSSES ARISING
OUT OF OR IN CONNECTION WITH THE USE OR PERFORMANCE OF THE
PRODUCTS OR DAMAGES WITH RESPECT TO ANY ECONOMIC LOSS,
PERSONAL INJURY, LOSS OF PROPERTY, LOSS OF REVENUES OR PROFITS,
LOSS OF ENJOYMENT OR USE, COSTS OF REMOVAL, INSTALLATION OR
OTHER INDIRECT, INCIDENTAL OR CONSEQUENTIAL DAMAGES OF ANY
NATURE OR KIND. Some states do not allow the exclusion or limitation of
incidental or consequential damages, so the preceding limitation or exclusion
may not apply to you.
20

Need help? We’re always here at
hello@fromourplace.com
Scan this QR code to purchase accessory kits. You can find recipes,
FAQs and more information on replacement parts there, too.