sharkninja.com
IMPORTANT SAFETY INSTRUCTIONS
PLEASE READ ALL INSTRUCTIONS BEFORE USE • FOR HOUSEHOLD USE ONLY
Read and review instructions for operation and use.
Indicates the presence of a hazard that can cause personal injury, death, or substantial property damage if
the warning included with this symbol is ignored.
For indoor and household use only.
When using electrical appliances, basic safety precautions should always be followed, including the following:
BLENDBOSS™
TUMBLER BLENDER
CO351DB Series | Owner’s Guide
1 Read all instructions prior to using the appliance and its accessories.
2 Carefully observe and follow all warnings and instructions. This unit contains electrical connections
and moving parts that potentially present risk to the user.
3 ALWAYS exercise care when handling the CrushBlade Assembly. The blades are sharp, handle
carefully. ONLY grasp the CrushBlade Assembly by the outer perimeter of the blade assembly base.
Failure to use care when handling the blade assembly will result in a risk of injury.
4 Take your time and exercise care during unpacking and appliance setup. This appliance contains
sharp blades that can cause injury if mishandled.
5 Take inventory of all contents to ensure you have all parts needed to properly and safely operate
your appliance.
6 DO NOT blend hot liquids. Doing so may result in pressure buildup and steam exposure that can
pose a risk of the user being burned or injury.
7 Blades are sharp. Handle carefully.
8 Unplug the appliance from the outlet when not in use, before assembling or disassembling parts, and
before cleaning. To unplug, grasp the plug by the body and pull from the outlet. NEVER unplug by
grasping and pulling the flexible cord.
9 Before use, wash all parts that may contact food. Follow washing instructions covered in this
instructionmanual.
10 To protect against the risk of electric shock, DO NOT submerge the appliance or allow the power
cord to contact any form of liquid.
WARNING: Handle the CrushBlade™ Assembly with care, as the blades are sharp.
WARNING: Remove utensils prior to processing. Failure to remove may cause the Ninja® travel
tumbler to be damaged or to shatter, which may cause personal injury.
WARNING: Do not blend hot, boiling, or carbonated liquids. Doing so may cause excessive
pressure buildup, resulting in risk of injury and or the user being burned.
WARNING: Remove the CrushBlade Assembly from the Ninja® travel tumbler upon completion
of blending. Do not store ingredients before or after blending them in the cup with the blade assembly
attached. Some foods may contain active ingredients or release gases that will expand if left in a
sealed cup, resulting in excessive pressure buildup that can pose a risk of injury.
WARNING: To reduce the risk of injury, fire, electrical shock or property damage, basic safety
precautions must always be followed, including the following numbered warnings and subsequent
instructions. Do not use appliance for any purpose other than its intended use.

sharkninja.com
sharkninja.com
IMPORTANT SAFETY INSTRUCTIONS
PLEASE READ ALL INSTRUCTIONS BEFORE USE • FOR HOUSEHOLD USE ONLY
38 The maximum wattage rating for this appliance is based on the configuration of the CrushBlade™
Assembly and Ninja® travel tumbler. Other configurations may draw less power or current.
39 DO NOT process dry ingredients without adding liquid to the Ninja travel tumbler; unit is not
intended for dry blending.
40 To protect against risk of electrical shock, DO NOT immerse the motor base in water or other liquid.
Unplug the motor base before cleaning.
41 NEVER place a blade assembly on the motor base without blade first being attached to the cup.
11 DO NOT use this appliance outdoors. It is designed for indoor household use only.
12 This appliance has important markings on the plug blade. The attachment plug or entire cordset
(if plug is molded onto cord) is not suitable for replacement. If damaged, the appliance shall be replaced.
13 This appliance has a polarized plug (one prong is wider than the other). To reduce the risk of electric
shock, this plug will fit in a polarized outlet only one way. If the plug does not fit fully in the outlet,
reverse the plug. If it still does not fit, contact a qualified electrician. DO NOT modify the plug in any way.
14 DO NOT operate any appliance with a damaged cord or plug, or after the appliance malfunctions
or is dropped or damaged in any manner. This appliance has no user-serviceable parts. If damaged,
contact SharkNinja for servicing.
15 Extension cords should NOT be used with this appliance.
16 DO NOT allow children to operate this appliance or use as a toy. Close supervision is necessary when
any appliance is used near children.
17 This appliance is NOT intended to be used by people with reduced physical, sensory, or mental
capabilities, or lack of experience and knowledge, unless they have been given supervision or
instruction concerning use of the appliance by a person responsible for their safety.
18 Before each use, inspect blade assembly for damage. If a blade is bent or damage is suspected,
contact SharkNinja to arrange for replacement.
19 DO NOT attempt to sharpen blades.
20 DO NOT allow the unit or the cord to hang over the edges of tables or counters. The cord may
become snagged and pull the appliance o the work surface.
21 DO NOT allow any part of the unit to contact hot surfaces, including stoves and other heating appliances.
22 ALWAYS use the appliance on a dry and level surface.
23 NEVER place a blade assembly on the motor base without it first being attached to the cup.
24 Keep hands, hair, and clothing out of the cup when loading and operating.
25 ONLY use attachments and accessories that are provided with the product or are recommended by
SharkNinja. The use of attachments not recommended or sold by SharkNinja may cause fire, electric
shock, or injury.
26 During operation and handling of the appliance, avoid contact with moving parts.
27 DO NOT operate the appliance with an empty cup.
28 DO NOT fill cups past the MAX FILL line.
29 DO NOT microwave any cups or accessories provided with the appliance.
30 DO NOT perform grinding operations.
31 Before operation, ensure all utensils are removed from containers. Failure to remove utensils can
cause cups to shatter and potentially result in personal injury and property damage.
32 NEVER operate the appliance without lids and caps in place. DO NOT attempt to defeat the interlock
mechanism. Ensure the cup and lid are properly installed before operation.
33 DO NOT expose the cups and accessories to extreme temperature changes. They may experience damage.
34 NEVER leave the appliance unattended while in use.
35 If you find unmixed ingredients sticking to the sides of the cup, stop the appliance, remove the blade
assembly, and use a scraper to dislodge ingredients.
36 DO NOT attempt to remove the cup and lid from the motor base while the blade assembly is still
spinning. Allow the appliance to come to a complete stop before removing lid and cup.
37 If the appliance overheats, a thermal switch will activate and temporarily disable the motor. To reset,
unplug the appliance and allow it to cool for approximately 15 minutes before using again.
SAVE THESE INSTRUCTIONS
sharkninja.com
sharkninja.com
1 Remove all packaging materials from the unit. Exercise care when unpacking blade assembly,
as the blades are sharp.
2 Wash cups, lids, straws, silicone boots, and blade assembly in warm, soapy water using a dishwashing
utensil with a handle to avoid direct contact with the blades. Exercise care when handling blade
assembly, as the blades are sharp.
3 Thoroughly rinse and air-dry all parts.
The maximum wattage rating can be achieved by chopping 280 g soybeans in the cup.
Other configurations may draw less power. Operation time should NOT exceed 15 seconds.
IMPORTANT: Review all warnings at the beginning of this Owner’s Guide before proceeding.
NOTE: Handle the CrushBlade Assembly by grasping around the perimeter of the blade assembly base.
BEFORE FIRST USE
WATTAGE
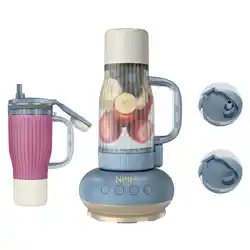
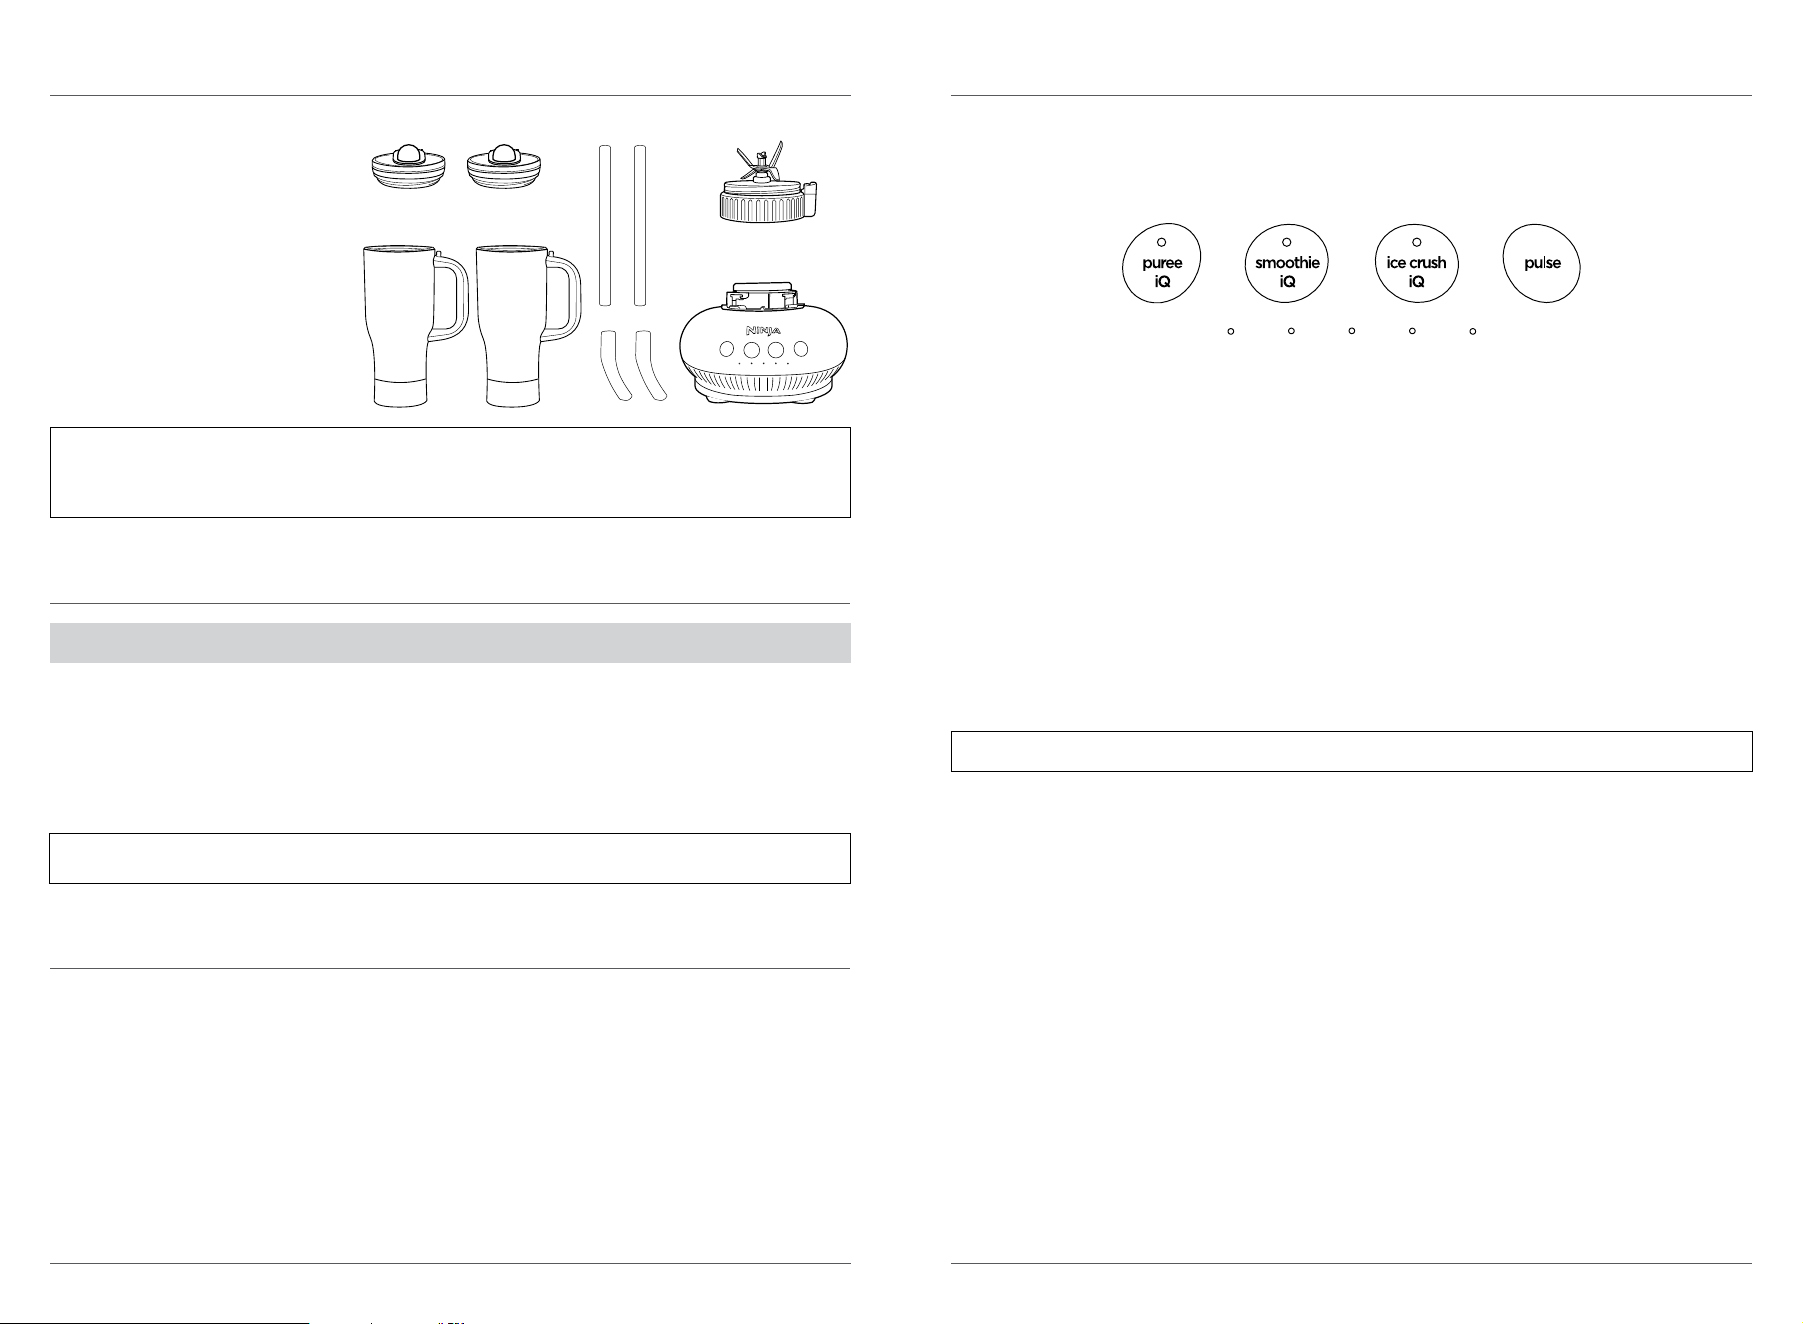
PARTS
A (2) Chug Lids
B (2) 26 oz.* Ninja Blendboss™
Travel Tumblers
C (2) Straws
D (2) Silicone Boots
E CrushBlade™ Assembly
F Motor Base
(attached power cord not shown)
NOTE:
• The CrushBlade Assembly and straw are not compatible with other Ninja products.
• Color, number of cups, lids and accessories vary by model.
A E
F
B
D
C
USING THE CONTROL PANEL
AUTO-IQ® PROGRAMS
Intelligent preset programs combine unique blending and pausing patterns that do the work for you.
Once a preset program is selected, it will start immediately and automatically stop when blending is
complete. To stop blending before the end of the program, press the currently active button again.
AUTO-IQ® PROGRAMS:
PUREE:
Create anything from silky-smooth sauces to perfect hummus.
SMOOTHIE:
Combine your favorite fresh or frozen ingredients, liquids, and powders to create smoothies
and protein shakes.
ICE CRUSH:
Turn ice, juices, and fruit into expertly blended frozen drinks.
MANUAL PROGRAMS:
PULSE: Oers greater control of pulsing and blending. Operates only when PULSE is pressed. Use short
presses for short pulses and long presses for long pulses.
PROGRESS BAR:
Upon plugging unit into power outlet, all 5 progress bar lights will blink until cup is installed on motor base.
After 60 seconds, the progress bar lights will time out if not in use.
When running an Auto-iQ program, the progress bar will reflect processing status in increments of 20%
completion for each LED. Upon completion, the LED progress bar lights will shut o.
NOTE: Manual programs cannot be used in conjunction with any Auto-iQ® programs.
*24 oz. max liquid capacity.
sharkninja.com
sharkninja.com
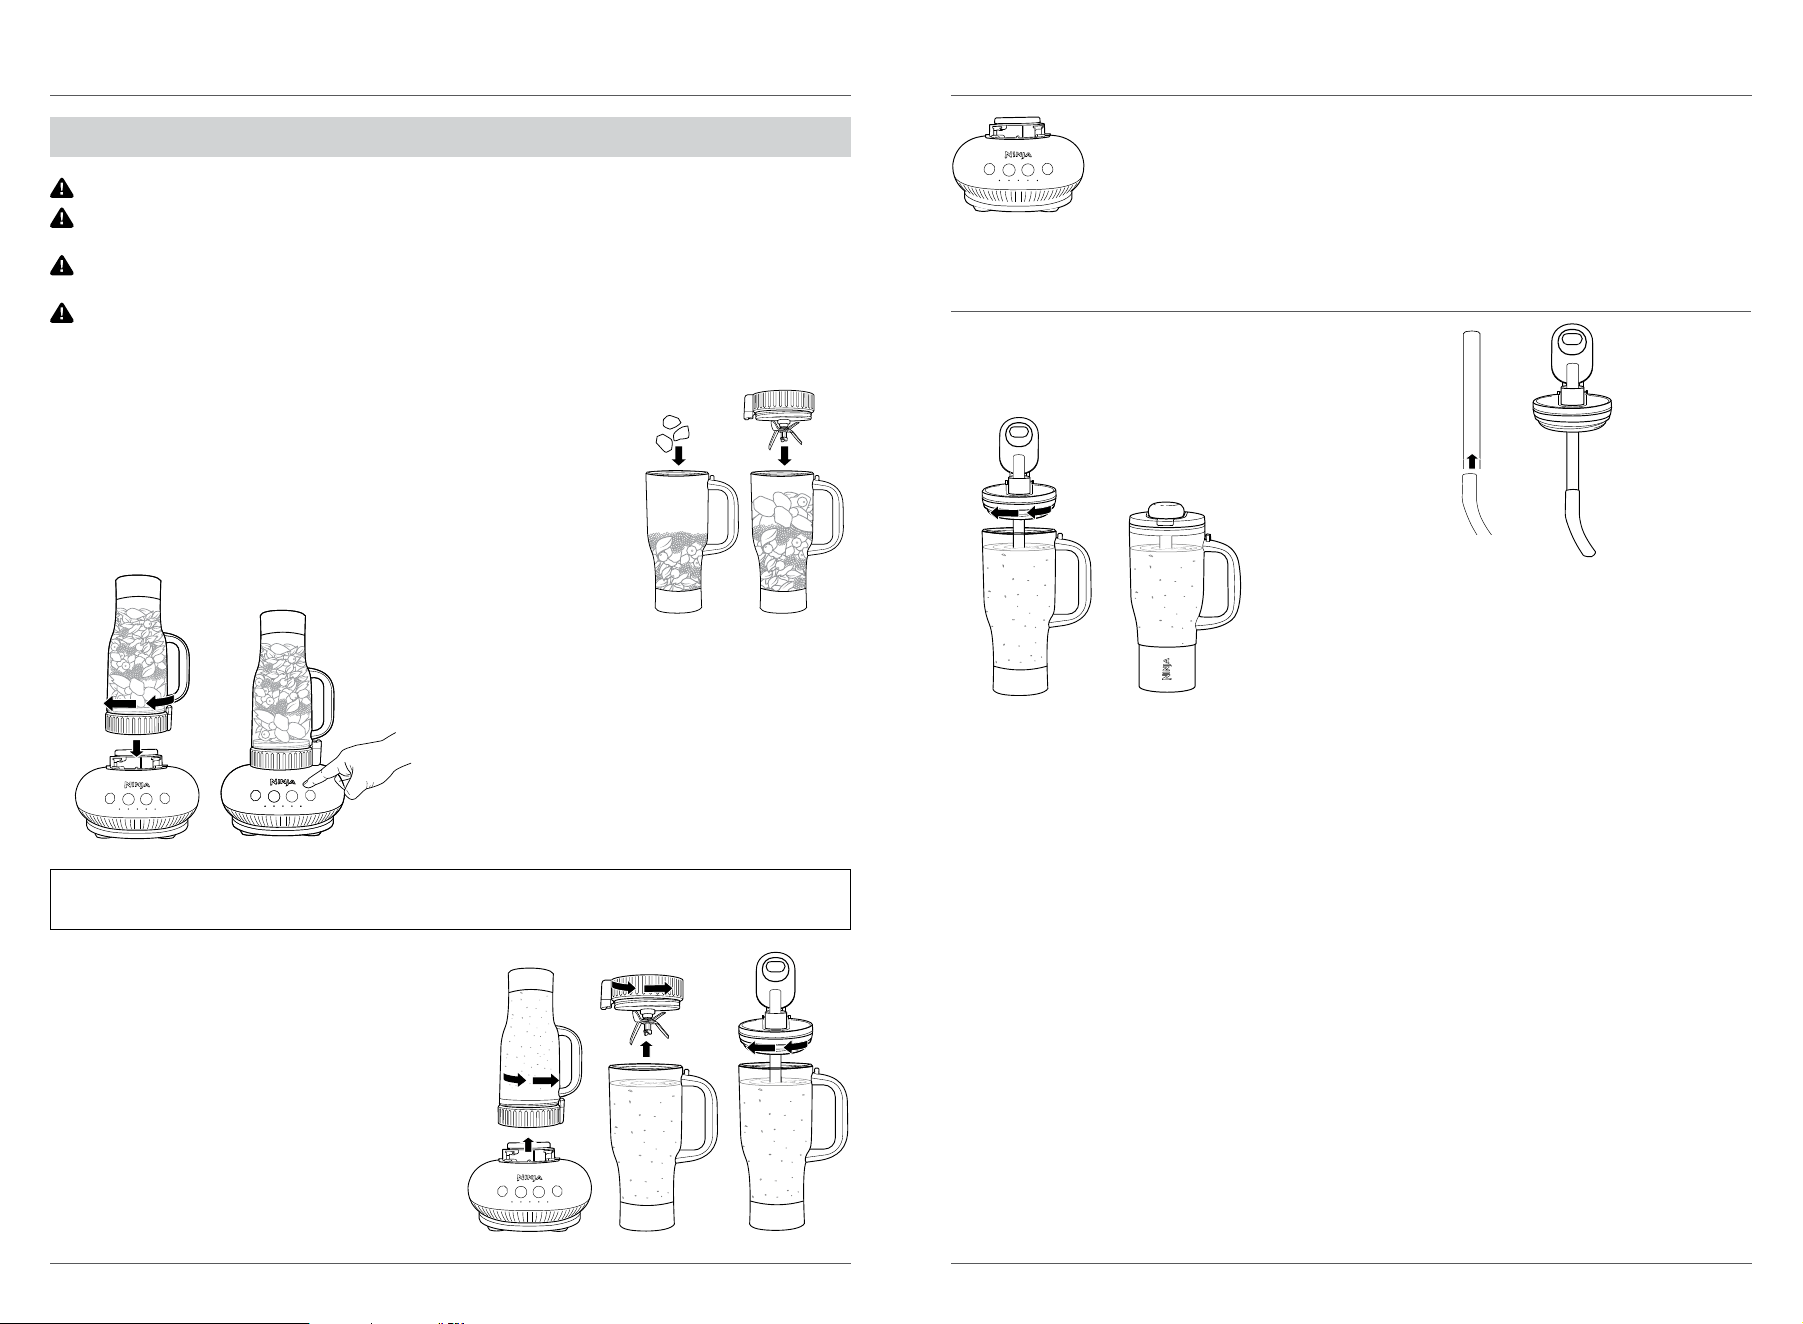
USING THE NINJA BLENDBOSS™ TRAVEL TUMBLER
1 Plug in motor base and place on a clean, dry, level surface such as a
countertop or table.
2 Add ingredients to the travel tumbler. Adhere to MIN FILL line when
adding liquid. DO NOT add ingredients past the MAX FILL line.
3 Place the CrushBlade Assembly on the top of the cup and turn
clockwise to seal.
4 Turn the cup upside down and install on the
motor base by aligning the dot on the blade
assembly with the dot on the motor base. Then,
rotate cup clockwise until it clicks in place. Once
locked in place, the programs will illuminate and
the unit will be ready for use.
5 If using an Auto-iQ® program, select the
program that best suits your desired output.
The preset feature will automatically stop at the
end of the program. To stop the unit at any
time, press any program button.
6 Remove the cup from the motor base by turning
it counterclockwise and then lifting up.
7 Flip the cup right-side up, then remove the blade
assembly by twisting counterclockwise. DO NOT
store blended contents with the blade assembly
attached. Only use the lid to cover. Exercise care
when handling the blade assembly, as the blades
are sharp.
8 To enjoy on the go, install the straw if desired.
Place the lid on the cup. The lid is designed to be
screwed on by both left- and right-handed users.
To attach, begin with the lid oriented toward you
while holding the cup in your preferred hand.
Twist clockwise to secure.
9 Unplug the unit when finished. Refer to the Care & Maintenance
section for cleaning and storage instructions.
WARNING: Handle the CrushBlade™ Assembly with care, as the blades are sharp.
WARNING: Remove utensils prior to processing. Failure to remove may cause the Ninja® travel
tumbler to be damaged or to shatter, which may cause personal injury.
WARNING: Do not blend hot, boiling, or carbonated liquids. Doing so may cause excessive
pressure buildup, resulting in risk of injury and or the user being burned.
WARNING: Remove the CrushBlade Assembly from the Ninja travel tumbler upon completion
of blending. Do not store ingredients before or after blending them in the cup with the blade
assembly attached. Some foods may contain active ingredients or release gases that will expand if left
in a sealed container, resulting in excessive pressure buildup that can pose a risk of injury.
IMPORTANT: Review all warnings before proceeding.
NOTE: When making thicker recipes like smoothies or protein shakes, pull the cup's sleeve back to make
sure all ingredients are fully blended before taking on the go.
STRAW ASSEMBLY
1 Align and secure the straw and silicone boot.
2 With the cap open, insert the straw through the bottom
of the lid.
3 Twist the lid onto the cup, keeping the cap open.
4 Close the cap of the lid once the lid is secure on the cup.
sharkninja.com
sharkninja.com
TROUBLESHOOTING GUIDE
WARNING: To reduce the risk of shock and unintended operation, turn power o and unplug
unit before troubleshooting.
DISPLAY READS: LED 1 ILLUMINATING RED, LED 2-5 BLINKING WHITE ON PROGRESS BAR.
The unit must be unplugged to reset and cancel runtime protection mode. Disengaging the interlock and
idle timeout will not reset the unit.
DISPLAY SHOWS SELECTED PROGRAM BLINKING.
• If cup is properly installed, all program icons will illuminate. Ensure the well of the motor base is clean
of any debris. Ensure blades are not blocked. Add more liquid if needed.
DISPLAY READS: ALL 5 PROGRESS LED LIGHTS FLASH ON AND OFF ON PROGRESS BAR.
• Ensure cup and blade assembly are properly installed and aligned on motor base.
DOESN’T MIX WELL; INGREDIENTS GET STUCK.
• Using the Auto-iQ® programs is the easiest way to achieve great results. The pulses and pauses allow
the ingredients to settle toward the blade assembly. If ingredients are routinely getting stuck, adding
some liquid will usually help.
• When filling the cup, start with
3
/4–1 cup of liquid, then seeds, powders, or nut butters. Next, add fresh
fruits and vegetables, then yogurt. Finally, add ice or frozen ingredients, then leafy greens.
UNIT MOVES ON COUNTER WHILE BLENDING.
• Make sure the counter and feet of the unit are clean and dry.
LID OR CRUSHBLADE™ ASSEMBLY IS HARD TO INSTALL ON THE CUP.
• Set the cup on a level surface. Carefully place the lid or blade assembly on the top of the cup and align
the threads so the lid/blade assembly sits flat. Twist clockwise until you have a tight seal.
To order additional parts and attachments, visit ninjaaccessories.com.
Please visit registeryourninja.com to register your new Ninja® product within ten (10) days of purchase.
You will be asked to provide the store name, date of purchase, and model number along with your name
and address.
The registration will enable us to contact you in the unlikely event of a product safety notification. By
registering, you acknowledge you have read and understood the instructions for use and warnings set
forth in the accompanying instructions.
This unit features a unique safety system that prevents damage to the motor and drive system should
you inadvertently overload the unit. If the unit is overloaded, the motor will be temporarily disabled.
Should this occur, follow the reset procedure below.
1 Unplug the unit from the electrical outlet.
2 Allow the unit to cool for approximately 15 minutes.
3 Remove the cup, lid, and blade assembly. Empty the cup and ensure no ingredients are jamming the
blade assembly.
IMPORTANT: Ensure that maximum capacities are not exceeded. This is the most typical cause of
appliance overload.
If your unit needs servicing, please call Customer Service at 1-877-646-5288. So we may better assist
you, please register your product online at registeryourninja.com and have the product on hand when
you call.
ORDERING REPLACEMENT PARTS
PRODUCT REGISTRATION
RESETTING THE MOTOR
CLEANING
• Hand-Washing Travel Tumblers
Wash cups, lids, straws, and silicone boots in warm, soapy water. Use a
dishwashing utensil with handle to reach bottom of the cup. Thoroughly rinse
and air-dry all parts.
• Hand-Washing Blade Assembly
Wash blade assembly in warm, soapy water. Use a dishwashing utensil with handle to
avoid direct contact with the blades. Exercise care when handling the blade assembly,
as the blades are sharp. Thoroughly rinse and air-dry all parts. For best cleaning
results, wash blade assembly within an hour of use, focusing on crevices, slots, and the
interlock where buildup may occur.
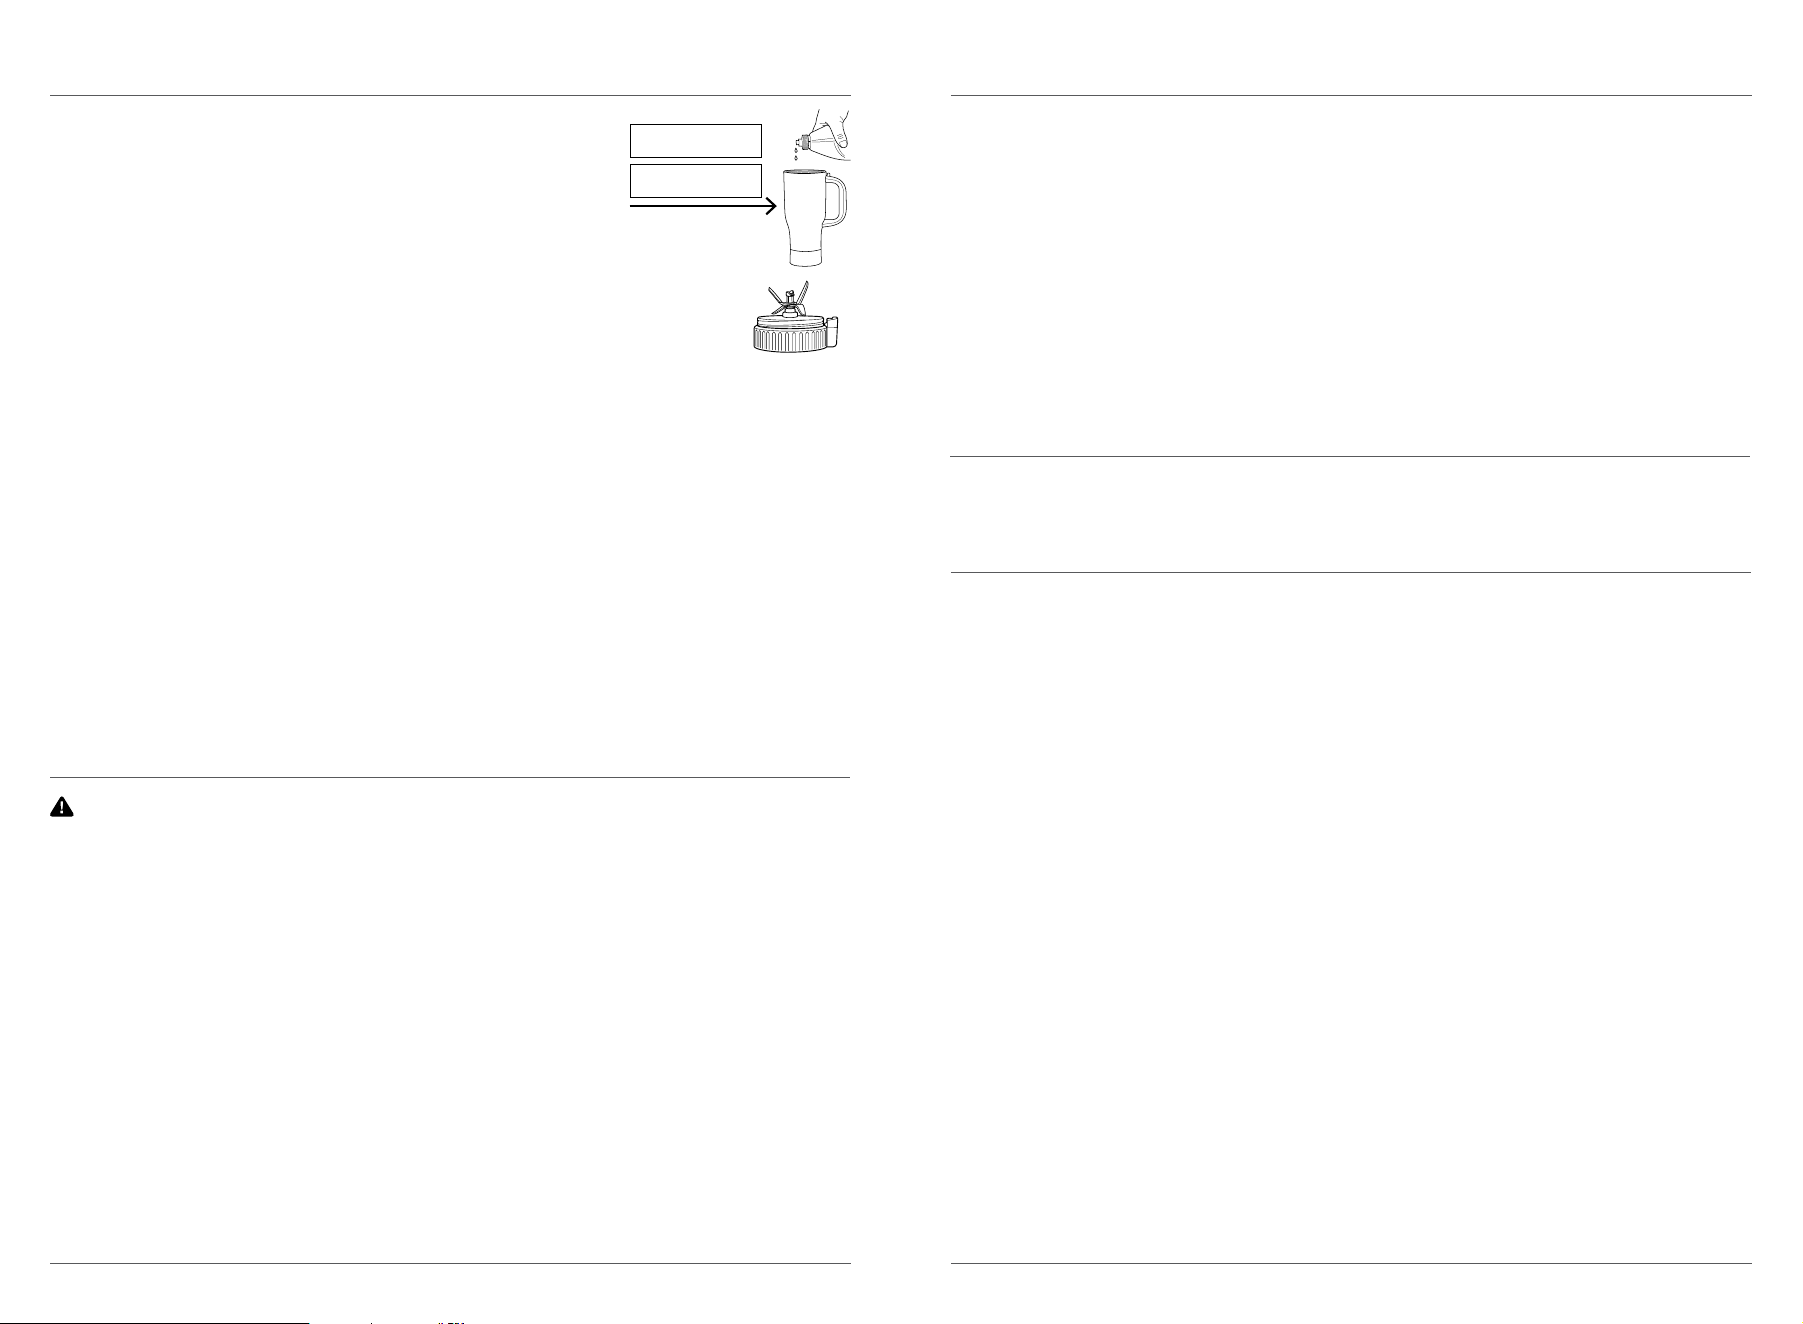
1-2 SMALL DROPS OF
DISH SOAP
FILL WATER TO TOP
OF STEP
• Quick Clean
• Rinse the cup and blade assembly under WARM WATER after processing.
• Fill the cup halfway with warm water and add 1-2 SMALL DROPS of dish soap.
• Screw on the blade assembly and press Puree.
• Once complete, empty contents.
• Dishwasher
Cup, straw, blade assembly, and lid in the open position are top-rack dishwasher safe ONLY. Ensure the
blade assembly, straw, silicone boot, and lid are removed from the cup before placing in the dishwasher.
Do not use on heated dry cycle.
TIP: To quickly dry the lid after washing, rest the lid in the open-position on its side.
• Motor Base
Unplug the unit before cleaning. Wipe motor base with a clean, damp cloth.
STORING
DO NOT store blended or unblended ingredients in the cup with the blade assembly attached. Use only
the lid when storing blended or unblended ingredients in the cups.
DO NOT stack items on top of the cups. Store any remaining attachments alongside the unit or in a
cabinet where they will not be damaged or create a hazard.
CARE & MAINTENANCE

NOTES
sharkninja.com
sharkninja.com
The One (1) Year Limited Warranty applies to purchases made from authorized retailers of
SharkNinja Operating LLC. Warranty coverage applies to the original owner and to the original product
only and is not transferable.
SharkNinja warrants that the unit shall be free from defects in material and workmanship for a period
of one (1) year from the date of purchase when it is used under normal household conditions and
maintained according to the requirements outlined in the Owner’s Guide, subject to the following
conditions and exclusions:
What is covered by this warranty?
1. The original unit and/or non-wearable parts deemed defective, in SharkNinja’s sole discretion,
will be repaired or replaced up to one (1) year from the original purchase date.
2. In the event a replacement unit is issued, the warranty coverage ends six (6) months following the
receipt date of the replacement unit or the remainder of the existing warranty, whichever is later.
SharkNinja reserves the right to replace the unit with one of equal or greater value.
California Residents Only: The One (1) Year Limited Warranty period begins on the original date of
delivery or pickup.
What is not covered by this warranty?
1. Normal wear and tear of wearable parts (such as blending vessels, lids, cups, blades, blender
bases, removable pots, racks, pans, etc.), which require regular maintenance and/or replacement
to ensure the proper functioning of your unit, are not covered by this warranty. Replacement parts
are available for purchase at ninjaaccessories.com.
2. Any unit that has been tampered with or used for commercial purposes.
3. Damage caused by misuse, abuse, negligent handling, failure to perform required maintenance
(e.g., failure to keep the well of the motor base clear of food spills and other debris), or damage
due to mishandling in transit.
4. Consequential and incidental damages.
5. Defects caused by repair persons not authorized by SharkNinja. These defects include damages
caused in the process of shipping, altering, or repairing the SharkNinja product (or any of its parts)
when the repair is performed by a repair person not authorized by SharkNinja.
6. Products purchased, used, or operated outside North America.
How to get service
If your appliance fails to operate properly while in use under normal household conditions within the
warranty period, visit ninjakitchen.com/support for product care and maintenance self-help. Our
Customer Service Specialists are also available at 1-877-646-5288 to assist with product support and
warranty service options, including the possibility of upgrading to our VIP warranty service options
for select product categories. So we may better assist you, please register your product online at
registeryourninja.com and have the product on hand when you call.
SharkNinja will cover the cost for the customer to send in the unit to us for repair or replacement. A fee
of $20.95 (subject to change) will be charged when SharkNinja ships the repaired or replacement unit.
How to initiate a warranty claim
You must call 1-877-646-5288 to initiate a warranty claim. You will need the receipt as proof of purchase.
We also ask that you register your product online at registeryourninja.com and have the product on
hand when you call, so we may better assist you. A Customer Service Specialist will provide you with
return and packing instruction information.
How state law applies
This warranty gives you specifi c legal rights, and you also may have other rights that vary from state
to state. Some states do not permit the exclusion or limitation of incidental or consequential damages,
so the above may not apply to you.
ONE (1) YEAR LIMITED WARRANTY
NJA_1_YR_IB_LMTD_WRNTY_US_ENG
REGISTER YOUR PURCHASE
registeryourninja.com
Scan QR code using mobile device
SharkNinja Operating LLC
US: Needham, MA 02494
1-877-646-5288
sharkninja.com
Illustrations may dier from actual product. We are constantly striving to improve our products;
therefore the specifications contained herein are subject to change withoutnotice.
AUTO-IQ and NINJA are registered trademarks of SharkNinja Operating LLC.
CRUSHBLADE and NINJA BLENDBOSS are trademarks of SharkNinja Operating LLC.
This product may be covered by one or more U.S. patents.
See sharkninja.com/patents for more information.
© 2025 SharkNinja Operating LLC
CO351DBSeries_IB_REV_Mv1
TECHNICAL SPECIFICATIONS
Voltage: 120V~, 60Hz
Power: 1100 Watts
RECORD THIS INFORMATION
Model Number: _________________________
Serial Number: __________________________
Date of Purchase: ________________________
(Keep receipt)
Store of Purchase: _______________________
@ninjakitchen