17
Operation (continued)
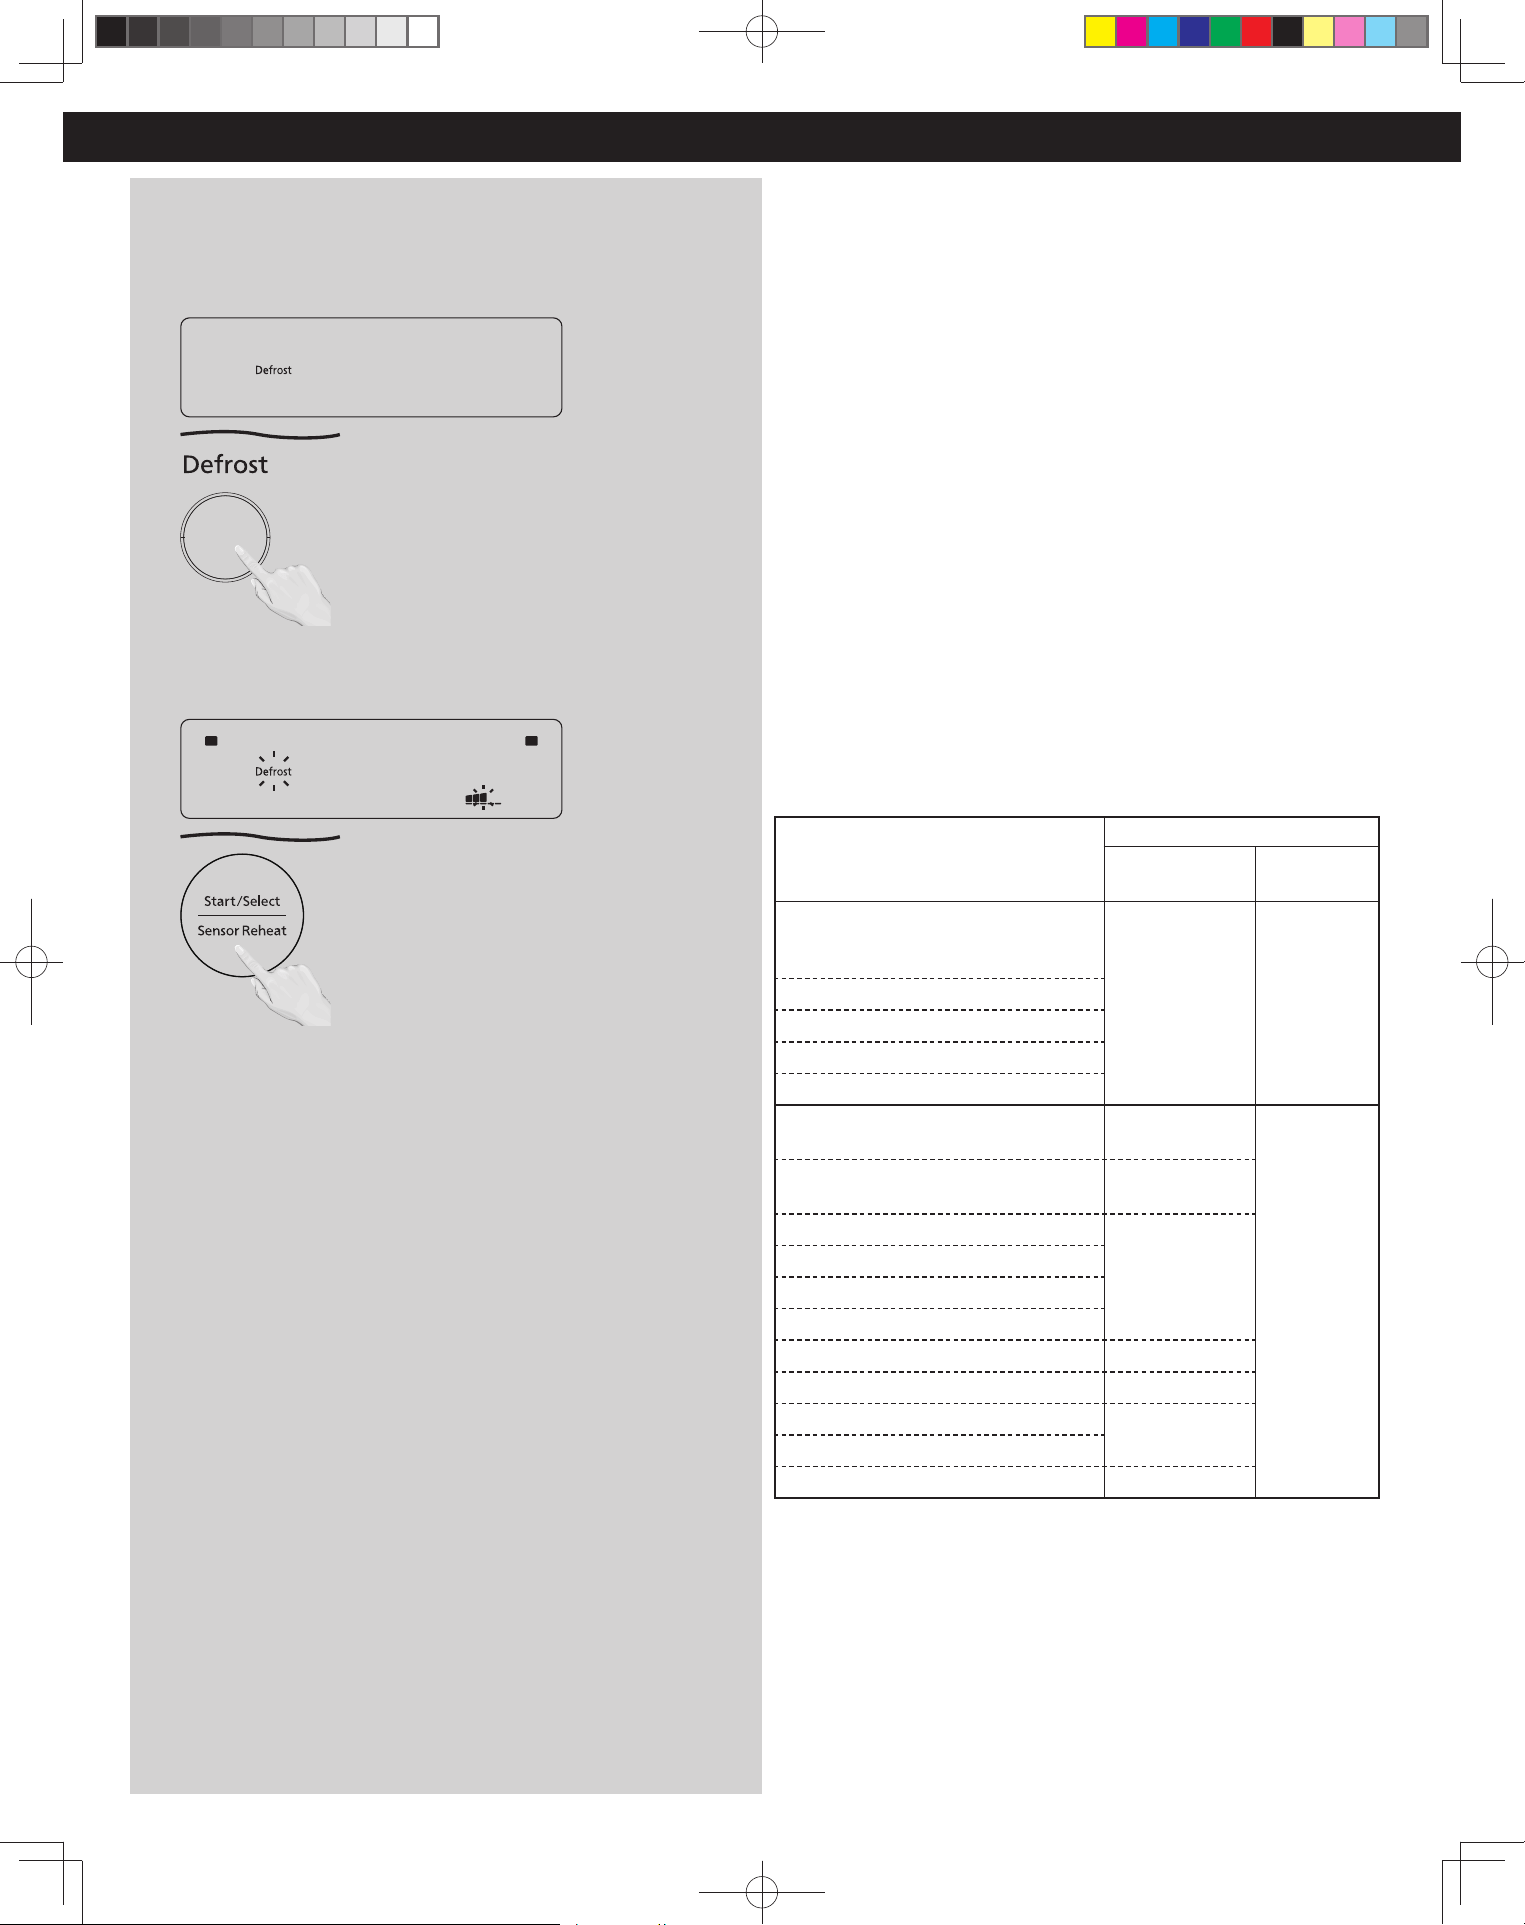
Defrost (Automatic)
Simply press the pad to defrost frozen food. It works
automatically without any settings.
[Example: Defrost food on Medium (Standard)]
1
This feature allows you to defrost foods such as meat cuts, poultry
and seafood, simply by pressing Defrost.
2
Press Start. Defrosting will start.
After pressing Start, you can adjust the temperature (level) from
Medium (Standard) within 14 seconds.
To Increase: Rotate the dial clockwise.
To Decrease: Rotate the dial counterclockwise.
The 5 available settings are:
Low → Medium-Low → Medium → Medium-High → High
(Less-) (Less) (Standard) (More) (More+)
(Adjust only if needed.)
NOTE:
1. The frozen defrost mark indicates that frozen food is being
defrosted.
2. The thickness of the meat must not exceed 1.2 in (3 cm).
3. Recommended portion size for defrosted meat is 4 – 35 oz. (110
g - 1000g).
Defrosting Tips & Techniques
Preparation For Freezing:
1. Freeze meats, poultry, and fish in packages with only one or two layers
of food. Place wax paper between layers.
2. Package in heavy-duty plastic wrap, bags (labeled “For Freezer”), or
freezer paper.
3. Remove as much air as possible.
4. Seal securely, date, and label.
To Defrost:
1. Remove wrapper. This helps moisture to evaporate. Juices from food can
get hot and cook the food.
2. It is not suitable to defrost meat joints and big pieces. For large
quantities , please use P3 manual power and time.
3. Set food in microwave safe dish. DO NOT COVER.
After Defrosting:
1. Large items may be frozen in the center. Defrosting will complete during
rest time.
2. Let rest, covered, following rest time directions in the chart below.
3. Rinse foods indicated in the chart.
4. Items which have been layered should be rinsed separately or have a
longer rest time.
FOOD
AFTER DEFROSTING
Rest Time
Rinse
(cold water)
Fish and Seafood
Crabmeat
5 mins YES
Fish Steaks
Fish Fillets
Sea Scallops
Whole sh
Meat
Ground Meat
10 mins
NO
Roasts 30 mins in refrig.
Chops/Steak
5 mins
Ribs/T-bone
Stew Meat
Liver (thinly sliced)
Bacon (sliced) ----
Cutlets 5 mins
Pieces
10 mins
Cornish hens
Turkey Breast 20 mins
in refrig.
F0003DB70AP_EN.indd 17F0003DB70AP_EN.indd 17 2026/2/26 15:50:282026/2/26 15:50:28
18
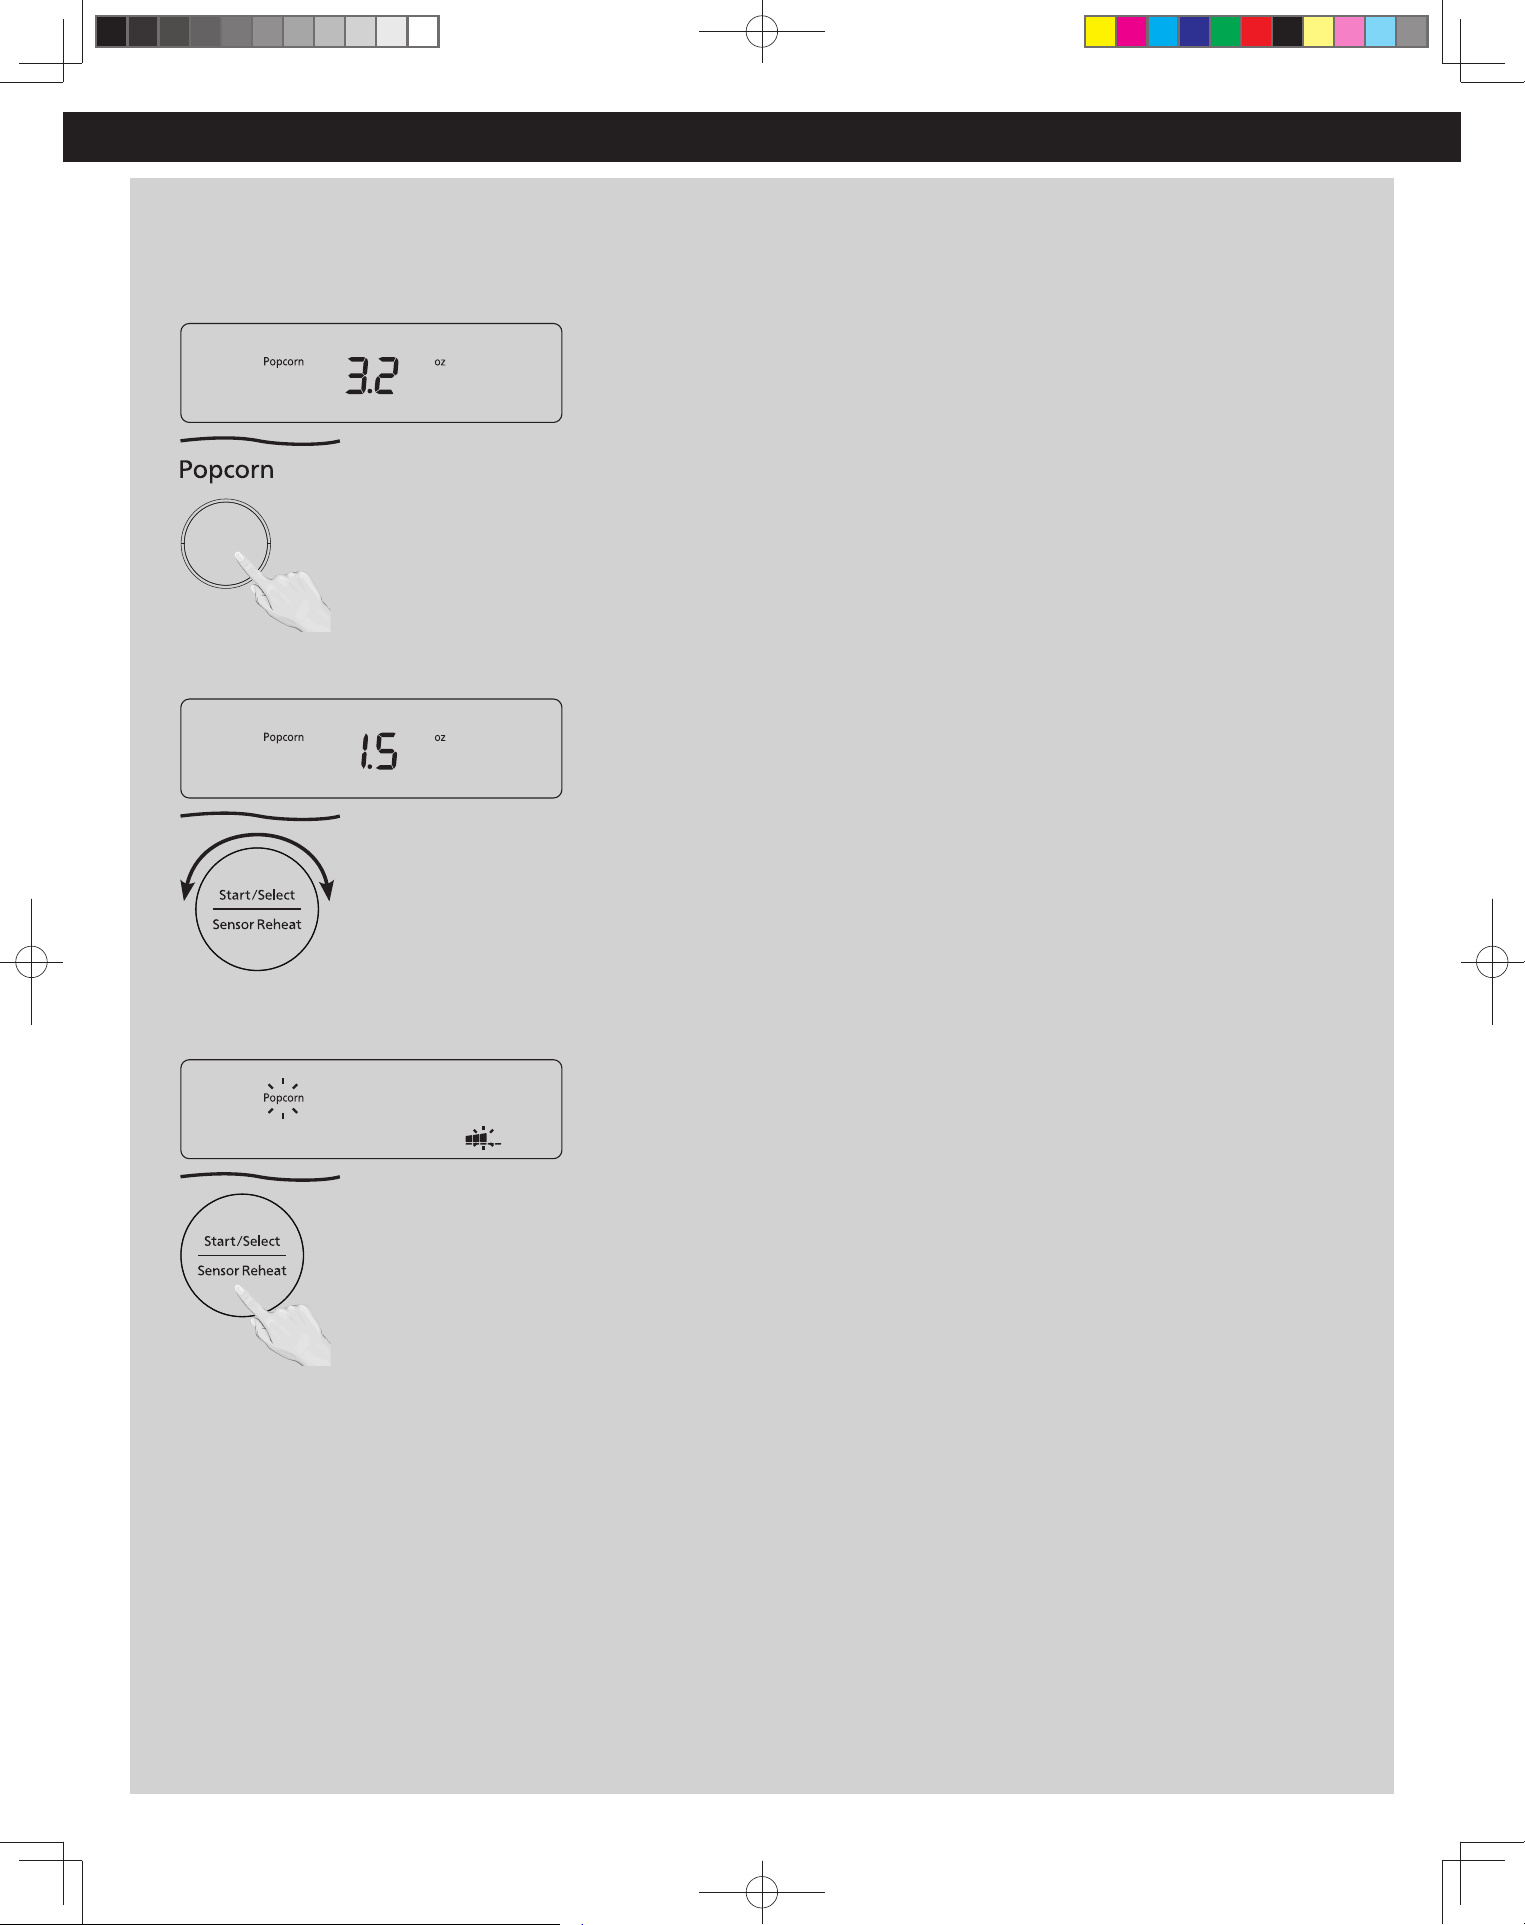
Popcorn
[Example: Pop 1.5 oz. (42
g
) of popcorn on Medium
(Standard)]
1
Press Popcorn once.
2
Use the dial to select from the following weight options: 3.2 oz.
(91 g), 2.75 oz. (78 g), or 1.5 oz. (42 g).
3
Press Start; After pressing Start, you can adjust temperature
(level) from Medium (Standard) within 14 seconds.
To Increase: Rotate the dial clockwise.
To Decrease: Rotate the dial counterclockwise.
The 5 available settings are:
Low → Medium-Low → Medium → Medium-High→ High
(Less-) (Less) (Standard) (More) (More+)
(Adjust only if needed.)
Operation (continued)
NOTES:
1. Pop one bag at a time.
2. Place bag in oven according to manufacturers’ directions.
3. Start with popcorn at room temperature.
4. Allow popped corn to sit unopened for a few minutes.
5. Open bag carefully to prevent burns, because steam will
escape.
6. Do not reheat unpopped kernels or reuse bag.
7. If popcorn is of a different weight than listed, follow
instructions on popcorn package.
8. Never leave the oven unattended.
9. If popping slows to 2 to 3 seconds between pops, stop
oven. Overcooking can burn popcorn or cause fire.
10. When popping multiple bags one right after the other, the
cooking time may vary slightly. This does not affect the
popcorn results.
F0003DB70AP_EN.indd 18F0003DB70AP_EN.indd 18 2026/2/26 15:50:282026/2/26 15:50:28
19
Operation (continued)
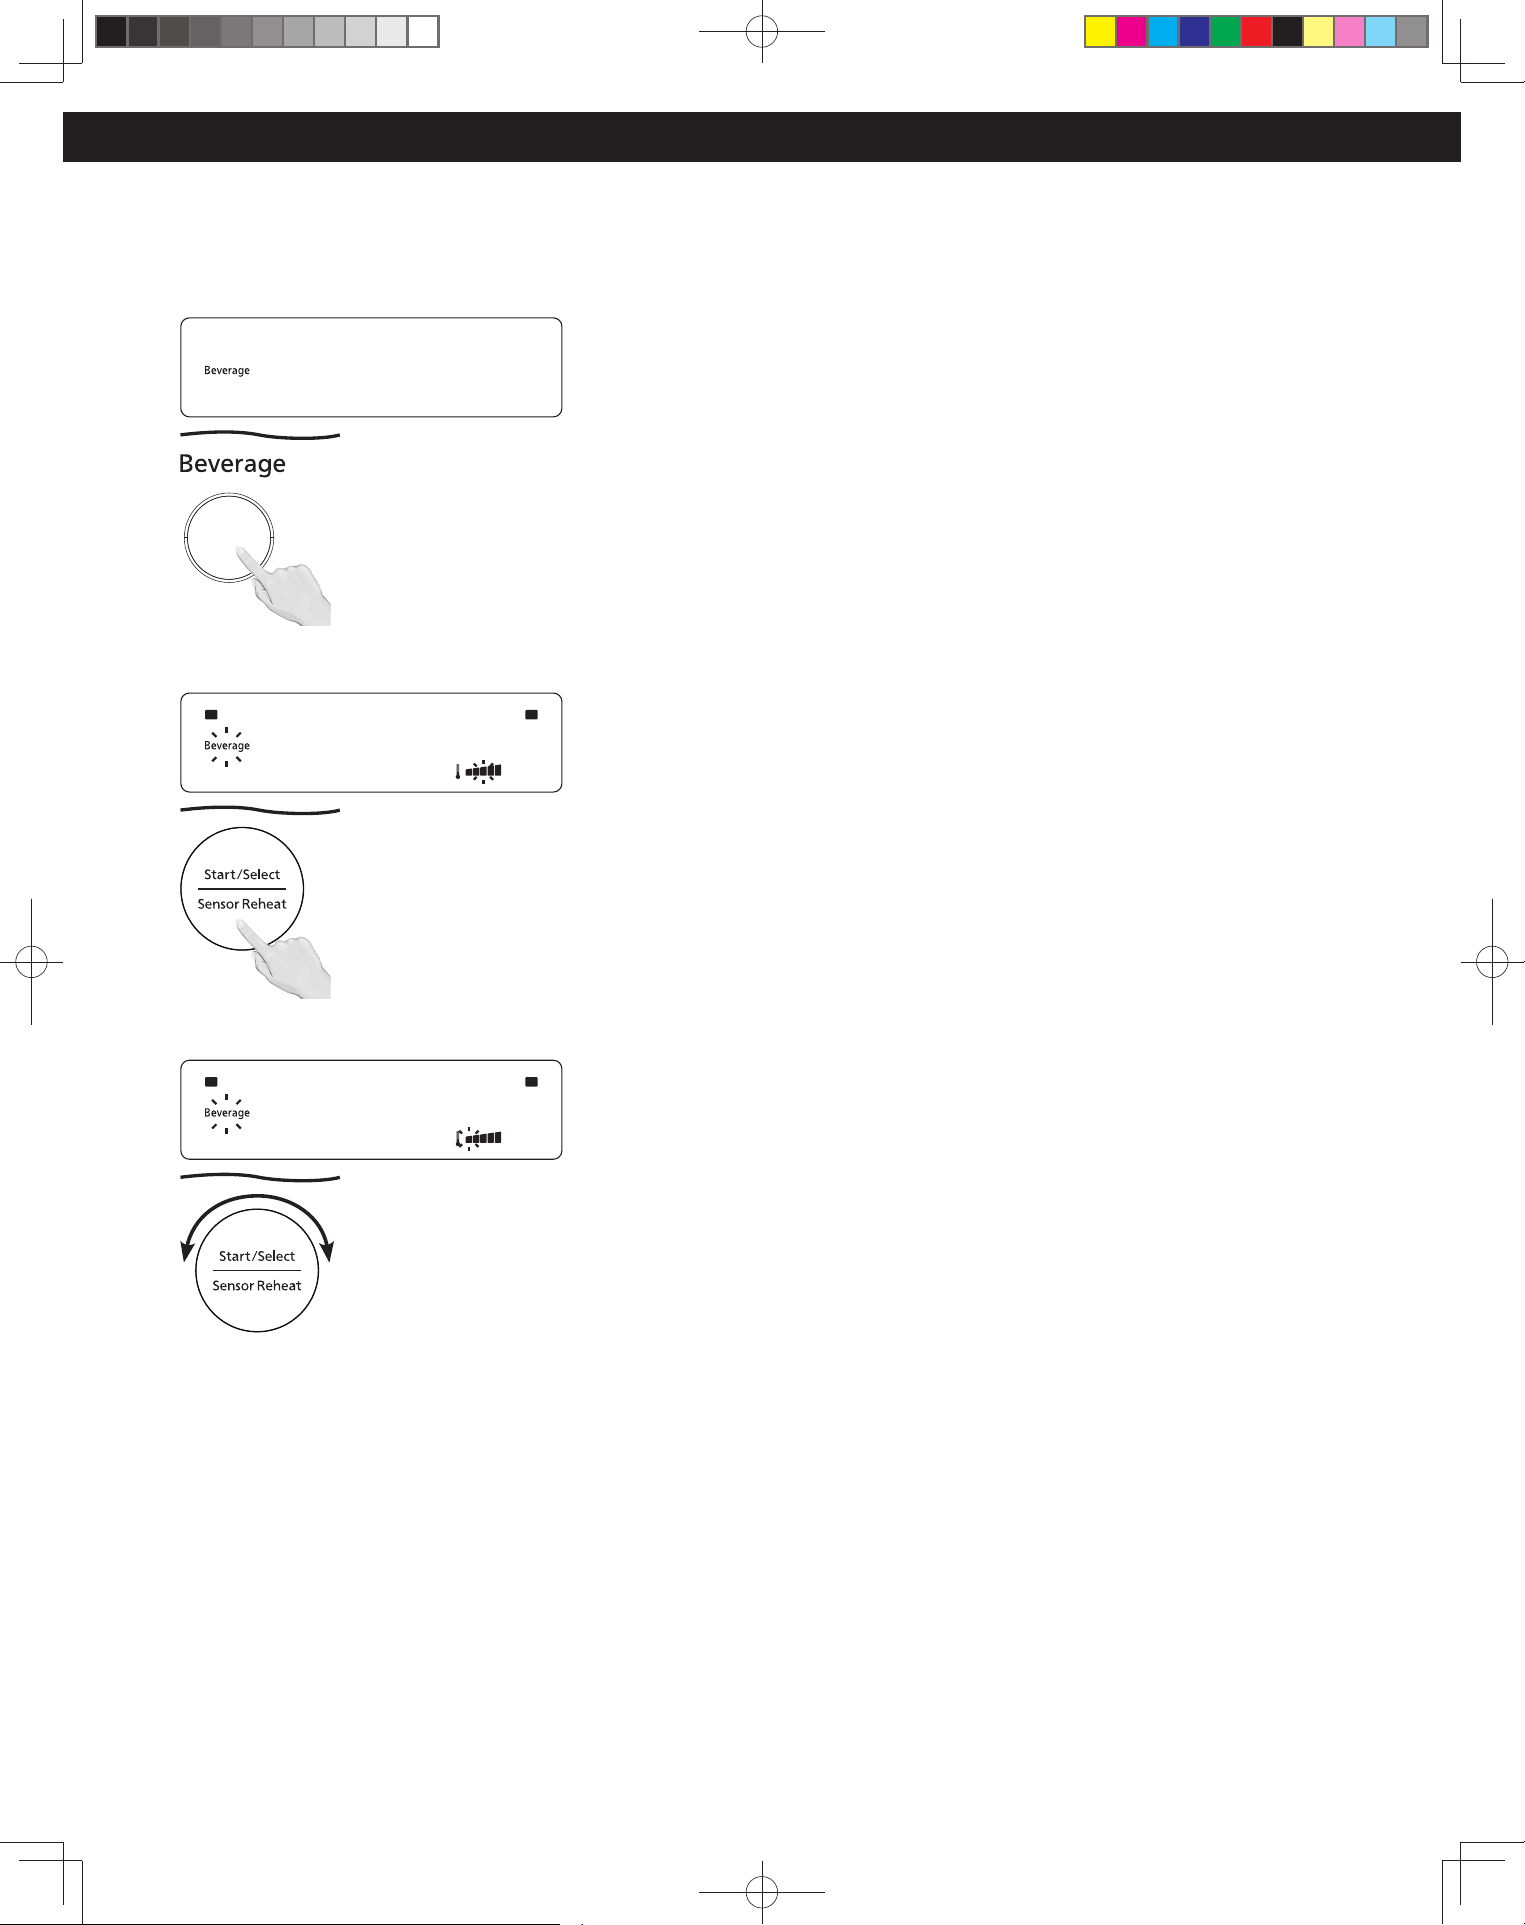
Beverage
(Simply press the pad to reheat beverage. It works
automatically without any settings.)
[Example: To reheat 1 cup of beverage on Low (Less-)]
1
Press Beverage once.
2
Press Start.
3
After pressing Start, you can adjust the temperature (level) from
Medium (Standard) within 14 seconds.
To Increase: Rotate the dial clockwise.
To Decrease: Rotate the dial counterclockwise.
The 5 available settings are:
Low → Medium-Low → Medium → Medium-High → High
(Less-) (Less) (Standard) (More) (More+)
(Adjust only if needed.)
NOTES:
1. It is suitable for reheating one cup of milk, coffee, etc. but not
suitable for alcohol.
2. Use a microwave safe cup. To prevent overflow, do not fill the
cup more than 80% with liquid for reheating. DO NOT COVER.
3. Overheated liquid can erupt if not mixed with air. Always stir
and check the temperature before serving.
4. The internal food temperature may differ from the set
temperature (level). But under-reheating is better than over-
reheating. Please add more time manually or utilize the
Temperature and More/Less selection before pressing Start.
Overheating will cause an increased risk of scalding, or water
eruption. Refer to page 4, item 19.
5. For even reheating, reheat only one cup of beverage at a time.
F0003DB70AP_EN.indd 19F0003DB70AP_EN.indd 19 2026/2/26 15:50:282026/2/26 15:50:28
20
Sensor Cook
Sensor Cook includes reheating breaded type foods, one
bowl cooking and other auto cook menus. Please refer next
page for auto menu numbers
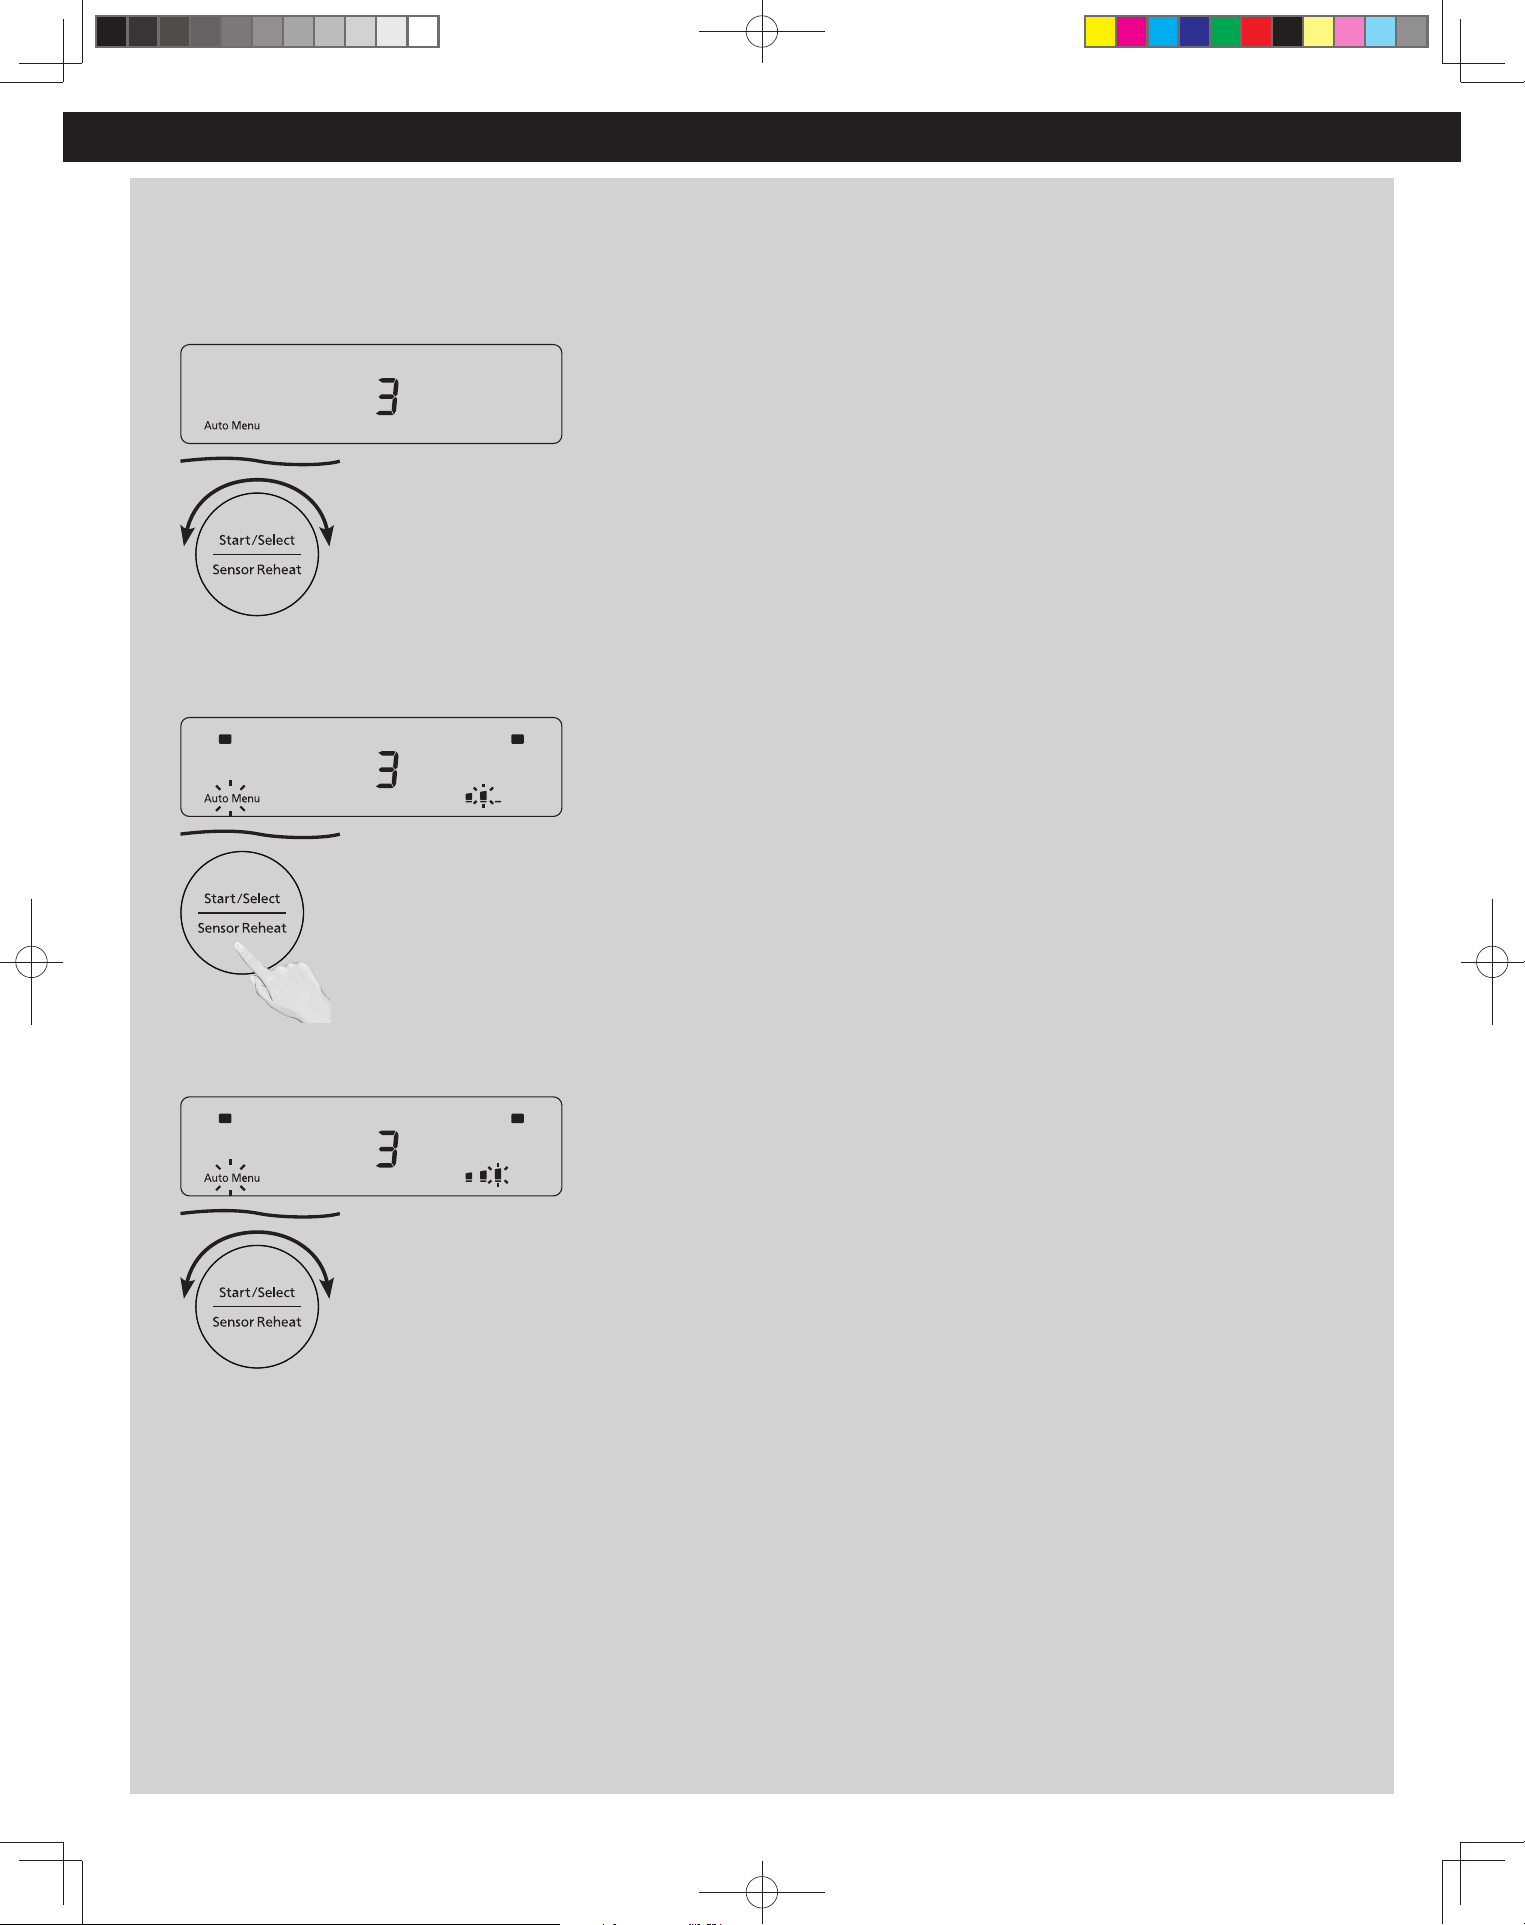
[Example: Set Sensor Cook Menu NO.3 on High (More)]
1
Turn the dial until the number corresponding to the desired food
appears in the display (see chart on the next page).
2
Press Start.
3
After pressing Start, you can adjust the temperature (level) from
Medium (Standard) within 14 seconds.
To Increase: Rotate the dial clockwise.
To Decrease: Rotate the dial counterclockwise.
The 3 available settings are:
Low → Medium → High
(Less) (Standard) (More)
(Adjust only if needed.)
Operation (continued)
What is one bowl recipe?
One bowl cooking is easy way to cook spaghetti, mac’n’cheese or
soup in the oven. You have 3 steps to do.
1. Put all ingredients in one glass bowl.
2. Seal with plastic wrap.
3. Put the bowl in the microwave oven and set one bowl cooking
menu. (No.2-No.7)
The Genius® 2.0 Sensor will monitor food for you for perfect result!
NOTES:
1. To reheat breaded type food, using Sensor Cook Menu NO.1 is
the best choice.
2. Do not open before cooking is complete. Always stir and check
the temperature before serving.
3. After having used the Sensor Cook feature a few times, you
may decide you would prefer your food cooked to a different
doneness – that is why you would utilize the Temperature and
More/Less selection pad.
4.
Automatic features are provided for your convenience. If results
are not suitable to your individual preference, or if serving size
is other than what is listed on page 21, please refer to manual
cooking on page 14.
For the best results with One Bowl Cooking powered by The
Genius® 2.0 Sensor , follow these recommendations:
BEFORE Cooking:
1. The room temperature surrounding the oven should be below
95 °F (35 °C).
2. Food weight should not exceed the weight range on next page.
3. Be sure the flat table, the outside of the cooking containers and
the inside of the microwave oven are dry before placing food
in the oven. Residual beads of moisture turning into steam can
mislead the sensor.
4. Cover food with plastic wrap for one bowl cooking (No.2-No.7)
and Oatmeal. Paper towel or silicon lid are not suitable as it will
affect the sensor performance.
AFTER Cooking:
All foods should have a rest time.
F0003DB70AP_EN.indd 20F0003DB70AP_EN.indd 20 2026/2/26 15:50:282026/2/26 15:50:28
21
Operation (continued)
Sensor Cook Chart
See the chart below for Sensor Cook categories.
Category Programs
Serving/
Weight
Recommended Container and Hints
Reheat
1. Pizza, Mexican Foods, Sandwiches
4 – 8 oz.
(110 – 225 g)
microwave safe dish
Cook
2. One Bowl Spaghetti
1 serv. – 4 servs.
2.5 qt (approx. 10 in) microwave-safe bowl.
Cover with plastic wrap. Paper towel or silicon lid are not suitable as it will
affect the sensor performance.
3. One Bowl Pasta Sauce
1 serv. – 4 servs.
4. One Bowl Mac’n’Cheese
1 serv. – 4 servs.
5. One Bowl Soup
1 serv. – 4 servs.
6. One Bowl Chilli
1 serv. – 4 servs.
7. One Bowl Stew
1 serv. – 4 servs.
8. Oatmeal
½ – 1 cup
(50 – 100 g)
9. Potato
8 – 40 oz.
(225 – 1100 g)
microwave safe dish
Melt
10. Butter
2 – 16 oz.
(55 – 450 g)
11. Chocolate
2 – 16 oz.
(55 – 450 g)
1. Pizza, Mexican Foods, Sandwiches
For reheating breaded type foods such as chilled, purchased pizza,
Mexican foods such as tacos or burritos and sandwiches within the
weight range 4 - 8 oz.(110 - 225g). Remove all packaging and place
food in a microwave-safe dish. Select Program 1 and press Start to
cook.
2. One Bowl Spaghetti (Bolognese)
Ingredients (4 servs)
12 oz. (340 g) Spaghetti
4 oz. (110 g) Half medium onion, chopped
8 oz. (225 g) Ground beef
1 clove Garlic, chopped
8 oz. (225 g) Canned chopped tomatoes
2 cups (480 ml) Water
4 tbsp (60 ml) Olive oil
1 tsp (5 g) Salt
4 tbsp (60 g) Tomato Paste
Directions:
1. Stir water and oil together in a large 2.5 qt (approx. 10 in)
microwave-safe bowl.
2. Break the spaghetti in half and put into the bowl. Gently stir
to coat the pasta,ensure that the noodles are fully covered with
water.
3. Add in all the remaining ingredients except salt and tomato
paste.
4. Cover tightly with plastic wrap.
5. Place bowl into the microwave oven, turn dial to select Program
2 and press Start to cook.
6. After cooking, add salt and tomato paste. Stir well and enjoy.
Note:
The ingredients listed are for 4 servings. Feel free to adjust the
amounts proportionally depending on your needs.
3. One Bowl Pasta Sauce (Meat Sauce)
Ingredients (4 servs)
4 oz. (110 g) Half medium onion, chopped
16 oz. (450 g) Ground beef
1 clove Garlic, chopped
1 tbsp (10 g) Flour
14 oz. (390 g) Canned chopped tomatoes
4 tbsp (60 g) Tomato Paste
1 tbsp (15 g) Salt
Pepper (to taste)
Directions:
1. Place the Ground beef in a heatproof glass bowl approximately
2.5 qt (approx. 10 in) and coat it with flour and break apart meat
with a spatula.
2. Stir in all the remaining ingredients.
3. Cover tightly with plastic wrap.
4. Place bowl into the microwave oven, turn dial and select
Program 3 and press Start to cook.
5. After cooking, stir well and enjoy with noodles.
Note:
The ingredients listed are for 4 servings. Feel free to adjust the
amounts proportionally depending on your needs.
4. One Bowl Mac’n’Cheese (HOMEMADE)
Ingredients (3 servs)
7.25 oz. (206 g) Macaroni
3 tbsp (45 g) Butter
1½ cup (360 ml) Water
1 cup (240 ml) Milk
7 oz. (195 g) Shredded Cheddar Cheese
2 tbsp (20 g) Flour
Salt and Pepper (to taste)
F0003DB70AP_EN.indd 21F0003DB70AP_EN.indd 21 2026/2/26 15:50:292026/2/26 15:50:29

22
Operation (Continued)
Directions:
1. Cut the butter into cubes and put them into a large 2.5 qt
(approx. 10 in) microwave-safe bowl.
2. Add in Macaroni and water. Gently stir to coat.
3. Cover tightly with plastic wrap.
4. Put into the microwave oven, turn dial to select Program 4 and
press Start to cook.
5. Drain macaroni.
6. Add milk, shredded cheese, flour, salt and pepper to cooked
macaroni and mix well.
7. Cover tightly with plastic wrap.
8. Place bowl into the microwave, select Manual MW P5 and press
Start to cook for five minutes.
9. After cooking, stir well and enjoy.
For Boxed Mac & Cheese follow steps 1 through 3 in the homemade
recipe. Put into the microwave oven, turn dial to select Program 4
and press Start to cook. After cooking, drain macaroni and stir in
milk and cheese powder.
Note:
The ingredients listed are for 3 servings. Feel free to adjust the
amounts proportionally depending on your needs.
5. One Bowl Soup (Chicken Noodle soup)
Ingredients (3 servs)
2 oz. (55 g) Onion, diced
2 oz. (55 g) Celery, diced
2 oz. (55 g) Carrot, sliced
8 oz. (225 g) Chicken breast, cubbed
2 oz. (55 g) Noodles
2 cups (480 ml) Chicken Stock
Salt and Pepper (to taste)
Dried Basil (to taste)
Dried Oregano (to taste)
Directions:
1. Put all ingredients together – except basil and oregano–in a large
2.5 qt (approx. 10 in) microwave-safe bowl.
2. Cover tightly with plastic wrap.
3. Place bowl into microwave oven, turn dial to select Program 5
and press Start to cook.
4. After cooking, add basil and oregano. Stir well and enjoy.
Note:
The ingredients listed are for 3 servings. Feel free to adjust the
amounts proportionally depending on your needs.
6. One Bowl Chilli
Ingredients (3 servs)
4 oz. (110 g) Half medium onion, chopped
8 oz. (225 g) Ground beef
15 oz. (420 g) Canned red kidney beans (drained)
14 oz. (390 g) Canned chopped tomatoes
2 tbsp (30 g) Tomato Paste
1 tbsp (10 g) Flour
1 tsp (5 g) Chili powder
1 tsp (5 g) Cumin
Salt and Pepper (to taste)
Directions:
1. Place the ground beef in a large 2.5 qt (approx. 10 in) microwave
safe bowl and coat with flour.
2. Break up ground beef with spatula.
3. Add the rest of the ingredients to ground beef mixture, stir well.
4. Cover tightly with plastic wrap.
5. Place bowl into the microwave oven, turn dial to select Program
6 and press Start to cook.
6. After cooking, stir well and enjoy.
Note:
The ingredients listed for chilli are for 3 servings. Feel free to adjust
the amounts proportionally depending on your needs.
7. One Bowl Stew
Ingredients (2servs)
8 oz. (225 g) Beef
4 oz. (110 g) Half medium onion, chopped
4 oz. (110 g) 2 Medium carrot
5 oz. (140 g) Medium potato
1 cup (240 ml) Beef broth (Cold)
2 tbsp (30 g) Tomato Paste
2 tbsp (20 g) Flour
1 tsp (5 g) Salt
Black pepper (to taste)
Directions:
1. Cut carrot into 1/4-inch pieces. Cut potato and beef into cubes.
2. Put beef and flour to a large micro-wave safe bowl and combine
well.
3. Add in the rest ingredients in the bowl and stir well.
4. Cover tightly with plastic wrap.
5. Place bowl into the microwave oven, turn dial to select
Program 7 and press Start to cook.
6. After cooking, caution to the hot steam.
Tips:
This function is suitable for tender beef cuts and is not
recommended for tougher ones, such as beef shank.
8. Oatmeal
Place oatmeal in a microwave safe serving bowl, Cover tightly with
plastic wrap. Follow manufacturers’ directions for preparation.
Select Program 8 and press Start to cook.
9. Potato
Pierce each potato with a fork 6 times spacing around surface.
Place in the center of the oven, at least 1 inch (2.5 cm) apart. Do
not cover. Select Program 9 and press Start to cook. Let stand 5
minutes to complete cooking.
10. Butter
Remove wrapper, cut butter into 1 inch (2.5 cm) cube, and place
into a microwave safe dish. Leave uncovered wrap, and put in the
center of the oven. Select Program 10 and press Start to melt.
After melting, stir until completely melted. If food needs more
time to melt or weight exceeds range, melt using Micro power P3.
11. Chocolate
Remove wrapper, separate chocolate into small pieces, and place
into a microwave safe dish. Leave uncovered, and put the dish in
the center of the oven. Select Program 11 and press Start to melt.
After melting, stir until completely melted. If food needs more
time to melt or weight exceeds range, melt using Micro power P3.
Note:
1.This function works best for melting baking chocolate.
2. Chocolate holds its shape even when softened.
Operation (continued)
F0003DB70AP_EN.indd 22F0003DB70AP_EN.indd 22 2026/2/26 15:50:292026/2/26 15:50:29
23
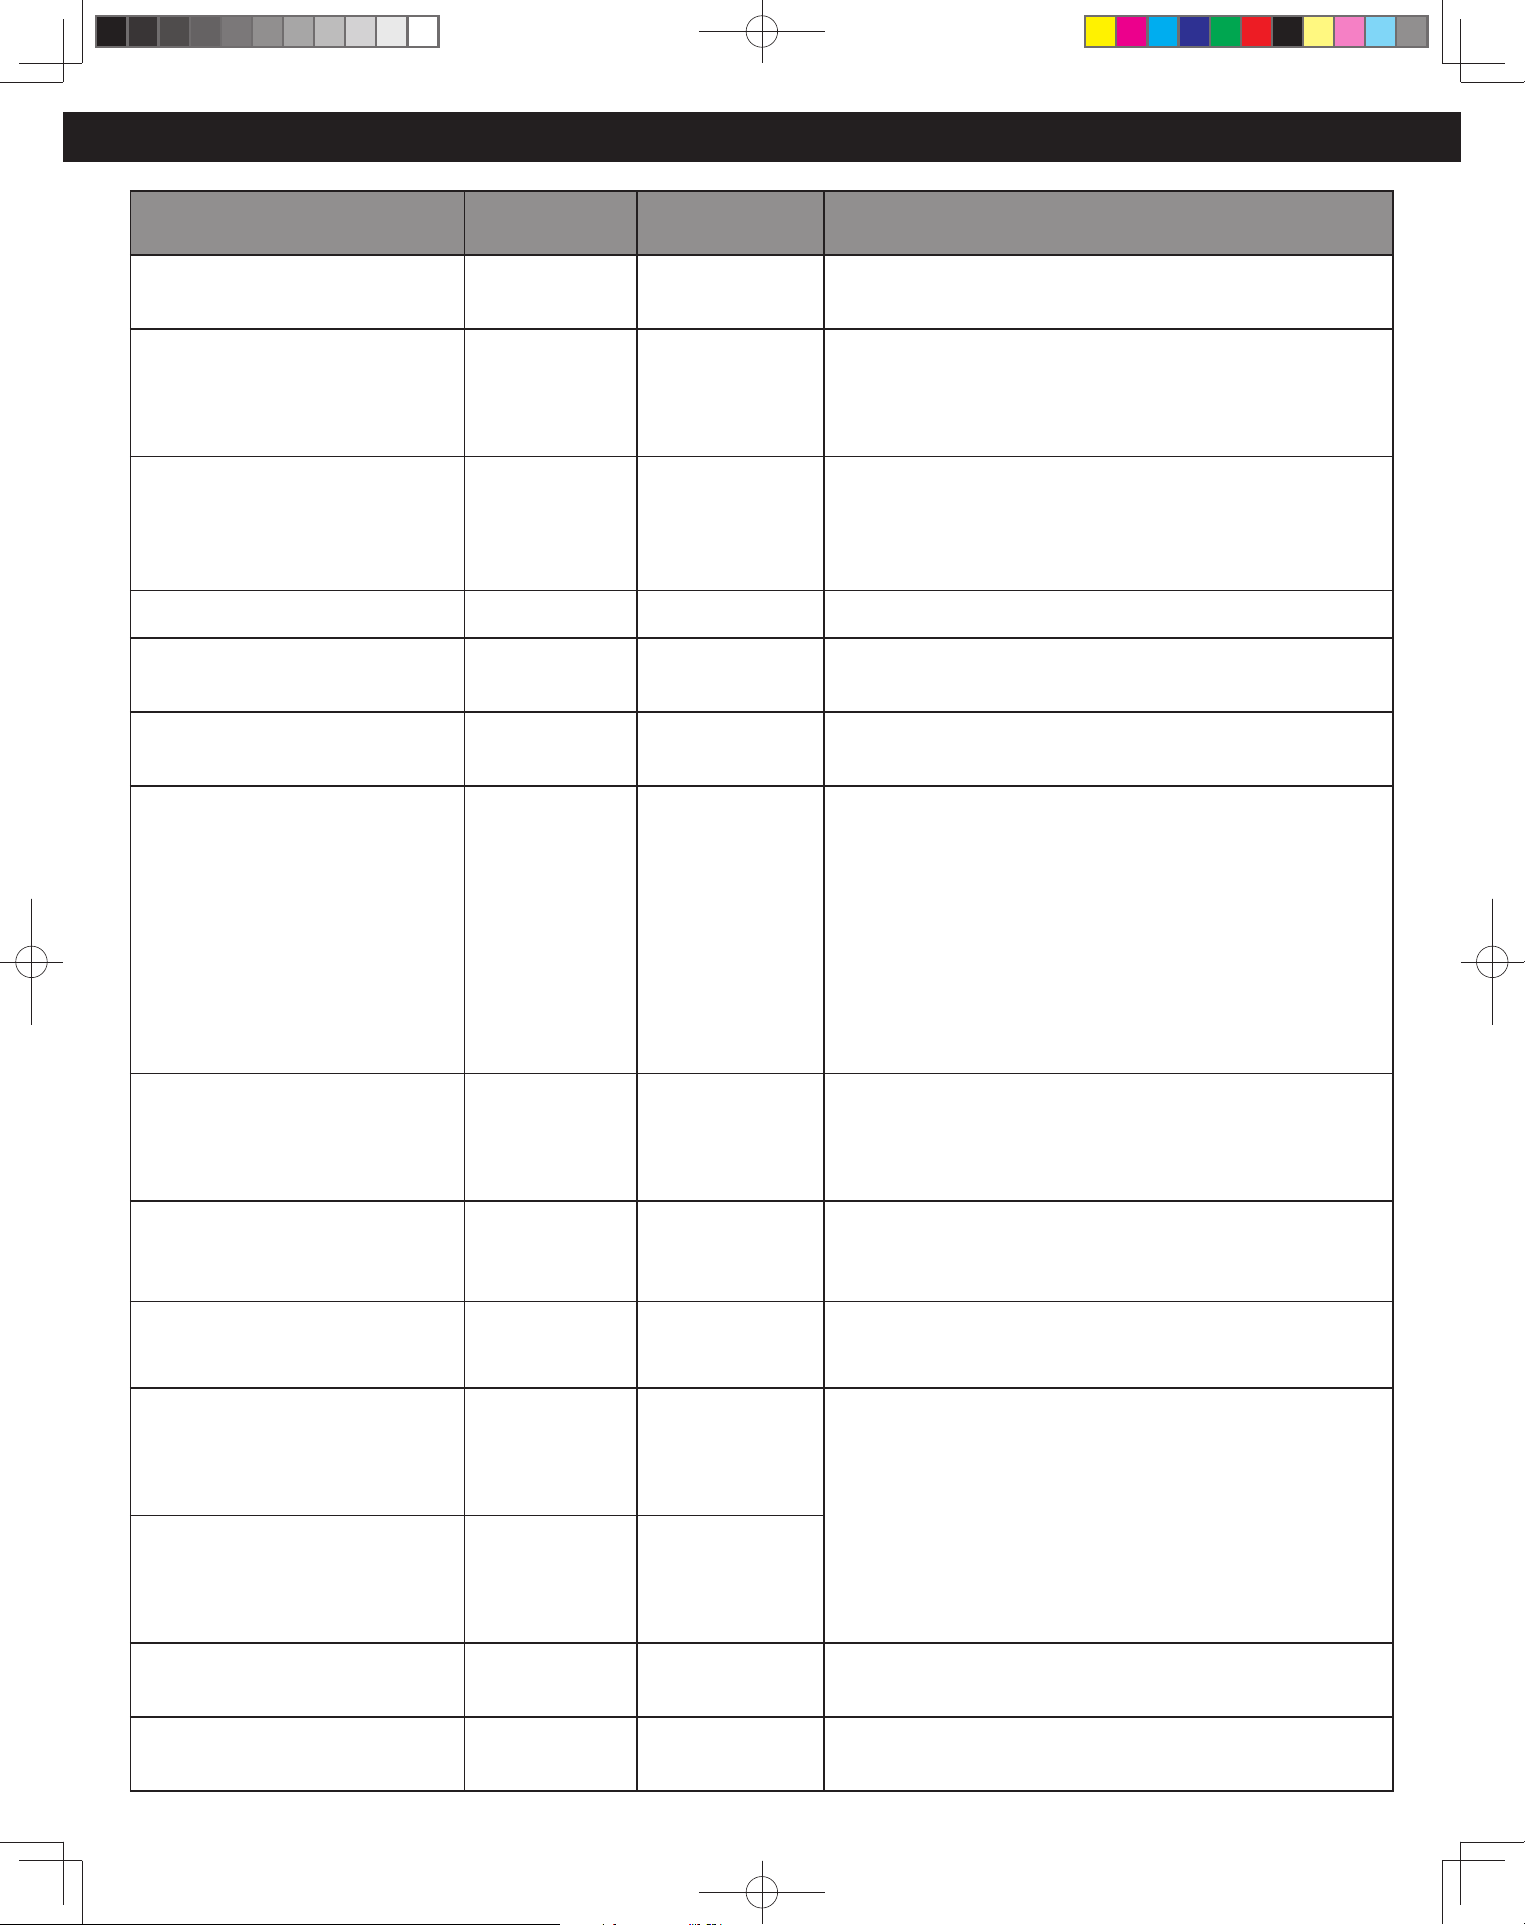
Microwave shortcuts
Food Power
Time
(in mins.)
Directions
To separate refrigerated Bacon,
16 oz. (450
g
)
P10 ½ Remove wrapper and place in microwave safe dish. After
reheating, use a plastic spatula to separate slices.
To soften refrigerated Butter,
1 stick, 4 oz. (110
g
)
To melt refrigerated Butter,
1 stick, 4 oz. (110
g
)
P3
P5
1
1½ – 2
Remove wrapper and place butter in a microwave safe dish
covered with lid or vented plastic wrap.
To melt Chocolate, 1 square,
1 oz. (28
g
)
To melt Chocolate,
½ cup (125 ml) chips
P3
P5
1 – 1½
1 – 1½
Remove wrapper and place chocolate in a microwave safe
dish. After melting, stir until completely melted.
NOTE: Chocolate holds its shape even when softened.
To toast Coconut, ½ cup (125 ml) P10 1 Place in a microwave safe dish. Stir every 30 seconds.
To soften Cream Cheese,
8 oz. (225
g
)
P3 1 – 1½ Remove wrapper and place in a microwave safe bowl.
To brown Ground Beef,
16 oz. (450
g
)
P10 4 – 5 Crumble into a microwave safe colander set into another
dish. Cover with plastic wrap. Stir twice. Drain grease.
To cook Vegetables,
Fresh 8 oz. (225
g
)
Frozen 10 oz. (280
g
)
Canned 15 oz. (420
g
)
P7
P7
P7
4 – 5
6 – 7
3½ – 4
All pieces should be the same size. Wash thoroughly, add 1
tbsp of water per ½ cup (125 ml) of vegetables, and cover
with lid or vented plastic wrap. Do not salt/butter until
after cooking.
Wash thoroughly, add 1 tbsp of water per ½ cup (125 ml)
of vegetables, and cover with lid or vented plastic wrap.
Do not salt/butter until after cooking. (Not suitable for
vegetables in butter or sauce.)
Empty contents into microwave safe serving bowl. Cover
with lid or vented plastic wrap.
To cook baked Potato,
6 – 8 oz. each (165 – 225
g
)
1 piece
2 pieces
P8
P8
4 – 5
6 – 7
Pierce each potato with a fork 6 times spacing around
surface. Place potato or potatoes on a plate at least 1 in (2.5
cm) apart. Do not cover. Let stand 5 minutes to complete
cooking.
To steam Hand Towel P10
½ Soak in water, then wring out excess. Place on a microwave
safe dish.
Heat. Present immediately.
To soften Ice Cream,
½ gallon (2 L)
P3 1 – 1½ Check often to prevent melting.
Cup of liquid
To boil water, broth, etc.
1 cup (240 ml)
2 cups (480 ml)
P10 1½ – 2
2½ – 3
Overheated liquids can erupt if not stirred. Do not
heat liquids in microwave oven without stirring before
reheating.
Cup of liquid
To warm Beverage,
1 cup (240 ml)
2 cups (480 ml)
P7 1½ – 2
2½ – 3
To roast Nuts, 1½ cups (340
g
) P10 3 – 4 Spread nuts into a 9-inch (23 cm) microwave safe pie plate.
Stir occasionally.
To toast Sesame Seeds,
¼ cup (55
g
)
P10 2 – 2½ Place in a small microwave safe bowl. Stir twice.
F0003DB70AP_EN.indd 23F0003DB70AP_EN.indd 23 2026/2/26 15:50:292026/2/26 15:50:29
24
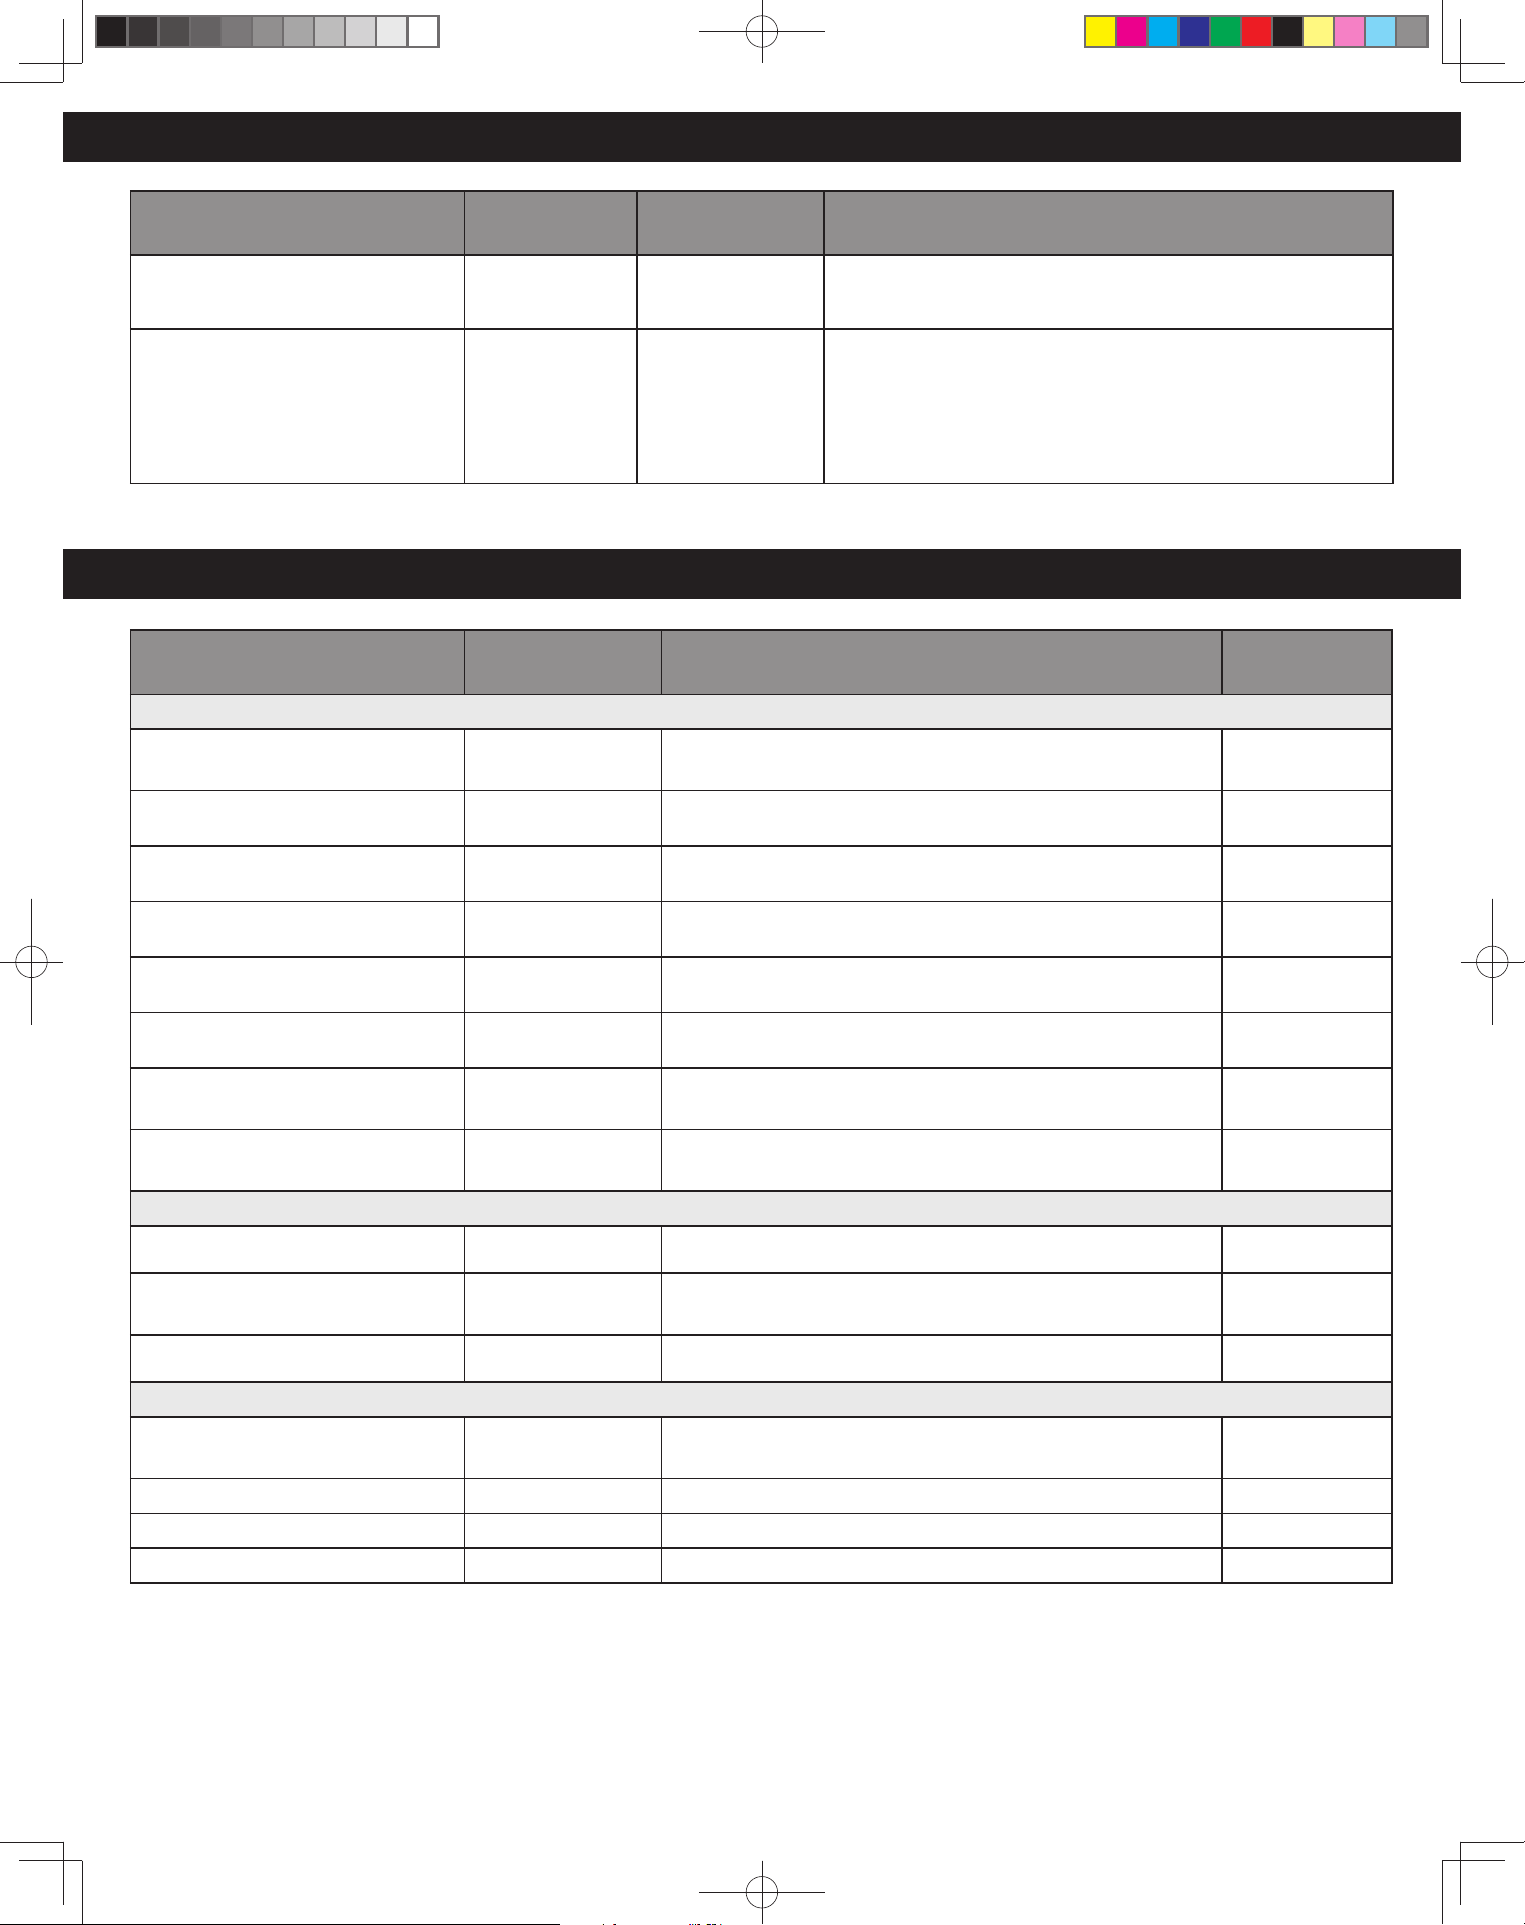
Food Power
Time
(in mins.)
Directions
To skin Tomatoes, (one at a time) P10
½ Place tomato into a microwave safe bowl containing
boiling water. Rinse and peel. Repeat for each tomato.
To remove Cooking Odours P10 5 Combine 1 to 1½ cups (240 – 375 ml) water with the juice
and peel of one lemon in a 2 quart microwave safe bowl.
After water nishes boiling, wipe interior of oven with a
cloth. You can also use a Combo of several whole cloves
and ¼ cup of vinegar with 1 cup of water.
Microwave shortcuts (continued)
Defrosting Chart
Food
Defrosting Time
at P3
Method Rest Time
Meat
Beef/Lamb/Pork joint
18 oz. (500
g
)
8 – 9 mins Place in a suitable dish or on an upturned saucer or use a
microwave safe rack. Turn once. .
30 mins
Minced beef 18 oz. (500
g
) 6 mins 30 secs Place in a suitable dish. Break up and turn once.
5 mins
Chops 16 oz. (450
g
) 6 – 7 mins Place in a suitable dish in a single layer. Turn once.
5 mins
Sausages 16 oz. (450
g
) 6 mins Place in a suitable dish in a single layer. Turn twice.
5 mins
Bacon slices 18 oz. (500
g
) 4 – 6 mins Place in a suitable dish. Turn and separate twice.
3 mins
Stewing steak 16 oz. (450
g
) 6 mins Place in a suitable dish. Break up frequently.
5 mins
Whole chicken 18 oz. (500
g
) 6 – 8 mins Place in a suitable dish on an upturned saucer or use a
microwave safe rack. Turn once.
10 mins
Chicken portions 16 oz. (450
g
) 5 – 7 mins Place in a suitable dish in a single layer. Turn once.
10 mins
Fish
Whole 12 oz. (340
g
) 7 – 9 mins Place in a suitable dish. Turn once. .
5 mins
Fillets/Steak
16 oz. (450
g
)
5 – 6 mins Place in a suitable dish. Turn once.
5 mins
Prawns 16 oz. (450
g
) 5 – 7 mins Place in a suitable dish. Stir halfway during defrosting.
5 mins
General
Bread sliced 14 oz. (390
g
) 4 mins Place on a plate. Separate and rearrange during
defrosting.
5 mins
Slice of bread 2 oz. (55
g
) 20 secs – 30 secs Place on a plate. 1 – 2 mins
Pastry 18 oz. (500
g
) 4 mins Place on a plate. Turn halfway. 5 – 10 mins
Soft fruit 16 oz. (450
g
) 5 – 6 mins Place in a suitable dish. Stir once during defrosting. 2 mins
F0003DB70AP_EN.indd 24F0003DB70AP_EN.indd 24 2026/2/26 15:50:292026/2/26 15:50:29
25
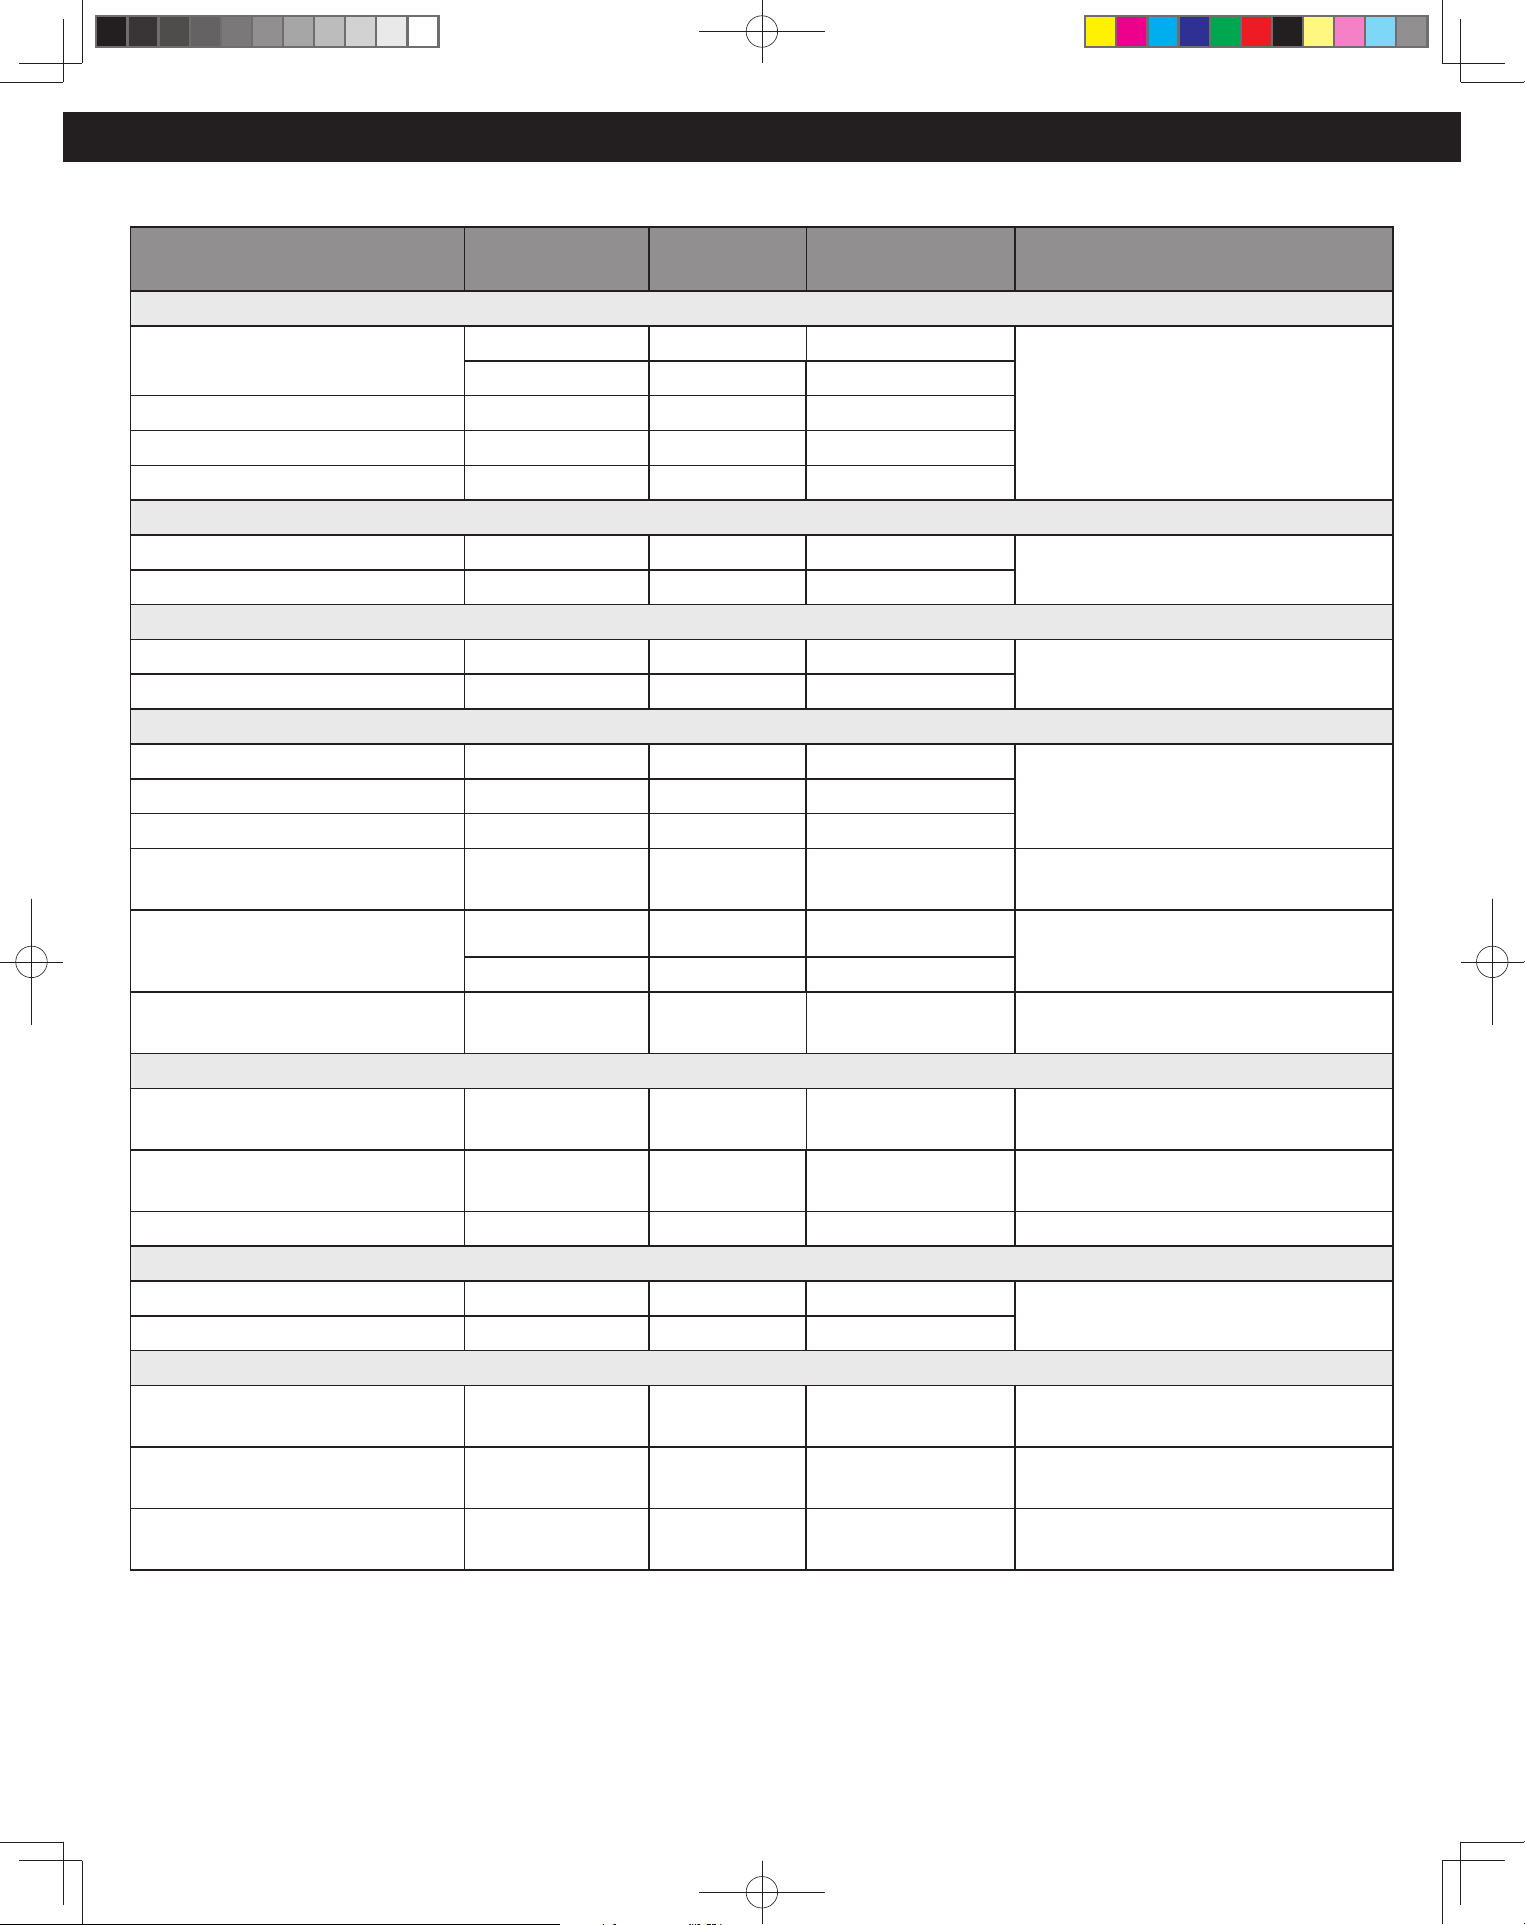
Reheating Chart
The times given in the charts below are a guideline only, and will vary depending on starting temperature, dish size etc.
Food Weight/ Quantity Power Level
Time to Select
(approx)
Instructions/Guidelines
Canned beans, pasta
Baked beans 8 oz. (225
g
) P10 2 mins Place in a micro-safe bowl on base.
Cover.
16 oz. (450
g
) P10 3 mins
Baked beans & sausages/burgers 16 oz. (450
g
) P10 3 – 4 mins
Broad beans 11 oz. (310
g
) P10 2 mins
Butter beans 8 oz. (225
g
) P10 1 min 30 secs
Canned meat
Hot dogs (drained) 16 oz. (450
g
) P10 2 – 3 mins Place in a micro-safe bowl on base.
Cover.
Stewed steak 16 oz. (450
g
) P10 3 – 4 mins
Canned soups
Cream of mushroom 16 oz. (450
g
) P10 3 – 4 mins Place in a micro-safe bowl on base.
Cover. Stir halfway.
Minestrone 16 oz. (450
g
) P10 2 mins 30 secs
Canned vegetables - Drain where appropriate
Carrots, whole 12 oz. (340
g
) P10 2 mins Place in a micro-safe bowl on base.
Cover. Stir halfway.
Carrots, baby 11 oz. (310
g
) P10 2 mins
Peas, mushy 12 oz. (340
g
) P10 2 mins
Peas, garden 12 oz. (340
g
) P10 2 mins – 2 mins 30
secs
Place in a micro-safe bowl on base.
Cover.
Sweetcorn 8 oz. (225
g
) P10 1 min 30 secs Place in a micro-safe bowl on base.
Cover. Stir halfway.
12 oz. (340
g
) P10 2 – 3 mins
Tomatoes, whole 14 oz. (390
g
) P10 3 mins 30 secs Place in a micro-safe bowl on base.
Cover.
Pastry products – precooked – N.B. Pastries reheated by microwave will have a soft base.
Quiche 16 oz. (450
g
) P10 4 – 5 mins Place in micro-safe dish on base. Do
not cover.
Xmas mince pies 4 oz. (110
g
) P10 10 – 20 secs Place in micro-safe dish on base. Do
not cover.
Pastries/slices 5 oz. (140
g
) P10 1 min 30 secs Place in glass dish on base.
Plated meals – homemade – chilled
Child size 1 P10 2 – 3 mins Place on a micro-safe plate on base.
Cover.
Adult size 1 P10 4 – 5 mins
Puddings and desserts- Transfer puddings to a micro-safe/heatproof dish
Bread and butter pudding
(chilled)
18 oz. (500
g
) P10 3 – 4 mins Place on base. Do not cover.
Apple pie (chilled) 18 oz. (500
g
) P10 3 – 4 mins Place in micro-safe dish on base.
Do not cover
Custard (chilled) 1¼ cups (300 ml) P10 2 mins – 2 mins
30 secs
Place in large jug. Stir during
reheating.
F0003DB70AP_EN.indd 25F0003DB70AP_EN.indd 25 2026/2/26 15:50:292026/2/26 15:50:29
26
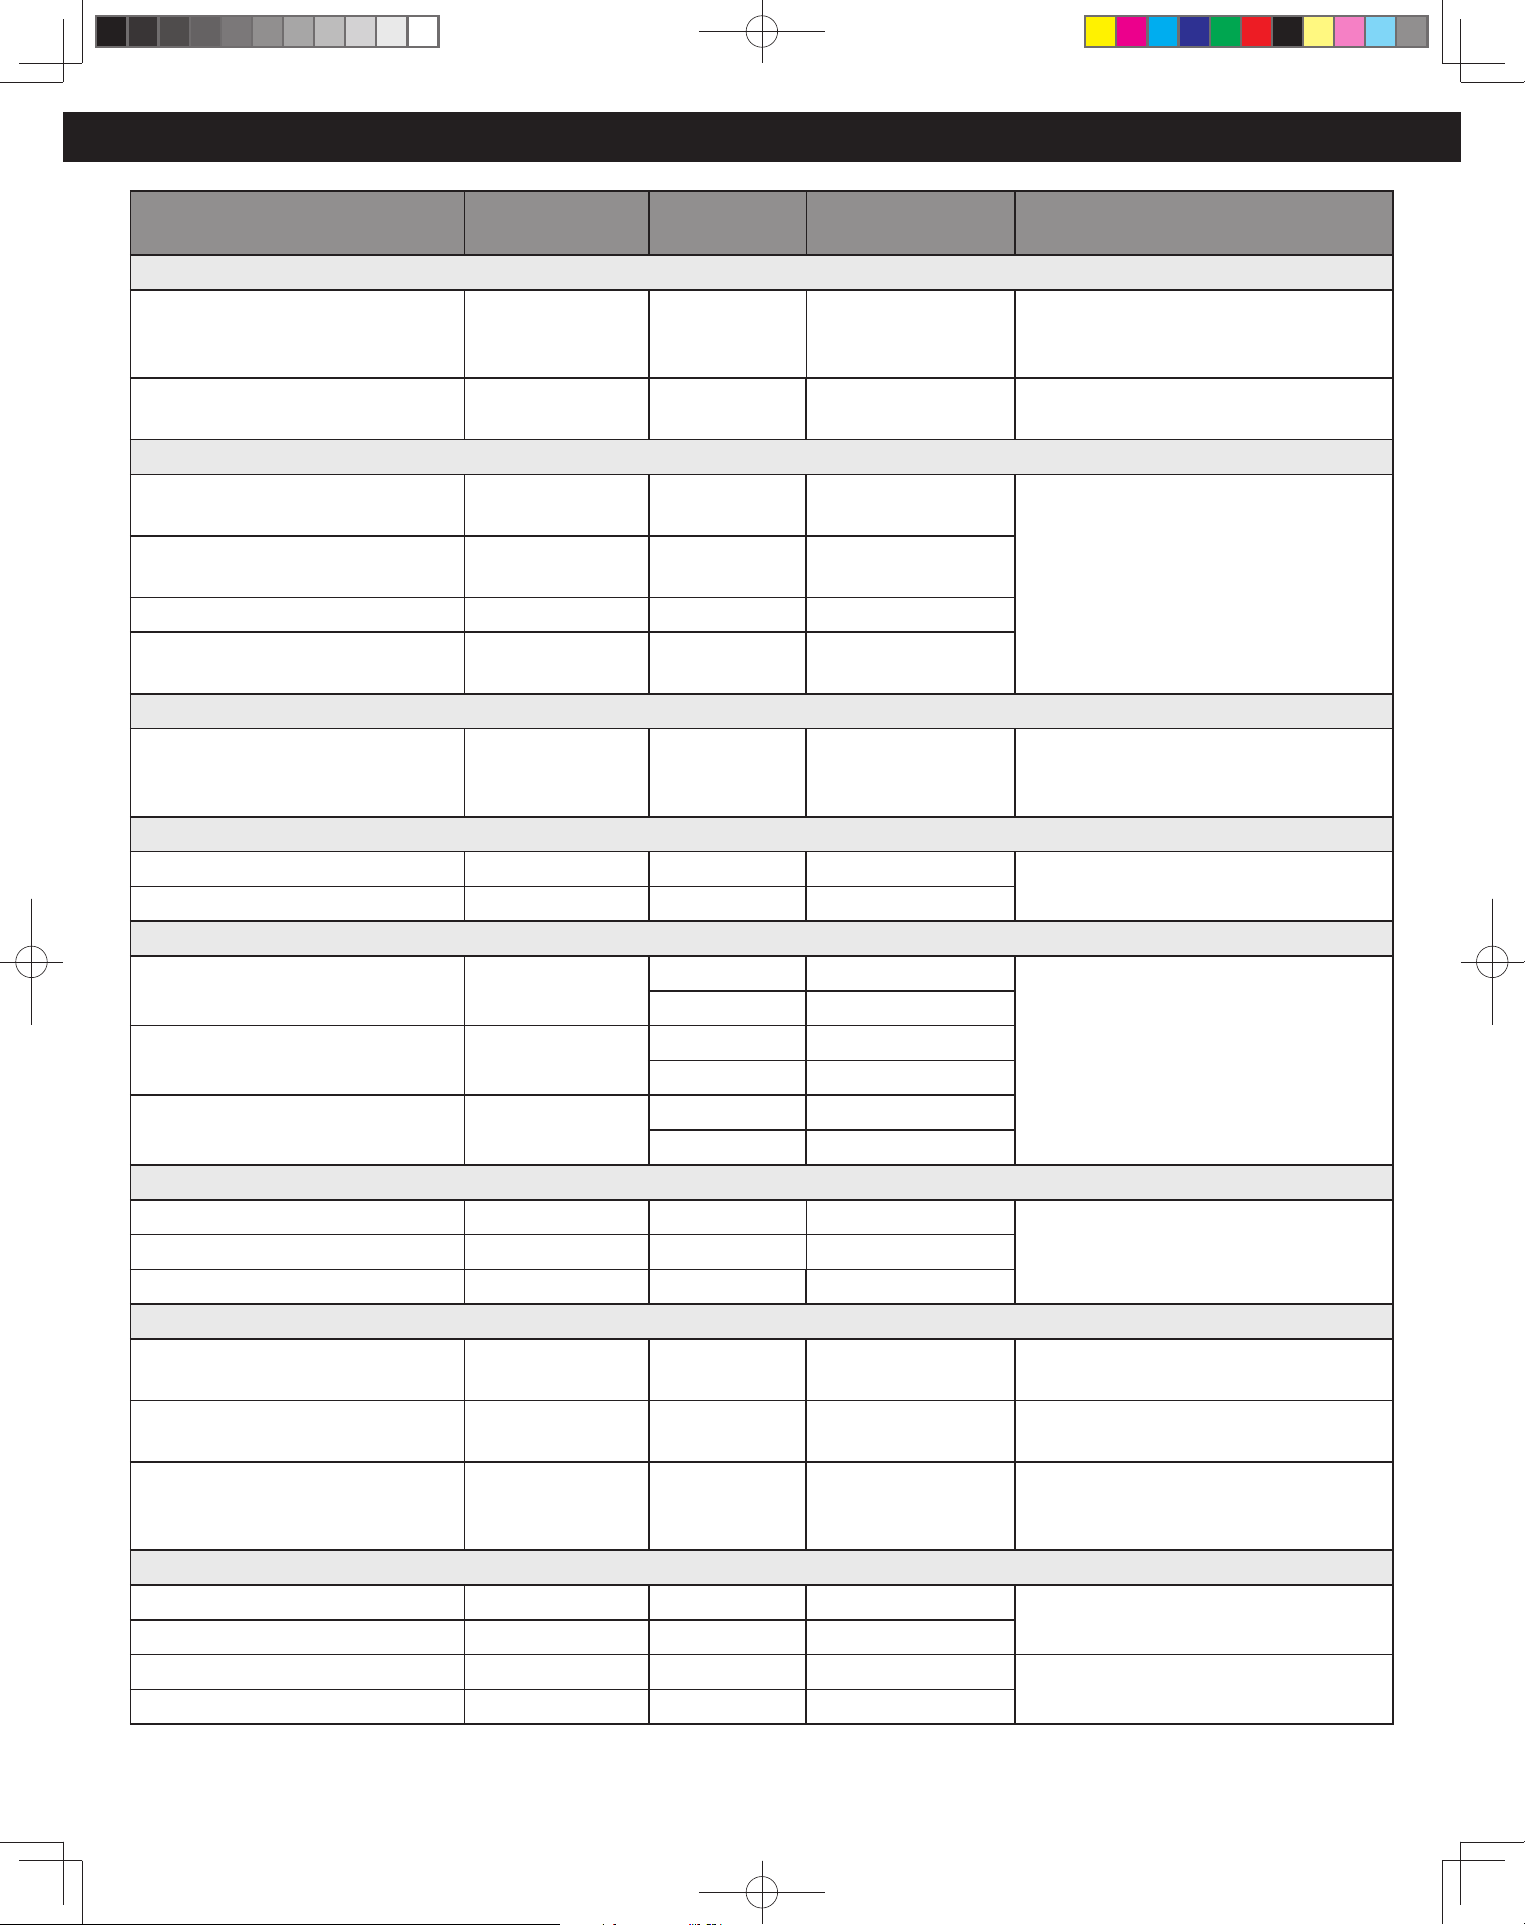
Cooking Chart
Food Weight/ Quantity Power Level
Time to Select
(approx)
Instructions/Guidelines
Bacon – from raw
Slices 12 oz. (340
g
) P10 4 – 6 mins or 1 min
per slice
Place on micro-safe rack or plate on
base and cover with kitchen towel to
minimise splatter.
Steaks 8 oz. (225
g
) P10 4 – 5 mins Place on micro-safe rack or plate on
base. Cover.
Beans & pulses – should be pre-soaked (except lentils)
Black eyed beans 8 oz. (225
g
) P10 then P3 10 mins
25 – 30 mins
Use 2½ cups (600 ml) boiling water in
a large bowl. Cover.
Chick peas 8 oz. (225
g
) P10 then P3 10 mins
45 mins
Lentils 8 oz. (225
g
) P5 10 – 15 mins
Red kidney beans 8 oz. (225
g
) P10 then P3 15 mins
35 – 40 mins
Beef - Joints from raw – Caution: Hot fat! Remove dish with care.
Mince 18 oz. (500
g
) P10 then P5 5 mins
5 mins
Place in micro-safe dish with stock
and seasonings on base. Stir halfway.
Cover.
Chicken from raw – Caution: Hot Fat! Remove oven accessories with care.
Breasts, boneless 26 oz. (730
g
) P5 14 – 16 mins Place on micro-safe rack or plate on
base. Cover.
Drumsticks 28 oz. (780
g
) P5 14 – 16 mins
Eggs – Scrambled
Egg 1 P10 30 secs Add 1 tbsp (15 ml) of milk for each
egg used. Beat eggs, milk and knob of
butter together. Cook for 1st cooking
time then stir.
Cook for 2nd cooking time then stand
for 1 minute.
P10 30 secs
Eggs 2 P10 50 secs
P10 40 secs
Eggs 3 P10 1 min 20 secs
P10 40 secs
Fish – Fresh from raw
Fillets 10 oz. (280
g
) P10 3 – 4 mins Place in micro-safe dish. Add 2 tbsp
(30 ml) of liquid. Cover.
Steaks 8 oz. (225
g
) P10 3 – 4 mins
Whole 11 oz. (310
g
) P10 3 – 4 mins
Lamb – from raw – Caution: Hot Fat! Remove accessory with care.
Chops, cutlets 11 oz. (310
g
) P5 4 – 6 mins Place in micro-safe dish or rack on
base. Cover.
Chops, loin 20 oz. (560
g
) P5 5 – 7 mins Place in micro-safe dish or rack on
base. Cover.
Stewing lamb 16 oz. (450
g
) P10 then P4 10 mins
40 mins
Place in micro-safe dish with stock
and vegetables on base. Stir halfway.
Cover.
Pasta - Place in a large 3 litre microwave safe bowl.
Twists 8 oz. (225
g
) P10 8 – 10 mins Use 1 litre boiling water. Add 1 tbsp
(15 ml) oil. Cover. Stir halfway.
Macaroni 8 oz. (225
g
) P10 10 – 12 mins
Spaghetti / tagliatelle 8 oz. (225
g
) P10 8 – 10 mins Use 1½ litres boiling water. Add 1 tbsp
(15 ml) oil. Cover. Stir halfway.
Pasta shells - i.e. conchiglie 8 oz. (225
g
) P10 10 – 12 mins
F0003DB70AP_EN.indd 26F0003DB70AP_EN.indd 26 2026/2/26 15:50:292026/2/26 15:50:29
27
Food Weight/ Quantity Power Level
Time to Select
(approx)
Instructions/Guidelines
Pizza – fresh chilled – N.B. Remove all packaging. Pizzas will have a soft base if cooked by microwave only.
Deep pan, ham 14 oz. (390
g
) P10 4 – 6 mins Place on micro-safe plate on base. Do
not cover.
Pork – from raw – Caution: Hot Fat! Remove oven accessories with care.
Joints P5 15 – 18 mins
per 16 oz. (450
g
)
Place on upturned saucer in micro-
safe dish on base. Turn joint over
halfway during cooking. Drain o fat
during cooking.
Ham covered with water P10 then P5 15 mins
25 – 30 mins per 16
oz. (450
g
)
Place in large casserole dish with lid
and cover with water.
Fresh vegetables – place in shallow micro-safe dish
Broad beans 16 oz. (450
g
) P10 5 – 6 mins
Add 6 tbsp (90 ml) water. Cover.
Beetroot 16 oz. (450
g
) P5 12 – 15 mins
Brussel sprouts 16 oz. (450
g
) P10 8 – 9 mins
Cabbage – sliced 16 oz. (450
g
) P10 8 – 10 mins
Carrots – sliced 16 oz. (450
g
) P10 8 – 10 mins
Brocolli 16 oz. (450
g
) P10 9 – 11 mins
Courgettes 16 oz. (450
g
) P10 5 mins
Corn on the cob 16 oz. (450
g
) P10 6 – 7 mins
Leeks – sliced 16 oz. (450
g
) P10 7 – 8 mins
Mushrooms 16 oz. (450
g
) P10 5 mins
Spinach 16 oz. (450
g
) P10 6 mins
Swede - cubed 16 oz. (450
g
) P10 8 – 12 mins
Frozen vegetables - place in shallow micro-safe dish.
Beans 16 oz. (450
g
) P10 8 – 9 mins
Add 2 tbsp (30 ml) water. Cover.
Beans – green 16 oz. (450
g
) P10 8 – 9 mins
Brocolli 16 oz. (450
g
) P10 8 – 9 mins
Brussels sprouts 16 oz. (450
g
) P10 9 – 10 mins
Cabbage – shredded 16 oz. (450
g
) P10 7 – 8 mins
Carrots – sliced 16 oz. (450
g
) P10 8 – 9 mins
Cauliflower 16 oz. (450
g
) P10 9 – 10 mins
Peas 16 oz. (450
g
) P10 7 – 8 mins
Sweetcorn 16 oz. (450
g
) P10 7 – 8 mins
Cooking Chart (continued)
F0003DB70AP_EN.indd 27F0003DB70AP_EN.indd 27 2026/2/26 15:50:292026/2/26 15:50:29
28
Food Characteristics
Bone and Fat
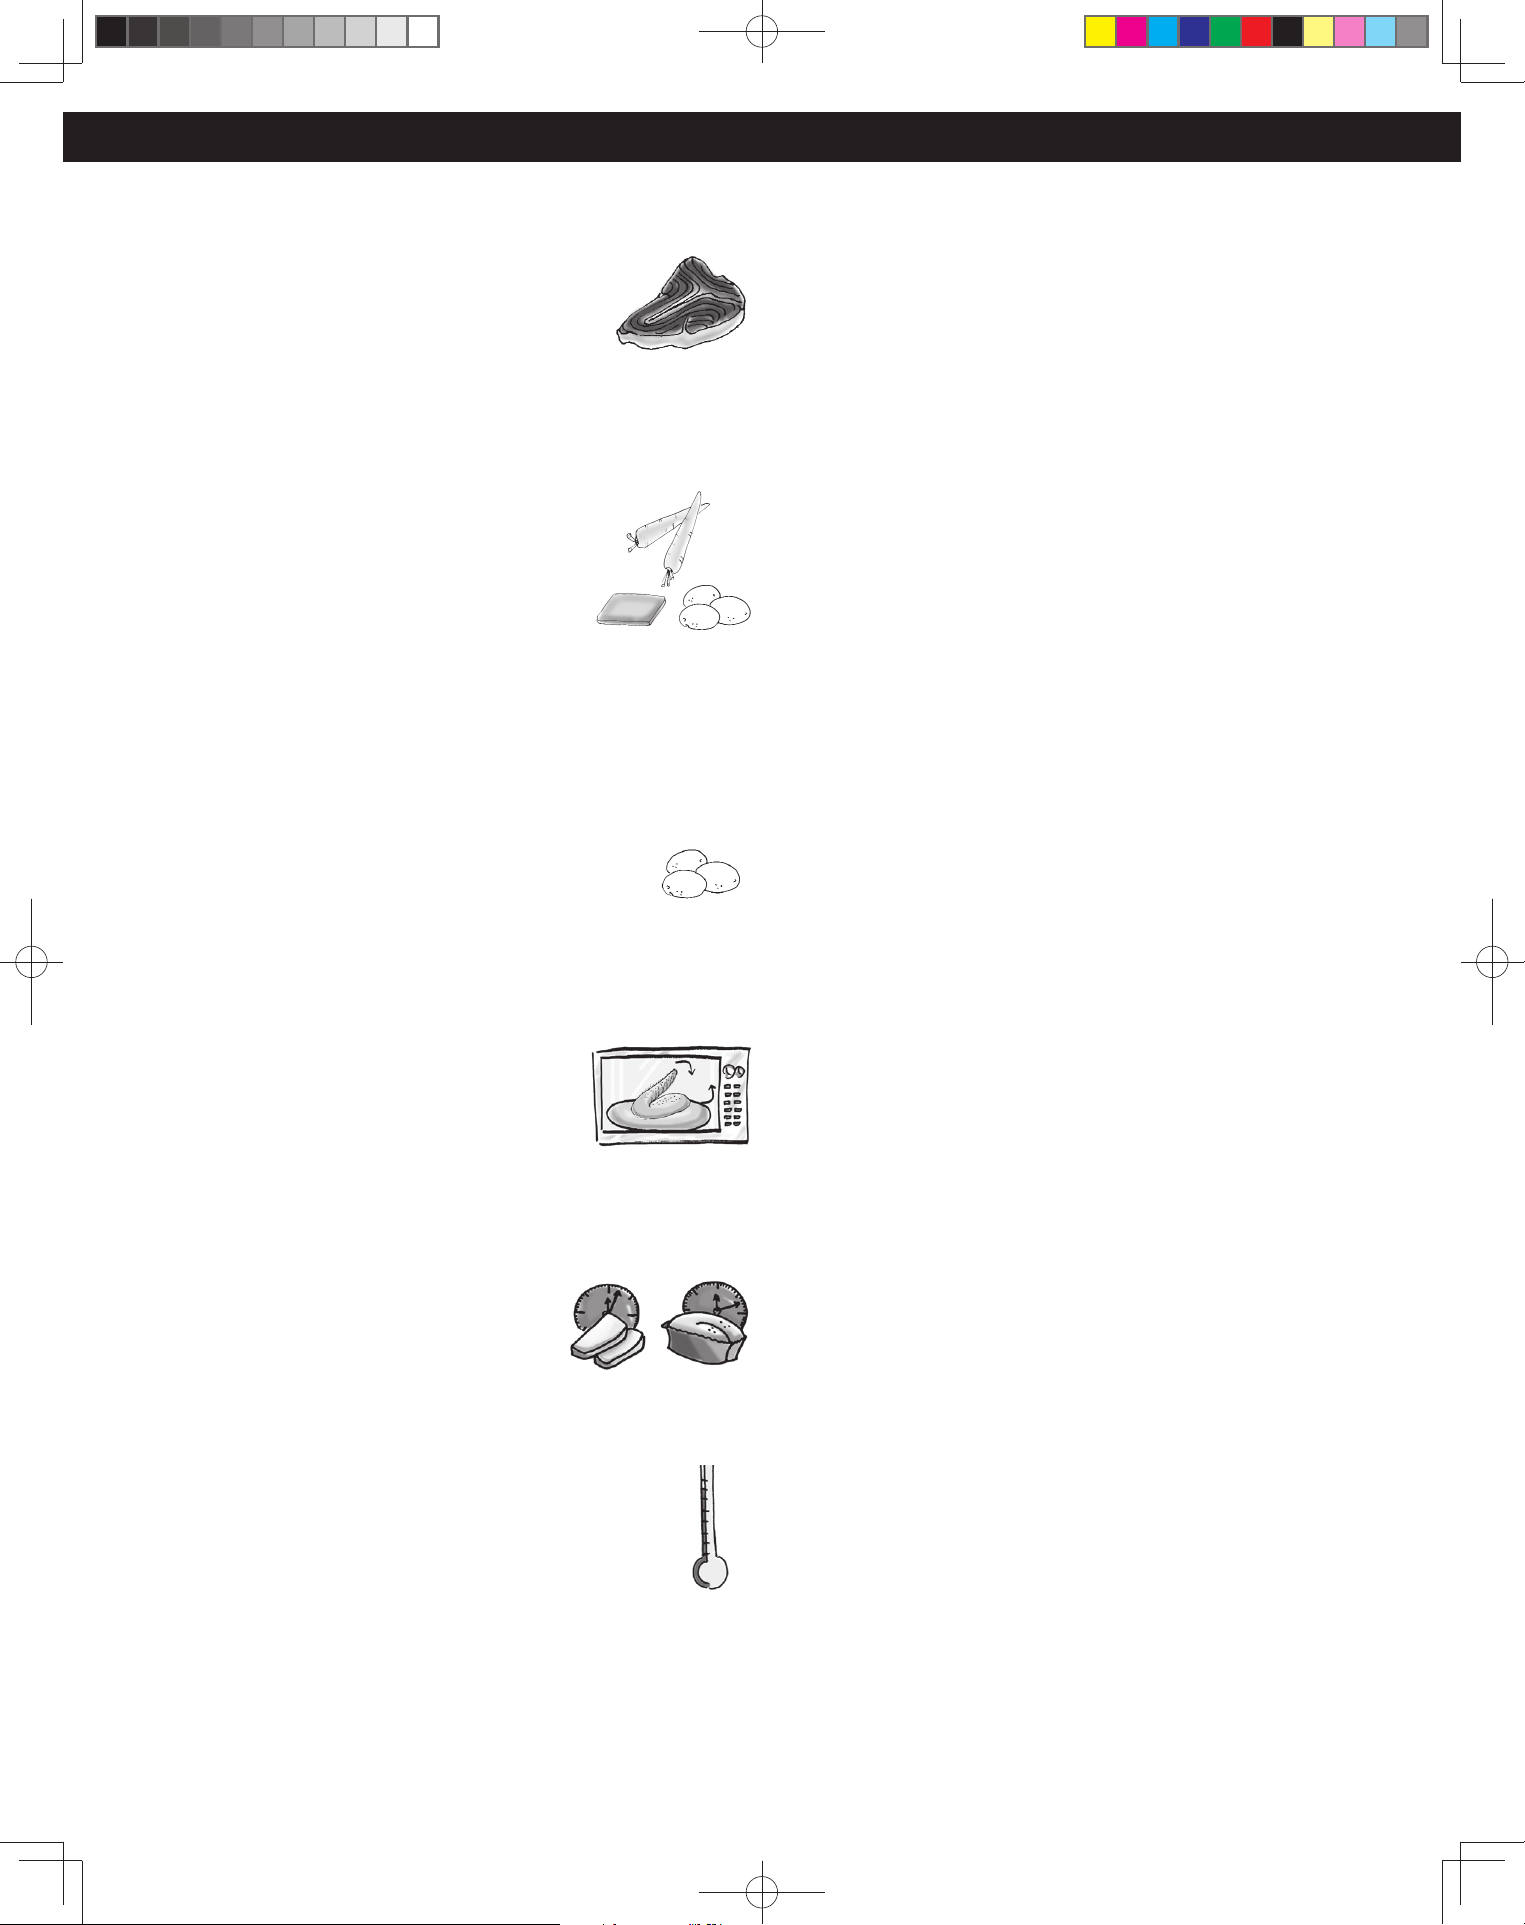
Both bone and fat affect cooking. Bones may cause
irregular cooking. Meat next to the tips of bones may
overcook while meat positioned under a large bone,
such as a ham bone, may be undercooked. Large
amounts of fat absorb microwave energy and the meat
next to these areas may overcook.
Density
Porous, airy foods such as breads, cakes or rolls take
less time to cook than heavy, dense foods such as
potatoes and roasts. When reheating donuts or other
foods with different centers be very careful. Certain
foods have centers made with sugar, water, or fat and
these centers attract microwaves (for example, jelly
donuts). When a jelly donut is reheated, the jelly can
become extremely hot while the exterior remains
warm to the touch. This could result in a burn if the food is not allowed to
cool properly in the center.
Quantity
Two potatoes take longer to cook than one potato. As the
quantity of the food decreases so does the cooking time.
Overcooking will cause the moisture content in the food
to decrease and a fire could result. Never leave microwave
unattended while in use.
Shape
Uniform sizes heat more evenly. The thin end of a
drumstick will cook more quickly than the meaty end.
To compensate for irregular shapes, place thin parts
toward the center of the dish and thick pieces toward
the edge.
Size
Thin pieces cook more quickly than thick pieces.
Starting Temperature
Foods that are at room temperature take less time to cook than
if they are chilled, refrigerated or frozen.
Cooking Techniques
Piercing
Foods with skins or membranes must be pierced, scored or have a strip of
skin peeled before cooking to allow steam to escape. Pierce clams, oysters,
chicken livers, whole potatoes and whole vegetables. Whole apples or
new potatoes should have a 1-inch (2.5 cm) strip of skin peeled before
cooking. Score sausages and frankfurters. Do not Cook/Reheat whole eggs,
with or without the shell. Steam buildup in whole eggs may cause them to
explode, and possibly damage the oven or cause injury. Reheating SLICED
hard-boiled eggs and cooking SCRAMBLED eggs is safe.
Browning
Foods will not have the same brown appearance as conventionally cooked
foods or those foods which are cooked utilizing a browning feature. Meats
and poultry may be coated with browning sauce, Worcestershire sauce,
barbecue sauce or shake-on browning sauce. To use, combine browning
sauce with melted butter or margarine and brush on before cooking. For
quick breads or muffins, brown sugar can be used in the recipe in place of
granulated sugar, or the surface can be sprinkled with dark spices before
baking.
Spacing
Individual foods, such as baked potatoes, cupcakes and appetizers, will
cook more evenly if placed in the oven equal distances apart. When
possible, arrange foods in a circular pattern.
Covering
As with conventional cooking, moisture evaporates during microwave
cooking. Casserole lids or plastic wrap are used for a tighter seal. When
using plastic wrap, vent the plastic wrap by folding back part of the plastic
wrap from the edge of the dish to allow steam to escape. Loosen or
remove plastic wrap as recipe directs for standing time. When removing
plastic wrap covers, as well as any glass lids, be careful to remove them
away from you to avoid steam burns. Various degrees of moisture
retention are also obtained by using wax paper or paper towels.
Cooking Time
Cooking times will vary because of food shape variations, starting
temperature, and regional preferences. Always cook food for the minimum
cooking time given in a recipe and check for doneness. If the food is
undercooked, continue cooking. It is easier to add time to an undercooked
product. Once the food is overcooked, nothing can be done.
Food Characteristics and Cooking Techniques
F0003DB70AP_EN.indd 28F0003DB70AP_EN.indd 28 2026/2/26 15:50:292026/2/26 15:50:29
29
Stirring
Stirring is usually necessary during microwave cooking. Always bring
the cooked outside edges toward the center and the less cooked center
portions toward the outside of the dish.
Rearranging
Rearrange small items such as chicken pieces, shrimp, hamburger patties
or pork chops. Rearrange pieces from the edge to the center and pieces
from the center to the edge of the dish.
Turning
It is not possible to stir some foods to distribute the heat evenly. At times,
microwave energy will concentrate in one area of the food. To help ensure
even cooking, these foods need to be turned. Turn over large foods, such
as roasts or turkeys, halfway through cooking.
Standing Time
Most foods will continue to cook by conduction after the microwave oven
is turned off. After cooking meat, the internal temperature will rise 5 °F to
15 °F (3 °C to 8 °C), if allowed to stand, tented with foil, for 10 to 15 minutes.
Casseroles and vegetables need a shorter amount of standing time, but
this standing time is necessary to allow foods to complete cooking to the
center without overcooking on the edges.
Test for Doneness
The same tests for doneness used in conventional cooking may be used
for microwave cooking. Meat is done when fork-tender or splits at fibers.
Chicken is done when juices are clear yellow and drumstick moves freely.
Fish is done when it flakes and is opaque. Cake is done when a toothpick or
cake tester is inserted and comes out clean.
Check foods to see that they are cooked to the United States Department of
Agriculture’s recommended temperatures.
To test for doneness, insert a meat thermometer in a thick or dense area
away from fat or bone. NEVER leave the thermometer in the food during
cooking, unless it is approved for microwave oven use.
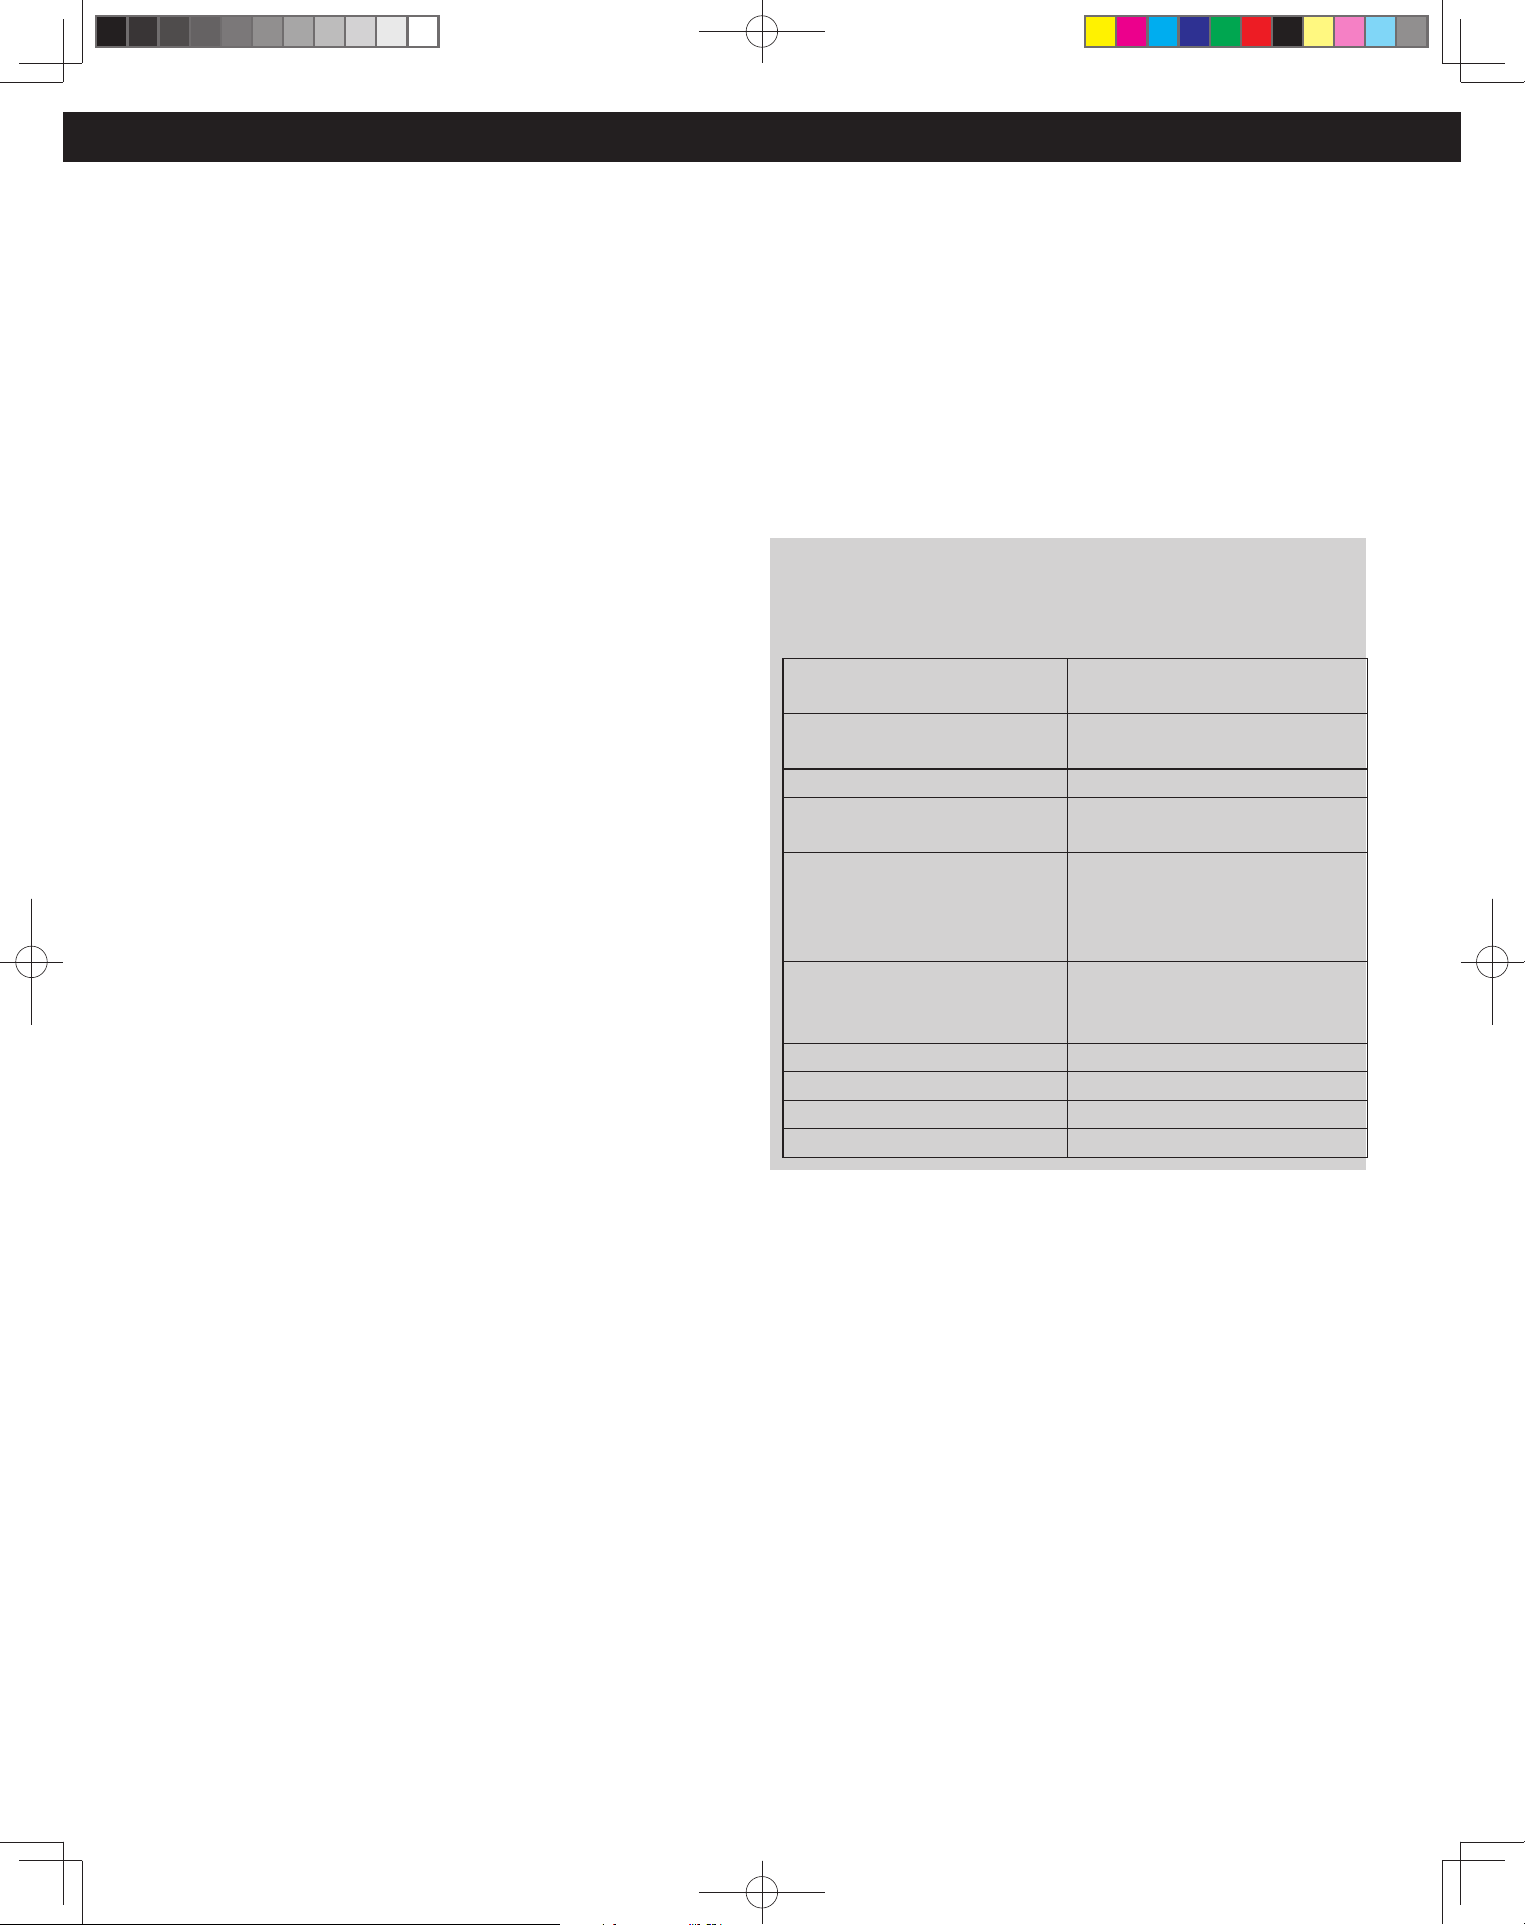
Cook all food to these minimum internal temperatures as measured
with a food thermometer before removing food from oven. For
reasons of personal preference, you may choose to cook food at
higher temperatures.
Product
Minimum Internal
Temperature & Standing Time
Beef, Pork, Veal & Lamb
Steaks, chops, roasts
145 °F (63 °C) and allow to rest
for at least 3 minutes
Ground meats 160 °F (71 °C)
Ham, fresh or smoked
(uncooked)
145 °F (63 °C) and allow to rest
for at least 3 min.
Fully Cooked Ham
(to reheat)
Reheat cooked hams
packaged in USDA-inspected
plants to 140 °F (60 °C); all oth-
ers to 165 °F (74 °C).
All Poultry (breasts, whole
bird, legs, thighs, and wings,
ground poultry, and stuffing)
165 °F (74 °C)
Eggs 160 °F (71 °C)
Fish & Shellfish 145 °F (63 °C)
Leftovers 165 °F (74 °C)
Casseroles 165 °F (74 °C)
Food Characteristics and Cooking Techniques (continued)
F0003DB70AP_EN.indd 29F0003DB70AP_EN.indd 29 2026/2/26 15:50:292026/2/26 15:50:29
30
Care and Cleaning of Your Microwave Oven
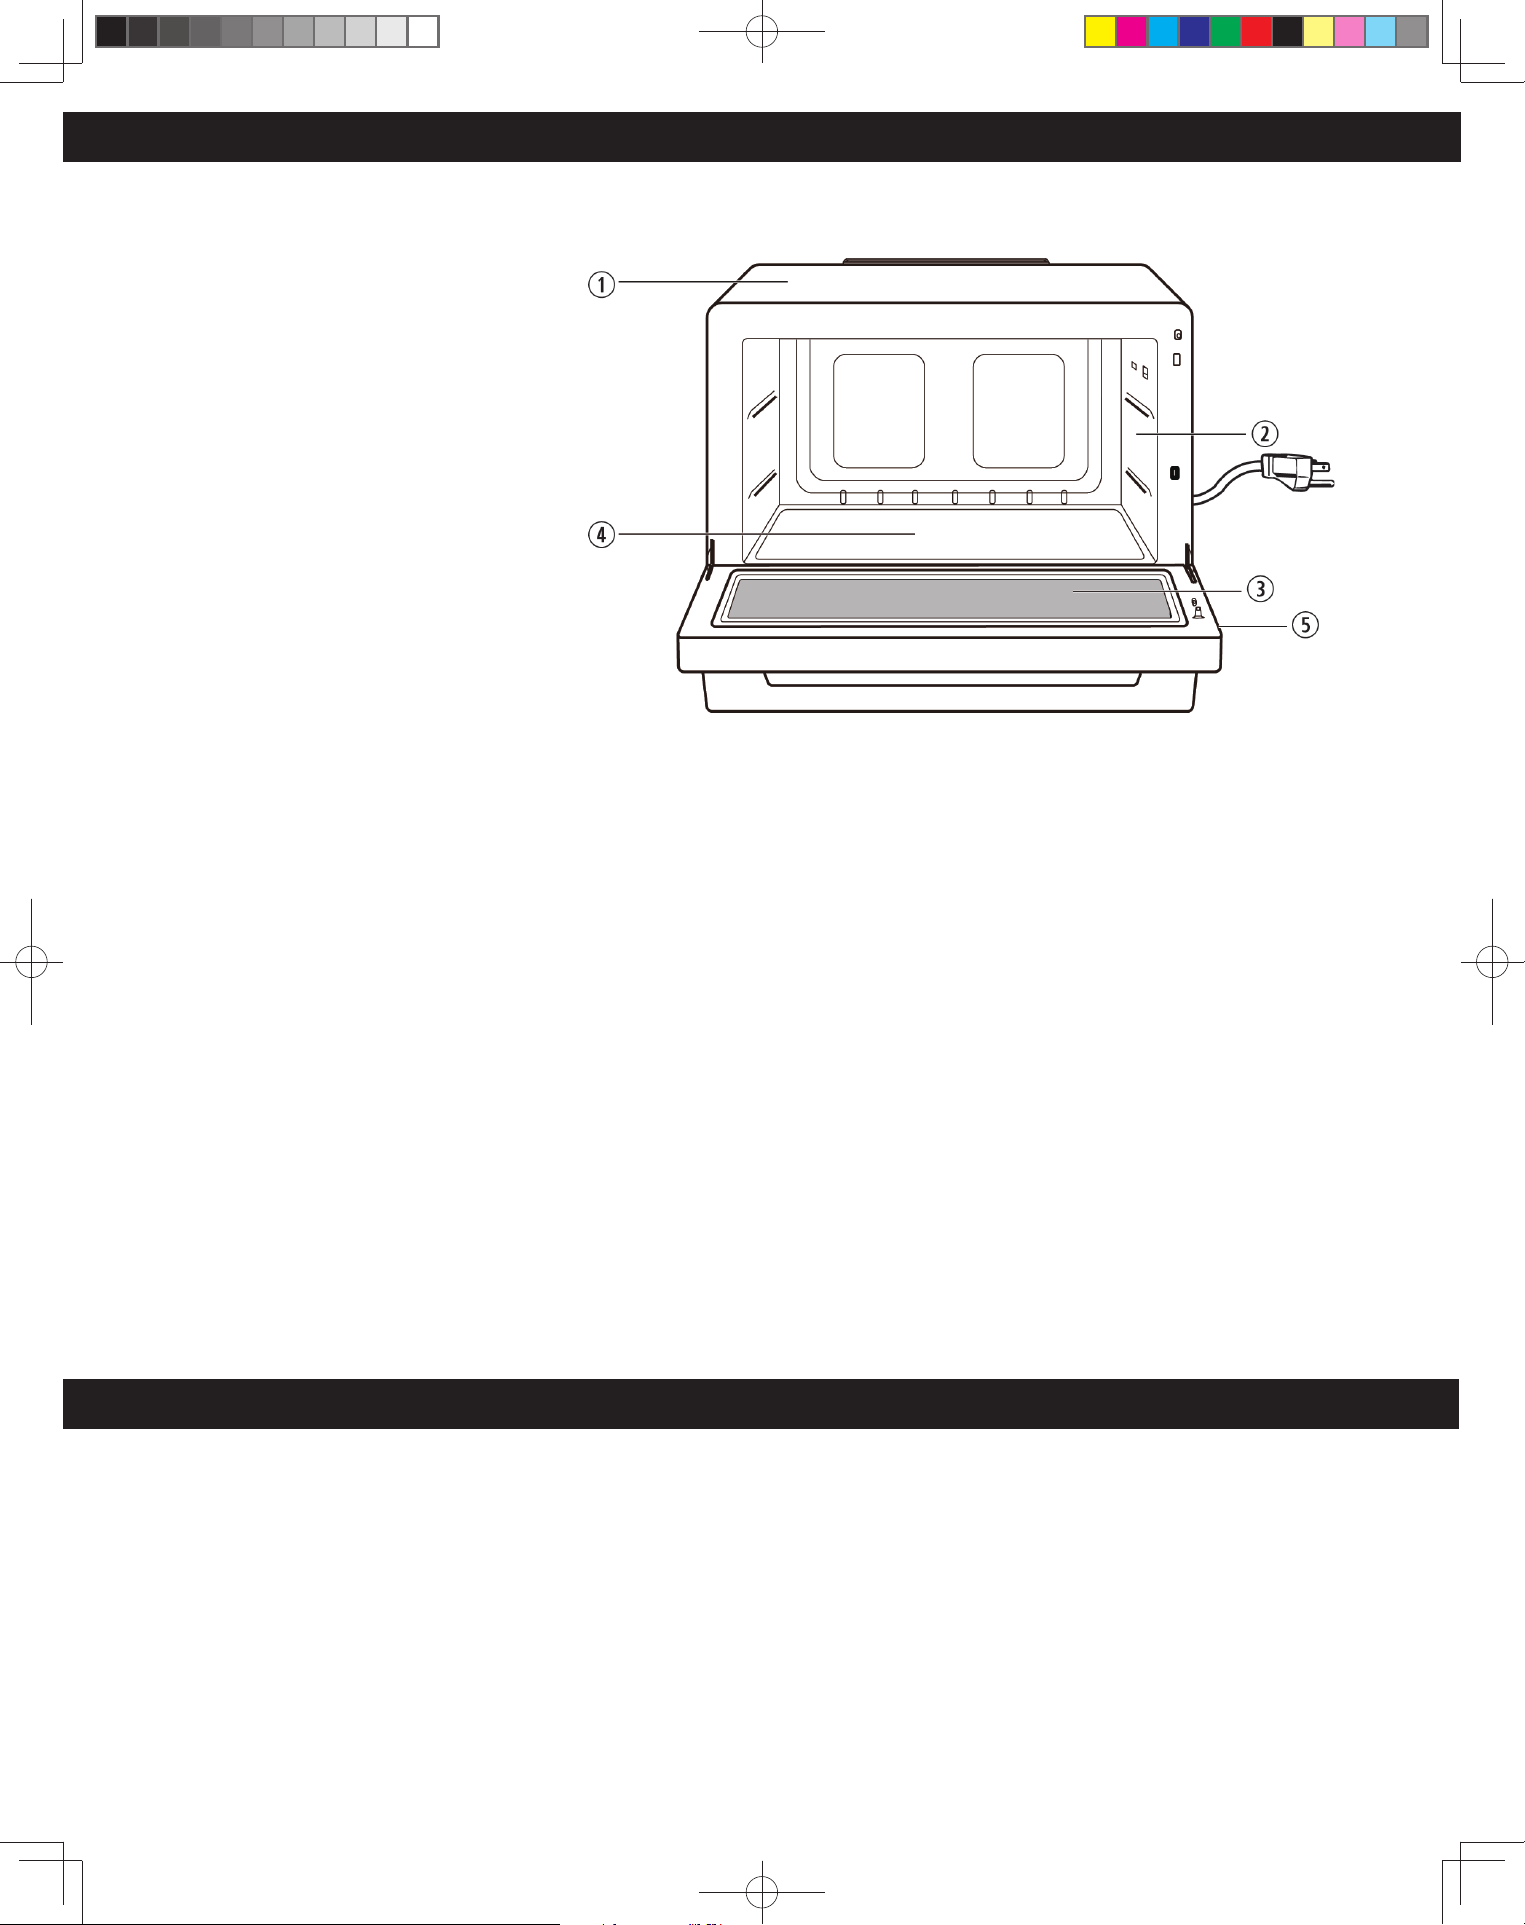
Please see below and the following page
for particular cleaning instructions for
each section of the oven.
BEFORE CLEANING: Unplug oven at wall
outlet. If outlet is inaccessible, leave oven
door open while cleaning.
AFTER CLEANING: Press the Stop/Reset
Pad to clear the Display.
1. Outside oven surfaces: Clean with a
damp cloth. To prevent damage to the
operating parts inside the oven, water
should not be allowed to seep into
ventilation openings.
2. Inside the Oven: Wipe with a damp
cloth after using. Mild detergent may
be used if needed. Do not use harsh
detergents or abrasives.
3. Oven Door: Wipe with a soft dry cloth
when steam accumulates inside or
around the outside of the oven door.
During cooking, especially under high
humidity conditions, steam is given
off from the food. (Some steam will
condense on cooler surfaces, such as the oven door. This is normal.)
4. Flat Table: Always clean the flat table after cooling down with a mild detergent and wipe to dry.
5. Control Panel: Do not allow the Control Panel to become wet. Clean with a soft, damp cloth. Do not use detergents, abrasives or
spray on cleaners on the Control Panel. After cleaning tap Stop/Cancel pad to clear display window.
AS WITH ANY COOKING APPLIANCE, MICROWAVE OVENS REQUIRE THE SAME LEVEL OF CARE TO PREVENT OVERHEATING OR
DAMAGE. IT IS IMPORTANT TO KEEP THE OVEN CLEAN AND DRY. FOOD RESIDUE AND CONDENSATION MAY CAUSE
RUSTING OR ARCING AND DAMAGE TO THE OVEN. AFTER USE, WIPE DRY ALL SURFACES,
INCLUDING VENT OPENINGS, OVEN SEAMS, AND UNDER FLAT TABLE.
Purchase Parts, Accessories and Instruction Books online for all Panasonic Products by visiting our Web Site at:
shop.panasonic.com/support
Parts Available to Order
Instructions/Operating Manual (this book) .....................................................F0003DB70AP
Shop Accessories
NOTE:
The illustration is for reference only.
F0003DB70AP_EN.indd 30F0003DB70AP_EN.indd 30 2026/2/26 15:50:292026/2/26 15:50:29
31
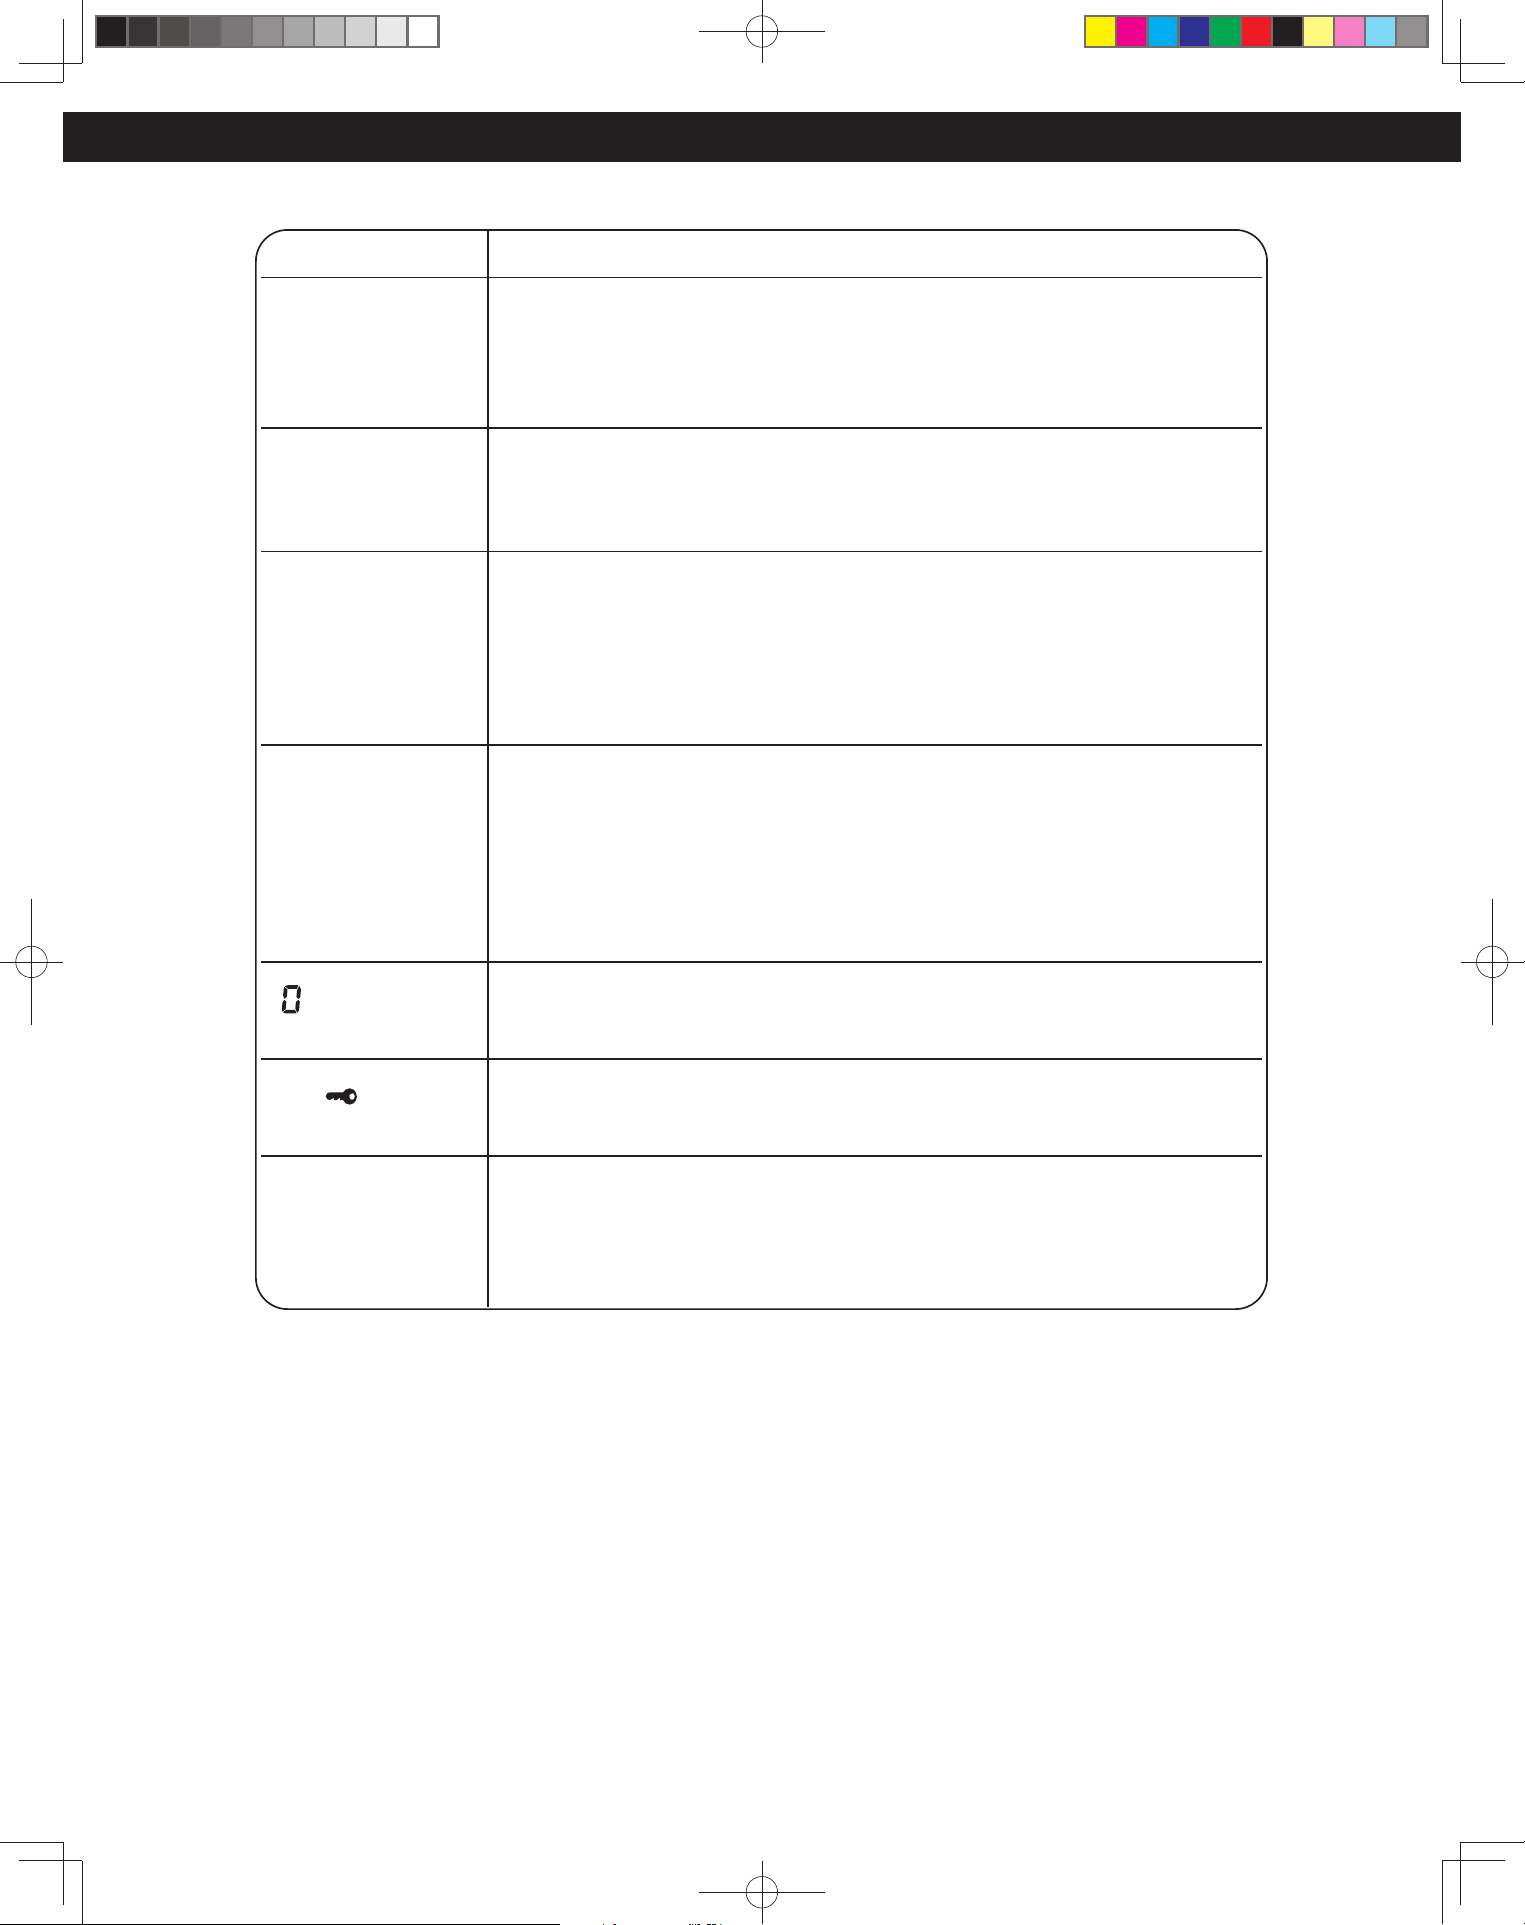
Before Requesting Service
See below before calling for service, as most problems can easily be remedied by following these simple solutions:
Problem Solution
The oven causes TV
interference.
Some radio, TV, Wi-Fi, cordless telephone, baby monitor, blue tooth or
other wireless equipment interference might occur when you cook with the
microwave oven. This interference is similar to the interference caused by small
appliances such as mixers, vacuums, blow dryers, etc. It does not indicate a
problem with your oven.
Steam accumulates
on oven door and
warm air comes from
the oven vents.
During cooking, steam and warm air are given off from the food. Most of the
steam and warm air are removed from the oven by the air which circulates in the
oven cavity. However, some steam will condense on cooler surfaces such as the
oven door. This is normal. After use, the oven should be wiped dry (see page 30).
Oven will not turn on.
The oven is not plugged in securely or needs to be reset; remove plug from
outlet, wait ten seconds and re-insert.
Main circuit breaker or main fuse is tripped; reset main circuit breaker or replace
main fuse.
There is a problem with the outlet; plug another appliance into the outlet to
check if it is working.
Oven will not start
cooking.
The door is not completely closed; close the oven door securely.
Start was not pressed after programming; press Start.
Another program is already entered into the oven; press Stop/Reset to cancel
the previous program and enter new program.
The program is not correct; program again according to the Owner’s Manual.
Stop/Reset has been pressed accidentally; program oven again.
“
” rotates in the
display window.
The fan is operating to cool the electric components. It will disappear after the
fan stops.
The “
” appears in
the display.
The CHILD SAFETY LOCK was activated by pressing Stop/Reset three times;
Deactivate CHILD SAFETY LOCK by pressing Stop/Reset three times.
The oven stops
cooking and nothing
appears in the display
windows.
The oven’s power supply has failed; please contact an authorized Service Center
(see next page).
F0003DB70AP_EN.indd 31F0003DB70AP_EN.indd 31 2026/2/26 15:50:292026/2/26 15:50:29
32
Limited Warranty (Only for U.S.A.)
Panasonic Products Limited Warranty
Limited Warranty Coverage (For USA Only)
If your product does not work properly because of a defect in materials or
workmanship, Panasonic Consumer Electronics Corporation (referred to as
“the warrantor”) will, for the length of the period indicated on the chart below,
which starts with the date of product receipt (“warranty period”), at its option
either (a) repair your product with new or refurbished parts, (b) replace it with
a new or a refurbished equivalent value product, or (c) refund your purchase
price. The decision to repair, replace or refund will be made by the warrantor.
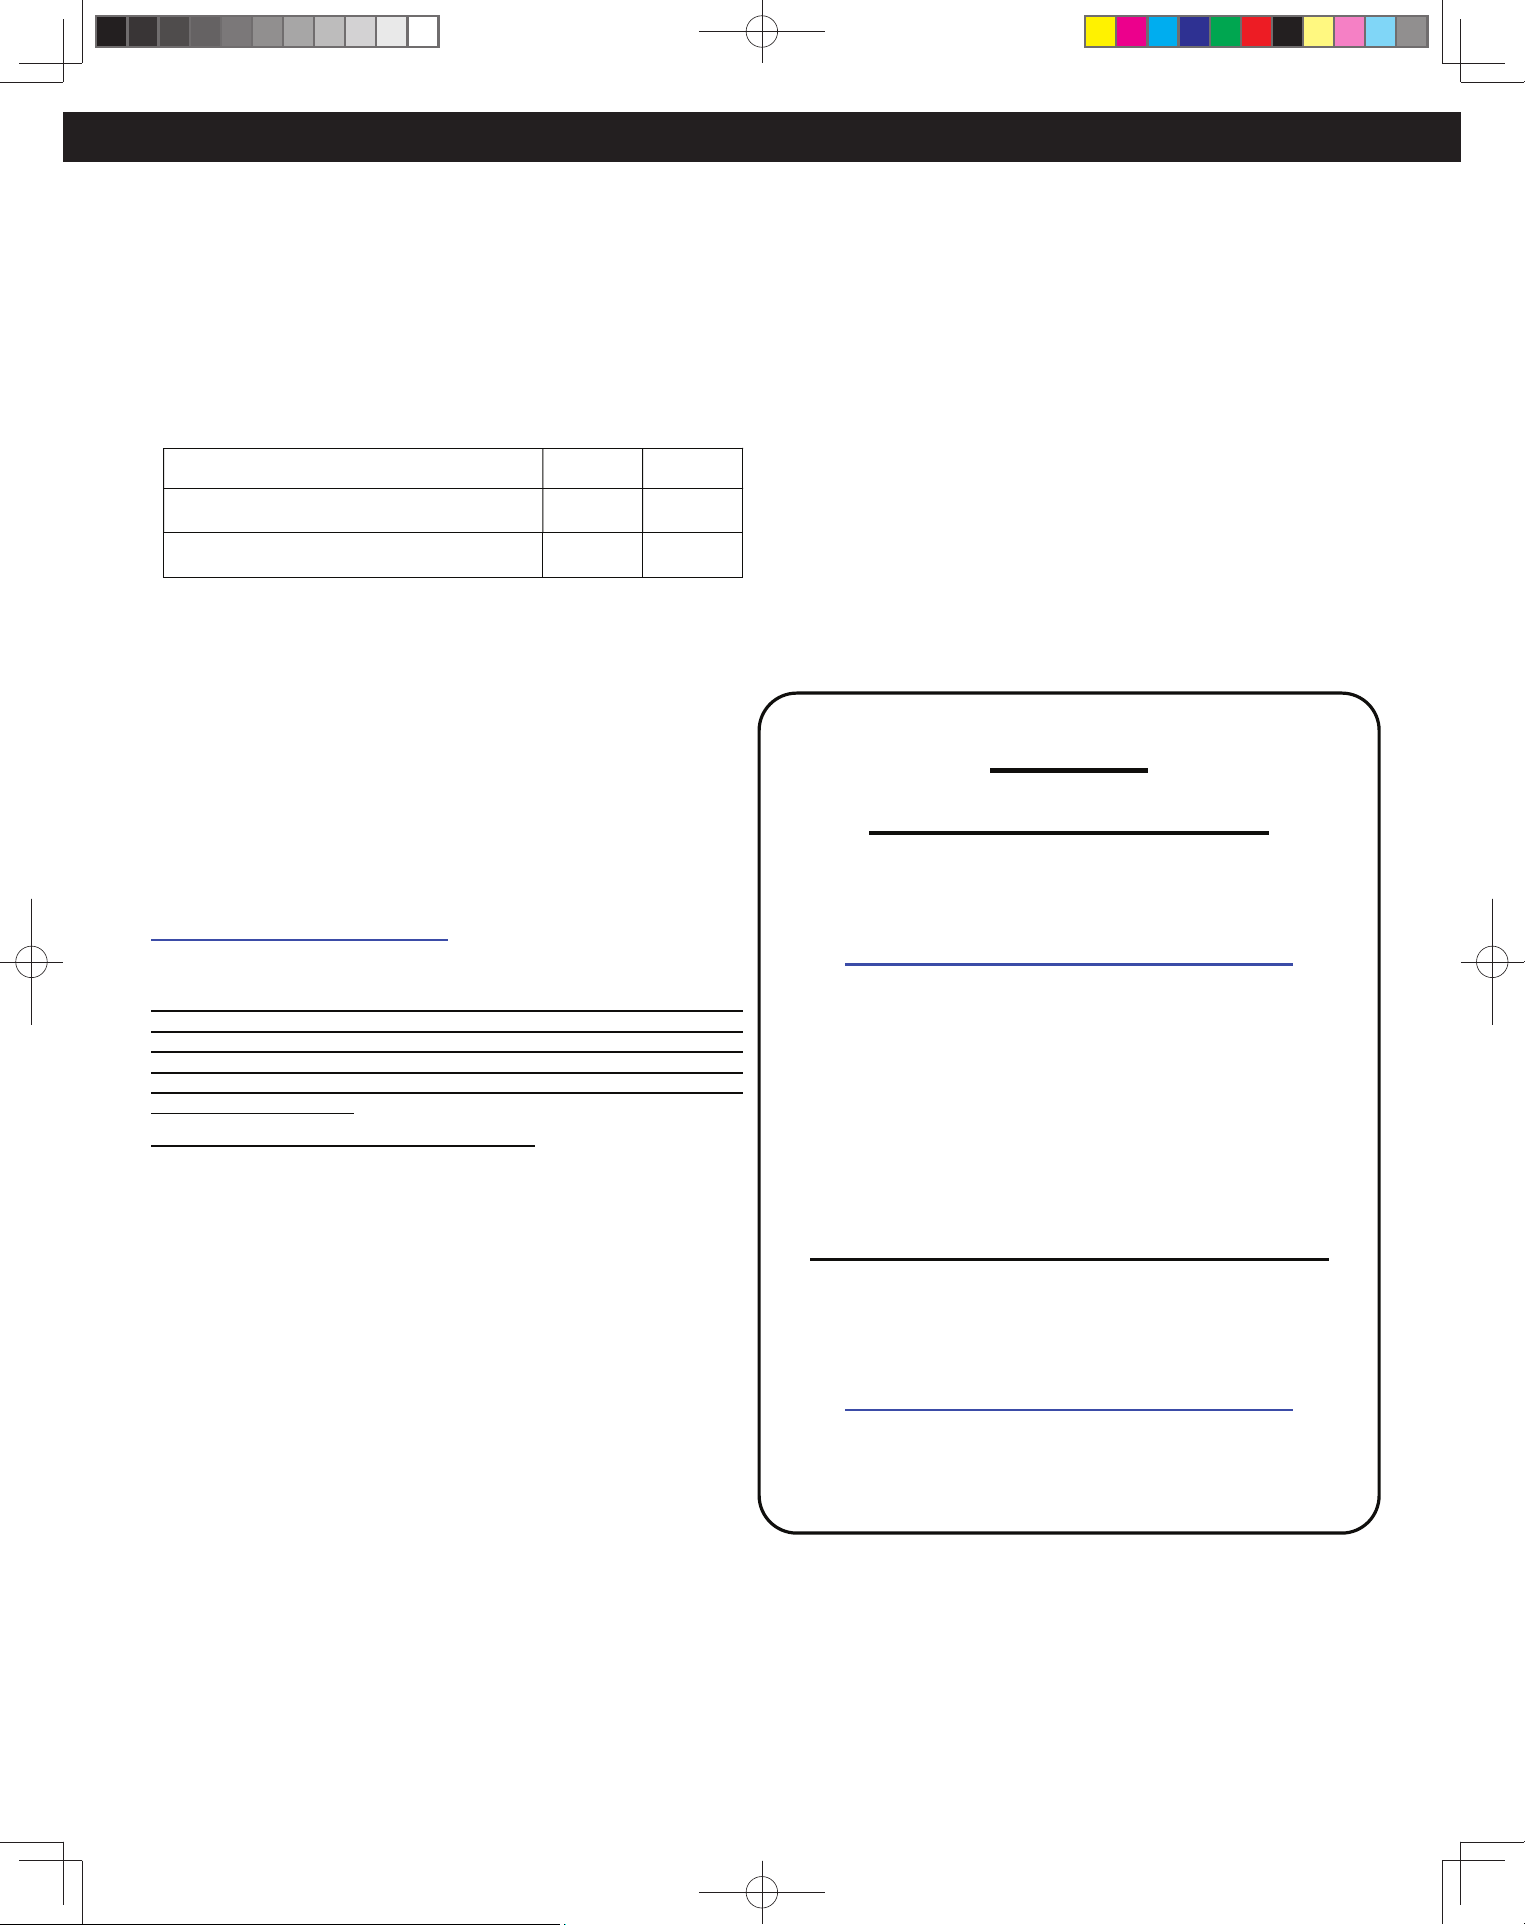
Product or Part Name Labor Parts
ALL PARTS (EXCEPT MAGNETRON TUBE) 1 yr. 1 yr.
MAGNETRON TUBE 1 yr. 5 yrs.
During the “Labor” warranty period there will be no charge for labor. During
the “Parts” warranty period, there will be no charge for parts.
This warranty only applies to products purchased and serviced in the United
States. This warranty is extended only to the original purchaser of a new
product which was not sold “as is”.
Mail-In Service – Online Repair Request
Online Repair Request
To submit a new repair request, and for quick repair status visit our Web
Site at: http://shop.panasonic.com/support
When shipping the unit, carefully pack and send it in the original (or supplied)
carton. Include a letter detailing the complaint along with the bill of sales and
provide a daytime phone number where you can be reached. A valid
registered receipt is required under the Limited Warranty.
When shipping Lithium Ion batteries please visit our web site at
http://shop.panasonic.com/support as Panasonic is committed to
providing the most up to date information.
IF REPAIR IS NEEDED DURING THE WARRANTY PERIOD, THE
PURCHASER WILL BE REQUIRED TO FURNISH A SALES
RECEIPT/PROOF OF PURCHASE INDICATING DATE OF PURCHASE,
AMOUNT PAID AND PLACE OF PURCHASE. CUSTOMER WILL BE
CHARGED FOR THE REPAIR OF ANY UNIT RECEIVED WITHOUT SUCH
PROOF OF PURCHASE.
Limited Warranty Limits And Exclusions
This warranty ONLY COVERS failures due to defects in materials or
workmanship, and DOES NOT COVER glass, plastic parts, temperature
probes (if included) and normal wear and tear or cosmetic damage. The
warranty ALSO DOES NOT COVER damages which occurred in shipment,
or failures which are caused by products not supplied by the warrantor, or
failures which result from accidents, misuse, abuse, neglect, bug infestation,
mishandling, misapplication, alteration, faulty installation, set-up
adjustments, maladjustment of consumer controls, improper maintenance,
power line surge, lightning damage, modification, or commercial use (such
as in a hotel, office, restaurant, or other business), rental use of the product,
service by anyone other than a Factory Service center or other Authorized
Servicer, or damage that is attributable to acts of God.
THERE ARE NO EXPRESS WARRANTIES EXCEPT AS LISTED UNDER
“LIMITED WARRANTY COVERAGE”.
THE WARRANTOR IS NOT LIABLE FOR INCIDENTAL OR
CONSEQUENTIAL DAMAGES RESULTING FROM THE USE OF THIS
PRODUCT, OR ARISING OUT OF ANY BREACH OF THIS WARRANTY.
(As examples, this excludes damages for lost time, travel to and from the
servicer, loss of or damage to media or images, data or other memory or
recorded content. The items listed are not exclusive, but for illustration only.)
ALL EXPRESS AND IMPLIED WARRANTIES, INCLUDING THE
WARRANTY OF MERCHANTABILITY, ARE LIMITED TO THE PERIOD
OF THE LIMITED WARRANTY.
Some states do not allow the exclusion or limitation of incidental or
consequential damages, or limitations on how long an implied warranty lasts,
so the exclusions may not apply to you.
This warranty gives you specific legal rights and you may also have other
rights which vary from state to state. If a problem with this product develops
during or after the warranty period, you may contact your dealer or Service
Center. If the problem is not handled to your satisfaction, then write to:
Panasonic Corporation of North America
Consumer Affairs Department
Two Riverfront Plaza
Newark NJ 07102-5490
PARTS AND SERVICE, WHICH ARE NOT COVERED BY THIS LIMITED
WARRANTY, ARE YOUR RESPONSIBILITY.
Product registration is not mandatory. Failure to complete the form
does not affect the consumer' s warranty rights.
As of January 4, 2026
Shop
Accessories!
ĨŽƌĂůůLJŽƵƌWĂŶĂƐŽŶŝĐŐĞĂƌ
'ŽƚŽ
ŚƚƚƉƐŚŽƉƉĂŶĂƐŽŶŝĐƐƵƉƉŽƌƚ
'ĞƚĞǀĞƌLJƚŚŝŶŐLJŽƵŶĞĞĚƚŽŐĞƚƚŚĞŵŽƐƚŽƵƚŽĨ
LJŽƵƌWĂŶĂƐŽŶŝĐƉƌŽĚƵĐƚƐ
ĐĐĞƐƐŽƌŝĞƐΘWĂƌƚƐĨŽƌLJŽƵƌĂŵĞƌĂWŚŽŶĞ
sƉƌŽĚƵĐƚƐdsŽŵƉƵƚĞƌƐΘEĞƚǁŽƌŬŝŶŐ
WĞƌƐŽŶĂůĂƌĞ,ŽŵĞƉƉůŝĂŶĐĞƐ,ĞĂĚƉŚŽŶĞƐ
ĂƚƚĞƌŝĞƐĂĐŬƵƉŚĂƌŐĞƌƐΘŵŽƌĞ
ƵƐƚŽŵĞƌ^ĞƌǀŝĐĞƐŝƌĞĐƚŽƌLJ
&ŽƌWƌŽĚƵĐƚ/ŶĨŽƌŵĂƚŝŽŶKƉĞƌĂƚŝŶŐƐƐŝƐƚĂŶĐĞ
WĂƌƚƐKǁŶĞƌƐDĂŶƵĂůƐĞĂůĞƌĂŶĚ^ĞƌǀŝĐĞŝŶĨŽ
ŐŽƚŽ
ŚƚƚƉƐŚŽƉƉĂŶĂƐŽŶŝĐƐƵƉƉŽƌƚ
&ŽƌƚŚĞŚĞĂƌŝŶŐŽƌƐƉĞĞĐŚŝŵƉĂŝƌĞĚ
ddzϭͲϴϱϱͲϰϵϳͲϮϬϱϲ
F0003DB70AP_EN.indd 32F0003DB70AP_EN.indd 32 2026/2/26 15:50:292026/2/26 15:50:29
33
Specifications
Power Source .........................................................................................................................................................................................................................120 V~, 60 Hz
Power Consumption ................................................................................................................................................................................................................. 8 A, 950 W
Cooking Power* ............................................................................................................................................................................................................................... 1,200 W
Outside Dimensions (W x H x D) ..................................................................................................................................................... 18
1
⁄2” x 13
3
⁄4” (**17
3
⁄16”) x 15
3
⁄8”
(470 mm x 350 (**436) mm x 390 mm)
Oven Cavity Dimensions (W x H x D)* ................................................................................................................................................................15
3
⁄16” x 8
1
⁄4” x 13
7
⁄16”
(385 mm x 210 mm x 341 mm)
Operating Frequency ................................................................................................................................................................................................................ 2,450 MHz
Net Weight ......................................................................................................................................................................................................Approx. 27.1 lbs. (12.3 kg)
*IEC Test procedure Specifications subject to change without notice.
** 350 mm is the dimension without handle.
436 mm is the dimension with handle.
The serial number of this product may be found on the back side of the oven. You should note the model number
and the serial number of this oven in the space provided and retain this book as a permanent record of your
purchase for future reference.
Model No. ______________________________
Serial No. ______________________________
Date of Purchase ________________________
Scan this code for product registration
User’s Record
F0003DB70AP_EN.indd 33F0003DB70AP_EN.indd 33 2026/2/26 15:50:292026/2/26 15:50:29

Panasonic Consumer Electronics Company,
Division of Panasonic Corporation of North America
Two Riverfront Plaza
Newark, New Jersey 07102
Website : http://shop.panasonic.com/support
F0003DB70AP_EN.indd 34F0003DB70AP_EN.indd 34 2026/2/26 15:50:292026/2/26 15:50:29