20250411.05
Smart Switch MT1
User Manual

Contents
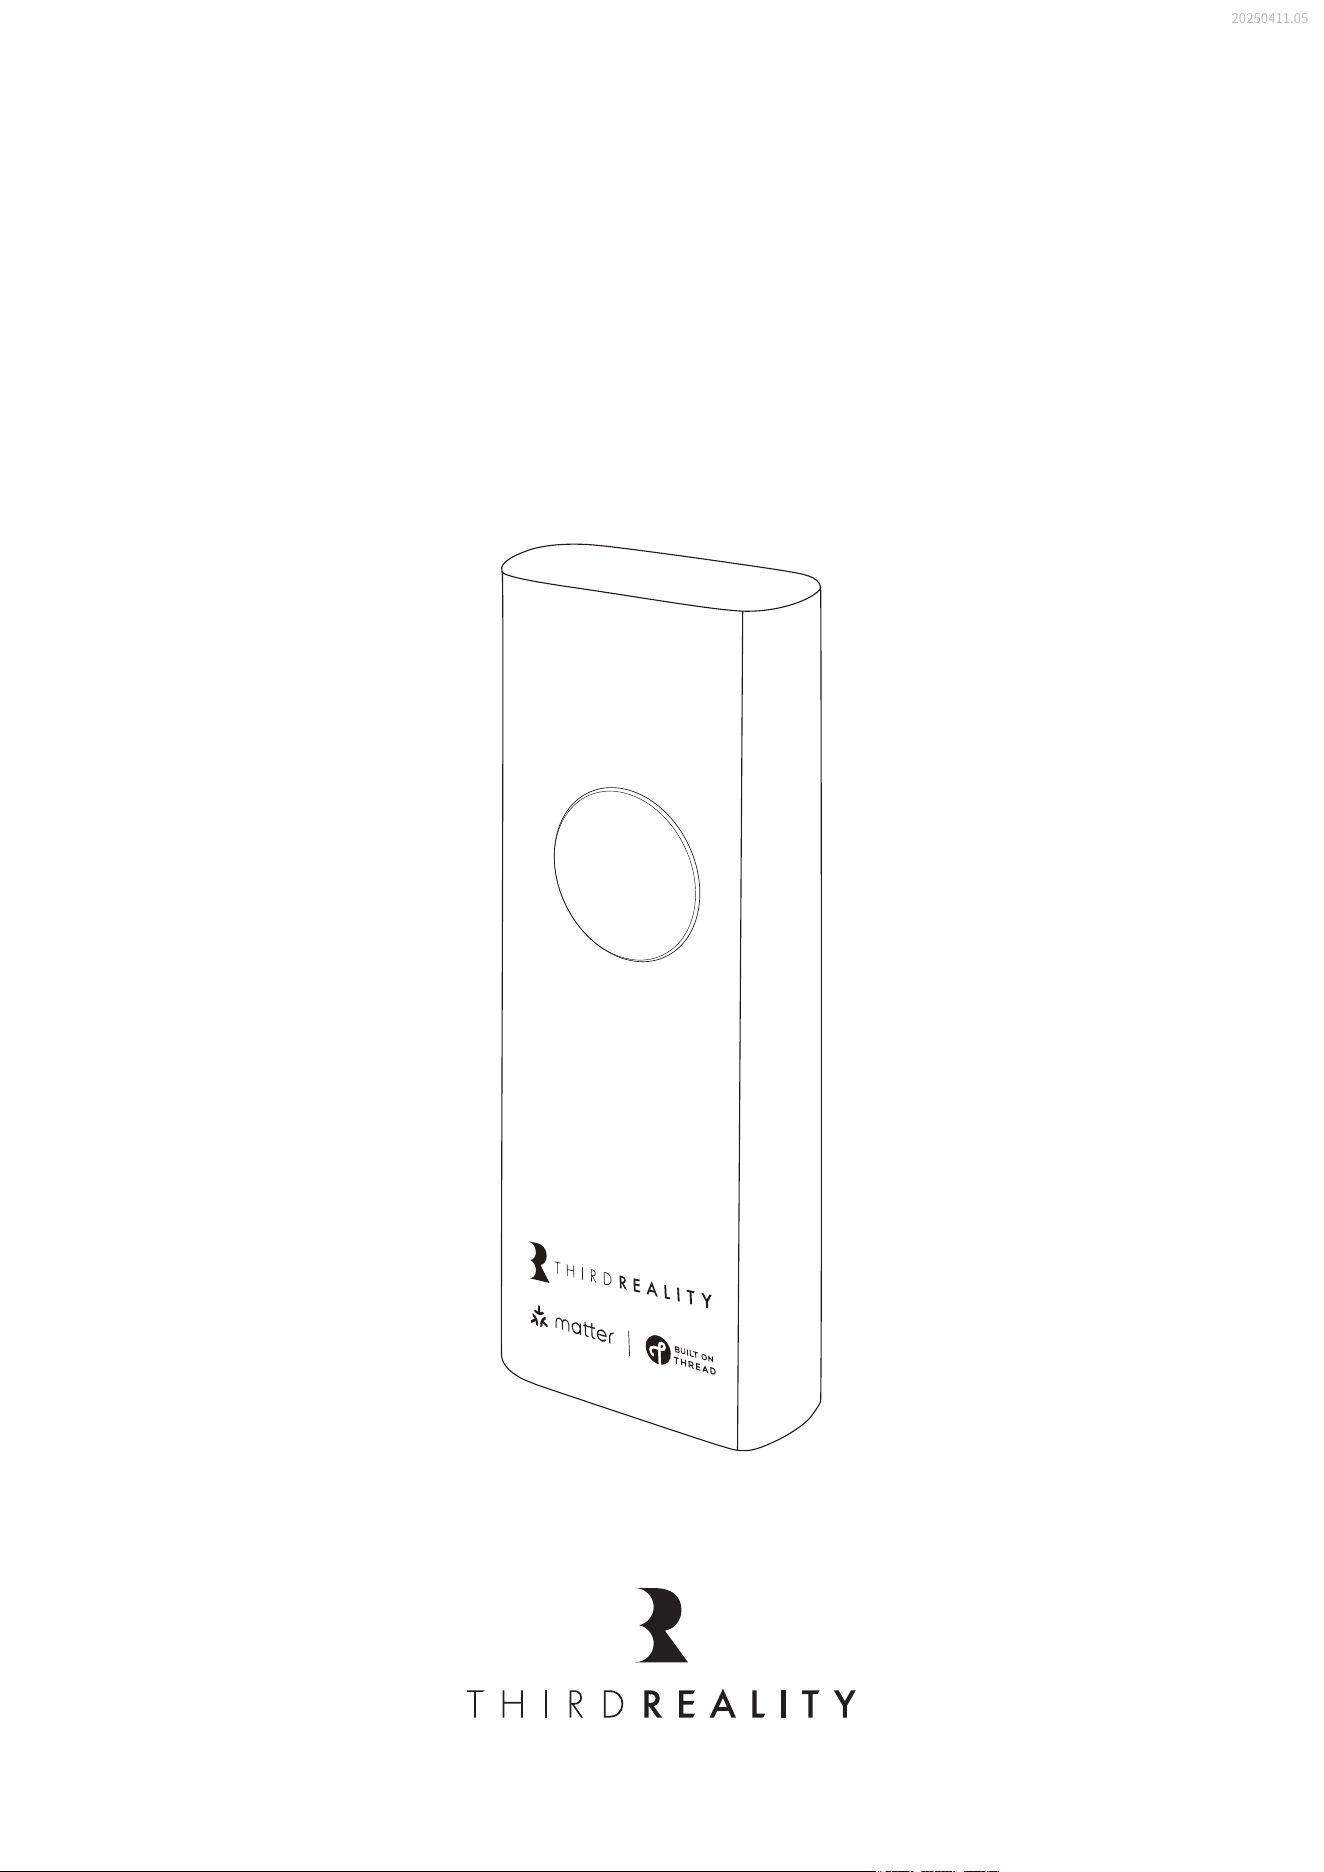
What's in the Box
Installation
Setup with Apple Home
Setup with Home Assistant
Setup with Google Home
Setup with SmartThings
Troubleshooting
FCC Regulatory Conformance
01
02
06
09
12
16
19
20
01
Fastener x2
Thin Spacer x2
Thick Spacer x2 Screw x2
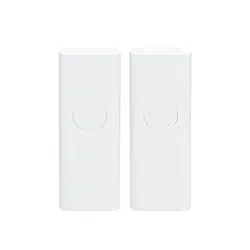
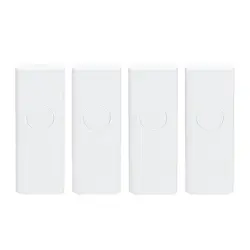
Battery x2 Protective Film x2Smart Switch MT1
What' s in the Box
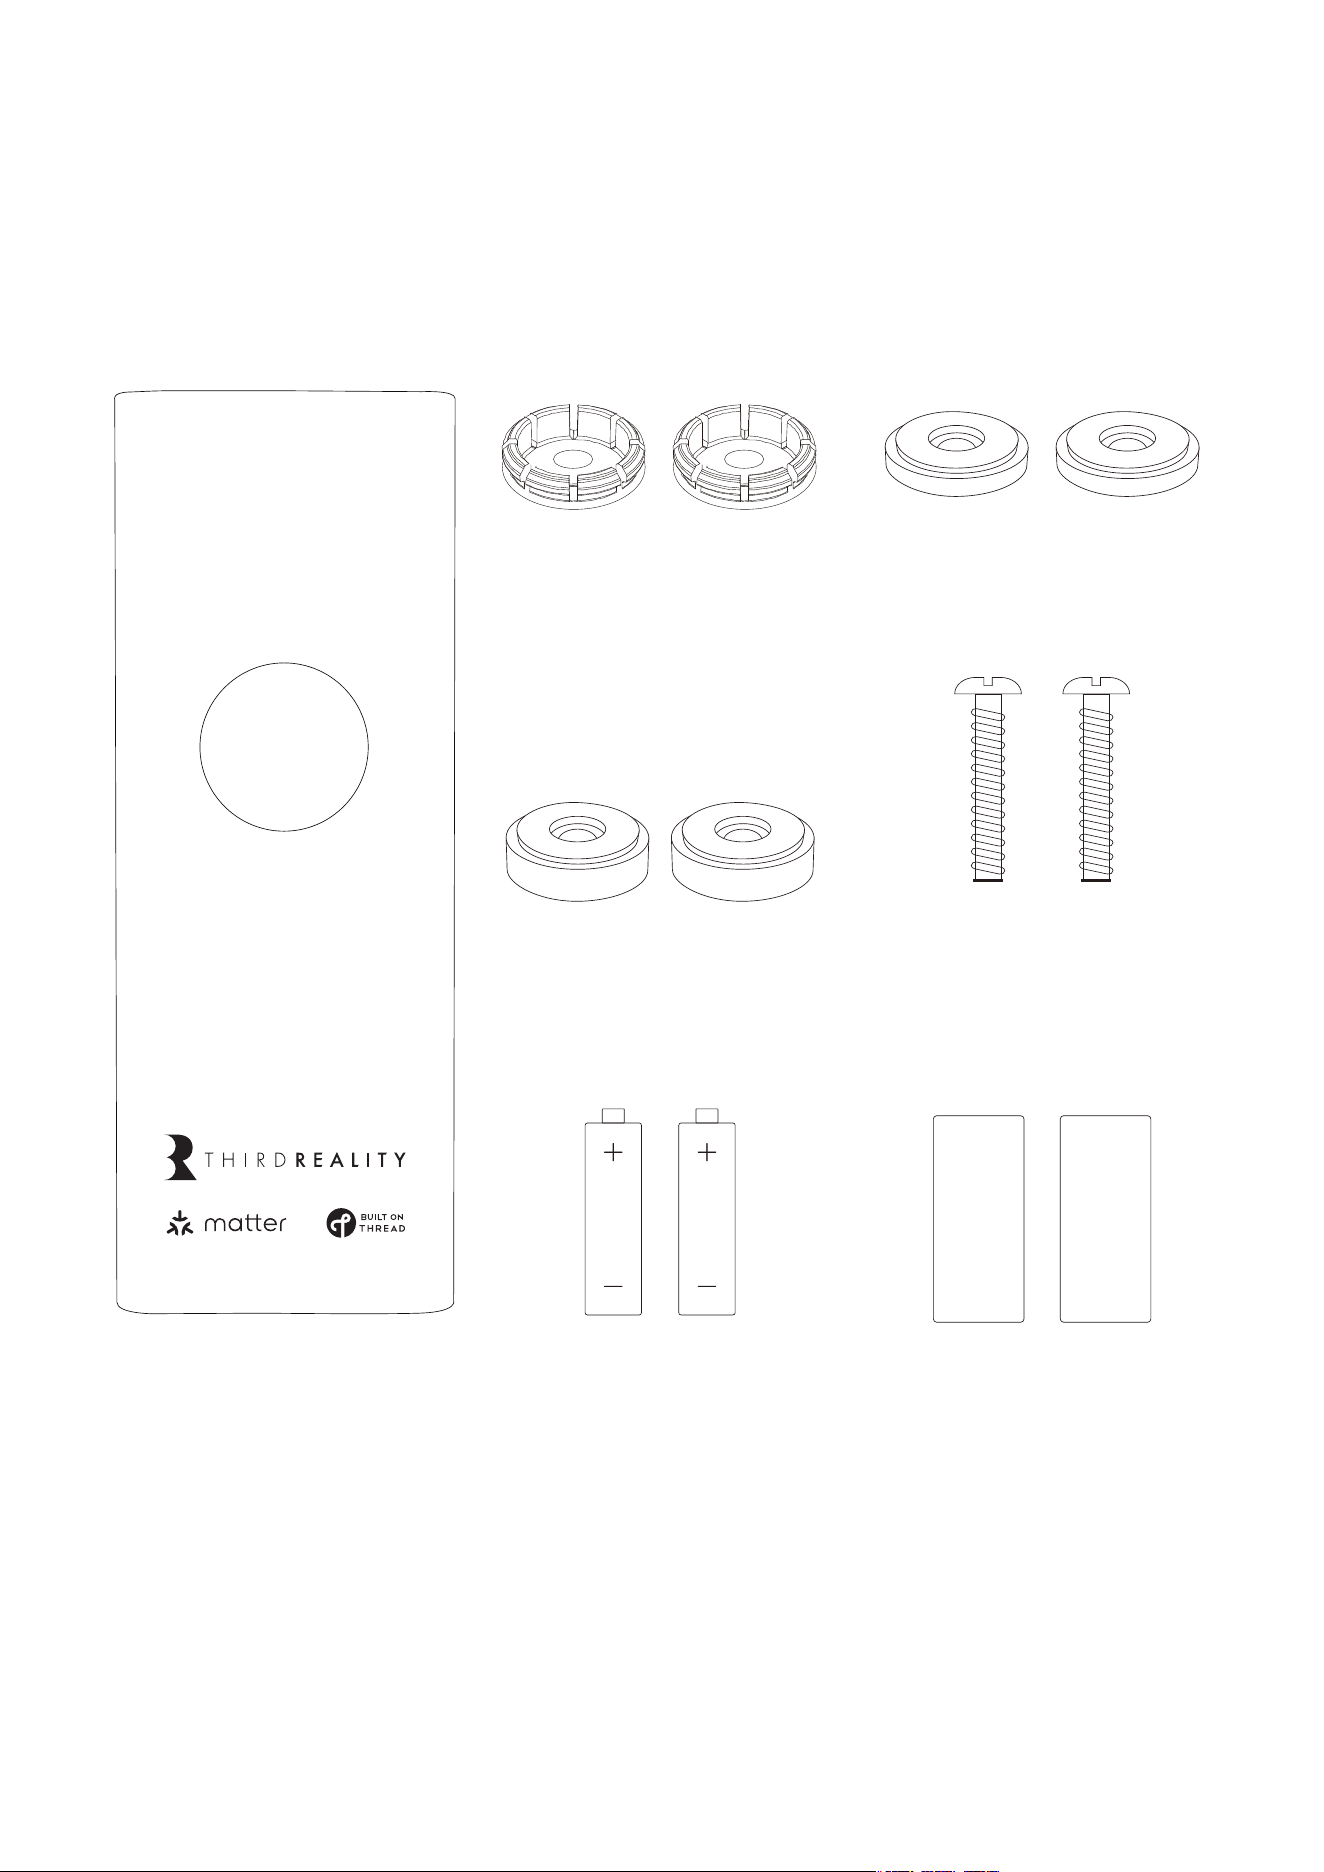
Installation
Remove screws from the switch panel.
For rocker switches, choose the fasteners and spacers indicated in
the form below.
1
2
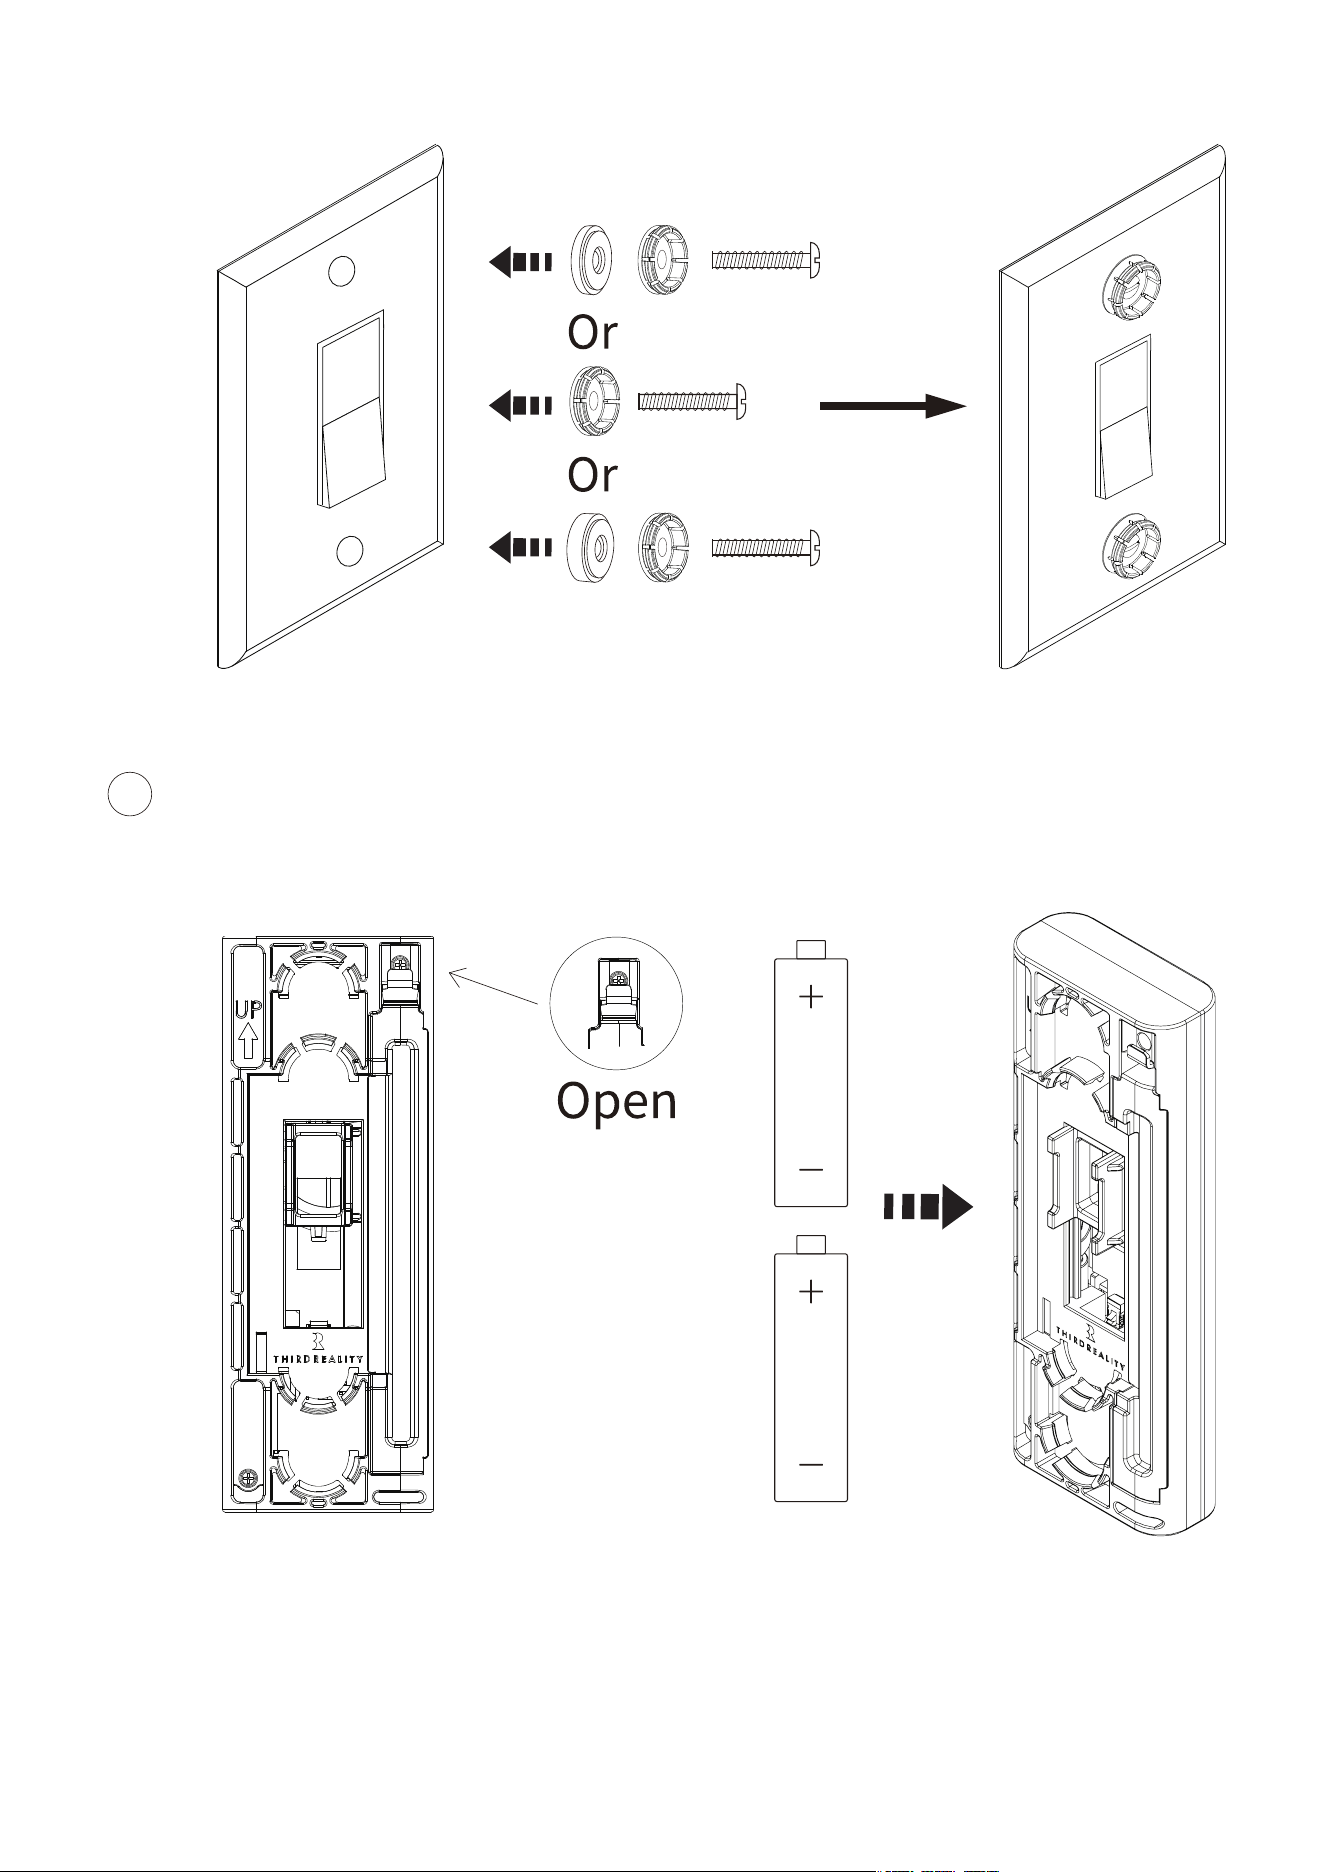
Insert two AAA batteries and put the battery cover back.
3
03
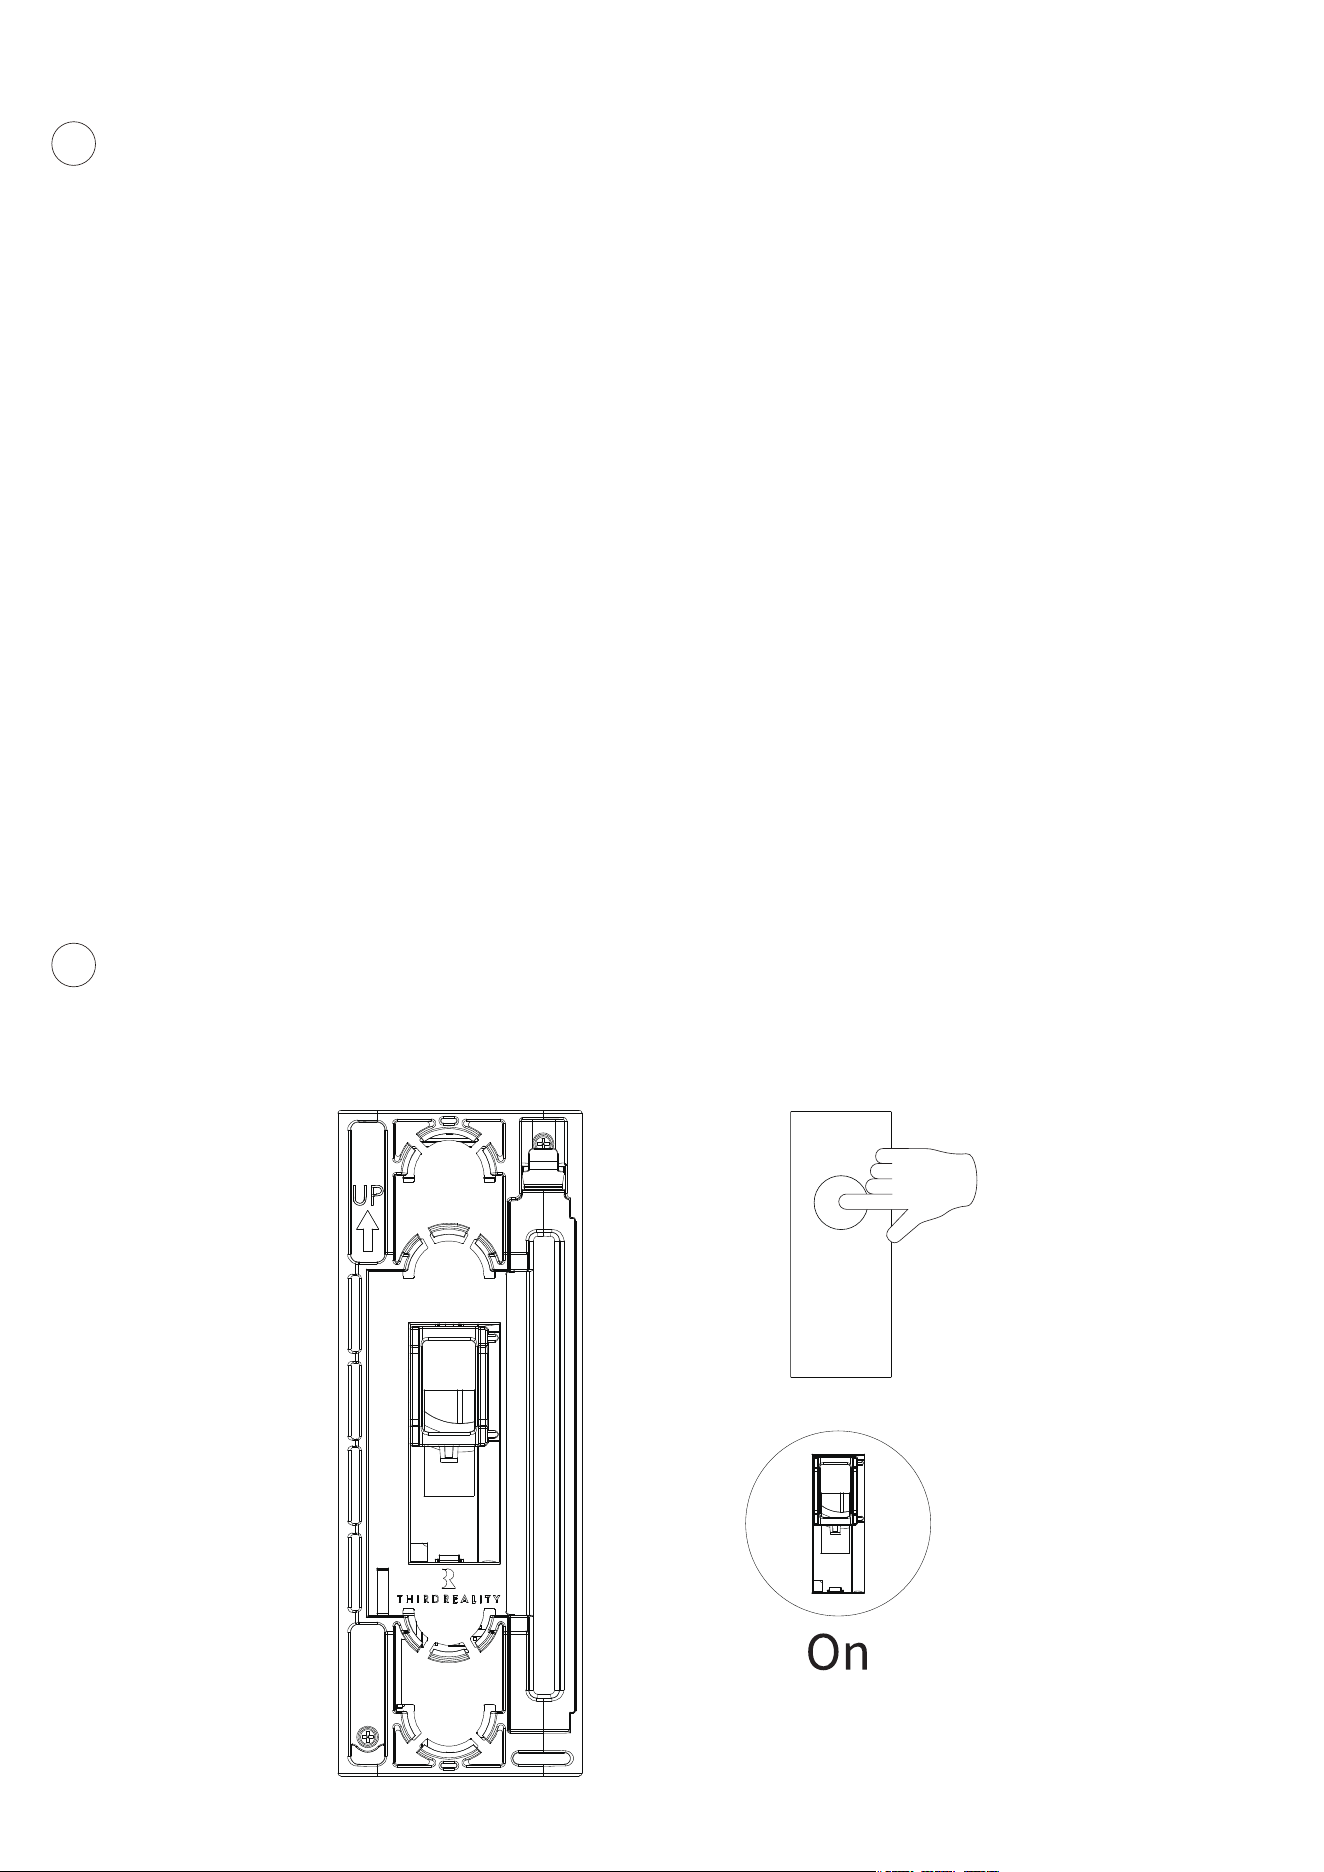
Make sure the Smart Switch actuator is in the up position, as the
figure shown below:
Position the switch close to your Matter controller.(Make sure the
controller supports the Thread)
Press and hold the button on the switch for at least 20 seconds.
Release when the LED starts flashing rapidly ‒ this means the
device is in pairing mode.
Open your Matter Platform app and start the "Add Matter Device"
process:
Preferred: Scan the Matter QR Code found on the device's packag-
ing or in the manual.
Alternative: Enter the Manual Code printed on the back of switch.
Once added, the switch will join your Thread network and appear
in your smart home app.
1.
2.
3.
4.
Pairing Instructions
4
5
04
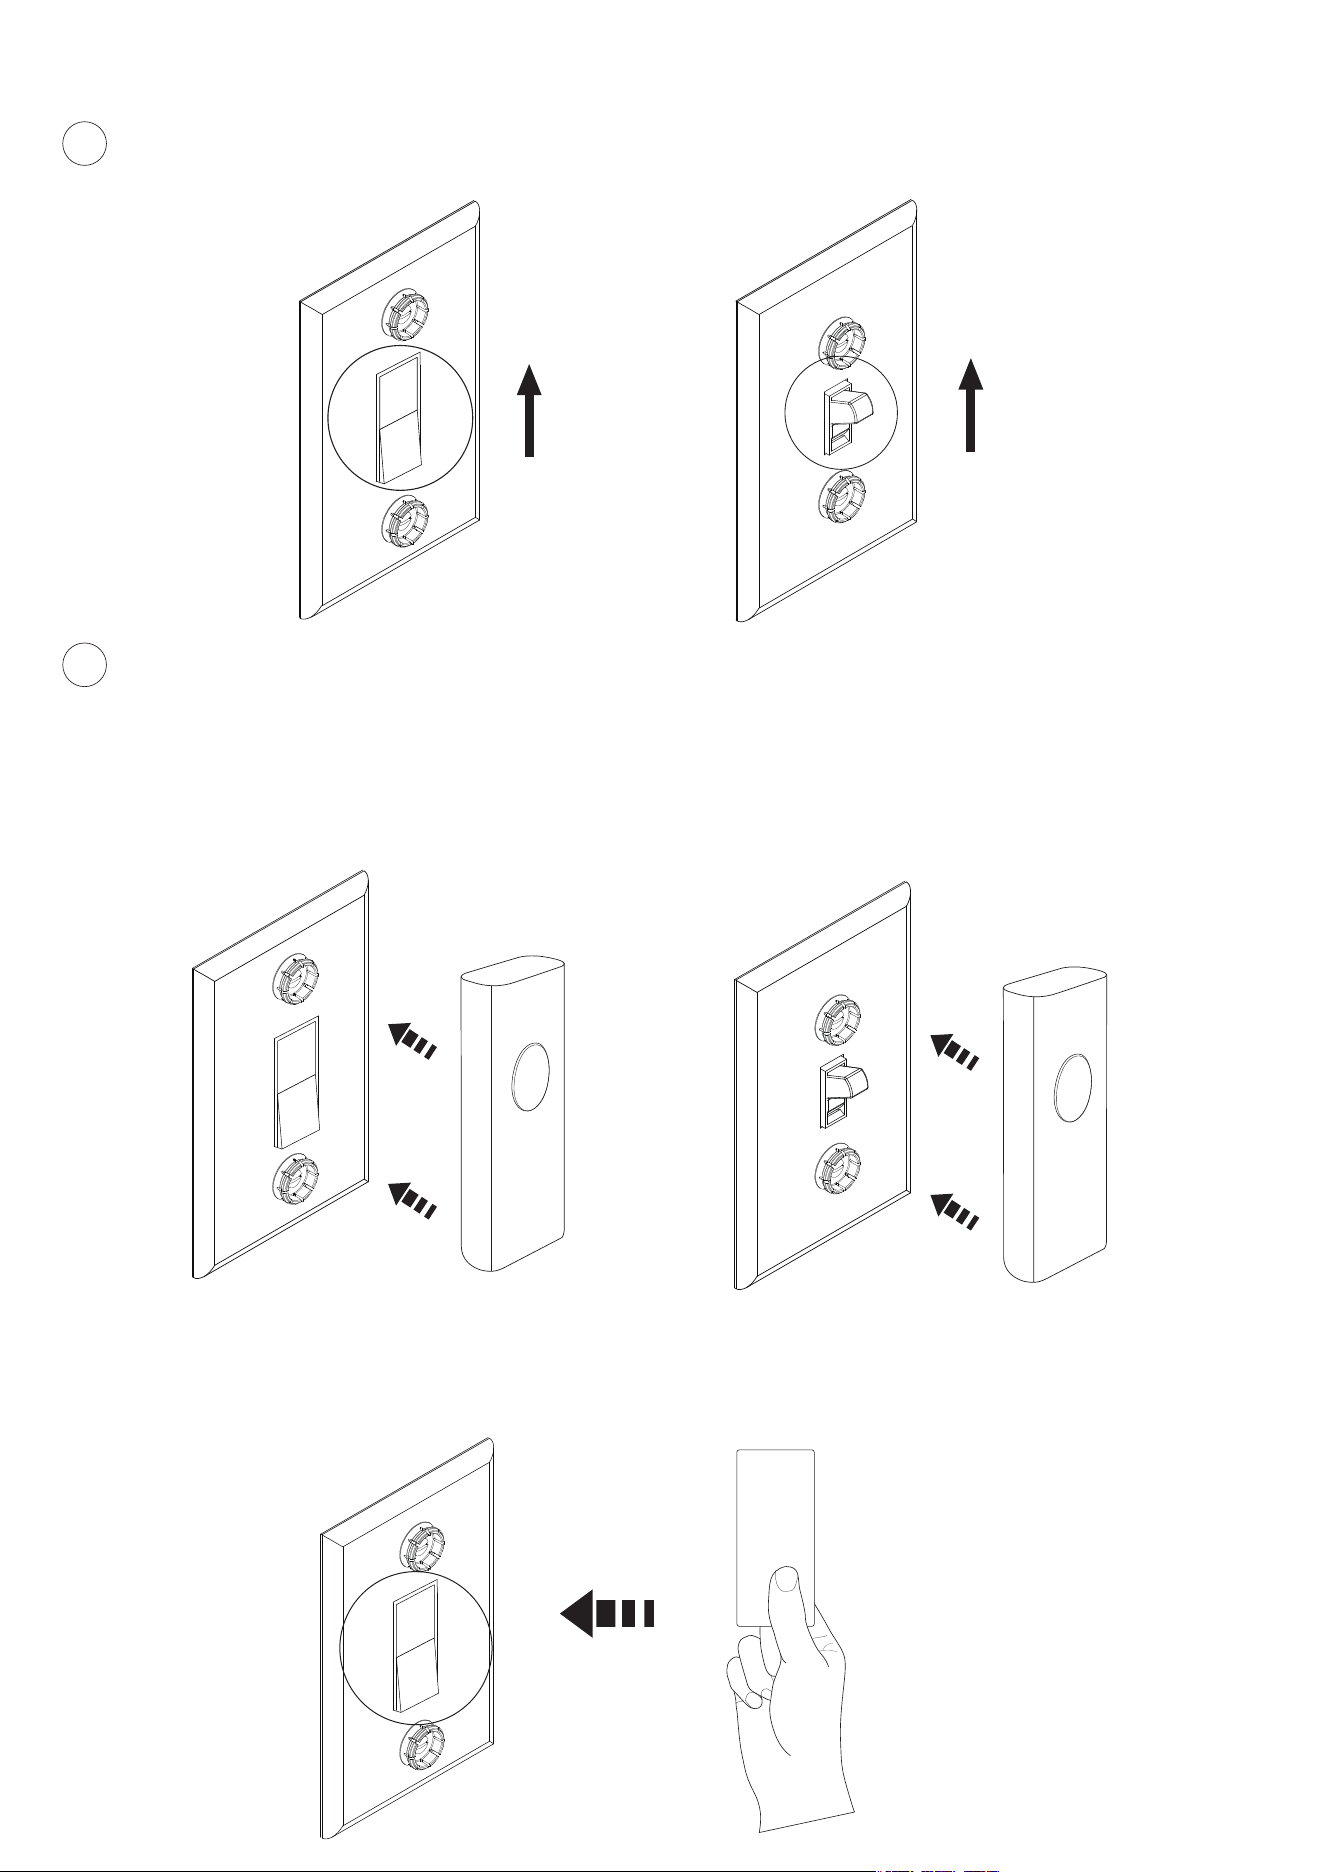
Line up the Smart Switch with the existing switch and click it in.
Test its functionality by pressing the button to turn on and off.
Adjust the spacers if needed to ensure the Smart Switch properly
engages with the wall switch.
Optional: For the rocker switch, apply a protective film over the
paddle to prevent scratches, as illustrated.
Turn your rocker or toggle switch to the ON position as shown:
6
7
05

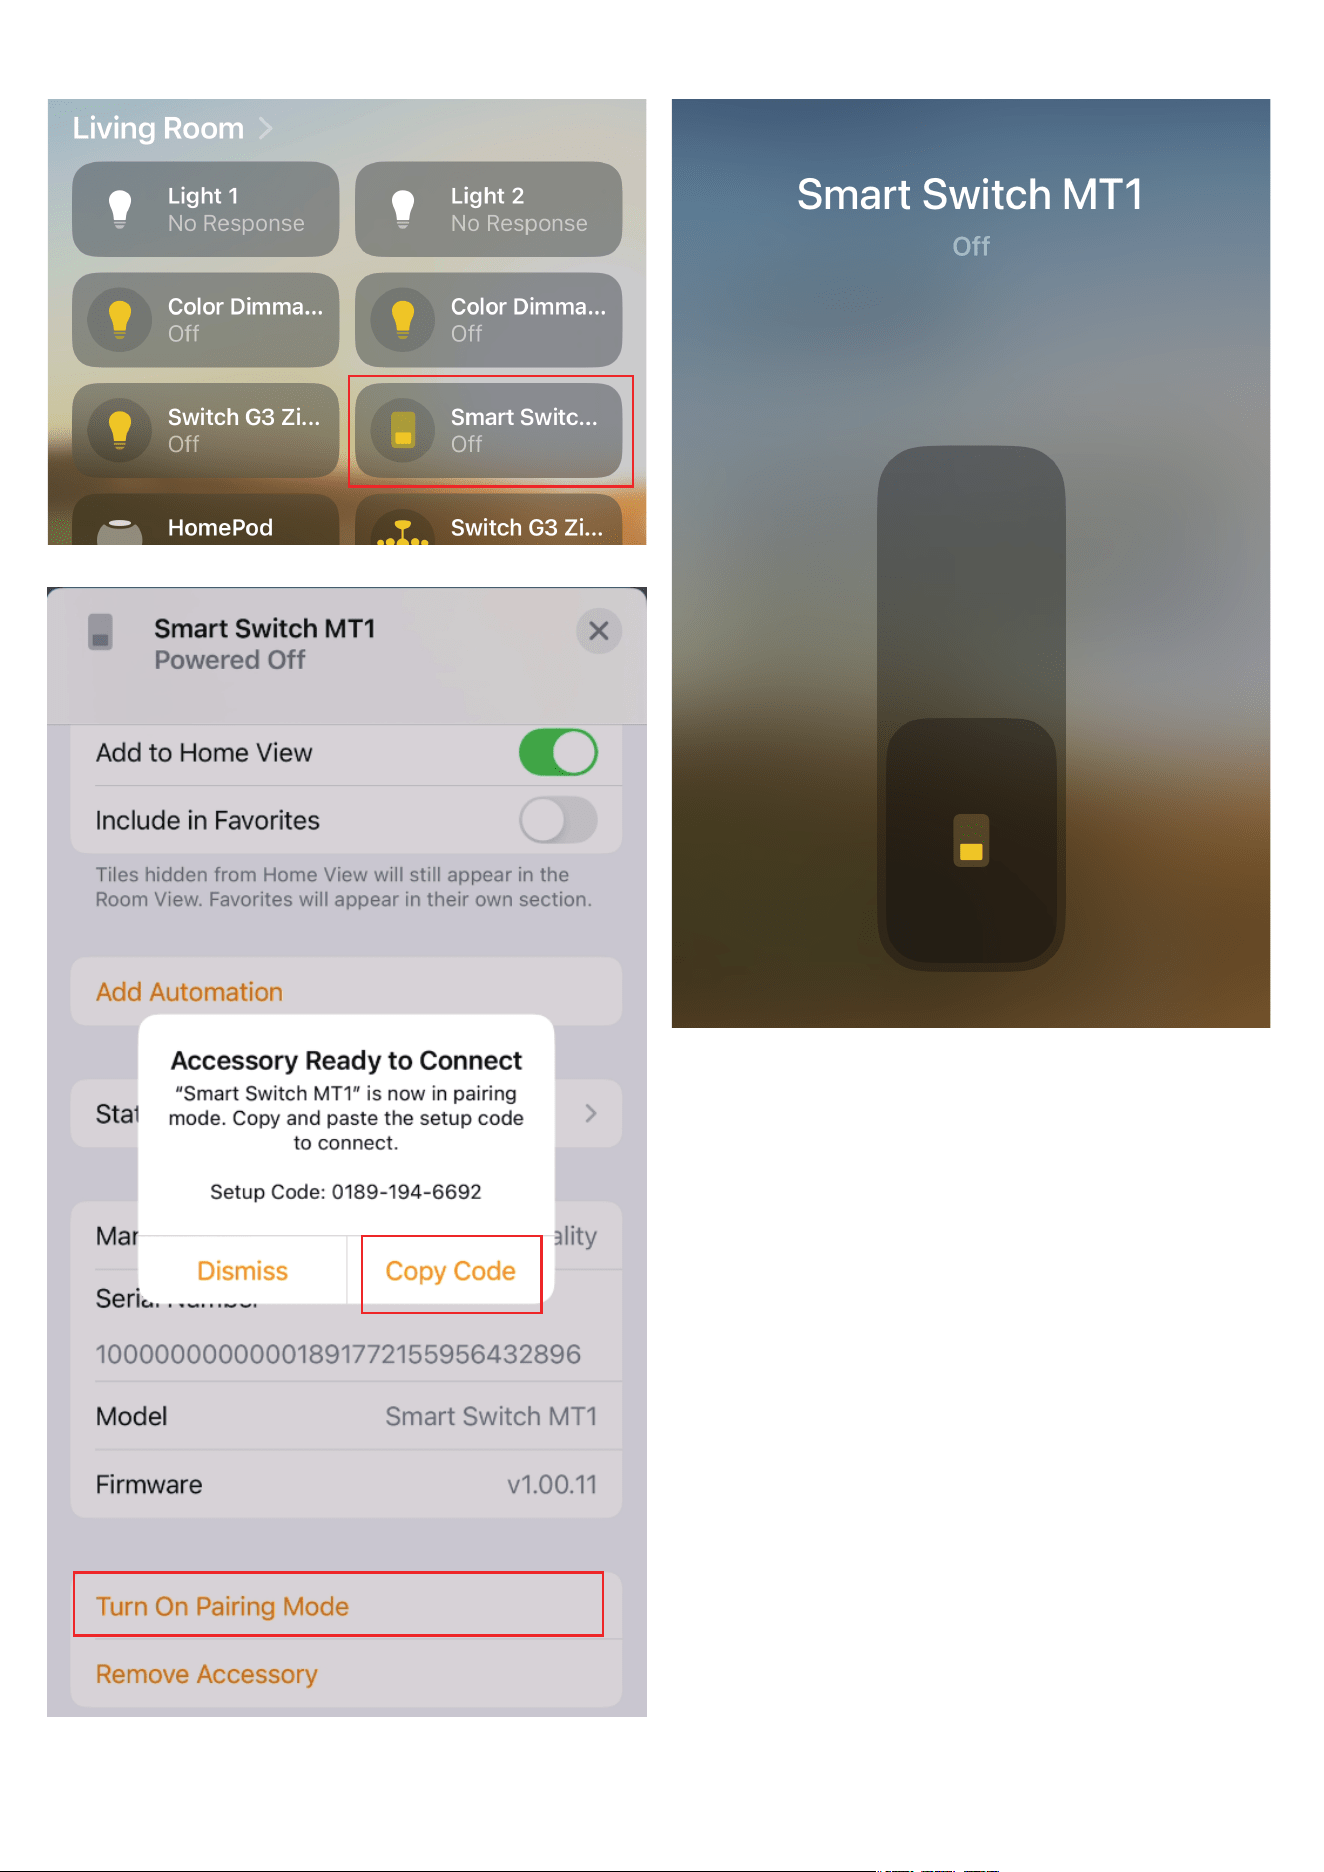
Setup with Apple Home
06
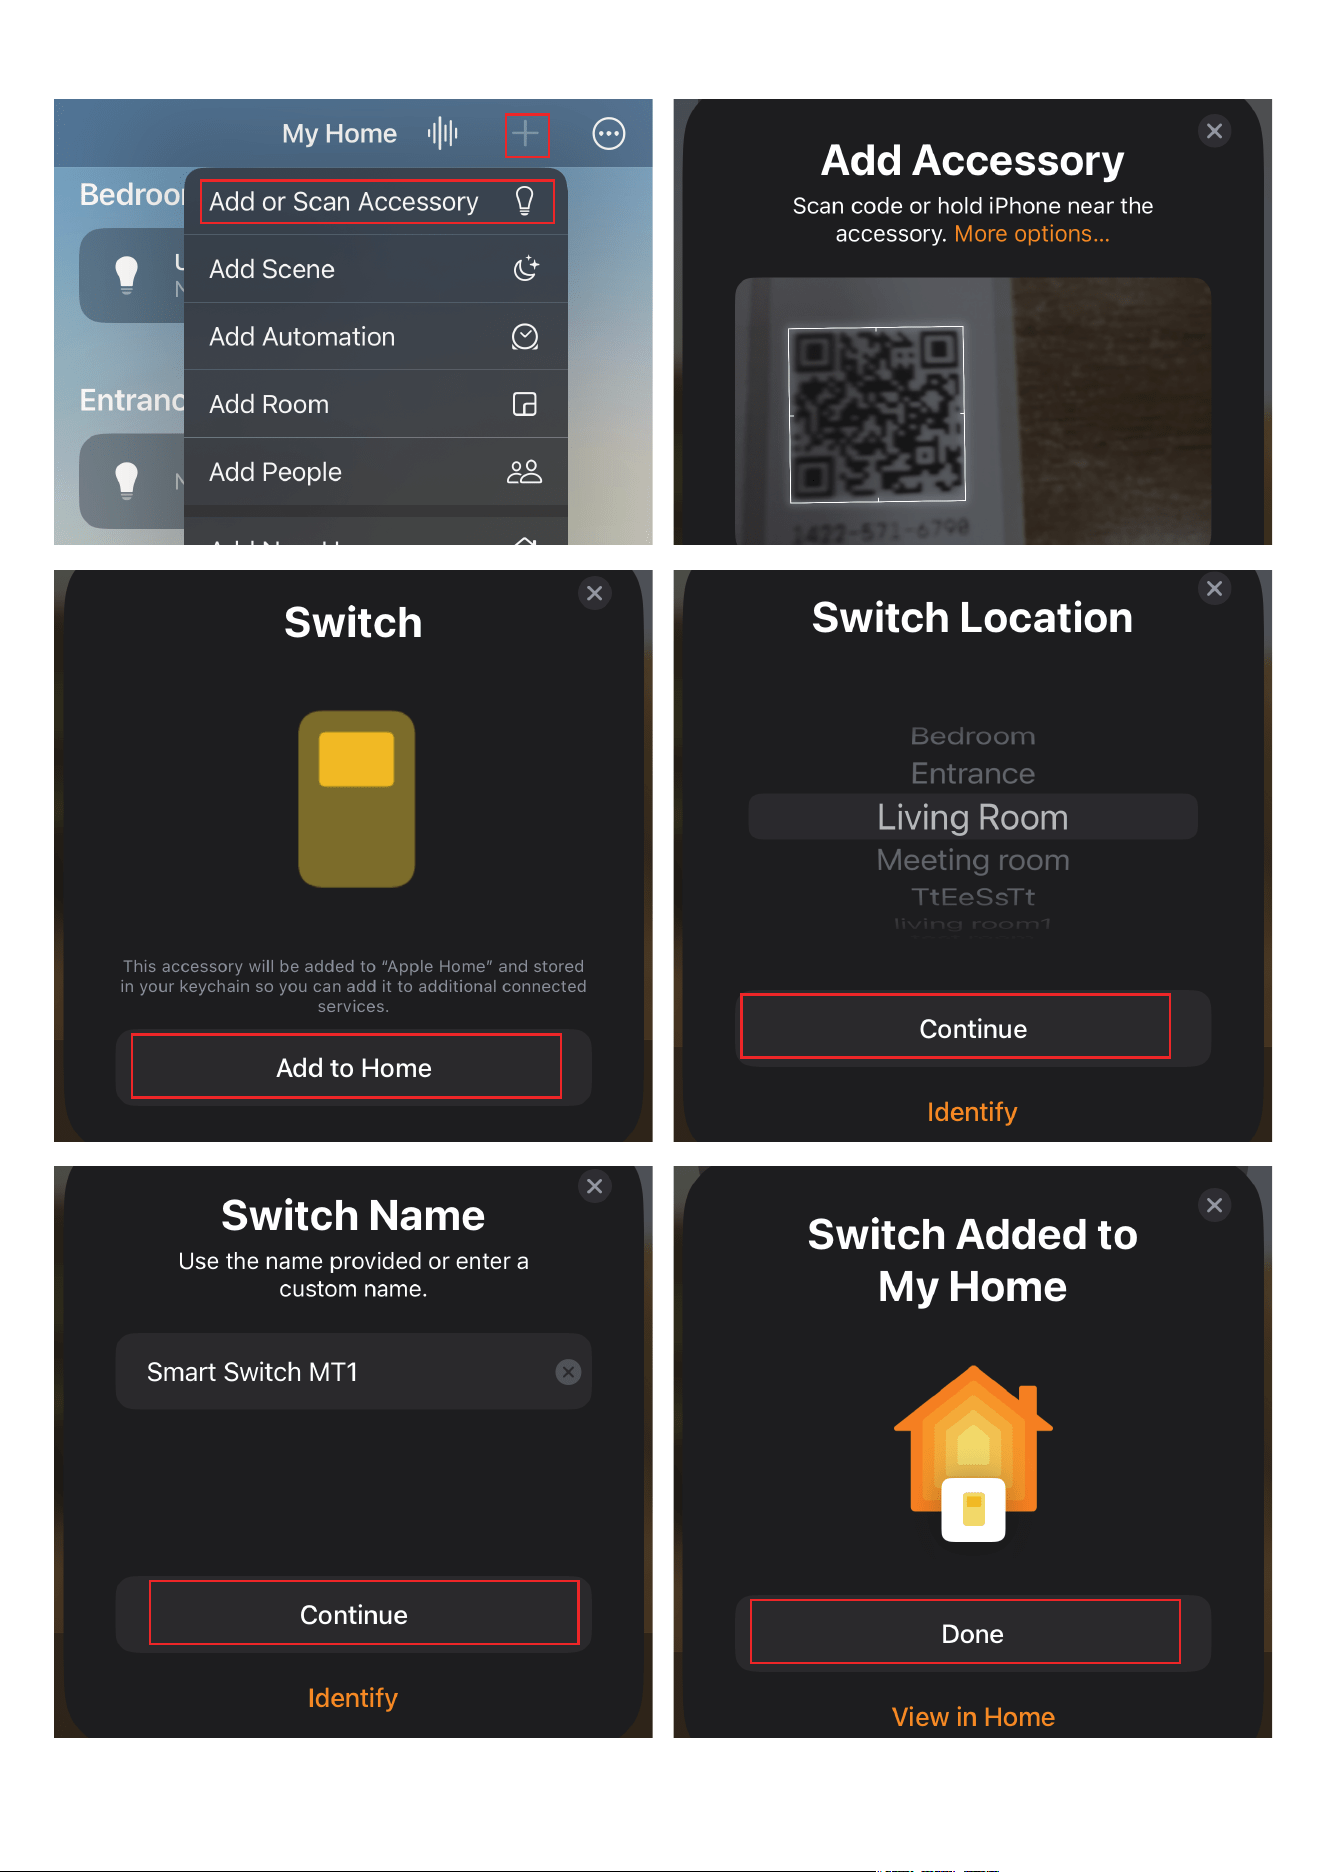
Press the button for at least 20 seconds until the light flashes rapidly
to put the switch into pairing mode.
Launch your Home App. Tap + and choose "Add or Scan Accessory" to
add a new device.
Scan the QR code on the manual.
Choose a location and set a name for your device.
Now you can check your device on the Device list, turn it on/off, and
create automation with the switch.
To connect the device with another Thread-certified ecosystem app,
please go to the Device Settings page, scroll to the bottom, and tap
"Turn On Pairing Mode" and then "Copy Code." After that, launch the
app you want to pair, follow the setup instructions to enter the setup
code, and follow the app instructions to complete the setup.
1.
2.
3.
4.
5.
6.
Make sure your Apple Home setup includes a hub that supports Thread,
such as HomePod mini or a supported third-party border router.
07
1
2
08
1
2

09
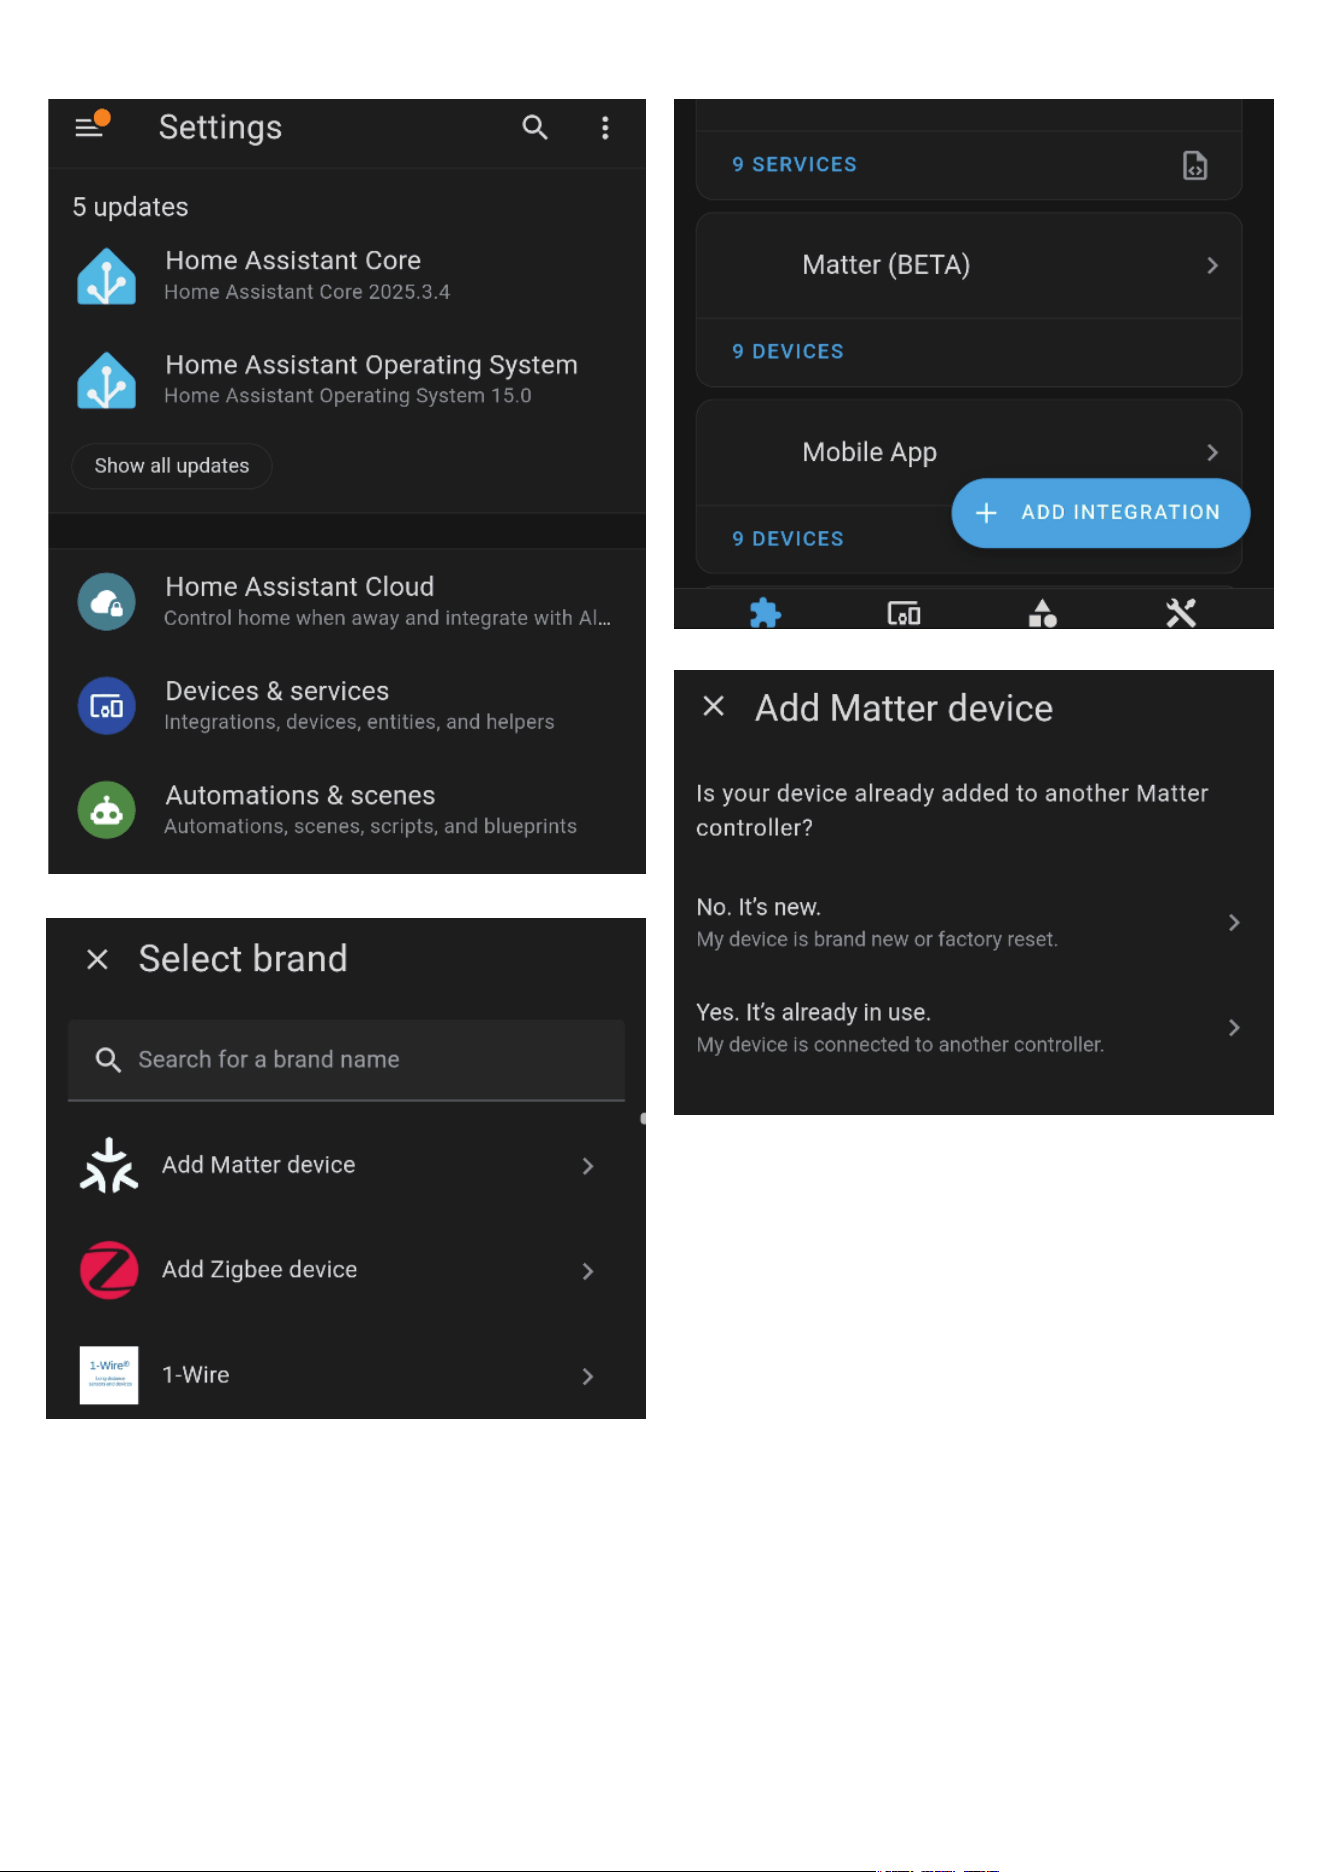
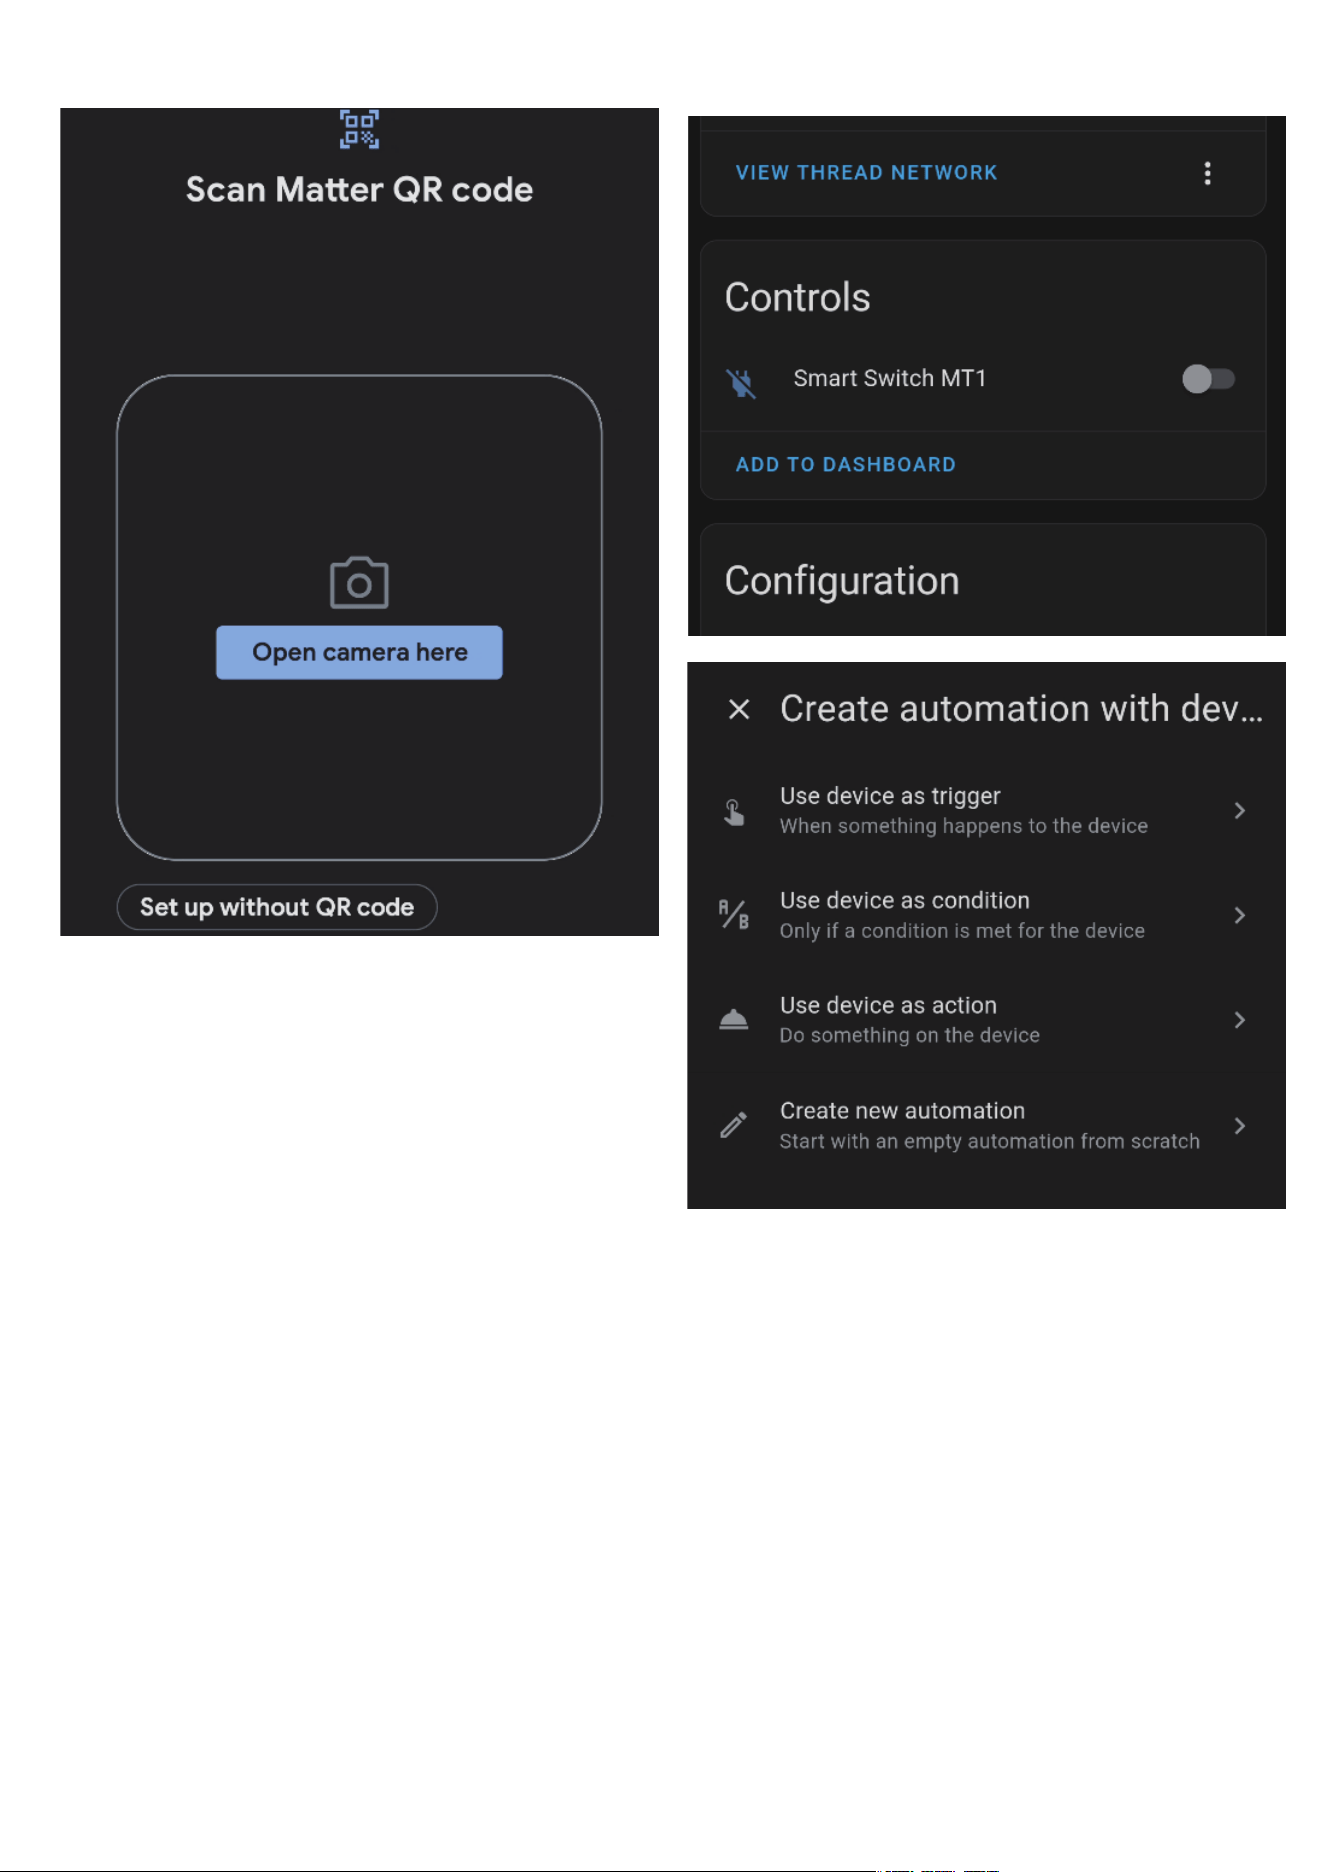
Press the button for at least 20 seconds until the light flashes rap-
idly to put the switch into pairing mode.
Launch the Home Assistant App/ Web control panel.
Select "Devices & services" - "Add Matter device."
Then choose "No, it's new." to add the switch as a new device.
If you are using a phone app, you can directly scan the QR pairing
code in the user manual to add the switch. If you are using a Web
control panel, you can choose "Setup without QR code" to manu-
ally enter the pairing code located on the back of the switch.
After setting up the switch, you can turn it on or off through the
device panel and set up automation.
1.
2.
3.
4.
5.
6.
Setup with Home Assistant
If you have an Apple iPhone and one or more Apple devices that can be
utilized by Home Assistant as a Thread Border router: HomePod gen2,
HomePod Mini, Apple TV 4K (with ethernet).
If you have an Android phone and one or more Google devices that can
be utilized by Home Assistant as a Thread Border router: Google Nest
Hub v2, Google Nest Hub Max, Google Nest Wi-Fi Pro.
10
11

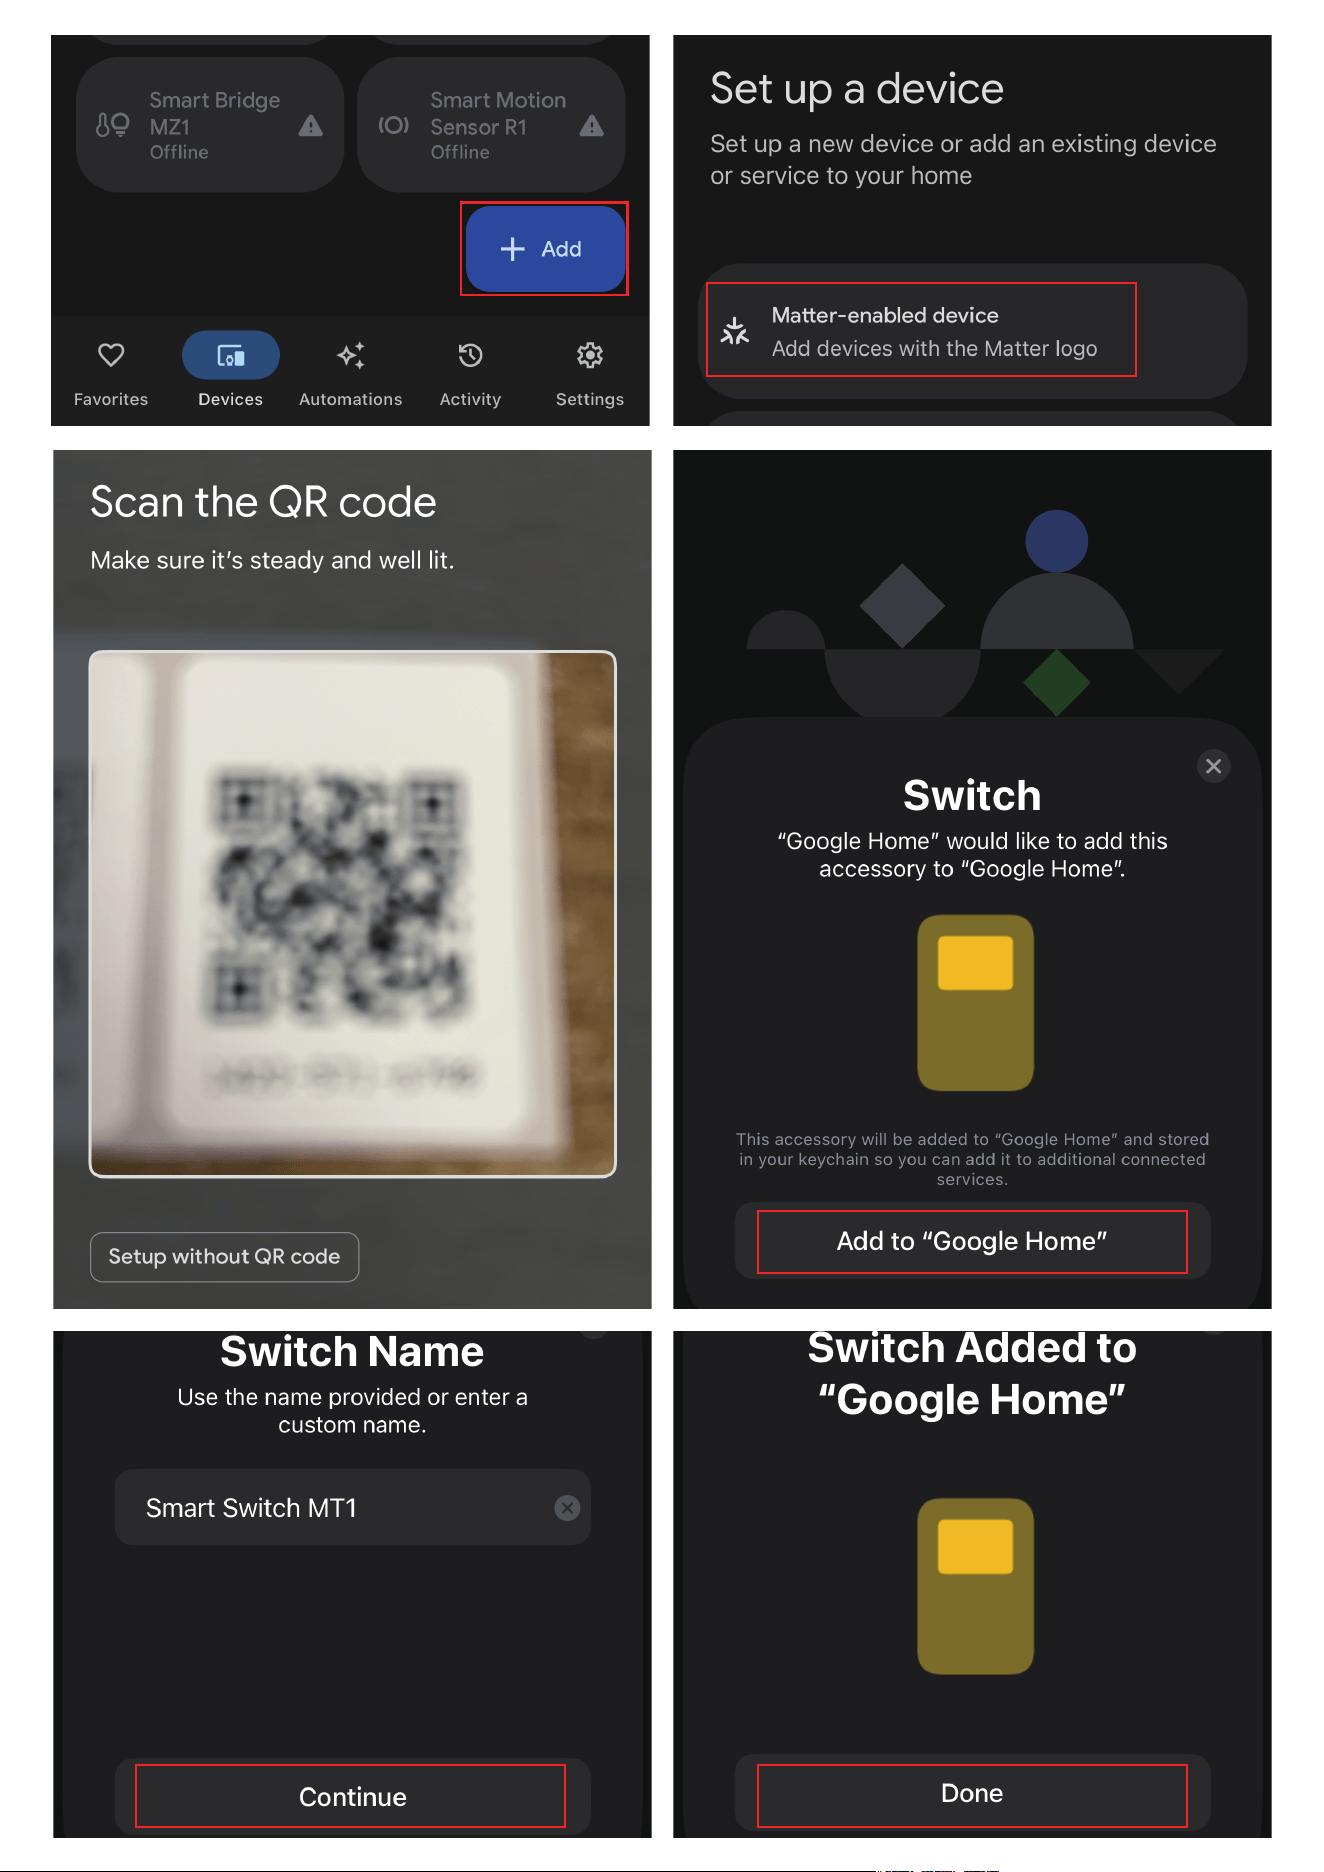
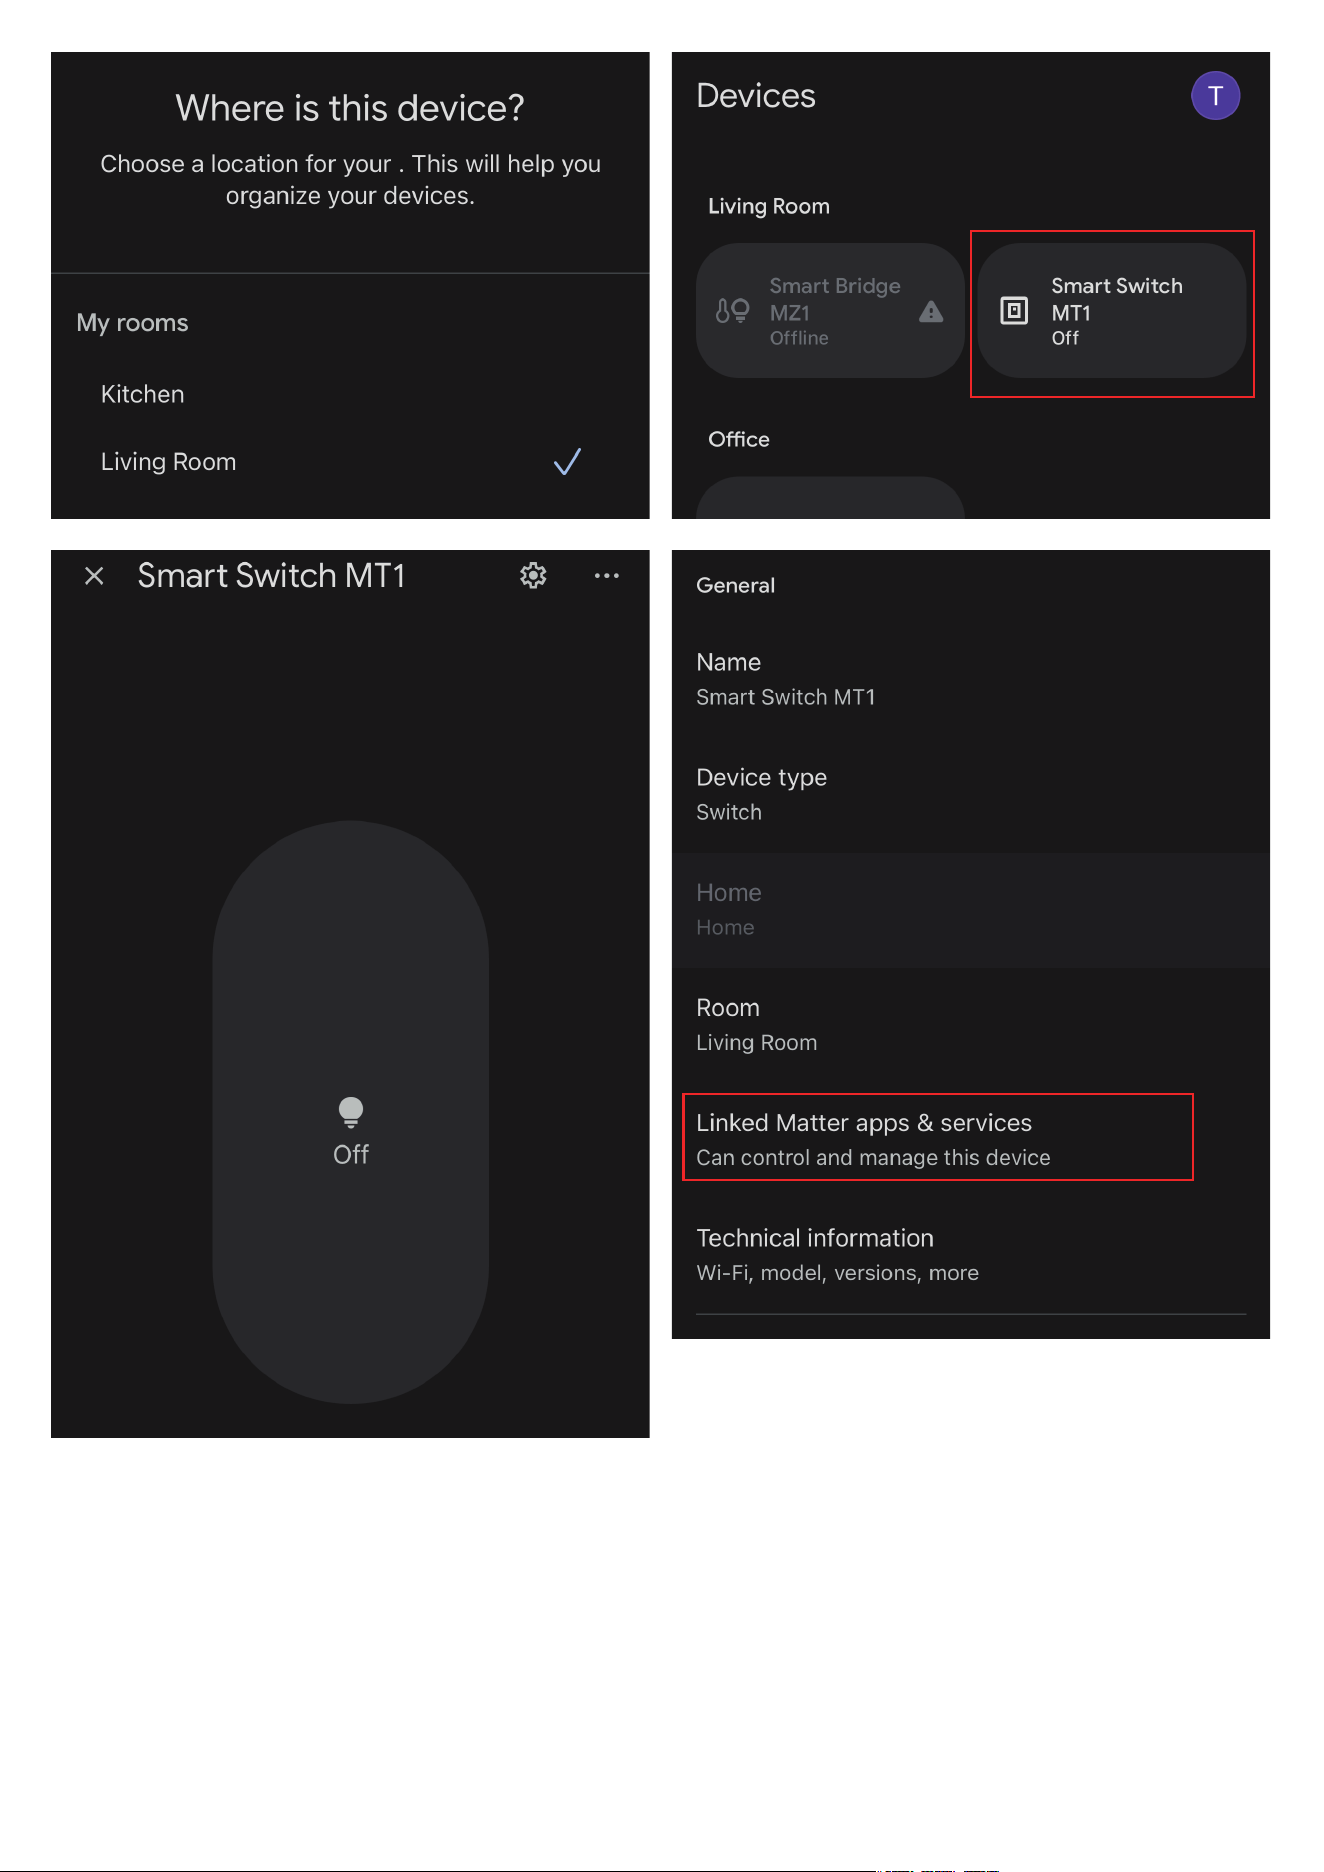
Setup with Google Home
12
Set up your Google Home Speaker in the Google Home App and con-
nect your phone to your Wi-Fi with a 2.4G signal.
Hold the button for at least 20 seconds until the LED indicator flashes
rapidly, indicating that the switch has entered pairing mode.
Your Google Home App will display a notification titled "Set up your
device." Tap "Scan QR code" and follow the instructions to add the
switch.
You can control the switch and create routines with it.
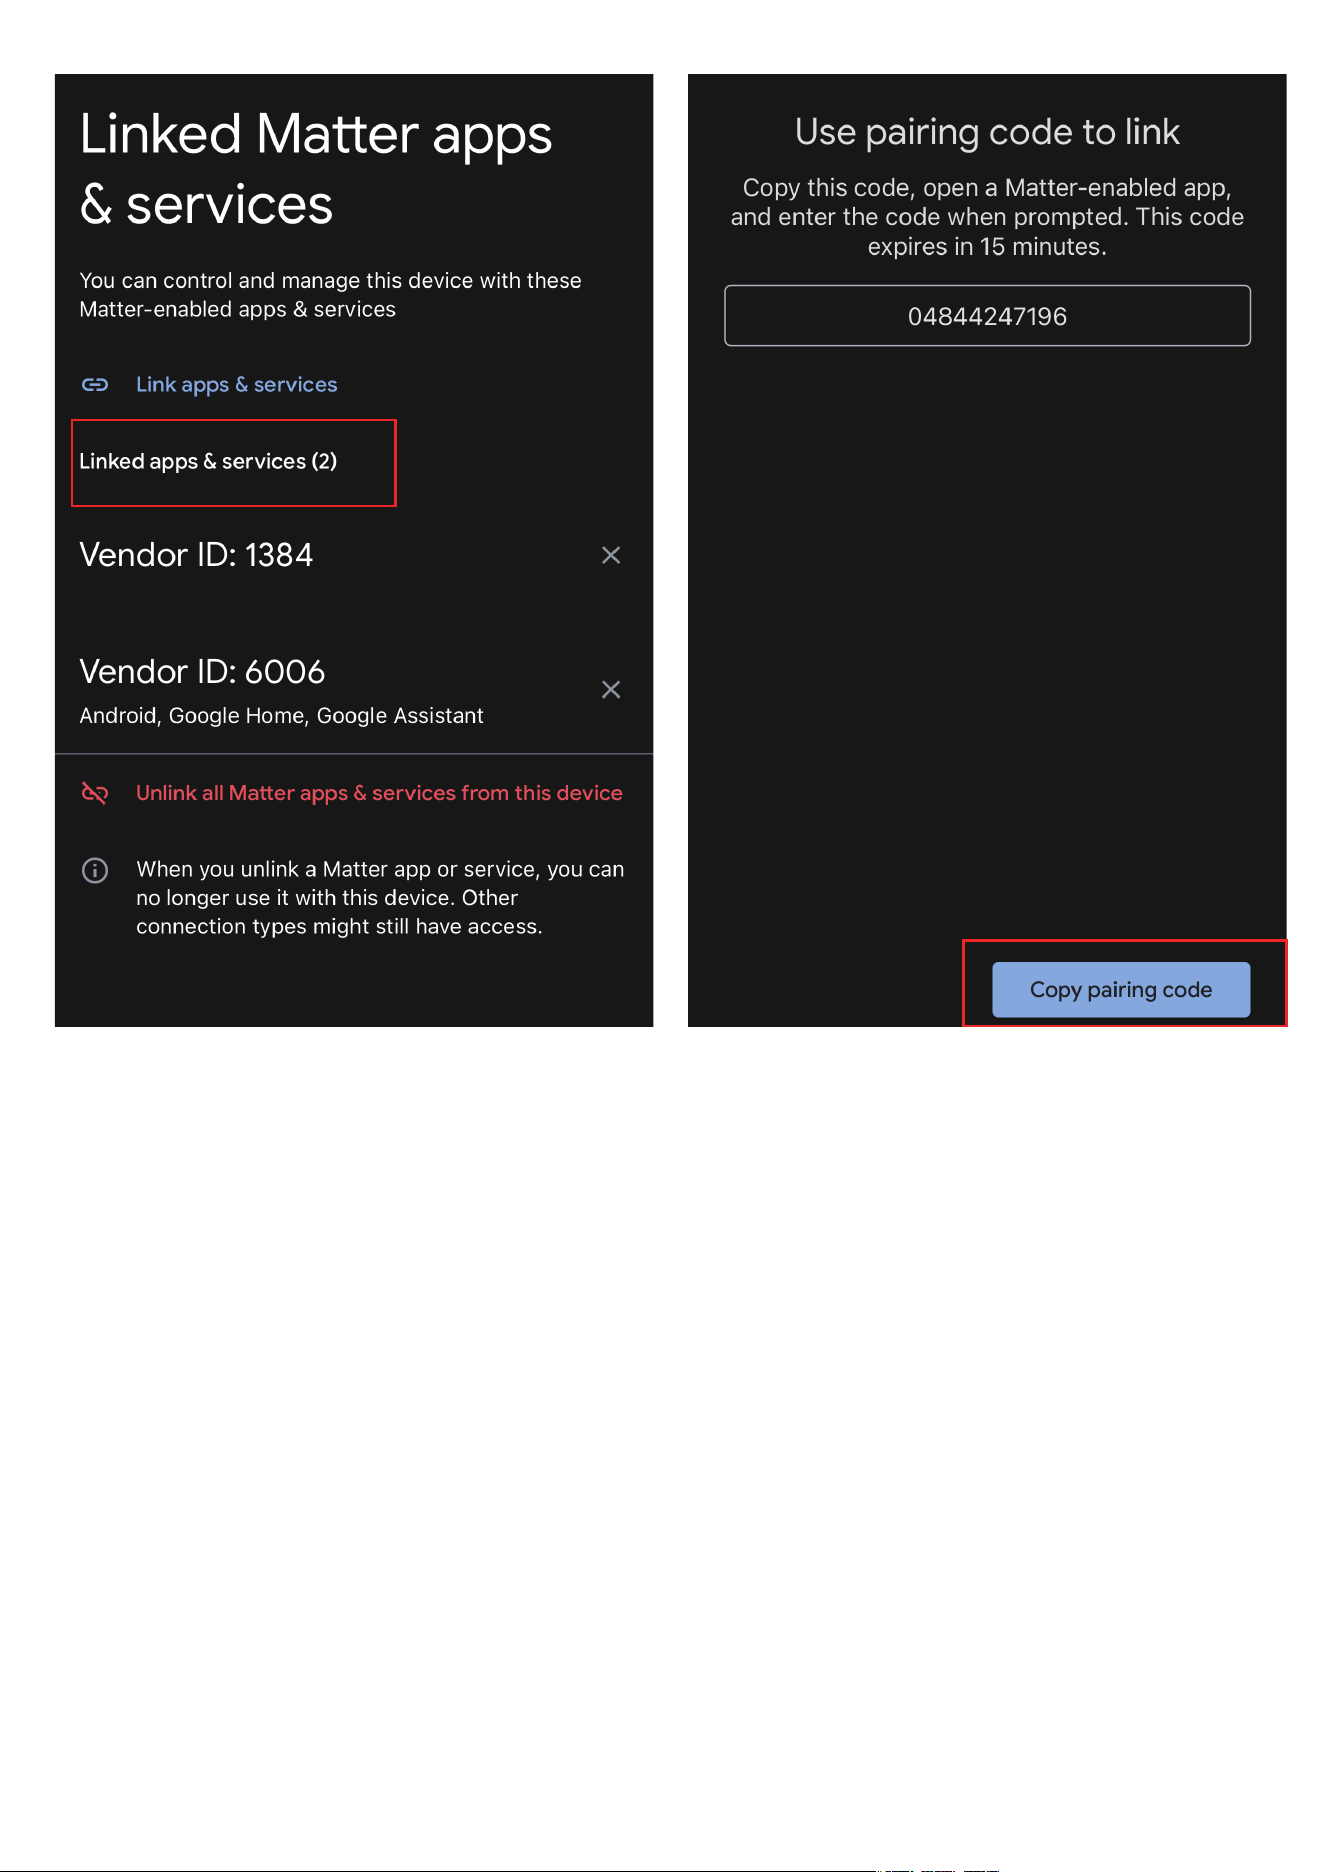
To connect the switch to another Thread ecosystem app, open the
device page and tap the setting icon on the upright. Then tap "Linked
MATTER apps & services" and "Copy pairing code." Launch another
Thread-certified ecosystem app, follow the setup instructions to
enter the setup code, and complete the setup.
1.
2.
3.
4.
5.
Make sure your Google Home setup includes a hub that thread board
router build in, such as Nest Hub Gen2, Nest Hub Max.
13
14
15

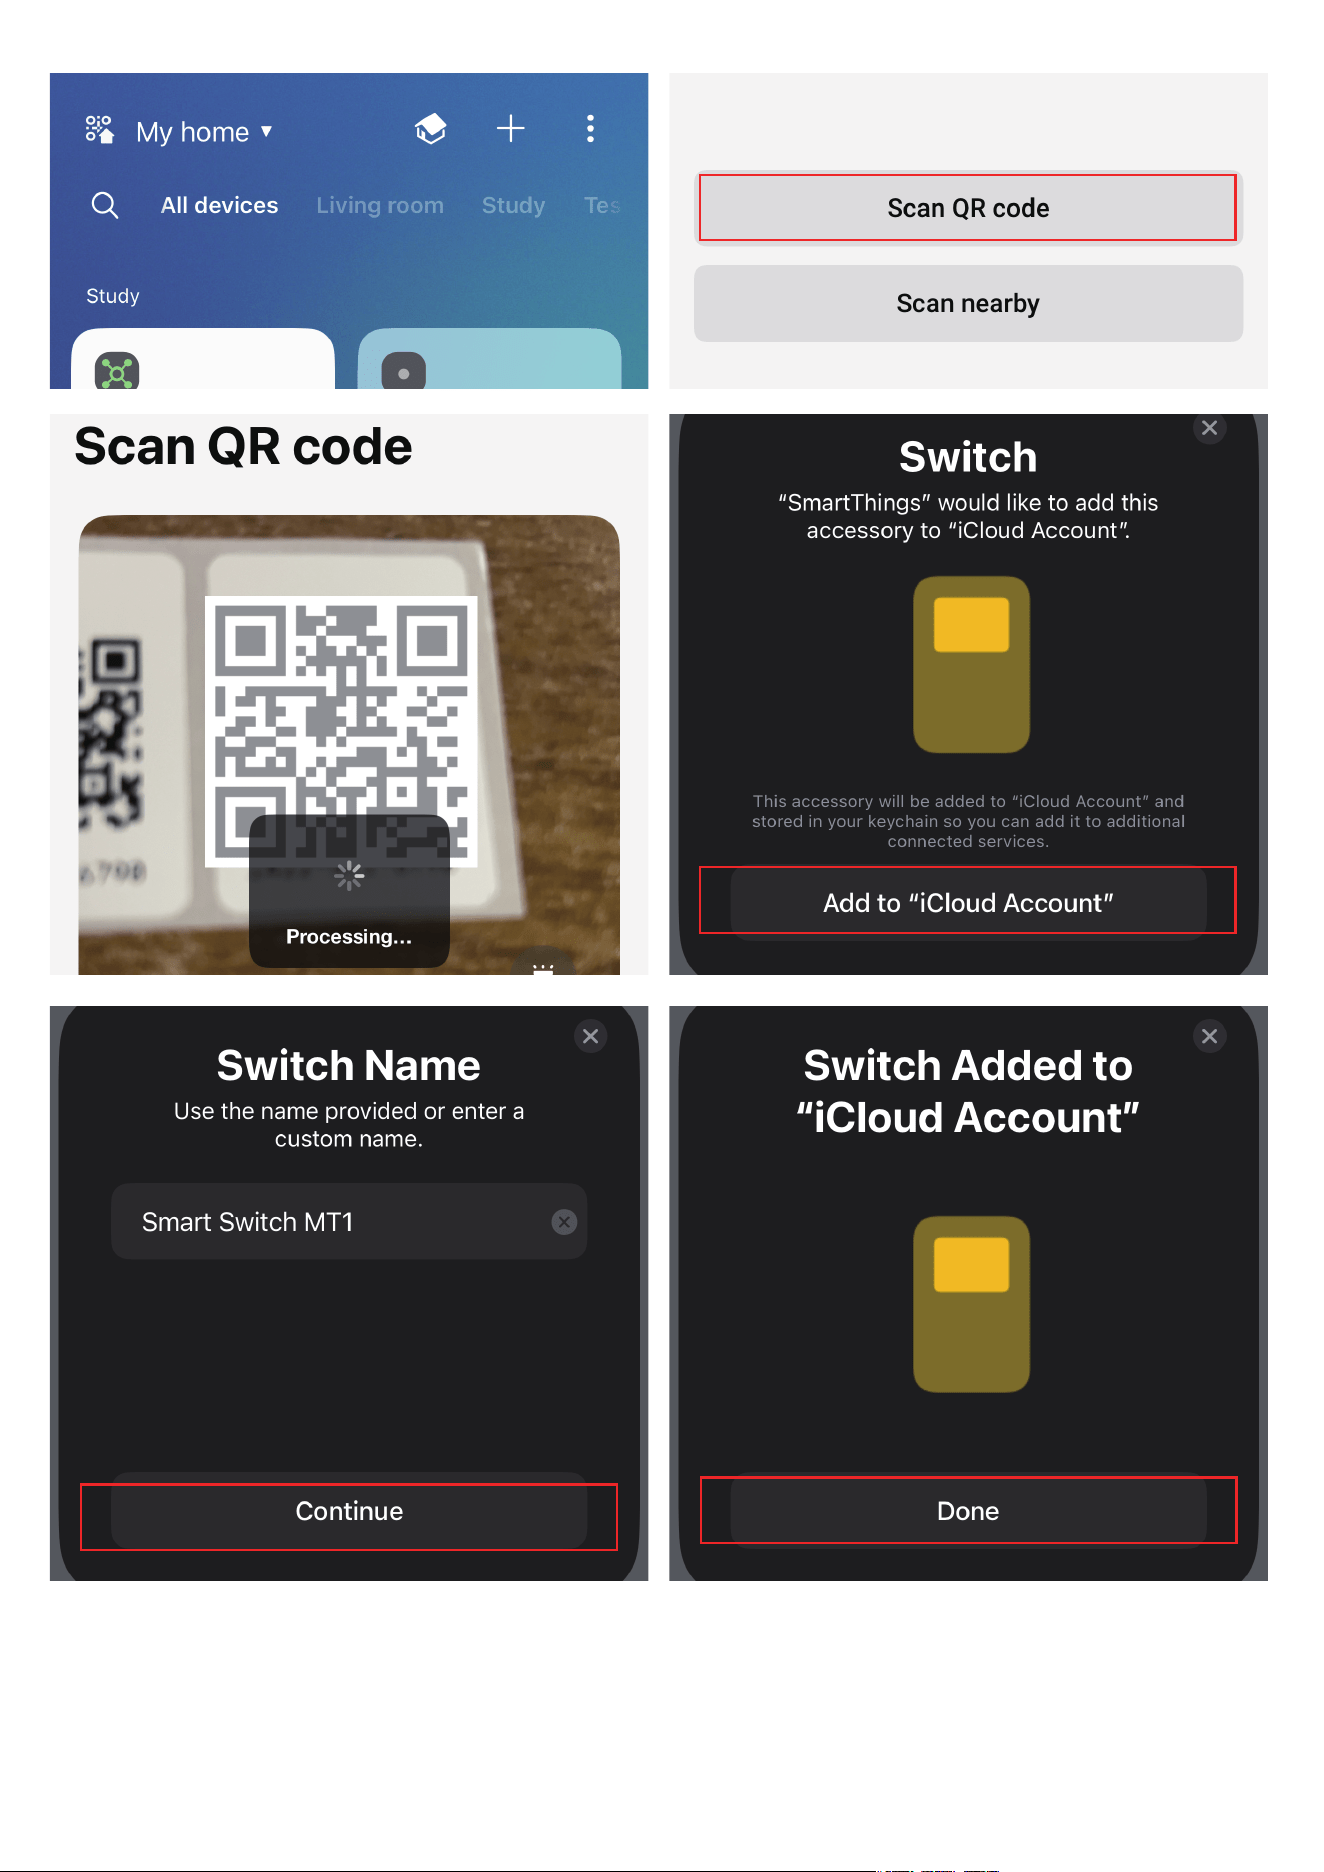
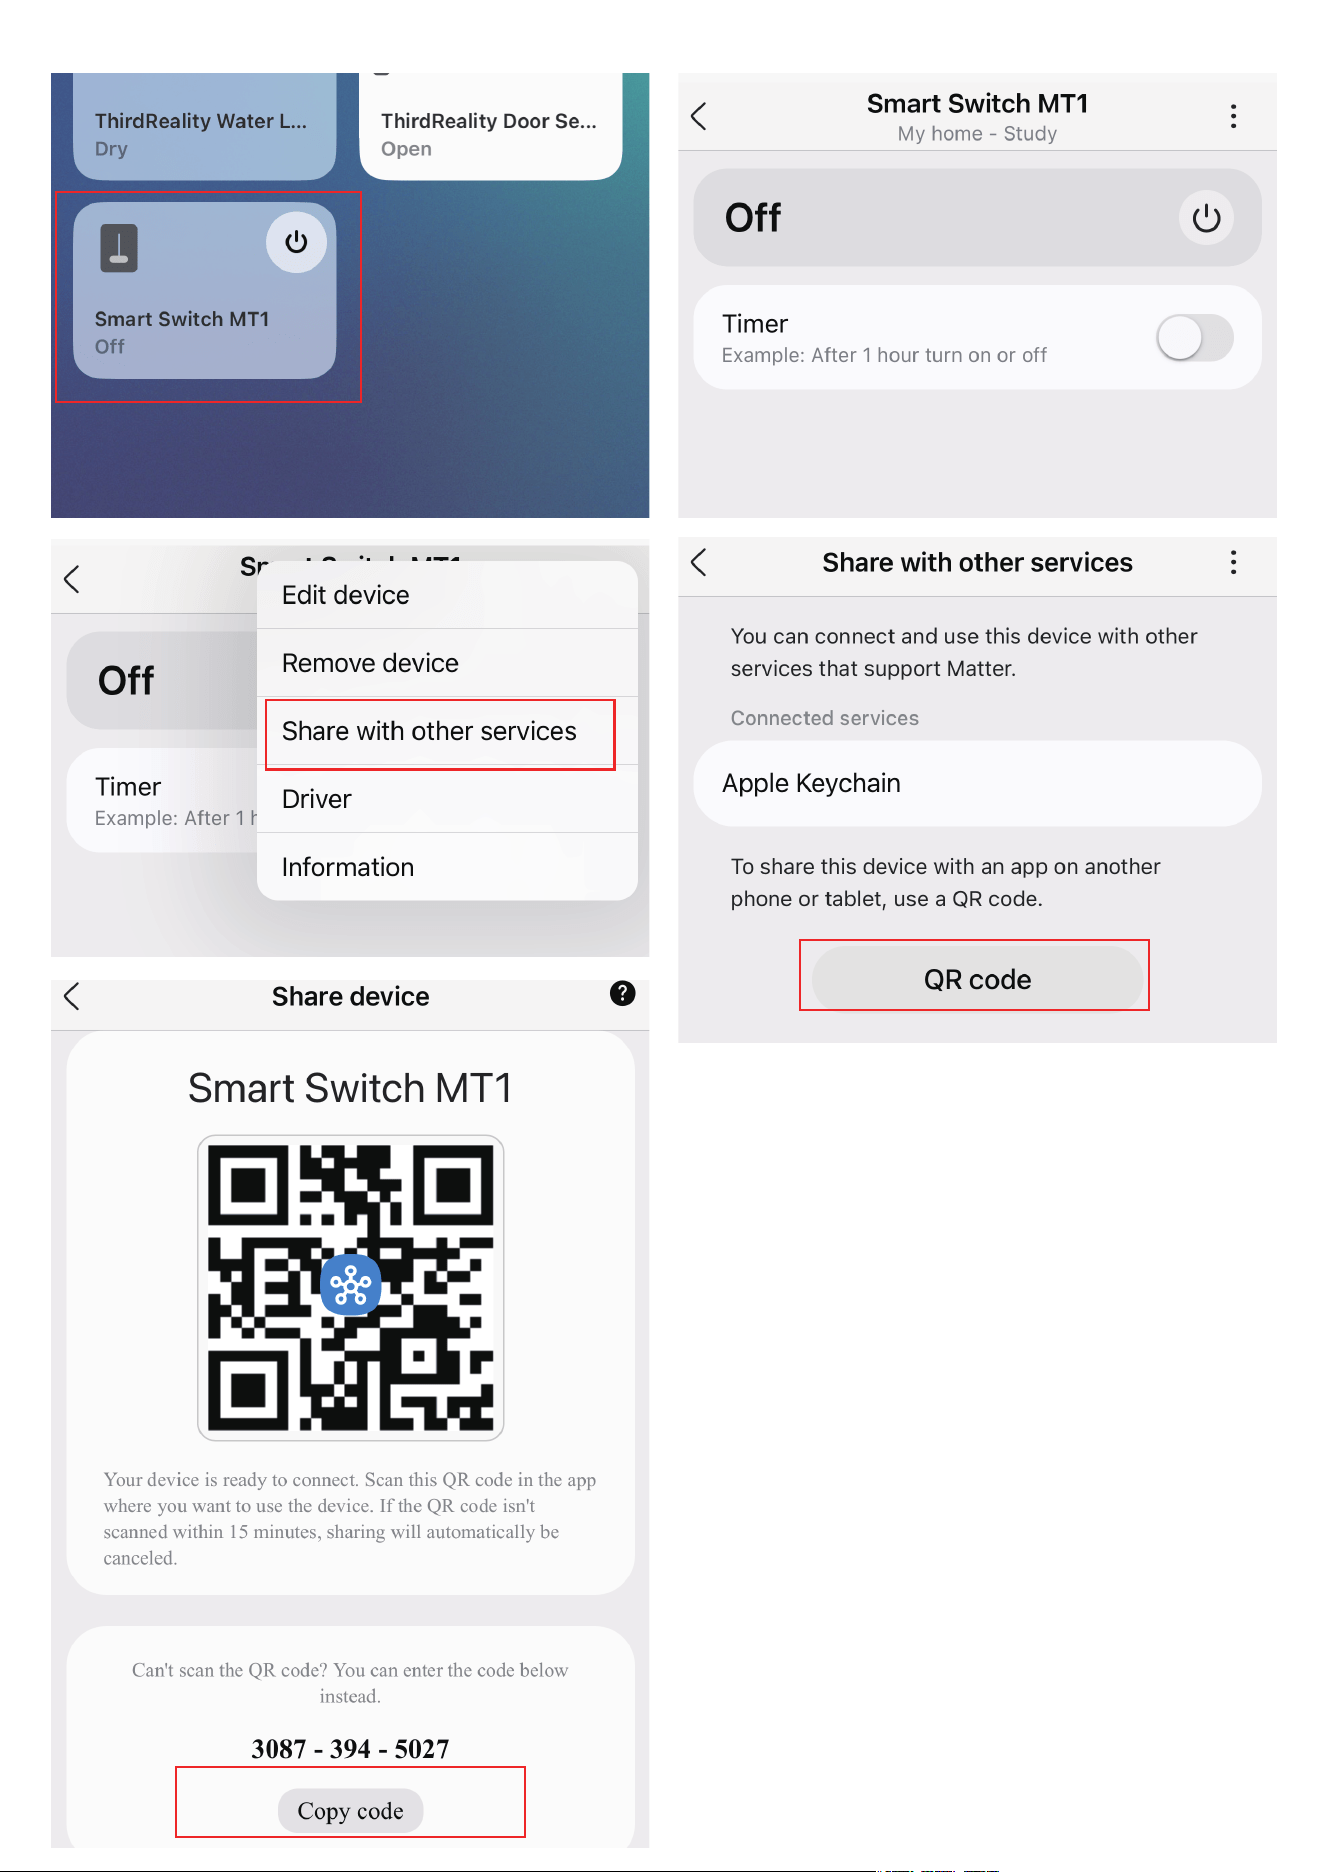
Setup with SmartThings
16
Launch your SmartThings App and tap + to Add device. Choose
Matter.
Hold the button for at least 20 seconds until the LED indicator flash-
es rapidly, indicating that the switch has entered pairing mode.
Scan the QR code on the manual.
Select a hub to connect your device. (You need to add to "iCloud
Account" in IOS, then create an Accessory Name, then Continue)
Now, you can check your device on the Device list, turn it on/off, and
create routines.
To connect the switch to another Thread-certified ecosystem app,
go to the Device Setting page, tap "Share with other services," and
"QR code," and then "Copy code." Launch the app of another
Thread-certified ecosystem, follow the setup instructions to enter
the setup code, and follow the app instructions to complete the
setup.
1.
2.
3.
4.
5.
6.
Make sure your SmartThings setup includes a hub that supports Thread.
Such as: SmartThings Station, Aeotec Hub.
17
-
-
18

19
Inverted On/Off status
To reverse On/Off direction of the switch, long press the Smart
Switch button more than 10 seconds until blue LED is displayed
solid then release.
Factory Reset
To factory reset the Smart Switch, press and hold the Smart Switch
button more than 20 seconds until the blue LED flashed rapidly,
indicating that the Smart Switch is in pairing mode now.
Adjusting/Adding Spacers
If the Smart Switch actuates but is not turning your wall switch on
or off, the gap between Smart Switch and wall switch may be too
wide. Try slightly tightening faceplate screws. You can also try
using a different size spacer.
If Smart Switch fails to actuate or comes off the wall when actuat-
ing, the Switch may be too close to the wall. Try changing the size
of your spacer.
1.
2.
3.
Troubleshooting

20
FCC Regulatory Conformance
This device complies with part 15 of the FCC rules. Operation is sub-
ject to the following two conditions: (1) this device may not cause
harmful interference, and (2) this device must accept any interfer-
ence received, including interference that may cause undesired
operation.
Changes or modifications not expressly approved by the party re-
sponsible for compliance could void the user’s authority to operate
the equipment.
NOTE: This equipment has been tested and found to comply with
the limits for a Class B digital device, pursuant to part 15 of the FCC
Rules. These limits are designed to provide reasonable protection
against harmful interference in a residential installation.
This equipment generates uses and can radiate radio frequency
energy and, if
not installed and used in accordance with the instruc-
tions, may cause harmful interference to radio communications.
However, there is no guarantee that interference will not occur in a
particular installation. If this equipment does cause harmful inter-
ference to radio or television reception, which can be determined by
turning the equipment off and on, the user is encouraged to try to
correct the interference by one or more of the following measures:

21
RF Exposure
Limited Warranty
‐Reorient or relocate the receiving antenna.
‐Increase the separation between the equipment and receiver.
‐Connect the equipment into an outlet on a circuit different from
that to which the receiver is connected.
‐Consult the dealer or an experienced radio/TV technician for help
important announcement.
NOTE: The manufacturer is not responsible for any radio or TV inter-
ference caused by unauthorized modifications to this equipment.
Such modifications could void the user’s authority to operate the
equipment.
This equipment complies with FCC radiation exposure limits set
forth for an uncontrolled environment.
This transmitter must not be co-located or operating in conjunction
with any other antenna
or transmitter.
For limited warranty, please visit https://3reality.com/faq-help-center/.
For customer support, please contact us at info@3reality.com or visit
www.3reality com.
For question on other platforms, visit for corresponding platform’s ap-
plication/support platforms.