
Email:
Validate your warranty within 7 days and get
2-year extended warranty on your
Yesimom security products.
FCC Statement
This equipment has been tested and found to comply with the limits
for a Class B digital device, pursuant to part 15 of the FCC rules.
These limits are designed to provide reasonable protection against
harmful interference in a residential installation.
This equipment generates, uses and can radiateradio frequency
energy and, if not installed andused in accordance with the
instructions, may causeharmful interference to radio communications.
However, there is no guarantee that interferencewill not occur in a
particular installation. lf thisequipment does cause harmful interfer-
ence to radioor television reception, which can be determinedby
turning the equipment off and on, the user isencouraged to try to
correct the interference by oneor more of the following measures:
Responsible for compliance could void the user'sauthority to operate
this equipment.(Example-useonly shielded interface cables when
connecting tocomputer or peripheral devices). Any Changes
ormodifications not expressly approved by the partyresponsible for
compliance could void the user'sauthority to operate the equipment.
This equipment complies with Part 15 of the FCCRules.
Operation is subject to the following two conditions:
This device may not cause harmful interference.This device must
accept any interferencereceived,including interference that may
causeundesired operation.
FCC Radiation Exposure Statement:
The equipment complies with FCC Radiation exposure limits set
forth for uncontrolled environment.
• Reorient or relocate the receiving antenna.
• Increase the separation between the equipmentand receiver
• Connect the equipment into an outlet on acircuit different from that
to which the receiver isconnected.
• Consult the dealer or an experienced radio/TVtechnician for help.
Watch operation videos
This equipment should be installed and operated with minimum
distance 20cm between the radiator and your body.
FCC ID: 2AUSP-BABY5SM(Camera)
FCC ID: 2AUSPBABY5SM(Monitor)
Scan the QR code to subscribe and watch more
step-by-step operation videos about YESIMOM cameras,and stay
informed with the latest in tech news and product launches.

Technical support(EN)
If you need help, please contact Yesimom before returning your
product. Most questions can be answered through our online
support center at https://www.yesimom.com/ or our
after-sale mailbox at [email protected].
Technische Unterstützung(DE)
Wenn Sie Hilfe benötigen, kontaktieren Sie bitte Yesimom, bevor
Sie lhr Produkt zurückschicken. Die meisten Fragen können über
unser Online-Support-Center unter https://www.yesimom.com/
oder über unsere After-Sale-Mailbox unter [email protected]
beantwortet werden.
Support Technique(FR)
Si vous avez besoin d'aide, veuillez contacter Yesimom avant de
retourner votre produit. La plupart des questions peuvent être
repondues via notre centre de service en ligne à lʼadresse
https://www.yesimom.com/, ou la boîte aux lettres
après-vente à l'adress [email protected]
Assistenza Tecnica(ES)
Se avete bisogno di aiuto, le chiediamo gentilmentedi contattare
Yesimom, prima di restituire il prodotto. La maggior parte delle
domande puo essererisolta tramite il nostro centro di assistenza
onlineall'indirizzo https://www.yesimom.com/ o la caselladi
posta post-vendita allindirizzo [email protected].
Soporte Tecnico(IT)
Si necesita ayuda, comuniquese con Yesimom antes de devolver su
producto. La mayoria de laspreguntas se pueden responder a través
de nuestrocentro de soporte en linea en https://www.yesimom.com/
o el buzon de postventa en [email protected]
Technische ondersteuning(NL)
Als u hulp nodig heeft, neem dan contact op met YESIMOM voordat
u uw product retourneert. De meeste vragen kunnen worden
beantwoord via ons online ondersteuningscentrum op
https://www.yesimom.com/ of via ons e-mailadres voor
naverkoopservice: [email protected]
www.yesimom.com user manual

CONTENT
ENGLISH 01-11
DEUTSCH 12-22
ESPAÑO 23-33
FRANÇAIS 34-44
ITALIANO 45-55
NEDERLANDS 56-66

ENGLISH
-01-
01 Overvi··············································· 02
02 Download 'YesiHome' APP ··················· 04
03 Connect the camera to the APP············ 05
04 Connect the camera to the Monitor······· 06
05 General settings ································· 08
06 FAQ·················································· 10
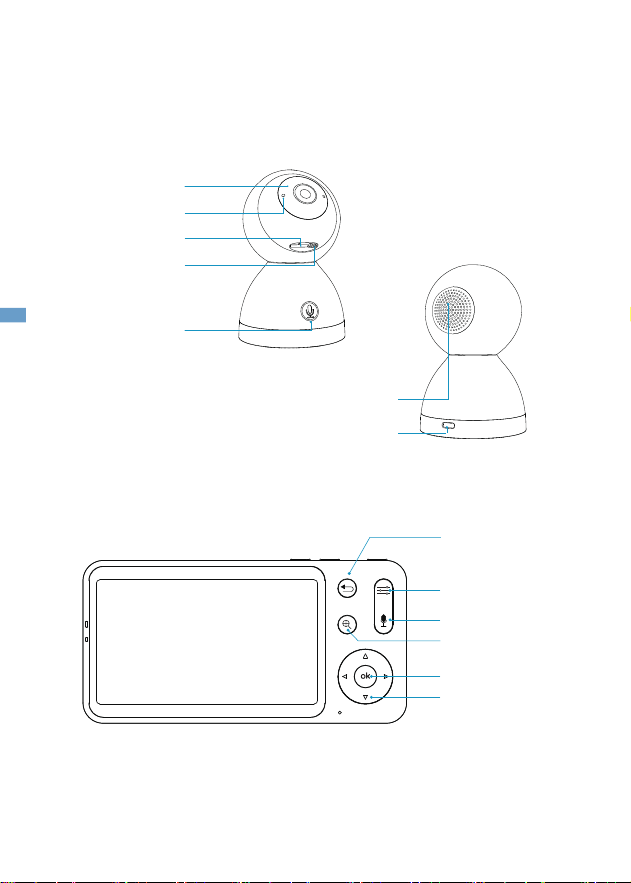
01
/
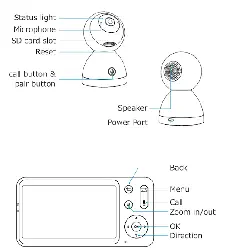
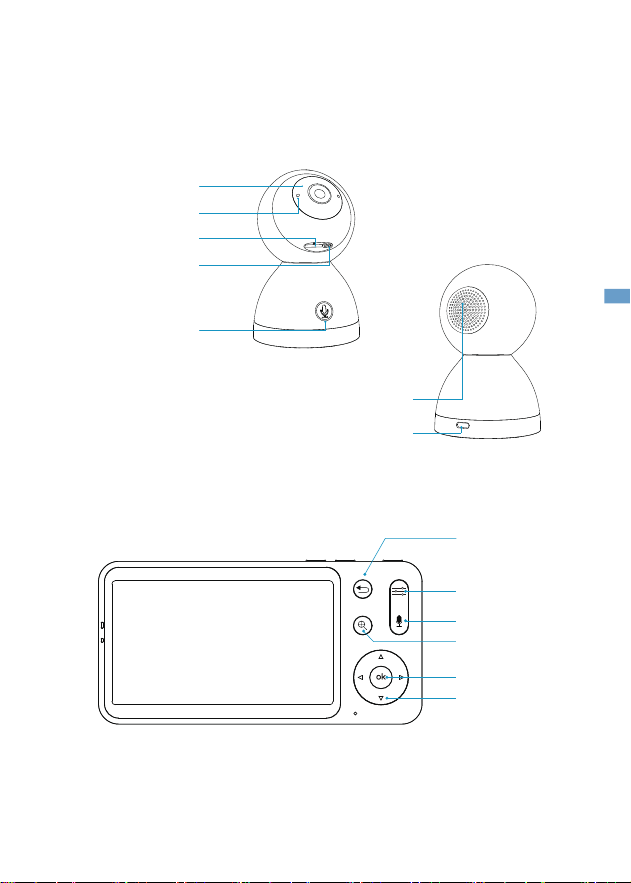
Overview
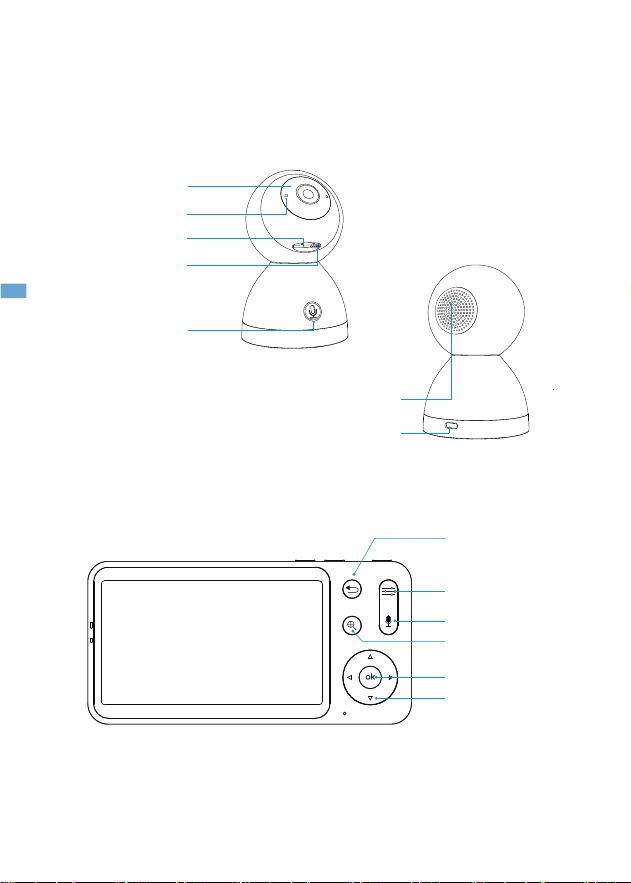
Status light
Microphone
SD card slot
Reset
call button &
pair button
Speaker
Back
Menu
Call
Zoom in/out
OK
Direction
Power Port
-02-
EN
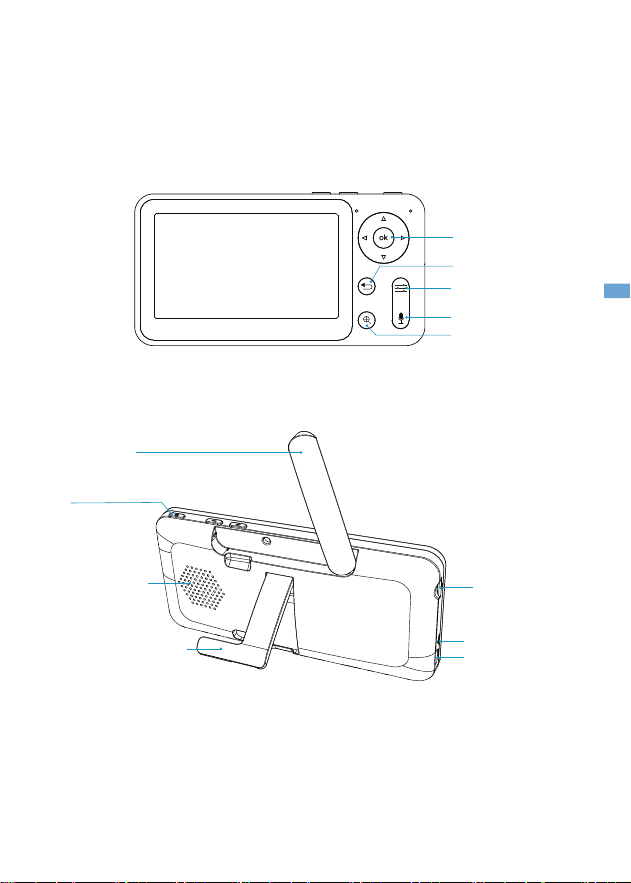
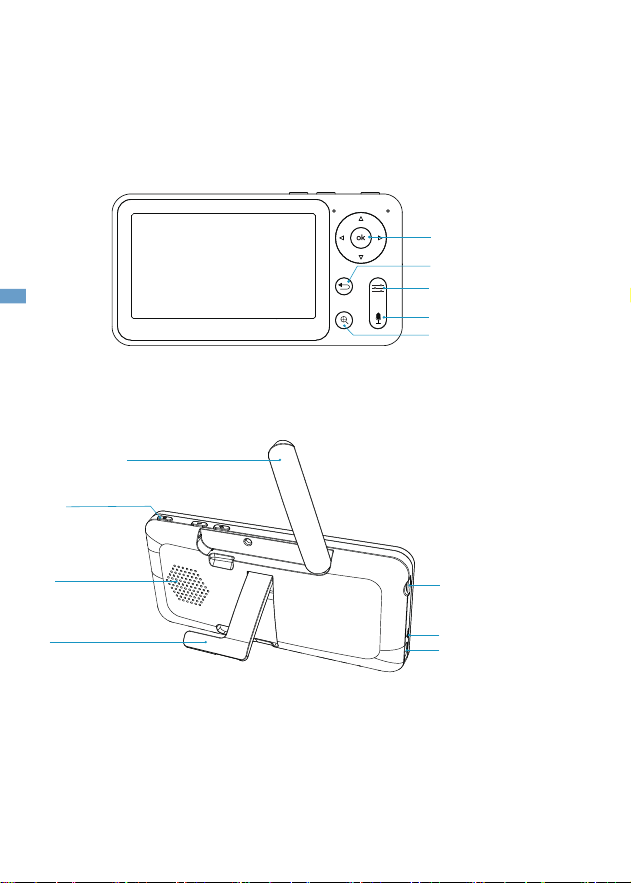
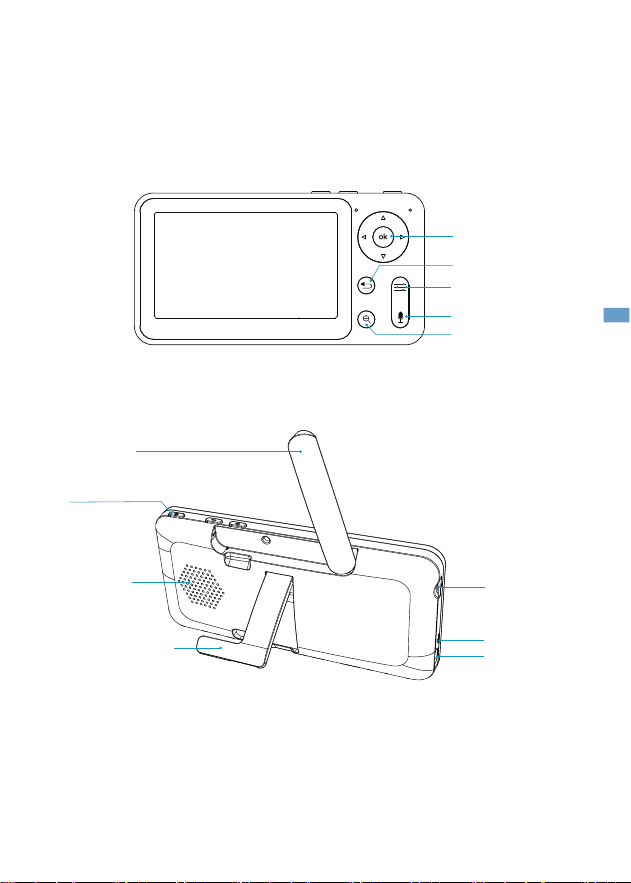
Back
Menu
Call
Zoom in/out
Antenna
ON/OFF button
Speaker
Screen holder
Charging port
Reset
SD card slot
OK
-03-
EN
02
/
Download'YesiHome APP
Method 1:
Download 'YesiHome' APP from APP Store (iOS) or Google
Play(Android).
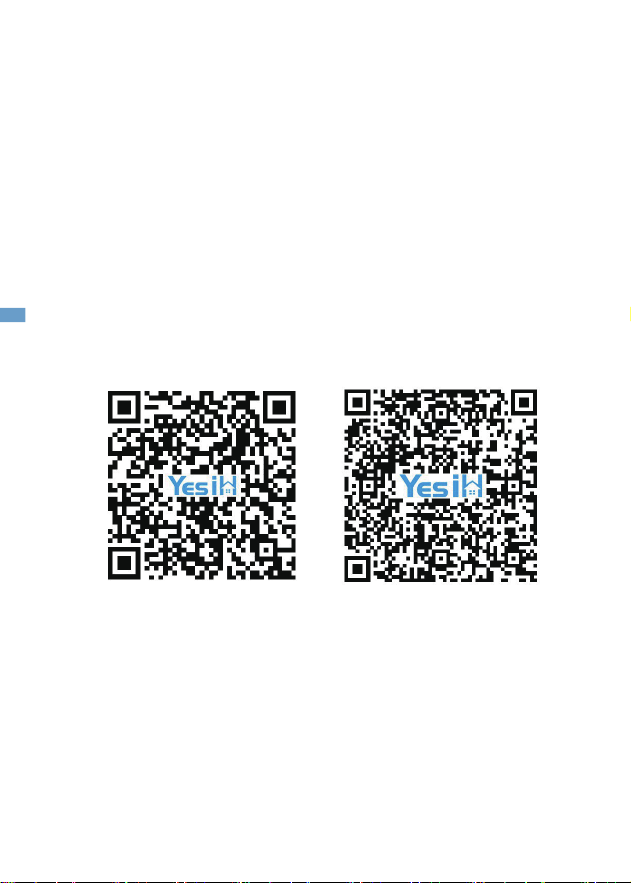
Method 2:
Scan the QR-Code to download the App
-04-
iOS Android
EN

03
/
connect the camera to the APP
The camera can be connected both to the monitor and the
App. Generally, it is connected to the monitor by default.
Follow the steps below to connect the camera to the App:
1.Make sure the Wi-Fi network is a 2.4 GHz network as the
camera doesn't support 5 GHz Wi-Fi.
2.Download the YesiHome App on your phone.Register a
new account to log in or log in directly.
3.Use the needle to reset the camera for 5 seconds until you
hear the 'BOOGu' beep, which means the camera has been
reset, after 10-20 seconds, you will hear another beep and
the red light of the camera blinks slowly.
4.Follow the step instructions on your smart phone to add the
camera, and scan the QR code with your camera.
-05-
EN
04
/
Connect the Camera to the Monitor
Turn on the power of the camera and the monitor,and then the
camera will automatically connect to the monitor.
Note:
If the connection to each other is not successful the first time,
please use the needle to reset the camera and reconnect the
monitor after the second beep of the camera.
The connection is distance-limited, so make sure the distance
between the camera and the monitor no more than300m.
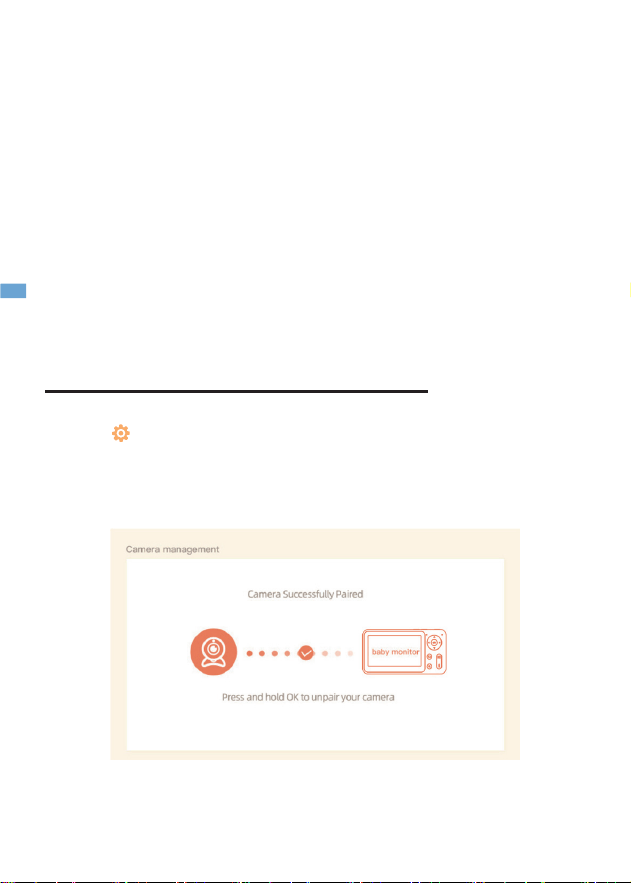
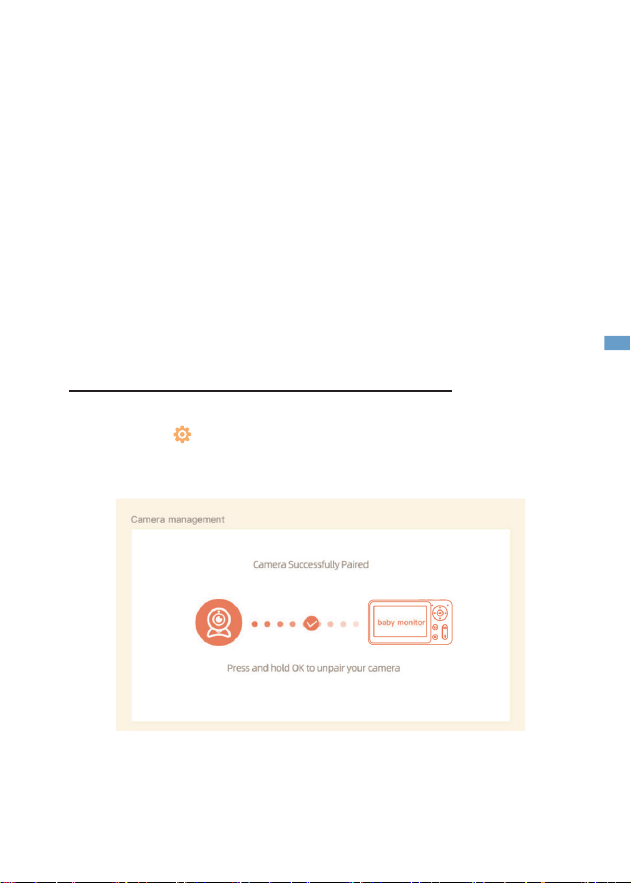
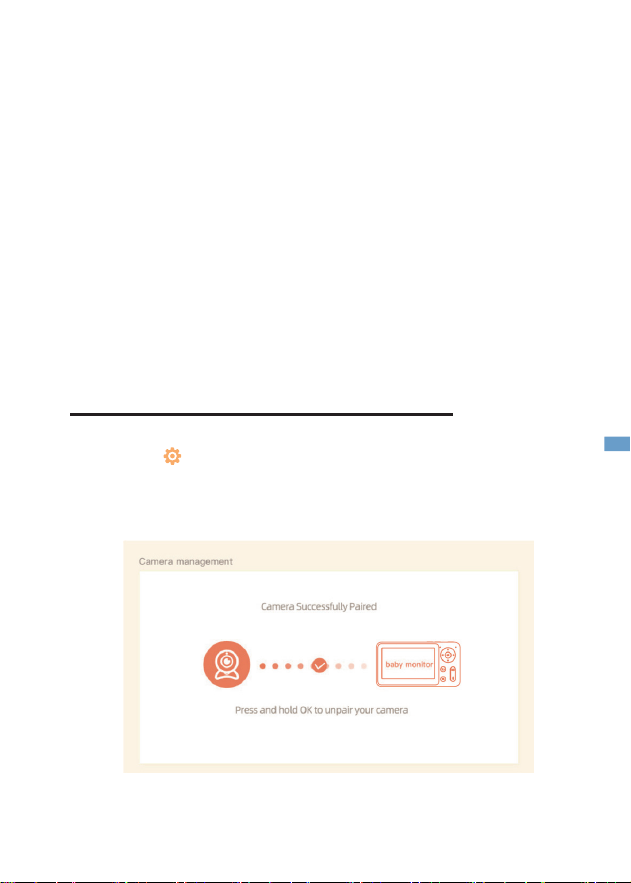
Disconnect the camera from the monitor
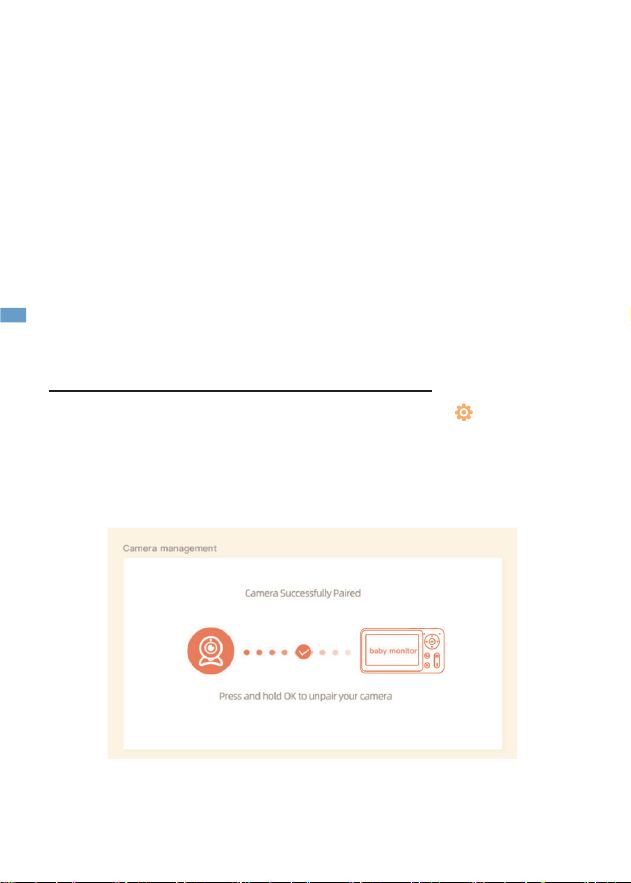
1.Press Menu button on the display screen, and
select >camera.
2.Long press the OK button on the display screen to release the
binding.
3.Use the needle to reset the camera for 5 seconds until you
hear the 'BOOGu' beep, which means the camera has been
reset, after 10-20 seconds, you will hear another beep and
the red light of the camera blinks slowly.
-06-
EN
Follow the step above to connect the two cameras in turn.Two
screens will appear on the monitor.
Press the for camera selection, the icon in the upper left
corner represents the currently selected camera, then you can
remotely control the selected camera under split-screen view.
Press OK key to enter the selected camera in full screen view.
Press back key to return to split-screen view.
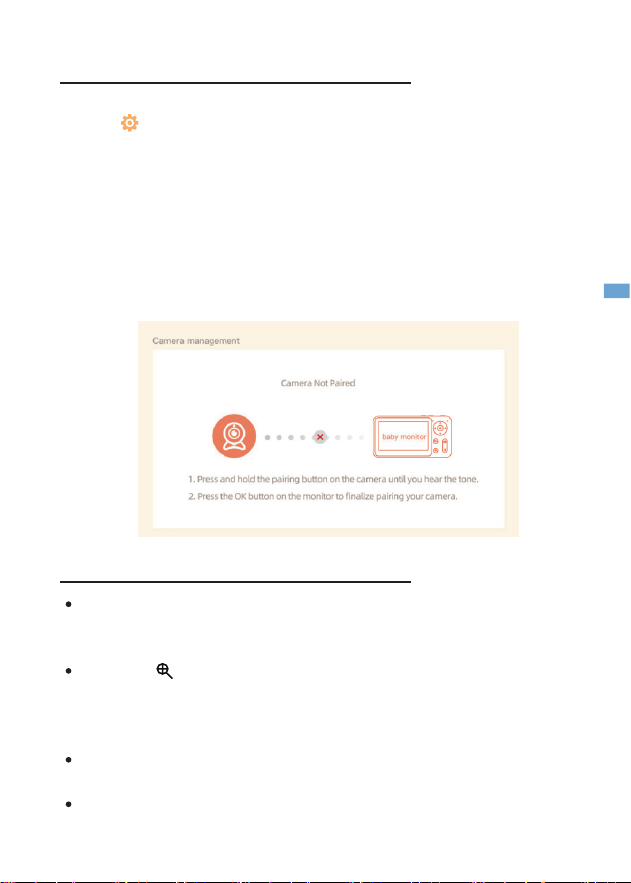
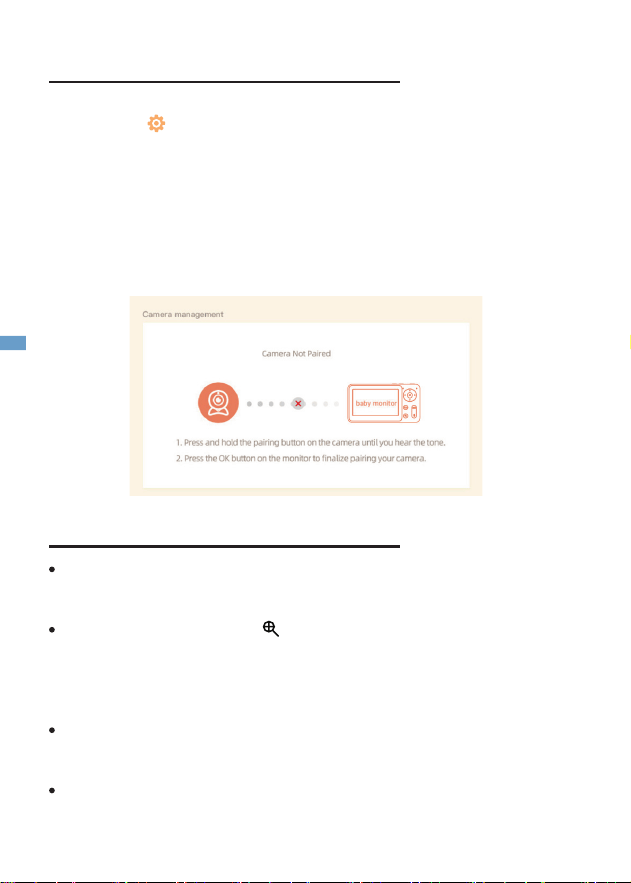
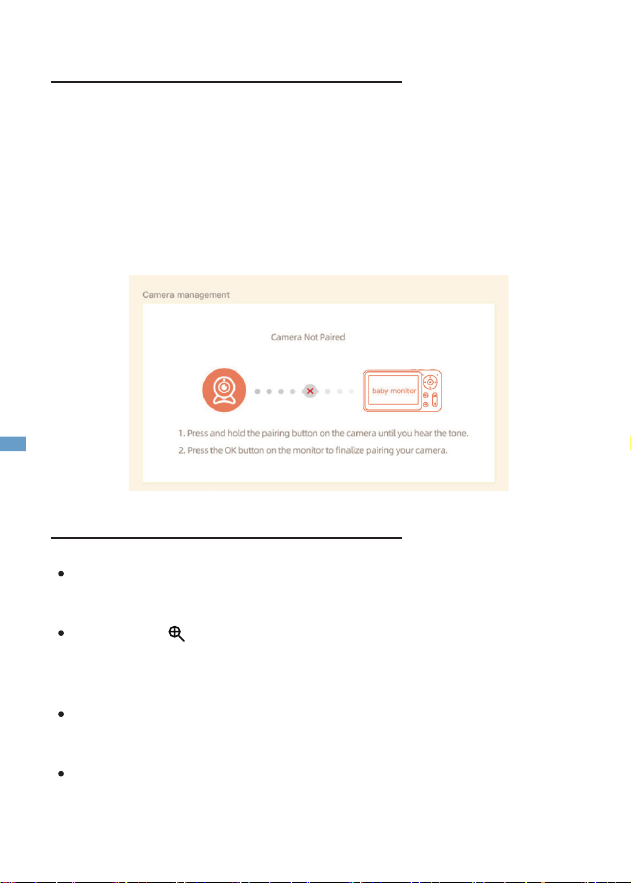
1.Press the Menu button on the display screen, and
select >Camera.
2.Long press the camera Pairing button until you hear the
prompt tone.
3.Press the OK button on the display screen to start pairing.
Note: If you have problems with connection, please feel free to
contact [email protected] for one-on-one customer service
guidance.
Reconnect the camera to the monitor
Connect two cameras to the monitor
-07-
EN
05
/
General settings
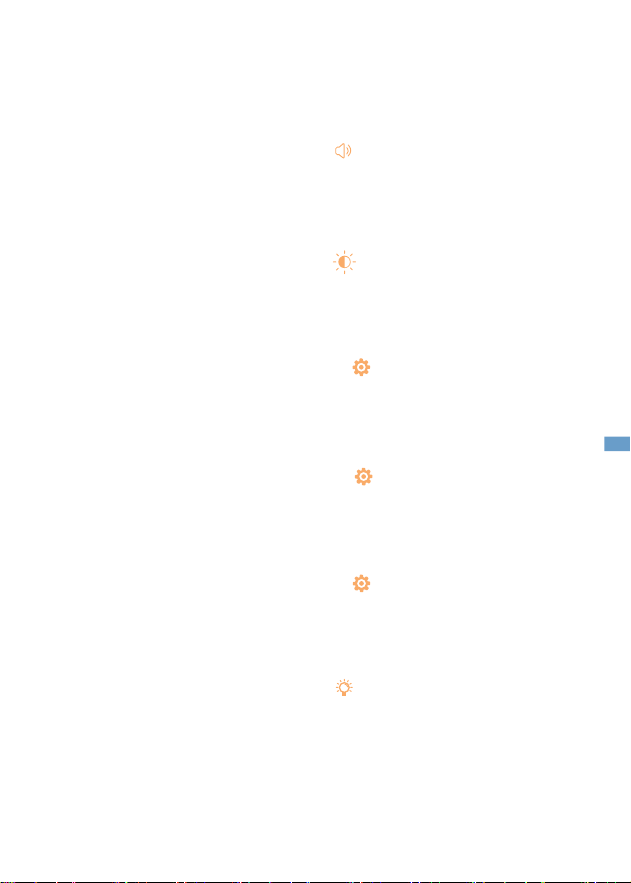
Set up • volume
1. Press Menu button on the display screen, and
select and press OK to enter the interface,
2. Press UP and DOWN direction buttons to adjust volume.
Set up • brightness
1. Press the Menu button on the display screen,
select and press OK to enter the interface.
2. Press UP and DOWN direction buttons to adjust brightness.
Set up • time
1. Press the Menu button on the display screen, and
select > Date and Time.
2. Press Direction buttons to change date, time and time displaying
mode.
Set up • language
1. Press the Menu button on the display screen, and
select >Language.
2. Select the language you need.
Set up • sleep mode
You can set up sleep mode to increase stand by time.
1. Press the Menu button on the display screen, and
select >sleep mode.
2. Select Sleep mode as1 minute, 5 minutes, 10minutes, 30
minutes, 60 minutes or off.
Setting • camera status indicator
1. Press the Menu button on the display screen, select and press
the OK button to enter the interface.
2.Press the left and right arrow keys to select on or off.
-08-
EN
SD card
1. Press the Menu button on the display screen, and select >SD
card management. Then you can view the total capacity and
remaining capacity of your SD card.
2.(Optional) You can format the SD card as you needed, but make
sure that the important data is backed up.
Note:
This product does not support hot-swapping.Please insert the SD
card before power on or unplug it after power off.
Upgrade
Make sure your camera is connected to a 2.4 GHz Wi-Fi. You can
upgrade your camera when the upgraded alarm appears. Or press
Menu button on the display screen, and select >Device
information to check whether it need to be upgraded.
Low battery alarm
When the camera is low on battery, the low battery alarm will appear
on the display screen. Please charge the display as soon as possible.
Motion Tracking & Alarm Area
1. Motion Tracking: Open YesiHome app, click your device, click the
pinion icon in the upper right corner, select Motion Tracking and
open it.
2. Alarm Area: Open YesiHome app, click your device, click the
pinion icon in the upper right corner, select Alarm Manage
ment>Motion Detection>Alarm Area.
Onvif settings
Open YesiHome app, click your device, click the pinion icon in the
upper right corner, select Onvif Setting, you need to set password to
enable this function.
-09-
EN

06
/
FAQ
Q: The monitor cannot be previewed properly ?
A:
Check whether the monitor has connected to the camera.If not, pair
the camera and the monitor firstly.
Q: Cannot find the pairing button ?
A:
The pairing button is the call button of the camera.Long press the
button for 3 seconds, and follow the step instructions of the display.
(To enter the pairing interface of the display, press the Menu button
on the display screen, and select >Camera Management.)
Q: What if the monitor screen is stuck and it doesn't
work while pressing any buttons ?
A:
Reset your monitor with the needle, and then long press the power
button of your monitor to restart it.
Q: Why l can't get the notifications with my cellphone
App when l connect the camera to the monitor ?
A:
Please confirm that the App has been running on the phone, and the
relevant reminder function has been opened; Message notification and
authority confirmation in the mobile phone system has been opened.
Q: How can l add devices or configure my network ?
A:
The camera can be connected to both the monitor and the application.
Generally, it connects to the monitor by default.
-10-
EN

Q: The sound and cry detection function doesn't work.
Please follow the steps below to connect the
camera to the application.
A:
The sound detection interval isl minute, after the sound triggers the
alarm, the interval is l minute again to avoid f ent alarms.The cry
detection function can detect most babies crying. This function uses
a sound filtering algorithm, so some crying may not trigger the 'cry
detection' function.
Q: Can l set up motion tracking and alarm zones on
the monitor?
A:
No, you need to set the motion tracking and alarm area through
the YesiHome APP.
Q: Why does the display make a bee sound ?
A:
Because the monitor is too close to the camera, take it away from
the camera m ore than l meter.
If you encounter any other problems, please send your order
number and problem to [email protected], we will deal
with your issue within 24hours.
1. Make sure the Wi-Fi network is a 2.4GHz network, as the camera
does not support 5GHz Wi-Fi.
2. Download the appropriate application on your phone. Register a
new account to sign in or sign in indirectly.
3. Use the needle to reset the camera until the red status light
flashes slowly(you must connect the camera to the app within 2
minutes or you must reboot the camera again)
4. Follow the step-by-step instructions on your smartphone to add
the screen and scan the QR code with the camera.
-11-
EN

DEUTSCH
-12-
01 Übersicht···········································13
02 'YesiHome' APP herunterladen ·············15
03 Kamera mit der APP verbinden·············16
04 Kamera mit dem Monitor verbinden······17
05 Allgemeine Einstellungen·····················19
06 FAQ··················································21
01
/
Übersicht
Statusleuchte
Mikrofon
SD-Kartenschlitz
Rückstellung
Ruftaste &
Kopplungstaste
Lautsprecher
Rückgabetaste
Menü
Anruf
Vergrößern/
verkleinern
OK
Richtung
Stromanschluss
-13-
DE
Rückgabetaste
Menü
Anruf
vergrößern/
verkleinern
Antenne
Taste ON/OFF
Lautsprecher
Bildschirmständer
Ladeanschluss
Rückstellung
SD-Kartenschlitz
OK
-14-
DE
02
/
Die 'YesiHome'APP herunterladen
Methode 1:
Laden Sie die ‚YesiHomeʻ-APP aus dem App Store (iOS) oder
Google Play (Android) herunter.
Methode 2:
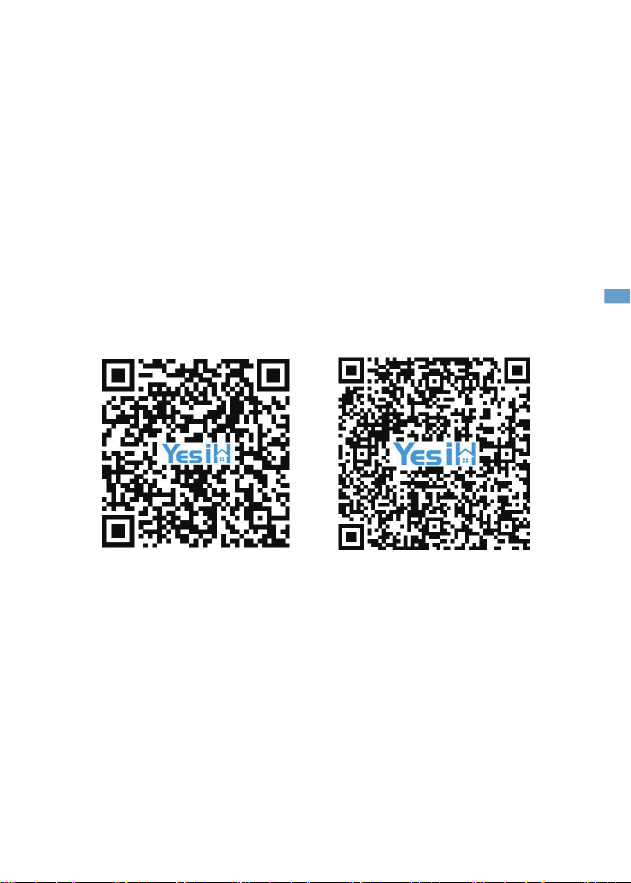
Scannen Sie den QR-Code zum Download der App
-15-
iOS Android
DE

03
/
Kamera mit der APP verbinden
Die Kamera kann sowohl mit dem Monitor als auch mit
der App verbunden werden. Standardmäßig ist sie in der
Regel mit dem Monitor verbunden.
Folgen Sie diesen Schritten, um die Kamera mit der App
zu verbinden:
1.Stellen Sie sicher, dass das Wi-Fi-Netzwerk ein 2,4-GHz-Netz ist, da
die Kamera kein 5-GHz-Wi-Fi unterstützt.
2.Laden Sie die YesiHome App auf Ihr Handy herunter.
Registrieren Sie ein neues Konto oder melden Sie sich direkt an.
3.Verwenden Sie die Nadel, um die Kamera 5 Sekunden lang
zurückzusetzen, bis Sie den „BOOGu“-Signalton hören. Dies
bedeutet, dass die Kamera zurückgesetzt wurde. Nach 10-20
Sekunden ertönt ein weiterer Signalton und die rote LED der
Kamera blinkt langsam.
4.Folgen Sie den Schritt-für-Schritt-Anweisungen auf Ihrem Handy,
um die Kamera hinzuzufügen, und scannen Sie den QR-Code
mit Ihrer Kamera.
-16-
DE
04
/
Kamera mit dem Monitor verbinden
Schalten Sie die Kamera und den Monitor ein. Die Kamera
verbindet sich automatisch mit dem Monitor.
Hinweis:
Falls die Verbindung beim ersten Versuch fehlschlägt, setzen Sie
die Kamera mit der Nadel zurück und verbinden Sie den Monitor
nach dem zweiten Signalton der Kamera erneut.
Die Verbindung ist durch die Entfernung begrenzt - stellen Sie
sicher, dass die Entfernung zwischen der Kamera und dem
Monitor nicht mehr als 300 Meter beträgt.
Kamera vom Monitor trennen
1.Drücken Sie die Menü-Taste auf dem Bildschirm und
wählen Sie >Kamera.
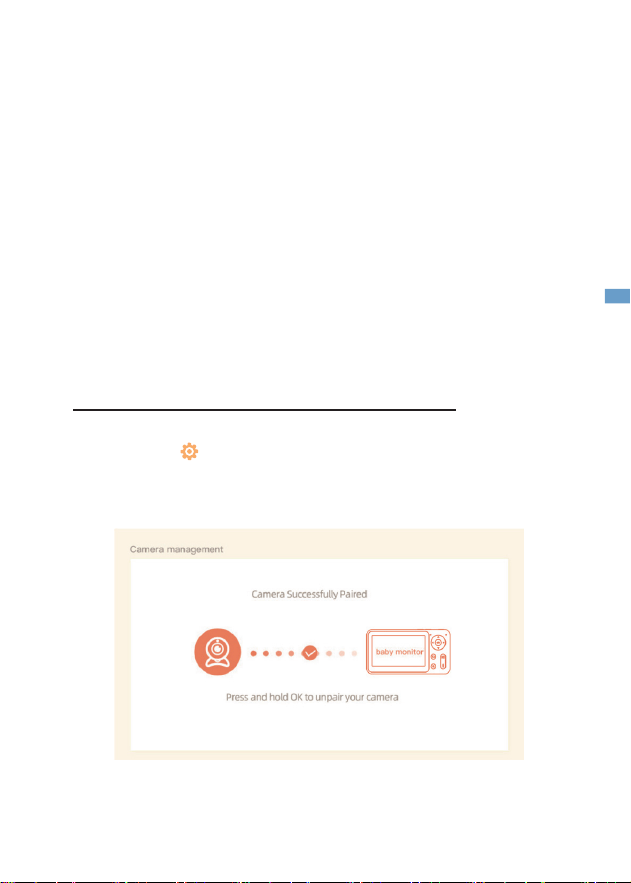
2.Drücken Sie die OK-Taste lange, um die Verbindung aufzuheben.
-17-
DE
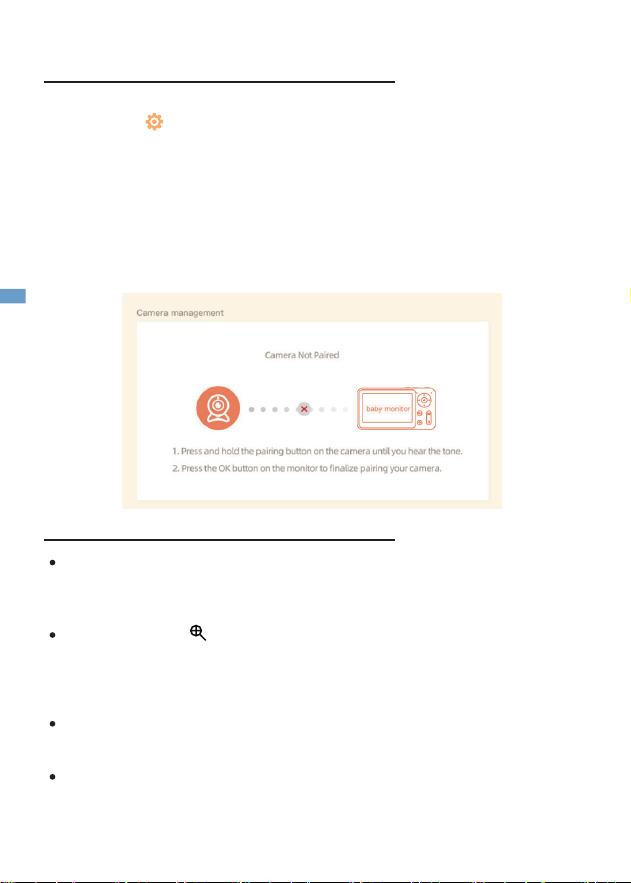
1.Drücken Sie die Menü-Taste auf dem Bildschirm und
wählen Sie >Kamera.
2.Drücken Sie die Pairing-Taste der Kamera lange, bis Sie den
Bestätigungston hören.
3.Drücken Sie die OK-Taste auf dem Bildschirm, um die Kopplung zu
starten.
Hinweis: Bei Verbindungsproblemen kontaktieren Sie bitte
[email protected] für persönliche Support-Anleitung.
Kamera erneut mit dem Monitor verbinden
-18-
Folgen Sie den oben genannten Schritten, um die beiden Kameras
nacheinander zu verbinden. Auf dem Monitor werden zwei
Bildschirme angezeigt.
Drücken Sie die Auswahltaste für die Kameraauswahl – das
Symbol in der linken oberen Ecke zeigt die aktuell ausgewählte
Kamera an.
Sie können die gewählte Kamera in der geteilten Ansicht
fernsteuern.
Drücken Sie die OK-Taste, um die ausgewählte Kamera im
Vollbildmodus anzuzeigen.
Drücken Sie die Zurück-Taste, um zur geteilten Ansicht
zurückzukehren.
Zwei Kameras mit dem Monitor verbinden
DE
05
/
Allgemeine Einstellungen
• Lautstärke einstellen
1.Drücken Sie die Menü-Taste auf dem Bildschirm, wählen Sie und
bestätigen Sie mit OK.
2.Nutzen Sie die Aufwärts-/Abwärts-Pfeiltasten zur Lautstärkerege
lung.
• Helligkeit einstellen
1.Drücken Sie die Menü-Taste, wählen Sie und bestätigen Sie
mit OK.
2.Regeln Sie die Helligkeit mit den Aufwärts-/Abwärts-Pfeiltasten.
• Zeit einstellen
1.Drücken Sie die Menü-Taste und
wählen Sie >Datum & Uhrzeit.
2.Ändern Sie Datum, Uhrzeit und Anzeigeformat mit den Pfeiltasten.
• Sprache einstellen
1.Drücken Sie die Menü-Taste und
wählen Sie >Sprache.
2.Wählen Sie die gewünschte Sprache aus.
• Ruhemodus einstellen
9.Drücken Sie die Menü-Taste und
wählen Sie >Ruhemodus.
10.Wählen Sie 1 Min./5 Min./10 Min./30 Min./60 Min./Aus.
• Kamera-Statusanzeige
11.Drücken Sie die Menü-Taste, wählen Sie und bestätigen Sie
mit OK.
12.Links-/Rechts-Pfeiltasten zum Aktivieren/Deaktivieren.
-19-
DE

SD-Karte
1.Drücken Sie die Menü-Taste, wählen Sie >SD-
Kartenverwaltung, um Gesamtkapazität und freien Speicher
anzuzeigen.
2.(Optional) Formatieren Sie die SD-Karte bei Bedarf – sichern
Sie wichtige Daten vorher.
Hinweis:
Hot-Swapping wird nicht unterstützt. SD-Karte vor dem
Einschalten einstecken oder nach dem Ausschalten entfernen.
Update
Stellen Sie eine 2,4-GHz-WiFi-Verbindung her. Die Aktualisierung
kann bei der Bestellung des Systems oder manuell über >
Geräteinfo im Menü durchgeführt werden.
Akkuwarnung
Bei niedrigem Akkustand erscheint eine Warnung auf dem Bildschirm.
Laden Sie den Monitor umgehend.
Bewegungsverfolgung & Alarmzone
1.Bewegungsverfolgung: App öffnen > Gerät wählen >
Zahnrad-Icon > „Bewegungsverfolgung“ aktivieren.
2.Alarmzone: App > Gerät > Zahnrad > „Alarmverwaltung“ >
„Bewegungserkennung“ > „Alarmzone“ einrichten.
ONVIF-Einstellungen
App > Gerät > Zahnrad > „ONVIF-Einstellungen“. Passwort
erforderlich zur Aktivierung.
-20-
DE

06
/
FAQ
F: Keine korrekte Bildvorschau auf dem Monitor?
A:
Überprüfen Sie die Kameraverbindung. Bei nicht verbundenem
Status zuerst Kamera-Monitor-Kopplung durchführen.
F: Wo ist der Paarungstaste?
A:
Der Paarungstaste ist der Rufknopf der Kamera (3 Sekunden
gedrückt halten). Folgen Sie den Anweisungen auf dem Monitor.
(Für Paarung-Menü: Menü-Taste >Kameramanagement)
F: Monitor hängt und reagiert nicht auf Tasten?
A:
Setzen Sie den Monitor mit der Nadel zurück. Halten Sie den
Power-Knopf 5 Sekunden zum Neustart.
F: Keine App-Benachrichtigungen bei
Monitorverbindung?
A:
Stellen Sie sicher, dass:
1.Die App im Hintergrund läuft
2.Funktionen der Benachrichtigung aktiviert sind
Autorisierung von Systembenachrichtigungen erteilt wurden
F: Wie füge ich Geräte hinzu oder konfiguriere
das Netzwerk?
A:
Die Kamera verbindet sich standardmäßig mit dem Monitor. Für
Netzwerkkonfiguration nutzen Sie die App.
-21-
DE

F: Ton- & Schrei-Erkennung funktioniert nicht?
Gerät mit App verbinden:
A:
Das Sound-Erkennungsintervall beträgt 1 Minute. Nach Auslösung
erfolgt eine Sperrzeit von 1 Minute zur Vermeidung von Fehlalarmen.
Die Schrei-Erkennung erfasst die meisten Babygeräusche.
Filteralgorithmen können seltene Schreie ausblenden.
F: Kann ich Bewegungszonen am Monitor einstellen?
A:
Nein. Nutzen Sie hier für die YesiHome App.
F: Warum piept der Monitor?
A:
Halten Sie einen Abstand von mindestens 1 Meter zur Kamera ein.
Wenn der Abstand zu gering ist, können elektromagnetische
Störungen auftreten.Interferenz bei zu geringem Abstand.
Wenn Sie weitere Fragen haben, senden Sie bitte Ihre
Bestellnummer und eine Beschreibung des Fehlers an
[email protected]. Die Bearbeitung erfolgt innerhalb
von 24 Stunden.
1.Verwenden Sie 2,4-GHz-Wi-Fi (5 GHz nicht unterstützt).
2.Laden Sie die App herunter. Registrieren Sie sich oder loggen
Sie direkt ein.
3. Reset mit Nadel bis die rote LED langsam blinkt (innerhalb 2
Minuten verbinden).
4.Folgen Sie den App-Anweisungen (QR-Code scannen).
-22-
DE

ESPAÑOL
-23-
01 Descripción general ··························· 24
02 Descargar la APP 'YesiHome'··············· 26
03 Conectar la cámara a la APP ··············· 27
04 Conectar la cámara al Monitor············· 28
05 Configuración general ························ 30
06 Preguntas frecuentes ························· 32
01
/
Descripción general
Luz de estado
Micrófono
Ranura
para tarjeta SD
Reinicio
Botón de
llamada y botón de
emparejamiento
Altavoz
Atrás
Menú
Llamar
Ampliar/Reducir
Aceptar
Dirección
PowerPort
-24-
ES
Atrás
Menú
Llamar
Ampliar/reducir
Antena
Botón de encendido/apagado
Altavoz
Soporte de
pantalla
Puerto de carga
Reinicio
Ranura para
tarjeta SD
Aceptar
-25-
ES
02
/
Descargar la APP ‚YesiHome
Método 1:
Descargue la APP ‚YesiHomeʻ desde App Store (iOS)
o Google Play (Android).
Método 2:
Escanee el código QR para descargar la aplicación
-26-
iOS Android
ES

03
/
Conectar la cámara a la APP
La cámara puede conectarse tanto al monitor como a la
aplicación. Por defecto, generalmente está conectada al
monitor.
Siga estos pasos para conectar la cámara a la aplicación:
1.Asegúrese de que la red Wi-Fi sea de 2,4 GHz, ya que la cámara
no admite Wi-Fi de 5 GHz.
2.Descargue la aplicación YesiHome en su teléfono. Registre una
nueva cuenta o inicie sesión directamente.
3.Use un objeto punzante para restablecer la cámara durante 5
segundos hasta escuchar el pitido «BOOGu», lo que indica que la
cámara se ha restablecido. Tras 10-20 segundos, oirá otro pitido
y la luz roja de la cámara parpadeará lentamente.
4.Siga las instrucciones paso a paso en su teléfono inteligente para
agregar la cámara y escanee el código QR con la cámara.
-27-
ES
04
/
Conectar la cámara al Monitor
Encienda la cámara y el monitor. La cámara se conectará
automáticamente al monitor.
Nota:
Si la conexión falla la primera vez, use un objeto punzante para
restablecer la cámara y vuelva a conectar el monitor después del
segundo pitido de la cámara.
La conexión tiene límite de distancia; asegúrese de que la distancia
entre la cámara y el monitor no supere los 300 m.
Desconectar la cámara del monitor
1.Presione el botón Menú en la pantalla y seleccione >Cámara.
2.Mantenga pulsado el botón OK para liberar el emparejamiento.
-28-
ES
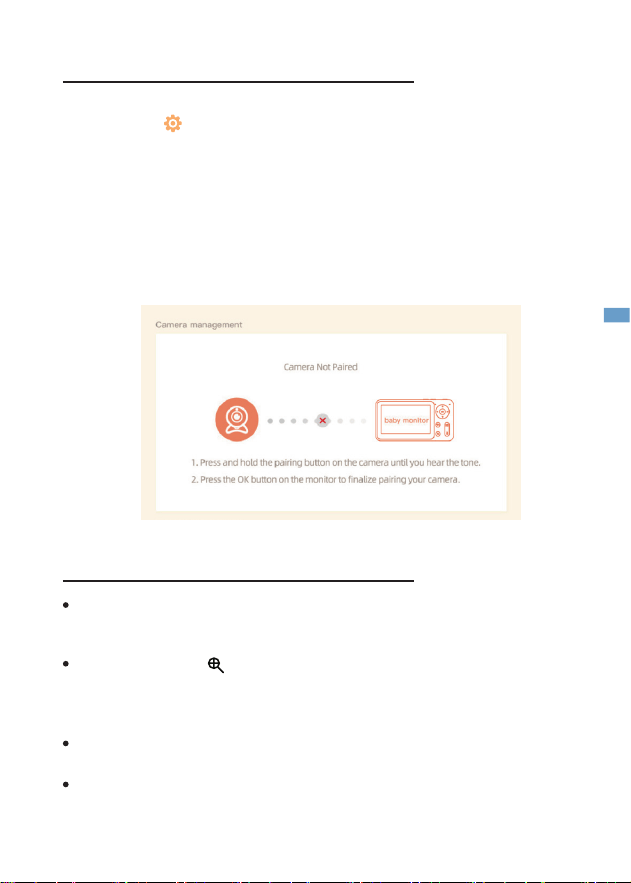
Siga los pasos anteriores para conectar las dos cámaras
secuencialmente. Aparecerán dos pantallas en el monitor.
Presione la tecla de selección de cámara: el icono en la esquina superior
izquierda representa la cámara seleccionada actualmente. Podrá controlar
remotamente la cámara seleccionada en vista dividida.
Presione la tecla OK para ver la cámara seleccionada en pantalla completa.
Presione la tecla Atrás para volver a la vista dividida.
1.Presione el botón Menú en la pantalla y
seleccione >Cámara.
2.Mantenga pulsado el botón de emparejamiento de la cámara hasta
escuchar el tono de confirmación.
3.Presione el botón OK en la pantalla para iniciar el emparejamiento.
Nota: Si tiene problemas de conexión, contacte a
[email protected] para asistencia personalizada.
Reconectar la cámara al monitor
Conectar dos cámaras al monitor
-29-
ES
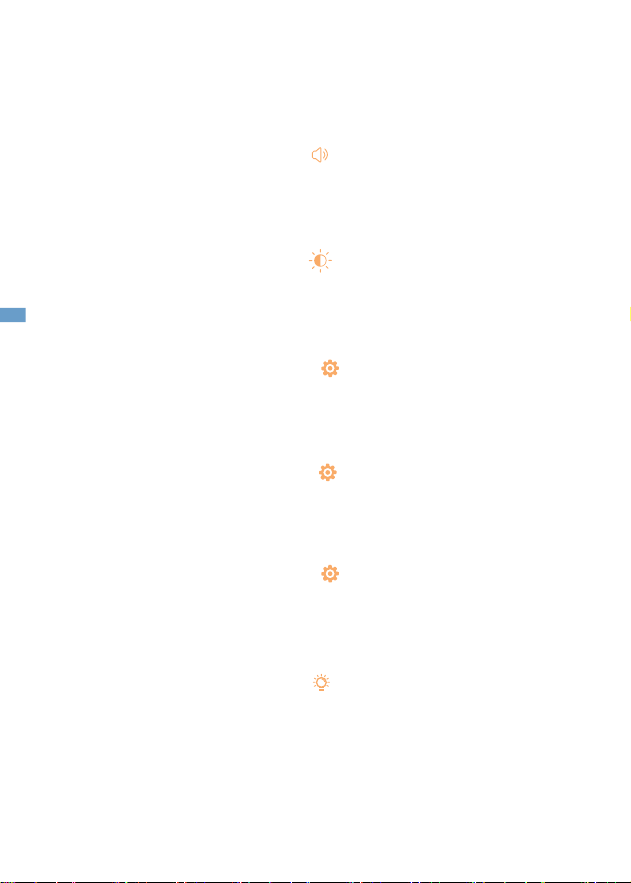
05
/
Configuración general
• Ajustar volumen
1.Pulse el botón Menú, seleccione y presione OK.
2.Use las flechas ARRIBA/ABAJO para ajustar el volumen.
• Ajustar brillo
1.Pulse el botón Menú, seleccione y presione OK.
2.Regule el brillo con las flechas ARRIBA/ABAJO.
• Ajustar hora
1.Pulse el botón Menú y seleccione >Fecha y Hora.
2.Cambie fecha, hora y formato con las flechas direccionales.
• Ajustar idioma
1.Pulse el botón Menú y seleccione >Idioma.
2.Seleccione el idioma deseado.
• Modo reposo
1.Pulse el botón Menú y seleccione >Modo reposo.
2.Elija 1 min/5 min/10 min/30 min/60 min/Desactivar.
• Indicador de estado de cámara
1.Pulse el botón Menú, seleccione y presione OK.
2.Flechas IZQ/DER para Activar/Desactivar.
-30-
ES

Tarjeta SD
1.Pulse Menú >Gestión de tarjeta SD para ver capacidad
total y disponible.
2.(Opcional) Formatee la tarjeta SD – asegure copias de
seguridad.
Nota:
No soporta cambio en caliente. Inserte/extraiga la tarjeta solo
con equipo apagado.
Actualización
Conéctese a Wi-Fi 2,4 GHz. Actualice cuando aparezca la alerta
o manualmente en >Información del dispositivo.
Alerta de batería baja
Al detectar batería baja, se mostrará un icono en pantalla.
Recargue el monitor inmediatamente.
Seguimiento de movimiento & Zona de alarma
3.Seguimiento: App > Dispositivo > Icono de engranaje > Activar
„Seguimiento“.
4.Zona de alarma: App > Dispositivo > Engranaje > „Gestión de
alarmas“ > „Detección de movimiento“ > Definir zona.
Configuración ONVIF
App > Dispositivo > Engranaje > „Configuración ONVIF“.
Establezca contraseña para activar.
-31-
ES

06
/
Preguntas frecuentes
P: ¿El monitor no muestra la vista previa?
A:
Verifique la conexión cámara-monitor. Si no está emparejado,
realice el emparejamiento primero.
P: ¿No encuentro el botón de emparejamiento?
A:
El botón de emparejamiento es el botón de llamada de la
cámara (mantener 3 segundos). Siga las instrucciones en pantalla.
(Menú >Gestión de cámaras para emparejar)
P: ¿Pantalla bloqueada sin respuesta?
A:
A: Reinicie el monitor con el punzón. Mantenga el botón de
encendido 5 segundos para reiniciar.
P: ¿No recibo notificaciones en la App?
A:
Confirme que:
1.La App está en ejecución
2.Las funciones de alerta están activadas
3.Los permisos de notificación del sistema están habilitados
P: ¿Cómo añadir dispositivos o configurar red?
A:
La cámara se conecta al monitor por defecto. Use la App para
configuración de red.
-32-
ES

P: ¿La detección de sonido/llanto no funciona?
Conexión a la App:
A:
El intervalo de detección es 1 minuto (evita falsas alarmas). El
algoritmo de filtrado puede ignorar algunos llantos.
P: ¿Configurar seguimiento en el monitor?
A:
No. Use la App YesiHome para esta función.
P: ¿Zumbido en el monitor?
A:
Mantenga mínimo 1 metro de distancia de la cámara.
Interferencia electromagnética.
Envía tu número de pedido y problema a
Solución en 24 horas.
1.Use Wi-Fi 2,4 GHz (no soporta 5 GHz).
2.Descargue la App. Registre una cuenta o inicie sesión
directamente.
3. Resetee con aguja hasta que la luz roja parpadee lentamente
(conecte en 2 minutos).
4.Siga las instrucciones para escanear el código QR.
-33-
ES

FRANÇAIS
-34-
01 Présentation ·····································35
02Télécharger l'application YesiHome·······37
03 Connecter caméra à l'APP···················38
04 Connecter caméra au moniteur ···········39
05 Paramètres généraux·························41
06 Questions et réponses························43
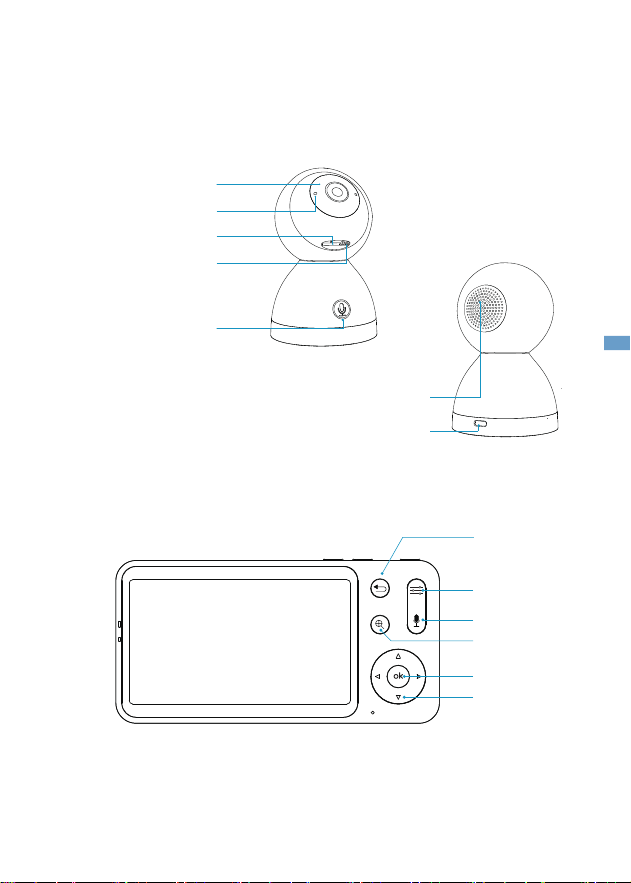
01
/
Vue d'ensemble
Voyant d'état
Microphone
Fente pour carte SD
Réinitialisation
Bouton d'appel et
Bouton de jumelage
SpeHaut-parleuraker
Retour
Menu
Appel
Zoom ouvrir/
fermer
OK
Orientation
Port d'alimentation
-35 -
FR
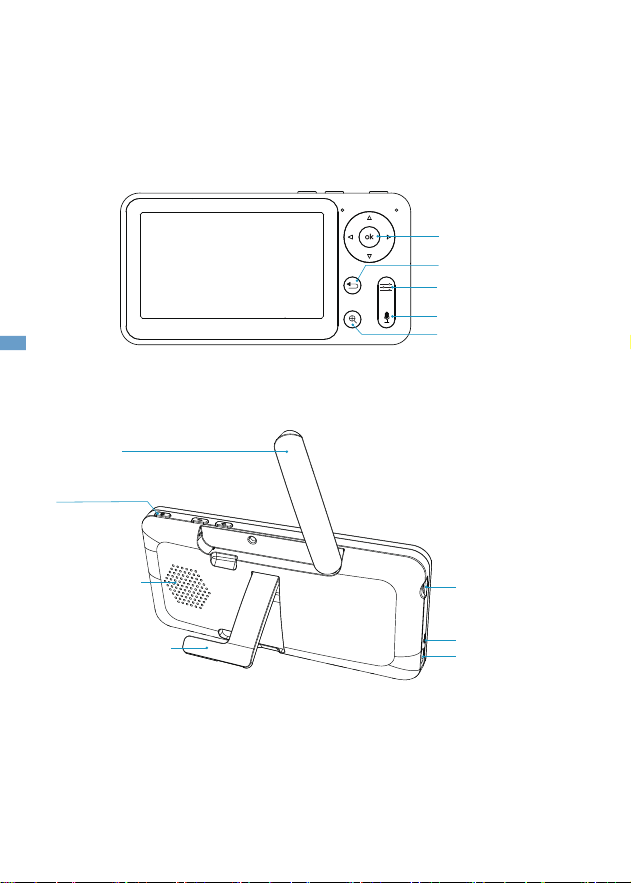
Retour
Menu
Appel
Zoom ouvrir/
fermer
Antenne
Bouton ouvrir/fermer
Haut-parleur
Support d'écran
Port de charge
Réinitialisation
Fente pour
carte SD
OK
-36-
FR
02
/
Télécharger lʻapplication YesiHome
Méthode 1 :
Téléchargez lʻapplication YesiHome sur lʻApp Store (iOS)
ou Google Play (Android).
Méthode 2 :
Scannez le code QR pour télécharger lʻapplication
-37-
iOS Android
FR

03
/
Connecter la caméra à lʼAPP
La caméra peut être connectée à la fois au moniteur et à
lʼapplication. Par défaut, elle est généralement connectée au
moniteur.
Procédez comme suit pour connecter la caméra à
lʼapplication :
1.Vérifiez que le réseau Wi-Fi est en 2,4 GHz, car la caméra ne
prend pas en charge le Wi-Fi 5 GHz.
2.Téléchargez lʼapplication YesiHome sur votre téléphone. Créez
un nouveau compte ou connectez-vous directement.
3.Utilisez une aiguille pour réinitialiser la caméra pendant 5
secondes jusquʼà entendre le bip « BOOGu », signifiant que la
caméra est réinitialisée. Après 10-20 secondes, un autre bip
retentit et le voyant rouge de la caméra clignote lentement.
4.Suivez les instructions étape sur votre smartphone pour
ajouter la caméra, puis scannez le code QR.
-38-
FR
04
/
Connecter la caméra au Moniteur
Allumez la caméra et le moniteur. La caméra se connectera
automatiquement au moniteur.
Remarque :
Si la connexion échoue lors de la première tentative, réinitialisez
la caméra avec une aiguille et reconnectez le moniteur après le
deuxième bip de la caméra.
La portée de connexion est limitée – veillez à ce que la distance
entre la caméra et le moniteur ne dépasse pas 300 m.
Déconnecter la caméra du moniteur
1.Appuyez sur le bouton Menu de lʼécran et
sélectionnez >Caméra.
2.Appuyez longuement sur le bouton OK pour annuler lʼappairage.
-39-
FR
Suivez les étapes précédentes pour connecter les deux caméras
tour à tour. Deux écrans sʼafficheront sur le moniteur.
Appuyez sur la touche de sélection de caméra – lʼicône en
haut à gauche indique la caméra actuellement sélectionnée.
Vous pouvez contrôler à distance la caméra choisie en mode
écran partagé.
Appuyez sur la touche OK pour afficher la caméra sélectionnée
en plein écran.
Appuyez sur la touche Retour pour revenir au mode écran
partagé.
1.Appuyez sur le bouton Menu de lʼécran et
sélectionnez >Caméra.
2.Maintenez enfoncé le bouton dʼappairage de la caméra jusquʼà
entendre le signal sonore.
3.Appuyez sur le bouton OK de lʼécran pour démarrer lʼappairage.
Remarque : En cas de problème de connexion, contactez
[email protected] pour un support personnalisé.
Reconnecter la caméra au moniteur
Connecter deux caméras au moniteur
-40-
FR
05
/
Paramètres généraux
• Réglage du volume
1.Appuyez sur Menu, sélectionnez et validez par OK.
2.Utilisez les flèches HAUT/BAS pour ajuster le volume.
• Réglage luminosité
1.Appuyez sur Menu, sélectionnez et validez par OK.
2.Ajustez avec les flèches HAUT/BAS.
• Réglage horaire
1.Appuyez sur Menu et sélectionnez >Date & Heure.
2.Modifiez date/heure/format avec les flèches.
• Réglage langue
1.Appuyez sur Menu et sélectionnez >Langue.
2.Choisissez la langue souhaitée.
• Mode veille
1.Appuyez sur Menu et sélectionnez >Mode veille.
2.Sélectionner 1 minute/5 minutes/10 minutes/30 minutes/60
minutes/Éteindre
• Indicateur d'état caméra
1.Appuyez sur Menu, sélectionnez et validez par OK.
2.Flèches GAUCHE/DROITE pour Activer/Désactiver.
-41-
FR
Carte SD
1.Appuyez sur Menu >Gestion de carte SD pour voir capacité
totale et disponible.
2.(Optionnel) Formatez la carte SD – sauvegardez les données
dʼabord.
Remarque :
Ne prend pas en charge le hot-swap. Insérez/retirez la carte
SD uniquement hors tension.
Mise à jour
Connectez lʼappareil au Wi-Fi 2,4 GHz. Mettez à jour via alerte ou
manuellement dans >Infos appareil.
Alerte batterie faible
Un icône sʼaffiche en cas de batterie faible. Rechargez lʼécran
rapidement.
Suivi de mouvement & Zone dʼalarme
1.Suivi: App > Appareil > Icône engrenage > Activer Suivi.
2.Zone dʼalarme: App > Appareil > Engrenage > Gestion des
alarmes > Détection de mouvement > Définir zone.
Paramètres ONVIF
App > Appareil > Engrenage > Paramètres ONVIF. Un mot de
passe est requis.
-42-
FR
06
/
FAQ
Q : Lʼécran ne prévisualise pas correctement ?
A:
Vérifiez la connexion caméra-écran. Si non appairé, procédez à
lʼappairage dʼabord.
Q : Où est le bouton dʼappairage ?
A:
Le bouton dʼappairage est le bouton dʼappel de la caméra
(maintenez 3 secondes). Suivez les instructions à lʼécran.
(Menu >Gestion des caméras pour lʼappairage)
Q : Lʼécran se bloque et ne répond pas ?
A:
Réinitialisez lʼécran avec lʼoutil. Maintenez le bouton power 5
secondes pour redémarrer.
Q : Pas de notifications sur lʼApp en mode moniteur ?
A:
Vérifiez que :
1.LʼApp tourne en arrière-plan
2.Les alertes sont activées
3.Les autorisations système sont accordées
Q : Comment ajouter un appareil ou configurer
le réseau ?
A:
La caméra se connecte par défaut à lʼécran. Utilisez lʼApp pour
la configuration réseau.
-43-
FR

Q : Détection sonore/cris ne fonctionne pas ?
Connexion à lʼApp :
A:
Intervalle de détection : 1 minute (évite les faux positifs).
Lʼalgorithme de filtrage peut ignorer certains cris.
Q : Configurer le suivi sur le moniteur ?
A:
Non. Utilisez lʼApp YesiHome.
Q : Buzzer du moniteur ?
A:
Maintenez 1 mètre minimum de la caméra. Interférences
électromagnétiques.
Contactez
[email protected] avec numéro de commande.
Réponse sous 24h.
1.Wi-Fi 2,4 GHz obligatoire.
2.Téléchargez lʼApp. Créez un compte ou connectez-vous.
3. Réinitialisez avec lʼoutil jusquʼau clignotement lent
(connexion sous 2 minutes).
4.Suivez les instructions pour scanner le QR code.
-44-
FR

ITALIANO
-45-
01 Panoramica ······································46
02 Scarica l'APP 'YesiHome'·····················48
03 Collegare la fotocamera all'APP ···········49
04 Collegare la fotocamera al Monitor·······50
05 Impostazioni generali·························52
06 FAQ·················································54
01
/
Panoramica
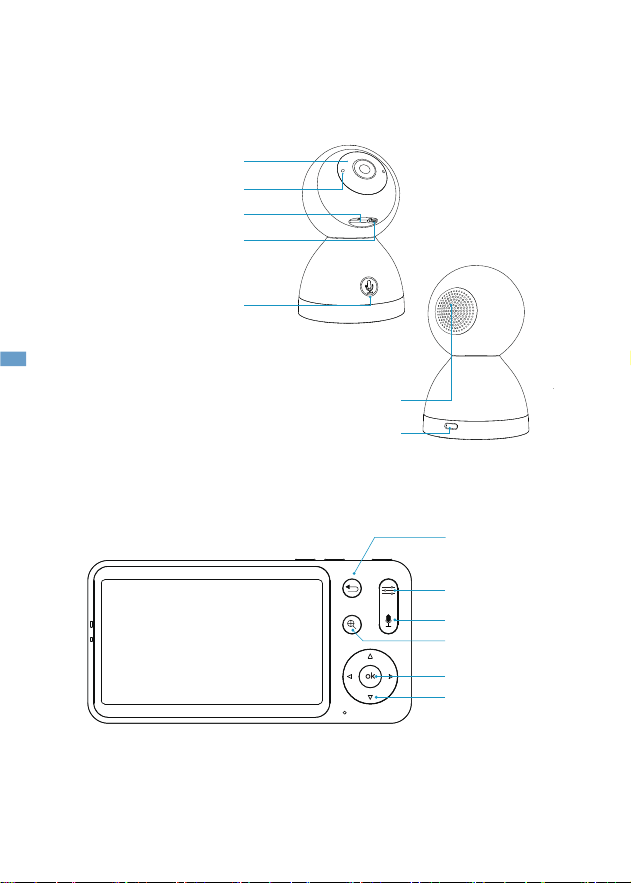
Luce di stato
Microfono
Slot per schede SD
Reset
Pulsante di chiamata &
pulsante di accoppiamento
Altoparlante
Indietro
Menu
Chiamata
Zoom avanti
/indietro
OK
Direzione
Porta di alimentazione
-46-
IT
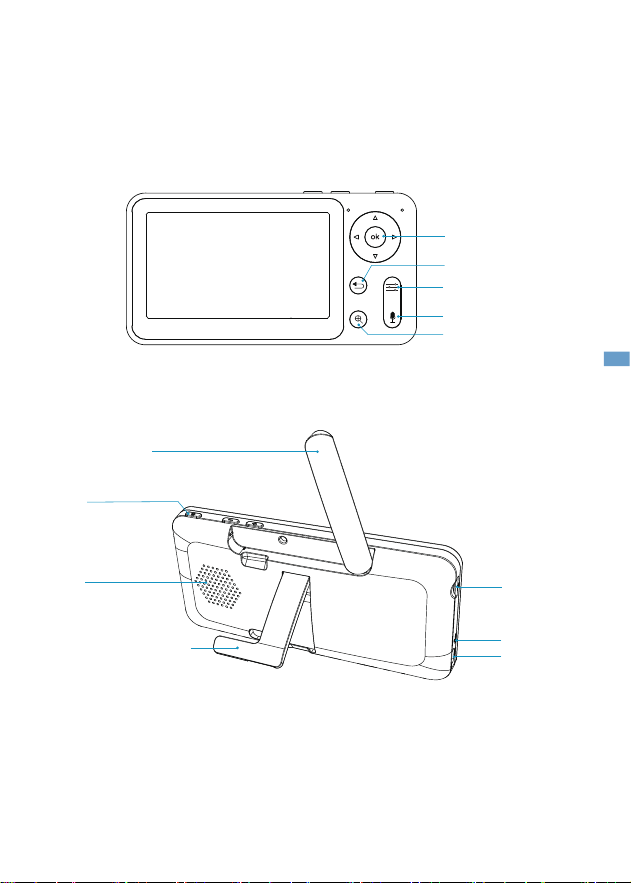
Indietro
Menu
Chiamata
Zoom avanti/
indietro
Antenna
Pulsante ON/OFF
Altoparlante
Supporto
schermo
Porta
di ricarica
Reset
Scheda SD
OK
-47-
IT
02
/
Scaricare lʻAPP ‚YesiHome
Metodo 1:
Scarica lʻAPP ‚YesiHomeʻ da App Store (iOS) o Google
Play (Android).
Metodo 2:
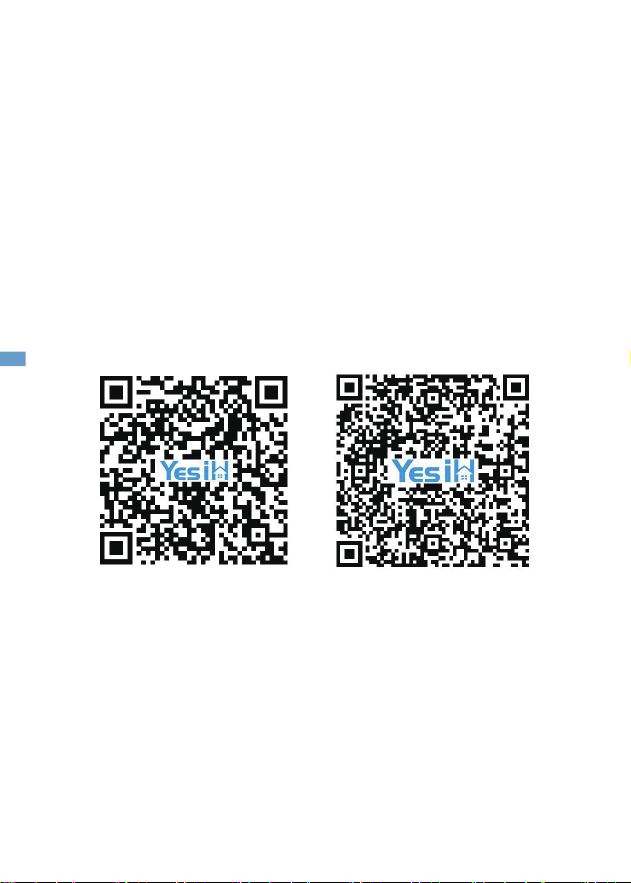
Scansiona il codice QR per scaricare lʻapp
-48-
iOS Android
IT

03
/
Collegare la fotocamera allʼAPP
La fotocamera può essere collegata sia al monitor che
allʼapp. Di norma, è preimpostata per il collegamento
al monitor.
Seguire questi passaggi per collegare la fotocamera
allʼapp:
1.Assicurarsi che la rete Wi-Fi sia a 2,4 GHz, poiché la
fotocamera non supporta Wi-Fi a 5 GHz.
2.Scaricare lʼapp YesiHome sul telefono. Registrare un nuovo
account o accedere direttamente.
3.Utilizzare un oggetto appuntito per resettare la fotocamera
per 5 secondi fino a sentire il segnale acustico «BOOGu»,
indicando che la fotocamera è stata resettata. Dopo 10-20
secondi, si sentirà un altro segnale acustico e la luce rossa della
fotocamera lampeggerà lentamente.
4.scansionare il codice QR con la fotocamera.
-49-
IT
04
/
Collegare la fotocamera al Monitor
Accendere la fotocamera e il monitor. La fotocamera si collegherà
automaticamente al monitor.
Nota:
Se il collegamento non riesce al primo tentativo, utilizzare un
oggetto appuntito per resettare la fotocamera e riconnettere il
monitor dopo il secondo segnale acustico.
La connessione ha una portata limitata – assicurarsi che la
distanza tra fotocamera e monitor non superi i 300 m.
Disconnettere la fotocamera dal monitor
1.Premere il pulsante Menu sullo schermo e
selezionare >Fotocamera.
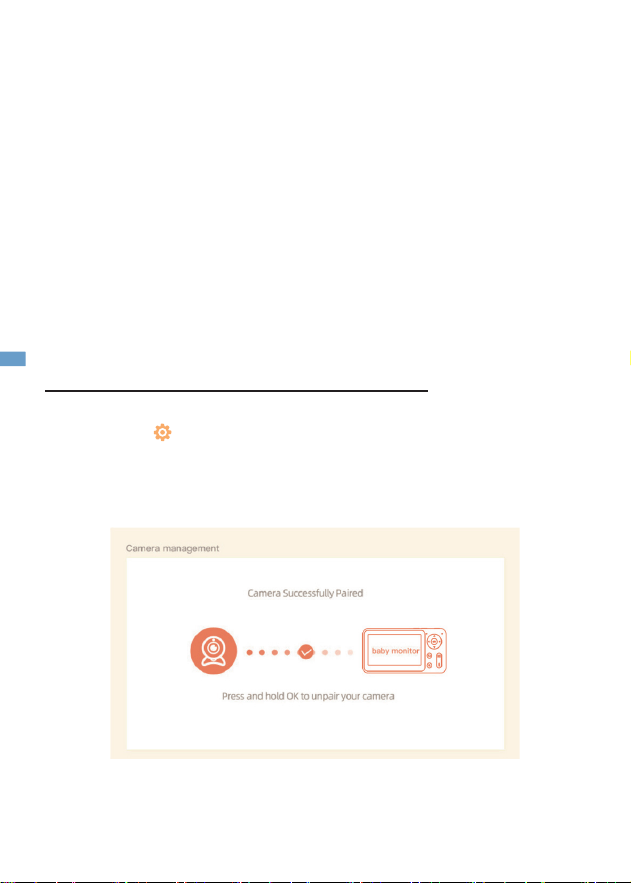
2.Premere a lungo il pulsante OK per rimuovere lʼassociazione.
-50-
IT
Seguire i passaggi precedenti per collegare le due fotocamere
in sequenza. Sul monitor appariranno due schermi.
Premere il tasto per la selezione della fotocamera: lʼicona
nellʼangolo superiore sinistro indica la fotocamera selezionata.
È possibile controllare da remoto la fotocamera scelta nella
visualizzazione a schermo diviso.
Premere il tasto OK per visualizzare la fotocamera selezionata
a schermo intero.
Premere il tasto Indietro per tornare alla visualizzazione a
schermo diviso.
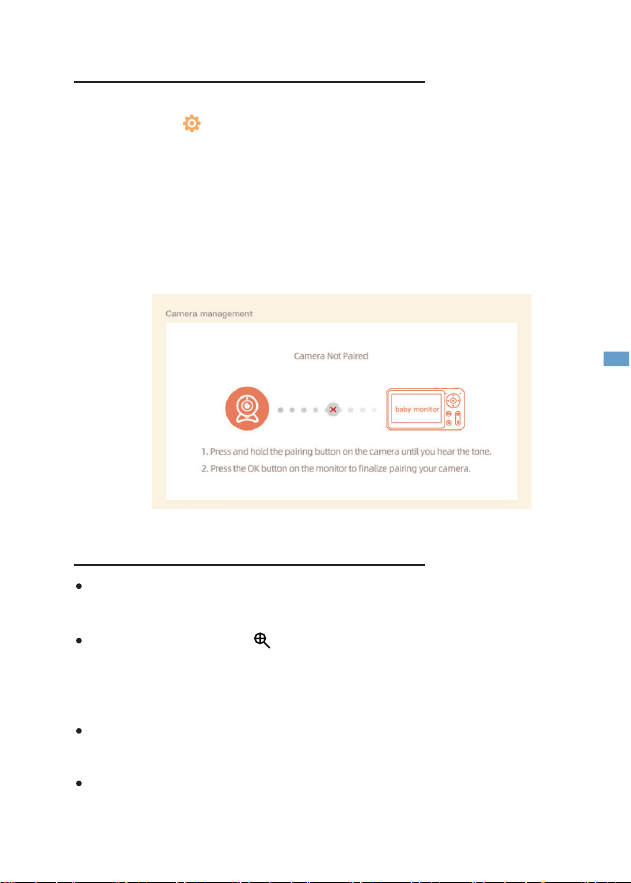
1.Premere il pulsante Menu sullo schermo e
selezionare >Fotocamera.
2.Tenere premuto il pulsante di accoppiamento della fotocamera
fino allʼemissione del segnale acustico.
3.Premere il pulsante OK sullo schermo per avviare lʼaccoppia
mento.
Nota: In caso di problemi di connessione, contattare
[email protected] per assistenza dedicata.
Ricollegare la fotocamera al monitor
Collegare due fotocamere al monitor
-51-
IT
05
/
Impostazioni generali
• Regolazione volume
1.Premere Menu, selezionare e confermare con OK.
2.Usare frecce SU/GIÙ per regolare il volume.
•Regolazione luminosità
3.Premere Menu, selezionare e confermare con OK.
4.Regolare con frecce SU/GIÙ.
• Impostazione orario
5.Premere Menu e selezionare >Data & Ora.
6.Modificare data/ora/formato con frecce direzionali.
• Impostazione lingua
7.Premere Menu e selezionare >Lingua.
8.Selezionare la lingua desiderata.
• Modalità standby
9.Premere Menu e selezionare >Modalità standby.
10.Scegliere 1 min/5 min/10 min/30 min/60 min/Disattiva.
• Indicatore stato telecamera
11.Premere Menu, selezionare e confermare con OK.
12.Frecce SINISTRA/DESTRA per Attivare/Disattivare.
-52-
IT

Scheda SD
1.Premere Menu >Gestione scheda SD per visualizzare
capacità totale e residua.
2.(Opzionale) Formattare la scheda SD – eseguire backup
preventivo.
Nota:
Non supporta hot-swapping. Inserire/rimuovere la scheda
solo a dispositivo spento.
Aggiornamento
Connessione Wi-Fi 2,4 GHz obbligatoria. Aggiornare tramite
avviso o manualmente in >Informazioni dispositivo.
Allarme batteria scarica
Icona di avviso appare a batteria bassa. Ricaricare lo schermo
urgentemente.
Tracciamento movimento & Area allarme
1.Tracciamento: App > Dispositivo > Icona ingranaggio > Attiva
„Tracciamento“.
2.Area allarme: App > Dispositivo > Ingranaggio > „Gestione
allarmi“ > „Rilevamento movimento“ > Imposta area.
Impostazioni ONVIF
App > Dispositivo > Ingranaggio > „Impostazioni ONVIF“.
Impostare password per attivare.
-53-
IT
06
/
FAQ
D: Il monitor non visualizza correttamente?
A:
Verificare la connessione camera-monitor. Se non accoppiati,
effettuare prima lʼaccoppiamento.
D: Dove si trova il pulsante di accoppiamento?
A:
Il pulsante è il tasto chiamata della telecamera (premere 3
secondi). Seguire le istruzioni a schermo.
(Menu >Gestione telecamere per accoppiamento)
D: Schermo bloccato e non risponde?
A:
Resettare il monitor con lo strumento. Tenere premuto il tasto
power 5 secondi per riavviare.
D: Nessuna notifica dallʼApp in modalità monitor?
A:
Assicurarsi che:
1.LʼApp sia in esecuzione
2.Le funzioni di notifica siano attive
I permessi di sistema siano concessi
D: Come aggiungere dispositivi o configurare
la rete?
A:
La telecamera si collega automaticamente al monitor. Usare
lʼApp per configurazioni di rete.
-54-
IT

D: Rilevamento suoni/pianto non funziona?
Connessione allʼApp:
A:
Intervallo di rilevamento: 1 minuto (previene falsi allarmi).
Lʼalgoritmo di filtraggio potrebbe ignorare alcuni pianti.
D: Impostare zone allarme sul monitor?
A:
No. Utilizzare lʼApp YesiHome.
D: Perché il monitor emette un ronzio?
A:
Mantenere almeno 1 metro di distanza dalla telecamera.
Interferenze elettromagnetiche.
Inviare numero dʼordine e problema a [email protected].
Risposta entro 24 ore.
1.Usare Wi-Fi 2,4 GHz.
2.Scaricare lʼApp. Registrarsi o accedere direttamente.
3. Resettare con lo strumento finché la luce rossa lampeggia
lentam ente (connettere entro 2 minuti).
4.Seguire le istruzioni per scansionare il QR code.
-55-
IT

NEDERLANDS
-56-
01 Overzicht··········································57
02 'YesiHome'-APP downloaden···············59
03 Camera met de APP verbinden············60
04 Camera met de Monitor verbinden·······61
05 Algemene instellingen ························63
06 Veelgestelde vragen ··························65
01
/
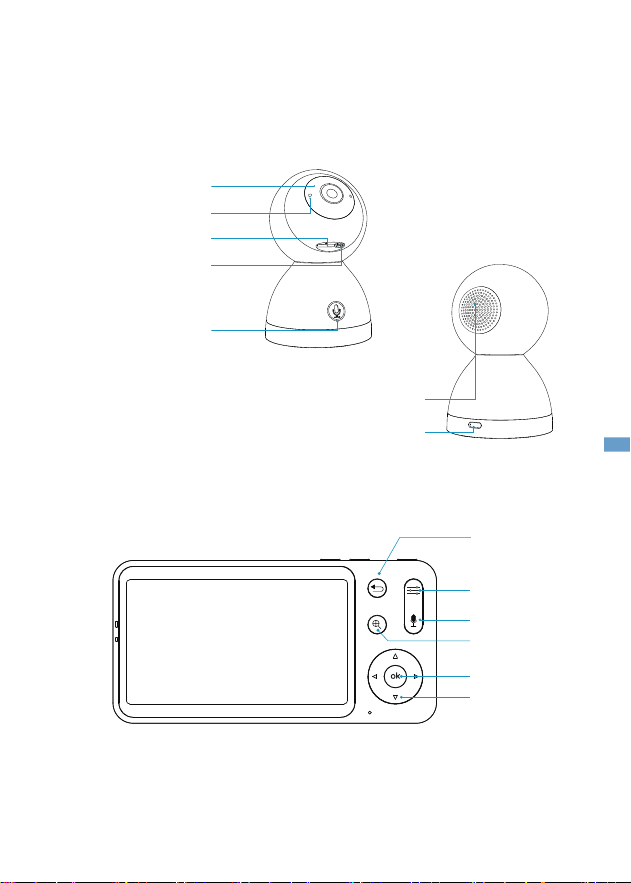
Overzicht
Statuslicht
Microfoon
SD-kaartslot
Reset
Belknop &
parenknop
Luidspreker
Terug
Menu
Bel
Zoom in/uit
OK
Richting
Stroompoort
-57-
NL
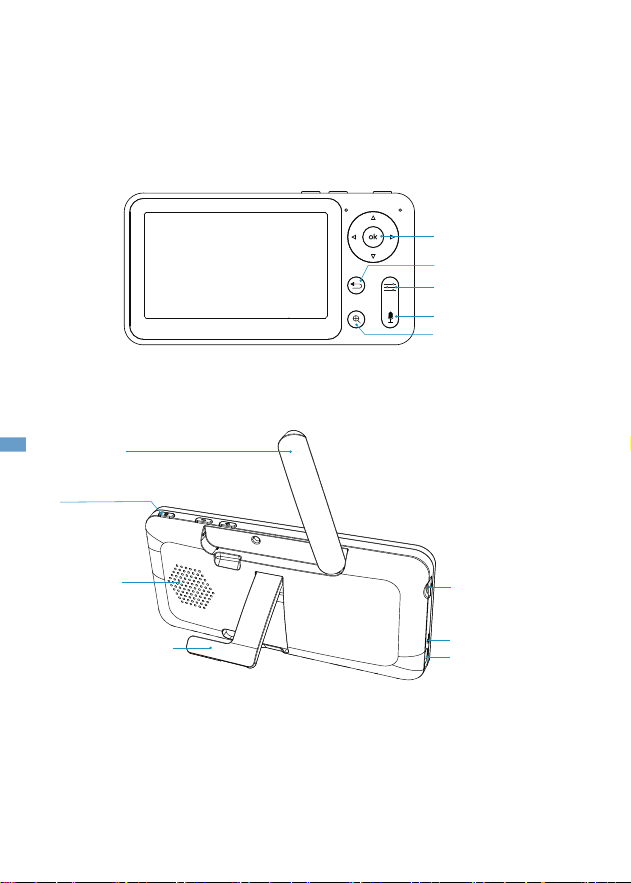
Terug
Menu
Bel
Zoom in/uit
Antenne
Aan/uit knop
Speaker
Schermhouder
Oplaadpoort
Reset
SD-kaartslot
OK
-58-
NL
02
/
‚YesiHome APP downloaden
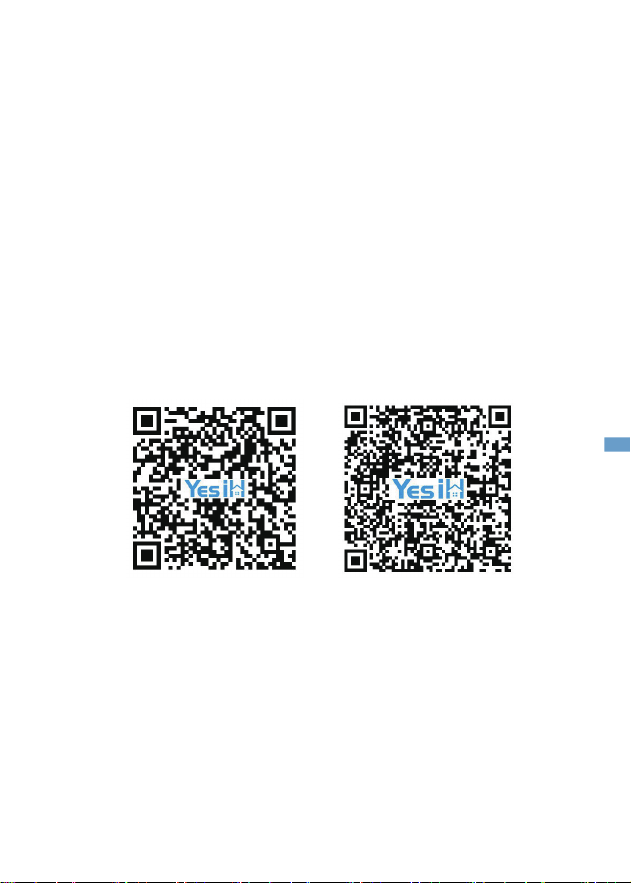
Methode 1:
Download de ‚YesiHomeʻ-APP via de App Store (iOS) of
Google Play (Android).
Methode 2:
Scan de QR-code om de app te downloaden
-59-
iOS Android
NL

03
/
Camera met de APP verbinden
De camera kan zowel met de monitor als de app worden
verbonden. Standaard is deze meestal met de monitor
verbonden.
Volg deze stappen om de camera met de app te verbinden:
1.Zorg dat het Wi-Fi-netwerk 2,4 GHz gebruikt, aangezien de
camera geen 5 GHz Wi-Fi ondersteunt.
2.Download de YesiHome-app op uw telefoon. Registreer een
nieuw account of log direct in.
3.Gebruik een naald om de camera 5 seconden lang te resetten tot
u de «BOOGu»-pieptoon hoort, wat betekent dat de camera is
gereset. Na 10-20 seconden hoort u nog een pieptoon en
knippert het rode lampje van de camera langzaam.
4.Volg de stapsgewijze instructies op uw smartphone om de
camera t oe te voegen en scan de QR-code met uw camera.
-60-
NL
04
/
Camera met de Monitor verbinden
Schakel de camera en monitor in. De camera verbindt automa-
tisch met de monitor.
Opmerking:
Als de verbinding de eerste keer mislukt, reset de camera met
een naald en verbind de monitor opnieuw na de tweede
pieptoon van de camera.
De verbinding heeft een afstandsbeperking – zorg dat de
afstand tussen camera en monitor niet meer dan 300 m
bedraagt.
Verbinding tussen camera en monitor verbreken
1.Druk op de Menuknop op het scherm en
selecteer >Camera.
2.Houd de OK-knop ingedrukt om de koppeling te verbreken
-61-
NL
Volg de eerder beschreven stappen om beide cameraʼs een voor
een te verbinden. Er verschijnen twee schermen op de monitor.
Druk op de camerakeuzetoets – het pictogram linksboven
geeft de geselecteerde camera aan. U kunt de gekozen camera
op afstand bedienen in gesplitste weergave.
Druk op de OK-toets om de geselecteerde camera in volledig
scherm te bekijken.
Druk op de terug-toets om terug te keren naar gesplitste
weergave.
1.Druk op de Menuknop op het scherm en selecteer >Camera.
2.Houd de koppelknop van de camera ingedrukt tot u de
bevestigingstoon hoort.
3.Druk op de OK-knop op het scherm om het koppelen te starten.
Opmerking:Neem bij verbindingsproblemen contact op met
[email protected] voor persoonlijke ondersteuning.
Camera opnieuw met de monitor verbinden
Twee cameraʼs met de monitor verbinden
-62-
NL
05
/
Algemene instellingen
• Volume instellen
1.Druk op Menuknop, selecteer en bevestig met OK.
2.Gebruik Omhoog/Omlaag-pijlen voor volume-aanpassing.
• Helderheid instellen
1.Druk op Menuknop, selecteer en bevestig met OK.
2.Pas helderheid aan met Omhoog/Omlaag-pijlen.
•Tijd instellen
1.Druk op Menuknop en selecteer >Datum & Tijd.
2.Wijzig datum/tijd/weergave met richtingspijlen.
•Taal instellen
1.Druk op Menuknop en selecteer >Taal.
2.Kies de gewenste taal.
•Slaapstand instellen
1.Druk op Menuknop en selecteer >Slaapstand.
2.Kies 1 min/5 min/10 min/30 min/60 min/Uit.
•Cameralampje instellen
1.Druk op Menuknop, selecteer en bevestig met OK.
2.Links/Rechts-pijlen voor Aan/Uit.
-63-
NL

SD-kaart
1.Druk op Menu >SD-kaartbeheer om totale en resterende
capaciteit te zien.
2.(Optioneel) Formatteer de SD-kaart – back-up belangrijke
data eerst.
Opmerking:
Geen hot-swapping. Plaats/verwijder SD-kaart alleen bij
uitgeschakeld apparaat.
Update
Zorg voor 2,4 GHz Wi-Fi. Update via melding of
handmatig via >Apparaatinfo.
Laag batterijalarm
Waarschuwingspictogram verschijnt bij lage batterij.
Laad de monitor direct op.
Bewegingsvolging & Alarmzone
1.Volgen: App > Apparaat > Tandwielpictogram >
„Bewegingsvolging“ inschakelen.
2.Alarmzone: App > Apparaat > Tandwiel > „Alarmbeheer“ >
„Bewegingsdetectie“ > Zone instellen.
ONVIF-instellingen
App > Apparaat > Tandwiel > „ONVIF-instellingen“. Wachtwoord
vereist voor activering.
-64-
NL

06
/
FAQ
V: Geen beeld op de monitor?
A:
Controleer de camera-verbinding. Indien niet gekoppeld, eerst
koppelprocedure uitvoeren.
V: Waar is de koppelknop?
A:
De koppelknop is de oproepknop van de camera (3 seconden
indrukken). Volg de scherminstructies.
(Menu >Camera-beheer voor koppeling)
V: Monitor reageert niet op knoppen?
A:
Reset de monitor met de naald. Houd de aan/uit-knop 5
seconden ingedrukt.
V: Geen meldingen via de App?
A:
Zorg dat:
1.De App op de achtergrond draait
2.Meldingenfuncties zijn ingeschakeld
Systeemmachtigingen zijn verleend
V: Hoe apparaten toevoegen of netwerk instellen?
A:
De camera koppelt standaard met de monitor. Gebruik de App
voor netwerkinstellingen.
-65-
NL

V: Geluid-/huilherkenning werkt niet?
App-verbinding:
A:
Detectie-interval: 1 minuut (voorkomt vals alarm).
Filteralgoritme kan sommige huilen negeren.
V: Bewakingszones instellen op monitor?
A:
Nee. Gebruik de YesiHome App.
V: Zoemgeluid van monitor?
A:
Houd minimaal 1 meter afstand van camera. Elektromagnetische
interferentie.
Stuur ordernummer en probleem naar [email protected].
Oplossing binnen 24 uur.
1.Gebruik 2,4 GHz Wi-Fi.
2.Download de App. Registreer of log direct in.
3. Reset met naald tot rode lamp langzaam knippert (binnen 2
minuten verbinden).
4.Volg de QR-code-instructies.
-66-
NL

www.yesimom.com
Yesimom-V20250905