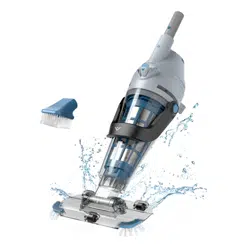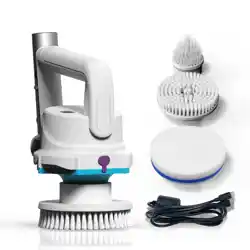
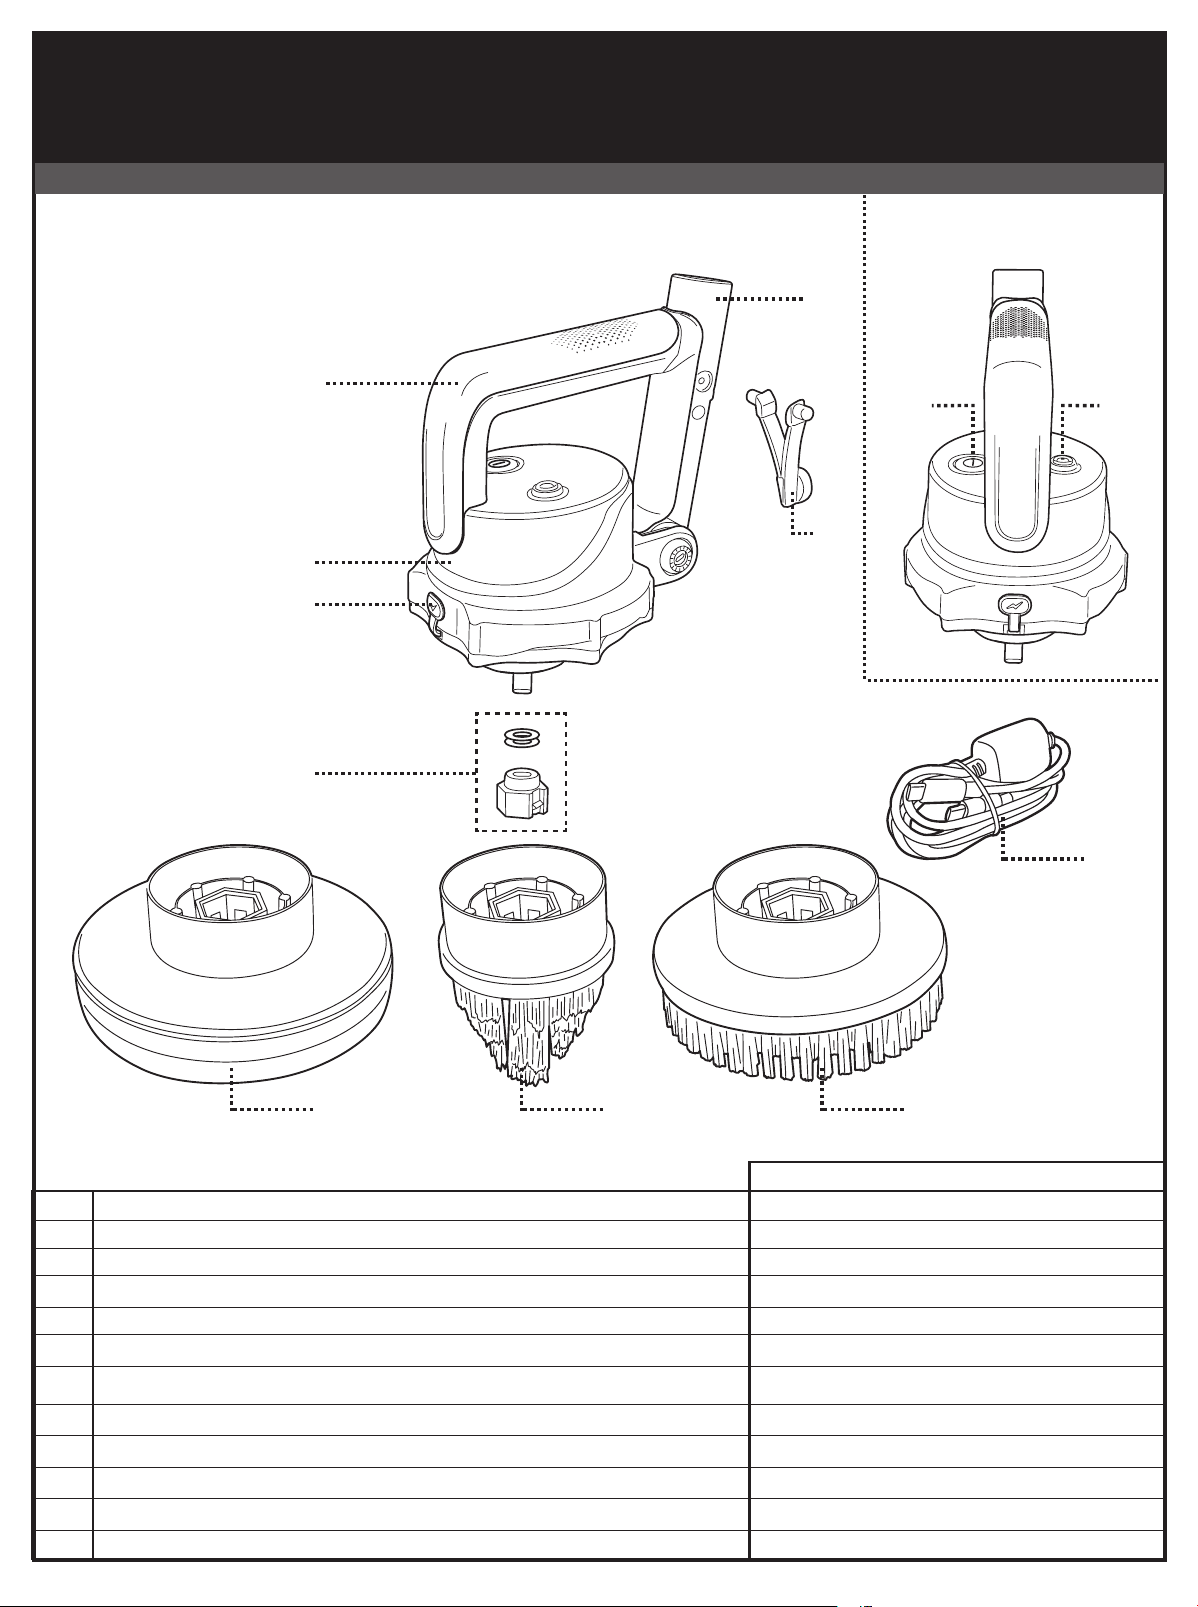
Replacement Parts Number
1
Main unit EB001ASM01
1.1
Handle --------------------------------
1.2
Pole connector (for EU & US only) --------------------------------
1.3
Press button (Power ON/OFF switch) --------------------------------
1.4
Indicator light --------------------------------
2
V-clip K023-07
3
Protective cap (for charging port) EB001-01-006
4
Washer & brush connector EB001ASM02
5
Standard brush EB001-04-002
5.1
Corner brush EB001-04-003
5.2
Magic foam EB001-04-004
6
USB Type-C to Type-C charging cable EB001-05-005
PARTS DIAGRAM
26004001 EB001BRXUSXXAMZ
3
4
2
6
55.15.2
1
1.1
1.2
1.41.3

2
US
ELECTRIC POOL SCRUBBER
SAFETY WARNINGS & INSTRUCTIONS
Information contained in this Instruction Manual
will help you operate the item safely, protect yourself
and others from hazards, and prevent damage to
the device and other property.
SAVE THESE INSTRUCTIONS
WARNING!
- Read all the instructions before using the appliance.
- This appliance is NOT a toy. Never allow children to operate, clean,
maintain or play with this appliance.
- To reduce the risk of injury, close supervision is required when the
appliance is used near children.
- Do not touch the brush while brush is spinning.
- Keep hair, loose clothing, ngers, and body parts away from moving
parts.
- This appliance is not intended for use by persons with reduced
physical, sensory, mental capabilities, or a lack of experience and
knowledge, unless they are given supervision or instructions
concerning the safe use of the appliance and understand the hazards
involved by a person responsible for their safety.
- To recharge the battery, only use a fully safety-approved and
certied USB charger (not included) with an output of 5.0VDC and
2.0A. Use only a limited power source (LPS) or Class 2 type USB
charger certicated by North American standards for the US and
Canada markets, whereas a certied USB charger (with Regulatory
Compliance Mark (RCM) or an approval number on it) must be used
in Australia and New Zealand. It must only be supplied at safety extra
low voltage corresponding to the marking on the appliance.
- Connect the external adaptor only to power source through a
residential current device (RCD) or a ground fault circuit interrupter
(GFCI). If in doubt, consult a qualied electrician.
- Maximum operating depth in water is 3 meters (9.8 ft).
Remark: Depending on the model you own, accessories/ parts
shown in this manual are not necessarily included in every model.
Product/parts in photos/drawings may vary with the model purchased.
Check the spare parts drawing to understand the parts included in your
model purchased.

3
US
- Maximum water and ambient temperature: 5˚C (41˚F) – 42˚C (107.6˚F).
- Disconnect the appliance from the supply mains before carrying out
any maintenance or cleaning.
- Ensure the appliance is completely powered o and unplugged
before replacing brush heads or accessories.
- DO NOT use this appliance if any damage is detected or when there
are people / pets in the water.
- This appliance contains batteries that are only replaceable by skilled
persons.
- The battery must be removed from the appliance before it is scrapped.
- Battery must be disposed of safely in accordance with local laws and
regulations. Refer to the section “BATTERY DISPOSAL” in the User
Manual for battery recycling / disposal or contact your local authority
for more information.
- ALWAYS disconnect the appliance from the power supply mains and
make sure the appliance is OFF before assembling, dissembling or
cleaning of any kind.
- Pollution of the liquid could occur due to leakage of lubricants.
- The product shall not be left outside during freezing weather
conditions.
- Only use the accessories provided with the appliance.
CAUTION!
- DO NOT attempt to use the appliance to clean anything other than your pool / spa.
- Use only original accessories delivered with this product.
- DO NOT use this appliance right after pool-shocking. It is recommended to rst let the pool circulate
for at least 24-48 hours.
- To avoid damaging the USB charging cable, do not carry the appliance by the cable or tug the USB
cable to disconnect it from the power source and product.
- Charge the pool vacuum indoors in a clean, dry area with good ventilation and away from sunlight.
- DO NOT leave the appliance plugged in to the charger for over 10 hours.
- If the appliance will not be used for an extended period, make sure it’s turned o and use a damp
cloth to clean and dry it and its accessories. Make sure to charge the appliance to about 30% to 50%
of the battery capacity before it is stored. Store in a well-ventilated area away from sunlight, heat,
ignition sources, pool chemicals, and children. Recharge the appliance every three months.
Above warnings and cautions are not intended to incorporate
all possible instances for risks and / or severe injuries. Pool / spa
owners should always exercise extra caution and common sense when
utilizing the product.
4
US
GETTING STARTED
Charging The Battery
IMPORTANT NOTE:
• USB charger not included - Most USB-C changer supported.
• Fully charge the pool scrubber for 3.5 hours before using it for the rst time.
WARNING!
- Only use certied USB charger. Using non-compliant charging equipment
may result in damage, reduced performance, or safety hazards.
- Do not use the USB charger if any damage is detected.
- Ensure the pool scrubber and charging port are clean and completely dry
before charging. Use a cotton bud to dry the port, and if needed, use a hair
dryer set to cool-dry only. Do not use heat, as excessive temperature can
cause the port to overheat or become damaged.
1. Place the unit on a at surface. Lift to open the protective cap, align and
insert the end of USB charging cable into the charging port and connect the
other end to the USB charger.
2. Connect the USB charger into the power source.
Once the pool scrubber begins to charge, the indicator light will ash cyan
(light blue). Normally, it takes about 3- 3.5 hours to reach a full charge. When
the cyan light stays on without ashing, the pool scrubber is fully charged.
Flashing cyan light- Charging
Solid cyan light- Charged
5
US
NOTE
· Use the supplied USB-C cable for best performance:
- Works with standard 5V USB-C chargers.
- Most USB-C PD chargers are supported if they oer a 5V output mode.
- If the original cable is lost, most USB-C to USB-C USB 2.0 cables will work.
· Always disconnect the USB charger from the power source as soon as
charging is complete.
· Immediately turn the power o and disconnect the USB charger from the
power source if you detect any of the following conditions:
- Oensive or unusual odor
- Excessive heat
- Deformation, cracks, leaks
- Smoke
3. When charging is complete, disconnect the USB charger from the power
source and unplug the USB cable from the pool scrubber.
Normally, the pool scrubber can operate up to 40 minutes on a full charge (after
3-3.5 hours of charging).
NOTE: Excessive pressure on the pool scrubber during cleaning increases the
load on the motor and will shorten the operating duration.
NOTE: Rechargeable lithium-ion battery is classied as a consumable item. It
has a limited life and will gradually lose its capacity to hold a charge. Therefore,
the running time of the pool scrubber will gradually reduce after repeated
charging and discharging throughout its product life.
Once the lifespan of the battery reaches its end, refer to section “BATTERY
DISPOSAL” for instructions regarding battery disposal.
NOTE: Let the pool scrubber rest for 30 to 40 minutes before charging it again.
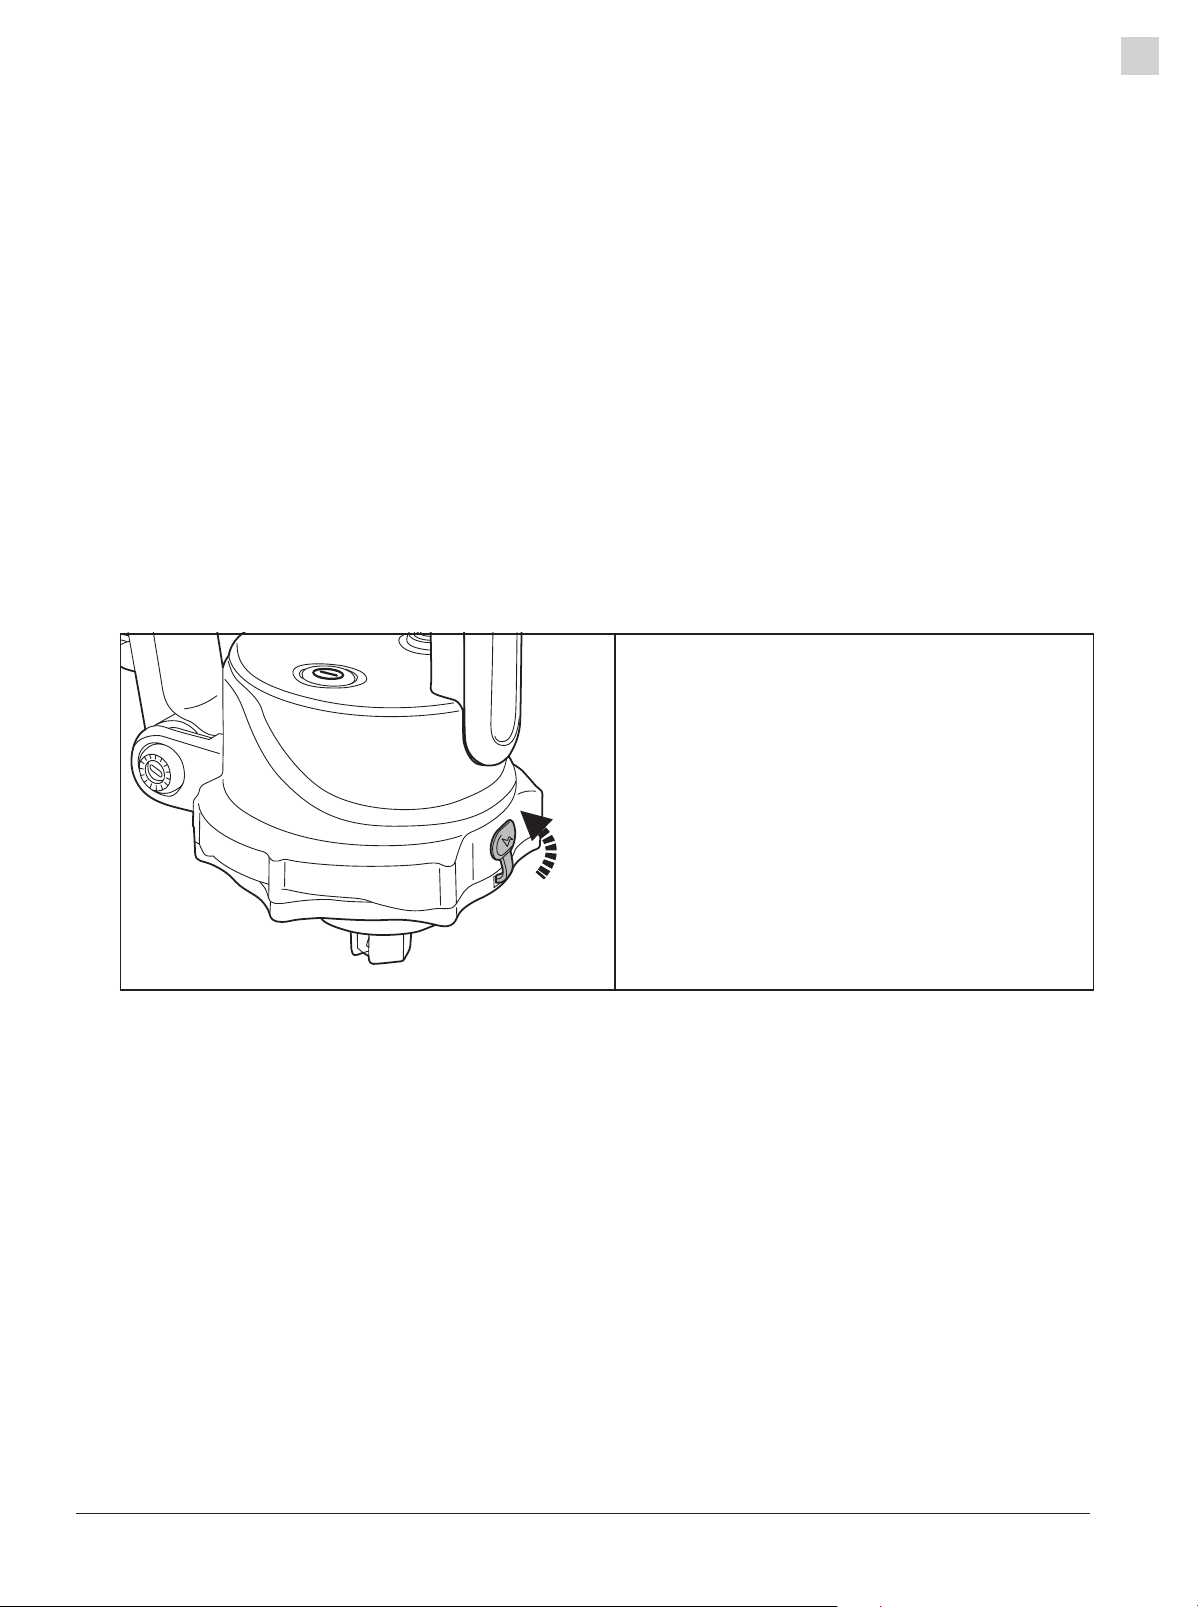
WARNING! Always make sure
to securely close the charging
port with the protective cap af-
ter charging to prevent water
or debris from entering.
6
US
Set-Up Before Use
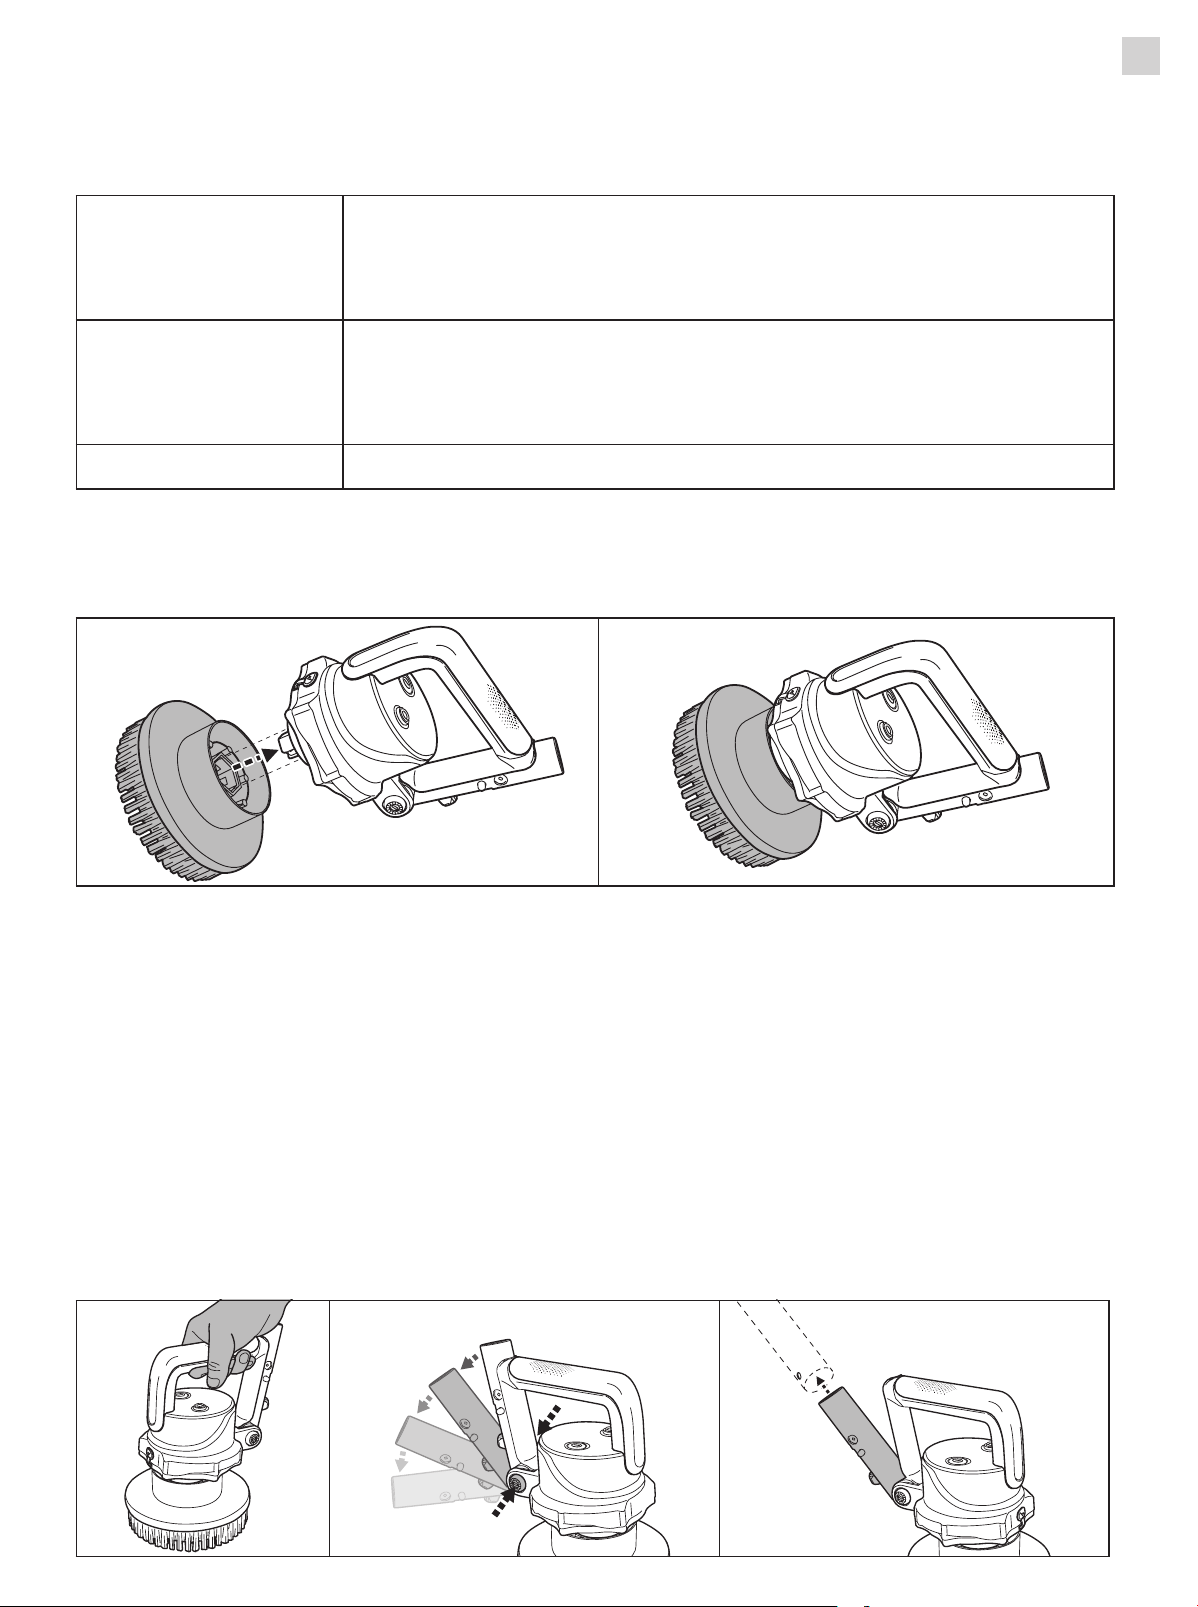
Brush selection and assembly
(Brush head availability varies by model. Your pool scrubber may not include all three brush types
described in this manual).
Align the brush with the connector and press rmly until it clicks into
place.
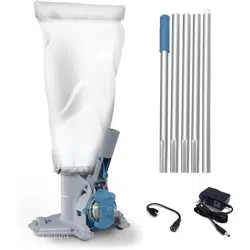
If the handheld brush cannot reach certain areas, a telescopic pole
(not included) may be used.
To attach, slide the telescopic pole onto the pole connector until the
side tabs on the connector are securely locked into the holes, as shown.
To clean eectively, move the pool scrubber steadily while the brush
is spinning. Keep the brush head at and parallel to the pool surface
— if it tilts, uneven force can make the brush slip sideways and hard-
er to control. Adjust the pole connector to one of ve angles to help
keep the brush head aligned.
Standard Brush Suitable for stains and algae on pool walls and
oors.
WARNING! Not suitable for cleaning the spa.
Corner Brush Ideal for cleaning corners and edges. The tapered
shape allows cleaning in tight spots.
WARNING! Not suitable for cleaning the spa.
Foam Brush Ideal for cleaning the waterlines and spas.
1
2
3
4
7
US
Precautions:
- When using the pool scrubber on a pool liner, avoid applying excessive force or scrubbing the same spot
for an extended period. Prolonged or forceful use may damage the liner surface.
- Skip or feather lightly over repaired patches, seams, or thinned liner; the brush rotation can lift edges or
delaminate adhesive.
- Feather or glide the brush gently along seams and corners. Do not press the brush head into crevices, as
excessive force may damage the liner or reduce cleaning eciency.
- Do not operate the pool scrubber directly over loose or abrasive particles. Such materials may scratch
pool liners or tiles, scatter during cleaning, and increase the load on the motor. Always remove these
particles with a pool vacuum or manual cleaning before using the pool scrubber.
Pool Preparation (Before Using Pool Scrubber)
- Vacuum or scoop loose particles
Eliminates grit or abrasive materials that could scratch the liner or tiles and reduce pool scrubber eciency.
- Inspect pool liner and tiles
Identies sharp edges, cracks, or weak spots that could be damaged during scrubbing or interfere
with brush movement. If necessary, contact a qualied professional to perform the necessary repairs or
perform a liner replacement prior to using the pool scrubber
- Remove obstructions
Clears ladders, toys, or oating accessories that may block the pool scrubber’s path or cause accidental
collisions.
- Verify seams and corners
Conrms no loose or damaged areas that could catch the brush head, ensuring smooth and safe operation.
- Wait at least 24–48 hours after shocking the pool
Allows concentrated chemicals to disperse. Using the pool scrubber too soon may expose it to high
chlorine levels that can corrode components or damage seals.
- Check salt levels in saltwater pools
Ensure salinity is within the manufacturer’s recommended range. Excess salt concentration can accelerate
corrosion of metal parts, damage seals, and reduce pool scrubber lifespan.
OPERATION
WARNING! Always make sure to securely close the charging port with
the protective cover before deploying the pool scrubber into the water.
Indicator Light
Cyan - Flashing Charging
Cyan - Solid Charged
Green - Solid Operate (the brush starts spinning)
Green - Flashing
Battery level is running low (about 5-10 min-
utes left)
Red - Solid
Brush has stopped spinning. Motor overload
protection is triggered

8
US
Press the Power ON/OFF button to start. The indicator will light up green, and the brush will begin
spinning.
NOTE: If too much force is applied, the motor will pause for about three seconds as overload protection.
Reduce the pressure and the pool scrubber will continue running. If the force is not reduced, the
motor will stop and the indicator light will turn red. To restart, press the Power ON/OFF button o,
then on again.
CAUTION!
· Remove the pool scrubber from the pool/spa as soon as cleaning is complete.
· Rinse the pool scrubber with fresh water after every use. DO NOT use any detergent.
Brush Cleaning
Detach the brush from the pool scrubber.
MAINTENANCE & STORAGE
NOTE:
1) Battery discharges on its own during storage. The battery should be stored at room temperature,
charged to about 30% to 50% of its capacity.
2) You must recharge the battery at least once every three months if it is not frequently used.
· Disconnect all USB charging peripherals.
· Detach all accessories from the pool scrubber. If necessary, rinse the pool scrubber and accessories
with fresh water. DO NOT use detergent. NOTE: Make sure to close the protective cover before
rinsing the pool scrubber.
· Use a damp cloth to clean and dry the pool scrubber and its accessories.
· Store them in a well-ventilated area away from the sunlight, children, heat, ignition sources, and
pool chemicals. Ambient temperature for storage should be 10˚C – 25˚C (50˚F – 77˚F). NOTE: A
higher temperature may reduce the battery life during storage.
WARNING! Under no circumstances should you attempt to
disassemble the pool scrubber and replace the motor and battery by
yourself.
CAUTION!
· Excessive heat can damage the battery and reduce the lifespan of your pool scrubber as a result.
· Consult your dealer regarding battery replacement if the following happens:
- Battery does not charge fully.
- Battery operation time is noticeably reduced. Observe and record the run times of the rst few
operations (on a full charge). Use these run times as a reference point for comparison with run
times in the future.
· The battery must be removed from the pool scrubber before it is scrapped.
· The pool scrubber must be disconnected from the supply mains when the battery is being removed.
· The battery is to be disposed safely in accordance with local ordinances or regulations.
NOTE: Incorrect maintenance may reduce the battery life and aect its capacity as a result.
Brush Type Cleaning Method Storage Tip
Standard / Cor-
ner brush
Rinse thoroughly under running water;
ush debris from bristles; shake o
excess water.
Airdry completely before storage;
keep in a dry, shaded place. Avoid
direct sunlight, as UV can weaken
bristles.
Foam brush
Rinse gently with clean water; squeeze
lightly to remove water.
Airdry in shade; avoid direct sunlight
to prevent sponge cracking.

9
US
BATTERY DISPOSAL (To be carried out by authorized technician)
Your pool scrubber’s battery is a maintenance-free, rechargeable lithium-ion battery pack, which must
be disposed properly. Recycling is required; please contact your local authorities for more information.
WARNING! Never attempt to disassemble a battery pack.
· Be sure to remove all personal items such as rings, bracelets,
necklaces, and watches before you unwire the battery pack from the
pool scrubber.
• A battery can produce a short circuit current high enough to weld a
ring (or similar items) to metal, potentially causing a severe burn in
the process.
• Wear complete eye protection, gloves, and protective clothing
before you remove the battery pack.
• Avoid touching the wires altogether and avoid allowing them to
make contact with any metal items, which could cause sparking
and/or short-circuit the battery.
• Never smoke or allow a spark or ame in the vicinity of the battery or
the pool scrubber.
• Do not expose the battery to re or intense heat as this may result in
an explosion.
CAUTION!
If a battery leak occurs, avoid contact with the leaking uids and place the damaged battery in a
plastic bag.
- If leaking uids come in contact with skin and clothing, wash immediately with plenty of soap and
running water.
- If leaking uids come in contact with eyes, immediately ush them with cool, running water for at
least 15 minutes and do not rub them. Seek medical attention immediately.
10
US
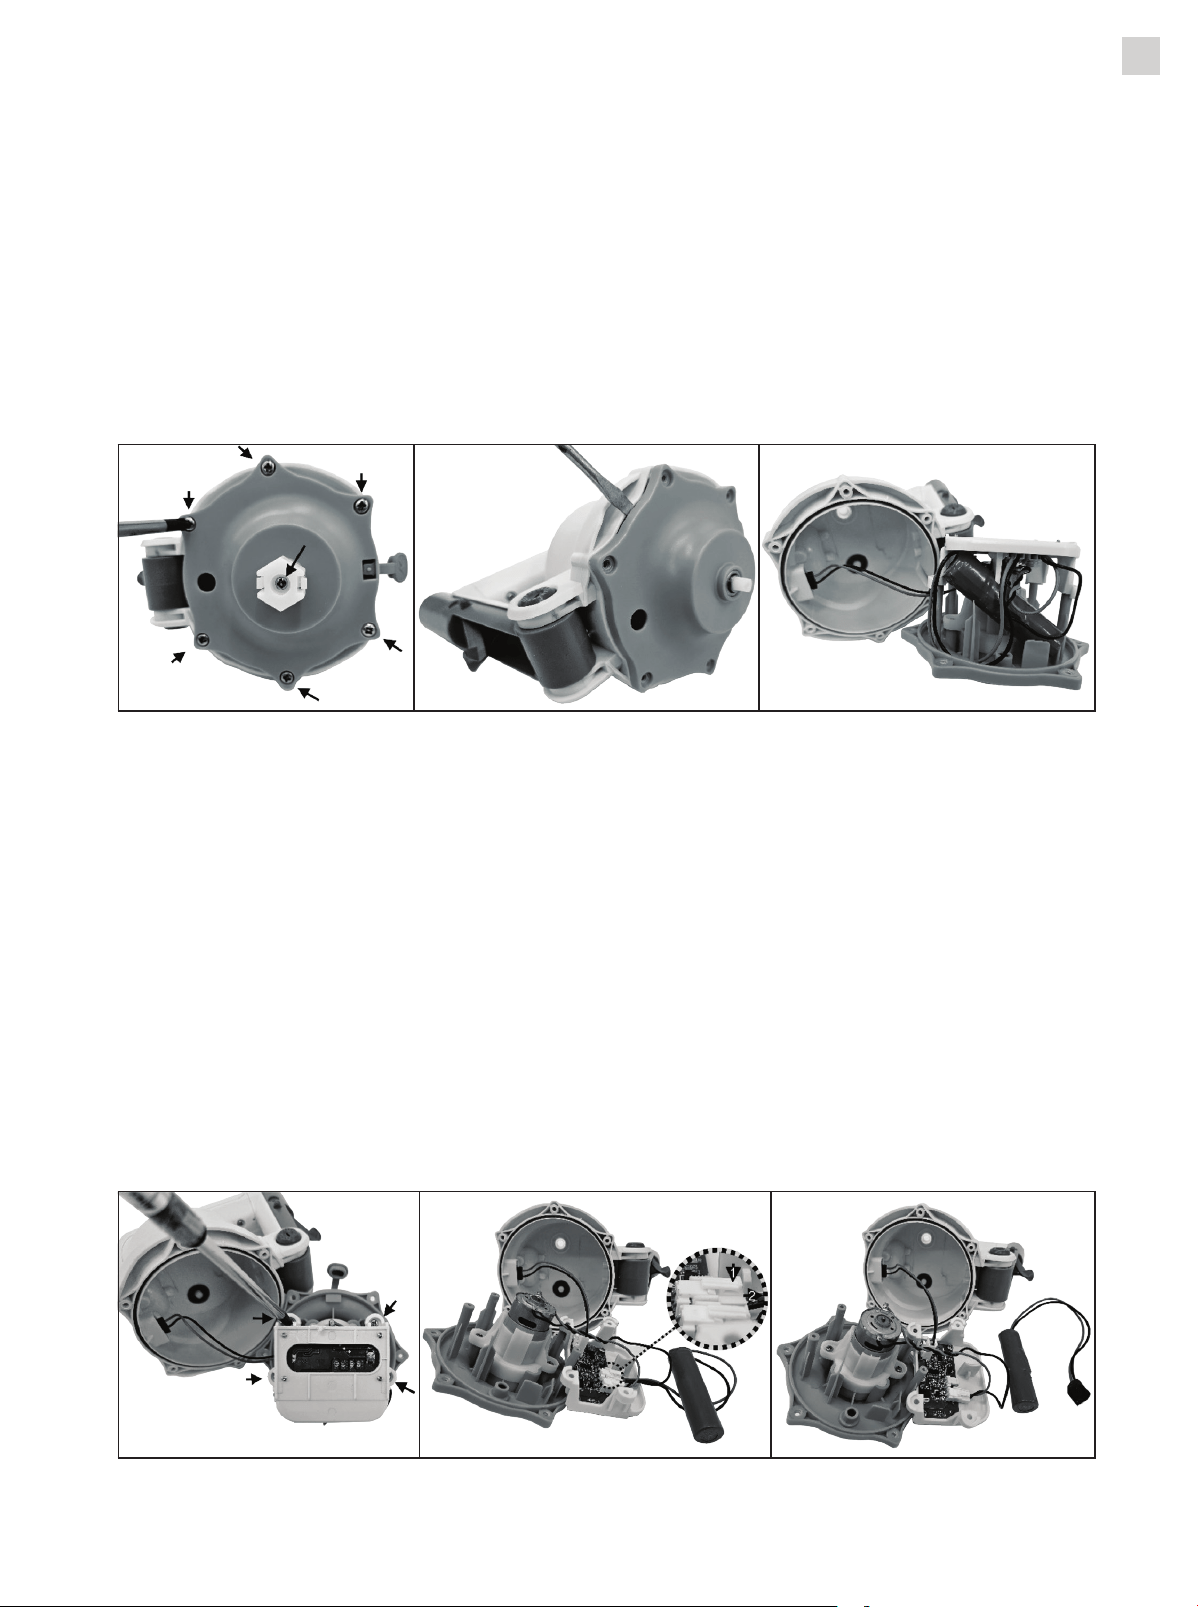
HOW TO REMOVE THE BATTERY PACK FOR BATTERY DISPOSAL ONLY
(To be carried out by authorized technician)
Recommended tools (not included): Philips screwdriver and small slot
screwdriver.
1) To begin, use a Philips screwdriver to remove all indicated screws,
then detach the brush connector and washers. With a small slot
screwdriver, gently pry along the edge of the bottom cover and
remove it to expose the internal components.
2) Next, use the Philips screwdriver again to remove the screws securing
the battery compartment cover and lift o the cover to reveal the
PCBA. Locate the battery connector on the PCB, press the clip to
release it, and carefully disconnect the connector. Immediately wrap
the battery connector with insulating tape to prevent a short circuit
caused by exposed wire terminals. Finally, dispose of the battery pack
in accordance with local regulations. Do not incinerate, puncture, or
expose the battery to high heat.

11
US
Problem Possible Cause Solution
Device does not
turn on
Battery is not charged Charge the pool scrubber fully.
Power button not pressed
correctly
Press and hold the Power ON/OFF button until the green
indicator lights up.
Brush does not spin
Battery is drained Recharge the battery fully.
Motor overload protection
triggered
Indicator lights up RED. Reset the pool scrubber according to the
instructions.
Pool scrubber
cannot be charged /
recharged
USB charger / charging cable
not connected properly
Check charger / cable connection. Conrm the power source is
working.
Battery is damaged
Contact an authorized dealer regarding replacements.
WARNING! DO NOT open the pool
scrubber and replace the battery by
yourself. This could result in severe or fatal
injuries, as well as voiding the warranty.
USB cable is damaged Replace with a new USB cable.
USB charger (not included) is
with wrong output
Should use the USB charger with output aligned with the input
of the pool scrubber.
WARNING! Only use certied USB
charger. Using non-compliant charging
equipment may result in damage,
reduced performance, or safety hazards.
USB charger (not included)
is faulty
Replace with a new USB charger.
Short operating time
Battery not fully charged or
battery aging
Fully recharge the battery fully. If the issue persists and the
pool scrubber has been extensively, the battery may be aging.
Contact an authorized dealer regarding replacement.
Brush falls out in
cleaning
Brush securing hook is
damaged
Replace with a new brush.
Brush connector is damaged Replace with a new brush connector.
Brush bristles wear
out quickly
Exposure to direct sunlight
or improper storage
Store in a cool, shaded place. Avoid UV sunlight, which weakens
bristles. Replace the brush if worn.
TROUBLESHOOTING